

Page 1

1
Dear Embrace™Owner
Embrace N0 Code
Dear Embrace™Owner,
Thank you for choosing the Embrace No Code Blood Glucose Monitoring System to help you manage your diabetes. We designed the Embrace No Code Blood Glucose Monitoring System to be accurate and
easy to use. The added convenience of the bi-lingual talking feature
can be used as a verbal aid for using the meter. This manual contains
all of the information needed to use and maintain your new blood glucose meter. Please read it carefully before use.
Your Embrace No Code Blood Glucose Monitoring System provides an
easy and precise way to measure blood glucose using fresh capillary
whole blood taken from fingertips, palm, or forearm. The added convenience of auto-coding can help reduce the chance of inaccurate readings caused by incorrect coding of the meter. Testing is done outside
the body (in vitro diagnostic use). The test results are plasma-calibrated for easy comparison to lab results. The Embrace No Code Blood
Glucose Monitoring System is a portable battery operated meter intended for use as an aid by persons with diabetes and by health care
professionals to monitor glucose concentration in whole blood.
If you have questions or simply need more information, please call our
authorized representative by using the information printed on the box or
visit our website at www.omnishealth.com. Thank you again for choosing the Embrace No Code Blood Glucose Monitoring System.
Page 2

2
Table of Contents
Embrace N0 Code
Table of Contents
Understanding Your New Blood Glucose Kit
The Embrace No Code Meter 5
The Embrace No Code Blood Glucose Test Strip 7
Meter Display Screen 8
Setting Up Your New System
The Set Up Screen 10
Setting the Clock 11
Setting the Alarm 14
Talking and Beeper Function 16
Talking Function Table 18
Control Solution Testing
Performing a Control Solution Test 23
Control Solution Trouble Shooting 27
Testing Your Blood Glucose
Preparing Your Lancing Device 28
Important Information on Alternate Site Testing (AST) 30
Performing Blood Glucose Test 31
Understanding Your Blood Glucose Test Results 35
Viewing Stored Readings and 7, 14, 30 Days Average 36
Caring for the Meter
Changing the Battery 39
Cleaning the Meter 40
Storage and Precautions 40
Page 3

3
Table of Contents
Embrace N0 Code
Solving Problems 41
Product Warranty 44
Specifications 45
Page 4
Understanding Your New Blood Glucose Kit
Embrace N0 Code
Understanding Your New Blood Glucose Kit
4
Kit Configuration
Contents Starter Kit Simple Kit
Embrace No Code Meter ★★
Instruction Manual ★★
Carrying Case ★★
Log Book ★★
Lancing Device with Clear Cap ★★
Test Strips ★
Lancets ★★
Glucose Control Solution ★
Page 5
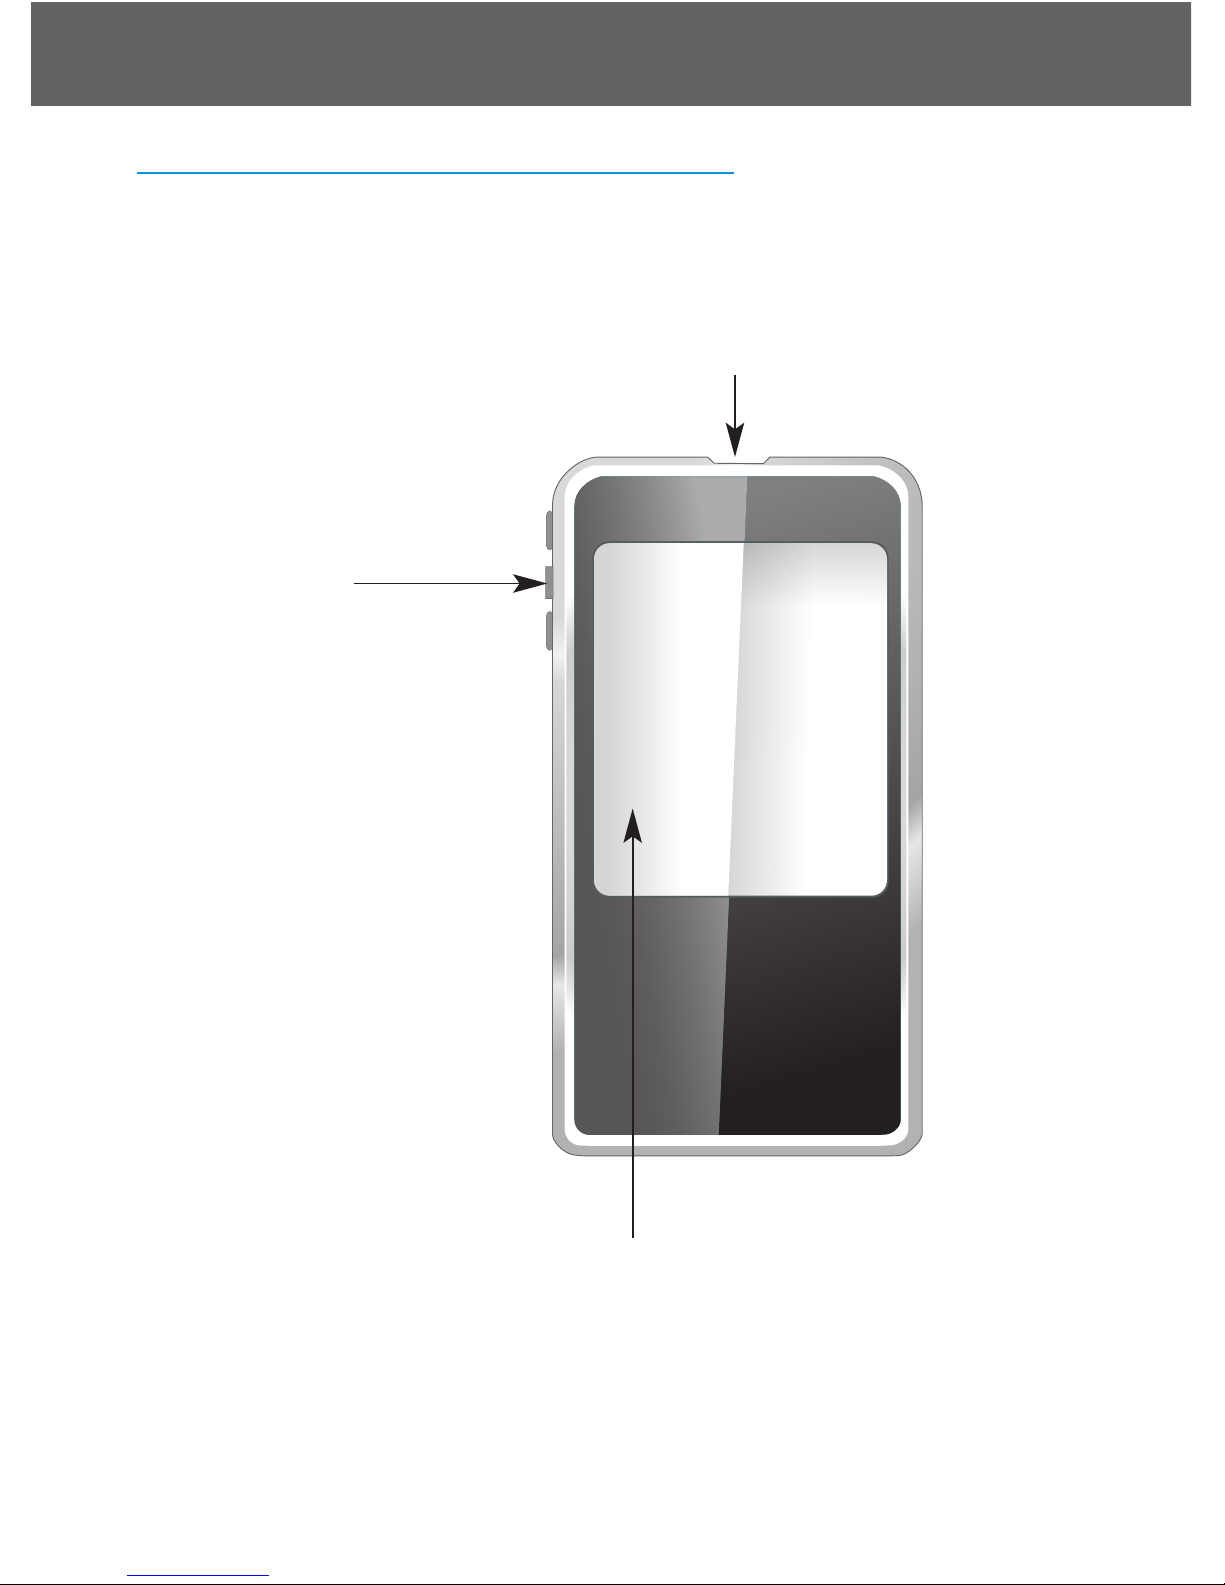
Embrace No Code Blood Glucose Meter
Embrace N0 Code
Understanding Your New Blood Glucose Kit
5
Meter Display
Shows your blood glucose test results, memory values, averages,
language selection, data port connection, and alarm times.
Meter Buttons
Press and hold the middle button on the side of
the meter. Press middle
button to select different
meter options. Press and
hold middle button to turn
on or off the meter.
Press middle button to
enter control mode with
test strip inserted (see
page 36), or enter set up
mode when not testing
(see page 10).
Test Strip Port
Insert test strip (see page 7)
to turn on the meter.
Page 6
Embrace N0 Code
Understanding Your New Blood Glucose Kit
6
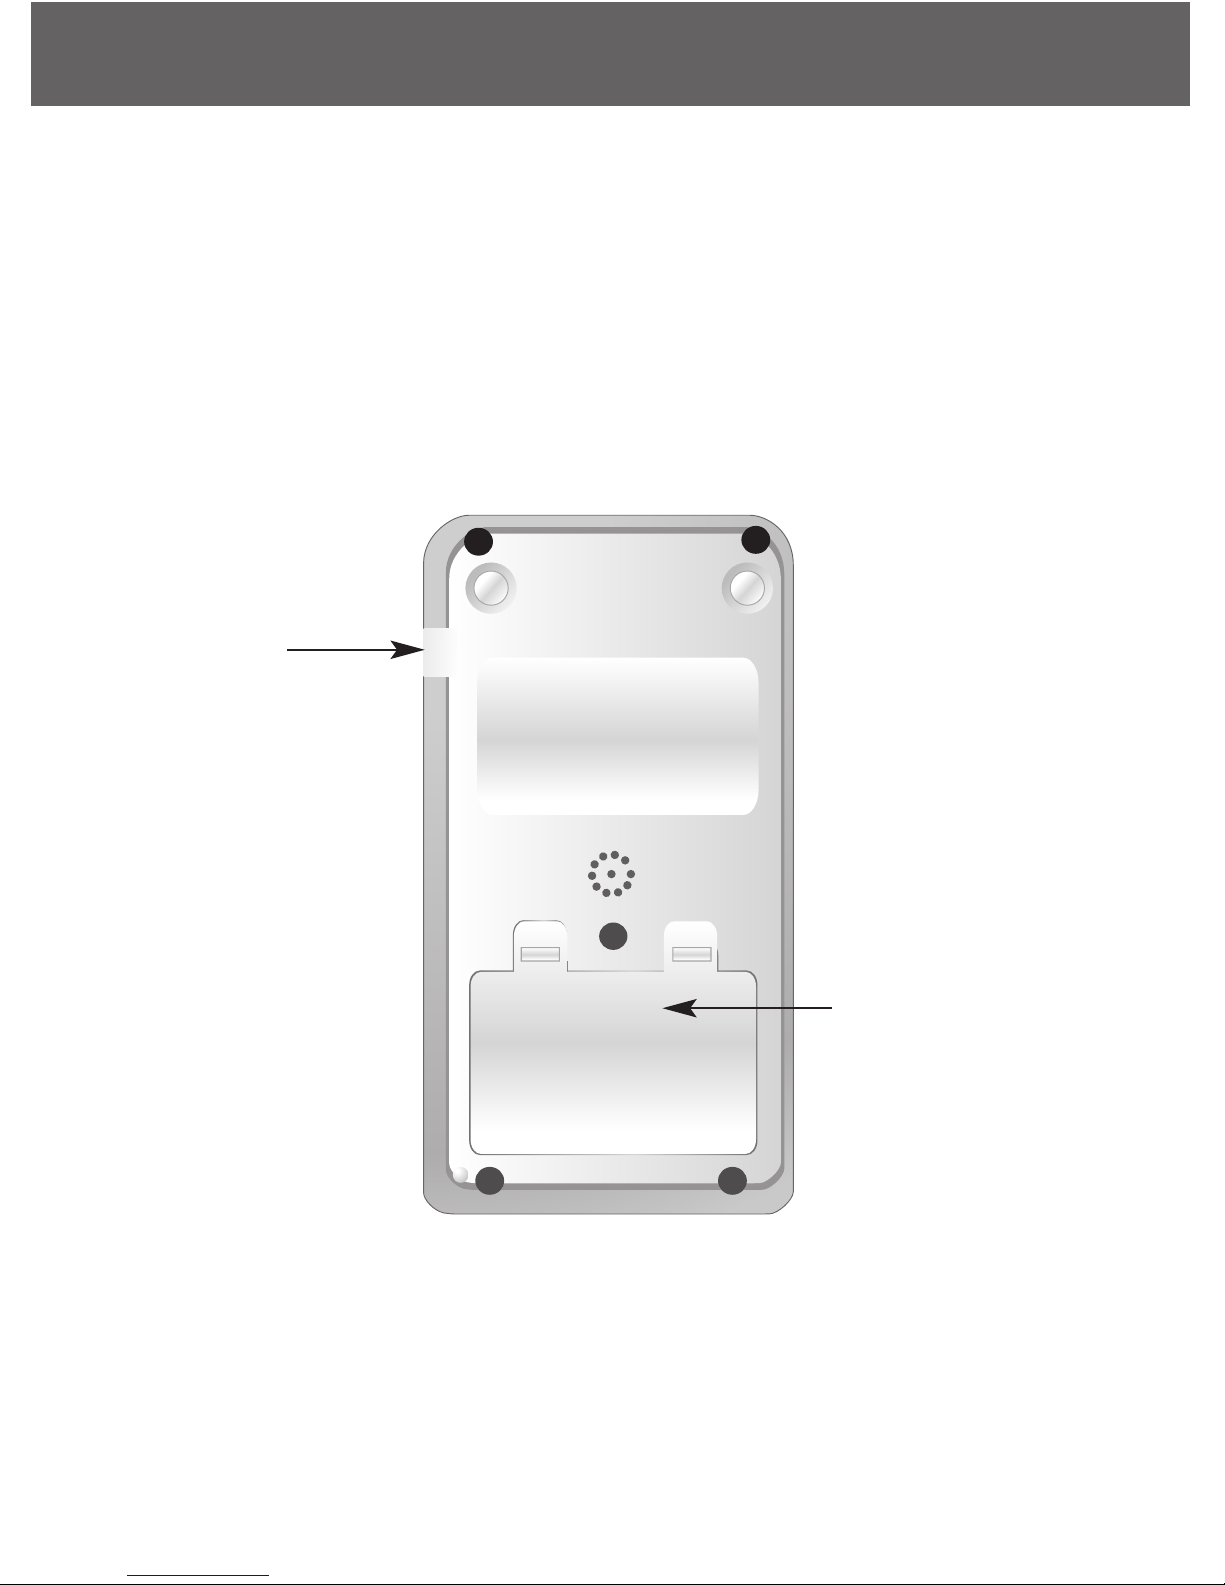
Data Port
Connect an
Omnis Health
data cable here
to send data into
a PC*
*purchased separately
Battery Compartment
Holds two AAA
batteries
Page 7
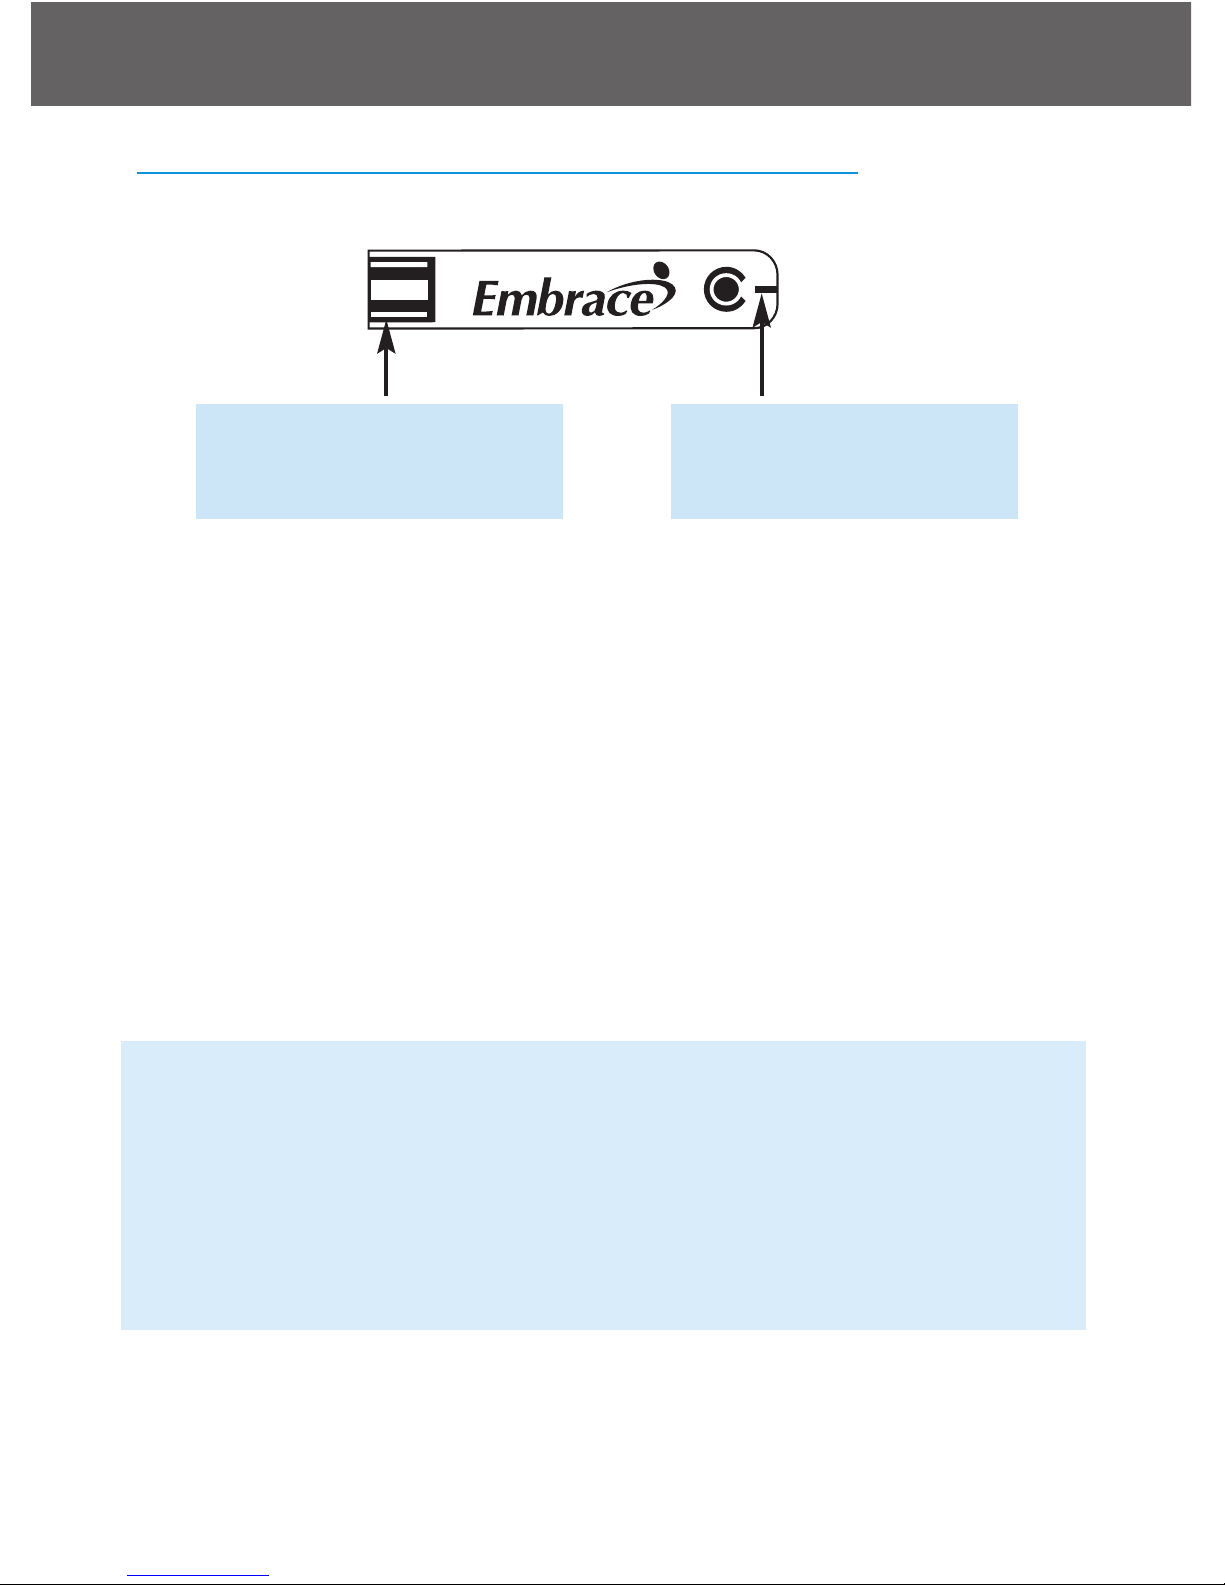
The Embrace No Code Blood Glucose Test Strip
The Embrace Test Strips are glucose specific, biosensor-based test
strips that requires very little blood sample to quickly test glucose in
fresh capillary whole blood. The test results are plasma-calibrated for
an easy comparison to lab results, but maybe 10 to 15% higher then results obtained from whole-blood referenced blood glucose analysis.
The test strip is also equipped with under-fill detection to alert you when
there is not enough blood to perform a test, so you can be assured that
each reading you get is an accurate and meaningful result.
IMPORTANT:
• Immediately close the vial cap of the test strip bottle tightly after each
use. Keep unused test strips in their original bottle. DO NOT leave
any test strips outside the bottle while not in use.
• DO NOT reuse test strips. Test strips are for single use only.
• Carefully discard used test strips and lancets in proper waste containers.
Embrace N0 Code
Understanding Your New Blood Glucose Kit
7
Contact Points
Insert this end to the test
strip port on the meter.
Sampling End
Apply blood or control
solution here.
Page 8
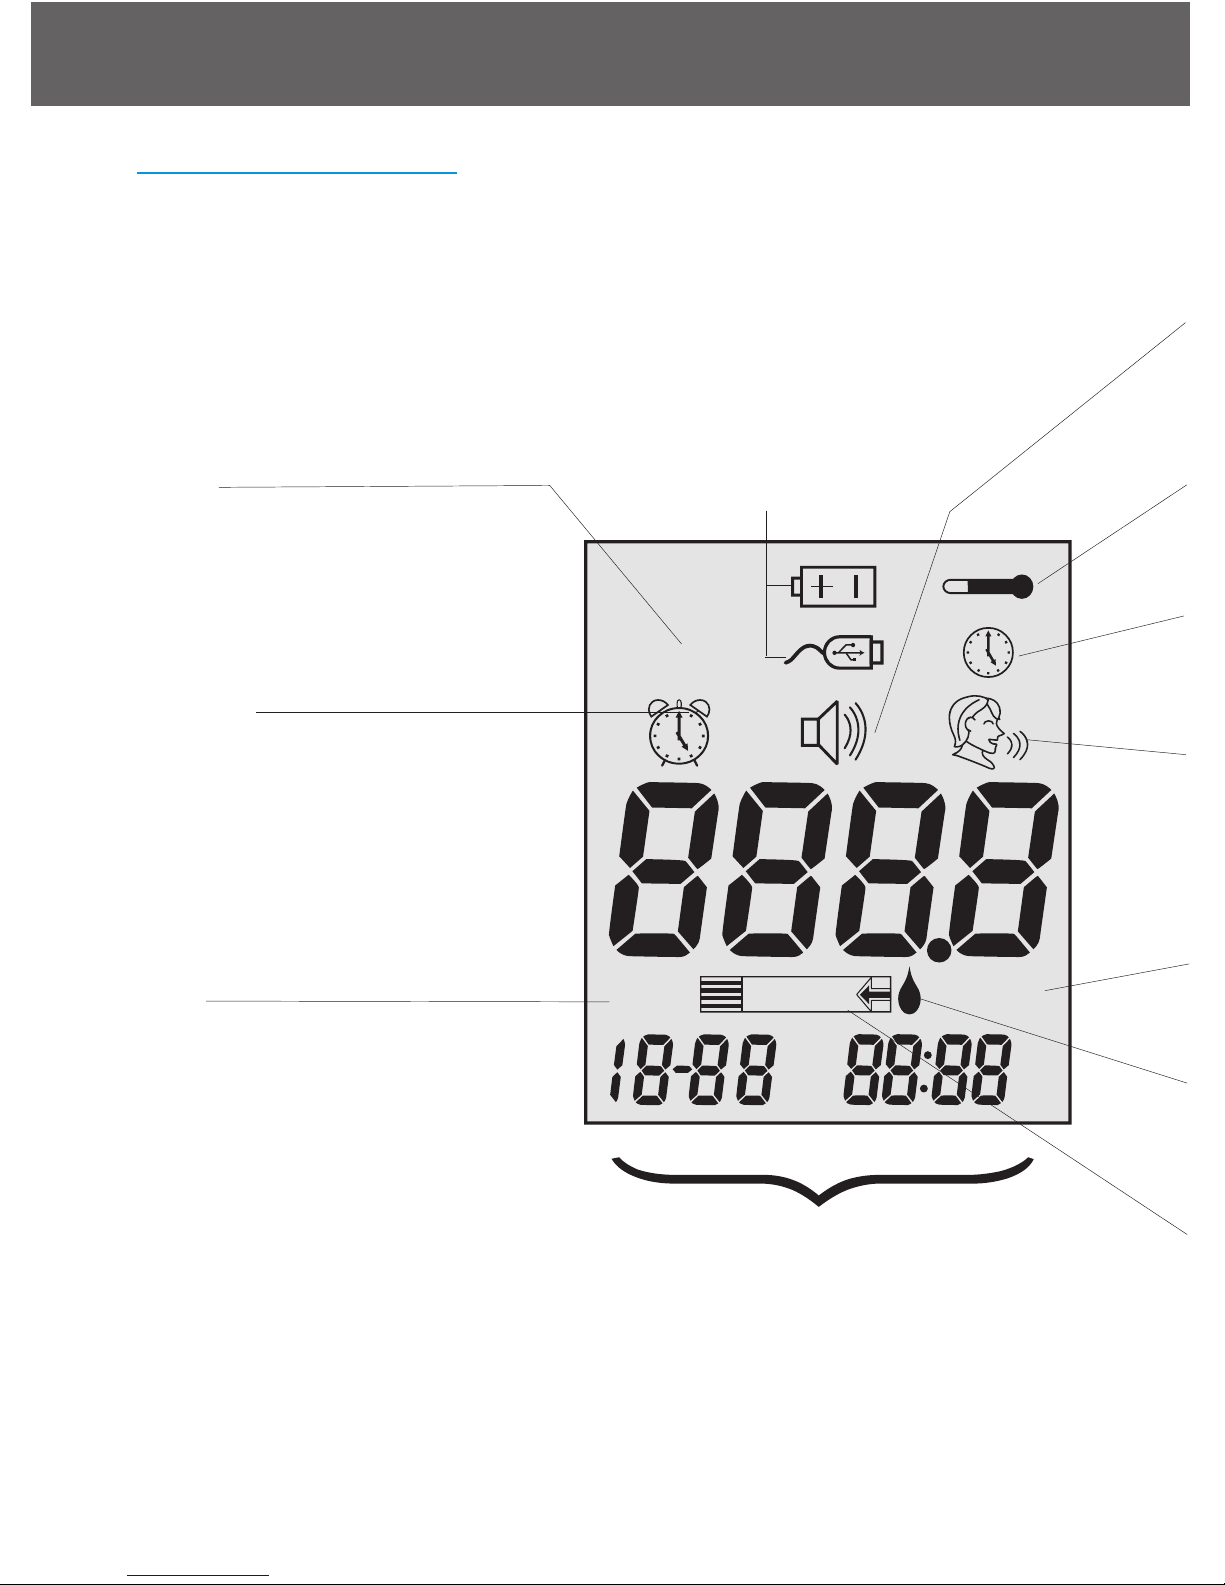
Meter Display Screen
kjhljkllhuhhiohoh
ctl
AM
DAY
AVG
PM
mg /dL
mem
CTL
This icon indicates a control
solution test (see page 23.)
or the stored value is a control solution result (see page
36).
MEM
Indicates the number in the
meter display is a stored test
value (see page 36.).
ALARM
Indicates alarm has been set
(see page 14).
BATTERY
Appears when batteries need to
be changed (see page 39).
CABLE
Indicates the meter is in data
transfer mode to PC*.
* purchased separately.
Displays the date, time, am/pm
(in 12-hours format, see page),
or type of day averages (7, 21,
or 30, see page 36)
8
Understanding Your New Blood Glucose Kit
Embrace N0 Code
Page 9

TEMPERATURE
Appears when it is either too hot or too cold to test
(outside the ranges of 10˚C~40˚C).
BEEPER
Set sound volume (see page 16.).
CLOCK
Indicates the meter is ready to set up time and date (see page 11).
Talking Feature
Indicates talking feature is turned on.
UNITS
Unit of measurement for your blood glucose is mg/dL.
BLOOD DROP and ARROW
Indicate the meter is ready for testing.
TEST STRIP
Flashes to prompt you to insert a test strip for testing.
9
Understanding Your New Blood Glucose Kit
Embrace N0 Code
Page 10
Setting Up Your New System
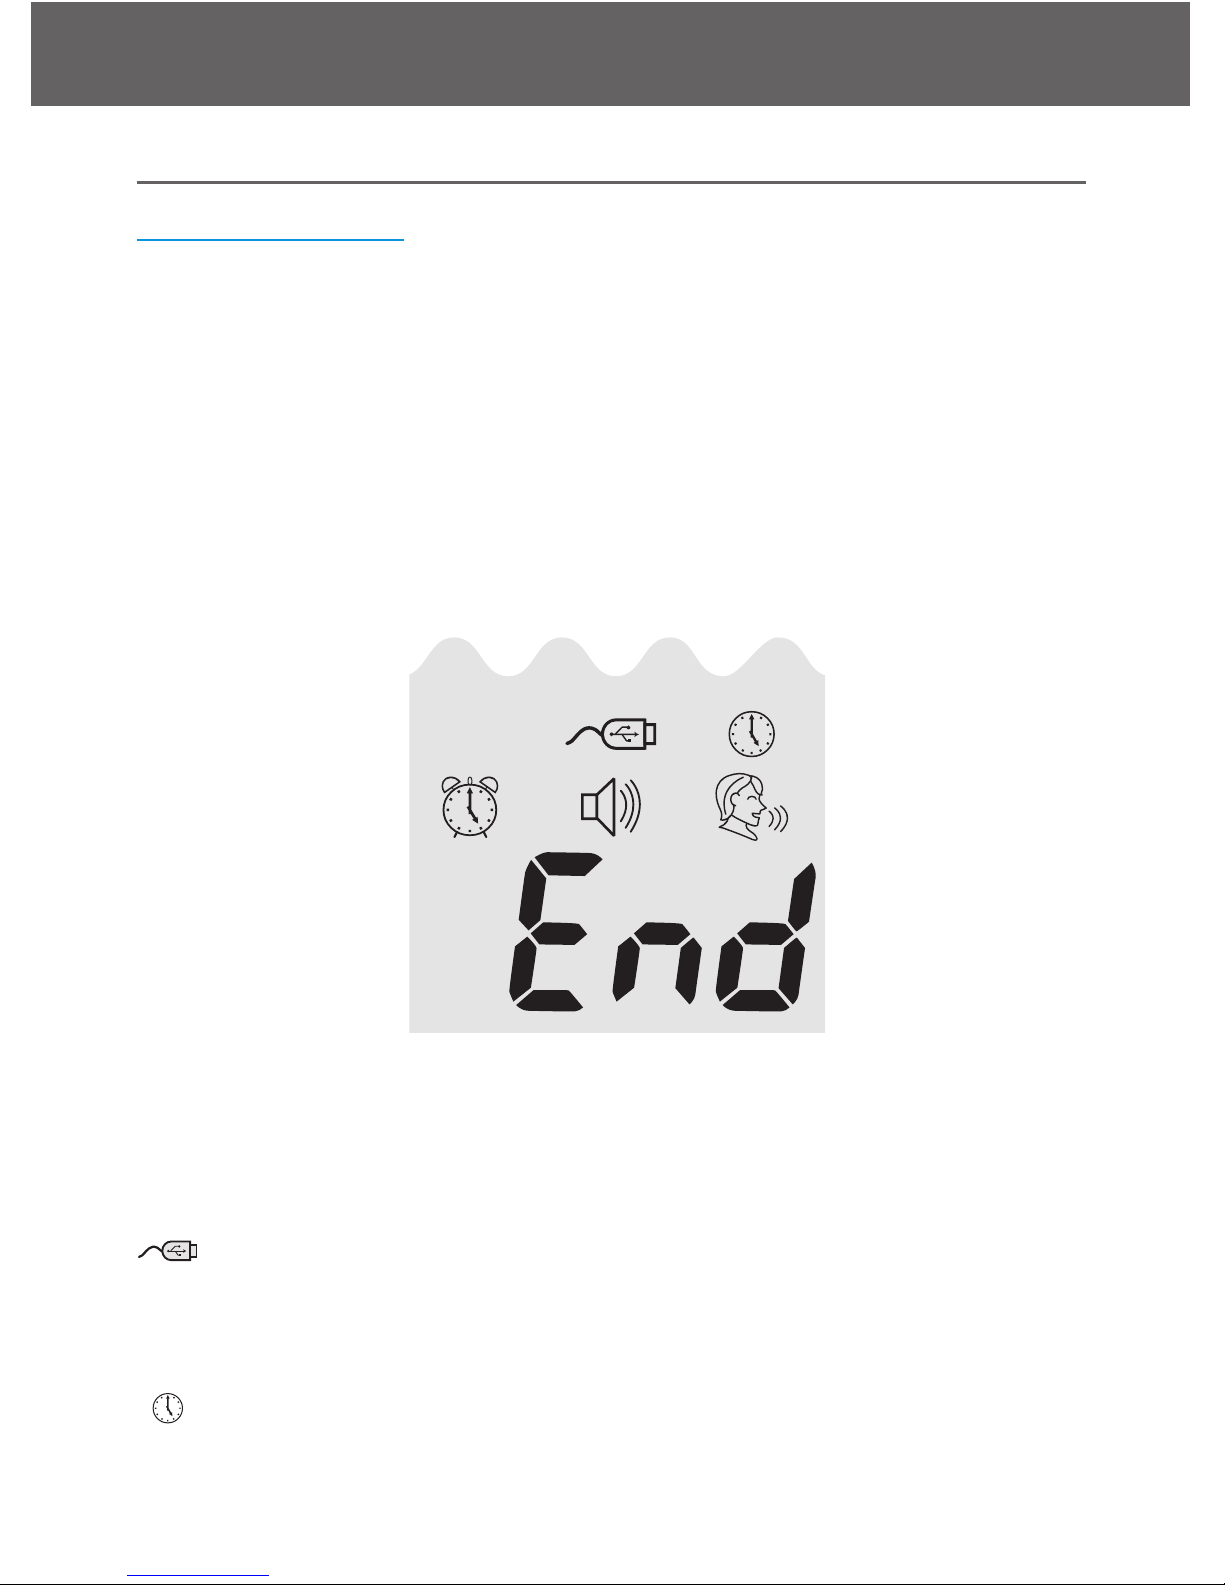
The Setup Screen
The Setup Screen of the Embrace Meter allows you to take advantage
of the advance functions of this meter. The buttons on the side of the
meter will assist you to select the function you want, simply push the
middle button and use the up or down arrows until you reach the desired functional icon, and press the middle button to enter that function
when the icon is flashing. Use the arrows to End at the display screen
to exit the Setup Screen. The meter will also announce each function
when the talking feature is turned on.
........press the middle button to enter Memory Recall to retrieve
stored results. Your meter can store up to 300 memories with
date and time. (see page 36)
........Press the buttons to enter PC Link Mode for data transfer
onto a PC*
*Software purchased separately
........Press the buttons to enter Time and Date Setup (see page
11).
mem
Embrace N0 Code
Setting Up Your New System
10
mem
Page 11
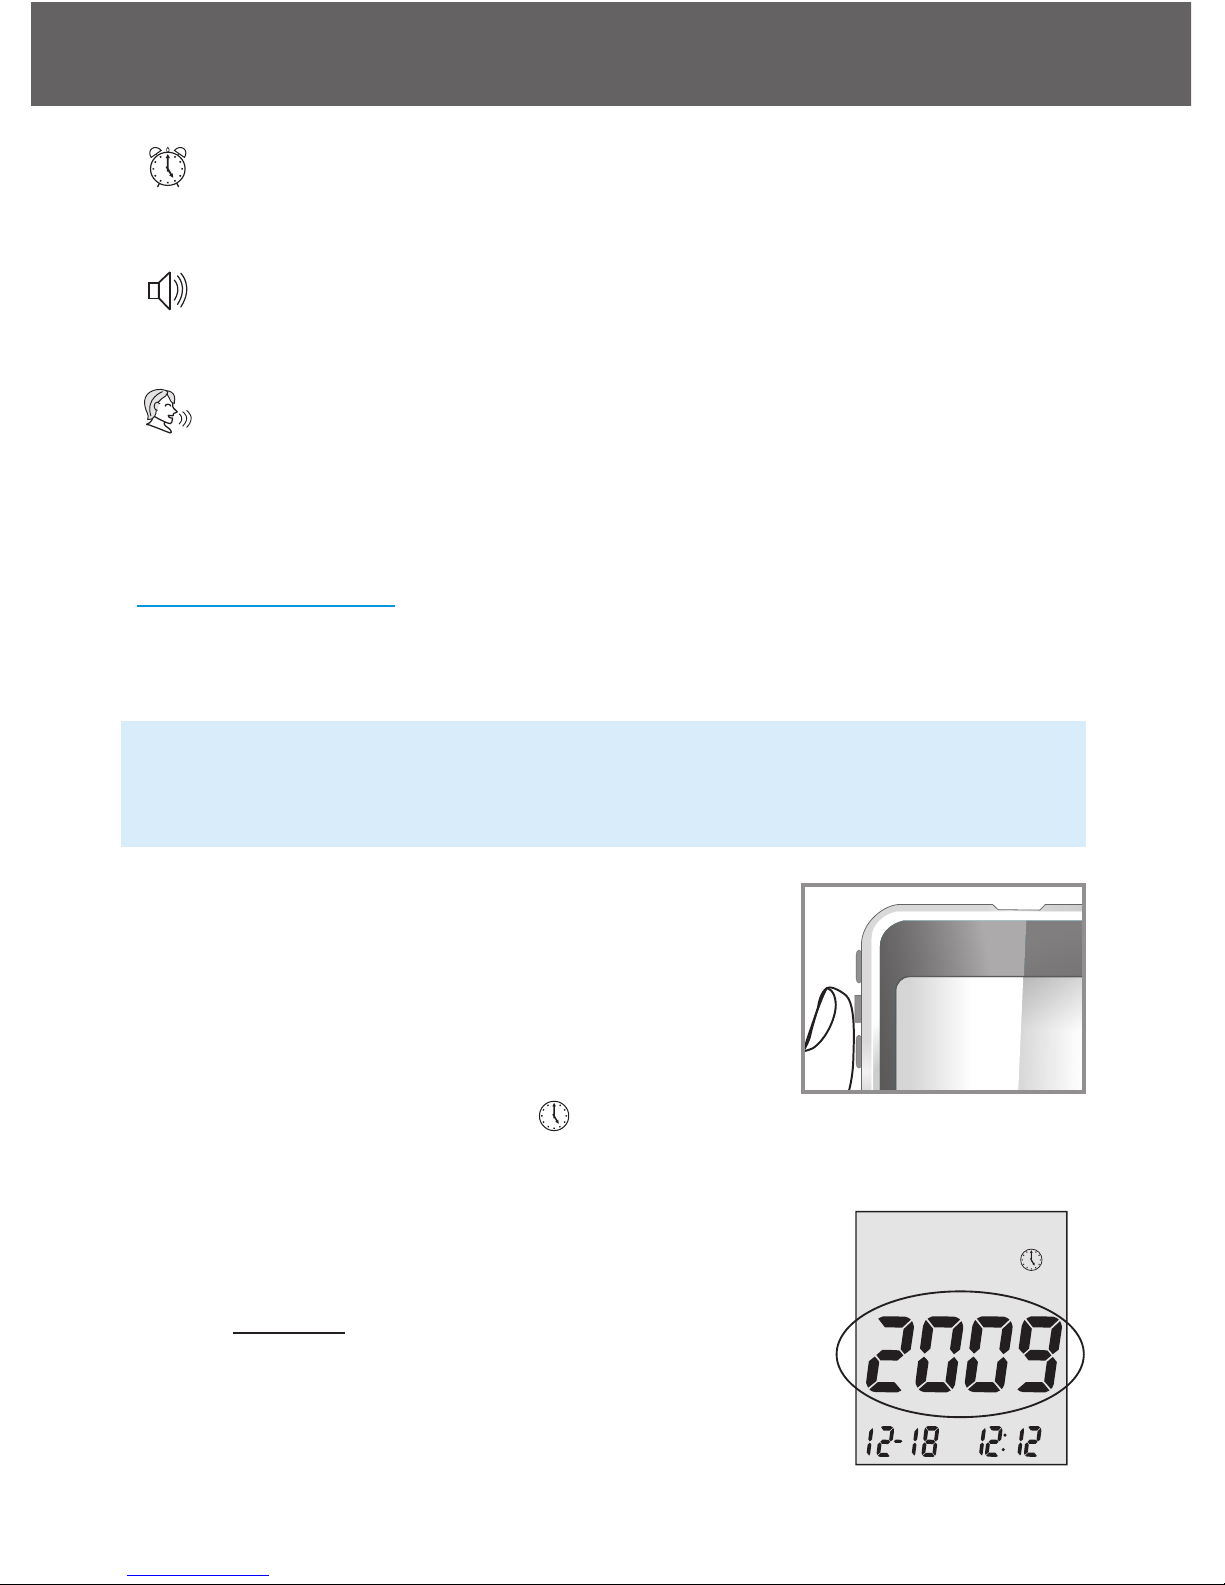
........Press the middle button and then the up arrow until you
reach the clock icon to enter Alarm Setup (see page 14) Your
meter can have as much as 3 alarm settings.
........Press the middle button and then the up arrow until you
reach the clock icon to enter Volume Setup (see page 16).
........Press the buttons to enter Language Selection (see page17).
End..........Exit Setup Screen and return to testing.
Setting the Clock
You will need:
√ Your Embrace Meter
NOTE:
If date and time on the Embrace Meter has not been set, test or control
result will not be stored in memory.
Step 1:
Press and hold the middle button to turn on the
meter.
Step 2:
Use up or down buttons until
starts to
flash. If the talking feature is on, the meter will
say, “Set date and time.” Press the middle button
to enter clock setup.
Step 3-Set Year
If the talking feature is on, the meter will say, “Set
Year.” Press the up or down arrow until the desired year is reached and then press the middle
button.
Embrace N0 Code
Setting Up Your New System
11
PM
Page 12
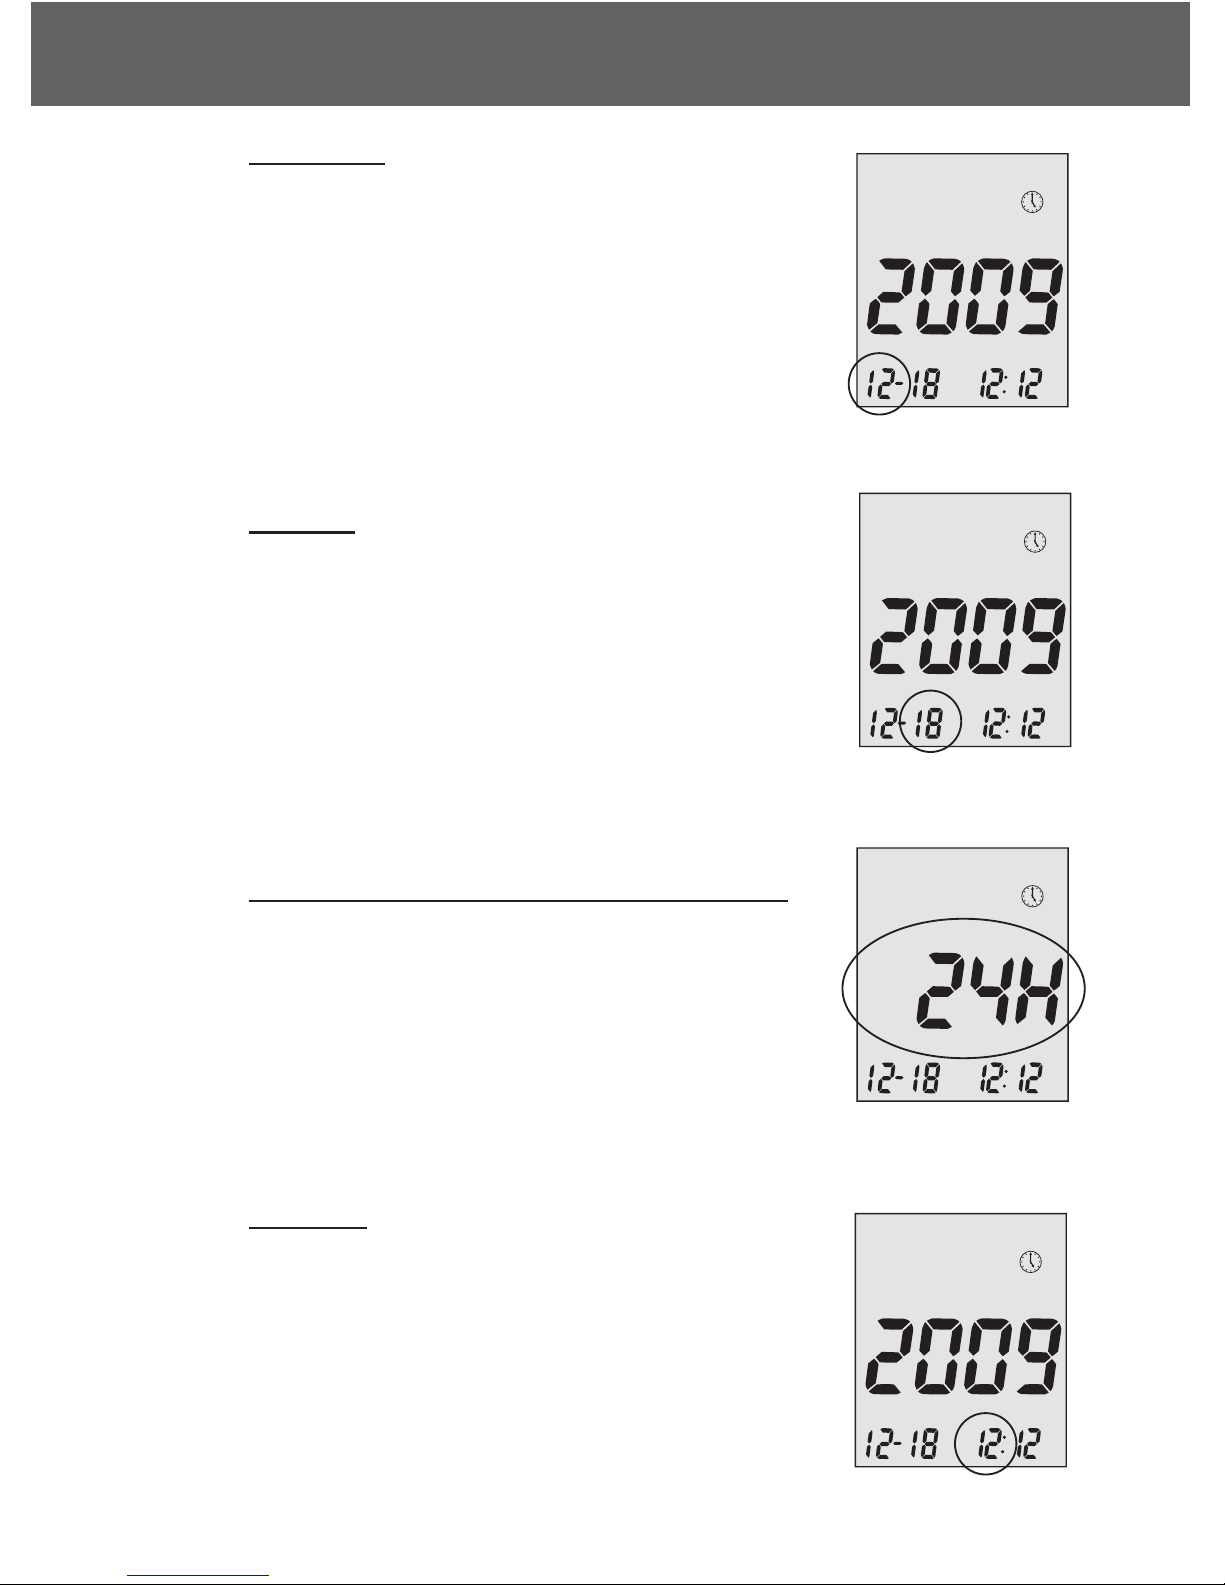
Step 4 - Set Month
The current month will flash. If the talking feature
is on, the meter will say, “Set Month.” Press the
up or down arrows to reach the desired month.
Once the desired month is reach press the middle
button.
Step 5 - Set Day
The current date will flash. Use the up and down
arrows to reach the desired day and when
achieved, press the middle button. If the talking
function is on, the meter will say, “Set Day.”
Step 6 - Set Time Format to 12-hours or 24-hours
The current time format will flash. Use the up
arrow to select for either 12-hours format or 24hour format. Press the middle button to confirm
your selection and advance to set hour.
Step 7 - Set Hour
The current hour will flash. If the talking feature is
on, the meter will say, “Set Hour.” Press the up
arrow to reach the correct hour. Press the middle
button to confirm your choice and advance to set
minutes.
Embrace N0 Code
Setting Up Your New System
12
PM
PMPMPM
Page 13
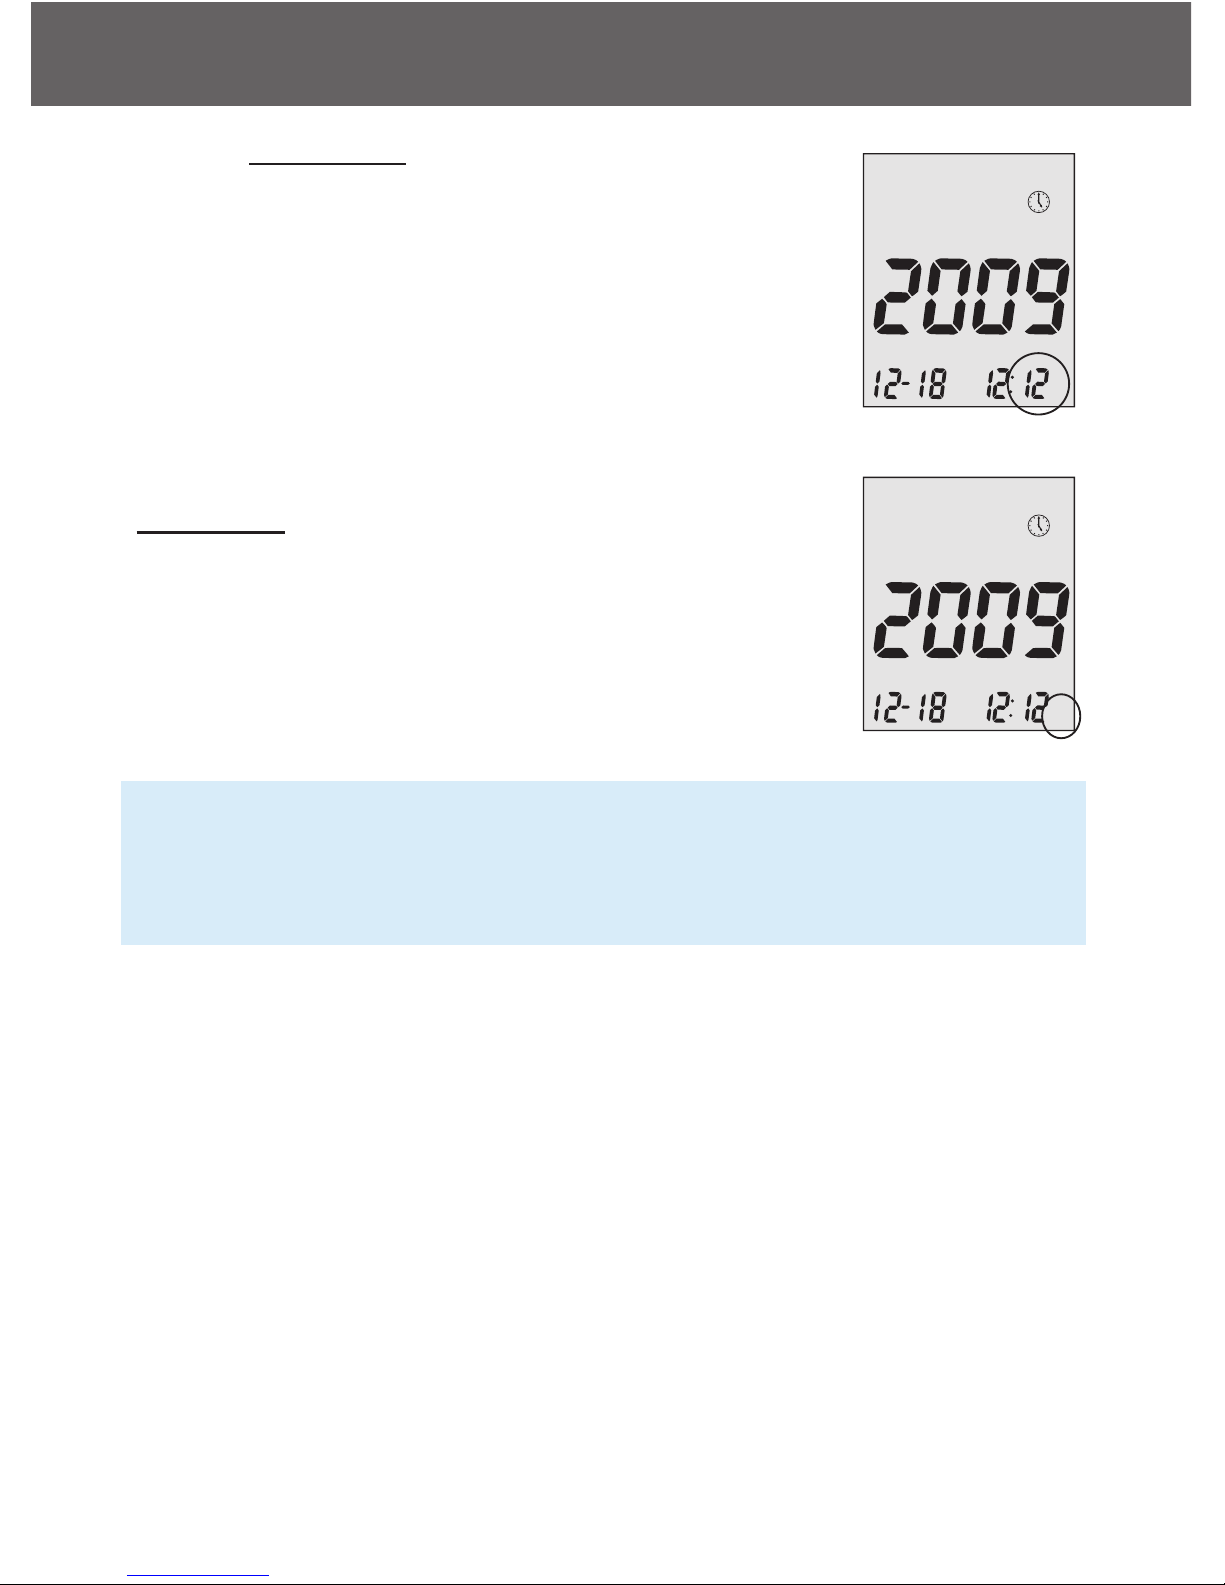
Step 8 - Set Minutes
The current minutes will flash. If the talking feature
is on, the meter will say, “Set Minutes.” Press the
up arrow to select the correct minutes. Press the
middle button to confirm your choice and finish setting the clock. If you have chosen 12-hours format
in step 6, then pressing the middle button will advance into set up am or pm.
Set AM/PM
(if selected 12-hours time format in step 6)
Step 1
Press the up or down arrow to select AM or PM.
NOTE:
• Anytime during set up, inserting an Embrace Test Strip will begin
testing. Any changes made so far will be stored.
• You may need to reset time after changing batteries.
After date and time have been set, the meter will announce the date
and time if the talking feature is on. Begin testing by inserting an Embrace Blood Glucose Test Strip (see page 28, Testing Your Blood Glucose), or press and hold the middle button to turn off the meter, or see
the next section on how to set up the alarm feature on your meter.
Embrace N0 Code
Setting Up Your New System
13
PM
PM
Page 14
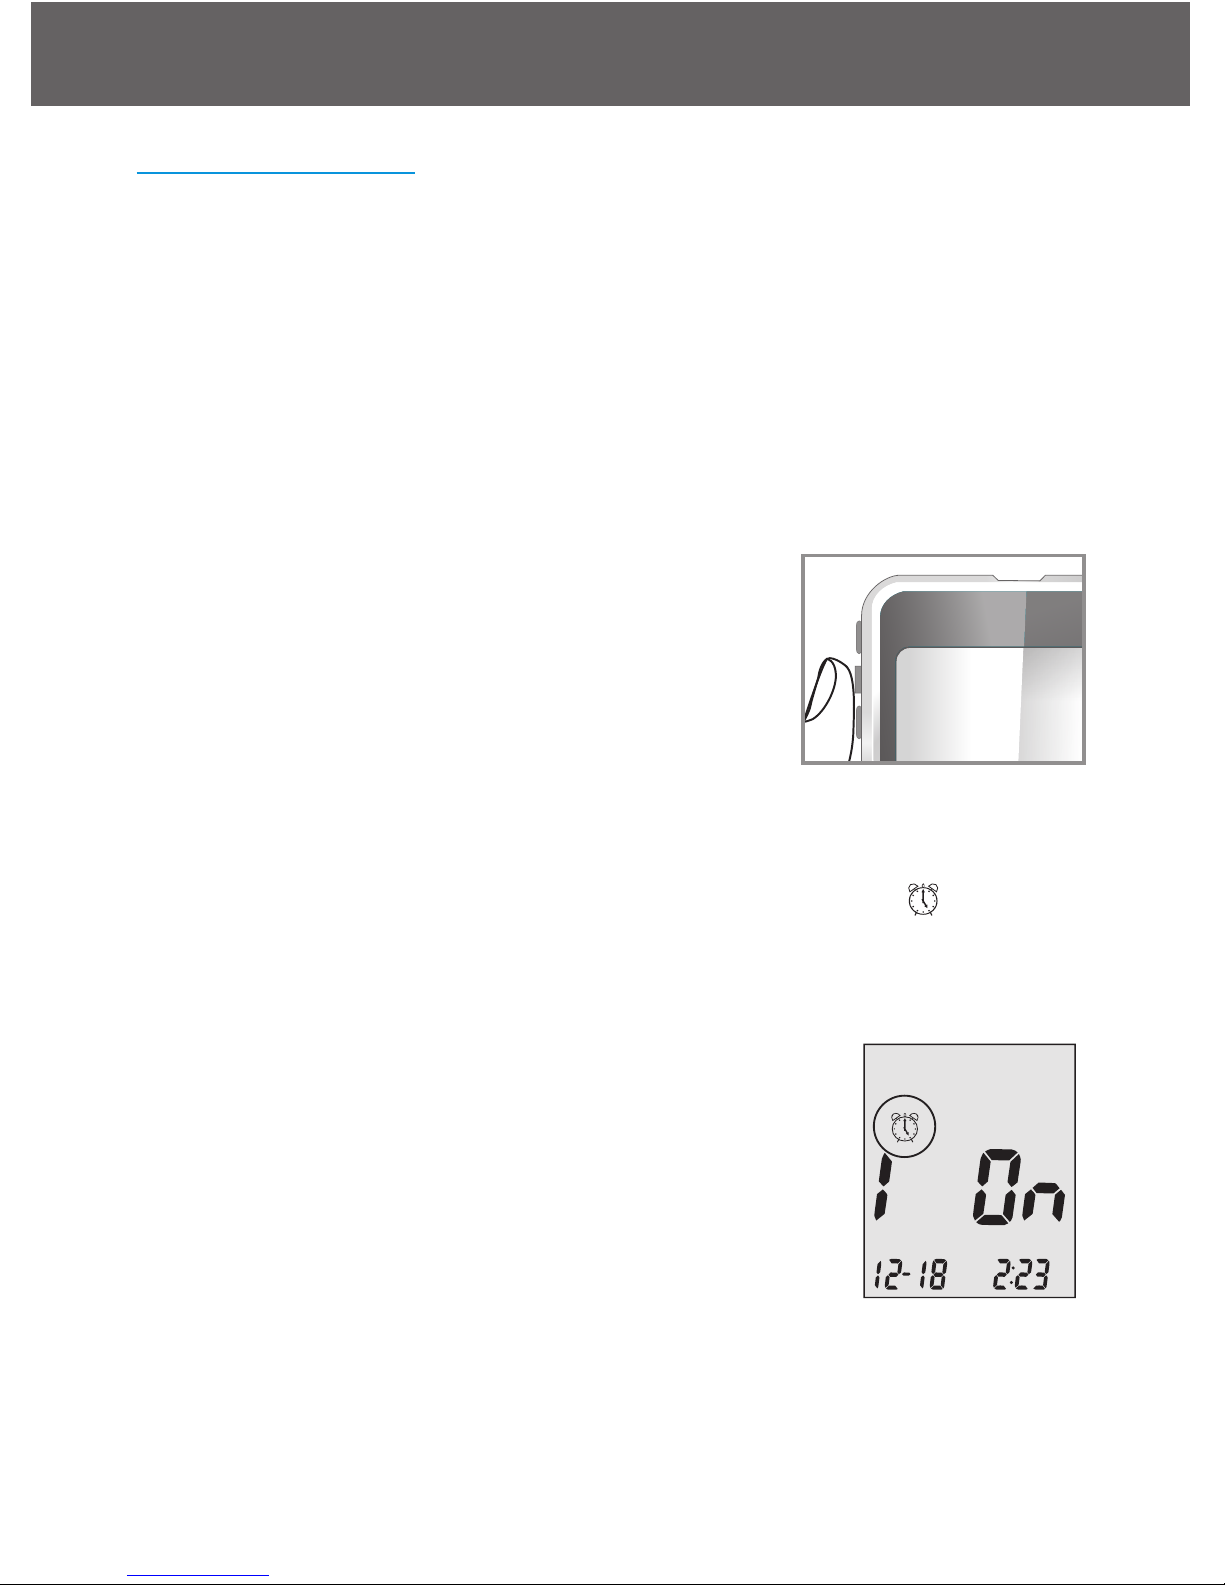
Setting the Alarms
You can set up to three alarms on the Embrace Meter. You must set the
clock before you can set the alarms. When an alarm sounds, the meter
will turn on, and a melody will sound for 30 seconds. Pressing the middle button or inserting a test strip will silence the alarm. You can set up
one or all three alarms.
You will need:
√ Your Embrace Meter
Step 1:
Press and hold the middle button to turn on the
meter.
Step 2:
Press the middle button and then arrow up or down until starts to
flash. If the talking feature is on, the meter will say, “Set Alarm.” Press
the middle button to enter alarm setting.
Step 3:
The display screen will indicate alarm 1 status.
You can turn it on or off by arrow up or down.
Embrace N0 Code
Setting Up Your New System
14
PM
Page 15
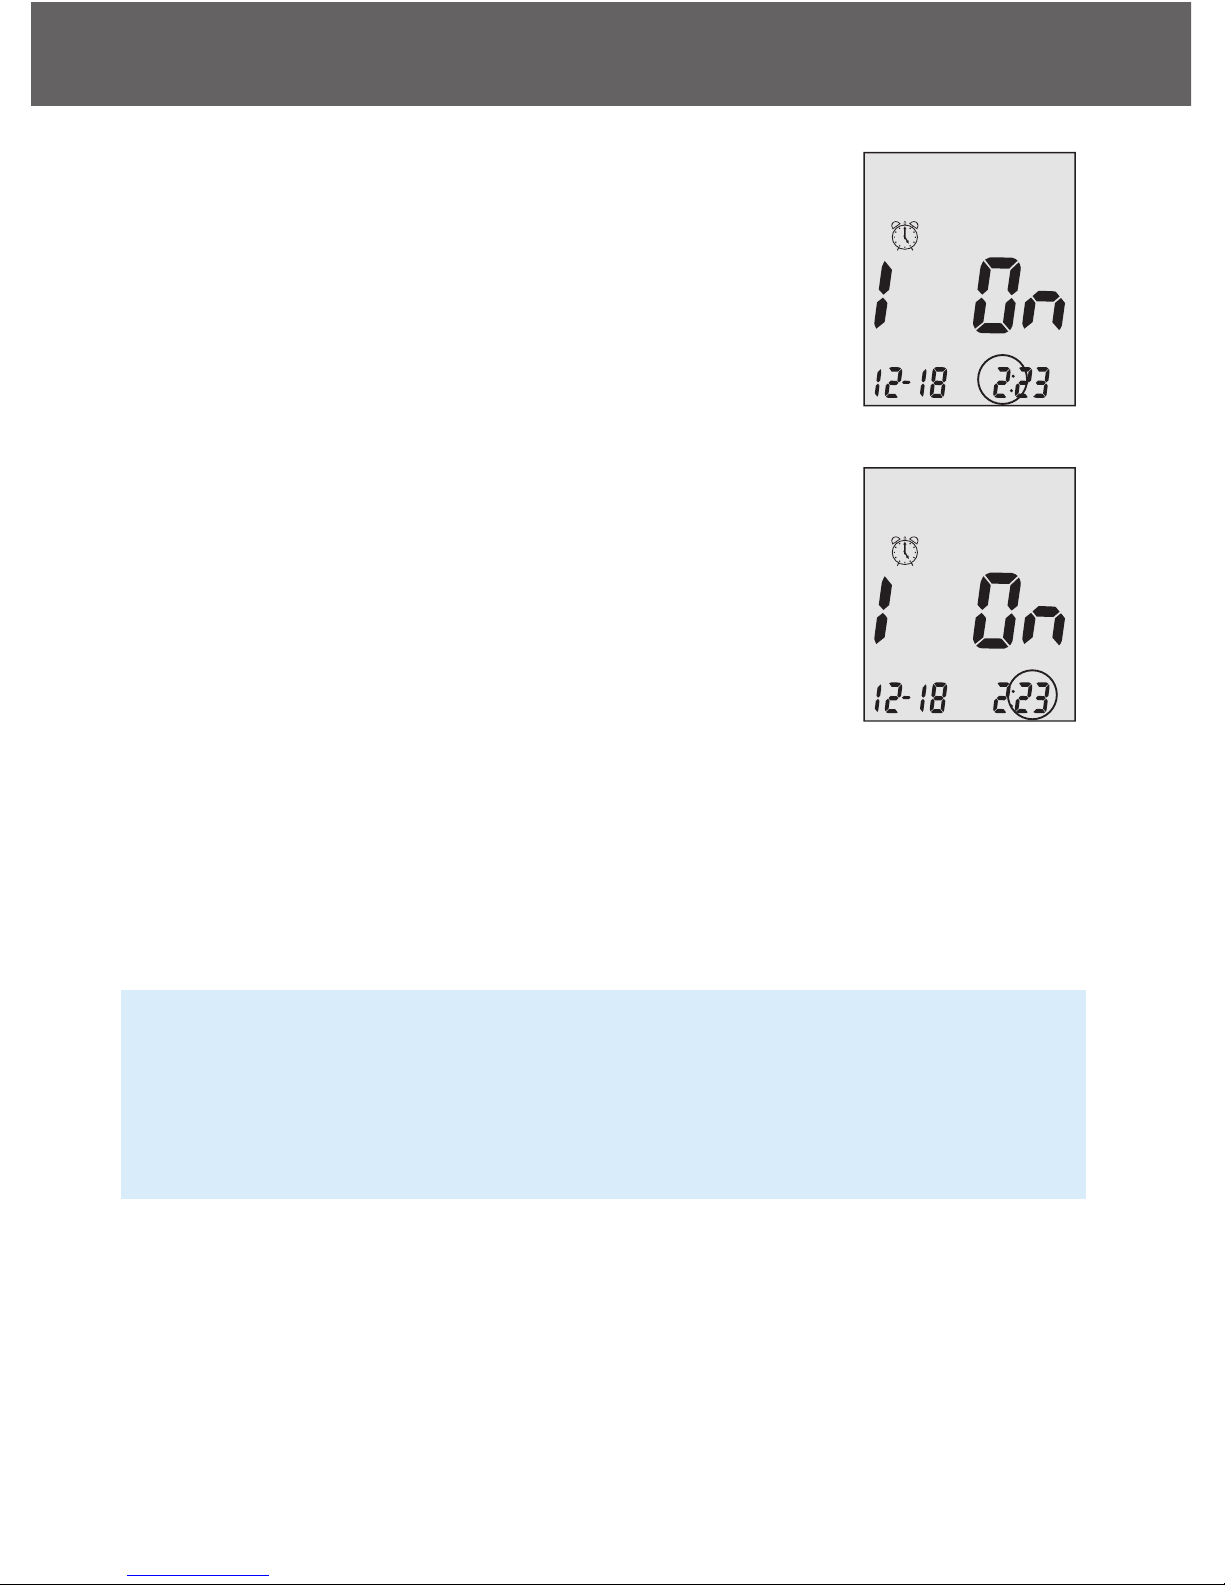
Step 4:
Press the middle button and the hour will flash.
Press the up or down arrow to select the hour.
Press the middle button to confirm your choice and
advance to set minutes.
Step 5:
The current minutes will flash. Press the up or
down arrows to select the correct minutes. Press
the middle button to confirm your choice and advance to set alarm 2.
Step 6:
Set alarm 2 and 3 following steps 3 through 5. After you finish setting
alarm 3, press the middle button to exit alarm setup.
NOTE:
• Alarm will not sound during testing.
• Alarm will follow the time format (12-hours or 24-hours) you choose
when setting up the clock.
• Alarm settings will not be erased when changing batteries.
Begin testing by inserting a Embrace Blood Glucose Test Strip (see
page 28, Testing Your Blood Glucose), or press and hold the middle
button to turn off the meter, or see the next section on how to set up the
talking feature on your meter.
Embrace N0 Code
Setting Up Your New System
15
PM
PM
Page 16
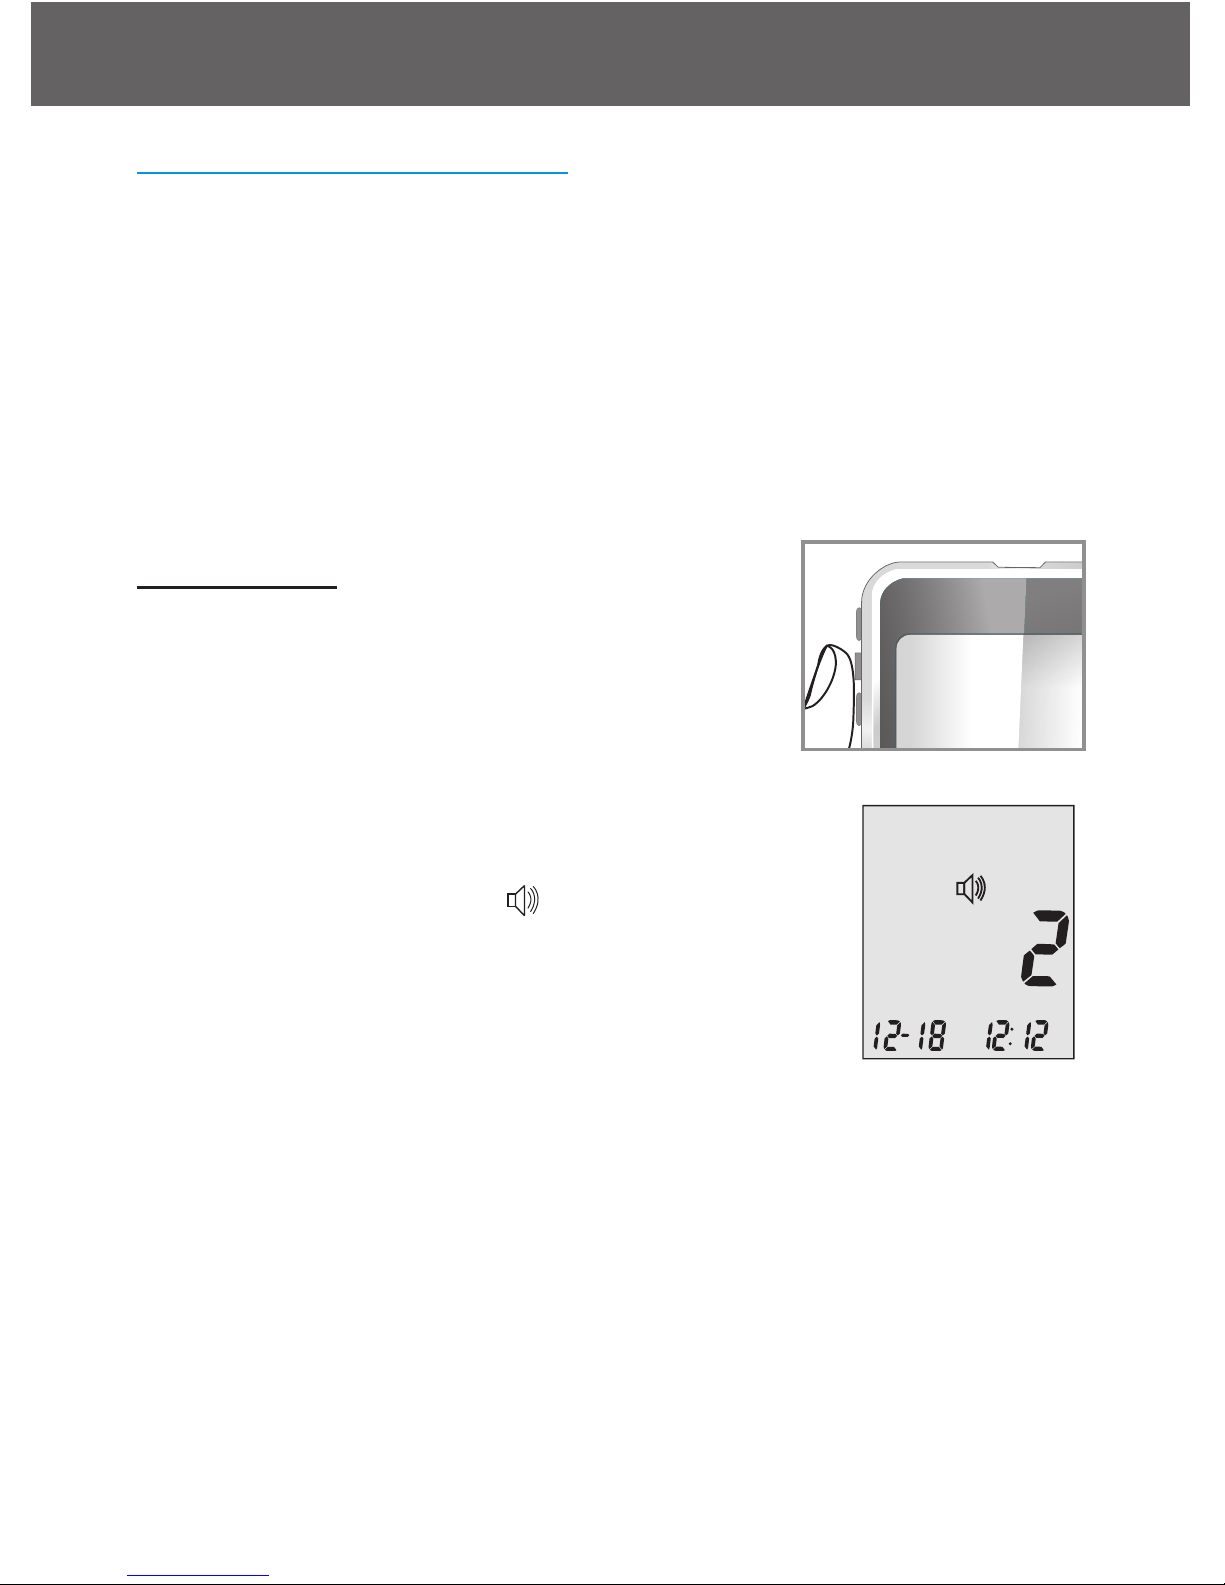
Talking and Beeper Function
Your meter has a bi-lingual talking function that can be use as a verbal
aid for using the meter and hearing test results. The default setting for
the talking function is on, and can be switched off to conserve battery
power. When the talking feature is off, the meter will beep to alert you to
important messages.
You will need:
√ Your Embrace Meter
Setting Volume
Step 1:
Press and hold the middle button to turn on the
meter.
Step 2:
Arrow up or down until the starts to flash.
Press the middle button to enter volume setting.
Step3:
The display screen will show the current sound volume.
Scroll up or down to adjust the sound volume from 1 (lowest) to 5 (highest). A melody will sound according to the sound volume you have selected. Setting to 0 will turn off the talking function. The meter will
instead beep to alert you to important messages. Once you have determined the suitable volume, press the middle button again to exit volume
setting.
Embrace N0 Code
Setting Up Your New System
16
PM
Page 17
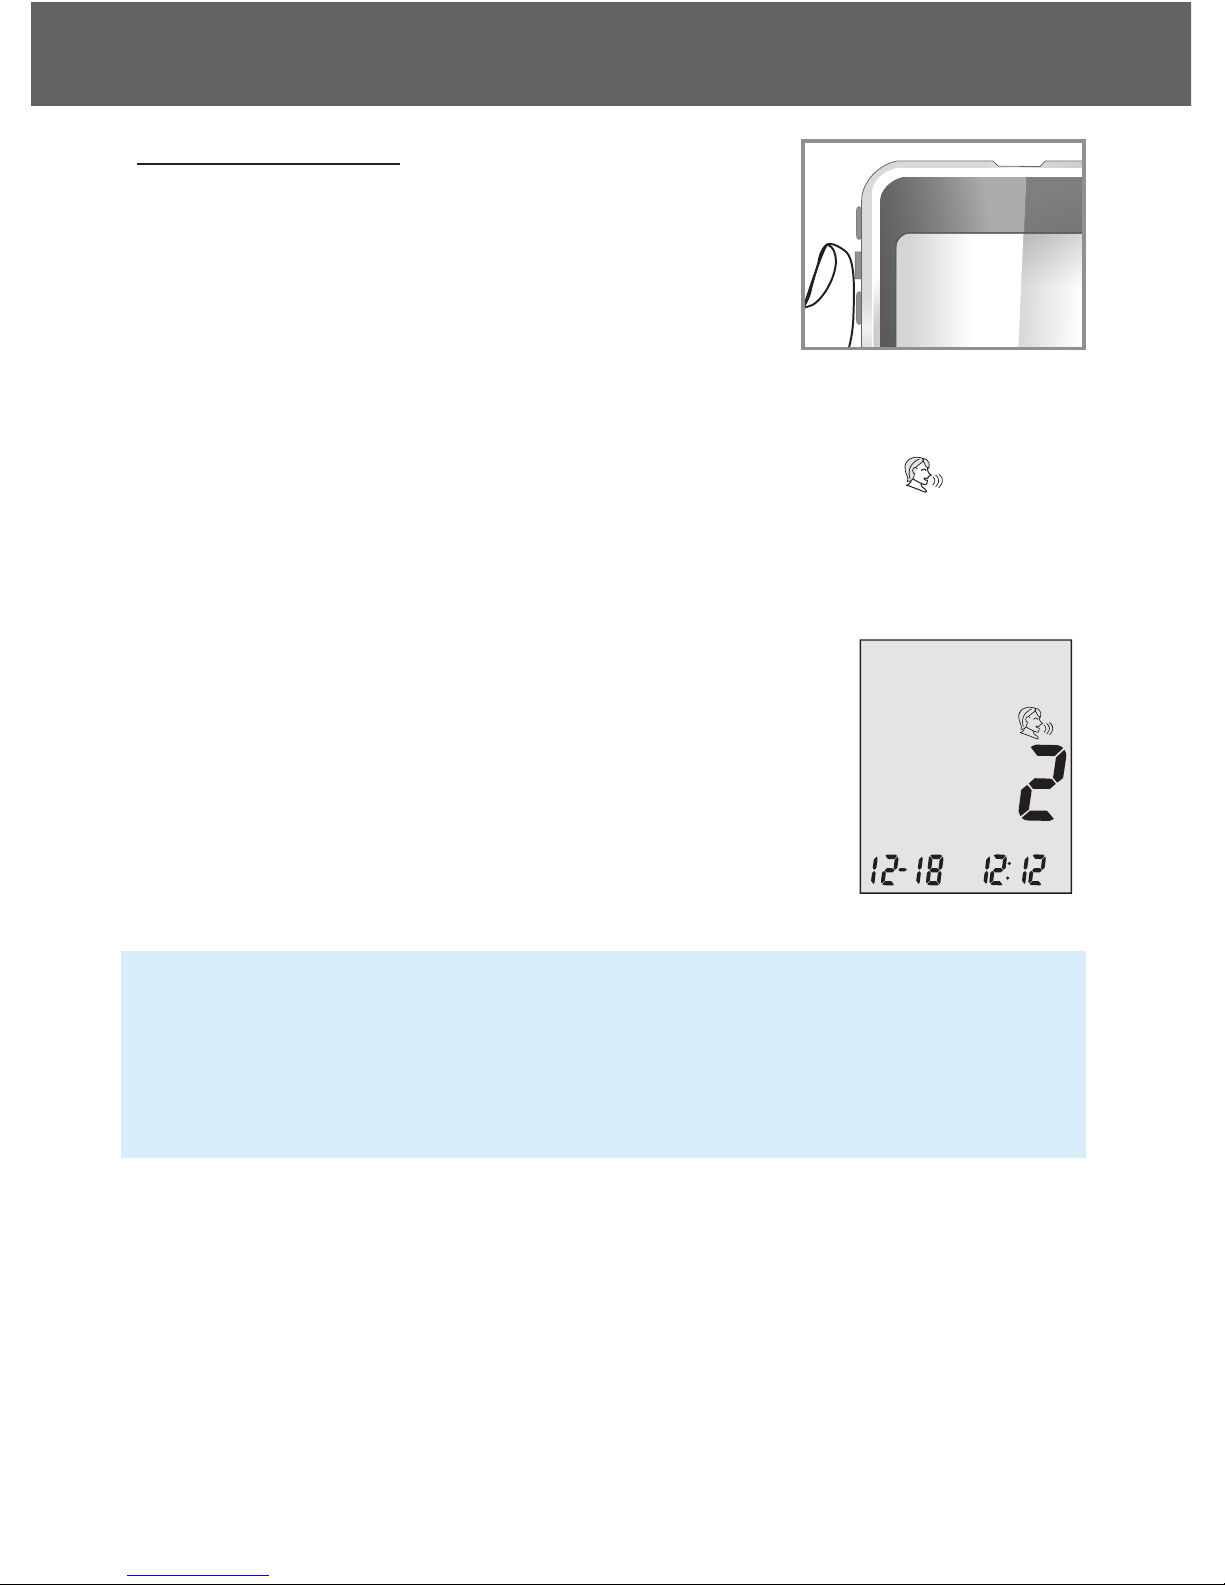
Language Selection
Step 1:
Press and hold the middle button to turn on the
meter.
Step 2:
Press the middle button once and arrow up or down until starts to
flash. The meter will announce “Language Selection.”
Step 3:
The default language ENGLISH is announced
(graph). Press the middle button and arrow up or
down to select another language. Press the middle button again when you have finished selecting
the language and exit language selection.
NOTE:
• Anytime during set up you can insert an Embrace No Code Test Strip
and begin testing. Any changes made so far are stored.
• Your choice of language and volume settings will not be erased when
changing batteries.
Begin testing by inserting an Embrace No Code Blood Glucose Test
Strip (see page 28, Testing Your Blood Glucose) or press and hold the
middle button to turn off the meter.
Embrace N0 Code
Setting Up Your New System
17
PM
Page 18

Talking Function Table
The talking function can be use as an aid for you to hear the test results
and use the meter. The following table lists WHEN the meter will speak
and WHAT the meter will say.
Testing blood and control solutions (see page 23, Control Solution
Testing, and page 28, Testing your blood glucose)
WHEN the meter will speak… WHAT the meter will say…
Embrace N0 Code
Talking Function Table
18
Turned on.
Prompt user to insert test strip.
Test strip is inserted and the
meter is ready to test (with flashing arrow and blood drop)
Blood Glucose test is completed
and the result is show on screen.
Blood Glucose test result is
BELOW the measurement range
of 20 mg/dL
Blood Glucose test result is
ABOVE the measurement range
of 600 mg/dL.
Greeting Tone.
“Please insert test strip”
“Blood glucose test. Please apply
blood onto the test strip.”
“Your blood glucose reading is
(number) milligram per deciliter.”
“Your blood glucose reading is
below 20 mg/dL.”
“Your blood glucose reading is
above 600mg/dL.”
Page 19
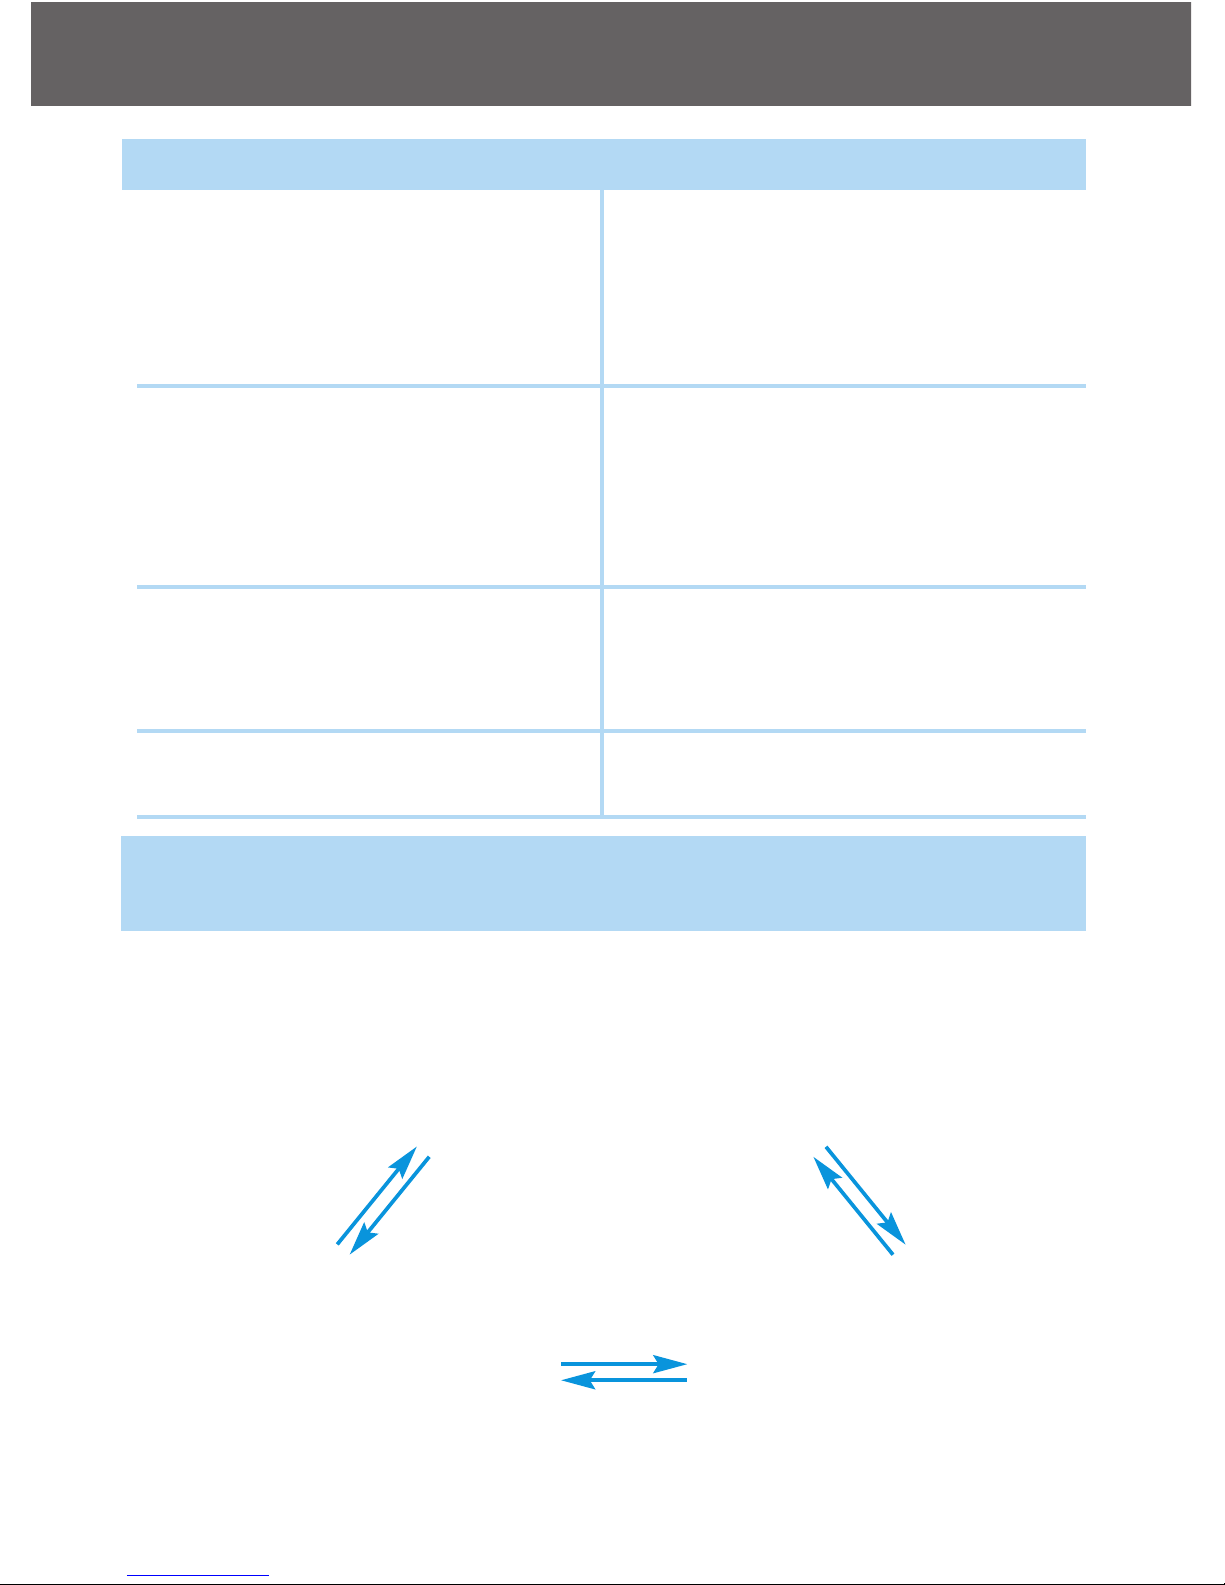
WHEN the meter will speak… WHAT the meter will say…
Embrace N0 Code
Voice Function Table
19
Control solution test is completed
and within range. The result is
show on screen
Control solution test is completed
and NOT within range. The result is show on screen
Temperature is out of range (between 50˚F~104˚F).
When the meter is turned off.
“Your L1/ L2 control solution test
result is (number) milligram per
deciliter, is within range”
“Your L1/ L2 control solution test
result is (number) milligram per
deciliter, is not within range”
“Temperature is out of range”
Melody.
Test Strip is inserted and use the up or down arrow to scroll up or down
(CTL showing next to the test strip icon)
“L1 control solution
test. Please apply
control solution onto
the test strip.”
“Blood glucose test.
Please apply blood
onto the test strip.”
“L2 control solution
test. Please apply
control solution.”
Arro
w
d
own
Arrow u
p
Arro
w
d
own
Ar
row up
Arrow down
Arrow up
Page 20
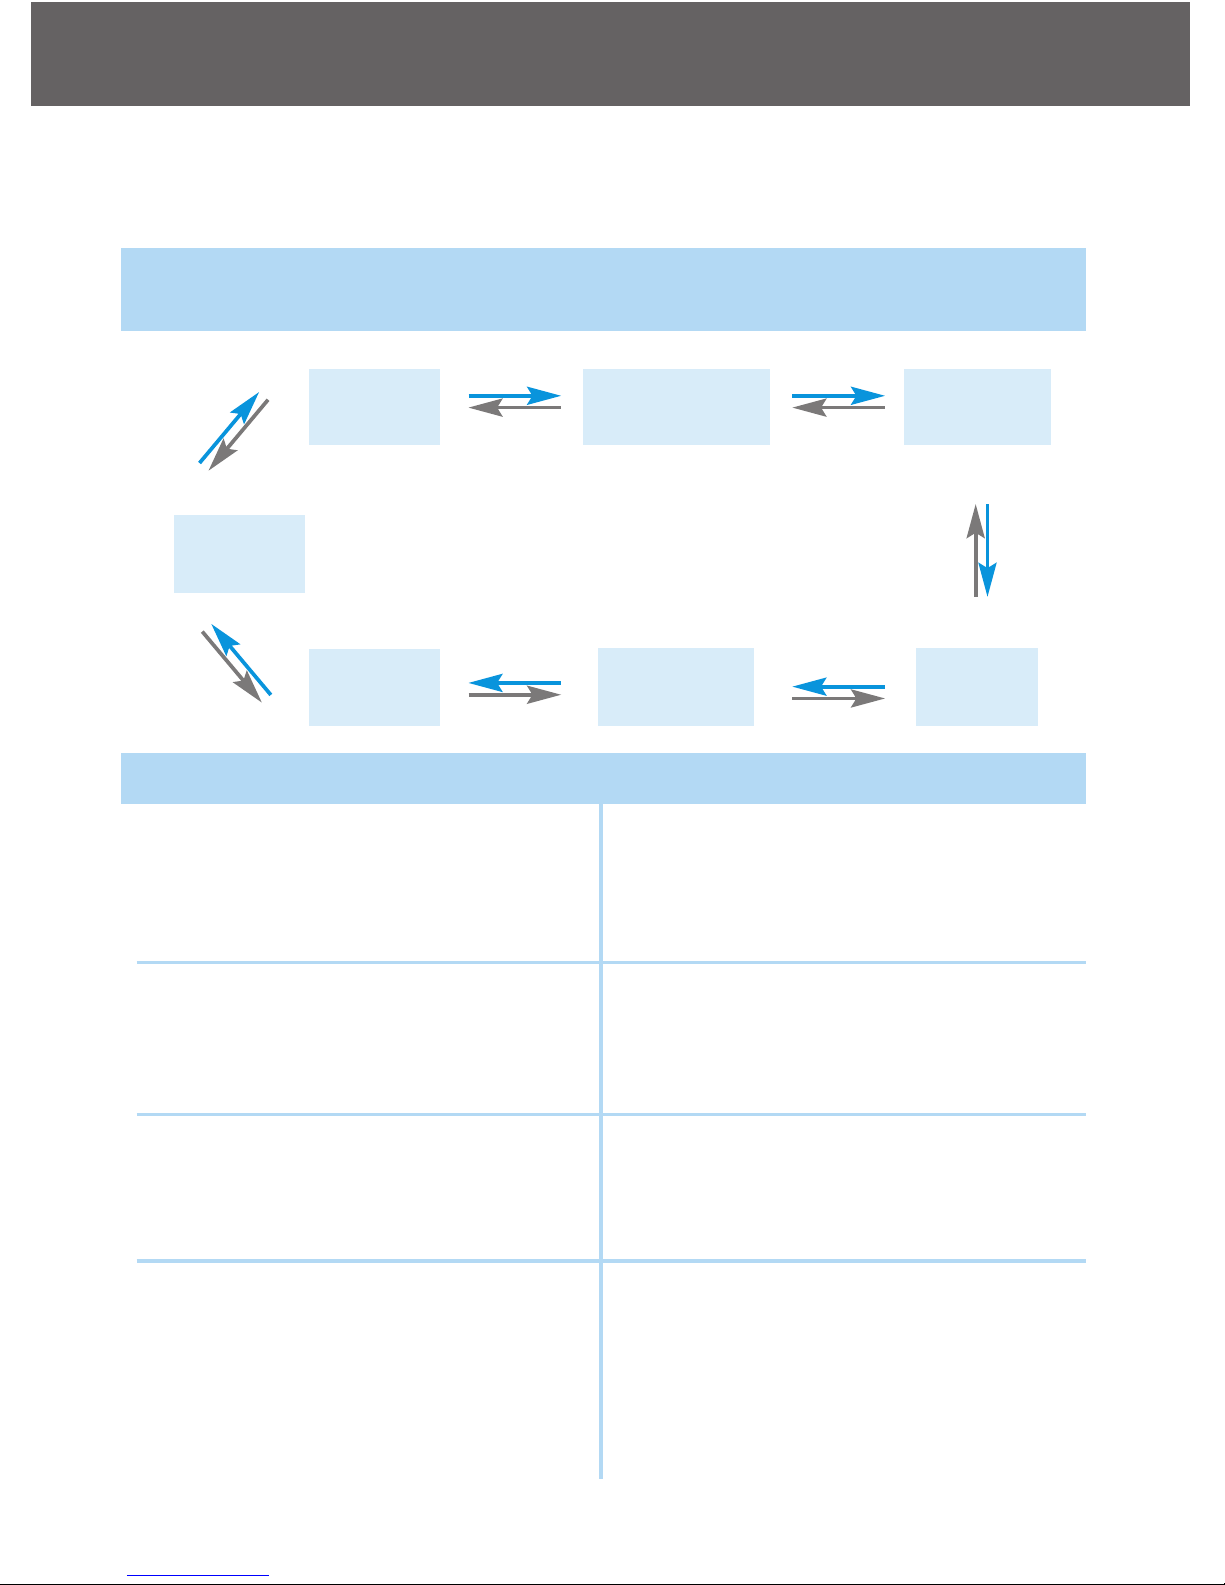
Setting Meter Functions via the Setup Screen
(see page 10, setting up your new system)
WHEN the meter will speak… WHAT the meter will say…
Embrace N0 Code
Voice Function Table
20
Press the middle button and then arrow up until you reach your desired
result (after the meter has turned on).
Memory
Recall
Memory
Recall
Language
Selection
Exit Function
Mode
Set
Volume
Set Testing
Alarm
Set Date
and Time
Arrow down
Arrow up
Arrow down
Arrow up
Arrow down
Arrow up
Arrow down
Arrow up
Arrow down
Arrow up
Arrow d
own
A
r
r
o
w
up
Arrow
dow
n
Arrow
up
During date and time setup,
setting up the year
During date and time setup,
setting up the month
During date and time setup,
setting up the date
During date and time setup,
setting up the hour
“Set Year”
“Set Month”
“Set Date”
“Set Hour”
Page 21

WHEN the meter will speak… WHAT the meter will say…
Embrace N0 Code
Voice Function Table
21
During date and time setup,
setting up the Minutes
After finish setting up date and
time
Turning on or off alarm 1, 2, or 3
Setting alarm 1, 2, or 3
When sending data to PC
Finish sending data to PC
“Set Minutes”
“The date and time is (year)
(month) (date) (hour) (minutes)”
“Alarm (number) is on/off”
“Set Alarm (number)”
“Sending data to PC”
“Data transmission complete”
Page 22

Other warning messages (see page 41, solving problems)
WHEN the meter will speak… WHAT the meter will say…
Embrace N0 Code
Voice Function Table
22
Meter date and time has not
been set
Batteries are low
Meter failure
Used test strip
Not enough blood or control solution
Meter can’t count down
“Please set date and time”
“Low Battery”
“Error 1 Meter Failure”
“Error 3 used test strip”
“Error 4 not enough sample”
“Error 5 count down error”
Page 23

Control Solution Testing
The purpose of the control solution testing is to make sure the Embrace
Meter and the Test Strip is working properly. You should perform control
solution testing when:
• Using the meter for the first time
• Using a new bottle of Embrace No Code Blood Glucose Test Strips
• You left the test strip bottle cap open for a while
• You dropped the meter
• You suspect your meter and test strips are not working properly
• The blood glucose test results do not reflect how you feel
• Practice the testing procedure
IMPORTANT:
• Use only the Embrace™ Glucose Control Solutions with the Em-
brace No Code Test Strips. Other brands of control solution can produce inaccurate results.
• Always check the expiration date. DO NOT use control solutions if
expired.
• DO NOT FREEZE. Store the control solutions at room temperature.
You will need:
√ Embrace™ Control Solution (Level 1 or Level 2)
√ Your Embrace Meter
√ A new Embrace No Code Blood Glucose Test Strip
Step 1:
Take out an Embrace Test Strip from the test
strip bottle and close the bottle immediately.
Insert the test strip to turn on the meter.
Embrace N0 Code
Control Solution Testing
23
Page 24
IMPORTANT:
• Check the expiration date printed on the test strip bottle and its pack-
age. Do not use expired test strips.
• Use each test strip immediately after removing it from the bottle.
• Do not use wet or damaged test strips.
• Keep away from direct sunlight and heat. Store the test strip bottle in
a dry, cool place.
• Record the "date opened" on the bottle label. Discard the bottle and
any remaining test strips after 3 months from date of opening.
• Test under the temperature range of 50˚F~104˚F. Your meter will not
work outside these ranges.
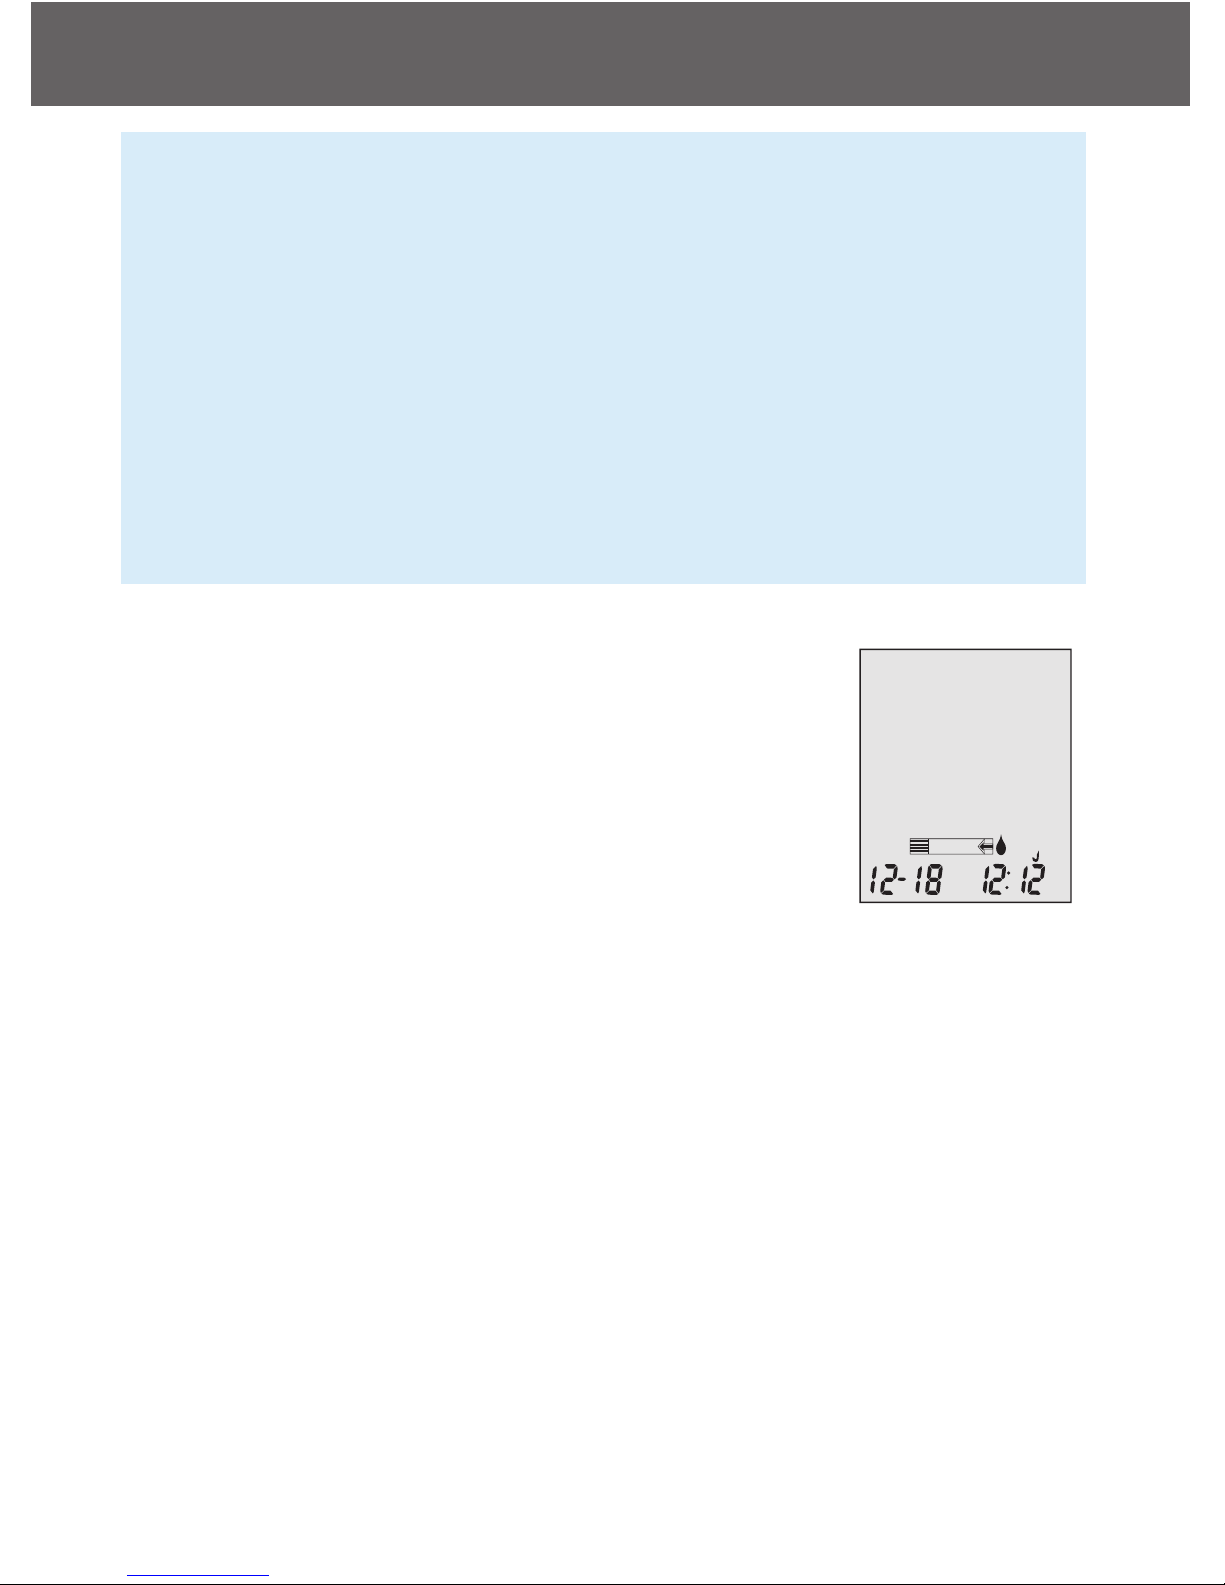
Step 2:
Wait until the flashing blood drop and arrow icons
appear on the meter display screen. The meter will
also announce, “Please apply blood onto the test
strip” if you have the talking feature turned on. Use
the middle button and arrow up or down to enter L1
control solution testing.
Step 3:
ctl icon will appear next to the test strip icon and L1 will appear on the
meter display screen. The meter will also announce “L1 (or L2) control
solution test, please apply control solution onto the test strip.” If you decide not to do a control solution test, arrow up or down until ctl disappeared from the meter display and press the middle button.
Step 4:
Squeeze a drop of control solution onto a clean, dry, nonabsorbent surface. Do not apply control solution to the test strip directly from the bottle. Replace the bottle cap on the control solution bottle immediately
after use.
Embrace N0 Code
Control Solution Testing
24
ctl
mo /dL
PM
Page 25
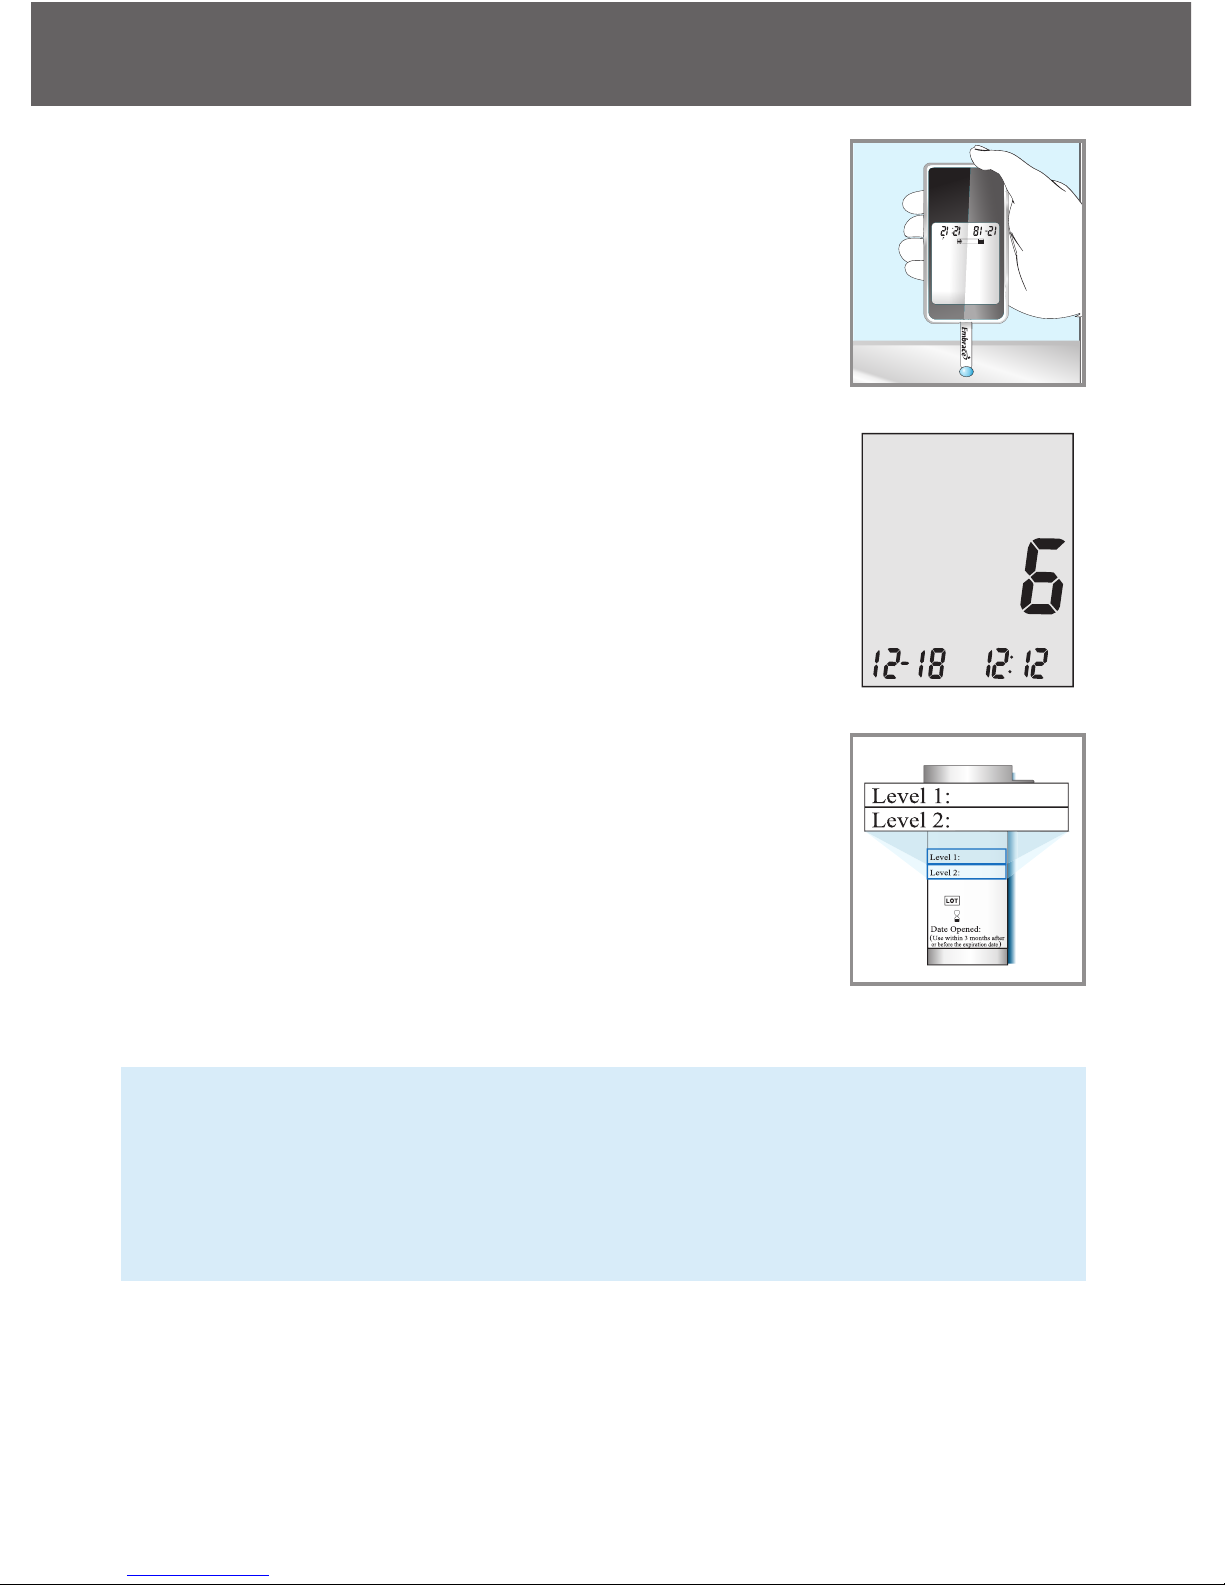
Step 5:
Gently touch the drop of the control solution to the
tip of the test strip. The meter will beep indicating
it has received the control solution
Step 6:
The screen will start to count down. After 6 seconds, the control test result will appear on the
meter’s display screen and announce the test result if the
Step 7:
Compare the reading on the screen to the Level 1
range printed on the test strip bottle or its package.
If the reading falls outside the Level 1 range
printed on the test strip bottle or its package, see
Control Solution Trouble Shooting , on page
NOTE:
• Control solution testing results will be stored into the meter memory
and indicated by ctl icon.
• Control solution testing result will not be used for calculating aver-
ages.
Step 8:
Remove the test strip into proper wastebasket. The meter will automatically turn off
Embrace N0 Code
Control Solution Testing
25
m
ol/dL
PM
PM
53¡ª79
135
¡ª203
Page 26

IMPORTANT:
Do not reuse Test Strips.
Follow steps 3 through 8 to do a Level 2 control solution testing and
compare the result with the Level 2 range printed on the test strip bottle.
Embrace N0 Code
Control Solution Testing
26
Page 27

Control Solution Trouble Shooting
If your control solution testing is out of range (too high or too low), it
maybe caused by the following:
Possible Causes What you can do…..
Embrace N0 Code
Control Solution Testing
27
• Wrong brand of Control Solu-
tion being used
• Control solution not at room
temperature
• Expired or contaminated con-
trol solution
• Damaged test strip.
• Meter malfunction
• Make sure you are using
Embrace™ Control Solution.
• Make sure the testing environment is between 50˚F~104˚F.
• Check the expiration and open
bottle date on both the control
solution and test strips. Repeat
testing using a new test strip. If
the result is still out of range,
use a new bottle of control solution and retest.
• If problem persists, call our authorized dealer
Page 28
Testing Your Blood Glucose
You will need:
√ Your Embrace No Code Meter
√ A new Embrace No Code Blood Glucose Test Strip
√ Lancing device with a clean, unused lancet (or safety lancets)
√ Clear cap for Alternate Site Testing (AST) on palm and forearm
Before you begin, make sure:
• Set up your meter properly and run a control test. See Setting Up
Your New System on page 4, and Control Solution Testing on page
23 for details.
• Wash your hands and testing site thoroughly with soap plus warm
water, and dry well.
• You are testing in an area between the temperature ranges of
50˚F~104˚F. Your meter will not test outside of this range and will
display with verbal indication if the voice feature is turned on.
Move the meter into an area that is between 50˚F~104˚F, and let it sit
for 10 to 15 minutes before testing again.
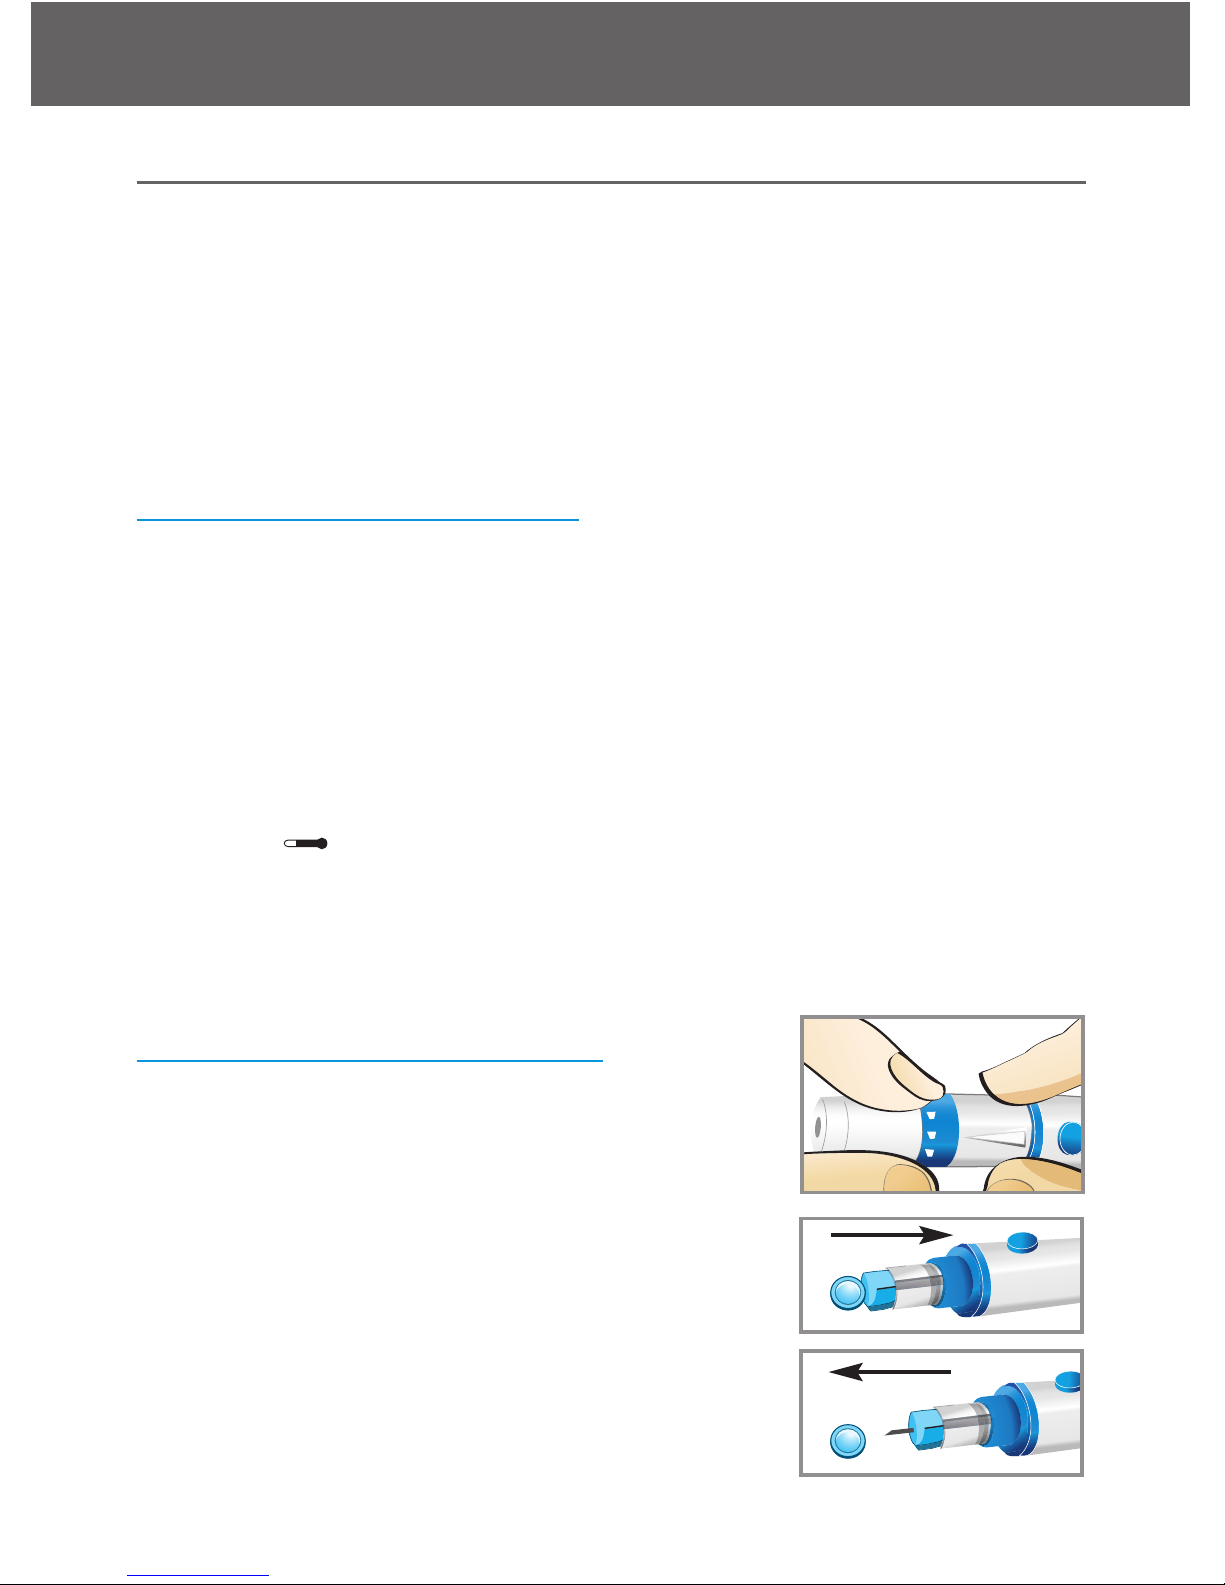
Preparing Your Lancing Device
Step 1:
Unscrew the adjustable cap of the lancing device and insert the lancet by push down firmly
until it is fully seated
Step 2:
Twist the protective cover off from the lancet.
Twist clockwise the adjustable cover back onto
the lancing device
Embrace N0 Code
Testing Your Blood Glucose
28
3
4
5
Page 29
NOTE:
• For fingertip testing, use the blue adjustable cap.
• For alternate site testing on palm and forearm, use the clear adjustable cap.
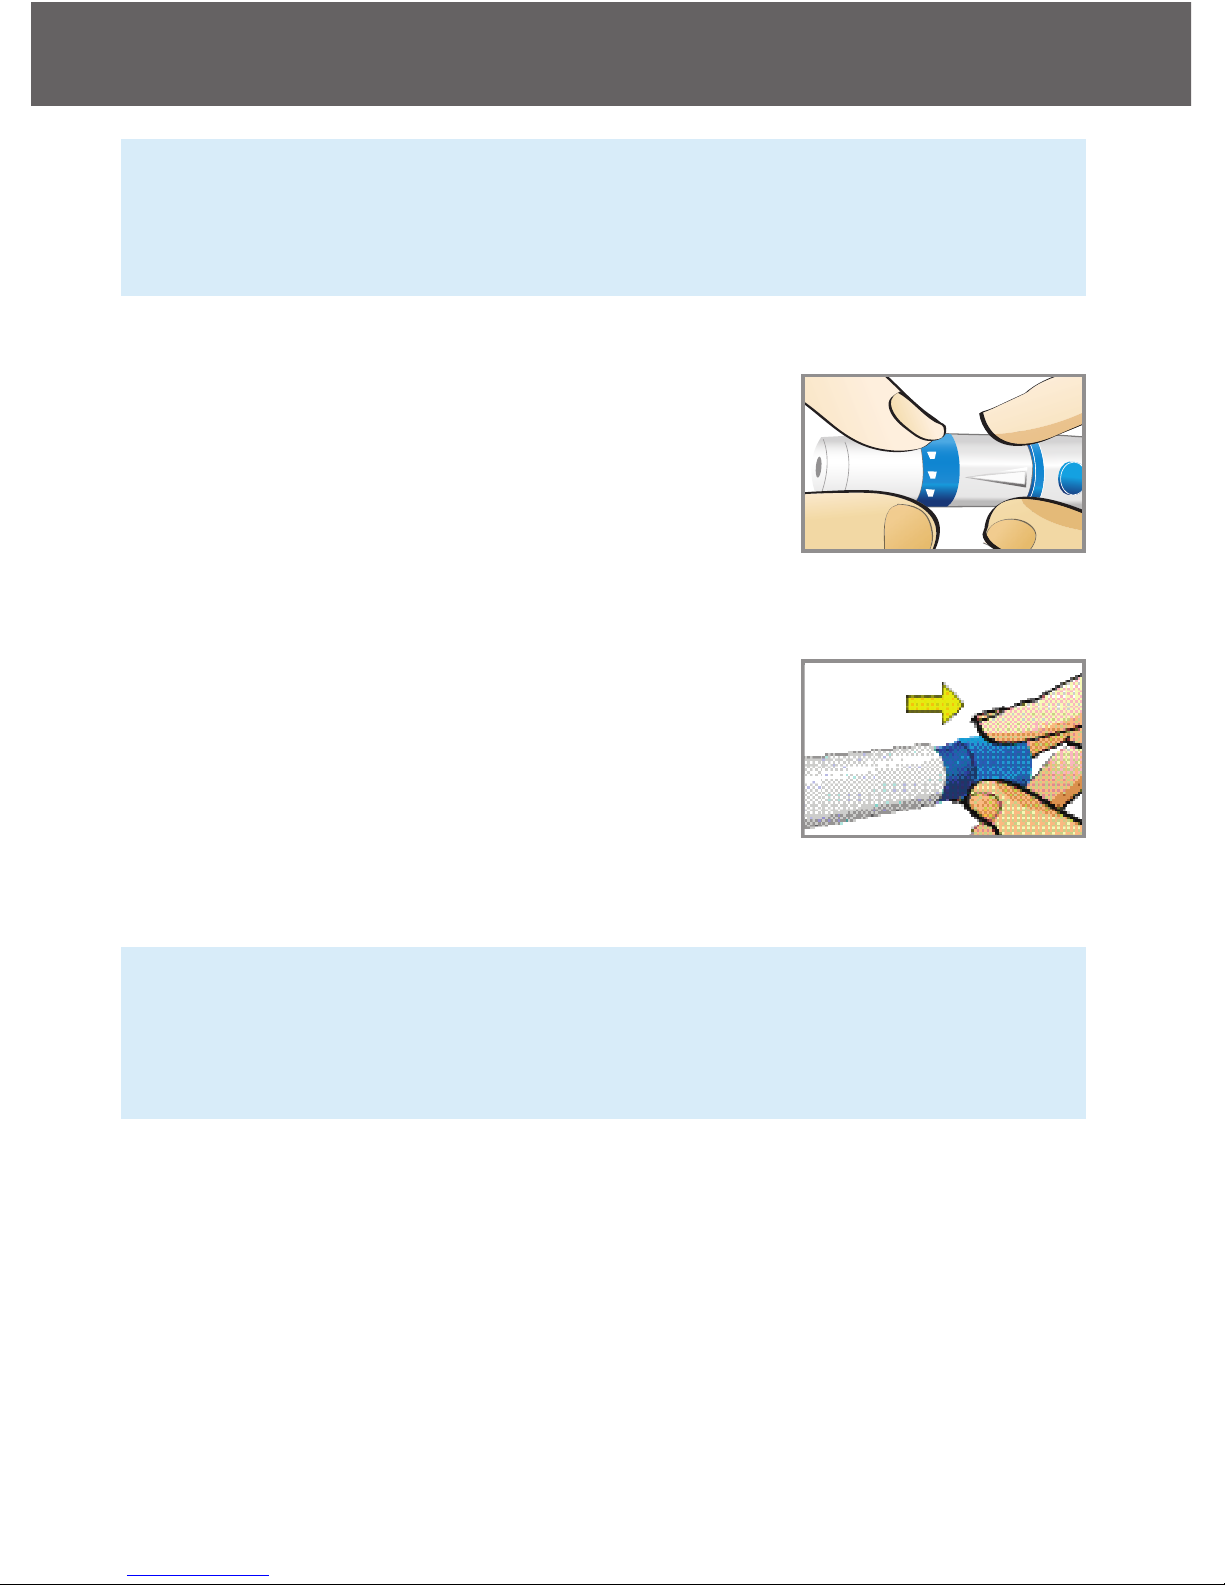
Step 3:
Adjust the puncture setting on the adjustable
cap for the puncture depth level (1 is the lightest and 5 is the deepest).
Step 4:
With one hand holding the adjustable cap, pull
back the lancing device with your other hand
until you hear a click sound. The lancing device is now ready for blood sampling.
IMPORTANT:
Use a new sterile lancet every time you test to avoid cross contamination. If alcohol wipes are used to cleanse the fingers, make sure the
area is dry before the blood sample is obtained.
Embrace N0 Code
Testing Your Blood Glucose
29
3
4
5
Page 30
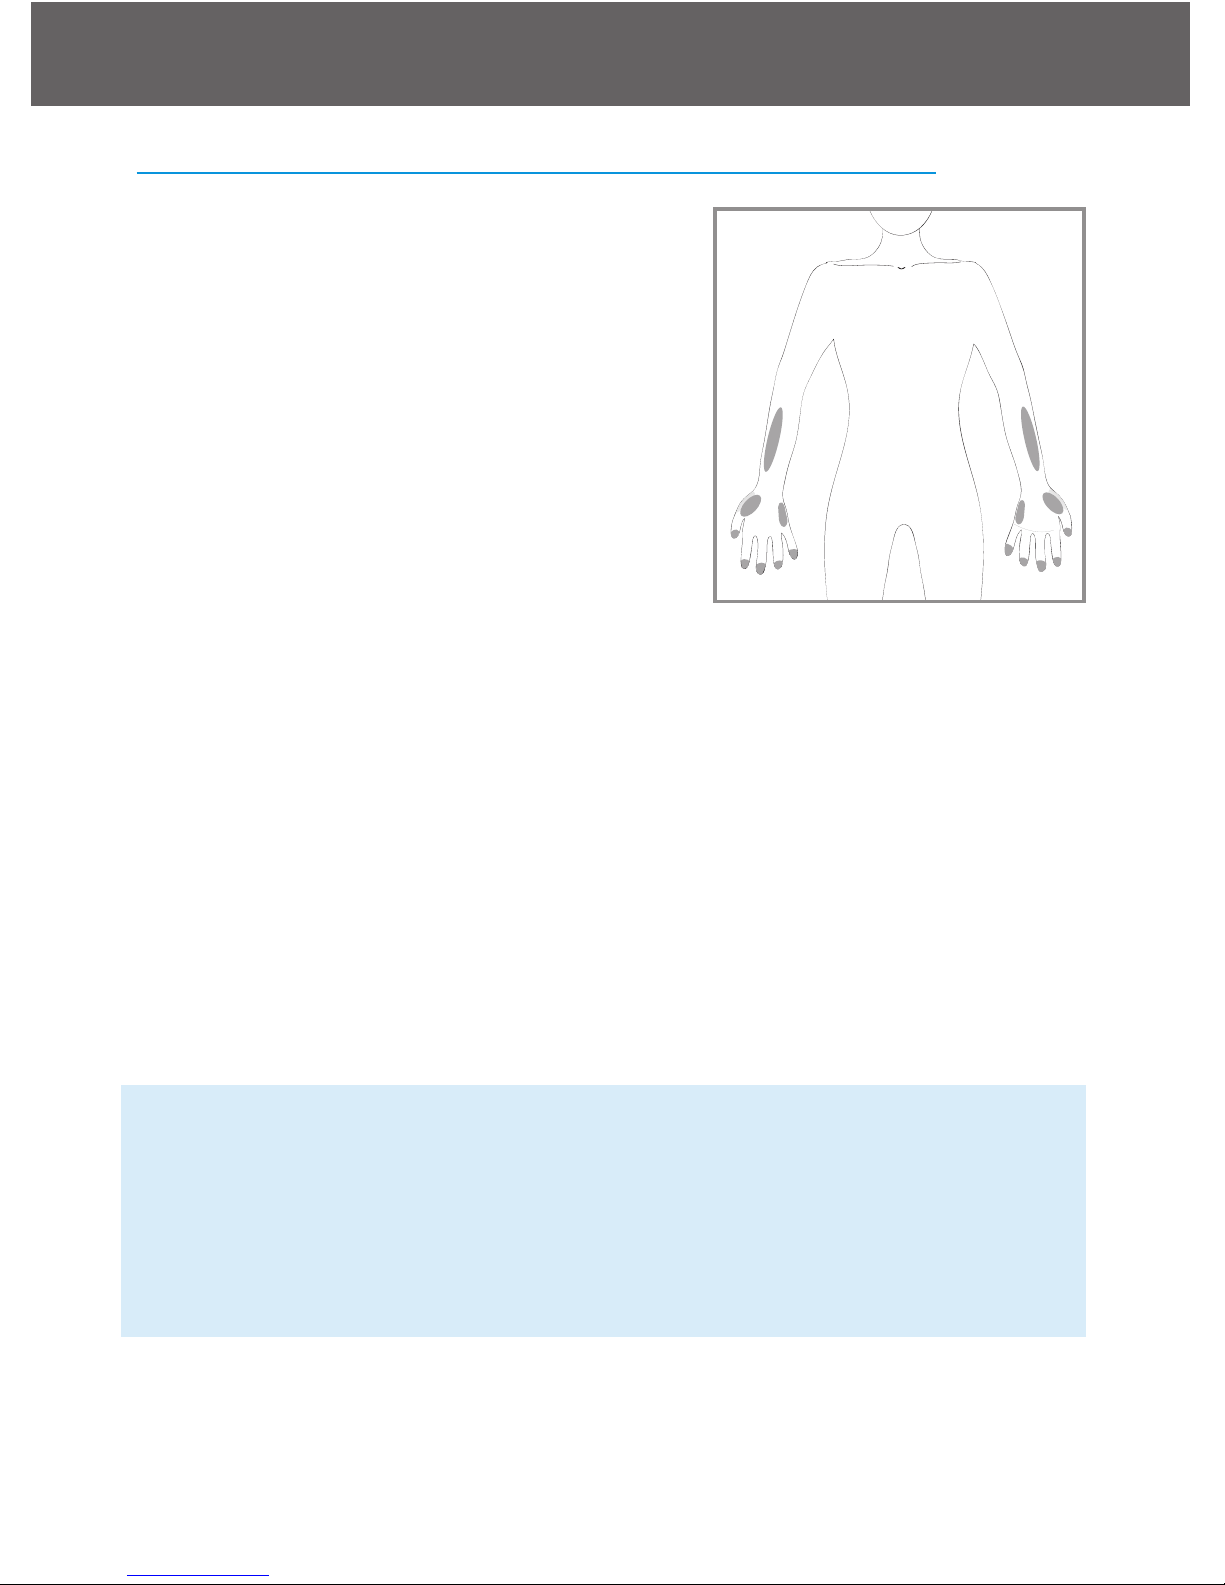
Important Information on Alternate Site Testing (AST)
The Embrace No Code Blood Glucose
Monitoring System can test for blood
glucose other then your fingertip such as
palm and forearm (alternate site testing,
or AST). Alternate site testing can be
less painful then fingertip testing, but because of the physiological differences
between your fingertip and palm and
forearm
(1)
; alternate site test result
maybe significantly different then results
from fingertip testing under certain conditions. You should consult with your doctor or healthcare professional
before using alternate site testing.
Alternate Site Testing SHOULD NOT be used when:
• You have Hypoglycemic unawareness (not able to tell if you have low
blood sugar)
• Within 2 hours of a meal, exercise, or medication
• You will be operating machinery or driving a car.
• You are sick
NOTE:
• Rubbing forearm until warm before lancing will help minimize the dif-
ference with fingertip test results. The palm (at the base of the
thumb) does not require rubbing before testing.
• If results from alternate site testing do not agree with how you feel,
use fingertip testing instead.
1. Jungheim K., Koschinsky T.: “Risky delay of hypoglycemia detection by glucose monitoring
at the arm.” Diabetes Care 2001:24(7):1303-04.
Embrace N0 Code
Testing Your Blood Glucose
30
Page 31
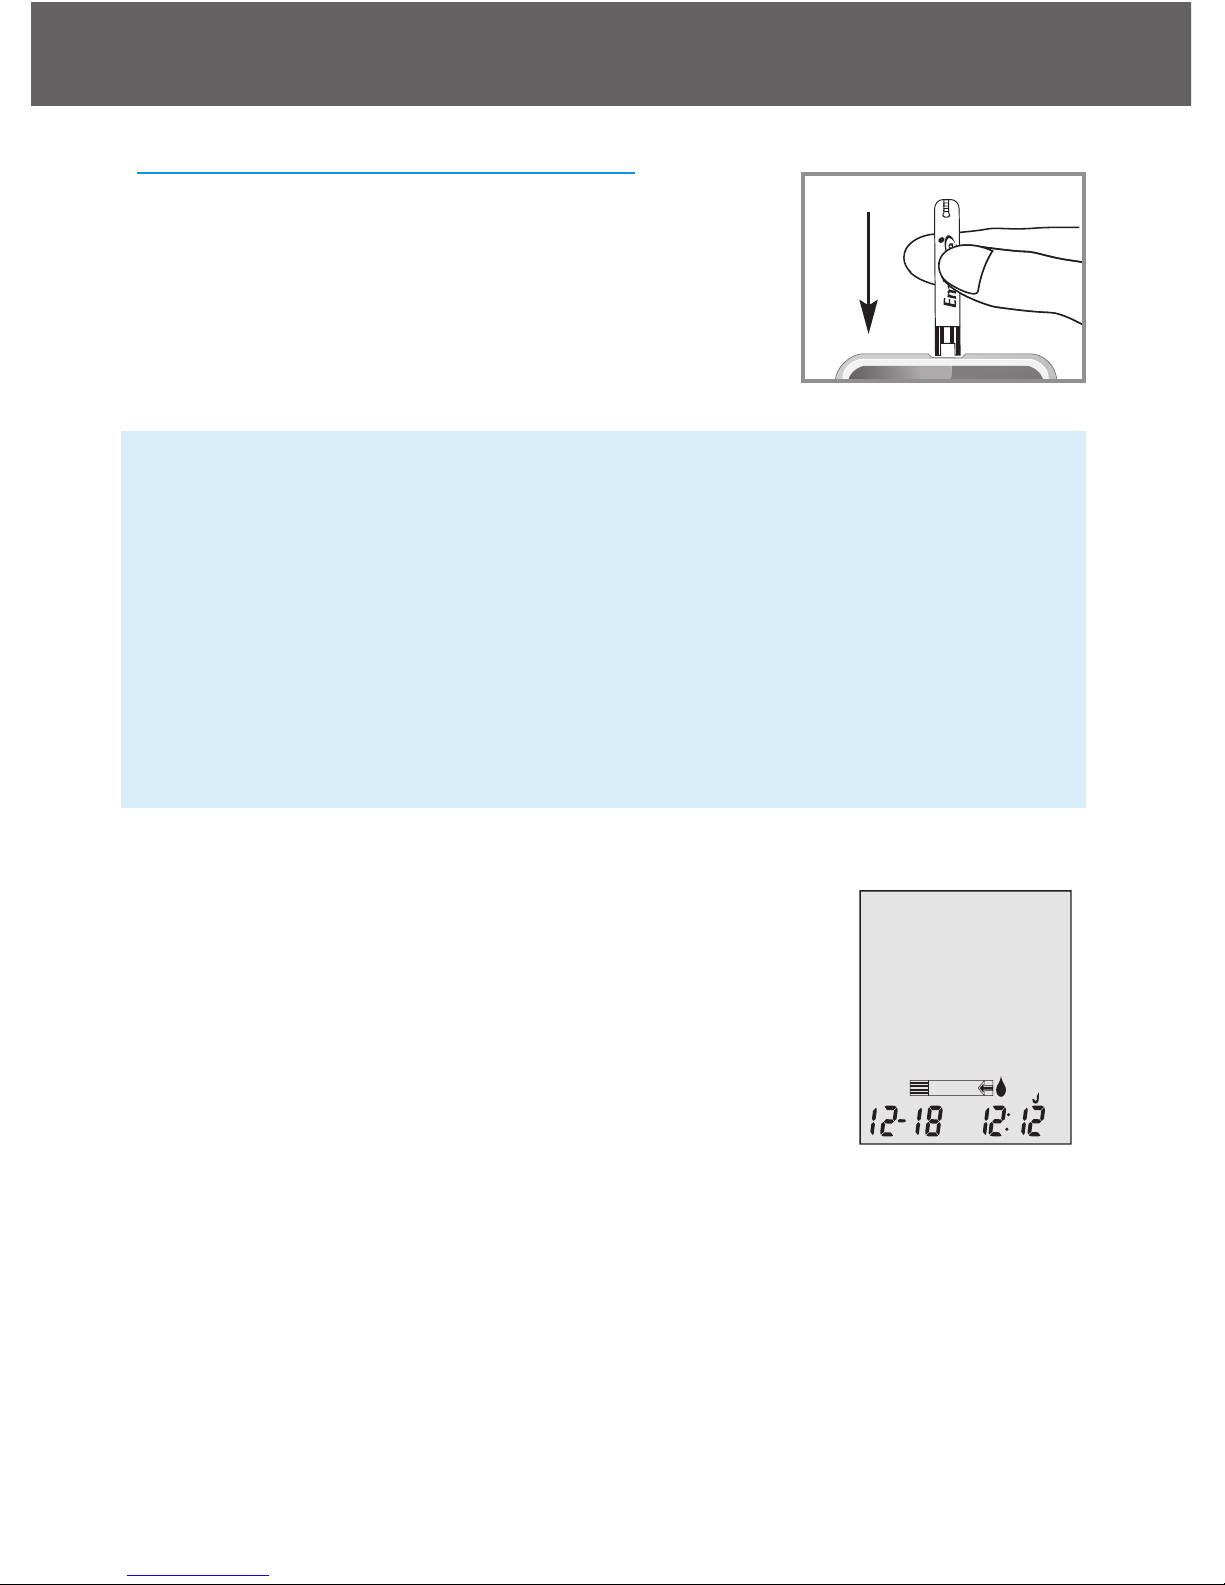
Performing a Blood Glucose Test
Step 1:
Take out a Embrace No Code Test Strip from
the test strip bottle and close the bottle immediately. Insert the test strip to turn on the meter.
IMPORTANT:
• Check the expiration date printed on the test strip bottle and its pack-
age. Do not use expired test strips.
• Use each test strip immediately after removing it from the bottle.
• Do not use wet or damaged test strips.
• Keep away from direct sunlight and heat. Store the test strip bottle in
a dry, cool place.
• Record the "date opened" on the bottle label. Discard the bottle and
any remaining test strip after 3 months from date of opening.
Step 2:
Wait for a flashing blood drop and an arrow icon
appears on the meter display screen. The meter
will also announce, “Please apply blood onto the
test strip” if you have the talking feature turned on.
Embrace N0 Code
Testing Your Blood Glucose
31
ctl
mo /dL
PM
Page 32
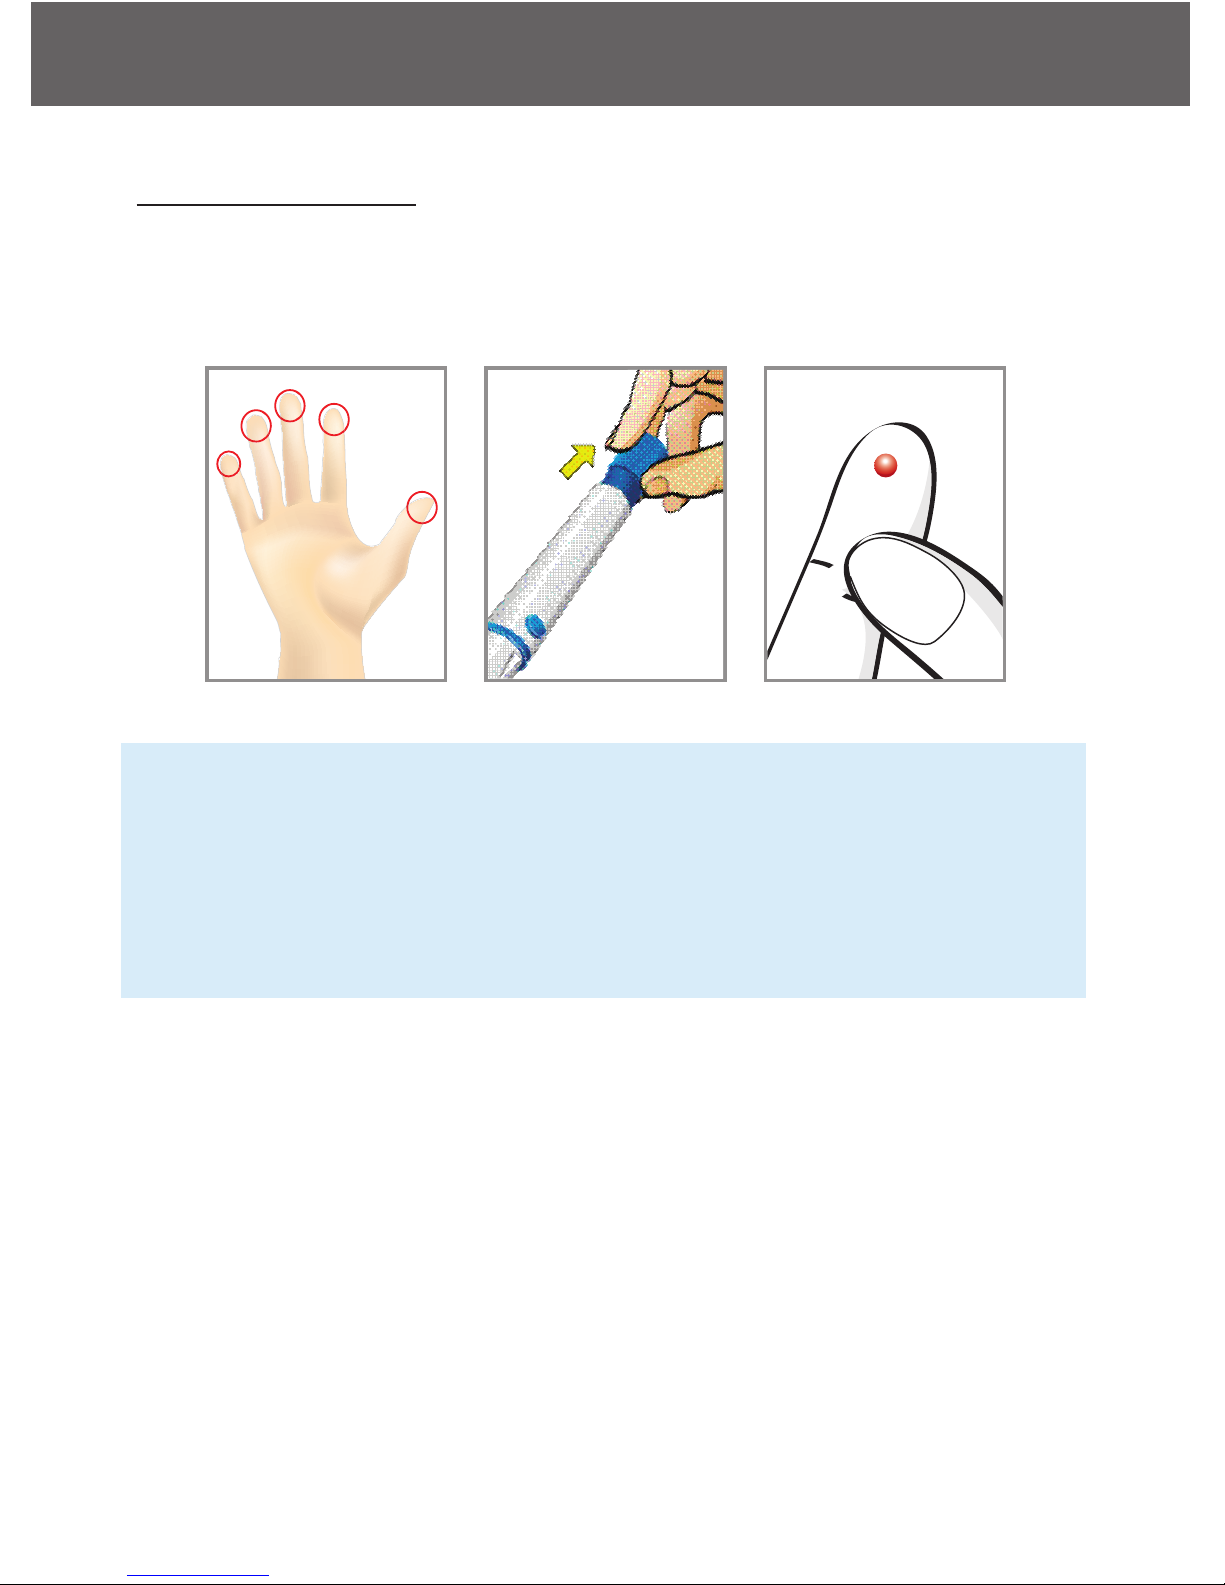
Step 3
For Fingertip Testing:
Hold the lancing device (use the blue adjustable cap) against the side of
your fingertip and press the release button to create a puncture.
TIP:
• Gently message your hand and finger toward the puncture site to
form a drop of blood (approximately: .5 ml blood drop graph). Do not
“milk,” or squeeze around the puncture site.
• Lance the side of your fingertip to avoid soreness. To avoid calluses,
choose a different lancing site each time.
Embrace N0 Code
Testing Your Blood Glucose
32
Page 33
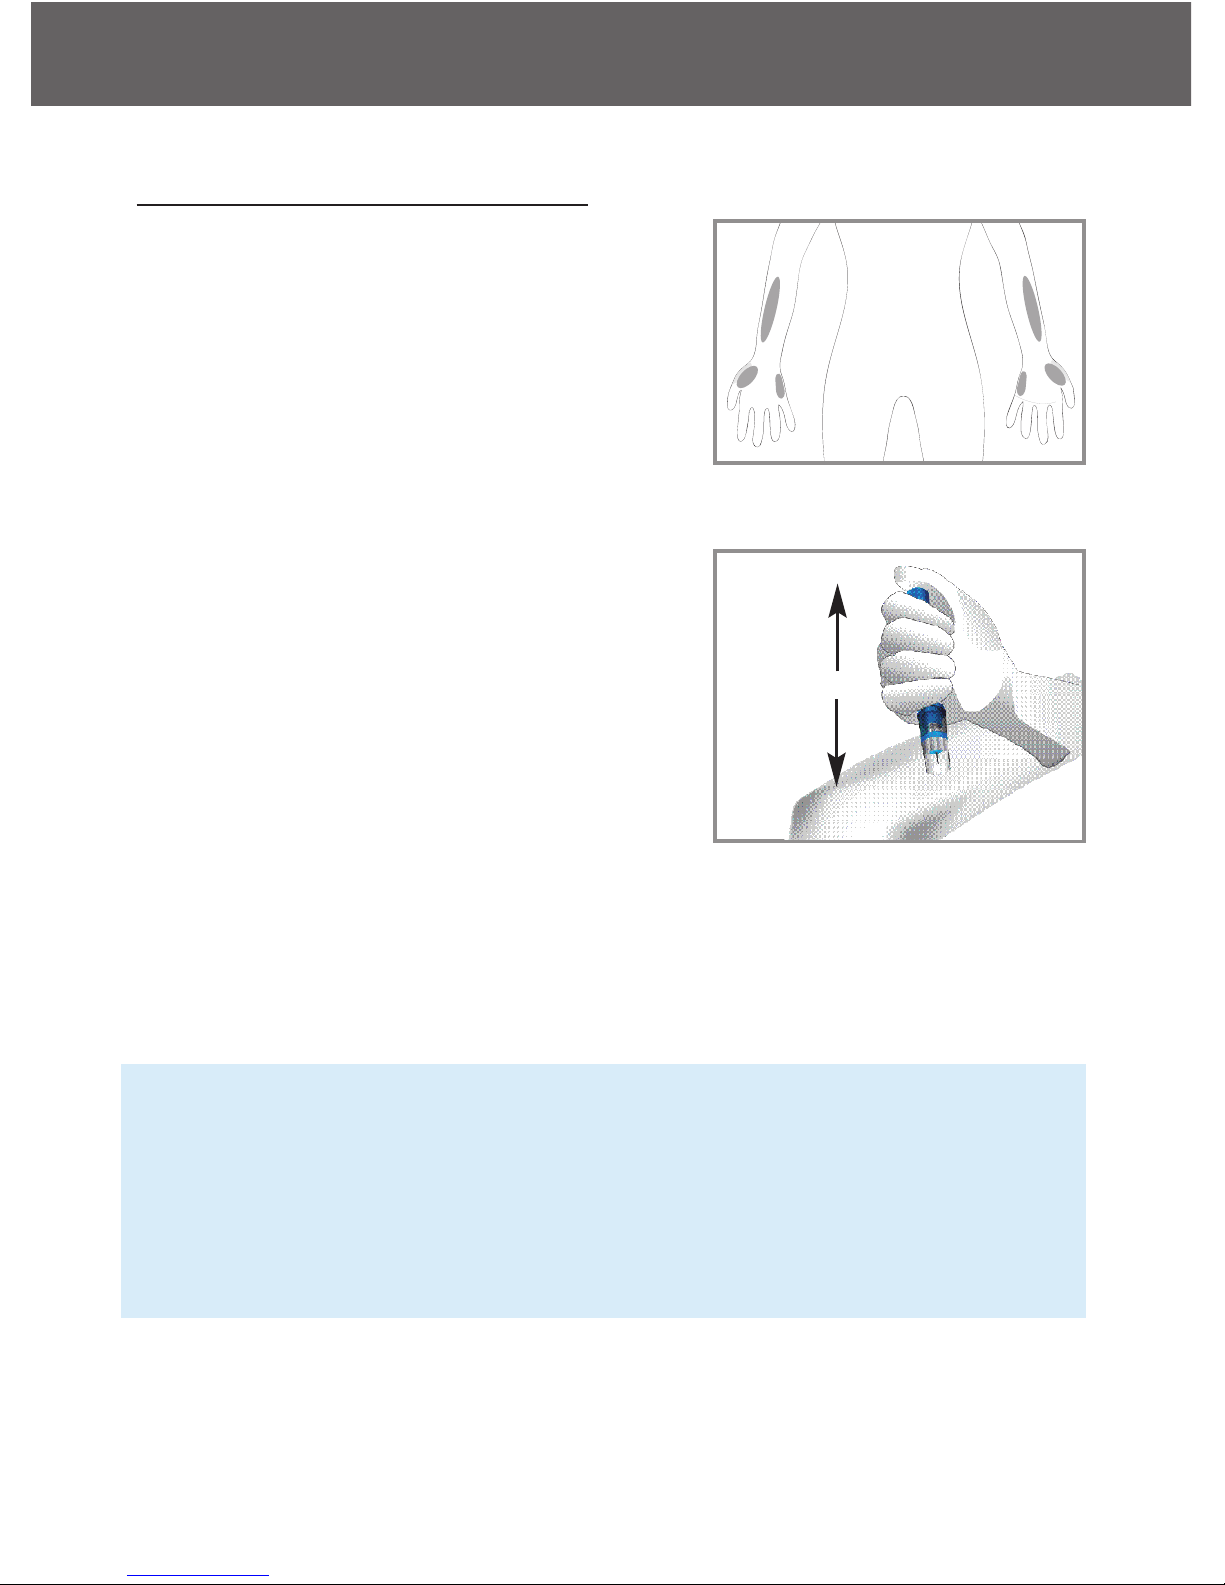
Step 3For Testing on Palm and Forearm:
Hold the lancing device (use the clear
adjustable cap) against the test site
(base of palm or forearm). Avoid a test
site that has veins, moles, excessive
hair, or bone. Press the lancing device
firmly against the test site and press the
release button, do not lift up.
For forearm test sites, apply and release
pressure (“pumping”) for a few seconds
while keeping the lancing device in constant contact with the skin. Palm testing
(at the base of the thumb) does not require pumping.
When the blood is approximately (.5 ml
blood drop graph) size, lift the lancing
device straight up without smearing the
blood.
NOTE:
• Rubbing forearm until warm before lancing will help minimize the dif-
ference with fingertip test results. The palm (at the base of the
thumb) does not require rubbing before testing.
• If results from alternate site testing do not agree with how you feel,
use fingertip testing instead.
Embrace N0 Code
Testing Your Blood Glucose
33
Page 34
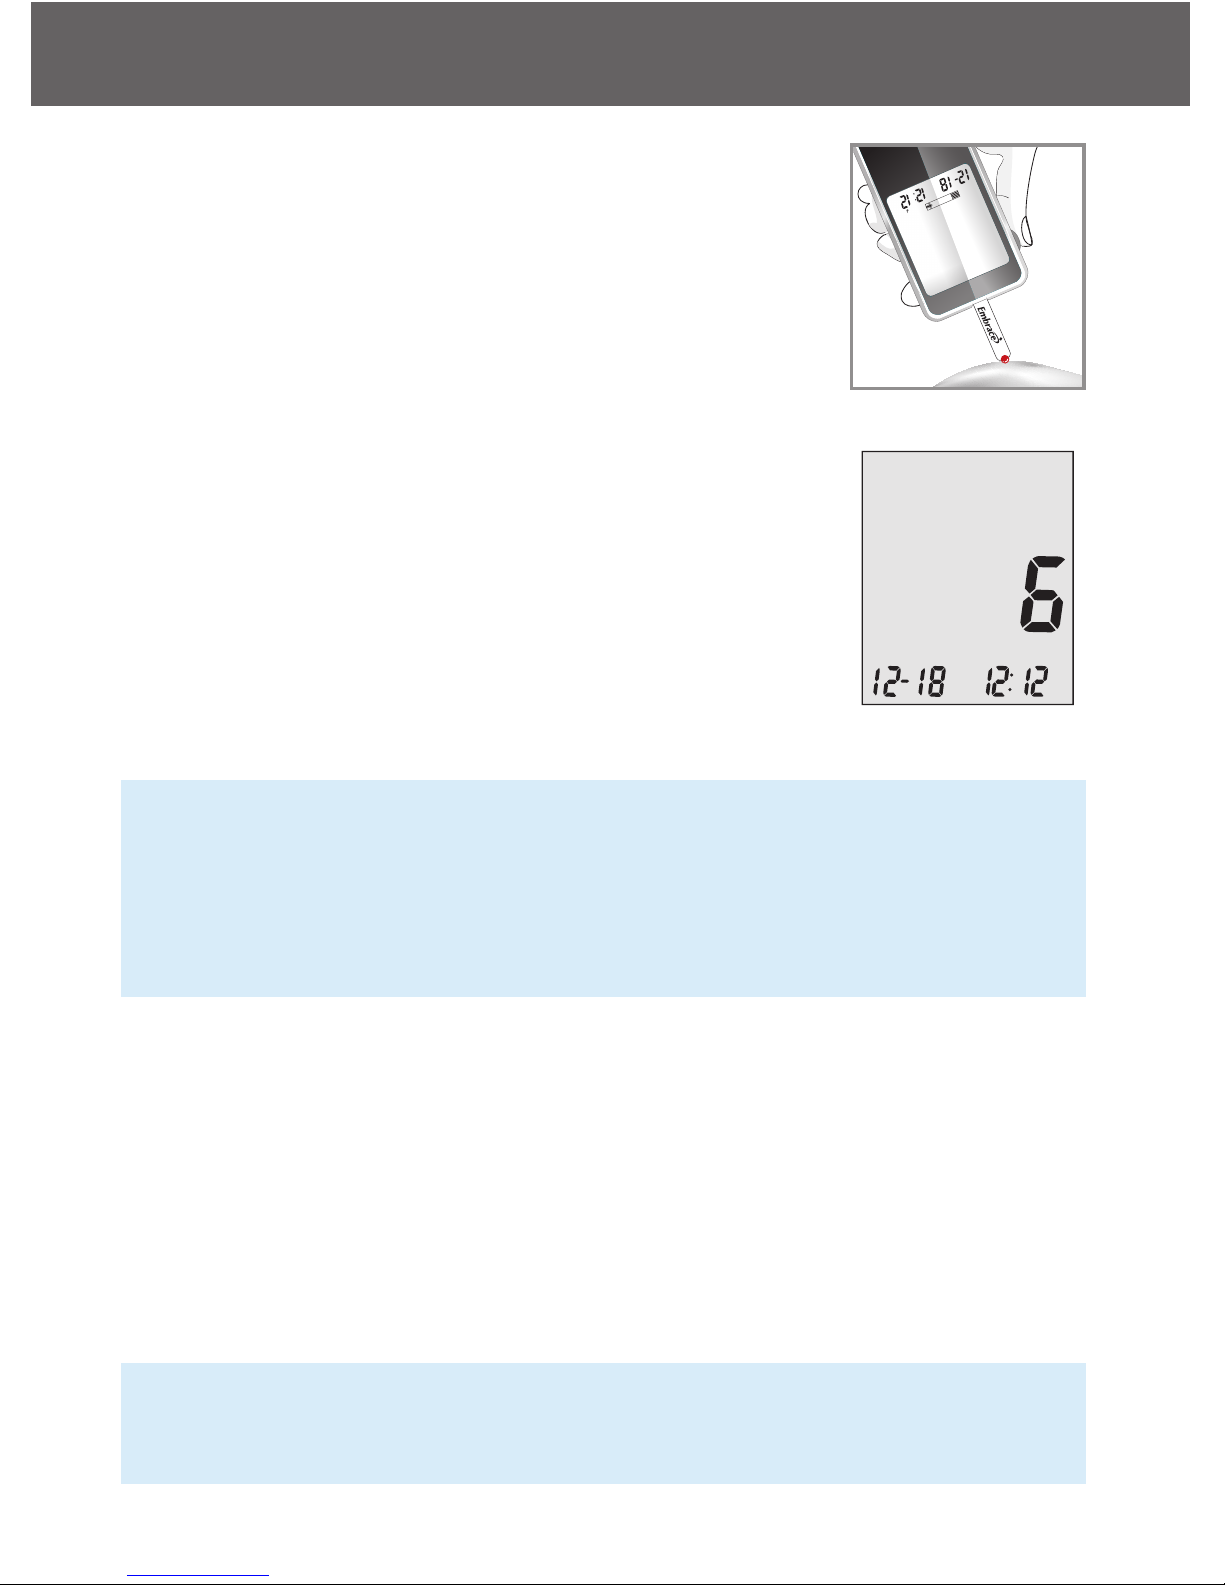
Step 4:
Gently bring the test strip and touch the drop of
blood at a slight angle. The test strip acts like a
straw to pull the blood in. Keep the test strip in the
blood drop until the meter beeps to indicate the
test strip has enough blood to test.
Step 5:
The screen will start to count down. After 6 seconds, your glucose testing result will appear on the
meter display screen and announced verbally if
you have the talking feature turned on. Your test
result will be automatically stored into the meter
memory.
CAUTION:
• If you see “HI” or “LO” displayed, your blood glucose level may be
above 600 mg/dL or below 20 mg/dL. Test again using fingertip testing, DO NOT test on forearm. If you still receive the same result, call
your physician or healthcare professional immediately.
Step 6:
Remove the used test strip into proper wastebasket. The meter will automatically shut off.
Step 7:
Remove the used lancet from your lancing device according to instructions and discard into proper wastebasket.
IMPORTANT:
• Discard used test strips and lancets according to your local disposal
regulations where applicable.
Embrace N0 Code
Testing Your Blood Glucose
34
m
o
l
/
d
L
P
M
PM
Page 35

Understanding Your Blood Glucose Test Results
Blood glucose values will vary depending on food intake, medication,
health, stress, and exercise. The ideal range for adult without diabetes
should be:
• 74~106 mg/dL before meals
(1)
, and
• Less than 140 mg/dL two hours after meal
(2)
.
It is important to consult with your physician or healthcare professional
to determine an appropriate target range for you.
WWhhaatt ttoo ddoo iiff yyoouu ggeett aa hhiigghh oorr llooww rreeaaddiinngg
If the Meter displays results that are HI or LO, or you get a result that is
more than 250 mg/dL or below 50 mg/dL AND you feel ill:
• Treat your diabetes according to the instruction from your doctor
and/or consult your healthcare provider.
If the Meter displays results that are “HI” or “LO,” or you get a result that
is more than 250 mg/dL or below 50 mg/dL AND you DO NOT feel ill:
• Test your meter with a control solution, refer to page 23, Control So-
lution Testing.
• Test again using fingertip or palm (at the base of the thumb). Do not
test on forearm.
If you still get a high or low reading, contact your health care profes-
sional.
Reference:
1. Stedman,Thomas Lathrop. Stedman’s Medical Dictionary, 27th Edition, 1999, pg. 2082
2. American Diabetes Association, “Clinical Practice Recommendations 2003.” Diabetes Care,
Vol 26, Supplement 1, pg. S22.
Embrace N0 Code
Understanding Your Blood Glucose Test Results
35
Page 36
Viewing Your Meter’s Memory
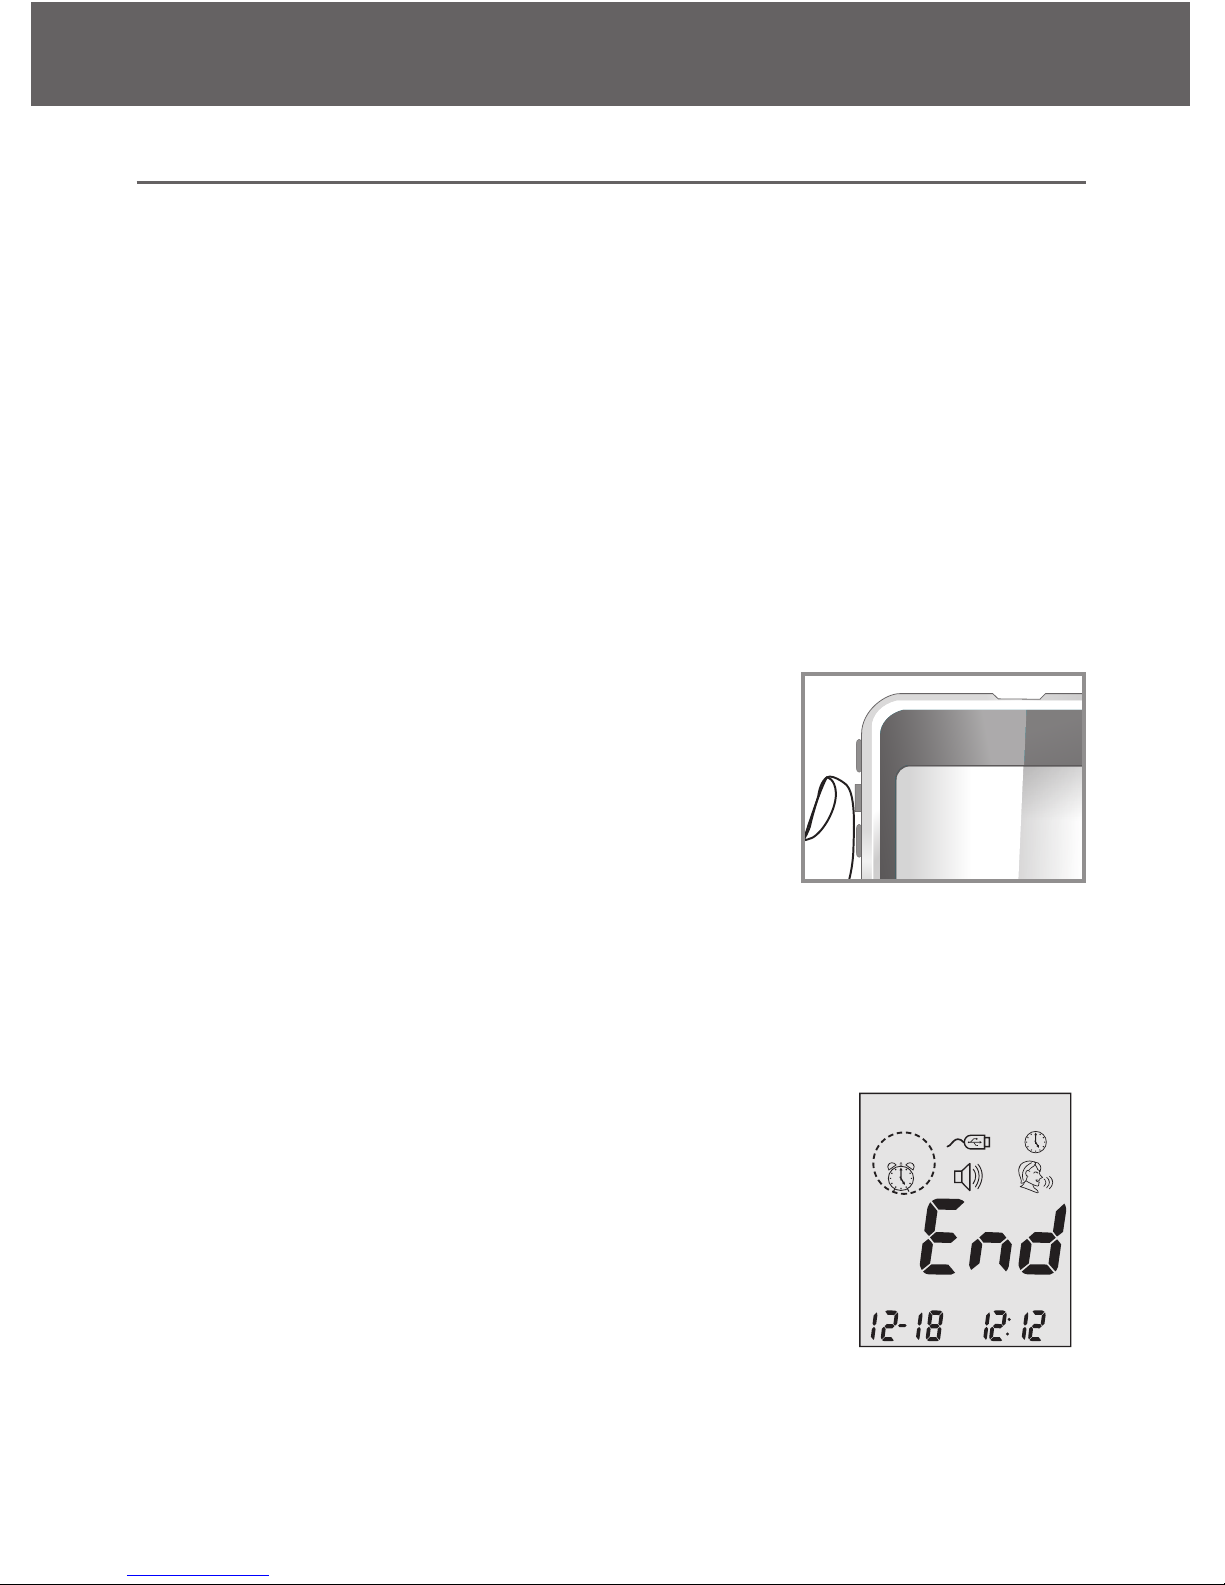
Your Embrace Meter automatically stores up to 300 test and control results with date and time. The meter also provides 7, 14, and 30 days
averaging to help track your blood glucose trend. You must set up your
meter to use the memory and day averaging function, see Setting Up
Your New System on page 10. The meter will not store test or control
results if the date and time is not set.
Viewing Stored Readings and 7, 14, 30 Days Average from
Memory
You will need:
√ Your Embrace Meter
Step 1:
Press and hold the middle button to turn on the
meter.
Step 2:
Press the middle button once and arrow up or
down until mem starts to flash. If the talking function is on, the meter will say “memory recall.”
Press the middle button to enter. Use the arrow
keys to view prior tests. Press the middle button
when complete to exit the memory section.
nil will appear on the display screen after the last
recorded test result if less then 300 readings are
stored. Use arrow buttons to review prior results.
mg /dL
DAY
A
VG
m
em
m
ol/dL
PM
m
ol/dL
PM
mmol/dL
PM
m
ol/dL
mmol/dL
mg/dL
mem
DAY
AVG
mg /dL
DAY
AVG
mem
mem
PM
mg /dL
mg /dL
mem
PM
ctl
mo /dL
PM
mg /dL
mem
PM
m
em
code
mem
PM
mem
PM
PM PM PM PM
36
Viewing Your Meter’s Memory
Embrace N0 Code
Page 37
Step 3:
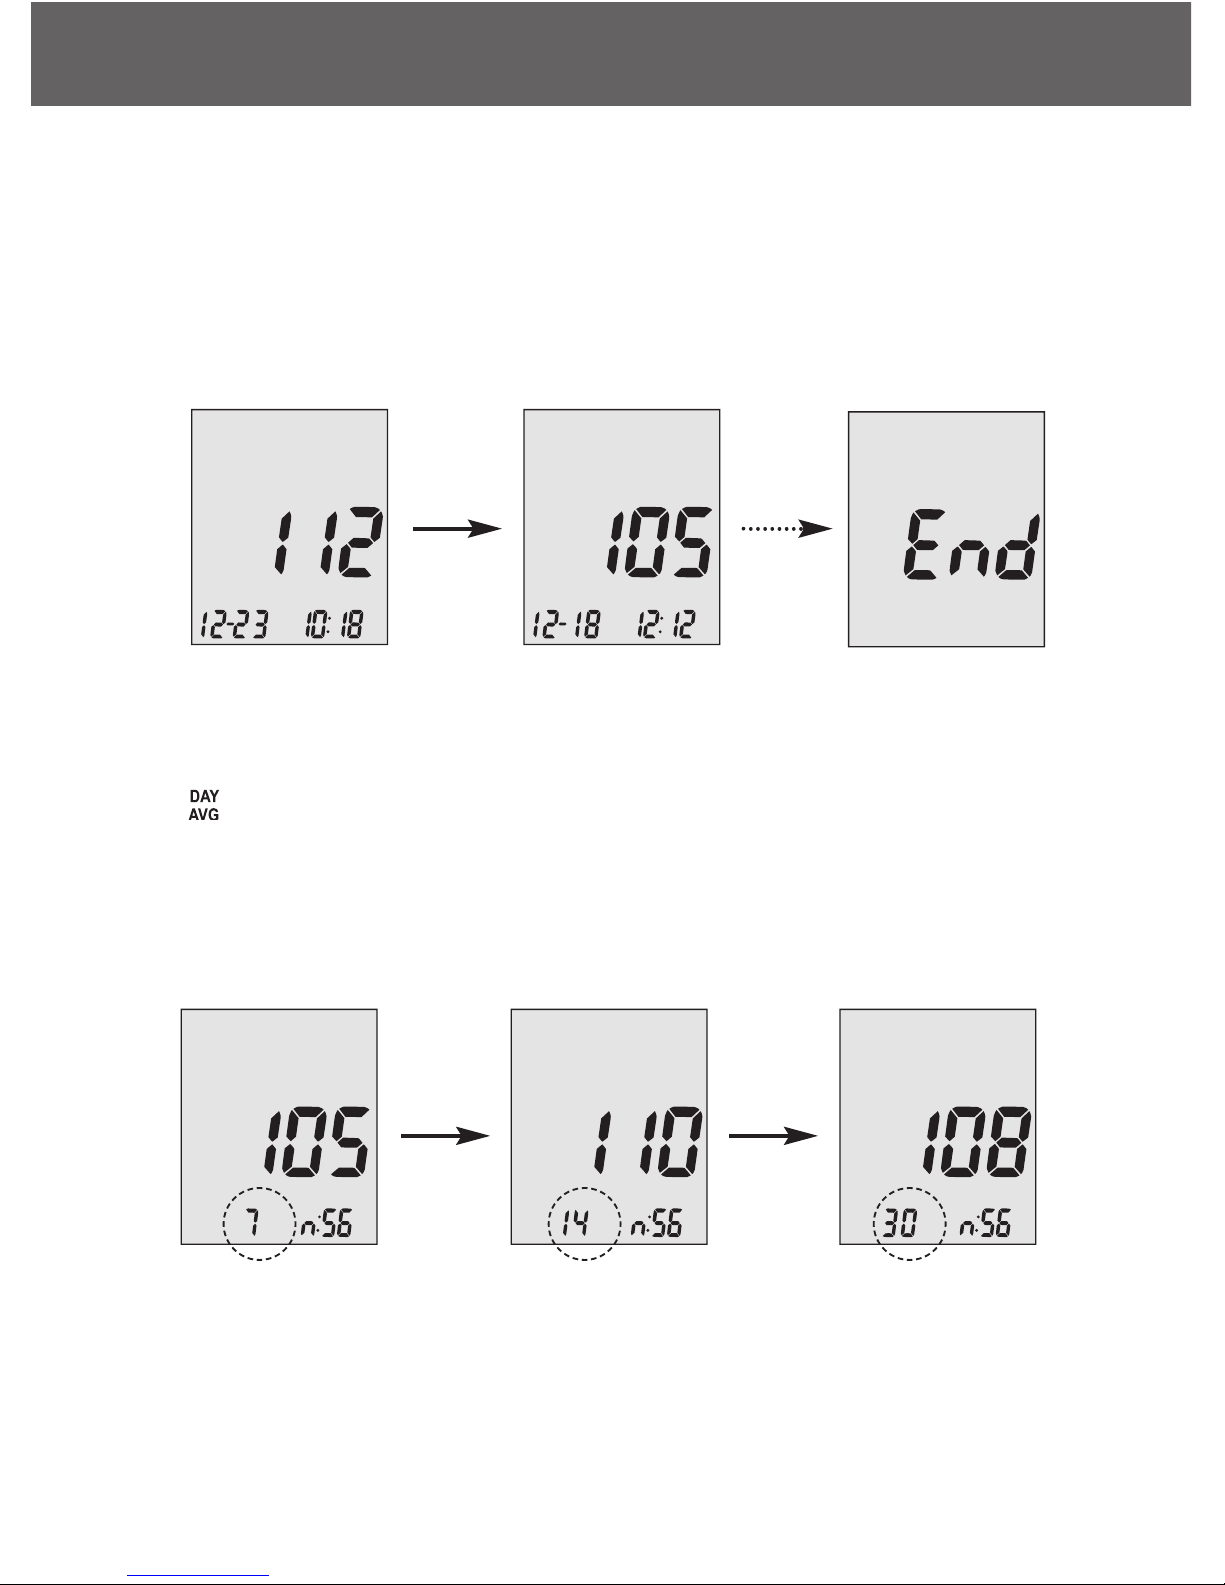
When you reach the most recent result, continue to arrow down to start
viewing day averages. The meter will display the 7 days average, scroll
down again to see 14 days average, and scroll down again to see 30
days average.
The number of results included in the averages is shown right next to
the icon.
Control solution results are not included in the day average calculations.
mg /dL
D
AY
A
VG
mem
mol/dL
c
ode
P
M
m
mol/dL
c
ode
P
M
mol/dL
m
mol/dL
PM
code
mem
P
M
mg /dL
PM
m
g /dL
mg /dL
mem
PM
mem
mg /dL
D
AY
A
VG
mem
P
M
mol/dL
c
ode
P
M
mol/dL
c
ode
P
M
m
mol/dL
c
ode
P
M
mol/dL
m
mol/dL
PM
mg /dL
D
AY
A
VG
mem
code
mem
P
M
mg /dL
PM
m
g /dL
mg /dL
mem
PM
mg /dL
mem
PM
mem
PM
mg /dL
PM
mg /dL
mem
mg /dL
DAY
AVG
mem
mg /dL
PM
PM
mol/dL
code
PM
mol/dL
code
PM
mmol/dL
code
PM
mol/dL
mmol/dL
PM
mg/dL
mem
DAY
AVG
mg/dL
mem
DAY
AVG
mg /dL
DAY
AVG
mem
code
code
mem
ctl
AM
DAY
AVG
PM
mg /dL
mem
mem
mg /dL
DAY
AVG
mem
mg /dL
PM
PM
mol/dL
code
PM
mol/dL
code
PM
mmol/dL
code
PM
mol/dL
mmol/dL
PM
mg/dL
mem
DAY
AVG
mg /dL
DAY
AVG
mem
code
mem
PM
mg /dL
PM
mg /dL
mem
mg /dL
DAY
AVG
mem
P
M
mol/dL
code
PM
mol/dL
code
PM
mmol/dL
code
PM
mol/dL
mmol/dL
PM
mg /dL
DAY
AVG
mem
code
mem
PM
mg /dL
PM
mg /dL
mem
37
Viewing Your Meter’s Memory
Embrace N0 Code
Page 38

NOTE:
• Control testing results are flagged by ctl on the bottom left corner of
the display screen in addition to mem .
• When the meter memory is blank, the display screen will show nil.
• When there are no day average data available, the display screen
will show 4 dashes.
• If the meter memory is full, adding a new test result will cause the
oldest one to be deleted.
• Stored test results and day averages will not be erased when chang-
ing batteries.
• You can begin testing anytime by inserting a test strip.
Embrace N0 Code
Viewing Your Meter’s Memory
38
Page 39
Embrace N0 Code
Caring for the Meter
39
Caring for the Meter
Caring for your Embrace Meter is easy. Follow these simple guidelines
to keep your meter working properly.
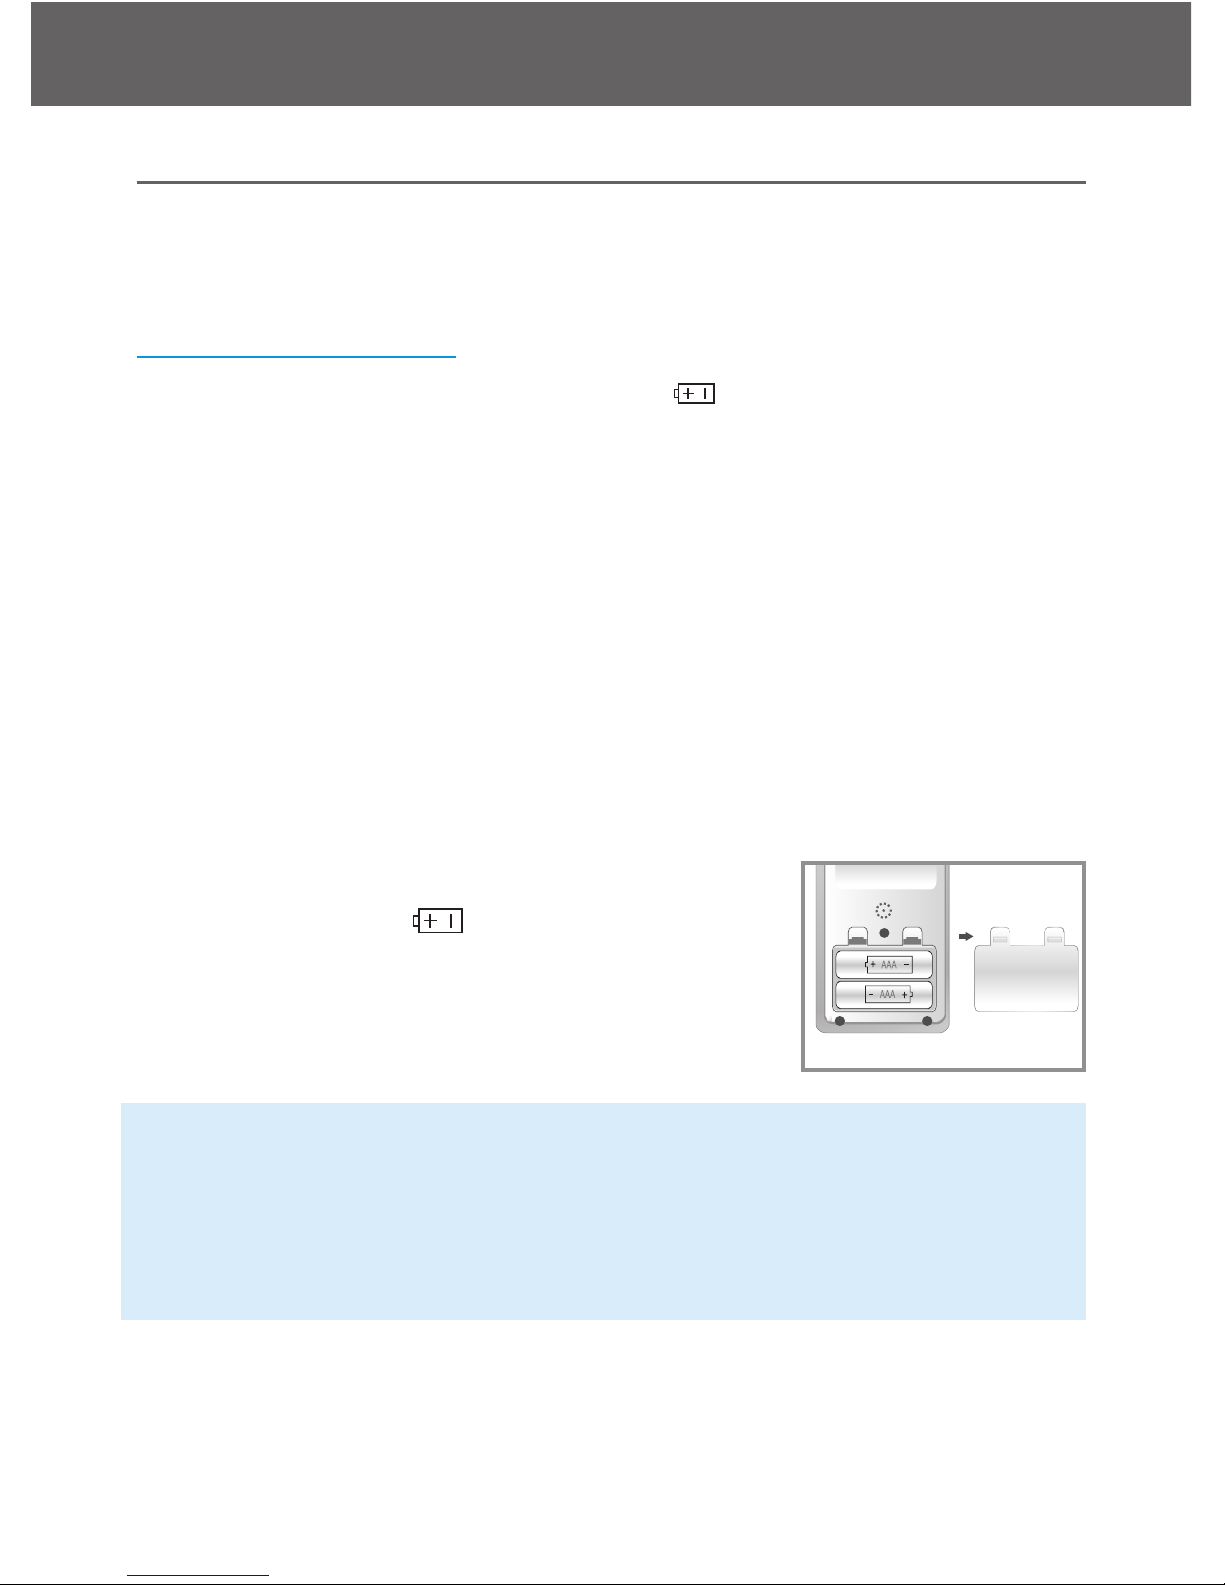
Changing the Battery
Batteries need to be changed when the icon appears on the meter
display.
Materials you will need:
√ Two Alkaline AAA Batteries
√ Your Embrace Meter
Step 1.
Press firmly on the battery cover and slide in the direction of the arrow
Step 2.
Insert new batteries . The meter will beep
after the batteries inserted correctly. Slide the
battery cover back into the meter firmly.
NOTE:
• Meter will prompt you to reconfirm the date and time when turned on.
See page 11 for Setting the Clock.
• The date, stored results, alarm settings, volume setting, and lan-
guage choice stay in memory when the batteries are changed.
code
code
Page 40

Caring for the Meter
40
Embrace N0 Code
Cleaning the Meter
• If the meter gets dirty, use a moist (NOT WET) lint-free cloth damp-
ened with a mild detergent.
• Do not get water inside the meter or hold it under running water.
• Do not use glass or household cleaners on the meter.
• Do not try to clean the test strip holder.
Storage and Precautions
• Handle the Meter with care - severe shock, such as dropping the
meter, could damage the electronics.
• The meter and test strips are designed to be used within the temper-
ature ranges between 50˚F~104˚F.
• Avoid leaving the meter in extremely hot or cold place, such as near
a heat source or in an extremely hot or cold car.
• Do not store or use the meter or test strips in high humidity levels,
such as bathroom or kitchen.
• Always close bottle cap immediately after removing a test strip and
make sure it’s closed tightly.
• Do not take the meter apart. Doing so will void the warranty. If there
are technical problems or questions, call our authorized dealer for
assistance.
Page 41
Solving Problems
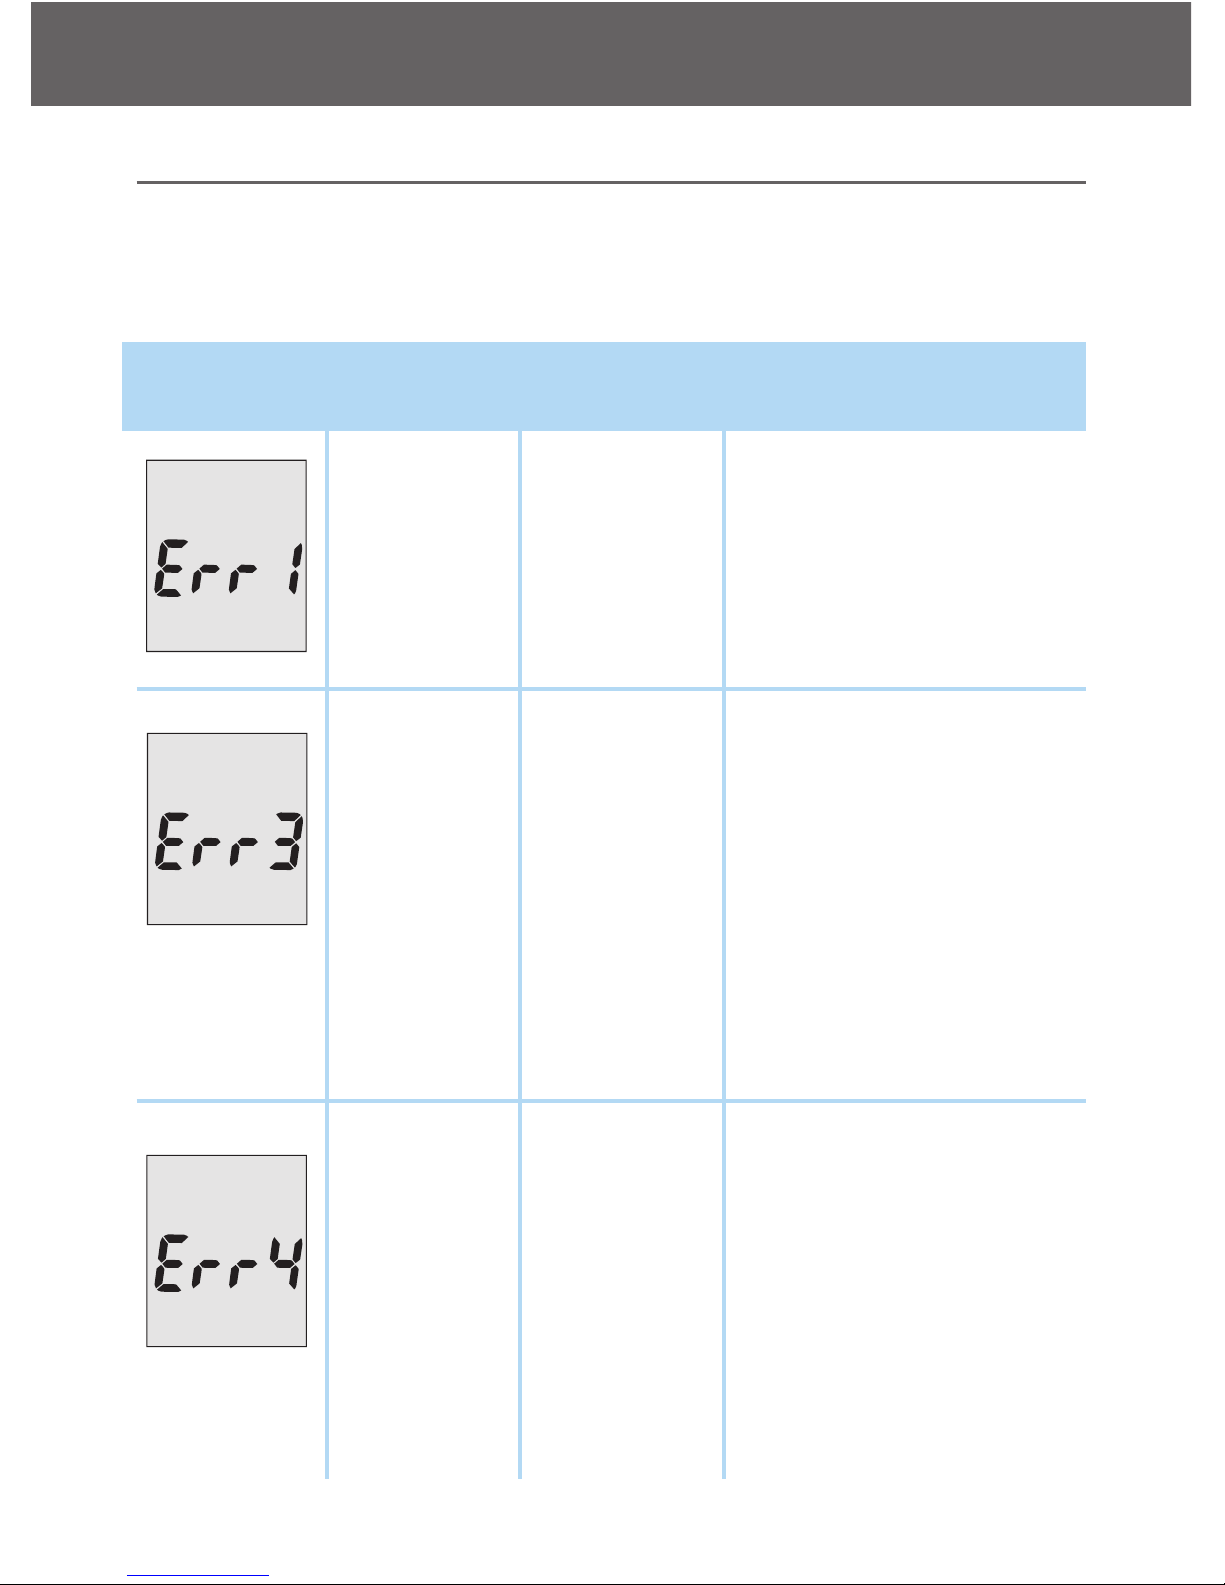
This section details the significant display screen messages and error
codes you will encounter when using your Embrace meter and test
strips.
What What the What it What Should
You See meter says Means You Do
Solving Problems
m
ol/dL
code
PM
mmol/dL
code
m
em
P
M
mg /dL
PM
mg /dL
mem
“Error 1
Meter Failure”
“Error 3
used test
strip”
“Error 4 not
enough
sample”
The meter
electronics
are damaged
Used or
damaged
test strip
Not enough
sample in
the test strip
to start
• Remove the battery
and turn on the Meter
again.
• If problem persists, call
us at 1-877-989-5454
• Repeat the test with a
new test strip. Remember add sample
only until you see the
prompt on the display
screen or the meter
verbally prompts you
to add sample.
• Remove the Test Strip
and repeat the test
with a new test strip.
See Testing Your
Blood Glucose on
page 28.
mg /dL
DAY
AVG
mem
mg /dL
PM
PM
mol/dL
code
PM
mol/dL
code
PM
mmol/dL
code
PM
mol/dL
mmol/dL
PM
mg/dL
mem
DAY
AVG
mg /dL
DAY
AVG
mem
code
mem
PM
mg /dL
P
M
mg /dL
mem
mg /dL
DAY
AVG
mem
PM
mol/dL
code
PM
mol/dL
code
PM
mmol/dL
code
PM
mol/dL
mmol/dL
PM
mg /dL
DAY
AVG
mem
code
mem
PM
mg /dL
PM
mg /dL
mem
41
Embrace N0 Code
Page 42
What What the What it What Should
You See meter says Means You Do
Solving Problems
mg /dL
DAY
A
VG
m
em
m
g /dL
P
M
P
M
mol/dL
c
ode
PM
mol/dL
c
ode
PM
mmol/dL
c
ode
PM
mol/dL
mmol/dL
PM
mg/dL
mem
DAY
A
VG
mg/dL
m
em
DAY
AVG
mg /dL
D
AY
AVG
mem
code
c
ode
mem
ctl
AM
D
AY
AVG
PM
mg /dL
mem
PM
mg /dL
PM
mg /dL
m
em
PM
mg /dL
PM
mg /dL
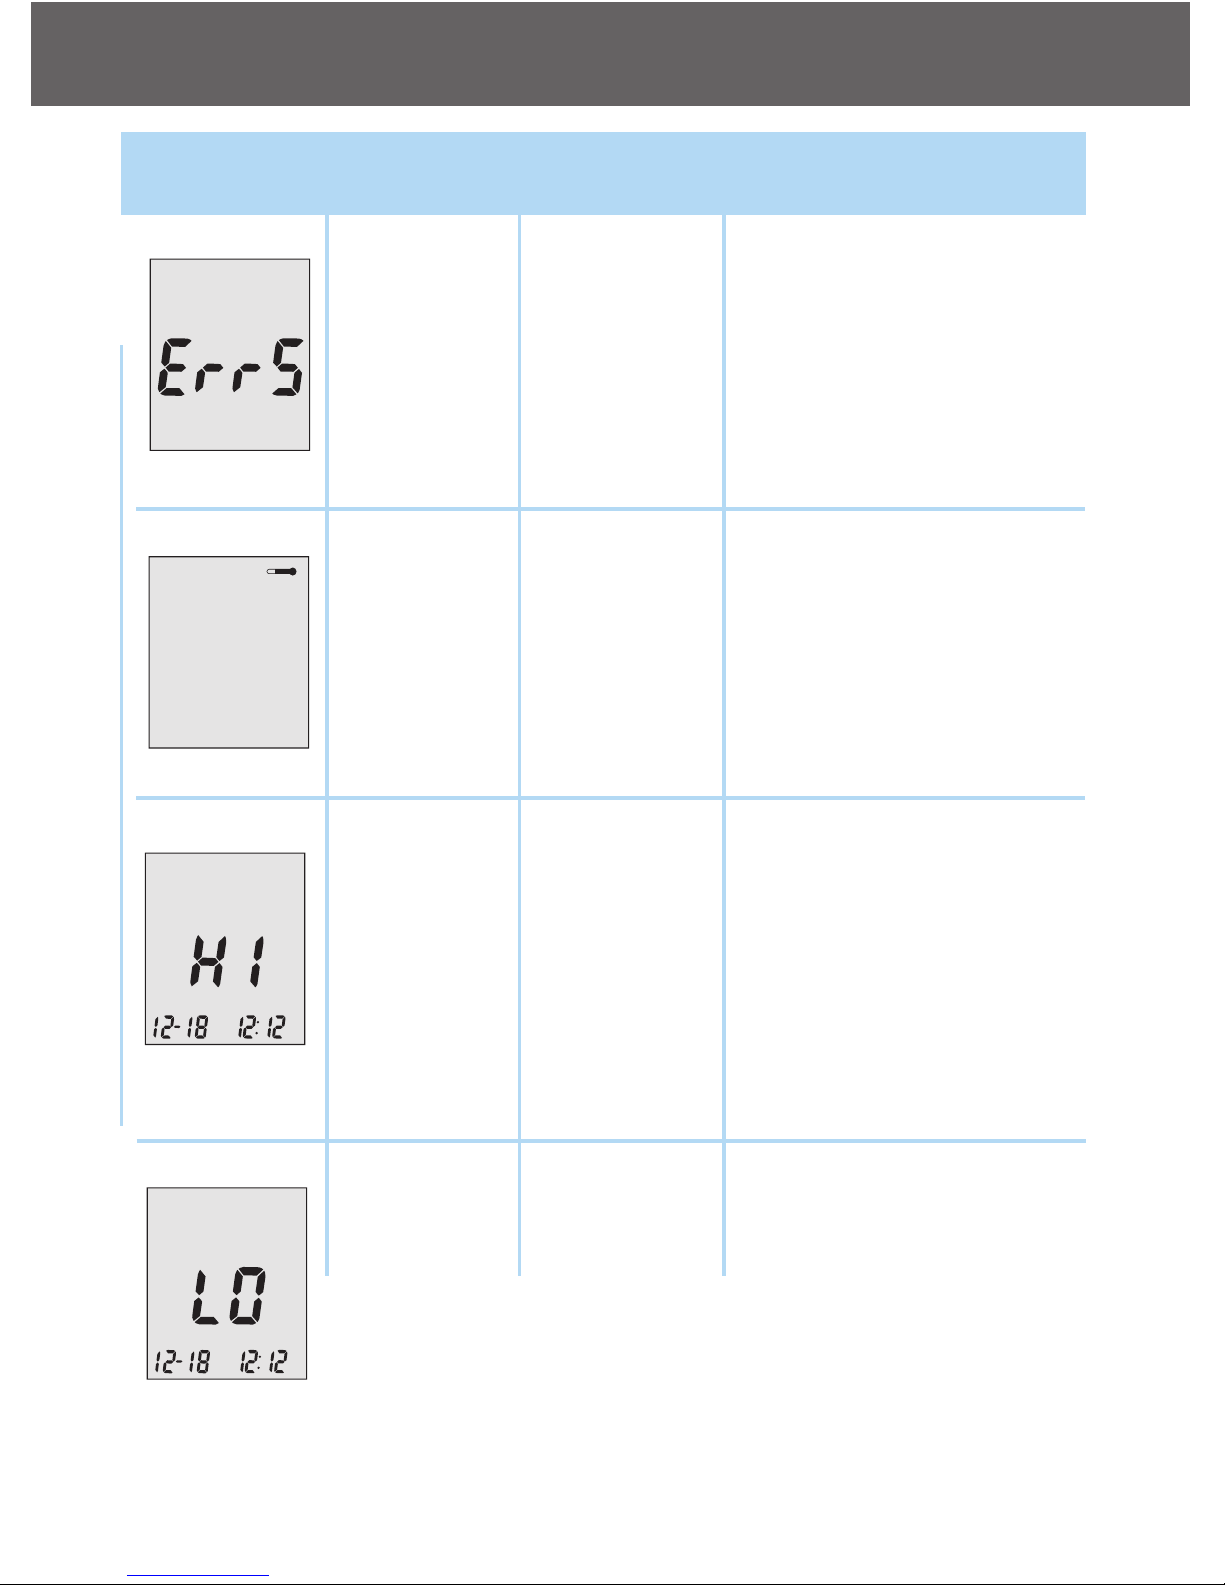
“Error 5
count down
error”
“Temperature is out
of range”
“Your blood
glucose
reading is
above 600
mg/dL.”
“Your blood
glucose
reading is
below 20
mg/dL.”
Test Strip
was removed during testing
Temperature
out of range.
Test result is
higher than
600 mg/dL
test result is
lower than
20 mg/dL
• Remove the Test Strip
and repeat the test
with a new test strip.
See Testing Your
Blood Glucose on
page 28.
Move the meter into an
area that is between
50˚F~104˚F, and allow 10
to 15 minutes for it to
reach the new temperature.
Wash and dry your hands
and repeat the test on
your fingertip with a new
test strip. If the result is
still “HI,” contact your
physician or healthcare
professional immediately.
Wash and dry your hands
and repeat the test on
your fingertip with a new
test strip. If the result is
still “LO,” contact your
physician or healthcare
professional immediately.
PM
mg /dL
P
M
mg /dL
m
em
PM
mg /dL
42
Embrace N0 Code
Page 43
What What the What it What Should
You See meter says Means You Do
Solving Problems
mol/dL
code
P
M
mmol/dL
code
mem
PM
mg /dL
PM
mg /dL
mem
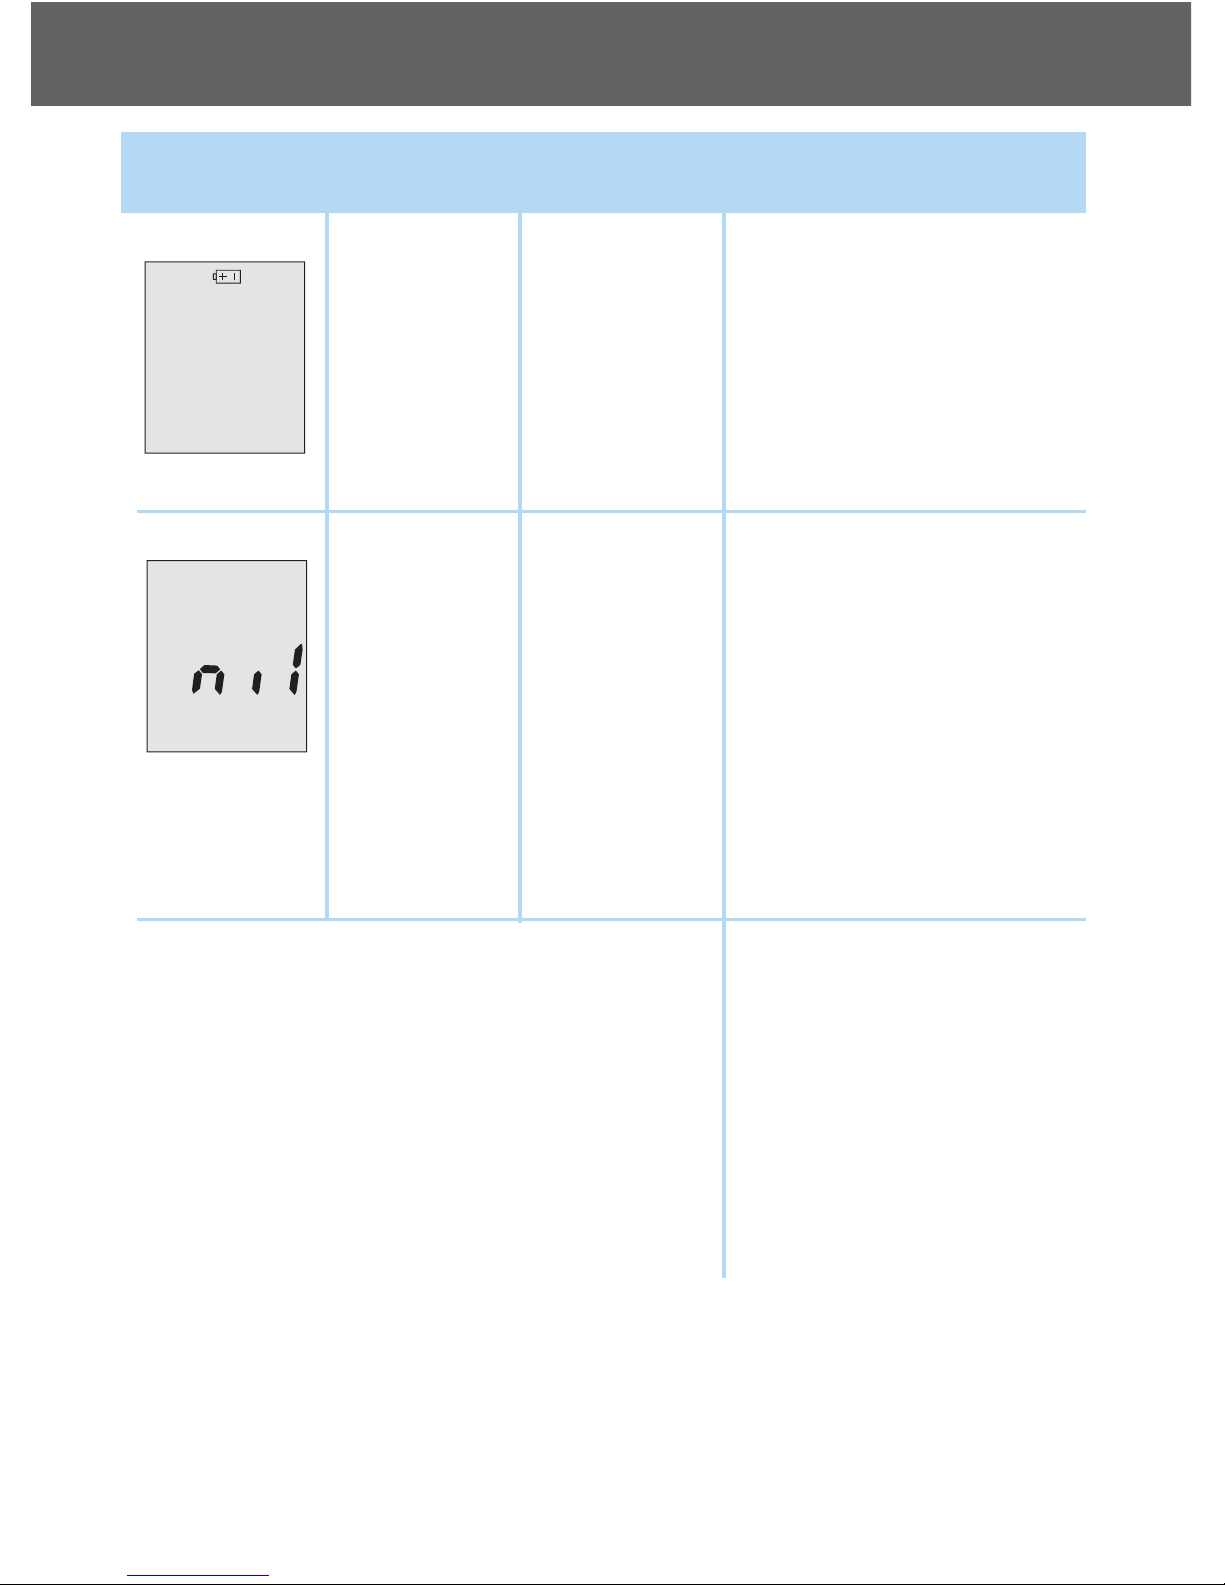
Low
Battery”
NA
Batteries are
low
There are no
memorized
results in the
meter
Change the battery according to page 39, Inserting (or changing) the
Battery.
• Check if the date and
time on you meter is
set up. See Setting
Up Your New System
on page 10.
• Start testing your
blood glucose, see
Testing Your Blood
Glucose on page 28.
mol/dL
code
P
M
mmol/dL
code
mem
PM
mg /dL
PM
mg /dL
mem
43
Embrace N0 Code
Page 44

Product Warranty
44
Embrace N0 Code
Product Warranty
Omnis Health, LLC warrants the Embrace Blood Glucose Meter to be
free of defects in workmanship and materials under normal use for a
lifetime warranty.
The liability of Omnis Health, LLC is limited to repair or replacement and
in no event shall Omnis Health, LLC be liable for any collateral or consequential damages or loss.
Instruments subjected to misuse, abuse, neglect, unauthorized repair or
modification will be excluded from this warranty.
This warranty specifically excludes expendables and consumables.
All warranty claims must be directed to the Omnis Health, LLC.
The warranty applies only to the original purchaser of the system.
Page 45

Specifications
45
Embrace N0 Code
Specifications
Test Strips: Embrace No Code Blood Glucose Test Strips
Test Range: 20 - 600 mg/dL
Calibration: Plasma
Test Time: 6 Seconds
Sample Size: 1.6ml
Hematocrit Range: 30-55%
Display Type: Large LCD screen
Memory: 300 blood test results with date and time
Result Averaging: 7, 14, and 30 days averaging
Dimension: 90L x 53W x 20H (mm)
Weight: 80g
Battery: 2 Alkaline AAA Battery
Battery Life: 1000 tests of continuous use or 1 year
Automatic Power-off: After 2 minutes of nonuse
Operating Temperature: 50˚F~104˚F
Relative Humidity: Less than 85%
Storage Condition: Meter at 3.89˚F ~ 50˚F
Test Strips at 3.89˚F ~ 50˚F
For additional information, refer to the Embrace No Code Test Strip insert.
 Loading...