

Embrace SEG Hopup
A variety of sizes, kits and options of displays are available.
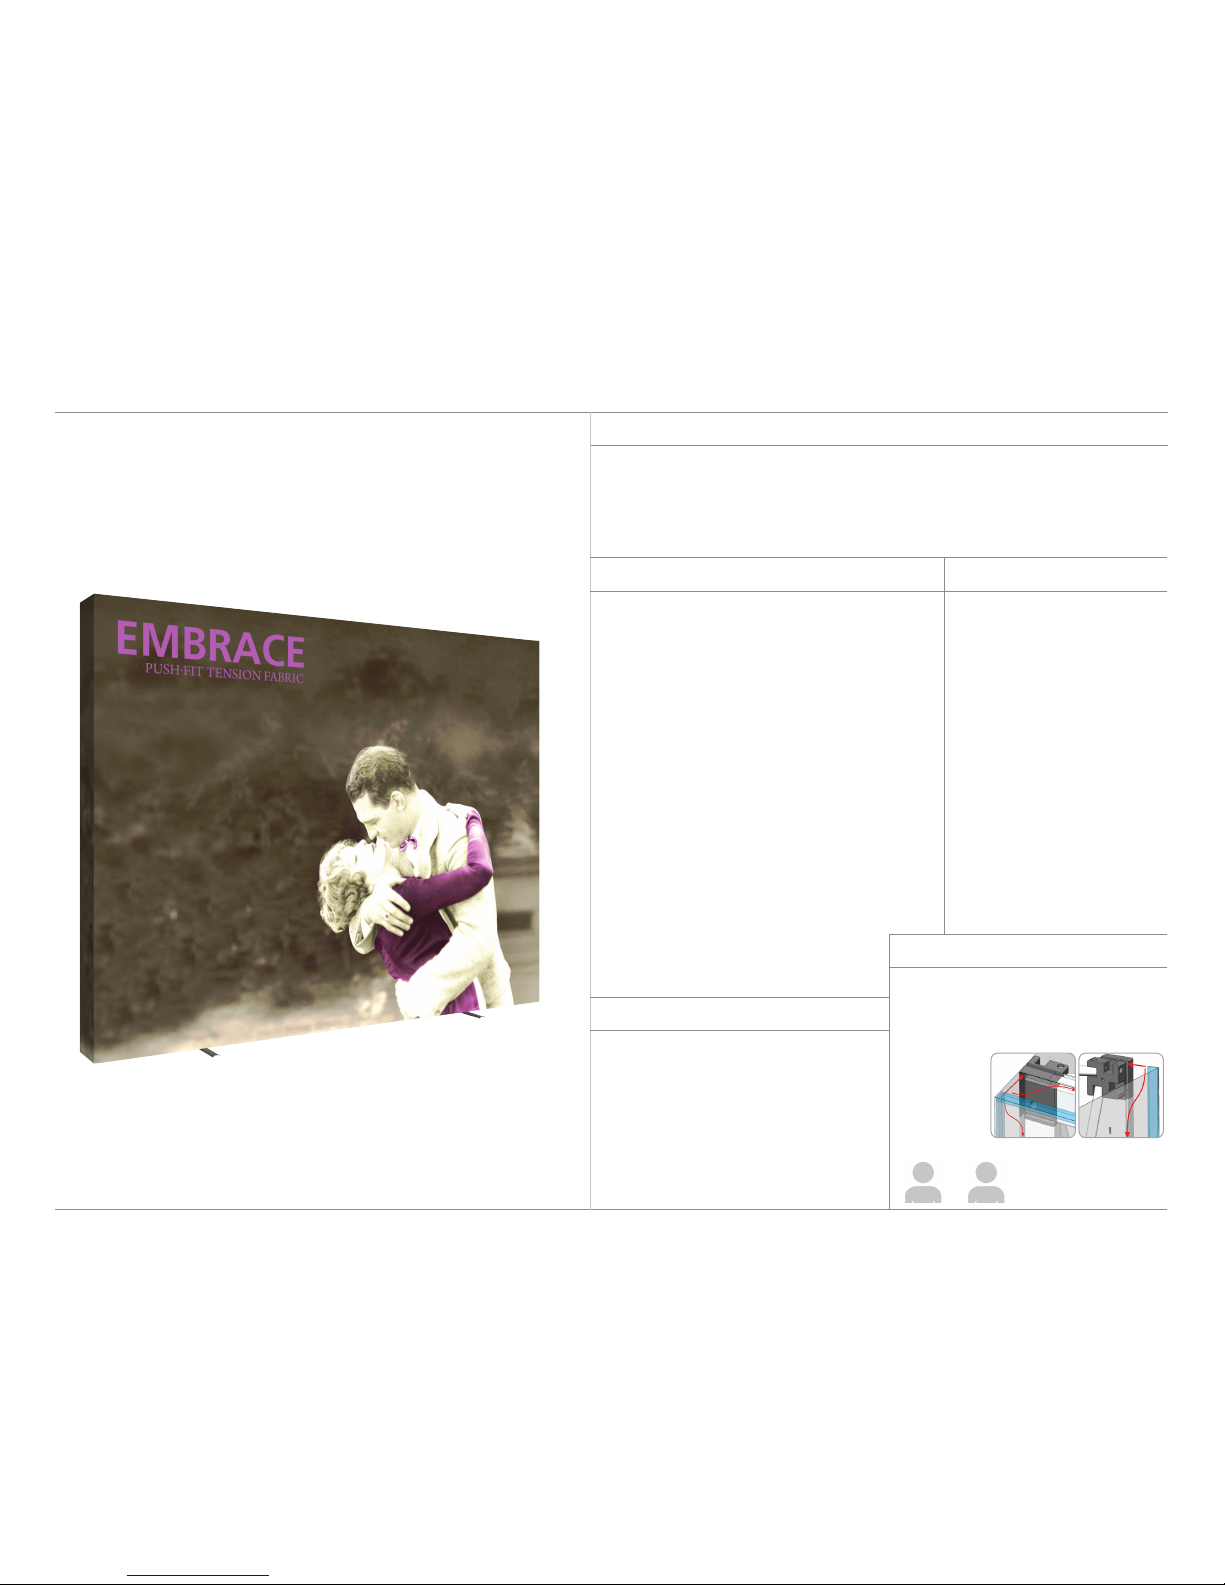
EmbraceTM is a sleek collapsible portable display that delivers style with minimal effort.
Embrace Fabric Displays come in a variety of sizes and is offered with or without end
caps. Embrace requires no tools for assembly, is lightweight and highly portable.
It packs away as easy as it sets up!
dimensions:
- Lightweight anodized straight silver frame
- Stabilizer feet on all 3 quad high frames
- Perimeter channel bars connect to frame and
hold push-fit fabric graphics
- Easy to assemble
features and benefits:
- Optional end caps available
- Carry bag included with kits 1x1 through 2x1
- Rolling bag included with kits 2x2 through 5x4
- Lifetime hardware warranty against
manufacturer defects
- Light clips included
We are continually improving and modifying our product range and reserve the right to vary the specifications without prior notice.
All dimensions and weights quoted are approximate and we accept no responsibility for variance. E&OE. See Graphic Templates
for graphic bleed specifications.
11/01/2017
Shipping
Hardware
Graphic
Graphic material:
Dye-sublimation SEG push-fit fabric
Refer to related graphic template for more
information.
Visit:
www.exhibitors-handbook.com/
graphic-templates
Stacking units require at least one return wall.
Do not attempt to connect frames lying on the
floor. Frames must always be upright when
assembling stacking configurations. Spot lights
not included.
additional information:
1x1: 30.89”w x 31.04”h x 13.32”d
785mm(w) x 788mm(h) x 338mm(d)
Approximate Weight: 13 lb / 6 kg
1x2: 30.89”w x 59.44”h x 13.32”d
785mm(w) x 1510mm(h) x 338mm(d)
Approximate Weight: 15 lb / 7 kg
1x3: 30.89”w x 88.65”h x 28.94”d
785mm(w) x 2252mm(h) x 735mm(d)
Approximate Weight: 22 lb / 10 kg
1x4: 30.89”w x 117.51”h x 28.94”d
785mm(w) x 2985mm(h) x 735mm(d)
Approximate Weight: 28 lb / 13 kg
2x1: 59.25”w x 31.04”h x 13.32”d
1505mm(w) x 788mm(h) x 338mm(d)
Approximate Weight: 15 lb / 7 kg
2x2: 59.25”w x 59.44”h x 13.32”d
1505mm(w) x 1510mm(h) x 338mm(d)
Approximate Weight: 20 lb / 9 kg
2x3: 59.25”w x 88.65”h x 28.94”d
1505mm(w) x 2252mm(h) x 735mm(d)
Approximate Weight: 26 lb / 12 kg
2x4: 59.25”w x 117.51”h x 28.94”d
1505mm(w) x 2985mm(h) x 735mm(d)
Approximate Weight: 32 lb / 15 kg
3x2: 88.15”w x 59.44”h x 13.32”d
2239mm(w) x 1510mm(h) x 338mm(d)
Approximate Weight: 26 lb / 12 kg
3x3: 88.15”w x 88.65”h x 28.94”d
2239mm(w) x 2252mm(h) x 735mm(d)
Approximate Weight: 30 lb / 14 kg
3x4: 88.15”w x 117.51”h x 28.94”d
2239mm(w) x 2985mm(h) x 735mm(d)
Approximate Weight: 39 lb / 18 kg
4x3: 117.01”w x 88.65”h x 28.94”d
2972mm(w) x 2252mm(h) x 735mm(d)
Approximate Weight: 39 lb / 18 kg
4x4: 117.01”w x 117.51”h x 28.94”d
2972mm(w) x 2985mm(h) x 735mm(d)
Approximate Weight: 44 lb / 20 kg
5x3: 145.87”w x 88.65”h x 28.94”d
3705mm(w) x 2252mm(h) x 735mm(d)
Approximate Weight: 41 lb / 19 kg
5x4: 145.87”w x 117.51”h x 28.94”d
3705mm(w) x 2985mm(h) x 735mm(d)
Approximate Weight: 48 lb / 22 kg
All kits ship in their bag inside a box. Add 2 lb to the
hardware weight for a shipping weight.
Box Size 1: 35”l x 15”h x 9”d
889mm(l) x 381mm(h) x 229mm(d)
Approximate Box Weight: 2 lb / 1 kg
Kits that ship in the carry bag within Box 1:
1x1, 1x3 & 2x1
Box Size 2: 38”l x 15”h x 9”d
966mm(l) x 381mm(h) x 229mm(d)
Approximate Box Weight: 2 lb / 1 kg
Kits that ship in the rolling bag within Box 2:
2x2, 2x3, 3x2, 3x3, 4x3, 4x4, 5x3 & 5x4
Box Size 3: 33”l x 15”h x 15”d
839mm(l) x 381mm(h) x 381mm(d)
Approximate Box Weight: 2 lb / 1 kg
Kits that ship in the rolling bag within Box 3:
1x2, 1x4 & 2x4
2 person assembly recommended:
Easy push-fit
fabric graphics
go into
channels.
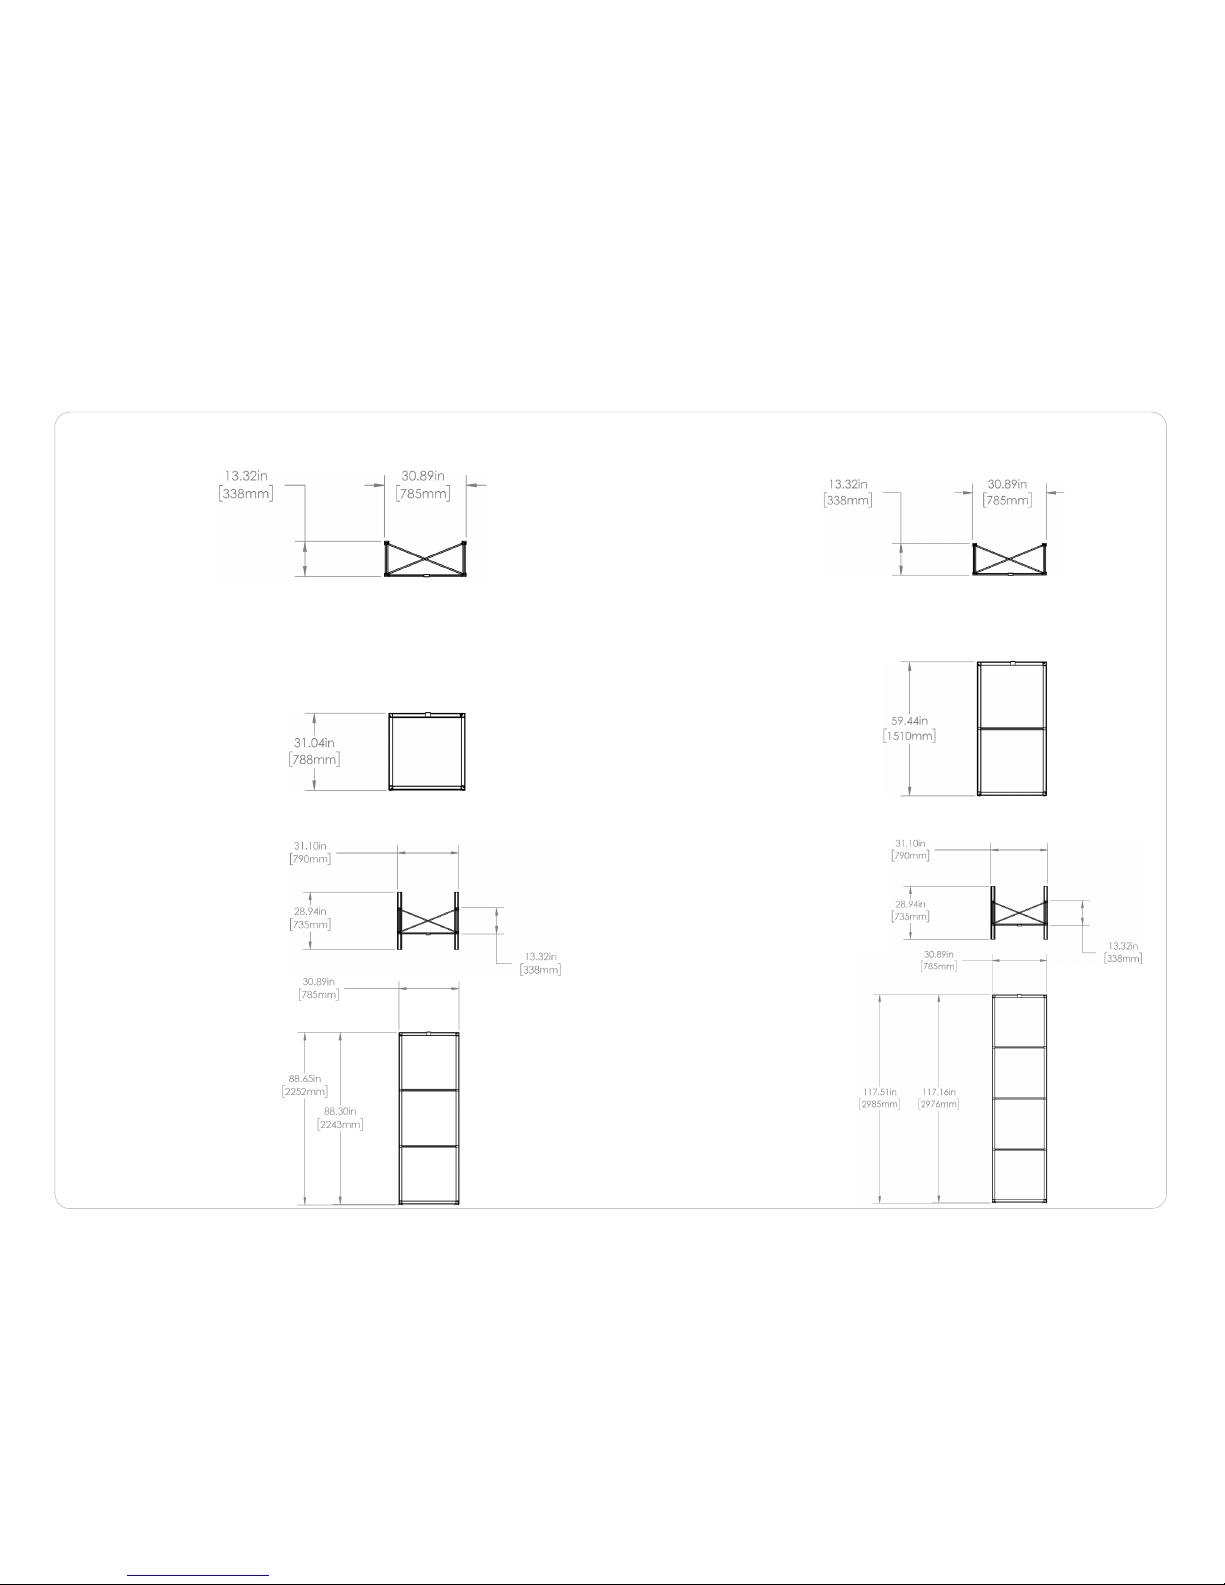
Dimensions
EMB-1X1-S
EMB-1X3-S
EMB-1X2-S
EMB-1X4-S
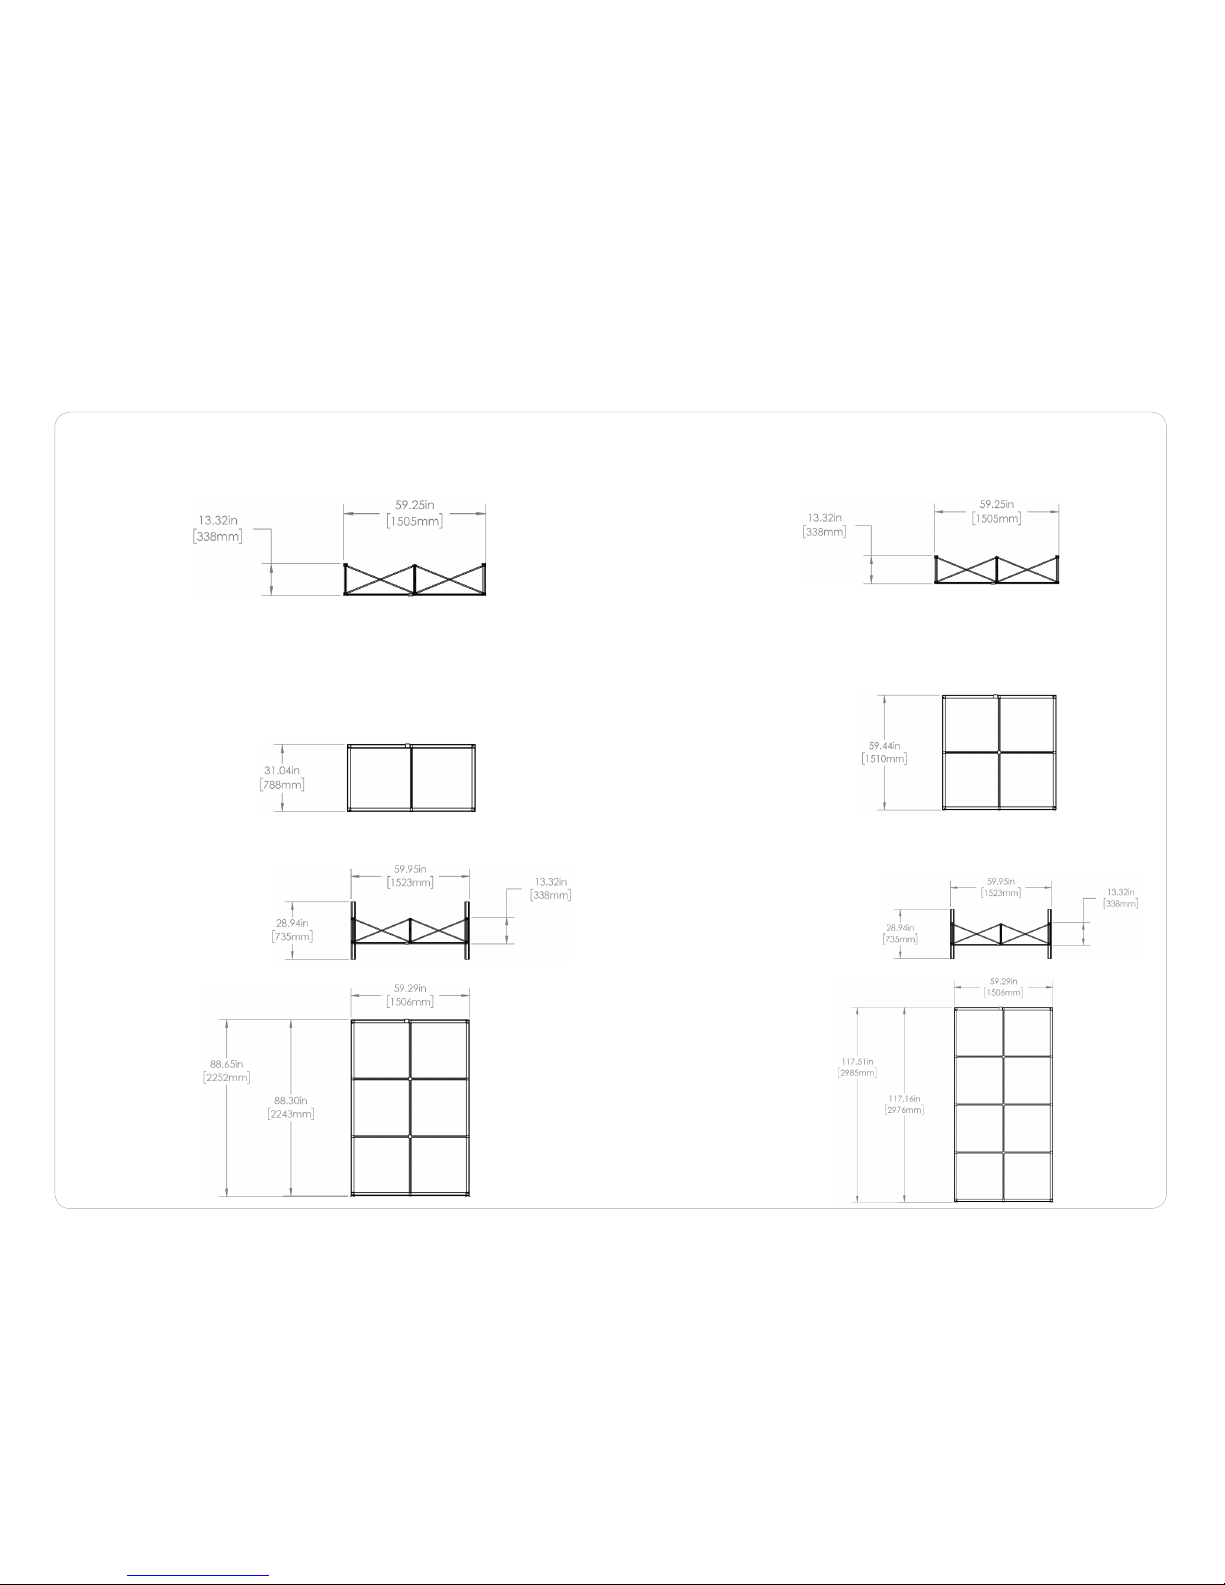
Dimensions
EMB-2X1-S
EMB-2X3-S
EMB-2X2-S
EMB-2X4-S

Dimensions
EMB-3X3-SEMB-3X2-S
EMB-3X4-S

Dimensions
EMB-4X3-S
EMB-5X3-S
EMB-4X4-S
EMB-5X4-S

Connection Method 1: Corner Hub & End Cap Connection Method 2: Middle Hub & Middle Cap
Connection Method 3: Silicon Edge Graphics
The scissor frames will have this corner hub installed on all four corners, front and back of the frame.
This corner hub takes the end caps of the channel bars. The end caps of the channel bar will snap
into place.
The scissor frames will have middle hubs with a metal prong installed on all four sides front and left
and right sides of back. Attach the middle caps of the channel bars onto the middle hubs. The middle
caps of the channel bar will snap into place.
To apply the silicone edge graphic, start by pressing the SEG into the top left corner hub of the frame.
Continue to press the SEG into the extrusion bar fabric channel. Keep pressing the SEG into the bar
fabric channel until you make down to the bottom right corner hub of the frame. This also works for
the second printed graphic option on the back side of the frame when horizontal channel bars are
installed.
Connection Methods & Notes
As an optional feature, the front printed graphic may have end cap graphics with silicone edge. Pull
the end cap silicone edge to the top of the back corner hub. Start to press in the SEG into the hub
and work your way down the side channel. Do the same for the opposite end cap.

Begin with the scissor frame,
expand it flat out on the floor.
Gather all the bungee channel
bars and slide them together.
EMB-CB-1 (Non-Bungee)
EMB-CB-2 (Shown)
EMB-CB-3
EMB-CB-4
EMB-CB-5
With the frame flat on the floor,
snap all the locking arms into
place. The side with the dove tail
hub design is the bottom of the
frame.
With the frame laid out flat on
the floor, carefully attach the
channel bars onto the front and
back side of the frame. You can
stand the frame upright without
the stabilizing bases if your frame
is 2 quads high or less.
Reference Connection Method(s)
1 and 2 for more details.
Step 1.
Step 3.
Step 2.
Step 4.
Kit Assembly
Step by Step

Attach the stabilizing bases
on the frames that are 3 quads
high or taller. Secure them in
place while you stand the frame
upright.
Optional spot light clip setup.
First, slide the light clip onto
the frame top channel. Place it
symmetrically centered. Next,
slide the light onto the clip.
Spot lights sold separately.
First, take the front graphic with
end caps and attach it to the
frame. Start at point 1 and work
the silicon edge into the channel
bars ending at point 2.
Then, take the end cap and fold
it back towards the back channel
starting at point 3. Work the
silicon edge down to point 4.
Do the same for the opposite
end cap.
Reference Connection Method(s)
3 for more details.
Setup is complete.
Step 5.
Step 7.
Step 6.
Step 8.
Kit Assembly
Step by Step
1
2
3
4
 Loading...