

Page 1
User Guide
xPointS
Executive Videoconferencing System
Version 1.5
Document Part No. DOC-02-003-09-10
Page 2

Disclaimer
The information contained in this document has been carefully examined and is
believed to be entirely accurate. However, Emblaze-VCON Ltd. assumes no
responsibility for errors or omissions. Emblaze-VCON Ltd. reserves the right to
make changes to this document without prior notification, in accordance with the
purpose of product support or improvement.
Emblaze-VCON Ltd. provides this publication “as is” without warranty of any
kind, either express or implied, including, but not limited to, the implied
warranties of merchantability or fitness for a particular purpose.
Copyright
© 2010 Emblaze-VCON Ltd. All Rights Reserved.
The contents of this document is the intellectual property of Emblaze-VCON Ltd.
and is protected under international copyright laws and treaties. Reproduction,
redistribution, translation, disassembling, or any editing of this document is
strictly prohibited without the written and explicit consent of Emblaze-VCON
Ltd.
VCON and Media Xchange Manager® (MXM) are registered trademarks of
Emblaze-VCON Ltd. xPoint, xPoint
Emblaze-VCON Ltd.
Microsoft Windows is a registered trademarks or trademarks of Microsoft
Corporation in the United States and other countries. All other trademarks are
the property of their respective holders.
S
, xPointS, and xPointHD are trademarks of
Contact Us
For further information about this product or for technical support, use the
following methods to contact us:
Website: www.emblaze-vcon.com/contact
E-mail: [email protected]
Page 3

Contents
Chapter 1. Introduction 5
Chapter 2. Getting Started 10
xPoint
Main Features ..................................................................................................... 6
Comparison Table ............................................................................................... 6
Feature Highlights .............................................................................................. 7
Using the Remote Control ................................................................................ 10
Using the On-Screen Menu ............................................................................... 13
Displaying System Information ......................................................................... 16
S
Overview ................................................................................................. 5
Alphanumeric Keypad ........................................................................... 11
Command Buttons ................................................................................. 12
Navigation Joystick and Additional Buttons ........................................ 13
Chapter 3. Configuration Basics 19
Entering Your User Details ................................................................................ 19
Configuring the Camera ..................................................................................... 19
Configuring the Audio ........................................................................................ 21
Configuring the Display .................................................................................... 23
Chapter 4. Videoconferencing 25
Starting Calls ..................................................................................................... 25
Auto-Answering Calls ....................................................................................... 27
Ending Calls ...................................................................................................... 27
Muting the Video............................................................................................... 28
Switching Image Modes .................................................................................... 28
Display Mode ........................................................................................ 28
Far End Mode ....................................................................................... 28
Switching Call View Modes ............................................................................... 28
Single Mode........................................................................................... 28
Dual Mode ............................................................................................. 28
Presentation Mode ................................................................................ 28
Using Picture-In-Picture (PIP) Modes ............................................................. 29
Call State Indications ........................................................................................ 30
Using Call Tones ................................................................................................ 31
Operator Request for Password ............................................................ 31
Operator Request for Telephone Tone ................................................. 32
Recording and Streaming ................................................................................. 32
Start Recording ..................................................................................... 32
Stop Recording ...................................................................................... 32
View Recording ..................................................................................... 33
Start Streaming ..................................................................................... 33
Stop Streaming ..................................................................................... 33
xPoint Standard (S) Ver. 1.5 User Guide • 2
Page 4

Contents
View Streaming ..................................................................................... 34
Data Sharing ...................................................................................................... 34
Choosing the Data Source .................................................................... 34
Connecting to a Laptop ......................................................................... 34
Connecting a USB flash drive ............................................................... 34
Viewing Recordings .............................................................................. 35
Chapter 5. Quick Dialing Methods 36
Using the Address Book .................................................................................... 36
Using the Address Book via the Remote Control ................................ 36
Using Address Book via the xPoint
Using the Address Book via the New Call Bar ..................................... 37
Adding Entries to the Address Book .................................................... 37
Editing Entries in the Address Book .................................................... 38
Deleting Entries from the Address Book ............................................. 38
Using the Call Log ............................................................................................. 38
Using the Call Log via the Remote Control .......................................... 38
Displaying the Call Log from the Address Book .................................. 39
Adding a Call Log Entry to the Address book ...................................... 39
Clearing the Call Log ............................................................................. 39
Using Speed Dial ............................................................................................... 39
Using Speed Dial via the Remote Control ........................................... 40
Using Speed Dial via the Address Book ............................................... 40
Adding numbers to the Speed Dial ...................................................... 40
Editing Speed Dial Numbers ................................................................ 40
Deleting Speed Dial entries ................................................................... 41
Using Online Directories ................................................................................... 41
Accessing an Online Directory via the Remote Control ....................... 41
Accessing the Online Directory via the Address Book ......................... 41
S
GUI ............................................. 37
Chapter 6. Interactive Multicast Videoconferencing 43
Interactive Multicast Overview ........................................................................ 43
Setting up Interactive Multicast Calls .............................................................. 44
Starting an Interactive Multicast ...................................................................... 44
Adding Participants to the Interactive Multicast ............................................. 45
Additional Interactive Multicast Options ........................................................ 46
On the Chair Side .................................................................................. 46
On the Remote Participant Side ........................................................... 48
Chapter 7. Advanced Settings 49
Display Adapter Settings .................................................................................. 49
Administration Settings ..................................................................................... 51
Call Settings ....................................................................................................... 53
Call Security ...................................................................................................... 54
Online Directory Properties .............................................................................. 54
H.323 Protocol Settings .................................................................................... 56
Working in MXM Mode ........................................................................ 58
Quality of Service (QoS) Settings ..................................................................... 59
License Settings ................................................................................................. 60
ISDN Settings .................................................................................................... 60
xPoint Standard (S) Ver. 1.5 User Guide • 3
Page 5

Contents
ISDN Lines Configuration .................................................................... 62
System Settings ................................................................................................. 63
Multicast Settings ............................................................................................. 65
Recording and Streaming Settings ................................................................... 66
MCU Settings .................................................................................................... 67
Secure Connect Settings ................................................................................... 69
Chapter 8. Web Access and Management 70
Accessing the xPoint
Viewing a Stream Session .................................................................................. 71
Viewing a Multicast Videoconference .............................................................. 72
Importing/Exporting the xPoint
Viewing the Recording Archive ........................................................................ 73
Sending Running Text in a Call ........................................................................ 75
Viewing Call Status ........................................................................................... 76
Performing System Upgrade ............................................................................. 77
Performing System Restore .............................................................................. 78
S
Unit via a Browser ........................................................ 70
S
License ....................................................... 72
xPoint Standard (S) Ver. 1.5 User Guide • 4
Page 6

Chapter 1. Introduction
In this Chapter
This chapter introduces the xPointS videoconferencing system and includes the
following sections:
xPointS Overview
Main Features
Feature Highlights.
xPointS Overview
The xPointS (xPoint Standard) is an all-in-one executive videoconferencing
system, featuring an embedded MCU, built-in recording capability, streaming of
live and recorded sessions, data sharing, interactive multicast, and more.
S
xPoint
application-in-a-box, providing on-screen operation controls and advanced call
control options during conferencing. Utilizing the newest H.264 video standard
and clear, crisp audio, the xPoint
organizations.
xPoint
to 8 additional participants. Using Interactive Multicast™, VCON’s patented
technology, xPoint
locations to join a conversation.
xPoint
videoconference into a fully interactive meeting. It can display presentations or
DVD videos on large monitors, connect to an external laptop for data sharing,
and open various file types from USB storage devices.
xPoint
point‐to‐point/multipoint capabilities, powered by VCON's xPoint software.
provides an interface to videoconferencing via its plug-and-play
S
enables you to record and stream video calls to multiple locations with up
S
incorporates advanced data sharing capabilities, allowing you to turn any
S
is ideal for users who need a powerful videoconference solution, offering
S
brings users face-to-face with other people and
S
enhances user experience and allows different remote
Various accessories, such as a PTZ camera, tabletop pod, omni-directional
microphone, extra remote control receiver, data point and ISDN adapters – can
S
be installed and integrated as part of the xPoint
system.
xPoint Standard (S) Ver. 1.5 User Guide • 5
Page 7

Chapter 1. Introduction Main Features
¾ For more information about the xPointS physical installation, including
the connection of cables and devices to xPointS, refer to the xPointS
Installation and Setup Guide.
S
¾ For the complete technical specifications, refer to the xPoint
datasheet.
Main Features
xPointS allows you to call a destination via LAN or ISDN, and to interact via video
and data-sharing during calls. Some of the primary capabilities of the system
include:
Point-to-point or multipoint connections
Recording, streaming, and data sharing
Streaming via a Web interface
Downloading/sharing files via a USB flash drive
Interactive multicast chair/participant
Session multicast
Embedded broadcast viewer
Calling via address book, log entries or speed dial
Calling via online directories
Multipoint videoconferences support
Configurable audio, video and displays, and automatic answering
Communicating in standalone mode, MXM mode and GateKeeper mode
Embedded Microsoft Windows system
Web-based management
ISDN links (optional)
Incorporating IEEE 802.11 Wi-Fi technology
Regulatory Compliance: UL, CSA (cUL), TUV, TUV-CB, CE-LVD, CE, FCC
Class B, BSMi, VCCI, C-Tick, RoHS.
Comparison Table
The following table specifies the differences between xPointS and other xPoint
models.
S
Table 1. xPoint
xPointLT xPointS xPointHD
Max Tx CIF 4CIF 720p
xPoint Standard (S) Ver. 1.5 User Guide • 6
vs. Other xPoint Models
Page 8

Chapter 1. Introduction Feature Highlights
xPointLT xPointS xPointHD
Max Rx CIF 720p 1080p
MCU
Recording √ √ √
Streaming √ √ √
Data via USB √ √ √
Data POD
(Optional)
ISDN Point √ √ √ Over LAN only
IMC √ √ √
Multiple
Cameras
Bandwidth Up to 1 Mbps Up to 4 Mbps Up to 6 Mbps
Wireless √ N/A
H.239 Dual
Video support
PTZ camera+
Digitus + Mic
1+3 ; Voice Switch
only
√ √ √
Sony or Cannon
cameras only (not
VCON cameras)
√ √ √
USB / Digitus √ √
1+5 1+8
Up to 2 cameras Sony cameras only
Requires external
Wi-Fi dongle*
Feature Highlights
New features incorporated in version 1.5 of xPointS include:
Embedded MCU for multipoint sessions – The embedded MCU
(optional component) enables connecting up to 4 endpoints simultaneously
from various locations. This MCU capability includes the host system and 3
additional endpoints, one of which can be connected through ISDN.
To access the MCU settings via the remote control, select: Menu >
Settings > MCU , or via the xPoint
> MCU Settings.
Recording and playback – The recording and playback functionality
allows you to record both point-to-point and multipoint (MCU based)
sessions, and view them at a later time. You can also download the recorded
session file from xPoint
connected, through the data sharing mechanism.
S
Web management: Configuration
S
and share it during a session with the parties
xPoint Standard (S) Ver. 1.5 User Guide • 7
Page 9

Chapter 1. Introduction Feature Highlights
To start recording via the remote control, select: Menu> Media> Start
S
Record, or via the xPoint
Web management: Call View> Start
Recording.
Session multicasting – Session multicasting allows you to broadcast your
session using the multicasting networking transport technology, which allows
users to send a video stream that can be received by multiple recipients, all
listening on a single multicast address. Multicasting a session from your
S
xPoint
allows numerous passive viewers to view the session. This is typically
used at lectures, or any session that passive viewers can benefit from.
Multicast sessions can be viewed by all VCON endpoints, the free VCON
Broadcast Viewer, and the Apple QuickTime viewer.
To start session multicasting via the remote control, select: Menu>
S
Media> Start Multicast, or via the xPoint
Web management: Call
View> Start Multicast.
Streaming for Windows Media Player – Session streaming for Windows
Media Player allows any system with the Microsoft™ media player
S
application to view an ongoing session from the xPoint
system.
To start the streaming via the remote control, select: Menu> Media>
S
Start Stream, or via the xPoint
Web management: Call View> Start
Streaming.
Side-by-side PIP view – A new side-by-side viewing option is available in
PIP (Picture-In-Picture) mode. The side-by-side view enables viewing both
the remote and local video streams at equal size on the screen, side by side.
To switch to side-by-side PIP view via the remote control, press the PIP
button on the remote control until you see both sides on the screen. If
data is shared, the remote video and the data are displayed side by side on
the screen.
System shutdown from the remote control – You can now turn off
S
(shut down) the xPoint
unit from the remote control, in addition to the
ability to do so via the On/Off switch.
To turn off the unit, press and hold the red End Call button on the
remote control (see Figure 2) until the shutdown prompt appears. Select
“Yes” to confirm and turn off the unit.
Access files on a USB flash drive while in idle mode – You can display
S
files from a USB flash drive connected to xPoint
, even while in idle mode.
You do not need to place a call to access files on the USB flash drive. The file
types are the same as for data sharing, including most image formats, video
formats and Microsoft Office files.
To view the files on the USB flash drive via the remote control, select:
Menu> Data Sharing> USB. The list of files and folders is presented,
and you can browse to the file you want to display using the joystick and
the OK button on the remote control, and then by selecting Open.
Display running text (on screen ticker) – You can display on the screen
a text message, which will be displayed to all participants, either in a point-topoint call or on a multipoint call. This functionality is available only via the
Web management and only during a call.
xPoint Standard (S) Ver. 1.5 User Guide • 8
Page 10

Chapter 1. Introduction Feature Highlights
To enter the text using the Web-based management pages (for more
information, see Chapter 8. Web Access and Management), click on the
Call View button. This will open the call view window. In this page, click
on the “Running Text” button to open the running text window.
Far End mute indicator – An indication that the remote side has muted
its microphone is now available. The indication appears on the screen if it is
supported by the remote system.
¾ Note: this option is not available in all videoconferencing systems.
Telnet interface – You can now use an external remote control system such
as Crestron® and AMX®. This functionality provides conference room
integrators utilizing touch panel screens with an easy-to-use programming
interface over a Telnet connection. The API specification can be found in a
separate document.
xPoint Standard (S) Ver. 1.5 User Guide • 9
Page 11

Chapter 2. Getting Started
In this Chapter
Once the xPointS unit is installed, connected and turned on, it is ready for use.
This chapter describes the following basic operations:
Using the Remote Control
Using the On-Screen Menu
Displaying System Information.
Using the Remote Control
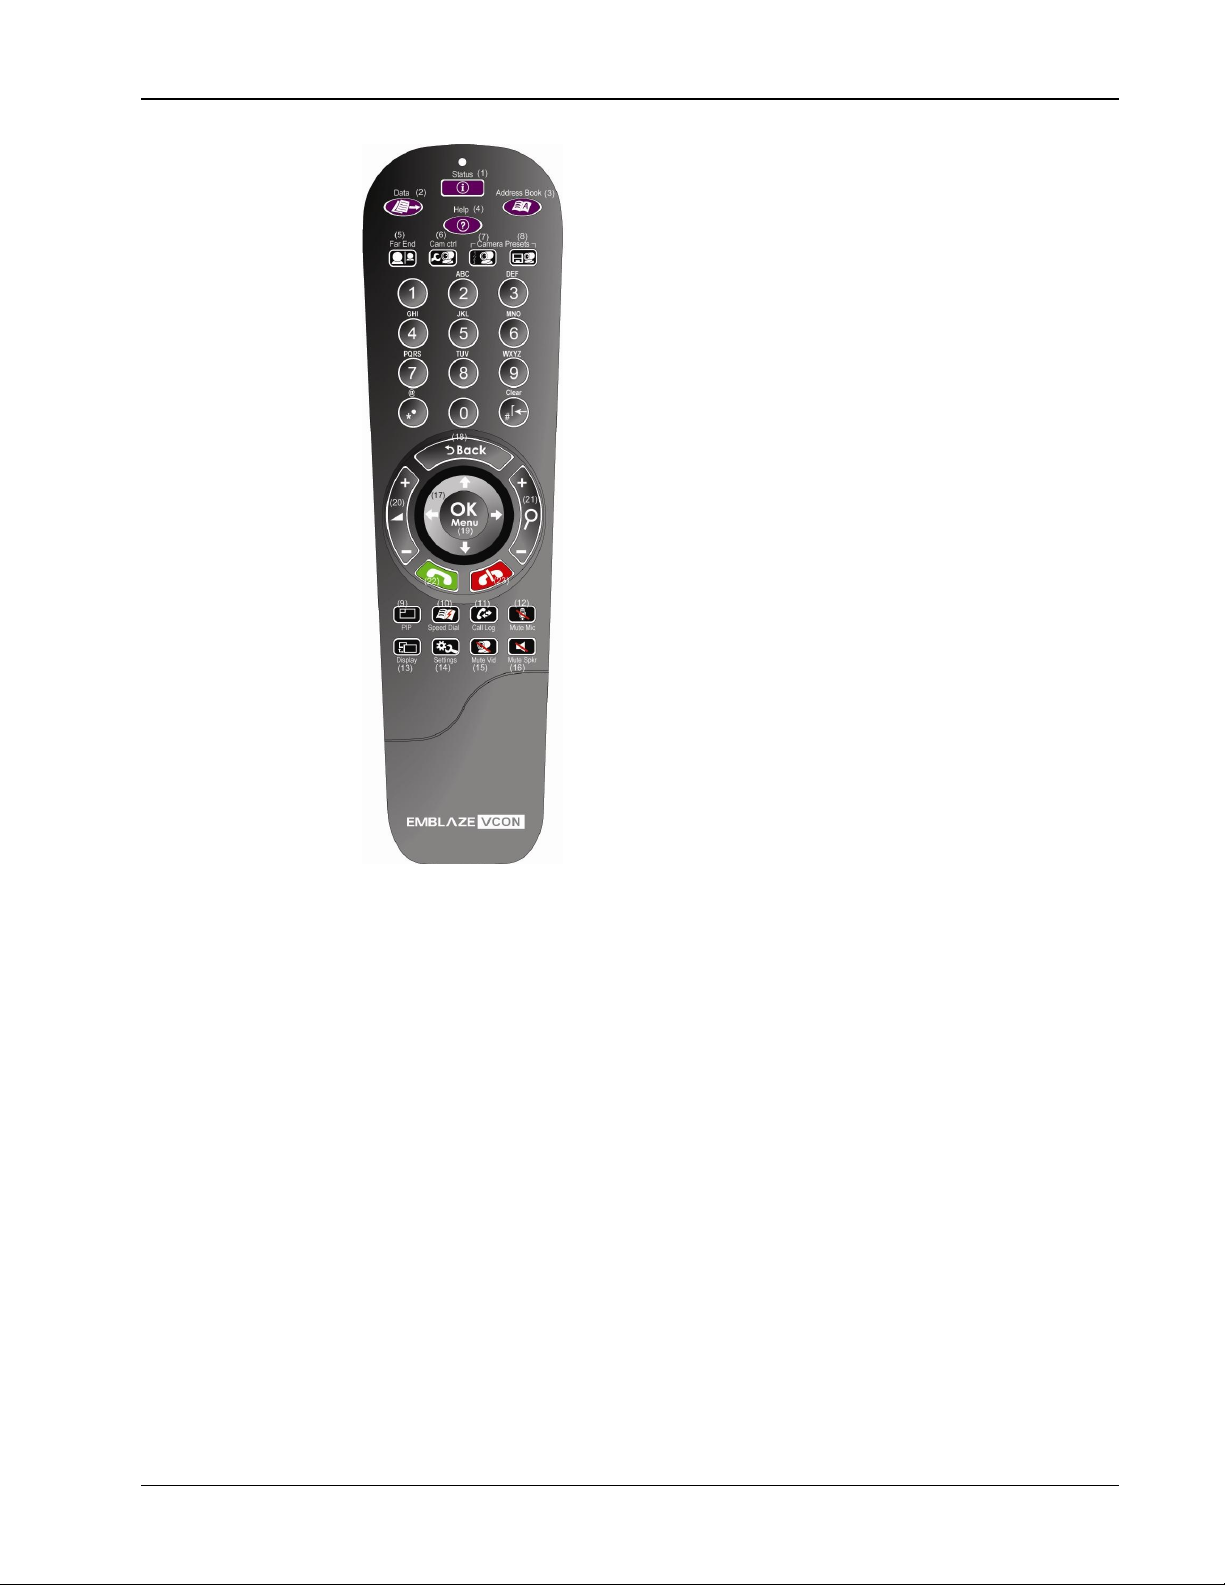
You can navigate the xPointS on-screen graphic user interface (GUI) using the
infrared remote control, bundled with the unit. A separate infrared signal
receiver unit is connected to the xPoint
input/commands from the remote control.
Pressing any button on the remote control activates the on-screen GUI, which
appears on top of the camera/videoconference picture.
S
unit, allowing it to receive your
xPoint Standard (S) Ver. 1.5 User Guide • 10
Page 12
Chapter 2. Getting Started Using the Remote Control
S
Figure 1. xPoint
Remote Control
The remote control includes the following button types:
Alphanumeric Keypad
Command Buttons
Navigation Joystick and Additional Buttons.
Alphanumeric Keypad
The remote control includes an alphanumeric keypad with buttons from 0 to 9, as
well as '.' , '*' , '#', ‘^’, and Clear (Å Backspace) buttons.
In different windows, you can toggle between numbers and letters, depending
on the field. Some fields accept numbers only.
Switch between letters and numbers by pressing a few times on the
corresponding key
Use Volume Up/Down buttons when you need to activate/deactivate CAPS
lock
When DTMF dialing is requested, use the numeric keypad.
xPoint Standard (S) Ver. 1.5 User Guide • 11
Page 13
Chapter 2. Getting Started Using the Remote Control
Command Buttons
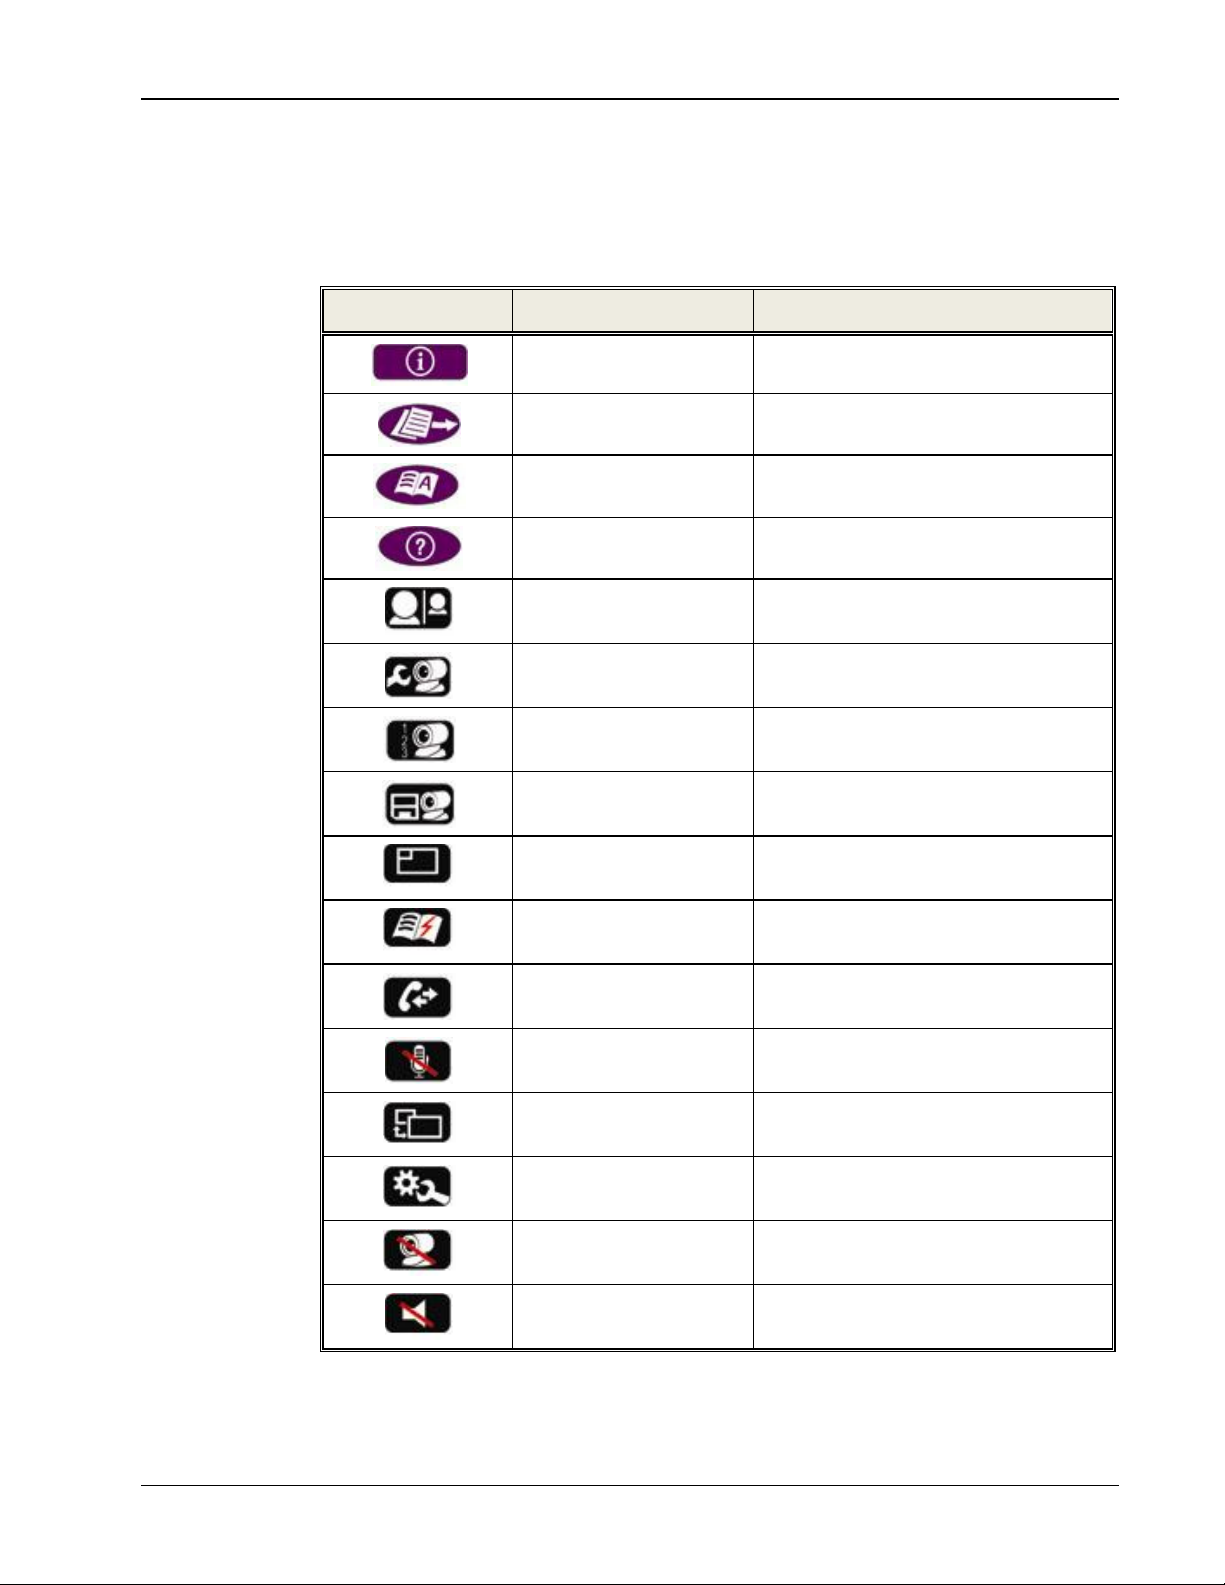
The following command buttons are available on the remote control:
Table 2. Remote Control Command Buttons
Button Image Button Name Command
Status Display the current call status
Data Initiate data sharing
Address Book Open the address book
Help Show the on-screen online help
Far End
Camera Control Configure the camera position settings
Preset: Recall Recall a camera PTZ preset position
Preset: Set Set a camera PTZ preset position
Picture-In-Picture (PIP)
Speed Dial Display the speed dial options
Call Log Display the current call log
Mute Mic Mute the local microphone
Display Toggle the local and remote displays
Settings Open the settings menu
Control the position (PTZ) of the
camera at the near/far end
Toggle the PIP position (5 positions +
Side-by-Side)
Mute Video
Mute Speaker Mute the speaker
Temporarily disable the local video
camera and its transmission
xPoint Standard (S) Ver. 1.5 User Guide • 12
Page 14
Chapter 2. Getting Started Using the On-Screen Menu
Navigation Joystick and Additional Buttons
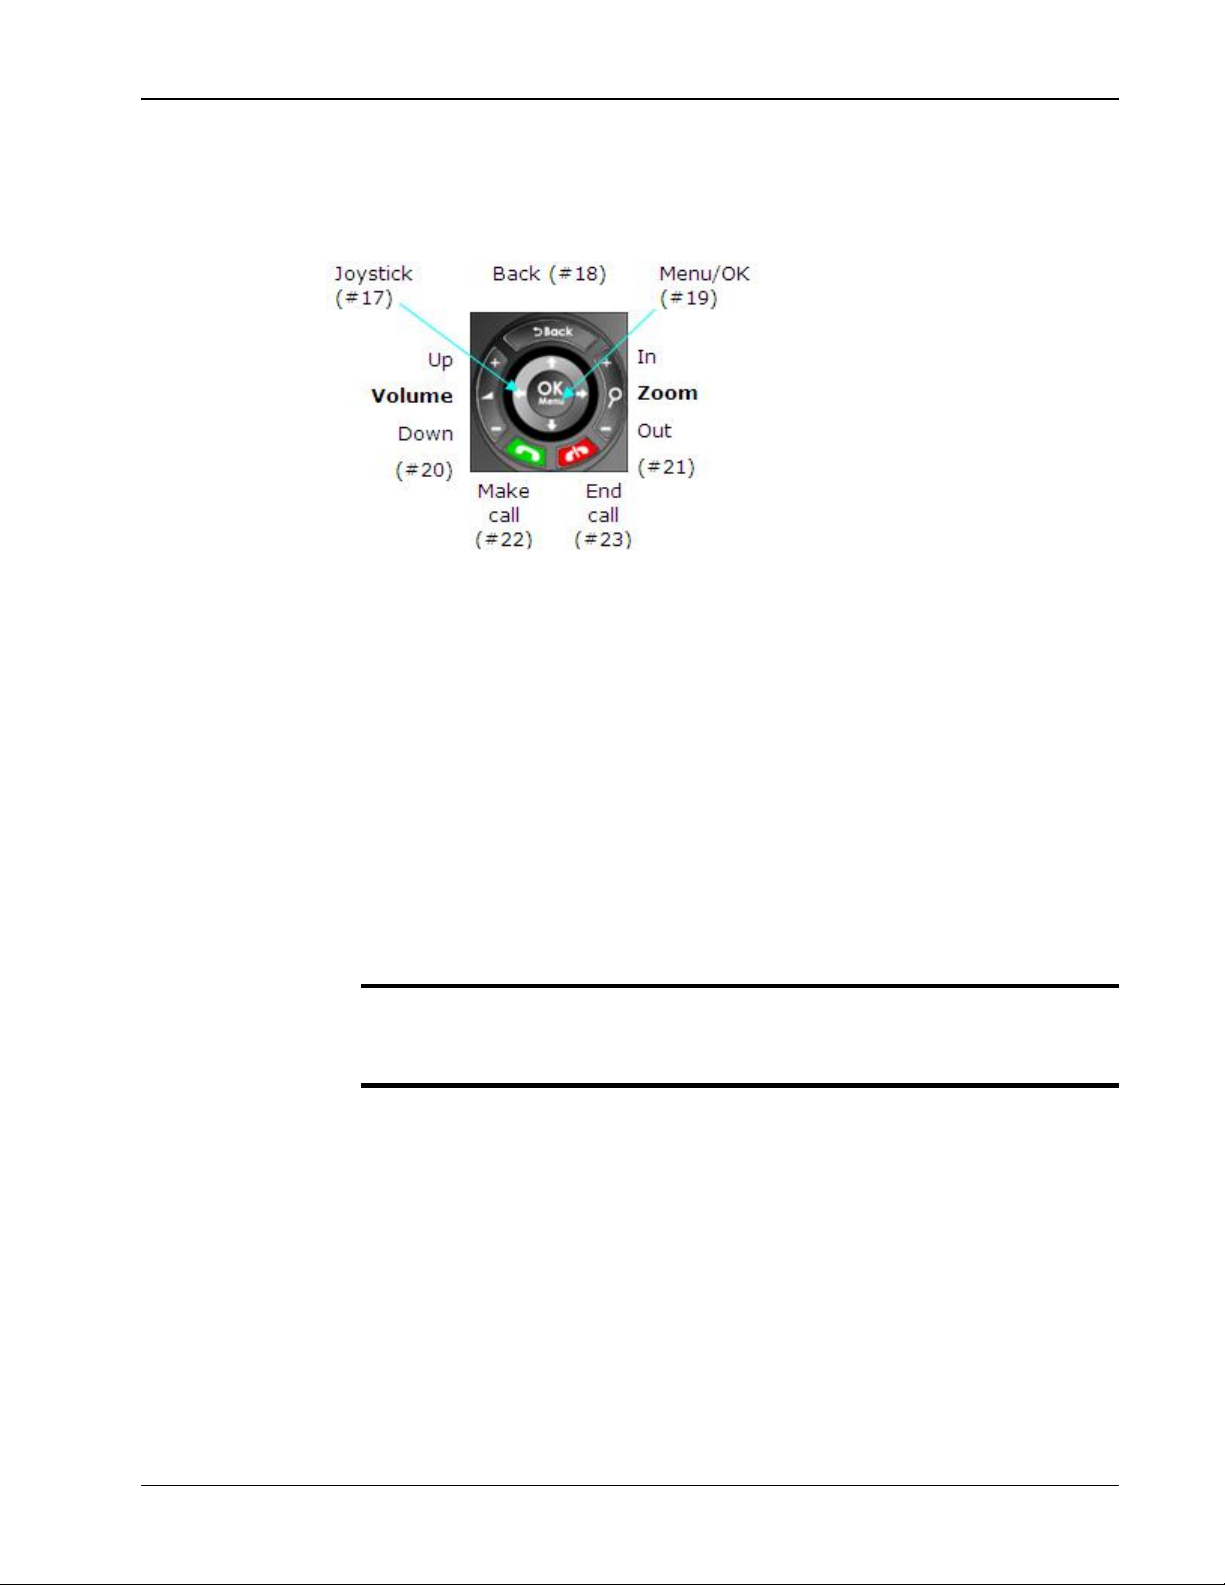
Using the joystick of the OK button, you can navigate the GUI menus/options in
four directional movements: Up , Down , Left , and Right .
Figure 2. Remote Control Joystick and Controls
In addition to the joystick, the following buttons are available around it:
Back – Returns to the previous step/window without saving changes
Menu/OK – Selects/activates a highlighted GUI item/function (highlighted
in green on the screen)
Volume Up/Down – Increases/decreases the volume or switches between
lower and upper case
Zoom In/Out – Zooms in or out with the camera
Make Call – Start a new call
End Call – End the current call or close the GUI.
¾ The red End Call button can also be used for turning off the unit. Press
and hold the button until the shutdown confirmation prompt appears.
Selecting “Yes” immediately shuts down the system.
Using the On-Screen Menu
The on-screen menu enables you to navigate xPointS options prior to and during
a videoconference call. The main menu is accessed using the remote control (see
‘Using the Remote Control’).
S
To display the xPoint
Press OK on the remote control.
xPoint Standard (S) Ver. 1.5 User Guide • 13
main menu:
Page 15
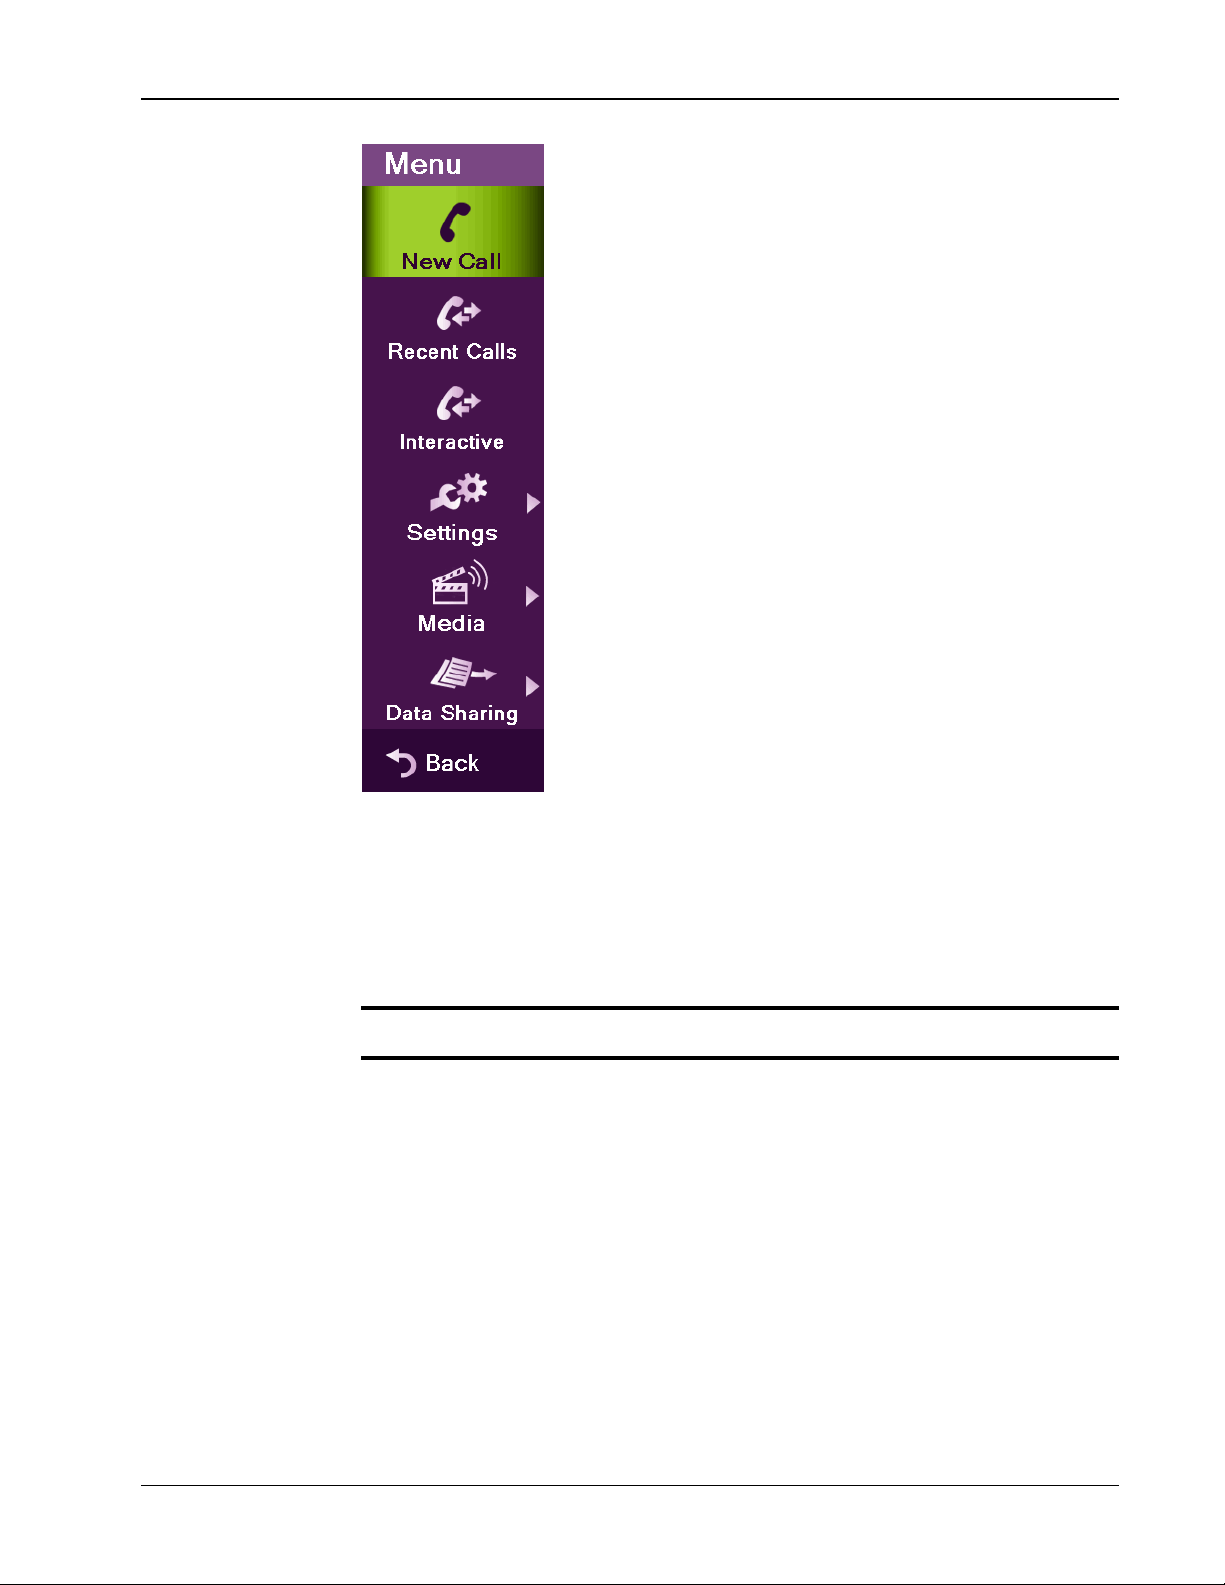
Chapter 2. Getting Started Using the On-Screen Menu
S
Figure 3. xPoint
Navigate the xPoint
Main Menu
S
menu using the remote control.
To expand menu options:
Press the right arrow () on the joystick when the expandable option is
selected.
¾ Note: expandable menu options are marked with a side triangle sign ().
xPoint Standard (S) Ver. 1.5 User Guide • 14
Page 16
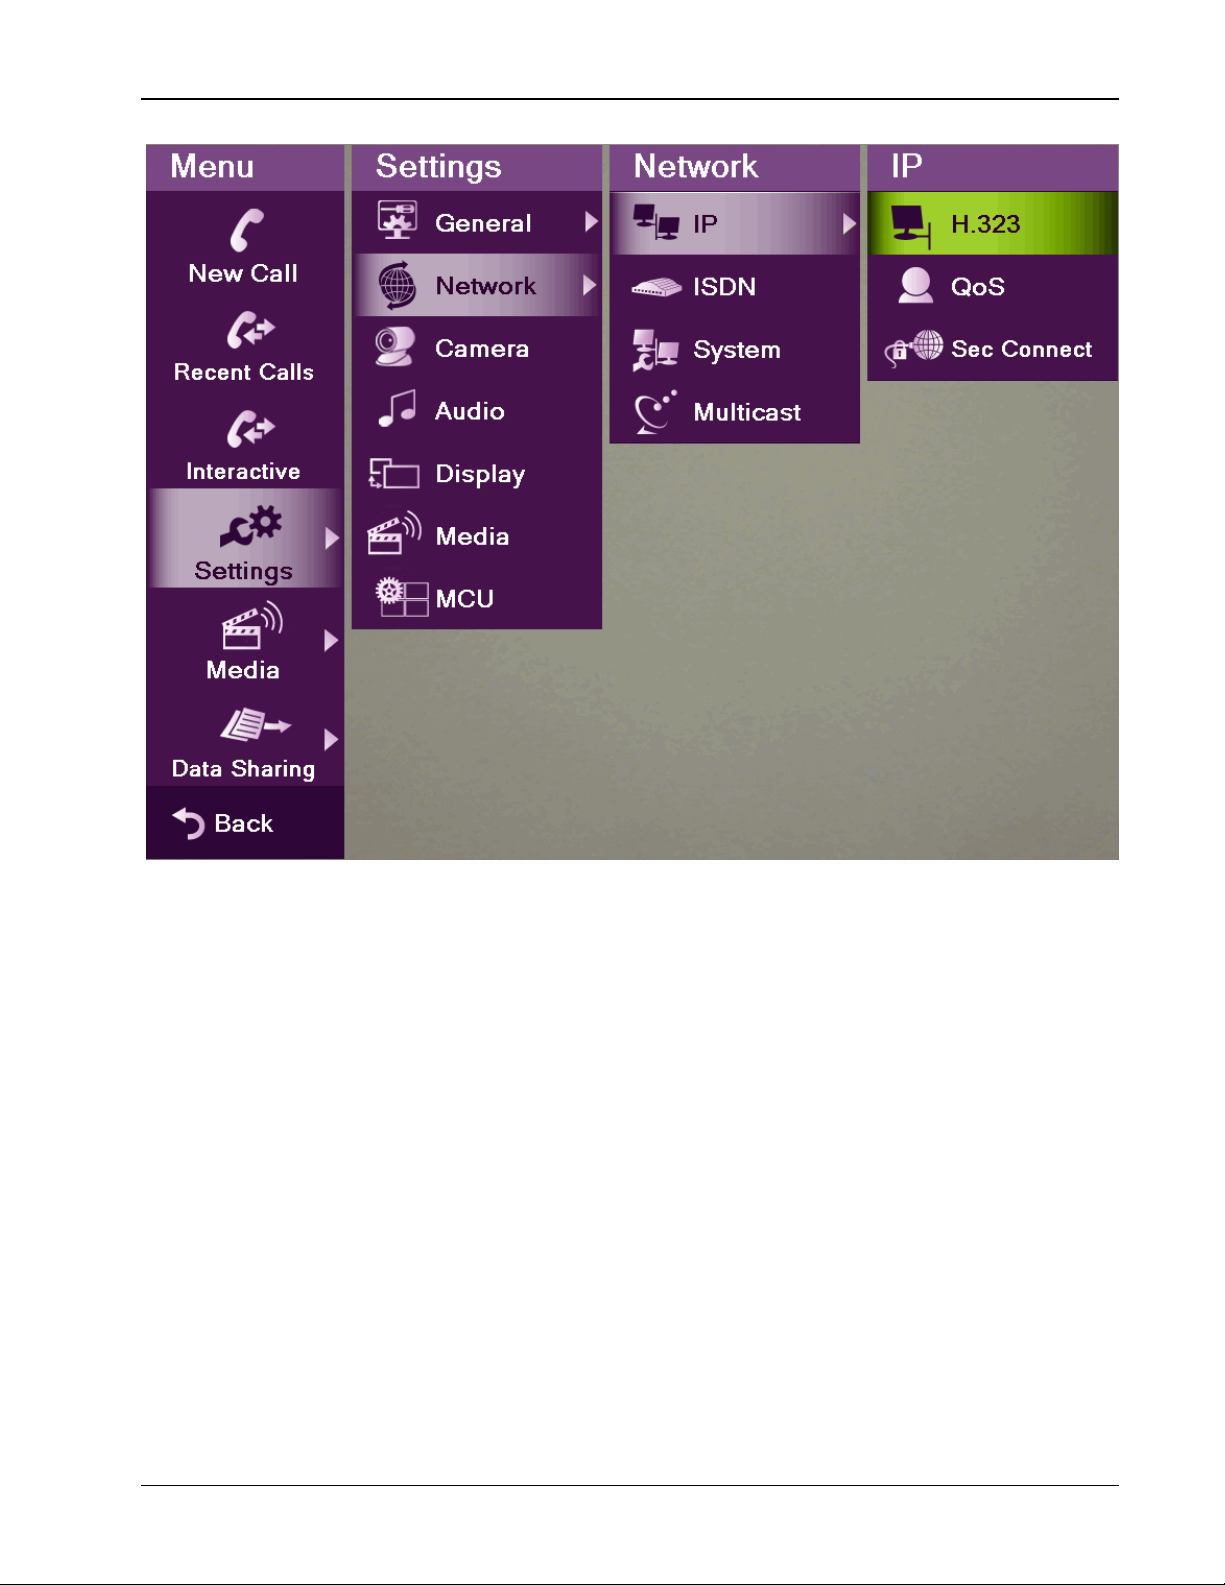
Chapter 2. Getting Started Using the On-Screen Menu
Figure 4. xPoint
To access a category/option:
Press OK when the category/option is selected (highlighted in green).
To collapse the menu options:
Press the left arrow () on the joystick, or press Back.
S
Expanded Menu Options
xPoint Standard (S) Ver. 1.5 User Guide • 15
Page 17
Chapter 2. Getting Started Displaying System Information
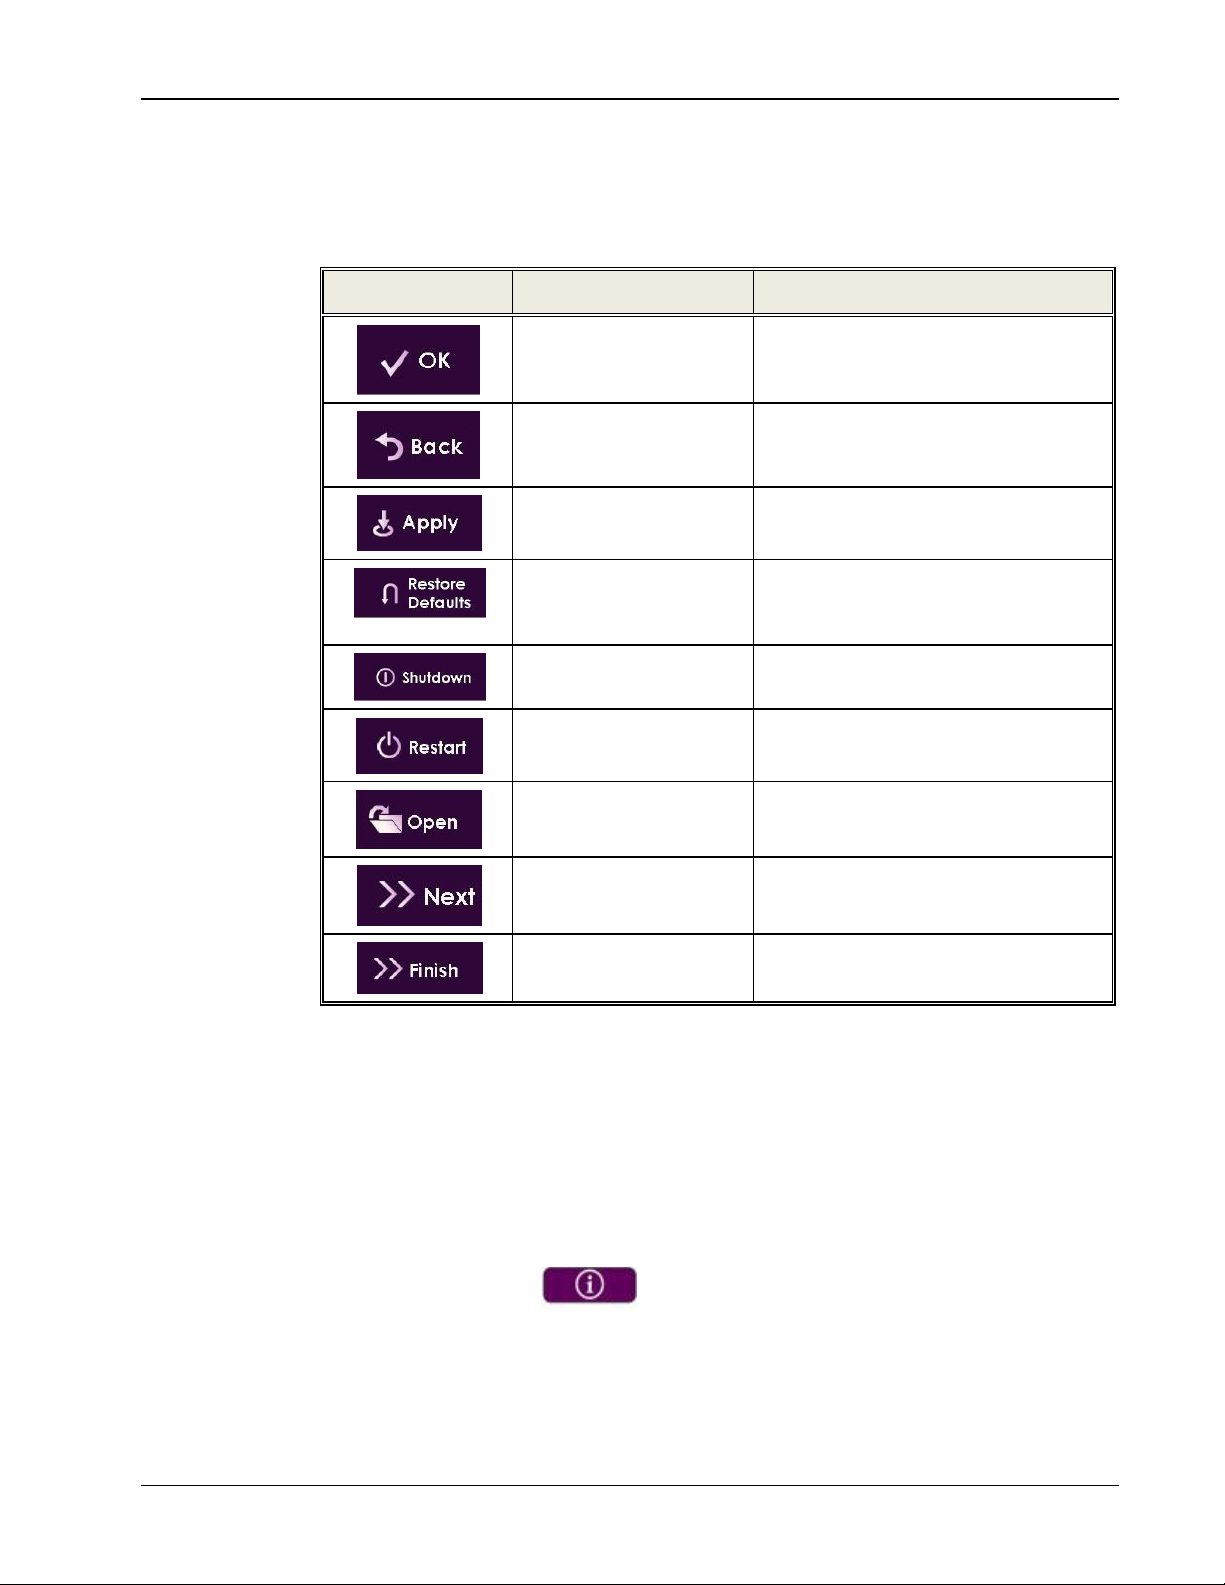
The following menu buttons may appear occasionally in the GUI (appear in the
context of use):
Table 3. Common GUI Buttons
GUI Button Label Function
OK Save changes
Back
Apply
Restore Defaults
Shutdown Shut down the unit
Restart Reboot the unit
Open Open the selected folder/file
Next Continue to the next step
Finish
Return to the previous window
without saving changes
Apply changes or soft-start your
system
Cancels all user-defined settings and
returns the unit to its factory default
settings
Finish and close a configuration
wizard/dialog
Displaying System Information
Whenever the xPointS unit is turned on, you can view the system status details.
Different details are displayed when the unit is in idle state, in recording mode, or
in an ongoing videoconference session.
To display the current system status details:
Press Status ( ) on the remote control; the Status window
appears.
xPoint Standard (S) Ver. 1.5 User Guide • 16
Page 18
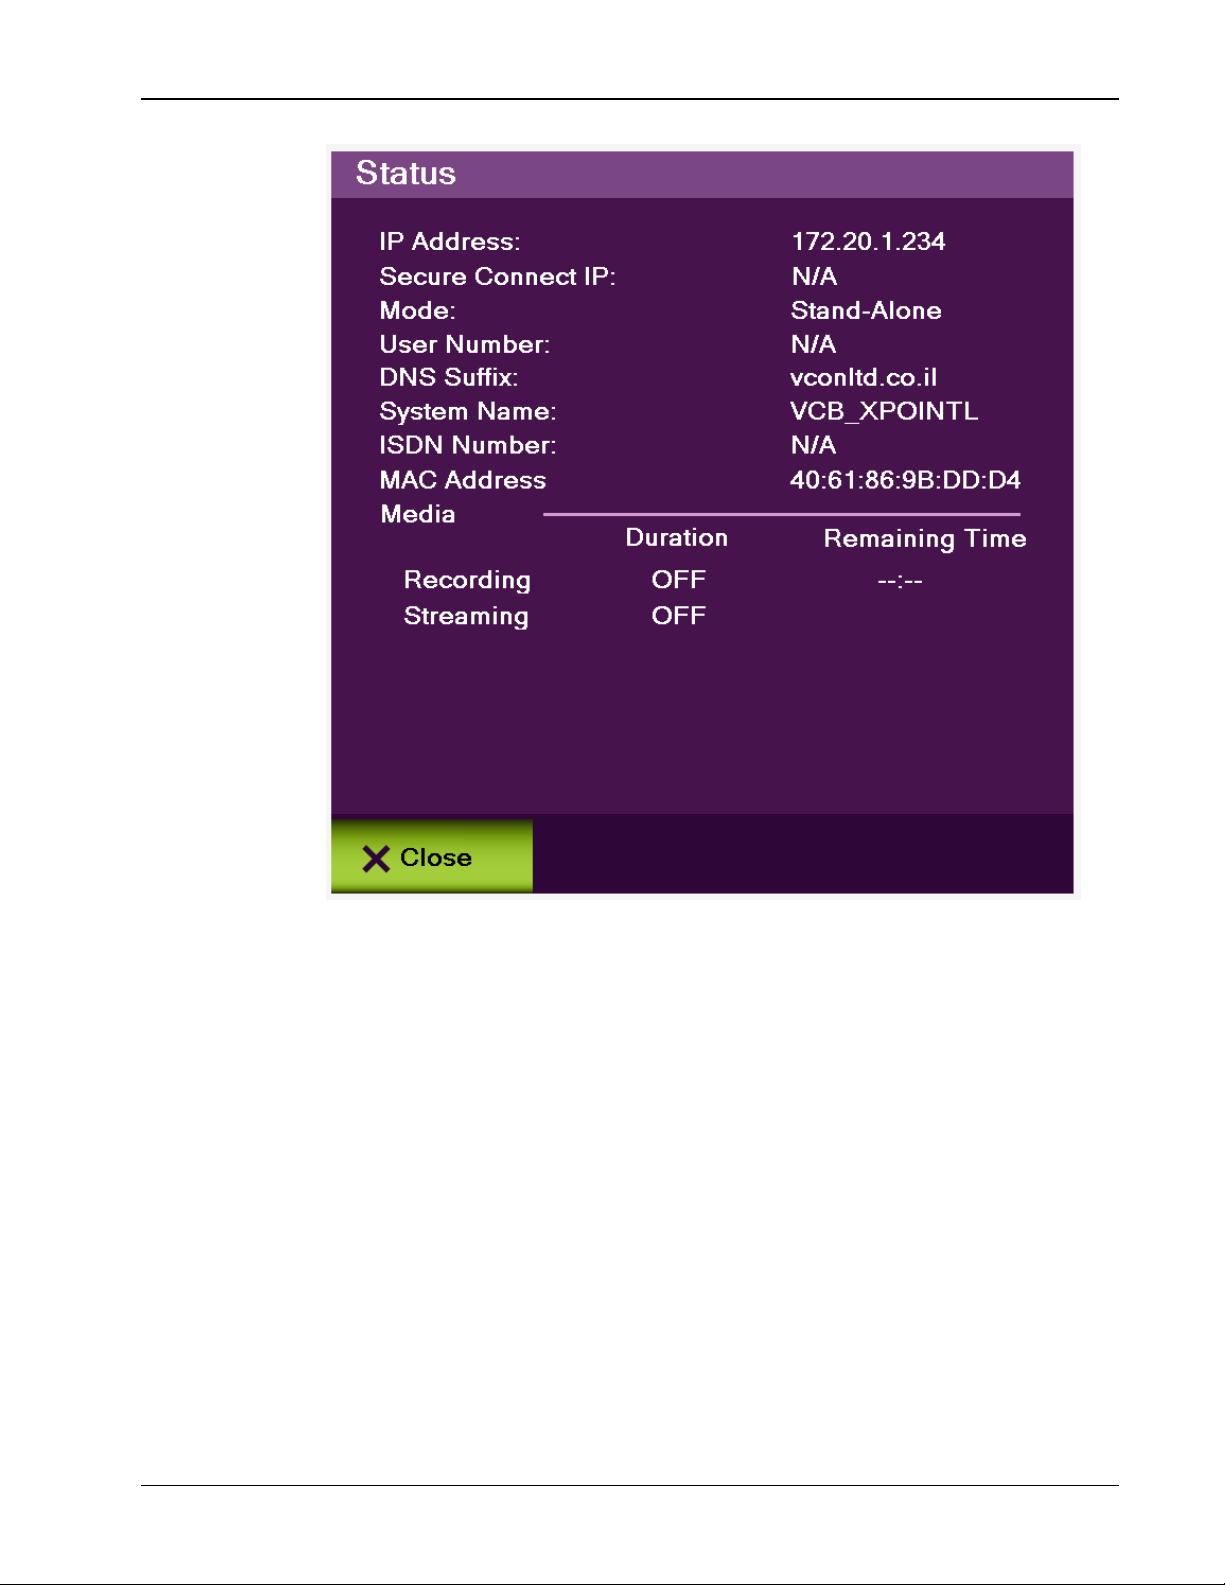
Chapter 2. Getting Started Displaying System Information
Figure 5. Status Window
S
When xPoint
is in idle state, the Status window displays the following
information:
IP Address – IP address of the xPoint
S
unit, as automatically assigned by
the DHCP server or as manually configured via Settings>System (static IP).
You can use this IP address to access and manage the unit via a browser (see
Accessing the xPointS Unit via a Browser)
S
Secure Connect IP – Indicates whether xPoint
uses a secure IP
connection, if such is defined (see Secure Connect Settings)
Mode – The current operation mode:
o Stand-Alone – The unit is not connected to an MXM server or a
gatekeeper
o MXM – The unit is connected to an MXM server
o Gatekeeper – The unit is connected to a gatekeeper server.
User Number – The user number used to identify the unit if an MXM
server or a gatekeeper is used
xPoint Standard (S) Ver. 1.5 User Guide • 17
Page 19

Chapter 2. Getting Started Displaying System Information
DNS Suffix – Suffix used for the DNS addressing by xPointS
System Name – System name as defined in the system settings (see System
Settings)
ISDN Number – ISDN number that is currently being used
S
MAC Address – MAC address of the xPoint
unit
Media – Indicates whether a recording/streaming session currently takes
place, and specifies the elapsed duration of the recording/streaming.
¾ Note: during a videoconference call, you can display additional/different
relevant information by selecting Advanced in the Status window.
xPoint Standard (S) Ver. 1.5 User Guide • 18
Page 20

Chapter 3. Configuration Basics
In this Chapter
This chapter explains the basic configuration options and includes the following
sections:
Entering Your User Details
Configuring the Camera
Configuring the Audio
Configuring the Display.
Entering Your User Details
You can register your personal contact details so that they will appear publicly in
outgoing calls instead of your IP address.
To set the user settings:
1. Select Settings>General>User; the User Settings window appears.
2. In the User Settings window, enter the following details:
o First Name – Type your first name
o Last Name – Type your last name
o Company – Type your company details
o Email Address – Type your email address.
3. Select Apply.
Configuring the Camera
Before you begin videoconferencing, you need to make sure that the cameras
connected to xPoint
Camera Settings window.
To access the camera settings:
1. Press OK on the remote control; the main menu appears.
xPoint Standard (S) Ver. 1.5 User Guide • 19
S
are properly configured. Cameras are configured via the
Page 21
Chapter 3. Configuration Basics Configuring the Camera
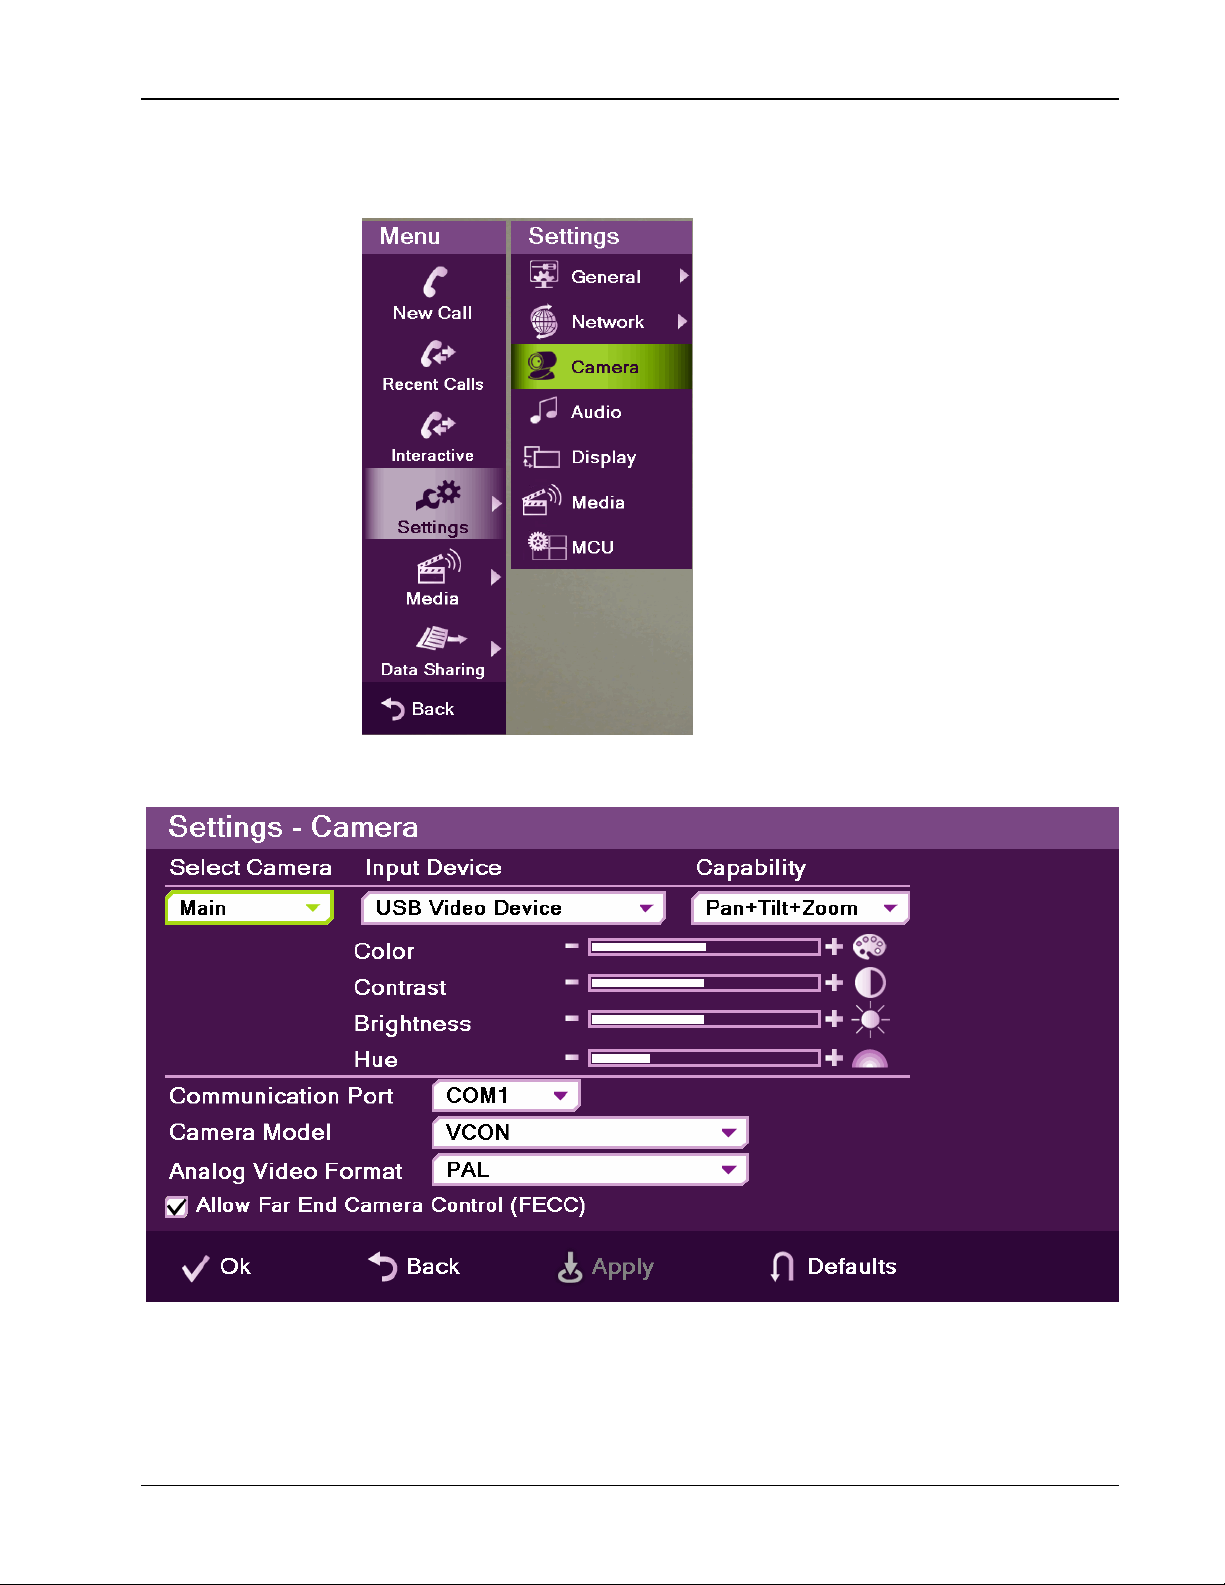
2. Using the remote control’s joystick, select Settings> Camera, and
then press OK; the Camera Settings window appears.
Figure 6. Entering Camera Settings
Figure 7. Camera Settings Window
xPoint Standard (S) Ver. 1.5 User Guide • 20
Page 22

Chapter 3. Configuration Basics Configuring the Audio
To configure the camera settings:
1. In the Camera Settings window, select the correct options from the
Camera, Input Device, and Capability drop-down lists.
S
¾ Note: xPoint
that should be connected using an appropriate adapter cable for analogto-digital conversion.
2. Optional: set the percentage (%) of Color, Contrast, Brightness, and
Hue. You can leave the default settings of these parameters unchanged.
3. Specify the Communication Port you are using (default is Com 1).
4. Select the correct option from the Camera Model and Analog Video
Format drop-down lists.
5. Optional for PTZ cameras: select the Allow Far End Camera
Control (FECC) check box to enable remote side to control your PTZ
camera.
6. Select Apply to apply the changes without leaving this window, or
select OK (in the GUI) to save the changes and close the Camera
Settings window.
camera can be either a USB video camera, or a PTZ camera
Configuring the Audio
The audio input/output must be configured so that you will be able to hear and
be heard properly in videoconferences.
To access the audio settings:
1. Press OK on the remote control; the main menu appears.
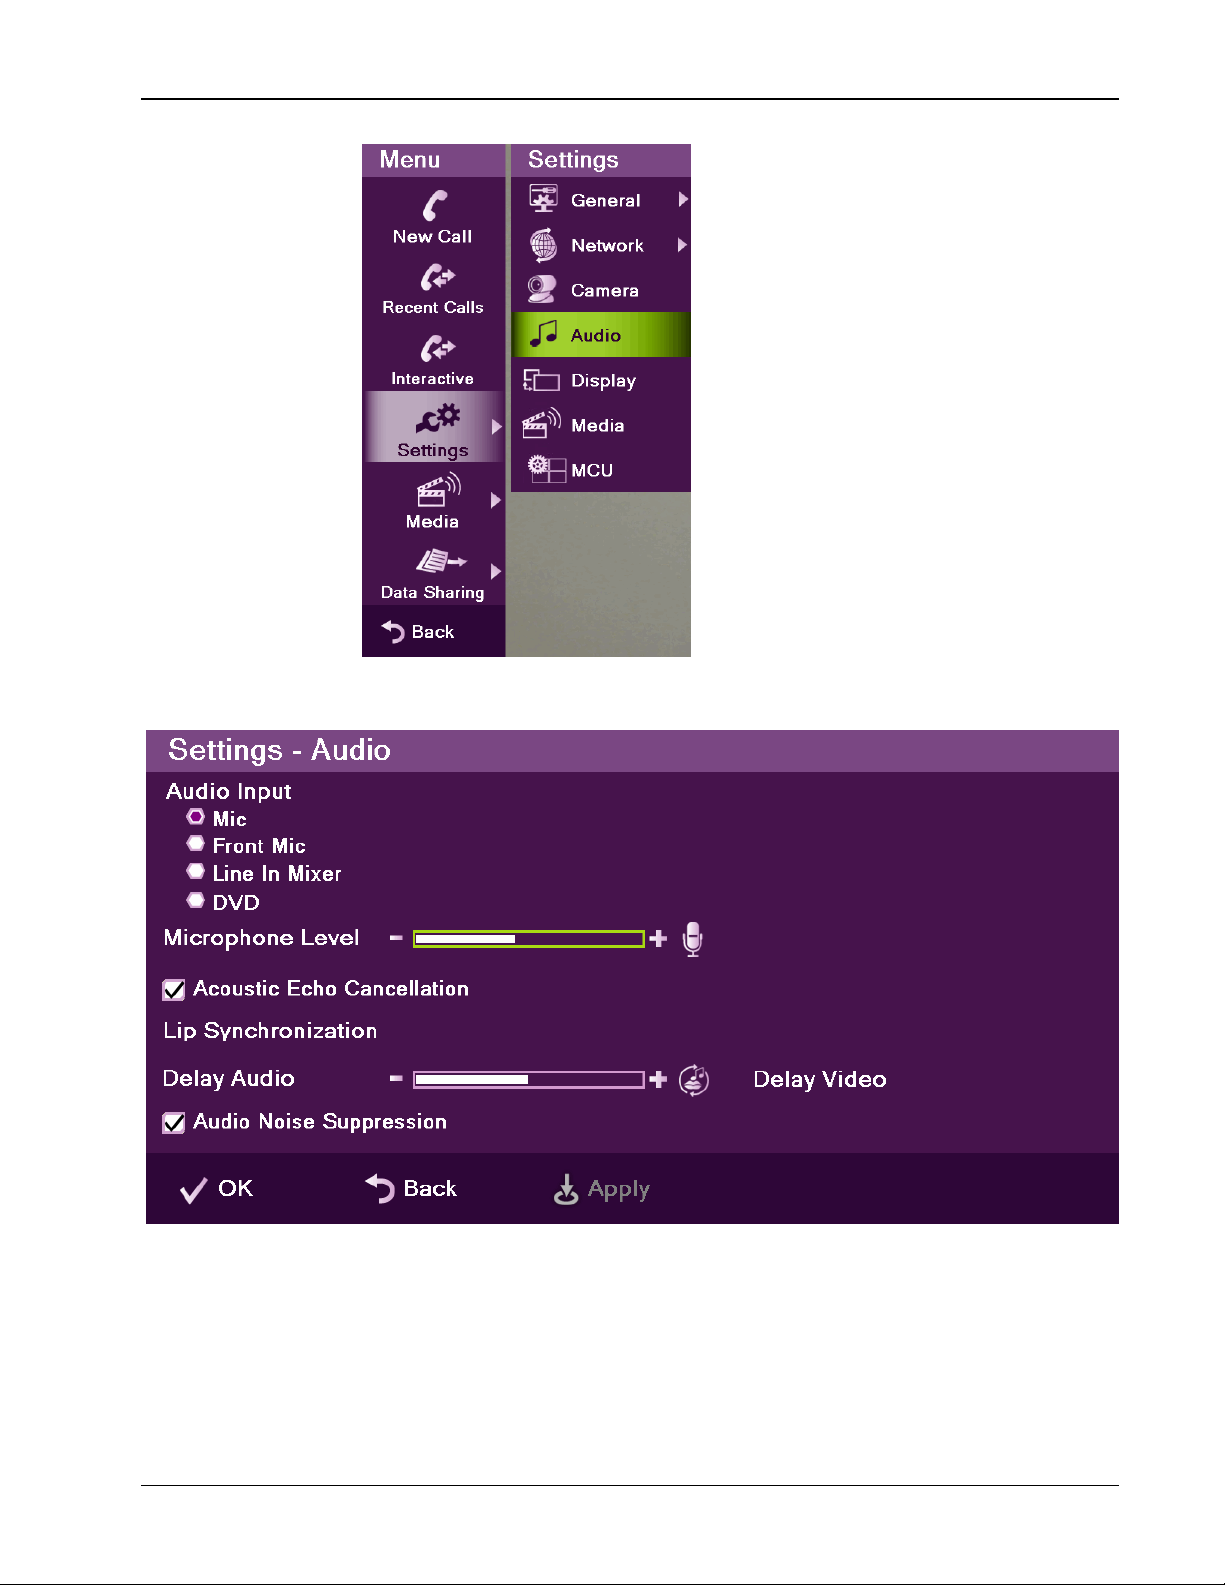
2. Using the remote control’s joystick, select Settings> Audio, and then
press OK; the Audio Settings window appears.
xPoint Standard (S) Ver. 1.5 User Guide • 21
Page 23
Chapter 3. Configuration Basics Configuring the Audio
Figure 8. Entering Audio Settings
Figure 9. Audio Settings Window
To configure the audio settings:
1. In the Audio Settings window, set the following properties of the
selected audio input:
xPoint Standard (S) Ver. 1.5 User Guide • 22
Page 24

Chapter 3. Configuration Basics Configuring the Display
o Audio Input Device – Select which audio device you want to
configure:
Ö Mic – A microphone is connected to the system via the
microphone input.
Ö Line In Mixer – An amplified device is connected to the system
via the line-in audio input.
Ö DVD – An external multimedia device is connected to the
system as an additional input device, both for video and audio.
Can be any of DVD, VCR or other players.
o Microphone Level – Adjust the microphone sensitivity level in
percentage (%).
o Acoustic Echo Cancellation – Select the check box to prevent
echo when the microphone and speaker are in the same room.
o Lip Synchronization – If the voice you hear is not synchronized
with the lip movement in the video display, move the slider as
follows:
Ö Towards Delay Video if voice is heard after the lip movement
Ö Towards Delay Audio if you see the appropriate lip movement
after you hear the voice.
o Audio Noise Suppression – Suppress unwanted background
noises.
2. Select Apply.
Configuring the Display
The display settings determine the method by which video is displayed on the
screen. Adjust the display settings depending on the room you are using for
videoconferencing and on your distance from the screen.
¾ Note: the term “screen” refers to any type of monitor you are using (CRT,
LCD, and so on).
To access the display settings:
1. Press OK on the remote control; the main menu appears.
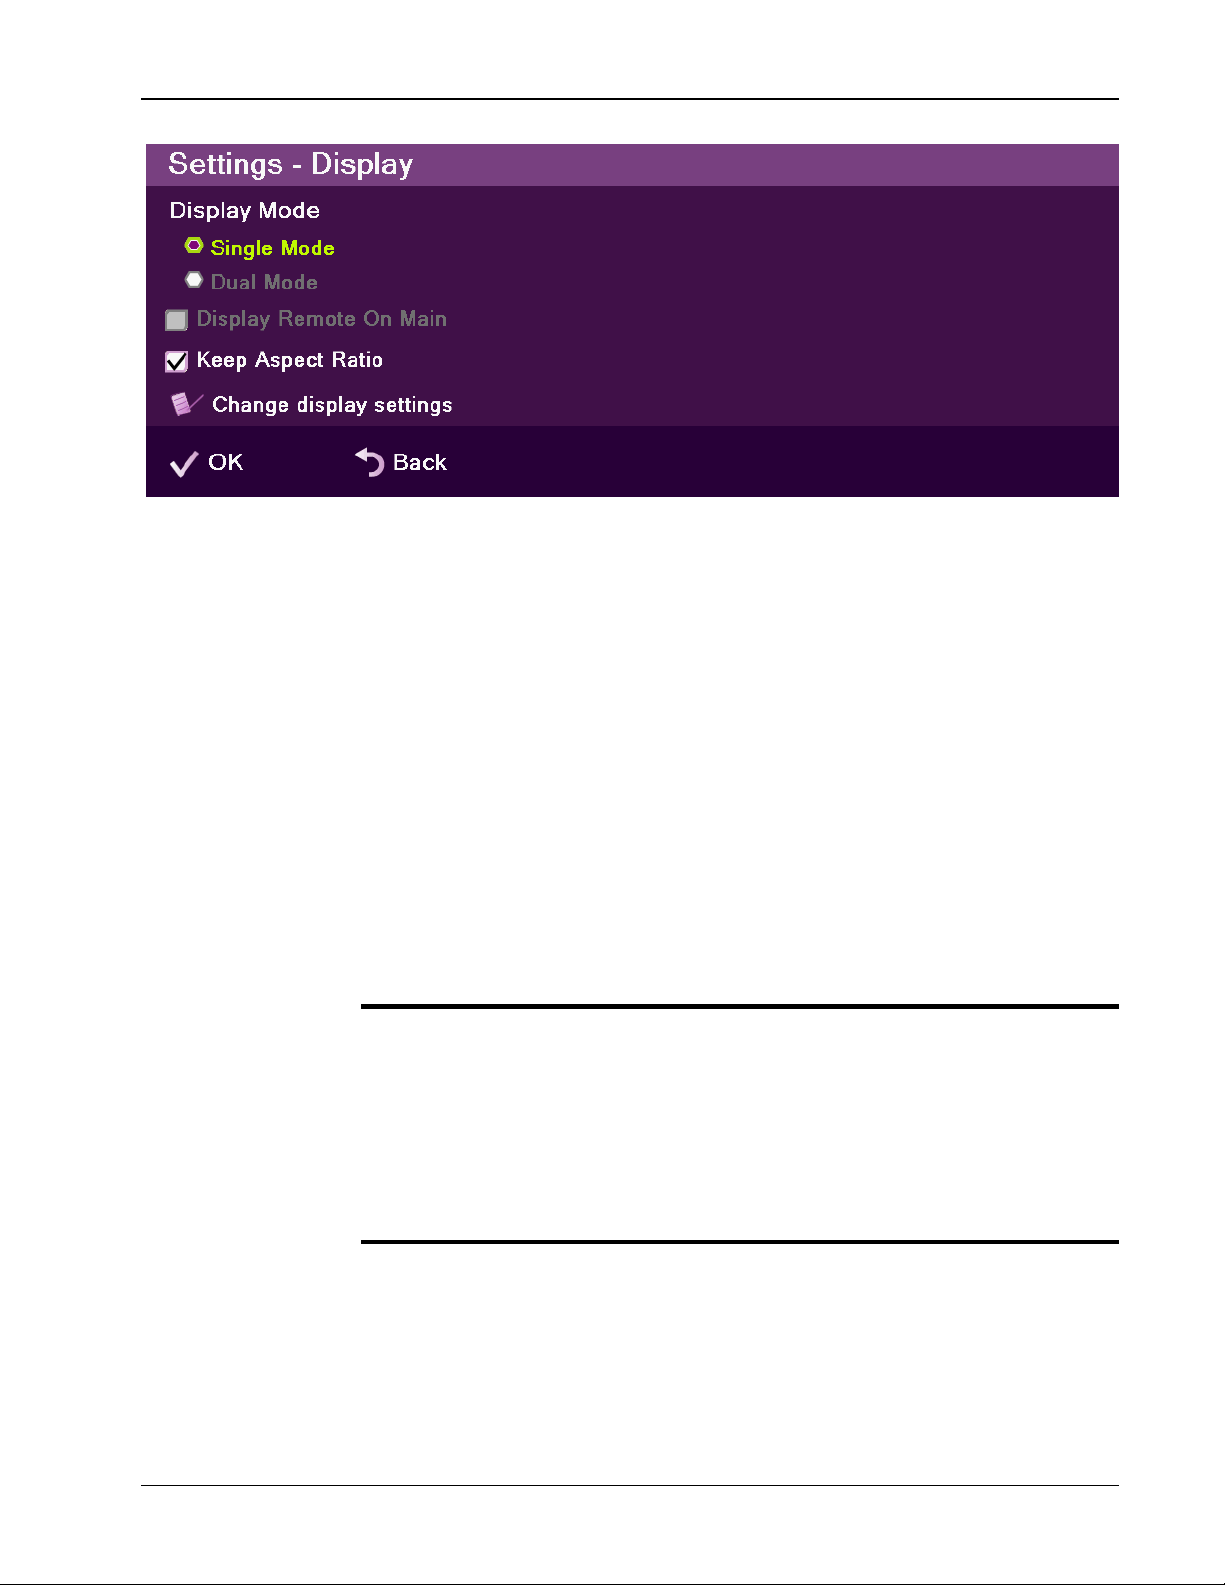
2. Using the remote control’s joystick, select Settings> Display, and
then press OK; the Display Settings window appears.
xPoint Standard (S) Ver. 1.5 User Guide • 23
Page 25
Chapter 3. Configuration Basics Configuring the Display
Figure 10. Display Settings Window
To configure the basic display settings:
1. In the Display Settings window, set the following options:
o Display Mode –
Ö Single Mode – Both videoconference parties are displayed on a
single screen.
Ö Dual Mode – Conferences are displayed on two screens. This
option is available only when two screens are connected.
o Keep Aspect Ratio – Select this option to keep the original aspect
ratio on screens that have different aspect ratio.
o Change display settings – see Display Adapter Settings in
Chapter 7. Advanced Settings.
2. Select Apply.
¾ Note: to simplify the step instructions in the next chapters, the basic
menu access procedure is shortened to the menu path only. For example,
the short instruction “Select Settings> Display” replaces the basic
procedure:
1. Press OK on the remote control; the main menu appears.
2. Using the remote control’s joystick, select Settings> Display, and
then press OK; the Display Settings window appears.
xPoint Standard (S) Ver. 1.5 User Guide • 24
Page 26

Chapter 4. Videoconferencing
In this Chapter
This chapter explains the videoconferencing basics and options using xPointS,
and includes the following sections:
Starting Calls
Auto-Answering Calls
Ending Calls
Muting the Video
Switching Image Modes
Switching Call View Modes
Using Picture-In-Picture (PIP) Modes
Call State Indications
Using Call Tones
Recording and Streaming
Data Sharing.
Starting Calls
You can start a manual call to an ISDN line number or a network IP address that
you type in the New Call bar.
To start a call using the manual dialer:
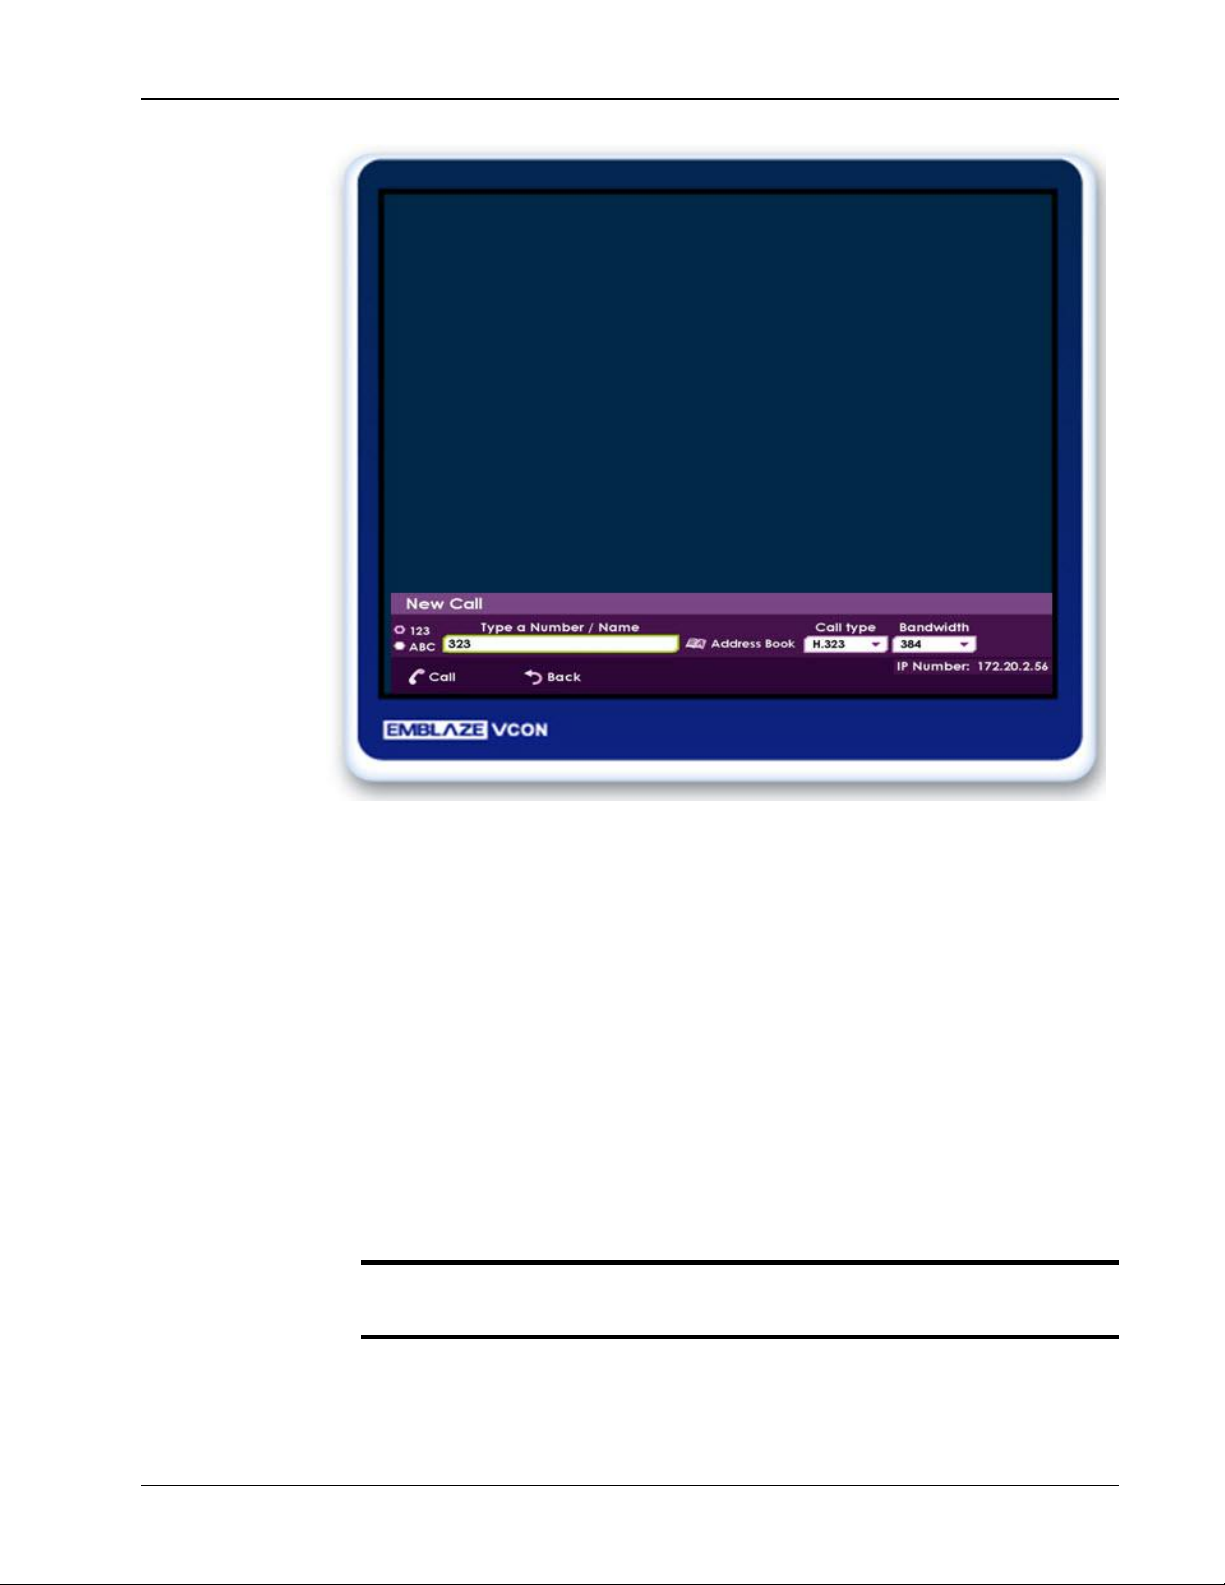
1. Select New Call on the main menu; the New Call bar appears.
xPoint Standard (S) Ver. 1.5 User Guide • 25
Page 27
Chapter 4. Videoconferencing Starting Calls
Figure 11. New Call Bar
2. Select the type of call you want to make:
o H.323 – an IP-based call via the connected local network (LAN).
o ISDN – a call via ISDN line(s). The ISDN line(s) must be
preconfigured via Settings (for more information, see ISDN
Settings).
3. In the Type Number/Name field, type the IP address or ISDN
number to which you want to call. Alternatively, instead of an IP
address, you can also use an Alias, E.164 number, or a DNS address (if
such are defined on your network).
Ö To type numbers, make sure that the 123 option is selected.
Ö To type letters, make sure that the ABC option is selected.
4. Select the maximum bandwidth for the call or use the default.
¾ Note: the maximum bandwidth of a single ISDN line is 128 kbps. The
maximum bandwidth of four concurrent lines is 512 kbps.
5. Select Call in the GUI or press the Make Call (green button) on the
remote control; the Calling window appears.
xPoint Standard (S) Ver. 1.5 User Guide • 26
Page 28
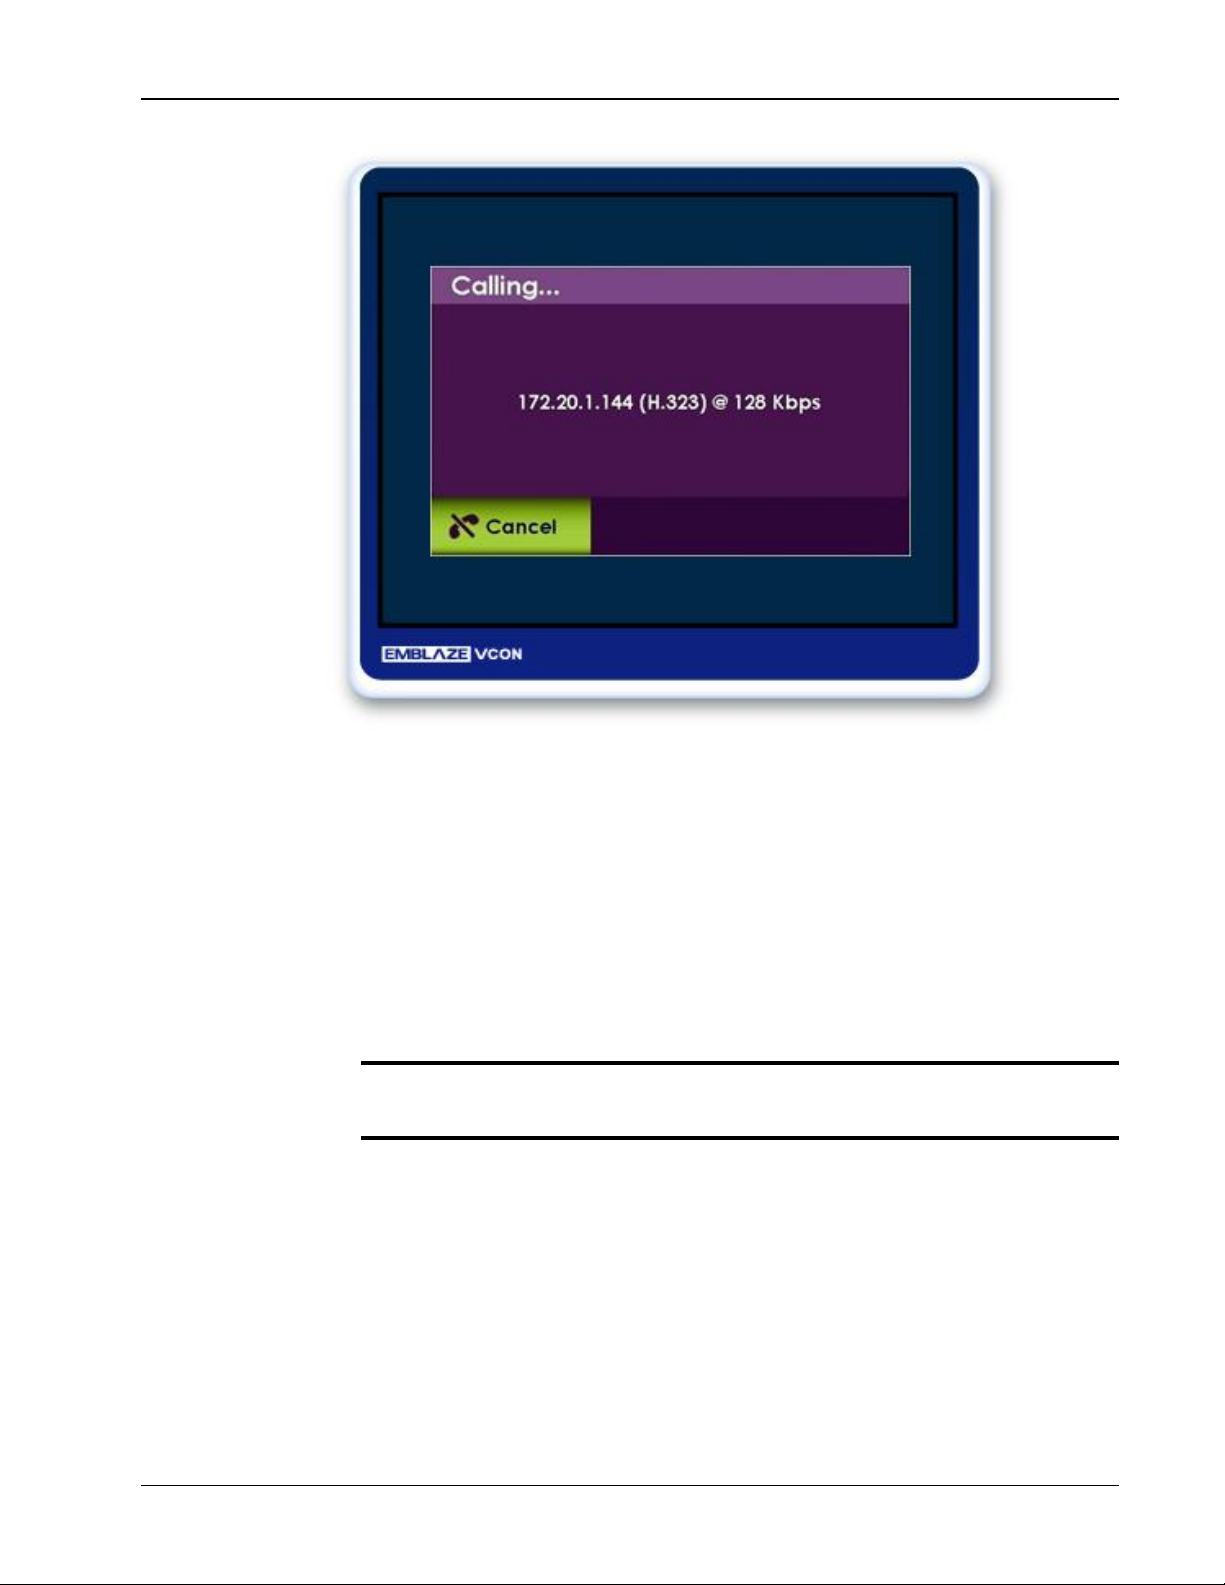
Chapter 4. Videoconferencing Auto-Answering Calls
Figure 12. A Call is Placed
When the call is answered on the far end, the system switches to Call mode.
Auto-Answering Calls
The auto-answer option is found in the Call Settings window (see Call Settings).
When the auto-answer option is not selected and an incoming call is received, a
message is displayed on the screen. You can accept or reject the call using the
buttons on the remote control, or via the screen message (Yes/No).
¾ Note: auto-answering does not apply to MCU or Interactive Multicast
calls.
Ending Calls
You can disconnect the current videoconference call at any time.
To end the current call:
On the remote control, press the red End Call button,
– or –
Select Hang Up in the GUI and then press OK on the remote control.
xPoint Standard (S) Ver. 1.5 User Guide • 27
Page 29

Chapter 4. Videoconferencing Muting the Video
Muting the Video
Muting during a videoconference is a preference which is selected via the remote
control.
When you press Mute Video during a call, the remote side sees the Mute Video
BMP image, which indicates that your video has been muted.
Switching Image Modes
When interacting with the remote side, two image modes are available: Display
mode and Far End mode.
Display Mode
When you want to switch between the remote and local display on your screen,
toggle the remote and local displays by pressing Display on the remote control.
The remote and local displays switch, enabling a quick presentation change.
Far End Mode
You can control the view at the Far End camera. By pressing Far End you can
control the camera of the remote person you are having a conversation with.
Switching Call View Modes
Depending on the type of screen and video interface you are using
(VGA/DVI/S-Video), a call may be displayed in single, dual or presentation
mode.
Single Mode
A single screen showing the output of the local video camera in the PIP screen
area (see Using Picture-In-Picture (PIP) Modes) and the output of the remote
video camera on the main screen area.
Dual Mode
Two screens: one showing the output of the local video camera, and a second
screen showing the output of the remote video camera.
Presentation Mode
When recordings or files are displayed in data sharing mode, the remote image is
shown in a PIP area, while the recordings/files are presented on the main screen
area.
xPoint Standard (S) Ver. 1.5 User Guide • 28
Page 30

Chapter 4. Videoconferencing Using Picture-In-Picture (PIP) Modes
When sharing data using a laptop, the PIP mode is not available and the system
switches to "Presentation Only" mode. Since the laptop is connected via a
datapoint (VGA), viewers see whatever is presented on the laptop.
Using Picture-In-Picture (PIP) Modes
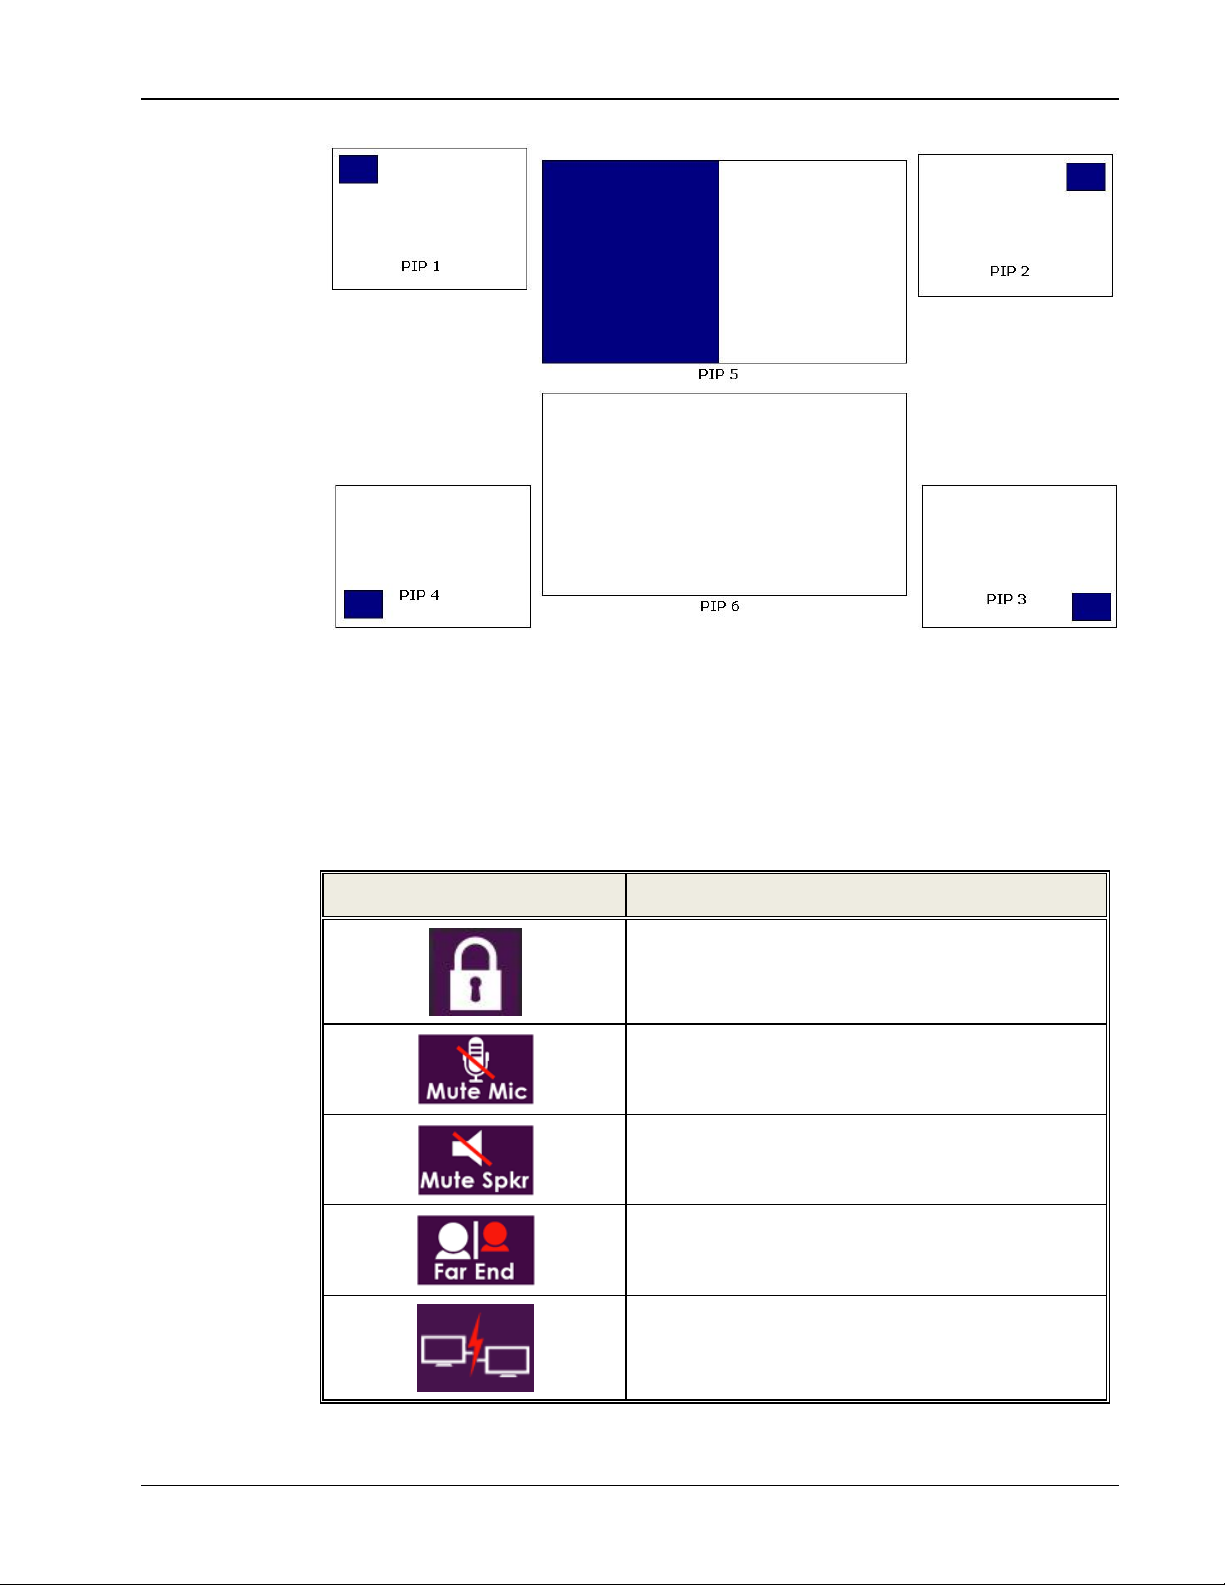
When a conference begins, the local video appears on the monitor in a small
rectangular inset located in the upper left corner of the larger remote video
display. This display mode is called Picture-In-Picture (PIP).
Each time you press the PIP button on the remote control, the PIP image rotates
counter-clockwise to the next corner of the screen. Pressing the PIP button after
the PIP completes a rotation to all corners then hides the PIP image, and starts
again on a subsequent button press.
The default video mode is PIP 1, in which the local caller’s video is displayed in
the small upper-left corner, while the remote person is viewed in the large area
of the screen. The other modes are:
PIP 2 – The local caller is viewed in the small upper-right corner, while the
remote person is viewed in the main area of the screen.
PIP 3 – The local caller is viewed in the small lower-right corner, while
remote person is viewed in the large area of the screen.
PIP 4 – The local caller is viewed in the small lower-left corner, while
remote person is viewed in the large area of the screen.
PIP 5 – The local caller is viewed on half the screen and the remote person is
viewed on the other half, also known as side-by-side view.
¾ Note: when data is shared, the remote video and the data are displayed
side by side on the screen.
PIP 6 – The local caller sees only the remote person.
xPoint Standard (S) Ver. 1.5 User Guide • 29
Page 31
Chapter 4. Videoconferencing Call State Indications
Figure 13. Picture-In-Picture (PIP) Modes
Call State Indications
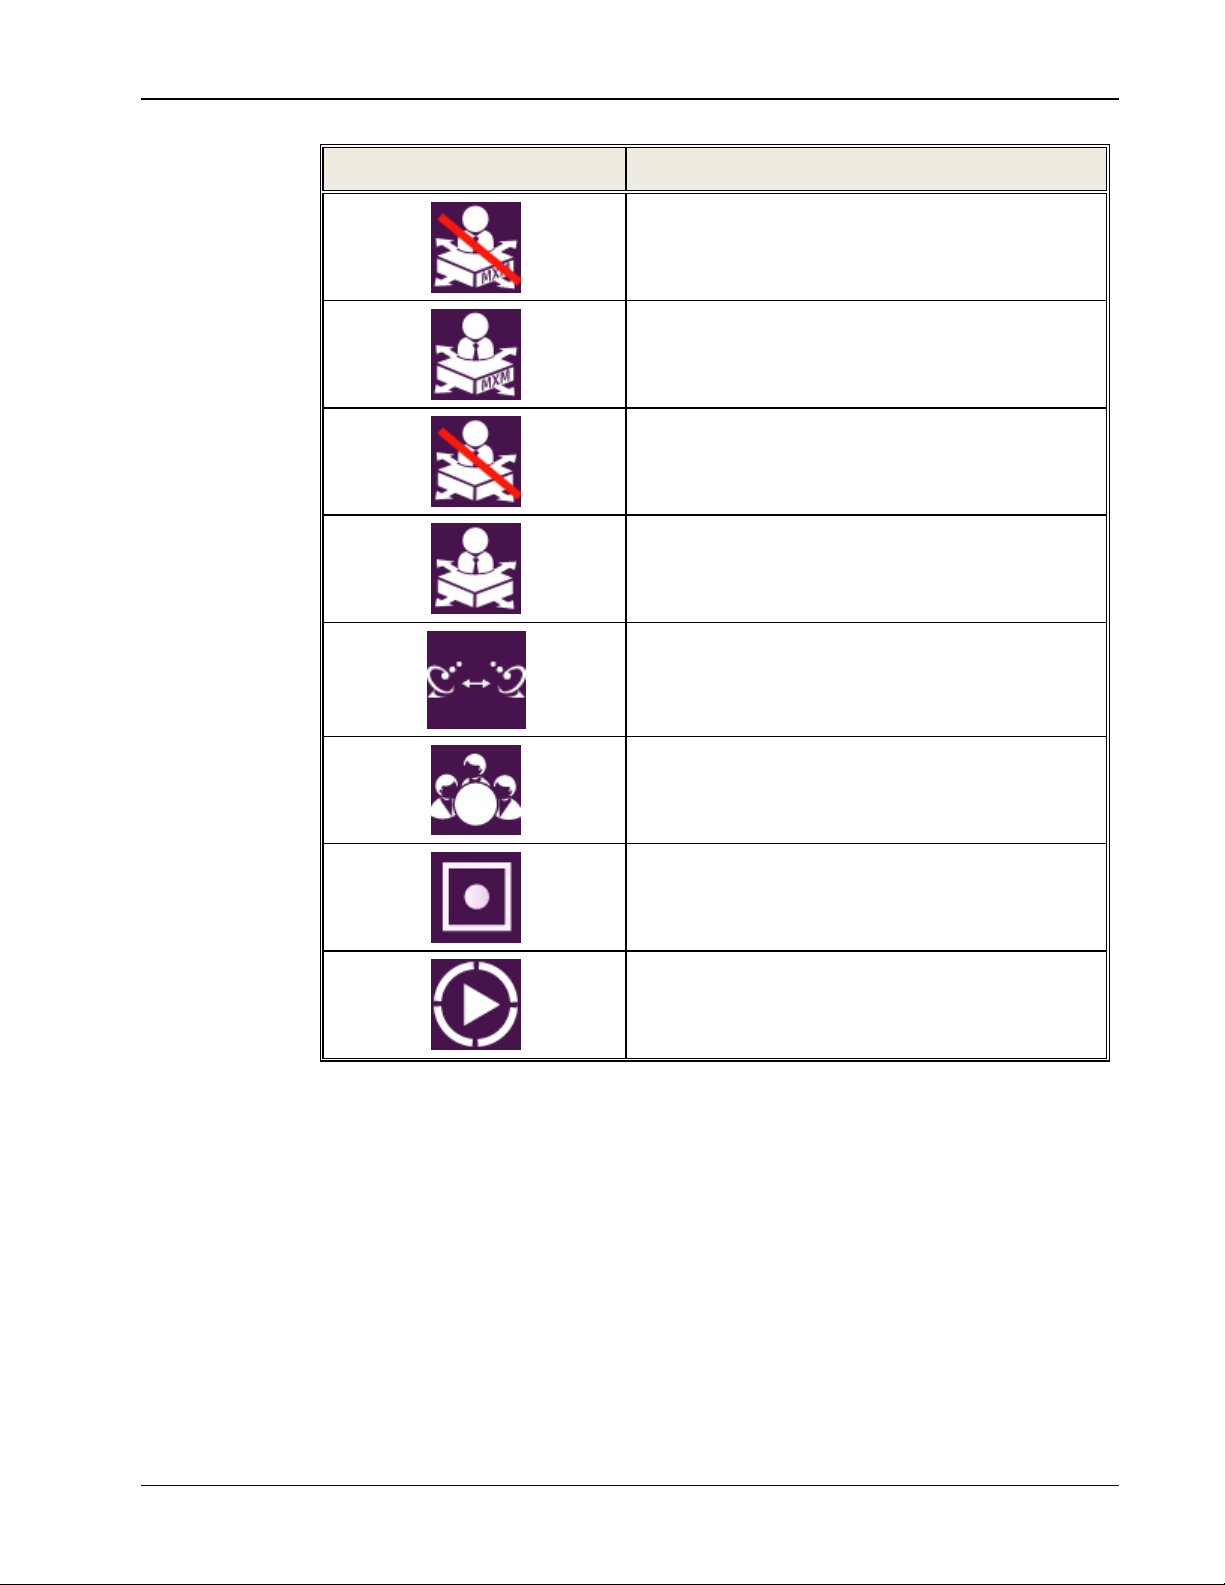
Various call states are represented by icons on the screen when
videoconferencing is taking place.
GUI Icon Indication
The current call is encrypted
The local microphone is muted
The local speaker is muted
Far End mode is on (you can control the remote side
camera)
Local network disconnection
xPoint Standard (S) Ver. 1.5 User Guide • 30
Page 32
Chapter 4. Videoconferencing Using Call Tones
GUI Icon Indication
Unsuccessful MXM registration
Successful MXM registration
Unsuccessful gatekeeper registration
Successful gatekeeper registration
Using Call Tones
When making calls the call operator can request a Password or DTMF tone to
connect.
Passive multicast mode
MCU VS layout mode
Currently recording
Currently streaming
Operator Request for Password
The Operator can request you to access a conference password to proceed with
the call.
xPoint Standard (S) Ver. 1.5 User Guide • 31
Page 33

Chapter 4. Videoconferencing Recording and Streaming
To enter a conference password:
Use the remote control, and press the numeric pad.
The screen shows DTMF message: "DTMF signal **** sent" representing the
numbers pressed on the keypad.
Operator Request for Telephone Tone
The Operator can request you to connect using a dial-tone to proceed with the
call.
To enter DTMF tone:
Use the remote control, dial using the numeric pad.
The screen shows DTMF message: "DTMF signal **** sent" representing the
numbers pressed on the keypad.
Recording and Streaming
The recording and playback functionality allows you to record both point-topoint and multipoint (MCU based) sessions, and view them at a later time. You
can also download the recorded session file from xPoint
videoconference with the parties connected, through the data sharing option.
S
Through the xPoint
previously recorded sessions and downloaded them for later viewing with
Windows Media Player. Alternatively, using streaming, remote users can view a
live broadcast of whatever the camera and microphone are currently
transmitting.
You can also view any previously recorded session when you are not in a call by
selecting the file from the stored recordings list. For more information about the
recording settings, see Recording and Streaming Settings.
Web management system, remote users can view all
S
and share it during a
Start Recording
You can start recording a call at any point during the call.
To start recording:
Select Media>Start Record; the message "Recording started"
appears for a few seconds, and the Record icon appears for the duration
of the recording.
¾ Note: the Record icon ( ) appears on the remote participant’s side to
indicate that the videoconference is being recorded (legal requirement).
Stop Recording
You can stop an on-going recording whenever you want.
xPoint Standard (S) Ver. 1.5 User Guide • 32
Page 34

Chapter 4. Videoconferencing Recording and Streaming
To stop recording:
1. Select Media>Stop Record; the message "Do you want to stop
recording?" appears.
2. Select Yes; the "Recording Stopped" message appears.
¾ When recording in idle mode (not during a videoconference), you can
stop the recording by pressing the End Call button on the remote
control. A confirmation message appears and requires you to select Yes.
View Recording
You can view recordings in either of the following ways:
Via the Web interface
Browse the locally saved recordings by selecting Data Sharing> File.
¾ Note: you can switch the Recording display so that the data is on the big
screen, and the remote camera is displayed on in the PIP.
Start Streaming
Session streaming allows any remote system with the Microsoft Media Player
application to view played recordings or whatever your camera/microphone are
transmitting from the xPoint
To start streaming to remote users:
Select Media>Start Stream. The message "Streaming Started" appears
for a few seconds, and the Streaming icon appears for the duration of the
streaming.
¾ Refer to Chapter 8. Web Access and Management for information on
recording and streaming via the Internet.
S
system.
Stop Streaming
You can stop the streaming when it is no longer needed.
To stop streaming:
1. Select Media>Stop Stream; the message "You are currently
streaming. Do you want to stop all?" appears.
2. Select Yes; the message "Streaming Stopped" appears.
¾ When streaming in idle mode (not during a videoconference), you can
stop the streaming by pressing the End Call button on the remote
control. A confirmation message appears and requires you to select Yes.
xPoint Standard (S) Ver. 1.5 User Guide • 33
Page 35

Chapter 4. Videoconferencing Data Sharing
View Streaming
You can view the streaming in either of the following ways:
From the xPoint
Management) by clicking View Stream button on the left menu. This takes
you to a page with the media player embedded in the webpage, displaying the
ongoing session.
On your network-connected PC, use the following address using Windows
Explorer, or via File>Open URL in the Windows Media Player:
HTTP://IP_ADDRESS:12100
IP_ADDRESS = IP address of the xPoint
12100 = the port number, as defined in Recording and Streaming
Settings.
S
Web management (see Chapter 8. Web Access and
S
unit
Data Sharing
Data Sharing can be accessed via the menu or via Data on the remote control.
Data Sources are selected inside the Data Sharing menu. Press Data a second
time to stop the data sharing.
Choosing the Data Source
In order for the system to recognize data sources, you need to be connected to a
USB flash drive, a laptop, or have recorded files saved locally in your system.
To choose a data source:
1. Select Data Sharing on the main menu; the Data Sharing menu opens.
2. Depending on the connected data sources, select either Laptop or File.
Connecting to a Laptop
The moment a device such as a laptop is connected to xPointS via a data point, the
Laptop option is enabled. The system will be connected to the laptop in
"presentation only" mode (see Presentation Mode).
When you select Laptop as data source, the screen switches to the data on the
laptop.
Connecting a USB Flash Drive
You can view and share files that are stored on a portable USB flash drive.
To view and share files from a USB flash drive:
S
1. Insert a USB flash drive to one of the xPoint
"USB device inserted" is displayed.
USB ports; the message
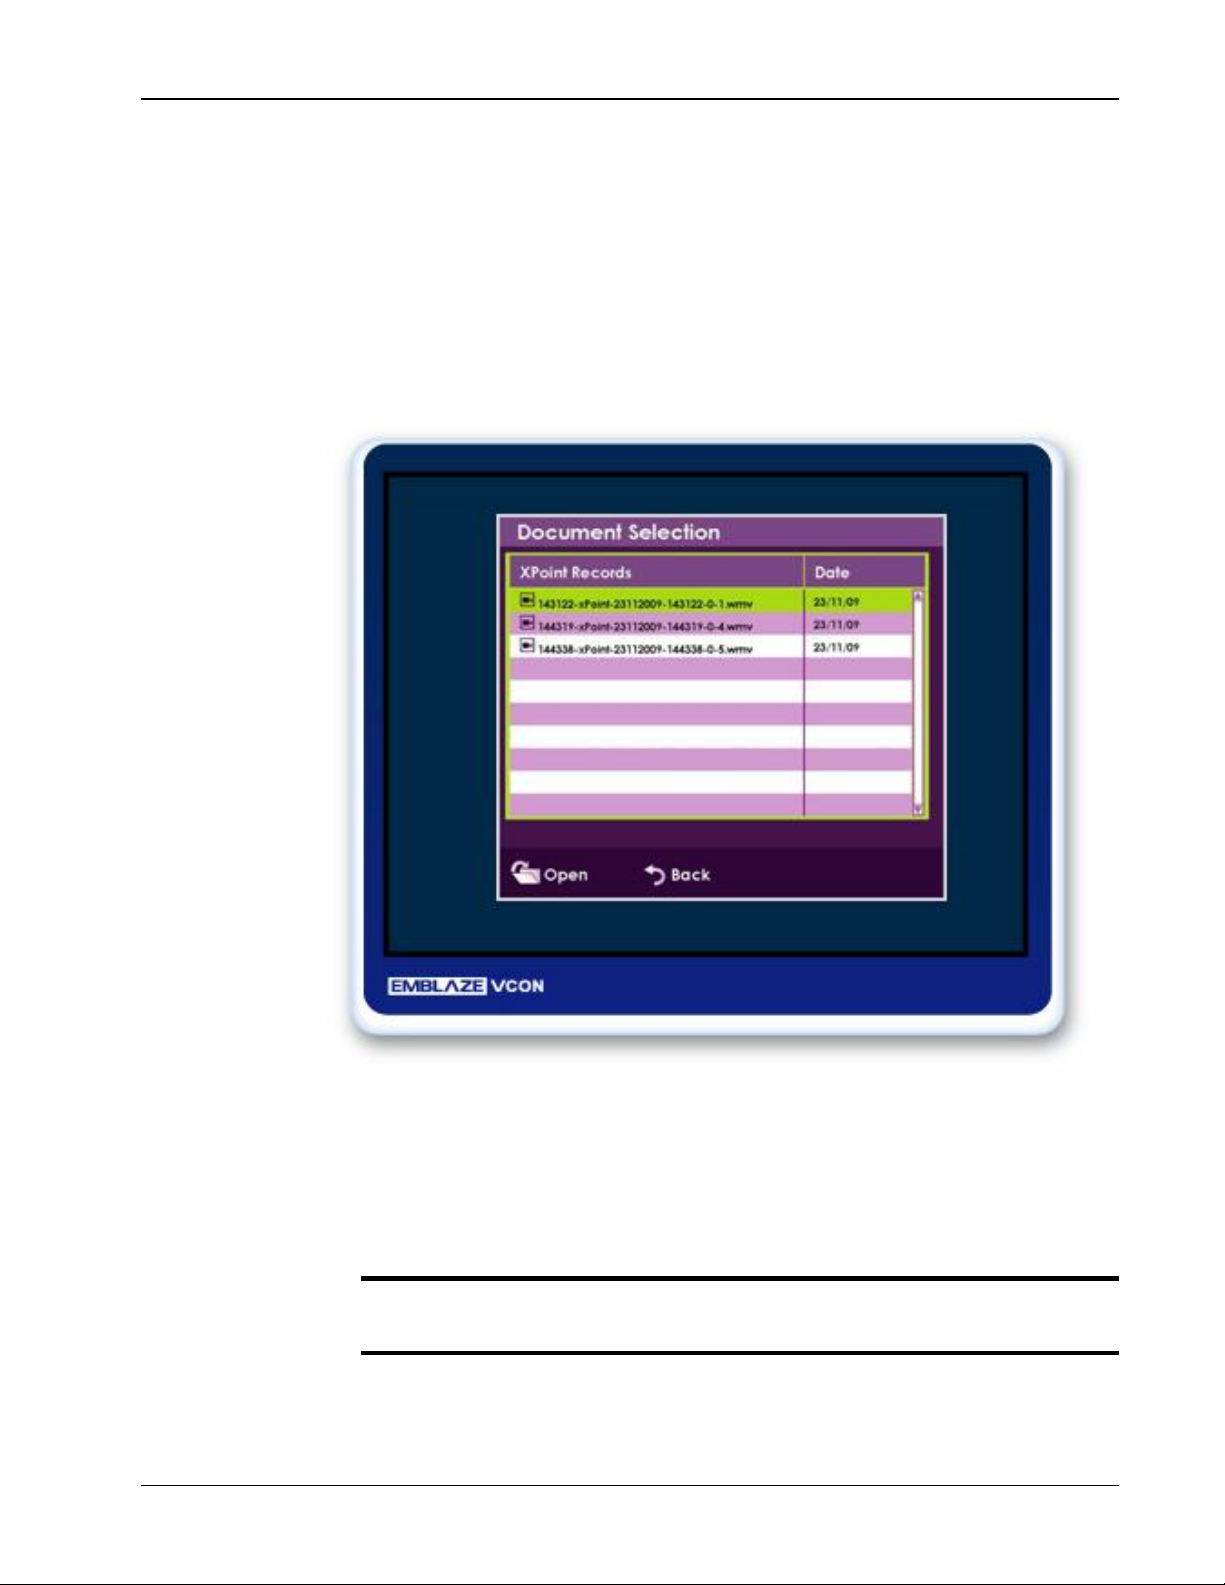
2. Select Data Sharing>File; the Document Selection window appears.
3. Select the file you want and then press OK on the remote control.
xPoint Standard (S) Ver. 1.5 User Guide • 34
Page 36
Chapter 4. Videoconferencing Data Sharing
4. Select Open; the file is displayed. If the file is opened during a
videoconference, it is shared with all the viewers.
Viewing Recordings
Recordings can be viewed when the system is idle. When opened during a
videoconference, recordings are shared.
To view recorded files:
1. Select Data Sharing>File; the Document Selection window appears.
Figure 14. Document Selection Window
2. Select the recorded file you want and then press OK on the remote
control.
3. Select Open; the file is displayed and if opened in a videoconference, it
is shared with all the viewers.
¾ To stop sharing the opened file, press Back on the remote control, or
select Stop Sharing from the main menu.
xPoint Standard (S) Ver. 1.5 User Guide • 35
Page 37

Chapter 5. Quick Dialing Methods
In this Chapter
This chapter describes the different quick dialing methods that are available in
xPoint
Using the Address Book
Using the Call Log
Using Speed Dial
Using Online Directories.
S
, and includes the following sections:
Using the Address Book
The address book enables you to make calls to addresses stored on the local
system. You can add frequently used addresses to the address book from where
calls can be made directly.
Using the Address Book via the Remote Control
You can select the address book using the remote control.
To select the address book via the remote control:
1. On the remote control, press Phone Book ( ); the Address
Book window appears.
2. In the Personal tab, select the number to dial, and then press OK on the
remote control; the number of the contact is copied to the number field
in the New Call bar.
¾ Note: when the address book is open, typing a letter in the ABC field
causes it to 'jump' to the first letter entered.
3. Press Make Call ( ); the Calling screen is displayed.
When the call is answered on the far end, the system switches to Call mode.
xPoint Standard (S) Ver. 1.5 User Guide • 36
Page 38
Chapter 5. Quick Dialing Methods Using the Address Book
Using Address Book via the xPointS GUI
You can display the address book using the xPointS GUI menus.
To select the address book via the xPoint
1. Select Settings>General>Address Book; the Address Book window
appears (use the joystick left button to skip to the left tabs).
2. In the Personal tab, select the number to dial, and then press OK on the
remote control. In the New Call bar, the address of the contact is copied
to the number field.
¾ Note: when the address book is open, typing a letter in the ABC field
causes it to 'jump' to the first letter entered.
3. Select Call ( ); the Calling screen is displayed.
When the call is answered on the far end, the system switches to Call mode.
S
GUI:
Using the Address Book via the New Call Bar
You can select the address book from the New Call bar.
To select the address book via the New Call bar:
1. Select New Call on the main menu; the New Call bar appears.
2. In the New Call bar, select Address Book (); the
Address Book window appears.
3. In the Personal tab, select the number to dial, and then press OK. In the
New Call bar, the address of the contact is copied to the number field.
¾ Note: when the address book is open, typing a letter in the ABC field
causes it to 'jump' to the first letter entered.
4. Select Call ( ) or press Make Call ( ); the Calling
screen is displayed.
When the call is answered on the far end, the system switches to Call mode.
Adding Entries to the Personal Address Book
You can add frequently used addresses to the personal address book from where
calls can be made directly.
To add a new contact to the personal address book:
1. In the personal address book, select Add and press OK; the
Name/Address bar opens.
2. Type in the new contact’s name and IP address, and then select Save.
The new contact is added to the address book.
xPoint Standard (S) Ver. 1.5 User Guide • 37
Page 39

Chapter 5. Quick Dialing Methods Using the Call Log
¾ Note: you can also set the dialing method (H.323 or ISDN) and the
bandwidth that you want to use specifically for the contact that you add.
If you choose ISDN, the number to be dialed must be predefined (see
ISDN Settings).
Editing Entries in the Personal Address Book
You can edit frequently used numbers already in the personal address book and
save them for repeated use.
To edit a contact’s details in the personal address book:
1. In the personal address book, select the entry you want to edit and then
press OK on the remote control.
2. Select OK in the GUI; the Name/Address bar opens.
3. Edit the contact name and IP address, and then select Save.
¾ Note: if necessary, you can change the dialing method (H.323 or ISDN)
and bandwidth that are used specifically for the contact that you edit. If
you choose ISDN, the number to be dialed must be predefined (see ISDN
Settings).
Deleting Entries from the Personal Address Book
You can delete and thus manage personal address book entries when they are no
longer in use.
To delete a contact from the personal address book:
1. In the address book, select the number you want to delete, select Delete
and then press OK. The following message is displayed: "Are you
sure?"
2. Select Yes to delete, or No to cancel.
Using the Call Log
Log Entries are automatically logged to the Call Log when an outgoing call is
made or when an incoming call is received. Add Log Entries to the address book,
or delete them from the Call Log.
¾ Note: log entries cannot be edited.
Using the Call Log via the Remote Control
You can select Call Log using the remote control.
xPoint Standard (S) Ver. 1.5 User Guide • 38
Page 40
Chapter 5. Quick Dialing Methods Using Speed Dial
To select the Call Log via the remote control:
1. On the remote control, press Call Log ( ) – or – on the main
menu, select Recent Calls; the Call Log window appears.
2. Select the number to dial; the contact number is copied to the New Call
field.
3. Select Call ( ) or press Make Call ( ); the Calling
screen is displayed.
When the call is answered on the far end, the system switches to Call mode.
Displaying the Call Log from the Address Book
You can select Call Log via the address book.
To display the call log via the address book:
In the address book, select Call Log by pressing left with the joystick and
scrolling down.
Adding a Call Log Entry to the Address book
You can add Call Log to the Address book for reuse later.
To add call log entry to the address book:
1. In the Call Log, select the entry you want to add to the address book and
then press OK on the remote control.
2. Select Add; the Name/Address bar appears.
3. Edit in the contact Name or Address if needed, and then select Save;
the log entry is added to the address book.
Clearing the Call Log
You can delete and thus manage Call Logs when you do not require them any
longer.
To delete a call log or clear the entire log:
1. In the Call Log window, select which log entry to delete.
2. Select Delete to delete just the selected entry, or Clear All to delete all
entries, and then press OK; the following message is displayed when
clearing all: "Are you sure?"
3. Select Yes to delete, or No to cancel.
Using Speed Dial
Add up to 10 frequently used numbers/addresses to the Speed Dial. You can add,
Edit or Delete Speed Dial entries.
xPoint Standard (S) Ver. 1.5 User Guide • 39
Page 41
Chapter 5. Quick Dialing Methods Using Speed Dial
Using Speed Dial via the Remote Control
You can use speed dial using the remote control.
To select speed dial via the remote control:
1. Enter the speed dial index number and press Make Call, or press
Speed Dial ; the Speed Dial window opens.
2. Select the number to dial; the contact number is copied to the New call
field.
3. Select Call ( ) or press Make Call ( ); the Calling
screen is displayed.
When the call is answered on the far end, the system switches to Call mode.
Using Speed Dial via the Address Book
You can use speed dial via the address book.
To select speed dial via the address book:
1. In the address book, select Speed Dial by pressing left with the joystick
and scrolling down.
2. Select the number to dial, and then press OK. The contact number is
copied to the new call field.
3. Select Call ( ) or press Make Call ( ); the Calling
screen is displayed.
When the call is answered on the far end, the system switches to Call mode.
Adding numbers to the Speed Dial
You can add the frequently used numbers to speed dial. The speed dial number is
added to the speed dial list and marked from 1 to 10 (you can define up to 10
speed dial numbers).
To add numbers to the speed dial:
1. In Speed Dial, select Add and press OK; the Name/Address bar opens.
2. Type the contact’s name and address, and then select Save.
Editing Speed Dial Numbers
You can edit frequently used numbers already in the Speed Dial.
To edit a speed dial number:
1. Select the number you want to edit in Speed Dial, select Edit and press
OK; the Name/Address bar opens.
2. Edit the contact’s name and address, and then select Save.
xPoint Standard (S) Ver. 1.5 User Guide • 40
Page 42
Chapter 5. Quick Dialing Methods Using Online Directories
Deleting Speed Dial entries
You can delete speed dial entries when they are no longer needed.
To delete a speed dial entry or all entries:
1. In Speed Dial, select the number you want to delete.
2. Select Delete to delete just the selected entry, or Clear All to delete all
entries, and then press OK. The following message is displayed: "Are
you sure?"
3. Select Yes to delete, or No to cancel.
Using Online Directories
Online Directory is an external directory which can be used for calling. If you are
registered in the online directory, you can view the Online Directory in the
address book under the Online Directory tab.
¾ Note: online directory entries cannot be edited or deleted.
Accessing an Online Directory via the Remote Control
You can access the address book using the remote control.
To access the address book via the remote control:
1. On the remote control, press the address book button. The
address book opens.
2. Select the Directory tab, and on the number to dial press OK. In the
New Call bar, the address of the contact is copied to the number field.
¾ Note: when the address book is open, typing a letter in the ABC field
causes it to 'jump' to the first letter entered.
3. Select Call ( ) or press Make Call ( ); the Calling
screen is displayed.
When the call is answered on the far end, the system switches to Call mode.
Accessing the Online Directory via the Address Book
You can access Online Directory via the address book.
To access the Online Directory via the address book:
1. In the address book, select Online Directory by pressing left with the
joystick and scrolling down.
2. Select the Directory tab, select the number to dial and press OK. In the
New Call bar, the address of the contact is copied to the number field.
xPoint Standard (S) Ver. 1.5 User Guide • 41
Page 43

Chapter 5. Quick Dialing Methods Using Online Directories
3. Select Call ( ) or press Make Call ( ); the Calling
screen is displayed.
When the call is answered on the far end, the system switches to Call mode.
xPoint Standard (S) Ver. 1.5 User Guide • 42
Page 44

Chapter 6. Interactive Multicast
Videoconferencing
In this Chapter
This chapter covers the available interactive videoconferencing options, and
includes the following sections:
Interactive Multicast Overview
Setting up Interactive Multicast Calls
Starting an Interactive
Adding Participants to the Interactive Multicast
Additional Interactive Multicast Options.
Interactive Multicast Overview
Interactive multicast allows multiple participants to hear and view one of the
other participants in a videoconference, while each participant can request to be
heard/seen at a time. This request is sent to the primary/initiating participant,
named as the Chair.
This method saves bandwidth as only one person is seen/heard at a time, while
the rest are passive participants. The Chair can allow numerous participants to
join the session but the bandwidth used is for one person only. The Chair limits
the total participant bandwidth to between 64Kb to 1 Mbps.
Interactive sessions can be held for up to 99 participants at one time. During a
session, the Chair may perform the Grant Floor (audio and video) or Grant
Talk (audio only) actions, which allows a participant to take the floor and
transmit audio and video. Whenever needed, participants may perform the
Request Floor or Request Talk actions on their side, and the Chair can
respond to these requests. In addition, other actions are available on both the
Chair and the participants’ side during the interactive multicast.
¾ The first person that creates the session via the Start Multicast window
is defined as the Chair. However, if both sides select Start Interactive,
neither will be defined as a participant.
xPoint Standard (S) Ver. 1.5 User Guide • 43
Page 45
Chapter 6. Interactive Multicast Videoconferencing Setting up Interactive Multicast Calls
Setting up Interactive Multicast Calls
You can start interactive multicast calls via the Start Multicast window.
To set interactive multicast settings:
1. Select Interactive on the main menu; the Start Multicast window
appears.
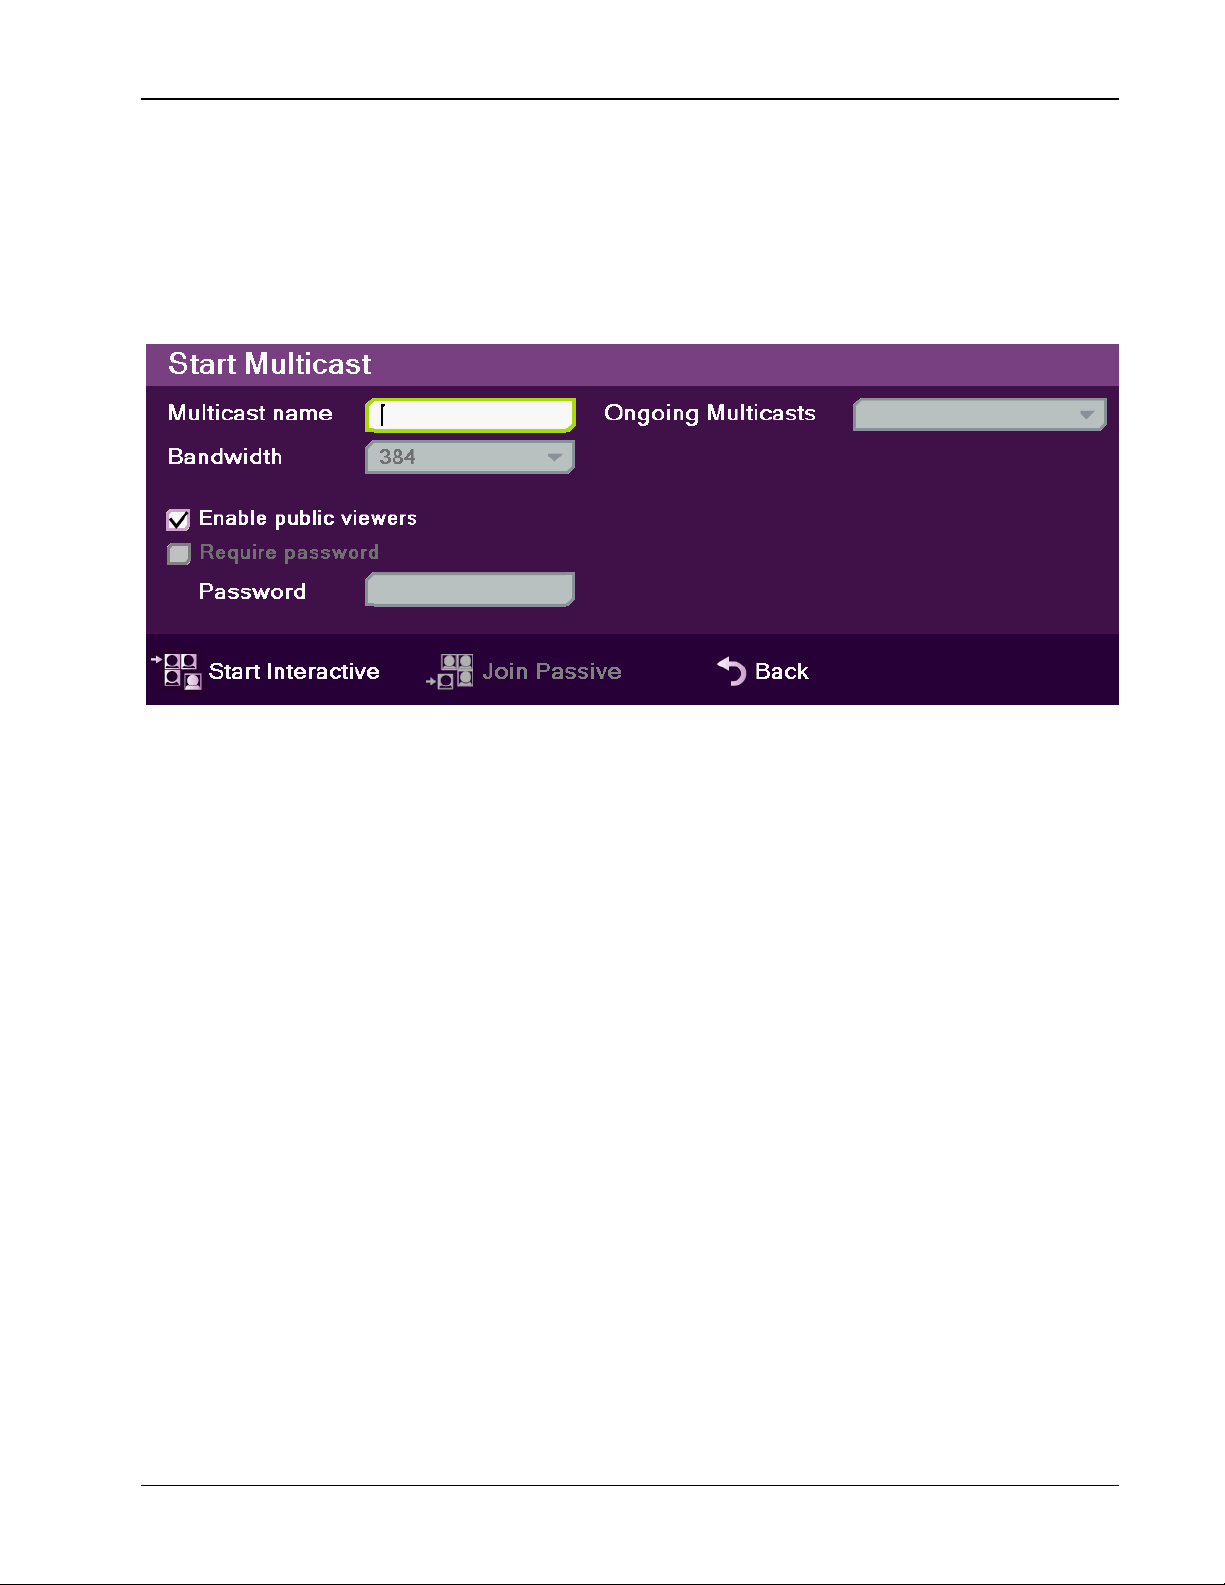
Figure 15. Start Multicast Window
2. The Start Multicast window includes the following properties:
o Multicast Name – Type in your name for the conference session.
o Bandwidth – Selected bandwidth for the conference session,
configured in Multicast Settings (see Multicast Settings).
o Enable public viewers – Select this option to enable anyone to
freely join the conference as a viewer. When this option is selected,
the Require Password option below is disabled.
o Require Password – Select this option to require a password from
the participants.
Ö Password – Enter the password that the participants will need
to type in order to join the multicast session.
o Ongoing Multicasts – For the Join Passive option only, select a
running conference on your network from the drop-down list. Once
selected, the Join Passive option becomes available. You join the
selected conference as a passive viewer, and the settings made above
are not applied.
Starting an Interactive Multicast
After you set the interactive session settings (see Setting up Interactive Multicast
Calls), start the interactive multicast session and then add additional participants
to the conversation.
xPoint Standard (S) Ver. 1.5 User Guide • 44
Page 46
Chapter 6. Interactive Multicast Videoconferencing Adding Participants to the Interactive Multicast
To start an interactive multicast:
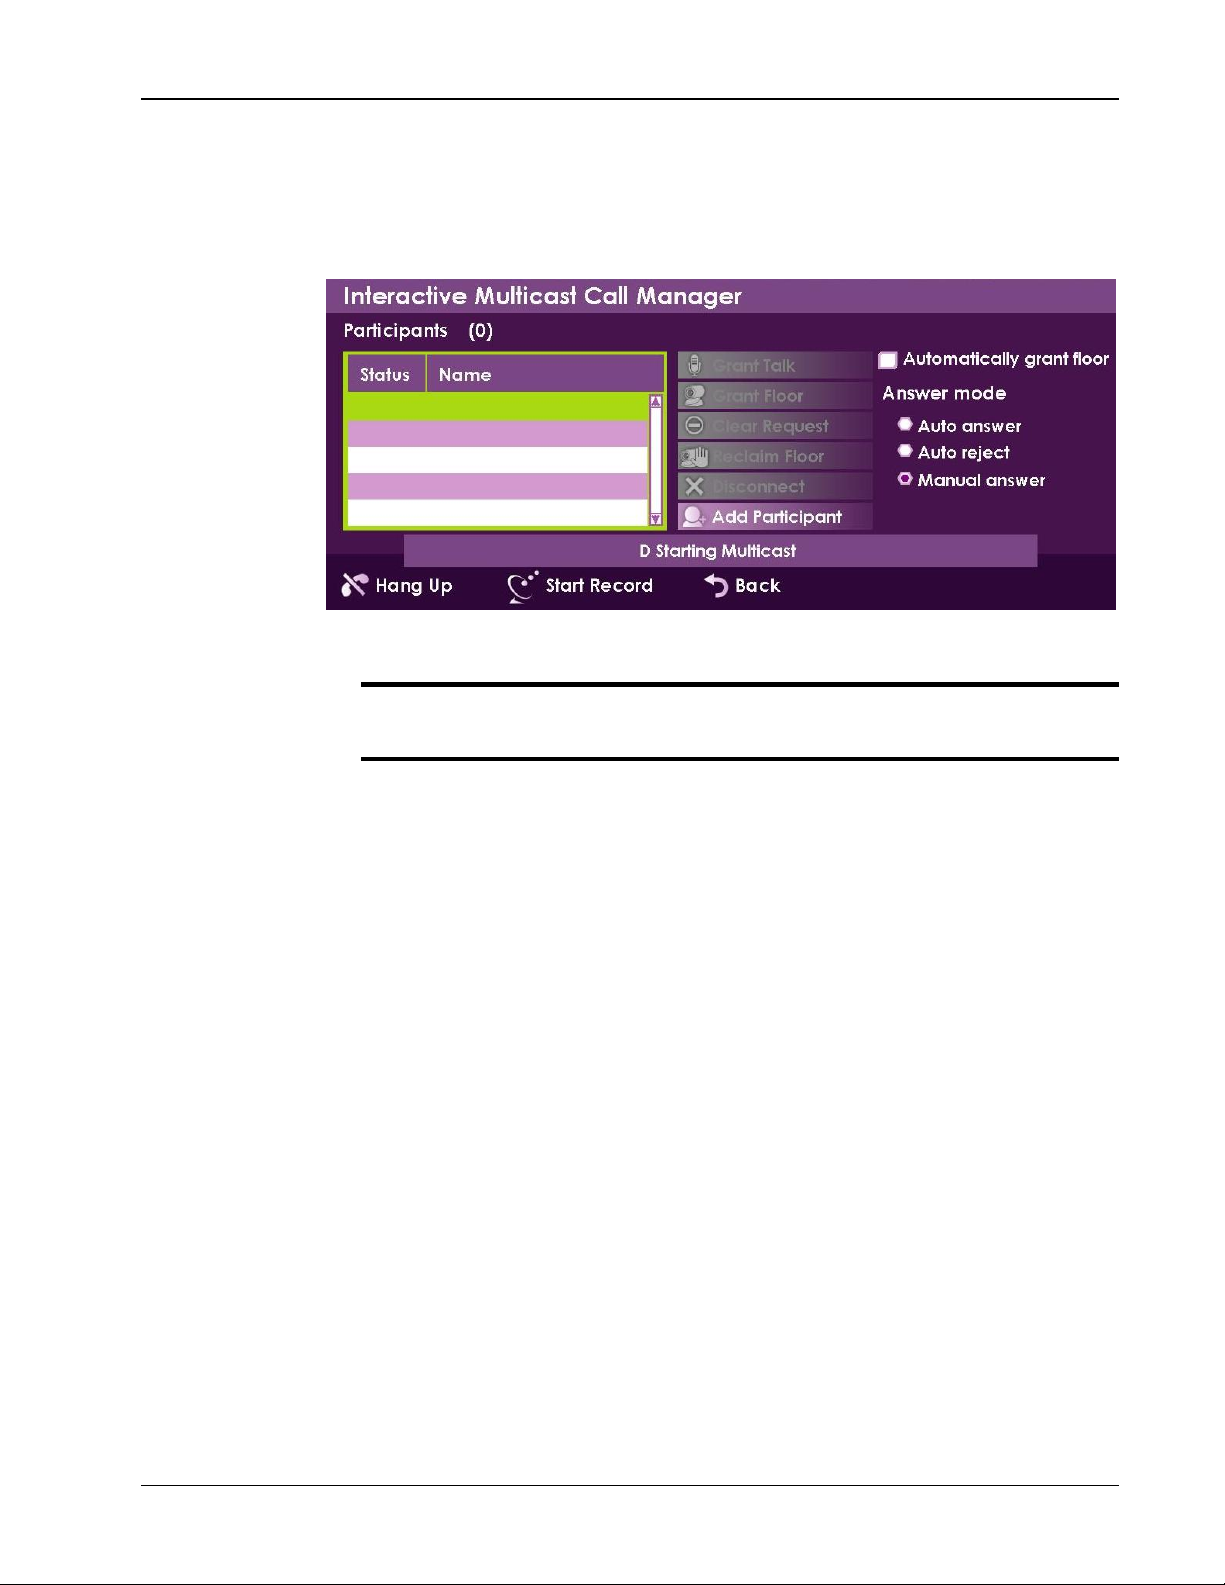
After defining the session in the Start Multicast window, select Start
Interactive; the Interactive Multicast Call Manager window appears,
and the message: "<Your Name> Starting Multicast" is displayed.
Figure 16. Interactive Multicast Call Manager
¾ Note: once you start the multicast session, you are defined as the Chair
(see Interactive Multicast Overview).
Adding Participants to the Interactive Multicast
You can wait for participants to join the interactive multicast, or you can actively
add participants to the session.
To add a participant to the interactive multicast:
1. In the Interactive Multicast Call Manager window, select Add
Participant; the New Call bar appears.
2. In the New Call bar, type the participant address/name or search in the
participant in the address book.
3. Press Call (green button) on the remote control; the message: "Calling"
is displayed.
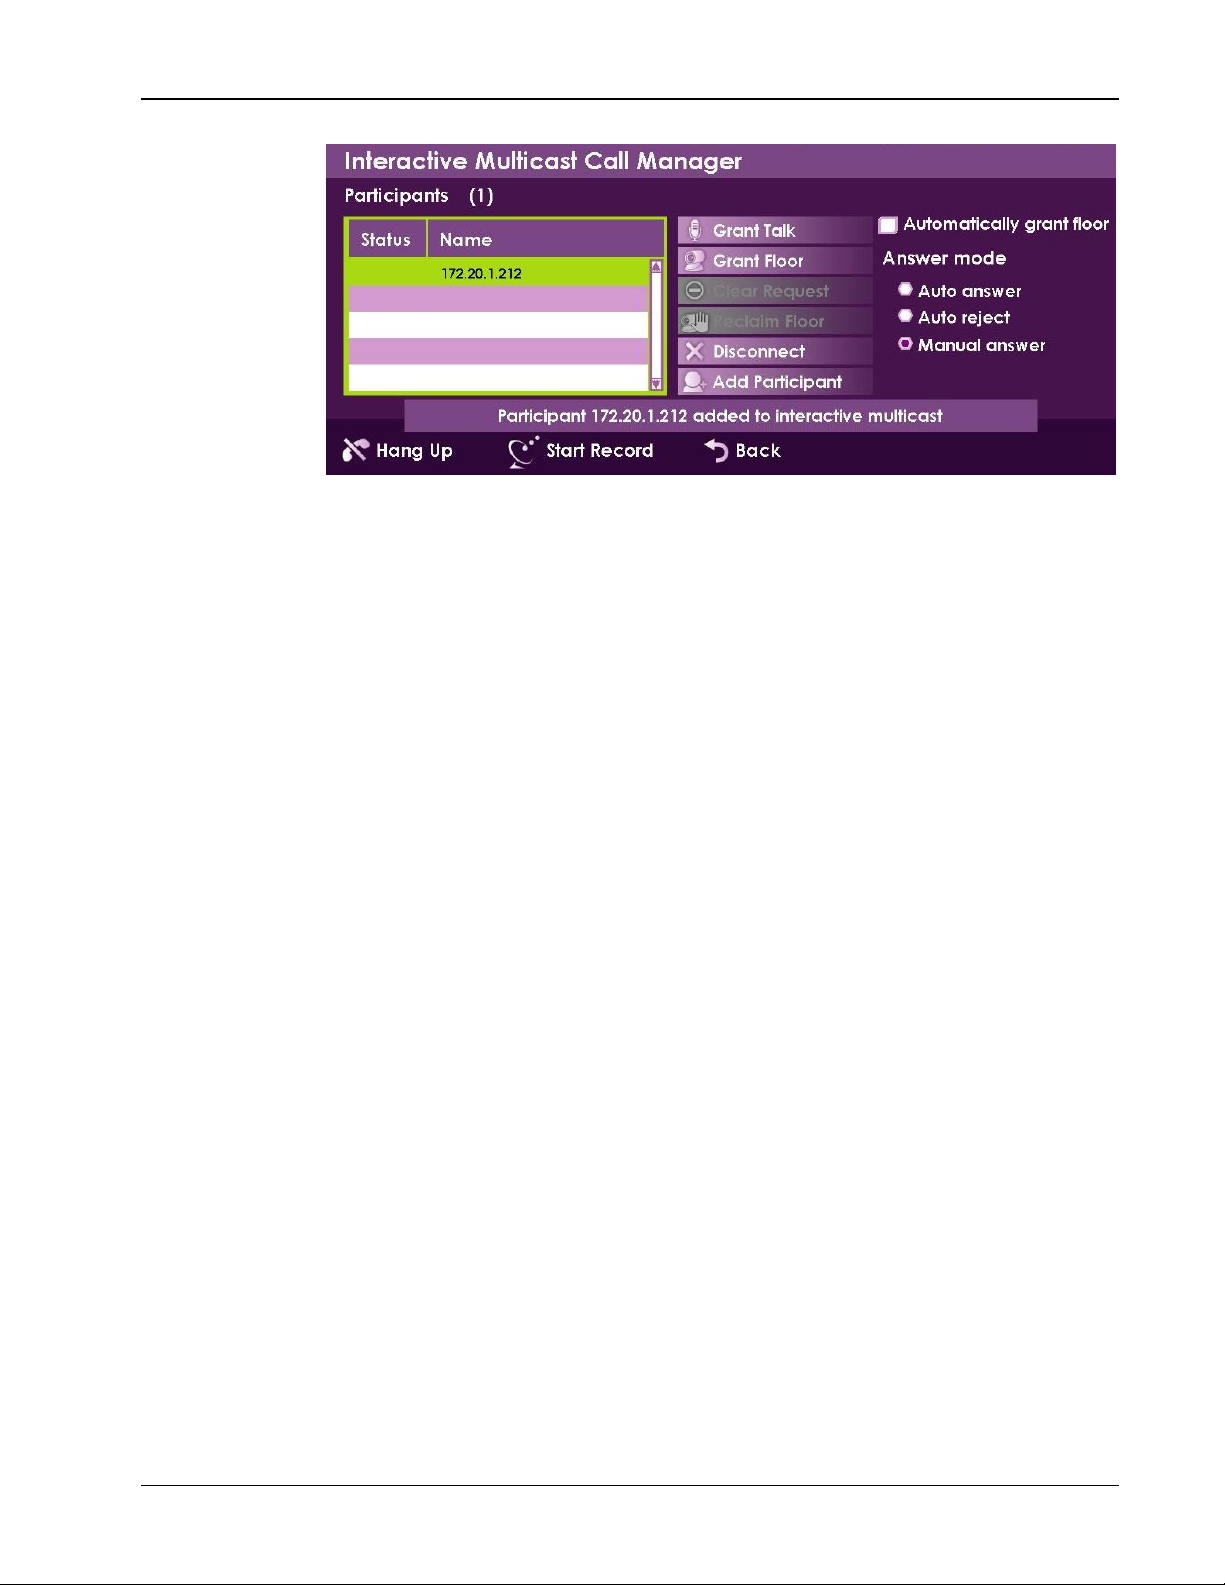
When the participant accepts the call, the following message is displayed:
"Participant <IP> added to Interactive multicast". The participant is
then added to the Participants list.
xPoint Standard (S) Ver. 1.5 User Guide • 45
Page 47
Chapter 6. Interactive Multicast Videoconferencing Additional Interactive Multicast Options
Figure 17. Interactive Multicast Call Manager – Participant Added
Additional Interactive Multicast Options
During the interactive multicast session, the Chair and the remote participants
can perform different actions that affect the way the session is viewed and heard
on each side.
On the Chair Side
On the Chair side, the following options are available during an interactive
multicast session:
Grant Talk to a Participant
Grant Floor to a Participant
Automatically Grant Floor
Set the Answer Mode
Reclaim Floor
Start/Stop Recording
Disconnect a Participant
Disconnect the Entire Session.
Grant Talk to a Participant
Allow the selected remote participant to transmit audio without video to all
the other participants, including to the Chair who ceases to transmit audio as
long as the grant is in effect.
Once the talk is granted, a green microphone icon appears on the Chair’s
participants list, indicating that the participant has the Talk.
xPoint Standard (S) Ver. 1.5 User Guide • 46
Page 48

Chapter 6. Interactive Multicast Videoconferencing Additional Interactive Multicast Options
Grant Floor to a Participant
Allow the selected remote participant to transmit audio and video to all the
other participants, including to the Chair who ceases to transmit audio and video
as long as the grant is in effect.
Once the Floor is granted, a green camera icon appears on the Chair's screen
indicating that the participant has the Floor.
Automatically Grant Floor
When the Automatically Grant Floor checkbox is selected, remote
participants that are added to the list may take the floor whenever they request it.
Set the Answer Mode
The answer mode is set so that new participants can be added automatically,
rejected automatically or added manually by the Chair to the list of participants
(adding without granting them the Talk/Floor).
Auto Answer – Enables new participants to join the interactive session even
when the Chair is not present. New participants are added to the Participants
list on the Chair’s screen view.
Auto Reject – Automatically rejects any request to join the session (any
incoming call). The Chair may use this option to prevent disruption or when
only specific participants were added or are to be added to the list of
participants.
Manual Answer – The Chair can manually accept or reject each individual
call when it is received. If the Chair rejects a call, the requesting participant
sees message: "Call has been rejected".
Reclaim Floor
Returns the floor to the Chair without disconnecting the participant who had the
floor.
Start/Stop Recording
The Chair can start recording the videoconference via Start Record even before
adding participants. The 'recording' icon is displayed on each remote side.
The Chair can stop the recording via Stop Record and view it via the recordings
archive via the Web (see Viewing the Recording Archive) or via Data
Sharing>File.
Disconnect a Participant
The Chair can disconnect a specific remote participant (one at a time) by
selecting the participant on the Participants list and then selecting Disconnect.
If the Talk/Floor was given to that participant at the time of disconnection, it
returns to the Chair.
Disconnect the Entire Session
The Chair can disconnect all participants and end the call (multicast session) by
selecting Hang Up.
xPoint Standard (S) Ver. 1.5 User Guide • 47
Page 49

Chapter 6. Interactive Multicast Videoconferencing Additional Interactive Multicast Options
On the Remote Participant Side
On the remote participant side, the following options are available during an
interactive multicast session:
Request Floor
Request Talk
Cancel Request
Start/Stop Recording.
Request Floor
After the participant has accepted the multicast call from the Chair, Request
Floor enables the participant to request permission (from the Chair) to
transmit audio and video during the interactive multicast session.
The Floor or Talk (see Request Talk) may be granted in one of the following ways:
The Chair selected 'Automatically grant floor' so the authorization occurs
immediately without any message on the Chair side.
The Chair receives a message announcing that “<name> requested
floor/talk”, and the Chair can accept the request. A blinking camera icon is
displayed on the Chair side as long as the participant is waiting for the Chair’s
authorization.
¾ Note: participants to which the floor is granted are temporarily given the
stage but they do not become the Chair and they cannot add participants
to the multicast session, nor can they perform any action that the Chair
can perform.
When the Chair accepts the request, the message "Please wait, granting
floor/talk" is displayed, followed by "Floor/Talk Granted to <IP>".
Request Talk
Once the participant has accepted the call from the Chair, Request Talk enables
the participant to request permission (from the Chair) to transmit audio
without video during the interactive multicast session.
Cancel Request
Cancel Request enables the remote participant to cancel a pending Request
Floor/Talk action.
On the Chair side, the message: "Your Floor/Talk request was cancelled"
confirms to the participant that the floor request was cancelled.
Start/Stop Recording
See Start Recording, Stop Recording and View Recording.
xPoint Standard (S) Ver. 1.5 User Guide • 48
Page 50

Chapter 7. Advanced Settings
In this Chapter
This chapter covers the advanced settings for xPointS, and includes the following
sections:
Display Adapter Settings
Administration Settings
Call Settings
Call Security
Online Directory Properties
H.323 Protocol Settings
Quality of Service (QoS) Settings
License Settings
ISDN Settings
System Settings
Multicast Settings
Recording and Streaming Settings
MCU Settings
Secure Connect Settings.
Display Adapter Settings
In addition to the basic display settings (see Configuring the Display), you can
set the advanced display properties for the embedded Windows system in
xPoint
S
, and use these settings to define dual monitor display when necessary.
A keyboard and a mouse must connected to the unit in order to configure the
advanced display properties. You can connect these devices via the USB ports.
S
¾ Note: the xPoint
display properties.
xPoint Standard (S) Ver. 1.5 User Guide • 49
system always reloads after accessing the advanced
Page 51
Chapter 7. Advanced Settings Display Adapter Settings
To access the advanced display properties:
1. Select Settings>Display; the Display Settings window appears.
2. Select Change display settings; the following message is displayed:
"Changing display settings will cause the system to reload
automatically. Are you sure you want to continue?"
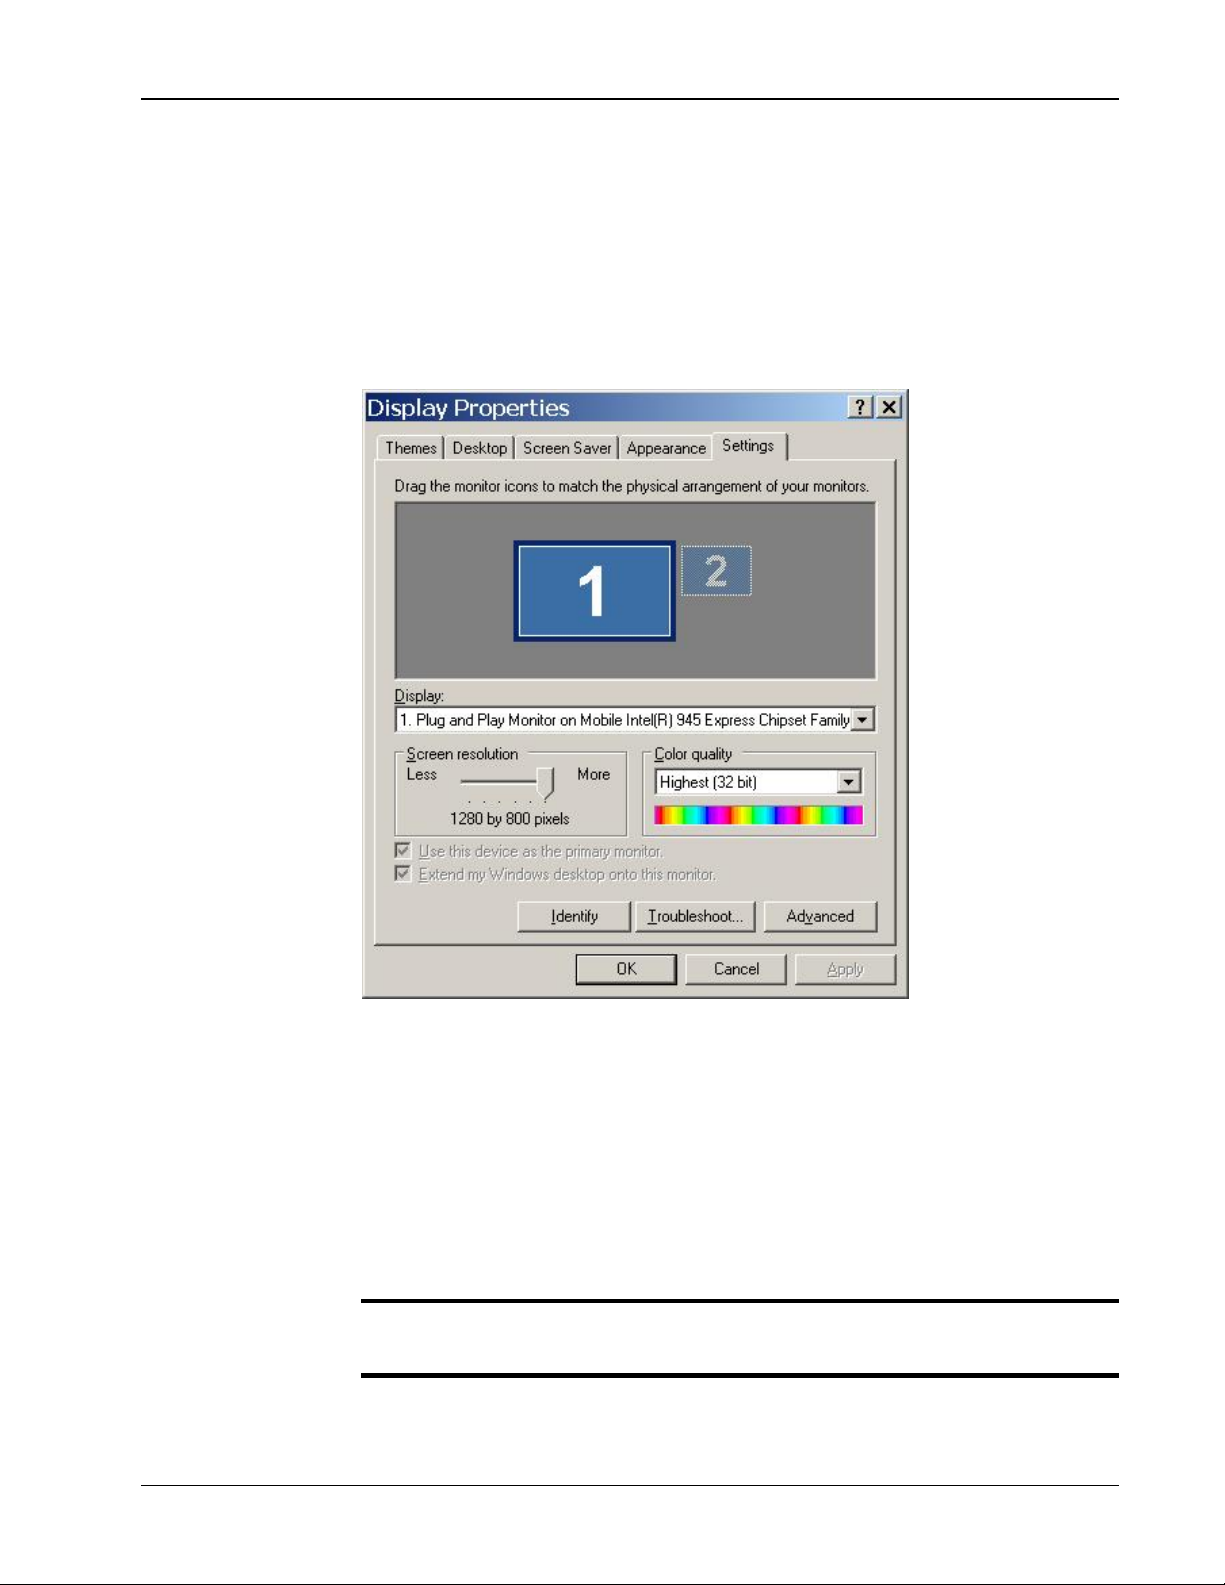
3. Select Yes; the system opens the embedded Windows Display
Properties dialog box.
Figure 18. Display Properties Dialog Box
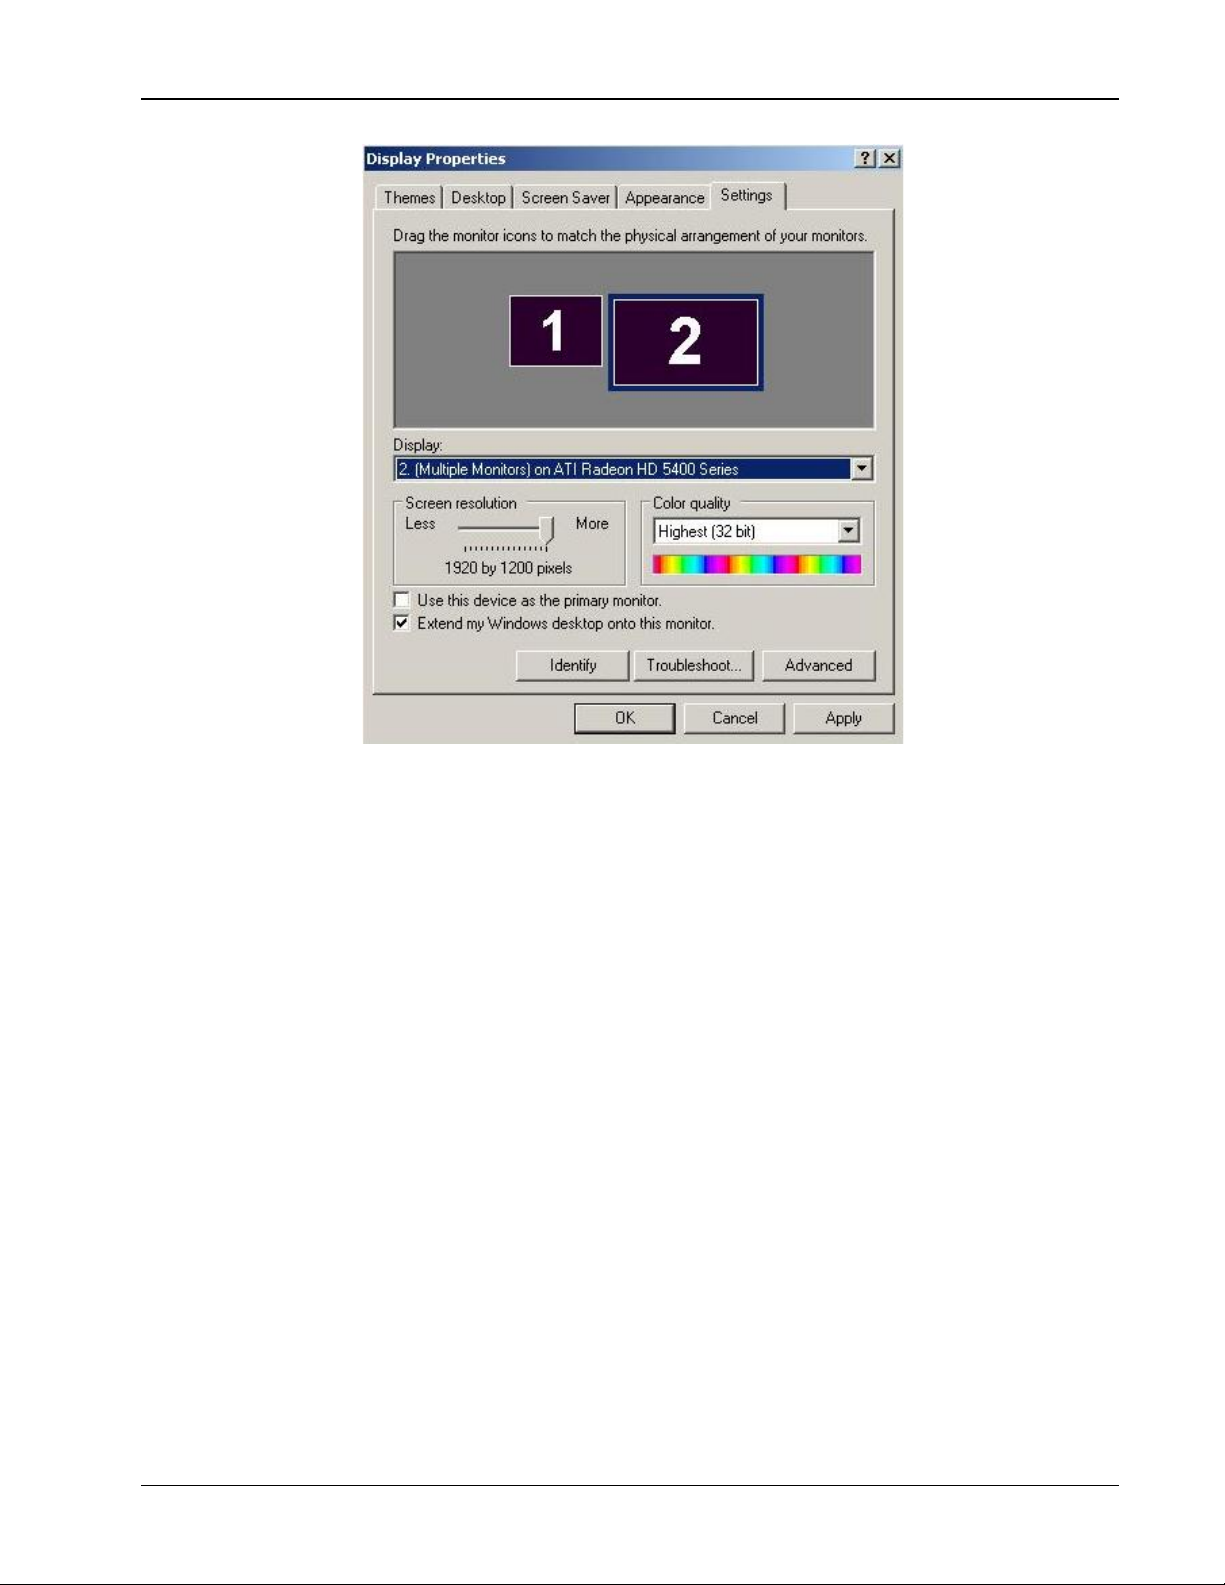
To set dual monitor display:
1. Access the Display Properties dialog box and click the Settings tab.
2. While Monitor #1 (with the navy blue border) is automatically selected,
make sure that the Use this device as the primary monitor
checkbox is selected.
3. Select Monitor #2 using the recommended Screen Resolution and
Color Quality.
S
¾ Note: if Monitor #2 is not physically connected to xPoint
, it cannot be
selected.
4. Select Extend my Windows desktop onto this monitor.
xPoint Standard (S) Ver. 1.5 User Guide • 50
Page 52
Chapter 7. Advanced Settings Administration Settings
Figure 19. Monitor #2 Selected
5. Click OK; the system reloads.
6. Return to Settings>Display, and select Dual mode which was
previously grayed-out (see Configuring the Display).
7. Click Apply; the dual monitor display settings are now activated.
Administration Settings
The administration settings define general system properties and also allow you
to set password protection for restricting management access when required.
To configure administration settings:
1. Select Settings>General>Admin; the Admin Settings window
appears.
xPoint Standard (S) Ver. 1.5 User Guide • 51
Page 53
Chapter 7. Advanced Settings Administration Settings
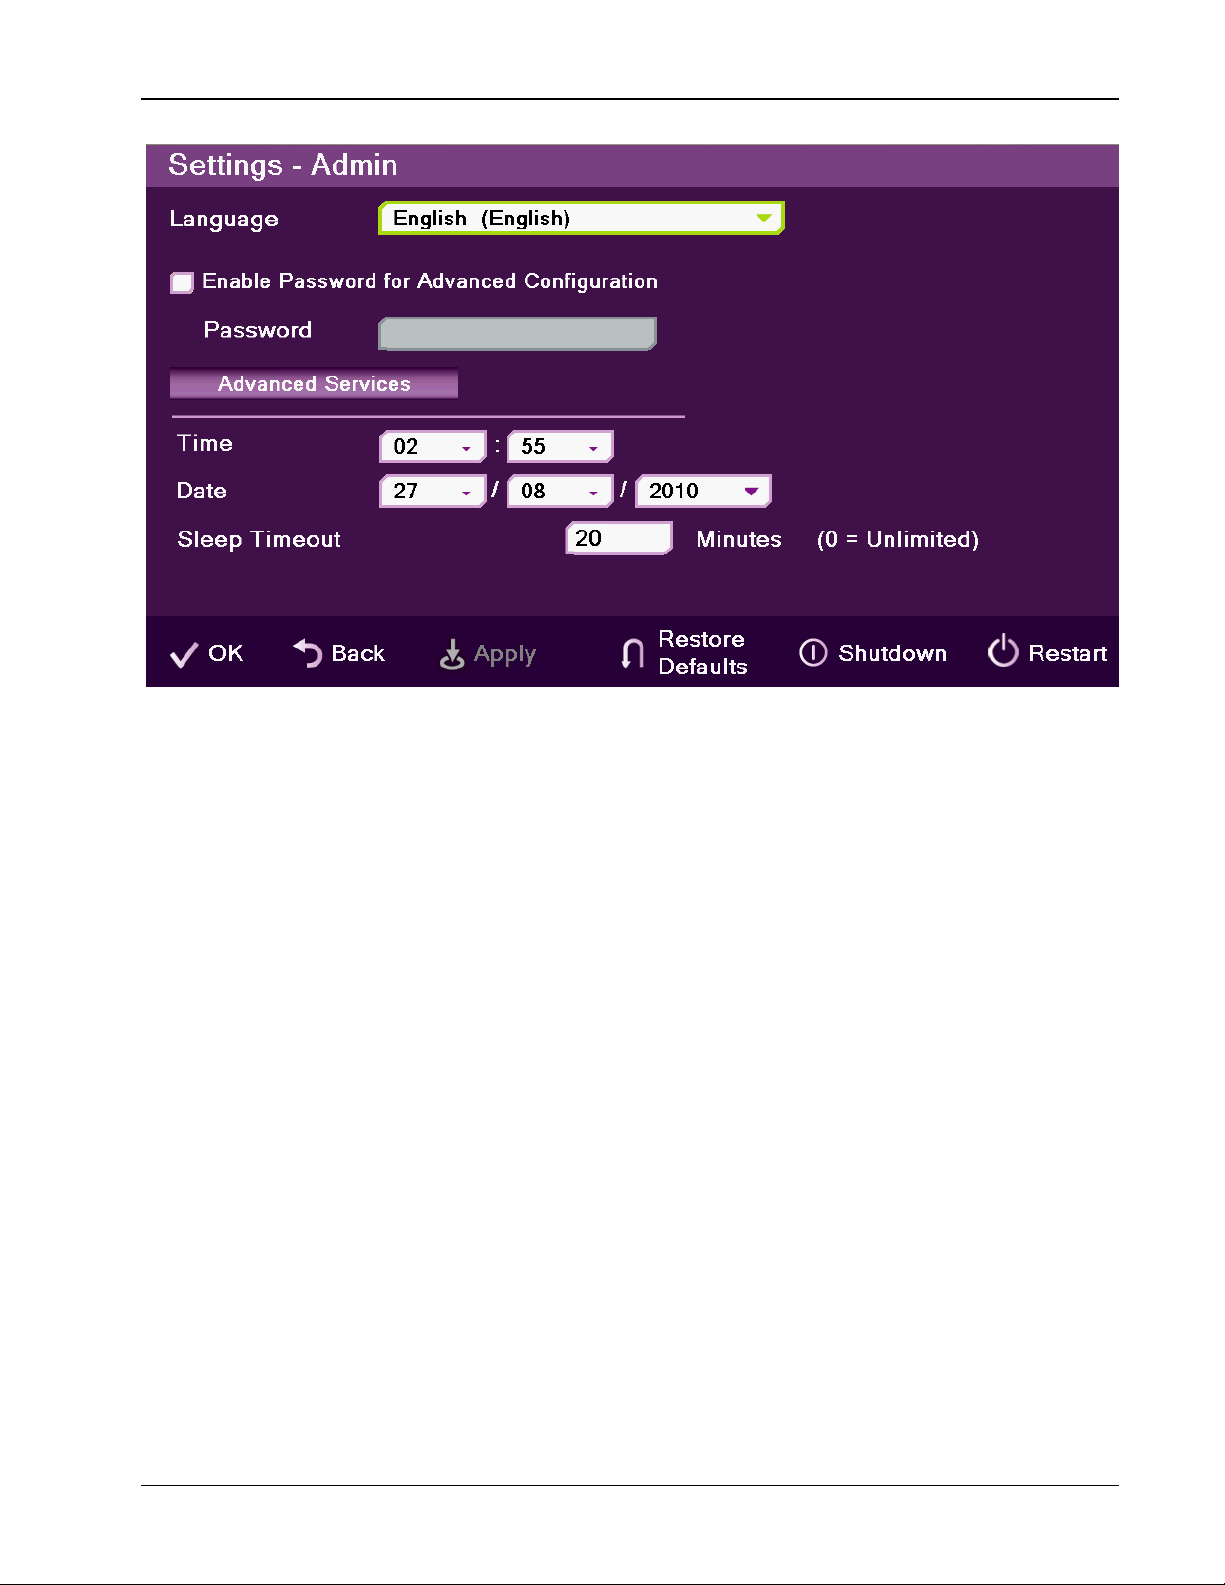
Figure 20. Admin Settings Window
2. In the Admin Settings window, set the following options and parameters
o Language – Select the desired language for the user interface. Press
OK or Apply for the change to take place immediately.
o Enable Password for Advanced Configuration – Selecting this
option restricts the access to the advanced configuration options of
the unit, which are: Admin (the current window), H.323, System,
Calls and ISDN.
Ö Password – Enter the password that will restrict the access to
the advanced configuration. When typing the password, each
letter is visible for one second and then turn into an asterisk (*).
o Advanced Services – opens a new window with the following
options:
Ö Enable Web Server – Select this option to allow Web access to
the xPoint unit via a browser. If you enter a password, Web users
will be required to enter the same password when they access the
unit (for more information, see Chapter 8. Web Access and
Management).
Ö Enable Telnet Interface – Select this option to allow access to
the xPoint unit via a Telnet-based terminal. If you enter a
password, Telnet users will be required to enter the same
password when they access the unit.
o Time – If not already set, enter the current time.
o Date – If not already set, enter the current date.
xPoint Standard (S) Ver. 1.5 User Guide • 52
Page 54
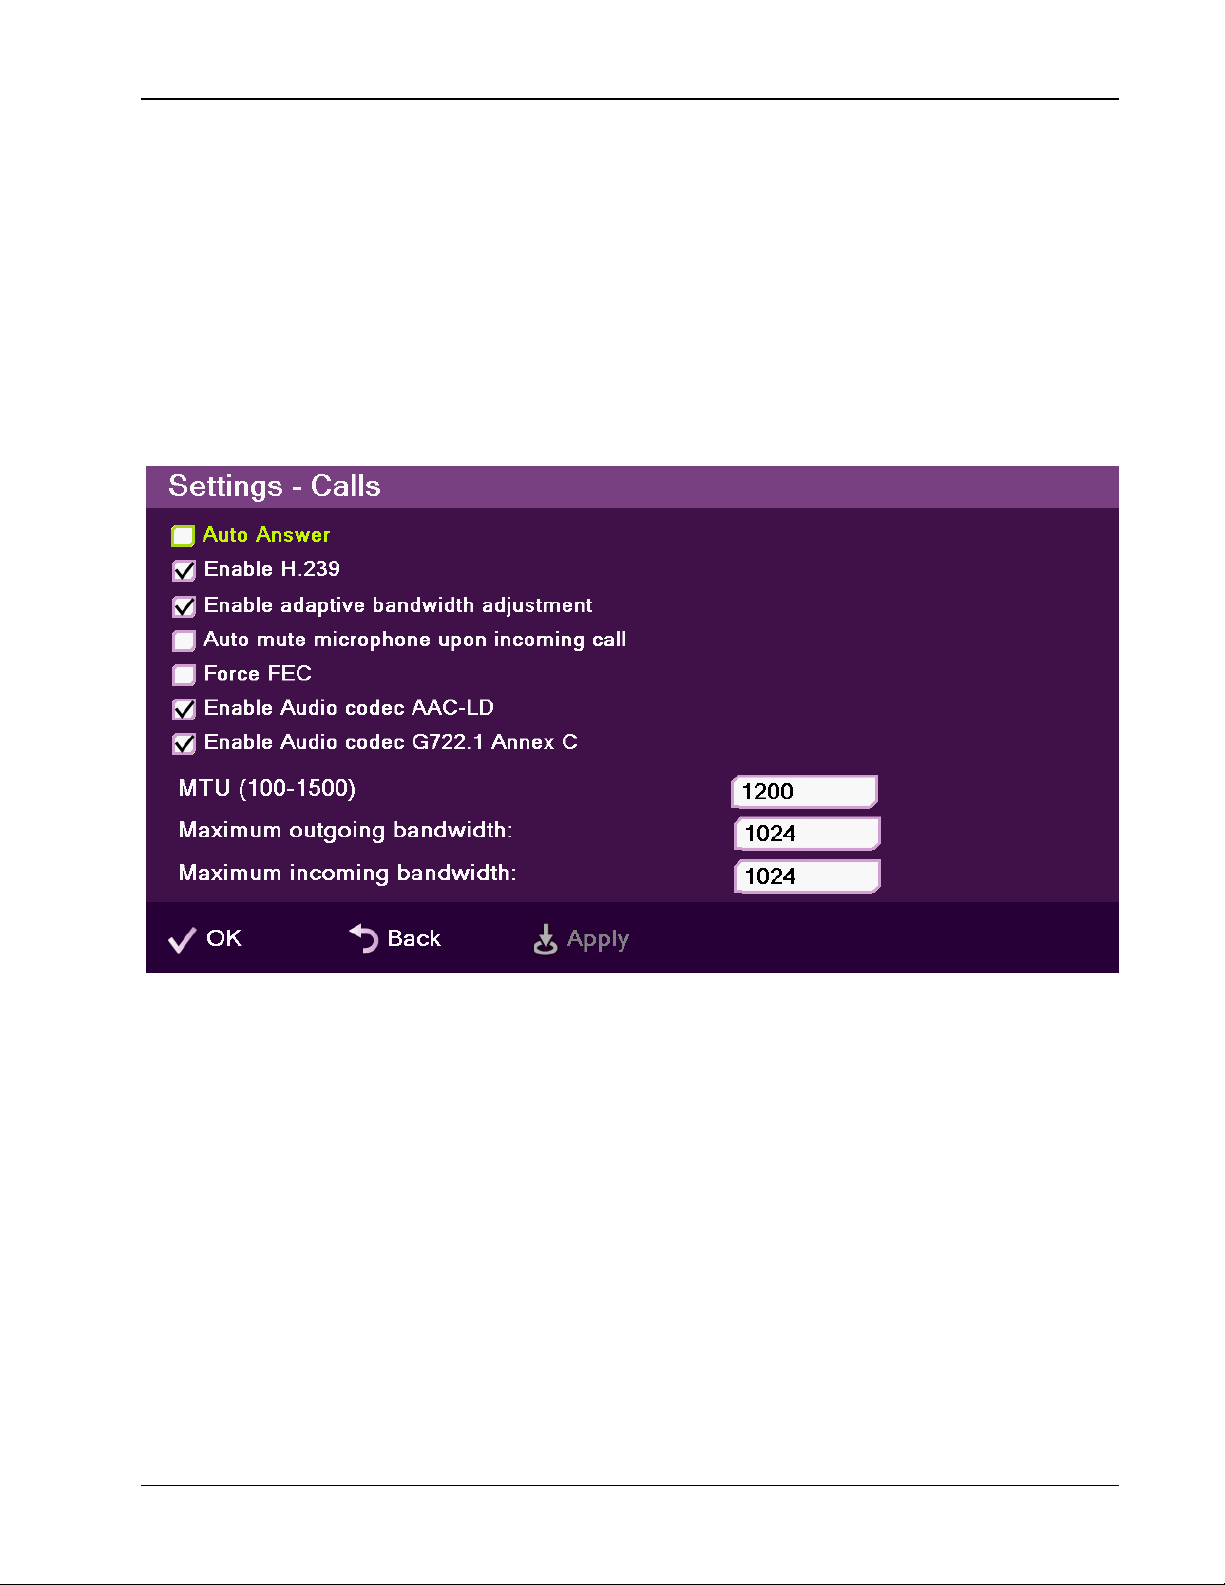
Chapter 7. Advanced Settings Call Settings
o Sleep Timeout – Duration of idle time (in minutes) before the
system goes into sleep mode.
3. Select Apply.
Call Settings
In the Call Settings window you can define miscellaneous technical settings that
affect how videoconference calls are performed by default.
To configure call settings
1. Select Settings>General>Calls; the Call Settings window appears.
Figure 21. Call Settings Window
2. In the Call Settings window, set the following options and parameters
o Auto Answer – Enables auto answering of incoming calls. Does not
apply to MCU or IMC calls.
o Enable H.239 – Enables data sharing protocol.
o Enable adaptive bandwidth adjustment – Enables
videoconferences to precede at reduced bandwidth if the network is
congested. Deselecting this option maintains a constant quality to the
session, but it may cause network problems.
o Auto mute microphone upon incoming call – Enables auto
muting the microphone for incoming calls
o Force FEC – Force Forward Error Correction (FEC) – Forwards an
error-correction code instead of automatically adjusting the
bandwidth.
xPoint Standard (S) Ver. 1.5 User Guide • 53
Page 55

Chapter 7. Advanced Settings Call Security
o Enable Audio Codec AAC-LD – Audio Codec: audio compression
format designed to combine the advantages of perceptual audio
coding with the low delay necessary for two-way communication.
o Enable Audio Codec G722.1 Annex C – Audio Codec: wide-band
compression algorithm provides higher-than-toll quality speech. The
codec operates between a wide-band, 50Hz to 7kHz signal range, at
the G.722.1 standard bit rate of 24kbps and 32kbps. GAO's G.722.1
algorithm is in the form of fixed-point arithmetic and is based on the
Modulated Lapped Transform (MLT).
o MTU (100–1500) – Set the designated MTU (Maximum Transfer
Unit) value; the default value is 1200. Applies only to RTP streams.
o Maximum Outgoing Bandwidth – Maximum upload bandwidth
(0 for unlimited)
o Maximum Incoming Bandwidth – Maximum download
bandwidth (0 for unlimited).
3. Select Apply.
Call Security
Calling securely requires setting the encryption protocol or using defaults which
include automatic encryption. Alternatively, you can disable the encryption if it is
not needed.
To configure security settings
1. Select Settings>General>Security; the Security window appears.
2. In the Security Settings window, select from the following options:
o Automatic – The default option; enables encryption automatically
o AES – An encryption algorithm included in the H.235 security
protocol
o No Encryption – No encryption method will be used.
3. Select Apply.
Calls that are made using encryption will have a lock icon on the rightbottom corner of the screen.
Online Directory Properties
Online directories are lists of contacts (such as Internet Location Server, or ILS)
whose videoconferencing systems are online and registered with that directory. If
your system is not registered with an MXM®, the Directory Settings provide a
way to register with an online directory.
S
¾ Note: directory settings are available only in xPoint
managed by a VCON Media Xchange Manager® (MXM).
xPoint Standard (S) Ver. 1.5 User Guide • 54
systems that are not
Page 56
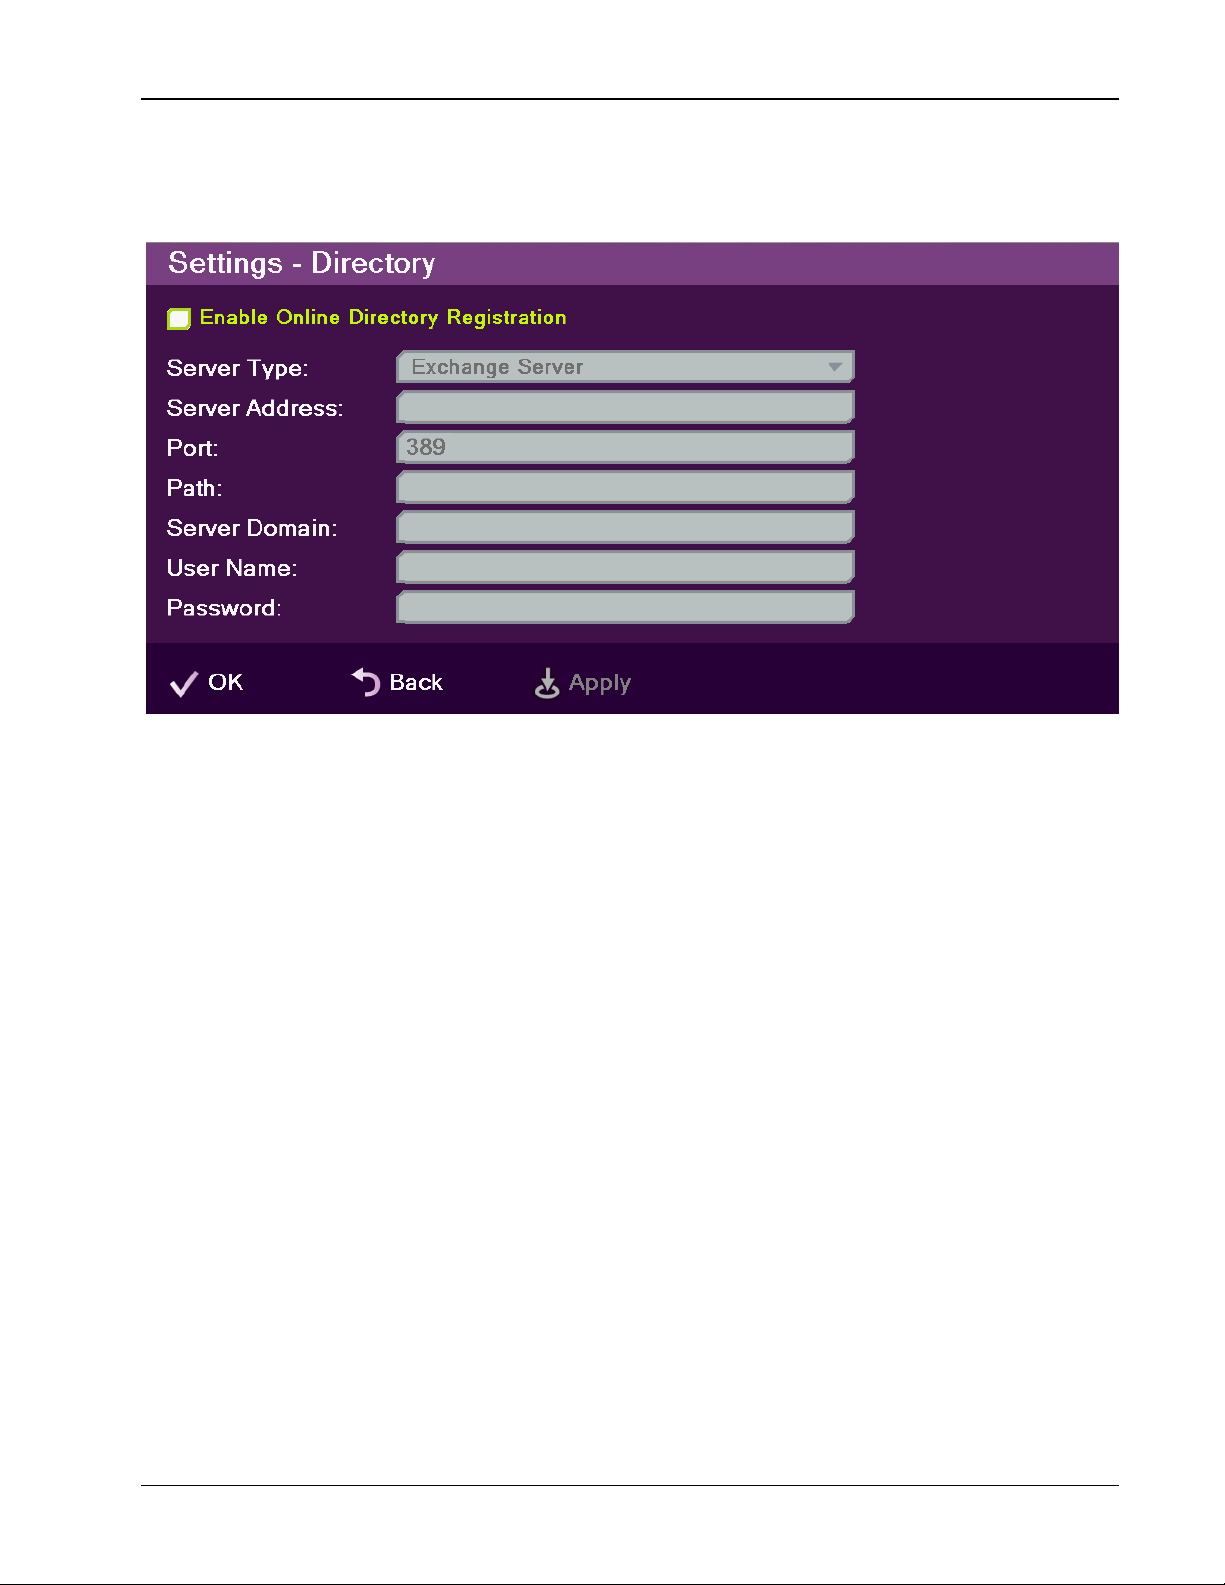
Chapter 7. Advanced Settings Online Directory Properties
To configure the online directory settings:
1. Select Settings>General>Directory; the Directory Settings window
appears.
Figure 22. Directory Settings Window
2. In the Directory Settings window, set the following options and
parameters
o Enable Online Directory Registration – When selected, this
checkbox activates the rest of the fields in this window and enables
the Online Directory connection registration.
o Server Type – Select the Online Directory server type. If you are
not sure which type to select, consult with your system administrator.
An LDAP (Lightweight Directory Access Protocol) server is usually
used.
o Server Address – The server’s IP address. If an IP is not entered,
the following message appears: "You must enter server address in
order to continue."
o Port – Number of the port through which the connection to the
server is established.
o Path – Folder in which your user information is stored, as created
on the Online Directory.
o Server Domain – Server’s domain name for the Online Directory.
o User Name – Your user name as defined on the Online Directory
server.
o Password – Your access password as defined on the Online
Directory server.
3. Select Apply.
xPoint Standard (S) Ver. 1.5 User Guide • 55
Page 57

Chapter 7. Advanced Settings H.323 Protocol Settings
¾ Note: In the Standalone/Gatekeeper mode, either the ILS or i-Planet
servers should be installed for the directory. Consult with your system
administrator regarding the installation/configuration of these servers.
Table 4. ILS and iPlanet Server Types
Server Type Description Prerequisites
ILS server
iPlanet server
Site Server ILS is a service used for
publishing H.323 videoconferencing
and telephony users and IP
multicast conferences on the
network.
Sun’s ONE Directory Server (also
known as iPlanet) is a scalable
distributed directory server for
running an enterprise-wide
directory containing lists of people
and resources.
Administrators can manage a single
user-repository for their
organization that can be used by
multiple applications to both
authenticate and retrieve stored
information for users such as access
levels and user profiles.
H.323 Protocol Settings
System administrator
configuration
System administrator
configuration
For point-to-point and multipoint videoconferences, the H.323 protocol standard
is used for call signaling and control, video/audio transport and control, and
S
bandwidth control . xPoint
utilizes H.323 to transport video/audio via DNS and
NAT addressing, and to communicate/interact with either an MXM server or a
standard gatekeeper server, one of which you can choose to work with in order to
gain better performance and flexibility in point-to-point and multipoint
videoconferences.
¾ For more information about VCON’s MXM server, its installation and
configuration, refer to the MXM User Guide.
To configure a connection to an MXM server or to a gatekeeper
server:
1. Select Settings>Network>IP>H.323; the H.323 Settings window
appears.
xPoint Standard (S) Ver. 1.5 User Guide • 56
Page 58
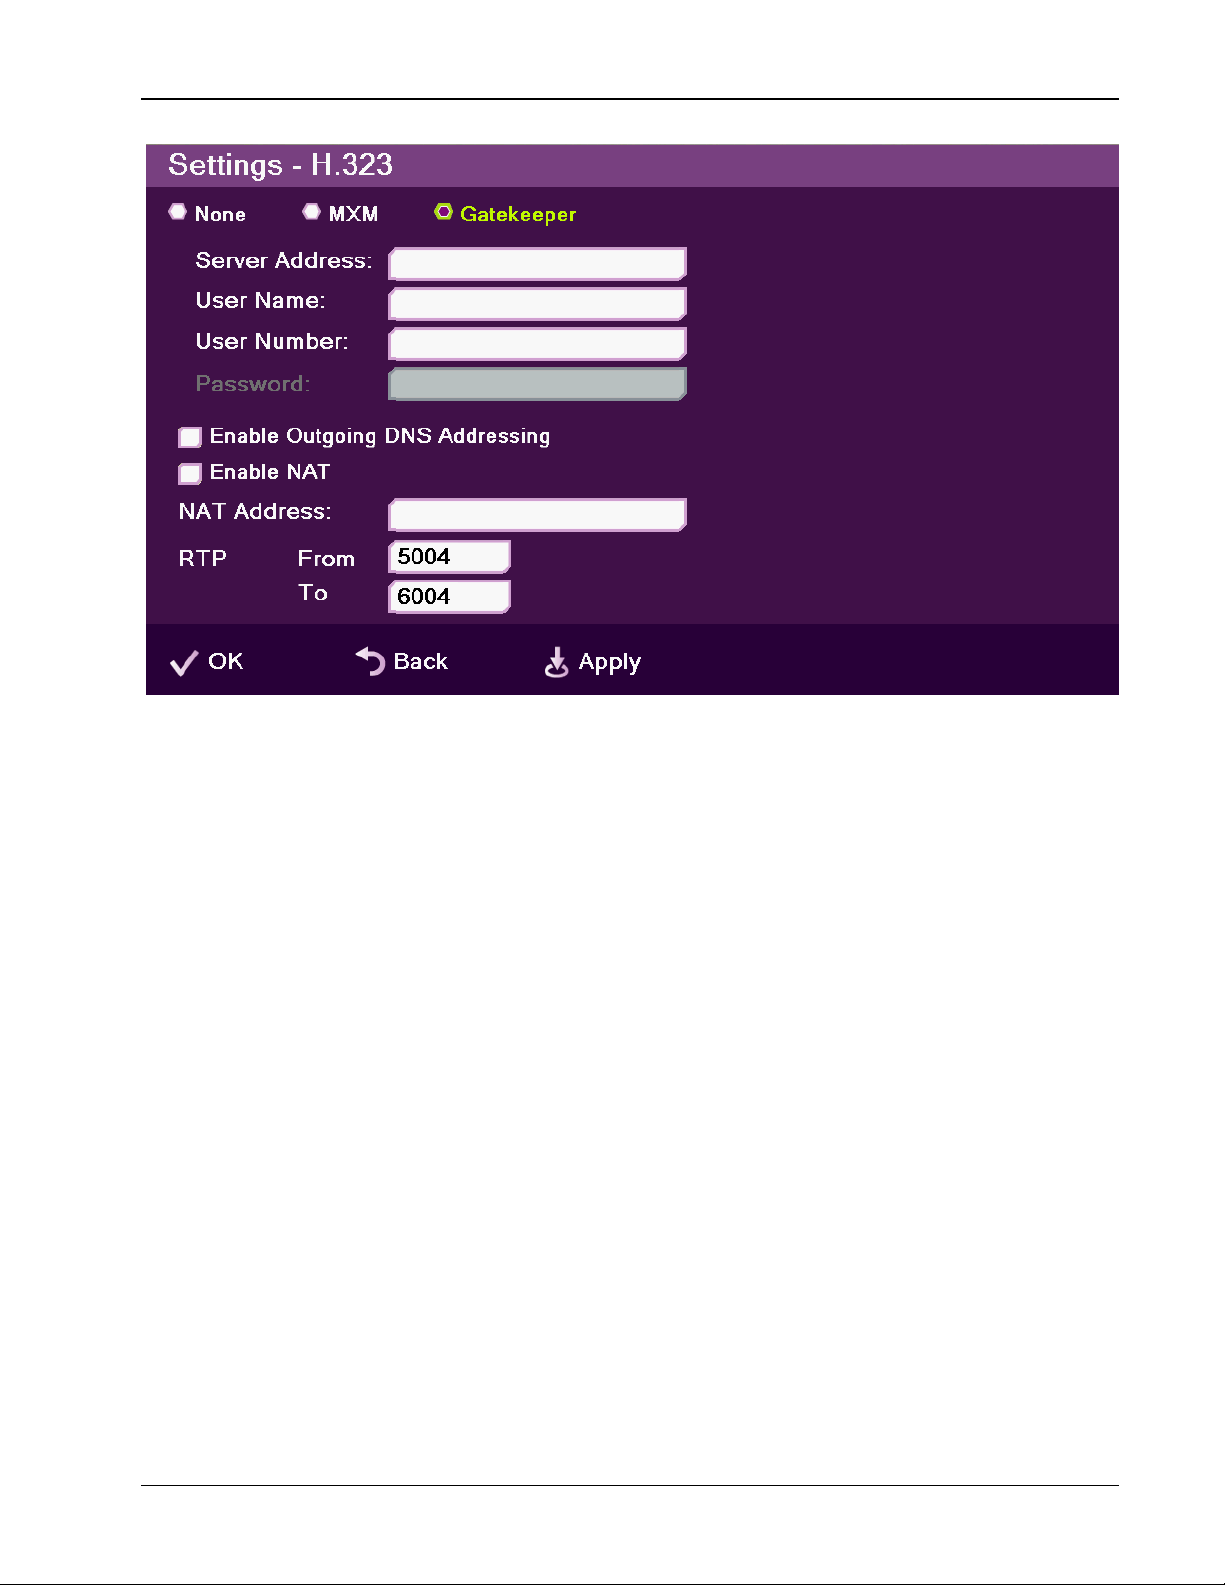
Chapter 7. Advanced Settings H.323 Protocol Settings
Figure 23. H.323 Settings
2. In the H.323 Settings window, set the following options and
parameters:
o None – Keep this option selected (selected by default) if you do not
want to use an MXM server or a gatekeeper.
S
o MXM – Select this option if you want xPoint
to
communicate/interact with an MXM server and utilize its advanced
features. If selected, enter the required details in the following fields:
Ö Server Address – Enter the IP address of the MXM server.
Ö User Name – Enter the user name used to log into the MXM
server.
Ö User Number – Enter your user number used for identification
on the MXM server. If not entered, the MXM server will
automatically generate a number.
Ö Password – Enter the password used to log into the MXM
server.
S
o Gatekeeper – Select this option if you want xPoint
to
communicate/interact with a gatekeeper server. If selected, enter the
required details in the following fields:
Ö Server Address – Enter the IP address of the gatekeeper
server.
Ö User Name – Enter the user name used to log into the
gatekeeper server.
xPoint Standard (S) Ver. 1.5 User Guide • 57
Page 59
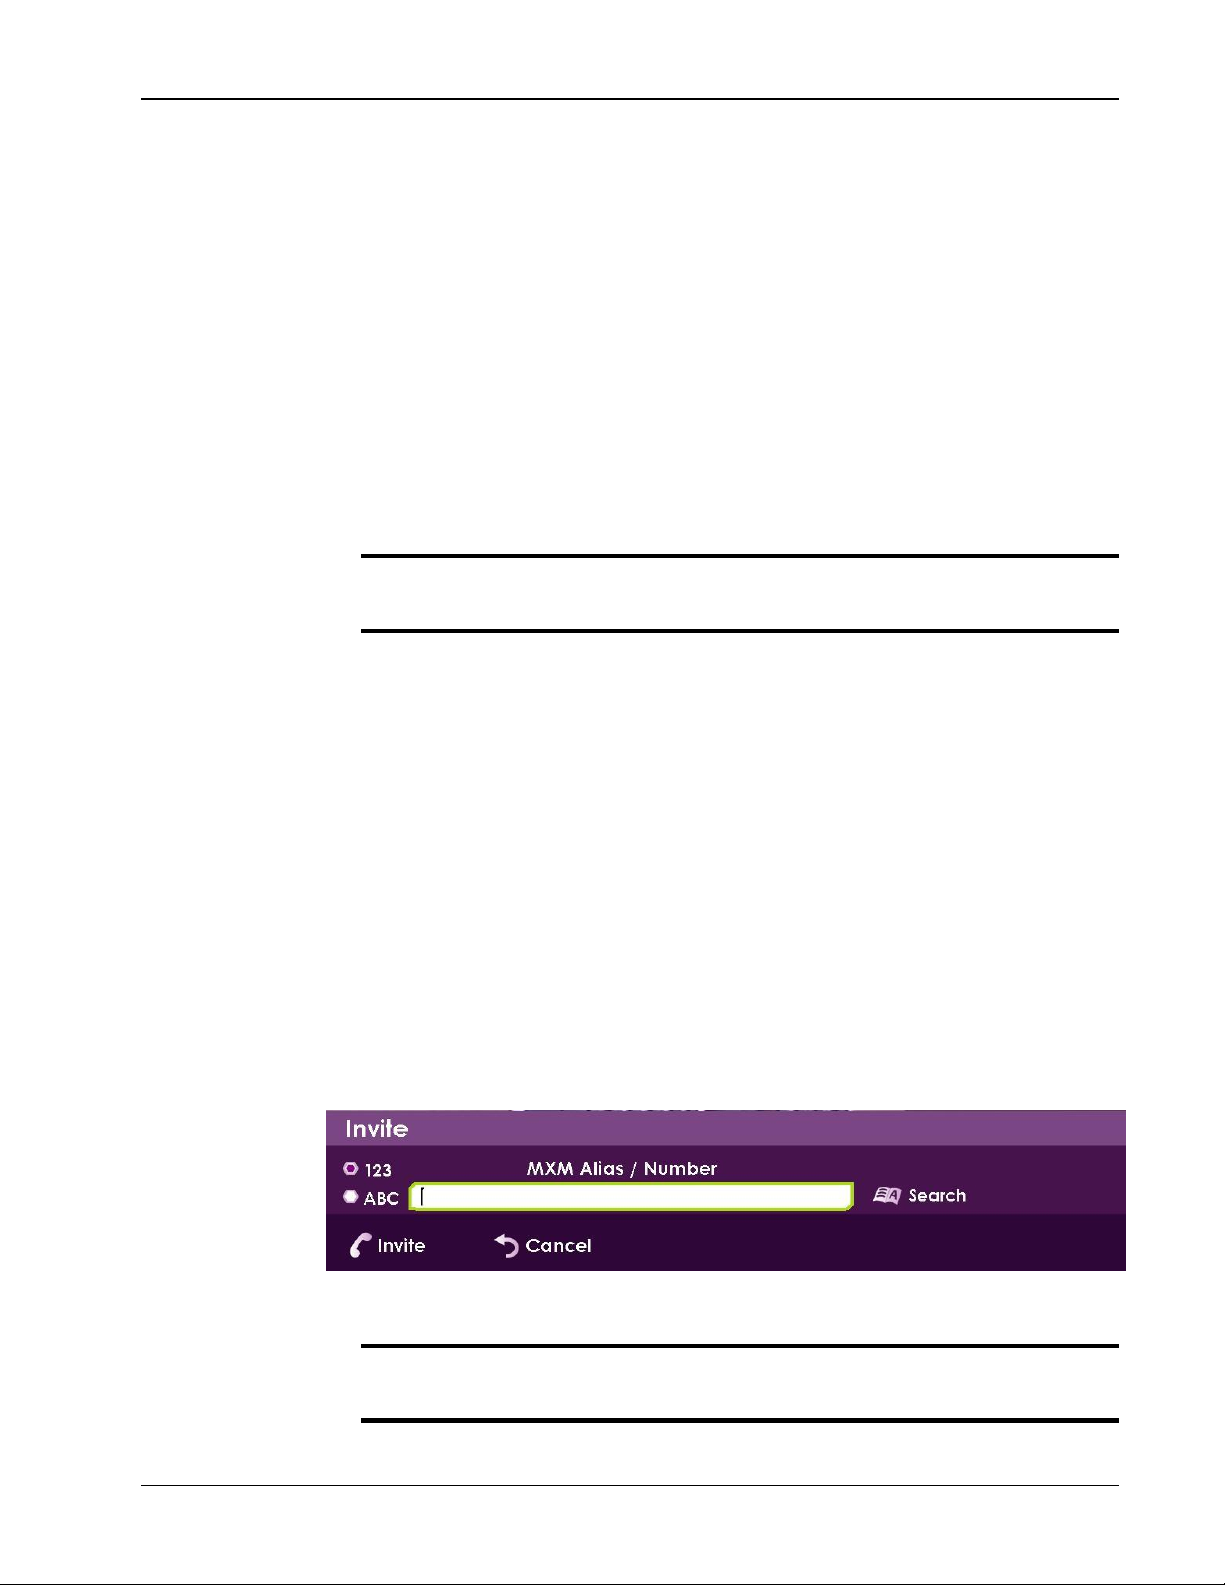
Chapter 7. Advanced Settings H.323 Protocol Settings
Ö User Number – Enter the user number used for identification
on the gatekeeper server.
o Enable Outgoing DNS Addressing – Select this checkbox to
enable outgoing DNS addressing.
o Enable NAT – Select this checkbox to NAT addressing.
o NAT Address – If Enable NAT is selected, enter the NAT IP
address.
o RTP – In the two boxes, set the RTP range:
Ö From – Enter the minimum RTP value.
Ö To – Enter the maximum RTP value.
3. Select Apply.
¾ Note: In MXM mode, the system administrator should configure the
LDAP settings for MXM on the server side.
To verify that MXM mode is active:
1. Press Status on the remote control and check in the displayed
information that an MXM icon appears.
2. Select Settings>Network>IP>H.323 and check the displayed
information.
The New Call IP number shows the extension number that the system
received when initiating MXM mode, which is the ID number.
Working in MXM Mode
In a point-to-point call and when MXM mode is active, you can add another
participant to the call without hanging up, i.e. – the call continues while the
additional participant is being invited.
To add participants to the call in MXM mode:
1. Select MXM>Invite; the Invite call window is displayed.
Figure 24. Entering MXM Alias/Number
¾ Note: the MXM>Invite option is available on the menu only when MXM
mode is active.
xPoint Standard (S) Ver. 1.5 User Guide • 58
Page 60
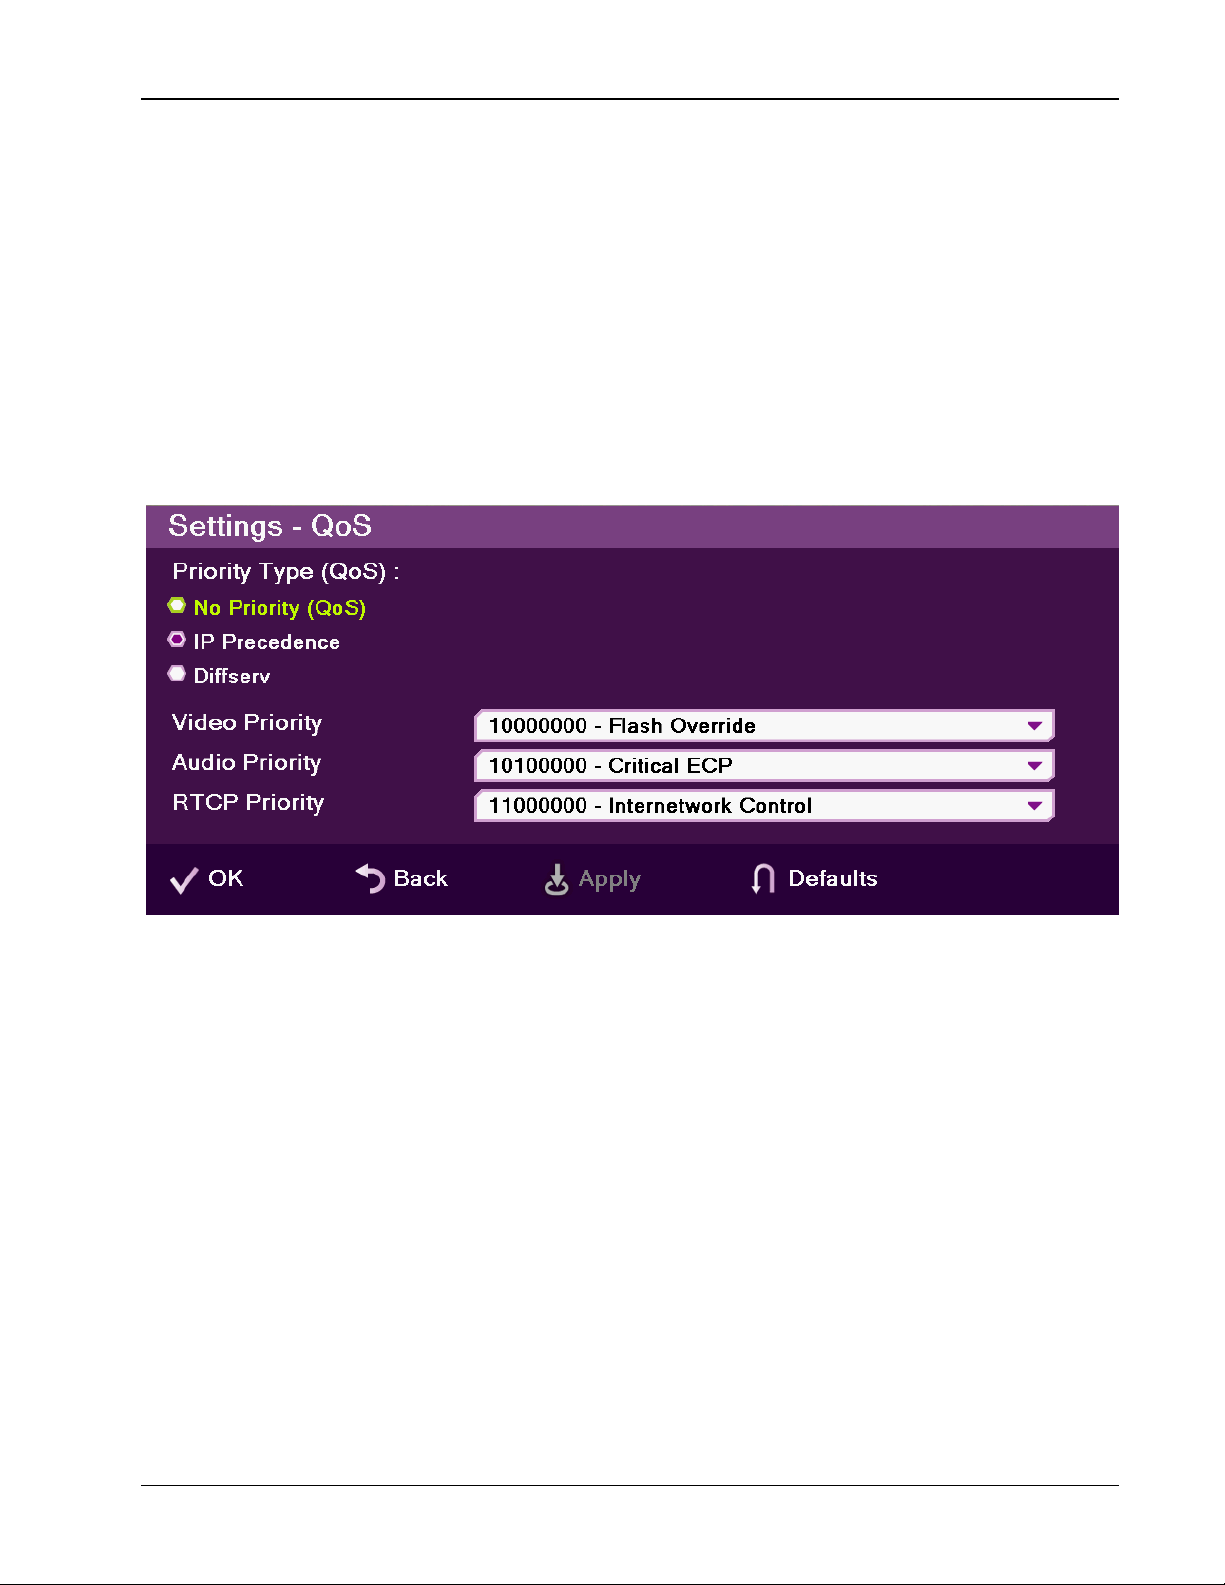
Chapter 7. Advanced Settings Quality of Service (QoS) Settings
2. Type in the participant MXM alias/IP number, and select Invite; the
call is connected.
Quality of Service (QoS) Settings
The Quality of Service (QoS) settings allow you to define the priorities by which
data packets are handled, thus adjusting the quality and priority of video/audio
on different networks with different bandwidth capacities, traffic loads, or other
limitations.
To configure the QoS definitions:
1. Select Settings>Network>IP>QoS; the QoS Settings window
appears.
Figure 25. QoS Settings Window
2. In the QoS Settings window, set the following options and parameters:
o No Priority (QoS) – Select this option if QoS prioritization is not
required on your network. When selected, this option disables all
other options in the QoS Settings window.
o IP Precedence – Select this option if you want to prioritize traffic
according to IP precedence. When selected, this option makes
available the following settings:
Ö Video Priority –Select the video traffic prioritization method
that best suits your network: Flash Override, Flash,
Immediate, Priority, or Routine.
Ö Audio Priority – Select the audio traffic prioritization method
that best suits your network: Critical ECP, Flash Override,
Flash, Immediate, or Priority.
xPoint Standard (S) Ver. 1.5 User Guide • 59
Page 61

Chapter 7. Advanced Settings License Settings
Ö RTCP Priority – Select the RTCP traffic prioritization method
that best suits your network: Interwork Control, Critical
ECP, Flash Override, Flash, and Immediate.
o Diffserv – Select this option if you want to prioritize traffic
according to Diffserv parameters. When selected, this option makes
available the following settings, with parameters :
Ö Video Priority – Select the video traffic prioritization method
that best suits your network, from Probability of Timely
Forwarding at level 0 to level 7.
Ö Audio Priority – Select the audio traffic prioritization method
that best suits your network, from Probability of Timely
Forwarding at level 0 to level 7.
Ö RTCP Priority – Select the RTCP traffic prioritization method
that best suits your network, from Probability of Timely
Forwarding at level 0 to level 7.
3. Select Apply.
License Settings
You can check your xPointS license and functionality details, which were
preconfigured at the factory based on your product ordering options.
To view the license settings:
1. Select Settings>General>License; the License Settings window
appears.
2. In the License Settings window, the following details are shown:
o Software Version – The software and firmware versions installed
o Features list – Only the selected (in a checkbox) and grayed-out
3. Select OK to close the window.
are:
S
unit.
on the xPoint
features are licensed and fully functional. The optional features for
xPoint
Ö ISDN
Ö Laptop Sharing Support
Ö MCU
Ö Recording/Streaming
S
ISDN Settings
ISDN (Integrated Services Digital Network) is a protocol that provides video
conferencing capabilities over telephone lines. It must be configured if the system
is connected through the ISDN infrastructure.
xPoint Standard (S) Ver. 1.5 User Guide • 60
Page 62
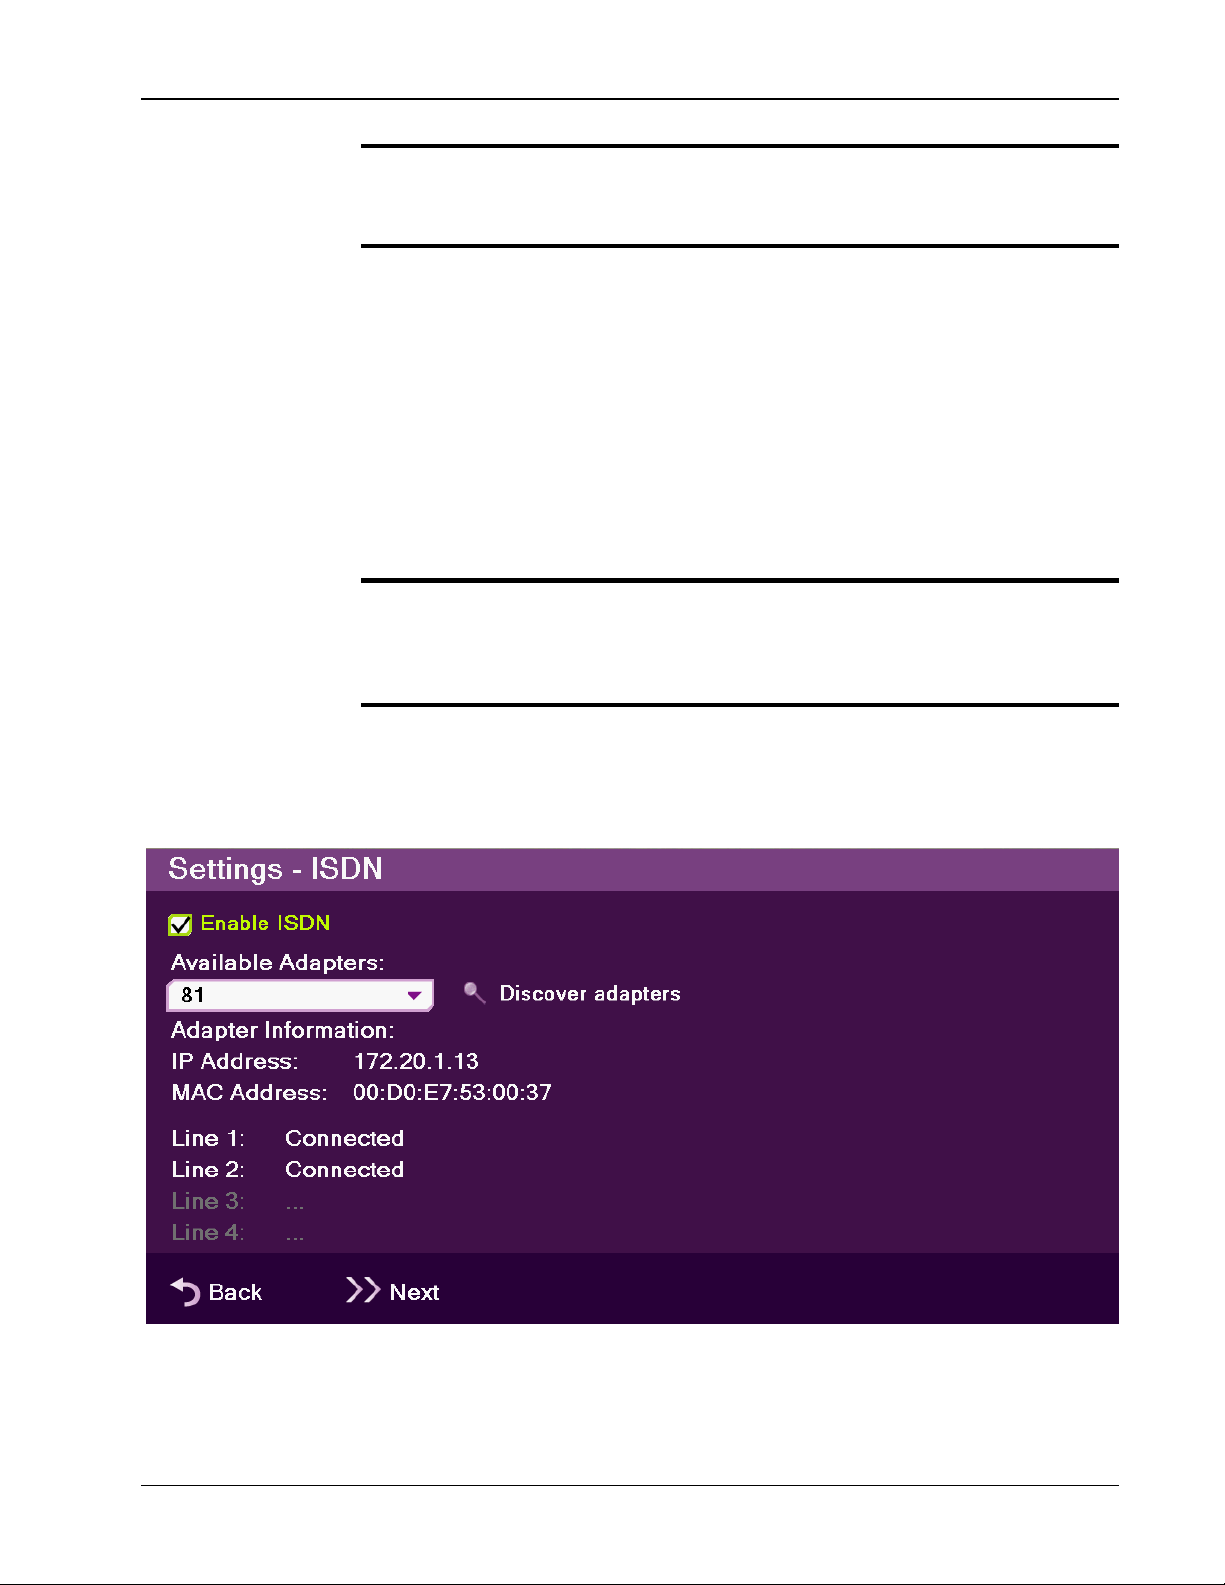
Chapter 7. Advanced Settings ISDN Settings
¾ Note: the ISDN functionality is available only if you purchased a license
code and the required peripherals for it . You can skip this section if you
did not purchase the ISDN option and if you do not use ISDN lines.
xPointS can register to an ISDN point in two ways:
Via a cross-cable from xPoint
S
ISDN connector to the ISDN point
Via the IP LAN.
The ISDN wizard enables connection to ISDN based networks, using up to 4
ISDN BRI lines, reaching connection bandwidth of up to 512 kbps.
To configure ISDN settings:
1. Select Settings>Network>ISDN; the ISDN Settings configuration
wizard appears.
¾ Note: the ISDN configuration wizard includes two or three steps,
depending on the switch type used, which is country dependant. The
configuration wizard guides you through the steps depending on your
selection of device and switch types.
2. The ISDN Connection wizard screen includes the following properties:
o Enable ISDN – Select this option to enable or disable ISDN
functionality. Once selected, the ISDN adapter detection may take up
to a minute.
Figure 26. ISDN Settings Window
xPoint Standard (S) Ver. 1.5 User Guide • 61
Page 63

Chapter 7. Advanced Settings ISDN Settings
o Available Adapters – Displays the list of ISDN adapters available
for this system. Click on Discover to populate the Available Adapters
list, and select the desired adapter from the list. After you select an
adapter, the Adapter Information, IP address and MAC address of
the adapter are displayed.
o Discover adapters – Select this button to scan for available ISDN
adapters.
o Adapter Information –
Ö IP Address – IP address of the ISDN adapter.
Ö MAC Address – MAC Address of the ISDN adapter.
o Line Indicators – Displays the line status after connecting:
Ö Line 1: ISDN line status for line number 1
Ö Line 2: ISDN line status for line number 2
S
Ö Line 3: Not available in xPoint
Ö Line 4: Not available in xPoint
S
3. Select Next to continue to the ISDN Lines Configuration step (see next
section: ISDN Lines Configuration).
ISDN Lines Configuration
The ISDN Lines Configuration window enables you to set the phone numbers of
up to 2 lines.
To define the ISDN phone numbers:
1. Enter the appropriate number for each field, without the area or country
code.
¾ Note: depending on the switch type you selected, an additional step may
be required. If you are not sure what numbers to enter, consult your
system administrator.
xPoint Standard (S) Ver. 1.5 User Guide • 62
Page 64
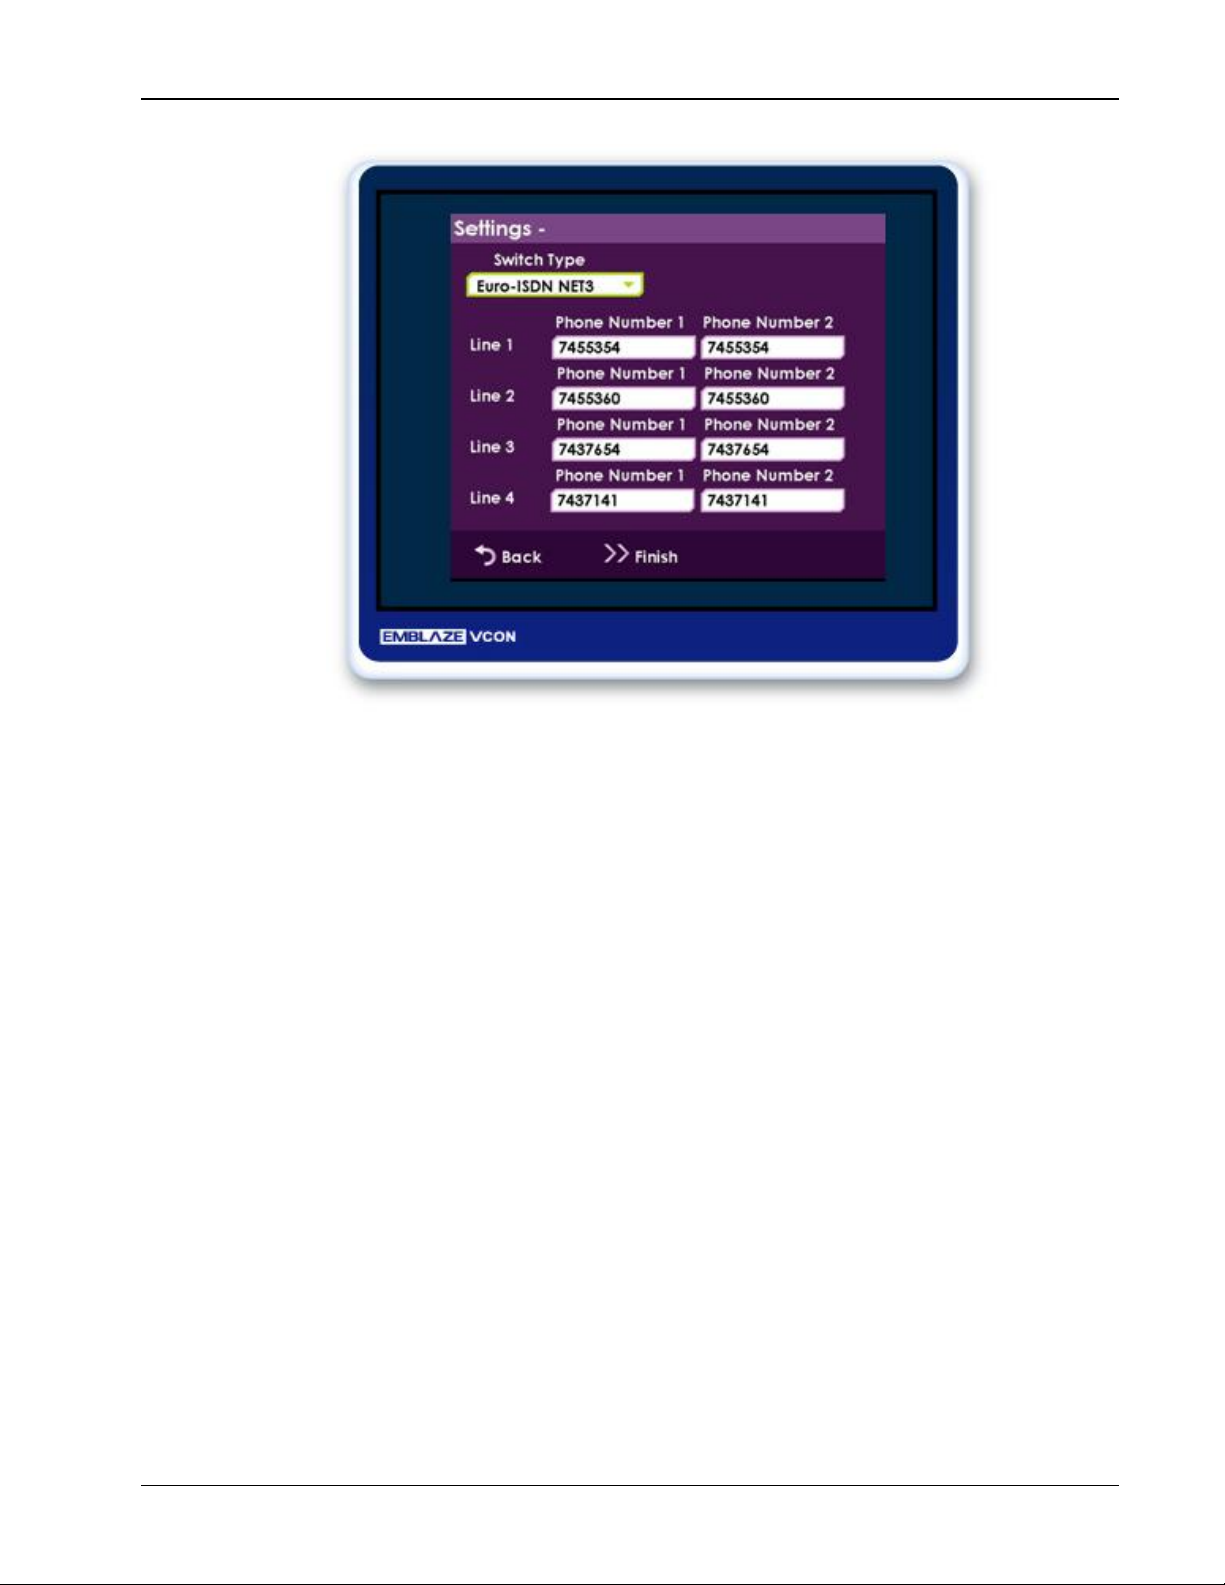
Chapter 7. Advanced Settings System Settings
Figure 27. ISDN Line Settings
Select Finish to save the ISDN lines configuration and complete the
configuration wizard.
System Settings
In the System Settings window you can configure TCP/IP networking parameters
for xPoint
To edit system settings:
1. Select Settings>Network>System; the System Settings window
appears.
S
.
xPoint Standard (S) Ver. 1.5 User Guide • 63
Page 65
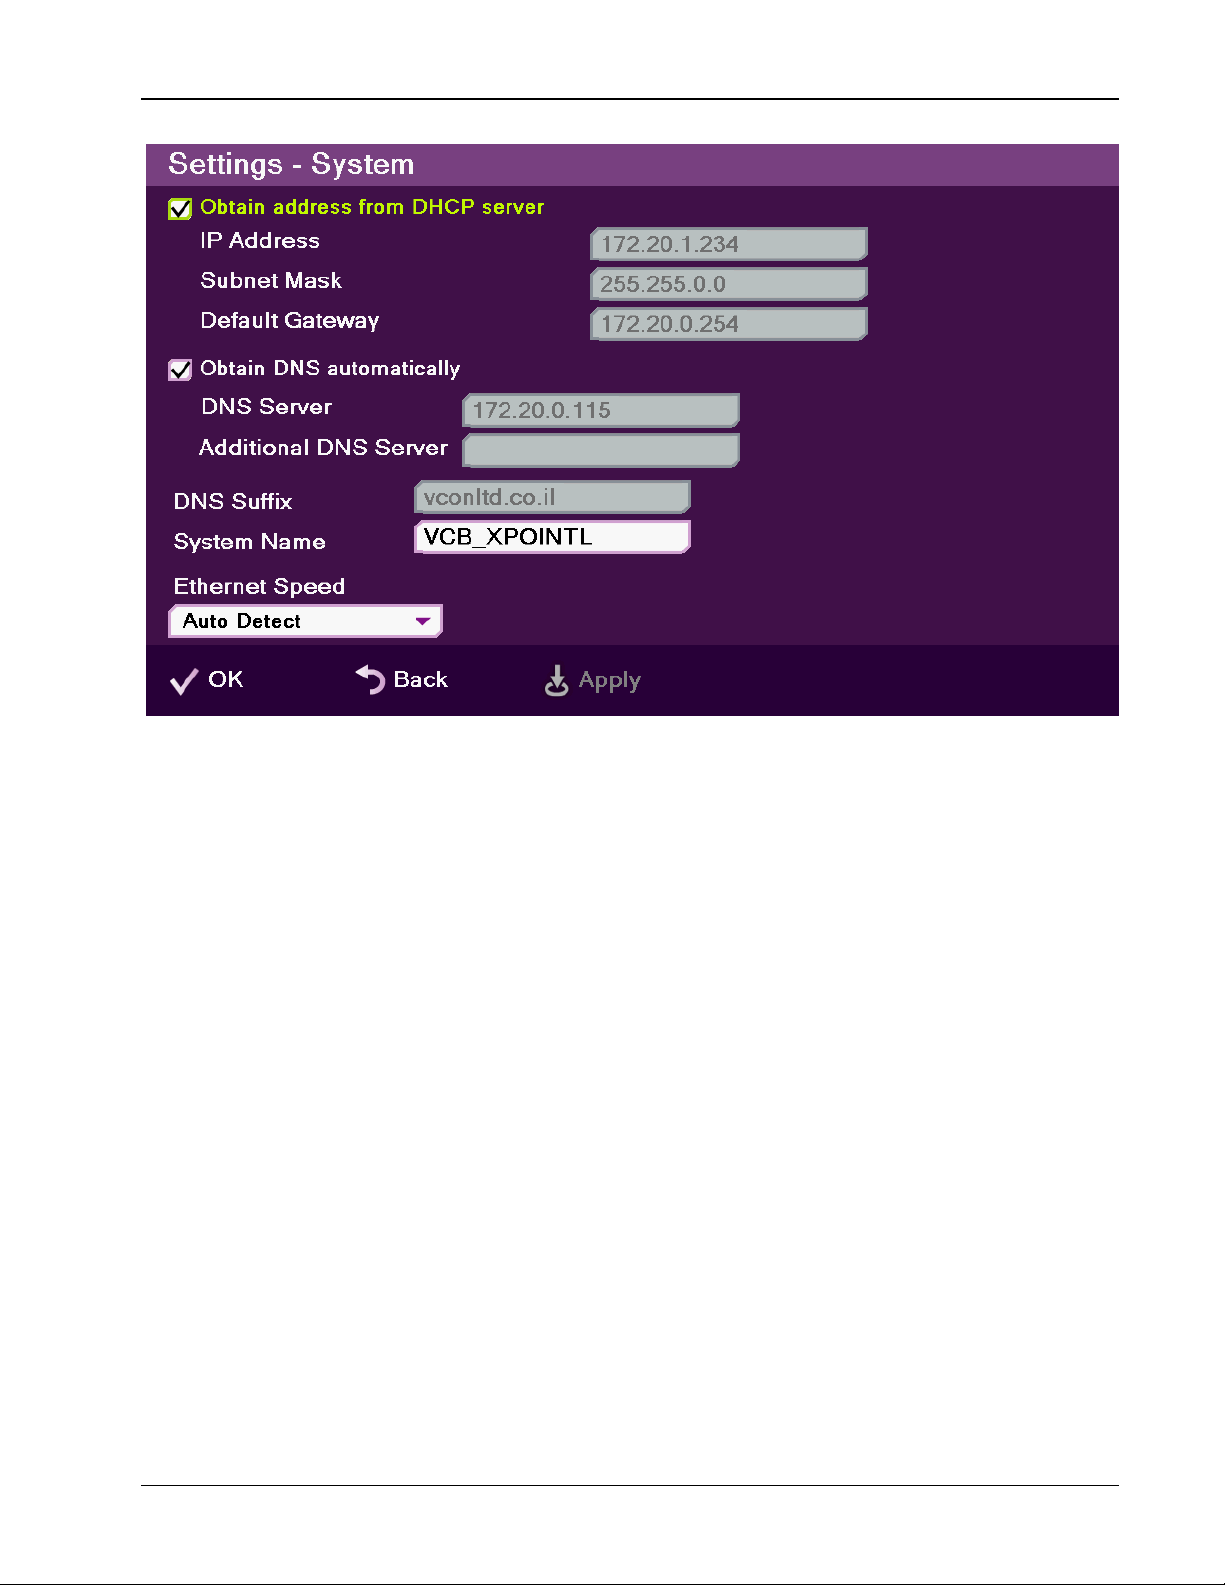
Chapter 7. Advanced Settings System Settings
Figure 28. System Settings Window
2. In the System Settings window, set the following options and
parameters
o Obtain Address from DHCP Server – Select the checkbox to
obtain an IP address from a DHCP server.
o IP Address – Set the IP address for this system. If using a DHCP
server, the address obtained from the DHCP server is displayed.
o Subnet Mask – Set the subnet mask number for your network. If
using a DHCP server, the address obtained from the DHCP server is
displayed.
o Default Gateway – Set the IP address of the default gateway
router. If using a DHCP server, the address obtained from the DHCP
server is displayed.
o Obtain DNS Automatically – Use the DHCP server to decide your
DNS server address. If you do not select Obtain address from DHCP
server, fill in the following fields:
o DNS Server – Set the IP address of the DNS server. If using a
DHCP server, the address obtained from the DHCP server is
displayed.
o Additional DNS Server – Alternative DNS server, to be used in
case the first DNS server defined can’t supply the needed services.
o DNS Suffix – Set the DNS domain suffix to be used by this system.
xPoint Standard (S) Ver. 1.5 User Guide • 64
Page 66
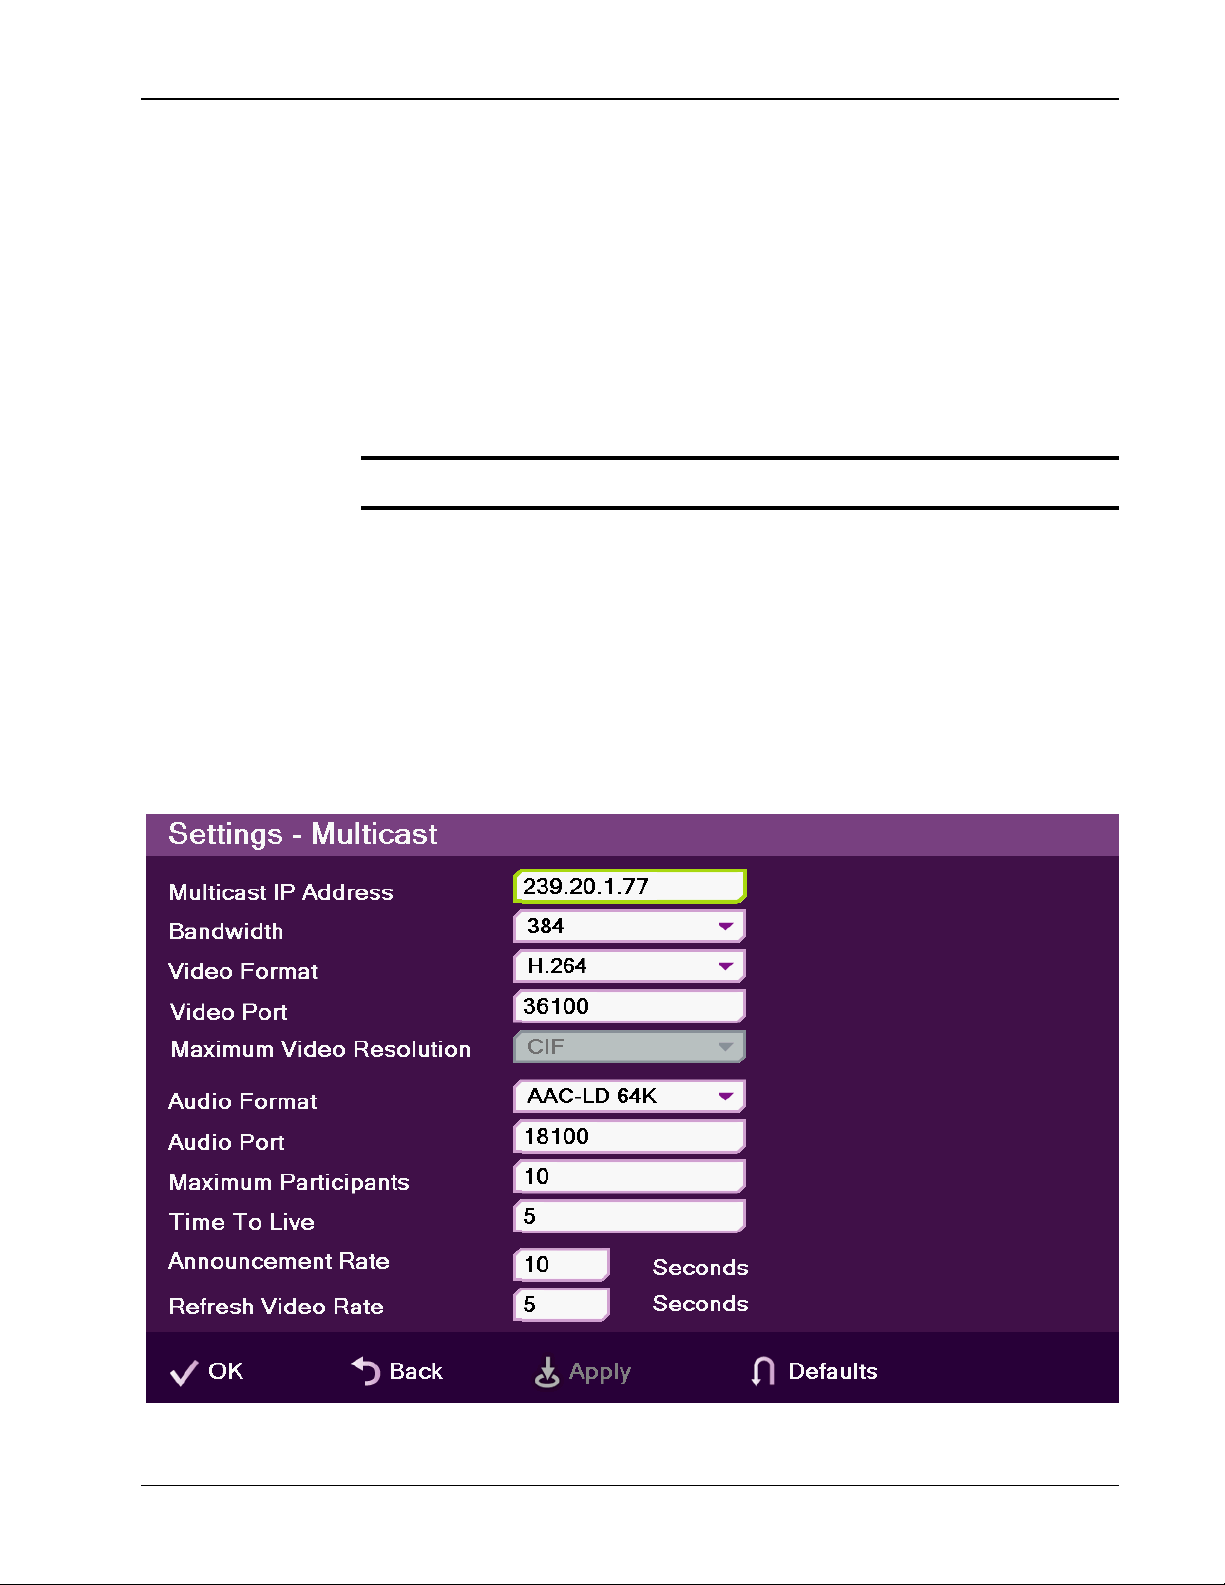
Chapter 7. Advanced Settings Multicast Settings
o System Name – Set the system DNS name used to identify the
system when using DNS dialing.
o Ethernet Speed – From the drop-down list, select the network
interface speed that matches your local LAN:
Ö Auto Detect – the link type is detected automatically
Ö 100MB Full Duplex – Set the link to 100MB full duplex
Ö 100MB Half Duplex – Set the link to 100MB half duplex
Ö 10MB Full Duplex – Set the link to 10MB full duplex
Ö 10MB Half Duplex – Set the link to 10MB half duplex.
¾ Note: modify these settings only if they are required in your network.
3. Select Apply.
Multicast Settings
The Multicast Settings window allows you to define how multicast sessions are
initiated by xPoint
To access the multicast settings
1. Select Settings>General>Network>Multicast; the Multicast
Settings window appears.
S
.
xPoint Standard (S) Ver. 1.5 User Guide • 65
Page 67

Chapter 7. Advanced Settings Recording and Streaming Settings
Figure 29. Multicast Settings Window
2. In the Multicast Settings window, set the following options and
parameters
o Multicast IP Address – IP address and gateway. The IP is dynamic
according to unit's IP. The first subgroup of the IP format
(AAA.BBB.CCC.DDD) is set to 239 according to the standard. You
can change it to any value from 224 to239, and you can also change
the rest of the sub groups (not recommended for multicast
communications).
o Bandwidth – Maximum bandwidth (in Kbps) allowed for outgoing
multicast streams.
o Video Format – The digital encoding format using during the
multicast transmission; by default is set to H.264.
o Video Port – Number of the port through which the video multicast
passes.
o Maximum Video Resolution – Select the required video
resolution from the drop-down list.
o Audio Format – The Audio codec responsible during the
transmission; by default is set to AAC-LD.
o Audio Port – Number of the port through which the audio
multicast passes.
o Maximum Participants – Maximum number of participants
allowed in an IMC session.
o Time to Live – The number of router hops allowed.
o Announcement Rate – SDP announcement rate in seconds.
o Refresh Video Rate – The video image refresh rate in multicast
streams; an interval of 5 seconds is set by default.
3. Select Apply.
Recording and Streaming Settings
You can define the local directory in which recordings should be saved, and also
define the video streaming port parameters.
To configure the recording and streaming settings:
1. Select Settings>Media; the Recording and Streaming Settings
window appears.
xPoint Standard (S) Ver. 1.5 User Guide • 66
Page 68
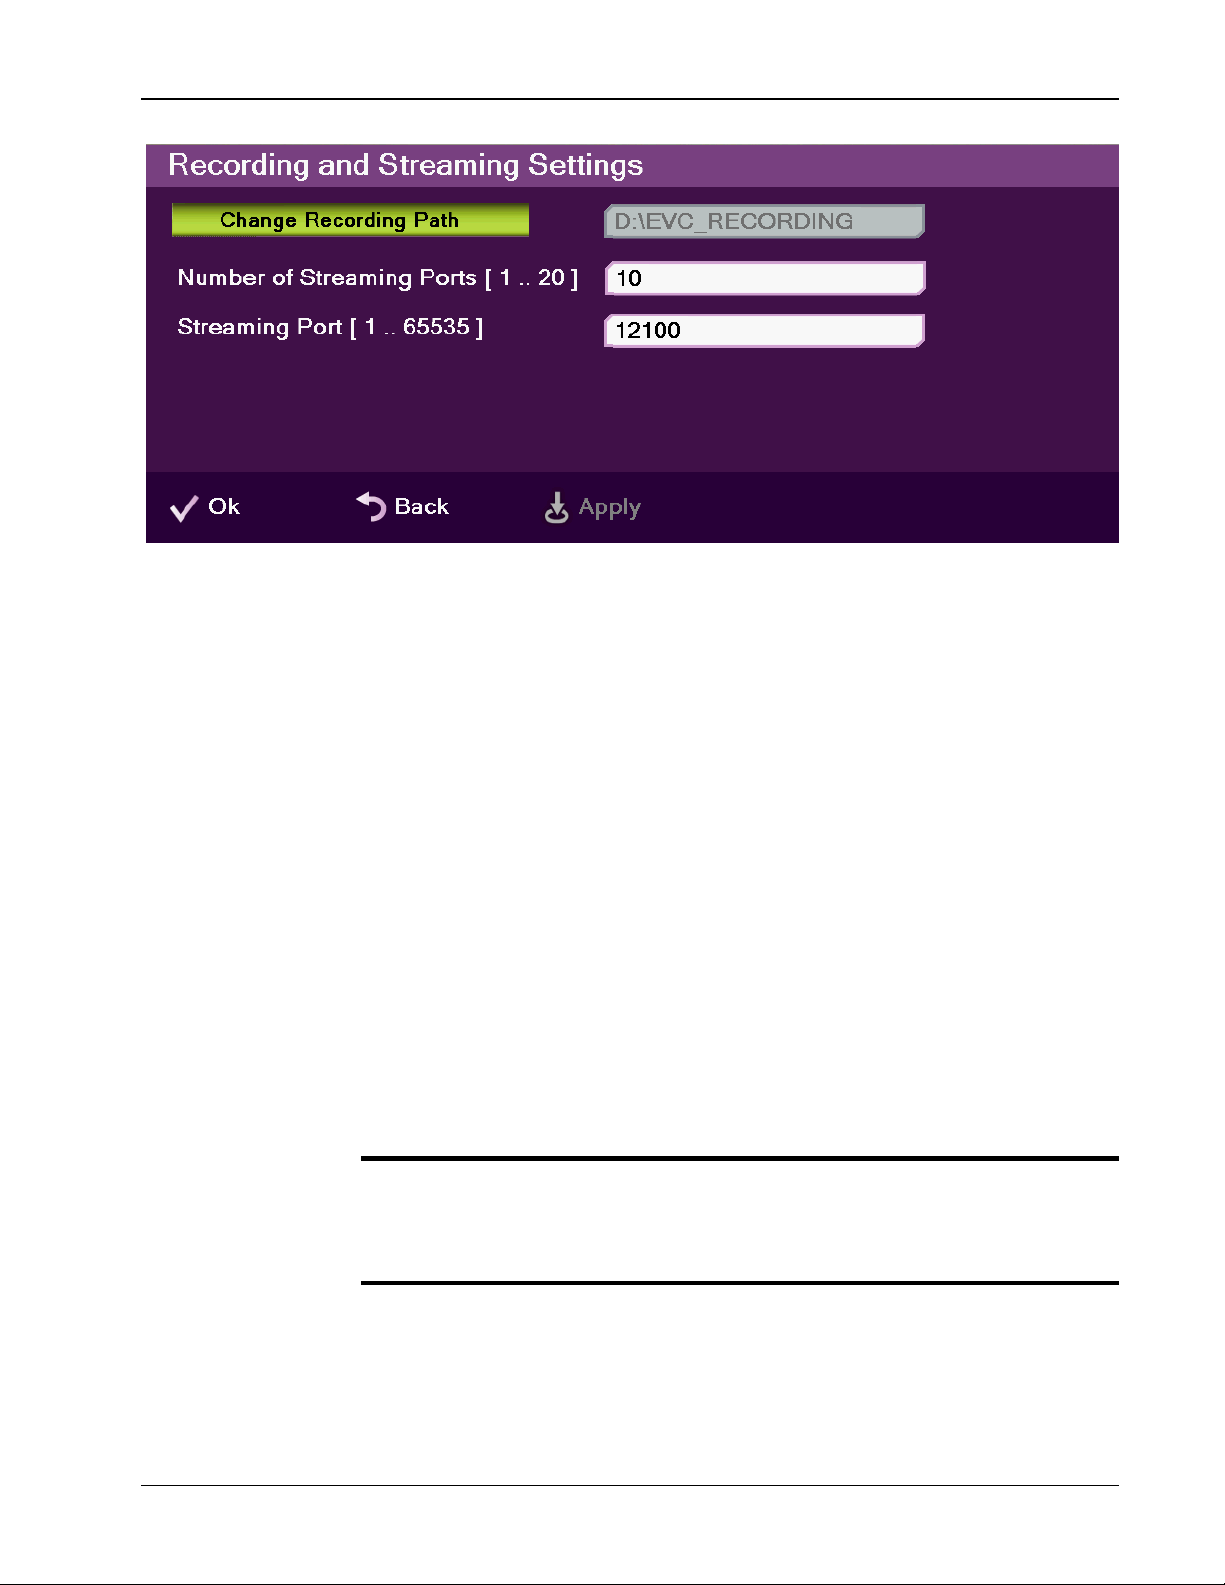
Chapter 7. Advanced Settings MCU Settings
Figure 30. Recording and Streaming Window
2. In the Recording and Streaming Settings window the following
properties can be configured:
3. Select Apply.
MCU Settings
The embedded MCU (optional feature) enables connecting up to 4 endpoints
simultaneously from various locations. This MCU capability includes the host
system and an additional 3 endpoints, one of which can be connected through
ISDN.
¾ Note: before using this functionality, please verify the licensing
o Change Recording Path – select this button to set the path of the
recording directory. This option is useful when changing the
recording location to a USB flash drive or any external storage
location.
o Number of Streaming Ports [1..20] – Enter the number of
streaming ports. The default number of streaming ports is 10.
o Streaming Port [1..65535] – Enter the streaming port number.
The default port is 12100.
capabilities of your system. Go to the license page:
Menu>Settings>General>License, and verify that the option “MCU”
is selected (√).
To configure the MCU settings:
1. Select Settings>MCU; the MCU Settings window appears.
xPoint Standard (S) Ver. 1.5 User Guide • 67
Page 69
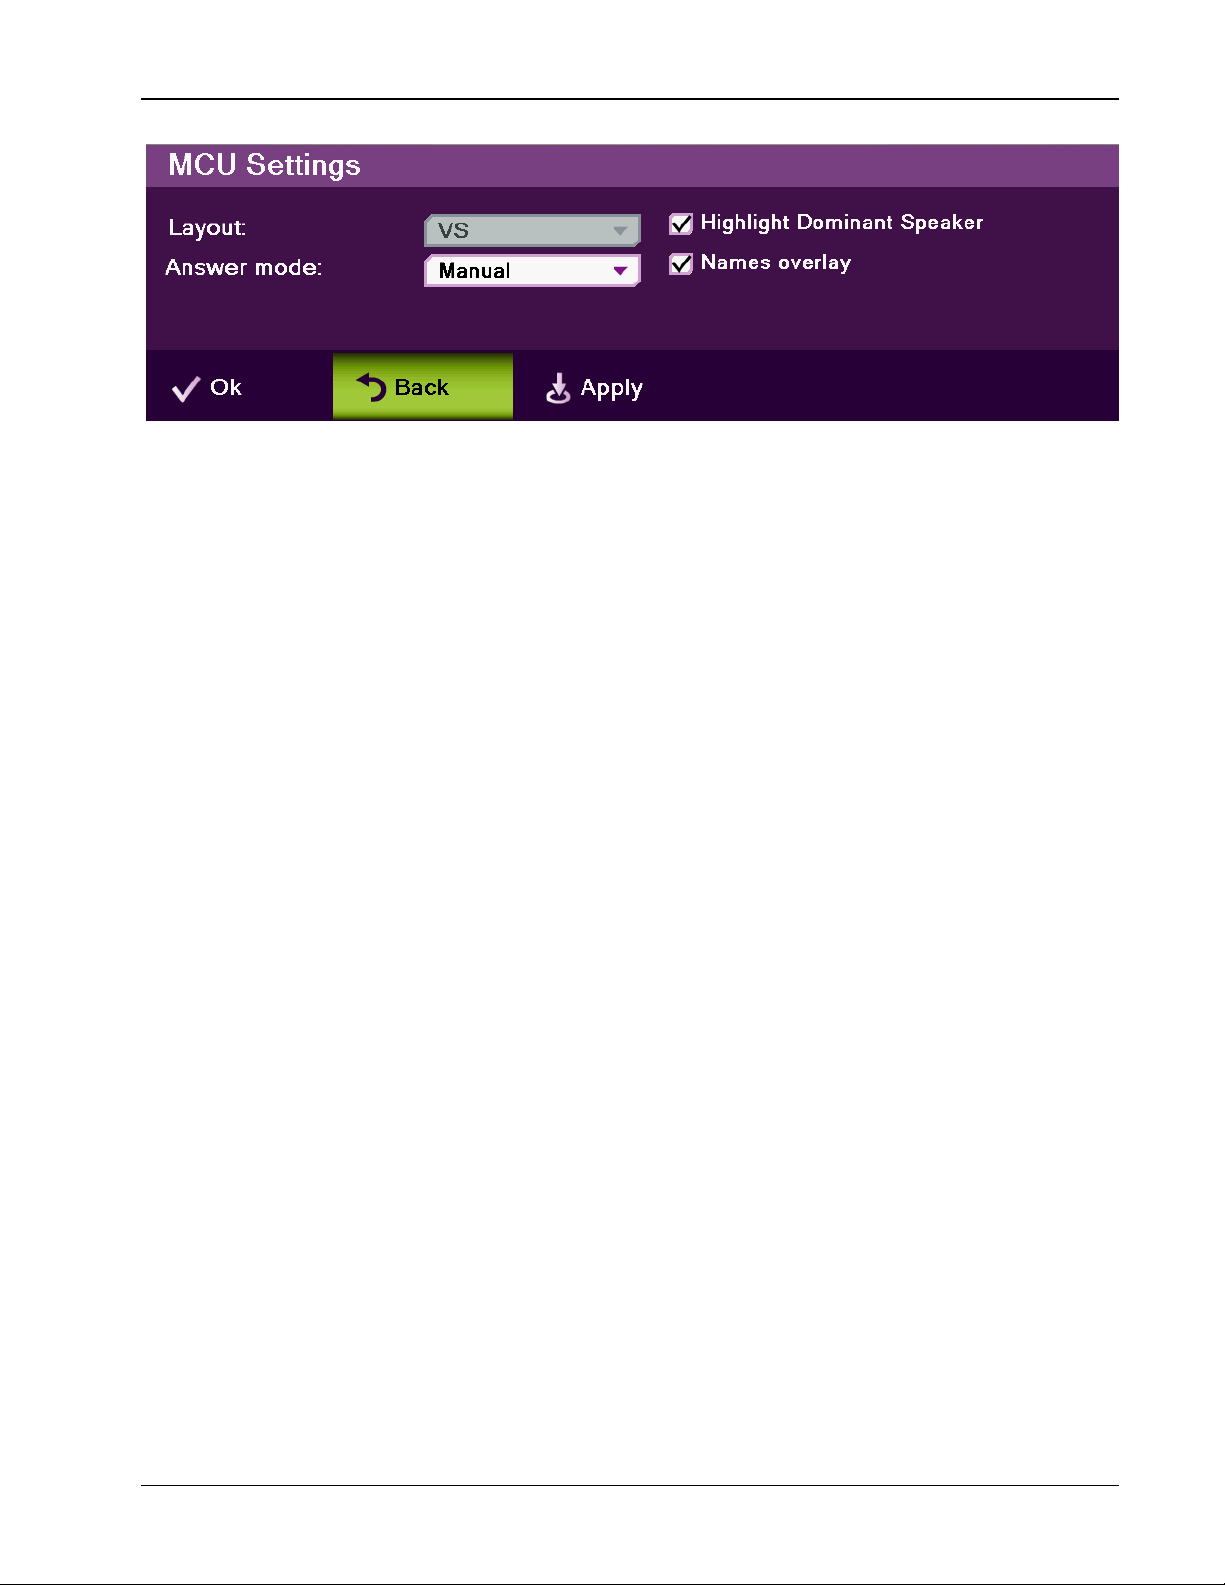
Chapter 7. Advanced Settings MCU Settings
Figure 31. MCU Settings Window
2. In the MCU window, set the following options and parameters:
o Layout – Set the default layout for a multipoint call:
Ö Auto – The system will change the layout automatically
according to the following principle: for up to 4 participants, the
2¯2 layout is used; for 5 or 6 participants, the 5+1 layout is
used; for 7 and up to 9 participants, the 3¯3 layout is used.
Ö VS (voice switched) – The video stream of the dominant speaker
is shown. The current dominant speaker sees the previous
dominant speaker.
Ö 2¯2 – The screen is divided into 4 quadrants of the same size.
Each quadrant contains an image. If there are more than 4
endpoints in the call using this layout, the dominant speaker
appears, replacing an image of a non-dominant speaker.
Ö 3¯3 – The screen is divided into 9 rectangle portions of the
same size. Each quadrant contains an image.
Ö 5+1 – This layout divides the screen into six rectangle portions.
One is larger than the other parts and contains the image of the
dominant speaker at any given time.
o Answer Mode – Set the default answer mode for the second and
subsequent calls:
Ö Accept – Automatically accept incoming calls
Ö Reject All – Automatically reject all incoming calls
Ö Manual – Display a prompt each time a call comes in
o Highlight Dominant Speaker – Display a green frame around the
quadrant of the dominant speaker, except for in the 5+1 layout.
o Names Overlay – Display the remote station name overlaid on
each participant image.
3. Select Apply.
Incoming calls will be answered using the settings you configured.
xPoint Standard (S) Ver. 1.5 User Guide • 68
Page 70
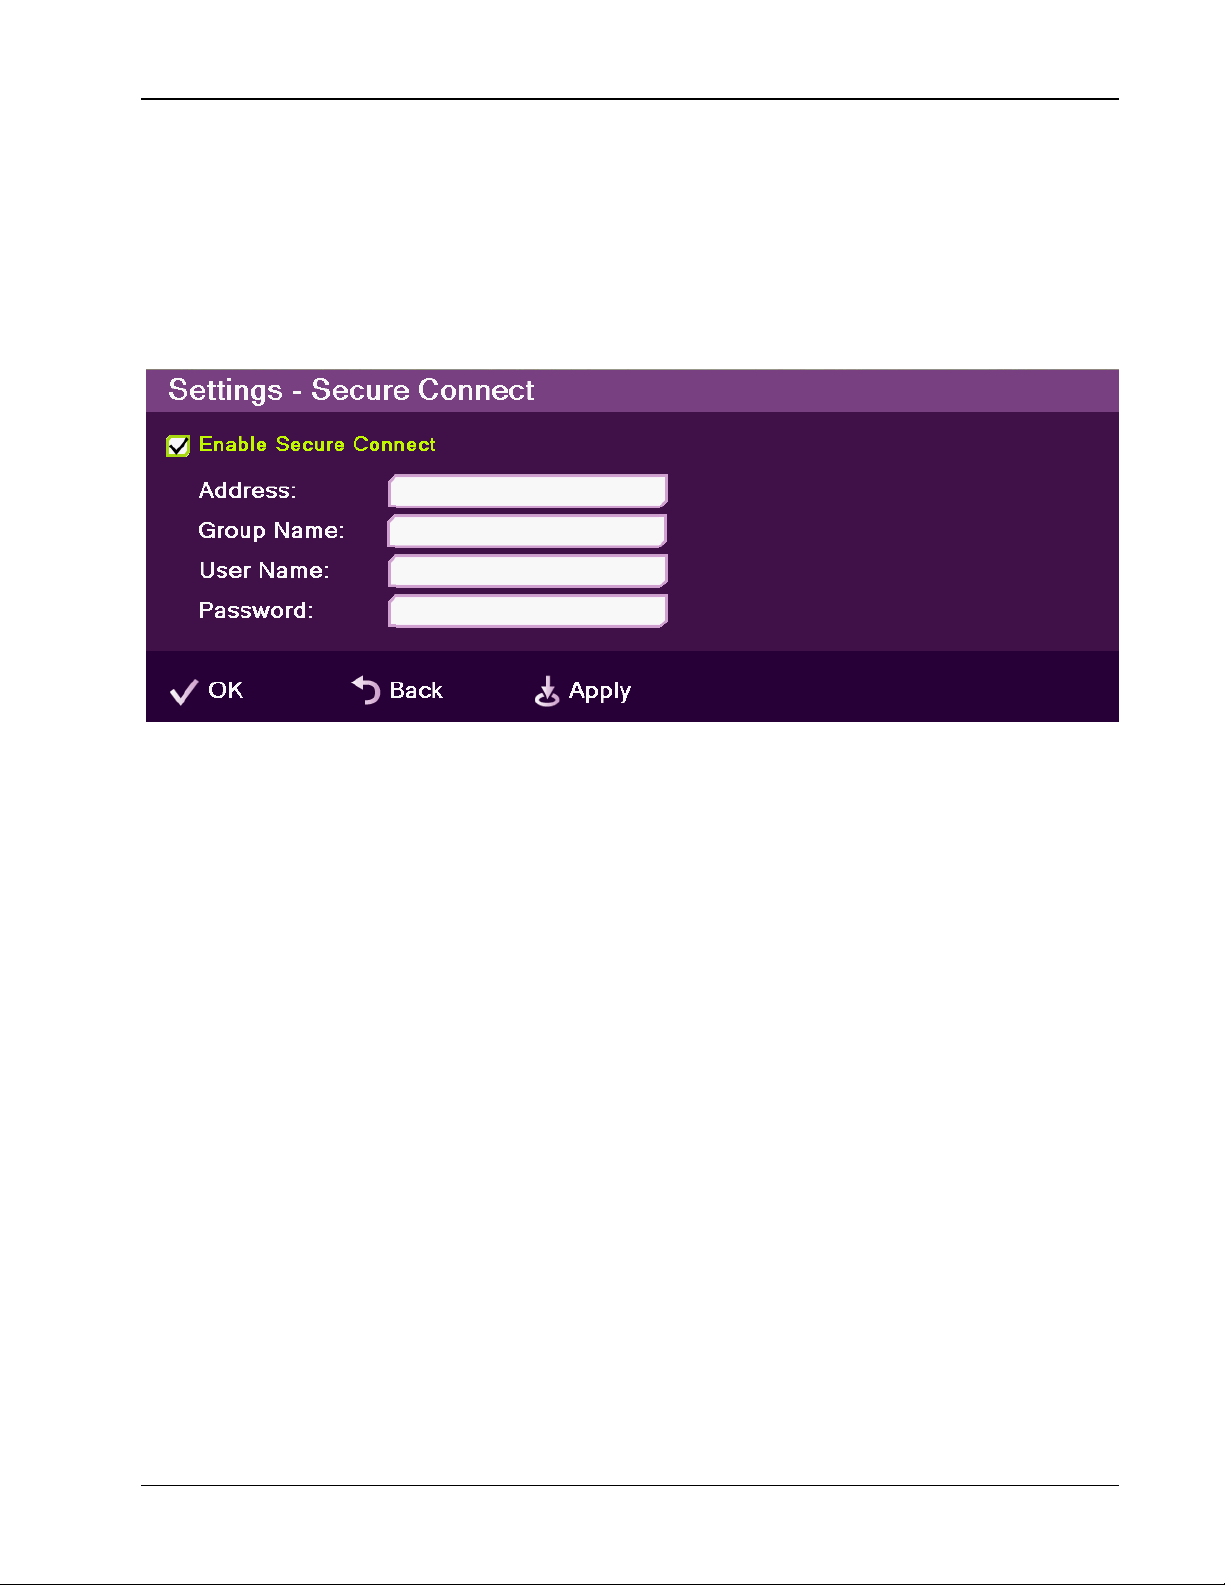
Chapter 7. Advanced Settings Secure Connect Settings
Secure Connect Settings
If required, you can configure a secure IP-based workgroup through which
xPoint
To set a secure workgroup connection:
S
will communicate.
1. Select Settings>Network>IP>Sec Connect; the Secure Connect
window appears.
Figure 32. Secure Connect Settings Window
2. Select the Enable Secure Connect checkbox; the following fields
become available:
o Address – Enter the IP address of the secure workgroup’s server
o Group Name – Enter the workgroup’s name
o User Name – Enter the user name for logging into the workgroup
server
o Password – Enter the password for logging into the workgroup
server.
3. Select Apply.
xPoint Standard (S) Ver. 1.5 User Guide • 69
Page 71

Chapter 8. Web Access and
Management
In this Chapter
This chapter explains how to access xPointS via a browser and use the Web-based
GUI for viewing sessions/files, and configuring the unit from a remote location or
via the LAN.
The Web interface includes all the options that are available via the regular onscreen GUI, as well as some additional configuration options that are not
available via the regular GUI.
Since the user options shared by both GUIs are generally the same, this chapter
focuses mainly on the exclusive Web options, and includes the following sections:
Accessing the xPointS Unit via a Browser
Viewing a Stream Session
Viewing a Multicast Videoconference
Importing/Exporting the xPointS License
Viewing the Recording Archive
Sending Running Text in a Call
Viewing Call Status
Performing System Upgrade
Performing System Restore.
Accessing the xPointS Unit via a Browser
You can access xPointS via a standard Web browser from any remote location or
from your LAN.
S
¾ Note: the current Web version of xPoint
Explorer 6 (or newer) only.
xPoint Standard (S) Ver. 1.5 User Guide • 70
supports Microsoft Internet
Page 72
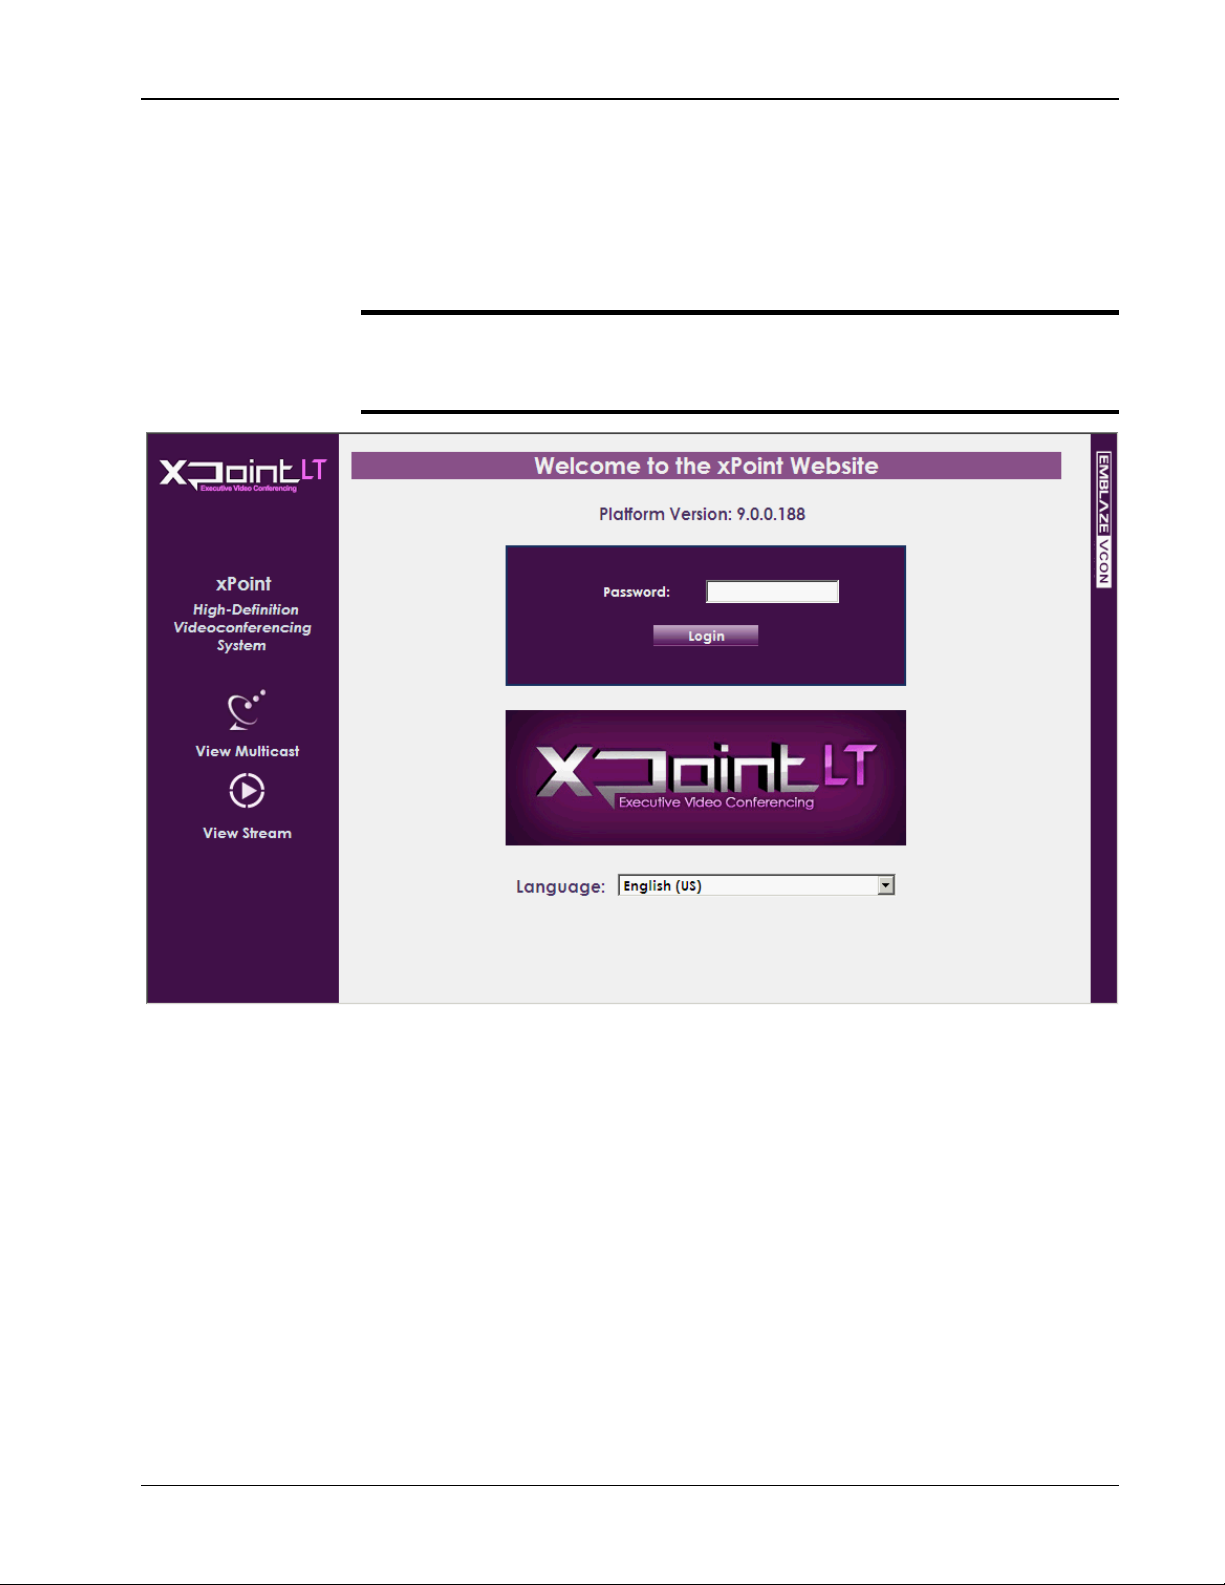
Chapter 8. Web Access and Management Viewing a Stream Session
To access xPointS via a browser:
1. Open your Internet Explorer browser.
2. In the browser’s address bar, type the direct IP address of the xPoint
unit; the xPoint
S
Web login page appears. For example:
S
http://172.100.100.25
S
¾ Note: if you do not now know the IP address of the xPoint
unit, request
assistance from a user in proximity to the unit, who can check the unit’s
IP address as explained in Displaying System Information.
Figure 33. Web Login Page
3. If a password was set for Web access (see Administration Settings): in
the Password field, enter your password for accessing the
management options, and then click Login.
If the password is authenticated, the management options page appears.
Viewing a Stream Session
You can view in your browser any stream that has started on xPointS. The stream
may be of whatever is currently being captured by the video camera and
microphone that are connected to xPoint
The stream is viewed in the browser using Window Media Player embedding.
xPoint Standard (S) Ver. 1.5 User Guide • 71
S
.
Page 73

Chapter 8. Web Access and Management Viewing a Multicast Videoconference
¾ Note: viewing a stream does not require you to enter your password and
you do not have to log in.
To view a stream session:
1. Open your Internet Explorer browser.
S
2. In the browser’s address bar, type the direct IP address of the xPoint
S
unit; the xPoint
Web login page appears.
3. Click View Stream; a new browser window opens and displays the
stream on a page with Windows Media Player embedded to it.
Viewing a Multicast Videoconference
You can view in your browser an ongoing multicast videoconference that has
started via the xPoint
S
unit.
The multicast videoconference is viewed in the browser using Window Media
Player or Apple QuickTime plug-in embedding.
¾ Note: viewing a multicast videoconference does not require you to enter
your password and you do not have to log in.
To view a stream session:
1. Open your Internet Explorer browser.
2. In the browser’s address bar, type the direct IP address of the xPoint
S
unit; the xPoint
Web login page appears.
3. Click View Multicast; a new browser window opens and displays the
videoconference on a page with Windows Media Player or QuickTime
embedded to it.
Importing/Exporting the xPointS License
Some features and functionalities in xPointS require licensing, and are activated
with a license key that you must enter and save to your xPoint
To enter and save a license to your xPoint
S
unit:
S
unit.
S
1. After logging in, click Configuration>Options>License; the License
page appears.
xPoint Standard (S) Ver. 1.5 User Guide • 72
Page 74
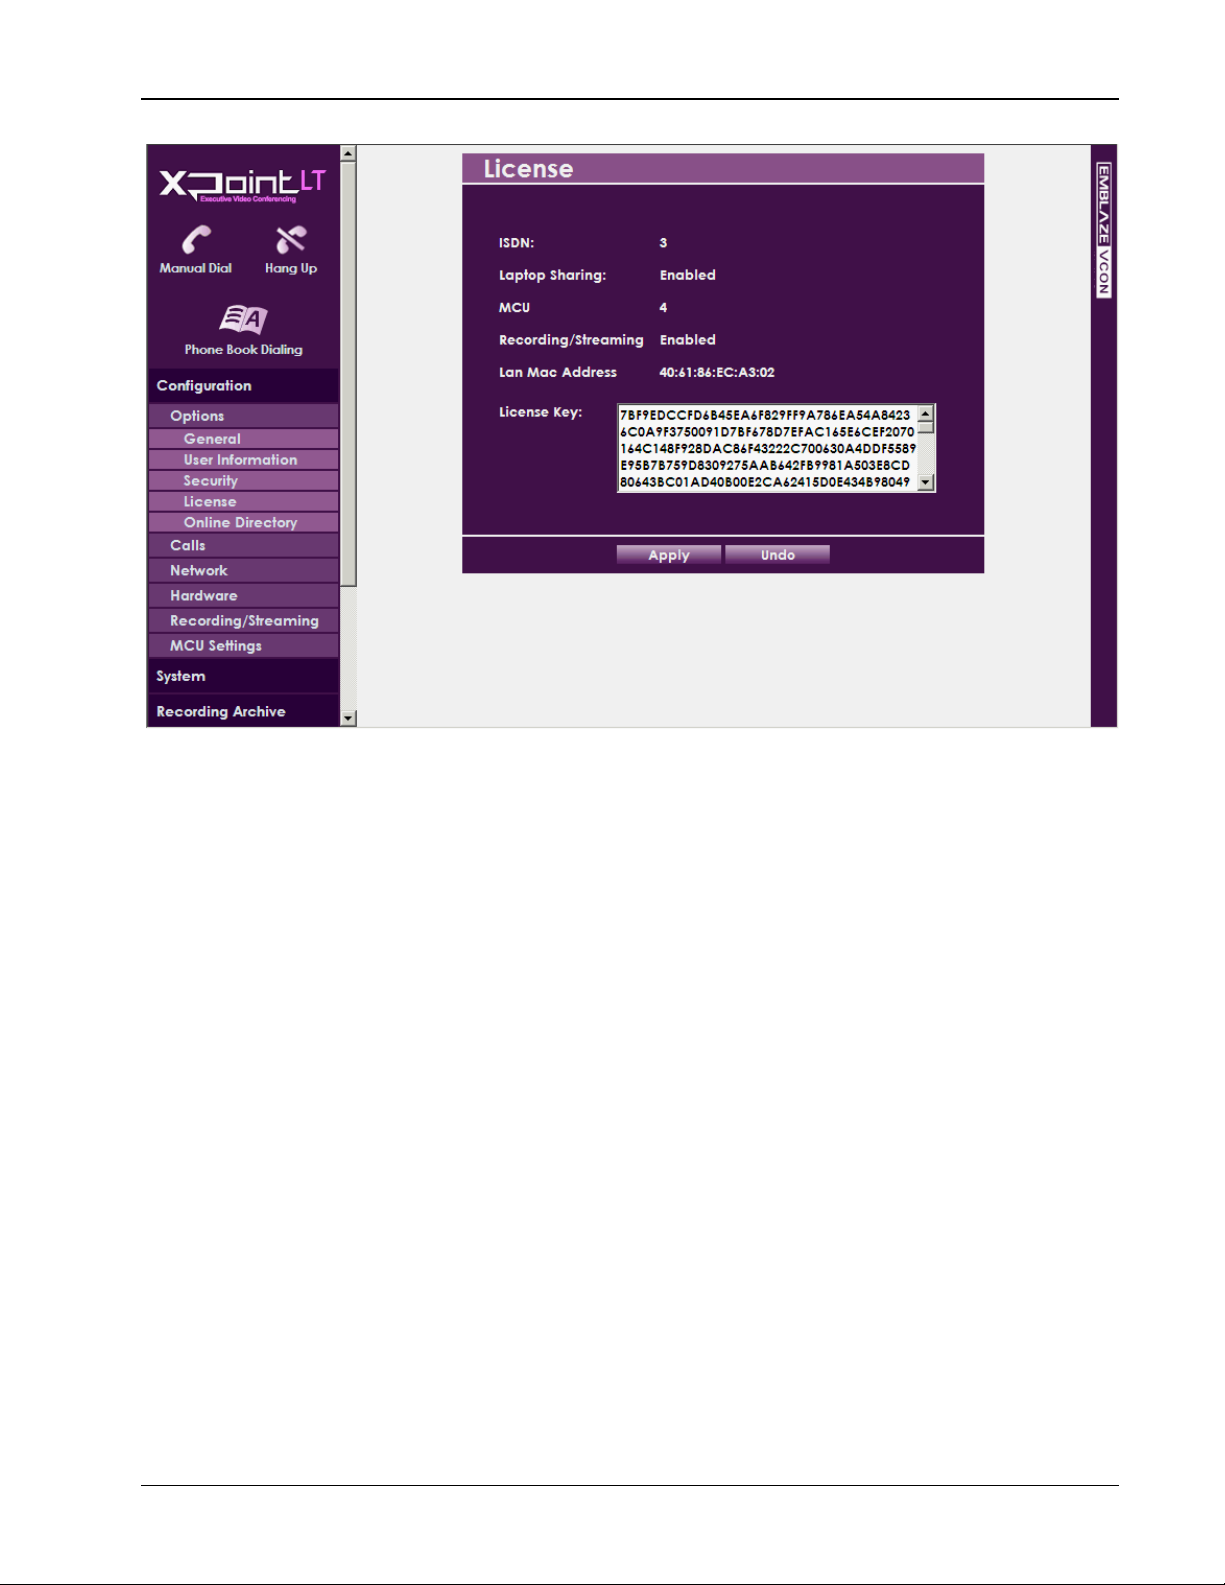
Chapter 8. Web Access and Management Viewing the Recording Archive
Figure 34. License Page
2. Copy and paste the license key (a long text-based string) that you
received from Emblaze-VCON into the License Key text box, and then
click Apply.
Once the license key is applied, you can view which features/functionalities
are available:
o ISDN – Number of ISDN lines available for use.
o Laptop Sharing – Indicates whether the laptop sharing
functionality is enabled or disabled.
o MCU – Maximum number of endpoints that can participate in
videoconferences using the embedded MCU.
o Recording/Streaming – Indicates whether the recording and
streaming functionalities are enabled or disabled.
The unit’s LAN MAC address is also displayed.
Viewing the Recording Archive
You can view the list of recordings that are stored in the xPointS recording
directory, and you can also delete recordings that are no longer needed.
xPoint Standard (S) Ver. 1.5 User Guide • 73
Page 75
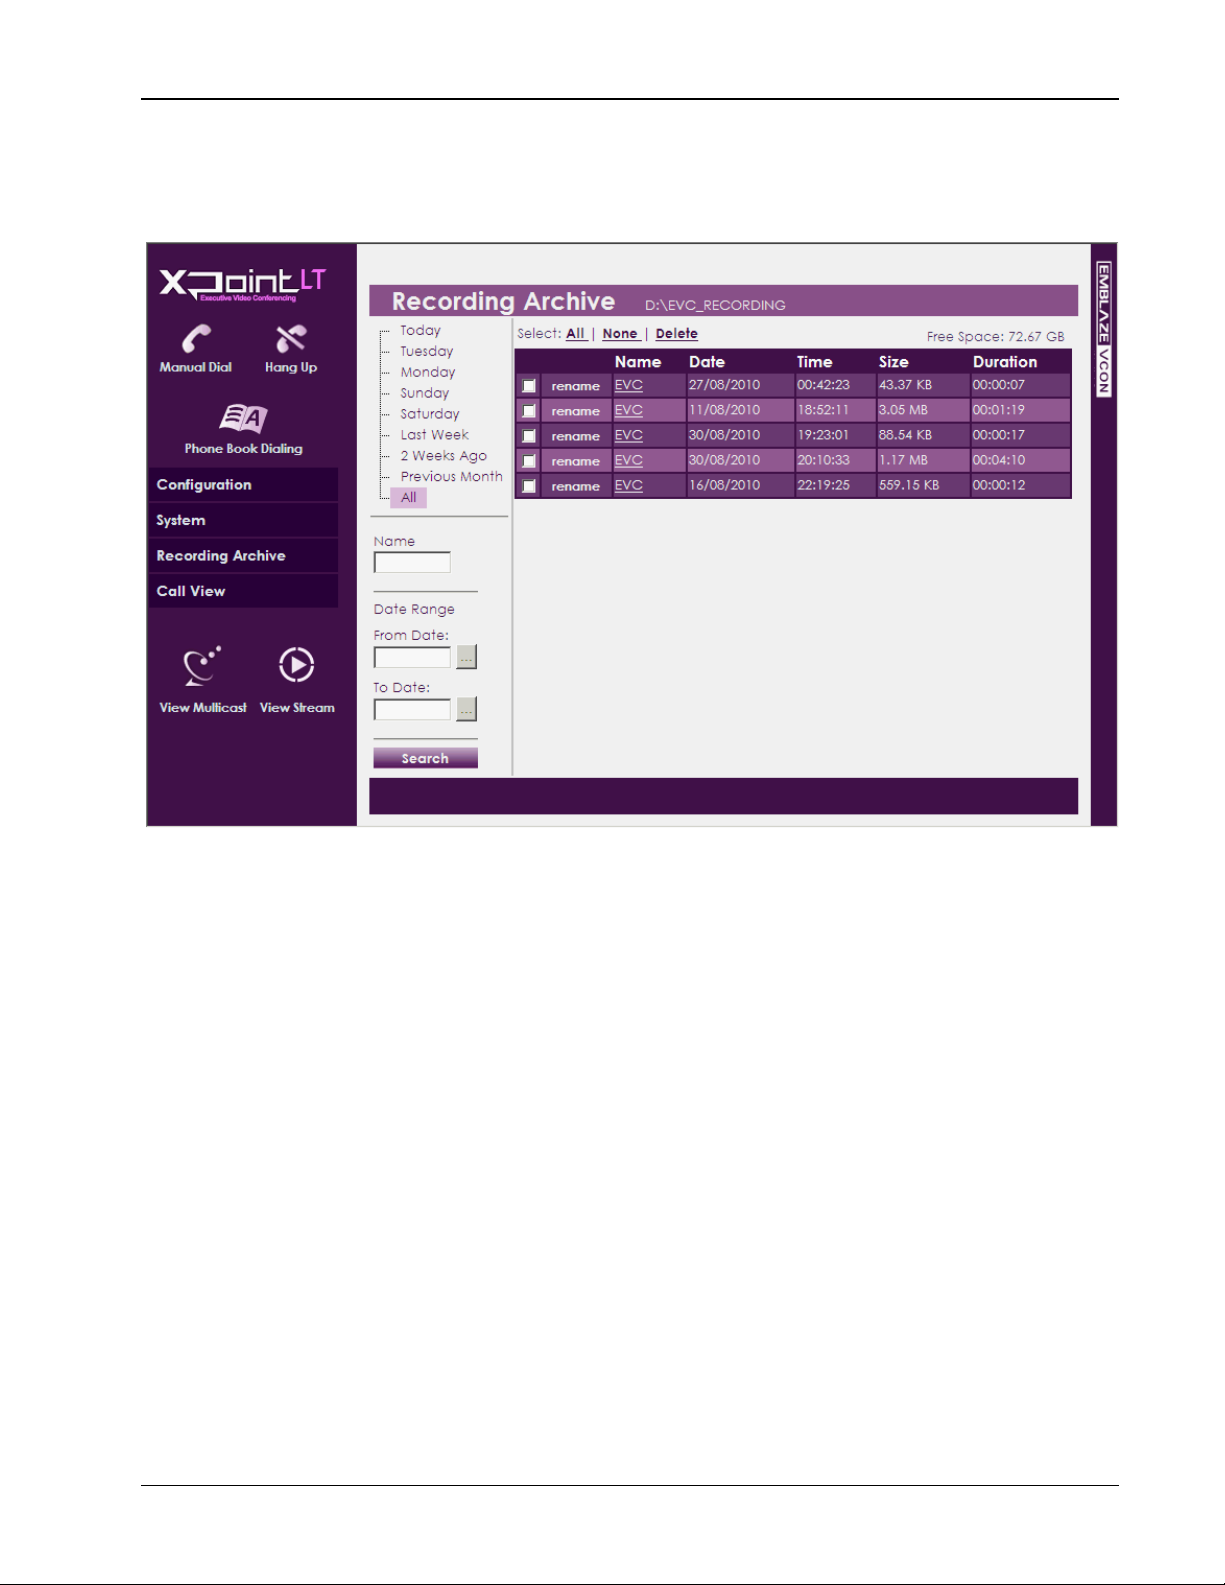
Chapter 8. Web Access and Management Viewing the Recording Archive
To view the list of recordings:
1. After logging in, click Recording Archive; the Recording Archive page
appears.
Figure 35. Recording Archive Page
2. Choose which recordings you would like to view by using the following
filtering options:
o Today – Click to display only the recordings that were saved in the
current day.
o Specific day of this week – Click any other day of the current
week to display the recordings that were saved on that specific
weekday.
o Last week – Click to display only the recordings that were saved last
week.
o 2 Weeks Ago – Click to display only the recordings that were saved
two weeks ago.
o Previous Month – Click to display only the recordings that were
saved in the previous month.
o All – Click to display the entire archive of recordings that are saved
S
in the xPoint
recording directory. The directory path is shown in the
title line above the list.
o Name – If you want to search for a specific recording name, enter
the name in this text box and then click the Search button below.
xPoint Standard (S) Ver. 1.5 User Guide • 74
Page 76

Chapter 8. Web Access and Management Sending Running Text in a Call
o From Date/To Date – Use these boxes to define a date range for
the recordings that you want to display on the list. Only the
recordings that were saved in the defined range will be displayed
once you click the Search button. You can browse for specific
From/To dates using the two Browse buttons available next to the
text boxes.
The Recording Archive list shows the following details for each saved
recording:
o Name – Name of the recording. You can click the adjacent Rename
button if you want to change the file name.
o Date – Date on which the recording was made and saved.
o Time – Time at which the recording was made and saved.
o Size – Size of the recording file in kilobytes or megabytes.
o Duration – The recording’s length.
The currently available disk space size, labeled Free Space, is displayed
above the list.
To delete a recording:
Select the checkbox on the row of the recording’s entry, and then click
Delete. You can select more than one recording.
¾ To select the checkboxes of all recordings that are currently displayed,
click Select All.
¾ To clear the checkboxes of all recordings that are currently displayed,
click None.
Sending Running Text in a Call
During a videoconference call, you can type and send a text message to the
person(s) with whom you are communicating. The message is displayed as
running text on top of the video image on the far-end screen.
To type and send a running text message:
1. Start the videoconference call; the Running Text button appears in the
Call View box (available only in the Web interface).
xPoint Standard (S) Ver. 1.5 User Guide • 75
Page 77
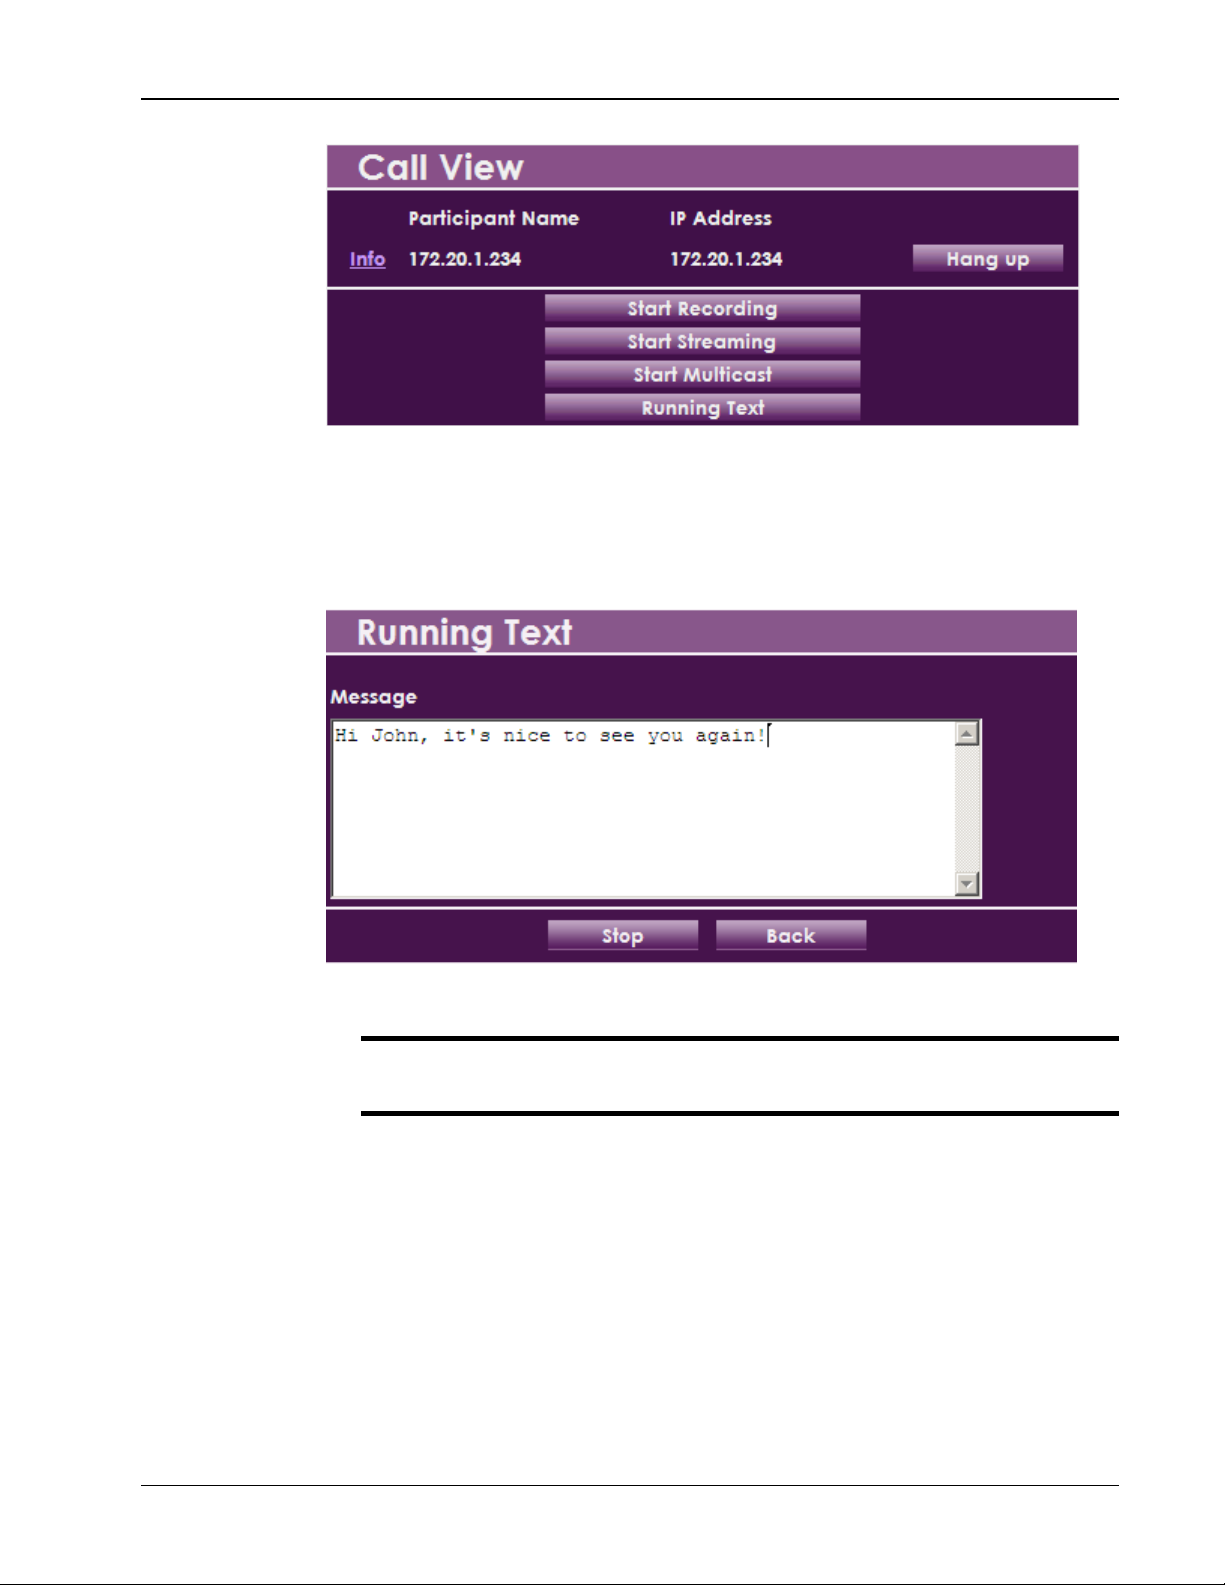
Chapter 8. Web Access and Management Viewing Call Status
Figure 36. Call View Box (Web)
2. Click the Running Text button; the Running Text box appears.
3. In the text box, type the message you want to send and display on the
far-end screen, and then click Start.
Figure 37. Running Text Box (Web)
¾ To stop the display of the running text message on the far end, click
Stop.
Viewing Call Status
During a videoconference call, you can view and check the technical details of the
call.
To view the call status details:
During the videoconference call, click the Info link in the Call View box
(see Figure 36).
xPoint Standard (S) Ver. 1.5 User Guide • 76
Page 78
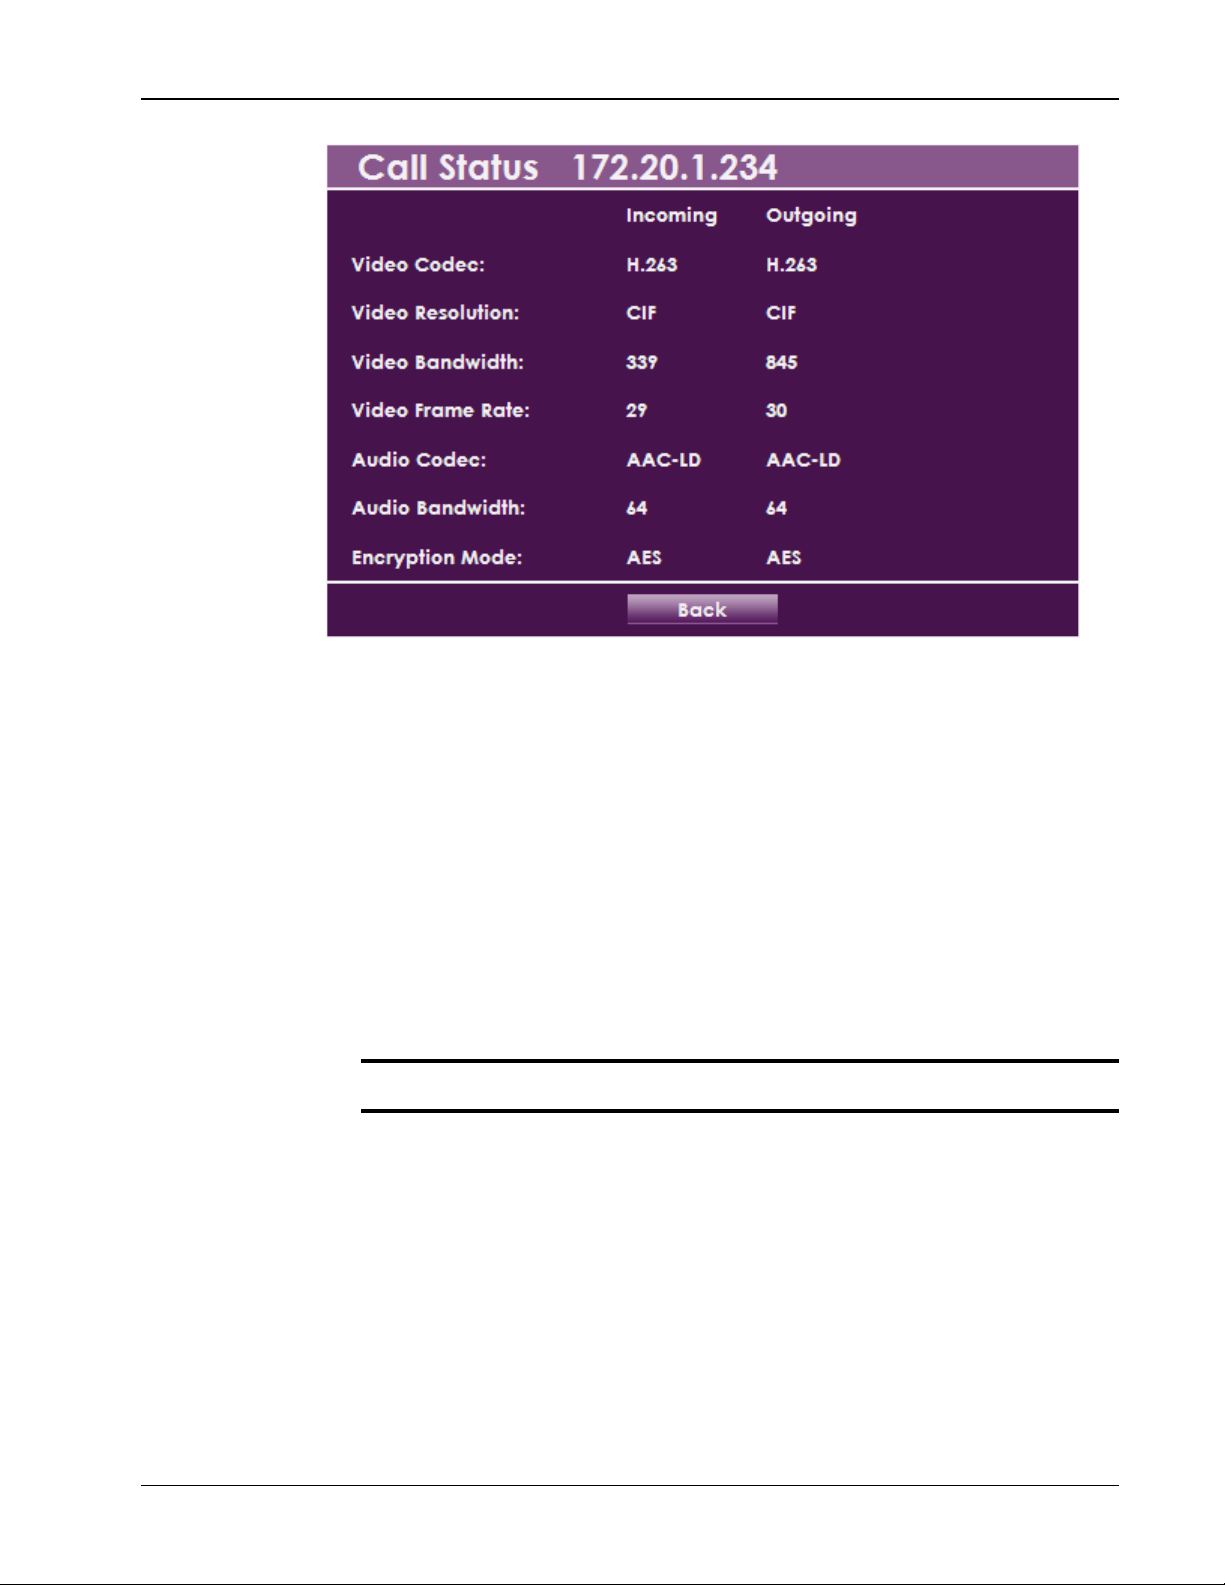
Chapter 8. Web Access and Management Performing System Upgrade
Figure 38. Call Status Box (Web)
The following information is displayed in the Call Status box for both incoming
and outgoing communication:
Video Codec – Video codec used to display video in this call
Video Resolution – Video resolution used in this call
Video Bandwidth – Bandwidth used by the video in this call
Video Frame Rate – Video frame rate used in this call
Audio Codec – Audio codec used to sound audio in this call
Audio Bandwidth – Bandwidth used by the audio in this call
Encryption Mode – Type of encryption used in this call (if encryption is
used).
¾ To return to the Call View box, click Back.
Performing System Upgrade
You can upgrade the xPointS software a newer version when such becomes
available.
To upgrade the xPoint
S
software:
1. After logging in, click System>System Upgrade; the System Upgrade
box appears.
xPoint Standard (S) Ver. 1.5 User Guide • 77
Page 79
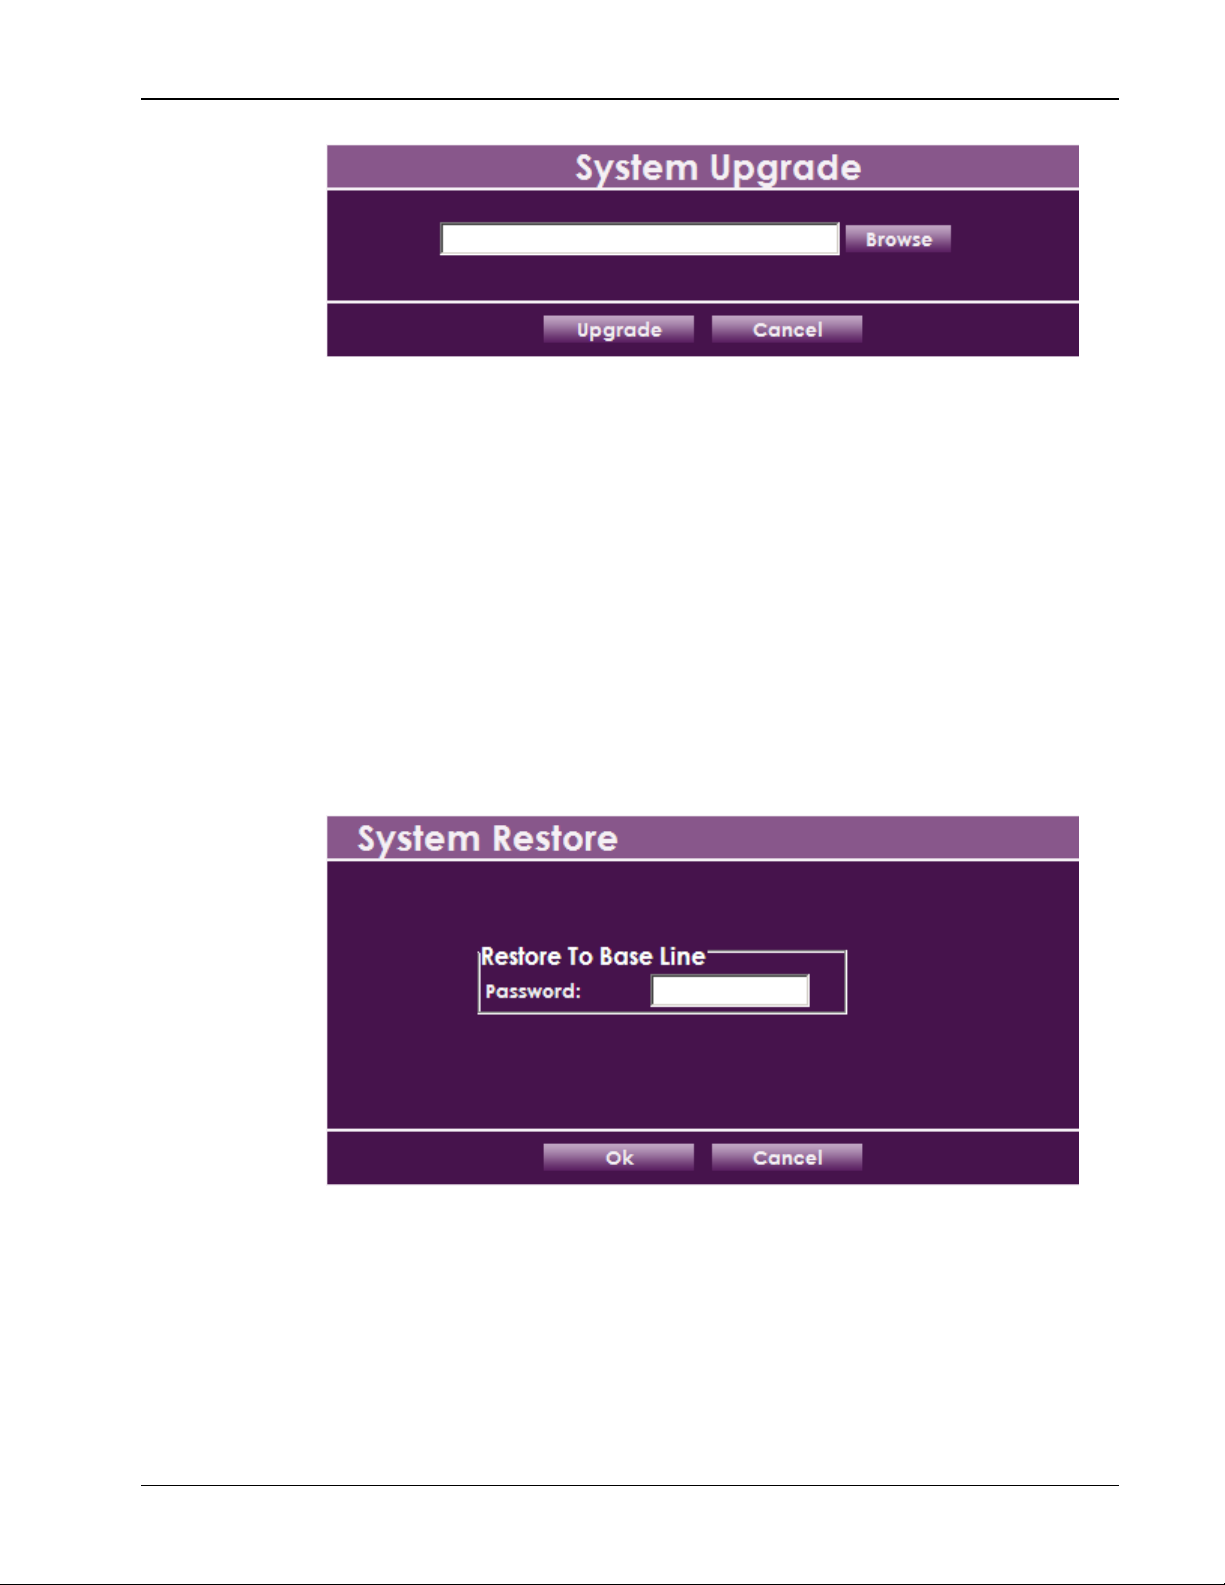
Chapter 8. Web Access and Management Performing System Restore
Figure 39. System Upgrade Box (Web)
2. Click Browse and then select the VCON-provided file that contains the
newer software version.
3. Click Upgrade; the system upgrade is performed and then the system
reboots.
Performing System Restore
Whenever necessary, you can discard all manual configuration and restore the
factory-default settings.
S
To reset the xPoint
1. After logging in, click System>System Restore; the System Restore
box appears.
Figure 40. System Restore Box (Web)
unit to its factory defaults:
2. In the Password box, enter the password (default: 1234) for restoring
the system to its factory defaults.
3. Click OK.
xPoint Standard (S) Ver. 1.5 User Guide • 78
Page 80

Preliminary Publication
Note: Information in this document may be incomplete or not fully accurate, and
is subject to change without prior notice. A final document version will be
released at the next official product update.
Emblaze-VCON Ltd. assumes no responsibility for errors or omissions. EmblazeVCON Ltd. reserves the right to make changes to this document without prior
notice.
Emblaze-VCON Ltd. provides this publication “as is” without warranty of any
kind, either express or implied, including, but not limited to, the implied
warranties of merchantability or fitness for a particular purpose.
xPoint Standard (S) Ver. 1.5 User Guide • 79
 Loading...