

Page 1
Thanks for purchasing the Tinyhawk II Race. Designed in California, assembled in
China.
Page 2

Tinyhawk II Race
Disclaimer
Please read the disclaimer carefully before using this product. By using this product,
you hereby agree to this disclaimer and signify that you have read them carefully and
completely. This product is not suitable for people under the age of 18. Adult
supervision is highly recommended for kids under the age of 18.
Our Tinyhawk II Race features open-source flight controller and Electronic Speed
Controllers to meet the FPV enthusiasts' need to upgrade their quad.
Please read the instruction manual and warnings carefully. Before every flight, make
sure the battery is fully charged and power connections are secure. DO NOT fly
around crowds, children, animals or objects. EMAX ACCEPTS NO LIABILITY FOR
DAMAGE(S) OR INJURIES INCURRED DIRECTLY OR INDIRECTLY FROM THE
USE OF THIS PRODUCT.
Precautions
Please follow the instructions to assemble and to operate this product in a proper
way.
Pilots do not use this product if you have physical or mental illness, dizziness,
fatigued, or use while under the influence of alcohol or drugs.
Please fly in a safe area away from people
Do not modify or use other parts and accessories not approved for the use of EMAX.
Do not use this product in harsh environments (such as winds, rain, lightning, snow,
etc.).
Do not use this product in a strong electromagnetic environment.
Support
Please visit emax-usa.com (North America Region) or emaxmodel.com
(International) for any updates or support needs.
emax-usa.com
Page 3

Tinyhawk II Race
Table of Contents
Disclaimer................................................................................................................................. 1
Precautions
Support......................................................................................................................................1
Product specification
Tinyhawk II Race........................................................ Error! Bookmark not defined.
Parameter......................................................................................................................... 1
Product list
Tinyhawk II Race Structure
Tinyhawk II Race................................................................Error! Bookmark not defined.
Propeller Direction and Mounting......................................................................................3
Tinyhawk II Race VTX Settings
VTX Channel Settings with the Button............................................................................. 4
CE and FCC unlicensed user chart
Unlocked FCC HAM licensed user chart........................................................................ 5
Changing VTX setting via Betaflight OSD
Tinyhawk II Race All-in-One Flight Controller
Emax On-Board Receiver.................................................................................................. 8
...............................................................................................................................
...............................................................................................................
............................................................................................................................
................................................................................................
.............................................................................................
..................................................................................
.......................................................................
..................................................................... 8
1
1
1
2
4
5
6
Binding Procedure
Emax Tinyhawk II Race Flight Controller (FC)................................................................9
Stock Flight Controller Settings
Adjusting Software Settings (Betaflight Configurator)................................................9
Reprogramming Tinyhawk II Race Flight Controller.................................................. 9
Restoring the Tinyhawk II Race default settings
Flight........................................................................................................................................11
Radio Stick Controls
Left Stick Diagram......................................................................................................... 11
Right Stick Diagram
Fly Tinyhawk II Race.........................................................................................................11
Arming............................................................................................................................. 12
Flying Modes
Line of Sight Flying........................................................................................................12
First Person View (FPV) Flying
...........................................................................................................
.....................................................................................
......................................................
..........................................................................................................
......................................................................................................
..................................................................................................................
...................................................................................
10
11
11
12
12
8
9
emax-usa.com
Page 4
Product specification
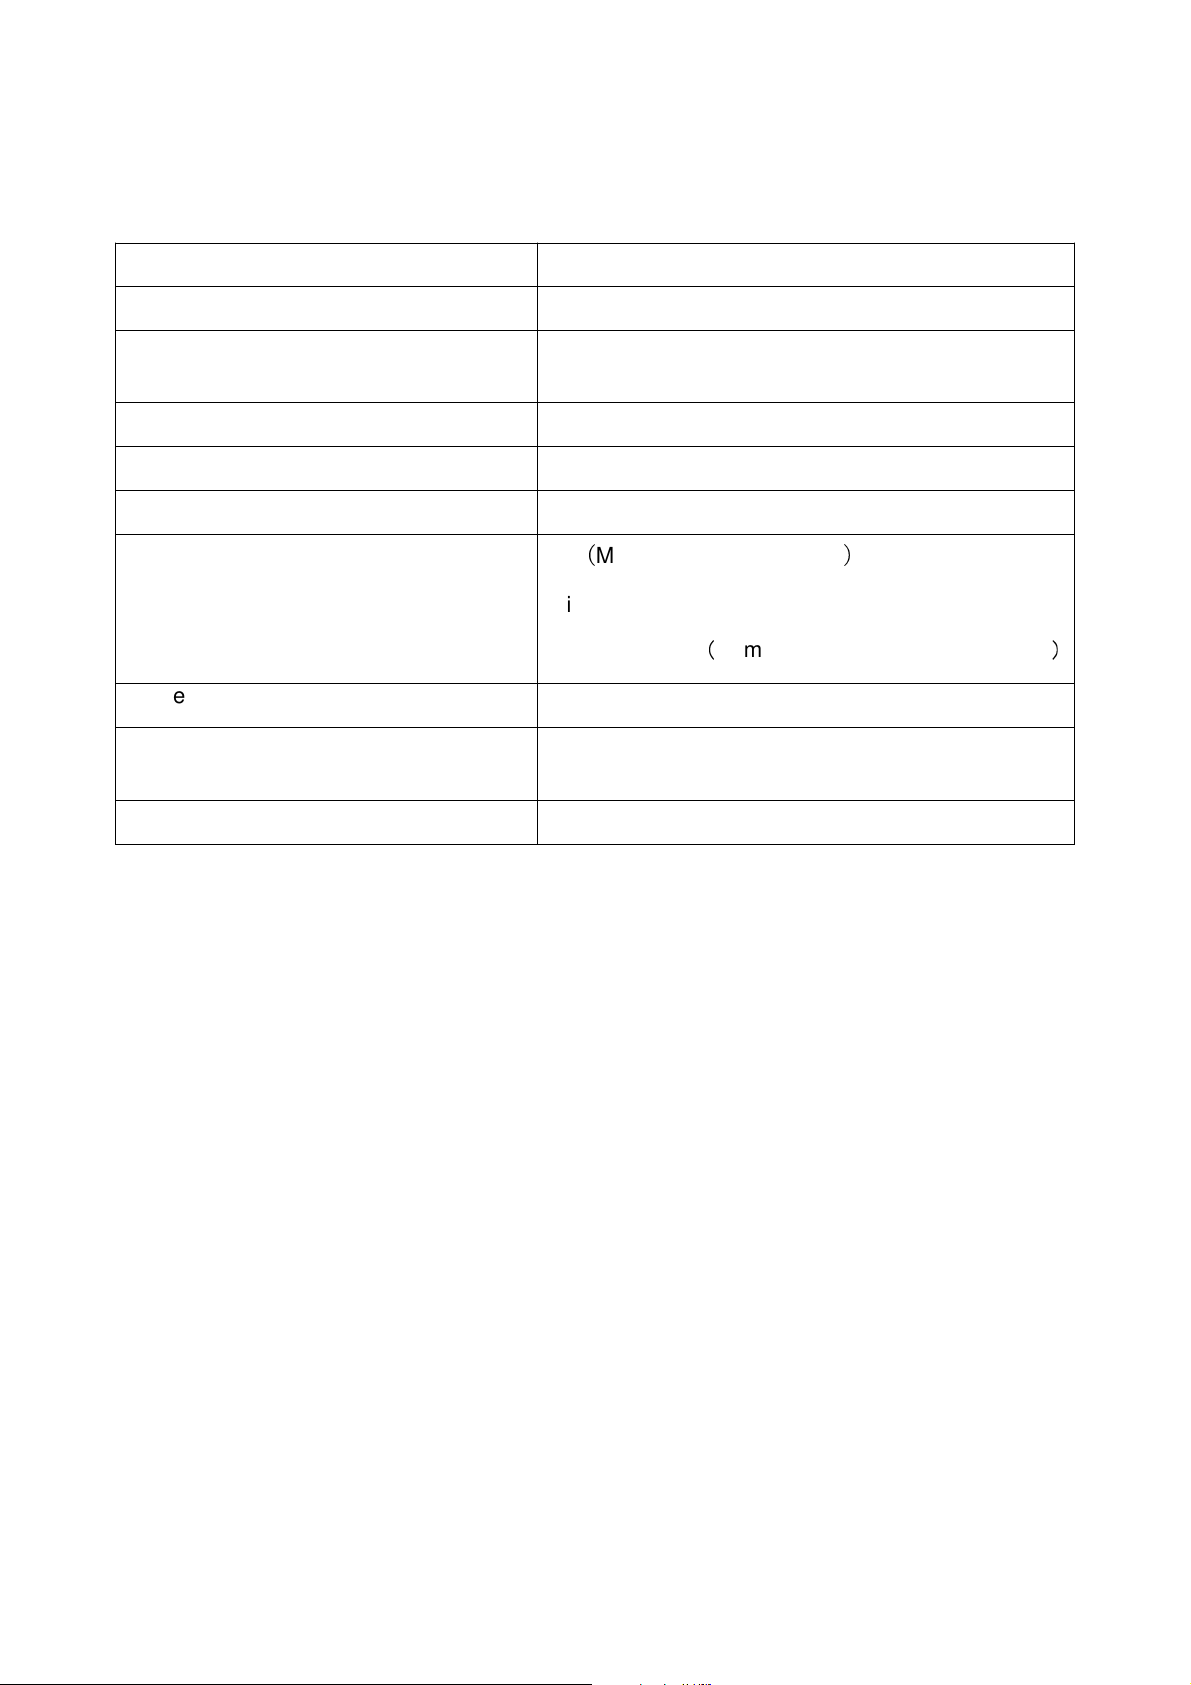
P
arameter
Tinyhawk II Race
Diagonal wheelbase (without paddles) 90mm
Tinyhawk II Race
Maximum size of the aircraft (without
antenna, cable tie)
Aircraft weight (without battery) 47.5g
Motor TH1103 7500KV
Propeller Avan Blur 2 Inch Propeller
Main Flight Controller
Camera RunCam Nano 2 Camera
Transmitter
Battery 2x 1 Cell 450 mAh HV lipo battery
119*110*40(mm)
F4(MATEKF411RX firmware
4 in one 5A ESC
SPI RX receiver(Compatible with Frsky D8 protocol
0-25-100-200mW Adjustable frequency 37CH,
Support SmartAudio
)
Product list
1. Tinyhawk II Race × 1
2. Emax 1s HV 450 mAh × 2
3. Charger × 1
4. Screwdriver x 1
5. Spare screws x 1
6. FC damper x 1
)
1
emax-usa.com
Page 5
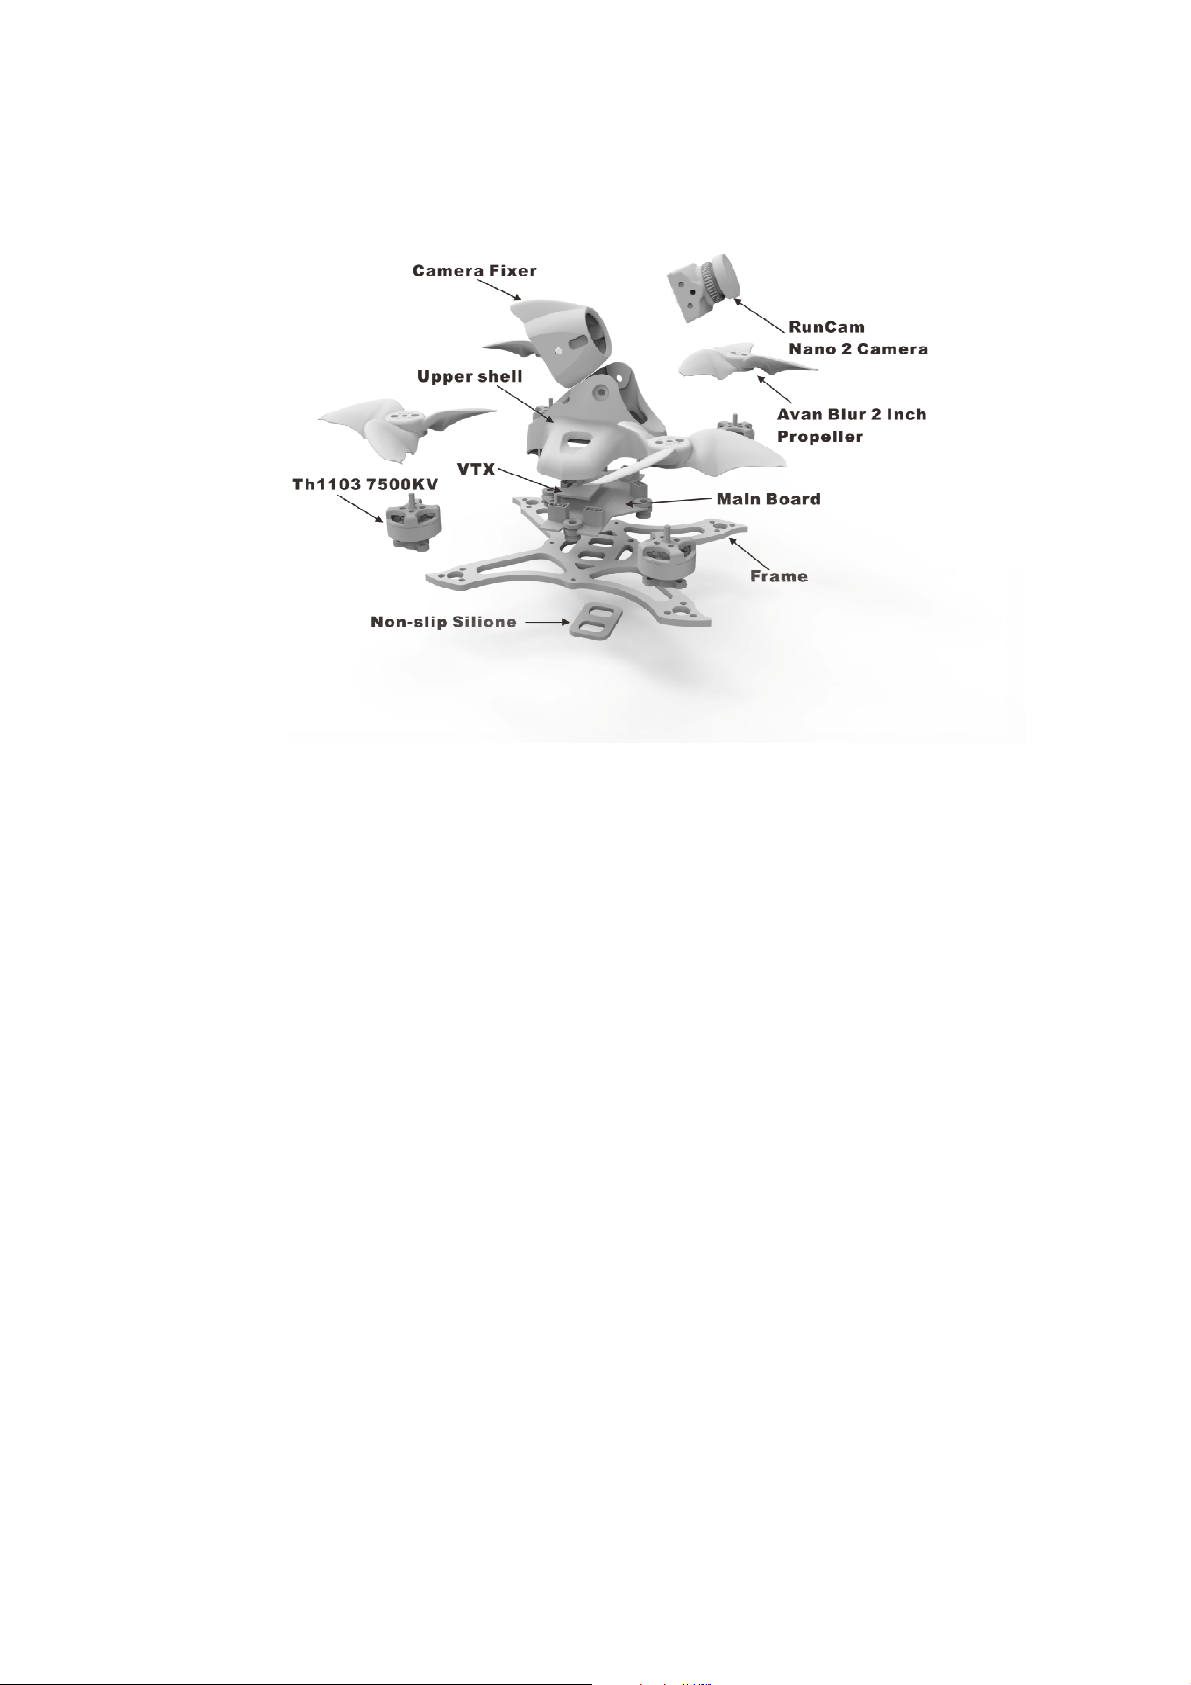
Tinyhawk II Race Structure
Tinyhawk II Race
emax-usa.com
2
Page 6
Tinyhawk II Race
Tinyhawk II Race
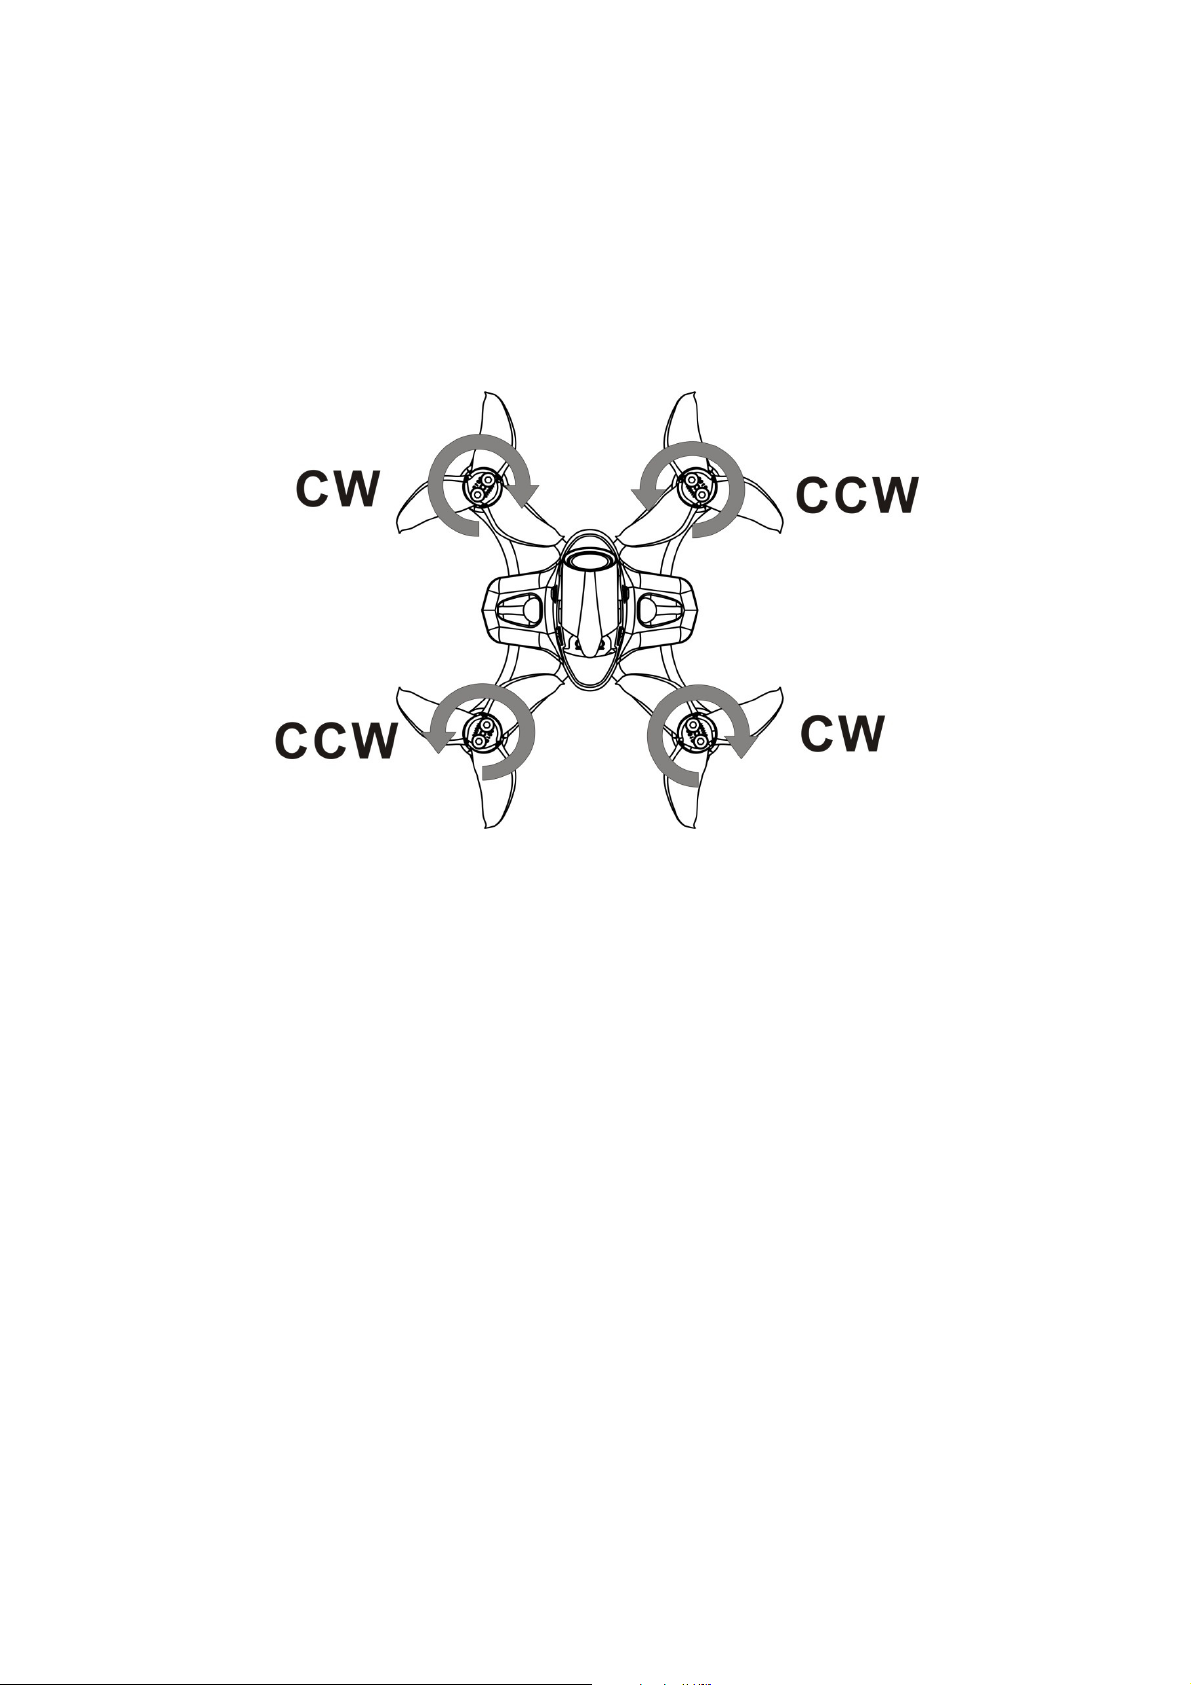
Propeller Direction and Mounting
There are 2 spinning directions for Tinyhawk II Race propellers, Clockwise (CW) and
Counter-Clockwise (CCW). When Buying a set of propellers, 2 CW and 2 CCW will
be given. The blunt leading edge indicates the direction the propeller is suppose to
rotate as compared to the sharp trailing edge. When mounting propellers please
make sure the correct orientation shown in the diagram below.
Caution: Failure to mount the propellers in the correct orientation will cause
Tinyhawk II Race to not fly correctly and with no control. Please double check for the
correct orientation.
1. Push the propeller down the motor
2. Tighten M2 screw and secure it.
3. Periodically check tightness to ensure it will stay tight during flight.
emax-usa.com
3
Page 7
Tinyhawk II Race
Tinyhawk II Race VTX Settings
NOTE: Under normal operating conditions, please use the Betaflight OSD function to
change VTX (video transmitter) settings. Only use the VTX push button to unlock as
allowed for under the FCC and HAM licensing requirements, see below. If using the
VTX push button to change settings, please note that the settings will revert to the
Betaflight OSD's settings once the drone is power-cycled.
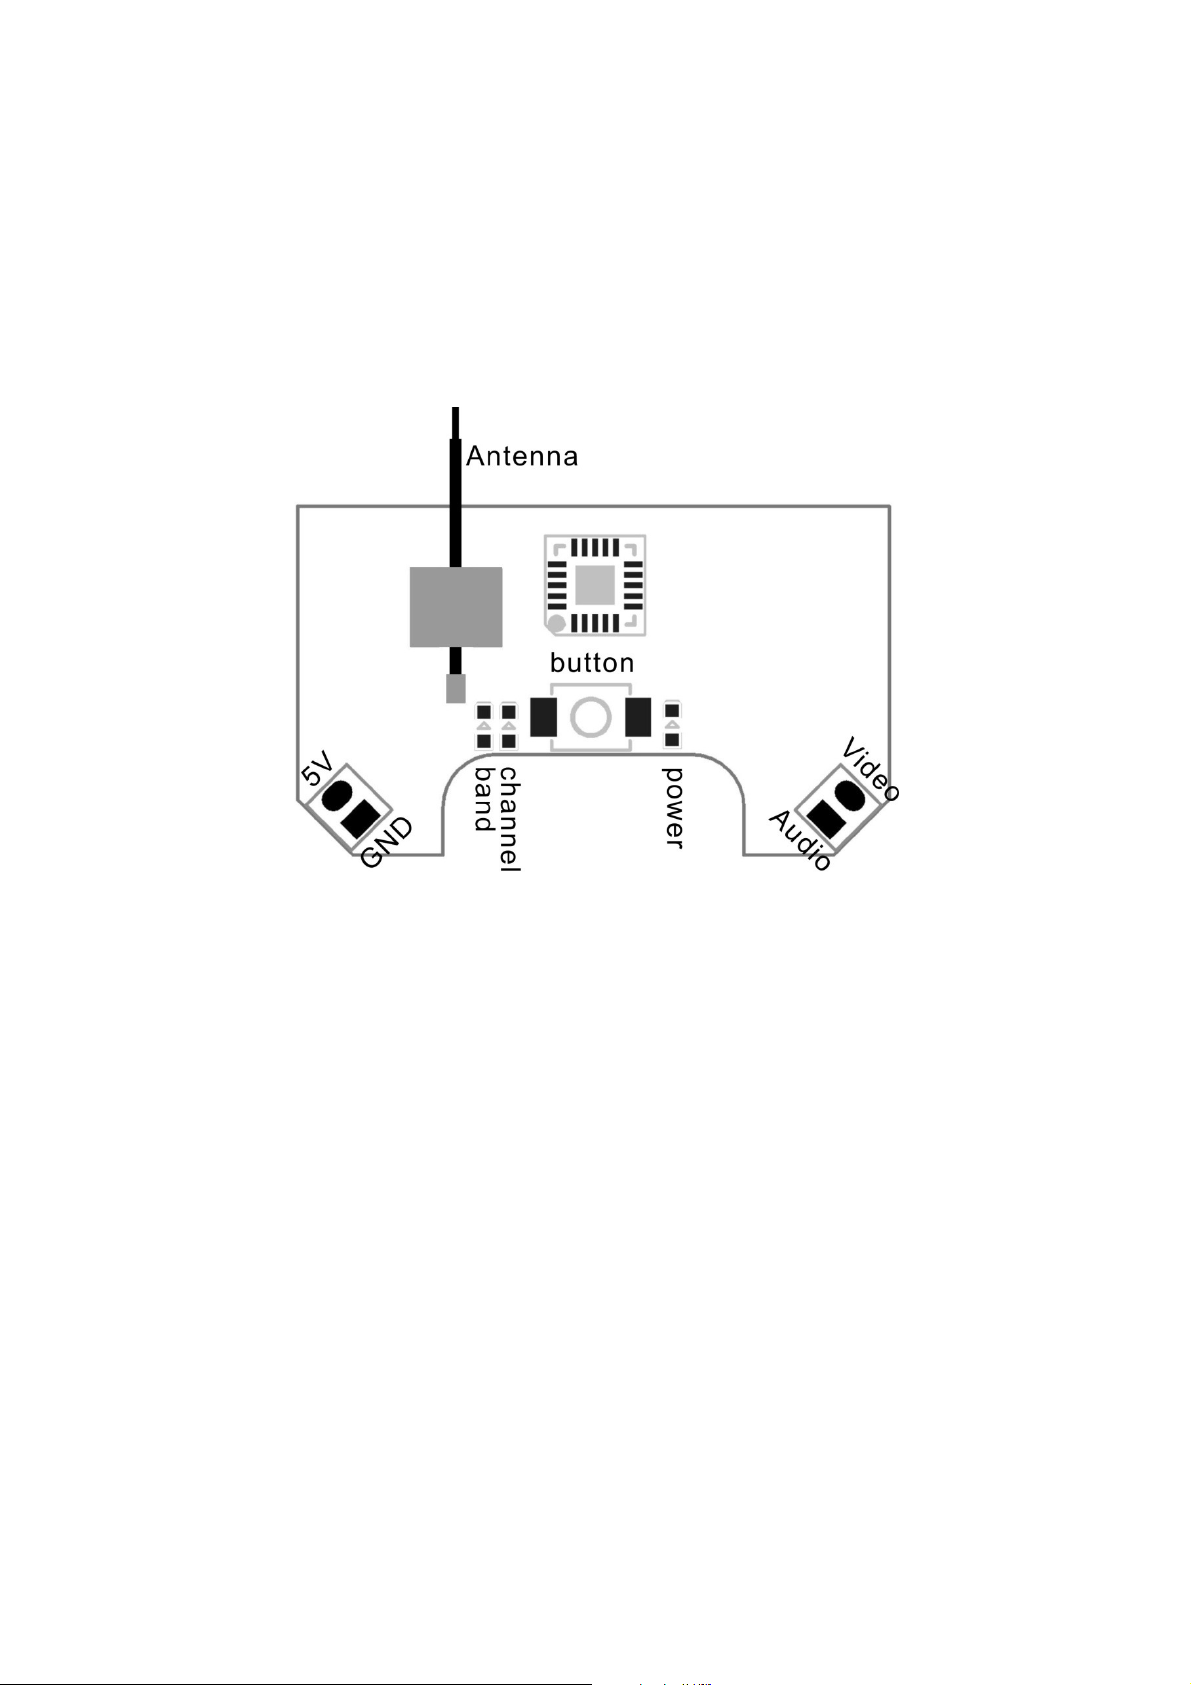
VTX Schematic and Button Diagram
VTX Channel Settings with the Button
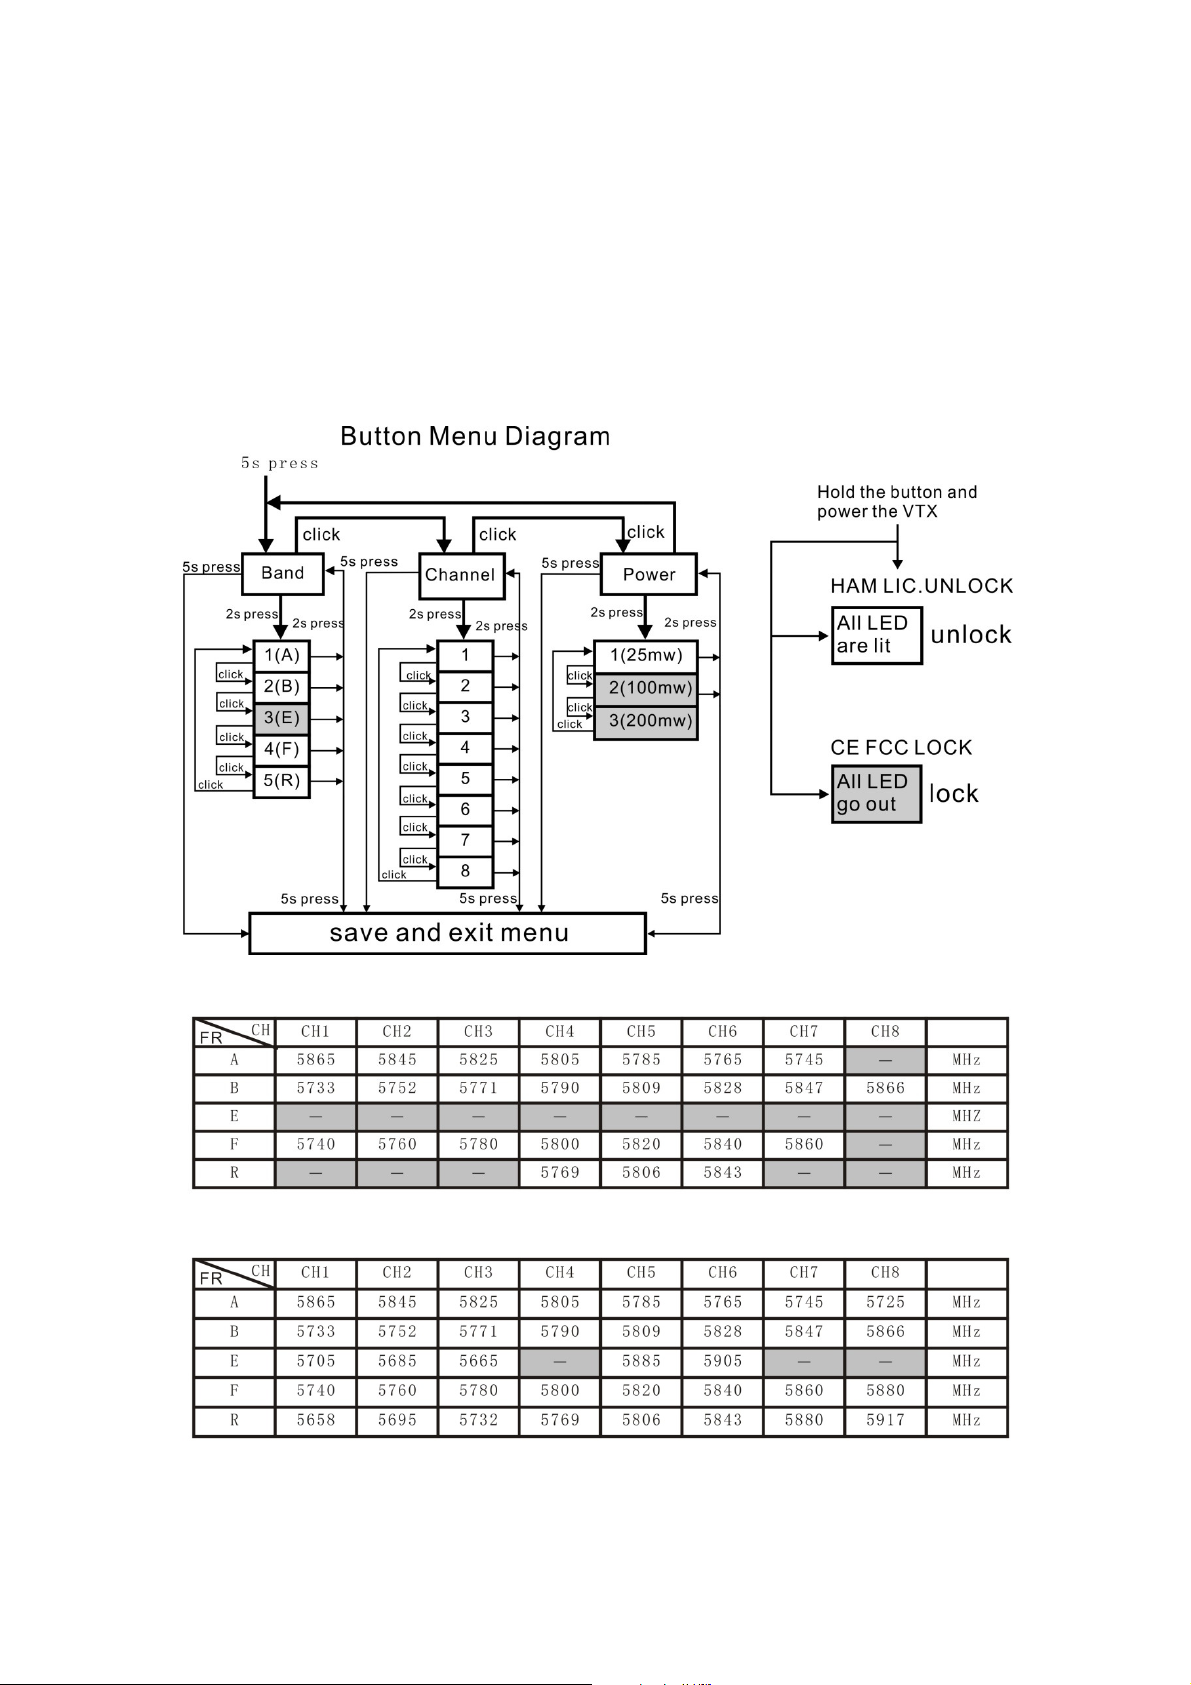
1. Normal display
When powered on, the parameters of frequency group band, frequency point and
power are displayed twice by LED cycle., then the LED is extinguished. To check
frequency group band ,channel and power status click the button once quickly, and
LED starts to indicate frequency band band , frequency channel and power. First
indicate the frequency group band and then indicate the frequency channel, final
indicative power. After all 2 rounds of LED display cycles, all LED will be off.
2. Menu Entry / Exit
(1)Press the button and hold for 5s to enter the menu. After entering the menu,
band LED lights up.
(2)Press the button and hold for 5s again to save parameters and exit the menu.
After saving and exiting the menu, all LED goes out.
3.Enter/Exit Band / Channel / Power option
(1) After entering menu, short click button to switch frequency group band /
frequency point / power, and the LED of the corresponding menu is lit.
(2) Press the button and hold for 2s to enter frequency group band / channel /
power option.
emax-usa.com
4
Page 8
Tinyhawk II Race
(3) Press the button and hold for 2s again to exit frequency group band / channel /
power option and return to the menu.
4. Band / Channel / Power parameter change
After entering frequency group band / channel / power option, short click button to
change the parameter.
Notice: If you change to an illegal channel using SmartAudio, there will be no image
transmitting from Tinyhawk II Race. To switch back to a legal channel, press the
button on the vtx and follow the vtx menu guide shown below.
CE and FCC unlicensed user chart
Unlocked FCC HAM licensed user chart
* From the factory this video transmitter is designed to operate within CE and FCC
unlicensed users specifications. To use the unlocked features of this VTX the user is
emax-usa.com
5
Page 9
Tinyhawk II Race
required to have a HAM radio license or prior consent from the FCC.By purchasing
this equipment, the user is agreeing that they understand these responsibilities and
will operate the equipment legally. Emax cannot be held responsible for your actions
if you purchase and/or use this product in violation of your government's regulations.
Changing VTX setting via Betaflight OSD
Tinyhawk II Race is equipped with SmartAudio and is already configured with stock
settings. The SmartAudio line is operated on UART 2 TX.
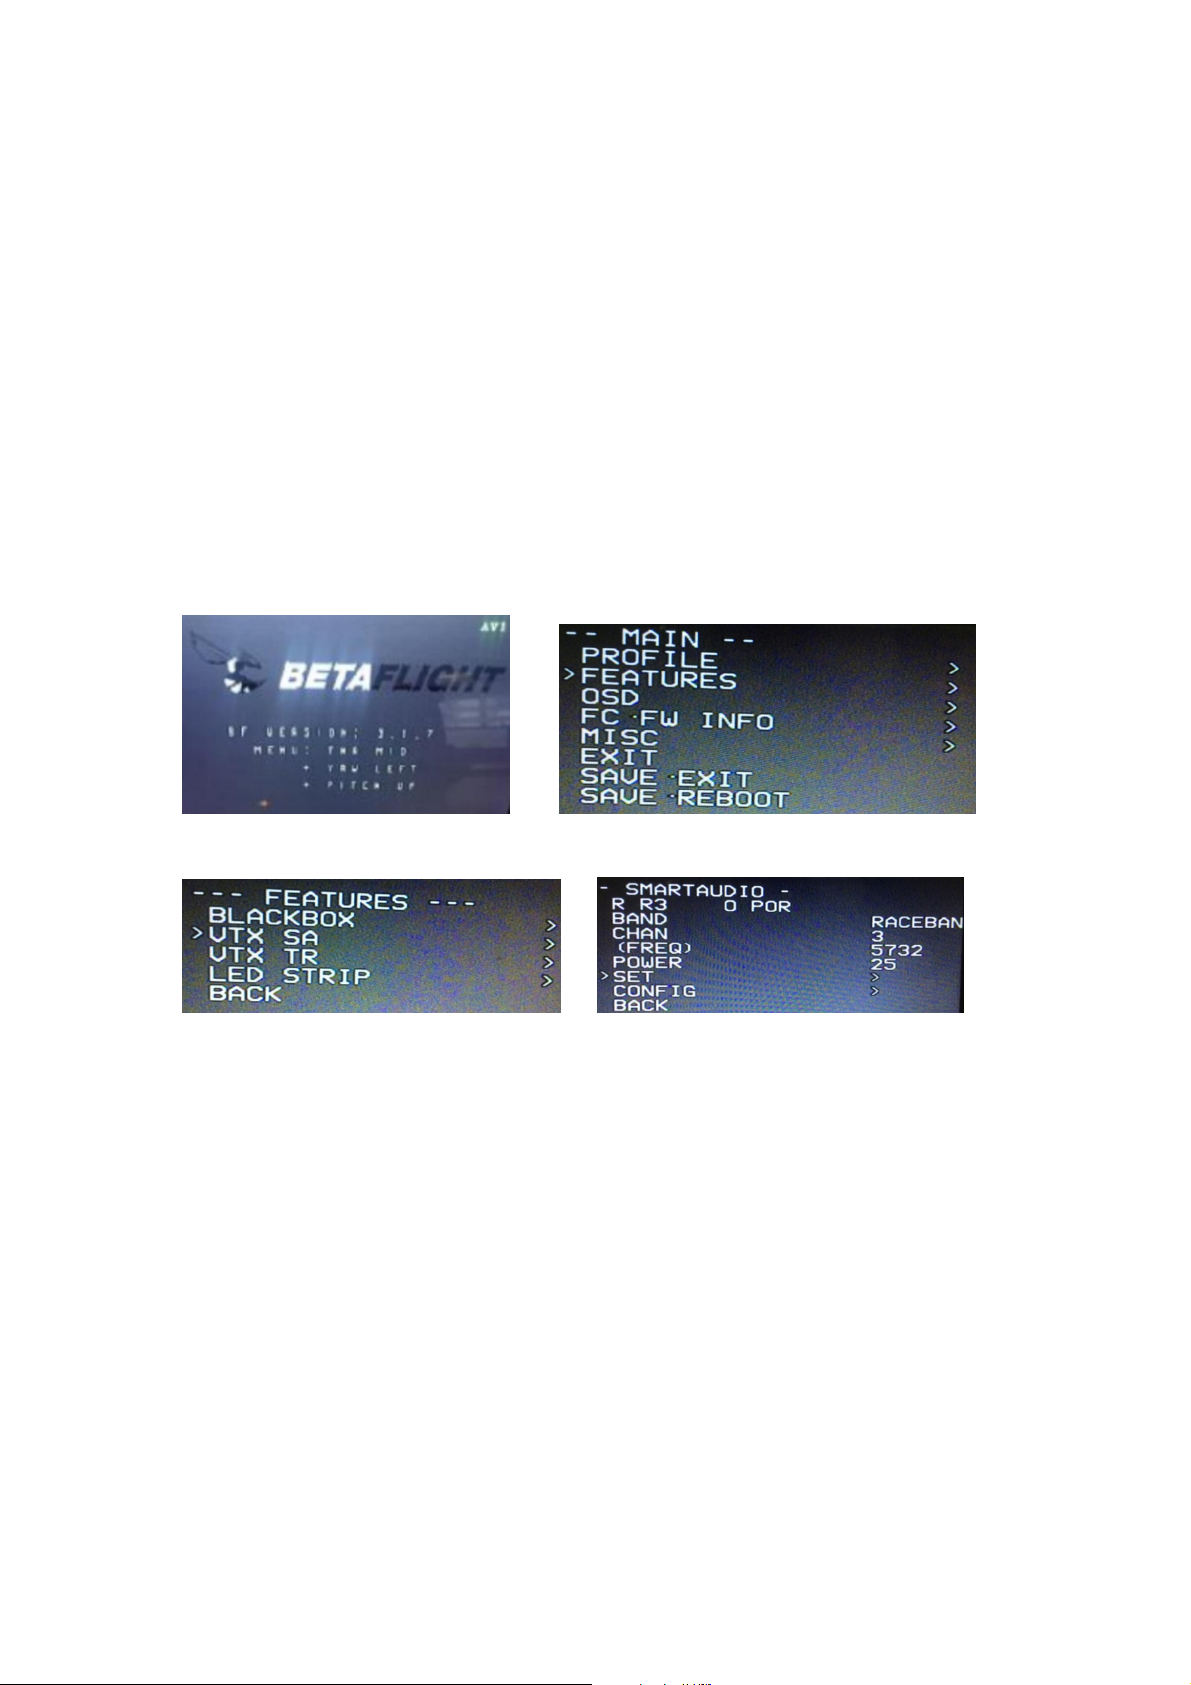
1. Power on Tinyhawk II Race, goggles, and Controller.
2. Follow the tips on screen to enter the main settings menu: THROTTLE MID+ YAW
LEFT+ PITCH UP to enter OSD parameter adjustment menu. as shown in Figure 1.
3. In the menu interface, switching PITCH up/down to choose menu option. Move the
cursor to “FEATURES” and stir Roll stick right to enter next menu. as shown in
Figure 2. Using PITCH stick to move cursor to “VTX SA”, as shown in Figure 3.Then
pull ROLL stick right to enter VTX configuration menu, as shown in Figure 4.
Figure 1 Figure 2
Figure 3 Figure 4
4. In the menu of VTX SA, we can configure the BAND, CHAN and POWER. Pulling
the PITCH stick to move cursor up and down to choose VTX options that need
setting. While pulling ROLL stick left and right to change the corresponding
parameters.Once the parameters is set, moving the cursor to “SET”, then turn ROLL
stick right to enter “SET” and choose “YES” and turn ROLL stick right to save setting
parameters, as shown in Figure 5.
5. In the menu of VTX SA, moving cursor to "CONFIG" to enter menu; While moving
cursor to "PIT FMODE" and pulling ROLL stick right can turn off the VTX power, as
shown in Figure 6.
NOTE: Because the VTX module offers power setting of 25mW / 100mW / 200mW
by default the Betaflight OSD displays 25mW, 200mW and 800mW as power options
If you wish to have the VTX at 100mW setting select > 200mW
If you wish to have the VTX at 200mW setting select > 800mW
emax-usa.com
6
Page 10
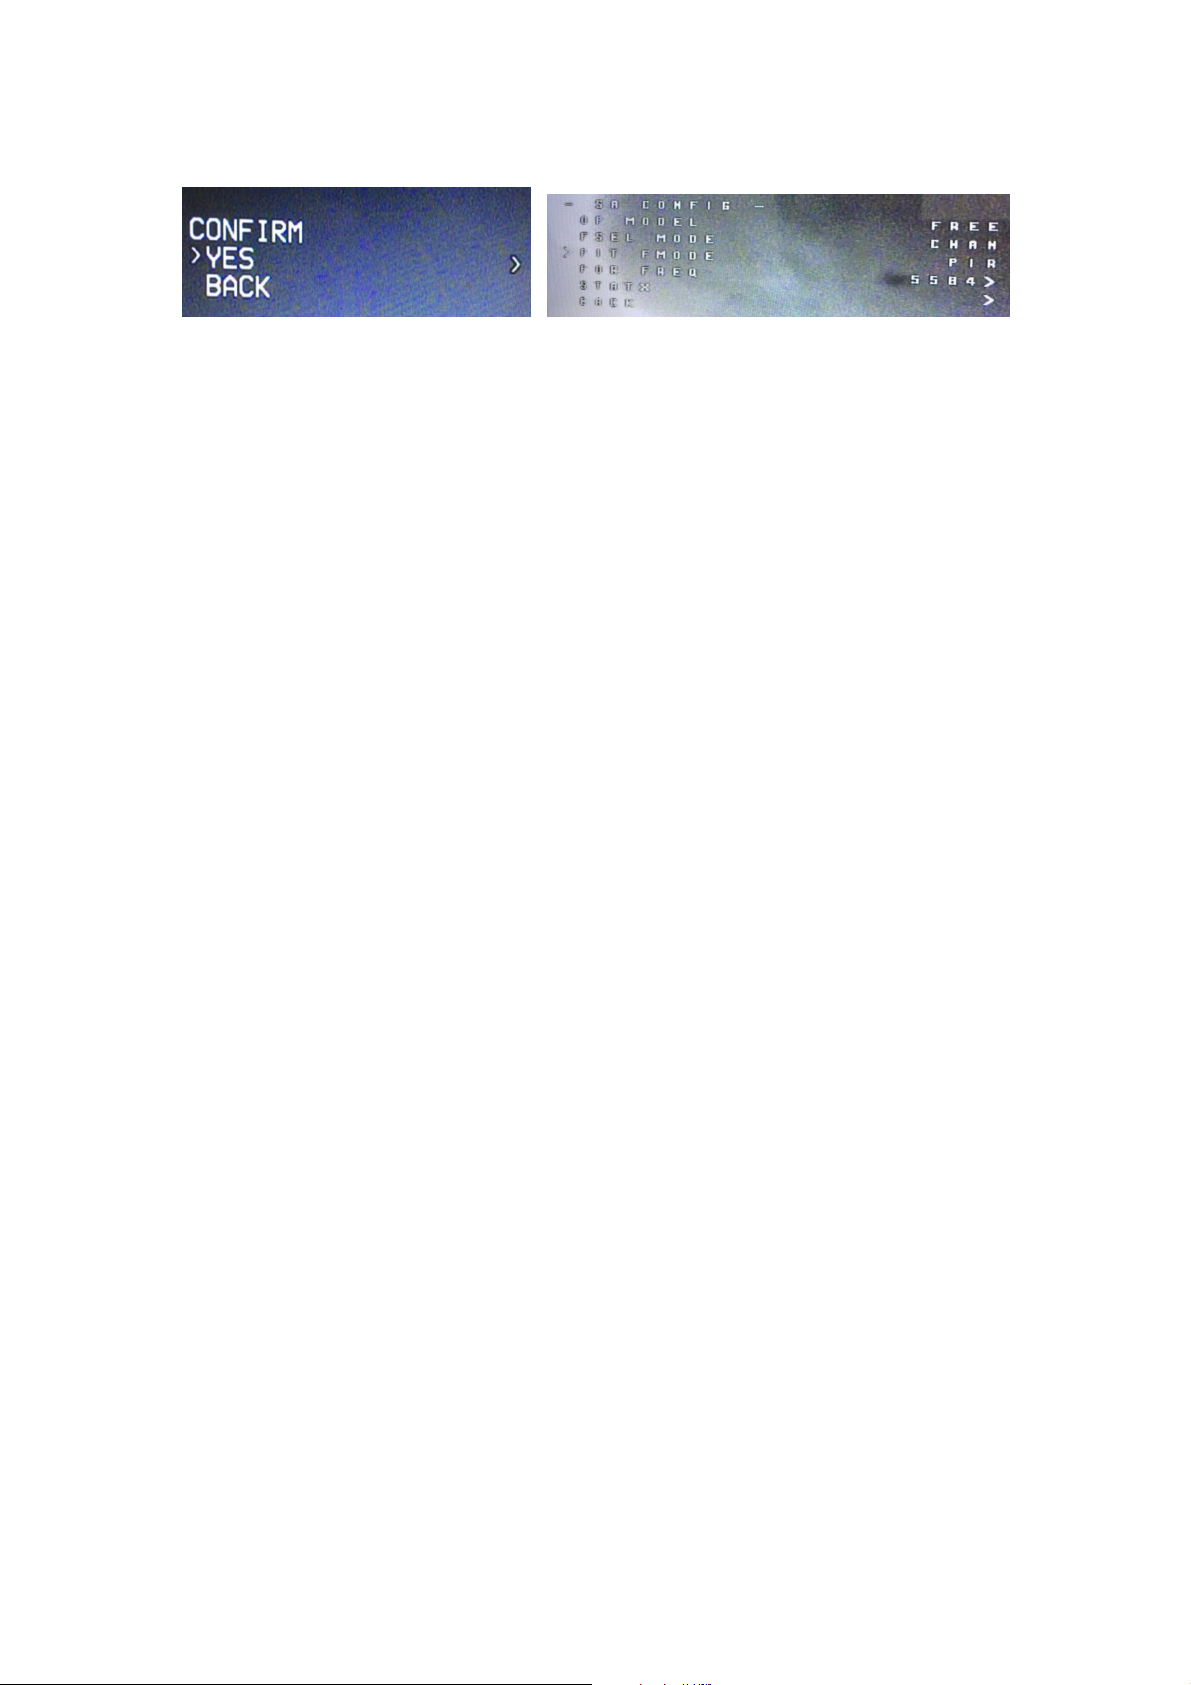
Figure 5 Figure 6
Tinyhawk II Race
emax-usa.com
7
Page 11
Tinyhawk II Race
Tinyhawk II Race All-in-One Flight
Controller
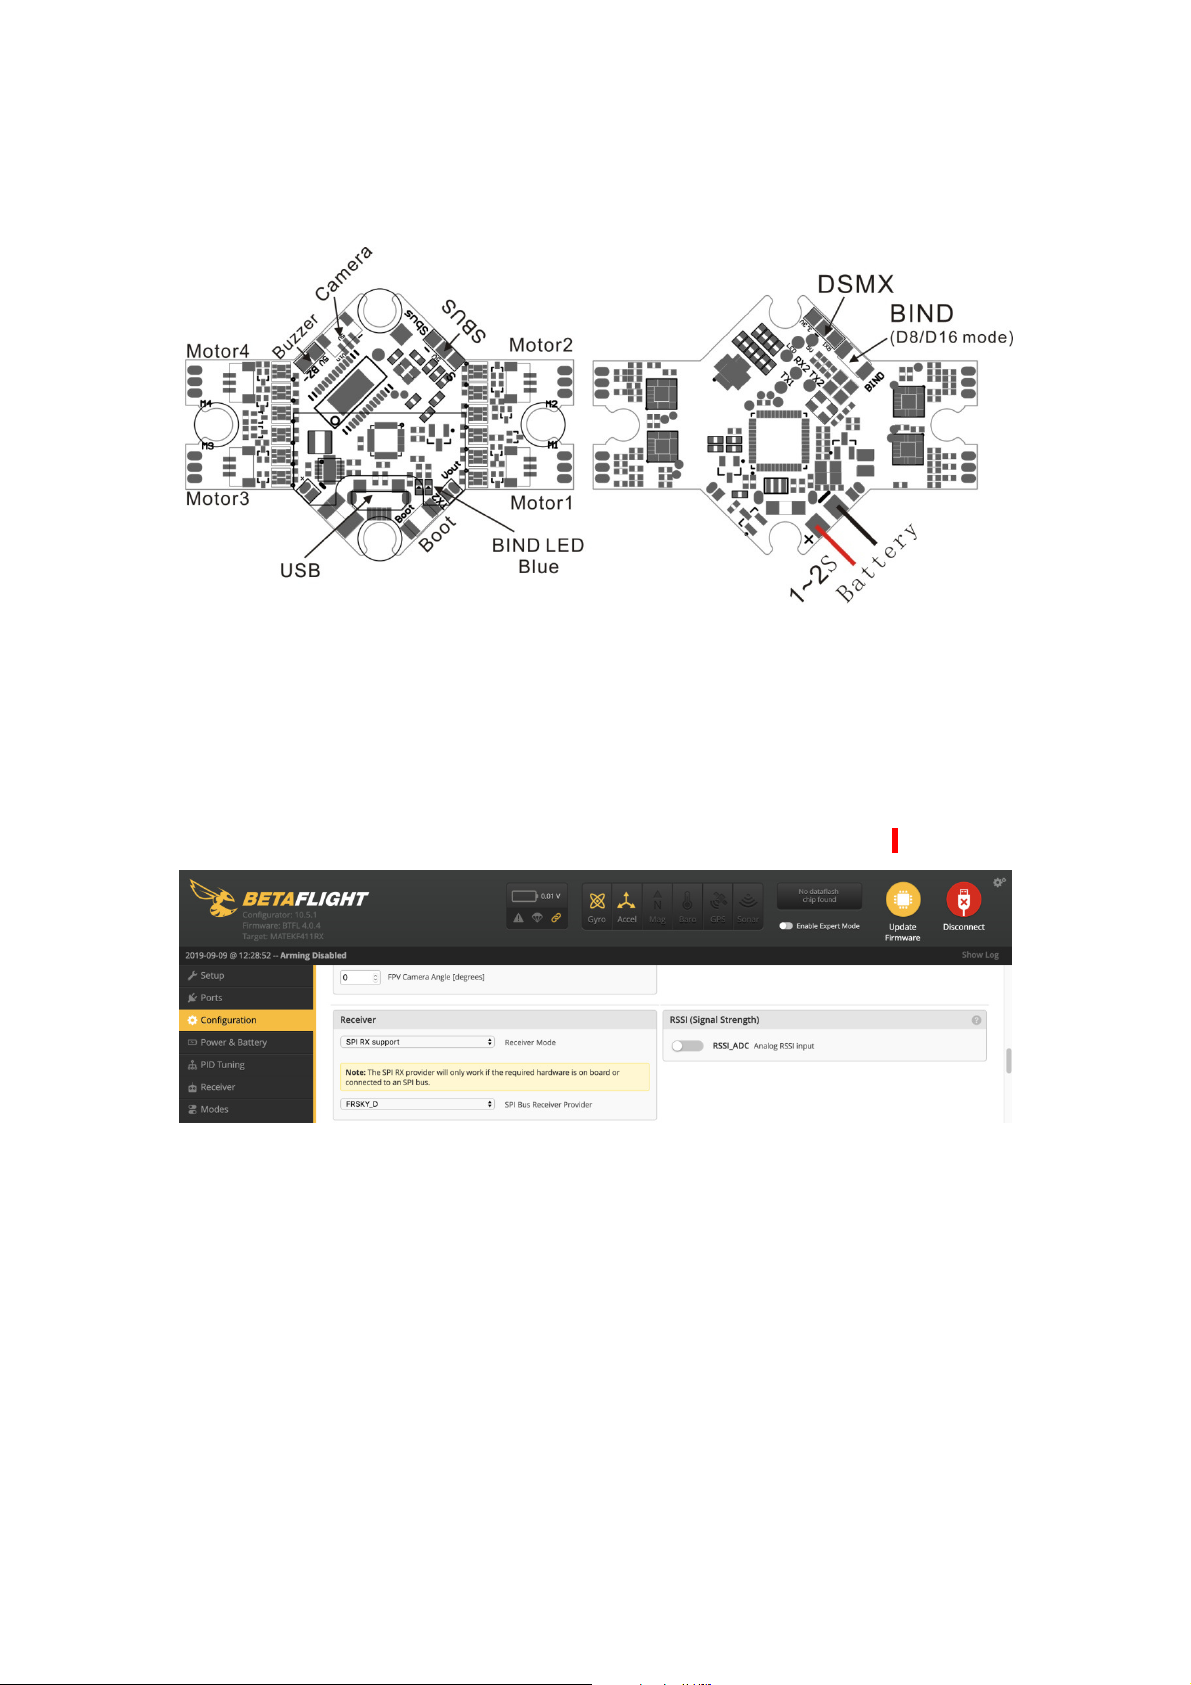
Tinyhawk II Race’s main electronic board is shown above. This board contains a F4
flight controller with all 4 esc’s and an 8CH receiver.
On-Board Receiver
The receiver is integrated into the main flight controller board and is set up via
betaflight.
Number of Channels: 8CH
Compatibility: Receiver mode is SPI RX default protocol is FrSky_D (D8).
Binding Procedure
Binding is the process of uniquely associating a receiver to a transmitter module. A
transmitter module can be bound to multiple receivers (not to be used
simultaneously). A receiver can only be bound to one transmitter module.
1.Hold the bind button for 2 seconds while the flight controller is already on. When
the RED LED is flashing, it means the receiver is in BIND MODE
2.Turn on the transmitter, make sure it is set to D8 mode, and then set it into bind
mode. When the BLUE LED on the flight controller starts flashing, it means bind
successful.
3.Power cycle the flight controller and take your radio out of bind mode.
Alternate Binding Method
emax-usa.com
8
Page 12

Tinyhawk II Race
It is possible to place the receiver into Bind Mode via the Betaflight configurator.
In the CLI tab type in this command:
bind_rx
Hit enter and your receiver should be in bind mode. Follow steps 2-3 from
above to complete the binding process.
Emax Tinyhawk II Race Flight Controller (FC)
This flight controller has a F4 MCU with a MPU6000 gyro. Tinyhawk II Race flight
controller comes pre-programmed and properly tuned for optimal flight. The flight
controller is programmed with Betaflight 4.1.0. For a full tune and configuration
setting file (CLI dump file) please visit https://emax-usa.com/ for the CLI dump file.
Stock Flight Controller Settings
Tinyhawk II Race is configured to take a channel map of the TAER1234 convention.
That is the channel map is in the respective order: throttle, aileron, elevator, rudder,
AUX 1, AUX 2, AUX 3, and AUX 4. The arm switch on Tinyhawk II Race is set on
AUX 1 and armed with the highest value. AUX 2 is configured for a 3 stage switch to
select flight modes: Acro, Horizon, and Angle activating in an increasing order. AUX
3 is configured for the beeper. In a high state the motors will beep. AUX 4 is set to
Flip Over After Crash mode (often referred to as turtle mode). Turtle mode is set
when AUX 4 is in a high state. Please configure your radio as described above or
change these settings in Betaflight Configurator.
Adjusting Software Settings (Betaflight Configurator)
Betaflight Configurator can be used to changed programmed settings on Tinyhawk II
Race and to flash new firmware if desired. Betaflight Configurator and flight controller
firmware can be downloaded at https://github.com/betaflight/. The hardware target for
Tinyhawk II Race Flight Controller is MatekF411RX.
DISCLAIMER: We do not suggest changing any PID settings on Tinyhawk II Race or
upgrading the firmware to new versions. Tinyhawk II Race comes stock with an
optimal tune for superior flight performance. Changing this can affect flight time,
overall speed, control of the aircraft, and excessive heat within the motors.
Reprogramming Tinyhawk II Race Flight Controller
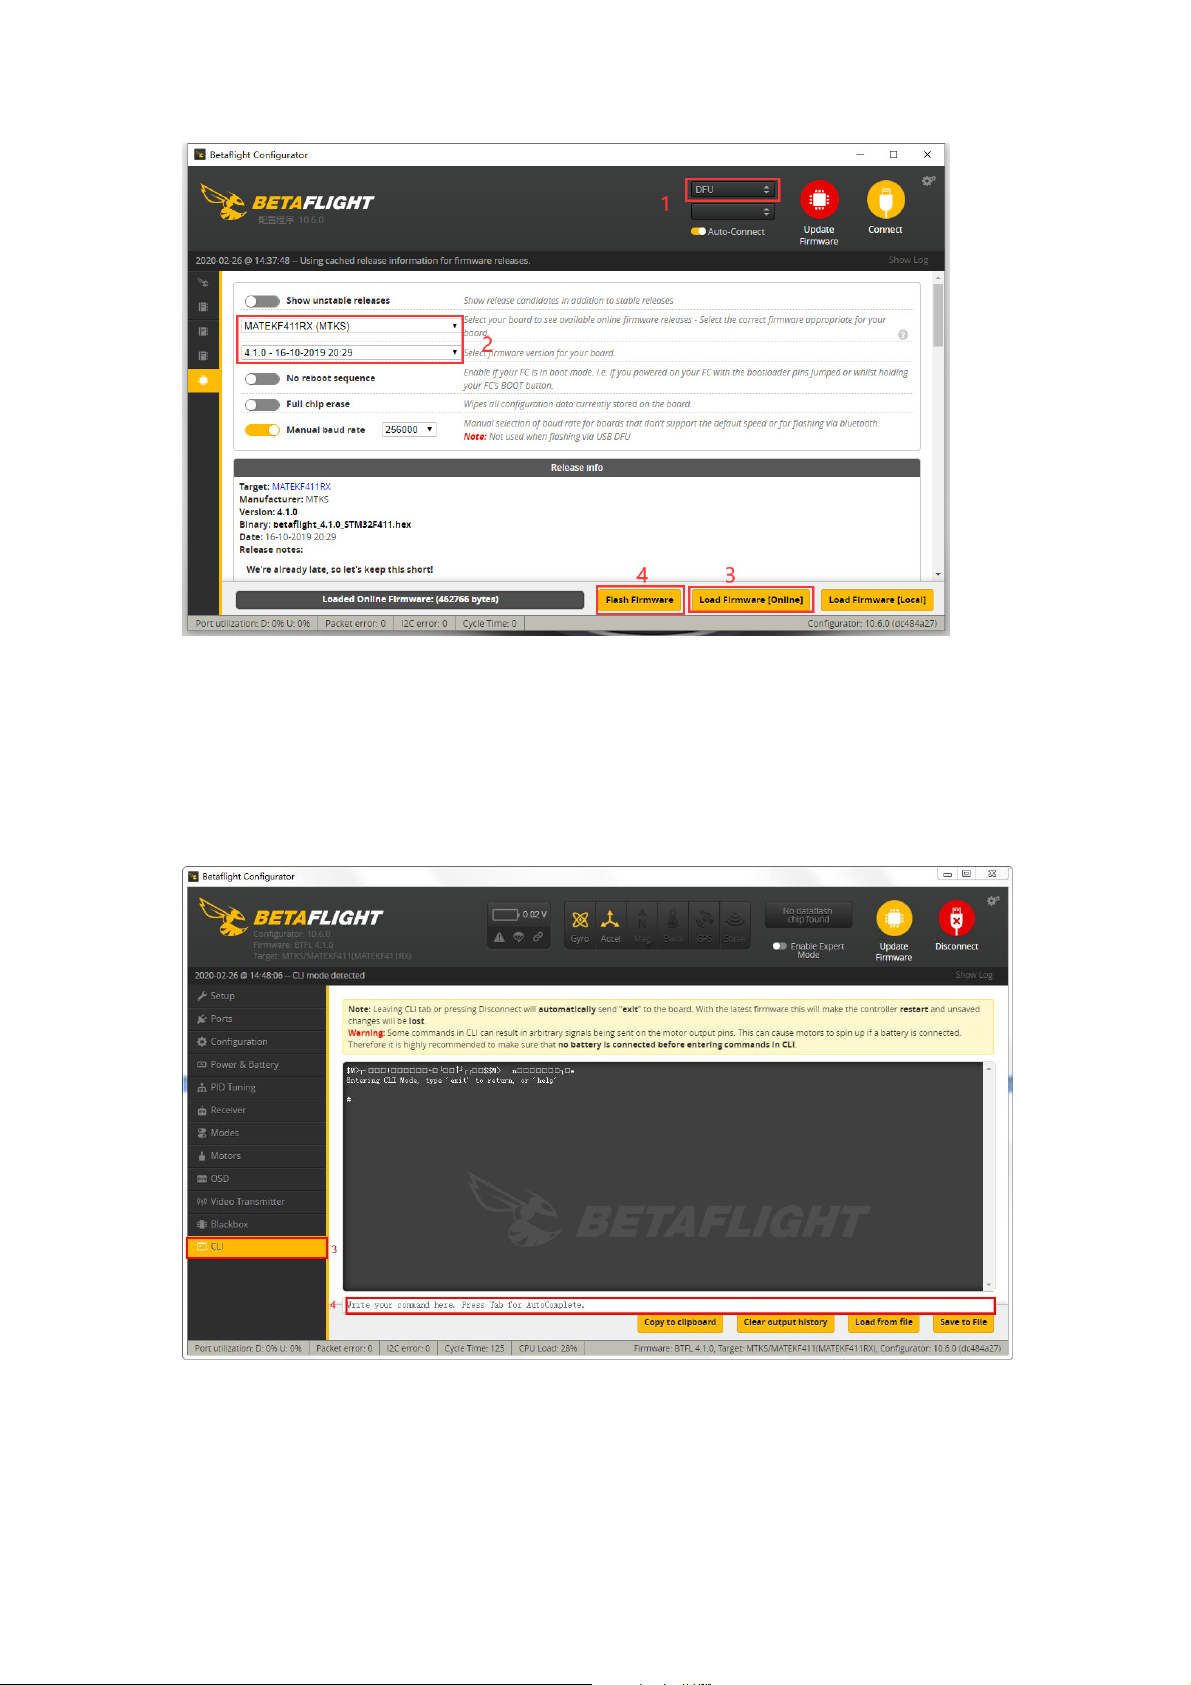
1. Put the Flight Controller in DFU mode by pressing the BOOT button while
plugging in the micro USB cable to a computer.
2. Select MATEKF411RX as the target and then select the firmware (4.1.0) or
download the hex file from https://emax-usa.com/ . Select Manual Baud Rate
with 256000 in the drop down menu
3. Select Load Firmware(Online) to download the firmware or Load
Firmware (Local) if already downloaded the hex file.
4. Select Flash Firmware to program the flight controller
emax-usa.com
9
Page 13
Tinyhawk II Race
Restoring the Tinyhawk II Race default settings
1. Download the latest CLI Dump File from https://emax-usa.com/
2. Connect Tinyhawk II Race to Betaflight configurator and select the CLI tab
3. Open the CLI Dump File in a text editor and copy all the text.
4. Paste the settings into the command bar and press enter
5. Tinyhawk II Race will reconnect to Betaflight when completed
emax-usa.com
10
Page 14
Tinyhawk II Race
Flight
Always use caution when flying and operate in an open and controllable area. Please
learn the flight controls first before powering on the aircraft to fly.
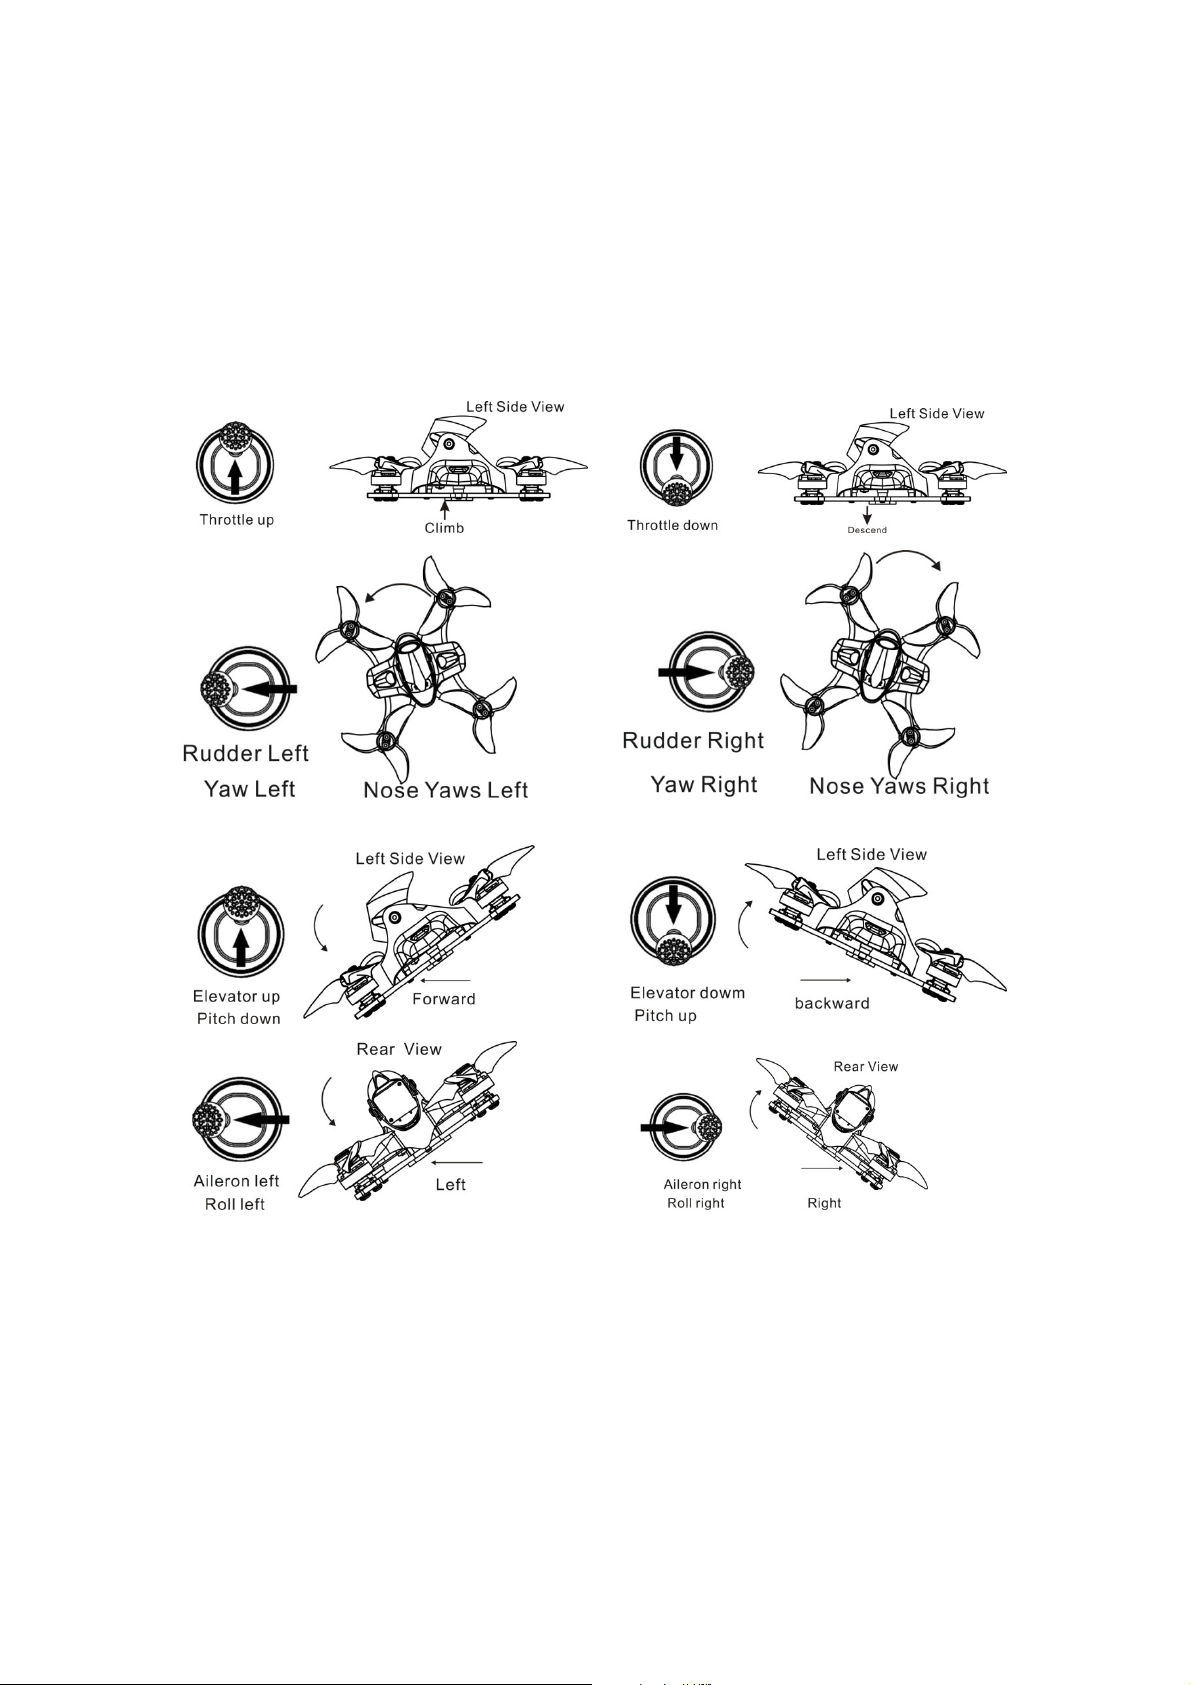
Radio Stick Controls
The left stick controls throttle and yaw direction of Tinyhawk II Race. The right stick
controls pitch and roll of the aircraft.
Left Stick Diagram
Right Stick Diagram
Fly Tinyhawk II Race
Start by powering on your Radio and Goggles. Tinyhawk II Race comes already
bound to your radio and on the right video channel matched with your goggles.
Power on Tinyhawk II Race by sliding the battery into the battery tray and plugging it
in. Once the battery is plugged in, set Tinyhawk II Race on a stable surface so it can
calibrate. Calibration takes a few seconds then Tinyhawk II Race is ready to fly.
Tinyhawk II Race can fly for 4 minutes on a fully charged battery. Land Tinyhawk II
Race when the battery reaches 3.2v; flying any longer can severely damage your
battery and is not recommended.
emax-usa.com
11
Page 15
Tinyhawk II Race
Arming
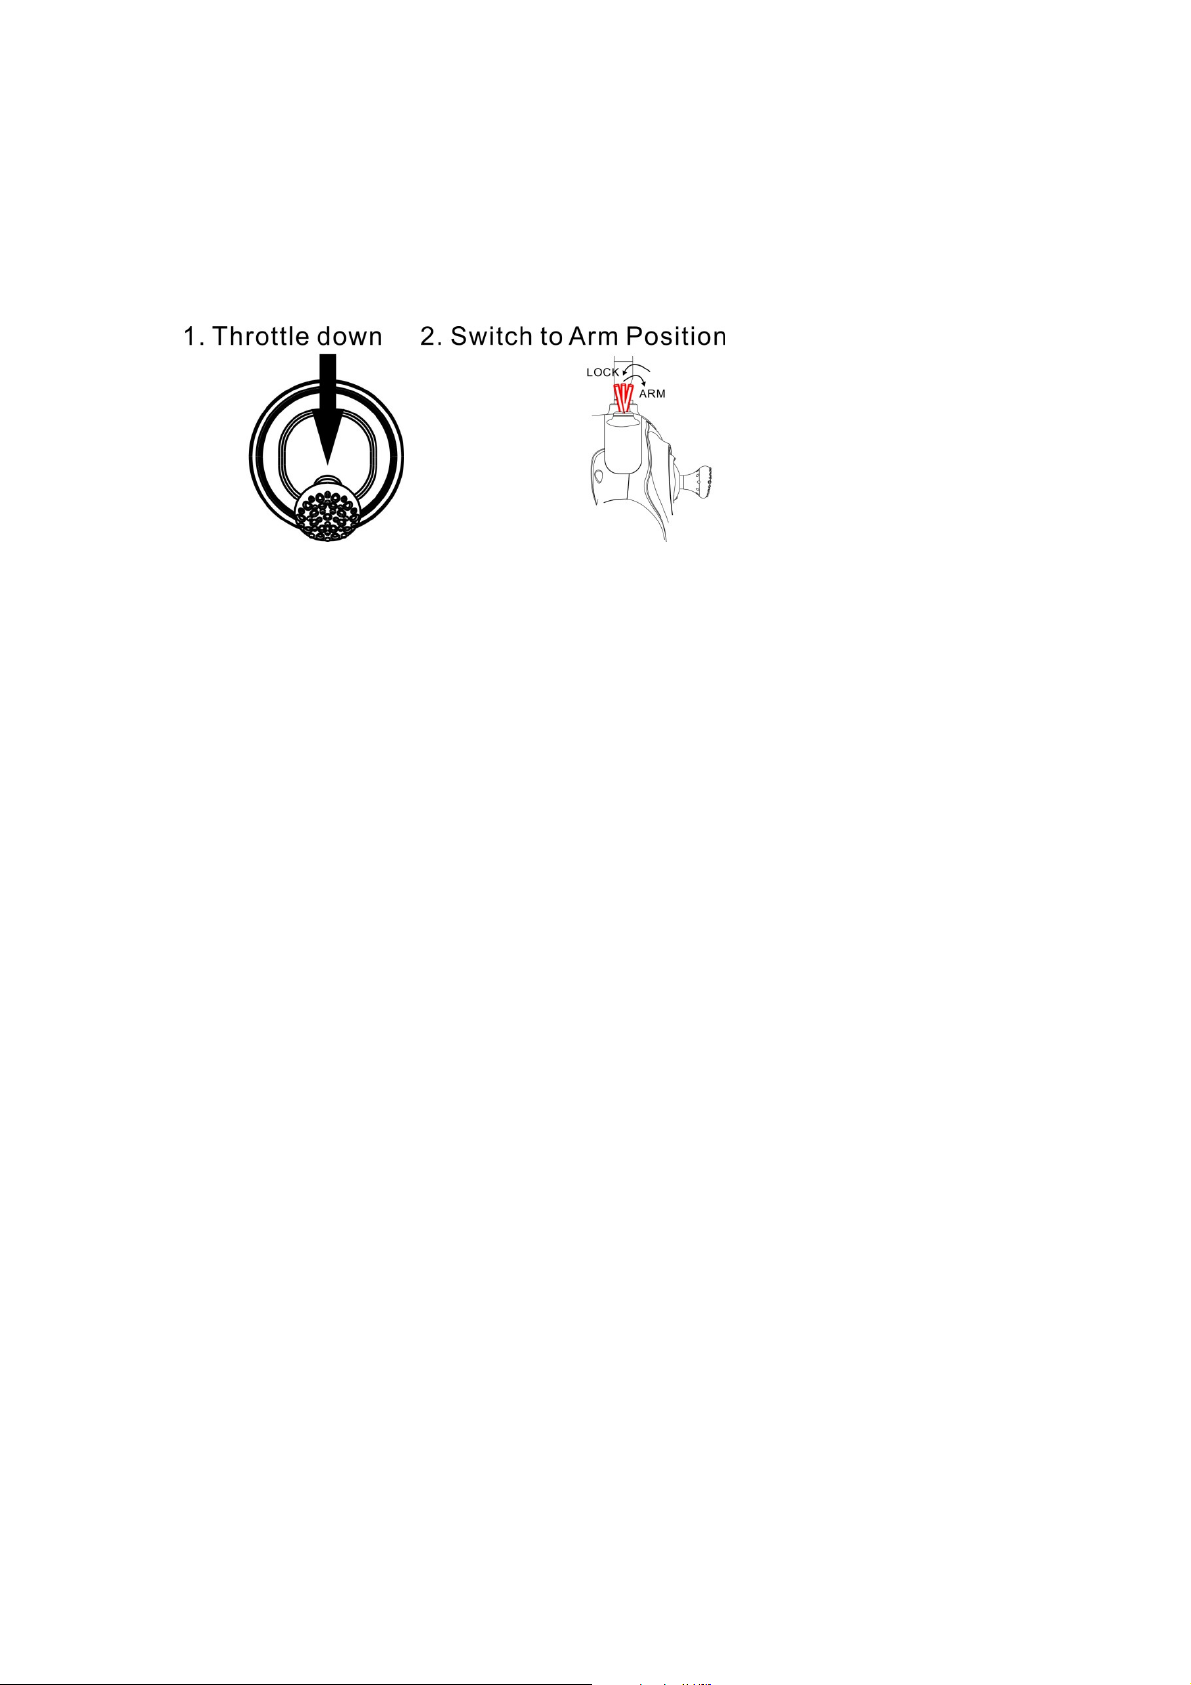
Arming refers to setting Tinyhawk II Race to a fly ready state. When Tinyhawk II
Race is powered on first it will not spin up the propellers until it is armed. Arm the
aircraft by first moving throttle to the bottom position. Then move the left switch of the
radio to its 3rdposition upwards. You will see the propellers spinning when Tinyhawk
II Race is successfully armed.
In the event of a crash always disarm immediately. Failure to disarm in a timely
manner can damage Tinyhawk II Race.
Always disarm Tinyhawk II Race before handling it.
Flying Modes
Tinyhawk II Race comes stock set in rate mode. This is an advance mode where
control sets the angular rate of the aircraft. The AUX 2 switch is set to change this
mode on a 3 stage switch. When AUX 2 is in a high state, Tinyhawk II Race will be in
angle mode where control sets the attitude of the aircraft. When the switch is in the
middle state, Tinyhawk II Race will be in Horizon mode.
Line of Sight Flying
To learn how to fly Tinyhawk II Race start by flying it line of sight (no goggles yet).
Power on Tinyhawk II Race and set it down in a cleared room. Arm Tinyhawk II Race
then throttle up using the left stick to a hover position. Work on maintaining a
constant altitude. Pitch and roll Tinyhawk II Race with the right thumb stick and yaw
Tinyhawk II Race with the left thumb stick.
First Person View (FPV) Flying
Make sure Tinyhawk II Race and the goggles are on the same vtx channel and that
you have a clear area to fly around in. Apply the same principals learned when flying
Tinyhawk II Race line of sight except now work on flying in a forward direction while
maintaining a controlled constant altitude. It is easier to learn flying FPV by always
moving in a forward direction so always apply a slight amount of pitch using your
right thumb stick. You can steer Tinyhawk II Race like a car using yaw on the left
thumb stick.
There is an on screen display (OSD) overlaying the video feed from the camera of
Tinyhawk II Race. The OSD displays important information such as flight time and
battery voltage. Pay attention to these numbers during flight to know how much
battery life is left. Tinyhawk II Race can fly for a maximum of 4 minutes. When the
battery reaches 3.2v, land Tinyhawk II Race. Drawing the battery below 3.2v is not
suggested and can damage the battery.
emax-usa.com
12
Page 16

Tinyhawk II Race
Thank you for purchasing our product! Enjoy Flying Tinyhawk II Race.
Warning:
Please pay attention to your surroundings.
Not recommended for persons under 18 years of age.
emax-usa.com
13
 Loading...