

Page 1
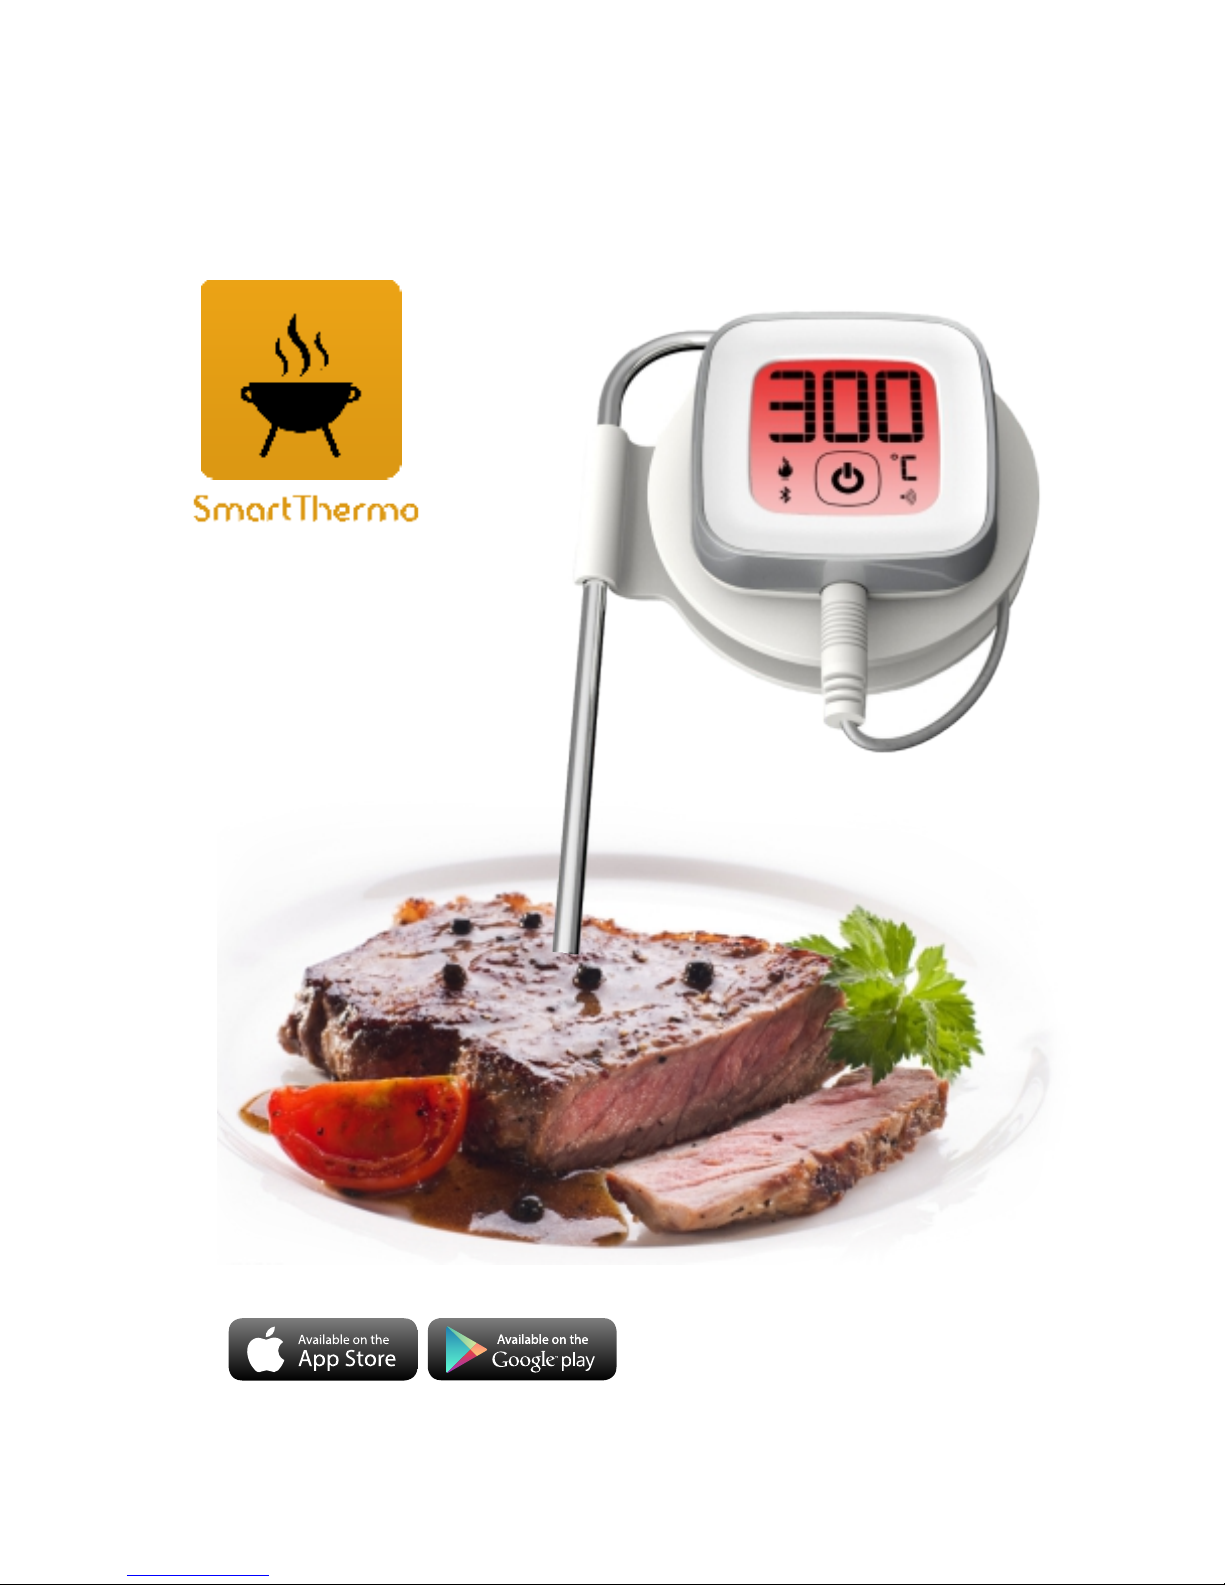
Bluetooth Smart Thermometer
Model:
EM
2239
App Downloads:
*Hardware Requirements:
iPhone 4s (or above) or Bluetooth v4.0 enabled smart device
*Software Requirements
iOS 7 (or above) or Android 4.3 (or above)
Page 2
Thank you for selecting Smart Thermo.Simply
program your choice of meat type,target
temperature or cooking time either on the
touch-key display unit or your smart device
via the corresponding app. When your grill is
cooked to perfection,You do not need to
wait by the grill to monitor the cooking status.
Best of all,the app allows you to even textintegrating photos of dishes on social
community.
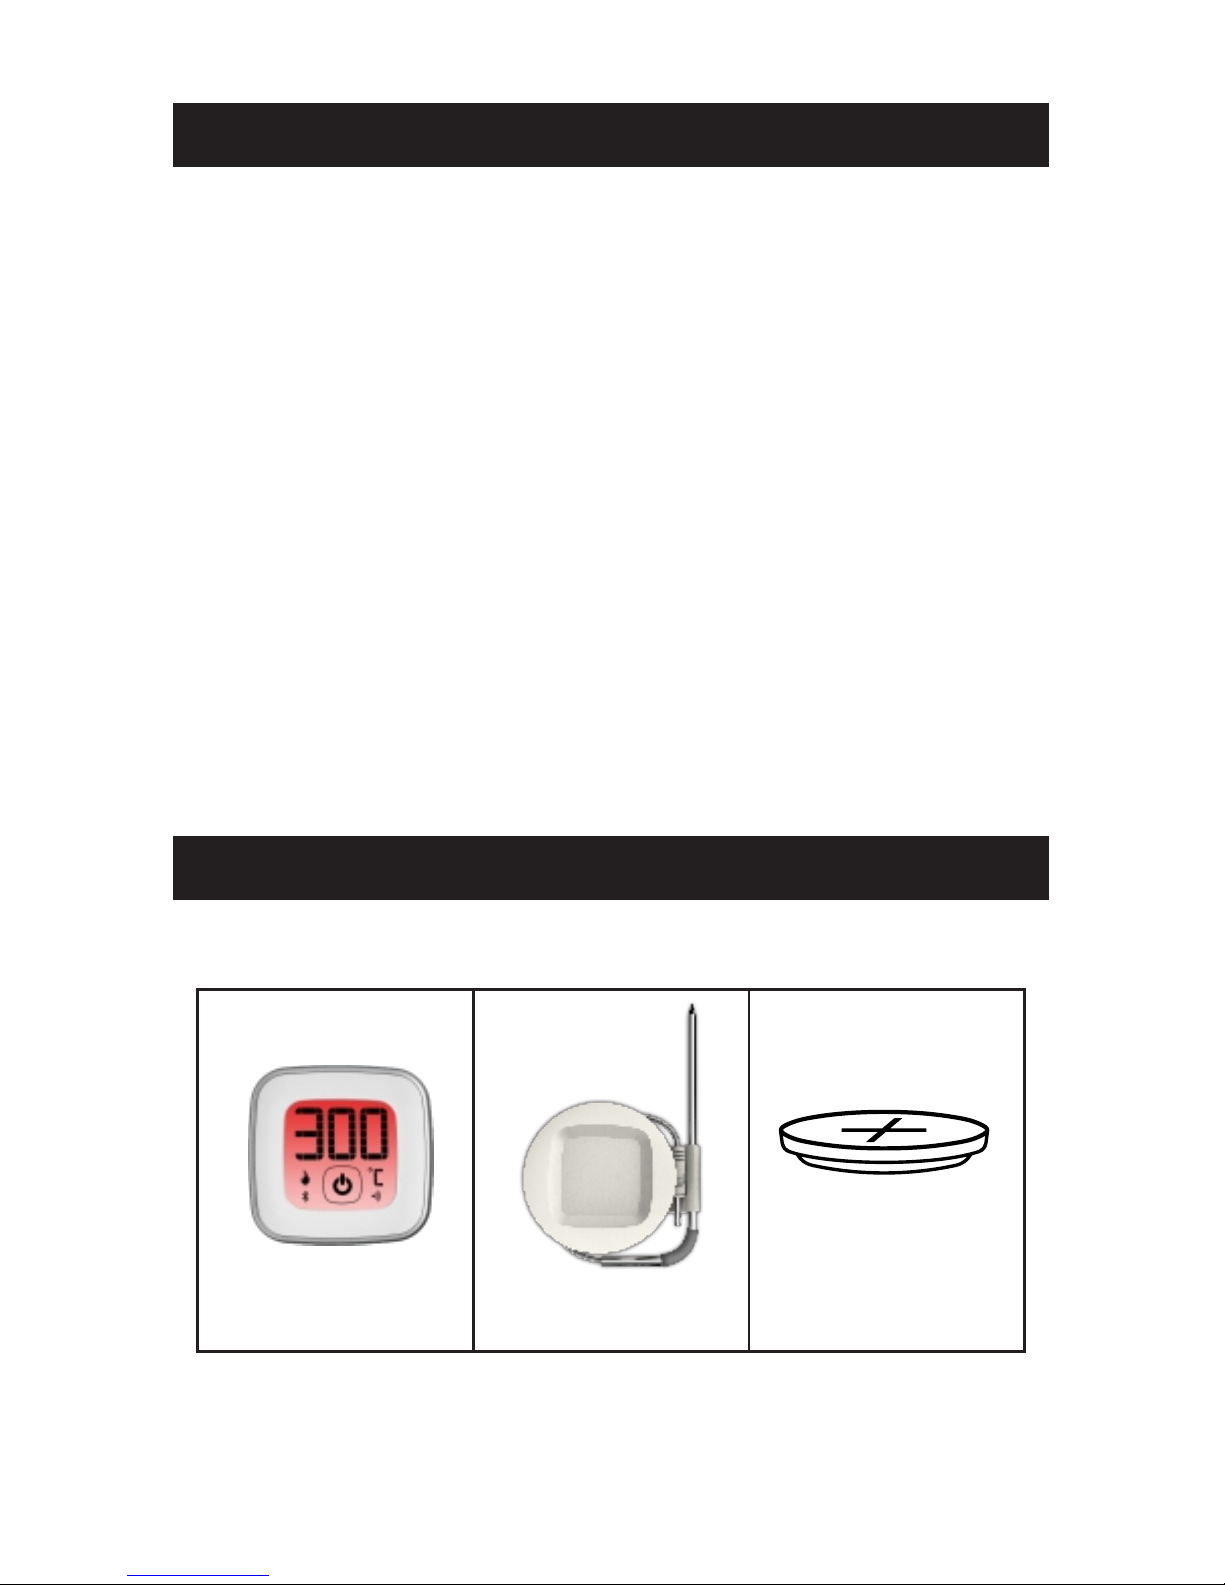
Probe wrap x1
2032 battery
x1
Metal probex1
Touch-key
display unit x1
INSTRUCTION
PACKAGING CONTENTS
CR
Page 3
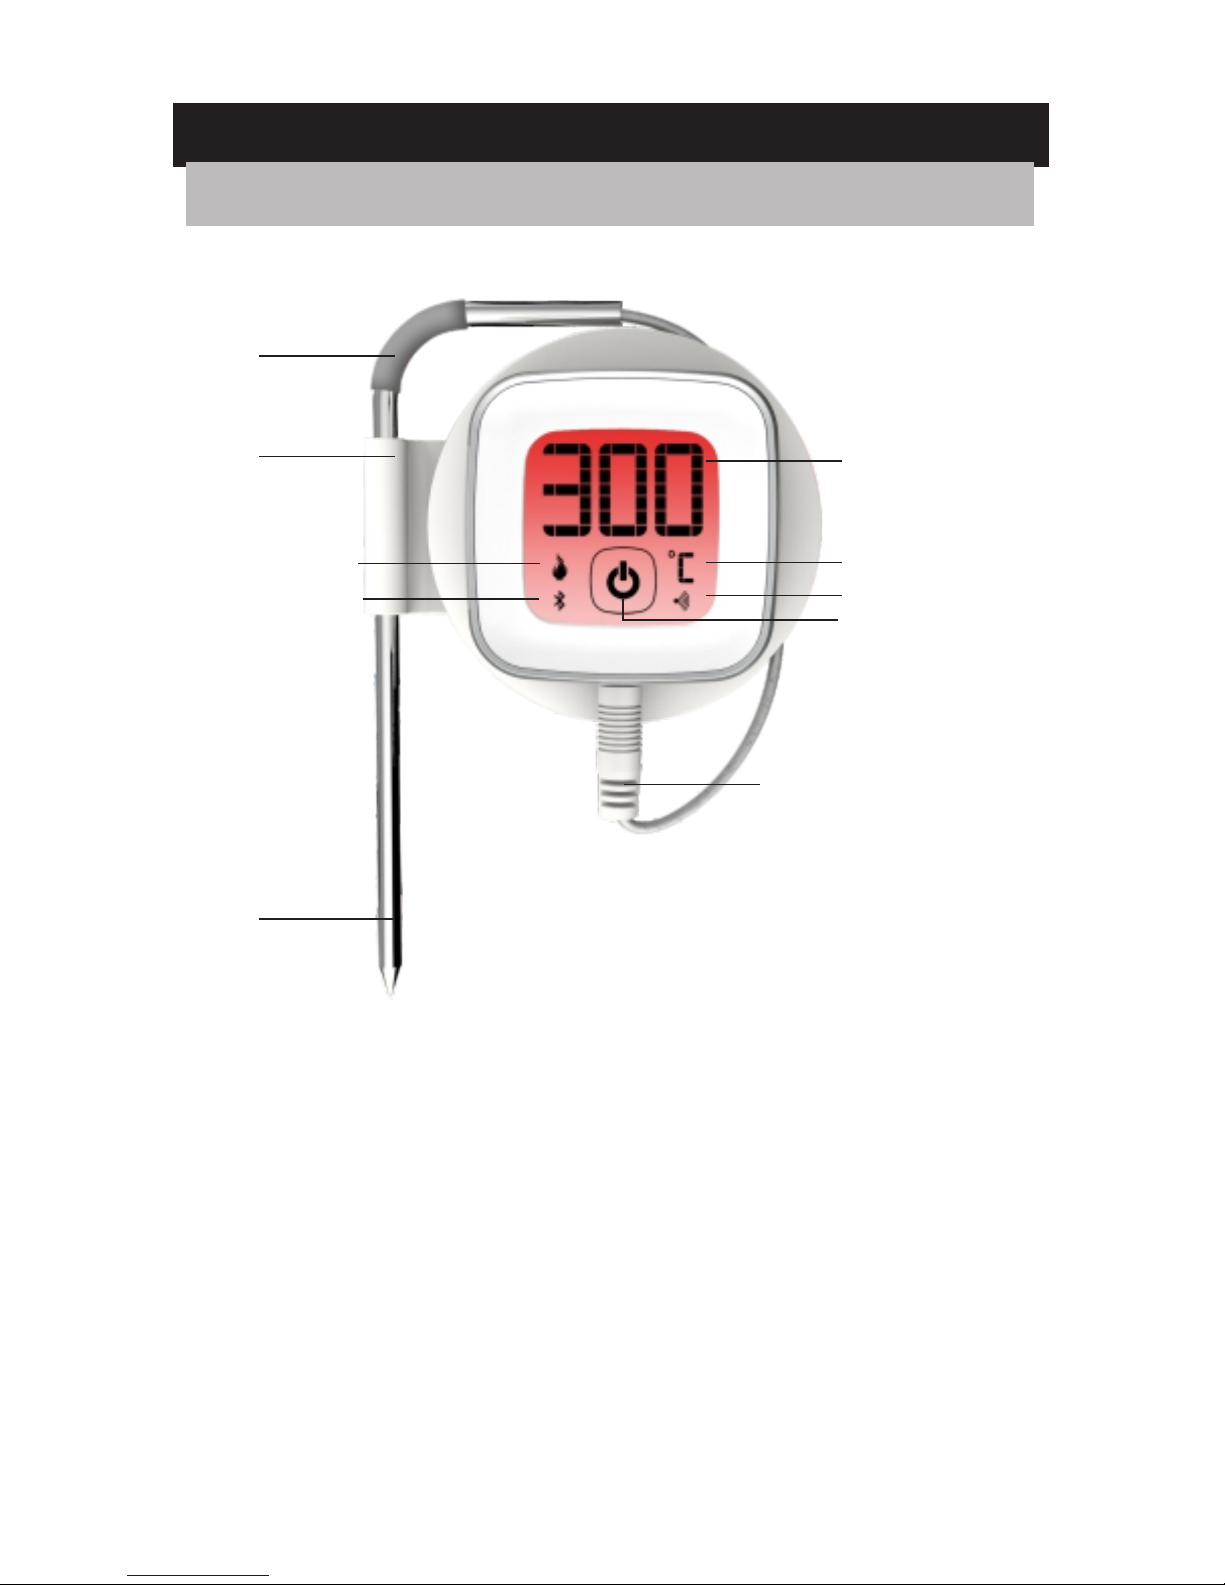
1. Current temperature;
2. °C/°F(temperature measurement unit)
3. Pairing indicator
4. power on/off.
5. Bluetooth indicator
6. Thermo logo
a. Metal Probe Connector Wire
b. Metal probe
c. Probe wrap
d. Silicone sleeve
1
2
3
4
6
5
a
b
c
d
OVERVIEW
DISPLAY UNIT-FRONT VIEW
Page 4
1
2
3
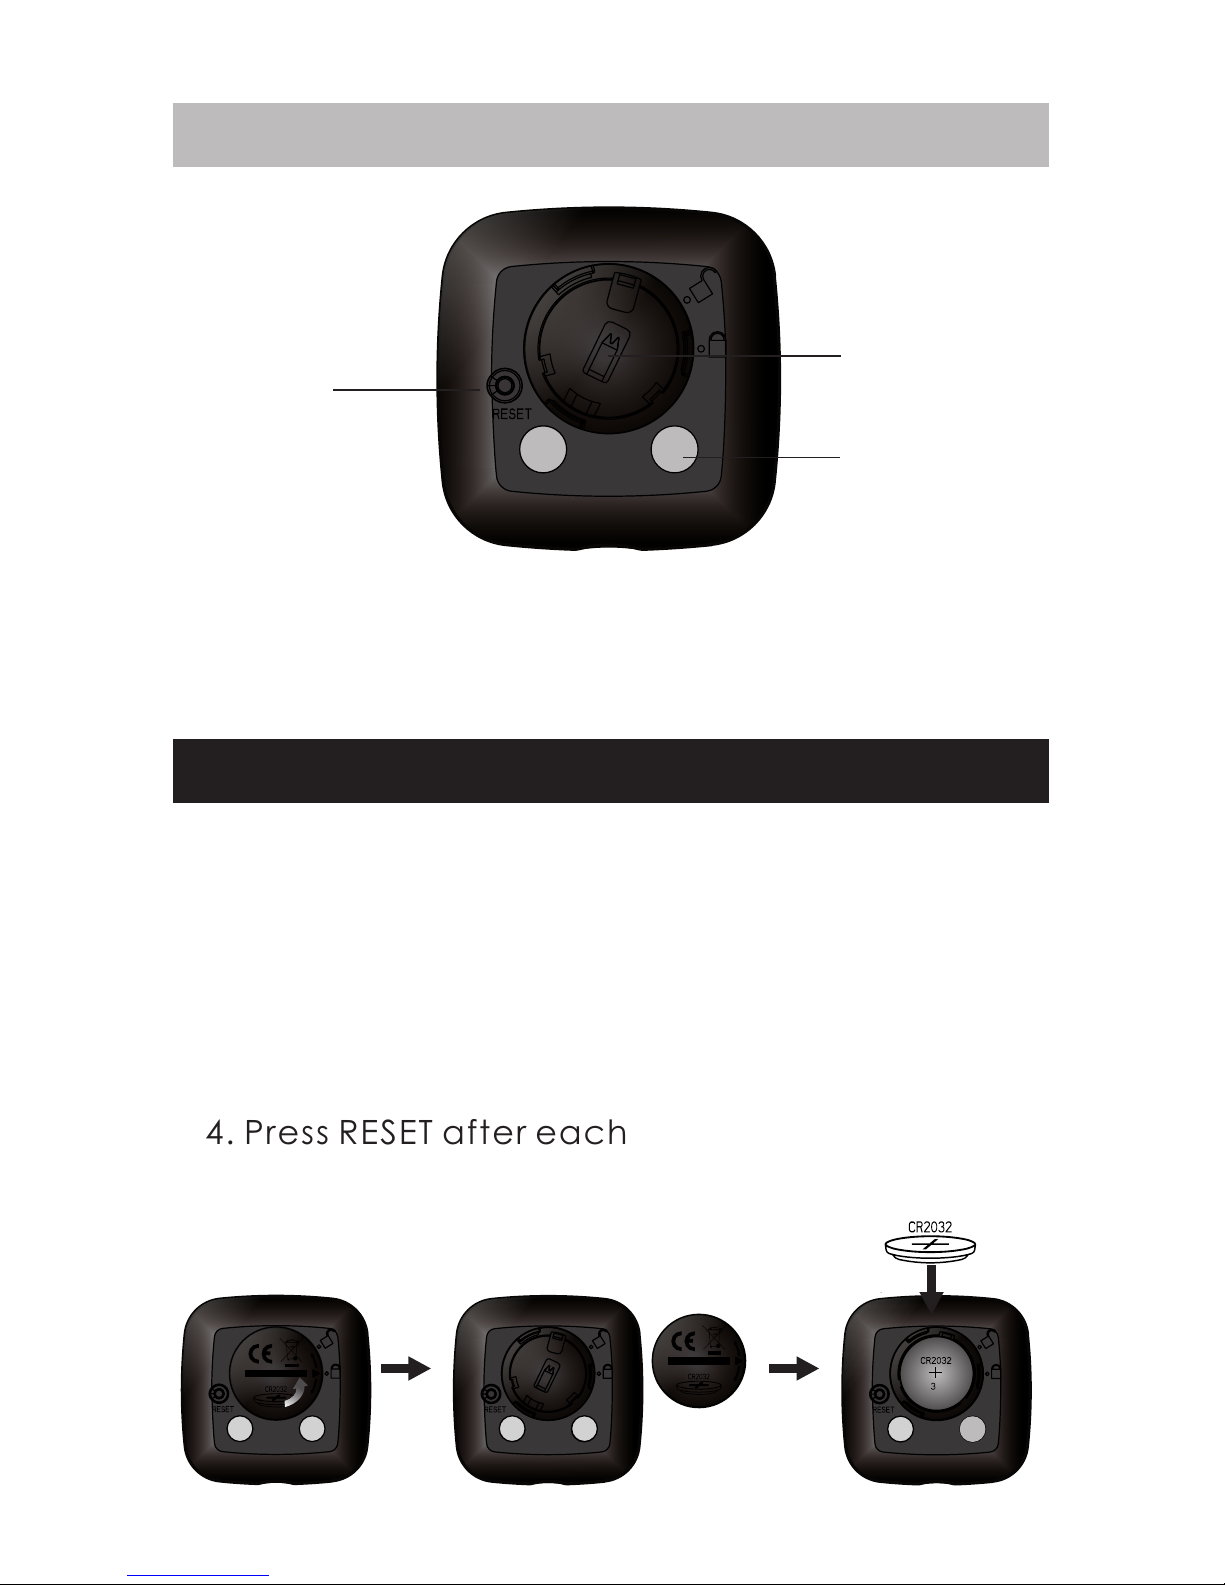
1. Battery compartment
2. Magnet
3. Reset button
1. Remove the battery door by twisting it
counter-clockwise
2. Replace the battery with a CR2032 coin cell
battery.
3. Ensure the battery is in place, matching the
polarities (+/-) and replace the battery door.
4. Press RESET after each battery change.
V
DISPLAY UNIT-REAR VIEW
BATTERY INSTALLATION
Page 5
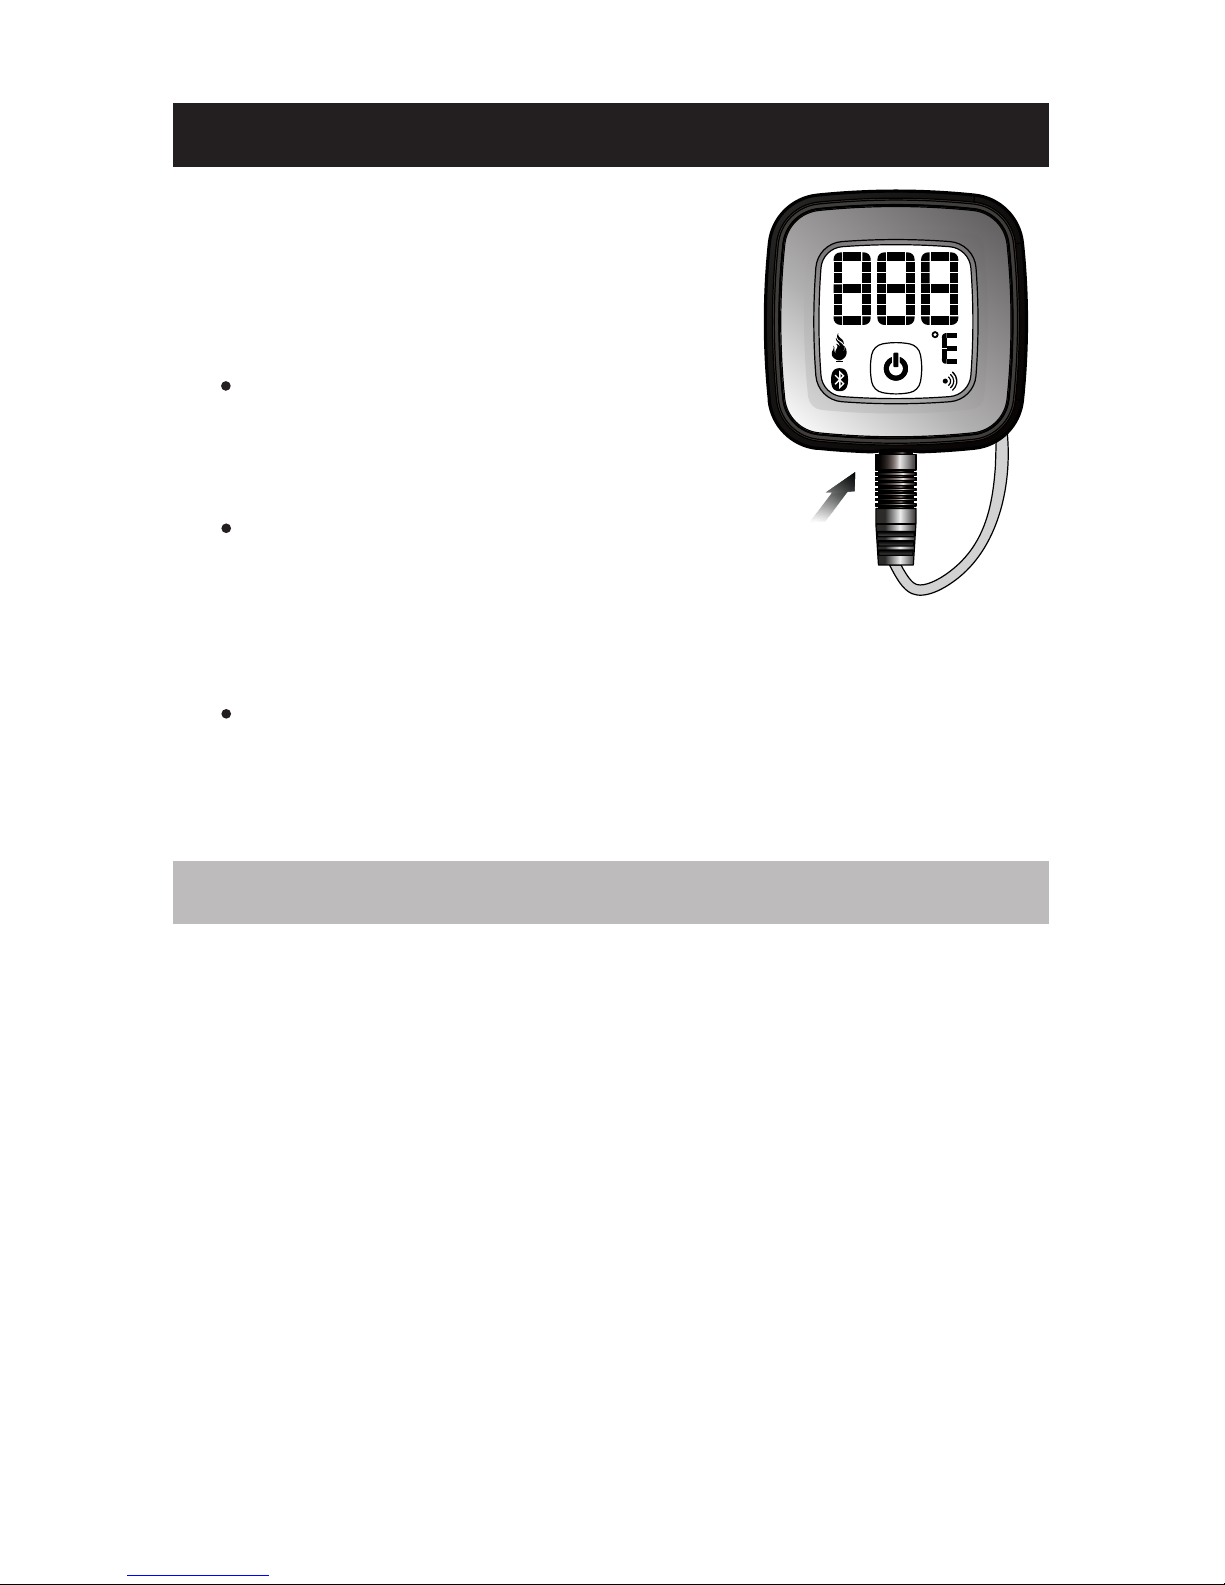
Carefully then plug the meat
probe into the bottom socket.
Probe Use
Meat Probe Acceptable
Temperature Range: -13°F
to 572°F (-25ºC to 300ºC)
The probe should be cleaned by hand with a
dishcloth, standard dishwashing soap and
warm water.The probe is not dishwasher safe.
Take precaution not to get the probe's wiring
wet.
Be sure to avoid water exposure to the
probe's wiring as well as the area where the
probe's wiring meets the probe.
The probe is not waterproof and damage
may result from water exposure. The probe
should never be submersed in water.
When using a standard Meat Probe, be sure
the probe wire will not be exposed to flames
or temperatures exceeding 572°F (300°C).
The Meat Probe should always
be inserted into the center of the
item which is being cooked for an
accurate temperature.
CONNECTING THE PROBE
NOTE
Page 6
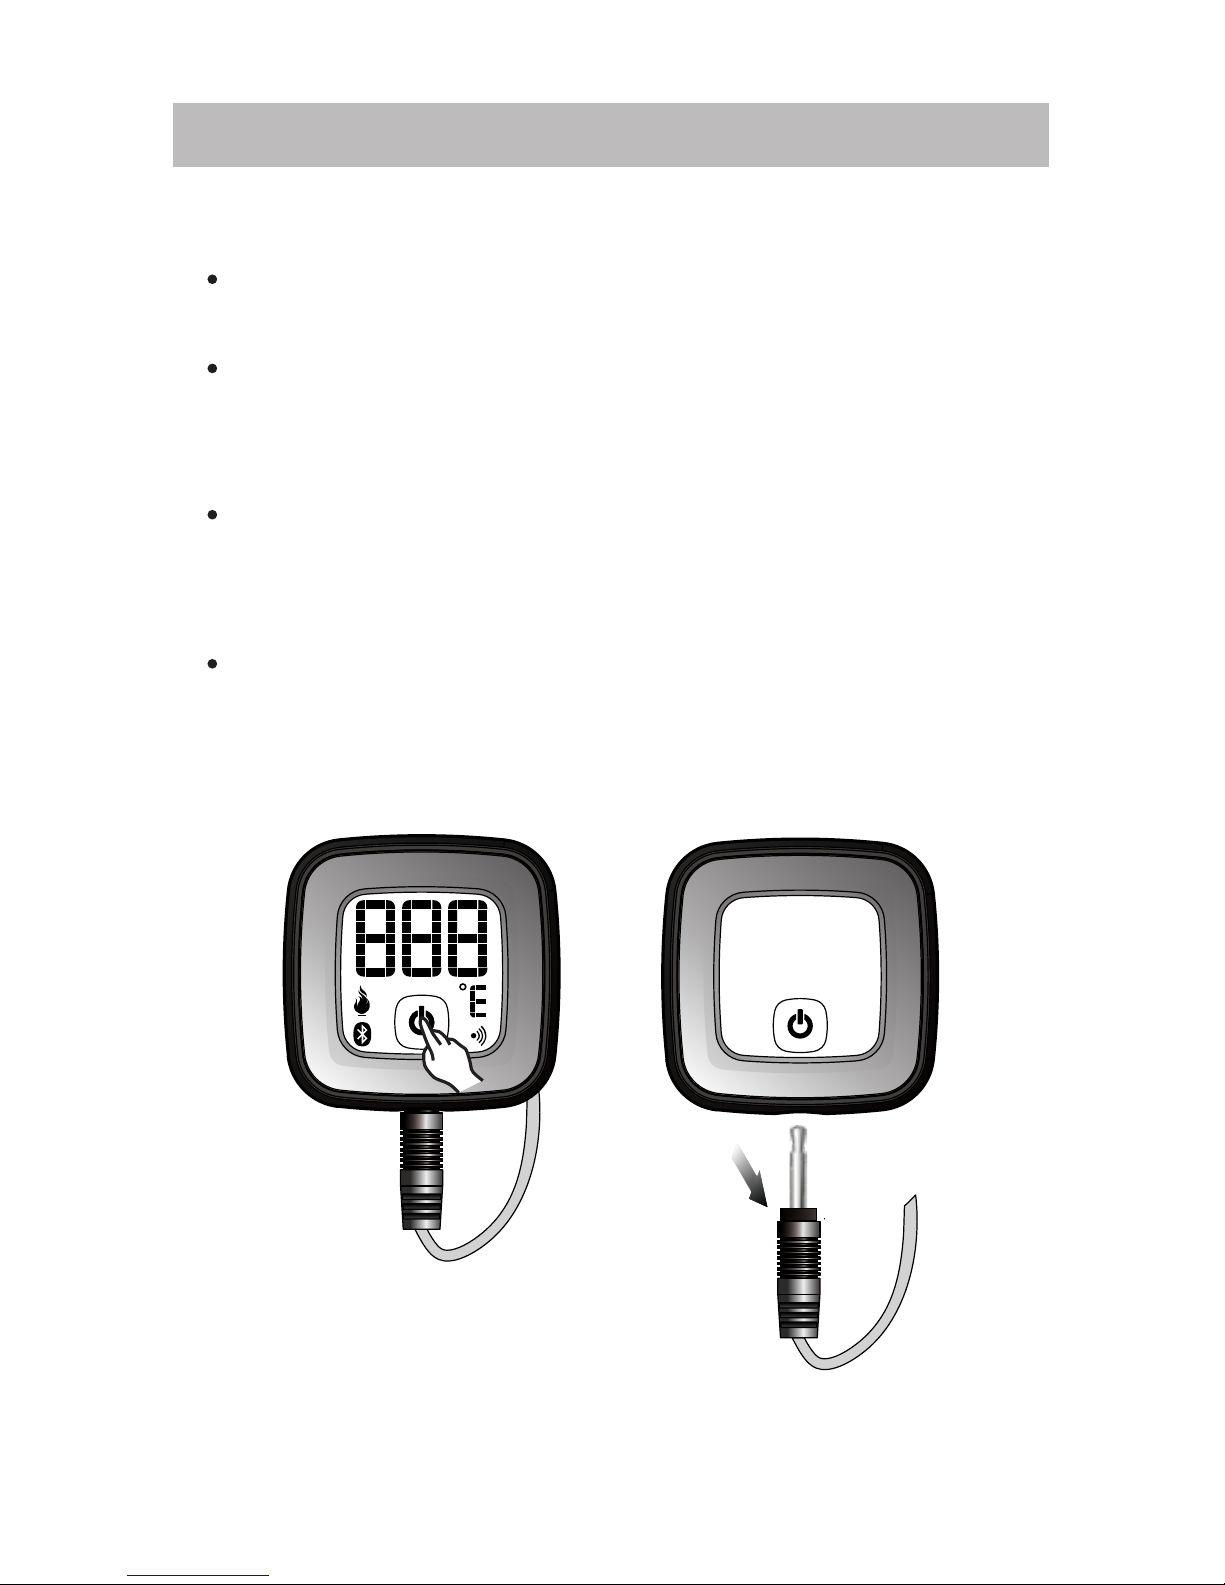
POWERING ON & OFF
1. To turn on the SmartThermo, follow these steps:
Press the power button located in the bottom
of the LCD.
The LCD will full screen display while waiting
for pairing.
2. To turn off the SmartThermo, follow these steps:
Press the power button located in the bottom
and hold of the LCD for three seconds.
Auto Shut-Off:
The SmartThermo will automatically turning off
if there is no probe installed.
Page 7
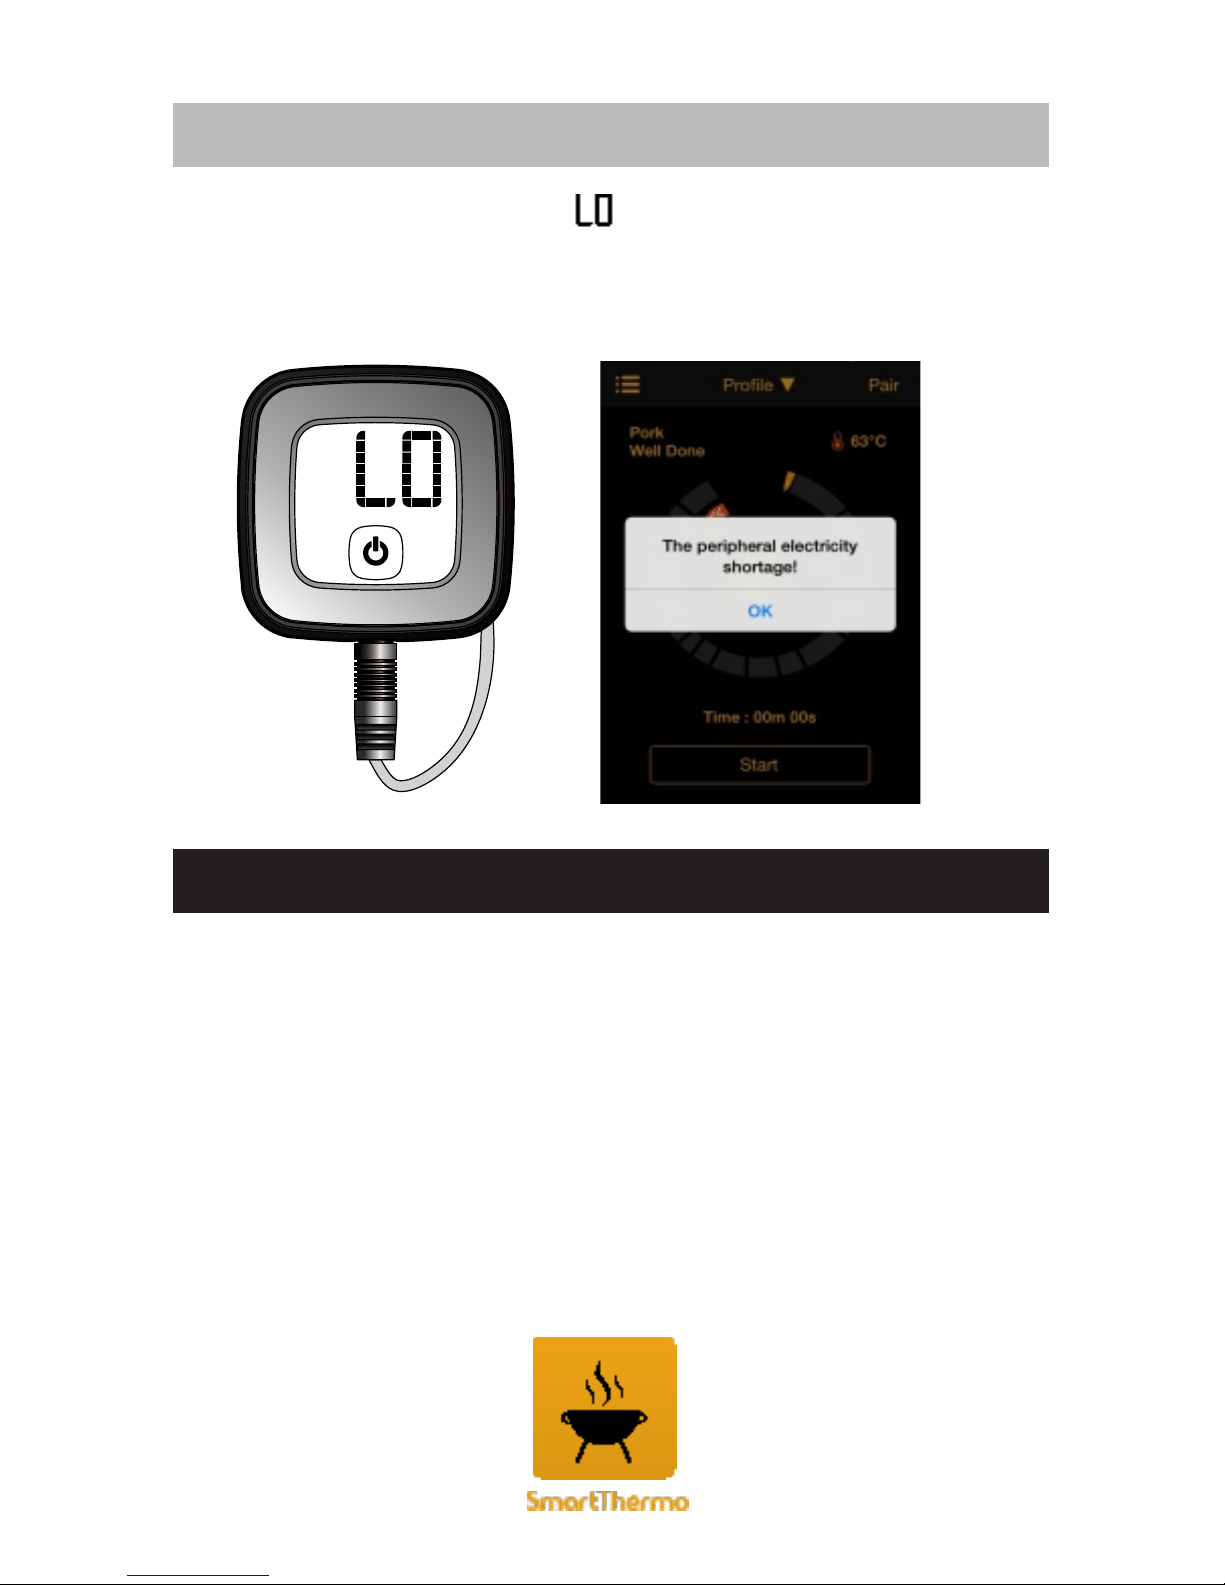
If low battery icon “ ” displays on the
screen, please replace with new batteries for
the corresponding device.
To quickly find the application from the Apple
Store , please type 'SmartThermo' as keyword in
the search engine. Ensure your mobile device is
compatible with iOS 7 and Android 4.3 devices
and later, Only compatible with Bluetooth v4.0
devices . You can remotely set the Smart Thermo
and read the thermometer information through
Bluetooth v4.0 with your mobile device.
NOTE
CONNECT WITH YOUR SMART DEVICE
Page 8
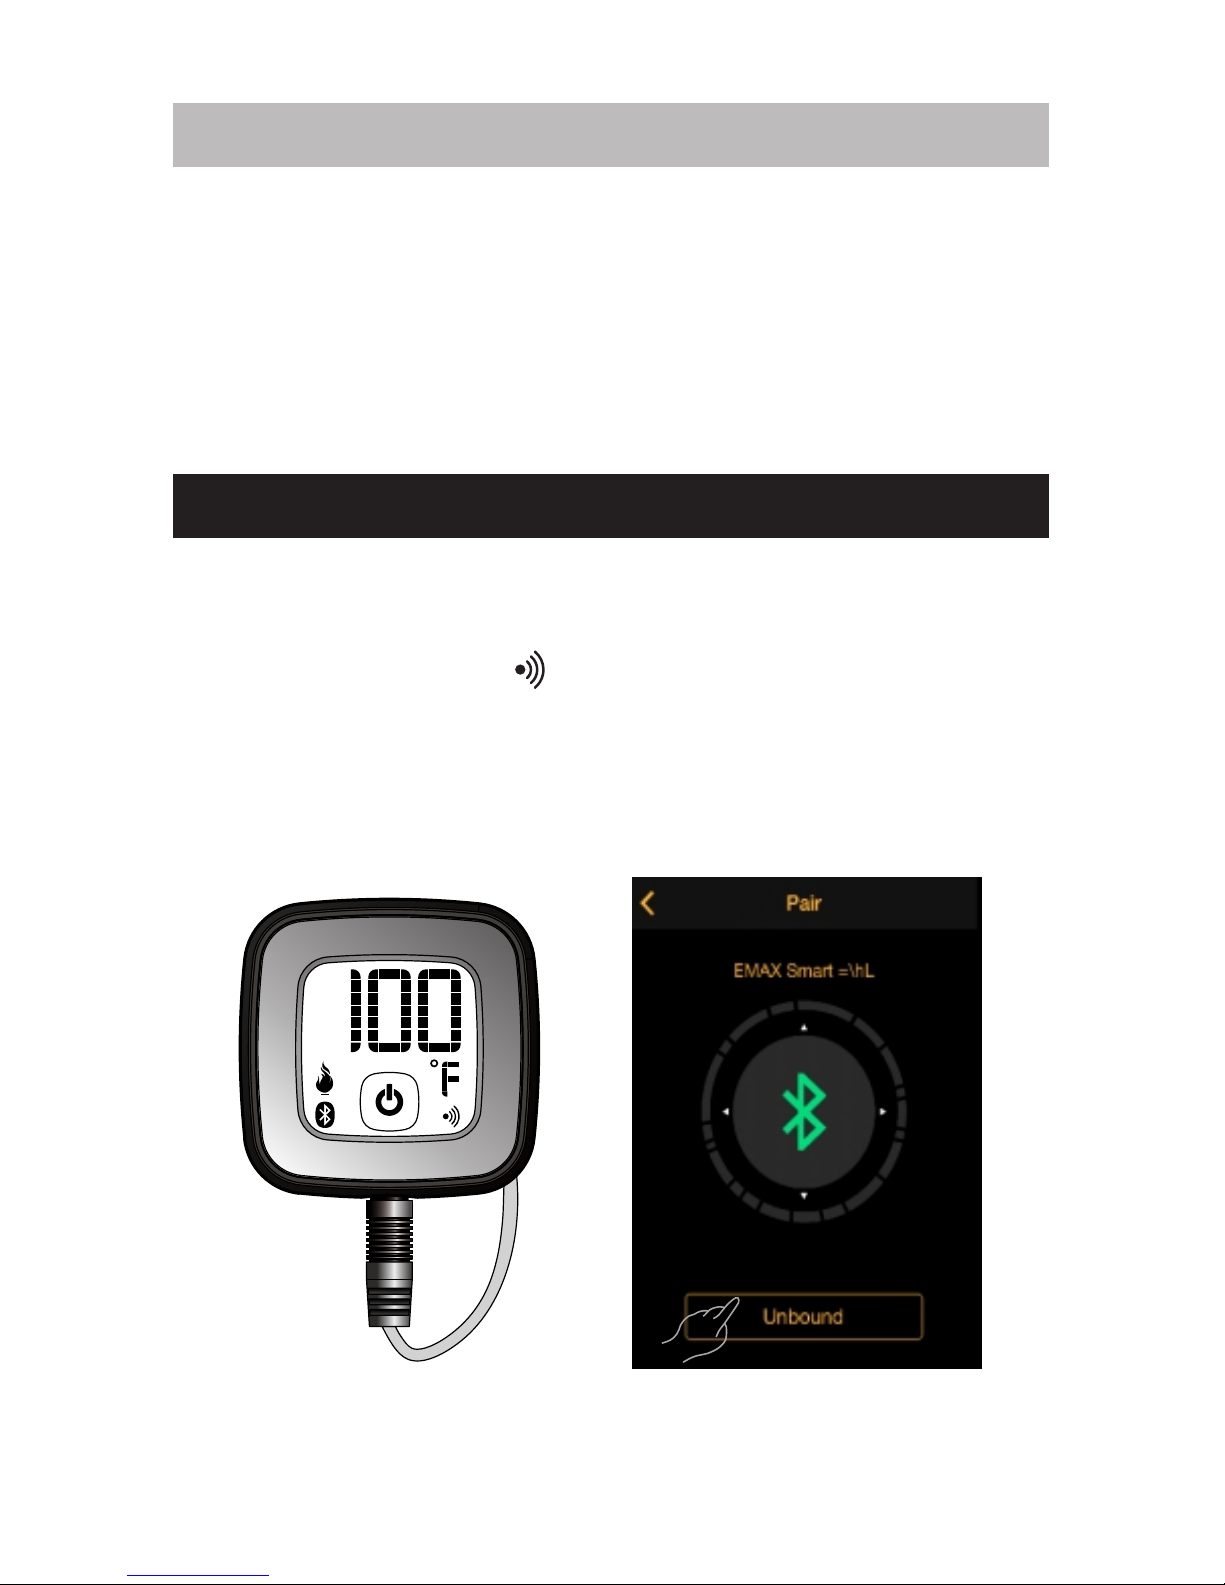
First of all, you need to pair your Smart Thermo
with your smart. “ ” will flash on the screen
of the Smart Thermo while pairing and be on
after successful pairing.
iPhone (4S and later)
iPad (3rd generation and later)
iPad mini (all generations)
iPod touch (5thgeneration and later)
TM
®
®
®
IOS SERIES MODEL
PAIRING YOUR Smart Thermo
Page 9
1
2
3
4
5
6
7
8
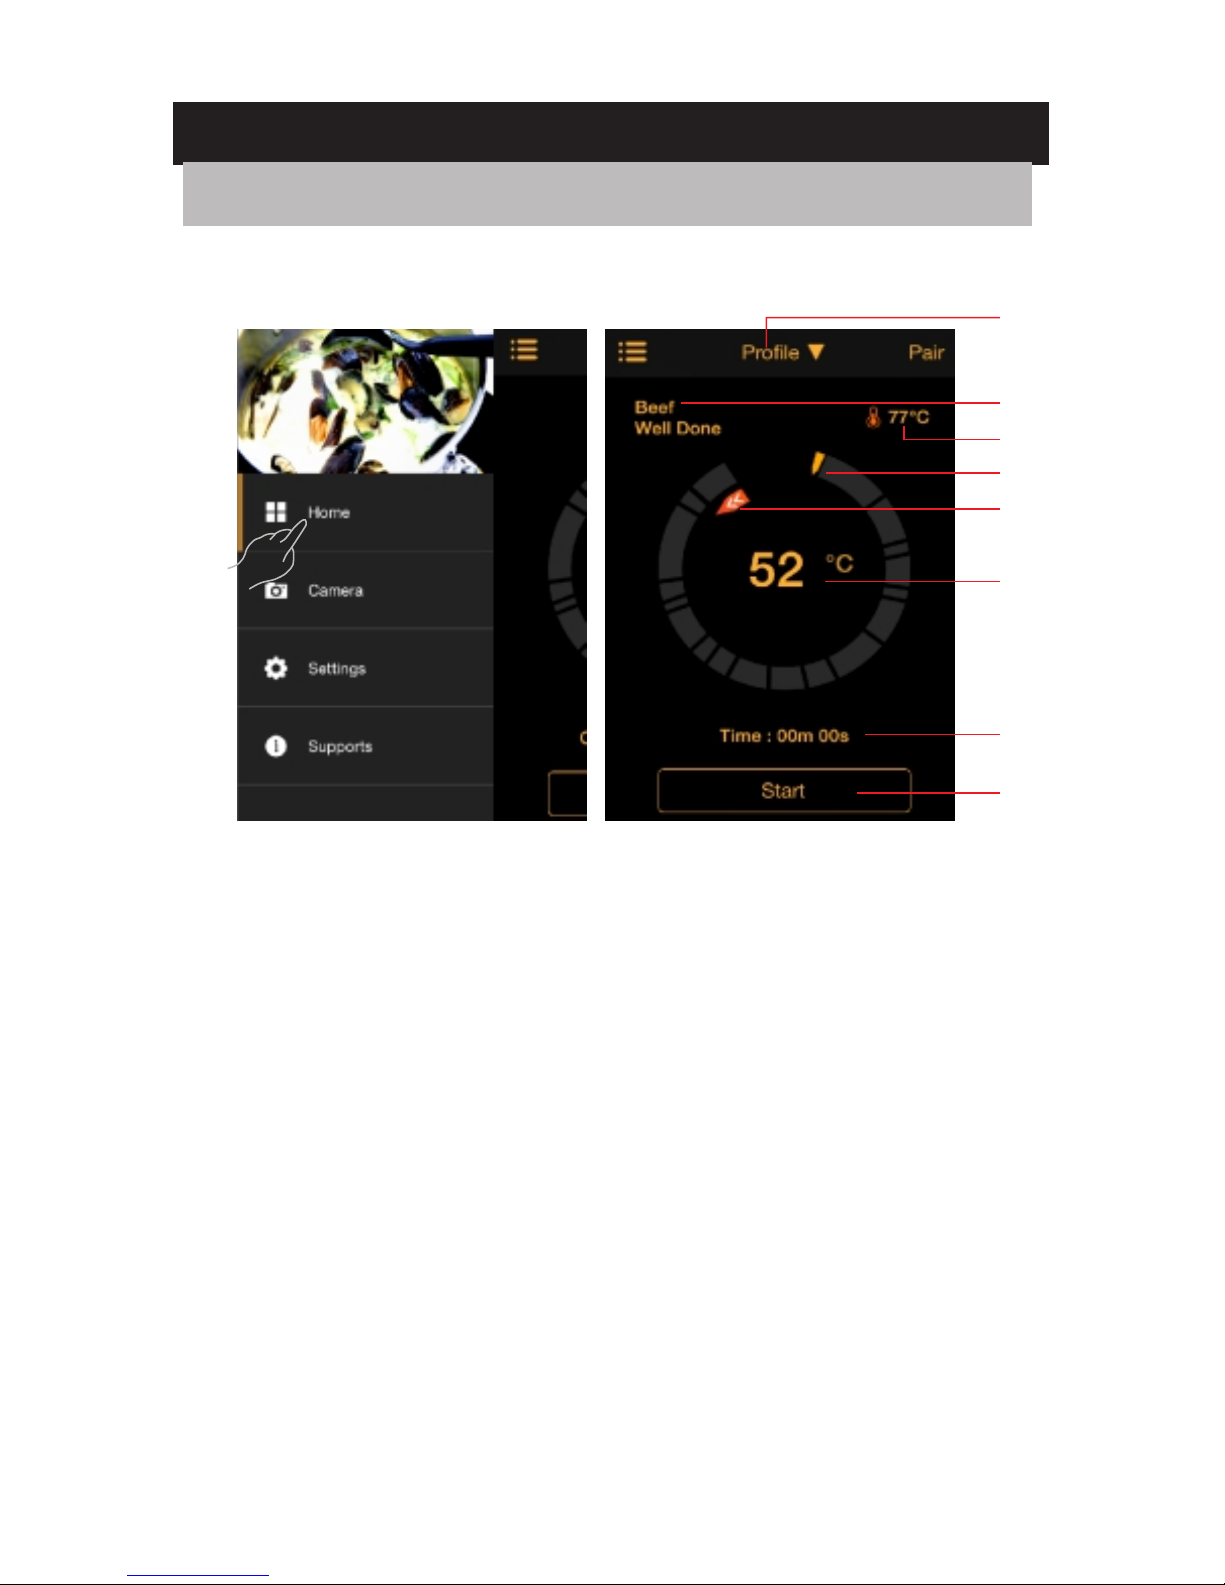
HOME
DISPLAY UNIT-WORK
1. Profile (Tap to display toggle between
Profile, Temperature or Timer display)
2. Meat and doneness display (Tap to
change setting)
3. Set temperature
4. Target temperature icon
5. Temperature trend display
6. Current meat temperature (Tap to
display temperature history)
7. Cooking time or count down timer
8. To start count up or count down timer
Page 10
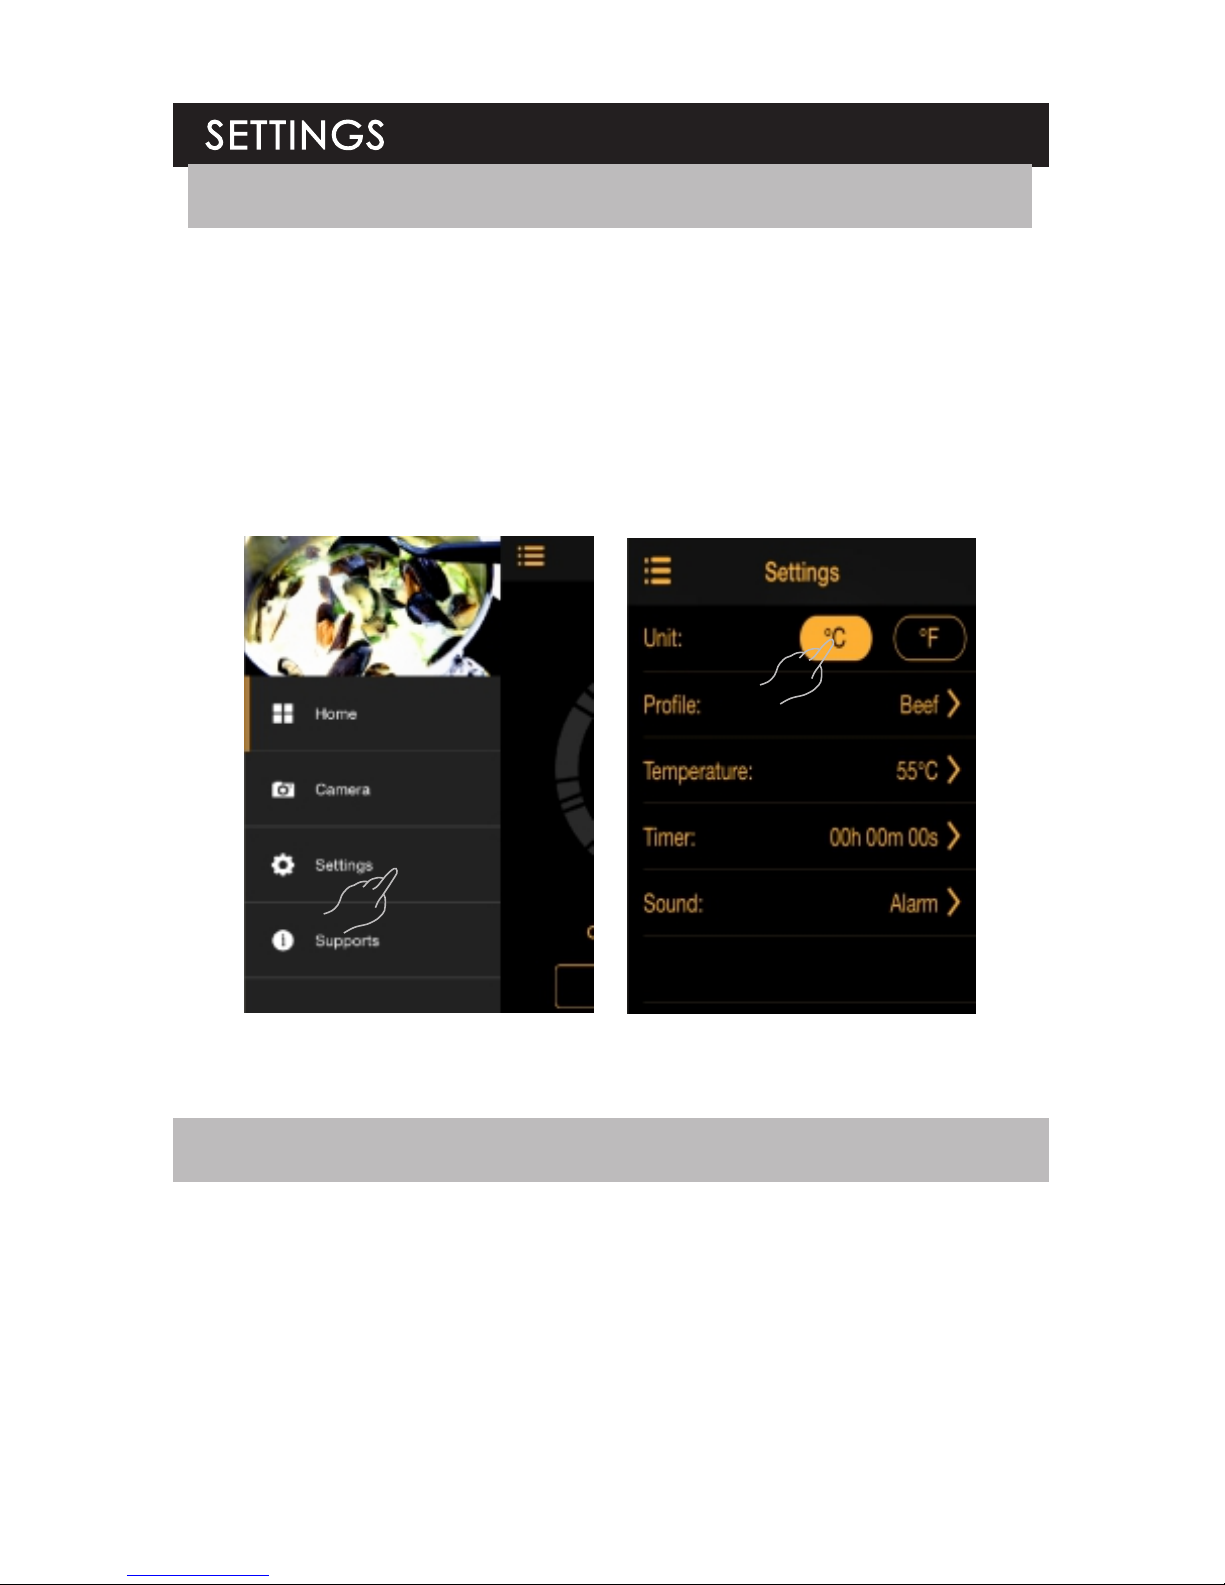
1. Tap to view the measurement unit options.
2. Tap on your desired unit.
3. Tap to go back to the previous screen to
save.
You can set your Smart Thermo through the
application, such as measurement units. The
settings are as follows.
To select the measurement unit:
Settings the choose food
Page 11
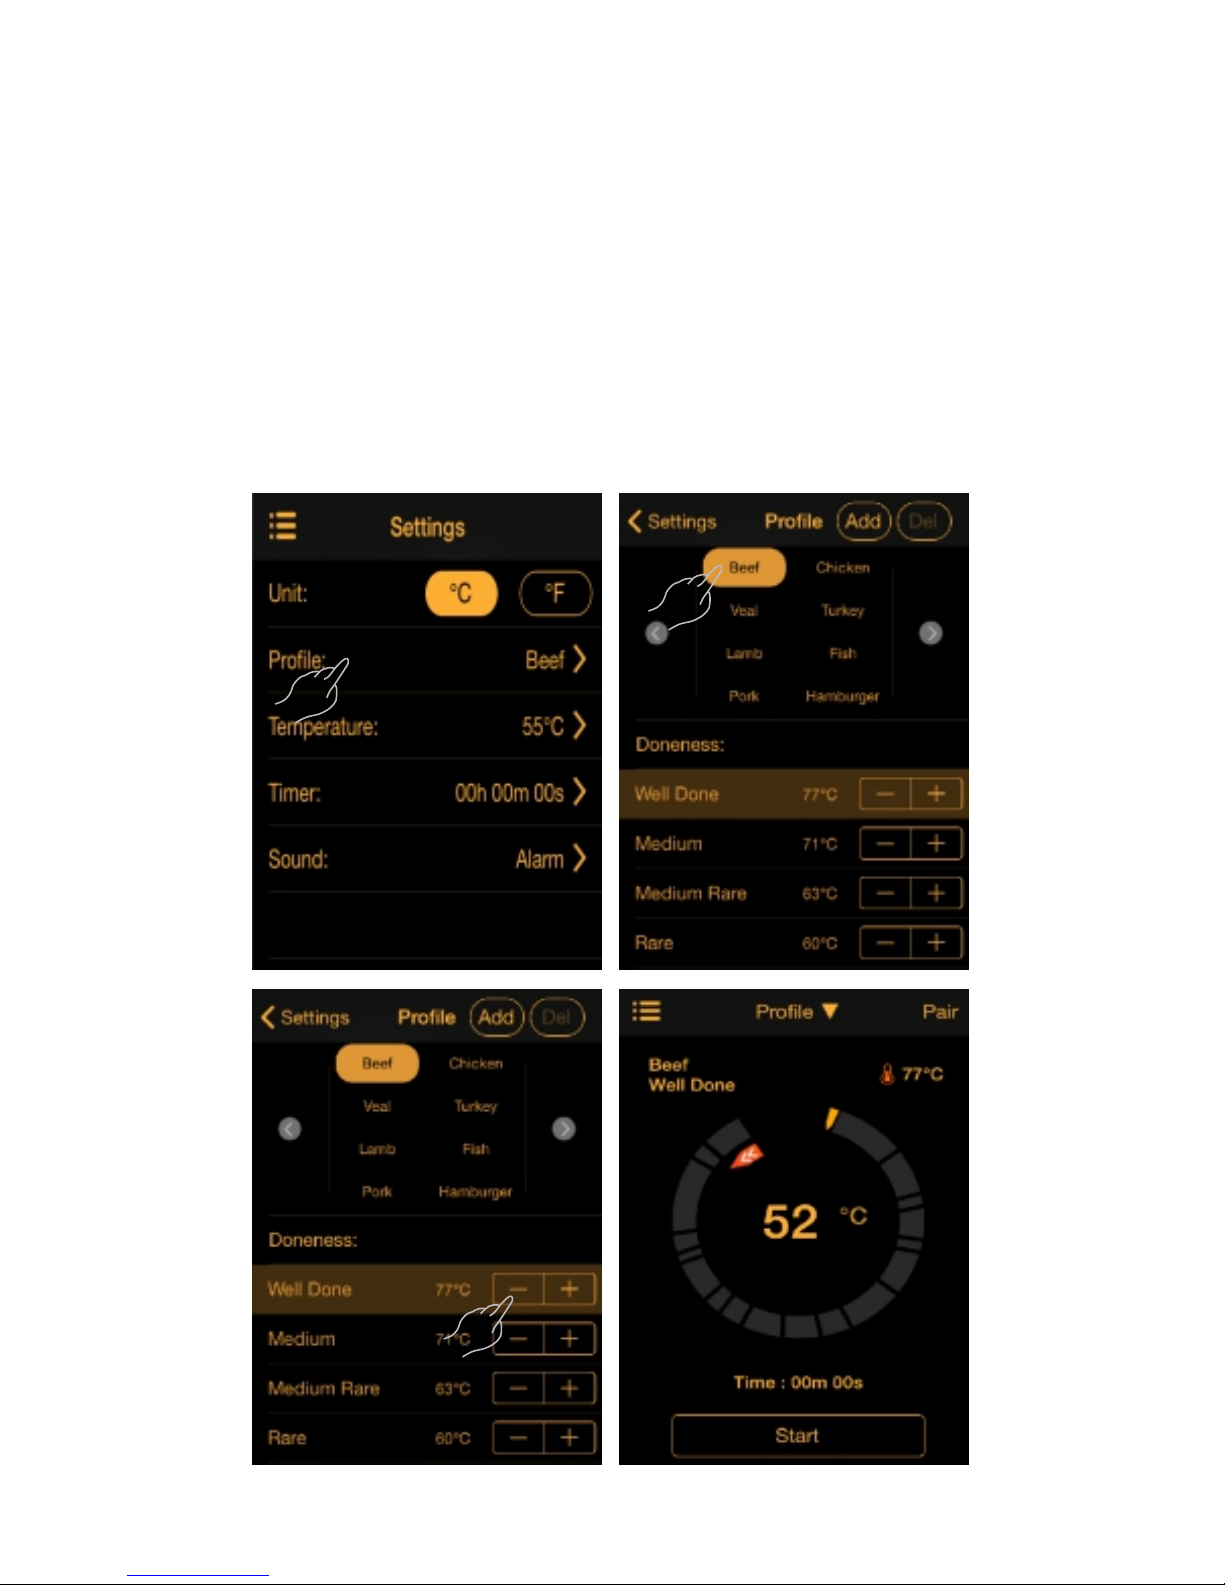
To select food:
1. Tap to view the Profile options of food .
2. Tap on your food type.
3. Tap to select cooking degree and
temperature can be adjusted up and down
2 degrees
4. Tap to go back to the previous screen to save.
Page 12
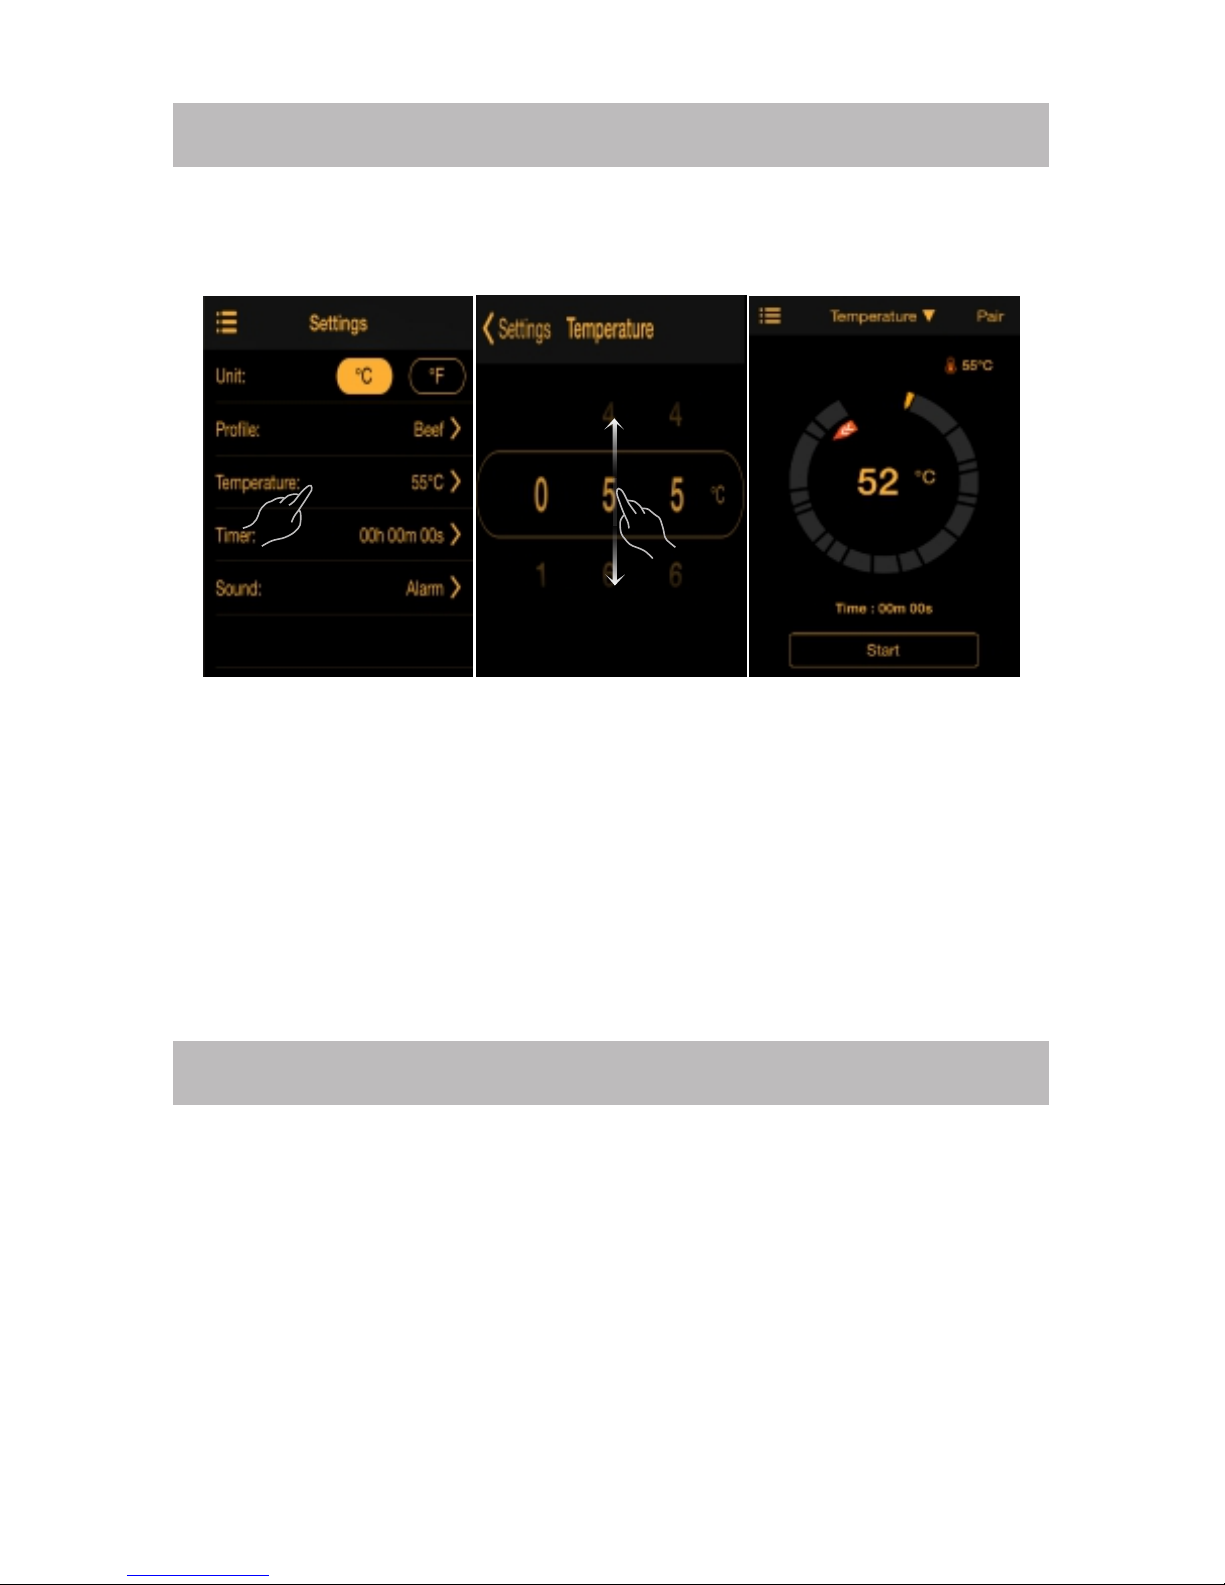
You can freely set alarm temperature by
remote device
To select the temperature:
1. Tap to view the Profile options of temperature
2. Slide down and up to set temperature you
need. Temperature measurement range:
-25°C to 300ºC (-13°F to 572°F)
3. Tap to go back to the previous screen to save.
You can freely set alarm time of your smart
Thermo by remote device.
To select the timer:
1. Tap to view the Profile options of timer .
2. Slide down and up to set time you need. Timer
measurement range: 23H 59M 59S.
3. Tap to go back to the previous screen to save.
Settings the definition temperature
Timer setting
Page 13
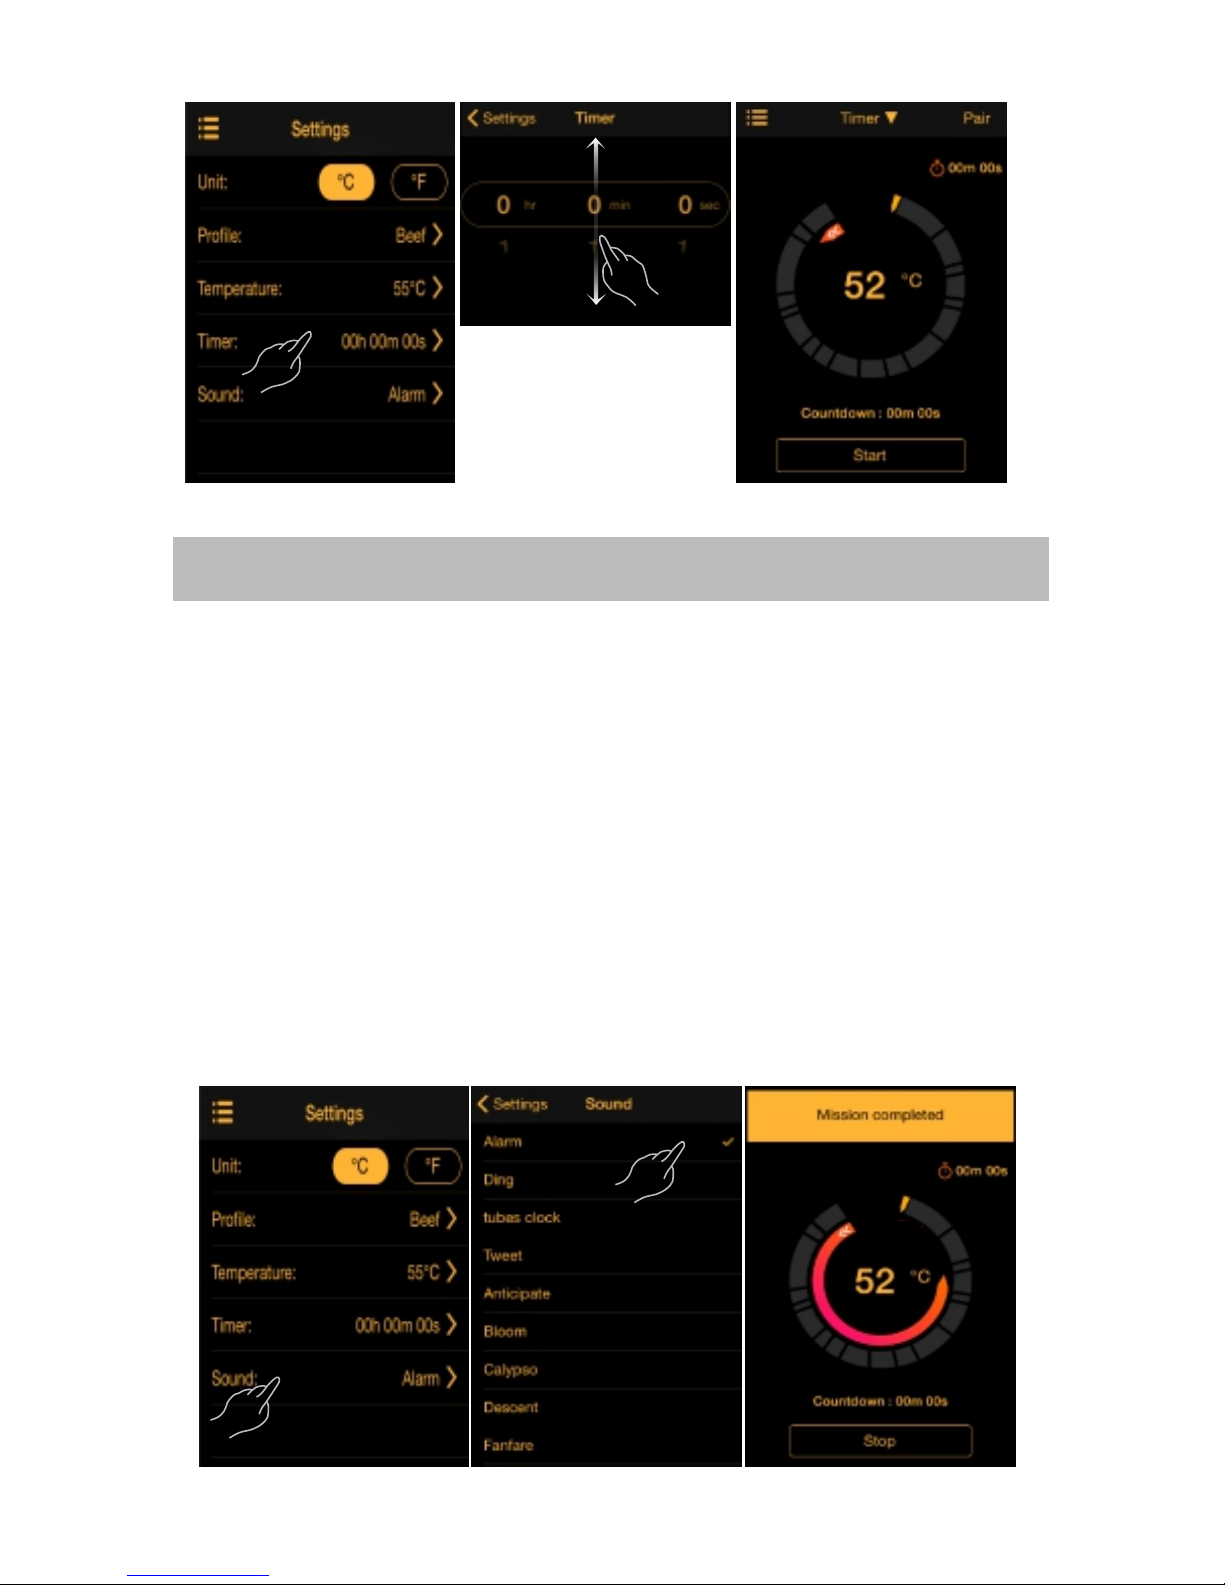
To select the alarm ring : You can choose any
alarm ring from 27 rings .
1. Tap to view the Profile options of rings
2. Tap to choose your favorite ring
3. Tap to go back to the previous screen to save.
4. If food is cooked , alarm ring will ring and show
notification menu. Temperature will show on
Smart Thermo screen and LED backlight will
flash 5 times.
Alarm seting
Page 14
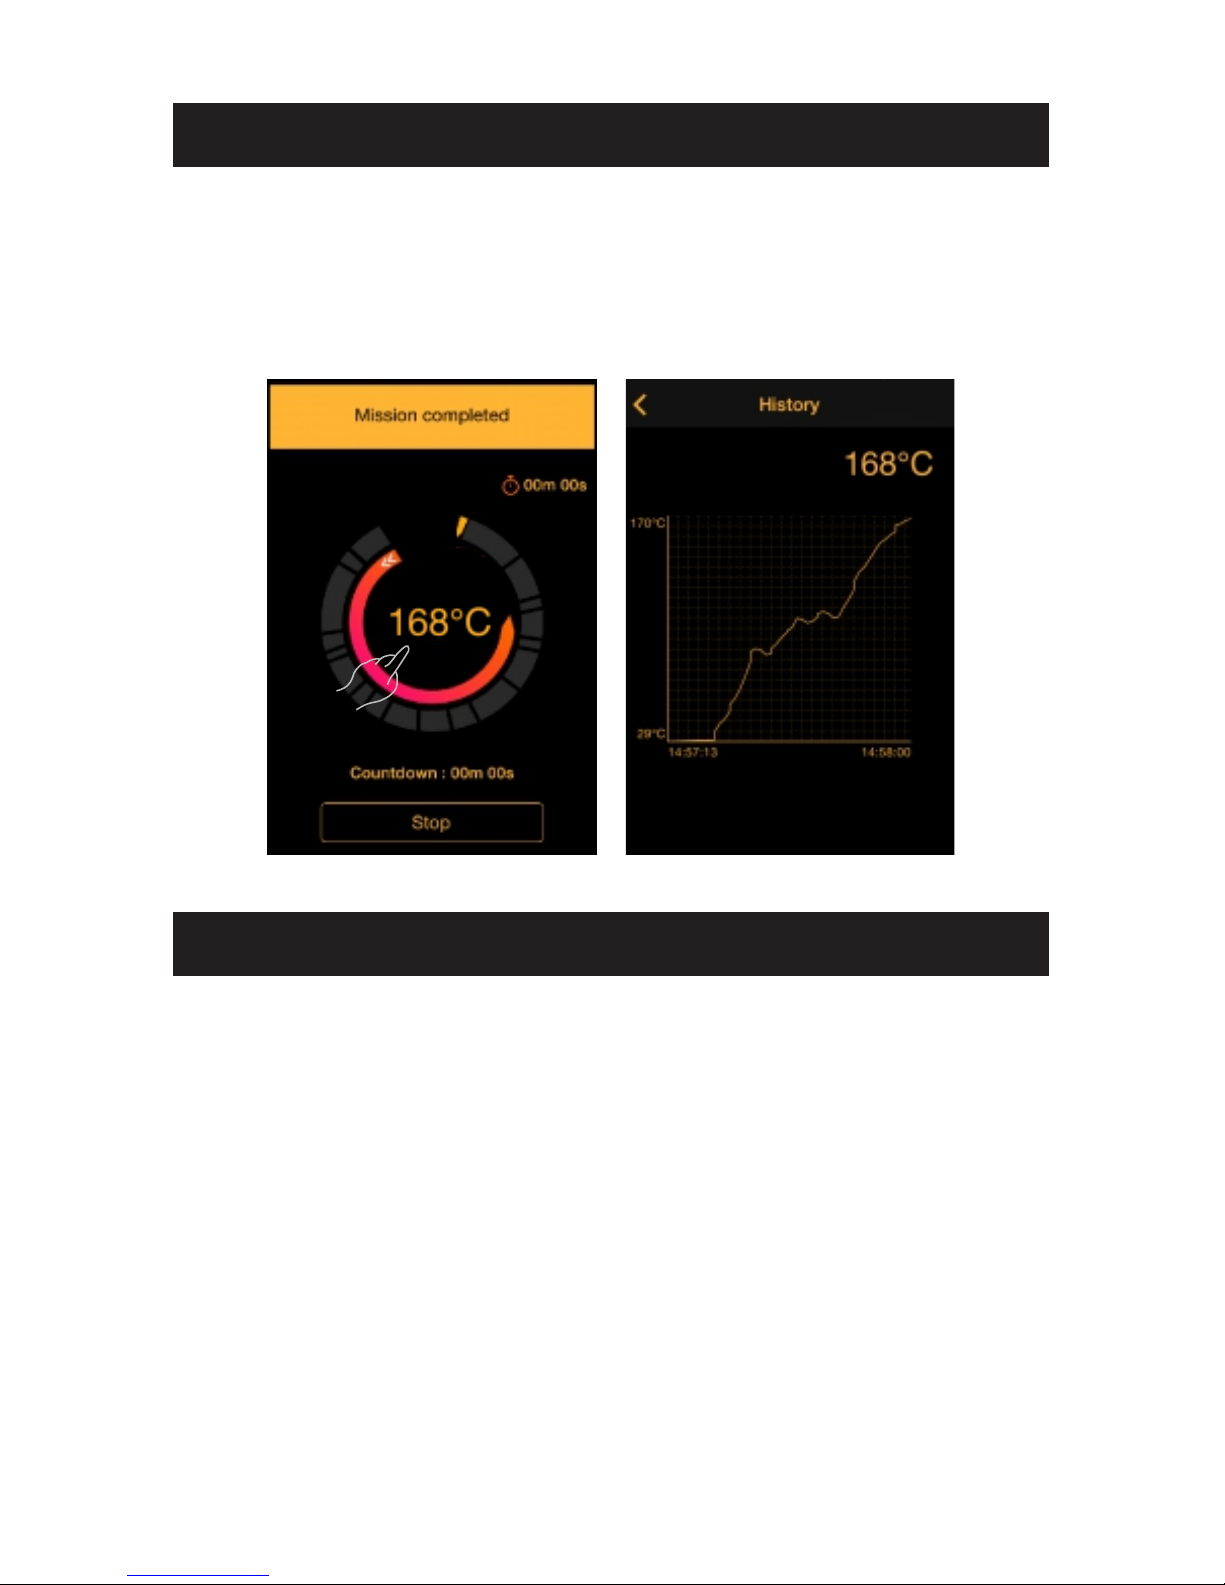
Tap on temperature in central. You can view
history date which is presented in graphs.
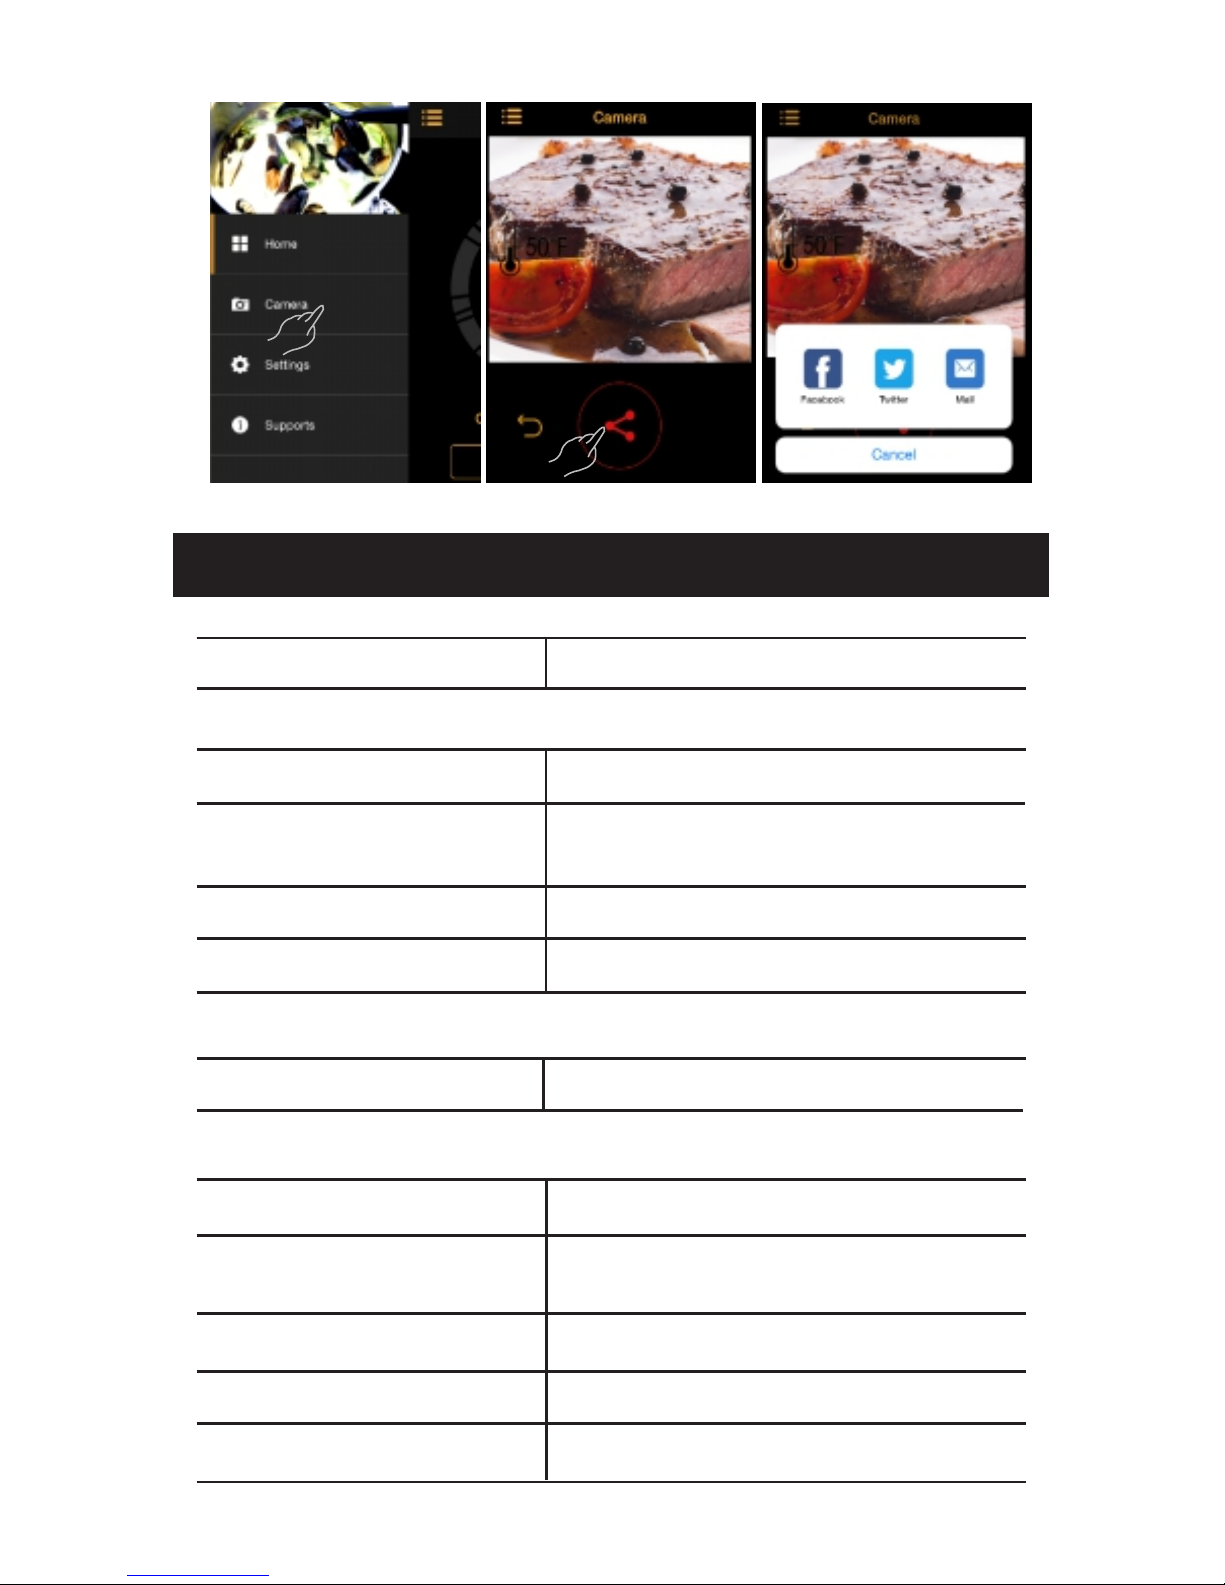
You can put the food cooking photos in
community and share with others.
To select the camera:
1. Tap to view the Profile options of camera
2. Tap on camera button .
3. Tap on share button and food cooking
photos you took will be shared in your
community.
SHARING
VIEW HISTORY READINGS
Page 15
TYPE
DESCRIPTION
DISPLAY UNIT
LxWxH
77x65x13.5mm
Power
Temperature unit
Temperature
measuring range
PROBE WRAP
1xCR2032 3V batteries
METAL PROBE
Length
Heat resistance for
metal probe
Temperature range
122mm
LxWxH
51x51x20.5mm
Around 300°C(572°F)
-25°C to 300ºC (-13°F to 572°F)
°C/°F
100-hour
Battery life
Bluetooth Range
30 meters(open territory)
-25°C to 300ºC (-13°F to 572°F)
SPECIFICATION
Page 16

Changes or modifications not expressly approved by the
party responsible for compliance could void the user's
authority to operate the equipment.
The statements should be displayed in the user manual:
This equipment has been tested and found to comply with the
limits for a Class B digital device, pursuant to Part 15 of the
FCC Rules. These limits are designed to provide reasonable
protection against harmful interference in a residential
installation. This equipment generates, uses and can radiate
radio frequency energy and, if not installed and used in
accordance with the instructions, may cause harmful
interference to radio communications. However, there is no
guarantee that interference will not occur in a particular
installation.
If this equipment does cause harmful interference to radio or
television reception, which can be determined by turning the
equipment off and on, the user is encouraged to try to correct
the interference by one or more of the following measures:
-- Reorient or relocate the receiving antenna.
-- Increase the separation between the equipment and
receiver.
-- Connect the equipment into an outlet on a circuit different
from that to which the receiver is connected.
-- Consult the dealer or an experienced radio/TV technician
for help.
This equipment complies with FCC radiation exposure limits set
forth for an uncontrolled environment. End user must follow
the specific operating instructions for satisfying RF exposure
compliance. This transmitter must not be co-located or operating in conjunction with any other antenna or transmitter.
The portable device is designed to meet the requirements for
exposure to radio waves established by the Federal
Communications Commission (USA). These requirements set a
SAR limit of 1.6 W/kg averaged over one gram of tissue. The
highest SAR value reported under this standard during
product certification for use when properly worn on the body.
 Loading...