

Page 1
1
Dear e-max riders,
We are pleased that you have chosen one of our brand name vehicles and we welcome you warmly
into the club of e-max riders.
This manual includes:
• correct handling
• inspections and service intervals
For your safety and comfortable riding, we recommend that you carefully read this manual before
using your vehicle.
Important tips:
WARNING! It is an instruction that draws attention to the risk of injury or death and tells you
how to avoid the problem.
CAUTION! It is an instruction that draws attention to the risk of damage to the vehicle, process
or surroundings.
Please kindly follow all the established maintenance and driving tips in this manual and have aftersales service in authorised e-max specialised dealer shop at the correct time.
We wish you an enjoyable and safe riding experience!
Page 2

2
Note:
l For possible technical update, will not inform separately.
l For SOC/Range, could be different upon rider and riding environment, what listed in
Manual only for reference.
Page 3

3
Operator’s Manual
Page
1. Safety tips ............................................................................................ 3 – 5
2. Attachments and Controls...................................................................... 6 - 25
3. Malfunctions ........................................................................................ 26 -28
4. Vehicle maintenance ................................................................................ 29
5. Shipment inspection ................................................................................ 30
6. Vehicle delivery ....................................................................................... 31
7. Warranty information ........................................................................... 32 – 33
8. Inspections ......................................................................................... 34 – 36
9. Specification ........................................................................................... 37
Repair tips 38
Page 4

4
1. Safety tips
Before using:
Check the scooter to make sure that:
• Enough capacity in the battery
• lights and horn work
• tyre: enough pressure/ proper tread/ no broken
• brakes system work: enough brake fluid/ no leak/ brake handle work/ disc ok.
• the steering movement is smooth without loose.
• no loosen screws or parts
l Please sure all these items above checked before using scooter!
l If it’s your first time driving this type of electric scooter, should test in an empty &
safe area in advance.
l Rider should use both hands on the handlebar, put feet steady on the pedal. Keep
holding the handlebar during driving.
l Low speed driving on wet/smooth ground.
l Follow the traffic regulations.
Page 5

5
Advice to customers:
1.1 Clothing
• Always drive with a well fit helmet
• Wear in tight and comfortable
• Wear appropriate shoes (Don’t wear high hill shoes or slippers)
Under some conditions, open or loose clothing can affect safety driving!
1.2 Riding style
l Ride with foresight and consideration
l Always keep both hands on the handlebars while riding
l Turn throttle slowly
l When turn left/right, rider should follow the forward/turning to move body
l Ride with exceptional care on poor or wet surfaces
l Use the MAX-function only when needed, e.g. when quick acceleration is required or on a hill
l Pay attention to any unusual noises or handling of the scooter
Page 6

6
1.3 Loading of objects and passengers
• Only rear storage box and loading hook are available for loading
• Forbid overload.
• The scooter is certified for a maximum of 1 people!
• Maximum load of front basket: 3 kg
• Maximum load of rear storage box: 30 kg
• Maximum load of storage box under seat: 5 kg
• Maximum load of hook: 3 kg
• Certified total weight for 100LD: 350KG
After using: Check SOC via speedometer, charge the battery accordingly.
l Using scooter when battery capacity low could short the lifetime of battery, or even damage
it.
l Always use original e-max charger.
l Charge after each using is the best way to keep the lifetime of battery.
l Please charge the battery every 2 months if scooter is not in use for a long time.
Page 7
7
l E-max Charger can balance each units of battery, and charger will stop charging
automatically when fully charged, so please don’t worry long charge time will damage
battery.
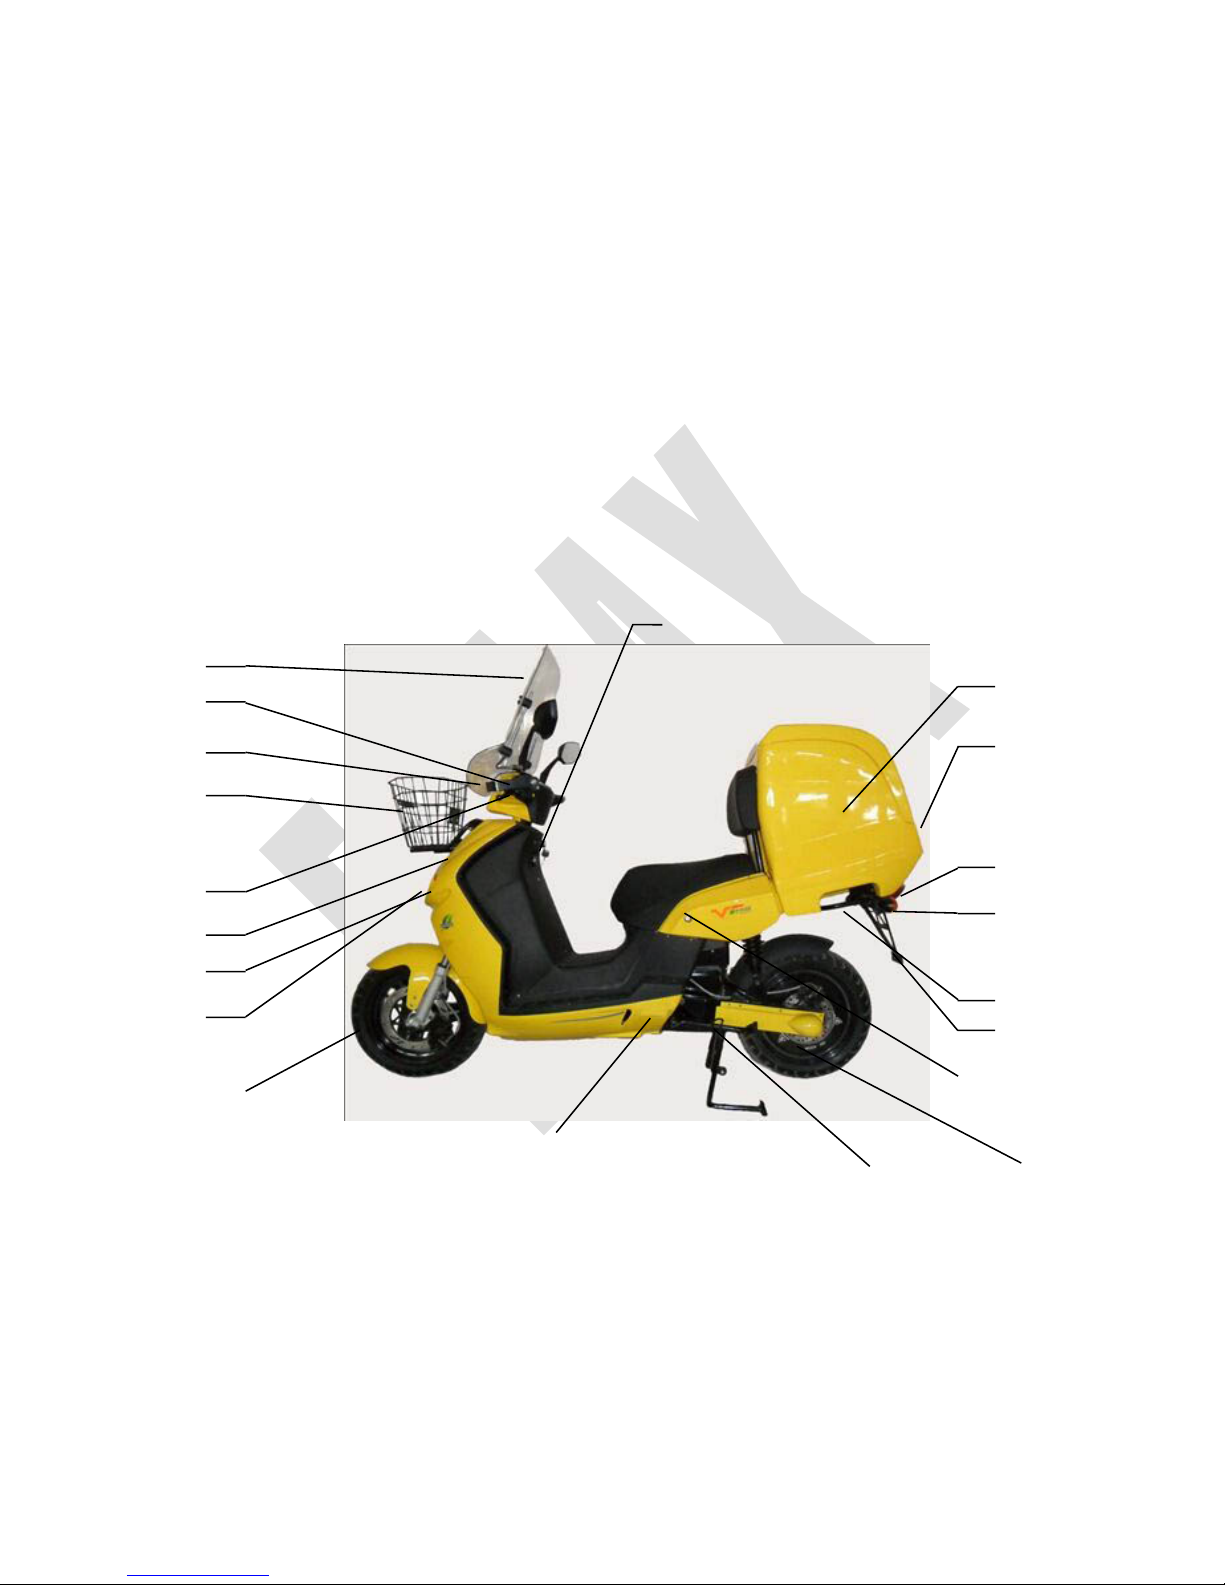
2. Attachments and controls
Ignition
Front turning light
High beam light
Front basket
Reverse switch
Front wind shield
Rear holder
Tail light & License plate light
Rear storage box
Seat locker
Rear turning light
Left-front hand
protect holder
Rear brake handle
Low beam light
Locker
Rear reflector
Page 8
8
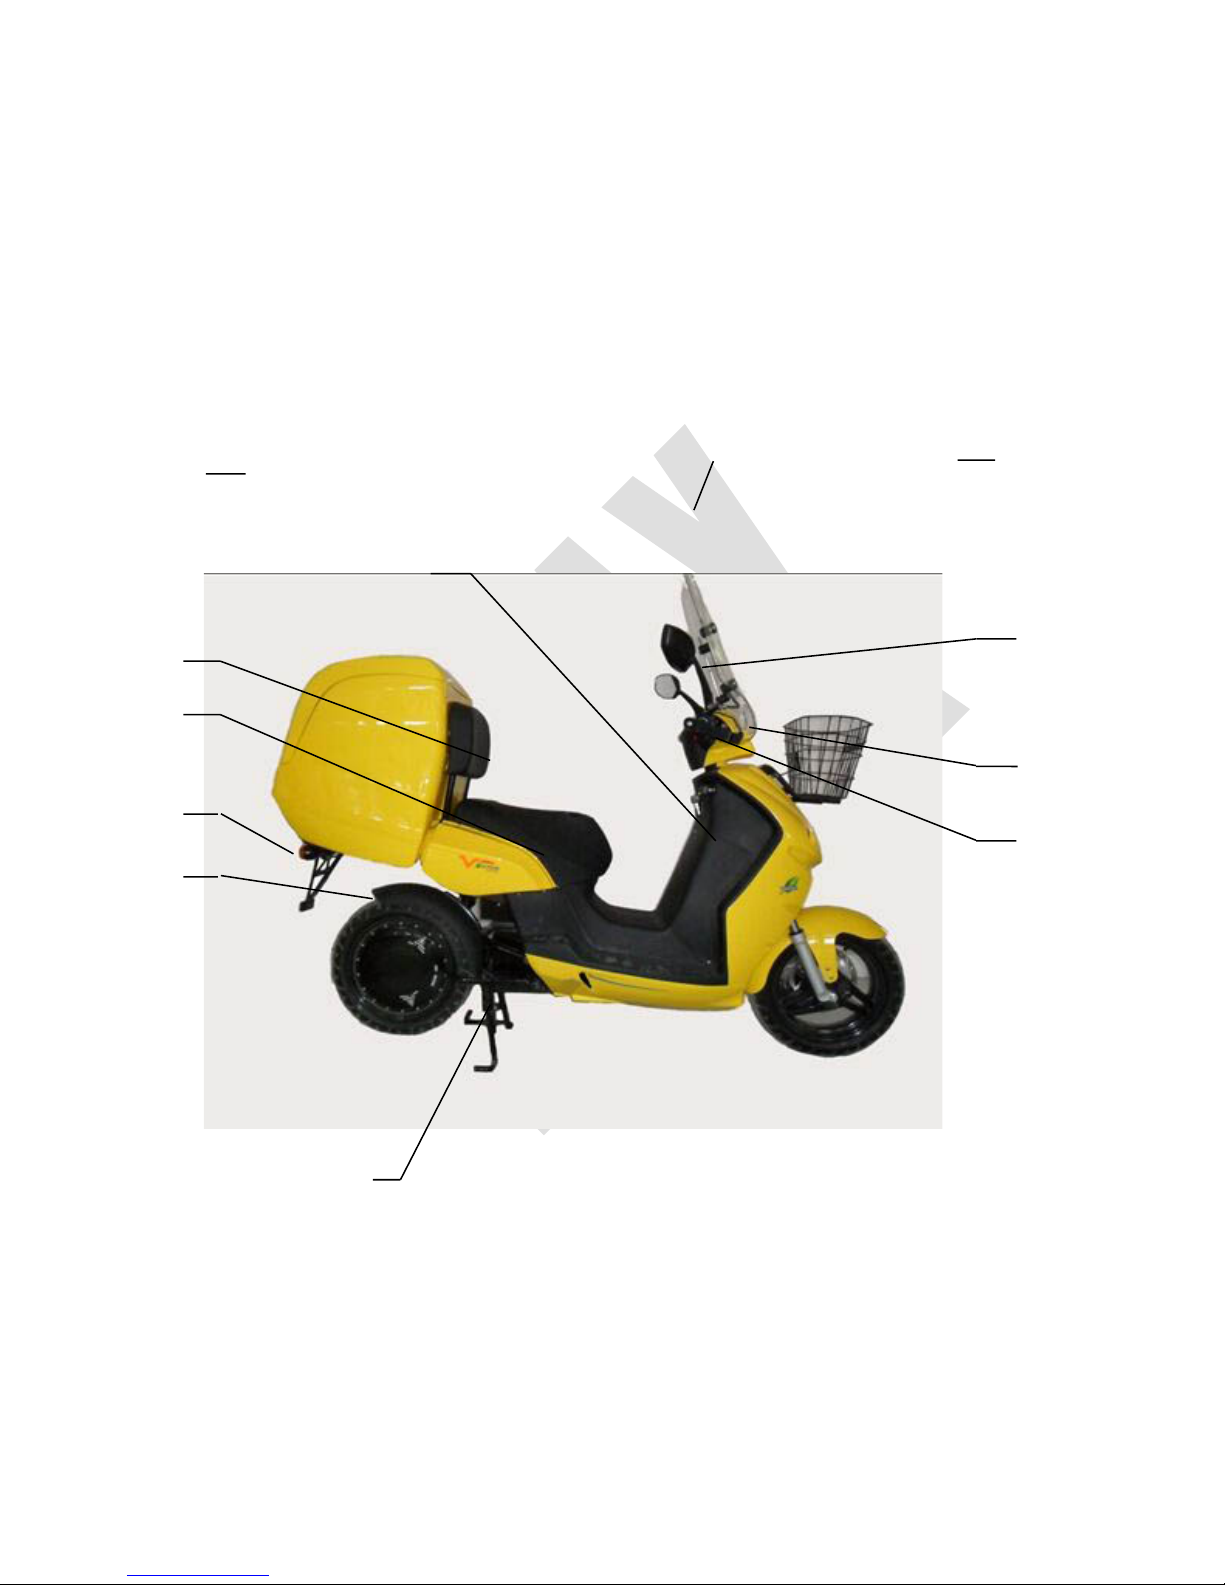
Hook
Rear brake handle
Mirror
Rear mud fender
License plate
light
Seat
Rear backseat
Model sticker
Main stand
Front wheel
Motor
Left side stand
Right side stand
Right-front hand
protect holder
Page 9
9
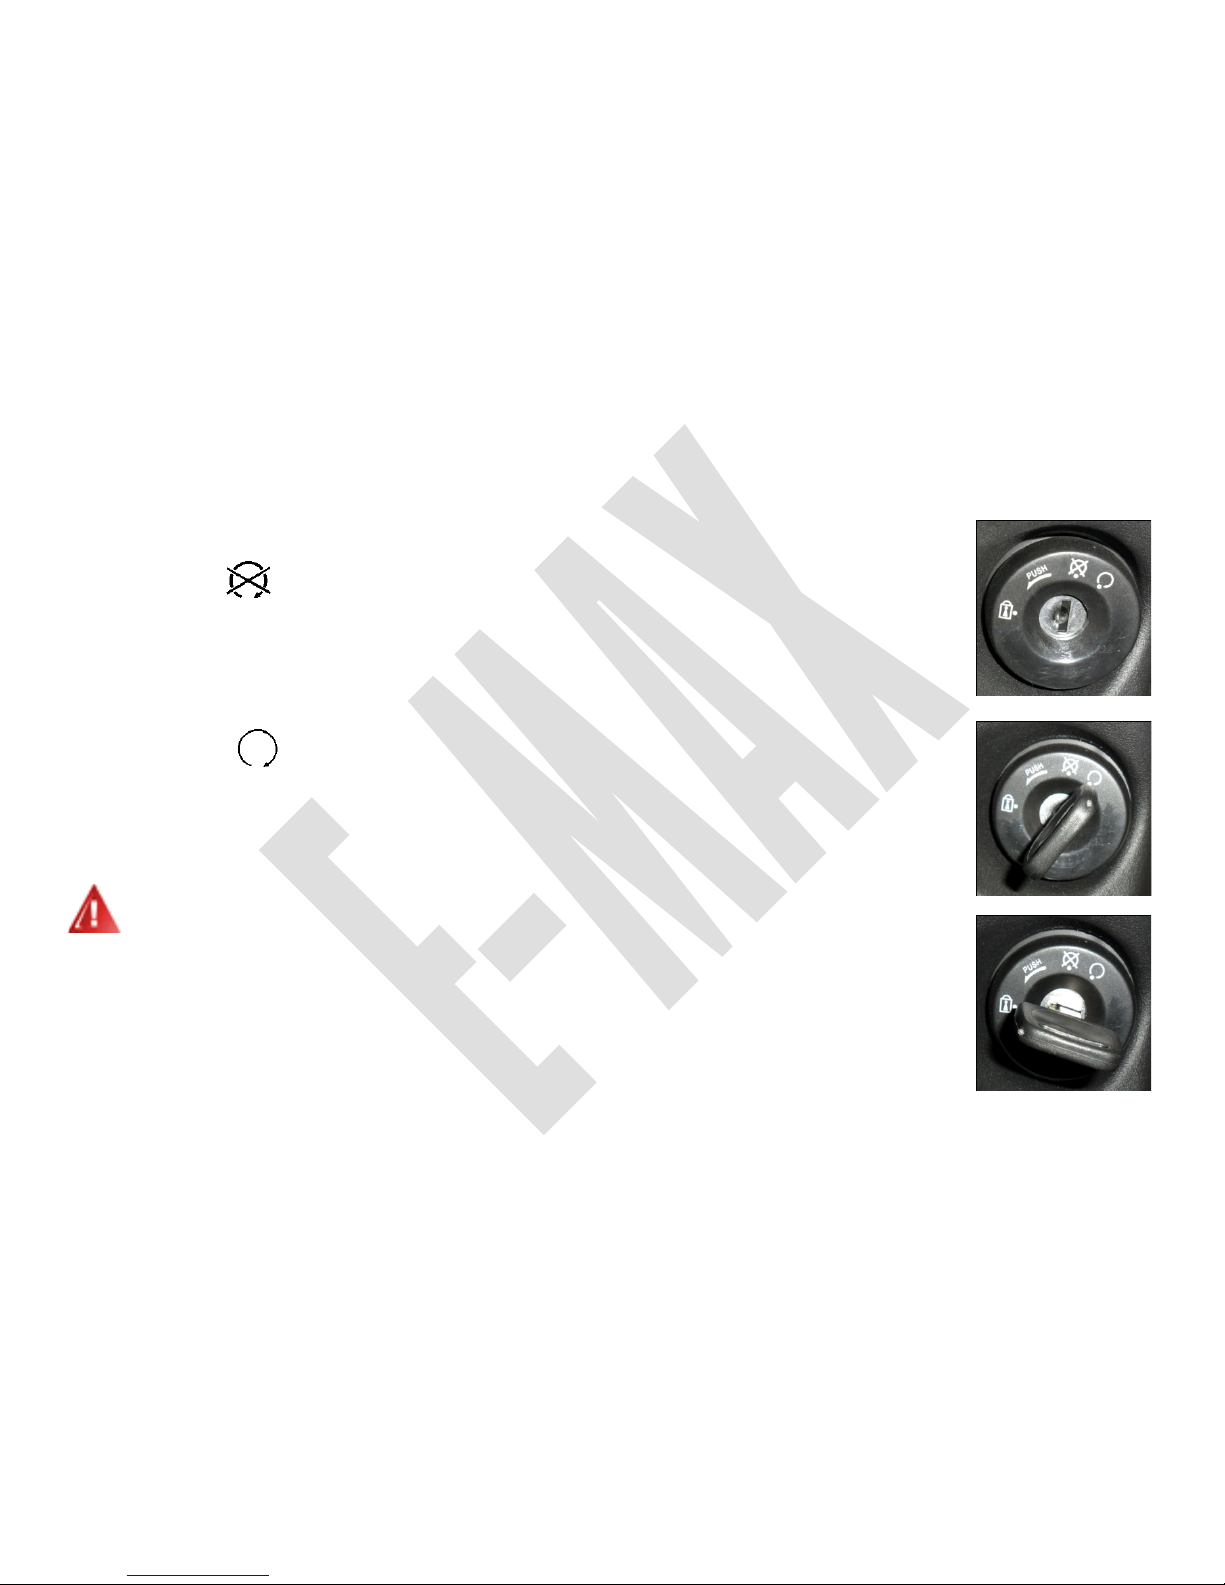
2.1 Ignition switch
Possible switch positions:
OFF:
• All functions off
• Steering lock not engaged
• Scooter can move
Start:
• All functions ready
• Scooter is ready for driving
• Can’t take key out
No engine noise!! Throttle active!!
Steering lock in position, “Handlebar locked”:
• Turn handlebar to the left until it can be locked
• "Handlebar locked" and then move out key
• All functions are turned off
• Scooter can’t move, locked!
Page 10
10
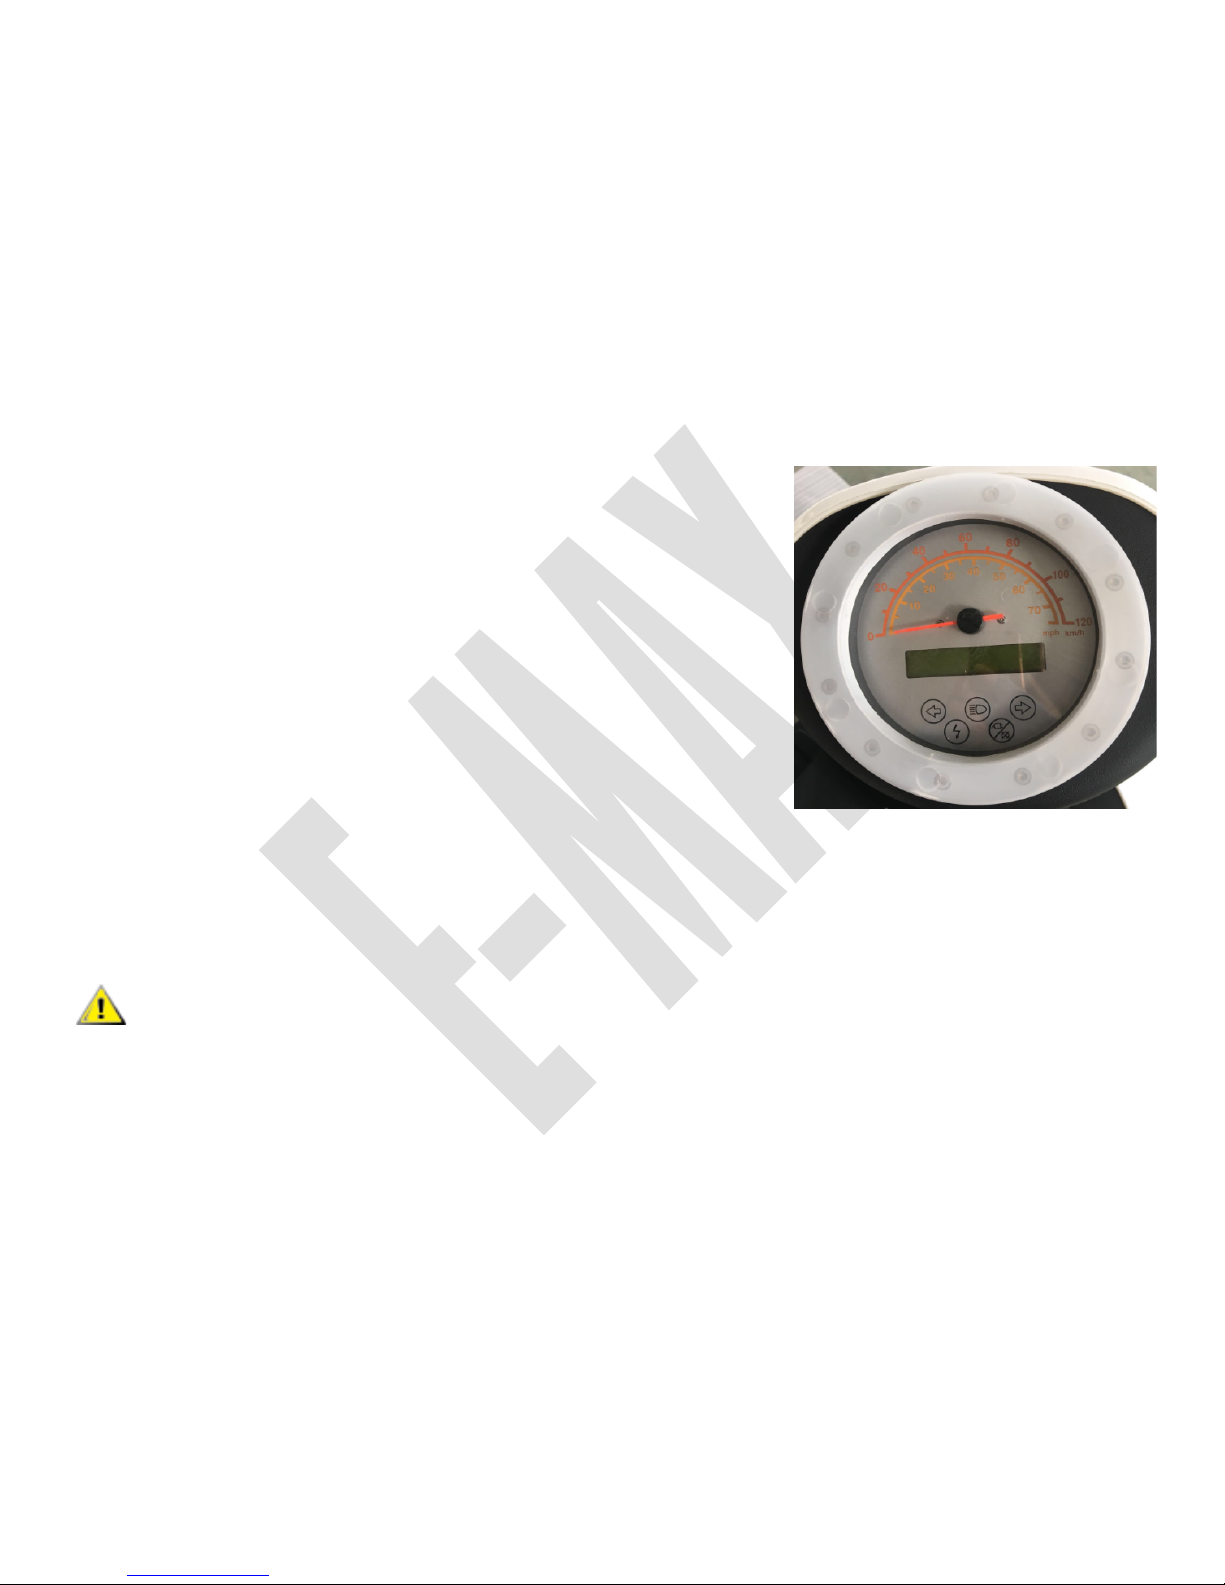
2.2 Speedometer / LCD Display
Switch on, a welcome text appears (if activated) in the display.
In case of a malfunction: see 3.3 for the respective information.
After welcoming words disappear, scooter can run.
Symbols in the display:
PKm: Single trip Range
TKm: Total KM
V: Battery Voltage
SOC: Estimated range can run is different at different mode. Press Boost, SOC changes.
Normal: Default status when scooter is turned on. Recommend to use on normal surface driving.
Max: Maximum power consumption and acceleration. Recommend to when overtaking or
climbing.
Eco: Under this mode, range is maximised. Recommend to use with low capacity or need to
drive long.
l Please choose running mode according to distance requirements.
l Voltage/Range on speedometer is for reference, please charge after using.
Page 11
11
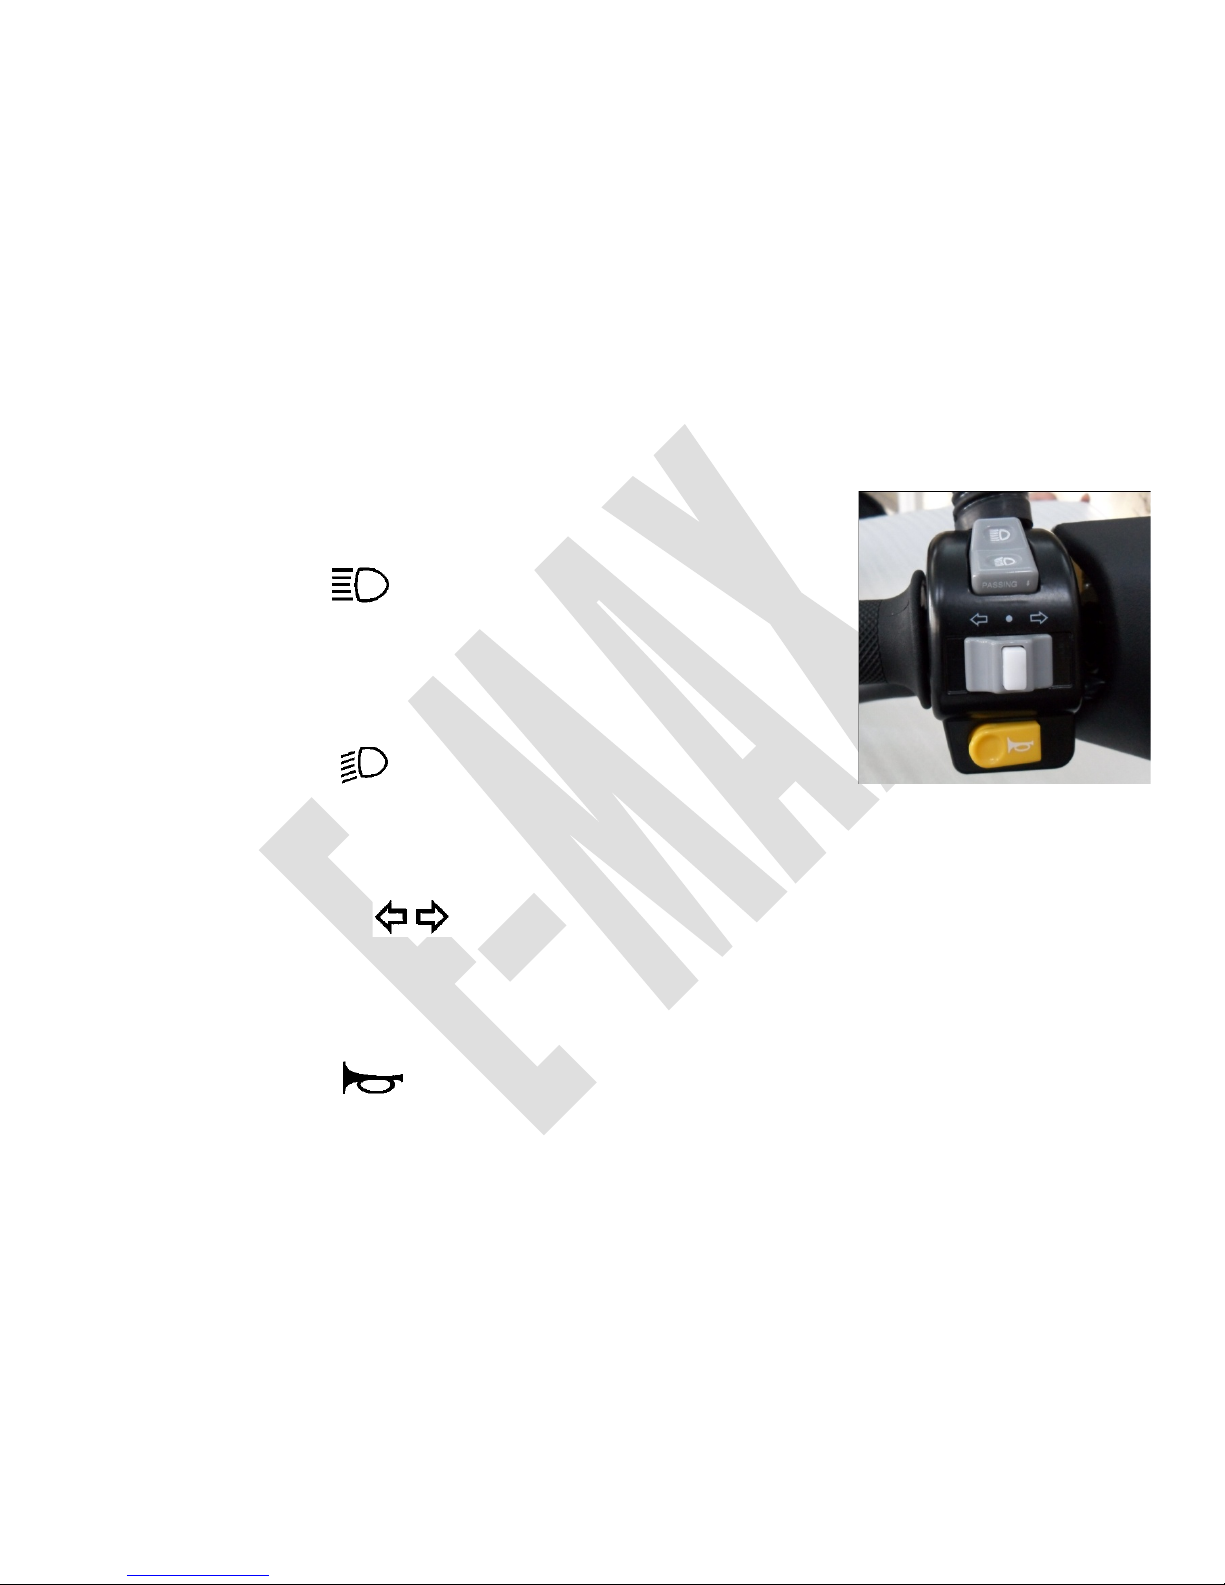
2.3 Left Switch Unit
2.3.1 High Beam switch
High beam:
l When low-beam light is on, press switch to this position will
turn
the high-beam light to on.
l High-beam indicator on speedometer turn blue
Flashing:
l When low-beam light on, press switch down, high-beam light will
on temporarily.
l High-beam light indicator on speedometer turn blue.
2.3.2 Indicator switch
Turning indicator: Slide switch to left or right, the left or right indicators shining
accordingly.
Turning indicator will flash with sounds.
Press white button to stop the turning indicators
Page 12
12
2.3.3 Horn
Pressing yellow switch sounds the horn
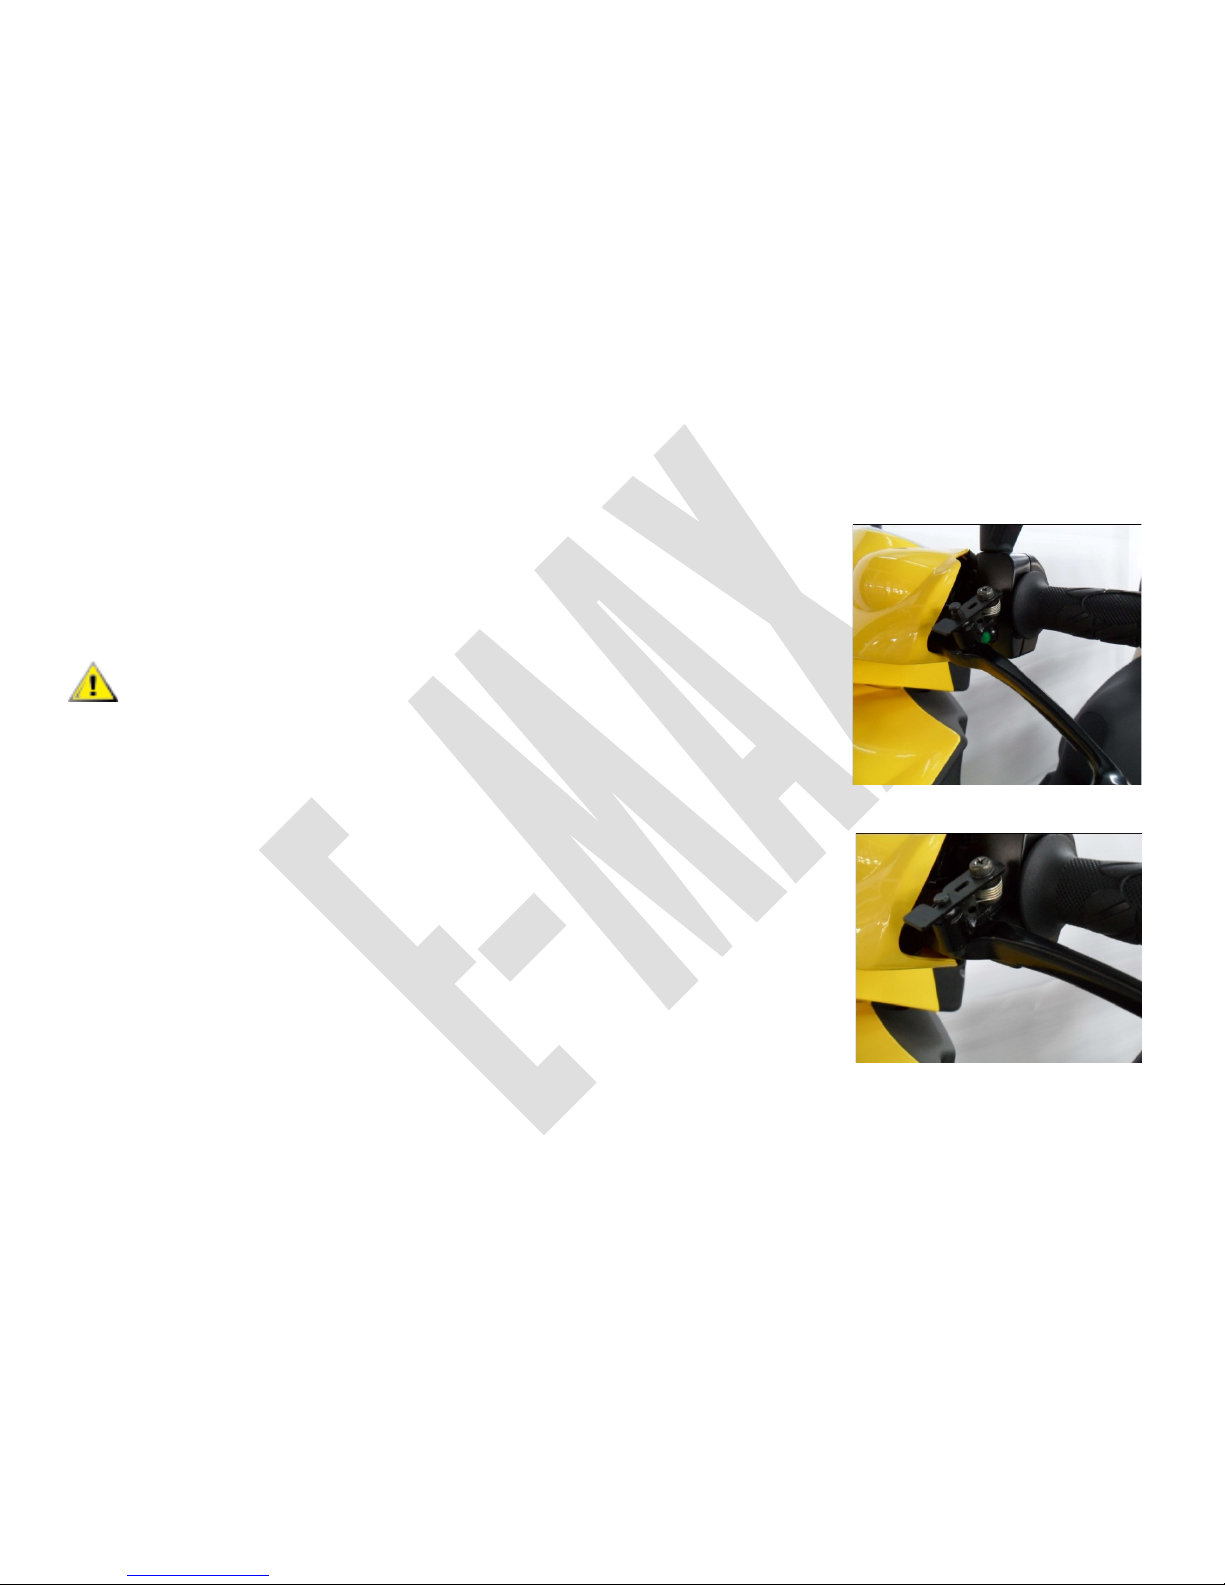
2.3.4 Reverse switch
Press switch, turn throttle, scooter move backwards/reverse;
Release switch, turn throttle, scooter move forward/normal.
Don’t use this switch until scooter is stationery.
2.3.5 Park brake
Pull Park brake back, put part support down, release, lock rear
wheel.
Page 13
13
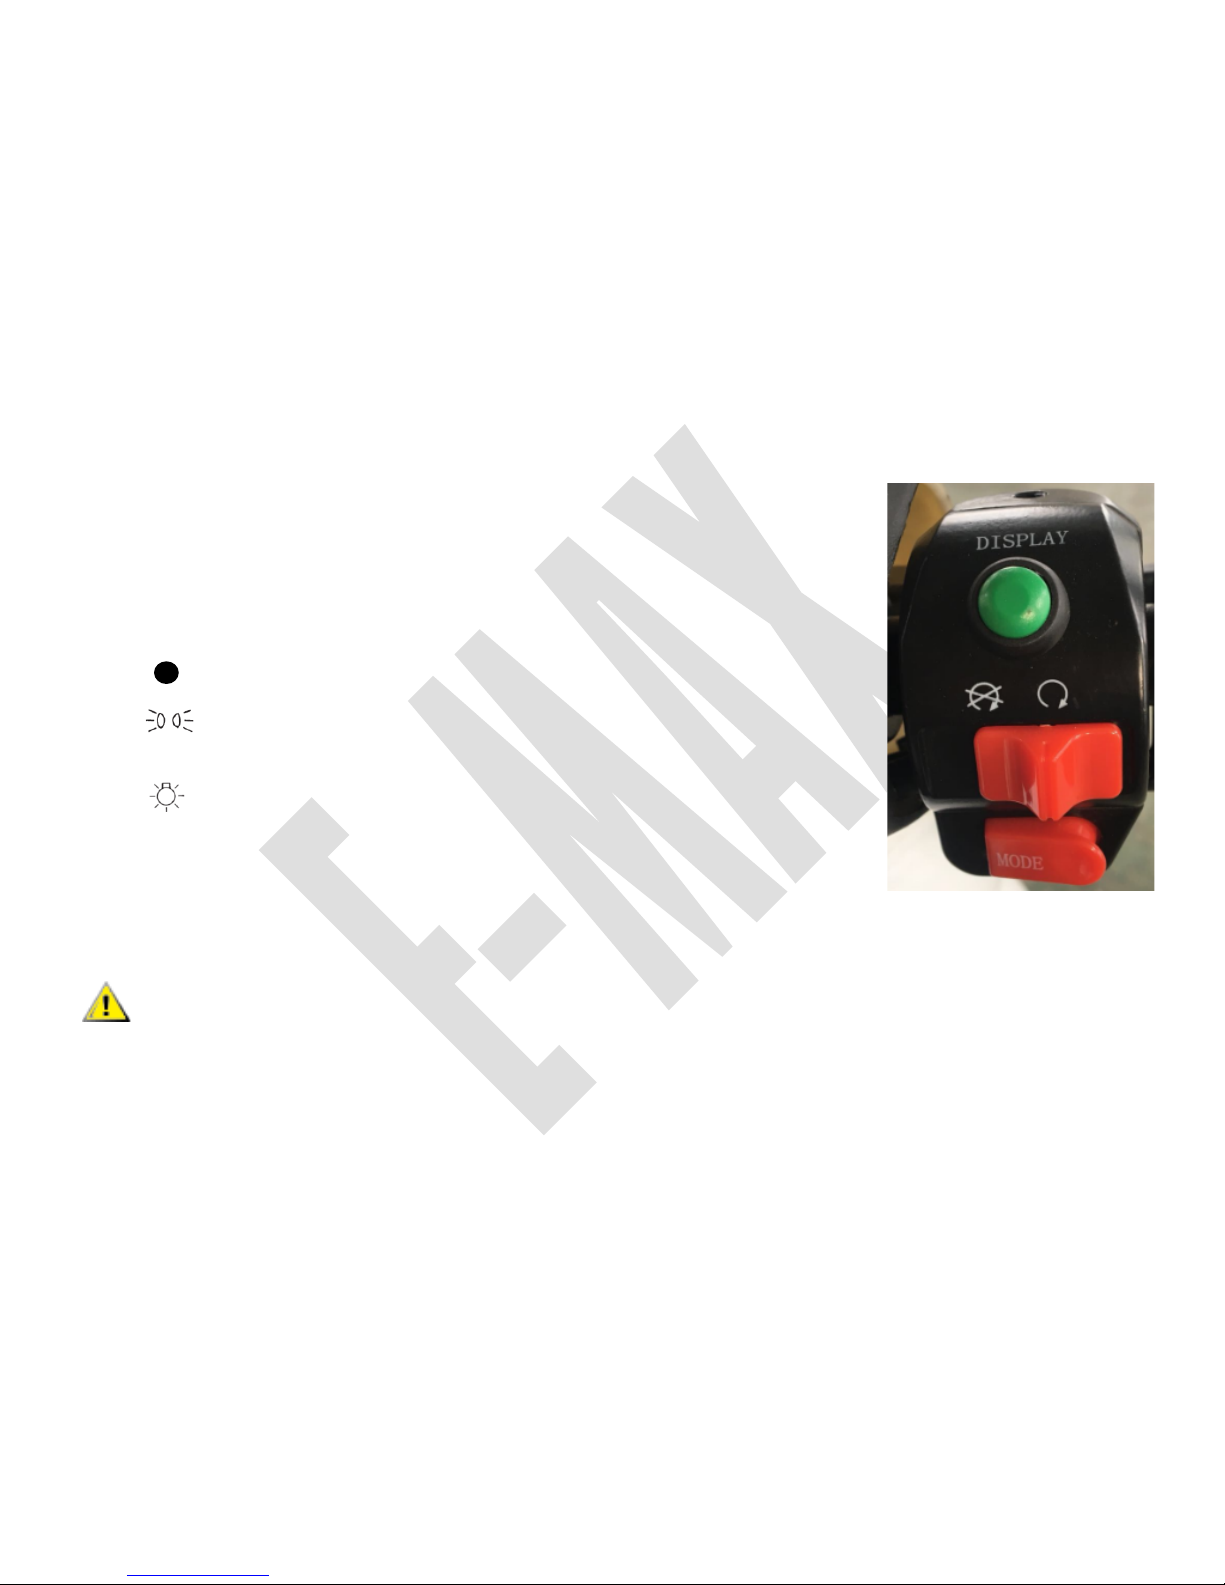
2.4 Right switch Unit
2.4.1 Mode Switch
• Short press: Display change between battery voltage and
total KM
• Press 5 seconds: clear single trip range
2.4.2 Light Switch
All lights off
Position lights, tail light, license plate light and speedometer
indicator lights on
Position lights, low/high beam lights, tail light, license plate
light and speedometer indicator lights on.
2.4.3 Accelerate switch (BOOST)
• Press boost can switch among ”NORMAL”, ”MAX”, ”ECO”;
• Mode shows at the right side of LED
Please choose mode according to traffic and distance requriement.
Page 14
14
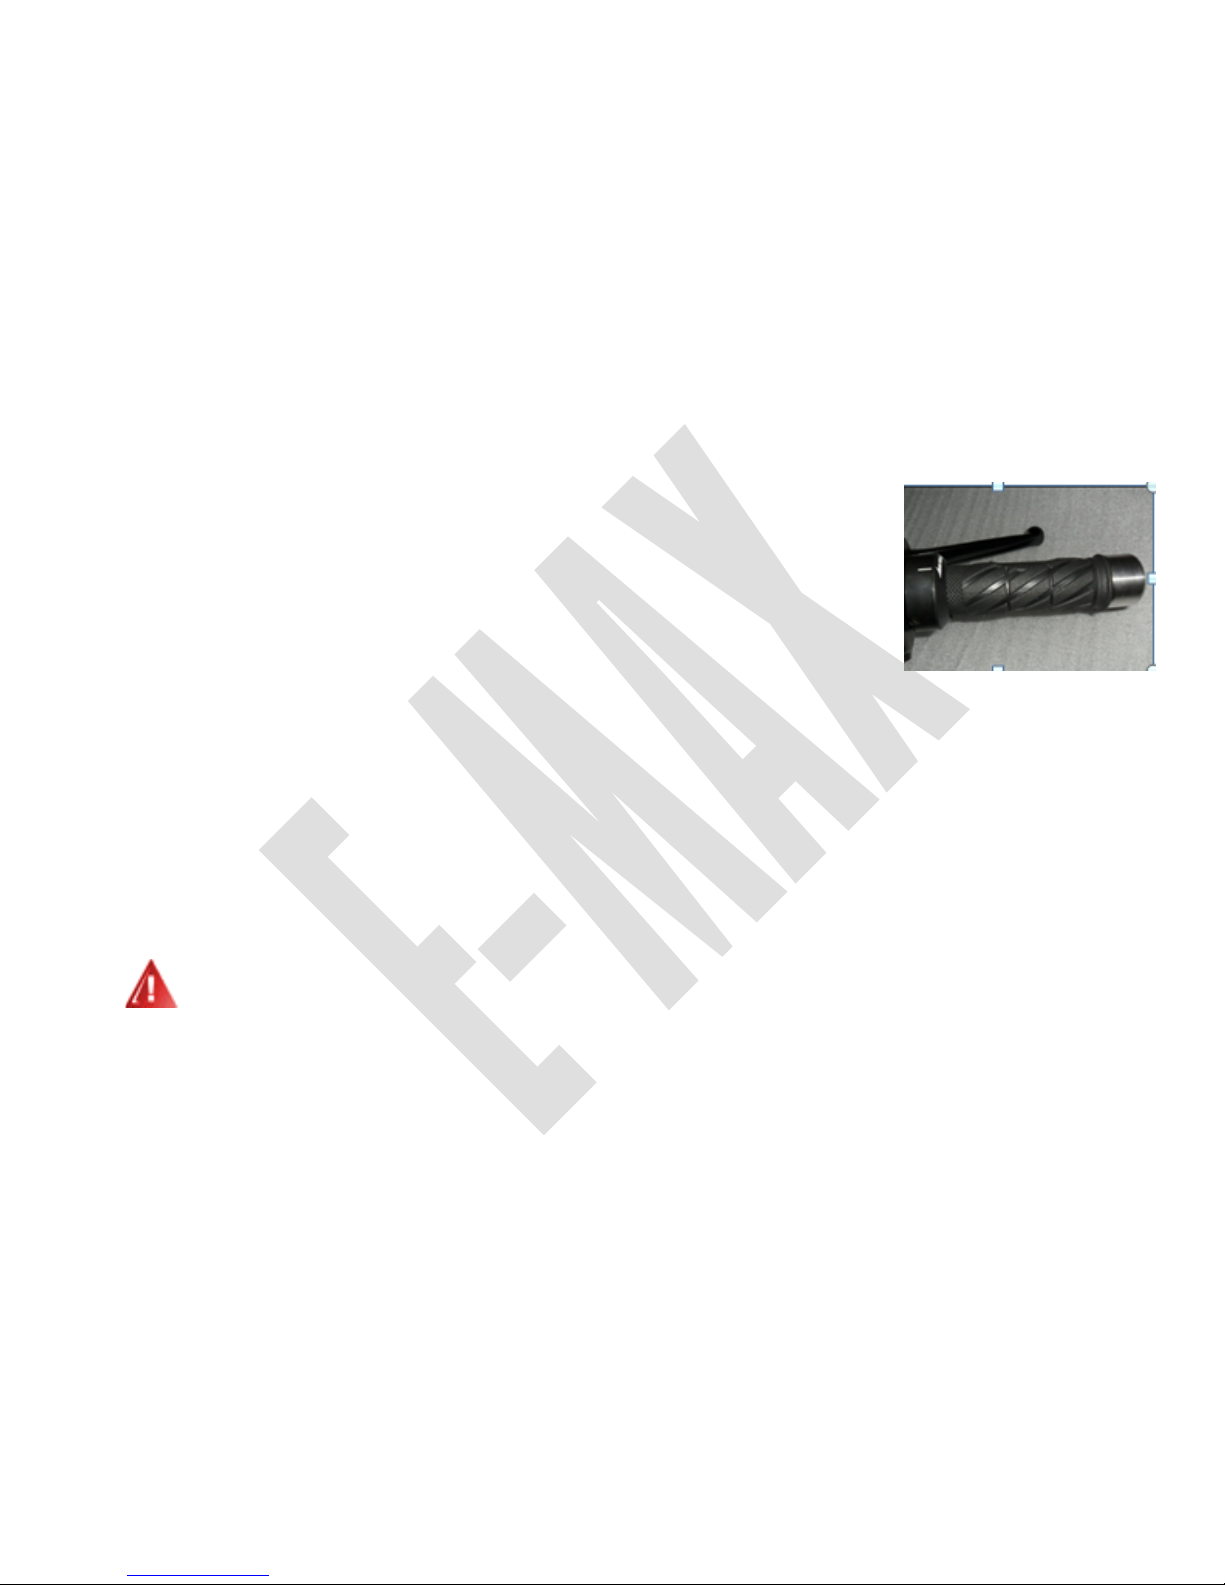
2.5 Throttle
Turn throttle changes thespeed.
• Avoid turning throttle too quickly to protect scooter and
rider.
Throttle un-locks:
• Throttle won’t work unless at beginning position;
Move throttle back to beginning position can work again.
Or turn key to “OFF” first then turn to “START”, throttle
un-lock.
• When scooter in “START” status, don’t turn throttle over 180
degrees, throttle will lock by itself. Turn key to “OFF” first
then turn to “START”, throttle un-lock.
In the “START” position, throttle is active!!
Page 15
15
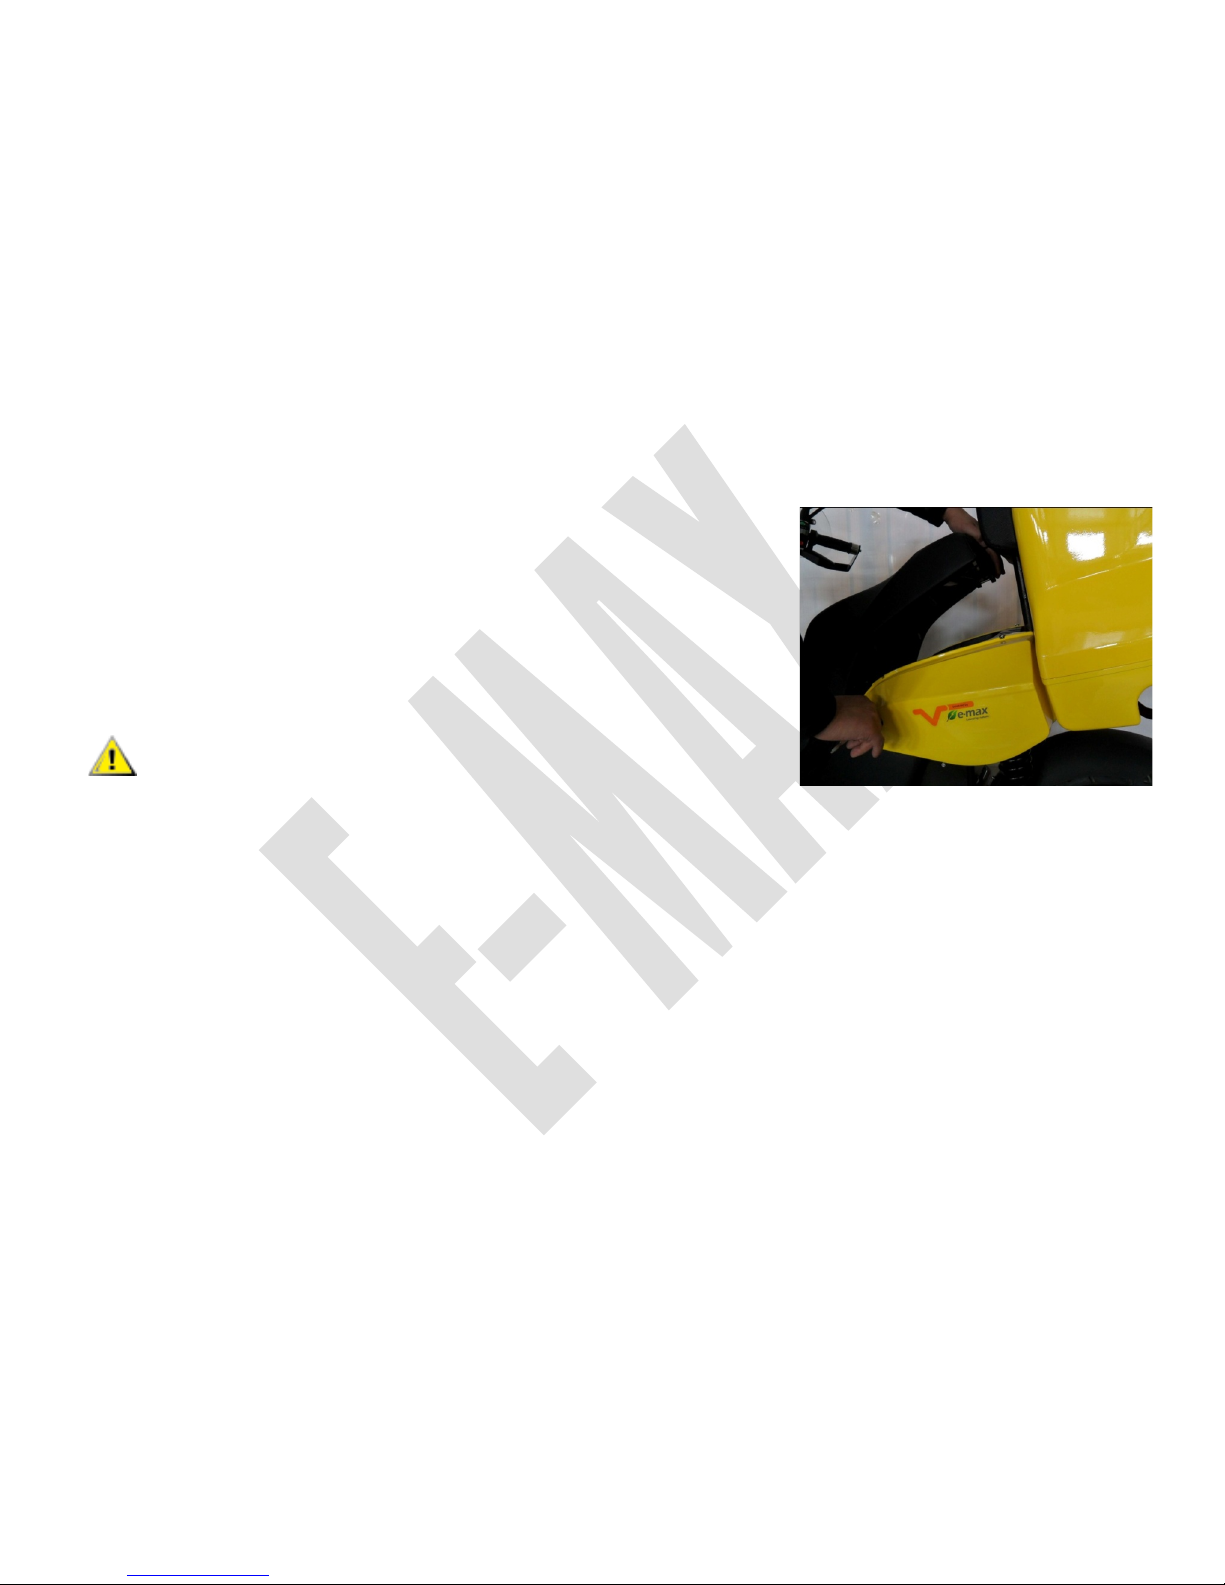
2.6 Under Seat Storage
OPEN: Put key in, turn left;
LOCK: Put seat down and press it to snap into right place
l Don't left keys in rear storage box;
l Max. Load is 5kg;
Page 16
16
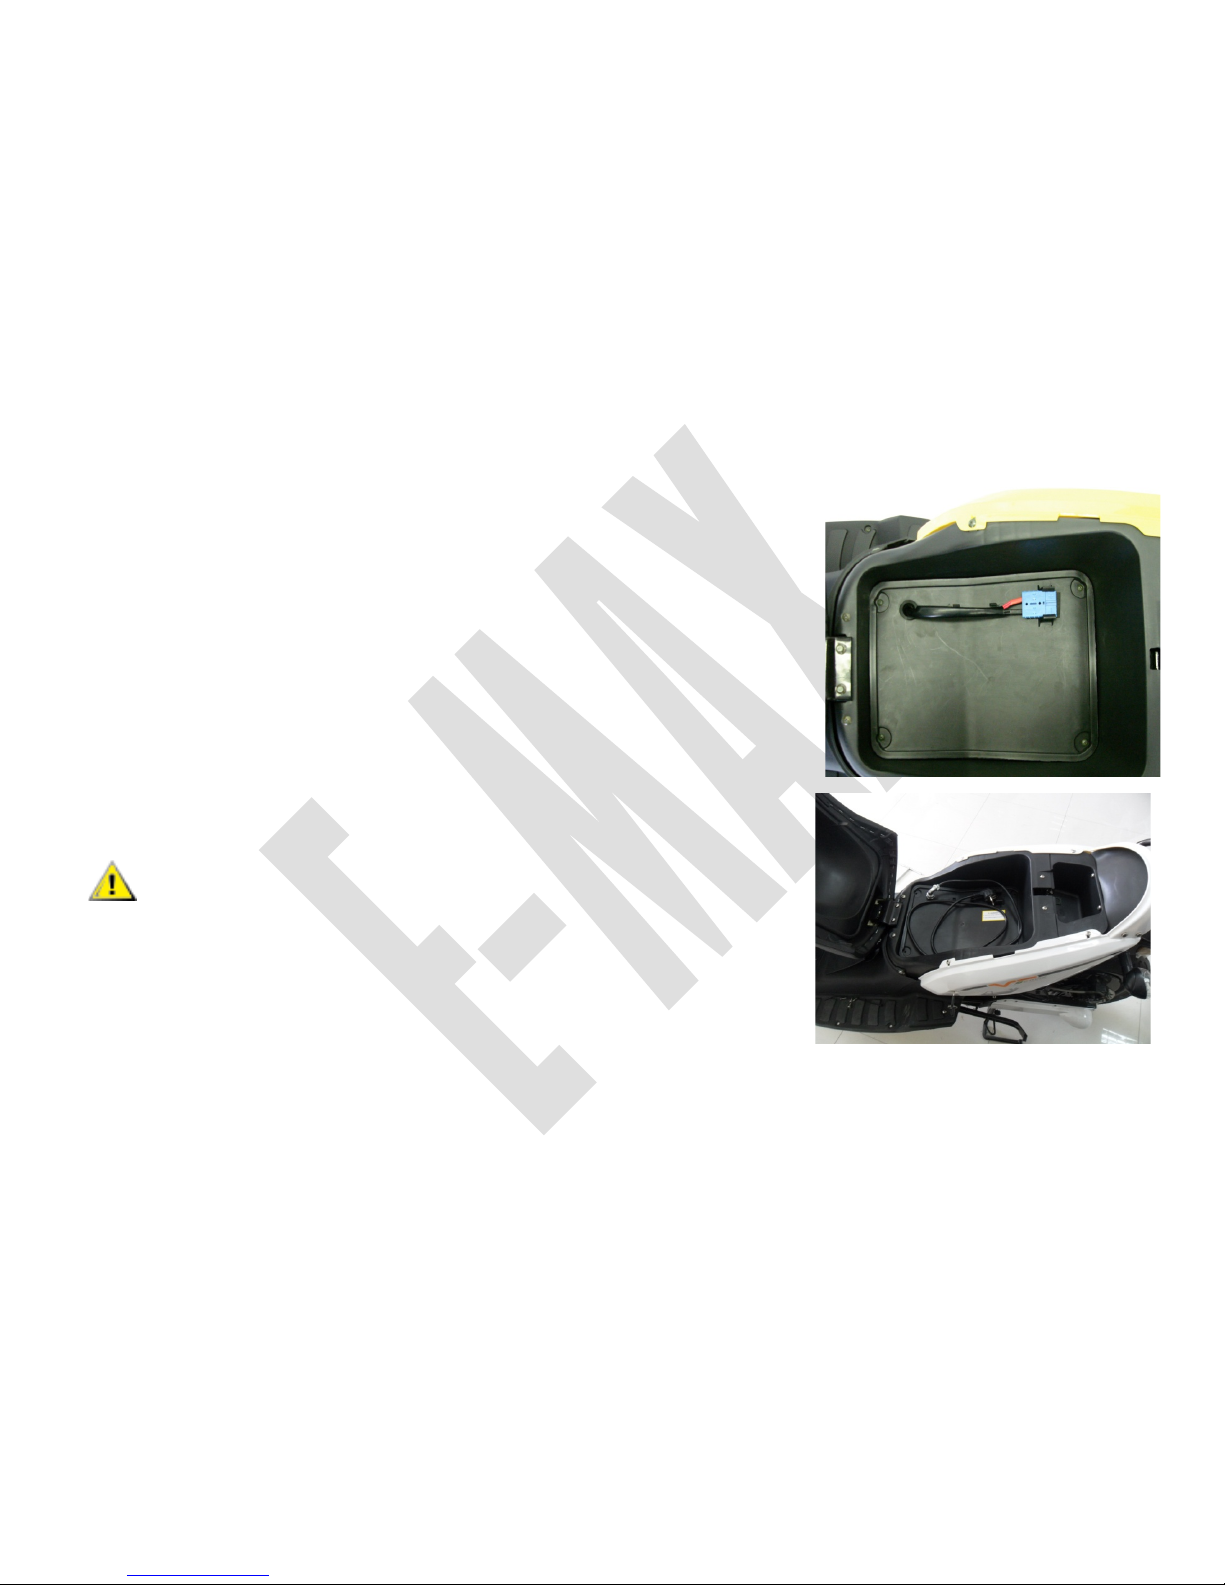
2.7 Charge connector
The product is provided with external charger or on-board charger.
2.7.1 External charger
l Charger connector place in storage under seat
(open method of seat see 2.6)
l After charging,put connector back to its position
2.7.2 On-board charger
l Charger connector positioned in storage under seat
l Connect charger to power wall plug
l After charging,put connector back to its position;
l Different country will have different charger. At first
time using charger, please check if the charger
connector is match with local situation. If need help,
please contact dealer
l During charging, don’t use scooter, don’t turn ignition
switch to “Start”
Page 17
17
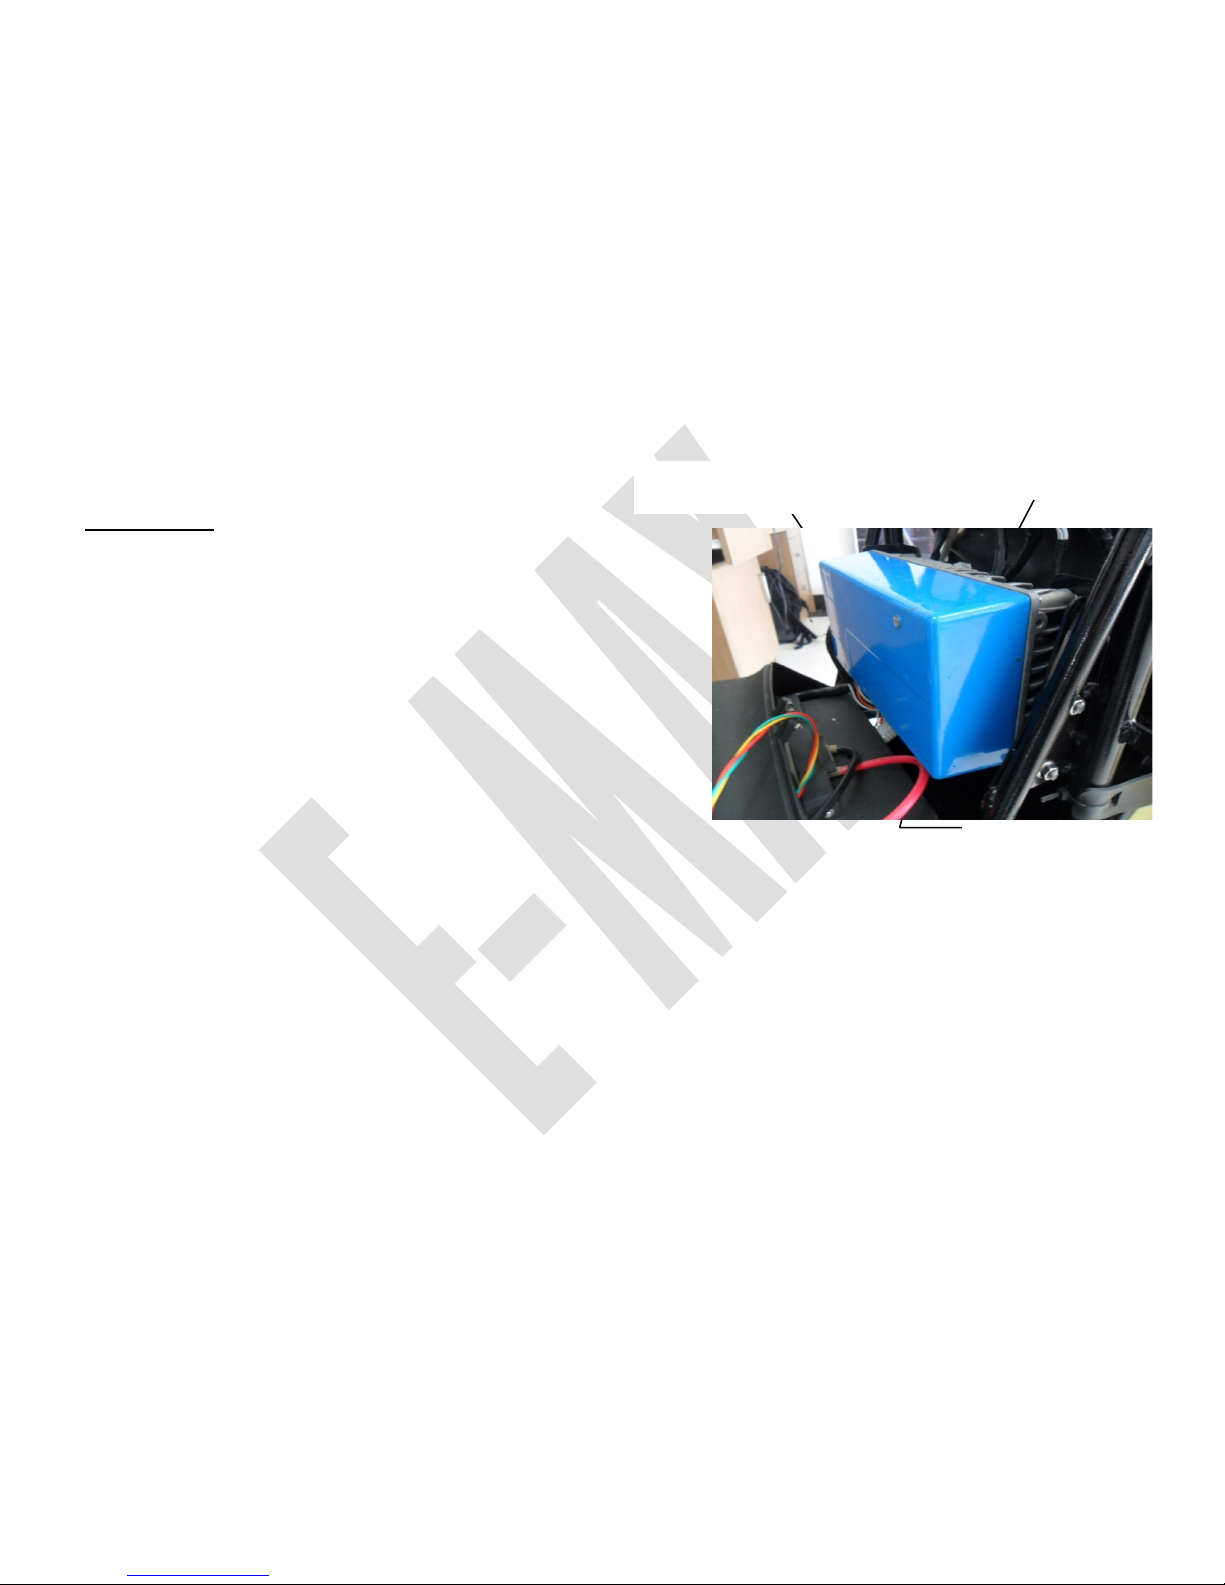
2.8 Battery
Attentions:
• Before first time using, please read following
information very carefully, this will avoid damage
to battery from incorrect operation, and reduce
any danger;
• Battery is packed in battery case and fixed on
frame, NEVER try to operate or disassemble
battery. That is dangerous and will invalidate your
warranty;
• Battery voltage is over 36V, avoid any bodily
contact between positive/negative terminals;
• Battery package is only for scooter, please don’t
use for other products, or will cause irreversible
battery damage;
• Please keep battery in a dry and cool place; if battery won’t be used for over 3 months,
please charge it each 2 months;
• Charge at room temperature 0~40°C;
• Battery package has self-protective function, when battery temperature lower than 0
℃
or
higher than60℃, battery will be self-protective to stop charging; as soon as temperature is
normal, charger will start charging process automatically;
• Please use original E-MAX authorised charger to charge the battery;
• Can’t use this battery in series or parallel connecting with other batteries
LED Display on
charger
On-board charger
Battery case
Page 18

18
• When battery voltage is low, don’t keep dis-charging battery continously, it will reduce the
life of battery and can even permanently damage the battery;
• Please see charge methods at 2.9
• Battery case is an assembled part, please don’t disassemble or modify battery case,
it will affect battery functions; Use of an un-authorised E-MAX charger or
disassembled/modified battery invalidates your warranty;
• Don’t subject battery to high temperature;
• Don’t connect battery’s positive with charger’s negative pole
• Don’t connect/store the battery‘s poles with fire or any metal objects as it will
cause damage and short circuit
• Don’t put sharp material into battery, don’t use hammer or anything to hit battery,
it will damage the battery;
• Don’t put battery under sea water/water/ or other conductive liquid; if won’t use
battery in a long time, please keep it at dry and cool place;
• Don’t put package in fire, don’t heat package
• Don’t connect battery positive and negative poles in an opposite way
• Don’t connect battery positive and negative directly to home outlet;
• Don’t disassemble or modify battery package;
• If battery turn old/heat/colour change/shape change/leak or any shows any
abnormal, don’t charge, contact Dealer for help;
• Battery voltage is over 36V, forbidden to contact positive/negative directly by
human body. During maintenance or when battery out of use for a long time, please
insulate positve and negative poles;
Page 19

19
• Please follow local regulations to dispose of the battery correctly and safely after
end of life.
2.9 Charger
• Scooter have external or internal charger from manufacture, can charge by taking out
charger connector
• Battery will stop charging when full-charged automatically
• Please disconnect charger connectors after charging
• Read the user manual before using
• Don’t turn key to “START” when charging!!!
• Don’t connect charger when scooter is in move!!!
• Frequent charging of the battery increases its life significantly
• Different country has different electric voltage, this charger can work
automatically under 100V~240V with 50Hz~60Hz;
• Charger’s normal working temperature is 0°C~40°C;
• When charging at over 40°C temperature, charger will stop frequently to cool
charger down, as soon as back to normal temperature, charger will back to work.
At summer, please charge scooter at cool place otherwise prolong charge time;
• When charging at lower 0°C temperature, charger won’t work, as soon as back to
normal temperature, charger will back to work. At winter, please charge scooter
at warm place;
• Do regular maintenance for heat sink; dust or other material will prolong charge
time;
• Don’t disassemble charger, disassemble it personally is not subject to warranty
claim;
Page 20

20
• Don’t charge to other batterytypes because each charger has internally different
charging curves;
• Wrong charger used to charge battery will destroy battery;
• Please keep charger connector dry, if there is any water at connector, please dry
it with cloth before using.
Page 21

21
• Please only use E-MAX authorized charger, or any issues on it won’t subject to
Page 22

22
warranty claim;
• Fan on charger is an important component, please keep it uncovered and work
smoothly;
• Don’t charge in the rain, please charge at waterproof place
• During charging, don’t turn on ignition switch, don’t turn throttle when ignition
switch on
•
2.10 Mirror
• Before riding, adjust mirrors in right position;
• Adjust glass inside of shape to finalize it;
For safety, please clean mirrors regularly!
Page 23
23
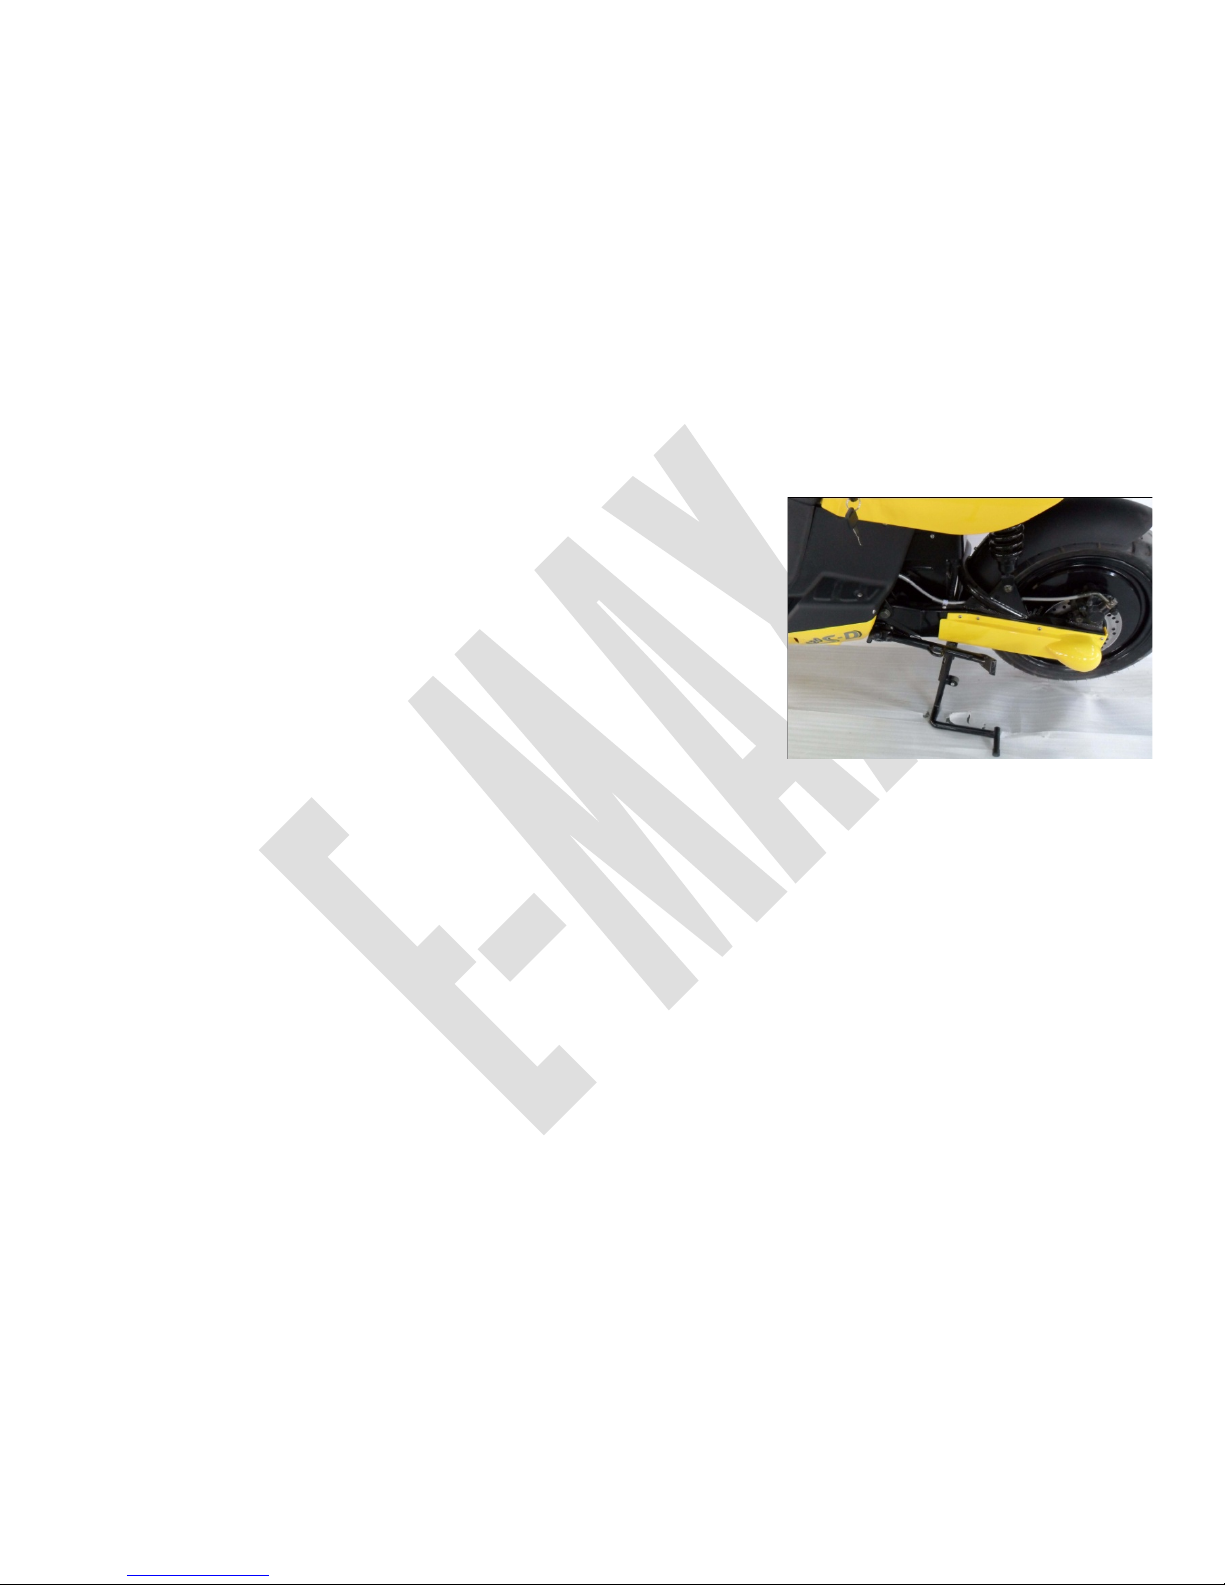
2.11 Park/Main stand
Main stand can hold scooter in an upright position.
Main stand usage:
• Need a long time park;
• Ground is not ok for side stand work;
• Scooter service time.
Page 24
24
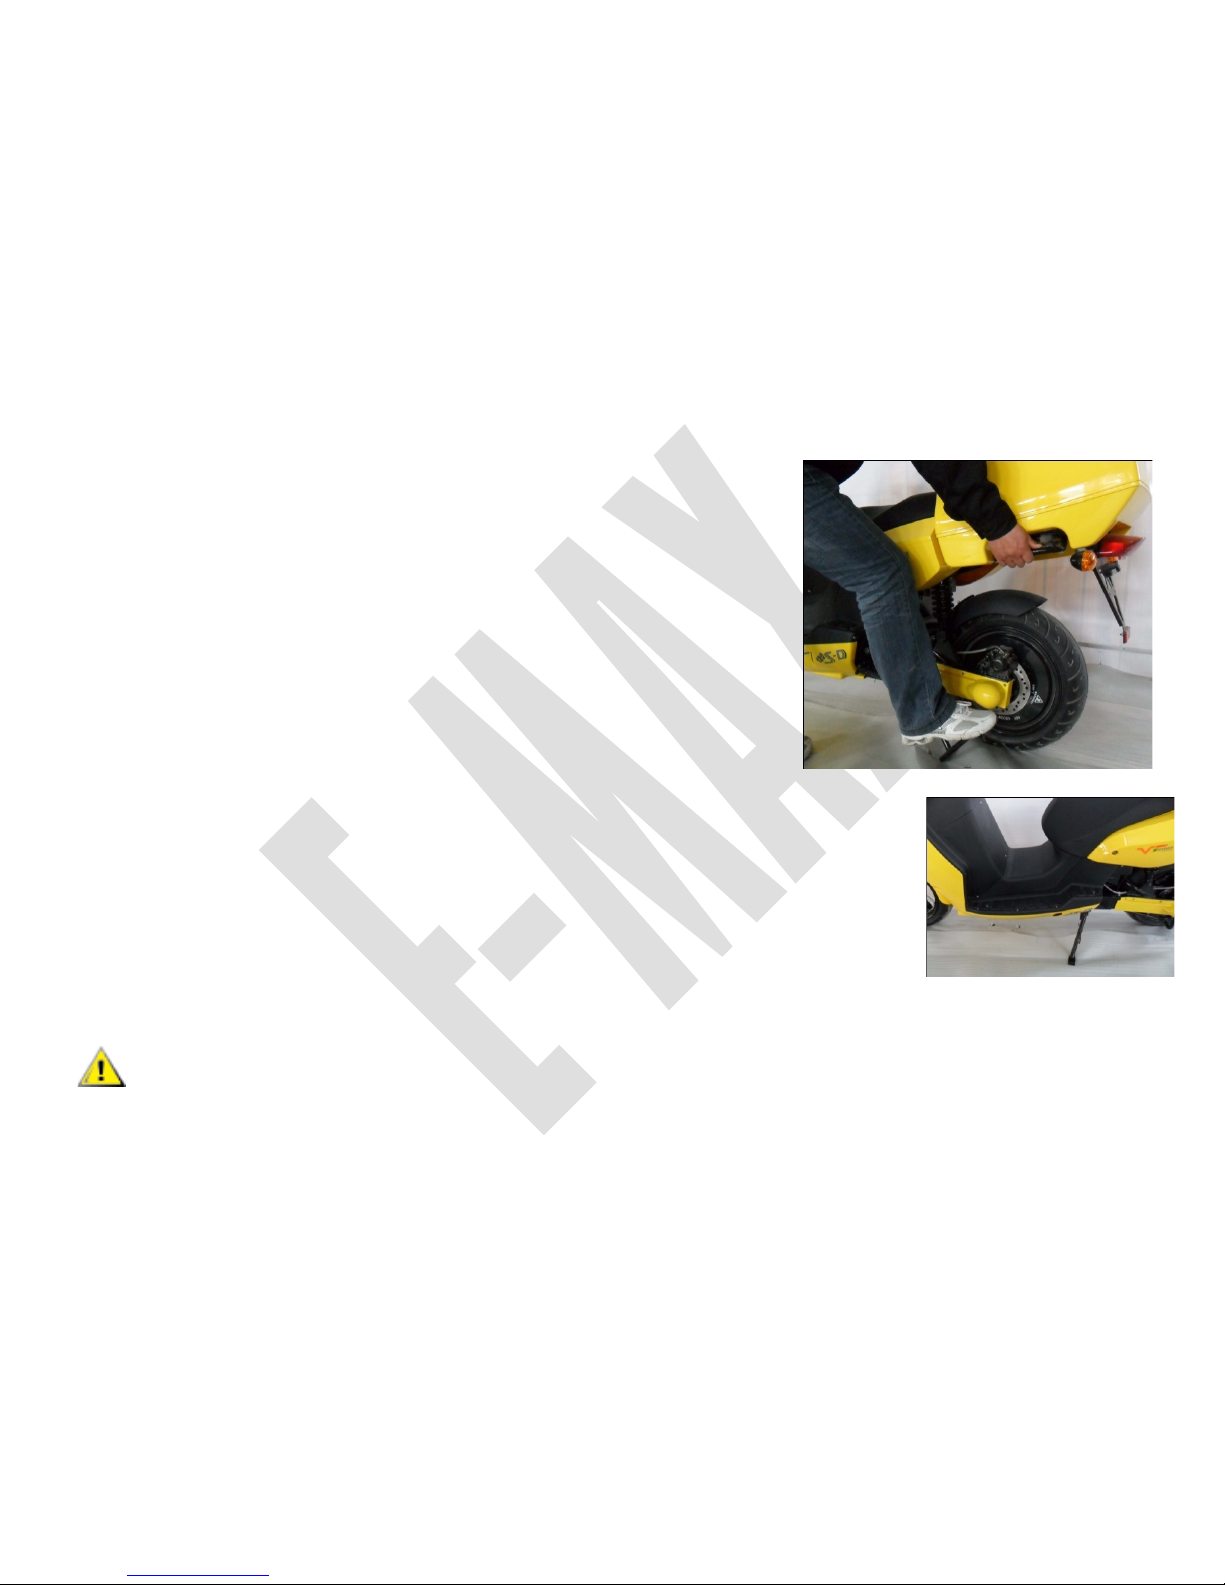
Instruction to lift up to the main stand:
• Grasp passenger holder with right hand, as pic shows;
• Hold left handlebar with left hand;
• Use right foot to step main stand down to ground and
lift scooter up with right hand.
2.12 Side Stand
• Double side stands at left and right
• The side stand holds the scooter in a slightly angled position
• Park scooter on a firm surface;
• Put side stand in right position by right foot;
• Move scooter upright (use main stand) then take side stand back
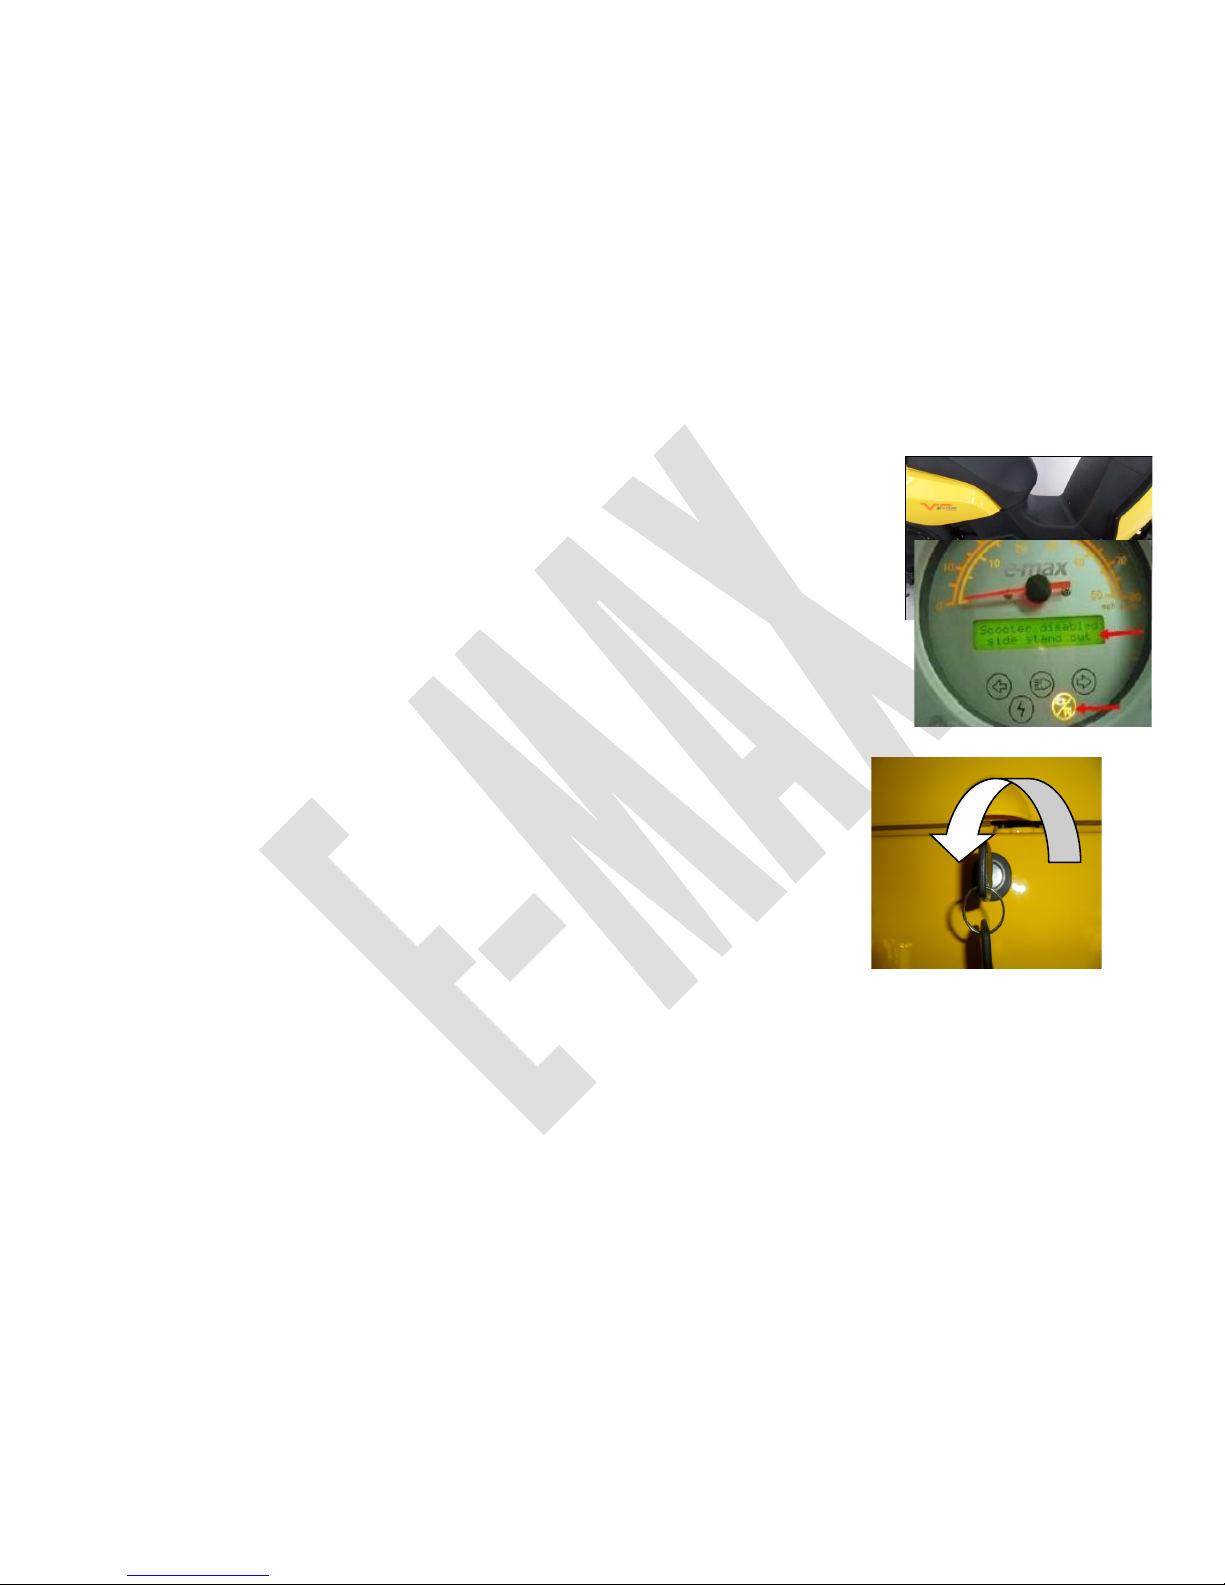
When use side stand park, even key is in position “START”
Page 25
25
• the throttle is disabled
• and speedometer shows like the picture
2.13 Transport Box
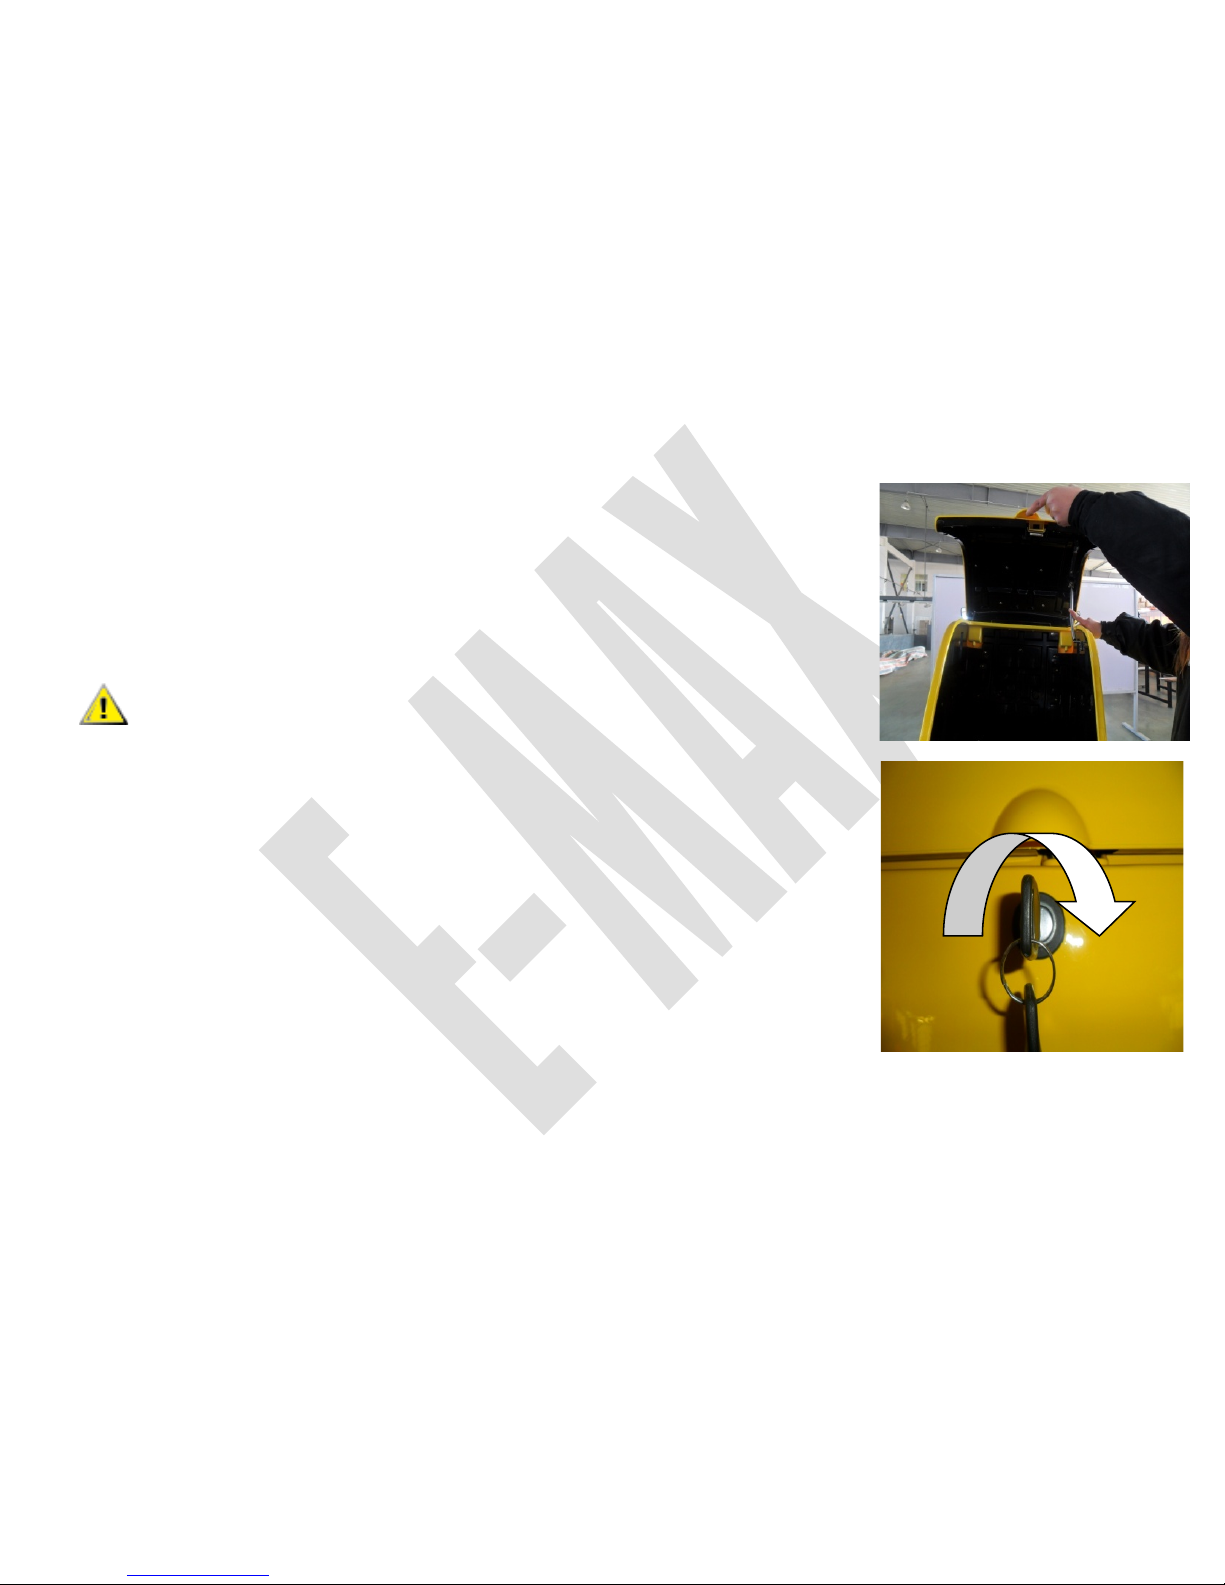
2.13.1 Open the transport Box.
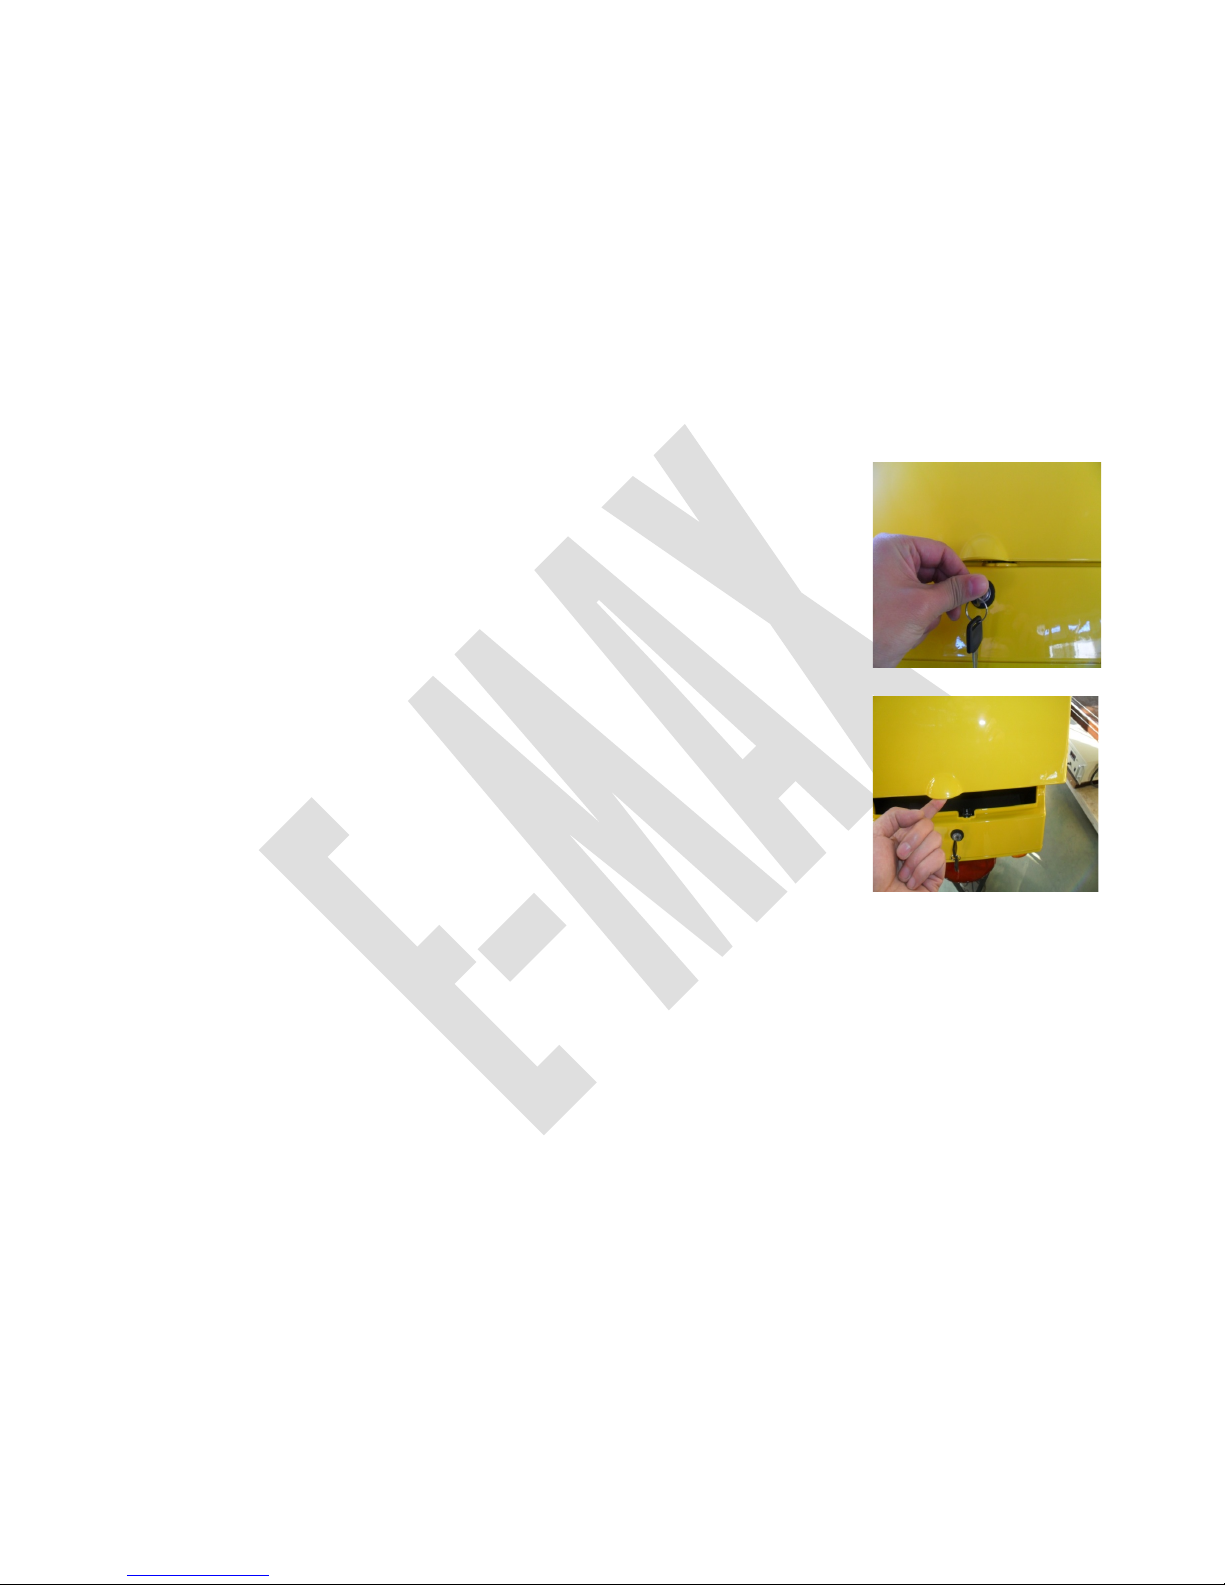
• Put key in, turn key to left at 90° as the position
Page 26
26
• Press the key in until lock snap off
• Open cover
2.13.2 Close the transport Box
Page 27
27
• Keep cover
• Push spring
• Close cover, press down until lock snap in
• Turn the key to right at 90°, take key out, box close 90°
When key at the position as right picture shows, box can
open if press locker, need to turn key as picture show to
finish locking.
Page 28

28
3. Malfunctions
Malfunctions describe here, we assume that they only happen because of parts issue. If fault
still happen after replacing parts, please contact your dealer.
3.1 Lights
3.1.1 Indicators
If a lamp is faulty, then the indicator frequency is twice faster than normal.
Front turning light: Should only be changed by the dealer. It is necessary to remove the main
panels!
Rear turning light: Unscrew and remove the cross-head screw from the indicator cover.
Replace the broken bulb (12V, 21W).
3.1.2 Front lights
Should be changed by the dealer only. It is necessary to remove the main panels!
3.1.3 Rear light or brake light
Unscrew and remove the cross-head screw from the rear light. Replace the broken lamp (12V,
5/21W).
3.1.4 License plate lighting
Unscrew and remove the cross-head screw from the license plate lighting. Replace the broken
lamp (12V, 5W).
Page 29

29
3.2 Tyres
Air pressure can be checked and adjusted if necessary at any service station.
Normal air pressure: 2.8bar
If the tyres are worn or broken, only the dealer can change them.
Too low air pressure or worn tyres may affect handling and range!
3.3 Brakes
Squealing noises while press brake indicates worn brake disc or that there is other object
(e.g. a stone) in brake.
In this case, please contact your dealer.
Page 30
30
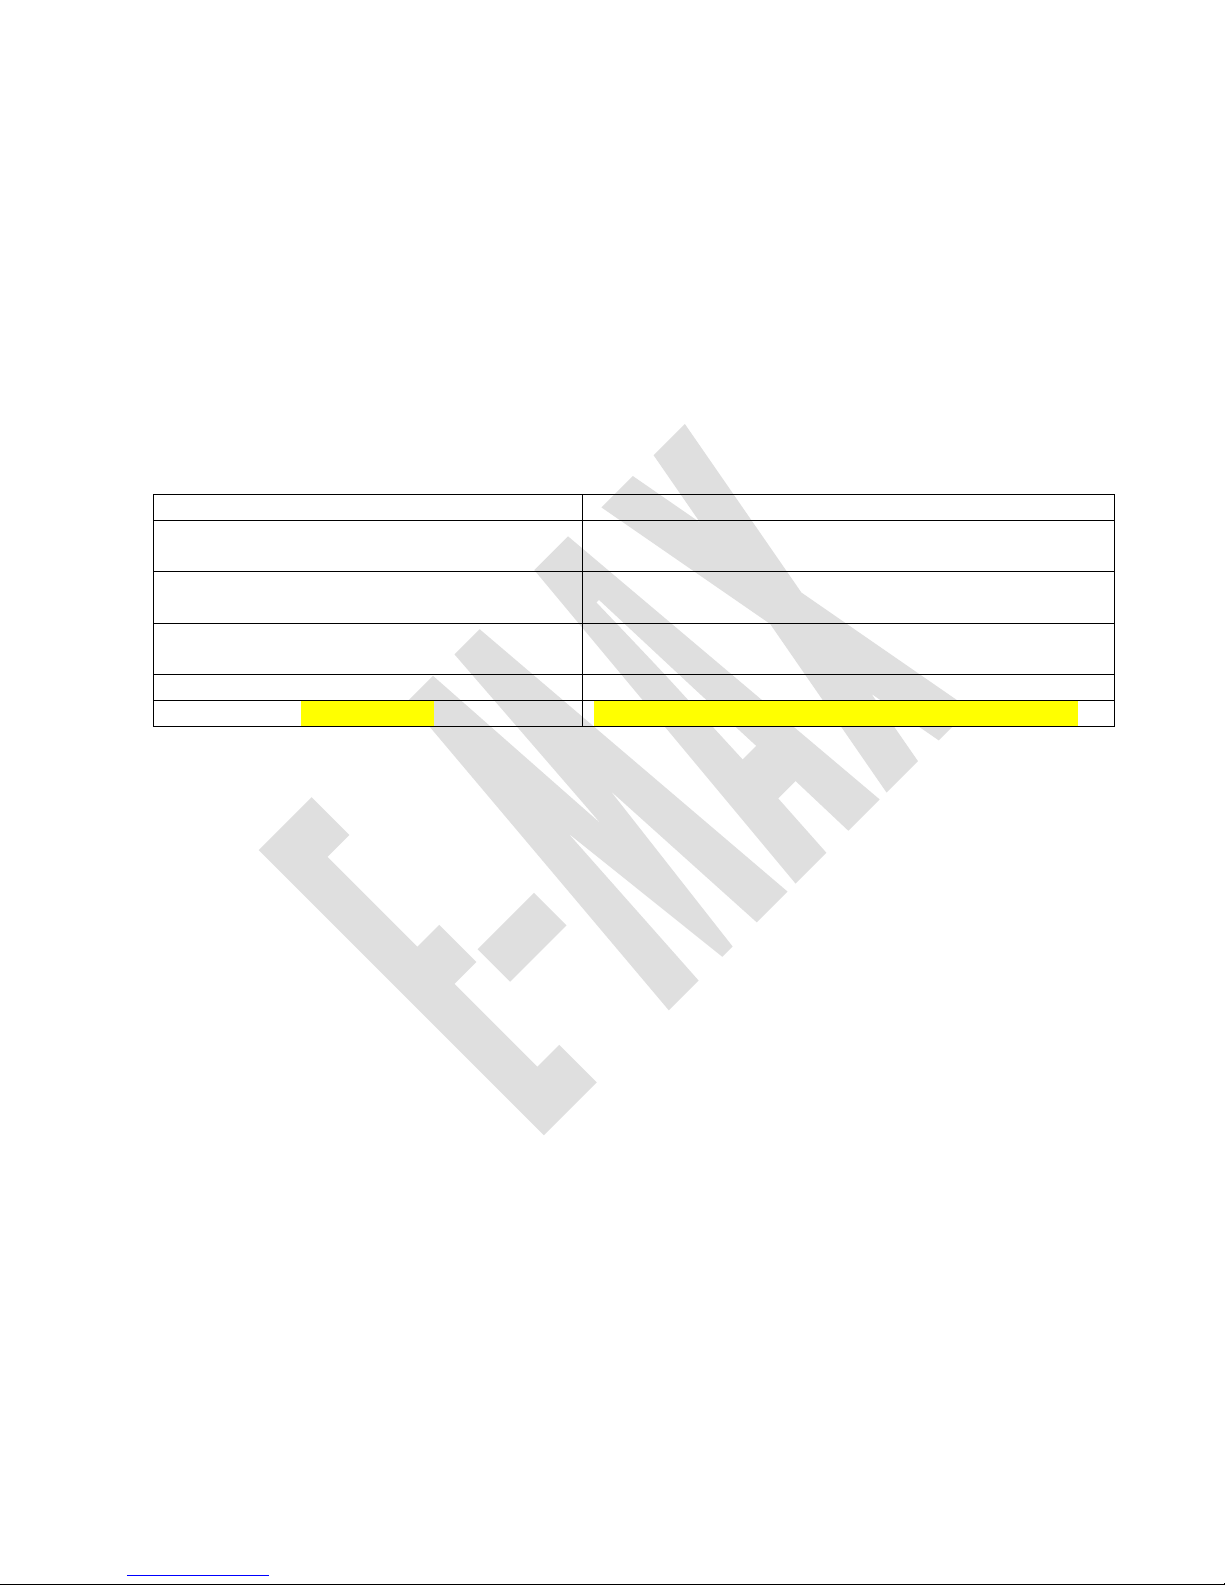
3.4 Malfunction messages in the speedometer display
Display Text
To overcome this problem:
Battery empty
Re-charge!
Please charge
Scooter disabled
side stand out
Fold side stand in and check the kill switch
broken or not
Error
Voltage too high
Don’t use scooter until voltage down to normal
Stop software
Input software again
Error system
Press MODE over 30s then start scooter again.
With all other messages that appear, turn the key switch to "Off" and then turn it back to
"Drive".
If fault message remains, please contact dealer.
Page 31

31
4. Vehicle maintenance
All parts of a motorbike are equally at risk of corrosion because of aggressive pollutants in the air
and from the effects of salt on the road. It is the responsibility of the user to adequately protect
the vehicle from these factors. This will help to maintain the value of the vehicle and any
warranty claims.
1. Clean painted chassis parts with finish restorer and treat the rubber parts with special rubber
care products
2. Clean the vehicle regularly
3. Clean aluminium parts with a protective spray (e.g. Motoplast) in order to prevent oxidation.
Carefully remove existing spots of corrosion on aluminium with appropriate steel wool containing
soap
4. Always oil or grease frame and metal parts. This reduces corrosion
5. Never remove insects with an insect sponge or any similarly hard object
6. A vehicle that is constantly parked outdoors must be covered with a protective covering in order
to prevent weathering of painted panels, as well as to prevent cracking of seats and other plastic
parts
7. Do not use a high pressure cleaner!!
Water particles could lead to contact problems in the electronics
8. Seats, instrument panels, indicators, rear light and weather protection screens as well as
hardened dirt and insects are to be cleaned with an insect remover, not with an insect sponge as
this can result in scratches
Page 32

32
Page 33

33
5. Shipment Inspection
The following inspection work have to be carried out before delivery:
• charge batteries (note battery guidelines) and check contacts
• check tyre pressure and correct if necessary
• check all main screws as torque requirements
• check screws, nuts and fastening points
• check motor mountings, stand mountings, suspension struts, fork and handlebar bearing
• check the functioning of front and rear suspension
• check that all operating parts are in working
order
• check all lights
• check directional stability, front & rear brakes
and handlebar
Date, Signature, Stamp
Authorizied “e-max“ Dealer
Page 34
34
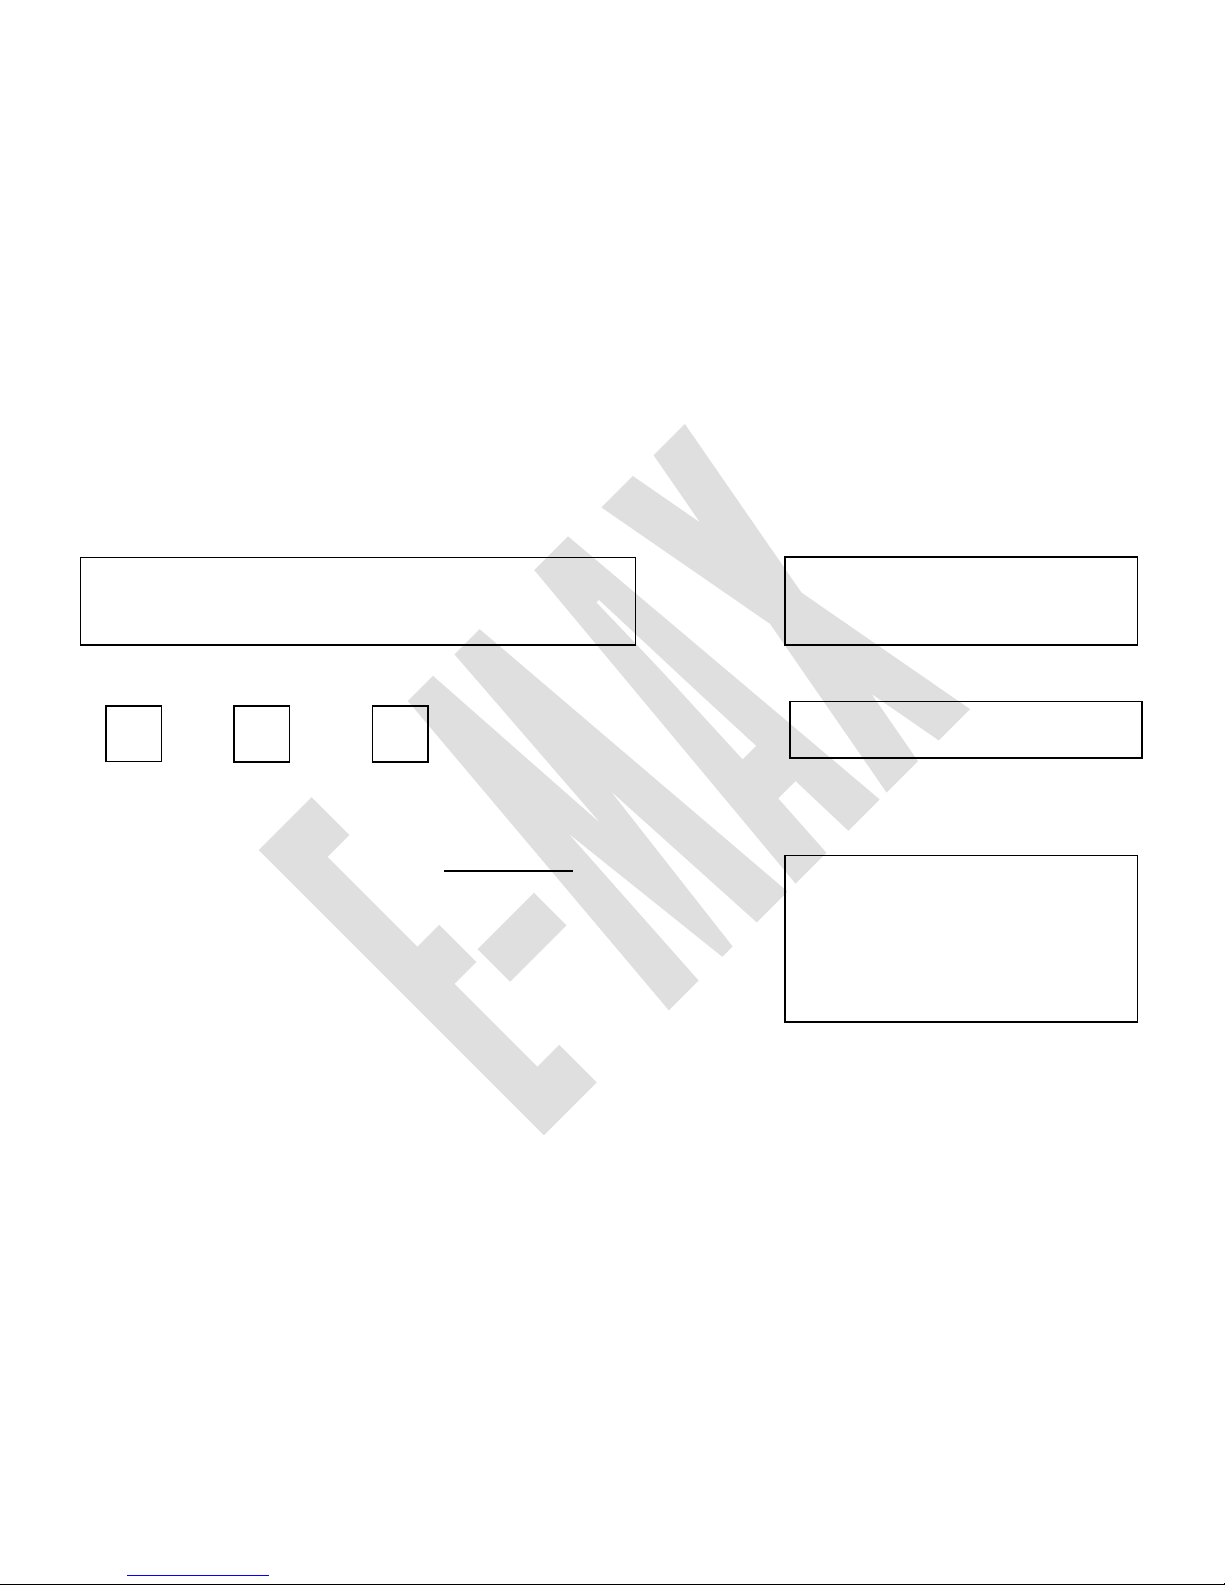
6. Vehicle delivery
Vehicle identification number: Date of delivery:
100LD 100LD+ 80km/h Dealer CODE:
De a l e r s t a mp:
Name:_________________________________
Street:__________________ __________
City: __________________________________
Postcode: ______________________________
Telephone: _____________________________
Email: ______________________________
This document is the foundation for the processing of warranty applications. Warranty applications
cannot be processed if warranty documents are not filled out or are incomplete!
Day Month Year
Dealer Stamp:
Page 35

35
7. Warranty Information
1. 2 years limited mileages warranty are provided;
2. Defects that are not reported to an authorised dealer within this time are not subject to
warranty claims;
2. Wearing parts, such as glass, bulbs, tyres, brake discs, brake pads are not warranty parts;
4. After understanding the situation, manufacturer will decide whether broken parts will be
replaced or repaired;
5. There is no warranty claim if
a) end user has treated the vehicle contrary to regulations, especially overloading
b) the end user has had even one of the inspections stipulated in the customer service check
book or a repair performed by a workshop that is not authorised by VMOTO
c) the vehicle has been modified or changed in any way or fitted with parts that are not
certified by VMOTO
d) the vehicle has been used in a race
e) the operating, maintenance, and service instructions stipulated in this manual have not
been
followed
6. Agreements that differ from the above guarantee conditions must be confirmed in writing by
VMOTO
Page 36

36
The following parts are not in warranty list:
l Bulb
l Brake discs and brake pads
l Tyres
l Accessories don't belong to standard parts
I accept the guarantee conditions in this manual
The vehicle was received in perfect condition.
The dealer explained the guarantee conditions to me.
Date, Signature
Customer
Page 37

37
8. 500 km Maintenance
This inspection must be performed in a time period that is 100 km either before or 100
km after, and no later than 1 year from the date of delivery.
• charge batteries (note battery guidelines) and check contacts
• check tyre pressure and correct if necessary
• check all main screws as torque requirements
• check screws, nuts and fastening points
• check motor mountings, stand mountings, suspension struts, fork and handlebar bearing
• check the functioning of front and rear suspension
• check that all operating parts are in working
order
• check all lights
• check directional stability, front & rear brakes
and handlebar
500KM Maintenance (+/- 100KM)
Mainten @ KM
Date, Signature, Stamp
Authorizied “e-max“ Dealer
Page 38

38
8.1 Maintenances
This inspection must be performed in a time period that is 100 km either before or 100
km after being due, and no later than1 year after the previous inspection.
Maintenance 5,000 km
km: ____________
Date, Signature, Stamp
Authorizied “e-max“ Dealer
Maintenance 10,000 km
km: ____________
Date, Signature, Stamp
Authorizied “e-max“ Dealer
Maintenance 15,000 km
km: ____________
Date, Signature, Stamp
Authorizied “e-max“ Dealer
Maintenance 20,000 km
km: ____________
Date, Signature, Stamp
Authorizied “e-max“ Dealer
Maintenance 25,000 km
km: ____________
Date, Signature, Stamp
Authorizied “e-max“ Dealer
Maintenance 30,000 km
km: ____________
Date, Signature, Stamp
Authorizied “e-max“ Dealer
Page 39

39
This inspection must be performed in a time period that is 100 km either before or 100
km after being due, however and no later than1 year after the previous inspection.
Maintenance 35,000 km
km: ____________
Date, Signature, Stamp
Authorizied “e-max“ Dealer
Maintenance 40.000 km
km: ____________
Date, Signature, Stamp
Authorizied “e-max“ Dealer
Maintenance 45.000 km
km: ____________
Date, Signature, Stamp
Authorizied “e-max“ Dealer
Maintenance 50.000 km
km: ____________
Date, Signature, Stamp
Authorizied “e-max“ Dealer
Maintenance 55.000 km
km: ____________
Date, Signature, Stamp
Authorizied “e-max“ Dealer
Maintenance 60.000 km
km: ____________
Date, Signature, Stamp
Authorizied “e-max“ Dealer
Page 40
40
Odometer
changed
Displayed mileage is not the
total mileage!
km: ____________
Date, Signature, Stamp
Authorizied “e-max“ Dealer
Odometer
changed
Displayed mileage is not the
total mileage!
km: ____________
Date, Signature, Stamp
Authorizied “e-max“ Dealer
Odometer
changed
Displayed mileage is not the
total mileage!
km: ____________
Date, Signature, Stamp
Authorizied “e-max“ Dealer
Page 41

41
9.0 Specification
Vehcile type (Model)
100LD
Dimension(L×W×H)
1905x720x1140mm
Wheelbase
1410mm
Tyre specification
130/60-13"
Weight
130Kg
Max load
350kg
Max speed
80Km/h
Single charge range
- 75 kg load
- flat road
- 5 starts/Stops
- 23°C outside temp.
90 -100km /45km/h
Climb ability - 75 kg load
≤14°
Motor type
DC brushless motor
Battery type
Lithium
Battery capacity
72V40AH
Charge time
- 30 to 100 %
5 – 6 h
Front suspension type
Oil/Gas pressure
Rear suspension type
Oil/Gas pressure
Front rim type
Aluminium
Rear rim type
Aluminium Hub-Motor
Brake system
Fr. Disc/Re. Disc
Brake operate system
Hydraulic
Page 42

42
10. Repair tips
Your Vmoto/E-max dealer would like to give you comprehensive advice and service your
vehicle competently.
Here are some tips for smooth proceedings if an inspection or repair has to be carried out:
1. Only let an authorised “e-max” dealer service your vehicle
2. Make an appointment with the workshop manager
3. Explain the work that has to be done on the vehicle or make a list
4. If something is unclear please talk to your workshop manager
5. Give clear instructions
6. Ask about the expected costs in advance
7. Leave your telephone number so that the workshop manager can reach you in case there are any
necessary questions
8. Set a price limit for any necessary additional work
9. Speak openly about any unclear items with your “e-max” dealer
10. Comply with the regular inspection intervals of your e-max vehicle
 Loading...