

emaux NP300 Series User Manual
4"min
To GFCI, CircuitBreaker
and Power Source
Rigid Conduit
18"min. to
top of Lens
"
NP300 Series Underwater Light
1-4
r Never install in vertical position with the lamp facing upwards / downwards,
r Intended for fresh & salt water swimming pool
A) Ensure that the electrical system of your pool conforms to the following requirements of all
local codes and ordinances. A licensed or certified electrician must install the electrical
system to meet or exceed those requirements before the niche (fixture-housing) is
installed.
B) Installation Guideline:
1) The top of the light lens be at least 18 inches (457mm) below the water level. Some installers
position the niche 24 inches (610mm) below anticipated water level to avoid any
inspection authority issues with this requirement.
2) The lighting circuit must have a Ground Fault Circuit Interrupter (GFCI), and an
appropriately rated circuit breaker.
3) The junction box or the low voltage transformer is located at least 8 inches (203mm) above
water level and at least 48 inches (1912mm) from the edge of the pool
4) The light fixture and all metal items within 5 feet (1534mm) of the pool must be properly
electrically bonded.
5) The niche must be properly installed so
that the "Top" sign inside is at the 12
o'clock position and that the top edge of
the underwater light's lens is at least 18
inches (457mm) below the surface of the
water in the pool
6) The niche is properly electrically bonded
and grounded via a ground connector located
at the rear of the niche
C) Terminal Block must meet the IEC60988-2-1
standard having the rated connecting capacity of
User Manual
4-4
General Information
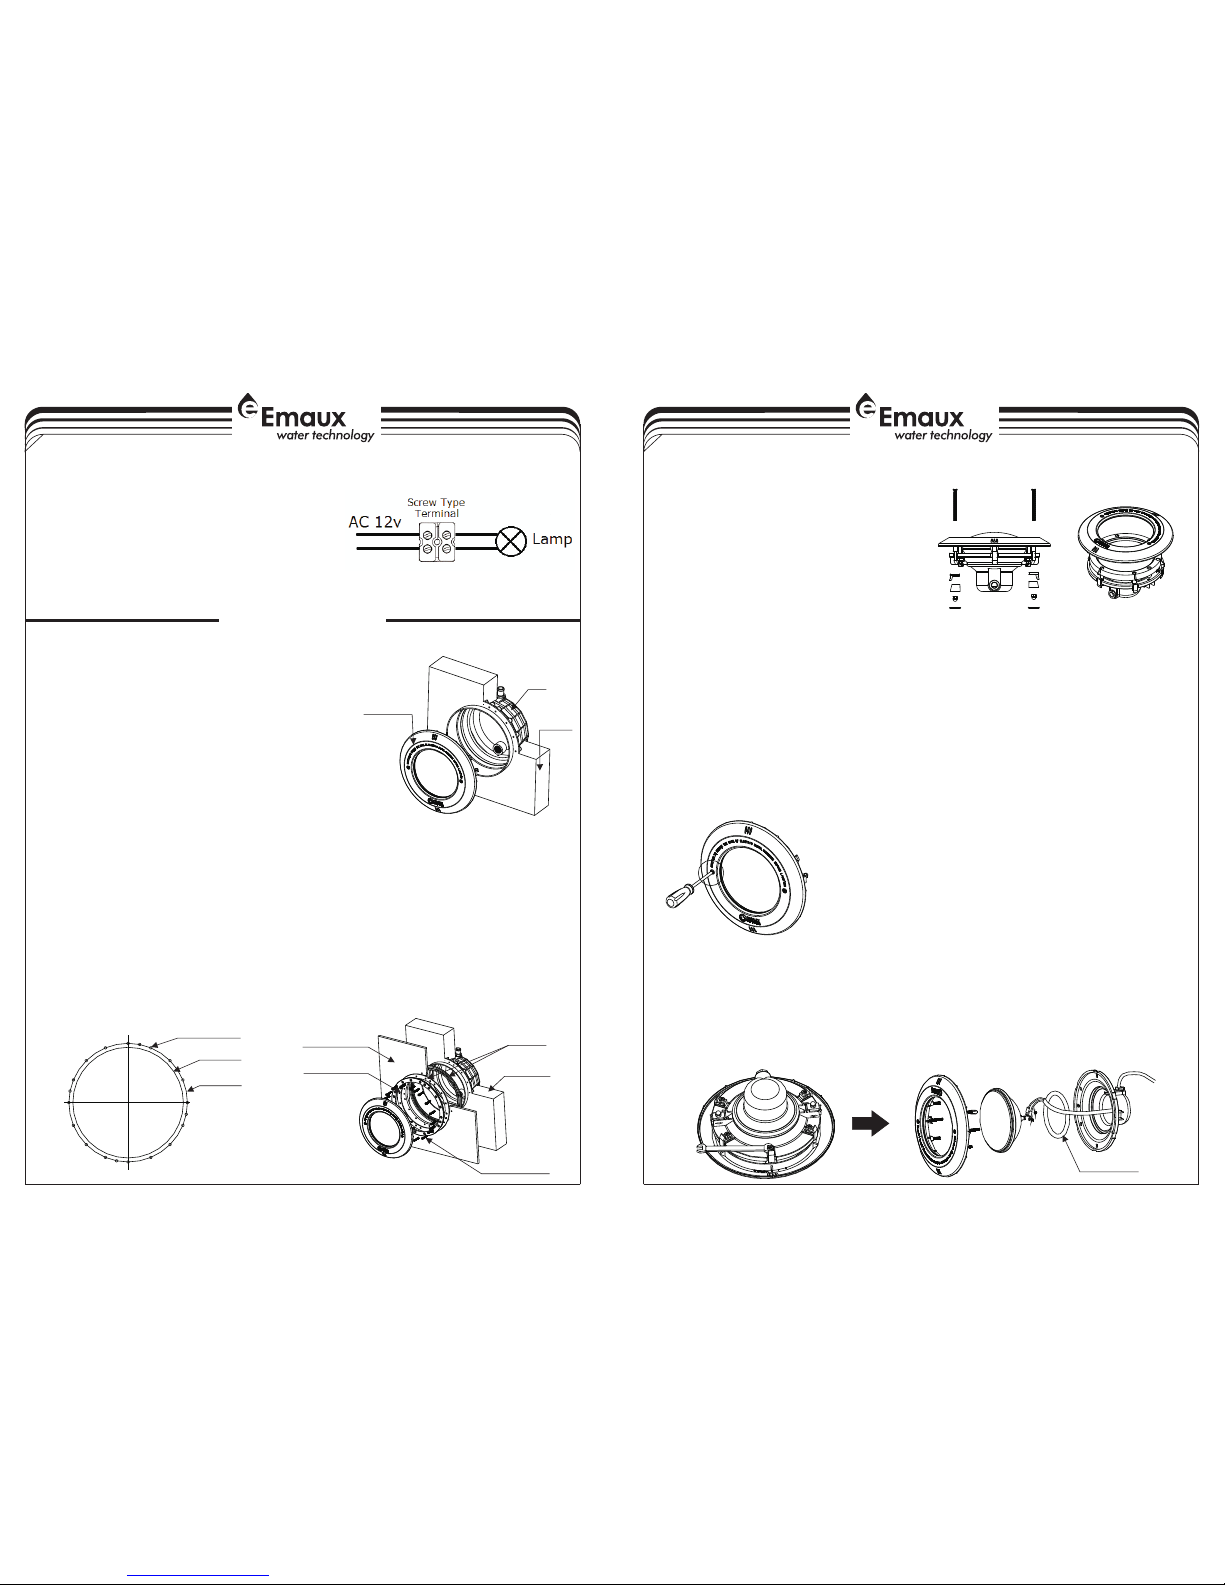
3 Remove the lamp and gasket from the inside of the
base of the underwater light by disconnecting the
two terminals, loosening the two screws which secure
them to the lamp,see Figure 9.
4) Change the lamp and assemble the Underwater light,
in the opposite order described, taking special care
to:
ØConnect the cable terminals to the lamp, using
the 2 screws supplied with the lamp,see Figure
10.
ØFully centre the gasket in its seat.
ØFirmly tighten the nuts.
ØBefore lamp replacement, ensure the power to
the underwater light is cut off.
ØIn order to ensure full water tightness, Discard
the old Gasket and replace it with a new one.
)
REPLACEMENT PARTS
Gasket
Figure 10
Figure 9
Installation Diagram for NP300
EMLI16 022950
Key
No.
Par t No.
Des cript ion
Qty
1
030 11326
M6* 80 Scre ws
2
2
010 50025
Pla stic Li d (Blan k)
12010 50008
Pla stic Li d (EMAU X)
12890 41609
Sta inles s Steel L id (EMA UX)
12890 41610
Sta inles s Steel L id (Bla nk)
13030 11327
M6* 55 Hexa gon Hea d Screw s
64011 00011
Fac e Ring 15
040 11004
PAR 56 Ligh t Bulb (Y ellow L ight) ( Stand ard Bul b)
1
5
040 11043
Par 56 252 LE D Bulbs ( White -Colo ur)
15040 11044
Par 56 252 LE D Bulbs ( Blue Co lour)
15040 11045
Par 56 252 LE D Bulbs ( With Re mote Co ntrol )
15040 11056
Par 56 (252 L ED Bulb s)12V /16W (A utoma tic Col our Cha nge)
15040 11047
Par 56 144 LE D Bulbs ( White C olour )
15040 11048
Par 56 144 LE D Bulbs ( Blue Co lour)
15040 11049
Par 56 144 LE D Bulbs ( Auto Co lour Ch ange)
16020 20038
Wat erpro of O-Ri ng for bu lb
17012 30003
Wat erpro of Cove r
1
8
890 41601
Wat erpro of O-Ri ng with T ooth He ad for Ca ble
19890 41602
Nut F ittin g610
890 41603
Fas tenin g Dog
211890 41604
Wat er Join t Fitti ngs for C able
112890 41606
NP3 00 Ligh ts Cabl e 2.5m
113890 41608
Vin yl Pool f ittin g for NP3 00
114010 50010
NP3 00 Ligh ts Nich e
115890 41605
Plu g with O- Ring
116011 71106
Joi nt for wi re & pipe
1
1) To install the underwater lighting in a concrete swimming
pool, the niche should be fixed in the wall of the
swimming pool. Be sure the top of the niche be at least
18 inches (457mm) below the water level, and the TOP
sign of the niche is at the 12 o'clock position.
2) There are two conduits at the back of the niche, please
chose one which is most convenient to your wiring design
and seal the other one with the plug provided.
3) Concreting the pool as shown in figure 2.
1) To install the underwater lighting in a concrete swimming pool with vinyl liner, the niche should
be fixed in the wall of the swimming pool. Be sure the top of the niche be at least 18 inches
(457mm) below the water level, and the TOP sign of the niche is at the 12 o'clock position.
2) There are two conduits at the back of the niche, please chose one which is most convenient to
your wiring design and seal the other one with the plug provided.
3) Punch or drill the holes in the vinyl liner as stated in figure 3.
4) Install the Niche as shown in figure 4.
3-42-4
Niche Installation
1 Feed cord through conduit to junction box, leaving at least 59 inches (1500mm) of cord at
the light fixture to coil around the back of the light, such that the light fixture would be
bought back to the pool deck for service.
2 Make the wire connection to the junction box.
3 Insert the entire underwater light fixture into the niche. In order to obtain good pool lighting
it is important that the company logo of Emaux of the lid is located on the 6 o'clock position.
4 Screw in the two M6 x 75 screws on the lid until the fastening dog is secured in the inner walls
of the niche figure 7.
5 Before operating the light for more than 10 seconds, fill the
pool with water until the underwater light is completely
submerged in water. To check for proper operation, turn on
main street or circuit breaker as well as the switch that
operates the underwater light itself.
)
)
)
)
as shown in
)
Figure 7
Concrete swimming pool with vinyl liner
Concrete swimming pool
Underwater light fixture installation
Gasket
1 To remove the underwater light to the pool deck, loosen the two screws on the lid until
the fastening dog yields sufficiently so that the underwater light unit can be separated
from the niche.
2 Unscrew the 6 nuts which secure the lid to the base of the underwater light
figure 8.
)
) as shown in
Figure 8
Lamp Replacement
Gasket
Concrete
Vinyl Liner
Setting Fitting
20-M5 Screw
Figure 4
20-Ø6mm
Ø235mm
Ø252mm
Figure 3
Installation of the stainless steel or plastic lid
Figure 5 Figure 6
1) Remove the old lid by unscrewing the two
M6 screw on the lid. Note that the O ring,
nuts slide block and the fastening dog will
be loosen too by removing the M6 screws
on the lid, as shown in figure 5.
2) Install the new plastic lid or stainless steel lid
as shown in figure 6, make sure the screws
hole are aligned. Fasten the M6 screw on
the lid.
4.0mm2, use of screw type terminal at least 25A rated current, mounted inside junction
boxes, see the figure1 below
D) Use only EMAUX lighting fixtures in this niche to
en sur e p ro per bo nd in g a nd gr ou ndi ng
connections.
ø(For US user, please also follow the requirements
of the National Electrical Code (NEC)
Niche
Concrete
Underwater
Light Fixture
Figure 2
Figure 1
 Loading...