

Page 1
TOUCH SCREEN RECEIVER
DAKOTA
BP800PLAY
Page 2
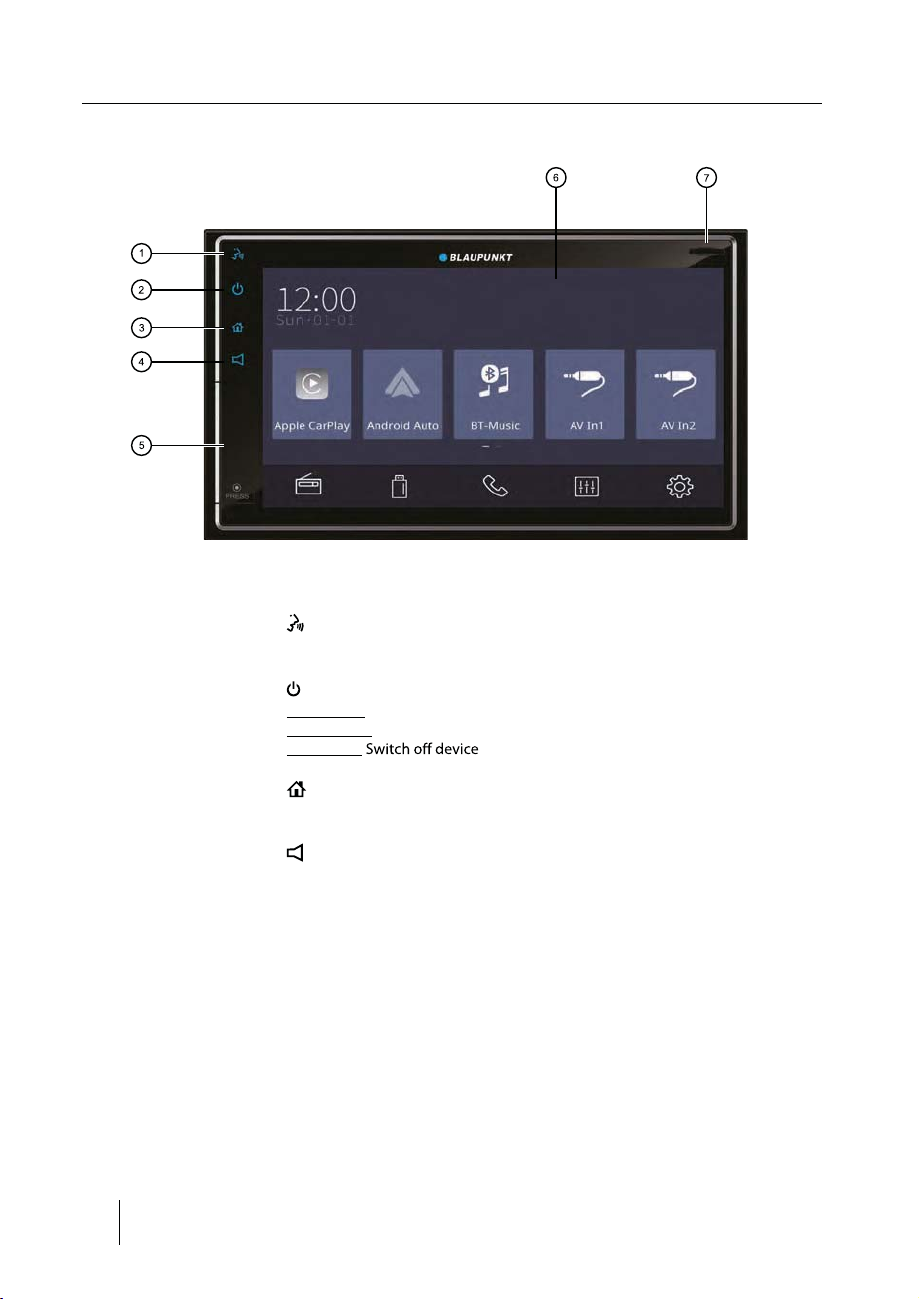
Controls – Device
1
Button
Activate Siri voice control
2 Button
Short press: Switch on device
In operation: Mute audio source
Long press:
3 Button
Call up main menu / Return to previous source
4 Button
Show the volume bar
5 USB socket / AV IN jack / Reset button
Access only with open cover (Pressing the bottom of the cover to
pop it)
6 Touchscreen user interface
7 microSD card reader
2
Page 3

Safety notes ................................................................ 4
Symbols used ...........................................................................4
Road safety ................................................................................ 4
General safety notes ..............................................................4
Declaration of conformity ....................................................4
Placing the device in operation ................................. 5
......................................................................5
Volume ........................................................................................5
Main menu ................................................................................5
Setting the reception area ................................................... 5
Radio mode ................................................................. 6
Start radio mode .....................................................................6
Select memory band .............................................................6
Tuning into a station ..............................................................6
Storing stations manually ....................................................6
Storing stations automatically (Travelstore) .................6
Adjusting the seek tuning sensitivity ..............................6
Audio playback from USB or microSDHC ....................... 7
Video playback from USB or microSDHC .......................7
Image playback from USB or microSDHC ......................8
Bluetooth mode .......................................................... 9
Starting Bluetooth mode .....................................................9
Registering Bluetooth devices ...........................................9
Telephone mode ..................................................................... 9
Alphabetic search ..................................................................9
Audio playback via Bluetooth streaming .................... 10
Bluetooth settings ............................................................... 10
Apple CarPlay ............................................................ 10
Android Auto ............................................................ 11
External audio/video sources .................................. 12
AV inputs ................................................................................. 12
Sound settings .......................................................... 12
Volume distribution (fader/balance) ............................ 12
Equalizer .................................................................................. 12
Steering Wheel Control ............................................ 12
Useful information ................................................... 13
Basic settings ............................................................ 13
Useful information ................................................... 13
Connection diagram ................................................. 14
Contents
3
Page 4
Safety notes | Cleaning notes | Disposal notes
Safety notes
The car sound system was manufactured according to
the state of the art and established safety guidelines.
Even so, dangers may occur if you do not observe the
safety notes in these instructions.
These instructions are intended to familiarize you with
the most important functions. Detailed information can
be found on the Internet under www.blaupunkt.com.
• Read these instructions carefully and completely
before using the car sound system.
• Keep the instructions at a location so that they
are always accessible to all users.
• Always pass on the car sound system to third parties
together with these instructions.
In addition, observe the instructions of the devices used
in conjunction with this car sound system.
Symbols used
These instructions employ the following symbols:
DANGER!
Warns about injuries
DANGER!
Warns about high volume
directives.
•
Road safety
Observe the following notes about road safety:
• Use your device in such a way that you can always
safely control your vehicle. In case of doubt, stop
at a suitable location and operate your device while
the vehicle is standing. As the driver, you may not
General safety notes
Observe the following note to protect yourself against
injuries:
Do not modify or open the device.
Use as directed
This car sound system is intended for installation and
operation in a vehicle with 12 V vehicle system voltage
and must be installed in a DIN slot. Observe the output
limits of the device. Repairs and installation, if necessary,
should be performed by a specialist.
Declaration of conformity
The Blaupunkt Technology GmbH declares that the
device complies with the basic requirements and the
other relevant regulations of the directive 1999/5/EC.
The declaration of conformity can be found on the
Internet under www.blaupunkt.com.
Cleaning notes
Solvents, cleaning and scouring agents as well as
dashboard spray and plastics care product may contain
ingredients that will damage the surface of the car sound
system.
Use only a dry or slightly moistened cloth for cleaning the
car sound system.
Disposal notes
Do not dispose of your old unit in the household
trash!
Use the return and collection systems available
to dispose of the old device, the remote control and
exhausted batteries.
(depending on the scope of functions of the device,
e.g. viewing videos, entering a destination).
• Follow the driving recommendations during
the route guidance only if you are not violating
regulations have always priority over driving
Recommendations.
• Always listen at a moderate volume to protect
your hearing and to be able to hear acoustic warning
signals (e.g. police sirens). During mute phases (e.g.
when changing the audio source), changing the
volume is not audible. Do not increase the volume
during this mute phase.
4
Page 5
Startup
Placing the device in operation
button
For switch-on, press the
than 2 seconds.
If the car sound system is connected with the vehicle
switched ON or OFF with the ignition.
Volume
Adjusting the volume
(maximum).
Press the
bar to change the volume.
Muting the car sound system (Mute)
button to mute the device or to
reactivate the previous volume.
button and drag left/right on the volume
button.
button pressed for more
button, it is
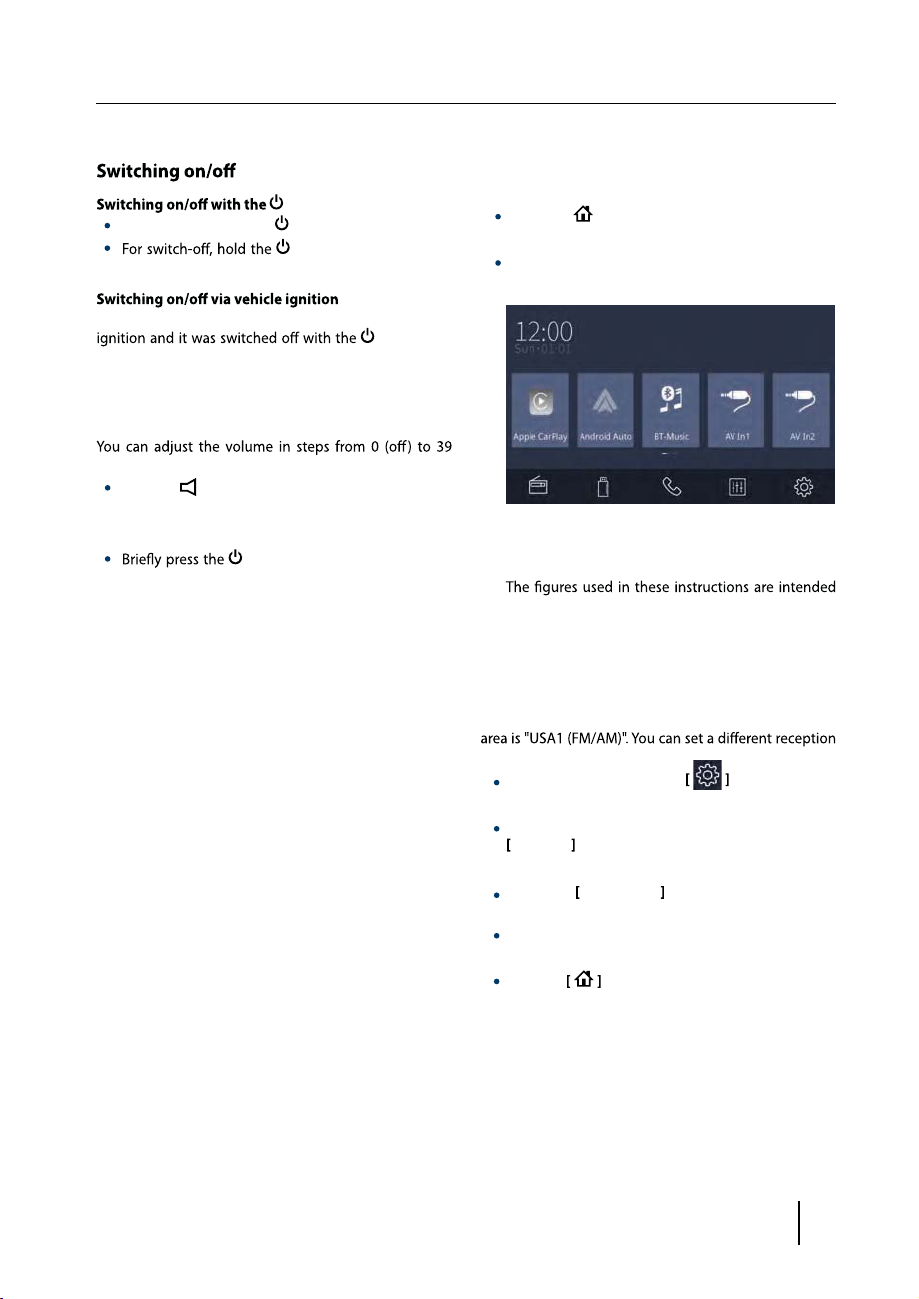
Main menu
In the main menu, you press the buttons on the touchScreen to call out the dierent sources and operating
modes.
Press the [
- Or -
In the current source, press the top left corner.
The main menu is displayed.
As long as you do not select a new audio source, the
last active audio source is played back.
Note:
to facilitate the explanations and details may deviate
from your device.
] button.
Setting the reception area
This car sound system is designed for operation in
dierent regions with dierent frequency ranges and
station technologies. The factory default of the reception
area.
In the main menu, press the
The Setting menu is displayed.
In the left area of the Setting menu, press the
General button.
The current setting is displayed behind "Radio Area".
Tap on the
available reception areas.
Select the desired reception area.
The list is hidden, the selected reception area is set.
Press the button.
The main menu is displayed again.
Radio Area button to display the list of
button.
5
Page 6

Radio mode
Radio mode
Start radio mode
In the main menu, press the button.
The radio playback menu is displayed.
Select memory band
Dierent memory bands and wavebands are available
Up to 18 FM and 12 AM stations can be stored in each
memory bank.
Press the
Tuning into a station
Tuning into stations manually
times to change the frequency in increments.
Enter broadcast frequency directly
If the frequency of the desired stations is known, it can
be entered directly via the touchscreen.
Press the
A numeric keypad is displayed for the frequency
input.
Enter the frequency of the desired station with the
numeric keypad.
Press the
The radio playback menu is displayed, the station of
the frequency entered is played back.
Starting station seek tuning
Press the
to start station seek tuning.
The radio tunes into the next receivable station.
Note:
For the reception area Europe: In the FM waveband,
only trac information stations are tuned into if the
priority for trac information is switched ON.
FM AM button to switch band.
or button once or several
button.
OK button.
or button for approx. 2 seconds
Storing stations manually
Select the desired memory band.
Set the desired station.
Press one of the memory buttons on center of the
screen for approx. 2 seconds to store the current
station at the button.
The station is stored.
Storing stations automatically
(Travelstore)
With Travelstore, you can automatically search for and
store the 6 FM stations oering the strongest reception
in the region in the current memory bank. Any previously
stored stations in this memory bank are deleted in the
process.
Press the
The tuner starts the automatic station seek tuning.
After the storing is completed, the radio plays the
station at memory location 1 of the previously seelected memory bank.
Note:
For the reception area Europe: With switched-on priority for trac information, only trac information
stations are stored.
button.
Adjusting the seek tuning sensitivity
The seek tuning sensitivity decides whether the
automatic station seek tuning nds only strong stations
or also weaker stations that may be noisy.
Press the
Press the button right to
sensitivity of station seek tuning.
If LOC is on, only stations with a strong signal are
found during seek tuning.
If LO C
are found during seek tuning.
button in main menu.
LOC to adjust the
is OFF, stations with a strong and weak signal
6
Page 7

Audio playback from USB or microSDHC
The principles of the audio playback (MP3/WMA) from
data carriers are identical for all sources.
Select the desired source via the main menu.
The device changes to the desired source and the
playback starts.
If the playback does not start with the audio playback,
Press the
list.
Press the
of the data carrier.
Briey tap on the name of the folder/track. The folder
is opened/the track is started.
After starting a title, the playback menu is displayed.
button to change to the folder/le
button to display all the audio les
USB/microSDHC media playback
[ ] Hide additional operating options.
Audio playback from USB or microSDHC:
[
] Start and end REPEAT function.
The REPEAT mode changes each time the
button is pressed.
REPEAT mode
Repeat current track
Repeat current folder
Repeat all tracks of data carrier
] Start MIX random track play and end it
[
again.
If the MIX function is switched on, the
symbol is displayed in white.
The MIX mode depends on the selected
REPEAT function.
[
] Display equalizer.
[ ] Short press: Title selection.
Long press: Fast searching.
[
/ ] Interrupt playback and continue playback.
[
] Short press: Title selection.
Long press: Fast searching.
[
]
Display the folder/le list.
[
] Show additional operating options.
Tap on
to display additional operating op-
tions of the playback menu.
Video playback from USB or microSDHC
Select the desired source via the main menu.
The device changes to the desired source and the
playback starts.
If the playback does not start with the video playback,
Press the
list.
Press the
of the data carrier.
Note:
Folders and videos are selected and started as
described under audio playback.
button to change to the folder/le
button to display all the video les
7
Page 8

USB/microSDHC media playback
If you selected a movie, the playback is started. During
the movie playback, the playback menu is hidden.
playback menu again.
The playback menu is shown.
[ ] Select previous movie.
[
/ ] Interrupt playback and continue playback.
[
] Select next movie.
[
]
Display the folder/les list.
[
] Show additional operating options.
Tap on
to display additional operating op-
tions of the playback menu.
Image playback from USB or microSDHC
Select the desired source via the main menu.
The device changes to the desired source and the
playback starts.
If the playback does not start with the image playback,
press the
list.
Press the
the data carrier.
Note:
Folders and images are selected and started as
described under audio playback.
button to change to the folder/le
button to display all the images of
[ ] Hide additional operating options.
Audio playback from USB or microSDHC:
[
] Start and end REPEAT function.
The REPEAT mode changes each time the
button is pressed.
REPEAT mode
Repeat current chapter
Repeat current folder
Repeat all chapters of data
carrier
] Start MIX random play and end it again.
[
If the MIX function is switched on, the
symbol is displayed in white.
The MIX mode depends on the selected
REPEAT function.
[
] Display equalizer.
8
Page 9

Bluetooth mode
Bluetooth mode
The Bluetooth® function allows registering cell phones
and media playback devices with the car sound system.
When you register a cell phone with the car sound system,
you can make phone calls with the built-in hands-free
function. You can access the lists of dialed numbers and
the phone book of the registered cell phone.
If the connected Bluetooth® device supports the
functions A2DP and AVRCP, you can play the music via
the car sound system and control the playback. During
a call, the music playback is interrupted and continued
again after the call.
If a cell phone is registered via Bluetooth® and a call is re
ceived during the playback of another source, the source
playback is interrupted and the call menu is displayed.
Starting Bluetooth mode
In the main menu, press ON .
The Bluetooth® menu is displayed. It contains the list
of known Bluetooth® devices. Other audio sources
are switched OFF.
[ ] Add new Bluetooth® device.
[
] Display options menu.
Press the
which you want to establish a connection.
When the device is in range, the connection is established and the menu for the device is displayed.
Press the
Bluetooth® device from the list.
button of the Bluetooth® device with
button if you want to delete the
-
The connection is being established and the menu
for the registered device is displayed.
Note:
If a telephone is connected with the car sound sys
tem, the Bluetooth® icon
right edge of the display in all audio/video sources.
is displayed at the top
Telephone mode
If you connected a phone with the car sound system via
Bluetooth®, the following menu appears.
[ ] Display the dial keypad menu.
[
] Disconnect connection with current device.
[
] Call up the phone book.
[
] Call up records lists.
[
] Display options menu.
Enter a phone number with the dial keypad and
press the
- Or -
Select a contact/number via the records lists or
phone book.
The connection is being established.
If a call is coming in, the call menu is displayed.
button.
-
Registering Bluetooth devices
If you want to register a device with the car sound system
for the rst time, proceed as follows:
Ensure that Bluetooth® is activated at the car sound
system and at your Bluetooth® device.
Search for new devices/connections on your
Bluetooth® device.
The car sound system appears as "Blaupunkt" in the
list of Bluetooth® devices.
Establish the connection; you may have to enter the
pairing code that was previously entered on the car
sound system.
[ ](Hang up): Reject a call.
[
](Answer): Answer a call.
Alphabetic search
Press [ ] O n the left bottom of the screen to access
Phonebook. If you want to search a contact, press [ ]
and enter the characters via the keypad.
9
Page 10

Bluetooth mode | Apple CarPlay
Audio playback via Bluetooth streaming
If an audio streaming device is connected with the car
sound system via Bluetooth®, you can play back the music via the car sound system and control the playback.
Press the
change to the audio playback.
[ ] Short press: Title selection.
[
[
BT Music button on main menu to
Long press: Fast searching.
] Interrupt playback and continue playback.
] Short press: Title selection.
Long press: Fast searching.
Bluetooth settings
In the options menu for Bluetooth®, you can make the
basic settings for the Bluetooth® mode.
Press the
The options menu is displayed.
button.
Apple CarPlay
Available on select cars, CarPlay is a smarter, safer way to
use your iPhone in the car. CarPlay takes the things you
want to do with your iPhone while driving and puts them
right on your car's built-in display. You can get directions,
make calls, send and receive messages, and listen to
audiobooks and music, all in a way that allows you to stay
focused on the road.
How to enter CarPlay mode
1. Connect your iPhone to the CarPlay connector of the
unit via the Apple Digital Cable. The unit will enter
CarPlay mode automatically.
2. To exit CarPlay mode, touch [ ] button on the front
panel.
If you want to return to CarPlay mode, touch [CarPlay]
on the main menu.
How to use CarPlay
CarPlay features and Siri voice control is specially
designed for driving scenarios. It also works with your
car’s controls. And the apps you want to use in the car
have been re-imagined, so you can use them while your
eyes and hands stay where they belong.
Auto Connect – If "Auto Connect" is activated,
the device automatically connects with known
Bluetooth® devices as soon as they are in range.
Auto Answer – If "Auto Answer" is activated,
incoming phone calls are automatically answered.
Synchronous Phone-Book – To be able to access
the phone book of a connected telephone, you must
Press top left of the screen to exit the options menu.
10
Voice
To activate Siri voice control, just press [ ] button on
the front panel.
Touch
you can use the touch screen of the unit to control
CarPlay.
Page 11

Android Auto
Android Auto
11
Page 12

External audio/video sources | Sound settings | Steering Wheel Control
12
Page 13

Basic settings | Useful information
13
Page 14

Connection diagram
Black
MIC
MIC LINE
POWER LINE
SPEAKER LINE
CAMERA IN
Yellow
SWC & CAMERA LINE
with white
VIDEO OUT
Green
Yellow
PARKING
Pink
Orange with white
Blue
SWC1
P.CONT
REVERSE
RADIO ANT
14
AV system
Brown
Brown
White
Red
White
Red
Yellow
White
Red
Rear USB
USB
Black
SUB.1/SUB.2FRONT L/R
LINE OUT & AV IN
REAR L/R
AUX IN CVBS
AUX IN L/R
Page 15

FCC Statement
1. This device complies with Part 15 of the FCC Rules.
Operation is subject to the following two conditions:
(1) This device may not cause harmful interference.
(2) This device must accept any interference received,
including interference that may cause undesired
operation.
Changes or modica
2.
by the party responsible for compliance could void the
user's authority to operate the equipment.
NOTE: This equipment has been tested and found
to comply with the limits for a Class B digital device,
pursuant to Part 15 of the FCC Rules. These limits are
designed to provide reasonable protection against
harmful interference in a residential installation.
This equipment generates uses and can radiate radio
frequency energy and, if not installed and used in
accordance with the instructions, may cause harmful
interference to radio communications. However, there
is no guarantee that interference will not occur in a
particular installation. If this equipment does cause
harmful interference to radio or television reception,
which can be determined by turning the equipment
o and on, the user is encouraged to try to correct the
interference by one or more of the following measures:
t R
eorient or relocate the receiving antenna.
t Increase the separation between the equipment and
receiver.
t Connect the equipment into an outlet on a circuit
dierent from that to which the receiver is connected.
t C
onsult the dealer or an experienced radio/TV
technician for help.
tions not expressly approved
FCC Radiation Exposure Statement
This equipment complies with FCC radiation exposure limits
set forth for an uncontrolled environment. This equipment
should be installed and operated with minimum distance of
20 centimeters between the radiator and your body.
15
Page 16

P/N:1270750007300/A0
 Loading...