

Page 1
Operation manual
TEC HNICA L SPE CIFIC ATIO NS
EMI TTER
Fre quenc y: 88.3 ± 0 .5 MHz
Mod ulati on: FM
Emi ssion d istan ce: 30 m.
Rec eptio n from an y audio a nd visu al equi pment
wit h an audi o out soc ket, su ch as TV, DVD , etc.
Pow er supp ly: 2 x AAA bat terie s or 4,5V D C
REC EIVER
Fre quenc y range : 86-10 8 MHz
Rec eptio n mode: F M
Dis torti on: ≤ 0.2 %
Pow er supp ly: 2 x AAA bat terie s
To achi eve the b est rec eptio n sprea d out emi tter au dio cab le of the
emi tter (t he emit ter aud io cabl e can als o be used a s an ante nna)
NO TES
If th e sound i s disto rted or t oo stro ng, adj ust the v olume o f the
sig nal sou rce (TV, DV D, etc. ) to a lowe r level a nd rece ption
per forma nce may b e impro ved.
Put T V on mute o r quite m ode so y ou can l iste n to TV wit hout
dis turbi ng any on e.
Rep lace th e batte ries if y ou are ha ving th e follo wing pr oblem s
1. Th e emitt er indi cator b ecom es dim
2. Th e recei ver rec eptio n is poor
3. Th e volum e becom es weak a nd the s ound i s dist orted
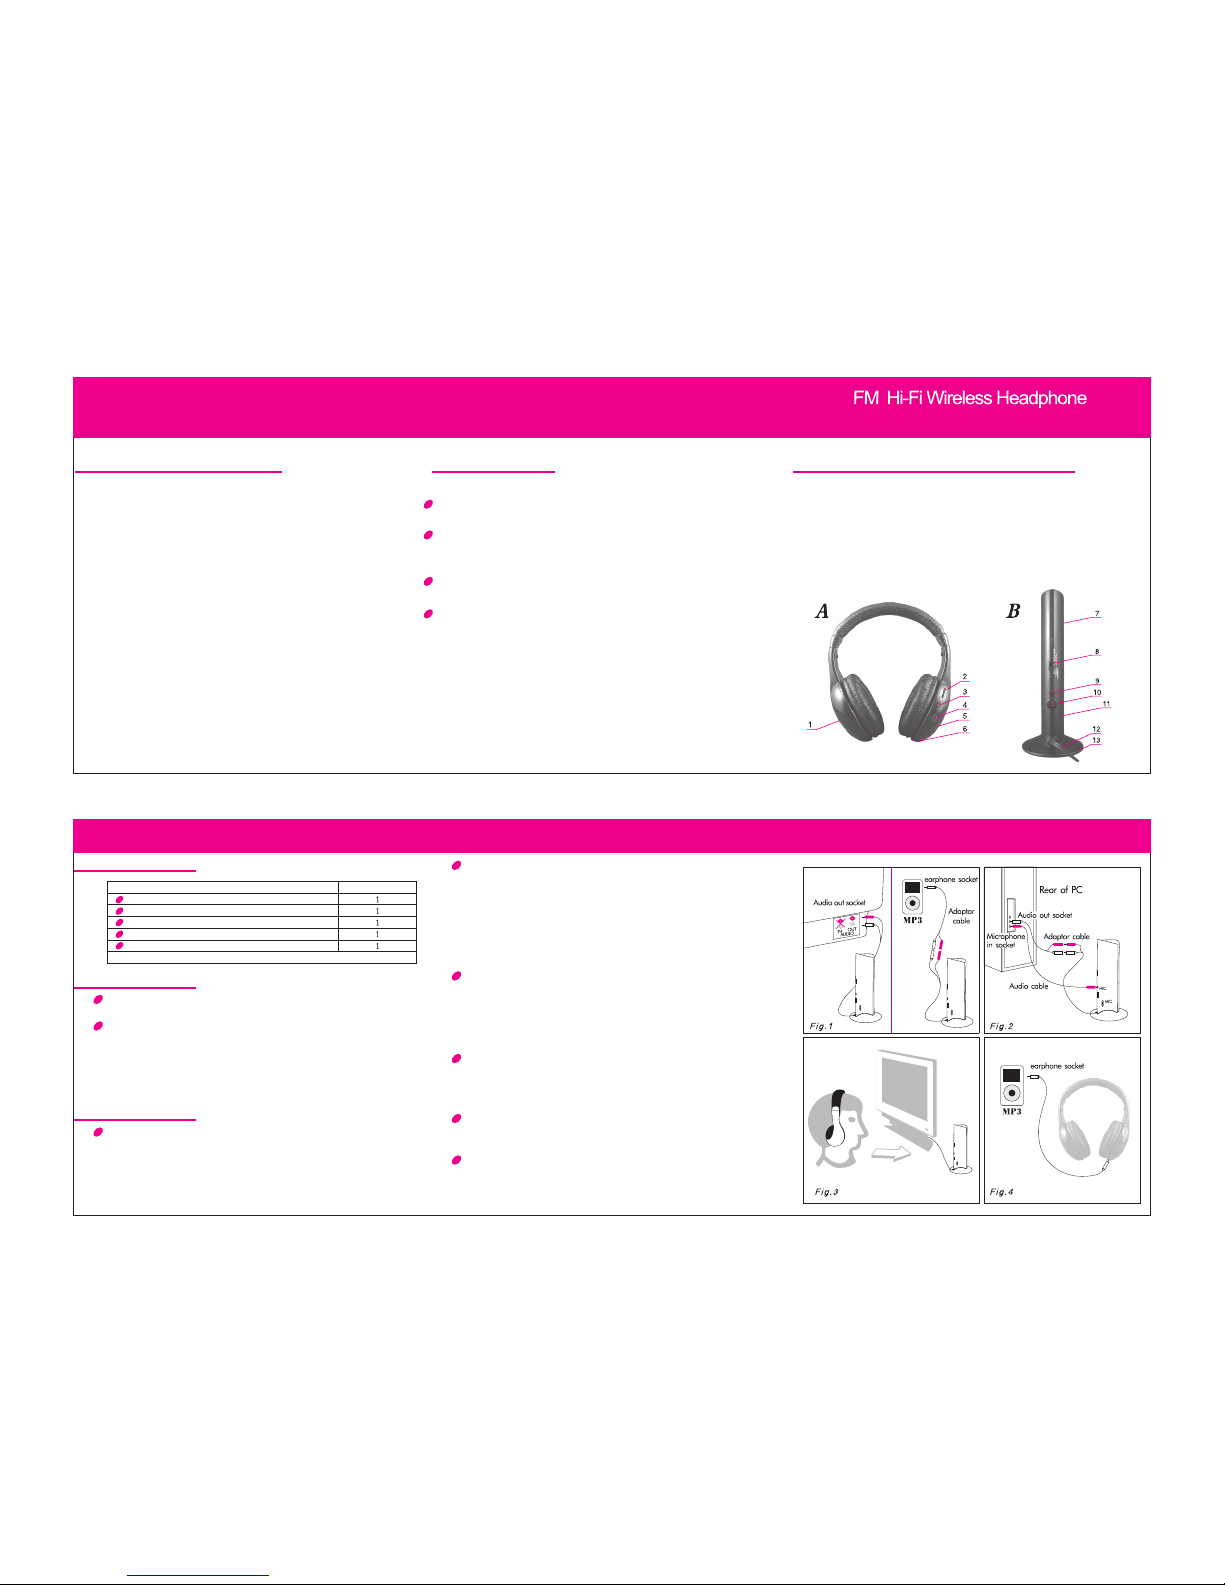
A. RE CEIVE R
1. Ba ttery c ompar tment c over
2. Vol ume con trol an d power
but ton (ON /OFF)
3. Sc an key (S CAN)
4. Re set key ( RESET )
5. Po wer ind icato r
6. Aud io sock et
B. EM ITTER
7. Po wer ind icato r (fron t)
8. Po wer and f uncti on swit ch
9. Mi croph one soc ket (MI C)
10. P ower so cket
11. Mic ropho ne (MIC )
12. Au dio cab le of emi tter
13. B atter y compa rtmen t
cov er (bot tom)
FUN CTION S
PART S
Pac kage in clude s
Emi tter
Rec eiver ( Headp hone x 1)
Ins truct ion man ual
Aud io Cabl e
Y adap tor cab le
Ins talli ng the re ceive r:
Inse rt 2 AAA batt eries i nto the b atter y compa rtmen t accor ding to t he + and – po larit y.
INS TALL ATIO N
Ins talli ng the em itter :
Ins ert 2 AAA bat terie s into th e batte ry comp artme nt acco rding t o the + and –
pol arity, or i nsert t he powe r adapt or into t he powe r socke t of the em itter ( 4.5V
DC) . Inser t the aud io plug o f the emi tter in to the AUD IO-OU T socket o f the aud io
sou rce (TV, DV D, etc. ) In case t he audi o out soc ket of th e audio s ource i s the
hea dphon e socke t. The Y ada ptor ca ble can b e used fo r conne ction . To ach ieve
the b est rec eptio n sprea d out the e mitte r audio c able, w hich ca n be also u sed as
an an tenna .
OPE RATION
WIRE LESS HE ADPHO NE
1. In sert th e emitt er audi o cable i nto the AU DIO-O UT socke t of the el ectri cal
dev ice or ea rphon e socke t, and mo ve the fu nctio n of the em itter t o the
WIR ELESS H EADPH ONE pos ition , and the p ower in dicat or of the e mitte r will
go on .
2. Tur n ON the vo lume co ntrol a nd powe r butto n (ON/O FF) on th e recei ver; th e
pow er indi cator o f the rec eiver w ill go on . First p ress th e RESET ke y, and pre ss
the S CAN key, th e sound s ent fro m emitt er shou ld be hea rd.
WIRE LESS NE T AUDIO CH AT
1. Co nnect t he emit ter aud io cabl e to the ad aptor t o the ada ptor ca ble (fi g. 2),
and i nsert t he othe r end of th e adapt or cabl e into th e audio o ut sock et of the P C,
the n inser t one end o f the aud io cabl e into th e micro phone s ocket ( MIC) on t he
emi tter, an d inser t the oth er end in to the mi croph one in so cket of t he PC.
2. Aim t he micr ophon e socke t (MIC) o f the emi tter at y ou (fig . 3), and m ove the
pow er swit ch of the e mitte r to the AUD IO CHAT pos ition , and the p ower
ind icato r will go o n.
3. Tur n on the vo lume co ntrol a nd powe r (ON/O FF) of th e recei ver and t he
pow er indi cator w ill go on . First p ress th e RESET ke y, and the n press t he SCAN
key, an d then th e sound s ent out f rom the e mitte r can be he ard.
WIRE LESS MO NITOR ING
Pla ce the em itter n ear the p eople y ou want m onito red (su ch as eld erly pe ople,
chi ldren , etc.) a nd aim th e micro phone ( MIC) to wards t he peop le. Mov e the
fun ction s witch o f the emi tter to t he MONI TOR posi tion an d the pow er indi cator
wil l go on. Tur n on the vo lume co ntrol a nd powe r butto n (ON/O FF) of th e
rec eiver a nd the po wer ind icato r of the re ceive r will go o n. Pres s the RES ET
key a nd pres s the SCA N key, the so und sen t out fro m emitt er can be h eard wi th
the h eadph one.
LIST ENING T O THE RAD IO
The r eceiv er can be u sed sep arate ly as an FM r adio. P ress th e SCAN ke y once,
and t he rece iver wi ll auto matic ally se arch to ward a hi gher ra nge and l ock one
rad io chan nel; wh en the hi ghest r ange is r eache d, pres s the RES ET key, and
the f reque ncy ret urns to t he lowe st rang e. Pres s the SCA N key aga in, and t he
rec eiver w ill sea rch the r adio ch annel s from th e low ran ge agai n.
WIRE D HEADP HONE
Ins ert one e nd of the a udio ca ble int o the aud io sock et of the r eceiv er (fig . 4)
and i nsert t he othe r end int o the hea dphon e socke t of the el ectri cal dev ices,
suc h as Mp3, D VD, etc . Then the u nit can b e used as a w ired he adpho ne.
TURN ING OFF T HE UNIT
Whe n the uni t is not us ed, mov e the fun ction s witch o n the emi tter to t he OFF
pos ition t o turn off t he emit ter and t urn the v olume c ontro l recei ver to th e OFF
pos ition , and the p ower in dicat or rece iver wi ll go out a nd the re ceive r will tu rn
off. R emove b atter ies whe n not usi ng for a lo ng time .
 Loading...