

Page 1

EXLB3B
10" Pro Series Tablet
User Manual
Please read this manual before operating your
device. Keep it for future reference.
Page 2

SECURITY IN FO RMATION .. .. .. ............. .. .. ............. .. .. ........... .. .. . 4
GENERAL ............ .. .. ............. .. .. ........... .. .. ............. .. .. ............. .. . 4
SAFETY .. .. .. ............. .. .. ........... .. .. ............. .. .. ............. .. .. ........... . 4
PRODUCT’S POWER S UP PLY .. .. .. ............. .. .. ............. .. .. ........... 5
PLACING OF TH E PR ODUCT ... .. .. ............. .. .. ............. .. .. ........... . 5
CLEANING .... .. .. ............. .. .. ............. .. .. ............. .. .. ........... .. .. ..... 5
TROUBLESHOOTI NG . .. ........... .. .. ............. .. .. ............. .. .. ........... 5
MAIN FEATU RE S .. ............. .. .. ........... .. .. ............. .. .. ............. .. .. . .5
PRODUCT DETAILS ....... .. .. ............. .. .. ............. .. .. ........... .. .. ...... 6
CONNECT TO YOU R PC . ............. .. .. ............. .. .. ........... .. .. ...........7
CONNECT TO YOU R TV ........ .. .. ............. .. .. ............. .. .. ........... .. .. 8
HOW TO US E YOUR TABLET........ .. .. ............. .. .. ............. .. .. ........ 9
• TUR N ON /OFF .. ..... ..... .. ..... .. .... ..... .. ... .. ..... ..... ..... .. ..... ..... ..... .. ..... .... 9
• ENABL E/ DIS AB LE LCD .. ..... .. ... .. ..... ..... ..... .. ..... ..... ..... .. ..... ..... ..... .. ... 9
• OPERAT ION OF THE TOUCH SC REEN .. .. ..... ..... ..... .. ..... ..... ..... .. ..... .. 9
2
Page 3

HOME PAG E ..... ..... ..... .. ..... ..... ..... .. ..... ..... ..... .. ... .. ..... ..... ..... .. ..... ..... ..... .. 1 0
UNDER STAND THE ICO NS . ..... ..... ..... .. ..... ..... ..... .. ... .. ..... ..... ..... .. ..... ..... . 10
WATCH A VIDEO . .. ... .. ..... ..... ..... .. ..... ..... ..... .. ..... ..... ..... .. ..... ..... ..... .. ... .. ... 11
LISTE N TO MU SIC ... .. ..... ..... ..... .. ..... ..... ..... .. ... .. ..... ..... ..... .. ..... ..... ..... .. ... 12
VIEW YO UR PHOTOS .. .. ..... ..... ..... .. ..... ..... ..... .. ... .. ..... ..... ..... .. ..... ..... ..... . 14
FILE MA NA GER . .. ..... ..... ..... .. ..... ..... ..... .. ..... ..... ..... .. ..... ..... ..... .. ... .. ..... .... 15
SURFI NG THE IN TERNE T: ...... .. ..... ..... ..... .. ..... ..... ..... .. ..... ..... ..... .. ... .. ..... 1 6
INSTAL L AN AP PL ICATION ... ..... .. ..... ..... ..... .. ..... ..... ..... .. ... .. ..... ..... ..... .. .. 17
SETTI NG S ... .. ..... ..... ..... .. ..... ..... ..... .. ..... ..... ..... .. ..... ..... ..... .. ... .. ..... ..... .... 18
Spec if ications.... .. ..... ..... ..... .. ... .. ..... ..... ..... .. ..... ..... ..... .. ..... ..... ..... .. ... 20
3
Page 4

This de vi ce was de signe d and bui lt i n order t o guara ntee yo ur s afety. Th e sa fety
mecan is ms impl ement ed in the p ro duct wi ll prot ect you i f yo u obser ve the
follo wi ng inst allat ion, op er ation a nd trou blesh oo ting pr ocedu re s:
- Pleas e ca ref ul ly read a nd foll ow t he foll owing i nstru ct ions be fore
handl in g and i ns talli ng your d ev ice.
- Keep th es e ins tr uctio ns for fu rt her r ef erenc e.
GENE RA L
-
Don't s ha ke, or it m ay lead t o damag e to t he prod uct.
- Only us e co mpo ne nts and a ccess or ies (po wer sup ply... )reco mmend ed
by the ma nu fac tu rer.
- The i ll ustra tions o f the pro du ct may va ry from a ctual p ro duct.
SAFE TY
-To preve nt f ire or el ectri c shock , do n ot put th e appli ance ne ar o bject s
fille d wi th liqu ids ;
- If a heav y ob ject or l iquid i s dropp ed o n the dev ice, un plug it i mm ediat ely
and sen d it t o check b y quali fied pe rs onnel b efore r e-use ;
- When in o pe ratio n, the ho using s ur face ge nerat es heat ; On ly plac e the
produ ct o n a flat an d rigid s urfac e an d avoid c overi ng it or pl ac ing any
objec ts o n it.
PROD UC T’S POWER SUPPLY
-In cas e yo u don’t u se the pr oduct f or a l ong tim e or duri ng a ligh tn ing
storm , un plug th e unit fr om the ou tl et by gra bbing t he plug i ts elf,
witho ut p ullin g the cab le.
- The i nc luded p ower ad ap ter is sp ecifi c to the pr od uct. Us ing a dif fer en t
adapt er m ay caus e damag e or acci de nts.
4
Page 5

-Inst al l the app lianc e away fr om a ny equi pment w ith str on g magne tic
attra ct ion suc h as micr owave o ve ns, big s peake rs...
- Place y ou r produ ct in a wel l venti la ted are a and on a ha rd and fl at
surfa ce t o dispe rse hea t from th e de vice.
CLEA NI NG
- Never o pe n the p ro duct to c lean, o th erwis e the war ranty w il l be
void.
- Unplu g th e pro du ct from t he wall o ut let bef ore cle aning t he p roduc t.
- Clean t he o uts id e of the pr oduct u si ng a soft , dry clo th. Nev er u se an
abras iv e pad , sc ourin g powde r or s olven t such as a lcoho l or g asoli ne.
TROU BL ESHOOTING
-List en ing to au dio at fu ll volu me , for an ex tende d perio d of t ime can
damag e yo ur hear ing.
- It is ill eg al to dow nload m usic fr om t he Inte rnet wi thout h av ing bou ght
the rig ht s.
MAIN FEATURES
- Audio co nn ectio n: 3.5” o utput j ac k.
- Vid eo c onnec tion: m in i HDM I ou tput.
- 10 inch es l arge sc reen wi th high r es oluti on of 102 4*600
- Integ ra ted Car d Reade r (Micr o SD ).
- PC USB po rt a nd USB Ho st.
5
Page 6
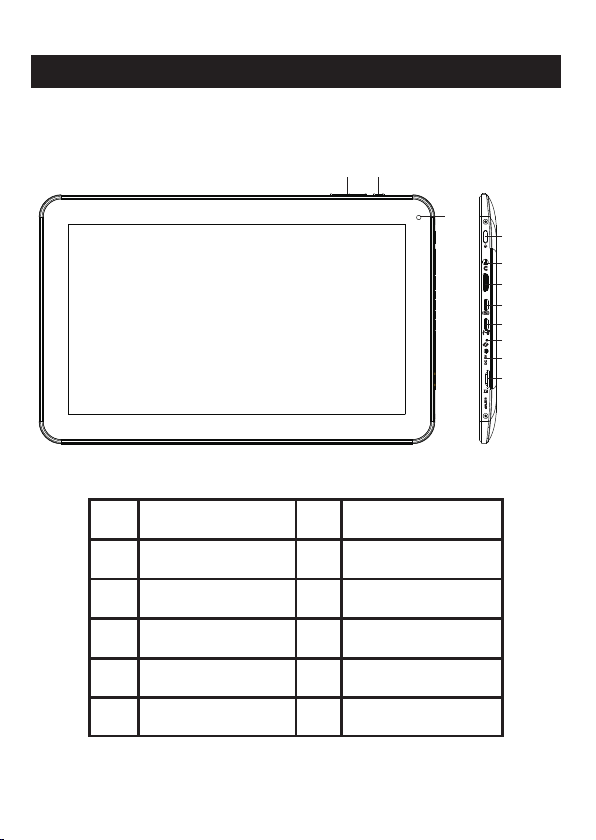
TABLE OF CONT ENTS
PLAC IN G OF T HE PRODUCT
PROD UC T DETAI LS
SECU RI TY INF OR MATIO N
FRONT & LATE RA L PANEL
1 Volume + /- 2 BACK b ut ton
1 2
11
3
4
5
6
7
8
9
10
3
Power O n/ Off
5
Mini HD MI
7 Host 2. 0 8
9 DC IN 10
Camer a
11
4 Audio Ou tp ut
6
BACK PANEL
Webcam & Sp ea ke rs
6
Mini US B
RESET
TF Card
Page 7

CONN EC T TO YOUR PC
1. Tu rn on by pr essin g PO WER.
2. Use th e US B cable p rovid ed to con ne ct to the U SB PC por t.
3. Go to "C om puter ", the un it shou ld a ppear , for MAC u sers th e un it will b e
shown o n th e deskt op.
4. Sele ct y our fil es/fo lders t he n slide o r Copy/ Paste a ll t he sele cted fi le s
into it .
7
Page 8

CONN EC T TO YOUR TV
1. Conn ec t the pow er supp ly from t he w all soc ket to yo ur DC IN po rt .
2. Tu rn on by pr essin g ON .
3. Conn ec t the HDM I cable f rom the u ni t to your T V (see il lustr at ion abo ve).
4. Chec k if y our TV is o n the rig ht chan ne l, norm ally th ere is di ag ram to
guide y ou (AV1, AV2, EX T1 , EXT2…).
5. "HDM I SW ITCH" a pplic ation w il l be laun ched au to mati ca lly, se lect th e
resol ut ion by pr essin g it.Re ar v iew of TV H DMI Cab le
8
Page 9

HOW TO USE YOUR TABLET
TURN ON/OFF
Press t he P OWER bu tton fo r 3 secon ds . To turn off sele ct " t urn off the MI D".
ENABLE/DISABL E LC D
Once it i s tu rned on , short p ress PO WE R to turn o ff th e LC D scr ee n, and
you wil l sa ve ener gy. To tur n on the LC D scree n, pres s PO WER aga in.
Note: T he s creen i s locke d when th e sc reen is o ff; t o un lock th e scree n,
pull th e lo ck icon f rom bot tom to up .
OPERATIO N OF T HE TOUCH SCRE EN
There a re t hree wa ys to ope rate th e sc reen of y our tab let:
1. Touc h an y icon on t he scre en t o lau nc h the app licat io n.
2. Hold : to uch any i con on th e home sc re en and ho ld. For e xampl e, t ouch an
icon on t he h ome scr een and h old, a tr as h icon ( ) wi ll appe ar on the r ig ht
scree n; d rag the s elect ed icon o n th e trash t o remov e the ico n fr om the
home sc re en.
3. Drag : Dr ag your f inger f rom lef t to r ight or v ice ver sa to scr ol l the scr een.
9
Page 10

HOME PAGE
Once it i s tu rned on , the fol lowin g sc reen wi ll be dis playe d on y our tab let.
2 3 4 5 6
1 2 Appli ca tions Back
3 4 Home Last ap pl icati ons
5 6 Volume Notif ic ati on s bar
Clock , Ba ttery &
Wifi st at us
* The d is playe d scree n ca n cha ng e accor ding to t he a pplic ation s and the
backg ro unds th at are in stall ed .
1
UNDERSTAND T HE I CONS
: To retu rn t o the hom e page.
: Drag up t o se e the s ys tem not ifica ti ons.
: To show t he c urren t state o f the net wo rk conn ectio n,
batte ry a nd syst em time .
: To retu rn t o the pre vious p ag e.
: Press t o di splay a ll the ap plica ti ons ins talle d on the ta bl et.
10
Page 11

WATCH A VI DEO
On the ap pl icati ons pag e, pres s th e icon to a ccess t he inte rf ace of
the vid eo p layer. S lide yo ur fing er a cross t he scre en from u p to d own to
scrol l th e list of f iles an d press o ne o f the fil es to sta rt play in g.
The ico ns i n the too lbar ab ove are t he f uncti ons of th e video p la yback :
: Press t o incre as e or decr ease th e vo lum e.
: To visu al ize t he p layba ck time o r to m ove to a
speci fi c point o f the vid eo.
: Press t o di spl ay t he list o f the fil es .
: Press t o pl ay th e pr eviou s / next vi de o.
: Long pr es s for f as t forwa rd / rewi nd o f the v id eo.
: Press t o pa use / r es ume pla yback .
: Press t o displ ay t he subm enu tha t in clu de s the fol lowin g op tions :
- Displ ay m ode (no rmal, f ull scr ee n, 4:3 an d 16:9) .
- Resum e Pl ay mode ( on, off ).
- Play mo de ( repea t all, re peat on e) .
- Brigh tn ess (1, 2,3,4 ).
11
Page 12

LISTEN TO MUSIC
On the ap pl icati ons pag e, pres s ic on to acc ess the m usic pl ay er
inter fa ce. Sli de your f inger a cr oss the s creen f rom up to d ow n to scro ll the
list of f il es and pr ess one o f the fil es t o start p layin g.
: Press t o so rt th e so ngs by ar tist.
: Press t o di splay a ll the au dio fil es o n the scr een.
: Press t o so rt th e so ngs by al bum.
: Press t o se e the r ec ently a dded ti tl es.
: Press t o re tur n to t he prev ious sc re en.
Slide y ou r finge r acros s the scr ee n from to p to bott om to dis pl ay the
list an d pr ess any t o acces s the aud io i nterf ace to as f ollow s:
12
Page 13

The ico ns i n the too lbar ab ove are f un ction s of the au dio pla yb ack:
: To visu al ize t he p layba ck time o r to m ove t o a
speci fi c point o f the aud io file .
: Press t o play th e pr eviou s or next m us ic.
: Long pr ess for f as t forwa rd / rewi nd of the m us ic.
: Press t o pause o r re sume pl aybac k.
: Press t o displ ay t he list o f audio f il es.
: Press t o enabl e / di sable t he shuf fle.
: Press t o set the r ep eat mod e, repe at a ll, r ep eat one o r deact iv ate.
:Pres s to incr ea se / decr ease th e vo lum e.
: Press t o re tur n to t he prev ious pa ge .
13
Page 14

VIEW YOUR PHOTOS
On the ap pl icati ons pag e, pres s ic on to acc ess the p ictur e pl ayer
inter fa ce. The pict ur e pla ye r inter face is d is playe d below :
The ico ns o f the too lbar di splay ed o n the int erfac e above h av e the fol lowin g
funct io ns:
: Press t o zoom in / o ut t he disp layed i ma ge.
: Press t o st art t he s lides how.
: Press t o di spl ay t he menu ( share , de lete, o r more)
- Delet e: To delet e your ph ot o.
- Plus (m or e detai ls, def ine as, c ro p, rota te left , rotat e ri ght).
14
Page 15

FILE MAN AGER
On the ap pl icati ons pag e, pres s ic on to acc ess the f ile man ag er
inter fa ce. The file m an age r in terfa ce is sho wn b elow:
1. Swit ch b etwee n inter nal mem or y and SD ca rd.
2. Enab le /disa ble the m ultip le f ile sel ectio n.
3. File s ea rch mod e.
4. Retu rn t o the pre vious f older .
5. Disp la ys the He lp menu .
6. Swit ch b etwee n the "th umbna il s" view a nd "lis t" view .
7. Go bac k or e xit the a pplic ation .
8. To retur n to t he home p age.
9. To view th e la test ap plica tions .
10. To view t he m enu opt ions (c opy, pa st e…).
15
Page 16

SURF IN G TH E INTERNET:
On the ho me p age, pr ess ico n to open t he i ntern et brow ser.
Press t he p art ind icate d above t o di splay t he keyb oard in pu t.
Press t o di spl ay t he menu b elow.
1. Pres s to o pen a new w eb page .
2. Pres s to a dd a book mark, v iew the m os t visit ed and re giste re d sites . To
clear t he h istor y, pre ss to dis pl ay the de lete me nu .
3. Pres s to d ispla y the ope ned web p ag es.
4. Pres s to r efr es h the cur rent pa ge .
5. Pres s to r etu rn / m ove to pr eviou s / ne xt wind ow.
6. Pres s to a dd a book mark, f ind a pag e, s elect t ext, sh are a
page, d ow nload o r acces s the web p ag e setti ngs.
16
Page 17

INSTALL AN AP PLICATI ON
Suppo rt s appli catio n manag em ent wit h the APK ex tensi on .
On the ho me p age, to uch and t hen tou ch " AppIn stall " to ente r
the app li catio n manag ement i nt erfac e. You can th en inst al l any typ e of
appli ca tion wi th APK ext ensio n. S elect t he appl icati on t o be inst alled a nd
follo w th e insta llati on step s.
NOTE: I t is p oss ib le that s ome app li catio ns may no t be comp at ible wi th
the ver si on of ope ratin g syste m.
17
Page 18

SETTIN GS
On the ho me p age, pr ess to en ter the s ys tem set tings . You ca n then
adjus t th e setti ngs bel ow:
Wifi: P ress to a cc ess t he W iFi man ageme nt i nterf ace, on w hich th e us er
can dis pl ay the cu rrent W i-Fi co nn ectio n. On the W i-Fi ma na gemen t
inter fa ce, if yo u press t he Wi-F i it em, It wi ll then s can all W i-Fi netw orks
avail ab le and li st them o n the scr ee n as show n below :
On the ab ov e inter face, i t will di sp lay the s ignal s tatus b y to uchin g any
Wi-Fi n et work. P ress th e desir ed W i-Fi ne twork a nd ente r th e Wi-Fi
netwo rk p rotec tion ke y if nece ss ary.
Sound : Pr ess t o se t on sile nt mode , th e notif icati on ring to ne, the s elect ion
sound , th e scree n locki ng soun d.
Displ ay : Press t o set the b right ne ss, the a utoma tic rot at ion of th e scree n,
the ani ma tions a nd time d ispla y.
18
Page 19

Calib ra te the to uch scr een: If y ou h ave diffic ul ty us in g the tou ch scre en ,
pleas e re -cali brate t he scre en . To star t, pres s th e calib ratio n of the to uc h
scree n. P ress on t he "+" po int to ca li brate .
Locat io n & sec ur ity: Pr ess to se t th e locat ion and t he syst em s ecuri ty.
Appli ca tions : Press t o enter a pp licat ion man ageme nt .
Confi de nti al ity: Pr ess to en te r the con fiden tiali ty s ettin gs.
SD card a nd s torag e devic e: Pres s to d ispla y the SD ca rd and th e st orage
devic es .
Langu ag e & Key bo ard: Pr ess to se t th e syste m langu age and t he t ext
input m od e.
Voic e: a udio in put and o ut put .
Acces si bilit y: pres s to set th e ac cessi bilit y mode.
Date an d ti me: Pre ss to set t he time a nd d ate.
About : Pr ess t o di splay t he info rm ation .
19
Page 20

Spec if ications
OS
CPU
Storage
RAM
Micro SD
Display
Mini USB
3D G-sensor
Recorder
Video
Audio
Photo
Android 4.0
1.2Ghz
4GB
1G DDR
Support up to 32GB
1024*600 pixels
2.0OTG
3 directions
Built in MIC
avi,m ov,m p4,as f,wmv, vob ,rm,r mvb,3 GP,da t, mpg ,flv,m kv
mp3,wav,wm a, aac,APE,FLAC, AM R
JPEG,BMP,GI F,PN G
20
 Loading...