

Page 1

22” FHD LED TV
MODEL:ETV220
User Manual
Before connecting, operating or adjusting this produc t, please read the manual completely.
Please keep this manual for future reference.
.
Page 2

CONTENTS
SAFETY
1
PRECAUTION
IMPORTANT
SAFETY
2
INSTRUCTION
ACCESSORIES
3
GETTING
4
STARTED
CONTROL
5
REFERENCE
GUIDE
CONNECTIONS
6
Remote Control
Front Frame
Back Frame
Top Panel
Antenna Connection
AV Connection
YPbPr Connection
HDMI Connection
VGA Connection
Headphone Connection
Power Cord Connection
Coax(SPDIF) Connection
1
2
3
3
4
6
6
7
8
8
9
9
10
10
10
11
WALL MOUNT
7
INSTALLATION
INITIAL SETUP
8
TV SETUP
9
Putting The Unit On A Proper Place
Turning The Unit On For The First Time
Source Selection
Picture Menu
Audio Menu
Time Menu
Setup Menu
LOCK(Parental) Menu
TV(CHANNEL) Menu
12
13
13
13
15
17
19
20
23
26
Page 3

CONTENTS
10
11
12
DISPLAY
MODE
SPECIFICATION
TROUBLESHOOTING
GUIDE
PC Formats
Video Formats
TV Symptom
27
28
29
30
SAFETY CLASS :This is an IEC safety class ll product
and it must be grounded for safety.
Page 4
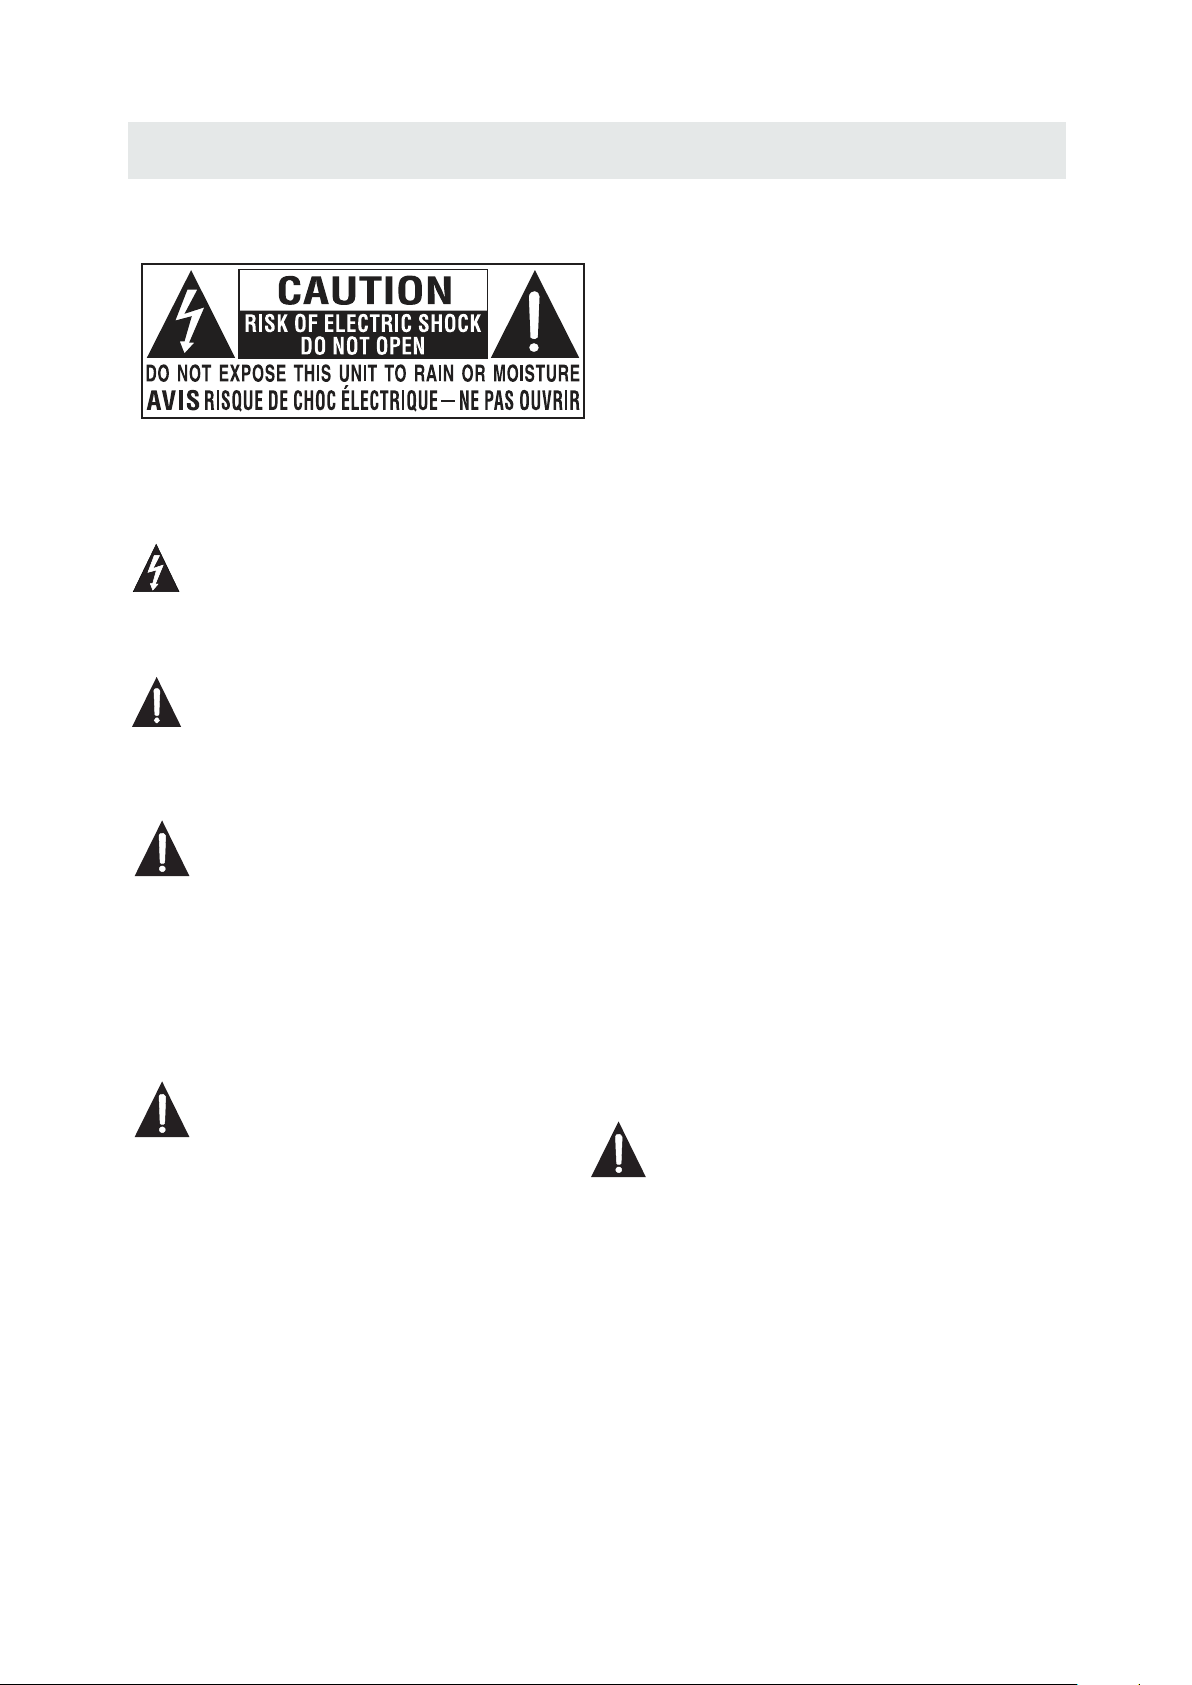
SAFETY PRECAUTION
CAUTI ON MA RKIN G WAS L OCAT ED AT T HE REA R
*
OF THE AP PAR ATUS .
WARNING: TO REDUCE THE RISK OF ELECTRIC
SHOCK,DO NOT REMOVE COVER(OR BACK)
NO USER SERVICEABLE PARTS INSIDE.
REFER SERVICING TO QUALIFIED SERVICE
PERSONNEL.
The lightning flash with arrowhead symbol,
within an equilateral triangle,is intended to
alert the user to the presence of uninsulated
“dangerous voltage”within the product's enclosure
that may beof sufficient magnitude to constitute a
risk of electric shock to persons.
The exclamation point within an equilateral
Triangle is intended to alert the user to
The presence of important operating and
maintenance (servicing) instructions in the literature
accompanying the appliance.
CAUTI ON
•
DANGER OF EX PLOSION IF BATTERY IS
INCORREC TLY REPLACED. REPLACE ONLY
WITH THE SAME OR EQUIVALENT TYPE.
•
USE OF CONTR OLS OR ADJUSTMENTS OR
PERFORMA NCE OF PROCEDURES OTHER
THAN THOSE S PECIFIED MAY RESULT IN
HAZARDOU S RADIATION EXPOSURE.
WARNIN G:
TO REDUCE TH E RISK OF FIRE OR ELECTRIC
•
SHOCK, DO NO T EXPOSE THIS APPLIANCE T O
RAIN OR MOISTURE.
TO REVENT FIRE OR SHOCK HAZARD, DO NOT
•
EXPOSE THIS UNIT TO RAIN OR MOISTURE. D O
NOT PLACE OB JECTS FILLED WITH LIQUI DS ON
OR NEAR THIS U NIT.
•
SHOULD ANY T ROUBLE OCCUR, DISCONN ECT
THE AC POWER C ORD AND REFER SERVICING
TO A QUALIFIED TECHNICIAN.
PL ACEM ENT INFO RMATIO N
•
Do not use thi s unit in places that are extremely
hot, cold, d usty or humid.
•
Do not restr ict the airflow of this uni t by placin g it
somewher e with poor airflow, by covering it wi th
a cloth, by pl acing it on bedding or carpeting.
SA FETY INFORMATION
•
When conne cting or disconnecting the power
cord, grip t he plug and not the cord itself. Pulli ng
the cord may d amage it and create a hazard.
•
When you are n ot going to use the unit for a long
period of ti me, disconnect the power cord.
RATING PL ATE LOCATION
The rating p late is located on the rear of the unit.
FCC STATEM ENTS
NOTE: This u nit has been tested and fou nd to compl y
with the lim its for a Class B digital device, purs uant
to Part 15 of the FCC Rules. These limits a re design ed
to provide r easonable protection against h armful
interfer ence in a residential installati on.
This unit ge nerates, uses and can radiate radi o
frequenc y energy and, if not installed and use d in
accordan ce with the instructions, may caus e harmful
interfer ence to radio communication. How ever, there
is no guaran tee that interference will not occ ur in a
particul ar installation. If thi s unit does c ause harmful
interfer ence to radio or television recept ion, which
can be deter mined by turning the unit off and on, th e
user is enco uraged to try to correct th e interference
by one or more o f the following measures:
- Reorient o r relocate the receiving antenna .
- Increase t he separation between the unit and
receiver .
-Connect t he unit into an outlet on a circuit diff erent
from that to which the receiver is conn ected.
- Consult th e dealer or an experienced radio/T V
technici an for help.
WARNING:
Changes or modifications to this
unit not expressly approved by the party responsible
for compliance could void the user authority
to operate the unit.
1
Page 5

IMPORTANT SAFETY INSTRUCTIONS
1)Read thes e instructions.
2)Keep thes e instructions.
3)Heed all wa rnings.
4)Follow al l instructions.
5)Do not use th is apparatus near water.
6)Clean onl y with a dry cloth.
7)Do not bloc k any ventilation openings.
Install in a ccordance with the
manufact urer's instructions.
8)Do not inst all near any heat sources such
as radiato rs, heat registers, stoves, or
other appa ratus (Including amplifiers) that
produce he at.
9)Do not defe ct the safety purpose of the
polarize d or grounding-type plug.
A polarize d plug has two blades with one
wider than t he other.
A groundin gtype plug has two blades
and a third gr ounding prong.
The wide bla de or the third prong is
provided f or your safety.
If the provi ded plug does not fit into your
wall outle t, consult an electrician for
replacem ent of the obsolete outlet.
10)Protec t the power cord from being walked on
or pinched p articularly at plugs, convenience
receptac les, and the point where they exit
from the app aratus.
11)Only use a ttachments / accessories specified
by the manuf acturer.
12)Use only w ith the cart, stand,
tripod, br acket, or table
specifie d by the manufacturer,
or sold with t he apparatus.
When a cart is u sed, use caution when
moving the c art / apparatus combination to
avoid inju ry from tip-over.
13)Unplug t his appar atus during lightning
Storms or wh en unused for long periods of
time.
14)Refer al l servicing to qualified service
personne l. Servicing is required when the
apparatu shas been damaged in any way,
such as the po wer cord or plug is damaged,
liquid has b een spilled or objects have fallen
into the app aratus, the apparatus has been
exposed to r ain or moisture, does not operate
normally , or has been dropped.
15)To preve nt electric shock, ensure the grounding
pin on the AC co rd power plug is securely
connecte d.
2
Page 6
ACCESSORIES
Pl ease ch eck and id enti f y the supp lied ac cess ories .
Remot e con trol ....... ..................................... ..................................... .................................
Remote control
x 1
Battery( AA)
Warranty C ard
Instruct ion Manua l
Power C ord and Ada pto r
Base stand and screws
Screw driver
............................................................................................................ .........
................................................................................................................
...........................................................................................................
....................................................................................................
...............................................................................................
................................................................................................................
GETTING STARTED
US ING TH E REMOT E CONT ROL
·Point the re mote cont rol at the remote sensor located on the unit.
·When there i s a strong am bient lig ht source, the performance of the infrared remote sensor
·may be degra ded, caus ing unrel iable ope ration.
·The recomm ended eff ective di stance for remote operation is about 16 feet (5 meters).
x 2
x 1
x 1
x 1
x 1
x 1
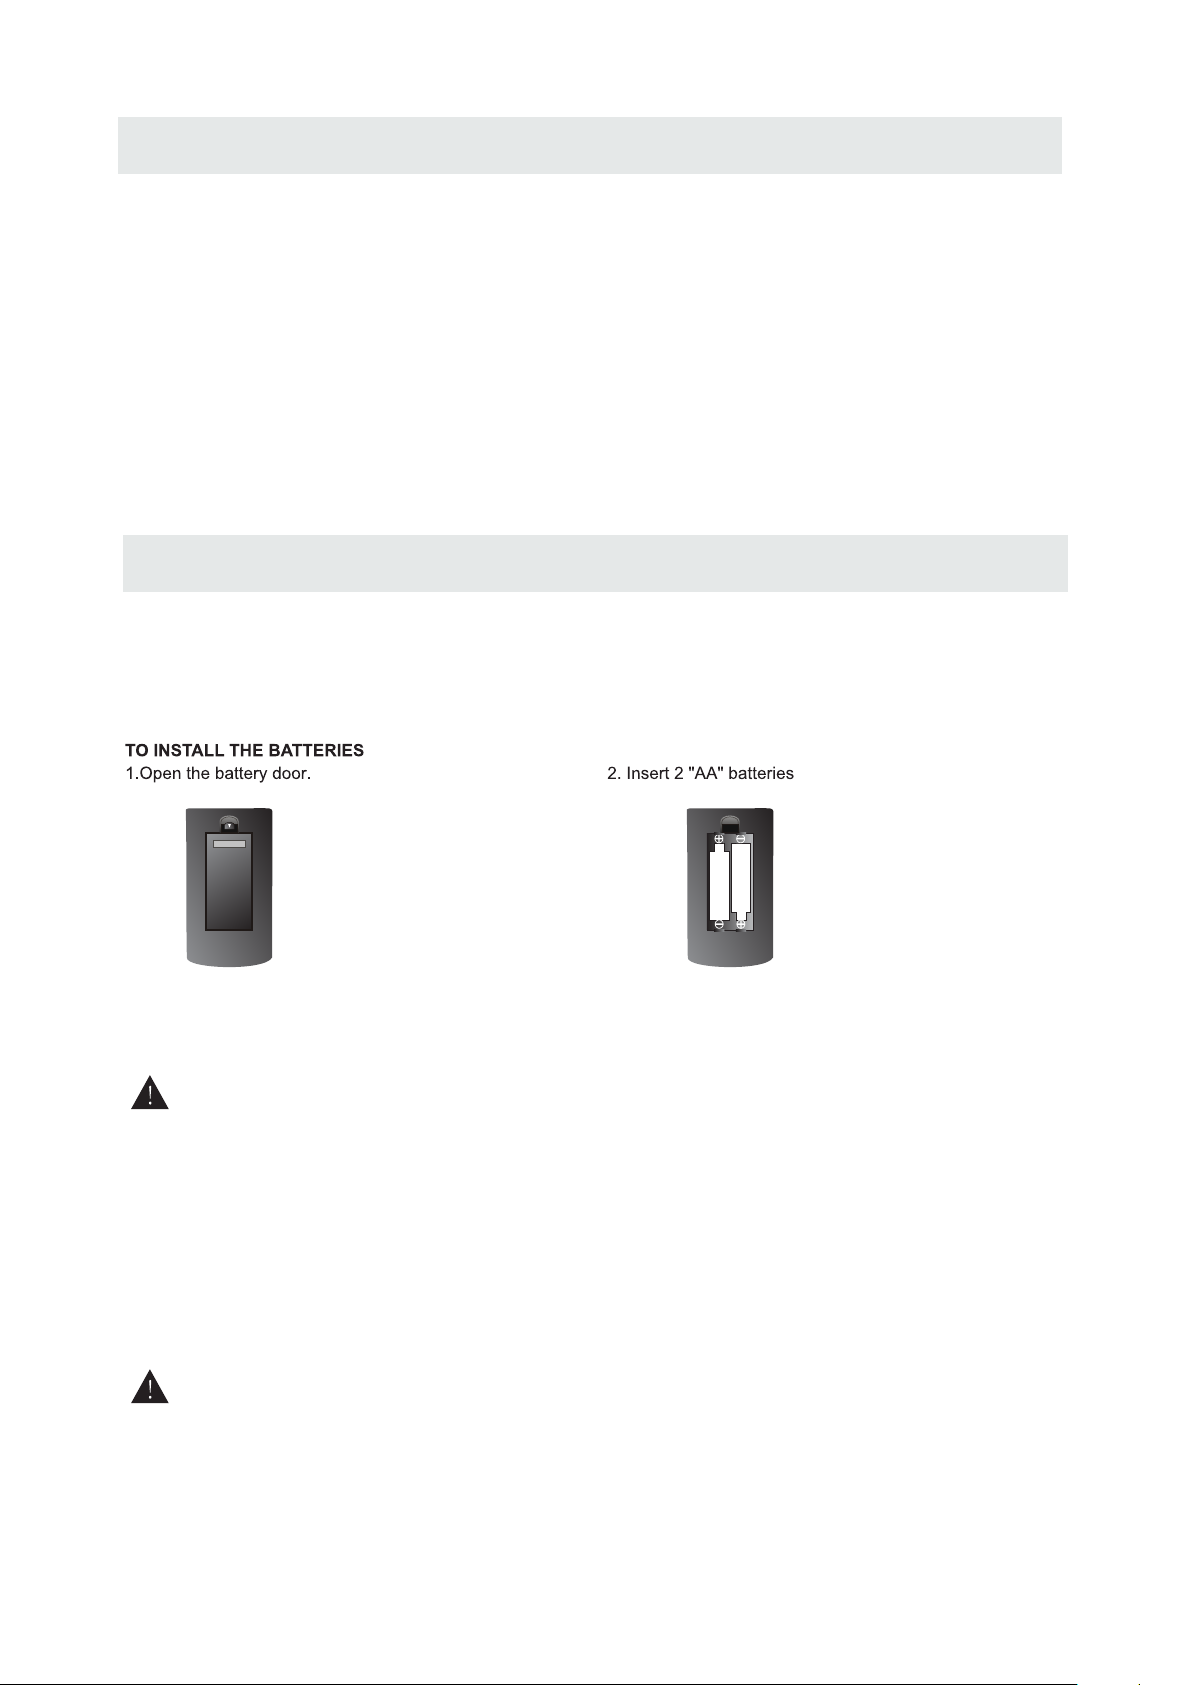
BATTERY REP L ACE MENT
When the batteries be come weak , the opera ting dist ance of the r emote con trol is gre atly
reduced and you will need to replace the batteries.
CAUTI ON
NOT ES
·If the remot e control i s not going t o be used for a l ong time, r emove the batteries to avoid
damage caused by battery leaka ge corros ion.
·Do not mix old a nd new batt eries. Do n ot mix ALKA LINE, sta ndard (CA RBON-ZINC) or
rechargeable (NICKEL-CAD MIUM) bat teries.
·Always rem ove batte ries as soo n as they bec ome weak.
·Weak batte ries can le ak and seve rely dama ge the remo te contro l.
WARNI NG :
Do not dispo se batter ies in a fire . Batteries may explode or leak.
Batterie s shall not b e exposed t o excessi ve heat such as sunshine, fire or the like.
: Da nger of exp losi on if batte r y i s inco rrec tly r epla ced.
3
Page 7
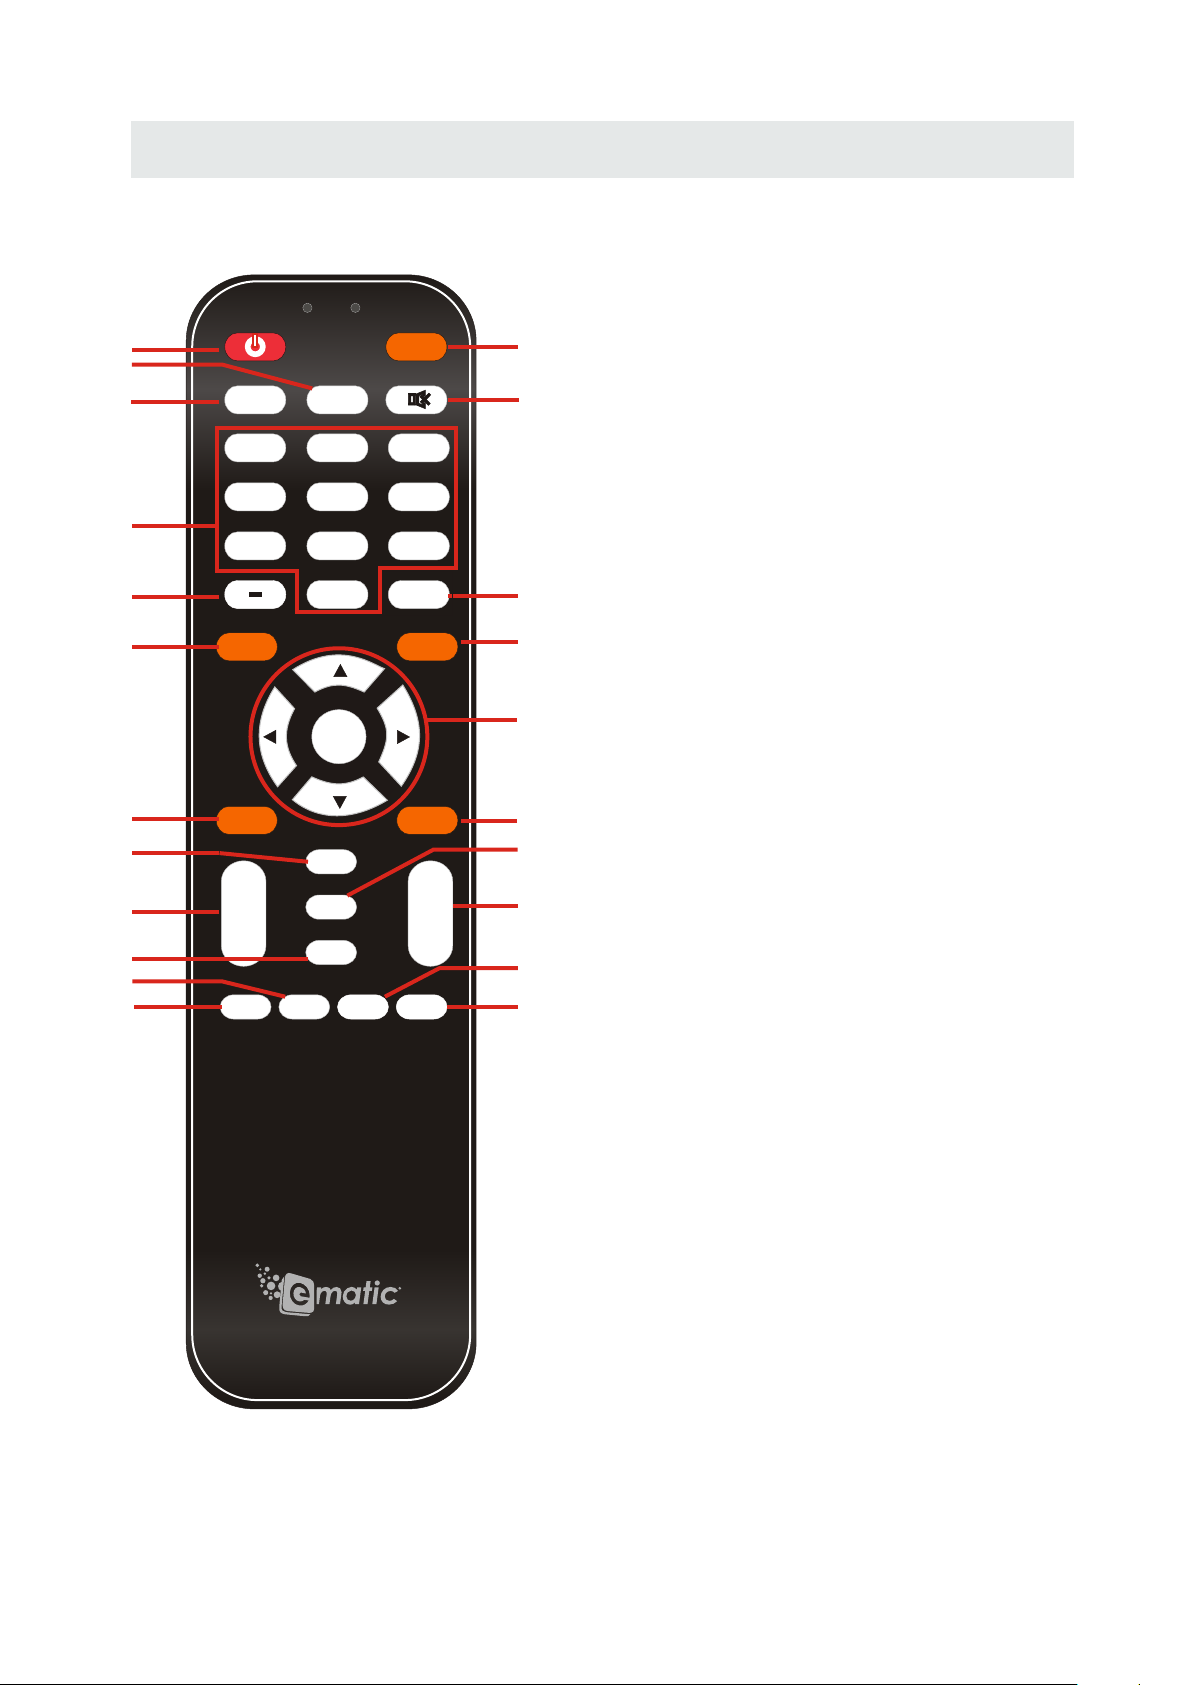
CONTROL REFERENCE GUIDE
REMOTE CONTROL
12
14
15
17
20
19
Powe rPower
1
4
3
6
CCCC MTSMTS
1 2
4
7
Sour ceSour ce
MuteMute
5
8 9
2
1.POWER: Turns the TV on or off.
5
2.SOURCE: Press this button to cycle
3
6
through the INPUT source.
3.CC:Cycles between different closed
captioning modes.
4.MTS:Selects stereo,mono,or second audio
7
Guid eGui de
9
0
RR
InfoInfo
8
programming.
10
5.MUTE:Turns the sound off from the TV.
To unmute either press VOL(+) or press
11
the MUTE button again.
6.NUMBER BUTTONS(0-9):Press 0-9 to
13
select a TV channel directly when you are
16
watching TV.The channel will change after
18
2 seconds.
7.(-):lnserts the dash for selecting digital
21
channels directly.
22
MenuMenu
+
VOLVOL
_
Pictu rePicture
SoundSound
ENTERENTER
Aspec tAspec t
Fre ez eFreeze
SleepS le ep
Favor it eFavor it e
ExitExit
+
CHCH
_
Add/d elAdd/d el
8.R:Returns to the previous channel.
9.GUIDE:Opens the current digital channel
information guide (antenna only).
10.INFO:Shows the display information.
11.THUMBSTICK(p /q /t /u /ENTER):
Allows you to navigate the on-screen menus
and adjust the system settings to your
preference.
4
Page 8

CONTROL REFERENCE GUIDE
REMOTE CONTROL
12
14
15
17
20
19
Powe rPower
1
4
3
6
CCCC MTSMTS
1 2
4
7
Sour ceSour ce
MuteMute
5
8 9
2
5
3
6
12.MENU:Brings up the main TV menu on
the screen.
13.EXIT:Exit the main TV menu on the screen.
14.ASPECT:Selects different viewing
modes of the TV.
15:VOL(+)/VOL(-)Press the VOL buttons
7
Guid eGui de
9
0
RR
InfoInfo
8
10
to increase or dicrease the sound level.
16.FREEZE:Freezes the TV picture.
17.SLEEP:Select amount of time.Let your
11
13
16
18
21
22
TV turn off automatically.
18:CH(+)/CH(-):Press the CH buttons to
go through the channel list.
19.PICTURE:Selects various preset
picture settings.
20.SOUND:Select various preset sound
settings.
21.FAVORITE:Gives you your list o
MenuMenu
+
VOLVOL
_
Pictu rePicture
SoundSound
ENTERENTER
Aspec tAspec t
Fre ez eFreeze
SleepS le ep
Favor it eFavor it e
ExitExit
+
CHCH
_
Add/d elAdd/d el
favorite channels.
22.Add/Del:Press to increase/decreasey
our favourite program.
5
Page 9
CONTROL REFERENCE GUIDE
FRONT VIEW
3
2 44 1
BACK VIEW
1.Color Screen
2.Remote Sensor
Do not block this sensor or the
remote control will not work.
3.Standby Indicator
Indicates whether the unit is ON
or in STANDBY (OFF) mode.
Light in red: The unit is in STANDBY.
Light in green :The unit is turned ON.
4. Speakers
3
10
9
1
2 3 4
5 6 7
8
1.DC IN
2.Service Port
3.HDMI IN Jacks
4.VGA IN Jack
5.PC AUDIO IN Jack
6.COMPONENT IN Jack
7.TV ANTENNA Terminal
8.Headphone Jacks
9.Coax OUT Jack
10.AV (VIDEO/ AUDIO L/R)in
6
Page 10
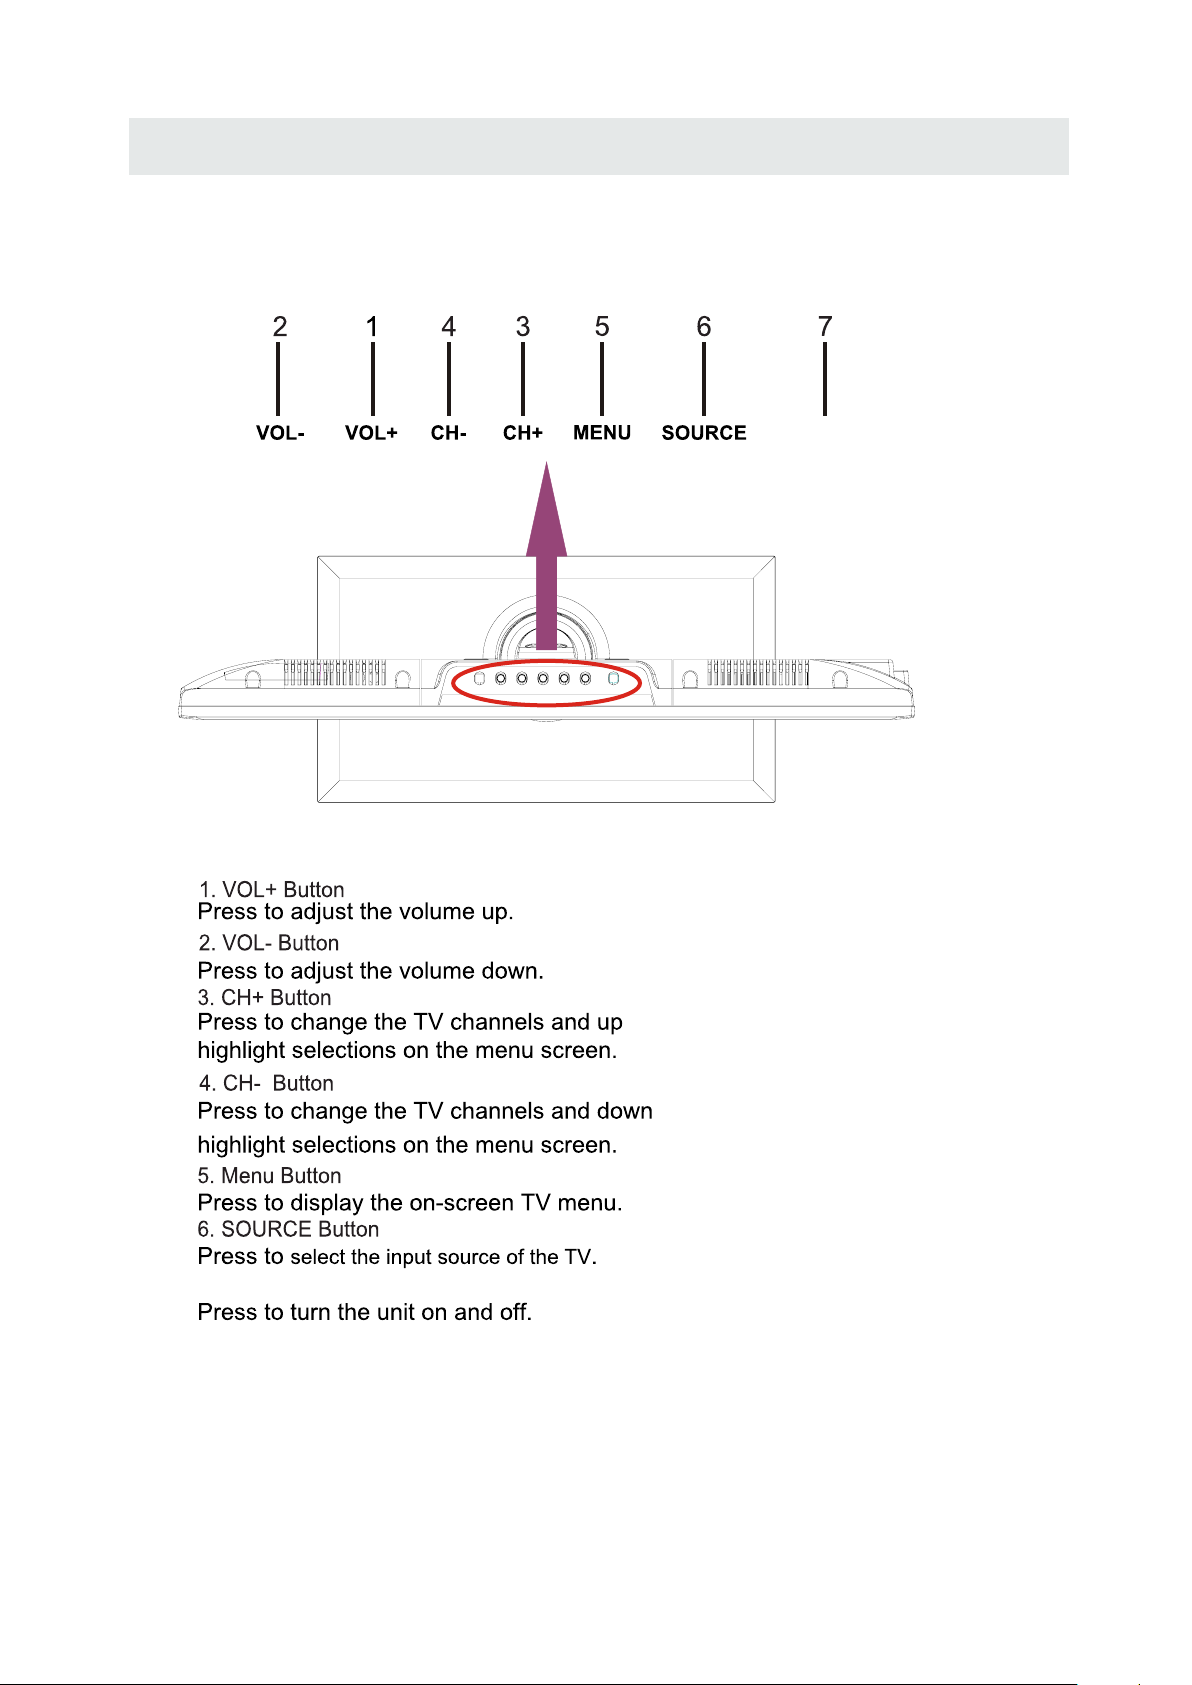
TOP VIEW
CONTROL REFERENCE GUIDE
POWER
7. POWER Button
7
Page 11

CONNECTIONS
CONNECT ING A TV ANTENN A / CABLE / S A TELLITE
To view tele vision channels correct ly, a signal must
be received from one of the following sources:
- An indoor or outdoor aerial antenn a
- A ca ble sys tem
- A satel l ite system
NOTE
Fo r receiv ing over-the-a ir TV broadc asts, we
recomm e nd that y ou use an ex ternal f ixed an tenna .
Sh ould yo u requi re the us e of a tem porary ante nna,
pl ease ensure that you purcha se an anten na with
su fficie nt ability to recei ve in weak signal area s.
On ly when y o u are in c lose proximi ty to a tra n smitter
wi ll a te mporary anten na reproduce a signal as
st rongl y as a fixe d antenn a.
CONNECT ING AN A/ V DEVICE
To connect to other equipment such as a VCR, camcorder, satell ite system or cable, etc.
CONNECT ING DEVIC ES WITH A COMPOSI TE (YELLOW RCA-T Y PE)
VI DEO OUTPU T
To con nect A/V d evices s uch as a VCR, vide o g ame sys tem or cam corde r.
Co nnecti ng to a VCR / Video Gam e Syste m / Camcorde r
Co nnect the AUDIO / VIDEO cable (not included) as shown.
Ma ke su re you co nnect th e cable from the ot her equi pment ( and ) to this un i t
(AV in)
Sa tel lite , cable or TV antenna
ca ble to T V ANTE NNA
termi nal (cable not included)
AUDIO VI DEO OUT
NOTE
Pl ease re fer to th e user man ual
fo r the oth er equipm ent for
mo re information.
To AUDIO / VIDEO
OU T jacks
To AU DI O / VIDEO
IN j ac ks
8
Page 12

CONNECTIONS
CONNE CTING A HIG H-DE FINI TION (HD) SOU RCE US ING CONN ECTION
High-Defi nition (HD) Devices with componen t video ou tput must be connected to the Y inpu t.
Conne ct the compon ent video cab le and aud io cable (not included) as shown.
Ma ke sure you conn ect the comp onen t vide o cabl e and au dio ca ble from th e othe r e qui pmen t
(COMPONENT OUT and AUDIO OUT)to the unit COMPONENT IN.
COMPONENT
PbPr
NOT E
When connecting a DVD player to the television ,
the picture res olution is solely dependent upon
the resolution supporte d by the DVD player attached.
DVD player resolutions var y from 480i to 1080p.
and this television can support DVD players up to
a maximum resolut ion of 1080p.
* May require a subscription
fo r receiving HD channels,
ch eck with your cable/satellite
COMPONENT IN
se r vi ce provider for details.
To COMPONENT
VIDEO IN jacks
To COMPO NENT
VI DEO OUT jac k s
To COMPONENT AUDIO
OU T jacks
To COMPONENT
AU DIO IN jacks
CONNE CTIN G A HIGH -DEF INIT ION (HD ) SOURCE USIN G HDMI CON NECT ION
HDMI (Hi gh Definition Multimedia Interface) supp orts both video an d audio on a sin gle dig ital connection
fo r use wi th DV D p layers, DTV, set-t op boxes an d o ther digi t al AV dev ices . HDMI w as develop ed to p rov ide
the tech nolo gies of High Bandwidth Dig ital Co nten t Protect ion (HDCP) as well as Digi tal Vis ual Interface
(D VI) in one spe cifi cati on. HD CP is us ed to p rotect di gita l cont ent tr ansm itte d and recei ved by
DVI-c ompl iant or HDMIcompliant displays.
HDMI has th e capabili ty to support stan dard, enhanced or high-definiti on video plus sta ndard to
multi -cha nnel surrou nd- soun d audio . HDMI features include uncompress ed digital video, a bandw idth of
up to 2.2 gigabytes per sec ond (with HDTV sign als), one conn ecto r (instead of several cables and
conne ctor s), and communication between the AV source and AV devices such as DTVs .
Co nnect the HD MI cable (no t incl uded ) as
sh own:
Ma ke sure you conn ect the cabl e fro m the
HDMI CABLE
(NOT INCLUDE D)
so urc e equip ment ( ) to this unit
( ).
HD MI IN
HD MI OUT
To HDMI
IN jack
To HDMI
ja ckOUT
9
Page 13

CONNECTIONS
CONNE CTIN G A
Co nnec t the 15- pin D-S UB PC/VGA con nector
from your computer to the 15-pin D-SUB PC /VG A
in put on this unit us ing a monito r cable an d an
au dio cable (not included) as shown.
Ma ke sure you conn ect the cabl e fro m the co mputer
( an d ) to this unit
VGA
( and ).
VGA AUDIO - PC IN
AUDIO - P C OUT
PC
TO AUDIO OUT jac ks
TO PC Connector
CONNECT ING THE POWER CORD
NOT E
• Inser t the power plug fully into the socket outlet
( ,
If the power plug is loose it could generate heat and
cause fire
•
Ensur e tha t the power p lug i s easi ly ac cessibl e.
•
Ensur e the e arth pin on t he po wer pl ug is s ecurely
connecte d to pre vent electrical sho ck.
•
Do not touch the power plug with a wet hand
( .)
This may cause electrical shock
•
Do not use any power cord other than that provide d
with this TV This may cause fire or elec tric al shock
•
Do not damage t he power cord
( ).
A damaged cord may cause fire or electrical shock
• Do not move the TV with the cord plu gged in the
socket outlet.
• Do not place a he avy object on the co rd or place
the cord near a high-temperat ure object.
• Do not twist th e cord, ben d it excessively, or stretch it.
• Do not pull on the cord. Hold onto the power plug body when disconnecting cord.
• Do not use a dama ged power plug or socket outlet.
.)
. ( .)
.
.
.
10
Page 14

CONNECTIONS
Connection to a Home Theater Audio System
For BEST au dio perf ormance
Connect ing to a Hom e Theater Syst em
Dolby Dig ital can d eliver o ptimal 2 channel
stereo or s urroun d sound wi th five discrete
full rang e channe ls plus a si xth channel for
a subwoof er.
Enjoy opt imal sou nd repro duction from your
system wi th a Dolby D igital a mplifier that
incorpo rates a di gital co axial input. Connect
an option al digit al cable d irectly to the
televis ion’s Coax audio outpu t to liste n
through a ll input s except V GA.
(The VGA does n ot suppo rt digit al audio)
SPD IF OUT
Coax
How To Setup Digit al Outpu t
Press the M ENU butt on on the remote control
Press the r ight ► arr ow button to select AUDIO
Press the d own ▼ arro w button to highlight
SPDIF typ e right ► Ra w or PCM
12
6
Set up
Pict ure Audio
Soun d Mode
Ba ss
Treble
Ba la nce
Surround
SP DI F Typ e
Au di o Lang uage
Mo ve Se le ct Return
Tim
e
St an dar d
50
50
50
Of f
PC M
En gl is h
MEN U
11
Page 15

WALL MOUNT INSTALLATION
INSTALLING REMOVING THE BASE STAND
WARNING/: The TV Dis play i s v ery fr agil e and m u st be prote cted a t all ti mes wh en rem oving t he ba s e
.
Stand
Be sure that no hard or sharp object or anyth ing that could scratch or damage the TV display comes into
contact wit h it Do NOT exer t press ure on the front of the unit at any tim e because the screen could cr ack
. .
1 Disconnect all cab les or cords connected to the unit
. .
2 Lay th e unit down on a f lat sur face with the back side f acing up Please make sure to place a sof t
cushi oned ma terial such as a pillow or thick piece of foam beneath the screen
. ,
3 To remove the base stand loosen screws off the holes then pull downwards to release
the base stand
. ,
4 To install the base stand put the stand into the hol e at the bottom of the TV then inser t screws to the
holes and tighten.
. .
.
,
MO UNTI NG ON THE WALL
This uni t is VESA-compliant, and is des igne d to be wall-mounted with a VESA-compliant 4”x 4 ”
(100m m x 100mm) mounting kit designed for flat-panel TVs (not supplied). Mount this unit acc ording to
the inst ructions includ ed in the mounting kit.
Length of s crew sho uld not ex ceed 10 mm.
NOTE
Remo ve the ba se stand before moun ting th e unit on the wall.
4”
4”
M4
12
Page 16

INITIAL SETUP
PUTTING THE UNIT ON A PROPER PL ACE
Wh en you tur n o n your te levisio n set for
th e first tim e , be sure to place it on a solid
st able surface .
To avo id dange r, do not ex pose the TV
to water, or a heat sou rce
(e .g. lamp, candle, radiator).
Do not obstruct the ventilation grid
at t he rear a nd be sure to leave s u fficient
ga ps around the unit.
TURNING THE UNIT ON FOR THE FIRST TIME
Af ter you have ini tially connect ed your TV
antenna or cabl e,
tu rn the televisio n ON.
A screen will dis play asking yo u to run a
Channel Aut o Scan
availabl e lo cal digital cha nnels.
It is he re where you wil l se lect antenna option s
an d run .
Channels will be s t ored in the TV tu ner.
Press the bu tton on the rem o te control.
Using th e buttons, scroll to h ighli ght channel m ode.
Pr ess the butt o n to highligh t A IR/CABLE.
1. Press the button on the remote control.
2.
(TV,AV,Comp onen t, HDM I1, HD MI2, V GA)
and select any of them using the button or
the button.
(T he scre en will cha nge to you r desire d s ).
Channel Aut o Scan
MENU
Us e or button to select the optionsthe
ENT ER
to se arch and rece ive
ource
Please run
Channel Auto Scan
INPUT SOURCE
TV
AV
Component
HDMI1
HDMI2
Note:
Be fore watching pl ease make sure all nec essary
cables and devices are connected.
VGA
13
Page 17

How to Navigate
INITIAL SETUP
Air Mode: Select wh en connected to an
AIR
in door/ o utdoor antenn a.
12
6
Setu p
Air
KO CEKOCE LBLB
AIR.
Set up
Au to
LOC K
MENU
MENU
CHAN NEL
Retur n
e
Pic ture Audio
Tim
Air /Cabl e
Au to Sca n
Fa vo ri teFav or it e
Show H id eShow H id e
Ch an ne l NoCha nn el No
Ch an ne l lab elCh an ne l lab el
DT V S igna lDT V S igna l
Mo ve
Se le ct Mo ve
Press th e button to highligh t
12
6
Pict ure Audio
Ca bl e Sys te m
St ar t t o Scan
e
Tim
Cable Mode: Select if you subscr i be to
CABLE
a pay television se r vice includ i ng satellite.
12
Pic ture Audio
Air /Cabl e
6
Setu p
e
Tim
Ca bl e
CHAN NEL
Au to Sca n
Fa vo ri teFav or it e
Show H id eShow H id e
Ch an ne l NoC ha n ne l No
Ch an ne l lab elChan ne l lab el
DT V S igna lDT V S i gn al
MENU
MENU
Mo ve
Se le ct
Retur n
Using th e ◄► button to highlig ht CABL E.
12
6
Pict ure Audio
Ca bl e Sys te m
St ar t t o Scan
Set up
e
Tim
Au to
CHAN NELCHAN NEL
MENU
Mo ve Nex t
Retur n
Press th e ▼ button to select AUTO SCAN then
press th e ► button to enter the su bmenu a nd
press th e ► button to start Chan nel Auto S can.
Mo ve Nex t
Press th e ▼ button to select AUTOSCAN.
Press th e ENTER button and the c ursor w ill move
up and CAB LE SYSTEM will be disp layed n ext.
MENU
Retur n
Press ► th e button to select STD > I RC > HRC >
Auto (Au to is recommended) .
Press th e ▼ button to select Sta rt to Scan
and pres s ENTER to start Chann el Auto Sc an.
RF CH
Fo un d
12
Set up
e
miT
CHAN NEL
7
4
MENU
Retur n
12
6
Set up
e
RF CH
Fo un d
miT
CHAN NEL
7
4
MENU
Retur n
Pic ture Audio
Mo ve Ne xt
Channe l Auto Sca n may take seve ral min utes
to compl ete.
Pic ture Audio
Mo ve Nex t
Channe l Auto Sca n may take seve ral min utes
to compl ete.
NOTE: Fo r cable or satellite u sers wi th no TV anten na, there no need to run C hanne l Auto Scan.
Connec t your ca ble or satell ite set t op box to one of th e avail able in puts on the TV f or viewing.
14
Page 18

TV SETUP
PICTURE MENU
Pict ure
The PICTURE menu o ffer s optio ns to enhance and r efine the picture disp layed on your TV
based on ambient r oom light and personal p references.
Adjustment opt ions include contras t, brightness, color, t int, sharpness and Col or Temp.
How to Navigate:
Press the MENU but ton on the remote contro l. Navigate using the ◄► b utton s to select PICTU RE.
12
Pic ture Audio
Pict ure Mo de
Co ntr ast
Brig htn es s
Co lo r
Tin t
Sh ar pne ss
Co lo r Temp.
Tim
6
Set up
e
St an dar d
50
50
50
0
50
No rm al
Press the ▼ button t o highlight ,
then press the ► but ton to se lect your viewi ng
preference fro m 4 facto ry options:
STANDA RD > DYNAMIC > MILD > U SER.
The STAN DARD setting is r ecomm ended for most
viewing enviro nments.
Depending on the a mbient light level in th e room,
you may find one of th e other options
more pleasing.
Mo ve Sel ec t Return
MEN U
To make mo re critical pic ture ad justments based on you r own preferences in USE R:
12
6
Set up
Tim
Tim
e
St an dar d
No rm al
MEN U
12
6
Set up
e
St an dar d
Par enta l
No rm al
Use the ▼ button to hi ghlight Contrast.
Navigate using t he ◄► buttons to
increase or decr ease contrast intens ity.
Use the ▼ button to hi ghlight Brightness .
Navigate using t he◄► buttons to
increase or decr ease overall brightn ess.
Pic ture Audio
Pict ure Mo de
Co ntr ast
Brig htn es s
Co lo r
Tin t
Sh ar pne ss
Co lo r Temp.
Mo ve Ad ju st R etu rn
Pic ture Audio
Pict ure Mo de
Co ntr ast
Brig htn es s
Co lo r
Tin t
Sh ar pne ss
Co lo r Temp.
50
50
50
0
50
TV
50
50
50
0
50
15
Mo ve Ad ju st R etu rn
MEN U
Page 19

TV SETUP
PICTURE MENU
Pict ure
The PICTURE menu o ffer s optio ns to enhance and r efine the picture disp layed on your TV
based on ambient r oom light and personal p references.
Adjustment opt ions include contras t, brightness, color, t int, sharpness and col or temp.
Press the M ENU butt on on the remote control. Navigate using th e ◄► butto ns to sele ct PICTURE.
12
6
Pic ture Audio
Pict ure Mo de
Co ntr ast
Brig htn es s
Co lor
Tin t
Sh ar pne ss
Co lo r Te mp.
Mo ve Ad jus t R etu rn
Tim
e
Set up
St an dar d
No rm al
MEN U
Use the ▼ but ton to hig hlight C olor.
Navigat e using th e ◄► buttons to
increas e or decre ase colo r intensity.
12
6
Set up
Pic ture Audio
Pict ure Mo de
Co ntr ast
Brig htn es s
Co lor
Tin t
Sh ar pne ss
Co lo r Te mp.
Tim
e
St an dar d
No rm al
50
50
50
0
50
50
50
50
0
50
12
6
Set up
Pic ture Audio
Pict ure Mo de
Co ntr ast
Brig htn es s
Co lor
Tin t
Sh ar pne ss
Co lo r Te mp.
Mo ve Ad jus t R etu rn
Tim
e
St an dar d
50
50
50
0
50
No rm al
MEN U
Use the ▼ but ton to hig hlight Tint.
Navigat e using th e ◄► buttons to adjust colors
toward gr een or red dish tin t.
12
6
Set up
Pic ture Audio
Pict ure Mo de
Co ntr ast
Brig htn es s
Co lor
Tin t
Sh ar pne ss
Co lo r Te mp.
Tim
e
St an dar d
50
50
50
0
50
No rm al
Mo ve Ad jus t R etu rn
MEN U
Use the ▼ but ton to hig hlight Sharpness.
Navigat e using th e ◄► buttons to soften or
view cris per edge s in the pic ture.
Use the ▼ but ton to hig hlight Color Temp.
Navigat e using th e ◄► buttons to select COOL
(more blu ish tone ), NORMA L or WARM .
Mo ve Ad jus t R etu rn
The defau lt setti ng is NORMAL.
WARM m ode will provide color that is calibrated
to D6500° K elvin, t he stand ard color that
broadca st stati ons and th e Motion Picture
industr y consid er as the mo st accurate to
view prog rammin g.
Note:
When adju stment s are comp leted, you may select another menu by press ing
the Menu bu tton.
16
MEN U
Page 20

TV SETUP
AUDIO MENU
Audio
The AUDIO m enu offers opt ions to ma ke sound e nhance ments while listening through the built -in
speaker s and pers onal pre ferences.
Adjustm ent opti ons incl ude bass, treble, balance, surround, SP DIF Type and audio language.
How to Navigate:
Press the MENU but ton on the remote contro l. Navigate using the ◄► b utton s to select AUDIO.
12
6
Set up
Pict ure Audio
Soun d Mode
Ba ss
Treble
Ba la nce
Surround
SP DI F Typ e
Au di o Lang uage
Mo ve Se lec t Return
Tim
e
St an dar d
Of f
PC M
En gl is h
50
50
50
MEN U
Press the ▼ b utton to h ighlight SoundMode,
then pres s the ► butt on to select your sound
prefere nce from 4 f actory options:
STANDARD > MUSIC > MOVIE > USE R.
The STANDARD setting is re commen ded for mo st
sound env ironme nts.
Dependi ng on the su rround ings in th e room,
you may fin d one of the o ther options
more plea sing.
To make more critical audi o adjust ments based on your own preferenc es in USER :
12
6
Set up
Tim
e
St an dar d
Of f
PC M
En gl is h
Use the ▼ but ton to hig hlight Bass.
Navigat e using th e ◄► buttons to
increas e or decre ase low fr equency intensity.
Pict ure Audio
Soun d Mode
Ba ss
Treble
Ba la nce
Surround
SP DI F Typ e
Au di o Lang uage
50
50
50
Use the ▼ but ton to hig hlight Treble.
Navigat e using th e ◄► buttons to
increas e or decre ase high f requency intensity.
Pict ure Audio
Soun d Mode
Ba ss
Treble
Ba la nce
Surround
SP DI F Typ e
Au di o Lang uage
17
Mo ve A dju st R et urn
12
6
Set up
e
Tim
St an dar d
PC M
En gl is h
Mo ve A dju st R et urn
MEN U
50
5050
50
Of f
MEN U
Page 21

TV SETUP
AUDIO MENU
Audio
The AUDIO m enu offers opt ions to ma ke sound e nhance ments while listening through the built-in
speaker s and pers onal pre ferences.
Adjustm ent opti ons incl ude bass, treble, balance, surround ,SP DIF Type and audio langua ge.
How to Navigate:
Press the MENU but ton on th e remote contro l. Navigate using the ◄► b utton s to select AUDIO.
12
6
Set up
Pict ure Audio
Soun d Mode
Ba ss
Treble
Ba la nce
Surround
SP DI F Typ e
Au di o Lang uage
Mo ve A dj ust R et urn
Tim
e
St an dar d
50
50
50
Of f
PC M
En gl is h
MEN U
Use the ▼ but ton to hig hlight Balance.
Navigat e using th e ◄► buttons to adjust sound
towards t he right o r left speaker.
12
6
Set up
Pict ure Audio
Soun d Mode
Ba ss
Treble
Ba la nce
Surround
SP DI F Typ e
Au di o Lang uage
Tim
e
St an dar d
50
50
50
Of f
PC M
En gl is h
12
6
Set up
Pict ure Audio
Soun d Mode
Ba ss
Treble
Ba la nce
Surround
SP DI F Typ e
Au di o Lang uage
Mo ve Se le ct Return
Tim
e
St an dar d
50
50
50
Of f
PC M
En gl is h
MEN U
Use the ▼ but ton to hig hlight Surround.
Navigat e using th e ► button to turn the
dimensi onal sur round effect O N or OFF.
(for buil t-in spe akers on ly).
12
6
Set up
Pict ure Audio
Soun d Mode
Ba ss
Treble
Ba la nce
Surround
SP DI F Typ e
Au di o Lang uage
Tim
e
St an dar d
50
50
50
Of f
PC M
En gl is h
Mo ve Se le ct Return
Use the ▼ but ton to hig hlight SPDIF Type.
Navigat e using th e ► button to adjust.
MEN U
Mo ve Se le ct Return
Use the ▼ but ton to hig hlight Au dio Language.
Navigat e using th e ◄► buttons to select to listen
to an alter native l anguag e broadcast
(if avail able) En glish > Fr ench > Spanish .
You may s elect an alternative language using
the remot e contro l by pressing MTS)
Note:
When adju stment s are comp leted, you may select another menu by press ing
the Menu bu tton.
18
MEN U
Page 22

TV SETUP
12
6
TIME MENU
e
Tim
The TIME me nu inclu des adju stment of settings for your local t ime zone a nd dayli ght savings time.
The clock w ill adju st autom atically after the initial Channel Auto Sc an of avai lable br oadcas t
channel s in your ar ea.
How to Navigate:
Press the MENU but ton on the remote contro l. Navigate using the ◄► b utton s to select TIME.
12
6
Set up
Pic ture
Audio
Sl ee p Tim er
Tim e Zo ne
Da yl igh t S avi ng Ti me
Cl oc k
Mo ve Se le ct Return
Tim
e
Of f
Pa ci fic
Of f
200 7 10 3 1 04 04 PM
MEN U
Use the ▼ but ton to hig hlight SleepTimer,
then pres s the ► butt on to select among:
5min, 10m in, 15mi n, 30min , 45min, 60min,
90min, 12 0min, 18 0min, 24 0min and off.
12
6
Set up
Pic ture
Audio
Sl ee p Tim er
Tim e Zo ne
Da yl igh t S avi ng Ti me
Cl oc k
Tim
e
Of f
Pa ci fic
Of f
200 7 10 3 1 04 04 PM
12
6
Set up
Pic ture
Audio
Sl ee p Tim er
Tim e Zo ne
Da yl igh t S avi ng Ti me
Cl oc k
Mo ve Se le ct Return
Tim
e
Of f
Pa ci fic
Of f
200 7 10 3 1 04 04 PM
MEN U
Use the ▼ but ton to hig hlight Ti meZone,
then pres s the ► butt on to select among:
EASTERN > C ENTRAL > MOUNTAIN >
PACIFIC > ALASKA > HAWAII.
12
6
Set up
Pic ture
Audio
Sl ee p Tim er
Tim e Zo ne
Da yl igh t S avi ng Ti me
Cl oc k
Tim
e
Of f
Pa ci fic
Of f
200 7 10 3 1 04 04 PM
Mo ve Se le ct Return
Use the ▼ but ton to hig hlight
MEN U
Clock: Di splay th e time at present.
Mo ve Se le ct Return
Dayligh t Saving Ti me.
Navigat e using th e ◄► buttons to turn
this feat ure on or off.
Note:
When adju stment s are comp leted, you may select another menu by press ing
the Menu bu tton.
19
MEN U
Page 23

TV SETUP
SETUP MENU
Setu p
In the SETU P menu you m ay change the initial set up of preferences t hat incl ude sett ings for
languag e, menu di splay, comput er monit oring, c losed captions, enhancement of black de tail
in the pict ure and re settin g your TV back to it s factory default status.
How to Navigate:
Press the MENU but ton on the remote contro l. Navigate using the ◄► b utton s to select SETUP .
12
12
12
6
6
Setu p
Pict ure
Audio
Pict ure
Audio
Me nu L angu ag e
Me nu L angu ag e
Tra ns pa re nc y
Tra ns pa re nc y
Zoo m Mo de
Zoo m Mo de
No is e Re duct io n
No is e Re duct io n
Ad va nce
Ad va nce
Clo se Ca pt io n
Clo se Ca pt io n
XVS
XVS
Re sto re De fa ul t
Re sto re De fa ul t
Mo ve Se lect E xi t
Mo ve Se lect
Setu p
Time Chan nel
Time
Eng lish
Eng lish
Off
Off
Nor mal
Nor mal
Off
Off
On
On
Lock
MENU
MENU
Retur n
Pict ure
Audio
Pict ure
Audio
Me nu L angu ag e
Me nu L angu ag e
Tra ns par ency
Tra ns par ency
Zoo m Mo de
Zoo m Mo de
No is e Re duct io n
No is e Re duct io n
Ad van ce
Ad van ce
Clo se Ca pt io n
Clo se Ca pt io n
XVS
XVS
Re st ore De fa ul t
Re st ore De fa ul t
Mo ve Se lect E xi t
Mo ve Se lect
12
6
6
Setu p
Setu p
Eng lish
Eng lish
Off
Off
Nor mal
Nor mal
Off
Off
On
On
Lock
MENU
MENU
Retur n
Time Chan nel
Time
Use the▼ bu tton to hi ghligh t Menu Language,
Press the ► b utton to s elect the language
you prefe r among En glish, F rench and Spanish.
12
12
6
6
Setu p
Pict ure
Audio
Pict ure
Audio
Me nu L angu ag e
Me nu L angu ag e
Tra ns pa re nc y
Tra ns pa re nc y
Zoo m Mo de
Zoo m Mo de
No is e Re duct io n
No is e Re duct io n
Ad van ce
Ad van ce
Clo se Ca pt io n
Clo se Ca pt io n
XVS
XVS
Re st ore De fa ul t
Re st ore De fa ul t
Mo ve Se lect E xi t
Mo ve Se lect
Setu p
Eng lish
Eng lish
Off
Off
Nor mal
Nor mal
Off
Off
On
On
Lock
MENU
MENU
Retur n Retur n
Time Chan nel
Time
Use the ▼ but ton to hig hlight Transparency.
Navigat e using th e ◄► buttons to turn Off or On
the trans lucent e ffec t of the OSD .
12
12
6
6
Setu p
Pict ure
Audio
Pict ure
Audio
Me nu L angu ag e
Me nu L angu ag e
Tra ns pa re nc y
Tra ns pa re nc y
Zoo m Mo de
Zoo m Mo de
No is e Re duct io n
No is e Re duct io n
Ad va nce
Ad va nce
Clo se Ca pt io n
Clo se Ca pt io n
XVS
XVS
Re sto re De fa ul t
Re sto re De fa ul t
Mo ve Se lect E xi t
Mo ve Se lect
Setu p
Eng lish
Eng lish
Off
Off
Nor mal
Nor mal
Off
Off
On
On
Lock
MENU
MENU
Retur n
Time Chan nel
Time
Use the ▼ but ton to hig hlight Noise Reduction.
Navigat e using th e ◄► buttons to reduce video
noise: Mi ddle > Str ong> Off > Weak
Default s etting : Middle )
1212
6
6
Setu p
Pict ure
Audio
Pict ure
Audio
Me nu L angu ag e
Me nu L angu ag e
Tra ns pa re nc y
Tra ns pa re nc y
Zoo m Mo de
Zoo m Mo de
No is e Re duct io n
No is e Re duct io n
Ad va nce
Ad va nce
Clo se Ca pt io n
Clo se Ca pt io n
XVS
XVS
Re sto re De fa ul t
Re sto re De fa ul t
Mo ve Se lect E xi t
Mo ve Se lect
Time
Time
Setu p
Eng lish
Eng lish
Off
Off
Nor mal
Nor mal
Off
Off
On
On
MENU
MENU
Use the ▼ but ton to hig hlight XVS.
Navigat e using th e ◄► buttons to select:
Off > On. XVS provides noti ceable b lack det ail
enhance ment tha t may be pre ferred.
1212
6
6
Setu p
Pict ure
Audio
Pict ure
Audio
Me nu L angu ag e
Me nu L angu ag e
Tra ns pa re nc y
Tra ns pa re nc y
Zoo m Mo de
Zoo m Mo de
No is e Re duct io n
No is e Re duct io n
Ad va nce
Ad va nce
Clo se Ca pt io n
Clo se Ca pt io n
XVS
XVS
Re sto re De fa ul t
Re sto re De fa ul t
Mo ve Se lect E xi t
Mo ve Ne xt
Time
Time
Setu p
Eng lish
Eng lish
Off
Off
Nor mal
Nor mal
Off
Off
On
On
MENU
MENU
Retur n
Ar e yo u su re ?
No
Yes
When
prom pte d,
Sele ct "Yes"
to con fir m.
Use the ▼ but ton to hig hlight Zoom Mode.
Navigat e using th e ◄► buttons to select the
viewing m ode: Nor mal > Wide > Z oom > Cinema.
Use the ▼ but ton to hig hlight Restore Default.
Press the ► b utton to a utomatically set all
adjustm ents bac k to their original settings.
20
Page 24

TV SETUP
SETUP MENU
Setu p
The SETUP m enu incl udes adj ustments for activating the Clo sed Capt ion feature for display
on the tele vision a nd custo mizing CC display types and font styles.
How to Navigate:
Pict ure
Audio
Pict ure
Audio
Menu La ng ua ge
Menu La ng ua ge
Tran sparenc y
Tran sparenc y
Zoo m Mode
Zoo m Mode
Nois e Re duct io n
Nois e Re duct io n
Advance
Advance
Close Ca ptio n
Close Ca ptio n
XVS
XVS
Restore De faul t
Restore De faul t
12
12
6
6
Set up
Set up
English
English
Off
Off
Norma l
Norma l
Off
Off
On
On
Lock
Time Chan nel
Time
Pict ure
Audio
CC Mo de
Basi c Sel ec tion
Advance d Se le ct io n
Opt io n
Time
12
6
Set up
On
CC 1
Service 1
MENU
Mo ve S el ec t Ex it
Mo ve Ne xt Return
MENU
Press the M ENU butt on on the remote control.
Navigat e using th e ◄► buttons to select SETUP.
Press the ▼ button t o highlight Closed Caption
then pres s the ► butt on to select from the
followi ng optio ns.
12
6
Set up
Audio
Time
Se rv ice 1
Se le ct Return
On
CC 1
MENU
Pict ure
CC Mod e
Bas ic Sel ectio n
Ad va nc ed Sel ecti on
Opt ion
Mo ve
Use the ▼ but ton to hig hlight CC Mode.
Navigat e using th e ◄► buttons to select
Off > On > CC on Mute.
12
6
Set up
Audio
Time
Se rv ice 1
Se le ct Return
On
CC 1
MENU
Pict ure
CC Mod e
Bas ic Sel ectio n
Ad va nc ed Sel ecti on
Opt ion
Mo ve
Move
Se le ct Return
MENU
Use the ▼ but ton to hig hlight Ad vance Selection.
Navigat e using th e ◄► buttons to select
Service 1 - 6 .
12
6
Set up
Audio
Time
CC 1
Se rv ice 1
Ne xt Ret ur n
On
MENU
Pict ure
CC Mod e
Bas ic Sel ectio n
Ad va nced Sel ecti on
Opt ion
Mo ve
Use the ▼ but ton to hig hlight Option.
Press the ► b utton to e nter a menu with options
to cus tomi ze text fo nts, colors and opacities.
12
6
Set up
Audio
Time
Se le ct
Cu st om
De fa ult
De fa ult
De fa ult
De fa ult
De fa ult
De fa ult
De fa ult
De fa ult
MENU
Retur n
Pict ure
Mo de
Fo nt S ty le
Fo nt S ize
Fo nt Ed ge St yl e
Fo nt E dg e Col or
FG Col or
BG Color
FG Opa city
BG O paci ty
Mo ve
Use the ▼ but ton to hig hlight Basic Selection.
Navigat e using th e ◄► buttons to select
CC 1-4, Text 1-4.
Note:
When adju stment s are comp leted, you may select another menu by press ing
the Menu bu tton.
21
Page 25

TV SETUP
SETUP MENU
Setu p
In the SETU P menu you m ay adjust the position of images displayed on scree n once you c onnect
an input si gnal fro m your PC.
If your PC sy stem use s a standard signal mode, the screen will adjust auto matica lly.
Connect a n option al 3.5mm a udio cable for stereo sound.
How to Navigate:
After con nectin g to a PC, press the SOURCE button and highlight VGA, the n press th e ENTER
button.
Pict ure
Audio
Pict ure
Audio
Me nu Lan guag e
Me nu Lan guag e
Tra ns pa re nc y
Tra ns pa re nc y
Zoo m Mo de
Zoo m Mo de
No is e R ed uc ti on
No is e R ed uc ti on
Ad va nce
Ad va nce
Cl os e C ap ti on
Cl os e C ap ti on
XVS
XVS
Re st ore De faul t
Re st ore De faul t
12
12
6
6
Set up
Set up
En gl is h
En gl is h
Off
Off
No rm al
No rm al
Off
Off
On
On
Lock
Time Cha nnel
Time
Picture Audio
H - pos
V - pos
Cl oc k
Ph as e
Au to
12
6
Set up
e
Tim
50
50
50
0
MENU
Mo ve S el ec t Ex it
Mo ve S el ec t Return
MENU
Press the M ENU butt on on the remote control
and navig ate usin g the ◄► buttons to select
SETUP. Press the ▼ button to hi ghligh t
Advance d, then pr ess the ►button to select
from the fo llowin g option s.
12
6
Set up
e
Picture Audio
H - pos
V - pos
Cl oc k
Ph as e
Au to
Mov e Adj ust
Tim
50
50
50
0
MENU
Retur n
Use the ▼ but ton to hig hlight H -POS.
Navigat e using th e ◄► but tons to adjust the
positio n of image s displa yed from side to side.
12
6
Set up
e
Picture Audio
H - pos
V - pos
Cl oc k
Ph as e
Au to
Move Adjus t
Tim
50
50
50
0
MENU
Retur n
Move Adj ust
MENU
Retur n
Use the ▼ but ton to hig hlight Clock.
Navigat e using th e ◄► buttons to control the
width of th e image.
12
6
Set up
e
Picture Audio
H - pos
V - pos
Cl oc k
Ph as e
Au to
Mov e Adj ust
Tim
50
50
50
0
MENU
Retur n
Use the ▼ but ton to hig hlight Phase.
Navigat e using th e ◄► buttons to improve focus
and image s tabili ty.
12
6
Set up
e
Picture Audio
H - pos
V - pos
Cl oc k
Ph as e
Au to
Mo ve Ne xt
Tim
50
50
50
0
Ar e yo u su re ?
No
Yes
When
prom pte d,
Sele ct "Yes"
to con fir m.
MENU
Retur n
Use the ▼ but ton to hig hlight V- POS.
Navigat e using th e ◄► buttons to adjust the
positio n of image s displa yed up and down.
Use the ▼ but ton to hig hlight AU TO.
Press the ► b utton to a utomatically adjust the
display t o the best s etting.
22
Page 26

TV SETUP
LOCK(PARENTAL) MENU
Lock
In the LOCK (PARENTAL) menu you may block televisi on by inpu tting pa sswords.
To gain acces s and sele ct your pr eferences within the LOCK(Parental) m enu
make cert ain your i nput is se t to TV.
How to Navigate:
Press the MENU but ton on the remote contro l. Navigate using the ◄► b utton s to select Paren tal.
12
6
Set up
Pic ture Audio
Tim
e
Ente r Pa ssw ord
0 9~
MEN U
Retur n
Press the ▼ b utton to h ighlight
Enter Pas sword. E nter your 4 digit code
(factor y defaul t code is "0000")
unless pr evious ly chang ed.
12
6
Pic ture Audio
Tim
Set up
e
12
6
Set up
e
Pic ture Audio
Tim
En ter Ne w P as s wo r d
Co nfi rm Pas swo rd
MEN U
0 9~
Retur n
Use the num eric but tons to in put a new
4 digit cod e by two tim es.
12
6
Pic ture Audio
Tim
Set up
e
Ch ang e Pass wor d
Sy st e m Lock
On
US
Ca nada
RR T Sett ing
Re set RR T
Mo ve
Ne xt
MEN U
Retur n
To change the p asswor d, press t he ► button
to displa y a screen t o enter yo ur new password,
then conf irm agai n.
Ch ang e Pass wor d
Sy st e m Lock
US
Ca nada
RR T Sett ing
Re set RR T
Mo ve
To make chang es to PARENTAL cont rols,
Highlig ht SYSTE M LOCK the n press
the ► butto n to ON.
NOTE:
RRT Se tting an d Reset RRT are not user's adjus table se ttings .
23
Se le ct
On
MEN U
Retur n
Page 27

TV SETUP
LOCK(PARENTAL) MENU
Lock
In the LOCK (PARENTAL) menu you may block te levisi on and mov ie progr amming based on
U.S TV and movie rating guideline s. To gain access and select y our pref erence s
within th e LOCK(P arenta l) menu make certain your input is set to TV.
How to Navigate:
Press the M ENU butt on on the remote control. Navigate using th e ◄► butto ns to sele ct LOCK
(Parent al).
Press the ▼ b utton to h ighlight ENTER PASSWORD. Enter your 4 digit code
(factor y defaul t code is "0000") unless previously changed.
To set parent al contr ols for television programming or DVD movies, pre ss the ▲▼b uttons to
highlig ht US. Nav igate us ing the ◄► buttons to highlight TV/MPAA me nu.
12
6
e
Tim
TV RATI NG
Ne xt Mo ve
Set up
MENU
Retur n
Pict ure Audio
TV
MPA A
Move
12
6
Set up
e
Tim
N A
MENU
Ne xt
Retur n
Pic ture Audio
AL L FV V S L D
TV Y
TV Y7
TV G
TV PG
TV 14
TV MA
Blo ck Pres s EN TE R t o loc k or unl oc k
Highlig ht TV, then pr ess the ► bu tton to enter the TV Ratings menu to select your preference .
12
Pict ure Audio
TV
MPA A
6
Set up
e
Tim
N A
N/ A
MENU
Move
Se le ct
Retur n
Highlig ht MPAA then press the ► butto n repeat edly to select your movie rating preferen ce.
24
Page 28

TV SETUP
LOCK(PARENTAL) MENU
Lock
In the LOCK (PARENTAL) menu you may block televisi on and mov ie progr amming based on
Canadia n TV and movie rating guid elines . To gain access and select yo ur prefe rences
within th e LOCK(P arenta l) menu make certain your input is set to TV.
How to Navigate:
Press the M ENU butt on on the remote control. Navigate using t he ◄ ► button s to selec t Parental.
Press the b utton to h ighlig ht ENTER PASSWO RD. Enter your 4 digit code
(factor y defaul t code is "0000") unless previously changed.
To set parent al contr ols for television programming or DVD movies, pre ss the ▲▼ bu ttons to
highlig ht Canad a.Navi gate usi ng the◄► buttons to highlight Can ada Engl ish/Ca nada Fre nch menu.
12
6
Set up
Pic ture Audio
Ca na da En gli sh
Ca na da Fre nc h
e
Tim
G
G
MENU
Mo ve
Se le ct
Retur n
Navigat e using th e ▼ button to highlight CANADA ENGLISH, then press the ► b utton re peatedly
to select y our rati ngs preference.
12
6
Set up
Pic ture Audio
Ca na da En g li sh
Ca na da Fre nc h
Mo ve
e
Tim
Se le ct
G
G
MENU
Retur n
Navigat e using th e ▼ button to highlight CANADA FRENCH, then press the ► bu tton rep eatedl y
to select y our rati ngs preference.
NOTE:
When adju stment s are comp leted, you may select another menu by press ing
the Menu bu tton.
25
Page 29

TV SETUP
TV(CHANNEL) MENU
Chan nel
The TV(CHANNEL) menu provides f or the set up of your television to receive TV channels, store
your favo rites, a dd or skip channels and label them by their call letter s.
How to Navigate:
Press the M ENU butt on on the remote control. Navigate using th e ◄► butto ns to sele ct TV.
Press the ▼ b utton to h ighlight your preferences.
12
6
e
Tim
ATSC 1
ATSC 2
ATSC 3
KO CE H D
KO CE S D
KO CE L B
Set up
Pic ture Audio
Air /Cabl e
Au to S ca n
Fa vo ri te
Show/ H id e
Ch an ne l No
Ch an ne l L abl e
DT V S igna l
12
6
Setu p
e
Tim
Air
Pict ure Audio
Channel Program Name Favorite
2 0
14 1
14 2
14 3
50 3
KO CE LB
Good
50 1
50 2
50 3
66 0
Prev Next
Mo ve N xe t Return
MENU
Mo ve Pres s 扙NTE R Cha nge Retu rn
MENU
Highlig ht FAVOURITE to ad d channe ls to your F avorites List. Navigate using the ▲▼◄► bu ttons
to select c hannel s to be adde d or deleted from your list. Press th e ENTER bu tton to ad d or delete
a channel . A checkmar k indica tes a channel has been added. You may also display your favourite
list from t he remot e control by pressing FAV.
12
6
Setu p
e
Pic ture Audio
Air /Cabl e
Tim
Air
Au to S ca n
Fa vo ri te
Show/ H id e
Ch an ne l No
Ch an ne l L abl e
50 3
KO CE LB
DT V S igna l
Mo ve N ex t Return
MENU
Good
Pict ure Audio
Channel Program Name Add/Delete
2 0
14 1
14 2
14 3
50 1
50 2
50 3
66 0
Prev Next
Mo ve Pres s 扙NTE R Cha nge Retu rn
12
6
e
Tim
ATSC 1
ATSC 2
ATSC 3
KO CE H D
KO CE S D
KOCE L B
Set up
MENU
Highlig ht to sele ct Show/ Hide or skip channels already in memory. Navigate using the ▲▼◄►
buttons t o access t he list of available channels. Press the EN TER butt on to chan ge the channels
status. A che ckmark i ndicat es a channel has been added.
12
6
Setu p
e
Pic ture Audio
Air /Cabl e
Tim
Air
Au to S ca n
Fa vo ri te
Show/ H id e
Ch an ne l No
Ch an ne l L abl e
50 3
KO CE LB
DT V S igna l
Mo ve N ex t Return
MENU
Pict ure Audio
Good
Mo ve Nex t
12
6
Set up
e
Tim
K B B C - D T
MENU
Retur n
Highlig ht CHANN EL LABEL to name or r ename a br oadcas t channel. Navigate using the ► button
to enter th e screen m enu to re-label a channel. Use the ▲▼ buttons t o spell ou t each let ter,
number or c haract er. Use the ◄ ► buttons to advance to the next spac e.
26
Page 30

PC FORMATS
DISPLAY MODE
Reisolut
X
6
4
0
X
8 6
00 00
X
0
0
8
X
061
2
4
1
1 20
X
60 7
X
4
60
7
80
0
on
0
8
836
8
Ho
r
iz
ontal
S
c n
an i
n
g
Frequ ncy
(KHz
31. 5
7. 74
09 1
6.
e
)
66
S
ca
n
n
Ve t
i
n
r
i
l
c
a
g Frequ
(H
z
)
ency
NOTE:
This prod uct does n ot suppo rt the display mode not listed above.
In order to a chieve t he best di splay effect , please select the above-listed
6 display m odes inp ut signa l.
Because o f the difference of disp lay driv ers outp ut signal
(especi ally non -stand ard signal output), the display image may appear li ttle
disturb ance whi ch can be ad justed on the PC menu.
F
orm
a
t
To prolong th is unit' s servic e life, please set your computer to power man agemen t mode.
27
Page 31

DISPLAY MODE
VIDEO FORMATS
SUPPORTED COMPONENT / HDMI INPUT MODE
e
720 480
720 480
1280 720
1280 720
1920 1080
1920 1080
1920 1080
1920 1080
1920 1080
iR so
l
u
t
o
n
X
X
X
X
X
X
X
X
X
Horizontal
Scanning Frequency
31. 47
15. 734
37. 5
45
31. 25
33. 75
27
56. 25
67. 50
Vertical
Scanning Frequency
(Hz)
59. 94
59. 94
50
60
50
60
24
50
60
Format
480 i
480 p
720 p
720 p
1080 i
1080 i
1080 p
1080 p
1080 p
NOTE:
The above l isted fo rmats ar e also related to the AV devices you are about to connect.
Before yo u connec t this uni t with others please read all instruction s carefu lly and
make sure a ll neces sary cab les are connected.
.
This unit m ay be inco mpatib le with some other formats which are not meet t he
above con dition s.
28
Page 32

SPECIFICATION
Panel
Systems
Input /
Output
Jacks
Model Description
Panel Type LED Panel
Diagonal Size
Screen Format 16 9:
Resolution 1920 x 1080
Brightness
Contrast
View Angle
Response Time
Maximum Color
Refresh Rate
Color System
Sound System
Audio System
Sound Output
RF Input 75 ohm external terminal
HDMI Input
PC RGB Input-
Composite Video Input
Component Y Pb Pr Input/
21.5 inches
200nit
1000 : 1
178(H )/17 8(V)
6.5 ms
16.7M colors
60Hz
ATSC/QAM/NTSC
M
BTSC
L/R Speaker:3 W
Video 480i 480p 720p 1080i, 1080p.: , , ,
Audio Two channel linear PCM 32 44 1 and 48kHz 16 20 and 24 bits: , . , ,
D sub 15pinG 0 7Vp p 75ohms: . - ,
B 0 7Vp p 75ohms: . - ,
R 0 7Vp p 75ohms: . - ,
1.0 Vp- p, 75ohms RCA
RCA
Y: 1.0 Vp-p , 75oh ms, 0.3 V negative sy nc
Pb: 0.7V p-p , 75ohm s
Pr : 0.7Vp- p, 75o hms
+
3W
22”LED TV
Component AUDIO: For Component Audio input
AV AUDIO: For CVBS Audio input
PC AUDIO: For PC RGB Audio input
500mV rms, Impedance: 20k ohms
DC12V 4.16A
40
Power
Sound Input
Power Requirement
Rate P owe r Con sum pti on
This manual is only for your reference.
Specifications are subject to update without prior notice.
29
Page 33

TROUBLESHOOTING GUIDE
SYMPTOM CAUSE AND REMEDY( )
TV
Picture
Bad
multiple
distortion,blurry)
No sound.
and
Black
picture.
(snow,
images
White
• Check the location of the antenna and adjust it if necessary.
• Make sure the antenna cable is firmly connected.
• Make sure all input cables are firmly connected.
• Increase the volume.
• Check
Remote Control.
• Check the PICTURE setting within the PICTURE menu.
• Check to make sure the program you are watching is broadcast
in Color and not Black & White.
whether the mute function has been activated on the
No picture or sound.
Coloredp atches o f
picture.
Panel function key does
not respond correctly.
The display monitor's
panel goes hot.
Unusual dots
• Make sure the unit is plugged in and turned on.
• Make sure that the ATV mode is selected.
• Try a new channel to check for possible station trouble.
• Make sure the antenna is connected properly.
• Increase the volume.
•
Make sure the antenna or audio/video source device is
working properly.
• Make sure all cables are firmly connected.
• Check for local interference.
• Make sure there are no unshielded electrical devices nearby
that are causing interference.
• Turn the TV off for 30 minutes, then try it again.
• Under the influence of electrostatic phenomenon, the product
may malfunction and require usertopowerreset.
• Unplug and re-plug the power cord.
• LED TV takes inside lighten phosphor. It may increase the
temperature of the screen in some occasions. It's not a defect.
• Black dots and Bright points may appear on the LED screen.
This is a structural property of the LED panel and is not a defect.
Stripes on screen
The top of the monitor
gets hot
Unable to select a
certain channel.
Disorder display
at power on.
.
• Adjust the impulse phase may decrease stripes. RGB in( )
• It may occur during long-time working. It's not a defect.
The channel may be skipped. Choose this channel by
•
directly selecting the buttons from the remote control.
••This may be caused because of a very short interval
between POWER OFF and ON.
Unplug the power and restart.
30
 Loading...