

Page 1
22” FHD LED TV
with DVD
MODEL:ETD229
User Manual
Before connecting, operating or adjusting this product, please read the manual completely.
Please keep this manual for future reference.
.
Page 2

CONTENTS
SAFETY
1
PRECAUTION
IMPORTANT
SAFETY
2
INSTRUCTION
ACCESSORIES
3
GETTING
4
STARTED
CONTROL
5
REFERENCE
GUIDE
CONNECTIONS
6
Remote Control
Front Frame
Back Frame
Top Panel
Antenna Connection
AV Connection
YPbPr Connection
HDMI Connection
VGA Connection
Headphone Connection
Power Cord Connection
Coax(SPDIF) Connection
1
2
3
3
4
6
6
7
8
8
9
9
10
10
10
11
WALL MOUNT
7
INSTALLATION
INITIAL SETUP
8
TV SETUP
9
Putting The Unit On A Proper Place
Turning The Unit On For The First Time
Source Selection
Picture Menu
Audio Menu
Time Menu
Setup Menu
LOCK(Parental) Menu
TV(CHANNEL) Menu
12
13
13
13
15
17
19
20
23
26
Page 3

CONTENTS
10
10
11
12
DVD Function
General Setup
DISPLAY
MODE
SPECIFICATION
TROUBLESHOOTING
GUIDE
General setup page
Audio setup page
Preference page
PC Formats
Video Formats
TV Symptom
27
28
28
30
31
32
33
Page 4
SAFETY PRECAUTION
CAUTION MARKIN G WAS LOC ATED AT T HE REAR
*
OF THE APPARATUS .
WARNING: TO REDUCE THE RISK OF ELECTRIC
SHOCK,DO NOT REMOVE COVER(OR BACK)
NO USER SERVICEABLE PARTS INSIDE.
REFER SERVICING TO QUALIFIED SERVICE
PERSONNEL.
The lightning flash with arrowhead symbol,
within an equilateral triangle,is intended to
alert the user to the presence of uninsulated
“dangerous voltage”within the product's enclosure
that may beof sufficient magnitude to constitute a
risk of electric shock to persons.
The exclamation point within an equilateral
Triangle is intended to alert the user to
The presence of important operating and
maintenance (servicing) instructions in the literature
accompanying the appliance.
CAUTION
•
DANGER OF EXPLOSION IF BATTERY IS
INCORRECTLY REPLACED. REPLACE ONLY
WITH THE SAME OR EQUIVALENT TYPE.
•
USE OF CONTROLS OR ADJUSTMENTS OR
PERFORMANCE OF PROCEDURES OTHER
THAN THOSE SPECIFIED MAY RESULT IN
HAZARDOUS RADIATION EXPOSURE.
WARNING:
TO REDUCE THE RISK OF FIRE OR ELECTRIC
•
SHOCK, DO NOT EXPOSE THIS APPLIANCE TO
RAIN OR MOISTURE.
TO REVENT FIRE OR SHOCK HAZARD, DO NOT
•
EXPOSE THIS UNIT TO RAIN OR MOISTURE. DO
NOT PLACE OBJECTS FILLED WITH LIQUIDS ON
OR NEAR THIS UNIT.
•
SHOULD ANY TROUBLE OCCUR, DISCONNECT
THE AC POWER CORD AND REFER SERVICING
TO A QUALIFIED TECHNICIAN.
PL ACEMENT INFORMATION
•
Do not use this unit in places that are extremely
hot, cold, dusty or humid.
•
Do not restrict the airflow of this unit by placing it
somewhere with poor airflow, by covering it with
a cloth, by placing it on bedding or carpeting.
SA FETY INFORMATION
•
When connecting or disconnecting the power
cord, grip the plug and not the cord itself. Pulling
the cord may damage it and create a hazard.
•
When you are not going to use the unit for a long
period of time, disconnect the power cord.
RATING PLATE LOCATION
The rating plate is located on the rear of the unit.
FCC STATEMEN TS
NOTE: This unit has been tested and found to comply
with the limits for a Class B digital device, pursuant
to Part 15 of the FCC Rules. These limits are designed
to provide reasonable protection against harmfu l
interference in a residential installation.
This unit generates, uses and can radiate radio
frequency energy and, if not installed and used in
accordance with the instructions, may cause harmf ul
interference to radio communication. However, t here
is no guarantee that interference will not occur in a
particular installation. If this unit does cause ha rmful
interference to radio or television reception, wh ich
can be determined by turning the unit off and on, the
user is encouraged to try to correct the interference
by one or more of the following measures:
- Reorient or relocate the receiving antenna.
- Increase the separation between the unit and
receiver.
-Connect the unit into an outlet on a circuit different
from that to which the receiver is connected.
- Consult the dealer or an experienced radio/TV
technician for help.
WARNING:
Changes or modifications to this
unit not expressly approved by the party responsible
for compliance could void the user authority
to operate the unit.
1
Page 5

IMPORTANT SAFETY INSTRUCTIONS
1)Read these instructions.
2)Keep these instructions.
3)Heed all warnings.
4)Follow all instructions.
5)Do not use this apparatus near water.
6)Clean only with a dry cloth.
7)Do not block any ventilation openings.
Install in accordance with the
manufacturer's instructions.
8)Do not install near any heat sources such
as radiators, heat registers, stoves, or
other apparatus (Including amplifiers) t hat
produce heat.
9)Do not defect the safety purpose of the
polarized or grounding-type plug.
A polarized plug has two blades with one
wider than the other.
A groundingtype plug has two blades
and a third grounding prong.
The wide blade or the third prong is
provided for your safety.
If the provided plug does not fit into your
wall outlet, consult an electrician for
replacement of the obsolete outlet.
10)Protect the power cord from being walked on
or pinched particularly at plugs, convenie nce
receptacles, and the point where they exit
from the apparatus.
11)Only use attachments / accessories speci fied
by the manufacturer.
12)Use only with the cart, stand,
tripod, bracket, or table
specified by the manufacturer,
or sold with the apparatus.
When a cart is used, use caution when
moving the cart / apparatus combination to
avoid injury from tip-over.
13)Unplug this apparatus during lightning
Storms or when unused for long periods of
time.
14)Refer all servicing to qualified service
personnel. Servicing is required when the
apparatushas been damaged in any way,
such as the power cord or plug is damaged,
liquid has been spilled or objects have fallen
into the apparatus, the apparatus has been
exposed to rain or moisture, does not operate
normally, or has been dropped.
15)To prevent electric shock, ensure the grou nding
pin on the AC cord power plug is securely
connected.
2
Page 6
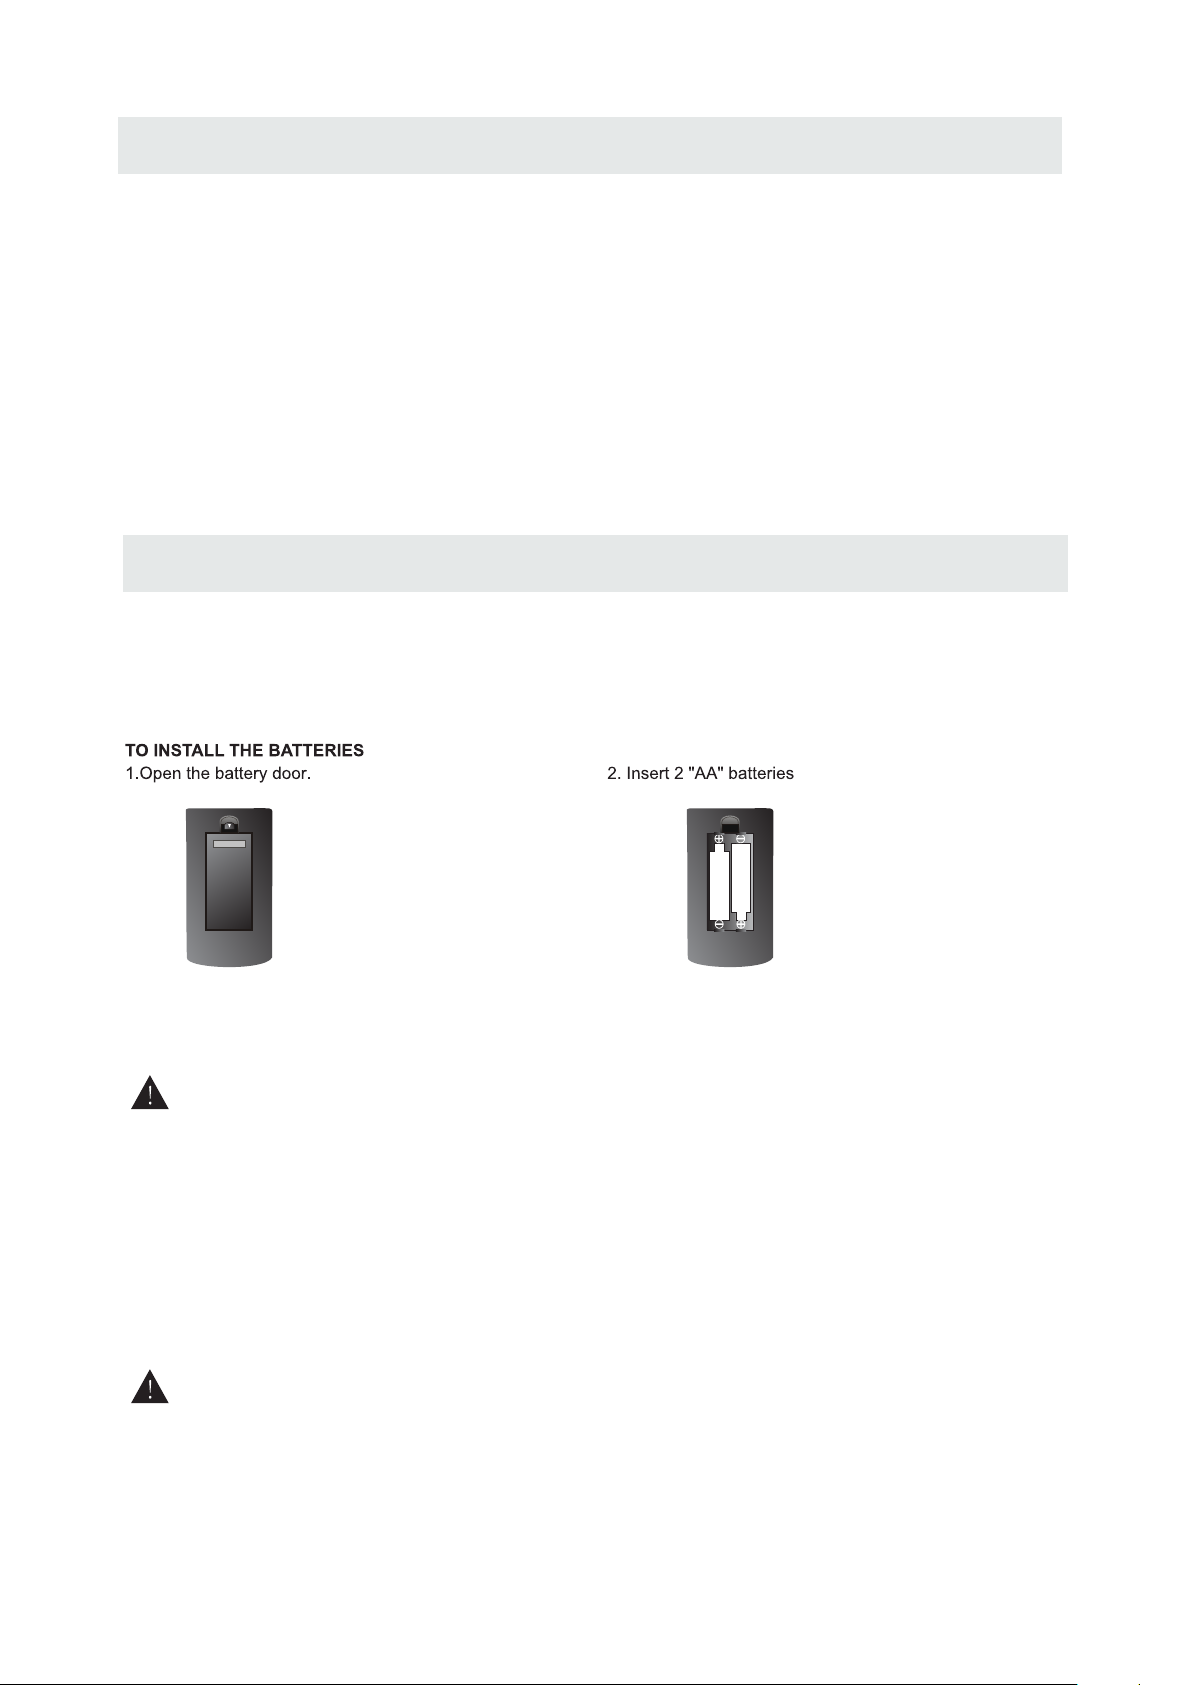
ACCESSORIES
Pl ease check an d identify the su pplied acc essorie s.
Remote control ..................................................................................................................
Remote control
x 1
Battery(AA)
Warranty Card
Instruction Manual
Power Cord and Ada ptor
Base stand and screws
Screw driver
..................... ....... ....... ....... ....... ....... ....... ....... ....... ....... ....... ....... ....... ... ...... ...
..................... ....... ....... ....... ....... ....... ....... ....... ....... ....... ....... ....... ....... .......
..................... ....... ....... ....... ....... ....... ....... ....... ....... ....... ....... ....... ....... ..
..................... ....... ....... ....... ....... ....... ....... ....... ....... ....... ....... ....... ..
..................... ....... ....... ....... ....... ....... ....... ....... ....... ....... ....... ....
..................... ....... ....... ....... ....... ....... ....... ....... ....... ....... ....... ....... ....... .......
GETTING STARTED
US ING THE REM OTE CONTRO L
·Point the remote control at the remote se nsor located on the unit.
·When there is a strong ambient light source, the performance of the infrared remote sen sor
·may be degraded, causing unreliable operation.
·The recommended effective distanc e for remote operation is about 16 feet (5 meters).
x 2
x 1
x 1
x 1
x 1
x 1
BATTERY REPLACEMENT
When the batteries become weak , the operating distance of the remote control is greatly
reduced and you will need to repla ce the batteries.
CAUTION
NOT ES
·If the remote control is not going to be used for a long time, remove the batteries to avo id
damage caused by battery leaka ge corrosion.
·Do not mix old and new batteries. Do n ot mix ALKALINE, standard (CARBON-ZINC) or
rechargeable (NICKEL-CAD MIUM) batteries.
·Always remove batteries as soo n as they become weak.
·Weak batteries can leak and seve rely damage the remote control.
WARNIN G :
Do not dispose batteries in a fire. Batte ries may explode or leak.
Batteries shall not be exposed to excessive heat such as sunshine, fire or the lik e.
: Da nger of explosio n if batt er y is i ncorrec tly rep laced.
3
Page 7
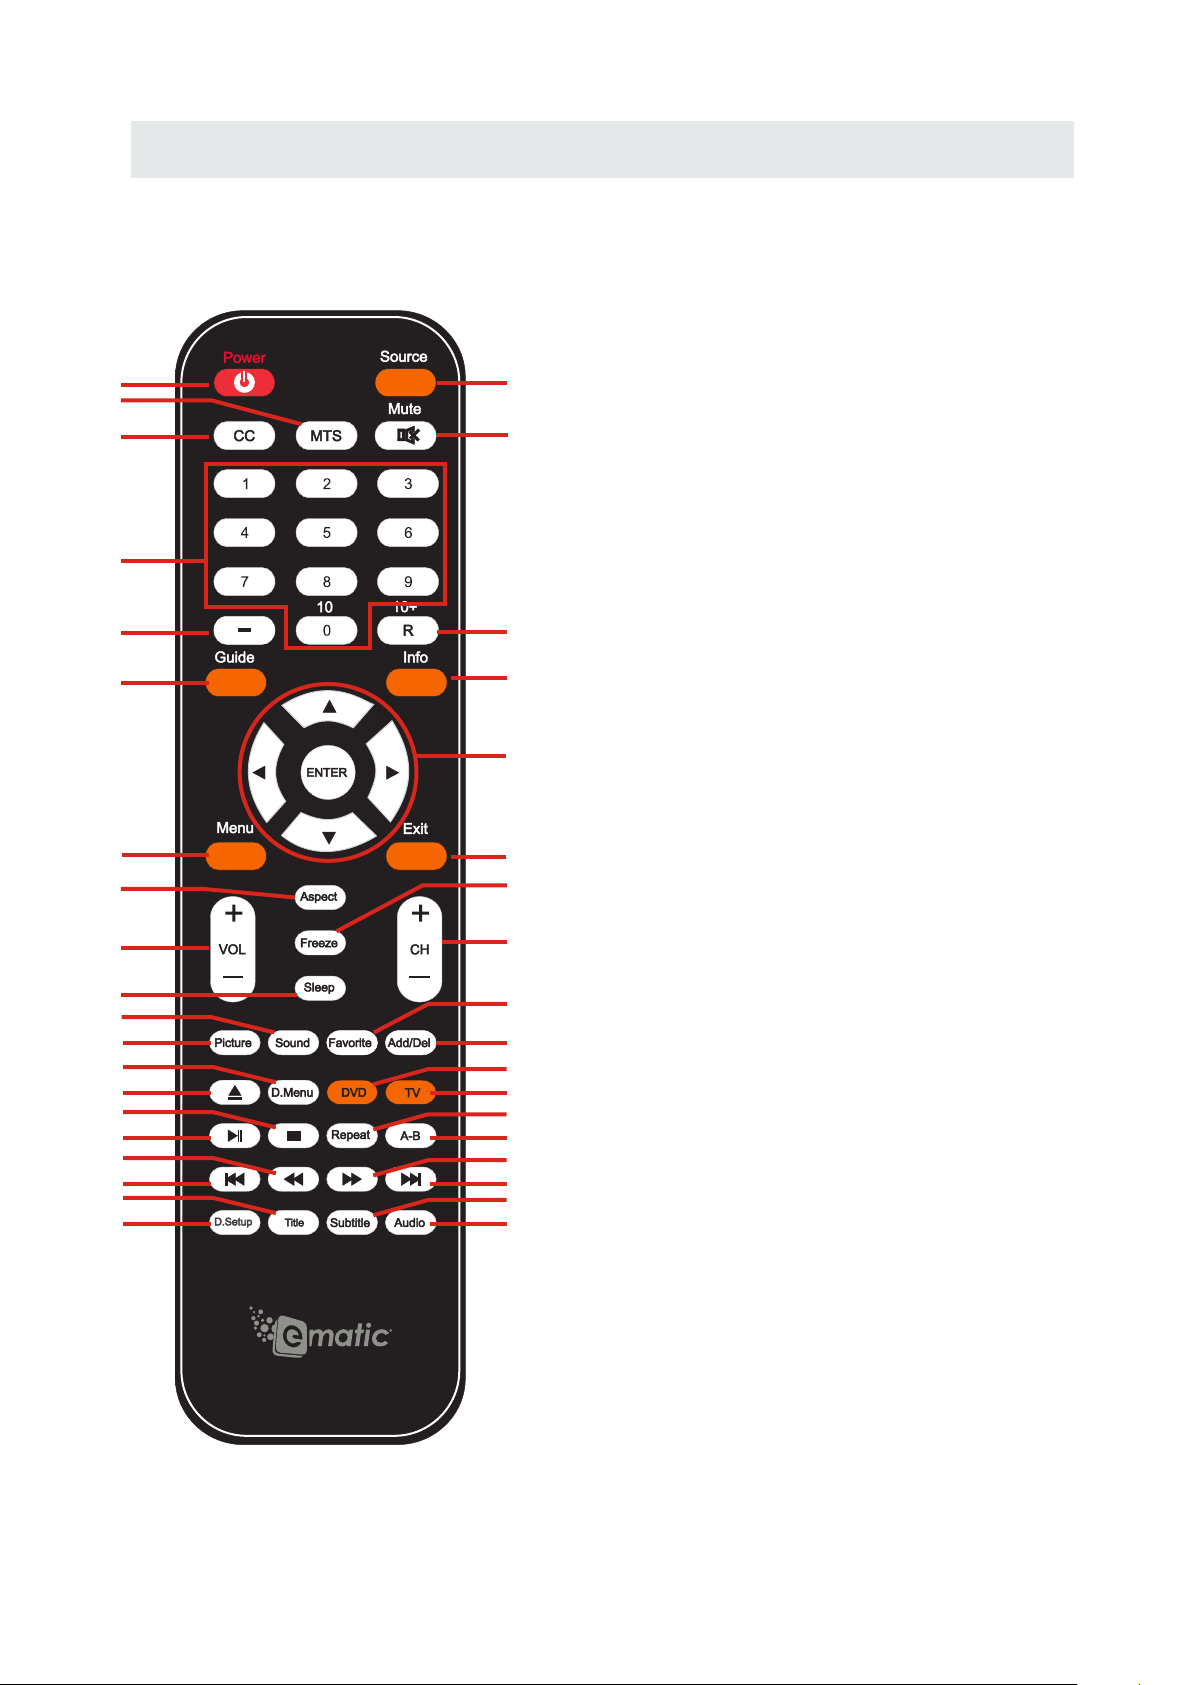
CONTROL REFERENCE GUIDE
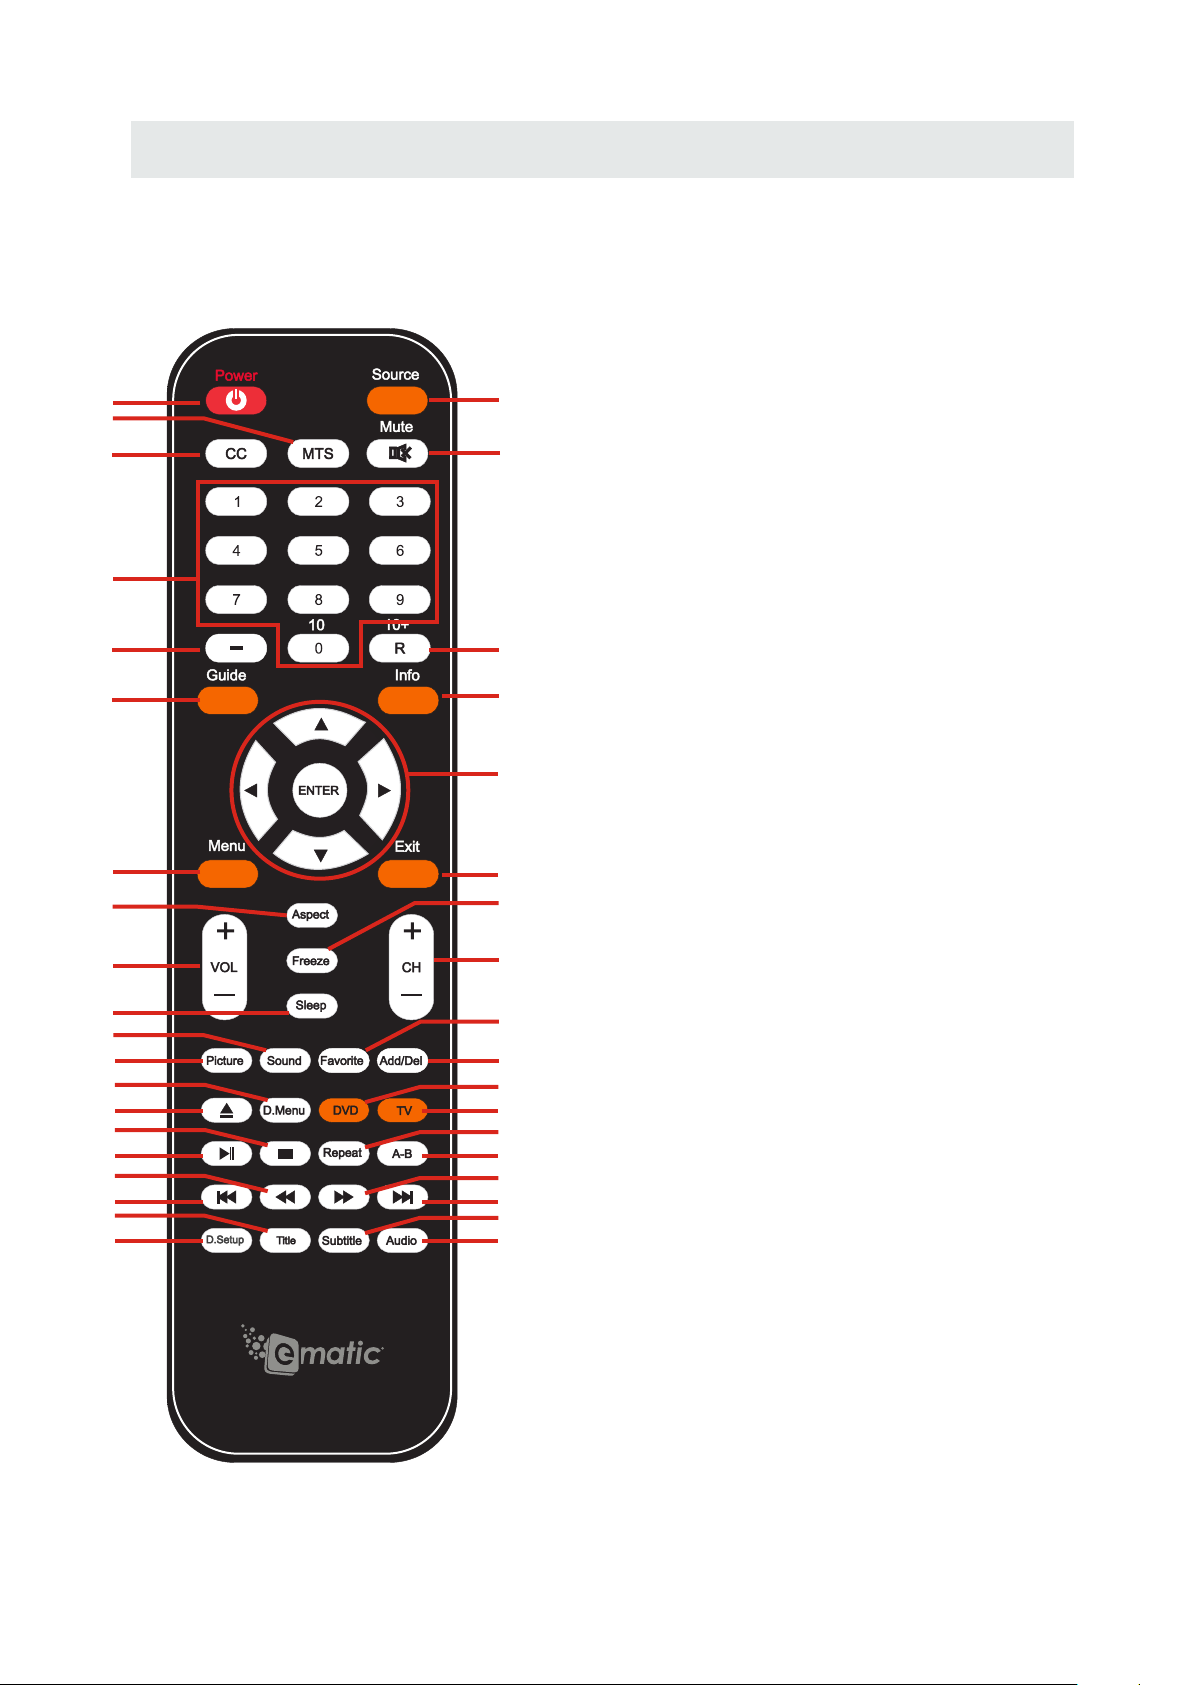
REMOTE CONTROL
1
4
3
1.POWER: Turns the TV on or off.
2.SOURCE: Press this button to cycle
through the INPUT source.
3.CC:Cycles between different closed
2
captioning modes.
5
4.MTS:Selects stereo,mono,or second audio
programming.
5.MUTE:Turns the sound off from the TV.
12
14
15
17
20
19
24
23
28
27
32
31
36
35
6
To unmute either press VOL(+) or press
the MUTE button again.
6.NUMBER BUTTONS(0-9):Press 0-9 to
7
8
select a TV channel directly when you are
9
10
watching TV.The channel will change after
2 seconds.
11
7.(-):lnserts the dash for selecting digital
channels directly.
8.R:Returns to the previous channel.
13
9.GUIDE:Opens the current digital channel
16
information guide (antenna only).
18
10.INFO:Shows the display information.
11.THUMBSTICK(p /q /t /u /ENTER):
21
Allows you to navigate the on-screen menus
22
25
and adjust the system settings to your
26
preference.
29
30
12.MENU:Brings up the main TV menu on
33
34
the screen.
37
13.EXIT:Exit the main TV menu on the screen.
38
14.ASPECT:Selects different viewing
modes of the TV.
15.VOL(+)/VOL(-):Press the VOL buttons
to increase or dicrease the sound level.
16.FREEZE:Freezes the TV picture.
17.SLEEP:Select amount of time.Let your
TV turn off automatically.
18.CH(+)/CH(-):Press the CH buttons to
go through the channel list.
4
Page 8
CONTROL REFERENCE GUIDE
REMOTE CONTROL
.PICTURE:Selects various preset picture
19
settings.
20.SOUND:Select various preset sound
12
14
15
17
20
19
24
23
28
27
32
31
36
35
1
4
3
2
21
.FAVORITE:Gives you your list o favorite
5
channels.
22.Add/Del:Press to increase/decrease y
our favourite program.
settings.
6
.AUTO EJECT Press this button to open
23 :
or close the DVD player.
7
9
8
24.D.MENU Shows the menu of the DVD disc.
10
2 .DVD Press this button to go to the DVD
5 :
:
source.
11
2 . .
6 TV: This button select source TV
27.►/║ Play/pause button in DVD mode.
28.■ Stop button in DVD mode.
13
16
29.REPEAT Press this button for repeat the
program.
18
0.A-B Press this button for repeat play point
3 :
21
A and B
22
31.PREVIOUS CHAPTER Press this button to
25
select the DVD's previous chapter.
26
29
32.REWIND Press this button to reverse the
30
33
DVD movie to a previous scene.
34
37
33.FAST FOWARD Press this button to fast
38
:
:
:
:
:
:
forward the DVDto the next scene.
34.NEXT CHAPTER Press this button to select
the DVD movie's next chapter.
35.D.SETUP Press this button to setup the disc
in DVD mode.
36.TITLE Press this button to go to the title menu
if the DVD you're watching has a title page.
37.SUBTITLE Displays the subtitle.
38.AUDIO Press to select TV sound option.
5
Page 9
CONTROL REFERENCE GUIDE
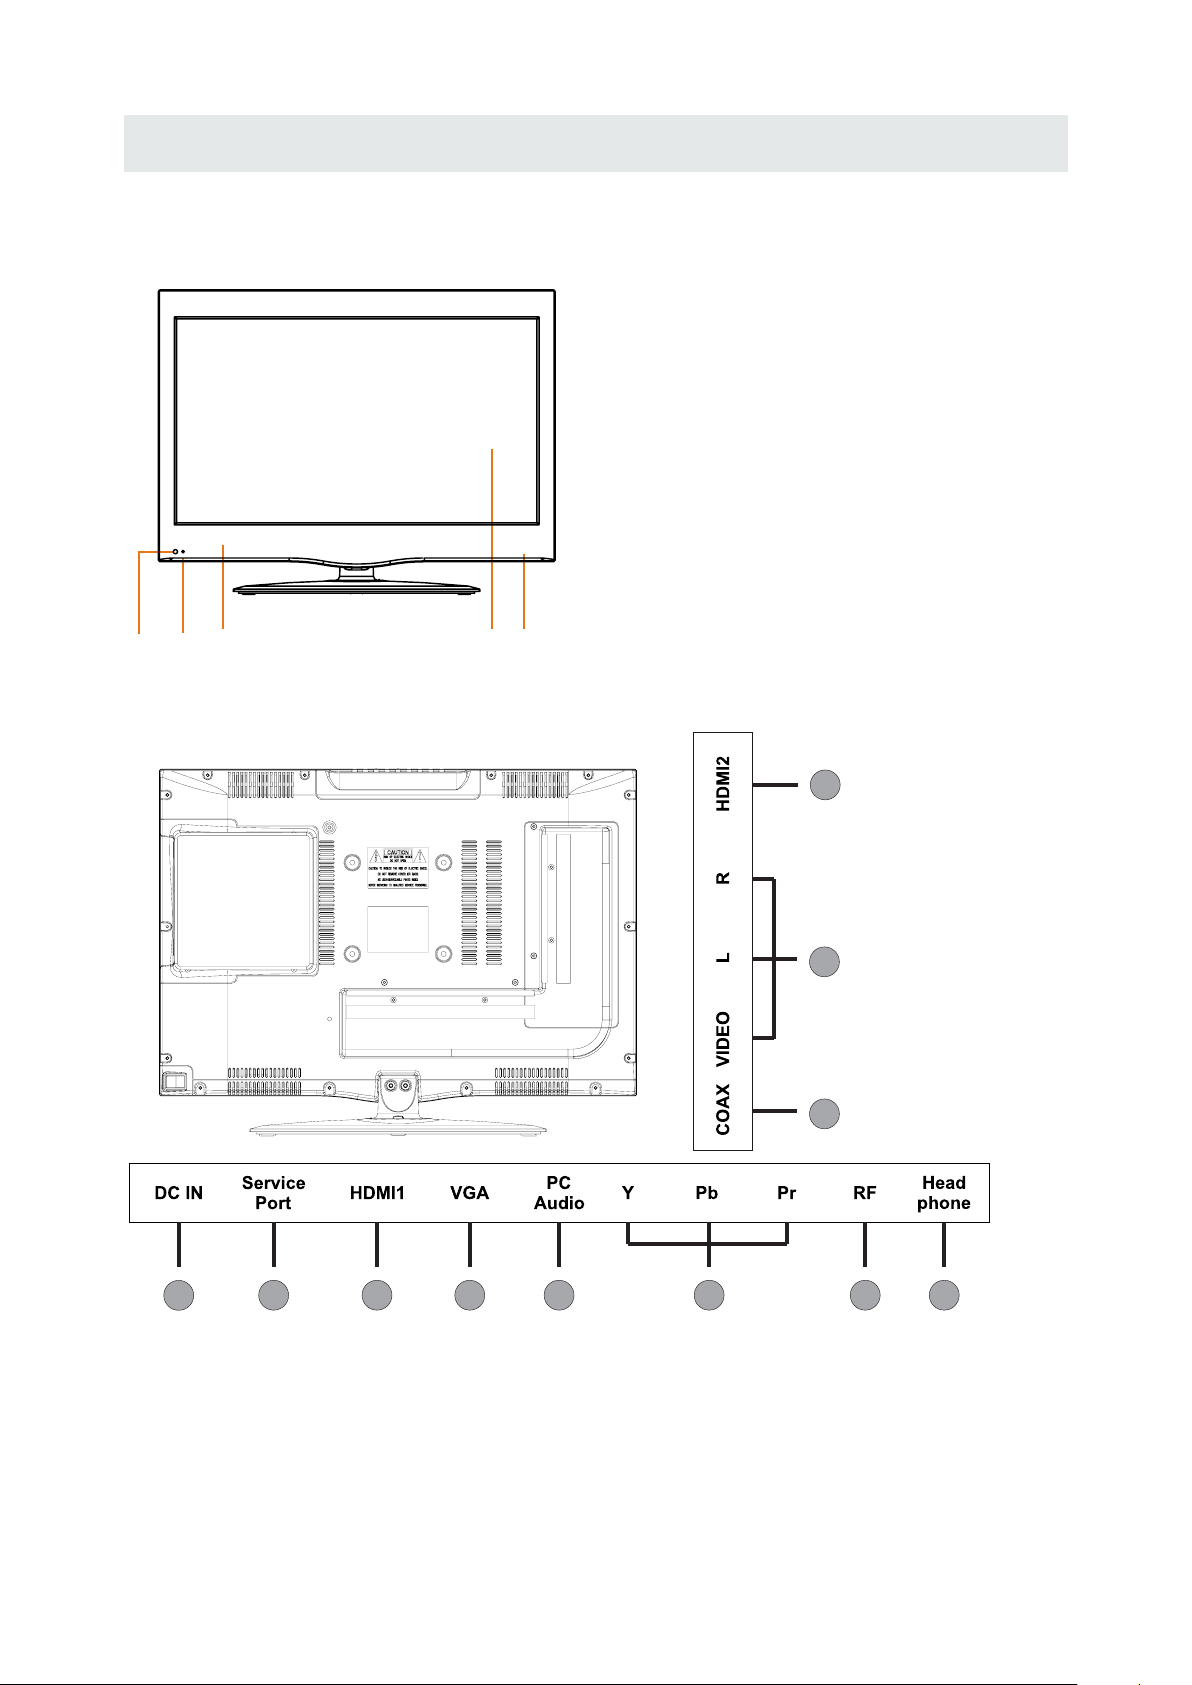
FRONT VIEW
3
2 44 1
BACK VIEW
1.Color Screen
2.Remote Sensor
Do not block this sensor or the
remote control will not work.
3.Standby Indicator
Indicates whether the unit is ON
or in STANDBY (OFF) mode.
Light in red: The unit is in STANDBY.
Light in green :The unit is turned ON.
4. Speakers
3
10
9
1
2 3 4
5 6 7
8
1.DC IN
2.Service Port
3.HDMI IN Jacks
4.VGA IN Jack
5.PC AUDIO IN Jack
6.COMPONENT IN Jack
7.TV ANTENNA Terminal
8.Headphone Jacks
9.Coax OUT Jack
10.AV (VIDEO/ AUDIO L/R)in
6
Page 10
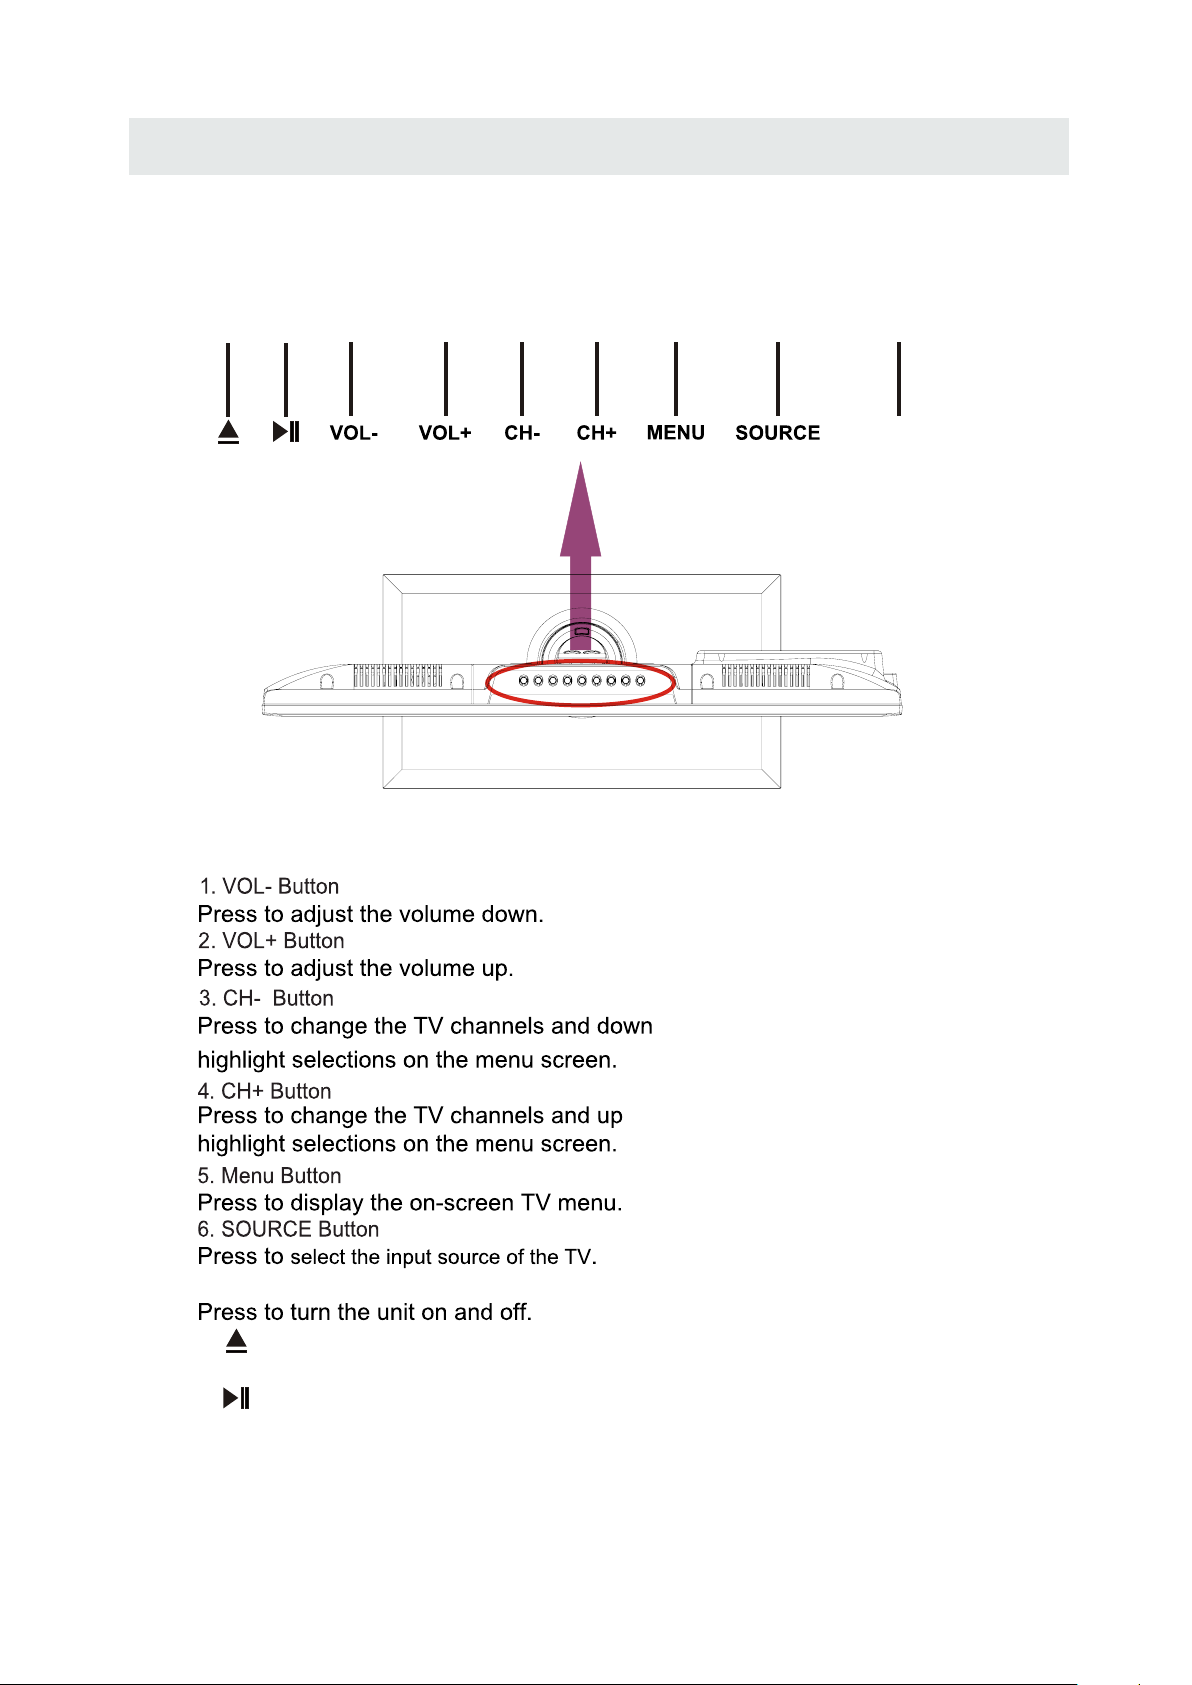
TOP VIEW
CONTROL REFERENCE GUIDE
1 2 3 4 5 6 78 9
POWER
7. POWER Button
8. Button
OPEN/CLOSE in DVD mode.
9. Button
PLAY/PUASE inDVD mode.
7
Page 11
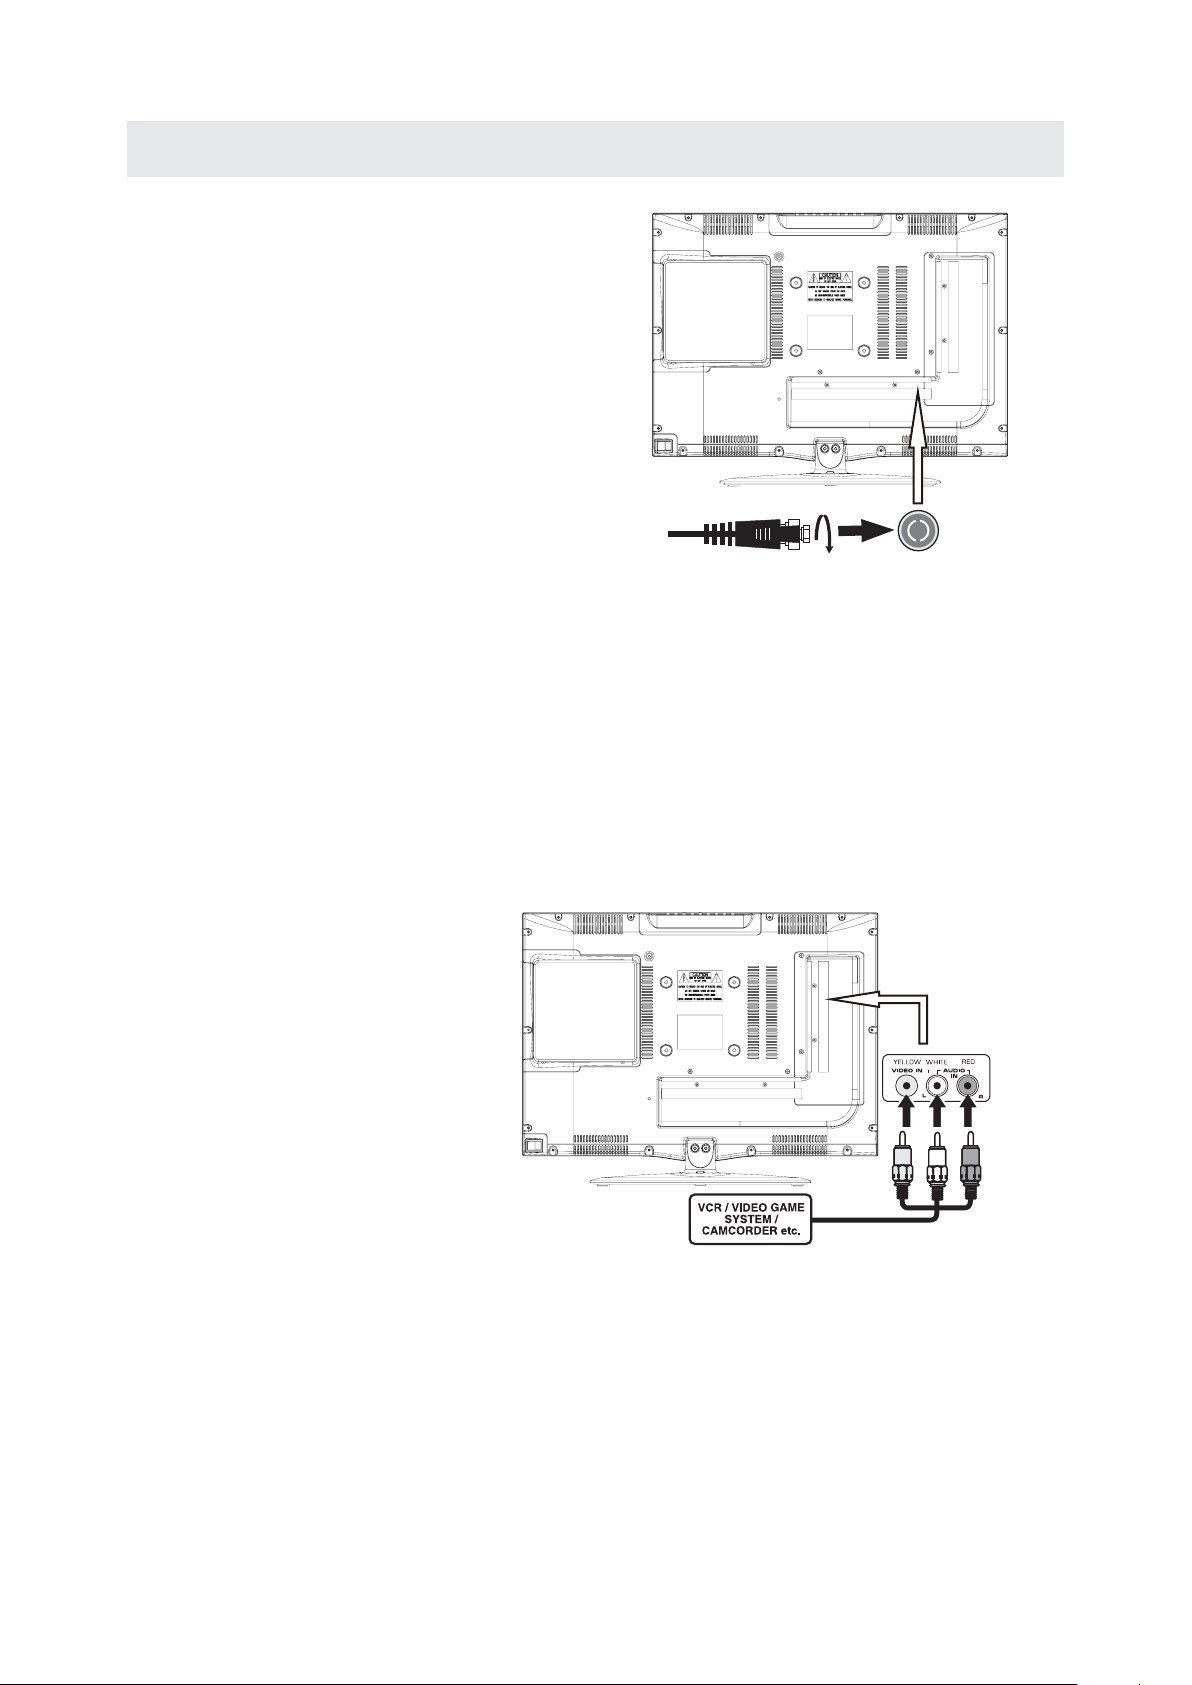
CONNECTIONS
CONNECTING A TV ANTENNA / CABLE / S A TELLITE
To view televis io n channels correctly, a signal must
be received fro m one of the following sources:
- An indoor or outdoor aerial anten na
- A ca ble system
- A satel li te system
NOTE
Fo r receiving over-the-air TV broadcasts, we
recommend that you us e an external fixed antenna.
Sh ould you require the use of a temp or ar y antenn a,
pl ease ensure that you purchase an antenna with
su fficient ability to receive in we ak signal areas.
On ly when you are in clos e proximity to a tr ansmitter
wi ll a temporary antenna repro duce a signal as
st rongly as a fixed antenna.
CONNECTING AN A/V DE VI CE
To connect to other equipment such as a VCR, camcorder, satel lite system or cable, etc.
CONNECTING DEVICES WITH A COMPOSITE (YELLOW RCA-TYPE)
VI DEO OUTPUT
To con nect A/V devices such as a VCR, video game syste m or c am corder.
Co nnecting to a VCR / Video Game Sys te m / Camcord er
Co nnect the AUDIO / VIDEO cable (not included) as shown.
Ma ke sure you c onnect the cable from t he o ther equipment ( and ) to this unit
(AV in)
Sa telli te, cable or TV anten na
ca ble to TV ANT ENNA
termina l (cable not included)
AUDIO VI DEO OUT
NOTE
Pl ease refer to the use r manual
fo r the other equipment for
mo re information.
To AUDIO / VIDEO
OU T ja cks
To AUDIO / VIDEO
IN j ack s
8
Page 12

CONNECTIONS
CONNECT ING A HIG H-DEFIN ITION (H D) SOURC E USING CONNE CTION
High-De finition (HD) Devic es with component video output must be connected to the Y input.
Connect the component video cable and audio cable (not included) as shown.
Ma ke su re you co nn ect the c om ponent vi deo cable a nd audio ca ble fro m the other e quipmen t
(COMPONENT OUT and AUDIO OUT)to the unit COMPONENT IN.
COMPO NENT
PbPr
NOT E
When connecting a DVD player to the telev ision,
the picture resolution is solely dependent upon
the resoluti on supported by the DVD player attached.
DVD player resolutio ns vary from 480i to 1080p.
and this television can suppor t DVD players up to
a maximum resol ution of 1080p.
* May require a subscription
fo r receiving HD channels,
ch eck with yo ur cable/satellite
COMPONENT IN
se rvice provider for details.
To COMPONENT
VIDEO IN jacks
To COMPO NENT
VI DEO OUT j acks
To COMPONENT AUDIO
OU T jacks
To COMPONENT
AU DIO IN jac ks
CONNECT ING A HIGH- DEFINIT ION (H D) SOURC E USING HDMI CONNECTI ON
HDMI (High De finition Multimedia Inter fa ce) supports both vid eo and audio on a single digital conne ction
fo r use with DVD playe rs , DTV, set-top b oxe s and other digital AV de vi ces. HD MI was deve loped to provide
the te chnolog ies of High Ban dwidth Digital Content Protection (HDCP) as wel l as Di gital Visual Interface
(D VI) in on e sp ecification. HDC P is used to prote ct digita l content t ransmit ted and received by
DVI-com pliant or HDMIcompliant display s.
HDMI has the capabil ity to support standard, enhanced or hi gh-definition vid eo plus standard to
multi-c hannel surround -sound audio. HDMI features include uncompress ed digital video, a bandwid th of
up to 2.2 gigabyt es per second (with HDT V signals), one connector (instea d of several cables and
connect ors), and communication bet ween the AV source and AV dev ices such as DTVs .
Co nnect t he H DMI cable (not inclu ded) as
sh own:
Ma ke su re you conn ect the c ab le from t he
HDMI CABLE
(NOT INCLUDED)
so urce equipment ( ) to this unit
( ).
HD MI IN
HD MI OUT
To HDMI
IN jack
To HDMI
ja ckOUT
9
Page 13

CONNECTIONS
CONNECT ING A
Co nnect the 15-pin D-S UB PC/VG A connecto r
from your computer to the 15-pin D-SUB PC/VG A
in put on this unit usi ng a monitor cab le and an
au dio cable (not inclu ded) as shown .
Ma ke su re you conn ect the c ab le from t he computer
( and ) to this un it
VGA
( an d ).
VGA AUDIO - PC IN
AUDIO - PC OU T
PC
TO AUDIO OUT j acks
TO PC Connector
CONNECTING THE POWER CORD
NOT E
• Insert the power plug fully into the socket outlet
( ,
If the power plug is loose it could generate he at and
cause fire
•
Ensure that the power plug is easily accessible.
•
Ensure the earth pin on the power plug is securely
connected to prevent electrical shock.
•
Do not touch the power plug with a wet hand
( .)
This may cause electrical shock
•
Do not use any power cord other than that provided
with this TV This may cause fire or electrical shock
•
Do not damage the power cord
( ).
A damaged cord may cause fire or electrical shock
• Do not move the TV with the cord plugged in the
socket outlet.
• Do not plac e a heavy object on the cord or place
the cord near a high-tempera ture object.
• Do not twis t the cord, bend it excessively, or stretch it.
• Do not pull on the cord. Hold onto the power plug body when disconn ecting cord.
• Do not use a damaged power plug or socket outlet.
.)
. ( .)
.
.
.
10
Page 14

CONNECTIONS
Connection to a Home Theater Audio System
For BEST audio performa nce
Connecting to a Home Theater System
Dolby Digital can deliver optimal 2 channel
stereo or surround sound with five discrete
full range channels plus a sixth channel for
a subwoofer.
Enjoy optimal sound reproduction from your
system with a Dolby Digital amplifier that
incorporates a digital coaxial input. Connect
an optional digital cable directly to the
television’s Coax audio output to listen
through all inputs except VGA.
(The VGA does not support digital audio)
SPD IF OUT
Coax
How To Setup Digit al Output
Press the MENU button on the remote control
Press the right ► arrow button to select AUDIO
Press the down ▼ arrow button to highlight
SPDIF type right ► Raw or PCM
12
6
Set up
Pict ure Audio
Sound Mode
Ba ss
Treble
Ba lan ce
Surround
SP DIF T ype
Au dio La ngu age
Mo ve Se lec t Return
Tim
e
St and ard
50
50
50
Of f
PC M
En glish
MEN U
11
Page 15

WALL MOUNT INSTALLATION
INSTALLING REMOVING THE BASE STAND
WARNING/: The TV Display i s ve ry fragil e and must b e prote cted at all times when remo vi ng the base
.
Stand
Be sure that no hard or sharp object or any thing that could scratch or damage th e TV display comes into
contact with it Do NOT exert pressu re on the f ront of the unit at any time because the screen could crac k
. .
1 Disconnect all cables or cords connected to the unit
. .
2 Lay the unit down on a flat surfac e with the back side facing up Please make sure to plac e a soft
cushion ed material such as a pillow or th ick piece of foam benea th the screen
. ,
3 To remove the base stand loosen screws off the holes then pull downwards to release
the base stand
. ,
4 To install the base s tand put the stand in to the hole at the bottom of the TV then inser t screws to t he
holes a nd tighten.
. .
.
,
MO UNTING ON THE WALL
This unit is VESA-compliant, and is designed to be wa ll-moun ted with a VESA-compliant 4”x 4 ”
(100mm x 100mm) mounting kit designed for flat-panel TVs (not supplied). Mount this unit according to
the in structi ons included in the mounting kit .
Length of screw should not exceed 10 mm.
NOTE
Remov e th e base stand before mounting the unit on the w all.
4”
4”
M4
12
Page 16

INITIAL SETUP
PUTTING THE UNIT ON A PROPER PLACE
Wh en you turn on your television set for
th e fi rs t ti me , be sure to place it on a solid
st able surface.
To avo id d anger, do not expose the TV
to water, or a hea t so urce
(e .g. lamp, candle, radiator).
Do not obstruct the ventilation grid
at t he rear and be sure to le ave sufficient
ga ps around the unit.
TURNING THE UNIT ON FOR THE FIRST TIME
Af te r you ha ve initiall y connected your TV
antenn a or cable,
tu rn th e television ON.
A scre en w ill display asking you to run a
Channel Auto Scan
available local digital chann el s.
It is he re where you will se le ct antenna options
an d run .
Channe ls will be stored in the TV tuner.
Pres s the bu tton on the remote control.
Using the buttons, scroll to highlight channel mode.
Pr es s th e butt on to highlight AIR/CABLE.
1. Press th e button on th e remo te co ntrol.
2.
(TV,AV,Component, HDMI1, HDMI2, VGA)
and select any o f th em using the button or
the button.
(T he s creen will change to your desired s ).
Channel Auto Sc an
MENU
Us e or button to s el ec t the optionsthe
ENT ER
to se ar ch an d receive
ource
Please run
Channel Auto Scan
INPUT SO UR CE
TV
AV
Component
HDMI1
HDMI2
Note:
Be fore watching pleas e make sure all nece ss ary
cables and de vices are connected.
VGA
13
Page 17

How to Navigate
INITIAL SETUP
Air Mode: Select wh en co nnected to an
AIR
in do or/outdoo r ant enna.
12
6
Setu p
Air
KO CEKO CE LBLB
AIR.
Set up
Au to
LOC K
MENU
MENU
CHAN NEL
Return
e
Pic ture Audio
Tim
Air /Ca ble
Au to S can
Fa vori teFa vori te
Show H ideShow H ide
Ch ann el NoCh ann el No
Ch anne l labe lCh anne l labe l
DT V Si gna lDT V Si gna l
Mo ve
Se lect Mo ve
Press the button to highlight
12
6
Pict ure Audio
Ca ble Sys tem
St art to Scan
e
Tim
Cable Mode: Sel ec t if you sub sc ribe to
CABLE
a pay televisi on se rvice includ ing satellite.
12
Pic ture Audio
Air /Ca ble
6
Setu p
e
Tim
Ca ble
CHAN NEL
Au to S can
Fa vori teFa vori te
Show H ideShow H ide
Ch ann el NoCh ann el No
Ch anne l labe lChanne l labe l
DT V Si gna lDT V Si gna l
MENU
MENU
Mo ve
Se lect
Return
Using the ◄► button to highlight CABLE.
12
6
Pict ure Audio
Ca ble Sys tem
St art to Scan
Set up
e
Tim
Au to
CHAN NELCHAN NEL
MENU
Mo ve Nex t
Return
Press the ▼ button to select AUTO SCAN then
press the ► button to enter the submenu and
press the ► button to start Channel Auto Scan.
Mo ve Nex t
Press the ▼ button to select AUTOSCAN.
Press the ENTER button and the cursor will move
up and CABLE SYSTEM will be displayed next.
MENU
Return
Press ► the button to select STD > IRC > HRC >
Auto (Auto is recommended).
Press the ▼ button to select Start to Scan
and press ENTER to start Channel Auto Scan.
RF CH
Fo und
12
Set up
e
miT
CHAN NEL
7
4
MENU
Return
12
6
Set up
e
RF CH
Fo und
miT
CHAN NEL
7
4
MENU
Return
Pic ture Audio
Mo ve Ne xt
Channel Auto Scan may take several minutes
to complete.
Pic ture Audio
Mo ve N ext
Channel Auto Scan may take several minutes
to complete.
NOTE: For cable or satellite users with no TV antenna, there no need to run Channel Auto Scan.
Connect your cable or satellite set top box to one of the available inputs on the TV for viewing.
14
Page 18

TV SETUP
PICTURE MENU
Pict ure
The PICTURE menu offers options to enhance and refine the picture displayed on your TV
based on ambient room light and personal preferences.
Adjustment options include contrast, brightness, color, tint, sharpness and Color Temp.
How to Navigate:
Press the MENU button on the remote control. Navigate using the ◄► buttons to select PICTURE.
12
Pic ture Audio
Pictu re Mode
Co ntr as t
Brigh tne ss
Co lor
Tin t
Sh arp nes s
Co lor Te mp.
Tim
6
Set up
e
St and ard
50
50
50
0
50
No rma l
Press the ▼ button to highlight ,
then press the ► button to select your viewing
preference from 4 factory options:
STANDARD > DYNAMIC > MILD > USER.
The STANDARD setting is recommended for most
viewing environments.
Depending on the ambient light level in the room,
you may find one of the other options
more pleasing.
Mo ve Select Return
MEN U
To make more cri tical picture adjustments based on your own preferences i n USER:
12
6
Set up
Tim
Tim
e
St and ard
No rma l
MEN U
12
6
Set up
e
St and ard
Par enta l
No rma l
Use the ▼ button to highlight Contrast.
Navigate using the ◄► buttons to
increase or decrease contrast intensity.
Use the ▼ button to highlight Brightness.
Navigate using the◄► buttons to
increase or decrease overall brightness.
Pic ture Audio
Pictu re Mode
Co ntr as t
Brigh tne ss
Co lor
Tin t
Sh arp nes s
Co lor Te mp.
Mo ve Ad jus t R eturn
Pic ture Audio
Pictu re Mode
Co ntr as t
Brigh tne ss
Co lor
Tin t
Sh arp nes s
Co lor Te mp.
50
50
50
0
50
TV
50
50
50
0
50
15
Mo ve Ad jus t R eturn
MEN U
Page 19

TV SETUP
PICTURE MENU
Pict ure
The PICTURE menu offers options to enhance and refine the picture displayed on your TV
based on ambient room light and personal preferences.
Adjustment options include contrast, brightness, color, tint, sharpness and color temp.
Press the MENU button on the remote control. Navigate using the ◄► buttons to select PICTURE.
12
6
Pic ture Audio
Pictu re M ode
Co ntr as t
Brigh tne ss
Co lor
Tin t
Sh arp nes s
Co lor Te mp.
Mo ve Ad just Ret urn
Tim
e
Set up
St and ard
No rma l
MEN U
Use the ▼ button to highlight Color.
Navigate using the ◄► buttons to
increase or decrease color intensity.
12
6
Set up
Pic ture Audio
Pictu re M ode
Co ntr as t
Brigh tne ss
Co lor
Tin t
Sh arp nes s
Co lor Te mp.
Tim
e
St and ard
No rma l
50
50
50
0
50
50
50
50
0
50
12
6
Set up
Pic ture Audio
Pictu re M ode
Co ntr as t
Brigh tne ss
Co lor
Tin t
Sh arp nes s
Co lor Te mp.
Mo ve Ad just Ret urn
Tim
e
St and ard
50
50
50
0
50
No rma l
MEN U
Use the ▼ button to highlight Tint.
Navigate using the ◄► buttons to adjust colors
toward green or reddish tint.
12
6
Set up
Pic ture Audio
Pictu re M ode
Co ntr as t
Brigh tne ss
Co lor
Tin t
Sh arp nes s
Co lor Te mp.
Tim
e
St and ard
50
50
50
0
50
No rma l
Mo ve Ad just Ret urn
MEN U
Use the ▼ button to highlight Sharpness.
Navigate using the ◄► buttons to soften or
view crisper edges in the picture.
Use the ▼ button to highlight Color Temp.
Navigate using the ◄► buttons to select COOL
(more bluish tone), NORMAL or WARM.
Mo ve Ad just Ret urn
The default setting is NORMAL.
WARM mode will provide color that is calibrated
to D6500° Kelvin, the standard color that
broadcast stations and the Motion Picture
industry consider as the most accurate to
view programming.
Note:
When adjustments are completed, you may select another menu by pressing
the Menu button.
16
MEN U
Page 20

TV SETUP
AUDIO MENU
Audio
The AUDIO menu offers options to make sound enhancements while listening through the built-in
speakers and personal preferences.
Adjustment options include bass, treble, balance, surround, SPDIF Type and audio language.
How to Navigate:
Press the MENU button on the remote control. Navigate using the ◄► buttons to select AUDIO.
12
6
Set up
Pict ure Audio
Sound Mode
Ba ss
Treble
Ba lan ce
Surround
SP DIF T ype
Au dio La ngu age
Mo ve Se lec t Return
Tim
e
St and ard
Of f
PC M
En glish
50
50
50
MEN U
Press the ▼ button to highlight SoundMode,
then press the ► button to select your sound
preference from 4 factory options:
STANDARD > MUSIC > MOVIE > USER.
The STANDARD setting is recommended for most
sound environments.
Depending on the surroundings in the room,
you may find one of the other options
more pleasing.
To make more critical audio adjustments bas ed on your own preferences in USER:
12
6
Set up
Tim
e
St and ard
Of f
PC M
En glish
Use the ▼ button to highlight Bass.
Navigate using the ◄► buttons to
increase or decrease low frequency intensity.
Pict ure Audio
Sound Mode
Ba ss
Treble
Ba lan ce
Surround
SP DIF T ype
Au dio La ngu age
50
50
50
Use the ▼ button to highlight Treble.
Navigate using the ◄► buttons to
increase or decrease high frequency intensity.
Pict ure Audio
Sound Mode
Ba ss
Treble
Ba lan ce
Surround
SP DIF T ype
Au dio La ngu age
17
Mo ve A dju st Return
12
6
Set up
e
Tim
St and ard
PC M
En glish
Mo ve A dju st Return
MEN U
50
5050
50
Of f
MEN U
Page 21

TV SETUP
AUDIO MENU
Audio
The AUDIO menu offers options to make sound enhancements while listening through the built-in
speakers and personal preferences.
Adjustment options include bass, treble, balance, surround ,SPDIF Type and audio language.
How to Navigate:
Press the MENU button on the remote control. Navigate using the ◄► buttons to select AUDIO.
12
6
Set up
Pict ure Audio
Sound Mode
Ba ss
Treble
Ba lan ce
Surround
SP DIF T ype
Au dio La ngu age
Mo ve A dju st Return
Tim
e
St and ard
50
50
50
Of f
PC M
En glish
MEN U
Use the ▼ button to highlight Balance.
Navigate using the ◄► buttons to adjust sound
towards the right or left speaker.
12
6
Set up
Pict ure Audio
Sound Mode
Ba ss
Treble
Ba lan ce
Surround
SP DIF T ype
Au dio La ngu age
Tim
e
St and ard
50
50
50
Of f
PC M
En glish
12
6
Set up
Pict ure Audio
Sound Mode
Ba ss
Treble
Ba lan ce
Surround
SP DIF T ype
Au dio La ngu age
Mo ve Se lec t Return
Tim
e
St and ard
50
50
50
Of f
PC M
En glish
MEN U
Use the ▼ button to highlight Surround.
Navigate using the ► button to turn the
dimensional surround effect ON or OFF.
(for built-in speakers only).
12
6
Set up
Pict ure Audio
Sound Mode
Ba ss
Treble
Ba lan ce
Surround
SP DIF T ype
Au dio La ngu age
Tim
e
St and ard
50
50
50
Of f
PC M
En glish
Mo ve Se lec t Return
Use the ▼ button to highlight SPDIF Type.
Navigate using the ► button to adjust.
MEN U
Mo ve Se lec t Return
Use the ▼ button to highlight Audio Language.
Navigate using the ◄► buttons to select to listen
to an alternative language broadcast
(if available) English > French > Spanish .
You may select an alternative language using
the remote control by pressing MTS)
Note:
When adjustments are completed, you may select another menu by pressing
the Menu button.
18
MEN U
Page 22

TV SETUP
12
6
TIME MENU
e
Tim
The TIME menu includes adjustment of settings for your local time zone and daylight savings time.
The clock will adjust automatically after the initial Channel Auto Scan of available broadcast
channels in your area.
How to Navigate:
Press the MENU button on the remote control. Navigate using the ◄► buttons to select TIME.
12
6
Set up
Pic ture
Audio
Sl eep T ime r
Tim e Zone
Da yli ght Saving Time
Cl ock
Mo ve Se lec t Return
Tim
e
Of f
Pa cif ic
Of f
200 7 10 31 04 0 4 PM
MEN U
Use the ▼ button to highlight SleepTimer,
then press the ► button to select among:
5min, 10min, 15min, 30min, 45min, 60min,
90min, 120min, 180min, 240min and off.
12
6
Set up
Pic ture
Audio
Sl eep T ime r
Tim e Zone
Da yli ght Saving Time
Cl ock
Tim
e
Of f
Pa cif ic
Of f
200 7 10 31 04 0 4 PM
12
6
Set up
Pic ture
Audio
Sl eep T ime r
Tim e Zone
Da yli ght Saving Time
Cl ock
Mo ve Se lec t Return
Tim
e
Of f
Pa cif ic
Of f
200 7 10 31 04 0 4 PM
MEN U
Use the ▼ button to highlight TimeZone,
then press the ► button to select among:
EASTERN > CENTRAL > MOUNTAIN >
PACIFIC > ALASKA > HAWAII.
12
6
Set up
Pic ture
Audio
Sl eep T ime r
Tim e Zone
Da yli ght Saving Time
Cl ock
Tim
e
Of f
Pa cif ic
Of f
200 7 10 31 04 0 4 PM
Mo ve Se lec t Return
Use the ▼ button to highlight
MEN U
Clock: Display the time at present.
Mo ve Se lec t Return
Daylight Saving Time.
Navigate using the ◄► buttons to turn
this feature on or off.
Note:
When adjustments are completed, you may select another menu by pressing
the Menu button.
19
MEN U
Page 23

TV SETUP
SETUP MENU
Setu p
In the SETUP menu you may change the initial set up of preferences that include settings for
language, menu display, computer monitoring, closed captions, enhancement of black detail
in the picture and resetting your TV back to its factory default status.
How to Navigate:
Press the MENU button on the remote control. Navigate using the ◄► buttons to select SETUP.
12
12
12
6
6
Setu p
Pict ure
Audio
Pict ure
Audio
Me nu La ngua ge
Me nu La ngua ge
Tra nspa ren cy
Tra nspa ren cy
Zoo m M ode
Zoo m M ode
No ise R educ tion
No ise R educ tion
Ad vanc e
Ad vanc e
Clo se Ca ptio n
Clo se Ca ptio n
XVS
XVS
Re stor e D efau lt
Re stor e D efau lt
Mo ve Sel ect Ex it
Mo ve Sel ect
Setu p
Time Chan nel
Time
Eng lish
Eng lish
Off
Off
Nor mal
Nor mal
Off
Off
On
On
Lock
MENU
MENU
Return
Pict ure
Audio
Pict ure
Audio
Me nu La ngua ge
Me nu La ngua ge
Tra nspa renc y
Tra nspa renc y
Zoo m M ode
Zoo m M ode
No ise R educ tion
No ise R educ tion
Ad vanc e
Ad vanc e
Clo se Ca ptio n
Clo se Ca ptio n
XVS
XVS
Re stor e D efau lt
Re stor e D efau lt
Mo ve Sel ect Ex it
Mo ve Sel ect
12
6
6
Setu p
Setu p
Eng lish
Eng lish
Off
Off
Nor mal
Nor mal
Off
Off
On
On
Lock
MENU
MENU
Return
Time Chan nel
Time
Use the▼ button to highlight Menu Language,
Press the ► button to select the language
you prefer among English, French and Spanish.
12
12
6
6
Setu p
Pict ure
Audio
Pict ure
Audio
Me nu La ngua ge
Me nu La ngua ge
Tra nspa renc y
Tra nspa renc y
Zoo m M ode
Zoo m M ode
No ise R educ tion
No ise R educ tion
Ad vanc e
Ad vanc e
Clo se Ca ptio n
Clo se Ca ptio n
XVS
XVS
Re stor e D efau lt
Re stor e D efau lt
Mo ve Sel ect Ex it
Mo ve Sel ect
Setu p
Eng lish
Eng lish
Off
Off
Nor mal
Nor mal
Off
Off
On
On
Lock
MENU
MENU
Return Return
Time Chan nel
Time
Use the ▼ button to highlight Transparency.
Navigate using the ◄► buttons to turn Off or On
the translucent effect of the OSD.
12
12
6
6
Setu p
Pict ure
Audio
Pict ure
Audio
Me nu La ngua ge
Me nu La ngua ge
Tra nspa ren cy
Tra nspa ren cy
Zoo m M ode
Zoo m M ode
No ise R educ tion
No ise R educ tion
Ad vanc e
Ad vanc e
Clo se Ca ptio n
Clo se Ca ptio n
XVS
XVS
Re stor e D efau lt
Re stor e D efau lt
Mo ve Sel ect Ex it
Mo ve Sel ect
Setu p
Eng lish
Eng lish
Off
Off
Nor mal
Nor mal
Off
Off
On
On
Lock
MENU
MENU
Return
Time Chan nel
Time
Use the ▼ button to highlight Noise Reduction.
Navigate using the ◄► buttons to reduce video
noise: Middle > Strong> Off > Weak
Default setting: Middle)
1212
6
6
Setu p
Pict ure
Audio
Pict ure
Audio
Me nu La ngua ge
Me nu La ngua ge
Tra nspa ren cy
Tra nspa ren cy
Zoo m M ode
Zoo m M ode
No ise R educ tion
No ise R educ tion
Ad vanc e
Ad vanc e
Clo se Ca ptio n
Clo se Ca ptio n
XVS
XVS
Re stor e D efau lt
Re stor e D efau lt
Mo ve Sel ect Ex it
Mo ve Sel ect
Time
Time
Setu p
Eng lish
Eng lish
Off
Off
Nor mal
Nor mal
Off
Off
On
On
MENU
MENU
Use the ▼ button to highlight XVS.
Navigate using the ◄► buttons to select:
Off > On. XVS provides noticeable black detail
enhancement that may be preferred.
1212
6
6
Setu p
Pict ure
Audio
Pict ure
Audio
Me nu La ngua ge
Me nu La ngua ge
Tra nspa ren cy
Tra nspa ren cy
Zoo m M ode
Zoo m M ode
No ise R educ tion
No ise R educ tion
Ad vanc e
Ad vanc e
Clo se Ca ptio n
Clo se Ca ptio n
XVS
XVS
Re stor e D efau lt
Re stor e D efau lt
Mo ve Sel ect Ex it
Mo ve Nex t
Time
Time
Setu p
Eng lish
Eng lish
Off
Off
Nor mal
Nor mal
Off
Off
On
On
MENU
MENU
Return
Ar e y ou sure ?
No
Yes
When
prompted,
Select "Yes"
to confirm.
Use the ▼ button to highlight Zoom Mode.
Navigate using the ◄► buttons to select the
viewing mode: Normal > Wide > Zoom > Cinema.
Use the ▼ button to highlight Restore Default.
Press the ► button to automatically set all
adjustments back to their original settings.
20
Page 24

TV SETUP
SETUP MENU
Setu p
The SETUP menu includes adjustments for activating the Closed Caption feature for display
on the television and customizing CC display types and font styles.
How to Navigate:
Pict ure
Audio
Pict ure
Audio
Menu La ngu age
Menu La ngu age
Tran spa ren cy
Tran spa ren cy
Zoo m Mode
Zoo m Mode
Noise Red uct ion
Noise Red uct ion
Advance
Advance
Close Ca ptio n
Close Ca ptio n
XVS
XVS
Restor e De fault
Restor e De fault
12
12
6
6
Set up
Set up
Englis h
Englis h
Off
Off
Normal
Normal
Off
Off
On
On
Lock
Time Chan nel
Time
Pict ure
Audio
CC Mo de
Basi c Sel ecti on
Advanc ed Se lect ion
Opt ion
Time
12
6
Set up
On
CC 1
Service 1
MENU
Mo ve Sel ect E xit
Mo ve Nex t Return
MENU
Press the MENU button on the remote control.
Navigate using the ◄► buttons to select SETUP.
Press the▼ button to highlight Closed Caption
then press the ► button to select from the
following options.
12
6
Set up
Audio
Time
Se rvic e 1
Se lect Return
On
CC 1
MENU
Pict ure
CC M ode
Bas ic Se lect ion
Ad vanc ed Se lect ion
Opt ion
Mo ve
Use the ▼ button to highlight CC Mode.
Navigate using the ◄► buttons to select
Off > On > CC on Mute.
12
6
Set up
Audio
Time
Se rvic e 1
Se lect Return
On
CC 1
MENU
Pict ure
CC M ode
Bas ic Se lect ion
Ad vanc ed Se lect ion
Opt ion
Mo ve
Move
Se lect Return
MENU
Use the ▼ button to highlight Advance Selection.
Navigate using the ◄► buttons to select
Service 1 - 6.
12
6
Set up
Audio
Time
CC 1
Se rvic e 1
Ne xt Ret urn
On
MENU
Pict ure
CC M ode
Bas ic Se lect ion
Ad vanc ed Se lect ion
Opt ion
Mo ve
Use the ▼ button to highlight Option.
Press the ► button to enter a menu with options
to cus tomize text fonts, colors and opacities.
12
6
Set up
Audio
Time
Se lect
Cu stom
De faul t
De faul t
De faul t
De faul t
De faul t
De faul t
De faul t
De faul t
MENU
Return
Pict ure
Mo de
Fo nt Sty le
Fo nt Si ze
Fo nt Ed ge Sty le
Fo nt Edg e C olor
FG Col or
BG Color
FG O paci ty
BG O pac ity
Mo ve
Use the ▼ button to highlight Basic Selection.
Navigate using the ◄► buttons to select
CC 1-4, Text 1-4.
Note:
When adjustments are completed, you may select another menu by pressing
the Menu button.
21
Page 25

TV SETUP
SETUP MENU
Setu p
In the SETUP menu you may adjust the position of images displayed on screen once you connect
an input signal from your PC.
If your PC system uses a standard signal mode, the screen will adjust automatically.
Connect an optional 3.5mm audio cable for stereo sound.
How to Navigate:
After connecting to a PC, press the SOURCE button and highlight VGA, then press the E NTER
button.
Pict ure
Audio
Pict ure
Audio
Me nu La ngu age
Me nu La ngu age
Tra nspa ren cy
Tra nspa ren cy
Zoo m M ode
Zoo m M ode
No ise R edu ctio n
No ise R edu ctio n
Ad vanc e
Ad vanc e
Cl ose C aption
Cl ose C aption
XVS
XVS
Re stor e De faul t
Re stor e De faul t
12
12
6
6
Set up
Set up
En glis h
En glis h
Off
Off
No rmal
No rmal
Off
Off
On
On
Lock
Time Cha nnel
Time
Picture Audio
H - pos
V - pos
Cl ock
Ph ase
Au to
12
6
Set up
e
Tim
50
50
50
0
MENU
Mo ve Sel ect E xit
Mo ve Sel ect Return
MENU
Press the MENU button on the remote control
and navigate using the ◄► buttons to select
SETUP. Press the ▼ button to highlight
Advanced, then press the ►button to select
from the following options.
12
6
Set up
e
Picture Audio
H - pos
V - pos
Cl ock
Ph ase
Au to
Mov e Adj ust
Tim
50
50
50
0
MENU
Return
Use the ▼ button to highlight H-POS.
Navigate using the ◄► but tons to adjust the
position of images displayed from side to side.
12
6
Set up
e
Picture Audio
H - pos
V - pos
Cl ock
Ph ase
Au to
Move A djus t
Tim
50
50
50
0
MENU
Return
Move A djus t
MENU
Return
Use the ▼ button to highlight Clock.
Navigate using the ◄► buttons to control the
width of the image.
12
6
Set up
e
Picture Audio
H - pos
V - pos
Cl ock
Ph ase
Au to
Mov e Adj ust
Tim
50
50
50
0
MENU
Return
Use the ▼ button to highlight Phase.
Navigate using the ◄► buttons to improve focus
and image stability.
12
6
Set up
e
Picture Audio
H - pos
V - pos
Cl ock
Ph ase
Au to
Mo ve Nex t
Tim
50
50
50
0
Ar e y ou sure ?
No
Yes
When
prompted,
Select "Yes"
to confirm.
MENU
Return
Use the ▼ button to highlight V-POS.
Navigate using the ◄► buttons to adjust the
position of images displayed up and down.
Use the ▼ button to highlight AUTO.
Press the ► button to automatically adjust the
display to the best setting.
22
Page 26

TV SETUP
LOCK(PARENTAL) MENU
Lock
In the LOCK(PARENTAL) menu you may block television by inputting passwords.
To gain access and select your preferences within the LOCK(Parental) menu
make certain your input is set to TV.
How to Navigate:
Press the MENU button on the remote control. Navigate using the ◄► buttons to select Parental.
12
6
Set up
Pic ture Audio
Tim
e
Enter Pa sswor d
0 9~
MEN U
Return
Press the ▼ button to highlight
Enter Password. Enter your 4 digit code
(factory default code is "0000")
unless previously changed.
12
6
Pic ture Audio
Tim
Set up
e
12
6
Set up
e
Pic ture Audio
Tim
En ter New Pa ssw ord
Co nfi rm Passw ord
MEN U
0 9~
Return
Use the numeric buttons to input a new
4 digit code by two times.
12
6
Pic ture Audio
Tim
Set up
e
Ch ang e Pass wor d
Sy ste m Lock
On
US
Ca nad a
RR T Se tting
Re set RRT
Mo ve
Ne xt
MEN U
Return
To change the password, press the ► button
to display a screen to enter your new password,
then confirm again.
Ch ang e Pass wor d
Sy ste m Lock
US
Ca nad a
RR T Se tting
Re set RRT
Mo ve
To make changes to PARENTAL controls,
Highlight SYSTEM LOCK then press
the ► button to ON.
NOTE:
RRT Setting and Reset RRT are not user's adjustable settings.
23
Se lec t
On
MEN U
Return
Page 27

TV SETUP
LOCK(PARENTAL) MENU
Lock
In the LOCK(PARENTAL) menu you may block television and movie programming based on
U.S TV and movie rating guidelines. To gain access and select your preferences
within the LOCK(Parental) menu make certain your input is set to TV.
How to Navigate:
Press the MENU button on the remote control. Navigate using the ◄► buttons to select LOCK
(Parental).
Press the ▼ button to highlight ENTER PASSWORD. Enter your 4 digit code
(factory default code is "0000") unless previously changed.
To set parental controls for television programming or DVD movies, press the ▲▼buttons to
highlight US. Navigate using the ◄► buttons to highlight TV/MPAA menu.
12
6
e
Tim
TV RATI NG
Ne xt Mo ve
Set up
MENU
Return
Pict ure Audio
TV
MPA A
Move
12
6
Set up
e
Tim
N A
MENU
Ne xt
Return
Pic ture Audio
AL L FV V S L D
TV Y
TV Y7
TV G
TV PG
TV 14
TV MA
Blo ck Pres s ENTE R t o l ock or un lock
Highlight TV, then press the ► button to enter the TV Ratings menu to select your preference.
12
Pict ure Audio
TV
MPA A
6
Set up
e
Tim
N A
N/ A
MENU
Move
Se lect
Return
Highlight MPAA then press the ► button repeatedly to select your movie rating preference.
24
Page 28

TV SETUP
LOCK(PARENTAL) MENU
Lock
In the LOCK(PARENTAL) menu you may block television and movie programming based on
Canadian TV and movie rating guidelines. To gain access and select your preferences
within the LOCK(Parental) menu make certain your input is set to TV.
How to Navigate:
Press the MENU button on the remote control. Navigate using t he ◄► buttons to select Parental.
Press the button to highlight ENTER PASSWORD. Enter your 4 digit code
(factory default code is "0000") unless previously changed.
To set parental controls for television programming or DVD movies, press the ▲▼ buttons to
highlight Canada.Navigate using the◄► buttons to highlight Canada English/Canada French menu.
12
6
Set up
Pic ture Audio
Ca nada E ngl ish
Ca nad a Fr enc h
e
Tim
G
G
MENU
Mo ve
Se lect
Return
Navigate using the ▼ button to highlight CANADA ENGLISH, then press the ► button repeatedly
to select your ratings preference.
12
6
Set up
Pic ture Audio
Ca nada E ngl ish
Ca nad a Fr enc h
Mo ve
e
Tim
Se lect
G
G
MENU
Return
Navigate using the ▼ button to highlight CANADA FRENCH, then press the ► button repeatedly
to select your ratings preference.
NOTE:
When adjustments are completed, you may select another menu by pressing
the Menu button.
25
Page 29

TV SETUP
TV(CHANNEL) MENU
Chan nel
The TV(CHANNEL) menu provides for the setup of your television to receive TV channels, store
your favorites, add or skip channels and label them by their call letters.
How to Navigate:
Press the MENU button on the remote control. Navigate using the ◄► buttons to select TV.
Press the ▼ button to highlight your preferences.
12
6
e
Tim
ATSC 1
ATSC 2
ATSC 3
KO CE H D
KO CE S D
KO CE L B
Set up
Pic ture Audio
Air /Ca ble
Au to S can
Fa vori te
Show/ Hide
Ch ann el N o
Ch anne l La ble
DT V Si gna l
12
6
Setu p
e
Tim
Air
Pict ure Audio
Channel Program Name Favorite
2 0
14 1
14 2
14 3
50 3
KO CE LB
Good
50 1
50 2
50 3
66 0
Prev Next
Mo ve Nxe t Return
MENU
Mo ve Pres s 扙NTER Ch ang e Return
MENU
Highlight FAVOURITE to add channels to your Favorites List. Navigate using the ▲▼◄► buttons
to select channels to be added or deleted from your list. Press the ENTER button to add or delete
a channel. A checkmark indicates a channel has been added. You may also display your favourite
list from the remote control by pressing FAV.
12
6
Setu p
e
Pic ture Audio
Air /Ca ble
Tim
Air
Au to S can
Fa vori te
Show/ Hide
Ch ann el N o
Ch anne l La ble
50 3
KO CE LB
DT V Si gna l
Mo ve Nex t Return
MENU
Good
Pict ure Audio
Channel Program Name Add/Delete
2 0
14 1
14 2
14 3
50 1
50 2
50 3
66 0
Prev Next
Mo ve Pres s 扙NTER Ch ang e Return
12
6
e
Tim
ATSC 1
ATSC 2
ATSC 3
KO CE H D
KO CE S D
KOCE L B
Set up
MENU
Highlight to select Show/Hide or skip channels already in memory. Navigate using the ▲▼◄►
buttons to access the list of available channels. Press the ENTER button to change the channels
status. A checkmark indicates a channel has been added.
12
6
Setu p
e
Pic ture Audio
Air /Ca ble
Tim
Air
Au to S can
Fa vori te
Show/ Hide
Ch ann el N o
Ch anne l La ble
50 3
KO CE LB
DT V Si gna l
Mo ve Nex t Return
MENU
Pict ure Audio
Good
Mo ve Nex t
12
6
Set up
e
Tim
K B B C - D T
MENU
Return
Highlight CHANNEL LABEL to name or rename a broadcast channel. Navigate using the ► button
to enter the screen menu to re-label a channel. Use the ▲▼ buttons to spell out each letter,
number or character. Use the ◄► buttons to advance to the next space.
26
Page 30

DVD Function General Setup
27
Page 31

DVD Function General Setup
The super password is 136900,
28
Page 32

DVD Function General Setup
AUTO
(The default password is 0000.)
29
Page 33

PC FORMATS
DISPLAY MODE
Reisolut
X
6
4
0
X
8 6
00 00
X
0
0
8
X
061
2
4
1
1 20
X
60 7
X
4
60
7
80
0
on
0
8
836
8
Ho
r
iz
ontal
S
c n
an i
n
g
Frequ ncy
(KHz
31.5
7. 74
09 1
6.
e
)
66
S
ca
n
n
Ve t
i
n
r
i
l
c
a
g Frequ
(H
z
)
ency
NOTE:
This product does not support the display mode not listed above.
In order to achieve the best display effect, please select the above-listed
6 display modes input signal.
Because of the difference of display drivers output signal
(especially non-standard signal output), the display image may appear little
disturbance which can be adjusted on the PC menu.
F
orm
a
t
To prolong this unit's service life, please set your computer to power management mode.
30
Page 34

DISPLAY MODE
VIDEO FORMATS
SUPPORTED COMPONENT / HDMI INPUT MODE
e
720 480
720 480
1280 720
1280 720
1920 1080
1920 1080
1920 1080
1920 1080
1920 1080
iR so
l
u
t
o
n
X
X
X
X
X
X
X
X
X
Horizontal
Scanning Frequency
31.47
15. 734
37.5
45
31.25
33.75
27
56.25
67.50
Vertical
Scanning Frequency
(Hz)
59.94
59.94
50
60
50
60
24
50
60
Format
480 i
480 p
720 p
720 p
1080 i
1080 i
1080 p
1080 p
1080 p
NOTE:
The above listed formats are also related to the AV devices you are about to connect.
Before you connect this unit with others please read all instructions carefully and
make sure all necessary cables are connected.
.
This unit may be incompatible with some other formats which are not meet the
above conditions.
31
Page 35

SPECIFICATION
Panel
Systems
Input /
Output
Jacks
Model Description
Panel Type LED Panel
Diagonal Size
Screen Format 16 9:
Resolution 1920 x 1080
Brightness
Contrast
View Angle
Response Time
Maximum Color
Refresh Rate
Color System
Sound System
Audio System
Sound Output
RF Input 75 ohm external terminal
HDMI Input
PC RGB Input-
Composite Video Input
Component Y Pb Pr Input/
21.5 inches
200nit
1000 : 1
178(H)/178(V)
6.5 ms
16.7M colors
60Hz
ATSC/QAM/NTSC
M
BTSC
L/R Speaker:3 W
Video 480i 480p 720p 1080i, 1080p.: , , ,
Audio Two channel linear PCM 32 44 1 and 48kHz 16 20 and 24 bits: , . , ,
D sub 15pinG 0 7Vp p 75ohms: . - ,
B 0 7Vp p 75ohms: . - ,
R 0 7Vp p 75ohms: . - ,
1.0 Vp-p, 75ohms RCA
RCA
Y: 1.0 Vp-p, 75ohms, 0.3V negative sync
Pb: 0.7Vp-p, 75ohms
Pr : 0.7Vp-p, 75ohms
+
3W
22”LED TV
Component AUDIO: For Component Audio input
AV AUDIO: For CVBS Audio input
PC AUDIO: For PC RGB Audio input
500mV rms, Impedance: 20k ohms
DC12V 4.16A
40
Power
Sound Input
Power Requirement
Rate Power Consumption
This manual is only for your reference.
Specifications are subject to update without prior notice.
32
Page 36

TROUBLESHOOTING GUIDE
SYMPTOM CAUSE AND REMEDY( )
TV
Picture
Bad
multiple
distortion,blurry)
No sound.
and
Black
picture.
(snow,
images
White
• Check the location of the antenna and adjust it if necessary.
• Make sure the antenna cable is firmly connected.
• Make sure all input cables are firmly connected.
• Increase the volume.
• Check
Remote Control.
• Check the PICTURE setting within the PICTURE menu.
• Check to make sure the program you are watching is broadcast
in Color and not Black & White.
whether the mute function has been activated on the
No picture or sound.
Coloredp atches of
picture.
Panel function key does
not respond correctly.
The display monitor's
panel goes hot.
Unusual dots
• Make sure the unit is plugged in and turned on.
• Make sure that the ATV mode is selected.
• Try a new channel to check for possible station trouble.
• Make sure the antenna is connected properly.
• Increase the volume.
•
Make sure the antenna or audio/video source device is
working properly.
• Make sure all cables are firmly connected.
• Check for local interference.
• Make sure there are no unshielded electrical devices nearby
that are causing interference.
• Turn the TV off for 30 minutes, then try it again.
• Under the influence of electrostatic phenomenon, the product
may malfunction and require usertopowerreset.
• Unplug and re-plug the power cord.
• LED TV takes inside lighten phosphor. It may increase the
temperature of the screen in some occasions. It's not a defect.
• Black dots and Bright points may appear on the LED screen.
This is a structural property of the LED panel and is not a defect.
Stripes on screen
The top of the monitor
gets hot
Unable to select a
certain channel.
Disorder display
at power on.
.
• Adjust the impulse phase may decrease stripes. RGB in( )
• It may occur during long-time working. It's not a defect.
The channel may be skipped. Choose this channel by
•
directly selecting the buttons from the remote control.
••This may be caused because of a very short interval
between POWER OFF and ON.
Unplug the power and restart.
33
 Loading...