

Page 1
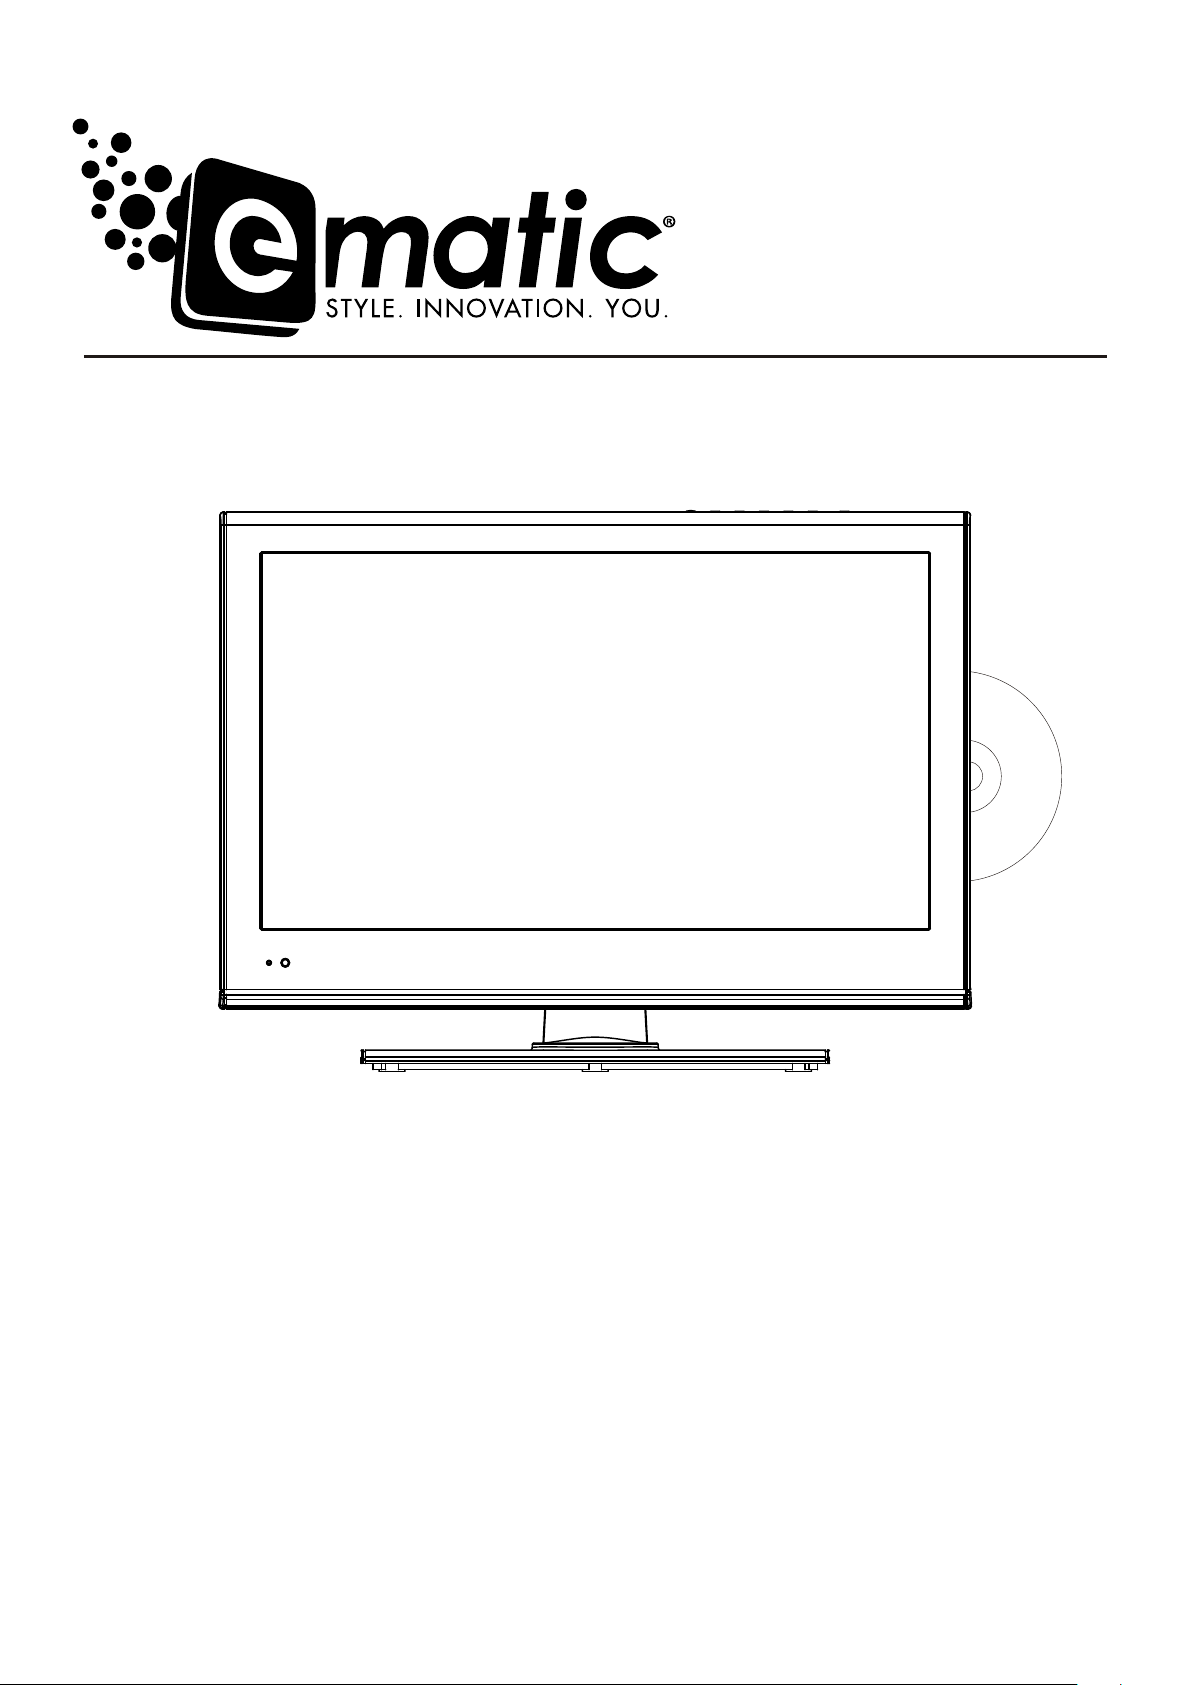
19” HD LED TV
with DVD
MODEL:ETD199
User Manual
Before connecting, operating or adjusting this product, please read the manual completely.
Please keep this manual for future reference.
.
Page 2

Table of Contents
Important Safety Instructions.............................. ..... ................................ ..... ...............................1
Important Notice .. ................................ ..... ................................ ..... ........................... ..... ..... ............4
Preparations ........................ ..... ........................... ..... ................................ ..... ................................ ..5
Identification of Controls .......... ..... ................................ ..... ................................ ..... .....................7
Connections........................ ..... ........................... ..... ..... ........................... ..... ................................ ..11
Basic Operations....................... ..... ........................... ..... ................................ ..... ...........................14
Getting Started ............. ..... ........................... ..... ................................ ..... ................................ ..... ...15
Troubleshooting....................... ..... ................................ ..... ........................... ..... ..... ........................24
Specifications....................... ..... ........................... ..... ................................ ..... ................................ .26
............ ..... ................................ ..... ................................ ..... .....................27Wall mounting operation
Page 3
Important Safety Instructions
Electrical energy can perform many useful functions, but it can also cause personal injuries and property damage if improperly
handled. This product has been engineered and manufactured with the highest priority on safety. But IMPROPER USE CAN
RESULT IN POTENTIAL ELECTRICAL SHOCK OR FIRE HAZARD. In order to prevent potential danger, please observe
the following instructions when installing, operating and cleaning the product. To ensure your safety and prolong the service
life of your TV product, please read the following precautions carefully before using the product.
1. Read t hese instruct ion s---All operating instructions must be read and understood before the product is operated.
2. Keep t hese instruct ion s---These safety and operating instructions must be kept in a safe place for future reference.
3. Heed a ll warnings---All warnings on the product and in the instructions must be observed closely.
4. Foll ow all instruct ion s---All operating instructions must be followed.
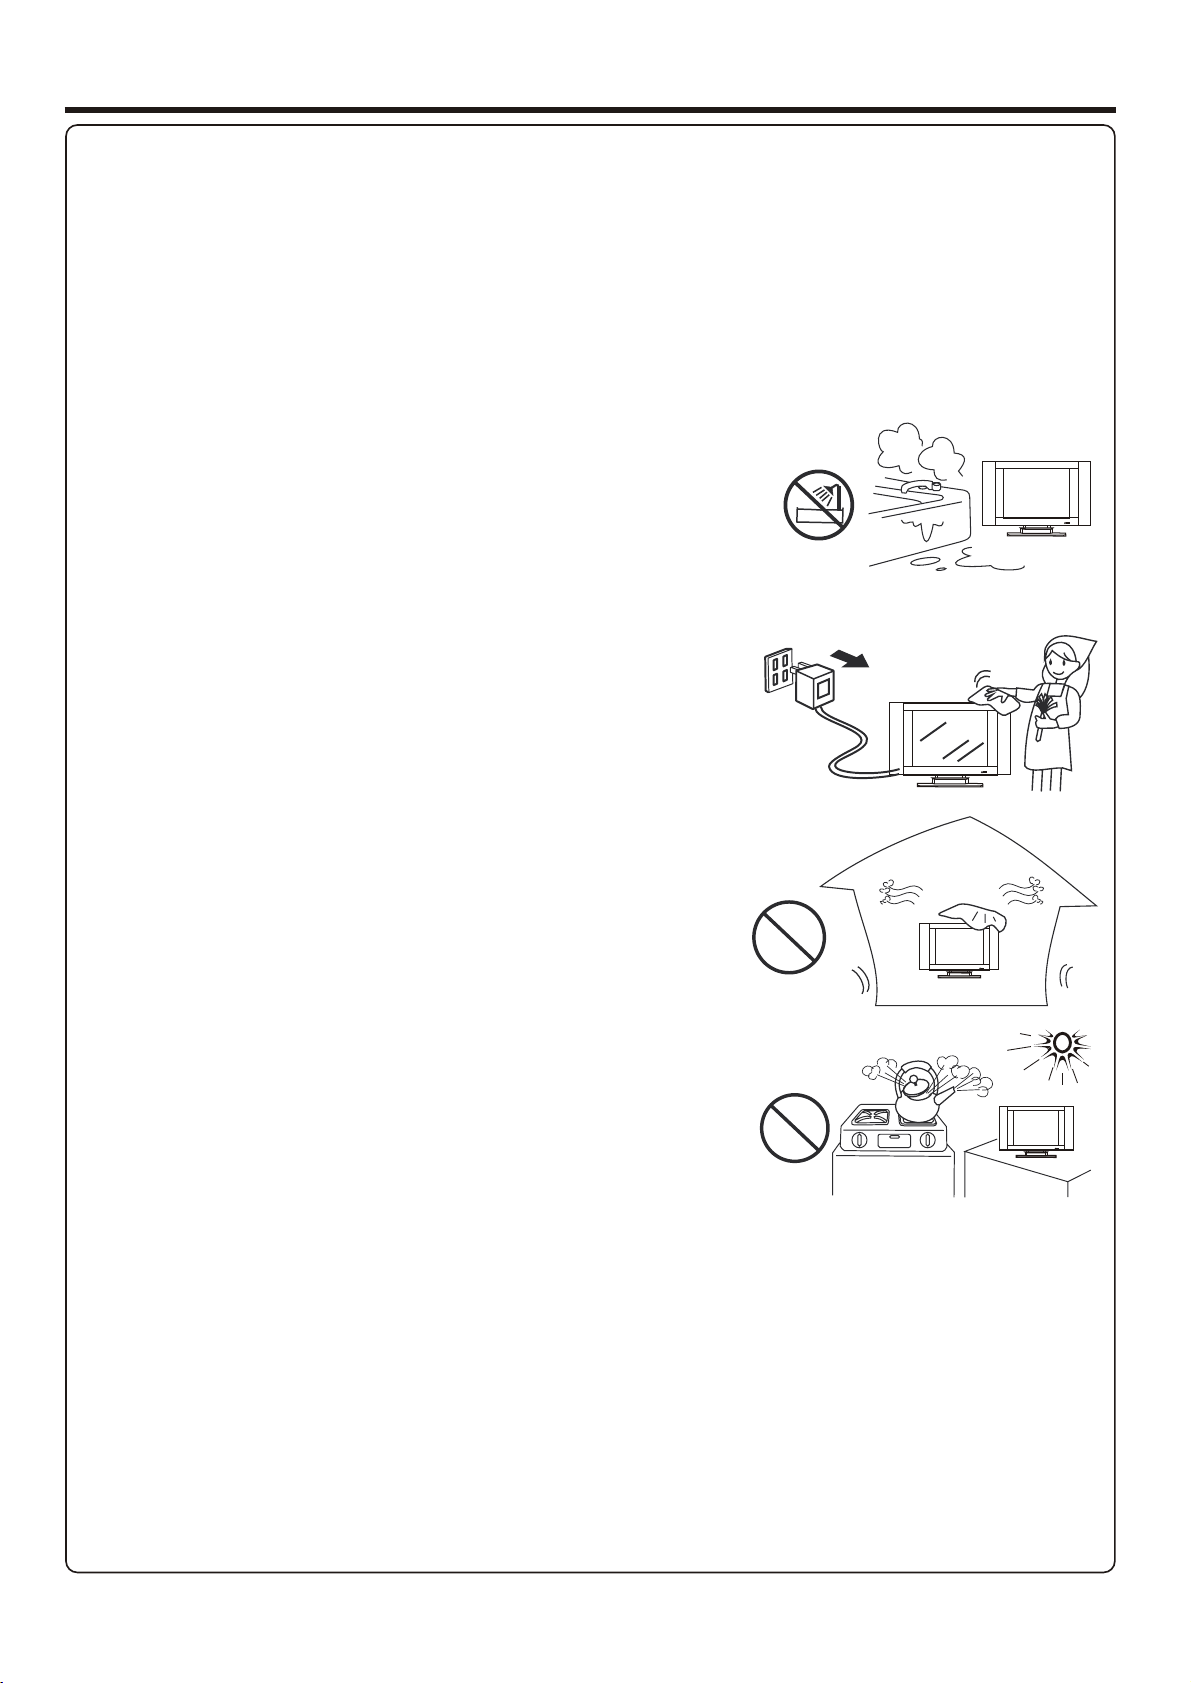
5. Do not u se this apparat us ne ar water---for example, near a bathtub,
washbowl, kitchen sink, or laundry tub, in a wet basement, or near a swimming
pool, and the like.
Do not use immediately after moving from a low temperature to high
temperature environment, as this causes condensation, which may result in fire,
electric shock, or other hazards.
The apparatus shall not be exposed to dripping or splashing and that no objects
filled with liquids, such as vases, shall be placed on the apparatus.
6. Clea n only with dry clo th---Unplug this product from the wall outlet before
cleaning. Do not use liquid cleaners or aerosol cleaners. Use a damp cloth for
cleaning.
7. Venti lation---Do not block any ventilation openings. Install in accordance
with the manufacturer instructions. The vents and other openings in the cabinet
are designed for ventilation. Do not cover or block these vents and openings
since insufficient ventilation can cause overheating and/or shorten the life of the
product. Do not place the product on a bed, sofa, rug or other similar surface,
since they can block ventilation openings. This product is not designed for builtin
installation; do not place the product in an enclosed place such as a bookcase
or rack, unless proper ventilation is provided or the manufacturer's instructions
are followed.
8.Hea t sources---Do not install near any heat sources such as radiators, heat
registers, stoves, or other apparatus (including amplifiers) that produce heat.
9.Gro unding or Polar iza tion---Do not defeat the safety purpose of the polarized or grounding-type plug. A polarized plug
has two blades with one wider than the other. A grounding type plug has two blades and a third grounding prong. The wide
blade or the third prong are provided for your safety. If the provided plug does not fit into your outlet, consult an electrician
for replacement of the obsolete outlet.
10.Po wer cord protec tio n---Protect the power cord from being walked on or pinched particularly at plugs, convenience
receptacles, and the point where they exit from the apparatus.
NOTE: where the mains plug or an appliance coupler is used as the disconnect device, the disconnect device shall remain
readily operable.
11.Att achments---Only use attachments/accessories specified by the manufacturer. Do not use attachments not
recommended by the manufacturer. Use of improper attachments can result in accidents.
1
Page 4
Important Safety Instructions (Continued)
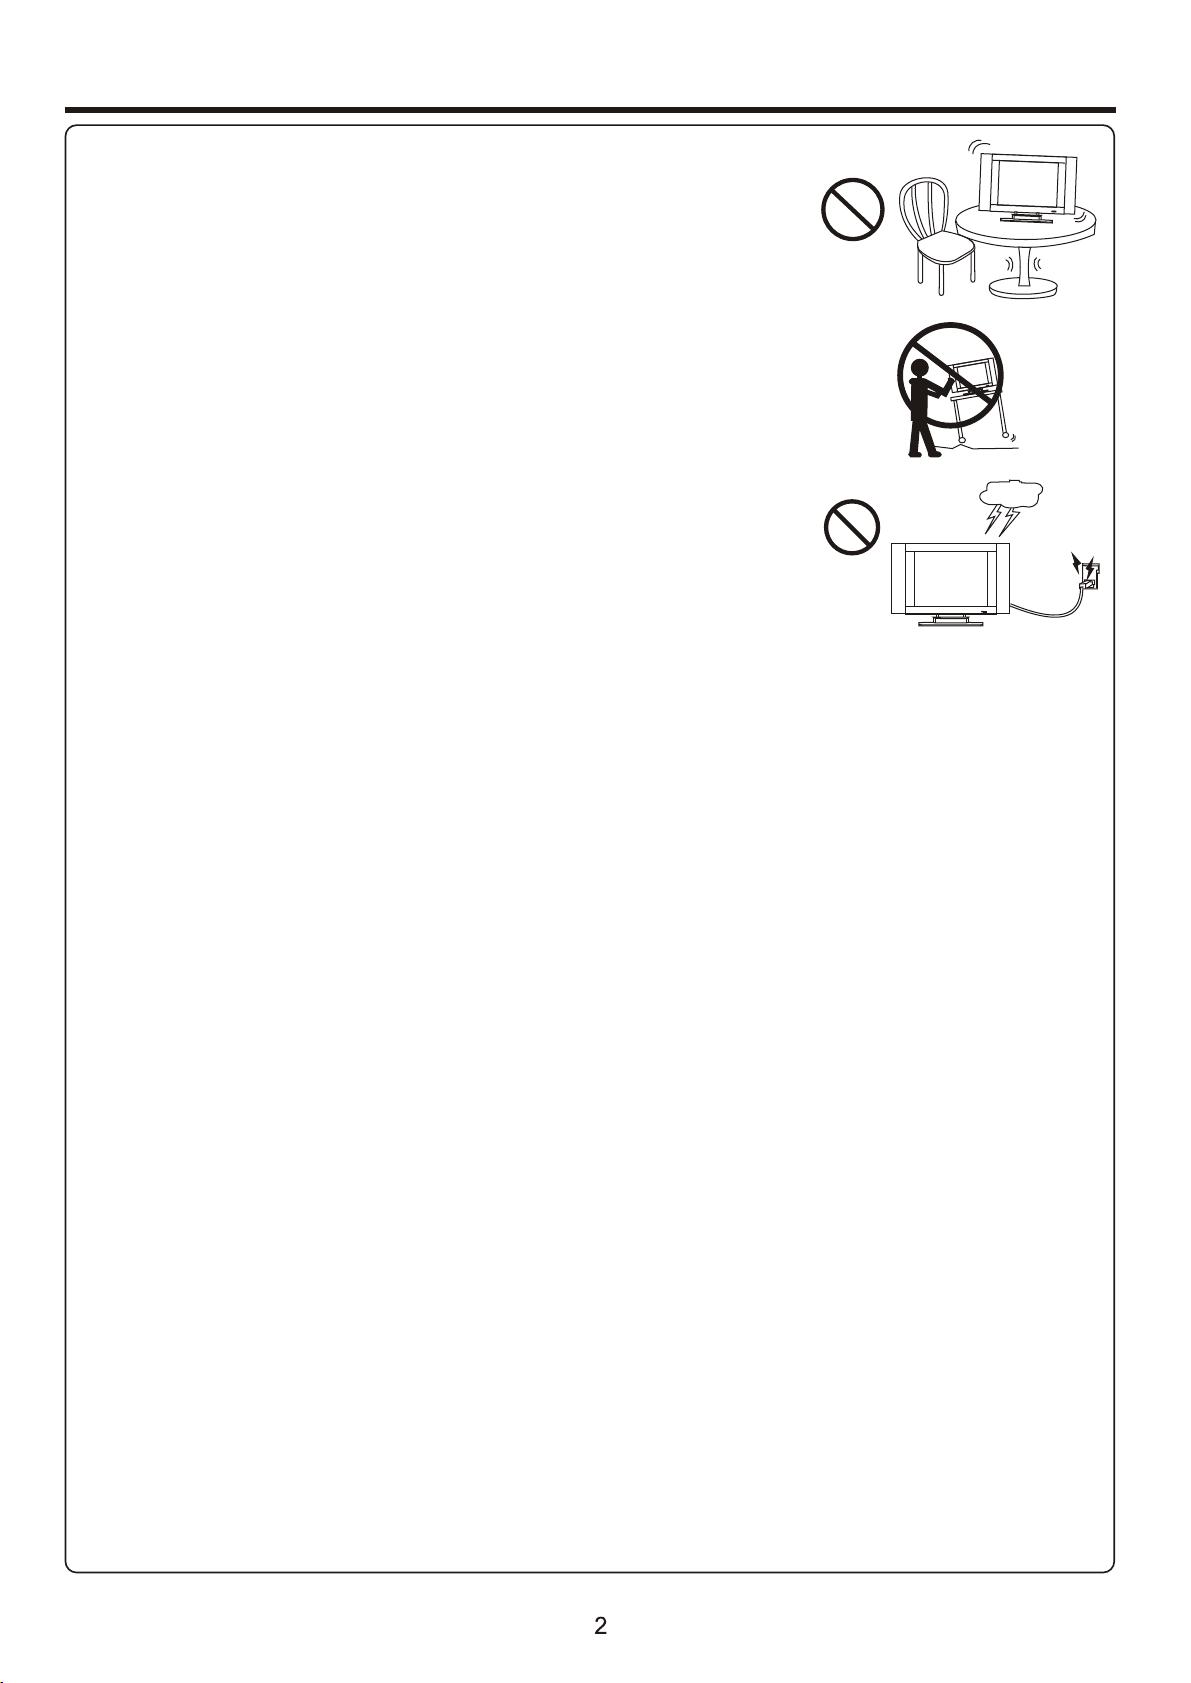
12. Sta nd---Use only with the cart, stand, tripod, bracket, or table specified by the
manufacturer, or sold with the apparatus. Do not place the product on an unstable
trolley, stand, tripod or table. Placing the product on an unstable base can cause the
product to fall, resulting inserious personal injuries as well as damage to the product.
When mounting the product on a wall, be sure to follow the manufacturer's instructions.
Use only the mounting hardware recommended by the manufacturer.
13. Mov e carefully---When a cart is used, use caution when moving the cart/apparatus
combination to avoid injury from tip-over. Sudden stops, excessive force and uneven
floor surfaces can cause the product to fall from the trolley.
Never attempt to move the TV unless the AC power cord has been disconnected.
14. Lig htning---Unplug this apparatus during lightning storms or when unused for long
periods of time.
For added protection for this television equipment during a lightning storm, or when it is
left unattended and unused for long periods of time, unplug it from the wall outlet and
disconnect the antenna. This will prevent damage to the equipment due to lightning and
power-line surges.
15. Ser vicing---Refer all servicing to qualified service personnel. Servicing is required when the apparatus has been damaged
in any way, such as power-supply cord or plug is damaged, liquid has been spilled or objects have fallen into the apparatus, the
apparatus has been exposed to rain or moisture, does not operate normally, or has been dropped.
16. Rep lacement part s---In case the product needs replacement parts, make sure that the service person uses
replacement parts specified by the manufacturer, or those with the same characteristics and performance as the
original parts. Use of unauthorized parts can result in fire, electric shock and/or other danger.
17.Ov erloading---Do not overload wall outlets, extension cords, or convenience receptacles on other equipment as this
can result in a risk of fire or electric shock.
18.En tering of objec ts an d liquids---Never insert an object into the product through vents or openings. High voltage flows
in the product, and inserting an object can cause electric shock and/or short internal parts. For the same reason, do not spill
water or liquid on the product.
19.Da mage requirin g service---If any of the following conditions occurs, unplug the power cord from the AC outlet, and
request a qualified service person to perform repairs.
a. When the power cord or plug is damaged.
b. When a liquid is spilled on the product or when objects have fallen into the product.
c. When the product has been exposed to rain or water.
d. When the product does not operate properly as described in the operating instructions.
Do not touch the controls other than those described in the operating instructions. Improper adjustment of controls not
described in the instructions can cause damage, which often requires extensive adjustment work by a qualified technician.
e. If the product has been dropped or the cabinet has been damaged in any way.
f. When the product displays an abnormal condition or exhibits a distinct change in performance. Any noticeable abnormality
in the product indicates that the product needs servicing.
20.Sa fety checks---Upon completion of service or repair work, request the service technician to perform safety
checks to ensure that the product is in proper operating condition.
21.Wall or ceiling m ounting---When mounting the product on a wall or ceiling, be sure to install the product according to
the method recommended by the manufacturer. This is a safety feature.
Page 5

Important Safety Instructions (Continued)
22. Pow er source---This product is intended to be supplied by a listed power supply indicated on the marking label. If you
are not sure of the type of power supply to your home, consult your product dealer or local power company. For added
protection for this product during a lightning storm, or when it is left unattended and unused for long periods of time, unplug it
from the wall outlet and disconnect the cable system. This will prevent damage to the product due to lightning and power line
surges. When the unit has to be used with another power supply voltage, the power cable must be changed. Consult your
product dealer. The socket outlet should be installed near the equipment and easily accessible. Use only the power cord
designated by our dealer to ensure safety and EMC. When connecting other products such as VCRs and personal computers,
you should turn off the power of the unit for protection against electric shock.
23.Pa nel protectio n---The display panel used in this product is made of glass.
Therefore, it can break when the product is dropped or impacted upon by other objects.
Be careful not to be injured by broken glass pieces in case the display panel breaks.
24.Pi xel defect---The display panel is a very high technology product, giving you finely detailed pictures. Occasionally, a few
non-active pixels may appear on the screen as a fixed point of blue, green or red. Please note that this does not affect the
performance of your product.
WARNIN G: For continued safety, apparatus with class I construction shall be connected to a mains socket outlet with a
protective earthing connection.
Page 6

Important Notice
About Temperature
About After-Image
Do not us e in hot and cold roo ms (l ocations)
● When the unit is used in rooms (locations) with low temperature, the picture may
leave trails or appear slightly delayed. This is not a malfunction, and the unit will
recover when the temperature returns to normal.
● Do not leave the unit in a hot or cold location. Also, do not leave the unit in a location
exposed to direct sunlight or near a heater, as this may cause the cabinet to deform
and the to malfunction.
● Storage temperature: 0°C to +50°C
● Working temperature: 5°C to +40°C
The extended use of fixed image program material can cause a permanent after-image
on the screen.
This background image is viewable on normal programs in the form of a stationary fixed
image. This type of irreversible screen deterioration can be limited by observing the
following steps:
A. Reduce the brightness/contrast setting to a minimum viewing level.
B. Do not display the fixed image for extended periods of time.
C. Turn the power off when not in actual use.
Important In formatio n Regarding Use of Video G ames, Computers ,
Captions or Ot her Fixed Im age Displays.
● Do not allow a still picture to be displayed for an extended period, as this can cause a
permanent after-image to remain on the screen.
Examples of still pictures include logos, video games, computer images, teletext and
images displayed in 4:3 mode.
Cleaning and
Maintenance
CAUTIONS:
● The permanent after-image on the screen resulting from fixed image use is not an
operating defect and as such is not covered by the warranty.
● This product is not designed to display fixed images for extended periods of time.
Do not le t images displa y in 4: 3 mode for extend ed periods of tim e.
To clean this unit , wipe with a soft, d ry cloth.
If the surfaces are extremely dirty, use a soft cloth dipped in a soap and water solution or
a weak detergent solution.
● Use eyeglass cleaner to remove stubborn dirt from the screen.
● Never use alcohol, paint thinner or benzine to clean this unit.
● Before using a chemically treated cloth, read the instructions that came with the
cloth carefully.
Page 7
Preparations
Using the Remote Control
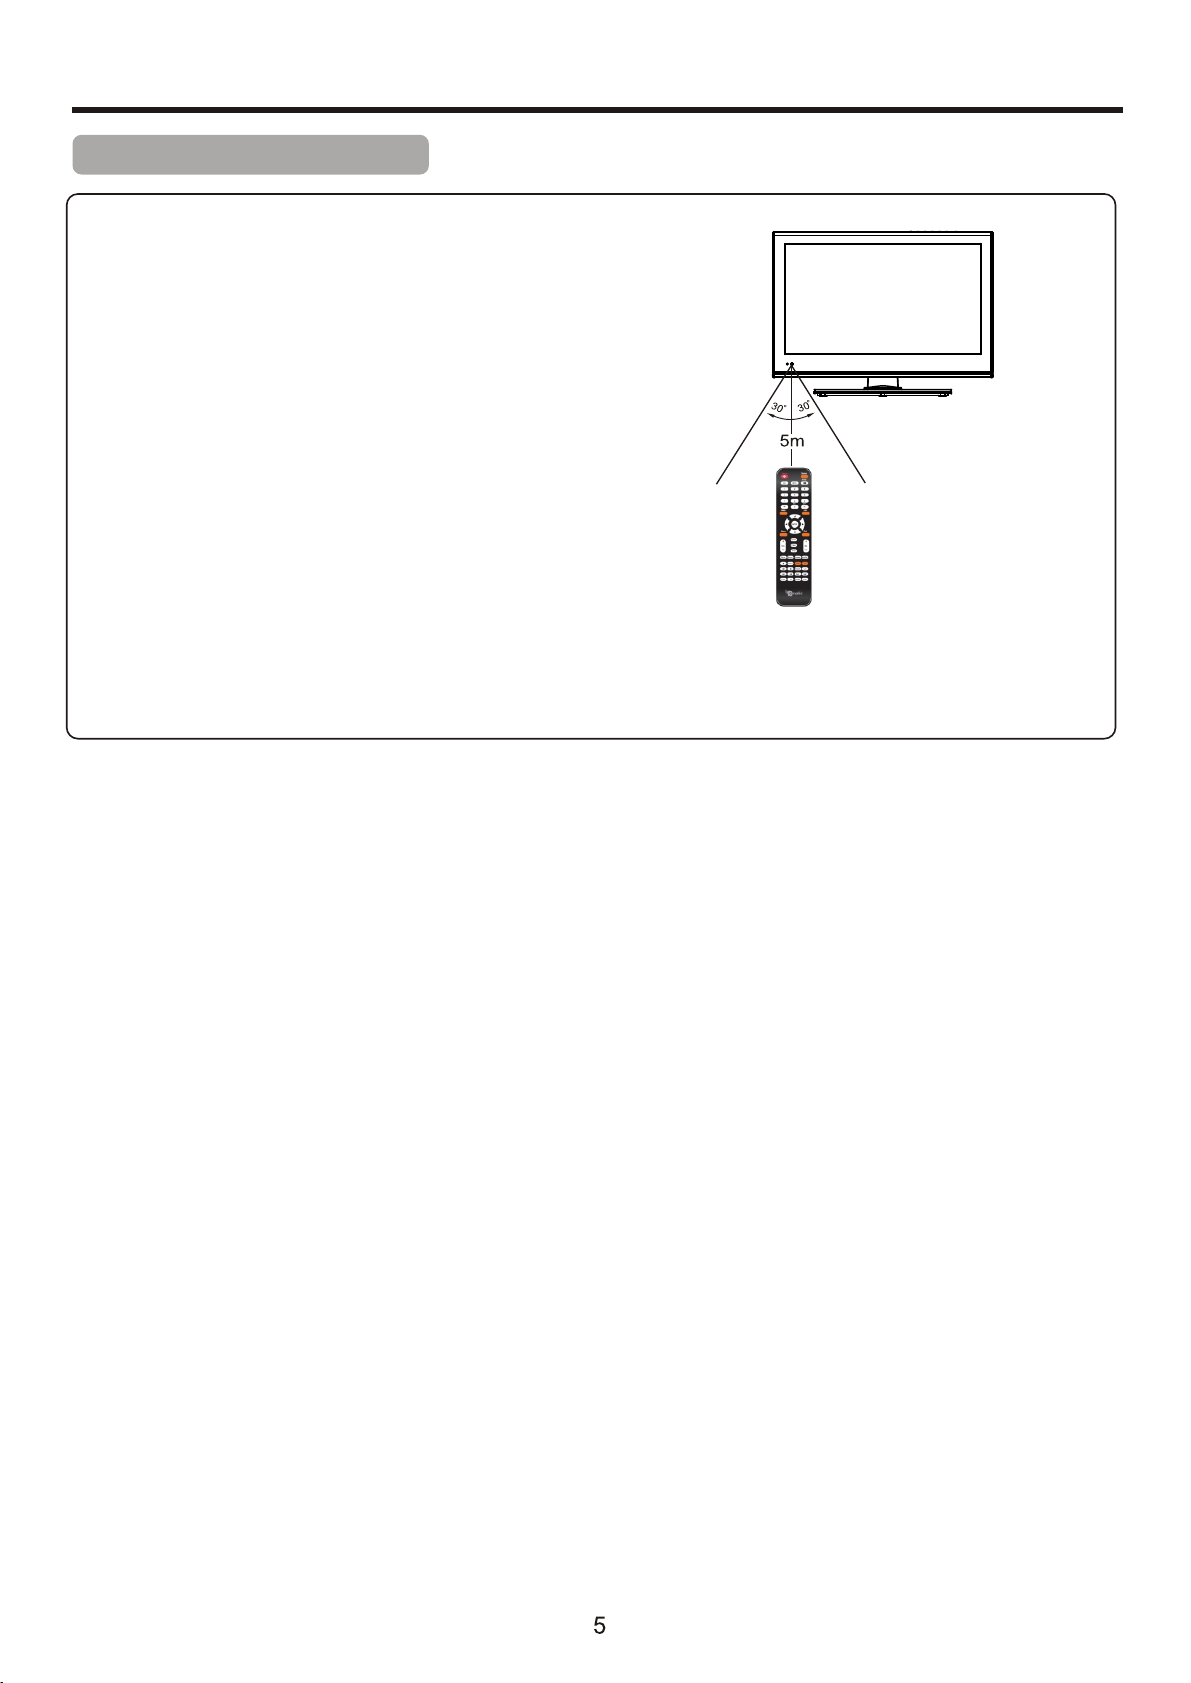
■ Use the remote control by pointing it towards the remote sensor window of the
set. Objects between the remote control and sensor window may prevent proper
operation.
Cauti ons regarding u se of r emote control
■ Do not expose the remote control to shock. In addition, do not expose the remote
control to liquids, and do not place in an area with high humidity.
■ Do not install or place the remote control under direct sunlight. The heat may cause deformation of the unit.
■ The remote control may not work properly if the remote sensor window of the main unit is under direct sunlight or strong
lighting. In such a case, change the angle of the lighting or the TV set, or operate the remote control closer to the remote
sensor window.
Page 8
Preparations (Continued)
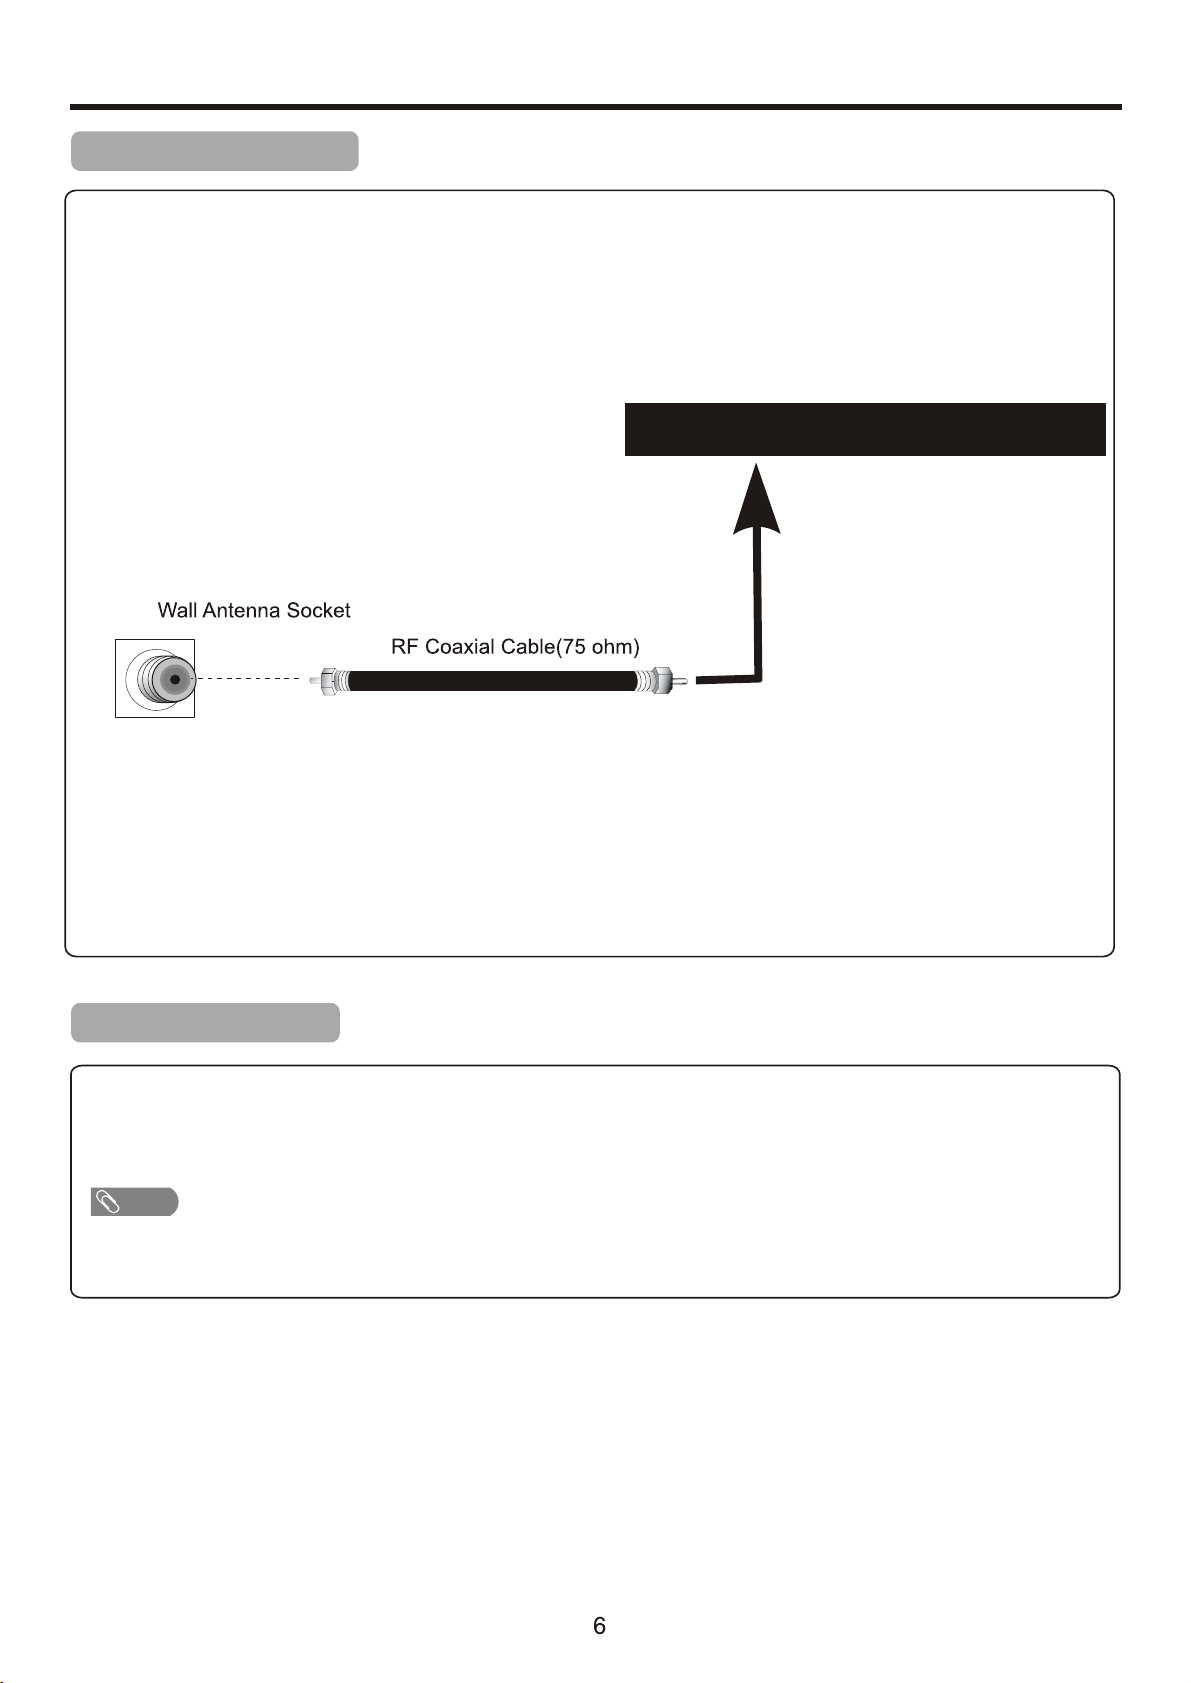
Antenna Connection
INSTALL the unit in a room where direct light will not fall upon the screen. Total darkness or a reflection on the picture
screen may cause eyestrain. Soft and indirect lighting is recommended for comfortable viewing.
Optimum reception of colour requires a good signal and will generally mean that an outdoor antenna must be used.
The exact type and position of the antenna will depend upon your particular area.
PC
Hea dphon e RF
Note:
● It is recomm end ed th at the 75-ohm coaxial cable be u sed t o eli min ate interference and noise w hic h may o ccu r due to radio wave
conditio ns.
● The antenn a cab le sh ould not be bundled with the pow er co rd an d the l ike.
● If the anten na is n ot in stalled properly, contact your dealer for ass ist anc e.
VGA
Aud io
Vid eo R
L
HDM I
USB
Power Connection
Insert the AC plug into a conveniently located AC outlet.
Note
● This pr oduct should be o perated only fr om th e type of power sou rce indicated o n the marking lab el.
● Alway s unplug the AC c ord from power ou tlet when not usi ng for a long perio d of ti me.
Page 9
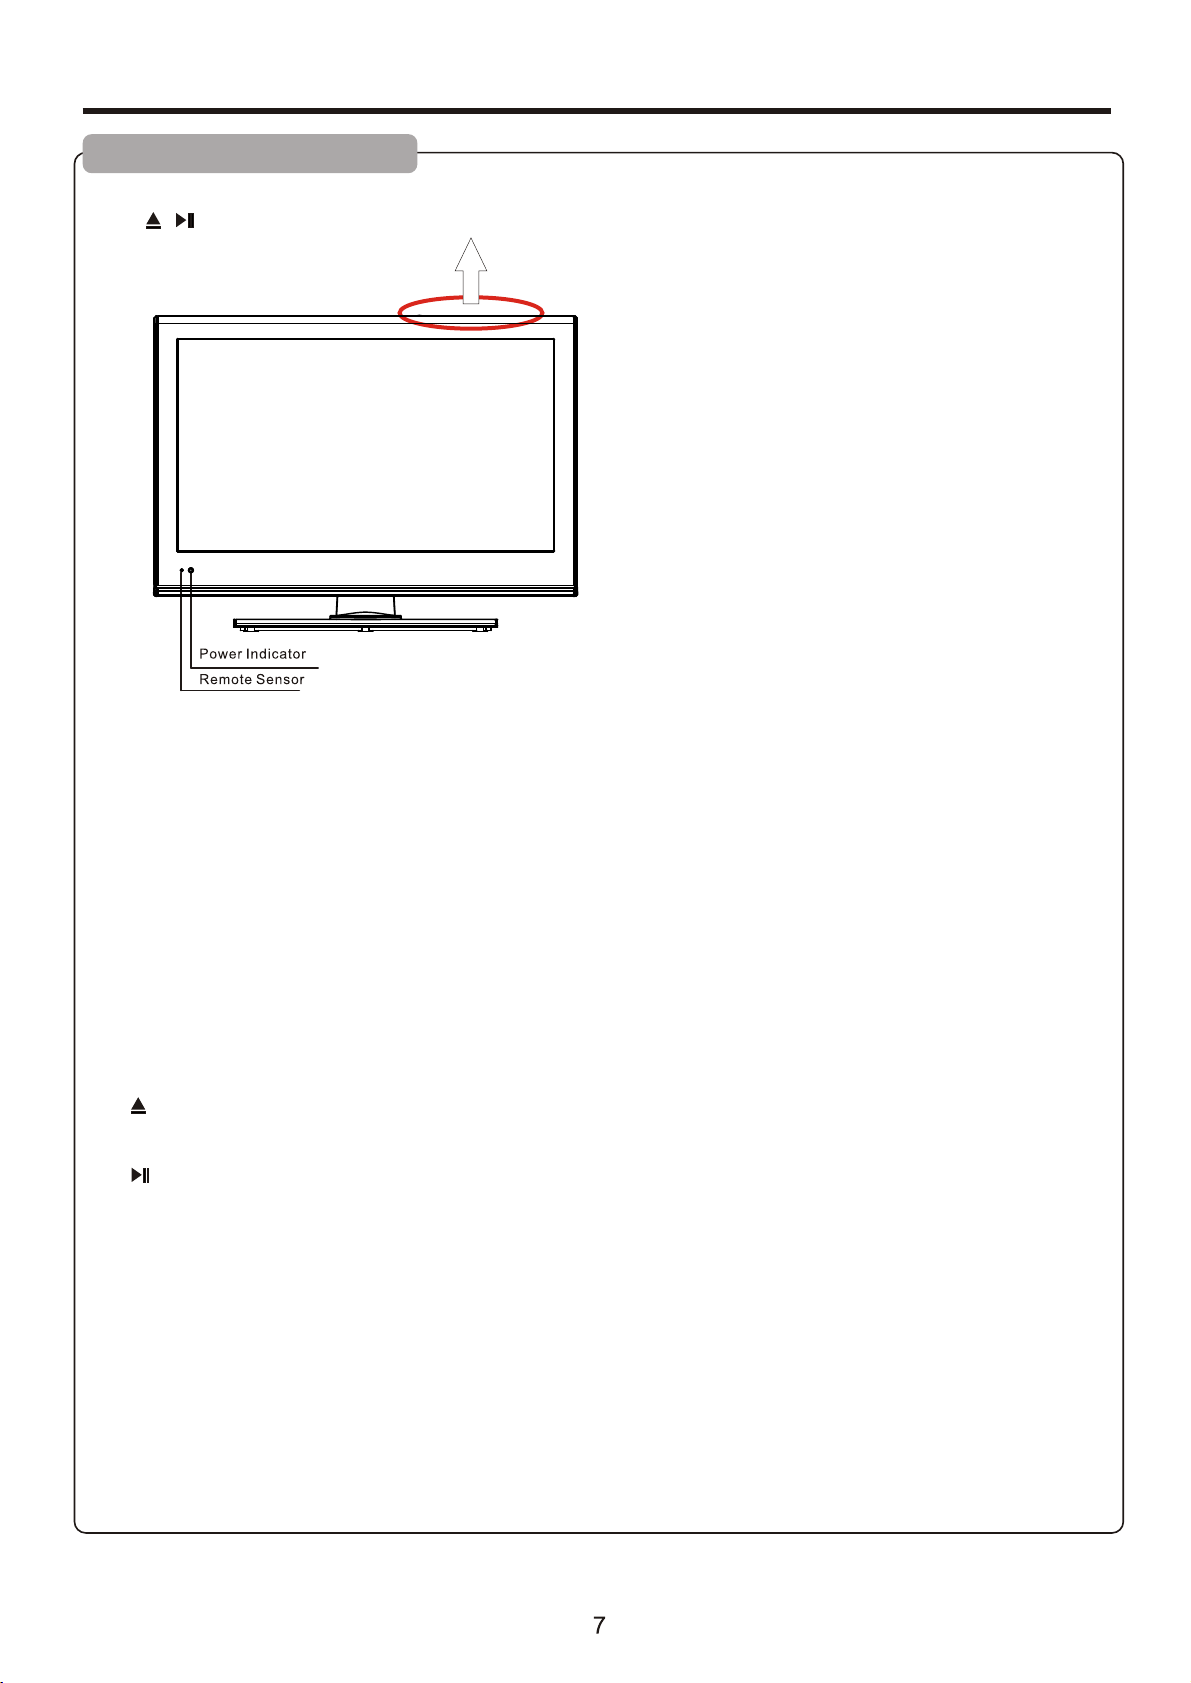
Identification of Controls
Main Unit (control panel)
MENU
SOURCECH+CH-
POWERVOL- VOL+
1. POWER
Press this button to turn the unit ON from STANDBY mode. Press it again to turn the set back to STANDBY.
2.SOURC E
To access INPUT SOURCE menu
3. M ENU
Press this button to access the menu main page.
4. C H+/-
Press these two buttons to directly change the TV channel;
In menu operations, these buttons serve as up/down buttons.
5. V OL+/-
Press the VO L+ or VOL - button to directly increase or decrease the sound volume level;
In menu operations, these buttons serve as right/left buttons.
.
6
OPEN/ COLSE in DVD mode.
7.
PLAY/PAUSE in DVD mode.
NOTE:
Funct ion s of CH+/-, VO L+/-, M ENU, SOURCE and POWE R are a lso provided to t he re mote control. This o peration
manua l pro vides a descrip tio n based on operating f unc tions with the re mot e control.
Page 10
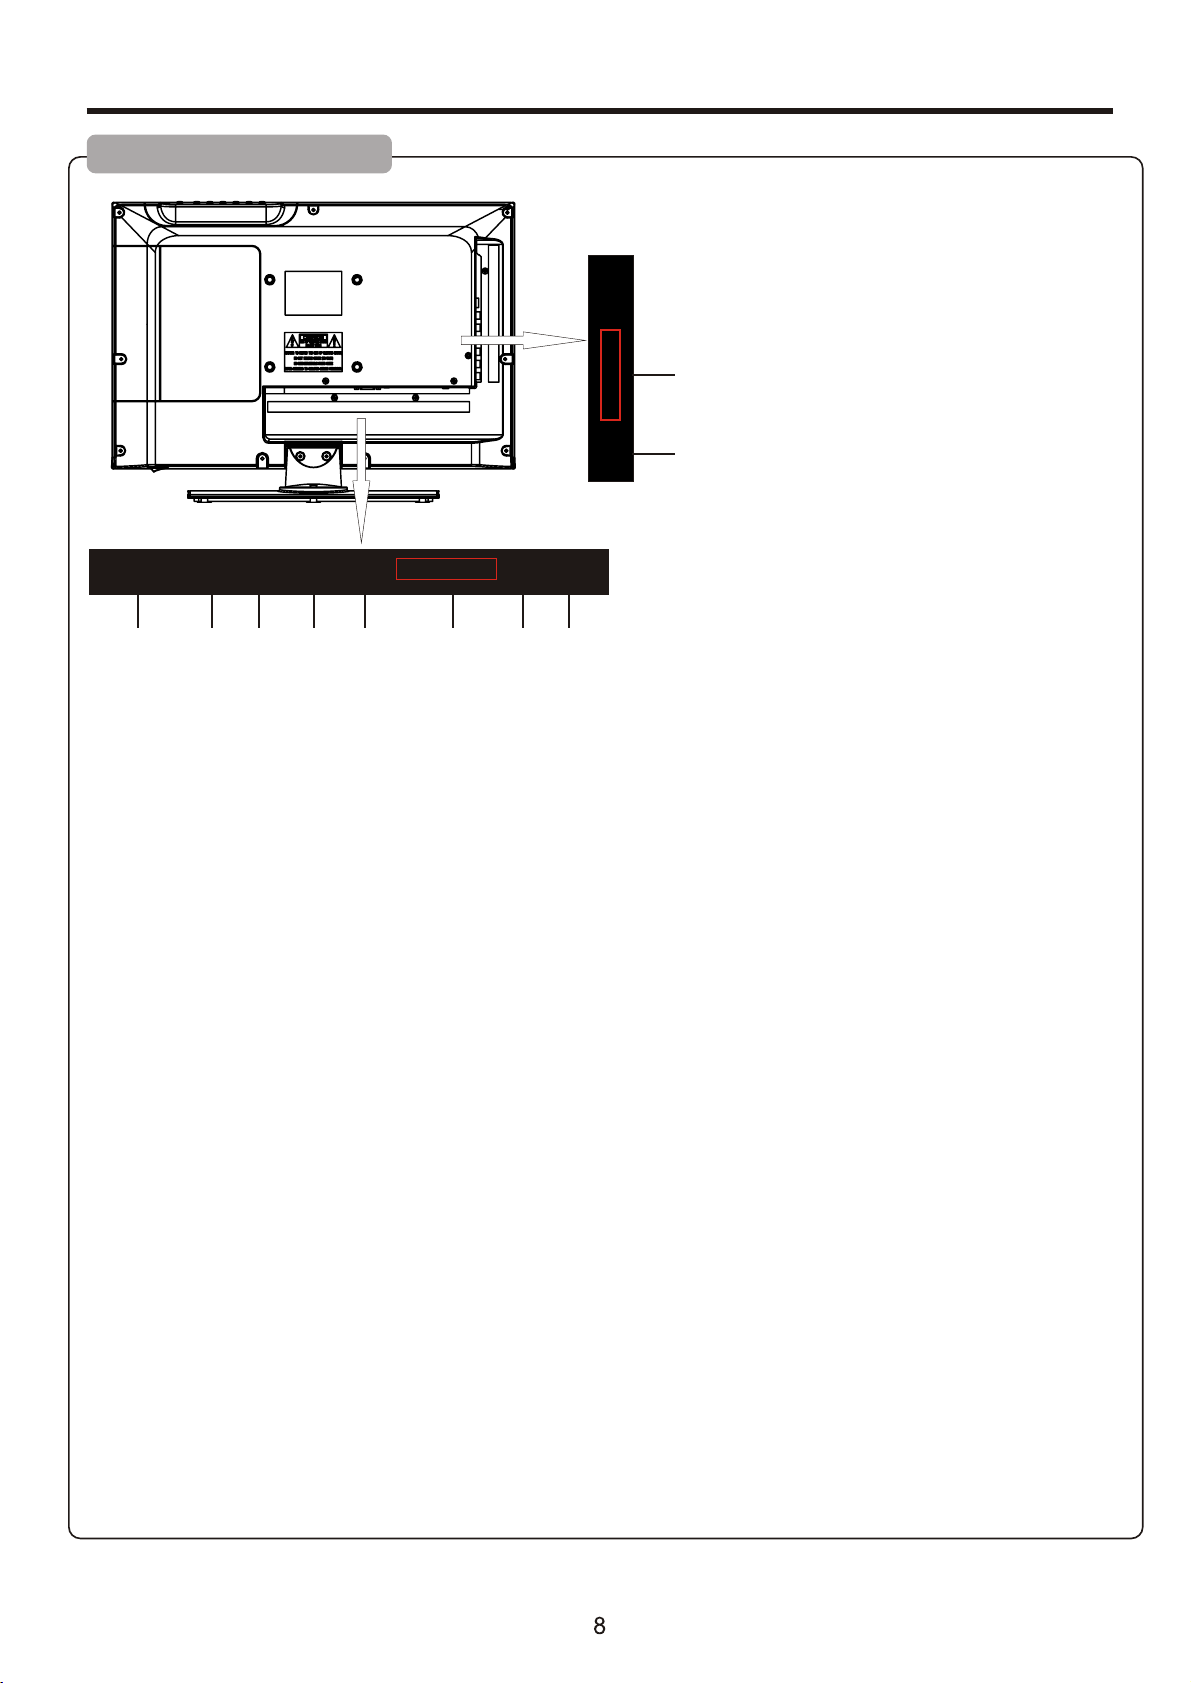
Identification of Controls (Continued)
Main Unit (connectors)
Pr
Pb
Y
10
9
Headphone RFDC IN
1
2
Coax
PC
Audio
5
Vid eo R
VGA
3
4
L
HDMI
USB
8
6
7
1.DC IN :Main power input.
2.HEADPHONE:Connect the earphone.
3.RF:This connection is for digital or analog cable without the cable box or over-the-airwave antennas. The tuner is a
hybrid tuner that tunes to both analog and digital channels. This connection uses coaxial RF cable.
4.VGA : This connection port connects to a PC for video using VGA cable. Be sure to connect your audio cable to
the VGA Stereo input if you want sound out of VGA video source.
5.PC Audio :This connection port is for people who want to provide audio to the TV when using a PC or a DVI video
device. The sources use 3.5mm mini-jack audio cable.
6.AV:Video connects to devices that use composite video cables such as VCR or DVD player or Wii™. Connect
the yellow for video and the red / white for audio. Audio o utput is sha red with Com ponent.
7.HDMI:HDMI connects to devices that use HDMI cable, such as Blu-ray or HD DVD player, or HD cable / satellite
set-top box. This connection port receives pure digital audio and high definition signal through one single cable. This
port also can accept a HDCP video device for video.
8.USB:USB connects to USB flash drives for playing music and picture. The USB port is also used for updating the
TV's firmware.
9.COAX:Connect the SPDIF receiver.
10.Co mponent-This connection port is for DVD players or satellite / cable set-top
boxes that use component cables. From left to right, connect green, blue, and red for video, and then connect white
for left channel audio, and red for right channel audio. Audio outp ut is shared w ith AV.
Page 11

Identification of Controls (Continued)
Remote Control Unit
1.POWER: Turns the TV on or off.
2.SOURCE: Press this button to cycle
through the INPUT source.
3.CC:Cycles between different closed
1
4
3
2
captioning modes.
4.MTS:Selects stereo,mono,or second audio
5
programming.
5.MUTE:Turns the sound off from the TV.
6
7
9
12
14
15
17
20
19
24
23
28
27
32
31
36
35
To unmute either press VOL(+) or press
the MUTE button again.
6.NUMBER BUTTONS(0-9):Press 0-9 to
8
select a TV channel directly when you are
10
watching TV.The channel will change after
2 seconds.
11
7.(-):lnserts the dash for selecting digital
channels directly.
8.R:Returns to the previous channel.
13
9.GUIDE:Opens the current digital channel
16
information guide (antenna only).
18
10.INFO:Shows the display information.
11.THUMBSTICK(p /q /t /u /ENTER):
21
Allows you to navigate the on-screen menus
22
and adjust the system settings to your
25
26
preference.
29
30
12.MENU:Brings up the main TV menu on
33
the screen.
34
37
13.EXIT:Exit the main TV menu on the screen.
38
14.ASPECT:Selects different viewing
modes of the TV.
15.VOL(+)/VOL(-):Press the VOL buttons
to increase or dicrease the sound level.
16.FREEZE:Freezes the TV picture.
17.SLEEP:Select amount of time.Let your
TV turn off automatically.
18.CH(+)/CH(-):Press the CH buttons to
go through the channel list.
Page 12

Identification of Controls (Continued)
Remote Control Unit
.PICTURE:Selects various preset picture
19
settings.
20.SOUND:Select various preset sound
settings.
1
4
3
6
7
9
2
21
.FAVORITE:Gives you your list o favorite
5
channels.
22.Add/Del:Press to increase/decrease y
our favourite program.
.AUTO EJECT Press this button to open
23 :
or close the DVD player.
8
24.D.MENU Shows the menu of the DVD disc.
10
2 .DVD Press this button to go to the DVD
5 :
:
12
14
15
17
20
19
24
23
28
27
32
31
36
35
source.
11
2 . .
6 TV: This button select source TV
27.►/║ Play/pause button in DVD mode.
28.■ Stop button in DVD mode.
13
16
29.REPEAT Press this button for repeat the
program.
18
0.A-B Press this button for repeat play point
3 :
21
A and B
22
31.PREVIOUS CHAPTER Press this button to
25
select the DVD's previous chapter.
26
29
32.REWIND Press this button to reverse the
30
33
DVD movie to a previous scene.
34
37
33.FAST FOWARD Press this button to fast
38
:
:
:
:
:
:
forward the DVDto the next scene.
34.NEXT CHAPTER Press this button to select
the DVD movie's next chapter.
35.D.SETUP Press this button to setup the disc
in DVD mode.
36.TITLE Press this button to go to the title menu
if the DVD you're watching has a title page.
37.SUBTITLE Displays the subtitle.
38.AUDIO Press to select TV sound option.
10
Page 13

Connections
Cautions Before Connecting
● Carefully check the terminals for position and type before making any connections.
● The illustration of the external equipment may be different depending on your model.
● Loose connectors can result in image or colour problems. Make sure that all connectors are securely inserted into
their erminals.
● Refer to the operating manual of the external device as well.
● When connecting an external device, turn the power off to avoid any issues.
Connecting a VCR
TV REAR
Hea dphon e RF
DC IN
VGA
PC
Aud io
Vid eo R
L
HDM I
USB
How to connect:
Connect the Audio/Video cables between the Audio (L/R)/Video jacks on the unit and VCR.
To play VCR
1. Turn on your TV, then press SOURCE button. The INP UT SOURCE menu opens.
2. Press ▲ or ▼ to select AV, then press EN TER to confirm.
3. Turn on your VCR , insert a videotape and press the Play button.
Page 14

Connections (Continued)
Connecting Component Video
Component video cable
TV REAR
DC IN
Y Pb Pr
PC
VGA
Aud io
Vid eo R
L
HDM I
USB
Coax
Hea dphon e RF
Cable s are often color -co ded
to conn ectors. Conne ct re d to
red, wh ite to white, etc .
To connect a device using component video:
Connect the Component Video cable between the Y, Cb/Pb, Cr/Pr input jacks on the unit and Y, Cb/Pb, Cr/Pr output jacks
on the device .
Connect the Audio cable between the AUDIO input jacks on the unit and AUDIO output jacks on the device.
To play component video from an external device:
1. Turn on your TV, then press SOURCE button. The INP UT SOURCE menu opens.
2. Press ▲ or ▼ to select Comp onent, then press EN TER to confirm.
3. Turn on your external device and set it to the correct mode. See the device's user guide for more information.
Page 15

Connections (Continued)
Connecting an HDMI device
TV REAR
Headph one RF
DC IN
VGA
PC
Audio
Vid eo R
L
HDMI
USB
Device with HDMI output
HDMI cable
How to connect a device using HDMI Connection:
Connect the HDMI cable between the HDMI interface on the unit and HDMI output on the device.
To play from the device using HDMI:
1. Turn on your TV, then press SOURCE button. The INP UT SOURCE menu opens.
2. Press ▲ or ▼to select HDM I, then press ENT ER to confirm.
3. Turn on your device and set it to the correct mode. See the device's user guide for more information.
Note:
If the exter nal d evi ce ha s DVI o utp ut only, us e a DVI t o HDM I ada pte r cable to connect to the HDMI terminal. Conn ect t he au dio
cable to the V GA AUDIO IN jack on the TV rear.
Connecting a Computer
TV REAR
Headph one RF
DC IN
VGA
PC
Audio
Vid eo R
L
HDMI
USB
D-Sub cable
(analog RGB)
To monitor port
(15-pin D-Sub)
Audio cable
(stereo mini plugs)
To audio output jack
How to connect:
Connect a VGA cable between the VGA jack on the computer and the VGA input jack on the unit.
Connect an Audio cable between the AUDIO output on the computer and AUDIO input jack on the unit.
To play video from a computer
1. Turn on your TV, then press SOURCE button. The INP UT SOURCE menu opens.
2. Press▲or▼to select VGA , then press ENTE R to confirm.
3. Turn on your computer, and adjust the display properties as required.
Page 16

Basic Operations
Turning On/Off the Power
■Turning On
Insert the power cord into the wall outlet.
Press the STANDBY button on the unit or the ON-O FF button on the remote control, the unit will be turned on and you
will be ready to use its features.
■Turning Off
With the power on, press the STANDBY button on the unit or the ON-OFF button on the remote control to turn off the unit,
and put the unit in standby mode. To cut off the power completely, please disconnect the AC power cord.
Note: If there is no si gnal input for a ce rta in time, the TV wil l auto go to standb y mode.
Switching Sources
Source Select
TV
AV
YPbPr
HDMI
PC
Media
DVD
1.Press the SOU RCE button on right of the TV you will see the picture above.
2.Use ▲▼ buttons to select the source you want to switch to and press the E NTER button in the middle
of the ▲▼ buttons.
Page 17

Getting Started
If You've Connected Antenna or Cable to the TV
If an antenna or cable (without a cable box) is connected to your TV's tuner, you will need to go through an
INITIAL SETUP process in order to watch the TV.
1.Press MENU to open the menu
Picture
2.Use the ◄ or ► button to select the CHANNEL icon and press ENTE R.
SOUND CHANNEL
PARENTAL
SETUP
OTHERS
CHANNEL
Channel List
Favorite List
Channel Settings
Signal Type
Auto channel search
▲
MENU
:Return
3.Use the ▲ or ▼ buttons to highlight the signal type and press ◄ or ► to select your connection either
AIR or CABLE.
4.Use the ▲ or ▼ buttons to select AUTO CHANNEL SEARCH and pressENTER to scan for channels.
▲
:Select menu :Go to next Menu
ENTER
/
Air
Execute
▲
AUTO CHANNEL SEARCH
Now Searching...Please Wait...
Return
Analog channels Found: 0
Digital channels Found: 0
:Stop Auto Channel Search
ENTER
5.Once the scanning finishes, you can begin to watch TV.
MENU
92%
:Skip
Page 18

Picture
SOUND CHANNEL
PARENTAL
SETUP
OTHERS
PICTURE This main option has functions for changing the picture settings for all ports, such as tint, contrast,
sharpness.
SOUND This main option has functions for changing sound settings for all ports, such as SPDIF Type, treble, bass,
and acoustic cinema enhancement….etc.
CHANNEL This main option has functions for the tuner port, such as scanning channels, editing channels, specific
range scans, audio language, tuner mode….etc.
PARENTAL This main option has functions for only composite and TV port. The purpose of this option is to block
TV inappropriate for children.
SETUP This main option has functions for all ports, OSD language, caption styles,
time setup, automatic synchronization, sleep timer and power on timer, power off timer.
OTHERS This main option has functions for all ports, OSD language, caption styles, time setup, automatic
synchronization, sleep timer and power on timer, power off timer.
PICTURE
This option al lows users t o adjust the TV's pic ture sharpness, c olor, tint, a nd other various fu nctions.
PICTURE
Picture Settings
Screen Size
Wide
PC Settings
Color Temperature Normal
Advanced picture Settings
1.Press MENU to open the OSD.
2.Press ◄ or ► to select PICTURE and press ENTER.
3.Use ▲ or ▼ to select the one you want to adjust and
◄ or ► or ENTER to adjust them.
▲
MENU
:Return
▲
:Move
I.PICTURE SET TINGS
PICTURE SETTINGS
Picture Mode User
Brightness
Contrast
Color
Tint
Sharpness
▲
MENU
:Return
▲
:Move
ENTER
▲
:Go to next Menu
/
▲
▲
▲
▲
▲
▲
:Change Setting
▲
i.PICTURE MODE This feature changes various
color modes for the TV.
▲
▲
▲
▲
▲
ii.BRIGHTNESS This feature changes the picture's
detail in dark colors.
iii.CONTRAST This feature changes the difference
between dark and bright objects.
iv.COLOR This feature changes the amount of color in
the picture.
v.TINT This feature changes the white balance of the
color.
Vi.SHARPNESS This feature changes the picture
quality.
Page 19

PICTURE
II.SCREEN Siz e
I.SCREEN SIZE This featur changes the various aspects of the TV’s video.(Aspects include Wide,Cinema,Zoom,Normal.)
III.PC SETTIN GS
PC SETTINGS
Auto Adjust
Horizontal Position
Vertical Position
Clock
Phase
Reset
MENU
:Return
▲
▲
:Move
▲
▲
▲
▲
ENTER
:Press to Execute
Execute
Execute
▲
▲
▲
▲
i.AUTO ADJUST This feature automatically adjusts the
picture syncing in with the signal of the PC.
ii.HORIZONTAL POSITION This feature adjusts the to
the left or right position of the PC picture.
iii.VERTICAL POSITION This feature adjusts the up or
down position of the PC picture.
iv.CLOCK This tunes in large increments the picture
quality of the PC picture.
v.PHASE This tunes in small increments the picture
quality of the PC.
Vi.RESET This resets the settings of PC settings.
IV.COLOR TEMPERATURE This fe ature adjusts the c olor temperatur e of the TV, gi ving warm, normal , cool,
(warm being mo re red, cool b eing more blue and no rmal being neutra l color).
V.ADVANCE PI CTURE SETTINGS
ADVANCED PICTURE SETTINGS
Dynamic Contrast
Film Mode
Noise Reduction
MPEG Noise Reduction
Off
Off
Low
Off
▲
MENU
:Return
i.DYNAMIC CONTRAST This feature allows the HDTV to
automatically adjust the contrast of the HDTV depending on
the picture you are viewing.
ii.FILM MODE This feature is 24p that syncs with DVD
movies, and should be enabled when viewing DVD video to
allow smoother frame rate.
iii.NOISE REDUCTION This feature reduces general
pixilation by blurring them.
Iv.MPEG NOISE REDUCTION This feature reduces DVD
video pixilation by blurring them.
▲
:Move
▲
:Change Setting
▲
Page 20

SOUND
This option al lows users t o adjust the TV's sou nd functions.
SOUND
Sound Settings
Surround Mode
AVL
Analog Sound
Digital Sound
Digital Audio Output PCM
Equalizer Settings
▲
MENU
:Return
1.Press MENU to open the OSD.
2.Press ◄ or ► to select SOUND and press ENTER.
3.Use ▲ or ▼ to select the one you want to adjust and ◄ or ► or EN TER to adjust them.
I.SOUND SETTI NGS
▲
:Move
ENTER
Stereo
English
▲
:Go to Next Menu
/
SOUND SETTING
Sound Mode Standard
MENU
Bass
Treble
Balance
:Return
▲
▲
:Move
▲
▲
▲
▲
:Change Setting
▲
▲
▲
▲
II.SURROUND M ODE This fea ture enables the TV t wo speakers to prov ide a wider sound eff ect.
III.AVL This feat ure adjusts the aut o volume leveler en abling vol ume protection fr om overly loud comm ercials.
IV.ANALOG SOUND This fea ture adjusts the se cond audio progra mming in ana log channels.
V.DIGITAL SOUND T his feature adjus ts the digital seco nd audio pro gramming in digit al channels.
VI. This feature a djusts the d igital audio outp ut in digital chann els.DIGITAL AUDIO O UTPUT
i.SOUND MODE This feature switches between
preset settings (presets include standard, soft, user, and
dynamic).
ii.BASS This feature adjusts the audio bass level of
the HDTV.
Iii.TREBLE This feature adjusts the audio treble level
of the HDTV.
iv.BALANCE This feature adjusts the balance
between the two speakers moving sound from left to right.
Page 21

SOUND
V I.EQUALIZER S ETTINGS Th is feature enable s the internal equa lizer of the s peake rs. You can adjust the
I
settings ind ividuall y or use the presets (u ser, off, rock, pop ja zz).
Equalizer SETTINGS
MENU
Mode
-2
-1 2 3 1 0 -1
100
250 500 1K 2K 4K 10K
:Return
▲
▲
:Move
▲
:Change Setting
▲
POP
CHANNEL
This option al lows user to a djust the TV's tune r functions.
CHANNEL
Channel List
Favorite List
1.Press MENU to open the OSD.
2.Press ◄ or ► to select CHANNEL and press ENTER .
Channel Settings
3.Use ▲ or ▼ to select the one you want to adjust
and ◄ or ► or OK to adjust them.
MENU
Signal Type
Auto channel search
▲
:Return
▲
:Move
ENTER
Air
Execute
▲
:Go to next Menu
/
I.CHANNEL LIST Thi s feature gives you t he list of cha nnels currently f ound by the TV.
CHANNEL LIST
Page 1/1
2 Ket
MENU
:Return
▲
▲
:Move
▲
▲
:Page
ENTER
:Select Channel
II.FAVORITE LIST Th is feature gives th e favorite l ist of channels add ed by you.
Page 22

CHANNEL
III.CHANNEL SETT INGS
CHANNELSETTINGS
Channel Number 2
In Channel List
Channel Label
Favirite Channel
▲
MENU
:Return
▲
▲
▲
:Cursor/Page
ENTER
Page 1/1
i.CHANNEL NUMBER This feature shows the channel
number.
ii.IN CHANNEL LIST This feature tells you if you have
chosen for channel to be skipped.
iii.CHANNEL LABEL This feature changes the name of the
channel.
Iv.FAVORITE CHANNEL This feature tells you if you have
the current channel in your favorite list.
:Select
IV.SIGNAL TYPE Th is feature a llows you to switch b etween air (such as u sing antenna) and cable.
V.AUTO CHANNEL SEARC H This feature sear ches channels aut omatical ly for you.
AUTO CHANNEL SEARCH-Air
Now Searching.... Please Wait...
Retirm
Analog Channels Found: 0
Digital Channels Found: 0
2%
PARENTAL
This option al lows users t o filter TV program s and movies while us ing the TV tun er. To use this option you
will need to ent er in the pass word first.
PARENTAL CONTROL
Lock Parental Control
V-CHIP
Change Password
Keypad Lock
Source Lock
:Enter password
MENU
:Return
I.LOCK PARENTAL CO NTR OL This feature al low s you t o inp ut a pa ssw ord i n order to access the other features.
(The default pa ssw ord i s “00 00” )
0-9
1.Press MENU to open the OSD.
2.Press ◄ or ► to select PARENTAL CONTROL and
press ENTER.
3.Use ▲ or ▼ to select the one you want to adjust and
◄ or ► or ENTER to adjust them.
II.V-CHIP This feature can into the sub men u to ad jus t.
III. CHANGE PASSWORD This feature changes the pa ssw ord o f the p are nta l con trol function.
IV.K EYPAD LOC K Thi s fea tur e loc ks th e but tons on the TV from functioning.
V.SO URC E LOC K This feature locks different sources from wo rki ng.
Page 23

SETUP
This option al lows user to a djust the TV's misc ellaneous optio ns.
SETUP
Closed Caption
Menu Language English
Clock
1.Press MENU to open the OSD.
2.Press ◄ or ► to select SETUP and press Ente r.
3.Use ▲ or ▼ to select the one you want to adjust and
◄ or ► or Enter to adjust them.
MENU
:Return
▲
▲
:Move
ENTER
▲
:Go to Next Menu
/
I.CLOSED CAPT ION This pro vides your TV tuner, AV po rts with subtitle s.
i.CAPTION DISPLAY This turns on or off the closed captioning.
Ii.ANALOG CAPTION TYPE This chooses the subchannel that supplies the closed captioning. For United States,
usually the setting is CC1. TEXT1-4 displays advertisements of the channel.
iii.DIGITAL CAPTION TYPE This chooses the subchannel for digital channel closed captioning.
iv.DIGITAL CC PRESET This unlocks users ability to change caption styles.
v.DIGITAL CC STYLE This feature changes caption options of digital closed captioning.
DIGITAL CC STYLE
CC Size Default
CC Font Default
CC Opacity Default
CC Color Default
CC Background Opacity Default
CC Background Color Default
Close Caption
MENU
:Return
▲
▲
:Select menu
▲
:Change Setting
▲
A)CC OPACITY This changes the transparency of the captioning.
B)Text COLOR This changes the color of the text.
C)CC BACKGROUND OPACITY This changes the transparency of background of the text.
D)CC BACKGROUND COLOR This changes the color of the background.
II.MENU LANGU AGE This fun ction adjusts the l anguage of the menu ( English, F rench, Spanish) .
III.CLOCK
i.TIME ZONE This adjusts the time zone for the TV's clock.
ii.AUTO CLOCK This feature sets the TV to the TV channel's clock. (You mu st ha ve an ten na to u se this feature.)
iii.SETUP TIME This feature manually lets you adjust the time and date.
iv.DAY OF WEEK This feature tells you the day of the week.
Page 24

OTHERS
This option al lows users t o set other feature s of the TV.
OTHERS
Blue Back
No Signal Power Off
No Operation Power Off
All Reset
▲
MENU
:Return
I.BLUE BACK T his f eat ure g ive s the T V a blu e default background when there is no signal.
II.NO SIGNAL POWER OFF This feature tur ns th e TV of f if th ere i s no si gna l given to the TV after a certain time.
III.NO OPERATIONS POWER OFF This feature tu rns t he TV o ff if t her e are n o commands given to the TV after a certain time.
IV.AL L RESET Th is re set a ll th e opt ion s in th e MENU back to it's default values.
▲
:Move
ENTER
Execute
:On/Off
1.Press MENU to open the OSD.
2.Press ◄ or ► to select OTHERS and press Enter.
3.Use ▲ or ▼ to select the one you want to adjust and
◄ or ► or Enter to adjust them.
Page 25

Slideshow Interval 1S
Slideshow Effect
Slideshow Repeat
Music Play Mode
Music Play Repeat
Music Auto Play
Off
Off
Once
Off
On
Page 26

Troubleshooting
If, after reading these operating instructions, you have additional questions related to the use of your television, please call
the services center in your local area.
Before calling service, please check the symptoms and follow suggested solutions.
Remote Control
Problem
Remote control does not operate
Video and Audio
Problem
No picture (screen not lit),
No sound
Dark, poor or no picture
(Screen lit), good sound
No color/dark picture/color
is not correct
Only snow and noise appear
on the screen
Possible Solutions
● The batteries could be weak. Replace the batteries.
● Check the orientation of the batteries.
● Make sure the power cord is plugged in.
Possible Solutions
● Make sure the power cord is plugged in.
● Press POWER on the TV or on the remote control.
● Try another channel; it could be station trouble.
● Select a proper picture mode.
● Adjust the brightness in the video setting.
● Check the antenna/cable connections.
● Adjust the color saturation in the video setting.
● Check the antenna/cable connections.
● Try another channel; it could be station trouble.
Dotted lines or stripes
Double images
Good picture, no sound
Audio noise
● ● Adjust the antenna.
Move the TV away from noise sources such as cars, neon signs, or hair dryers.
● Using a highly directional outdoor antenna or a cable may solve the problem.
●
The sound may be muted. Press MUTE again to cancel.
●
Make sure the stereo mode is set to stereo or mono.
● Communication problems may occur if infrared communication equipment (e.g.,
infrared cordless headphones) is used near the TV. Move the infrared
communication equipment away from the TV until the noise is eliminated.
Page 27

Troubleshooting (Continued)
General
Problem
One or some channels can't be
displayed
Possible Solutions
● These channels may be blocked. Please unblock them (see <Setting Parental
Controls> section).
● These channels may be set hidden. You may set it to show or select them with
0-9 number buttons.
Some items can't be accessed
TV cabinet creaks
● If a setting option appears in gray, this indicates that the settings option is unavailable
in current input mode.
● When the TV is in use, there is a natural rise in temperature, causing the cabinet to
expand or contract and may be accompanied by a slight creaking noise. This is not
a malfunction.
Control buttons do not operate
● Disconnect the power cord and wait for a few seconds. Then re-plug the power cord
and turn on the unit again.
Note:
If your proble m is not solved, turn y our unit off a nd then on again.
Cautions:
Never attemp t to repair a defecti ve TV yourse lf.
25
Page 28

DVD Function General Setup
Page 29

DVD Function General Setup
The super password is 136900,
Page 30

DVD Function General Setup
AUTO
(The default password is 0000.)
Page 31

Specifications
Panel
19 inches
0.1mmX0.3mm
1366 (H) x 768 (V)
16 : 9
250
5ms
170 (H) / 160(V)
30,000 hours
TV/AV/YPbPr/HDMI/PC/Media
VOL-, VOL+, CH-, CH+, MENU, SOURCE,POWER
DC12V 3.33A 33W
3w +3w
Note:
1. Design and specifications are subjec t to change without notice.
2. Weight and dimensions shown are approximate.
3. Specifications and external appear ance may be changed for the sake of improvement.
26
Page 32

Wall mounting operation
Attach the stand
Remove the Stand
To remove the stand remove the screws in the circled area and the neck will come off.
Rear View Mounting Pattern
Mounting Specification:
100mm
100mm
The screw in the package are for securing the TV stand only. If you are mounting
the TV please consult a qualified installer for further instructions on bracket
support and wall support.
100mm x 100mm using screw size M4
(not supplied). Length of screw should
not exceed 8mm.
Please Note: The 8mm length of screw
refers to how deep the screw can go
inside the mounting holes. When you're
buying screws, you should add the original
8mm to the thickness of your mounting
plate in order to get the total screw length.
27
 Loading...