

Page 1

Page 2

1
Overview
1. Foreword
Thank you for choosing our product. Please r ead this manual carefull y before using the product.
Specifications and software updates ma y be subject to change without notice. So me pictures in
this manual may be different than the product display; however, it should perform the same
functions.
2. W arnings
a) Do not use the product in extreme temperatures, dusty or wet environments;
b) Do not leave the product under direct sunlight;
c) Handle the player carefully, or the hardware and housing may be damaged or destroyed;
d) When inserting or removing a TF card, make sure the player is set to the “OFF” position, the
current is enough to damage the product;
e) When formatting or transferring files, do no t disconnect the USB c able from the P C, this ma y
cause damage to the player;
f) Keep this product out of children’s reach;
g) Do not open housing, doing so may damage the hardware;
h) Keep away from e xt remely dry places to avoid dama ge c a us ed by Electrostatic Disc ha rge (ESD)
Page 3

2
i) Avoid formatting the player. If formatting is necessary, copy all data files to your computer
first;
j) Touch S creen Pen Calibration may be required if the sc reen is not performing correctly. For
details refer to Main Menu-Settings-Calibration
3. Features
• Fashionable housing;
• 3.0” LCD Touch Screen with true color;
• Resolution 320 x 240 Pixels (QVGA) ;
• Movie format Supports AVI, RM, RMVB, 3GP, MP4, WMV and ASF data stream;
• Support MP3 and WMA audio formats;
• JPEG, GIF and BMP picture review
• E-Book Function;
• Stereo FM Radio;
• Supports 3D EQ surrounding effect;
• Multi-language support, including English and Spanish
• External TF (Micro SD) card support (not included)
Page 4

3
4. Requirement for PC
a) At least Pentium 100MHz;
b) Windows 98/2000/ME/XP/Vista;
c) USB slot;
d) CD-ROM drive;
e) At least 15MB free hard disk space;
f) At least 32MB memory;
Page 5
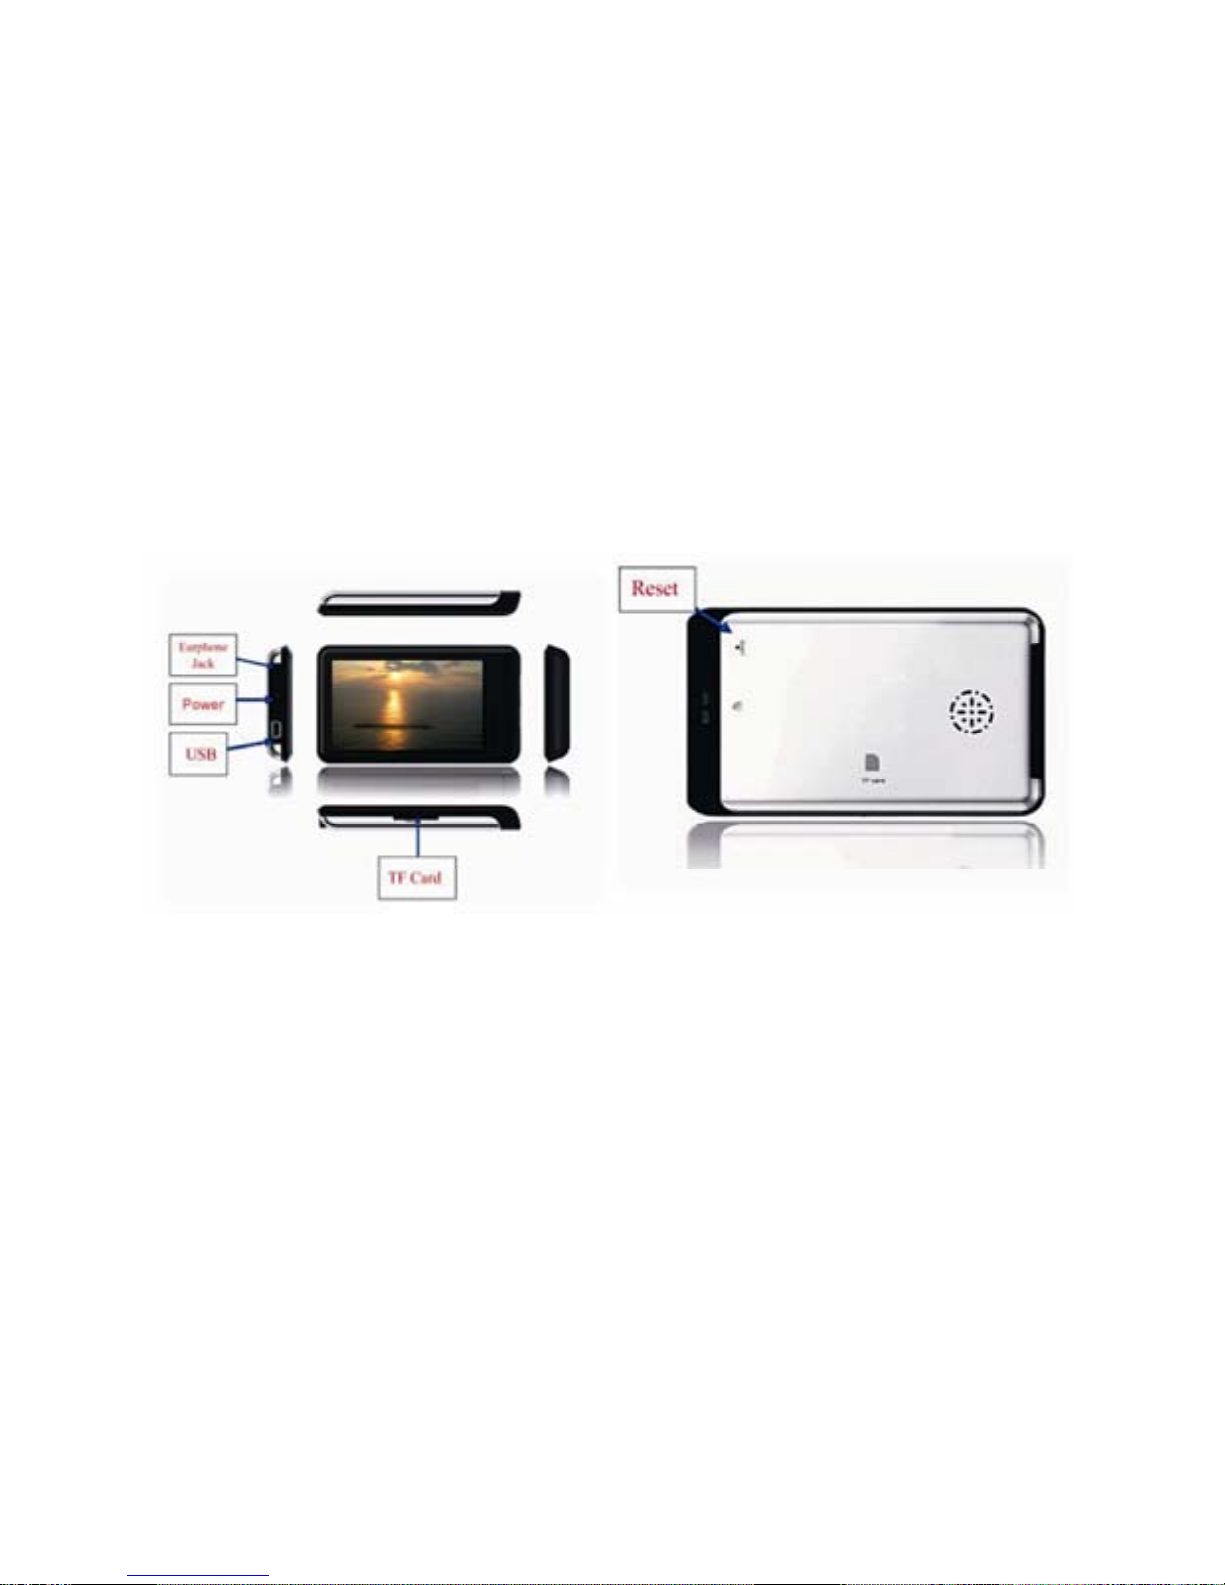
5. Layout of the Player
EM Video Player Controls
4
Page 6
Note: If the screen freezes, press the hidden “Reset” button on the back with a pin, and the
screen will shut down. Press the POWER Key for 3 seconds and the player will resume working.
Your files will not be deleted.
User Guidelines
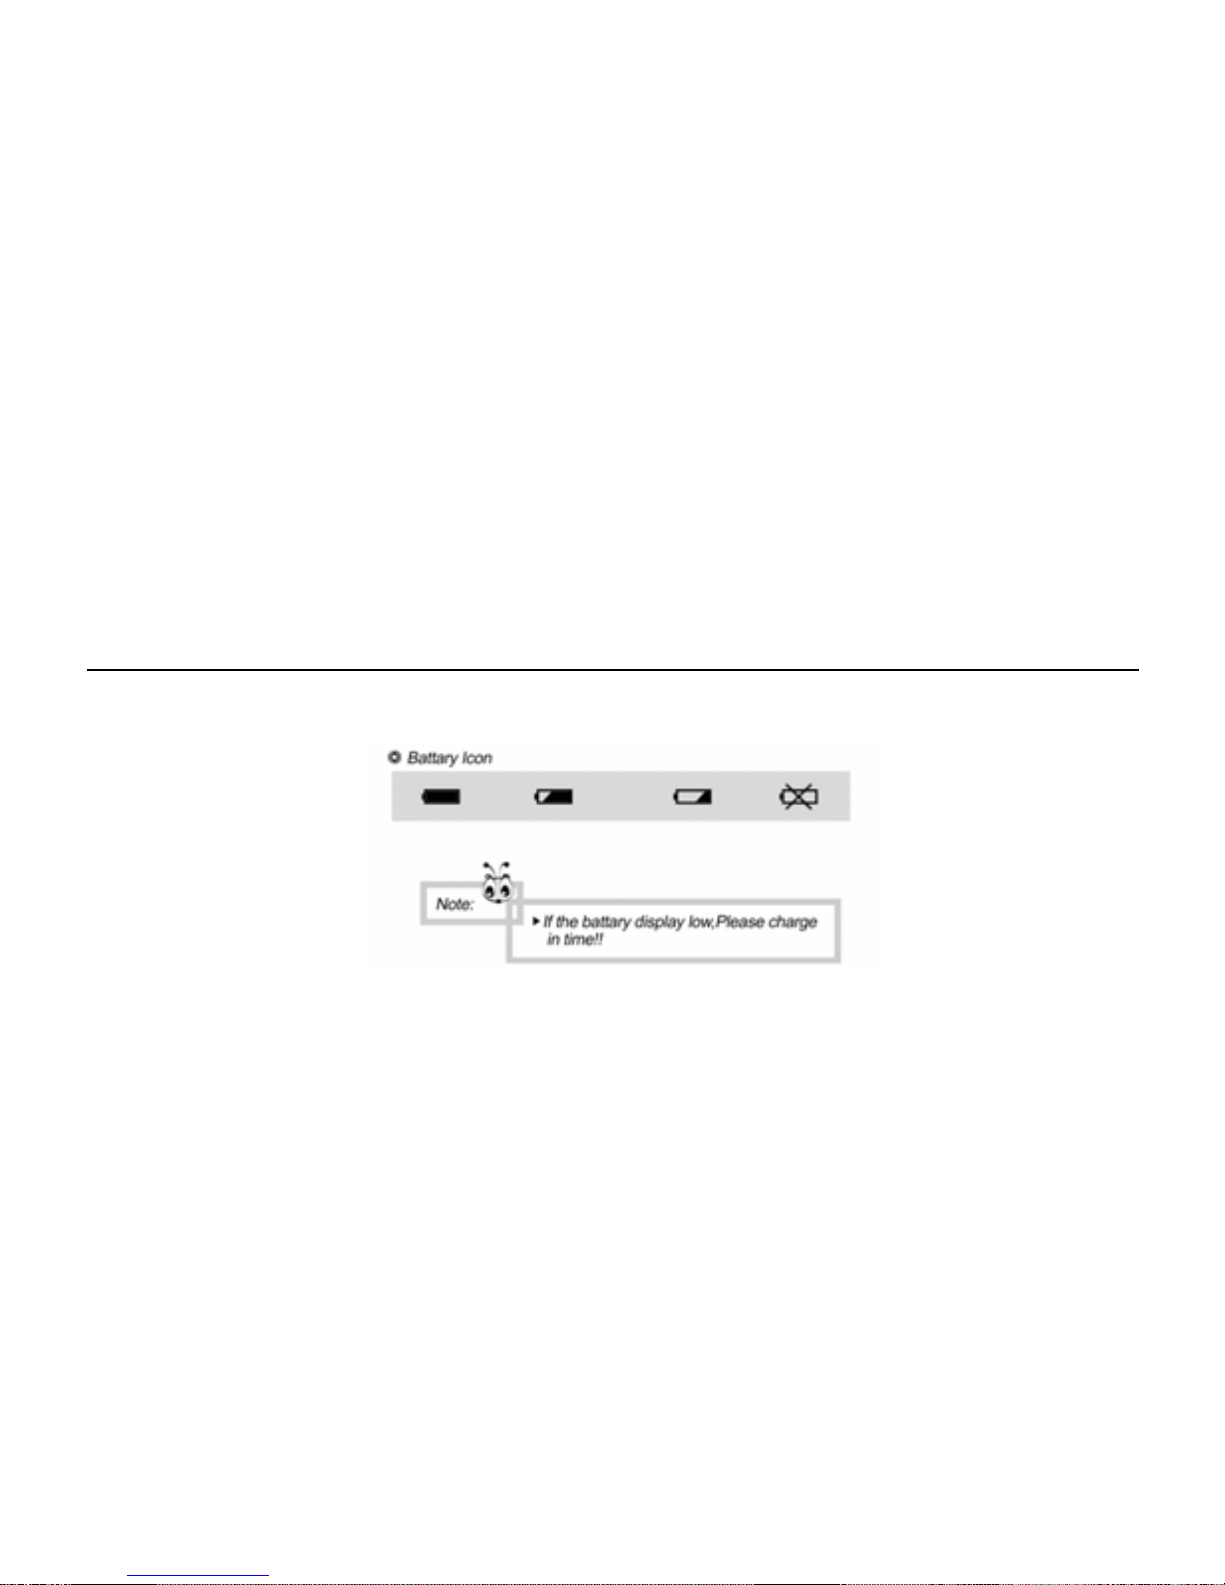
1. Battery W arnings
The icon of the battery with different statuses
Note: If player fails to start, the battery may be empty. Please recharge it and try again.
5
Page 7

6
2. Recharging the Battery
Connect one end of the supplied mini USB cable to the player
Connect the other end of the mini USB cable to the computer
Charging process begins automatically
When it is fully charged, it will show a full battery icon
Be sure to safely remove the device
Warnings:
• Warranty is void when you open the player housing
3. Basic Operation
a) POWER ON
Press and hold the POWER switch down for 5 seconds, the player will turn on and enter the
Main Menu.
b) POWER OFF (Manually)
In any working status, press an d hold the P OWER switch down for 5 seconds and the LC D will
shut down and the system will turn off.
c) POWER OFF (Automatically)
The product will be switched off automatically when the batter y is empty. It will also turn off if
Page 8
left idle for however long you have the AutoShut Time set as (3min, 5min, 10min, 15min, 20min,
or No AutoShutDown)
d) Enter/Select
In any working status, click the icon or file to select an option.
e) Directional Keys
Click
or to choose the files or options you want to select.
f) Entering Sub-Menu
Click the
icon to enter any sub-menu.
g) Exit Sub-Menu
Click
return to previous Menu, and to Main Menu.
h) Hidden Control icon
Click
to hide Control icons. Press anywhere on the screen to display the control bar again.
i) Reset
If the screen freezes, you must Reset your device. This may be due to unstable data files, or
pressing the touch screen too quickl y. Use a pin and press the Reset button on the back side of
the player. The screen will shut down. Turn the player back on to resume playback. You may
also need to calibrate the screen after a reset is performed. All your files will remain intact.
7
Page 9

8
4. Transferring Files
1) Connect the player using the USB cable.
2) Wait for your computer to recognize the player.
3) Once the player has been detected, you should be able to add songs using Windows Media
Player® (Follow the On-screen Instructions). If you prefer to manually load songs onto the
player then please follow the steps below:
4) Open My Computer
5) Select the Removable Disk that correlates to your player.
6) In a new window, go to the folder of your file(s) and copy the file(s) you want.
7) Paste the files to the Removable Disk (into sub-folders if you have created them).
8) After copying is complete, safely remove the Removable Disk.
Note: If you have inserted a MicroSD me mory card, you will have t he option to cop y the file(s)
either to the flash memory or the TF memory; it will show on your computer as a separate
Removable Disk signifying Flash and TF memory.
5. Disconnecting from the PC
After transferring files to the player, it must be disconnected properly from your computer.
Page 10
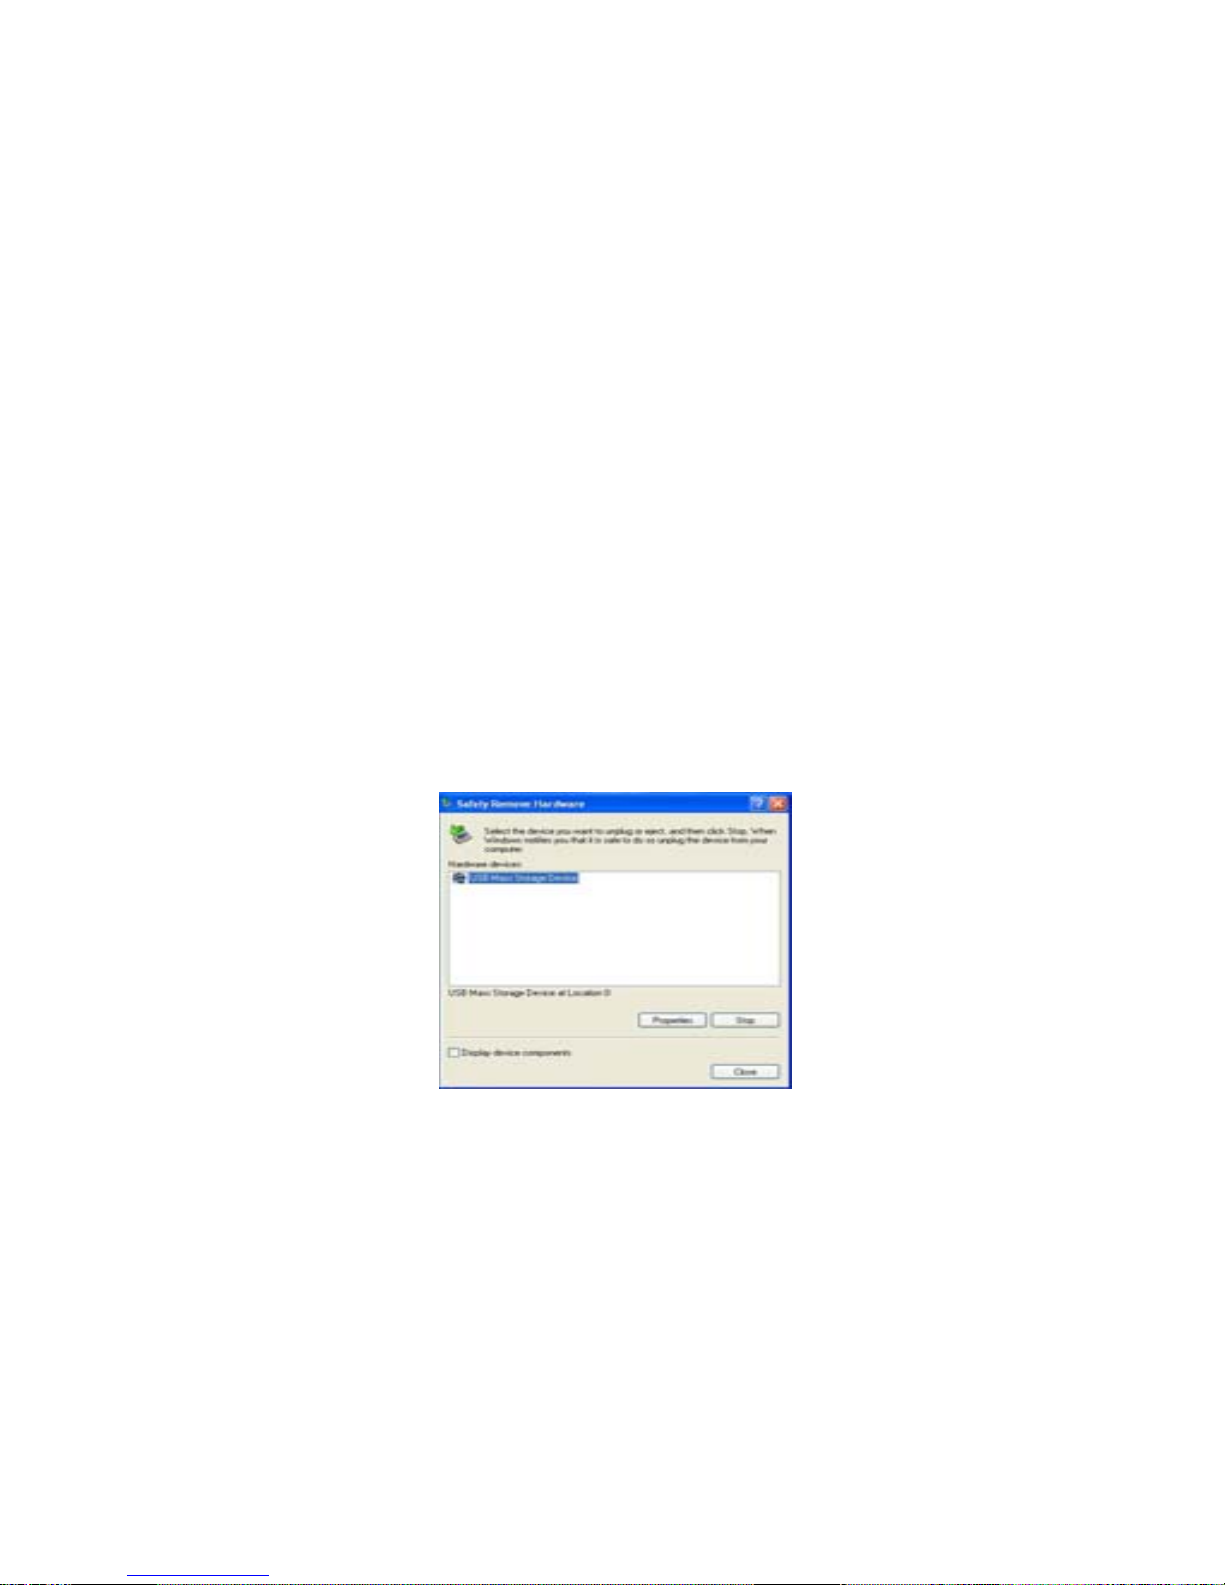
To safely remove hardware:
1) Right-click the “Safely Remove Hardware” icon on the bottom right corner of your screen.
2) Select “Safely Remove Hardware”
3) A dialog box will pop up.
4) Select USB mass storage device.
5) Click STOP.
6) Click OK.
7) You will be prompted that you may safely remove the device.
8) Disconnect the player from the computer by removing the USB cable from the player.
9
Page 11
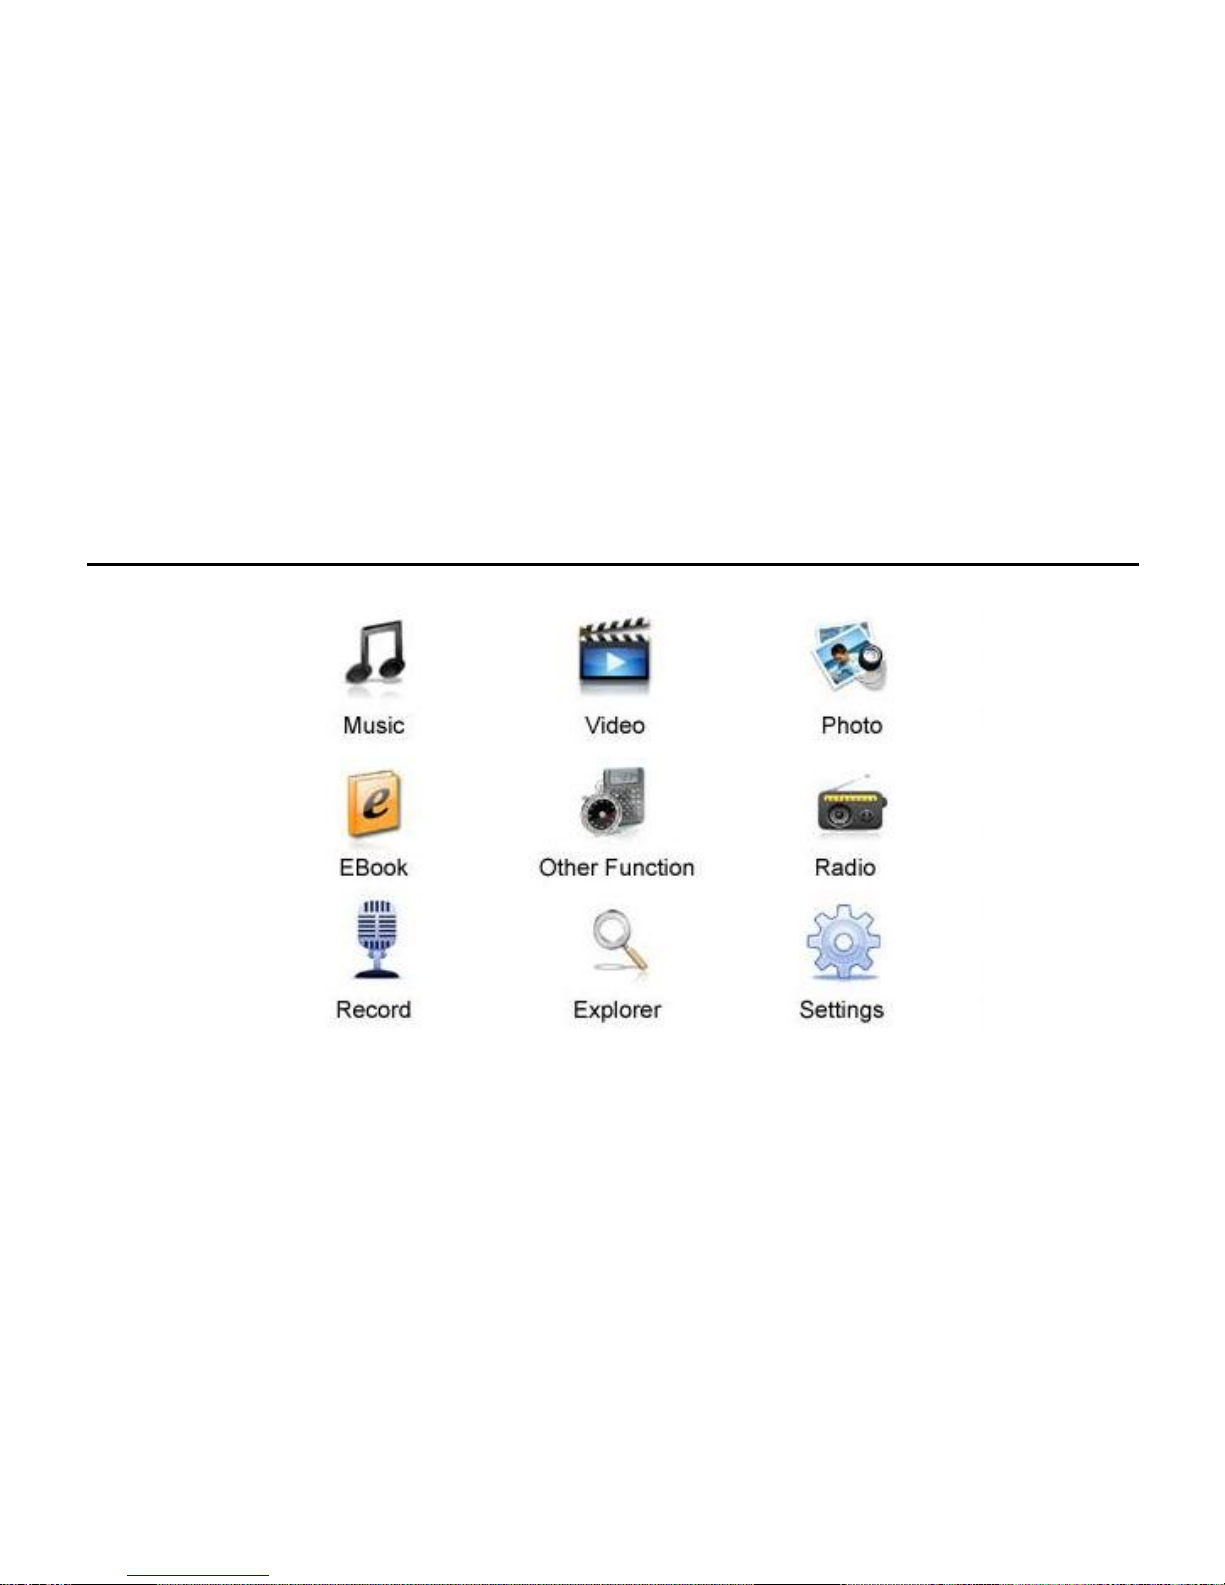
Main Menu
1. The Main Menu
Fig 1. The Main Menu
10
Page 12

2. Video Player
a) To enter Video Mode:
Click the Video icon in the Main Menu to enter video mode.
11
Fig 2. The Video Mode Icon
Fig 3. Playback View of Video Mode
b) Video Configuration
If a dialog comes out, select “Yes” for Conti nue Last Play, or “No ” to play the movie from the
Page 13

beginning.
c) Video Play
Use
or to select the file you want to p la y in the video mode menu, then click the file to
begin playing the video.
During video playback, click either
to adjust the volume.
Click the
icon to pause or play the video file, will jump to the next file, while will
return to the previous one.
Click the
icon to go back to the video menu.
d) Exiting the video mode
While in the video menu, click the
icon to go back to the Main Menu.
3. Audio Player
a) To enter Audio Mode:
Click the Music icon in the Main Menu to go to the audio mode.
Fig 4. The Audio Mode Icon
12
Page 14

Fig 5. The Audio Mode Menu
Use
or to choose the files you want to select. Click on the file to select it.
b) Playback Functions
• Click the
icon to pause or play the audio file
• Click the
to fast-forward within the track, and to rewind
• Click the
icon will skip to the next track
• Click the
will return to the previous track
• Click
to adjust the volume
• Click the
icon to access the sub-menu, which allow s you to change the repeat mode, play
mode, MSEQ, Equalizer, or adjust the equalizer to your preference.
The playback view is shown below:
13
Page 15

Fig 6. Playback View of Audio Mode
Click the
icon to go back to the audio menu
c) Exiting the audio mode
While in the audio menu, click the
icon to go back to the Main Menu
4. Picture View
a) To enter Picture View Mode
Click the Picture View icon in the Main Menu to enter the Picture View mode.
Fig 7. The Picture View Mode Icon
14
Page 16

b) Viewing Pictures
Use
or to choose the files you want to select. Click the file to view the photo.
In the Slide Show mode, the pictures will play automatically.
Click the
icon while viewing a picture to ac cess the sub-menu, which allows you to rotate
the picture left and right, zoom in and out, and adjust the slide show settings.
Click the
icon to go back to the Picture View menu.
Note: Only JPEG / GIF / BMP format is supported b y this product. Other picture formats need
to be converted to JPEG.
c) Exiting the Picture View mode
While in the Picture View menu, click the
icon to go back to the Main Menu.
5. Audio Record Mode
a) To enter the Audio Record mode
Click the Audio Record icon in the Main Menu to enter the audio record mode.
Fig 8. The Audio Record Mode Icon
15
Page 17

Fig 9. Audio Record Mode View
b) Record
Click the
icon to start the recorder. Click to save the recorded file.
Click
to access the s ub-menu, which will allow you to change the recording level and th e
recording volume.
c) Exiting the Audio Recording mode
Click the or icon to go back to the Main Menu.
d) Review the Recorded file
Go to the Main Menu and go to A udio Player, from there you can access your audio recording
files.
6. E-book
a) To enter the E-book mode
16
Page 18

17
Click the E-Book icon in the Main Menu to enter the E-book mode.
Fig 10. The E-book Mode Icon
Use
or to choose the files you want to select. Click the file to access your E-books
or .TXT files.
Fig 11. View of E-book Mode
Click the icon to enter the sub-menu, which allows you to jump pages, save/load/delete
bookmarks, set font, set color, set browser mode, and change page flip time.
When reading TXT files, use
or to scroll up and down the selected TXT file.
b) Exiting the E-book mode
Click the
or icon to go back to the Main Menu.
Page 19

7. FM Radio
a) To enter the FM Radio mode
Click the Radio icon in the Main Menu to enter the FM Radio mode.
Fig 12. The FM Radio Mode Icon
Fig 13. FM Radio Mode View
NOTE: FM RADIO WILL ONLY WORK WITH HEADPHONES CONNECTED
(Headphones work as the antenna)
18
Page 20

b) Tuning
1. Manual Tuning
Click the
icon to enter the Sub-Menu, select Manual Tuning, then use or for
Tuning.
2. Automatic Tuning
Click the
icon enter Sub-Menu and select Auto Tuning. The icons will not respond until
Auto-Scan is finished.
3. Pre-Set Station
Click the
icon enter Sub-Menu, then select Pre-Set Mode. Stations stored in the memory
can be played.
4. Save Station
Tune to the station you desire to save. Click the
icon enter the S ub-Menu and select Save
Station. Select an open slot and the FM Frequency will be displayed and saved.
5. Delete Station
Click the
icon enter Sub-Menu, then select Delete Station. Select the FM Frequency you
want to delete. Click Confirm to delete the station.
Click the icon to go back to the Previous Menu.
c) FM Recording
19
In the Radio Menu, click the
icon to enter Recording mode. Click to enter the
sub-menu, which will allow you to select Recording Sound Quality and Volume. Click
to
Page 21

save Recorded data;
to Start / Stop Recording.
Fig 14. FM Recording Mode
d) Exiting the Radio / Radio Recording mode
20
Click the or icon to go back to the Previous Menu or Main Menu.
8. Explorer
a) To enter the Explorer mode
In the Main Menu, click the Explorer icon to go to the Data Management mode. If a TF Memor y
Card was inserted, two selections will be displayed in Explorer – Fla sh or TF. Flash memory is
the memory stored on the player, while TF memory is the memory stored on an optional
MicroSD card.
Page 22

Fig 15. The Explorer Mode Icon
Fig 16. The Explorer Mode Menu
WE RECOMMEND PUTTING YOUR FILES IN SUB-FOLDERS TO EASILY MANAGE
THEM
b) Select Files
Use
or to choose the files you want to select. Click on a file to open it.
c) Delete Files
21
Page 23

Use or to choo se the files you want to delete. Clicking will bring up a “Delete
file” box. Select Delete file or Exit.
d) Exiting the Explorer mode
Click the
or icon to go back to the Previous Menu or Main Menu.
9. Other Function
a) To enter the Other Function mode
Click the Other Function icon in the Main Menu to enter the Other Function mode. Click Timer
to perform stopwatch function, or select Calendar to open the calendar.
Fig 17. Other Function Icon
Click the
or icon to go back to the Previous Menu or Main Menu.
10. Settings
a) To enter the Settings mode
22
Page 24

Click the Settings icon in the Main Menu to enter the Settings mode.
Fig 18. The Settings Mode Icon
Fig 19. The Settings Mode Menu
Use
or to choose the items you want to select, then click your choice.
b) Display Settings
Use
or to scroll through the four choices: Backlight Time, Brightness, Backlight
Mode and Display Status. Click the
or icon to go back to the Previous Menu or Main
Menu.
1. Backlight Time: 5 / 10 / 15 / 20 / 30 Second / Always On
23
Page 25

2. Brightness: 1 / 2 / 3 / 4 / 5
3. Backlight Mode: LCD Display All dim, or Half dim
4. Hidden Status Bar: Select Hidden / Display Battery icon to show Power level.
c) System Settings
1. Firmware Upgrade: Perform Firmware upgrade or exit
2. Factory Default: Select system back to Factory default value or exit
d) DeskTop
Choose from 8 different desktops, or exit
e) Language
Up to 20 language selections, including: English, Spanish, French, Japanese, Chinese etc…
f) Device Information :
Memory Size, SD Card (TF) memory size, Model No., etc… Read only Information
Fig 20. Device Information Menu
g) Touch Screen Alignment / Pen Calibration :
24
Page 26

Fig 21. Touch Screen Alignment View
Click the 5 “+” signals that appear to calibrate the device.
h) Exiting the Tools mode
Click the
or icon to go back to the Previous Menu or Main Menu.
11. Memory
a) This product supports TF cards with the slot shown below:
25
Page 27

b) If a Memory Card (Micro SD or TF Card) was inserted in the M emory Slot, the player will
recognize the additional memory, and in the Explorer mode it will show “Flash” (built-in
memory) or SDCard (add-on SD card) as the two choices to explore.
Click either Flash or SDCard and the contents will show up for selection.
Note: If no SDCard Director y was shown in Music / Video / Picture / E-Book etc, check the SD
Card insertion; or take out the memory card and try again.
Communicate with PC
1. U-Disk Driver Setup ONLY FOR WINDOWS 98 USERS
This product does not support OS versions older than Windows 2000 without installing the
driver. Put the included CD-ROM into your PC. Connect the pla yer to your PC using the USB
26
Page 28

cable. Your PC will ask to setup the USB driver.
Press “Next” and then choose the item of “Add New Hardware Wizard” in the window, click
“Next” and press “View”
27
Page 29

Select the folder of WIN98 in the CD-ROM drive and select “Next”
Next, click “Setup”. After the setup, reboot your PC. Connect the player to the PC again. Your
Removable Disk will be in “My Computer.”
2. Connect with PC
Connect the player to your PC using the USB cable.
3. U-Disk Status
28
Connect the player to PC with USB cable, and it is in U-Disk status.
Page 30

Note: After Safely Removing the device as a U-Disk in Windows, the screen will show a batter y
charging symbol.
4. Formatting The Player
With the player connected, go to “My Computer” and locate the removable disk that corresponds
with the player. Right click and choose “Format”. Make sure the file system says “FAT” and
click Start;
29
Page 31

In the Warning window, select “OK” to start the formatting.
Warning:
Select the proper format type before formatting or else the product may be damaged.
DO NOT remove the USB cable from the player during formatting, it may cause damage t o the
player;
If formatting is necessary, copy all data files to your computer first. Formatting the device will
erase all data on the player.
30
Page 32

31
The Configuration
Profile 90.3mm*54.2mm*12.8mm (length×width×thickness)
Panel 3” QVGA LCD
USB USB2.0 (High Speed)
Memory Supports TF Card of 1GB\2GB\4GB\8GB(optional)
Format AMR
Record
Length 53 Hours(128MB)
Compress rate 32Kbps-384Kbps
Frequency response 20Hz~20KHz
Th-D <0.1%
SNR >85dB
MP3&WMA
Audio Power 5mW+5mW(32Ω)
Frame 30fps
Color bit 24bit
CMOS
Camera
Focus 1x to 2x
Page 33

32
Photo format JPG
Video format RM, RMVB, 3GP, ASF, MP4, AVI
Resolution 320*240
Frame Freq. NTSC 30fps ; PAL 25fps
AV-out
Voltage
>/=1V (VPP)
Music
format
MP3、WMA、AMR、AAC-LC、WAV
Picture
Format
JPG, GIF, BMP
Temperature -5 ~ 40
Menu
language
English/Chinese/Trad.
Chinese/Japanese/Korean/French/German/Spanish/Portuguese/Italian/Russian/Polish
Page 34

33
Common Problems
Problem Possible Reason Solution
Switch ON failure
Battery empty
Illegal operation
Recharge
Auto off Battery shortage Recharge
USB in, but NO
Removable Disk
Battery empty
USB wire damage
USB disable by PC BIOS
OS does NOT support USB
Wire wrongly connected
Any issues of the PC
Recharge
Replace new wire
Set USB ENABLED
Update the OS driver
Connect again
Reboot PC
Page 35

34
When playing, NO sound
Volume too low
Wrong audio out device
The file from web is not the
limited
Bad earphone
Format failure
Turn volume up
Set right parameter
Download standard MP3 file
Use good earphone
Format under “FAT”
Save failure
Storage full
Wrong save path
Delete same files or unused files
Words shown abnormal
Language wrong
Language is not supported
Set the correct parameter of the
language
Explorer our web for more info
For answers to your frequently asked questions, please visit:
www.Ematic.us
You can also email us at: CustomerService@ematic.us
Windows Media Player is a registered trademark of Microsoft Corp.
 Loading...