

Page 1
ED929D
Ematic 9” Dual Portable DVD Player
Page 2
1
Table Of Contents
Safety Precaution 1
Package 3
Main Features 3
4
System Connection 5
The Remote Control 8
Basic operation 11
System Setup 19
Specification 23
Troubleshooting 24
Overview of Unit A/B Controls
Warning:To reduce the ri sk o f fi re or el ect ric sh ock , do not exp ose thi s de vic e to rai n
or moisture.
1) Please read th e in str uct ion manua l car ef ull y an d fo llo w al l th e re qui remen ts of sa fe
opera tio n.
2) Do not us e th is u nit nea r wa ter.D o not pl ace the uni t ov er a ny cont ain er wit h li qui d
insid e.
3) Do not in sta ll n ear any hea t sour ces suc h as rad iat ors ,he at r eg ist ers ,st ove s,o r ot her
appar atu s(i ncl udi ng a mplif ier s)t hat pro duc e he at.
4) Unplug this un it d uri ng l igh tning sto rms or w hen unu sed for long time .
5) About Cl ean ing :Un plu g the s yst em, use onl y a m ois t cl oth to c lean. Do not u se l iqu id
deter gen t or aer oso l.
6) Only use ac ces sor ies spe cifie d by the man ufa ctu rer .
7) Refer all se rvi cin g to qua lifie d servi ce p ers onn el, ser vicin g is req uir ed w hen the uni t
has be en d ama ged in a ny w ay.Such as if t he p owe r su pply cord or p lug is d ama ged ,
liqui d sp ill ed o r ob jec ts h avi ng f allen int o th e un it, has bee n ex posed to mois tur e,o r
is not ope rat ing nor mal ly. Don't try t o re pair the m ach ine by your sel f be cause of the
dange r of hig h vo lta ge a nd e lec tri c shock.
8) Do not us e ir reg ula r sh aped disc s su ch a s he art or s tar -sh aped discs as the y ma y
cause the uni t to mal fun cti on.
Hi-voltage, Do Not Op en
Use care to a void elect ri c
shock
Thank you for ch oos ing our por table DVD pla yer . Pl eas e re ad t he manu al car efu lly pri or
to use and ke ep i t fo r fu tur e re fer ence.
Safety Precaution
Page 3
32
This device complies wi th P art 15 of th e FC C Rules. O per ati on i s su bje ct t o th e
following two conditions: (1 ) Th is d evi ce may n ot c aus e ha rmf ul i nterf ere nce , an d
(2) Th is d evi ce must acc ept any int erf ere nce re cei ved , in clu din g in ter fer en ce t hat
may cause undesired op era tio n.
Warning: Changes or mod ifi ca tio ns t o this u nit not exp res sly app rov ed by th e pa rty
responsible for compliance co uld voi d th e us er' s au tho rity t o ope rat e t he e qui pme nt.
NOTE: This equipment h as b een teste d and found to comp ly w ith the lim its for a
Class B digital de vic e, p urs uan t to Par t 15 of the FCC Rul es. The se l imi ts a re
designed to provide re aso nab le p rot ectio n ag ain st harm ful int erfer enc e in a
residential installation. This e qui pme nt gen era tes , us es and c an r adi ate rad io
frequency energy and, if not ins tal led and used i n accor dan ce w ith the ins tru ction s,
may cause harmful in ter fer enc e to radio com mun ica tio ns.
However, there i s no gua ran tee tha t in terfe ren ce w ill not occ ur i n a partic ula r
installation. If this e quipm ent doe s ca use har mfu l inte rfe ren ce t o ra dio or t ele vis ion
reception, which can be det erm ine d by tur ning t he e qui pme nt off a nd o n, the u ser is
encouraged to try to cor rec t th e in ter fer ence b y on e or mor e of the fol low ing
measures:
Reori ent or r elo cat e th e re cei vin g ante nna .
Incre ase the sep ara tio n be twe en t he equ ipm ent and rec eiv er.
Conne ct t he e qui pme nt into an out let on a cir cui t di ffe ren t fr om t hat to w hic h
the re cei ver is conn ect ed.
Consu lt t he d eal er or an exp erien ced rad io/ TV t ech nic ian fo r hel p.
High b rig htn ess col or 9" LC D scre en
Compa tib le w ith dis c of DVD ,VC D,M P3, MPEG4 ,CD ,JP EG, etc
Built -in ste reo spe ake r
Suppo rt P AL or NTS C sy ste m
Suppo rt M ult i-l ang uag e OSD, spe ed forw ard /ba ckw ard ,re peat f unc tio n
Zoom i n/o ut f unc tio n
Package
Main Features
2
2
2
1
1
2
Remot e Co ntr ol w ith bat ter y
AV Cabl e(D VD to D VD)
AC/ DC Po we r A da pt er
Cigar ett e Li ght er Adapter
User M anu al
Car St rap s
9 '' DVD Pl aye rs
1
Page 4

5
4
AV OUT
SD
AV OUT
SD
AV IN/OUT
SD
Note:
1.Car cig are tte lig hte r ad apt or is not r eco mme nde d to rec har ge t he bat ter y.
2.Car cig are tte lig ht a dap tor can onl y be used when the car pow er s upp ly i s 9- 12V .
3.The mai ns p lug is u sed as the d isc onnec t de vic e, the d isc onn ect devic e sho uld re mai n
readi ly o per abl e.
Powering and installation
Plug one end of the AC/DC power adaptor int o th e DC IN 9 -12V j ack on t he r igh t of the
unit, then plug th e ot her end int o th e AC power receptacle. Pl ea se r efe r to the fol low ing
illustration.
If usi ng c ar ciga ret te l igh ter adapt or to co nne ct t o th e po wer :
Plug o ne e nd of th e ci gar ett e li ght er a dap tor in to the D C IN 9-1 2V j ack on the u nit , plug
the ot her end int o th e ca r ci gar ett e li ght er soc ket .Se e il lus tra tio n be low .
System Connection
Car cigar ette lighter
AV IN/OUT
SD
Main Unit Controls
Overview of Unit A/B Controls
1. Ope n kn ob
2. Pow er O N/O FF swit ch
3. SET UP b utt on
4. MOD E bu tto n
5.
6. OK b utt on
7. PLA Y/PAUSE button
8. STO P bu tto n
1. O pen knob
2. P ower ON/ OFF swi tch
3. S ETUP but ton
4. M ODE butt on
5.
6. O K button
7. P LAY/PAUSE button
8. S TOP butt on
9. DC IN 9-12V
10. AV OUT
11. Ea rph one jac k
12. Vo lum e kn ob
13. SD car d sl ot
14. US B Po rt
15. Br ack et
16. Ra tin g la bel pos iti on
9. DC I N 9- 12V
10. AV IN /OU T
11. Ea rph one jac k
12. Vo lum e kn ob
13. SD car d sl ot
14. US B Po rt
15. Br ack et
16. Ra tin g la bel pos iti on
16
16
( )/
( )/
( )/
( )/
( )/
( )/
( )
( )
CLOSE
CLOSE
1
1
2
2
15
15
3
3
445
5
6
6
778
8
9
9
10
10
11
11
12
12
13
13
15
15
AV OUTAV IN/OUT
ON OFF
ON OFF
SDSD
SD
Unit A
Unit B
Page 5
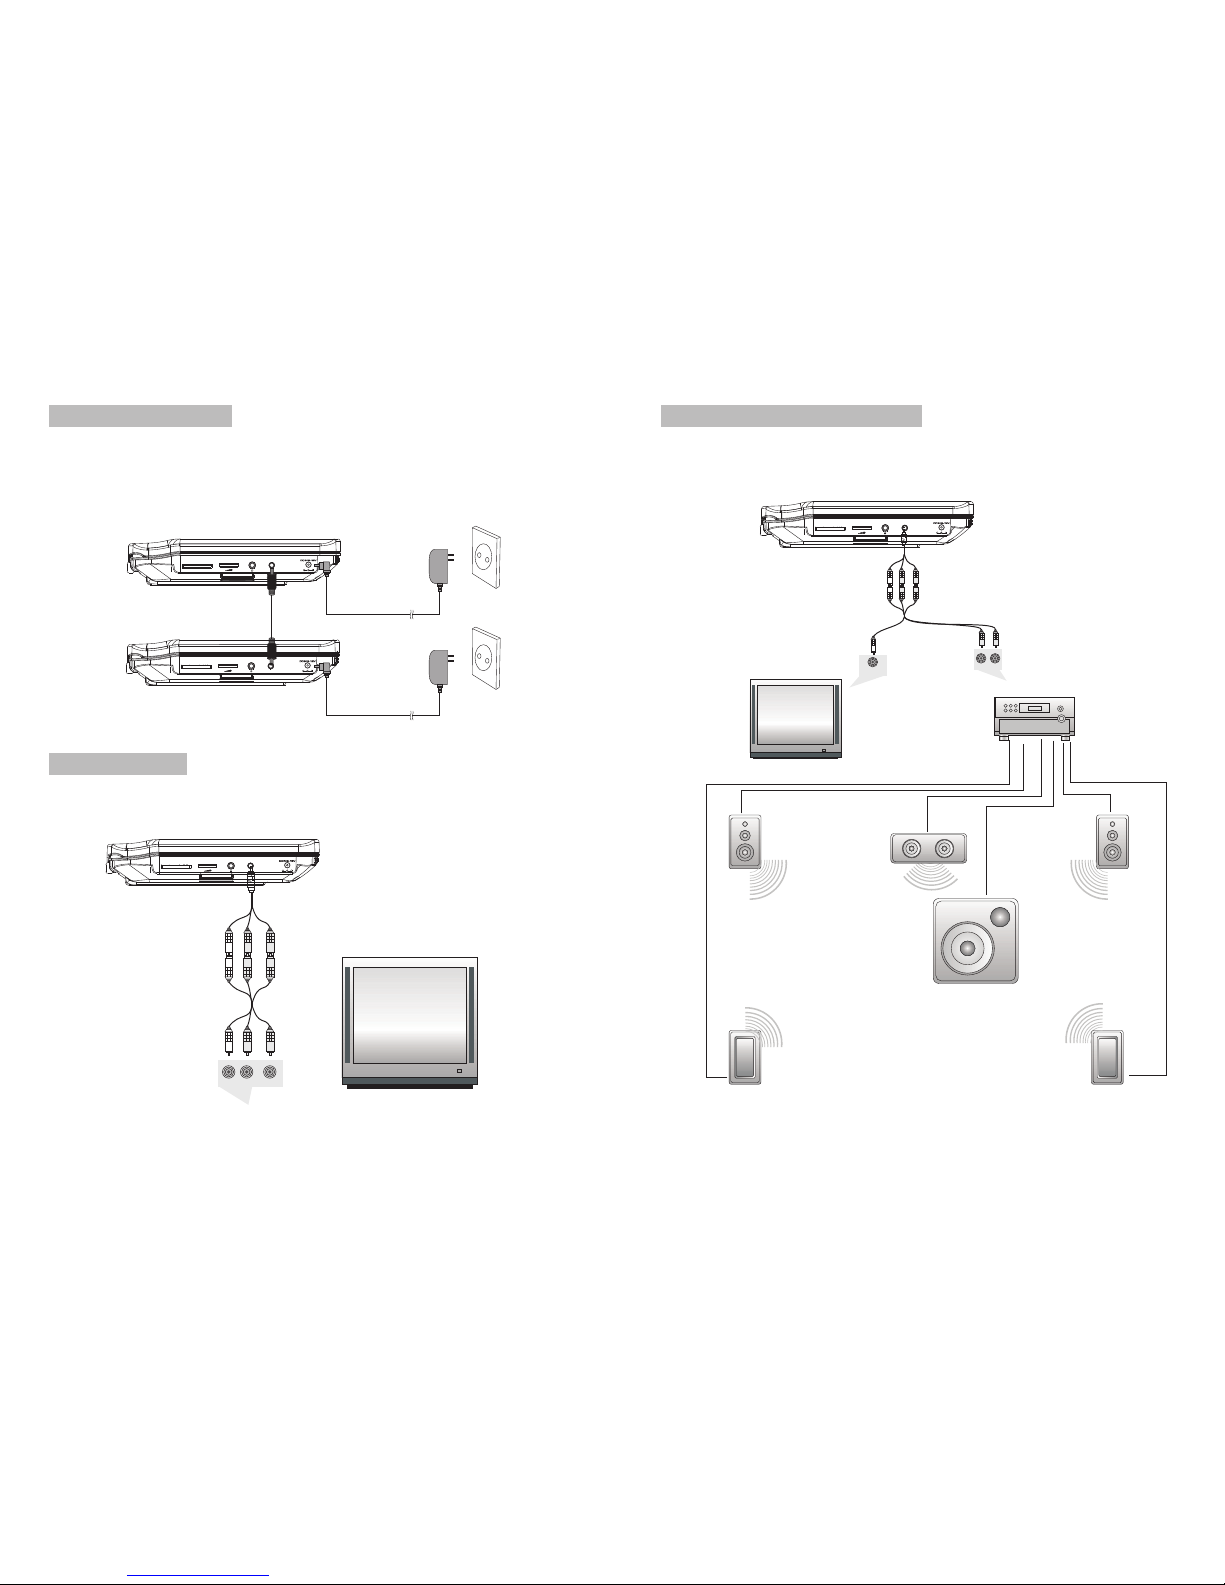
Connecting with external Spe ak er
Both unit A and u nit B ca n be con nec ted wi th exte rna l sp eak er. Pleas e see the fo llo win g
illustration.
AMPLIFIER
TV
SUBWOOFER
Left front speaker
Right front speaker
Center speaker
Left rear speaker
Right rear speaker
Note:
There is no 5. 1 ch ann el i n th e un it, howev er,after connecting to APM it i s av ailable to output
audio in 5.1 ch ann el.
AUDIO INVIDEO IN
AV CAB LE
Not supplied
AV OUT
SD
AV OUT
SD
AV OUT
SD
Connecting to Unit A/B
1.Connect unit A and u nit B wi th AV ca ble .
2.Connect the unit to pow er b y AC /DC ada pte r or cig are tte li ght ada pte r
3.Turn on t hes e tw o unit s, inse rt a dis c in to t he d isc com par tment of t he main uni t A,
press the IN/ OUT key on r emo te cont rol B to cha nge Un it B to AV IN mode, t hen yo u
can se e th e same i mag e on bot h un its .
Pleas e re fer to the i llu str ation bel ow.
Connecting to TV
You can co nne ct u nit A or uni t B with TV t o en joy hig h qu ali ty pict ure an d st ere o so und .
Please refer to th e fo llo win g il lustr ati on:
Please use AV cable t o co nne ct t he mach ine and th e TV. Make s ure it is co nne cte d
correctly.
TV
AUDIO IN
VIDEO IN
AV CABLE
Not supplied
AV IN/OUT
SD
76
Page 6

ED929D
A
ED929D
B
98
1. Number button
2. TITLE(To display title i nfo rma tio n)
3. AUDIO(To select audio la ngu age )
4. SETUP(To go to o r ex it s etu p menu)
5. Previous/Next button(To go
to pre vio us/ nex t ch apt er or sc ene
durin g pl ayi ng)
6. Fast forward/backward
butto n(T o scan f orw ard /ba ckw ard
at 2,4 ,8, 16, or 3 2 ti mes )
7. OSD(To display disc i nfo rma tio n
durin g pl ayi ng s uch as e lap sed an d
remai nin g ti me)
8. PLAY/PAUSE
9. STOP (press once to stop playback,
then pre ss t o r esu me play bac k
from t he p oin t wh ere you sto ppe d;
press sto p bu tto n tw ice to s top
playb ack com ple tel y)
The Remote Control of Unit A The Remote Control of Unit B
1 1
2 2
3 3
4 4
5 5
6 6
7 7
8 8
9 9
10 10
11
11 12
12 13
13 14
14 15
15 16
16 17
17 18
18 19
10.MODE
11.
12.
13.
14.
15.
16.
17.
18.VOL+/-(To adj ust the volum e)
19.ENTER(To con fir m)
MENU(To ent er o r ex it root me nu)
SUBTITLE(To sel ect sub title lan gua ge
when p lay ing DVD dis c)
ANGLE (To change viewing a ngl e
when p lay ing dis c wi th m ult i-a ngl e)
A-B(Repeat a specific po rti on f rom
point A t o B, pre ss it ag ain to can cel
repea t pl ayi ng)
REPEAT(To repeat playing tit le,
chapt er o r tr ack )
RETURN(To ret urn to t he main me nu)
ZOOM(To zoo m in /ou t the imag e
durin g th e pl ayb ack )
10.IN/OUT(To inp ut o r ou tput sign al)
11.MODE
12.
13.
14.
15.
16.
17.
18.
19.VOL+/-(To adj ust the volum e)
20.ENTER(To con fir m)
MENU(To ent er o r ex it roo t me nu)
SUBTITLE(To sel ect sub title lan gua ge
when p lay ing DVD dis c)
ANGLE (To change viewing a ngl e
when p lay ing dis c wi th m ult i-a ngl e)
A-B(Repeat a specific po rti on f rom
point A t o B, pre ss it ag ai n to can cel
repea t pl ayi ng)
REPEAT(To repeat playing tit le,
chapt er o r tr ack )
RETURN(To ret urn to t he main me nu)
ZOOM(To zoo m in /ou t the imag e
durin g th e pl ayb ack )
19 20
Page 7

ED929D
A
ED929D
A
1
2
CR2025 CR2025
Please put the ba tte ry i nto the rem ote co ntr ol a s pe r il lus tra tio n be lo w .
When using remote co ntr ol, mak e su re the inf rar ed w ind ow is po int ed to infr are d
receiving window of th e un it. The dis tan ce b etw een th e uni t and r emo te cont rol mus t be
within 3 metres. Pl eas e re fer to the f ollow ing ill ust rat ion .
The Use of Remot e Cont rol
0
30
0
30
Note:
1. To avoid falling o ff o r pl ace nea r da mp e nvi ron men t.
2. To avoid infrared r ece ivi ng w ind ow o f th e un it b ein g un der dir ect su nli ght .
3. Please use a n ew b att ery to r epl ace old one if t he remote con tro l do esn 't work .
4. Remote control A can o nly ope rat e un it A , Re mot e co ntr ol B can onl y oper ate uni t B.
0
30
0
30
Unit BUnit A
Remote Control A Remote Control B
10 11
Basic Operation
Playing disc of DV D, M PEG 4, S VCD , VC D, C D, MP3 .
1.
2. Open the di sc d oor and ins ert a disc int o th e do or with the lab el side fa cin g up .
3. Close the di sc d oor .Th e un it w ill load the d isc and sta rt p lay ing .
4. Press“ ”once to stop p layba ck; pre ss“ ”to resume playback f rom the po int
where you sto ppe d;p res s“ ”twice to stop pl ayb ack com ple tely.
5. During playback,press“ ”to pause; press it aga in t o re sum e pl ayb ack .
6. When the playing i s finish ed, ple ase tur n off the power b y sl idi ng ON/O FF sw itc h to OFF .
7. For some DV D di sc w ith Tit le o r Chapter men u, p res s“MENU”button to enter men u
page, and use“ ”to select. Press E NTE R to confi rm.
DVD
MPEG 4
SVCD
VCD CD
MP3
Note:
Please do not di sco nne ct U SB d evice s or plu g ou t SD/MM C ca rds whi le they are worki ng
with the unit.Functional fa ilu re m ay o ccu r in cas e of wro ng o perat ion s.
In the Source Mo de, you can pre ss to select and ENTER key to ent er the
source you want.
“ ” “ ”
DVD
SD USB
Play/pause
Cursor button
ENTER
Title
Menu
ED929D
A
ED929D
B
Page 8

ED929D
A
12 13
ED929D
A
When playing disc of DVD ,MP EG4 ,SV CD,VC D,C D,M P3, use r ca n re pea ted ly pla y a
specific section.
During playback,press“A-B”bu tto n at a po int A,t hen pre ss
this b utt on a gai n in poi nt B ,th e un it w ill aut omati cal ly repe at
playi ng t he p art bet wee n“A-B”
Press it t he thir d ti me, the uni t wi ll r etu rn to norm al p lay bac k.
AB
A
During playing DVD di sc w ith multi-angle, pre ss“Angle”button to change th e di spl ay angle .
Repeat playing of favor ite sc ene
Angle
A-B
Angle
Number
Note:
The function is av ail abl e on ly f or dis cs w ith mul ti- ang le.
2X
3X
4X
1 /2X
1 /3X
1 /4X
During playback,press“Zoom”button,the image will be
enlarged;press it again th e im age wil l be enl arg ed aga in;
press it fourth ti me, the ima ge w ill zoo m out, pre ss i t
repeatedly and the im age wil l re tur n to no rma l st atu s.
When the image is enl arg ed, use r can pres s“ / / / ”to move the i mag e.
Zoom in/ out
When playing disc of DVD ,MP EG4 ,SV CD,VC D,u ser can
zoom in or zo om o ut t he imag e.
MP3
VCD
SVCD
MPEG 4
DVD
CD
DVD
SVCD
DVD
MPEG 4
VCD
DVD
MPEG 4
SVCD
VCD CD
MP3
DVD
MPEG 4 S VCD
VCD CD
2X 4X
8X16X32X
2X 4X
8X
16X32X
Search forward
When playing disc of DVD ,MP EG4 ,SV CD,VC D,C D, t he mach ine can searc h for ward o r
backward.
1. Pre ss“ ”,the unit will s ear ch f orw ard.
Press it r epe ate dly ,th e ma chine wil l play a t
2, 4,8 , 16 , 32 tim es o f sp eed .
2. Press“ ”, the unit w ill se arc h ba ckw ard .
Press it r epe ate dly,the machine will pla y at
2,4,8 ,16 ,32 tim es o f sp eed .
When playing disc of DVD ,MP EG4 ,SV CD,VC D,C D,M P3, use r ca n re pea t pl aying one
chapter, title o r th e wh ole dis c.
For DVD disc,press“repeat”button,user can repeat p lay ing one Ch apt er; pre ss it
again to repeat pl ayi ng T itl e;p ress it th e th ird tim e to rep eat pla ying t he w hol e di sc.
For MP3 disc,press“repeat”button to repeat p lay ing pre se nt f ile ;pr ess it a gai n to rep eat
playing the folder;press it the thi rd time to c ancel rep eat fun cti on.
Search backward
Chapter Title All
Repeat off
one fol der
Repeat off
Fast forward and fas t b ack wa rd
Repeat playing
Track
All
Repeat off
For CD/VCD disc, pr ess rep eat edly t o re pea t th e tr ack and the who le d isc. “repeat”button
Page 9

14 15
SD/MMC/USB main menu
After entering the SD /MM C or USB ,th e sy ste m wi ll sho w Main M enu whi ch incl ude s 4
Function ICONS.You can select t hem by and press key to confirm.“ ” “ENTER”
Photo Mode
Please refer to P1 6 -1 7 fo r de tai l ex pla natio n
Browser Mode
Please refer to P1 6 fo r de tai l ex pla nat ion
Music Mode
Please refer to P1 7 fo r de tai l ex pla nat ion
Movie Mode
Please refer to P1 8 fo r de tai l ex pla nat ion
Note:Media cards formatted in exF AT file system are no t su ppo rte d.
Mp3
......
\Ctyy\
00 36 03 43
Dir 001
Mp3
TRACK02
TRACK01
Mp3
Mp3
TRACK03
Playing JPEG file in d at a di sc
Playing MP3 files in d at a di sc
1.Place MP3 d isc int o th e di sc d oor . Pr ess “ ” or “E NTER” but ton to choo se a n MP 3
file; Pre ss “ ” or “EN TER ”bu tto n to play the f ile sel ect ed.
TRACK05
Mp3
TRACK04
1. Place a JP EG d isc int o th e tr ay, the uni t wi ll star t read ing and pla y.
2. Press“ ”to select a J PEG fi le a nd pres s“E NTE R”b utton to c onf irm .
Note: you can pre ss “MEN U” t o retu rn to th e fo lde r li st. Pre ss “ ” or “EN TER ” to
previ ew t he f ile sel ect ed.
3. To rotate the p ict ure cou nte r-c lockw ise ,pr ess “ ”; Pre ss “ ” to rot ate the pic ture
clock wis e.
4. Press OSD bu tto n wh en v iew ing pic tures ,yo u ca n se lec t di ffe ren t re fresh mod e as
follo ws:
1. fro m to p to bot tom
2. fro m bo tto m to top
3. fro m le ft side to r igh t si de
4. fro m ri ght sid e to lef t si de
5. fro m le ft top t o ri ght bot tom
6. fro m ri ght top to l eft bot tom
7. fro m le ft bott om t o ri ght top
8. fro m ri ght bot tom to l eft top
9. fro m ho riz ont al cent er t o both sid es
10.from vertical center to bot h si des
11.from top an d bott om t o ce nte r
12.from right and le ft t o ce nte r
13.from four window's to p si de t o bo tto m si de
14.from four window's le ft s ide to righ t si de
15.from 4 edges to cen ter
5. During viewing fi les ,“ ” may app ear whe n pres sin g“A ngl e”o r“S ubtit le” or “ Aud io”
or“A- B”o r“T itl e”e tc; in thi s si tua tio n th ese opt ion s are u nav ail abl e to ope rat e.
6. When viewing JP EG f ile s,p res s“ ”,p ict ure s wi ll b e di spl aye d in thu mbn ail mo de,
press “ ” or “ENTER” button t o se lec t on e pi ctu re t o vi ew.
Page 10

16 17
1. fro m to p to bot tom
2. fro m bo tto m to top
3. fro m le ft side to r igh t si de
4. fro m ri ght sid e to lef t si de
5. fro m le ft top t o ri ght bot tom
6. fro m ri ght top to l eft bot tom
7. fro m le ft bott om t o ri ght top
8. fro m ri ght bot tom to l eft top
9. fro m ho riz ont al cent er t o both sid es
10.from vertical center to bot h si des
11.from top an d bott om t o ce nte r
12.from right and le ft t o ce nte r
13.from four window's to p si de t o bo tto m si de
14.from four window's le ft s ide to righ t si de
15.from 4 edges to cen ter
When playing JPEG :
1.To rot ate the pi ctu re coun ter -cl ock wis e,pre ss “ ”; Pres s“ ” to rota te t he p ict ure
clock wis e
2. Press OSD button w hen vie win g pi ctu res,y ou can s ele ct d iff ere nt refr esh mod e a s
follo ws:
In the Music Mo de, the sys tem will show the lis t of mus ic f ile ,li ke Mp3 a nd so on.
Press , , ,select and play.
Press to fast forward / bac kwa rd M P3 d uri ng playin g.
Press to select the f unc tio n bu tto n wh en in stop status.
Page-:Page Up.
:play
Page+:Page Down
Note:Press Return Key to Return to t he M ain Men u.
“ ” “ ” “ENTER”
“ ”
“ ” “ ”
“”
Music mode
00 0 0 03 43
001/008
Repeat Off
Mp3
TRACK01
Mp3
TRACK02
Mp3
TRACK03
Mp3
TRACK04
Mp3
TRACK05
128Kbps
P P
3. During viewing fi les ,“ ” may app ear whe n pres sin g“A ngl e”o r“S ubtit le” or“ Aud io”
or“A- B”o r“T itl e”e tc; in thi s si tua tio n th ese opt ions are u nav ail abl e to ope rat e.
4. When viewing JP EG f ile s,p res s“ ”an d“R ETU RN” key,pictures will be dis pla yed in
thumb nai l mo de, pre ss“ ”or“ENTER”button to select o ne pic tur e to vie w.
Note :
If you want to ret urn the Mai n Me nu, pl eas e pr ess “RE TUR N”k ey i n the thumbna il m ode .
00 00 03 43
001/008
\Ctyy\
......
Mp3
TRACK01
Mp3
TRACK02
Mp3
TRACK03
Mp3
TRACK04
Mp3
TRACK05
Browser mode
Photo mode
Slide Show Menu Prev Next
In the Photo Mo de, the Sys tem wi ll show the thu mbn ail Mod e fi rst.
, , , , :select and play.
Slide Show:play the JP EG.
Menu:Enter the Help Me nu.
Prev:Page Up.
Next:Page Down.
“ ” “ ” “ ” “ ” “ENTER”
In the Browser Mo de, the sys tem wi ll show the lis t of fil e an d fo lde r.
, , key:select and play
:Enter the folder
:Quit the folder
“ ” “ ” “ENTER”
“ ”
“ ”
Note:
If you want to ret urn to the M ain Menu, ple ase mak e su re t he syst em i s in lis t of fi le or
folder status,then press RETURN KEY.“”
Page 11

18
19
CD RI P
Rip ping
Sel ected t rack
Trac k Progr ess
Total P rogre ss
Trac k 01 9%
Can cel
SUM MARY
Now r ippin g
Trac k 01/01
During the converting,you ca n se lec t “CANCEL” to s top it.
Speed: In thi s it em, you can set the rip sp eed : Norma l or Fas t.
Bitrate: In this item, yo u can s et the b itr ate . It has 6 ch oices ,12 8Kb ps, 192 Kbp s,256 Kbp s,
320Kb ps, 96K bps and 112Kbps.
Create ID3:In this item, yo u can c rea te ID3 w hen pla yin g CD text.
Device: This item indicates wh ether USB or SD CA RD i s co nne cte d wi th DVD pla yer .
Exit: Exit to the pr eviou s me nu.
All: Select all the fi les in the dis c fo r co nve rti on and sto rag e.
None: Cancel the selection.
Start: Move the cursor to the it em and p res s “E NTE R” butt on, th e co nve rti on begi ns.
System Setup
Press the "Setup" bu tton, the ma in men u will
be displayed on th e scre en
In the main Page, P ress " button to
highlight the item.
Press the "ENTER" button t o acce ss.
Press the "Setup" button t o exit .
"
General Setup
Video Setup
Preference Setup
Setup Menu -- Main Pag e
In the Movie Mo de, the sys tem will show the lis t of Mov ie f ile ,li ke AVI and s o on .
, , Key:Select and Play.
When playing movie yo u ca n pr ess MENU and Return Key to back to the li st of mo vie
file status.And if yo u wa nt t o Re tur n to the Mai n Menu ,Pl eas e Pr ess Return key in list
of Movie file st atu s.
“ ” “ ” “ENTER”
“”“ ”
“”
Movie mode
001/006
AVI
TRACK01
TRACK02
TRACK03
TRACK04
TRACK05
TRACK06
AVI
AVI
AVI
AVI
AVI
During playing the CD /HD CD d isc ,yo u can ente r CD Rip pin g fu nct ion .By press ing
subtitle button,DVD player wi ll b e ab le to ch ang e the CD fo rma t in to MP3 f orm at,
and then store it in t he USB o r SD car d.
CD RIPPING
CD RI P
Opt ions
Trac k
Trac k 01 03:36
SUM MARY
Sele cted Tra ck 0
Sele cted Tim e 00:00
Trac k 02 03:36
Trac k 03 03:36
Trac k 04 03:36
Trac k 05 03:36
Trac k 06 03:36
Trac k 07 03:36
Spee d Norma l
Bitr ate 128 kbps
Crea te Id3 Yes
Devi ce USB 1
Star t E xit A ll None
Page 12

20 21
Video Setup P age
Video Setup
:Move
:Return
:Entry
TV Type NTSC
Set the Video Qu ality of AV OUT
TV Type:
Enter this option to selec t TV type
(PAL, NTSC)
The default is NT SC.
Video Setup
:Move
:Return
:Entry
TV Type NTSC
Set the Video Qu ality of PANEL
Video Setup
:Move
:Return
:Entry
Quality
Panel Quality
Quality
Panel Quality
Quality
Panel Quality
TV Type NTSC
NTSC
PAL
Preference Page
Audio:
Enter this option, us er can sel ect preferred
audio language for DVDs.
The default is En glish .
Note
The audio langu age depen ds on t he
mat erial on eac h disc .
Use r can a lso chang e the a udio lan guag e
durin g playback by pressing the Aud io button.
Preference Setup
:Move
:Return
:Entry
Audio ENG
Subtitle Off
Disc Menu E NG
Parental
Default
English
French
Spanish
Portuguese
General Setup
TV Display Wide
Angle Mark ON
OSD Lang ENG
Screen Saver ON
Normal/PS
Normal/LB
Wide
:Move
:Return
:Entry
General Setup Page
TV display:
Enter this option,user ca n set s creen dis play
format(Nomal/PS,Nomal/LB,Wide)
The default is Wide
Note
The funct ion de pends on t he dis play rati o
wit h whic h the DVD d isc is rec orded .
Ple ase ch oose Wide(16:9) when using
a 16 :9 wid e scre en T V set.
“”
“”
General Setup
TV Display Wide
Angle Mark ON
OSD L ang ENG
Screen Saver ON
On
Off
:Move
:Return :Entry
Angle Mark:
Enter this option to set th e a ngle d uring
playback.
Optional setting:ON,OFF
The default is:ON
General Setup
TV Display Wide
Angle Mark ON
OSD L ang ENG
Screen Saver ON
English
French
Spanish
Portuguese
:Move
:Return :Entry
OSD Language:
In the option us er can set OSD me nu
language ( English, Fr ench, Spani sh,
Portuguese).
The default is En glish .
TV Display Wide
Angle Mark ON
OSD L ang ENG
Screen Saver ON
On
Off
:Move
:Return :Entry
General Setup
Screen Saver
Enter this option to s et whe ther t o acti vate
the screen saver fu nctio n.
The default is ON .
Page 13

22
23
Specification
Compatible disc: DVD/VCD/CD/MP3/MPEG4
Signal system: PAL/NTSC
Panel size: 9 in ch
Frequency response: 20 Hz to 2 0 kH z
Video output: 1 Vp -p/ 75O hm, unb ala nce d
Audio output: 1.4Vrms/10kOhm
Audio S/N: Better th an 8 0dB
Dynamic range: Better th an 8 5dB
Laser: Semiconductor Laser, Wave Len gth : 65 0nm /795n m
Power source: DC 9- 12V
Power consumption: 10 W
Operating temperature: 0~40°C
Weight(2 ): 0.93/ 0.93 k g
Dimensions (2 (W x D x H ): 2 70x 186 x40/270x186x40mm
DVD Player
DVD Player)
Note:
1.The quality and sp eed for rea ding JPEG pho tos dep end s on the re sol uti on and
compr ess ion of t he phot os. Some J PEG pho to m ay n ot be pl ayed d ue to th e di sc
quali ty a nd t he form ats .
2.Some DVD+R/RW,DVD-R/RW,CD-R/RW discs ma y no t be pla yed due to the q ua lit y of
burni ng.
Default:
Sel ect th is ite m and press “ butto n to
reset.
ENTER”
Preference Setup
:Move
:Return
:Entry
Audio ENG
Subtitle Off
Disc Menu E NG
Parental
Default
Reset
Preference Setup
:Move
:Return :Entry
Audio ENG
Subtitle Off
Disc Menu E NG
Parental
Default
English
French
Spanish
Portuguese
Off
Disc Menu
This function allows yo u to ch oose the m enu
language stored on the dis c.
The default is En glish .
Note:the disc menu la nguag es dep end on the
information available on the dis c.
Parental:
Enter this option to set th e par enta l cont rol
level to block un suita ble sc enes f or ch ildr en.
Optional parental control levels: KID SAFE ,
G, PG, PG 13 , PGR, R, Nc 17, A DULT.
The default is AD ULT.
The default password is 8888.
:Move
:Return
:Entry
Audio ENG
Subtitle Off
Disc Menu E NG
Parental
Default
English
French
Spanish
Portuguese
Preference Setup
1 KID SAFE
2 G
3 PG
4 PG 13
5 PGR
6 R
7 NC 17
8 ADULT
:Move
:Return
:Entry
Audio ENG
Subtitle Off
Disc Menu E NG
Parental
Default
Preference Setup
Subtitle
Select your preferred la nguag e to sh ow th e
subtitles on the sc reen.
The default is OFF
The subtitle languages de pend o n the
information available on ea ch dis c,Yo u can
also change the su btitl e lang uage duri ng
playback by pressing th e SUBT ITLE butt on.
Page 14

Troubleshooting
PROBLEM SOLUTION
Picture is distorted
If at any time in the future you should need to dispose of this product please
note that waste electrical products should not be disposed of with household
waste.Please recycle where facilities exist.Check with your Local Authority
or retailer for recycling advice.(Waste Electrical and Electronic equipment
Directive)
Due continuous improvement, no pri or n oti ce will be giv en rega rdi ng c han ges on
above feature and sp ec.
Some discs have se cti ons tha t pr ohibi t rapid
scanning or chapter sk ip; If y ou t ry to sk ip
through the warning in for mat ion and credi ts
at the beginning of a mo vie ,yo u wo n't be a ble
to.This part of th e mo vie is ofte n pr ogram med
to prohibit skipping th rou gh i t.
No forward or
reverse scan
The disc might be dam age d.T ry ano the r di sc;
it is normal fo r so me d ist ort ion to a ppear dur ing
forward or reverse sc an.
The feature or ac tio n ca nno t be com plete d at
this time because:
1.The disc's software re str ict s it .
2.The disc's software do esn 't s upp ort the
featu re ( e.g .,a ngl es)
3.The feature is no t av ail abl e at the momen t.
4.You've reque ste d a t itl e or cha pte r nu mbe r
that i s ou t of ran ge.
The icon
appears on
screen
You can't adv anc e th rou gh the o pen ing cr edi ts
and warning information th at a ppe ars at the
beginning of movies be cau se t he d isc is
programmed to prohibit th at a cti on.
Can't advance
through a movie
Make sure the ma chi ne i s co nne cted properl y.
Make sure all ca ble s ar e se cur ely ins ert ed int o
the appropriate jacks.
No sound or
distorted sound
24
 Loading...