

Page 1
Page 2
E6 Series Quick Start Guide Page 2 of 8
Page 3
protected DVDs.
2.0 Connecting the Player to Your Computer
Charging the Battery
The player has a built-in battery that must be charged before the player can be used. To
charge the battery, turn on the player, then use the included USB cable to connect it to a
turned-on computer. The player will display a screen that says ‘USB Connected.’ Wait
15 seconds, then press the EXIT button and the screen will change to a large
recharging battery icon (indicating the player is properly charging). Let the player
charge for 4 Hours.
Disconnecting the Player from Your Computer
To disconnect the player from the computer you should use the Windows safely remove
process. See the User Manual for more information.
Installing Video Conversion Software
Before videos can be played on your new player, videos must be
converted to a video format recognized by the player. The
conversion is done with Windows-compatible software that came
with your player. Follow these steps to install the software: (1)
Place the included CD into your computer's disc drive. (2) Click Start > My Computer,
and then double-click the disc drive. (3) Double-click Setup.exe and complete the
installation. If Windows asks to allow the installation, click ALLOW. The installation
program will first install the Arcsoft Video Downloader, and then the E-matic video
converter.
Linux® and Mac OS X ®
users should refer to the User
Converting Video for Use with the Player
Follow these steps to convert videos to a format that is
compatible with the player:
1. Turn on your player and connect it to your computer with the USB cable.
2. Click Start > All Programs > Media Player Utilities > Video Converter.
E6 Series Quick Start Guide Page 3 of 8
You cannot convert copy-
Page 4

Choose a folder in which to save the converted files by clicking the red icon beside
the Output File field.
You can save the converted files to your computer, and copy them to the player
later, or save them directly to the player itself. When saving the converted files
directly to the player, save to the player's VIDEO folder by selecting the green icon
in the bottom and locating the VIDEO folder on the player.
3. Click Input File and navigate to the folder with the original videos and select one or
more video files (To select more than one video at a time click on each video while
holding the ctrl key or clicking and drag the mouse box over them). The video files
will appear in the converters conversion list.
4. Click the two-arrow Begin button ( ) to start converting and saving your videos.
Copying Media Files to your Player
To use media files on your player, you must copy them from your computer:
1. Turn on your player and connect it to your computer with the USB cable.
2. Open a window to the player’s internal folders: Double-click My Computer, and then
double-click the drive that corresponds to the player. It will probably be labeled
EMATIC MP3.
3. Open a second window to the folder(s) on your hard drive containing your music,
video, or other media.
4. Drag-and-drop media files from your computer’s folders to the player's folders. In
order to work properly, media files must be copied to the following directories:
Music files are copied to the MUSIC folder. You can use subfolders.
Video files are copied to the VIDEO folder.
Image files are copied to the PICTURES folder.
E-book files are copied to the TXT folder.
5. Disconnect the player from the computer using the safe
removal method discussed in the User Manual.
If the media is not
copied to the appropriate
folder it will not appear on
the player
Using Windows Media Player 11®’s Sync Function
If you sync your player with Windows Media Player, follow these steps when initially
syncing the device:
1. Turn the player ON and use the USB cable to connect it to your computer.
2. Run Windows Media Player. If this is the first time connecting the player to
Windows Media Player, the program will ask you to name the device. Choose a
name and click Finish.
3. If you want Windows to automatically sync your player, right click the Sync tab,
highlight the player’s name with the mouse cursor, and then click Set Up Sync
from the submenu that appears. In the Device Setup window, click the box next
to Sync this device automatically, add or remove playlists you want to sync from
the playlists to sync box, and then click Finish.
E6 Series Quick Start Guide Page 4 of 8
Page 5

4. If you want to manually sync the player, click the Sync tab. Highlight the files you
and hold
a button/icon!
want transferred to your device, drag them into the Sync List column, and then
click Start Sync to begin transferring them to the player. When the process is
complete, you should be able to see the song files on the player through My
Computer.
Note: See the full list of supported formats under “Technical Specifications” on pg. 27 of
User Manual to determine which synced songs will be supported by the player.
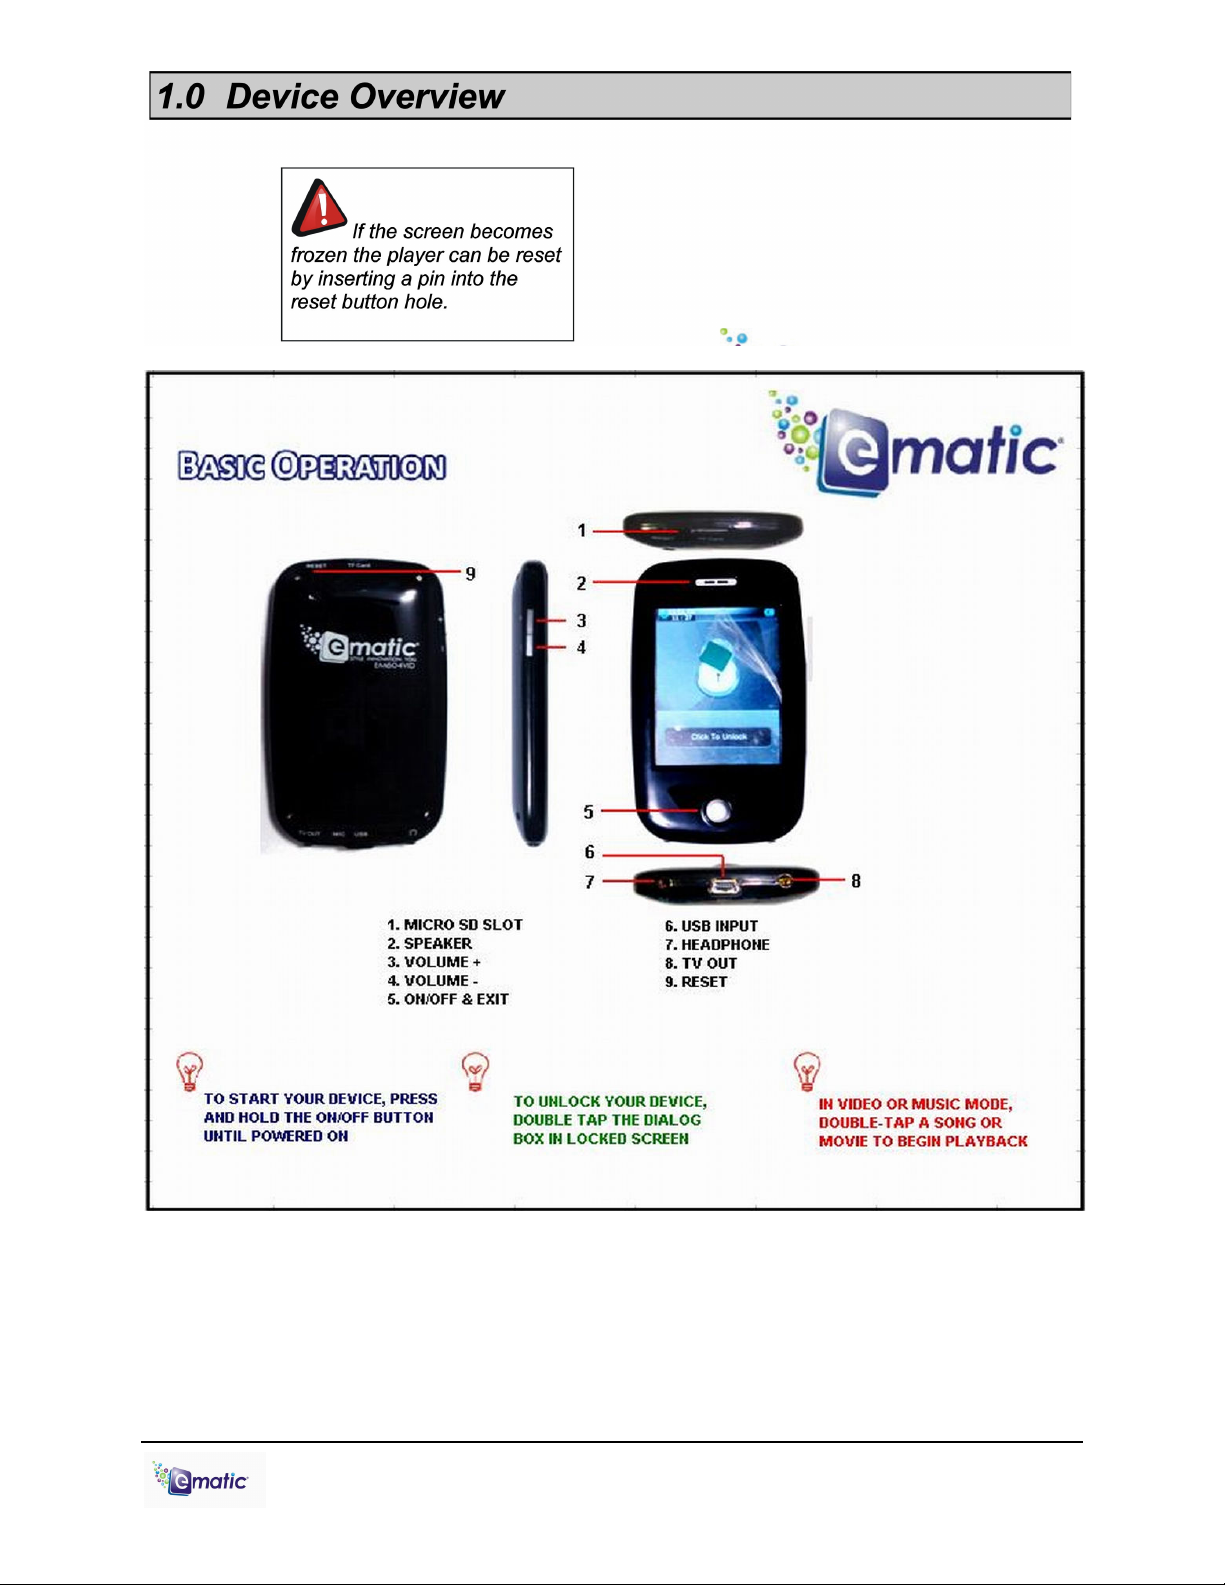
3.0 Using the Player
Turning the Player On and Off
To turn the player ON, press and hold the player's ON/OFF button it there until the
display turns on.
To turn the player OFF, press and hold the player's ON/OFF button until the display
turns off.
Desktop (Main Menu) Navigation
To enter into any of the modes on the Desktop (Main Menu), simply
tap once on the mode’s icon.
attention to whether these
instructions indicate whether
to tap/press or tap/press
File List Navigation
To scroll up or down Tap the up or down arrows on the scroll bar
To highlight a file Tap the file once
To view/watch/listen to a file Tap the file twice
To delete a file
Highlight a file, then tap the delete/trash icon at the
bottom of the screen
To access a previous directory
Tap the previous arrow in the upper left corner of the
screen
Pay special
To go back to the previous mode Tap the back icon at the bottom of the screen
To return to the desktop Tap the desktop icon at the bottom of the screen or
press the EXIT button
E6 Series Quick Start Guide Page 5 of 8
Page 6

Audio Player Function
In Music mode:
To pause/resume Tap the PLAY/PAUSE icon
To skip to previous/next song
in playlist
To rewind/fast-forward song
Tap the NEXT/FAST FORWARD or
PREVIOUS/REWIND arrows
Tap and Hold the PREVIOUS/REWIND or
NEXT/FAST-FORWARD arrows
To access options menu Tap the ‘Setting’ icon
To change volume Drag the Volume Slider
To view song library
Tap the ‘Browser’ icon and select a method of file
organization
To return to Desktop
Tap the ‘Desktop’ icon at the bottom of the screen or
press the EXIT button
Video Player Function
After selecting a file to view in the Video mode file list:
To bring up video menu Tap the middle of the screen
To PLAY/PAUSE Tap the PLAY/PAUSE icon
To skip to previous/next video
Tap the PREVIOUS/REWIND or NEXT/FAST
FORWARD arrows
To change the volume Tap the SPEAKER icon, and Drag the volume slider
To rewind/fast-forward video
Tap and Hold the PREVIOUS/REWIND or
NEXT/FAST-FORWARD arrows
To go back to Video file list Tap the magnifier icon, then tap MainDir
To return to Desktop Press the EXIT button
E6 Series Quick Start Guide Page 6 of 8
Page 7

Camera Function
In order to:
Enter mode:
Button to perform most basic function:
Exit button:
To get to camera mode, tap the Camera icon on the Desktop, then tap twice on Capture.
While in Capture mode:
To take picture
Tap the middle of the screen and Press the
CAMERA icon
To access options menu Tap the gear icon
To view photos Tap the magnifier icon
To return to Desktop Press the EXIT button
DV (Digital Video) Function
To get to camera mode, tap the Camera icon on the Desktop, then tap twice on Record.
While in DV mode:
To begin/stop recording
Tap the Start Recording icon to begin, and Tap
the File and Exit icon to stop
To select special effects Tap the magic wand icon
To play recorded videos
Tap the magnifier icon , then select a video to
play
To return to desktop Press the EXIT button
Extras
Use the following table as a quick reference for extra modes:
View pictures Photo Tap twice on the file you want to view EXIT
Record audio Applications-
Recorder
Read e-books EBook Scroll by tapping PgUp/PgDn icons EXIT
Listen to FM radio Radio Insert earphones, tune frequencies by tapping
Change settings System
Settings
Tap the Start/stop recording icon to begin
recording
arrow buttons
Change settings. (See User Guide) EXIT
EXIT
EXIT
E6 Series Quick Start Guide Page 7 of 8
Page 8

Adding a microSD/TransFlash Card
To use the extra storage space provided by a microSD card: (1) switch the player off.
(2) Insert the card into the microSD/TF card slot. (3) Switch the player on. (4) Tap
System Setting on the Desktop. (4) Tap on Other Settings, tap twice on Format Card,
then tap ‘yes’ in the window that pops up.
You can access the files on your microSD card through most file lists by tapping the
‘previous directory’ arrow in the upper-left corner of the screen , until you see
the directory ‘Card Memory.’ You can also access microSD card content through
Explorer mode, which is accessed through the Desktop (see section 7.2 for more
information). When a microSD card is inserted, there will be a “Card Memory”
directory in the Explorer mode, which you can open to access your files.
Using your Player as a Webcam
To use your player as a Webcam, first connect the player to your computer with the
USB cable. When the USB connection screen appears on the player, press the
player’s MENU/EXIT button twice to access the Desktop. Next, tap the Camera
mode on the Desktop, then tap PC Camera twice. In Windows, the camera should
now appear in My Computer as USB Video Device, after which it can be used with
any webcam-capable programs.
Supported Formats
Images: JPG, PNG, GIF, BMP, TIFF images that are uncompressed, TIFF images that
are compressed via Pack Bits, Group 3 fax images, and Group 4 fax images.
Videos: RM, RMVB, AVI, WMV, and FLV videos at a resolution of 320x240 or smaller.
Larger videos will not play on the device and may result in a malfunction. Videos with
other formats can be converted using the conversion software.
Audio: MP3, WAV, OGG, FLAC, APE and unprotected WMA. Protected WMA audio
files, and M4A/M4P files (any AAC-encoded audio) from iTunes® are not supported.
E-Books: TXT
E6 Series Quick Start Guide Page 8 of 8
 Loading...