

Page 1
Playtime Pad DVD Combo
7 HD Kid Safe Tablet & DVD Player
Parent’s Guide
PBDV704DVD
Page 2

Section 1: Tablet Overview
Tablet Overview
Icon Glossary
Charging
Touch Screen Basics
Section 2: Initial Setup
Lock Screen
User Setup
Option A: Email Verification
Option B: Credit Card
G-sensors
Section 3: Basics
Playtime Home
Parent Mode
Adding and Removing Apps
Exit Playtime Mode
Downloading New Apps
Uninstalling Apps
Removing Apps from Home Screen
Parent Dashboard
Connecting to a Computer
PC
Mac
Factory Restore
Reset Device
User Manual
Widgets
Adding Music & Movies
Settings
1
2
2
3
4
4
5
5
6
7
7
8
8
9
9
9
9
10
10
11
12
12
12
13
13
14
Section 4: Apps
Included Apps
Section 5: DVD Player
Main Features
Main Controls
15
18
18
Page 3

Connect to Monitor
Basic Operation
Section 6: Google Services
Why use a Google Account?
Add a Google Account
Remove a Google Account
Google Play
Google Apps
Google Now
Google Now Cards
Location Access
Google Now Settings
Voice Actions
Voice Commands
Section 7: Miscellaneous
Tips and Tricks/FAQs
Care
Specifications
Limitations of Liability
Customer Support
Disclaimer
19
19
21
22
22
23
23
24
24
25
25
27
28
29
30
30
31
33
34
Page 4
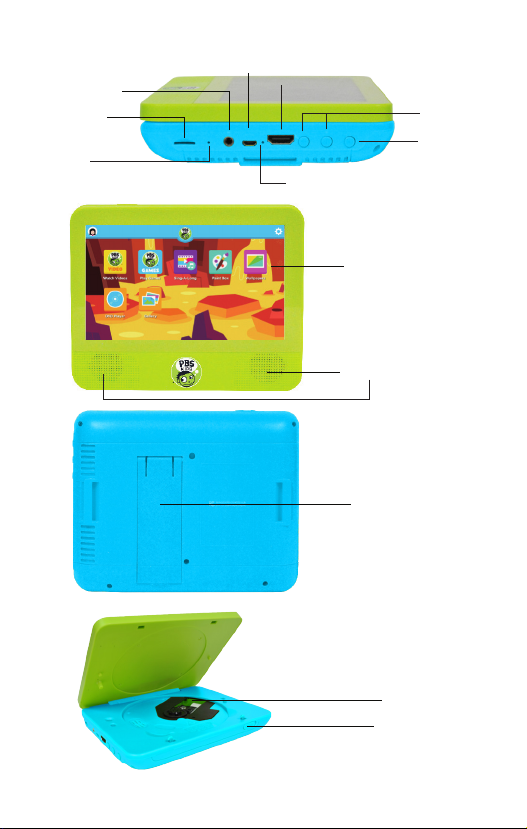
Tablet Overview
1.
Audio Jack
Micro SD Card
Slot
Reset
Micro USB Port
HDMI Port
Microphone
Speakers
Screen
Built-in
Kickstand
Volume
Control
Power
DVD Player
Open Button
1
Page 5

Icon Glossary
Battery Level: The white battery level indicator
will decrease and change to red as the battery
is drained.
Wi-Fi Signal: As the Wi-Fi signal strength
decreases, the white bands will change to grey.
Settings: Tap to adjust settings for Wi-Fi, screen
brightness, security settings, language options,
and more.
Charging
Fully charge your Playtime Pad for 6 hours before the first use.
Use the included USB Charger.
The battery indicator will show that your
device is charging.
Note: Charging your tablet using the USB port on your
computer will be slow. We recommend using the included
wall charger.
Turn On
To turn on your Playtime Pad, press and hold the power key
for 2 seconds. The PBS KIDS logo indicates the software
is loading.
2
Page 6
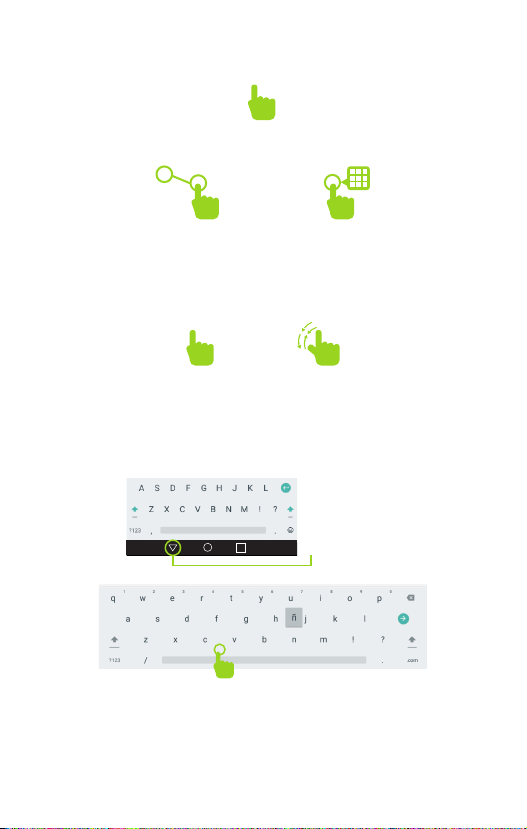
Touch Screen Basics
Tap an app icon once to activate or open an app. Touch and hold to
move an item by dragging.
*In many apps touch and hold can oer more options.
Zooming: Double tap quickly to zoom into a webpage, picture,
or map. Some apps allow you to zoom in and out by touching
the screen with two fingers, and pinching them together.
x2
TIP: You can flick the screen with your finger to quickly scroll
through a long list, such as a library of music.
Tap a specific location on the screen where you would like to
enter text. The on-screen keyboard will pop up.
Hide Keyboard
Touch and hold a letter for special characters.
3
Page 7
Initial Setup
2.
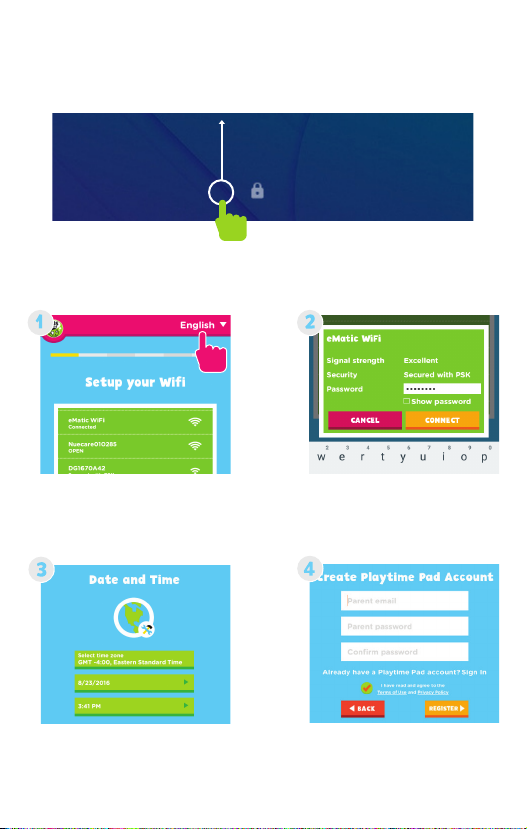
Lock Screen
Slide the padlock icon up to unlock the screen.
User Set up
Follow the steps upon initial startup to begin using your Playtime Pad.
Choose your language and
tap a Wi-Fi network to
connect to.
Setup Date and Time then
Tap “Next” when done.
Enter your Wi-Fi password
then tap “Connect.”
Enter a valid email address
and password.
Tap “Register.”
4
Page 8
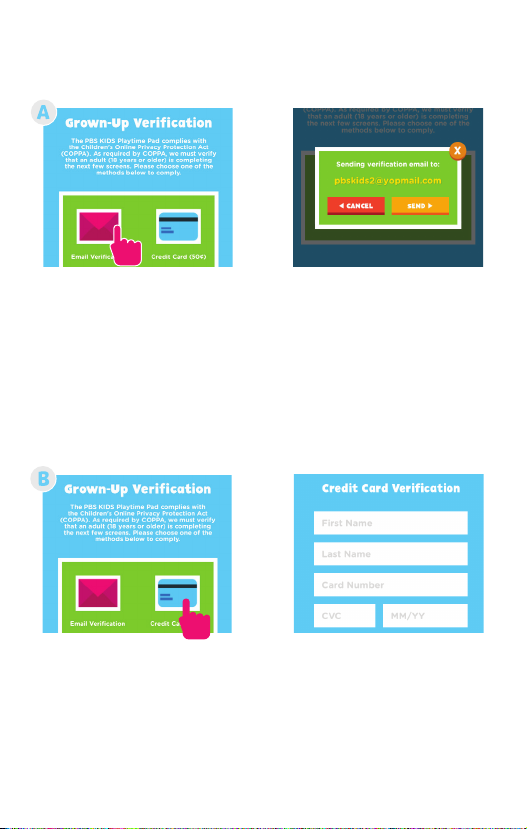
Option A: Email Verification
If choosing to verify by Email Address please follow these steps.
A. Select “Email Verification”
to prove that the information is
submitted by an adult.
B. Tap “Send” then follow the
instructions provided in your email.
Option B: Credit Card (Optional)
If choosing to verify with a Credit Card please follow these steps.
A. Select “Credit Card” to
prove that the information is
submitted by an adult.
5
B. Enter your Credit Card
information then tap Continue.
Page 9
Note: A one-time nonrefundable fee of 50¢ will be charged to your
credit card.
Why do you need my credit card to verify my
kid’s account?
To comply with the U.S. Children’s Online Privacy Protection
Act (COPPA), kids younger than 13 years old must have
parents’ permission to join.
There are only a few approved ways we can obtain parental
consent according to these regulations & the quickest way to
do that is to verify your identity using a credit card.
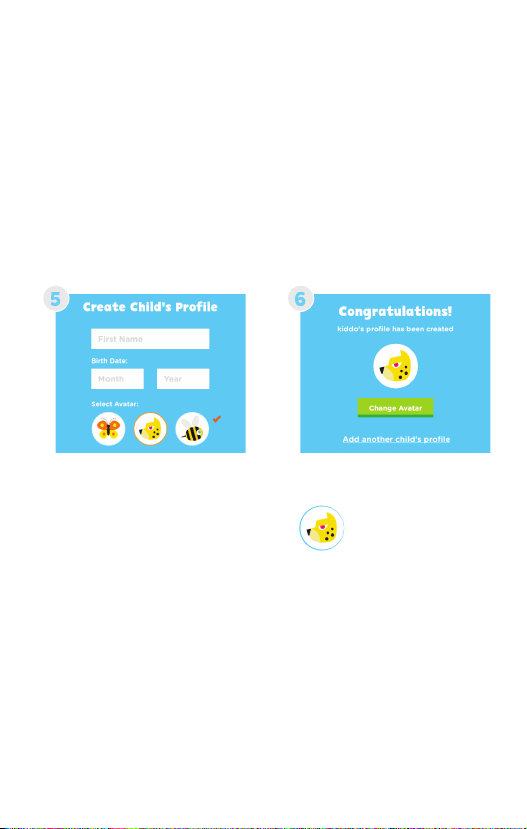
Enter your child’s first name
and birthday. Tap “Create”
Note: You can add another
child now or later at any time
by clicking your child’s avatar.
You are all set! Tap “Next”
G- Sensors
The G-Sensor allows the tablet to detect screen rotation. You
can view the home screen in either a landscape or portrait
format as you use the apps. Some functions in the Playtime
Pad only display in landscape format.
6
Page 10
Basics
3.
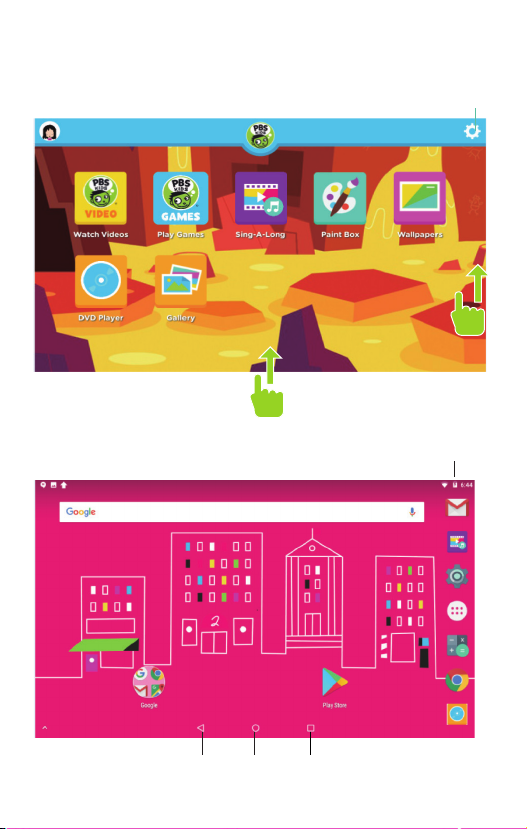
Playtime Home
Parent Dashboard
Exit Playtime Mode
Swipe up near the bottom of the
screen to reveal the navigation bar
Parent Mode Overview
7
Swipe up to reveal more apps.
Battery
Multi-TaskingHomeBack
Page 11
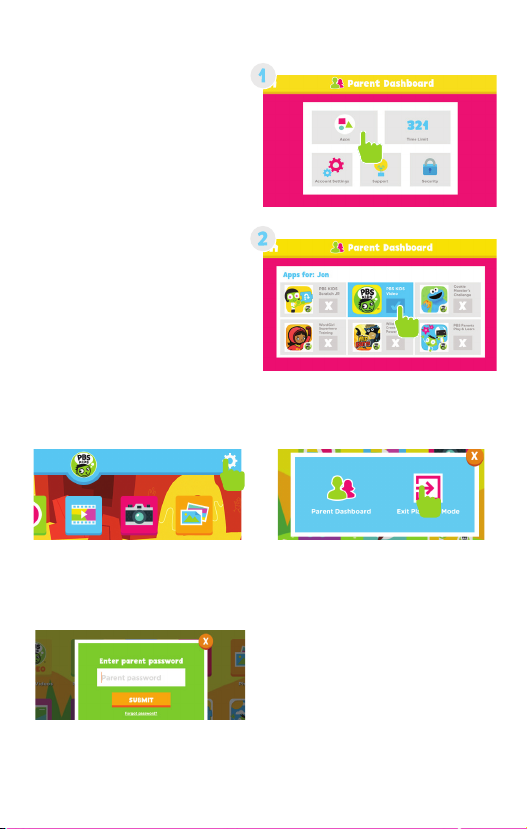
Adding & Removing Apps
You can add or remove
apps from your child’s
home screen by selecting “Apps” while in the
Parent Dashboard.
You can now add or
remove apps by clicking
on the “X” or check mark.
Exit Playtime Mode
Tap the gear icon on the top
right corner of the screen.
Simply select “Exit
Playtime Mode.”
Enter your parent password
then tap “Submit” to exit
Playtime Mode
8
Page 12
Downloading New Apps
You will need a Google account in order to download
third-party apps. Exit Playtime Mode and open the
Google Play Store.
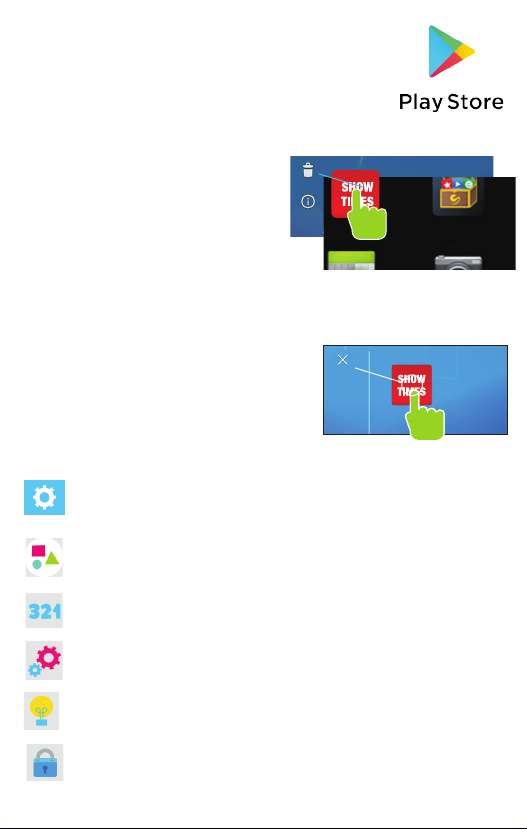
Uninstalling Apps
In Parent Mode, touch and hold an
app in the all apps drawer and drag
them to the trashcan Uninstall icon.
Note: You can also uninstall by
tapping Apps in the settings app.
!"#$%& '()*
Removing Apps from Home Screen
In Parent Mode, touch and hold an
app on the home screen and drag
the app to the “X” icon
Parent Dashboard
Select the settings tab to access Parent Dashboard or to
exit Playtime Mode
Apps: Select apps that you want to choose for your child.
Time Limit: Control the amount of time you want your child to
be using the tablet.
Account Settings: Adjust account settings
Support: Submit requests or get answers from Support Team.
Security: Change child safety features.
9
Page 13

Connecting to a Computer
Connect to your computer by USB.
1
You must be in Parent Mode to connect to a computer.
PC
2
3
PBSPlaytime Pad (E:)
PBDV704DVD (E:)
PBDV704DVD (E:)
PBSPlaytime Pad (E:)
4
PBDV704DVD (E:)
Music
PBSPlaytime Pad (E:)
The device driver will install.
Choose open folder
to view files or select
removable disk.
You will now be able to
drag and drop files from
your computer onto your
tablet just as you would
with a USB Flash drive
10
Page 14

®
Mac
1
First, install the Android File Transfer application for Mac. Go to
android.com/filetransfer on your Mac and choose download now.
Install the application.
2
3
The Android File Transfer application will launch automatically when
you connect your tablet. Drag & drop files to transfer.
11
Page 15

Factory Restore
Select Backup & Reset in
the settings app to restore
factory settings.
This will erase all data on
the tablet.
Reset Device
The reset button is located on the side of the unit. Reset this
device by pressing the button inside the hole with a small
object such as a paper clip.
User Manual
Use ES File Explorer
app to locate the
Manuals folder
12
Page 16

Widgets
Widgets allow you to personalize your home screen with useful
information and tools.
Press and hold an empty space
on your home screen to access
the widgets.
Touch and Hold a widget to
place it onto your home screen.
Once the widget is placed you
can touch and hold the widget
again to place it on a dierent
part of the homescreen.
Adding Music and Movies
To view videos and listen to music that have already been
loaded, the Play Music and Play Movies app must be made
available in Playtime Pad. Use the Playtime Pad Parent
Dashboard to add them if they aren’t already. See the Adding
& Removing Apps Section.
Play Music Play Movies & TV
13
Page 17

Settings
Wireless & Networks
Wi-Fi: Turn Wi-Fi on to see available networks and connect.
Bluetooth: Provides Android Bluetooth to nearby devices.
Data usage: Shows data usage.
More: Provides Airplane mode and VPN
Devices
Home: Google Now Launcher
Display: Adjust brightness, change your wallpaper, sleep settings,
font size, HDMI setting, and device rotation.
Storage: Provides storage use data.
Battery: Provides battery usage data.
Apps: Tap an app to force stop, uninstall, clear data, move to SD
card, or clear data.
Sound: Sound general settings.
Notifications: Adjust the notifications.
Memory: Show the size of memory used.
Personal
Location: Allow Google to use data to determine your location for
improved search results.
Security: Adjust settings to make your tablet more secure. Allow
installation of non-Market apps.
Accounts: Tap to add or remove email accounts.
Language & input: Set language, spelling correction, keyboard
and voice settings.
Backup & rest: Backup data and factory reset your tablet.
Google: Provides Google services.
System
Date & time: Set the date, time, and time zone.
Accessibility: Adjust settings for users with poor vision, turn on/
o screen rotation.
Printing: Print services
About tablet: Model number and general tablet information.
14
Page 18

4.
Apps
Included Apps
Calculator: Basic calculator functions.
Calendar: Keep track of your schedule and set reminders.
Chrome™: Browse the web with Google Chrome.
Clock: Keep time and set alarms.
Contacts: Keep track of your friends’ information.
Downloads: Manage your current Downloads.
Drive: Share your Google docs and files.
ES File Explorer: Browse for files to open, delete, etc.
Gmail: Fast searchable email from Google.
Google: Stay up to date with Google Now cards.
Play Games: Experience endless fun with the 20+ games
included on the PBS KIDS Tablet/DVD Player.
15
Page 19

Sing-A-Long: Sing along with your favorite PBS
KIDS characters.
Wallpaper: Personalize your Tablet / DVD player with our
colorful wallpapers
DVD Player: Insert your favorite DVDs and watch them using
this app.
Hangouts: One-on-one and group conversations with photos
and fee video calls.
Maps™: Find directions and locations.
Paint Box: Boost your creativity as you doodle from scratch,
choose a coloring page, or even draw over photos.
Play Movies & TV: Stream movies & TV shows instantly.
Play Store: Shop for music, books, magazines, movies, TV
shows, games and apps.
Playtime Mode: The Primary interface for the Playtime Pad
with educational content, games, and more
Photos: View the photos.
Play Music: Play the music.
Gallery: View the photos.
16
Page 20

Settings: Adjust settings on the Playtime Pad.
Sound Recorder: Record audio, Voice notes, etc.
Voice Search: Search your tablet by using your voice.
Watch Videos: Stream PBS KIDS videos.
Youtube: Stream your favorite videos on the web.
17
Page 21
5.
DVD Player
Main Features
• High brightness color 7” LCD screen
• Compatible with discs DVD, VCD, MP3, CD, JPEG, etc.
• Built-in stereo speaker
• Speed forward/backward,repeat functions
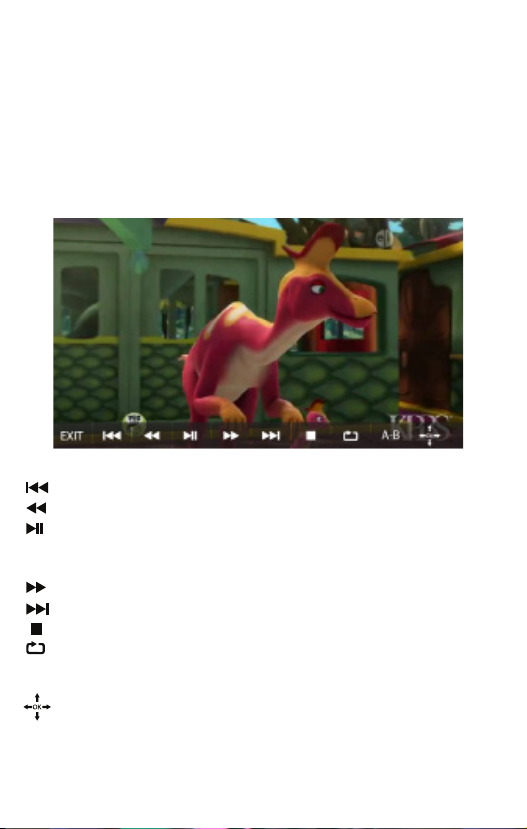
Main Controls
Exit
Press Exit to close the DVD App
Press Return to Previous to return to the previous scene.
Press Rewind to go back through the video.
Press Play to start the video and press again to Pause playback.
Press one more time to resume playback from the point where
you stopped.
Press Fast-Forward to speed forward through a video.
Press Skip to Next to skip to the next scene.
Press Stop to stop playback completely.
Press Repeat to replay the video from the very beginning or to
play one scene over.
Press the OK but to confirm a selection.
18
Page 22

Press at your desired start point (A), and then press this button again to
A-B
mark your desired endpoint (B).
The unit will automatically repeat playing the part between A and B.
Press to display the title of the video
Title
Press to select Title/Chapter
Select
Press to activate subtitles and toggle through language display options
Press to change the audio language and sound type (Sound Type: Mono
Left or Right, Mixed, or Stereo)
Press to change angles (if multiple angles are available)
Shows Disk Information
Ver.
Connect to Monitor
Connect an HDMI cable from the device to any HDMI-compatible
display (i.e. television, computer monitor, projector, etc.)
Basic Operation
1. To open the disc door, press the “open” button on the tablet.
Center the disc over the plastic spindle rod with the label side facing up
and gently press the disc onto the spindle.
2. Gently press the disc door closed.
3. Press “ ” once to stop playback temporarily; press“ ”to resume
playback from the point where you stopped; press “ ” twice to stop
playback completely.
5. During playback, press“ ”to pause; press it again to resume playback.
6. When the disc is finished playing, press “Exit” to return to the tablet’s
home screen.
19
Page 23

7. Sometimes a DVD has a Title or Chapter menu option. To access, press
the “MENU” button to access the menu screen and use “ ”“ ”
to select. Press ENTER to confirm.
Fast-forward and rewind function
When playing DVDs, the machine can search forward or backward.
1. Press “ ” to fast-forward through video or music. Press it repeatedly to increase speed of fast-forward function (x2, x4, x8, x16, x32).
2. Press “ ” to rewind through video or music. Press it repeatedly to
increase speed of rewind function (x2, x4, x8, x16, x32).
Repeat Function
When playing DVDs, users can repeat playing one chapter, title or
the whole disc.
For DVDs, press the “repeat” button to repeat playing one chapter;
press it again to repeat playing title; press it a third time to repeat
playing the whole disc.
For CD/VCD disc, press “repeat” button repeatedly to repeat the
track and the whole disc.
Repeat playing of favorite scenes
When playing DVDs, users can repeatedly play a specific section.
During playback, press the “A-B” button at your desired start point
(A), and then press this button again to mark your desired endpoint
(B). The unit will automatically repeat playing the part between
A and B.
Press it a third time to return to normal playback.
Language and Subtitle Selection
When playing DVDs that feature multiple language tracks and subtitle functions, you can instantly switch between them while watching
your favorite movies and shows.
To switch between language and audio tracks, press repeatedly
until you change to the desired track. To change between subtitle
options, press repeatedly until you change to the desired subtitle option.
20
Page 24

Google Services
6.
Why use a Google Account?
Google Accounts let you organize and access your personal
information from any computer or mobile device.
Sync & Back-up: Whether you draft an email, add a contact,
or add an event to your calendar, your work continuously gets
backed up and synchronizes with any computer with the same
Google Account.
Accessibility: Check your latest emails, events, or text messages
wherever you are on any computer or mobile device.
Security: Google works round the clock to ensure your private
information stays secure.
Shopping: Connect your Google Account with your Google
Wallet™ to easily purchase music, books, apps, and more on
Google Play and other online stores.
Services: Your Google Account also lets you take full advantage
of other Google apps and services such as YouTube, Google Play,
Hangouts, Google Maps, Messaging, and more.
21
Page 25

Add a Google Account
1
Tap Settings
2
Under Accounts, tap Add account
3
Tap what kind of account you want
to add and sign in.
Remove a Google Account
1
Tap Settings Under Accounts, tap Google
3
2
Tap the account that you
want to remove.
4
Tap Menu icon and then
Remove account
22
Page 26

Google Play
Google Apps
Play Store
Play Movies & TV
Play Music
Google Play brings together all of your
favorite content in one place. Access movies,
TV shows, music, books, magazines, apps,
and more when you sign in with your Google
Account. You can also shop for more games,
books, magazines, and more in the Google
Play Store app.
Purchase music, games, books, magazines,
movies, TV shows, and apps on the Google
Play Store app
Choose from thousands of movies and TV
shows on Google Play and stream them
instantly on your Android phone, tablet or
the web.
Buy now, listen now, sync never, with
music on Google Play.
23
Page 27

Google Now™
Google Now uses contextual data from your tablet and from
other Google products to supply you with just the right
information at just the right time. You can download the
Google Search app on Google Play.
After you have downloaded and installed the Google Search
app, tap the Google search bar on the Home screen or swipe
up from the icon to open Google Now.
Google Now Cards
Google Now displays cards when they’re most likely to be
useful and relevant based on the current time and your
current location. Find out what the weather is like, how much
trac to expect before you leave for work, or how your
favorite sports team is doing.
To dismiss a card from the Google Now screen, swipe it away.
The card will return the next time it’s relevant, which may be
hours or days from now.
You can turn Google Now cards on or o at any time. To
do so from the main Google Now screen go to Menu <
Settings < Google Now and choose a specific card. You
can then check or uncheck when you would like that card
to appear.
24
Page 28

Location Access
Find out what the weather is like or how the commute to
work will be by confirming your home and work locations.
Google Now Settings
In order to get to your Google Now settings from the Google
Now Main Screen, touch the Menu icon at the bottom right
of the screen. Then touch Settings. 4 types of settings will
be available.
Google Now: These settings allow you to turn Google Now
On or O. It will also take you through a brief introduction to
Google Now and you will be given the chance to opt in. From
the settings screen you can also change the priority of cards
and also sound settings for notifications.
Voice settings: Voice settings control dierent aspects of
speech input and output.
• Language: Select a language to use for Voice Searches. The
Voice Search language can be dierent from the language
displayed by your tablet.
• Speech Output: Select Hands-free only to turn on speech
output only when using a headset.
• Block oensive words: Check to ensure that search results
with oensive language are blocked.
• Hotword detection: When this is checked, you can say
“Google” when viewing the Google Now screen to initiate a
voice search or action.
25
Page 29

Tablet Search: Select which apps in your tablet are included
in Google searches.
Privacy & Accounts: Control search-related privacy options
for your Google Account.
• Manage location history: Opens Google Maps settings,
where you can turn location settings and location reporting
on or o.
• Location services: Allows you to turn location access by all
Google apps on or o.
• Show recent searches: Check if you want search suggestions
based on your recent searches.
• Manage Web History: View your Web History after signing in
26
Page 30

Voice Actions
After installing the Google Search app you can use Voice
Actions to get directions, send messages, and perform a
number of other common tasks.
To initiate a Voice Action you can:
• Tap the Microphone in the Google Search Bar on your
Home Screen
• Tap the Microphone in your keyboard
Next, speak the Voice Action you want to use. Here are some
typical examples:
“Set alarm for 8:30 a.m”
“Send email to Marcus Foster. Subject: Coming tonight?
Message: Hope to see you later.”
“Navigate to Mike’s Bikes in Palo Alto”
As you speak, Voice Search analyzes your speech and
initiates the action. If Voice Search doesn’t understand you,
it lists a set of possible meanings. Just tap the one you want.
Some Voice Actions, such as “send email” and “note to self,”
open a panel that prompts you to complete the action by
speaking or typing more information.
When prompted, you can:
• Touch any text already in the panel to add, or edit the
text by typing. (You can tap the Microphone icon again to
continue speaking instead of typing)
• Touch underlined words or phrases, drag across multiple
words to view a list of alternate transcriptions, or edit by
speaking or typing.
• Touch a button at the bottom of the window to add any
optional fields (you can also speak the name and content of
any of these fields)
• When you are done, touch the button appropriate to
complete the action, such as Send.
27
Page 31

Voice Commands
To initiate a Voice Action touch the Microphone icon
*Voice Actions will only be available after downloading
the Google Search app.
Some handy voice commands are:
Say
[Words you want
to search for]
“Map of”
“Go to”
“Note to self”
Followed By
Address, name,
business name, or
other destination
Search string or
URL
Message text
Examples
“bike shoes”
“Navigate to Union
Square” or “1299
Colusa Ave, Berkeley,
CA”
“Go to Google.com”
“Note to self: remember to buy milk”
“Define”
“Weather”
“Movie”
“Pictures of”
“Translate to”
[A math phrase]
Word to define
Location
Movie location and
Movie name
Topic
Language & Phrase
“Define campanile”
“Weather Detroit”
“Movie, Los Angeles,
London After Midnight”
“Pictures of cats”
“Translate to French,
Where is the restroom?”
“75 divided by 6”
28
Page 32
Miscellaneous
7.
Tips and Tricks/FAQs
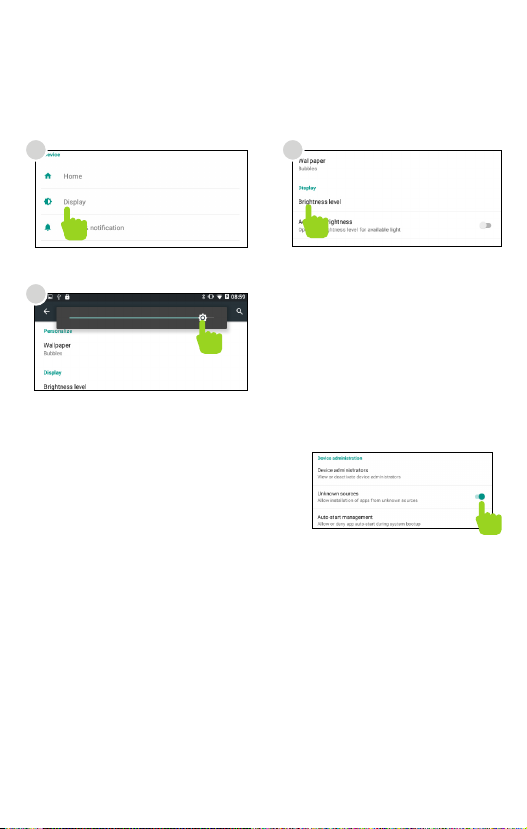
Screen Brightness
1
In the settings tap Display. Tap Brightness.
3
Use the slider to adjust
the brightness.
2
Tip: Lower the brightness
at night to extend your
battery life.
Apps Won’t Install
In the Settings app, tap Security.
Be sure “Allow installation of
non-Market apps” is checked.
You must allow installed apps to be accessed in the Playtime Pad Parent Dashboard.
See the Adding & Removing Apps section.
Won’t Connect to Computer
Try a dierent USB port on your computer and/or restarting
your Playtime Pad.
The battery may be too low and the computer is not providing
enough power by USB. Use the wall charger to charge your
Playtime Pad for 30 minutes then re-connect to the computer.
29
Page 33

Care
The Playtime Pad is an electronic device and can be damaged
if used improperly.
• Don’t expose your device to liquids, water or extreme humidity.
• Don’t try to dry the Playtime Pad using a heat source such as
a dryer, microwave, or oven.
• Don’t charge your tablet or use it in environments above 95°F
and below 32°F.
• Don’t expose the Playtime Pad to dirt or sand.
• Use a clean, dry cloth to clean your tablet. Do not use chemicals
or water.
• The Playtime Pad can be damaged by shock from dropping.
Specifications
CPU: 1.3GHz Quad-Core
RAM: 1GB
Memory: 16GB
MicroSD Card Supported: up to 32GB
Resolution: 1024x600
Battery: Rechargeable Li-Polymer
Record: Built-in Microphone
Operating System: Android 7.1.1
Video Formats: WMV, MKV, MO, AVI, RM/RMVB, MPEG-2/4
Music Formats: MP3, WMA, APE, FLAC, AAC, AC3, WAV
Caution - Electric Device
Not recommended for children under 3 years of age. As with
all electric products, precautions should be observed during
handling and use to prevent electric shock.
Attention: Important Safety Information
All charging functions and mechanisms (AC adapter, car
charger) are intended for adult usage. Children should not
use this device while charging.
30
Page 34

Limitations of Liability Statement
Links to Third Party Sites
The Ematic User Manual may contain or reference links to third-party sites, however,
please be aware that Ematic is not responsible for and cannot control these other sites.
Ematic makes no representations or warranties whatsoever about any other website
which you may access as a result of reading this user manual, or otherwise. When you
access a website that is not owned or operated by Ematic (a “non-Ematic website”),
even one that may contain an Ematic logo, please understand that it is independent
from Ematic, and that Ematic has no direct control over the content on such website(s).
In addition, a link to any such non-Ematic website does not mean Ematic endorses or
accepts any responsibility for the content, or of any functionalities or services, of such
website(s). Furthermore, Ematic makes no promise, representation or warranty that any
non-Ematic website you navigate to will be free of viruses, worms, Trojan horses and
other items of a destructive nature. The Ematic User Manual is for your exclusive benefit
and you assume all risks, losses and/or damages of whatever nature that may result
arising out of your use of the Ematic User Manual.
31
Page 35

Limitation of Liability and Indemnity
To the maximum extent permitted by applicable law, Ematic shall not be liable for any
damages suffered as a result of using, modifying, contributing, copying, distributing, or
downloading the materials, use of the Ematic User Manual or use of any Ematic product
and/or software. In no event shall Ematic be liable for any indirect, extraordinary,
exemplary, punitive, special, incidental, or consequential damages (including, without
limitation, loss of data, revenue, prots, use or other economic advantage) however
arising, whether for breach of contract or in tort, even if Ematic has been previously
advised of the possibility of such damage. You agree that you have sole responsibility
for adequate protection and backup of data and/or equipment used in connection with
the product and software and will not make a claim of any nature against Ematic for
lost data, inaccurate output, work delays or lost prots resulting from the use of the
materials. You agree to indemnify, hold harmless and defend Ematic, together with
its afliates, parent and subsidiary entities, successors, assigns, partners, managers,
members, employees, ofcers, directors and shareholders, from and against any and
all damages, liens, liabilities, losses, demands, actions, causes of action, claims, costs
and expenses (including, without limitation, reasonable attorneys’ fees, charges and
disbursements, as well as the cost of in-house counsel and appeals) arising from or
related to Ematic, the use of The Ematic User Manual or any Ematic product and/or
software. Some jurisdictions do not allow the exclusion or limitation of incidental or
consequential damages, so the above limitation or exclusion may not apply to you.
Windows™ is a registered trademark of Microsoft Corp. in the United States and
other countries; Mac® and Finder® are registered trademarks of Apple Inc.; Linux™ is
a registered trademark of Linus Torvalds. Android is a trademark of Google Inc. The
Android Robot logo is a trademark of Google Inc and used under a Creative Commons
Attribution license. Ematic is not afliated with Google Inc. Angry Birds is a trademark
of Rovio Entertainment Ltd. and used by Ematic under a license. Ant Smasher for
Kids is a trademark of Nuriara Games and used by Ematic under a license. Caveman
2 is a trademark of KidsFun and used by Ematic under a license. Clouds & Sheep is
a trademark of Handygames and used by Ematic under a license. ZeptoLab, Cut the
Rope, Cut the Rope Experiments, Om Nom, and Feed with Candy are the trademarks
or registered trademarks of ZeptoLab UK Ltd. © 2012 and used by Ematic under a
license. Devil Ninja 2 is a trademark of Droid Studio and used by Ematic under a license.
EVERNOTE, the Evernote Elephant logo and REMEMBER EVERYTHING are trademarks
of Evernote Corporation and used by Ematic under a license. Fruit Ninja is a trademark
of Halfbrick Studios and used by Ematic under a license. Geo Quiz is a trademark of
Paweł Janeczek and used by Ematic under a license. Gravitire 3D is a trademark of
Anuloid and used by Ematic under a license. MeeGenius is a trademark of MeeGenius
and used by Ematic under a license. Intellijoy is a trademark of Intellijoy and used by
Ematic under a license. Kids Animal Piano is a trademark of rad lemur a division of Byte
Cave Software Inc. and used by Ematic under a license. Maxthon Kid-Safe Browser is a
trademark of Maxthon Intenational Ltd and used by Ematic under a license. Lightracer
3D is a trademark of Battery Powered Games LLC and used by Ematic under a license.
Noogra Nuts is a trademark of Bengigi Studio and used by Ematic under a license. Radio
Ball 3D is a trademark of Gamesoul Studio and used by Ematic under a license. School
Assistant is a trademark of Gil Castro and used by Ematic under a license. Return Zero
is a trademark of We Came From Mars and used by Ematic under a license. School
Assistant is a trademark of Gil Castro and used by Ematic under a license. Skitch is a
trademark of Evernote Corporation and used by Ematic
32
Page 36

under a license. Squibble is a trademark of MassHabit Games and used by Ematic under
a license. Tiki Kart 3D is a trademark of Arb Studios LLC and used by Ematic under a
license. Kido’z is a trademark of Kido’z Ltd. and used by Ematic under a license. HDMI
is a trademark of HDMI licensing, LLC and used by Ematic under a permissions process
granted to Ematic (Shaghal Ltd) as an Adopter. The Bluetooth® word mark, gure mark
(stylized “B Design”), and combination mark (Bluetooth word mark and “B Design”) are
registered trademarks and are wholly owned by the Bluetooth SIG. Adobe and Flash
are either registered trademarks or trademarks of Adobe Systems Incorporated in the
United States and/or other countries. Wi-Fi®, the Wi-Fi CERTIFIED logo, and the Wi-Fi
logo are registered trademarks of the the Wi-Fi Alliance.
Ematic is not afliated with Microsoft, Apple, Inc., Linux, or Google, Inc., (including
Android). Borders, or Bluetooth SIG Inc.
This device complies with Part 15 of the FCC Rules. Operation is subject to the following
two conditions: (1) this device may not cause harmful interference, and (2) this device
must accept any interference received, including interference that may cause undesired
operation.
The Ematic brand and products are owned by Shaghal, Ltd
Customer Support
Visit ematic.zendesk.com for customer support regarding
your device.
To submit a request, fill out the required information online.
You will be provided a ticket number regarding your issue,
which you can refer to when contacting us further.
33
Page 37

PBS KIDS and the PBS KIDS logo are registered trademarks of PBS. Used with permission. ©2017 PBS. All rights
reserved.©2017 Ematic. All Rights Reserved. The Android robot is reproduced or modified from work created
and shared by Google and used according to terms described in Creative Commons 3.0 Attribution License.
©2012 Google Inc. All rights reserved. Android, Google, and Google Play are trademarks of Google Inc. ©2010
Bluetooth SIG, Inc. All rights reserved. HDMI is a trademark of HDMI Licensing, LCC and used by Ematic under
a permissions process granted to Ematic (Shaghal, Ltd.) as an adopter. Wi-Fi® is a registered trademarks of
the Wi-Fi Alliance. This device complies with Part 15 of the FCC Rules. Operation is subject to the following two
conditions: (1) this device may not cause harmful interference, and (2) this device must accept any interference
received, including interference that may cause undesired operation. MicroSD card not included. Ematic is not
affiliated with Microsoft, Apple, Inc., Google, Inc., (including Android). 1 year warranty from date of purchase, 6
months only on parts and labor. WARNING: This product contains a chemical known to the State of California
to cause cancer and reproductive toxicity. Wild Kratts® © 2015 Kratt Brothers Company Ltd. / 9 Story Media
Group Inc. Wild Kratts® and Creature Power® and associated characters, trademarks, and design elements
are owned by Kratt Brothers Company Ltd. Licensed by Kratt Brothers Company Ltd. All Rights Reserved.
WordGirl and underlying materials (including artwork) TM, ® & © Scholastic Inc. Odd Squad and underlying
materials (including artwork) © 2014 The Fred Rogers Company. Peg + Cat and underlying materials (including
artwork) ©2016 Feline Features, LLC. Ready Jet Go! and underlying materials (including artwork) ©2016 Jet
Propulsion, LLC. Ready Jet Go! and A Kids Place Is Exploring Space are registered trademarks of Jet Propulsion,
LLC. Sid the Science Kid © 2011 The Jim Henson Company. Characters and elements are trademarks of The
Jim Henson Company. All Rights Reserved. Super Why and underlying materials (including artwork) © 2016
Out of the Blue Enterprises LLC. The Cat in the Hat Knows a Lot About That! logo, word mark and artwork
™ 2016 Dr. Seuss Enterprises, L.P. Collingwood O’Hare Productions Limited, and Portfolio Entertainment Inc.
All Arthur characters and underlying materials (including artwork) © Marc Brown. “Arthur” and “D.W.” and all
of the ARTHUR characters are trademarks of Marc Brown. Nature Cat and associated characters, trademarks,
and design elements are owned by Spiffy Entertainment, LLC. © 2016 Spiffy Entertainment, LLC. All rights
reserved. Ruff Ruffman ©2016 WGBH Educational Foundation. All rights reserved. FETCH!, the characters
and related indicia are trademarks of the WGBH Educational Foundation. Dinosaur Train and associated
characters, trademarks, and design elements © 2009 - 2015 The Jim Henson Company. All Rights Reserved.
Daniel Tiger and underlying materials (including artwork) © 2016 The Fred Rogers Company. Bob the Builder
and underlying materials (including artwork) © 2016 HIT Entertainment Limited and Keith Chapman. Fizzy’s
Lunch Lab and underlying materials (including artwork) ©2009-2016 Lunch Lab, LLC. These and all third party
trademarks are the property of their respective owners. Used with permission. Shaghal Ltd. 2231 Colby Ave,
Los Angeles, CA 90064.
34
Page 38

Warning Statement
This device complies with part 15 of the FCC Rules. Operation is subject to the
following two conditions: (1) This device may not cause harmful interference, and (2)
this device must accept any interference received, including interference that may cause
undesired operation.
Any Changes or modifications not expressly approved by the party responsible for
compliance could void the user's authority to operate the equipment.
Note: This equipment has been tested and found to comply with the limits for a Class B
digital device, pursuant to part 15 of the FCC Rules. These limits are designed to
provide reasonable protection against harmful interference in a residential installation.
This equipment generates uses and can radiate radio frequency energy and, if not
installed and used in accordance with the instructions, may cause harmful interference
to radio communications. However, there is no guarantee that interference will not
occur in a particular installation. If this equipment does cause harmful interference to
radio or television reception, which can be determined by turning the equipment off and
on, the user is encouraged to try to correct the interference by one or more of the
following measures:
-Reorient or relocate the receiving antenna.
-Increase the separation between the equipment and receiver.
-Connect the equipment into an outlet on a circuit different from that to which the
receiver is connected.
-Consult the dealer or an experienced radio/TV technician for help.
The device has been evaluated to meet general RF exposure requirement. The device
can be used in portable exposure condition without restriction.
 Loading...