

EMAK plus4, exa4, allroad plus4 series, allroad exa4 series, 44 Owner's Manual
...
I
MANUALE USO E MANUTENZIONE
Pubbl. 66070541D - Feb/2015
GB
F
D
E
SK
OWNER’S MANUAL
MANUEL D’UTILISATION ET D’ENTRETIEN
BETRIEBS- UND WARTUNGSANLEITUNG
MANUAL DE USO Y MANTENIMIENTO
NÁVOD NA POUŽITIE A ÚDRŽBU
I
ISTRUZIONI ORIGINALI
Per un corretto impiego del rasaerba e per evitare incidenti, non iniziare il lavoro
senza aver letto questo manuale con la massima attenzione. Su questo manuale
sono indicate le spiegazioni di funzionamento dei vari componenti e le istruzioni
per i necessari controlli e per la manutenzione.
N.B. Le descrizioni e le illustrazioni contenute nel presente manuale si
intendono non rigorosamente impegnative. La Ditta si riserva il diritto di
apportare eventuali modifiche senza impegnarsi ad aggiornare di volta in
volta questo manuale.
GB
TRANSLATION OF ORIGINAL INSTRUCTIONS
To correctly use the lawnmower and prevent accidents, do not start work without
having first carefully read this manual. You will find explanations concerning the
operation of the various parts plus instructions for necessary checks and relative
maintenance.
Note: Illustrations and specifications in this manual may vary according to
Country requirements and are subject to change without notice by the
manufacturer.
INTRODUZIONE
INTRODUCTION
ATTENZIONE!!! ACHTUNG!!!
RISCHIO DI DANNO UDITIVO
NELLE NORMALI CONDIZIONI DI UTILIZZO,
QUESTA MACCHINA PUÒ COMPORTARE
PER L’OPERATORE ADDETTO, UN LIVELLO DI
ESPOSIZIONE PERSONALE E GIORNALIERO
A RUMORE PARI O SUPERIORE A
85 dB(A)
HÖRSCHADEN - RISIKO
UNTER NORMALEN
NWENDUNGSBEDIGUNGEN KANN DIESES
GERÄT DIE BEDIENUNGSPERSON
EINEM TÄGLICHEN GERÄUSCHPEGEL VON
85 dB(A)
ODER MEHR AUSSETZEN
F
TRADUCTION DES INSTRUCTIONS ORIGINALES
Pour un emploi correct de la tondeuse et pour éviter les accidents, ne commencez
pas le travail sans avoir d’abord lu attentivement le manuel. Vous trouverez les
descriptions du fonctionnement des divers composants et les instructions pour
les contrôles nécessaires et pour l’entretien.
N.B. Les descriptions et les illustrations contenues dans ce manuel
n’engagent pas rigoureusement le constructeur. La société se réserve le droit
d’apporter d’éventuelles modifications sans devoir mettre à jour à chaque
fois le manuel.
D
ÜBERSETZUNG DER ORIGINALANLEITUNGEN
Lesen Sie diese Broschüre vor Arbeitsbeginn aufmerksam durch, um mit dem
Rasenmäher richtig umgehen zu können und Unfälle zu vermeiden. In dieser
Bedienungsanleitung finden Sie die Erklärung der Funktionsweise der
verschiedenen Bauteile und Hinweise zu den anfallenden Kontroll- und
Wartungsarbeiten.
Anm.: Die in dieser Broschüre enthaltenen Beschreibungen und Abbildungen
sind unverbindlich. Der Hersteller behält sich das Recht vor, eventuelle
Veränderungen vorzunehmen, ohne jeweils vorher eine Anpassung der
vorliegenden Bedienungsanleitung vorzunehmen.
E
TRADUCCIÓN DE LAS INSTRUCCIONES ORIGINALES
Para una correcta utilización del cortacesped y para evitar accidentes, no empiece
a trabajar sin haber leído atentamente este manual. Ud. encontrará las
explicaciones de funcionamiento de los diferentes componentes y las
instruccciones para el control y mantenimiento de la motosierra.
P.D. Las descripciones contenidas en el presente manual no se consideran
rigurosamente obligatorias. La empresa se reserva el derecho de aportar
eventuales modificaciones sin obligarse a poner al día este manual.
SK
PREKLAD PÔVODNÉHO NÁVODU NA POUŽITIE
Pre správne pouÏitie stroja a vyhnutie sa úrazom, nezačínajte prácu bez
dôkladného prečítania tohto návodu. V tomto návode je vysvetlené ako
fungujú rôzne časti stroja a informácie potrebné na kontrolu a údrÏbu.
POZNÁMKA: Opisy a nákresy obsiahnuté v tomto návode nie sú
prísne záväzné. SpoloãnosÈ si vyhradzuje právo vykonaÈ prípadné
zmeny bez toho, aby sa zaviazala vÏdy tento návod aktualizovaÈ.
INTRODUCTION
EINLEITUNG
INTRODUCCION
ÚVOD
WARNING!!! ATENCION!!!
RISK OF DAMAGING HEARING
IN NORMAL CONDITIONS OF USE,
THIS MACHINE MAY INVOLVE A DAILY LEVEL
OF PERSONAL EXPOSURE TO NOISE
FOR THE OPERATOR EQUAL TO
OR GREATER THAN
85 dB(A)
ATTENTION!!!
DANGER D’ATTEINTE A L’OUIE
L’OPERATEUR UTILISANT NORMALEMENT
CETTE MACHINE PEUTS S’EXPOSER
QUOTIDIENNEMENT A UN BRUIT
EGAL OU DEPASSANT
85 dB(A)
RIESGO DE DAÑO AUDITIVO
EN NORMALES CONDICIONES DE
UTILIZACIÓN, ESTA MAQUINA PUEDE
TOLERAR, PARA EL OPERADOR ENCARGADO,
UN NIVEL DE EXPOSICÍON DIARIO A RUIDO
EQUIVALENTE O SUPERIOR A
85 dB(A)
POZOR!!!
RIZIKO POŠKODENIA SLUCHU
ZA BEŽNÝCH PRACOVNÝCH PODMIENOK
MÔŽE TENTO STROJ PREDSTAVOVAŤ PRE
PRACOVNÍKA VYSTAVENIE DENNEJ HLADINE
HLUKU ROVNAJÚCEJ SA ALEBO VYŠŠEJ AKO
85 dB(A)
2

I
INDICE
D
INHALT
SPIEGAZIONE SIMBOLI E
AVVERTENZE DI SICUREZZA _______ 4
COMPONENTI DEL RASAERBA _____ 6
NORME DI SICUREZZA ___________ 8
ABBIGLIAMENTO PROTETTIVO DI
SICUREZZA ____________________ 14
ASSEMBLAGGIO ________________ 16
AVVIAMENTO __________________ 20
UTILIZZO ______________________ 32
GB
CONTENTS
EXPLANATION OF SYMBOLS AND
SAFETY WARNINGS ______________ 4
LAWNMOWER COMPONENTS _____ 6
SAFETY PRECAUTION ____________ 9
SAFETY PROTECTIVE CLOTHING ___ 14
ASSEMBLY _____________________ 16
STARTING _____________________ 20
ARRESTO MOTORE ______________ 40
RIMESSAGGIO-TRASPORTO _______ 42
MANUTENZIONE ________________ 44
DATI TECNICI ___________________ 50
DICHIARAZIONE DI CONFORMITÀ __ 52
TABELLA DI MANUTENZIONE ______ 54
RISOLUZIONE DEI PROBLEMI ______ 57
CERTIFICATO DI GARANZIA _______ 61
ENGINE STOPPING ______________ 40
STORAGE-TRANSPORTATION ______ 42
MAINTENANCE _________________ 44
TECHNICAL DATA _______________ 50
DECLARATION OF CONFORMITY ___ 52
MAINTENANCE CHART ___________ 54
TROUBLE SHOOTING CHART ______ 57
ERLAUTERUNG DER SYMBOLE UND
SICHERHEITSHINWEISE ___________ 4
BAUTEILE DES RASENMÄHERS _____ 6
SICHERHEITSVORKERUNGEN ______ 11
SICHERHEITS-/SCHUTZKLEIDUNG __ 15
MONTAGE _____________________ 17
STARTEN ______________________ 21
GEBRAUCH ____________________ 33
E
INDICE
EXPLICACION SIMBOLOS Y
ADVERTENCIÂS DE SEGURIDAD ___ 4
COMPONENTES DE EL CORTACESPED
NORMAS DE SEGURIDAD _________ 12
INDUMENTOS DE SEGURIDAD _____ 15
MONTAJE _____________________ 17
PUESTA EN MARCHA ____________ 21
_ 6
MOTOR ABSTELLEN _____________ 41
LÄNGERUNG-TRANSPORT ________ 43
WARTUNG _____________________ 45
TECHNISCHE DATEN _____________ 50
KONFORMITATS-ERKLARUNG _____ 52
WARTUNGSTABELLE _____________ 55
STÖRUNGSBEHEBUNG ___________ 58
GARANTIE-ZERTIFICAT ___________ 62
PARADA MOTOR ________________ 41
ALMACENAJE-TRANSPORTE ______ 43
MANTENIMIENTO _______________ 45
DATOS TECNICOS _______________ 50
DECLARACION DE CONFORMIDAD _ 52
TABLA DE MANTENIMIENTO ______ 56
RESOLUCIÓN DE PROBLEMAS _____ 59
USE __________________________ 32
F
INDEX
EXPLICATION DES SYMBOLES ET
REGLES DE SECURITE ____________ 4
COMPOSANTS DE LA TONDEUSE ___ 6
NORMES DE SECURITE ___________ 10
VÊTEMENTS DE PROTECTION ______ 14
ASSEMBLAGE __________________ 16
MISE EN MARCHE _______________ 20
UTILISATION ___________________ 32
WARRANTY CERTIFICATE _________ 61
ARRET MOTEUR ________________ 40
REMISSAGE-TRANSPORTE ________ 42
ENTRETIEN ____________________ 44
DONNEES TECHNIQUES __________ 50
DECLARATION DE CONFORMITÉ ___ 52
TABLEAU D'ENTRETIEN ___________ 55
RÉSOLUTION DES PROBLÈMES ____ 58
CERTIFICAT DE GARANTIE ________ 61
UTILIZACION ___________________ 33
SK
OBSAH
VYSVETLIVKY A BEZPEČNOSTNÉ
UPOZORNENIA _________________ 4
ČASTI KOSAČKY ________________ 6
PRAVIDLÁ BEZPEČNOSTI _________ 13
OCHRANNÝ BEZPEČNOSTNÝ ODEV _ 15
MONTÁŽ ______________________ 17
ŠTARTOVANIE __________________ 21
POUŽITIE ______________________ 33
CERTIFICADO DE GARANTIA ______ 62
VYPNUTIE MOTORA _____________ 41
PREPRAVA - SKLADOVANIE _______ 43
ÚDRŽBA ______________________ 45
TECHNICKÉ ÚDAJE ______________ 50
ES VYHLÁSENIE O ZHODE ________ 52
TABUĽKA ÚDRŽBY ______________ 56
RIEŠENIE PROBLÉMOV ___________ 59
ZÁRUKA ______________________ 62
3
I SPIEGAZIONE SIMBOLI E AVVERTENZE DI SICUREZZA D ERLÄUTERUNG DER SYMBOLE-UND SICHERHEITSHINWEISE
GB EXPLANATION OF SYMBOLS AND SAFETY WARNINGS E EXPLICACION SIMBOLOS Y ADVERTENCIAS DE SEGURIDAD
F EXPLICATION DES SYMBOLES ET REGLES DE SECURITE SK VYSVETLIVKY A BEZPEČNOSTNÉ UPOZORNENIA
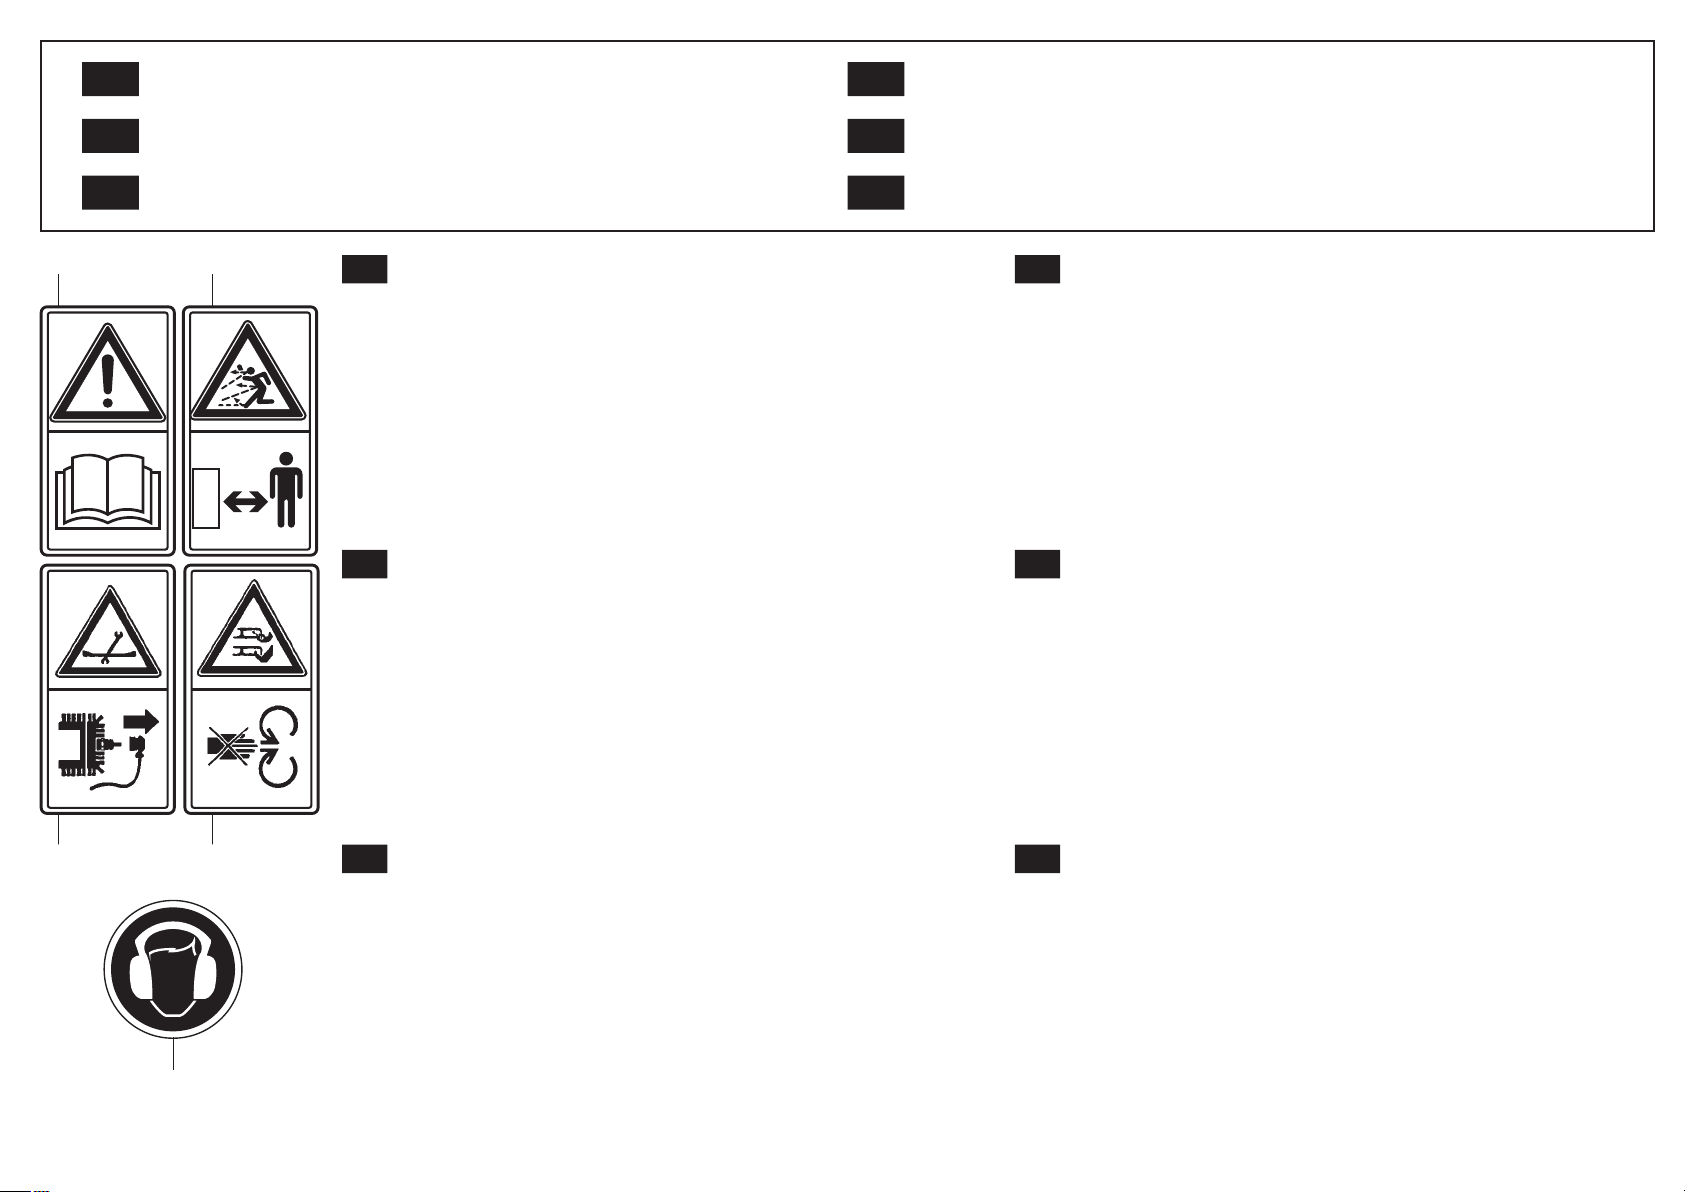
1 - Leggere il libretto uso e manutenzione prima di utilizzare questa
I
GB
macchina.
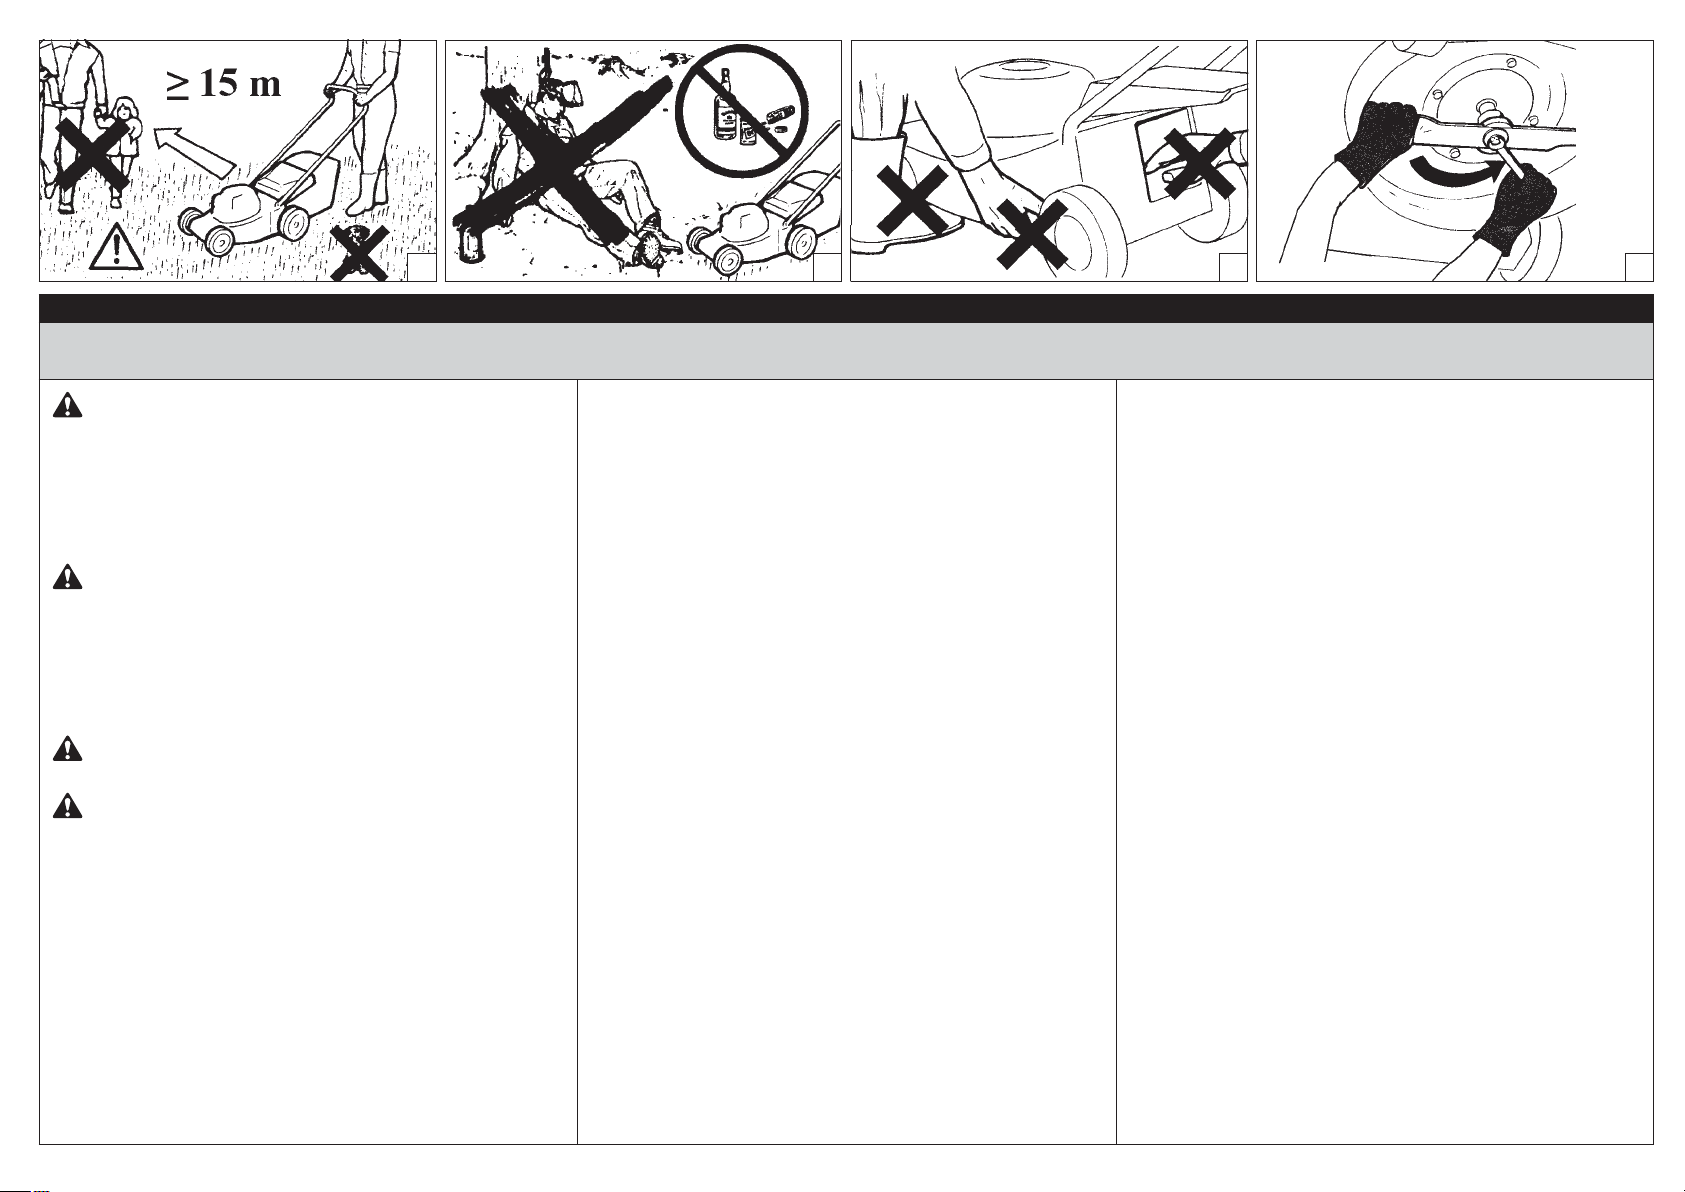
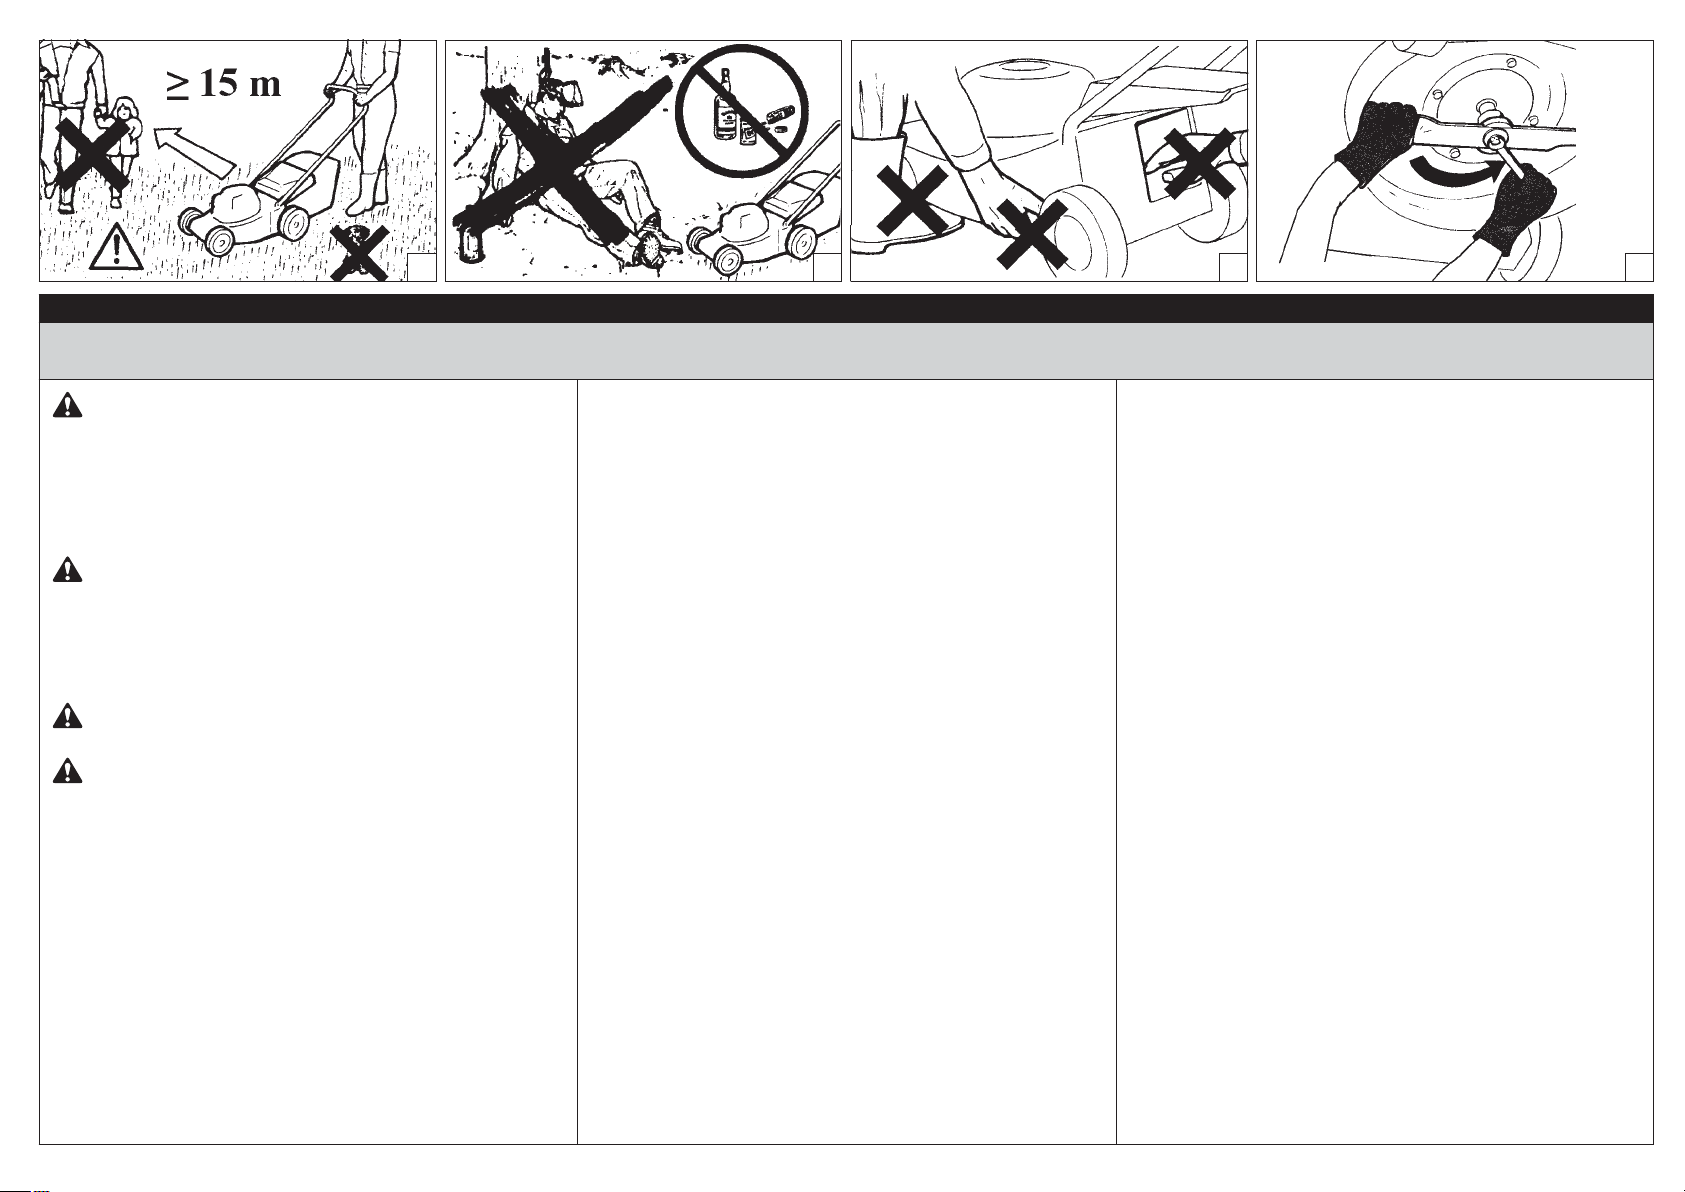
2 - ATTENZIONE! - Non lasciare avvicinare nessuno durante il lavoro.
Fare attenzione alla proiezione di oggetti.
3 - Prima di effettuare qualsiasi pulizia o riparazione, fermate il
motore e staccate il filo della candela.
4 - Non avvicinare mani o piedi al carter della lama mentre il motore
è avviato.
ATTENZIONE! - Le lame rimangono in movimento per alcuni
secondi anche dopo che il motore è stato spento.
5 - Obbligo di indossare le cuffie (modello 53)
1 - Read operator’s instruction book before operating this machine.
2 - WARNING! - Do not let anybody approach to the working area.
Be careful of thrown objects
3 - Before cleaning or repairing the mower, stop the engine and
disconnect the spark plug lead.
4 - When the engine is running, do not put hands or feet near or
under the mower deck.
WARNING! - Blades continue to rotate for little seconds after
machine is switched off.
5 - Must wear ear protection (model 53)
1 - Betriebsanleitung vor der Inbetriebsnahme lesen.
D
2 - ACHTUNG! - Das Annähern von Unbefugten an die Maschine
während der Arbeit ist untersagt: Gefahr projezierter
Gegenstände.
3 - Bevor Sie den Mäher reinigen oder reparieren, ziehen Sie den
Zündkerzenstecker ab.
4 - Wenn die Maschine läuft, Hände und Füße vom Mähwerkzeug
E
fernhalten.
ACHTUNG! - Die Messer bleiben auch nach dem Abschalten des
Motors noch einige Sekunden in Bewegung.
5 - Gehörschutz tragen (modell 53)
1 - Antes de utilisar esta maquina, leer el manual de instrucciones.
2 - ¡ATENCIÓN! - No permitir que nadie se acerque durante el trabajo.
Prestar atención a la proyección de objetos.
3 - Antes de efectuar la limpieza o reparación del motor pararlo y
desconectar el cable de la bujia.
4 - No poner las manos o los ples proximos a la cuchilla hasta que el
motor este parado.
¡ATENCIÓN! - Las hojas permanecen en movimiento durante
algunos segundos incluso después de que el motor ha sido
apagado.
5 - Obligación de utilizar auriculares (modelo 53)
4
1 - Lire le manuel avant d’utiliser cette machine.
F
2 - ATTENTION! - Ne laisser s’approcher personne durant le travail.
Faire attention aux objets qui pourraient être projetés.
3 - Arrêter le moteur et débrancher le fil de la bougie avant de
nettoyer le carter de lame, d'inspecter ou de réparer la tondeuse.
4 - Ne pas placer les mains ou les pieds à proximité du carter de lame
lorsque le moteur est en marche.
ATTENTION! - Les lames restent en movement pour quelques
secondes même après que le moteur a été éteint.
5 - Protection obligatoire des oreilles (modèle 53)
1 - Pred použitím tohto stroja si prečítajte návod na použitie a
SK
údržbu.
2 - POZOR! - Počas práce nenechajte nikoho priblížiť sa ku stroju.
Pozornosť venujte odmršteným predmetom.
3 - Pred vykonaním akejkoľvek údržby alebo opravy, vypnite motor a
odstráňte káblovú koncovku zo sviečky.
4 - Nepribližujte ruky alebo chodidlá ku krytu noža, keď je motor
spustený.
POZOR! - Nôž je v pohybe počas niekoľkých sekúnd, aj potom, ako
bol motor vypnutý.
5 - Používajte chrániče sluchu (model 53)

I SPIEGAZIONE SIMBOLI E AVVERTENZE DI SICUREZZA D ERLÄUTERUNG DER SYMBOLE-UND SICHERHEITSHINWEISE
GB EXPLANATION OF SYMBOLS AND SAFETY WARNINGS E EXPLICACION SIMBOLOS Y ADVERTENCIAS DE SEGURIDAD
F EXPLICATION DES SYMBOLES ET REGLES DE SECURITE SK VYSVETLIVKY A BEZPEČNOSTNÉ UPOZORNENIA
쐉
쐅
쐈
6 - Marchio e modello macchina.
I
7 - Dati Tecnici.
8 - Livello di potenza acustica garantita
9 - Numero di serie.
10 - Marchio CE di conformità.
11 - Anno di fabbricazione
12 - Tipo di macchina: RASAERBA
6 - Machine brand and model
GB
7 - Specifications
8 - Guaranteed sound power level
9 - Serial number
10 - CE conformity marking
11 - Year of manufacture
12 - Type of machine: LAWNMOWER
6 - Marke und Maschinenmodell
D
7 - Technische Daten
8 - Garantierter akustischer Schalleistungspegel.
9 - Seriennummer
10 - CE-Zeichen
11 - Baujahr
12 - Gerät: RASENMÄHER
6 - Marca y modelo de la máquina
E
7 - Datos técnicos
8 - Nivel de potencia acústica garantizado.
9 - Número de serie
10 - Marcha CE de conformidad
11 - Año de fabricación
12 - Tipo de máquina: CORTACÉSPED
6 - Marque et modèle de la machine
F
7 - Données techniques
8 - Niveau de puissance acoustique garanti.
9 - Numéro de série
10 - Label CE de conformité
11 - Année de construction
12 - Type de machine : TONDEUSE
6 - Značka a model stroja
SK
7 - Technické údaje
8 - Zaručená hladina akustického výkonu
9 - Číslo série
10 - Značka CE v súlade s predpismi ES
11 - Rok výroby
12 - Druh stroja: KOSAČKA
5
I - VEDI MANUALE MOTORE
GB- SEE THE ENGINE MANUAL
F - CONSULTER LE LIVRET D’UTILISATION DU MOTEUR
D - SIEHE MOTOR-HANDBUCH
E - CONSULTAR EL MANUAL DE INSTRUCCIONES DEL MOTOR
SK - POZRITE SI NÁVOD NA MOTOR
6
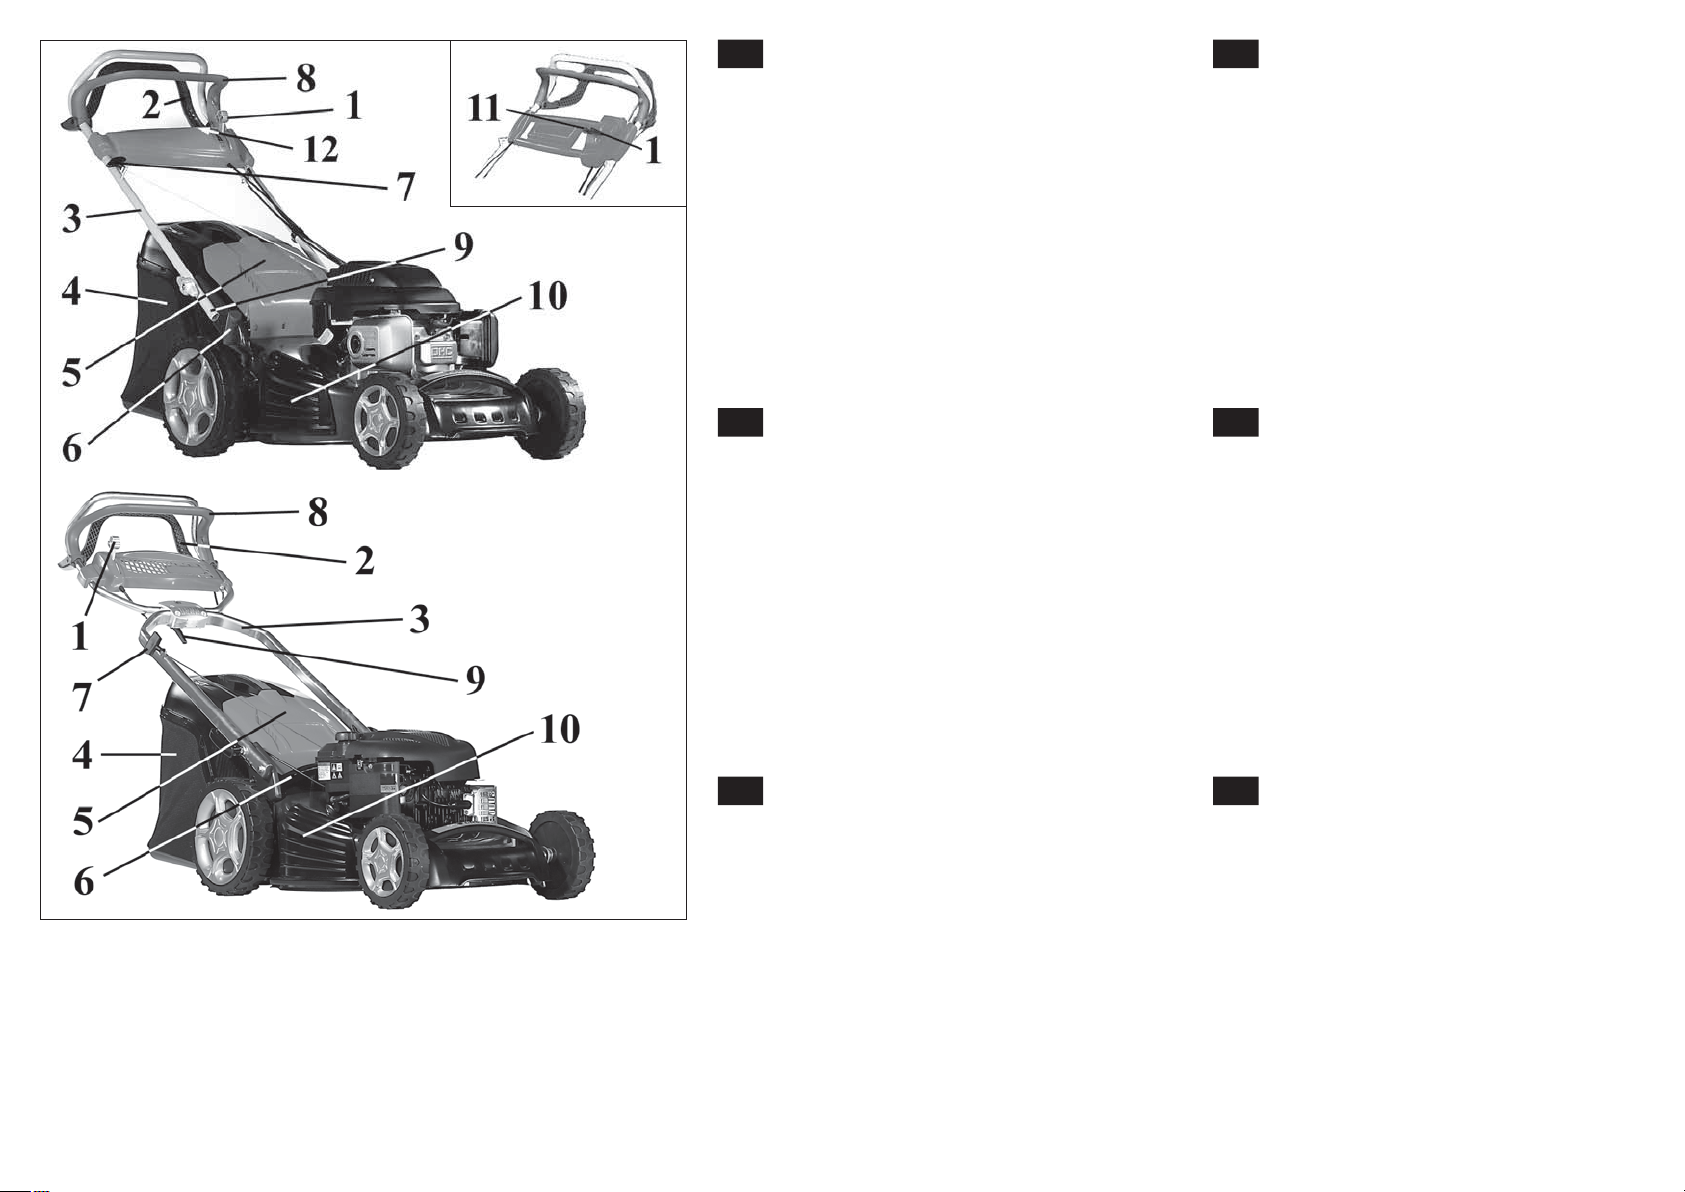
I COMPONENTI DEL RASAERBA
1. Comando acceleratore
2. Leva frizione
3. Manubrio
4. Sacco raccoglierba
5. Deflettore posteriore
6. Regolaz. altezza taglio
7. Impugnatura avviamento
8. Leva arresto motore
9. Regolazione altezza manubrio
10. Portello laterale
11. Comando variatore (solo nei modelli che
ne sono provvisti)
12. Chiave avviamento (solo nei modelli che
ne sono provvisti)
GB LAWNMOWER COMPONENTS
1. Throttle lever
2. Clutch lever
3. Handle
4. Grass catcher
5. Rear deflector
6. Cutting height adjustment
7. Starter handle
8. Engine stop lever
9. Height adjusting knob
10. Side flap
11. Speed control (only on models that are so
equipped)
12. Electric starting key (only on models that
are so equipped)
F COMPOSANTS DE LA TONDEUSE
1. Accélerateur
2. Commande d’embrayage
3. Guidon
4. Panier de ramassage
5. Déflecteur
6. Régl. fauteur dei coupe
7. Poignée de lanceur
8. Commande d'arrêt moteur
9. Réglage de hauteur du guidon
10. Volet latéral
11. Commande variateur (uniquement pour les
modèles qui en sont équipés)
12. Clef de contact (uniquement pour les
modèles qui en sont équipés)
D BAUTEILE DES RASENMÄHERS
1. Motorbedienung
2. Kupplungshebel
3. Griffholm
4. Grasfangbehälter
5. Deflektor
6. Drehgriff zur zentralen Schnitthöheneinstellung
7. Startergriff
8. Motorstopphebel
9. Knopf zur Höhenverstellung des Griffholms
10. Seitliche Klappe
11. Geschzindigkeitsregelung (nur in den
damit ausgerüsteten Modellen)
12. Elektr. Startschüssel (nur in den damit
ausgerüsteten Modellen)
E COMPONENTES DE EL CORTACESPED
1. Mando acelerador
2. Palanca embrague
3. Manillar
4. Bolsa recogedora
5. Deflector
6. Regul. altura de corte
7. Tirador de arranque
8. Palanca parada motor
9. Regulador altura manillar
10. Tapa lateral
11. Mando velocidad (solo en los modelos que
lo incluyen)
12. Llave arranque eléctrico (solo en los
modelos que lo incluyen)
SK ČASTI KOSAČKY
1. Páčka plynu
2. Páka pojazdu
3. Rukoväť
4. Zberný kôš trávy
5. Zadný kryt
6. Páčky nastavenia výšky kosenia
7. Rukoväť štartovacieho lanka
8. Páčka brzdy motora
9. Nastavenie výšky rukoväte
10. Bočný kryt
11. Páčka nastavenia rýchlostí (iba pri
modeloch, kde je k dispozícii)
12. Lanko meniča (iba pri modeloch, kde je k
dispozícii)

NOTE:
7
1234
Italiano
NORME DI SICUREZZA
ATTENZIONE - La macchina, se ben usata, è uno
strumento di lavoro rapido, comodo ed efficace;
se usata in modo non corretto o senza le dovute
precauzioni potrebbe diventare un attrezzo
pericoloso. Perchè il vostro lavoro sia sempre
piacevole e sicuro, rispettare scrupolosamente le
norme di sicurezza riportate qui di seguito e nel
corso del manuale.
ATTENZIONE: Il sistema di accensione della vostra
unità, produce un campo elettromagnetico di
intensità molto bassa. Questo campo può interferire
con alcuni pacemaker. Per ridurre il rischio di
lesioni gravi o mortali, le persone con pacemaker
dovrebbero consultare il proprio medico e il
costruttore del pacemaker prima di utilizzare questa
macchina.
ATTENZIONE! – Regolamenti nazionali possono
limitare l’uso della macchina.
CAUTELA – Leggere il manuale del motore allegato.
Contiene informazioni importanti.
1. Leggere attentamente e seguire le istruzioni scritte sulle
etichette fissate sulla macchina (vedi pag. 4).
2. Assicurarsi che nessuno, in particolare bambini, si trovi
nel raggio d'azione del rasaerba (Fig. 1).
3. Non lasciare usare il rasaerba a persone che non hanno
nè l'età, nè l'esperienza, nè la forza fisica necessaria o
dopo avere assunto alcool, droghe o farmaci (Fig. 2).
4. Non avvicinare mani o piedi al carter della lama mentre
il motore è avviato (Fig. 3).
5. Pensate sempre alla Vs. sicurezza e vestiteVi di
conseguenza. Mettete sempre scarpe robuste, mai
sandali. Indossate sempre occhiali protettivi o altre
protezioni per gli occhi prima di iniziare a lavorare.
Quando si utilizza il rasaerba, indossare sempre calzoni
lunghi (vedi pag. 14-15).
6. Rendersi ben conto di come si utilizza il rasaerba, dei
suoi comandi e in special modo di come si possa fermare
in caso di necessità urgente.
7. Assicurarsi sempre che tutti i bulloni, i dadi e le viti del
rasaerba siano ben serrati (Fig. 4).
8. Usare il rasaerba soltanto dopo essersi assicurati
che tutti gli elementi di sicurezza e protezione siano
correttamente montati.
9. Fermare il motore prima di lasciare il rasaerba e
assicurarsi che tutti gli organi in movimento si siano
fermati.
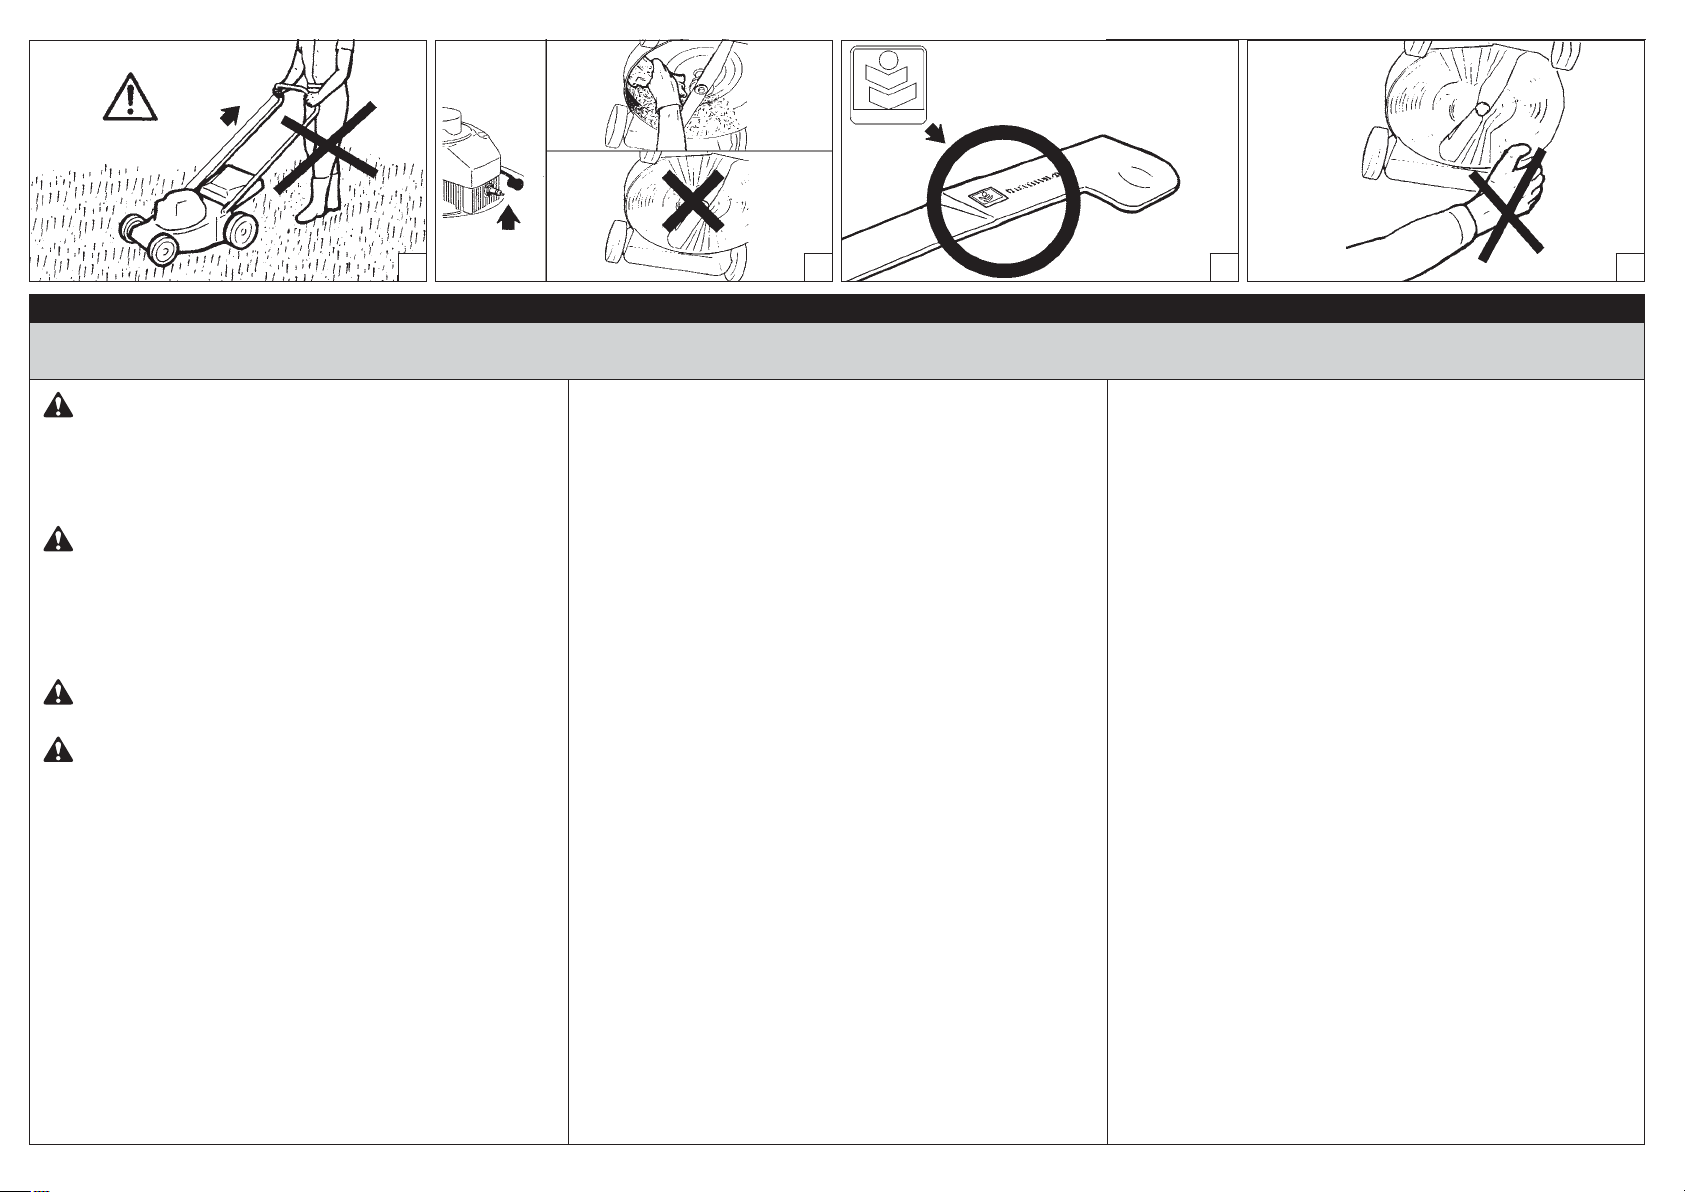
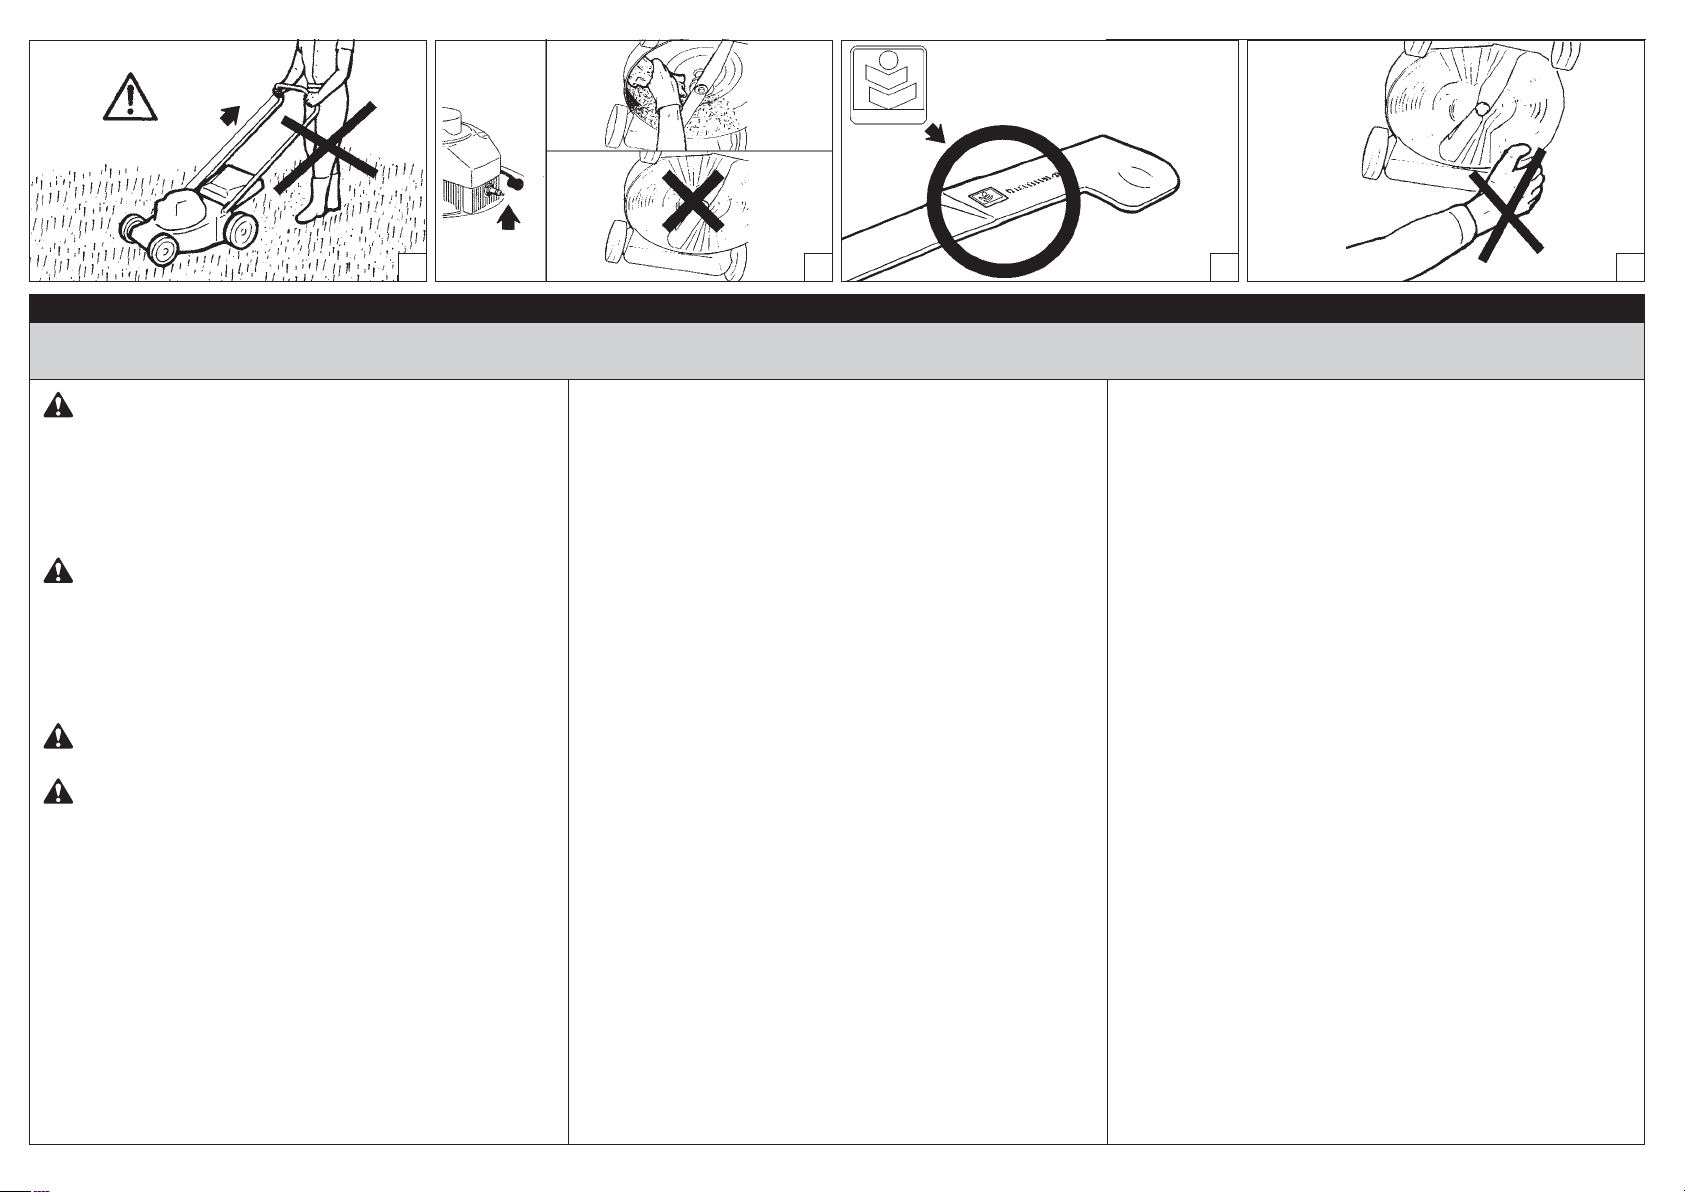
10. Non bloccare mai il deflettore posteriore in posizione
sollevata (Fig.5).
11. Se lasciate il rasaerba senza sorveglianza, fermate il
motore e mettetelo in un luogo pianeggiante.
12. Leggi locali possono limitare l’età dell’operatore e l’uso
della macchina in particolari condizioni.
13. Ricordare che il proprietario o l’operatore è responsabile
degli incidenti o dei rischi subiti da terzi o da beni di loro
proprietà.
14. Fermare il motore e scollegare la candela: ogni
qualvolta si abbandona la macchina, prima di eliminare
intasamenti della lama o dello scarico, se si toglie il
sacco, prima di effettuare qualsiasi pulizia o riparazione,
se il rasaerba inizia a vibrare in modo anomalo
(controllare immediatamente) e dopo l’urto di un
oggetto estraneo. Verificare se il rasaerba è danneggiato
e fare le riparazioni del caso prima di avviarlo e utilizzarlo
(Fig. 6).
15. Assicurarsi che siano utilizzati solo dispositivi di taglio
originali (Fig. 7).
16. Prima dell’utilizzo, ispezionare sempre visivamente la
lama, il bullone della lama e che l’assieme dell’apparato
di taglio non sia logoro o danneggiato.
17. Mantenere tutte le etichette con i segnali di pericolo
e di sicurezza in perfette condizioni. In caso di
danneggiamenti o deterioramenti occorre sostituirle
tempestivamente (Vedi pag. 4).
18. Non utilizzare la macchina per usi diversi da quelli
indicati dal manuale (vedi pag. 34).
19. Seguire sempre le nostre istruzioni per le operazioni di
manutenzione.
20. Non lavorare con una macchina danneggiata, mal
riparata, mal montata o modificata arbitrariamente.
Non togliere o danneggiare o rendere inefficace alcun
dispositivo di sicurezza.
21. Non effettuare mai da soli operazioni o riparazioni che
non siano di normale manutenzione. Rivolgersi soltanto
ad officine specializzate ed autorizzate.
22. In caso di necessità della messa fuori servizio della
macchina, non abbandonarla nell’ambiente, ma
consegnarla al Rivenditore che provvederà alla corretta
collocazione.
23. Consegnate o prestate la macchina soltanto a persone
esperte e a conoscenza del funzionamento e del corretto
utilizzo della macchina. Consegnate anche il Manuale
con le istruzioni d’uso, da leggere prima di iniziare il
lavoro.
24. Rivolgetevi sempre al vostro Rivenditore per qualsiasi
altro chiarimento o intervento prioritario.
25. Conservare con cura il seguente Manuale e consultarlo
prima di ogni utilizzo della macchina.
26. Questo dispositivo non è destinato per essere utilizzato
da persone (compresi i bambini) con ridotte capacità
fisiche, sensoriali o mentali, o mancanti d’esperienza
e conoscenza, a meno che siano stati supervisionati
o istruiti circa l’utilizzo del dispositivo da una persona
responsabile per la loro sicurezza. I bambini dovranno
essere supervisionati per garantire che non giochino con
il dispositivo.
27. Non toccate mai le parti in movimento o calde, come la
marmitta (Fig. 8).
8
5678
English
SAFETY PRECAUTIONS
WARNING - The machine, when used correctly, is
a useful and effective tool; if used improperly or
without the due precautions it could become a
dangerous tool. For pleasant and safe work,always
strictly comply with the safety rules that follow and
throughout this manual.
WARNING: The ignition system of your machine
produces an electromagnetic field of very low
intensity. This field could interfere with certain
pacemakers. To reduce the risk of serious or fatal
injury, persons with pacemakers should consult their
doctor or the manufacturer of the pacemaker before
using this machine.
WARNING: – National regulations could limit use of
the machine.
CAUTION – Read the attached engine handbook.
Contains important information.
1. Carefully read and follow the instructions printed on the
labels fixed to the machine (Look page 4).
2. Keep bystanders, particularly children and pets away
from the mowing area (Fig. 1).
3. Do not allow any inexperienced or under age persons,
or those who may not possess sufficient strength, to
operate the mower or if you have taken alcohol, drugs,
or medication (Fig. 2).
4. When the engine is running, do not put hands or feet
near or under the mower deck (Fig. 3).
5. Always think about safety and dress accordingly. Wear
only tough shoes when mowing, never sandals. Always
put on safety glasses or eye protection before starting
to work. Always wear long trousers when mowing
(Look pages 14-15).
6. Familiarize yourself thoroughly with the controls and the
proper use of the mower, before using it, especially on
how to stop it in case of urgent need.
7. Maker certain that all nuts, bolts and screws are securely
tightened (Fig. 4).
8. Start mowing only after having checked that all the
safety systems are fitted and operating correctly.
9. Before leaving the mower, stop the engine and make
sure that all rotating parts have stopped moving.
10. Never lock the rear deflector in the raised position
(Fig.5).
11. If the mower is left unattended, stop the engine and
park it on level ground.
12. Local by-laws may place restrictions on the age of
the operator and the use of the machine in certain
conditions.
13. Please note that the owner or the user is responsible
for any accidents or damage to third parties or their
property.
14. Always stop the engine and disconnect the spark plug
lead: whenever the machine is left unattended; before
clearing obstructions from the blade or the outlet;
when removing the grass bag; before commencing
any cleaning or repair operation; if the machine starts
vibrating abnormally (inspect immediately), or after
striking an obstacle. Following any impact, check for
possible damage and ensure the necessary repairs are
carried out before starting and operating the machine
again (Fig. 6).
15. Ensure that only replacement cutting means of the right
type are used (Fig. 7).
16. Before operating the machine, always check that the
blade, blade bolt and cutter assembly are not worn or
damaged.
17. All labels with health hazards must be kept in good
conditions. In case of damage or deterioration,
immediately substitute them (see pag.4).
18. Do not utilize the machine for uses different from the
ones specified in the manual (see pag. 34).
19. Always follow the manufacturer’s instructions for the
maintenance operations.
20. Do not use a machine that has been damaged, badly
repaired, improperly assembled or modified. Do not
remove, damage or disactivate any of the safety devices.
21. Never carry out operations or repairs on your own that
are other than routine maintenance. Call specialised and
authorised workshops only.
22. When the machine is at the end of its useful life, do not
simply dump it; either return it to the dealer or take it to
a waste collection and recycling centre.
23. Only experienced persons who are familiar with the
operation and safe use of this machine should use it.
Give other users the manual with operating instructions,
which they should read before using.
24. All service, other than the operations shown in the
present manual, should be performed by competent
personnel.
25. Keep this manual on hand and consult it before each use
of the tool.
26. This appliance is not intended for use by persons
(including children) with reduced physical, sensory
or mental capabilities, or lack of experience and
knowledge, unless they have been given supervision
or instruction concerning use of the appliance by a
persons responsible for their safety. Children should be
supervised to censure that they do not play with the
appliance.
27. Never touch hot parts, like the silencer, or moving parts
(Fig. 8).
9

1234
Français
NORMES DE SECURITE
ATTENTION - Si vous utilisez correctement la
machine, vous aurez un instrument de travail rapide,
pratique et efficace; utilisé de façon non correcte
ou sans adopter les précautions nécessaires, cet
instrument pourrait s’avérer dangereux. Pour que
votre travail soit toujours agréable et sûr, respectez
scrupuleusement les mesures de sécurité reportées
ici et au cours du manuel.
ATTENTION : Le système de mise en marche de l'unité
produit un champ électromagnétique de très basse
intensité. Ce champ peut créer des interférences
avec certains pacemakers. Pour réduire le risque
de lésions graves ou mortelles, les porteurs de
pacemaker devraient consulter leur médecin et
le fabricant du pacemaker avant d'utiliser cette
machine.
ATTENTION ! – Certains règlements nationaux
pourraient limiter l'utilisation de la machine.
ATTENTION – Lire le manuel du moteur en annexe. Il
contient des informations importantes.
1. Lire attentivement et suivre les instructions données sur
les étiquettes fixées sur la machine (Voir page 4).
2. S'assurer qu'aucune personne, et en particulier de jeunes
enfants, ne se trouve sur l'aire à tondre (Fig. 1).
3. Ne pas laisser utiliser la tondeuse par des enfants qui
n'auraient pas l'âge, l'expérience ou la force physique
nécessaires ou sous l’influence de l’alcool, de drogues ou
de médicaments (Fig. 2).
4. Ne pas placer les mains ou les pieds à proximité du
carter de lame lorsque le moteur est en marche (Fig. 3).
5. Penser sans cesse à la sécurité et s'habiller
convenablement lors de l'utilisation de la tondeuse.
Toujours porter des chaussures fermées, jamais de
sandales. Toujours porter des lunettes de sécurité ou
d’autres protections pour les yeux avant de commencer
à travailler. Toujours porter des pantalons longs pour
utiliser la tondeuse (Voir pages 14-15).
6. Se familiariser avec la méthode d'utilisation, en
particulier avec la manière d'arrêter la machine en cas
d'urgence.
7. Toujours s’assurer que les boulons, écrous et vis sont
serrés correctement (Fig. 4).
8. La mise en service de la machine doit être faite
après avoir vérifié que les éléments de sécurité et de
protection sont correctement montés.
9. Arrêter le moteur avant de quitter la tondeuse et
s'assurer que la lame et tout outre élément sont arrêtés.
10. Ne jamais bloquer le déflecteur arrière s'il est soulevé
(Fig.5).
11. Arrêter le moteur et placer la machine dans un endroit
plat lorsqu'elle est laissée sans surveillance.
12. Lois locales peuvent limiter l’age de l'opérateur et
l’usage de la machine dans des particulieres conditions.
13. Se rappeler que le propriétaire ou l’opérateur sont
responsables des accidents ou des dommages à tiers,
aux biens de leur propriété.
14. Arrêter le moteur et débrancher la bougie : chaque fois
que l’on quitte la machine, avant d’éliminer ce qui gêne
la lame ou l’échappement, pour retirer le panier, avant
toute opération de nettoyage ou de réparation, si la
tondeuse commence à vibrer d’une façon anormale
(contrôler immédiatement) et après la collision avec un
corps étranger. Vérifier si la tondeuse est endommagée
et la réparer avant de la mettre en marche et de l’utiliser
(Fig. 6).
15. S’assurer que soient utilisé seulement dispositifs de
taillage originaux (Fig. 7).
16. Avant d’utiliser la tondeuse, contrôler la lame et le
boulon de la lame et vérifier si l’ensemble du groupe de
coupe est endommagé ou usé.
17. Veillez à ce que les étiquettes portant les signaux de
danger et de sécurité soient toujours en parfait état.
Si elles sont détériorées, remplacez-les sans délai
(voir pag.4).
18. N'utilisez pas la tronçonneuse dans un but autre que
ceux indiqués dans le manuel (voir pag. 34).
19. Suivez toujours nos instructions pour les opérations
d’entretien.
20. Ne travaillez pas avec une machine endommagée, mal
réparée, mal montée ou modifiée arbitrairement. Évitez
d'enlever, de détériorer ou de neutraliser les dispositifs
de sécurité. Utilisez uniquement des guides de la
longueur indiquée dans le tableau.
21. N’effectuez jamais par vous-mêmes des opérations ou
des réparations qui ne sont pas d’entretien normal.
Adressez-vous seulement à des ateliers spécialisés et
autorisés.
22. Si votre machine ne marche plus, ne l'abandonnez pas
dans la nature ! Appelez votre revendeur habituel, qui
saura résoudre la situation.
23. Ne prêtez votre machine qu’à des personnes expertes
qui sachent la faire fonctionner correctement. Donnezleur aussi le manuel avec le mode d’emploi à lire avant
de commencer à travailler.
24. S’adresser a un revendeur pour toutes autres demandes
ou pour une intervention prioritaire.
25. Conservez ce manuel soigneusement et consultez-le à
chaque foisque vous devrez utiliser la machine.
26. Cet appareil n’est pas destiné à être utilisé par des
personnes (enfants compris) atteintes de déficiences
physiques, sensorielles ou mentales, ayant une
expérience et des connaissances insuffisantes, sauf si
placées sous surveillance ou instruites sur l’utilisation de
l’appareil par une personne responsable de leur sécurité.
Les enfants doivent être surveillés afin de s’assurer qu’ils
ne jouent pas avec l’appareil.
27. Ne pas toucher les pièces chaudes, comme le pot
d'échappement, ni les pièces rotatives (Fig. 8).
10
5678
Deutsch
SICHERHEITSVORKERUNGEN
ACHTUNG - Bei richtigem Einsatz ist die Maschine
ein schnelles, praktisches und leistungsfähiges
Arbeitsgerät; falls Sie sie falsch oder ohne die
nötige Vorsicht einsetzen, kann sie zu einer Gefahr
werden. Beachten Sie bitte daher unbedingt die
Sicherheitsvorschriften die Sie nachstehend in der
Betriebsanleitung finden, damit ihre Arbeit immer
angenehm und sicher ist.
ACHTUNG: Das Zündsystem Ihres Geräts erzeugt ein
elektromagnetisches Feld geringer Stärke. Dieses
Feld kann unter Umständen Herzschrittmacher
beeinflussen. Um die Gefahr ernster oder gar
tödlicher Unfälle zu reduzieren, sollten Personen mit
Herzschrittmachern vor Benutzung dieser Maschine
ihren Arzt und den Hersteller des Herzschrittmachers
zu Rate ziehen.
ACHTUNG! – Nationale Verordnungen können den
Gebrauch des Geräts einschränken.
WARNUNG – Lesen die anliegende Betriebsanleitung
des Motors. Sie enthält wichtige Informationen.
1. Lesen und befolgen Sie genauestens die Anweisungen auf
den Aufklebern und auf dem Gerät (Siehe seite 4).
2. Vergewissern Sie sich, dass sich niemand, insbesondere
keine Kinder, in der Reichweite des Rasenmähers aufhält
(Abb. 1).
3. Erlauben Sie keinen unerfahrenen oder minderjährigen
Personen, oder Personen, die nicht die nötige körperliche
Kraft besitzen, den Mäher zu bedienen nicht unter
dem Einfluß von Aikohol, Drogen oder Medikamenten
(Abb. 2).
4. Wenn der Motor läuft, Hände und Füße vom Mähwerkzeug
fernhalten (Abb. 3).
5. Denken Sie immer an Ihre Sicherheit und kleiden Sie
sich dementsprechend. Tragen Sie festes Schuhwerk
beim Mähen, niemals Sandalen. Tragen Sie immer eine
Sicherheitsbrille oder Augenschutz, bevor Sie zu arbeiten
beginnen.Tragen Sie zum Rasenmähen immer lange
Hosen (Siehe seite 14-15).
6. Machen Sie sich vertraut mit den Bedienungshebeln
und dem Gebrauch des Mähers, bevor Sie ihn benutzen,
speziell, wie man ihn im Notfall stoppt.
7. Überzeugen Sie sich, dass alle Bolzen, Muttern und
Schrauben fest angezogen sind (Abb. 4).
8. Beginnen Sie erst zu mähen, nachdem Sie geprüft haben,
ob alle Sicherheitssysteme in Ordnung und korrekt
montiert sind.
9. Stellen Sie den Motor ab, bevor Sie den Mäher stehen
lassen und stellen Sie sicher, dass alle rotierenden Teile
still stehen.
10. Belassen Sie den Deflektor niemals in angehobener
Position (Abb.5).
11. Wenn Sie den Mäher unbeaufsichtigt lassen, stellen Sie
den Motor ab und stellen Sie den Mäher auf einer ebenen
Fläche ab.
12. Ör tliche Vorschriften können das Alter der
Bedienungsperson und die Benutzung der Maschine
unter bestimmten Bedingungen einschränken.
13. Der Besitzer bzw. Bediener ist in jedem Fall für die
Unfälle oder Risiken gegenüber Dritten oder deren Besitz
verantwortlich.
14. Schalten Sie den Motor ab und unterbrechen Sie den
Kerzenkontakt immer: wenn die Arbeit beendet ist, bevor
Sie das Messer oder den Auswurf von Verstopfungen
befreien, bevor Sie den Grasfangsack abnehmen, vor
jeder Reinigung und Reparatur, wenn der Rasenmäher
beginnt, auf ungewöhnliche Weise zu vibrieren (sofort
kontrollieren), und nach Zusammenstoß mit einem
Fremdkörper. Prüfen Sie den Rasenmäher auf Schäden
und reparieren Sie ihn gegebenenfalls vor erneutem
Gebrauch (Abb. 6).
15. Verwenden Sie ausschließlich Originalschneidwerkzeuge
(Abb. 7).
16. Vor jedem Gebrauch muss das Messer und die Mutter
des Messers inspiziert, und kontrollieren werden, ob das
Schneidwerk abgenutzt oder beschädigt ist.
17. Sämtliche Schilder mit den Gefahrensymbolen und
Sicherheitszeichen müssen sich in einwandfreiem Zustand
befinden. Bei Beschädigung oder Unleserlichkeit müssen
sie rechtzeitig ersetzt werden (siehe Seite 4).
18. Das Gerät darf ausschließlich für die in der
Betriebsanleitung angegebenen Zwecke verwendet
werden (siehe seite 35).
19. Folgen Sie bei den Wartungsarbeiten stets unseren
Anweisungen.
20. Arbeiten Sie nicht mit einer beschädigten, behelfsweise
reparierten, falsch montierten oder eigenmächtig
umgerüsteten Maschine. Entfernen, beschädigen oder
ändern Sie nie die Schutzvorrichtungen.
21. Nehmen Sie nie alleine Reparaturen oder Arbeiten vor, die
nicht zur normalen Wartung gehören. Wenden Sie sich
ausschließlich an spezialisierte Vertragswerkstätten.
22. Lassen Sie stillgelegte Maschinen unbedingt durch den
Fachhändler oder eine Wertstoffstelle umweltgerecht
entsorgen.
23. Geben bzw. borgen Sie die Maschine nur Personen, die
über Funktionsweise und Gebrauch genau informiert
sind. Geben Sie den Benutzern der trennschleifer stets
die Gebrauchsanweisung, die vor Arbeitsbeginn gelesen
werden sollte.
24. Wenden Sie sich für weitere Auskünfte stets an Ihren
Fachhändler.
25. Bewahren Sie dieses Handbuch sorgfältig auf und lesen
Sie es vor jeder Inbetriebnahme der Maschine.
26. Dieses Gerät ist nicht dafür bestimmt, durch Personen
(einschließlich Kinder) mit eingeschränkten physischen,
sensorischen oder geistigen Fähigkeiten oder mangels
Erfahrung und/oder mangels Wissen benutzt zu werden,
es sei denn, sie werden durch eine für ihre Sicherheit
zuständige Person beaufsichtigt oder erhielten von ihr
Anweisungen, wie das Gerät zu benutzen ist. Kinder
sollten beaufsichtigt werden, um sicherzustellen, dass sie
nicht mit dem Gerät spielen.
27. Berühren Sie nie heiße Teile wie Schalldämpfer oder sich
bewegende Teile (Abb. 8).
11
1234
Español
NORMAS DE SEGURIDAD
ATENCION - Si se utiliza correctamente, la máquina
es un instrumento de trabajo rápido, cómodo y
eficaz; si se usa incorrectamente o sin las debidas
precauciones puede convertirse en un instrumento
peligroso. Para que su trabajo sea siempre agradable
y seguro, respete escrupulosamente las normas de
seguridad indicadas a continuación en el presente
manual.
ATENCIÓN: El sistema de encendido de su unidad
produce un campo electromagnético de muy baja
intensidad. Este campo puede interferir con algunos
marcapasos. Para reducir el riesgo de lesiones graves
o mortales, las personas con marcapasos deberían
consultar a su médico y al fabricante del marcapasos
antes de utilizar esta máquina.
¡ATENCIÓN! – El uso de la máquina puede estar
limitado por reglamentos nacionales.
PRECAUCIÓN – Lea el manual del motor que se
adjunta. Contiene información importante.
1. Leer atentamente y respetar las instrucciones que
figuran en las etiquetas aplicadas a la máquina
(Vea pág 4).
2. Asegurarse de que nadie, en particular los niños, se
encuentre en la zona donde se va a cortar el césped
(Fig. 1).
3. No dejar utilizar el cortacésped a personas que no
tengan la edad apropiada y la experiencia o la fuerza
física necesaria o se encuentre bajo el efecto de alcohol,
drogas o medicación (Fig. 2).
4. No acercar las manos o los pies a la protección de la
cuchilla hasta que el motor esté parado (Fig. 3).
5. Pensar siempre en la seguridad y vestirse
convenientemente para la utilización del cortacésped.
Llevar siempre zapatos gruesos y cerrados, nunca
sandalias. Ponerse siempre gafas de seguridad u
otras protecciones en los ojos antes de comenzar a
trabajar. Cuando se utilice el cortacésped, llevar siempre
pantalones largos (Vea pág 14-15).
6. Familiarizarse con las instrucciones de uso, en particular
con la norma de parar la máquina en caso de urgencia.
7. Asegurarse de que todos los tornillos y tuercas del
cortacésped estén bien apretados (Fig. 4).
8. Antes de utilizar el cortacésped, comprobar que
todos los elementos de seguridad y protección estén
correctamente montados.
9. Antes de alejarse del cortacésped, parar el motor y
asegurarse de que todos los elementos móviles se
hayan detenido.
10. No bloquear nunca el deflector trasero en la posición
elevada (Fig. 5).
11. Antes de dejar el cortacésped sin vigilancia, parar el
motor y dejar la máquina en un lugar llano.
12. En algunos casos las leyes locales pueden establecer
límites para la edad del usuario y para el uso de la
máquina.
13. El propietario o el usuario es responsable de los riesgos
y accidentes sufridos por terceros y de los daños
sufridos por bienes.
14. Apagar el motor y desconectar la bujía en los siguientes
casos: cuando se deja de utilizar el cortacésped; antes
de quitar material atascado de la cuchilla o de la salida
de hierba; para quitar el saco; antes de realizar la
limpieza o efectuar reparaciones; si el cortacésped vibra
de modo anómalo (controlar de inmediato) o después
de un golpe contra cualquier objeto. Verificar si el
cortacésped se ha dañado y repararlo antes de utilizarlo
nuevamente (Fig. 6).
15. Utilizar solamente dispositivos de corte originales
(Fig. 7).
16. Antes de utilizar el cortacésped, revisar visualmente la
cuchilla y su perno, y comprobar que ninguna pieza de
la máquina esté desgastada o dañada
17. Mantenga todas las etiquetas con las señales de peligro
y seguridad en perfectas condiciones. Si alguna se
estropea, sustitúyala de inmediato (vea pag.4).
18. No utilice la máquina para una aplicación distinta de las
que se indican en el manual (vea pag. 35).
19. Seguir siempre nuestras instrucciones para las
operaciones de mantenimiento.
20. No trabajar con la máquina dañada, mal reparada, mal
montada o modificada arbitrariamente. No quite, dañe,
o vuelva ineficaz ningún dispositivo de seguridad.
21. No efectuar nunca operaciones o reparaciones que
no sean de normal mantenimiento. Dirijirse a talleres
especializados y autorizados.
22. Cuando la máquina se retire del uso, no abandonarla en
el medio ambiente sino entregarla al revendedor o a un
centro de recogida de desechos.
23. Entregar o prestar la máquina sólo a personas expertas
y conocedoras del funcionamiento y del uso correcto.
Prestar conjuntamente el manual de instrucciones de
uso, que se deberá leer antes de comenzar el trabajo.
24. Dirigirse siempre a su vendedor para cualquier otra
aclaraciòn o intervenciòn prioritaria.
25. Conservar cuidadosamente el presente manual de
instrucciones y consultarlo en cada ocasión en que la
máquina sea utilizada.
26. Este electrodoméstico no está diseñado para que lo
usen personas (incluidos niños) con discapacidad física,
sensorial o mental, o con experiencia y conocimiento
insuficientes, a menos que una persona responsable
de su seguridad les supervise o les instruya en el uso
del electrodoméstico. Es necesario vigilar a los niños
pequeños para que no jueguen con la máquina.
27. No tocar nunca las piezas en movimiento o calientes,
como el escape (Fig. 8).
12

5678
Slovensky
PRAVIDLÁ BEZPEČNOSTI
POZOR - Pri správnom používaní je stroj pohodlným
a účinným pracovným nástrojom; ak sa však používa
nesprávne alebo bez dodržiavania bezpečnostných
opatrení, mohol by sa stať nebezpečným zariadením.
Aby bola vaša práca vždy príjemná a bezpečná,
dodržujte vždy prísne bezpečnostné pravidlá, ktoré
sú uvedené v tomto návode na použitie.
POZOR: Štartovací systém jednotky produkuje
elektromagnetické pole veľmi nízkej intenzity. Toto
pole môže rušiť činnosť niektorých
kardiostimulátorov. Na zníženie rizika vážnych alebo
smrteľných poranení, by sa osoby s
kardiostimulátorom mali poradiť so svojím lekárom
a výrobcom kardiostimulátora ešte pred používaním
tohto stroja.
UPOZORNENIE! – Používanie stroja môžu
obmedzovať vnútroštátne predpisy.
UPOZORNENIE – Prečítajte si priložený návod na
použitie motora. Obsahuje dôležité informácie.
1. Pozorne si prečítajte a dodržiavajte pokyny uvedené na
štítkoch umiestnených na stroji (str. 4-5).
2. Uistite sa, že sa nikto, najmä nie deti, nenachádzajú v
blízkom okolí stroja (Obr. 1)
3. Nenechajte používať stroj osobám, ktoré nemajú
požadovaný vek, skúsenosti, alebo fyzickú silu, alebo
sú pod vplyvom alkoholu, drog, iných omamných látok
alebo liekov (Obr. 2).
4. Nepribližujte ruky alebo nohy ku krytu noža pokiaľ je
motor v chode (Obr. 3)
5. Vždy pamätajte na vlastnú bezpečnosť, a preto vždy
noste schválený pracovný ochranný odev, ktorý spĺňa
určité požiadavky. Na nohách noste vždy pevnú uzavretú
obuv. Nikdy nepracujte s naštartovaným strojom ak
máte obuté sandále, papuče, prípadne ste bosí a pod.
Vždy pred začatím práce si nasaďte ochranné okuliare
alebo inú ochranu očí. Pri používaní stroja, majte na sebe
vždy dlhé nohavice (pozri str. 14-15).
6. Preštudujte si v návode hlavne kapitoly, ako sa stroj
používa, ako sa ovláda a hlavne ako ho možno vypnúť v
prípade náhlej potreby.
7. Pred každým použitím stroja sa uistite, že všetky matice
a skrutky sú dobre utiahnuté (Obr. 4).
8. Pred použitím stroja skontrolujte či sú všetky
bezpečnostné a ochranné prvky správne namontované.
9. Pred opustením stroja vždy vypnite motor a uistite sa, že
všetky pohybujúce časti sa zastavili.
10. Nikdy žiadnym spôsobom neblokujte zadný vyhadzovací
otvor, keď je kryt vo zdvihnutej polohe (Obr.5).
11. V prípade, že necháte stroj bez dozoru, vypnite motor a
postavte ho na rovnú plochu.
12. Miestne zákony môžu stanoviť obmedzenie pre vek
osoby, ktorá chce stroj použiť alebo vymedziť špeciálne
podmienky pre použitie stroja.
13. Nezabudnite, že majiteľ alebo obsluhujúci pracovník
nesú zodpovednosť za úrazy alebo riziká pre iné osoby,
ako aj za ich majetok.
14. Motor vypnite a odpojte káblovú koncovku sviečky:
vždy, keď sa nechá stroj bez dozoru, pred odstránením
upchatia noža alebo vyhadzovacieho otvoru na trávu,
vždy keď odstránite zberný kôš, pred vykonaním
akéhokolvek čistenia alebo opravy, ak stroj začne
vibrovať neobvyklým spôsobom (neodkladne
skontrolujte), alebo po narazení na neznámy predmet.
Skontrolujte, či je stroj poškodený a pred opätovným
použitím ho opravte (Obr. 6).
15. Uistite sa a dbajte na to, aby boli vždy používané
originálne (od výrobcu) rezné nástroje (Obr. 7).
16. Pred použitím stroja vždy opticky skontrolujte nôž,
skrutku noža a celé kosiace zariadenie či nie je
opotrebované alebo poškodené.
17. Všetky štítky a nálepky s výstražnou signalizáciou
udržiavajte v čitateľnom stave. V prípade poškodenia
alebo opotrebovania ich treba včas vymeniť (str. 4).
18. Stroj nepoužívajte na iné účely ako sú uvedené v návode
(str. 35).
19. Pri údržbe vždy dodržiavajte pokyny výrobcu.
20. So strojom nepracujte, ak je poškodený, nesprávne
opravený, nesprávne zmontovaný alebo upravený
bez povolenia. V žiadnom prípade neodstraňujte,
nepoškodzujte a nevyraďujte žiadne bezpečnostné
zariadenie.
21. Okrem bežnej údržby nikdy nerobte zásahy alebo opravy
sami. Obráťte sa iba na špecializované a autorizované
servisy.
22. V prípade nevyhnutnosti vyradenia stroja ho
nevyhadzujte voľne, ale odovzdajte ho v predajni, kde
ste ho kúpili alebo v zbernom stredisku odpadov.
23. Stroj odovzdajte alebo požičiavajte len skúseným
osobám, ktoré sú oboznámené s jeho správnym
používaním. Pri odovzdaní stroja ďalšiemu používateľovi,
odovzdajte aj návod na použitie, aby si ho mohol pred
použitím stroja prečítať.
24. Všetky servisné úkony, ktoré nie sú uvedené v tomto
návode na použitie by mali byť vykonávané len v
autorizovanom servisnom stredisku.
25. Tento návod starostlivo uschovajte a pred každým
použitím stroja si ho prečítajte.
26. Tento spotrebič nie je určený pre osoby (vrátane
detí) so zníženými fyzickými, senzorickými alebo
duševnými schopnosťami alebo osoby s nedostatočnými
skúsenosťami a vedomosťami, ak nie je zabezpečený
dohľad alebo poučenie o používaní spotrebiča osobou
zodpovednou za ich bezpečnosť. Nenechávajte deti bez
dozoru, aby ste mali istotu, že sa nebudú so spotrebičom
hrať.
27. Nechytajte horúce alebo pohybujúce sa časti, ako
napríklad tlmič výfuku, alebo nôž (Obr. 8).
13

Size 41 p.n. 001001079A
Size 42 p.n. 001001080A
Size 43 p.n. 001001081A
Size 44 p.n. 001001082A
Size 45 p.n. 001001083A
1234
Italiano English Français
Size 41 p.n. 001000975B
Size 42 p.n. 001000976B
Size 43 p.n. 001000977B
Size 44 p.n. 001000978B
Size 45 p.n. 001000979B
ABBIGLIAMENTO PROTETTIVO DI SICUREZZA SAFETY PROTECTIVE CLOTHING VÊTEMENTS DE PROTECTION
Quando si lavora con il rasaerba usare sempre
un abbigliamento protettivo di sicurezza
omologato.
L’uso dell’abbigliamento protettivo non elimina
i rischi di lesione, ma riduce gli effetti del
danno in caso di incidente. Fatevi consigliare
dal vostro rivenditore di fiducia per la scelta
dell’abbigliamento adeguato.
L’abbigliamento deve essere adatto e non d’impaccio.
Indossare un abito aderente protettivo. La giacca
(Fig. 1) e la salopette (Fig. 2) di protezione sono
l’ideale.
Indossare gli stivali o le scarpe di sicurezza munite
di suole antisdrucciolo e puntali d’acciaio (Fig. 3-4).
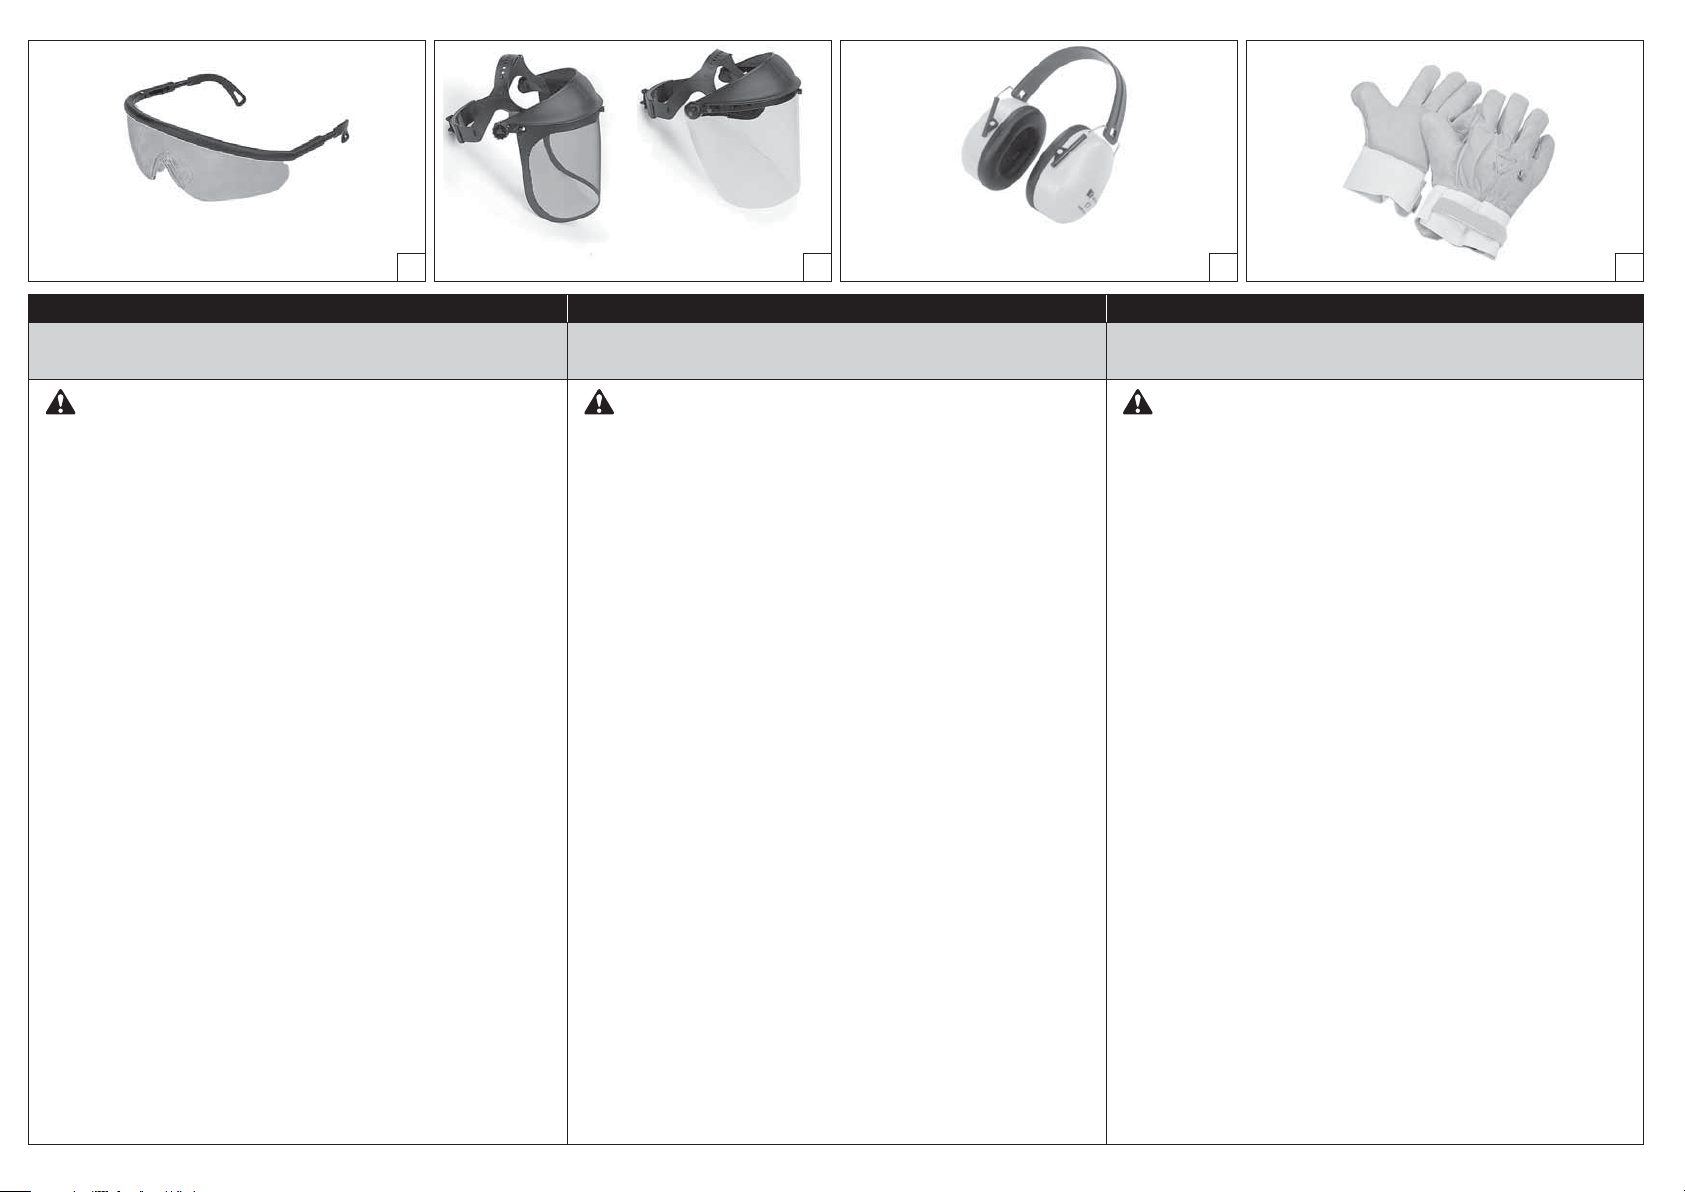
Indossare gli occhiali o la visiera protettivi
(Fig. 5-6)!
Applicare protezioni dai rumori; per esempio le
cuffie (Fig. 7) o i tappi. L’uso delle protezioni per
l’udito richiede maggior attenzione e prudenza, perché
la percezione di segnali acustici di pericolo (grida,
allarmi, ecc.) è limitata.
While working with the lawnmover, always use
safety protective approved clothing.
The use of protective clothing does not eliminate
injury risks, but reduces the injury effects in case of
accident. Consult your trusted supplier to choose
an adequate equipment.
The clothing must be proper and not an obstacle.
Wear adherent protective clothing. Protective jackets
(Fig. 1) and dungarees (Fig. 2) are ideal.
Safety boots or shoes having skid-proof sole and
anti-piercing insert (Fig. 3-4).
Wear protective goggles or face screens (Fig. 5-6)!
Use protections against noises; for example noise
reduction ear guards (Fig. 7) or earplugs. The use of
protections for the ear requests much more attention
and caution, because the perception of danger audio
signals (screamings, alarms, etc.) is limited.
Toujours porter des vêtements de protection
homologués pour utiliser une tondeuse.
Le port de vêtements de protection n’élimine pas
les risques de blessure mais il peut en réduire les
effets en cas d’accident. Demandez conseil à votre
revendeur habituel pour choisir le vêtement qui
répond le mieux à vos exigences.
Assurez-vous que le vêtement choisi ne gêne pas les
mouvements. Portez un vêtement de protection près
du corps. La veste (Fig. 1) et la salopette (Fig. 2) de
protection sont l’idéal.
Portez des bottes ou des chaussures de protection
avec semelles antiglisse et pointes en acier
(Fig. 3-4).
Portez des lunettes ou une visière de protection
(Fig. 5-6)!
Utilisez des dispositifs protégeant contre les
émissions sonores; casque (Fig. 7) ou boules dans
les oreilles. Rappelez-vous d’être extrémement
prudents lorsque vous utilisez ce genre de protection
car la perception des signaux acoustiques de danger
(cris, alarmes, etc...) est réduite.
Calzare guanti (Fig. 8) che permettano il massimo
assorbimento delle vibrazione.
14
Wear gloves (Fig. 8) that permit the maximum
absorption of vibrations.
Portez des gants (Fig.8) qui absorbent le plus
possible les vibrations.
p.n. 3155027R
Deutsch Español Slovensky
p.n. 001000939A p.n. 001000940A p.n. 001000835
5678
SICHERHEITS-/SCHUTZKLEIDUNG INDUMENTOS DE SEGURIDAD OCHRANNÝ BEZPEČNOSTNÝ ODEV
Bei der Arbeit mit dem Rasenmäßger muss
der Bediener daher immer zugelassene
Sicherheits-/Schutzkleidung tragen.
Durch die Benutzung der Schutzkleidung wird die
Verletzungsgefahr zwar nicht beseitigt, aber die
Auswirkungen des Schadens im Falle eines Unfalls
reduziert. Ihr Fachhändler berät Sie gern bei der
Wahl der richtigen Schutzkleidung.
Die Kleidung muss geeignet sein und darf die Arbeit
nicht behindern. Tragen Sie anliegende Schutzkleidung.
Die Jacke (Abb.1) und die Schutzlatzhose (Abb.2)
sind ideal.
Tragen Sie Sicherheitsstiefel oder -schuhe mit
rutschfesten Sohlen und Stahlkappen (Abb.3-4).
Benutzen Sie die Schutzbrille oder das Schutzvisier
(Abb. 5-6)!
Benutzen Sie einen Gehörschutz; zum Beispiel den
Gehörschutz mit Bügel (Abb.7) oder die
Gehörschutzstöpsel. Die Verwendung eines
Gehörschutzes erfordert erhöhte Aufmerksamkeit und
Vorsicht, denn die Wahrnehmung akustischer
Warnsignale (Rufe, Alarme usw.) wird dadurch
eingeschränkt.
Para trabajar con el cortacésped, colocarse
siempre indumentos de seguridad
homologados.
El uso de elementos de seguridad no elimina los
riesgos de lesiones pero reduce los daños en caso
de accidente. Consultar con el vendedor de la
máquina sobre los indumentos adecuados.
La ropa debe ser cumplir su función de protección y ser
cómoda. Utilizar ropa adherente y protectora. La
chaqueta (Fig. 1) y el peto (Fig. 2) son ideales.
Utilizar botas o zapatos de seguridad con suela
antideslizante y punteras de acero (Figs. 3 y 4).
Colocarse gafas o una visera de protección
(Figs. 5 y 6).
Emplear elementos de protección contra el ruido,
como auriculares (Fig. 7) o tapones. El uso de las
protecciones para el oído exige mayor atención y
prudencia porque se reduce la percepción de las
señales sonoras de peligro (gritos, alarmas, etc.).
Pri práci so strojom vÏdy používajte
schválen˘ ochrann˘ bezpeãnostn˘ odev.
PouÏitie ochranného obleãenia nevyluãuje
riziko zranenia úplne, ale v prípade úrazu zníži
jeho následky. Pri výbere pracovného oblečenia sa
poraďte s vaším predajcom.
Pracovný odev musí byť vhodný k danej práci, musí
byť pohodlný a nesmie obmedzovať v pohybe. Noste
priliehav˘ ochrann˘ odev. Ochranná bunda (Obr. 1)
a montérky (Obr. 2) sú ideálne.
Noste ochranné čižmy alebo topánky vybavené
proti‰mykovou podráÏkou a oceľovou ‰picou
(Obr. 3-4).
Používajte ochranné okuliare alebo ochranný štít
tváre (Obr. 5-6)!
Používajte chrániče proti hluku; napríklad slúchadlá
(Obr. 7) alebo ušné tampóny. Používanie chráničov
sluchu vyžaduje zvýšenú pozornosť a opatrnosť,
pretože sa obmedzí vnímanie výstražných zvukových
signálov (krik, alarmy, atď.).
Tragen Sie Handschuhe (Abb.8), mit denen die
Vibrationen maximal gedämpft werden.
Utilice guantes (Fig. 8) que absorban el máximo
posible de vibraciones.
Používajte rukavice (Obr. 8), ktoré umoÏnujú
maximálne pohltenie vibrácií.
15
1234
Italiano English Français
ASSEMBLAGGIO ASSEMBLY ASSEMBLAGE
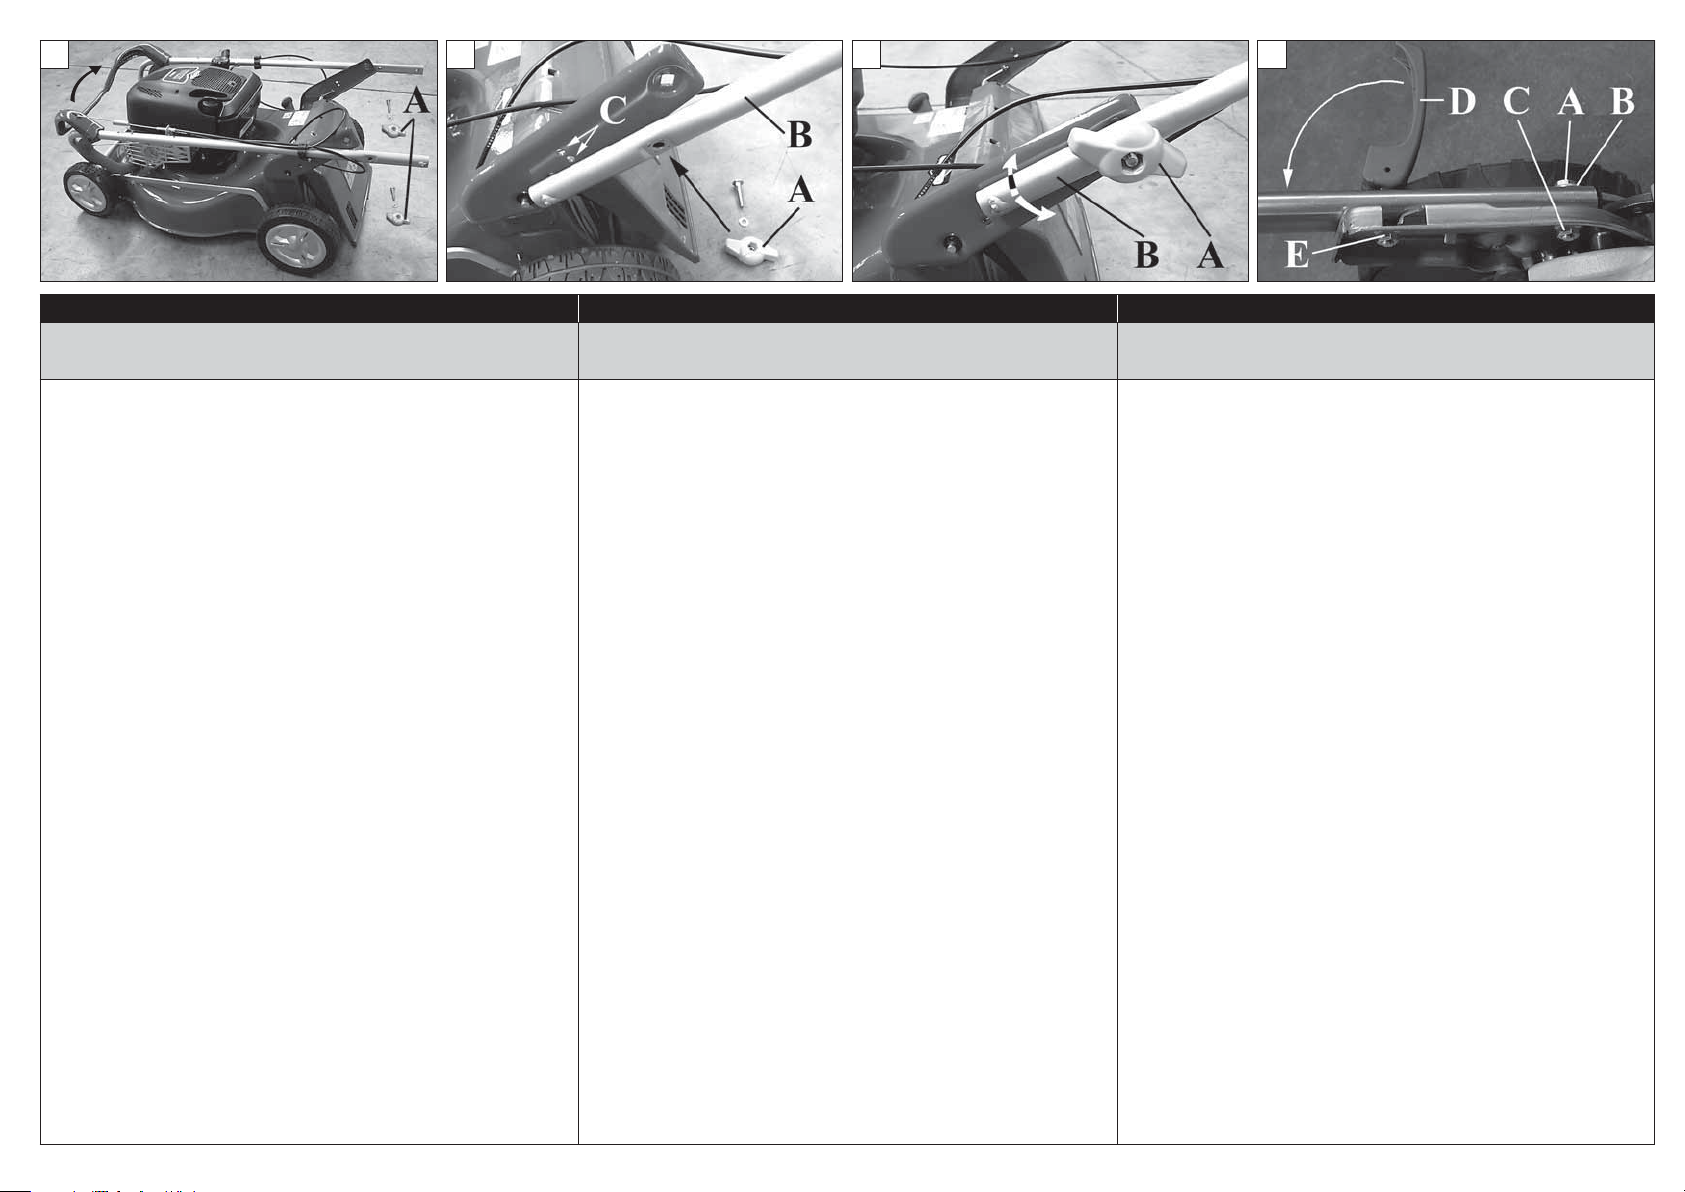
MONTAGGIO MANUBRIO ALLROAD PLUS 4 (Fig. 1-2-3)
Sollevare il manubrio come mostra la Fig. 1. Serrare i pomelli
(A, Fig. 3) dopo avere posizionato il manubrio (B) e deciso
l’altezza dello stesso, scegliendo una delle due posizioni
(C, Fig. 2).
ALTEZZA DEL MANUBRIO (Fig. 3)
Svitare i pomelli (A) ed alzare o abbasare il manubrio (B).
MONTAGGIO MANUBRIO ALLROAD EXA 4 (Fig.4-5-6)
Fissare il manubrio inferiore al telaio con le viti (A, Fig.4), le
rondelle (B) e i dadi (C). Quindi montare le maniglie (D) con i
dadi (E). Ruotare infine le maniglie (D, Fig.4-5) per serrare il
manubrio. Il serraggio maggiore o minore dei dadi (E)
cambia la forza del bloccaccio. È possibile liberare il
manubrio dal telaio per poterlo ruotare e facilitare il
trasporto e il rimessaggio (Fig.7).
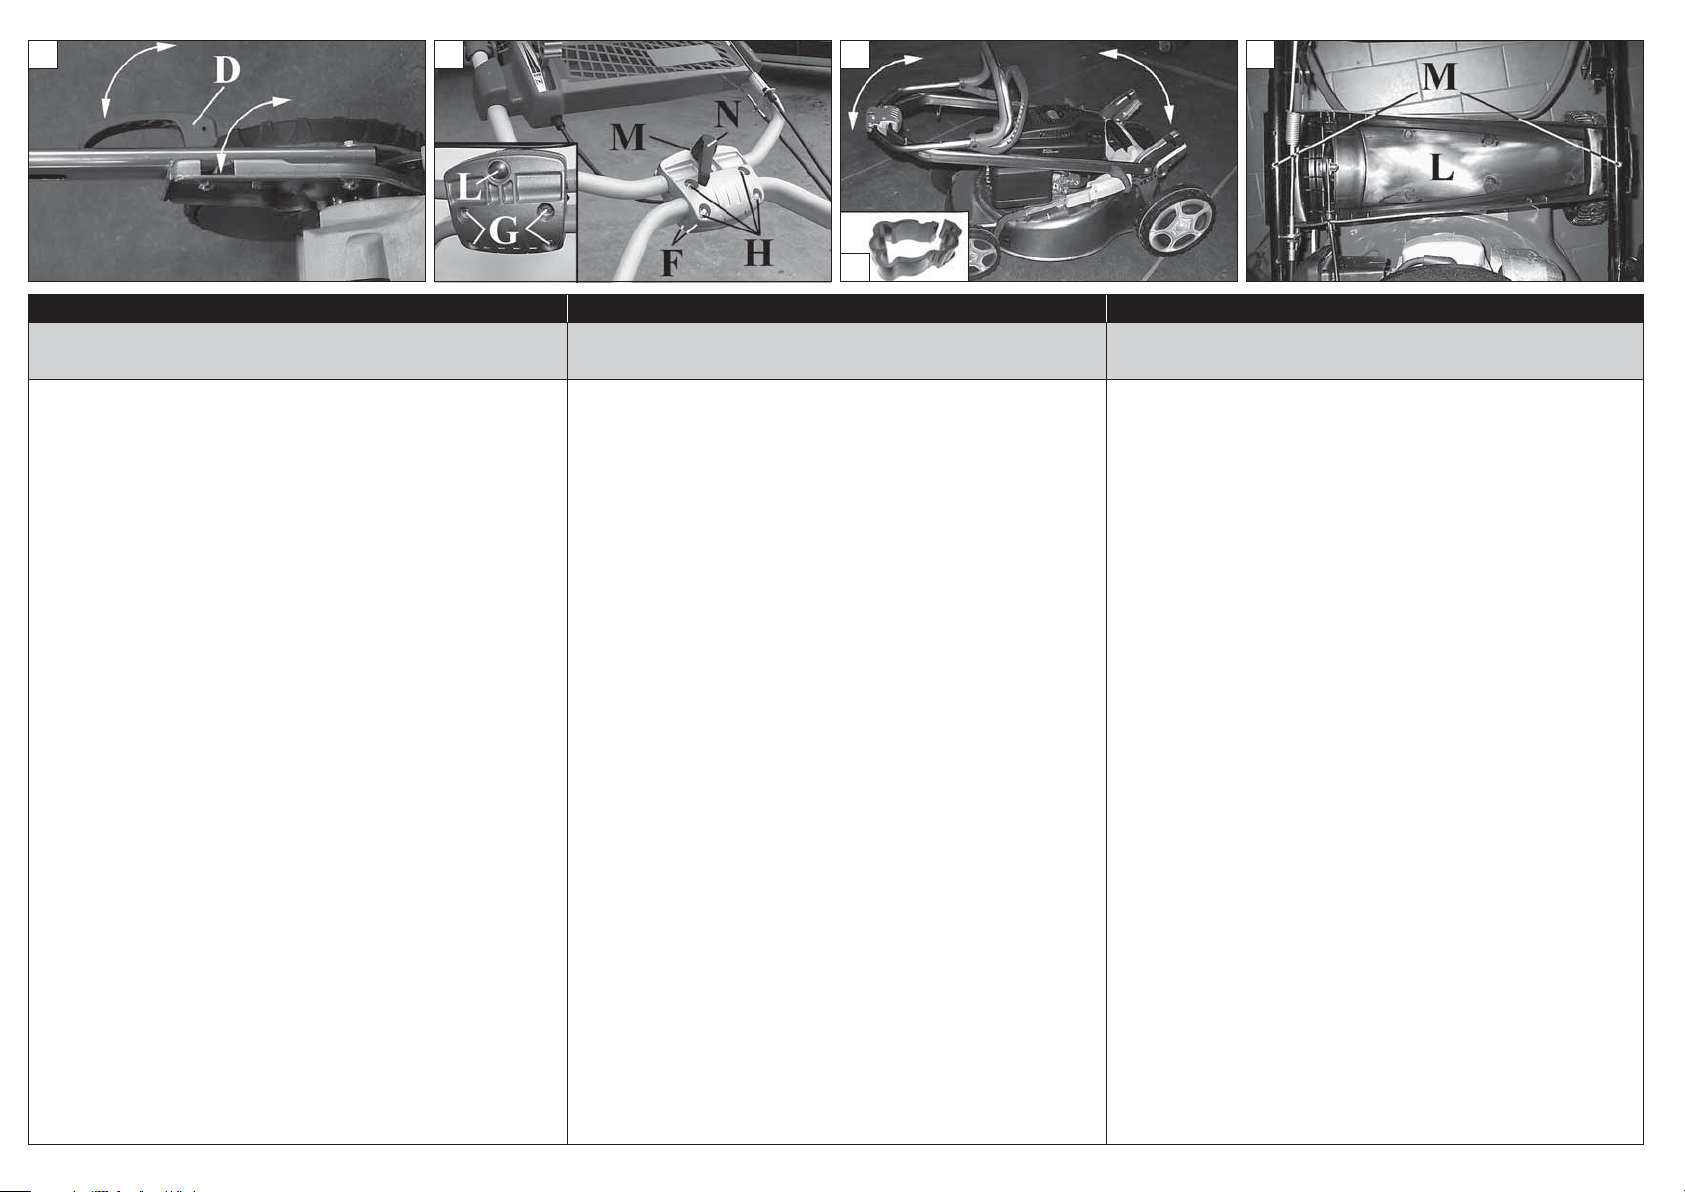
Fissare poi la parte superiore del manubrio, assemblando i
due semigusci del supporto (F, Fig.6) con le quattro viti (G) e i
quattro dadi (H). Montare la vite (L), la rondella (M) e la leva
(N). Ruotando la leva (N) per allentare il serraggio è possibile
regolare il manubrio in altezza; inoltre è possibile ruotare la
parte superiore del manubrio per facilitare il trasporto e il
rimessaggio (Fig.7).
MONTAGGIO DELLA PLANCIA (Fig. 8)
Montare la plancia (L) tramite le due viti (M) (solo nei modelli
che ne sono provvisti).
FASCETTE
Bloccare i cavi sul manubrio con le apposite fascette (Fig.7A).
FIXING HANDLE ALLROAD PLUS 4 (Fig. 1-2-3)
Lift the handle as in Fig. 1. Tighten the knobs (A, Fig. 3) after
positioning the handle (B) at the correct height. Choose one
of the two positions (C, Fig. 2).
HANDLE HEIGHT ADJUSTMENT (Fig. 3)
Unscrew knobs (A) and lift or lower the handle (B).
INSTALLING ALLROAD EXA 4 HANDLEBAR (Fig.4-5-6)
Mount lower handlebar to frame with screws (A, Fig.4),
washers (B) and nuts (C). Then fit handles (D) with nuts (E).
Finally, rotate handles (D, Fig.4-5) to secure handlebar. The
clamping force exerted can be adjusted by tightening or
loosening nuts (E). The handlebar can be released from the
frame in order to fold it for easy transport and storage (Fig.7).
Mount upper part of handlebar, assembling two halves of
support (F, Fig.6) with four screws (G) and four nuts (H). Fit
screw (L), washer (M) and lever (N). Rotate lever (N) to release
handlebar in order to adjust height; also, you can rotate
upper handlebar to facilitate lawnmower transport and
storage (Fig.7).
FIXING CONTROL PANEL (Fig. 8)
Fix the control panel (L) with the two screws (M) (only on
models that are so equipped).
TIES
Secure the cables to the handle with the supplied ties
(Fig.7A).
ASSEMBLAGE DU GUIDON ALLROAD PLUS 4 (Fig. 1-2-3)
Soulever le guidon comme indiqué par la Fig. 1. Serrer les
pommeaux (A, Fig. 3) après avoir positionné le guidon (B) et
décidé l’hauteur du même, en choisissant une des deux
positions (C, Fig. 2).
HAUTEUR DU GUIDON (Fig. 3)
Dévisser les pommeaux (A). Lever ou baisser le guidon (B).
MONTAGE DU GUIDON ALLROAD EXA 4 (Fig.4-5-6)
Fixer le guidon inférieur sur le châssis à l'aide des vis
(A, Fig.4), des rondelles (B) et des écrous (C). Monter les
poignées (D) à l'aide des écrous (E). Tourner les poignées
(D, Fig.4-5) pour serrer le guidon. La force du blocage change
selon que les écrous (E) seront plus ou moins serrés. Il est
possible de dégager le guidon du châssis pour pouvoir le
tourner et faciliter le transport et le remisage (Fig.7).
Fixer ensuite la partie supérieure du guidon en assemblant
les deux demi-coques du support (F, Fig.6) à l'aide des quatre
vis (G) et des quatre écrous (H). Monter la vis (L), la rondelle
(M) et le levier (N). Desserrer le levier (N) en tournant pour
régler la hauteur du guidon ; il est également possible de
tourner la partie supérieure du guidon pour faciliter le
transport et le remisage (Fig.7).
MONTAGE DE LA PLANCHE (Fig. 8)
Monter la planche (L) à l’aide des deux vis (M) (uniquement
pour les modèles qui en sont équipés).
COLLIERS
Retenir les câbles sur le guidon à l'aide des colliers prévus à
cet effet (Fig.7A).
16
5678
7A
Deutsch Español Slovensky
MONTAGE MONTAJE MONTÁŽ
MONTAGE DES GRIFFHOLMS ALLROAD PLUS 4
(Abb. 1-2-3)
Den Griffholm anheben, wie in Abb. 1 gezeigt. Die
Drehknöpfe (A, Abb. 3) festziehen, nachdem der Griffholm
(B) positioniert und dessen Höhe bestimmt wurde, wobei
eine der zwei Positionen (C, Abb. 2) zu wählen ist.
GRIFFHÖHE (Abb. 3)
Griff (A) ein-oder ausschrauben um den Griffholm (B)
anzuheben oder abzusenken.
EINBAU DES LENKHOLMS BEI ALLROAD EXA 4
(Abb.4-5-6)
Befestigen Sie den unteren Lenkholm mit den Schrauben
(A, Abb.4), den Unterlegscheiben (B) und Muttern (C) am
Rahmen. Bringen Sie dann die Griffe (D) mit den Muttern (E)
an. Drehen Sie die Griffe (D, Abb.4-5) zum Arretieren des
Lenkholms. Das stärkere oder schwächere Festziehen der
Muttern (E) beeinflusst die Anzugskraft. Sie können den
Lenkholm vom Rahmen lösen und ihn dadurch zum
leichteren Transport und Unterstellen des Rasenmähers
(Abb.7) drehen.
Befestigen Sie anschließend den oberen Teil des Lenkholms,
indem Sie die zwei Halterungsschalen (F, Abb.6) mit den vier
Schrauben (G) und den vier Muttern (H) zusammenbauen.
Bringen Sie die Schraube (L), die Unterlegscheibe (M) und
den Hebel (N) an. Durch Drehen des Hebels (N) zum Lockern
der Befestigung können Sie die Höhe des Lenkholms
einstellen; Sie können außerdem den oberen Teil des
Lenkholm zum leichteren Transport und Unterstellen (Abb.7)
drehen.
MONTAGE DES BEDIENFELDS (Abb. 8)
Das Bedienfeld (L), mit den zwei Schrauben (M) montieren
(nur in den damit ausgerüsteten Modellen).
KABELBINDER
Sichern Sie die Bowdenzüge mit den Kabelbindern (Abb.7A)
am Lenkholm.
MONTAJE DEL MANILLAR ALLROAD PLUS 4 (Fig. 1-2-3)
Levantar el manillar como se indica en la Fig. 1, posicionarlo
(B) y seleccionar una de las dos posiciones (C, Fig. 2) para
regular la altura. Por último apretar las perillas (A, Fig. 3).
ALTURA DEL MANILLAR (Fig. 3)
Desatornillar el pomo (A) y subir o bajar el manillar (B).
MONTAJE DEL MANILLAR DE ALLROAD EXA 4
(figs. 4, 5 y 6)
Fijar el manillar inferior al bastidor con los tornillos (A, fig. 4),
las arandelas (B) y las tuercas (C). Luego, montar las asas (D)
con las tuercas (E). Girar las asas (D, figs. 4 y 5) para bloquear
el manillar. El mayor o menor apriete de las tuercas (E)
modifica la fuerza de bloqueo. El manillar se puede liberar
del bastidor para abatirlo a fin de facilitar el transporte y el
guardado (fig. 7).
Fijar luego la parte superior del manillar, ensamblando las
dos piezas del soporte (F, fig. 6) con los cuatro tornillos (G) y
las cuatro tuercas (H). Aplicar el tornillo (L), la arandela (M) y
la palanca (N). Tras girar la palanca (N) para aflojar el bloqueo,
el manillar se puede regular en altura. También es posible
abatir la parte superior del manillar para facilitar el transporte
y el guardado (fig. 7).
MONTAJE DEL TABLERO DE MANDOS (Fig. 8)
Coloque el tablero (L) y fíjelo con los dos tornillos (M) (solo
en los modelos que lo incluyen).
ABRAZADERAS
Fije los cables al manillar con las abrazaderas (Fig. 7A).
MONTÁÎ RUKOVÄTE ALLROAD PLUS 4 (Obr. 1-2-3):
Preklopte rukoväÈ ako je znázornené na obr. 1. Na
držiaky kosačky umiestnite rukoväť (B). Z dvoch polôh
nastavenia výšky rukoväte (obr. 2, C) si zvoľte jednu a
krídlovými maticami rukovať pritiahnite (A, Obr. 3).
V¯·KA RUKOVÄTE (Obr. 3)
Uvoľnite krídlové matice (A) a zvýšte alebo znížte rukoväť
(B).
MONTÁŽ DRŽADLA ALLROAD EXA 4 (Obr. 4-5-6)
Upevnite spodné držadlo na rám skrutkami (A, Obr. 4),
podložkami (B) a maticami (C). Potom namontujte rukoväte
(D) pomocou matíc (E). Nakoniec otočte rukoväte (D, Obr. 4-5)
aby sa držadlo upevnilo. Silnejšie alebo slabšie utiahnutie
matíc (E) mení silu blokovania. Držadlo môžete odpojiť od
rámu, aby ste ho mohli otočiť, čím sa uľahčí preprava a
uskladnenie (Obr. 7).
Potom upevnite hornú časť držadla spojením dvoch častí
puzdra držiaka (F, Obr. 6) pomocou štyroch skrutiek (G) a
štyroch matíc (H). Namontujte skrutku (L), podložku (M) a
páčku (N). Otočením páčky (N) na uvoľnenie utiahnutia bude
možné regulovať výšku držiaka; okrem toho bude možné
otočiť hornú časť držiaka, čím sa uľahčí preprava a
uskladnenie (Obr. 7).
MONTÁÎ OVLÁDECIEHO PANELU (Obr. 8)
Pripevnite ovládací panel (L) prostredníctvom dvoch skrutiek
(M) (iba pri modeloch, ktoré sú ním vybavené).
SPONY
Káble na rukoväti zaistite príslušnými sponami (Obr. 7A).
17
9 101112
Italiano English Français
ASSEMBLAGGIO ASSEMBLY ASSEMBLAGE
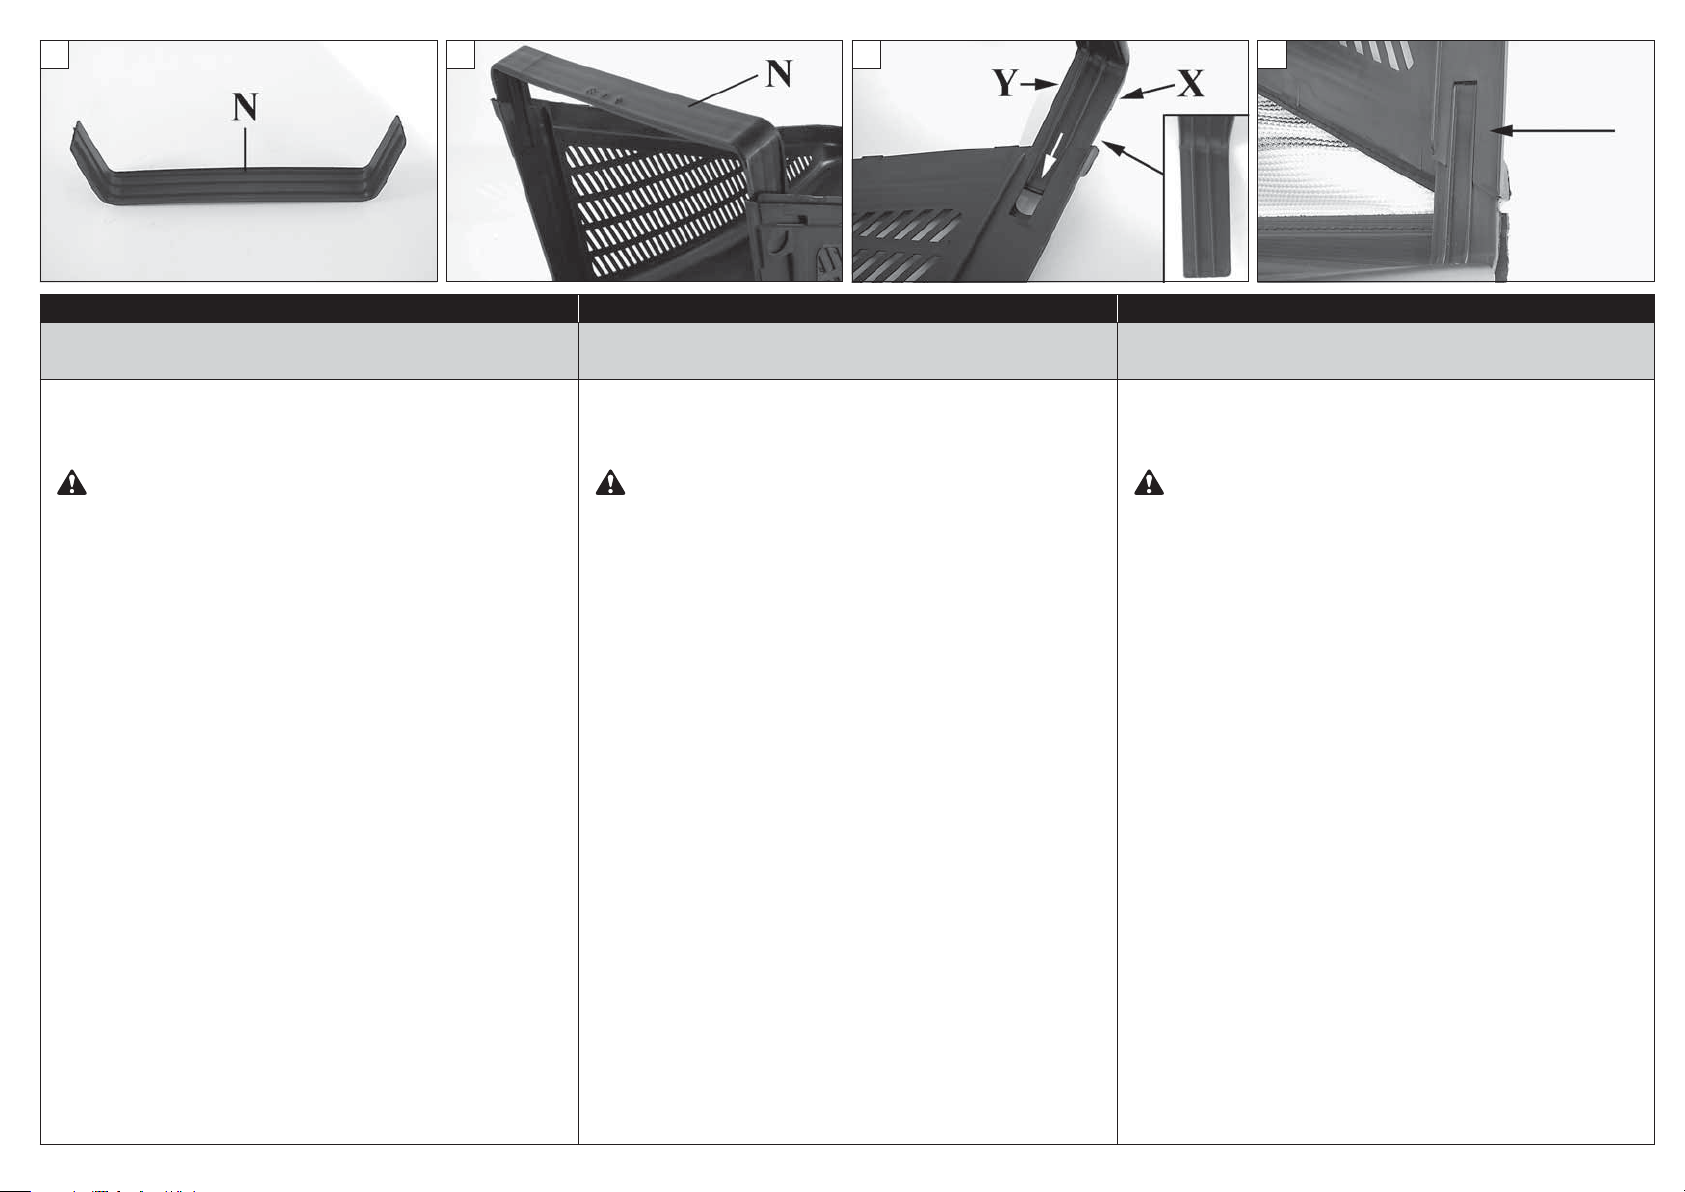
SACCO RACCOGLI ERBA
Montare il traverso (N, Fig.9-10).
ATTENZIONE! – Il traverso ha un verso di
montaggio. Il lato (X, Fig.11) è più grande e deve
rimanere verso l’esterno del cesto. Il lato (Y) è più
piccolo e deve rimanere verso l’interno del cesto. Il
traverso deve essere spinto a fondo fino
all’aggancio (Fig.12). NB: l’avvenuto aggancio è
udibile acusticamente.
Assemblare quindi la parte in rete (D, Fig.13) con la
parte rigida (E) tramite gli appositi agganci (F, Fig.14).
Iniziare dalla parte posteriore per terminare sui due
lati.
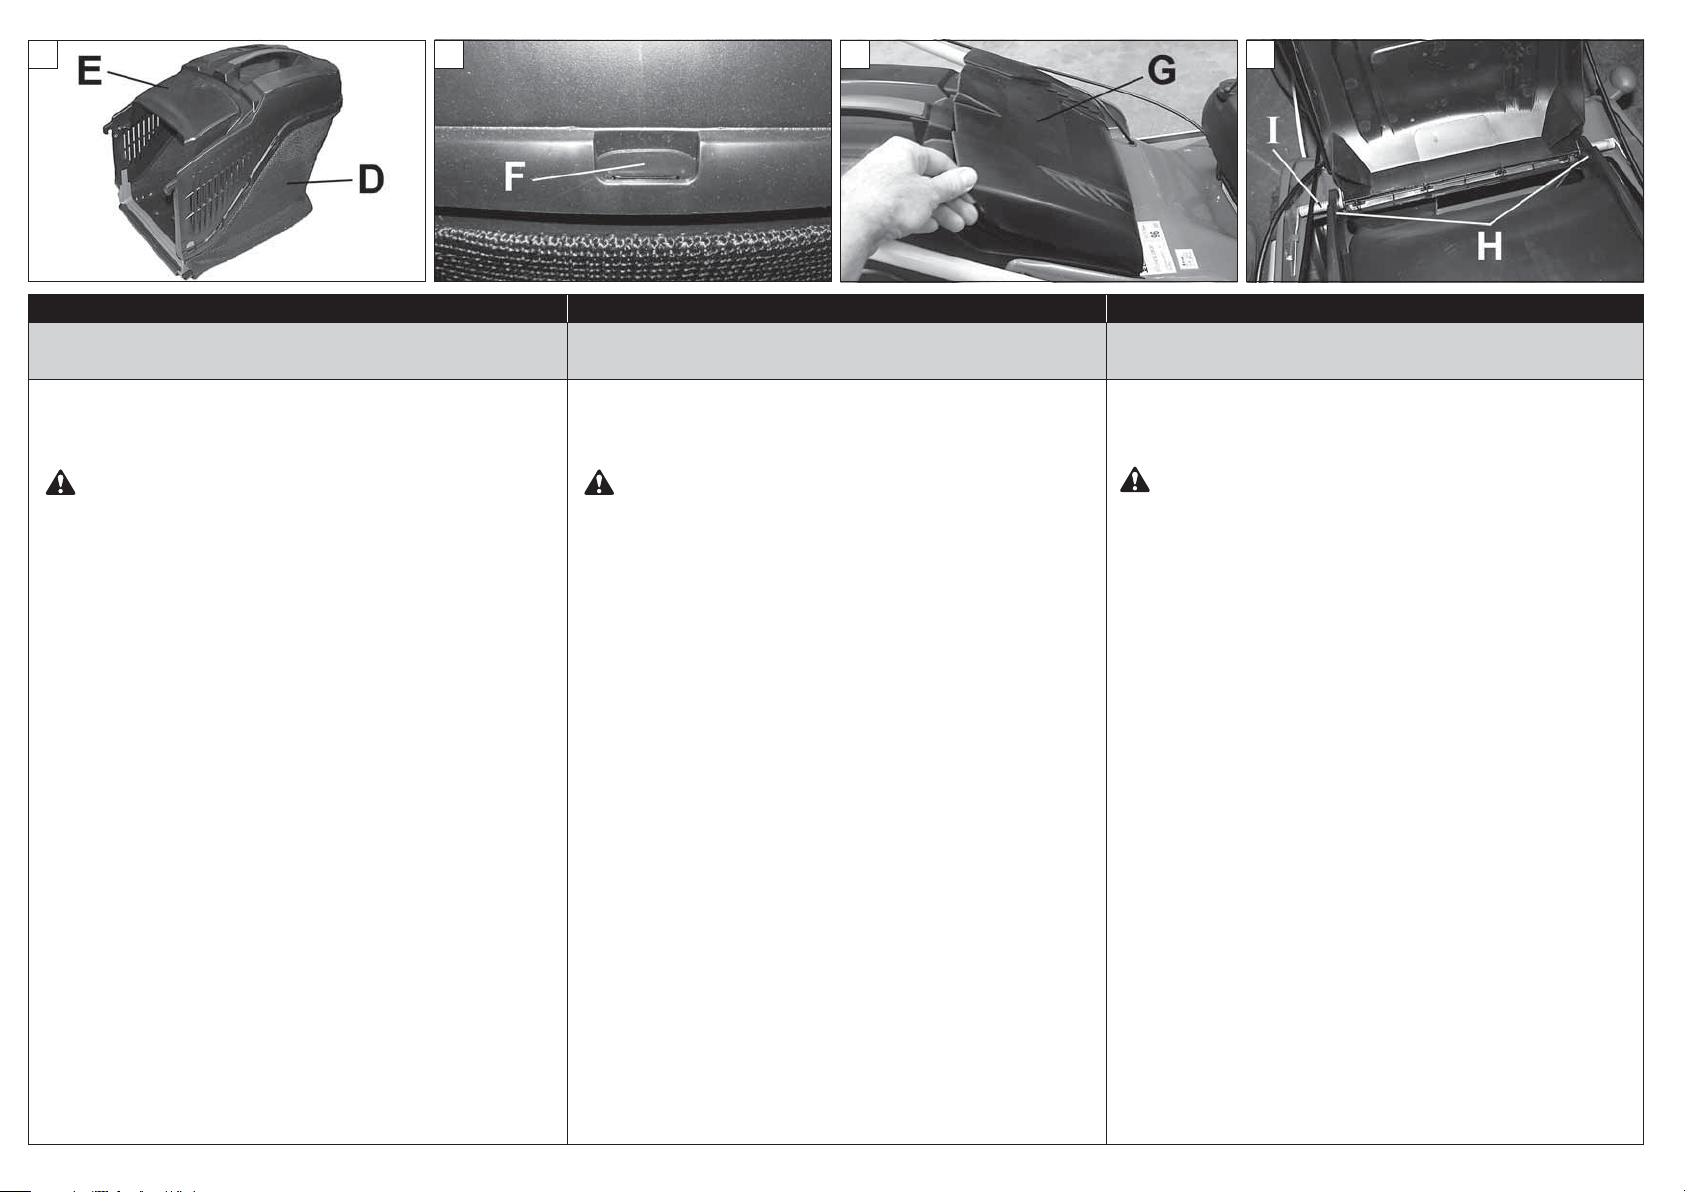
POSIZIONAMENTO DEL SACCO (Fig. 15-16)
- Alzare il deflettore (G).
- Appoggiare i due ganci (H) sul perno del deflettore
(I).
- Abbassare il deflettore e assicurarsi che chiuda
completamente la parte superiore del sacco
raccoglierba.
GRASS CATCHER
Fix the support bar (N, Fig.9-10).
IMPORTANT! – The rail must be the right way
up. One side (X, Fig.11) is bigger, and this must
face away from the grass catcher. The smaller
side (Y) should face toward the grass catcher.
The handlebar rail must be pushed fully home
and locked (Fig.12). NB: the locking action is
accompanied by an audible click.
Now assemble the mesh part (D, Fig.13) of the catcher
with the rigid top (E) by securing the relative catches
(F, Fig.14). Begin at the rear, and finish with the two
sides.
POSITIONING OF GRASS CATCHER (Fig. 15-16)
- Lift rear deflector (G).
- Attach the two hooks (H) onto the deflector support
shaft (I).
- Lower rear deflector and make sure it covers
completely the upper part of the grass catcher.
SAC COLLECTEUR D’HERBE
Monter la barre trasversale (N, Fig.9-10).
ATTENTION! – La traverse peut se monter dans un
seul sens. Le côté (X, Fig.11) est plus grand et doit
rester vers l’extérieur du panier. Le côté (Y) qui est
plus petit doit rester vers l’intérieur du panier.
Pousser la traverse à fond jusqu’à ce qu’elle
s’emboîte (Fig.12). NB: l’enclenchement émet un
déclic.
Assembler ensuite le filet (D, Fig.13) et la paroi rigide
(E) à l’aide des dispositifs de fixation (F, Fig.14).
Commencer par l’arrière pour terminer sur les deux
côtés.
MISE EN PLACE DU SAC (Fig. 15-16)
- Lever le déflecteur (G).
- Poser les deux crochets (H) sur le pivot du déflecteur
(I).
- Baisser le déflecteur et s’assurer qu’il obture
hermétiquement l’ouverture supérieure du sac
d’herbe.
18
13 14 15 16
Deutsch Español Slovensky
MONTAGE MONTAJE MONTÁŽ
GRASFANGSACK
Die Querstange (N, Abb. 9-10) montieren.
ACHTUNG! – Der Querholm hat einen Einbausinn.
Die größere Seite (X, Abb.11) muss zur Außenseite
des Korbs gerichtet sein. Die kleinere Seite (Y)
muss zur Innenseite des Korbs gerichtet sein.
Der Querholm muss bündig eingerastet werden
(Abb.12). Hinweis: es ist ein Einrastgeräusch
hörbar.
Das Gitterteil (D, Abb.13) anhand der entsprechenden
Laschen (F, Abb. 14) mit dem steifen Teil (E)
zusammenbauen. Von hinten ausgehend bis zu beiden
Seiten fortfahren.
ANBRINGEN DES GRASFANGBEHÄLTERS
(Abb. 15-16)
- Heben Sie den Deflektor (G) an.
- Die beiden Haken (H) auf den Stift des Deflektors (I)
auflegen.
- Drücken Sie den Deflektor herunter und versichern
Sie sich, daß er den oberen Teil des Grasfanghälters
komplett bedeckt.
BOLSA CONTENEDORA
Armar la traversa de junccion (N, Fig. 9-10)
¡ATENCIÓN! – El travesaño se debe montar por
el lado de montaje correcto. El lato (X, Fig.11) es
mayor y debe quedar hacia el exterior del cesto. El
lado (Y) es menor y debe quedar hacia el interior
del cesto. El travesaño se debe empujar a fondo
hasta engancharlo (Fig.12). Nota: el enganche es
audible.
Ensamblar la parte de red (D, Fig.13) con la pared rígida
(E) mediante los enganches (F, Fig.14). Comenzar por la
parte posterior y terminar por los costados.
COLOCACION DE LA BOLSA RECOGEDORA
(Fig. 15-16)
- Alzar el deflector (G).
- Apoyar los dos ganchos (H) sobre el perno del
deflector (I).
- Bajar el deflector asegurándose que queda
completamente cerrada la abertura superior de la
recogedora.
ZBERNÝ KÔŠ
Namontujte priečnu konzolu (N, Obr. 9-10).
POZOR! – Priečna časť konzoly musí byť
namontovaná v správnej polohe. Väčšia strana
(X, Obr. 11) musí ostať otočená k vonkajšej časti
koša. Menšia strana (Y, obr.11) musí ostať otočená
smerom dovnútra koša. Priečnu konzolu treba
zatlačiť až nadoraz, kým nezaskočí (Obr.12). Pozn:
pri zaskočení počuť cvaknutie.
Potom zmontujte sieťovú časť (D, Obr.13) s pevnou
stenou (E) pomocou príslušných úchytiek (F, Obr.14).
Začnite v zadnej časti, aby ste montáž ukončili na
oboch stranách.
UMIESTNENIE KOŠA (Obr. 15-16)
- Nadvihnite kryt vyhadzovacieho otvoru (G).
- Zaháčkujte úchytky (H) na kolík krytu vyhadzovacieho
otvoru (I).
- Uvoľnite kryt vyhadzovacieho otvoru a uistite sa, že
úplne zakrýva vrchnú časť zberného koša.
19
17 18 19 20
p.n. 4175169
Italiano English Français
AVVIAMENTO STARTING MISE IN ROUTE
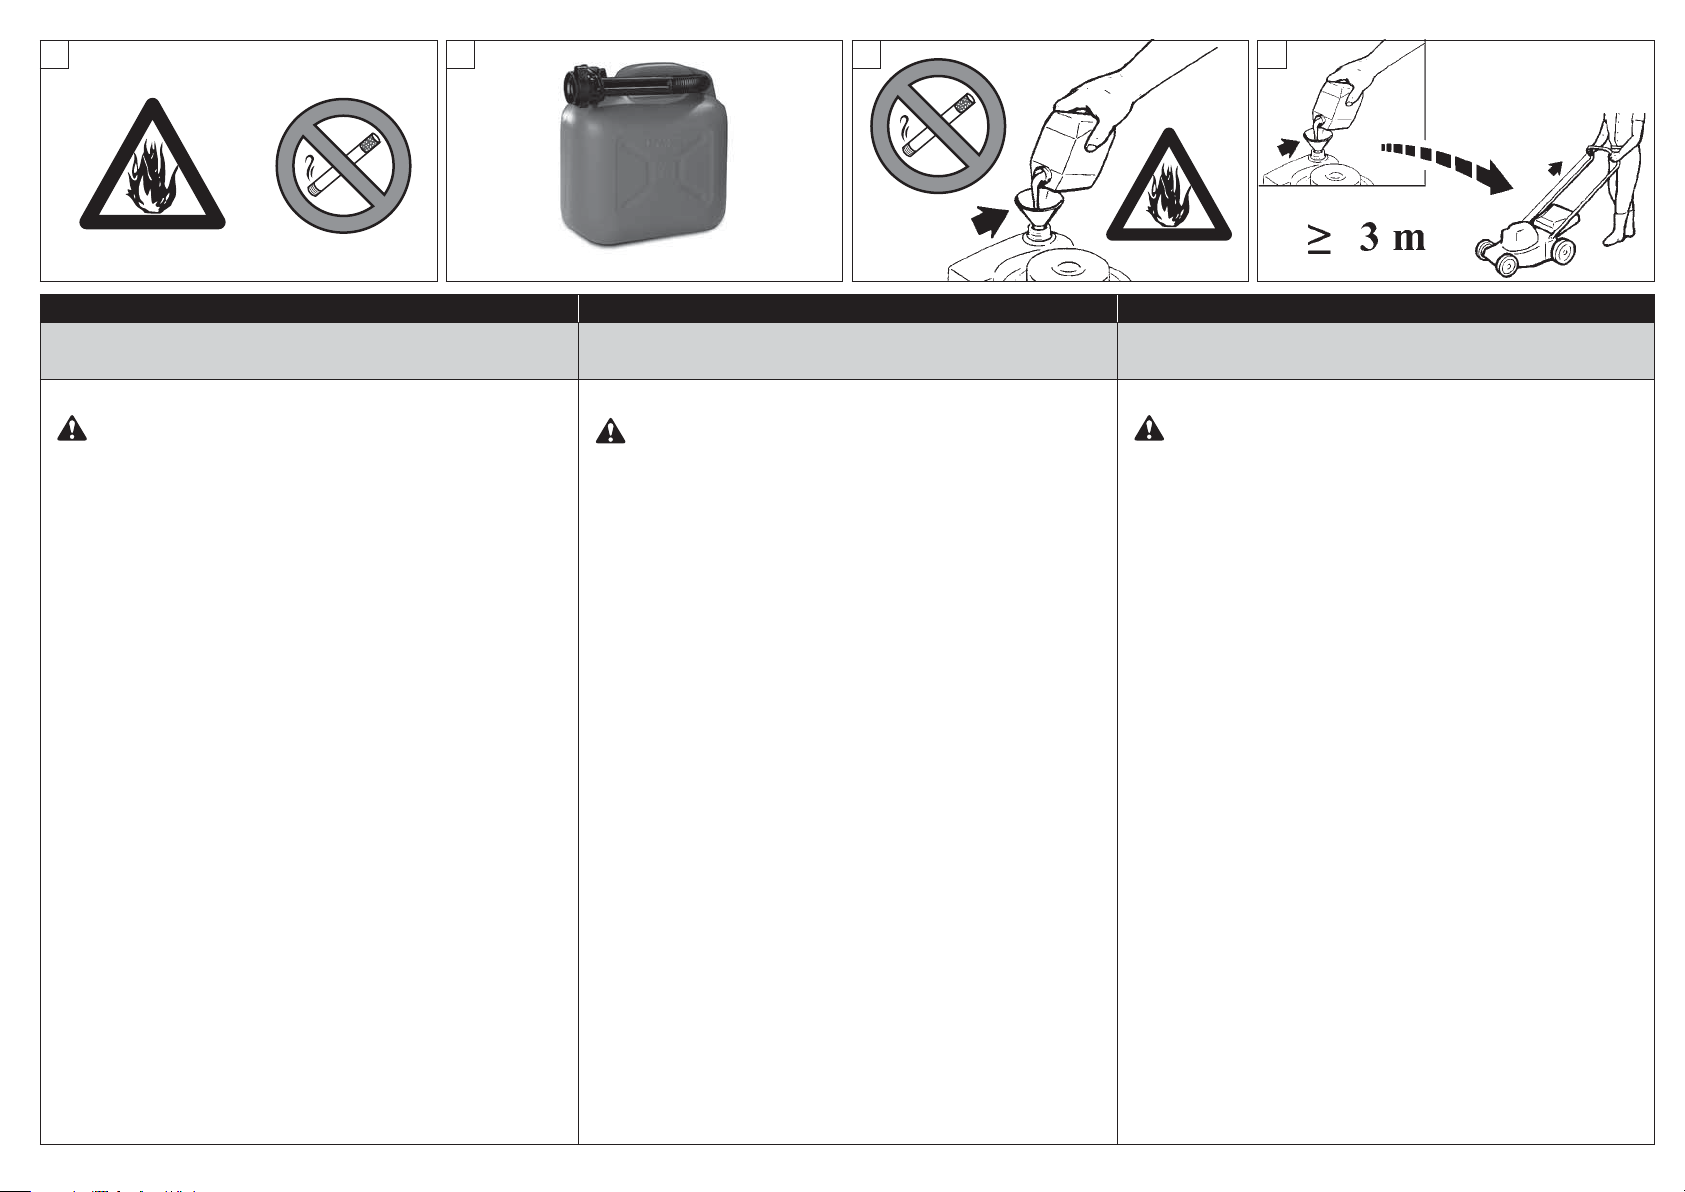
CARBURANTE
ATTENZIONE: la benzina è un carburante estremamente
infiammabile. Usare estrema cautela quando si
manipola la benzina. Non fumare o portare fuoco o
fiamme vicino al carburante o alla macchina (Fig.17).
· Non fate il pieno con motore in marcia e nemmeno quando è
ancora caldo.
· Immagazzinare il carburante in contenitori specificamente
destinati a questo uso (Fig. 18).
· Effettuare il rifornimento esclusivamente all’aria aperta e non
fumare durante lo stesso (Fig. 19).
· Posizionare su di un terreno sgombro, fermare il motore e
lasciare raffreddare prima di effettuare il rifornimento.
· Allentare il tappo del carburante lentamente per rilasciare la
pressione e per evitare la fuoriuscita di carburante.
· Serrare saldamente il tappo carburante dopo il rifornimento.
Le vibrazioni possono causare un allentamento del tappo e la
fuoriuscita di carburante.
· Asciugare il combustibile fuoriuscito dall'unità. Spostare la
macchina a 3 metri di distanza dal sito di rifornimento prima
di avviare il motore (Fig.20).
· Non tentare mai di bruciare combustibile fuoriuscito in
qualsiasi circostanza.
· Non fumare durante la manipolazione del combustibile o
durante il funzionamento della macchina.
· Stoccare il carburante in un luogo fresco, asciutto e ben
ventilato.
· Non stoccare il combustibile in luoghi con foglie secche,
paglia, carta, ecc.
· Conservare l'unità e il carburante in luoghi in cui i vapori di
carburante non vengano a contatto con scintille o fiamme
libere, bollitori di acqua per riscaldamento, motori elettrici o
interruttori, forni, ecc.
· Non rimuovere mai il tappo del serbatoio benzina quando il
motore è in moto o è caldo.
· Non utilizzare combustibile per operazioni di pulizia.
· Fare attenzione a non spargere carburante sul proprio
abbigliamento.
FUELING
WARNING: Gasoline is an extremely flammable fuel.
Use the utmost caution when handling petrol. Do not
smoke or approach fuel or the machine with an open
flame or source of ignition (Fig.17).
· Do not refuel the engine while running or even while still hot.
· Store fuel in containers specifically designed for the purpose
(Fig. 18).
· Always refuel outdoors and do not smoke while refuelling
(Fig. 19).
· Select bare ground, stop engine, and allow to cool before
refueling.
· Loosen fuel cap slowly to release pressure and to keep fuel
from escaping around the cap.
· Tighten fuel cap securely after refueling. Unit vibration can
cause an improperly tightened fuel cap to loosen or come off
and spill quantities of fuel.
· Wipe spilled fuel from the unit. Move 3 metre away from
refueling site before starting engine (Fig.20).
· Never attempt to burn off spilled fuel under any
circumstances.
· Do not smoke while handling fuel or while operating the
machine.
· Store fuel in a cool, dry, well ventilated place.
· Never place the mitblower in a combustible area such as dry
leaves, straw, paper, etc.
· Store the unit and fuel in an area where fuel vapors cannot
reach sparks or open flames from water heaters, electric
motors or switches, furnaces, etc.
· Never remove the cap of the fuel tank while the engine is
running or when the engine is hot.
· Never use fuel for cleaning operations.
· Take care not to get fuel on your clothing.
CARBURANT
ATTENTION : l'essence est un carburant extrêmement
inflammable. Prendre toutes les précautions
nécessaires pour manipuler de l'essence. Ne pas fumer
ni approcher de flammes à proximité du carburant ou
de la machine (Fig. 17).
· Ne pas faire le plein d'essence pendant que le moteur est
chaud ou en marche
· Emmagasiner le carburant dans des récipients prévus à cet
effet (Fig. 18).
· Effectuer le ravitaillement en plein air et ne pas fumer
pendant cette opération (Fig. 19).
· Placez au sol, coupez le moteur et laissez-le refroidir avant de
procéder au ravitaillement.
· Desserrez lentement le bouchon du carburant pour évacuer
la pression et pour éviter que le carburant ne se déverse.
· Serrez fermement le bouchon après le ravitaillement. Sous
l'effet des vibrations, le bouchon risque de se desserrer et le
carburant de s'échapper.
· Essuyez le carburant qui aurait pu s'échapper. Écartez l'outil à
3 m du lieu de ravitaillement avant de démarrer le moteur
(Fig.20).
· Ne tentez en aucun cas de brûler le carburant déversé.
· Ne fumez pas durant le ravitaillement ou lorsque la machine
est en marche.
· Stockez le carburant dans un endroit frais, sec et bien aéré.
· Ne stockez pas le carburant dans un endroit présentant des
feuilles sèches, de la paille, du papier, etc.
· Conservez l'outil et le carburant dans un endroit où les
vapeurs de carburant n'entreront pas en contact avec des
étincelles ou des flammes libres, des ballons d'eau pour le
chauffage, des moteurs électriques ou des interrupteurs, des
fours, etc.
· Ne jamais retirer le bouchon du réservoir à carburant lorsque
le moteur est en marche ou encore chaud.
· N'utilisez pas de carburant pour les opérations de nettoyage.
· Assurez-vous de ne pas déverser de carburant sur vos
vêtements.
20
 Loading...