

MSE-159SP User Manual
v1.0 May 2012

Page 2 of 25
Contents
Declaration of Conformity Page 3
Safety Instructions Page 4
1.0 - Introduction Page 7
2.0 – The MSE-159SP Loudspeaker Page 8
3.0 – Mains Power Requirements Page 9
3.1 – Power Supply Page 9
3.2 – AC input connector Page 9
3.3 – AC output connector Page 9
3.4 – Looped Mains connections Page 9
3.5 – Powering Up Page 10
Electrical Safety Issues Page 10
4.0 – Amplification and Audio Page 11
4.1 – Audio Inputs Page 11
4.2 – Linking Audio Signals Page 12
4.3 – DSP Menu Structure Page 12
4.4 – Remote Monitoring & Control Page 13
5.0 – Mounting & Rigging Options Page 14
5.1 – System Overview Page 14
5.2 – Rigging hardware & Accessories Page 15
5.3 – Permanent Installation Page 17
5.4 – Attachment of the FC-159v vertical cradle Page 17
5.5 – Attachment of the VFA-159 bracket Page 18
6.0 - Servicing Information Page 20
Appendix A – Technical Specifications Page 21
Appendix B – Spare Parts Page 23
Appendix C – Warranty Information Page 24
MSE-159SP User Manual
v1.0 May 2012
DECLARATION OF CONFORMITY
The product contained within this manual conform to the
requirements of the EMC Directive 89/336/EEC, amended by
92/31/EEC and 93/68/EEC, and to the requirements of the Low
Voltage Directive 73/23/EEC amended by 93/68/EEC.
Products Covered:
MSE-159SP
Page 3 of 25
EMC Emission EN55103-1:1996
Immunity EN55103-2:1996
Electrical Safety EN60065:2002
Notes:
1.This device may not cause harmful interference.
2.This device must accept any interference received, including interference that
may cause undesired operation.
RECYCLING
This product and its packaging constitute the applicable product according
to the WEEE directive. Please ensure that at the end of the working life of
this product, it is disposed of sensibly in accordance with local and national
recycling regulations. The packaging supplied with this product is
1
2
recyclable. Please retain all packaging, however if disposing of this
packaging please ensure that you comply with local recycling regulations.
These products also all comply to the RoHS Directive 2002/95/EC.
MSE-159SP User Manual
v1.0 May 2012

Page 4 of 25
IMPORTANT SAFETY INSTRUCTIONS
Please read these instructions completely before use.
Please keep the user manual in a safe place during the lifetime of the product - the
user manual forms an integral part of the product.
Heed all warnings.
Follow all instructions.
Do not use this product near water (for example, in damp rooms or near a
swimming pool).
Clean only with a dry cloth.
Do not cover or obstruct the heatsink – install this product only in accordance with
the instructions in this manual.
Do not install near heat sources such as radiators, heat registers, stoves or other
apparatus that produce heat.
Protect the power cable from being walked on, pinched or damaged in any way.
Pay particular attention to plugs and the point where they exit the loudspeaker.
This product may only be used in accordance with the information provided within
this manual. Before and during the usage of this product please ensure that all
recommendations, especially those relating to electrical safety, are adhered to.
The loudspeaker can only be disconnected from the power supply by removing the
plug, which must remain freely accessible at all times.
Unplug the loudspeaker from the mains power supply during electrical storms or
when unused for long periods of time.
Disconnect the mains plug before disconnecting the power cable from the
loudspeaker.
Refer all servicing to qualified personnel.
Servicing is required when:
o The power supply cable has been damaged
o Liquid has been spilled into the loudspeaker
o The loudspeaker has been exposed to rain or moisture
o The loudspeaker has been dropped or suffered damage in any way
o The loudspeaker exhibits a distinct change from its normal function or
performance for undetermined reasons.
SERVICING
Do not attempt to service this product yourself. Opening or removing covers may expose
you to dangerous voltages or other hazards – the amplifier module should only be opened
by qualified personnel. Please refer any service issues to your local EM Acoustics
representative. Upon completion of any service or repairs to this product, please ensure
your dealer or distributor has performed safety checks to determine the loudspeaker is in
proper operating condition.
ENVIRONMENTAL USE
Use this product only in E1, E2, E3 or E4 environments according to EN55103-2
“Electromagnetic compatibility – product family standard for audio, video, and audio-visual
and entertainment lighting control apparatus – Part 2: Immunity”.
VENTILATION AND HEAT SINK
MSE-159SP User Manual
v1.0 May 2012

Page 5 of 25
The heatsink and cooling fans are provided to ensure reliable operation of the
loudspeaker, and to protect it from overheating. The heatsink and fans must not be
blocked or covered. This product should only be installed with adequate ventilation
around the rear of the unit.
WATER AND MOISTURE
Do not use this product anywhere near water, or place any liquid-containing-vessels near
to the unit where spillage could occur.
CLEANING
Clean the loudspeaker only with a dry cloth. Disconnect the loudspeaker from the mains
before cleaning. Do not use liquid or aerosol cleaners.
POWER CABLE PROTECTION
Power supply cables should be routed so that they are not likely to be walked upon,
pinched or damaged by items placed upon or against them. Pay particular attention to
cables and plugs where they connect to the mains supply and to the loudspeaker itself.
LIGHTNING
For added protection of the product during lightning storms, or when it is left unattended
and unused for long periods of time, disconnect it from the mains supply. This will
prevent damage due to lightning and power line surges. Disconnection from the mains
power supply can only be achieved by removing the plug from the mains socket and by
external disconnection of all poles from the mains.
INTERFERENCE OF EXTERNAL OBJECTS AND/OR LIQUIDS
Never push any object of any kind into this product through its openings as they may
touch dangerous voltage points or short out parts that could result in a fire or electric
shock. Never spill liquid of any kind on the loudspeaker.
ACCESSORIES
Only use accessories supplied by EM Acoustics specifically for use with this product.
Unsuitable accessories for mounting or flying this loudspeaker could fail, causing serious
physical injury and/or damage to the loudspeaker.
CONNECTIONS
When connecting this product, perform all connections before connecting the unit to the
mains power. Failure to do so may cause electric shock and serious personal injury and/or
damage to the loudspeaker.
MAINS POWER PRECAUTIONS
When mounting or connecting this product, always disconnect it from the mains supply.
Only connect the product to an appropriate AC circuit and outlet, according to the
requirements stated on the panel on the rear of the loudspeaker.
If a power cut occurs when the unit is switched on, it will restart automatically once the
power supply is restored. All settings prior to the loss of power will be maintained.
MSE-159SP User Manual
v1.0 May 2012

Page 6 of 25
IMPORTANT: Always connect the product to the mains using the blue PowerCON MAINS
IN connector.
IMPORTANT: Only connect additional products to the white PowerCON MAINS LINK
connector, keeping within the specified current rating.
IMPORTANT: When disconnecting this product from mains power, always disconnect the
mains end first before disconnecting the PowerCON connector. Similarly, when connecting
this product always connect to the loudspeaker first, before applying mains power at the
supply.
ONLY CONNECT THIS PRODUCT TO MAINS POWER USING THREE CORE MAINS
POWER CABLE WITH A SUITABLE GROUNDING CONNECTION. REMOVAL OF
THE GROUNDING CONNECTION IS EXTREMELY DANGEROUS AND MAY
VIOLATE LOCAL ELECTRICAL CODES OF CONDUCT.
MSE-159SP User Manual
v1.0 May 2012

Page 7 of 25
1.0 - Introduction
Thank you for purchasing the MSE-159SP self-powered fullrange loudspeaker from EM
Acoustics. The MSE-159SP has been designed and rigorously tested to give you the
utmost in sonic performance and many years of reliable, trouble-free operation. Please
take the time to read this user manual thoroughly to ensure you get the best performance
from your system and to ensure you set it up correctly and safely. If you have any
questions or are in any doubt whatsoever about any aspect of your new system, please do
not hesitate to contact us directly or your local EM Acoustics representative.
The MSE-159SP system is one of the most accurate and powerful 2-way loudspeakers on
the market today. The marriage of the utmost in drive unit technology, EM Acoustics
unrivalled experience with passive crossovers along with a state-of-the-art amplifier and
control electronics package creates an ideal solution to a variety of applications. MSE159SP loudspeakers can be deployed in a wide range of professional audio applications
and will deliver stunning results time after time. Added to this is the incredibly intuitive
flying system, and the one-to-one customer support that EM Acoustics is known for and
you should be congratulated for purchasing one of the finest loudspeaker products on the
market today.
This manual contains all the information you should need on topics of set up, connection,
flying & stacking and basic service. If you feel we have missed anything, or you have a
question not covered by this manual, please visit our website www.emacoustics.co.uk and
send us a message or give us a call – we’re only too happy to help.
Unpacking
Please take care when unpacking your loudspeaker system. Once unpacked, please
inspect each enclosure thoroughly for any transit damage and in the case of any damage
please notify your carrier immediately. It is the responsibility of you, the consignee , to
instigate any claim. Please retain all original packaging in case of future re-shipment.
MSE-159SP User Manual
v1.0 May 2012

Page 8 of 25
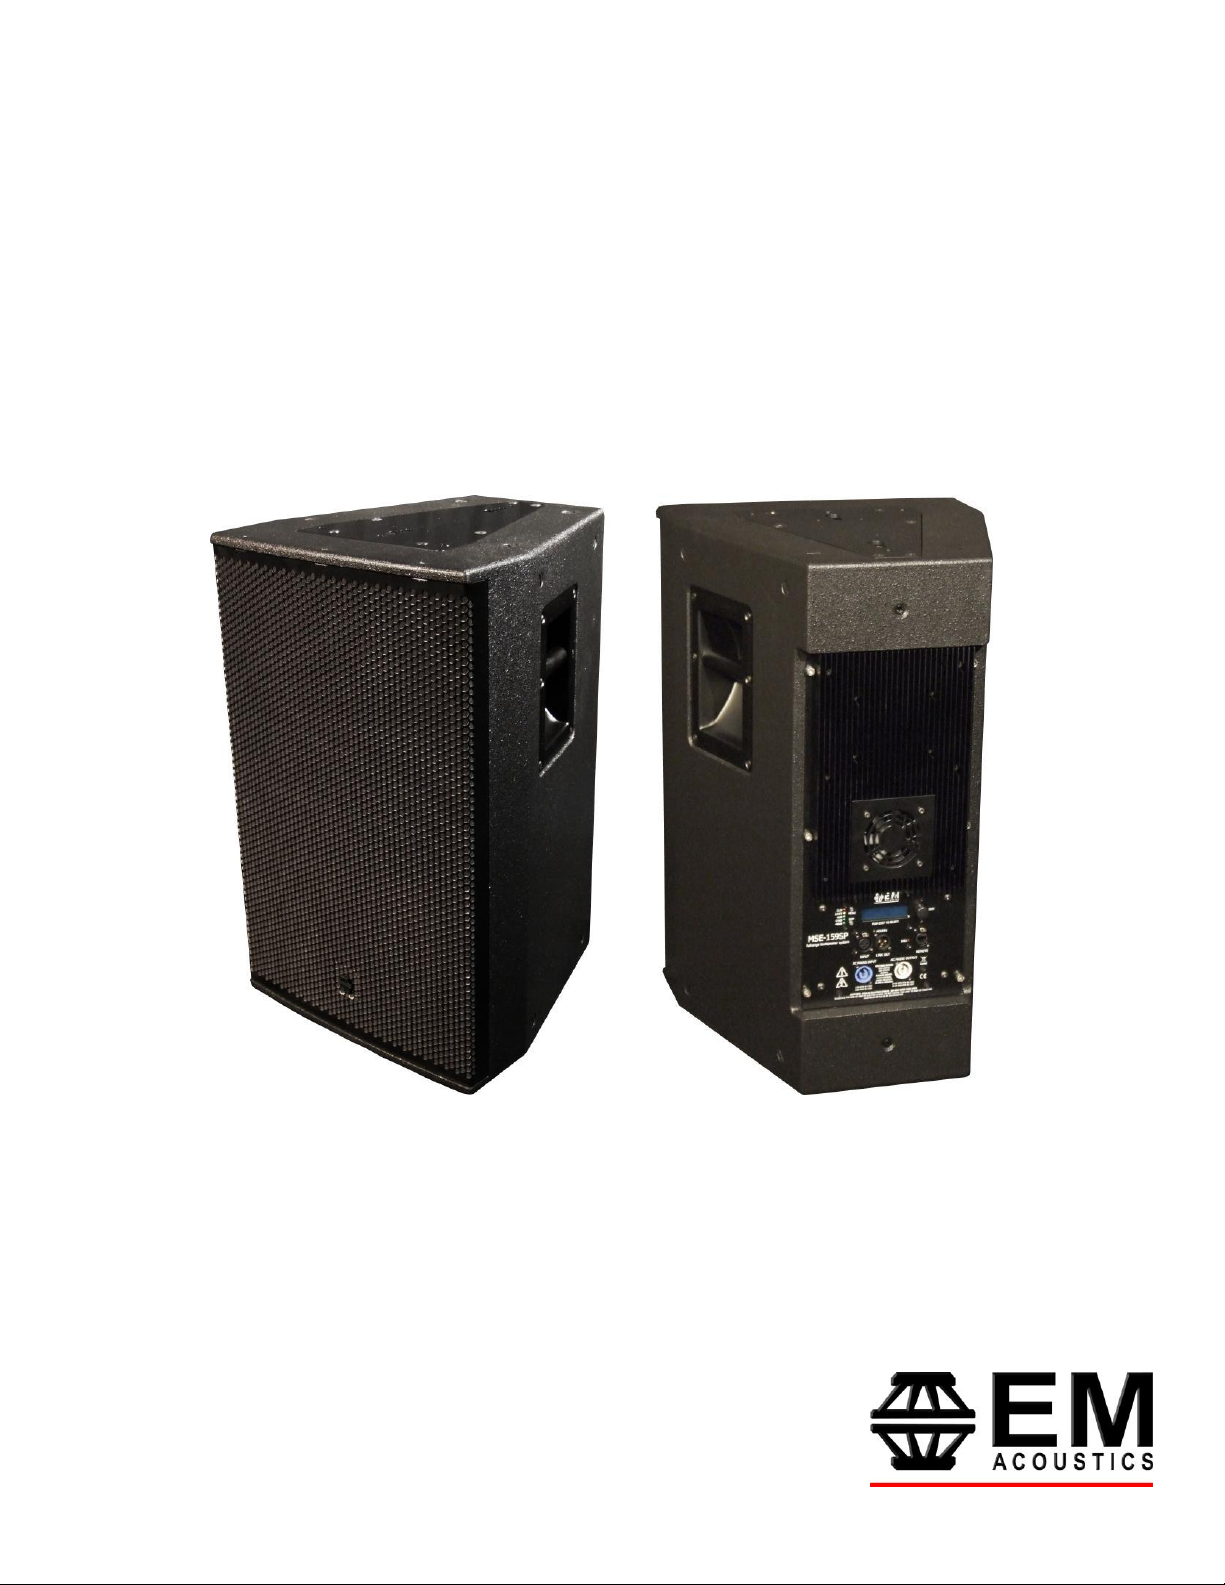
2.0 – The MSE-159SP Loudspeaker
The MSE-159SP is the self-powered variant of the MSE-159 loudspeaker, and as such
follows all the same principles in design and operation. The MSE-159SP is unique in that it
is a
powered-passive
passive crossover and use a two-channel amplifier and active crossover, we believe that
the passive crossover forms part of the signature of the loudspeaker itself. As such, a
monobloc amplifier is used and drives the passive network, keeping the sonic performance
of the powered and non-powered variants as close as possible.
The two-way design utilizes a powerful 4” voice coil 15” (381mm) neodymium LF drive
unit, and a 4” diaphragm, 1.4” (36mm) exit HF compression drive unit coupled to a 90 x
60 rotatable waveguide. This combination, along with the signature EM Acoustics passive
crossover network provides unprecedented frequency and phase response from a two-way
loudspeaker, as well as reliable and predictable coverage from the loudspeaker.
The MSE-159SP loudspeaker is designed and manufactured in our UK headquarters, and
rigorously tested before they leave the factory. All flying hardware is designed and
manufactured to exacting standards for both ease of use and user safety.
loudspeaker – whereas alternative products might remove the
2.1 – Rotating the HF waveguide
1. Remove the front grille as described in the Maintenance section on Page 10 of this
manual.
2. Using a 4mm Allen key, remove the eight countersunk bolts retaining the HF
waveguide in place.
3. Lift the waveguide up and rotate to the desired position – the label on the waveguide
shows the dispersion orientation.
4. Reinstate the socket-head bolts and retighten. Avoid over-tightening as this may crack
the waveguide.
5. Reinstate the grille as described in the Maintenance section on Page 11.
MSE-159SP User Manual
v1.0 May 2012

3.0 – Mains Power Requirements
3.1 - Power Supply
Page 9 of 25
The MSE-159SP utilises a UMAC
TM
Class-D amplifier module with a Power Factor
Correction (PFC) power supply, ensuring universal mains voltage operation. The amplifier
modules can safely operate with voltage ranges from 100-120VAC and 200-240VAC.
Important Note – please be aware that using these products on 100-120VAC will draw
more current from the mains supply than using at 200-240VAC.
3.2 - AC Input Connector (BLUE)
The blue Neutrik PowerCON connector supplies mains power to the MSE-159SP. This
connector is rated at 20 amps and is locking to prevent accidental disconnection. Any
additional loudspeakers connected to the MAINS LINK (GREY) connector also take their
power from this primary input connector, and as such you must ensure the total load does
not exceed 20 amps.
3.3 - AC Link Connector (GREY)
The grey Neutrik PowerCON connector supplies mains power to additional loudspeakers in
the chain. The PowerCON connector is a locking design, which prevents accidental
disconnection. Cables used to connect additional loudspeakers should be of a suitable
gauge to support the potential current draw from multiple loudspeakers.
3.4 - Maximum Number of Looped Mains Connections
It is very important that the total current draw does not exceed 20 amps. Please
remember that any loudspeaker connected in the chain will draw its power from the blue
mains input connector on the first loudspeaker in the chain. Detailed below are the
maximum recommended numbers of MSE-159SP loudspeakers that can be connected at
different voltage and supply current limits.
20-amp supply limit:
Product 115VAC 230VAC
MSE-159SP 4 looped (5 total) 8 looped (9 total)
16-amp supply limit:
Product 115VAC 230VAC
MSE-159SP 3 looped (4 total) 7 looped (8 total)
MSE-159SP User Manual
v1.0 May 2012

Page 10 of 25
3.5 - Powering up the MSE-159SP
When mains power is supplied, the power supply automatically detects the supply voltage
and adjusts itself accordingly. Once the display has gone through the “initializing” stage,
the screen will show the unit name and current preset recalled, and is then ready for use.
Important Note: When connecting the MSE-159SP to mains power supplies, always
connect the PowerCON first, and then connect to the mains supply. Similarly when
disconnecting, always disconnect from the mains supply first. Failure to do this can cause
arcs within the PowerCON connector, which can cause the amplifier to detect a fault and
require resetting.
Electrical Safety Issues
Please pay close attention to the following electrical and safety issues:
a) The MSE-159SP requires a grounded mains outlet. Always use a grounded outlet
and plug.
b) Never use a ground-lifting adapter or cut the earth pin or cable.
c) Do not exceed the 20-amp current capability of the PowerCON input connector.
When connecting multiple loudspeakers together, consider the current
requirements of all loudspeakers in the circuit – including the first one.
d) Ensure that the AC power connector for the mains outlet has the appropriate rating
for the planned total current draw, and is also suitable for the area the loudspeaker
is being used in.
e) Do not use the loudspeaker if the power cables are frayed or broken.
f) Keep all liquids away from the units to avoid hazards from electrical shock.
MSE-159SP User Manual
v1.0 May 2012

Page 11 of 25
4.0 – Amplification and Audio
The MSE-159SP includes a highly advanced 64-bit DSP processing card to handle high
pass filters, gain and delay settings, which are accessed by means of preset programs that
are factory installed into the unit. This DSP card feeds a Class-D amplifier package (single
channel) providing ample power to drive your loudspeakers to their full potential. The
amplifier and DSP combination also provides full limiting and remote monitoring.
4.1 - Audio Inputs
The loudspeakers are supplied with female XLR input connectors, and male XLR link
output connectors. Both of these connectors are wired pin 1 screen, pin 2 positive, pin 3
negative. The MSE-159SP loudspeakers can accept both analog and digital AES/EBU
inputs. The factory default setting is analog – see later in this manual for details on
selecting digital input.
MSE-159SP User Manual
v1.0 May 2012

Page 12 of 25
4.2 - Linking multiple loudspeaker audio signals
Via the male output XLR, multiple loudspeakers can be linked together on the same signal.
With the digital input stage selected, the output is internally buffered so in essence an
infinite number of units can be connected in parallel without signal degradation. In
analogue mode, ensure that the source device can drive the combined impedance of all of
the connected loudspeakers. With most sources, 6 loudspeakers in a chain is a practical
maximum limit.
4.3 - DSP System Menu Structure
The advanced DSP card within the amplifier modules handles all crossover, gain and
limiting functions for the MSE-159SP. The user interface is via a backlit LCD screen on the
rear of the unit, which provides a very intuitive means of accessing relevant information as
well as recalling presets for different system configurations.
4.3.1 – LCD Display and Output Meter
The LCD display is the primary means of establishing information from the loudspeaker.
By default, the screen will display the unit name on the top line and the currently selected
program on the bottom line. Adjusting parameters via the MENU key or EDIT encoder will
change the display to reflect the current function.
The output signal meter displays the level relative to limit and clipping of the amplifier
channel which is
working the hardest.
Should the meter be displaying the red CLIP LED,
reduce the system level in order to prevent damage.
4.3.2 - MENU Key
Each press of the menu key will step through the following options:
LOAD PRESET=>SAVE PRESET=>ACCESS LEVEL=>VERSION INFO
On each of these options, turning the “Edit” rotary encoder gives the user the relevant
choices:
LOAD PRESET – turn the Edit encoder to select the desired preset to recall. Press the
Edit control to select preset, and then highlight Yes/No and press the encoder again to
recall.
SAVE PRESET – turn the Edit encoder to select an unused preset location, then press the
Edit encoder to select. Preset name is then requested, which can be entered by rotating
the edit encoder for each character, and pressing the encoder to move to the next
character. Once you have finished, press the MENU key and you are asked to confirm
preset storing by selecting YES with the Edit encoder and pressing the Edit control.
“PRESET SAVED OK” will then be displayed.
MSE-159SP User Manual
v1.0 May 2012

Page 13 of 25
ACCESS LEVEL – Administrators can choose to lock all functions on the amplifier modules
by entering the relevant password – please contact EM Acoustics for further details on this
function.
VERSION INFO – by pressing the Edit encoder repeatedly, the unit will step through
user information such as software version, hardware version, IP address and MAC
address.
4.3.3 – EXIT Key
The exit key takes you one step back in the menu system from wherever you are for each
press of the key. For example, if you have just adjusted the input gain, pressing the exit
key will take you back to the parameter scroll screen.
4.3.4 - EDIT encoder function
The Edit encoder is the primary control for the user when operating the MSE-159SP. From
the opening display screen (which displays the unit name – which by default is “MSE159SP” but can be changed by the user in the remote software – on the top line and the
loaded preset on the bottom line), simply rotating the encoder will display the unit status
in the following order:
INPUT GAIN=>INPUT DELAY=>INPUT SOURCE
Pressing the edit encoder will then allow the user to edit the selected function:
INPUT GAIN – adjustable by the user from 0dB down to -20dB. This control adjusts
both analog and digital input gains simultaneously.
INPUT DELAY – adjustable by the user from 0.0ms to 1000ms.
INPUT SOURCE – this selects either standard analog input, or AES/EBU digital input. If
digital is selected, the yellow “AES/EBU” LED will illuminate between the two XLR
connectors. There are four options – Analog, AES/EBU Left channel, AES/EBU Right
channel and AES/EBU mono sum.
4.4 – Remote Monitoring and Control
By connecting a cat5 Ethernet cable to the RJ45 port on the rear of the unit, remote
monitoring and control can be achieved through the optional remote software. Please see
the remote software manual for more details. The amber “Data” LED will illuminate
showing an active data connection.
MSE-159SP User Manual
v1.0 May 2012

Page 14 of 25
5.0 – Mounting & Rigging Options
5.1 - System Overview
The flying system for the MSE-159SP has been specifically designed to be flexible, intuitive
and reliable. Please read this section of the user manual extremely carefully as the
rigging of loudspeakers is a very serious matter with potentially fatal consequences should
anything go wrong. If you are in ANY DOUBT WHATSOEVER, contact a reputable
rigging company or your local EM Acoustics representative.
IMPORTANT SAFETY CONSIDERATIONS
The MSE-159SP rigging hardware & accessories have been designed and constructed to a
very high standard of safety, and tested to demanding specifications. To ensure the
highest standards of safety, the following information on array assembly must be exactly
followed and understood.
Only use EM Acoustics recommended rigging hardware and accessories, which are
specifically designed for the purpose. Do not use MSE-159SP flying hardware for any
other loudspeaker system – the components are specifically designed to work with the
MSE-159SP and are not interchangeable with any other EM Acoustics loudspeaker product
or any other loudspeaker system. The use of MSE-159SP flying hardware with other
manufacturers’ systems may compromise the safety standards and EM Acoustics, and its
parent company, are in no way liable for any loss, damage or injury caused by such
practice.
Do not modify or alter the MSE-159SP hardware or accessories, nor use them in any way
other than that described in this manual. Rigging components supplied as part of the
MSE-159SP system are in no way interchangeable and should not be used as such.
The component parts of the MSE-159SP rigging assembly should only be assembled in the
manner described in this manual, using the fasteners and fixings stated herein. The use
of fasteners and methods of assembly not described in this manual may result in an
unsafe assembly and as such EM Acoustics will not be responsible for any loss, damage or
injury caused by such practice. Welding, drilling or any other means of modifying any part
of the flying hardware or permanently fixing components to each other is strictly
forbidden.
Rigging assemblies must only be assembled using the appropriate parts and fixings as
described in this manual, explicitly following the assembly instructions given herein.
Rigging components must only be fixed to EM Acoustics MSE-159SP system components,
using the correct cabinet location points, assembly methods and fasteners specifically
described within this manual.
MSE-159SP User Manual
v1.0 May 2012

Page 15 of 25
Walls, floors and ceilings must be capable of supporting the actual load placed upon them.
The rigging hardware must be safely and securely fixed to both the loudspeaker system
and the supporting structure.
When mounting components on walls, floors or ceilings ensure that all fixings and
fasteners used are of an appropriate size and load rating. Wall and ceiling claddings, and
the construction/composition of walls and ceilings also need to be taken into consideration
when determining if a given suspension method is safe.
5.1.1 - Secondary Safeties
It is best practice to ensure that all loudspeakers flown in any given environment should
be provided with a second, independent and properly rated safety suspension point in
addition to the principle load bearing means of suspension. Steel wire ropes or steel
chains of an approved construction and load rating only may be used as secondary
safeties. Plastic covered steel chains may not be used as secondary safeties under any
circumstances. Also ensure that all local and national laws are complied with when
determining your primary and secondary suspension points.
5.1.2 - Safety Inspections
Carefully inspect all flying system components prior to use for defects or signs of damage
prior to flying your MSE-159SP. If any components damaged or you suspect them to
be damaged, DO NOT USE THEM.
Regular scheduled tests – which are much more rigorous than visual inspections – of all
rigging components must also be carried out. Safety legislation, and test/inspection
requirements, will vary from country to country and as such it is the user’s responsibility to
ensure that local regulations are adhered to. In most cases, annual independent tests &
inspections carried out by a suitably approved and qualified inspector will be required.
EM Acoustics recommends detailed logbooks be kept of all inspections and load tests to
ensure an accurate record is kept of the testing for each EM Acoustics rigging accessory.
When flying any loudspeaker system, always wear protective headwear, footwear and eye
protection in accordance with local regulations.
The rigging of a flown loudspeaker system may be dangerous if not undertaken
by a suitably experienced and qualified rigger. Installation & fixing of all
hanging points should only be carried out by a professional rigger in
accordance with local legislation as well as the rules of the venue. The house
rigger and/or venue manager must always be consulted.
MSE-159SP User Manual
v1.0 May 2012

Page 16 of 25
5.2 - Rigging Hardware & Accessories
The MSE-159SP has three options for mounting and suspension, both for temporary use
and permanent fixed installation.
The MSE-159SP is fitted with bespoke flying plates top & bottom of the enclosure to
enable suspension in a variety of ways. Simple suspension is available using M10 forged
shoulder eyebolts (minimum thread length 20mm) in the M10 threaded holes in the
flying plates. These M10 points can also be used as secondary safety points with M10
eyebolts.
The most common method for suspension uses the keyhole cutouts in the top & bottom
flying plates. Machined bosses on the optional flying hardware mate with these keyhole
plates, allowing extremely swift attachment of flying hardware in a touring environment.
¼” ball-lock pins secure the optional flying hardware into the flying plates.
The MSE-159 also has two M8 threaded fixings on the rear for use as a pull-back point or
for attachment of a secondary safety point.
With any suspension method, a second anchor point should be used as a safety.
Under no circumstances should the mounting points of one enclosure be used
to suspend another enclosure below it. EM Acoustics are in no way responsible
for the failure of incorrectly rigged systems. This information relates
specifically to the rigging techniques for the MSE-159SP loudspeaker only. If
you are in any doubt about safe practices for rigging loudspeakers, please
contact your local EM Acoustics dealer who will be able to advise you.
MSE-159SP User Manual
v1.0 May 2012

Page 17 of 25
5.3 - Permanent Installations
Any installation (permanent or temporary) must be securely attached to the structure of
the building using chain, steel wire or web straps that are certified and load rated for the
loudspeaker system. Consideration must be taken when determining the loading on the
structure to include loudspeakers and rigging hardware, and the appropriate safety factor
can then be decided upon. If you are in any doubt whatsoever, please contact your
EM Acoustics dealer who will be able to refer you to an experienced rigging company. A
reputable rigging organisation should also be able to advise on legislation regarding safety
factors for suspended systems of this type.
5.4 - Attachment of the FC-159v vertical flying cradle
The FC-159v vertical flying cradle is intended particularly for
touring purposes, hence the extremely quick attachment
method.
To attach the cradle, first release the two ball-lock pins from the
coffin plate on the cradle. Position the cradle over the top or
bottom of the loudspeaker (it can be flown either way up) and
insert the bosses on the bottom of the cradle’s coffin-shaped
plate into the keyholes on the enclosure’s flying plate. Slide the
cradle to the rear of the enclosure until the two ¼” diameter
locking-pin holes line up. Insert the two ball-lock pins into the
holes to lock the cradle in place. IMPORTANT: DO NOT
ATTEMPT TO LIFT THE LOUDSPEAKER WITHOUT BOTH
BALL-LOCK PINS IN PLACE. The point on the top of the flying cradle can be used for
permanent installations or to secure a hook clamp. Ensure that an eyebolt is secured to
the rear point on the MSE-159/MSE-156 (M8 at the rear) or one of the top points (M10 on
top or bottom) to use as a secondary safety. To set the angle of the loudspeaker, there
are standard clamping levers on each side as a primary system however as a secondary,
and to act as a repeatable method for flying, the holes and ball-lock pins allow quick and
easy angle setting in 5-degree increments.
MSE-159SP User Manual
v1.0 May 2012

Page 18 of 25
As shown in the
diagram opposite, as
you rotate the inner
yoke different holes will
be available to secure
with the pins. Select
the desired angle, and
lock in place with the
attached ball-lock pin.
To give further explanation, Holes A-D are used for down-tilt and holes E-H are used for
up-tilt. Hole A is used for 0-degree angle, and also for multiples of 20 degrees above this
(20, 40, 60, 80 degree down-angle). Hole B is used for 10 degrees, and multiples of 20
degrees above this (10, 30, 50, 70, 90 degree down angle). Similarly, Hole C is used for 5
degrees and multiples of 20 degrees above this (5, 25, 45, 65, 85) and Hole D is used for
15 degrees and multiples of 20 degrees above (15, 35, 55, 75). Holes E-H apply in a
similar way for up-tilt.
5.5 - Attachment of the VFA-159 variable flying bracket
To attach the bracket, first release the two ball-lock
pins from the base of the bracket. Position the
bracket over the top or bottom of the loudspeaker (it
can be flown either way up) and insert the bosses on
the bottom of the bracket into the keyholes on the
enclosure’s flying plate. Slide the bracket to the rear
of the enclosure until the two ¼” diameter locking-pin
holes line up. Insert the two ball-lock pins into the
holes to lock the bracket in place. IMPORTANT: DO
NOT ATTEMPT TO LIFT THE LOUDSPEAKER
WITHOUT BOTH BALL-LOCK PINS IN PLACE.
Finally, attach a hook-clamp to the sliding mounting
point and secure the mounting point bolt through the
MSE-159SP User Manual
v1.0 May 2012

Page 19 of 25
main section of the VFA-159 bracket.
The VFA-159 bracket works on the centre of gravity of the MSE-159SP. The lone hole in
the centre of the VFA bracket will mean the MSE-159SP enclosure will hang level. Moving
the pickup point to the rear of the enclosure will add down-tilt, and moving to the front of
the enclosure will apply up-tilt. Each notch represents 5-degrees of angle, so by taking
the weight of the loudspeaker the angle can easily be changed. The VFA-159 will allow a
maximum of 25 degrees of up-tilt and 30 degrees of down-tilt. For more extreme down-
tilt angles, select the rearmost notch and use the M8 point on the rear of the enclosure as
a pull-back.
Ensure that an eyebolt is secured to one of the rear points on the MSE-159SP (M8 at the
rear) or one of the top points (M10 on top or bottom) to use as a secondary safety.
MSE-159SP User Manual
v1.0 May 2012

Page 20 of 25
6.0 - Servicing Information
Your EM Acoustics loudspeakers have been rigorously tested before they leave our factory,
to ensure that they give you a lifetime of flawless operation. Should any of your drive
units fail and need replacing, please follow the guidelines below.
MSE-159: Low Frequency Drive Unit
1. Using a 3mm Allen key, undo the six M4 machine screws top & bottom of the
enclosure (3 each end). Gently remove the grille from the front of the enclosure.
2. Using a 5mm Allen key, remove the two M6 socket-head bolts holding the central grille
brace in place.
3. Using a 5mm Allen key, remove the eight M6 socket-head bolts holding the drive unit
in place, and keep them safe – ensuring you have collected both the shake-proof and
flat washers for each bolt. Gently lift the drive unit out of its locating hole – please
take care as it is heavy! Carefully disconnect the cables from the drive unit.
4. To reinstate the driver, simply reverse the above procedure. Please observe the
correct polarity – red cable to positive terminal, black cable to negative.
5. Reinstate the grille by gently placing it in place over the front of the loudspeaker.
Replace the six M4 machine screws to secure it in place.
MSE-159: High Frequency Drive Unit
1. Follow the procedure above to remove the front grille.
2. Using a 4mm Allen key, remove the eight M6 countersunk socket-head bolts holding
the waveguide in place. Gently disconnect the cables from the drive unit and remove
the unit from the enclosure.
3. To reinstate the drive unit, gently reconnect the cables (white cable to positive
terminal, yellow cable to negative) and insert back into position. Note the waveguide
orientation for correct dispersion. Replace the four bolts and gently tighten.
4. Reinstate the grille by gently placing it in place over the front of the loudspeaker.
Replace the six M4 machine screws to secure it in place.
MSE-159SP User Manual
v1.0 May 2012

Appendix A – Technical Specifications
MSE-159 2-way self-powered fullrange loudspeaker
ACOUSTICAL
ENCLOSURE TYPE: 2-way reflex loaded, self-powered
FREQUENCY RESPONSE1: 65Hz – 20KHz +/- 3dB
DISPERSION2: 90° x 60° (rotatable)
DRIVE UNITS: 1 x 15” (381mm) neodymium LF cone drive unit
1 x 1.4” (36mm) exit neodymium HF compression drive unit
MAXIMUM SPL3: 130dB continuous, 136dB peak
MECHANICAL
DIMENSIONS (HxWxD): 707 (27.8) x 440 (17.3) x 450 (17.7) mm/(ins)
Page 21 of 25
NET/SHIPPING WEIGHT: 50 (110) / 52 (114.4) kg/(lbs)
ENCLOSURE: 15mm (5/8”) multi-laminate Birch plywood – rebated, screwed &
glued.
Finished in black semi-matt textured paint
RIGGING/SUSPENSION: Keyhole quick-release top & bottom
8 x M10 threaded points
2 x M8 threaded safety points
GRILLE: Fabric-backed hex punched steel
AMPLIFIER PACKAGE
AMPLIFIER TYPE: Single channel Class-D
AMPLIFIER POWER: 1550W RMS @ 8 ohm load
DSP SYSTEM: 96kHz sample rate, 120dB dynamic range
COOLING: low-speed 5VDC fan on heatsink – temperature controlled, only
required under extreme conditions
CONNECTORS: Female XLR input, male XLR link output (selectable as analog or
AES/EBU input)
Neutrik PowerConTM input with loop output
Neutrik EtherconTM RJ45 socket
MSE-159SP User Manual
v1.0 May 2012

Page 22 of 25
DISPLAY: High resolution backlit LCD display with rotary encoder for user
control
OPERATING VOLTAGE: Automatic selection via PFC power supply:
100-120V AC & 200-240V AC, 50/60Hz
NOMINAL CURRENT: 1.4A RMS @ 230V
2.8A RMS @ 120V
POWER COMSUMPTION: 411W nominal
1600W maximum
Notes on measurement conditions:
1
Measured on-axis
2
Average SPL over stated bandwidth with 1W input, measured at 1m
3
Nominal dispersion, averaged over stated bandwidth
MSE-159SP User Manual
v1.0 May 2012

Page 23 of 25
Appendix B – Spare Parts List
01A021 DU-1505 15” neodymium LF drive unit, 8 ohms
01B005 CDU-1402 1.4” exit neodymium HF drive unit, 16 ohms
01C017 RK-1505 8 ohm recone kit for DU-1505
01D003 RD-2001 Diaphragm for CDU-2001/1402, 16 ohms
07A023 PX-MS159 Passive crossover network for MSE-159/MSE-159SP
MSE-159SP User Manual
v1.0 May 2012

Page 24 of 25
Appendix C – Warranty Information
Limited Warranty
This EM Acoustics loudspeaker product is warranted to the original end-user purchaser
and all subsequent owners for a period of three years from the original date of purchase.
Warranty Coverage
This warranty covers defects in materials and workmanship. It does not include:
Damage or failure caused by accident, misuse, neglect, abuse or modification by any
person other than an authorised EM Acoustics representative.
Damage or failure caused by operating the loudspeaker product contrary to the
instructions contained within this manual.
Damage caused during shipment.
Claims based on any misrepresentation by the seller.
Products which contain anything other than the original components (or EM Acoustics
factory supplied spare parts).
Products on which the serial number has been removed, altered or defaced.
Returning your EM Acoustics loudspeaker
Should your EM Acoustics loudspeaker develop a fault, please return it (freight prepaid) in
its original packaging, along with proof of purchase to your local dealer or to:
EM Acoustics (Returns Department), Building 74, Dunsfold Park, Cranleigh, Surrey, GU6 8TB, UK
including a description of the suspected fault. Serial numbers must be quoted in all
correspondence relating to the claim. EM Acoustics or its representatives are in no way
liable for any loss or damage in transit, and hence it is recommended that the sender
insure the shipment. EM Acoustics will pay for return freight should the repair be covered
under warranty.
MSE-159SP User Manual
v1.0 May 2012

Page 25 of 25
EM Acoustics’ liability is to the replacement or repair (at our discretion) of any defective
components, and as such are not liable for any incidental and consequential damages
including (without limitation) injury to persons, damage to property or loss of use.
This warranty is exclusive and no other warranty is expressed or implied. This
warranty is also in addition to – and in no way detracts from – your statutory
rights as a consumer.
MSE-159SP User Manual
v1.0 May 2012
 Loading...