

Page 1
Flat Panel Monitor
User Guide
Page 2

Page 3

Contents
Using Your eMachines Flat-Panel Monitor . . . . . . . . . . . . . . . . . . . . . . . . . . . 1
Unpacking the monitor . . . . . . . . . . . . . . . . . . . . . . . . . . . . . . . . . . . . . . . . . . . . . . . . . . . . . 2
Connecting the monitor . . . . . . . . . . . . . . . . . . . . . . . . . . . . . . . . . . . . . . . . . . . . . . . . . . . . 3
Attaching the base . . . . . . . . . . . . . . . . . . . . . . . . . . . . . . . . . . . . . . . . . . . . . . . . . . 3
Connecting video inputs . . . . . . . . . . . . . . . . . . . . . . . . . . . . . . . . . . . . . . . . . . . . . 4
Connecting power . . . . . . . . . . . . . . . . . . . . . . . . . . . . . . . . . . . . . . . . . . . . . . . . . . . 5
Connecting a security cable . . . . . . . . . . . . . . . . . . . . . . . . . . . . . . . . . . . . . . . . . . 5
Setting up the optional stand . . . . . . . . . . . . . . . . . . . . . . . . . . . . . . . . . . . . . . . . . . . . . . . 6
Attaching the USB stand . . . . . . . . . . . . . . . . . . . . . . . . . . . . . . . . . . . . . . . . . . . . . 6
Adjusting monitor height tension . . . . . . . . . . . . . . . . . . . . . . . . . . . . . . . . . . . . . 8
Adjusting monitor tilt tension . . . . . . . . . . . . . . . . . . . . . . . . . . . . . . . . . . . . . . . . 9
Connecting the USB hub . . . . . . . . . . . . . . . . . . . . . . . . . . . . . . . . . . . . . . . . . . . .10
Setting up the optional speaker bar . . . . . . . . . . . . . . . . . . . . . . . . . . . . . . . . . . . . . . . . 11
Installing the speaker bar . . . . . . . . . . . . . . . . . . . . . . . . . . . . . . . . . . . . . . . . . . .11
Starting the monitor . . . . . . . . . . . . . . . . . . . . . . . . . . . . . . . . . . . . . . . . . . . . . . . . . . . . . .12
Adjusting monitor settings . . . . . . . . . . . . . . . . . . . . . . . . . . . . . . . . . . . . . . . . . . . . . . . . . 13
Monitor buttons . . . . . . . . . . . . . . . . . . . . . . . . . . . . . . . . . . . . . . . . . . . . . . . . . . .13
On-screen display options . . . . . . . . . . . . . . . . . . . . . . . . . . . . . . . . . . . . . . . . . . 14
Changing Windows screen settings . . . . . . . . . . . . . . . . . . . . . . . . . . . . . . . . . . 17
Video modes . . . . . . . . . . . . . . . . . . . . . . . . . . . . . . . . . . . . . . . . . . . . . . . . . . . . . . . 18
Power management . . . . . . . . . . . . . . . . . . . . . . . . . . . . . . . . . . . . . . . . . . . . . . . . . . . . . . 19
ENERGY STAR . . . . . . . . . . . . . . . . . . . . . . . . . . . . . . . . . . . . . . . . . . . . . . . . . . . . . .19
Energy declaration . . . . . . . . . . . . . . . . . . . . . . . . . . . . . . . . . . . . . . . . . . . . . . . . .19
Maintaining . . . . . . . . . . . . . . . . . . . . . . . . . . . . . . . . . . . . . . . . . . . . . . . . . . . . . . . . . . . . . . 20
Troubleshooting . . . . . . . . . . . . . . . . . . . . . . . . . . . . . . . . . . . . . . . . . . . . . . . . . . . . . . . . . .20
No power . . . . . . . . . . . . . . . . . . . . . . . . . . . . . . . . . . . . . . . . . . . . . . . . . . . . . . . . . 20
No picture . . . . . . . . . . . . . . . . . . . . . . . . . . . . . . . . . . . . . . . . . . . . . . . . . . . . . . . . . 20
Display colors are wrong . . . . . . . . . . . . . . . . . . . . . . . . . . . . . . . . . . . . . . . . . . . 21
Picture has shadows or “ghosts” . . . . . . . . . . . . . . . . . . . . . . . . . . . . . . . . . . . . . 21
Color is not uniform . . . . . . . . . . . . . . . . . . . . . . . . . . . . . . . . . . . . . . . . . . . . . . . .21
Image is not sized or centered correctly . . . . . . . . . . . . . . . . . . . . . . . . . . . . . . 21
The monitor has pixels that are alw ays dark or too bright . . . . . . . . . . . . .22
Connecting an HDMI source (19-inch model) . . . . . . . . . . . . . . . . . . . . . . . . . . 22
Connecting a game console . . . . . . . . . . . . . . . . . . . . . . . . . . . . . . . . . . . . . . . . .22
Speaker bar does not work . . . . . . . . . . . . . . . . . . . . . . . . . . . . . . . . . . . . . . . . .22
Specifications . . . . . . . . . . . . . . . . . . . . . . . . . . . . . . . . . . . . . . . . . . . . . . . . . . . . . . . . . . . . .24
Safety, Regulatory, and Legal Notices . . . . . . . . . . . . . . . . . . . . . . . . . . . . . . 25
Recycling . . . . . . . . . . . . . . . . . . . . . . . . . . . . . . . . . . . . . . . . . . . . . . . . . . . . . . . . . .27
i
Page 4

Contents
ii
Page 5

Using Your eMachines
Flat -P anel Monitor
• Connecting t he monitor
• Setting up the optional stand
• Setting up the optional speaker bar
• Starting the monitor
• Adjusting monitor settings
• Power management
• Maintaining
• Troubleshooting
• Specifications
1
Page 6

Using Your eMachines Flat-Panel Monitor
Unpacking t he monitor
Your monitor box should contain the following items:
• Monitor (with neck attached)
• Base
• This User Gui de
• VGA c ab l e
• Powe r c o rd
If you are mis s ing an y items, call C u st omer Car e . F or telephone numbers, se e t he labe l on t he bac k
of your monitor.
2
Page 7
www.emachines.com
Connec ting the monit or
Important
To at tach the optional USB stand instead of the base , complete the instruc tions
in “Setting up the optional stand” on page6.
To set up the monitor, first atta ch the base, then m ake your ca ble con nection s.
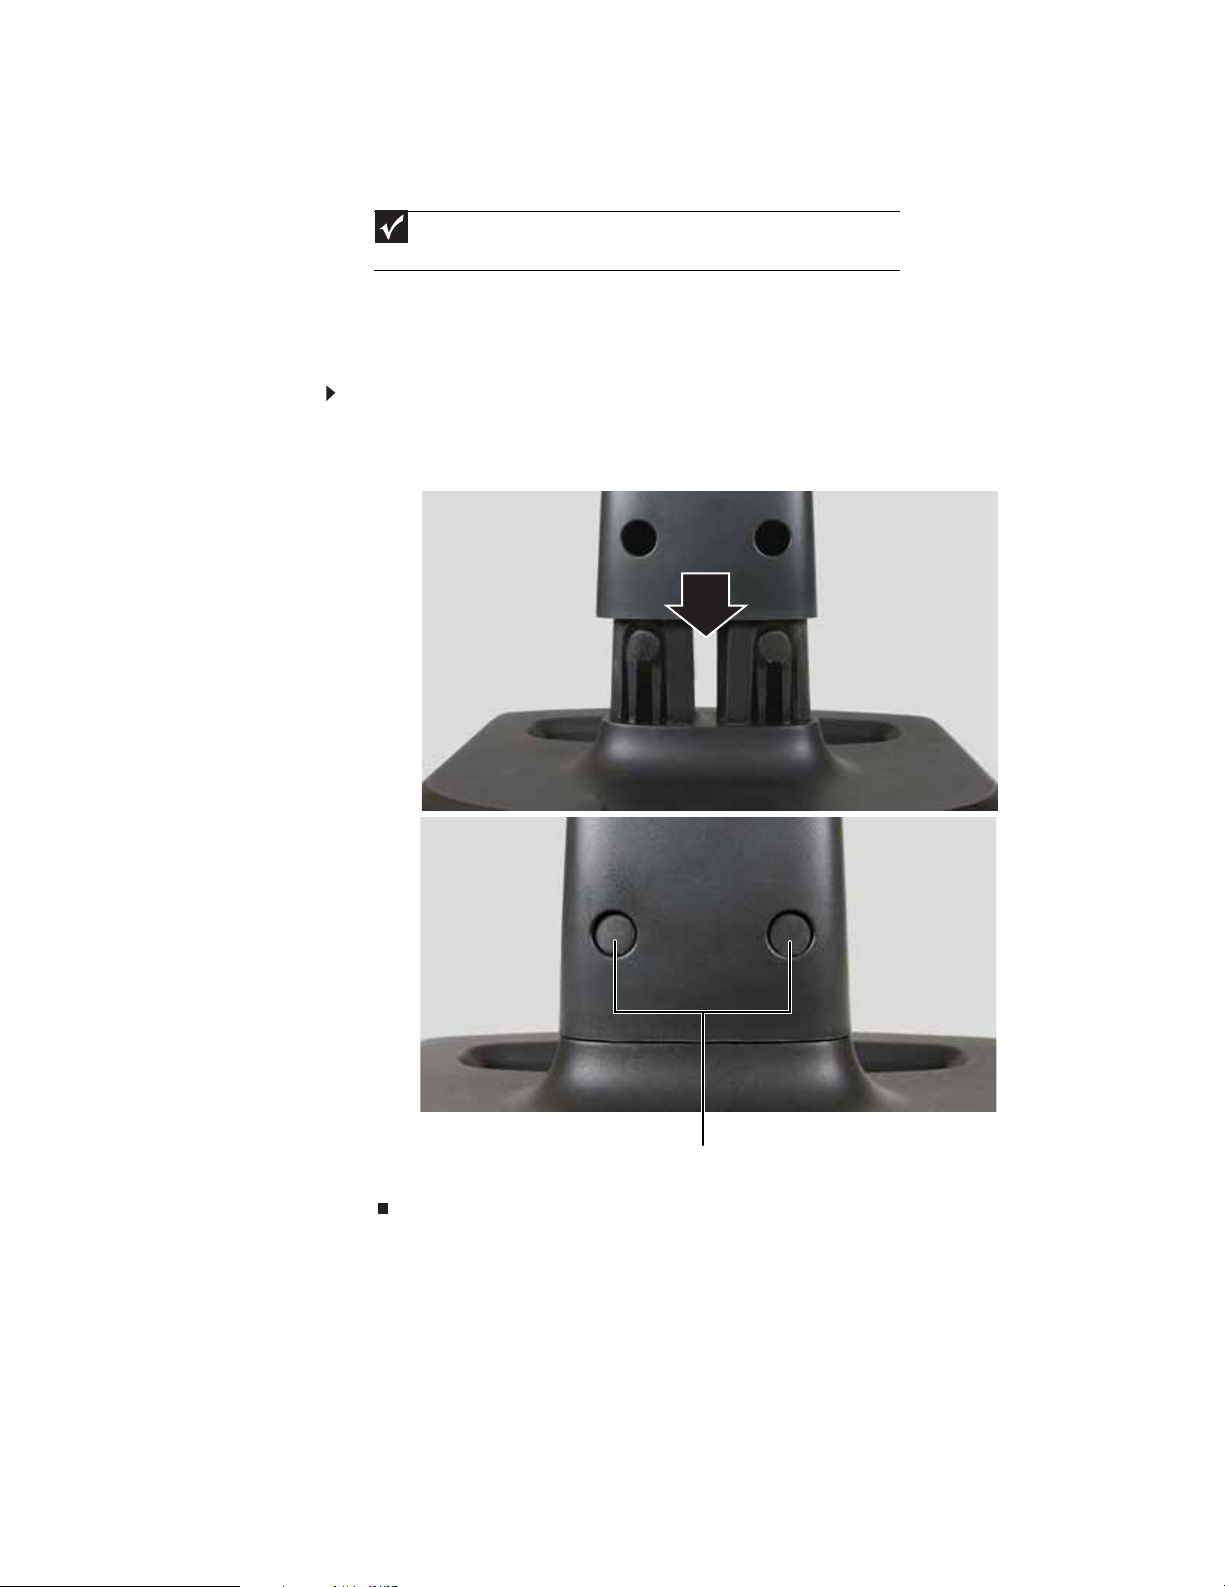
Attachi ng the bas e
To attach the base:
• Place the monitor base on a t able top, then slide th e mon itor neck down onto the base until
it cl ick s i nto pla ce. You may ne ed to p ress the two bu tton s o n th e b ase to l et th e m on ito r
slide on smoothly.
Base buttons
3
Page 8

Connec ting video inputs
To connect video sources to your monitor:
1 Position your computer and the monitor so you can reach the back of each.
Tip (19-inch model)
When using the optional speaker bar (described in “Setting up the optional
speaker ba r” o n page 11), we recommend that y ou use th e inc lude d right-angle VGA
cable for t h e video connectio n so the speake r bar does not obstruct t h e c able. In the
United Stat es, if you a re u sing a DVI c onnec tion, y ou can or der a ri ght -an gle DV I cable
from www.gateway.com
2 If your computer has a digital video connector (DVI), connect a DVI video cable (not included)
to the white connector under the back of the display. The DVI jack is only available on the
19-inch model. In the United States, you can buy a DVI video cable from www.gateway.com
Using Your eMachines Flat-Panel Monitor
.
.
- OR Connect the blue VGA video cable to the blue VGA video connector under the back of
the display. (The appearance of your cable and connector may vary from that shown.)
3 Make sure that your computer is turned off, then connect the other end of the video cable
to the matching video port on the back of your computer.
4
Page 9
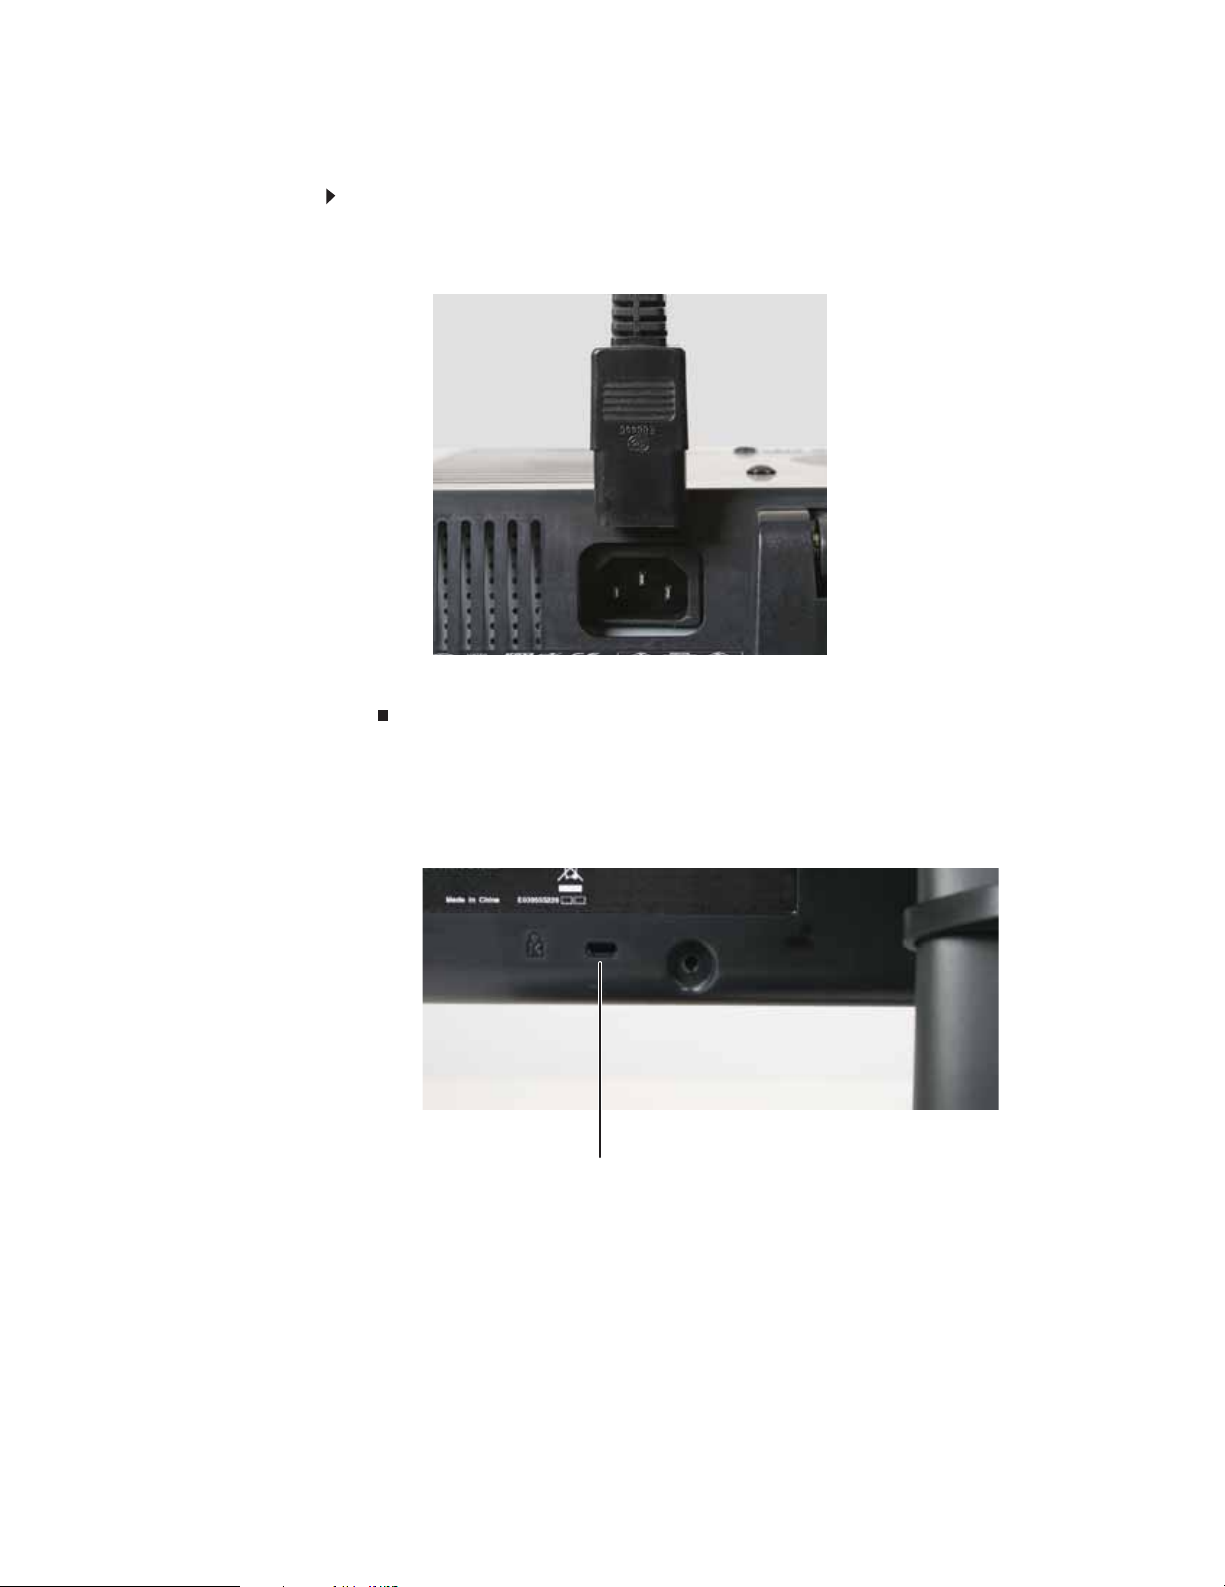
Connec ting pow er
To connect power:
1 Position your monitor so you can r eac h the back, then connect the power cord to the power
www.emachines.com
connector under the back of the monit or. (The appearance of your cable and connector may
vary from that shown.)
2 Plug the power cord into a correctly grounded power outlet. We recommend using a surge
protector to protect your monitor from voltage spikes.
Connec ting a sec urity c able
Y ou can secure your monitor to your computer desk (or to another heavy objec t) w ith a cable lock
(such as a Kensington™ lock). To connec t a c able loc k, f ollo w the c able lo ck ’ s instr uc tions t o conn ect
it to the lock slot on the back of your monitor (cable lock not included).
Cable lock slot
5
Page 10
Using Your eMachines Flat-Panel Monitor
Set ting up the optional stand
Attachi ng the USB stand
In the United Stat e s, yo u can buy an adjusta ble USB stand f r om www.gateway.com. You can adjust
the stand for height, tilt, and screen rotation. When the stand is connected to your computer’s
USB port, you can connect up to four USB devices to the USB 2.0 ports on the stand.
To attach the adjustable st and:
1 Make s ure th at th e m on ito r i s t urn ed off.
2 Place the monitor face-down on a stable, soft (non-marring) surface. A non-slip mat on a
tabletop is ideal. Let the monitor base hang down over the edge of the tabl e.
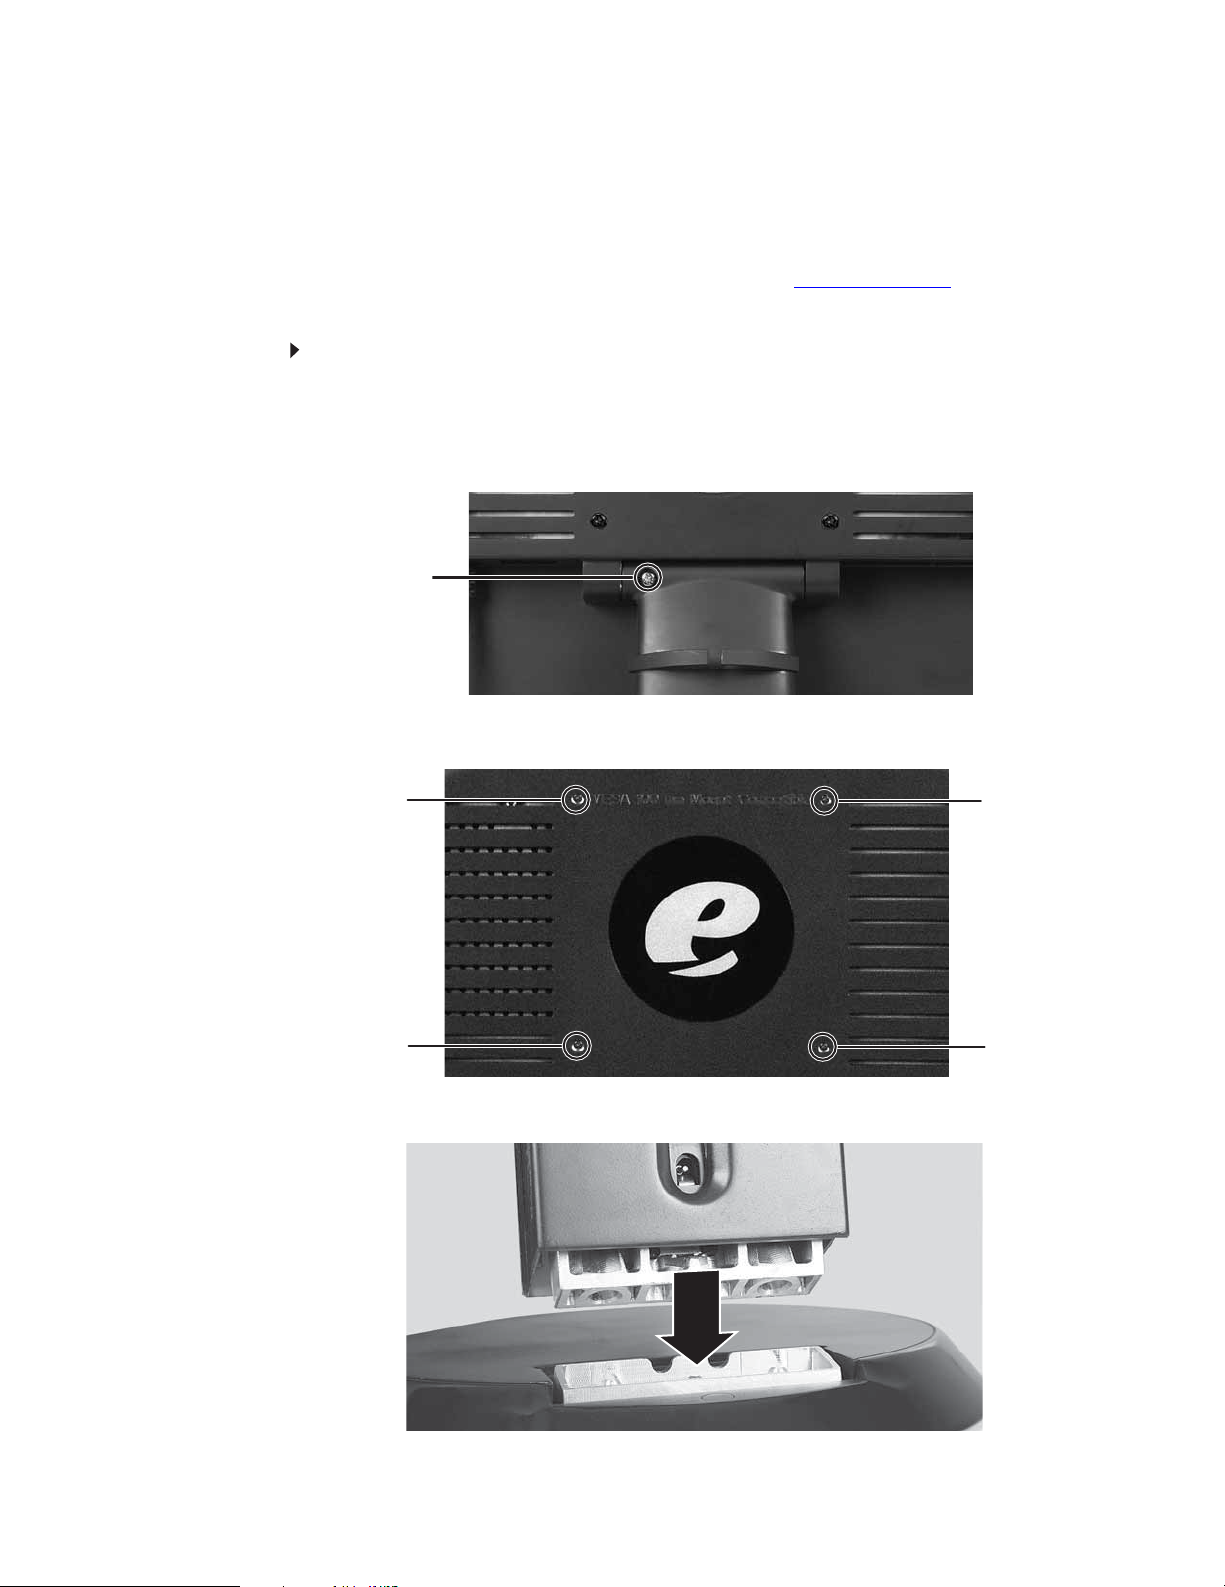
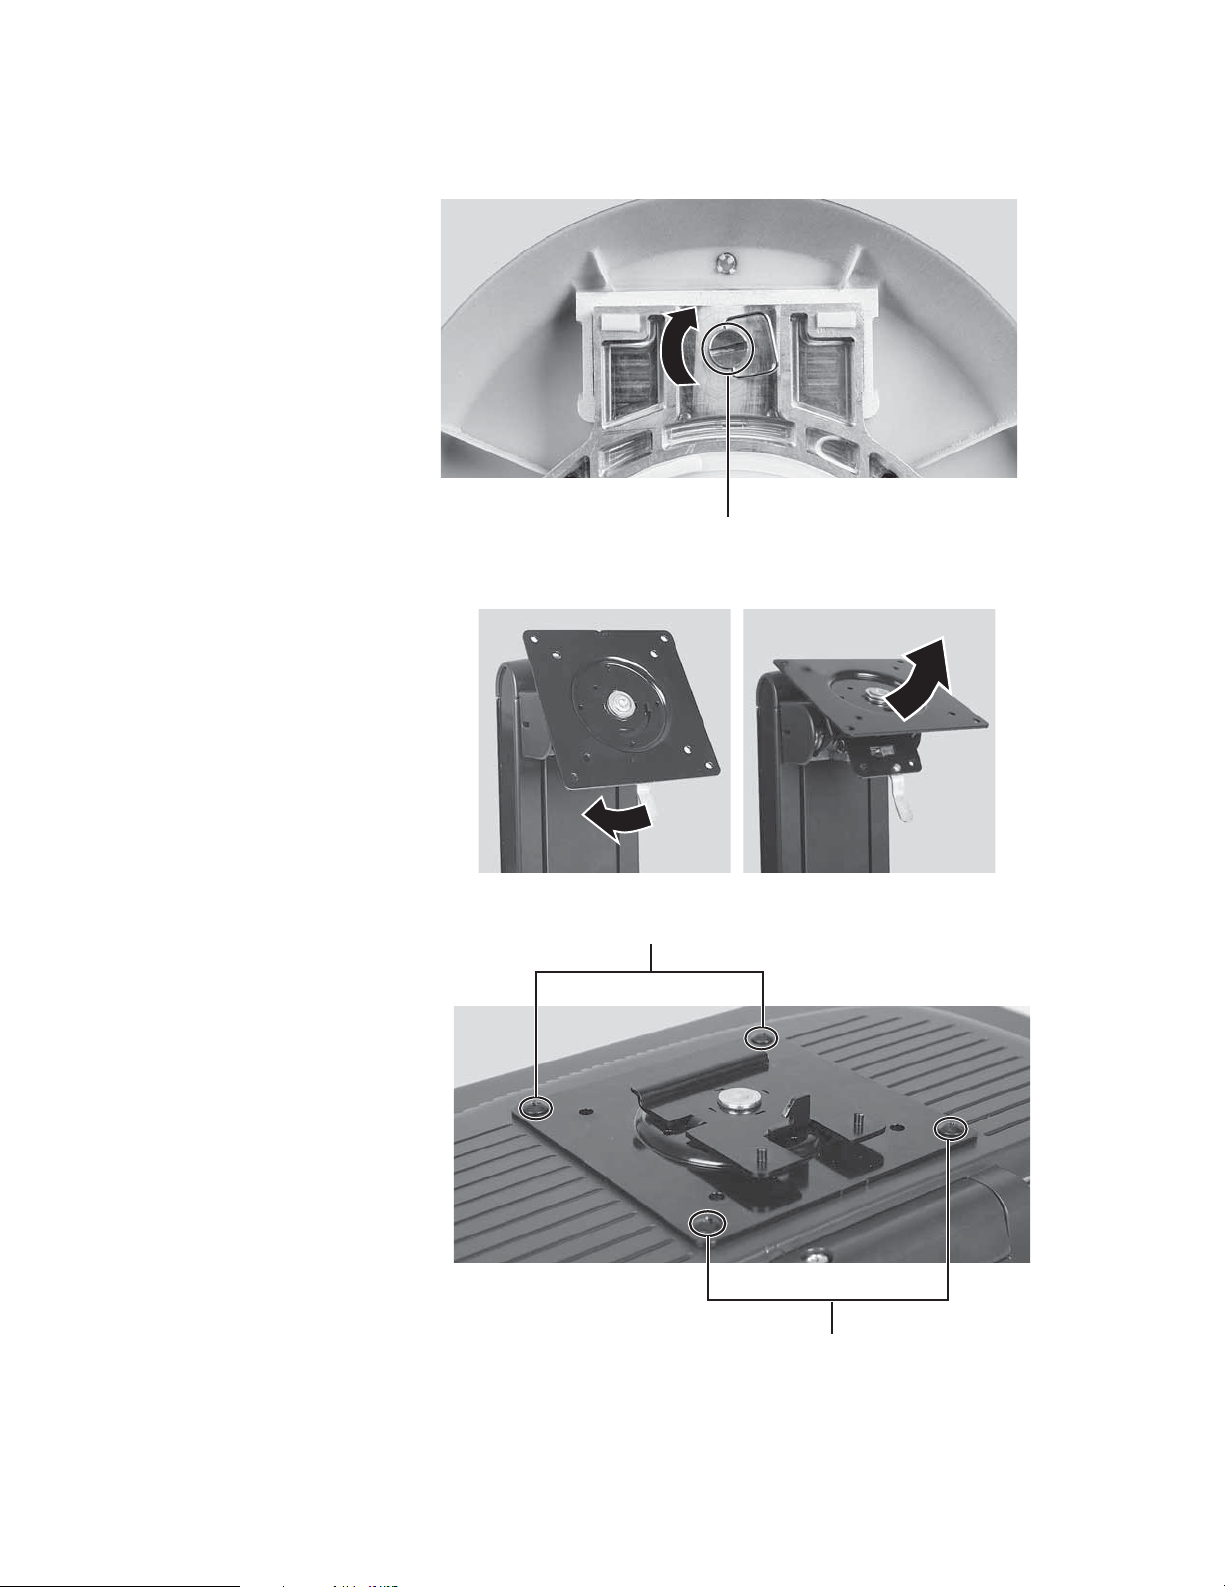
3 Remove the screw from the neck hinge, the n remove the n eck from the LCD panel.
Screw
4 Remove the four small screws from the back of the LCD panel. Save the four screws.
Screw
Screw Screw
Screw
5 Slide the adjustable stand’s neck onto the base.
6
Page 11
www.emachines.com
6 Tighten the thumbscrew under the base with your fingers (or a flat screwdriver) to secure
the neck into place.
Thumbscrew
7 With the stand facing you, press the mounting bracket lever to the left and hold it, then
remove the bracket from the st and.
8 Attach the bracket to the LCD panel using the four screws you removed previously.
Screws
Screws
7
Page 12

Using Your eMachines Flat-Panel Monitor
9 Slid e th e n eck ’s bra cket s lo t o nto the bra cket’s mo unt in g t ab.
10 Press the bracket lever to the right and hold it, then lower the neck into place and release
the lever.
Adjusting monit or height t ension
The stand is factory adjusted to maintain the height for your monitor. However, if it does not stay
in place when you let go, you need to change the stand’s height tension. You also need to adjust
the stand if the amounts of force required to raise and lower the monitor are not equal.
To adjust your monitor’s height tension:
1 Press the screwdriver access h ole ca p from bel ow the b ase to remove it from the base.
Screwdriver access cap
8
Page 13

www.emachines.com
2 Insert a Phillips scr ewdriv er through the access hole in the base and onto the height t ension
screw (on the back of the stand, in the slot above the USB In port).
Height tension screw
3 Adjust the height tension scr ew s o the monitor sta ys in place when you let go. If the monitor
lowers by itself when you let go, turn the screw clockwise several complete turns. If the
monitor rise s wh en you le t go, turn th e sc re w count er-clockwise se v er al complet e tur ns. You
may need to tu rn the screw several ti mes before the tension is co rrect for your size of
monitor.
4 Adjust the height tension screw so the r aising and lowering for ces are equal. Aft er the f orces
are equalized, turn the tension screw clockwise two to four turns to slightly decrease the
lifti ng ten si on.
5 Replace the screwdriver access hole cap.
6 For optimum viewing, adjust the height so the top of the monitor is about 1inch (2.5 cm)
below eye level.
Adjusting monit or tilt tension
To adjust your monitor’s tilt tension:
• Adjust the tilt tension screw (on the top of the stand) so the monitor stays in place when
you let go. If the monitor chan ges its ti lt angl e when you let go, turn the screw clockwise
one com pl ete t urn to i ncr ease the ten si on.
Tilt tension screw
9
Page 14

Ergonomic guidelines
The recommen ded sc reen positi oning is ba sed up on the f o llow ing guidel ine s. Thes e guide lines ar e
based on available scientific literature and published standards.
Screen heig ht
The recommended screen height for displays (except in special circumstances, such as for bifocal
use) is that the top of the display should be set at or slightly below (about 1 inch or 25mm) your
eye level while you are sitting in a comfortable working posture. This guideline places the center
of the screen at an ideal 15° to 20° viewing angle for most desktop displays. If the display has
multiple users, the screen height should be easily adjustable to accommodate each user’s height
and preference.
Screen tilt
The screen should be tilted so your line of sight is perpendicular to the screen. This angle creates
the m ost co ns iste nt viewi ng di st anc e w hen sc an nin g fro m th e to p of t he scree n to th e bo ttom .
You may need to adjust lighting to avoid screen glare when the screen is tilted upward.
Screen distance from user
The screen should first be placed at arm’s length from the user, then adjusted back and forth to
suit individual preference.
Connec ting the U SB hub
Using Your eMachines Flat-Panel Monitor
The optional USB stand has a built-in, 4-port, USB 2.0 hub. To use these USB ports, you need to
connect the hub to a power outlet and to your computer.
To connect your USB stand’s built-in USB hub:
1 Plug the included USB cable into the USB In port on the back of your USB stand and i nto a
USB 2.0 port on your computer. If you connect the stand to a USB 1.1 port on your computer ,
the stand’s USB hub operates in USB1.1 mode (much slower than USB 2.0).
USB In p or t
Power connector
USB 2.0 p ort s
10
2 To provide full power to your stand’s USB ports (recommended), c onnect the ACpower
adapter to the power connector on the back of your USB stand and to an ACpower outlet.
Page 15

www.emachines.com
Set ting up the optional speak er bar
Headphone jack
Bass port (for bass so und. Do no t blo ck.)
Installing the speak er bar
To install the speaker bar:
Tip (19-inch model)
When usi ng the o pt ion a l s pe aker ba r, we re co mm en d that yo u us e th e
included right-angle VGA cable for the video co nne ction so th e s peaker bar does not
obstruct the cable. In the United States, if you are using a DVI connection, you can
order a right-angle DVI cable from www.gateway.com
Powe r / Vol u me c o n tro l
Power i ndic ator
Microphone jack Headphone jack
.
Kensington lock slot
Bass port (for bass sound. Do not block.)
1 Tilt the screen back, then center the speaker bar below the screen. Make sure that the
speakers face forward.
2 Tighten the two thumbscrews on the back of the speaker bar.
3 Connect the speaker bar’s USB power cord to any available USB port on your computer.
4 Connect the speaker bar’s headphone (green) and microphone (pink) cables to your
computer’s headphone and microphone jacks.
5 If your computer is not already on, turn it on.
11
Page 16

Using Your eMachines Flat-Panel Monitor
6 Turn on the speaker bar by rotating the power/volume knob clockwise. The green LED to
the left of the power butt on is lit when pow er ha s been correct l y connect ed and the speak er
bar has been t urned on.
Starting the monit or
To s t a rt t h e m o n i to r :
1 Press the power button on the front of your monitor. The power LED on the power button
turns on. (The appearance of your monitor may vary from that shown.)
12
Powe r b ut ton
2 Turn on y ou r co mp ut e r.
After your computer is running, the power LED on the monitor’s power button should be
blue. Allow about 10 seconds for the display image to appear. If the power LED is not blue
or you do not see a display image, check the connections. For more troubleshooting
information, see “Troubleshooting” on page 20.
3 Adjust the tilt of the monitor for the best viewing angle.
4 After yo u see the Win d o ws d e s k top, pres s the Auto butto n o n t h e rig h t s ide of the m onito r
to auto ma ti cal ly a dj ust you r d is play im ag e to the id ea l sett in gs .
5 Use the on-screen display (OSD) to adjust other monitor settings. For more information, see
“Adjusting monitor settings” on page13.
Important
When adjusting the monitor settings, always press the Auto button before
entering the OSD. T his will automaticall y adjust the displa y image to the ideal settings
for the current screen resolution.
Page 17

www.emachines.com
Adjusting monit or set tings
Use the monitor controls (locat ed on t he monitor itself) and computer contr ols (acces sible thr ough
Windows) to adjust the display image. For more information about computer controls, see
“Changing Windows screen settings” on page 17.
Monitor but tons
This monitor f eatures an on-screen display (OSD) that lets you adju st contrast, brightnes s, and other
settings for the monitor. The monitor saves changes you make to the settings, even if you turn off
the monitor. (The appearance of your monitor may vary from that shown.)
Input button
Auto butto n
Bright ness b utton
Contrast bu tton
Menu button
• Input
OSD active: Press to move to the previous menu.
OSD inactive: Press to select the video source.
• Auto
OSD active: Press to open a menu or setting.
OSD inacti v e : Pre s s t o automatically optimize the monitor’s image po si tion, cl ock , andphase.
• / (brightness)
OSD active: Press to move up through menus and adjust OSD options.
OSD i nacti ve: Pr ess to o pen the Brightness menu.
• / (co ntrast)
OSD active: Press to move down through menus and adjust OSD options.
OSD i nacti ve: Pr ess to a dju st th e co ntr ast.
• Menu
Press to open or close the OSD.
13
Page 18

On-scr een display optio ns
Adjusti ng OSD settin gs
To adjust the OSD settings:
Tip
While the OSD is active, on-screen labels appear next to the buttons to help
you identify them.
1 Press the Auto button. The display image is automatically adjusted to the ideal settings for
your current screen resolutio n.
2 Press the Menu button. The OSD opens.
3 Press th e / (b rig ht nes s) or / (con tr ast ) bu tton s to h ig hli gh t a s etti ng , th en p ress
the Auto button to open the selected menu or setting.
4 Press the / (brightness) or / (contrast) buttons to adjust the setting to the desired
level or change the opt ion.
5 Press the Input button to retu rn to a previ ou s me nu .
6 When you have finished making all adjustments, press the Menu button at the Main Menu
to exi t.
Using Your eMachines Flat-Panel Monitor
14
Page 19

www.emachines.com
OSD menus
OSD Menu Description
Main menu
Main Menu
Auto
Picture
Geometry
Advanced
Reset
Picture menu
Picture
Brightness
Contrast
Auto—Automaticall y adjusts your mo nitor to its optim um
settings.
Picture—Opens the Picture menu, where you can adjust
brightness, contrast, and gamma.
Geometry—Op ens the Geometry menu, where you can
adjust image size and minimize distortions.
Advanced—Opens the Advanced menu, where you can
adjust color balance, change the OSD language, and
display information about current monitor settings.
Reset—Resets the monitor to its factory settings.
Brightness— Adjusts th e amount of lig ht in the darkest
portion of the picture. Use the lowest brightness setting
you are comfortable with to maximize the life of the
monitor backlights.
You may need to readjust bright ness after the monitor
warm s up .
Contrast—Adjusts the le vel of wh it e bet wee n th e light es t
and darkest portions of an image.
Gamma—Customizes the gamma level. High gamma
levels increase white levels and low gamma levels
increase contrast.
Gamma
15
Page 20

Using Your eMachines Flat-Panel Monitor
OSD Menu Description
Geometry menu
Geometry
H-Position
V-Position
Clock
Phase
Adva nced menu
Advanced
Color
Language
LED Brightness
H-Position—Moves the display image left and right. You
can also press the Auto button t o configure the horiz ontal
position automatically.
V-Position—Moves the dis play image up and down. You
can also press the Auto button to configure the vertical
position automatically.
Clock—Minimizes any vertical bars or stripes visible on
the screen background. The horizontal screen size will
also change.
Phase—Minimize s an y h or izontal distortion and clears or
sharpens the displayed characters.
Color—Customizes the color levels.
Language—Changes the language of the OSD.
LED Brightness—Changes t he bri ghtn es s of t he Standby
and Power LED to Day Mode or Nite Mode.
Resolu tio n Rem ind er—If the computer display input is
not set to 1440× 900, di splays a reminder that you
should change your computer’s settings to use the
optimum 1440×900 resolution. If you prefer using your
monitor at a resolu ti on l ess tha n tha t, use thi s op tio n to
turn off the Resolution Reminder. For information on
changing your computer’s display resolution, see
“Changing Windows screen settings” on page17.
Information—Displays the current screen resolution.
Resolution Reminder
Information
16
Page 21

www.emachines.com
Changing Windo ws s creen s ettings
Color depth and screen resolution are two of the most basic monitor settings you may need to
change to suit your needs.
Color depth is the number of colors your computer uses to display images on your monitor. Most
images look best displayed with the maximum number of colors available. If the color in your
images seems “false” or “jump y,” especially af t er y ou ha v e pla yed a game or run a video-intensive
program, check the color depth setting and return it to the highest color setting, if necessary.
Screen resol uti on is the number of pixels (individual colored dots) your computer uses to display
images on your monitor. The higher the resolution, the more information and scre en components
(such as icons and menu bars) can be displayed on the monitor.
Help
For more information about adjusting the screen, click Start, then click Help and
Support. Type adjusting monito r settings in the Search Help box, then press E
To change the color depth and screen resolution in WindowsVista
1 Click (Start), Control Panel, then under Appearance and P ersonalization, c lick Adjust
Screen Resolution. The Display Settings dialog box opens.
Shortcut
You can also right-click on your Windows desktop, then click Personalize.
2 To change the color depth, click the Colors list, then click the color depth you want.
Color depth settings:
• Low (8-bit) = 256 colors
• Medium (16-bit) = 65,500 colors
• Highest (32-bit) = 16,700,000 colors
3 To change the screen resolution, drag the Resolution slider to the size you prefer.
4 Click Apply. If the new set tings do not look right, click No. If the new settings mak e the screen
illegible and you cannot click No, th e se tti ngs ret urn to thei r previ ous val ue s a fter s evera l
seconds.
5 Click OK, then click Yes to save yo ur cha ng es.
NTER.
®
:
To change the color depth and screen resolution in WindowsXP:
1 Click Start, then click Control Panel. The Contro l Panel opens. If your Control Panel is in
Category View, click Appearance and Themes.
Shortcut
You can also right-click on your Windows desktop, then click Properties.
2 Click Display. The Di splay Pro perties dialog box opens.
3 Click the Settings tab.
4 To change the color depth, click the arrow button to open the Color quali ty list, then click
the color depth you want.
Color quality settings:
• Low (8-bit) = 256 colors
• Medium (16-bit) = 65,500 colors
• Highest (32-bit) = 16,700,000 colors
5 To change the screen resolu tion, drag the Sc reen resolution slider to the size you prefer,
then click OK. The optimum resolution for your display is 1440 × 900.
17
Page 22

Video mo des
Using Your eMachines Flat-Panel Monitor
Your monitor supports several video modes. If you do not use the best mode for the monitor, the
display image may look s lightly “ fuzzy.”
Mode Mode name and
resolution
1 VGA 640× 350 31.469 70.087 No
2 VGA 640× 480 31.469 59.941 Yes
3 VESA 640× 480 37.861 72.810 Yes
4 VESA 640× 480 37.500 75.000 Yes
5 VGA 72 0 × 4 00 31.469 70.087 No
6 VESA 800× 600 35.156 56.250 Yes
7 VESA 800× 600 37.87 9 60.31 7 Yes
8 VESA 800× 600 48.077 72.188 Yes
9 VESA 800× 600 46.875 75.000 Yes
10 VESA 1024 × 768 4 8.363 60.0 04 Yes
11 VESA 1024 × 768 56.476 70.069 Yes
12 VESA 1024 × 768 60 .02 3 75.0 29 Yes
13 VESA 1280 × 1024 63.980 60.020 Yes
14 VESA 1280 × 1024 79.976 75.0 25 Yes
Horizontal
frequency ( kHz)
Vertical
frequency (Hz)
Availa ble in DVI mode
(19-inch model)
15 V ESA 1440 × 9 00 55.935 59.887 Yes
16 VESA 1440 × 900 70.635 74.984 No
18
Page 23

P ower man agement
ENERG Y STAR
As an ENERG Y STAR® Partner, eMachines has det ermined that this pr oduct meets the ENER GY S TAR
guidelines for energy efficiency.
This monitor complies with the EPA’s International ENERGY STAR Program, which is a program
designed to encourage manufactur ers of computer equipment to build cir cuitry into t heir products
to reduce energy consumption during time of non-use.
Energy declar ation
When connected to a computer that supports the VESA Display Power Management Signaling
(DPMS) Protocol, the monitor can conserve significant energy by reducing power consumption
during periods of non-use. When your computer goes into the energy saving mode, the monitor
enters the ActiveOff mode (sleep) . In the ActiveOff mode the Power LED turns orange.
Use these conventions and the power can be reduced to the following levels:
www.emachines.com
VESA state LED indicator 17-inch power
consumption
On Blue < 25 W < 38 W
ActiveOff Orange < 2W < 2W
To “wake” the monitor when it is in Active Off mode, move the mouse or press any keyboard key.
Access the power management options in the Control Panel to change the period of time after
which the monitor enters these low power states.
19- in ch po wer
consumption
19
Page 24

Maintaining
To keep the monitor in optimal working order:
• Do not block the ventilation holes.
• Do n ot exp ose the mo nito r to ra in o r u se n ea r wa ter.
• Keep th e m on ito r away from ra dia tor s o r h ea t ve nt s.
• Keep the monitor out of direct sunlight.
Caution
Do not use any type of abrasive pad or glass cleaner. You will permanently
scratch the screen.
• To clean the monitor, use a soft cloth slightly moistened with water only. Wipe the cabinet,
screen, and controls.
Troubleshooting
Important
Make sure that the monitor has warmed up for approximately 30 minutes before
making any judgments about the picture quality.
Using Your eMachines Flat-Panel Monitor
No power
No picture
If you have problems with the monitor, the information in this troubleshooting section may help
you solve them.
• Make sure that the power cord is connected correctly to both the back of the monitor and
the wall outle t. F or mor e information about connecting the p ower cord, se e “Connec ting the
monitor” on page 3.
• Make sure that the power cord is connected correctly to both the back of the monitor and
the wall outle t. F or mor e information about connecting the p ower cord, se e “Connec ting the
monitor” on page 3.
• Make s ure tha t th e vi de o c ab le i s c on necte d se cure ly to the ba ck o f th e m on itor an d
computer. For more information about connecting the video cable, see “Connecting the
monitor” on page 3.
• Make s ure th at the mon ito r i s t urn ed on .
• If you have the monitor connected to your notebook’s video port, you have two options:
• If your notebook supports dual displays, you can use both your notebook’s display and
this monitor in extended desktop multi-monitor mode. See Windows Help to learn how
to enable multiple monitors.
• You can also use this monitor as your primary monitor and not use the notebook’s
screen. Notebook computers typically have an FN key combination that lets you toggle
between your notebook’s display, an externally attached display, and both at the same
time. See your notebook’s user guide for more information.
20
Page 25

• If the power LED is orange :
• Make sure that your computer is turned on.
• Move the mouse or press any key on the keyboard to bring the monitor out of sleep
mode.
• Restart your computer with the monitor turned on.
• Make sure that the video cable is not damaged.
• Check the end of the video cable for any pins that might be bent or pushed in.
• Turn off the monitor and unplug the video cable from the back of you r computer. Turn the
moni tor ba ck o n a nd wai t for ten sec on ds. If th e m oni tor is fun cti on ing co rre ctly, a “No
Signal” message appears. For more information about connecting the video cable, see
“Connecting the monitor” on page 3.
Display colors ar e wrong
• Press Menu, then Auto to au toma ti ca lly adj ust th e d is play im ag e to t he id eal s etti ngs .
• Restart your computer with the monitor turned on.
• Make sure that the video cable is connected securely to the back of the monitor and your
computer. For more information about connecting the video cable, see “Connecting the
monitor” on page 3.
• Make sure that the video cable is not damaged.
• Check the end of the video cable for any pins that might be bent or pushed in.
www.emachines.com
Pic ture has shado ws or “ gho sts”
• Press Menu, then Auto to au toma ti ca lly adj ust th e d is play im ag e to t he id eal s etti ngs .
• Remove any extens ion cab les o r switchb oxes.
• Make sure that the video cable is connected securely to the back of the monitor and your
computer. For more information about connecting the video cable, see “Connecting the
monitor” on page 3.
• Make sure that the video cable is not damaged.
• Check the end of the video cable for any pins that might be bent or pushed in.
• Make sure that your monit or connection is using the VGA cable that came with y our monitor.
Color is not unif or m
• Press Menu, then Auto to au toma ti ca lly adj ust th e d is play im ag e to t he id eal s etti ngs .
• Make sure that the monitor w arms up for at lea st 30minutes before making a final judgment
about color uniformity or brightness.
Image is not siz ed or cent ered correc tly
• Press Menu, then Auto to au toma ti ca lly adj ust th e d is play im ag e to t he id eal s etti ngs .
• Use the position controls to adjust the image. For instructions on how to adjust the display
image position, see “Adjusting monitor settings” on page 13.
21
Page 26

Using Your eMachines Flat-Panel Monitor
• If the image looks stret che d or fuzzy , you mu st adjust the oper ating sy st em’ s displa y se ttings
to match the m oni tor ’s op tim al ( native) 1440 × 900 setting. For information on adjusting
settings, see “Changing Windows screen settings” on page 17.
• If you are trying to select 1440 × 900 but it is not available in the Windows display
controlpanel:
• Make sure that your video card can display at 1440 × 900 resolution.
• This may be cau sed by older v ideo dri vers on y our computer . See the eMachines suppor t
Web s i te ( www.emachines.com
also go directly to your video card’s support Web site for the most up-to-date video
drivers. The Web sites for the major video card manufacturers are:
®
ATI
: www.ati.com
Intel®: www.intel.com
Nvidia®: www.nvidia.com
) for updated video drivers fo r your computer. You can
• If your games do not have support for widescreen displays:
• Newer games are adding support for widescreen displays as the widescreen format
becomes more popular. Check the game’s Web site for updates. You can also consult
the following Web site for specific settings and options to configure older games to
support widescreen: www.widescreengamingforum.com
• Some adjustments may require you to make changes to the Windows System Registry.
We recommend making a complete system backup before changing the System Registry.
The monit or has pi xels that are alw a ys dark or t oo bright
.
• This condition is normal and inherent in the TFT technology used in active-matrix LCD
screens. eMachines’ inspection standards keep these to a minimum. If you feel these pixels
are unacceptably numerous or dense on your display, contact eMachines Customer Care to
identify whether a repair or replacement is justified based on the number of pixels affected.
Connec ting an HDMI s ource ( 19-inch model)
• Y ou can connect the HDMI output of your ext ernal v ideo device t o the DVI port of t he monitor .
In the United States, you can buy an HDMI-to-DVI adapter cable from www.gateway.com
When using the digital connection, your video cont ent remains completely digital fr om your
exter n a l v ideo device (such as a cable box, HD DV R, or DVD player). This results in a superior
digital im age.
Important
Although the HDMI inter face suppor ts audio, no audio is sent to the monitor.
You must separately connect the a udio output of your video d evice to an external
audio amplifier.
Connec ting a game consol e
• If you want to connect your game console to this monit or , use optional video cables (avai lable
at www.gateway.com if ordering from the United States). To determine the type of cable
you need, see your gaming console’s documentation.
Speake r bar does not work
The speaker bar is installed, but no sound is coming out of the speakers.
• Make sure that its power cord is plugged into a USB port on the back of your computer.
• Make sure that the volume control knob on the front of the speaker bar is turned on. Turn
the knob clockwise to turn on the speakers and increase the volume. Turn the knob
counter -clockwise to dec rease the volume and turn of f the speakers. The speaker bar’s pow er
indicator lights blue when power is connected and the speakers are turned on.
.
22
Page 27

www.emachines.com
All connections are made correctly and the speaker bar is on, but there is still no sound.
• Your headphone/speaker jack may have been muted using Windows sound controls. To
check your headphone/speak er mute setti ngs, click the speak er icon in the Windows ta skbar ,
or click (Start), Control Panel, Sounds and Audio Devices, the Volume tab, then click
Advanced. For optimum volume control using the speaker bar, we recommend that you
set the Windows volume mid-way between the lowest and highest setting.
You want to know which headphone jack on the speaker bar to use.
• You can use either j ack or bo th jack s at the same t ime.
The sound comin g from the speakers soun ds distorted.
• Turn down the volume until the distortion disappears.
• Check the audio output volume of the sound device the speaker bar is connected to. If the
audio device’s output volume is set too high, the speaker bar’s sound may always be
distorted. To adjust the audio device’s output volume, see the device’s user guide. To adjust
the volume in WindowsXP, click the speaker icon in the Windows taskbar. For optimum
volume control using the speaker bar, we recommend that you set the Windows volume
mid-way between the lowest and highest setting.
You plugged your microphone into the speaker bar’s microphone jack, but your computer still cannot record any sound.
• Make sure that the speaker bar’s pink microphone plug is connected t o the mic r ophone jack
on your computer.
• Your microphone jack may have been muted using Windows sound controls. To check your
microphone’s m ute settings, click the speaker icon in the Windows taskbar.
23
Page 28

Specif ications
Specifications are subject to change without notice or obligation. Many products for eMachines
are custom engineered by our suppliers to eMachines specifications and may vary from similarly
marketed products.
Using Your eMachines Flat-Panel Monitor
17- in ch m o d e l 19-inch model
Pane l s ize
Panel type
Pixel resol ution
Pixel pitch
Aspect rati o
Brightness and
contrast ratio
Viewing angles
Response time
Lamp type/life
Colors
OSD lang uages
Connections and
inputs
17 inches (diagonal) 19 inches (diagonal)
17-inch viewable TFT with anti-g lare
coating
1440× 900 (native) 1440× 900 (native)
0.01×0.01inches (0.255 × 0.255 mm) 0.0112×0.0112inches
16:10 16:10
250 c d/ m2, 600:1 300 cd/m2, 700:1
160° h o ri zo nt a l
150° ve r ti c a l
8ms 5ms
2 dual CCFT/ 40,000 hours 40,000 hours
16.2 million 16.2 million
English, French, Spanish, Italian,
Japanese, Dutch
Analog (VGA): 15-pin mini d-sub VGA
AC power
19-inch viewable TFT with anti-glare
coating
(0. 2835 × 0 . 2835 m m)
150° h or i zo nt a l
135 ° v er t ica l
English, French, Spanish, Italian,
Japanese
Analog (VGA): 15-pin mini d-sub VGA
Digital (DVI-D): 24-pin DVD-D wit h HDCP
AC power
24
Cables
Power
consumption
Power inp ut
Power
management
Certifications
Wall mount
bracket
Dimensions
15-pin mini d-sub analog VGA
(included)
Normal operation: <25W
Off (power-save): <2 W
100-240 VAC, 50/60Hz 100-240 VAC, 50/60Hz
Energy Star
UL, cUL, FCC Class B, NOM, CE.
VCCI where applicable.
VES A 3. 93 7 × 3 . 937 i n ch es
(100× 100mm)
16.05×37.12× 7.13 inches
(4 0 .7 7 × 39.01 × 18.1 cm ) w i th b as i c
stand
®
15-pin mini d-sub analog VGA
(included)
24-pin DVI-D (not included)
Normal operation: <38 W
Off (power-save): <2W
Energy Star
UL, cUL, FCC Class B, NOM, CE.
VCCI where applicable.
VESA 3.937 × 3.937 inches
(100 × 100 mm)
17.52 × 15.36 × 7.04 inch es
(44.50× 39.01 × 17.88 cm) with basic
stand
®
Page 29

Saf et y , R egulat ory , and
• Important safety information
• Envir onmental infor mation
• Regulatory compliance statements
• Notices
Legal Notices
25
Page 30

Safety, Regulatory, and Legal Notices
Important saf ety inf ormation
Warning
Alway s follow these instructions t o help gu ar d agai nst person al inju ry and damag e t o y our Gat e w a y product.
Warning
Do not use Gat e w ay produc ts in are a s c la s sif ied a s ha zar dou s l ocati ons. Suc h ar ea s include patient car e are a s
of medical and dental facilities, oxygen-laden environments, or industrial facilities.
Your Gate wa y product is designed and tested t o meet the latest standards for safety of information technology equipment. However,
to ensure safe use of this product, it is important that the safety instructions marked on the product and in the documentation are
followed.
Setting up your syst em
■
Read and follow all instructions marked on the pr oduct and in the documentation before y ou operate your sy st em. Retain all saf ety
and operating instructions for future use.
■
Do not us e th is pr odu ct ne ar w at er o r a heat sou rce suc h as a ra diat or.
■
Set up the system on a stable work surfa ce.
■
The product should only be operated from the type of power source indicated on the rating label.
■
If your product has a voltage select or swit ch, mak e sure that the sw itc h is in the proper position for y our area. The voltage selector
switch is set at the factory to the correct voltage.
■
Openings in the monitor case are provided f or ventilation. Do not block or cover t hese openings. Make sure y ou prov ide adequate
space, at least 6 inches (1 5cm), around the system for ventilation when you set up your work area. Nev er insert objects of any kind
into the monitor ventilation openings.
■
Some products are equipped with a three-wire power cord to make sure that the product is properly grounded when in use. The
plug on this cord will only fit into a grounding-type outlet. This is a saf ety f eature. If y ou are unable to insert t he plug into an outlet,
contact an elec tric ia n to instal l t he appr opr iat e out let.
■
If you use an extension cord with this system, make sure that the total ampere rating on the products plugged into the extension
cord does not exceed the extension cord ampere rating.
Care during use
Warning
To pr e v ent elec tric shoc k, ne ver r emo v e the cov er. No user serviceable parts inside . Re f er servi c ing t o qualifi ed
service personnel.
■
Do not walk on the power cord or allow anything to rest on it.
■
Do not spill anything on the system. Th e best wa y to av oid spills is to a v oid eating and drinking near your system.
■
Do not ex pos e t he mon it or t o r ain or us e ne ar w at er. If the monit or doe s ge t e xpos ed to m oist ure , unpl ug it an d all ow it t o dry for
24 hours. Call Gateway Customer Care for advice on whether the monitor is safe to turn back on.
■
When the monitor is turned off, a small amount of electrical curr ent still flow s through the monitor. To avoid electrical shock,
always unplug all power cables and modem cables from the wall outlets before cleaning the system.
■
Unplug the system fr om the wall outlet and ref er servic ing to qualified personnel if:
■
The power cord or plug is damaged.
■
Liquid has been spilled into the system.
■
The system does not operate pr operly when the operating instructions are follo wed.
■
The system wa s dropped or the cabinet is damaged.
■
The system performance changes.
Replacement parts and accessories
Use only replacement parts and accessories recommended by Gateway.
26
Page 31

www.emachines.com
Env ironmental inf ormation
Recycling
Mercury Warning
The lamp(s) in this display contain mercury. Dispose according to local, state and federal law.
Hg
The product you have purchased contains extract ed natural resources t hat have been used in the manufacturing process. This product
may contain substances known to be hazardous to the environment or to human health.
To pre vent release s of harmful substances into the environment and to maximize the use of our natural resources, Gate wa y provides
the following information on how you can responsibly recycle or reu se most of the materials in your “end of lif e” product.
Waste Electrical and Electronic Equipment (commonly known as WEEE) should never be disposed of in the municipal waste
stream (residential garbage collection). The “Crossed-Out Waste Bin” label affix ed to this pr oduct is y our reminder to
dispose of your “end of life” product properl y .
Substances such as glass, plastics, and certain chemical compounds are highly recoverable , recy clable, and reus able. You
can do y our p art f or t he e nv i ronm ent b y following the s e sim ple st e ps :
■
When your electrical or electronic equipment is no longer useful to you, “take it back” t o your local or r egional wast e collection
administration for recycling.
■
In some cases, your “end of life” pr oduct may be “traded in” for cr edit towa rds the purchase of ne w Gatewa y equipment. Call
Gateway t o see if this pr ogram is a vailable in your ar ea.
■
If you need further assistance in recycling, reusing, or trading in your “end of life” product, you may contact us at the Customer
Care number listed in your product’s us er guide and we will be glad to help you with y our eff ort.
Finally, we suggest that you practice other environmentally friendl y actions by understanding and using the energy-saving features of
this product (where applicable), recycling the inner and outer packaging (including shipping containers) this product was delivered in,
and by dispos ing of or recy c ling u sed ba tt erie s pr operl y .
With your help, we can reduce the amount of natural resources needed to produce electrical and electronic equipment, minimize the
use of landfills for the disposal of “end of life” products, and generally improv e our quality of life by ensuring that potentially
hazardous substances are not released into the en vironment and are disposed of properly .
For additional recycling inf ormation specific t o your area, pleas e go to www.gateway.com/recycle
.
Re gulatory compliance statements
United State s of America
Federal Communications Commission (FCC) Unint entional emitter per FCC P art 15
This device has been tested and found to comply with the limits for a Class B digital device, pursuant to Part 15 of the FCC rules. These
limits are designed to provide rea sonable protec tion against harmful interference in a r esidential installation. This equipment
generates, uses, and can radiate radio frequency energy and, if not installed and used in accordance with the instructions, may caus e
harmful interference to r adio or telev ision reception. Howe ver, there is no guarantee that interference will not occur in a particular
installation. If this equipment does cause interference t o radio and telev ision reception, which can be determined by turning the
equipment off and on, the user is encouraged to try to correct the interference by one or more of the f ollowing measures:
■
Reorient or relocate the r eceiv ing ante nna
■
Increase the separation between the equipment and receiver
■
Connect the equipment to an outlet on a different circuit from that to which the receiver is connected
■
Consult the dealer or an experienced radio/TV technician for help.
Compliance Accessories: The accessories ass ociat ed with this equipment are: shielded video cable. These accesso ries are required t o
be used in order to ensure compliance with FCC rules.
27
Page 32

Canada
Safety, Regulatory, and Legal Notices
FCC declar ation of conf ormity
Responsible party:
Gateway, Inc.
7565 Irvine Center Drive
Irvine, CA 926 18USA
This device complies with Part15 of the FCC Rules. Operation of this de vice is subject t o the f ollowing two conditions: ( 1 ) this de v i ce
may not caus e harmfu l inter fe rence , and (2) t his de vice mu st accept an y interf erence recei ved, including inter ference that ma y cause
undesired operation.
Caution
Changes or m odifi cations not e xpressly approved by Gateway could void the FCC com plianc e and negate
your authority to operate the product.
California Proposition65 warning
This product contains chemicals known to the State of California to cause cancer, birth defects, and/or other
reproductive harm. For additional information regarding this product warning, go to
www.gateway.com/prop65
.
Industry Canada (IC) Unintentional emitter per ICES-003
This digital apparatus does not exceed the Clas sB limits for radio noise emissions from digital apparatus as set out in the radio
interference regulations of Industry Canada.
Le pré se nt appa re il numé riqu e n’é met pa s de br uits ra dioé lec tri que s dé pa ssa nt le s l imit es appl icabl es a ux appar ei ls nu mér ique s de
ClasseB prescrites dans le règlement sur le brouillage radioélectrique édicté par Industrie Canada.
Notices
© 2007 Gate wa y , Inc.
All rights reserved.
Gateway, Inc.
7565 Irvine Center Drive
Irvine, CA 92618 US A
All Rights Reserved
This publication is protected b y copyr ight and all rights are reserved. No part of it may be r eproduced or transmitte d by any means or
in any form, without prior consent in wr iting from Gat ew ay .
The information in this manual has been carefully check ed and is believ ed to be accur ate . Howe ver, changes are made periodically.
These changes are incorporated in new er publication editions. Gatewa y may impro ve and/ or change products des cribed in this
publication at any time. Due to continuing system improv ements, Gatew ay is not re sponsible for inaccurat e inf ormation which may
appear in this manual. For the latest product updates, consult the Gateway Web site at www.gateway.com
be liable for direct, indirec t, special, exemplary , inc idental, or consequential damages resulting from any defec t or omission in this
manual, even if advised of t he possibility of such damages.
In the interest of continued product development, Gateway reserv es the right to mak e improvements in this manual and the products
it describes at an y time, wit hout notices or obligation.
T rademark acknow ledgments
Gatew a y and eM achin es are tr adema rks or r egist er ed tr ademark s of Gat e w ay, Inc. in the United Stat es an d ot her cou ntrie s. Al l other
brands and product names are trademarks or registered trademarks of their respective companies.
. In no event will Gateway
28
Page 33

Page 34

MAN E17T6W/E19T6W GDE R2 10/07
 Loading...