

Page 1
Flat Panel Monitor
User Guide
Page 2

Page 3

i
Contents
Using Your eMachines Flat-Panel Monitor . . . . . . . . . . . . . . . . . . . . . . . . . . . 1
Unpacking the monitor . . . . . . . . . . . . . . . . . . . . . . . . . . . . . . . . . . . . . . . . . . . . . . . . . . . . . 2
Setting up the monitor . . . . . . . . . . . . . . . . . . . . . . . . . . . . . . . . . . . . . . . . . . . . . . . . . . . . . 2
Attaching the base . . . . . . . . . . . . . . . . . . . . . . . . . . . . . . . . . . . . . . . . . . . . . . . . . . 2
Connecting cables . . . . . . . . . . . . . . . . . . . . . . . . . . . . . . . . . . . . . . . . . . . . . . . . . . . 3
Connecting a security cable . . . . . . . . . . . . . . . . . . . . . . . . . . . . . . . . . . . . . . . . . . 4
Turning on the monitor . . . . . . . . . . . . . . . . . . . . . . . . . . . . . . . . . . . . . . . . . . . . . . . . . . . . 4
Adjusting monitor settings . . . . . . . . . . . . . . . . . . . . . . . . . . . . . . . . . . . . . . . . . . . . . . . . . . 5
Monitor buttons . . . . . . . . . . . . . . . . . . . . . . . . . . . . . . . . . . . . . . . . . . . . . . . . . . . . 5
On-screen display options . . . . . . . . . . . . . . . . . . . . . . . . . . . . . . . . . . . . . . . . . . . 6
Changing Windows screen settings . . . . . . . . . . . . . . . . . . . . . . . . . . . . . . . . . . . 8
Power management . . . . . . . . . . . . . . . . . . . . . . . . . . . . . . . . . . . . . . . . . . . . . . . . . . . . . . . 9
Energy declaration . . . . . . . . . . . . . . . . . . . . . . . . . . . . . . . . . . . . . . . . . . . . . . . . . . 9
Maintaining . . . . . . . . . . . . . . . . . . . . . . . . . . . . . . . . . . . . . . . . . . . . . . . . . . . . . . . . . . . . . . 10
Troubleshooting . . . . . . . . . . . . . . . . . . . . . . . . . . . . . . . . . . . . . . . . . . . . . . . . . . . . . . . . . . 10
No power . . . . . . . . . . . . . . . . . . . . . . . . . . . . . . . . . . . . . . . . . . . . . . . . . . . . . . . . . 10
No picture . . . . . . . . . . . . . . . . . . . . . . . . . . . . . . . . . . . . . . . . . . . . . . . . . . . . . . . . . 10
Display colors are wrong . . . . . . . . . . . . . . . . . . . . . . . . . . . . . . . . . . . . . . . . . . . 11
Picture has shadows or “ghosts” . . . . . . . . . . . . . . . . . . . . . . . . . . . . . . . . . . . . . 11
Color is not uniform . . . . . . . . . . . . . . . . . . . . . . . . . . . . . . . . . . . . . . . . . . . . . . . . 11
Image is not sized or centered correctly . . . . . . . . . . . . . . . . . . . . . . . . . . . . . . 11
The monitor has pixels that are always dark or too bright . . . . . . . . . . . . . 12
Connecting a game console . . . . . . . . . . . . . . . . . . . . . . . . . . . . . . . . . . . . . . . . . 12
13
Video modes . . . . . . . . . . . . . . . . . . . . . . . . . . . . . . . . . . . . . . . . . . . . . . . . . . . . . . .
Safety, Regulatory, and Legal Notices . . . . . . . . . . . . . . . . . . . . . . . . . . . . . .
Recycling . . . . . . . . . . . . . . . . . . . . . . . . . . . . . . . . . . . . . . . . . . . . . . . . . . . . . . . . . .
14
16
Page 4

Contents
ii
Page 5

1
• Unpacking the monitor
• Setting up the monitor
• Turni ng o n the mon itor
• Adjusting monitor settings
• Power management
• Maintaining
• Troubleshooting
Using Your eMachines
Flat-Panel Monitor
Page 6
Using Your eMachines Flat-Panel Monitor
2
Unpacking the monitor
Your monitor box should contain the following items:
• Monitor (with neck attached)
• Base (to connect to the neck)
• This User Guide
• VGA cable
• Power cord
If you are missing any items, call Customer Care.
Setting up the monitor
To set up the monitor, first attach the base, then connect cables.
Attaching the base
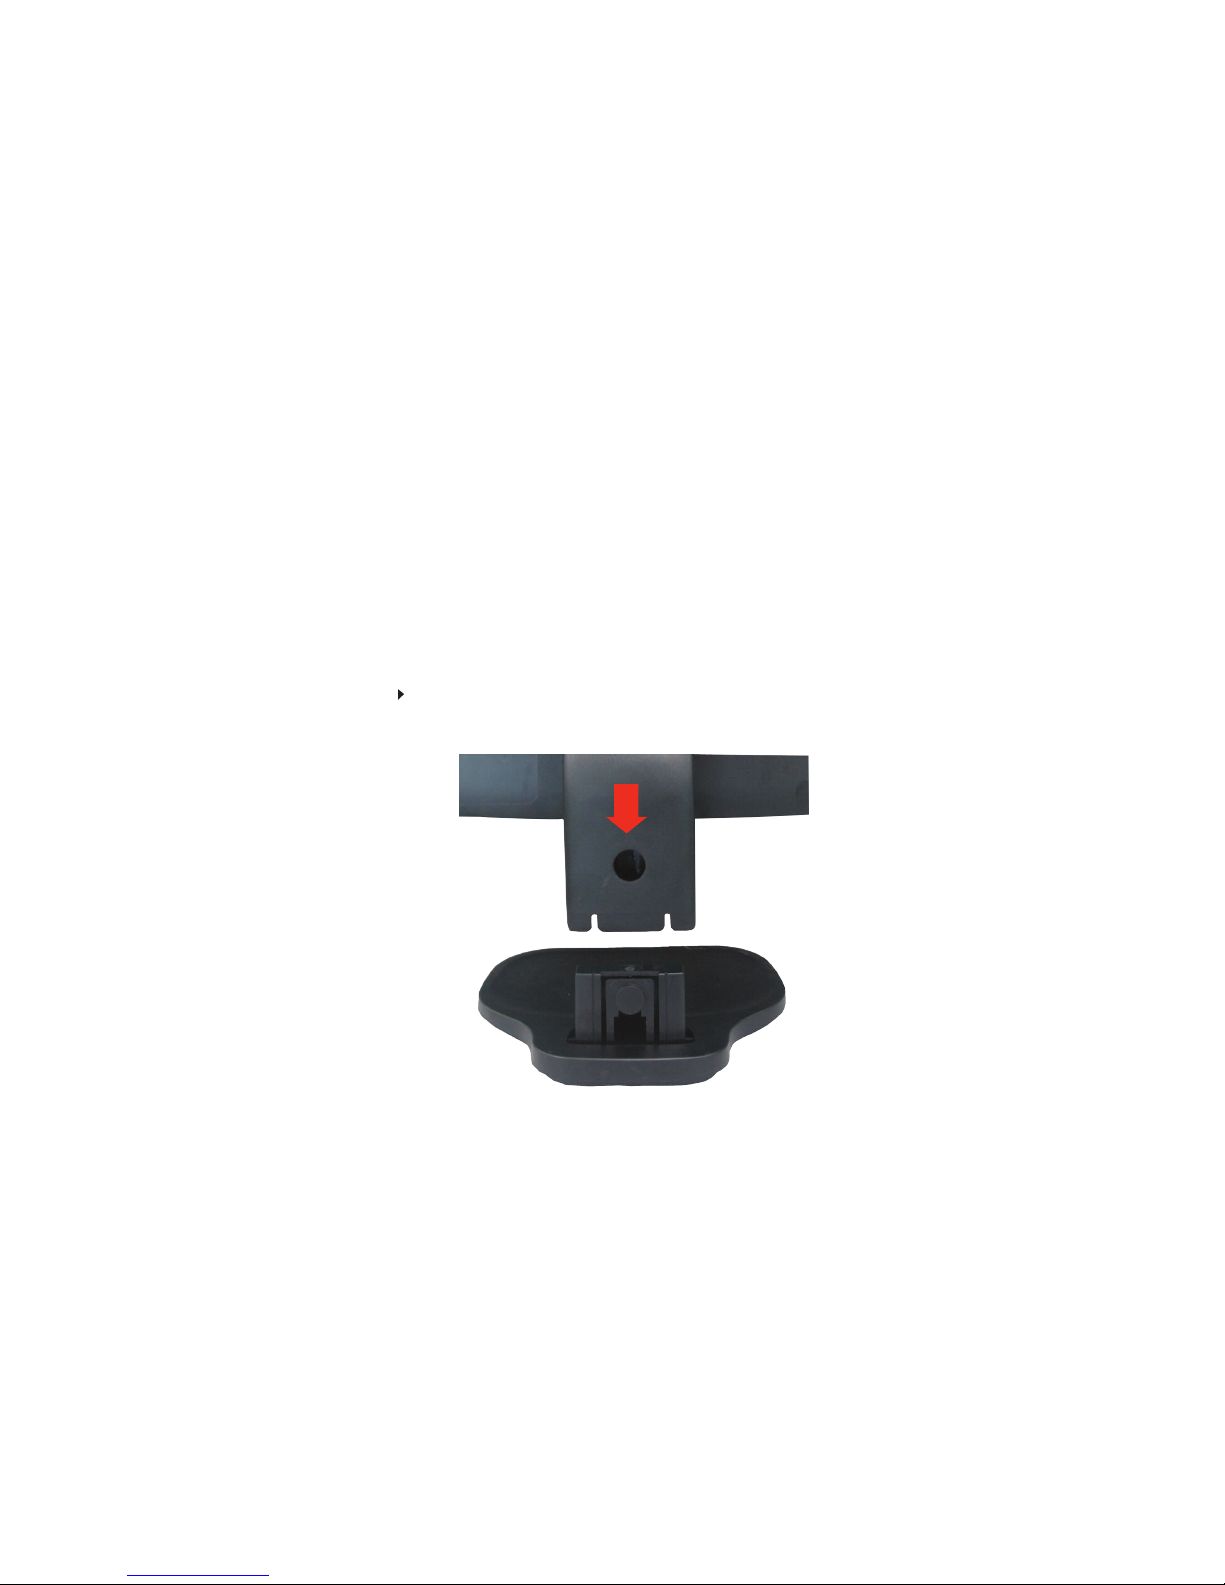
To attach the base:
• Place the base on a table top, then press the base’s release button while you slide the monitor
neck down onto the base.
(optional)
Page 7
www.emachines.com
3
Connecting cables
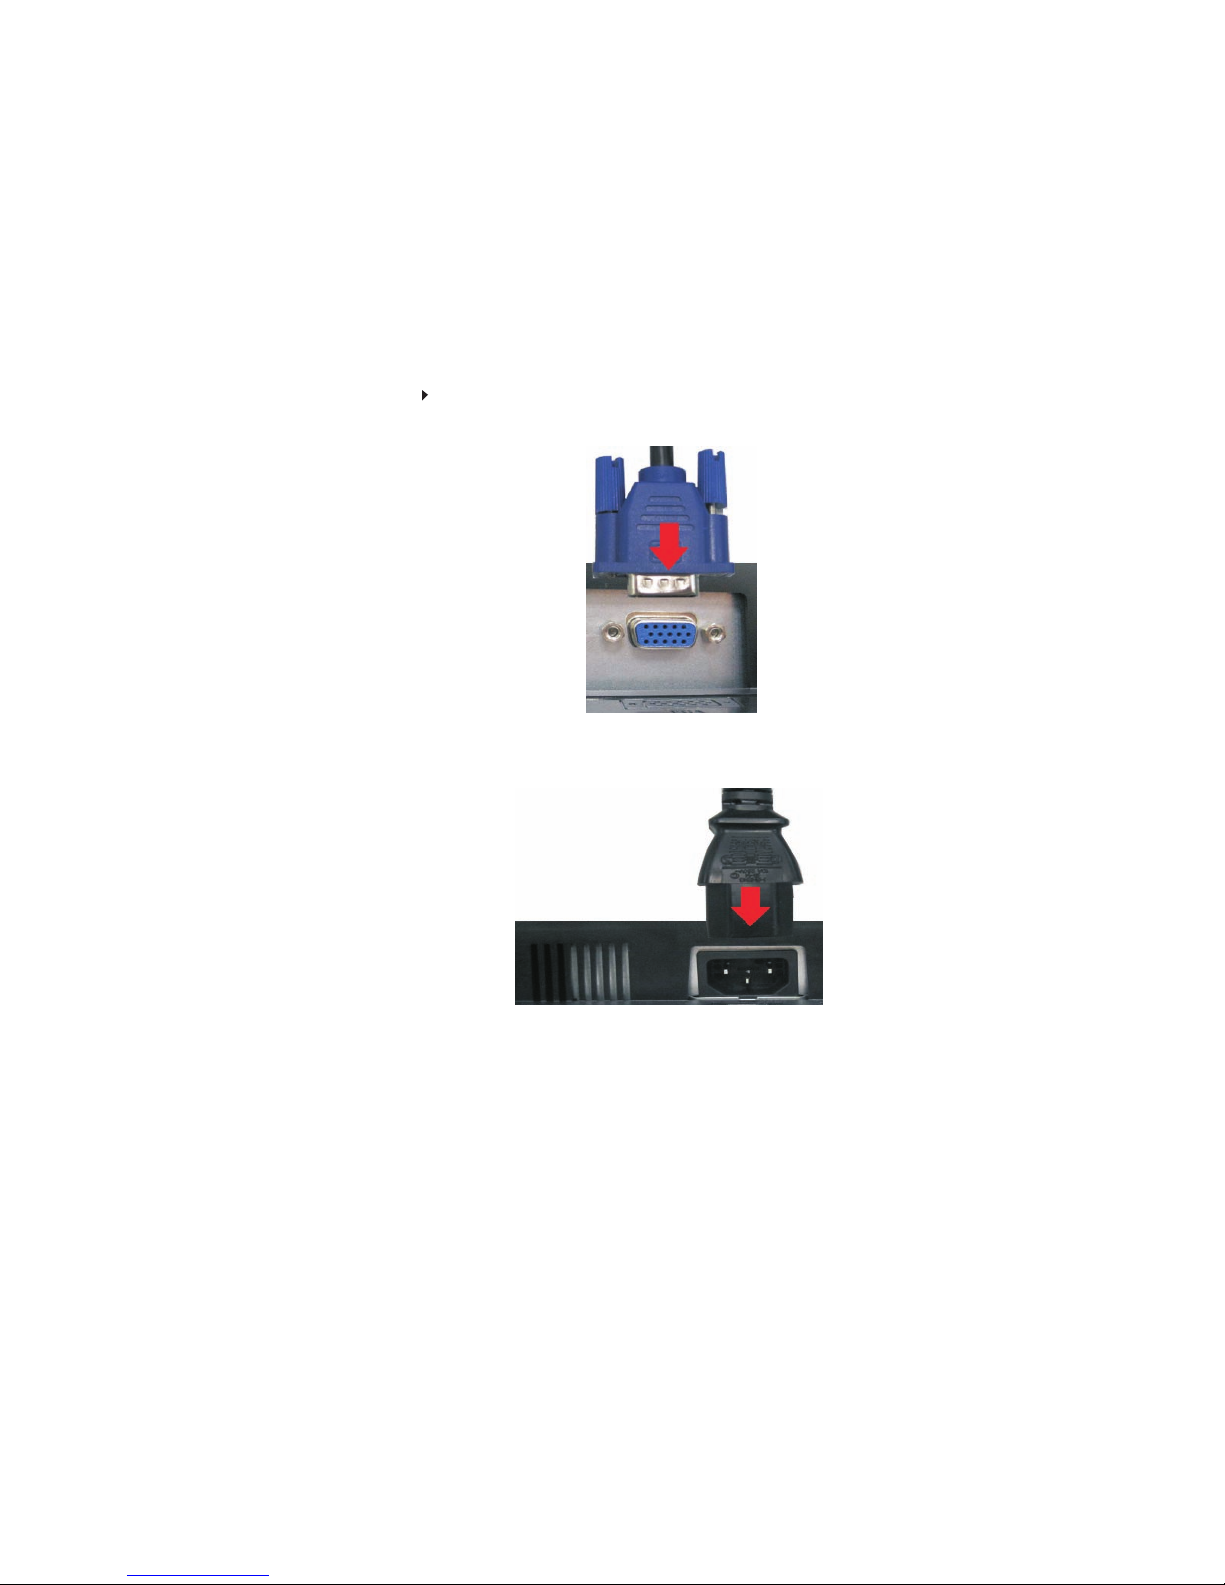
To connect video and power cables:
1 Position your computer and the monitor so you can reach the back of each, then connect
the blue VGA video cable to the blue VGA video connector under the back of themonitor.
2 Make sure that your computer is turned off, then connect the other end of the video cable
to the matching video port on the back of your computer.
3 Connect the power cord to the power connector under the back of the monitor.
Page 8
Using Your eMachines Flat-Panel Monitor
4
4
Plug the power cord into a correctly grounded (three-prong) AC power outlet. We
recommend using a surge protector to protect your monitor from voltage spikes.
Connecting a security cable
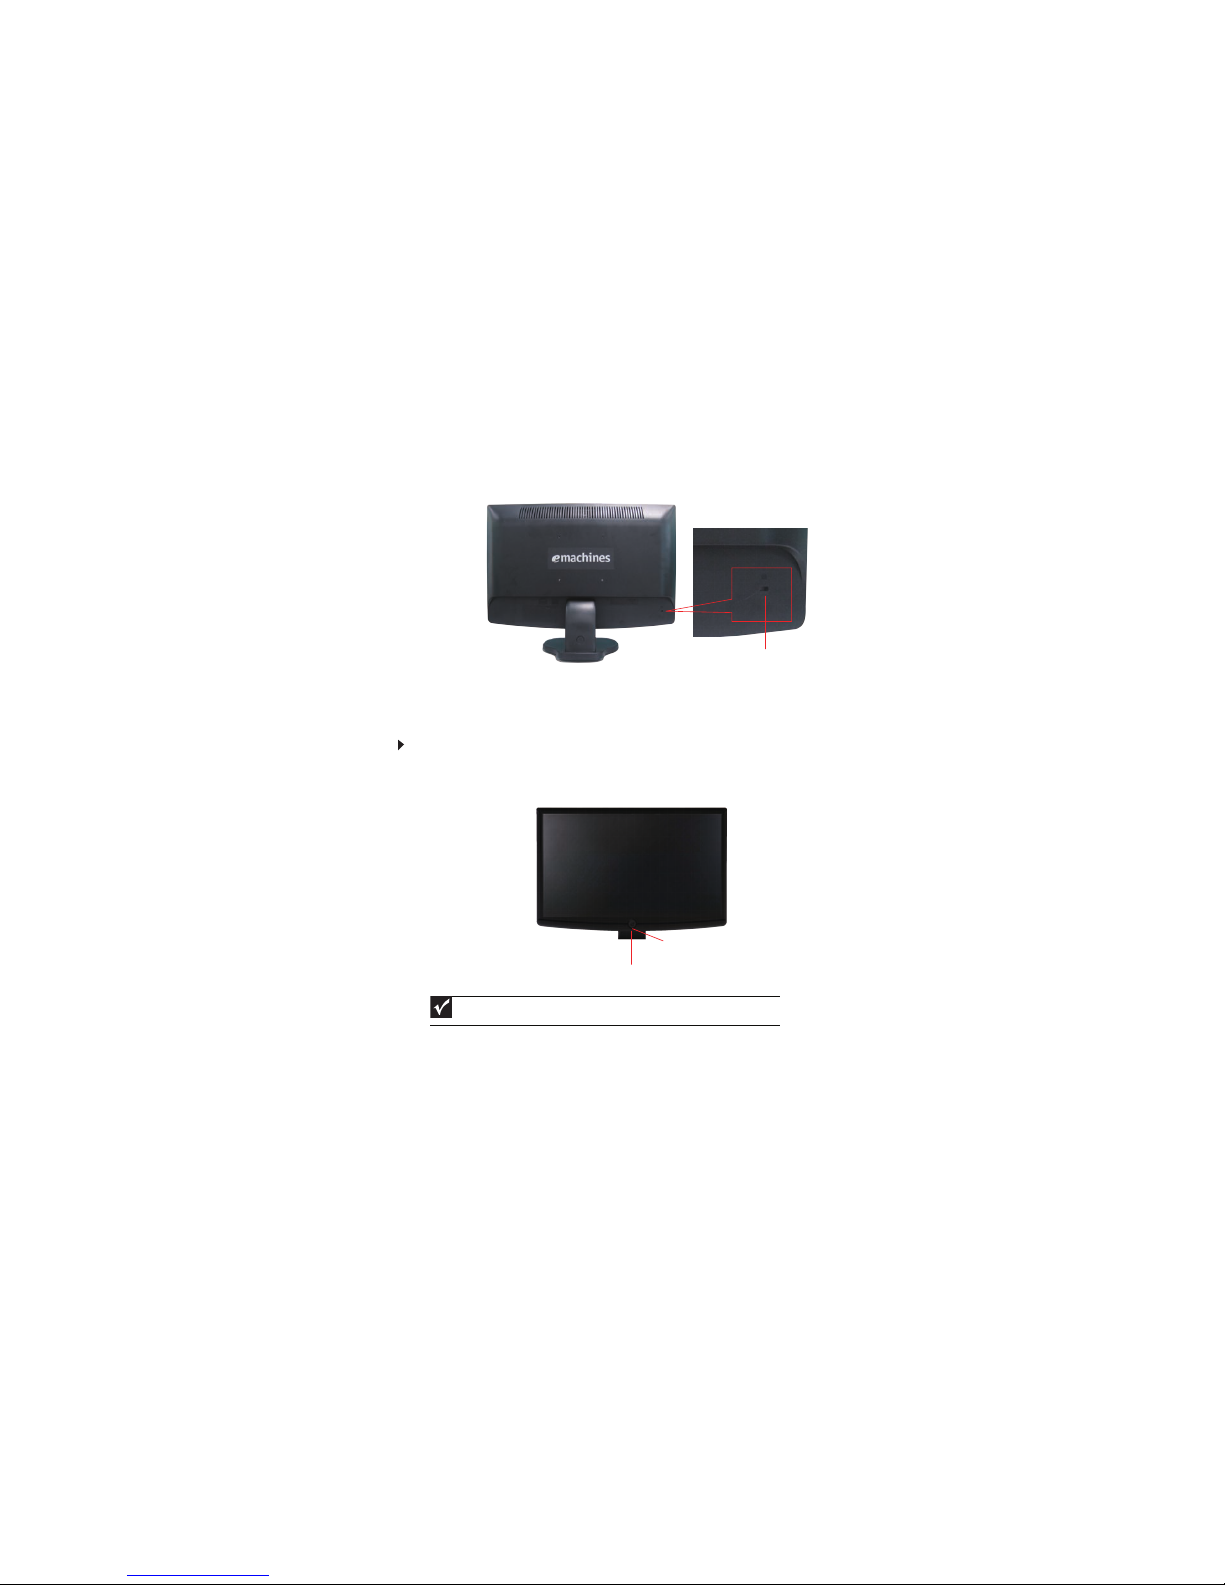
You can secure your monitor to your computer desk (or to another heavy object) with a cable lock
(such as a Kensington™ lock). To connect a cable lock, follow the cable lock’s instructions to connect
it to the lock slot on the back of your monitor (cable lock not included).
Turning on the monitor
To turn on the monitor:
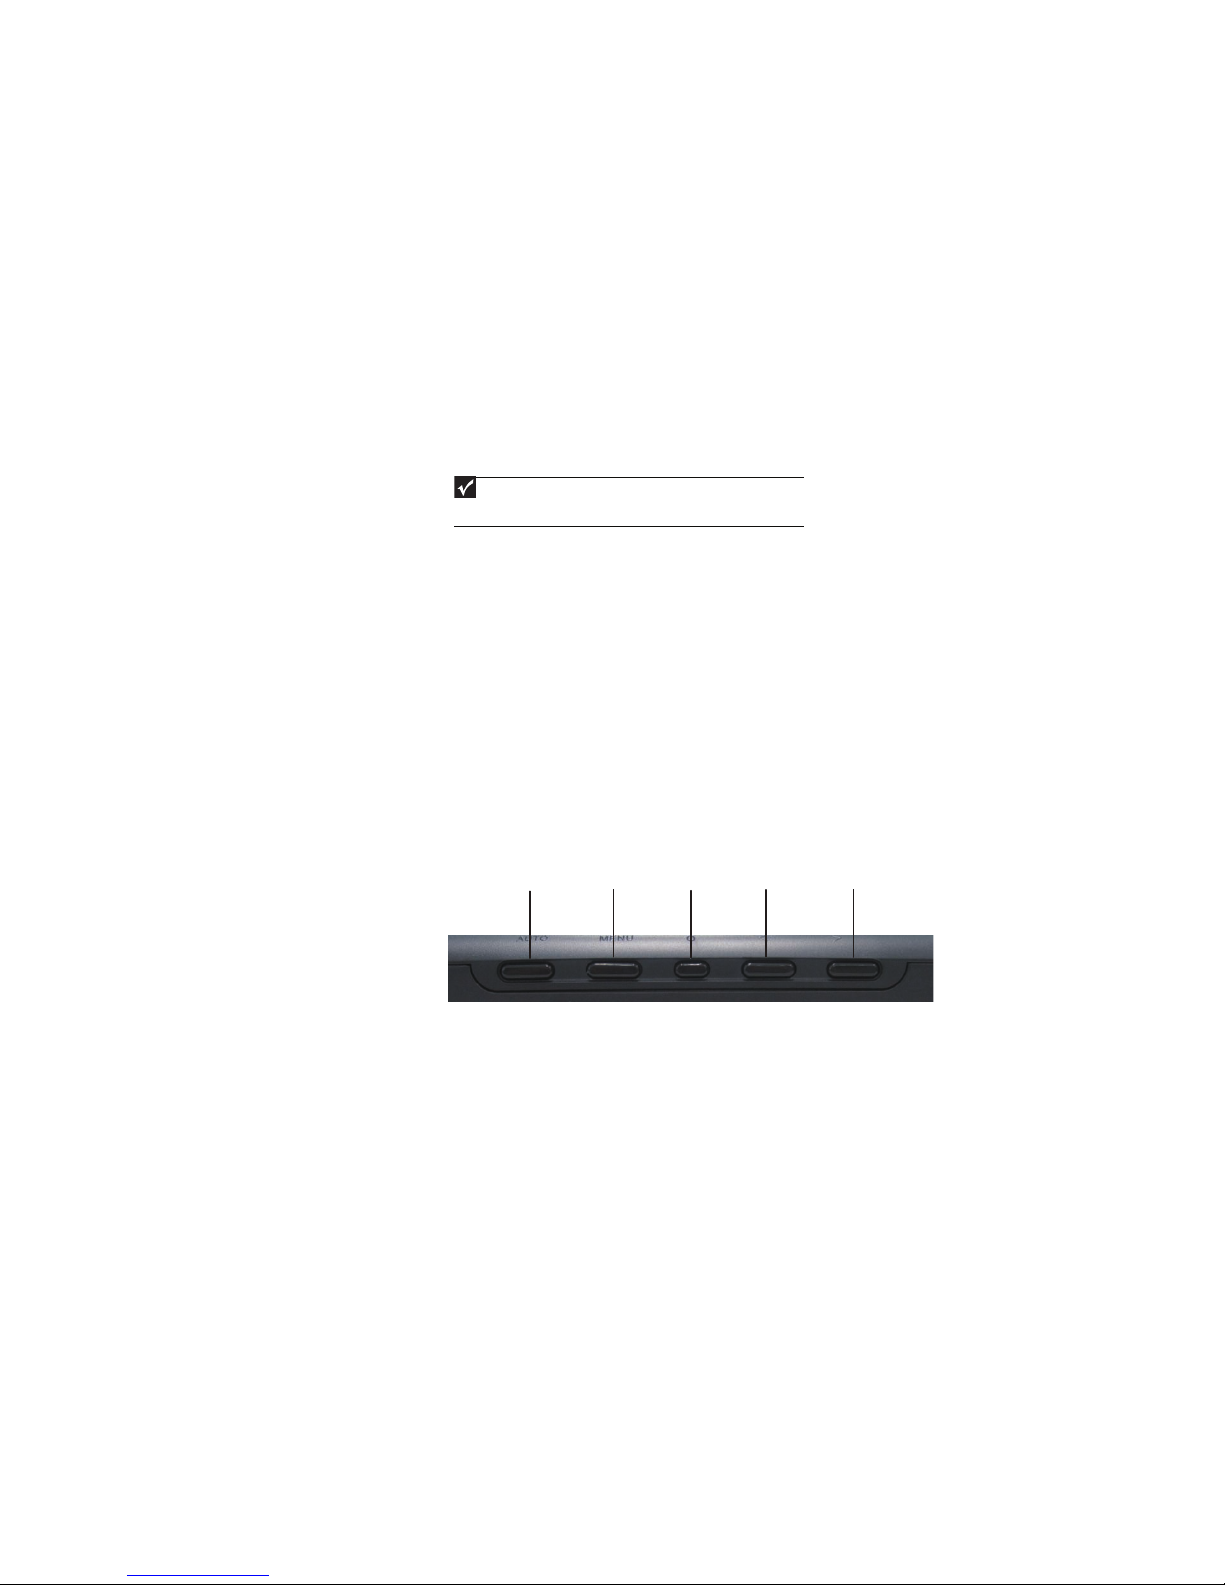
1 Press the power button on the front of your monitor. The power LED on the power button
Important
Turn on your monitor before turning on your computer.
Cable lock slot
Power button
Power LED
turns green. (The appearance of your monitor may vary from that shown.)
Page 9
www.emachines.com
5
2 Tu rn on your comp ute r.
After your computer is running, the power LED on the monitor’s power button should be
3
back to 5° forward.
4 After you see the Windows desktop, press the Auto button on the bottom of the monitor
to automatically adjust your display image to the ideal settings.
5 Use the on-screen display (OSD) to adjust other monitor settings. For more information, see
“Adjusting monitor settings” on page 5.
Adjusting monitor settings
Use the monitor controls (located on the monitor itself) and computer controls (accessible through
Windows) to adjust the display image. For more information about computer controls, see
“Changing Windows screen settings” on page 8.
Monitor buttons
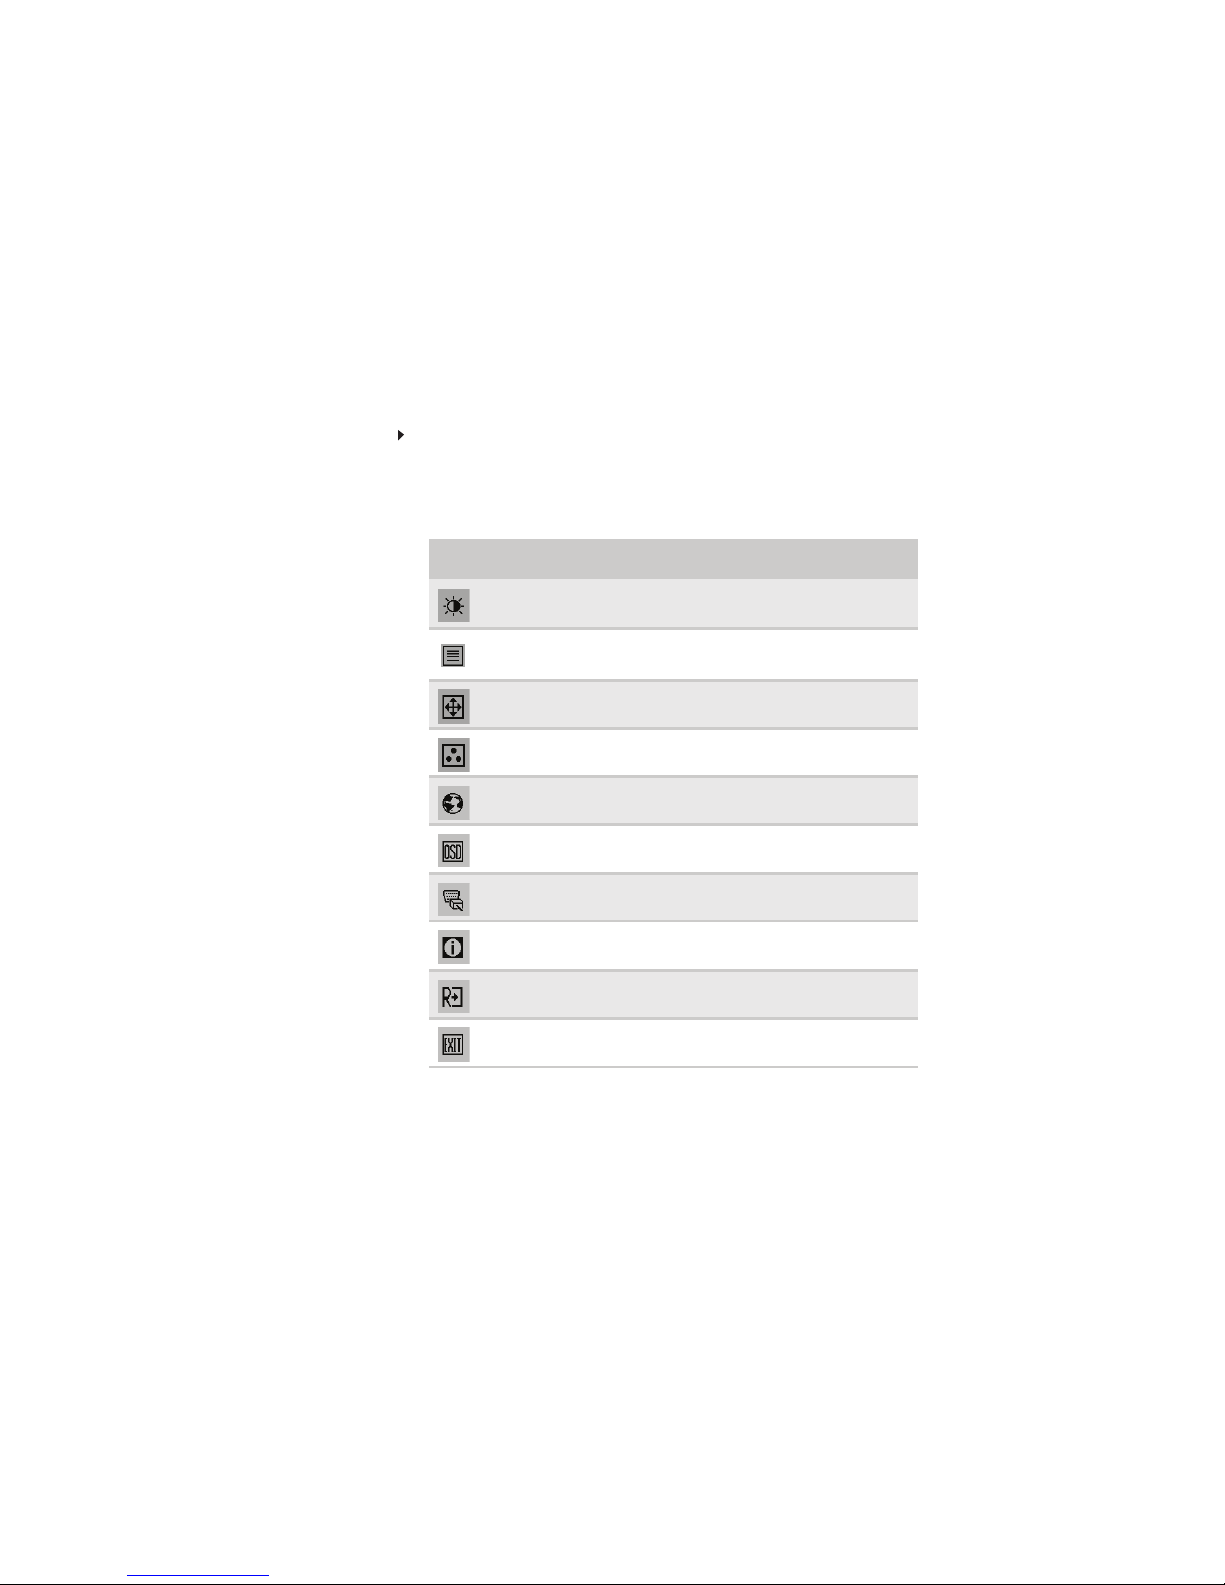
This monitor features an on-screen display (OSD) that lets you adjust contrast, brightness, and other
settings for the monitor. The monitor saves changes you make to the settings, even if you turn off
the monitor. (The appearance of your monitor may vary from that shown.)
• Auto butto n
Press to have the monitor self-adjust its image position, clock, and focus settings. While the
Scenario Mode menu is open, press to exit the menu.
• < and > buttons
While the OSD is open, press to highlight and adjust settings.
• Menu
Press once to open or close the OSD and select the highlighted menu or setting.
Important
When adjusting the monitor settings, always press Auto before entering the
on-screen display menu (OSD). This will automatically adjust the display image to the
ideal settings for the current screen resolution.
Bottom view
Menu button
> buttonAuto button
< button
Power button
information, see “Troubleshooting” on page 10.
green. Allow several seconds for the display image to appear. If the power LED is not on or
is flashing, or you do not see a display image, check the connections. For more troubleshooting
Adjust the tilt of the monitor for the best viewing angle. The monitor can adjust from 15°
Page 10
Using Your eMachines Flat-Panel Monitor
6
On-screen display options
Adjusting OSD settings
To adjust the OSD settings:
1 Press Auto. The display image is automatically adjusted to the ideal settings for your current
screen resolution.
2 Press Menu. The OSD opens.
3 Press < and > to highlight a setting, then press Menu to open the selected menu or setting.
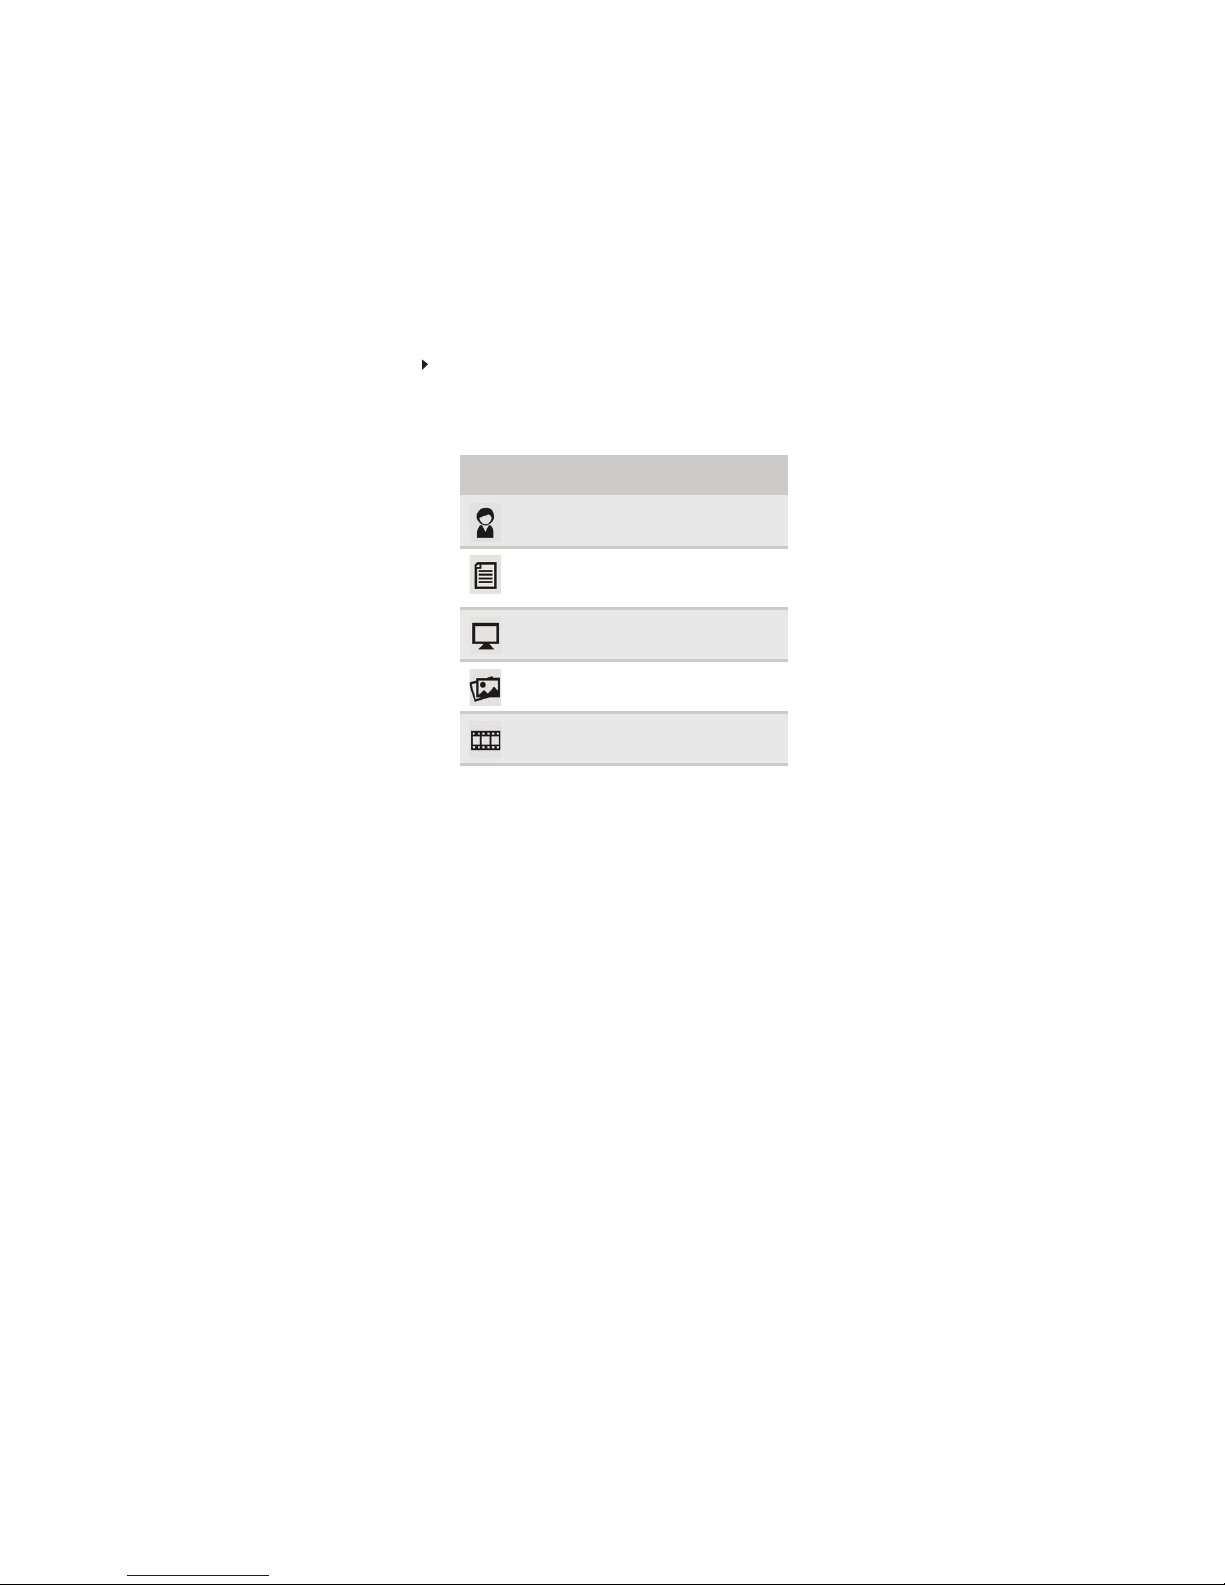
You can configure settings in the following menus:
4 Press < and > to adjust the setting to the desired level or change the option.
5 When you have finished making all adjustments, press Auto repeatedly to exit.
Menu
icon
Name Description
Brightness and
Contrast
Adjusts the brightness and contrast
(by selecting User) or selects a color
mode (by selecting Scenario Mode).
Focus and Clock
Adjusts focus and clock settings.
Positi on
Adjusts horizontal and vertical
screen image position.
Color Temperat ure
Selects a warm, cool, or
user-defined color temperature.
Language
Selects the language for the OSD.
OSD Settings Adjusts the horizontal and vertical
position of the OSD and sets the
timeout.
DDC/CI Settings
Turns DDC/CI support on or off.
Mode Information Displays the monitor’s current
resolution, timing, input type, and
serial number.
Reset to Defaults
Resets all OSD settings to defaults.
Exit
Exits the OSD.
Wide Mode Select Wide mode setting for Full screen, Aspect ratio
Page 11
www.emachines.com
7
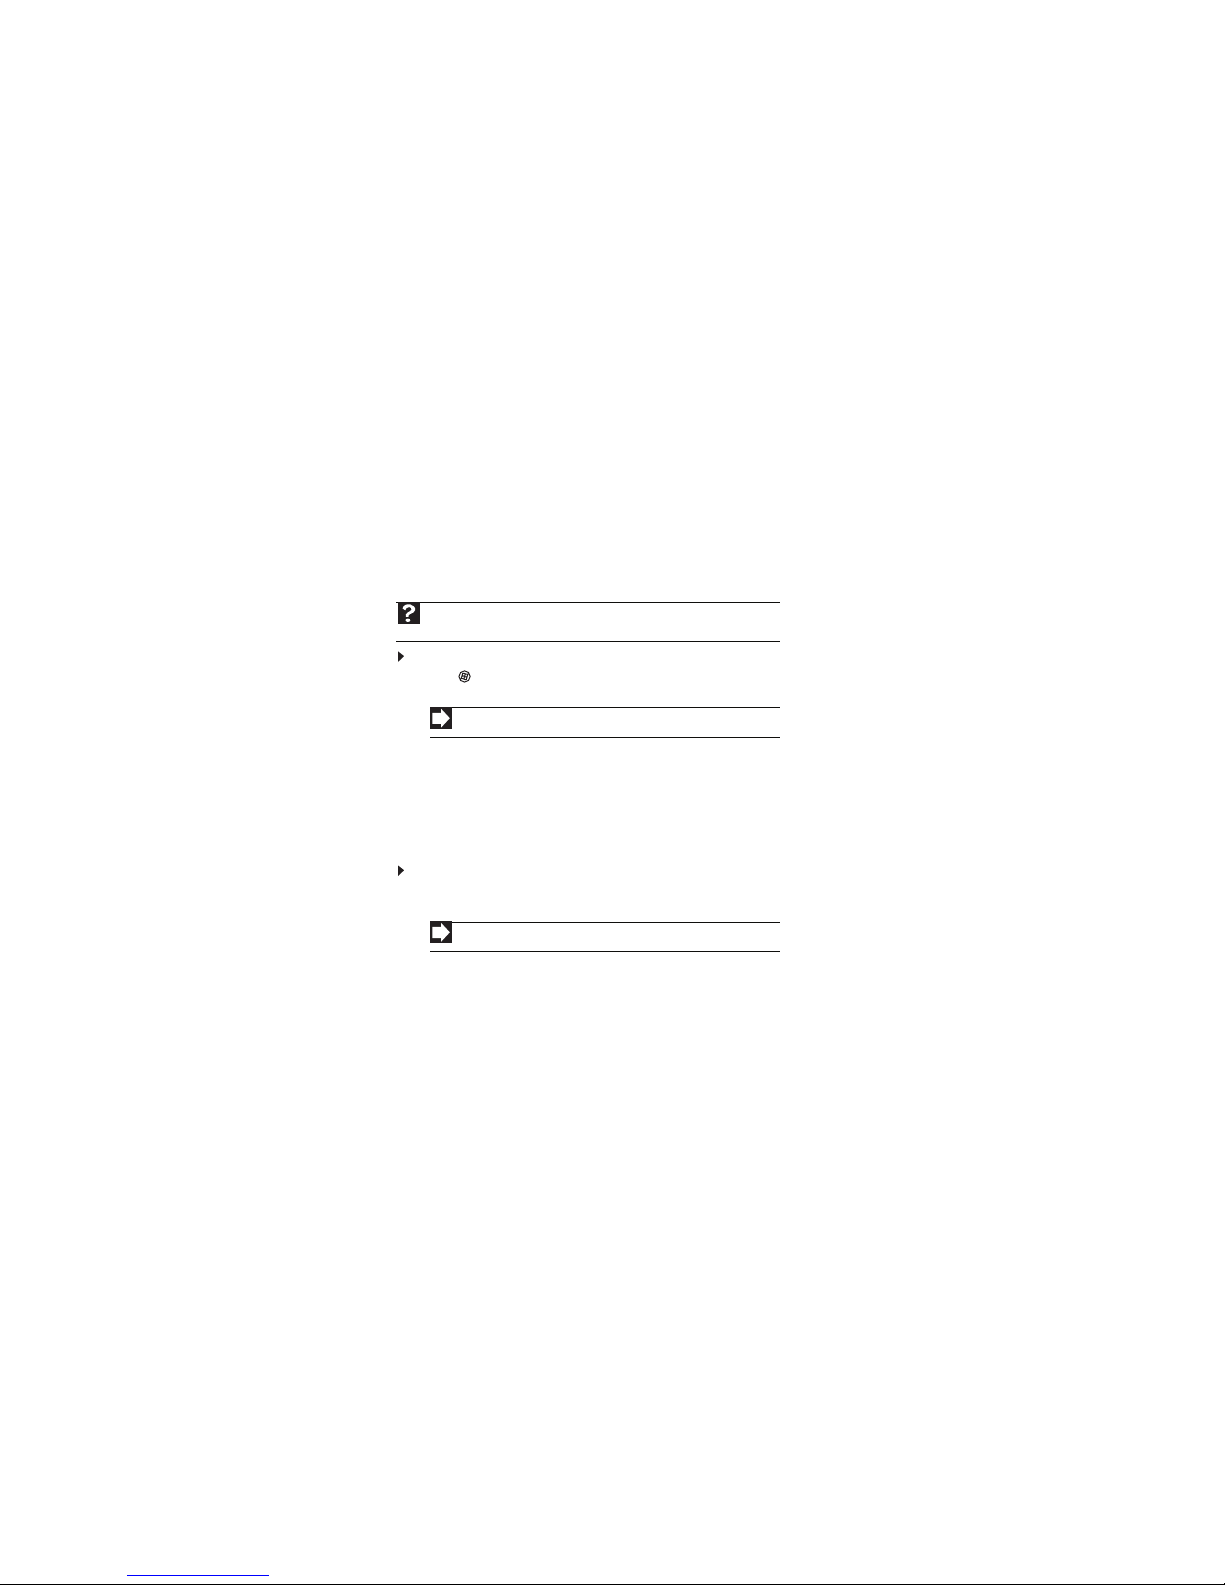
To set the scenario mode:
1 Press Menu to open the OSD, then press Menu again to select the Brightness and Contrast
menu.
2 Press > to highlight Scenario Mode, then press Menu. The Scenario Mode menu opens.
3 Press < and > to highlight a scenario mode, then press Auto to keep the setting.
Menu
icon
Mode Description
User
User-defined (custom) settings,
which can be adjusted to suit
your needs.
Text
This is the best balance of
brightness and contrast to
preven t eye stra in whil e readi ng
on-screen text.
Standard
This uses default settings, and is
the best general-purpose mode.
Graphic
This enhances color and
emphasizes fine detail.
Movie
This displays full-motion scenes
in the clearest detail.
Page 12
Using Your eMachines Flat-Panel Monitor
8
Changing Windows screen settings
Color depth and screen resolution are two of the most basic monitor settings you may need to
change to suit your needs.
Color depth is the number of colors your computer uses to display images on your monitor. Most
images look best displayed with the maximum number of colors available. If the color in your
images seems “false” or “jumpy,” especially after you have played a game or run a video-intensive
program, check the color depth setting and return it to the highest color setting, if necessary.
Common color depth settings include:
• Low (8-bit) = 256 colors
• Medium (16-bit) = 65,500 colors
• Highest (32-bit) = 16,700,000 colors
Screen resoluti on is the number of pixels (individual colored dots) your computer uses to display
images on your monitor. The higher the resolution, the more information and screen components
(such as icons and menu bars) can be displayed on the monitor.
To change the color depth and screen resolution in Windows Vista
®
:
1 Click (Start), Control Panel, then under Appearance and Personalization, click Adjust
Screen Resolution. The Display Settings dialog box opens.
2 To change the color depth, click the Colors list, then click the color depth you want.
3 To change the screen resolution, drag the Resolutio n slider to the size you prefer.
4 Click Apply. If the new settings do not look right, click No. If the new settings make the screen
illegible and you cannot click No, the settings return to their previous values after several
seconds.
5 Click OK, then click Yes to save your changes.
To change the color depth and screen resolution in Windows XP:
1 Click Start, then click Control Panel. The Control Panel opens. If your Control Panel is in
Category View, click Appearance and Themes.
2 Click Display. The Display Properties dialog box opens.
3 Click the Settings tab.
4 To change the color depth, click the arrow button to open the Color quality list, then click
the color depth you want.
5 To change the screen resolution, drag the Screen resolution slider to the size you prefer,
then click OK.
Help
For more information about adjusting the screen, click Start, then click Help and
Support. Type adjusting monitor settings in the Sear ch Help box, then press E
NTER.
Shortcut
You can also right-click on your Windows desktop, then click Personalize.
Shortcut
You can also right-click on your Windows desktop, then click Properties.
Page 13

www.emachines.com
9
Power management
Energy declaration
When connected to a computer that supports the VESA Display Power Management Signaling
(DPMS) protocol, the monitor can conserve significant energy by reducing power consumption
during periods of non-use. When your computer goes into the energy-saving mode, the monitor
To “wake” the monitor when it is in Active Off mode, move the mouse or press any keyboard key.
Access the power management options in the Control Panel to change the period of time after
which the monitor enters these low power states.
enters the ActiveOff mode (sleep). In the Active Off mode the power LED turns flashing.
Page 14
Using Your eMachines Flat-Panel Monitor
Maintaining
To keep the monitor in optimal working order:
• Do not block the ventilation holes.
• Do not expose the monitor to rain or use near water.
• Keep the monitor away from radiators or heat vents.
• Keep the monitor out of direct sunlight.
• To clean the monitor, use a soft cloth slightly moistened with water only. Wipe the cabinet,
screen, and controls.
Troubleshooting
If you have problems with the monitor, the information in this troubleshooting section may help
you solve them.
No power
• Make sure that the power cord is connected correctly to both the back of the monitor and
an AC power outlet. For more information about connecting the power cord, see “Setting
up the monitor” on page 2.
No picture
• Make sure that the power cord is connected correctly to both the back of the monitor and
an AC power outlet. For more information about connecting the power cord, see “Setting
up the monitor” on page 2.
• Make sure that the video cable is connected securely to the back of the monitor and the
computer. For more information about connecting the video cable, see “Setting up the
monitor” on page 2.
• Make sure that the monitor is turned on.
• If you have the monitor connected to your notebook’s video port, you have two options:
• If your notebook supports dual displays, you can use both your notebook’s display and
this monitor in extended desktop multi-monitor mode. See Windows Help to learn how
to enable multiple monitors.
• You can also use this monitor as your primary monitor and not use the notebook’s
screen. Notebook computers typically have an FN key combination that lets you toggle
between your notebook’s display, an externally attached display, and both at the same
time. See your notebook’s user guide for more information.
Caution
Do not use any type of abrasive pad or glass cleaner. You will permanently
scratch the screen.
Important
Make sure that the monitor has warmed up for about 30 minutes before making any
judgments about the picture quality. The screen’s backlight can take several minutes to reach
maximum brightness.
10
Page 15

www.emachines.com
11
•
• Make sure that your computer is turned on.
• Move the mouse or press any key on the keyboard to bring the monitor out of sleep
mode.
• Restart your computer with the monitor turned on.
• Make sure that the video cable is not damaged.
• Check the end of the video cable for any pins that might be bent or pushed in.
• Turn off the monitor and unplug the video cable from the back of your computer. Turn the
monitor back on and wait for ten seconds. If the monitor is functioning correctly, a “Cable
Not Connected” message appears. For more information about connecting the video cable,
see “Setting up the monitor” on page 2.
Display colors are wrong
• Press Auto to automatically adjust the display image to the ideal settings.
• Restart your computer with the monitor turned on.
• Make sure that the video cable is connected securely to the back of the monitor and your
computer. For more information about connecting the video cable, see “Setting up the
monitor” on page 2.
• Make sure that the video cable is not damaged.
• Check the end of the video cable for any pins that might be bent or pushed in.
Picture has shadows or “ghosts”
• Press Auto to automatically adjust the display image to the ideal settings.
• Remove any extension cables or switchboxes.
• Make sure that the video cable is connected securely to the back of the monitor and your
computer. For more information about connecting the video cable, see “Setting up the
monitor” on page 2.
• Make sure that the video cable is not damaged.
• Check the end of the video cable for any pins that might be bent or pushed in.
• Make sure that your monitor connection is using the VGA cable that came with your monitor.
Color is not uniform
• Press Auto to automatically adjust the display image to the ideal settings.
• Make sure that the monitor warms up for at least 30 minutes before making a final judgment
about color uniformity or brightness.
Image is not sized or centered correctly
• Press Auto to automatically adjust the display image to the ideal settings.
• Change the position settings. For instructions on how to adjust the display image position,
see “Adjusting monitor settings” on page 5.
If the power LED is flashing:
Page 16

Using Your eMachines Flat-Panel Monitor
12
• If the image looks stretched or fuzzy, you must adjust the operating syste m’s display settings
to match the monitor’s optimal (native) setting. For information on adjusting settings, see
“Changing Windows screen settings” on page 8.
• If you are trying to select your monitor’s native resolution but it is not available in the
Windows display control panel:
• Make sure that your video card can display at your monitor’s native resolution.
• This may be caused by older video drivers on your computer. See the eMachines support
Web site (www.emachines.com
) for updated video drivers for your computer. You can
also go directly to your video card’s support Web site for the most up-to-date video
drivers.
• If your games do not have support for widescreen displays:
• Newer games are adding support for widescreen displays as the widescreen format
becomes more popular. Check the game’s Web site for updates. You can also consult
the following Web site for specific settings and options to configure older games to
support widescreen: www.widescreengamingforum.com
.
• Some adjustments may require you to make changes to the Windows System Registry.
We rec om me nd m ak in g a com pl ete sys te m ba cku p b efo re cha ng in g th e Sy ste m R eg ist ry.
The monitor has pixels that are always dark or too bright
• This condition is normal and inherent in the TFT technology used in active-matrix LCD
screens. eMachines’ inspection standards keep these to a minimum. If you feel these pixels
are unacceptably numerous or dense on your display, contact eMachines Customer Care to
identify whether a repair or replacement is justified based on the number of pixels affected.
Connecting a game console
• To determine the type of cable you need, see your gaming console’s documentation.
Page 17

Using Your eMachines Flat-Panel Monitor
Video modes
E210H/E220HQ
Mode Mode name and
resolution
Horizontal
frequency (kHz)
Vertical
frequency (Hz)
1 31.469 59.941
2 640 × 480
3 V 720 × 400
4 SVGA 800 ×600
5 SVGA 800 ×600
6 XGA 1024 ×768
7 XGA 1024 ×768
8 VESA 1152 ×864
9 SXGA 1280 ×1024
10 WXGA 1280 ×800
11 WXGA+ 1440 ×900
12 UXGA 1920 ×1080
13 UXGA 1920 ×1080
35 66.66
31.469 70.087
35.156 56.250
37.879 60.3 17
48.363 60.004
56.476 7 0.069
67.5 75
63.981 6 0.020
49.702 59.810
55.935 5 9.887
67.158 59.963
67.500
60.000
13
640 × 480
ESA
MAC
Page 18

Safety, Regulatory, and
Legal Notices
• Important safety information
• Environmental information
• Regulatory compliance statements
14
Page 19

Safety, Regulatory, and Legal Notices
Important safety information
Your eMachines product is designed and tested to meet the latest standards for safety of information technology equipment.
However, to ensure safe use of this product, it is important that the safety instructions marked on the product and in the
documentation are followed.
Setting up your system
■
Read and follow all instructions marked on the product and in the documentation before you operate your system. Retain all safety
and operating instructions for future use.
■
Do not use this product near water or a heat source such as a radiator.
■
Set up the system on a stable work surface.
■
The product should only be operated from the type of power source indicated on the rating label.
■
If your product has a voltage selector switch, make sure that the switch is in the proper position for your area. The voltage selector
switch is set at the fa ctory to the c orrect volt age.
■
Openings in the monitor case are provided for ventilation. Do not block or cover these openings. Make sure you provide adequate
space, at least 6 inches (15 cm), around the system for ventilation when you set up your work area. Never insert objects of any kind
into the monitor ventilation openings.
■
Some products are equipped with a three-wire power cord to make sure that the product is properly grounded when in use. The
plug on this cord will only fit into a grounding-type outlet. This is a safety feature. If you are unable to insert the plug into an outle t,
contact an electrician to install the appropriate outlet.
■
If you use an extension cord with th is system, m ake sure that the total a mpere rati ng on the p roducts plu gged into the extensio n
cord does not exceed the extension cord ampere rating.
Care during use
■
Do n ot wal k on t he po wer c ord or allo w anyt hing to res t on i t.
■
Do not spill anything on the system. The best way to avoid spills is to avoid eating and drinking near your system.
■
Do not expose the monitor to rain or use near water. If the monitor does get exposed to moisture, unplug it and allow it to dry for
24 h ours . Cal l eMa chin es Cus tomer Care for ad vice o n whe ther the m onito r is s afe to turn b ack o n.
■
When the monitor is turned off, a small amount of electrical current still flows through the monitor. To avoid electrical shock,
always unplug all power cables and modem cables from the wall outlets before cleaning the system.
■
Unplug the system from the wall outlet and refer servicing to qualified personnel if:
■
The power cord or plug is damaged.
■
Liquid has been spilled into the system.
■
The system does not operate properly when the operating instructions are followed.
■
The system was dropped or the cabinet is damaged.
■
The system performanc e changes .
Replacement parts and accessories
Use only replacement parts and accessories recommended by eMachines.
Warning
Always follow these instructions to help guard against personal injury and damage to your product.
Warning
Do not use eMachines products in areas classified as hazardous locations. Such areas include patient care
areas of medical and dental facilities, oxygen-laden environments, or industrial facilities.
Warning
To prevent electric shock, never remove the cover. No user serviceable parts inside. Refer servicing to qualified
service personnel.
15
Page 20
www.emachines.com
Environmental information
Recycling
The product you have purchased contains extracted natural resources that have been used in the manufacturing process. This product
may contain substances known to be hazardous to the environment or to human health.
To prevent releases of harmful substances into the environment and to maximize the use of our natural resources, eMachines provides
the following information on how you can responsibly recycle or reuse most of the materials in your “end of life” product.
Waste Electrical and Electronic Equipment (commonly known as WEEE) should never be disposed of in the municipal waste
stream (residential garbage collection). The “Crossed-Out Waste Bin” label affixed to this product is your reminder to
dispose of your “end of life” product properly.
Substances such as glass, plastics, and certain chemical compounds are highly recoverable, recyclable, and reusable. You
can do your part for the environment by following these simple steps:
■
When your electrical or electronic equipment is no longer useful to you, “take it back” to your local or regional waste collection
administra tion for recycling.
■
In some cases, your “end of life” product may be “traded in” for credit towards the purchase of new eMachines equipment. Call
eMachines to see if this program is available in your area.
■
If you need further assistance in recycling, reusing, or trading in your “end of life” product, you may contact us at the Customer
Care number listed in your product’s user guide and we will be glad to help you with your effort.
Finally, we suggest that you practice other environmentally friendly actions by understanding and using the energy-saving features of
this product (where applicable), recycling the inner and outer packaging (including shipping containers) this product was delivered in,
and by disposing of or recycling used batteries properly.
With your help, we can reduce the amount of natural resources needed to produce electrical and electronic equipment, minimize the
use of landfills for the disposal of “end of life” products, and generally improve our quality of life by ensuring that potentially
hazardous substances are not released into the environment and are disposed of properly.
For additional recycling information specific to your area, please go to
Mercury Warning
Lamp(s) inside this product contain mercury and must be recycled or disposed of according to local, state,
or federal laws.
H
g
16
http://www.acer‐group.com/public/Sustainability/sustainability01.htm
http://www.acer‐group.com/public/Sustainability/sustainability04.htm
Page 21
Safety, Regulatory, and Legal Notices
Canada
Industry Canada (IC) Unintentional emitter per ICES-003
This digital apparatus does not exceed the Class B limits for radio noise emissions from digital apparatus as set out in the radio
interference regulations of Industry Canada.
Le présent appareil numérique n’émet pas de bruits radioélectriques dépassant les limites applicables aux appareils numériques de
Classe B prescrites dans le règlement sur le brouillage radioélectrique édicté par Industrie Canada.
17
$FHU$PHULFD&RUSRUDWLRQ
:HVW6DQ&DUORV6W6DQ-RVH
&$86$
7HO
)D[
ZZZDFHUFRP
)HGHUDO&RPPXQLFDWLRQV&RPPLVVLRQ
'HFODUDWLRQRI&RQIRUPLW\
7KLV GHYLFH FRPSOLHV ZLWK 3DUW RI WKH )&& 5XOHV 2SHUDWLRQ LV VXEMHFW WR WKH
IROORZLQJWZR FRQGLWLRQV WKLVGHYLFHPD\QRWFDXVHKDUPIXOLQWHUIHUHQFHDQG
WKLV GHYLFH PXVW DFFHSW DQ\ LQWHUIHUHQFH UHFHLYHG LQFOXGLQJ LQWHUIHUHQFH WKDW PD\
FDXVHXQGHVLUHGRSHUDWLRQ
7KHIROORZLQJORFDO0DQXIDFWXUHU,PSRUWHULVUHVSRQVLEOHIRUWKLVGHFODUDWLRQ
3URGXFW
/&'0RQLWRU
0RGHO1XPEHU
6.81XPEHU
1DPHRI5HVSRQVLEOH3DUW\ $FHU$PHULFD&RUSRUDWLRQ
$GGUHVVRI5HVSRQVLEOH3DUW\ :HVW6DQ&DUORV6W
6DQ-RVH&$
86$
&RQWDFW3HUVRQ $FHU5HSUHVHQWDWLYH
3KRQH1R
)D[1R
Second " " = Q, V or
bODQN)
First " " 0 or 1 or 2 or 3
E2x0H
E210H/E220HQ
x
x
x
Page 22
Acer Incorporated
8F, 88, Sec. 1, Hsin Tai Wu Rd., Hsichih
Taipei Hsien 221, Taiwan
Tel : 886-2-2696-1234
Fax : 886-2-2696-3535
Declaration of Conformity
We,
Acer Incorporated
And,
Acer Europe SA
Hereby declare that:
Product: LCD Monitor
Trade Name: eMachines
Is compliant with the essential requirements and other relevant provisions of the following EC directives,
and that all the necessary steps have been taken and are in force to assure that production units of the
same product will continue comply with the requirements.
-. EN55022, AS/NZS CISPR22 Class B.
-. EN55024
-. EN61000-3-2, Class D
-. EN61000-3-3
-. EN60950-1
-. The maximum concentration values of the restricted substances by weight in homogenous material are:
_______________________________
Jan. 18, 2010
Easy Lai /Manager
Date
Regulation, Acer Inc.
Lead 0.1% Polybrominated Biphenyls (PBB’s) 0.1%
Mercury 0.1% Polybrominated Diphenyl Ethers (PBDE’s) 0.1%
Hexavalent Chromium 0.1% Cadmium 0.01%
8F, 88, Sec. 1, Hsin Tai Wu Rd., Hsichih, Taipei Hsien 221, Taiwan
Model Number:
Contact Person: Mr. Easy Lai, E-mail: [email protected]
Via Cantonale, Centro Galleria 2 6928 Manno Switzerland
standards:
in Electrical and Electronic Equipment:
Year to begin affixing CE marking 2010.
Low Voltage Directive 2006/95/EC as attested by conformity with the following
EMC Directive 2004/108/EC as attested by conformity with the following harmonized
harmonized standard:
RoHS Directive 2002/95/EC on the Restriction of the Use of certain Hazardous Substances
Directive 2009/125/EC with regard to establishing a framework for the setting of
ecodesign requirements for energy-related product.
SKU Number:
E2x
0H
E210H/E220HQ
x
Second " " = Q, V or
bODQN)
First " " 0 or 1 or 2 or 3
x
x
Trademark acknowledgments
1
18
European Union
Page 23

Safety, Regulatory, and Legal Notices
19
Page 24

MAN E 210H/E220HQ GDE R0 6/08
MU.Q3R00.001
 Loading...