

Page 1
Starter Guide
for your eMachines computer
Look inside for helpful hints on:
• Using Windows
• Using multimedia
• Protecting your computer
• Restoring your computer
Page 2

Thank you!
Thank you for your purchase! We want to make your
experience a satisfying one, so we’ve put together tips
to help you get started with your eMachines computer.
Page 3

Contents
Getting started with Windows ...............................................4
Windows Welcome Center ....................................................... 7
Getting help .................................................................................. 8
Internet .........................................................................................10
E-mail .............................................................................................11
Using CDs and DVDs ................................................................12
Safety and security....................................................................14
Improving performance .........................................................19
Restoring your system .............................................................20
Page 4
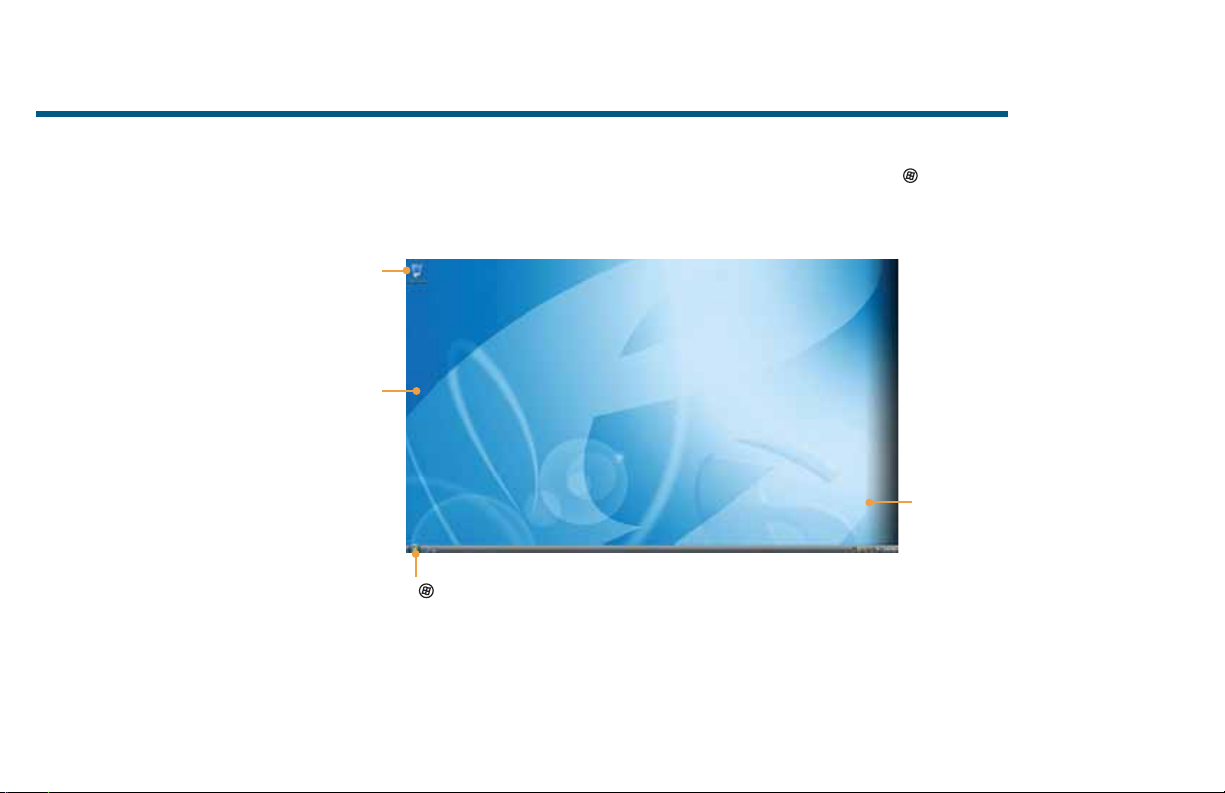
we do Windows
After you start your computer and complete the Windows® setup, the rst thing you’ll see on
your screen is the Windows desktop. The desktop includes a taskbar, Start button ( ), and
Recycle Bin icon. Other icons may be added depending on your computer’s con guration.
Drag items to
the Recycle
Bin to delete
them
Add icons of
your own
This is the
Windows
desktop
Click (Start) to access programs
and to turn o your computer
4
For more information about Windows, see “Windows Basics” under Help and Support in the Start menu.
Page 5
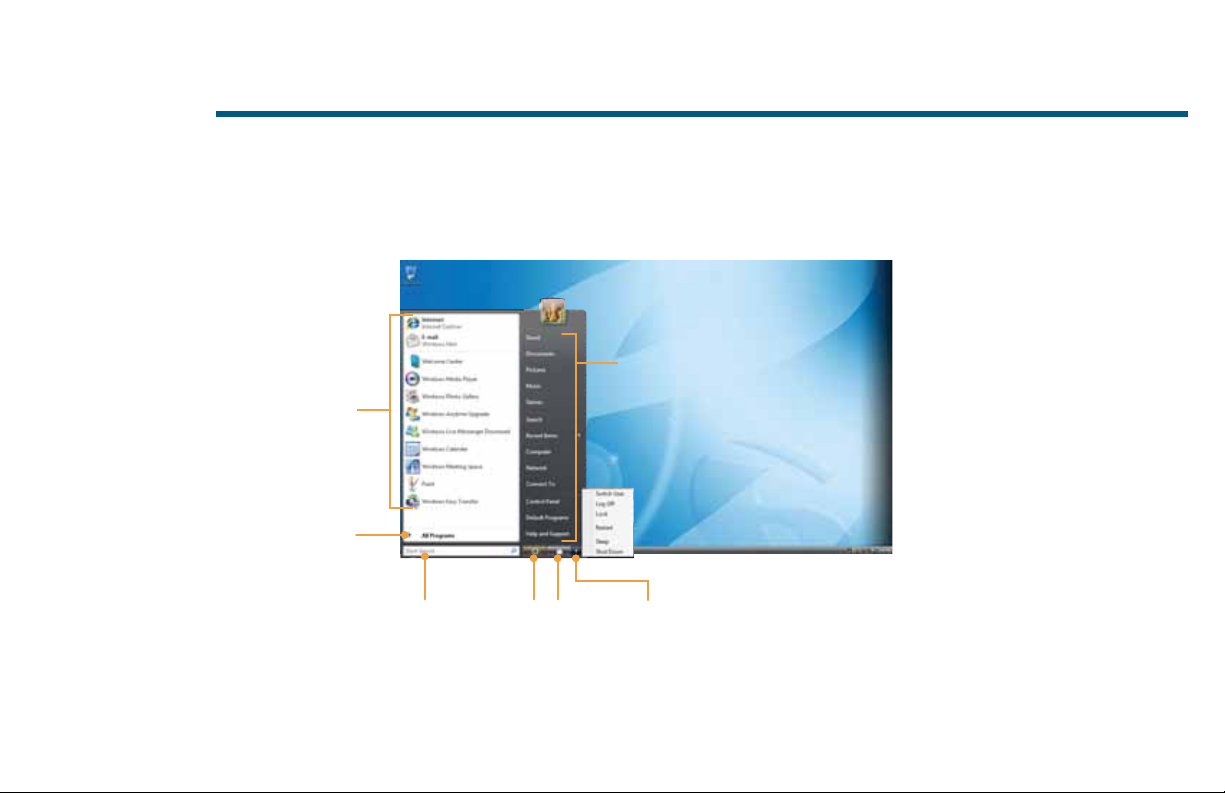
getting things started
The Start menu is the command center of your computer. Whether you want to start a program,
nd a le, change settings, or even shut down your system, the Start menu is where it all begins.
Click here to
access the
Internet, e-mail,
and your most
frequently used
programs
Click here to see
all your programs
Click here to open les
and folders, access
networking, and
change settings
Type here to nd
a le or folder
Click here
to put your
computer in
Sleep mode
Click here
to lock your
computer
Click here
to shut
down your
computer
For more information about Windows, see “Windows Basics” under Help and Support.
5
Page 6
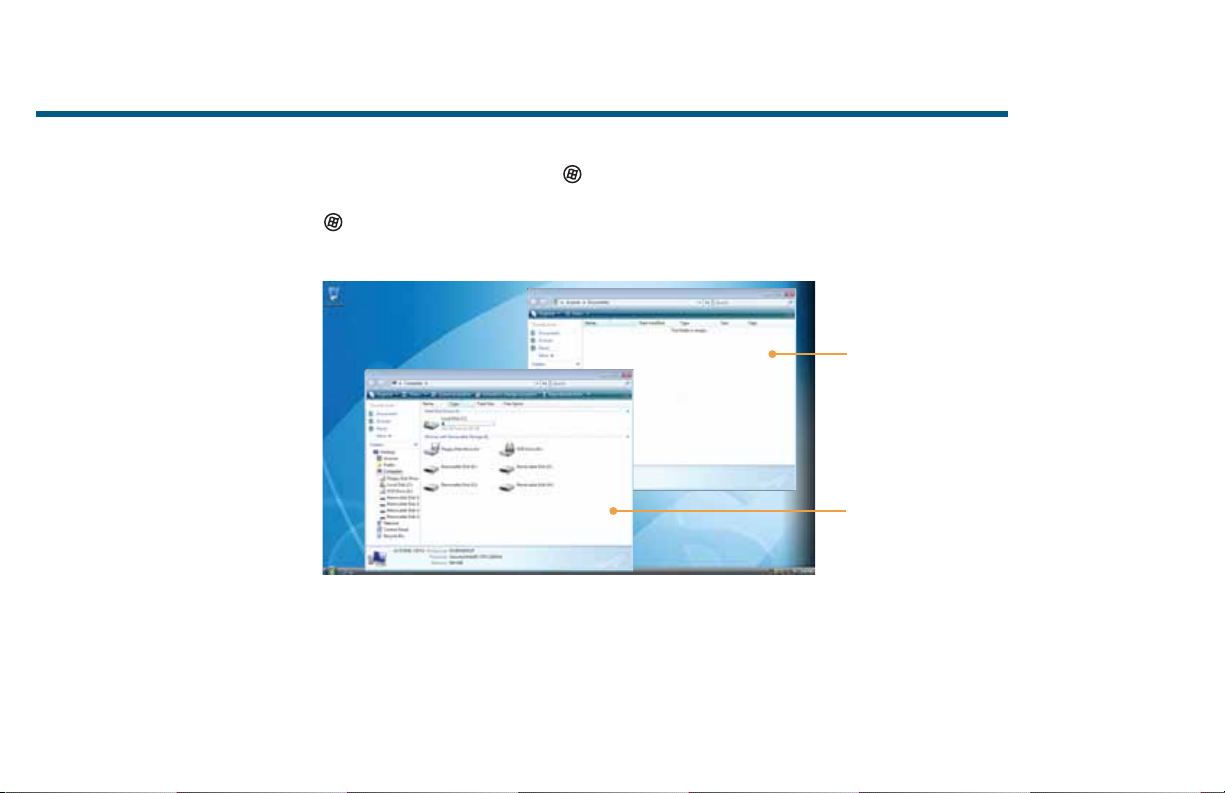
maintaining order
Managing les and folders starts with the Computer folder. From there, you can see everything
on your computer. To get there, click (Start), then click Computer. To save something right
away, use the Documents folder that has already been set up for you. To access that folder,
click
(Start), then click Documents.
Documents
Already created
for you, this
folder is ready for
immediate use
Computer
Look here to see
what’s on your
computer
6
For more information about Windows, see “Windows basics” under Help and Support.
Page 7
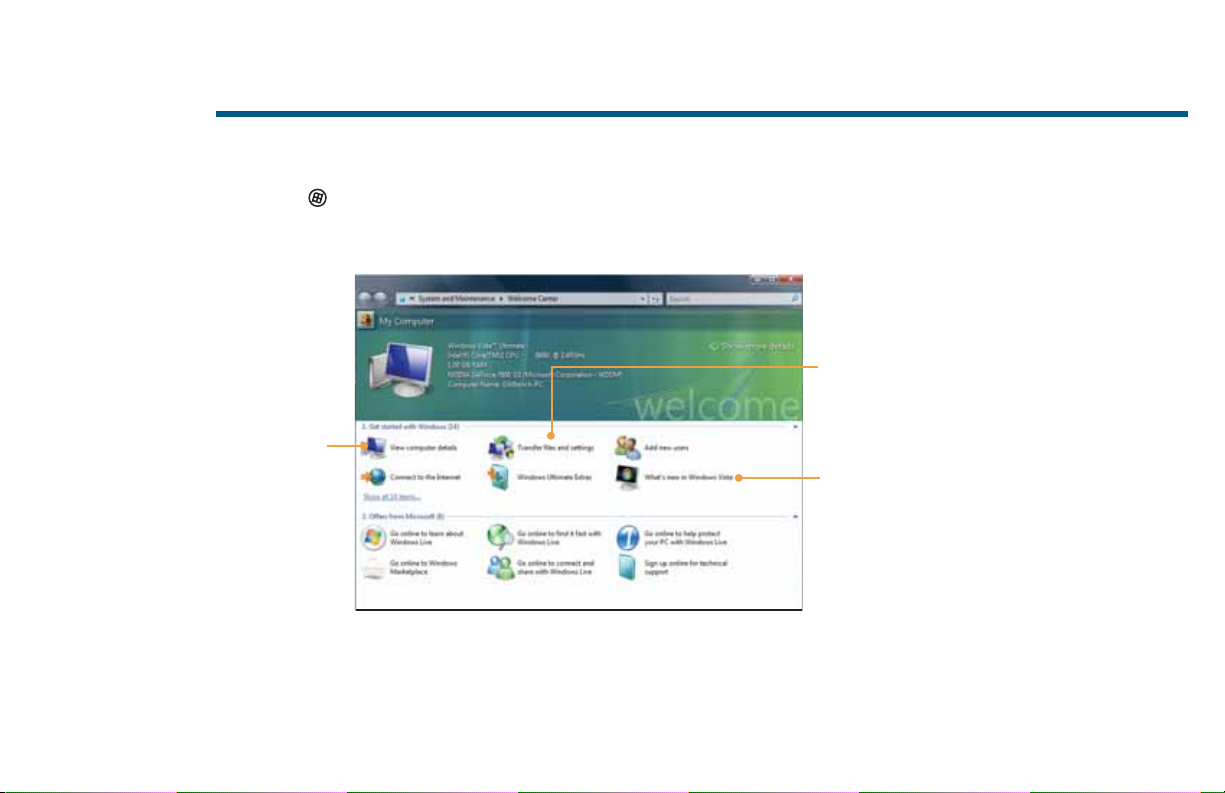
welcome to the Welcome Center!
The Welcome Center o ers a wealth of options for getting more information about your
computer, as well as links to special deals from eMachines partners! To access the Welcome
Center, click (Start), Control Panel, then click System and Maintenance. Click Welcome
Center and select an option.
Transfer les
and settings
from a previous
computer to a
Get information
about your
computer
new one
Learn about the
newest features
in Windows Vista®
7
Page 8

need additional help?
If you need a little extra help with something on your computer, eMachines o ers several
options designed to meet your needs:
• eMachines Web support—Available 24/7,
eMachines’ online support provides current drivers,
product speci cations, tutorials, and personalized
information about your computer. Visit it at
www.emachines.com/support.
• Help and Support—This collection of Windows
help and troubleshooting information, along with
automated support, is easily accessible. Just click
(Start), then click Help and Support. Click a
link, do a search, or simply browse to nd what
you’re looking for.
Help and
Support is a
quick and easy
way to get
information
eMachines’ Web support is available 24
hours a day, 7 days a week
8
Page 9

help, continued...
• User guide—For detailed information on using your
eMachines computer, see the provided Reference Guide or
online User Guide. To access the online guide, click (Start),
All Programs, then click eMachines Documentation.
• Tech support—For help and advice you can trust, talk to
people who know computers. You can nd the number on
the setup poster that came with your computer.
• BigFix*—Pre-installed for you on your eMachines
computer, BigFix checks your computer for problems and
con icts and lets you know if it nds something. To start
BigFix, click (Start), All Programs, then click BigFix. Click
Help, then click Tutorial to learn more about it.
*May not be available in all regions
Check your online user
guide for easy-to-understand
information on a variety of
topics
9
Page 10

surfi ng the ’net
Explore the World Wide Web with an Internet connection. Just connect your computer to
a telephone line, Digital Subscriber Line (DSL), or cable TV line and sign up with an Internet
Service Provider (ISP).
To get to the Internet, click (Start), then click Internet or the ISP you’ve connected with. Type
in an Internet address, such as www.emachines.com, click Go, and you’re on your way.
The address bar is
where you type in
the Internet address
or URL (Universal
Resource Locator)
This is a
Web page
This is a linked Web page
If your pointer arrow turns into a hand
when you move over something, it’s a link.
Click on it and see where it takes you!
10
To learn more about the Internet, see “Using the Internet” in your online user guide.
Page 11

welcome to e-mail!
Staying in touch with family and friends is easy with e-mail and is usually free with your Internet
account.
To send e-mail, connect to your ISP, click (Start), then click E-mail. When your default e-mail
program opens, complete any setup required, then click Create Mail and type the e-mail
address of the person that you want to send a message to in the To box. Add a description in
the Subject box, type the e-mail message, then click Send. Your message will arrive at most
e-mail addresses in seconds.
Type the e-mail
address of the person
you want to send a
message to here
Include others in your
message by typing
their e-mail addresses
here or in the To box
For more information about e-mail, see “Using the Internet” in your online user guide.
This is the user name
part of an e-mail address
JohnSmith@microsoft.com
Type a short description
of your message here
This is the Internet domain name
part of an e-mail address
11
Page 12

for your listening and viewing pleasure...
Enjoy listening to favorite music CDs or watching DVDs with software already installed on your
new eMachines computer.
To listen to a music CD or watch a movie on DVD, click
Windows Media Player. Put the disc into the CD or DVD drive on your computer, then click the
Play button ( ). You can control how the music CD or video DVD plays from Windows Media
Player.
Note: You must
have a DVD drive
to play a DVD
Click these buttons to play, pause, or stop disc
playback. You can also control the volume here.
(Start), All Programs, then click
Songs
or scene
selections
from the CD
or DVD you
are playing
are listed here
12
For more information about using media, see “Using Multimedia” in your online user guide.
Page 13

rip, burn, play
Create a custom music CD with MP3s you rip yourself, or create a video DVD of home movies
or special videos. If your computer came with a DVD burner, you can do it all with easy-to-use
software already installed on your eMachines computer.
Create an MP3 music le
To create an MP3, click (Start), All Programs,
then click Windows Media Player. Put a music
CD in the disc drive on your computer, then
click Rip. Make sure that the songs you want to
create MP3s of are checked, then click Start Rip.
Windows Media Player will create MP3s and save
them to the Music folder.
Create a DVD
To save content such as data or movies to DVD,
open Windows Media Player and put a blank,
writable DVD into the DVD burner on your
computer. Click Burn , then select the items you
want to save by right-clicking on the item and
selecting Add to Burn List. When your selections
are complete, click Start Burn.
Note: you
must have a
DVD burner to
create a DVD
For more information about using media, see “Using Multimedia” in your online user guide.
13
Page 14

keeping your computer safe
Your eMachines computer comes with hardware and software features that can help you keep
your computer secure and up-to-date. Use these tools regularly to improve the security of
personal information stored on your computer:
• Windows Security—Provides access to security features such as Windows Security
Center, Windows Firewall, Windows Update, and Windows Defender—all built into
Windows Vista
• Norton 360—Reduces the chances of a virus a ecting your computer
• BigFix—Monitors your computer for problems, and alerts you if something is detected
14
For more information on security, see “Protecting Your Computer” in your online user guide.
Page 15

securing the perimeter
Windows Vista provides built-in security features designed to protect you, your family, and your
computers. To view or change Windows Vista security settings, click (Start), Control Panel,
Security, then click Security Center.
Guard against
spyware, pop-ups,
and other unwanted
software
Select and
control the
type and level
of protection
you want for
your computer
For more information on security, “Protecting Your Computer” in your online user guide.
15
Page 16

up-to-date security
Windows Update
If a hacker nds a way to bypass the security features built into Windows Vista, Microsoft creates
a high-priority Windows update to x the problem. You should update Windows regularly to
keep your computer secure.
To run Windows Update, click (Start), All Programs, then click Windows Update and
download high-priority updates.
You can
schedule
automatic
updates with
Windows
Update
16
Page 17

virus-free with Norton 360
Norton 360
Norton 360 helps protect your computer from viruses, hackers, and privacy threats. To run
Norton 360, click (Start), All Programs, Norton 360, then click Norton 360.
Your computer came with virus,
spyware, rewall, and phishing
protection turned on. Keep
virus de nitions current to
ensure up-to-date protection.
You need to extend your subscription
to update Norton 360 after the
complimentary trial period ends.
For more information on security, see “Protecting Your Computer” in your online user guide.
17
Page 18

secure with Big Fix
BigFix
Your computer may include BigFix. BigFix monitors your computer for problems and con icts.
It automatically gathers information about the latest bugs, security alerts, and updates from
BigFix sites on the Internet. Whenever BigFix detects a problem, it alerts you by ashing the blue
taskbar icon ( ). To x the problem, click that icon and BigFix will open.
Click here,
then click
Tutorial to
learn more
about BigFix
Click here for
information about
updates speci c
to your computer
Click here to go
directly to the
eMachines Web
support site
Details and
information
about updates
are provided here
18
For more information on safety, see “Protecting Your Computer” in your online user guide.
Page 19

improving performance
Keep your computer in top running condition with regular maintenance. Click (Start),
Control Panel, System and Maintenance, then click Performance Information and Tools.
Select a task and follow the instructions. Do this regularly and you’ll have a smoother running
system.
Click here to return your
computer to a previous state
when it was working better
Click here to see details
about the components
of your system
Click here to adjust
how quickly your
computer goes into
power-saving modes
Click here to do maintenance, such as Disk Cleanup,
or to defragment your hard drive (click Advanced
Tools, then click Open Disk Defragmenter)
For more information on system recovery, see “Recovering Your System” in your online user guide.
19
Page 20

backing up a bit - restoring your computer
In the unlikely event that you experience software problems, the Windows Vista Backup and
Restore Center let you roll back your computer to a previous state when everything worked
right. Windows Vista takes regular snapshots of your system, called Restore Points. You can return
to one of these Restore Points to get your computer running again. To take advantage of the
restore features in Windows, click
click Backup and Restore Center.
(Start), Control Panel, System and Maintenance, then
20
Page 21

prepare to recover
When you rst get your computer, it is a good idea to make a backup of the software that came
with your system. Before you create these “recovery discs,” make sure that your computer has
a recordable drive and that you have blank discs ready. Depending on the type of recordable
drive you use, you’ll need either several CD-R discs or one DVD-R or DVD+R disc. CD-RW,
DVD-RW, and DVD+RW discs will not work.
To create the disc, click
Recovery Center, then click Application and Drivers External Media and follow the on-
screen instructions. When prompted, choose either Create Application and Driver Recovery
Disc (makes a backup of applications and drivers) or Create an ISO image (creates complete
system backup). Make your selection, then continue with the on-screen instructions.
(Start), All Programs, eMachines Recovery Center, click eMachines
21
Page 22

reinstalling the operating system
A backup copy of your hard drive’s original factory-installed contents is saved on a hidden area
of your hard drive. This lets you restore your computer to its original factory settings.
1 Turn on or restart your computer, then press the F8 key on your keyboard repeatedly while
your computer is starting. When the Advanced Boot Options screen appears, click Repair
Your Computer, then click Next.
2 Pick your country and keyboard layout, then click Next.
3 Log on, then click Next.
4 On the System Recovery Options screen, click Recovery Manager (last option). The System
Recovery wizard opens.
5 Follow the on-screen instructions.
6 Click one of the following system recovery options when prompted:
• Recovery with automatic data backup (recommended)— This moves the contents
of the hard drive to the C:\My Backup folder and installs a new copy of Windows. This
option saves your existing data les, but all programs must be re-installed and the
program settings recon gured. You need at least 4 GB of hard drive space to use this
restore option
• Full factory recovery—Reformats and restores the system software as it was when
you purchased your computer. This process deletes your data les, so they must be
saved on an external disc prior to reformatting.
22
Page 23

7 Click Next, then click Ye s . Recovery starts.
8 When recovery is complete, click Finish. Your computer will restart and Windows will nish
its setup and installation.
IMPORTANT
• If your hard drive has failed and you can’t restore the software from the hard drive,
contact eMachines Customer Care for help.
• After you restore your computer, it will appear with the same les and programs it
had when it shipped from the factory. You still need to download Windows updates
and antivirus updates to bring your computer’s software up to date.
23
Page 24

MAN EM DT/PTB STARTER GDE V R3 4/08
 Loading...