

Page 1
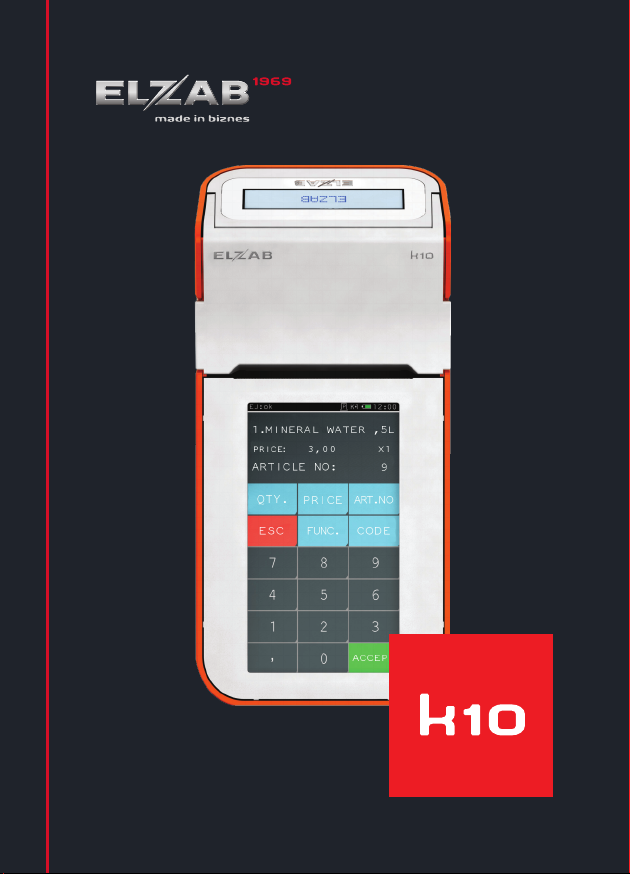
QUICK START
Page 2
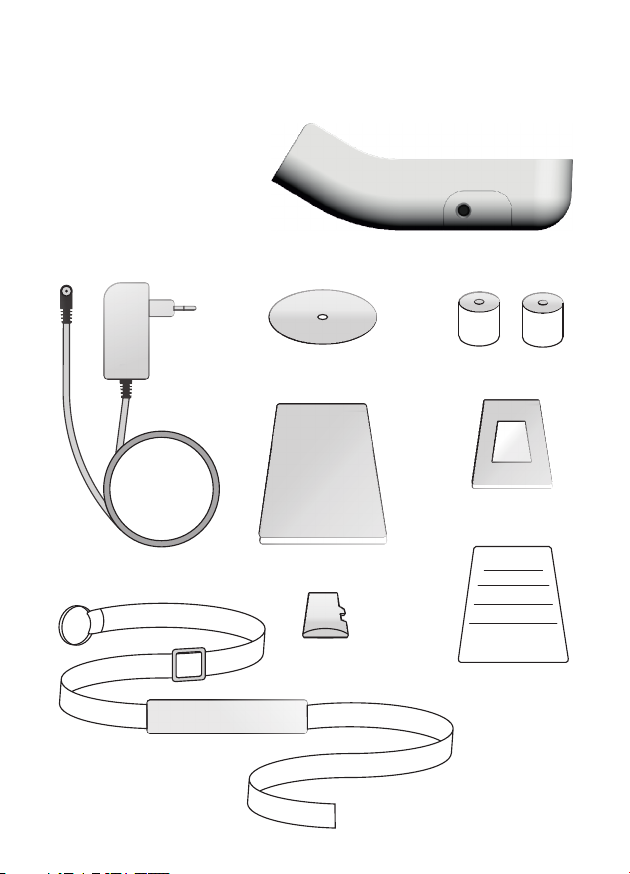
Package contents
Cash register K10
Power supply unit 12V/1A
CD-ROM disc (instruction manual, etc.)
Two rolls of thermal paper
Form for registration of the cash register
in the tax office
Cash register book
Quick start brochure
Micro SC card (in the cash register)
Lanyard (allows hanging the cash register round your arm)
Page 3

Table of contents
K10QSA0010
1. CASH REGISTER DESIGN 3
2. SWITCHING ON THE CASH REGISTER 5
3. SELLING PRODUCTS 7-14
4. ELECTRONIC COPY OF THE PRINTOUTS
[ELECTRONIC JOURNAL]
15
5. EXCHANGING THE PAPER ROLLS 17
The instruction manual contains a detailed description of all the functions of the cash
register.
Page 4
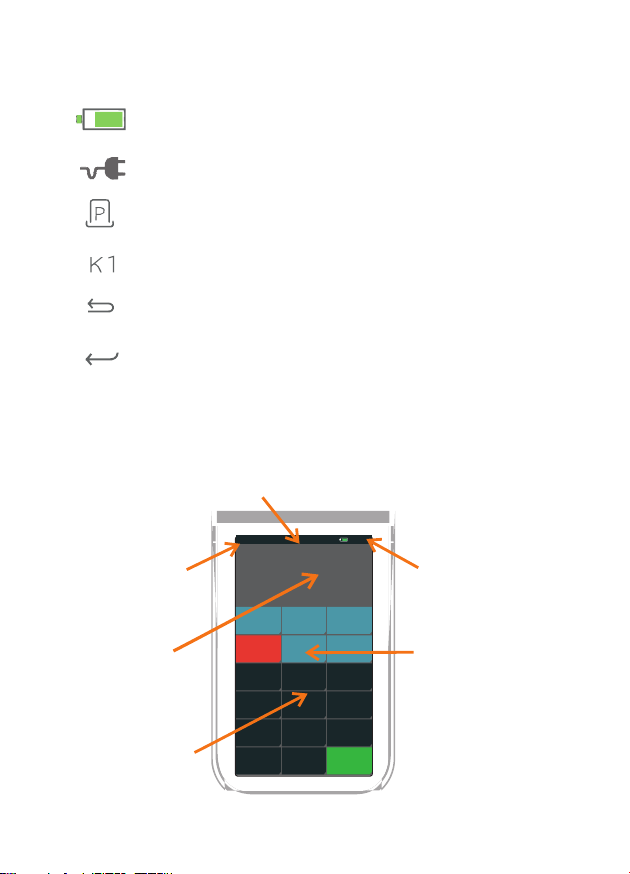
DESCRIPTION OF GRAPHIC SIGNS
battery charging level
power supply from mains
open receipt
cashier’s number
withdrawing from the function
confirming the selection
VIEW OF THE MAIN MENU
status bar
status of the
electronic copy
operations
screen
2 |
digital
keypad
EJ:ok
EJ:OK
ARTICLE NO:
QTY.
PRICE
FUNC.
ESC
7
8 9
5
4
2
1
0
,
K1
12:00
12:0012:0012:0012:0012:0012:0012:0012:0012:0012:00
12:0012:0012:0012:0012:0012:0012:0012:0012:0012:0012:0012:0012:0012:0012:0012:0012:0012:00
12:00
ART.NO
CODE
6
3
ACCEPT
time
access to the functions
Page 5
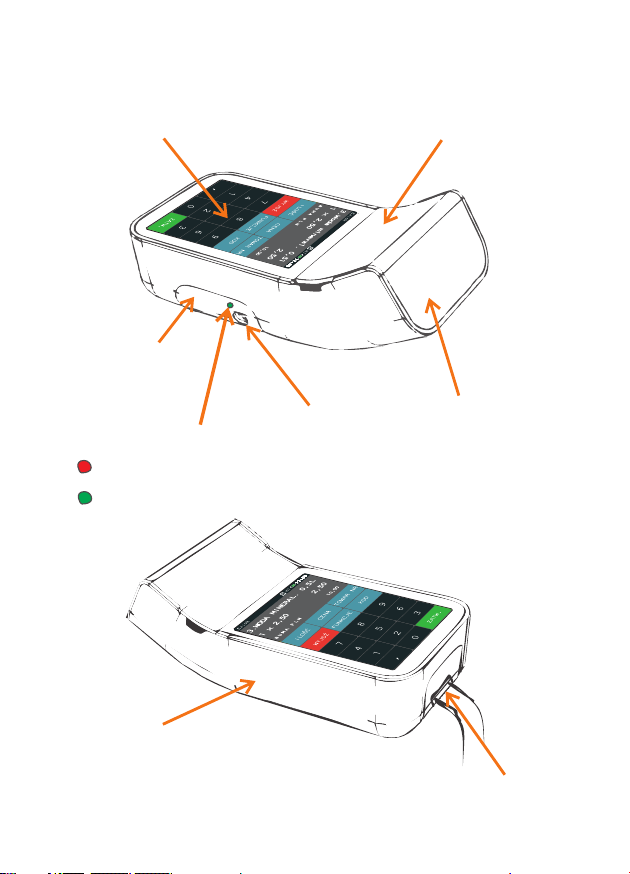
CASH REGISTER DESIGN
replaceable battery
1
printer covertouch screen
power supply
and charging indication:
charging in progress / external power supply
fully charged / external power supply.
non-slip surface
power supply socket
customer display
eye for lanyard
| 3
Page 6

4 |
Page 7
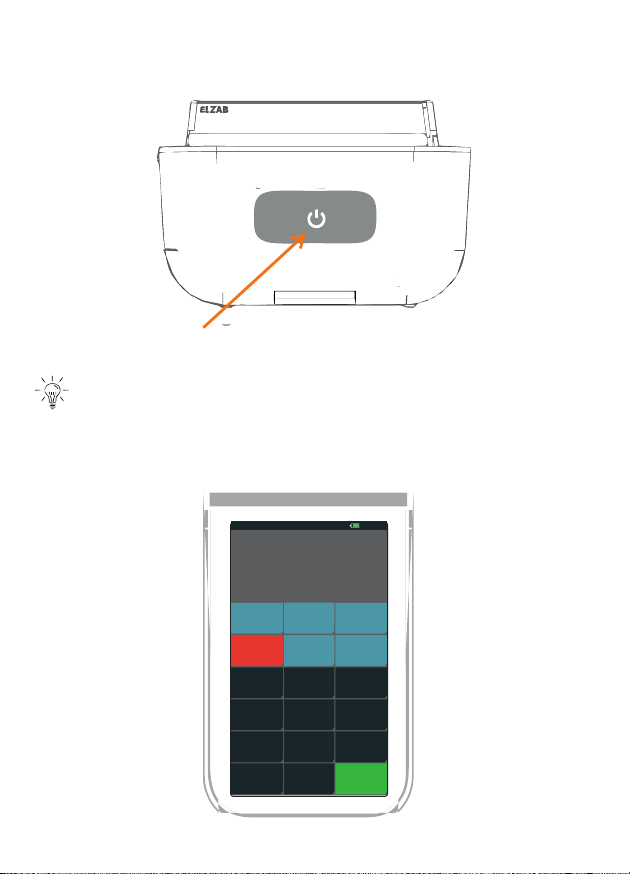
SWITCHING ON THE CASH REGISTER
ON / OFF button
To switch on the cash register, keep the button pressed for more
than one second
After switching on the cash register and displaying the touchpad, the
device is immediately ready for work.
2
EJ:ok
EJ:OK
ARTICLE NO:
PRICE
QTY.
ESC
FUNC.
7
8 9
5
4
2
1
0
,
K1
ART.NO
CODE
ACCEPT
12:0012:0012:0012:0012:0012:0012:0012:0012:0012:00
12:0012:0012:0012:0012:0012:0012:0012:0012:0012:0012:0012:0012:0012:0012:0012:0012:0012:00
12:00
12:00
6
3
| 5
Page 8

6 |
Page 9

SELLING PRODUCTS
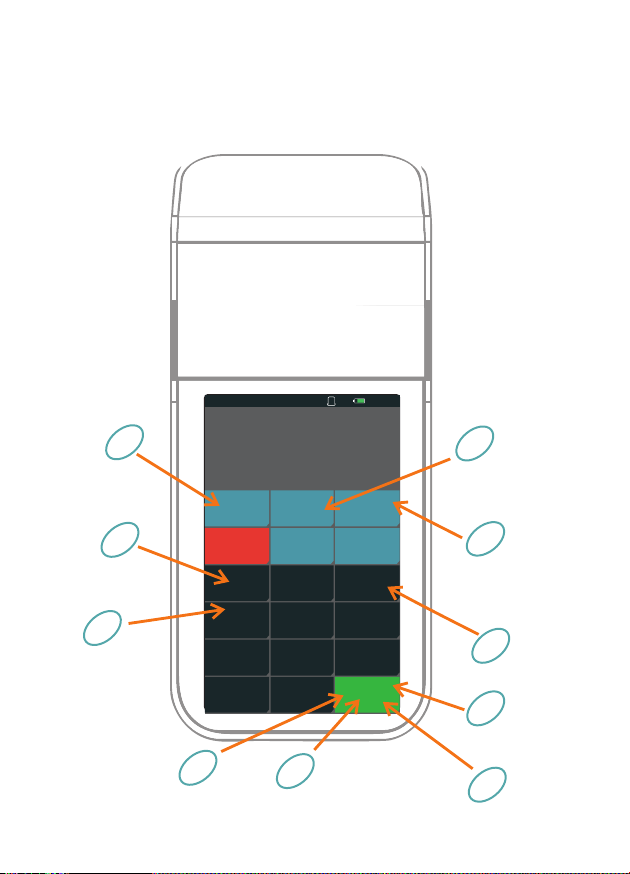
3
SIMPLE - context keypad display – only those keys are displayed that
QUICK - you can sell products using only one key
FLEXIBLE - you can enter the quantity, price, product number, and digits
INTUITIVE - legible interface – trouble-free operation at first contact with
are active for the particular function
in random order
the cash register
| 7
Page 10
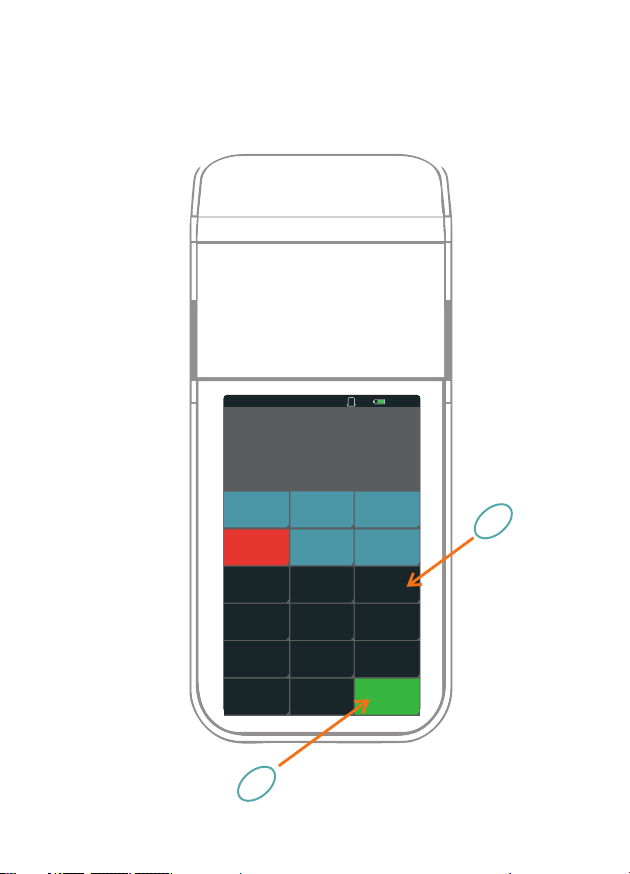
1. for three EUR.MINERAL WATER 0.5L
8 |
EJ:ok
EJ:OK
1.MINERAL WATER 0,5L
PRICE: 3 , 0 0 X1
ARTICLE NO:
QTY.
ESC
PRICE
7
4
1
,
sell this
item
2
P
FUNC.
8 9
5
2
0
K1
12:0012:0012:0012:0012:0012:0012:0012:0012:0012:00
12:0012:0012:0012:0012:0012:0012:0012:0012:0012:0012:0012:0012:0012:0012:0012:0012:0012:00
12:00
12:00
ART.NO
CODE
6
3
ACCEPT
9
enter the
product
1
number
Page 11
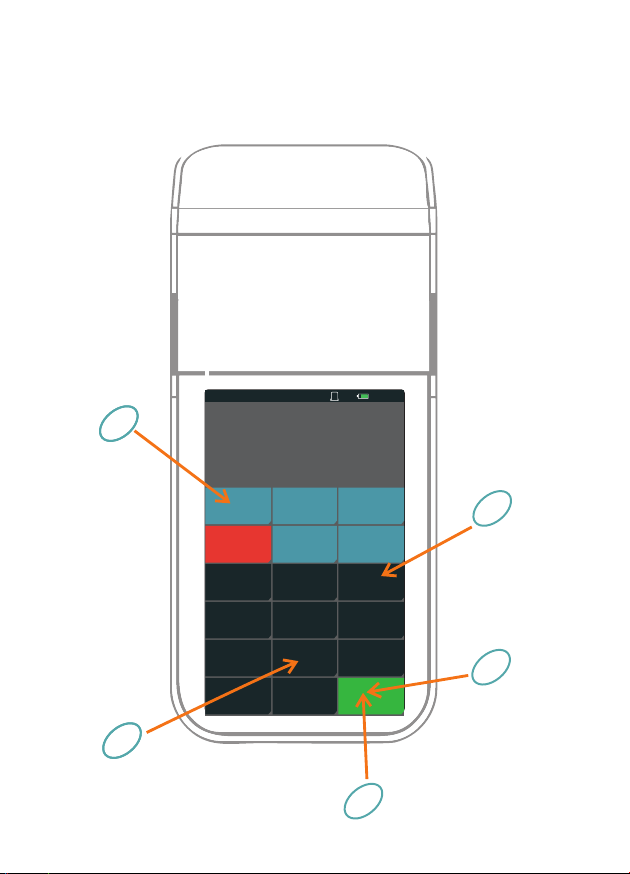
2. Two MINERAL WATERS 0.5L for three EUR each.
go to
entering the
quantity
2
EJ:ok
EJ:OK
1.MINERAL WATER 0,5L
2 x 3,00 6,00
TOTAL EUR 6,00
QTY.
ESC
PRICE
FUNC.
P
K1
12:0012:0012:0012:0012:0012:0012:0012:0012:0012:00
12:0012:0012:0012:0012:0012:0012:0012:0012:0012:0012:0012:0012:0012:0012:0012:0012:0012:00
12:00
12:00
ART.NO
CODE
enter the
product
1
number
enter
the
quantity
7
4
1
,
8 9
5
2
ACCEPT
0
6
3
5
sell
the item
3
confirm
4
the quantity
| 9
Page 12
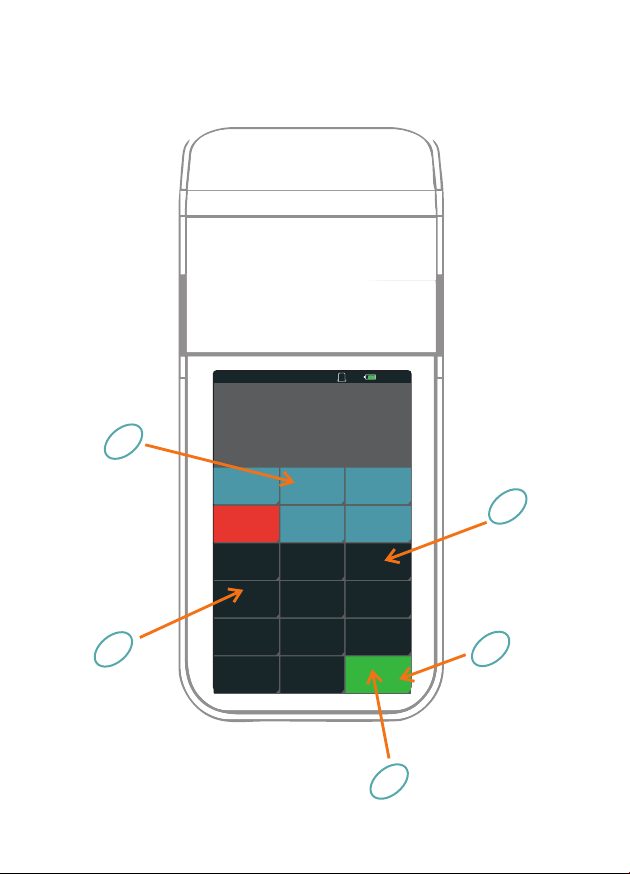
3. MINERAL WATER 0.5L for four EUR.
go to entering
the price
2
enter
the
3
price
10 |
EJ:ok
EJ:OK
1.MINERAL WATER 0,5L
1 x 4,00 4,00
TOTAL EUR 4,00
QTY.
ESC
7
4
1
,
P
PRICE
FUNC.
8 9
5
2
0
K1
12:0012:0012:0012:0012:0012:0012:0012:0012:0012:00
12:0012:0012:0012:0012:0012:0012:0012:0012:0012:0012:0012:0012:0012:0012:0012:0012:0012:00
12:00
12:00
ART.NO
CODE
6
3
ACCEPT
4
5
confirm the
quantity
enter the
product
1
number
sell the
item
Page 13
4. It is also possible to enter the price, quantity,
product number, and digits in a different order.
go to
entering
the
quantity
enter
the
quantity
enter
the
price
5
1
2
confirm
the
quantity
PRICE
FUNC.
8 9
5
2
0
confirm
6
the price
P
EJ:ok
EJ:OK
1.MINERAL WATER 0,5L
7 x 4,00 28,00
TOTAL EUR 21,00
QTY.
ESC
7
4
1
,
3
K1
12:00
ART.NO
CODE
6
3
ZATW.
12:0012:0012:0012:0012:0012:0012:0012:0012:0012:00
12:0012:0012:0012:0012:0012:0012:0012:0012:0012:0012:0012:0012:0012:0012:0012:0012:0012:00
12:00
sell the
item
go to
entering
4
the price
przejdź do
wprowadzenia
numeru
7
towaru
enter the
product
8
number
confirm the
9
product
10
| 11
Page 14
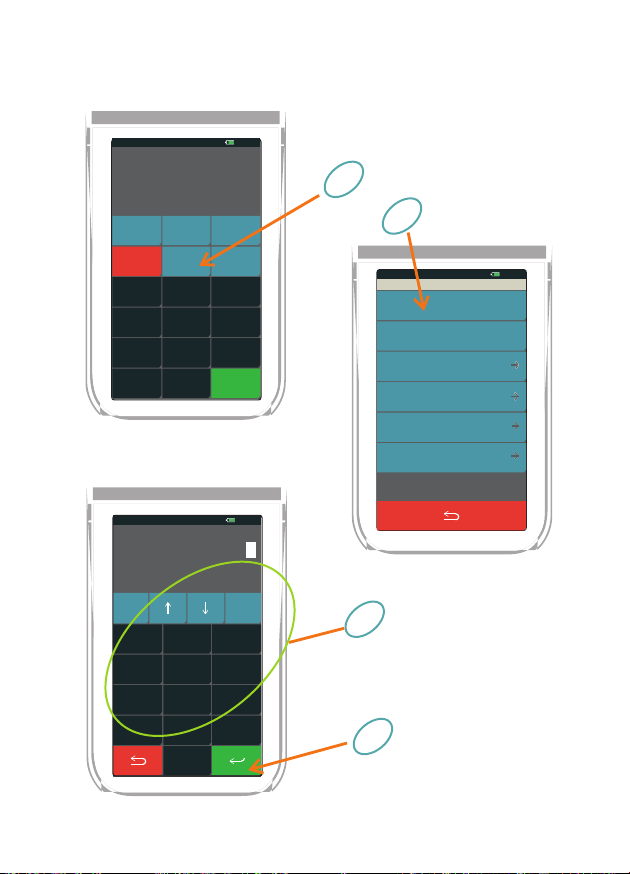
5. Selling a product by entering the product name.
EJ:ok
EJ:OK
K1
12:0012:0012:0012:0012:0012:0012:0012:0012:0012:00
12:0012:0012:0012:0012:0012:0012:0012:0012:0012:0012:0012:0012:0012:0012:0012:0012:0012:00
12:00
12:00
ARTICLE NO:
QTY.
ESC
7
4
1
,
EJ:ok
ENTER BEGINNING OF NAME
MINERAL WATER. 0,5L
DEL
GHI
PQRS TUV WXYZ
ĄĆĘ ŁŃO ŚŻŹ
ART.NO
PRICE
FUNC.
CODE
8 9
5
2
ACCEPT
0
K1
MIN
ABC DEF
JKL MNO
-
6
3
12:0012:0012:0012:0012:0012:0012:0012:0012:0012:00
12:0012:0012:0012:0012:0012:0012:0012:0012:0012:0012:0012:0012:0012:0012:0012:0012:0012:00
12:00
12:00
12:00
12:0012:0012:0012:0012:0012:0012:0012:0012:0012:0012:0012:0012:0012:0012:0012:0012:0012:0012:0012:0012:0012:0012:0012:0012:0012:0012:0012:0012:0012:0012:0012:0012:0012:0012:0012:0012:0012:0012:0012:0012:0012:0012:0012:0012:0012:0012:0012:0012:0012:0012:0012:0012:0012:0012:0012:0012:0012:00
1/3
go to the cash register’s
Functions
1
select the function:
2
Find name
EJ:ok
EJ:OK
EJ:OK
EJ:OK
FUNCTIONS
FIND NAME
FAST SALE
FAST FUNCTION
CLERK FUNCTION
MANAGER FUNCTION
SERVICE FUNCTION
enter the first letter(s)
of the product name
3
and find using arrows
confirm the
4
selected product
K1
12:0012:0012:0012:0012:0012:0012:0012:0012:0012:00
12:0012:0012:0012:0012:0012:0012:0012:0012:0012:0012:0012:0012:0012:0012:0012:0012:0012:00
12:00
12:00
12:00
12:00
12:0012:0012:0012:0012:0012:0012:0012:0012:0012:00
12:0012:0012:0012:0012:0012:0012:0012:0012:0012:0012:0012:0012:0012:0012:0012:0012:0012:00
12:0012:0012:0012:0012:0012:0012:0012:0012:0012:00
12:0012:0012:0012:0012:0012:0012:0012:0012:0012:0012:0012:0012:0012:0012:0012:0012:0012:00
12 |
Page 15
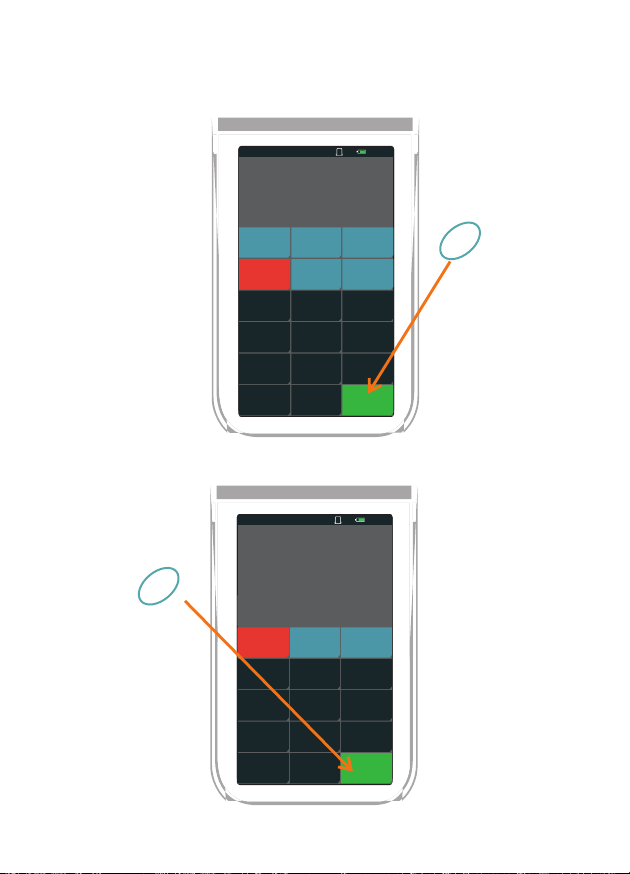
6. Closing the Receipt
now you can enter
the cash received
and close the
receipt
2
EJ:ok
EJ:OK
P
K1
12:0012:0012:0012:0012:0012:0012:0012:0012:0012:00
12:0012:0012:0012:0012:0012:0012:0012:0012:0012:0012:0012:0012:0012:0012:0012:0012:0012:00
12:00
12:00
1.MINERAL WATER 0,5L
1 x 3,00 3,00
TOTAL EUR 3 , 0 0
PRICE
QTY.
ESC
FUNC.
ART.NO
CODE
7 8 9
5
2
0
5
5
2
2
0
0
ACCEPT
P
P
K1
K1
12:00
12:00
12:00
KOD
TOWAR NR
PAYMANT
6
6
3
3
ZATW.
ACCEPT
6
3
12:0012:0012:0012:0012:0012:0012:0012:0012:0012:00
12:0012:0012:0012:0012:0012:0012:0012:0012:0012:0012:0012:0012:0012:0012:0012:0012:0012:00
12:00
12:0012:0012:0012:0012:0012:0012:0012:0012:0012:00
12:0012:0012:0012:0012:0012:0012:0012:0012:0012:0012:0012:0012:0012:0012:0012:0012:0012:00
12:00
4
1
,
EJ:ok
EJ:ok
EJ:OK
EJ:OK
EJ:OK
1.Woda mineral. 0,5l
TOTAL EUR 3,00
TO PAY 3,00
1 x 3,00 3,00
CASH EUR 3,00
T O W A R N R :
CENA
ILOŚĆ
FUNKCJE
FUNC.
ESC
WYJDŹ
7 8 9
7 8 9
4
4
1
1
,
,
receipt
summary
1
9
| 13
Page 16
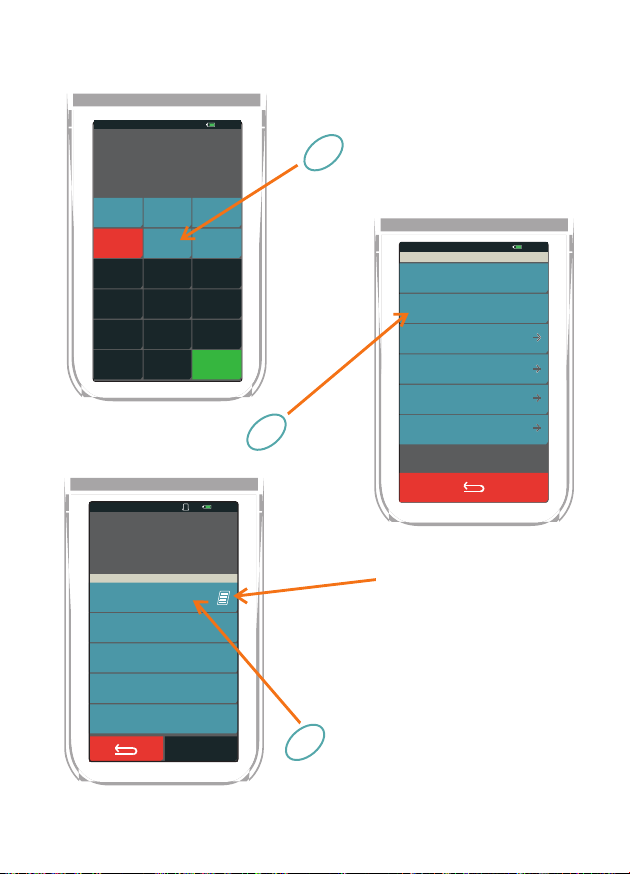
7. Selling with the use of a shortcut key.
EJ:ok
EJ:OK
K1
ARTICLE NO:
QTY.
ESC
7
4
1
,
EJ:ok
EJ:OK
1.BREAD
1 x 3,50 3,50
TOTAL EUR
FAST SALE
BREAD
BUTTER
PEAR
APPLE
MINERAL WATER 0,5L
ART.NO
PRICE
FUNC.
8 9
5
2
ACCEPT
0
select the
function:
Quick sale
P
K1
1/3
CODE
12:00
12:0012:0012:0012:0012:0012:0012:0012:0012:0012:00
12:0012:0012:0012:0012:0012:0012:0012:0012:0012:0012:0012:0012:0012:0012:0012:0012:0012:00
12:00
12:00
6
3
12:0012:0012:0012:0012:0012:0012:0012:0012:0012:00
12:0012:0012:0012:0012:0012:0012:0012:0012:0012:0012:0012:0012:0012:0012:0012:0012:0012:00
12:00
3,50
go to the cash
register’s Functions
1
EJ:ok
EJ:OK
EJ:OK
EJ:OK
FIND NAME
FAST SALE
FAST FUNCTION
CLERK FUNCTION
MANAGER FUNCTION
2
SERVICE FUNCTION
if an icon appears
at the product name,
this means that after
FUNCTIONS
K1
12:0012:0012:0012:0012:0012:0012:0012:0012:0012:00
12:0012:0012:0012:0012:0012:0012:0012:0012:0012:0012:0012:0012:0012:0012:0012:0012:0012:00
12:00
12:00
12:00
12:00
12:0012:0012:0012:0012:0012:0012:0012:0012:0012:00
12:0012:0012:0012:0012:0012:0012:0012:0012:0012:0012:0012:0012:0012:0012:0012:0012:0012:00
12:0012:0012:0012:0012:0012:0012:0012:0012:0012:00
12:0012:0012:0012:0012:0012:0012:0012:0012:0012:0012:0012:0012:0012:0012:0012:0012:0012:00
selecting the product
the receipt will be closed
press, and the
3
product will be sold
14 |
Page 17
ELECTRONIC COPY OF PRINTOUTS
[ELECTRONIC JOURNAL]
Generating a copy is easy, quick and safe. While saving to the SD card
or verifying, the device can be used as usual for selling operations.
Status of the electronic copy
4
EJ: ok
Data verification
Card from a different device
- normal working status,
receipts can be made
out
- normal working status,
the SD card is being
verified
- a card from a different
cash register has been
put in (you should put
in the card dedicated
for this device)
SD card missing
Saving in progress...
Data corrupt
- put in the card dedicated
for this device
- normal working status,
data are being saved to
the SD card
- an uninitialized or corrupt
card has been put in
Saving data to the SD card takes place after generating a daily report,
don’t switch off the cash register until the saving process is finished
( info on the display: “EJ: OK” ).
For a trouble-free use of the electronic copy you should only make
sure that the SD card is placed in the cash register all the time.
REGULARLY GENERATE A BACKUP COPY with the programme SDBackup.
( available on a CD and at the address: www.elzab.com.pl/programy )
| 15
Page 18
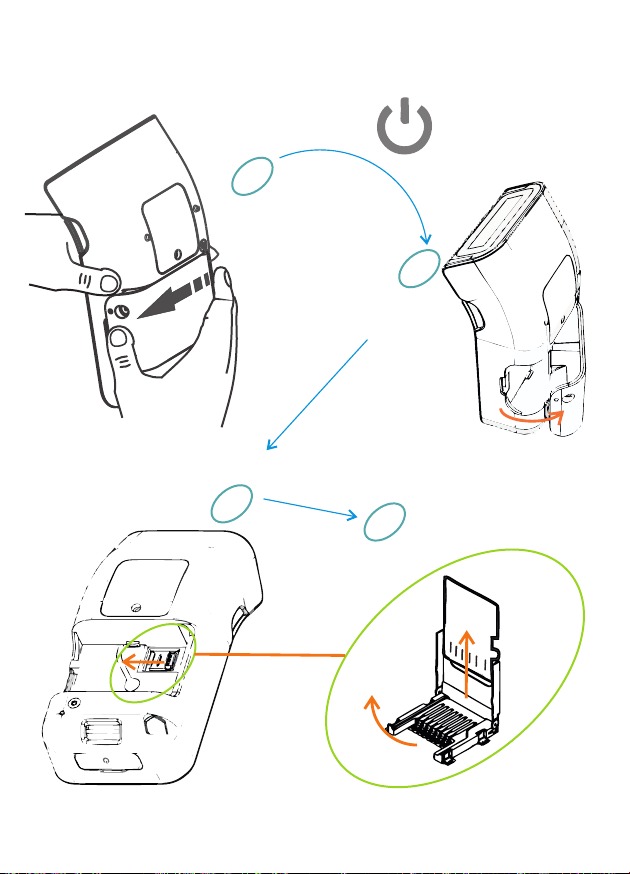
Use ONLY the card supplied by ELZAB S.A.
How to remove the battery
klik
How to remove the card
shift the card holder
to unlock it
3
SWITCH OFF THE CASH REGISTER
1
press the
battery until clicks off
2
pull out
the battery
lift the card holder
4
and then pull it up lightly
16 |
Page 19
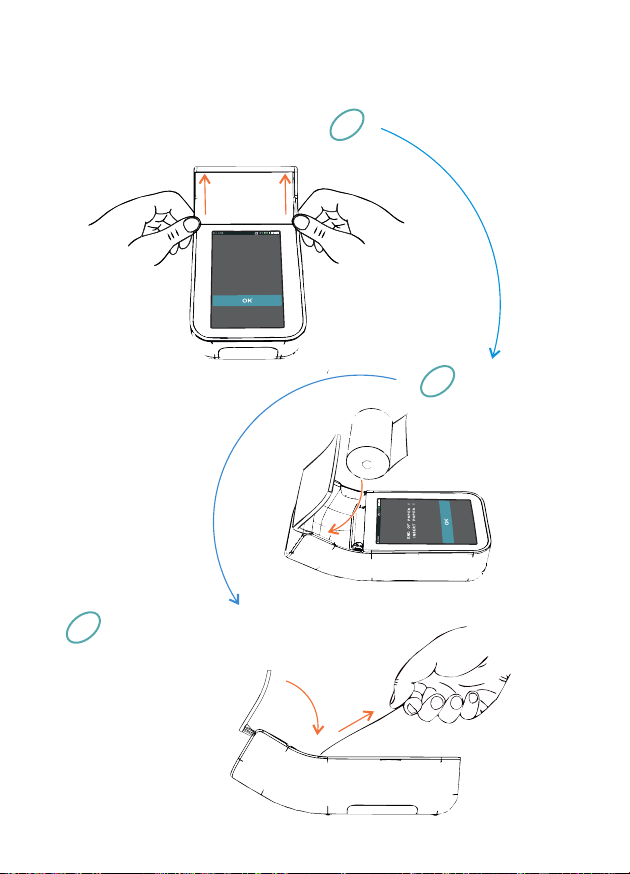
PAPER REPLACEMENT
open the cover
END OF PAPER !
INSERT PAPER !
clik !
clik !
close the cover
3
and tear off the excess paper
4
1
put in the
2
paper roll
clik !
| 17
Page 20
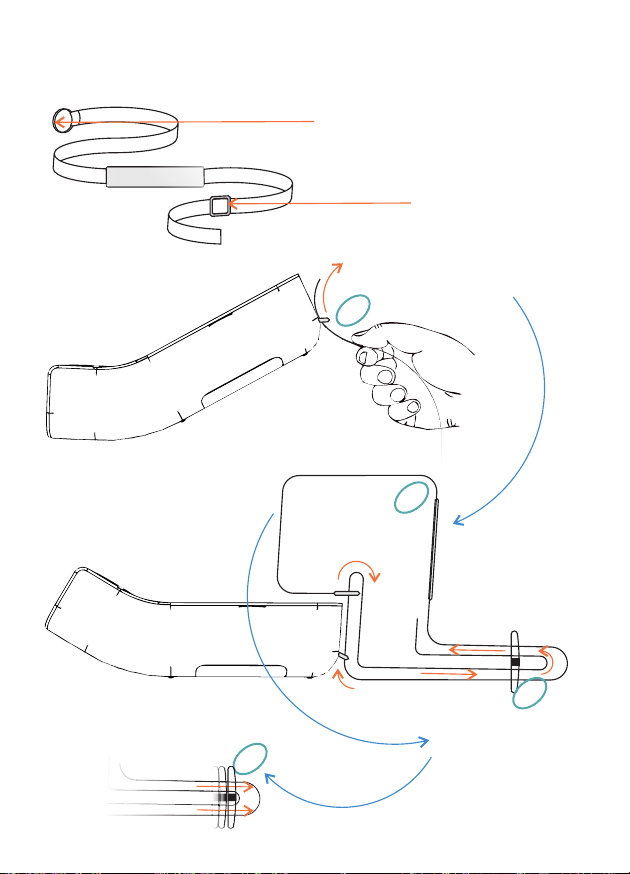
FIXING THE LANYARD
lanyard ring
lanyard loop
guide the end of the lanyard
through the eye in the device
and pull it further
1
2
guide through
the ring
finally tighten the loop
all the way to the stop
18 |
3
then guide it
4
through the loop
Page 21
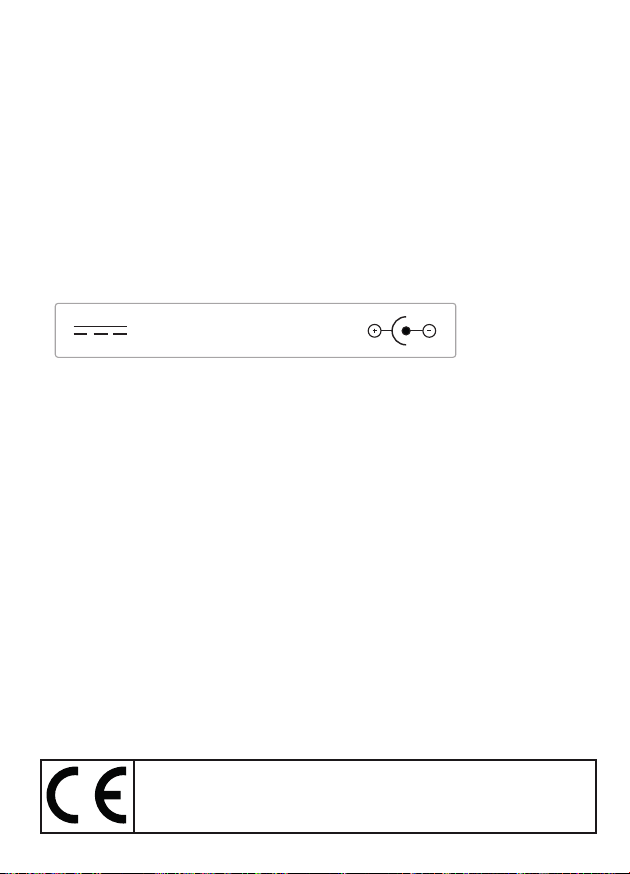
TECHNICAL SPECIFICATION OF THE CASH REGISTER
POWER SUPPLY |
from the mains
nominal voltage 220 - 230 V
frequency 47 - 63 Hz
power consumption max 12W
from the internal battery
nominal voltage / capacity 7,4V/2,0Ah
12V/1A
SAFETY |
The cash register is made in the electric shock protection class III
acc. to PN-EN 60950 - 1:2007.
The power supply unit is made in the electric shock protection
class II acc. to PN-EN 60950 - 1:2007.
LIMITING WORKING CONDITIONS |
temperature -5° - 35° C
CAUTION |
This device is a class A appliance. In residential environment, it may
cause radio interference. In such cases, the user may be required to
apply appropriate preventive measures.
process of assessment of compliance with the requirements of the EU
directives. The detailed list of the relevant directives and standards is
included in the Declaration of Conformity as published in: www.elzab.com.pl
eht gnissap mrfinoc ot kram EC eht htiw dekram neeb sah ecived sihT
Page 22

Page 23

Page 24

OFFICE:
41 - 813 Zabrze
ul.Kruczkowskiego 39
tel. +48 32 37 06 200
fax +48 32 27 22 583
EXPORT:
Sales Representative of ELZAB
elzab.pl
 Loading...