

Page 1
OWNER’S MANUAL
EQ.45
Specifications
Main Rotor Blade Length: 315mm
Tail Rotor Blade Length: 55 mm
Overall Length: 630mm
Width: 120 mm
Height: 230 mm
Weight: 620g
Battery: Lipo 11.1V 1200/1800 mAh
Model Features
Aluminum Rotor Head
120° CCPM Control System
Brushless ESC (12V 35A)
High Performance Brushless ESC
High Performance Brushless Motor
Hi Performance Auto-Rotation System
Hi Performance Head Lock Gyro
Servo Tail
2.4G 6CH Transmitter System
100% READY-TO-FLY RC HELICOPTER
Page 2

User’s manual r.0805 EQ45 (EN) www.elyq.com
Page 2/21
Index
Introduction 3
Warning 3
Warranty Information 3
Battery Warnings, Guidelines and Charging 3
Safety precautions 4
Kit Contents 5
Charging the batteries 5
Assembly Instructions 5
Install Batteries in the Transmitter 5
Install the Transmitter Antenna 6
Install the Battery 6
Install Main Rotor Blades 6
Blade Tension Test 6
Assemble Training Gear 6
Get the model Ready-To-Fly (RTF) 7
Electric Motor warning 7
Turning the Model On 7
Range Check 7
Balance the Main Blades 7
General 7
Radio Control 7
Transmitter 8
Transmitter Controls 8
Control Functions 8
Transmitter back and side view 9
Receiver and Servo connectivity 9
Transmitter matching code 9
Transmitter configuration software 10
PL-2303 driver installation 10
T6Config software installation 10
T6Config: System Option 11
T6Config: System Setting 11
T6Config: Switch Program 11
Transmitter Operation and Control – Mode 1 13
Elevator 13
Tail 13
Pitch 13
Roll 14
Trim Adjustment – Mode 1 14
Elevator / Pitch Trim 14
Tail Rotor / Yaw Trim 14
Aleiron Trim 14
Transmitter Operation and Control – Mode 2 14
Elevator 14
Tail 14
Pitch 15
Roll 15
Trim Adjustment – Mode 2 15
Elevator / Pitch Trim 15
Tail Rotor / Yaw Trim 15
Aleiron Trim 15
Tracking the main Blades 16
Flight Instructions 16
Takeoff 16
Hovering 16
Landing 16
Basic Maneuvers 16
Slow Pirouettes 16
Aerobatics 17
Loops 17
Flips 17
Inverted Hovering 17
Spare Parts 18
Page 3
User’s manual r.0805 EQ45 (EN) www.elyq.com
Page 3/21
Introduction
Congratulation for your choice! The EQ.45 R/C helicopter is a high performance Read y-to-Fly Electric Helicopter for
indoor and outdoor flying on calm days. At about 620 grams, the EQ.45 R/C helicopter will fly for 5-8 minutes powere d
by 11.1V 1200mAh LiPo batteries. Although the R/C helicopter EQ.45 is not difficult to operate, we recommend you to
carefully read these instructions, for a proper and safe use of it.
Warning
The EQ.45 is a precision machine, which requires proper assembly and setup in order to avoid accidents. It is under
owner responsibility to operate the EQ.45 in a safe manner, as it can cause serious personal inj uries and damages to
property, due to carelessness or misuse.
Do not overcharge the battery pack! If batteries get hot while charging, stop charging immediately and disco nnect the
battery from the charger.
Do not leave the battery pack unattended during the charging process. If you are not sure how to charge this kind of
battery, please contact us or your local hobby shop. Never let children charge batteries without adult superv ision. In
order to properly set the EQ.45, at first turn the transmitter on and then connect the battery to the helicopter. By
analogy, when turning the helicopter off, always disconnect the battery at first and then turn the transmitter off. If the
orders are reversed, the helicopter may become uncontrollable and cause serious damages. If you ar e in doubt of your
ability, ask for assistance from experienced radio controlled helicopter modelers or j oin your local Heli club to get the
required knowledge and skills. ElyQ does not assume any liability for the use of this prod uct. The use of the helicopter
under the age of 14 (fourteen) is allowed only under the supervision of an adult.
Warranty Information
ElyQ S.p.a. guarantees this model to be free from defects in both material and workmanship at the date of purchase.
This warranty does not cover any component parts damaged by use or modification. In no case shall ElyQ’s liability
exceed the original cost of the purchased kit. Further, ElyQ reserv es the right to c hange or modif y this warrant y without
notice. In that ElyQ has no control over the final assembly or material used for the fina l assembly, no liability shall be
assumed nor accepted for any damage resulting from the use of the fi nal assembled product. By the act of using the
assembled product, the user accepts all resulting liability. Please note that once assembly of the model has been
started, you must contact ElyQ, Inc. directly regarding any warranty question. This will enable ElyQ to better answer
your questions and service you in the event that you may need any assistance.
ElyQ S.p.a.
Strada di Oselin, 39
33047 – Remanzacco (Ud) – Italy
www.elyq.com
Battery Warnings, Guidelines and Charging
While the 11.1V 1200mAh 3-cell Lithium Polymer Battery Pack (Q4584) include d with your EQ.45 features Charge
Protection Circuitry and Balance Charging via the include d 3-cell Lithium Polymer Balance Charger (Q4586) to help
ensure a safe charge every time, you MUST read the following safety instructions and warnings before handling,
charging or using the Li-Po battery pack.
Note: Lithium Polymer batteries are significantly more volatile than the alkaline, Ni-Cd or Ni-MH batteries
used in RC applications. All instructions and warnings must be followed exactly. Mishandling of Li-Po
batteries can result in fire.
Page 4

User’s manual r.0805 EQ45 (EN) www.elyq.com
Page 4/21
By handling, charging or using the included Li-Po battery you assume all risks associated with lithium batteries. If you
do not agree with these conditions, return your complete EQ.45 model in new, unused condition to the place of
purchase immediately.
You must charge the included 11.1V 100mAh 3-cell Li-Po battery pack in a safe area away from flammable materials.
9 Do not charge the battery when installed in the helicopter.
9 Never charge the battery unattended. When charging the battery you should always remain in constant
observation to monitor the charging process and react to potential problems that may occur.
9 After flight, the battery must be cooled to ambient temperature before charging.
9 You MUST use the included 3-cell Li-Po Balance Charger ONLY. Failure to do so may result in a fire
causing personal injury and/or property damage. DO NOT use a Ni-Cd or Ni-MH charger.
9 If at any time during the charge or discharge process the battery begins to balloon or s well, stop charging or
discharging immediately. Quickly and safely disconn ect the battery, then place it in a safe, open area away
from flammable materials to observe it for at least 15 minutes. Continuing to charge or discharge a battery that
has begun to balloon or swell can result in a fire. A battery that has ballooned or swollen even a small amoun t
must be removed from service completely.
9 In the event of a crash, you must quickly and safely disconnect and remove the battery from the model, then
place it in a safe, open area away from flammable materials to observe it for at least 15 minutes.
9 Store the battery at room temperature for best results.
9 When transporting or temporarily storing the battery, the temperature range should be from 5–50 degrees
Celsius. Do not store the battery or model in a car or direct sunlight whenever possible. If stored in a hot car,
the battery can be damaged or even cause a fire.
9 Do not over-discharge the battery. Discharging the battery too low can cause damage to the pack resulting in
reduced performance and duration.
If you have any further questions or concerns regarding the handl ing, charging a nd/or use of th e included Li-Po batter y
pack, please contact ElyQ’s Product Support staff.
It is important that you only charge the included 11.1V 1200m Ah 3-cell Li-Po Battery Pack w ith the included 3cell 11.1V Li-Po Balance Charger. Your battery pack is equipped w ith special Charg e Protection Circuitr y and a
Balance Charge Lead with connector that is only comp atible with this charger. Attempting to ch arge the pack
using another Li-Po charger or non Li-Po compatible charger could result in serious damage. Please
familiarize yourself thoroughly with the warnings and guidelines before continuing.
Note: The Li-Po battery pack included with your EQ.45 will arrive partially charged. For this reason the initial charge
may only take approximately one hour.
The included 3-cell 11.1V Li-Po Balance Charger will charge a near fully discharged (not over-discharged) 11.1V
1200mAh 3-cell Li-Po Battery Pack in approximately 2.0–2.5 hours. In some cases the charge time may be shorter
depending on the actual amount of capacity left in the pack after a flight. NEVER charge the battery unattended.
The charger requires up to 1.5 Amps of 11.5–15 Volt DC input power that can b e supplied from a small 12V gel cell or
car battery. Input power for the charger can also be supplied through the use of an AC to DC adapter/power supply for
convenient charging anywhere an AC outlet is availabl e. NEVER attempt to power the charger from an AC outlet
without the use of a proper AC to DC adapter/power supply.
Safety precautions
The Failure to follow these safety precautions may result in severe injury to yourself an d others.
Keep your face and body as well as all spectators away from the plane of rotation of the r otors whenever the batter y is
connected.
Keep these items away from the rotors: loose clothing. Shirt sleeves. ties. scarfs. long hair or loose objects such as
pencils or screwdrivers that may fall out of shirt or jacket pockets into the rotors .
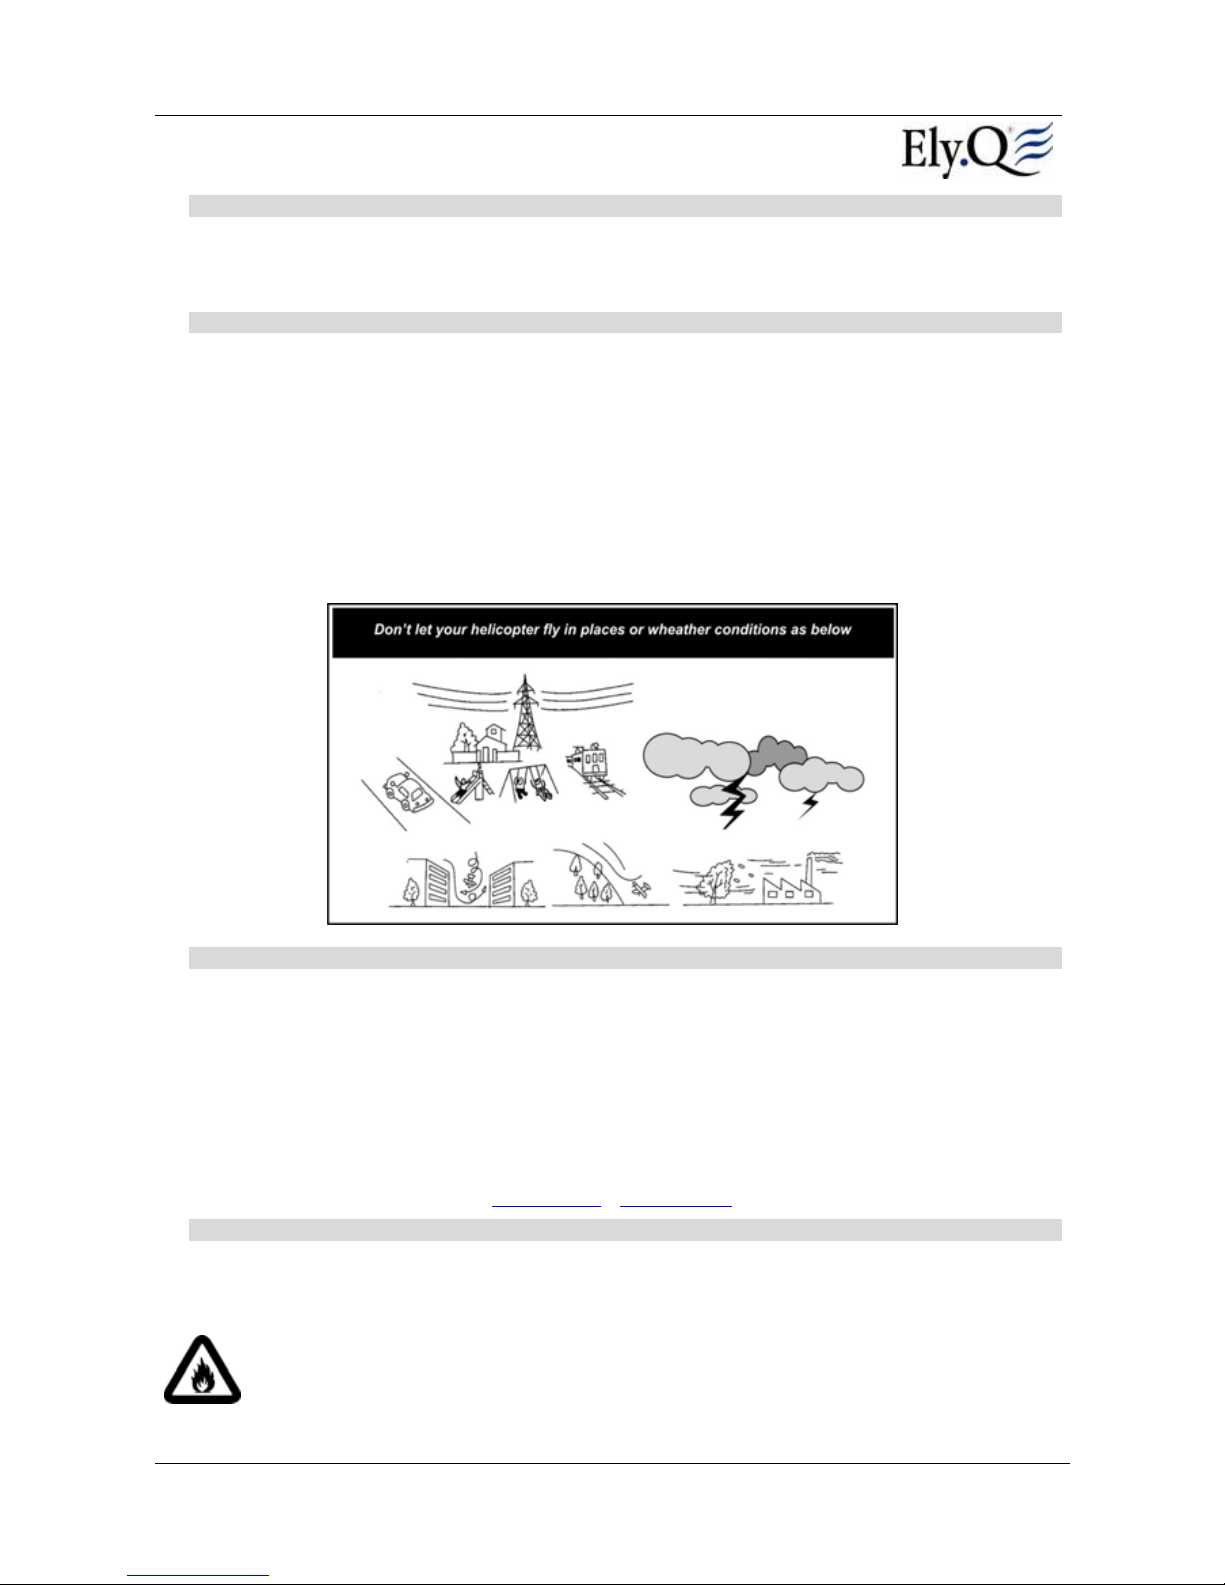
The spinning blades of a model helicopter can cause serious inj ury. When choosing a flying site for your EQ.45, stay
clear of buildings. trees and power lines. AVOID flying in or near crowded areas. DO NOT fly close to peop le. children
or pets . Maintain a safe pilot-to-helicopter distance while flying.
9 Your EQ.45 RTF should not be considered a toy ,but rather a sophisticated, working model that functions ve r y
much like a full-size helicopter. Because of its performance capabilities, the EQ.45, if not assembled and
operated correctly, could possibly cause injury to yourself or spectators and damage to property.
9 You must chec k the operation of the model before every flight to i nsure that all equipment is operating and
that the model has remained structurally sound. Be sure to check linkages or other connectors often and
replace them if they show any signs of wear or fatigue.
9 If you are not an experienced pilot or have not flown this type of model before, we recommend that you get the
assistance of an experienced pilot in your club for your first flights. lf you're not a member of a club, your local
hobby shop has information about clubs in your area whose membership includes experienced pil ots.
We, as the manufacturer, provide you with a top qualit y, thor oug hl y tested helic opter and i nstructions, but ultimatel y the
quality and flyability of your finished mod el depen ds on ho w yo u buil d it; therefore, we cannot in any way guar antee the
performance of your completed model, and no representations are expressed or implied as to the performance or
safety of your completed model.
Page 5
User’s manual r.0805 EQ45 (EN) www.elyq.com
Page 5/21
Kit Contents
Before starting assembly, take an inventory of th e EQ.45 RTF to make sure it is complete, and inspect the parts to
make sure they are of acceptable quality. If any parts are missing or are not of acceptable quality, or if you need
assistance with assembly, contact Product Support. If any defective or missing parts, please us e the part names
exactly as they are written in the Kit Contents list.
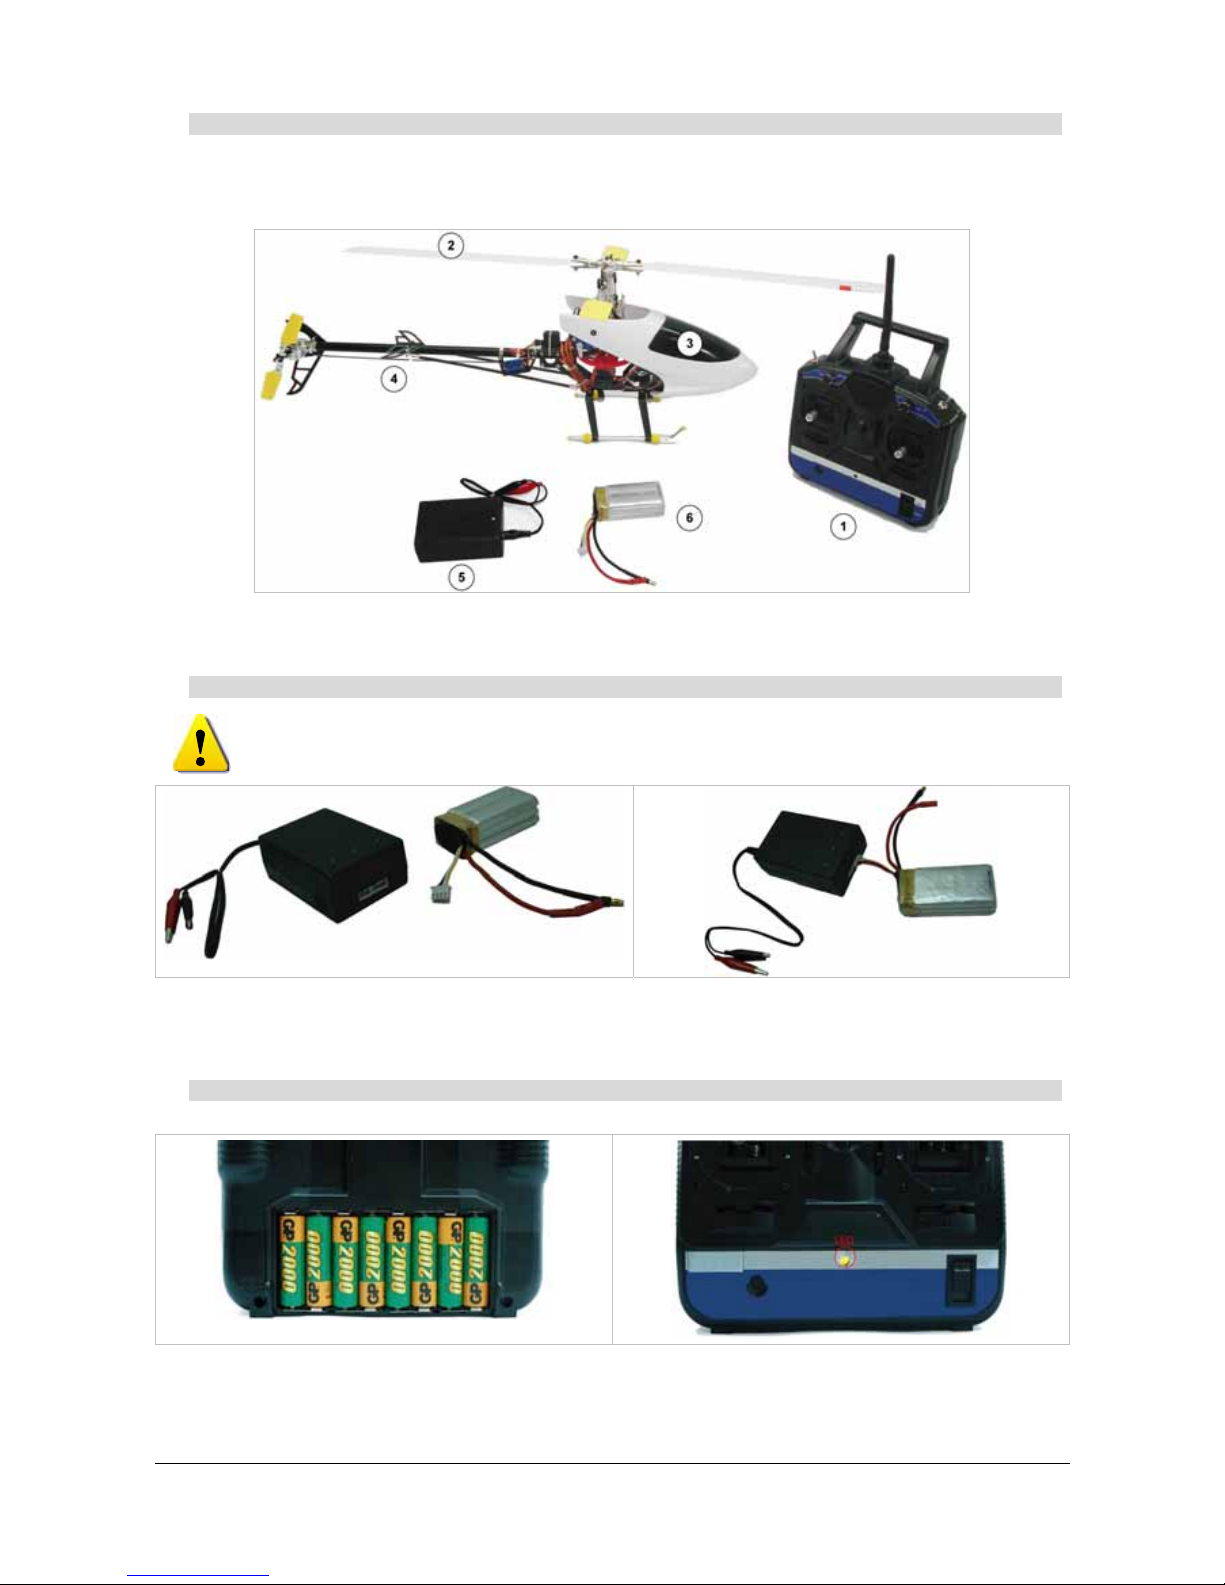
1. Trasmitter 2. Main Rotor Blades 3. Canopy
4. Helicopter 5. Battery Charger 6. LiPo Battery
Charging the batteries
The charger supplied with the EQ.45 RTF is only meant to charg e the supplied Li-Po battery pack. Do not
attempt to charge any other type of battery with this charger.
Plug the battery charger into an AC outlet. The light on the charger should be Green. Now plug the battery pack into the
charger. The light should turn Red, which indicates chargin g. Once the battery is completely charged the li ght will turn
Green again, indicating it is done. If your flight battery is completely discharged it will take approximately t wo hours to
re-charge
.
Assembly Instructions
Install Batteries in the Transmitter
Remove the battery cover from the back of the
transmitter. Remove the battery box and install eight "AA"
batteries in the transmitter. Double-check the polarity of
each battery before replacing the battery cover.
Turn on the transmitter using the power switch as shown
above. Check the LEDs on the front of the transmitter.
Only the Green LED should be on. If the Red LED is on,
then the batteries need replacing.
Page 6
User’s manual r.0805 EQ45 (EN) www.elyq.com
Page 6/21
Install the Transmitter Antenna
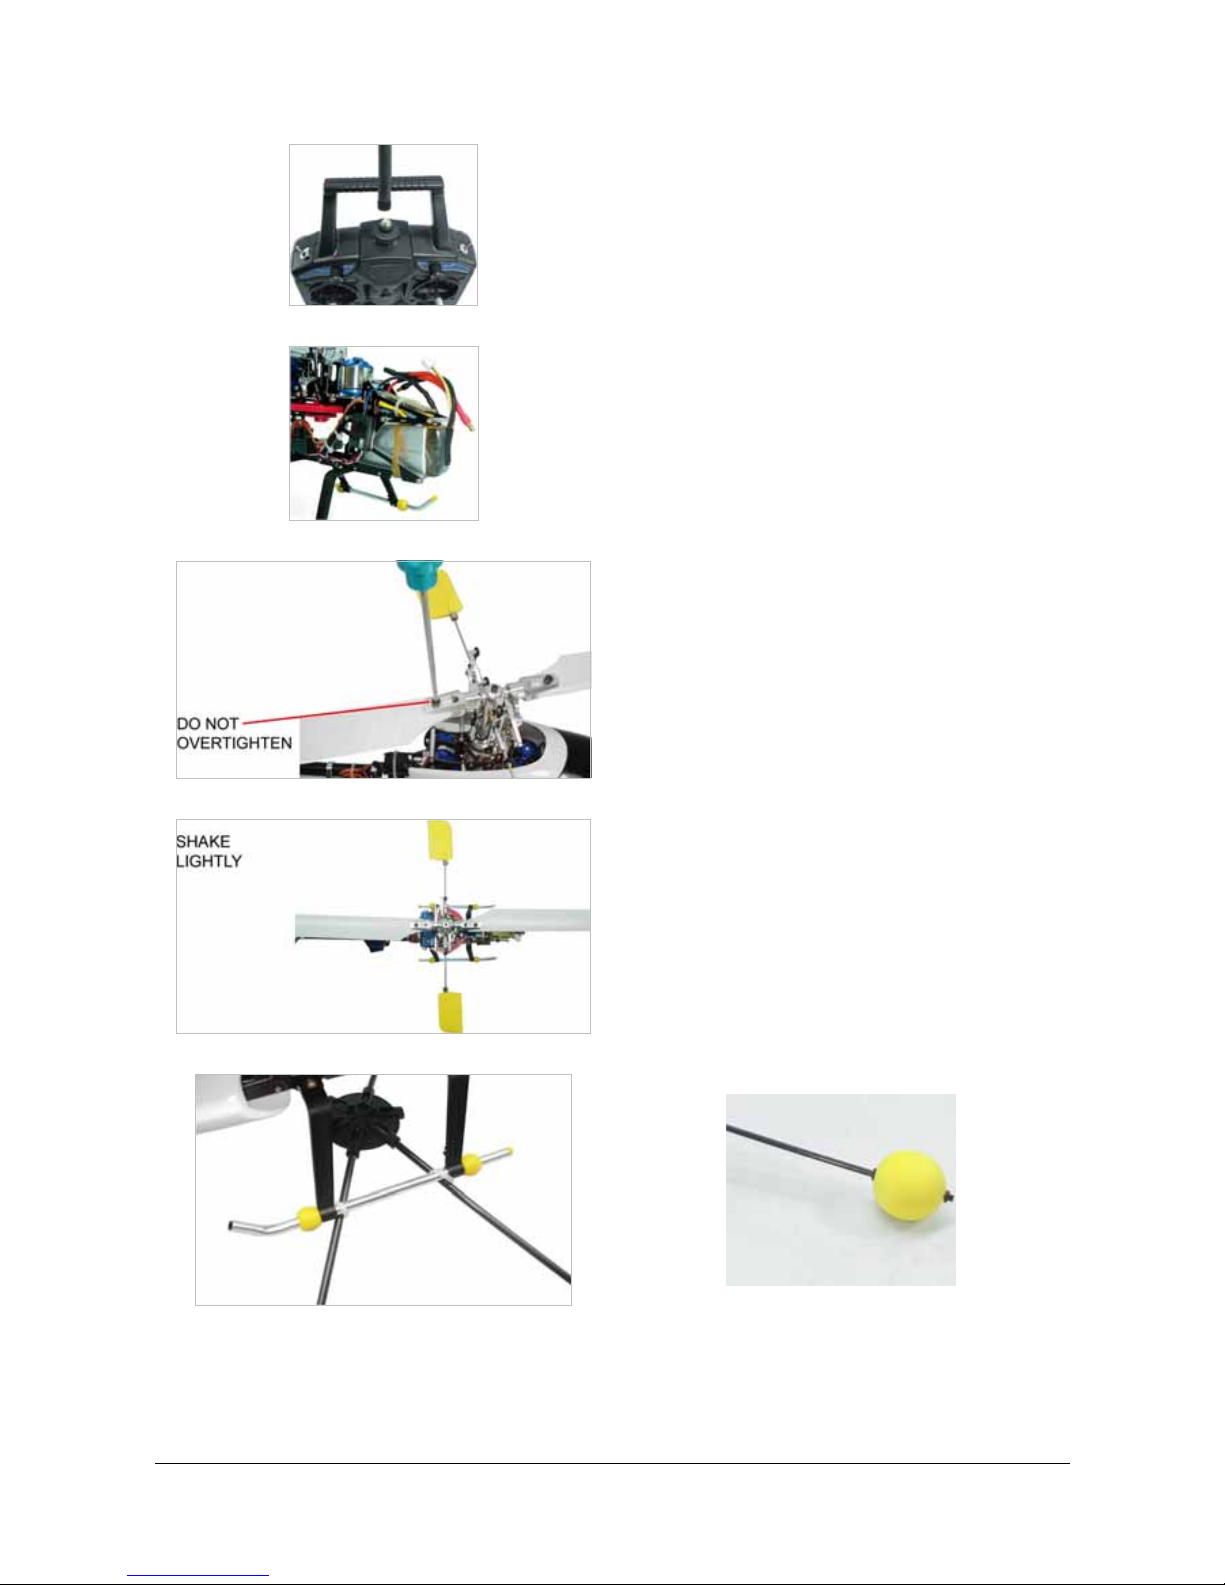
Insert the antenna into the top of the transmitter and turn
clockwise until tight.
Install the Battery
Remove the canopy by sliding the canopy grommets off of
the rods. Slide the battery into the front of the battery tray
as shown above. Use a rubber band to hold the battery
into the tray.
Install Main Rotor Blades
Using the 3 x 12mm hex screws, and M3 nut. Mount the
main rotor blades as shown. Be careful not to over-tighten
them.
Blade Tension Test
To test the blade tension, hold the helicopter up sideways.
The blades should support themselves until the helicopter
is shaken slightly; then they will fall as shown in the
picture above. The blades should be fairly loose b ut it is
critical that both blades be the same tension.
Assemble Training Gear
Snap the four plastic fittings onto the landing gear as
shown above and slide the carbon rods through the
underside of them. Center the carbon rods and apply a
drop of medium CA to the holder to lock the carbon rods
in place. Also apply a drop of CA to the landing gear skids
where the fittings snap on
.
Cut the supplied silicone tubing into eight 3mm pieces.
Please keep in mind that carbon rods are dangerous to
handle and splinter easily. Using pliers carefully slide the
silicone tubing onto the carbon rod approxim ately 10 2mm.
Now install a foam ball followed by a washer. No w using
pliers again install the last piece of fuel tubing. Repeal this
Page 7
User’s manual r.0805 EQ45 (EN) www.elyq.com
Page 7/21
step for the other three balls.
Get the model Ready-To-Fly (RTF)
Electric Motor warning
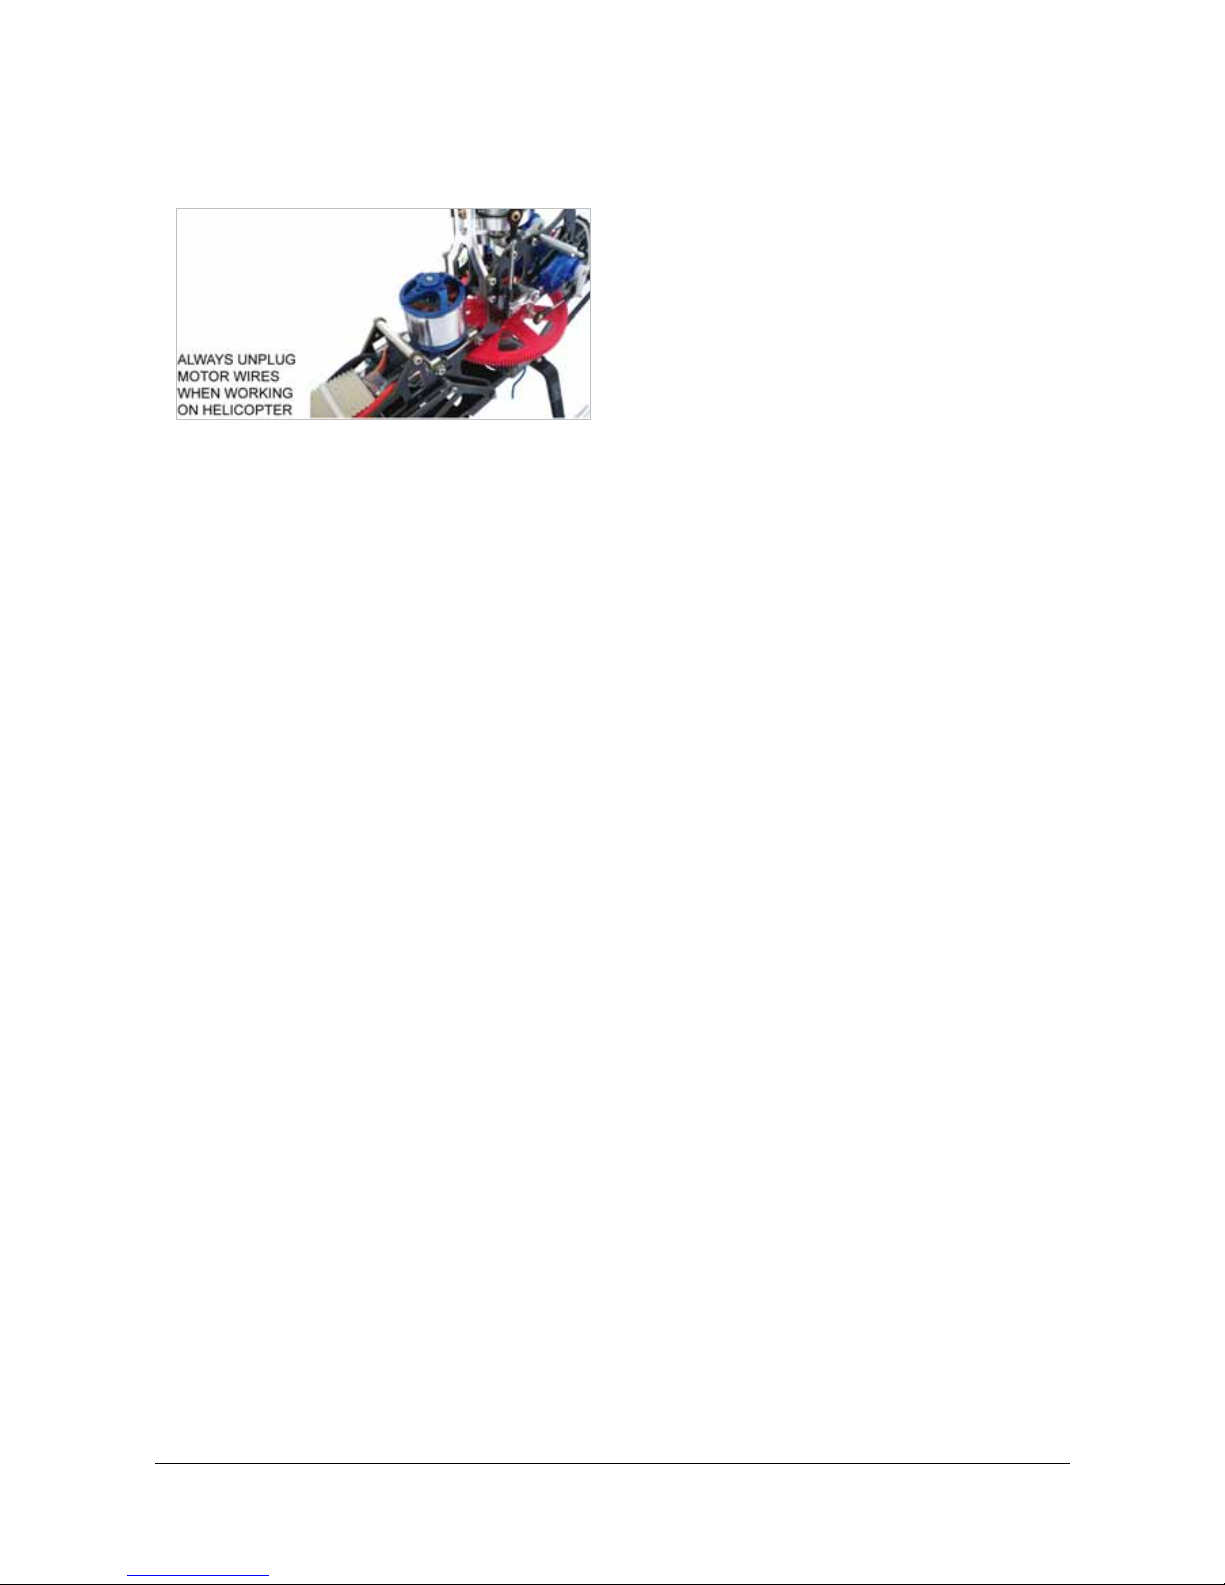
Electric motors are very dangerous. Please remove the
pinion gear or unplug the motor while working on the
model.
Turning the Model On
Always turn the Transmitter on first. Then, with the EQ.45 sitting still, plug the battery into the ESC. The EQ.45 will
need to sit still for 10 seconds so the gyro can initialize and determine centre. If the EQ.45 is moved during this
initialization, then the gyro will not operate properly.
Always step 5 m away from the helicopter before flipping any switches or operating th e throttle. Do not hold onto the
model and run it up. Safety first!!!.
Range Check
Ground check the operational range of your radio before the first flight of the day. For safet y reasons, unplug the main
motor so power cannot be applied to the main rotor blades. With the transmitter antenna collapsed and th e receiver
and transmitter on, you should be able to walk at least 1 5 m away from the model and still have control. Have an
assistant stand by your model and while you work the controls, tell you what the servos are doing. If the controls do not
respond correctly, do not fly! Find and correct the problem first. Look for loose servo connections or broken wires,
corroded wires on old servo connectors, poor solder joints in your battery pack or a defective cell or a damaged
receiver crystal from a previous crash.
Balance the Main Blades
The EQ.45 main rotor blades are already balanced and ready to fly.
General
Take your time and follow the instruction for a safe flight.
9 Do not fly the model aircraft in sanctioned events, air shows, or model flying demonstrations until it has been
proven to be airworthy by having been previously, successfully flight tested.
9 Do n ot fly the helicopter higher than approximately 130 feet within 3 miles of an airport without notifying the
airport operator. Avoid flying in the proximity of full-scale aircraft. Where necessary, an observer shall be
utilized to supervise flying to avoid having models fly in the proximity of full-scale aircraft.
9 Where established, follow the safety rules for the flying site used, and do not willfully and deliberately fly the
models in a careless, reckless and/or dangerous manner.
9 Do not operate models with pyrotechnics (any device that explodes, burns, or propels a projectile of any kind).
Radio Control
9 Complete a successful radio equipment ground check before the first flight of a new or repaired model.
9 Do not fly the model aircraft in the presence of spectators until you become a qualified flier, unless assisted by
an experienced helper.
9 At all flying sites a straight or curved line(s) must be established in front of which all flying takes place with the
other side for spectators. Only personnel involved with flying the aircraft are allo wed at or in the front of the
flight line. Intentional flying behind the flight line is prohibited.
9 Operate the model using only radio control frequencies currently allowed by the Government.
9 Under no circumstances may a pilot or other person touch a powered model in flight; nor should any part of
the model other than the landing gear, intentionally touch the ground, except while landing.
Page 8
User’s manual r.0805 EQ45 (EN) www.elyq.com
Page 8/21
Transmitter
Always turn the Transmitter on first and then with the EQ.45 sitting still plug the battery into the ESC. The helicopter will
need to sit still for 10 seconds so the gyro can initialize and can determine centre. If the EQ.45 is moved during this
initialization, then the gyro will not operate properly. There is a safety built into the EQ.45 that prevents the motor from
activating unless the collective stick has been lowered to its lowest position. If the motor won't run and turn the main
blades, please make sure the collective stick is all the way down and leave it there for a coupl e of seconds. Then try
raising the stick slowly.
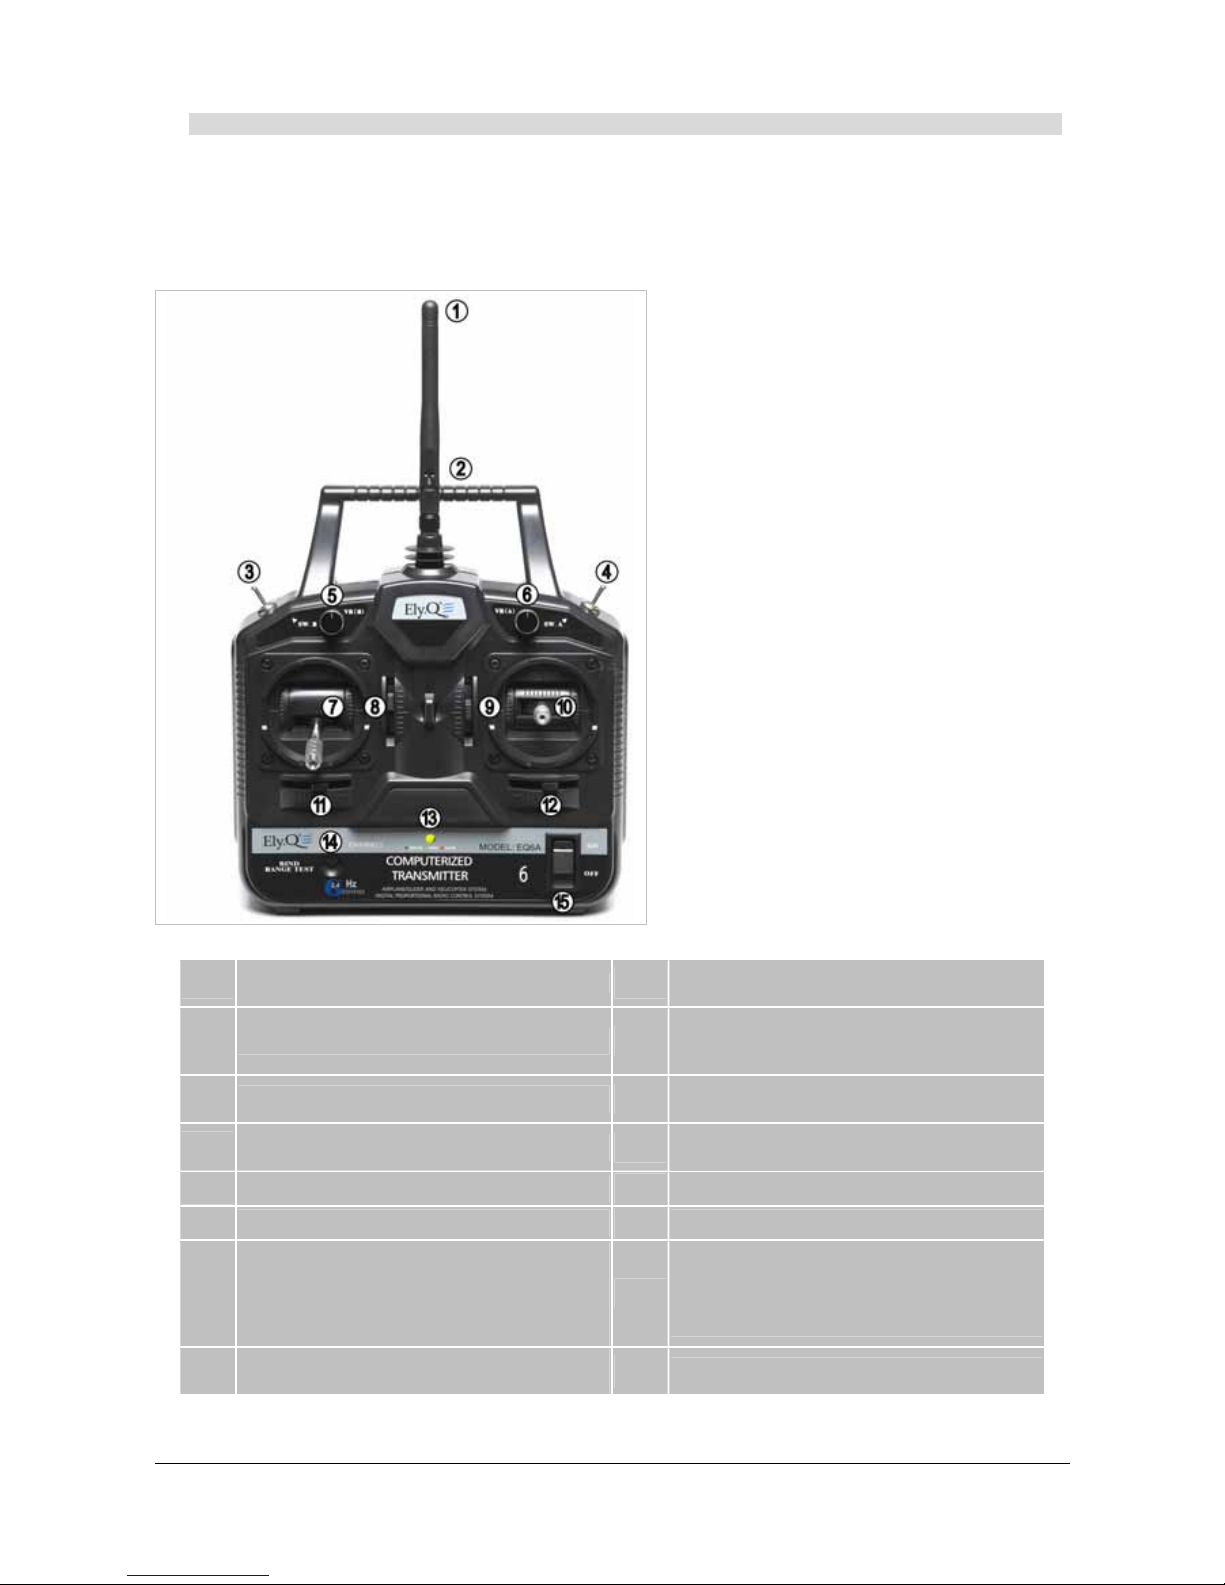
Transmitter Controls
All controls described are defined with the tail
pointing directly towards you. This is the best way to
start out since it keeps the control inputs orientated
the same. Once you start getting comfortable you can
work on side hovering and nose in.
Trainer System - You can use a cable to connect
two transmitters together and an instructor can take
and give control back with the release of a switch. Be
careful not to hit this switch while in flight as it
disables the transmitter output.
The idle up switch is used for forward flight and
aerobatics. It raises the main rotor RPM and also
changes the lowest position on the throttle stick to
around 40% throttle. This allows the EQ.45 to
perform aerobatics and inverted flight. This can be a
dangerous switch since it raises the throttle. Be
extremely careful not to hit this switch
accidentally or the motor will instantly come on to
at least 40% power.
Control Functions
X
Antenna
`
Throttle trim: it allows the helicopter to ascend
and descend.
Y
Handle
a
Ciclic stick - Throttle / Ailerons: it allows your
helicopter to ascend, descend, move to the right
and move to the left.
Z
Switch B
k
Tail Rotor / Rudder trim: it allows your
helicopter to rotate rightward and leftward.
[
Switch A
l
Aileron trim: the ailerons trim allows the
helicopter to move to the right or to the left.
\
VR (B)
m
Power indicator led
]
VR (A)
n
Matching Key
^
Collective stick - Elevator / Tail rotor: It
allows your helicopter to move forward and
backward (pitch down/nose down and pitch
up/nose up), and to move rightward and
leftward
o
Power Switch: It turns on and off the
transmitter. Push up the switch to turn the
transmitter on and push it down in order to turn
the transmitter off.
_
Elevator Trim: it allows your helicopter to pitch
up and down.
Page 9
User’s manual r.0805 EQ45 (EN) www.elyq.com
Page 9/21
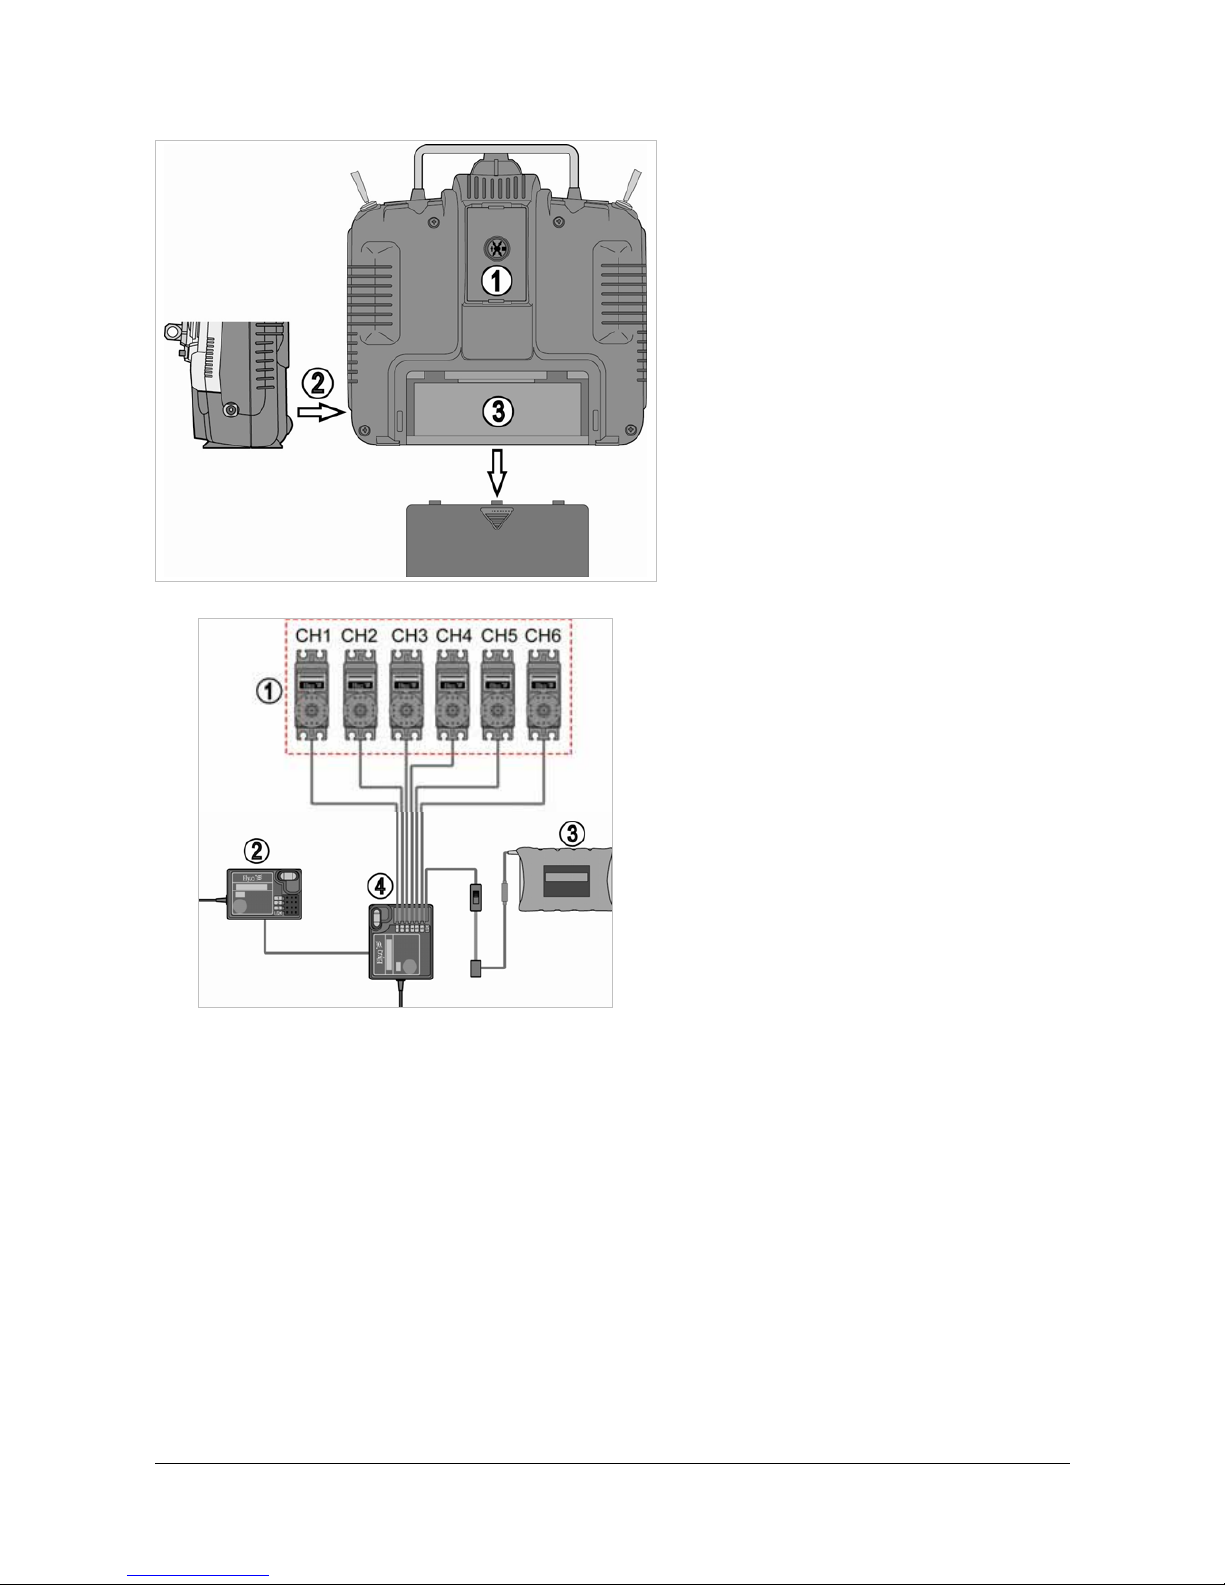
Transmitter back and side view
In the back side of the transmitter, there are the
following plugs:
1. Serial Comm Port: plug the
communication cable in order to configure
the transmitter.
2. Charger Port: use to charge the
transmitter batteries. ElyQ doesn’t provide
any battery charger and recommends to
unplug the batteries and than charge
externally.
3. Battery placeholder
Receiver and Servo connectivity
The radio supports six channels. In the figure in the
right, there is a simple connection diagram:
1. Helicopter servos
2. Receiver module
3. Battery
4. Main Receiver Module: in order to
increase the radio receiving field, it is
necessary that the two receiver antennas
form an angle of 90 degrees.
Transmitter matching code
This is 2.4GHz Frequency model product makes an automatic address code. It uses digital transmission mode to
prevent outside interference (active and/or passive). Our products are pre-pair ed: you do not need to match them by
yourself. If it is necessary to match the receiver with another transmitter, please follow the next instructions:
1. Install the battery to 2.4 GHz transmitter and shut it down. Insert the matching line into the BAT channel of the
receiver.
2. Connect the receiver battery to any one of the channel port. The two LEDs start flashing meaning that the
receivers are going to the matching status.
3. Press and hold the button on the transmitter, and then switch on the power supply.
4. Check the LED on the receiver: if it is not flashing anymore, the matching process has finished successfully
(the delay should be about 10s).
5. Release the matching key on the transmitter, and then disconnect the receiver batteries and the matching line.
6. Install the servos and then test the helicopter.
7. If the tests fail, please repeat the actions above.
8. If the tests suc ceed, insert the power supply port into BAT, match complete (the ab ove ways of match is only
suitable on ElyQ 2.4G products).
Page 10
User’s manual r.0805 EQ45 (EN) www.elyq.com
Page 10/21
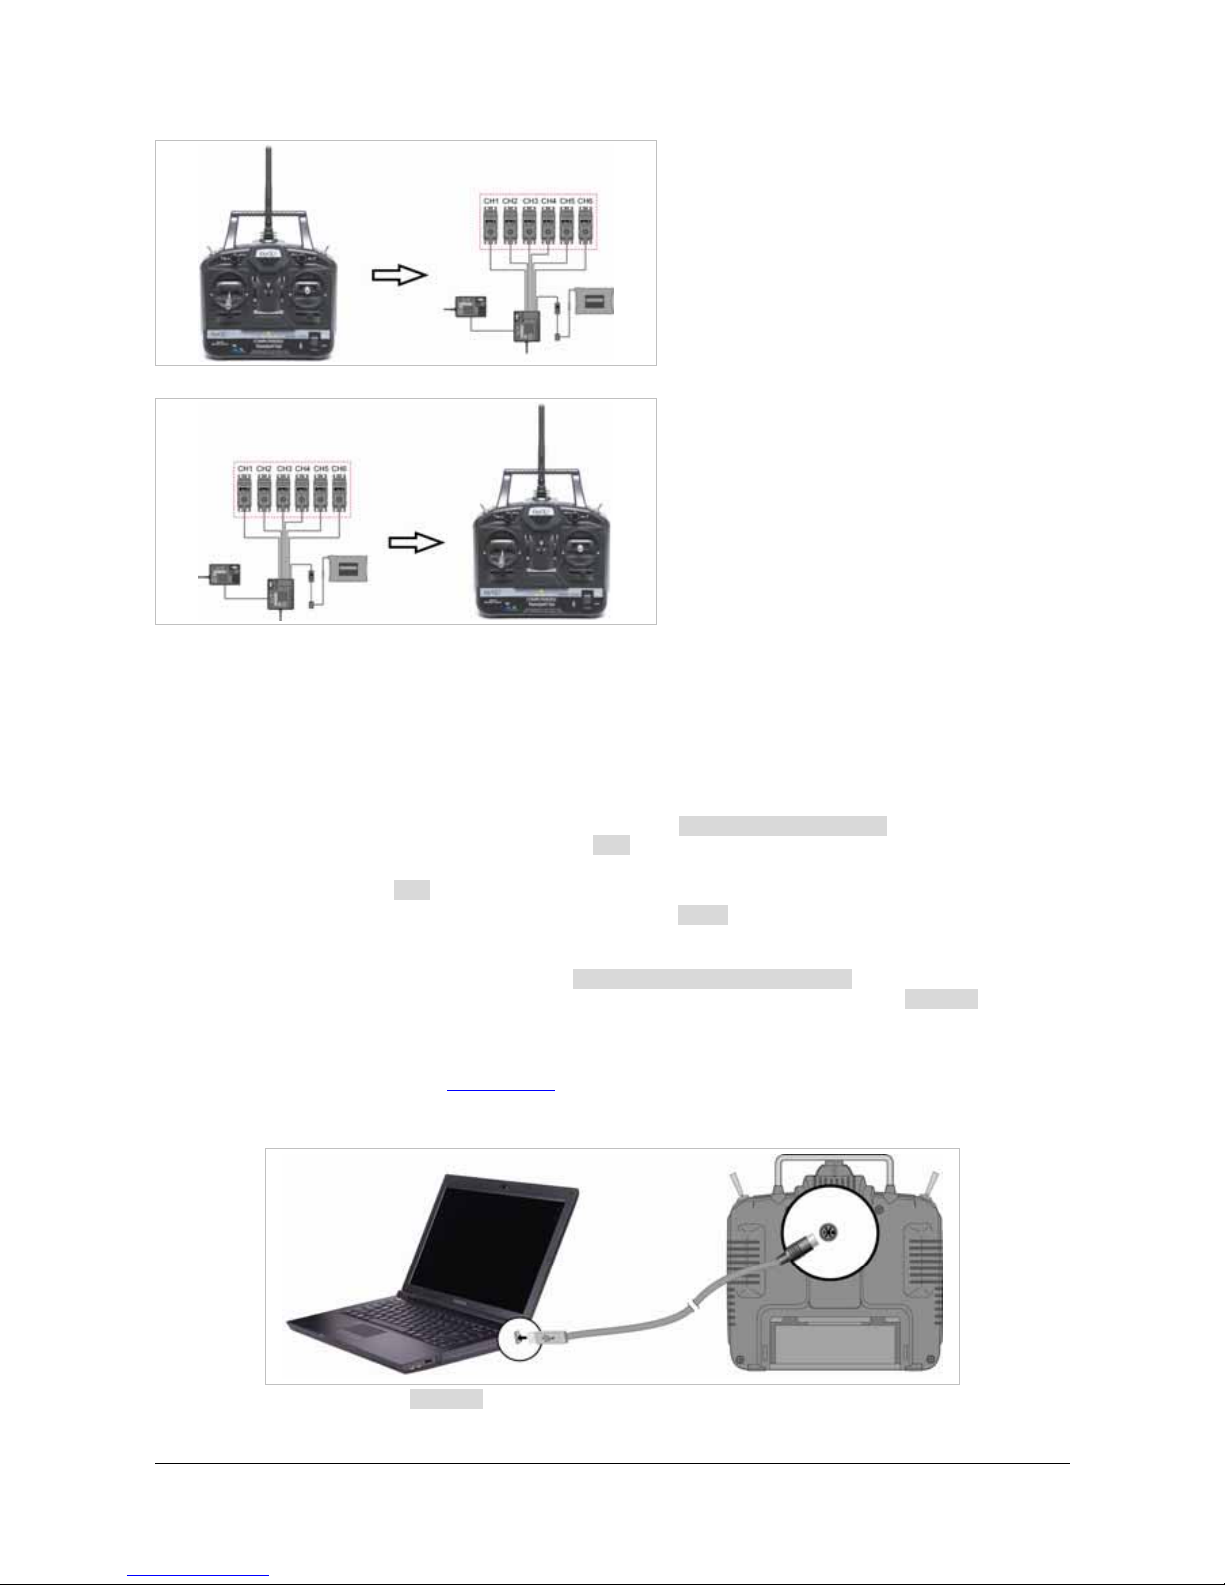
Transmitter Boot
1. Switch the radio on.
2. Turn on the helicopter connecting the
battery plug. The receiver led should light
on.
3. Now it is possible to fly.
Transmitter Shutdown
1. Cut off the receiver power supply (by
unplugging the battery cord).
2. Switch off the radio transmitter.
Transmitter configuration software
Before installing the transmitter configuration software (T6Config.exe), it is necessary to setup the PL-230 3 USB to
serial adapter driver. This driver provides a bridge con nection with the serial connector of the transmitter in one end,
and a standard USB connector on the PC side.
PL-2303 driver installation
The following steps will show how to install t he device under Win dows XP, but, basica lly the procedures ar e some what
the same for all other Windows systems.
1. Power up your computer and boot Windows.
2. Run or double click the InstallShie ld driver setup program PL-2303 Driver Install.exe. The setup wizard will
inform that the new driver will be installed. Click Next to continue and start the installation.
3. The End User License Agreement (EULA) window will be displayed: click to accept the terms of the
agreement, and click Next to continue.
4. W ait until the installation is successfully ended, and click Finish in order to close the program. If you have
plugged the cable into the PC while running the setup program, pleas e unplug and replug for enabling the
system to detect the device.
5. Windows should detect the new driver as Prolific USB-to-Serial Comm Port. Moreover, Windows may
prompt that the device driver has not yet passed Windows Logo compatibility tests. Click Continue anyway, if
you want to install the driver.
T6Config software installation
The configuration software can be used to setup every fu nction of the radio transmitter. The last revision of the program
can be downloaded from our website www.elyq.com
. To install the software, please follow the next instructions:
1. Install the batteries to the transmitter and switch the power on.
2. Plug the communication cable to the radio communication port and to the PC USB port
3. Run or double click the T6Config setup program and install the software.
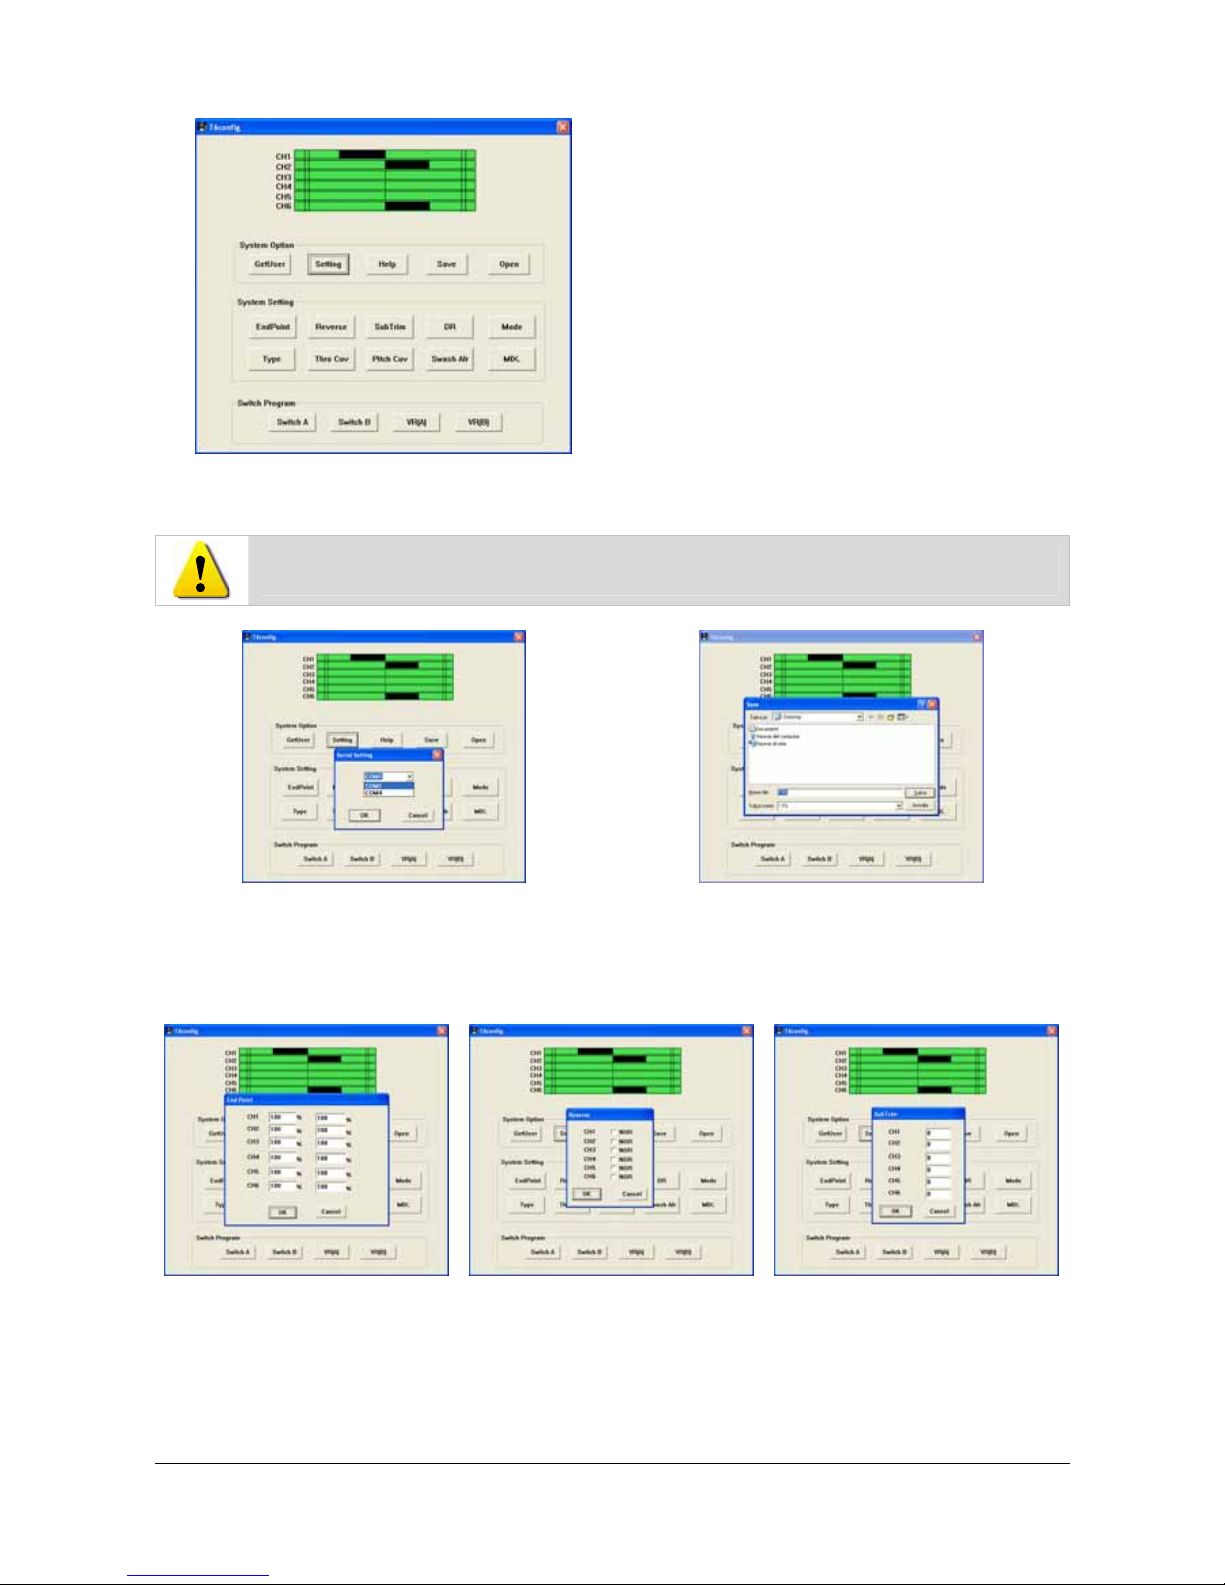
4. Finish the installation and start the application. Windows should display the following application interface:
Page 11
User’s manual r.0805 EQ45 (EN) www.elyq.com
Page 11/21
In the interface window can be detected four different
areas, corresponding to groups of functions supported by
the radio:
9 Channels: for each channel the black bar
represents the servo command position.
9 System Option
9 System Setting
9 Switch Program
T6Config: System Option
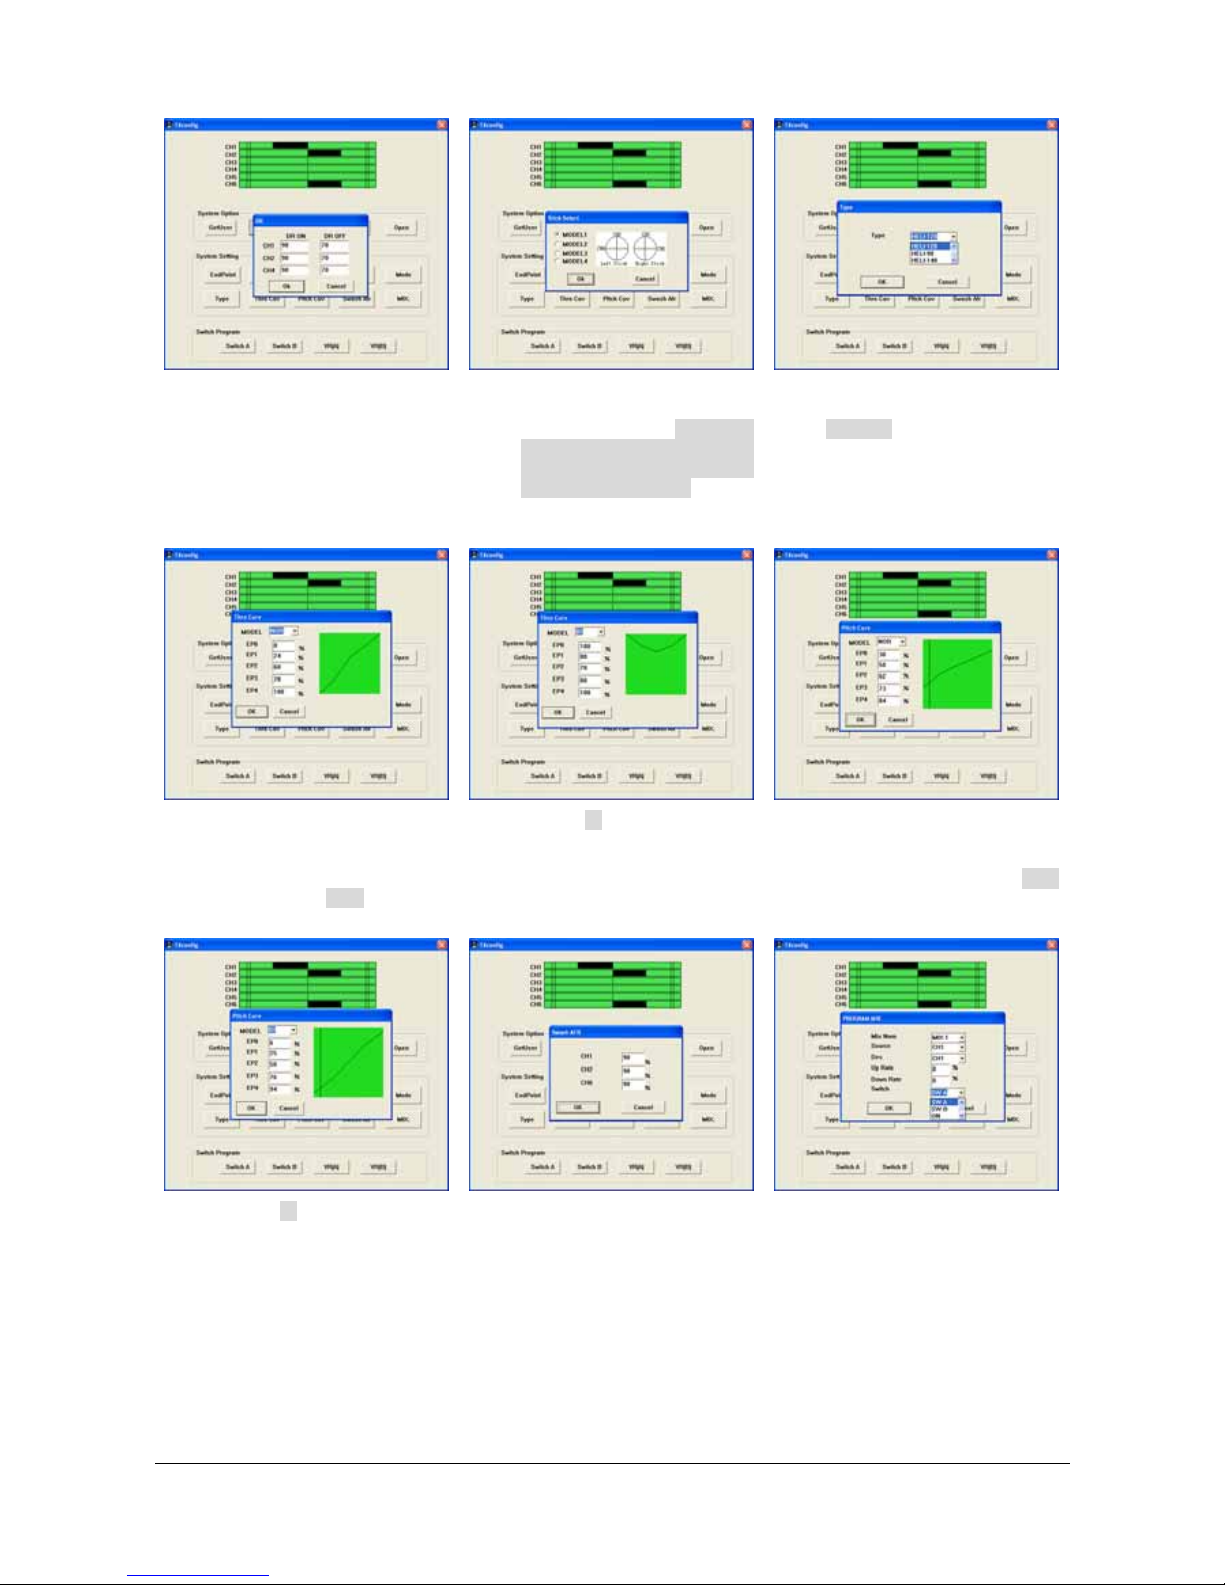
The functions supported in this section are the following:
¾ GetUser: import the transmitter data to PC.
Before changing any of the transmitter parameters (and at first use), please execute the GetUser function.
This prevents unwanted modifications.
¾ Setting: define the interface communication port
(please use Prolific Comm Port).
¾ Open / Save: use to open and/or save a new
transmitter configuration.
¾ Help: displays the program version.
T6Config: System Setting
The functions supported in this section are the following:
¾ EndPoint: defines the servos
angle excursion. For each
servo it is possible to define
MIN and MAX limits.
¾ Reverse: use to reverse the
channel control / channel
direction.
¾ SubTrim: use this function to
add a software trim to servo
channel controls. The values
can be adjusted between -120
and +120.
Page 12
User’s manual r.0805 EQ45 (EN) www.elyq.com
Page 12/21
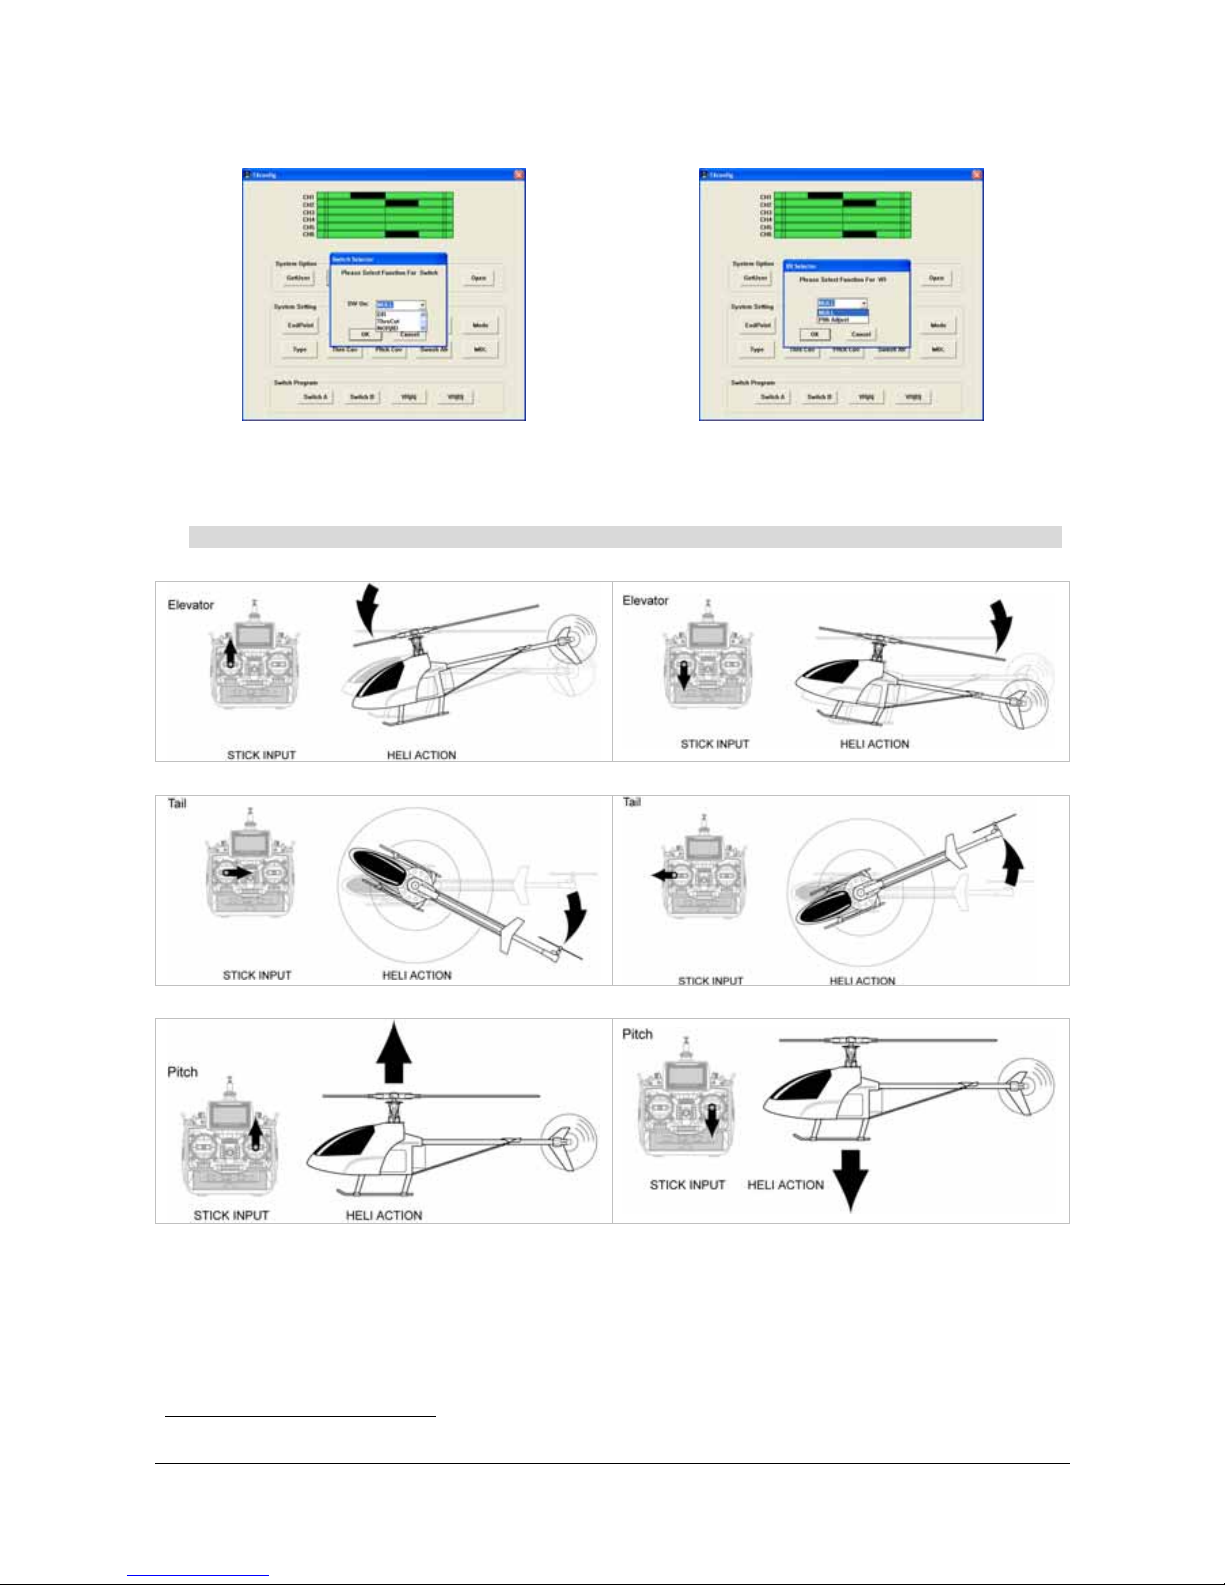
¾ DR (Dual rate): defines the
gain percentage gain of the
corresponding control (default
value is 70) .This function can
be applied to CH1, CH2 and
CH4 channels only and it is
enabled by setting the
corresponding switch.
¾ Mode: it represents the radio
transmitter mode according to
different user habit. Please be
careful: changing the mode
can lead to a new hardware
setting of the radio (if any
doubt, please contact ElyQ
customer service center).
¾ Type: defines the helicopter
type. For EQ.45, please select
HELI120.
¾ Thro Cuv: represents the
engine throttle curve, and can
be used to improve the
performance of the model.
Please select NOR for normal
flight mode.
Please select ID for acrobatic flight
mode. The curves are divided in 5
segments, which can be configured
with values between 0% and 100%.
¾ Pitch Cuv: represents the
pitch curve, and can be used
to improve the performance of
the model. Please select NOR
for normal flight mode.
Please select ID for acrobatic flight
mode. The curves are divided in 5
segments, which can be configured
with values between 0% and 100%.
¾ Swash Afr (swashplate
function rate): use to adjust the
range and the direction of the
pitch, aileron and elevator.
CH1, CH2 and CH6
correspond respectively to
aileron, elevator and pitch.
¾ MIX: can be used for channel
mixing.
Page 13
User’s manual r.0805 EQ45 (EN) www.elyq.com
Page 13/21
T6Config: Switch Program
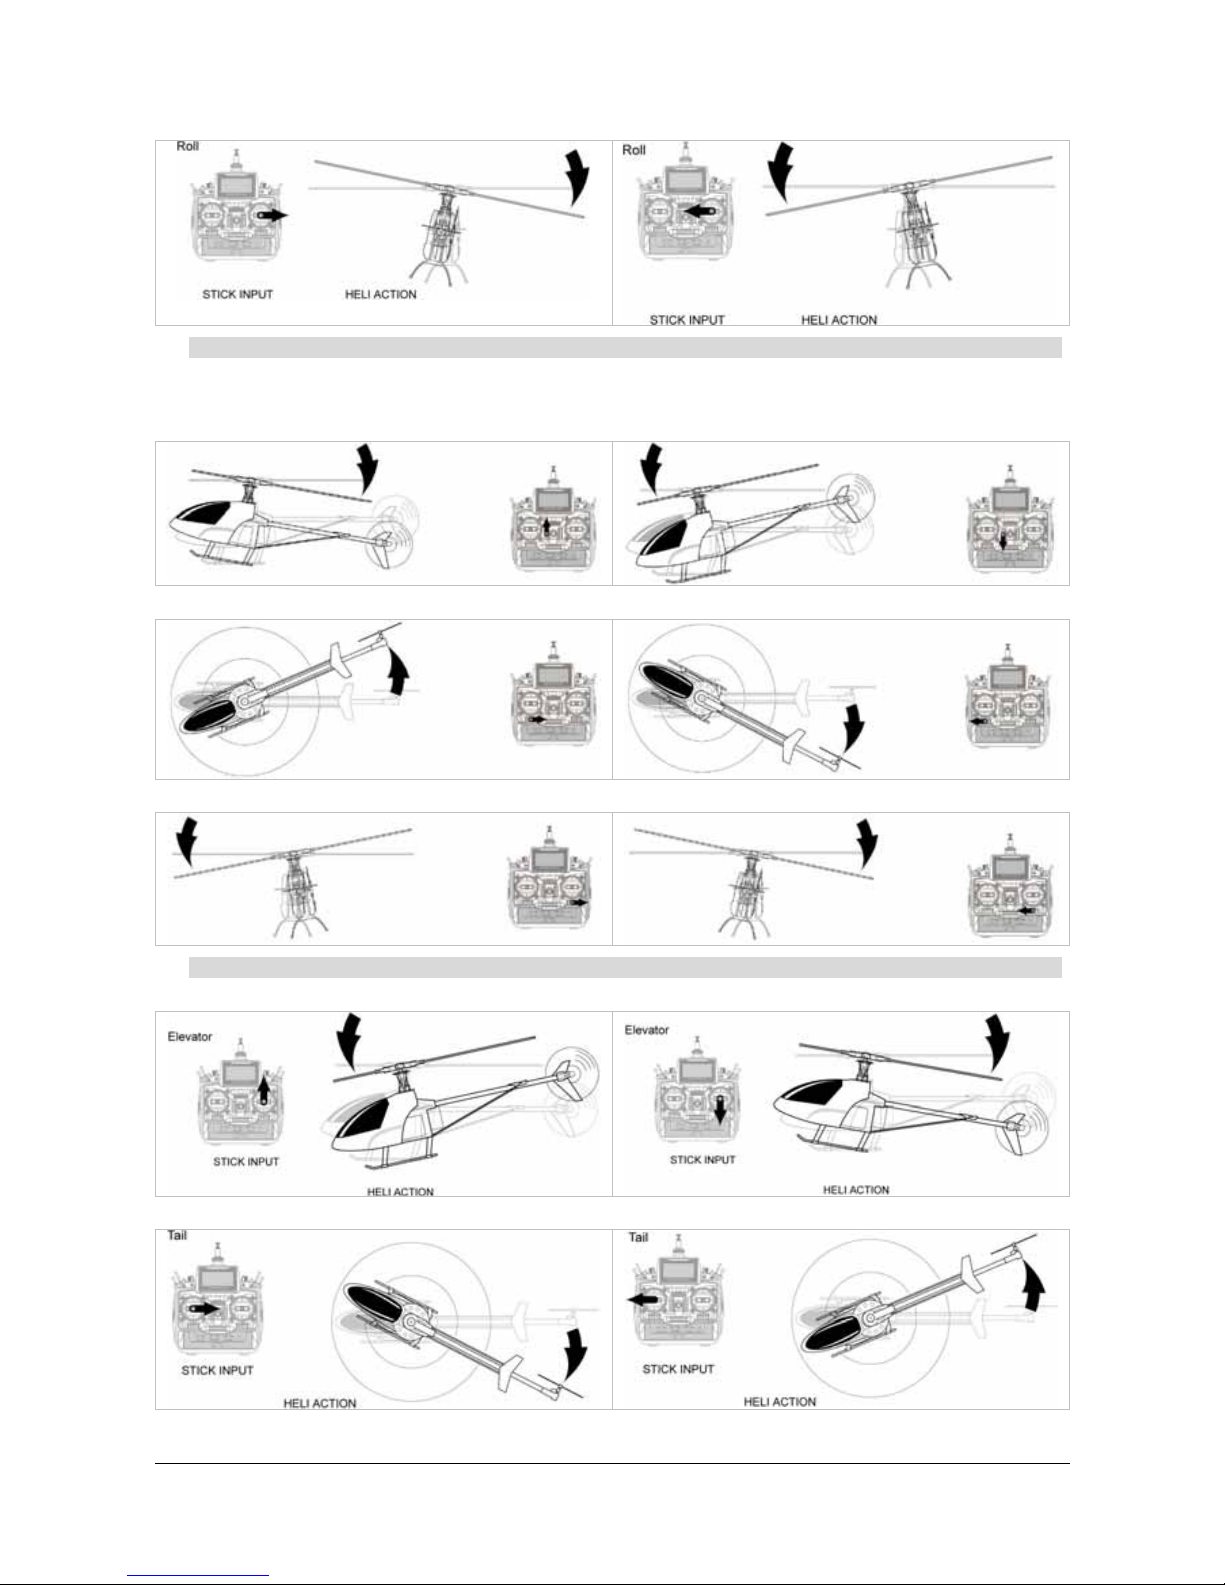
The functions supported in this section are the following:
¾ Switch A / Switch B: each switch can be
programmed individually. It is possible to select
between DR (Dual Rate), THRO CUT
1
(throttle cut)
and NOR / ID (normal or idle).
¾ VR (A) / VR (B): choose on of these
potentiometers in order to adjust the pitch (by
selecting PITH ADJUST). The other, can be
used for channel mixing.
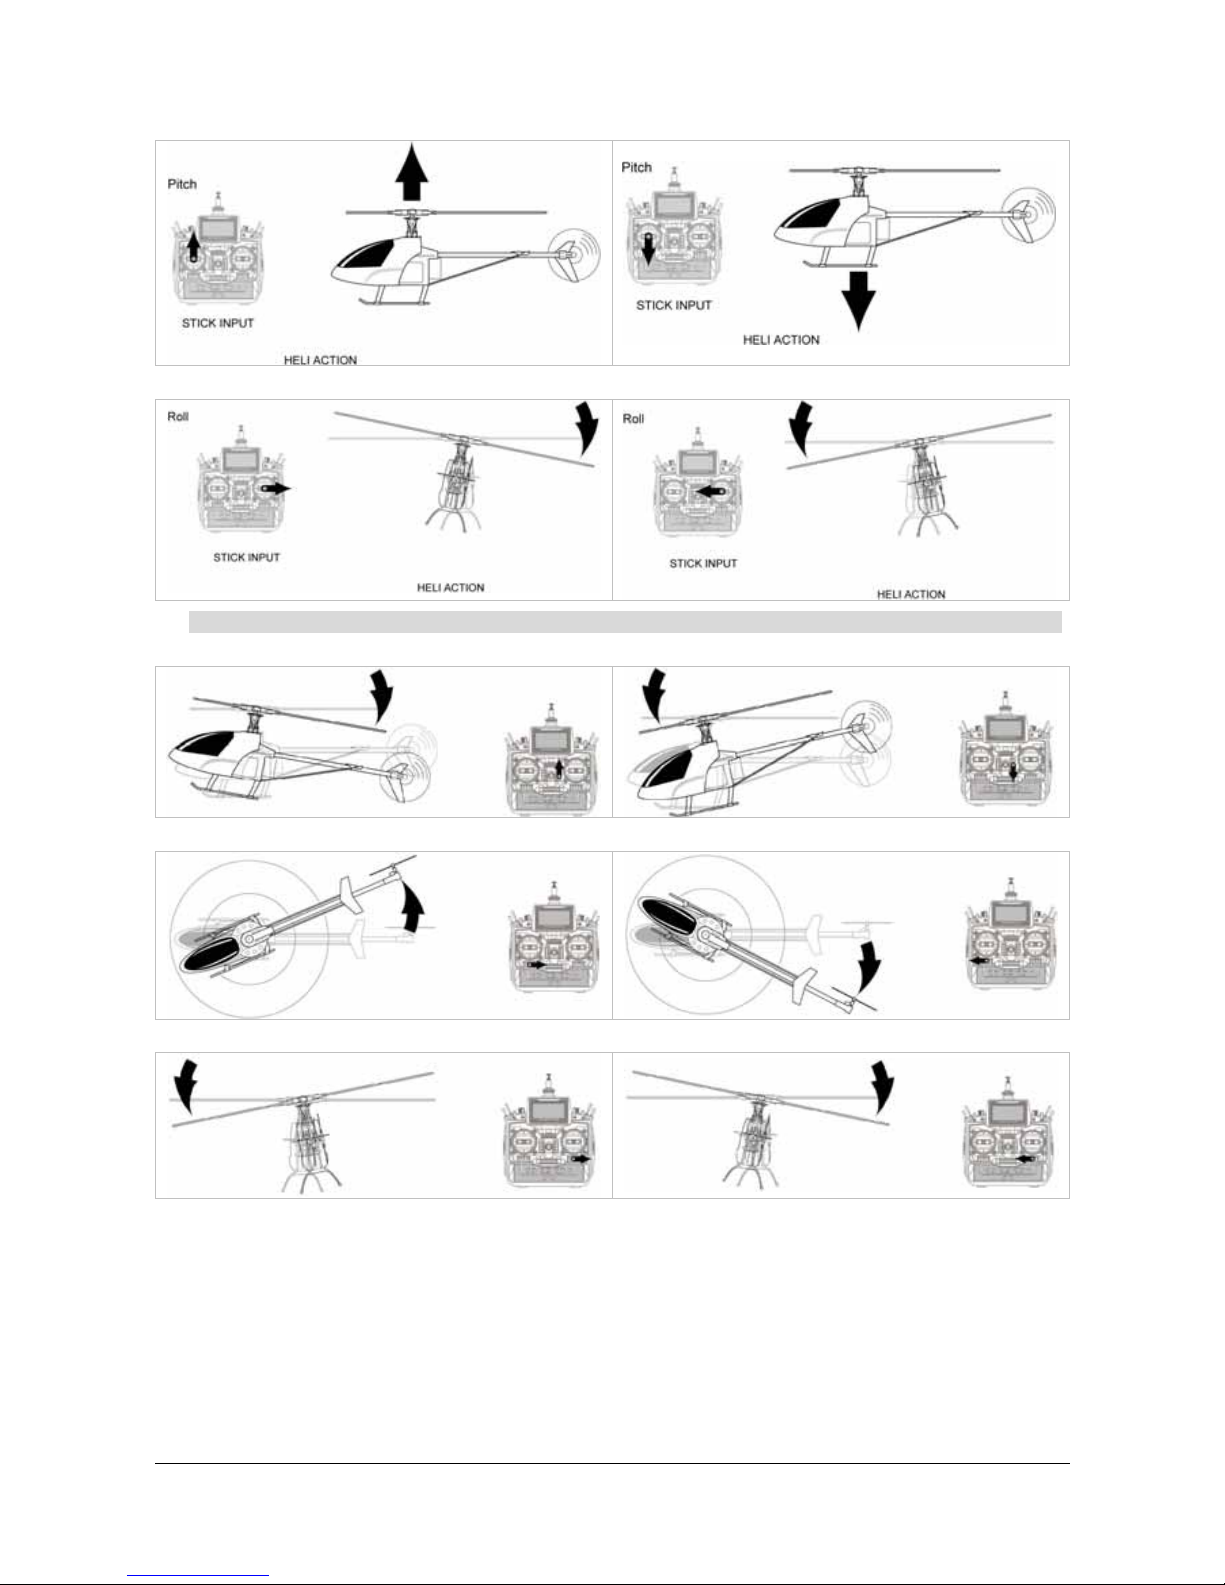
Transmitter Operation and Control – Mode 1
Elevator
Tail
Pitch
1
In order to check the curves parameters, it can be used to disable the engine.
Page 14
User’s manual r.0805 EQ45 (EN) www.elyq.com
Page 14/21
Roll
Trim Adjustment – Mode 1
If the helicopter does not fly in neutral position, adjust the Trims. The Trim adjustment depends on the helicopter
action. Please look at the pictures below in order to understand how to trim perfectly your helicopter.
Elevator / Pitch Trim – Stick Input / Heli Action
Tail Rotor / Yaw Trim - Stick Input / Heli Action
Aleiron Trim - Stick Input / Heli Action
Transmitter Operation and Control – Mode 2
Elevator
Tail
Page 15
User’s manual r.0805 EQ45 (EN) www.elyq.com
Page 15/21
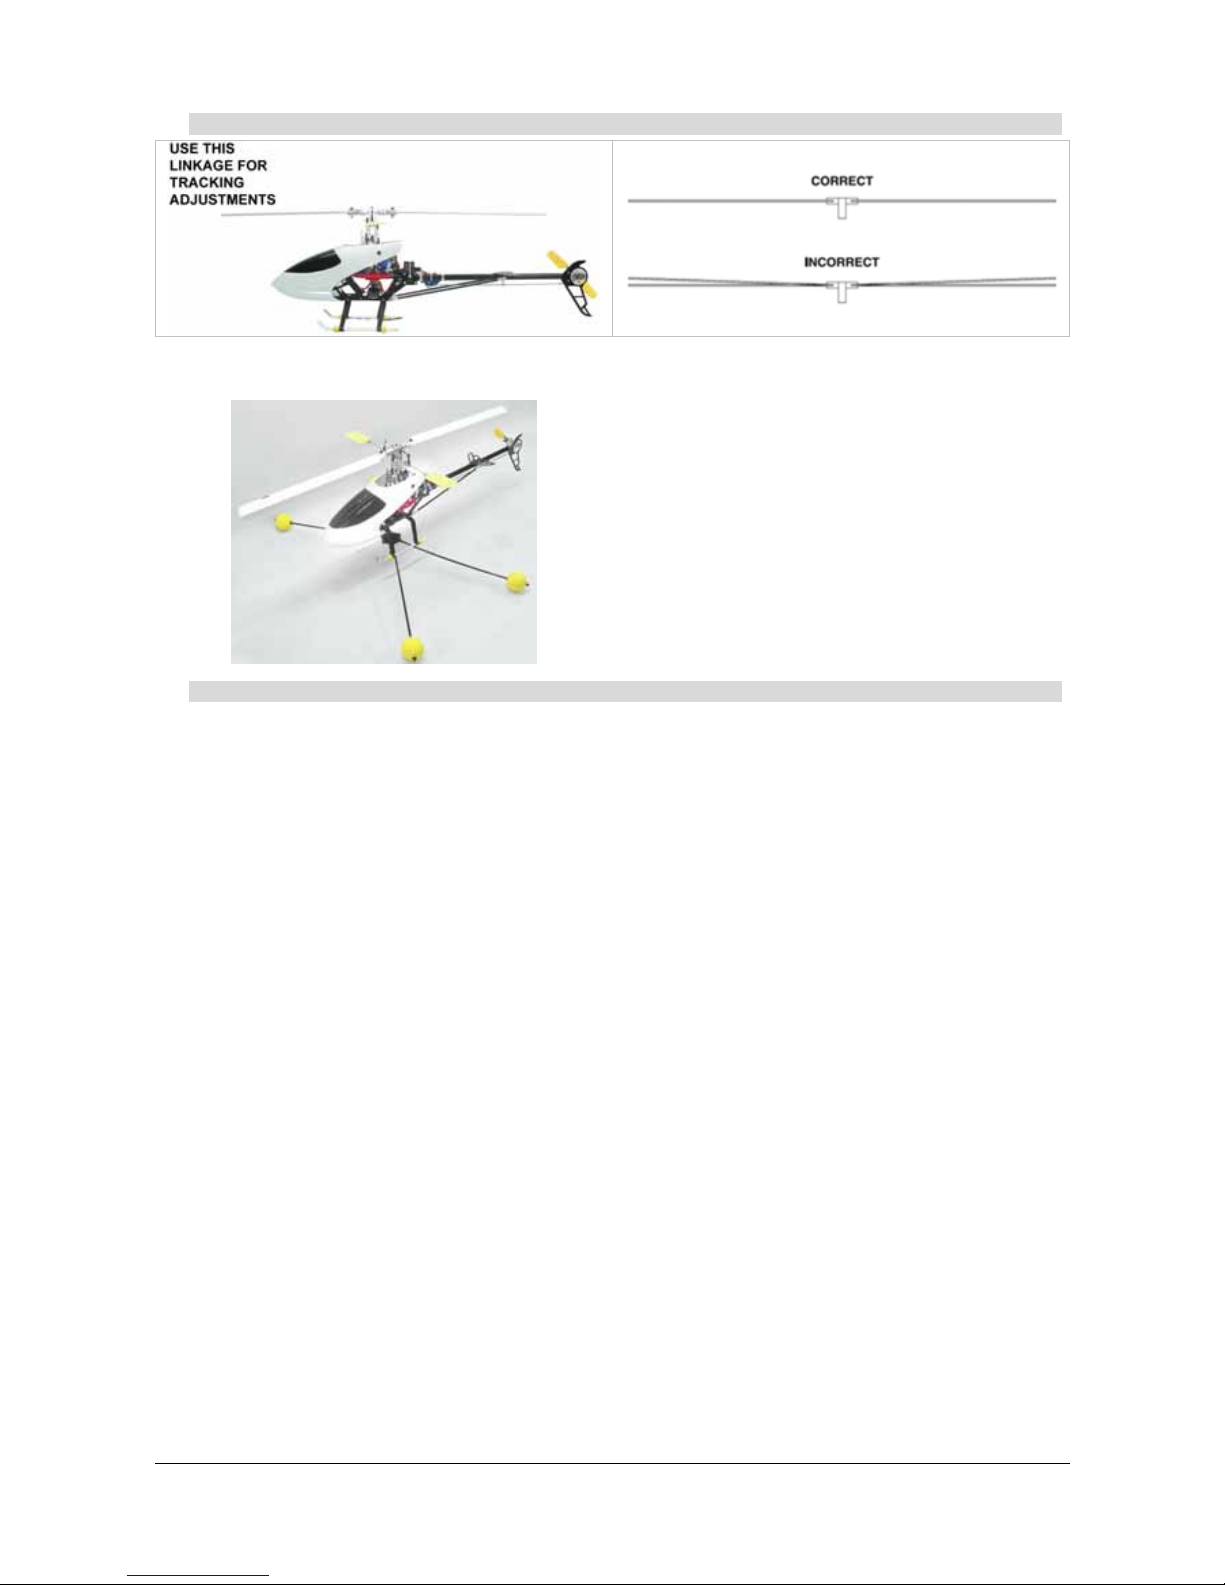
Pitch
Roll
Trim Adjustment – Mode 2
Elevator / Pitch Trim – Stick Input / Heli Action
Tail Rotor / Yaw Trim – Stick Input / Heli Action
Aleiron Trim – Stick Input / Heli Action
Page 16
User’s manual r.0805 EQ45 (EN) www.elyq.com
Page 16/21
Tracking the main Blades
At zero pitch, bring the main rotor up to speed and obs erve whether th e rotation al planes of the blades are the same. If
they are not, adjust one of the linkages to bring the blades into the same plane.
Apply the two different colored stripe decals to the tips of your main rotor blades.
The training gear is a big help to beginners. They soften
not so perfect landings and help to prevent the helicopte r
from tipping over. Even if you have experience flying a
helicopter, please consider using the supplied training
gear for the first few flights.
Flight Instructions
Takeoff
During your first flights it is very helpful to have light winds and a helper to keep an eye on things around you. Also, if
you are flying out of grass, make sure it's cut lo w as this will allo w the helicopter to slide around without catchi ng. Also
make sure there are no obstacles in your flying area to distract you.
Slowly add power and observe the model. If you feel it needs trimming, do so before lift off. You will quickly find that
model helicopters never allow you to return the sticks to centre. You just need to hold the sticks as needed to keep a
steady hover. So please don't fight the trim too much as it i s a norma l thi ng to experie nc e, Winds hav e a l arge effect o n
model helicopters. Please wait for calmer days and slowly work into windy days.
You will notice the cyclic controls lag behind a little from your inputs. This is perfectly normal an d something you g et the
feel for with time. It's normal to drift around a little in a hover until you get used to flying the model. The cyclic controls
on the EQ.45 RTF are fairly sensitive so only small movements are necessary.
Hovering
Once the helicopter is up in the air simply try to hold the helicopter in one spot as best you can. This can take some
practice and wind has a big effect on the stability of the helicopter as well. Be patient and slowly work forward as trying
to rush the learning process can be costly.
Landing
Level the helicopter into a solid hover and slowly decrease power until the helicopter settles onto the ground.
Basic Maneuvers
Once you get comfortable with hovering at different orientations and landing, it's time to move on to more advanced
maneuvers.
Slow Pirouettes
Add a small amount of tail rotor (left or right) and try rotati ng the helicopter slightly sid eways and see if you can hol d it
there. If you get uncomfortable bring the tail back towards you. Once you start getting comfortable, try moving the
helicopter to the side and turning back. Then fly back to the other side in straight lines.
Once you get that down you can try rotating the helicopter around 360 degrees, which is called a pirouette. The
helicopter can drift during these so make sure you have plenty of room when you first start practicing.
After pirouettes it's time to move onto nose-in hovering. The best bet is to wait for a calm da y. Take off and climb to 15
feet, practice half pirouettes from tail-in to nose-in hovering, and try to lengthen the delay in bet ween. This will give yo u
a little practice nose-in and still give you a chance to get out
of trouble. As you improve you'll remain nose-in for longer periods of time.
Now it's time to work into basic forward flight. Just take the basic hovering maneuvers listed abov e and slowly go out
farther and faster and always bring the helicopter back after one pass. Practice controll ed slow flight in close as well.
The more time you spend practicing here the easier things will be later on.
Page 17

User’s manual r.0805 EQ45 (EN) www.elyq.com
Page 17/21
Aerobatics
So you are getting pretty comfortable in fast forward flight. Well, now it's time to slowly progress into aerobatics. Once
you are into forward flight start using the idle up switch which raises the rotor RPM for aerobatics and gives us the
ability to fly inverted. In wind it may be difficult to descend to land without the idle up on.
Your first step is chandelles. Fly straight across in front of you and pull up to a 45" angle. Now at the top, when the
helicopter slows down to a stop, apply some tail rotor to bring the nose around 180 deg rees and continue back down
on the 45" angle. As you progress with the maneuver you can pull a grea ter angle than 45 degrees, up to 90 degre es,
and it becomes a stall turn.
Loops
Once you get comfortable with the chandelles and stall turns it's time to move onto the loop. The key to the loop is to
enter with plenty of speed. Start pulling aft cyclic to enter the loop and as the model goes inverted at the top pull back
on the throttle a little bit (towards negative (-) collective) to help hold altitude and as the model comes back vertical add
some positive (+) collective to keep your speed up. One of the most common mistakes made on loops is usi ng too
much negative (-) collective at the top.
Flips
These are a lot easier than they sound to perform. Be sure to start with plent y of altitude. Basically from a upright hover
slowly add in full forward cyclic and as the model approaches vertical bri ng the collective stick back to center. Now as
the model continues over to inverted you will need to start adding in negative (-) collective (or pull the collective stick
back towards yourself). As the model transitions back to vertical again bri ng the collective stick back to the middle and
start adding in positive (+) collective as the model comes back to upright.
It's all a matter of timing. The most important thing is not throw the sticks around as this can ca use the head speed to
drop and may cause the tail to drift.
Inverted Hovering
Keep in mind flying a helicopter inverted is ver y difficult but can be learned. One of the key pr o blems is 3 out of 4 of th e
controls are reversed (forward/aft cyclic, collective and tail rotor) and you have to mentall y reverse these while flyi ng. It
will take some practice.
Take the loop you learned above an d just hold the inverted portion for short periods of time. As you get used to the
reversed controls, you will extend the time inverted. It is very difficult and will take some time to pick up. Also make sure
you have plenty of altitude for recovery.
Page 18
User’s manual r.0805 EQ45 (EN) www.elyq.com
Page 18/21
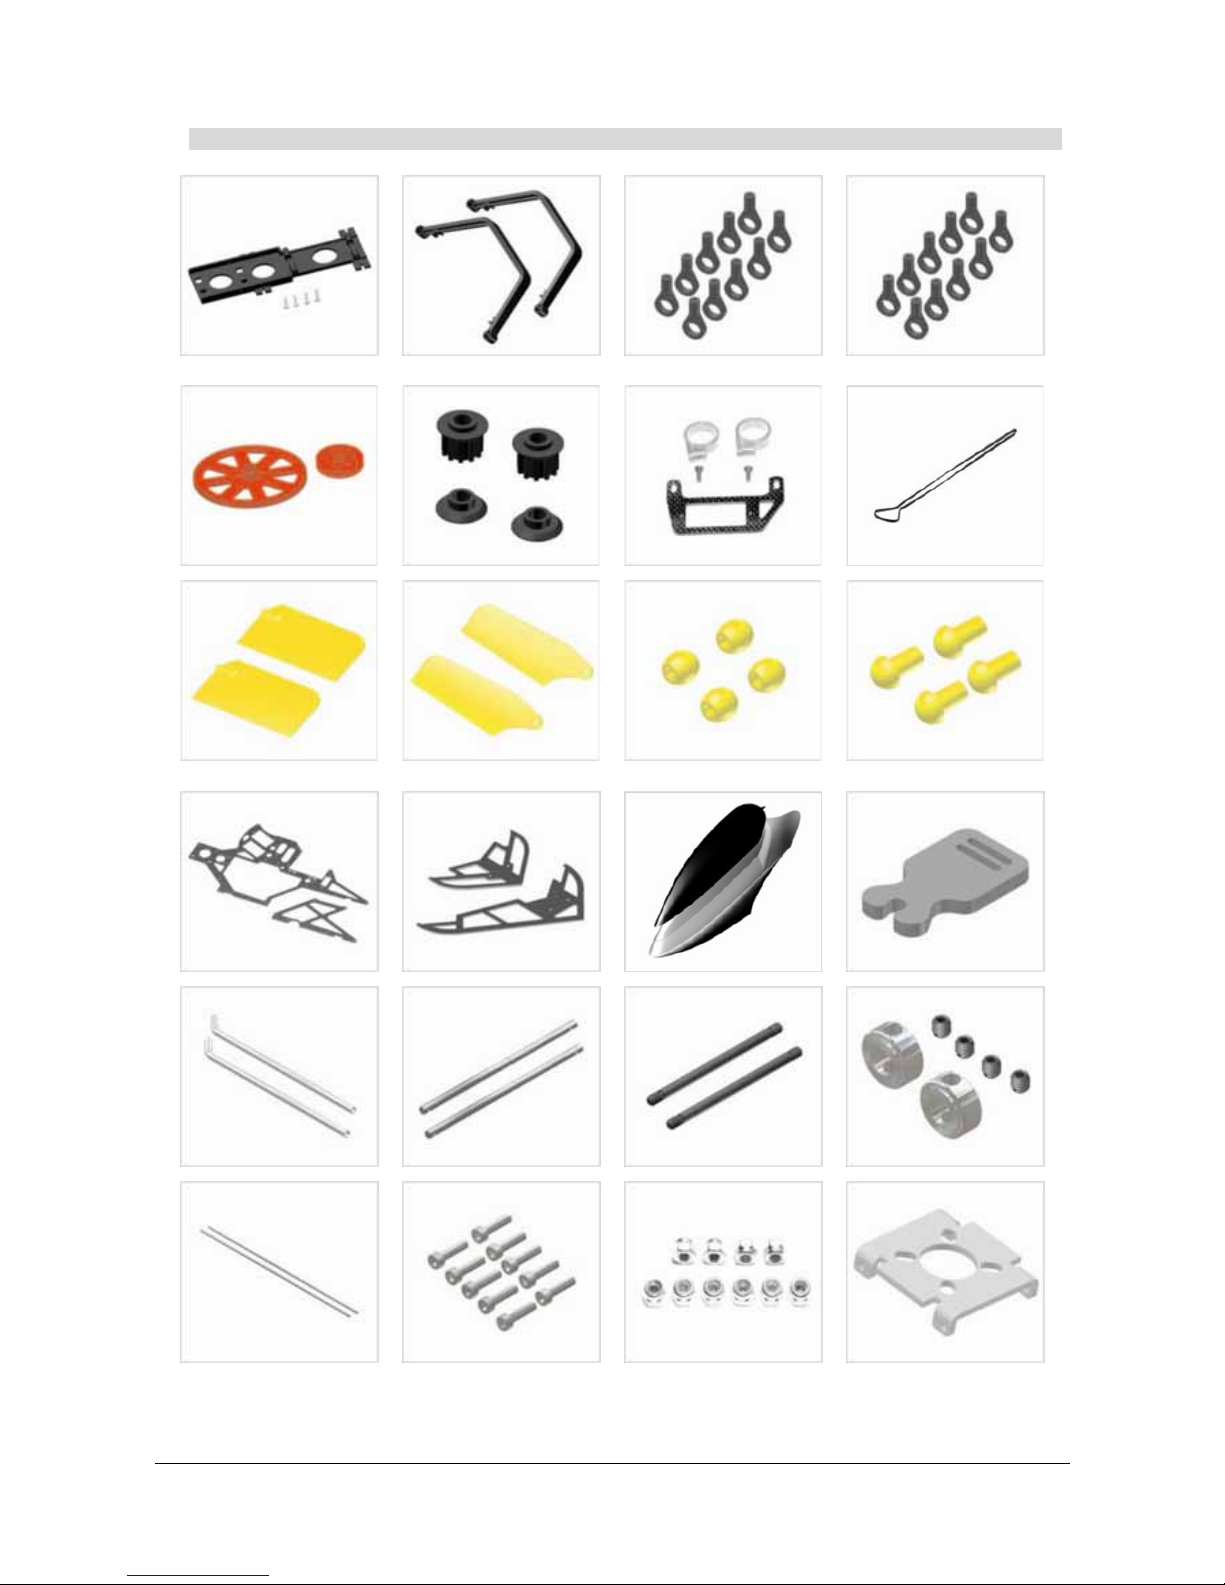
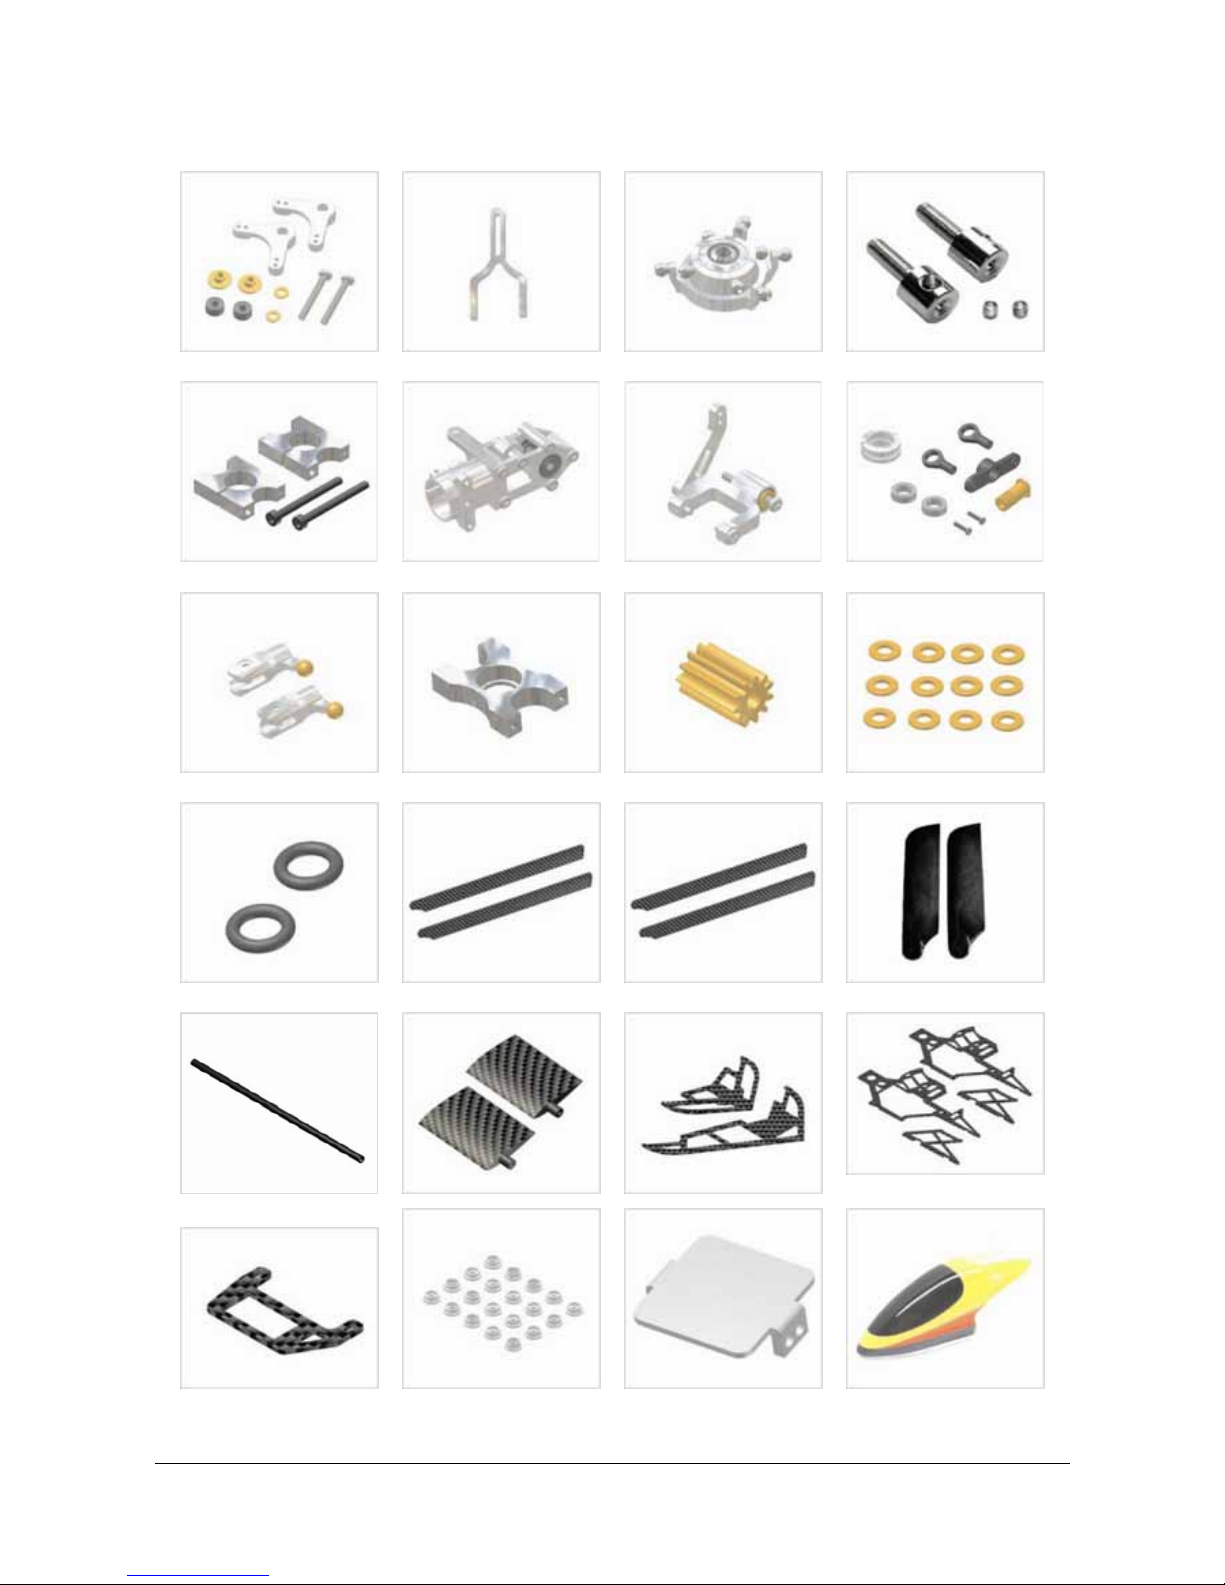
Spare Parts
Q4501 Chassis set Q4502 Landing skid structure
set
Q4503 Ball link set Q4504 Ball link set B
Q4505 Main gear set Q4506 Tail drive gear assembly Q4507 Tail servo mount set Q4508 Belt set
Q4509 Stabilizer set yellow Q4510 Tail rotor blade set
yellow
Q4511 Landing gear stopper
yellow
Q4512 Landing gear end cap
yellow
Q4513 Main frame set Q4514 Stabilizer/fin set Q4515 Canopy set Q4516 Blade holder
Q4517 Landing gear skids Q4518 Main shaft set Q4519 Spindle shaft Q4520 Main shaft stopper set
Q4521 Stabilizer bar
Q4522 Screw set for main blade
set (3*16mm)10pcs
Q4523 Nut set Q4524 Aluminium motor mount
set
Page 19
User’s manual r.0805 EQ45 (EN) www.elyq.com
Page 19/21
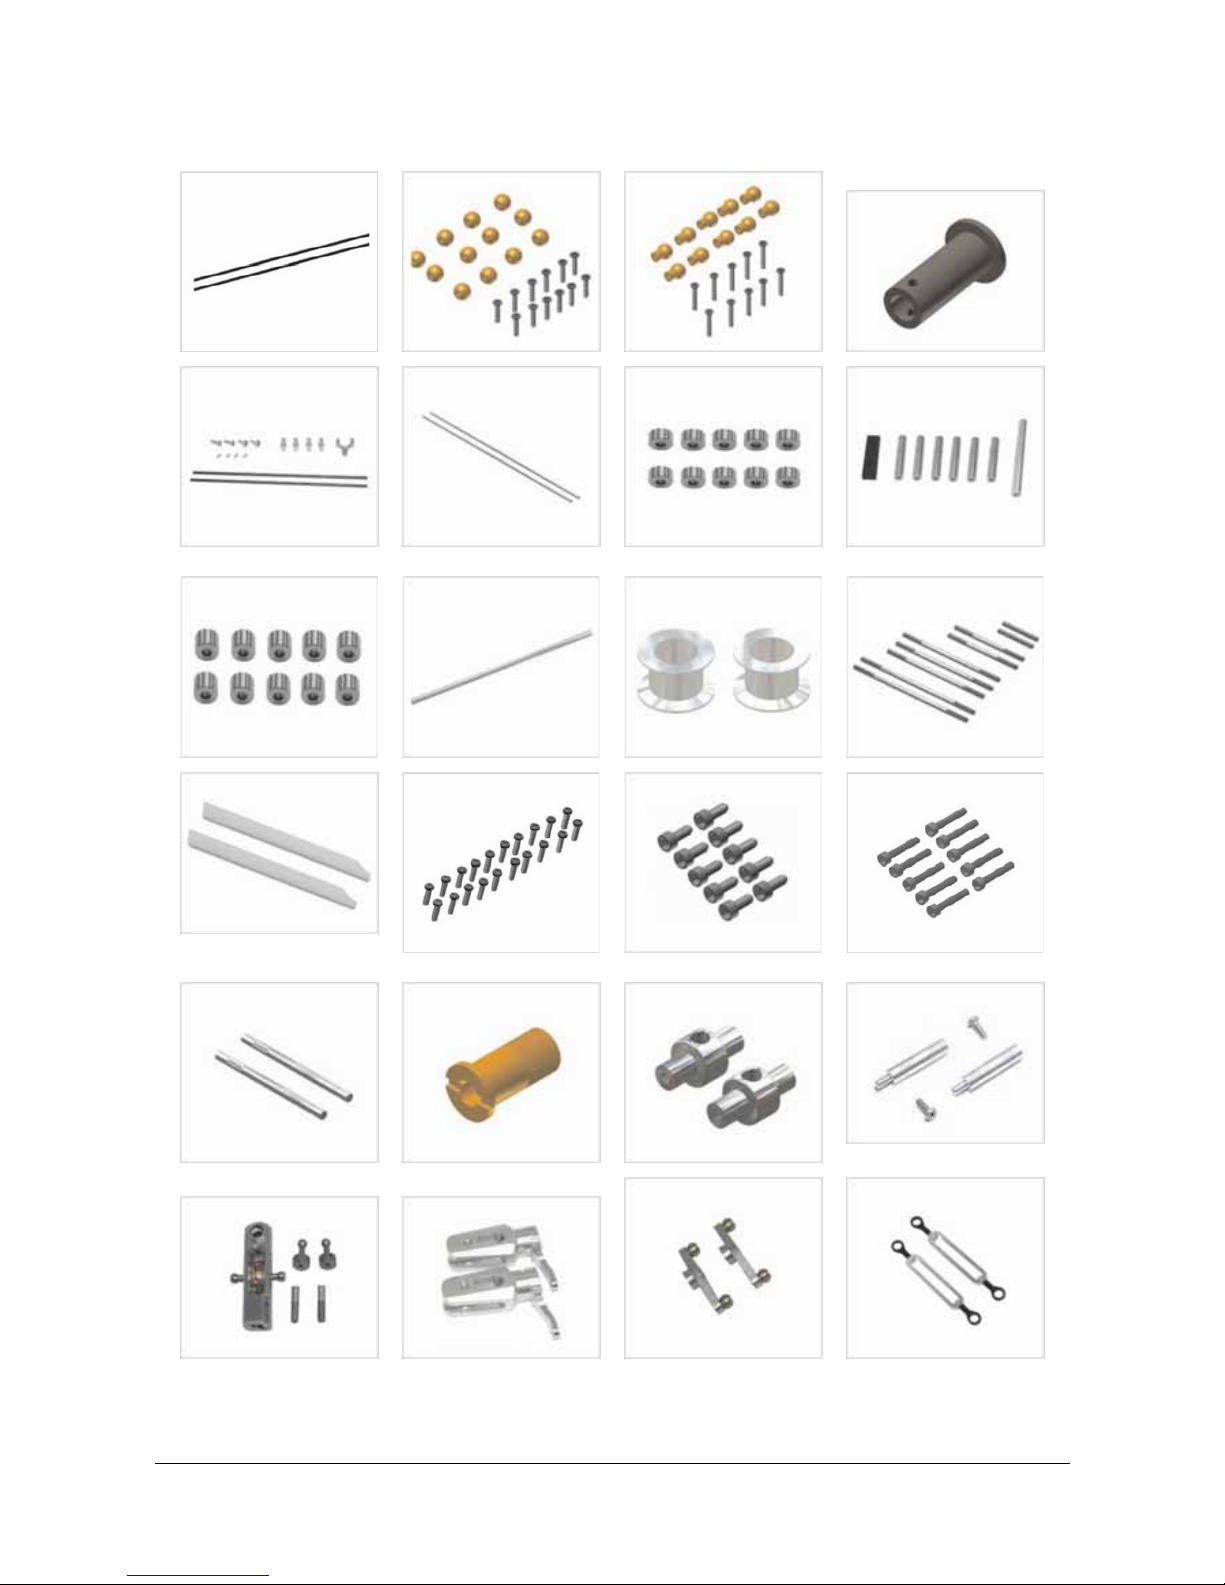
Q4525 Tail support PVC set Q4526 Brass balls w/screws Q4527 Brass balls w/screws Q4528 Autorotation sleeve set
Q4529 Tail boom support set Q4530 Pitch lever joint set Q4531 Main frame holder set
(4.5*2.5mm)
Q4532 Main frame holder set
Q4533 L arm support holder Q4534 Tail boom Q4535 Belt wheel set Q4536 Linkage set
Q4537 Main rotor blade set Q4538 Screw set for main frame
set (m1.7*5mm), 20 pcs
Q4539 Screw set for main frame
set (m2*5), 10 pcs
Q4540 Screw set for main frame
set (m2*10), 10 pcs
Q4541 Tail output shaft set Q4542 Tail pitch bushing Q4543 Pitch lever joint set Q4544 Canopy mount set
Q4545 Aluminium main rotor
yoke set
Q4546 Aluminium main rotor
grip set
Q4547 See-saw set Q4548 See-saw set
Page 20
User’s manual r.0805 EQ45 (EN) www.elyq.com
Page 20/21
Q4549 Aluminium l arms set Q4550 Swashplate antirotation
CNC
Q4551 Aluminium swashplate
set
Q4552 Stabilizer bar adaptor set
Q4553 Aluminium tail boom
mount
Q4554 Aluminium tail case set Q4555 Aluminium tail pitch
lever
Q4556 Aluminium tail pitch
yoke
Q4557 Aluminium tail grip set Q4558 Aluminium bearing block
(main shaft)
Q4559 Motor gear set (11t) Q4560 Washer set (d2, d4, w0,4)
50 pcs
Q4561 O-ring set Q4562 Carbon main rotor
blades set (carbon fiber)
Q4563 Carbon main rotor
blades set (fiber glass)
Q4564 Tail rotor set (carbon
fiber)
Q4565 Tail boom (carbon fiber) Q4566 Carbon stabilizer set Q4567 Carbon stabilizer/fin set Q4568 Carbon frame set
Q4569 Carbon tail servo mount Q4570 Aluminium washer set Q4571 Aluminium gyro mount Q4572 Canopy set (fiber glass)
Page 21
User’s manual r.0805 EQ45 (EN) www.elyq.com
Page 21/21
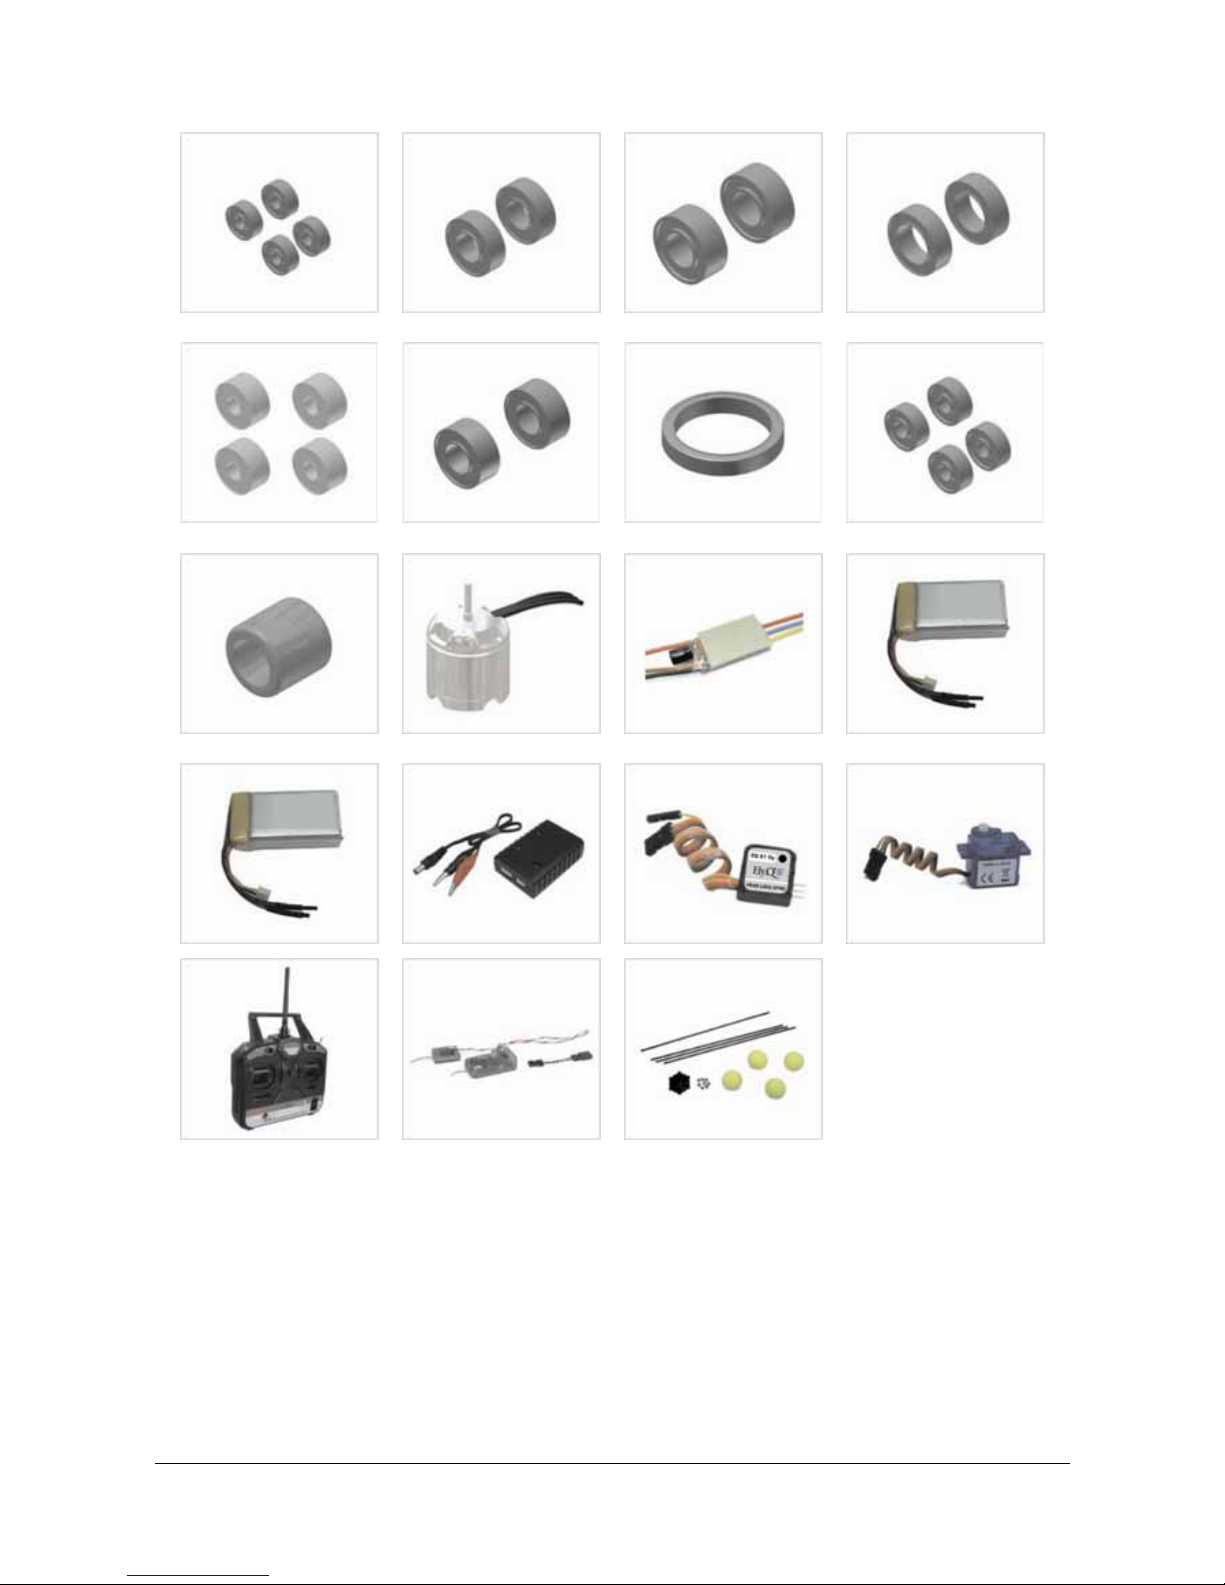
Q4573 Ball bearing 2*5*2.5mm -
4 pcs
Q4574 Ball bearing 3*6*2mm - 2
pcs
Q4575 Ball bearing 5*10*4mm -
2 pcs
Q4576 Ball bearing 5*8*2.5mm-
2 pcs
Q4577 Ball bearing 3*8*4mm - 4
pcs
Q4578 Ball bearing 3*6*2.5mm -
2 pcs
Q4579 Ball bearing 20*25*4mm -
1 pc
Q4580 Ball bearing 3*8*3mm - 4
pcs
Q4581 One-way bearing
8*12*12mm - 1pc
Q4582 Brushless motor Q4583 Esc (12v 30a) Q4584 Battery (11.1v 1200 mah)
Q4585 Battery(11.1v 1800 mah) Q4586 Charger Q4587 Gyro Q4588 Servo
Q4589 Transmitter (6ch/2.4g) Q4590 Receiver (6ch/2.4g) Q4591 Training kit
 Loading...