

Page 1
Cod. S6I.884.G00
RL.07
9/2012
Il prodotto è conforme alla direttiva europea 2004/108/CE, 2006/95/CE e successive.
Product is according to EC Directive 2004/108/CE, 2006/95/CE and following norms.
Le produit est conforme à la directive européenne 2004/108/CE, 2006/95/CE et suivantes.
Das Produkt entspricht den europäischen Richtlinien 2004/108/CE, 2006/95/CE und Nachfolgenden.
El producto es conforme a la directiva europea 2004/108/CE, 2006/95/CE y sucesivas.
O produto está conforme a directiva europeia 2004/108/CE, 2006/95/CE e seguintes.
PDGB EFI
MANUALE PER IL COLLEGAMENTO E L’USO - INSTALLATION AND OPERATION MANUAL - MANUEL POUR LA CONNEXION ET L’EMPLOI
INSTALLATION UND BEDIENUNGSANLEITUNG - MANUAL PARA EL CONEXIONADO Y EL USO - MANUAL DE INSTALAÇÃO E UTILIZAÇÃO
Art. 884G - 884H
TÜRSPRECHANLAGE FÜR EINFAMILIENHAUS MIT SIMPLIFIZIERTEM 2-ADERNANSCHLUSS
PORTERO ELÉCTRICO UNIFAMILIAR CON CONEXIONADO SEMPLIFICADO A 2 HILOS
PORTEIRO ELÉCTRICO UNIFAMILIAR COM LIGAÇÃO
SEMPLIFICADA COM 2 CONDUTORES.
PORTIERE ELETTRICO UNIFAMILIARE
CON COLLEGAMENTO SEM PLI FI CA TO A 2 FILI
ELECTRIC DOOR-OPENER SYSTEM FOR SINGLE
RESIDENCE WITH 2-WIRE SIMPLIFIED CONNECTION
PORTIER ÉLECTRIQUE POUR VILLA AVEC
CONNEXION SEMPLIFIÉE À DEUX FILS
Art. 884G - 884H
Page 2

884G - 884H
2/12
PS1
Anschluß der Sprechverbindung: verwenden Sie zwei
Drahte mit 0,65 mm2Querschnitt, bis max. 150m.
Instalación de audio solamente: utilizar dos conductore
de 0,65 mm
2
hasta 150m.
Ligação sómente do audio: utilizar dois conductores de
0,65mm
2
até 150m.
Anschluß der Sprechverbindung und des Türöffner: verwenden Sie Draht mit 1 mm
2
Querschnitt, bis max. 50m.
Instalación de audio y cerradura: utilizar cable de 1 mm
2
hasta 50m.
Ligação sómente do audio e trinco: utilizar conductores
de 1mm
2
até 50m.
N. C3683-2
SCHEMA COLLEGAMENTO PORTIERE ELETTRICO UNIFAMILIARE KIT ART. 884G - 884H
WIRING DIAGRAM FOR ELECTRIC DOOR-OPENER SYSTEM FOR SINGLE RESIDENCE KIT
ART. 884G - 884H
SCHÉMA DES CONNEXIONS PORTIER ÉLECTRIQUE POUR VILLA KIT ART. 884G - 884H
SCHALTPLAN FÜR EINFAMILIENHAUS-TÜRSPRECHANLAGE SET ART. 884G - 884H
ESQUEMA DE CONEXIONADO PORTERO ELÉCTRICO UNIFAMILIAR KIT ART. 884G - 884H
ESQUEMA DE LIGAÇÃO DO PORTEIRO ELÉCTRICO UNIFAMILIAR KIT ART. 884G - 884H
Collegamento solo audio: utilizzare solo due con dut to ri da 0,65 mm2fino a 150m.
Audio connection only: use two 0.65mm
2
fino a 150m.
of distance.
Connexion phonie uniquement: utiliser deux câbles de
0,65mm
2
jusqu'à 150 m.
Collegamento audio e serratura: utilizzare cavo da 1
mm
2
fino a 50m.
Audio and lock connection: use two 1mm
2
fino a 50m.
of distance.
Connexion phonie uniquement: utiliser deux câbles de
1mm
2
jusqu'à 50 m.
RETE-MAINS
RÉSEAU-NETZ
RED-REDE
Serratura
Lock
Gâche
Türöffner
Cerradura
Trinco
12V ∼
Art. 88T4
Art. M832
Art. 8874
Ripetitore di chiamata
Call repeater
Répétiteur d'appel
Lautsprecher für
Rufverdoppelung
Repetidor de llamada
Repetidor de chamada
Art. 0002/841.05
Art. 930B
Collegamenti comuni (necessari) - Common connections (necessary) - Raccordements communes (nécessaires)
Gemeimsame Anschlüsse (notwendig) - Conexionados comunes (necesarios) - Ligações comuns (necessárias)
Collegamenti chiamata (necessari) - Call connections ( necessary) - Raccordements appel (necessaires)
Rufsanchlüsse (notwendig) - Conexionados llamada (necesarios) - Ligações chamada (necesárias)
Collegamenti opzionali - Optional connections - Raccordements optionnels
Optionanschlüsse - Conexionados opcionales - Ligaçöes opcionais
Page 3
884G - 884H
3/12
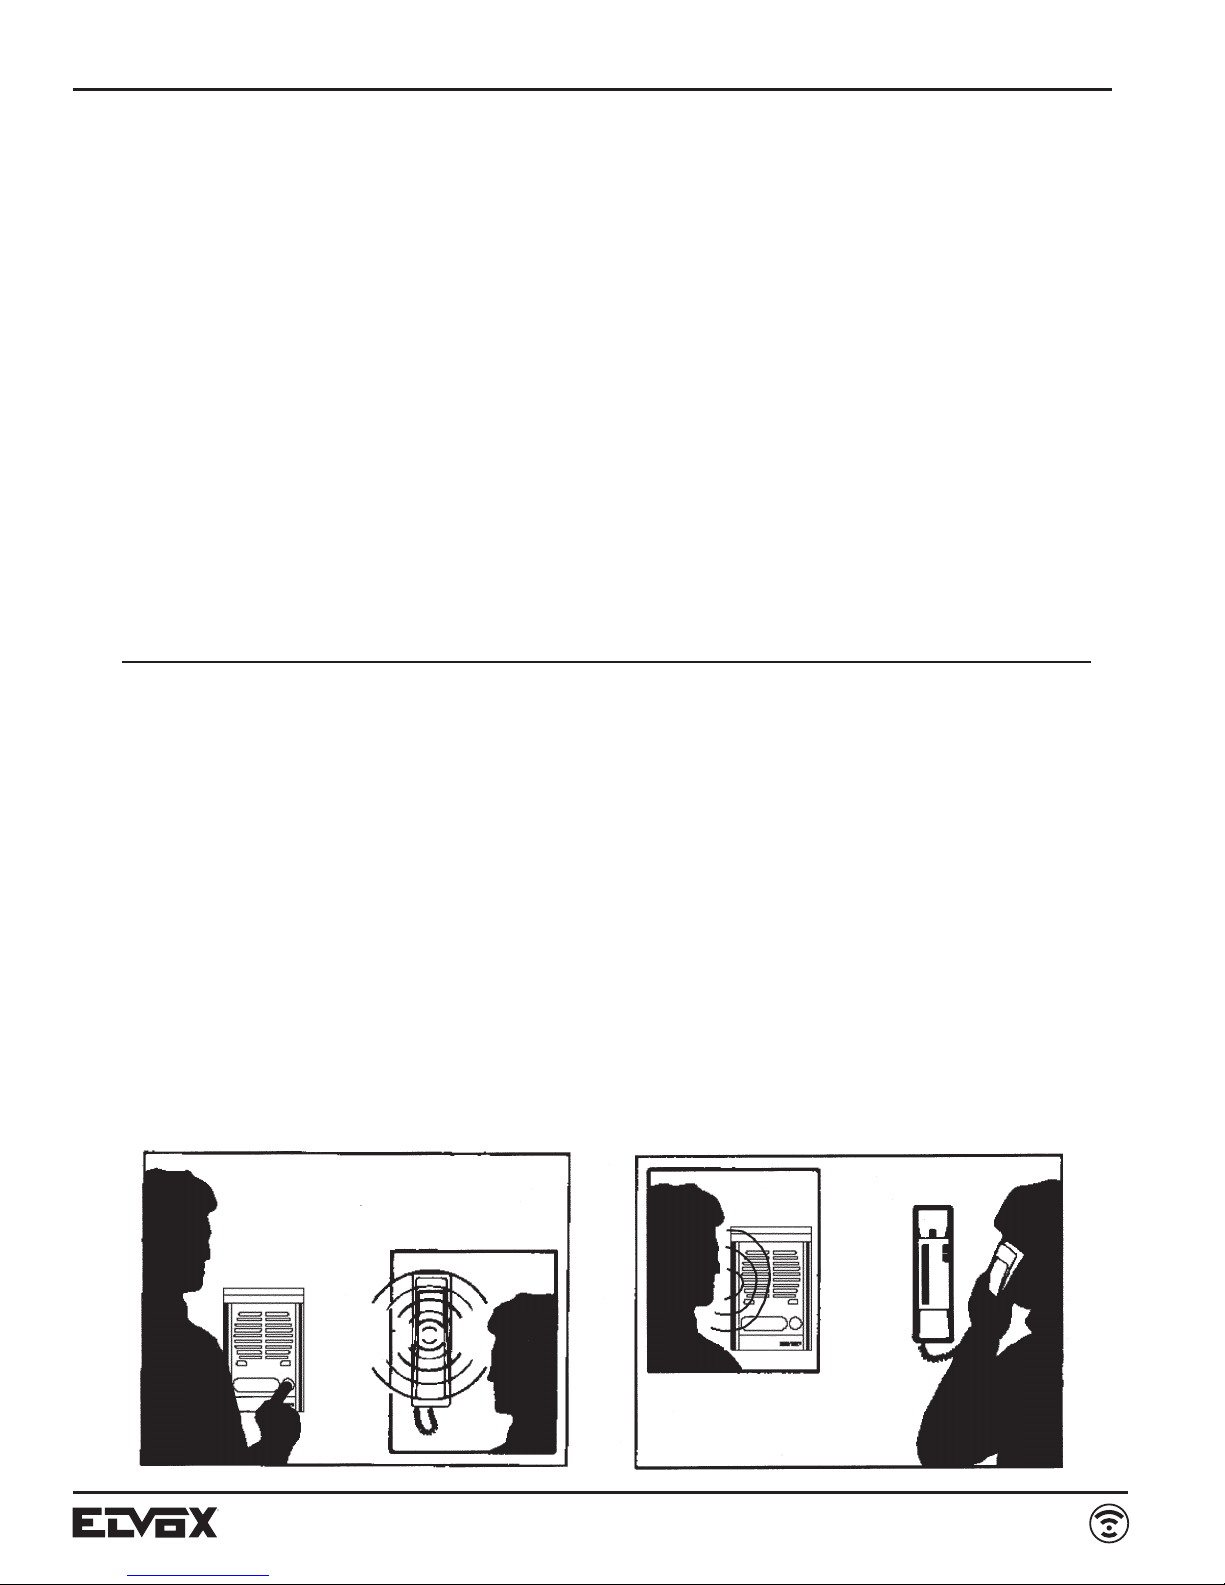
All'interno sollevare il microtelefono ed incominciare a
parlare. Premere l'apposito pulsante per azionare la serratura elettrica.
Answer calls by lifting phone handset. Operate electric
lock by pushing appropriate button.
Pour répondre aux appels soulever le combiné du poste
d'appartement, la gâche électrique est commandée par
le bouton approprié.
Nach Abheben des Haustelefons ist die
Gesprächsverbindung hergestellt. Türöffner durch
entsprechende Taste betätigen.
En el interior, levantar el microteléfono y comenzar a
hablar. Apretar el pulsador apropiado para accionar la
cerradura eléctrica.
No interior levantar o telefone e começar a falar. Premir
o botão respectivo para accionar o trinco eléctrico.
Eseguire la chiamata dall'esterno premendo il pul san te
della targa e parlare a mani libere dopo aver ricevuto la
risposta.
Make calls by pushing door panel button and talk
handsfree after receiving reply.
Appeler en appuyant sur le bouton-poussoir de la
plaque de rue et parler mains libres après avoir reçu la
réponse.
Herstellung des Rufes durch Betätigung des Klingeltasters.
LLamar desde el exterior apretando el pulsador de la
tarjeta y hablar a manos libres después de haber
recibido la respuesta.
Efectuar a chamada do exterior premindo o botão da
botoneira e falar a mãos livres depois de receber a resposta.
USO - OPERATION - MODE D'EMPLOI - FUNKTION - UTILIZAÇÃO
I cavi di alimentazione (230V) e i cavi 12 o 15 Vca vanno su canalizzazioni separate dagli altri conduttori per non determinare disturbi di induzione. I cavi 12 o 15 Vca vanno collegati direttamente ai morsetti 6 e 7 del citofono Art. 8874.
The power supply cables (230 V) and the 12 or 15 Vac cables should run through separate ducts from the other conductors, so as not to cause interference by induction.
The 12 or 15 Vac cables should be connected directly to the terminals 6 and 7 on interphone Art. 8874.
Les câbles d'alimentation (230 V) et les câbles de 12 ou 15 Vca vont sur des conduites séparées des autres conducteurs pour éviter des phénomènes d'induction.
Les câbles de 12 ou 15 Vca doivent être reliés directement aux bornes 6 et 7 du micro haut-parleur Art. 8874.
Die Versorgungskabel (230V) und die 12 bzw. 15 Vac Kabel sind in von anderen Leitern separaten Kanälen zu verlegen, um Störungen durch Induktionsströme vorzubeugen.
Die 12 bzw. 15 Vca Kabel sind direkt an die Klemmen 6 und 7 der Haustelefon Art. 8874 anzuschließen.
Los cables de alimentación (230 V) y los cables de 12 o 15 Vca deben instalarse en canaletas separadas de los demás
conductores para evitar interferencias por inducción.
Los cables de 12 o 15 Vca deben conectarse directamente a los bornes 6 y 7 del teléfono Art. 8874.
Os cabos de alimentação (230V) e os cabos de 12 ou 15 Vca vão para canalizações separadas dos outros condutores para não determinar distúrbios de indução.
Os cabos de 12 ou 15 Vca são directamente ligados aos bornes 6 e 7 do telefone Art. 8874.
Page 4
884G - 884H
4/12
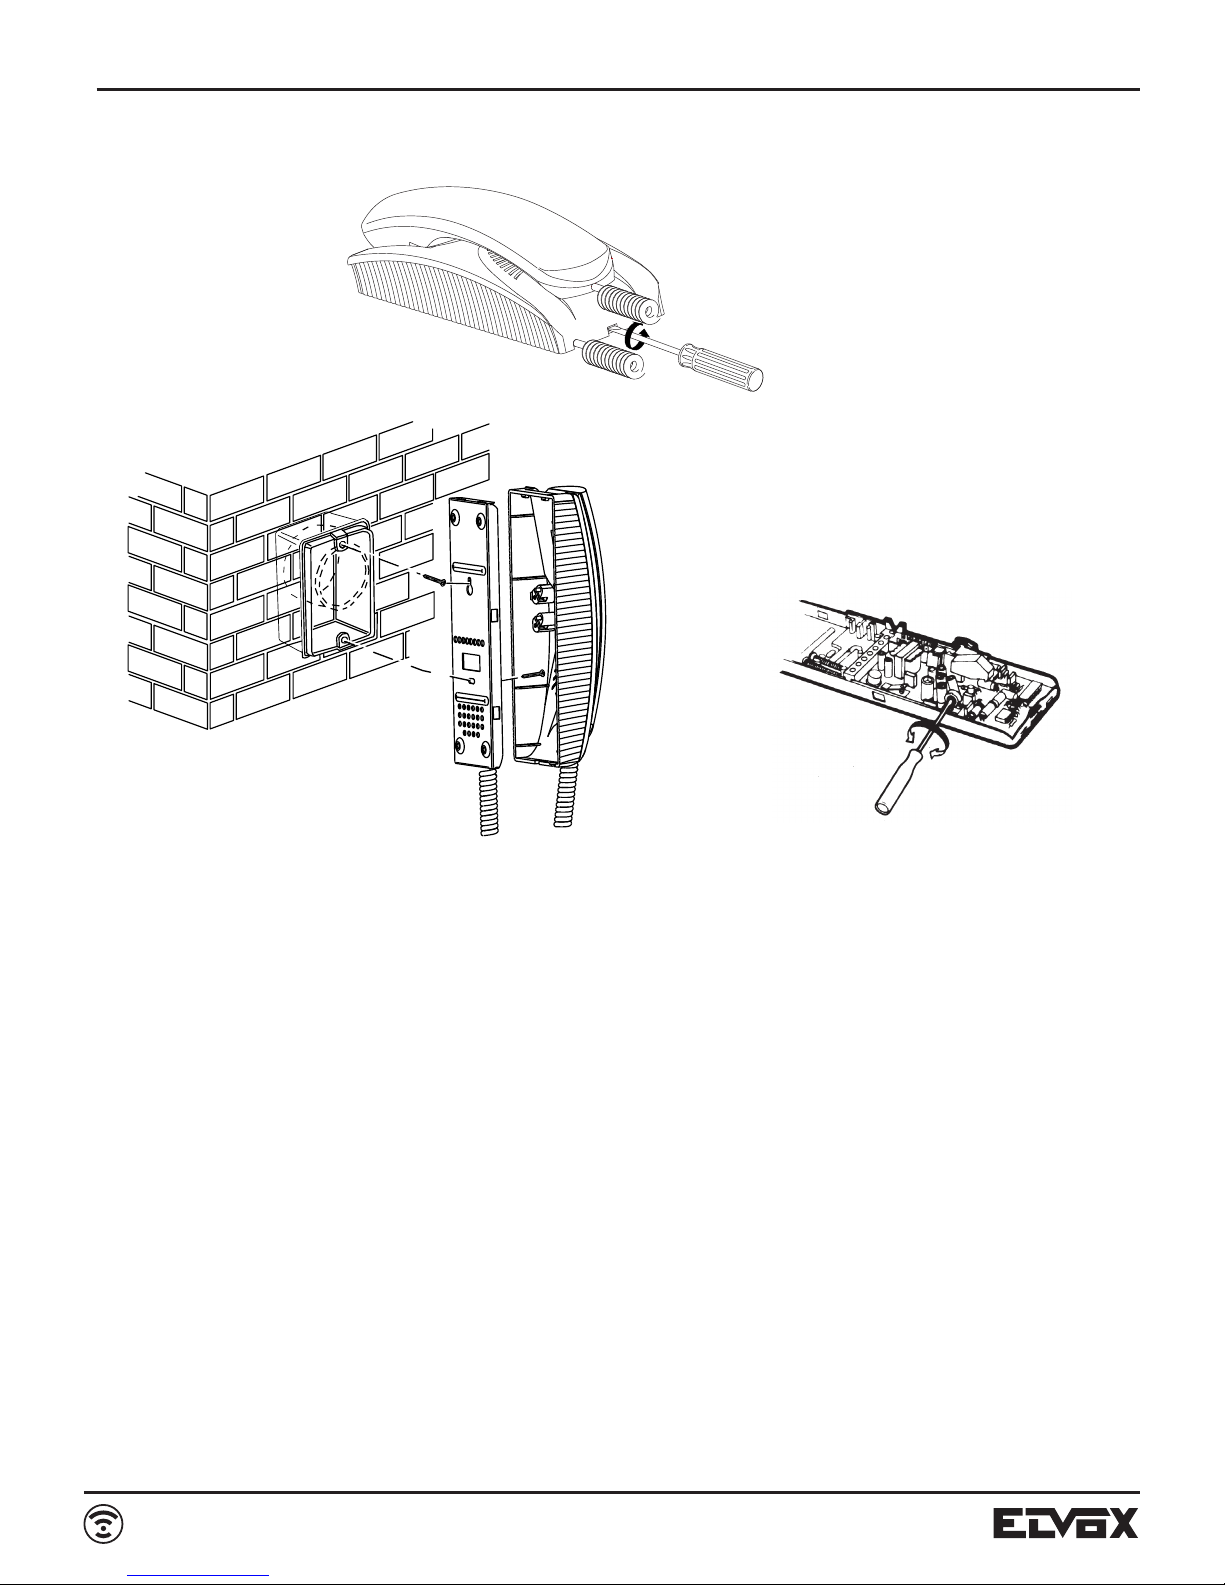
Per aprire il citofono
To open interphone
Pour ouvrir le poste
Öffnen des Haustelefone
Para abrir el teléfono
Para abrir o telefono
INSTALLAZIONE DEL CITOFONO - PHONE INSTALLATION - INSTALLATION DU POSTE
HAUSTELEFON INSTALLIERUNG - INSTALACION DO TELÉFONO- INSTALAÇÃO DO TELEFONE
1 Fissare la vite superiore (A) nella sca to la incasso (o
tassello) lasciando spor ge re la testa della vite per
2-3 mm.
2 Agganciare il citofono alla vite su pe rio re uti liz zan -
do l’apposito foro po ste rio re accostandolo alla
parete e ti ran do lo verso il basso in di re zio ne delle
frecce.
3 Completare il fissaggio con la vite inferiore (B) nel-
l’apposito foro.
1 Partially fasten upper screw "A" to back box leav-
ing it out for 2 or 3 mm.
2 Hook interphone to upper screw "A" in rear hole
and pull it downwards. 1 - 2
3 Complete mounting with lower screw "B" in pre-
pared hole.
1 Fixer la vis supérieure (A) dans la boîte de rac-
cordement (ou vis à goujon) en laissant saillir la tête
de la vis pour 2-3 mm.
2 Accrocher le poste à la vis supérieure en utilisant le
trou approprié, le rapprocher à la paroi et en le tirant
vers le bas en suivant la direction des flèches.
3 Completer le montage avec la vis inférieure (B)
fixée dans le trou approprié.
1 Die obere Schraube (A) am Unterputz-Gehäuse
(oder Dübel) befestigen. Die Schraube 2-3 mm
vorstehen lassen.
2 Das Haustelefon an der Schraube (A) durch das
rückseitige Lock zuhacken und es nach unten laut
dem Zeichen ziehen.
3 Die untere Schraube (B) im bestimmten Loch be-
festigen.
1 Fijar el tornillo superior (A) en la caja empotrada (o
taco) dejando la cabeza del tornillo unos 2-3 mm
fuera.
2 Enganchar el teléfono al tornillo superior utilizando
el correspondiente orificio posterior; acercarlo a la
pared y tirar de él hacia abajo en la dirección
ilustradas por las flechas.
3Com ple tar la fijación con el tornillo inferior (B) en el
correspondiente orificio.
1 Fixar o parafuso superior (A) no local de encaixe
deixando a cabeça do parafuso sa lien te 2 a 3 mm.
2 Prender o telefone ao parafuso superior, utilizando
o furo posterior adequado, aproximando-o da
parede e puxando-o para baixo na direcção da
seta.
3 Completar a fixação com o parafuso (B) no furo
apropriado.
Regolazione del volume esterno
all'interno del citofono potenziometro: P1, 470 Ohm.
External volume adjustement inside the interphone potentiometer: P1, 470 Ohm.
Réglage du volume externe à
l'intérieur du combiné: potentiomètre: P1, 470 Ohm.
Externlautstärkeregelung innen im
Haustelefon Potentiometer: P1,
470 Ohm.
Regulación del volumen externo
a l'interior del teléfono potenciómetro: P1, 470 Ohm.
Regulação do volume externo ao
interior do telefone potenciómetro: P1, 470 Ohm.
Page 5

884G - 884H
5/12
INSTALLAZIONE DELLE TARGHE - MOUNTING INSTRUCTIONS OF ENTRANCE PANEL - INSTALLATION DE LA
PLAQUE DE RUE -MONTAGEHINWEISE FÜR TÜRSPRECHSTELLE - INSTALACION DE LA PLACA EXTERNA -
INSTALAÇÃO DA BOTONEIRA EXTERIOR
Transformator auf DIN-Schiene oder mit Dübeln montieren.
Schrauben befinden sich im Innern der Apparate.
Fijar el transformador sobre barra DIN o con cuñas. Los
tornillos de fijación están en el interior de los aparatos.
Fixar o traNsformador em calha DIN ou através de parafusos. Os parafusos de fixação encontram-se no interior dos
aparelhos.
Fissare il trasformatore su barra DIN o con tasselli. Le viti
di fissaggio sono all'interno degli apparecchi.
Fix power transformer on DIN support or with expanding
plugs with screws. Find mounting screws inside each set.
Fixer le transformateur sur un support pour boîte DIN ou
avec vis à goujons. Les vis de fixation sont dans les appareils.
Per accedere al cartellino portanomi togliere il fermacartellino
dal retro come mostra la fi gu ra.
To reach name-tag, remove name-tag holder from the back, as
shown.
Pour acceder à l'étiquette porte-noms enlever le porte-étiquette
de la partie postérieure comme le montre la figure.
Um das Namensschild zu erhalten, entfernen Sie die Namenschildhalterung von der Rückseite, wie dezeigt.
Para acceder a la tarjetita portanombres mover el sujetatarjetita
desde atrás como muestra la figura.
Para ter acesso ao cartão porta-nomes extrair a tampa de plástico que o prende como mostra a figura.
ESTRAZIONE DEL CARTELLINO PORTANOME-NAME - TAG REMOVING
EXTRACTION DE L'ÉTIQUETTE PORTE - NOMS-HERAUSZIEHEN DES NAMENSSCHIELD
ESTRACCIÓN DE LA TARJETITA PORTANOBRMES - EXTRAÇÃO DO CARTÃO PORTA-NOMES
Montare la targa esterna su scatola ret tan go la re o con tasselli.
Fix door panel on rectangular box or with expansion screws.
Installer la plaque de rue sur boîte rectangulaire ou avec vis à goujouns.
Klingeltableau an der Wand mit Schrauben und Dübel montieren.
Montar la tarjeta externa sobre la caja rectangular o con cuñas.
Montar a botoneira através de parafusos.
Page 6

884G - 884H
6/12
Das Netzgerät ist an einem trockenen und staubfreien Ort unter Vermeidung der Nähe von Wärmequellen zu installieren. Zur Erleichterung von Kontrollen und Einstellungen sollte der Aufstellungsort gut zugänglich sein. Das Netzgerät
mit den beigepackten Dübeln an der Wand befestigen oder in einen Verteiler mit DIN-Omegaschiene einsetzen. Vor dem
Anschluß an das Stromnetz mit einem Testgerät sicherstellen, daß die Leiter nicht unterbrochen oder kurzgeschlossen
sind. Zur größeren Sicherheit des Anwenders werden alle Apparate mit Niederspannung betrieben und durch einen stark
isolierenden Transformator vom Stromnetz getrennt. In jedem Fall sollte jedoch zwischen dem Stromnetz und der Anlage ein Fehlerstromschutzschalter von angemessener Stromfestigkeit installiert werden.
Die Produkte sind konform zu den CE-Markenzeichen und Richtlinien:
- zu den EG-Richtlinien 2004/108/CE und Folgenden
- zu den EG-Richtlinien 2006/95/CE (73/23/CEE).
Die Netzgeräte, die die vom Art. 411.1.2.2 der CEI 64-8 (Ausgabe 2003) Norm Vorgesehene Fähigkeiten respektieren, eine SELV Quelle bestellen.
Die Netzgerätserzeugung ist unter ständiger Aufsicht:
L'alimentatore andrà posto in un luogo asciutto e lontano da polvere e fonti di calore. Al fine di facilitare controlli e
messe a punto curare che il luogo sia facilmente accessibile. Fissare a parete l'alimentatore mediante i tasselli in
dotazione o inserendolo in apposito quadro con barra DIN ad omega. Prima di procedere al collegamento accertarsi
mediante un normale tester che i conduttori non siano interrotti o in corto circuito. Per una maggiore sicurezza dell'utente, tutte le apparecchiature funzionano in bassa tensione e sono separate dalla rete da un trasformatore ad alto isolamento. È opportuno comunque interporre tra la rete di alimentazione e l'apparecchio un interruttore magnetotermico
di portata adeguata.
I prodotti sono conformi al marchio CE e alle direttive:
- Alla direttiva europea 2004/108/CE e successive.
- Alla direttiva europea 2006/95/CE (73/23/CEE).
Gli alimentatori costituiscono una sorgente SELV rispettando i requisiti previsti dall’articolo 411.1.2.2 della norma
CEI 64-8 (ed. 2003).
La produzione dell’alimentatore è sotto costante sorveglianza:
INSTALLAZIONE DEGLI ALIMENTATORI - POWER SUPPLY INSTALLATION
INSTALLATION DES ALIMENTATIONS - INSTALLATION DER NETZGERÄTE
INSTALACIÓN DE LOS ALIMENTADORES - INSTALACIÓN DE LOS ALIMENTADORES
L’alimentation devra être placée dans un endroit sec, à l’abri de la poussière et loin de toute source de chaleur. Afin de
faciliter les contrôles et les mises au point, choisir un endroit facilement accessible. Fixer l’alimentation sur le mur à
l’aide des chevilles fournies de série ou en l’insérant dans un tableau approprié avec barre DIN en oméga. Avant
d’effectuer le raccordement, s’assurer, à l’aide d’un testeur normal, que les conducteurs ne sont pas interrompus ou
en court-circuit. Pour une plus grande sécurité de l’utilisateur, tous les appareils fonctionnent en basse tension et sont
séparés du réseau par un transformateur à haute isolation. Il convient dans tous les cas d’interposer un disjoncteur magnétothermique d’une portée appropriée entre le réseau d’alimentation et l’appareil.
Les produits sont conformes à la marque CE et à les directives :
- À la directive européenne 2004/108/CE et suivantes.
- À la directive européenne 2006/95/CE (73/23/CEE).
Les alimentations constituent une source SELV et respectent les qualités requises par l’article 411.1.2.2 de la
norme CEI 64-8 (ed. 2003).
La production est sous constante surveillance:
D
V
E
D
V
E
D
V
E
Page 7

884G - 884H
7/12
The power supply must be installed in a dry place away from direct heat or dust. Ensure easy access for inspection
and maintenance. Secure the unit to the wall with the anchor bolts provided or insert it into a rack with a omega DIN
bar. Before connecting the unit use a tester to make sure that the cables are not broken or short-circuited. For user
safety, the equipment operates at a low voltage and is separated from the mains by a high-insulation transformer. We
recommend installation of an overload cutout of appropriate capacity between the mains and the unit.
Product is according to CE mark and directives:
- EC Directives 2004/108/CE and following norms.
- EC Directives 2006/95/CE (73/23/CEE).
Power supply units constitute SELV sources in compliance with the requirements stipulated in Article
411.1.2.2 of CEI standard 64-8 (ed. 2003).
Production is subject to costant surveillance:
O alimentador deverá ser colocado num local seco e ao abrigo do pó e de fontes de calor. Para facilitar os controlos
e as afinações, certifique-se de que o local é de fácil acesso. Fixe o alimentador à parede com as buchas fornecidas
ou inserindo-o num quadro próprio com calha DIN tipo omega. Antes de proceder à ligação certifique-se, com um
tester normal, de que os condutores não estão interrompidos ou em curto-circuito. Para uma maior segurança do utilizador, todos os aparelhos funcionam em baixa tensão e estão separados da rede por um transformador de alto isolamento. Em todo o caso, convém colocar entre a rede de alimentação e o aparelho um interruptor magnetotérmico
de capacidade adequada.
Os produtos estão em conformidade com a marca CE e as directivas:
- Directiva europeia 89/336/CEE e seguintes.
- Directiva europeia 2006/95/CE (73/23/CEE).
Os alimentadores constituem uma fonte SELV e cumprem os requisitos previstos no artigo 411.1.2.2 da
norma CEI 64-8 (ed. 2003).
A produção do alimentador está sob vigilância constante:
El alimentador tiene que ser colocado en un lugar seco y lejos del polvo y fuentes de calor. Al fin de facilitar controles y puestas a punto el lugar de la instalación debe ser fácilmente accesible.
Fijar a la pared el alimentador por medio de tacos en dotación o insertándolo en un cuadro apropiado con barra DIN
a omega. Ante de proceder al conexionado asegurarse, por medio de un normal tester, que los conductores no sean
interrumpidos o en cortocircuito Para una mayor seguridad del usuario, todas los aparatos funcionan a baja tensión
y son separados de la red por un transformador a alta isolación. Es oportuno de todas maneras poner entre la red de
alimentación y el aparato un interruptor magnetotérmico de portada adecuada.
Los productos son conformes a la marca CE y a las normas :
- A las normas europeas 2004/108/CE y siguientes
- A las normas europeas 2006/95/CE (73/23/CEE).
Los alimentadores constituyen una fuente SELV y respectan los requisitos previstos por el artículo 411.1.2.2
de la norma CEI 64-8 (ed. 2003).
A fabrico do alimentador está sob a constante vigilância de:
D
V
E
D
V
E
D
V
E
Page 8

884G - 884H
8/12
NOTE:
Page 9

884G - 884H
9/12
NOTE:
Page 10

10/12
AVVERTENZE PER L'INSTALLATORE
- Leggere attentamente le av ver ten ze contenute nel pre sen te do cu men to in quanto for ni sco no importanti
indicazioni ri guar dan ti la sicurezza di in stal la zio ne,
d'uso e di ma nu ten zio ne.
- Dopo aver tolto l'imballaggio assicurarsi dell'integrità
del l'ap pa rec chio. Gli ele men ti dell'imballaggio
(sacchetti di pla sti ca, po li sti ro lo espanso, ecc.) non
devono essere lasciati alla portata dei bambini in
quanto potenziali fonti di pericolo. L'esecuzione
dell'impianto deve essere ri spon den te alle nor me CEI
vigenti.
- È necessario prevedere a monte dell'alimentazione un
appropriato in ter rut to re di tipo bipolare facilmente accessibile con separazione tra i contatti di almeno
3mm.
- Prima di col le ga re l'apparecchio ac cer tar si che i dati di
targa siano rispondenti a quelli della rete di di stri bu zio ne.
- Questo ap pa rec chio dovrà essere de sti na to solo
all'uso per il quale è stato espres sa men te concepito,
e cioè per sistemi di citofonia. Ogni altro uso è da con si de rar si im pro prio e quindi pericoloso. Il costruttore
non può essere con si de ra to re spon sa bi le per even tua li danni derivanti da usi impropri, erronei ed ir ra gio
ne -
vo li.
- Prima di ef fet tua re qual si a si operazione di pu li zia o di
ma nu ten zio ne, disinserire l'apparecchio dalla rete di
ali men ta zio ne elettrica, spe gnen do l'interruttore del l'im pian to.
- In caso di guasto e/o di cattivo fun zio na men to del l'ap pa rec chio, togliere l'ali men ta zio ne me dian te
l'interruttore e non ma no met ter lo. Per l'even tua le ri pa ra zio ne ri vol ger si so la men te ad un centro di assistenza
tecnica autorizzato dal costruttore. Il mancato ri spet to di quanto so pra può com pro met te re la si cu rez za
del l'ap pa rec chio.
- Non ostru i re le aperture o fessure di ven ti la zio ne o di
smaltimento calore e non esporre l’apparecchio a stillicidio o spruzzi d’acqua.
- L'installatore deve as si cu rar si che le in for ma zio ni per
l'uten te siano pre sen ti sugli ap pa rec chi derivati.
- Tutti gli apparecchi costituenti l'impianto devono
essere de sti na ti esclu si va men te all'uso per cui sono
stati con ce pi ti.
- L’interruttore onnipolare deve essere facilmente accessibile.
- ATTENZIONE: per evitare di ferirsi, questo apparec-
chio deve essere assicurato alla parete secondo le
istruzioni di installazione.
- Questo do cu men to dovrà sem pre ri ma ne re allegato
alla do cu men ta zio ne dell'impianto.
Direttiva 2002/96/CE (WEEE, RAEE).
Il simbolo del cestino barrato riportato sull’apparecchio indica che il prodotto, alla fine della
propria vita utile, dovendo essere trattato se-
paratamente dai rifiuti domestici, deve essere
conferito in un centro di raccolta differenziata per apparecchiature elettriche ed elettroniche oppure riconsegnato al rivenditore al momento dell’acquisto di una
nuova apparecchiatura equivalente.
L’utente è responsabile del conferimento dell’apparecchio a fine vita alle appropriate strutture di raccolta.
L’adeguata raccolta differenziata per l’avvio successivo
dell’apparecchio dismesso al riciclaggio, al trattamento
e allo smaltimento ambientalmente compatibile contribuisce ad evitare possibili effetti negativi sull’ambiente
e sulla salute e favorisce il riciclo dei materiali di cui è
composto il prodotto. Per informazioni più dettagliate
inerenti i sistemi di raccolta disponibili, rivolgersi al servizio locale di smaltimento rifiuti, o al negozio in cui è
stato effettuato l’acquisto.
Rischi legati alle sostanze considerate pericolose
(WEEE).
Secondo la nuova Direttiva WEEE sostanze che da
tempo sono utilizzate comunemente su apparecchi elettrici ed elettronici sono considerate sostanze pericolose
per le persone e l’ambiente. L’adeguata raccolta differenziata per l’avvio successivo dell’apparecchio dismesso al riciclaggio, al trattamento e allo smaltimento
ambientalmente compatibile contribuisce ad evitare
possibili effetti negativi sull’ambiente e sulla salute e favorisce il riciclo dei materiali di cui è composto il prodotto.
SAFETY INSTRUCTIONS FOR INSTALLERS
- Carefully read the instructions on this leaflet: they give
important information on the safety, use and maintenance of the installation.
- After removing the packing, check the integrity of the
set. Packing components (plastic bags, expanded polystyrene etc.) are dangerous for children. Installation
must be carried out according to national safety regulations.
- It is convenient to fit close to the supply voltage source
a proper bipolar type switch with 3 mm separation (minimum) between contacts.
- Before connecting the set, ensure that the data on the
label correspond to those of the mains.
- Use this set only for the purposes designed, i.e.for
electric door-opener systems. Any other use may be
dangerous. The manufacturer is not responsible for
damage caused by improper, erroneous or irrational
use.
- Before cleaning or maintenance, disconnect the set.
- In case of failure or faulty operation, disconnect the
set and do not open it.
- For repairs apply only to the technical assistance centre authorized by the manufacturer.
- Safety may be compromised if these instructions are
disregarded.
- Do not obstruct opening of ventilation or heat exit slots
and do not expose the set to dripping or sprinkling of
water.
- Installers must ensure that manuals with the above instructions are left on connected units after installation,
for users' information.
- All items must only be used for the purposes designed.
- The ominipolar switch must be easily accessed.
- WARNING: to avoid the possibility of hurting yourself,
this unit must be fixed to the wall according to the installation instructions.
- This leaflet must always be enclosed with the equipment.
Directive 2002/96/EC (WEEE)
The crossed-out wheelie bin symbol marked on
the product indicates that at the end of its useful life, the product must be handled separately
from household refuse and must therefore be
assigned to a differentiated collection centre for electrical and electronic equipment or returned to the dealer
upon purchase of a new, equivalent item of equipment.
The user is responsible for assigning the equipment, at
the end of its life, to the appropriate collection facilities.
Suitable differentiated collection, for the purpose of
subsequent recycling of decommissioned equipment
and environmentally compatible treatment and disposal, helps prevent potential negative effects on health
and the environment and promotes the recycling of the
materials of which the product is made. For further details regarding the collection systems available, contact
your local waste disposal service or the shop from
which the equipment was purchased.
Risks connected to substances considered as dangerous (WEEE).
According to the WEEE Directive, substances since
long usually used on electric and electronic appliances
are considered dangerous for people and the environment. The adequate differentiated collection for the
subsequent dispatch of the appliance for the recycling,
treatment and dismantling (compatible with the environment) help to avoid possible negative effects on the environment and health and promote the recycling of
material with which the product is compound.
CONSEILS POUR L'INSTALLATEUR
- Lire attentivement les instructions contenues dans ce
document puisqu'elles fournissent d'importantes indications concernant la sécurité pour l'installation,
l'emploi et la maintenance.
- Après avoir enlevé l'emballage s'assurer de l'intégrité
de l'appareil. Les éléments de l'emballage (sachets en
plastique, polystyrène, etc.) ne doivent pas être laissés à la portée des enfants, car ils peuvent être dangereux. L'exécution de l'installation doit être conforme
aux normes nationales.
- Il est nécessaire de prévoir près de la source
d’alimentation un interrupteur approprié, type bipolaire, avec une separation entre les contacts d’au
moins 3mm.
- Avant de connecter l'appareil s'assurer que les données reportées sur l'étiquette soient les mêmes que
celles du réseau de distribution.
- Cet appareil devra être destiné uniquement à l'emploi
pour lequel il a été expressément conçu, c'est-à-dire
pour l'alimentation des systèmes de portiers électriques. Tout autre emploi doit être considéré impropre et
donc dangereux. Le constructeur ne peut pas être
considéré responsable pour d'éventuels dommages
résultant de l'emploi impropre, erroné et déraisonnable.
- Avant d'effectuer n'importe quelle opération de nettoyage ou de maintenance, débrancher l'appareil du réseau d'alimentation électrique, en éteignant
l'interrupteur de l'installation.
- En cas de pan ne et/ou de mauvais fonctionnement de
l'appareil, enlever l'alimentation au moyen de
l'interrupteur et ne pas le modifier.
- Pour une éventuelle réparation s'adresser uniquement
à un centre d'assistance technique autorisé par le constructeur. Si on ne respecte pas les instructions mentionnées ci-dessus on peut compromettre la sécurité
de l'appareil.
- Ne pas obstruer les ouvertures et les fentes de ventilation ou de refroidissement et ne pas exposer
l’appareil à l’égout ou jet d’eau.
- L'installateur doit s'assurer que les renseignements
pour l'usager soient présents dans les appareils connectés.
- Tous les appareils constituant l'installation doivent être
destinés exclusivement à l'emploi pour lequel ils ont
été conçus.
- L’interrupteur omnipolaire doit être d’accès aisé.
- ATTENTION: pour éviter de se blesser, cet appareil
doit être assuré au mur selon les instructions
d’installation.
- Ce document devra être toujours joint avec
l'appareillage.
Directive 2002/96/CE (WEEE, RAEE)
Le symbole de panier barré se trouvant sur
l'appareil indique que le produit, à la fin de sa
vie utile, doit être traité séparément des autres
déchets domestiques et remis à un centre de
collecte différencié pour appareils électriques et électroniques ou remis au revendeur au moment de l'achat
d'un nouvel appareil équivalent.
L’usager est responsable du traitement de l'appareil en
fin de vie et de sa remise aux structures de collecte appropriées. La collecte différenciée pour le démarrage
successif de l’appareil remis au recyclage, au traitement
et à l'élimination écocompatibles contribue à éviter les
effets négatifs environnementaux et sur la santé tout en
favorisant le recyclage des matériaux dont se compose
le produit. Pour des informations plus détaillées sur les
systèmes de collecte disponibles, contacter le service
local d'élimination des déchets ou le magasin qui a
vendu l'appareil.
Risques liés aux substances considérées dangéreuses (WEEE).
Selon la Directive WEEE, substances qui sont utilisées
depuis long temps habituellement dans des appareils
électriques et électroniques sont considerées dangéreuses pour les personnes et l'environnement. La collecte sélective pour le transfert suivant de l’équipement
destiné au recyclage, au traitement et a l’écoulement
environnemental compatible contribue à éviter possibles effets négatifs sur l’environnement et sur la salue et
favorise le recyclage des matériaux dont le produit est
composé.
Page 11

11/12
CONSEJOS PARA EL INSTALADOR
- Leer atentamente los consejos contenidos en el presente documento en cuanto dan importantes indicaciones concernientes la seguridad de la instalación,
del uso y de la manutención.
- Después de haber quitado el embalaje asegurarse de
la integridad del aparato.
- Los elementos del embalaje (bolsos de plástico etc.)
no tienen que ser dejados al alcance de los niños en
cuanto posibles fuentes de peligro.
La ejecución de la instalación, debe respetar las normas en vigor.
- Es necesário instalar cerca la fuente de alimentación
un interruptor apropiado, de tipo bipolar, con una separación entre los contactos de al menos 3mm.
- Antes de conectar el aparato asegurarse que los datos
de la placa sean iguales a los de la red de distribución.
- Este aparato tendrá que ser destinado solamente al
uso para el cual fue expresamente concebido, es decir
para alimentación de sistemas de portero eléctrico.
Los otros usos deben ser considerados impropios y
por lo tanto peligrosos.
El constructor no puede ser considerado responsable
de eventuales daños causados por usos impropios erróneos e irrazonables.
- Antes de efectuar cualquiera operación de limpieza o
de manutención, desconectar el aparato de la red de
alimentación eléctrica, apagando el interruptor de la
instalación.
- En caso de daño y/o de malo funcionamiento del aparato, quitar la alimentación por medio del interruptor y
no manipularlo.
Para eventuales reparaciones recurrir solamente a un
centro de asistencia técnica autorizado por el constructor. La falta de respeto a lo anteriormente expuesto puede comprometer la seguridad del aparato.
- No obstruir las aberturas o hendiduras de ventilación
o de salida calor.
- El instalador debe asegurarse que las informaciones
para el usuario sean presentes en los aparatos derivados.
- Todos los aparatos que constituyen la instalación
deben ser destinados exclusivamente al uso para el
qual fueron concebidos.
- O interrruptor omnipolar deve ser fácilmente acessível.
- ATTENCIÓN: Para evitar de herirse, este aparato
debe ser fijado a la pared según las instruciones de
instalación.
- Este documento tendrà que ser siempre adjuntado al
aparato.
Directiva 2002/96/CE (WEEE, RAEE)
El símbolo del cubo de basura tachado, presente en el aparato, indica que éste, al final de
su vida útil, no debe desecharse junto con la
basura doméstica sino que debe llevarse a un
punto de recogida diferenciada para aparatos eléctricos y electrónicos o entregarse al vendedor cuando se
compre un aparato equivalente.
El usuario es responsable de entregar el aparato a unpunto de recogida adecuado al final de su vida.La recogida diferenciada de estos residuos facilita el reci-claje
del aparato y de sus componentes, permite su tratamiento y eliminación de forma compatible con el medioambiente y previene los efectos negativos en la
naturale-za y la salud de las personas. Si desea obtener
más infor-mación sobre los puntos de recogida, contacte con el ser-vicio local de recogida de basura o con
la tienda dondeadquirió el producto.
Riesgos conectados a sustancias consideradas peligrosas (WEEE).
Según la Directiva WEEE, substancias que desde
tiempo son utilizadas conmunemente en aparatos eléctricos ed electrónicos son consideradas substancias
peligrosas para las personas y el ambiente. La adecuada colección diferenciada para el siguiente envio del
aparato destinado al reciclaje , tratamiento y eliminación ambientalmente compatible contribuye a evitar posibles efectos negativos sobre el ambiente y la salud y
favorece el reciclo de los materiales que componen el
producto.
CUIDADOS A TER PELO INSTALADOR
- Ler atentamente as advertências contidas no presente
do cu men to que fornecem importantes indicações no
que diz respeito à segurança da instalação, ao uso e
à manutenção.
- Após retirar a embalagem, assegurar-se da integridade do aparelho. Todos os elementos da embalagem
(sacos plásticos, esferovite, etc.) ñao devem ser deixados ao alcance de crianças pois são fontes potenciais
de perigo. A execução da instalação deve respeitar a
regulamentação vigente no país.
- É necessàrio instalar, perto da fuente de alimentação,
um interruptor apropriado, do tipo bipolar, com uma
separação minima de 3 mm entre os contactos.
- Antes de ligar o aparelho verificar se os dados da
placa estão de acordo com os da rede de distribuição.
- Este aparelho só deve ser destinado ao uso para o
qual foi expressamente concebido, isto é, para alimentação de porteiro eléctrico.
Qualquer outra utilização deve ser considerada imprópria e por conseguinte perigosa. O construtor não
pode ser considerado responsável por eventuais
danos provocados por usos impróprios, errados e irracionáveis.
- Antes de efectuar qualquer operação de limpeza ou
de manutenção, desligar o aparelho da rede de
alimentação eléctrica através do di spo si ti vo instalado.
- No caso de dano e/ou mau funcionamento do aparelho, eliminar a alimentação da rede através do dispositivo de corte e mantê-lo desligado. Para uma
eventual reparação recorrer sòmente a um centro de
assistência técnica autorizado pelo construtor. O não
cumprimento de tudo quanto anteriormente se disse
pode comprometer a segurança do aparelho.
- Não obstruir as aberturas ou ranhuras de ventilação
ou de dissipação de calor e não expor o aparelho ao
estilicidio du pulverização de agua.
- O instalador deve assegurar-se de que as informações
para o utilizador estão presentes nos aparelhos.
- Todos os aparelhos que constituem a instalação
devem ser destinados exclusivamente ao uso para o
qual foram concebidos.
- El interruptor omnipolar ha de ser fá fácilmente accesibile.
- ATEN Ç Ã O: Para evitar ferir-se, este aparelho deve ser
fixado na parede de acordo com as instruções de instalação.
- Este documento deverá estar sempre junto ao aparelho.
Norma 2002/96/CE (WEEE, RAEE)
O símbolo do cêsto barrado referido no aparelho indica que o producto, no fim da sua
vida útil, tendo que ser tratado separadamente
dos refugos domésticos, deve ser entregado
num centro de recolha diferenciada para aparelhagens
eléctricas e electrónicas ou reconsignado ao revendedor no momento de aquisição dum novo aparelho equivalente.
O utente é responsável de entregar o aparelho a um
pontode recolha adequado no fim da sua vida. Arecolha
diferen-ciada de estos resíduos facilita a reciclagem do
aparelhoe dos suos componentes, permite o suo tratamento e a eli-minação de forma compatível com o meio
ambiente e pre-vem os efectos negativos na natura e
saude das pessoas.Se se pretender mais informações
sob os puntos de recol-ha, contacte o serviço local de
recolha de refugos ou onegócio onde adquiriu o producto.
Perigos referidos à substancias consideradas perigosas (WEEE).
Según a Directiva WEEE, subtáncias que desde há
tempo utilizam-se comunemente nos aparelhos eléctricos e eléctrónicos são consideradas substáncias perigosas para as pessoas e o ambiente. A dequada
colecção diferenciada para o envio seguinte da aparelhagem deixada de usar para a reciclagem, ao tratamento e à eliminação ambientalmente compatível
contribui a evitar possíveis efectos negativos no ambiente e na saude e favorece o reciclo dos materiais dos
quais o producto é composto.
ANWEISUNGEN FÜR DEN INSTALLATEUR
- Diese Anweisungen genau lesen, da sie über die Sicherheit beim Einbau, den Gebrauch und Pflege informieren.
- Nach dem Auspacken die Unversehrtheit des Geräts
feststellen. Verpackungsteile (Plastiktüten, etc.) sind
gefährlich für Kinder.
Die Installation muss den nationalen Normen entsprechen.
- Es ist notwendig bei der Spannungsversorgun-
gsquelle einen passenden zweipoligen Schalter einzubauen, der mindestens 3 mm Abstand zwischen
den Kontakten haben muss.
- Vor dem Anschließen des Gerätes sich versichern,
dass die Daten am Typenschild mit denen des Leitungsnetzes übereinstimmen.
- Dieses Gerät nur für den vorbestimmten Gebrauch
verwenden, d.h. für Türsprechanlagen. Jeder andere
Gebrauch ist gefährlich. Der Hersteller nimmt keine
Verantwortung für beim Missbrauch des Gerätes entstandene Schäden.
- Vor jeglicher Säuberung oder Nachpflege das Gerät
vom Versorgungsnetz trennen.
- Im Falle einer Beschädigung und/oder falschen Fun-
ktion des Geräts, dieses vom Versorgungsnetz trennen und das Gerät nicht öffnen.
- Für eine eventuelle Reparatur wenden Sie sich an
eine offizielle technische Kundenbetreuungsstelle.
- Die Missachtung dieser Hinweise könnte Ihre Sicher-
heit gefährden.
- Die Lüftungsschlitze des Gerätes nicht abdecken und
das Gerät keiner Feuchtigkeit oder Nässe aussetzen.
- Der Installateur muss nach dem Einbau darauf
achten, dass diese Hinweise zur Benutzerinformation
immer bei den Geräten vorhanden sind.
- Alle Geräte dürfen nur für den vorbestimmten Ge-
brauch verwendet werden.
- Der zweipolige Schalter muss leicht zugänglich sein.
- VORSICHT: um eine Verletzung zu vermeiden, dieses
Gerät an der Wand, wie in der Installationsanleitung
beschrieben, montieren.
- Dieses Blatt muss den Geräten immer beigelegt wer-
den.
Richtlinie 2002/96/EG (WEEE)
Das am Gerät angebrachte Symbol des durchgestrichenen Abfallkorbs bedeutet, dass
das Produkt am Ende seiner Lebenszeit vom
Hausmüll getrennt zu entsorgen ist, und einer
Müllsammelstelle für Elektro- und Elektronik-Altgeräte
zugeführt, oder bei Kauf eines neuen gleichartigen Geräts dem Händler zurückgegeben werden muss.
Der Benutzer ist dafür verantwortlich, dass das Gerät
am Ende seiner Nutzungsdauer zu den entsprechenden Sammelstellen gebracht wird. Die korrekte getrennte Sammlung des Geräts für seine anschließende
Zuführung zum Recycling, zur Behandlung und zur
umweltgerechten Entsorgung trägt dazu bei, mögliche
negative Auswirkungen auf die Umwelt und auf die Gesundheit zu vermeiden und begünstigt die Wiederverwertung der Werkstoffe des Produkts. Für genauere
Informationen über die verfügbaren Sammelsysteme
wenden Sie sich bitte an den örtlichen Müllsammeldienst oder an den Händler, bei dem Sie das Gerät gekauft haben.
Risiken, die mit den als gefährlich geltenden Stoffen verbunden sind (WEEE).
Bezugnehmend auf die WEEE – Richtlinie werden
Stoffe, die schon lange in elektrischen und elektronischen Anlagen verwendet werden, für Personen und
Umwelt als gefährlich betrachtet. Die getrennte Müllsammlung für das darauffolgende Geräte-Recycling
und umweltfreundliche Entsorgung, tragen zur Vermeidung möglicher negativer Auswirkungen für die menschliche Gesundheit und für die Umwelt bei. Die
getrennte Müllsammlung trägt zur Wiederverwertung
der Stoffe, aus denen das Produkt besteht, bei.
Page 12

CERT n° 9110.ELVO
UNI EN ISO 9001:2008
FILIALI ESTERE
ELVOX Costruzioni elettroniche S.p.A. - ITALY
Via Pontarola, 14/a - 35011 Campodarsego (Padova)
Tel 049 9202511 - Fax 049 9202603 - info@elvox.com
Telefax Export Dept. +39/049 9202601 - elvoxexp@elvox.com
www.elvox.com
ELVOX Austria GmbH
Grabenweg 67
A-6020 Innsbruck
Milano
Via Conti Biglia, 2
20162 Milano
Torino
Strada del Drosso, 33/8
10135 Torino
FILIALI ITALIA
ELVOX Shanghai Electronics Co. LTD
Room 2616, No. 325 Tianyaoqiao Road
Xuhui District
200030 Shanghai Cina
 Loading...