

Page 1
INSTRUCTION MANUAL
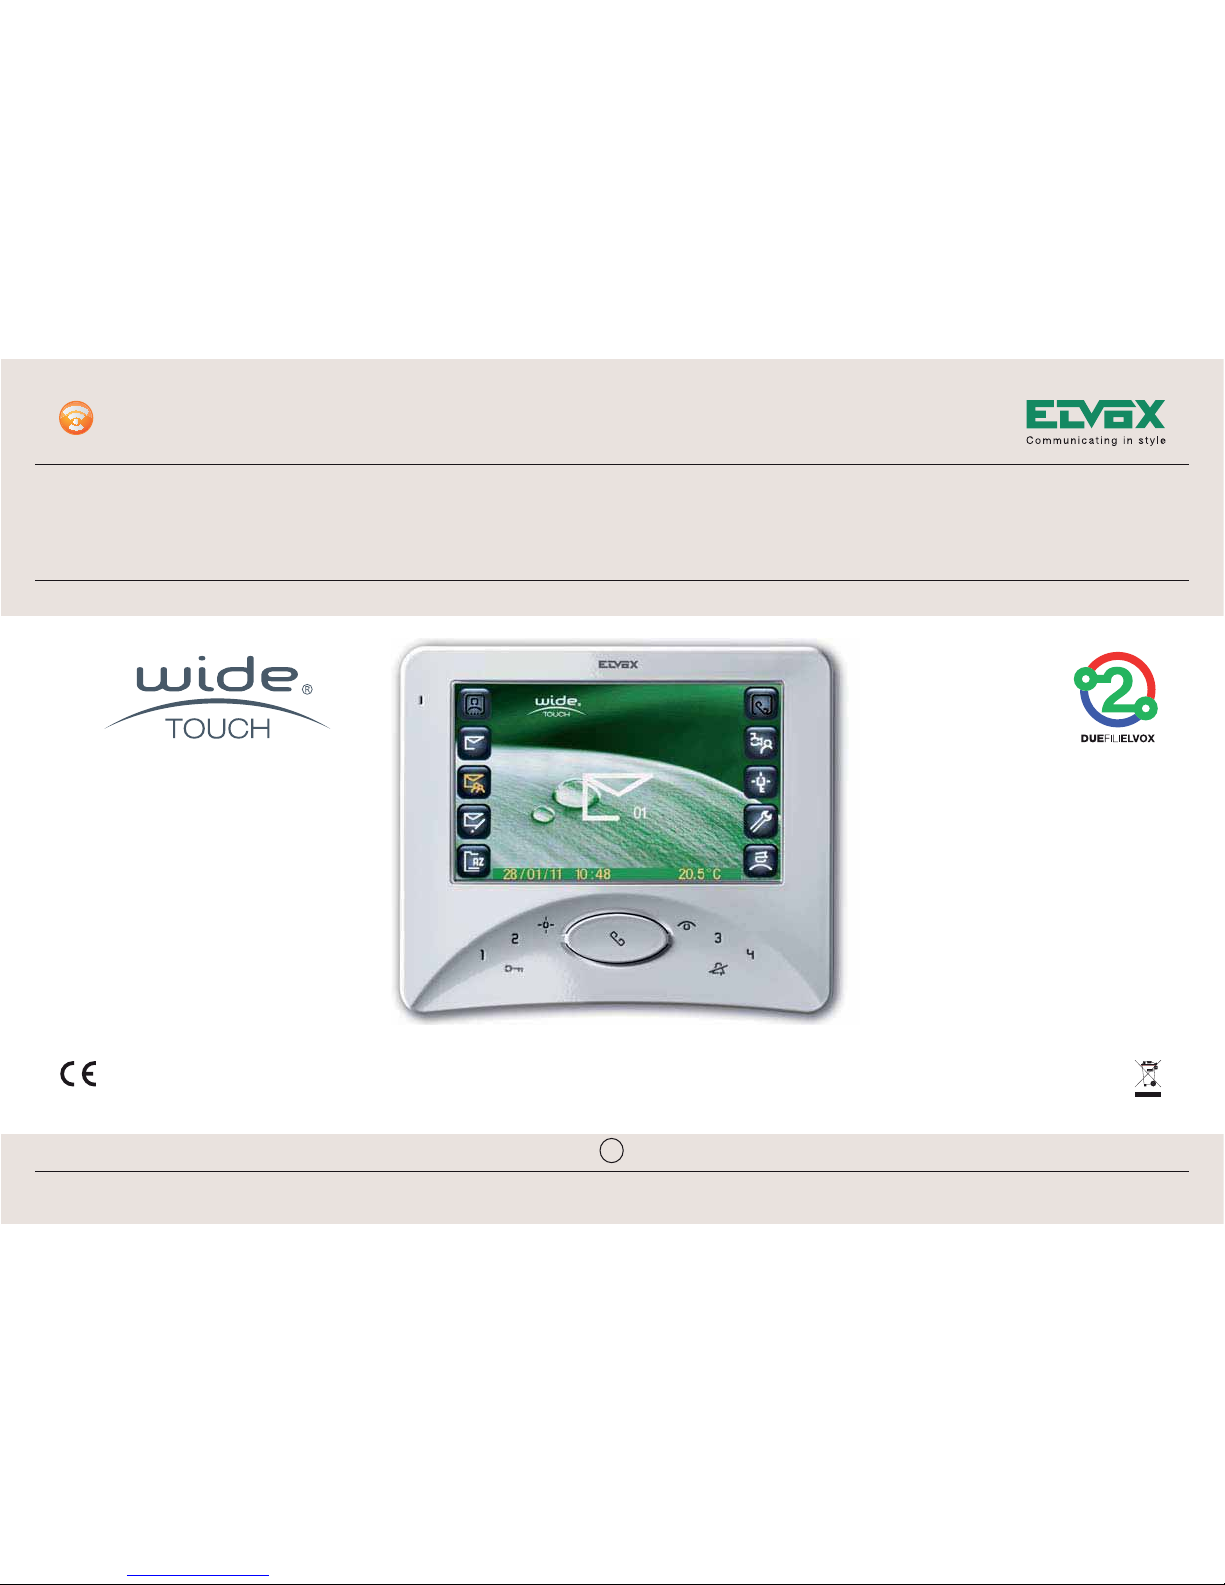
Art. 7311
WIDE TOUCH MONITOR TYPE 7311
Cod. S6I.731.11E
RL.02
02/2011
Product is according to EC Directive 2004/108/CE and following norms.
GB
Page 2
2/32
GB
WIDE TOUCH monitor type 7311
CONTENTS
1. General description page 3
2. User interface pages 4 - 5
3. Operation during a video call pages 6 - 7
4. Operation during self-start of the external camera page 8
5. Description of home page page 9
6. Video answering machine menu page 10
6.1. Recording an answer message page 11
6.2. Call recording menu page 12
7. Family Memo menu page 13
8. Picture Memo menu page 14
9. User directory menu pages 15 - 16
10. Cameras and CCTV functions menu page 17
11. Activations menu pages 18 - 19
11.1. Camera and activations menu page 20
12. Settings menu page 21
12.1. Wake-up call menu page 22
12.2. Volume and ringtone controls menu page 23
12.3. Background selection menu page 24
12.4. Time slot setup menu page 25
12.5. Menu for setting date, time, temperature and formats page 26
13. Maintenance, keypad and touch screen lock page 27
Page 3

3/32
GB
WIDE TOUCH monitor type 7311
1. GENERAL DESCRIPTION
Wide Touch is a latest-generation door entry monitor which combines an
array of useful functions and technologies with all the classic features of
a door entry monitor. Wide Touch enables you to record photo sequences and audio conversations with visitors calling from external entrance
panels, and to record audio conversations with other intercom devices.
You can also record an answer machine message to be replayed when
you are out, or when you are at home but do not wish to be disturbed.
The messaging capability is further enhanced by the Family Memo and
Picture Memo applications, which enable you to leave audio recordings
and written notes for the attention of family members or cohabitants.
The monitor can be personalised by setting different polyphonic ringtones and photographic backgrounds.
Page 4
4/32
GB
WIDE TOUCH monitor type 7311
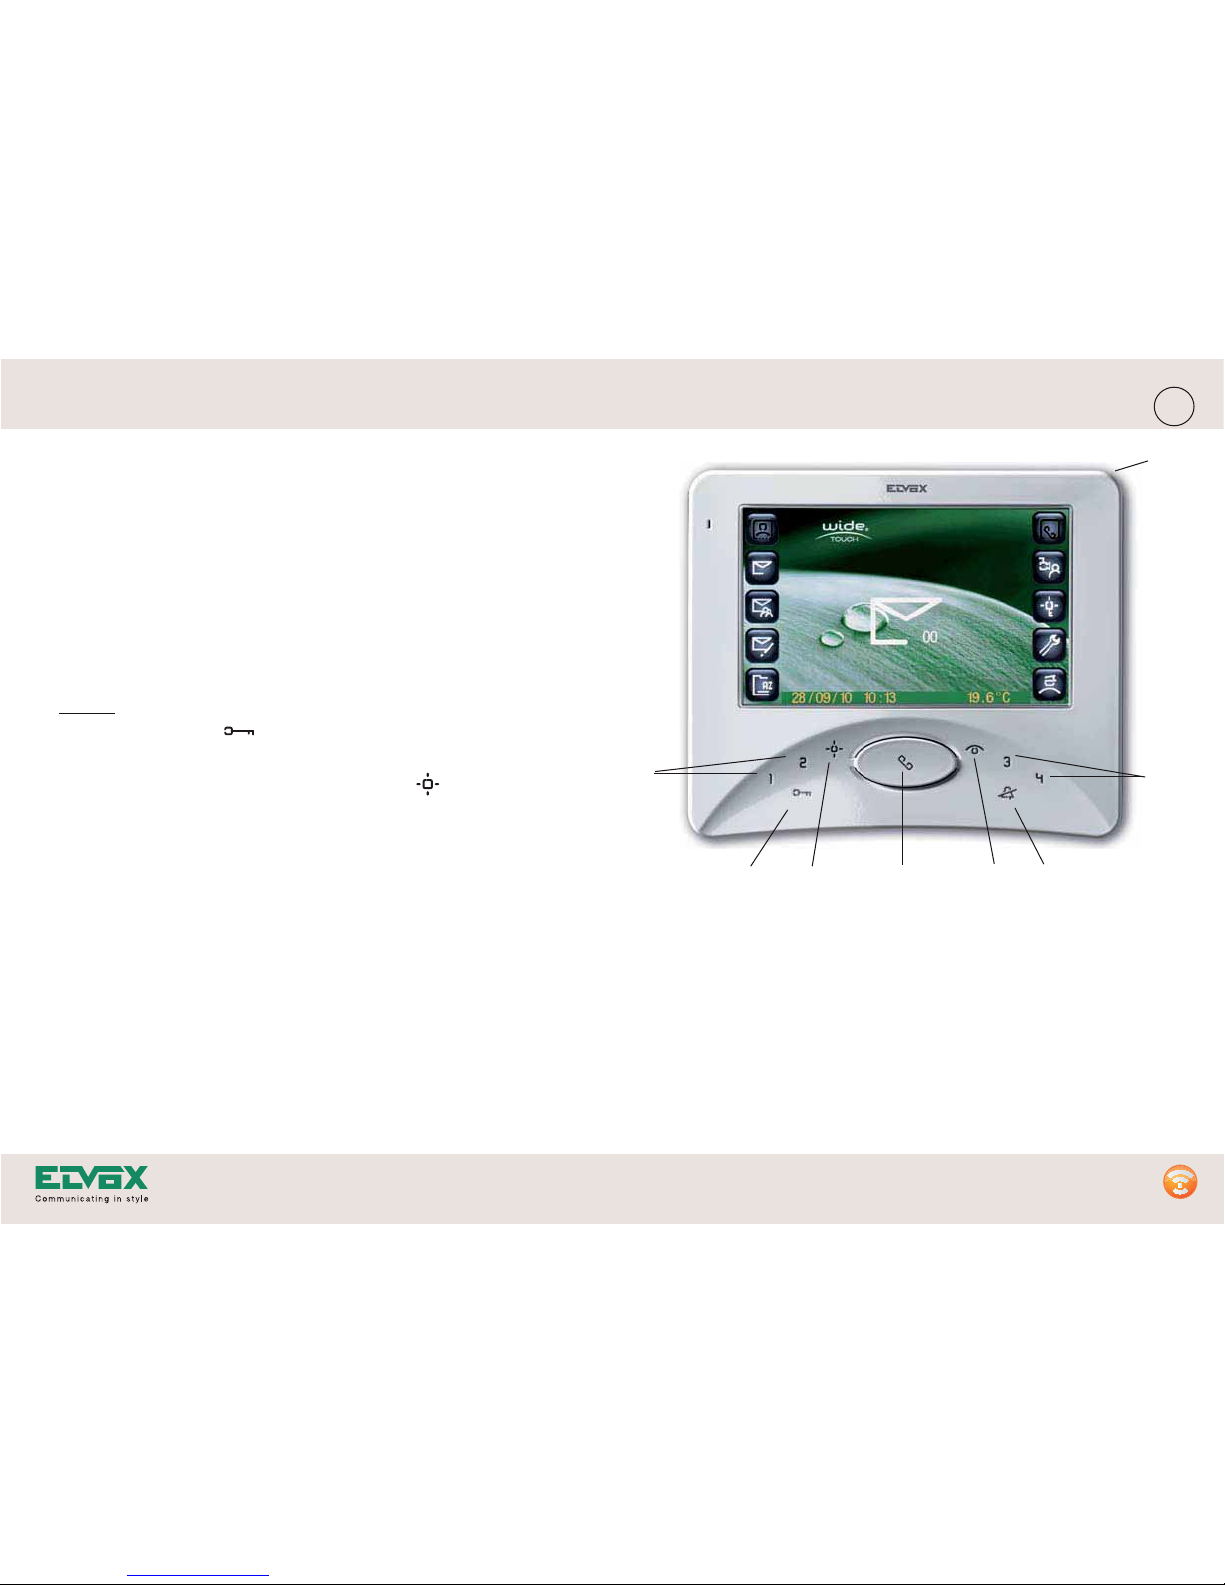
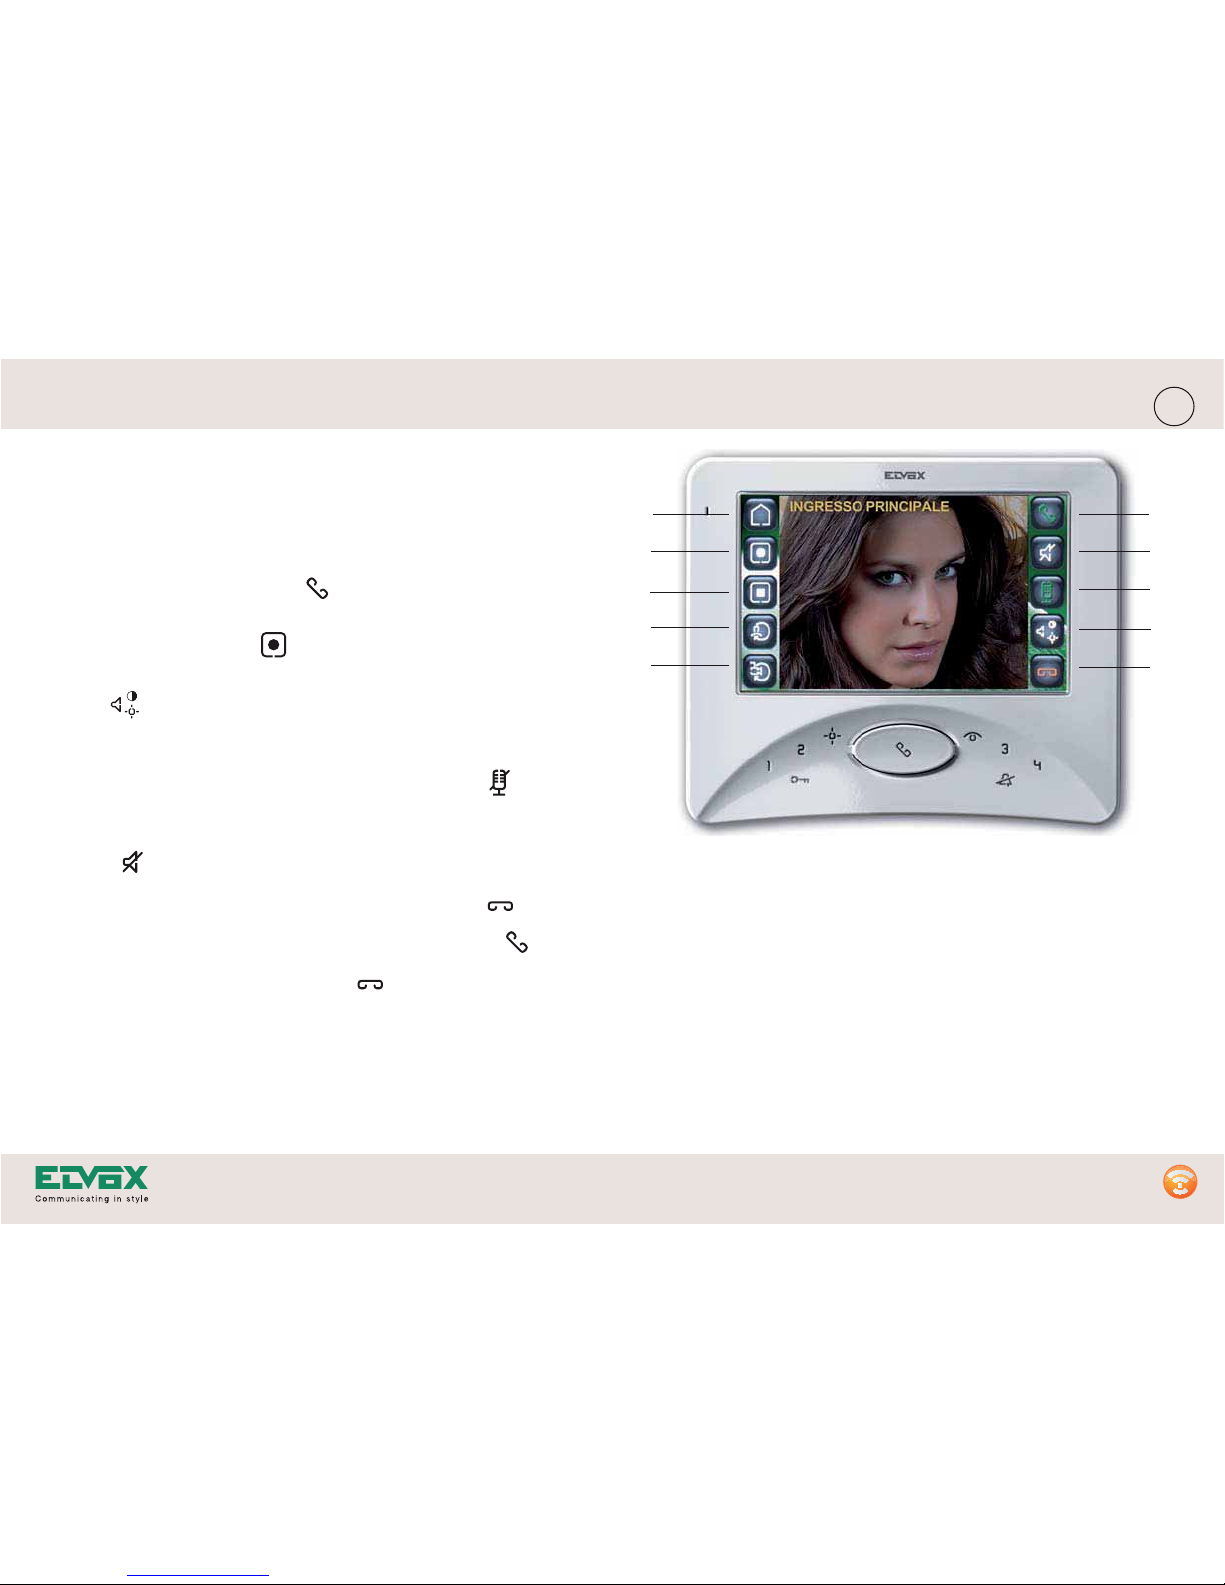
2. USER INTERFACE
The user interface consists of a soft-touch keypad and a touch screen.
The keypad can be used to activate all the classic video entry functions,
such as answering a call and opening the gate or door.
The touch screen provides access to advanced functions such as messaging.
We recommend using the removable stylus (8) to interact with the touch
screen.
ab c de
f
f
Keypad
a. Main lock release .
This button lights up when the door is open
b. Activate an auxiliary service (e.g. stair light) ) .
c. Conversation button. If this button flashes when the monitor is off, it
means that there are unread messages on the answering machine
d. Switch on main external camera
e. Audio mute (privacy), loudspeaker disabled
The illumination of the LED and the confirmation tone indicate that
the loudspeaker is muted. For conversation it is necessary to deacti-
vate the function.
f. Buttons 1-2-3-4 programmable buttons for specific functions (these
buttons must be programmed by the installer).
8
Page 5
5/32
GB
WIDE TOUCH monitor type 7311
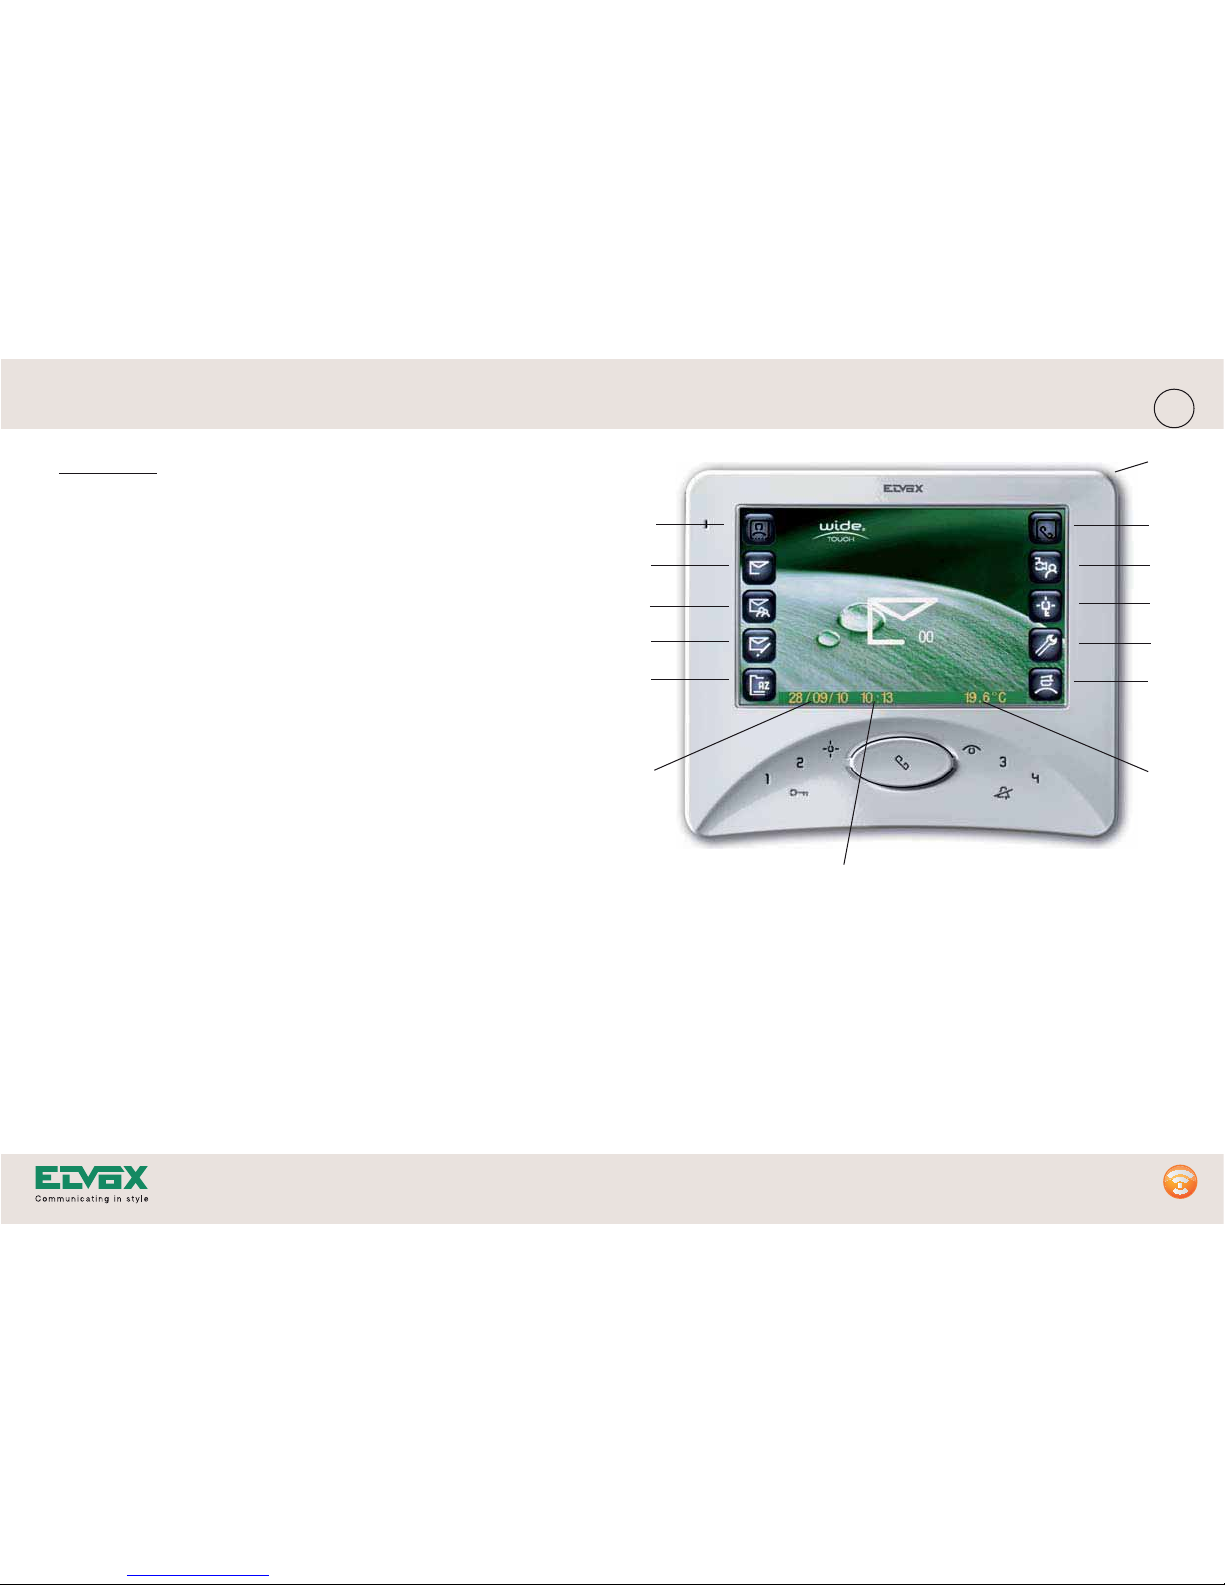
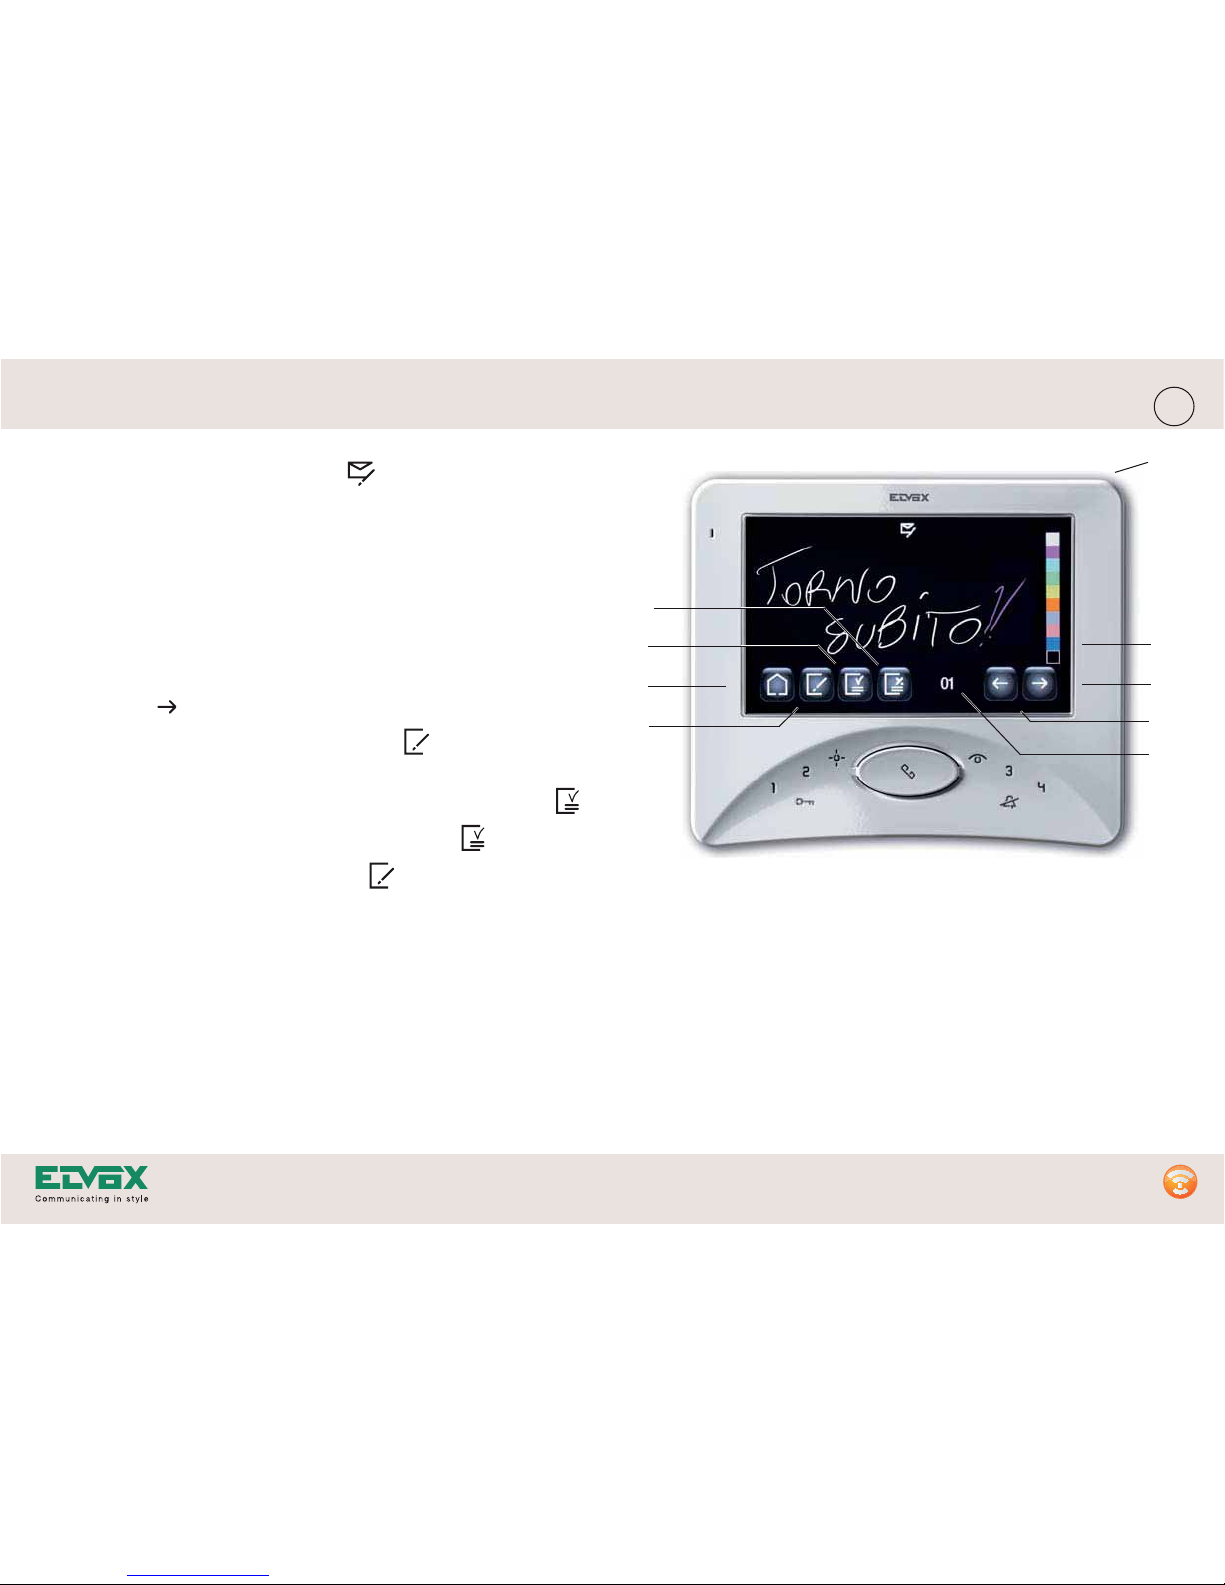
Touch screen
1. Automatic record button
2. Answer message playback button
3. Menu for accessing:
3.1. Video Answering Machine menu
3.2. Family Memo menu
3.3. Picture Memo menu
3.4. Directory menu
3.5. Cameras and CCTV functions menu
3.6. Activations menu
3.7. Options and Settings menu
4. Button for call to porter switchboard (only in systems with this faci-
lity. The button will turn green and emit a beep to confirm that the
call has been sent)
5. Date
6. Time
7. Ambient temperature
8. Removable stylus for touch screen
5
1
8
4
2
6
7
3.2
3.1
3.3
3.7
3.5
3.6
3.4
Page 6
6/32
GB
WIDE TOUCH monitor type 7311
3
1
2
4
9
7
6
8
10
Icon meanings
1. Home page
2. Start recording
3. Stop recording
4. Entrance panel cyclical sequence (speech units)
5. Camera cyclical sequence (when video switches present)
6. Answer call
7. Loudspeaker mute (red)
8. Microphone mute (red)
9. Controls (brightness, contrast colour and conversation volume)
10. End conversation or refuse call
5
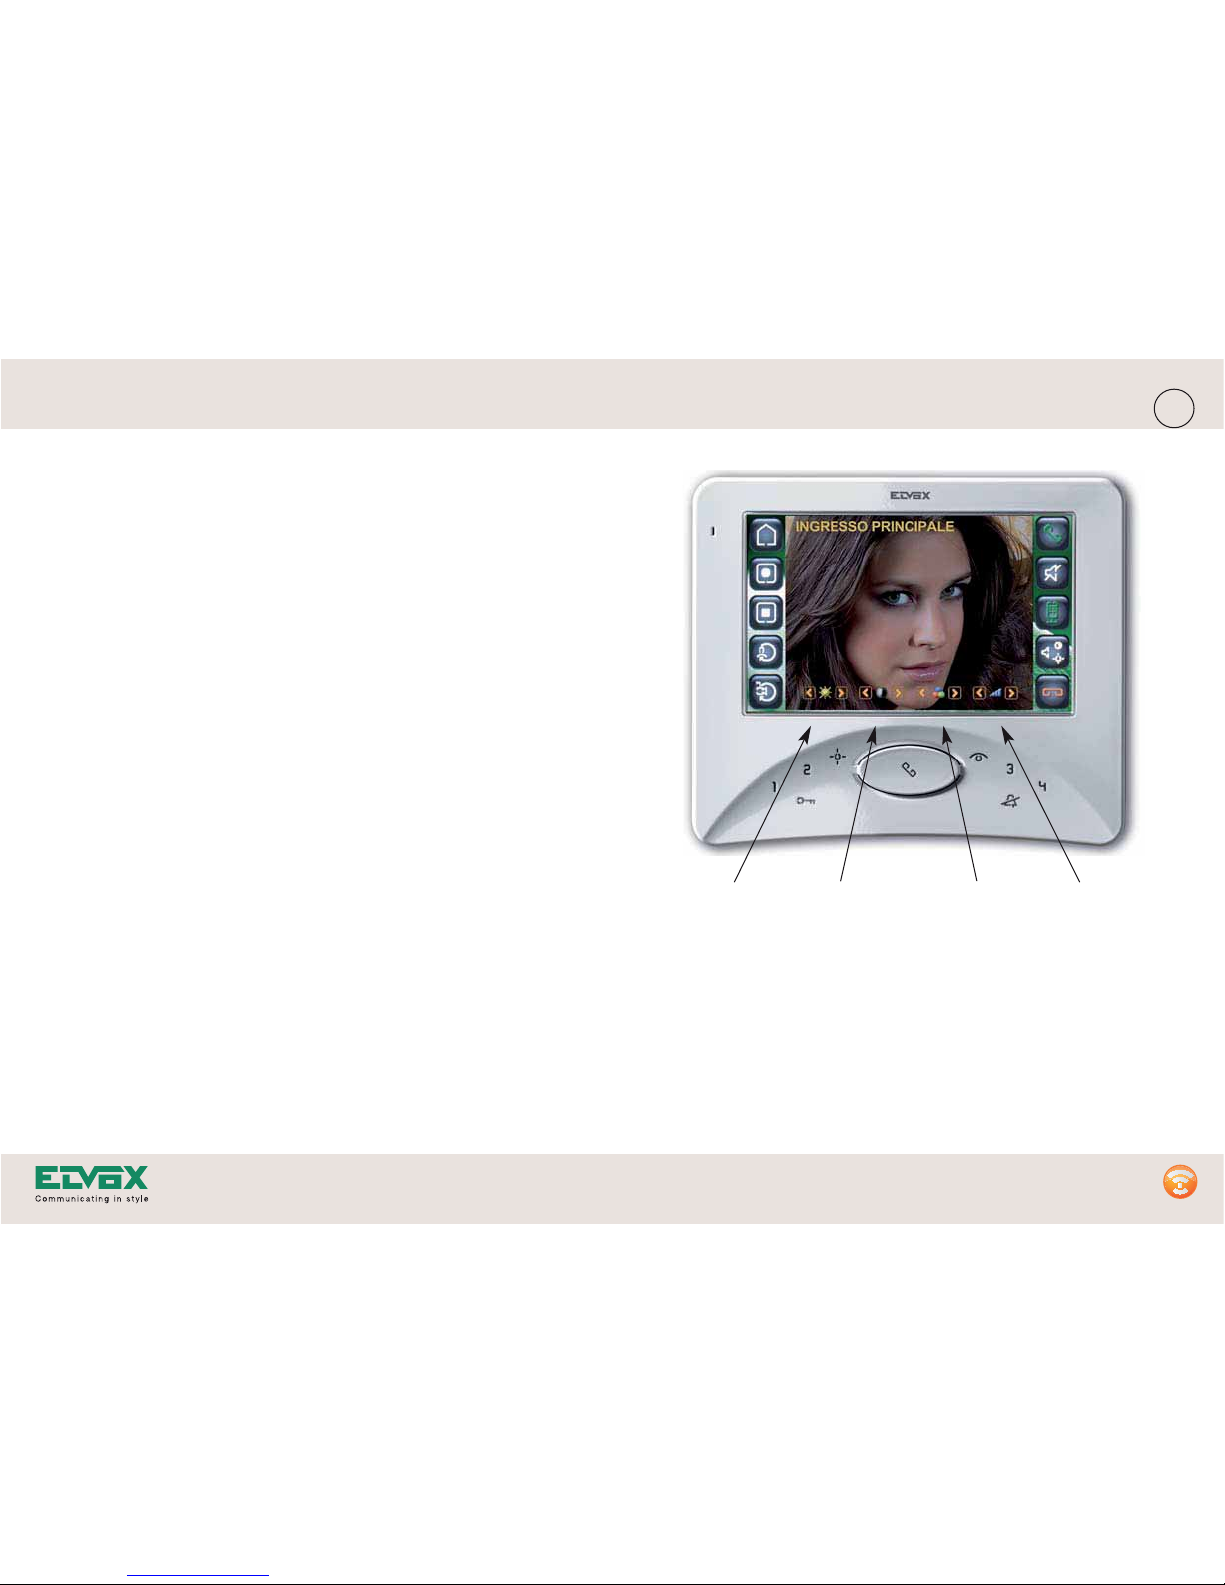
3. OPERATION DURING A VIDEO CALL
When a call is received, the name of the entrance from where the call is
made (if entrance labels programmed) appears at the top of the screen.
On receipt of a call and during a call you can:
• Answer the call by pressing the flashing conversation button or the
green “off-hook handset” icon (6) on the touch screen
• Start a recording after answering, if the automatic record function is not
already on, by pressing on the touch screen (2)
• Adjust the display brightness, contrast, colour and conversation volu-
me (See Fig. 3.1)
• Activate mute to temporarily disable the monitor microphone, thus pre-
venting the caller at the external entrance panel from hearing what is
being said in the room where the monitor is located (green =
microphone enabled / red = microphone disabled)
• Temporarily silence the monitor using the loudspeaker mute/no mute
icon .
• Refuse the call by pressing the “on-hook handset” icon (red)
• To end a call, press the conversation button (talk/listen) on the
keypad or the “replace handset” icon (red)
Page 7
7/32
GB
WIDE TOUCH monitor type 7311
Brightness
Control
Contrast
Control
Colour
Control
Conversation
volume
Control
Fig. 3.1
3.1 Controls (brightness, contrast, colour and conversation volu-
me)
Page 8

8/32
GB
WIDE TOUCH monitor type 7311
4. OPERATION DURING SELF-START OF EXTERNAL CAMERA
Press the “eye” button to switch on the monitor to the main camera.
Once the image appears on the display, the conversation button
will flash and you can then perform all the operations described in the
previous paragraph.
To switch off the video, simply press the conversation button or the
“on-hook handset” icon .
While the conversation is in progress, you can start an audio/video recor-
ding by pressing the button (2) on the touch screen, and stop the
recording by pressing (3).
3
1
2
4
9
7
6
8
10
Icon meanings
1. Home page
2. Start recording video calls
3. Stop recording video calls
4. Entrance panel cyclical sequence (speech units)
5. Camera cyclical sequence (when video switches present)
6. Answer call
7. Loudspeaker mute (red)
8. Disable microphone (red)
9. Video controls (colour, brightness and contrast)
10. End conversation or refuse call
5
Page 9
9/32
GB
WIDE TOUCH monitor type 7311
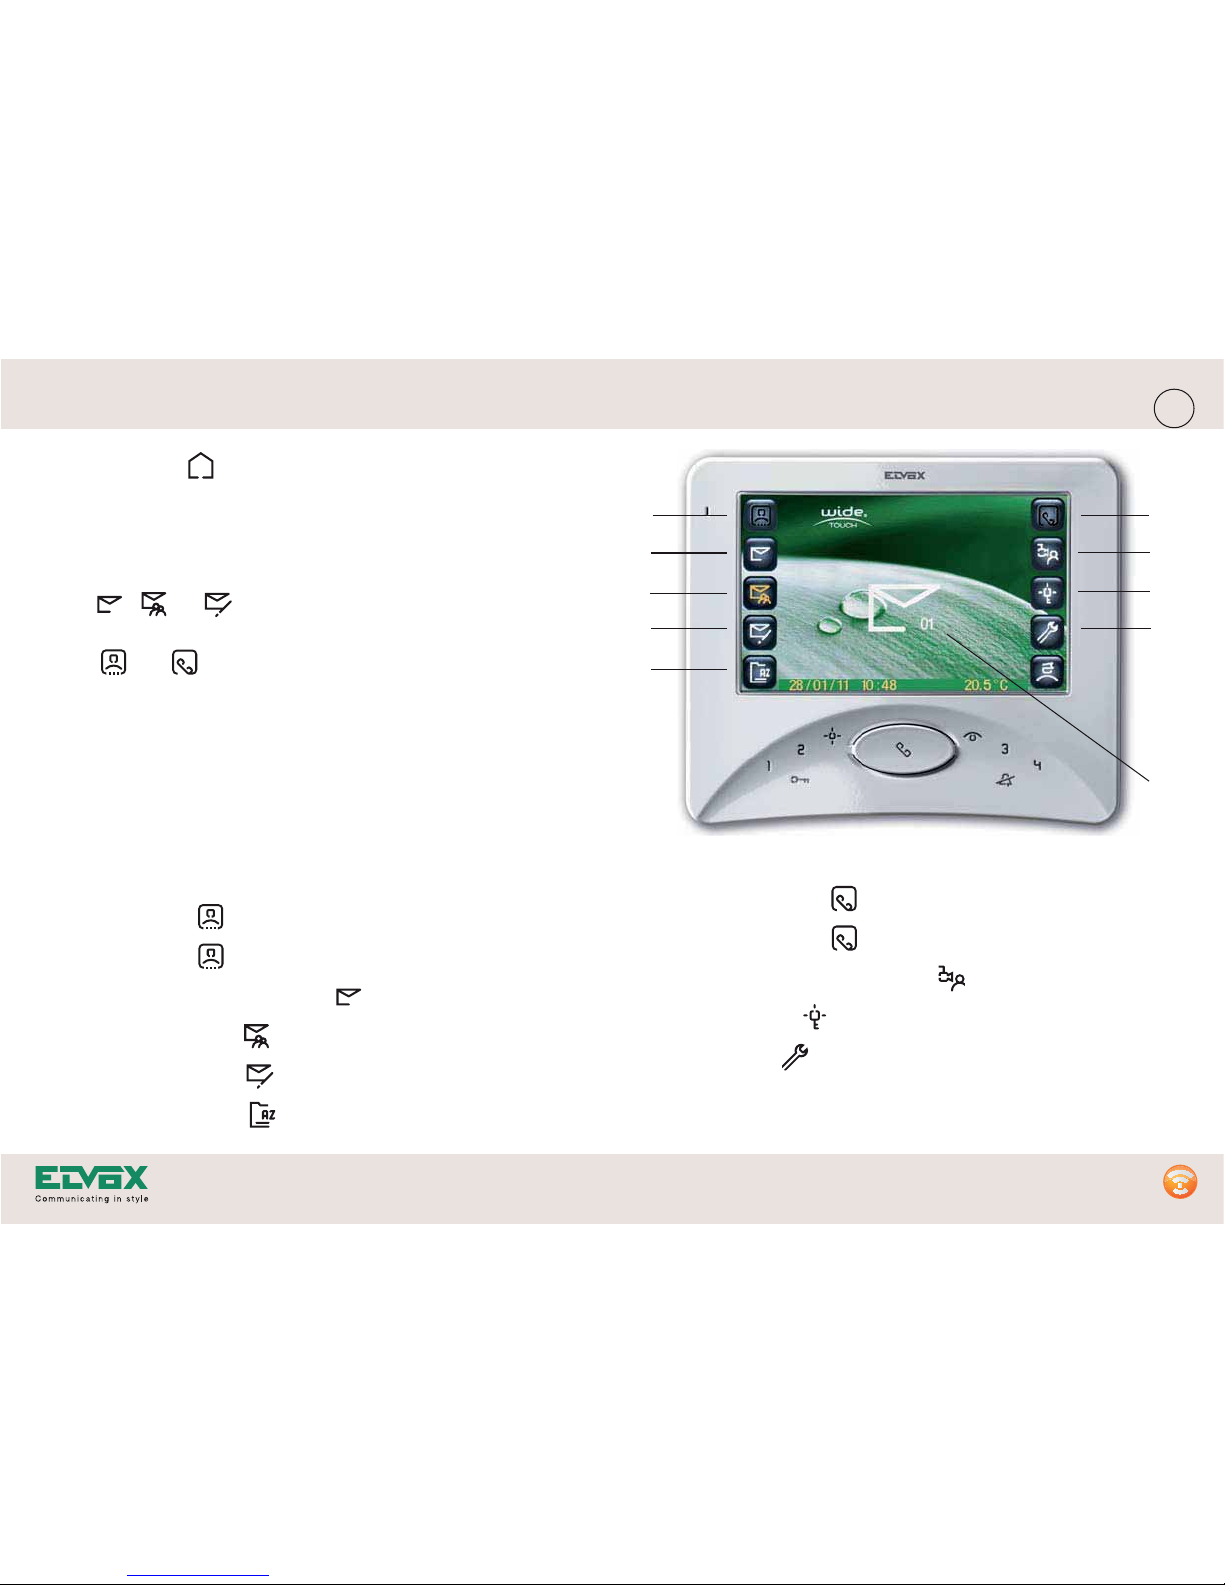
6. Automatic answer on (red icon)
Automatic answer off (black icon)
7. Cameras and CCTV functions menu (Page 17)
8. Activations menu (Page 18)
9. Settings menu (Page 21)
10. Indicates presence and number of unread messages
Icon meanings
1. Recording on (red icon)
Recording off (black icon)
2. Video Answering Machine menu (Page 10)
3. Family Memo menu (Page 13)
4. Picture Memo menu (Page 14)
5. User directory menu (Page 15)
3
1
2
4
9
7
6
10
5
8
5. HOME PAGE
From the home page you can access the various menus and activate the
recording and answering machine functions. In the middle of the display,
the “envelope“ symbol (10) indicates the presence of new messages. The
number on the envelope indicates the number of unread messages (family + audio/video answering machine).
The , , or icons light up to indicate the message type and
the menu from which they can be replayed.
The and icons are used to activate and deactivate the “record
call” and “automatic answer message playback” functions. Red indicates
that the function is on, black indicates that the function is off.
Page 10
10/32
GB
WIDE TOUCH monitor type 7311
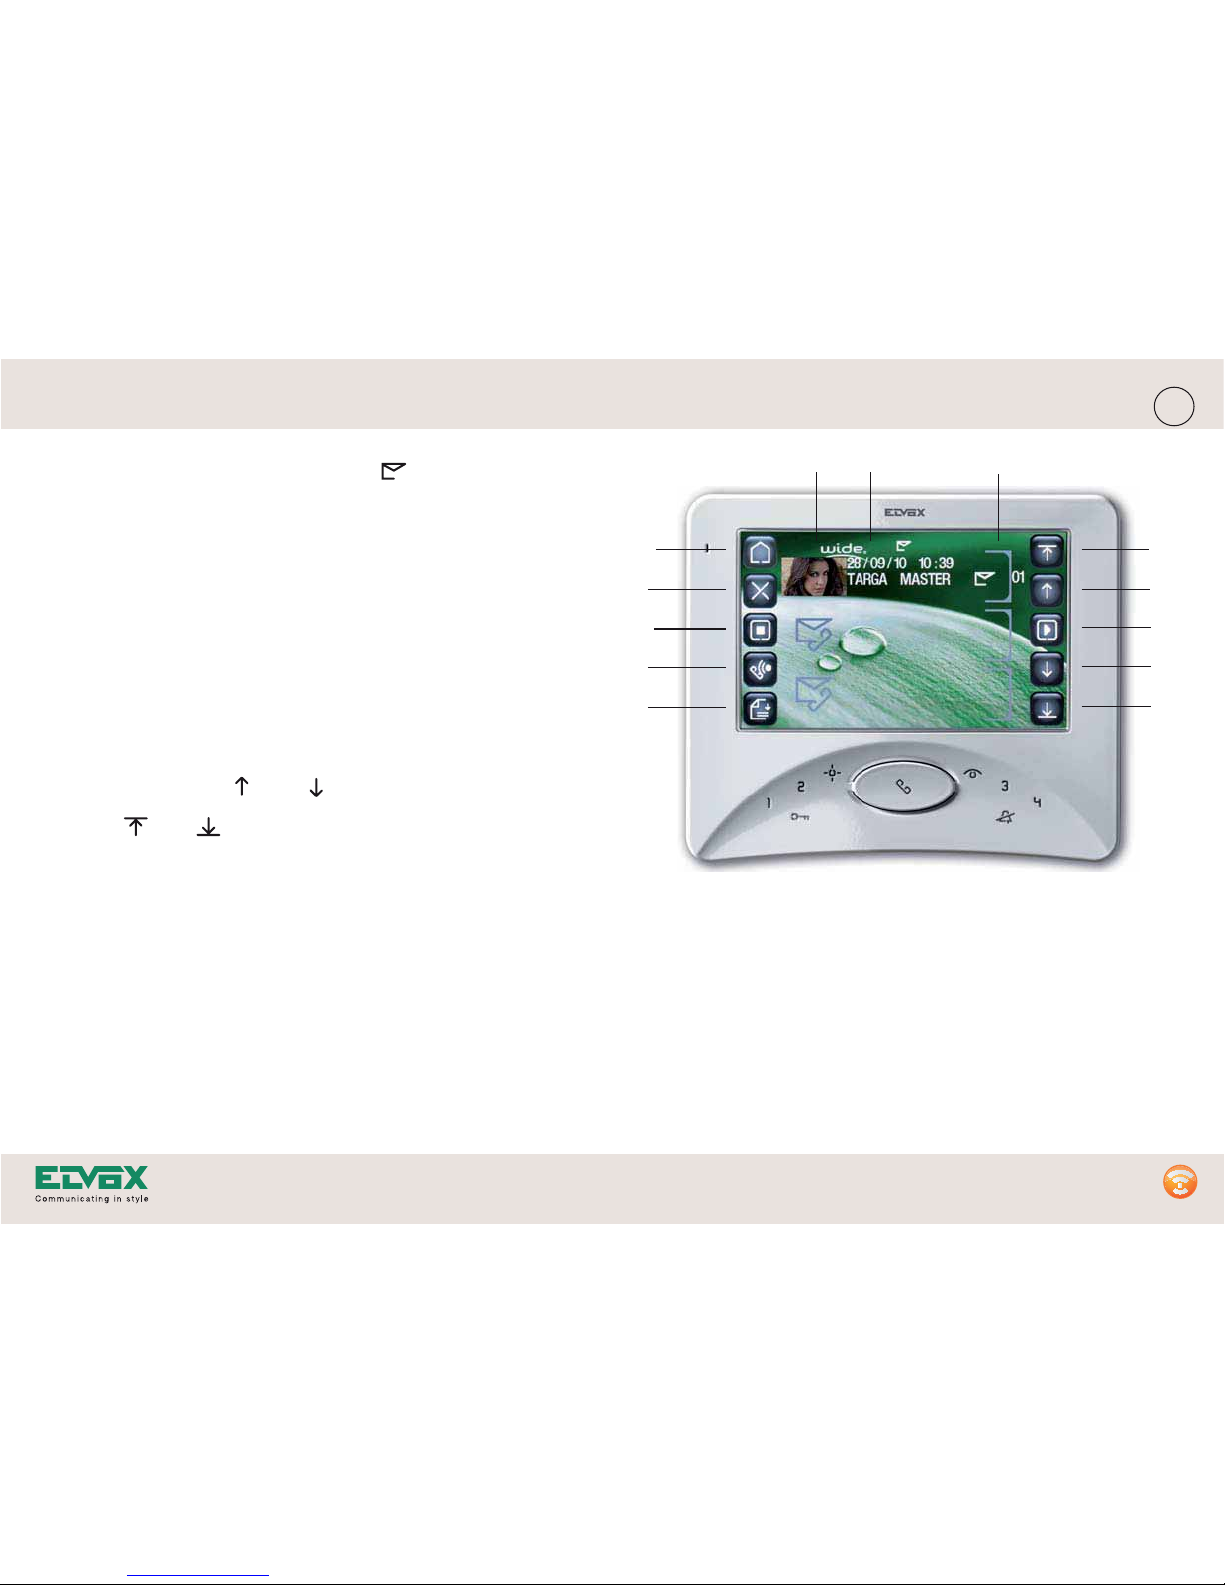
7. Select previous message
8. Start playback of selected message
9. Select next message
10. Next page
11. Photo thumbnail of the recorded message
12. Message info
13. Read/unread message icon (open/closed envelope)
3
1
4
9
7
6
8
10
1312
11
2
5
Icon meanings
1. Return to home page
2. Delete selected message
3. Stop recording message
4. Record answer message
5. Record calls from speech unit (highlighted in yellow when there are
unread calls)
6. Previous page
6. VIDEO ANSWERING MACHINE MENU
In this menu you can play back and/or delete messages recorded by the
entrance cameras, or record an answer message. Messages recorded
from outside the property (“Vision Memo” messages) consist of audio files
and a sequence of photographs. Groups of three messages appear in
the middle of the screen, each of which shows the first image in the photo
sequence (11), the message date and time, and the entrance where the
message was recorded (12).
Unread messages are listed first, arranged in chronological order from
the most recent to the oldest, and accompanied by a “closed envelope”
(13). Read messages are listed next, identified by an “open envelope”,
also in chronological order from the most recent to the oldest. Up to 32
Vision Memo messages can be recorded, after which the oldest message will be automatically overwritten.
Use the scroll arrows ( and ) to select a message and the TAB
arrows ( and ) to scroll the pages.
Page 11

11/32
GB
WIDE TOUCH monitor type 7311
Icon meanings
1. Return to previous menu
2. Record message (red during recording)
3. Delete message
4. Return to home page
5. Play the recorded message (green if already present, white if not present)
6. Stop recording or stop playback
3
1
4
6
2
5
6.1. RECORDING AN ANSWER MESSAGE
From the video answering machine menu (paragraph 6), access the
“record answer message” submenu by pressing the icon.
This function is used to record a message with a maximum duration of 32
seconds, to be played to the visitor if you are out or do not wish to be
disturbed.
To record the message (maximum 32 secs), press the “start recording”
icon (2) and start recording your voice message. To end the recor-
ding before the 32 seconds are up, press the “stop” icon (6). At this
point you can listen to the recording by tapping the “play” icon (5). If
you wish to record a new message, delete this one by tapping the “dele-
te” icon , and record a new message.
On the HOME PAGE described in paragraph 5, you can activate the
answering machine function whenever you wish, by tapping the “activate
automatic answer” icon in the top right-hand part of the screen (see
paragraph 5).
Page 12

12/32
GB
WIDE TOUCH monitor type 7311
Icon meanings
1. Return to home page
2. Return to previous menu
3. Delete entire list of recorded calls (maximum 10)
4. Calls list recording On/Off (Green = On - Black = Off)
2
1
3
4
6.2. Call Recording menu
From the video answering machine menu (paragraph 6), access the “Call
Recording” submenu by pressing the icon.
This function enables you to view a list of the last 10 calls received, indicating for each call: date, time and entrance panel from which the call
was received. The function can be switched on or off by pressing the
icon; if the icon is green the function is on, if it is black this means
that it is off. To delete the list press “delete” .
Note: We recommend that you activate this function only when necessary, so as to preserve the long-term duration of the memory.
Page 13

13/32
GB
WIDE TOUCH monitor type 7311
Icon meanings
1. Return to home page
2. Activate the local system camera (not available)
3. Start recording a new message
4. Increase volume (during a call/playback)
5. Decrease volume (during a call/payback)
6. Select previous message
7. Play recorded message
8. Stop recording or stop playback
9. Delete message
10. Select next message
11. Message info
12. Read message (open envelope) – unread message (closed envelo-
pe)
3
1
4
9
7
6
8
10
12
11
2
5
7. FAMILY MEMO MENU
From the home page you can access the Family Memo Menu by pressing
the icon. In this menu you can record new messages and play messages left by family members or cohabitants. Up to 3 messages can be
stored in the memory. Each message is accompanied by the recording
date and time (11), as well as a closed envelope symbol if it has not been
read, or an open envelope symbol if it has already been read (12).
To play any message, whether read or unread, select it (it will be highli-
ghted in white) using the scroll arrows and and press the “play
recording” icon .
You can interrupt playback at any time by pressing the “stop” icon .
To record a new message, select the message that you wish to replace,
delete it using the “delete” icon and then press the “record” icon
(if not deleted it will be overwritten anyway). A progress bar will indicate the remaining recording time.
Once you have recorded a new message, the number of unread messages indicated on the “envelope” in the middle of the HOME PAGE screen
will increase. The Family Memo icon will also turn yellow to indicate the
presence of one or more new unread messages of this type. In addition
to the family memo icon turning yellow, the middle key of the keypad will
flash, even when the monitor is switched off.
Page 14
14/32
GB
WIDE TOUCH monitor type 7311
Icon meanings
1. Return to home page
2. Write new message/clear screen
3. Save message
4. Delete message
5. Message numbering
6. See previous
7. See next
8. Select colour (the last square at the bottom can be used as an eraser with a thickness of 8x8 pixels)
9. Removable stylus for touch screen
4
2
3
6
7
1
9
5
8
8. PICTURE MEMO MENU
The Picture Memo menu enables you to write a short message for the
attention of your family members or cohabitants, by means of the removable stylus (9).
You can write up to 32 Picture Memo messages, after which message no.
1 will be overwritten if there are already 32 messages stored in the
memory. Once your note has been saved, the Picture Memo icon on the
HOME PAGE will light up to indicate the presence of one or more unread
messages of this type. When the Picture Memo icon is pressed, the last
saved note will be displayed. To read the next messages, press the right
scroll arrow .
To write a new message, press the “New” icon and write it (pressing
lightly on the screen) after first selecting the desired colour in the graphic
tab on the right-hand side of the touch screen. Then press “Save” ,
or delete the message by pressing the “Delete” icon . Alternatively
you can clear the screen by pressing the icon. When you enter the
Picture Memo menu, the right-hand arrow will be coloured yellow if there
are unread messages. Pressing the scroll arrows will display all unread
messages first. If the arrows are white, there are no unread messages.
Page 15

15/32
GB
WIDE TOUCH monitor type 7311
2
1
3
8
6
5
7
9
4
Icon meanings
1. Return to home page
2. Insert new item in directory
3. Delete selected item or one with the same ID (appliance identifica-
tion code)
4. Edit name in directory
5. Scroll up one page in the list
6. Scroll up one item in the list
7. Call the item selected in orange
8. Scroll down one item in the list
10. Scroll down one page in the list
11. User name
11
9. USER DIRECTORY MENU
From the main menu you can access the “User directory menu” by tap-
ping the icon. In this menu you can call other internal users (audio
and video door entry units), by means of intercom calls. You first need
to make a call and save the internal user in the directory, assigning a
user name (maximum 14 characters) for each intercom appliance.
Page 16

GB
WIDE TOUCH monitor type 7311
1
3
2
Icon meanings
1. Return to home page
2. Save item in directory
3. Switch on the self-learning function
4. ID (Remote appliance identification code)
Fig. 9.1
4
The “User directory menu” functions are:
- Enter a new user in the directory by tapping the icon. Assigning
the ID of the internal user requires the use of the self-learning function,
which is described below. Each line can be assigned one name of up
to 14 characters.
- Delete a user name from the directory by tapping the icon
Warning: each line of the directory is assigned a name and an ID (identification code). If there are multiple lines associated with the same ID,
the 1st line corresponding to the ID concerned will be deleted.
- Edit the user name by tapping the icon
- Make an intercom call to the internal user, by selecting the user and
pressing the icon.
Self-learning function.
Each audio door entry unit and video door entry unit in the system is
associated with an ID (identification number) that is unique and which is
assigned by the installer. The ID can only be changed by the installer. In
order to be able to save the desired internal user in the directory, you
need to know the ID of the internal user or use the self-learning function.
- From the user directory menu press the icon (new)
- Press the icon to activate the self-learning function
- Press the lock release push-button on the remote interphone/monitor
of the internal user who you want the intercom call to be addressed to.
- Type the user name (maximum 14 characters) and confirm by tapping
the icon.
16/32
Page 17

17/32
GB
WIDE TOUCH monitor type 7311
Icon meanings
1. Return to home page
2. Delete selected item
3. Stop recording or stop playback
4. Activates/deactivates automatic deletion of recordings after 24
hours. Green icon = Function activated / Black icon = Function
deactivated
5. Activates/deactivates automatic video recording from local CCTV
cameras. Green icon = Function activated / Black icon = Function
deactivated
6. Scroll up one page in the list
7. Scroll up one item in the list
8. Play video recording
9. Scroll down one item in the list
10. Scroll down one page in the list
10. CAMERAS AND CCTV FUNCTIONS MENU
The Cameras and CCTV Functions menu is used to control images
recorded by local cameras, if fitted. Camera(s) and movement sensors
need to have been connected and the CCTV functions programmed by
the installer. Up to 80 files can be recorded and displayed in a list sorted by date (with the earliest files displayed first). This list is overwritten
cyclically and when the option to delete recordings automatically after
24 hours is activated. Each file can contain up to 10 images (approx.
one photo every 3 seconds) and ends 32 seconds after the start of the
recording. Displayed at the top is the number of unread messages and
an envelope indicating the presence of unread messages. On the Home
page, if enabled, the CCTV function appears as an icon at the top
near to the wake-up call function.
NOTE: Activation or deactivation of the automatic recording and/or
automatic deletion functions is enabled only if programmed by the
installer.
3
1
4
2
5
Page 18

GB
WIDE TOUCH monitor type 7311
Icon meanings
1. Return to home page
2. Go to Camera and Activations menu
3. View the list of direct commands to the locks connected to the
entrance panels
4. View the list of F1 and F2 commands to the entrance panels
5. View the list of auxiliary commands to the relays connected to the
system
6. Scroll up one page in the list
7. Scroll up one item in the list
8. Activate the command selected in the list
9. Scroll down one item in the list
10. Scroll down one page in the list
3
1
4
9
7
6
8
10
2
5
Fig. 11.1
To view the list of direct commands to the locks connected to the
entrance panels, press the icon.
11. ACTIVATIONS MENU
From the main menu you can access the “Activations menu” by tapping
the icon.
In this menu you can view and activate different direct commands to programmed devices in the system:
- Access the camera menu and switch on local camera (Fig.11.1)
- Command activating locks connected to the entrance panels (Fig.11.1)
- Command activating auxiliary services of entrance panel auxiliary fun-
ctions F1 and F2 (Fig.11.2)
- Command activating other auxiliary services, connected to relays in
the system (Fig.11.3).
Select the desired command (lock, F1 or F2, auxiliary command) and
press to activate it.
18/32
Page 19

19/32
GB
WIDE TOUCH monitor type 7311
3
1
4
9
7
6
8
10
2
5
3
1
4
9
7
6
8
10
2
5
To view the list of F1 or F2 commands to the entrance panels, press
the icon.
F1 F2
To view the list of auxiliary commands to relays connected to the
system, press the icon.
AUX
Icon meanings
1. Return to home page
2. Go to Camera and Activations menu
3. View the list of direct commands to the locks connected to the
entrance panels
4. View the list of F1 and F2 commands to the entrance panels
5. View the list of auxiliary commands to the relays connected to the
system
6. Scroll up one page in the list
7. Scroll up one item in the list
8. Activate the command selected in the list
9. Scroll down one item in the list
10. Scroll down one page in the list
Fig. 11.3
Fig. 11.2
Page 20

20/32
GB
WIDE TOUCH monitor type 7311
3
1
4
9
7
6
8
10
2
5
Icon meanings
1. Return to home page
2. Connection with local camera (only for systems with this facility)
3. View the list of locks connected to the entrance panels
4. View the list of F1 and F2 functions connected to the entrance
panels
5. View the list of auxiliary activation commands to the relays connected to the system
6. Scroll up one page in the list
7. Scroll up one item in the list
8. Switch on the camera selected in the list
9. Scroll down one item in the list
10. Scroll down one page in the list
11.1. CAMERA AND ACTIVATIONS MENU
From the camera menu you can switch on one of the outdoor cameras,
the main camera or secondary ground floor cameras, depending on the
type of installation.
To switch on a camera, select it and then press the “ ” icon. Once the
video image has appeared, it is possible to record, or communicate with
the outside area. To play back recordings use the “Video answering
machine” menu (paragraph 4).
Page 21

21/32
GB
WIDE TOUCH monitor type 7311
Icon meanings
1. Home page
2. (Not active)
3. Installer menu (only for installation)
4. Calibrate touch screen (only accessible from installer menu)
5. Select language (only accessible from installer menu)
6. Wake-up call menu
3
1
4
7
6
8
10
2
5
9
7. Volume and ringtone controls menu
8. Background selection menu
9. Menu for setting time slots
10. Menu for date, time, temperature settings and formats
12. SETTINGS MENU
From the Settings menu you can:
• Set the wake-up call function by tapping the icon
• Adjust the volume controls for communicating with speech units and
intercom devices, adjust the ringtone volume and recorded message
playback volume and select the corresponding melodies which can be
played by tapping the icon
• Select the home page background by tapping the icon
• Change the date, time and temperature, and set the date, time and
temperature formats by tapping the icon.
Page 22

GB
WIDE TOUCH monitor type 7311
1
3
4
2
Icon meanings
1. Return to home page
2. Return to previous menu
3. Activate wake-up call (icon yellow if wake-up call service active)
If the wake-up call service is activated, the icon is displayed at
the top centre of the home page.
4. Deactivate wake-up call (icon yellow if wake-up call service not active).
12.1. WAKE-UP CALL MENU
After entering the wake-up call menu you can make the following adju-
stments:
a. Set the hour and minutes of the wake-up call (wake-up call time is
always displayed in 24-hour format).
To edit the hour and minutes press the arrow symbols displayed
below the hour : min.
b. Select the days of the week on which the wake-up call will be acti-
ve. The numbers 1 to 5 (in grey) correspond to the weekdays
Monday to Friday, the numbers 6 and 7 (in red) correspond to
Saturday and Sunday. Tap the number(s) to select the day(s) of the
week on which the wake-up call will be activated. If the number box
is yellow it means that the wake-up call is activated on that day.
a
b
22/32
Page 23

23/32
GB
WIDE TOUCH monitor type 7311
12.2. VOLUME AND RINGTONE CONTROLS MENU
1
4
3
2
Icon meanings
1. Return to home page
2. Return to previous menu
3. Test ringtone for external call
4. Test ringtone for intercom calls
e
d
a
b
c
After entering the volume and ringtone controls menu you can make the
following adjustments:
a. Adjust the volume for communicating with speech units
b. Adjust the volume for communicating with intercom devices
c. Adjust the ringtone volume and recorded message playback volu-
me
d. Select the type of ringtone for calls from a speech unit
e. Select the type of ringtone for intercom calls.
Page 24

24/32
GB
WIDE TOUCH monitor type 7311
12.3. BACKGROUND SELECTION MENU
1
3
2
1. Press the button to confirm the background and return to the
previous menu.
2. Select the previous background.
3. Select the next background.
Page 25

25/32
GB
WIDE TOUCH monitor type 7311
1
3
4
4
3
2
Icon meanings
1. Return to home page
2. Return to previous menu
3. ACTIVATE/deactivate time slot
4. Delete time slot
5. Days of the week:
From 1 to 5 (white numbers) = from Monday to Friday
From 6 to 7 (red numbers) = Saturday and Sunday
The numbers indicate, for each time slot, what day the time slot is
in operation when the edge of the number is highlighted in yelloworange
12.4. TIME SLOT SETUP MENU
If programmed (by the installer) the monitor can execute, in these time
slots, the automatic activation of an auxiliary function or a programmed
command, for example automatically releasing a lock on receiving an
external call, switching on a light, activating an automation, etc. In this
menu you can set two time slots, with the possibility of individually selecting the days of the week on which to activate them. Programming each
time slot involves the input of two times (start/end). Set the start hours
and minutes of the time slots using the arrow buttons shown above and
below the hour:minutes, activate/deactivate the time slot by pressing the
button or press to delete. Programming involves the input of
two times (start/end) for each time slot. The activation days for each time
slot are highlighted with a yellow-orange box. If the start and end values
are equal, the function is null.
NOTE: Association between functions and time slots is assigned by the
installation.
5
5
Start End
Start End
Page 26
26/32
GB
WIDE TOUCH monitor type 7311
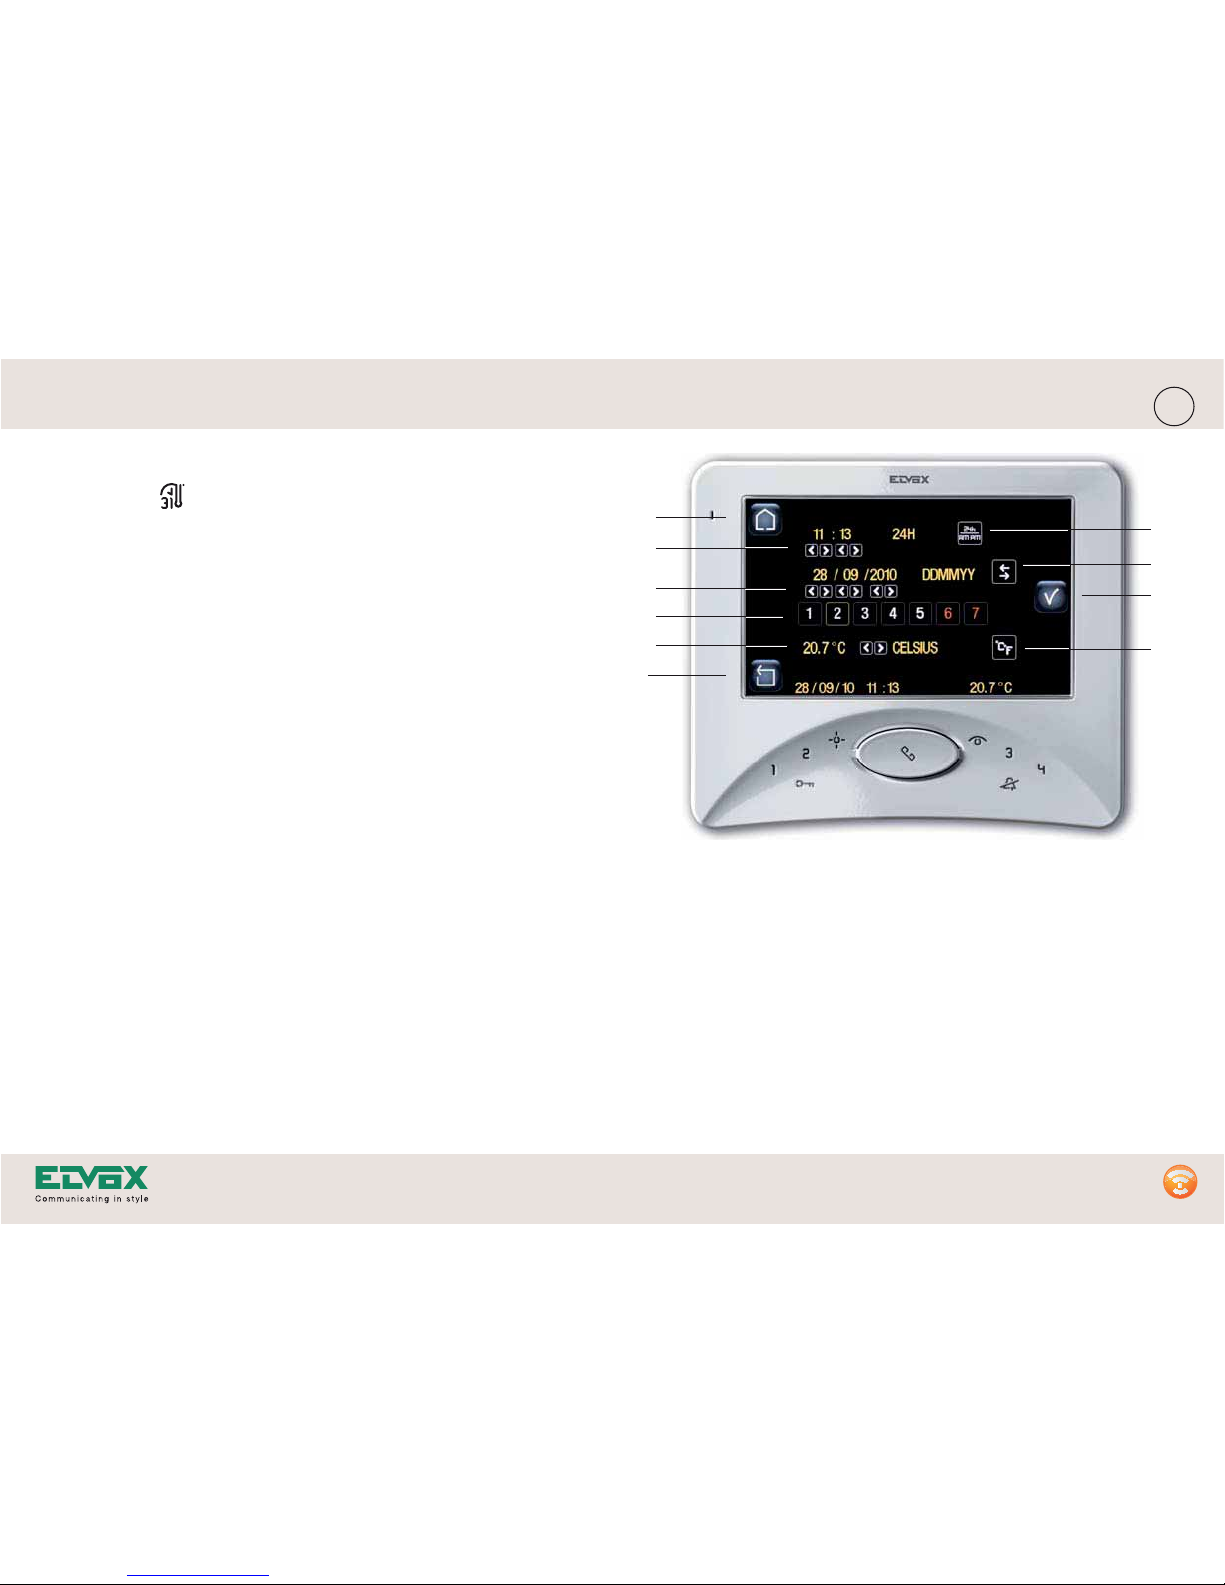
12.5 MENU FOR SETTING DATE, TIME, TEMPERATURE AND FOR-
MATS
1
3
2
Icon meanings
1. Return to home page
2. Return to previous menu
3. Confirm settings
From this menu you can make the following adjustments:
a. Set hour and minutes
b. Select the time display format (24h or am/pm)
c. Set the date (day/month/year)
d. Select the day of the week (1=Monday, 2=Tuesday, ...)
b. Select the date display format (day/month/year or month/day/year)
f. Calibrate the ambient temperature
g. Select the temperature unit of measurement (° Celsius or ° Fahrenheit)
a
c
d
f
b
g
e
Page 27

27/32
GB
WIDE TOUCH monitor type 7311
13 MAINTENANCE, KEYPAD AND TOUCH SCREEN LOCK
To clean the monitor you need to activate the keypad and touch screen
lock. To do this press and hold the central button on the keypad for
five seconds, until you hear a beep. At this point the red “padlock” symbol appears at the bottom of the screen. Clean the monitor using a soft
cloth, which can be dry or slightly dampened with water. Do not pour
water directly onto the screen and do not use any type of chemical pro-
duct. After cleaning deactivate the lock by pressing the button on
the keypad for five seconds until the “padlock” symbol turns green.
Page 28

28/32
GB
WIDE TOUCH monitor type 7311
Page 29

29/32
GB
WIDE TOUCH monitor type 7311
Page 30

30/32
GB
WIDE TOUCH monitor type 7311
Page 31

31/32
GB
WIDE TOUCH monitor type 7311
SAFETY INSTRUCTIONS FOR INSTALLERS
-Carefully read the instructions on this leaflet: they give important information on
the safety, use and maintenance of the installation.
-After removing the packing, check the integrity of the set. Packing components
(plastic bags, expanded polystyrene etc.) are dangerous for children. Installation
must be carried out according to national safety regulations.
-It is convenient to fit close to the supply voltage source a proper bipolar type
switch with 3 mm separation (minimum) between contacts.
-Before connecting the set, ensure that the data on the label correspond to those
of the mains.
-Use this set only for the purposes designed, i.e.for electric door-opener systems.
Any other use may be dangerous. The manufacturer is not responsible for damage caused by improper, erroneous or irrational use.
-Before cleaning or maintenance, disconnect the set.
-In case of failure or faulty operation, disconnect the set and do not open it.
-For repairs apply only to the technical assistance centre authorized by the manufacturer.
-Safety may be compromised if these instructions are disregarded.
-Do not obstruct opening of ventilation or heat exit slots and do not expose the set
to dripping or sprinkling of water.
-Installers must ensure that manuals with the above instructions are left on connected units after installation, for users' information.
-All items must only be used for the purposes designed.
-The ominipolar switch must be easily accessed.
-WARNING: to avoid the possibility of hurting yourself, this unit must be fixed to
the wall according to the installation instructions.
-This leaflet must always be enclosed with the equipment.
Directive 2002/96/EC (WEEE)
The crossed-out wheelie bin symbol marked on the product indicates that at
the end of its useful life, the product must be handled separately from household refuse and must therefore be assigned to a differentiated collection centre
for electrical and electronic equipment or returned to the dealer upon purchase of
a new, equivalent item of equipment.
The user is responsible for assigning the equipment, at the end of its life, to the
appropriate collection facilities.
Suitable differentiated collection, for the purpose of subsequent recycling of
decommissioned equipment and environmentally compatible treatment and
disposal, helps prevent potential negative effects on health and the environment
and promotes the recycling of the materials of which the product is made. For further details regarding the collection systems available, contact your local waste
disposal service or the shop from which the equipment was purchased.
Risks connected to substances considered as dangerous (WEEE).
According to the WEEE Directive, substances since long usually used on electric
and electronic appliances are considered dangerous for people and the environment. The adequate differentiated collection for the subsequent dispatch of the
appliance for the recycling, treatment and dismantling (compatible with the environment) help to avoid possible negative effects on the environment and health
and promote the recycling of material with which the product is compound.
Page 32

INTERNATIONAL BRANCHES
ELVOX Austria GmbH
Grabenweg 67
A-6020 Innsbruck
Milan
Via Conti Biglia, 2
20162 Milan
Padua
Via A. Ferrero, 9
35133 Padua
Turin
Strada del Drosso, 33/8
10135 Turin
ELVOX Shanghai Electronics Co. Ltd
3. Floor No. 2 Building No. 1898 Lai Yin Road
Hi-Tech Park SongJiang, Jiu Ting District
Shanghai 201615
BRANCHES IN ITALY
www.elvox.com
ELVOX Costruzioni elettroniche S.p.A. - ITALY
Via Pontarola, 14/a - 35011 Campodarsego (Padova)
Tel 049 9202511 - Fax 049 9202603 - info@elvox.com
Telefax Export Dept. +39/049 9202601 - elvoxexp@elvox.com
 Loading...