

Page 1
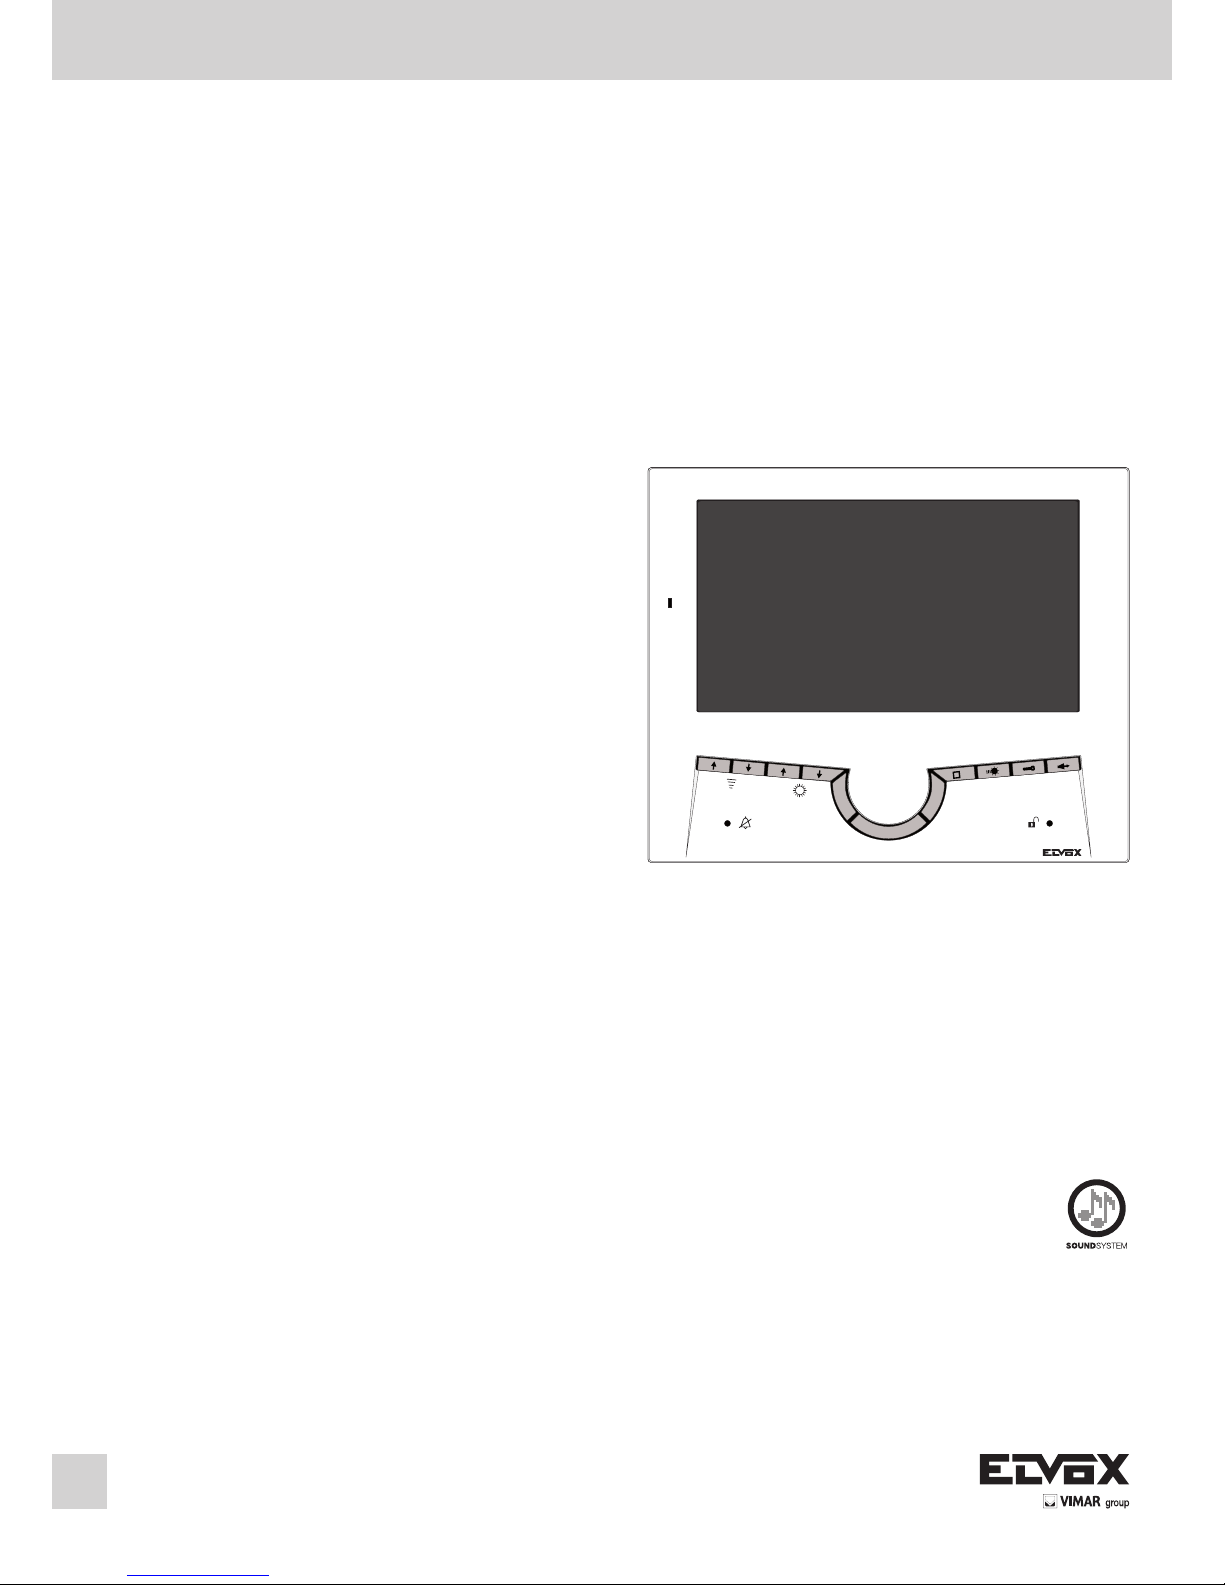
Art. 7200
Videocitofono serie 7200 per Sound System
7200 series monitor for Sound System installations
Moniteur série 7200 pour systèmes Sound System
Monitor Serie 7200 für Sound System Anlagen
Videoportero serie 7200 para sistemas Sound System
Monitor série 7200 para sistemas Sound System
Manuale per il collegamento e l’uso - Installation and operation manual
Manuel pour le raccordement et l’emploi - Installations-und Benutzerhandbuch
Manual para el conexionado y el uso - Manual de instalação e utilização
7200
Page 2
I
2
7200
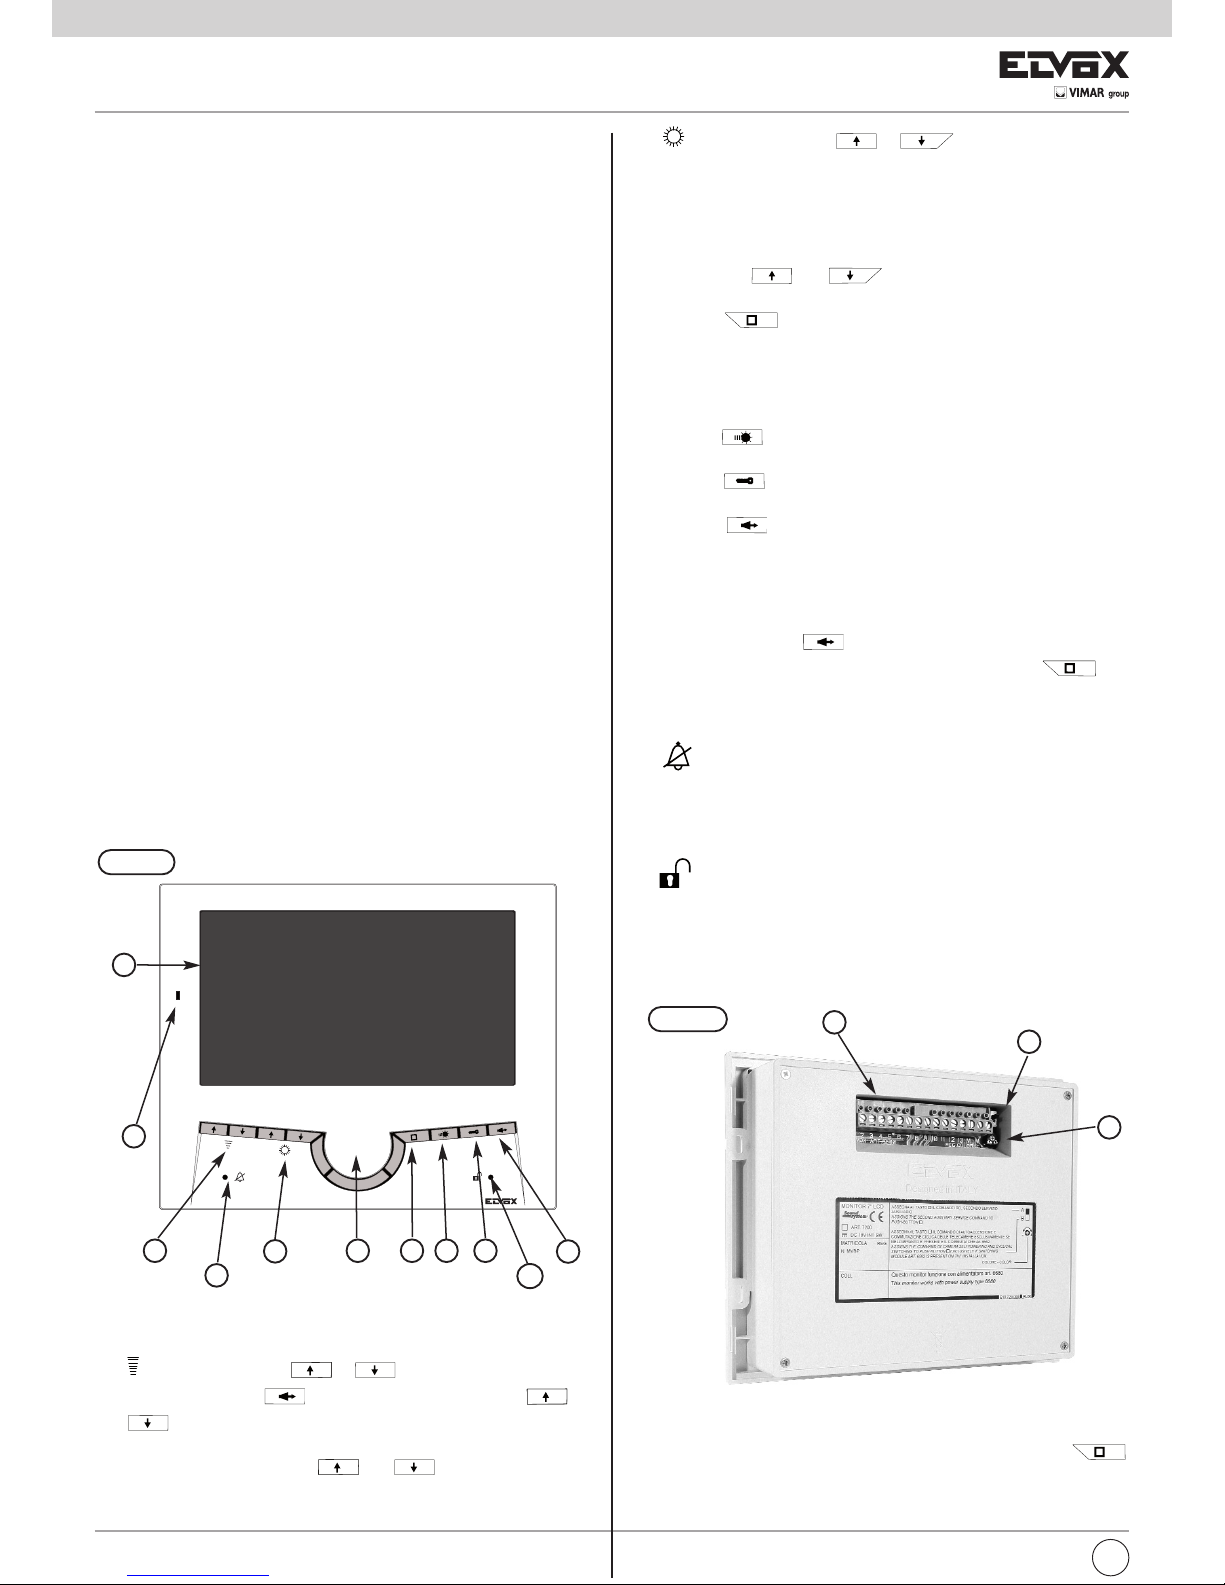
E) Coppia di pulsanti “ e ”:
1) Quando il monitor è acceso i pulsanti permettono la regolazione della
luminosità.
2) Quando il monitor è spento i pulsanti permettono la selezione della
melodia per la sola chiamata da posto esterno. Il videocitofono dispone
di sette diverse melodie. Per scegliere una melodia diversa di quella di
default (din don dan) mantenere premuto per almeno 1 secondo uno dei
due pulsanti “ ” o “ ”; poi premerli ripetutamente per selezionare la melodia desiderata.
F) Pulsante : per l’autoaccensione del videocitofono sulla teleca-
mera del posto esterno (selettore sul retro vicino alla morsettiera in posizione B, come di default). In alternativa questo pulsante può essere
utilizzato per l’attivazione di un secondo servizio ausiliario (per esempio
una seconda serratura) semplicemente spostando il selettore posto affianco alla morsettiera in posizione A (vedi Fig. 1B).
G) Pulsante : per attivazione 1° servizio ausiliario se collegato (es. luci
scale).
H) Pulsante : per apertura serratura.
I) Pulsante (parla/ascolta): per comunicare con il posto esterno
alla ricezione di una chiamata oppure dopo l’autoaccensione. Di default
la conversazione avviene in modalità “MANI LIBERE” . In alternativa
può essere programmato per conversazione mantenendo premuto il
pulsante (vedi paragrafo “Funzione di scelta della modalità di comu-
nicazione”).
Questo pulsante può anche essere utilizzato per
l’autoaccensione del monitor nel caso in cui il pulsante “ ” sia
impegnato per l’attivazione di una seconda funzione ausiliaria. In tal
caso, spostare il selettore posto affianco alla morsettiera in posizione A
(vedi Fig. 1B).
L) Segnalazione chiamata esclusa: l’accensione della segnala-
zione (LED rosso) indica che la chiamata è esclusa (vedi punto “D”). Inoltre, nel caso di comunicazione in modalità “MANI LIBERE”, il LED rosso
rimane acceso per tutta la durata della conversazione, cioè fino a che
la fonica è attiva.
M) Segnalazione porta aperta: l’accensione del LED verde indica
che la serratura comandata dal videocitofono è aperta (è necessario il
cablaggio del morsetto 13, vedi Variante 3 nella sezione schemi di collegamento).
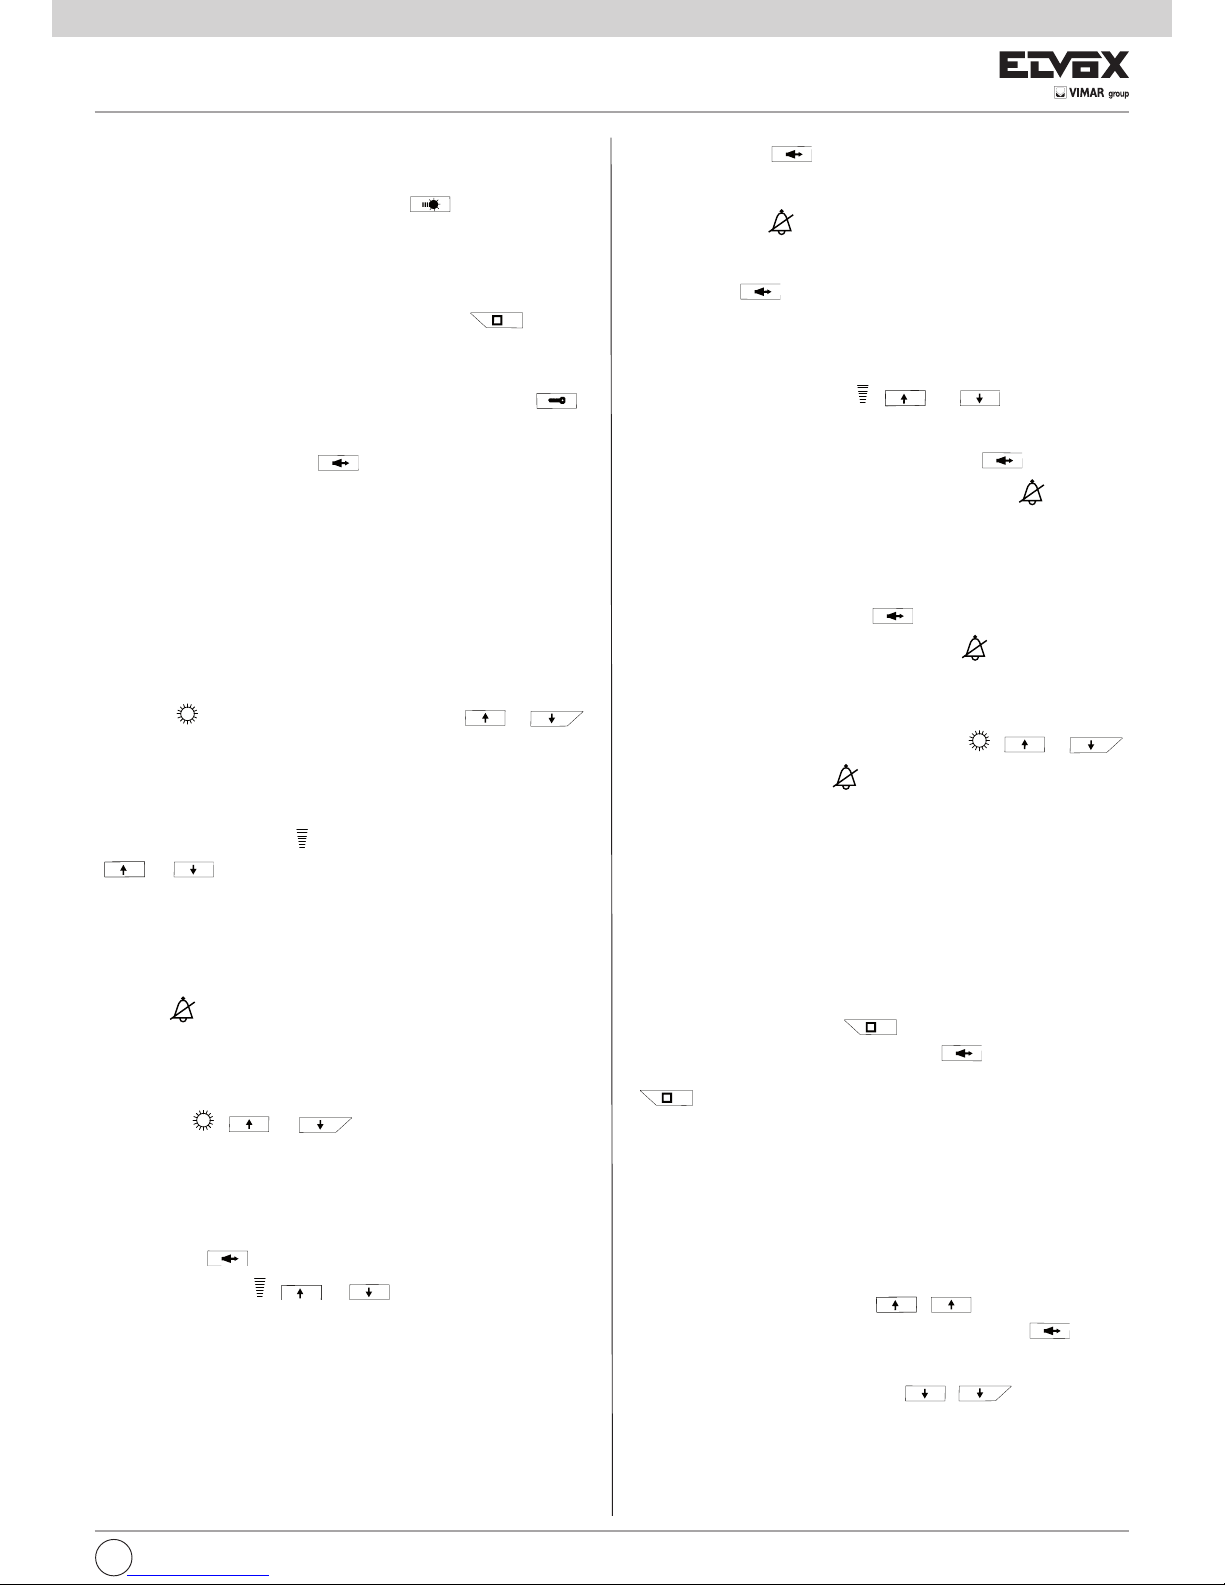
B
A
D
L
E
C F HG
I
M
Fig. 1A
A) Schermo TFT LCD 7” a colori, formato 16:9
B) Microfono.
C) Altoparlante.
D) Coppia di pulsanti “ e ”:
1) Con il pulsante “ “ premuto, premere i pulsanti “ ” o
“ ” per aumentare o diminuire il volume di conversazione.
2) Per regolare il volume della suoneria mantenere premuto per almeno
2 secondi uno dei 2 pulsanti “ ” o “ ”; poi premerli ripetuta-
mente per aumentare o diminuire oppure escludere il volume della suoneria (vedi punto L).
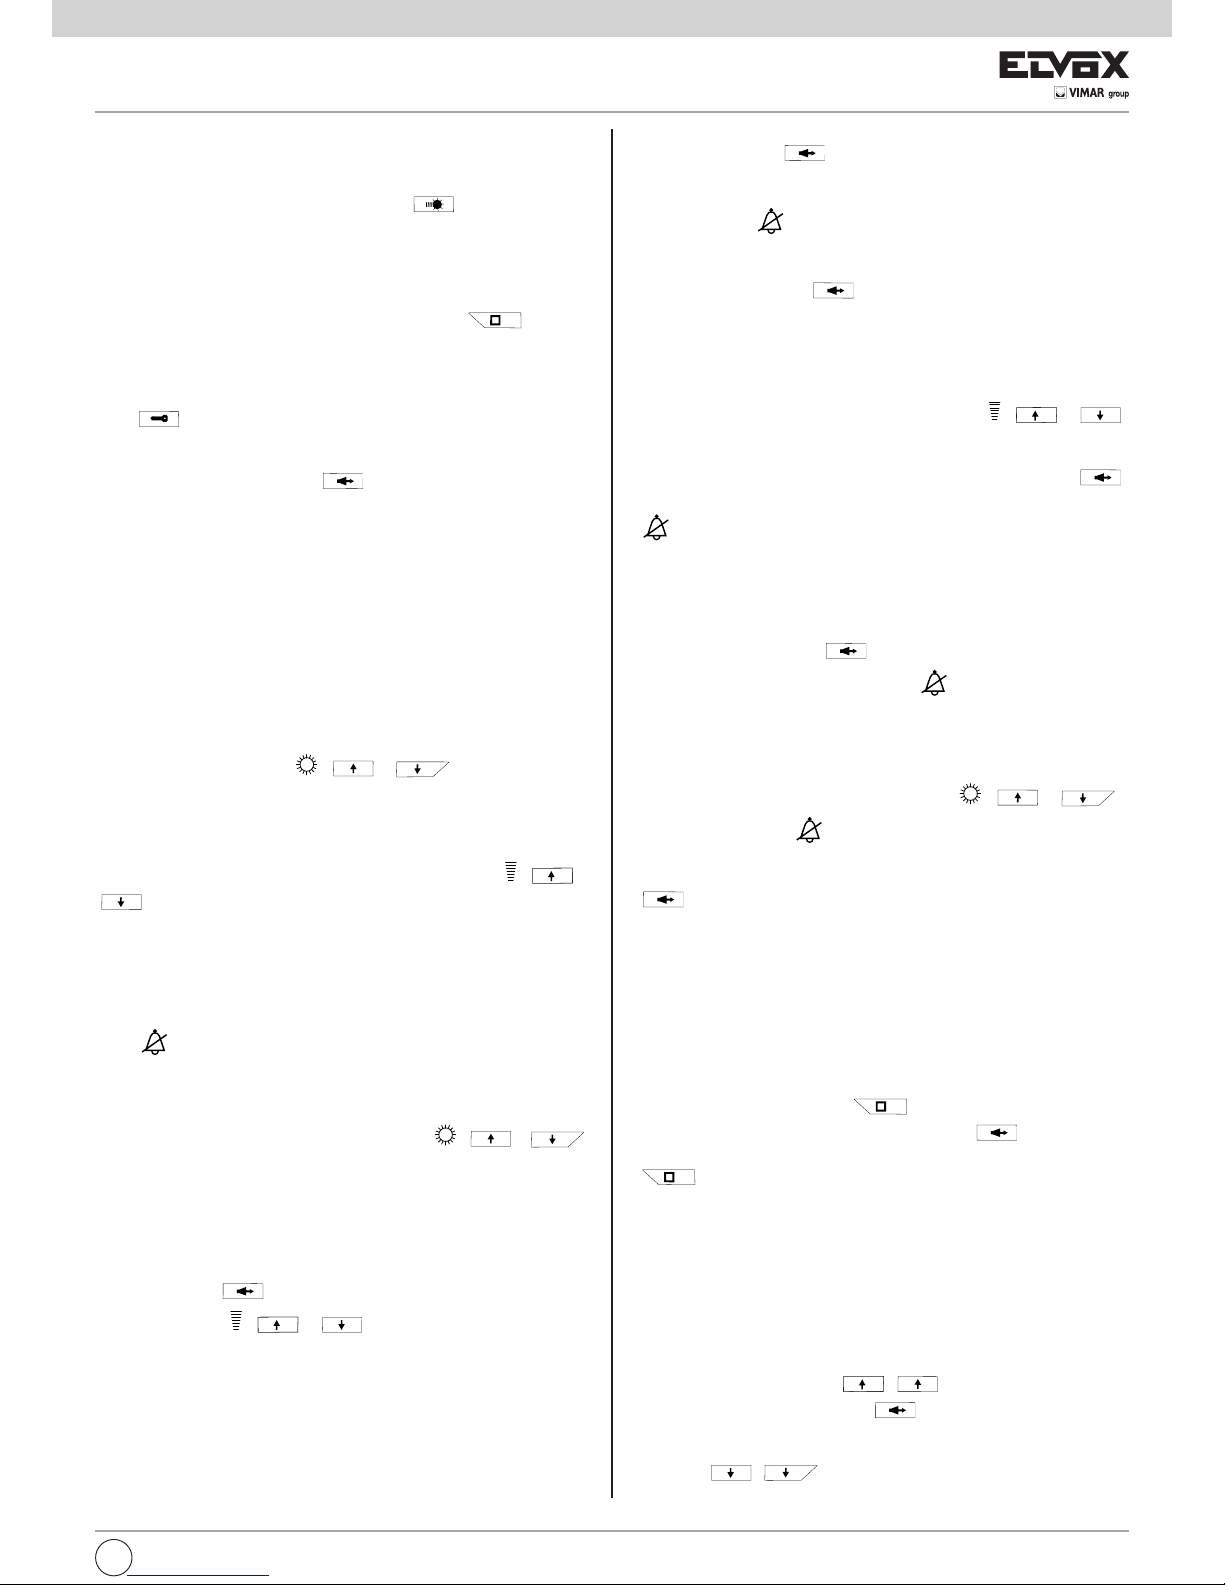
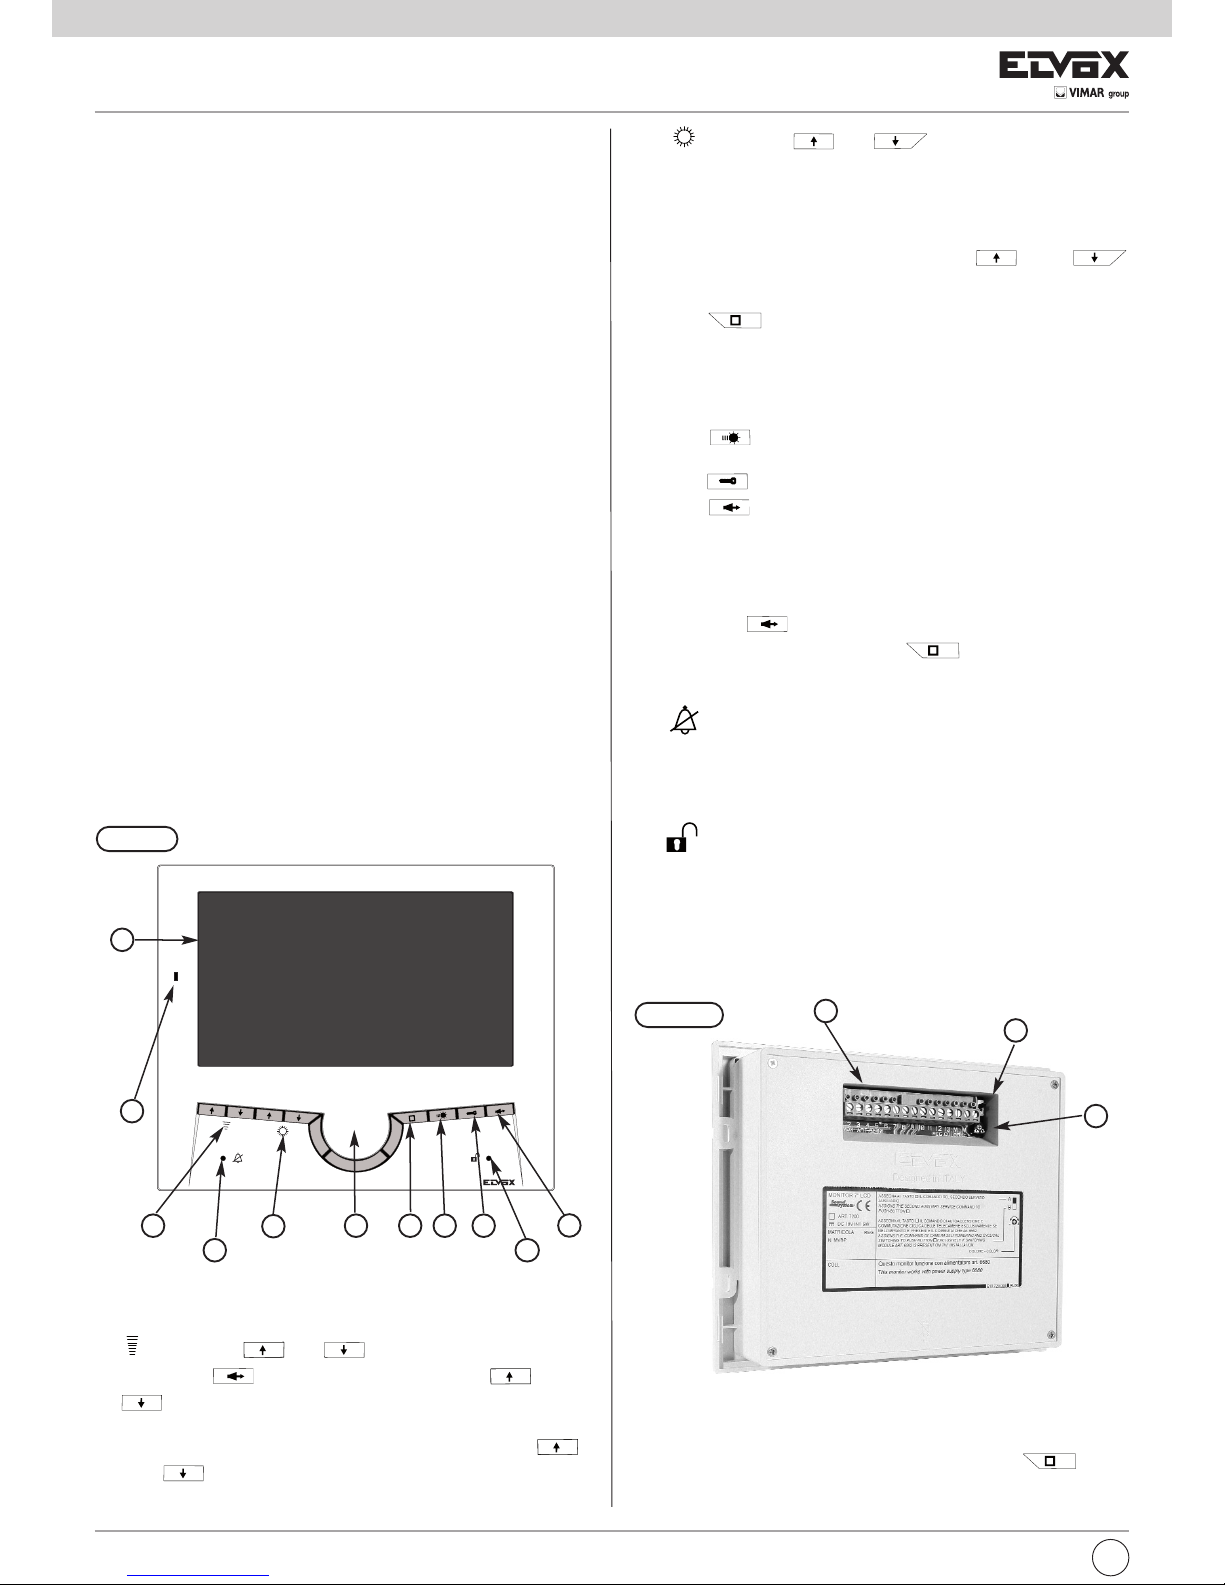
Fig. 1B
R
Q
P
Morsettiera di collegamento e regolazioni sul retro del Videocitofono
P) Trimmer di regolazione del colore
Q) Microinterruttore per la selezione della funzione del tasto
- secondo servizio ausiliario (posizione A)
- autoaccensione (posizione B), di default.
DESCRIZIONE
L’ Art. 7200 è un videocitofono viva voce della serie 7200 con schermo a colori TFT LCD 7” (Transistor a pellicola sottile per display a matrice attiva),
formato 16:9 Wide Screen per impianti videocitofonici Sound System.
E’ dotato di una tastiera retro illuminata composta da 8 pulsanti, 4 per le
funzioni tradizionali: apertura della serratura, autoaccensione del videocitofono, conversazione, servizio luce scale, e di 4 pulsanti per le seguenti regolazioni: regolazione della luminosità, regolazione ed esclusione del
volume suoneria, selezione del tipo suoneria, regolazione del volume di
conversazione e scelta della modalità di comunicazione. Sono inoltre presenti due LED (rosso e verde) per le segnalazioni di esclusione della chiamata e porta/cancello aperto.
Il videocitofono è fornito di una cover estraibile e ha la possibilità di scegliere tra altre colorazioni diverse.
L’installazione del videocitofono Art. 7200 richiede l’utilizzo della scatola da
incasso Art. 7249. La scatola è in materiale ABS, è dotata di un coperchio
che impedisce l’ingresso della malta durante le fasi di muratura e la sue dimensioni sono 189x160x52 mm.
Attenzione: Nel caso di impianti con telecamere separate, è consigliabile
adottare telecamere con risoluzione minima 420 linee TV.
Caratteristiche tecniche videocitofono
- Videocitofono in ABS.
- Morsettiera estraibile.
- Monitor a colori TFT LCD 7”, formato 16:9 Wide Screen.
- Segnale video standard PAL.
- Temperatura di funzionamento da 0° a +40° C.
- Suoneria elettronica.
- Possibilità di scegliere tra la modalità di comunicazione “hands free”,
ovvero a mani libere senza la necessità di tenere premuto il tasto
parla/ascolta; oppure la modalità tradizionale, ovvero tenendo premuto
il pulsante parla/ascolta.
- Dimensioni: 193x159x18 mm + 31 mm (per incasso)
Comandi e controlli frontali
Page 3
3
I
7200
R) Morsettiera di collegamento estraibile:
1: Ricevitore
2: Microfono
3: Comune fonica
4: Servizio ausiliario attivabile con pulsante (con riferimento al
morsetto 5)
5: Negativo alimentazione da alimentatore principale Art. 6680 o ali-
mentatore supplementare Art. 6582
6:
Positivo alimentazione
da alimentatore principale Art. 6680 o alimen-
tatore supplementare Art. 6582
(tensione minima in arrivo 15V c.c.)
7: Seconda funzione ausiliaria attivabile da pulsante (funzione
abilittata solo con microinterruttore posto sul retro del videocitofono
in posizione A)
8: Chiamata dalla targa esterna
9: Comando per apertura serratura, uscita attivata da pulsante
10: Uscita 12V c.c. per distributore video Elvox
11: Chiamata fuoriporta
12: Pulsante attivazione fonica (o autoaccensione con deviatore
in posizione “A”)
13: Alimentazione LED verde (ingresso positivo alimentazione max.
18Vc.c.)
V: Segnale video, entrata per il collegamento del cavo coassiale 75
Ohm.
M: Massa relativa al morsetto V
REGOLAZIONI E MODALITÀ DI FUNZIONAMENTO
Selezione della melodia di chiamata da posto esterno
Il videocitofono dispone di sette diverse melodie. Per scegliere una melodia diversa di quella di default (din don dan), quando il videocitofono è spento mantenere premuto per almeno 1 secondo uno dei due pulsanti pulsanti di
regolazione della luminosità ( e ), poi premere ripetutamente i pulsanti per selezionare la melodia desiderata.
Regolazione del volume suoneria
Per regolare il volume della suoneria di chiamata mantenere premuto per al-
meno 2 secondi uno dei 2 pulsanti di regolazione del volume ( e
), poi premere ripetutamente i pulsanti per aumentare o diminuire op-
pure escludere il volume della suoneria.
Esclusione della suoneria
L’esclusione della suoneria si ottiene con la stessa procedura espressa
sopra per regolare il volume della suoneria. Una volta raggiunto il “fondo
scala” avendo ripetutamente premuto il tasto freccia giù, si accende il LED
rosso in basso a sinistra, per segnalare lo stato di “suoneria esclusa”.
Regolazione luminosità
Questa regolazione avviene in condizioni di display acceso.
Utilizzare i pulsanti di regolazione della luminosità ( e
) per scegliere la luminosità. I valori di fondo scala (massimo e minimo)
sono segnalati da un beep.
Regolazione del volume di conversazione
Per “volume di conversazione” si intende il volume con cui percepiamo la
voce dell’interlocutore che si trova di fronte al posto esterno (targa).
Per regolare il volume di conversazione, occorre tenere premuto il pulsante
PARLA/ASCOLTA e aumentare o diminuire con i pulsanti di rego-
lazione di volume ( e ).
Questa procedura è valida sia in modalità MANI LIBERE (hands free) che
nella modalità con pulsante PARLA/ASCOLTA premuto.
Funzione di scelta della modalità di comunicazione
È possibile scegliere tra due diverse modalità di comunicazione con i posti
esterni:
1) Modalità MANI LIBERE (hands free): premo il pulsante
PARLA/ASCOLTA solo all’inizio della conversazione per “attivare la fonica”, ed alla fine della conversazione per “disattivare la fonica”. La condizione di “fonica attiva” viene segnalata dall’accensione
del LED rosso in basso a sinistra del videocitofono, normalmente
utilizzato per segnalare l’ESCLUSIONE DELLA SUONERIA.
2) Modalità con pulsante parla/ascolta PREMUTO: tengo premuto il
pulsante parla/ascolta durante la conversazione; lo rilascio alla
fine della conversazione.
Il videocitofono serie 7200 è programmato in fabbrica con la modalità
di comunicazione A MANI LIBERE (Hands free).
Per passare da una modalità all’altra, occorre tenere contemporanea-
mente premuti i pulsanti di regolazione del volume ( e
) fino a che il LED rosso sottostante non inizia a lampeggiare (circa 2 secondi) per segnalare l’ingresso in modalità di REGOLAZIONE. A questo
punto, durante il lampeggio, premere il pulsante PARLA/ASCOLTA
per confermare la modifica. La funzione è stata acquisita se il LED rosso
si spegne.
Funzione di risposta automatica
La funzione, disponibile solo in modalità MANI LIBERE (hands free), consiste nell’attivare la fonica del videocitofono automaticamente al ricevimento della chiamata da posto esterno, senza la necessità di premere il
pulsante PARLA/ASCOLTA . La condizione di “fonica attiva” viene
segnalata dall’accensione del LED rosso in basso a sinistra del videocitofono, normalmente utilizzato per segnalare l’ESCLUSIONE DELLA
SUONERIA. La fonica si attiva automaticamente dopo circa 5 secondi dal
ricevimento della chiamata.
Per abilitare questa funzione, occorre tenere contemporaneamente pre-
muti i pulsanti di regolazione della luminosità ( e )
fino a che il LED rosso sottostante non inizia a lampeggiare (circa 2
secondi) per segnalare l’ingresso in modalità di REGOLAZIONE. A questo punto, durante il lampeggio, premere il pulsante PARLA/ASCOLTA
per confermare la modifica. La funzione è stata acquisita se il LED
rosso si spegne.
Per disabilitare questa funzione, si utilizza la stessa procedura.
Nel caso in cui la modalità MANI LIBERE (hands free) non fosse stata attiva all’atto dell’abilitazione, questa verrà automaticamente attivata all’abilitazione della funzione di RISPOSTA AUTOMATICA. Se
successivamente viene disabilitata la funzione di ingresso in fonica automatico, la funzione MANI LIBERE rimane attiva.
Funzione di Autoaccensione
La funzione autoaccensione verso una telecamera del posto esterno può
essere eseguita con il pulsante se il selettore A/B (posto vicino
alla morsettiera) é in posizione B o con il pulsante se il selettore è
in posizione A. Se il selettore è in posizione B si può utilizzare il pulsante
per la commutazione ciclica delle telecamere con il commutatore Art. 6592.
N.B.: L’uso della funzione autoaccensione è disponibile solo se è stato
eseguito il collegamento nell’impianto.
Programmazione segreto di conversazione
Il segreto di conversazione permette di tutelare la PRIVACY degli utenti di
un condominio i quali altrimenti potrebbero ascoltare le chiamate di altri
utenti. Questa funzione ha concettualmente senso solo se abilitata
su tutti i monitor dell’impianto.
La funzione “segreto di conversazione” si ottiene tenendo premuti contemporaneamente i due tasti " , " per 2 secondi. Al lampeggio del LED rosso premere il tasto fino allo spegnimento del LED
per confermare la programmazione. La funzione di “esclusione del segreto di conversazione” si ottiene come indicato sopra ma utilizzando i
due tasti " , ".
Page 4
4
GB
7200
E) Pair of “ and ” push-buttons:
1) When the monitor is ON, the push-buttons can be used to adjust
the brightness
2) When the monitor is OFF, the buttons can be used to select the ringtone melody for calls from a speech unit only. The monitor has seven
different melodies. To select a different melody from the default one
(ding dong dang) hold down either the “ ” or “ ” button for at least 1 second; then press the buttons repeatedly to select
the desired melody
F) push-button: for monitor self-start on activation of the spe-
ech unit camera (switch located on rear next to the terminal block set
to position B, the default setting). Alternatively this button can be used
to activate a second auxiliary service (e.g. a second lock), simply by
setting the switch located next to the terminal block to position A (see
Fig. 1B)
G) push-button: for activating 1st auxiliary service, if connected
(e.g. stair lights)
H) push-button: for door lock release
I) push-button (talk/listen): to communicate with the speech
unit on receiving a call or after self-start. The default conversation
mode is “HANDS FREE”. Alternatively the unit can be set to push-totalk mode (see paragraph “Communication mode selection fun-
ction”).
This push-button can also be used for monitor self-start if the
" " push-button is used for activating a second auxiliary fun-
ction. In which case, set the switch located next to the terminal block
to position A (see Fig. 1B)
L) Ringtone mute indicator: if the red LED lights up, this indica-
tes that the ringtone is off (see point D). Also in the case of “HANDS
FREE” communication mode, the red LED remains on throughout the
conversation, e.g. as long as the audio connection is active
M) Door open indicator: if the green LED lights up, this indicates
that the lock controlled by the monitor is open (requires wiring of terminal 13, see Version 3 in the wiring diagram section)
B
A
D
L
E
C F HG
I
M
DESCRIPTION
Type 7200 is a 7200 series open-voice monitor with 7" TFT LCD screen
(thin film transistor for active matrix display) and 16:9 widescreen aspect
ratio, for Sound System video interphone installations.
It is equipped with a backlit keypad consisting of 8 push-buttons, 4 for
conventional functions: door lock release, monitor self-start, conversation
and stair light service, and 4 push-buttons for the following settings: brightness control, ringtone volume control and mute, selection of ringtone
type, conversation volume control and selection of communication mode.
It also has two LEDs (red and green) for indicating ringtone mute and
door/gate open. The monitor is equipped with a removable cover and is
available in a range of alternative colours. Installation of monitor type 7200
requires the use of back box type 7249. The back box is made of ABS plastic and is equipped with a cover to prevent the ingress of mortar and grout
during masonry work. Its dimensions are 189x160x52 mm.
Caution: In the case of systems with separate cameras, we recommend
using cameras with a minimum resolution of 420 TV lines.
Monitor technical specifications
- ABS video interphone
- Removable terminal block
- 7" TFT LCD monitor, 16:9 widescreen aspect ratio
- Standard PAL video signal
- Operating temperature from 0° to +40° C
- Electronic ringtone
- Option of selecting hands-free communication mode (e.g. no need to
keep the talk/listen button pressed) or push-to-talk mode
- Dimensions: 193x159x18 mm + 31 mm (for flush-mounting)
Fig. 1A
Front panel commands and controls
A) 7" TFT LCD colour screen, 16:9 aspect ratio
B) Microphone
C) Loudspeaker
D) Pair of “ and ” push-buttons:
1) While holding down the “ “ button, press the “ ” or “
” buttons to increase or decrease the conversation volume
2) To adjust the ringtone volume, hold down either the “ ” or “
” button for at least 2 seconds; then press the buttons repeate-
dly to increase, decrease or mute the ringtone volume (see point L).
Fig. 1B
R
Q
P
Connection terminal block and settings on back of monitor
P) Colour adjustment trimmer
Q) Microswitch for selecting the function of button:
- second auxiliary service (position A)
- self-start (position B, default setting)
Page 5

GB
5
7200
R) Removable connection terminal block:
1: Receiver
2: Microphone
3: Common voice line
4: Auxiliary service activated using push-button (with reference to
terminal 5)
5: Negative power supply from main power supply unit type 6680 or ad-
ditional power supply unit type 6582
6: Positive power supply from main power supply unit type 6680 or ad-
ditional power supply unit type 6582 (minimum input voltage 15V DC)
7: Second auxiliary function activated by push-button (function
enabled only with microswitch located on rear of monitor in position A)
8: Call from entrance panel
9: Command for door lock release, output activated from push-
button
10: 12V DC output for Elvox video distributor
11: Door call
12: Push-button for audio activation (or self-start when switch is in
position A)
13: Green LED power supply (max. positive input voltage 18V DC)
V: Video signal, input for connection of 75 Ohm coaxial cable
M: Earth for terminal V
SETTINGS AND OPERATING MODES
Selecting the speech unit call melody
The monitor has seven different melodies. To select a different melody from
the default one (ding dang dong), when the monitor is switched off hold
down either of the brightness control push-buttons ( and
) for at least one second, then press the buttons repeatedly to se-
lect the desired melody.
Adjusting the ringtone volume
To adjust the call ringtone volume, hold down either of the volume control
push-buttons ( and ), for at least two seconds, then press
the buttons repeatedly to increase, decrease or mute the ringtone volume.
Ringtone mute
Ringtone mute is activated using the same procedure described above for
adjusting the ringtone volume. Once the volume has been adjusted to the
lowest setting by repeatedly pressing the down arrow, the red LED in
the bottom left-hand corner, illuminates to indicate that ringtone mute is
activated.
Brightness control
Brightness can only be adjusted when the display is switched on. Use the
brightness control push-buttons ( and ) to select the
brightness. When the maximum and minimum values are reached, this is
indicated by a beep.
Adjusting the conversation volume
The term “conversation volume" refers to the perceived volume of the caller's voice when he/she is standing in front of the speech unit (entrance
panel). To adjust the conversation volume, hold down the TALK/LISTEN
push-button and increase or decrease the setting using the volume
control push-buttons ( and ). This procedure applies both
in HANDS FREE mode and in PUSH-TO-TALK mode.
Communication mode selection function
It is possible to choose one of two different modes of communication with
the speech units:
1) HANDS FREE mode: press the TALK/LISTEN button at the
start of the conversation only, to activate the audio, and at the end of
the conversation to deactivate the audio. The “audio active” status is
indicated by illumination of the red LED in the bottom left corner
of the monitor, which is normally used to indicate RINGTONE MUTE.
2) PUSH-TO-TALK mode: keep the talk/listen push-button pres-
sed during the conversation; release it at the end of the conversation.
The 7200 series monitor is factory set to HANDS FREE communication
mode.
To switch from one mode to the other, hold down both volume control
push-buttons ( and ) until the red LED underneath starts
flashing (for around 2 seconds) to indicate entry into ADJUSTMENT mode.
At this point, while the LED is flashing, press the TALK/LISTEN push-but-
ton to confirm the change. The function is confirmed if the red LED
switches off.
Automatic answer function
This function, which is only available in HANDS FREE mode, activates the
monitor audio connection automatically when a call is received from the
speech unit, without the need to push the TALK/LISTEN button .
The “audio active” status is indicated by illumination of the red LED
in the bottom left corner of the monitor, which is normally used to indicate
RINGTONE MUTE. The audio is activated automatically 5 seconds after
the call is received. To enable this function, hold down both brightness
control push-buttons ( and ) until the red LED
underneath starts flashing (for around 2 seconds) to indicate entry into ADJUSTMENT mode. At this point, while the LED is flashing, press the
TALK/LISTEN push-button to confirm the change. The function is confirmed if the red LED switches off.
To disable this function, follow the same procedure. If HANDS FREE mode
was not active during the enabling process, it will be activated automatically when the AUTOMATIC ANSWER function is enabled. If the automatic answer function is subsequently disabled, the HANDS FREE function
will remain active.
Self-start function
The monitor can be programmed to self-start on activation of a speech
unit camera by using the push-button if the A/B selector (located
near to the terminal block) is in position B or using the push-but-
ton if the selector is in position A. If the selector is in position B you can use
the push-button for sequential switching between cameras with
switching module type 6592.
NOTE: Use of the self-start function is only available if the connection has
been made in the installation.
Conversation privacy programming
Conversation privacy protects the privacy of users in an apartment block,
who would otherwise be able to listen to the calls of other users.
This function is only useful if all of the monitors in the installation are
enabled. The conversation privacy function is activated by holding down
both " , " buttons for 2 seconds. When the red LED starts
flashing press the button until the LED switches off to confirm the
setting. To turn conversation privacy OFF, follow the above procedure but
using the " , " buttons instead.
Page 6

6
F
7200
E) Paire de boutons “ et ” :
1) Lorsque le moniteur est allumé, les boutons permettent de régler la
luminosité.
2) Lorsque le moniteur est éteint, les boutons permettent de sélectionner la mélodie pour appel seulement à partir du micro haut-parleur. Le
moniteur dispose de sept mélodies différentes. Pour choisir une mélodie différente de celle programmée par défaut (ding dong) maintenir
l'un des deux boutons “ ” ou “ ” enfoncé pendant au
moins 1 second; les appuyer ensuite plusieurs fois pour sélectionner la
mélodie désirée.
F) Bouton : pour l'auto-allumage du moniteur sur la caméra du
micro haut-parleur (sélecteur au dos près du bornier en position B,
comme par défaut). En alternative, ce bouton peut être utilisé pour
l'activation d'un second service auxiliaire (par exemple une seconde
gâche) simplement en déplaçant le sélecteur situé à côté du bornier
en position A (voir Fig. 1B).
G) Bouton : pour l'activation du 1er service auxiliaire si relié (ex.
lumières d'escalier).
H) Bouton : pour ouverture de la gâche.
I) Bouton (parler/écouter) : pour communiquer avec le micro
haut-parleur à la réception d'un appel ou après l'auto-allumage. Par
défaut, la conversation s'effectue en mode “MAINS LIBRES”. En alternative, on peut le programmer pour la conversation en maintenant le
bouton appuyé (voir paragraphe “Fonction de choix du mode de
communication”). Ce bouton peut également être utilisé pour
l'auto-allumage du moniteur lorsque le bouton “ ” est occupé
pour l'activation d'une seconde fonction auxiliaire. Dans ce cas, déplacer le sélecteur situé à côté du bornier en position A (voir Fig. 1B).
L) Signalisation appel exclu : l'allumage de la signalisation (led
rouge) indique que l'appel est exclu (voir point “D”). En outre, en cas
de communication en mode “MAINS LIBRES”, la led rouge reste allumée pendant toute la durée de la conversation c'est-à-dire tant que la
fonction phonique est active.
M) Signalisation porte ouverte : l'allumage de la led verte indique
que la gâche commandée par le moniteur est ouverte (le câblage de la
borne 13 est nécessaire, voir Variante 3 dans la section schémas de
raccordement).
B
A
D
L
E
C F HG
I
M
DESCRIPTION
L'art. 7200 est un moniteur mains libres de la série 7200 à écran couleurs
TFT LCD 7” (Transistor à pellicule fine pour afficheur à matrice active), format 16:9 Wide Screen pour systèmes visiophoniques Sound System.
Il est équipé d'un clavier rétro-éclairé comprenant 8 boutons, 4 pour les
fonctions traditionnelles : ouverture de la gâche, auto-allumage du moniteur, conversation, service lumières d'escalier, et 4 boutons pour les réglages suivants : réglage de la luminosité, réglage et exclusion du volume de
la sonnerie, sélection du type de sonnerie, réglage du volume de conversation et choix du mode de communication. En outre, deux leds (rouge et
verte) signalent l'exclusion de l'appel et la porte/portail ouverts. Le moniteur possède une façade amovible qui permet de choisir parmi de nombreuses colorations différentes. Pour installer le moniteur Art. 7200, utiliser
la boîte d'encastrement Art. 7249. La boîte est en matière plastique ABS,
équipée d'un couvercle pour éviter que le mortier n'entre dans la boîte durant les phases de murage. Ses dimensions sont : 189x160x52 mm.
Attention : En cas d'installations avec caméras séparées, il est conseillé
d'adopter des caméras avec résolution minimum de 420 lignes TV.
Caractéristiques techniques du moniteur
- Moniteur en ABS.
- Bornier amovible.
- Moniteur couleurs TFT LCD 7”, format 16:9 Wide Screen.
- Signal vidéo standard PAL.
- Gamme de température de fonctionnement de 0° à +40°C.
- Sonnerie électronique.
- Possibilité de choisir entre le mode de communication “hands free”
c'est-à-dire mains libres sans avoir besoin de maintenir la touche parler/écouter appuyée ; ou bien le mode traditionnel c'est-à-dire en maintenant la touche parler/écouter enfoncée.
- Dimensions : 193x159x18 mm + 31 mm (pour encastrement)
Fig. 1A
Commandes et contrôles frontaux
A) Écran TFT LCD 7” couleurs, format 16:9
B) Microphone.
C) Haut-parleur.
D) Paire de boutons “ et ” :
1) Avec le bouton “ “ enfoncé, appuyer sur les boutons “
” ou “ ” pour augmenter ou diminuer le volume de conversation.
2)
Pour régler le volume de la sonnerie, maintenir l'un des deux boutons “
” ou “ ” enfoncé pendant au moins 2 secondes ;
ensuite,
les appuyer plusieurs fois pour augmenter ou diminuer ou exclure le
volume de la sonnerie (voir point L).
Fig. 1B
R
Q
P
Bornier de raccordement et réglages au dos du moniteur
P) Variateur de réglage de la couleur
Q) Micro-interrupteur pour la sélection de la fonction de la touche
:
- second service auxiliaire (position A)
- auto-allumage (position B), par défaut.
Page 7
F
7
7200
R) Bornier de connexion amovible :
1: Récepteur
2 : Microphone
3 : Commun phonique
4 : Service auxiliaire à activer avec le bouton (avec référence à la
borne 5)
5 : Négatif alimentation par alimentation principale Art. 6680 ou alimenta-
tion supplémentaire Art. 6582
6 : Positif alimentation par alimentation principale Art. 6680 ou alimenta-
tion supplémentaire Art. 6582 (tension minimum en entrée 15V c.c.)
7 : Seconde fonction auxiliaire à activer avec le bouton (fonction
validée uniquement avec micro-interrupteur situé au dos du moniteur
en position A)
8 : Appel depuis la plaque de rue
9 : Commande pour ouverture gâche, sortie activée par bouton
10 : Sortie 12V c.c. pour distributeur vidéo Elvox
11 : Appel palier
12 : Bouton activation phonique (ou auto-allumage avec déviateur
en position “A”)
13 : Alimentation led verte (entrée positive alimentation maxi. 18Vc.c.)
V : Signal vidéo, entrée pour le raccordement du câble coaxial 75 Ohm.
M : Masse relative à la borne V.
RÉGLAGES ET MODES DE FONCTIONNEMENT
Sélection de la mélodie d'appel depuis micro haut-parleur
Le moniteur dispose de sept mélodies différentes. Pour choisir une mélodie différente de celle programmée par défaut (ding dong), lorsque le moniteur est éteint maintenir l'un des deux boutons de réglage de la
luminosité enfoncé pendant au moins 1 seconde ( et
), puis appuyer plusieurs fois sur les boutons pour sélectionner la mélodie
désirée.
Réglage du volume de la sonnerie
Pour régler le volume de la sonnerie d'appel, maintenir l'un des deux bou-
tons de réglage du volume enfoncé pendant au moins 2 secondes
( et ), puis appuyer plusieurs fois sur les boutons pour aug-
menter ou diminuer ou exclure le volume de la sonnerie.
Exclusion de la sonnerie
L'exclusion de la sonnerie s'obtient en suivant la procédure illustrée cidessus pour régler le volume de la sonnerie. Après avoir atteint la “pleine
échelle” en ayant appuyé plusieurs fois sur la touche flèche vers le bas, la
led rouge s'allume en bas à gauche, pour signaler l'état de “sonnerie exclue”.
Réglage luminosité
Ce réglage a lieu avec l'afficheur allumé. Utiliser les boutons de réglage de
la luminosité ( . et ) pour choisir la luminosité. Les valeurs de pleine échelle (maximum et minimum) sont signalées par un bip.
Réglage du volume de conversation
Par “volume de conversation” on entend le volume qui permet d'entendre
la voix de l'interlocuteur qui se trouve devant le micro haut-parleur (plaque
de rue). Pour régler le volume de conversation, maintenir le bouton PAR-
LER/ÉCOUTER appuyé et augmenter ou diminuer avec les boutons
de réglage de volume ( et ). Cette procédure est valable
tant en mode MAINS LIBRES (hands free) qu'en mode avec bouton PARLER/ÉCOUTER appuyé.
Fonction de choix du mode de communication
Il est possible de choisir parmi deux différents modes de communication
avec les micros haut-parleur :
1) Mode MAINS LIBRES (hands free) : appuyer sur le bouton PAR-
LER/ÉCOUTER uniquement au début de la conversation pour
“activer la phonie”, et à la fin de la conversation pour “désactiver la
phonie”. La condition de “phonie activée” est signalée par l'allumage
de la led rouge en bas à gauche du moniteur, normalement utilisée pour signaler l'EXCLUSION DE LA SONNERIE.
2) Mode avec bouton parler/écouter APPUYÉ : maintenir le bouton par-
ler/écouter enfoncé durant la conversation ; le relâcher à la fin
de la conversation. Le moniteur série 7200 est programmé en usine
avec le mode de communication MAINS LIBRES (Hands free).
Pour passer d'un mode à l'autre, maintenir simultanément enfoncés les
boutons de réglage du volume ( et ) jusqu'à ce que la
led rouge située dessous ne commence à clignoter (environ 2 secondes)
pour signaler l'entrée en mode de RÉGLAGE. À ce stade, durant le cligno-
tement, appuyer sur le bouton PARLER/ÉCOUTER pour confirmer
la modification. La fonction a été acquise si la led rouge s'éteint.
Fonction de réponse automatique
La fonction, disponible uniquement en mode MAINS LIBRES (hands free),
consiste à activer la phonie du moniteur automatiquement à la réception
de l'appel provenant du micro haut-parleur, sans avoir besoin d'appuyer
sur le bouton PARLER/ÉCOUTER . La condition de “phonie acti-
vée” est signalée par l'allumage de la led rouge en bas à gauche du
moniteur, normalement utilisée pour signaler l'EXCLUSION DE LA SONNERIE. La phonie s'active automatiquement 5 secondes environ après la réception de l'appel. Pour valider cette fonction, maintenir simultanément
enfoncés les boutons de réglage de la luminosité ( et
) jusqu'à ce que la led rouge située dessous ne commence à clignoter (environ 2 secondes) pour signaler l'entrée en mode de RÉGLAGE. À
ce stade, durant le clignotement, appuyer sur le bouton PARLER/ÉCOUTER pour confirmer la modification. La fonction a été acquise
si la led rouge s'éteint. Pour invalider cette fonction, utiliser la même procédure. Lorsque le mode MAINS LIBRES (hands free) n'est pas activé au
moment de la validation, il est automatiquement activé à la validation de
la fonction de RÉPONSE AUTOMATIQUE. Si la fonction d'entrée automatique en phonie est invalidée par la suite, la fonction MAINS LIBRES reste
active.
Fonction d'auto-allumage
La fonction d'auto-allumage vers une caméra du micro haut-parleur peut
être effectuée avec le bouton si le sélecteur A/B (situé près du
bornier) est en position B ou avec le bouton si le sélecteur est en
position A. Si le sélecteur est en position B, on peut utiliser le bouton
pour la commutation cyclique des caméras avec le commutateur Art. 6592.
N.B.: L'emploi de la fonction d'auto-allumage n'est disponible que si la
connexion dans l'installation a été effectuée.
Programmation secret de conversation
Le secret de conversation permet de sauvegarder la PRIVACY des usagers d'une copropriété qui, dans le cas contraire, pourraient écouter les
appels des autres usagers. Cette fonction n'a évidemment de sens que
si elle est validée sur tous les moniteurs de l'installation.
La fonction “secret de conversation” s'obtient en maintenant simultanément enfoncées les deux touches " , " pendant 2 secondes.
Au clignotement de la led rouge, appuyer sur la touche jusqu'à
l'extinction de la led pour confirmer la programmation. La fonction
d'“exclusion du secret de conversation” s'obtient comme indiqué ci-des-
sus mais en utilisant les deux touches " , ".
Page 8
8
D
7200
B
A
D
L
E
C F HG
I
M
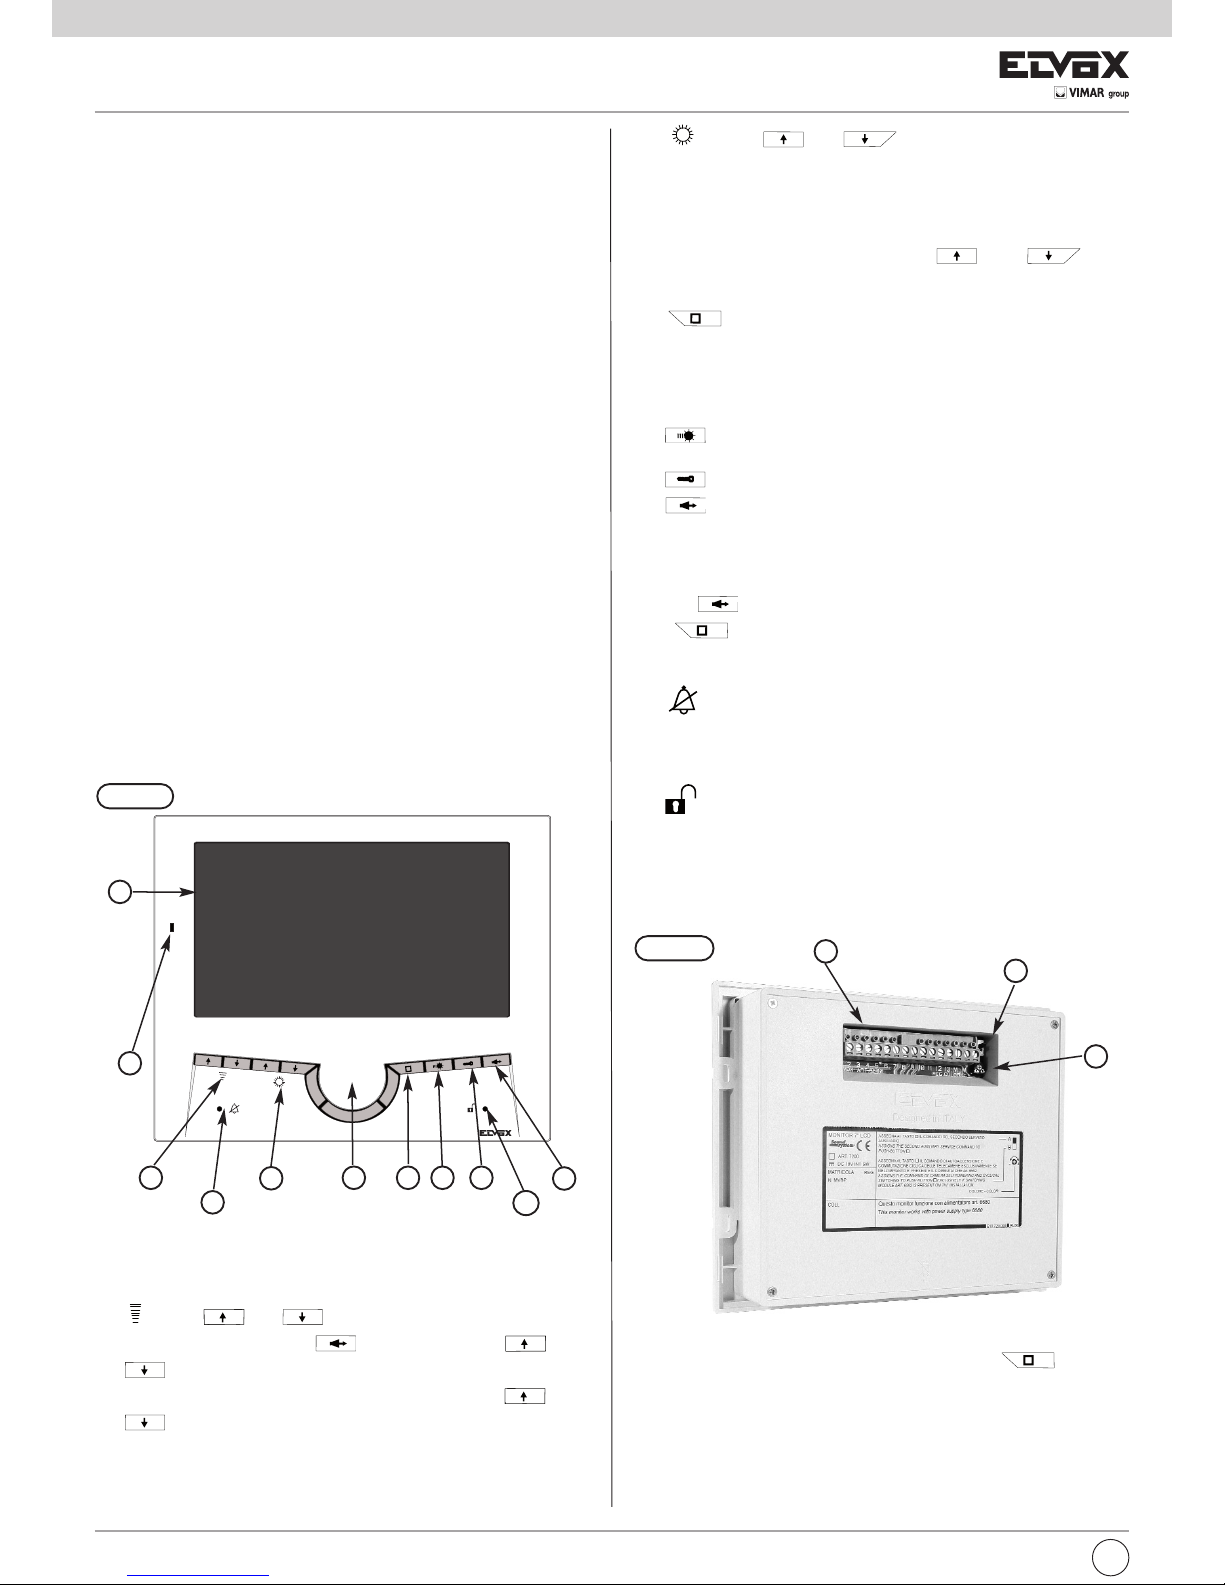
Abb. 1A
Abb. 1B
R
Q
P
Anschlussklemmenleiste und Einstellungen an der Rückseite des Monitors
P) Trimmer für die Farbeinstellung
Q) Mikroschalter für die Wahl der Funktion der Taste :
- zweite Zusatzfunktion (Stellung A)
- Selbsteinschaltung (Stellung B), Default.
BESCHREIBUNG
Der Art. 7200 ist ein Freisprechmonitor der Serie 7200 mit 7” TFT-LCD-Farbbildschirm (Dünnschichttransistor für Aktiv-Matrix-Display), Format 16:9
Wide Screen, für Sound System Video-Türsprechanlagen. Er hat ein hinterleuchtetes Tastenfeld mit 8 Tasten, davon 4 für die traditionellen Funktionen: Türöffner, Selbsteinschaltung des Monitors, Gespräch,
Treppenhausbeleuchtung, und 4 Tasten für folgende Einstellungen: Helligkeitsregelung, Regelung und Abschaltung der Ruftonlautstärke, Wahl der
Ruftonart, Einstellung der Gesprächslautstärke und Wahl des Kommunikationsmodus. Außerdem sind zwei LED (rot und grün) vorhanden, die anzeigen, dass der Ruf abgeschaltet, bzw. die Tür/das Tor offen ist.
Der Monitor ist mit einem abnehmbaren Cover ausgestattet, und es besteht die Möglichkeit der Wahl zwischen mehreren anderen Farben. Die Installation des Monitors Art. 7200 erfordert die Verwendung des
Unterputzgehäuses Art. 7249. Das Gehäuse ist aus ABS, seine Abdeckung
verhindert das Eindringen von Mörtel während der Maurerarbeiten. Die Abmessungen des Gehäuses betragen 189x160x52 mm.
Achtung: In Anlagen mit externen Kameras empfiehlt sich die Verwendung
von Kameras mit einer Mindestauflösung von 480 TV-Linien.
Technische Merkmale des Monitors
- Monitor aus ABS.
- Abnehmbare Klemmenleiste.
- 7” TFT-LCD-Farbbildschirm, Format 16:9 Wide Screen.
- Standard-Videosignal PAL.
- Betriebstemperatur 0° bis +40° C.
- Elektronisches Läutwerk.
- Wahlmöglichkeit zwischen Kommunikationsmodus “Hands-Free”, das
heißt freihändig und ohne die Taste Sprechen/Hören drücken zu müssen, und dem traditionellen Modus, bei dem die Taste Sprechen/Hören
gedrückt gehalten werden muss.
- Abmessungen: 193x159x18 mm + 31 mm (Unterputz)
Frontseitige Bedien- und Kontrollelemente
A) 7” TFT LCD-Farbbildschirm, Format 16:9
B) Mikrofon.
C) Lautsprecher.
D) Tastenpaar “ und ”:
1) Die Taste “ “ gedrückt halten und die Tasten “ ” bzw. “
” drücken, um die Gesprächslautstärke zu erhöhen bzw. zu ver-
ringern.
2) Für die Regelung der Ruftonlautstärke eine der 2 Tasten “ ”
oder “ ” mindestens 1 Sekunde lang drücken; anschließend die
Ruftonlautstärke durch wiederholte Betätigung der Tasten erhöhen, verringern oder abschalten (siehe Punkt L).
E) Tastenpaar “ und ”:
1) Bei eingeschaltetem Monitor wird mit den Tasten die Helligkeit ge-
regelt.
2) Bei ausgeschaltetem Monitor wird mit den Tasten die Melodie für
den Ruf von der Außenstelle gewählt. Der Monitor verfügt über sieben
verschiedene Melodien. Um eine andere als die Standardmelodie (Ding
Dang Dong) einzustellen, eine der zwei Tasten “ ” oder “
” mindestens 2 Sekunden lang gedrückt halten; anschließend die gewünschte Melodie durch wiederholte Betätigung der Tasten wählen.
F) Taste : Für die Selbsteinschaltung des Monitors und der Ka-
mera (Umschalter auf der Rückseite bei der Klemmenleiste in Stellung
B, wie standardmäßig vorgesehen). Alternativ hierzu kann diese Taste
für die Aktivierung einer zweiten Zusatzfunktion (zum Beispiel ein zweiter Türöffner) verwendet werden, indem ganz einfach der Umschalter
an der Seite der Klemmenleiste auf A gestellt wird (siehe Abb. 1B).
G) Taste : für die Aktivierung der 1. Zusatzfunktion sofern ange-
schlossen (z.B. Treppenhausbeleuchtung).
H) Taste : Türöffner.
I) Taste (Sprechen/Hören): Für die Kommunikation mit der Au-
ßenstelle bei Eingehen eines Rufes oder nach Selbsteinschaltung.
Standardmäßig erfolgt das Gespräch im Modus “HANDS-FREE”. Alternativ hierzu kann der Kommunikationsmodus mit gedrückt gehaltener Taste programmiert werden (siehe Abschnitt “Wahl des
Kommunikationsmodus”).
Diese Taste kann auch für die Selbsteinschaltung des Monitors
verwendet werden, wenn die Taste “ ” für die Aktivierung einer
zweiten Zusatzfunktion belegt ist. In diesem Fall muss der Umschalter
seitlich an der Klemmenleiste auf A gestellt werden (siehe Abb. 1B).
L) Anzeige Rufabschaltung: Das Aufleuchten der Anzeige (rote
Led) bedeutet, dass der Ruf abgeschaltet wurde (siehe Punkt “D”). Im
Kommunikationsmodus “HANDS-FREE” leuchtet die rote Led für die
gesamte Gesprächsdauer, das heißt solange die Sprechleitung aktiv
ist, auf.
M) Anzeige Tür offen: Das Aufleuchten der grünen Led bedeutet,
dass das vom Monitor angesteuerte Türschloss offen ist (hierzu ist die
Verdrahtung der Klemme 13 erforderlich, siehe Variante 3 im Abschnitt
Anschlusspläne ).
Page 9

D
9
7200
R) Abnehmbare Anschlussklemmenleiste:
1: Lautsprecher
2: Mikrofon
3: Sammelklemme Sprechleitung
4: Mit Taste aktivierbare Zusatzfunktion (Bezug auf Klemme 5)
5: Minuspol Versorgung vom Hauptnetzgerät Art. 6680 oder Zusatznetz-
gerät Art. 6582
6: Pluspol Versorgung vom Hauptnetzgerät Art. 6680 oder Zusatznetz-
gerät Art. 6582 (Mindest-Eingangsspannung 15V DC)
7: Von Taste aktivierbare zweite Zusatzfunktion (Funktion ist nur
freigegeben, wenn der Mikroschalter an der Monitorrückseite auf A
steht)
8: Ruf vom Klingeltableau
9: Türöffner, von Taste aktivierter Ausgang
10: Ausgang 12V DC für Elvox Videosignalverteiler
11: Etagenruf
12: Taste für die Aktivierung der Sprechleitung (oder Selbstein-
schaltung mit Umschalter in Stellung “A”)
13: Versorgung der grünen LED (Eingang Pluspol Versorgung max. 18VDC)
V: Videosignal, Eingang für den Anschluss des Koaxialkabels 75 Ohm.
M: Masse für Klemme V
EINSTELLUNGEN UND BETRIEBSARTEN
Wahl der Ruftonmelodie vom Klingeltableauruf
Der Monitor verfügt über sieben verschiedene Melodien. Um eine andere
als die Standardmelodie (Ding Dang Dong) einzustellen, bei ausgeschal-
tetem Monitor eine der zwei Tasten der Helligkeitsregelung (
und ) mindestens zwei Sekunden lang gedrückt halten, anschlie-
ßend die gewünschte Melodie durch wiederholte Betätigung der Tasten
wählen.
Regelung der Ruftonlautstärke
Für die Regelung der Ruftonlautstärke eine der 2 Tasten der Helligkeitsre-
gelung ( und ) mindestens zwei Sekunden lang gedrückt
halten, anschließend die Ruftonlautstärke durch wiederholte Betätigung
der Tasten erhöhen, verringern oder ganz abschalten.
Ruftonabschaltung
Um den Rufton ganz abzustellen, genauso vorgehen, wie oben für die Regelung der Ruftonlautstärke beschrieben. Sobald das untere “Ende der
Lautstärkeskala” durch mehrmaliges Betätigen der „Pfeil nach unten“-
Taste erreicht wird, leuchtet die rote Led unten links auf, um zu signalisieren, dass der “Rufton abgestellt” ist.
Helligkeitsregelung
Für diese Regelung muss das Display eingeschaltet sein. Mit den Tasten
der Helligkeitsregelung ( und ) die Helligkeit einstellen. Die Minimal- und Maximalwerte werden von einem Piepton signalisiert.
Einstellung der Gesprächslautstärke
Unter “Gesprächslautstärke” ist die Lautstärke zu verstehen, mit der man
die Stimme des Anrufers hört, der sich an der Außenstelle (Klingeltableau)
befindet. Zum Einstellen der Gesprächslautstärke die Taste SPRE-
CHEN/HÖREN gedrückt halten und die Lautstärke mit den Tasten
der Lautstärkeregelung ( und ) erhöhen bzw. verringern.
Diese Vorgehensweise gilt sowohl im Kommunikationsmodus HANDSFREE als auch im Modus mit gedrückter SPRECHEN/HÖREN-Taste.
Wahl des Kommunikationsmodus
Es besteht die Wahl zwischen zweierlei Kommunikationsarten mit den Außenstellen:
1) Modus HANDS-FREE: Die Taste SPRECHEN/HÖREN wird nur
bei Gesprächsbeginn gedrückt, um “die Sprechleitung zu aktivieren”,
und bei Gesprächsende, um “die Sprechleitung zu deaktivieren”. Die
Bedingung “Sprechleitung aktiv” wird durch das Aufleuchten der roten
Led unten links am Monitor signalisiert, die normalerweise zur Anzeige der RUFTONABSCHALTUNG dient.
2) Modus mit GEDRÜCKTER Taste Sprechen/Hören: Die Taste Spre-
chen/Hören wird während des Gesprächs gedrückt gehalten;
sie wird erst bei Beendigung des Gesprächs losgelassen. Der Monitor
der Serie 7200 ist werkseitig auf den Kommunikationsmodus HANDSFREE eingestellt. Um von einem Modus auf den anderen zu wechseln,
müssen die Tasten der Lautstärkeregelung ( und )
gleichzeitig gedrückt gehalten werden, bis die darunter befindliche rote
Led zu blinken beginnt (ca. 2 Sekunden), um zu signalisieren, dass auf
den EINSTELLUNGSMODUS gewechselt wurde. Solange die Led
blinkt, die Taste SPRECHEN/HÖREN drücken, um die Änderung zu bestätigen. Die Funktion wurde übernommen, wenn die rote
Led erlischt.
Funktion der automatischen Rufbeantwortung
Die Funktion, die nur im Modus HANDS-FREE verfügbar ist, dient zur automatischen Aktivierung der Sprechleitung des Monitors sobald ein Ruf
von der Außenstelle eingeht, ohne dass die Taste SPRECHEN/HÖREN
gedrückt werden muss. Die Bedingung “Sprechleitung aktiv” wird
durch das Aufleuchten der roten Led unten links am Monitor signalisiert, die normalerweise zur Anzeige der RUFTONABSCHALTUNG dient.
Die Sprechleitung wird 5 Sekunden nach Eingehen des Anrufs automatisch aktiviert. Um diese Funktion zu aktivieren, die Tasten der Helligkeit-
sregelung ( und ) gleichzeitig gedrückt halten, bis die
darunter befindliche rote Led zu blinken beginnt (ca. 2 Sekunden),
um zu signalisieren, dass auf den EINSTELLUNGSMODUS gewechselt
wurde. Solange die Led blinkt, die Taste SPRECHEN/HÖREN drücken, um die Änderung zu bestätigen. Die Funktion wurde übernommen,
wenn die rote Led erlischt. Zur Deaktivierung dieser Funktion genauso vorgehen. Falls der Modus HANDS-FREE bei Freigabe der Funktion nicht aktiv
ist, wird er bei Freigabe der Funktion AUTOMATISCHE RUFBEANTWORTUNG automatisch aktiviert. Wenn die Funktion der automatischen Rufbeantwortung danach wieder deaktiviert wird, bleibt die Funktion
HANDS-FREE aktiv.
Selbsteinschaltungsfunktion
Die Aktivierung der Funktion Selbsteinschaltung erfolgt mit der Taste
, wenn der Umschalter A/B (neben der Klemmenleiste) auf B steht,
bzw. mit der Taste , wenn der Umschalter auf A steht. Wenn der
Umschalter auf B steht, kann die Taste für den zyklischen We-
chsel der Kameras mit dem Umschalter Art. 6592 verwendet werden.
HINWEIS: Die Funktion Selbsteinschaltung ist nur verfügbar, wenn der entsprechende Anschluss in der Anlage ausgeführt wurde.
Programmierung der Mithörsperre
Die Mithörsperre schützt die PRIVATSPHÄRE der Bewohner eines Mehrfamilienhauses, die ansonsten die Gespräche der andern Benutzer mithören könnten. Diese Funktion hat nur einen Sinn, wenn sie an allen
Monitoren der gesamten Anlage aktiviert ist. Die Funktion “Mithörsperre”
wird aktiviert, indem die zwei Tasten " , " 2 Sekunden lang
gleichzeitig gedrückt werden. Sobald die rote Led blinkt, die Taste
drücken, bis die Led erlischt, um die Programmierung zu bestätigen. Zur
Deaktivierung der Mithörsperre wird wie oben beschrieben vorgegangen,
aber mit den zwei Tasten " , ".
Page 10

10
E
7200
E) Pareja de pulsadores “ y ”:
1) Cuando el monitor está encendido, los pulsadores permiten regu-
lar el brillo.
2) Cuando el monitor está apagado, los pulsadores permiten seleccionar el tono únicamente para la llamada desde el aparato externo.
El videoportero dispone de siete tonos distintos. Para elegir un tono distinto al configurado por defecto (din don dan), mantenga pulsado du-
rante al menos 1 segundo uno de los dos pulsadores “ ” o
“ ”; luego vuelva a pulsarlos repetidamente para seleccionar el
tono deseado.
F) Pulsador : para el autoencendido del videoportero en la cá-
mara del aparato externo (selector colocado en la parte trasera, cerca
de la caja de conexiones en la posición B, por defecto). Como alternativa, este pulsador se puede utilizar para activar un segundo servicio auxiliar (por ejemplo una segunda cerradura) simplemente
desplazando el selector al lado de la caja de conexiones en posición
A (véase la Fig. 1B).
G) Pulsador : para activar el primer servicio auxiliar si está co-
nectado (por ejemplo, la luz de la escalera).
H) Pulsador : para abrepuertas.
I) Pulsador (Hablar/Escuchar): para comunicar con el aparato
externo al recibir una llamada o bien después del autoencendido. Por
defecto, la conversación se realiza en el modo “MANOS LIBRES”.
Como alternativa, se puede programar para conversación manteniéndolo pulsado (véase el apartado “Función de selección del modo de
comunicación”). Este pulsador se puede utilizar también para
el autoencendido del monitor si el pulsador “ ” está ocupado
para activar una segunda función auxiliar. En este caso, desplace el
selector colocado al lado de la caja de conexiones en posición A
(véase la Fig. 1B).
L) Señalización de llamada excluida: el encendido de la señaliza-
ción (led rojo) indica que la llamada está excluida (véase el punto “D”).
Además, en caso de comunicación en el modo “MANOS LIBRES”, el
led rojo permanece encendido durante toda la conversación, es decir
hasta que la línea fónica esté activa.
M) Señalización de puerta abierta: el encendido del led verde in-
dica que la cerradura accionada por el videoportero está abierta (es
necesario el cableado del borne 13, véase la Variante 3 en el apartado
de los esquemas de conexión).
B
A
D
L
E
C F HG
I
M
DESCRIPCIÓN
El Art. 7200 es un videoportero manos libres de la serie 7200 con pantalla
en color TFT LCD 7” (Transistor de película delgada para pantalla de matriz activa), formato 16:9 Wide Screen para videoporteros Sound System.
Cuenta con teclado retroiluminado de 8 pulsadores, 4 para las funciones
tradicionales (abrepuertas, autoencendido del videoportero, conversación,
servicio auxiliar de luz de escalera) y 4 pulsadores para los siguientes ajustes: brillo, ajuste y exclusión del volumen del timbre, selección del tipo de
timbre, ajuste del volumen de conversación y selección del modo de comunicación. Además, hay dos leds (rojo y verde) para señalizar la exclusión de la llamada y la apertura de la puerta/cancela. El videoportero se
suministra con una carcasa extraíble, siendo posible elegir entre distintos
colores. La instalación del videoportero Art. 7200 requiere la utilización de
la caja de empotrar Art. 7249. La caja es de ABS, está provista de una
tapa que impide la entrada de mortero durante la instalación y mide
189x160x52 mm.
Atención: en caso de equipos con cámaras separadas, se recomienda
utilizar cámaras con una resolución mínima de 420 líneas TV.
Características técnicas del videoportero
- Videoportero de ABS.
- Caja de conexiones extraíble.
- Monitor en color TFT LCD 7”, formato 16:9 Wide Screen.
- Señal de vídeo estándar PAL.
- Temperatura de funcionamiento de 0° a +40° C.
- Timbre electrónico.
- Posibilidad de elegir entre el modo de comunicación manos libres, es
decir sin mantener pulsada la tecla para hablar/escuchar; o bien el modo
tradicional, es decir manteniendo pulsada dicha tecla.
- Medidas: 193x159x18 mm + 31 mm (para empotrar)
Fig. 1A
Mandos y controles frontales
A) Pantalla TFT LCD 7” en color, formato 16:9
B) Micrófono.
C) Altavoz.
D) Pareja de pulsadores “ y ”:
1) Con el pulsador “ “ accionado, pulse “ ” o “ ”
para aumentar o disminuir el volumen de la conversación.
2) Para ajustar el volumen del timbre, mantenga pulsado durante al
menos 2 segundos uno de los 2 pulsadores “ ” o “ ”;
luego púlselos repetidamente para aumentar, disminuir o bien excluir
el volumen del timbre (véase el punto L).
Fig. 1B
R
Q
P
Caja de conexiones y ajustes en la parte trasera del videoportero
P) Trimmer de ajuste del color
Q) Microinterruptor para la selección de la función del pulsador
:
- segundo servicio auxiliar (posición A)
- autoencendido (posición B), por defecto.
Page 11

E
11
7200
R) Caja de conexiones extraíble:
1: Receptor
2: Micrófono
3: Común de la línea fónica
4: Servicio auxiliar que se activa con el pulsador (con referencia
al borne 5)
5: Negativo de la alimentación desde el alimentador principal Art. 6680
o alimentador adicional Art. 6582
6: Positivo de la alimentación desde el alimentador principal Art. 6680 o
alimentador adicional Art. 6582 (tensión mínima en entrada 15 Vcc)
7: Segunda función auxiliar que se activa desde el pulsador
(función habilitada sólo con el microinterruptor colocado en la parte
trasera del videoportero en posición A)
8: Llamada desde la placa externa
9: Mando abrepuertas, salida activada por el pulsador
10: Salida 12 Vcc para distribuidor de vídeo Elvox
11: Llamada desde fuera de la puerta
12: Pulsador de activación de la línea fónica (o autoencendido con
desviador en posición “A”)
13: Alimentación del led verde (entrada positiva alimentación máx. 18 Vcc)
V: Señal de vídeo, entrada para la conexión del cable coaxial de 75 oh-
mios.
M: Masa relativa al borne V
AJUSTES Y MODOS DE FUNCIONAMIENTO
Selección del tono de llamada desde el aparato externo
El videoportero dispone de siete tonos distintos. Para elegir un tono distinto al configurado por defecto (din don dan), cuando el videoportero
esté apagado mantenga pulsado durante al menos 1 segundo uno de los
dos pulsadores de ajuste del brillo ( y ), luego pulse
repetidamente los pulsadores para seleccionar el tono deseado.
Ajuste del volumen del timbre
Para ajustar el volumen del timbre de llamada, mantenga pulsado durante
al menos 2 segundos uno de los 2 pulsadores de ajuste del volumen
( y ), luego pulse repetidamente los pulsadores para aumen-
tar, disminuir o bien excluir el volumen del timbre.
Exclusión del timbre
La exclusión del timbre se obtiene con el mismo procedimiento ilustrado
anteriormente para ajustar el volumen del timbre. Una vez alcanzado el
“mínimo” pulsando repetidamente la tecla con la flecha abajo, se enciende
el led rojo abajo a la izquierda, para indicar el estado de “timbre excluido”.
Ajuste del brillo
Este ajuste se realiza con el monitor encendido. Utilice los pulsadores de
ajuste del brillo ( y ) para seleccionar el nivel deseado.
Los valores máximo y mínimo se indican con un bip.
Ajuste del volumen de conversación
El “volumen de conversación” es el nivel de percepción de la voz del interlocutor que se encuentra delante del aparato externo (placa). Para ajustar el volumen de conversación, hay que mantener pulsada la tecla
HABLAR/ESCUCHAR y subirlo o bajarlo con los pulsadores de aju-
ste del volumen ( y ).
Este procedimiento es válido tanto en el modo MANOS LIBRES como con
el pulsador HABLAR/ESCUCHAR pulsado.
Función de selección del modo de comunicación
Es posible elegir entre dos modos de comunicación con los aparatos externos:
1) Modo MANOS LIBRES: pulse HABLAR/ESCUCHAR sólo al
principio de la conversación para “activar la línea fónica”, y al finalizar
para “desactivarla”. La condición de “línea fónica activa” se indica con
el encendido del led rojo abajo a la izquierda del videoportero,
que normalmente se utiliza para indicar la EXCLUSIÓN DEL TIMBRE.
2) Modo con pulsador Hablar/Escuchar PULSADO: Mantenga pulsado
Hablar/Escuchar durante la conversación; suéltelo al finalizar.
El videoportero de la serie 7200 está programado de fábrica con el
modo de comunicación MANOS LIBRES.
Para pasar de un modo a otro, hay que mantener pulsados a la vez los
pulsadores de ajuste del volumen ( y ) hasta que el
led rojo colocado abajo empiece a parpadear (unos 2 segundos) para
indicar la entrada en el modo AJUSTE. Entonces, durante el parpadeo,
pulse HABLAR/ESCUCHAR para confirmar la modificación. La
función está activada si el led rojo se apaga.
Función Respuesta automática
La función, disponible sólo en el modo MANOS LIBRES, consiste en la activación automática de la línea fónica del videoportero al recibir la llamada
desde el aparato externo, sin que sea necesario pulsar HA-
BLAR/ESCUCHAR . La condición de “línea fónica activa” se indica
con el encendido del led rojo abajo a la izquierda del videoportero,
que normalmente se utiliza para señalizar la EXCLUSIÓN DEL TIMBRE. La
línea fónica se activa automáticamente unos 5 segundos después de recibir la llamada. Para habilitar esta función, hay que mantener pulsados a
la vez los pulsadores de ajuste del brillo ( e ) hasta
que el led rojo colocado abajo empiece a parpadear (unos 2 segundos) para indicar la entrada en el modo AJUSTE. Entonces, durante el par-
padeo, pulse HABLAR/ESCUCHAR para confirmar la modificación.
La función está activada si el led rojo se apaga. Para desactivar esta función, se utiliza el mismo procedimiento. Si el modo MANOS LIBRES no
está activado, se activará automáticamente al habilitar la función RESPUESTA AUTOMÁTICA. Si posteriormente se desactiva la función de entrada
automática en línea fónica, la función MANOS LIBRES permanece activada.
Función Autoencendido
La función autoencendido de una cámara del aparato externo se puede
realizar con el pulsador si el selector A/B (colocado cerca de la
caja de conexiones) está en posición B o con el pulsador si el se-
lector está en posición A. Si el selector está en posición B, se puede utilizar el pulsador para la conmutación cíclica de las cámaras con
el conmutador Art. 6592.
Nota: La función autoencendido está disponible sólo si se ha realizado la
conexión en la instalación.
Programación de la conversación privada
La conversación privada permite proteger la CONFIDENCIALIDAD de los
usuarios de una comunidad de vecinos que, de otro modo, podrían escuchar las llamadas de otros usuarios. Esta función tiene sentido sólo si
está activada en todos los monitores de la instalación.
La función “conversación privada” se obtiene manteniendo pulsados a la
vez los dos pulsadores " , " durante 2 segundos. Cuando el
led rojo parpadea, pulse la tecla hasta que se apague el led para
confirmar la programación. La función “exclusión de la conversación privada” se obtiene como indicado anteriormente, pero utilizando las dos te-
clas " , ".
Page 12

12
P
7200
E) Par de botões “ e ”:
1) Quando o monitor está ligado, os botões permitem a regulação da
luminosidade.
2) Quando o monitor está desligado, os botões permitem a selecção
do toque apenas para a chamada feita a partir do posto externo. O monitor dispõe de sete toques distintos. Para escolher um toque diferente
do predefinido (din don dan), mantenha premido, durante pelo menos
1 segundo, um dos dois botões “ ” ou “ ”
; depois,
prima-os repetidamente para seleccionar o toque desejado.
F) Botão : para o autoacendimento do monitor na telecâmara do
posto externo (selector na parte traseira, junto à régua de bornes na
posição B, tal como predefinido). Alternativamente, este botão pode
ser utilizado para a activação de um segundo serviço auxiliar (por
exemplo, um segundo trinco), deslocando simplesmente o selector situado ao lado da régua de bornes para a posição A (ver a Fig. 1B).
G) Botão : para a activação do 1° serviço auxiliar, se ligado (ex.:
luz das escadas).
H) Botão : para a abertura do trinco.
I) Botão (falar/escutar): para comunicar com o posto externo
aquando da recepção de uma chamada ou após o autoacendimento.
Por defeito, a conversação ocorre no modo “MÃOS LIVRES”. Alternativamente, pode ser programado para a conversação mantendo o
botão premido (ver o parágrafo “Função de escolha do modo de co-
municação”).
Este botão também pode ser utilizado para o autoacendimento
do monitor no caso de o botão “ ” estar ocupado para a acti-
vação de uma segunda função auxiliar. Nesse caso, desloque o selector situado ao lado da régua de bornes para a posição A (ver a Fig.
1B).
L) Sinal de chamada excluída: o acendimento do sinal (LED ver-
melho) indica que a chamada foi excluída (ver o ponto “D”). Além disso,
no caso de uma comunicação no modo “MÃOS LIVRES”, o LED vermelho mantém-se aceso durante toda a conversação, isto é, enquanto
o áudio estiver activo.
M) Sinal de porta aberta: o acendimento do LED verde indica que
o trinco comandado pelo monitor está aberto (é necessária a cablagem do borne 13, ver a Variante 3 na secção de esquemas de ligação).
DESCRIÇÃO
O Art. 7200 é um monitor alta-voz da série 7200 com ecrã a cores TFT
LCD 7” (Transístor de película fina para visor de matriz activa), formato
16:9 Wide Screen para sistemas de vídeo Sound System.
É dotado de um teclado retroiluminado constituído por 8 botões, 4 para
as funções tradicionais: abertura do trinco, autoacendimento do monitor,
conversação, serviço de luz das escadas, e de 4 botões para as seguintes regulações: regulação da luminosidade, regulação e exclusão do volume da campainha, selecção do tipo de campainha, regulação do volume
de conversação e escolha do modo de comunicação. Possui ainda dois
LEDs (vermelho e verde) para os sinais de exclusão da chamada e
porta/portão aberto. O monitor possui uma tampa extraível e permite
optar por outras cores diferentes. A instalação do monitor Art. 7200 requer
a utilização da caixa de embeber Art. 7249. A caixa é em material ABS, é
dotada de uma tampa que impede a entrada da argamassa durante as
fases de alvenaria e as suas dimensões são 189x160x52 mm.
Atenção: No caso de instalações com telecâmaras separadas, é aconselhável adoptar telecâmaras com uma resolução mínima de 420 linhas TV.
Características técnicas do monitor
- Monitor em ABS.
- Régua de bornes extraível.
- Monitor a cores TFT LCD 7”, formato 16:9 Wide Screen.
- Sinal de vídeo standard PAL.
- Temperatura de funcionamento de 0° a +40°C.
- Campainha electrónica.
- Possibilidade de escolher entre o modo de comunicação “hands free”,
ou seja, com as mãos livres sem que seja necessário manter o botão de
falar/escutar premido; ou o modo tradicional, ou seja, mantendo premido
o botão de falar/escutar.
- Dimensões: 193x159x18 mm + 31 mm (para embeber)
Comandos e controlos frontais
A) Ecrã TFT LCD 7” a cores, formato 16:9
B) Microfone.
C) Altifalante.
D) Par de botões “ e ”:
1) Com o botão “ “ premido, prima os botões “ ” ou
“ ” para aumentar ou diminuir o volume de conversação.
2) Para regular o volume da campainha, mantenha premido durante
pelo menos 2 segundos um dos 2 botões “ ” ou “ ”; de-
pois, prima-os repetidamente para aumentar ou diminuir ou, então, excluir o volume da campainha (ver o ponto L).
Fig. 1B
R
Q
P
Régua de bornes de ligação e regulações na parte traseira do Monitor
P) Potenciómetro de regulação da cor
Q) Microinterruptor para a selecção da função do botão :
- segundo serviço auxiliar (posição A)
- autoacendimento (posição B), por defeito.
B
A
D
L
E
C F HG
I
M
Fig. 1A
Page 13

P
13
7200
R) Régua de bornes de ligação extraível:
1: Receptor
2: Microfone
3: Comum áudio
4: Serviço auxiliar activável com o botão (tendo como referência
o borne 5)
5: Negativo de alimentação a partir do alimentador principal Art. 6680 ou
do alimentador suplementar Art. 6582
6: Positivo de alimentação a partir do alimentador principal Art. 6680 ou
do alimentador suplementar Art. 6582 (tensão mínima de chegada 15V
c.c.)
7: Segunda função auxiliar activável com o botão (função acti-
vada apenas com o microinterruptor situado na parte traseira do mo-
nitor na posição A)
8: Chamada da botoneira externa
9: Comando para a abertura do trinco, saída activada a partir do botão
10: Saída 12V c.c. para distribuidor vídeo Elvox
11: Chamada de patamar
12: Botão de activação do áudio (ou autoacendimento com o de-
sviador na posição “A”)
13: Alimentação do LED verde (entrada do positivo de alimentação máx.
18Vc.c.)
V: Sinal de vídeo, entrada para a ligação do cabo coaxial 75 Ohm.
M: Massa relativa ao borne V
REGULAÇÕES E MODOS DE FUNCIONAMENTO
Selecção do toque de chamada a partir do posto externo
O monitor dispõe de sete toques distintos. Para escolher um toque diferente do predefinido (din don dan), quando o monitor está desligado, mantenha premido, durante pelo menos 1 segundo, um dos dois botões de
regulação da luminosidade ( e ), depois, prima repetidamente os botões para seleccionar o toque desejado.
Regulação do volume da campainha
Para regular o volume da campainha de chamada, mantenha premido, durante pelo menos 2 segundos, um dos 2 botões de regulação do volume
( e ), depois, prima repetidamente os botões para au-
mentar ou diminuir ou, então, excluir o volume da campainha.
Exclusão da campainha
A exclusão da campainha é obtida com o mesmo procedimento descrito
acima para regular o volume da campainha. Uma vez atingido o “fundo da
escala”, tendo premido repetidamente o botão da seta para baixo, acende-
se o LED vermelho em baixo à esquerda, para assinalar o estado de
“campainha excluída”.
Regulação da luminosidade
Esta regulação é feita com o visor ligado. Utilize os botões de regulação da
luminosidade ( e ) para escolher a luminosidade. Os
valores de fundo da escala (máximo e mínimo) são assinalados por um
bip.
Regulação do volume de conversação
Por “volume de conversação” entende-se o volume com que ouvimos a
voz do interlocutor que se encontra à frente do posto externo (botoneira).
Para regular o volume de conversação, deverá manter premido o botão de
FALAR/ESCUTAR e aumentar ou diminuir com os botões de regu-
lação de volume ( e ). Este procedimento é válido tanto
no modo MÃOS LIVRES (hands free) como no modo com o botão de
FALAR/ESCUTAR premido.
Função de escolha do modo de comunicação
É possível escolher entre dois modos de comunicação distintos com os
postos externos:
1) Modo MÃOS LIVRES (hands free): prima o botão de
FALAR/ESCUTAR apenas no início da conversação para “activar o áudio” e no fim da conversação para “desactivar o áudio”. O
estado de “áudio activo” é assinalado pelo acendimento do LED ver-
melho em baixo à esquerda do monitor, normalmente utilizado
para assinalar a EXCLUSÃO DA CAMPAINHA.
2) Modo com o botão de falar/escutar PREMIDO: mantenha premido
o botão de falar/escutar durante a conversação; solte-o no fim
da conversação. O monitor da série 7200 é programado de fábrica
com o modo de comunicação MÃOS LIVRES (Hands free).
Para passar de um modo ao outro, deverá manter premidos em simultâ-
neo os botões de regulação do volume ( e ) até que o
LED vermelho subjacente comece a piscar (cerca de 2 segundos) para
assinalar a entrada no modo de REGULAÇÃO. Enquanto ele estiver a pi-
scar, prima o botão de FALAR/ESCUTAR para confirmar a altera-
ção. A função foi memorizada se o LED vermelho se apagar.
Função de resposta automática
A função, apenas disponível no modo MÃOS LIVRES (hands free), consiste em activar automaticamente o áudio do monitor aquando da recepção
da chamada do posto externo, sem ser necessário premir o botão de
FALAR/ESCUTAR . O estado de “áudio activo” é assinalado pelo
acendimento do LED vermelho em baixo à esquerda do monitor, normalmente utilizado para assinalar a EXCLUSÃO DA CAMPAINHA. O áudio
activa-se automaticamente cerca de 5 segundos após a recepção da chamada. Para activar esta função, deverá manter premidos em simultâneo
os botões de regulação da luminosidade ( e ) até que
o LED vermelho subjacente comece a piscar (cerca de 2 segundos)
para assinalar a entrada no modo de REGULAÇÃO. Enquanto ele estiver
a piscar, prima o botão de FALAR/ESCUTAR para confirmar a alteração. A função foi memorizada se o LED vermelho se apagar. Para desactivar esta função, utiliza-se o mesmo procedimento. Caso o modo
MÃOS LIVRES (hands free) não esteja ligado aquando da activação, este
será automaticamente activado ao ligar a função de RESPOSTA AUTOMÁTICA. Se, posteriormente, for desactivada a função de entrada automática no áudio, a função MÃOS LIVRES mantém-se activa.
Função de Autoacendimento
A função de autoacendimento para uma telecâmara do posto externo
pode ser activada com o botão se o selector A/B (situado junto
à régua de bornes) estiver na posição B ou com o botão se o se-
lector estiver na posição A. Se o selector estiver na posição B pode utilizar-se o botão para a comutação cíclica das telecâmaras com o
comutador Art. 6592.
N.B.: O uso da função de autoacendimento só está disponível se se tiver
feito a ligação no circuito.
Programação da conversação privada
A conversação privada permite tutelar a PRIVACIDADE dos utilizadores
de um condomínio, os quais, de outro modo, poderiam escutar as chamadas de outros utilizadores. Esta função só faz, conceptualmente, sen-
tido se estiver activada em todos os monitores da instalação. A função
de “conversação privada” é obtida mantendo premidos em simultâneo os
dois botões " , " durante 2 segundos. Quando o LED vermelho começar a piscar, prima o botão até que o LED se apague
para confirmar a programação. A função de “exclusão da conversação
privada” é obtida conforme indicado acima, mas utilizando os dois bo-
tões " , ".
Page 14

I
14
GB
7200
INSTALLAZIONE ART. 7200 - Montaggio da incasso parete
Il videocitofono viene fornito con cover frontale separata, in quanto deve
essere applicata solo alla fine dell’installazione.
- Installare il videocitofono lontano da fonti luminose e di calore.
- Incassare la scatola Art. 7249 al muro ad un’altezza di circa 1,45 m dal
pavimento al bordo inferiore (Fig. 2A, 2B).
Attenzione: Durante l’installazione della scatola da incasso parete Art.
7249, è necessario inserire il coperchio copriforo fornito in dotazione per
evitare eventuali deformazioni della scatola stessa.
- Estrarre la morsettiera dal fondo del videocitofono, utilizzando un cacciavite adeguato, facendo attenzione a far leva sui due morsetti estremi e
non sulla scheda elettronica (Fig. 3).
- Eseguire il cablaggio secondo gli schemi di collegamento.
- Ricollegare la morsettiera cablata al videocitofono assicurandosi che sia
premuta fino in fondo.
- Fissare il videocitofono alla scatola tramite le 4 viti in dotazione (Fig. 4).
- Togliere la pellicola protettiva del display (Fig. 4 - Part. A)
- Applicare la cover frontale.
Nota: Nel caso in cui fosse necessario
togliere o sostutuire la cover fron-
tale, agire con un cacciavite adeguato come illustrato in fig. 6.
INSTALLATION OF TYPE 7200 - Flush-mount assembly
The monitor is supplied with a separate front cover, since it must only be
fitted at the end of the installation.
- Install the monitor away from sources of light and heat
- Install the flush-mount back box type 7249 at a height of approximately
1.45 m from the floor to the lower edge (Fig. 2A, 2B)
Caution: When installing flush-mount back box type 7249, it is necessary
to insert the bezel supplied in order to prevent deformation of the box itself
- Extract the terminal block from the bottom of the monitor, using a suitable screwdriver, taking care to lever the two end terminals and not the
circuit board (Fig. 3)
- Make the connection following the wiring diagrams
- Reconnect the wired terminal block to the monitor, ensuring that it fits
snugly
- Fit the monitor to the box using the 4 screws supplied (Fig. 4)
- Remove the protective film from the display (Fig. 4 - Part A)
- Fit the front cover
Note: If for any reason you need to remove or replace the front cover,
use a suitable screwdriver as shown in Fig. 6.
INSTALLATION ART. 7200 - Montage à encastrer
Le moniteur est équipé d'une façade séparée qui ne doit être appliquée
qu'à la fin de l'installation.
- Installer le moniteur loin des sources lumineuses et de chaleur.
- Encastrer la boîte Art. 7249 dans le mur à une hauteur de 1,45 m environ du sol au bord inférieur (Fig. 2A, 2B).
Attention : Durant l'installation de la boîte d'encastrement Art. 7249, insérer le couvercle cache-trou fourni pour éviter les éventuelles déformations de ladite boîte.
- Extraire le bornier au fond du moniteur, en utilisant un tournevis approprié et en faisant levier sur les deux bornes aux extrémités et non sur la
carte électronique (Fig. 3).
- Effectuer le câblage selon les schémas de raccordement.
- Reconnecter le bornier câblé au moniteur en le pressant bien jusqu'au
fond.
- Fixer le moniteur à la boîte au moyen des 4 vis fournies (Fig. 4).
- Enlever la pellicule de protection du display (Fig. 4 - Pièce A)
- Appliquer la façade.
Remarque : Pour ôter ou remplacer la façade en cas de besoin, utiliser
un tournevis approprié comme illustré sur la fig. 6.
INSTALLATION ART. 7200 - Unterputzmontage
Der Monitor wird mit einer separaten Frontblende geliefert, da sie nur nach
erfolgter Installation angebracht werden kann.
- Den Monitor fern von Licht- und Wärmequellen installieren.
- Das Gehäuse Art. 7249 unter Putz auf einer Höhe von ca. 1,45 m vom
Boden bis zur unteren Kante an der Wand installieren (Abb. 2A, 2B).
Achtung: Während der Installation des Unterputzgehäuses Art. 7249,
muss der mitgelieferte Putzabdeckrahmen eingesetzt werden, um eventuelle Verformungen des Gehäuses zu verhindern.
- Die Klemmenleiste mithilfe eines geeigneten Schraubendrehers vom Monitorboden abnehmen, dabei an den zwei äußersten Klemmen und nicht
an der Elektronikplatine aufhebeln (Abb. 3).
- Die Verdrahtung gemäß Anschlussplan vornehmen.
- Die verdrahtete Klemmenleiste wieder am Monitor anschließen und sicherstellen, dass sie ganz aufgesetzt ist.
- Den Monitor mit den 4 mitgelieferten Schrauben am Gehäuse befestigen
(Abb. 4).
- Die Schutzfolie des Monitors abziehen (Abb. 4 - Teil A)
- Die Frontblende anbringen.
Hinweis: Falls die Frontblende entfernt oder ausgewechselt werden muss,
mit einem geeigneten Schraubendreher wie in Abb. 6 dargestellt vorgehen.
INSTALACIÓN DEL ART. 7200 - Montaje empotrado
El videoportero se suministra con la carcasa frontal separada, ya que se
debe colocar sólo al final de la instalación.
- Instale el videoportero lejos de fuentes luminosas y de calor.
- Empotre la caja Art. 7249 en la pared a una altura de aproximadamente
1,45 m del suelo al borde inferior (Fig. 2A, 2B).
Atención: durante la instalación de la caja de empotrar Art. 7249, es
necesario colocar la tapa que se suministra para evitar posibles deformaciones de la caja.
- Retire la caja de conexiones del fondo del videoportero, utilizando un
destornillador adecuado y teniendo cuidado de hacer palanca en los
dos bornes de los extremos y no en la tarjeta electrónica (Fig. 3). Realice el cableado según los esquemas de conexión.
- Vuelva a conectar la caja de conexiones cableada al videoportero asegurándose de que esté apretada a tope.
- Fije el videoportero a la caja con los 4 tornillos suministrados (Fig. 4).
- Retire la película de protección del display (Fig. 4 - Detalle A)
- Coloque la carcasa frontal.
Nota: Si fuera necesario retirar o cambiar la carcasa frontal, utilice un
destornillador adecuado como se muestra en la Fig. 6.
INSTALAÇÃO DO ART. 7200 - Montagem de embeber na parede
O monitor é fornecido com a tampa frontal separada, dado que só deve ser
aplicada no fim da instalação.
- Instale o monitor longe de fontes luminosas e de calor.
- Embeba a caixa Art. 7249 na parede a uma altura de cerca de 1,45 m
do pavimento ao rebordo inferior (Fig. 2A, 2B).
Atenção: Durante a instalação da caixa de embeber na parede Art.
7249, é necessário inserir a tampa de cobertura do orifício fornecida
para evitar eventuais deformações da caixa.
- Extraia a régua de bornes pelo fundo do monitor, utilizando uma chave
de fendas adequada e tendo o cuidado de a usar como alavanca nos
dois bornes extremos e não na placa electrónica (Fig. 3).
- Realize a cablagem de acordo com os esquemas de ligação.
- Ligue novamente a régua de bornes cablada ao monitor, carregando
nela até ao fundo.
- Fixe o monitor à caixa com os 4 parafusos fornecidos (Fig. 4).
- Retire a película de protecção do display (Fig. 4 - Peça A)
- Aplique a tampa frontal.
Nota: Caso seja necessário retirar ou substituir a tampa frontal, use
uma chave de fendas adequada conforme ilustrado na fig. 6.
F
D
E
P
Page 15

15
7200
Fig. 2A
Fig. 4
Fig. 6
Fig. 5
Part. A
1,45 m
Fig. 3
193 mm
159 mm
Fig. 1C
Fig. 2B
Page 16

16
7200
7
13
1
CHCH CH 6S53
7
4
3
2
5
6
10
8
9
12
11
21 V
V1
M
V3
V2
6E
6
6S
6PCA
1
AU
3
5
2
V3
CH
CN1 CN2
+
+D
+A
-
CN1
V1
M
V2
M
CH 6S 5321 V
PRI
V1M1
3AUM2V21C2 2
A
B
+-S76-8AM+T 015 S1 C1
D
C
L1
A
7
B
+T
M
V
8
CT
3
4
6
CH
7
2
1
5
6
3
4
12
10
11
8
9
M
13
V
C2
E
E
E
C2
ELVOX
MONTANTE MONITOR
MONITOR CABLE RISER
MONTANT MONITEUR
MONITORSTEIGLEITUNG
COLUNA MONTANTE DE
MONITORES
Art. 6680
N° vc4306R1
*
MONITOR COLORI
COLOUR MONITOR
MONITEUR COULEURS
FARBMONITOR
MONITOR A COLORES
MONITOR CORES
Art. 6023 +
Art. 6200 +
Art. 6145
MONITOR COLORI
COLOUR MONITOR
MONITEUR COULEURS
FARBMONITOR
MONITOR A COLORES
MONITOR CORES
Art. 7200
Art. 662A
Art. 6620
Art. 6720
IMPIANTO VIDEOCITOFONO MONO E PLURIFAMILIARE “SOUND SYSTEM” CON ALIMENTATORE ART. 6680 SENZA SEGRETO DI CONVERSAZIONE
"SOUND SYSTEM" SINGLE AND MULTIPLE RESIDENCE VIDEO DOOR ENTRY SYSTEM WITH POWER SUPPLY TYPE 6680 AND WITHOUT CONVERSATION PRIVACY
INSTALLATION PORTIER VIDÉO MONO ET PLURIFAMILIAL “SOUND SYSTEM” AVEC ALIMENTETION ART. 6680 SANS SECRET DE CONVERSATION
VIDEO-TÜRSPRECHANLAGE „SOUND SYSTEM” FÜR EIN- UND MEHRFAMILIENHÄUSER MIT NETZGERÄT ART. 6680 OHNE MITHÖRSPERRE
INSTALACIÓN DE VÍDEO-PORTERO UNI Y PLURIFAMILIAR "SOUND SYSTEM" CON ALIMENTADOR ART. 6680 Y SIN CONVERSACIÓN PRIVADA
INSTALAÇÃO VIDEO-PORTEIRO MONO E PLURIFAMILIAR “SOUND SYSTEM” COM ALIMENTADOR ART. 6680 SEM SEGREDO DE CONVERSAÇÃO
CAVO
CABLE
CÂBLE
KABEL
CABLE
CABO
Art. 0061/001
Art. 0061/003
CAVO - CABLE
CÂBLE - KABEL
CABLE - CABO
Art. 0061/001
Art. 0061/003
MONITOR COLORI
COLOUR MONITOR
MONITEUR COULEURS
FARBMONITOR
MONITOR A COLORES
MONITOR CORES
Art. 6351
Art. 6323
Alimentatore
Power supply
Alimentation
Netzgerät
Alimentador
RETE-MAINS
RÉSEAU-NETZ
RED-REDE
Page 17

17
7200
In caso di ronzio sulla fonica spostare il commutatore “A-B” situato sotto
il coperchio in posizione “A”.
In the event of buzzing on the audio line, move the switching module "AB" located under the cover to position "A".
En cas de bourdonnement sur la ligne phonique, basculer le commutateur
“A-B” situé sous le couvercle, sur la position "A"
Falls in der Sprechleitung ein Brummton zu hören ist, den Umschalter
„A-B” unter der Abdeckung auf „A” verstellen.
En caso de perturbaciones en la conexión fónica, mover el conmutador
"A-B" situado debajo de la tapa a la posición "A".
No caso de ruído no audio mudar o comutador “A-B”, situato por baixo
da cobertura, na posição “A”.
Nell’ultimo monitor inserire tra i morsetti V2-M la resistenza di 75 Ohm
fornita in dotazione.
Connect 75 Ohm resistor (supplied) to the last monitor, between terminals V2-M.
Raccorder dans le dernier moniteur la résistance de 75 Ohms fournie
entre les bornes V2-M.
Im letzten Monitor zwischen den Klemmen V2-M den mitgelieferten 75
Ohm Abschlusswiderstand montieren.
Montar la resistencia de 75 Ohm suministrada de serie entre los bornes
V2-M del último monitor.
No último monitor inserir a resistência de 75 Ohm fornecida entre os bornes V2-M.
*
La funzione “SEGRETO DI CONVERSAZIONE” è normalmente disattivata. Per attivare o disattivare la funzione vedere programmazione del
segreto.
The “CONVERSATION PRIVACY” function is normally deactivated. To
activate or deactivate the function see conversation privacy programming.
La function “SECRET DE CONVERSATION” est normalement désactivée. Pour activer ou désactiver la fonction voir la programmation du secret de conversation.
Die « ABHÖRSPERRE » ist normalerweise deaktiviert. Um die Funktion
zu aktivieren oder deaktivieren siehe die Anleitung zur Programmierung
der Abhörsperre.
La función „SECRETO DE CONVERSACIÓN” es normalmente desactivada. Para activar o desactivar la función ver programación del secreto
de conversación.
A função “SEGREDO DE CONVERSAÇÃO” é normalmente desactivada.
Para activar ou desactivar a função ver a programação do segredo de
conversação.
Posizionare il microinterruttore su senza segreto di conversazione. Il microinterruttore è posto sul retro del monitor.
The monitors have a microswitch on the back, set it to “without conversation privacy”.
Positionner le micro-interrupteur sur la fonction excluant le secret de
conversation. Le micro-interrupteur est situé à l’arrière du moniteur.
Den Mikroschalter auf der Monitorrückseite auf „ohne Mithörsperre”
schalten.
Colocar el microinterruptor en la función sin conversación privada. El microinterruptor está en la parte posterior del monitor.
Colocar o microinterruptor em “sem segredo de conversação”. O microinterruptor situa-se na parte de trás do monitor.
A- Targa per videocitofono
Serie 8000, 3300, 8100 1200, PATAVIUM e portalettere
2550/301-302, 259C/P
Con telecamera ad alta risoluzione
B- Pulsante supplementare serratura
C- Serratura elettrica 12V~
D- Telecamera con posto esterno
Art. 559B, 559C, 570C+930A
L1- Led di illuminazione cartellino portanomi
(10 moduli LED max.)
30 moduli LED con Art. M832
40 moduli LED con Art. 0832/030
A- Video entrance panel
series 8000, 3300, 8100, 1200, PATAVIUM and letter box
2550/301-302, 259C/P
With high resolution camera
B- Additional door lock button
C- 12V~ electric lock
D- Camera with speech unit
type 559B, 559C, 570C+930A
L1- Name-tag lighting Led
(10 LED modules max.)
30 LED modules with type M832
40 LED modules with type 0832/030
A- Plaque de rue pour portier vidéo
Série 8000, 3300, 8100, 1200, PATAVIUM et boîte aux lettres
2550/301-302, 259C/P
With high resolution camera
B- Poussoir supplémentaire gâche
C- Gâche électrique 12V~
D- Caméra avec poste externe
Art. 559B, 559C, 570C+930A
L1- Led d'éclairage porte-nomes
(10 modules LED max.)
30 modules LED avec Art. M832
40 modules LED avec Art. 0832/030
A- Video-Klingeltableau
Serie 8000, 3300, 8100, 1200, PATAVIUM und Briefkasten
2550/301-302, 259C/P
Mit hochauflösender kamera
B- Zusätzliche Türöffnertaste
C - elektrischer Türöffner 12 V~
D- Kamera mit Sprechstelle
Art. 559B, 559C, 570C+930A
L1- Beleuchtungsled des namenschilds
(max. 10 LED-Mödule)
30 LED-Mödule mit Art. M832
40 LED-Mödule mit Art. 0832/030
A- Placa para vídeo-portero de las
series 8000, 3300, 8100, 1200, PATAVIUM y buzón 2550/301-302,
259C/P
Con camara de alta resolución
B- Pulsador suplementario para cerradura
C- Cerradura eléctrica 12 V~
D- Cámara con aparato externo Art. 559B, 559C, 570C+930A
L1- Led de iluminación de la tarjeta portanombres
(10 módulos LED máx.)
30 módulos LED con art. M832
40 módulos LED con art. 0832/030
A- Botoneira para vídeo-porteiro
Série 8000, 3300, 8100, PATAVIUM, 1200 e caixa de correio
2550/301-302, 259C/P
Com telecâmara de alta resolução
B- Botão suplementar do trinco
C- Trinco eléctrico 12V~
D- Telecâmara com posto externo Art. 559B, 559C, 570C+930A
L1- Led de iluminação do cartão portanomes
(10 módulos LED máx.)
30 módulos LED com Art. M832
40 módulos LED com Art. 0832/030
Page 18

18
7200
V
7
3
2
1
5
4
6
10
9
8
12
11
13
M
5
3
2
1
4
6
S1 C10AM 15+T8-76S+32-AU C2V2 M2V1M1 1
PRI
B
A
A- Pulsante per chiamata fuoriporta
Landing call push-button
Poussoir appel de porte palière
Etagenruftaste
Pulsador de llamada desde fuera de la puerta
Botão para chamada do patamar
Art. 6680
A
RETE-MAINS
RÉSEAU-NETZ
RED-REDE
Alimentatore
Power supply
Alimentation
Netzgerät
Alimentador
8
1
5
4
2
3
7
6
V
11
9
10
12
13
M
S1M1 +AUV1 V2 M2 2C2 1 3 - S 6 7 8 AM+T-150
PRI
A
B
C1
VARIANTE - VERSION - SONDERSCHALTUNG - VARIACIÓN 1
Schema di collegamento del pulsante autoaccensione monitor
Wiring diagram for self-start of monitor
Schéma de raccordement du bouton-poussoir auto-allumage moniteur
Anschluss der Taste für Monitor-Selbsteinschaltung
Esquema de conexión del pulsador de autoencendido del monitor
Ligação do botão de autoacendimento do monitor
Monitor
Moniteur
Art. 7200
Alimentatore
Power supply
Alimentation
Netzgerät
Alimentador
Art. 6680
RETE-MAINS
RÉSEAU-NETZ
RED-REDE
E’ possibile attivare l’impianto video dal monitor, utilizzando il pulsante con il simbolo “ ” oppure “ ” (a seconda della selezione mediante il microinter-
ruttore posto a fianco alla morsettiera) collegando il morsetto “AU” dell’
alimentatore al morsetto “12” del videocitofono come illustrato nello schema
.
To configure the video system so that it may be switched on from the monitor using
the push-button with the “ ” or “ ” symbol (depending on the setting
of the microswitch located next to the terminal block), connect the “AU” terminal of
the power supply unit to terminal “12” of the monitor as illustrated in the diagram.
Il est possible d'activer l'installation vidéo depuis le moniteur en utilisant le bouton
portant le symbole “ ” ou “ ” (selon la sélection au moyen du micro-
interrupteur situé à côté du bornier) en reliant la borne “AU” de l'alimentation à la
borne “12” du moniteur comme illustré sur le schéma.
Es ist möglich, die Videotürsprechanlage vom Monitor aus zu aktivieren. Dazu die
Taste mit dem Symbol “ ” oder “ ” (je nach Stellung des Mikroschal-
ters neben der Klemmenleiste) betätigen und die Klemme “AU” des Netzgeräts mit
der Klemme “12” des Monitors verbinden, wie im Schaltplan dargestellt.
Es posible activar el equipo vídeo desde el monitor, utilizando el pulsador con el
símbolo “ ” o bien “ ” (según la selección mediante el microinterrup-
tor colocado al lado de la caja de conexiones) conectando el borne “AU” del alimentador al borne “12” del videoportero como se muestra en el esquema.
Monitor
Moniteur
Art. 7200
VARIANTE - VERSION - SONDERSCHALTUNG - VARIACIÓN 2
Schema di collegamento del pulsante chiamata fuoriporta.
Wiring diagram for landing call button.
Schéma de raccordement du bouton-poussoir appel de porte palière.
Anschluss der Etagenruftaste.
Esquema de conexión del pulsador de llamada desde fuera de la
puerta.
Ligação botão chamada do patamar.
Azionando il pulsante fuoriporta il monitor suona con tonalità differente da
quello ottenuto con la chiamata dalla targa esterna. Il monitor rimane spento.
When the landing call push-button is pressed, the monitor sounds with a
different tone from the tone generated by a call from the entrance panel.
The monitor remains OFF.
En actionnant le bouton-poussoir de la porte palière, le moniteur produit
une tonalité différente de celle obtenue en appelant à partir de la plaque
de rue. Le moniteur demeure éteint.
Beim Etagenruf läutet der Monitor mit einem anderen Ton als bei einem
Ruf vom Klingeltableau. Der Monitor bleibt ausgeschaltet.
Al accionar el pulsador de llamada desde fuera de la puerta, el monitor
suena con una tonalidad diferente a la obtenida con la llamada desde la
placa externa. El monitor está apagado.
Accionando o botão do patamar, o monitor toca com um timbre diferente
do obtido com a chamada da botoneira externa. O monitor neste caso,
permanece desligado.
É possível activar o sistema de vídeo a partir do monitor, utilizando
o botão com o símbolo “ ” ou “ ” (consoante a se-
lecção feita através do microinterruptor situado ao lado da régua
de bornes), ligando o borne “AU” do alimentador ao borne “12” do
monitor conforme ilustrado no esquema.
Page 19

19
7200
VARIANTE - VERSION - SONDERSCHALTUNG - VARIACIÓN 3
Schema di collegamento per accensione luce scale o altri servizi ausiliari alimentati da rete c.a., comandati da pulsante “”,
tramite un relè Art. 0170/001.
Wiring diagram for switching on stair light or other auxiliary services powered by AC mains controlled by push-button “ ”, by
means of a relay type 0170/001.
Schéma de raccordement pour l'allumage des lumières d'escalier ou autres services auxiliaires alimentés par le réseau c.a., com-
mandés par le bouton “ ”, au moyen d'un relais Art. 0170/001.
Anschlussschema für die Einschaltung der Treppenhausbeleuchtung oder anderer vom Wechselstromnetz versorgter Zusatzfun-
ktionen mit Steuerung von Taste “ ”, über ein Relais Art. 0170/001.
Esquema de conexión para el encendido de la luz de la escalera u otros servicios auxiliares alimentados con corriente alterna,
accionados por el pulsador “ ”, a través de un relé Art. 0170/001.
Esquema de ligação para o acendimento da luz das escadas ou outros serviços auxiliares alimentados pela rede c.a., comanda-
dos pelo botão “ ”, através de um relé Art. 0170/001.
3
1
2
10
6
4
5
8
7
9
13
12
11
M
V
32145
Per attivare il servizio ausiliario premere il pulsante con il simbolo
“”.La portata dei contatti del pulsante del citofono è di
24 Vc.c./c.a. 0,5 A max.
To activate the auxiliary service, press the push-button with the
“ ” symbol. The capacity of the interphone push-button
contacts is 24 V DC/AC 0.5A max.
Pour activer le service auxiliaire, appuyer sur le bouton portant
le symbole “ ”. La portée des contacts du bouton du
poste d'appartement est de 24 Vc.c./c.a. 0,5 A maxi.
Zur Aktivierung der Zusatzfunktion die Taste mit dem Symbol
“ ” drücken. Die Kontaktbelastung der Taste beträgt 24
VDC/AC 0,5 A max.
Para activar el servicio auxiliar, pulse la tecla con el símbolo “
”. La capacidad de los contactos del pulsador del telé-
fono es de 24 Vcc/ca 0,5 A máx.
Para activar o serviço auxiliar, prima o botão com o símbolo “
”. A corrente dos contactos do botão do telefone é de
24 Vc.c./c.a. 0,5 A no máximo.
Monitor
Moniteur
Art. 7200
Relè-Relay-Relais
Art. 0170/001
Servizio ausiliario
(luce scale, o altri servizi)
Carico massimo 3A 230V c.a.
Auxiliary service
(stair light or other services)
Maximum load 3A 230V AC
Service auxiliaire (éclairage
d'escalier, ou autres services)
Charge maximum 3A 230V c.a.
Zusatzfunktionen (Treppenhauslicht
od. sonstige Funktionen)
Max. Belastung 3 A 230 VAC
Servicio auxiliar (luz de la escalera
u otros servicios)
Carga máxima 3A 230V c.a.
Serviço auxiliar (luz das escadas,
ou outros serviços)
Carga máxima 3A 230V c.a.
Pulsanti (per accensione
luce scale o altro)
Buttons (for switching on
stair light etc.)
Boutons-poussoirs pour
l'allumage éclairage
d'escalier ou autre
Tasten (Lichttaste o.a.)
Pulsadores (para el encendido de la luz de la escalera u otros servicios)
Botões (para acendimento
luz das escadas ou outro)
Pulsante “”
Push-button bouton “”
Bouton “”
Taste “”
Pulsador “”
Botão “”
Page 20

20
7200
5
2
1
3
4
11
8
6
7
10
9
V
13
12
M
123 54
Relè-Relay-Relais
Art. 0170/001
Servizio ausiliario
(luce scale, o altri servizi)
Carico massimo 3A 230V c.a.
Auxiliary service
(stair light or other services)
Maximum load 3A 230V AC
Service auxiliaire (éclairage
d'escalier, ou autres services)
Charge maximum 3A 230V c.a.
Zusatzfunktionen (Treppenhauslicht
od. sonstige Funktionen)
Max. Belastung 3 A 230 VAC
Servicio auxiliar (luz de la escalera
u otros servicios)
Carga máxima 3A 230V c.a.
Serviço auxiliar (luz das escadas,
ou outros serviços)
Carga máxima 3A 230V c.a.
Pulsante “ ”
Push-button bouton “ ”
Bouton “ ”
Taste “ ”
Pulsador “ ”
Botão “ ”
VARIANTE - VERSION - SONDERSCHALTUNG - VARIACIÓN 4
Schema di collegamento per attivazione di un eventuale secondo servizio ausiliario alimentato da rete c.a., comandato da pulsante “ ”, tramite un relè Art. 0170/001. La funzione è abilitata solo con microinterruttore posto sul retro del videocitofono
in posizione A
.
Wiring diagram for switching on a second auxiliary service, if present, powered by AC mains controlled by push-button “
”, by means of a relay type 0170/001. Function is enabled only with microswitch located on rear of monitor in position A.
Schéma de raccordement pour l'activation d'un éventuel second service auxiliaire alimenté par le réseau c.a., commandé par le
bouton “ ”, au moyen d'un relais Art. 0170/001. La fonction n'est validée qu'avec un micro-interrupteur situé au dos du moniteur en position A.
Anschlussschema für die Aktivierung einer eventuellen zweiten vom Wechselstromnetz versorgten Zusatzfunktion mit Steuerung
von Taste “ ”, über ein Relais Art. 0170/001. Die Funktion ist nur freigegeben, wenn der Mikroschalter an der Monitorrückseite auf A steht.
Esquema de conexión para la activación de un posible segundo servicio auxiliar alimentado con corriente alterna, accionado por
el pulsador “ ”, a través de un relé Art. 0170/001. La función está activada sólo con el microinterruptor, colocado en la parte
trasera del videoportero, en posición A.
Esquema de ligação para a activação de um eventual segundo serviço auxiliar alimentado pela rede c.a., comandado pelo botão
“ ”, através de um relé Art. 0170/001. A função só é activada com o microinterruptor situado na parte traseira do monitor
na posição A.
Per attivare il servizio ausiliario premere il pulsante con il simbolo
“”.La portata dei contatti del pulsante del cito-
fono è di 24 Vc.c./c.a. 0,5 A max.
To activate the auxiliary service, press the push-button with the
“ ” symbol. The capacity of the interphone push-button
contacts is 24 V DC/AC 0.5A max.
Pour activer le service auxiliaire, appuyer sur le bouton portant
le symbole “ ”. La portée des contacts du bouton du
poste d'appartement est de 24 Vc.c./c.a. 0,5 A maxi.
Zur Aktivierung der Zusatzfunktion die Taste mit dem Symbol
“ ” drücken. Die Kontaktbelastung der Taste beträgt 24
VDC/AC 0,5 A max.
Para activar el servicio auxiliar, pulse la tecla con el símbolo “
”. La capacidad de los contactos del pulsador del
teléfono es de 24 Vcc/ca 0,5 A máx.
Para activar o serviço auxiliar, prima o botão com o símbolo “
”. A corrente dos contactos do botão do telefone é
de 24 Vc.c./c.a. 0,5 A no máximo.
Monitor
Moniteur
Art. 7200
Pulsanti (per accensione
luce scale o altro)
Buttons (for switching on
stair light etc.)
Boutons-poussoirs pour
l'allumage éclairage
d'escalier ou autre
Tasten (Lichttaste o.a.)
Pulsadores (para el encendido de la luz de la escalera u otros servicios)
Botões (para acendimento
luz das escadas ou outro)
Page 21

21
7200
CH
1V32CH-+CS
S/S1
15/AS
PRI
+I-+U A B DC
V
S
CH
-
+
2
3
1
6
1
3
2
4
5
11
8
7
9
10
13
12
V
M
VARIANTE - VERSION - SONDERSCHALTUNG - VARIACIÓN 5
Schema di collegamento della segnalazione ottica della serratura aperta (LED verde) con monitor serie 7200.
Wiring diagram of "lock open" visual indication (green LED) with 7200 series monitors.
Schéma de raccordement de la signalisation optique de la gâche ouverte (LED verte) avec moniteur série 7200.
Anschluss der Anzeige „Tür Offen” (grüne LED) am Monitor Serie 7200.
Esquema de conexión de la señalización óptica de cerradura abierta (LED verde) con monitor de las series 7200.
Ligação sinalização óptica de trinco aberto (LED verde) com monitores série 7200.
RETE-MAINS
RÉSEAU-NETZ
RED-REDE
Contatto NO serratura
N.O. contact lock
Contact NO gâche
Schließkontakt am Türöffner
Contacto NO cerradura
Contacto NO trinco
Alimentatore
Power supply
Alimentation
Netzgerät
Alimentador
Art. 6582
Lo schema illustra il collegamento della segnalazione di serratura aperta
(LED verde) con monitor Art. 6600-660A-6700 e Art. 7200 (collegamento
al morsetto 13). Se si collegano fino a 5 monitor, non è necessario utilizzare l’alimentatore Art. 6582, ma è sufficiente utilizzare il morsetto “+”
del 6680 per alimentare il led verde.
Per escludere la segnalazione di serratura aperta non collegare il morsetto N. 13 dei monitor.
The diagram shows the connection of the "lock open" indicator (green
LED) with monitor Art. 6600-660A-6700 and Art. 7200 (connection to terminal 13). Should up to 5 monitors be connected, it is not necessary the
use of power supply Art. 6582, but it is sufficient to use terminal “+” of
power supply type 6680 to power the green led.
To disable the "lock open" indication, do not connect terminal No 13 of
the monitors
Le schéma représente le raccordement de la signalisation de gâche ouverte
(LED verte) avec moniteur Art. 6600-660A-6700 et Art. 7200 (raccordement
à la borne 13). Si on raccorde jusqu’à 5 moniteurs, il n’est pas nécessaire
d’utiliser l’alimentation Art. 6582, mais il est suffisant d’utiliser la borne «
+ » de l’alimentation Art . 6680 pour alimenter la led verte. Pour exclure
la signalisation de gâche ouverte, ne pas connecter le borne N. 13 des moniteurs.
Im Plan ist der Anschluss der Anzeige „Tür Offen”
(grüne LED) am Monitor Art. 6600-660A-6700 und Art. 7200 (Anschluss
an Klemme 13) dargestellt. Bei bis zu 5 Monitoren ist es nicht notwendig
das Netzgerät Art. 6582 zu verwenden, es kann die Klemme „+“ des
Netzgeräts Art. 6680 verwendet werden, um die grüne Led zu versorgen.
Um die Anzeige „Tür Offen” nicht zu verwenden, die Monitorklemme Nr.
13 nicht anschließen.
El esquema ilustra la conexión de la señalización de cerradura abierta
(LED verde) con monitor Art. 6600-660A-6700 y Art. 7200 (conexión al
borne 13).
Si se conectan hasta 5 monitores, no es necesario utilizar el alimentador
Art. 6582, mas es suficiente utilizar el borne “+” del alimentador Art. 6680
para alimentar el led verde.
Para excluir la señalización de cerradura abierta, no hay que conectar el
borne N. 13 de los monitores.
O esquema refere-se à ligação da sinalização de trinco aberto (LED
verde) com monitores Art. 6600-660A-6700 e Art. 7200 (ligação ao borne
13). Se se ligarem até 5 monitores, não é necessário utilizar o alimentador Art. 6582, mas è suficiente utilizar o terminal “+” do alimentador Art.
6680 para alimentar o led verde.
Sem sinalização de trinco aberto não é ligado o borne N. 13 dos monitores
Monitor
Moniteur
Art. 7200
Page 22

22
AVVERTENZE PER L'INSTALLATORE
- Leggere attentamente le av ver ten ze contenute nel
pre sen te do cu men to in quanto for ni sco no importanti
indicazioni ri guar dan ti la sicurezza di in stal la zio ne,
d'uso e di ma nu ten zio ne.
- Dopo aver tolto l'imballaggio assicurarsi dell'integrità
del l'ap pa rec chio. Gli ele men ti dell'imballaggio
(sacchetti di pla sti ca, po li sti ro lo espanso, ecc.) non
devono essere lasciati alla portata dei bambini in
quanto potenziali fonti di pericolo. L'esecuzione
dell'impianto deve essere ri spon den te alle nor me CEI
vigenti.
- È necessario prevedere a monte dell'alimentazione
un appropriato in ter rut to re di tipo bipolare facilmente
accessibile con separazione tra i contatti di almeno
3mm.
- Prima di col le ga re l'apparecchio ac cer tar si che i dati
di targa siano rispondenti a quelli della rete di di stri bu zio ne.
- Questo ap pa rec chio dovrà essere de sti na to solo all'uso per il quale è stato espres sa men te concepito, e
cioè per sistemi di citofonia. Ogni altro uso è da con si de rar si im pro prio e quindi pericoloso. Il costruttore
non può essere con si de ra to re spon sa bi le per even tua li danni derivanti da usi impropri, erronei ed ir ra gio ne vo li.
- Prima di ef fet tua re qual si a si operazione di pu li zia o di
ma nu ten zio ne, disinserire l'apparecchio dalla rete di
ali men ta zio ne elettrica, spe gnen do l'interruttore del l'im pian to.
- In caso di guasto e/o di cattivo fun zio na men to del l'ap pa rec chio, togliere l'ali men ta zio ne me dian te
l'interruttore e non ma no met ter lo. Per l'even tua le ri pa ra zio ne ri vol ger si so la men te ad un centro di assistenza tecnica autorizzato dal costruttore. Il mancato
ri spet to di quanto so pra può com pro met te re la si cu rez za del l'ap pa rec chio.
- Non ostru i re le aperture o fessure di ven ti la zio ne o di
smaltimento calore e non esporre l’apparecchio a
stillicidio o spruzzi d’acqua.
- L'installatore deve as si cu rar si che le in for ma zio ni per
l'uten te siano pre sen ti sugli ap pa
rec chi derivati.
- Tutti gli apparecchi costituenti l'impianto devono
essere de sti na ti esclu si va men te all'uso per cui sono
stati con ce pi ti.
- L’interruttore onnipolare deve essere facilmente accessibile.
- ATTENZIONE: per evitare di ferirsi, questo apparec-
chio deve essere assicurato alla parete secondo le
istruzioni di installazione.
- Questo do cu men to dovrà sem pre ri ma ne re allegato
alla do cu men ta zio ne dell'impianto.
Direttiva 2002/96/CE (WEEE, RAEE).
Il simbolo del cestino barrato riportato sull’apparecchio indica che il prodotto, alla fine della
propria vita utile, dovendo essere trattato se-
paratamente dai rifiuti domestici, deve essere
conferito in un centro di raccolta differenziata per apparecchiature elettriche ed elettroniche oppure riconsegnato al rivenditore al momento dell’acquisto di una
nuova apparecchiatura equivalente.
L’utente è responsabile del conferimento dell’apparecchio a fine vita alle appropriate strutture di raccolta.
L’adeguata raccolta differenziata per l’avvio successivo
dell’apparecchio dismesso al riciclaggio, al trattamento
e allo smaltimento ambientalmente compatibile contribuisce ad evitare possibili effetti negativi sull’ambiente
e sulla salute e favorisce il riciclo dei materiali di cui è
composto il prodotto. Per informazioni più dettagliate
inerenti i sistemi di raccolta disponibili, rivolgersi al servizio locale di smaltimento rifiuti, o al negozio in cui è
stato effettuato l’acquisto.
Rischi legati alle sostanze considerate pericolose
(WEEE).
Secondo la nuova Direttiva WEEE sostanze che da
tempo sono utilizzate comunemente su apparecchi
elettrici ed elettronici sono considerate sostanze pericolose per le persone e l’ambiente. L’adeguata raccolta
differenziata per l’avvio successivo dell’apparecchio dismesso al riciclaggio, al trattamento e allo smaltimento
ambientalmente compatibile contribuisce ad evitare
possibili effetti negativi sull’ambiente e sulla salute e favorisce il riciclo dei materiali di cui è composto il prodotto.
SAFETY INSTRUCTIONS FOR INSTALLERS
- Carefully read the instructions on this leaflet: they
give important information on the safety, use and
maintenance of the installation.
- After removing the packing, check the integrity of the
set. Packing components (plastic bags, expanded
polystyrene etc.) are dangerous for children. Installation must be carried out according to national safety
regulations.
- It is convenient to fit close to the supply voltage
source a proper bipolar type switch with 3 mm separation (minimum) between contacts.
- Before connecting the set, ensure that the data on
the label correspond to those of the mains.
- Use this set only for the purposes designed, i.e.for
electric door-opener systems. Any other use may be
dangerous. The manufacturer is not responsible for
damage caused by improper, erroneous or irrational
use.
- Before cleaning or maintenance, disconnect the set.
- In case of failure or faulty operation, disconnect the
set and do not open it.
- For repairs apply only to the technical assistance
centre authorized by the manufacturer.
- Safety may be compromised if these instructions are
disregarded.
- Do not obstruct opening of ventilation or heat exit
slots and do not expose the set to dripping or sprinkling of water.
- Installers must ensure that manuals with the above
instructions are left on connected units after installation, for users' information.
- All items must only be used for the purposes designed.
- The ominipolar switch must be easily accessed.
- WARNING: to avoid the possibility of hurting your-
self, this unit must be fixed to the wall according to
the installation instructions.
- This leaflet must always be enclosed with the equipment.
Directive 2002/96/EC (WEEE)
The crossed-out wheelie bin symbol marked on
the product indicates that at the end of its useful life, the product must be handled separately
from household refuse and must therefore be
assigned to a differentiated collection centre for electrical and electronic equipment or returned to the dealer
upon purchase of a new, equivalent item of equipment.
The user is responsible for assigning the equipment, at
the end of its life, to the appropriate collection facilities.
Suitable differentiated collection, for the purpose of
subsequent recycling of decommissioned equipment
and environmentally compatible treatment and disposal, helps prevent potential negative effects on health
and the environment and promotes the recycling of the
materials of which the product is made. For further details regarding the collection systems available, contact
your local waste disposal service or the shop from
which the equipment was purchased.
Risks connected to substances considered as dangerous (WEEE).
According to the WEEE Directive, substances since
long usually used on electric and electronic appliances
are considered dangerous for people and the environment. The adequate differentiated collection for the
subsequent dispatch of the appliance for the recycling,
treatment and dismantling (compatible with the environment) help to avoid possible negative effects on the environment and health and promote the recycling of
material with which the product is compound.
CONSEILS POUR L'INSTALLATEUR
- Lire attentivement les instructions contenues dans
ce document puisqu'elles fournissent d'importantes
indications concernant la sécurité pour l'installation,
l'emploi et la maintenance.
- Après avoir enlevé l'emballage s'assurer de l'intégrité
de l'appareil. Les éléments de l'emballage (sachets
en plastique, polystyrène, etc.) ne doivent pas être
laissés à la portée des enfants, car ils peuvent être
dangereux. L'exécution de l'installation doit être conforme aux normes nationales.
- Il est nécessaire de prévoir près de la source
d’alimentation un interrupteur approprié, type bipolaire, avec une separation entre les contacts d’au
moins 3mm.
- Avant de connecter l'appareil s'assurer que les données reportées sur l'étiquette soient les mêmes que
celles du réseau de distribution.
- Cet appareil devra être destiné uniquement à
l'emploi pour lequel il a été expressément conçu,
c'est-à-dire pour l'alimentation des systèmes de portiers électriques. Tout autre emploi doit être considéré impropre et donc dangereux. Le constructeur
ne peut pas être considéré responsable pour
d'éventuels dommages résultant de l'emploi impropre, erroné et déraisonnable.
- Avant d'effectuer n'importe quelle opération de nettoyage ou de maintenance, débrancher l'appareil du
réseau d'alimentation électrique, en éteignant
l'interrupteur de l'installation.
- En cas de pan ne et/ou de mauvais fonctionnement
de l'appareil, enlever l'alimentation au moyen de
l'interrupteur et ne pas le modifier.
- Pour une éventuelle réparation s'adresser uniquement à un centre d'assistance technique autorisé par
le constructeur. Si on ne respecte pas les instructions
mentionnées ci-dessus on peut compromettre la sécurité de l'appareil.
- Ne pas obstruer les ouvertures et les fentes de ventilation ou de refroidissement et ne pas exposer
l’appareil à l’égout ou jet d’eau.
- L'installateur doit s'assurer que les renseignements
pour l'usager soient présents dans les appareils connectés.
- Tous les appareils constituant l'installation doivent
être destinés exclusivement à l'emploi pour lequel ils
ont été conçus.
- L’interrupteur omnipolaire doit être d’accès aisé.
- ATTENTION: pour éviter de se blesser, cet appareil
doit être assuré au mur selon les instructions
d’installation.
- Ce document devra être toujours joint avec
l'appareillage.
Directive 2002/96/CE (WEEE, RAEE)
Le symbole de panier barré se trouvant sur
l'appareil indique que le produit, à la fin de sa
vie utile, doit être traité séparément des autres
déchets domestiques et remis à un centre de collecte
différencié pour appareils électriques et électroniques
ou remis au revendeur au moment de l'achat d'un nouvel appareil équivalent.
L’usager est responsable du traitement de l'appareil en
fin de vie et de sa remise aux structures de collecte appropriées. La collecte différenciée pour le démarrage
successif de l’appareil remis au recyclage, au traitement
et à l'élimination écocompatibles contribue à éviter les
effets négatifs environnementaux et sur la santé tout en
favorisant le recyclage des matériaux dont se compose
le produit. Pour des informations plus détaillées sur les
systèmes de collecte disponibles, contacter le service
local d'élimination des déchets ou le magasin qui a
vendu l'appareil.
Risques liés aux substances considérées dangéreuses (WEEE).
Selon la Directive WEEE, substances qui sont utilisées
depuis long temps habituellement dans des appareils
électriques et électroniques sont considerées dangéreuses pour les personnes et l'environnement. La collecte sélective pour le transfert suivant de l’équipement
destiné au recyclage, au traitement et a l’écoulement
environnemental compatible contribue à éviter possibles effets négatifs sur l’environnement et sur la salue et
favorise le recyclage des matériaux dont le produit est
composé.
Product is according to EC Directive 2004/108/EC,
2006/95/EC and following norms.
Il prodotto è conforme alla direttiva europea
2004/108/CE, 2006/95/CE e successive.
Le produit est conforme à la directive européenne
2004/108/CE, 2006/95/CE et suivantes.
Page 23

23
CONSEJOS PARA EL INSTALADOR
- Leer atentamente los consejos contenidos en el presente documento en cuanto dan importantes indicaciones concernientes la seguridad de la instalación,
del uso y de la manutención.
- Después de haber quitado el embalaje asegurarse
de la integridad del aparato.
- Los elementos del embalaje (bolsos de plástico etc.)
no tienen que ser dejados al alcance de los niños en
cuanto posibles fuentes de peligro.
La ejecución de la instalación, debe respetar las normas en vigor.
- Es necesário instalar cerca la fuente de alimentación
un interruptor apropiado, de tipo bipolar, con una separación entre los contactos de al menos 3mm.
- Antes de conectar el aparato asegurarse que los
datos de la placa sean iguales a los de la red de distribución.
- Este aparato tendrá que ser destinado solamente al
uso para el cual fue expresamente concebido, es
decir para alimentación de sistemas de portero eléctrico.
Los otros usos deben ser considerados impropios y
por lo tanto peligrosos.
El constructor no puede ser considerado responsable de eventuales daños causados por usos impropios erróneos e irrazonables.
- Antes de efectuar cualquiera operación de limpieza
o de manutención, desconectar el aparato de la red
de alimentación eléctrica, apagando el interruptor de
la instalación.
- En caso de daño y/o de malo funcionamiento del
aparato, quitar la alimentación por medio del interruptor y no manipularlo.
Para eventuales reparaciones recurrir solamente a
un centro de asistencia técnica autorizado por el
constructor. La falta de respeto a lo anteriormente
expuesto puede comprometer la seguridad del aparato.
- No obstruir las aberturas o hendiduras de ventilación
o de salida calor.
- El instalador debe asegurarse que las informaciones
para el usuario sean presentes en los aparatos derivados.
- Todos los aparatos que constituyen la instalación
deben ser destinados exclusivamente al uso para el
qual fueron concebidos.
- O interrruptor omnipolar deve ser fácilmente acessível.
- ATTENCIÓN: Para evitar de herirse, este aparato
debe ser fijado a la pared según las instruciones de
instalación.
- Este documento tendrà que ser siempre adjuntado al
aparato.
Directiva 2002/96/CE (WEEE, RAEE)
El símbolo del cubo de basura tachado, presente en el aparato, indica que éste, al final de
su vida útil, no debe desecharse junto con la
basura doméstica sino que debe llevarse a un punto de
recogida diferenciada para aparatos eléctricos y electrónicos o entregarse al vendedor cuando se compre
un aparato equivalente.
El usuario es responsable de entregar el aparato a unpunto de recogida adecuado al final de su vida.La recogida diferenciada de estos residuos facilita el reci-claje
del aparato y de sus componentes, permite su tratamiento y eliminación de forma compatible con el medioambiente y previene los efectos negativos en la
naturale-za y la salud de las personas. Si desea obtener más infor-mación sobre los puntos de recogida,
contacte con el ser-vicio local de recogida de basura o
con la tienda dondeadquirió el producto.
Riesgos conectados a sustancias consideradas peligrosas (WEEE).
Según la Directiva WEEE, substancias que desde
tiempo son utilizadas conmunemente en aparatos eléctricos ed electrónicos son consideradas substancias
peligrosas para las personas y el ambiente. La adecuada colección diferenciada para el siguiente envio del
aparato destinado al reciclaje , tratamiento y eliminación ambientalmente compatible contribuye a evitar posibles efectos negativos sobre el ambiente y la salud y
favorece el reciclo de los materiales que componen el
producto.
CUIDADOS A TER PELO INSTALADOR
- Ler atentamente as advertências contidas no
presente do cu men to que fornecem importantes indicações no que diz respeito à segurança da instalação, ao uso e à manutenção.
- Após retirar a embalagem, assegurar-se da integridade do aparelho. Todos os elementos da embalagem (sacos plásticos, esferovite, etc.) ñao devem ser
deixados ao alcance de crianças pois são fontes potenciais de perigo. A execução da instalação deve
respeitar a regulamentação vigente no país.
- É necessàrio instalar, perto da fuente de alimentação, um interruptor apropriado, do tipo bipolar, com
uma separação minima de 3 mm entre os contactos.
- Antes de ligar o aparelho verificar se os dados da
placa estão de acordo com os da rede de distribuição.
- Este aparelho só deve ser destinado ao uso para o
qual foi expressamente concebido, isto é, para alimentação de porteiro eléctrico.
Qualquer outra utilização deve ser considerada imprópria e por conseguinte perigosa. O construtor não
pode ser considerado responsável por eventuais
danos provocados por usos impróprios, errados e irracionáveis.
- Antes de efectuar qualquer operação de limpeza ou
de manutenção, desligar o aparelho da rede de alimentação eléctrica através do di spo si ti vo instalado.
- No caso de dano e/ou mau funcionamento do aparelho, eliminar a alimentação da rede através do dispositivo de corte e mantê-lo desligado. Para uma
eventual reparação recorrer sòmente a um centro de
assistência técnica autorizado pelo construtor. O não
cumprimento de tudo quanto anteriormente se disse
pode comprometer a segurança do aparelho.
- Não obstruir as aberturas ou ranhuras de ventilação
ou de dissipação de calor e não expor o aparelho ao
estilicidio du pulverização de agua.
- O instalador deve assegurar-se de que as informações para o utilizador estão presentes nos aparelhos.
- Todos os aparelhos que constituem a instalação
devem ser destinados exclusivamente ao uso para
o qual foram concebidos.
- El interruptor omnipolar ha de ser fá fácilmente accesibile.
- ATENÇÃO: Para evitar ferir-se, este aparelho deve
ser fixado na parede de acordo com as instruções
de instalação.
- Este documento deverá estar sempre junto ao aparelho.
Norma 2002/96/CE (WEEE, RAEE)
O símbolo do cêsto barrado referido no aparelho indica que o producto, no fim da sua vida
útil, tendo que ser tratado separadamente dos
refugos domésticos, deve ser entregado num centro de
recolha diferenciada para aparelhagens eléctricas e
electrónicas ou reconsignado ao revendedor no momento de aquisição dum novo aparelho equivalente.
O utente é responsável de entregar o aparelho a um
pontode recolha adequado no fim da sua vida. Arecolha
diferen-ciada de estos resíduos facilita a reciclagem do
aparelhoe dos suos componentes, permite o suo tratamento e a eli-minação de forma compatível com o meio
ambiente e pre-vem os efectos negativos na natura e
saude das pessoas.Se se pretender mais informações
sob os puntos de recol-ha, contacte o serviço local de
recolha de refugos ou onegócio onde adquiriu o producto.
Perigos referidos à substancias consideradas perigosas (WEEE).
Según a Directiva WEEE, subtáncias que desde há
tempo utilizam-se comunemente nos aparelhos eléctricos e eléctrónicos são consideradas substáncias perigosas para as pessoas e o ambiente. A dequada
colecção diferenciada para o envio seguinte da aparelhagem deixada de usar para a reciclagem, ao tratamento e à eliminação ambientalmente compatível
contribui a evitar possíveis efectos negativos no ambiente e na saude e favorece o reciclo dos materiais
dos quais o producto é composto.
ANWEISUNGEN FÜR DEN INSTALLATEUR
- Diese Anweisungen genau lesen, da sie über die Sicherheit beim Einbau, den Gebrauch und Pflege informieren.
- Nach dem Auspacken die Unversehrtheit des Geräts feststellen. Verpackungsteile (Plastiktüten, etc.)
sind gefährlich für Kinder.
Die Installation muss den nationalen Normen entsprechen.
- Es ist notwendig bei der Spannungsversorgungsquelle einen passenden zweipoligen Schalter einzubauen, der mindestens 3 mm Abstand zwischen
den Kontakten haben muss.
- Vor dem Anschließen des Gerätes sich versichern,
dass die Daten am Typenschild mit denen des Leitungsnetzes übereinstimmen.
- Dieses Gerät nur für den vorbestimmten Gebrauch
verwenden, d.h. für Türsprechanlagen. Jeder andere
Gebrauch ist gefährlich. Der Hersteller nimmt keine
Verantwortung für beim Missbrauch des Gerätes entstandene Schäden.
- Vor jeglicher Säuberung oder Nachpflege das Gerät
vom Versorgungsnetz trennen.
- Im Falle einer Beschädigung und/oder falschen Funktion des Geräts, dieses vom Versorgungsnetz trennen und das Gerät nicht öffnen.
- Für eine eventuelle Reparatur wenden Sie sich an
eine offizielle technische Kundenbetreuungsstelle.
- Die Missachtung dieser Hinweise könnte Ihre Sicherheit gefährden.
- Die Lüftungsschlitze des Gerätes nicht abdecken
und das Gerät keiner Feuchtigkeit oder Nässe aussetzen.
- Der Installateur muss nach dem Einbau darauf
achten, dass diese Hinweise zur Benutzerinformation immer bei den Geräten vorhanden sind.
- Alle Geräte dürfen nur für den vorbestimmten Gebrauch verwendet werden.
- Der zweipolige Schalter muss leicht zugänglich sein.
- VORSICHT: um eine Verletzung zu vermeiden, die-
ses Gerät an der Wand, wie in der Installationsanleitung beschrieben, montieren.
- Dieses Blatt muss den Geräten immer beigelegt
werden.
Richtlinie 2002/96/EG (WEEE)
Das am Gerät angebrachte Symbol des durchgestrichenen Abfallkorbs bedeutet, dass
das Produkt am Ende seiner Lebenszeit vom
Hausmüll getrennt zu entsorgen ist, und einer
Müllsammelstelle für Elektro- und Elektronik-Altgeräte
zugeführt, oder bei Kauf eines neuen gleichartigen Geräts dem Händler zurückgegeben werden muss.
Der Benutzer ist dafür verantwortlich, dass das Gerät
am Ende seiner Nutzungsdauer zu den entsprechenden Sammelstellen gebracht wird. Die korrekte getrennte Sammlung des Geräts für seine anschließende
Zuführung zum Recycling, zur Behandlung und zur umweltgerechten Entsorgung trägt dazu bei, mögliche negative Auswirkungen auf die Umwelt und auf die
Gesundheit zu vermeiden und begünstigt die Wiederverwertung der Werkstoffe des Produkts. Für genauere
Informationen über die verfügbaren Sammelsysteme
wenden Sie sich bitte an den örtlichen Müllsammeldienst oder an den Händler, bei dem Sie das Gerät gekauft haben.
Risiken, die mit den als gefährlich geltenden Stoffen verbunden sind (WEEE).
Bezugnehmend auf die WEEE – Richtlinie werden
Stoffe, die schon lange in elektrischen und elektronischen Anlagen verwendet werden, für Personen und
Umwelt als gefährlich betrachtet. Die getrennte Müllsammlung für das darauffolgende Geräte-Recycling
und umweltfreundliche Entsorgung, tragen zur Vermeidung möglicher negativer Auswirkungen für die menschliche Gesundheit und für die Umwelt bei. Die
getrennte Müllsammlung trägt zur Wiederverwertung
der Stoffe, aus denen das Produkt besteht, bei.
Das Produkt entspricht den europäischen Richtlinien
2004/108/EG, 2006/95/EG und Nachfolgenden.
El producto es conforme a la directiva europea
2004/108/CE, 2006/95/CE y sucesivas.
O produto está conforme a directiva europeia
2004/108/CE, 2006/95/CE e seguintes.
Page 24

S6I.720.000 RL. 02 12 12
ELVOX - Campodarsego - Italy
Via Pontarola, 14/a
35011 Campodarsego PD
Tel. +39 049 920 2511
Fax +39 049 920 2603
www.elvox.com
 Loading...