

Page 1
ART. 6601/AU , 660C/AU, 6701/AU
Manuale utente - User guide
Manuel utilisateur - Benutzerhandbuch
Instrucciones usuario - Manual do Usuario
Page 2
2
B
E
D
D
L MC
E
F
G
H
I
FR
EN
IT
PT
ES
DE
Page 3
3
IT
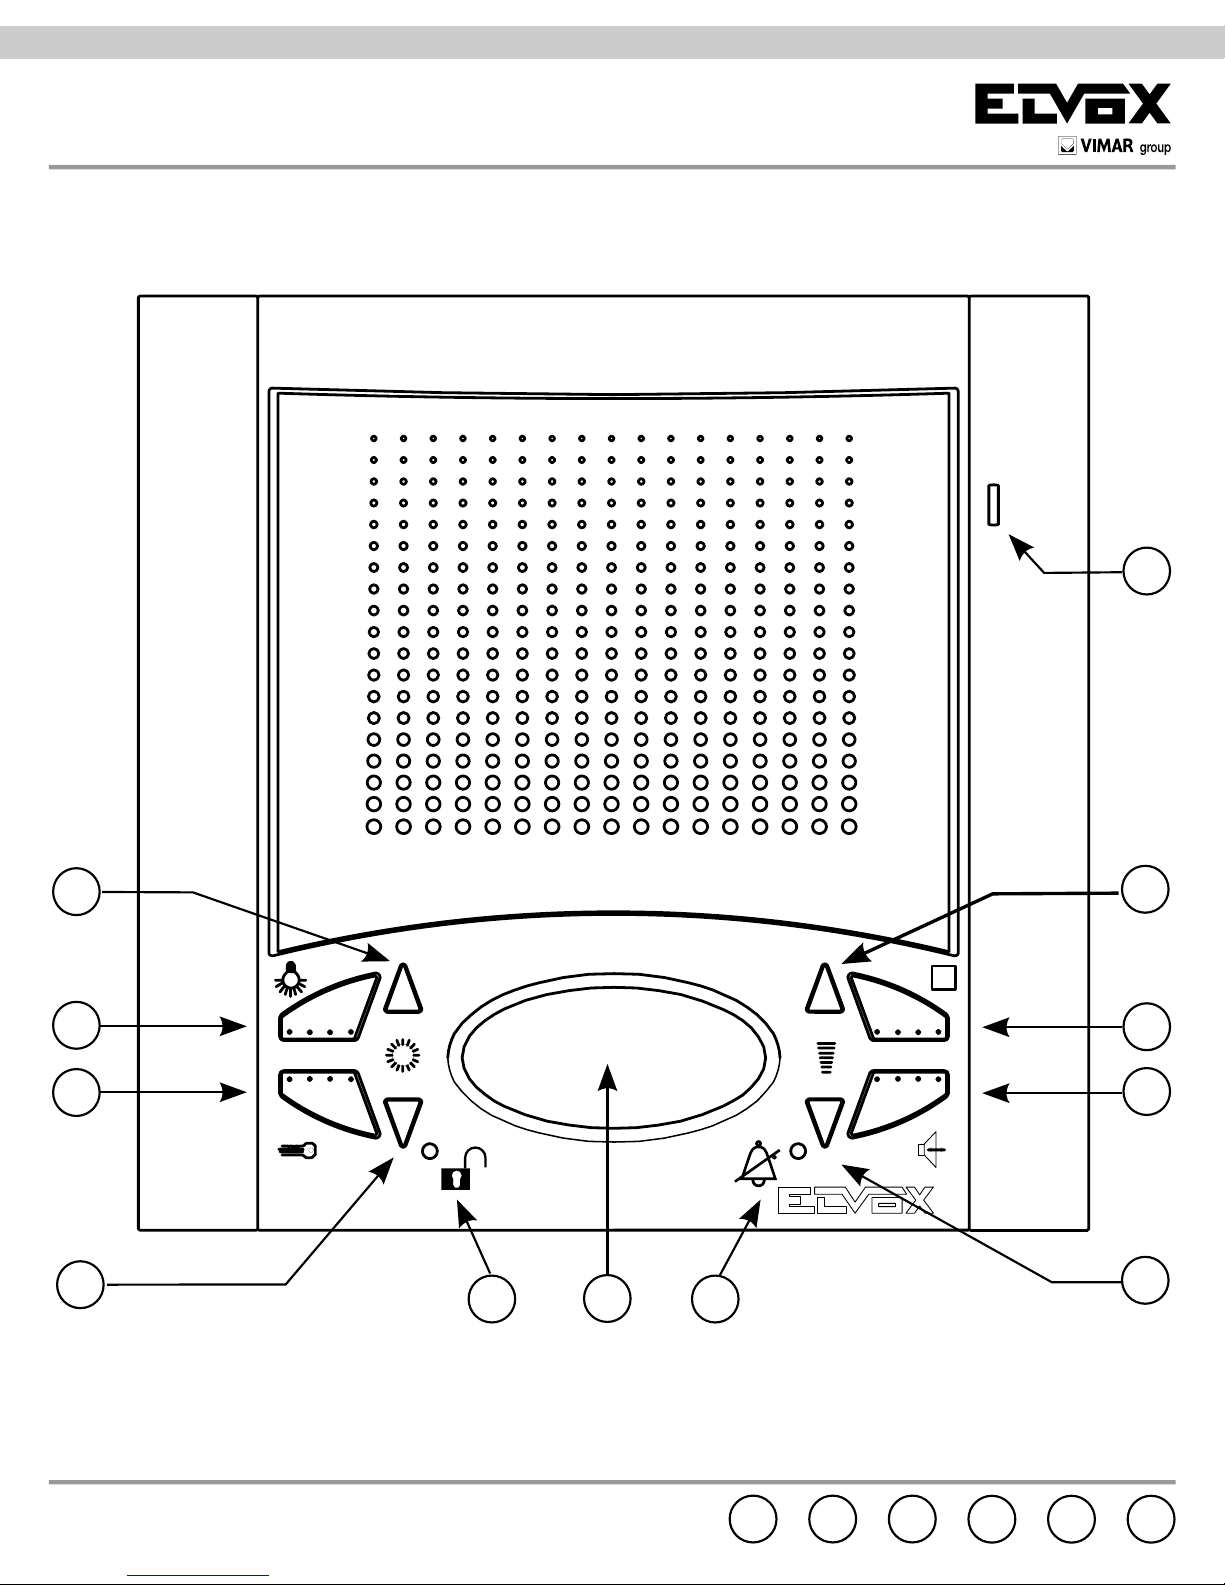
B) Microfono.
C) Altoparlante.
D)
Coppia di pulsanti.
1) Quando il citofono non è inserito i pul-
santi permettono la selezione della melodia
per la sola chiamata da targa esterna.
Per programmare la melodia: mantenere
premuto per almeno 2 secondi uno dei 2
pulsanti, ripremere ripetutamente i pulsanti
per selezionare la melodia interessata.
E)
Coppia di pulsanti.
1) In conversazione con il pulsante “H” premuto, premere i pulsanti “D” per aumentare
o diminuire il volume della fonica interna.
2) Per regolare il volume della suoneria:
mantenere premuto per almeno 2 secondi
uno dei 2 pulsanti “D”, premere ripetutamente i pulsanti per aumentare o diminuire
oppure escludere il volume della suoneria. I
pulsanti “D” regolano il volume della suoneria anche durante l’emissione del suono di
chiamata interna o esterna o fuoriporta.
F) Pulsante
: per attivazione 1° servizio
ausiliario se collegato (es. luci scale).
G) Pulsante
: per apertura serratura e
termina anche l’eventuale conversazione in
corso.
H) Pulsante
: per autoinserimento del
citofono senza essere stato chiamato.
I)
Pulsante parla/ascolta bicanale:
dopo la chiamata e/o l’accensione del cito-
fono premere una volta per attivare la
fonica. Ripremendolo una seconda volta la
conversazione viene terminata. Durante la
conversazione il LED rosso rimane acceso.
L)
Segnalazione porta aperta: l’accensione della segnalazione (LED verde)
indica che la porta è aperta (la funzione è
opzionale in relazione al tipo di installazione).
M)
Segnalazione chiamata esclusa:
l’accensione della segnalazione (LED
rosso) indica che la chiamata è esclusa
(vedi punto “E”).
Manutenzione
Eseguire la pulizia utilizzando un panno morbido. Non versare acqua direttamente sullo
schermo e non utilizzare alcun tipo di prodotto
chimico.
AVVERTENZE PER L’UTENTE:
- Non aprire o manomettere l’apparecchio.
- Evitare urti o colpi all’apparecchio che
po treb be ro pro vo ca rne la rottura con conse guen te proiezione di fram men ti.
- In caso di guasto, modifica o intervento
sugli apparecchi del l’im pian to (ali men ta tore ecc.) avvalersi di personale specializzato.
- Temperatura di funzionamento: 0° ÷ 40° C
- Non esporre l’apparecchio a stillicidio a
spruzzi d’acqua, e non porre sopra di esso
alcun oggetto pieno di liquido. Non ostruire
le aperture di ventilazione
- Attenzione: per evitare di ferirsi, questo
apparecchio deve essere assicurato alla
parete secondo le istruzioni di installazione.
Page 4
4
B) Microphone.
C) Loudspeaker.
D)
Pair of push-buttons.
1) When the interphone has not self.starter,
the push-buttons can be used to select the
tune for calls from a speech unit only. To
programme the tune: hold down 1 of the
2 push-buttons for at least 2 second, then
press the push-buttons repeatedly to select
the desired tune.
E)
Pair of push-buttons.
1) During conversation, with push-button
“H” pressed, press push-buttons “D” to
increase or decrease the volume of the
internal voice line.
2) To adjust ringtone volume: hold down 1
of the 2 push-buttons “D” for at least 2 second, then press the push-buttons repeatedly to increase or reduce ringtone volume,
or mute the ringtone. The “D” push-buttons
adjusts the chime volume also during the
emission of the internal or external or outdoor call tone.
F) Push-button
for activating 1st auxilia-
ry service if connected (e.g. stair lights).
G) Push-button
: for door lock release
and terminate also the conversation in progress.
H) Pushbutton
for selfactivation of inter-
phone without call from the entrance panel.
I) Pushbutton
: after the call and/or
switch-on of the monitor press the pushbutton once to activate the audio. Pressing it
once again the conversation terminates.
The red LED remains lit for the whole conversation dwell.
L)
Door open signal: if the green LED
lights up, this indicates that the door is open
(the function is optional according to the
type of installation).
M)
Call disabled signal: if the red LED
lights up, this indicates that the call is disabled (see point “E”).
Maintenance
Clean the monitor using a soft cloth, which
can be dry or slightly dampened with water.
Do not pour water directly onto the screen
and do not use any type of chemical product.
NOTES FOR USER:
- Do not open or tamper with the set.
- Avoid impact or blows to the set since
these could break and lead to dangerous
scattering of fragments.
- In case of failure, modification or main-
tenance of the units (power supply, etc.)
contact only specialized technicians.
- Operating temperature: 0° ÷ 40° C
- Do not expose the appliance to drip-
ping, sprinklings of water and do not put
any object filled with water on it. Do not
obstruct the ventilation openings.
- Warning: to avoid hurting oneself, this
appliance must be fixed to the wall according to the installation instructions.
EN
Page 5

5
FR
B) Microphone.
C) Haut-parleur.
D)
Paire de boutons-poussoirs
Lorsque le poste n’est pas inseré, les bou-
tons-poussoirs permettent de sélectionner
la mélodie pour appel seulement à partir d’un poste externe. Pour programmer
la mélodie: appuyer pendant au moins 2
secondes sur l’un des 2 boutons-poussoirs,
appuyer à plusieurs reprises sur les boutons-poussoirs pour sélectionner la mélodie
voulue.
E)
Paire de boutons-poussoirs.
1) En conversation avec le bouton-poussoir
“H” activé, appuyer sur les touches “D” pour
augmenter ou diminuer le volume de la
phonique interne.
2) Á repos its réglent le volume de la sonnerie: maintenir pressé pour au moins 2
seconde un des 2 boutons-poussoirs “D”,
appuyer à nouveau plusieurs fois pour augmenter ou diminuer ou exclure le volume
de la sonnerie. Les boutons-poussoirs “D”
règlent le volume de la sonnerie même
pendant la transmission su son d’appel
interne ou externe.
F) Bouton-poussoir
: pour l’activation
du 1er service auxiliaire si relié (par
exemple, éclairage d’escaliers).
G) Bouton-poussoir
pour l’ouverture de la serrure et termine
même la conversation eventuelle en cours.
H) Bouton-poussoir
permet insertion
automatique du poste sans avoir été appelé.
I) Bouton-poussoir
: après l’appel et/ou
l’allumage du poste appuyer une fois sur le
bouton-poussoir pour activer la phonique.
En appuyant une deuxième fois la conversation termine. La LED rouge reste allumée
pour toute la durée de la conversation.
L)
Signalisation porte ouverte:
l’allumage de la signalisation (LED verte)
indique que la porte est ouverte (cette
fonction est une option selon le type d’installation).
M)
Signalisation appel exclu:
l’allumage de la signalisation (LED rouge)
indique que l’appel est exclu (voir point “E”).
Entretien
Effectuer le nettoyage en utilisant un chiffon
doux et sec ou légèrement humide (uniquement avec de l’eau). Ne pas verser d’eau
directement sur l’écran et n’utiliser aucun type
de produit chimique.
CONSEILS POUR L’USAGER:
- Ne pas ouvrir et ne pas modifier l’appareil.
- Eviter les chocs à l’appareil qui pourraient
provoquer la rupture et donc la projection
de fragments.
- En cas de panne, de modification ou de
maintenance aux appareils de l’installation
(alimentation etc.) se servir de personnel
spécialisé.
- Temperature de fonctionnement: 0° ÷ 40°C
- Ne pas exposer cet appareil à égout, jets
d’eaux, et ne mettre aucun objet plein
d’eau sur le même. Ne pas obstruer les
fentes pour la ventilation.
- Attention: pour éviter de se blesser, cet
appareil doit être fixé au mur selon les
instructions pour l’installation.
Page 6

6
B) Mikrofon.
C) Lautsprecher.
D)
Tastenpaar.
Bei ausgeschaltetem Haustelefon wird mit
den Tasten die Melodie für Ruf von der
Außenstation gewählt. Programmierung
der Melodie: Eine der beiden Tasten
mindestens 2 Sekunde gedrückt halten.
Anschließend die gewünschte Melodie
durch wiederholte Betätigung der Tasten
wählen.
E)
Tastenpaar.
1) Während des Gesprächs mit der „H”
Taste gedrückt die „D” Tasten drücken um
die Lautstärke des Interaudio zu erhöhen
oder vermindern.
2) In Ruhezustand einstellen sie die
Klingellautstärke: eine der zwei “D” Tasten
für 2 Sekunden gedrückt halten, die
Tasten mehrmals wieder drücken um die
Lautstárke zu erhöhen oder vermindern
oder die Klingellautstärke ausschalten. Die
“D” Tasten die Klingelautstärke einstellen
auch während den Tonübertragung des
intern- oder Externrufs.
F) Taste
für erste Zusatzfunktion, insofern angeschlossen (z.B.
Treppenhauslicht).
G) Türöffnertaste
. Für Türoffneröffnung
und endet auch die eventuelle laufende
Konversation.
H)
Taste: für die Selbsteinschaltung
des Haustelefon ermöglicht
Selbsteinschaltung der Anlage vom Innen
Klingeltableauruf.
I) Taste
für Verbindung mit der
Außenstation nach Ruf und/oder
Monitoreinschaltung drücken um das Audio
zu aktivieren. Durch wieder Drücken der
Taste endet die Konversation. Der
Konversation bleibt die rote LED eingeschaltet.
L)
Anzeige “Türoffen”: Grüne LED-
Anzeige für geöffnete Tür (Funktion auf
Wunsch verfügbar und je nach Anlagentyp).
M)
Anzeige Rufabschaltung: Rote
LED-Anzeige für Ausschluss des Ruftons
(s. Punkt “E”).
Pflege
Verwenden Sie zur Reinigung ein weiches
und trockenes oder leicht mit Wasser angefeuchtetes Tuch. Gießen Sie kein Wasser
direkt auf den Bildschirm und vermeiden Sie
chemische Reinigungsprodukte.
ANWEISUNGEN FÜR DEN BENUTZER
- Gerãt nicht öffnen.
- Vermeiden Sie Stöße und Schläge. Dies
kann zum Bruch der Bildröhre führen.
- Im Falle eines Defektes, Änderung oder
Wartung der Geräte (z.B. Netzgerät, etc.)
wenden Sie sich nur an Fachpersonal.
- Betriebstemperatur: 0° ÷ 40° C
- Das Gerät auf Tropfen, Wassersträhle
nicht ausstellen, und keine FlüssigkeitvollObjekte über es setzen. Die Schlitzen für
die Lüftung nicht verstopfen.
- Achtung: Um zu vermeiden sich zu ver-
wunden, dieses Gerät muss an die Wand
befestigt werden.
DE
Page 7

7
ES
B) Micrófono.
C) Altavoz.
D)
Par de pulsadores.
Cuando el teléfono está desconectado, los
pulsadores permiten seleccionar la melodía
únicamente para la llamada desde el aparato externo. Para seleccionar la melodía:
mantener accionado, durante dos segundos como mínimo, uno de los 2 pulsadores
y accionar repetidamente los pulsadores
hasta encontrar la melodía deseada.
E)
Par de pulsadores.
1) Durante la conversación, con el pulsador
“H” accionado, accionar los pulsadores “D”
para aumentar o disminuir el volumen de la
línea fónica interna.
2) Para regular el volumen del timbre:
mantener accionado, durante 2 segundos
como mínimo, uno de los 2 pulsadores “D”
y accionar repetidamente los pulsadores
para aumentar, disminuir o excluir el volumen del timbre. Los pulsadores “D” regulan
el volume del timbre también durante la
inmisión del sonido de llamada interna o
externa o puerta apartamiento.
F) Pulsador
: para la activación del 1er
servicio auxiliar si se ha conectado (por
ejemplo, luces de la escalera).
G) Pulsador
: para la apertura de la
cerradura y termina también la eventual
conversación en curso.
H)
Pulsador para el autoencendido del
teléfon sin que se haya producido una llamada.
I) Pulsador
: tras la llamada y/o el
encendido del teléfono, mantener accionado el pulsador para la conversación con el
aparato externo.
L) Señalización de puerta abierta
:
el encendido de la señalización (LED
verde) indica que la puerta está abierta (la
función es opcional en relación con el tipo
de instalación).
M) Señalización de llamada excluida
el
encendido de la señalización (LED rojo)
indica que la llamada se encuentra excluida
(véase punto “E”.
Mantenimiento
Limpie con un paño suave y seco o ligeramente humedecido con agua. No rocíe el
agua directamente en la pantalla y no utilice
ningún tipo de producto químico.
CONSEJOS PARA EL USUARIO:
- No abrir o manipular el aparato.
- Evitar choques o golpes al aparato que
prodrían pro vo car la rotura con consiguiente proyección de fragmentos.
- En caso de avería, modificación o inter-
vención en los aparatos de la instalación
(alimentador etc.) interpelar personal especializado.
- Temperatura de funcionamiento: 0° ÷ 40* C
- No exponer el aparato a estilicidio, rocia-
das de agua y no poner algún objeto lleno
de líquido sobre él. No obstruir las aperturas para la ventilación.
- Atención: para evitar de herirse, este
aparato debe ser fijado a la pared según
las instrucciones para la instalación.
Page 8

8
B) Microfone.
C) Altifalante.
D)
Par de botões.
Quando o telefone está desligado, os
botões permitem a selecção da melodia
só para a chamada do posto externo. Para
programar a melodia: manter pressionado durante pelo menos 2 segundos um
dos 2 botões, pressionar repetidamente os
botões para seleccionar a melodia pretendida.
E)
Par de botões.
1) Em conversação, com o botão “H”
pressionado, pressionar os botões “D” para
aumentar ou diminuir o volume do audio
interno.
2) Para regular o volume da campainha:
manter pressionado durante pelo menos 2
segundos um dos 2 botões “D”, pressionar
repetidamente os botões para aumentar
ou diminuir ou excluir o volume da campainha. Os botões “D” regulem o volume da
campainha mesmo durante a imissão do
som de chamada interna ou externa ou no
patamar.
F) Botão
: para a activação do 1° servi-
ço auxiliar, se ligado (por exemplo: luzes da
escada).
G) Botão
: para abertura do trinco e
termina mesmo a eventual conversação em
curso.
H) Botão
: para o autoinserção do telefo-
ne.
I)
Botão: para a chamada e/ou o acen-
dimento do telefone e premir uma vez o
botão para activar a fónica.
Premindo-lo uma segunda vez a conversa-
ção termina. O LED vermelho permanece
aceso por toda a duração da conversação.
L)
Sinalização porta aberta: acendi-
mento da sinalização (LED verde) indica
que a porta está aberta (a função é opcional em relação ao tipo de instalação).
M)
Sinalização chamada excluida: o
acendimento da sinalização (LED vermelho) indica que a chamada é excluida (ver
ponto “E”).
Manutenção
Limpe com um pano macio e seco ou ligeiramente humedecido com água. Não deite
água directamente sobre o ecrã e não utilize
nenhum tipo de produto químico.
CUIDADOS A TER PELO UTENTE:
- Não abrir o aparelho.
- Evitar choques ou pancadas no aparelho
pois podem pro vo car a ruptura com a consequente projecção de fragmentos.
- No caso de avaria, modificação ou inter-
venção nos aparelhos da instalação (alimentador, etc.) recorrer a pessoal especializado.
- Temperatura de funcionamento: 0° ÷ 40° C.
- Não expôr a aparelhagem à estilicídio, bor-
rifos de agua e não colocar nenhum objeito
cheno de líquido sobre éle. Não obstruir a
fentas para a ventilação.
- Atenção: para evitar de se ferir, este apa-
relho deve ser fixado à parede según as
instruções para a instalação.
PT
Page 9

9
B
E
D
D
L MC
E
F
G
H
I
FR
EN
IT
PT
ES
DE
Page 10

10
Il prodotto è conforme alla direttiva europea 2004/108/CE, 2006/95/CE e successive.
Product is according to EC Directive 2004/108/CE, 2006/95/CE and following norms.
Le produit est conforme à la directive européenne 2004/108/CE, 2006/95/CE et suivantes.
Das Produkt entspricht den europäischen Richtlinien 2004/108/CE, 2006/95/CE und Nachfolgenden.
El producto es conforme a la directiva europea 2004/108/CE, 2006/95/CE y sucesivas.
O produto está conforme a directiva europeia 2004/108/CE, 2006/95/CE e seguintes.
FR
EN
IT
PT
ES
DE
Page 11

11
Page 12

Vimar SpA: Viale Vicenza, 14
36063 Marostica VI - Italy
Tel. +39 0424 488 600 - Fax (Italia) 0424 488 188
Fax (Export) 0424 488 709
www.vimar.com
S6I.660.A11 06 1407
VIMAR - Marostica - Italy
 Loading...