

Page 1
Manuale per il collegamento e l’uso
Installation and operation manual
46816.212C
Telecamera bullet IR 800TVL, obiettivi 2,8-12 mm
Camera bullet IR 800TVL, lens 2.8-12 mm
Page 2
2
LED IR a elevate prestazioni
Controllo automatico del guadagno (AGC)
Per emettere un segnale video standard in diverse condizioni
di illuminazione, il guadagno dell’amplicatore deve essere in
grado di regolarsi automaticamente in grandi ambiti. La sensibilità aumenta automaticamente quando la luce è bassa e
migliora l’uscita del segnale fornendo un’immagine chiara e
nitida.
Bilanciamento automatico del bianco
Il bilanciamento automatico del bianco è l’inversione degli
oggetti bianchi eseguito dalle telecamere. Quando la temperatura del colore cambia, l’occhio umano riesce comunque a
percepire il bianco come bianco. Questo accade perché l’occhio umano può adattarsi alla temperatura del colore, ma la
telecamera non è in grado di farlo con altrettanta precisione,
in presenza di luce il bianco cambia in altri colori dopo le riprese. La tecnologia del bilanciamento del bianco può correggere questo problema.
Staffa
Staffa di tipo elegante e combinato, con cavo video e di alimentazione incorporato
. Rende il montaggio pratico e afdabile.
Standard IP-66 resistente agli agenti atmosferici
I
ATTENZIONE
RISCHIO DI SCOSSA
ELETTRICA. NON APRIRE
ATTENZIONE: PER RIDURRE IL RISCHIO DI INCENDIO O DI SCOSSA
ELETTRICA NON RIMUOVERE IL COPERCHIO
O IL PANNELLO POSTERIORE.
L’INTERNO NON CONTIENE PARTI CHE POSSONO ESSERE RIPARATE
DALL’UTENTE.
PER L’ASSISTENZA TECNICA RIVOLGERSI A PERSONALE QUALIFICATO.
123
Altri marchi
Durata utile
Sensibilità IR
1 anno 2 anno 3 anno 4 anno
DESCRIZIONE
Questa telecamera IR bullet utilizza un sensore ad altasensibilità e una progettazione avanzata della circuiteria, risolu-
zione no a 800TVL, design moderno e professionale e altre
funzioni assistite con il modello del ltro IR-CUT offrono funzionamento diurno e notturno 24 ore su 24 senza difcoltà.
ATTENZIONE
Grazie per aver acquistato questo prodotto. Prima di cercaredi collegare o utilizzare il prodotto, leggere attentamente le
istruzioni e conservare il manuale per consultazione futura.
1. Utilizzare una rete di alimentazione appropriata.
La tensione di ingresso della telecamera è 12 Vcc. Assicu-
rarsi di collegarla a una sorgente di alimentazione idonea.
Una connessione errata può causare malfunzionamenti
e/o danneggiare la telecamera.
2. Non cercare di smontare la telecamera.
Per evitare il rischio di scosse elettriche, non rimuovere viti
o coperchi. All'interno non vi sono parti che possono essere
riparate dall'utente. Per l'assistenza rivolgersi a un tecnico
qualicato
.
3. Maneggiare la telecamera con cura.
Non utilizzare la telecamera in modo improprio. Evitare
colpi, scossoni e simili. La telecamera potrebbe riportare
danni a seguito di utilizzo o conservazione non idonei.
4.
Non utilizzare detergenti aggressivi o abrasivi per pulire il corpo della telecamera.
Se la telecamera è sporca, passare un panno asciutto. Se
lo sporco risulta difcile da rimuovere, utilizzare un detergente delicato e stronare leggermente.
5. Pulire la piastra anteriore del sensore con cautela.
Per pulire il pannello del sensore, non utilizzare detergenti
aggressivi o abrasivi. Utilizzare carta per la pulizia di obiettivi o la punta di un bastoncino cotonato inumidito con alcol.
6. Non cercare di puntare la telecamera verso il sole
Non cercare di puntare la telecamera verso il sole o altri
oggetti molto luminosi che farebbero comparire macchie
anche se la videocamera non è in uso. Si potrebbe danneggiare il sensore.
7. Non collocare la telecamera in luoghi soggetti a interferenza.
Quando la telecamera è installata vicino ad apparecchia-
ture come dispositivi che comunicano in wireless, che
emettono forti campi elettromagnetici, potrebbero vericarsi alcune irregolarità quali rumore sullo schermo del
monitor.
FUNZIONI
Utilizza un sensore a prestazioni elevate, l'immagine risulta
nitida e perfetta
Funzione automatica da colore a bianco/nero
Monitoraggio giorno e notte: di giorno con luce sufciente,
immagine a colori; di notte, con luce bassa; passa all'immagine in bianco e nero automaticamente per migliorare la sensibilità e la qualità dell'immagine.
Alta risoluzione
Fino a 800TVL di alta risoluzione.
Rapporto S/N elevato.
Denizione del rapporto S/N: il rapporto tra la tensione del
segnale e la tensione del rumore, più è alto il rapporto, minore è l'interferenza del rumore e più è chiara l'immagine.
Menu OSD UTC (in opzione)
Il potente menu OSD consente di impostare
numerose funzioni.
Desing dei LED IR per lunga durata
LED IR a elevate prestazioni, con luminosità molto superiore e durata utile molto più lunga rispetto ai normali LED.
Page 3
1
IR CUT
Filtro IR incorporato, ltro normale durante il giorno e ltro IR
durante la notte per ottenere immagini chiare e nitide diurne e
notturne, assicura una sorveglianza ininterrotta.
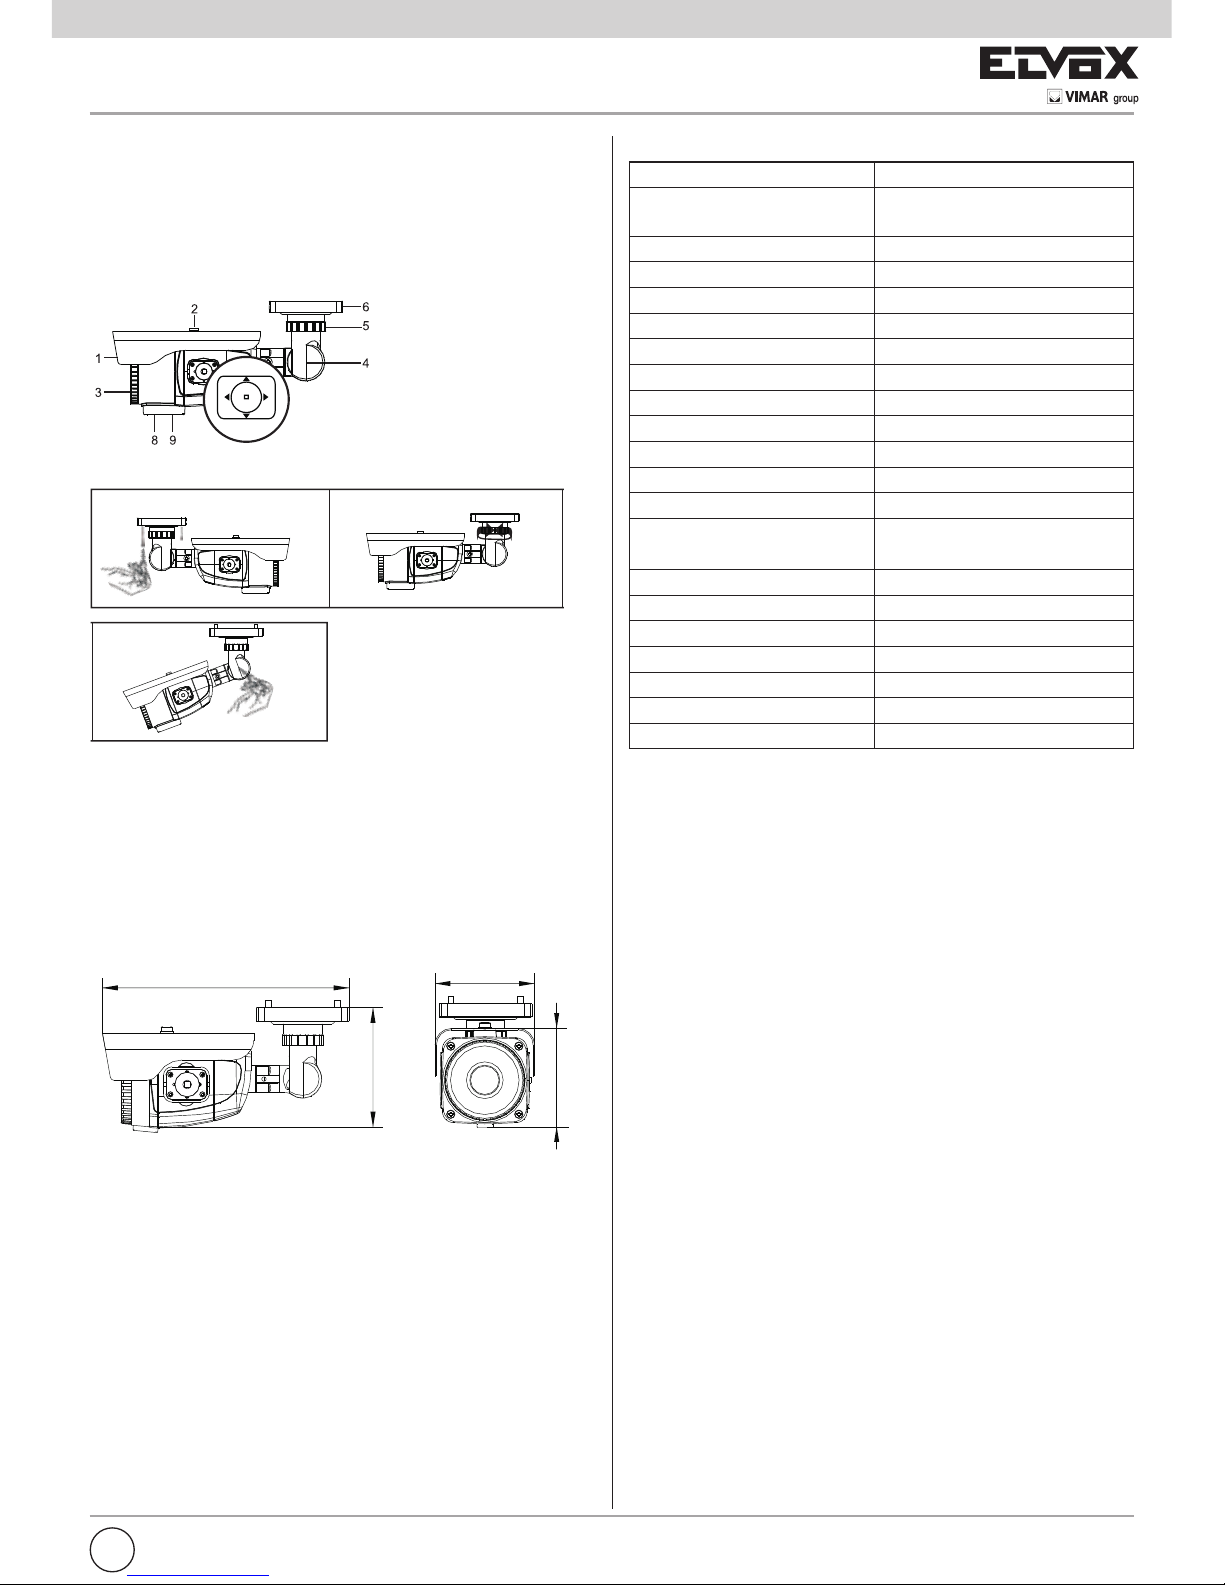
ISTRUZIONI E INSTALLAZIONE DELLE PARTI
1. Paraluce
2. Vite di ssaggio del
paraluce
3. Corpo della telecamera
4. Vite di ssaggio verticale
della telecamera
5. Anello di regolazione
verticale della telecamera
6. Base staffa
8. Manopola messa a fuoco
9. Manopola zoom
Installazione della telecamera
1. Fissare la telecamera nel luogo desiderato con le quattro
viti.
2. Allentare l’anello di regolazione orizzontale, regolare nella
posizione richiesta, quindi stringerlo di nuovo.
3. Allentare la vite di ssaggio dell’angolazione, regolare nella posizione richiesta, quindi stringerla di nuovo.
DIMENSIONI (mm)
I
123
3
)
244.00
120.00
90. 00
SPECIFICHE
N. modello 46816.212C
Sensore Sensore ad alta sensibilità
1/3" 960H
Formato video PAL/NTSC
Risoluzione 800 TVL
Illuminazione min. 0 Lux (con IR ON)
Rapporto S/N ≥48 dB (con AGC OFF)
Bilanciamento del bianco ATW
Otturatore AUTO (1/100~1/100000)
Specchio NO/O/V/OV
D/N AUTO
2D-DNR 2D
Modo Sync INTERNO
Tensione 12 Vdc
Corrente 350 mA±10%(IR ON);
85 mA±10%(IR OFF)
Raggio IR 40 m
Impermeabilità IP66
Attacco obiettivo 2,8-12 mm
Temp. immagazzinamento -20°C ~60°C
Temp. esercizio -10°C ~50°C RH90% MAX
Dimensioni 244 (L) * 120 (H) * 80 (P)
Peso 1000 g
* Le speciche sono soggette a modiche senza preavviso.
Page 4
2
I
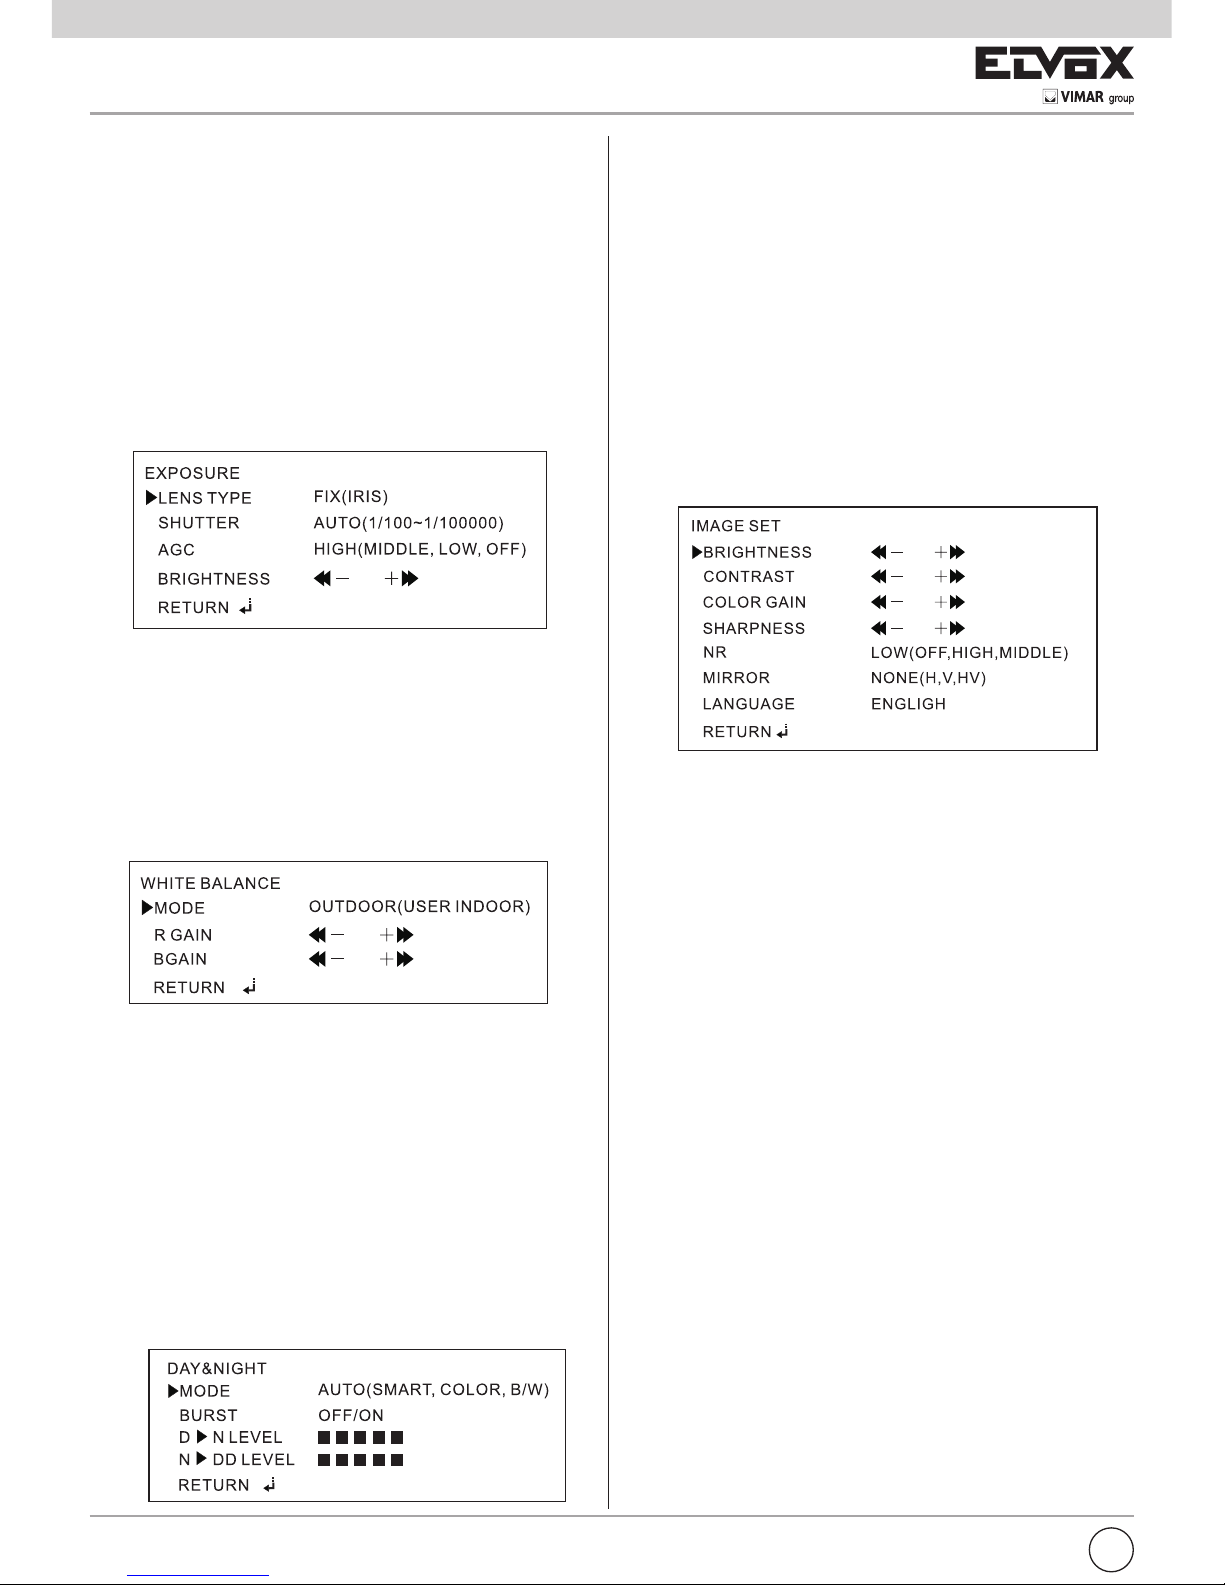
EXPOSURE (Esposizione)
1. Premere il pulsante joystick OSD per visualizzare
il Main Menu (Menu principale), spostare il cursore su EXPOSURE (Esposizione) e premere il
pulsante menu per accedere al menu Exposure
(Esposizione), in cui è possibile impostare il tipo
di obiettivo su Auto Iris (Diaframma automatico)
e Fix iris (Diaframma sso); Shutter (Auto) (Otturatore (automatico)); AGC (High) (Controllo automatico del guadagno (Alto)). Inoltre è possibile
premere a SINISTRA e a DESTRA per regolare la
luminosità dell'immagine
Bilanciamento del bianco:
1.
Spostare il cursore su WHITE BALANCE (Bilanciamento del bianco), spostarsi a SINISTRA o a
DESTRA per impostare la modalità su INDOOR
(Interno), OUTDOOR (Esterno), USER (Utente) o
FIX (Fisso). L'impostazione di R GAIN (Guadagno
del blu) e R GAIN (Guadagno del rosso) è possibile soltanto in modalità ”MANUAL” (Manuale).
Giorno/Notte:
1. Spostare il cursore su DAY&NIGHT (Giorno e
Notte), spostarsi a SINISTRA e a DESTRA per
impostare la modalità. Sono disponibili quattro
modalità: AUTO (Automatica); SMART IR (IR
intelligente); COLOR (Colore); B/W (B/N); l'impostazione di fabbrica è su AUTO e BURST su
OFF. Utilizzare i pulsanti SINISTRA e DESTRA
per regolare il valore numerico da B/N a Colore
e da Colore a B/N. N.B: IN MODALITÀ "COLOR"
SONO ATTIVE SOLO LE VOCI "MODE" (Modalità) E "RETURN" (Invio)..
Impostazione immagine:
1, Spostare il cursore su IMAGE SET (Impostazio-
ne immagine) e utilizzare i pulsanti SINISTRA
e DESTRA per regolare i valori BRIGHTNESS
(Luminosità), CONTRAST (Contrasto), COLOR
GAIN (Guadagno colore), SHARPNESS (Nitidezza) dell'immagine e selezionare OFF, LOW
(Basso), MIDDLE (Medio), HIGH (Alto) per DNR
NR (Riduzione digitale del rumore) e impostare
MIRROR (Riessione) su NONE (Nessuna) H
(Orizzontale), V (Verticale), HV (Orizzontale e
verticale). Il valore predenito è su OFF. La voce
LANGUAGE (Lingua) consente di scegliere tra
CHINESE (Cinese) e ENGLISH (Inglese)
Impostazione delle funzioni:
1. Spostare il cursore su MOTION (Movimento) e
impostare il movimento mediante i pulsanti SINISTRA e DESTRA. È possibile impostare da 1 a 6
aree e la funzione ALARM (Allarme) può essere
impostata su ON oppure su OFF
2. Spostare il cursore su PRIVACY (Riservatezza) e,
con i pulsanti DESTRA e SINISTRA, impostarla
su ON, oppure su OFF per impostare l'assenza di
riservatezza. Premere i pulsanti per accedere al
sottomenu e impostare COLOR (Colore) per l'area riservata con i pulsanti SINISTRA E DESTRA.
Impostare inoltre "HEIGHT" (Altezza), "WIDTH"
(Larghezza), "LEFT/RIGHT" (A sinistra/A destra) e
"TOP/BOTTOM" (In alto/In basso).
3. Spostare il cursore su SYSTEM SET (Impostazione sistema) per accedere al sottomenu e impostare SYNC (Sincronizzazione), BURST, PEDESTAL
(Piedistallo), WHITE (Bianco) mediante i pulsanti
SINISTRA e DESTRA. I colori supportati dall'OSD
sono White (Bianco), Green (Verde), Red (Rosso),
ecc. OSD BG (Sfondo OSD) è impostato su OFF.
Page 5

3
I
RESET:
1. Spostare il cursore su FACTORY MODE (Impostazioni di fabbrica) e impostare a: YES (Sì) o NO.
Spostare il cursore su SAVE&EXIT (Salva ed esci)
per salvare le modiche apportate e uscire dal
menu oppure spostare il cursore su EXIT (Esci)
per uscire direttamente dal menu.
SAVE&EXIT (Salva ed esci)
1. Spostare il cursore su SAVE&EXIT (Salva ed esci)
per uscire.
Page 6

4
EN
Long-effective IR Light Source Design
Automatic gain control (AGC)
In order to output standard video signal under different
illumination conditions, The amplier gain need to adjust
automatically in large scope.it can increase the sensitivity automatically when low light and enhance the signal
output to have a clear bright image.
Auto White Balance
ATW is the cameras’ reversion of the white objects, it can
adjust the room temperature and outside temperature.
when the temperature change, the human eye can see
that white is white. This is because human eye can adapt
to the changes of the color temperature, but the camera does not perform well equally, when Light occurs, the
white color will change to others after shooting. White
Balance technology can correct this problem
Bracket
Elegant and solid combined type bracket, with video and
power cable built-in
. Makes installation convenient and
reliable
IP-66 weather proof standard
ATTENZIONE
RISCHIO DI SCOSSA
ELETTRICA. NON APRIRE
ATTENZIONE: PER RIDURRE IL RISCHIO DI INCENDIO O DI SCOSSA
ELETTRICA NON RIMUOVERE IL COPERCHIO
O IL PANNELLO POSTERIORE.
L’INTERNO NON CONTIENE PARTI CHE POSSONO ESSERE RIPARATE
DALL’UTENTE.
PER L’ASSISTENZA TECNICA RIVOLGERSI A PERSONALE QUALIFICATO.
1. Use the Appropriate Power Supply
The input power for the camera is DC12V. Be sure to
connect it to the appropriate power. Wrong connection
may cause malfunction and/or damage to the video
camera.
2. Do not attempt to disassemble the camera.
To prevent electric shock, do not remove screws or covers. There are no user ser viceable parts inside. Ask a
qualied ser vice person for servicing
.
3. Handle the camera with care.
Do not abuse the camera. Avoid striking, shaking, etc.
The camera could be damaged by improper handling
or storage.
4.
Do note use strong or abrasive detergents when clea-
ning the camera body.
Use a dry cloth to clean the camera when dirty. In case
the dirt is hard to remove. Use a mild detergent and
wipe gently.
5. Clean the sensor faceplate with care.
When cleaning the sensor panel, do not use strong
or abrasive detergents. Use a piece of lens tissue or
cotton tipped applicator and ethanol.
6. Do not attempt to aim the camera at the sun
Do not attempt to aim the camera at the sun or other
extremely brightobjects that causes mear to appear irrespective of whether the camera is operating or not.
This can damage the sensor.
7. Do not put the camera in a place with interference.
When this camera is installed near the equipment like
wireless communication device which emits strong
electromagnetic eld, some irregularity such as noise
on monitor screen may happen.
FEATURES
Adopt high perfor mance sensor, the image is clear, exquisite
Auto color to black function
Day and Night Monitoring daytime with enough light, color
image, at night, low light, change to black image automatically to improve the sensitivity and picture quality.
High resolution
Up to 800TVL high resolution.
High S/N Ratio.
S/N Ratio denition: the ratio between signal voltage and noise voltage, the higher of the ratio, the less interference of the
noise, and the image is more clearer.
UTC OSD Menu (optional)
Powerful OSD menu allows for various function settings.
Long-life IR LEDS Design
High-performance IR LED, whose brightness
is several times higher and service life longer
than an ordinary LED’s.
DESCRIPTION
This IR Bullet Camera adopt high sensitivity sensor and advanced circuit design, The resolution up to 800TVL, Fashionable and professional appearance design, functions ensure
clear bright pictures. Besides, Mirror, Privacy and other aided
functions with IR-CUT lter design, easily have 24 hours day
and night.
ATTENTION
Thank you for your purchasing this product. Before attempting to connect or operate this product, please read these instr
uctions carefully and save this manual for future use.
123
Other brands
Service Life
IR Sensnsitivity
1 yr 2 yr 3 yr 4 yr
Page 7

5
EN
ISTRUZIONI E INSTALLAZIONE DELLE PARTI
1. Sunshade
2. Fixing Screw for Sunshade
3. Camera Body
4. Camera Vertical Fixing
Screw
5. Camera Horizontal
Adjusting Ring
6. Bracket Base
8. Focus Knob
9. Zoom Knob
Camera Installation
1. Fix the camera to the needed place with the four pieces of
screws.
2. Loosen the horizontal adjusting ring, adjust it to the nee-
ded place, then x the horizontal adjusting ring.
3. Loosen the angle xing screw, adjust it to the needed place, then x the angle xing screw.
DIMENSION (mm)
123
3
)
244.00
120.00
90. 00
SPECIFICATION
Model No 46816.212C
Sensor 1/3" 960H High Sensitivity sensor
Video Format PAL/NTSC
Resolution 800TVL
Mini Illumination 0 Lux (IR ON)
S/N Ratio ≥48dB (AGC OFF)
White Bal ATW
Shutter AUTO (1/100~1/100000)
Mirror NONE/H/V/HV
D/N AUTO
2D-DNR 2D
Sync Mode INTERNAL
Voltage DC12V
Cur rent 350mA±10%(IR ON);
85mA±10%(IR OFF)
IR range 40m
Water proof Ip66
Lens Mount 2.8-12mm
Storage Temp -20°C ~60°C
Operating Temp -10°C ~50°C RH90% MAX
Dimension 244(L) * 120(H) * 80(W)
Weight 1000g
*Specications subject to change without notice.
Page 8

6
EN
EXPOSURE
1. Press OSD Joystick button to display Main Menu,
move the cursor to EXPOSURE and Press menu
button to enter Exposure menu, it is available to
adjust lens type by Auto Iris and Fix iris; Shutter
(Auto); AGC (High); And Press LEFT and RIGHT
side to adjust image brightness
White Balance:
1. Move the cursor to White Balance, turn LEFT
and RIGHT to set mode as indoor Outdoor User
Fix.R/B GAIN setting ONLY UNDER THE MODE
”MANUAL”.
Day/Night:
1. Move the cursor to Day and Night,turn LEFT and
RIGHT to set mode and it is support four mode
as Auto; Smart IR; Color; Black/White; and factory set is Auto and Burst select Off. Turn LEFT
and RIGHT button to adjust numerical value for
Black to color and Color to Black. NOTE ONLY
”MODE” and “return” ITEMS WORKING UNDER
MODEL”COLOR”.
Image set:
1, Move the cursor to image set and turn LEFT and
RIGHT buttons to adjust Brightness of IMAGE,
CONTRAST, COLOR GAIN, SHARPNESS and
Select OFF; LOW; MIDDLE; HIGH; for DNR NR
and set MIRROR by NONE; HFLIP;VTLIP;HVFLIP,the default is OFF and LANGUAGE supports 2 types as Chinese and English
Function set:
1. Move the cursor to MOTION,and SET Motion by
LEFT and RIGHT Buttons,you can set 1~6 AREA;and ALARM supports “ON/OFF”
2. Move the cursor to Privacy and Set it by LEFT and
RIGHT buttons for ON/OFF,when set as open.
Press buttons enter to Submenu and set Color for
Privacy Area by LEFT and RIGHT buttons. Futhermore, set “HEIGHT”, “WIDTH”, “LEFT/RIGHT”,
“TOP/BUTTON”.
3. Move the cursor to SYSTEM SET Press buttons to
enter submenu and adjust SYNC; BURST; PEDESTAL;WHITE; by LEFT AND RIGHT buttons,OSD
color supports White; Green; Red; etc. OSD BG
set as OFF.
Page 9

7
EN
RESET:
1. Move the cursor to Factory set and set it as : YES;NO. Moving the cusor SAVE&EXIT is to save the
changes you have made and exit,move the curs or
to EXIT and exit the menu directly.
SAVE&EXIT
1. Move the cursor to SAVE@EXIT to exit.
Page 10

8
AVVERTENZE PER L’INSTALLATORE
- Leggere attentamente le av ver ten ze contenute nel pre sen te do cu-
men to in quanto for ni sco no importanti indicazioni ri guar dan ti la sicurezza di in stal la zio ne, d’uso e di ma nu ten zio ne.
- Dopo aver tolto l’imballaggio assicurarsi dell’integrità del l’ap pa rec-
chio. Gli ele men ti dell’imballaggio (sacchetti di pla sti ca, po li sti ro lo
espanso, ecc.) non devono essere lasciati alla portata dei bambini
in quanto potenziali fonti di pericolo. L’esecuzione dell’impianto deve
essere ri spon den te alle nor me CEI vigenti.
- È necessario prevedere a monte dell’alimentazione un appropriato
in ter rut to re di tipo bipolare facilmente accessibile con separazione
tra i contatti di almeno 3mm.
- Prima di col le ga re l’apparecchio ac cer tar si che i dati di targa siano
rispondenti a quelli della rete di di stri bu zio ne.
- Questo ap pa rec chio dovrà essere de sti na to solo all’uso per il quale
è stato espres sa men te concepito, e cioè per sistemi di citofonia o
videocitofonia. Ogni altro uso è da con si de rar si im pro prio e quindi
pericoloso. Il costruttore non può essere con si de ra to re spon sa bi le
per even tua li danni derivanti da usi impropri, erronei ed ir ra gio ne vo li.
- Prima di ef fet tua re qual si a si operazione di pu li zia o di ma nu ten zio ne,
disinserire l’apparecchio dalla rete di ali men ta zio ne elettrica, spegnen do l’interruttore del l’im pian to.
- In caso di guasto e/o di cattivo fun zio na men to del l’ap pa rec chio,
togliere l’ali men ta zio ne me dian te l’interruttore e non ma no met tere
l’apparecchio. Per l’even tua le ri pa ra zio ne ri vol ger si so la men te ad un
centro di assistenza tecnica autorizzato dal costruttore. Il mancato
ri spet to di quanto so pra può com pro met te re la si cu rez za del l’ap parec chio.
- Non ostru i re le aperture o fessure di ven ti la zio ne o di smaltimento
calore e non esporre l’apparecchio a stillicidio o spruzzi d’acqua. Nessun oggetto pieno di liquido, quali vasi, deve essere posto sull’apparecchio.
- L’installatore deve as si cu rar si che le in for ma zio ni per l’uten te siano
pre sen ti sugli ap pa rec chi derivati.
- Tutti gli apparecchi costituenti l’impianto devono essere de sti na ti
esclu si va men te all’uso per cui sono stati con ce pi ti.
- ATTENZIONE: per evitare di ferirsi, questo apparecchio deve essere
assicurato al pavimento/alla parete secondo le istruzioni di installazione.
- Questo do cu men to dovrà sem pre ri ma ne re allegato alla do cu men ta-
zio ne dell’impianto.
Direttiva 2002/96/CE (WEEE, RAEE).
Il simbolo del cestino barrato riportato sull’apparecchio indica
che il prodotto, alla ne della propria vita utile, dovendo essere
trattato separatamente dai riuti domestici, deve essere conferito
in un centro di raccolta differenziata per apparecchiature elettriche ed
elettroniche oppure riconsegnato al rivenditore al momento dell’acquisto
di una nuova apparecchiatura equivalente.
L’utente è responsabile del conferimento dell’apparecchio a ne vita
alle appropriate strutture di raccolta. L’adeguata raccolta differenziata
per l’avvio successivo dell’apparecchio dismesso al riciclaggio, al trattamento e allo smaltimento ambientalmente compatibile contribuisce ad
evitare possibili effetti negativi sull’ambiente e sulla salute e favorisce
il riciclo dei materiali di cui è composto il prodotto. Per informazioni più
dettagliate inerenti i sistemi di raccolta disponibili, rivolgersi al servizio lo-
cale di smaltimento riuti, o al negozio in cui è stato effettuato l’acquisto.
Rischi legati alle sostanze considerate pericolose (WEEE).
Secondo la nuova Direttiva WEEE sostanze che da tempo sono utilizzate comunemente su apparecchi elettrici ed elettronici sono considerate
sostanze pericolose per le persone e l’ambiente. L’adeguata raccolta
differenziata per l’avvio successivo dell’apparecchio dismesso al riciclaggio, al trattamento e allo smaltimento ambientalmente compatibile contribuisce ad evitare possibili effetti negativi sull’ambiente e sulla salute e
favorisce il riciclo dei materiali di cui è composto il prodotto.
Il prodotto è conforme alla direttiva europea 2004/108/CE e
successive.
SAFETY INSTRUCTIONS FOR INSTALLERS
- Carefully read the instructions on this leaet: they give important information on the safety, use and maintenance of the installation.
- After removing the packing, check the integrity of the set. Packing
components (plastic bags, expanded polystyrene etc.) are dangerous
for children. Installation must be carried out according to national safety regulations.
- It is convenient to t close to the supply voltage source a proper bipolar type switch with 3 mm separation (minimum) between contacts.
- Before connecting the set, ensure that the data on the label correspond to those of the mains.
- This apparatus must only be used for the purpose for which it was
expressly designed, e.g. for audio or video door entry systems. Any
other use may be dangerous. The manufacturer is not responsible for
damage caused by improper, erroneous or irrational use.
- Before cleaning or maintenance, disconnect the set.
- In the event of faults and/or malfunctions, disconnect from the power
supply immediately by means of the switch and do not tamper with
the apparatus.
- For repairs apply only to the technical assistance centre authorized
by the manufacturer.
- Safety may be compromised if these instructions are disregarded.
- Do not obstruct opening of ventilation or heat exit slots and do not
expose the set to dripping or sprinkling of water. No objects lled with
liquids, such as vases, should be placed on the apparatus.
- Installers must ensure that manuals with the above instructions are
left on connected units after installation, for users’ information.
- All items must only be used for the purposes designed.
- WARNING: to prevent injury, this apparatus must be securely atta-
ched to the oor/wall in accordance with the installation instructions.
- This leaet must always be enclosed with the equipment.
Directive 2002/96/EC (WEEE)
The crossed-out wheelie bin symbol marked on the product
indicates that at the end of its useful life, the product must be
handled separately from household refuse and must therefore be
assigned to a differentiated collection centre for electrical and electronic
equipment or returned to the dealer upon purchase of a new, equivalent
item of equipment.
The user is responsible for assigning the equipment, at the end of its life,
to the appropriate collection facilities.
Suitable differentiated collection, for the purpose of subsequent recycling
of decommissioned equipment and environmentally compatible treatment and disposal, helps prevent potential negative effects on health
and the environment and promotes the recycling of the materials of which
the product is made. For further details regarding the collection systems
available, contact your local waste disposal service or the shop from
which the equipment was purchased.
Risks connected to substances considered as dangerous (WEEE).
According to the WEEE Directive, substances since long usually used
on electric and electronic appliances are considered dangerous for people and the environment. The adequate differentiated collection for the
subsequent dispatch of the appliance for the recycling, treatment and
dismantling (compatible with the environment) help to avoid possible negative effects on the environment and health and promote the recycling
of material with which the product is compound.
Product is according to EC Directive 2004/108/CE and following norms.
I EN
Page 11

9
NOTE:
Page 12

Vimar SpA: Viale Vicenza, 14
36063 Marostica VI - Italy
Tel. +39 0424 488 600 - Fax (Italia) 0424 488 188
Fax (Export) 0424 488 709
www.vimar.com
49400718A0 01 15 09
VIMAR - Marostica - Italy
 Loading...