

Page 1
Page 2

Please download the Elvie Pump app.
The app is available on devices that support Bluetooth Low Energy.
iPhones must be iPhone 5S or later and have iOS10 or above.
Android phones must have version 6 or newer.
For other languages, visit elvie.com/languages
For the most up to date information, please check elvie.com
Page 3

Questions?
For further assistance, please refer to the Help section in the Elvie Pump app or
visit elvie.com. You can get in touch with us at [email protected] or by calling
customer care on +44 (0)203 823 6298 (UK) or +1 (508) 300 9989 (US).
Page 4

Meet Elvie Pump
A silent wearable breast pump that
fits in your bra, and your life.
Designed for women’s bodies and modern lives, Elvie Pump is
worn inside your bra. It’s the silent, hands-free breast pump that
you’ve been waiting for.
Download the Elvie Pump app to monitor milk volume in real time,
track sessions and control Elvie Pump remotely.
We love hearing your feedback, so please let us know
how we can keep improving our products.
Tania Boler, CEO
4
Page 5
1. Charge Elvie Pump (see section 4.3)
Before using Elvie Pump for the first time, it needs to be charged.
Please note Elvie Pump does not turn on while it is charging.
2. Download the Elvie Pump app
Download the Elvie Pump app to make use of the
smart features: monitor milk volume in real time,
track sessions and control the pump remotely.
The Elvie Pump app can be downloaded from
the App Store (for iPhone) or Google Play Store
(for Android). The Elvie Pump app is available
on devices that support Bluetooth Low
Energy. iPhones must be iPhone 5s or later
and have iOS10 or above. Android phones
must have version 6 or newer. Once you
have downloaded the app, please follow
the onscreen setup instructions.
3. Getting started (see section 4)
Before you start using Elvie Pump learn
about cleaning, charging and finding your fit.
4. Your first expression session (see section 5)
Let’s look at how to express with Elvie Pump.
5. Questions
For further assistance, please refer to the Help section in
the Elvie Pump app or visit elvie.com. You can get in touch
with us at [email protected] or by calling customer care
on +44 (0)203 823 6298 (UK) or +1 (508) 300 9989 (US).
5
Page 6

Index
1
1.1
1.2
2
2.1
2.2
3
3.1
3.2
4
4.1
4.2
4.3
4.4
4.5
5
5.1
5.2
5.3
5.4
5.5
5.6
5.7
5.8
5.9
5.10
5.11
Parts
Product description
Controls
Intended use
Indications for use
Operating life
Safety
Warnings
Precautions
Getting started
Taking apart Elvie Pump
Cleaning before first use
Charging
Breast Shield sizing
Assembling Elvie Pump
Using Elvie Pump
Turning on Elvie Pump
Aligning your nipple
Finding the right compression
Starting your session
Intensity settings and modes
Automatic functions
Changing the bottle
Ending your session
After each use
Storing your milk
How to store Elvie Pump
8
8
10
11
11
11
12
12
13
15
15
18
21
23
25
28
28
28
31
33
33
35
36
37
37
40
41
6
Page 7

6
6.1
6.2
6.3
6.4
Troubleshooting
Alerts and warnings on Elvie Pump
Factory reset
Warranty
Symbols
42
42
43
44
45
7
7.1
7.2
7.3
8
Product specifications
Technical specifications
Transport, storage and disposal
EMC advice
Notes
46
46
47
48
50
7
Page 8

1. Parts
1.1 Product description
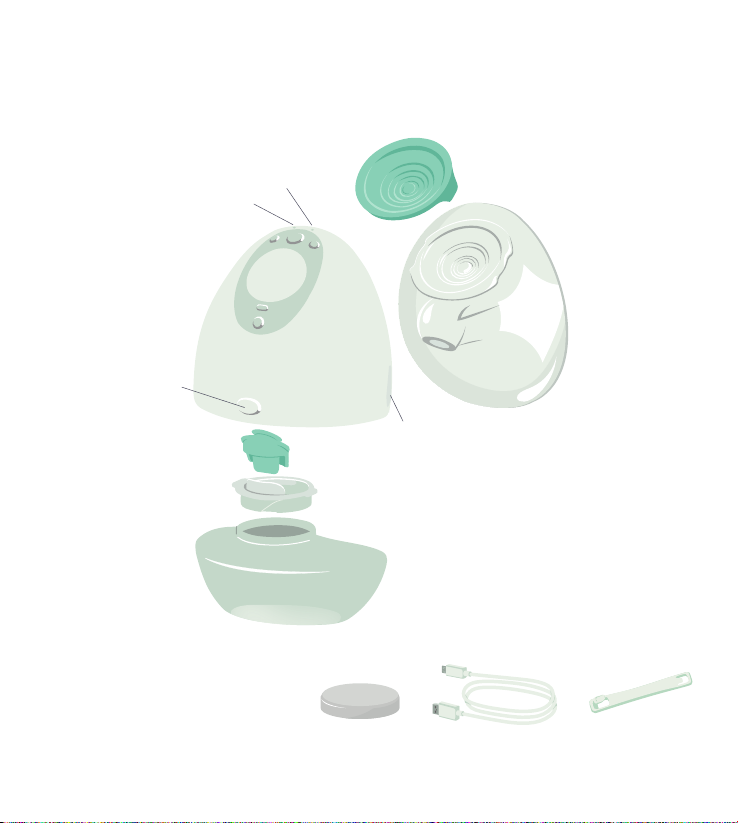
Elvie Pump contains the parts and accessories listed below,
as shown on the following page.
Elvie Pump Double
2 Hubs
4 Bottles
2 Breast Shields 24mm
2 Breast Shields 28mm
4 Seals
4 Spouts
4 Valves
4 Bra Adjusters
4 Bottle Lids
2 USB Charging Cables
2 Carry Bags
Tip: Before using Elvie Pump for the first time, it needs to be charged. See section 4.3
for more information on charging. Please note Elvie Pump does not turn on while
it is charging.
8
Elvie Pump Single
1 Hub
2 Bottles
1 Breast Shield 24mm
1 Breast Shield 28mm
2 Seals
2 Spouts
2 Valves
2 Bra Adjusters
2 Bottle Lids
1 USB Charging Cable
1 Carry Bag
Page 9
1. Parts
Bottle Release
Hub
Battery Light
Bottle Light
Seal
Breast
Shield
See section 4.4 for
sizing information
Bottle
Valve
Spout
Charging Port
Lid Bra Adjuster
Charging Cable
9
Page 10
1. Parts
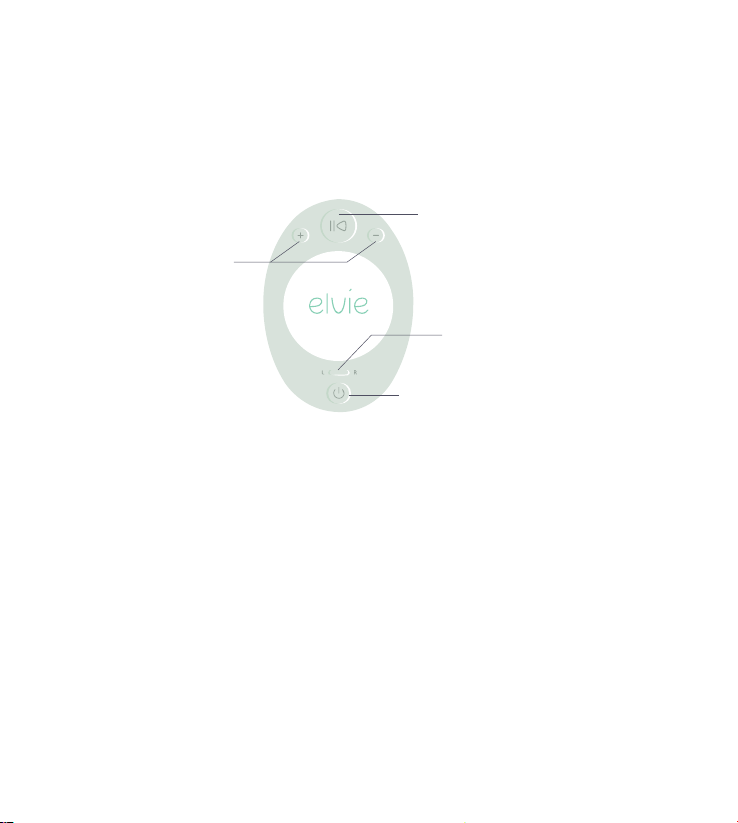
1.2 Controls
Play / Pause
Intensity Settings
Side Selector
Power
Tip: Download the Elvie Pump app to control the pump remotely, track results
of pumping sessions for each breast and make use of other smart features.
10
Page 11

2. Intended use
2.1 Indications for use
Powered breast pump, to express and collect milk from lactating women.
The device is intended for a single user.
2.2 Operating life
The operating life of the Hub is defined to be approximately 500 hours.
The expected operating life of the replaceable washable components
is six months.
It is recommended to replace the washable components after long-term storage
or before pumping for your next child.
11
Page 12

3. Safety
Read all instructions before using. Elvie Pump is not provided sterile.
It must be cleaned and sterilized before first use (see section 4.2).
When using electrical products, especially when children are present, basic safety
precautions should always be maintained, including the following:
3.1 Warnings
• This is a single-user product. Use by more than one person may present a health
risk and voids the warranty
• It is recommended you consult with a licensed healthcare professional before
using Elvie Pump if you have an active implanted device that would be aected
by a magnetic field (e.g. pacemaker, implantable cardioverter defibrillator)
• Inspect for damage, clean and sterilize washable components that come into
contact with your breast and breast milk prior to first use
• Clean all parts that come into contact with your breast and breast milk, and inspect
for damage after every use
• During normal use, areas of the Elvie Pump may warm up. If your pumping
environment is at the upper operating temperature limit (+30°C / +86°F) for the
maximum session time (40 minutes), the temperature of the Breast Shield may reach
up to +43°C / +109°F
• The black semicircle on the base of the Hub uses infrared (IR) energy to monitor the
milk volume in the bottle when Elvie Pump is pumping. Ensure the black semicircle
does not come into direct contact with skin while Elvie Pump is pumping
• Do not store wet or damp parts, as mold may develop
• Do not immerse the Hub in water or other liquids. Wipe with a clean, damp cloth
• This product contains small parts and a cable that may present a hazard. Keep out
of reach of children
• Only use Elvie manufactured parts with Elvie Pump, including the Charging Cable;
do not substitute
• It is recommended to use an adaptor compatible with both IEC 60601-1 and your
regional power source
12
Page 13

3. Safety
• Do not drop or insert any foreign object into any openings on the Hub and always
close the Charging Cap after charging
• Never operate an Elvie Pump if it has been damaged, is not working properly,
or has been dropped into water. If damage is found, immediately discontinue use
and email [email protected] or call customer care on +44 (0)203 823 6298 (UK)
or +1 (508) 300 9989 (US). In case of damage or wear, please replace parts
• Elvie Pump and its components are not heat-resistant. Keep away from heat sources
• Do not use flammable materials while using Elvie Pump or connecting Elvie Pump
to a charger
• Do not use Elvie Pump while sleeping or overly drowsy
• Do not use Elvie Pump when driving or operating heavy machinery
• Elvie Pump uses Bluetooth technology. Please follow airline rules for the use of
portable electronic devices when flying. Furthermore, high altitudes, including while
in a pressurized aircraft cabin, will aect the performance of Elvie Pump
• Pumping can induce labor. Do not pump until after giving birth. If you become
pregnant while breastfeeding or breast pumping, consult with a licensed healthcare
professional before continuing
• Only use Elvie Pump for its intended use as described in this manual
3.2 Precautions
• Always inspect all parts before use for damage and cleanliness
• Always ensure all parts are completely dry before assembling
• Do not place the Hub in the fridge or freezer
• Using a breast pump should not cause pain. Do not try to express with an
intensity setting that is too high or uncomfortable. If excessive discomfort or
pain is felt during pumping, stop pumping, break the seal around your nipple
and discontinue the session
• Contact your healthcare professional if you express minimal or no milk, or if
expression is painful
• For assistance with correct Breast Shield sizing and comfort, please see section 5
or talk to a lactation consultant or breastfeeding specialist
13
Page 14

3. Safety
• If the package appears damaged or tampered with before use, do not use and
email [email protected] or call customer care on +44 (0)203 823 6298 (UK)
or +1 (508) 300 9989 (US)
• Extra care is necessary when using Elvie Pump in the vicinity of children
• Elvie Pump should not be used while lying down, or engaging in strenuous exercise
or activities with risk of harm
• Do not wear Elvie Pump when not pumping
• Always break the seal around your nipple before removing Elvie Pump from your breast
• Portable and mobile frequency communications equipment can aect the breast pump
• Do not expose Elvie Pump or components to direct sunlight
• Elvie Pump will not work when connected to the charger; always disconnect Elvie
Pump from the charger and close the Charging Cap before using
• Do not attempt to reset Elvie Pump during use
• Email [email protected] or call customer care on +44 (0)203 823 6298 (UK) or
+1 (508) 300 9989 (US) and discontinue use if you notice a loss of power or if the
fully charged battery lasts for less than two hours of continuous use. The battery is
not replaceable
Please keep a copy of these instructions for future reference.
14
Page 15
4. Getting started
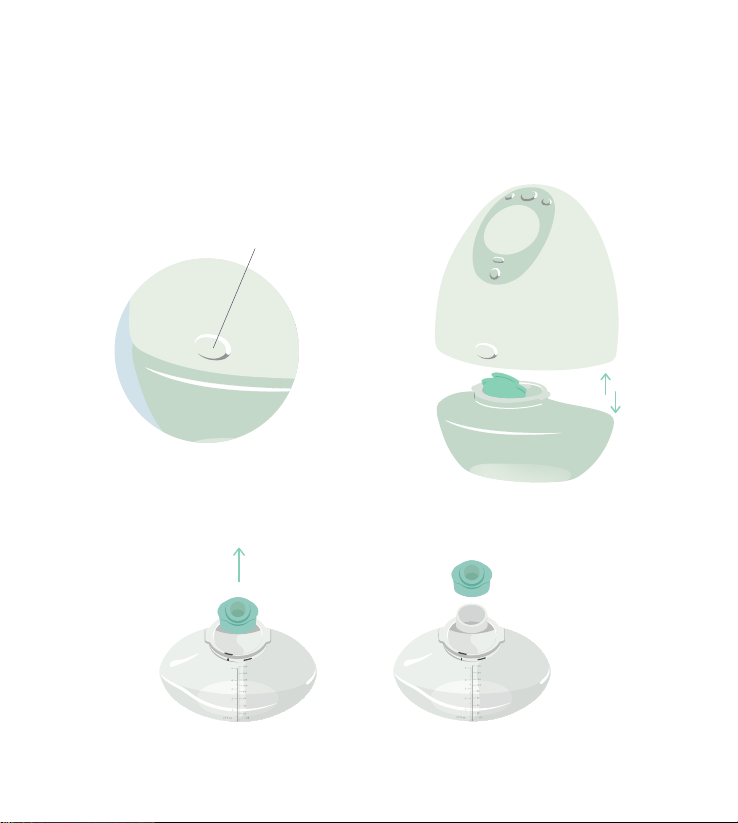
4.1 Taking apart Elvie Pump
1. Press the Bottle Release to separate the Bottle from the Hub
Bottle Release
2. Remove the Valve from the Spout
15
Page 16
4. Getting started
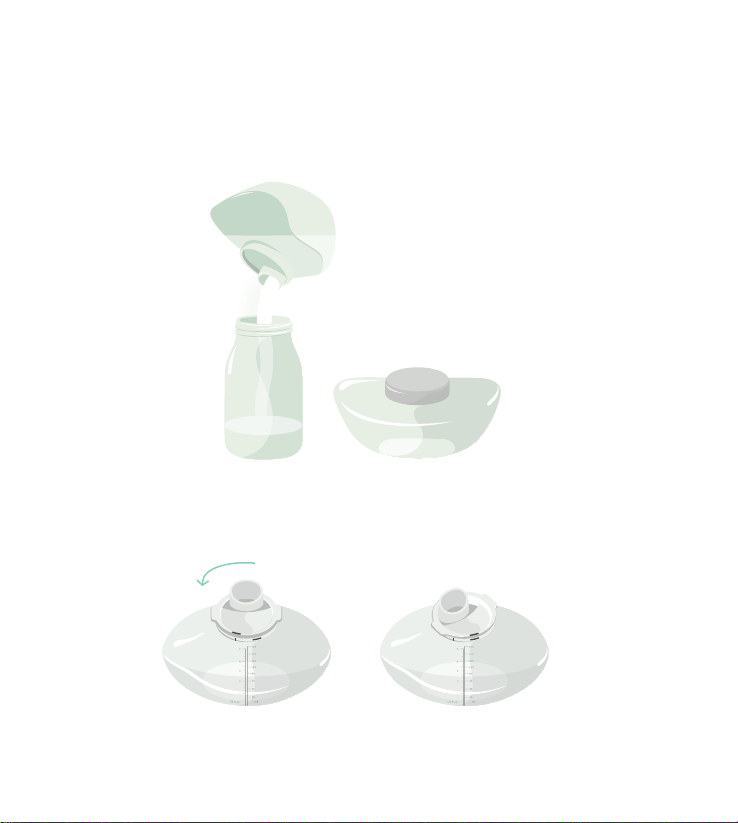
3. Using the Spout, you can pour your expressed milk into a container of your choice
for storage or feeding
4. Twist the Spout to remove it from the Bottle
16
Page 17
4. Getting started
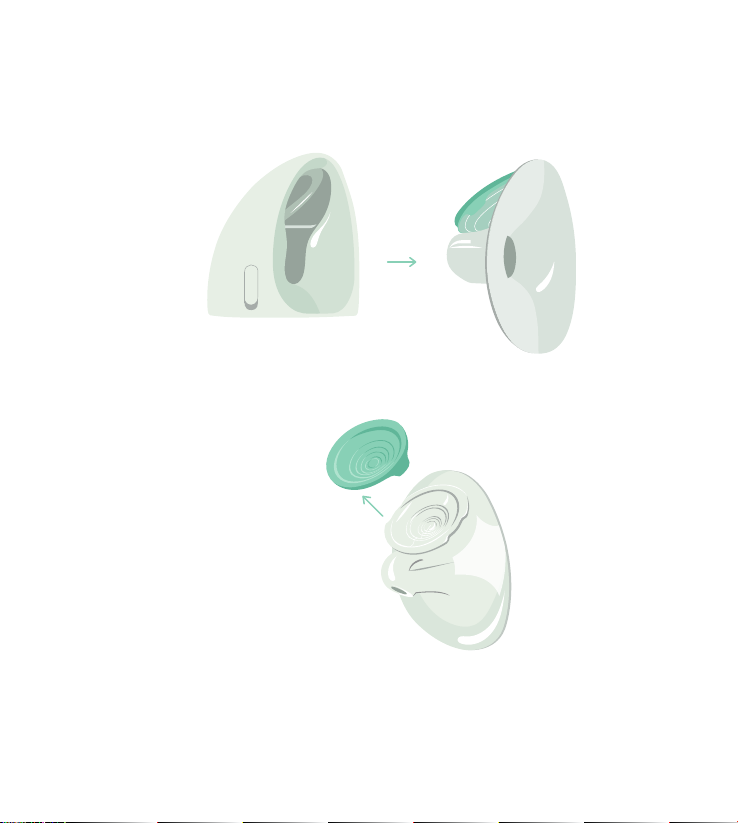
5. Pull the Breast Shield away from the Hub to remove it
6. Take the Seal o the Breast Shield
7. Follow the instructions in section 4.2 for cleaning and care
17
Page 18
4. Getting started
4.2 Cleaning before first use
Elvie Pump is not provided sterile. It must be cleaned and sterilized
before first use.
Always take apart components before cleaning or sterilizing.
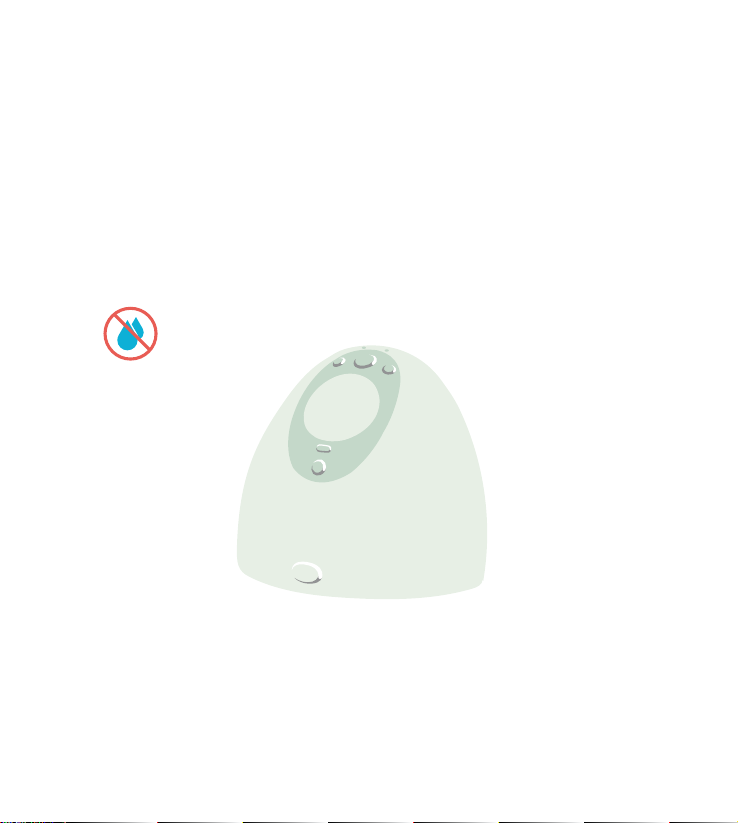
The Hub: electronics care
Do not get wet!
The Hub contains electronics that should be kept dry. A clean, damp cloth can be used
to clean the Hub. The black semicircle on the base of the Hub monitors milk volume.
Please keep this area dry and clear of residue. Any other cleaning method will be
classed as misuse under the warranty (see section 6.3).
18
Page 19
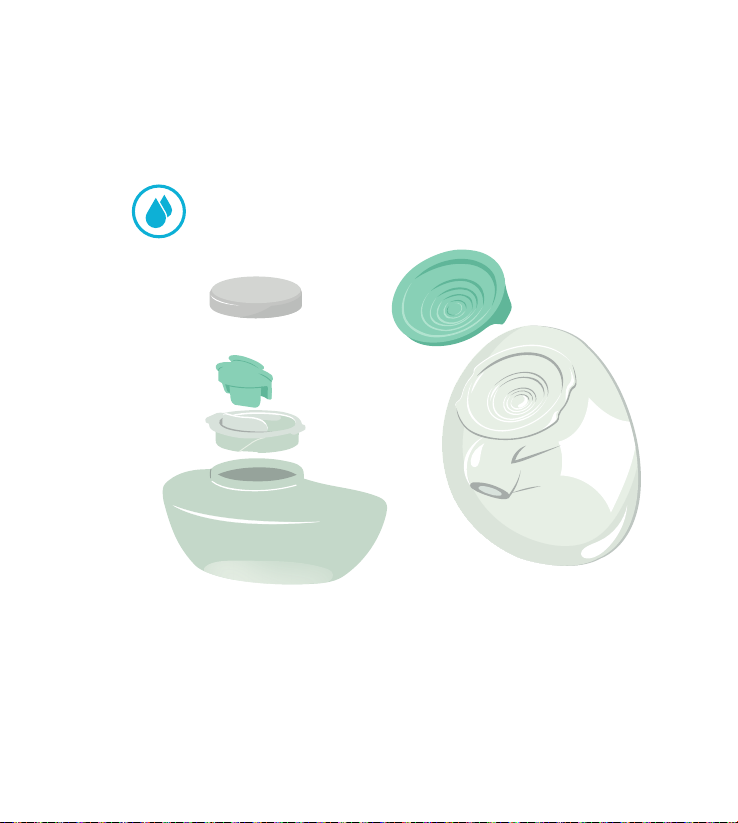
4. Getting started
Washable components
Seal
Lid
Breast
Shield
Valve
Spout
Bottle
Cleaning washable components that come into contact with milk prevents the build-up
of dry milk residue, which can cause the growth of bacteria that may be harmful to you
and your baby.
19
Page 20

4. Getting started
Before first use
washable components
Clean
1. Rinse in cold, clear water
(approx +20°C / +68°F)
2. Wash in warm water (approx
+30°C / +86°F) using mild
dish washing soap and wipe
afterwards with a clean cloth
3. Rinse with cold, clear water
(approx +20°C / +68°F) for 10
to 15 seconds
OR
Place on the top shelf
of the dishwasher
Dry completely before assembly
*Always refer to the manufacturers instructions.
20
washable components
Sterilize
Boil in water for five minutes
OR
Suitable for microwave,
steam or cold water
sterilizing methods.
We do not recommend
microwave or steam sterilizing
for more than five minutes*
Page 21
4. Getting started
4.3 Charging
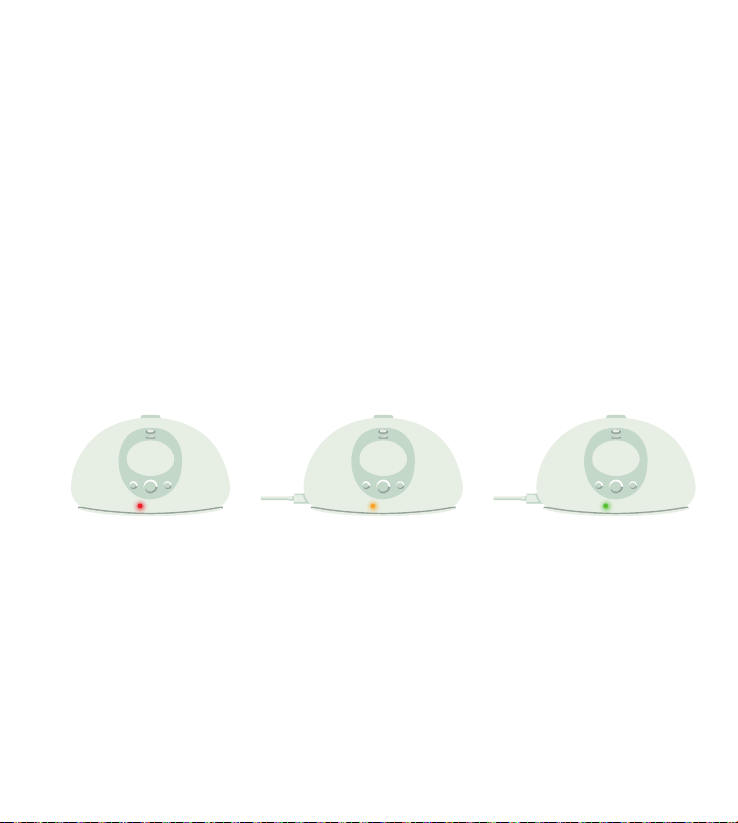
1. When the battery is low, the Battery Light will be red
2. When charging, the Battery Light will be orange and Elvie Pump will not turn on. Use
the Charging Cable provided to connect Elvie Pump to a USB power source, such as
your computer or phone plug
3. When fully charged, the Battery Light will be green. It takes approximately two hours
to fully charge the battery, which provides approximately two and a half hours at
standard settings
Please only use the Charging Cable provided with Elvie Pump. Do not use Elvie Pump
while charging.
1. Battery low 2. Battery charging 3. Fully charged
Tip: Charge immediately after finishing your pumping session if low battery is indicated.
21
Page 22

4. Getting started
Warnings
• Only use the Elvie Charging Cable; do not substitute
• Only use Elvie manufactured parts with Elvie Pump, including the Charging
Cable; do not substitute.
• It is recommended to use an adaptor compatible with both IEC 60601-1
and your regional power source
• Do not drop or insert any foreign object into any openings on the Hub and
always close the Charging Cap after charging
• Never operate an electrical device if it has been damaged, is not working
properly, or has been dropped into water. If damage is found, immediately
discontinue use and email [email protected] or call Elvie customer care
on +44 (0)203 823 6298 (UK) or +1 (508) 300 9989 (US). In case of damage
or wear, please replace parts
Precautions
• Elvie Pump will not work when connected to the charger. Always disconnect
Elvie Pump from the charger and close the Charging Cap before using
• Email [email protected] or call customer care on +44 (0)203 823 6298
(UK) or +1 (508) 300 9989 (US) and discontinue use if you notice a loss
of power or if the fully charged battery lasts for less than two hours of
continuous use. The battery is not replaceable
22
Page 23
4. Getting started
4.4 Breast Shield sizing
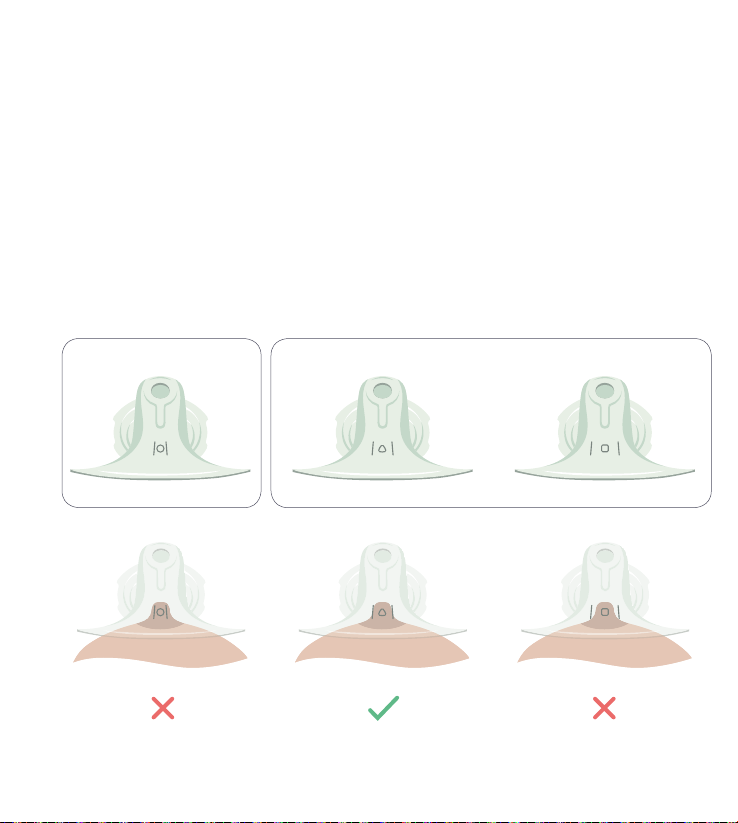
Elvie Pump comes with Breast Shields in two sizes, so you can find a Breast Shield fit
that is comfortable for you. If needed, a smaller Breast Shield size is available through
elvie.com or authorized retailers.
1. To determine the correct size, put the Breast Shield on with the sizing symbol facing
upwards and place your nipple in the center of the fit lines. The fit lines should align
with the outside of your nipple
Included in the boxAvailable as an accessory
21mm 24mm 28mm
Breast Shield too small Breast Shield too bigBreast Shield correct fit
23
Page 24

4. Getting started
2. Try dierent Breast Shields to find the best fit for you
3. To comfortably pump on both sides, repeat this process for both nipples to ensure
you have the correct Breast Shield for each nipple
Please check elvie.com or your authorized retailer website for the full range of Breast
Shields available to order.
Keep the unused Breast Shields in a safe place. Women’s bodies often change during
the pumping life cycle, so you may find that another Breast Shield size becomes a
better fit.
Tip: Lanolin cream can be used for lubrication to reduce the likelihood of sore nipples.
Precautions
• For assistance with correct Breast Shield sizing and comfort, please see
a lactation consultant or breastfeeding specialist
24
Page 25
4. Getting started
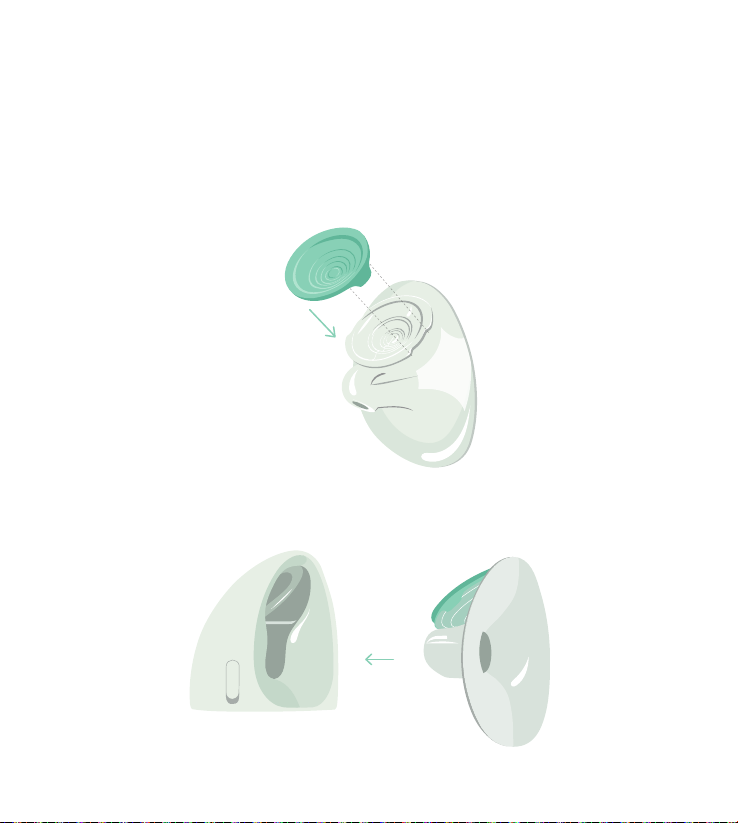
4.5 Assembling Elvie Pump
1. Make sure all parts are dry before putting them together (after the parts have been
cleaned and sterilized). Attach the Seal to the Breast Shield using the tabs as guides
2. Push the Breast Shield into the Hub
25
Page 26
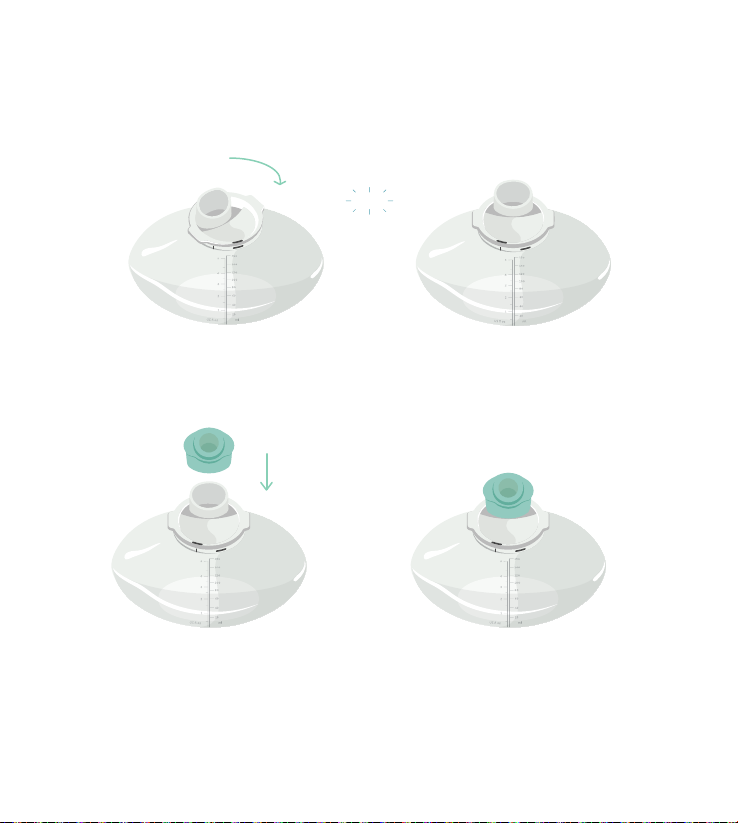
4. Getting started
3. Twist and click the Spout onto the Bottle
4. Push the Valve onto the Spout
Click
26
Page 27
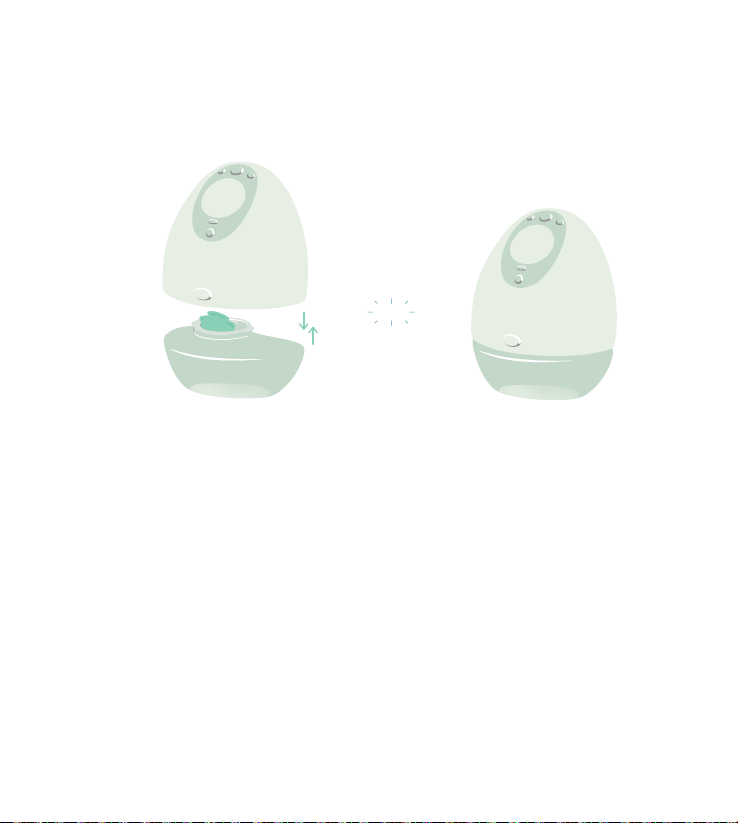
4. Getting started
5. Click the Bottle onto the Hub
Click
27
Page 28
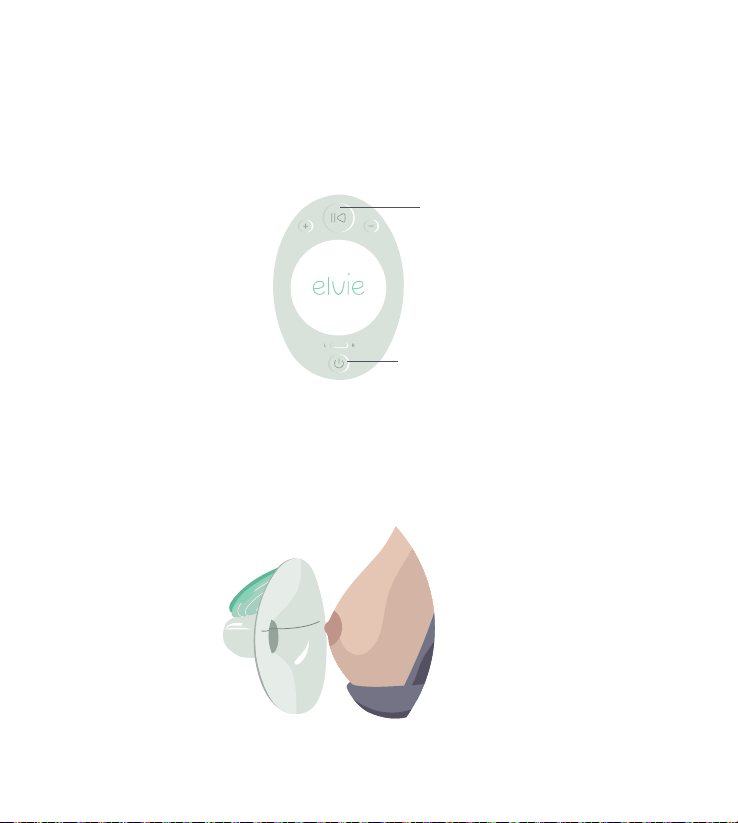
5. Using Elvie Pump
5.1 Turning on Elvie Pump
Once fully assembled, press Power to switch Elvie Pump on. Play / Pause will flash.
Play / Pause
Power
5.2 Aligning your nipple
Correct nipple alignment in the Breast Shield is key to comfort, expression and
performance. Your nipple must be positioned correctly in the Breast Shield tunnel
before pumping to avoid discomfort. You can use the markings on the Breast Shield
to help align your nipple.
Tip: See section 4.4 to make sure you are using the correct size Breast Shield.
28
Page 29
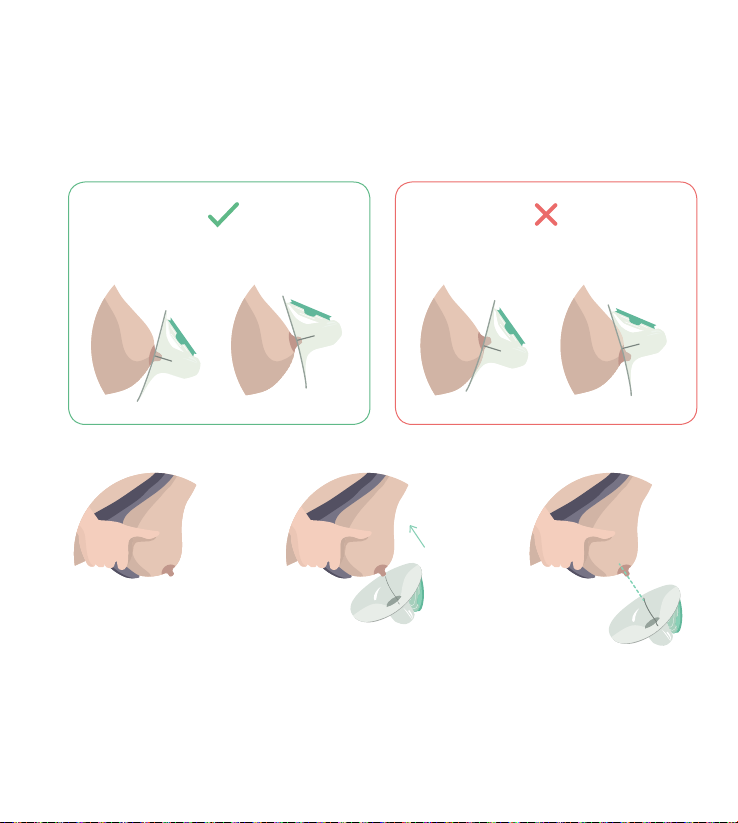
5. Using Elvie Pump
We’re all dierent. No two nipples point in the same direction!
Align the Breast Shield to the direction of your nipples when you are putting it on:
Breast Shield incorrectly alignedBreast Shield correctly aligned
Bend forwards
and hold your breast
from underneath.
Bring the Breast Shield
to your breast, paying
attention to the direction
of your nipple.
You can use the
markings on the
Breast Shield to help
align your nipple.
29
Page 30
5. Using Elvie Pump
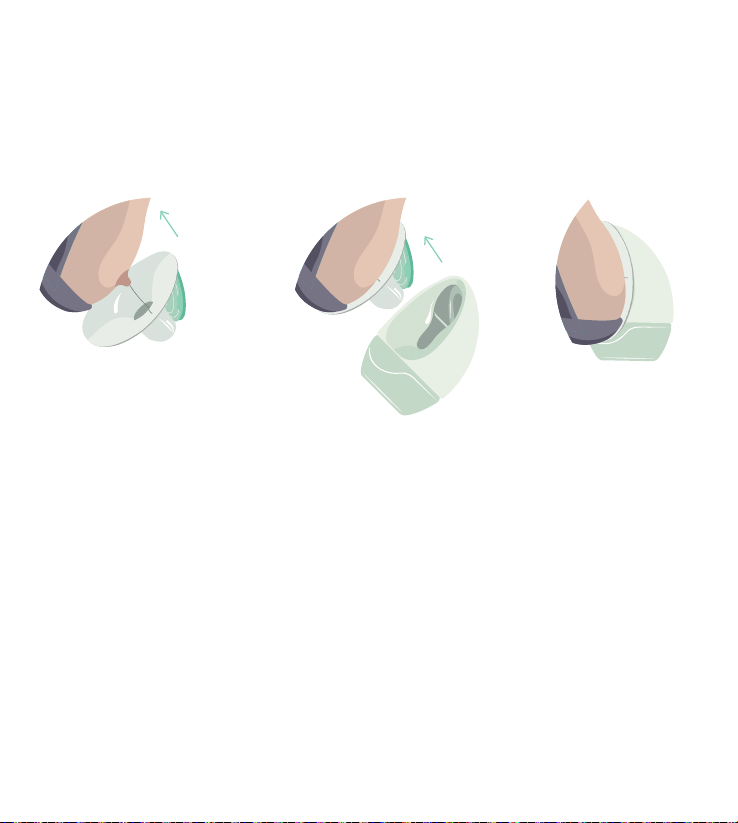
Getting Elvie Pump on correctly can take a little practice. Until you are comfortable
aligning your nipple, we recommend following the steps below:
Put on just the Breast
Shield, without the Hub.
Use a mirror to check
your nipple is centered.
30
Once you are confident the Breast Shield is in the
right place, hold it in position with one hand and
push the Hub onto the Breast Shield.
Page 31
5. Using Elvie Pump
5.3 Finding the right compression
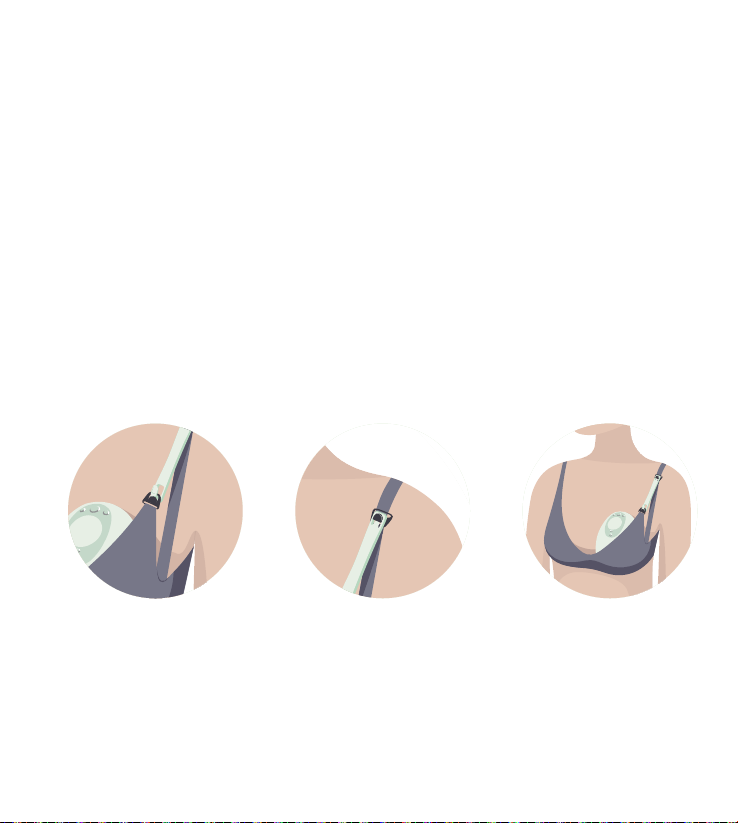
Elvie Pump is designed to be worn with your standard nursing bra and you can use
it in either a sitting or standing position.
Getting the right compression could impact milk volumes. Elvie Pump needs to be
firmly pressed against your breast, there should be no gaps between Elvie Pump
and your breast.
Every bra has a dierent level of support, so make sure to get the compression right
before each session. If you are using a particularly structured and inflexible bra,
the Bra Adjuster may be used to create more room.
The Elvie logo on the Bra Adjuster should face outwards
Tip: The Bra Adjusters are machine washable. To order additional Bra Adjusters, please
visit elvie.com or an authorized retailer.
31
Page 32

5. Using Elvie Pump
Precautions
• Always inspect all parts before use for damage and cleanliness
• Always ensure all parts are completety dry before assembling
• Do not wear Elvie Pump when not pumping
• Wash your hands thoroughly with soap and water before touching Elvie
Pump, its components or your breasts, and avoid touching the inside
of the Bottle or Lid
32
Page 33
5. Using Elvie Pump
5.4 Starting your session
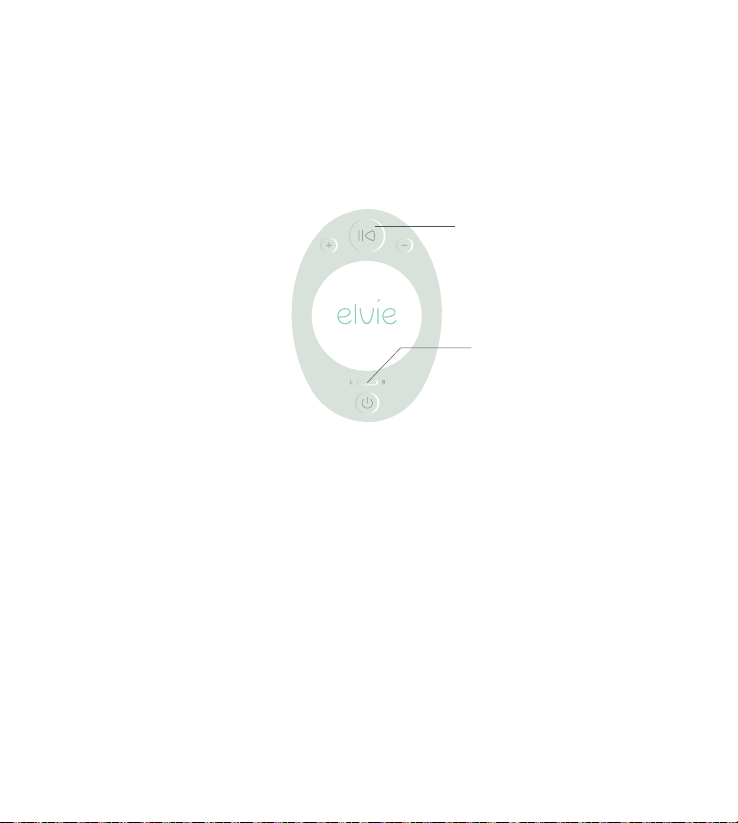
Once Elvie Pump is turned on and positioned in your bra (see sections 5.1 to 5.3),
press Play / Pause to start pumping. If you need to pause pumping for any reason,
press Play / Pause again.
Play / Pause
Side Selector
Tip: Elvie Pump gets warm when it is running. Don’t worry! This is normal.
5.5 Intensity settings and modes
Modes
Elvie Pump has two modes: Stimulation and Expression. Elvie Pump will always start
in Stimulation mode. This is a faster pumping rhythm to stimulate milk let-down.
Elvie Pump will automatically switch to Expression mode either when it detects milk
has started to flow or after approximately two minutes. This is a slower pumping
rhythm for ecient milk expression.
Switching sides
If you are switching Elvie Pump from one breast to the other, make sure you press the
Side Selector while Elvie Pump is paused. When you restart Elvie Pump on your other
breast, it will start in Stimulation mode.
33
Page 34
5. Using Elvie Pump
Intensity settings
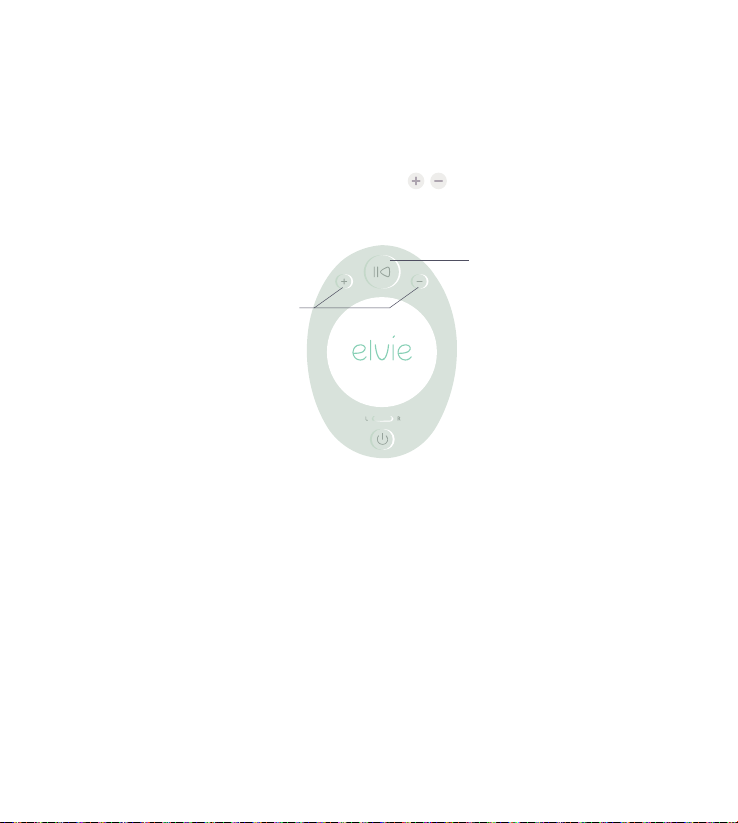
Elvie Pump has seven intensity settings, giving you control over what feels comfortable
and works most eciently in both Stimulation and Expression modes.
Once you can feel the suction on your nipple, use to adjust intensity to find
your preferred setting in both modes. When you reach the maximum or minimum
intensity setting, Play/Pause will flash three times.
Play / Pause
Adjust
intensity
Tip: A higher intensity setting does not always mean a higher volume of milk. Putting
your nipple under excess stress can reduce milk production. Always ensure you are
pumping at a comfortable level. If you don’t feel suction, please check the pump is
assembled correctly (see section 4.5).
34
Page 35
5. Using Elvie Pump
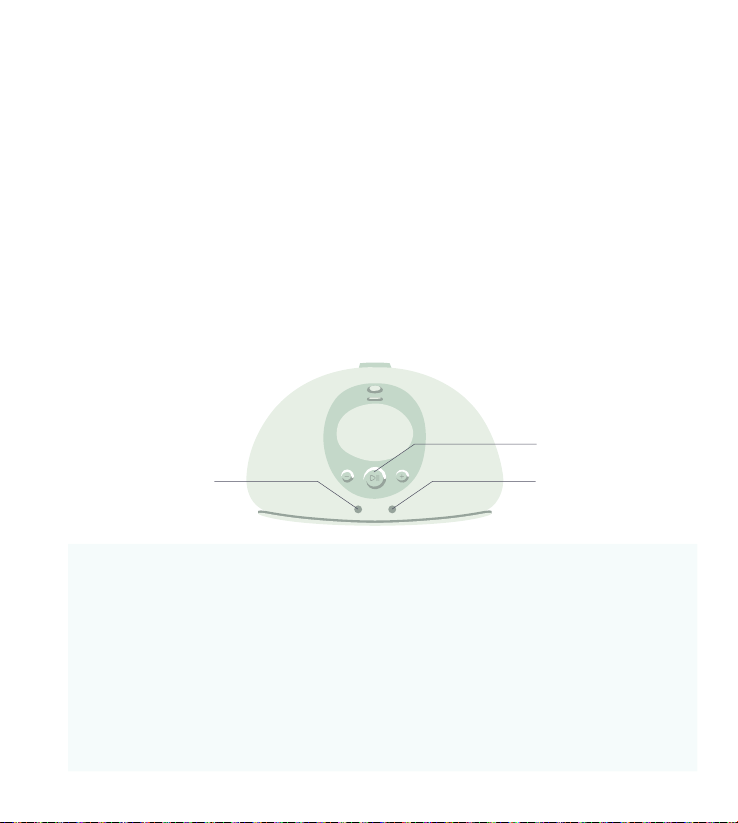
5.6 Automatic functions
• Elvie Pump will automatically switch from Stimulation mode to Expression mode
when milk is detected in the Bottle (after let-down)
• Elvie Pump will automatically pause when the Bottle is full, which is indicated by
the Bottle Light. You must empty the Bottle before resuming your session.
• When Elvie Pump is pumping, it will automatically stop after 40 minutes.
It is recommended to leave Elvie Pump for 60 minutes before using it again.
• When Elvie Pump is paused, it will automatically turn o if a button has not been
pressed for five minutes
• Elvie Pump will automatically turn o if the battery is empty
• Elvie Pump will automatically turn o if a technical error has occurred
Play / Pause
Battery Light
Bottle Light
Precautions
• Elvie Pump will not work when connected to the charger. Always
disconnect from the charger and close the Charging Cap before using
• Do not attempt to reset Elvie Pump during use
• Elvie Pump should not be used while lying down, engaging in strenuous
activities or performing activities with risk of harm
• Using a breast pump should not cause pain. Do not try to express with an
intensity setting that is too high or uncomfortable. If excessive discomfort or
pain is felt during pumping, stop pumping, break the seal around your nipple
and discontinue the session
35
Page 36
5. Using Elvie Pump
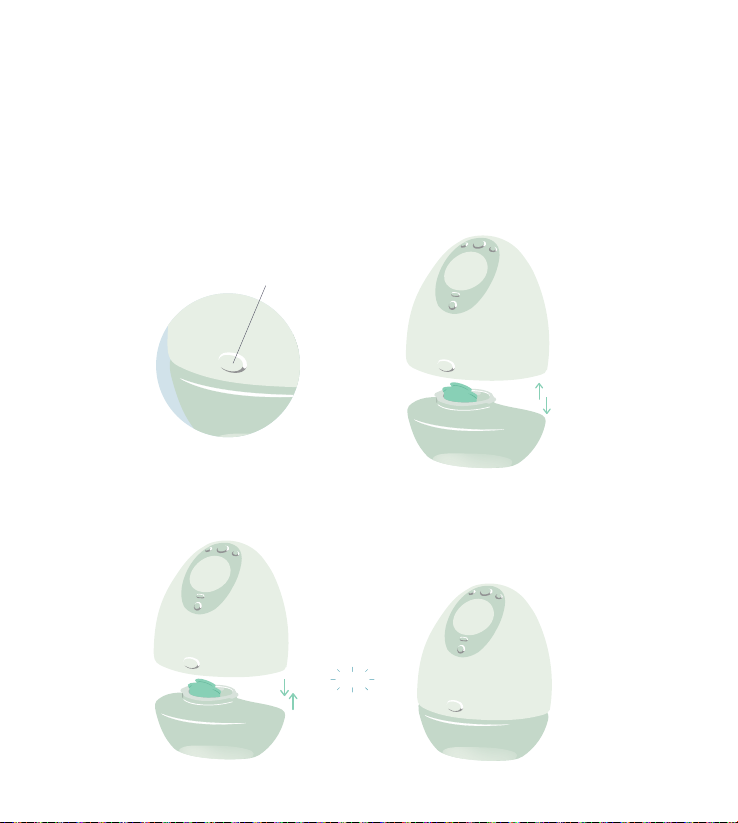
5.7 Changing the Bottle
Elvie Pump will automatically pause when the Bottle is full, indicated by the Bottle Light.
You must empty the Bottle before resuming your session.
Press the Bottle Release to separate the full Bottle from the Hub.
Bottle Release
Replace the full Bottle with an empty Bottle or pour your expressed milk into a
container of your choice and continue with the same Bottle. Click the empty Bottle
on to the Hub.
Click
36
Page 37

5. Using Elvie Pump
5.8 Ending your session
1. Press Play / Pause to stop pumping
2. Unclip your bra and use your finger to break the seal around your nipple
to avoid nipple damage
3. Remove Elvie Pump from your bra
4. Press Power to switch o
5.9 After each use
Clean washable components
1. Rinse in cold, clear water (approx +20°C / +68°F)
2. Wash in warm water (approx +30°C / +86°F) using mild dishwashing soap and
wipe afterwards with a clean cloth
3. Rinse with cold, clear water (approx +20°C / +68°F) for 10 to 15 seconds
OR
Place on the top shelf of the dishwasher
Dry completely before assembly
37
Page 38

5. Using Elvie Pump
Once a day
Sterilize washable components
Boil in water for five minutes
Suitable for microwave, steam or cold water sterilizing methods.
We do not recommend microwave or steam sterilizing
for more than five minutes*
Dry completely before assembly
*Always refer to the manufacturers instructions.
38
OR
Page 39

5. Using Elvie Pump
Warnings
• Inspect for damage, clean and sterilize washable components that come
into contact with your breast and breast milk prior to first use
• Clean all parts that come into contact with your breast and breast milk,
and inspect for damage after every use
• Do not store wet or damp components, as mold may develop
• Do not immerse the Hub in water or other liquids. Wipe with a clean,
damp cloth
Precautions
• Always inspect all parts before use for damage and cleanliness
• Wash your hands thoroughly with soap and water before touching Elvie
Pump, its components or your breasts, and avoid touching the inside
of the Bottle or Lid
• Only use drinking-quality tap water or bottled water for cleaning
components that come into contact with milk
• Do not use harsh chemicals to clean the Breast Shield, Bottle, Valve,
Spout or Seal
39
Page 40

5. Using Elvie Pump
5.10 Storing your milk
You may store your expressed milk in the
Bottle using the Lid provided (both are fridge
and freezer safe). Always make sure you
remove the Bottle from the Hub before
storing. Alternatively, you can pour your
expressed milk into a container of your
choice for storage or feeding.
When storing milk, always follow the
guidance of your lactation consultant
or health professional.
Tip: Store milk in the coldest part of
the fridge: the back of the shelf above
the vegetable compartment. Do not store
breast milk in the door of the fridge.
Warnings
• Clean all parts that come into contact with your breast and breast milk,
and inspect for damage after every use
Precautions
• Always break the seal around your nipple before removing Elvie Pump
from the breast
• Do not place the Hub in the fridge or freezer
40
Page 41

5. Using Elvie Pump
5.11 How to store Elvie Pump
Short-term storage
Between sessions, please store your Elvie Pump out of direct sunlight and ensure
the washable parts are dry. Keep out of reach of children. Recharge immediately
after finishing your pumping session if the Battery Light is on.
Long-term storage
Please use the Charging Cable provided to charge Elvie Pump before long-term
storage and store out of direct sunlight. These measures will increase the lifespan of
your Elvie Pump. Elvie Pump contains a rechargeable battery. When Elvie Pump is not
in use for an extended period of time, it will automatically transition into Storage mode
in order to preserve battery life. When removing from storage, plug the Charging Cable
into your Elvie Pump and fully charge for approximately two hours.
The washable parts will require cleaning and drying before long-term storage and
should be stored out of direct sunlight to avoid discoloration.
If stored at minimum or maximum storage temperatures (see section 7.2), when
removing from storage, please allow 24 hours for the pump to reach normal operating
temperatures before use.
Warnings
• Do not store wet or damp parts, as mold may develop
• This product contains small parts and a cable that may present a hazard.
Keep out of reach of children
Precautions
• Do not place the Hub in the fridge or freezer
• Do not expose Elvie Pump or its components to direct sunlight
41
Page 42
6. Troubleshooting
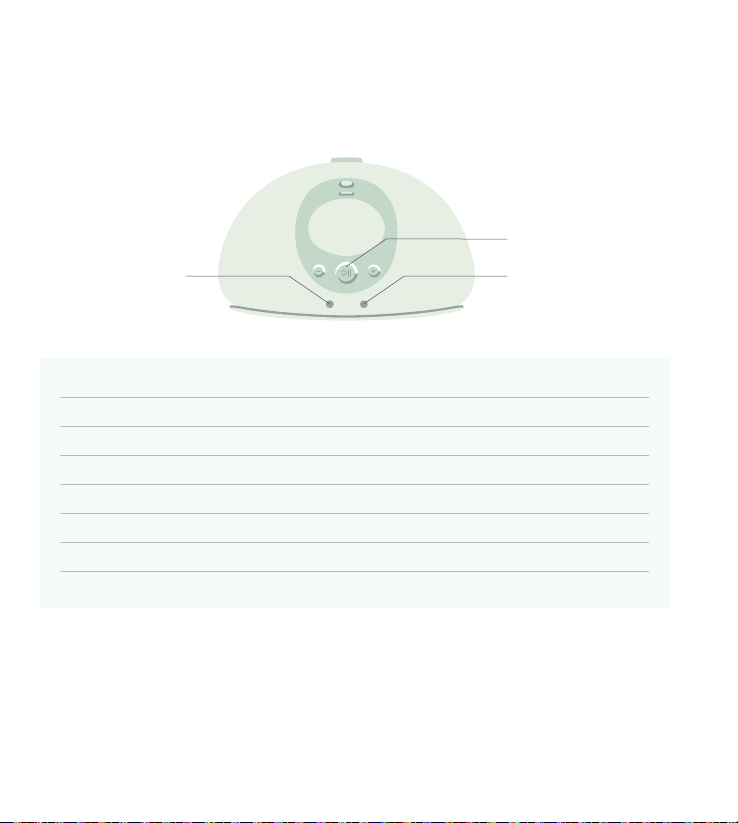
6.1 Alerts and warnings on Elvie Pump
Play / Pause
Battery Light
Play / Pause - White: slow flash
Battery Light - Green
Battery Light - Red
Battery Light - Red: flashes then turns o
Battery Light - Orange
Bottle Light - White: Elvie Pump will pause
Play / Pause - White: flashes three times
All lights - Flash then turn o
Pump paused
Fully charged
Battery low
Battery empty
Charging
Milk bottle full
Maximum / minimum intensity level reached
Technical error. Contact customer care
Bottle Light
Please refer to elvie.com for the most up-to-date troubleshooting information.
If you are experiencing an issue with your Elvie Pump, you can get in touch with us
at [email protected] or call customer care on +44 (0)203 823 6298 (UK)
or +1 (508) 300 9989 (US).
42
Page 43
6. Troubleshooting
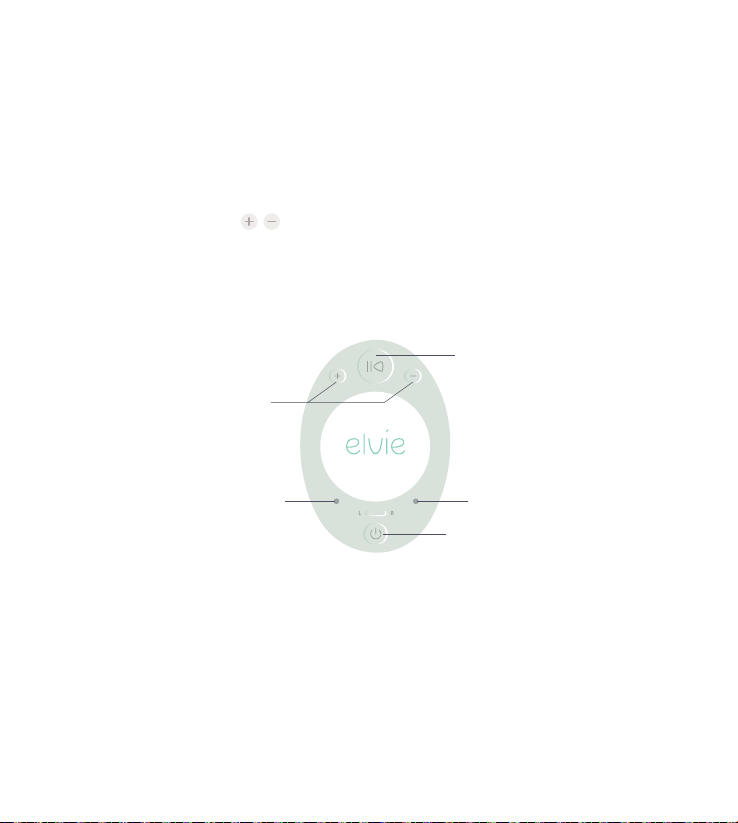
6.2 Factory reset
To perform a factory reset:
1. Turn Elvie Pump on
2. Press and hold both simultaneously for 5 seconds
3. Play/Pause and side LEDs will flash while Elvie Pump is resetting.
The LEDs and Elvie Pump will then turn o
Play / Pause
Intensity Settings
Side LightSide Light
Power
43
Page 44

6. Troubleshooting
6.3 Warranty
Elvie Pump is backed by a limited manufacturer’s warranty against any defects
in materials and/or workmanship: the Hub for two (2) years and the washable
components for 90 days from the date of original purchase. Defects discovered
within the warranty period should be reported to Chiaro Technology Limited, “Chiaro”.
Chiaro reserves the right to a period of investigation to establish the cause of the defect
and may exercise its discretion in determining whether or not to replace free of charge.
This warranty does not cover cosmetic deterioration or damage caused by general
wear and tear, physical or natural destruction, accident, misuse, neglect or other
external causes. Any attempt to take the Hub apart will invalidate this warranty.
The warranty does not cover purchases from non-authorized resellers.
Any warranty claims must be supported with reasonable evidence, including proof of
date of purchase, alongside these warranty conditions. Chiaro must be notified of any
defects. We will then provide you with a Return Merchandise Authorization number,
which must be displayed on the outside packaging. In the event that Chiaro decides
to provide a replacement, any replacement will not extend the life of this warranty.
This is a single-user product. Use by more than one person may present a health risk
and voids the warranty.
Please keep your proof of purchase in the event that you need to contact
customer care.
44
Page 45
6. Troubleshooting
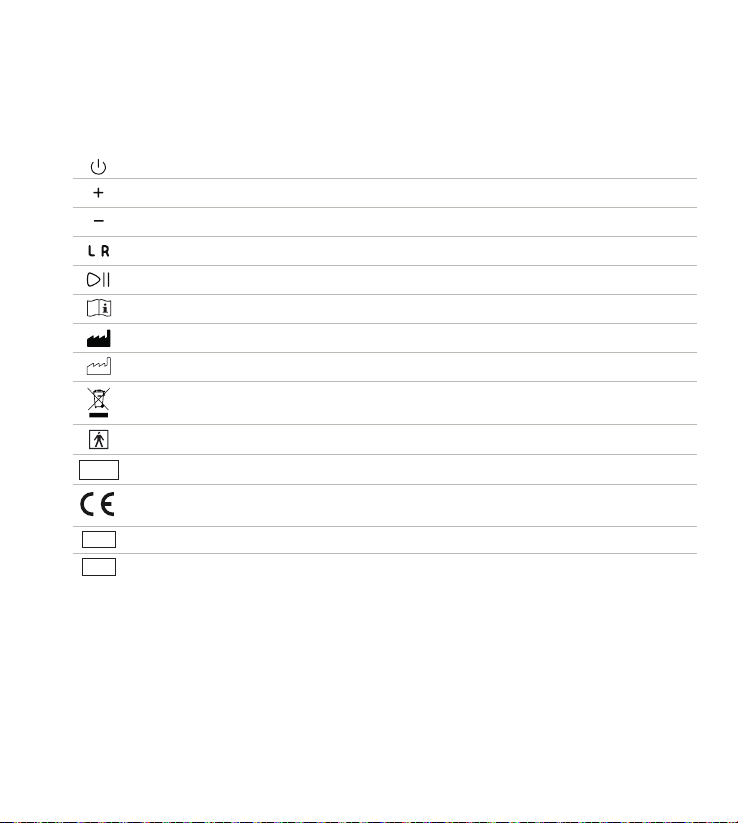
6.4 Symbols
On/O
Increase intensity
Decrease intensity
Left and Right side selection
Play/Pause
Consult instructions for use
Manufacturer
Date of manufacture
Do not dispose the device together with unsorted municipal waste (in accordance with local
regulations)
Compliance with international requirements for protection from electric shock. (Type BF applied parts)
Protection against entrance of solid foreign objects and against harmful eects due to the entrance of water
IP22
Manufacturer has taken all necessary measures to ensure that the product complies with applicable
safety legislation for distribution within the European Community
Serial Number
SN
LOT
Lot Number
45
Page 46

7. Product specifications
7.1 Technical specifications
Vacuum range:
Power:
Battery capacity and type:
Size:
Weight:
Bluetooth info:
Operation temperature:
Transport/storage temperature:
Operation humidity:
Transport/storage humidity:
Ambient pressure:
Infrared details:
40 to 220 mmHg
5v DC, 3A max
1460mAh Lithium polymer
128mm x 110mm x 68mm / 5in x 4.3in x 2.7in
225g / 7.9oz
Bluetooth v5 (Bluetooth Low Energy). Range up to 10m
+5 to +30°C / +41 to +86°F
-20 to +60°C / -4 to +140°F
15 to 90%
15 to 90%
90 to 106 kPa
Peak frequency: 319THz, Radiant power: 55mW
46
Page 47

7. Product specifications
7.2 Transport, storage and disposal
Transport
While traveling, use the Charging Cable provided and pair with the appropriate power
source for your current location. Please check with the airline prior to travel for advice
on carrying and using Elvie Pump while flying.
Temperature: -20 to +60°C / -4 to +140°F
Relative humidity: 15 to 90%
Storage
Temperature: -20 to +60°C / -4 to +140°F
Relative humidity: 15 to 90%
Ambient pressure: 90 to 106 kPa
Disposal
Elvie Pump contains a rechargeable lithium polymer battery. Please dispose of the Hub
at a designated collection point for the recycling of waste electrical and electronic
equipment. The appropriate disposal of Elvie Pump will help conserve natural
resources and ensure that it is recycled in a manner that protects human health and
the environment. For more information about where you can drop o your waste for
recycling, please contact your local authority or where you purchased your product.
Warnings
• Elvie Pump and its components are not heat-resistant. Keep away from
heat sources
• Elvie Pump uses Bluetooth technology. Please follow airline rules for the use of
portable electronic devices when flying. Furthermore, high altitudes, including
while in a pressurized aircraft cabin, will aect the performance of Elvie Pump
47
Page 48

7. Product specifications
7.3 EMC advice
Declaration for Electromagnetic Compatibility (EMC): For information use only.
FCC Statement: This device complies with part 15 of the FCC rules. Operation is subject to
the following two conditions: (1) This device may not cause harmful interference, and (2)
this device must accept any interference received, including interference that may cause
undesired operation.
This equipment has been tested and found to comply with the limits for a Class B digital
device, pursuant to part 15 of the FCC Rules. These limits are designed to
provide reasonable protection against harmful interference in a residential installation.
This equipment generates, uses and can radiate radio frequency energy, and if not installed
and used in accordance with the instructions, may cause harmful interference to radio
communications. However, there is no guarantee that interference will not occur in a
particular installation. If this equipment does cause harmful interference to radio or television
reception, which can be determined by turning the equipment o and on, the user is
encouraged to try to correct the interference by one or more of
the following measures:
• Reorient or relocate the receiving antenna
• Increase the separation between the equipment and receiver
• Connect the equipment into an outlet on a circuit dierent from that to which
the receiver is connected
• Consult the dealer or an experienced radio/TV technician for help
Stacking: This device should not be used adjacent to or stacked with other equipment.
And if adjacent or stacked use is necessary, this device should be observed to verify normal
operation in the configuration in which it will be used.
FCC Radiation Exposure Statement: This equipment complies with FCC radiation exposure
limits set forth for an uncontrolled environment. This transmitter must not
be co-located or operating in conjunction with any other antenna or transmitter.
Caution: The user is cautioned that changes or modifications not expressly approved by the party
responsible for compliance could void the user’s authority to operate the equipment.
48
Page 49

Questions?
For further assistance, please refer to the Help section in the Elvie Pump app or
visit elvie.com. You can get in touch with us at [email protected] or by calling
customer care on +44 (0)203 823 6298 (UK) or +1 (508) 300 9989 (US).
Manufactured and Distributed by Chiaro Technology Limited
Model number: EP01
Document number: EP-S-0005
Revision number: 8
49
Page 50
Page 51

Page 52

elvie.com
 Loading...