

Elvid Studiovision STV-150-4KH, Studiovision STV-230-4KH, Studiovision STV-280-4KH Quick Start Manual
Page 1
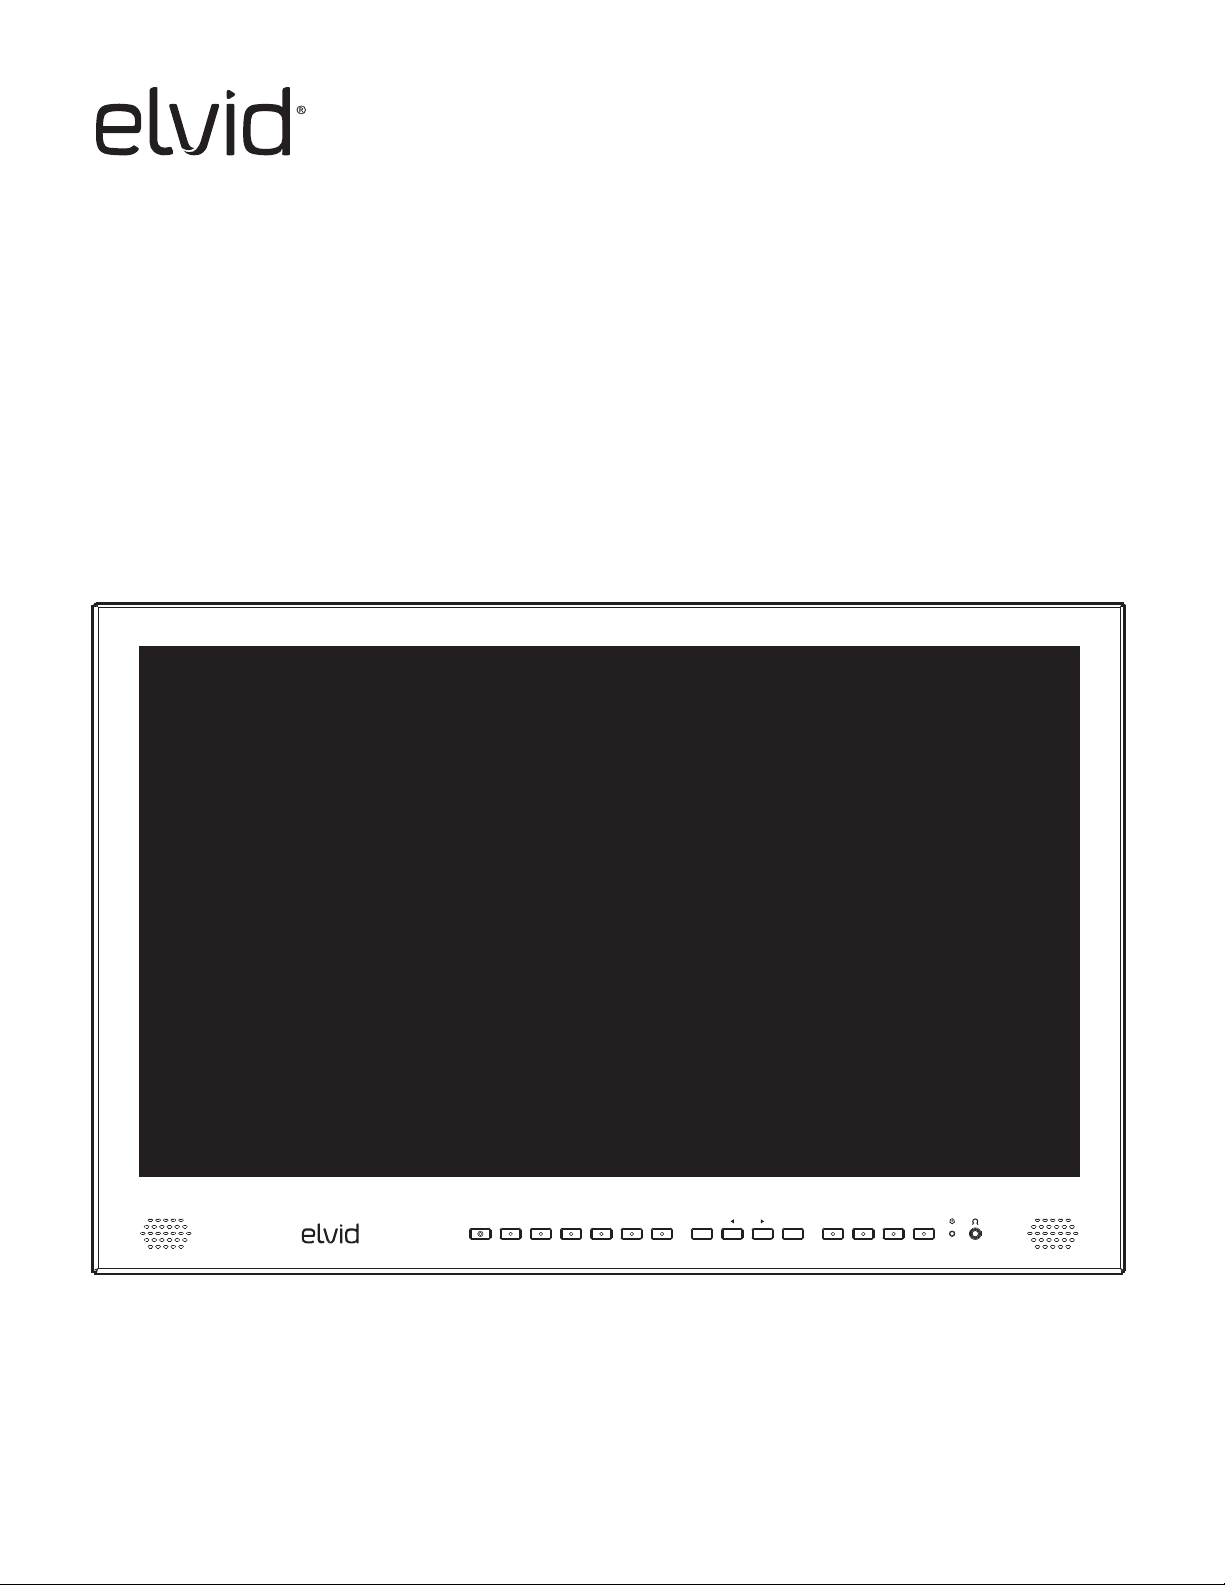
STUDIOVISION
STV-150-4KH / STV-230-4KH / STV-280-4KH
4K HDMI Monitor (15" / 23" / 28")
STUDIOVISION 4K
SDI HDMI1 HDMI2 HDMI3 HDMI4 DVI VGA MENU EXIT
QUICKSTART GUIDE
F1 F2 F3 F4
Page 2

BOX CONTENTS
• Elvid StudioVision Monitor
• Sun hood
• AC adapter
• DC power cord
• Tally connector and hardware
• Mounting feet (×2) and hardware
PRECAUTIONS
• Keep this product away from water and any ammable gases or liquids.
• Do not expose this product to humidity or extreme heat or cold.
• Make sure this product is powered off when plugging it into a power source.
• Use only the correct, recommended voltage.
• Do not attempt to disassemble or repair this product.
• Exposure to high sound levels can cause permanent hearing loss. Avoid listening at high volumes for extended periods of time.
• When the monitor is not in the protective case, do not place or store it facedown, since this can damage the screen.
• Handle this product with care. Avoid any impacts to this product.
• Do not block the vents in this product.
• Disconnect this product from its power source before storage and during electrical storms.
• Do not use chemical solutions to clean this product. Clean it with only a soft, dry cloth.
• Keep this product away from children.
• Make sure that this product is intact and that there are no missing parts.
• To avoid damage to this product, be careful not to overtighten or improperly thread any of the threaded ttings.
• All images are for illustrative purposes only.
2
Page 3
OVERVIEW
STUDIOVISION 4K
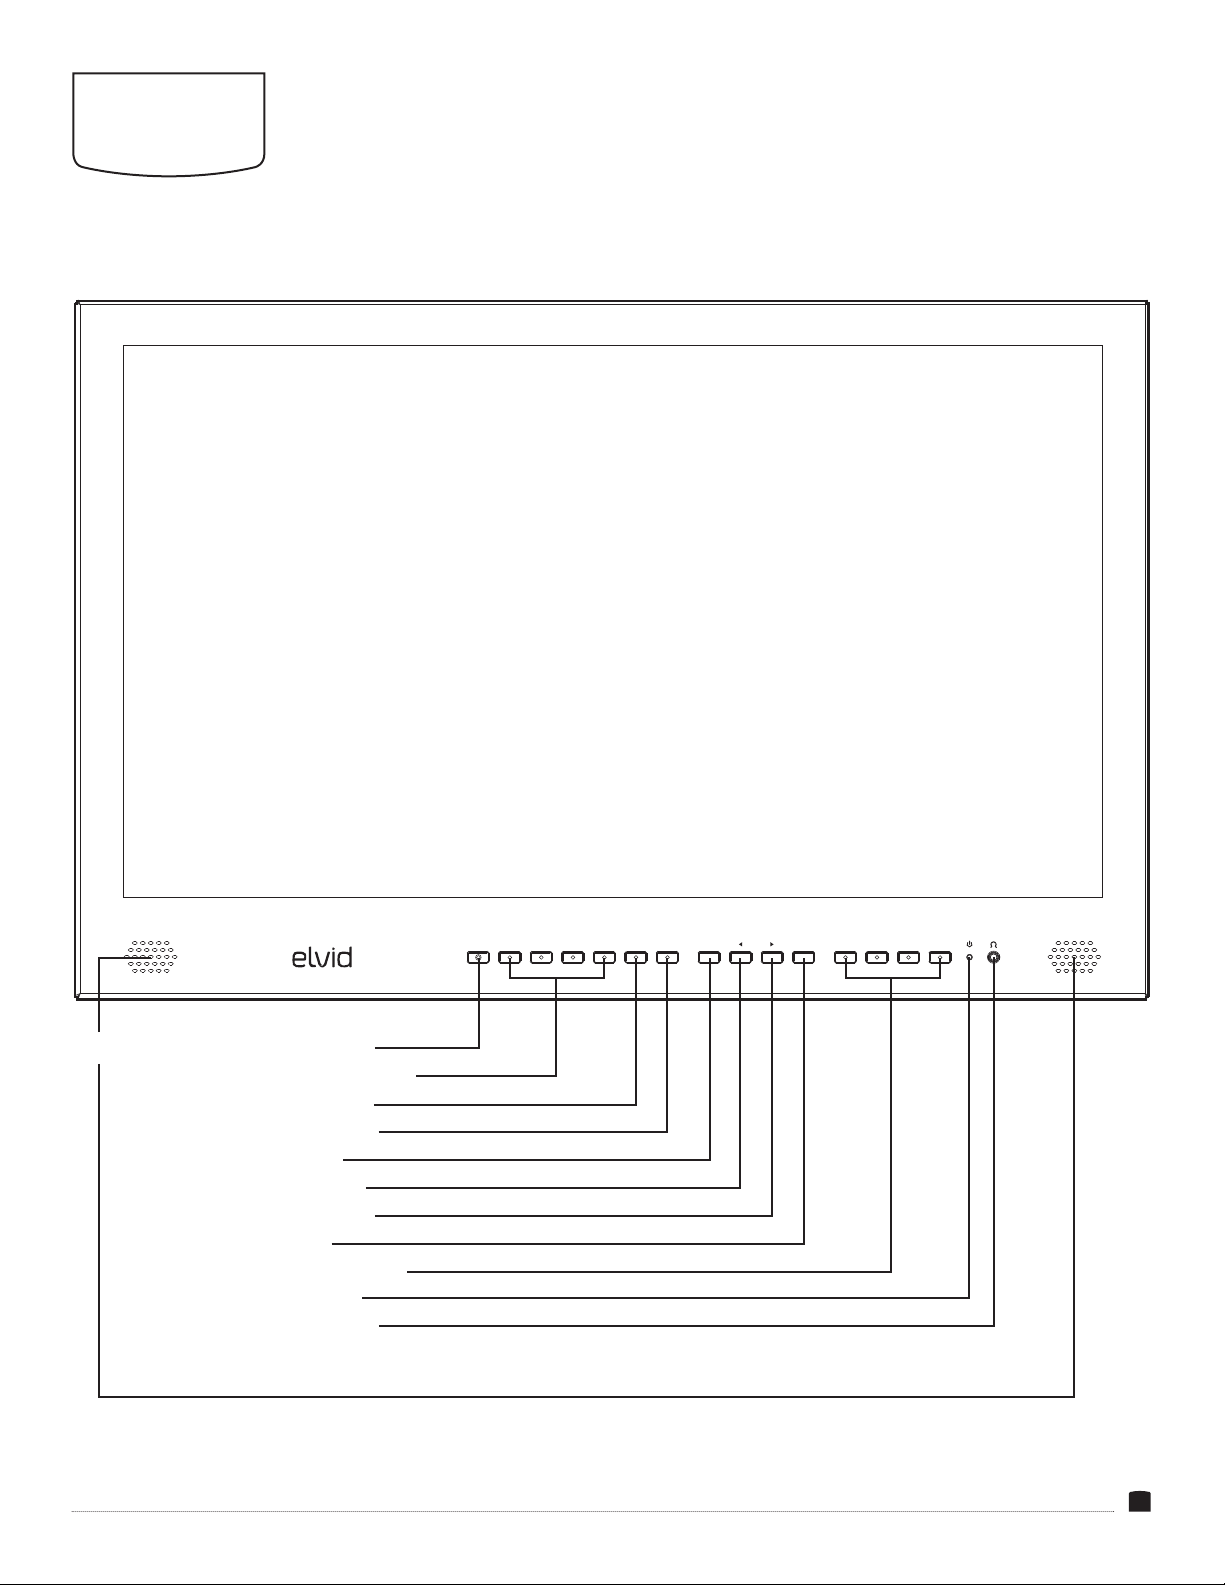
FRONT
Speakers
SDI input selector
HDMI 1–4 input selectors
DVI input selector
VGA input selector
Menu button
Scroll left button
Scroll right button
Exit button
F1–F4 function buttons
Power indicator
Headphone output
SDI HDMI1 HDMI2 HDMI3 HDMI4 DVI VGA MENU EXIT
F1 F2 F3 F4
3
Page 4
BACK
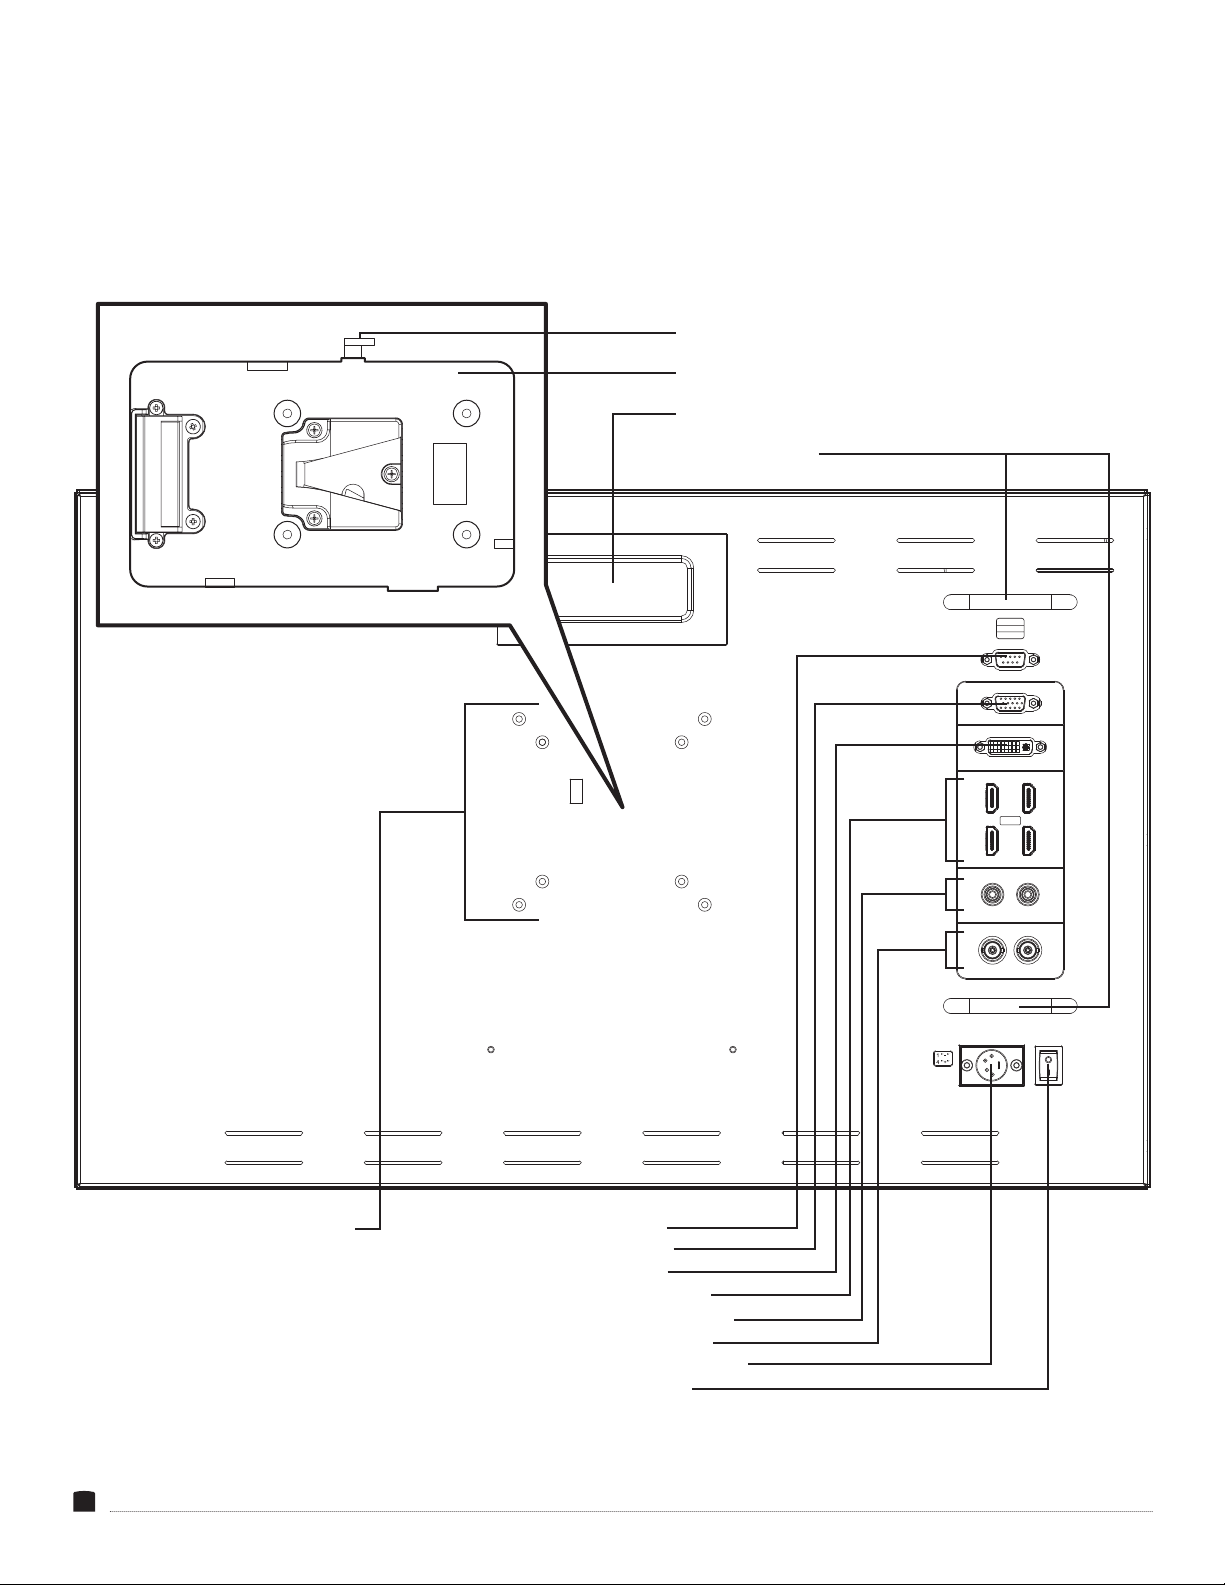
Release button
V-mount battery plate
Handle
Connector protection
R 2
G 3
GND 5
TALLY
VGA
DVI
2
1
HDMI
4
3
L R
AUDIO
IN
OUT
SDI
OFF
VESA 75/100 mounting threads
DC 15V
Tally port
ON
VGA input
DVI input
HDMI input (×4)*
RCA audio L/R input
SDI input/output
4-pin XLR power input
Power switch
*Note: HDMI 1 supports 4K @ 60 Hz. HDMI 2–4 support 4K @ 30 Hz.
4
Page 5

GETTING
STARTED
ATTACHING A V-MOUNT BATTERY
Attach a battery by sliding it into the V-mount plate until it clicks into place.
Release the battery by pressing the release button and sliding the battery off the V-mount.
CONNECTING TO AC POWER
1. Plug the AC power adapter’s 4-pin XLR connector into the power input on the back of the monitor.
2. Connect the power cable to the AC adapter, and plug it into an outlet.
POWERING ON
1. Connect the video and audio signals from your camera to the StudioVision monitor with the appropriate cables.
2. Move the Power switch to the DC position for plug-in power, or the BATT position for battery power.
Once the monitor is powered on, the and buttons adjust the volume output to the speakers or headphones. The output level is
displayed on the screen as you adjust the volume.
SUN HOOD
The sun hood can be used only with the StudioVision monitor’s case. To attach the sun hood, remove it from the inside of the front case
door, and follow these steps:
1. Align the touch-connect strips on the sun hood and the case.
2. Press the hood to the case to secure it.
5
Page 6

USER
INTERFACE
MENUS
1. Press the Menu button to open the main menu.
Main menu items are Picture, Function, Display Mode, Display
Setting, Select Region, Input, Audio, VGA, System, and
Information.
2. Use the and buttons to navigate to the desired menu. As you
scroll through the menus, the submenu options appear in the bar
beneath the menu item.
3. Once the menu item is highlighted, press Menu to open it.
To close the main menu and return to the main view, press the Exit
button.
SUBMENUS
1. As you scroll through the submenu functions, the current value
will appear below it.
2. Scroll to function you want to adjust, and press Menu. The value
will change to yellow.
3. Use the and buttons to change the value of the submenu
function, and press Menu. The new value will be saved, and you’ll
return to the submenu.
4. Press Exit to return to the main menu.
5. Press Exit again to close the menu. The main screen is always on.
FUNCTION BUTTONS
The function buttons default to the following menus:
• F1: Display Mode
• F2: Display Rotate
• F3: Safety Marker
• F4: Aspect
Pressing the function button opens the submenu for that menu
item.
To reassign menus to the function buttons, follow these steps:
1. Press and hold the function button until the function select menu
appears.
2. Press the function button repeatedly to select the desired option
or value, and press Menu to set the change and return to the
main view.
Pressing Exit before you set the value change with the Menu
button will revert to the previous value and return you to the main
view.
RESTORING THE FACTORY PRESETS
To erase all submenu changes and return to the factory presets:
1. Press Menu to open the main menu, and scroll to the System
menu. Press Menu to open the submenu.
To return to the sub menu without saving the change to the
submenu selection, press the Exit button.
6
2. Use the and buttons to select Reset in the System submenu,
and press the Menu button.
The monitor takes about 5 seconds to reset, and you will return to
the main view.
Note: Once the monitor is reset, the volume will be reset to zero.
Use the and buttons to reset to the desired audio level.
Page 7

USER OPTIONS
REMOVING THE MONITOR FROM THE FLIGHT CASE
1. Remove the V-mount battery, or unplug the AC power adapter.
2. Set the monitor faceup on a at surface.
3. Use an M5 hex key to remove the four mounting screws.
4. Lift the monitor out of the case by the front handles.
VESA MOUNT
The StudioVision 4K monitors are equipped with 75×75 and
100×100 mm VESA mounting holes. Refer to your VESA mount's
weight capacity specications to ensure that it will securely support
the monitor.
To mount the StudioVision monitor on a VESA mount, follow these
steps:
1. Remove the monitor from its ight case.
2. Remove the battery.
3. Unscrew the four V-mount plate screws, and remove and unplug
the V-mount plate.
4. Unscrew the four sub-plate screws, and remove the sub plate
from the monitor.
STAND-ALONE USE
Metal feet and attachment screws are included for stand-alone
operation.
1. Attach the feet to the bottom edge of the monitor with the
included screws.
2. For semi-permanent installation, or to operate the stand-alone
monitor with a V-mount battery, bolt the feet to a table top or
other at horizontal surface through the holes on the base of the
feet.
RACK MOUNT (15 IN. MONITOR ONLY)
To mount the STV-150-4KH 15-inch monitor into a standard 19-inch
machine rack, follow these steps:
1. Remove the V-mount battery, or unplug the AC power adapter.
2. Remove the monitor from its ight case.
3. Use standard rack screws to mount the monitor into a 19-inch
machine rack.
Important: Refer to the machine rack’s specications for maximum
weight capacity to ensure that it will securely hold the monitor.
5. Use the screws that are included with the VESA mount to attach
the monitor to the mount.
Important: VESA screws should screw in snugly. But if the screw
meets some resistance, do not use force to continue screwing it in.
Doing so may damage the monitor.
7
Page 8
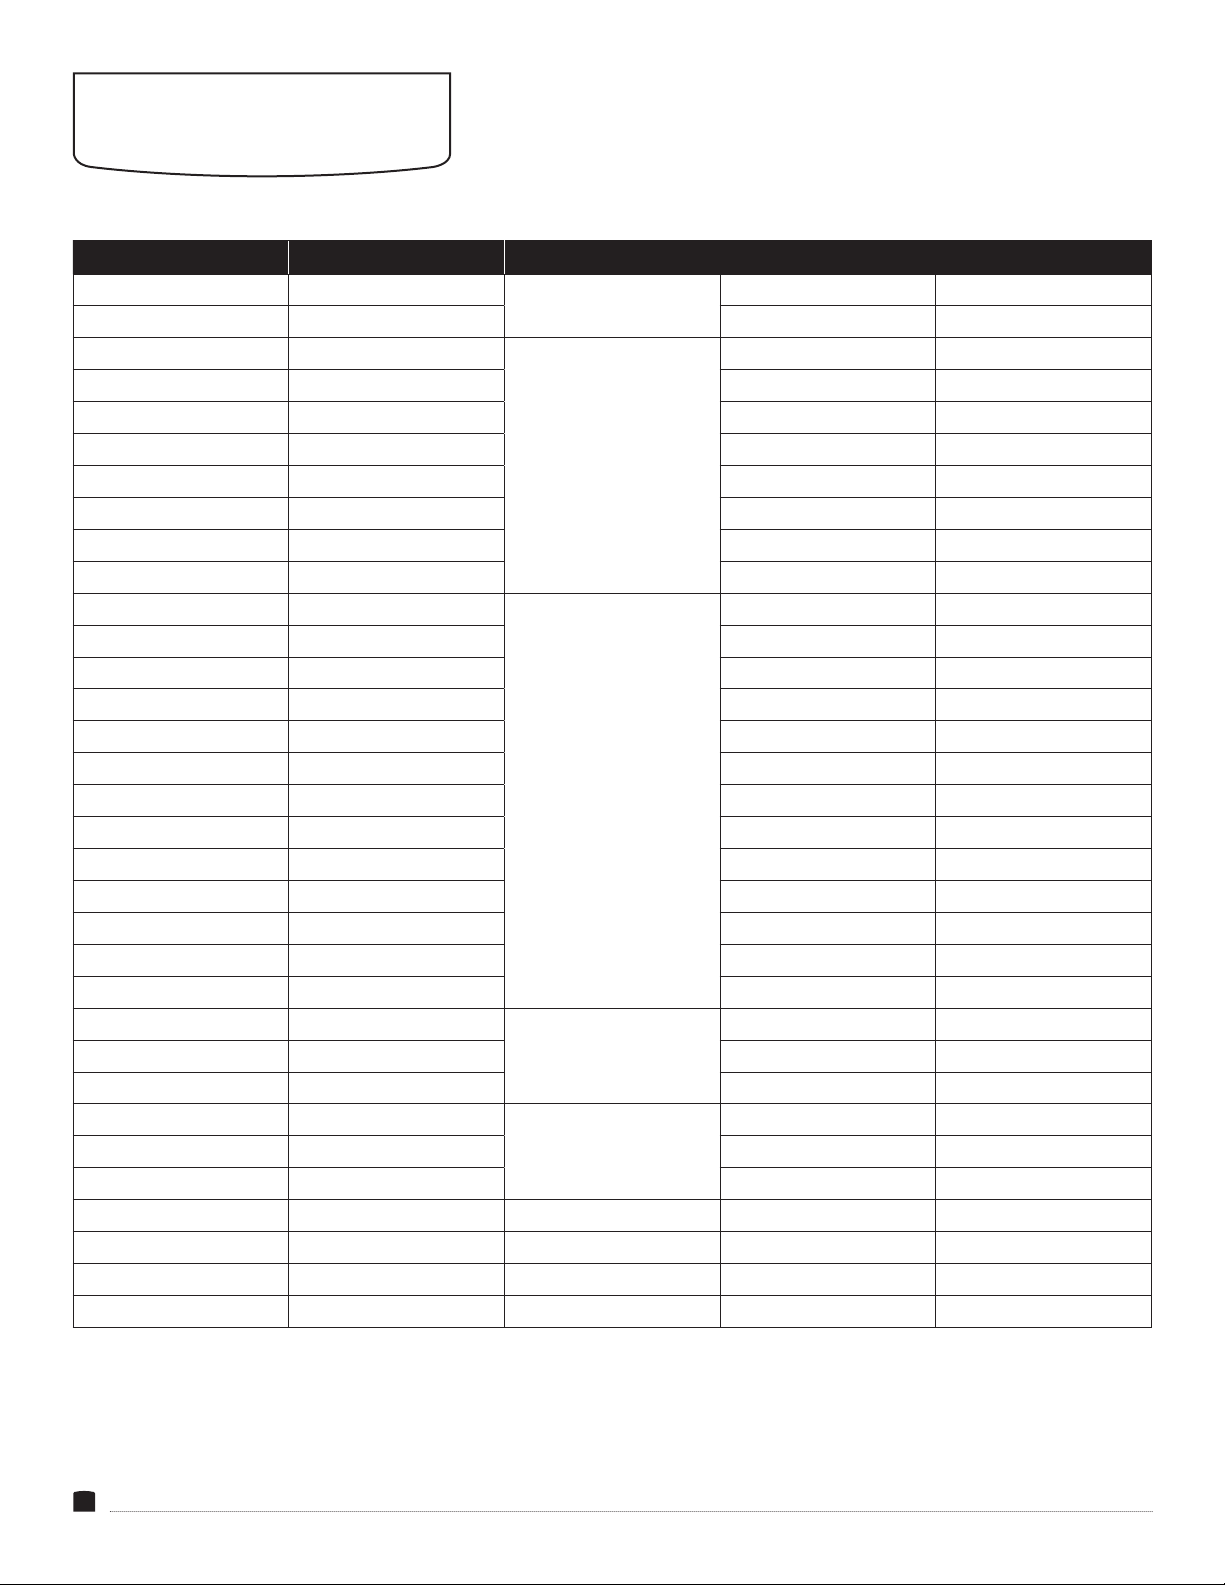
SUPPORTED RESOLUTIONS
AND FRAME RATES
HDMI2.0 HDMI1.4 3G-SDI
480i (59.94) 480i (59.94)
480i (60) 480i (60) 625 50i
576i (50) 576i (50)
480p (59.94) 480p (59.94) 720 59.94p
480p (60) 480p (60) 720 60p
576p (50) 576p (50) 720 23.98p
720p (23.98) 720p (23.98) 720 24p
720p (24) 720p (24) 720 25p
720p (25) 720p (25) 720 29.97p
720p (29.97) 720p (29.97) 720 30p
720p (30) 720p (30)
720p (50) 720p (50) 1080 59.94i
720p (59.94) 720p (59.94) 1080 60i
720p (60) 720p (60) 1080 23.98p
1080i (50) 1080i (50) 1080 23.98sF
1080i (59.94) 1080i (59.94) 1080 24p
1080i (60) 1080i (60) 1080 24sF
1035i (59.94) 1035i (59.94) 1080 25p
1035i (60) 1035i (60) 1080 25sF
1080p (23.976) 1080p (23.976) 1080 29.97p
1080p (23.98) 1080p (23.98) 1080 29.97sF
1080p (24) 1080p (24) 1080 30p
1080p (25) 1080p (25) 1080 30sF
1080p (29.97) 1080p (29.97)
1080p (30) 1080p (30) 1080 59.94p
1080p (50) 1080p (50) 1080 60p
1080p (59.94) 1080p (59.94)
1080p (60) 1080p (60) 1080 59.94p
3840×2160 (24) 3840×2160 (24) 1080 60p
3840×2160 (25) 3840×2160 (25)
3840×2160 (30) 3840×2160 (30)
3840×2160 (50)
3840×2160 (60)
SD
HD
(1920×720)
HD
(1920×1080)
3G-Level A
(1920×1080)
3G-Level B
(1920×1080)
525 59.94i
720 50p
1080 50i
1080 50p
1080 50p
8
Page 9

VGA DVI-I
Resolution Hz Resolution Hz
800x600 56/60/70/72/75 720x480 60
1024x768 50/60/66/70/75 800x600 56/60/72/75
1152x864 60/70/75 1024x768 50/60/66/70/75
1152x900 76 1152x864 60/70/75/76
1280x720 50/60/70/72/75 1280x720 50/60/70/72/75
1280x768 50/60/70/75 1280x768 50/60/70/75
1280x800 60/70/72/75 1280x800 60/70/72/75/85
1280x960 60/70/72/75 1280x960 60/72/75
1280x1024 60/70/72/75/76 1280x1024 60/70/72/75/76
1360x768 60 1360x768 60
1440x900 60/75 1400x1050 60/75/85
1400x1050 60/75 1440x900 60/75/85
1600x900 60 1600x900 60
1600x1200 60/65/70/75 1600x1000 60/75
1680x1050 60/75 1680x1050 60/75/85
1920x1080 24/25/50/60 1920x1080 24/60
1920x1200 60
9
Page 10
SPECIFICATIONS
DISPLAY POWER
Panel Type IPS LCD
Display Size STV-150-4KH: 15.6 in. (39.6 cm)
STV-230-4KH: 23.8 in. (60.5 cm)
STV-280-4KH: 28 in. (71.1 cm)
Screen Resolution 3840 × 2160
Aspect Ratio 16:9
Viewing Angle
(H/V)
Touchscreen No
Maximum
Brightness
Contrast Ratio 1000:1
Bit Depth/
Color Support
LUT Support No
Image Controls Brightness, Contrast, Saturation, Hue,
I/O
Video Input HDMI 2.0 (HDMI Type A)
Video Output 3G-SDI (BNC)
Audio 2 RCA line input
Built-In Speaker 2
Power 4-pin XLR input
Other I/O Tally (DE-9)
Card Slot None
STV-150-4KH: 176°/176°
STV-230-4KH: 178°/178°
STV-280-4KH: 170°/160°
STV-150-4KH: 330 cd/m2
STV-230-4KH: 300 cd/m2
STV-280-4KH: 450 cd/m2
STV-150-4KH: 8-Bit (16.7 million colors)
STV-230-4KH: 8-Bit + FRC (1.07 billion colors)
STV-280-4KH: 10-Bit (1.07 billion colors)
Sharpness, Color Temperature, Backlight,
Center Marker, Safety Marker, Aspect,
Underscan, Check Field, Freeze Input,
Peaking, Display Mode, Display Rotate
HDMI 1.4 (HDMI Type A) ×3
3G-SDI (BNC)
Dual-Link DVI (DVI-I)
VGA (DE-15)
1/8 in. (3.5 mm) headphone output
DC Input Power 12 to 24 V DC
Battery Type V-mount
Power
Consumption
MOUNTING
Mounting-Hole Pattern VESA 75×75 and 100×100 mm
Mounting STV-150-4KH: 19-inch machine rack
ENVIRONMENTAL
Operating Temperature 32°F to 140°F (0°C to 60°C)
Storage Temperature -4°F to 140°F (-20°C to 60°C)
GENERAL
Dimensions
(W × H × D)
Dimensions
with Case (W
× H × D)
Approximate
Weight
Approximate
Weight with
Case
STV-150-4KH: ≤15 W
STV-230-4KH: ≤36 W
STV-280-4KH: ≤48 W
STV-230-4KH: None
STV-280-4KH: None
STV-150-4KH: 11.1 × 10.5 × 1.5 in.
(28.3 × 26.7 × 3.8 cm)
STV-230-4KH: 22.8 × 14.8 × 1.8 in.
(57.9 × 37.6 × 4.5 cm)
STV-280-4KH: 26.4 × 16.7 × 1.8 in.
(67 × 42.5 × 4.5 cm)
STV-150-4KH: 20.6 × 12 × 6.7 in.
(52.4 × 30.5 × 17 cm)
STV-230-4KH: 26.2 × 16.4 × 6.8 in.
(66.6 × 41.7 × 17.3 cm)
STV-280-4KH: 30 × 18.7 × 6.8 in.
(76.1 × 47.4 × 17.3 cm)
STV-150-4KH: 9.5 lb. (4.3 kg)
STV-230-4KH: 19.4 lb. (8.8 kg)
STV-280-4KH: 23.1 lb. (10.5 kg)
STV-150-4KH: 20.5 lb. (9.3 kg)
STV-230-4KH: 35.9 lb.(16.3 kg)
STV-280-4KH: 41.9 lb. (19 kg)
10
Page 11

TROUBLESHOOTING
Problem Solution
The StudioVision will not turn on. • Make sure that the AC adapter is fully plugged in, and that the AC power source is reliable.
• Make sure the V-mount battery is fully charged and properly seated in the V-mount battery plate.
The StudioVision is turned on, but
there is only a black and white
image
The StudioVision is turned on, but
there is no onscreen image.
The StudioVision is not receiving
a video signal.
A “no signal” or “not supported”
message is displayed onscreen.
The onscreen image size is not
correct.
There’s no sound coming from the
speakers.
• Check whether the color saturation is properly congured.
• Make sure the Check Field mode is disabled.
• Check your cables to make sure they are properly connected.
• Make sure your cables are securely plugged into the correct input.
• Make sure the video resolution and frame rate are supported by the monitor. See the
Resolutions and Frame Rates
• Check your cables to make sure they are reliable.
• Make sure the proper input is selected.
• Check your cables to make sure they are properly connected.
• Check your cables to make sure they are reliable.
• Make sure your cables are securely plugged into the inputs.
• Make sure the video resolution and frame rate are supported by the monitor. See the
Resolutions and Frame Rates
• Make sure the Underscan and Pixel-to-pixel modes are disabled.
• Check whether the aspect ratio is set correctly.
• Make sure the volume is turned up.
• Disconnect headphones if they’re plugged into the headphone port.
• Make sure the proper source is selected in the Audio Source menu.
chart in this manual.
chart in this manual.
Supported
Supported
11
Page 12

ONE-YEAR LIMITED WARRANTY
This Elvid product is warranted to the original purchaser to be free from defects in materials and
workmanship under normal consumer use for a period of one (1) year from the original purchase
date or thirty (30) days after replacement, whichever occurs later. The warranty provider’s
responsibility with respect to this limited warranty shall be limited solely to repair or replacement,
at the provider’s discretion, of any product that fails during normal use of this product in its
intended manner and in its intended environment. Inoperability of the product or part(s) shall be
determined by the warranty provider. If the product has been discontinued, the warranty provider
reserves the right to replace it with a model of equivalent quality and function.
This warranty does not cover damage or defect caused by misuse, neglect, accident, alteration,
abuse, improper installation or maintenance. EXCEPT AS PROVIDED HEREIN, THE WARRANTY
PROVIDER MAKES NEITHER ANY EXPRESS WARRANTIES NOR ANY IMPLIED WARRANTIES,
INCLUDING BUT NOT LIMITED TO ANY IMPLIED WARRANTY OF MERCHANTABILITY OR FITNESS
FOR A PARTICULAR PURPOSE. This warranty provides you with specic legal rights, and you may
also have additional rights that vary from state to state.
To obtain warranty coverage, contact the Elvid Customer Service Department to obtain a return
merchandise authorization (“RMA”) number, and return the defective product to Elvid along with
the RMA number and proof of purchase. Shipment of the defective product is at the purchaser’s
own risk and expense.
For more information or to arrange service, visit www.elvidcinema.com or call Customer Service at
212-594-2353.
Product warranty provided by the Gradus Group.
www.gradusgroup.com
Elvid is a registered trademark of the Gradus Group.
© 2019 Gradus Group LLC. All Rights Reserved.
www.elvidcinema.com
GG2
 Loading...