

Page 1
RIGVISION
RVM-5P-HDR
5" 4K On-Camera HDMI Monitor
USER
MANUAL
Page 2
THANK YOU FOR CHOOSING ELVID.
The compact and lightweight full-HD RVM-5P-HDR is a feature-rich on-camera monitor that delivers extremely sharp images whether you’re
shooting with a DSLR or a pro camcorder. It boasts a daylight-viewable LCD touchscreen that allows you to access menus and control
functions. In addition, a simple double-tap on the screen activates 1:1 pixel mode that offers a view of your video at full resolution. You can
zoom in and out of your shot with the same pinch gesture you use with a smartphone or tablet. All the functions and menu items are also
accessible with the onboard controls.
The RVM-5P-HDR monitor supports a wide range of video signals and is equipped with HDMI input and output ports. A swing arm is included
for mounting onto a gimbal, camera cage, or your camera itself. The monitor is powered by a single NP-F battery, and the battery plate includes
an integrated DC output and dummy battery to power your camera.
2
Page 3

Precautions ..................................................................................................................................................................................................................................................................4
Overview .......................................................................................................................................................................................................................................................................5
Product Contents .......................................................................................................................................................................................................................................................6
Getting Started ...........................................................................................................................................................................................................................................................7
Using the RigVision Monitor ................................................................................................................................................................................................................................. 8
Guides Menu .............................................................................................................................................................................................................................................................10
Video Cong Menu ...................................................................................................................................................................................................................................................11
System Cong Menu ..............................................................................................................................................................................................................................................12
LUT Cong Menu .....................................................................................................................................................................................................................................................13
Function Setup Menu .............................................................................................................................................................................................................................................14
Camera Control Functions ....................................................................................................................................................................................................................................16
Firmware Menu .......................................................................................................................................................................................................................................................22
Specications ...........................................................................................................................................................................................................................................................23
3
Page 4

PRECAUTIONS
• Exposure to high sound levels can cause permanent hearing loss. Avoid listening at high volumes for extended periods of time.
• Keep this product away from water and any ammable gases or liquids.
• Do not expose this product to humidity or extreme heat or cold.
• Make sure this product is powered off when plugging it into a power source.
• Use only the correct, recommended voltage.
• Do not attempt to disassemble or repair this product.
• Do not place or store the RigVision monitor facedown, since this can damage the screen.
• Handle this product with care. Avoid any impacts to this product.
• Do not block the vents in this product.
• Disconnect this product from its power source before storage and during electrical storms.
• Do not use chemical solutions to clean this product. Clean it with only a soft, dry cloth.
• Keep this product away from children.
• Make sure that this product is intact and that there are no missing parts.
• To avoid damage to this product, be careful not to overtighten or improperly thread any of the threaded ttings.
• All images are for illustrative purposes only.
4
Page 5
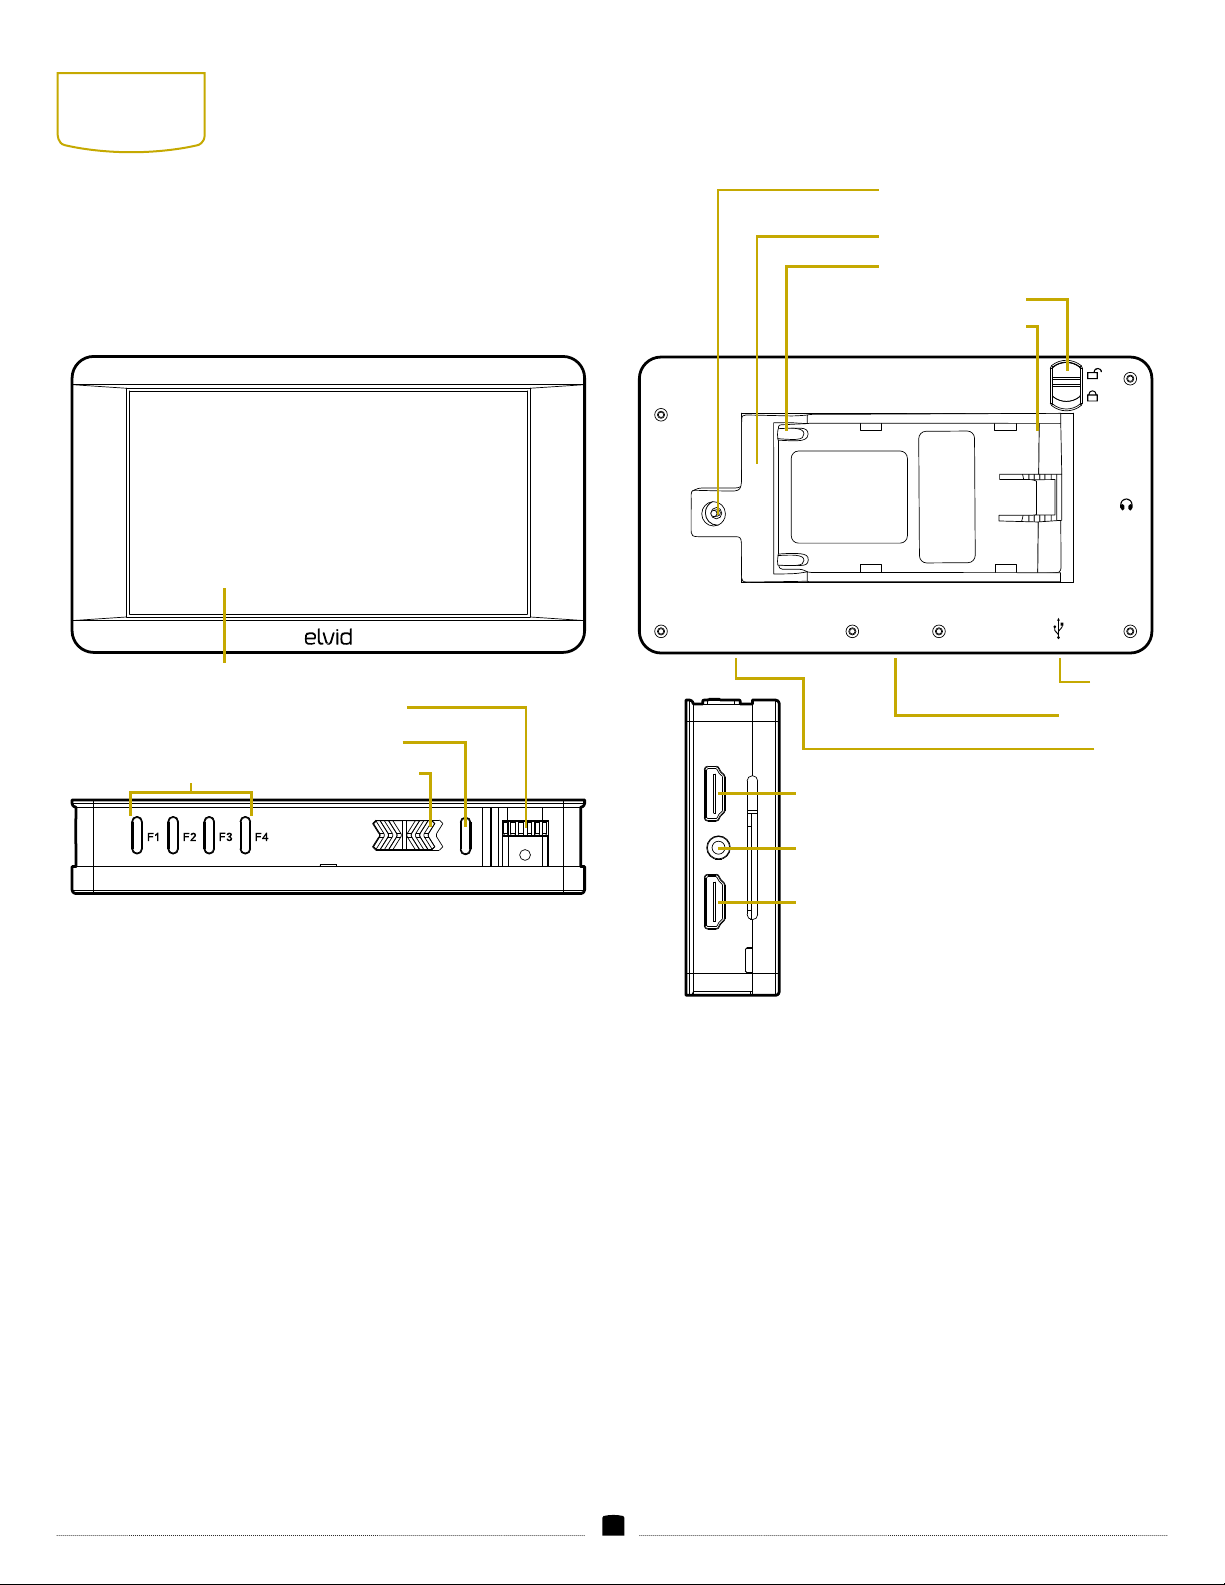
OVERVIEW
Touch screen
Scroll wheel
Exit button
Power switchFunction buttons
MENU EXIT OFF ON
DC 7~24V
HDMI input
DC output
(Dummy battery connection)
Battery plate
Battery terminals
Battery plate lock
Battery plate slot
1/4-20 socket
HDMI
IN
HDMI
OUT
USB port
DC input
Headphone output
HDMI output
5
Page 6
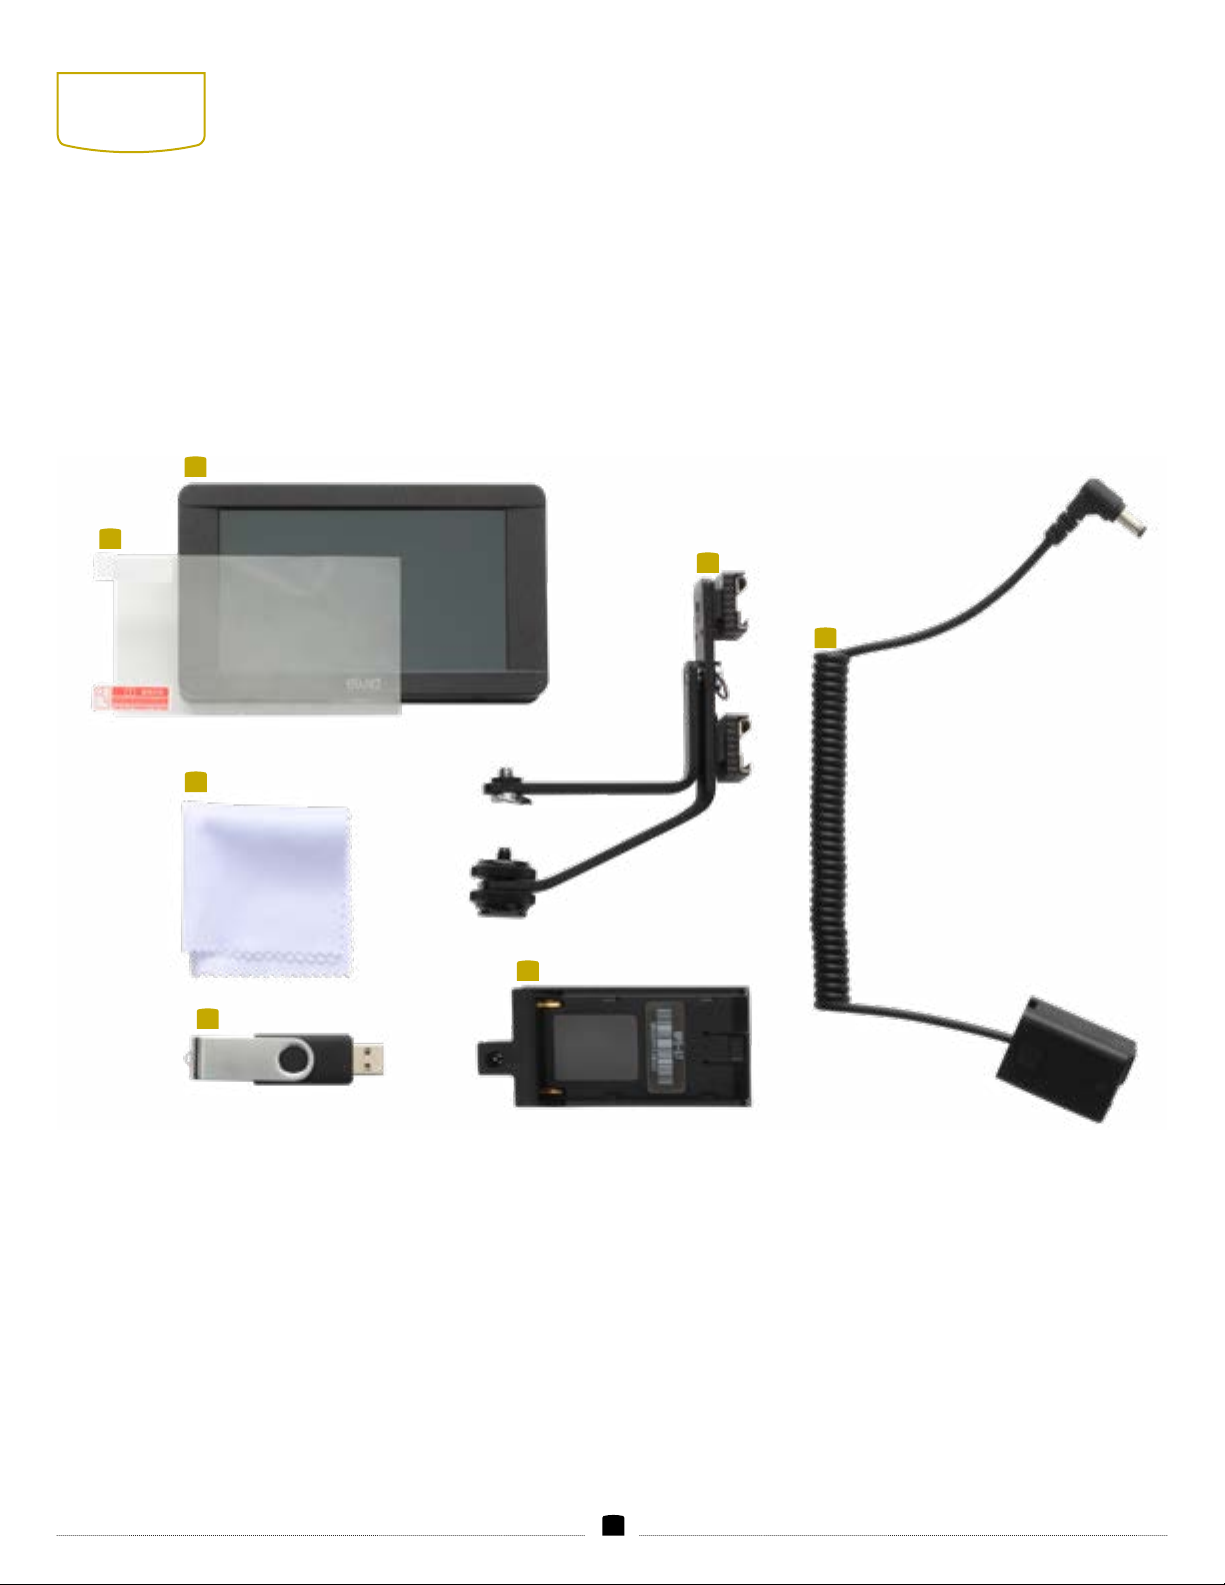
PRODUCT
CONTENTS
1. 5 in. on-camera monitor
2. Screen protector
3. Swing arm
4. NP-FW50 dummy battery
5. Cleaning cloth
6. USB drive
7. Battery plate
1
2
3
4
5
7
6
6
Page 7
GETTING
STARTED
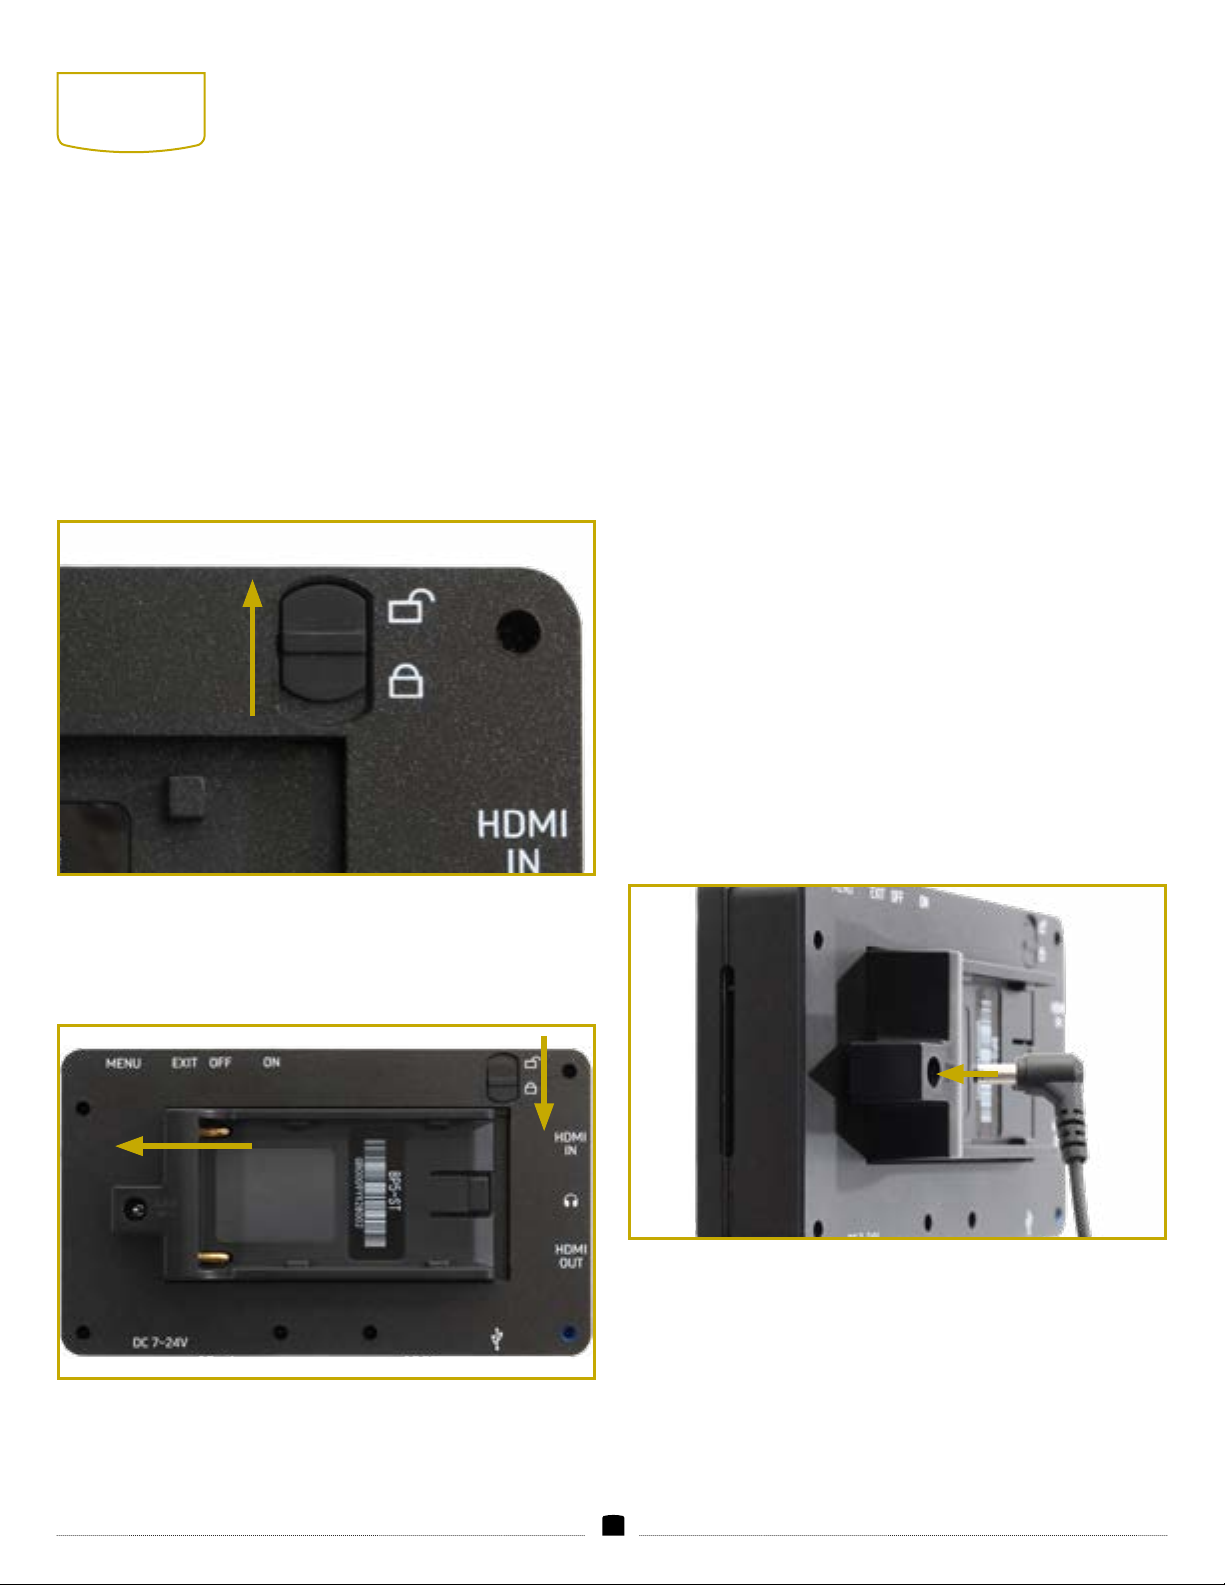
ATTACHING THE BATTERY PLATE
The monitor’s built-in battery plate accommodates an NP-F type
battery. This allows you to power the monitor with a readily available
battery type that you may already own. For more information on
compatible battery types, see
If the battery plate is already attached to the monitor, proceed to
Installing a Battery
1. Move the battery plate lock to the unlocked position.
below.
Specications
below.
INSTALLING A BATTERY
1. Place an NP-F style battery into the battery plate, making sure
the plate’s contacts align with the battery terminals.
2. Slide the battery toward the contacts until it’s rmly in place.
POWERING ON
1. Connect the HDMI input to your camera’s output with an
HDMI cable.
2. Move the Power switch to the on position.
VOLUME CONTROL
Use the scroll wheel to adjust the headphone volume when the menu
is not displayed on-screen. The output level is displayed on-screen as
you adjust the volume.
POWERING A CAMERA
The battery plate has an integrated DC output that can power your
camera via the dummy battery.
Note: The included dummy battery is an NP-FW50 type. Other
dummy battery types are available separately.
2. Place the battery plate into the battery slot, making sure the
battery plate contacts and guide tabs match the contacts and tabs
in the battery slot.
1. Plug the barrel connector into the DC output on the battery plate.
2. Insert the dummy battery into the camera’s battery compartment.
3. Slide the battery slot toward the contacts until it’s snug, and move
the locking switch to the locked position.
7
Page 8

USING THE
RIGVISION
MONITOR
ACCESSING THE MENUS
To get the most out of the monitor, make sure the monitor’s settings
are properly congured. All of the setting congurations are located
in the main menu, which has six submenus: Guides, Video Cong,
System Cong, LUT Cong, Function Setup, and Firmware.
1. Press the scroll wheel to open the main menu.
2. Use the main menu to select one of the submenus: Guides, Video
Cong, System Cong, LUT Cong, Function Setup, or Firmware.
3. Turn the scroll wheel to navigate to the desired submenu, and
press the scroll wheel to open it.
To close the main menu and return to the main view, select Exit at
the bottom of the main menu, and press the scroll wheel.
For a list and description of all the menu and submenu options, see
the menus sections below.
ACCESSING THE SUBMENUS
1. In the submenu, scroll to highlight the item you want to adjust,
and press the scroll wheel.
2. The menu function is surrounded by “< >” marks, which means the
submenu is active and can be adjusted.
3. Use the scroll wheel to select the desired value or function.
4. Press the scroll wheel to set the selection.
Selecting Back at the bottom of each submenu returns you to the
main menu.
To immediately return to the main view, press the Exit button.
FUNCTION BUTTONS
The four function buttons (F1–4) on the top of the monitor engage
monitor functions that can be programmed to accommodate your
specic needs. See
information on changing the function assignment for each button.
By default, the function buttons are set as follows:
F1: Audio Meters. Places an audio meter on-screen to monitor the
level of incoming audio. Open the Audio Meters menu to change the
on- screen position of the meters and the blending, or opaqueness,
level.
F2: Peaking. Adds a red outline to any part of the image that is in
focus. Open the Peaking meter to adjust the factor (strength) and the
outline color.
F3: False Color. Replaces the true colors of the image with a standard
set of colors, displayed in an on-screen chart, that represent exposure
levels. The higher—or hotter—the exposure, the higher the color will
be in the chart. Open the False Color menu to adjust under warning
(-10 to 15) and over warning (85 to 110) and to turn the on-screen
chart on or off.
F4: HDR (HLG). Turn on HDR (HLG) when monitoring a camera
that’s recording in Hybrid Log-Gamma format. The function uses
the display’s luminance range to correctly display an incoming HLG
signal. The HDR (HLG) function can be used in tandem with any
applied LUT.
Important! The function buttons are active only when the monitor
receives a video signal.
Function Button Shortcut Menu
below for
• Press the function button to turn the function on and off.
• Press and hold the function button to activate the function’s menu.
Then use the scroll wheel to select menu options, set values, and
exit the menu.
8
Page 9

Function Button Setup Menu
To change the functions of the buttons, follow these steps:
1. Press the scroll wheel to open the main menu.
2. Select Function Setup, and press the scroll wheel to open the
Function Setup menu.
3. Scroll to the function button you want to change, and press the
scroll wheel to activate the menu item.
4. Use the scroll wheel to move through the options until you arrive
at the desired function, and press the scroll wheel to save it.
5. Press the Exit button to return to the main view.
Menu options for the function buttons are Audio Meters, 5D II Rec,
Pixel to Pixel, HDR (HLG), Brightness, Contrast, Chroma, Sharpness,
Tint, Color Temperature, Aspect, Backlight, Camera Control, Display
Flip, OSD Flip, Check Field, H/V Display, Guides, Cross Hair, Grids,
Peaking, False Color, Zebra, UnderScan, DSLR Scaling, Histogram, and
Zooming.
RESETTING THE RVM-5P-HDR
To erase all settings and return to the factory presets:
TOUCH-SCREEN FUNCTIONS
Touch-screen functions are active only when the monitor receives a
video signal.
Touch the screen once to bring up the signal status and settings
menu and the four function displays.
• Touch any of the functions to turn them on and off.
• Touch the signal status and settings menu to open the main menu.
• Touching a non-menu portion of the screen or pressing the Exit
button clears the screen and returns you to the main view.
• Double-tapping the screen turns the pixel-to-pixel function on and
off.
• Dragging your nger on the screen repositions the image.
The screen responds to the pinch-and-zoom command similar to a
smartphone or tablet.
1. Touch the screen with two ngers, and slowly
spread them apart to zoom into the image.
1. Press the scroll wheel to open the main menu.
2. Select System Cong.
3. In the System Cong menu, scroll down to System Reset, and
press the scroll wheel.
4. If you’re ready to reset the monitor, use the scroll wheel to select
Yes, and press the scroll wheel to accept the selection.
The monitor takes about 5 seconds to reset and return to the main
view.
2. Slowly bring your two ngers together to return
the screen to the full-screen view.
9
Page 10

GUIDES MENU
GUIDES
Adjusts the aspect ratio of the incoming video signal and how it is
displayed on-screen. Select between Off (default), 80%, 90%, 15:9,
1.33:1, 1.5:1, 1.85:1, 2:1, 2.35:1, and Custom.
• H (Custom): 100%–1%. Default value is 80%.
• V (Custom): 100%–1%. Default value is 80%.
GUIDE MASKS
(On, off) When turned on, the areas outside the guide are dimmed.
The default setting is On.
CROSSHAIR
(On, off) Puts a crosshair at the center of the screen. The default
setting is Off.
GRIDS
(Off, 1–10) Creates grids on-screen with 1 to 10 subdivisions. The
default setting is Off.
Pressing the Exit button will disable any enabled guides, one at a
time.
10
Page 11

VIDEO
CONFIG MENU
BRIGHTNESS
Adjusts the monitor’s brightness value from 0–100. The default
setting is 50.
CONTRAST
Adjusts the contrast value of the on-screen image from 0–100. The
default setting is 50.
CHROMA
Adjusts the chroma value of the on-screen image. The default setting
is 50.
SHARPNESS
Adjusts the value of ne detail of the picture from 1–100 in
increments of 10. The default setting is 30.
TINT
Adjusts the tint value from 0–100. The default setting is 50.
COLOR TEMPERATURE
Presets are 5600, 6500 (default), 7500, 9300, and Manual. When
User mode is selected, the values of red, green, and blue can be set
manually from 0–255. Red, green, and blue are preset to 128.
BACKLIGHT
Adjusts the intensity of the backlight. Options are low, middle, and
high (default).
ASPECT
Adjusts the aspect ratio of the incoming video signal and how it is
displayed on-screen. Options are User, 16:9 (default), 15:9, 1.33:1, 1.5:1,
1.85:1, 2:1, and 2.35:1.
In User mode, height and width can be adjusted from 50 to 100. The
default setting is 100.
11
Page 12

SYSTEM
CONFIG MENU
OSD LANGUAGE
You can set the on-screen language to English (default) or Chinese.
OSD DURATION
Set the length of time the on-screen menu is displayed. Select 5, 10
(default), 15, 20, 25, or 30 seconds, or off (the menu will be displayed
until the user exits the menu).
OSD TRANSPARENCY
Set the menu’s level of opacity. You can adjust this setting to low
(default), middle, high, and off, with high being the most transparent.
The default setting is low, which makes the menu opaque.
MENU SETUP
Recall monitor settings for ve different users. Select from User 1
(default) to User 5.
SYSTEM RESET
Resets the monitor to the factory default settings and removes any
loaded LUTs.
FLIP CONTROL
Display Flip Mode controls the orientation of the on-screen image.
Flip the screen vertically or horizontally with the H Flip and V Flip
options.
OSD Flip mode controls the orientation of the on-screen display. Flip
the menu vertically or horizontally with the H Flip and V Flip options.
BATTERY VOLTAGE DISPLAY
Places an icon in the upper left corner of the screen that displays the
remaining battery voltage. Select on (default) or off.
FAN
Sets the level of the internal cooling fan. Options are high, medium
(default), and low.
TOUCH CONTROL
Turns the touch control feature on or off.
12
Page 13

LUT CONFIG
MENU
This menu allows you to apply 17×17×17.cube LUT les to color grade
your footage.
STORED FROM USB
Select or switch to a different LUT le that’s stored in the monitor’s
memory.
To delete a LUT le, select the le, and press and hold the scroll
wheel until you’re prompted to conrm the deletion.
USB LOOKS
Select this option to navigate through the les on a connected USB
drive and move LUTs from the USB drive to the monitor.
Press the scroll wheel to select a folder to open or a LUT le to be
loaded onto the monitor. Any LUT that is loaded onto the monitor
will be immediately enabled. To disable the LUT or select a different
LUT that has already been loaded from the USB drive, use the Stored
from USB submenu.
Select Return or press the Exit button to go back to the previous
folder and exit the USB Looks interface after reaching the root
directory.
13
Page 14

FUNCTION
SETUP MENU
This menu sets the functions for the four function buttons on the top
of the monitor.
Available functions:
AUDIO METERS
1
Displays left- and right-channel audio meters on-screen. Position
options are top, left, division, right, and bottom. The default setting
is top.
5D II REC
Scales the video output to t the screen when recording with a 5D
Mark II DSLR camera.
PIXEL TO PIXEL
1
Pixel-to-Pixel mode turns off scaling and displays the incoming video
signal in its native resolution and aspect ratio with 1:1 pixel mapping.
If the picture is larger than the monitor’s 1920 × 1080 resolution, the
center of the image will appear on-screen.
HDR (HLG)
Turn on Hybrid Log-Gamma (HLG) format to correctly display the
entire dynamic range of an incoming HDR signal that utilizes the
Hybrid Log-Gamma luminance map. The HDR (HLG) function can be
used with any applied LUT. Options are on or off. The default setting
is on.
BRIGHTNESS
Adjusts the monitor’s brightness value from 0–100. The default
setting is 50.
CONTRAST
Adjusts the contrast value of the on-screen image from 0–100. The
default setting is 50.
CHROMA
Adjusts the saturation of the on-screen image. The default setting is
50.
2
2
2
SHARPNESS
2
Adjusts the value of ne detail of the picture from 1–100. The default
setting is 30.
2
TINT
Adjusts the tint value from 0–100. The default setting is 50.
COLOR TEMPERATURE
2
Adjusts the color temperature of the on-screen image. Presets are
5600, 6500 (default), 7500, 9300, and Manual. When User mode is
selected, the values of red, green, and blue can be set manually from
0–255. Red, green, and blue are preset to 128.
ASPECT
2
Adjusts the aspect ratio of the incoming video signal and how it is
displayed on-screen. Options are User, 16:9 (default), 15:9, 1.33:1, 1.5:1,
1.85:1, 2:1, 2.35:1.
BACKLIGHT
2
Adjusts the intensity of the backlight. Options are low, middle, and
high. The default setting is high.
CAMERA CONTROL
1
This displays on-screen controls for the selected camera type. Camera
options are Canon (default), Sony, Panasonic, BMPCC, Remote, and Z
CAM E2. Position options are right (default) and left. The Update USB
option allows you to upgrade the rmware of your camera control
device using the included USB drive. For more information, see
Camera Control Functions
below.
DISPLAY FLIP
Flips the on-screen image along the horizontal axis.
OSD FLIP
Flips the on-screen display and menus along the horizontal axis.
CHECK FIELD
When Check Field mode is on, only the selected color information
from the incoming video signal will appear on-screen. Check Field
mode is useful for calibrating the monitor. Select between blue, red,
green, mono, and off. The default setting is off.
3
1
Once the function is assigned to the function button, press and hold the button for 3 seconds to display the function’s menu.
2
Once the function is assigned to the function button, press the button, and then use the scroll wheel to adjust the parameters.
3
Once the function is assigned to the function button, press the button repeatedly to cycle through the function options.
14
Page 15

H/V DELAY
3
H/V delay mode highlights the horizontal and vertical blanking
portions of the incoming signal. Press the function button to switch
between three delay modes. (1) H & V mode delays both horizontal
and vertical sync. (2) V mode delays the vertical sync. (3) H mode
delays the horizontal sync.
ZEBRA
1
Turning on displays animated black and white stripes through areas
of the image that are overexposed along with an on-screen under and
over warning display. Adjust the underexposure warning from -10 to
15 (default -1), and the overexposure warning from 85 to 110 (default
101). The Tooltip option turns the on-screen chart on or off.
GUIDES
1,3
Shows aspect ratio overlays on top of the incoming video signal. The
default setting is Off. Press repeatedly to scroll through the frame
settings: off (default), 80%, 90%, 15:9, 1.33:1, 1.5:1, 1.85:1, 2:1, 2.35:1,
and Custom. In Custom mode, horizontal and vertical guides can be
set from 1%–100%. Select between white (default), red, green, blue,
and black guide colors. Select guide thickness from 0 (no line) to 50;
the default value is 2. The guide masks option dims the portion of the
image outside the guide.
CROSS HAIR
1
Places a center marker on-screen. Choose from color options white
(default), red, green, blue, black. Set horizontal and vertical offset
from 0%–100%. Default is 50%.
GRIDS
1,3
Creates grids on-screen with 1 to 10 subdivisions. The default setting
is Off. Select grid color options white (default), red, green, blue, and
black.
PEAKING
1
Adds a color outline to high contrast areas of the image, highlighting
areas that are in focus. Select white, red (default), green, blue, and
black. Select outline intensity from 0 to 10 (default).
FALSE COLOR
1
Replaces the true colors of the image with a standard set of colors,
displayed in an on-screen chart, that represent exposure levels. The
higher—or hotter—the exposure, the higher the color will be in the
chart. Adjust the underexposure warning from -10 to 15 (default
-1), and the overexposure warning from 85 to 110 (default 101). The
Tooltip option turns the on-screen chart on or off.
UNDERSCAN
1
If the image exceeds the area of the monitor, turn on this feature
to display a blank area around the active image. Activate this mode
to clearly see the edges of the active video area. Select the factor
between 50 and 100 (no underscan). The default is set to 94.
DSLR SCALING
3
Scales the incoming video signal to ll the screen. This is useful when
shooting on a DSLR. Select full, 16:9, 3:2, or off (default).
HISTOGRAM
1
Activates histogram mode to indicate the overall level of exposure
from light to dark. The on-screen meter shows the percentage of the
image at a particular exposure level. Adjust the position of the meter
from right-bottom (default), left-bottom, left-top, and right-top. Select
meter size small (default) or large. The meter transparency can be on
(default) or off.
LUMA WAVEFORM
Turning on Luma Waveform displays a waveform exposure guide
in the lower right corner of the screen to evaluate your image and
accurately gauge the exposure of specic areas of the image. Select
on (default) or off.
ZOOMING
Scales the incoming video signal. Select the zooming area: middle
(default), left and top, right and top, right and bottom, left and
bottom, and user. User mode activates X offset (-480 to +480) and Y
offset (-270 to +270). Select between magnication factors of ×1.5,
×2 (default), ×2.5, ×3, and User. User mode activates horizontal and
vertical magnication factors of ×1.01 to ×3.00, in 0.01 increments.
The default is 2.00.
1
1
Once the function is assigned to the function button, press and hold the button for 3 seconds to display the function’s menu.
2
Once the function is assigned to the function button, press the button, and then use the scroll wheel to adjust the parameters.
3
Once the function is assigned to the function button, press the button repeatedly to cycle through the function options.
15
Page 16
CAMERA
CONTROL
FUNCTIONS
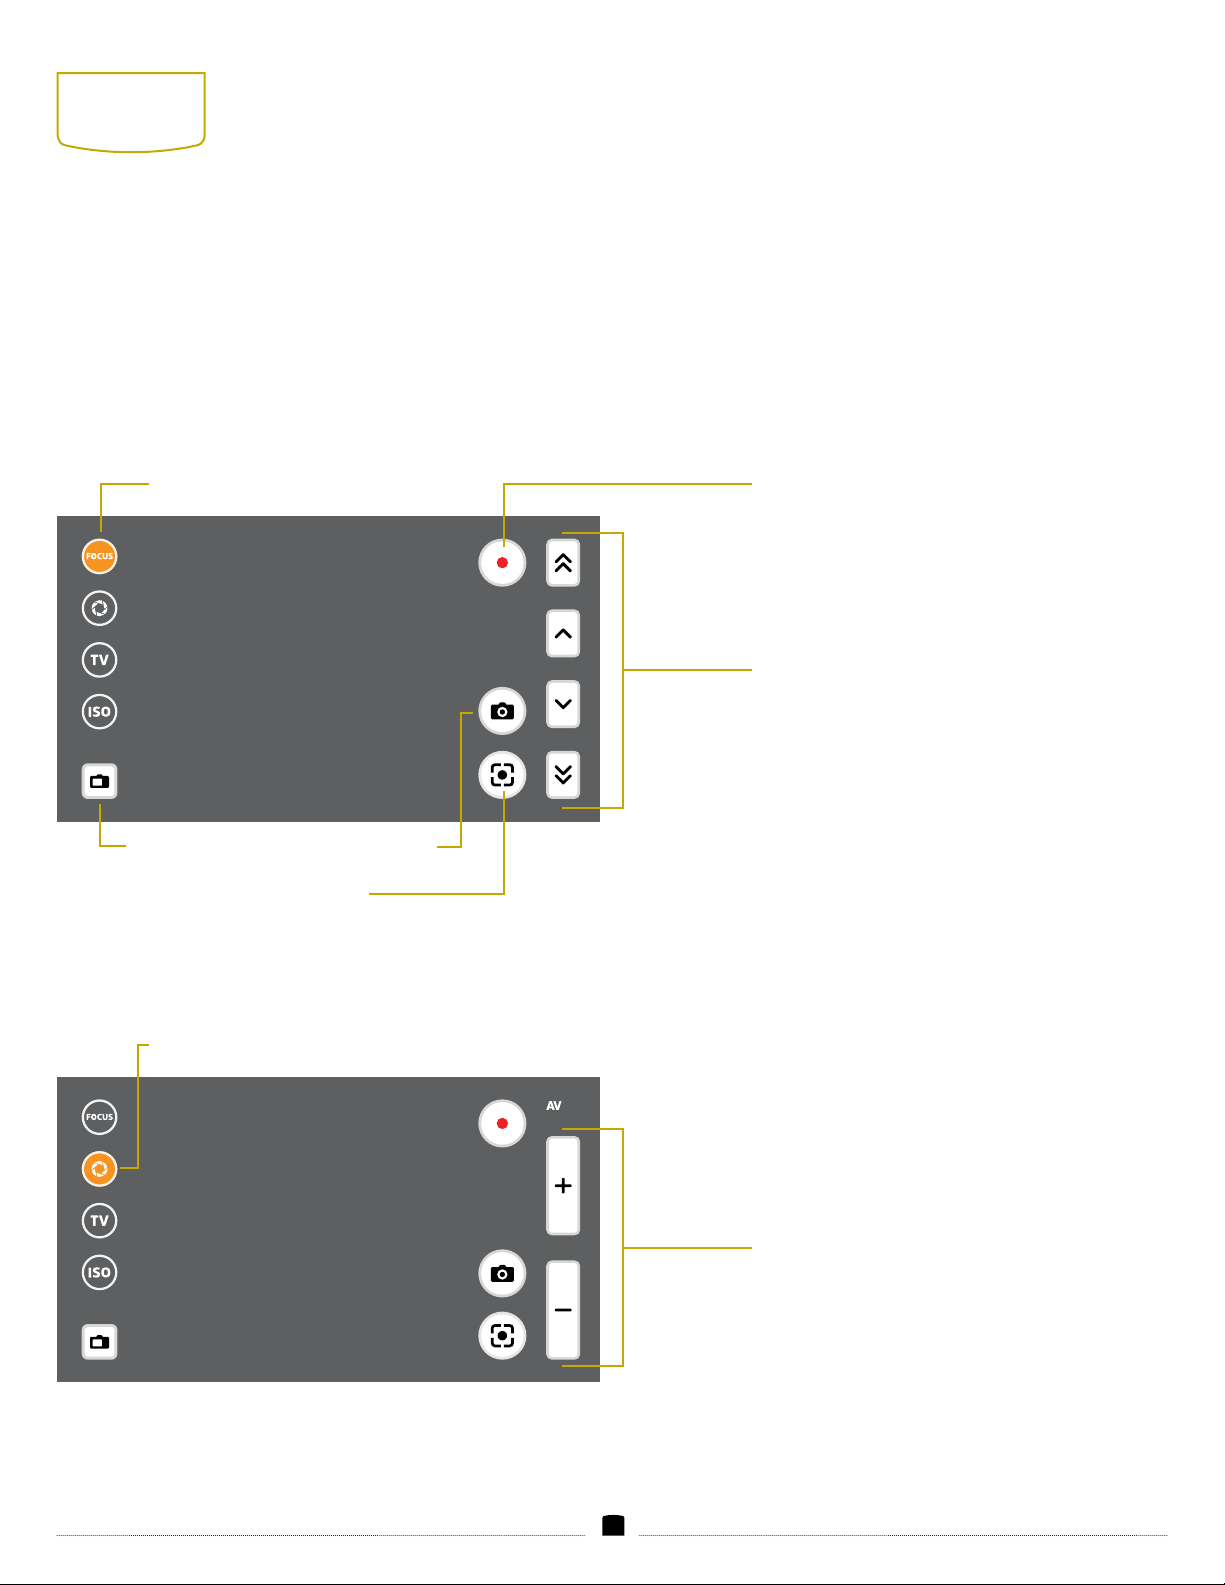
When a camera control accessory (available separately) is attached
to the monitor’s HDMI ports, activate Camera Control to operate the
camera via the touch screen. Select between Canon, Sony, Panasonic,
BMPCC, Z CAM E2, and Remote functions. Each selection will bring
up a control screen with the following available functions:
CANON
Zoom Adjustment Screen
Zoom select
Switch to
viewnder
Aperture Adjustment Screen
Aperture select
Camera trigger
Focus
Record
(Other icons are hidden during recording. When
the Record button is pressed, the focus controls
automatically appear.)
Focus controls
(When adjusting the focus, peaking will
automatically activate for approximately a
half second, and then turn off.)
Aperture controls
16
Page 17
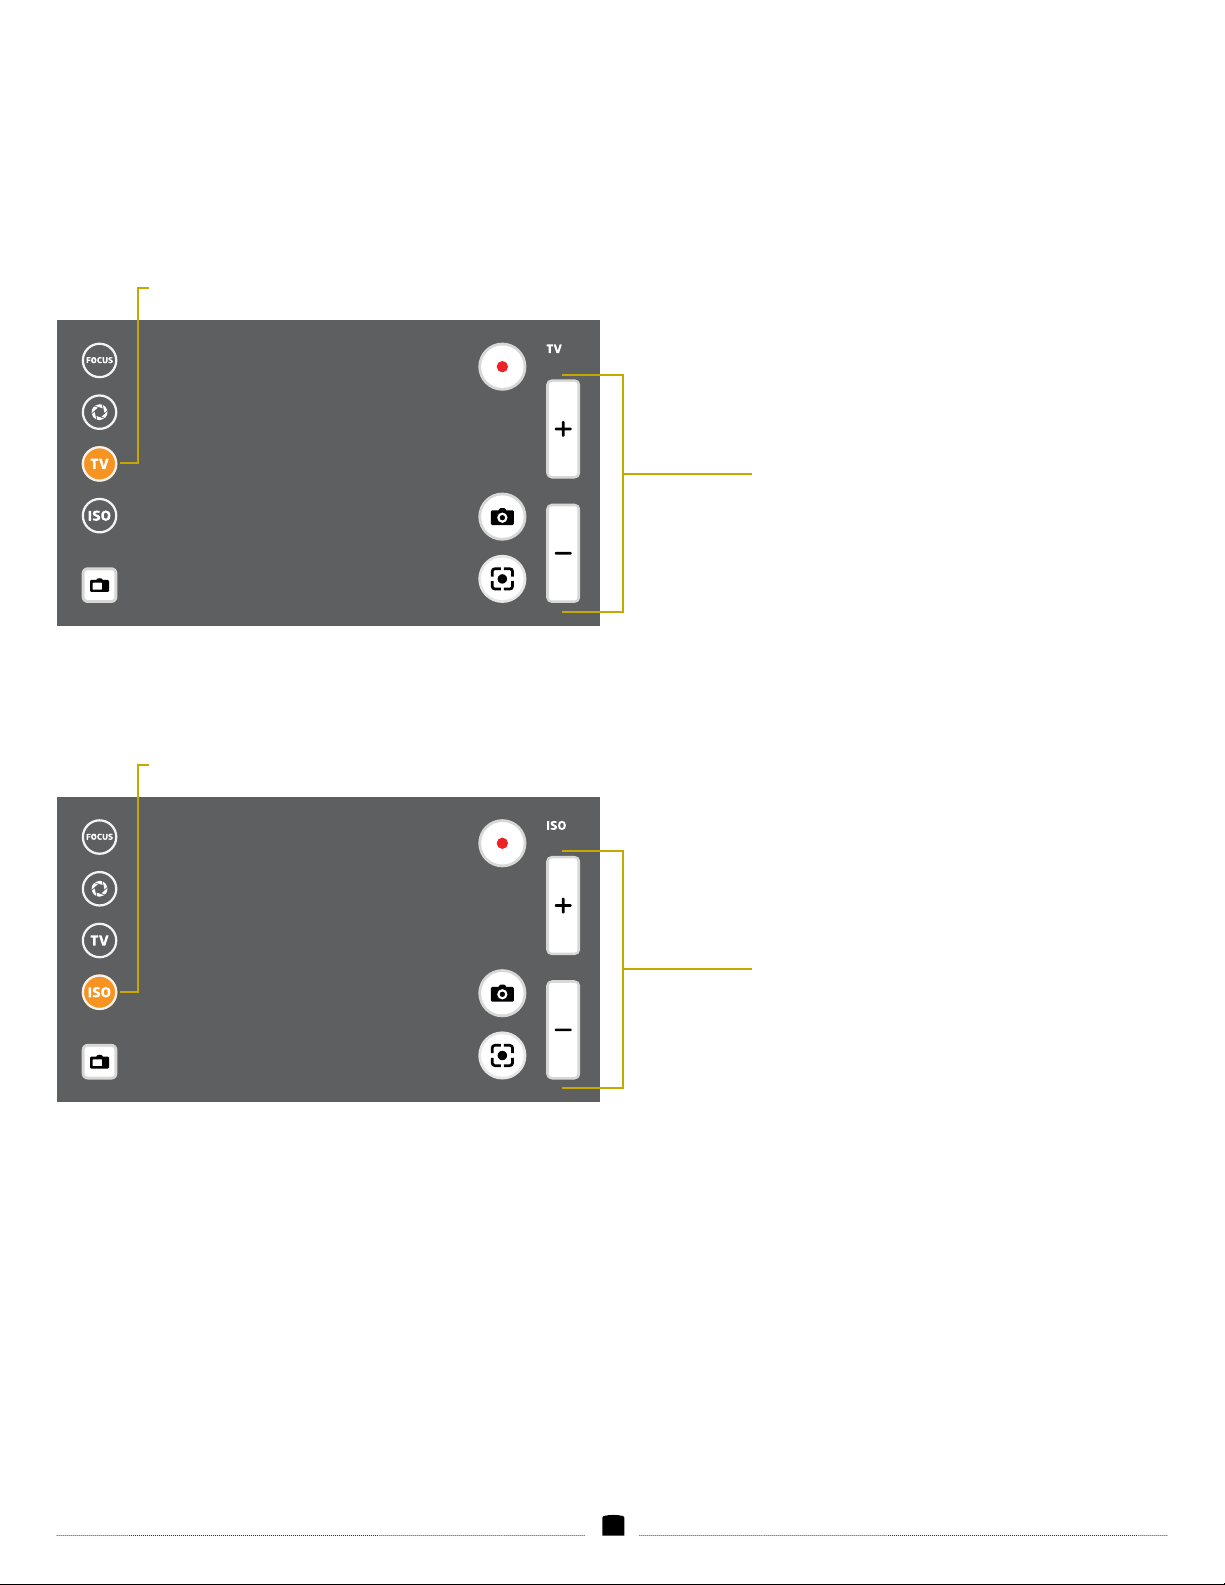
Shutter Speed Adjustment Screen
Shutter-speed select
ISO Adjustment Screen
ISO select
Shutter speed controls
ISO controls
17
Page 18
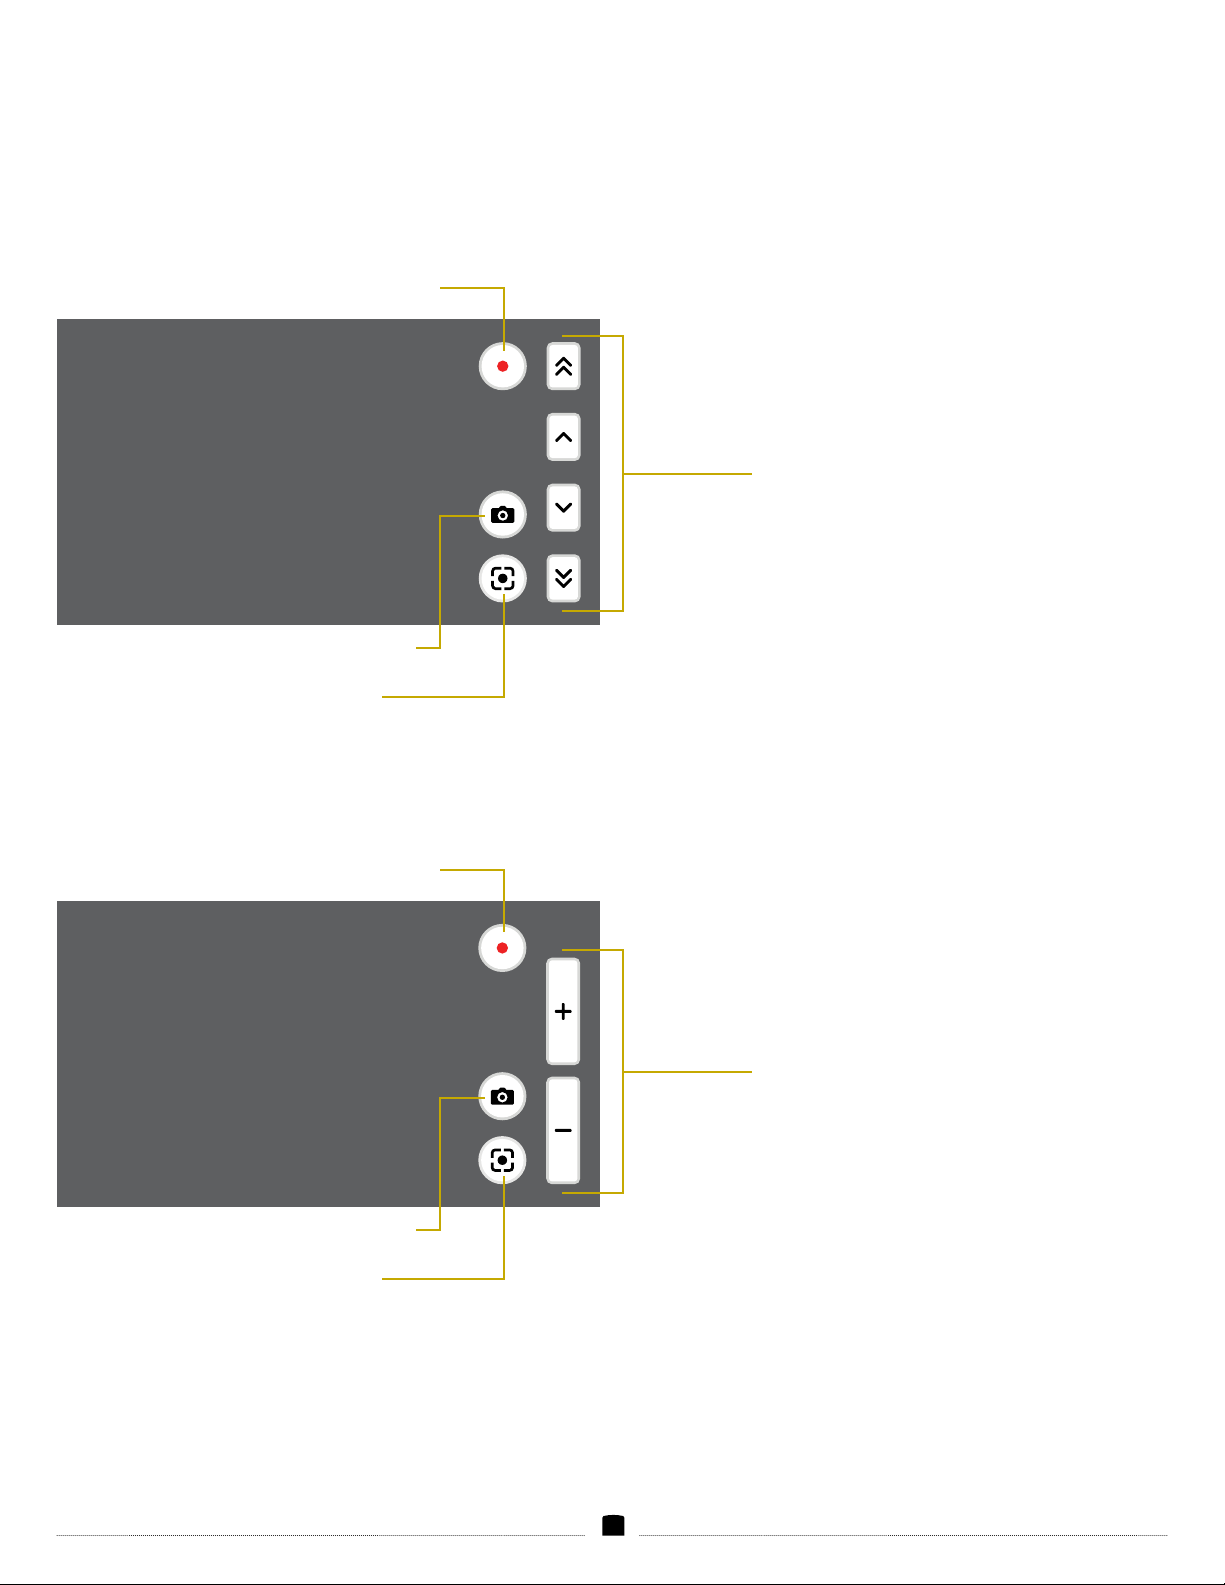
SONY
Record
Zoom in/out
controls
Camera trigger
PANASONIC
Autofocus
(Press and hold, and then swipe
up to trigger the camera.)
Camera trigger
Record
Zoom in/out
controls
Autofocus
(Press and hold, and then swipe
up to trigger the camera.)
18
Page 19
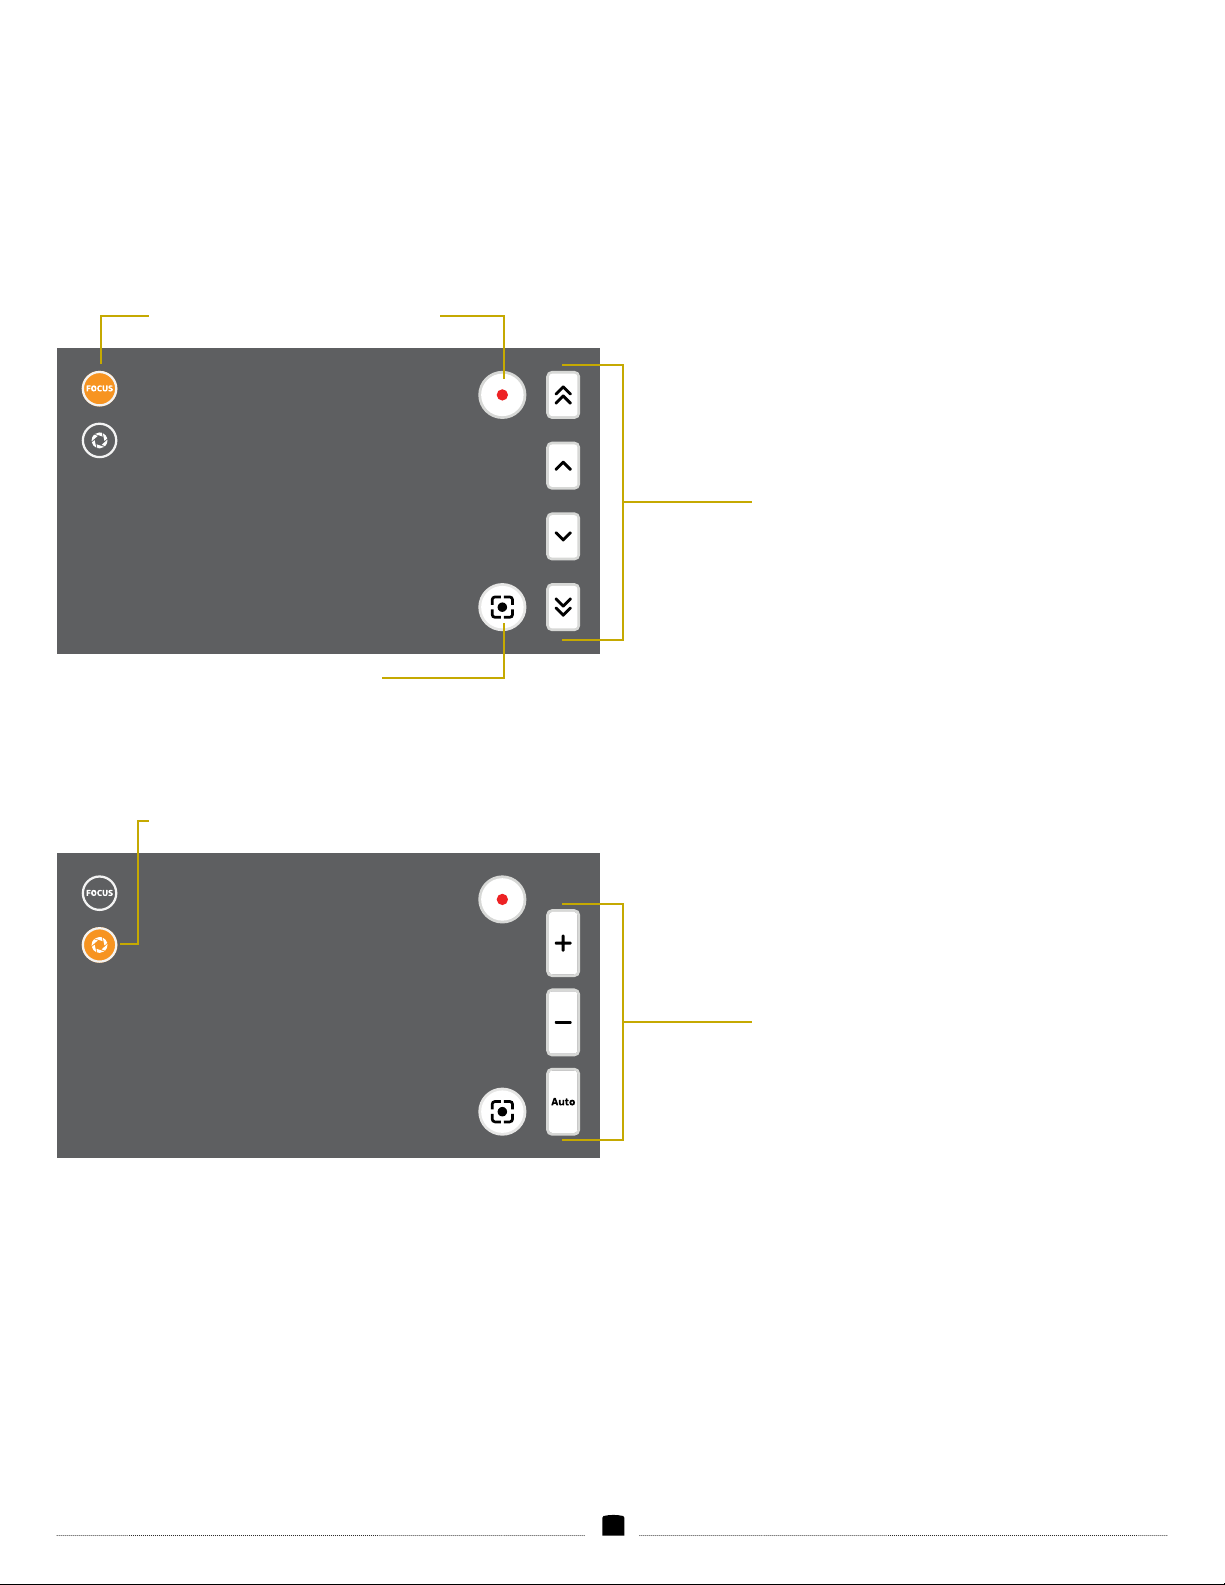
BMPCC
Zoom Adjustment Screen
Zoom select
Aperture Adjustment Screen
Aperture select
Focus
Record
Focus controls
(When adjusting the focus, peaking will
automatically activate for approximately a
half second, and then turn off.)
Aperture and auto mode controls
19
Page 20
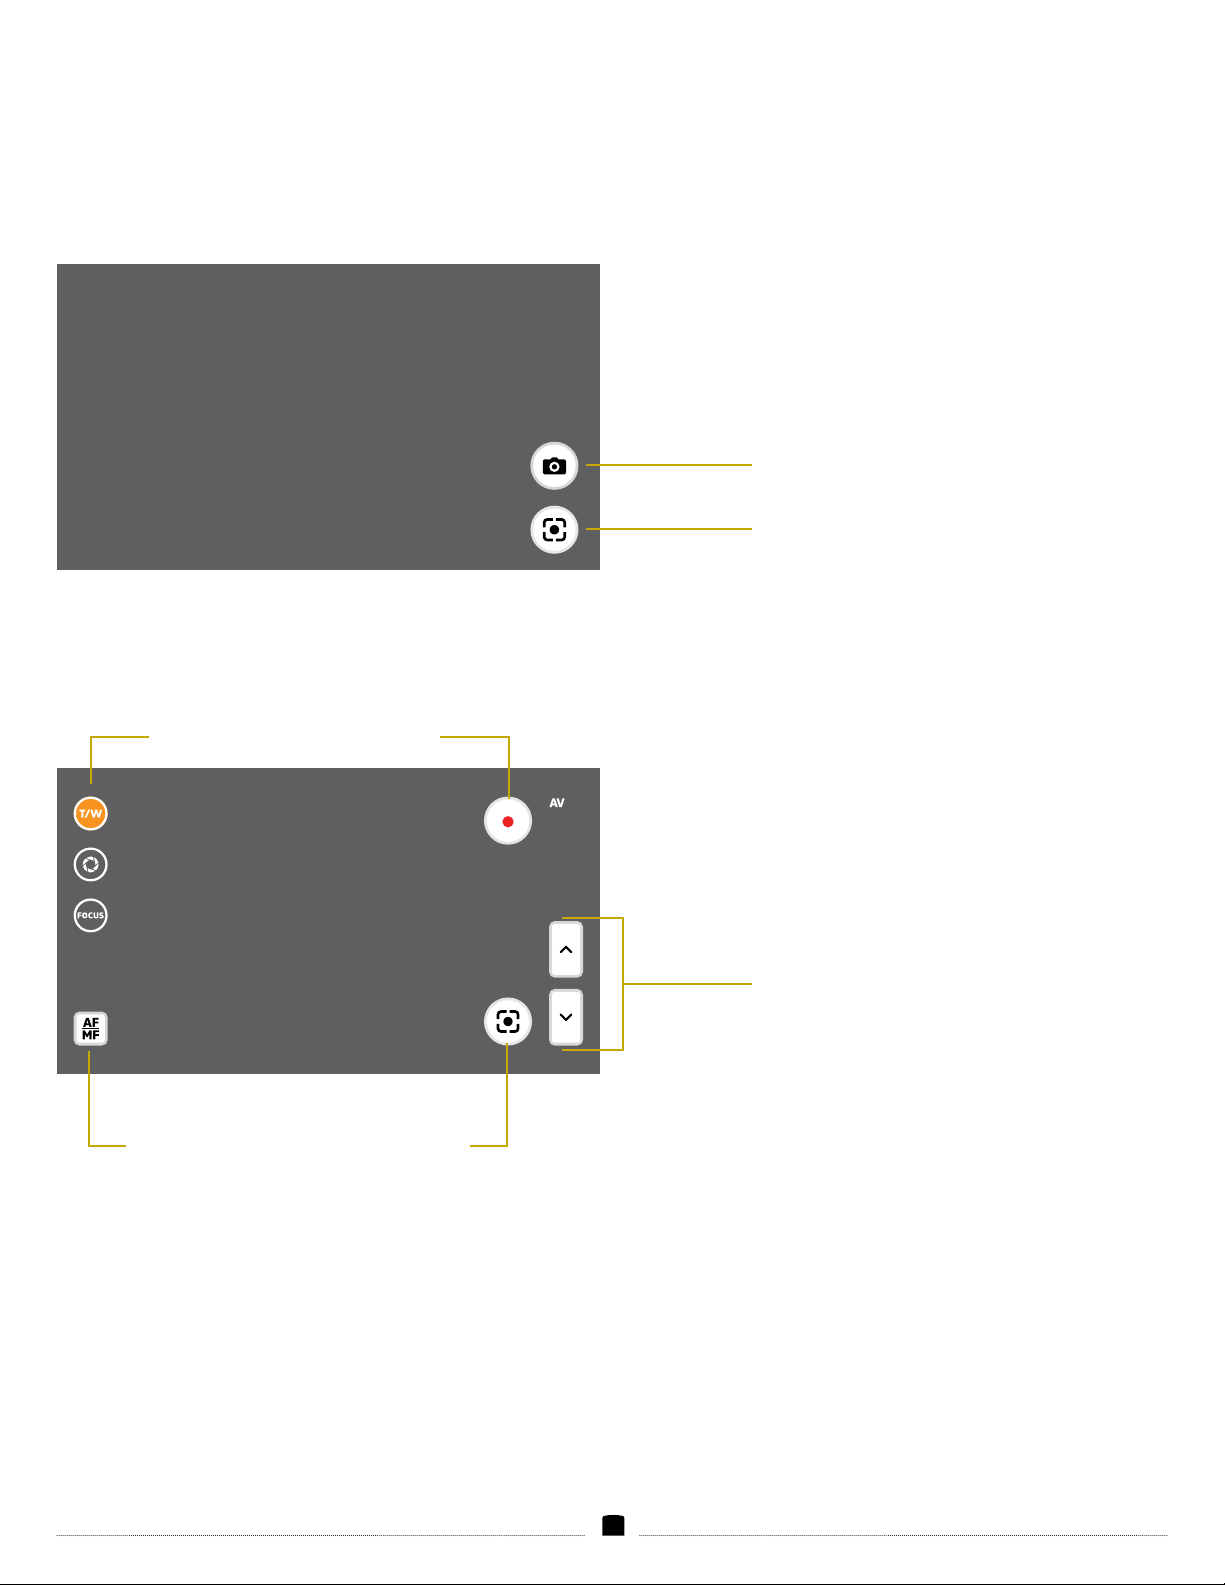
REMOTE
Z CAM E2
T/W Focus Control Screen
Trigger
Focus
(Press and hold, and then swipe
up to trigger the camera.)
T/W focus select
Record on/off
T/W focus controls
FocusAF/MF select button
20
Page 21
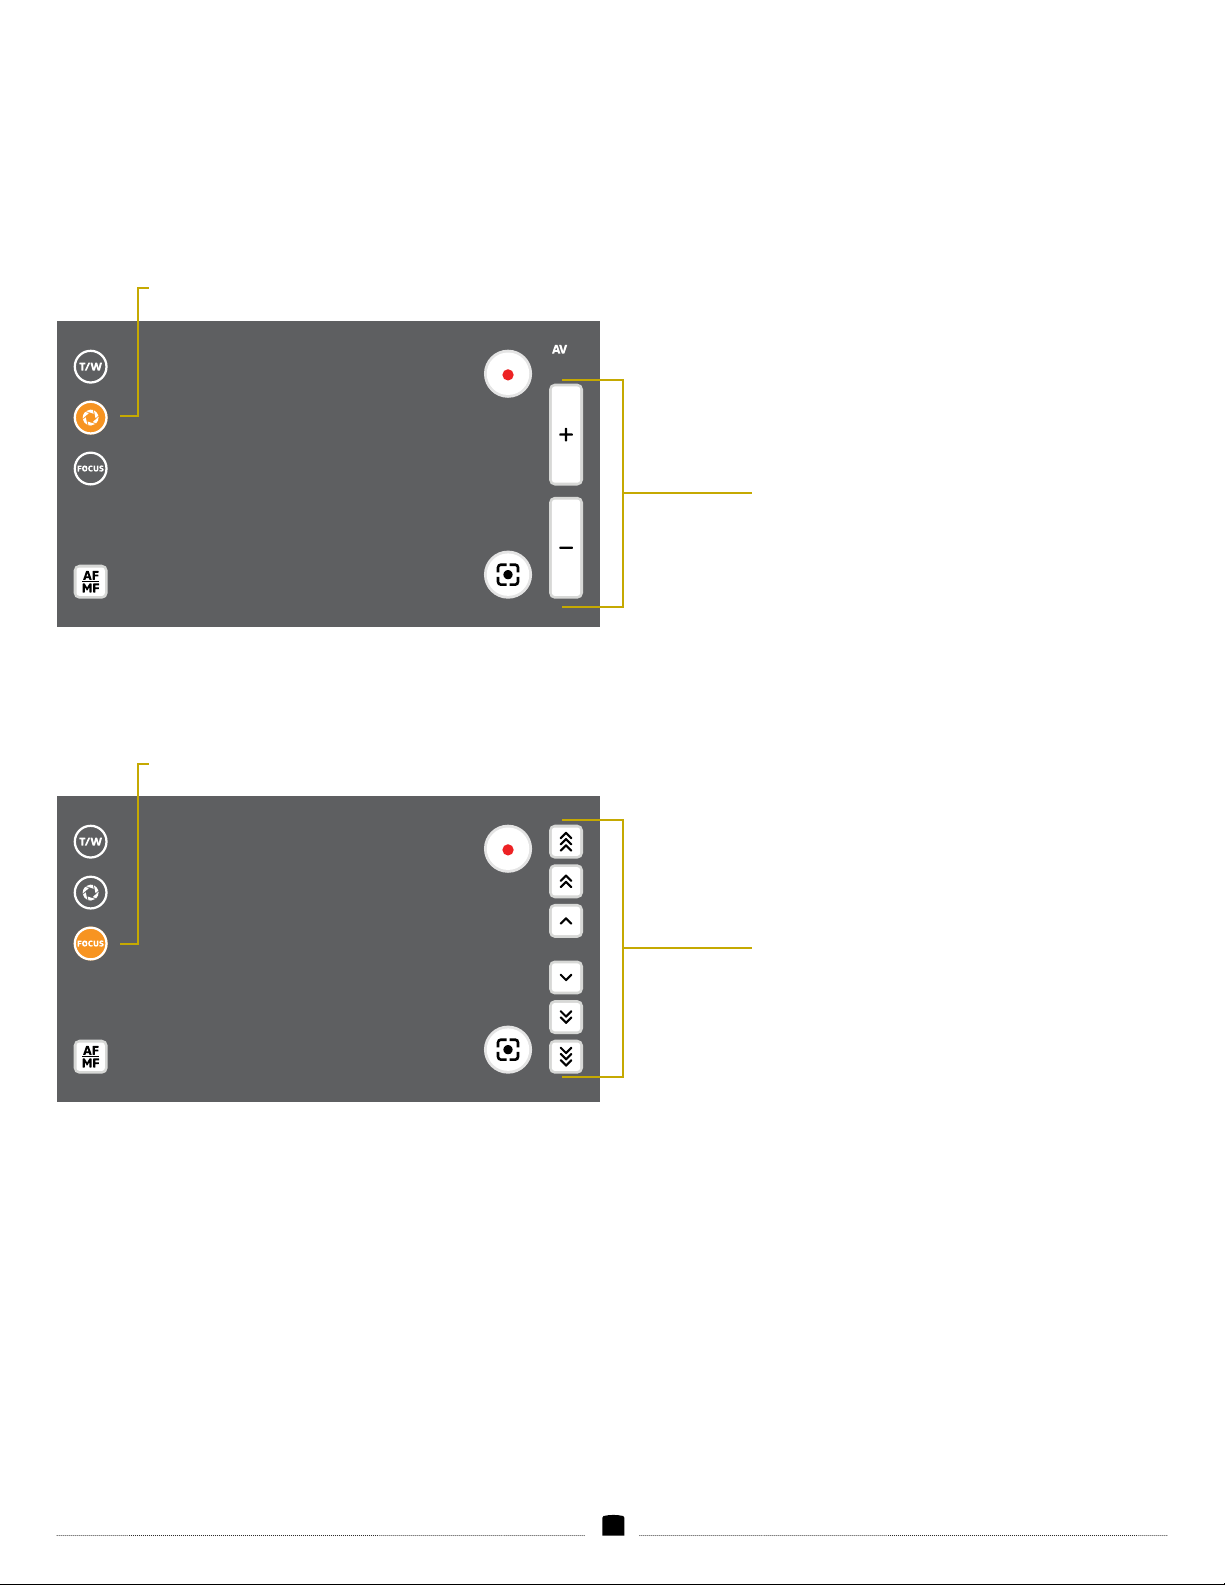
Aperture Adjustment Screen
Aperture select
Focus Adjustment Screen
Focus select
Aperture controls
Focus controls
(When adjusting the focus, peaking will
automatically activate for approximately
a half second, and then turn off.)
21
Page 22

FIRMWARE
MENU
Information about rmware updates and version history is available
at elvidcinema.com.
FIRMWARE VERSION INFORMATION
Select Version Information in the Firmware menu, and press the
scroll wheel. The current rmware version will appear on-screen.
FIRMWARE UPDATE
To update the rmware, follow these steps:
1. Go to the Elvid homepage at www.elvidcinema.com, and click on
the link to the Downloads page.
2. In the Select Your Model drop-down menu, select RVM-5P-HDR.
3. Click on the latest rmware version to download it to your
computer.
4. Once the .zip le has been downloaded, extract or copy the
enclosed .bin le to the root directory of the included USB drive.
Important! If you save the zip le directly to the USB drive:
Unzip the le, and move the .bin le out of the folder, so the folder
and the .bin le appear together on-screen. If the .bin le is inside
the folder, the monitor will not see it, and the rmware will not
update.
5. Plug the USB drive into the USB port on the monitor.
6. Press the scroll wheel to open the main menu.
7. Select Firmware, and press the scroll wheel.
8. Select Update (USB), and press the scroll wheel.
9. At the prompt, select YES, and press the scroll wheel.
10. Follow the instructions at elvidcinema.com to update the
rmware.
22
Page 23
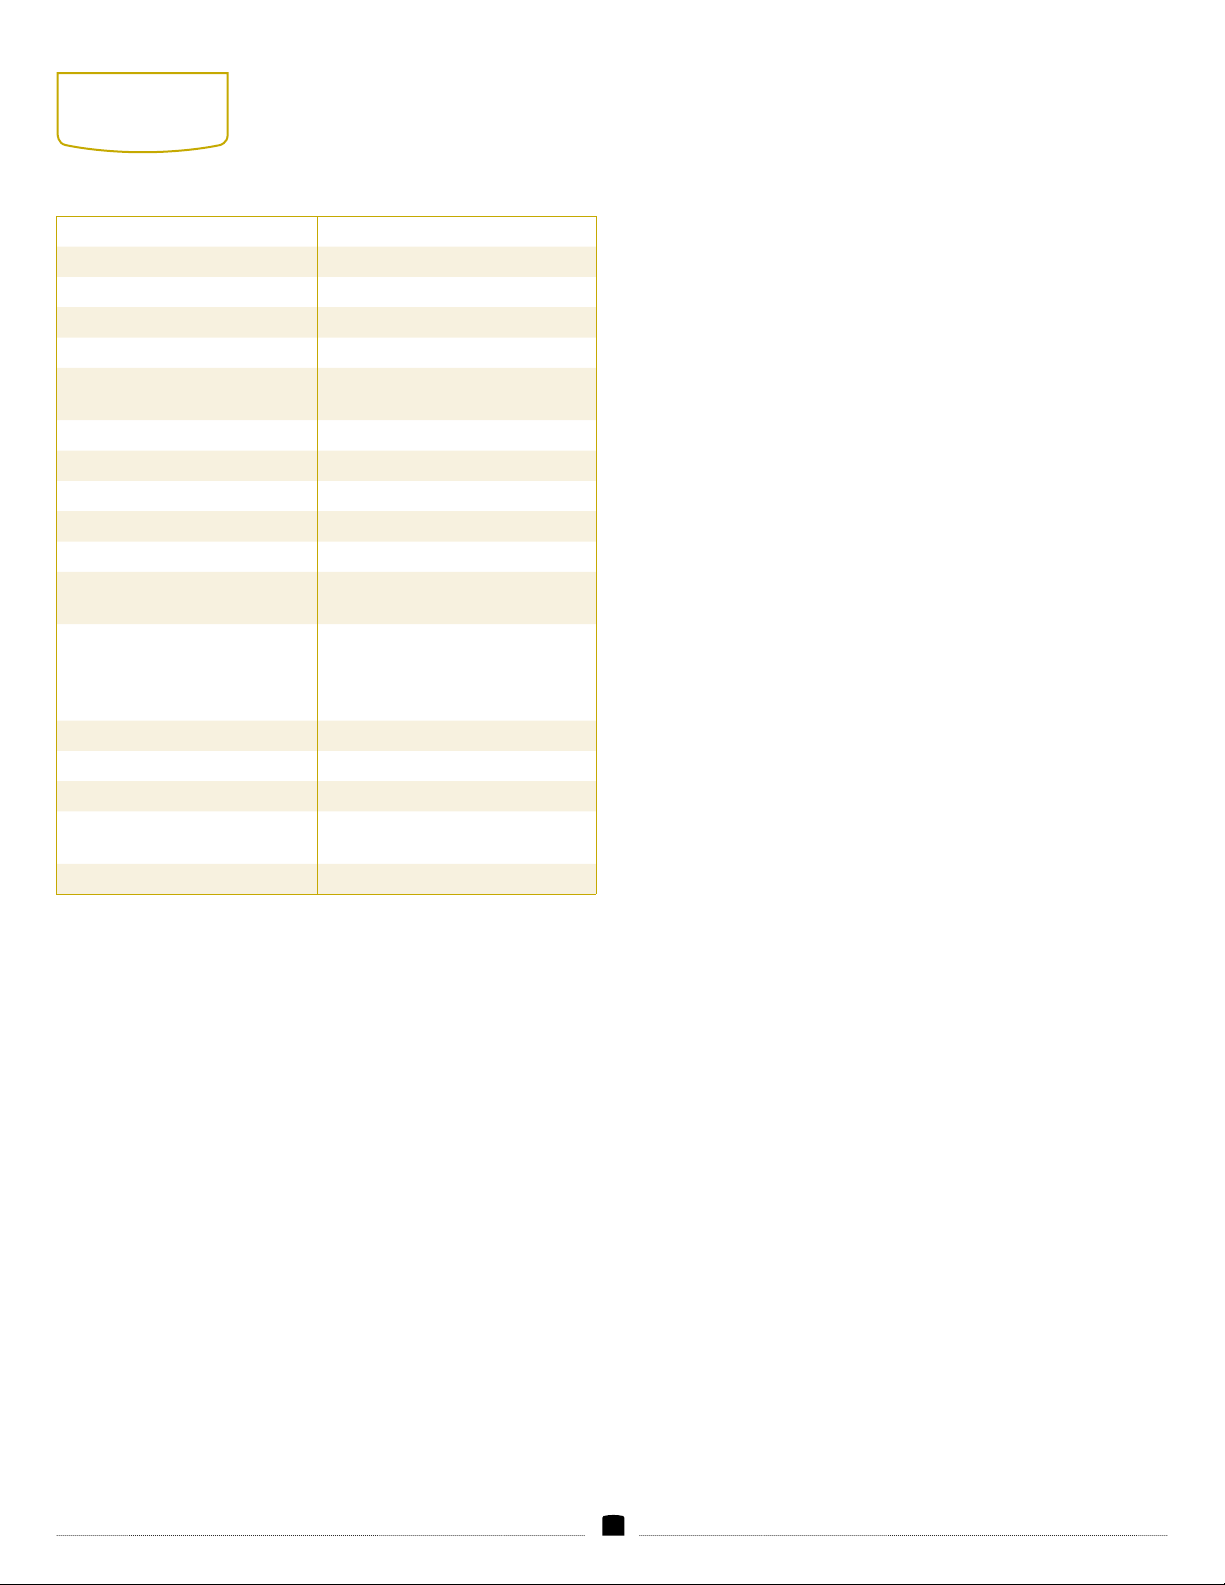
SPECIFICATIONS
Display Size 5 in. (12.7 cm)
Panel Type IPS LCD touchscreen
Backlight LED
Screen Resolution 1920 × 1080
Aspect R tio 16:9
Viewing Angle 160° (L/R)
160° (U/D)
Brightness 450/1000/1500 cd/m
Contrast Ratio 1000:1
Dot Pitch 0.01925 × 0.05775 mm
Bit Depth 8 bit
Finish Matte black
Controls Scroll wheel, Function buttons (×4),
Exit button, Touch screen
Connectors HDMI input, HDMI output,
3.5 mm headphone output,
5.5 mm barrel output,
USB 2.0 Standard-A
Input Voltage 7 to 24 V DC
Power Consumption 7.6 to 12 W
Construction ABS plastic
Dimensions (H × W × D) 3.25 × 5.6 × 1 in. (8.3 × 14.2 × 2.5 cm)
monitor only
Weight 7.7 oz. (218 g)
2
23
Page 24

ONE-YEAR LIMITED WARRANTY
This Elvid product is warranted to the original purchaser to be free from defects in materials and
workmanship under normal consumer use for a period of one (1) year from the original purchase
date or thirty (30) days after replacement, whichever occurs later. The warranty provider’s
responsibility with respect to this limited warranty shall be limited solely to repair or replacement,
at the provider’s discretion, of any product that fails during normal use of this product in its
intended manner and in its intended environment. Inoperability of the product or part(s) shall be
determined by the warranty provider. If the product has been discontinued, the warranty provider
reserves the right to replace it with a model of equivalent quality and function.
This warranty does not cover damage or defect caused by misuse, neglect, accident, alteration,
abuse, improper installation or maintenance. EXCEPT AS PROVIDED HEREIN, THE WARRANTY
PROVIDER MAKES NEITHER ANY EXPRESS WARRANTIES NOR ANY IMPLIED WARRANTIES,
INCLUDING BUT NOT LIMITED TO ANY IMPLIED WARRANTY OF MERCHANTABILITY OR FITNESS
FOR A PARTICULAR PURPOSE. This warranty provides you with specic legal rights, and you may
also have additional rights that vary from state to state.
To obtain warranty coverage, contact the Elvid Customer Service Department to obtain a return
merchandise authorization (“RMA”) number, and return the defective product to Elvid along with
the RMA number and proof of purchase. Shipment of the defective product is at the purchaser’s
own risk and expense.
For more information or to arrange service, visit www.elvidcinema.com or call Customer Service at
212-594-2353.
Product warranty provided by the Gradus Group.
www.gradusgroup.com
Elvid is a registered trademark of the Gradus Group.
© 2019 Gradus Group LLC. All Rights Reserved.
www.elvidcinema.com
24
Page 25

®
ELVID
A Gradus Group Brand
GG2
 Loading...