

Page 1

FIELDVISION
BATTERY PLATE
USER
MANUAL
FOR: CMP-C511A / CMP-CE6
CMP-NEL3 / CMP-SML
Page 2

Page 3

INTRODUCTION
Thank you for choosing Elvid. The Elvid
Battery Plate for the Elvid CM-7 7˝
FieldVison Monitor will allow you to use
the battery indicated on the package
to power your CM-7 FieldVision LCD
monitor.
By removing the battery plate that’s
mounted on the monitor and replacing
it with this battery plate, you can use
the indicated battery to power your
CM-7 monitor.
3
Page 4

PRECAUTIONS
• Please read and follow these instructions and keep
this manual in a safe place.
• Keep this unit away from water and ammable gases
or liquids.
• Handle this unit with care.
• Clean this unit with a soft, dry cloth only.
• Keep this unit away from children.
• Use parts provided by the manufacturer only.
• Make sure the item is intact and that there are no
missing parts.
• Use only with designated battery.
The following battery plates are available for use
with the Elvid CM7 7˝ FieldVision Monitor:
Elvid CMP-C511A
Canon BP-511A Battery Plate for
Elvid CM7 Monitor
Elvid CMP-CE6
Canon LP-E6 Battery Plate for
Elvid CM7 Monitor
4
Elvid CMP-SL
Sony L and M Series Battery
Plate for Elvid CM7 Monitor
Elvid CMP-NEL3
Nikon EN-EL3e Battery Plate for
Elvid CM7 Monitor
Page 5
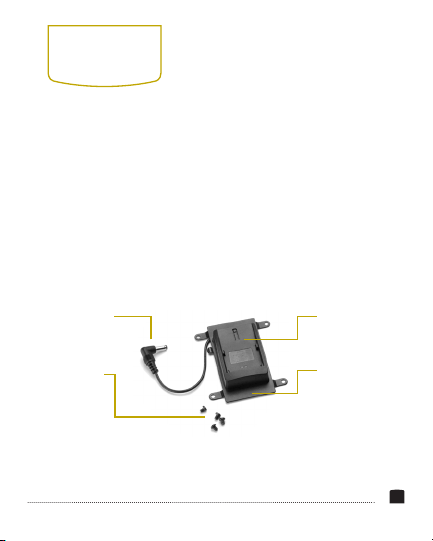
BOX CONTENTS
• Battery plate
• Battery plate adapter
• Four mounting screws
• User instruction manual
• Warranty
Input Cable
Mounting
Screws
Battery Plate
Battery Plate
Adapter
5
Page 6
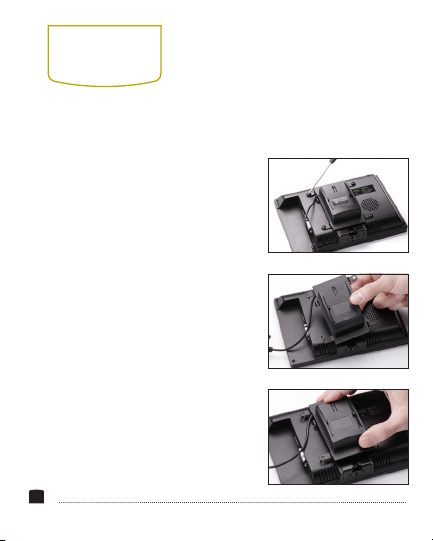
INSTRUCTIONS
1. Turn the Elvid CM7 7˝ FieldVision monitor around so
that the back of the monitor faces you.
2. Remove the battery plate that’s
mounted to the back of the
monitor by unscrewing the
four screws holding it in place
and taking it off the monitor.
Set the old battery plate aside.
3. The battery plate is open on
one end to slide the battery
into place. When the battery
plate is mounted to the
monitor, the open end of the
battery plate must be the
end closest to the top of the
monitor.
4. Position the new battery plate
adapter with the battery plate
in place of the old one, with the
6
Page 7
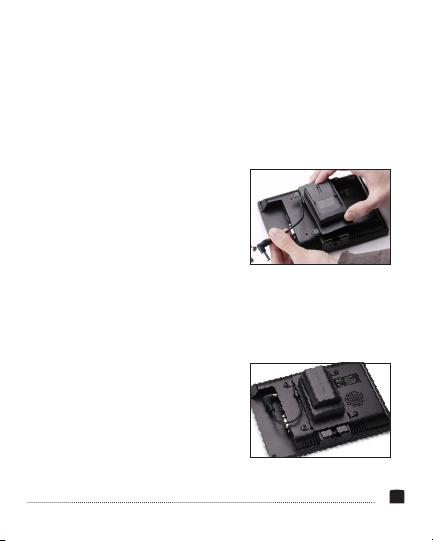
screw-mounting holes positioned over the screw holes
on the monitor. (Battery plate is pre-installed on the
battery plate adapter.)
5. Make sure that the
connecting cable from the
battery plate is positioned
to the left of the plate, as
shown in this image.
6. When the battery plate is correctly positioned, use
the four included screws to mount the plate to the
back of the monitor. Tighten the screws securely, but
do not over-tighten them.
7. When the battery is placed
in the battery plate, plug
the connector cable into
the connector on the upper
left side of the back of the
monitor.
7
Page 8

LIMITED ONE-YEAR WARRANTY
Elvid provides a limited warranty that this product is free from
defects in materials and workmanship to the original purchaser
under normal use for a period of one (1) year from the original
purchase date or thirty (30) days after replacement, whichever
occurs later (the “Warranty Period”). Our responsibility with
respect to this limited warranty shall be limited solely to repair or
replacement, at its option, of any product which fails during normal
consumer use. To obtain warranty coverage during the Warranty
Period, contact your place of purchase (“Seller”) to obtain a return
merchandise authorization (“RMA”) number, and return to Seller
the defective product along with proof of purchase and the RMA
number. This warranty does not extend to damage or failure which
results from misuse, neglect, accident, alteration, abuse, improper
installation or maintenance. EXCEPT AS PROVIDED HEREIN,
ELVID MAKES NEITHER ANY EXPRESS WARRANTIES NOR ANY
IMPLIED WARRANTIES, INCLUDING BUT NOT LIMITED TO ANY
IMPLIED WARRANTY OF MERCHANTABILITY OR FITNESS FOR A
PARTICULAR PURPOSE. This warranty provides you with specic
legal rights, and you may also have additional rights which vary from
state to state.
www.elvidcinema.com © Copyright 2013 Gradus Group LLC
 Loading...