

ELV Electronic ETH comfort200 User Manual
Gener al func tion
Th is ele ct ro ni c th er mo st at f or rad ia to rs c an be use d t o c ontrol room temperature on t he basis of time. T he actuato r
moves a valve, thereby allowing the amount of heat flowing
to the heating applia nce to be controlled. The controll er
is compati ble with all standard heating ap pliance val ves.
The large illuminated displ ay ensures user-friendl y operation. A wireless receiver allows the device to receive commands from t aught-in system compon ents.
Insta llati on can be ac hieved in 3 easy st eps.
Step 1: Ins erti ng (repl acing) the bat teries
Remove the bat tery compartme nt cover.•
Insert 2 new LR6 bat teries (Mi gnon/AA) •
into the battery compartment, ensuring
they are the ri ght way round.
Reattac h the ba ttery compartment •
cover and cli ck into place.
New alkaline batterie s have a life of app r o x i m a t e l y t w o y e a r s . A b a t t e r y s y m b o l
(
) will indicate wh en th e bat teries need to be repla ced. After rem oving the old batte ries,
please wait approxim ately 1 minute befor e inse rting the
new o nes. This device does not suppo rt operatio n wit h
recharg eable bat teries.
Never recha rge standard batte ries.
Doing so will p resent a risk of explosi on.
Do not throw the b atterie s into a fire.
Do not shor t-circu it batteri es.
Us ed bat te ri es s ho uld no t be di spo se d of
with regular domestic waste. Instead, they
should be taken to your local batter y disposal poi nt.
ACB
D
Radio electronic thermostat
ETH comfort200
Opera tion an d displ ay
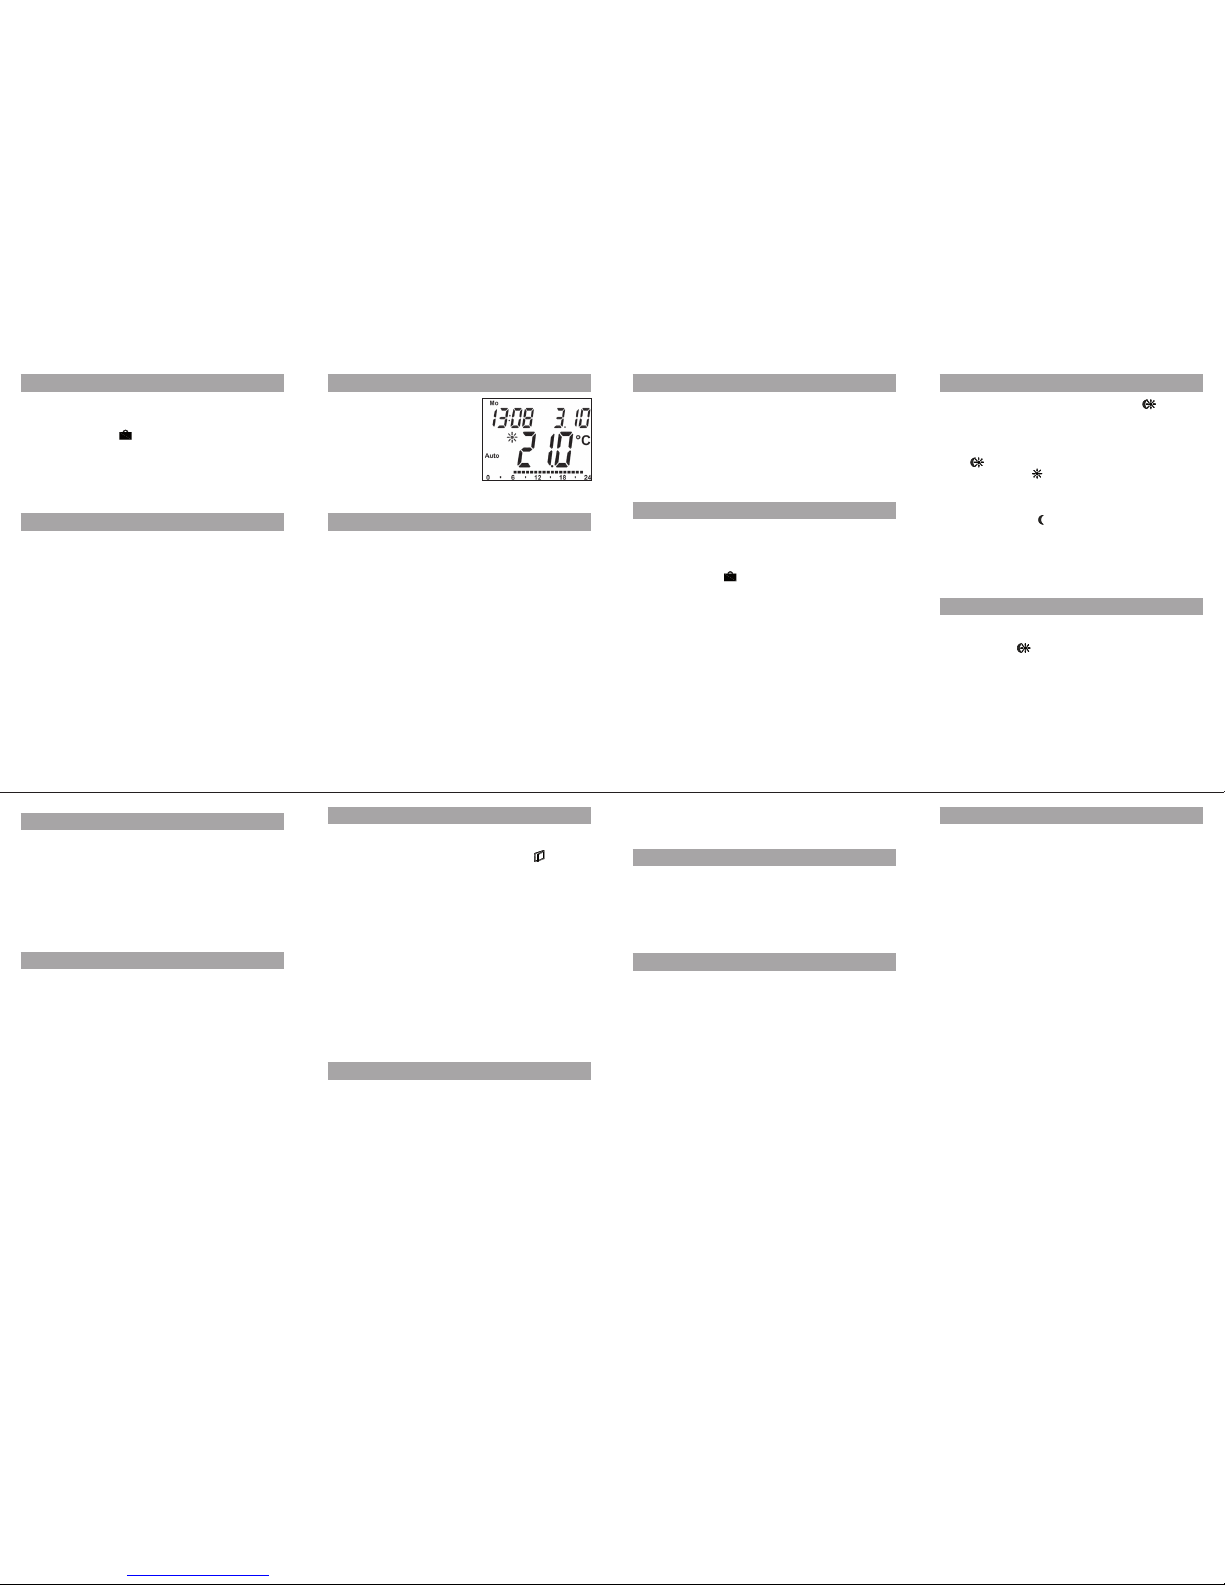
Step 2: S etting the da te and time of day
The firmware versi on num ber w ill be displ ayed briefly
once you have inserted/rep laced the batterie s and then
you will be automati cally prompted to se t the date and
time of day.
Use the set ting wheel (C) •
to set the year ( B).
Confirm wit h OK (D).•
Use the set ting wheel (C) •
to set the month ( B).
Confirm wit h OK (D).•
Use the set ting wheel (C) •
to set the day (B).
Confirm wit h OK (D).•
Use the set ting wheel (C) •
to set the hour ( A).
Confirm wit h OK (D).•
Use the set ting wheel (C) •
to set the minut e (A).
Confirm wit h OK (D).•
The motor will star t moving back the cont rol pin while the
entries a re still bein g made.
If “InS” is displayed with a rotating “∏” symbol, this indi-•
cates that the motor is still moving back. Once the device
is ready for the actuator to be installed on the valve, just
“InS” will ap pear on the di splay.
The weekl y program and oth er sett ings can be cus-•
tomised prior to installation. To do this, press the m enu
button w hen “InS ” is show n on the display. For furthe r
details, p lease see “4. Confi guration m enu”.
Once prog ramming is c omplete, “In S” will reapp ear •
on the displa y and instal lation (Step 3) c an commence.
When “InS” is v isible on the di splay, you can activ ate the teach -in functi on prior to installa tion by pres sing the
button br iefly.
Step 3: I nstal ling th e elect ronic th ermostat
The actuato r can be in stall ed on all standa rd he ating
valves. There is n o need to drain away w ater or fid dle
around with the heating system before doing this . Fir st,
you nee d to remove th e old thermostat dia l:
Turn the thermos tat dial anti-•
clockwi se as far as it w ill go
(A).
Release th e thermal ring of the •
thermos tat (B).
Remove the the rmostat f rom •
the valve (C).
An adapter will need to be used in
the case of certain valves. Adapters for Danfoss valves (R A, RAV,
RAVL) are inc luded in the sc ope
of deliver y. For details , please
ref er to the adap ter overv iew
(see 20).
The adapte r must be plac ed •
on the valve
and turne d until it is sec urely
seated.
In the case of th e RAV adapter, the ex tension sup plied •
must be att ached to the valve tappet .
The RA and R AV adapter s must, in addition, be se -•
cured by mea ns of the bolt an d nut supplied.
The elect ronic therm ostat can only be instal led if “InS” is
showing on the display. Following installation, the actuator
will perf orm an adjus tment run so tha t it can adapt to the
valve. Durin g this proce ss, “AdA” will be disp layed.
Place the act uator on the val ve.•
Tighten the u nion nut.•
“InS” will ap pear on the di splay, press the O K button.•
The actuato r will perform an adj ustment ru n (“AdA” will •
appear on t he display, oper ation not pos sible).
After that, the ac tuator will be ready for operatio n (Auto •
mode).
If the adjustment run was in itiated prior to installa tion, or if an erro r message will b e displayed (F1, F2,
F3); pre ss OK to move the motor back to the “InS”
position.
1. Setti ng the weekly pr ogram
The weekly program al lows yo u to set up to 3 separate
heating periods (7 switc hing times) for each day of the
week. Programming is per formed in r elation to the selected
days, for which temp eratures mu st be stored for a perio d
from 00:0 0 to 23:59.
Press and h old down the me nu •
button for mo re than 3 seconds.
“Pro” will appe ar on the dis-•
pla y.
Confirm wit h OK.•
“dAy” will appe ar on the display. Th e setting wheel can be •
used to select an individ ual day of the week, all working
days, the weekend or th e entire week (example s hows
working day s selected ).
Confirm wit h OK.•
Use the set ting wheel to set the first time segment (ex-•
ample shows 0 :00 to 6:00).
Confirm wit h OK.•
Then, s elect t he requi red temp erature for the selected •
time segme nt (example sh ows 17.0°C).
Confirm wit h OK.•
Keep repeating this process until you have finishe d stor-•
ing temper atures for th e period fr om 0:00 to 23:59.
In Auto mode, the temperature can be modified at any time
via the set ting wheel. The modifi ed temper ature will th en
be retaine d until the next program c hangeover.
2. Week ly progr am: Examples
Th e e lec tr oni c t he rmo st at a ll ows yo u to sto re up t o 3 h ea ting p eriods (7 switching t imes) with individua l tem perature s ettings for each day of the we ek. T he factory setting con sists of two heati ng phase s (from 6:00 unti l 9:00
and f rom 17:00 until 23:00 respe ctively) for every single
day of the week:
From 0 0:00 to 06:00 17.0°C
From 0 6:00 to 09:00 21.0°C
From 0 9:00 to 17:00 17.0°C
From 17:00 to 23:00 21.0°C
From 23:0 0 to 23:59 17.0°C
To represent the switching periods, the display shows
bars for ever y other switching inter val. In this example, no bars are sh own for the interval from 0:0 0 to
6:00. Bar s are only show n on the display for the in-
tervals f rom 6:00 to 9:00 a nd from 17:00 to 23:00.
If a room also needs to be heated at around noon, the correspondi ng progra m might look like t his:
Monday to Sun day
From 0 0:00 to 06:00 16.0°C
From 0 6:00 to 09:00 22.0°C
From 0 9:00 to 12:00 17.0°C
From 12:00 to 14:00 20.0°C
From 14:00 to 17:30 17.0°C
From 17:30 to 23:30 21.0°C
From 23:3 0 to 23:59 16.0°C
If you have a hom e office a nd onl y want it to be heate d
during the day on working days , yo u can program the following time s:
Monday to Frida y
From 0 0:00 to 08:30 17.0°C
From 0 8:30 to 17:00 21.0°C
From 17:00 to 23:59 17.0°C
Saturday an d Sunday
From 0 0:00 to 23:59 15.0°C
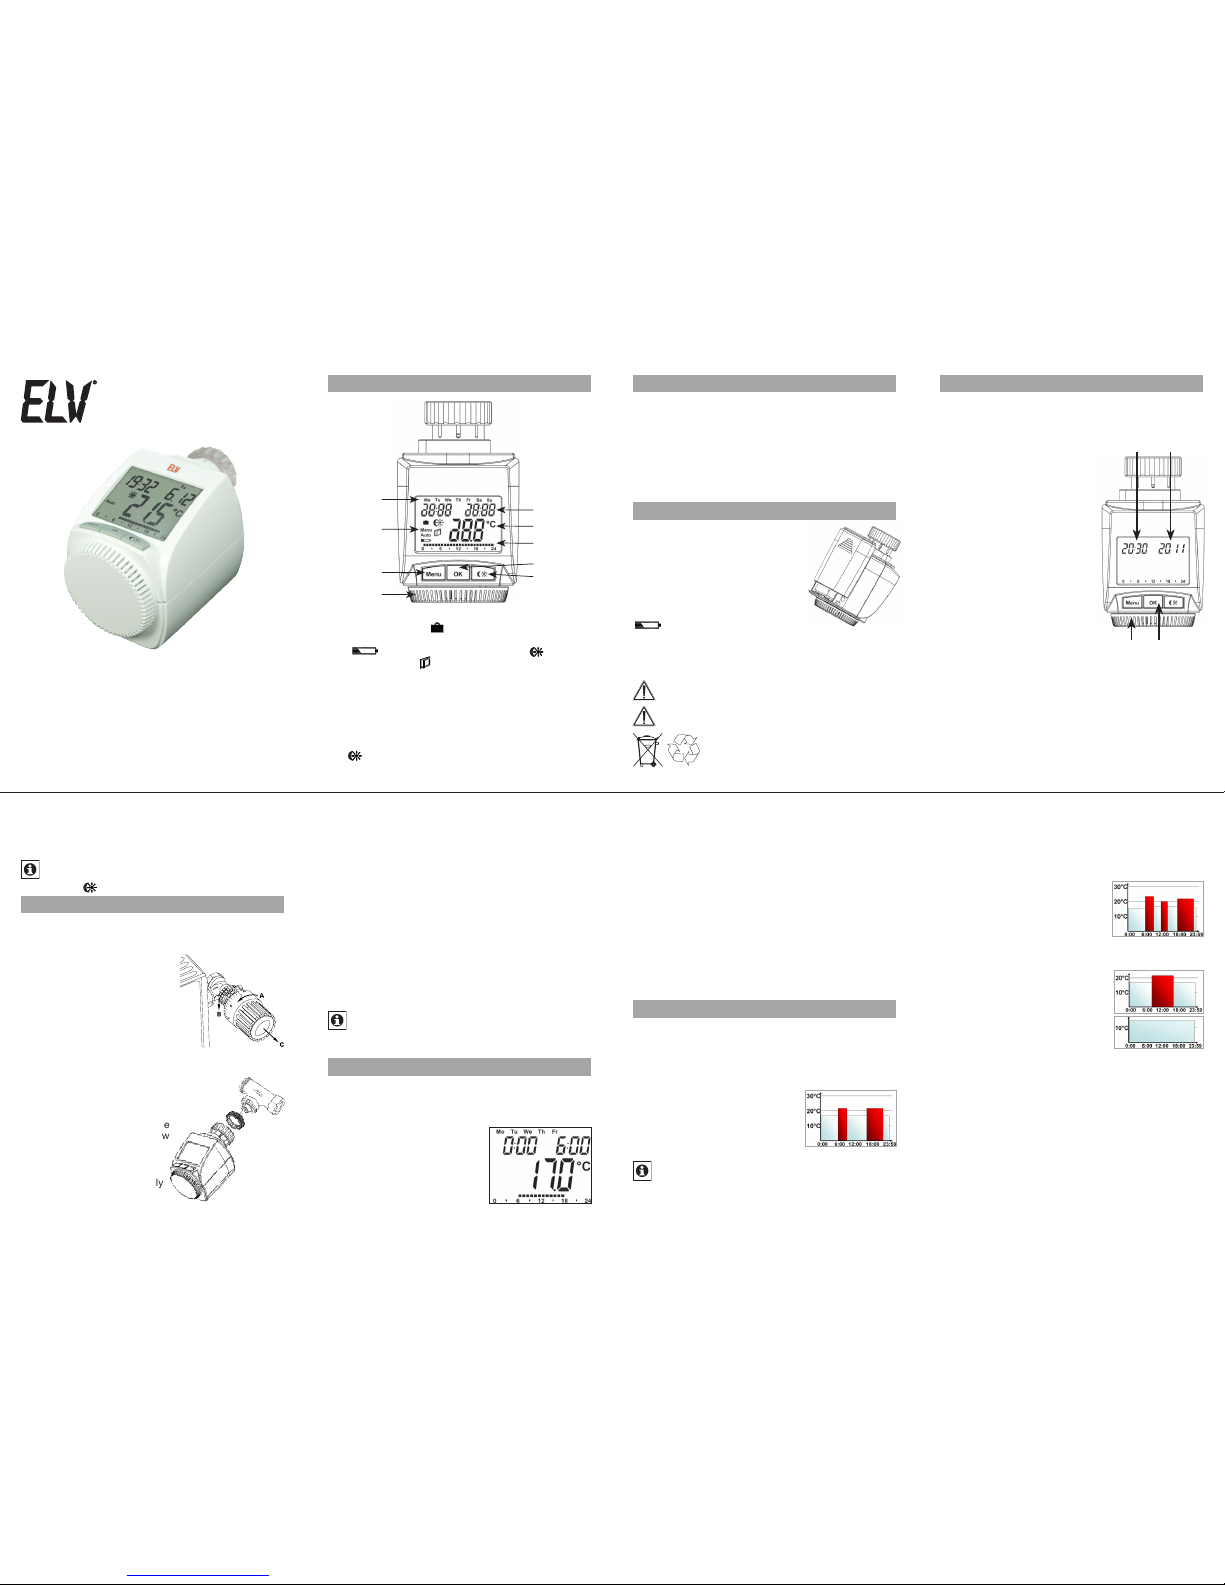
Please read th is manual ca refully in ord er to help you put
the device into op eration. Kee p the manual hand y so you
can refer to it a t a later date!
A Day of the week
B H oliday function (
), manual ope ration (Manu), automatic operation (Auto), “ba tter y empt y” sym bol
(
), se t-back/com fort temperat ure ( ), “wind ow
open” symbo l (
)
C Menu button: Press and hold down the button for more
than 3 seco nds to open the c onfigurati on menu
D Setting wheel: For making adjustments (e.g. temperature)
E Time and d ate indicator, menu items, fu nctions
F Cur rent temper ature setting
G Switch ing perio ds set within we ekly program
H OK bu tton: For confirming/sa ving, teachi ng in
I
bu tt on: For sw itc hi ng b et we en s et- ba ck a nd co m-
fort temp eratures
5
2
6
3
7
4
8
ELV Elekt ronik AG · P.O.Box 1000 · D-26 787 Leer
A
B
C
D
E
F
G
H
I
3. Oper ating modes
To switch between t he 3 operati ng modes des cribed below, press the m enu button briefly (these operating modes
can only be s elected fol lowing inst allation /Step 3):
Holida y function• (
): Set a tempe rature that is to be
maintain ed until a fixed p oint in time.
Manu: • Manual operation – The te mperatur e is set manu-
ally using t he setting w heel.
Auto: • Weekly program – T he temperature is c ontrol-
led automat ically in acc ordance wit h the stored week ly
program.
4. Config uration men u
The con figuration menu can be u sed to modify settings.
To a cces s this m enu, press and hold down t he men u
button (fo r more than 3 se conds).
Pro: For setting the weekly progra m (see Section “1 Set-•
ting the week ly progra m”)
dAt: For modif ying the time of day and date•
POS: For quer ying the actuator’s curre nt position•
dSt: Automatic switchove r at the star t or end of daylight •
saving time c an be deacti vated.
AEr: For se tting the “ window open” temperature and •
time (temper ature is automat ically redu ced in the event
of ventilati on)
tOF: For setti ng the offs et tempera ture•
rES: For restor ing the facto ry setti ngs•
UnL: For teaching out all taught-in wireless comp o-•
nents
Us e th e s et ti ng w he el t o s ele ct me nu i te ms and th e OK bu tto n to co nfir m y our ch oic e. Pre ss th e me nu but to n ag ai n to
return to the previous level. After 65 seconds without anything happ ening, the me nu will close a utomatica lly.
5. Disp lay content dur ing normal ope ratio n
Dur ing normal op era tion, the
fol lowin g are d isp laye d: day
of th e week, time of day, da te,
ope rati ng m ode, temper ature
settin g and switc hing pe riods.
The bars indic ating the weekly
pro gram’s sw itchi ng peri ods
are s hown for eve ry other time
interval. For an example , pleas e refer to “2. Weekly pr ogram: Exam ples”.
6. Teachin g in wirel ess componen ts
The ac tuator s upport s the t eaching in of up to 4 system
compone nts (e.g. remote co ntrol and win dow contact).
Press and h old down the OK b utton for mo re than 3 •
seconds.
The rem aining teach-in time will be displayed (30 sec-•
onds).
The device being taught-in now needs to se nd a wire less •
signal (e.g. pr ess butto n on remote con trol).
The display w ill then switc h to the normal v iew.•
On ce thi s h as b ee n d one , t he a ct uat or wil l r es pon d t o wi re le ss com ma nd s fr om t au gh t-i n de vi ces . W hen ev er t he actuator recei ves a signal from a win dow contact or rem ote
control, th e display will li ght up briefly.
7. Teaching out wi reless compo nents
Compon ents that have be en taught in on the actuato r
can b e taugh t out again using the “UnL” (Unlearn) function. All wire less compo nents are tau ght out at once with
this functi on.
Press and hol d d own the menu butto n f or more than •
3 seconds .
Use the set ting wheel to s elect the “U nL” menu item.•
Confirm wit h OK.•
“ACC” will appear o n the display; p ress OK to confirm.•
8. Set ting th e holid ay funct ion
If you want a fixed tempera ture to be maintain ed for a set
period of time while yo u are on hol iday or dur ing a par ty,
you can make us e of the Holiday f unction.
Press and re lease the me nu button re peatedly un til the •
suitcase sy mbol (
) appears on the disp lay.
Use the se tting wh eel to set the end of the time period •
during whi ch the temper ature is to be maintaine d.
Press the OK b utton to confi rm.•
Then use th e setting wh eel to set the da te.•
Press the OK b utton to confi rm.•
Use the se tting wheel to set the temperature; press OK to •
confirm. Th e display will fl ash to confir m your settin gs.
The s et tem perature will remai n in force until the specified t ime. A fter that, the actuator will adopt Auto mode.
Wireless comma nds from the window contact and remote
control wil l continue to b e executed.
9. Comfo rt and se t-back t emper ature s
The comfo rt/set-b ack tempe rature but ton (
) provides
an easy a nd conveni ent way of s witching b etween th ese
two temperatures. The factory settings are 21.0°C and
17.0°C respe ctively. To adapt them, p roceed as f ollows:
Press and hold down the comfort /set-back temperature but- •
ton (
) for more than 3 second s.
The sun symbol ( •
) will a ppear on the display along
with the cur rent comfor t temperature.
Use the settin g wheel to modif y the temperatu re; press •
OK to confirm.
The moon symbo l ( •
) will appea r together with the setback tempe rature.
Use the settin g wheel to modif y the temperatu re; press •
OK to confirm.
The temperature can even be modified in Auto mode at any
time by using this button. The new settin g will be retained
until the pro gram’s next switc hing time.
10. Child -proof lock/O perating in hibit
Operati on can be inhib ited.
To a ctivate/deac tivate th e operating inhibit, briefly press •
the Menu and
buttons at t he same time.
Once the functi on is active, “LOC” will appear on the •
display.
To deactivate the fun ction, press both but tons again.•
11. Setting t he heating bre ak
If the heating is being switc hed o ff fo r the summ er, you
can save battery p ower. This involves opening the valve
up fully. Lim escale p rotection measure s remain i n place.
Wireles s comman ds from t he window contact or remote
control wil l no longer be e xecuted.
To ac tivate the heating break, turn the setting wheel •
clockwi se during manual operatio n ( Manu) u ntil “On”
appear s on the display.
To terminate the heating break, quit manual ope ration •
(Manu) or turn the se tting whe el anticlo ckwise.
12. Set ting fr ost prot ectio n mode
If you do not want the room to be hea ted, the valve can
be closed. It will only be o pened aga in if there is a r isk of
freezing due to fro st. Limes cale pro tection me asures remain in place. Wireles s c ommands from the window con tact or rem ote control wi ll no longer b e executed.
To activate frost protec tion mode, turn the setting wheel •
anticlockwise during manual operation (Manu) until “OFF”
appear s on the display.
To terminate frost prote ction mode, quit manual oper a-•
tion (Manu) or turn t he setting w heel clock wise.
13. “Win dow open ” funct ion
If the room is bei ng vent ilated, the act uator co ntrols the
temperat ure to save on heat ing costs. W hile this fun ction is active , t he “window op en” symbol (
) appea rs
on the displa y.
Without window contact: The actuator will automatically dete ct a significa nt drop in temperature du e to ventilation. You c an se t your own “window open” temp erature and time .
With taught-in window contact : The temperature will
only be reduced during the t ime t hat t he w indow is l eft
open. You can set your own “window open” temperature.
Press and hol d d own the menu butto n f or more than •
3 seconds .
Use the set ting wheel to s elect the “AEr” m enu item.•
Confirm wit h OK.•
Use the sett ing wheel to se t the tempera ture/time . •
Then pres s OK to confirm.
Without a taught-in window contac t, this function c an •
be deactiva ted by selec ting a time of “0”.
14. Sett ing the of fset temper ature
The temper ature is meas ured at the heat ing applian ce itself, wi th the result that other par ts of the room m ay be
warmer o r colder than this. To allow for this, you can set
a temperatu re offset of ±3.5°C. If, for example, a te mperature of 18°C is meas ured somewhere within th e r oom
instead o f the 20°C s et, it means that an offset of -2.0°C
needs to be c onfigured.
Press and hol d d own the menu butto n f or more than •
3 seconds .
Use the set ting wheel to s elect the “ tOF” menu item.•
17. Intended us e
The electro nic thermost at has been desig ned for the purpose of contro lling a standa rd h eating appliance valve.
The device may only be operated indoors an d mu st b e
protected from the ef fects of damp and dust, a s well as
solar radi ation and so urces of rad iant heat.
Using the dev ice for a purpose or in a manner oth er than
that desc ribe d in th is operati ng ma nual constitu tes a
breach of the “inten ded use” and shall invali date the warranty and a ny liabilit y claims. Th e same shall ap ply in the
event of any c onversion or modification work. The devices
are intende d exclusively for domest ic use.
9
13
10
14
11
15
12
16
Confirm wit h OK.•
Use the set ting wheel to m odify the te mperatur e.•
Press the OK b utton to confi rm.•
15. Resto ring th e factor y settings
You can reset the actuator to its initial state manually. This
will clear a ll the setti ngs that have be en made manu ally.
Press and hol d d own the menu butto n f or more than •
3 seconds .
Use the set ting wheel to s elect the “r ES” menu item.•
Confirm wit h OK.•
“ACC” will appear o n the display; p ress OK to confirm.•
16. Oper ation w ith a wall t hermostat
If the actuator is goin g to be operated in conjun ction with
a wall thermostat, this thermos tat will need to be t aught in
(see section 14). Once it h as been taught in, “ECF” will appear on the display. No further setti ngs can then be made
on the actua tor and it will no l onger resp ond to taught-in
remote contr ols or window conta cts. If no wireles s signal
is received from the wall the rmostat for a perio d o f 60 minutes, the ac tuator will exit ECF mode.
It will then assume control of the temperature, which it will
continue to regulate in accordance wi th the weekly program unti l the nex t wireles s signal is recei ved. To “teach
out” a wal l thermos tat, you must reins ert the batterie s in
the actuator (and wait for approx. 1 mi nute). Once you have
entered the date and tim e of day, you can use the menu
button ( before the adjustment run is initiated) to per form
the “teach -out” process as d escribe d in section 15.“
 Loading...