

Page 1
Page 2
2
Page 3
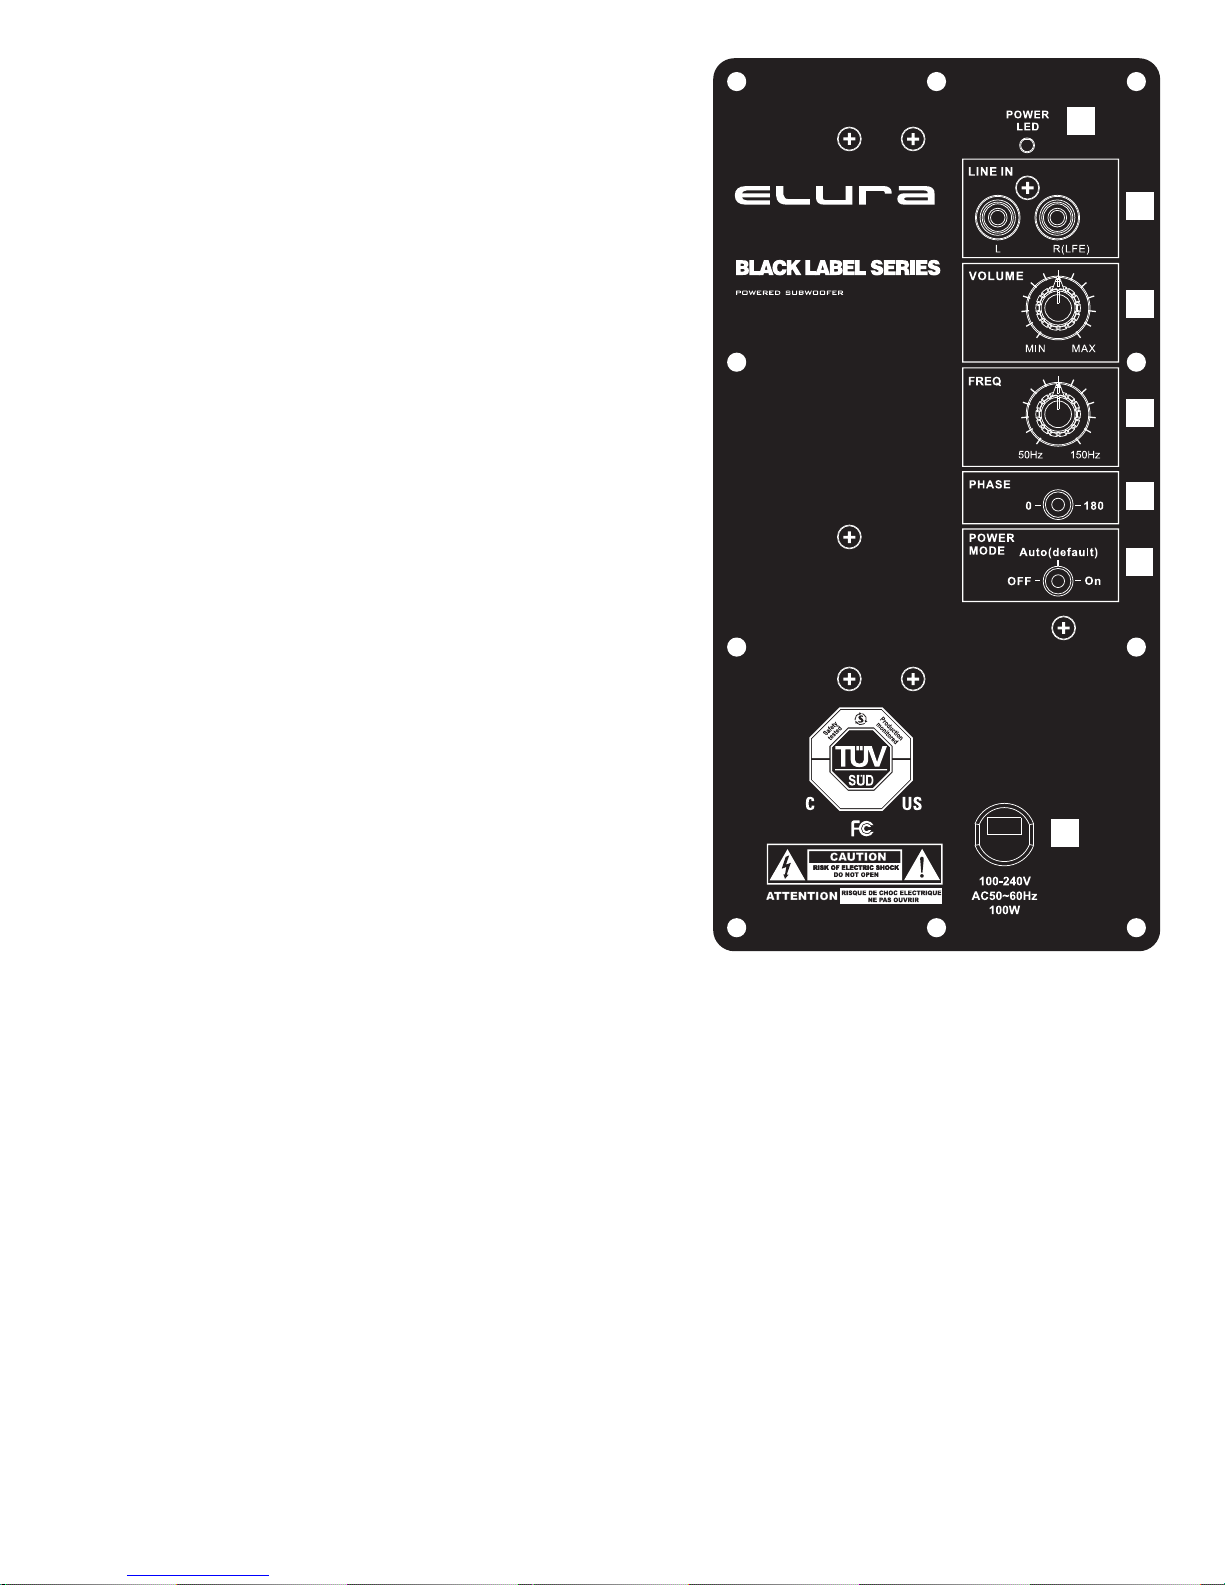
TABLE OF CONTENTS
A. UNPACKING . . . . . . . . . . . . . . . . . . . . . . . . . 3
. AMPLIFIER PANEL TOUR . . . . . . . . . . . . . . . 3
B
C. PLACEMENT . . . . . . . . . . . . . . . . . . . . . . . . 4
D. CONNECTIONS . . . . . . . . . . . . . . . . . . . . . . 4
E. INITIAL LISTENING TESTS . . . . . . . . . . . . 7
F. SPECIFICATIONS . . . . . . . . . . . . . . . . . . . . 8
G. TROUBLESHOOTING & SERVICE . . . . . . . 8
H. WARRANTY . . . . . . . . . . . . . . . . . . . . . . . . . 8
3
1
2
3
Congratulations on your purchase of an Elura
Black Label Series SUBB8.2/SUBB10.2 powered
subwoofer. It will give your stereo, or home theater
system unparalleled low frequency output.
Bass frequencies are critical to realistic sound
reproduction. After you’ve hooked up your
SUBB8.2/SUBB10.2 subwoofer, you’ll discover
just how much “punch” and depth you’ve been
missing. No matter what kind of music or videos
you listen to... whether you listen to it loud or soft,
you’ll experience sound that’s richer and fuller.
Bass guitar and string bass will have more
impact. You’ll be able to FEEL as well as hear
percussion – just the way you would at a live performance. If you have an audio/video system,
movies will come alive with thunderous sound
effects that were never possible without the Elura
SUBB8.2/SUBB10.2.
The Elura SUBB8.2/SUBB10.2 is a self-powered
subwoofer that frees your receiver or power
amplifier from the power demands of reproducing very low frequencies. To do this, the Elura
SUBB8.2/SUBB10.2 incorporates its own built-in
crossover system that automatically “assigns”
lower frequencies to its own power amplifier, contained within the subwoofer enclosure.
The Elura SUBB8.2/SUBB10.2 has been meticulously designed and tested to insure high performance, durability and longevity.
This manual is designed to take you step-by-step
through the hook-up and operating process. This
procedure is not difficult, but it IS slightly different
than hooking up a line level component such as
a cassette deck or DVD player. Reading this manual carefully will insure that you get maximum performance from your Elura SUBB8.2/SUBB10.2.
A. UNPACKING
Remove the Elura SUBB8.2/SUBB10.2 from its
packing carefully and inspect it for any shipping
damage. If you discover damage, contact your
Elura dealer or installer immediately.
If possible, save the carton and internal packing.
It’s the best possible protection for your Elura
SUBB8.2/SUBB10.2 if you need to move it or
return it for service.
Keep your sales receipt in a secure place. It helps
establish the duration of your warranty and is good
for insurance purposes (just in case anything
happens to your stereo/home theater system).
B. AMPLIFIER
PANEL TOUR
Before actual hookup, you should
familiarize yourself with the connections on the back of the Elura
SUBB8.2/SUBB10.2, as shown
in Fig.1.
1. POWER INDICATOR:
OFF = No color
STANDBY = Red
ON = Blue.
2. LFE/SUBWOOFER/ LOW LEVEL LINE IN (line level connections). These connections are
used if you have a preamplifier or
a receiver/integrated amplifier
which has LFE, subwoofer, or
line level outputs that follow the
volume control, or to connect to
the line-level audio output of a
flat panel TV.
3. VOLUME CONTROL. Rotating
this knob clockwise increases
the output level of the subwoofer.
To start out, make sure that the
VOLUME is turned all the way
down (fully counterclockwise).
Later, after some initial listening tests, you can adjust the volume to your own taste. However, care
should be taken not to overdrive the subwoofer to the point of audible distortion.
4. CROSSOVER FREQUENCY CONTROL. This control determines what lower part of the
frequency spectrum will be reproduced by the Elura SUBB8.2/SUBB10.2. It is a “crossover” control. Rotating the knob sets the point where all lower frequencies will be handled by the subwoofer.
As a starting point, set the control around 100Hz if you are using left and right tower speakers,
125 - 150Hz. with bookshelf or small mini-speakers.
5. PHASE SWITCH. This switch is used to set the subwoofer’s phase between normal “0°”
or reverse “180°” (out of phase). Once you determine the placement of the Elura SUBB8.2/
SUBB10.2, you will need to set this switch for the best bass output for your listening position. The
physical location of your subwoofer and main speakers determines the phase setting that will
sound best at your main listening position.
6. OFF/AUTO/ ON SWITCH. This switch turns Elura SUBB8.2/SUBB10.2 on or into AUTO mode.
When this switch is in the AUTO position, the amplifier will stay turned on as long as a signal is
being fed to the subwoofer amplifier. Approximately 8 minutes after you stop playing music or a
video, the amplifier goes into STANDBY mode. When you again begin to play music or a video,
the amplifier will automatically turn on. With the switch in the ON mode the amplifier will stay on
indefinitely.
7. NON-REMOVABLE AC POWER CORD.
FIG. 1 – Elura SUBB8.2/SUBB10.2 rear panel
7
4
5
6
Page 4
4
C. PLACEMENT
Where to position your
Elura SUBB8.2/SUBB10.2
The Elura SUBB8.2/SUBB10.2 operates at low
bass frequencies which are essentially omni-directional. That means you can place the Elura
SUBB8.2/ SUBB10.2 almost anywhere in a room
without compromising the effectiveness of your
main stereo speakers.
Four factors need to be considered:
1) distance from your main speakers;
2) distance from a wall outlet;
3) distance from your receiver, amplifier,
or flat panel TV; and
4) proximity to walls and corners.
5) CAUTION: The Elura SUBB8.2/SUBB10.2 are
not magnetically-shielded. If used with an older
CRT monitor or TV, keep it at least 2 feet from
the monitor.
1. Distance from your main speakers. The best
placement for your subwoofer is on the same wall
as the main speakers, especially if you are matching up with small bookshelf speakers. With tower
speakers, side wall or rear placement is also
acceptable.
2. Wall outlet. Since the Elura subwoofer requires
AC power, it must be placed where it will reach a
wall outlet. We don’t recommend extending that
range with an extension cord.
3. Connections to your receiver, amplifier, preamplifier or flat panel TV. You will need to con-
nect the subwoofer to your receiver subwoofer output or LFE output, flat panel TV, or preamp line
level outputs (see next page). You can basically
place the Elura SUBB8.2/SUBB10.2 anywhere in a
normal-sized room.
4. Proximity to walls and corners. Physical
placement of the subwoofer will have a definite
impact on the frequency response and the perceived amount of Elura SUBB8.2/SUBB10.2 bass
output. Because low frequencies have long wavelengths, they are influenced by proximity to a
boundary such as a wall or floor.
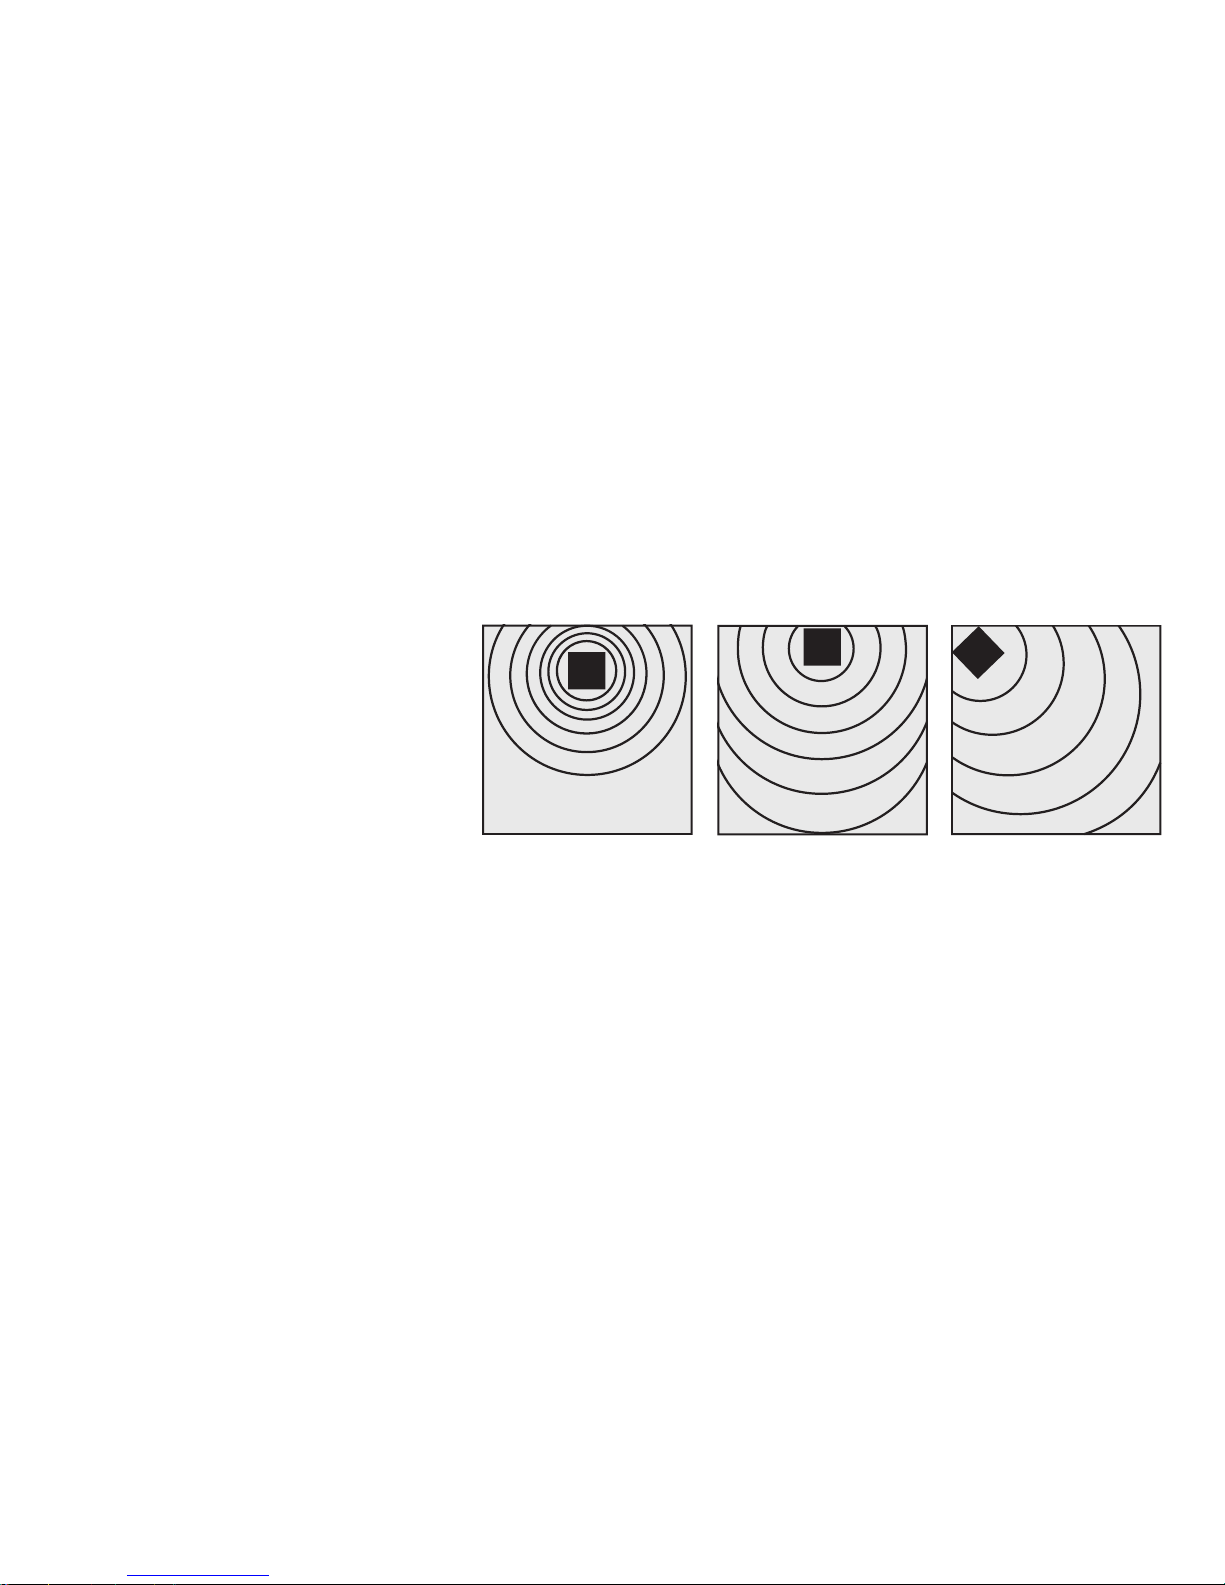
See Fig. 2. When you place the Elura SUBB8.2/
SUBB10.2 well away from a wall, it will produce
bass at a certain level. Move the subwoofer close
to the wall, it will produce more output (about 3dB
more). Putting the subwoofer in a corner will
increase output another 3dB (6dB more than when
placed away from walls and corners).
All this technical jargon may sound confusing, but it basically means that you have a number
of options, each of which produces a different amount of bass. For example, if you like a lot of
heavy bass, consider putting the Elura SUBB8.2/SUBB10.2 into a corner. If you like smoother,
less-obvious bass, move the subwoofer out into the room. The main thing to remember is that
there is no “right” or “wrong” place to put the Elura SUBB8.2/SUBB10.2. It all depends on how
much bass you want.
Another reason to experiment – because low bass waves are very large (up to 40 feet or more
across!), they tend to cancel and reinforce each other, causing places in the room where there
is lots of bass and others where there isn’t very much at all. If you walk around your listening
room while playing music, you’ll probably discover these sorts of areas where bass is either
exaggerated or reduced. Needless to say, if your main listening area ends up in a “dead” space,
you will need to move the Elura SUBB8.2/SUBB10.2 so that bass is more normal.
Incidentally, moving the Elura SUBB8.2/SUBB10.2 around won’t affect the stereo imaging of
your main stereo system, so feel free to try various subwoofer positions.
Away from walls:
Normal bass
Against walls:
More bass
FIG. 2 - Elura SUBB8.2/SUBB10.2 placement
In corner:
Most bass
Connecting to a wall plug
The Elura SUBB8.2/SUBB10.2 draws a moderately high amount of current. We do not recommend plugging it into a “convenience” outlet (switched or unswitched) that is often found
on the back of receivers and other stereo components.
Instead, connect the subwoofer ONLY to its own AC outlet. See items 9 and 10 in the Safety
Instructions on Page 2 of this manual.
D. CONNECTIONS
Three basic connection options
1. Connection to electronics with subwoofer or LFE output. If you own a surround sound
receiver or integrated amplifier with a subwoofer or LFE output, use Method A as shown
in Fig. 3.
2. Connection to stereo preamp and amplifier. If you have separate preamp and amplifier,
use Method B as shown in Fig. 4.
3. Connection to flat-panel TV. If you have a flat panel TV with stereo analog audio outputs,
use Method C as shown in Fig. 5.
Page 5
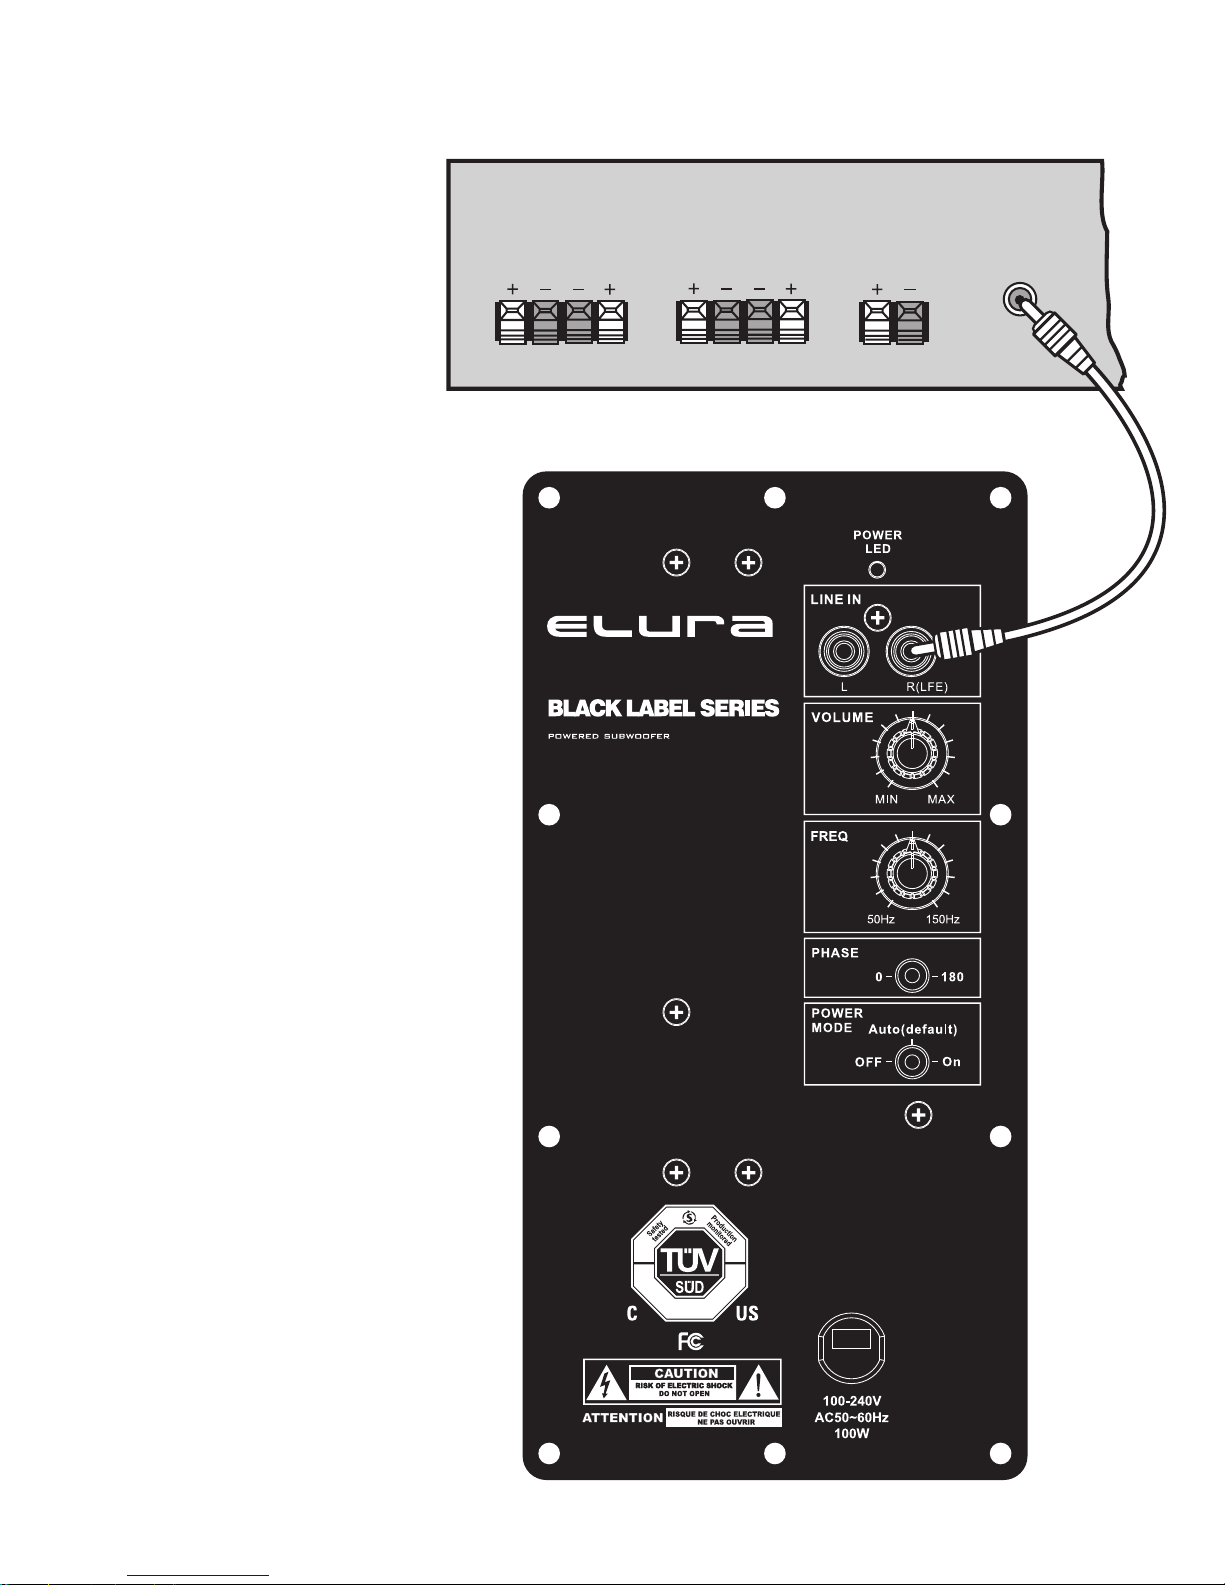
SURROUND SOUND RECEIVER
NOTE: SEE ITEM 5 ABOVE FOR PROPER RECEIVER TYPE SWITCH SETTING
5
Method A: Line level
hookup steps for receivers
with subwoofer connections
(Refer to Fig. 3)
Note: This connection method is only for receivers that
have a subwoofer or LFE output. You will need one line
level RCA to RCA connector cable long enough to reach
from your receiver to your Elura SUBB8.2/SUBB10.2
location. This should be available from your Elura dealer
or from radio supply stores.
1. IMPORTANT: Make sure that ALL system components including the Elura SUBB8.2/SUBB10.2 are
turned OFF before proceeding.
2. Locate the subwoofer or LFE output connector on the
rear of your receiver and connect one end of the RCA line
level cord to it.
3. Route the line cord to the subwoofer location (trying to
minimize areas where it may be stepped on) and connect
the other end directly to the sub’s LINE IN R or LFE input.
FRONT
SPEAKERS
RIGHT LEFT
REAR
SPEAKERS
RIGHT LEFT
CENTER
SPEAKERS
RIGHT LEFT
SUBWOOFER
OR LFE
OUT
4. Connect your main (and surround speakers if applica-
ble) to the receiver according to the receiver’s owner’s
manual.
5. Note: If you are using a Dolby Digital type receiver with
built-in crossover, you must set the crossover frequency in
your receiver (check your receiver’s owner’s manual). Set
the subwoofer’s crossover to 150Hz.
6. You are now ready to put your Elura SUBB8.2/SUBB10.2
subwoofer into use. Skip to “E – INITIAL LISTENING
TEST.”
FIG. 3 - Hookup for Surround Sound Receiver with a Subwoofer Output
Page 6
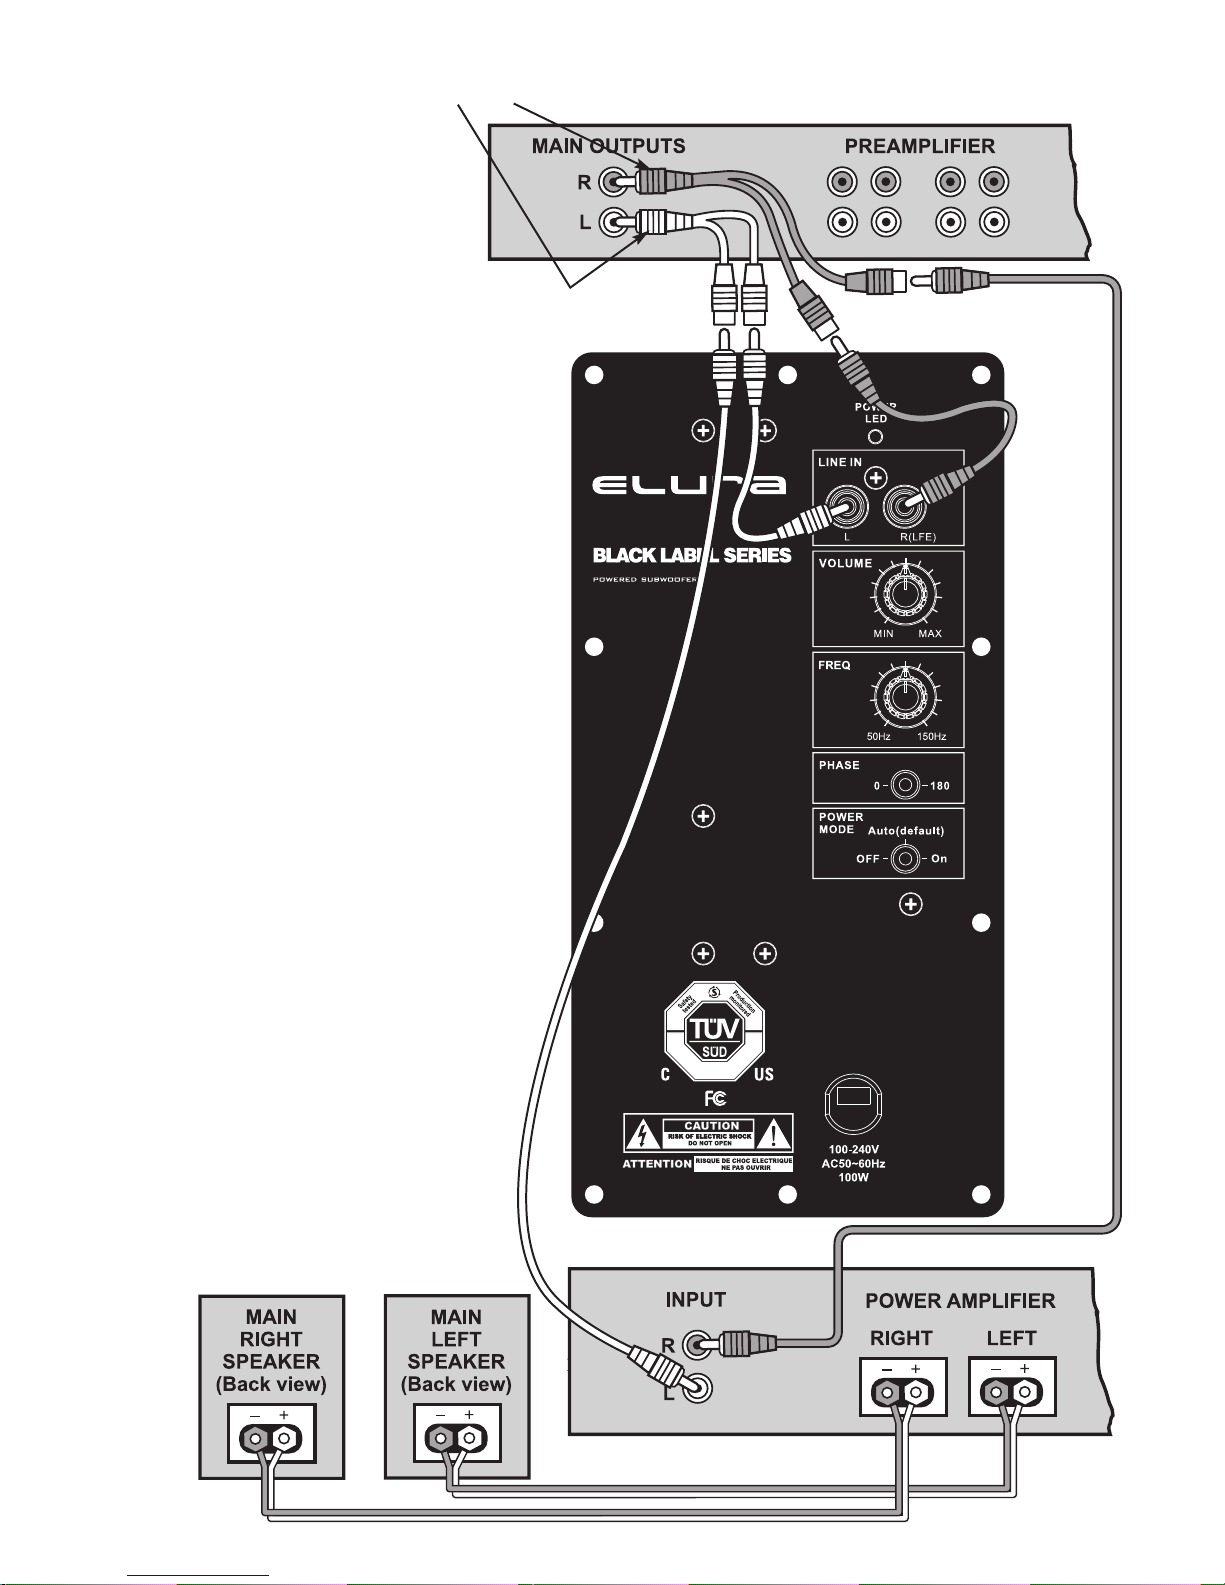
6
Y CONNECTORS
Method B: Line level hookup
steps for systems with
preamplifier and power amplifier
(Refer to Fig. 4)
1. IMPORTANT: Make sure that ALL system components
including the Elura SUBB8.2/ SUBB10.2 are turned OFF
before proceeding.
2. Locate the LINE output RCA sockets on the back of your
preamplifier. These are typically marked PRE, PRE OUT,
LINE OUT or TO POWER AMP, depending on the make and
model of component.
3. Connect a set of high-quality line level RCA male to dual
female Y-connectors to the preamp’s LINE OUT sockets.
Then connect a pair of high-quality line level cables from the
Y connectors to the left and right LINE IN of your subwoofer.
Make sure that left is connected to left and right is connected to right.
4. Connect another set of connection cables between
Y-connectors and the MAIN INPUTS of your power amplifier.
Again, make sure that left is connected to left and right is
connected to right.
5. Connect your main speakers to the speaker terminals on
the back of your power amplifier.
6. You are now ready to put your Elura SUBB8.2/SUBB10.2
subwoofer into use. Skip to “E – INITIAL LISTENING TEST.”
FIG.4 –
Method B, Line Level
Hook-up with Preamplifier
and Power Amplifier
Page 7
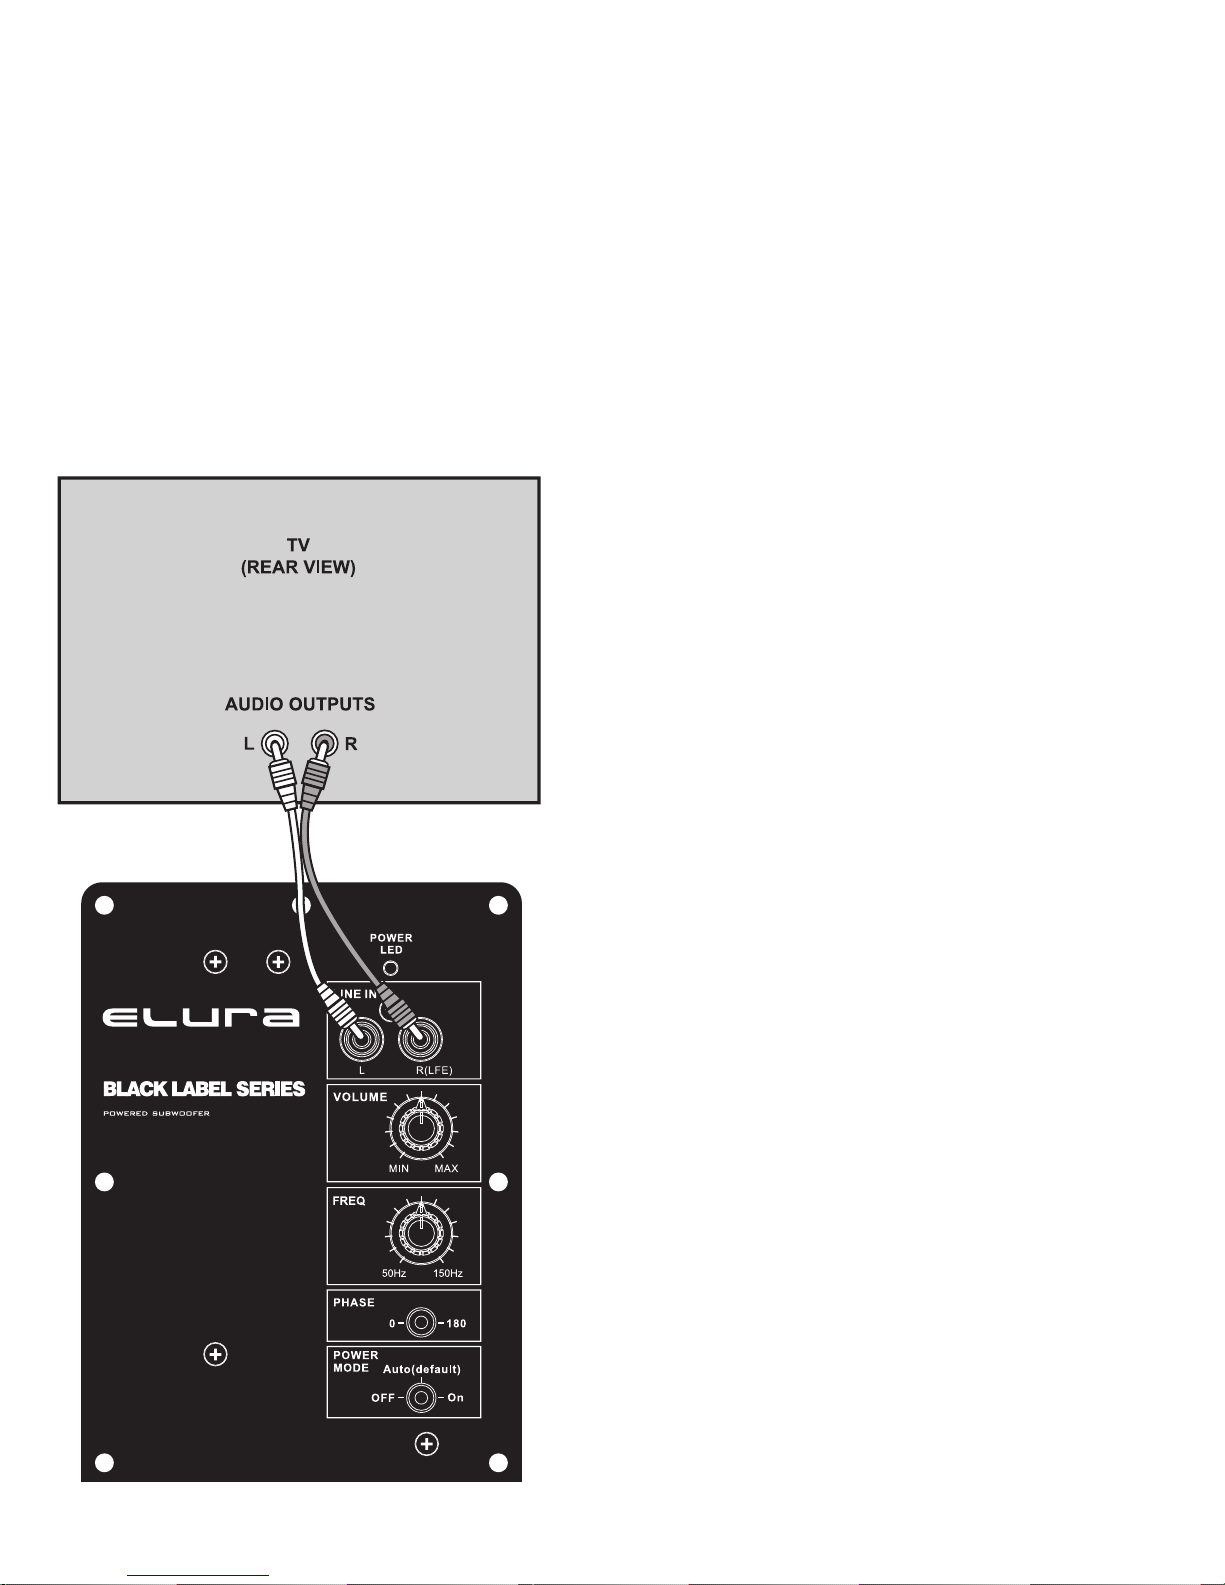
7
Method C: Line level hookup steps
for flat panel TVs
(Refer to Fig. 5 below)
1. IMPORTANT: Make sure that ALL system components
including the Elura SUBB8.2/SUBB10.2 are turned OFF before
proceeding.
2. Connect a set of high-quality line level connection cables (patch
cords) between the TV analog audio output connectors and the
LINE IN sockets on the back of the Elura SUBB8.2/SUBB10.2.
Make sure that left is connected to left and right is connected to
right.
3. You are now ready to put your Elura SUBB8.2/SUBB10.2 subwoofer into use. Skip to “E – INITIAL LISTENING TEST.”
E. INITIAL LISTENING TEST
It’s now time to introduce the Elura SUBB8.2/SUBB10.2 amplifier’s potent and
plentiful bass into your listening environment.
1. Double-check all connections.
. Make sure that the volume controls on both the Elura SUBB8.2/SUBB10.2
2
nd your receiver/integrated amp/preamp/TV are turned all the way down (fully
a
ounterclockwise). Set the PHASE switch to zero. Set the CROSS- OVER FRE-
c
QUENCY knob to 100Hz for normal operation, or to 150Hz for Dolby Digital operation where the proper crossover frequency is set in the receiver’s crossover.
3. Turn on your stereo/home theater system. THEN turn on the Elura SUBB8.2/
SUBB10.2. Confirm that the subwoofer’s blue POWER indicator is glowing. If it
isn’t, check the power connections between the Elura SUBB8.2/SUBB10.2 and
the wall socket.
4. Play a musical selection or DVD that you are familiar with. Pick a song that
has regular low bass beats. Advance the receiver/ integrated amp/preamp/TV’s
volume control up to a normal listening level. If you don’t hear sound through your
main speakers, turn off the system and check connections. Also consult the troubleshooting tips on page 8.
5. If sound is indeed coming out of your main speakers, turn the Elura
SUBB8.2/SUBB10.2’s VOLUME control clockwise until you hear noticeable additional bass. If you don’t hear bass by the time you have advanced the subwoofer’s VOLUME control halfway, turn off the system and check connections.
Also consult the troubleshooting tips on page 8.
FIG.5 – Method C, Line Level Hook-up with Flat Panel TV
6. Adjust the Elura SUBB8.2/SUBB10.2’s VOLUME control until you are satisfied
with the amount of bass. You may want to try several different albums, compact
discs, or DVDs while determining how high to adjust the Elura SUBB8.2/
SUBB10.2’s VOLUME. The amount of bass varies from CD to CD and DVDs.
7. Now that you have adjusted the quantity of bass via the volume, it’s time
to work on the quality of the bass with the CROSSOVER FREQUENCY control,
PHASE switch – and experimentation with Elura SUBB8.2/SUBB10.2 room
position.
• While playing music or a movie, move the subwoofer around, in and out of
corners, closer and farther from the wall, etc. as much as the power cord and
other connections will allow.
• Change the PHASE switch between 0° - 180°, while someone sits in the main
listening position. Leave the switch in the position where you like the bass most.
• Change the CROSSOVER FREQUENCY control (for Dolby Pro-Logic receivers)
to higher and lower settings. If the CROSS-OVER FREQUENCY control is set too
high, you’ll start to hear low midrange (voices and instruments) through it. This will
negatively affect the stereo imaging of your main speakers. Lower the CROSSOVER FREQUENCY setting until you hear only bass from the Elura SUBB8.2/
SUBB10.2. If the CROSSOVER FREQUENCY control is set too low, you simply
won’t get much output from the subwoofer. Move it back closer to 80 - 100Hz.
8. After you are satisfied with the output of your Elura SUBB8.2/SUBB10.2, you
can make all your volume settings through your main stereo system’s volume
control. The only time you might want to re-adjust the Elura SUBB8.2/SUBB10.2’s
VOLUME is when you encounter a musical selection or movie that has abnormally low – or high – bass.
You can leave the Elura SUBB8.2/SUBB10.2 turned on and in AUTO mode when
not in use. It does not draw much power in this state and will be ready to add low
bass the moment you begin to play music.
Remember, you don’t have to do anything except leave the POWER switch in the
AUTO position. The Elura SUBB8.2/SUBB10.2 will automatically go into STANDBY mode after approximately 8 minutes, when no music or movie is playing.
If you’re not using your system for a long period of time (such as when you’re on
vacation), turn the POWER switch to the OFF position.
Page 8

8
Caring for Your
Elura SUBB8.2/SUBB10.2
he Elura SUBB8.2/SUBB10.2 enclosure is
T
inished in a very high-quality black vinyl fin-
f
sh that is both attractive and excellent pro-
i
ection for the wood cabinet. To remove dust,
t
inger prints, and light water marks you can
f
se a soft, dry cloth. Never use a solvent like
u
aint thinner, Ketone, gasoline, MEK, lighter
p
fluid, etc., on the enclosure surface or it will
cause permanent damage.
F. SPECIFICATIONS
Amplifier
Digital (Class D) with switching power supply,
thermal protection, overload protection, soft
clipping, short circuit protection, high-efficency,
with low power consumption in standby mode.
Power
Elura SUBB8.2 100 watts RMS,
150 watts peak
Elura SUBB10.2 125 watts RMS,
175 watts peak
Input Connections
RCA L/R, LFE Line Level
System Design
Vented Enclosure with Down-Firing Woofer
Woofer
Elura SUBB8.2: 8˝ High-Excursion,
2˝ (50mm) Voice-Coil, Polypropylene Cone
with Rubber Surround
Elura SUBB10.2: 10˝ High-Excursion,
1.5˝ (38mm) Voice-Coil, Polypropylene Cone
with Rubber Surround
Frequency Response
Elura SUBB8.2: 38Hz - 150Hz Variable
Elura SUBB10.2: 30Hz - 150Hz Variable
Crossover Control
50 - 150Hz Variable
Controls
Power, Volume, Off/Auto/On, Phase,
Crossover Frequency
Video-Shielded
No
Dimensions (including feet)
Elura SUBB8.2: 12.8˝ H x 11.8˝ W x 11.8˝ D
(325mm H x 300mm W x 300mm D)
Elura SUBB10.2: 14.5˝ H x 13.5˝ W x 13.5˝ D
(368mm H x 343mm W x 343mm D)
Weight
Elura SUBB8.2: 18 lbs.
Elura SUBB10.2: 23 lbs.
Finish
Black Vinyl
G. TROUBLESHOOTING
& SERVICE
Before returning your Elura SUBB8.2/SUBB10.2
for service, you can save time (and often embarrassment) by checking for a few problems that
are most often encountered.
Power light is not lit. No sound.
1. Is your Elura SUBB8.2/SUBB10.2 plugged in
to a live AC wall socket?
2. Is the power switch on?
3. Has the Elura SUBB8.2/SUBB10.2 overheated
and shut off temporarily?
No sound from either set of speakers.
1. Are your other components turned on?
2. Is the receiver, preamp, or TV set to the appro-
priate input and is that sound source playing?
3. Do you have an unconnected tape monitor
selected?
4. Is the Elura SUBB8.2/SUBB10.2 correctly
connected to your receiver, preamplifier, integrated amplifier, or TV and turned on?
Sound comes from main speakers but not
the subwoofer
1. Is the Elura SUBB8.2/SUBB10.2 turned on
(power light in the blue mode) and VOLUME
control turned up?
2. Some digital receivers only send a sub out
signal when in the movie or digital mode. In the
2 channel (stereo music) mode, no sub out
signal is sent to the sub.
You may need to set your main speakers to
“small” mode in your receiver setup to get the
receiver’s subwoofer output to turn on. Check
your receiver’s owner’s manual for subwoofer
operation.
3. For digital receivers – make sure the subwoofer is “ON” and the subwoofer level is set
to “0 dB” or greater.
Sound comes from the subwoofer but not
your main speakers
1. • Confirm that the power amplifier is turned on.
• Check the RCA patch cord
• Check the speaker wire connections between
the receiver and main or satellite speakers.
Bass is muffled or weak
1. Check speaker wire polarity of all connections.
2. Reposition your subwoofer. At some points in
the room, its output may be cancelled by the
geometry of the room. Moving the Elura
SUBB8.2/SUBB10.2 can eliminate this problem. Please refer to Item 14 in the Safety Instructions for conditions that ALWAYS require
service by qualified personnel.
If you have tried all the above and still can’t
get the Elura SUBB8.2/SUBB10.2 to operate
properly, consult your dealer or contact MSTR
BRAND.
H. PRODUCT
WARRANTY
The SELLER warrants the SUBB8.2/SUBB10.2
free from defects in the material and workmanship for 1 year from the date of purchase from
the SELLER or an authorized dealer. Should
this product fail to be in good working order
within 1 year warranty period, the SELLER, at
its option, repair or replace the unit, provided
that the unit has not been subjected to accident, disaster, abuse or any unauthorized
modifications including static discharge and
power surge. This warranty is offered by the
SELLER for its BUYER with direct transaction
only. This warranty does not apply to products
that have been abused, incorrectly installed,
modified, disassembled and/or repaired by
anyone other than Elura or our appointed repair
facility.
A unit that fails under conditions other than
those covered will be repaired at the current
price of parts and labor in effect at the time of
repair. Such repairs are warranted for 90 days
from the day of reshipment to the BUYER. If
the unit is delivered by mail, customers agree
to insure the unit or assume the risk of loss or
damage in transit. Under no circumstances will
a unit be accepted without a return authorization number.
The warranty is in lieu of all other warranties
expressed or implied, including without limitations, any other implied warranty or fitness or
merchantability for any particular purpose, all
of which are expressly disclaimed.
Proof of sale may be required in order to claim
warranty.
The content of this manual has been carefully
checked and is believed to be accurate.
However, the SELLER assumes no responsibility for any inaccuracies that may be contained in this manual. The SELLER will NOT
be liable for direct, indirect, incidental, special,
or consequential damages resulting from any
defect or omission in this manual, even if
advised of the possibility of such damages.
Also, the technical information contained herein regarding the SUBB8.2/SUBB10.2 features
and specifications are subject to change without further notice.
www.elura.audio
 Loading...