

Page 1
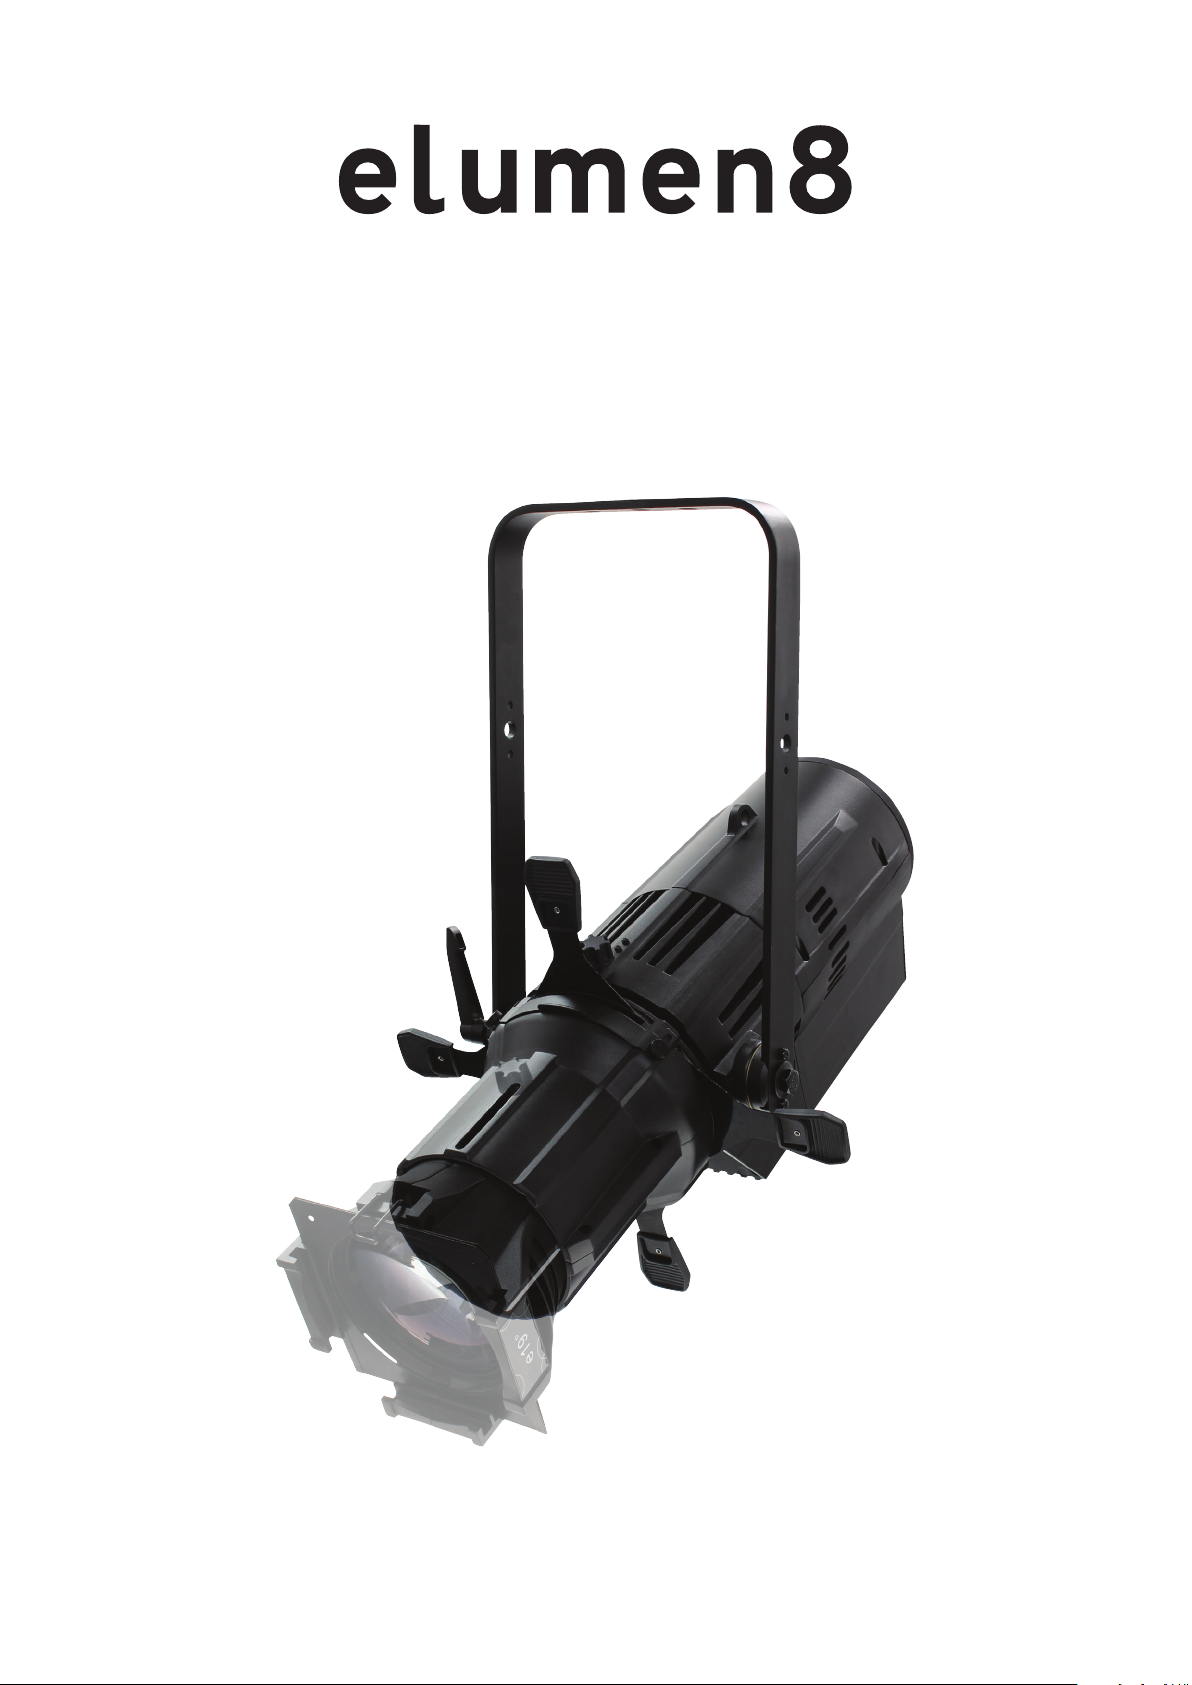
Virtuoso 1000 Prole RGBAL
User Manual
Order codes: ELUM132
Page 2
Safety advice
WARNING
FOR YOUR OWN SAFETY, PLEASE READ THIS USER MANUAL
CAREFULLY BEFORE YOUR INITIAL START-UP!
• Before your initial start-up, please make sure that there is no damage caused during transportation.
• Should there be any damage, consult your dealer and do not use the equipment.
• To maintain the equipment in good working condition and to ensure safe operation, it is necessary
for the user to follow the safety instructions and warning notes written in this manual.
• Please note that damages caused by user modications to this equipment are not subject to warranty.
CAUTION!
KEEP THIS EQUIPMENT
AWAY FROM RAIN,
MOISTURE AND LIQUIDS
CAUTION!
TAKE CARE USING
THIS EQUIPMENT!
HIGH VOLTAGE-RISK
OF ELECTRIC SHOCK!!
IMPORTANT:
The manufacturer will not accept liability for any resulting damages caused by the non-observance
of this manual or any unauthorised modication to the equipment.
• Never let the power cable come into contact with other
cables. Handle the power cable and all mains voltage
connections with particular caution!
• Never remove warning or informative labels from the unit.
• Do not open the equipment and do not modify the unit.
• Do not connect this equipment to a dimmer pack.
• Do not switch the equipment on and off in short intervals,
as this will reduce the system’s life.
• Only use the equipment indoors.
• Do not expose to ammable sources, liquids or gases.
• Always disconnect the power from the mains when
equipment is not in use or before cleaning! Only handle
the power-cable by the plug. Never pull out the plug by
pulling the power-cable.
• Make sure that the available mains supply voltage is
between 100~240V AC, 50/60Hz.
• Make sure that the power cable is never crimped or
damaged. Check the equipment and the power cable
periodically.
• If the equipment has been exposed to drastic
temperature uctuation (e.g. after transportation),
do not connect power or switch it on immediately.
The arising condensation might damage the equipment.
Leave the equipment switched off until it has reached
room temperature.
• Never touch the xture during operation as it may be hot.
• If the equipment is dropped or damaged, disconnect the
mains power supply immediately and have a qualied
engineer inspect the equipment before operating again.
• If your product fails to function correctly, stop use
immediately. Pack the unit securely (preferably in the
original packing material), and return it to your Pro Light
dealer for service.
• Only use fuses of same type and rating.
• Repairs, servicing and power connection must only be
carried out by a qualied technician. THIS UNIT CONTAINS
NO USER SERVICEABLE PARTS.
• This lighting xture is for professional use only - it is not
designed for or suitable for household use. The product
must be installed by a qualied technician in accordance
with local territory regulations. The safety of the installation
is the responsibility of the installer. The xture presents
risks of severe injury or death due to re hazards, electric
shock and falls.
• Warning! Risk Group 2 LED product according to
EN 62471. Do not view the light output with optical
instruments or any device that may concentrate the beam.
• WARRANTY: Two years from date of purchase.
OPERATING DETERMINATIONS
If this equipment is operated in any other way, than those described in this manual, the product may suffer damage and
the warranty becomes void. Incorrect operation may lead to danger e.g: short-circuit, burns and electric shocks etc.
Do not endanger your own safety and the safety of others!
Incorrect installation or use can cause serious damage to people and/or property.
www.prolight.co.uk Virtuoso 1000 Prole RGBAL User Manual
2
Page 3
Product overview & technical specications
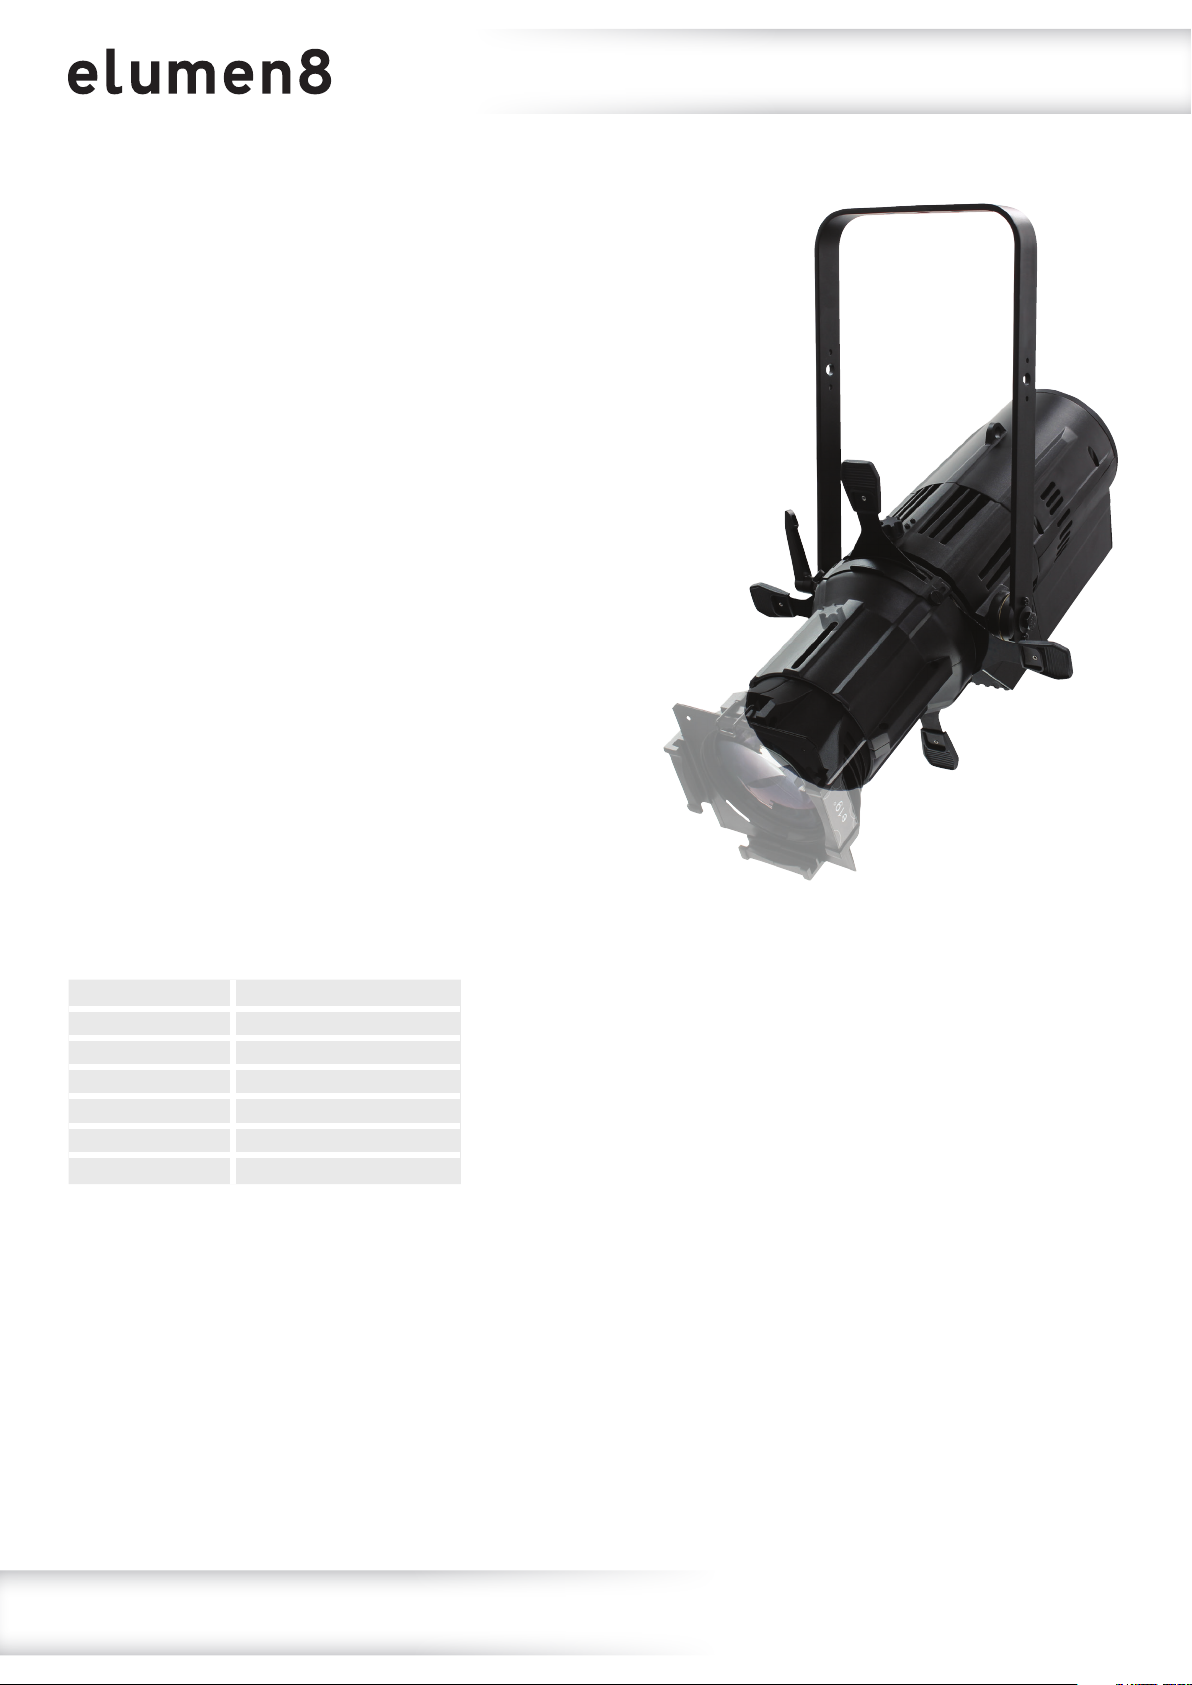
Virtuoso 1000 Prole RGBAL
The Virtuoso 1000 Prole features an advanced RGBAL LED system that
outputs a at and even eld and is suitable for many applications. HSIC
colour management allows you to create virtually any colour whilst the virtual
colour wheel provides direct access to many colours along with a 2700K to
8000K colour temperature control. On board features include DMX, RDM
and adjustable PWM rate. Due to the design of the body many common and
aftermarket lens tubes can t directly onto the xture allowing you to upgrade
to LED without having to replace your existing lens tubes.
• 1 x 250W ve-colour COB LED (RGBAL)
• Beam angle: 15°- 50° dependent on lens used
• 23,031 Lux @ 2m (full on, 19° lens)
• CRI ≥ 90
• Colour temperature: 2700K-8000K
• Refresh rate: 600Hz, 1.2kHz, 2kHz, 2.4kHz,
6kHz or 25kHz selectable
• Beam framing shutters
• DMX channels: 6/7/8/11 or 17 selectable
• RDM (Remote Device Management)
• 0 - 100% 8 or 16 bit dimming and variable strobe
• 4 dimming curves: Linear, square law,
inverse square law and S-curve
• 4 push button menu with LCD display
• PowerCON input/output
• 5-Pin XLR input/output
• 3-Pin XLR input/output
• Temperature controlled fan for whisper quiet operation
• Handle on rear panel
Specications Virtuoso 1000 Prole RGBAL
Power consumption 305W
Fuse T6.3A 250V
Power supply 100~240V, 50/60Hz
Dimensions 520 x 310 x 540mm
Weight 8.3kg
Order code ELUM132
www.prolight.co.uk Virtuoso 1000 Prole RGBAL User Manual
3
Page 4
Technical specications
380mm
310mm
250mm
540mm
360mm
35mm
520mm
587mm
225mm
10
13
145mm
09
10
10
03
01
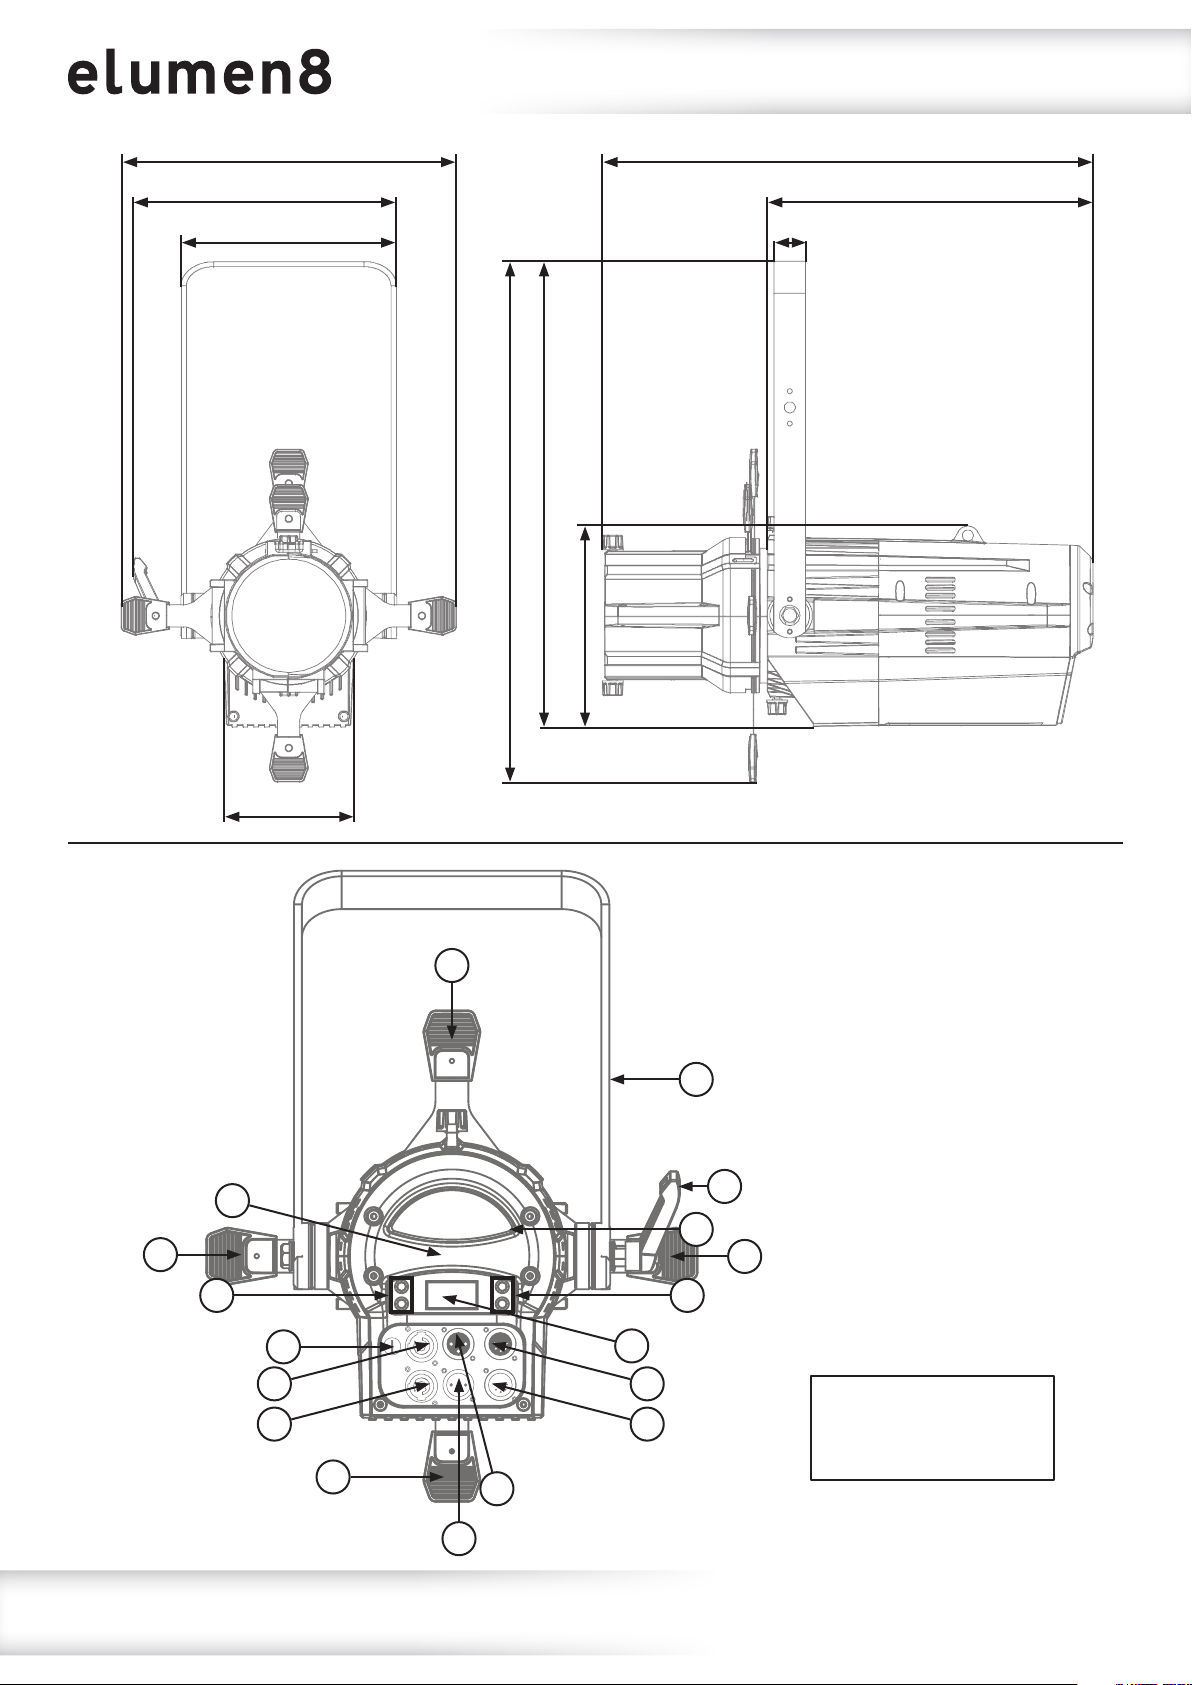
01 - LCD display
02 - Function buttons
03 - 3-Pin DMX input
11
04 - 3-Pin DMX output
05 - 5-Pin DMX input
06 - 5-Pin DMX output
07 - PowerCON input
12
08 - PowerCON output
09 - Fuse T6.3A 250V
03
10
0202
10 - Shutters
11 - Hanging bracket
12 - Hanging bracket
adjustment knob
13 - Carry handle
0507
In the box: 1 x xture,
0608
1 x power cable
& 1 x user manual
04
www.prolight.co.uk Virtuoso 1000 Prole RGBAL User Manual
4
Page 5
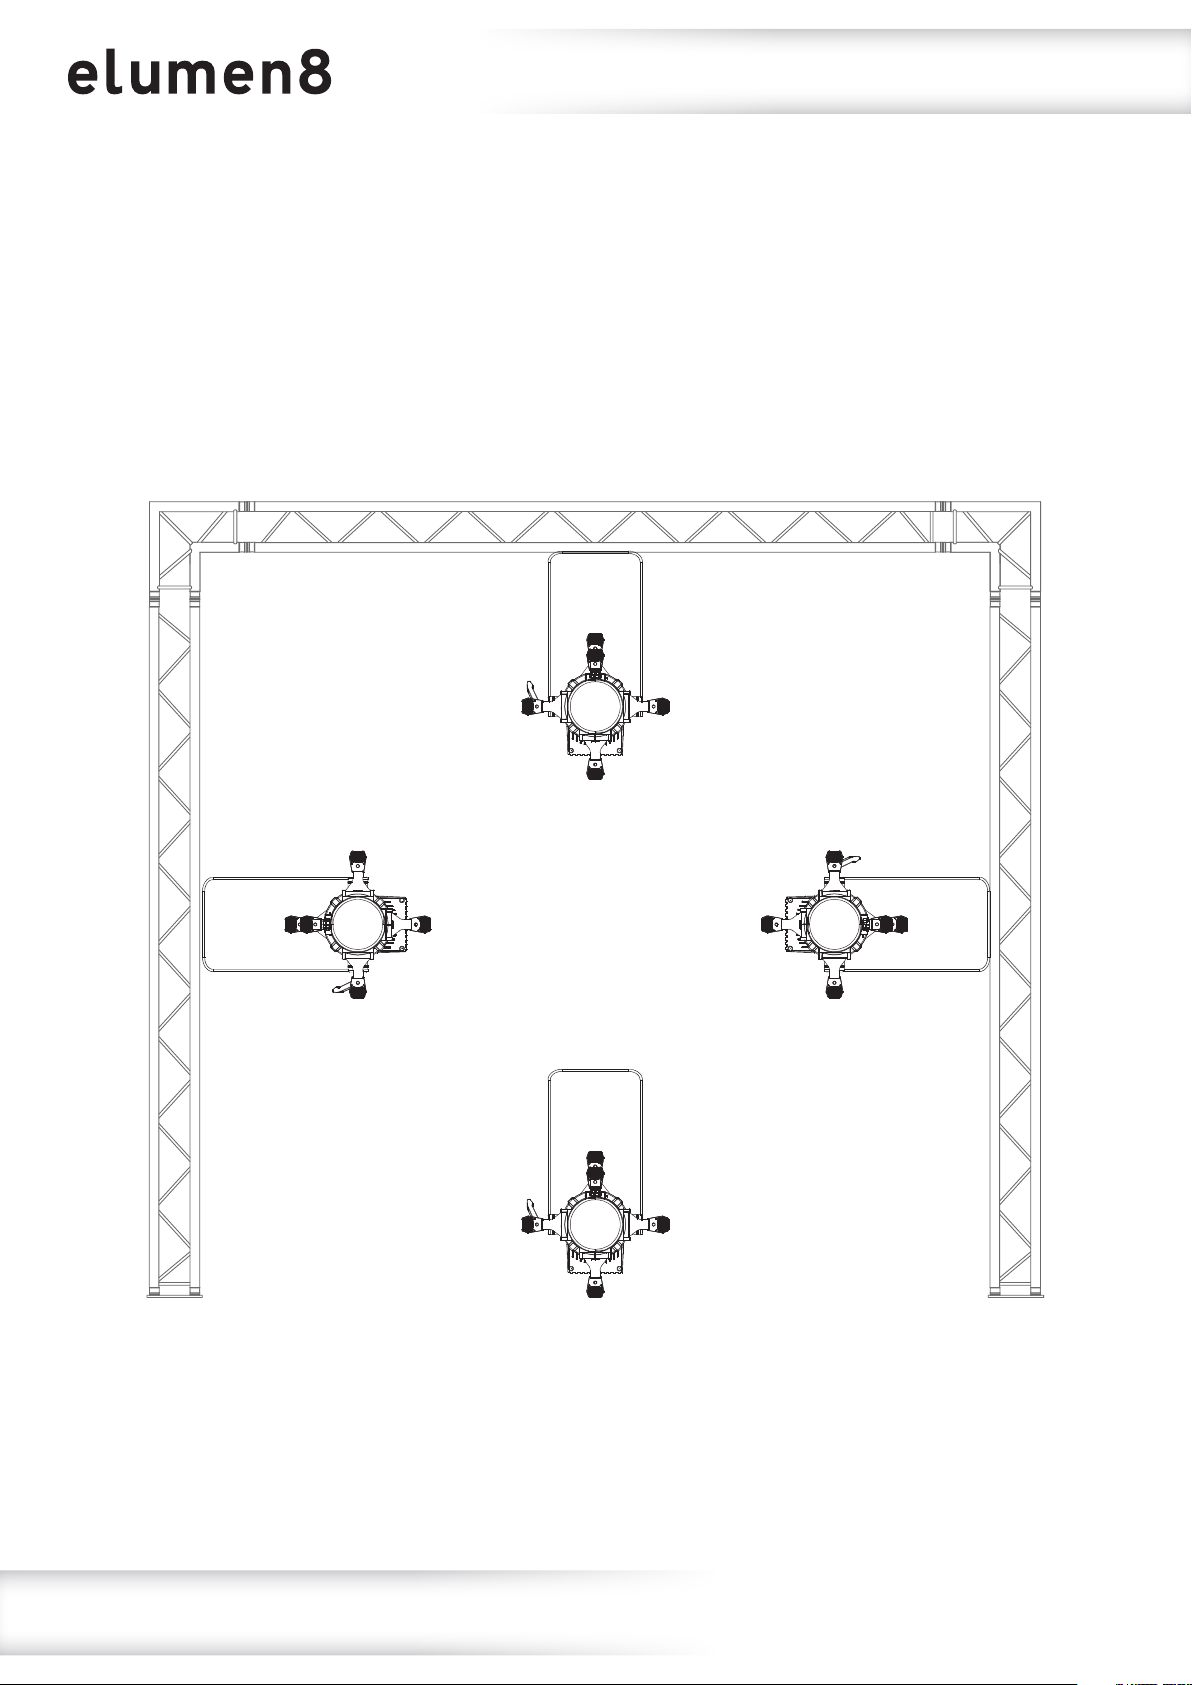
Installation
Before installing the xture, the supporting structure (ie. truss) must be able to hold a minimum of 10
times the xtures weight without any deformation (eg. 15kg - 150kg point load). The xture must be
secured with a secondary safety attachment when being installed (ie. an appropriate safety cable).
Never stand directly below the xture when mounting, removing, and/or servicing.
Overhead installation requires experience and qualications to calculate working load limits, the
material being used at the installation area and periodic safety inspections of the xture and installation
material. If you do not have the relevant experience and/or qualications please do not attempt the
installation yourself. The installation should be checked annually by a qualied person.
The eLumen8 Virtuoso 1000 Prole RGBAL can be operated in a number of mounting positions as
shown in the diagram above, hanging upside-down from the ceiling or truss, mounting sideways on truss
or stood upright on a at level surface. Always use a safety wire as an extra safety precaution to prevent
damage/injury in the event a clamp fails (see the next page for clamp installation).
Never use the carry handles for secondary attachments.
www.prolight.co.uk Virtuoso 1000 Prole RGBAL User Manual
5
Page 6
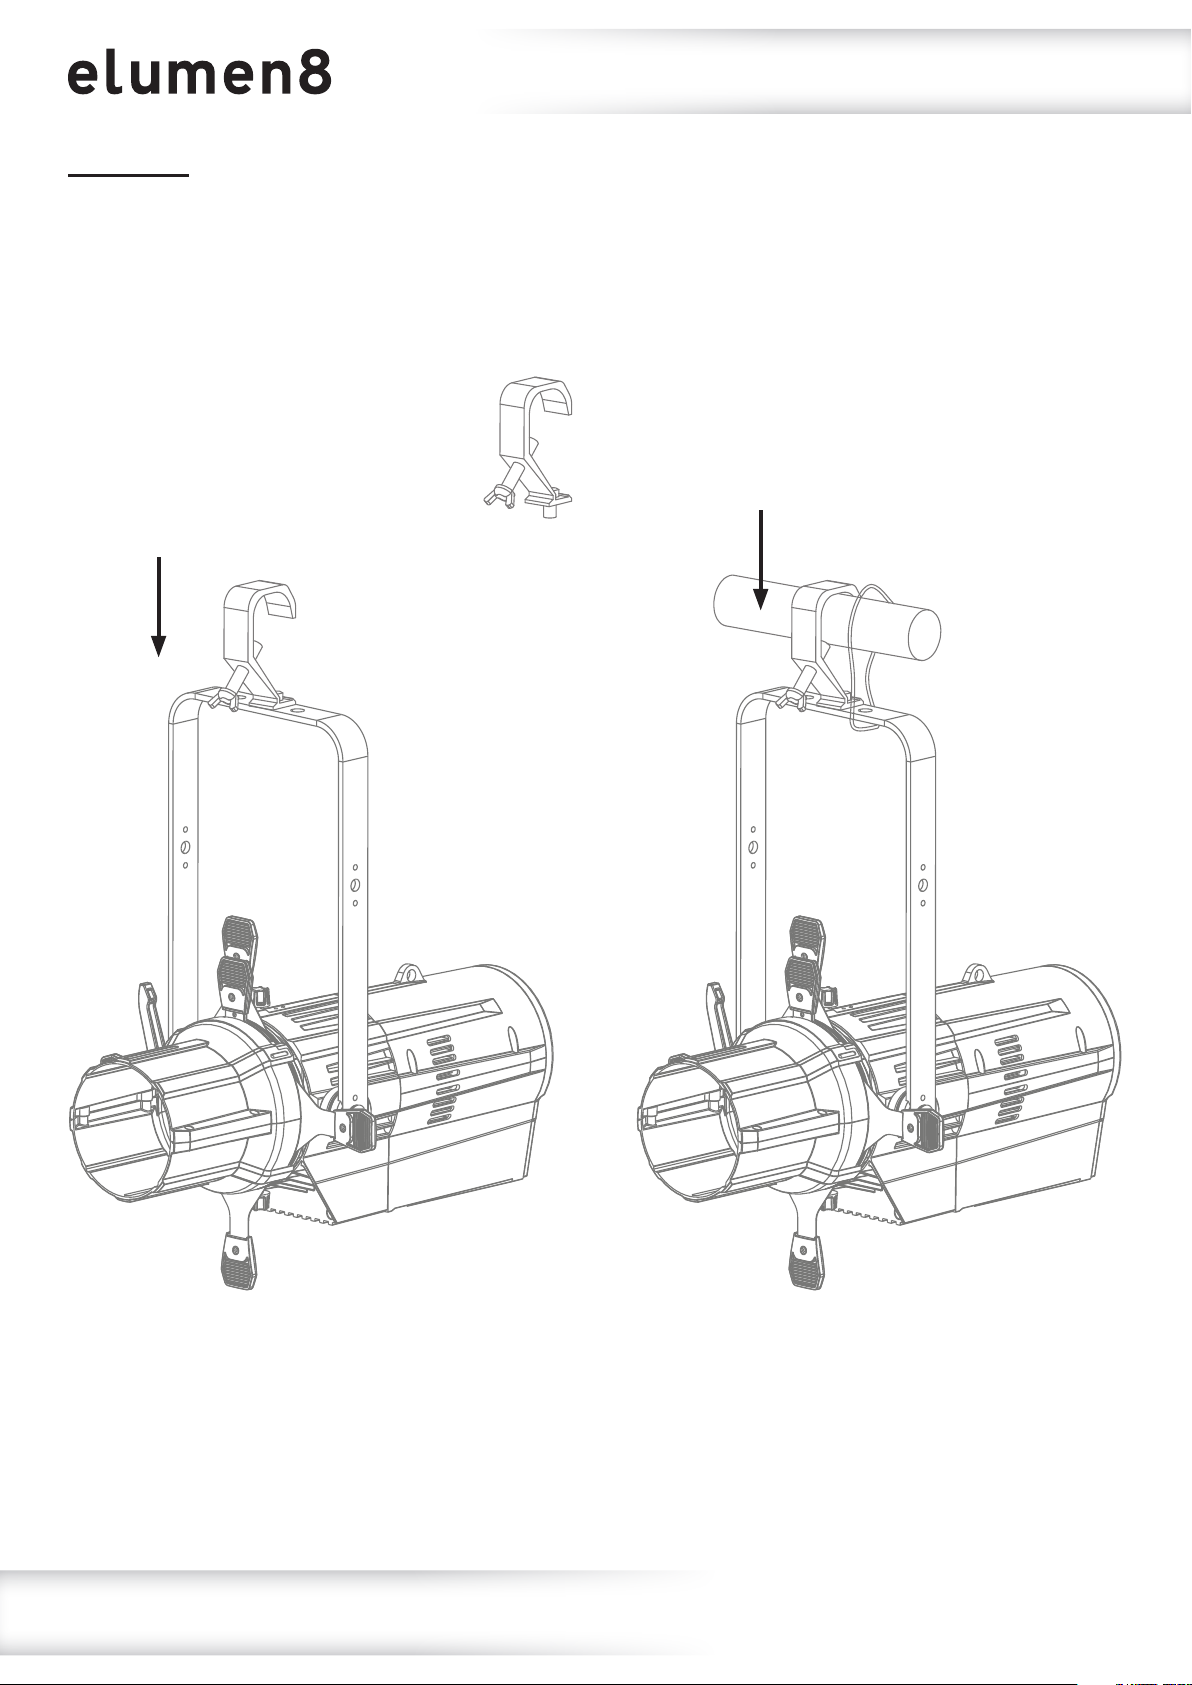
Installation
Installation:
1. Fasten the clamp to the xtures bracket with a bolt and lock nut through one of the mounting holes.
2. Mount the xture onto your truss system via the clamp and tighten to ensure secure.
3. Pull the safety cable through the xture bracket and around the truss.
2
1
3
www.prolight.co.uk Virtuoso 1000 Prole RGBAL User Manual
6
Page 7
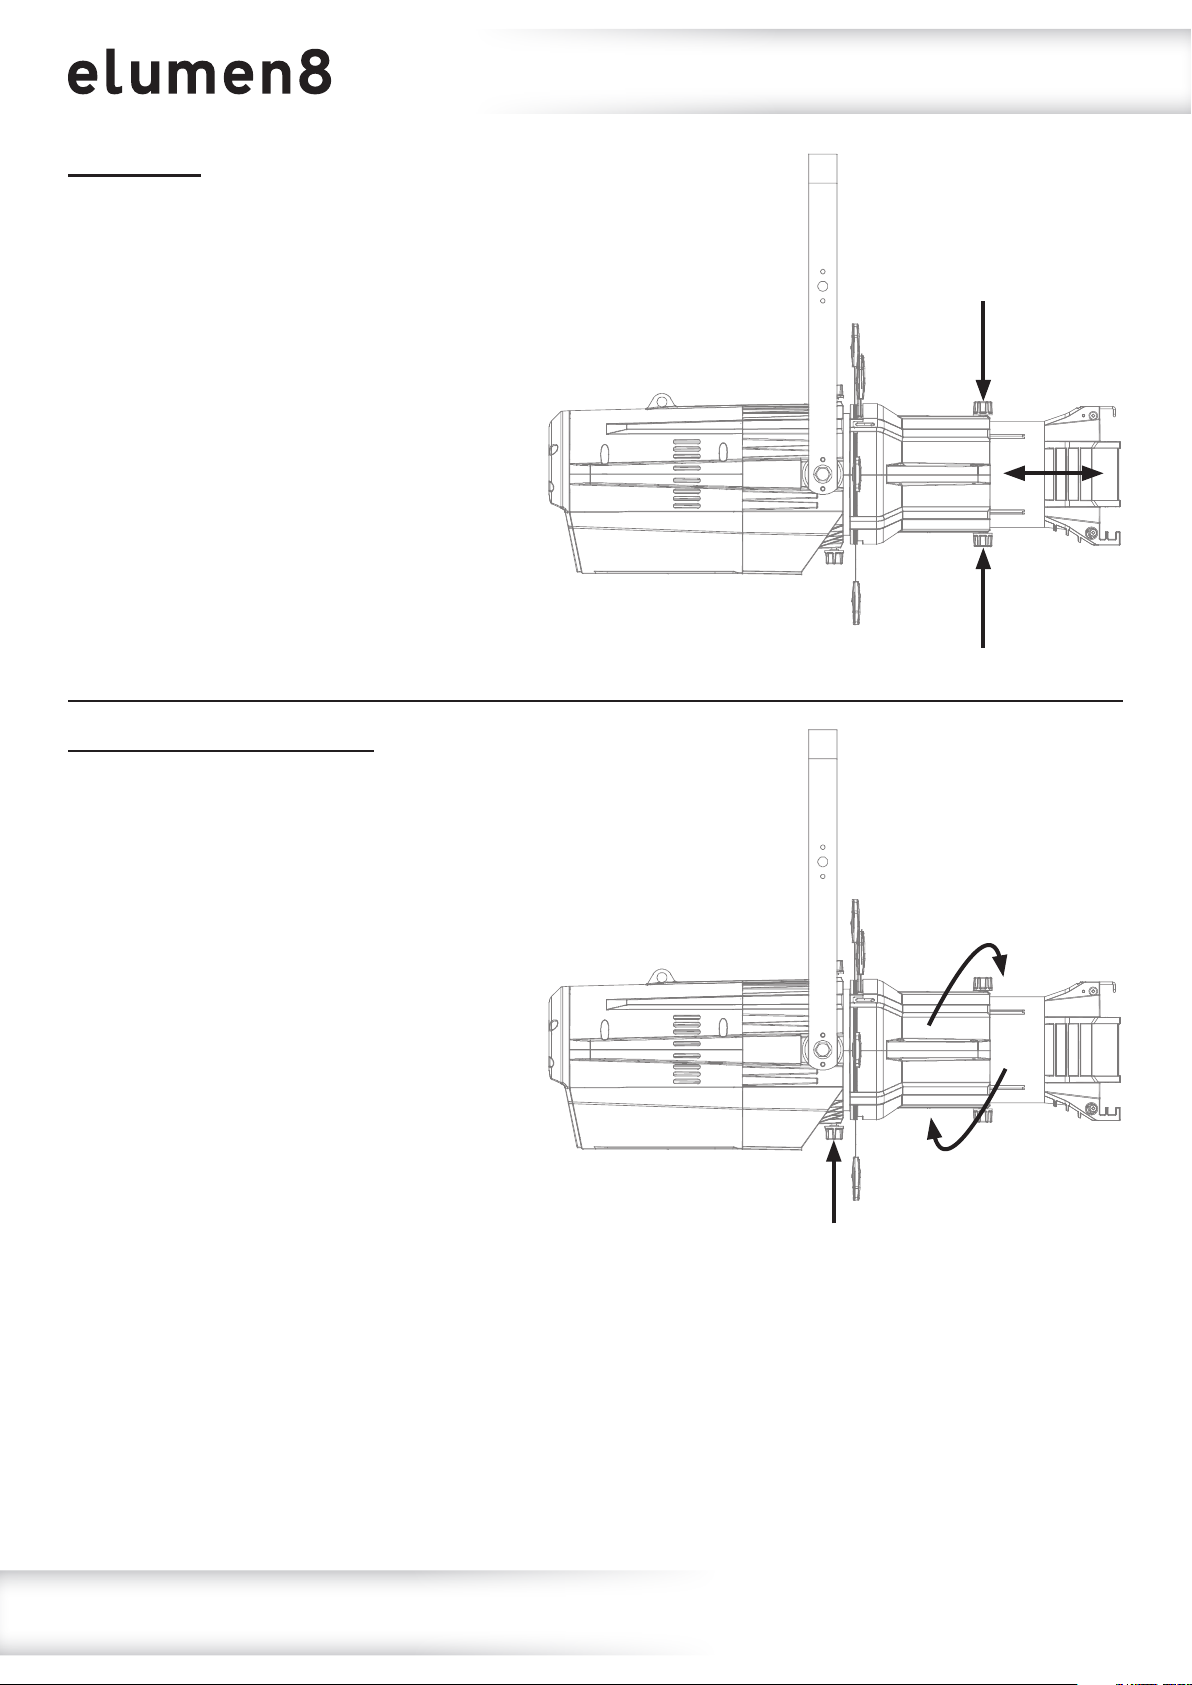
Beam Focus:
1. Loosen the beam focus knobs located at
the top and bottom of the barrel.
Focus/barrel adjustment
2. Slide the lens tube forward or backward
until you achieve the desired focus.
3. Once the xture is focussed, tighten the
beam focus knobs.
Rotating the Barrel Assembly:
1. Loosen the barrel rotation knobs located
at the bottom of the xture (do not remove
the knobs or the barrel assembly).
Beam focus knobs
Beam focus knobs
2. Rotate the barrel into the
desired position.
3. Once the barrel is rotated, tighten the
barrel rotation knobs.
Barrel rotation knob
www.prolight.co.uk Virtuoso 1000 Prole RGBAL User Manual
7
Page 8
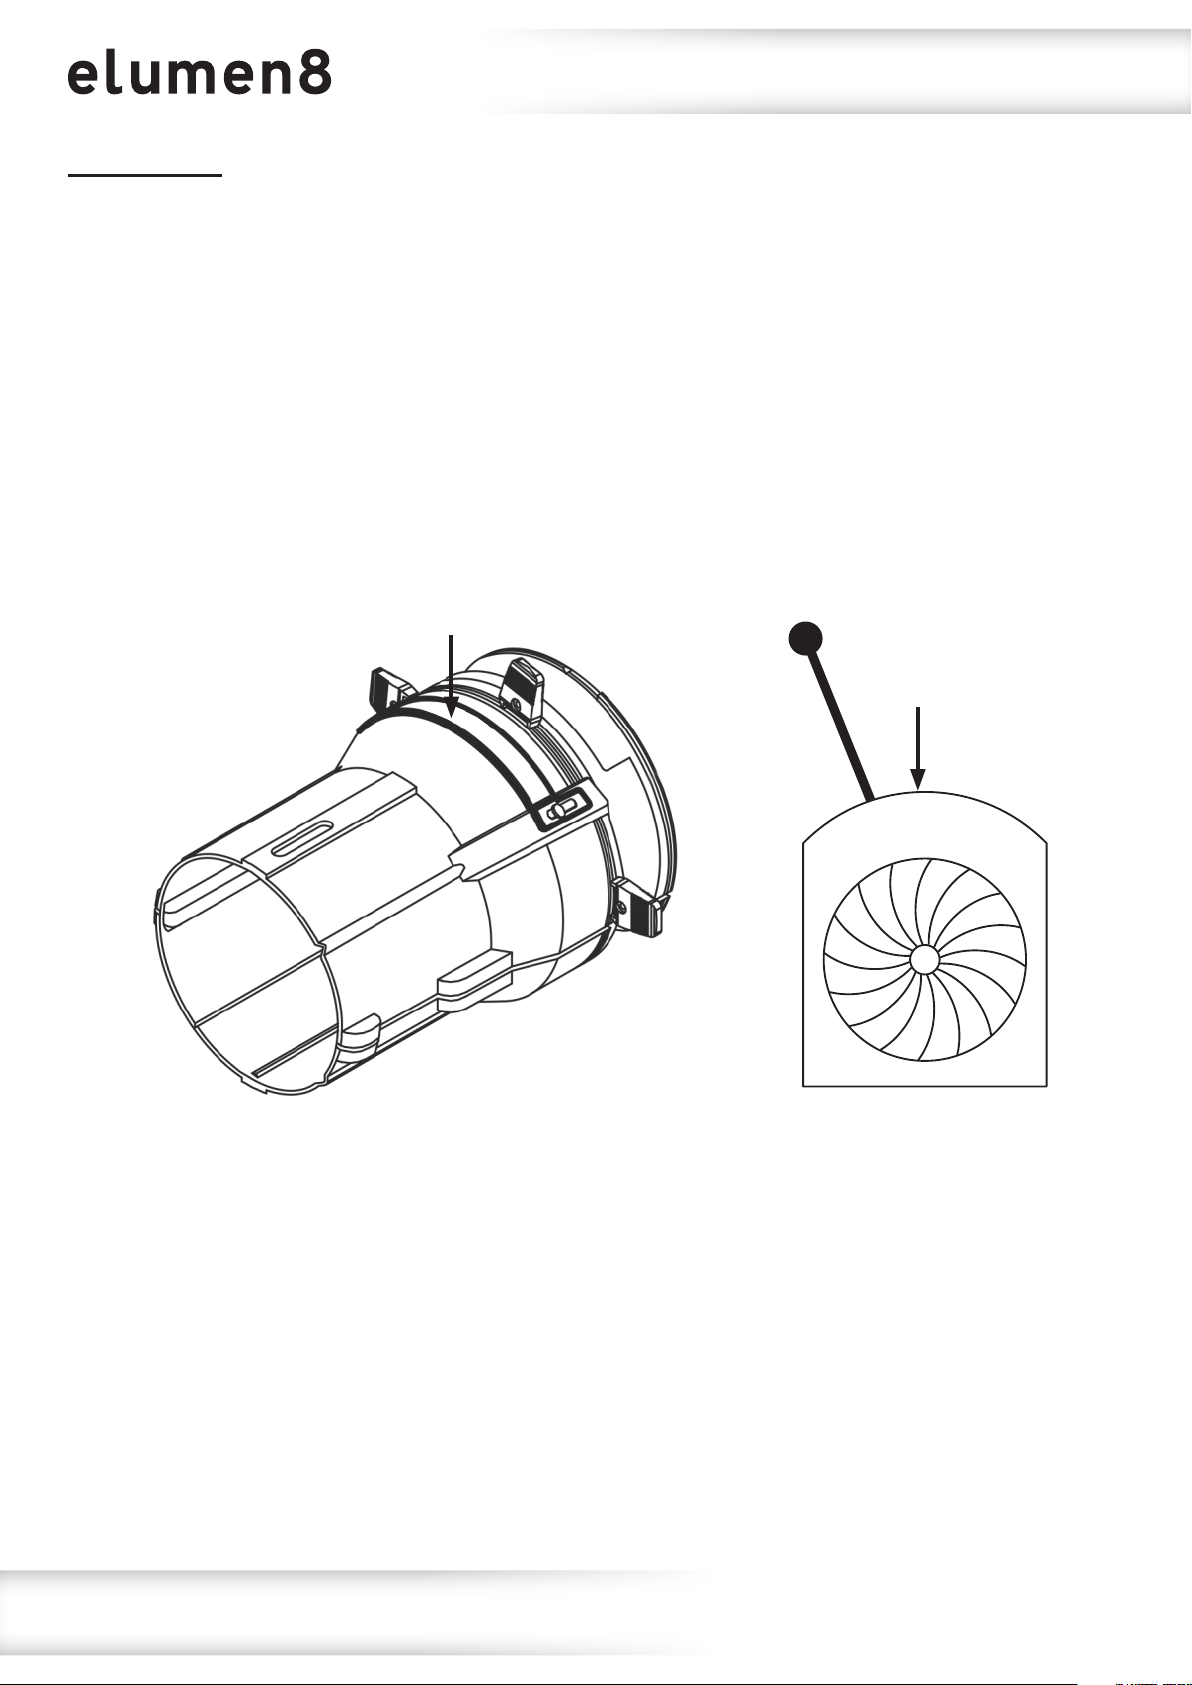
Accessory slot
Accessory Slot:
The Virtuoso 1000 Prole RGBAL has an accessory slot, which holds a drop-in iris or a motorised pattern
device (sold separately). When the slot is not in use a small metal cover secures the slot with 2 screws
to prevent light leakage.
1. Use a screwdriver to loosen the screws on the slot cover (do not remove the screws).
2. Slide to cover completely forward to expose the slot.
3. Insert the iris or motorised pattern device. When installing an iris, install the at side towards the
shutters and make sure the iris handle extends upwards from the slot.
4. Slide the cover back towards the shutters until it meets the iris handle. Make sure any handles or
adjustment tools that stick out the top are able to function correctly.
5. Secure the slot with the tightening screws.
Accessory Slot
Iris
www.prolight.co.uk Virtuoso 1000 Prole RGBAL User Manual
8
Page 9
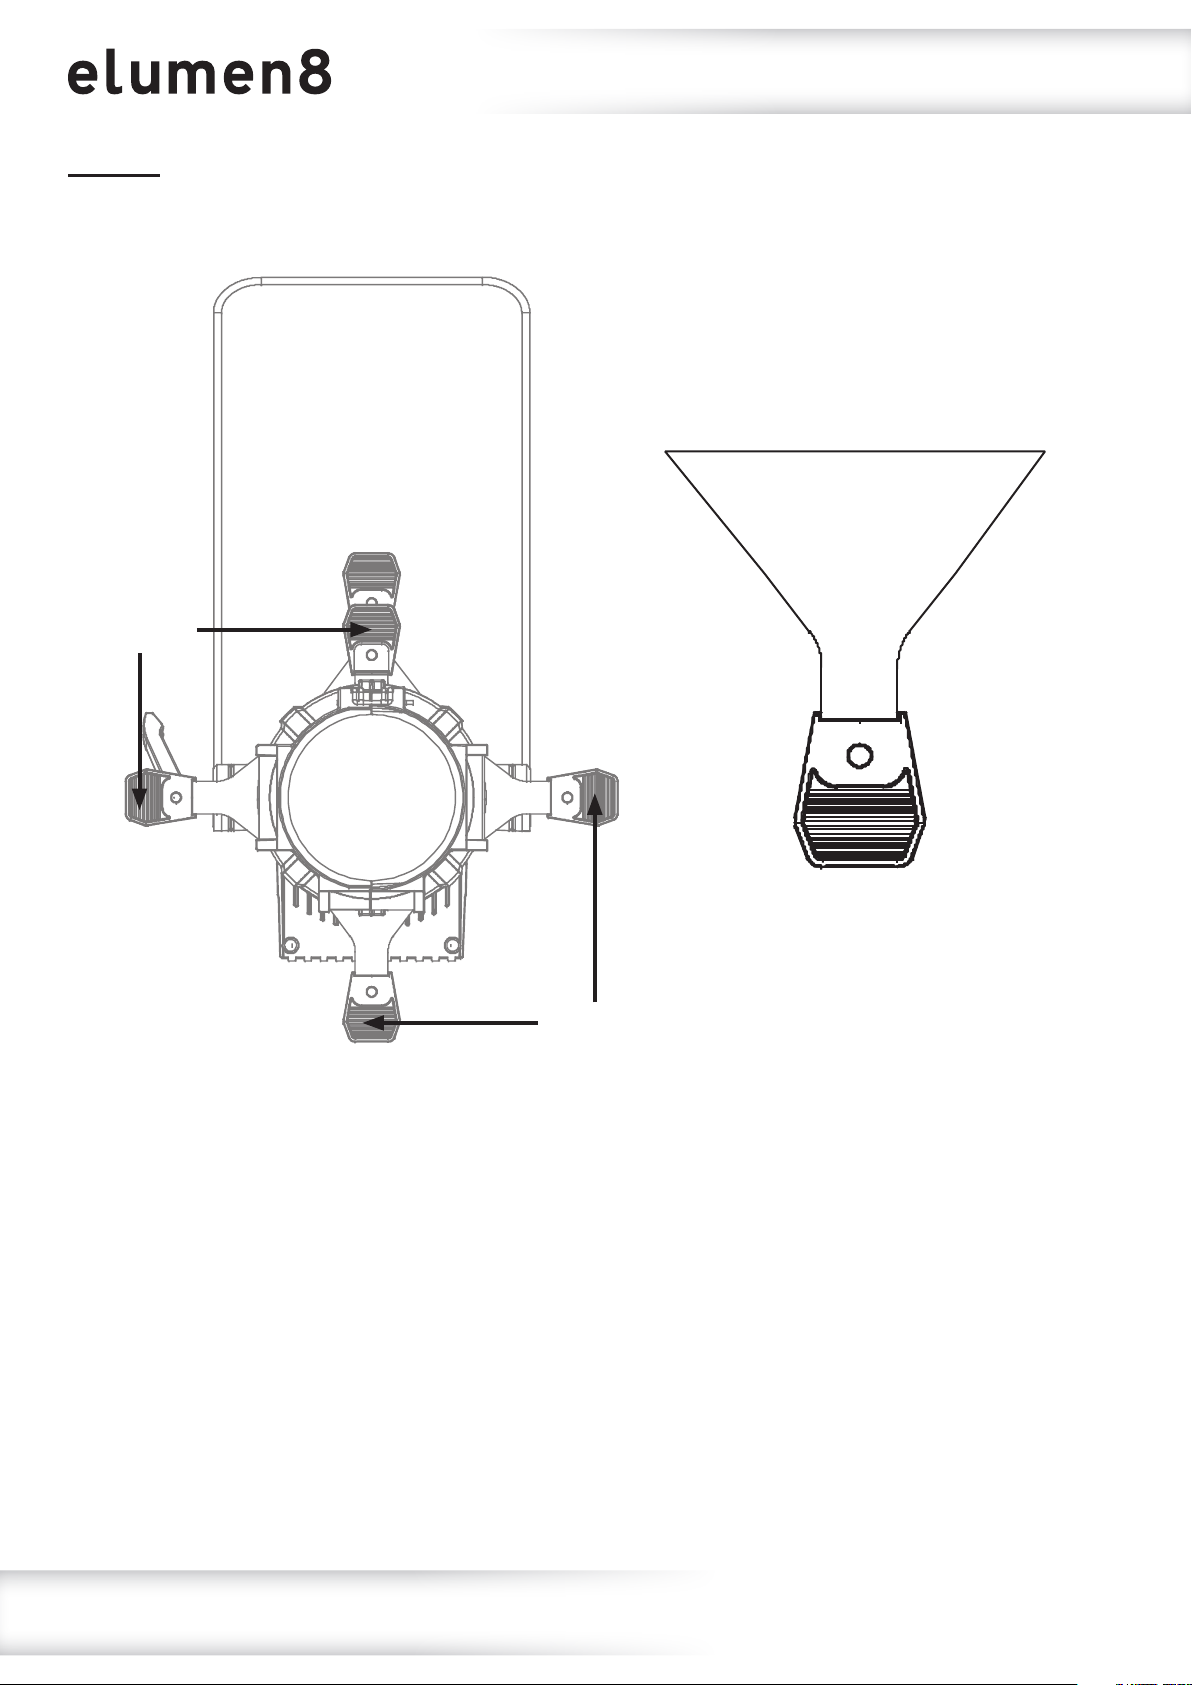
Shutter adjustment
Shutters:
The shutters are located inside the barrel. They can be adjusted via the shutter handles to adjust the
shape of the beam.
Shutters
Shutters
www.prolight.co.uk Virtuoso 1000 Prole RGBAL User Manual
9
Page 10
Operating instructions
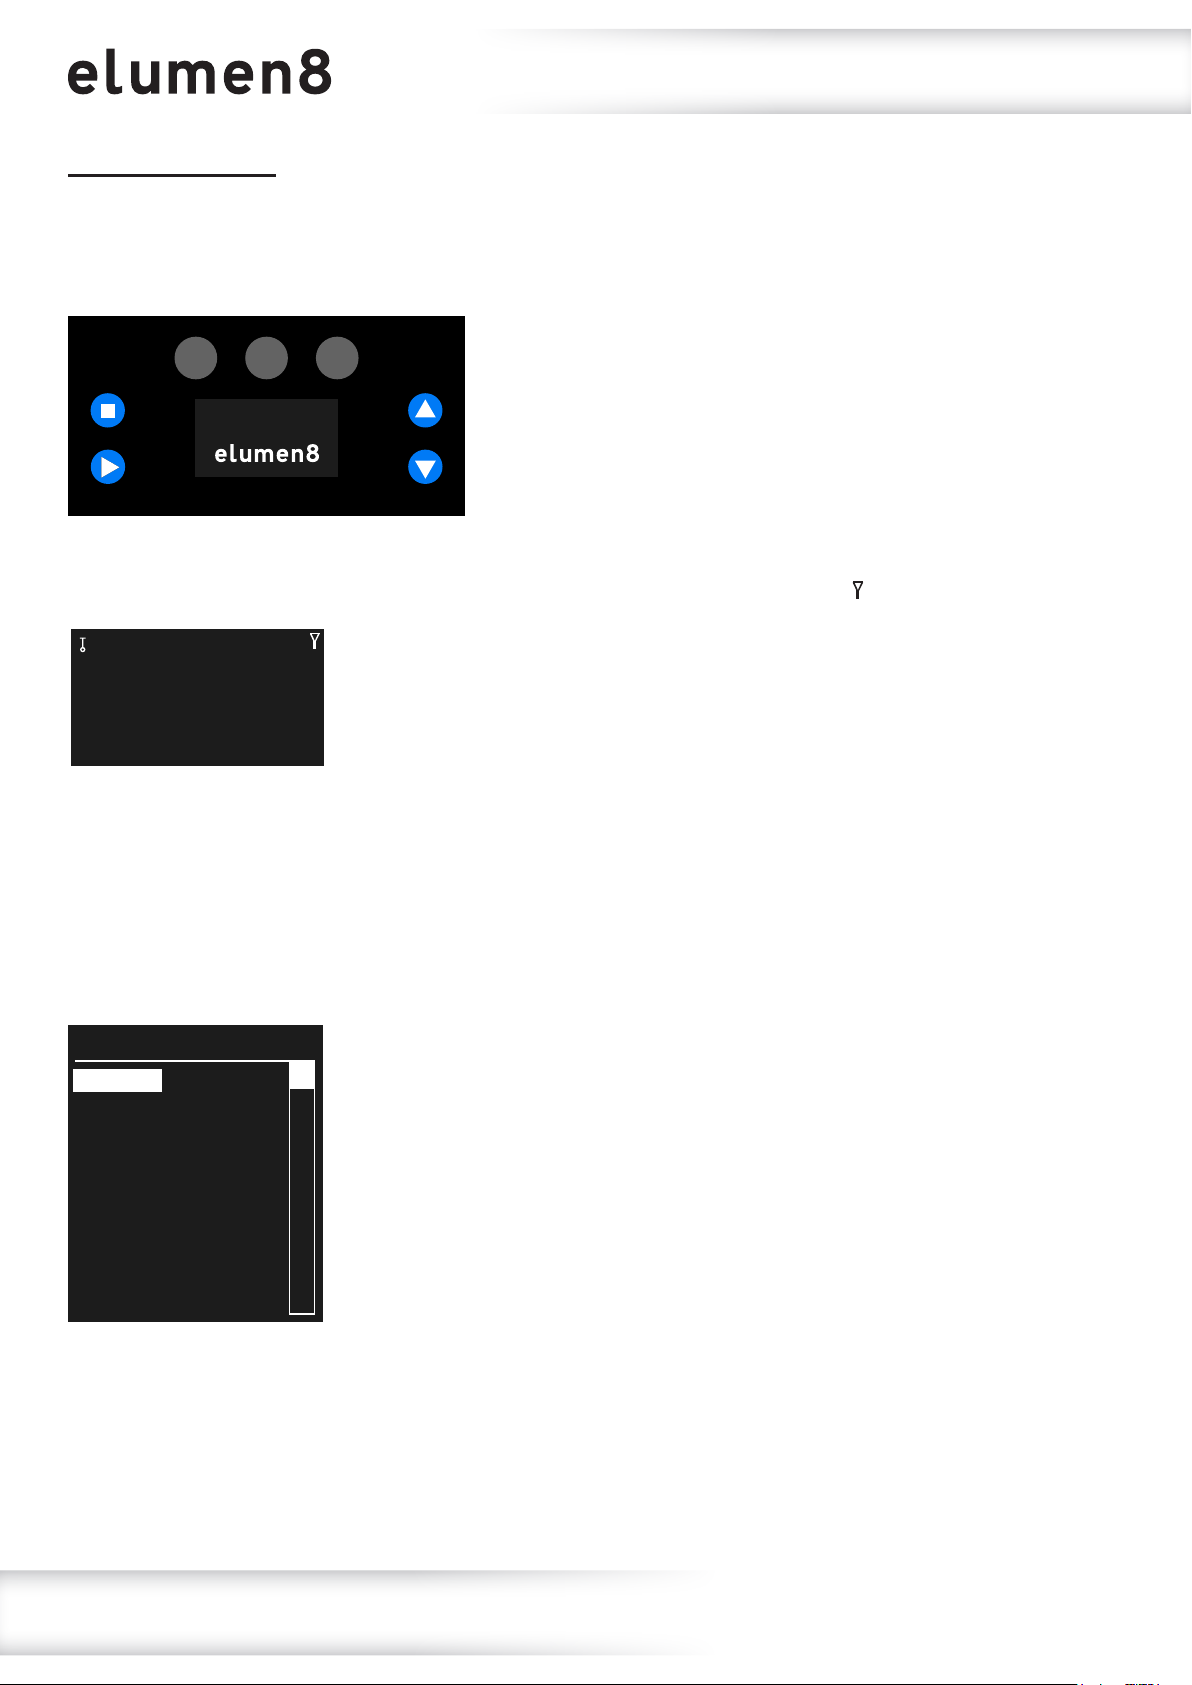
Control Panel Menu:
The LCD control panel situated on the rear of the xture allows the user to access the menu system
to adjust the xtures settings.
When the unit has been powered on the display will show “eLumen8”.
MENU
ENTER
UP
DOWN
The xture will then return to its home screen.
Please note: when DMX signal is being received the display will show a small ‘ ’ icon on the top right.
27°C
001
HSIC
Pressing the “ENTER” button once will take the user to the xtures main menu. Using the “UP” and
“DOWN” buttons you can then navigate between the different options in the main menu. Pressing the
“ENTER” button on one of these options allows you to access the sub menu where you can use the “UP”
and “DOWN” buttons to select option/value required. Once the option/value has been selected press
the “ENTER” button once more to conrm the setting.
To exit out of any of the above options, press the “MENU” button.
MAIN MENU
STATIC
PRESET COLOUR
ADDRESS
RUN MODE
PERSONALITY
SETTING
KEY
CALIB.C
INFO
www.prolight.co.uk Virtuoso 1000 Prole RGBAL User Manual
10
Page 11
Operating instructions
Static colour mode:
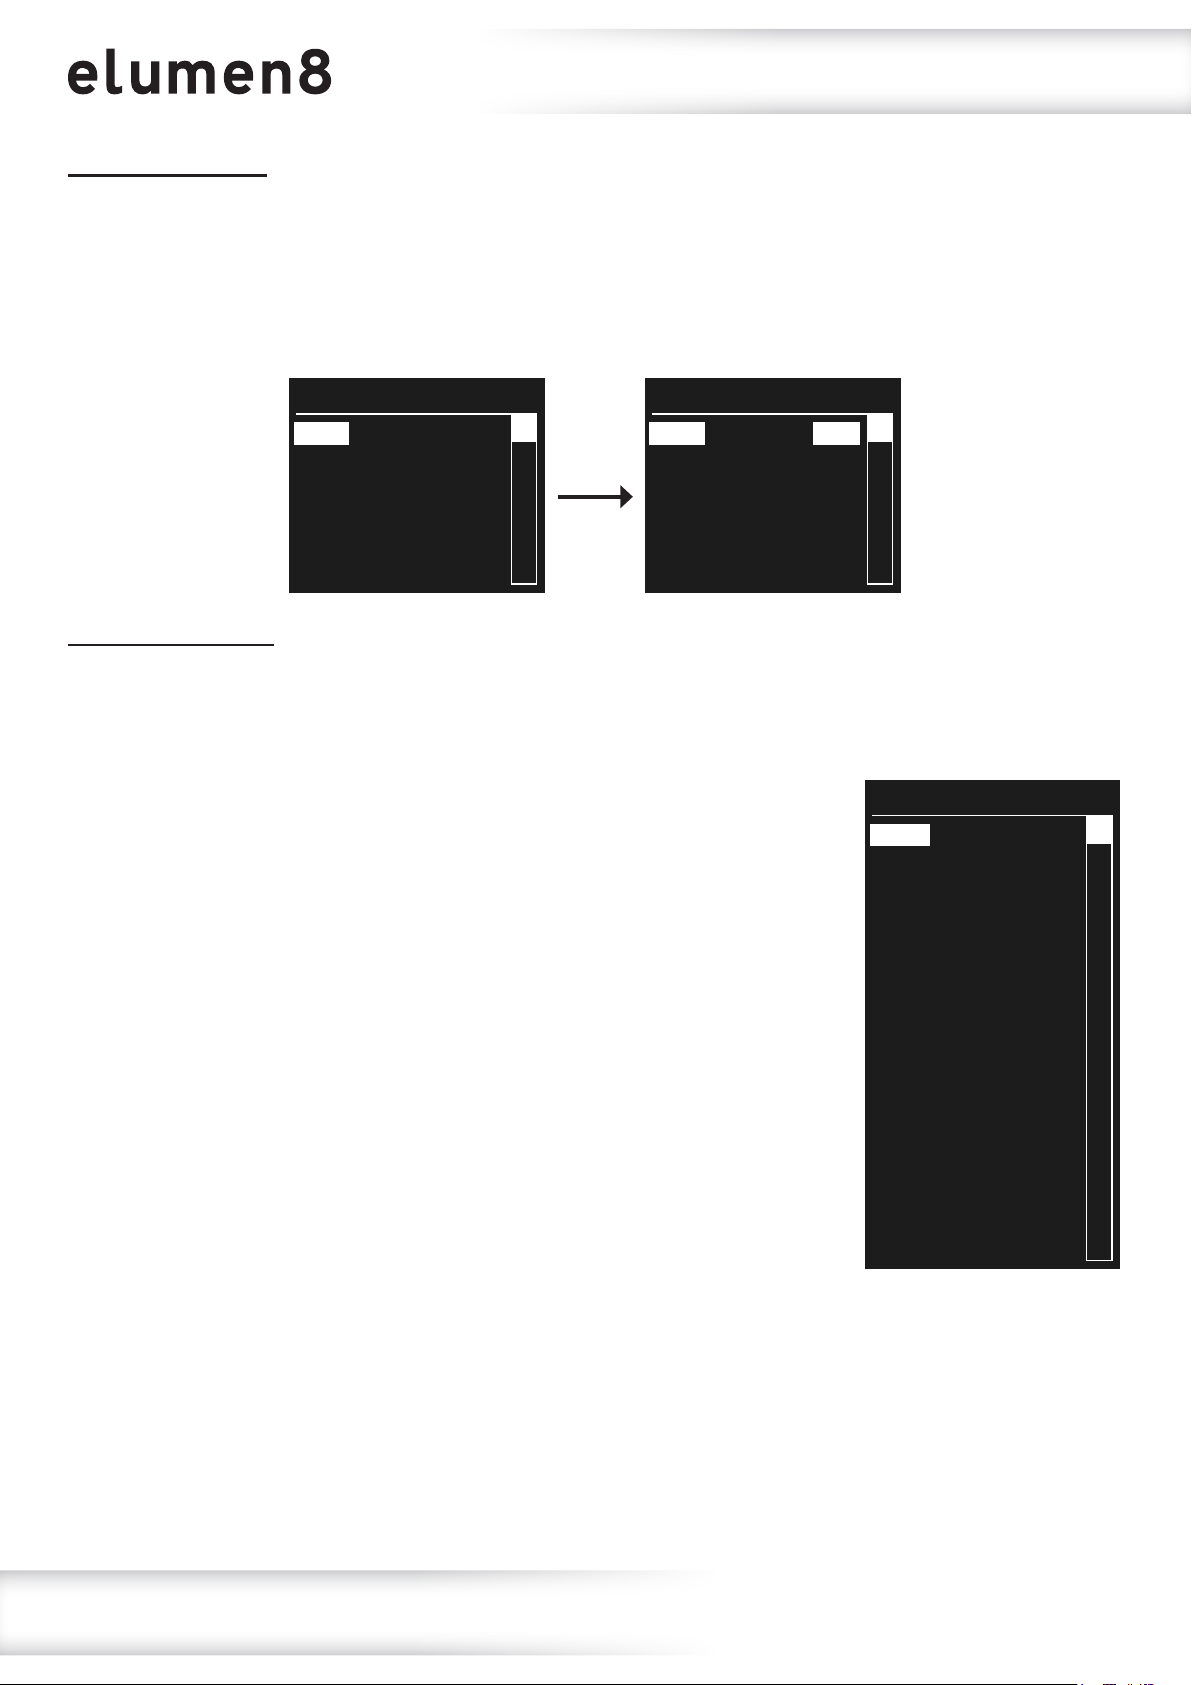
To access static colour mode, press the “ENTER” button and use the “UP” and “DOWN” buttons until
“STATIC” is highlighted on the LCD display. Press the “ENTER” button and use the “UP” and “DOWN”
buttons to select the various options. Press the “ENTER” button and use the “UP” and “DOWN” buttons
to select between “0” - “255” (Red, Green, Blue, Amber and Lime) or “0” - “25” (Strobe).
Press the “ENTER” button to conrm the setting.
STATIC
RED
GREEN
BLUE
AMBER
LIME
STROBE
STATIC
RED
GREEN
BLUE
AMBER
LIME
STROBE
255
255
255
255
255
25
Preset colour mode:
To access preset colour mode, press the “MENU” button and use the “UP” and “DOWN” buttons until
“PRESET COLOUR” is highlighted on the LCD display. Press the “ENTER” button and use the “UP” and
“DOWN” buttons to select the various colours. Press the “ENTER” button to conrm the setting.
L106 - Primary Red
R05 - Rose Tint
L194 - Surprise Pink
R54 - Special Lavender
L019 - Fire
R08 - Pale Gold
R89 - Moss Green
R86 - Pea Green
L213 - White Flame Green
R377 - Iris Purple
R80 - Primary Blue
L202 - Half C.T. Blue
L328 - Follies Pink
R3314 - Tough 1/4 Minusgreen
L101 - Yellow
L768 - Egg Yolk Yellow
PRESET COLOUR
L106
R05
L194
R54
L019
R08
R89
R86
L213
R377
R80
L202
L328
R3314
L101
L768
www.prolight.co.uk Virtuoso 1000 Prole RGBAL User Manual
11
Page 12
Operating instructions
DMX address setting:
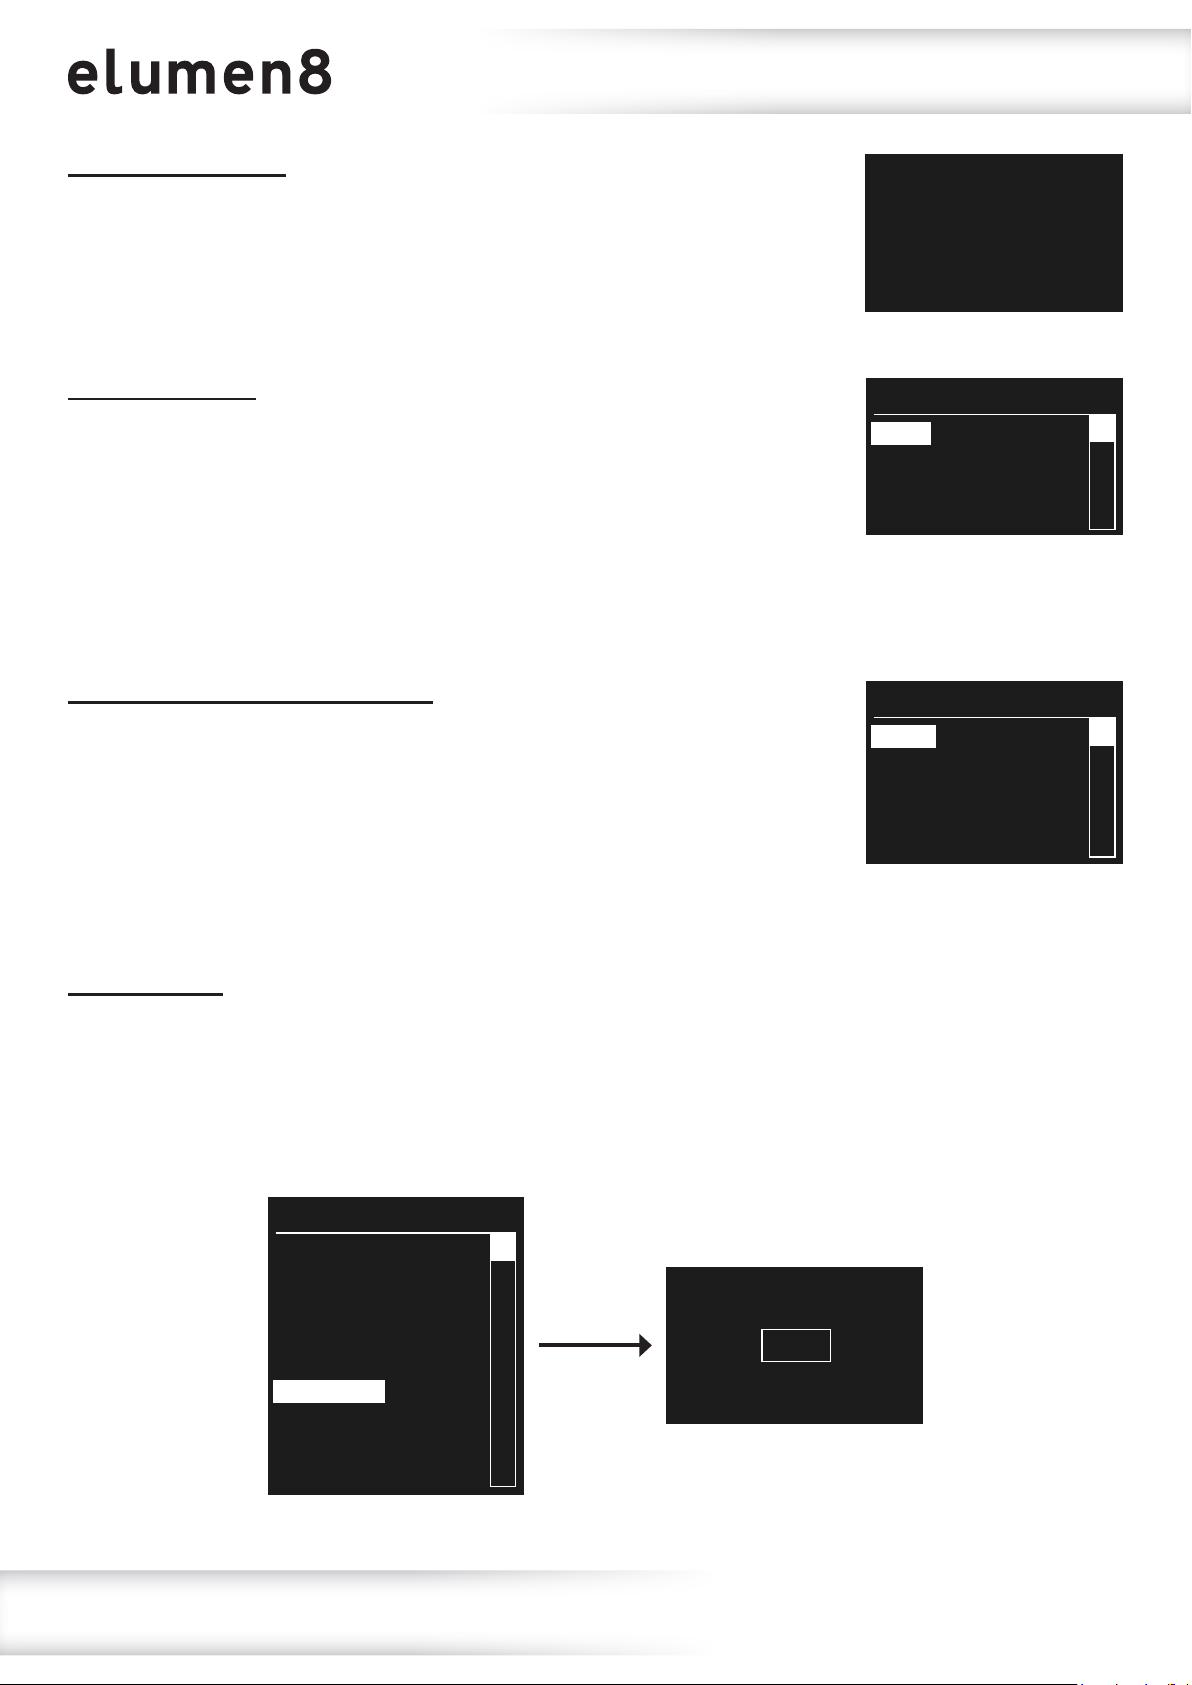
To access the xtures DMX address setting, press the “MENU” button and
use the “UP” and “DOWN” buttons until “ADDRESS” is highlighted on the
LCD display. Press the “ENTER” button and use the “UP” and “DOWN”
buttons to select between “001” - “512”.
Press the “ENTER” button to conrm the setting.
Run mode setting:
To access the xtures run mode setting, press the “MENU” button and use
the “UP” and “DOWN” buttons until “RUN MODE” is highlighted on the LCD
display. Press the “ENTER” button and use the “UP” and “DOWN” buttons
to select between “DMX” or “SLAVE”.
Press the “ENTER” button to conrm the setting.
DMX - Use this setting when using via a DMX controller.
SLAVE - Use this setting when using the xture via master/slave.
Channel mode (personality) setting:
To access the xtures channel mode (personality)setting, press the “MENU”
button and use the “UP” and “DOWN” buttons until “PERSONALITY” is
highlighted on the LCD display. Press the “ENTER” button and use the “UP”
and “DOWN” buttons to select between “HSIC” (8 channel),
“SIMPLE” (8 channel), “SDO” (6 channel), “COLOUR 8BIT” (11 channel)
or “COLOUR 16BIT” (17 channel).
Press the “ENTER” button to conrm the setting.
ADDRESS
001
RUN MODE
DMX
SLAVE
PERSONALITY
HSIC
SIMPLE
SDO
COLOUR 8BIT
COLOUR 16BIT
Settings menu:
To access the xtures settings menu, press the “MENU” button and use the “UP” and “DOWN” buttons
until “SETTING” is highlighted on the LCD display. Press the “ENTER” button. “Pass code” will now
be displayed and a button press combination will need to be entered. To do this press the buttons in
the following order; “UP”, “DOWN”, “UP”, “DOWN”, “ENTER”. You can now access the sub menus as
described below.
MAIN MENU
STATIC
PRESET COLOUR
ADDRESS
RUN MODE
PERSONALITY
SETTING
KEY
CALIB.C
INFO
Pass code:
www.prolight.co.uk Virtuoso 1000 Prole RGBAL User Manual
12
Page 13
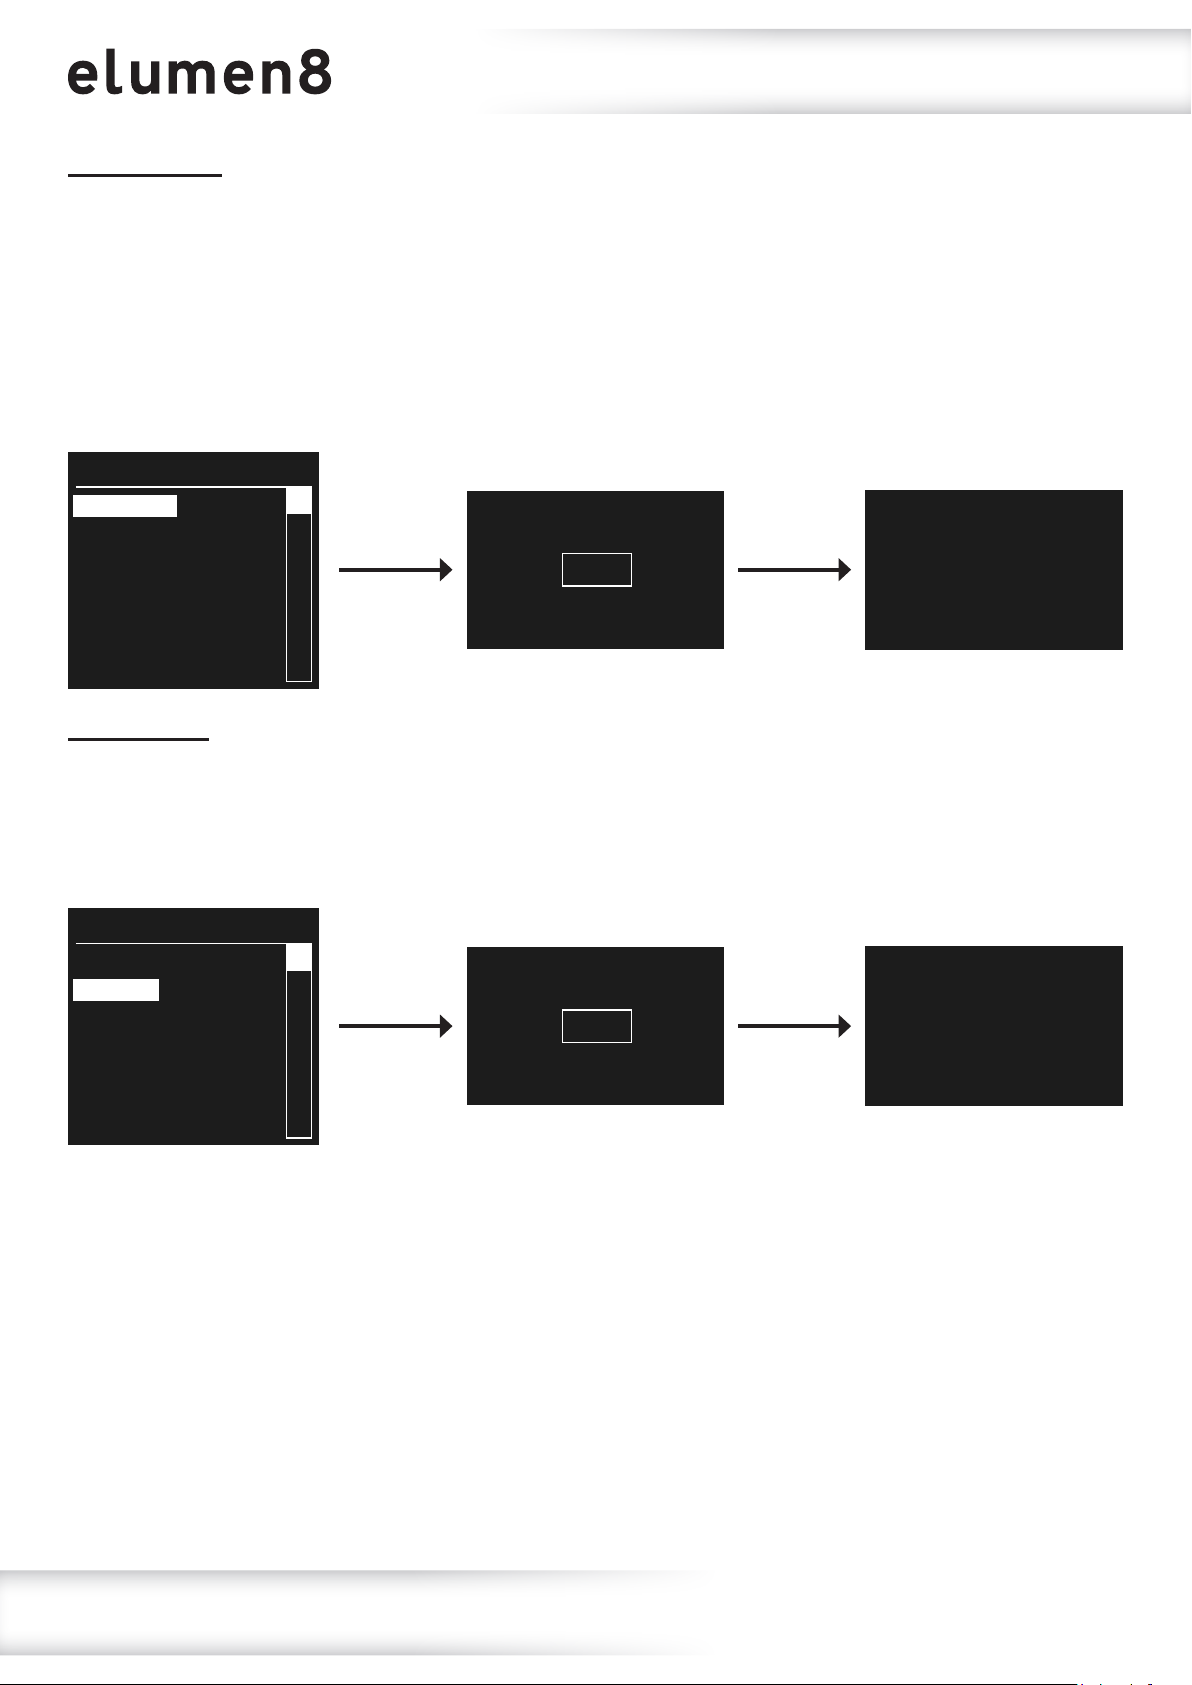
Operating instructions
Upload setting:
This setting allows custom programs to be sent to Slave xtures.
To access the xtures upload setting, use the “UP” and “DOWN” buttons to select “UPLOAD”.
Press the “ENTER” button. “Pass code” will now be displayed and a button press combination will
need to be entered. To do this press the buttons in the following order; “UP”, “DOWN”, “UP”, “DOWN”,
“ENTER”. The unit will display “SEND. . . ” and the front lens will illuminate yellow whilst exporting to
the slave units. The front lens will turn green if the export has completed successfully. If there are any
problems whilst exporting the front lens will turn red.
SETTING
UPLOAD
RESET
DIMMER
DMX FAIL
PERFORMANCE
PWM RATE
FULL
POWER CCT
Pass code:
SEND. . .
Reset setting:
To access the xtures reset setting, use the “UP” and “DOWN” buttons to select “RESET”. Press the
“ENTER” button. “Pass code” will now be displayed and a button press combination will need to be
entered. To do this press the buttons in the following order; “UP”, “DOWN”, “UP”, “DOWN”, “ENTER”.
The unit will display “RESET. . . ” and the xtures settings will return to the factory settings.
SETTING
UPLOAD
RESET
DIMMER
DMX FAIL
PERFORMANCE
PWM RATE
FULL
POWER CCT
Pass code:
RESET. . .
www.prolight.co.uk Virtuoso 1000 Prole RGBAL User Manual
13
Page 14
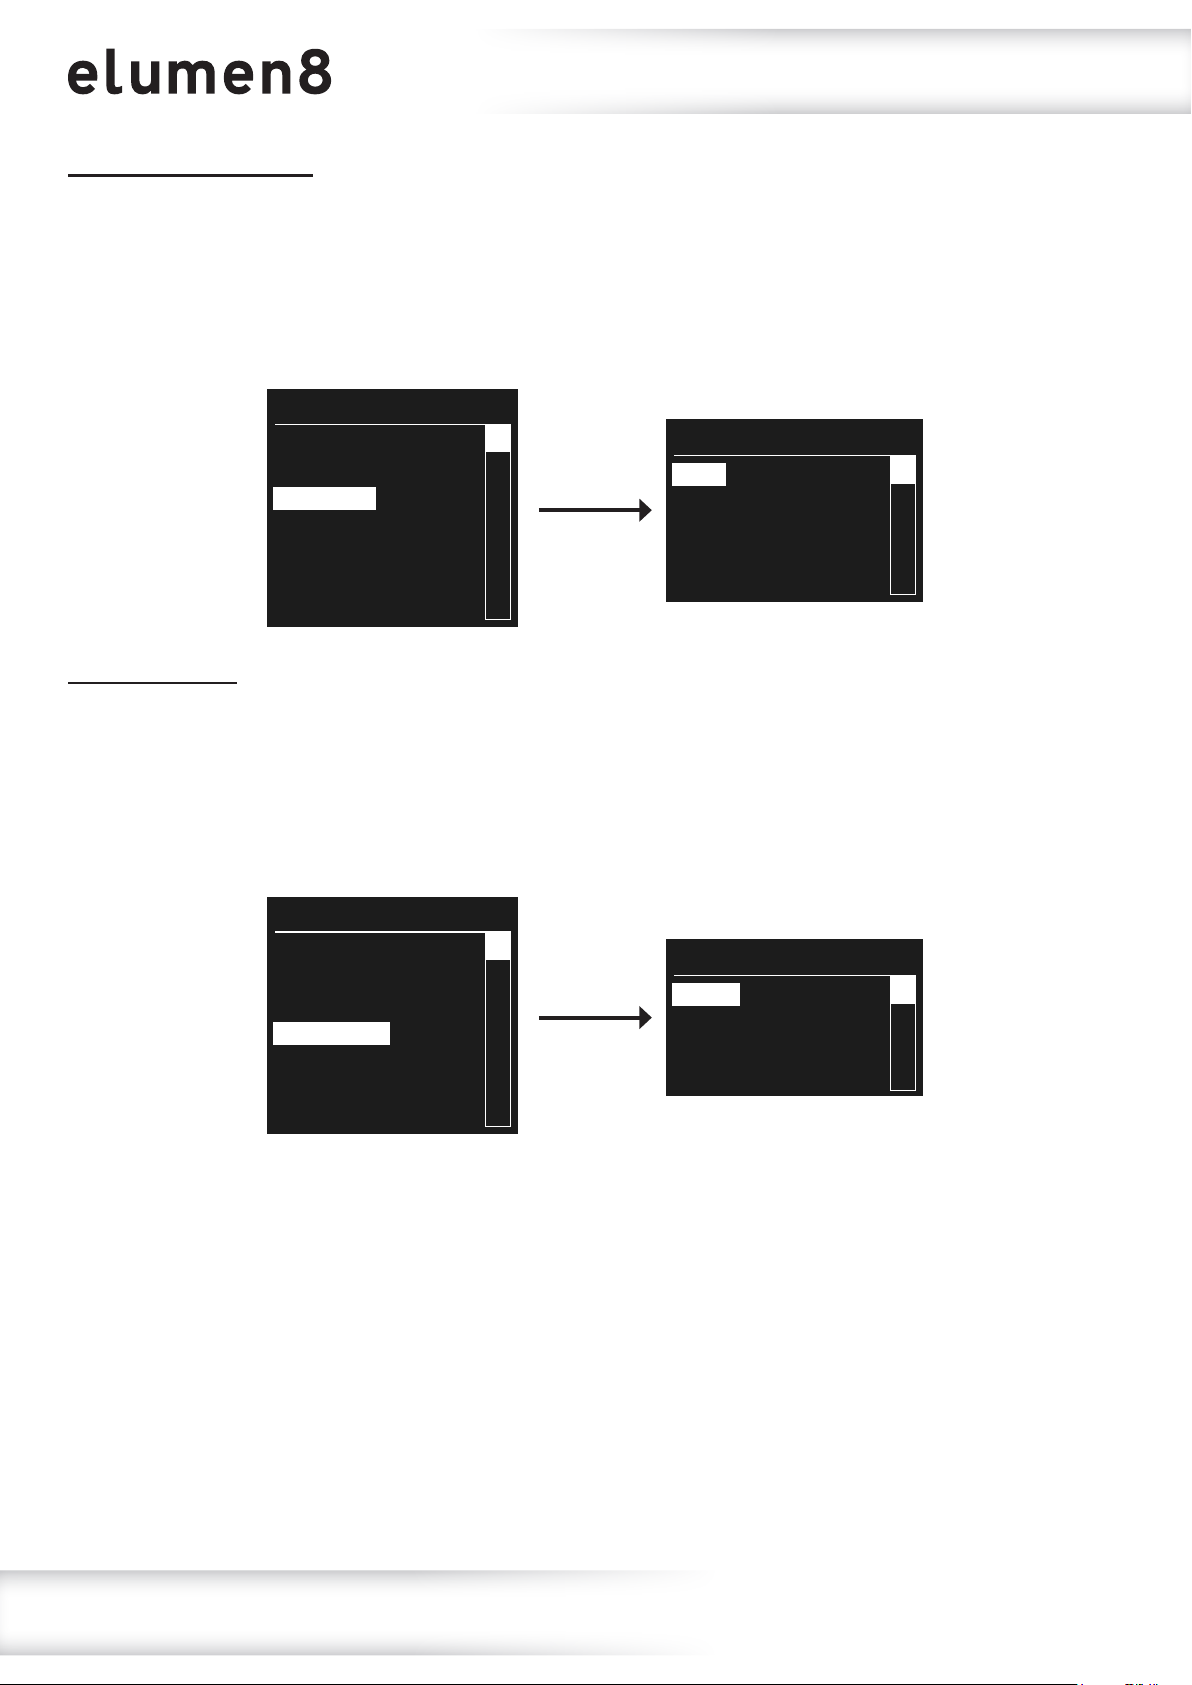
Operating instructions
DIM4
Dimming speed setting:
To access the dimming speed setting, use the “UP” and “DOWN” buttons to select “DIMMER”. Press
the “ENTER” button and use the “UP” and “DOWN” buttons to select between “OFF”, “DIM1”, “DIM2”,
“DIM3”, and “DIM4”. Press the “ENTER” button to conrm the setting.
DIM1-DIM4 - Dimmer speed fast-slow.
OFF - Dimmer speed off.
SETTING
UPLOAD
RESET
DIMMER
DMX FAIL
PERFORMANCE
PWM RATE
FULL
POWER CCT
DIMMER
OFF
DIM1
DIM2
DIM3
DMX fail setting:
To access the DMX fail setting, use the “UP” and “DOWN” buttons to select “DMX FAIL”. Press the
“ENTER” button and use the “UP” and “DOWN” buttons to select between “SAVE” and “BLACK”.
Press the “ENTER” button to conrm the setting.
SAVE - The xture will remember the last DMX signal.
BLACK - The xture will blackout when the DMX signal is lost.
SETTING
UPLOAD
RESET
DIMMER
DMX FAIL
PERFORMANCE
PWM RATE
FULL
POWER CCT
DMX FAIL
SAVE
BLACK
www.prolight.co.uk Virtuoso 1000 Prole RGBAL User Manual
14
Page 15
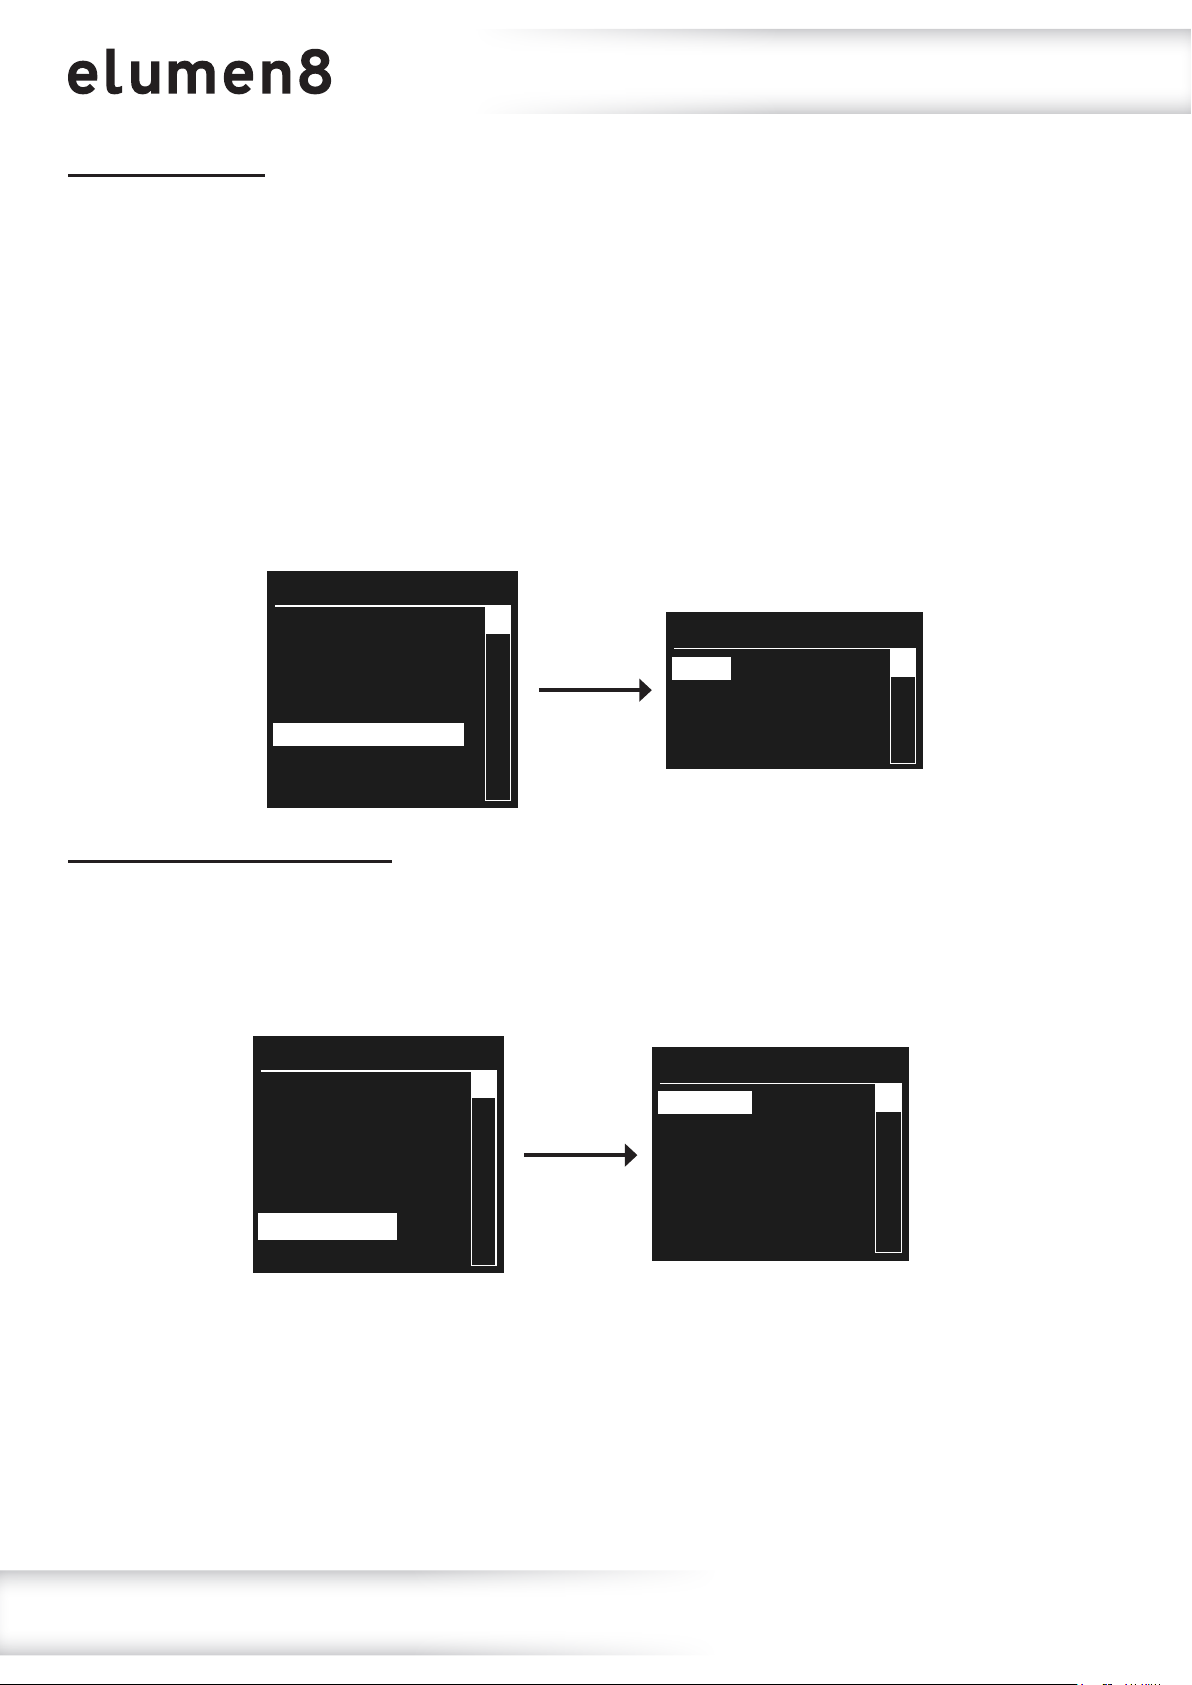
Operating instructionsOperating instructions
Fan control setting:
This setting allows the performance of the cooling fan to be adjusted.
To access the fan control setting, use the “UP” and “DOWN” buttons to select “PERFORMANCE”. Press
the “ENTER” button and use the “UP” and “DOWN” buttons to select between “LIVE”, “STUDIO” and
“POWER”. Press the “ENTER” button to conrm the setting.
LIVE - This is the default performance mode. This provides a compromise between both output quality
and noise level.
STUDIO - This is a noise level performance mode designed to operate at the lowest noise possible but
with a moderate output.
POWER - This is an output performance mode designed to operate at full power with no consideration
for the noise level.
SETTING
UPLOAD
RESET
DIMMER
DMX FAIL
PERFORMANCE
PWM RATE
FULL
POWER CCT
PERFORMANCE
LIVE
STUDIO
POWER
PWM rate setting (refresh rate):
This setting allows the refresh rate to be adjusted.
To access the PWM rate setting, use the “UP” and “DOWN” buttons to select “PWM RATE”. Press
the “ENTER” button and use the “UP” and “DOWN” buttons to select between “600Hz”, “1200Hz”,
“2000Hz”, “2400Hz”, “6000Hz”, and “25000Hz”. Press the “ENTER” button to conrm the setting.
SETTING
UPLOAD
RESET
DIMMER
DMX FAIL
PERFORMANCE
PWM RATE
FULL
POWER CCT
PWM RATE
600Hz
1200HZ
2000HZ
2400HZ
6000HZ
25000HZ
www.prolight.co.uk Virtuoso 1000 Prole RGBAL User Manual
15
Page 16
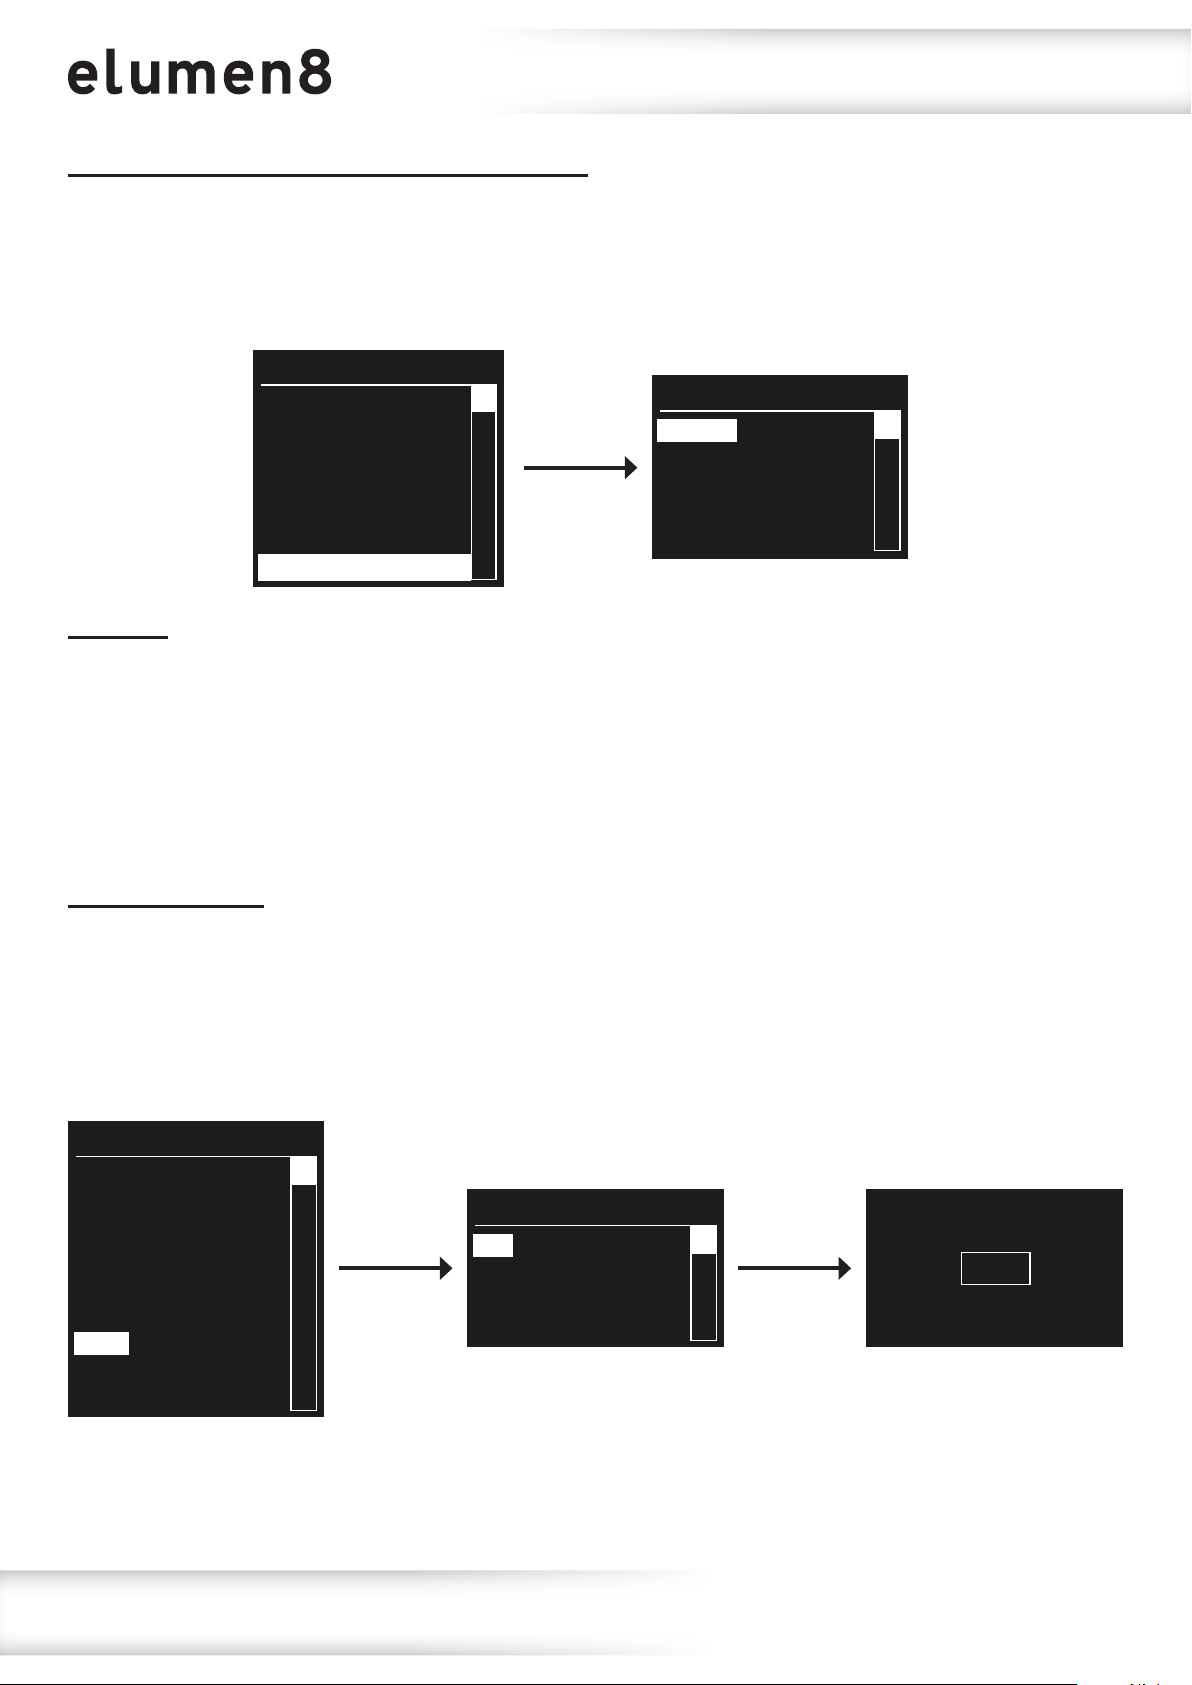
Operating instructions
Power CCT setting (correlated colour temperature):
This setting allows the colour temperature to be adjusted.
To access the CCT setting, use the “UP” and “DOWN” buttons to select “FULL POWER CCT”. Press the
“ENTER” button and use the “UP” and “DOWN” buttons to select between “3200K”, “4200K”, “5600K”,
“10000K”, and “NORMAL”. Press the “ENTER” button to conrm the setting.
SETTING
FULL POWER CCT
3200K
4200K
5600K
10000K
NORMAL
XY Offset:
UPLOAD
RESET
DIMMER
DMX FAIL
PERFORMANCE
PWM RATE
FULL
POWER CCT
There is also an “XY OFFSET”, sub menu within the settings menu this can be set between “HIDE”
(default) and “SHOW”. When set to show this will display the XY OFFSET calibrations in some menus.
These calibrations have been set when the xture was being manufactured to ensure the colour
consistency throughout xtures from different batches. These settings should NOT be changed.
If these settings are accidentally changed then the “RESET” function can be used to reset them to the
defaults (see page 13).
Safety lock setting:
To access safety lock setting, press the “ENTER” button and use the “UP” and “DOWN” buttons until
“KEY” is highlighted on the LCD display. Press the “ENTER” button and use the “UP” and “DOWN”
buttons to between “ON” and “OFF”. Press the “ENTER” button to conrm the setting.
When this is set to ON, the passcode will need to be entered each time the display goes off.
The passcode sequence is; “UP”, “DOWN”, “UP”, “DOWN”, “ENTER”.
MAIN MENU
STATIC
PRESET COLOUR
ADDRESS
RUN MODE
PERSONALITY
SETTING
KEY
CALIB.C
INFO
KEY
ON
OFF
Pass code:
www.prolight.co.uk Virtuoso 1000 Prole RGBAL User Manual
16
Page 17
Operating instructionsOperating instructions
X FINE
000
Colour calibration setting:
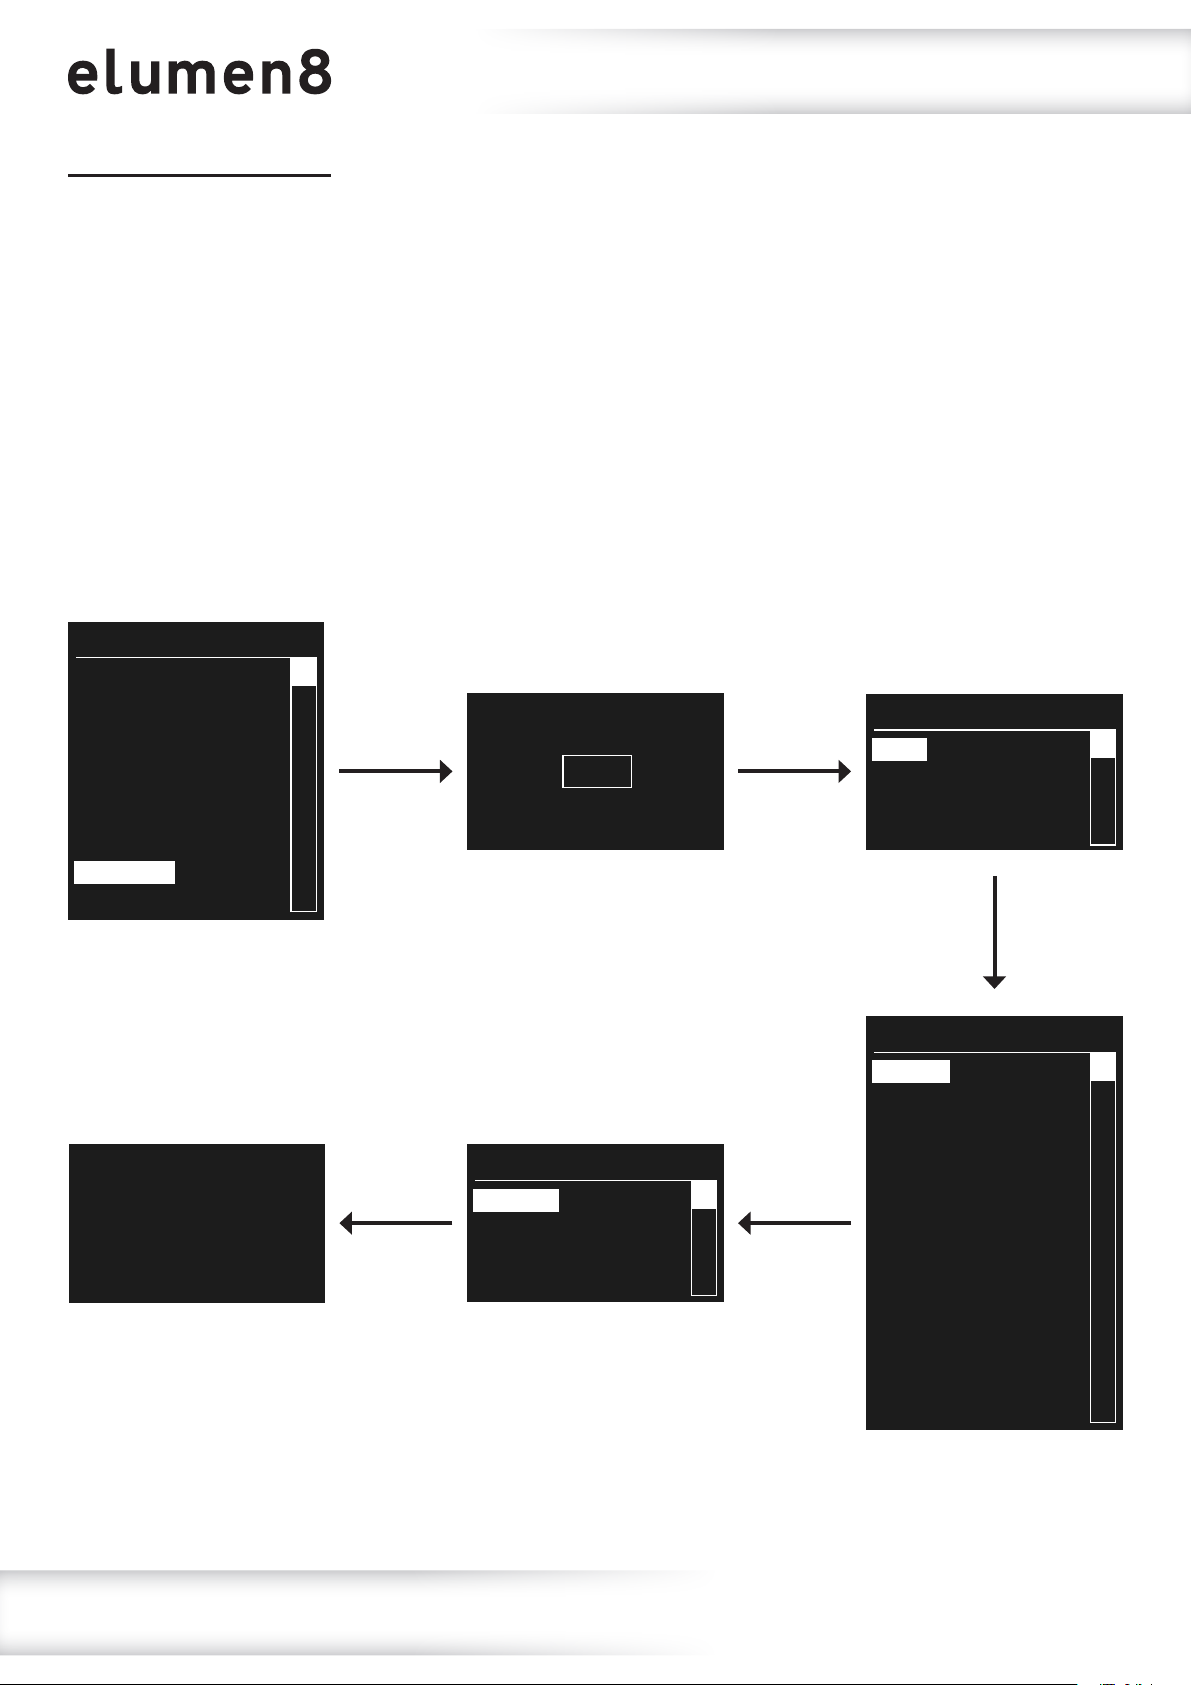
To access the colour calibration setting, press the “ENTER” button and use the “UP” and “DOWN”
buttons until “CALIB.CCT” is highlighted on the LCD display. Press the “ENTER” button.
“Pass code” will now be displayed and a button press combination will need to be entered.
To do this press the buttons in the following order; “UP”, “DOWN”, “UP”, “DOWN”, “ENTER”.
“CCT” will be displayed, press the “ENTER” button and the “UP” and “DOWN” buttons to select between
“2700K”, “3000K”, “3200K”, “3500K”, “4000K”, “4200K”, “4500K”, “5600K”, “6000K”, “6500K”,
“7200K”, “8000K” and “10000K”.
Press the “ENTER” button to enter the selected menu. Now use the “UP” and “DOWN” buttons to select
between “X FINE”, and “Y FINE” (these settings will adjust the tint of the CCT). Press the “ENTER” button
and use the “UP” and “DOWN” buttons to adjust between “-200”, and “+200”.
Press the “ENTER” button to conrm the setting.
Please note: XY Offset must be set to show to adjust colour calibration (see page 16).
MAIN MENU
STATIC
PRESET COLOUR
ADDRESS
RUN MODE
PERSONALITY
SETTING
KEY
CALIB.C
INFO
Pass code:
2700K
X FINE
Y FINE
CALIB.C
CCT
CALIB.CCT
2700K
3000K
3200K
3500K
4000K
4200K
4500K
5600K
6000K
6500K
7200K
8000K
10000K
www.prolight.co.uk Virtuoso 1000 Prole RGBAL User Manual
17
Page 18
Operating instructionsOperating instructions
Fixture information:
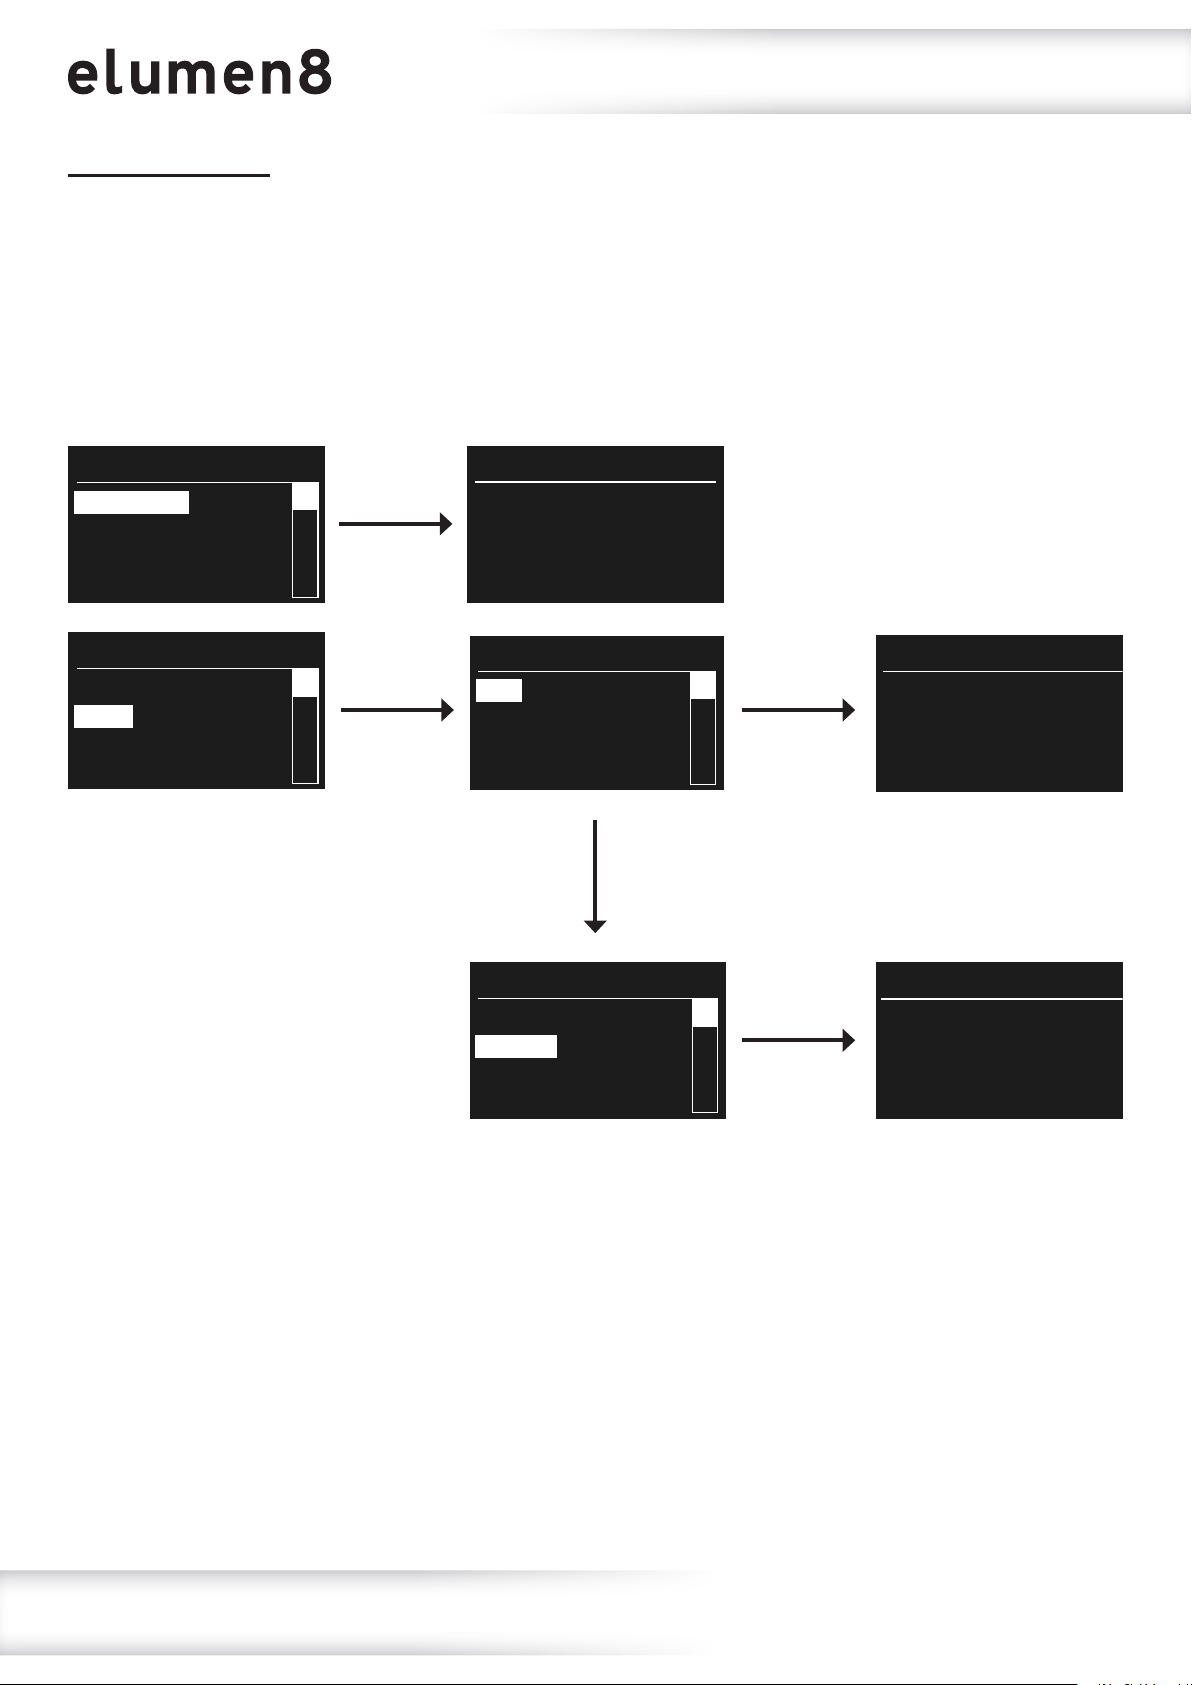
To access the xture information press the “ENTER” button and use the “UP” and “DOWN” buttons until
“INFO” is highlighted on the LCD display. Press the “ENTER” button and use the “UP” and “DOWN”
buttons to select between “VERSION” and “RDM”. If VERSION is highlighted press the “ENTER” button
and the version number and manufacture date will be displayed. If RDM is highlighted, press the
“ENTER” button and use the “UP” and “DOWN” buttons to select between “UID” and “LABEL”. If UID is
highlighted press the “ENTER” button and the xtures RDM UID will be displayed. If LABEL is highlighted
press the “ENTER” button and the model number will be displayed.
INFO
VERSION
RDM
INFO
VERSION
RDM
VERSION
xx/xx/xxxx
RDM
UID
LABEL
RDM
UID
LABEL
Vxx
UID
0x09A5xxxxxxxx
LABEL
Virtuoso
1000P-5C
www.prolight.co.uk Virtuoso 1000 Prole RGBAL User Manual
18
Page 19
Operating instructions
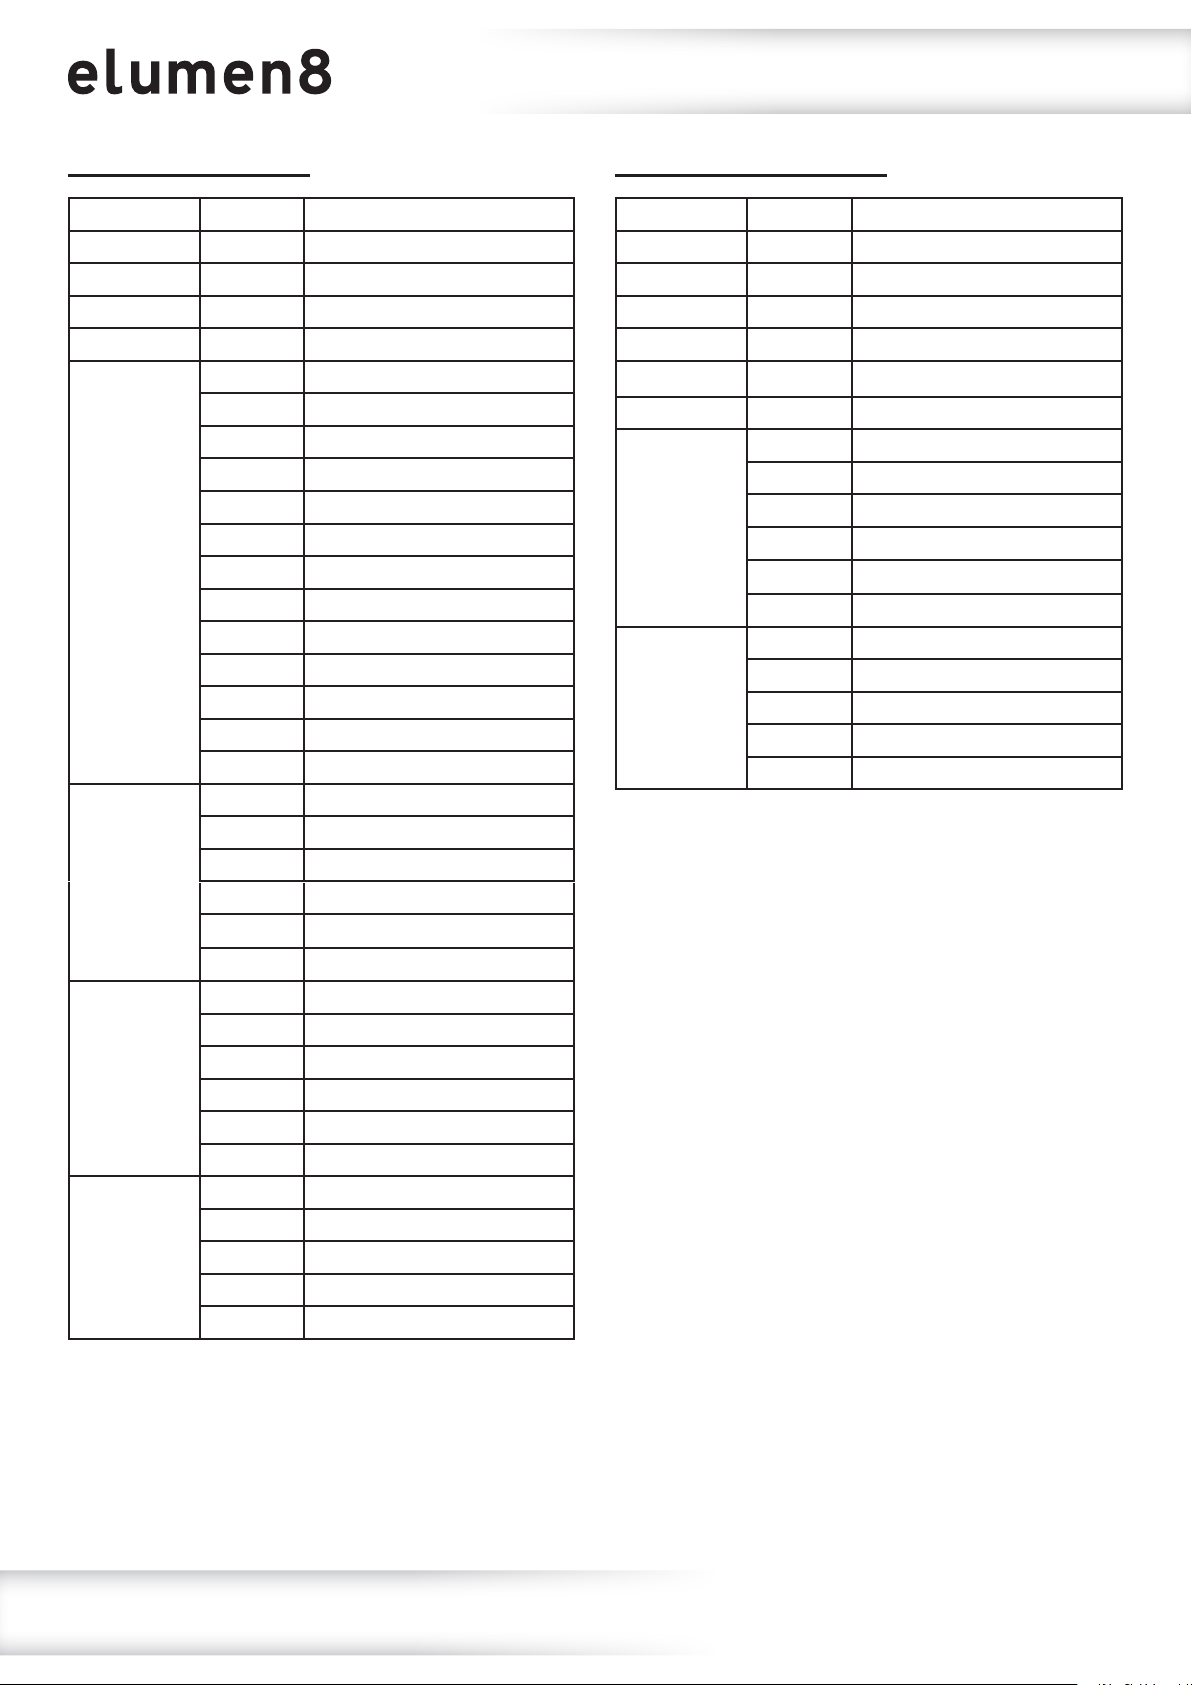
8 channel mode (HSIC):
Channel Value Function
CH1 000-255 Intensity (0-100%)
CH2 000-255 Hue
CH3 000-255 Hue ne
CH4 000-255 Saturation
000-010 No function
011-030 2700K
031-050 3000K
051-070 3200K
071-090 3500K
091-110 4000K
CH5
CH6
CH7
CH8
111-130 4200K
131-150 4500K
151-170 5600K
171-190 6000K
191-210 6500K
211-230 7200K
231-255 8000K
000-009 No function
010-099 Strobe (slow-fast)
100-109 No function
110-179 Lightning strobe
180-189 No function
190-255 Random strobe
000-009 Dimming mode (set in menu)
010-029 No function
030-069 Dimming speed 1
070-129 Dimming speed 2
130-189 Dimming speed 3
190-255 Dimming speed 4
000-009 No function
010-080 Live performance mode
081-160 Studio performance mode
161-240 Power performance mode
241-255 No function
8 channel mode (SIMPLE):
Channel Value Function
CH1 000-255 Master dimmer (0-100%)
CH2 000-255 Red (0-100%)
CH3 000-255 Green (0-100%)
CH4 000-255 Blue (0-100%)
CH5 000-255 Amber (0-100%)
CH6 000-255 Lime (0-100%)
000-009 No function
010-099 Strobe (slow-fast)
CH7
CH8
100-109 No function
110-179 Lightning strobe
180-189 No function
190-255 Random strobe
000-009 No function
010-080 Live performance mode
081-160 Studio performance mode
161-240 Power performance mode
241-255 No function
www.prolight.co.uk Virtuoso 1000 Prole RGBAL User Manual
19
Page 20
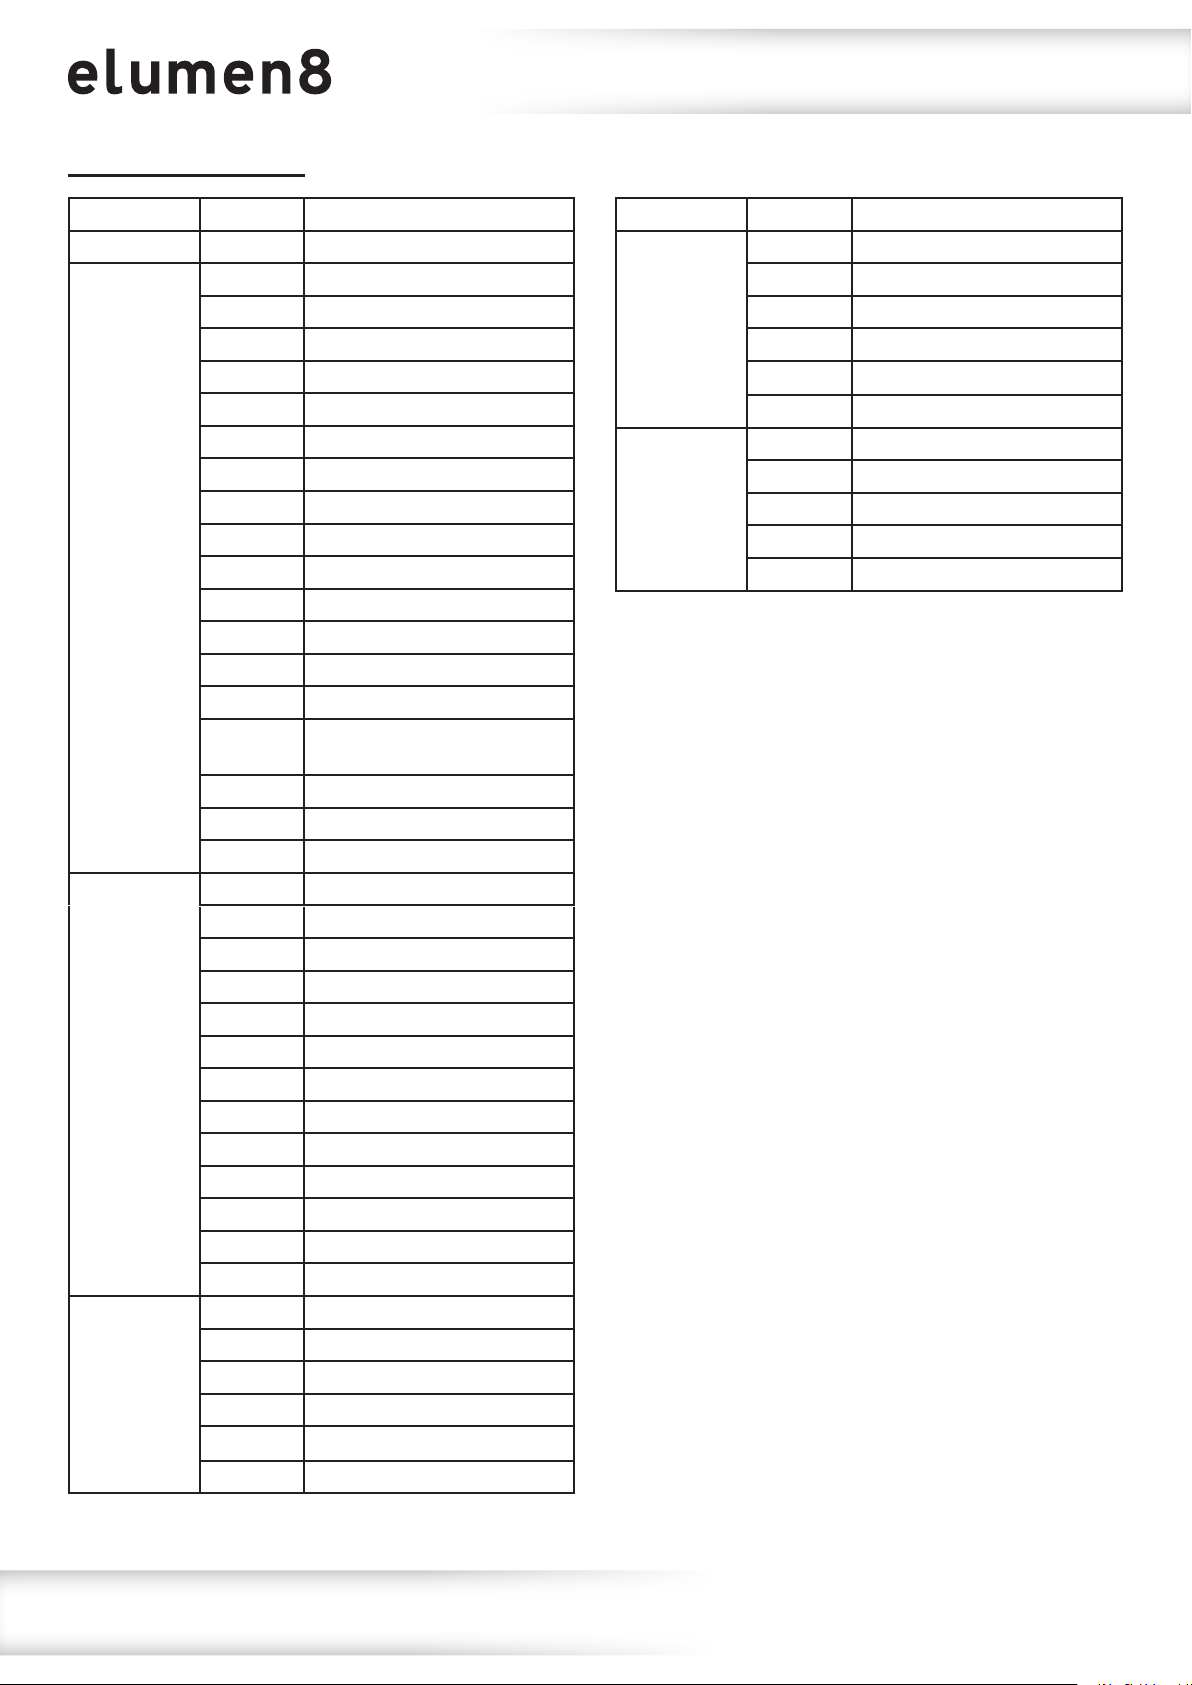
6 channel mode (SDO):
Operating instructions
Channel Value Function
CH1 000-255 Master dimmer (0-100%)
000-010 No function
011-020 L106 - Primary Red
021-030 R05 - Rose Tint
031-040 L194 - Surprise Pink
041-050 R54 - Special Lavender
051-060 L019 - Fire
061-070 R08 - Pale Gold
071-080 R89 - Moss Green
081-090 R86 - Pea Green
CH2
CH3
CH4
091-100 L213 - White Flame Green
101-110 R377 - Iris Purple
111-120 R80 - Primary Blue
121-130 L202 - Half C.T. Blue
131-140 L328 - Follies Pink
141-150
151-160 L101 - Yellow
161-170 L768 - Egg Yolk Yellow
171-255 No function
000-010 No function
011-030 2700K
031-050 3000K
051-070 3200K
071-090 3500K
091-110 4000K
111-130 4200K
131-150 4500K
151-170 5600K
171-190 6000K
191-210 6500K
211-230 7200K
231-255 8000K
000-009 No function
010-099 Strobe (slow-fast)
100-109 No function
110-179 Lightning strobe
180-189 No function
190-255 Random strobe
R3314 - Tough 1/4
Minusgreen
Channel Value Function
000-009 Dimming mode (set in menu)
010-029 No function
CH5
CH6
030-069 Dimming speed 1
070-129 Dimming speed 2
130-189 Dimming speed 3
190-255 Dimming speed 4
000-009 No function
010-080 Live performance mode
081-160 Studio performance mode
161-240 Power performance mode
241-255 No function
www.prolight.co.uk Virtuoso 1000 Prole RGBAL User Manual
20
Page 21
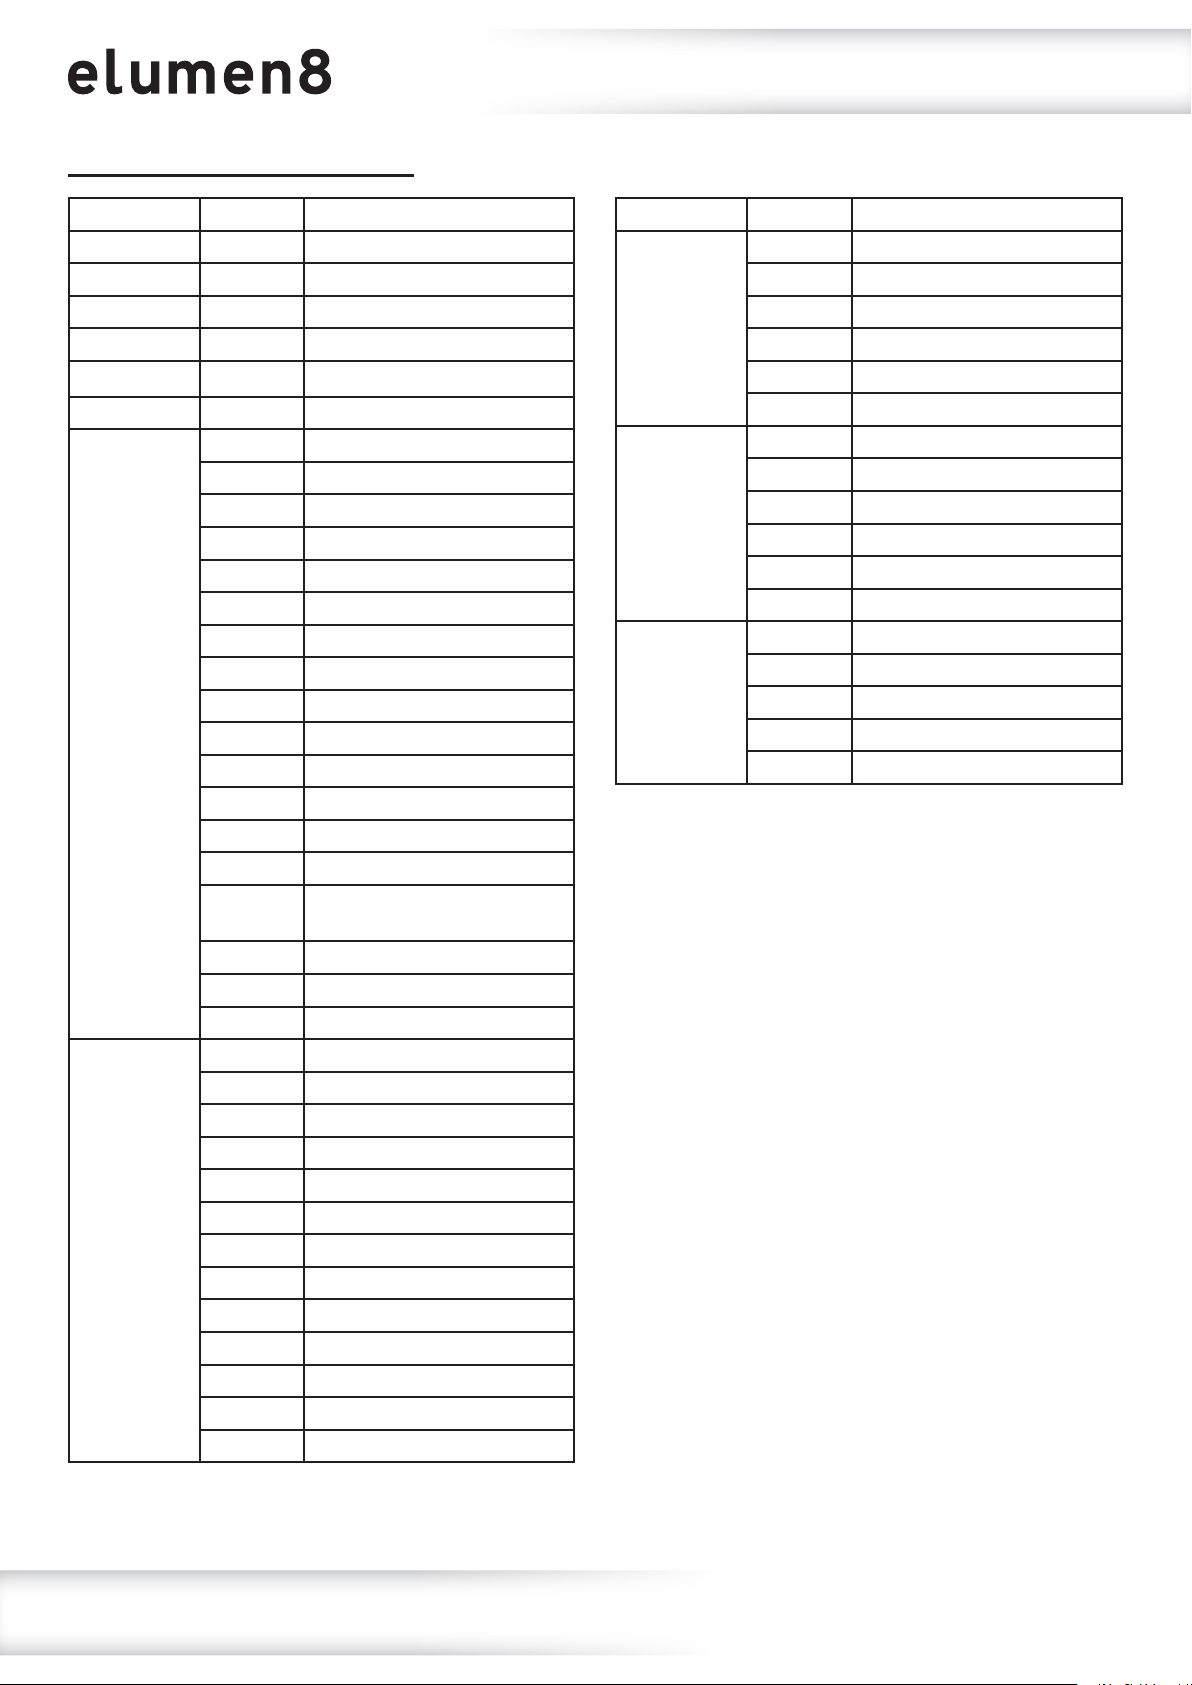
11 channel mode (COLOUR 8BIT):
Operating instructions
Channel Value Function
CH1 000-255 Master dimmer (0-100%)
CH2 000-255 Red (0-100%)
CH3 000-255 Green (0-100%)
CH4 000-255 Blue (0-100%)
CH5 000-255 Amber (0-100%)
CH6 000-255 Lime (0-100%)
000-010 No function
011-020 L106 - Primary Red
021-030 R05 - Rose Tint
031-040 L194 - Surprise Pink
041-050 R54 - Special Lavender
051-060 L019 - Fire
061-070 R08 - Pale Gold
071-080 R89 - Moss Green
081-090 R86 - Pea Green
CH7
CH8
091-100 L213 - White Flame Green
101-110 R377 - Iris Purple
111-120 R80 - Primary Blue
121-130 L202 - Half C.T. Blue
131-140 L328 - Follies Pink
141-150
151-160 L101 - Yellow
161-170 L768 - Egg Yolk Yellow
171-255 No function
000-010 No function
011-030 2700K
031-050 3000K
051-070 3200K
071-090 3500K
091-110 4000K
111-130 4200K
131-150 4500K
151-170 5600K
171-190 6000K
191-210 6500K
211-230 7200K
231-255 8000K
R3314 - Tough 1/4
Minusgreen
Channel Value Function
000-009 No function
010-099 Strobe (slow-fast)
CH9
CH10
CH11
100-109 No function
110-179 Lightning strobe
180-189 No function
190-255 Random strobe
000-009 Dimming mode (set in menu)
010-029 No function
030-069 Dimming speed 1
070-129 Dimming speed 2
130-189 Dimming speed 3
190-255 Dimming speed 4
000-009 No function
010-080 Live performance mode
081-160 Studio performance mode
161-240 Power performance mode
241-255 No function
www.prolight.co.uk Virtuoso 1000 Prole RGBAL User Manual
21
Page 22
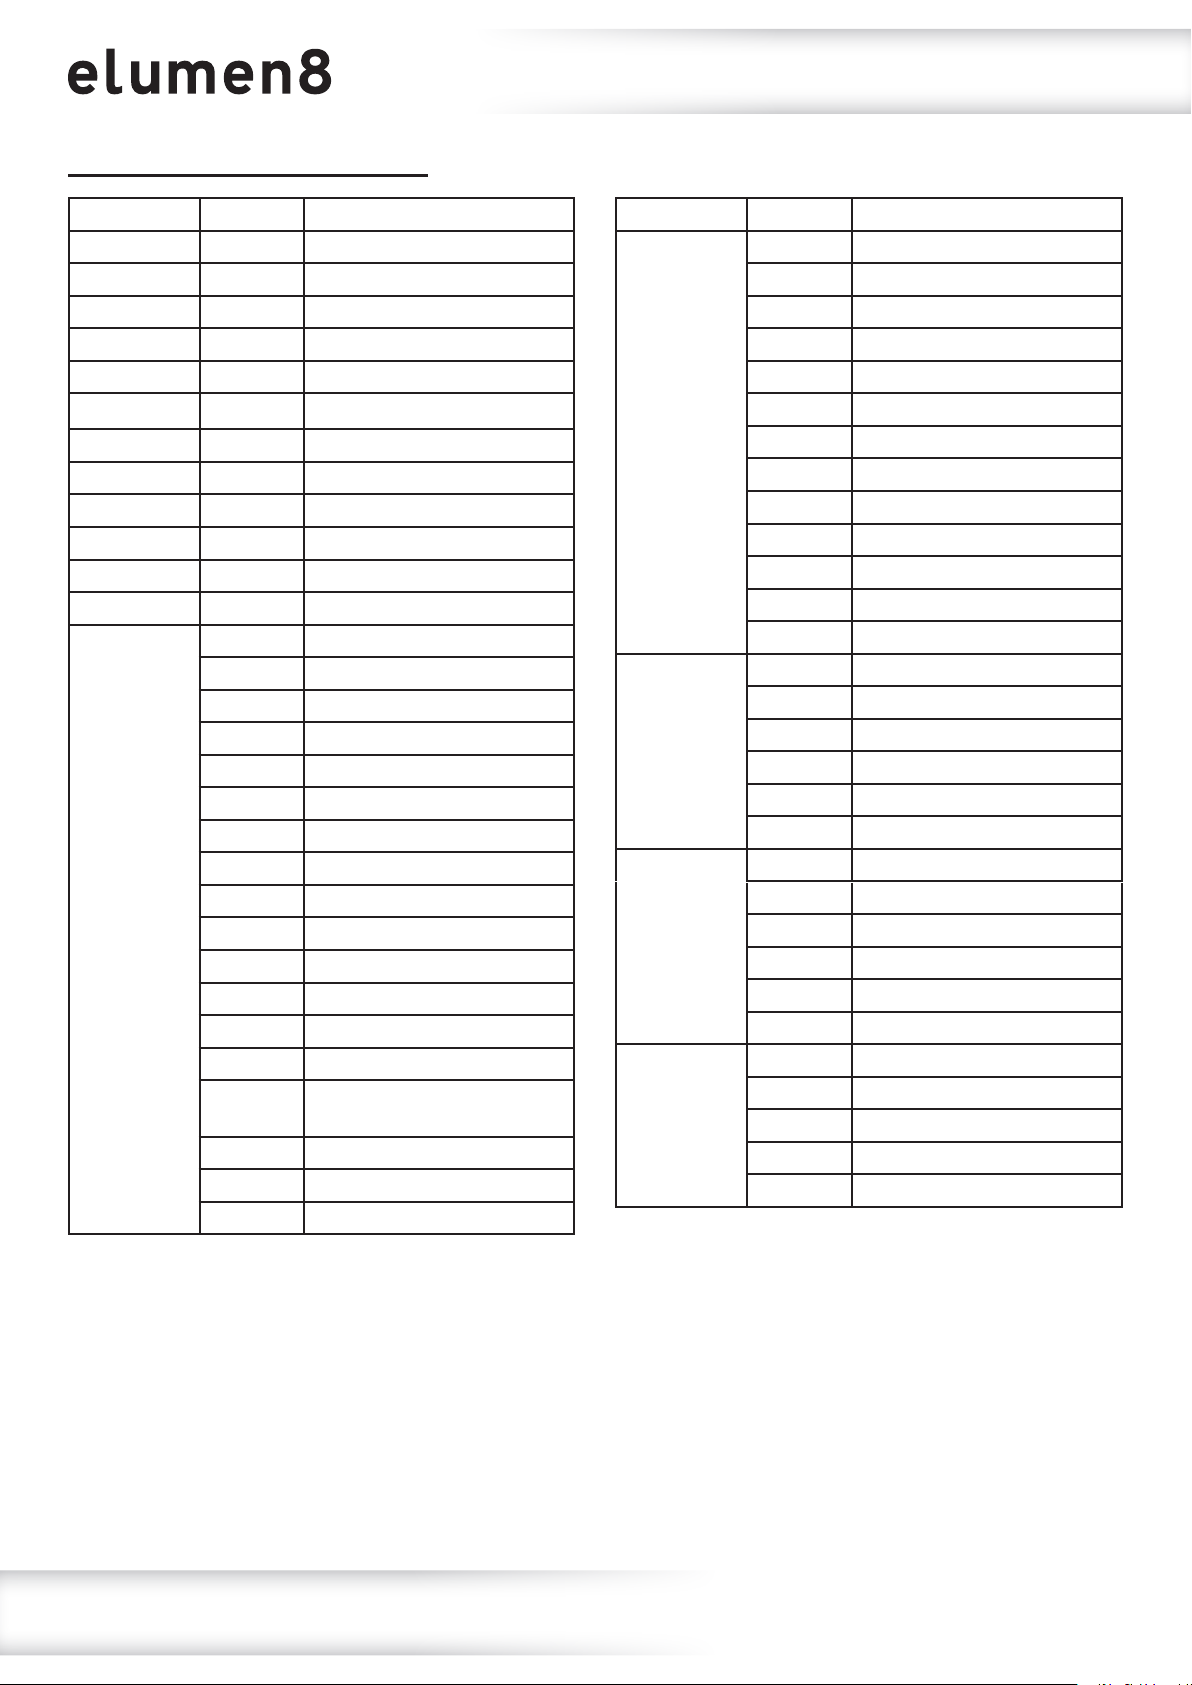
17 channel mode (COLOUR 16BIT):
Operating instructions
Channel Value Function
CH1 000-255 Master dimmer (0-100%)
CH2 000-255 Dimmer ne (0-100%)
CH3 000-255 Red (0-100%)
CH4 000-255 Red ne (0-100%)
CH5 000-255 Green (0-100%)
CH6 000-255 Green ne (0-100%)
CH7 000-255 Blue (0-100%)
CH8 000-255 Blue ne (0-100%)
CH9 000-255 Amber (0-100%)
CH10 000-255 Amber ne (0-100%)
CH11 000-255 Lime (0-100%)
CH12 000-255 Lime ne (0-100%)
000-010 No function
011-020 L106 - Primary Red
021-030 R05 - Rose Tint
031-040 L194 - Surprise Pink
041-050 R54 - Special Lavender
051-060 L019 - Fire
061-070 R08 - Pale Gold
071-080 R89 - Moss Green
081-090 R86 - Pea Green
CH13
091-100 L213 - White Flame Green
101-110 R377 - Iris Purple
111-120 R80 - Primary Blue
121-130 L202 - Half C.T. Blue
131-140 L328 - Follies Pink
141-150
151-160 L101 - Yellow
161-170 L768 - Egg Yolk Yellow
171-255 No function
R3314 - Tough 1/4
Minusgreen
Channel Value Function
000-010 No function
011-030 2700K
031-050 3000K
051-070 3200K
071-090 3500K
091-110 4000K
CH14
CH15
CH16
CH17
111-130 4200K
131-150 4500K
151-170 5600K
171-190 6000K
191-210 6500K
211-230 7200K
231-255 8000K
000-009 No function
010-099 Strobe (slow-fast)
100-109 No function
110-179 Lightning strobe
180-189 No function
190-255 Random strobe
000-009 Dimming mode (set in menu)
010-029 No function
030-069 Dimming speed 1
070-129 Dimming speed 2
130-189 Dimming speed 3
190-255 Dimming speed 4
000-009 No function
010-080 Live performance mode
081-160 Studio performance mode
161-240 Power performance mode
241-255 No function
www.prolight.co.uk Virtuoso 1000 Prole RGBAL User Manual
22
Page 23
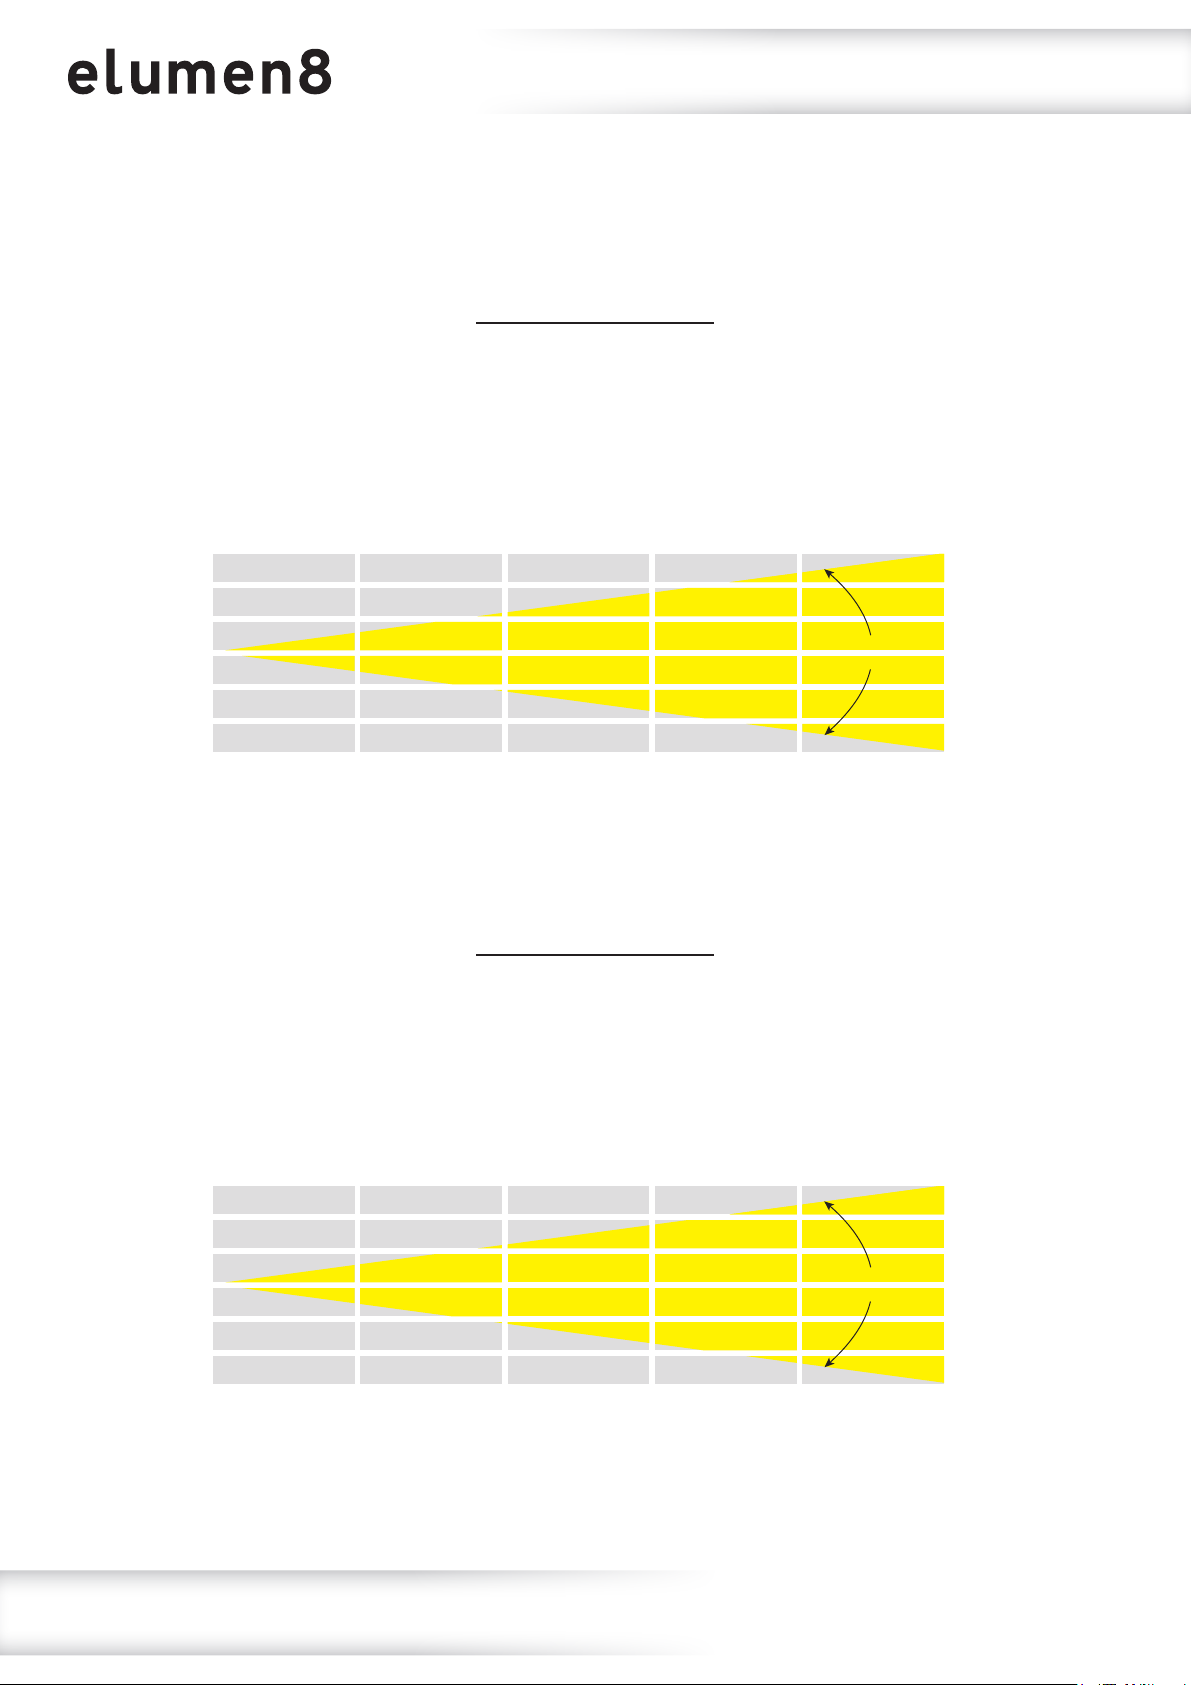
19° - Lux
FULL ON
R
G
B
A
L
92124
6716
17976
3112
23108
83404
19° Fixed Lens
23031
1679
4494
778
5777
20851
10236
746
1997
345
2567
9267
Photometric Charts
5757
419
1123
194
1444
5212
19°
3684
268
719
124
924
3336
0m 1m 2m 3m 4m 5m
26° Fixed Lens
26° - Lux
FULL ON
R
G
B
A
L
60800
5508
11996
2100
13432
39640
15200
1377
2999
525
3358
9910
6755
612
1332
233
1492
4404
3800
344
749
131
839
2477
2432
220
479
84
537
1585
26°
0m 1m 2m 3m 4m 5m
www.prolight.co.uk Virtuoso 1000 Prole RGBAL User Manual
23
Page 24
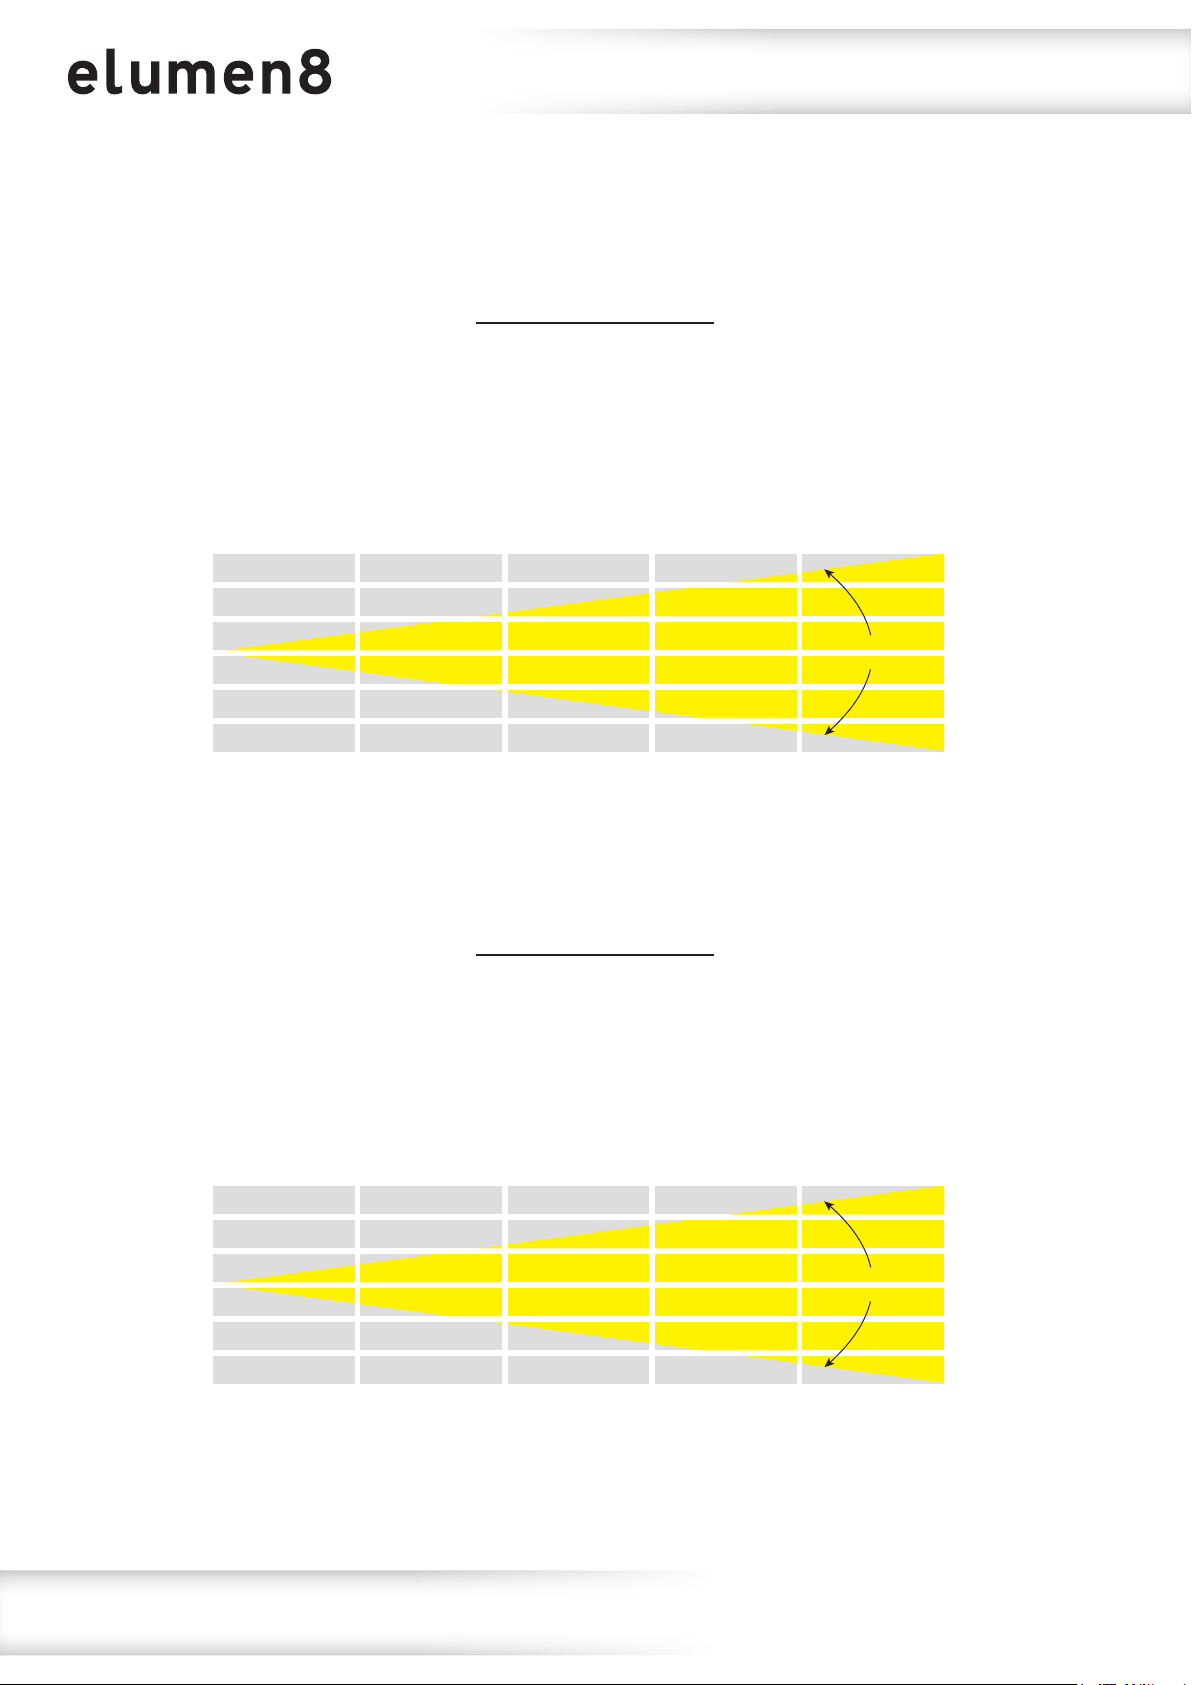
36° - Lux
FULL ON
R
G
B
A
L
40000
3720
8544
1432
8832
27368
36° Fixed Lens
10000
930
2136
358
2208
6842
4444
413
949
159
981
3040
Photometric Charts
2500
232
534
89.5
552
1710
36°
1600
148
341
57.2
353
1094
0m 1m 2m 3m 4m 5m
50° Fixed Lens
50° - Lux
FULL ON
R
G
B
A
L
10356
1456
3396
572
3652
10944
2589
364
849
143
913
2736
1150
161
377
63.5
405
1216
647
91
212
35.7
228
684
414
58.2
135
22.8
146
437
50°
0m 1m 2m 3m 4m 5m
www.prolight.co.uk Virtuoso 1000 Prole RGBAL User Manual
24
Page 25
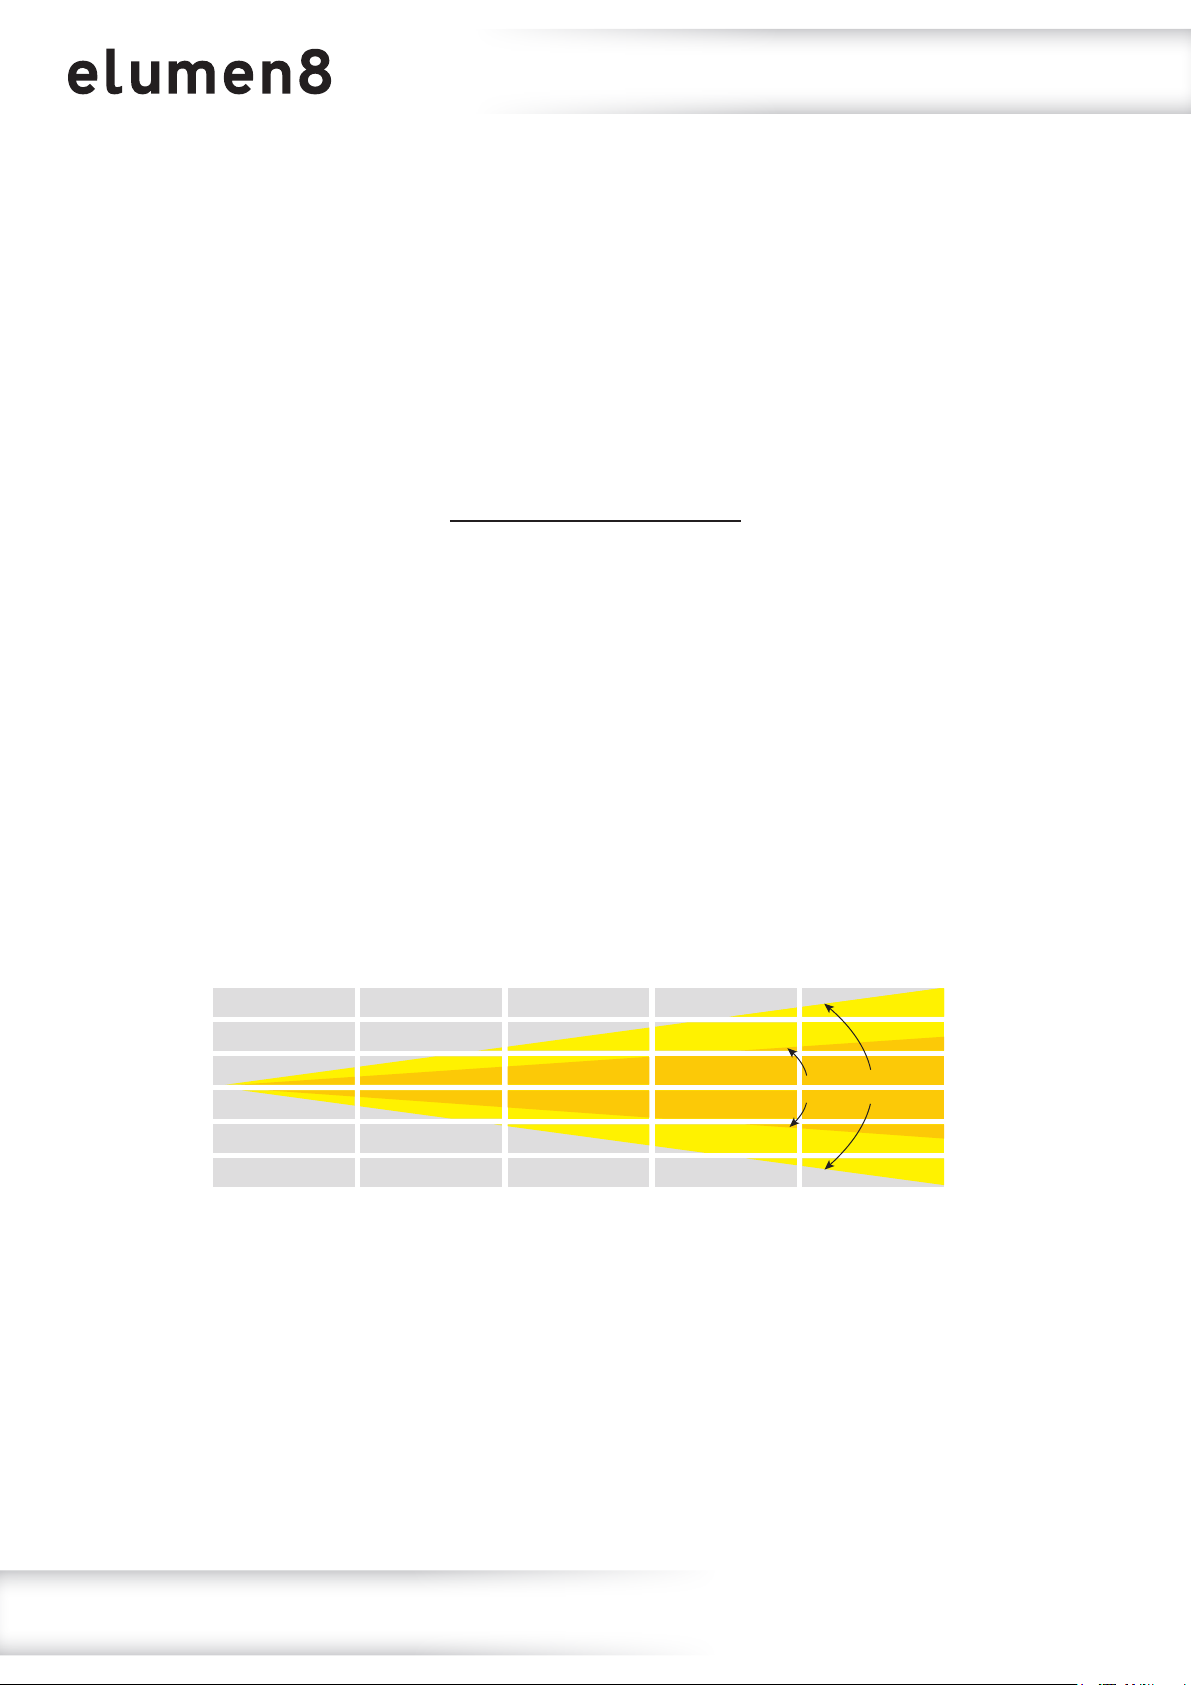
15° - Lux
FULL ON
R
G
B
A
L
107944
9572
25612
4124
35740
83404
15-30° Fixed Lens
26986
2393
6403
1031
8935
20851
11993
1063
2845
458
3971
9267
Photometric Charts
6746
598
1600
257
2233
5212
4317
382
1024
164
1429
3336
30° - Lux
FULL ON
R
G
B
A
L
0m 2m 3m 4m 5m1m
51432
3684
9084
1548
10576
31068
12858
921
2271
387
2644
7767
5714
409
1009
172
1175
3452
3214
230
567
96
661
1941
15°
2057
147
363
91.9
423
1242
30°
www.prolight.co.uk Virtuoso 1000 Prole RGBAL User Manual
25
Page 26
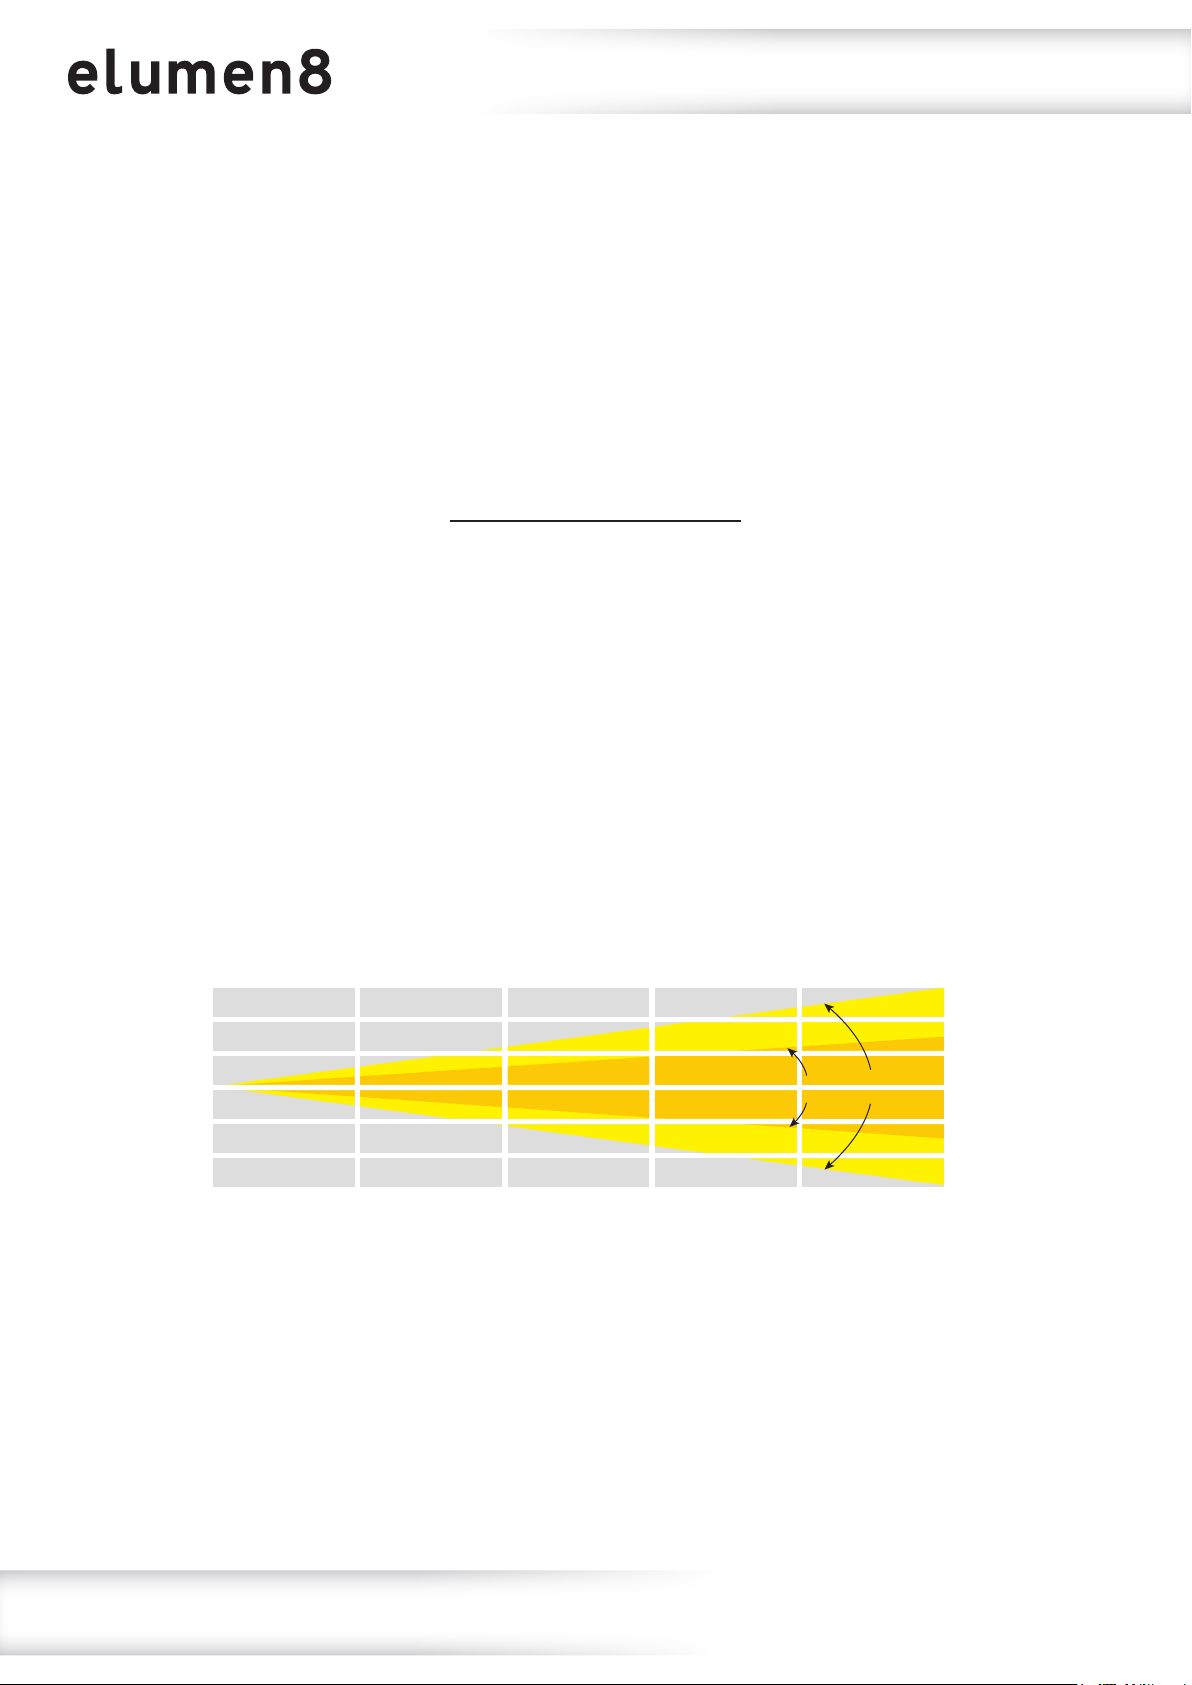
25° - Lux
FULL ON
R
G
B
A
L
58480
5192
12232
2064
12788
39924
25-50° Fixed Lens
14620
1298
3058
516
3197
9981
6497
576
1359
229
1420
4436
Photometric Charts
3655
324
764
129
799
2495
2339
207
489
82.5
511
1596
50° - Lux
FULL ON
R
G
B
A
L
0m 2m 3m 4m 5m1m
21000
1948
4452
736
4772
14104
5250
487
1113
184
1193
3526
2333
216
494
81.7
530
1567
1312
121
278
46
298
881
25°
840
77.9
178
29.4
190
564
50°
www.prolight.co.uk Virtuoso 1000 Prole RGBAL User Manual
26
Page 27
DMX setup
Setting the DMX address:
The DMX mode enables the use of a universal DMX controller. Each xture requires a “start address”
from 1- 512. A xture requiring one or more channels for control begins to read the data on the channel
indicated by the start address. For example, a xture that occupies or uses 7 channels of DMX and was
addressed to start on DMX channel 100, would read data from channels: 100, 101, 102, 103, 104,
105 and 106. Choose a start address so that the channels used do not overlap. E.g. the next unit in
the chain starts at 107.
DMX 512:
DMX (Digital Multiplex) is a universal protocol used as a form of communication between intelligent
xtures and controllers. A DMX controller sends DMX data instructions form the controller to the xture.
DMX data is sent as serial data that travels from xture to xture via the DATA “IN” and DATA “OUT”
XLR terminals located on all DMX xtures (most controllers only have a data “out” terminal).
DMX linking:
DMX is a language allowing all makes and models of different manufactures to be linked together
and operate from a single controller, as long as all xtures and the controller are DMX compliant.
To ensure proper DMX data transmission, when using several DMX xtures try to use the shortest
cable path possible. The order in which xtures are connected in a DMX line does not inuence the
DMX addressing. For example; a xture assigned to a DMX address of 1 may be placed anywhere in
a DMX line, at the beginning, at the end, or anywhere in the middle. When a xture is assigned a
DMX address of 1, the DMX controller knows to send DATA assigned to address 1 to that unit,
no matter where it is located in the DMX chain.
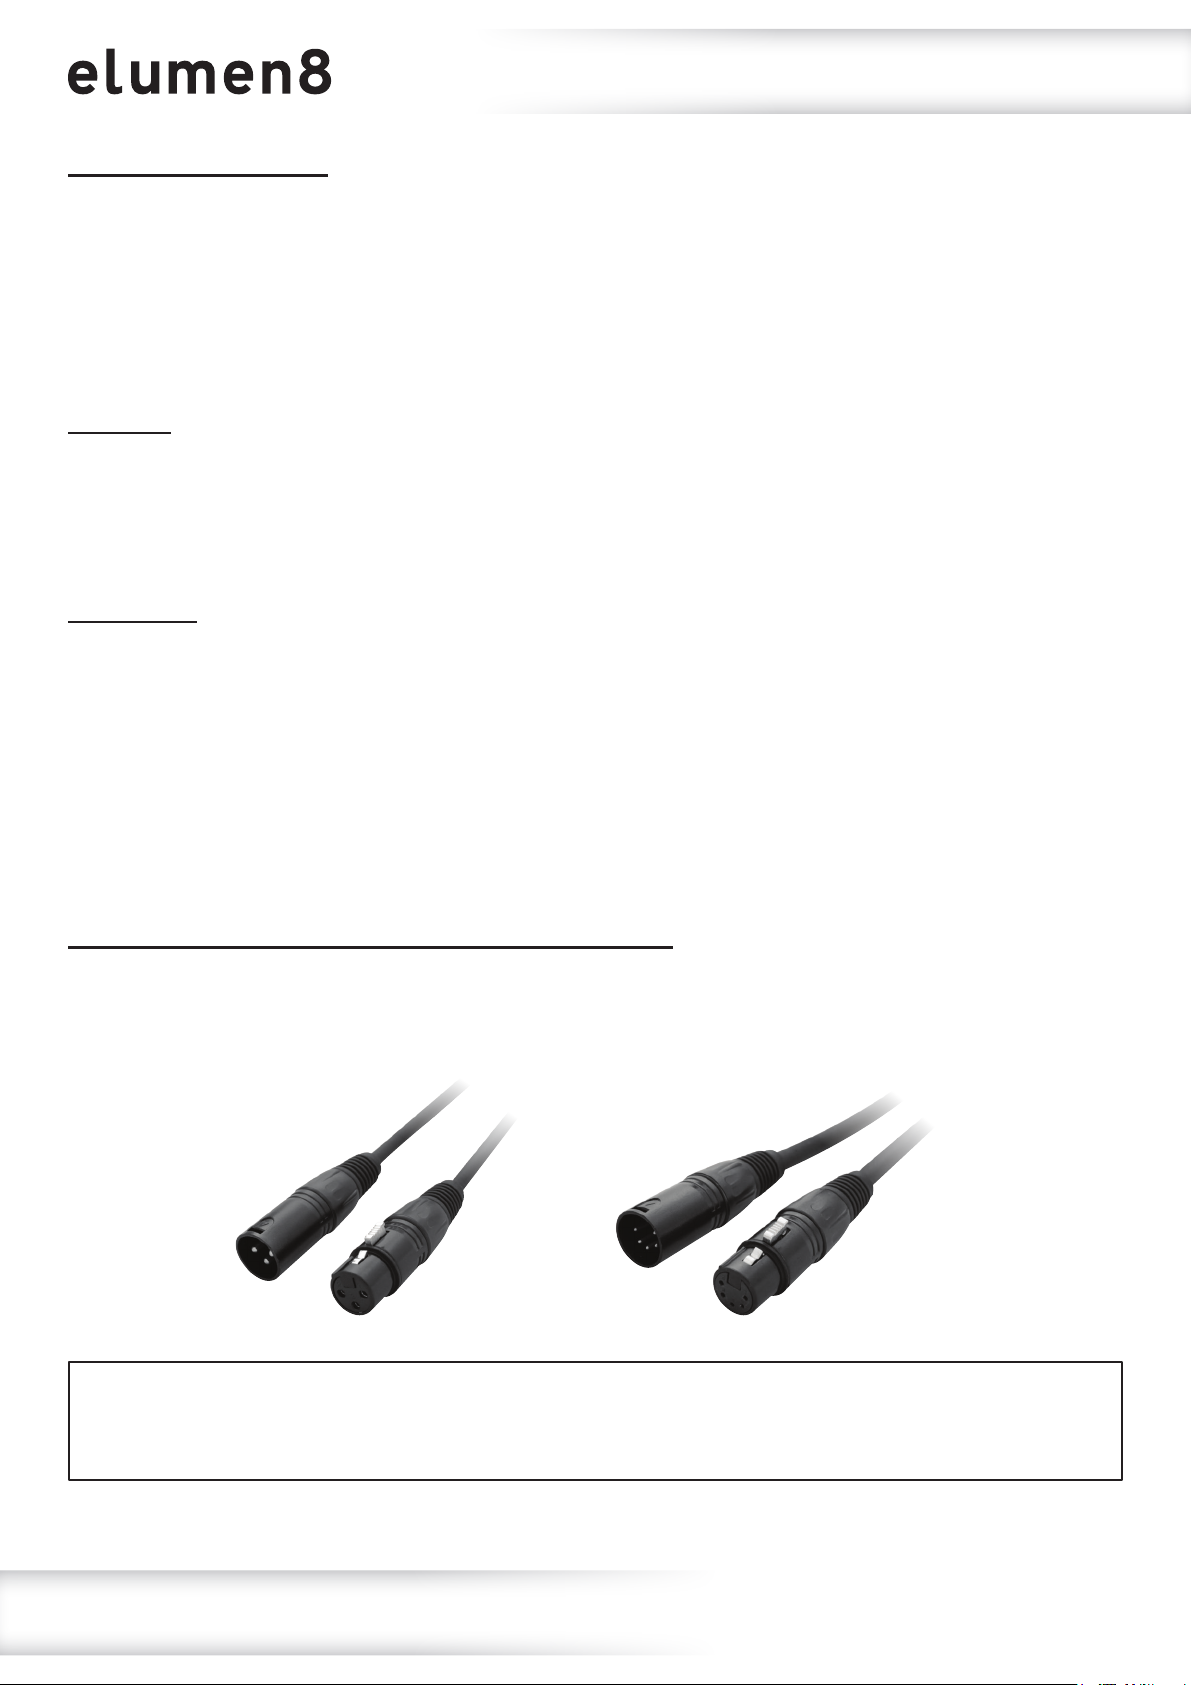
DATA cable (DMX cable) requirements (for DMX operation):
This xture can be controlled via DMX-512 protocol. The DMX address is set on the back of the unit.
Your unit requires either a standard 3-pin or 5-pin XLR connector for data input/output,
see images below.
Further DMX cables can be purchased from all good sound and lighting suppliers or Prolight Concepts dealers.
Please quote:
Also remember that DMX cable must be daisy chained and cannot be split.
CABL10 – 2m CABL11 – 5m CABL12 – 10m3-Pin:
CABL185 – 2m CABL187 – 5m CABL188 – 10m5-Pin:
www.prolight.co.uk Virtuoso 1000 Prole RGBAL User Manual
27
Page 28
Notice:
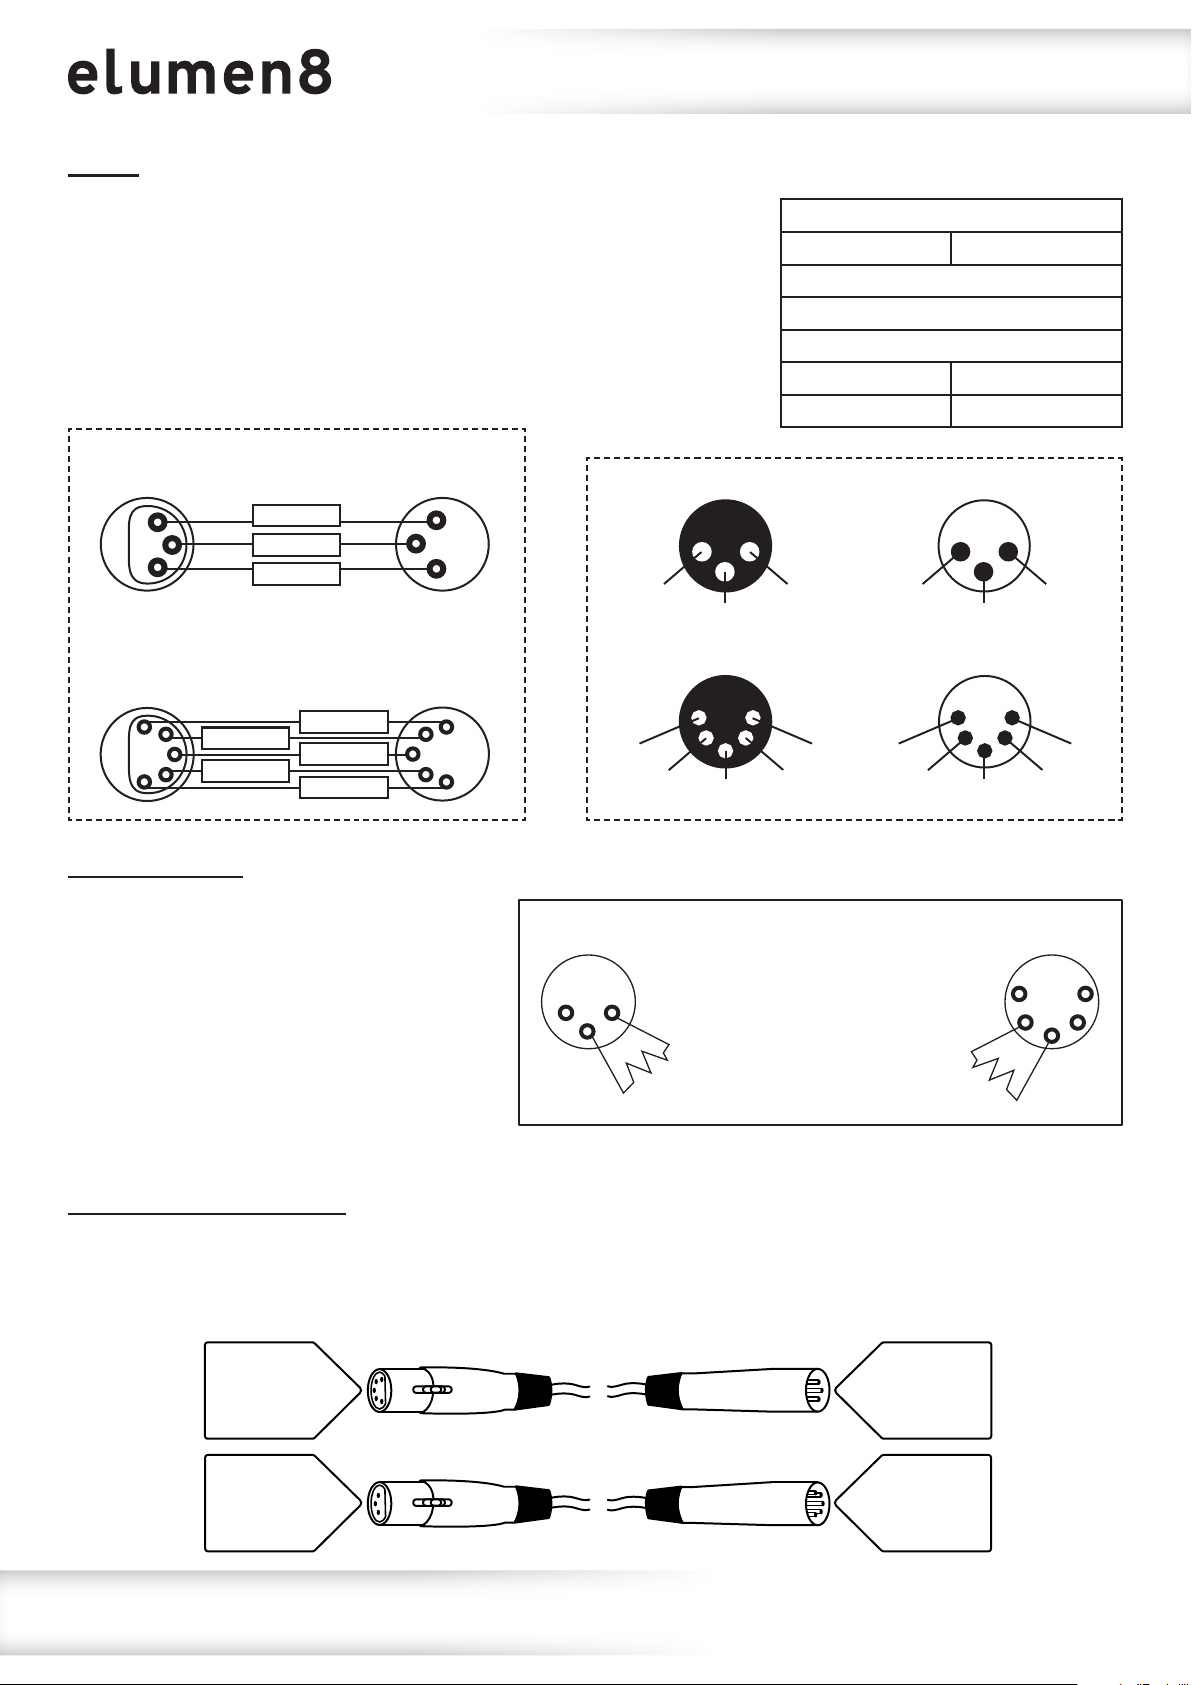
DMX setup
Be sure to follow the diagrams below when making your own cables.
Do not connect the cables shield conductor to the ground lug or
allow the shield conductor to come in contact with the XLRs
outer casing. Grounding the shield could cause a short circuit
and erratic behaviour.
DMX 512
3-Pin XLR output
1
3
2
DMX 512
5-Pin XLR output
1
2
3
4
5
GROUND
DMX –
N/C
DMX +
DMX –
GROUND
DMX +
N/C
DMX 512
3-Pin XLR input
1
3
2
DMX 512
5-Pin XLR input
1
2
3
4
5
3-Pin XLR male 3-Pin XLR female
1 ground
3 hot
5-Pin XLR male 5-Pin XLR female
1 ground 5 N/C
2 cold
3 hot
2 cold
4 N/C
Pin Conguration
3-Pin 5-Pin
Pin 1 - Ground
Pin 2 - Negative
Pin 3 - Positive
– Pin 4 - N/C
– Pin 5 - N/C
2 cold
5 N/C 1 ground
4 N/C
3 hot
3 hot
1 ground
2 cold
Line termination:
When longer runs of cable are used,
you may need to use a terminator on
the last unit to avoid erratic behaviour.
Using a cable terminator will decrease
the possibilities of erratic behaviour.
(3-pin - Order ref: CABL90,
3-Pin
1 2
3
Termination reduces signal
transmission problems and
interference. It is always
advisable to connect a DMX
terminal, (resistance 120
Ohm 1/4W) between pin 2
(DMX-) and pin 3 (DMX+) of
the last xture.
5-Pin
1
2 4
3
5
5-pin - Order ref: CABL89)
5-pin XLR DMX connectors:
Some manufactures use 5-pin XLR connectors for data transmission in place of 3-pin. 5-pin XLR xtures
may be implemented in a 3-pin XLR DMX line. When inserting standard 5-pin XLR connectors in to a
3-pin line a cable adaptor must be used. The diagram below details the correct cable conversion.
5-pin XLR (female)
Pin 1: GND (screen)
Pin 2: Signal (-)
Pin 3: Signal (+)
Pin 4: N/C
Pin 5: N/C
3-pin XLR (male)
Pin 1: GND (screen)
Pin 2: Signal (-)
Pin 3: Signal (+)
3-pin XLR (female)
Pin 1: GND (screen)
Pin 2: Signal (-)
Pin 3: Signal (+)
5-pin XLR (male)
Pin 1: GND (screen)
Pin 2: Signal (-)
Pin 3: Signal (+)
Pin 4: N/C
Pin 5: N/C
www.prolight.co.uk Virtuoso 1000 Prole RGBAL User Manual
28
Page 29
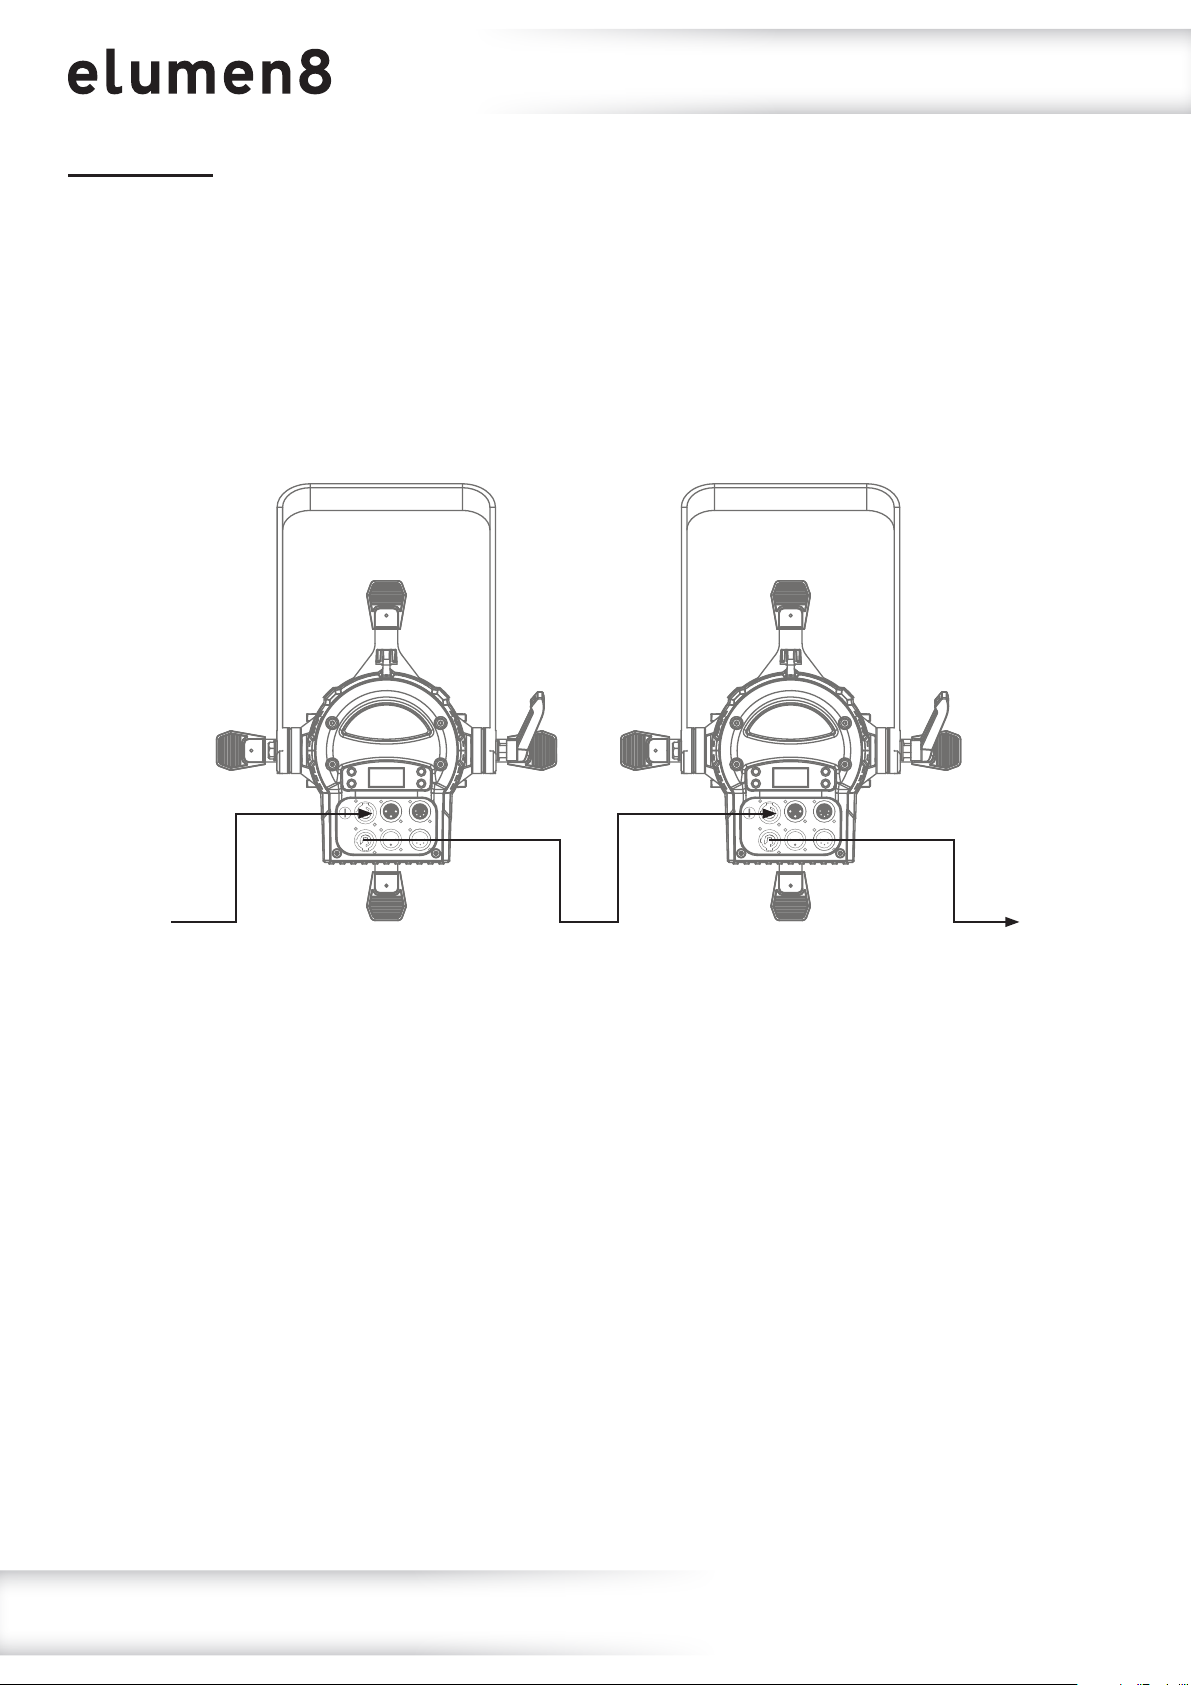
Multiple xture power linking
Power linking:
This xture provides power linking via the power output on the rear allowing multiple units to be
connected together. The maximum number of xtures that can be connected is 6 xtures @ 240V
or 3 xtures @ 120V (including the rst xture). After the maximum number of xtures are
connected a new power run will need to be started.
Please note: Caution should be used when power linking other xtures to the Virtuoso 1000 Prole as
the power consumption of other xtures will vary. Fixtures tted with lamps often require 2/3 times
more current on startup, these may require their own power source.
www.prolight.co.uk Virtuoso 1000 Prole RGBAL User Manual
29
Page 30
WEEE notice
Correct Disposal of this Product
(Waste Electrical & Electronic Equipment)
(Applicable in the European Union and other European countries
with separate collection systems)
This marking shown on the product or its literature, indicates that it should not be disposed
with other household wastes at the end of its working life. To prevent possible harm to the
environment or human health from uncontrolled waste disposal, please separate this from other
types of wastes and recycle it responsibly to promote the sustainable reuse of material resources.
Household users should contact either the retailer where they purchased this product, or their
local government ofce, for details of where and how they can take this item for environmentally
safe recycling.
Business users should contact their supplier and check the terms and conditions of the
purchase contract. This product should not be mixed with other commercial wastes for disposal.
www.prolight.co.uk Virtuoso 1000 Prole RGBAL User Manual
30
Page 31
www.prolight.co.uk Virtuoso 1000 Prole RGBAL User Manual
31
Page 32

www.prolight.co.uk Virtuoso 1000 Prole RGBAL User Manual
32
 Loading...