

Page 1

LP/LP+ Series
User’s Manual
Models:
LP2022, LP2042
LP2122, LP2142
©1995 Eltron International Inc.
User’s Manual No. 980008-001
Rev. B
Page 2

Page 3

FOREWORD
This manual provides installation and operation information for LP & LP+ Series printers
manufactured by Eltron International Incorporated, Simi Valley, California. The contents
includes installation & operation instructions.
TECHNICAL SUPPORT
If for any reason you require product technical support, please contact the Distributor where
you first purchased your equipment. If they cannot help you or at their direction, Eltron
Technical Support can be reached at:
Eltron International Incorporated Eltron International, Europe
41 Moreland Road Unit 2, Rose Kiln Lane
Simi Valley, CA. 93065 Reading, Berkshire, RG2 OHP England
(800) 344-4003 +44 (0) 1734 752 024
FAX (805) 579-1808 FAX: +44 (0) 1734 752 005
e-mail: eltron@eltron.com
BBS: (805) 579-3445
Return Materials Authorization
Before returning any equipment to Eltron for in warranty or out of warranty repair, contact
Repair Administration for a Return Materials Authorization (RMA) number. Repack the
equipment in the original packing material and mark theRMA numberclearly onthe outside.
Ship the equipment, freight prepaid, to the address listed below.
Eltron Repair Adminstration
41 Moreland Road
Simi Valley, CA 93065-1692
(805) 579-1800
FAX (805) 579-1808
COPYRIGHT NOTICE
This document contains information proprietary to Eltron International Incorporated. This
document and the information contained within is copyright by Eltron International Incorporated and may not be duplicated in fullorinpart by anyperson without prior writtenapproval
of Eltron. While every effort has been made to keep the information contained within current
and accurate as of the dateof publication, no guaranteeis given or implied that the document
is error-free or that it is accurate with regard to any specification. Eltron reserves the right to
make changes, for the purpose of product improvement, at any time.
TRADEMARKS
LP Series and LP+Series are service marks and Eltron is a trademark of Eltron International
Incorporated. Windows & MS-DOS are registered trademarks of Microsoft Corp. All other
marks are trademarks or registered trademarks of their respective holders.
980008-002 Rev. B
iii
Page 4

WARRANTY INFORMATION
We Need To Hear From You!
To establish your warranty period and provide access to Technical Support,
Send Us Your Product Registration Card Today!
Eltron warrants the mechanism, control electronics and power supply, under normal use and
service, to be free from defects in material and workmanship for a period of twelve months
from the date of purchase by the end user. Eltron warrants the printhead, under normal use
and service, to be free from defects in material and workmanship for a period of90 daysfrom
the date of purchase by the end user. Proof of purchase or product registration is required.
If proof of purchase or product registration cannot be established,shipmentdate to the original
buyer (dealer or distributor) will be be used to establish warranty period.
Failure to exercise caution to protect the equipment from electrostatic discharge damage,
adverse temperature and humidity conditions or physical abuse may void the warranty.Eltron
will, at it’s option, repair or replace the equipment or any parts which are determined to be
defective within this warrantyperiod and whichare returned to Eltron F.O.B. factory of origin.
The warranty set forth above is exclusive and no other warranty, whether written or oral, is
expressed or implied. Eltron specifically disclaims the implied warranties of merchantability
and fitness for a particular purpose.
FCC Notice:
This equipment has been tested and found to comply with the limits of a Class A digital device, pursuant to Part 15 of the
FCC Rules. These limits are designed to provide reasonable protection against harmful interference when the equipment is
operated in a commercial environment.. Thisequipment generates,uses and can radiateradio frequencyenergy and, if not
installed and used in accordance withthe instructions, maycause harmfulinterference to radio communications. However,
there is no guarantee that interference will not occur in a particular installation. Operation of this equipment in a residential
area is likely to cause harmful interference in which case the user will be required to correct the interference in which case
the user will be required to correct the interference at his own expense.
CSA Notice:
This equipment does notexceedClassAlimitsperradio noise emissionsfordigitalapparatusset out in theRadioInterference
Regulation of the Canadian Department of Communications. Operation in a residential area may cause unacceptable
interference to radio and TV reception requiring the owner or operator to take whatever steps are necessary to correct the
interference.
Cet equipment ne depasse pas les limites de Classe A d’emission de bruits radioelectriques pour les appareils numerriques
tells queperscrites par leReglement sur lebrouillageredioelectrique etabli parle ministere desCommunicationsdu Canada.
L’exploitationfaiteenmilieuresidentielpeutentrainer lebrouillagedes receptionsradioettele,cequiobligerait leproprietaire
ou l’operateur a pendre les dispositions necessaires pour en eliminer les causes.
CE Notice
This equipment has been tested and found to comply with the European Council Directives only when used with a double
shielded parallel interface cable such as Eltron part number 300058-006. Use of a lower grade interface cable may result in
RF emissions thatcauseunacceptableinterferenceto radioandTV receptionrequiringthe owneroroperatortotakewhatever
steps are necessary to correct the interference.
iv
980008-002 Rev. B
Page 5

Table Of Contents
Getting Started
Introduction . . . . . . . . . . . . . . . . . . . . . . . . . . 1
Unpacking the Printer . . . . . . . . . . . . . . . . . . . . . . 2
Parts Check List . . . . . . . . . . . . . . . . . . . . . . . . 3
Installation . . . . . . . . . . . . . . . . . . . . . . . . . . . 4
Operation
Controls & Indicators . . . . . . . . . . . . . . . . . . . . . . 9
Loading Labels or Tags . . . . . . . . . . . . . . . . . . . . . 12
Threading The Label Dispenser . . . . . . . . . . . . . . . . . 17
AutoSense Gap Sensor Adjustment . . . . . . . . . . . . . . . 19
Cleaning The Print Head . . . . . . . . . . . . . . . . . . . . 20
Replacing the Printer Memory Backup Battery (LP+ Only) . . . 21
Appendix A - Troubleshooting . . . . . . . . . . . . . . . . 25
Appendix B - Supplies and Accessories . . . . . . . . . . . 37
Appendix C - Windows Printer Driver . . . . . . . . . . . . 39
980008-002 Rev. B
v
Page 6

vi
980008-002 Rev. B
Page 7

1
Getting Started
This section provides information on the installation of the printer and software.
Introduction
Features
The LP Series and LP+ Series printers are low
cost direct thermal printers specifically designed for printing labels, tags or continuous
receipts (with or without bar codes) from any
DOS™or Windows™ or ASCII based compatible computer.
• Direct thermal printing for reliability.
• Supports over 13 types of bar code sym-
bologies.
• High resolution print head for sharp graphics
and text.
• Download forms, fonts and graphics perma-
nently to removable memory cartridges
(LP+ Series).
980008-001 Rev. B
1
Page 8
Getting Started
Unpacking the
Printer
The printer is shipped in a carton and protective bag. Keep all packing material in case you
need to move or re-ship the printer. Avoid
touching the electrical connectors to prevent
Electro-Static Discharge damage while setting
up the printer.
The discharge of electrostatic energy that accumulates on the surface of the human body or
other surfaces can damage or destroy the print
head or electronic components used in this
device.
2
980008-001 Rev. B
Page 9
Getting Started
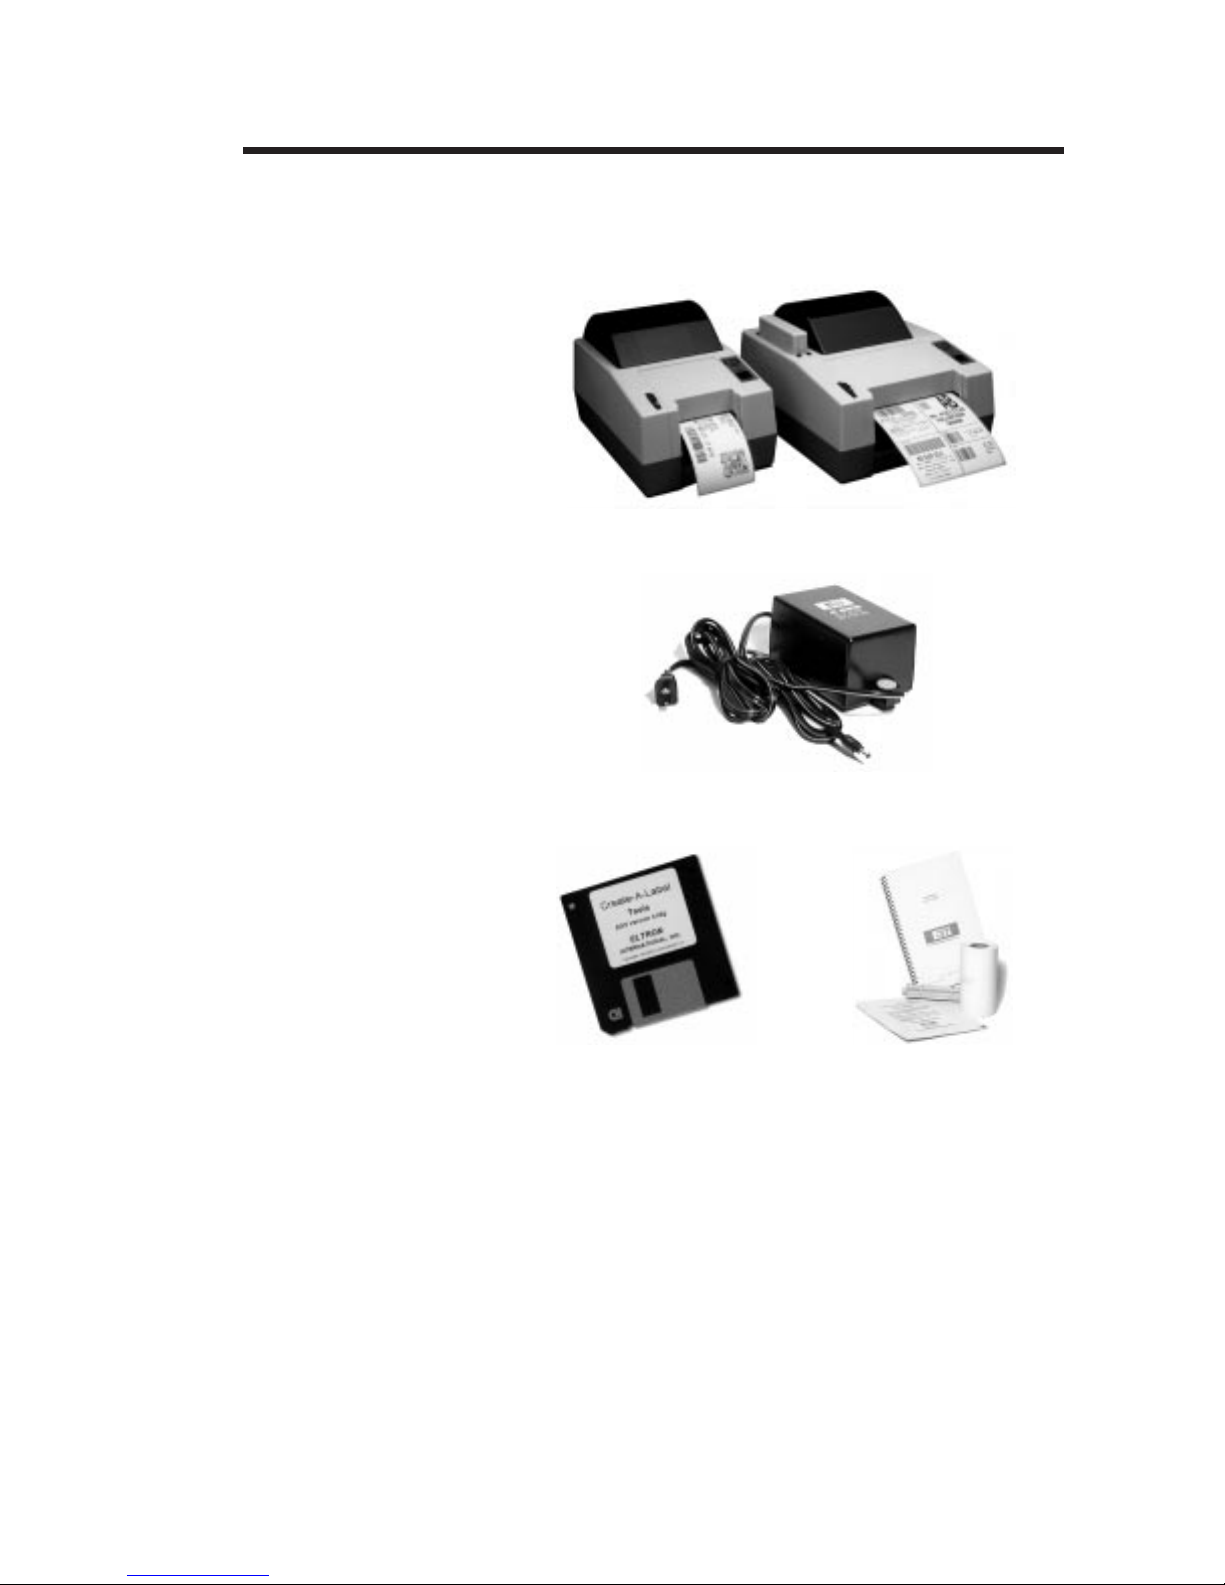
Parts Check List
Your printer kit should contain the items listed
below.
• The LP or LP+printer.
• The printer Power Supply.
• Create-A-Label Tools software disk & man-
ual (LP+ only).
• Printer User’s Guide (this manual).
• 1 roll of Sample Labels and Spool.
• 1 printer Cleaning Card.
If any items are missing, contact your dealer for
replacement parts.
980008-001 Rev. B
3
Page 10

Getting Started
Installation
Step ➊
Attach Power
Supply
The following sections will step you through the
installation of the printer and Create-A-Label
Tools software.
Place the printer in a suitable location that
allows easy access to printed labels. The printer
should never be operated while resting on it’s
side or upside down. Place the power supply
in a suitable location, preferably on the floor
near an electrical outlet. Check that the printer
power switch is in the OFF (0) position. Attach
the printer power cable to the jack at the rear
of the printer,near the power switch. Check the
label on the power supply for input voltage
requirements. Attach the power supply line
cord to an electrical outlet of the proper voltage.
4
The printer and power supply should never be
operated in a location where either one can get
wet. Personal injury could result.
980008-001 Rev. B
Page 11

Getting Started
Step ➋
Insert Memory
Cartridge
(LP+ Only)
The memory /real-time clock cartridge provides permanent storage for downloaded
forms and time/date information. Cartridges
are available in four upgradable memory configurations: 128KB, 256KB, 384KB & 512KB.
The memory cartridge can be damaged if
plugged in or unplugged while the printer
power is ON(1).
Insert the memory cartridge with the label side
facing the label roll holder. Push firmly to engage the cartridge.
980008-001 Rev. B
Before the additional memory can be accessed, the printer memory must be repartitioned. Refer to the EPL2 Programming
manual for more information on the M command.
5
Page 12
Getting Started
Step ➌
Attach Interface
Cable
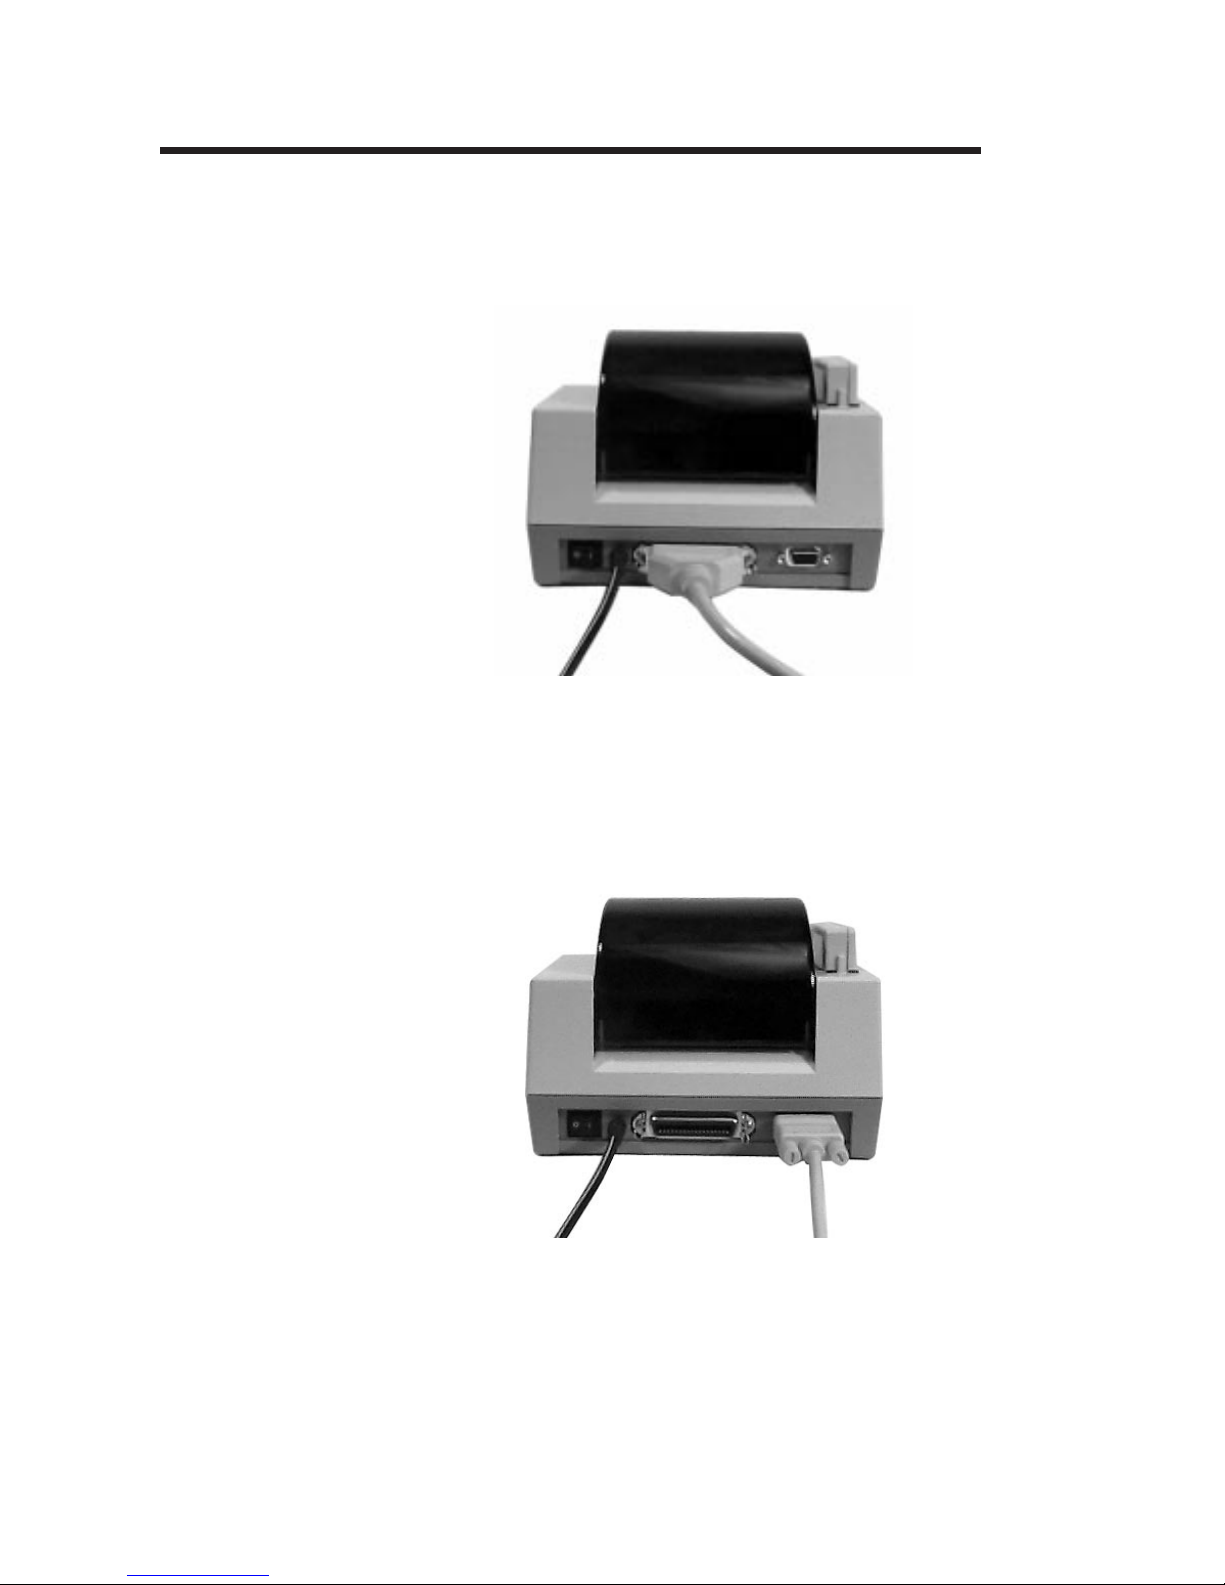
Parallel Interface
Attach a suitable parallel printer cable from the
computer to the Centronics interface connector
on the rear of the printer.
Serial Interface
Attach a suitable serial printer cable from the
computer to the DB-9 RS-232 Serial interface
connector at the back of the printer. For additional information on serial cable wiring, refer
to Appendix A - Trouble Shooting.
6
When the power switch is moved to the ON (1)
position, the Power Indicator should light Red
indicating that the printer is out of paper. If the
indicator fails to light, refer to Appendix A Trouble Shooting.
980008-001 Rev. B
Page 13

Getting Started
Step ➍
Install Software
(LP+ Only)
Start your computer. After DOS has loaded,
insert the Creat-A-Label Tools diskette into
your floppy disk drive. From the DOS prompt,
enter B:INSTALL (or A:INSTALL if you placed
the diskette in drive A). Press the Enter key.
Follow the installation instructions on the
screen to install the software.
Refer to Section 2 - Operation, for information
on loading labels and using your printer.
980008-001 Rev. B
7
Page 14

Getting Started
8
980008-001 Rev. B
Page 15

2
Operation
This section provides information on the operation of the LP and LP+ printers.
Controls &
Indicators
The printer’s power switch is located on the
rear of the unit near the power cord. Placing
this switch in the “1" (ON) position will apply
power to the printer. Place this switch in the ”0"
(OFF) position to remove power when you
have finished using your printer.
The printer is equipped with one front panel
control switch, labeled FEED and one indicator
light labeled POWER. Refer to Figure 2-1.
980008-001 Rev. B
9
Page 16

Operation
Push Back
To Release
Tension
Release
Power
Indicator
Feed
Control
Label Taken
Sensor
Power
Switch
10
Figure 2-1
Controls & Indicators
980008-001 Rev. B
Page 17

Operation
The FEED Control
The FEED control can be used in two ways,
tapping or holding. When power is first applied to the printer, tapping the FEED control
will cause the paper to advance approximately
0.25". This condition is refereed to as a Line
Feed. After printing a label, tapping the FEED
control will cause the paper to advance to the
top of the next label. This condition is referred
to as a Form Feed.
When power is first applied, holding the FEED
control will cause the paper to continuously line
feed until the control is released. This mode is
useful when loading labels in the printer. After
printing a label, holding the FEED control will
cause the paper to continuously form feed until
the control is released.
The POWER
Indicator
When the printer is first switched on, the
POWER indicator will glow Red. If labels are
not loaded, the indicator will continue to glow
Red. If labels are loaded, the indicator will
switch to Green, indicating that the printer is
ready for operation.
Indicator
Meaning
Color
Power On, labels loaded, ready
Green
for use.
Red Power On, out of labels.
Error condition, refer to
Orange
Appendix A - Troubleshooting.
Dark Power Off.
If the POWER indicator should fail to light or
glows Red even when labels are loaded, refer
to the Trouble Shooting section in Appendix A.
980008-001 Rev. B
11
Page 18

Operation
Loading Labels
or Tags
Your printer can print on adhesive backed
labels or non-adhesive tags. Loading either
type of material is easy, however the feed
direction of the roll is different.
If adhesive backed labels are used that do not
lay flat on the liner paper, the exposed edges
may stick to the label guides and rollers inside
the printer, causing the label to peel off from
the liner. Always use high quality, Eltron approved labels. Supplies can be ordered from
Eltron by calling 1(800) 344-4003.
Before loading labels, insure that the power
supply is connected to a suitable power source
and the printer power switch is in the ON (1)
position.
If you should run out of labels while printing,
Do Not turn the power switch off while reloading or data loss may result. The printer will
automatically resume printing when new labels
are loaded.
12
980008-001 Rev. B
Page 19

Operation
Step ➊
Figure 2-2
Loading Labels
Open the top cover and remove the spindle
from the printer. Place the spindle inside the
roll of labels or tags.
Cutting the corners off the end of the roll allows
for easier insertion into the feed slot.
If loading labels, place the roll in the top cover
so that the end feeds from the top as shown in
Figure 2-2.
Top Feed
980008-001 Rev. B
Figure 2-3
Loading Tags
If loading tags, place the roll in the top cover so
that the end feeds from the bottom as shown
in Figure 2-3.
Bottom
Feed
13
Page 20

Operation
Step ➋
Figure 2-4
Open Paper Guides
Step ➌
Adjust the guide tabs to their widest position by
pushing one or both towards the sides of the
printer.
Insert the end of the roll into the feed slot
between the guide tabs until resistance is felt
(approximately 3").
Figure 2-5
Feed Slot
14
980008-001 Rev. B
Page 21

Operation
Step ➍
Figure 2-6
Press FEED Control
Step ➎
While continuing to gently push the labels into
the feed slot, press the FEED control to advance labels until the end is visible at the front
of the printer.
Press the tension release towards therear of the
printer and center the labels in the slot. Adjust
the guide tabs so they just touch the edges of
the liner.
Figure 2-7
Center The Labels
980008-001 Rev. B
15
Page 22

Operation
Step ➏
Figure 2-8
Place Roll In Slots
Step ➐
Rewind the excess paper onto the roll while
placing the spindle into the holder slots.
Tap the FEED control 3 times or until the
POWER indicator glows Green. If you were in
the middle of printing labels, the printer will
automatically resume printing.
16
980008-001 Rev. B
Page 23

Operation
Threading The
Label Dispenser
Step ➊
Step ➋
Step ➌
Figure 2-9
Threading The Label
Dispenser
If your printer is equipped with the optional
label dispenser and you would like the printer
to automatically peel adhesive labels from the
backing liner, follow the steps below:
Perform steps 1-7 of the Loading Labels procedure.
Advance the labels through the printer until at
least two full labels (approximately 6") are in
front of the print head assembly. Peel the second and third labels off the backing liner.
Insert the label leader into the peeler slot between the peeler bar and the dispenser stopper.
Peeler Bar
Peeler
Slot
980008-001 Rev. B
Dispenser
Stopper
17
Page 24

Operation
Step ➍
Step ➎
Step ➏
Figure 2-10
Activate Sensor
Press the FEED control to feed the leader
through the dispenser.
Push the Label Release towards the rear of the
printer and pull the excess liner through the
front until it is tight across the peeler bar.
Activate the LabelTaken Sensorby pushing on
the top and sliding towards the front of the
printer (see Figure 2-1). The printer is now
ready to dispense automatically peeled labels.
Push Sensor Out
To Activate
18
980008-001 Rev. B
Page 25

Operation
AutoSense
Gap Sensor
Adjustment
Your printer is equipped with a sensor capable
of detecting the gap between labels while they
are being printed. This feature depends on the
ability of the sensor to “see through” the label
carrier between labels. Due to manufacturing
differences in label stock, the sensor may have
difficulty discriminating the difference between
labels and the carrier. When this occurs, the
printer Power indicator will switch from Green
to Red.
If the printer Power indicator switches from
Green to Red,the AutoSense feature should be
activated to adjust the sensitivity of the sensor.
After loading labels into the printer, place the
power switch inthe “0" (OFF) position. Press and
hold the FEED control while placing the power
switch in the ”1" (ON) position. Release the
FEED control when the printer starts feeding
labels. The POWER indicator will turn off and
then switch to Green while the adjustment is
being made. The printer will advance 3-4 labels
while performing the adjustment. When the adjustment is complete, a status summary label will
be printed and the printer will be placed in
Diagnostic Dump mode. Tap the FEED Control
once to switch the printer back to normal operation. When the indicator switches to Green, the
printerisreadyforuse.
980008-001 Rev. B
19
Page 26

Operation
Cleaning The
Print Head
Step ➊
Step ➋
As you use your printer, the print head may
become dirty resulting in poor print quality.
Whenever new labels are loaded into the
printer, the print head should be cleaned with
a Cleaning Card.
Cleaning cards are available in two sizes, 2"
(P/N 800100-001) for the LP2022 & LP2122
and 4" (P/N 800101-001) for the LP2042 &
LP2142. Supplies can be ordered from Eltron
by calling 1(800) 344-4003.
Remove any labels loaded in the printer by
pressing the tension release towards the rear of
the printer and rewinding them onto the roll.
Insert the cleaning card into the feed slot between the guide tabs until resistance is felt
(approximately 3").
Step ➌
While continuing to gently push the cleaning
card into the feed slot, press and hold the FEED
control until the card is fed through the printer.
Repeat steps 2-3 twice. Discard the cleaning
card after it’s use.
Head cleaning cards are only effective for one
cleaning cycle and should not be re-used.
20
980008-001 Rev. B
Page 27

Operation
Replacing the
Printer Memory
Backup Battery
(LP+ Only)
Battery
Replacement
Step ➊
The Memory Cartridge provides storage of operating parameters, forms, graphics and soft
fonts. A battery in the cartridge prevents memory loss if the printer power is switched off or
disconnected. When the battery is exhausted,
the printer will print “BATTERY LOW”. If this
happens, follow the steps below to replace the
battery.
Turn the printer on with the Memory Cartridge
installed, for a minimum of 5 minutes. This is
to prevent data loss while replacing the battery.
Memory loss will occur if this process is not
completed in approximately 5 minutes.
The discharge of electrostatic energy that accumulates on the surface of the human body or
other surfaces can damage or destroy electronic components used in this device.
Step ➋
980008-001 Rev. B
Turn off the printer and remove the memory
cartridge.
21
Page 28

Operation
Battery
Replacement
Step ➌
Figure 2-11
Open Cover
Step ➍
Remove the Memory Cartridge’s top cover
screw with a #1 Phillips screwdriver. Slide the
casing top cover off.
Lift the battery retaining clip up and slide the
old battery out. Replace the battery by lifting
the battery retaining clip up and inserting the
new battery in with the printed side up.
Figure 2-12
Replace Battery
TOP CO VER
EPROM
BATTERY
BATTERY
RETAINING
CLIP
TIME/DATE CHIP
SRAMS
TOP COVER SCREW
INSTALL BATTERY WITH PRINTED
SIDE UP!
Improper installation can damage the printer.
22
980008-001 Rev. B
Page 29

WARNING
Operation
Do Not dispose of the old battery in fire. The
battery may explode causing damage or injury.
Dispose of the battery according to the manufacturer’s instructions.
Step ➎
Step ➏
Re-install the cartridge cover and insert the
retaining screw.
Re-insert the Memory Cartridge into the printer
and turn the printer power on.
980008-001 Rev. B
23
Page 30

Operation
24
980008-001 Rev. B
Page 31

Troubleshooting
Appendix A
Troubleshooting
This section addresses the most common issues
user’s may face with operation and configuration of your printer.
The first trouble shooting reference source is
the Common Problems Trouble Shooting table
on the following page.
Eltron International also provides a variety of
information and user support services:
• Faxback Service: (805) 579-1809
To find out about available technotes, supplies, accessories, specifications, pricing, etc.
select (order) a catalog by FAX.
• Internet:
Web Address: http://www.eltron.com/eltron
e-mail: techsup@eltron.com
• BBS: (805) 579-3445
The BBS supports data rates up to 28.8 BPS
with No Parity, 8 data bits, and 1 stop bit
(n,8,1). Communications software should
have an ANSI Terminal Mode (not MS Windows Terminal) such as Q-Modem.
• CompuServe e-mail: 102251,1164
• Customer Service: (800) 344-4003
To order printer supplies and accessories.
Eltron accepts Mastercard and Visa for
phone orders.
• Technical Support: (800) 344-4003
For your assistance and support with Eltron
printers and software.
980008-001 Rev. B
25
Page 32

Troubleshooting
Common Printing Problems
Toruble Shooting Guide
Problem Solution or Reason
POWER indicator does not light
Green when power switch is
turned to “1" (ON) position
POWER indicator lights Green,
but printer will not print.
Printer appears to be working,
but nothing is printed.
Printing is faded.
Prints only partial label.
Difficult to load labels.
Printer keeps printing and feeding labels when it should not be.
1. Check power connections from
power supply to printer and A.C.
outlet.
1. Check interface cable connections
from computer to printer.
1. Verify that the labels are the correct
type (direct thermal).
2. Check that the roll is loaded with
the thermal side facing up.
1. Clean print head with thermal head
cleaning card.
2. Adjust print speed/darkness in
software.
1. Label caught on print head.
1. Label caught on print head or
mechanism.
1. Label caught on label gap sensor
inside mechanism.
2. Possible software problem.
Printing stops and POWER indicator lights Orange or Red.
26
1. Possible problem with label gap
sensor. Perform AutoSense
adjustment.
2. Possible problem with label stock.
Use only Eltron approved labels
and tags.
3. Possible label jam.
4. Possible software problem.
980008-001 Rev. B
Page 33

Troubleshooting
Serial Interface
Cable Wiring
The figure below displays the cable wiring required to use the printer’s serial interface.
DB-9
Pin #
N/C
RxD
TxD
DTR
GND
DSR
RTS
CTS
RI
Female DB-9 to Male DB-9
Cable P/N 300017-006 (6') or 300017-010 (10')
DB-25
Pin #
N/C
RxD
TxD
DTR
GND
DSR
RTS
CTS
RI
DB-9
Pin #
11
22
33
44
55
66
77
88
99
DB-9
Pin #
18
23
32
420
57
66
74
85
922
PrinterHost
+5 Volts*
TxD
RxD
N/C
GND
RDY
N/C
RDY
N/C
PrinterHost
+5 Volts*
TxD
RxD
N/C
GND
RDY
N/C
RDY
N/C
980008-001 Rev. B
Female DB-25 to Male DB-9
Cable P/N 300018-006 (6')
*+5 volts at 150 mA for external device (e.g. KDU or scanner)
27
Page 34

Troubleshooting
Removing Stuck
Labels
Under certain conditions, labels can become
stuck inside the printer on the print head or the
mechanism. This usually occurs when the
edges of a label pull away from the label liner.
The adhesive comes in contact with the print
head or the mechanism and the label peels off
the liner. The easiest way to prevent this type
of jam is to always use Eltron approved labels.
Another way labels can become stuck in the
printer is by allowing the tape at the beginning
and end of the label roll to go through the
printer. The tapecan leave an adhesive residue
behind that can stick to the label liner, causing
the label to peel inside the printer.
The following pages detail the procedures that
must be followed to safely remove a stuck label
from the print mechanism. When removing a
stuck label, DO NOT use any type of sharp
instrument to scrape the label off theprint head
or mechanism. The best cleaning agent to remove the adhesive residue from the printer
surfaces is 91% Isopropyl alcohol.
28
A label removal kit (p/n 800115-001) is available from Eltron. It contains the items necessary to safely remove a stuck label from the
printer.
Before attempting to remove a stuck label,
remove the roll of labels by cutting the liner
between two labels. Move the power switch to
the OFF (0) position. Disconnect the power
and interface cables.
980008-001 Rev. B
Page 35

Troubleshooting
Step ➊
Remove Top Cover
Move the power switch to the OFF (0) position
and disconnect the power and interface cables.
Place the printer upside down and remove the
four rubber feet by pulling them out of the
mounting holes. Using a #1 Phillips screwdriver, remove the four screws that secure the
top cover.
Carefully turn the printer right side up and lift
off the top cover. Use care not to damage the
cables leading from the top cover to the main
circuit board. Disconnect the cables leading
from the top cover to the main circuit board,
noting there positions.
980008-001 Rev. B
29
Page 36

Troubleshooting
Step ➋
Remove The Print
Head
CAUTION
The most common location of stuck labels is at
the print head. Check this area first before
checking the remainder of the print mechanism.
The discharge of electrostatic energy that accumulates on the surface of the human body or
other surfaces can damage or destroy the print
head or electronic components used in this
device. Before touching the print head, you
should be wearing a grounding wrist strap or
should touch a metal part of another piece of
equipment that is properly grounded.
Using a #1 Phillips screwdriver, remove the
two screws that secure the top print head
bracket. Remove the bracket and the head
tension spring.
30
980008-001 Rev. B
Page 37

Troubleshooting
While lifting the lower head bracket, remove
the tension release rod. Without disconnecting
and cables, lift and rotate the print head so that
the surface can be inspected.
Print Head
CAUTION
CAUTION
Do not unplug the print head. The cable provides ground for E.S.D. protection.
Carefully clean the print head surface with 91%
Isopropyl alcohol and a soft cloth or cotton
tipped swab.
Do not use a sharp or metal instrument to
scrape the stuck label from the print head. The
surface can be easily damaged.
980008-001 Rev. B
31
Page 38

Troubleshooting
Step ➌
Install The Print
Head
To install the print head, first position it back
over the platen. Lift the front slightly and insert
the tension release rod under the metal tabs at
the front edge. Lower the head down so that
the ends of the rod drop into the slots on the
sides of the carriage.
Next, install the head tension spring aligning it
with the two posts on the print carriage. Ensure
that the label guide near the rear of the print
carriage is fully seated. Install the top head
bracket on top of the spring, aligning it with the
two posts on the print carriage. Insert the two
screws removed earlier and tighten to secure
the print head.
32
980008-001 Rev. B
Page 39

Troubleshooting
Step ➍
Remove
Mechanism
Labels can become stuck to several parts in side
the print mechanism. To clear labels stuck inside the mechanism, it must be removed from
the printer base.
Remove the three screws that secure the
mechanism to the base and the screw that
secures the ground wire. Carefully lift up the
mechanism and disconnect the four cables that
lead to the main board noting their positions.
980008-001 Rev. B
33
Page 40

Troubleshooting
Step ➎
Remove Sensor
Assembly
Locate the push tabs on the rear of the mechanism. While pushing in on both tabs, pull the
lower sensor assembly away from the mechanism.
This provides easy access to the inside of the
print mechanism. If the clear mylar label guide
is damaged, it should be replaced. Spare parts
can be ordered by contacting Eltron at 1(800)
344-4003.
34
980008-001 Rev. B
Page 41

Troubleshooting
Step ➏
Install Print
Mechanism
Replace the lower sensor assembly by sliding
back into the mechanism until it locks in place.
Reconnect the four connectors to the main
board. Position the print mechanism on the
printer base and install the three screws removed earlier. Install the ground wire retaining
screw.
Replace the top cover and secure with the four
screws removed earlier. Press the four rubber
feet into the screw holes. Perform the AutoSense procedure it check for proper operation
of the printer.
980008-001 Rev. B
35
Page 42

Troubleshooting
36
980008-001 Rev. B
Page 43

Supplies
Appendix B
Supplies and
Accessories
Accessories
LP & LP+ Series Accessories
Supplies and Accessories can be ordered from
ELTRON by calling: 1(800) 344-4003.
Eltron gladly accepts Mastercard and Visa. For
easier ordering, use the supplies order form
included with your printer. For an up-to-date
supplies & spare parts list, call Eltron’s FaxBack
service at 1(805) 579-1809, andorder document number 2301 for LP Series printers or
2302 for LP+ Series printers. Always refer
to the ELTRON part number when placing an
order.
Accessories available for the LP & LP+ printers
are listed below. Please, always refer to the
Eltron part number when placing an order.
Description Part Number
Parallel Interface Cable, 6’
Parallel Interface Cable, 10’
Serial Interface Cable, 6’(DB-9 to DB-9)
Serial Interface Cable, 10’(DB-9 to DB-9)
Serial Interface Cable, 6’(DB-25 to DB-9)
Battery Pack Kit, 2" (battery pack & adapter plate)
Battery Pack Kit, 4" (battery pack & adapter plate)
Cleaning Card, 2", single
Cleaning Card, 2", box of 25
Cleaning Card, 4", single
Cleaning Card, 4", box of 25
User’s Manual 980008-001
300016-006
300016-010
300017-006
300017-010
300018-006
120185-001
120186-001
800100-001
800110-001
800101-001
800111-001
LP+ Series Accessories
Create-A-Label TOOLS Software for DOS
Create-A-Label 3 Software for DOS
Create-A-Label Pro Software for Windows
Windows v3.1 & 95 Printer Driver for all models
Keyboard Display Unit 120180-001
105505-001
105506-001
105504-001
105501-003
980008-001 Rev. B
37
Page 44

Accessories
38
980008-001 Rev. B
Page 45

Windows Printer Driver
Appendix C
Windows Printer
Driver
To install the Windows printer driver, use the
following steps. Start your computer and then
start Windows. Insert the Windows Driver diskette into your floppy disk drive. Double-click
the Control Panel icon in the Main program
group. Select the Printers icon, the Printers
dialog box is displayed.
NOTE
Select the Add button, the printer list is displayed. Under the List of Printers, select “Install
Unlisted or Updated Printer”. When prompted
for the location of the driver, enter the drive
where the diskette is (i.e. A: or B:). Click OK.
Select the LP+ driver that represents your
printer. The printer driver is installed and appears in the Installed Printers list in the Printers
dialog box.
Windows For Workgroup Users! If you receive
a warning stating: “The currently installed
UNIDRV.DLL is newer...”, select the default
“NO” button.
980008-001 Rev. B
39
Page 46

Windows Printer Driver
Using The
Windows Driver
Paper (Label) Size
The Windows printer driver provides control
of several printer features when printing from
Create-A-Label Professional for Windows and
other Windows software applications. These
features are accessed through the “Printers”
control panel in the Program Manager “Main”
group.
Before creating a label, the paper size for the
currently loaded labels must be selected in the
control panel.
40
Setting the proper label size allows the driver
to provide accurate printing limits and margin
information to other Windows applications including Create-A-Label.
980008-001 Rev. B
Page 47

Windows Printer Driver
Paper Quality,
Print Speed
The print speed can be adjusted to compensate
for manufacturing differences in label stock.
Selecting a slower print speed can improve the
appearance of lines and text on some label
stocks. When printing large labelsor labels with
a lot of information near the right edge, a
slower print speed will avoid pauses while
printing caused by buffer under-run.
Print Quality,
Print Density
NOTE
To access this menu, select Options from the
printer setup control panel.
The print darkness or density can be changed
by using the Print Quality option. If print looks
faded when printing at high speed, select a
higher darkness number for the Print Quality
setting. If horizontal lines seem to run together,
select a lower darkness number.
Print density is also affected by print speed.
Changing both Paper Quality and Print Quality
may be required to achieve the desired results.
To access this menu, select Options from the
printer setup control panel.
980008-001 Rev. B
41
Page 48

41 Morela nd Rd .
Simi Va lley, C A 93065-1692
(805)579-1800
 Loading...