

V12Pro
LS&S Model 221105

2
Instruction Manual
Thank you for choosing Eltrinex V12Pro. Before you start
using this product, please read the instruction manual
carefully.
Please pay attention to the following information.
This Voice Recorder includes a Voice Guide, which has been
specially developed for visually impaired users. If you like to
switch the product to the version for sighted users, please
contact your seller to get the proper firmware.
This product is ready for Firmware Upgrade. We recommend
you to check for firmware updates from time to time. New
firmware versions bring new functions and better user
experience.
Warning: we strongly recommend to backup your recordings
regularly. Please backup all important data to your computer
or a cloud service using a USB cable. Otherwise you can loose
all your recordings if an error occures, or if your voice
recorder is lost or stolen.

3
Content
Content ...................................................................... 3
Accessories ................................................................. 5
Power source ................................................................... 5
How to change batteries ................................................. 5
Product description .................................................... 6
Basic operations ......................................................... 8
Turn on / turn off ............................................................ 8
Lock buttons .................................................................... 8
Changing mic. mode (meeting / interview) ..................... 8
Recording ........................................................................ 9
Divide file during recording............................................ 9
How to add bookmarks (indexes) ................................ 10
Change of information about recording ...................... 10
Playback of recorded files ............................................. 10
Selecting the file .......................................................... 10
Bookmarks (indexes) .................................................... 10
Setting of playback filters ............................................ 10
Playback pause and rewind ......................................... 11
Append and Overwrite ................................................. 11
Slow / fast playback ..................................................... 11
Loop playback .............................................................. 12
Connecting with PC ....................................................... 12
Outdoor recording ......................................................... 12
LCD display .................................................................... 13

4
Main Menu .............................................................. 13
Context menu ................................................................ 18
Music ............................................................................. 21
FM Radio ....................................................................... 22
Bookmarks ..................................................................... 23
Settings .......................................................................... 23
Recording ..................................................................... 23
Playback ....................................................................... 27
Interface ...................................................................... 28
Informations ................................................................ 30
More settings ............................................................... 30
Additional informations ............................................ 33
Filename structure of recorded file ............................... 33
Technical parameters ............................................... 34
5
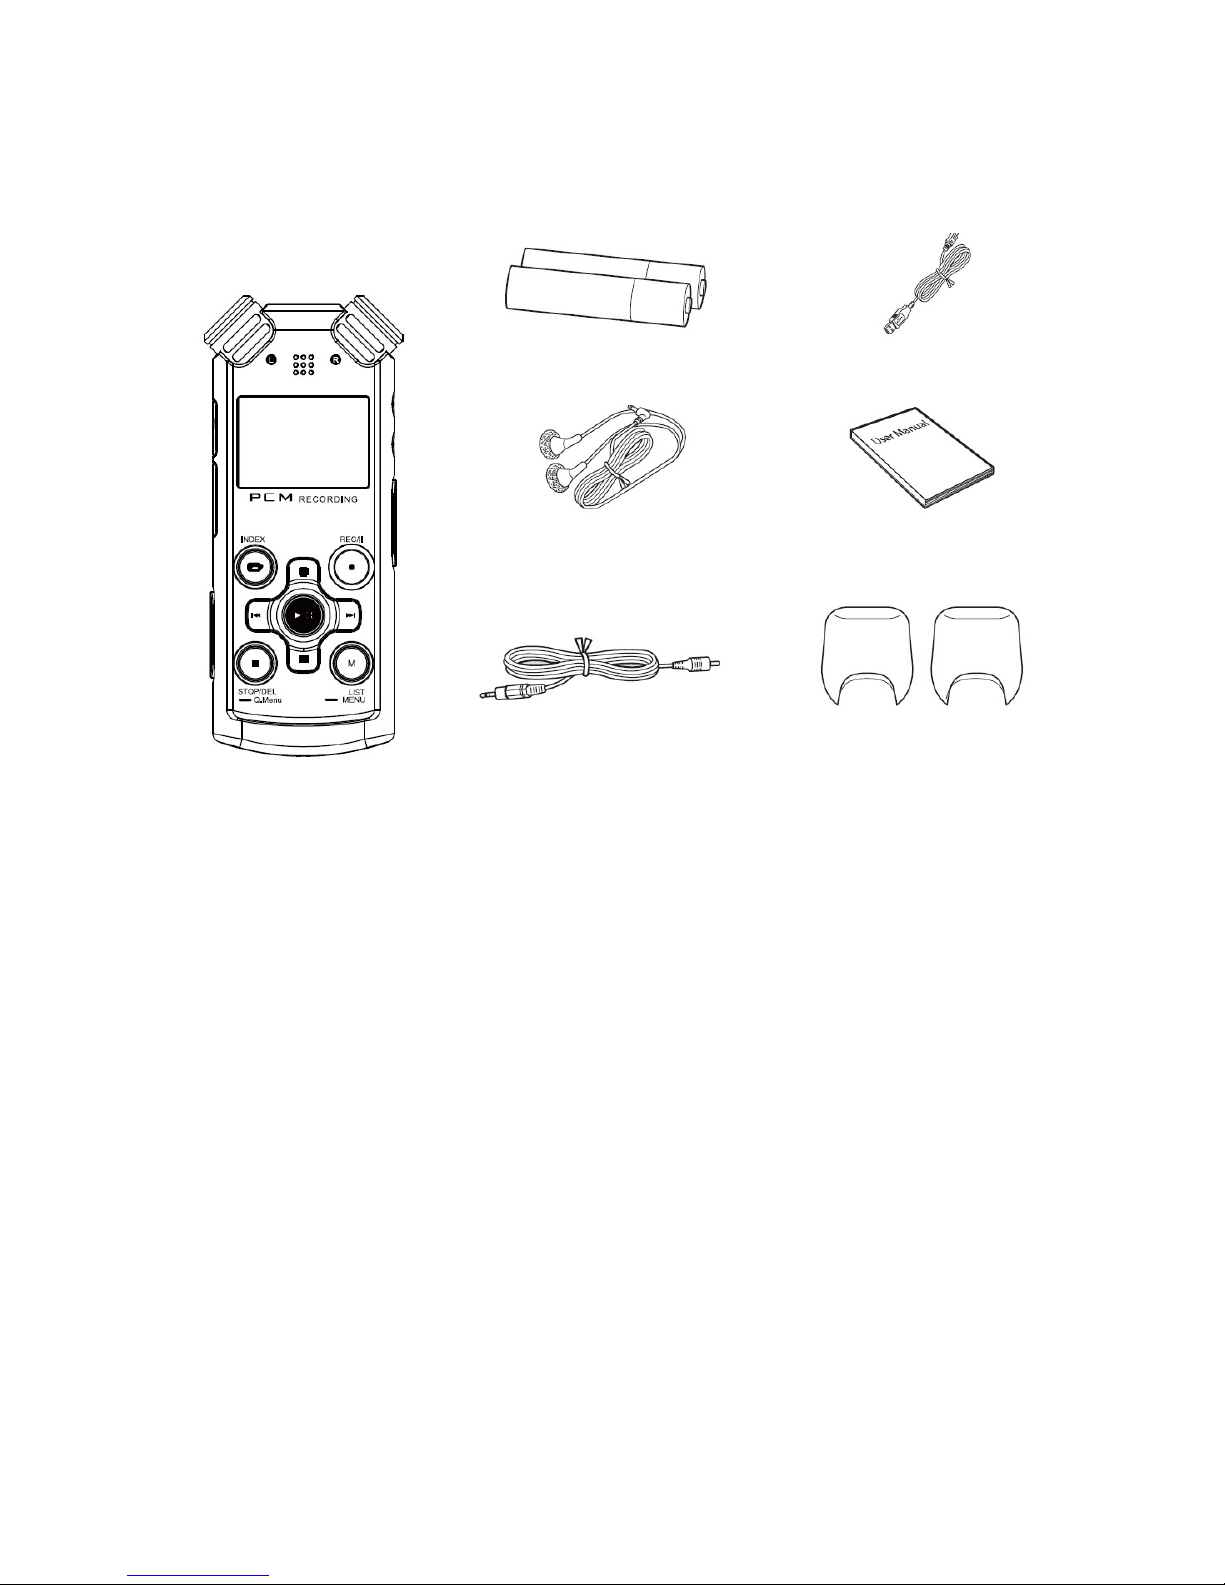
Accessories
Power source
Please use 2 AAA batteries – Alkaline, Ni-MH or Ni-CD.
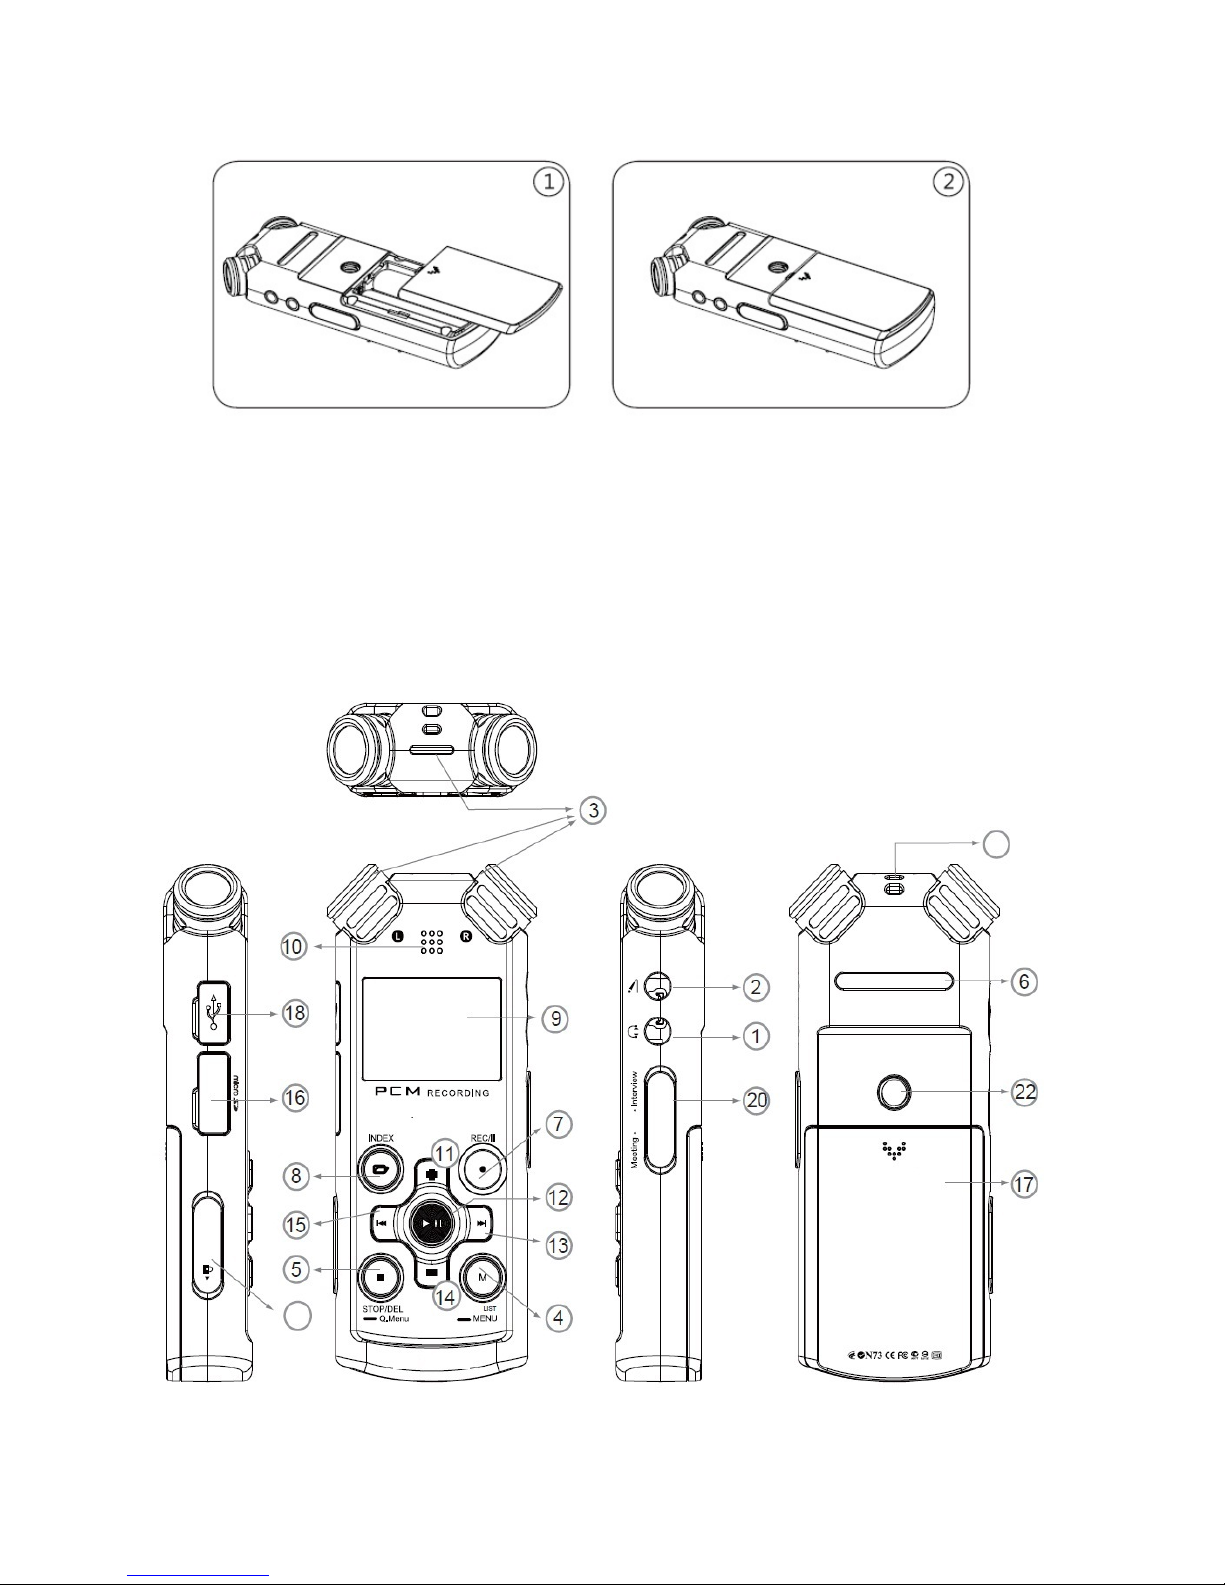
How to change batteries
1. Press the battery cover on the back side and slide down.
(see picture 1).
2. Insert two AAA batteries (take care of the orientation of
the batteries!) Close the battery cover (picture 2).
Eltrinex V12Pro
2 x AAA
Earphones
Manual
Line-in
Microphone
covers
6
Product description
19
21

7
1
Earphones
2
Line-in
3
Built-in microphones
4
MENU button
5
STOP button
6
Speaker
7
RECORD button
8
INDEX button
9
LCD
10
Recording and playback indicator
11
Volume up / move cursor up
12
PLAY button
13
Move forward
14
Volume down / move cursor down
15
Move backward
16
MicroSD card
17
Battery cover
18
USB connector
19
Hole for belt
20
Changing the mode
21
Buttons lock
22
Tripod mounting (1.4“ standard ISO 1222)

8
Basic operations
Turn on / turn off
Press and hold the PLAY button until the LCD start displaying
starting logo. After that release the PLAY button and wait for
the voice recorder to warm up. For turning off, use also the
long press of PLAY button as well.
Lock buttons
To avoid the unwanted press of buttons while carying the
voice recorder in your pocket, please use the Buttons Lock
slide which is located on the left side. If your voice recorder
refuses to turn on, please check this slide if it is not set to
„Locked“ position.
Changing mic. mode (meeting / interview)
Using the slide on right side (20), you can switch between
two modes:
Meeting – recording of the whole room or wider space
without any focus.
Interview – targeted recording with focus on the person who
is speaking directly to the microphones.

9
Recording
Switch to the main mode and press the REC button. If the
voice recorder is not powered on at that time, just press and
hold the REC button. It will turn on and start recording
autimatically. The beginning of the recording is announced by
the double beep.
To pause the recording please press REC button again. The
display shows PAUSE and the recording is temporarly
stopped. To continue the recording, please press the REC
button again.
To end the recording, please press the STOP button and wait
until the file is saved and the voice recorder beeps as a sign of
operation finised. If you press PLAY button instead of STOP
button while recording, it stops recording, saves the file and
plays the currently recorded file immediately.
Divide file during recording
Using short press of right arrow saves the recording and
starts automatically recording of a new file. This function is
suitable to create more small files of recording according to
the situation.

10
How to add bookmarks (indexes)
Press the INDEX button stortly while recording or playback of
the file. The bookmark appears at that position and allows
you to find this position very easily in the future.
Change of information about recording
Use short press of M button while recording to see all
important informations abou the length of recording,
remaining time of recording, etc.
Playback of recorded files
Selecting the file
Use left and right arrow to find the requested file and press
PLAY button to confirm your selection. Use short press of M
button to list all recorded files.
Bookmarks (indexes)
For skipping to next or previous bookmark, please press the
right or left arrow during playback.
Setting of playback filters
Press the REC button shortly while playback to change the
sound filter applied on currently played file. You can choose

11
between LCF (low frequency cut), VOC or NORMAL (no filter
applied)
Playback pause and rewind
Press PLAY button shortly to pause the playback. To resume
the playback, please press the PLAY button once again. Please
press and hold the right or left arrow to rewind the actual
position inside the file to a new one and release the button to
continue playback.
Append and Overwrite
Press the PLAY button shortly while playback to switch to
pause mode. Next, press the REC button shortly. The voice
recorder start to rewrite the recording from the paused
position, or to append the recording to the end of the file. To
choose which operation will occure, please open the Menu
using long press of M button, choose settings, recording, edit
and set the prefered option.
Slow / fast playback
Press and hold INDEX button during playback to switch
between slow and fast playback modes. The actually selected
mode is indicated by a message in top left corner of display.

12
Loop playback
Press M button shortly during playback to choose the starting
point of the loop recording. Press the M button shortly again
to choose the end point of loop recording. The loop
automatically start to repeat. To reset this function, please
press the M button again.
Connecting with PC
Connect the voice recorder with PC using the USB cable and
wait for automatic drivers installation to finish. The internal
memory of the voice recorder appears in PC as a new drive. If
the SD card is inserted, it appear as another drive. Your
recordings can be found in the VOICE folder, in subfolders
A,B,C,D.
Before disconnecting the USB cable, please always use the
„remove hardware“ function, which is indicated by icon in
the system tray of windows (bottom right). Warning:
Disconnecting the voice recorder without using this function
may cause damage or loss of data.
Outdoor recording
The voice recorder is equipped with two soft foam
microphone shields. Please put these shields on while
recording in windy environments.

13
LCD display
Main Menu
Press M button for approx 2 seconds to open the main menu.
Use arrows to move the cursor and PLAY button to confirm
your selection. The change of curently selected item can be
done by +/- button, the selection by left and right arrow.
Line-in
Alarm
Recording mode
Remaining time
Battery life
Locked file
L/R EQ
SD card
File
File name
Total Files
Recording format
VOR mode
Indicator
Current folder
Lock

14
Recording
→
A folder
→
Show content of A folder
B folder
→
Show content of B folder
C folder
→
Show content of C folder
D foder
→
Show content of D folder
Music
→
→
List the Music folder
FM Radio
→
→
Activate the FM radio
Bookmarks
→
→
List files with bookmarks
Settings
→
Recording
→
Quality
→
SLP
LP
SP
HQ
SHQ
44/16b M
44/16b S
44/24b S
48/16b S
48/24b S
→
Input
→
Microphone
Line-in
→
Mic. Sens.
→
Lowest
Low
Middle

15
High
Highest
→
VOR
→
Off
Auto
Lowest Low
High
Highest
→
Hidden rec.
→
Cancel
OK
→
Timer
→
5 presets for
timer rec.
→
Auto.Divide
→
Off
10 min
30 min
60 min
→
Edit
→
Append
Overwrite
→
Auto. Gain
→
Off
On
→
Pause indi.
→
Off
On

16
→
Playback
→
Hidden
→
Cancel
OK
→
Timer play.
→
Repeat M.
→
Disabled
One file
All files
→
Skip Forw.
→
Off
5, 10, 30s
5 minutes
→
Skip Back.
→
Off
5, 10, 30s
5 minutes
→
Interface
→
Sound
→
Off
Buttons
Guide
→
Backlight
→
Off
2 Sec.
5 Sec.
10 Sek.
Always

17
→
Language
→
Language of
menu
→
Voice G.
Volume
→
Set the
volume of
VoiceGuide
→
Info.
→
Memory
→
Internal
SD Card
→
Information
→
Product
information
→
Format
→
Cancel
OK
More
settings
→
More set.
→
Power Off
→
Off
5 min
15 min
→
Date/Time
→
Set the date
→
Set Default
→
Cancel
OK

18
→
USB Power
→
Off
On
→
Hear. Aid
→
Cancel
OK
→
Batteries
→
Batteries
→
Remote ctl.
→
Off
On
→
Firm. Upg.
→
Cancel
OK
Context menu
In the main mode you can use the advantage of the context
menu, which contains functions handling the currently
selected file. Please open the context menu by long press of
the STOP button. The context menu contains following
options
Delete
→
File
→
Delete of a recoded file
→
Bookmark
→
Delete bookmarks (indexes)
→
Folder
→
Delete content of folder

19
Protect
→
Files
→
Select file to be protected against
delete
Undelete
→
Cancel
→
Return back
→
OK
→
Recovers the last deleted file
Split
→
Cancel
→
Returns back
→
OK
→
Split actually selected file into two
parts
Label
→
Cancel
→
Returns back
→
OK
→
Allows to record short note which
will be added to the beginning of
file.
Copy
→
Cancel
→
Returns back
→
OK
→
Copy file to clipboard
Move
→
Cancel
→
Returns back
→
OK
→
Move file to clipboard
Paste
→
Cancel
→
Returns back
→
OK
→
Paste file from clipboard
Delete – Choosing this option you can delete the selected file,
bookmarks of the selected file, or all files in the folder.

20
Protect – Mark the file as protected if you like to avoid a
delete by mistake. The protected file cannot be deleted in the
voice recorder.
Undelete – the mistakenly deleted file in internal memory
can be recovered. This function is only available immediately
after delete and only in the internal memory. Please be
careful while deleting files.
Split – split the actually selected file into two parts. The file
will be deleted exactly at the position where the playback
was stopped by pressing of the STOP button. Warning: It is
not possible to split the files recorded in SLP quality.
Label – After confirming this selection, the voice recorder
starts recording. Please talk to the microphones and say the
name of the currently selected recording. After that, press
the STOP button. The voice recorder will join this new
recording at the beginning of selected file. This function is
very useful to find the requested file in the future.
Copy – the selected file will be placed into a clipboard and
ready for copy. This feature is similar to a Copy selection used
in Windows operating system.
Move – the selected file will be placed into a clipboard and
ready for move. This feature is similar to a Move selection
used in Windows operating system. Warning: Using this

21
option will remove the original file after moving to the
destination location.
Paste – The file previously marked as copy or move will be
placed into the currently seleted position. To change the
folder simply escape the context menu and change the folder
by short press of INDEX button. To switch the memory
between internal memory and SD card, please press shortly
the INDEX buttin while context menu is opened.
Music
The Music seletion from the main menu of the voice recorder
shows the content of the MUSIC folder. Into this folder you
can load any music or sound file which is supported by the
machine. You can also create new folders and subfolders
using the file commander in your PC.
The music folder is ready not only for music files, but also for
audio books. For easier orientation in the folders and files,
the voice guide is spelling the name of the actually selected
item. The playback of a music file or audio book can be
stopped at any time. The voice recorder remembers the last
position and next time continues exactly at that place. This
function is called as RESUME.

22
FM Radio
For a good quality of radio playback we recommend to
connect earphones. The wire of the earphones is used as an
antenae. Turn on the radio by long press of M button and
choosing the FM Radio item in the main menu. Confirm by
PLAY button.
Short press of M button will open the context menu of FM
Radio, where you can choose from Auto search and Output
settings option.
Auto search – choose this option to activate automatic tuning
of strongest available radio channels. The voice recorder
beeps at every time it saves a new channel. After tuning is
finished, it starts to play the first preset.
Output – Choose if you prefer to use the earphones or
internal speaker as a source of the FM Radio sound output.
The INDEX button switches between manual mode and
preset mode. Long press of INDEX button switches to
Recording mode.
Press STOP button shortly to turn off the radio.
Long press of STOP button in the manual mode switches
between MONO and STEREO.

23
Long press of STOP button in the preset mode deletes the
actually selected preset. The short press of PLAY button saves
the actually tuned frequency.
Bookmarks
Choosing this option show a list of all available bookmarks.
Select the bookmark and confirm using the PLAY button. To
move between bookmarks use the left and right arrow.
Settings
This option allows to configure all settings of the voice
recorder. Use + and – buttons to move the cursor up and
down and PLAY button or right arrow to confirm your
selection. Left arrow can be used to move one level back.
Recording
Quality
Set the preferred format of recording. For a high quality
recording we recommend to use the PCM formats.
SLP
mp3 / mono
Very low recording
quality
LP
mp3 / stereo
Middle quality, MP3
format recording
SP
mp3 / stereo
HQ
mp3 / stereo
SHQ
mp3 / stereo

24
PCM M
44/16b
wav / mono
Higher quality(mono)
PCM S
44/16b
wav / stereo
Highest quality (stereo)
PCM S
44/24b
wav / stereo
PCM S
48/16b
wav / stereo
PCM S
48/24b
wav / stereo
Input
If external sound input is connected, you can set the type.
Microphone – the external microphone is connected
Line-in – external audio source with stronger output
connected by a line cable.
Mic. Sens.
Setting of microphone sensitivity for optimal recording level.
Lowest, low – low microphone sensitivity, optimal for
recording of very loud sound sources
Middle – the standard sensitivity of microphones.
High, Highest – recording of very silent sound source

25
Voice Operated Recording (VOR)
Turn this function on to activate the voice operated
recording. If this function is set to ON, the voice recorder
pauses recording when the silence is detected. When any
sound occures it resumes recording again. This function is
good for very long recordings and its main benefits are saving
the memory space and removing unneeded silent parts in the
recording.
Hidden recording
When recording is activated, the voice recorder behaves like
it is turned off. This feature is recommended for use in places
such as cinema, church etc., and all other places where you
like to respect the darkness and silence.
To activate this function please set Hidden rec. In menu and
confirm by PLAY button. The voice recorder starts recording
and simulates the OFF mode. To end the recording, please
press STOP button.
To show hiddenly recorded files, please open the Menu,
choose Settings, Playback and Hidden option.

26
Timer
Set up to 5 presets of the recording at the requested time.
First of all, choose the preset using the +/- buttons and
confirm by right arrow. Then choose the source of recording.
You can choose beween FM Radio or Microphone. The FM
Radio choice is only available if there are FM Radio presets
tuned already.
Next step select the day in week or every day recording. After
that set the beginning time of the recording and length of
recording.
The last item to be set is the folder for recording. If you set
recording from FM radio, please choose also the preset which
you prefer to be recorded.
Auto divide
Automatically divides every recording into smaller parts. You
can turn this function off or you can choose between 10, 30
and 60 minutes for each part. If this option is set to OFF, the
voice recorder can still divide the file if it is needed because
of the file system.
Edit
Set the behaviour of edit function activated by REC button in
Recording Pause mode. If you set to Overwrite, the voice

27
recorder starts to write new recording exactly at the paused
position and previous recording is overwritten. If you set this
to Append, the previous rerding is kept and new recording
will be appended at the end of previous recording. Please be
carefull while setting the Overwrite option.
Automatic Gain Control
The voice recorder is equipped with the automatic control of
the sound input level. This function avoids the sound
distortion caused by high volume sound sources. If you wish
to deactivate this funcion, please set to OFF.
Playback
Hidden
Choose this option to open the H folder, which contains
recordings recorded using the Hidden recording function.
Timer
Setting of 5 presets for playback activated at selected time.
Off – the preset is disabled.
File – Play specified time at the selected time.
Beep – Make a beep sound at the selected time.
The setting of this function is similar to Timer Recording
settings.

28
Repeat
Set the repeat mode for playback of files.
Skip forward and backward
For playing long files it can be very useful to set the Skip
forward and Skip backward function. Please choose the value
of the distance which will be skipped by press of right or left
arrow during playback. Standard behaviour of the right and
left arrow when this function is disabled is skipping to next or
previous file.
Interface
Setting of the audio guide, LCD backlight and other parts of
the voice recorder interface.
Sound
Setting of the sound interface of the voice recorder.
Off – all sounds off.
Buttons – beep sound activated on press of button.
Guide – the sound of the voice guide which is important for
visually impaired users. If you mistakenly turn this setting off ,
please just restart your voice recorder and the voice guide
will start speaking again.

29
Backlight
Set the value for how long the LCD backlight will be activated
after every button press. The setting of higher values causes
lower battery life.
Off – the backlight is off
1 Sec. – backlight activated for 1 second after every button
press.
2 Sec. – backlight activated for 2 second after every button
press.
5 Sec. – backlight activated for 5 second after every button
press.
10 Sec. – backlight activated for 10 second after every button
press.
Always on – the backlight is always on.
Language
Change of the menu language. This option only affects the
text menu which is shown on the display. It does not have
effect on the voice guide.
Voice Guide Volume
Setting of the volume of voice guide. This volume setting only
works with voice guide on.

30
Information
Memory
Switch between the internal memory and external memory
(SD Memory card)
Information
Shows the informations about the hardware and firmware of
the voice recorder.
Format
Formatting of the currently selected memory. Warning: All
your data will be deleted using this function.
More settings
Power Off
Automatically power off the voice recorder after some time
of non-activity.
Off – Power off function is disabled. Stay always on.
5 min – the voice recorder shuts down after 5 minutes.
15 min – the voice recorder shuts down after 15 minutes.

31
Date/Time
For correct behaviour of the voice recorder i tis needed to set
date and time correctly. Please open this menu and set the
current values according to your time zone.
Set Default
All settings will be changed back to default values. This
function has no effect on the data (recorded files will not be
deleted).
USB Power
This voice recorder can be powered not only from batteries
but also from the USB port (cable connected to PC or USB
adaptor from electric socket). If you like to power by USB,
please set this function to ON. Otherwise the voice recorder
switches to „transfer data“ mode after USB is connected.
Warning: If your voice recorder is not connecting with PC,
please check if this swtting is not set to ON.
Hearing aid
You can check realtime the quality and level of the recorded
sound. To activate this feature, please turn on the Hearing aid
function. All recorded sounds can be checked realtime by the
earphones connected to the earphone socket.

32
Batteries
Please set the type of batteries which are currently inserted
in the voice recorder. The correct setting will bring the
optimal battery performance. You can choose between
alkaline for non-rechargable and rechargable batteries.
Remote control
After connecting the remote control (for example a foot
switch), please set this option to ON to activate the remote
control function.
Firmware Upgrade
Use this option to update the firmware version of the
firmware. Before you start, check if the batteries are fully
charged. The blackout during firmware upgrade proces can
cause the damage of the voice recorder.
Check for latest updates at web:
http://help.talkingrecorder.com. Download the .zip archive and extract the file
with BIN extension. Copy this file to the root folder of the
internal memory of the voice recorder. This is the folder
where you can see VOICE and MUSIC folders. Please copy this
BIN file to the same place. Turn on the voice recorder and
activate Firmware Upgrade by selecting Settings – More
settings – Firmware Upgrade. Please wait for upgrade to

33
finish. The end of process is indicated by a beep. Please take
out batteries for a few seconds and return back. Turn on the
voice recorder, open the menu and set Settings – More
Settings – Set defaults. Now the firmware upgrade process is
finished.
Additional information
Filename structure of recorded file
The name of the file consist of following parts:
E.g..: VR_080701_A0001.MP3
VR – the mark for „recording“
080701 – date of recording in format YYMMDD
A – folder of recording
0001 – order number of the file
MP3 – file format

34
Technical parameters
Supported
formats
MPEG 1/2/2.5 LAYER3/WMA/Linear
PCM
Display
graphical, with backlight, 1.4"
Recording format
MP3, WAV (4 kbps/5 kHz ~ 2304kbps /
48.1 kHz)
Playback format
MP3 (8-320 kbps), WMA (23-192)
without DRM
Memory
12 GB (8 GB int. + 4 GB SD)
Microphone
stereo
Distortion
0.4%±0.2
Frequency range
20Hz ~ 25KHz (-6dB)
Earphone output
jack 3.5 mm, 5.5mW
Speaker
300mW
FM radio
87.5 ~ 108MHz,
USB version
2
Memory card
microSD (up to 32GB)
Batteries
2 x AAA, LR03 - R03
USB powering
DC 5V/ 500 mA
Temperature range
40°~110° F
Humidity range
10% - 90%
Dimensions(in)
1.4“ × .7“ × 4“
Weight (ounces)
1.5 ounces
Supported
Operating
systems
Windows ME , Windows 2000 ,
Windows XP, Windows VISTA,
Windows 7
 Loading...