

Page 1

PLEASE SEE WWW.SUEX.IT FOR UPDATED MANUAL - VISITARE IL SITO WWW.SUEX.IT PER I MANUALI AGGIORNATI
1
User manual
Battery charger for Li-Ion batteries
LI5000V42
i
Page 2
PLEASE SEE WWW.SUEX.IT FOR UPDATED MANUAL - VISITARE IL SITO WWW.SUEX.IT PER I MANUALI AGGIORNATI
2
General battery charger specifications
Model
LI5000V42
Power
90-265 Vac ≈ 50/60 Hz
Rated power
200W
Output voltage
Output current
42 Vdc
4,8A
Charge method
DC/CV
Charge time
9h
Weight
Size
Safety grade
Protections
Protection grade
Working temperature
About 1.3 Kg
L. 250 x D. 90 x H. 90
I
Fuse 5A T 5x20
Transistor suppressor
Short circuit
Polarity inversion
Thermal protection
IP30
0 +40°C
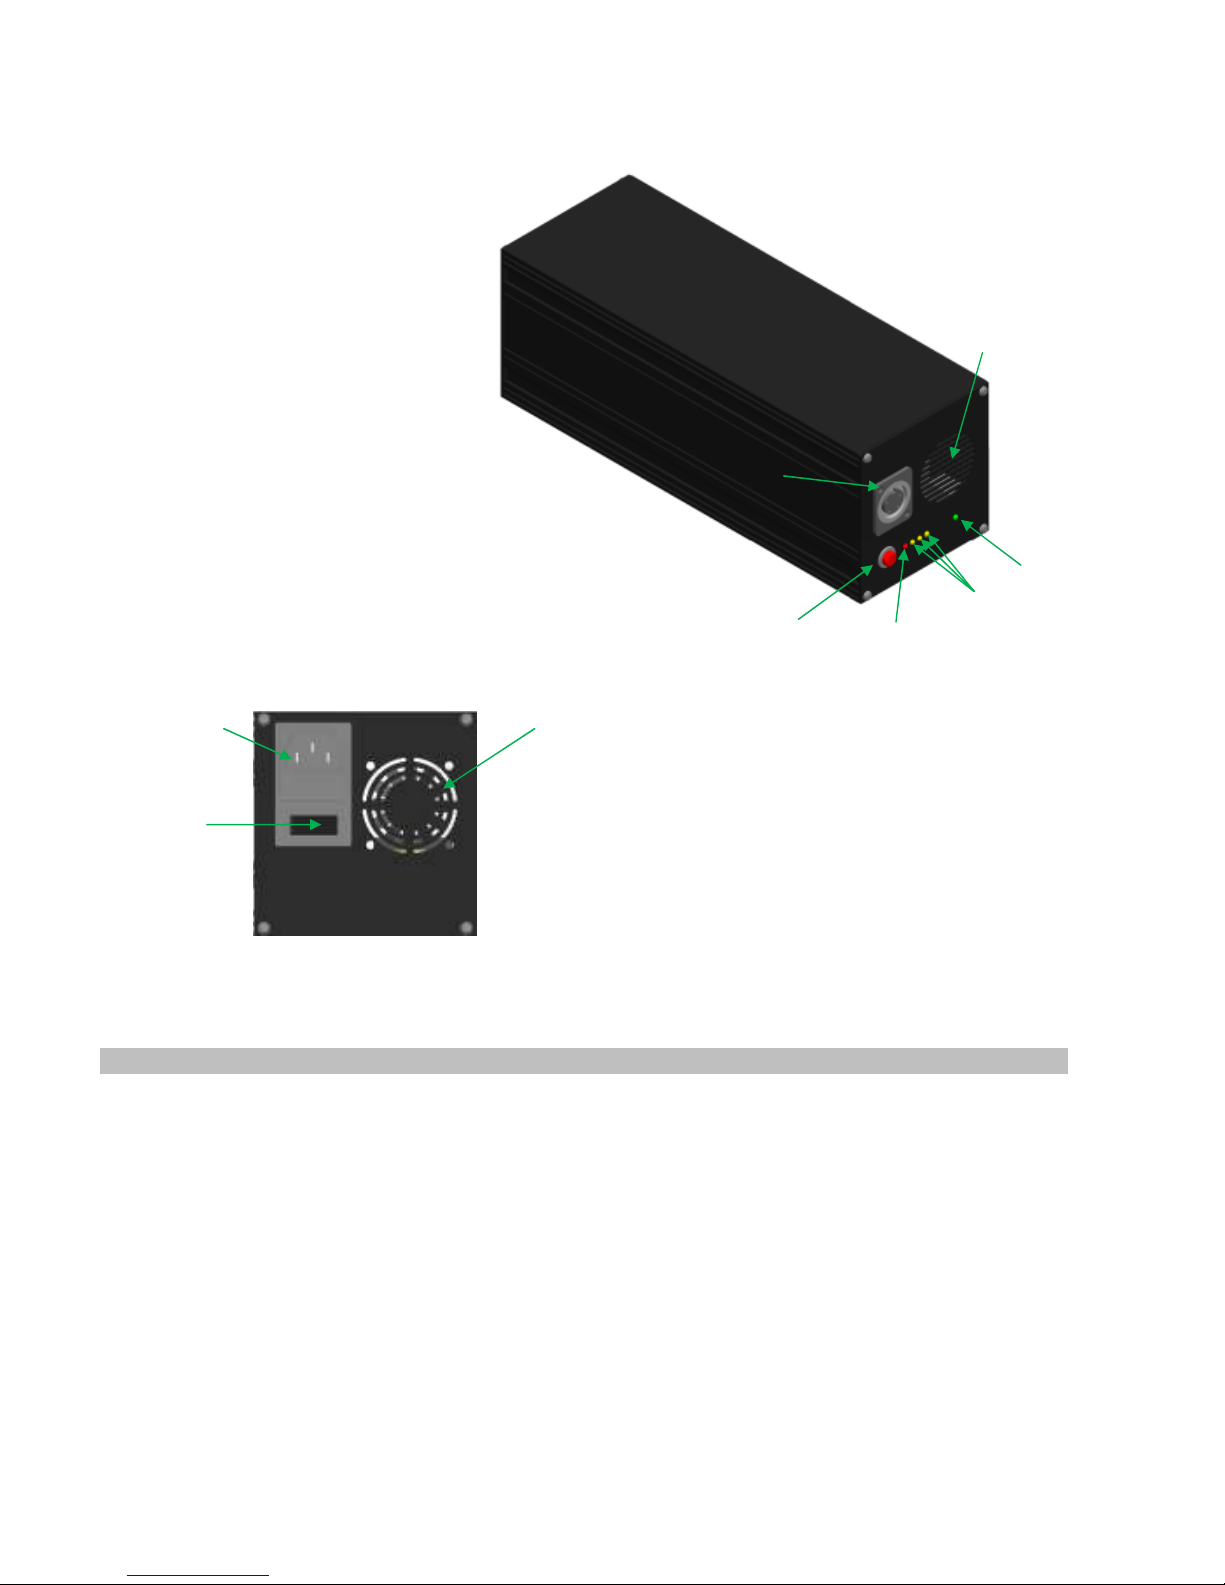
Fan
Power plug
Main switch
Rear panel
Charge
selection
button
Charger
connector
Ventilation
slot
Power-on
Charge
selection
Alarm
Page 3
PLEASE SEE WWW.SUEX.IT FOR UPDATED MANUAL - VISITARE IL SITO WWW.SUEX.IT PER I MANUALI AGGIORNATI
3
Warning!
Carefully read the instructions.
Failure to observe the indicated
cautions and procedures may be
harmful to people and property.
Protect the battery charger from rain and humidity.
Observe battery polarity
Use the battery charger in a site sheltered from the weather and humidity.
Do not charge batteries other than those for which the battery charger was designed.
Do not subject batteries to forced depletion. The Li-Ion battery accepts partial charges without
compromising its operations and efficiency.
Always keep the battery charger clean and store it in a dry place
Always check battery charge and battery wire integrity before charging.
The battery should not show breaks, deformations, burns or strange odors. Do not use the battery if
the red led is on.
Do not open the battery charger. Only qualified personnel are authorized to perform repairs.
Keep this product away from children.
Preliminary operations
1 Place the battery charger in a ventilated site, sheltered from the weather, humidity or jets of water.
2 Do not cover the battery charge with cloths or close it in containers when operating. The battery charger is
equipped with forced ventilation to better dissipate heat generated when charged.
3 Make sure the power voltage matches the one indicated on the label and in the instruction manual.
4 Connect the power cord to the electrical mains
5 Connect the charger wires to the battery observing polarity
The battery charger is protected against polarity inversion. Pay the utmost attention connecting the red wire to the
positive terminal and the black wire to the negative terminal. Otherwise charging will not start.
After correctly connecting the battery, the charge starts indicated by the yellow LED turning on.
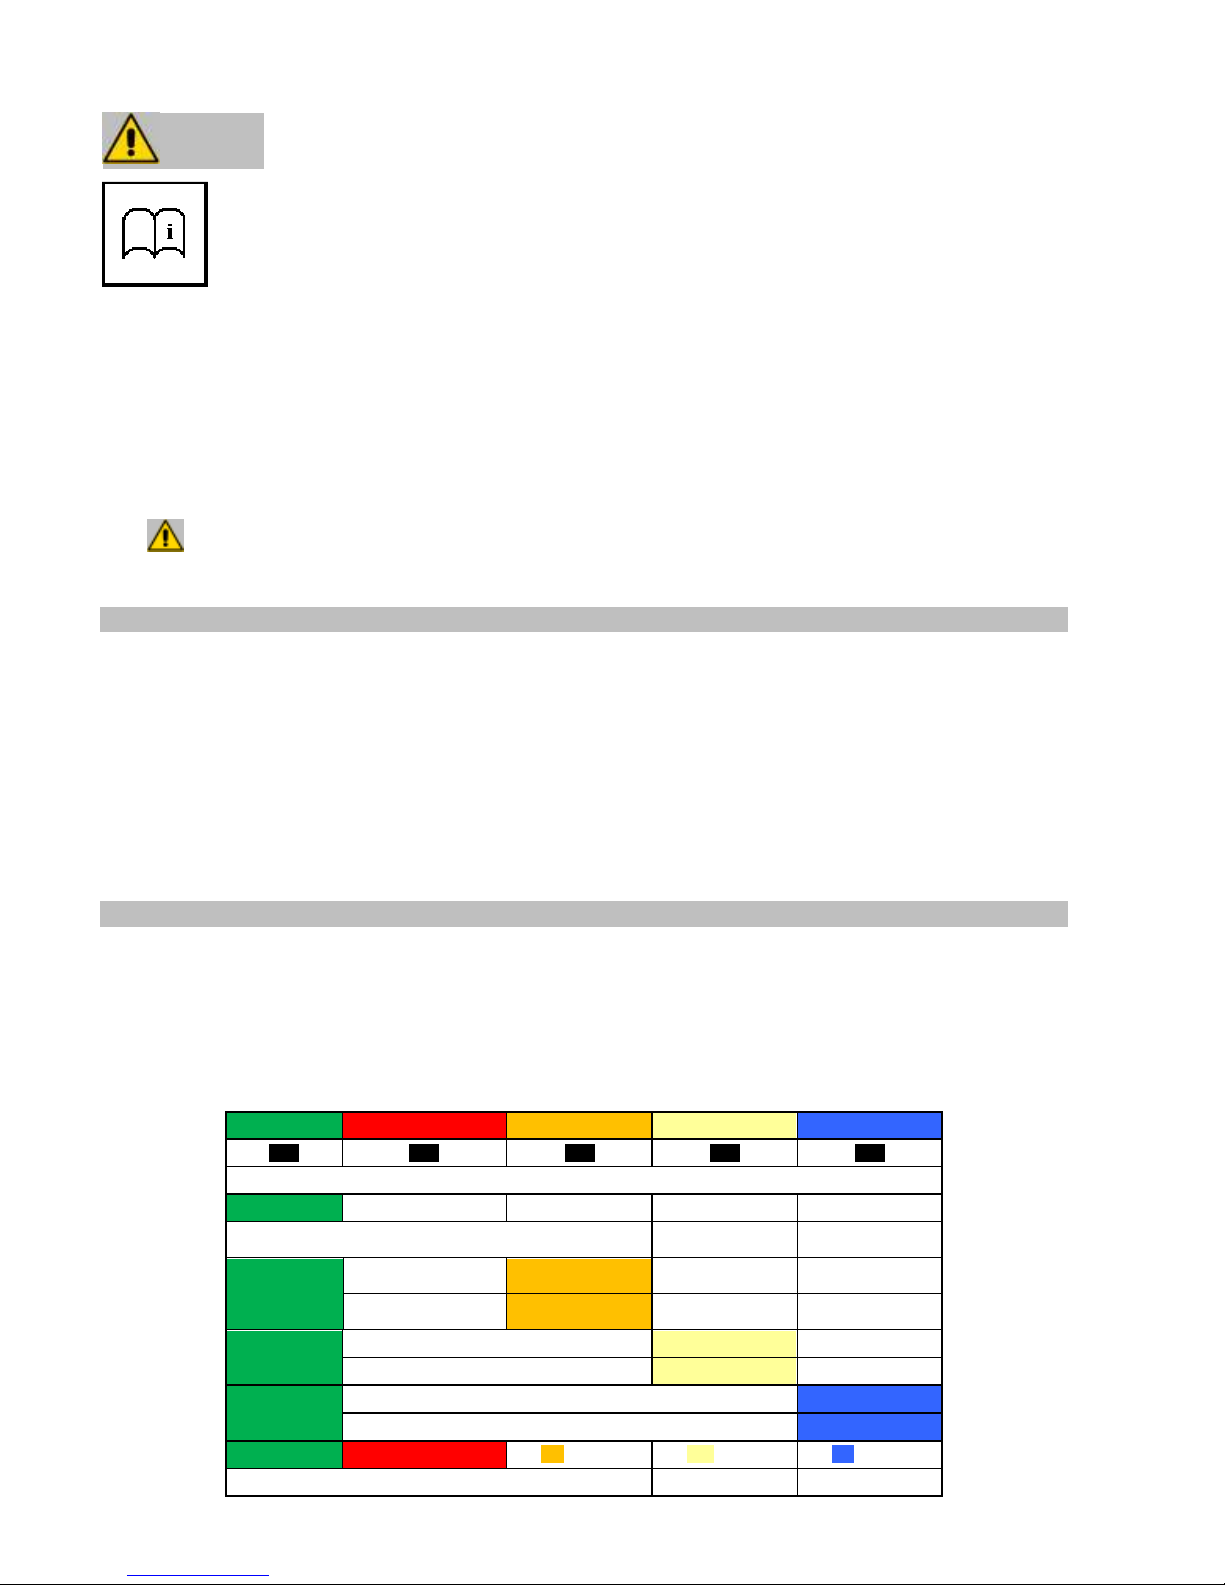
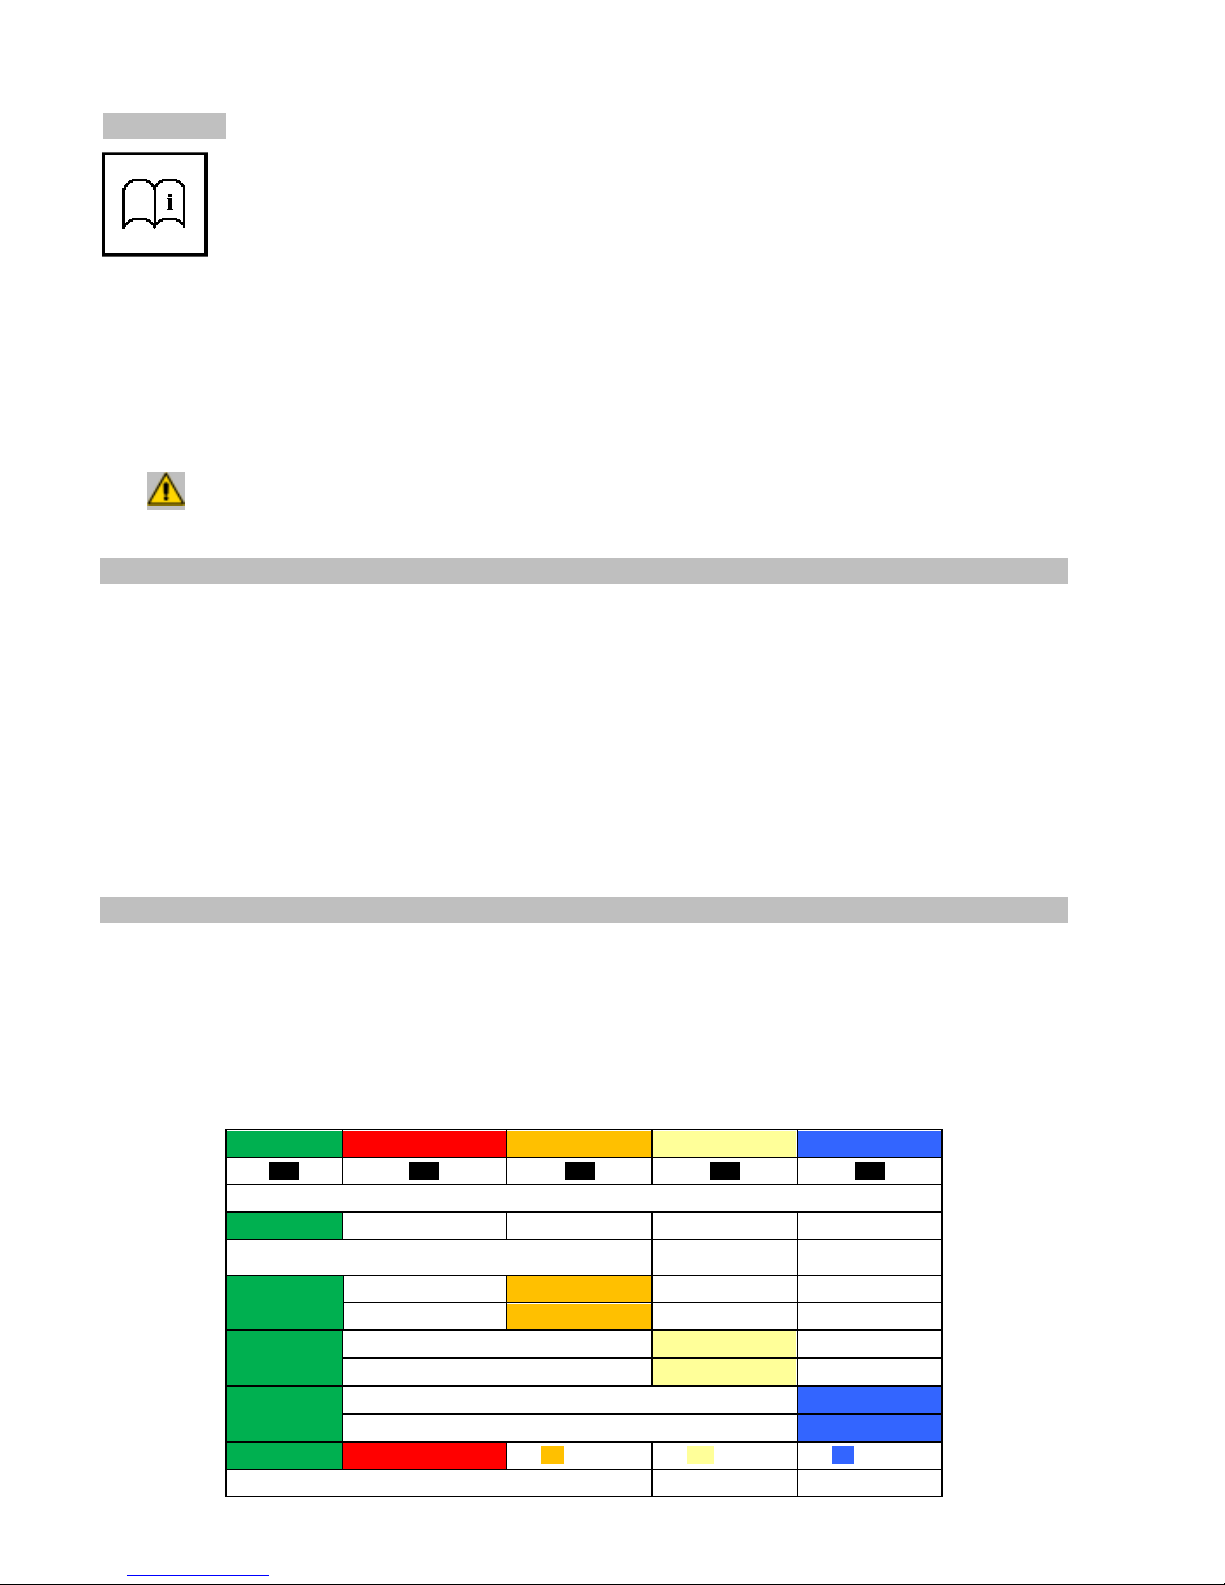
Lighted signals
Battery charger operations are displayed by LEDs on the front panel.
Green LED: power
Orange LED: 100% full charge
Yellow LED: 90% “long life” charge
Blue LED: 50% “storage” charge
Red LED: alarm
Green Red
Orange
Yellow
Blue
OFF OFF OFF OFF OFF
Battery charger off or not powered
ON
Battery charger powered
Battery not connected
ON
100% charge in
progress
Blinking
100% charge
completed
On
ON
90% long life charge in progress
Blinking
90% long life charge completed
On
ON
50% storage charge in progress
Blinking
50% storage charge completed
On
ON ON ON or OFF ON or OFF ON or OFF
Alarm: disconnect the battery
Page 4
PLEASE SEE WWW.SUEX.IT FOR UPDATED MANUAL - VISITARE IL SITO WWW.SUEX.IT PER I MANUALI AGGIORNATI
4
Charge procedure selection
Use the black button on the front panel to select the most suitable battery charge procedure:
1. Normally connect the battery
2. Repeatedly press the button to select one of the three possible procedures from the sequence.
A LED will turn on for each selected charge method:
- Orange – 100% standard charge. The battery is charged to the maximum admitted level, to
restore 100% of its capacity and provide maximum autonomy.
- Yellow – 90% “Long Life” charge. This program provides a more conservative charge that allows
the battery to support a higher number of work cycles, sacrificing, however, about 10% of
autonomy. The battery must be partially depleted to select this program.
- BLUE – 50% "storage” charge- Select this charge to only charge 50% of the battery. In these
electrical conditions, the battery has a minimum self-depletion and is thus recommended for
prolonged periods of storage between 2 and 6 months. After 6 months, we recommend another
50% charge cycle. In order to select this cycle the battery voltage should be within 30 and 36 Volts
(without applied load) . The battery should be at ambient temperature (not warm) and should have
been rested at least two hours after the last discharge/use before starting the charging process.
Note: the battery charger is automatically set for 100% charge when turned on. Partial charge levels (90% and
50%) may be selected in sequence by pressing the button but the selection will only be accepted by the battery
charge if actual battery charge is under the selected level. The battery charger does not have a discharge function.
Thus the 50% charge cannot be selected for a battery with over 50% charge. Similarly, the 90% charge cannot be
selected for a fully charged battery.
Maintenance and cleaning
The battery charger does not require periodic maintenance or calibration. Make sure the battery charger is always
clean and stored in a dry place.
Environmental protection
At the end of its working life, the battery charger becomes special waste
and should not be discarded in standard waste collection bins
but delivered to town RAEE collection centers
Both the battery charge and its accessories can be recycled.
Warranty
The battery charger is guaranteed for one year. The warranty does not cover damages caused by neglect or use
other than that expressly described in this manual.
Manufacturer information
The product is manufactured by:
ELTEC s.a.s. – S.P. 586 n. 3° - 16042 Carasco (GE) – Italy
Declaration of conformity
The product is manufactured according to current Electrical Safety regulations
IEC EN 60335-1
IEC EN 60335-2-29
and Electromagnetic Compatibility regulations
EN 50081-1 (Emissions)
EN 50082-1 (Immunity)
Page 5

PLEASE SEE WWW.SUEX.IT FOR UPDATED MANUAL - VISITARE IL SITO WWW.SUEX.IT PER I MANUALI AGGIORNATI
5
Manuale d’uso
Caricabatterie per batterie Li-Ion
LI5000V42
i
Page 6
PLEASE SEE WWW.SUEX.IT FOR UPDATED MANUAL - VISITARE IL SITO WWW.SUEX.IT PER I MANUALI AGGIORNATI
6
Caratteristiche generali del caricabatterie
Modello LI5000V42
Alimentazione 90-265 Vac ≈ 50/60 Hz
Potenza nominale 200W
Tensione d’uscita
Corrente d’uscita
42 Vcc
4,8A
Metodo Ricarica CC/CV
Tempo di carica 9h
Peso
Dimensioni
Classe di sicurezza
Protezioni
Grado di protezione
Temperatura di esercizio
Circa 1.3Kg
L. 250 x P. 90 x H. 90
I
Fusibile 5A T 5x20
Soppressore transitori
Corto circuito
Inversione di polarità
Protezione termica
IP30
0 +40°C
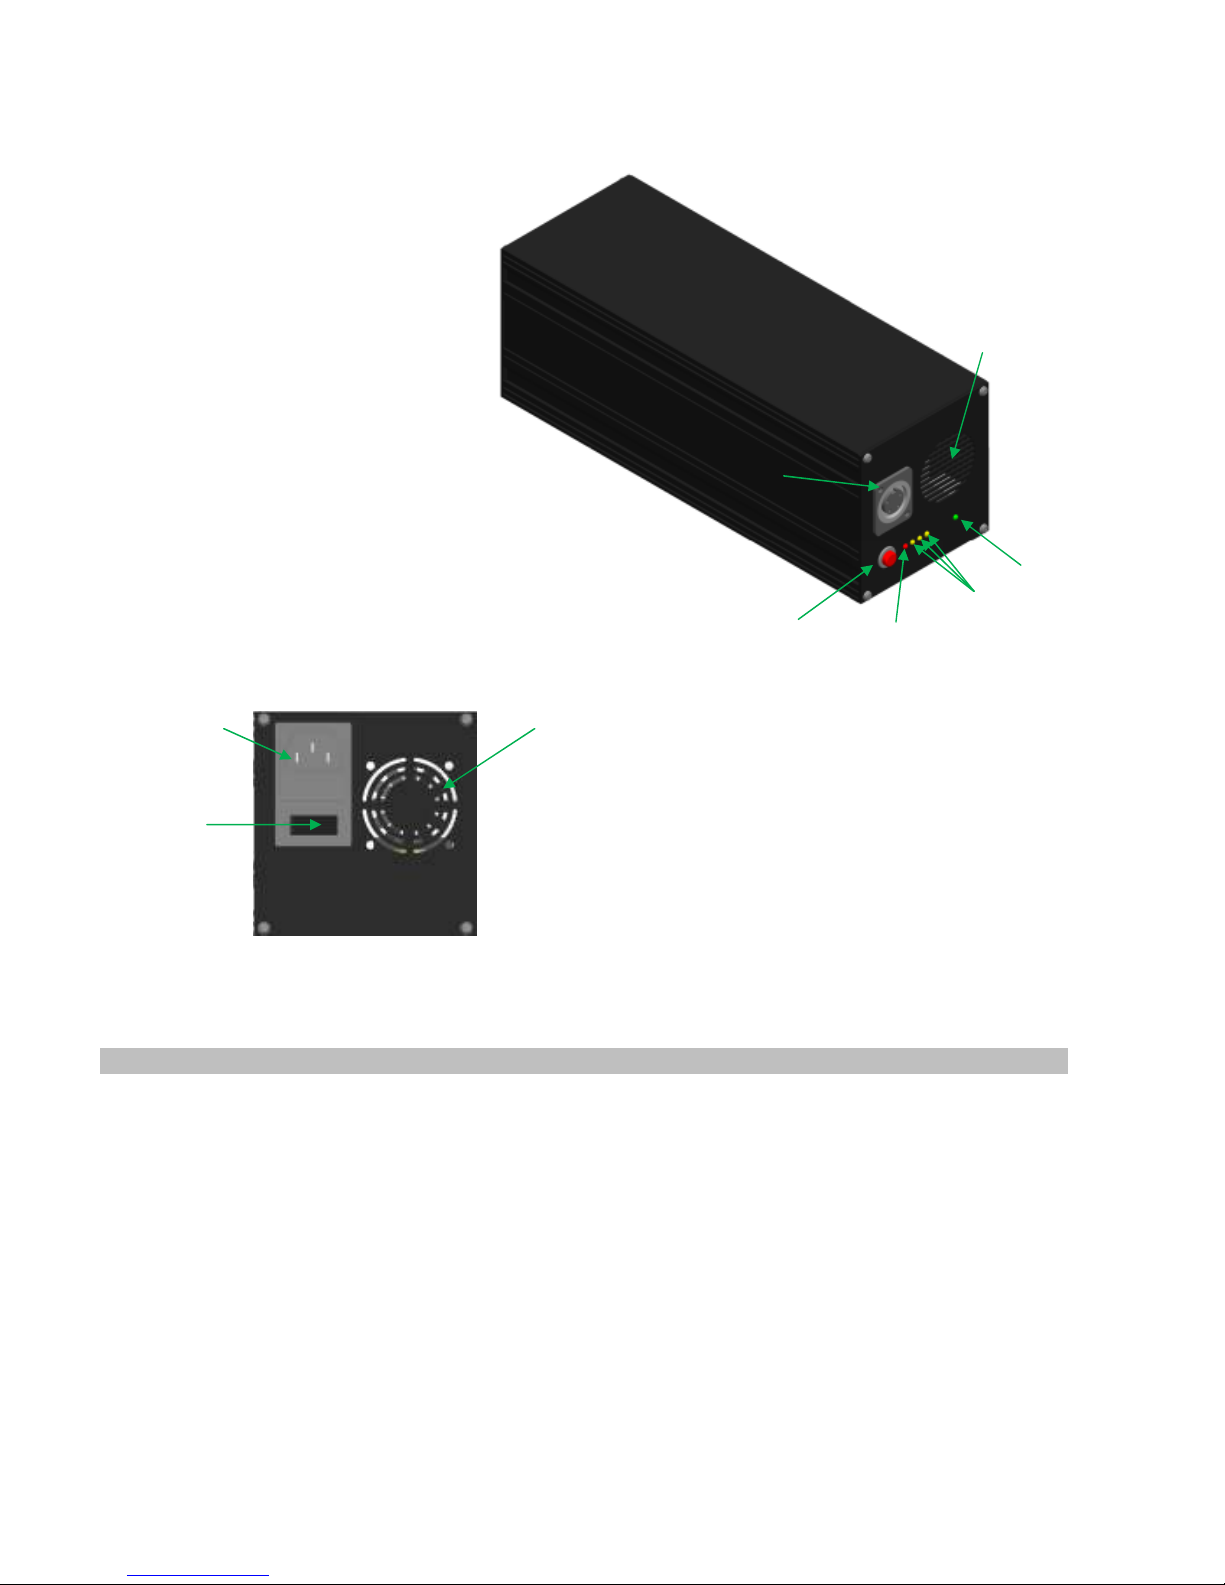
Ventilatore
Presa di rete
Interruttore
generale
Pannello posteriore
Pulsante
selezione
ricarica
Connettore
ricarica
Presa d’aria
ventilazione
Power-on
Selezione
ricarica
Allarme
Page 7
PLEASE SEE WWW.SUEX.IT FOR UPDATED MANUAL - VISITARE IL SITO WWW.SUEX.IT PER I MANUALI AGGIORNATI
7
Attenzione!
Leggere attentamente le
istruzioni.
Il mancato rispetto delle
cautele e delle procedure indicate può
causare pericolo per le persone e le cose.
Proteggere il caricabatterie dalla pioggia e dall’umidità.
Rispettare la polarità della batteria
Utilizzare il caricabatterie in luoghi riparati da intemperie e umidità.
Non caricare batterie differenti da quelle per cui il caricabatterie è stato progettato.
Non sottoporre la batteria a scariche forzate. La batteria Li-Ion accetta cariche parziali senza pregiudizio per
la sua funzionalità ed efficienza.
Tenere sempre il caricabatterie pulito e conservarlo in un luogo asciutto
Controllare sempre l’integrità dei cavi del caricabatteria e della batteria prima di avviare una ricarica. La
batteria non deve mostrare rotture, deformazioni, bruciature, odori strani. Non utilizzare la batteria in caso di
accensione del LED rosso.
Non aprire il caricabatterie. Eventuali riparazioni devono essere eseguite solo da personale qualificato.
I bambini non devono utilizzare questo prodotto.
Operazioni preliminari
6 Posizionare il caricabatterie in un luogo ventilato ma protetto dalle intemperie, dall’umidità o da spruzzi
d’acqua.
7 Non coprire il caricabatterie con panni o chiuderlo in contenitori durante il funzionamento. Il caricabatterie è
provvisto di ventilazione forzata per un miglior smaltimento del calore generato durante la carica.
8 Controllare che la tensione di alimentazione sia conforme a quanto indicato sull’etichetta e sul manuale
d’istruzioni
9 Collegare il cavo di alimentazione alla rete elettrica
10 Collegare il cavi di ricarica alla batteria rispettando la polarità
Il caricabatterie è protetto contro l’inversione della polarità. Porre comunque la massima attenzione collegando il
cavo rosso al terminale positivo ed il cavo nero al terminale negativo. In caso contrario la carica non avrà inizio.
Collegata correttamente la batteria, la carica avrà inizio e sarà evidenziata dall’accensione del LED giallo.
Segnalazioni luminose
Il funzionamento del caricabatterie viene visualizzato tramite i LEDs presenti sul frontale.
LED verde: alimentazione
LED arancio: ricarica completa 100%
LED giallo: ricarica “long life” 90%
LED blu: ricarica “storage” 50%
LED rosso: allarme
Verde Rosso Arancio Giallo Blu
OFF OFF OFF OFF OFF
Caricabatterie spento o non alimentato
ON
Caricabatterie alimentato
Batteria non collegata
ON
Carica 100% in corso
Lampeggiante
Carica 100% ultimata
Fisso
ON
Carica long life 90% in corso
Lampeggiante
Carica long life 90% ultimata
Fisso
ON
Carica storage 50% in corso
Lampeggiante
Carica storage 50% ultimata
Fisso
ON ON ON or OFF ON or OFF ON or OFF
Allarme: scollegare la batteria
Page 8
PLEASE SEE WWW.SUEX.IT FOR UPDATED MANUAL - VISITARE IL SITO WWW.SUEX.IT PER I MANUALI AGGIORNATI
8
Scelta della procedura di carica
Utilizzando il pulsante nero sul pannello frontale, il caricabatterie consente di selezionare la procedura
di carica più idonea:
3. Collegare normalmente la batteria
4. Premendo il pulsante ripetutamente si selezioneranno in sequenza le tre possibili procedure.
Per ogni carica selezionata corrisponderà l’accensione di un LED:
- Arancio - Carica standard al 100%. La batteria verrà ricaricata fino al livello massimo consentito,
così da reintegrare il 100% della sua capacità e fornire il massimo dell’autonomia.
- Giallo – Carica “Long Life” al 90%. Questo programma prevede una ricarica più conservativa che
consente alla batteria di sopportare un maggior numero di cicli di funzionamento, sacrificando però
il 10% circa dell’autonomia. Per poter selezionare questo programma la batteria deve essere
parzialmente scarica.
- BLU – Carica “Storage” al 50%. La selezione di questa ricarica permette di caricare la batteria
solo al 50%. In questa condizione elettrica la batteria ha una autoscarica minima ed è quindi
consigliata per periodi di inutilizzo prolungati compresi fra 2 e 6 mesi. Oltre 6 mesi è consigliabile
un nuovo ciclo di carica al 50%. Per poter selezionare questo programma la batteria deve avere
una tensione residua compresa da 30Volt a 36 Volt (misurata in assenza di carico), deve essere a
temperatura ambiente e deve essere lasciata riposare per almeno due ore dopo la scarica prima
di iniziare il processo di carica.
Nota bene: all’accensione il caricabatteria si predispone automaticamente per la carica al 100%. I livelli di carica
parziali (90% e 50%) potranno essere selezionati in sequenza premedo il pulsante, ma la selezione verrà accettata
dal caricabatterie solo se la tensione effettiva della batteria risulta inferiore ai livelli selezionati. Il caricabatterie non
è provvisto della funzione di scarica per cui in presenza di una batteria con una capacità maggiore del 50% non
potrà essere caricata al 50%. Analogamente una batteria completamente carica non potrà essere caricata al 90%.
Manutenzione e pulizia
Il caricabatterie non necessità di manutenzione o tarature periodiche. Assicurarsi comunque che il caricabatteria sia
sempre pulito e conservato in luogo asciutto
.
Protezione dell’ Ambiente
A fine vita il cari
cabatterie diventa un rifiuto speciale e non va gettato nei
cassonetti della raccolta indifferenziata
ma consegnato ai centri comunali per la raccolta dei RAEE.
Sia il caricabatterie che i suoi accessori possono essere riciclati.
Garanzia
Il caricabatterie è garantito per anni uno. Sono esclusi dalla garanzia danni causati da incuria o utilizzo difforme da
quanto non espressamente indicato nel presente manuale.
Informazioni sul produttore
Il prodotto è costruito da:
ELTEC s.a.s. – S.P. 586 n. 3° - 16042 Carasco (GE) – Italia
Dichiarazione di conformità
Il prodotto è costruito in conformità alle vigenti norme di Sicurezza Elettrica
IEC EN 60335-1
IEC EN 60335-2-29
e Compatibilità Elettromagnetica
EN 50081-1 (Emissioni)
EN 50082-1 (Immunità)
 Loading...