

Page 1

1
MiniSafe
Kurzanleitung
Quick Start Guide
Page 2

2 3
Technischer Überblick
Prozessor: Intel X1021
Speicher: 1 GB DDR3 RAM + 4 GB eMMC
LAN: 1 x 10/100 Mbit Ethernet
Integriertes EnOcean 868 MHz Funkmodul (TCM310) ESP3
Stromversorgung:
5 V, 4A
Abmaße: L x B x H: 165 x 70 x 35 mm
Gewicht: 140 Gramm
Technical overview
Processor: Intel X1021
Memory: 1 GB DDR3 RAM + 4 GB eMMC
LAN: 1 x 10/100 Mbit Ethernet
Integrated EnOcean 868 MHz radio module (TCM310) ESP3
Power supply:
5 V, 4A
Dimensions: L x B x H: 165 x 70 x 35 mm
Weight: 140 grams
LED ON/rot: Stromversorgung
LED ON/red: Power supply
LED CFG/grün: (während des Startvorganges)
1. LED leuchtet: Initialisierung Secure Bootloader
2. LED blinkt: Firmware wird geladen
3. LED aus: Gerät betriebsbereit
LED CFG/green: (During the start-up process)
1. LED lights up: Initialisation of Secure Bootloader
2. LED flashes: Firmware is loading
3. LED off: Device is ready for operation
LED CFG/grün: (im Betrieb)
1. LED leuchtet: Mindestens ein Nutzer ist verbunden
2. LED aus: Keine offenen Verbindungen
LED CFG/green: (In operation)
1. LED lights up: At least one user is connected
2. LED off: No open connections
Reset: Das Betätigen
des Reset-Knopfes startet
das Gerät neu
Reset: Pressing the reset
button restarts the device
Power:
Stromversorgung
Power: Power supply
LAN: Ethernet-Schnitt-
stelle 10/100 Mbit
LAN: Ethernet interface
10/100 Mbit
1
1 2 2 3 4
4
5
3
5
Page 3

4 5
Herzlich Willkommen
Vielen Dank, dass Sie sich für das
Qualitätsprodukt MiniSafe von
Eltako entschieden haben. Nehmen
Sie sich jetzt die Zeit und lernen die
Grundlagen Ihres neuen Eltako Produktes kennen.
In nur wenigen Minuten werden Sie in
der Lage sein, Ihre gesamte Installation
in Betrieb zu nehmen.
Sie brauchen dafür keine Vorkenntnisse und können alle nötigen Schritte mit
dem Gebäudefunkassistenten 4
(GFA 4) selbst durchführen.
Die folgenden Seiten sollen Ihnen einen kurzen Überblick über die notwendigen Schritte geben.
Welcome
Thank you for choosing the highquality Eltako MiniSafe. Take some
time now to familiarise yourself with
the basics of your new Eltako product.
You will be able to get your entire
installation up and running in just a
few minutes.
You do not need any prior knowledge
and can carry out all the necessary
steps yourself using the Gebäude-
funkassistenten 4 (GFA 4).
The next few pages are here to give
you a brief overview of the necessary
steps.
1. MiniSafe starten
Schließen Sie den MiniSafe an das
mitgelieferte Netzteil an und verbinden Sie diesen dann mit Ihrem Router über das im Lieferumfang enthaltene Netzwerkkabel.
Idealerweise wird der MiniSafe zentral
aufgestellt. Das bedeutet, dass er jedes
der später angelernten Geräte gleich
gut erreichen kann.
Eine ausführliche Beschreibung der
Funktionen finden Sie im Benutzerhandbuch. Dieses finden Sie im Downloadbereich unter www.eltako.com.
1. Starting the MiniSafe
Connect the MiniSafe to the supplied
power adapter, then connect it to your
router using the supplied network
cable.
Ideally, the MiniSafe will be centrally
located. This makes it equally
accessible to any devices that need
to be connected.
You can find a detailed description of
the functions in the user manual.
This can be found in the download
section at www.eltako.com.
Page 4
6 7
2. App laden
Suchen Sie in Ihrem App Store einfach
nach »Eltako« oder scannen Sie einen
der abgebildeten QR-Codes um die
GFA 4 App zu erhalten.
2. Download App
Simply search for »Eltako« in your app
store or scan one of the QR codes to
get the GFA 4 app.
Android (> Version 5)
iOS (> Version 10)
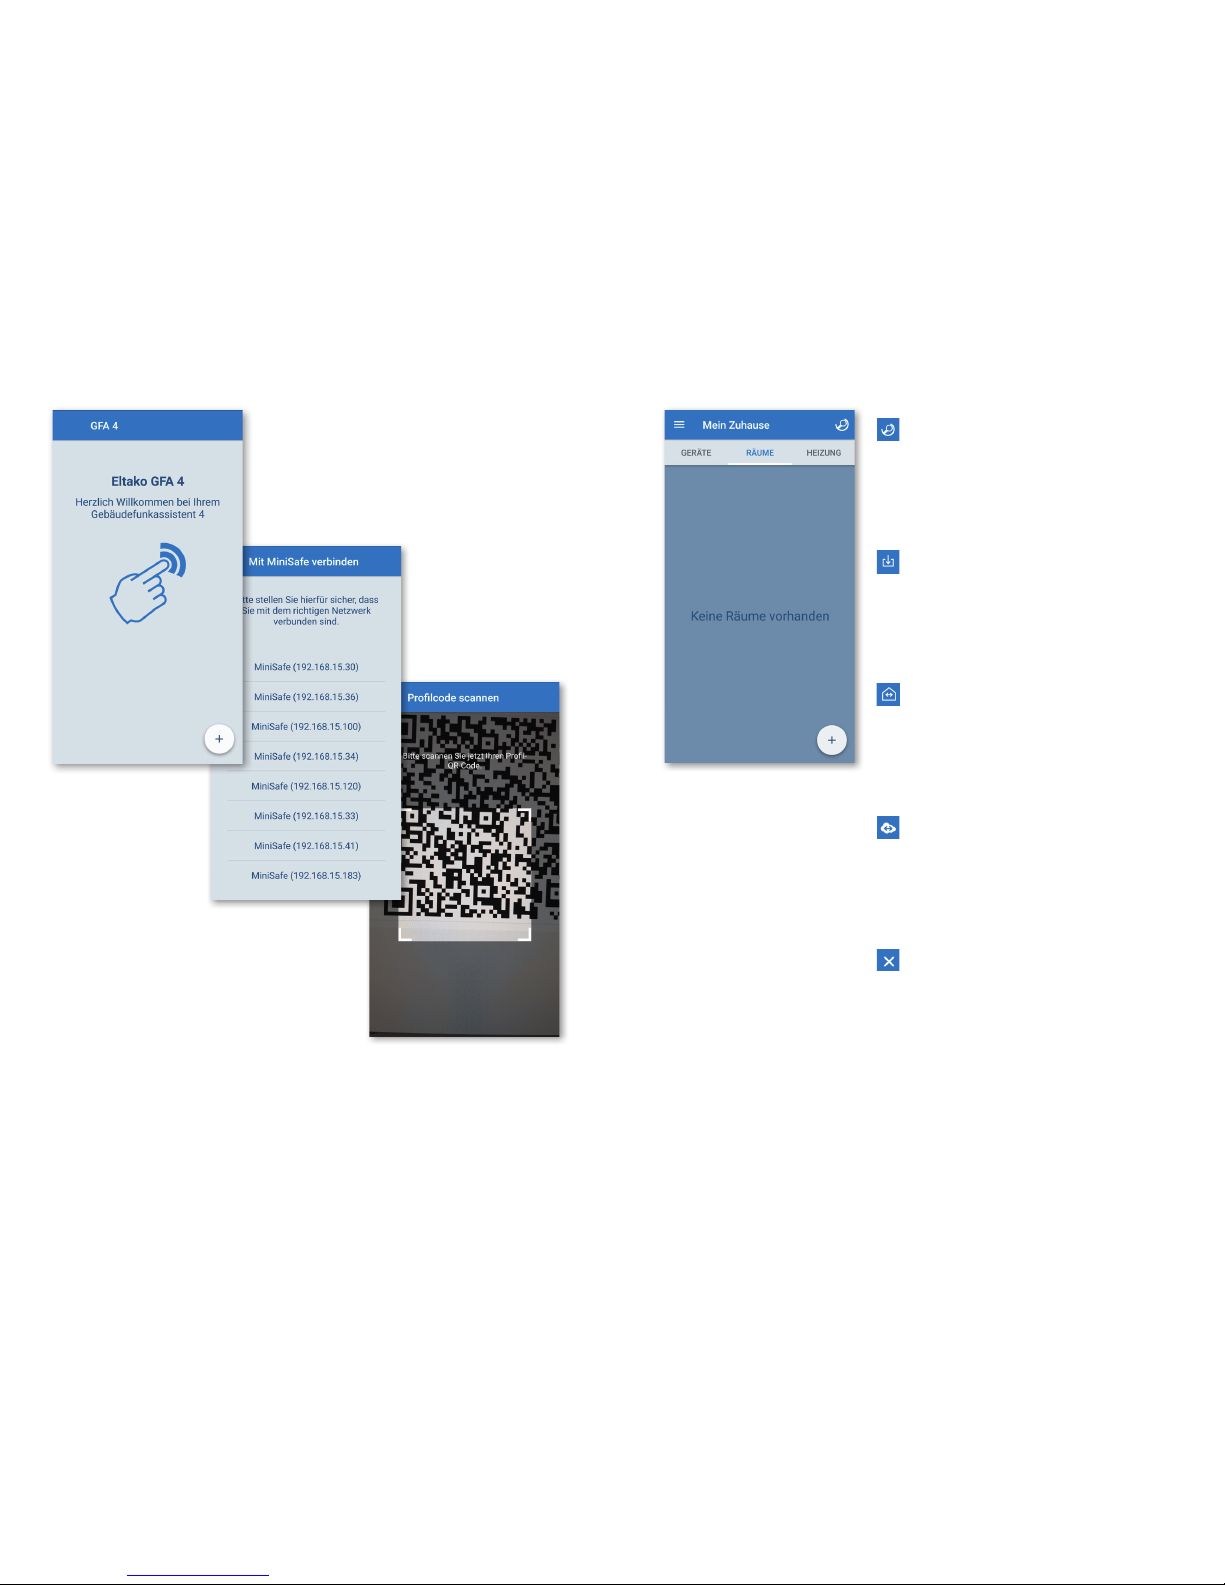
3. Profil anlegen
Befindet sich der MiniSafe im selben
Netzwerk wie das Smartphone, kann
über den Punkt »MiniSafe suchen«
eine Verbindung zum Gerät aufgebaut
und ein Profil angelegt werden.
Benutzername: Admin
Passwort: Im Auslieferungszustand
ist dies der »Master Key«, welcher
auf der Unterseite des MiniSafe zu
finden ist.
Nach dem ersten erfolgreichen
Login besteht sofort Fernzugriff
auf den MiniSafe.
Die intelligente quickcon®-Tech
nologie erkennt automatisch Ihr
Heimnetzwerk, eine Internet
verbindung wird dann für den
Zugriff nicht benötigt.
3. Create profile
If the MiniSafe is on the same network
as the smartphone, a connection
to the device can be established and
a profile created using the »Find
MiniSafe« function.
Username: Admin
Password: For new devices, this is the
master key, which can be found on the
bottom of the MiniSafe.
The first successful login enables
immediate remote access to the
MiniSafe.
The intelligent quickcon®
technology automatically detects
your home network so that an
Internet connection is not required
for access.
Page 5
8 9
Schlüssel aushandeln
Wird beim ersten Verbindungsaufbau
und alle sieben Tage durchgeführt.
Key negotiation
Is implemented the first time you connect
and every seven days.
Daten laden & aktualisieren
Dies kann, je nach Netzwerkverbindung, einige Sekunden dauern.
Load & update data
This can take a few seconds, depending
on the network connection.
Lokal verbunden
Es wird kein Internetzugang für den
Betrieb des MiniSafe benötigt.
Connected locally
No Internet access is required to operate
the MiniSafe.
Über quickcon® verbunden
Hierfür muss der MiniSafe mit dem
Internet verbunden sein.
Connected via quickcon®
The MiniSafe must be connected to the
Internet for this.
Keine Verbindung möglich
Dies kann unterschiedliche Gründe
haben, z.B. keine aktive Internetverbindung am Smartphone.
No connection possible
There can be different reasons for this,
e.g. no active Internet connection on the
smartphone.
Page 6
10 11
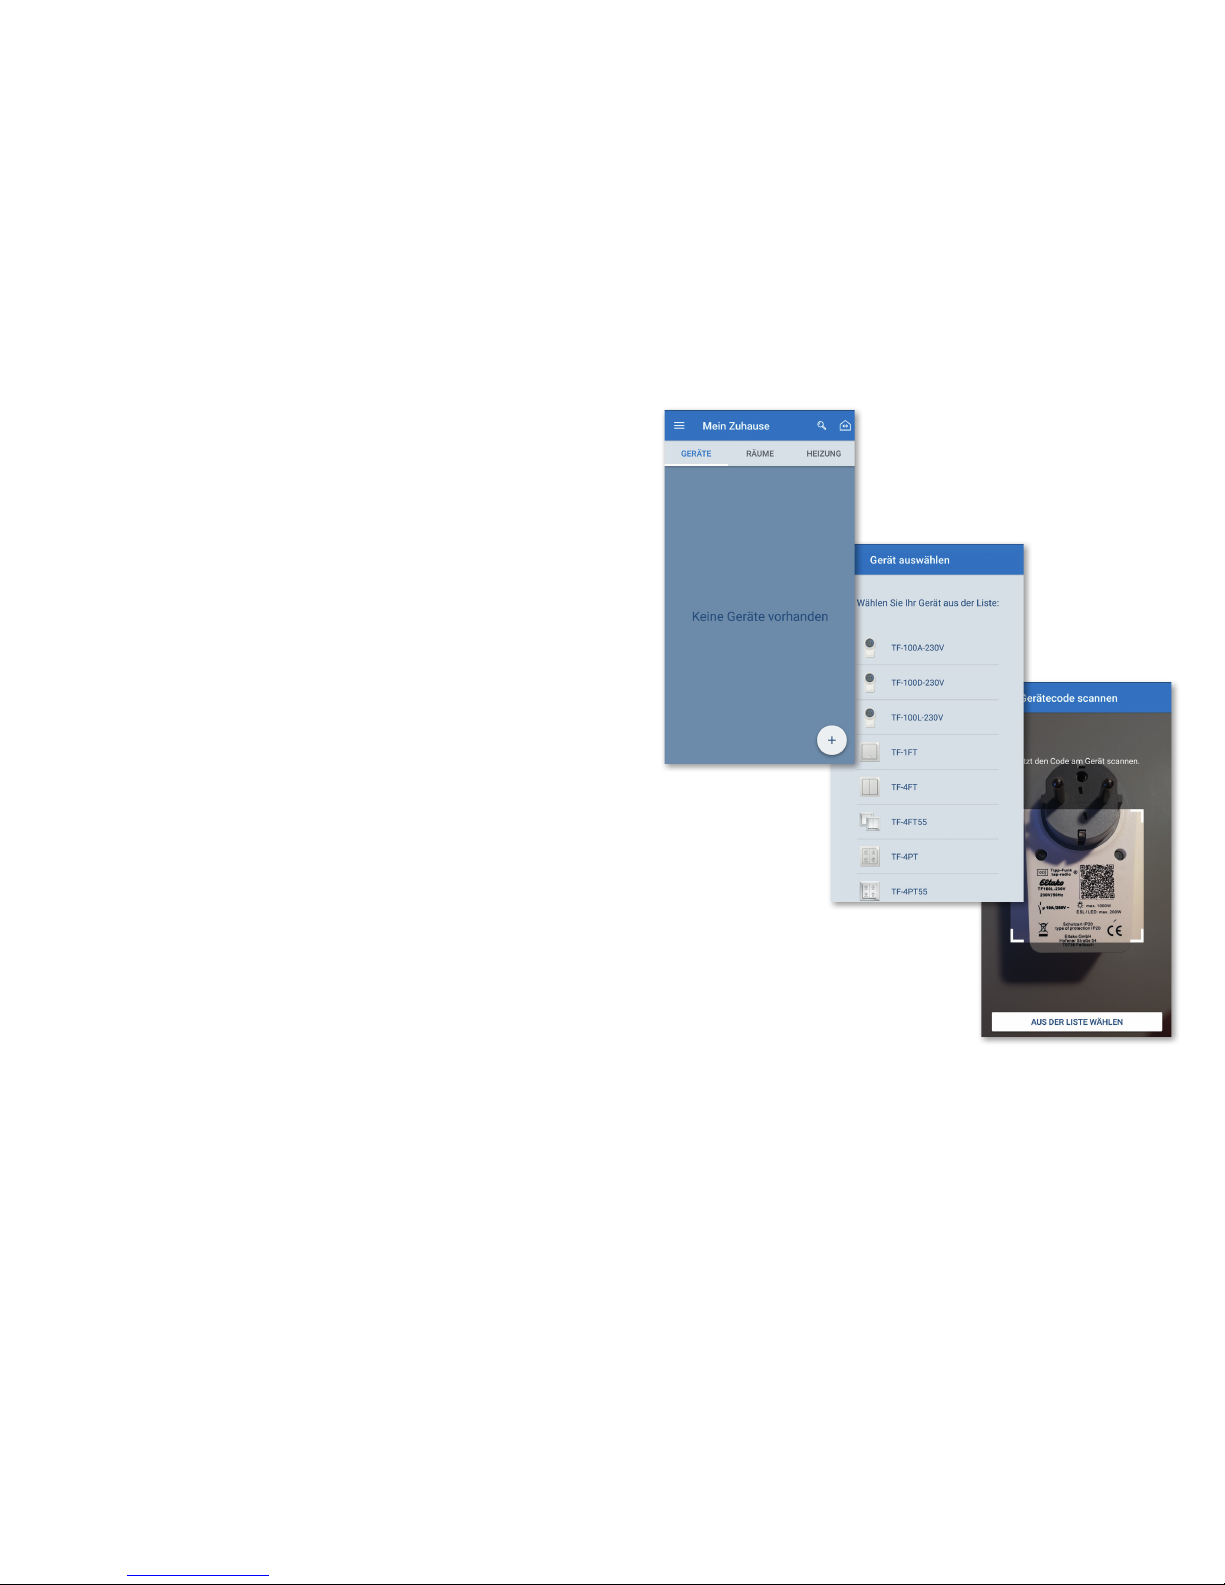
4. Geräte anlernen
Neue Geräte können in der Geräteübersicht an den MiniSafe angelernt
werden.
Das Plus-Symbol führt zu einem QRCode-Scanner und einer Liste mit einer
Auswahl an Geräten.
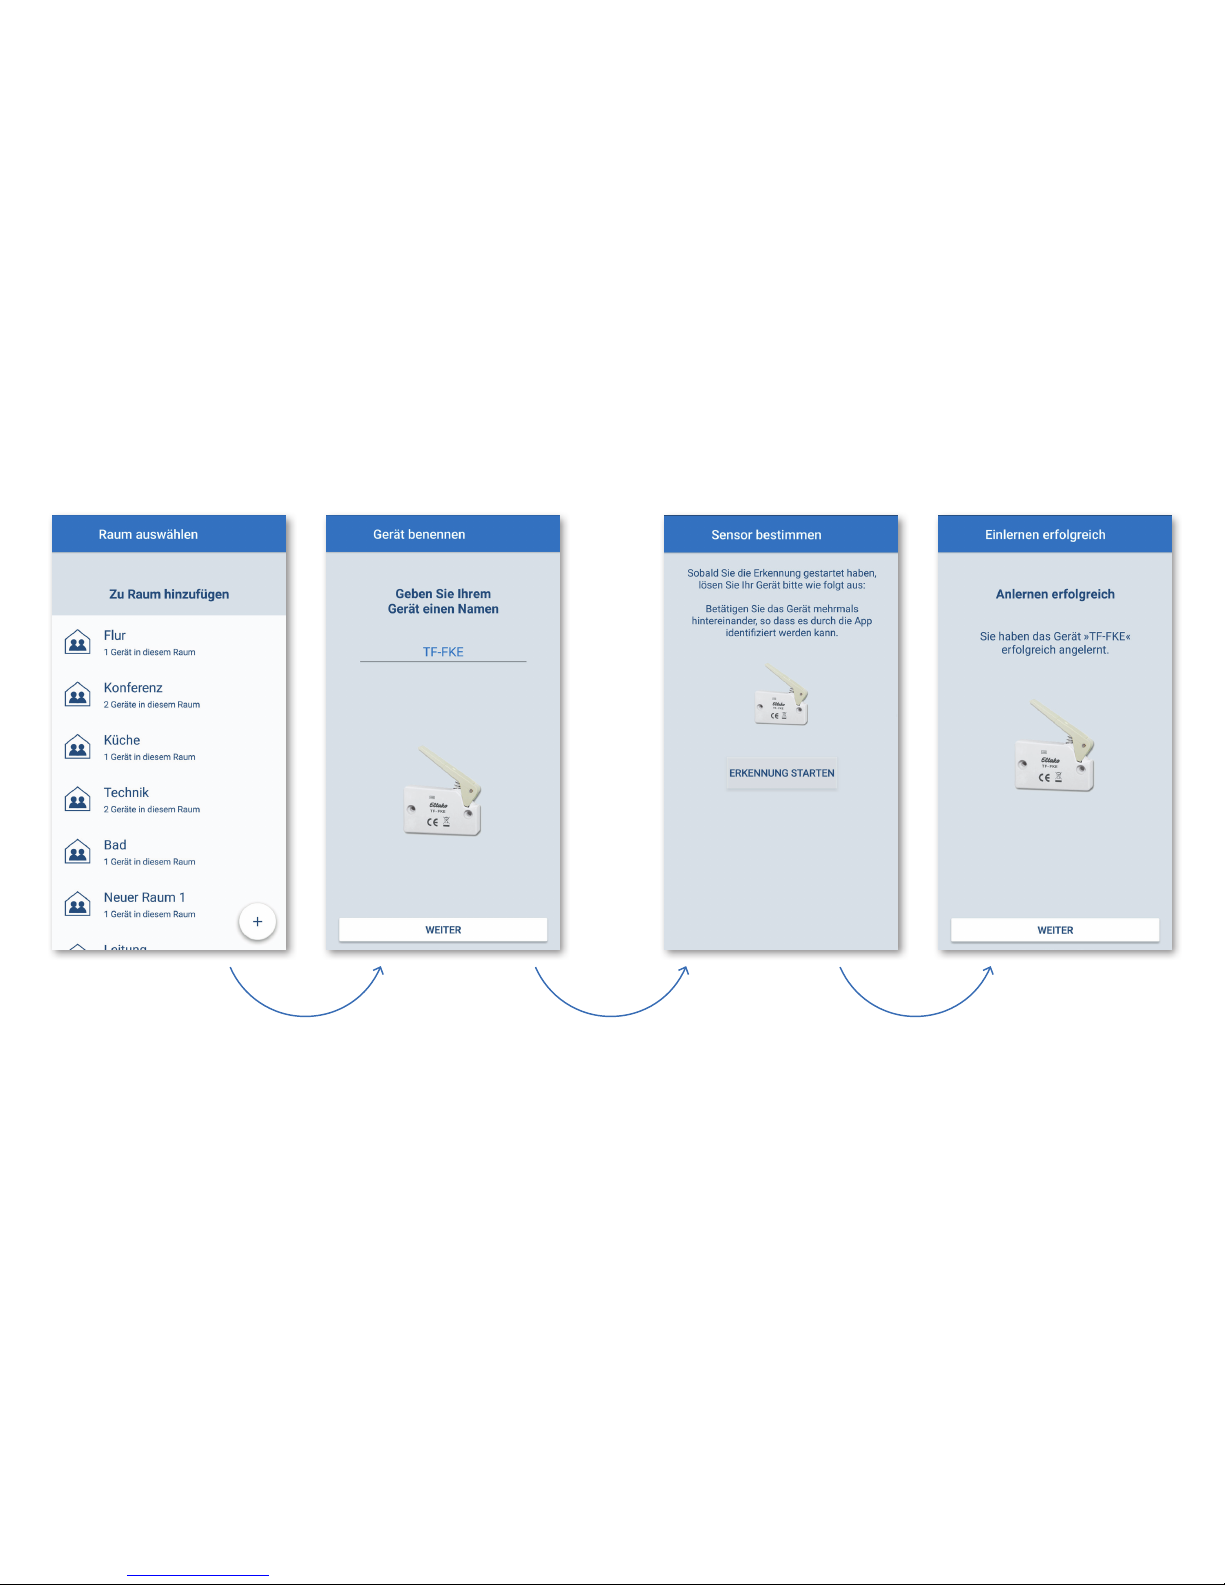
Das Anlernen selbst erfolgt dann in
vier einfachen Schritten:
1. Raum auswählen
2. Gerät benennen
3. Gerät authentifizieren
4. Abschließender Funktionstest
4. Devices Teach-In
New devices can be connected to the
MiniSafe in the device overview.
The add icon will take you to a QR
code scanner and a list of devices to
select from.
Teach-In takes place in four simple
steps:
1. Select room
2. Name the device
3. Authenticate device
4. Concluding functionality test
Page 7
12 13
Page 8
14 15
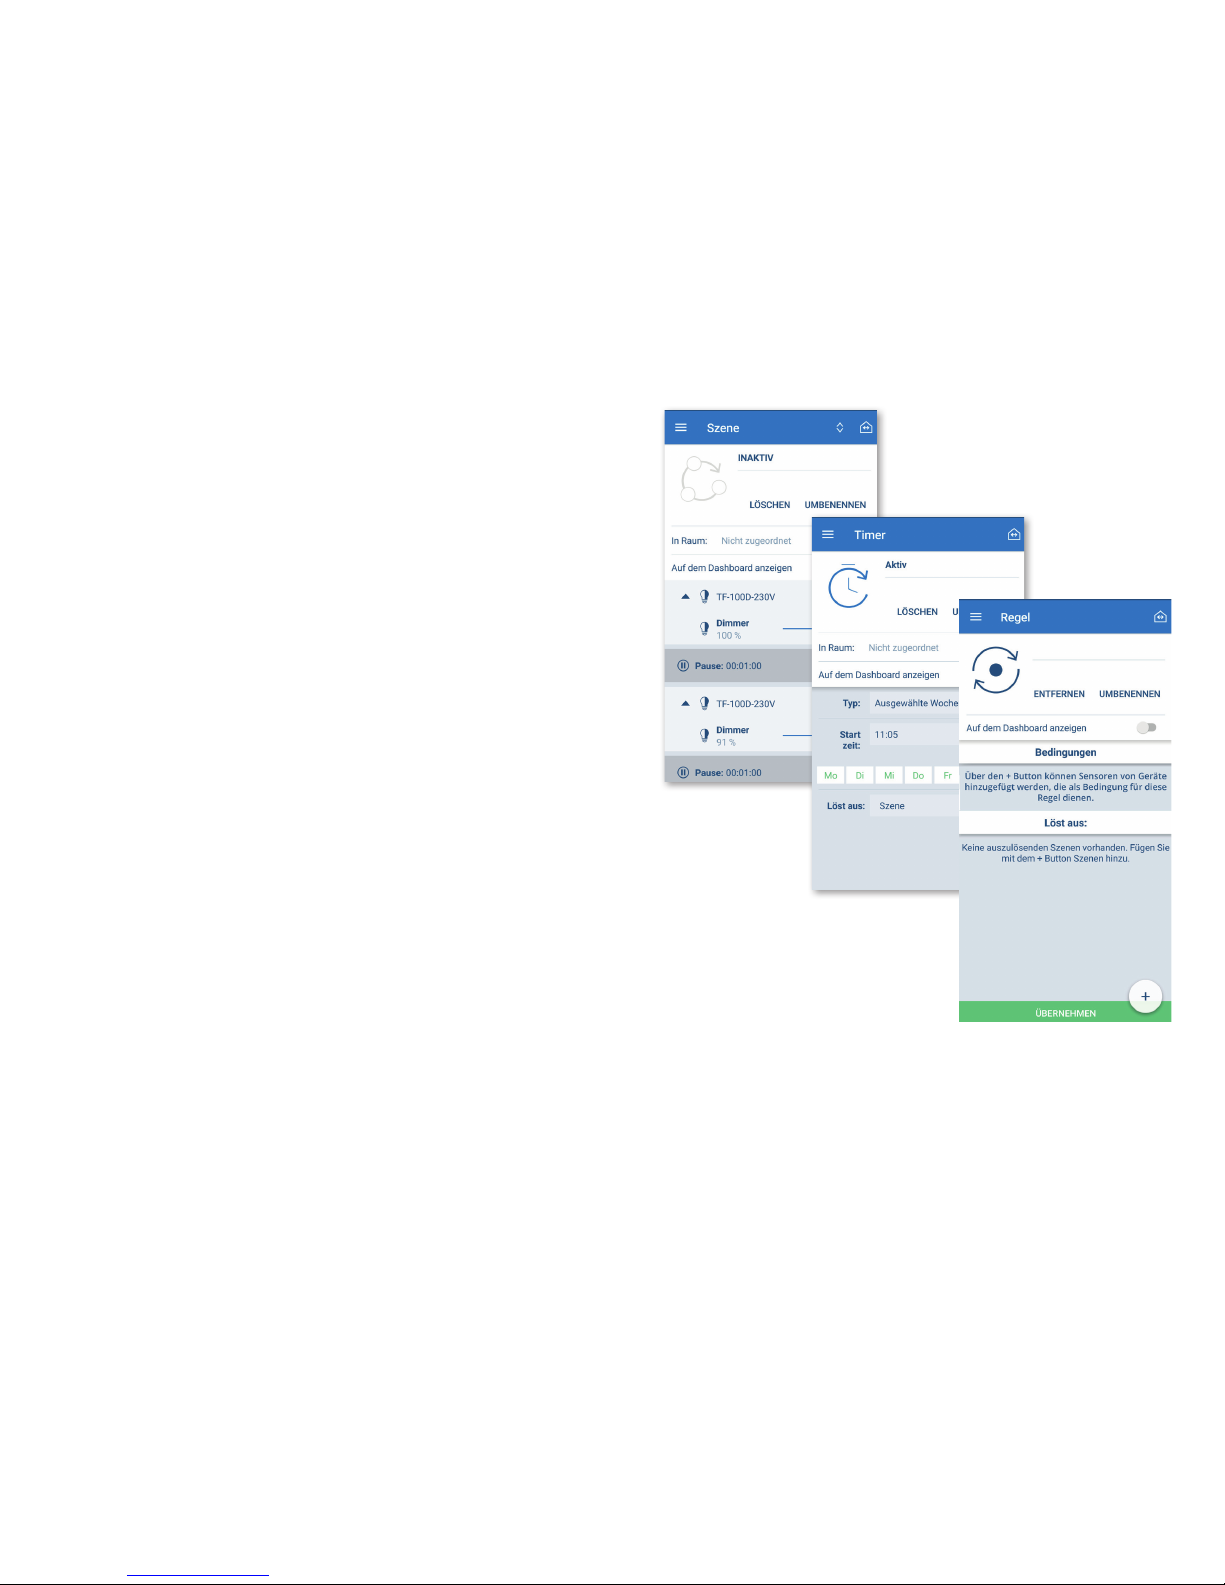
5. Funktionen erstellen
Unter dem Punkt Funktionen im
Seitenmenü können drei unterschiedliche Funktionen erzeugt und bearbeitet
werden: Szenen, Timer und Regeln.
In einer Szene werden mehrere
Aktionen zusammen gestellt, die der
MiniSafe gemeinsam ausführen soll.
Werden Pausen hinzugefügt, kann
auch ein zeitlicher Ablauf erstellt
werden.
Szenen können durch die Timer
zeitbasiert ausgelöst werden,
Regeln ermöglichen bereits an
-
spruchsvolle Automationen.
5. Create functions
By selecting Functions on the page
menu, three different functions can be
created and edited: scenes, timers
and rules.
In a scene, several actions are put
together, which the MiniSafe will
execute together.
If pauses are added, a timeline can
also be created.
Scenes can be triggered by set
timers whilst rules enable more
complex automations.
Page 9
16 17
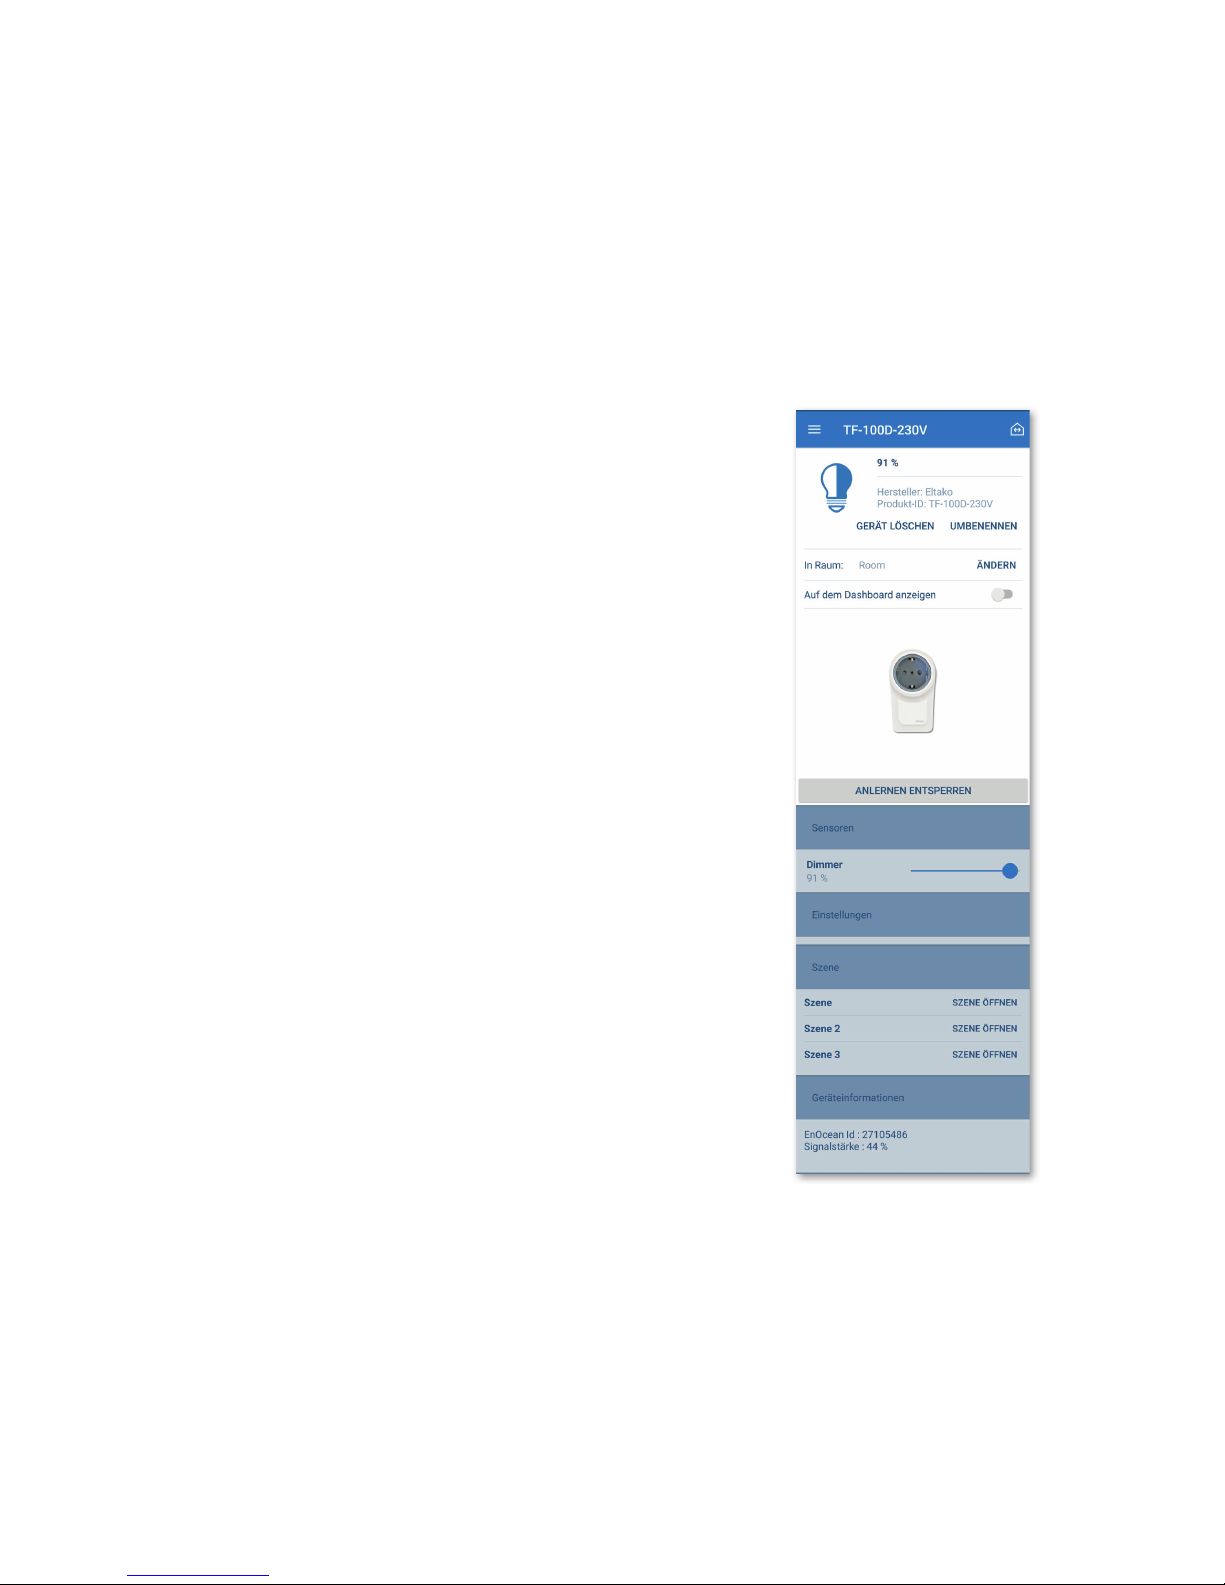
Gerätedetails
In der Detailansicht der Geräte werden
weiterführende Informationen dargestellt. Sie hängen vom Funktionsumfang des jeweiligen Geräts ab.
Alle Geräte können in dieser Ansicht
gelöscht werden. Aktoren lassen sich
darüber hinaus aus dieser Ansicht
schalten.
Für alle Geräte werden folgende
Informationen angezeigt:
– Name des Gerätes
– Zugehörigkeit zu Räumen
– Zugehörigkeit zu Szenen
– Auf dem Dashboard anzeigen
– EnOcean-ID
– Signalstärke
Findet ein Gerät in Szenen Verwendung, wird diese Information
ebenfalls hier angezeigt und ein
direkter Zugriff auf diese Szene
ermöglicht.
Device details
Further information is shown in the
detail view of the devices. This
depends on the functional scope of the
respective device.
All devices can be deleted in this view.
Actuators can also be switched on/off
in this view.
The following information is displayed
for all devices:
– Name of the device
– Which rooms it is connected to
– Which scenes it is connected to
– Show on the dashboard
– EnOcean ID
– Signal strength
If a device is used in scenes,
this information will also be
displayed here and allows
direct access to the scene.
Page 10
18 19
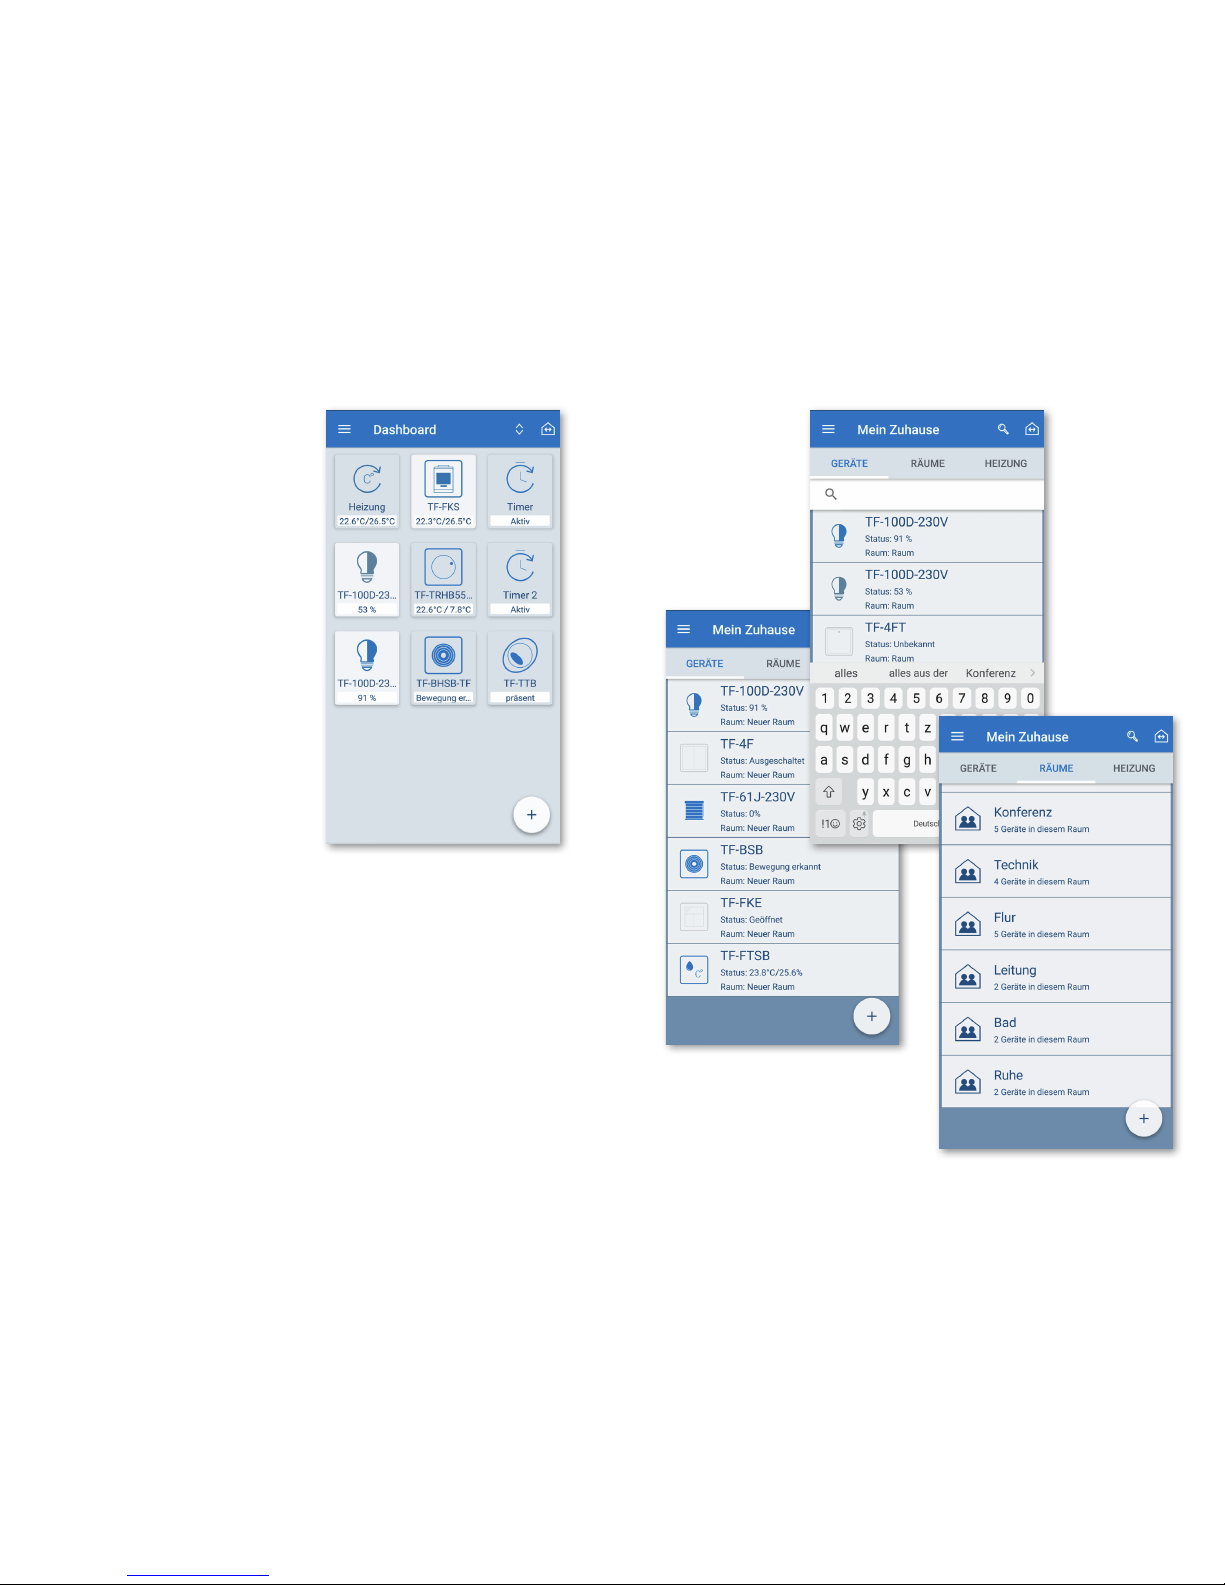
6. Geräte verwalten
Welche Geräte und Funktionen auf
dem Dashboard angezeigt werden,
kann in den Geräte- und Funktionsdetails kontrolliert werden.
Über das Plus-Symbol auf dem
Dashboard können bereits an
gelegte Geräte und Funktionen
direkt hinzugefügt werden.
In der Geräte-Liste lassen sich über die
Suchfunktion schnell die benötigten
Geräte finden.
6. Manage devices
Which devices and functions are
displayed on the dashboard can be
controlled in the device and function
details.
The add icon on the dashboard
allows you to add devices and
features that you have already
created.
Required devices can be found quickly
in the device list by using the search
function
.
Page 11
Produktberatung und Technische Auskünfte
Product consultation and technical information
+49(0) 711 943 500 – 02
[email protected]
Kundenservice mit Auftragsbearbeitung
Customer service and order processing
+49(0) 711 943 500 – 01
[email protected]
Eltako GmbH
Hofener Straße 54
D-70736 Fellbach
 Loading...