

Page 1
R
4556
DESIGN UHRENRADIO MIT FLIP-FLOP
DESIGN CLOCK RADIO WITH FLIP FLOP
RADIO-RÉVEIL DESIGN AVEC ÉCRAN
FORMATERVEZETT ÉBRESZTŐÓRÁS
RÁDIÓ FLIP-FLOP KIJELZŐVEL
RADIOSVEGLIA CON DISPLAY FLIP-FLOP
RADIO-RELOJ DE DISEÑO CON PANTALLA
DISPLAY
DISPLAY
BASCULANT
GIRATORIA
RÁDIO COM RELÓGIO DE DESIGN
D
RADIO Z ZEGAREM I BISTABILNYM
H
RADIOBUDÍK S OTOČNÝM DISPLEJEM
DDEESSIIGGNN FFLLIIPP--FFLLOOPP EEKKRRAANNLLýý SSAAAATTLLII
I
COM VISOR FLIP-FLOP
WYŚWIETLACZEM
DESIGN WEKKERRADIO MET
FLIPFLOP-DISPLAY
E
RRAADDYYOO
P
Page 2
MODELL 4556
AM / FM DOPPEL-DISPLAY-UHRENRADIO MIT WOCHENEND-AUSSETZ-FUNKTION
VORSICHT
GEFAHR EINES ELEKTRISCHEN SCHLAGES,
NICHT ÖFFNEN
VORSICHT: UM DIE GEFAHR EINES
ELEKTRISCHEN SCHLAGES ZU REDUZIEREN
Das dreieckige Blitzsymbol mit
Pfeilkopf weist den Benutzer auf
das Vorhandensein von nichtisolierter "gefährlicher Spannung"
im Inneren des Gerätes hin, die
ausreichen kann, um für Personen
die Gefahr eines elektrischen
Schlages darzustellen.
GEBRAUCHSANWEISUNG
DIE FRONT- (BZW. RÜCK-) ABDECKUNG
NICHT ENTFERNEN ES SIND KEINE VOM
BENUTZER ZU WARTENDEN TEILE IM
INNEREN VORHANDEN
WARTUNGSARBEITEN QUALIFIZIERTEM
FACHPERSONAL ÜBERLASSEN
9
10
Das dreieckige Symbol mit dem
Ausrufezeichen weist den Benutzer
auf wichtige Bedienungs- und
Wartungs- (Reparatur-) hinweise hin,
die in dieser Gebrauchsanweisung
enthalten sind.
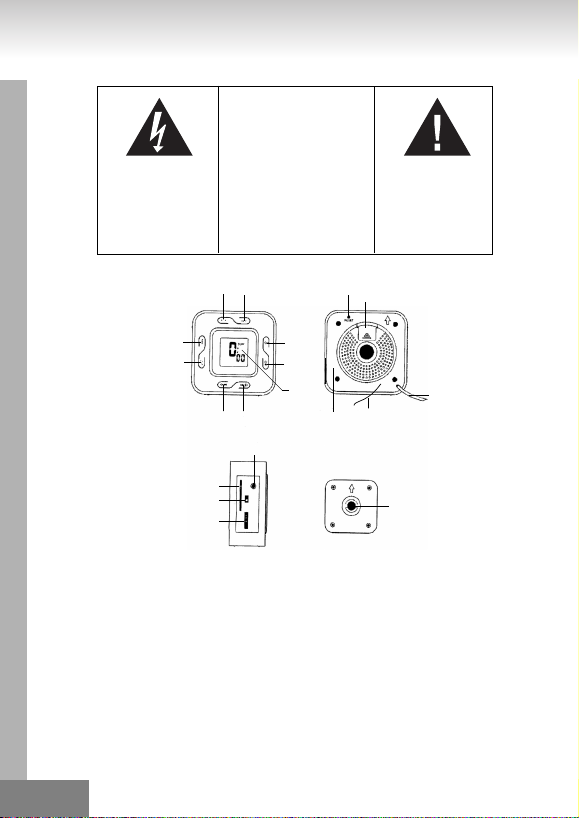
17
6
12
16
4
14
13
1
3
7
19
5
15
11
2
8
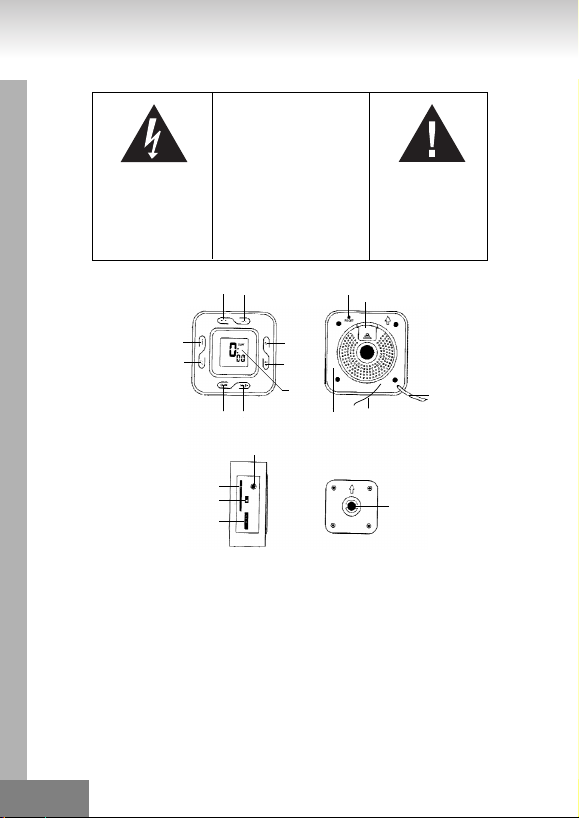
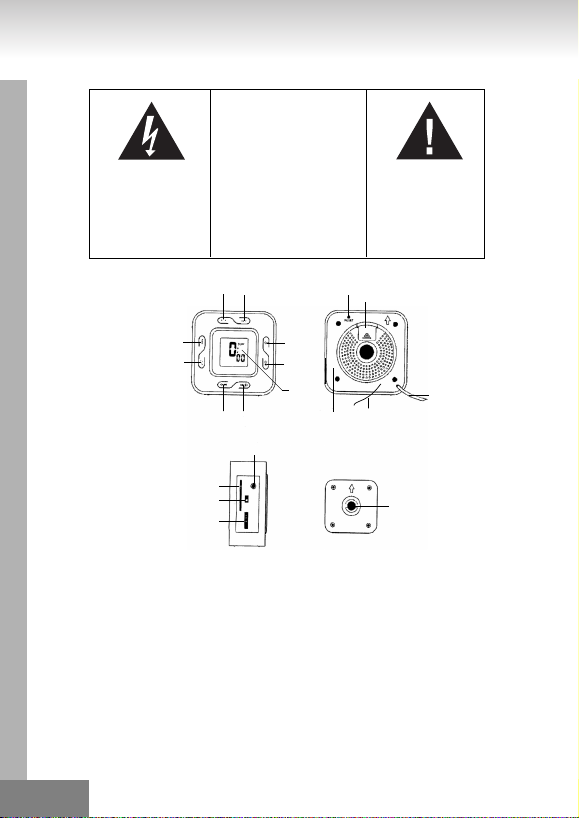
1. LCD-ANZEIGE 11. SKAL A UND ZEIGER
2. SCHALTER BAND (FM/AM) 12. TASTE ZEIT EINSTELLEN
3. REGLER LAUTSTÄRKE HOCH 13. TASTE ALARM 1 / ALARM 2 / ALARM 1+2 WÄHLEN
4. REGLER LAUTSTÄRKE RUNTER 14. NETZTASTE AN/AUS TASTE ALARM AUS
5. NETZKABEL 15. AUDIO EINGANGSBUCHSE
6. BATTERIEFACH 16. TASTE SCHLUMMER / SCHLAF
7. FM ANTENNENKABEL 17. TASTE ZURÜCKSETZEN
8. FREQUENZREGLER 18. GERÄTEHALTERUNG
9. TASTE ALARM 1 EINSTELLEN 19. NENNGRÖSSEN-ETIKETT (AUF DER RÜCKSEITE
10. TASTE ALARM 2 EINSTELLEN DES GERÄTES BEFESTIGT)
18
D 02.
Page 3

NETZANSCHLUSS
Schließen Sie das Netzkabel an eine Steckdose an.
Drücken Sie dann die Taste Reset (17) mit einem Kugelschreiber.
Dieses Gerät ist mit einem Batterie-Unterstützungs-System ausgestattet, das flache 3 V Lithium Batterien
benötigt.
Setzen Sie die Batterien in das Batteriefach ein.
Stellen Sie sicher, dass der positive und negative (+ und -) Batteriepol zu den passenden Seiten im
Batteriefach ausgerichtet sind.
ANMERKUNG:
Wenn ein Fehler beim Netzstrom auftritt, schaltet die Uhr automatisch auf Batteriebetrieb um und die
Uhrzeit läuft weiter.
Wenn der Netzstrom wieder verfügbar ist, schaltet die Uhr auf Netzstrombetrieb um.
kung ESD
Anmer
Setzen Sie das Gerät im Falle einer Fehlfunktion aufgrund elektrostatischer Entladung einfach zurück (evtl.
ist ein erneuter Anschluss ans Netz erforderlich), um zum normalen Betrieb zurück zu kehren.
WARNUNG
Trennen Sie den Netzstecker von der Steckdose, wenn das Gerät nicht benutzt wird.
Entfernen Sie nicht das Gehäuse, um das Risiko eines elektrischen Schocks zu vermeiden.
Es befinden sich keine zu wartenden Teile im Inneren.
Setzen Sie das Gerät keinem Regen oder keiner Feuchtigkeit aus, um sich vor Feuer oder einem
elektrischen Schock zu schützen.
Der Netzstecker stellt eine Trenneinheit dar. Die Trenneinheit sollte immer betriebsbereit sein.
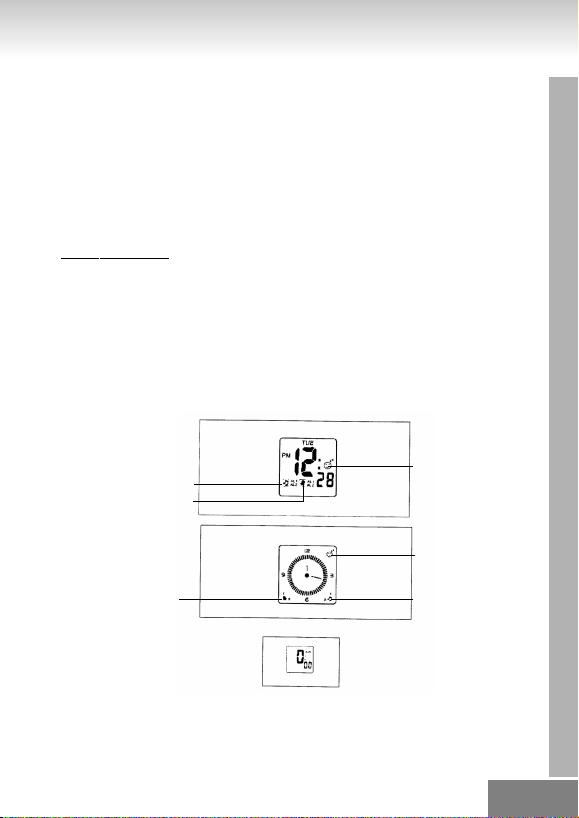
ALARM 1,2 WECKRADIO
ALARM 1,2 WECKKLINGEL
ALARM 1,2 WECKKLINGEL
DIGITALUHR-MODUS
ANALOGUHR-MODUS
DIGITALUHR-MODUS
HINWEIS:
ZEITEINSTELLUNG,
ALARMEINSTELLUNG/SCHL AFEINSTELLUN
G NUR IM DIGITALUHR-MODUS
TAG
SCHLAFMODUS EIN
SCHLAFMODUS EIN
ALARM 1,2 WECKRADIO
D 03.
Page 4
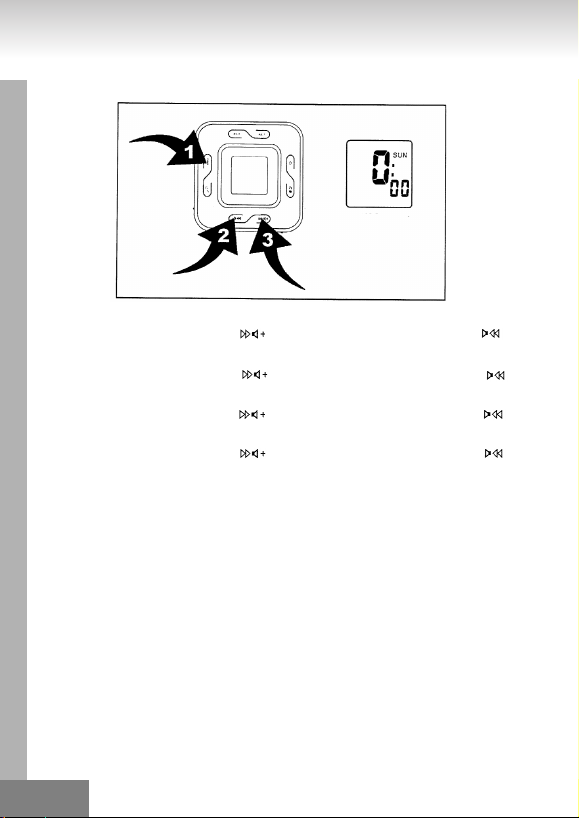
AKTUELLE ZEIT EINSTELLEN ODER ZURÜCKSETZEN
MODUS UHREINSTELLUNG
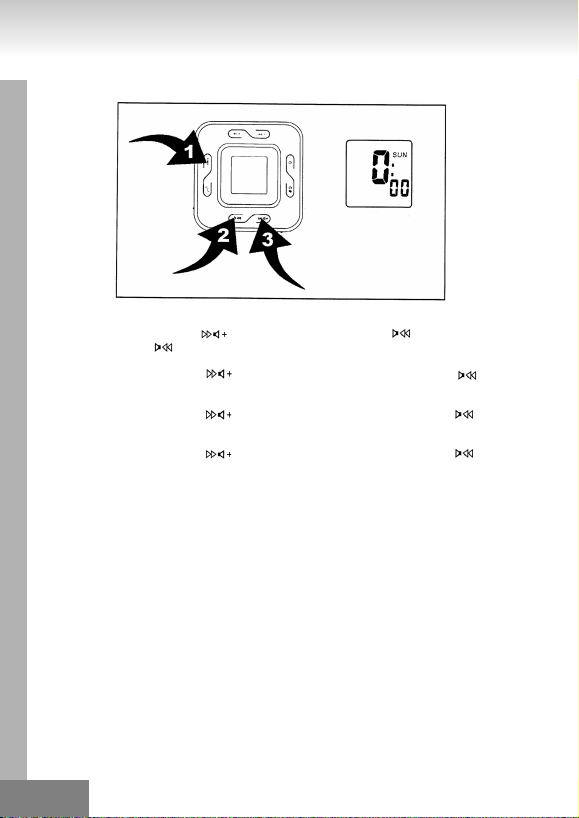
1. Halten Sie die Taste Time Set (12) (Position 1) für 2 Sekunden gedrückt, der Tag blinkt.
2. Drücken Sie die Taste Lautstärke hoch (3) (Position 3) und die Taste Lautstärke runter (4)
(Position 2), um den Tag einzustellen.
3. Drücken Sie die Taste Time Set (12) (Position 1), 24 Std. / 12 Std. blinkt
4. Drücken Sie die Taste Lautstärke hoch (3) (Position 3) und die Taste Lautstärke runter (4)
(Position 2), Stunde blinkt.
5. Drücken Sie die Taste Time Set (12) (Position 1), Stunde blinkt.
6. Drücken Sie die Taste Lautstärke hoch (3) (Position 3) und die Taste Lautstärke runter (4)
(Position 2), um die Stunden einzustellen.
7. Drücken Sie die Taste Time Set (12) (Position 1), Minute blinkt.
8. Drücken Sie die Taste Lautstärke hoch (3) (Position 3) und die Taste Lautstärke runter (4)
(Position 2), um die Minuten einzustellen.
D 04.
Page 5

ALARM 1 EINSTELLEN
ALARM 1
EINSTELLUNGSMODUS
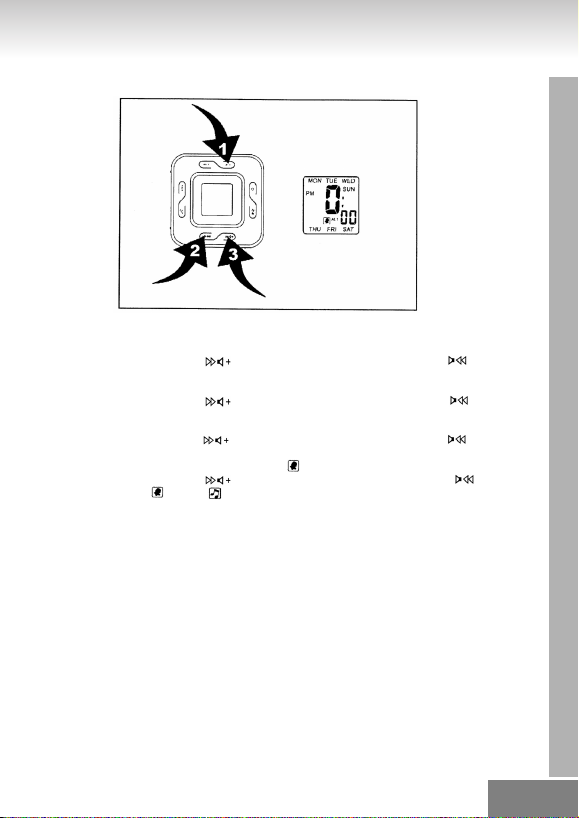
1. Drücken Sie die Taste Alarm 1 (10) (Position 1) um in den Alarm 1 Einstellungsmodus zu gelangen.
2. Halten Sie die Taste Alarm 1 Set (10) (Position 1) für 2 Sekunden gedrückt, Tag blinkt. (Diagramm 1)
3. Drücken Sie die Taste Lautstärke hoch (3) (Position 3) und die Taste Lautstärke runter (4)
(Position 2), um den Tag einzustellen.
4. Drücken Sie die Taste Alarm 1 Set (10) (Position 1), Stunde blinkt.
Drücken Sie die Taste Lautstärke hoch (3) (Position 3) und die Taste Lautstärke runter (4)
(Position 2), um die Stunden einzustellen.
5. Drücken Sie die Taste Alarm 1 Set (10) (Position 1), Minute blinkt.
Drücken Sie die Taste Lautstärke hoch (3) (Position 3) und die Taste Lautstärke runter (4)
(Position 2), um die Minuten einzustellen.
6. Drücken Sie die Taste Alarm Set 1(10) (Position 1), die Alarm 1 Glocke blinkt.
Drücken Sie die Taste Lautstärke hoch (3) (Position 3) und die Taste Lautstärke runter (4)
(Position 2), um das Alarm 1 Klingelzeichen und Radioalarm auszuwählen.
D 05.
Page 6
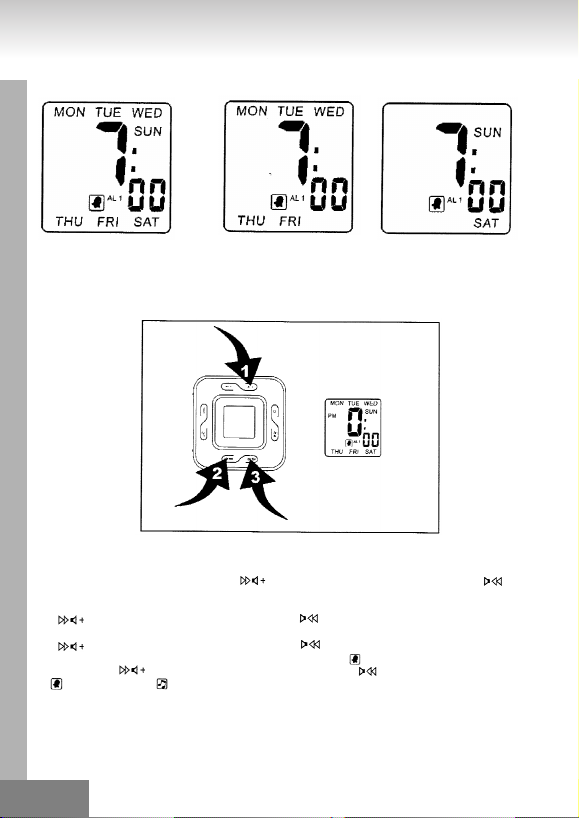
DIAGRAMM 1
EINSTELLUNG ALARM 1
WOCHENENDMODUS
(MO BIS SO)
ALARM 2 EINSTELLEN
1. Drücken Sie die Taste Alarm 2 (9) (Position 1) um in den Alarm 2 Einstellungsmodus zu gelangen.
2. Halten Sie die Taste Alarm 2 Set (9) für 2 Sekunden gedrückt, Tag blinkt. (Diagramm 2)
3. Drücken Sie die Taste Lautstärke hoch (3) (Position 3) und die Taste Lautstärke runter (4)
(Position 2), um den Tag einzustellen.
4. Drücken Sie die Taste Alarm 2 Set (9) (Position 1), Stunde blinkt. Drücken Sie die Taste Lautstärke hoch
(3) (Position 3) und die Taste Lautstärke runter (4) (Position 2), um die Stunden einzustellen.
5. Drücken Sie die Taste Alarm 2 Set (9) (Position 1), Minute blinkt. Drücken Sie die Taste Lautstärke hoch
(3) (Position 3) und die Taste Lautstärke runter (4) (Position 2), um die Minuten einzustellen.
6. Drücken Sie die Taste Alarm Set 2 (9) (Position 1), die Alarm 2 Glocke blinkt. Drücken Sie die Taste
Lautstärke hoch (3) (Position 3) und die Taste Lautstärke runter (4) (Position 2), um das Alarm
2 Klingelzeichen und Radioalarm auszuwählen.
EINSTELLUNG ALARM 1
WOCHENENDMODUS
(MO BIS FR)
ALARM 2
EINSTELLUNGSMODUS
EINSTELLUNG ALARM 1
WOCHENENDMODUS
(SA BIS SO)
D 06.
Page 7

DIAGRAMM 2
EINSTELLUNG ALARM 2
WOCHENENDMODUS
(MO BIS SO)
DIAGRAMM 3
Alarmsignal einstellen und Alarm ein-/ausstellen
Drücken Sie die Taste Alarm 1 / Alarm 2 / Alarm 1+2 (13), um das Alarmsignal oder Wecken durch Radio
einzustellen. (Diagramm 3)
ALARMDAUER
Das Alarmsignal oder der Radioalarm erklingen für eine Stunde, wenn kein Knopf gedrückt wird. Der Alarm
stoppt automatisch und startet erneut am nächsten Tag zur selben Zeit.
ALARM STOPPEN
Drücken Sie die Taste Power (14), um den aktuellen Alarm und somit die Schlummer funktion zu stoppen.
EINSTELLUNG ALARM 2
WOCHENENDMODUS
(MO BIS FR)
ALARM 1 WECKEN DURCH KLINGEL
ALARM 2 WECKEN DURCH RADIO
EINSTELLUNG ALARM 2
WOCHENENDMODUS
(SA BIS SO)
D 07.
Page 8

DIAGRAMM 4
MODUS SCHLAFEINSTELLUNG
Schlaffunktion aktivieren
Schalten Sie das Radio ein und drücken Sie die Taste Snooze/Sleep (16). Das Symbol für den Schlafmodus
und "90" wird auf dem Display angezeigt. Jedes Mal, wenn Sie die Taste Snooze/Sleep (16) drücken, wird
der Timer um 2 Sekunden zurückgestellt.
ANMERKUNG: Drücken Sie die Taste Power On/Off, um die Schlaffunktion auszustellen.
Schlummerfunktion:
2. Drücken Sie die Taste Snooze / Sleep (16), um die Schlummerfunktion während des Alarms zu
aktivieren (Alarmsignal oder Radioalarm wird gestoppt).
2. Das Schlummerintervall beträgt 9 Minuten.
MIT AUDIOQUELLEN ARBEITEN
1. Verbinden Sie eine Audioquelle mit dem Gerät über ein Verbindungskabel.
2. Stellen Sie die Lautstärke der Audioquelle ein, um einen besseren Verstärkungseffekt zu erhalten.
ANMERKUNG: Stellen Sie die Lautstärke der Audioquelle nicht zu hoch ein, um Überlastung zu vermeiden.
Der ausgegebene Sound des Gerätes wird eliminiert und von der anderen Audioquelle, die über die "AUDIO
IN"-BUCHSE (15) angeschlossen ist, ersetzt.
Der Sound wird normal wiedergegeben, wenn das Verbindungskabel von der Buchse getrennt wird.
Wenn die Funktion "Audio In" und Rundfunk genutzt werden, wird das Alarmsignal während des
Radioprogramms zur eingestellten Zeit ertönen.
Drücken Sie die Taste Power On/Off Alarm Off (14), um das Signal zu stoppen.
RADIOBETRIEB
- Drücken Sie die Taste Power On/Off (14), um das Radio einzuschalten.
- Wählen Sie AM oder FM mit dem Schalter Wave Band (2).
- Wählen Sie den Sender mit dem Frequenzregler (8).
- Drücken Sie den Lautstärkeregler (3)/(4), um die Lautstärke einzustellen.
- Drücken Sie die Power On/Off-Taste, um das Radio auszuschalten.
Anmerkung:
- Das Band AM wird über eine interne Richtungsantenne empfangen. Drehen Sie das Radio, um den
Empfang zu verbessern.
- Versichern Sie sich, dass das FM Antennenkabel komplett abgerollt ist und für den Empfang von FM
verlängert ist.
D 08.
Page 9

ZURÜCKSETZEN
- Die Taste Reset (17) befindet sich auf der unteren Seite des Gerätes.
- Benutzen Sie einen Kugelschreiber, um sie zu drücken, wenn Sie Batterien wechseln oder wenn das
Gerät nicht funktioniert wie erwartet.
- Sie setzen somit alle Einstellungen auf Werkseinstellung zurück und Sie werden einigen Daten verlieren
(Alarm und Uhrzeit).
ACHTUNG
- Auf dem Gerät sollten keine Quellen mit offenen Flammen, wie zum Beispiel Kerzen, platziert werden.
- Platzieren Sie das Gerät nicht in geschlossenen Schränken oder sonstigen Plätzen mit unzureichender
Belüftung.
- Setzen Sie das Gerät keinem Regen und keiner Feuchtigkeit aus, um sich vor Feuer oder einem
elektrischen Schock zu schützen.
- Das Gerät sollte keinem direkten Sonnenlicht, sehr hohen oder sehr niedrigen Temperaturen,
Feuchtigkeit, Vibrationen oder staubigen Plätzen ausgesetzt werden.
- Benutzen Sie kein Scheuermittel, Benzin, Verdünner oder anderen Lösungsmitteln, um die Oberfläche
des Gerätes zu reinigen. Wischen Sie das Gerät mit einer nicht-scheuernden Reinigungslösung und
einem trockenen, weichen Tuch.
- Versuchen Sie niemals, Kabel, Nadeln oder ähnliche Gegenstände in die Ventilationsöffnungen oder in
andere Öffnungen am Gerät zu stecken.
TECHNISCHE DATEN
Frequenzbereich: AM 525 – 1615 kHz
Ausgangsleistung: 280 mW
Lautsprecher-Impedanz: 8 Ohm
Batterieunterstützung: 1 x CR2032, 3V Lithium Flachbatterie (nicht inklusive)
Stromquelle: 230 V~50 Hz, 5 Watt
ACHTUNG: FÜR DEN SICHEREN GEBRAUCH
Wählen Sie die korrekte Spannung, bevor Sie das Netzkabel an eine Haushaltsteckdose anschließen.
Andererseits könnte Ihrem Gerät Schaden zugefügt werden.
Spritzwassergefahr:
Setzen Sie das Produkt nicht Tropf- oder Spritzwassergefahr aus. Stellen Sie keine mit Flüssigkeit gefüllten
Objekte wie z. B. Vasen auf das Produkt.
Belüftungsgefahr:
Die normale Belüftung des Produkts darf für den bestimmungsgemäßen Gebrauch nicht eingeschränkt
werden.
FM 87,5 – 108 MHz
D 09.
Page 10

DIAGRAMM 1 DIAGRAMM 2
PFEIL OBEN
WANDSCHRAUBE UND
DÜBEL
• Wählen Sie die Position an der Wand aus, an der das Uhrradio aufgehängt werden soll.
• Bringen Sie die Wandhalterung an, indem Sie die 4 Schrauben mit den Dübeln an der Wand befestigen
(Diagramm 2).
• Setzen Sie das Gerät auf die Wandhalterung und stellen Sie sicher, dass das AC-Kabel und die FMAntenne separat außerhalb der Halterung sind.
• Schrauben Sie die Halterungsschraube in die Unterseite des Gerätes (Diagramm 3).
• Vergewissern Sie sich, dass die Halterung und das Gerät fest an der Wand hängen.
DIAGRAMM 3
WANDBEFESTIGUNG
SCHRAUBE
SCHRAUBE
WAND
SCHRAUBE
SCHRAUBE
D 010.
Page 11
WEITERE INFORMATIONEN
Achtung bei Kleinteilen und Batterien, bitte nicht Verschlucken, dies kann zu ernsthaften
Schädigungen oder Erticken führen. Achten Sie inbesondere bei Kindern darauf, dass Kleinteile
und Batterien ausserhalb deren Reichweite sind.
Wichtige Hinweise zum Gehörschutz
Vorsicht:
Ihr Gehör liegt Ihnen und auch uns am Herzen.
Deshalb seien Sie bitte vorsichtig beim Gebrauch dieses Gerätes.
Wir empfehlen: Vermeiden Sie hohe Lautstärken.
Sollte das Gerät von Kindern verwendet werden, achten Sie darauf, dass das Gerät nicht zu laut eingestellt wird.
Achtung! Zu hohe Lautstärken können bei Kindern irreparable Schäden hervorrufen.
Lassen Sie NIEMALS Personen, und insbesondere keine Kinder, Gegenstände in Löcher,
Schächte oder andere Öffnungen des Gehäuses stecken; dies könnte zu einem tödlichen
elektrischen Schlag führen. Das Gerätegehäuse, darf nur von ausgebildetem Fachpersonal
geöffnet werden.
Bitte verwenden Sie das Gerät nur seiner vorhergesehenen Bestimmung entsprechend.
Bitte bewahren Sie die Bedienungsanleitung auch für eine spätere Verwendung sorgfältig auf.
Hinweise zum Umweltschutz
Dieses Produkt darf am Ende seiner Lebensdauer nicht über den normalen Haushaltsabfall
entsorgt werden, sondern muss an einem Sammelpunkt für das Recycling von elektrischen und
elektronischen Geräten abgegeben werden. Das Symbol auf dem Produkt, der
Gebrauchsanleitung oder der Verpackung weist darauf hin.
Die Werkstoffe sind gemäß ihrer Kennzeichnung wiederverwertbar. Mit der Wiederverwendung,
der stofflichen Verwertung oder anderen Formen der Verwer tung von Altgeräten leisten Sie einen
wichtigen Beitrag zum Schutze unserer Umwelt.
Bitte erfragen Sie bei der Gemeindeverwaltung die zuständige Entsorgungsstelle.
Behindern Sie nicht die Belüftung des Gerätes, wie etwa mit Vorhängen, Zeitungen, Decken oder
mit Möbelstücken, die Belüftungsschlitze müsssen immer frei sein. Überhitzung kann Schäden
verursachen und die Lebensdauer des Gerätes verkürzen.
Hitze und Wärme
Setzen Sie das Gerät nicht direkter Sonnenstrahlung aus. Achten Sie darauf, das das Gerät keinen
direkten Wärmequellen wie Heizung oder offenem Feuer ausgesetzt ist. Achten Sie darauf, das die
Lüftungsschlitze des Gerätes nicht verdeckt sind.
Feuchtigkeit und Reinigung
Dieses Produkt ist nicht wasserfest! Tauchen Sie den Player nicht in Wasser ein und lassen ihn
auch nicht mit Wasser in Berührung kommen. In den Player eindringendes Wasser kann ernsthafte
Schäden verursachen. Verwenden Sie keine Reinigungsmittel, die Alkohol, Ammoniak, Benzen
oder Schleifmittel enthalten, da diese den Player beschädigen können.
D 011.
Page 12
MODEL: 4556
AM / FM DUAL DISPLAY CLOCK RADIO WITH WEEKEND CANCELLATION
WARNING
DANGER OF A HAZARDOUS ELECTRIC
SHOCK. DO NOT OPEN
WARNING: TO REDUCE THE RISK OF AN
ELECTRIC SHOCK, DO NOT REMOVE THE
The triangular symbol with the
lightning Bolt warns the user to the
presence of dangerous non-isolated
voltage on the inside of this device
which may cause an electric shock.
OPERATING INSTRUCTIONS
FRONT OR BACK COVER. INSIDE THE UNIT,
THERE ARE NO PARTS THAT CAN BE
REPAIRED OR ADJUSTED BY THE USER.
PLEASE REFER TO QUALIFIED TECHNICIANS.
9
10
The triangular symbol with the
exclamation highlights important
points of which the user should refer
to the manual regarding maintenance
17
6
and repair.
12
16
4
14
13
1
3
7
19
5
15
11
2
8
1. LCD DISPLAY 11. DIAL SCALE AND POINTER
2. BAND (FM/AM) SWITCH 12. TIME SET BUTTON
3. VOLUME UP CONTROL 13. ALARM 1 / ALARM 2 / AL ARM 1+2 SELECT
4. VOLUME DOWN CONTROL 14. POWER ON/OFF ALARM OFF BUTTON
5. AC CORD 15. AUDIO IN JACK
6. BATTERY COMPARTMENT 16. SNOOZE / SLEEP BUTTON
7. FM ANTENNA WIRE 17. RESETZ BUTTON
8. TUNING CONTROL 18. UNIT BRACKET
9. ALARM 2 SET BUTTON 19. RATING LABEL (AFFIXED ON THE BACK OF THE
10. ALARM 1 SET BUTTON UNIT)
BUTTON
18
012.
Page 13

POWER CONNECTION
Plug the AC Power Cord to a household outlet AC source.
Then press the Reset button (17) with a ballpoint pen.
This unit is equipped with a battery back up system, it requires a 3V Flat Lithium battery.
Insert the battery in the battery compar tment.
Marking certain that the positive and negative (+ and -) battery terminals are attached to the corresponding
terminals on the plate of the battery compartment.
NOTE:
If an AC Power failure occurs, the clock automatically switches to the battery power supply and the clock
and the time memory continue running.
When the AC Power resumes, the clock switches back to AC again.
emark
ESD R
In case of malfunction due to electrostatic discharge just reset the product (reconnected of power source
may be required) to resume normal operation.
WARNING
Disconnect the mains plug from the supply socket when not in use.
To avoid the risk of electric shock, do not remove the cover of the apparatus.
There are no user serviceable parts inside.
To prevent fire or shock hazard do not expose the apparatus to rain or moisture.
The mains plug is used as the disconnect device, the disconnect device shall remain readily operable.
ALARM 1, 2 WAKE RADIO
ALARM 1, 2 WAKE BELL
ALARM 1, 2 WAKE BELL
DIGITAL CLOCK MODE
ANALOG CLOCK MODE
DIGITAL CLOCK MODE
NOTE:
TIME SETTING/ ALARM SETTING/SLEEP
SETTING ONLY IN DIGITAL CLOCK MODE.
DAY
SLEEP ON
SLEEP ON
ALARM 1, 2 WAKE RADIO
013.
Page 14
TO SET OR RESET THE ACTUAL TIME
CLOCK SET MODE
1. Press and hold time set button (12) (position 1) 2 seconds, day blinking.
2. Press volume up control button (3) and volume down control button (4) (position 2) and volume
down control button (4) (position 2) to set day.
3. Press time set button (12) (position 1), 24 hour / 12 hour blinking.
4. Press volume up control button (3) (position 3) and volume down control button (4) (position
2), hour blinking.
5. Press time set button (12) (position 1), hour blinking.
6. Press volume up control button (3) (position 3) and volume down control button (4) (position
2) to set hour.
7. Press time set button (12) (position 1), minute blinking.
8. Press volume up control button (3) (position 3) and volume down control button (4) (position
2) to set minute.
014.
Page 15
ALARM 1 SETTING
ALARM 1 SET MODE
1. Press alarm 1 set button (10) (position 1) to enter into alarm 1 set mode.
2. Press and hold alarm 1 set button (10) (position 1) 2 seconds, day blinking. (Diagram 1)
3. Press volume up control button (3) (position 3) and volume down control button (4) (position 2)
to set day.
4. Press alarm 1 set button (10) (position 1) hour blinking.
Press volume up control button (3) (position 3) and volume down control button (4) (position 2)
to set hour.
5. Press alarm 1 set button (10) (position 1) minute blinking.
Press volume up control button (3) (position 3) and volume down control button (4) (position 2)
to set minute.
6. Press alarm set 1 button (10) (position 1) alarm 1 bell blinking.
Press volume up control button (3) (position 3) and volume down control button (4) (position
2) to select alarm 1 bell and alarm radio.
015.
Page 16
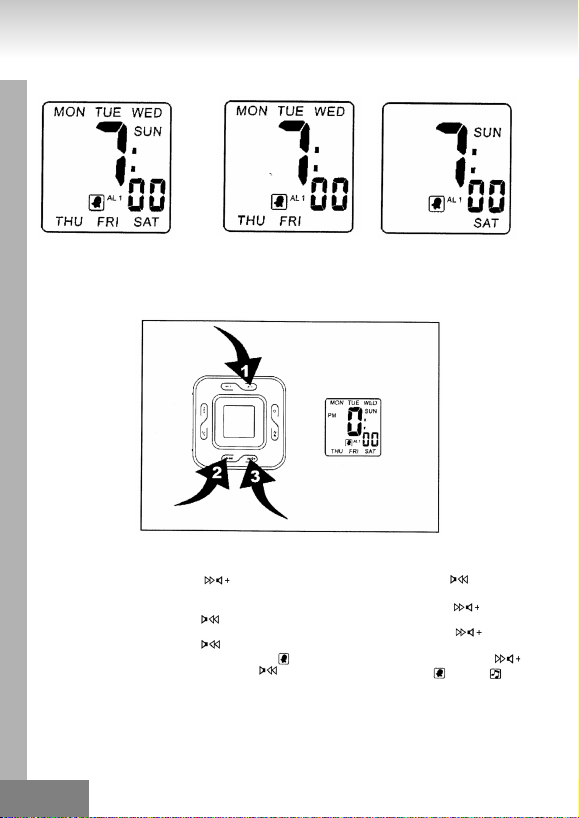
DIAGRAM 1
WEEKED ALARM 1 SET MODE
(MON TO SUN)
ALARM 2 SETTING
1. Press alarm 2 set button (9) (position 1) to enter into alarm 2 set mode.
2. Press and hold alarm 2 set button (9) 2 seconds, day blinking. ( Diagram 2)
3. Press volume up control button (3) (position 3) and volume down control button (4) (position 2)
to set day.
4. Press alarm 2 set button (9) (position 1) hour blinking. Press volume up control button (3) (position
3) and volume down control button (4) (position 2) to set hour.
5. Press alarm 2 set button (9) (position 1) minute blinking. Press volume up control button (3) (position
3) and volume down control button (4) (position 2) to set minute.
6. Press alarm 2 set button (9) (position 1) alarm 2 bell blinking. Press volume up control button (3)
(position 3) and volume down control button (4) (position 2) to select alarm 2 bell and alarm
radio.
WEEKED ALARM 1 SET MODE
(MON TO FRI)
ALARM 2 SET MODE
WEEKED ALARM 1 SET MODE
(SAT TO SUN)
016.
Page 17
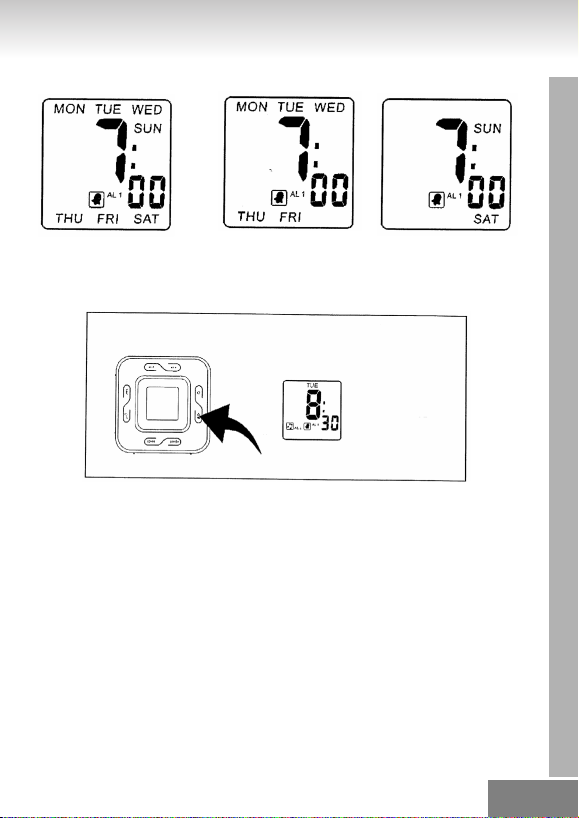
DIAGRAM 2
WEEKED ALARM 2 SET MODE
(MON TO SUN)
DIAGRAM 3
Alarm output setting and alarm on/off
Press alarm 1 / alarm 2 / alarm 1+2 select button (13) to select alarm wake up by bell and radio.
(Diagram 3)
ALARM DURATION
Bell alarm or radio alarm will continue output for 1 hour if no key is pressed. Alarm will stop automatically and
restart at the same alarm set time on next day.
STOP THE ALARM
Press power button (14) to stop the current alarm and will cancel the snooze function as well.
WEEKED ALARM 2 SET MODE
(MON TO FRI)
ALARM 1 WAKE BY BELL
ALARM 2 WAKE BY RADIO
WEEKED ALARM 2 SET MODE
(SAT TO SUN)
017.
Page 18
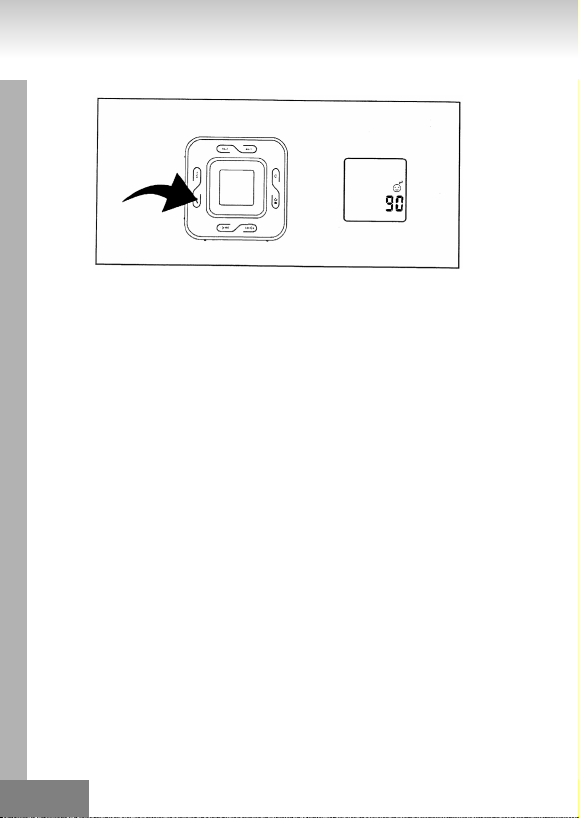
DIAGRAM 4
SLEEP SET MODE
To activate the sleep function
When radio on press snooze/sleep button (16), sleep “90” show on display with 2 second decrease sleep
timer 90 minute-off by press snooze/sleep button (16) each. (Diagram 4)
NOTE: Press power on/off button (14) to off sleep function.
Snooze function:
1. Press snooze / sleep button (16) to activate snooze function (bell alarm or radio alarm will stop) when
alarming.
2. Snooze interval is 9 minutes.
WORKING WITH AUDIO SOURCE
1. Use connective wire to join the audio source and the main unit together.
2. Adjust volume of the audio source in order to get a better amplifying effect.
REMARK: DO NOT set the audio source to too high volume to avoid overloading.
The output sound of the main unit will be eliminated and replaced once the “AUDIO IN” JACK (15) has
connected to other audio source.
The sound will resume once the connective wire is removed from jack.
If “audio in“ function is in use and broadcasting music, the alarm sound will insert into the music at the pre-set
wake up time.
To stop the sound, simply press the power on/off alarm off button (14).
RADIO OPERATION
- Press the power on/off button (14) to turn radio on.
- Select AM or FM band using the wave band switch (2).
- Select the station using the tuning control (8).
- Press the volume control button (3)/(4) to adjust volume as required.
- Press the power on/off button (14) to turn radio off.
Note:
- The AM band use an internal directional aerial. Rotate the radio for best reception.
- Ensure that FM cord antenna (7) is completely unrolled and extended for FM reception.
018.
Page 19

RESET
- The reset button (17) is located on the bottom of unit.
- Use a ballpoin pen to press it whenever you change batteries, or unit is not performing as expected.
- This will return all settings to default value, and you will lose any stored data (alarm and clock settings).
CAUTION
- No naked flame sources, such as lighted candles, should be placed on the apparatus.
- Do not place the unit in closed bookcases or racks without proper ventilation.
- To prevent Fire or shock hazard, do not expose unit to rain or any type of moisture.
- The unit should not be exposed to direct sunlight, very high or low temperatures, moisture, vibrations or placed in a dusty environment.
- Do not use abrasive, benzene, thinner or other solvents to clean the surfaces of the unit. To clean, wipe
it with mild non-abrasive detergent solution and clean soft cloth.
- Never attempt to insert wire, pins or other such object onto the vents or openings or the unit.
SPECIFICATION
Frequency range: AM 525 – 1615 kHz
Output Power: 280 mW
Speaker Impedance: 8 ohm
Battery backup: 1 x CR2032, 3V Flat Lithium (not included)
Power source: AC 230V ~50 Hz, 5 watts
ATTENTION: FOR SAFETY USAGE
Please select the correct voltage before plug in the AC power cord to a Household outlet. Otherwise, it may
cause damage to the unit.
Dripping warning:
The proudct shall not be exposed to dripping or splashing and that no objects filled with liquids, such as
vases, shall be placed on the product.
Ventilation warning:
The normal ventilation of the product shall not be impeded for intended use.
FM 87,5 – 108 MHz
019.
Page 20
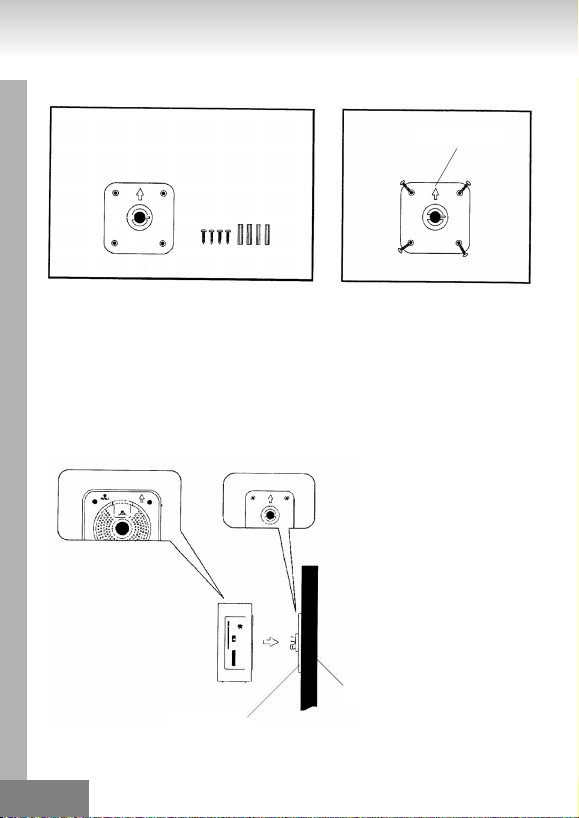
DIAGRAM 1 DIAGRAM 2
ARROW ON TOP
WALLSCREW & DOWLES
• Desire the wall position to hang the clock radio.
• Hang the wall bracket by fixing 4 screw with the dowles tightly on wall ( Diagram 2 )
• Put the unti on the bracket and make sure the AC cord and FM antenna is separately outside of bracket.
• Tighten the bracket screw into the bottom of unit ( Diagram 3 )
• Re-check again the all bracket and unit is strongly hanging on the wall.
DIAGRAM 3
WALL BRACKET
SCREW
SCREW
WALL
SCREW
SCREW
020.
Page 21

MORE INFORMATION
Beware of small pieces and batteries, do not swallow them. It may be hazardous to your health and
lead into suffocation. Please, Make sure to keep small devices and batteries out of the reach of
children.
Important advice regarding hearing protection
Caution:
You care for your hearing, and so do we.
Therefore, use caution while using this appliance.
Our recommendation: Avoid high volumes.
Children should be supervised while using headphones; make sure that the appliance is not set to high volume.
Caution!
High volumes may cause irreparable damage to children’s ears.
NEVER let allow anyone, especially children, to put objects into the holes, slots or openings on
this devise. This may lead into death due to electric shock. The device must only be opened by a
qualified assistant.
Only use the appliance for its intended purpose.
This device may only be used in housings and business premises.
Please keep this instruction manual for further reference.
MORE INFORMATION
Instructions on environment protection
Do not dispose of this product in the usual household garbage at the end of its life cycle; hand it
over at a collection point for the recycling of electrical and electronic appliances. The symbol on
the product, the instructions for use or the packing will inform about the methods for disposal.
The materials are recyclable as mentioned in its marking. By recycling, material recycling or other
forms of re-utilization of old appliances, you are making an important contribution to protect our
environment.
Please inquire at the community administration for the authorized disposal location.
Do not obstruct the ventilation of the device. Make sure, that no curtains, newspapers, furniture or
any other type of object are blocking the ventilation system of the apparatus. The ventilation system
must be clear of objects at all times! Overheating may lead into serious damage of the device and
reduce its performance and lifespan.
Heat and warmth
Do not expose the appliance to direct sunlight. Make sure that the appliance is not subject to direct
heat sources such as heaters or open fire. Make sure that the ventilation slots of the appliance are
not covered.
Moisture and cleaning
This appliance is not waterproof! Do not immerse player in water. Do not allow player to come in
contact with water. If water gets inside the player it may cause serious damage. Do not use
cleaning agents that contain alcohol, ammoniac, benzene or abrasives as these could damage the
player. For cleaning, use a soft, moistened cloth.
021.
Page 22
MODELL 4556
REVEIL-RADIO AM/FM AVEC AFFICHEUR ET OPTION D’ANNULATION LE
WEEK-END
ATTENTION
RISQUE D’ELECTROCUTION. NE PAS OUVRIR
ATTENTION: AFIN DE REDUIRE LES RISQUES
D’ELECTROCUTION, NE PAS RETIRER LE
COUVERCLE (OU LE DOS). AUCUNE PIECE A
MODE D’EMPLOI
Le voyant lumineux, inscrit dans un
triangle équilatéral et dont le
symbole est une flèche, avertit le
consommateur d’une ‘dangereuse
tension’ non isolée dans le boîtier
de l’article, qui pourrait avoir une
amplitude suffisante pour causer
une électrocution.
L’INTERIEUR N’EST UTILE AU
CONSOMMATEUR. POUR UN DEPANNAGE,
SE REFERER AU PERSONNEL QUALIFIE.
9
10
Le point d’exclamation à l’intérieur
d’un triangle équilatéral avertit le
concernant le fonctionnement et
l’entretien (dépannage) dans le mode
17
6
consommateur de la présence
d’instructions importantes
d’emploi de l’appareil.
12
16
14
13
1
3
4
7
19
15
11
2
8
1. AFFICHEUR LCD 11. CADRAN DE L’ECHELLE AVEC AIGUILLE
2. REGLAGE DE BANDE (FM/AM) 12. REGLAGE DE L’HORLOGE
3. BOUTON POUR AUGMENTER LE SON 13. BOUTON SELECTEUR DE REVEIL 1/ REVEIL 2/
4. BOUTON POUR BAISSER LE SON 14. BOUTON ALLUMER/ETEINDRE REVEIL
5. FIL D’ALIMENTATION 15. PRISE D’ENTREE AUDIO
6. BOITIER DES PILES 16. BOUTON REPOS/SOMMEIL
7. ANTENNE FM 17. BOUTON DE REINITIALISATION
8. BOUTON DES REGLAGES 18. SUPPORT DE L’APPAREIL
9. BOUTON REGLAGE DU REVEIL 2 19. ETIQUETTE DE COTE (AU DOS DE L’APPAREIL
10. BOUTON REGLAGE DU REVEIL 1
REVEIL 1+2
18
022.
5
Page 23
ALIMENTATION
Branchez le fil d’alimentation de l’appareil sur une prise du secteur.
Puis appuyez sur le bouton réinitialiser (17) à l’aide d’un stylo à bille.
Cet appareil est équipé d’un système de batterie de recharge, celui-ci nécessite une pile plate de Lithium
3 V.
Introduisez la pile dans son boîtier.
Assurez-vous que les extrémités positive et négative (+ et -) soient placées en face des terminaux qui
correspondent à l’intérieur du boîtier.
AVIS :
S’il survenait une coupure de courant, l’horloge commencerait automatiquement à fonctionner sur piles et
l’heure ainsi que le réveil resteraient intacts.
Lorsque le courant revient sur le secteur, l’appareil s’alimentera de nouveau sur le secteur.
emarque sur le DES
R
En cas de problèmes de fonctionnement à cause d’un déchargement électrostatique, veuillez réinitialiser
l’appareil (rebranchez l’appareil lorsque cela est nécessaire) pour que celui fonctionne normalement.
ATTENTION
Débranchez du secteur lorsque vous ne l’utilisez pas.
Pour éviter les risques d’électrocution, ne pas détachez le panneau couvrant l’appareil.
A l’intérieur, aucun élément ne peut être modifié ou réparé par l’utilisateur.
Pour éviter de provoquer un feu ou une électrocution, ne pas exposer l’appareil à la pluie ou l’humidité.
La prise sur le secteur est un moyen de débrancher l’appareil et doit être accessible en tout temps.
REVEIL 1, 2 RADIO
REVEIL 1, 2 SONNERIE
REVEIL 1, 2 SONNERIE
MODE HORLOGE DIGITALE
MODE HORLOGE ANALOGUE
MODE HORLOGE DIGITALE
AVIS :
REGLAGE DE L’HEURE, REGLAGE DU REVEIL/ REGLAGE
DE L’OPTION SOMMEIL SEULEMENT EN MODE HORLOGE
DIGITALE.
JOUR
MODE SOMMEIL
ALLUME
SOMMEIL
ALLUMER
REVEIL 1, 2 RADIO
023.
Page 24

POUR REGLER L’APPAREIL OU REINITIALISER L’HEURE ACTUELLE
REGLAGE DE
L’HORLOGE
1. Appuyez et maintenez appuyé le bouton du réglage de l’heure (12) (position 1) pendant deux secondes et
le jour clignotera.
2. Appuyez sur le bouton pour augmenter le son (3) et le bouton pour baisser le son (4) (position
2) pour régler la date.
3. Appuyez sur le bouton réglage de l’heure (12) (position 1), les mots 24 heures/ 12 heures clignoteront.
4. Appuyez sur le bouton pour augmenter le son (3) et le bouton pour baisser le son (4) (position
2) les chiffres des heures clignoteront.
5. Appuyez sur le bouton réglage de l’heure (12) (position 1), l’heure clignotera.
6. Appuyez sur le bouton pour augmenter le son (3) et le bouton pour baisser le son (4) (position
2) pour régler l’heure.
7. Appuyez sur le bouton réglage de l’heure (12) (position 1), les minutes clignoteront.
8. Appuyez sur le bouton pour augmenter le son (3) et le bouton pour baisser le son (4) (position
2) pour régler les minutes.
024
Page 25

REGLER LE REVEIL 1
MODE REGLAGE DU
REVEIL 1
1. Appuyez sur le bouton réglage du réveil 1 (10) (position 1) pour vous mettre en mode réglage.
2. Appuyez et maintenez appuyé le bouton réglage du réveil 1 (10) (position 1) pendant deux secondes et
les jours clignoteront (Diagramme 1).
3. Appuyez sur le bouton pour augmenter le son (3) et le bouton pour baisser le son (4) (position
2) pour régler la date.
4. Appuyez sur le bouton réglage du réveil 1 (10) (position 1), les heures clignoteront.
Appuyez sur le bouton pour augmenter le son (3) et le bouton pour baisser le son (4) (position
2) pour régler l’heure.
5. Appuyez sur le bouton réglage du réveil 1 (10) (position 1), les minutes clignoteront.
Appuyez sur le bouton pour augmenter le son (3) et le bouton pour baisser le son (4) (position
2) pour régler les minutes.
6. Appuyez sur le bouton réglage du réveil 1 (10) (position 1), la cloche du réveil 1 clignotera.
Appuyez sur le bouton pour augmenter le son (3) et le bouton pour baisser le son (4) (position
2) pour choisir la sonnerie du réveil 1 et le réveil radio .
025
Page 26
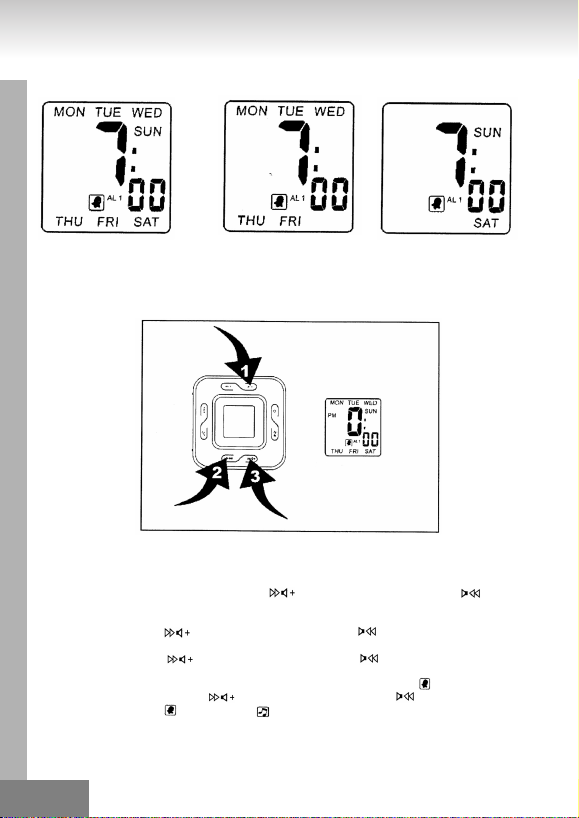
DIAGRAMME 1
MODE REVEIL 1 EN SEMAINE
(LUNDI AU DIMANCHE)
REGLAGE DU REVEIL 2
1. Appuyez sur le bouton réglage du réveil 1 (10) (position 1) pour vous mettre en mode réglage.
2. Appuyez et maintenez appuyé le bouton réglage du réveil 1 (10) (position 1) pendant deux secondes et
les jours clignoteront (Diagramme 1).
3. Appuyez sur le bouton pour augmenter le son (3) et le bouton pour baisser le son (4) (position
2) pour régler la date.
4. Appuyez sur le bouton réglage du réveil 1 (10) (position 1), les heures clignoteront. Appuyez sur le bouton
pour augmenter le son (3) et le bouton pour baisser le son (4) (position 2) pour régler l’heure.
5. Appuyez sur le bouton réglage du réveil 1 (10) (position 1), les minutes clignoteront. Appuyez sur le bouton
pour augmenter le son (3) et le bouton pour baisser le son (4) (position 2) pour régler les
minutes.
6. Appuyez sur le bouton réglage du réveil 1 (10) (position 1), la cloche du réveil 1 clignotera. Appuyez sur
le bouton pour augmenter le son (3) et le bouton pour baisser le son (4) (position 2) pour choisir
la sonnerie du réveil 1 et le réveil radio .
MODE REVEIL 1 EN SEMAINE
(LUNDI AU VENDREDI)
MODE REGLAGE DU REVEIL 2
MODE REVEIL 1 EN WEEK-END
(SAMEDI AU DIMANCHE)
026.
Page 27

DIAGRAMME 2
MODE REVEIL 1 EN SEMAINE
(LUNDI AU DIMANCHE)
DIAGRAMME 3
Réglage du type de réveil et allumer/éteindre
Appuyez sur le bouton réveil 1/ réveil 2/ réveil 1+2 (13) pour choisir entre la sonnerie ou la radio
(Diagramme 3).
DUREE DE LA SONNERIE DU REVEIL
La sonnerie ou la radio continueront de sonner pendant une heure si vous n’appuyez sur aucune touche.
Puis, le réveil s’arrêtera automatiquement et se déclanchera le jour suivant à la même heure.
ARRETER LE REVEIL
Appuyez sur le bouton allumer/éteindre (14) pour arrêter le réveil et cela annulera aussi la fonction repos.
MODE REVEIL 1 EN SEMAINE
(LUNDI AU VENDREDI)
REVEIL 1 AVEC SONNERIE
REVEIL 1 AVEC RADIO
MODE REVEIL 1 EN WEEK-END
(SAMEDI AU DIMANCHE)
027.
Page 28

DIAGRAMME 4
REGLAGE DE L’HEURE DE
SOMMEIL
Pour mettre en marche la fonction sommeil
Lorsque la radio est allumée, appuyez sur le bouton repos/sommeil (16). Le symbole « sommeil » et « 90 »
s’afficheront sur l’écran. A chaque fois que vous appuyez sur le bouton repos/sommeil (16), la minuterie
diminue de deux secondes (Diagramme 4).
AVIS : Appuyez sur le bouton allumer/éteindre (14) pour éteindre la fonction sommeil.
Fonction repos :
1. Appuyez sur le bouton repos/sommeil (16) lorsque le réveil sonne pour déclencher la fonction repos et
mettre le réveil en veille (la sonnerie ou la radio s’arrêteront).
2. Les intervalles de la fonction repos sont de 9 minutes.
UTILISATION DU SOURCE AUDIO
1. Utilisez un câble connecteur pour rattacher la source audio sur l’appareil.
2. Réglez le son de la source audio pour améliorer la qualité du son.
AVIS : NE PAS régler le son de la source audio trop haut pour éviter de surcharger l’appareil.
Le son de l’appareil sera remplacé lorsque le PRISE D’ENTREE AUDIO (15) est branchée sur une autre
source audio. Le son reviendra lorsque vous débranchez le câble.
Si la fonction « entrée audio » est utilisée et que vous écoutez de la musique, la sonnerie se fera
entendre à l’heure choisie, malgré la musique.
Pour arrêter le son, appuyez simplement sur le bouton allumer/éteindre (14).
MODE D’EMPLOI DE LA RADIO
- Appuyez sur le bouton allumer/éteindre (14) pour allumer la radio.
- Veuillez choisir AM ou FM en utilisant le bouton de changement de bande (2).
- Choisissez la station à l’aide du bouton de réglage.
- Appuyez sur le bouton de réglage du son (3)/(4) pour ajuster le son à votre guise.
- Appuyez sur le bouton allumer/éteindre (14) pour éteindre la radio.
Avis :
- Lorsque vous écoutez une chaîne radio AM, veuillez utiliser l’antenne directionnelle interne. Tournez la
radio pour améliorer la qualité de la réception.
- Assurez-vous à ce que l’antenne FM soit complètement déroulée pendant que vous écoutez une chaîne
FM.
.
028
Page 29

REINITIALISER
- Le bouton de réinitialisation (17) est situé en dessous de l’appareil.
- Utilisez un stylo à bille pour l’appuyer à chaque fois que vous changez les piles ou lorsque l’appareil ne
fonctionne pas normalement.
- Ceci remettra tous les réglages à zéro et vous perdrez toute information mémorisée (les réglages du
réveil et de l’horloge).
ATTENTION
- Aucun objet enflammé, par exemple une bougie, ne doit être placée sur l’appareil.
- Ne pas placé sur une étagère fermée ou des étalages mal aérés.
- Pour éviter les risques de feu ou d’électrocution, ne pas exposer l’appareil à la pluie ni à l’humidité.
- Cet appareil ne doit pas être exposé directement au soleil, aux températures trop basses ou trop hautes,
à l’humidité, aux vibrations ou aux endroits poussiéreux.
- Pour nettoyer la surface de l’appareil, ne pas utiliser d’abrasif, de benzène, de diluant, ou autres produits
nettoyants. Pour le nettoyer, veuillez l’essuyer à l’aide d’un savon doux et d’un chiffon propre et doux.
- Ne jamais essayer d’introduire des fils, des aiguilles ou autres objets de ce genre dans les bouches
d’aération ou orifices de l’appareil.
DONNEES TECHNIQUES
Fréquence : AM 525 – 1615 kHz
Puissance : 280 mW
Impédance des enceintes : 8 ohms
Piles de recharge : 1 x CR2032, plate de Lithium 3 V (non fournie)
Alimentation : AC 230V – 50 Hz, 5 watts
ATTENTION : POUR VOTRE SECURITE
Veuillez vous assurez que le voltage correspondant avant de brancher l’appareil sur le secteur. Sinon, cela
pourrait endommager l’appareil.
Mise en garde au sujet des coulées :
Cet appareil ne doit pas être exposé à des liquides dégoulinant ou des éclaboussures et tout appareil
contenant de l’eau ne doit jamais être placé sur l’appareil.
Mise en garde au sujet de l’aération :
Les bouches d’aérations du produit ne seront empêchées de fonctionner normalement.
FM 87,5 – 108 MHz
029.
Page 30
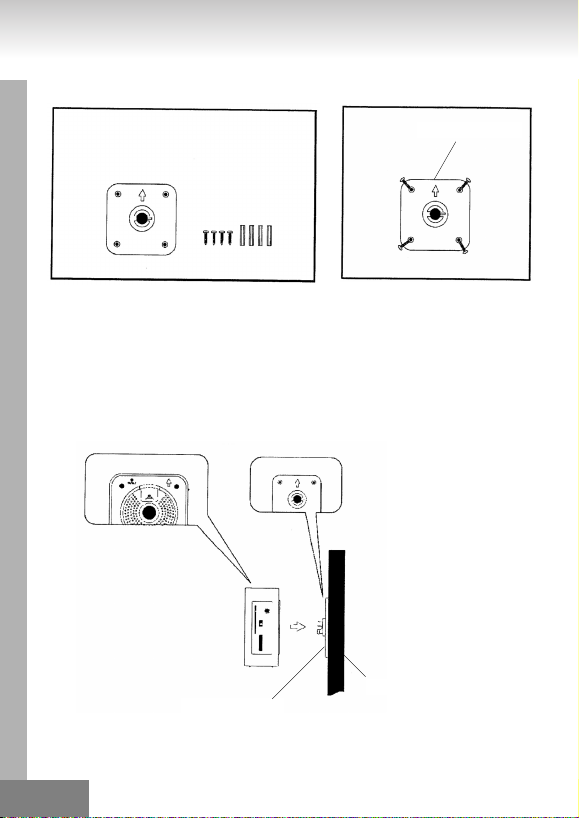
DIAGRAMME 1 DIAGRAMME 2
FLECHE DU DESSUS
VIS
VIS MURALES ET
POTEAUX
VIS
• Choisissez l’endroit ou vous désirez accrocher l’horloge.
• Sur le mur, fixez de manière sure la monture murale à l’aide de quatre vis et les poteaux.
• Placez l’appareil sur la monture et assurez-vous que le fil d’alimentation et l’antenne sont
séparément en dehors de la monture.
• Resserrez les vis de la monture en bas de l’appareil. (Diagramme 3).
• Vérifiez de nouveau que la monture et l’appareil soit bien en place sur le mur.
DIAGRAMME 3
ATTACHE MURALE
MUR
VIS
VIS
030.
Page 31

PLUS D’INFORMATIONS
Prenez garde aux petites pièces et piles, ne les avalez pas. Cela pourrait être dangereux pour votre
santé et mener à l'étouffement. Prêtez l'attention la plus élevée pour garder les petits appareils et
piles hors de la portée des enfants.
Conseil important pour la protection de l’ouïe
Attention:
Nous tenons à votre ouïe autant que vous.
Par conséquent, prenez vos précautions lors de l’usage de cet appareil.
Notre recommandations: Evitez les volumes forts.
Dans le cas où des enfants utilisent l’appareil, assurez-vous que le volume n’est pas sur la position élevée.
Attention! Les volumes élevés peuvent irrémédiablement endommager l’ouïe des enfants.
NE JAMAIS laisser une personne ou surtout un enfant mettre des objets dans les trous, fentes ou
autres ouvertures de l’appareil. Cela pourrait entraîner la mort par décharge électrique. L’appareil
doit être ouvert uniquement par un assistant qualifié.
Veuillez utiliser l’appareil uniquement aux fins pour lesquelles il a été créé.
Cet appareil est exclusivement destiné à l'usage dans des locaux privés ou à usage commercial.
Veuillez conserver ce mode d`emploi pour utilisation ultérieure.
PLUS D’INFORMATIONS
Indications relatives à la protection de l’environnement
Au terme de sa durée de vie, ce produit ne doit pas être éliminé avec les ordures ménagères mais
doit être remis à un point de collecte destiné au recyclage des appareils électriques et
électroniques. Le symbole figurant sur le produit, la notice d’utilisation ou l’emballage vous indique
cela.
Les matériaux sont recyclables conformément à leur marquage. Vous apportez une large
contribution à la protection de l’environnement par le biais du recyclage, de la réutilisation matérielle
ou par les autres formes de réutilisation des appareils usagés.
Veuillez vous adresser à la municipalité pour connaître la déchetterie compétente.
Ne gênez pas la ventilation du dispositif. Assurez-vous que rideaux, journaux, couvertures ou
meubles ne bloquent en aucun cas les fentes de ventilation de l’appareil. La ventilation doit être
assurée à tout moment! La surchauffe peut causer à l’appareil des dommages sérieux et réduire sa
performance et sa durée de vie.
La chaleur et sources de chaleur
Veuillez ne pas exposer l’appareil à la lumière directe (du soleil). Assurez-vous que l’appareil n’est
pas en contact direct avec des sources de chaleur telles qu’un chauffage ou un feu. Assurez-vous
que les fentes d’aération de l’appareil ne sont pas fermées.
Humidité et nettoyage
L’appareil n’est pas étanche! Ne plongez pas l’appareil dans l’eau. Evitez son contact avec l’eau. De l’eau
dans l’appareil pourrait sérieusement l’endommager. N’employez pas de détergents contenant de l’alcool,
de l’ammoniaque, du benzène ou des abrasifs. Ces produits pourraient endommager votre appareil. Pour
nettoyer l’appareil, utilisez un chiffon doux et humide.oder Schleifmittel enthalten, da diese den Player
beschädigen können.
031.
Page 32

MODELL: 4556
DIGITÁLIS KIJELZŐS ÓRÁVAL ELLÁTOTT KÉTSÁVOS AM/FM RÁDIÓ
FIGYELEM!
ÁRAMÜTÉS VESZÉLYE
NE NYISSA FEL!
FIGYELEM: AZ ÁRAMÜTÉS VESZÉLYÉNEK
ELKERÜLÉS ÉRDEKÉBEN NE TÁVOLÍTSA EL A
Az egyenlő oldalú háromszögben
nyílban végződő villám szimbólum
arra figyelmeztet, hogy a készülék
belsejében nem leszigetelt,
veszélyes magasfeszültségű áram
található, amely komoly áramütést
okozhat!
HASZNÁLATI UTASÍTÁS
FEDELET (VAGY A HÁTLAPOT)! ITT
NINCSENEK A FELHASZNÁLÓ SZÁMÁRA
HOZZÁFÉRHETŐ ALKATRÉSZEK. A JAVÍTÁST
BÍZZA SZAKEMBERRE!
9
10
Az egyenlő oldalú háromszögben
lévő felkiáltójel szimbólum arra
figyelmeztet, hogy a készülékkel
szállított dokumentumokban a
használattal és karbantartással
(javítással) kapcsolatos fontos
17
6
útmutatások találhatók.
12
16
14
13
1
3
4
7
19
15
11
2
8
1. LCD KIJELZŐ 11. KIJELZŐ
2. FREKVENCIAKAPCSOLÓ (AM/FM) 12. IDŐBEALLITÓ GOMB
3. HANGERŐ FEL 13. ALARM 1/ALARM 2/ALARM 1+2 ÉBRESZTÉS
4. HANGERŐ LE 14. KIKAPCSOLÁS/ÉBRESZTÉS KI GOMB
5. AC VEZETÉK 15. AUDIOBEMENET
6. ELEMTARTÓ TOK 16. SZUNDI/ IDŐZÍTETT KIKAPCSOLÁS GOMBJA
7. FM ANTENNA 17. RESET GOMB
8. ÁLLOMÁSKERESŐ 18. TARTÓEGYSÉG
9. ALARM 1 ÉBRESZTÉS GOMBJA 19. KATEGÓRIAMEGJELÖLÉSEK (A KÉSZÜLÉK
10. ALARM 2 ÉBRESZTÉS GOMBJA HÁTOLDALÁN TALÁLHATÓ)
VÁLASZTÓ GOMB
18
H 032.
5
Page 33

ÁRAMELLÁTÁS
Csatlakoztassa az AC vezetéket a háztartási AC konnektorhoz.
Nyomja meg a RESET gombot (17) egy golyóstoll segítségével.
E készulék elemmel való működésre is képes: 3V lítiumelemet igényel.
Helyezze az elemet az elemtartó tokba
Ellenőrizze, hogy az elem a jelzett polaritásnak (+ ill. -) megfelelően kerül bele az elemtartó tokba.
MEGJEGYZÉS:
Amennyiben bármi hiba történne az áramellátásban, az óra automatikusan átáll az elemről való működésre,
az idő tehát tárolva marad.
Amennyiben a hálózati áramellátás ismét használható, az óra visszaáll.
ESD MEGJEGYZÉS
Működési hiba esetén állítsa a készüléket alaphelyzetbe (húzza ki a hálózati áramellátásból) hogy a normális
működéshez visszatérhessen
FIGYELMEZTETÉS
Ha a készülék használaton kívül van, akkor húzza ki a konnektorból.
Ne vegye le a készülék borítását, ugyanis az elektromos sokkot okozhat.
Semmi olyan alkatrész nincs belül, ami önnek hasznos lehet.
Tűzeset vagy sokk kockázatával járhat az is, ha a készüléket esőnek, vagy egyéb nedvességnek teszi ki.
A hálózati csatlakozóhoz nem kapcsolt készülék is működőképes.
ALARM 1,2 ÉBRESZTŐ
CSENGÉS
ALARM 1,2 ÉBREDÉS
RÁDIÓRA
ALARM 1,2 ÉBREDÉS
RÁDIÓRA
DIGITÁLIS ÓRA
ANALÓG ÓRA
DIGITÁLIS ÓRA MÓD
MEGJEGYZÉS:
AZ IDŐ, AZ ÉBRESZTŐ ILLETVE AZ IDŐZÍTETT
KIKAPCSOLÁS BEÁLLÍTÁSA KIZÁRÓLAG
DIGITÁLIS MÓDBAN LEHETSÉGES.
NAP
SLEEP ON (IDŐZÍTETT
KIKAPCSOLÁS)
SLEEP ON (IDŐZÍTETT
KIKAPCSOLÁS)
ALARM 1,2 ÉBRESZTŐ
CSENGÉS
H 033
Page 34

A PONTOS IDŐ BEÁLLÍTÁSA
PONTOS IDŐ BEÁLLÍTÁSA
1. Nyomja meg, majd tartsa lenyomva az idő beállító gombot (12) (1-es helyzet) két másodpercig, a nap
kijelzője villogni fog.
2. Nyomja meg a Hangerő fel gombot (3) illetve a Hangerő le gombot (4) (2-es helyzet) az aktuális
nap beállításához.
3. Nyomja meg az idő beállító gombot (1-es helyzet), a 24/12 óra kijelzés villogni fog.
4. Nyomja meg a Hangerő fel gombot (3) illetve a Hangerő le gombot (4) (2-es helyzet) az óra
villogni fog.
5. Nyomja meg az idő beállító gombot (1-es helyzet), az óra villogni fog.
6. Nyomja meg a Hangerő fel gombot (3) illetve a Hangerő le gombot (4) (2-es helyzet) az óra
beállításához.
7. Nyomja meg az idő beállító gombot (1-es helyzet), az perc villogni fog.
8. Nyomja meg a Hangerő fel gombot (3) illetve a Hangerő le gombot (4) (2-es helyzet) a perc
beállításához.
H 034
Page 35

ALARM 1 ÉBRESZTŐ BEÁLLÍTÁSA
ALARM 1 ÉBRESZTŐ
BEÁLLÍTÁSA
1. Nyomja meg az ALARM 1 ébresztés gombját (1O) (1-es helyzet), hogy belépjen az ALARM 1 ébresztés
módba.
2. Nyomja meg és tartsa lenyomva az ALARM 1 ébresztés gombját (1O) (1-es helyzet) két másodpercig, a nap
villogni fog. (Lásd Diagram 1)
3. Nyomja meg a Hangerő fel gombot (3) illetve a Hangerő le gombot (4) (2-es helyzet) a nap
beállításához.
4. Nyomja meg az ALARM 1 ébresztés gombját (1O) (1-es helyzet) az óra villogni fog.
Nyomja meg a Hangerő fel gombot (3) illetve a Hangerő le gombot (4) (2-es helyzet) az óra
beállításához.
5. Nyomja meg az ALARM 1 ébresztés gombját (1O) (1-es helyzet) a perc villogni fog.
Nyomja meg a Hangerő fel gombot (3) illetve a Hangerő le gombot (4) (2-es helyzet) a perc
beállításához
6. Nyomja meg az ALARM 1 ébresztés gombját (1O) (1-es helyzet) az alarm 1 csengő villogni fog.
Nyomja meg a Hangerő fel gombot (3) illetve a Hangerő le gombot (4) (2-es helyzet) az
ébresztéshez a csengő illetve a rádió kiválasztásához.
H 035
Page 36

DIAGRAM 1
ALARM 1 ÉBRESZTÉS
BEÁLLÍTÁSI MÓD (Hétfővasárnap)
ALARM 2 ÉBRESZTŐ BEÁLLÍTÁSA
1. Nyomja meg az ALARM 2 ébresztés gombját (9) (1-es helyzet), hogy belépjen az ALARM 2 ébresztés
módba.
2. Nyomja meg és tartsa lenyomva az ALARM 2 ébresztés gombját (9) két másodpercig, a nap villogni fog.
(Lásd Diagram 2)
3. Nyomja meg a Hangerő fel gombot (3) illetve a Hangerő le gombot (4) (2-es helyzet) a nap
beállításához.
4. Nyomja meg az ALARM 2 ébresztés gombját (9) (1-es helyzet), az óra villogni fog. Nyomja meg a Hangerő
fel gombot (3) illetve a Hangerő le gombot (4) (2-es helyzet) az óra beállításához.
5. Nyomja meg az ALARM 2 ébresztés gombját (9) (1-es helyzet), a perc villogni fog. Nyomja meg a Hangerő
fel gombot (3) illetve a Hangerő le gombot (4) (2-es helyzet) a perc beállításához.
6. Nyomja meg az ALARM 2 ébresztés gombját (9) (1-es helyzet) az alarm 2 csengő villogni fog.
Nyomja meg a Hangerő fel gombot (3) illetve a Hangerő le gombot (4) (2-es helyzet) az
ébresztéshez a csengő illetve a rádió kiválasztásához.
ALARM 1 ÉBRESZTÉS
BEÁLLÍTÁSI MÓD (Hétfő-péntek)
ALARM 2 ÉBRESZTŐ
BEÁLLÍTÁSA
ALARM 1 ÉBRESZTÉS
BEÁLLÍTÁSI MÓD (Szombatvasárnap)
H 036
Page 37

DIAGRAM 2
ALARM 2 ÉBRESZTÉS
BEÁLLÍTÁSI MÓD (Hétfővasárnap)
DIAGRAM 3
Ébresztési mód kiválasztása, és bekapcsolása
Nyomja meg az ALARM 1/ALARM 2/ALARM 1+2 (13) ébresztés választó gombot az ébresztő funkció
kiválasztásához. (Diagram 3)
AZ ÉBRESZTÉS IDŐTARTALMA
Az ébresztéskor a csengő vagy a rádió egy órán keresztül szól, amennyiben Ön nem nyom meg semmilyen
gombot. Ezután automatikusan kikapcsol, és a következő napon ugyanazon időben indítja újra az ébresztést.
AZ ÉBRESZTÉS MEGÁLLÍTÁSA
Nyomja meg a kikapcsolás (power) gombot (14) az ébresztés leállításához. Ez egyidőben a szundi funkciót is
leállítja.
ALARM 2 ÉBRESZTÉS
BEÁLLÍTÁSI MÓD (Hétfő-péntek)
ALARM 1 ÉBRESZTŐ (CSENGÉS)
ALARM 1 ÉBRESZTŐ (RÁDIÓRA)
ALARM 2 ÉBRESZTÉS
BEÁLLÍTÁSI MÓD (
Szombat-vasárnap)
H 037
Page 38

DIAGRAM 4
SLEEP (IDŐZÍTETT
KIKAPCSOLÁS BEÁLLÍTÁSA)
Időzített kikapcsolás funkció (sleep)
Amikor a rádió bekapcsolt állapotban van, nyomja meg a snooze/sleep gombot (16), a kijelzőn megjelenik a
sleep “9O” felirat (9O perc a kezdő kikapcsolási idő). Ahányszor megnyomja a snooze/sleep gombot (16), az
idő annyiszor 2 perccel csökken. (Diagram 4)
MEGJEGYZÉS: : Nyomja meg a power on/off gombot (14) az időzített kikapcsolás funkció kikapcsolásához..
Szundi (Snooze) funkció:
1. Nyomja meg a snooze / sleep gombot (16) a szundi funkció aktiválásához ébresztés közben (csengés
vagy rádió le fog állni)
2. A szundi funkció 9 percig aktív.
AUDIO FORRÁS HASZNÁLATA
1. Használjon összekötőkábelt az audio forrás és a készülék összekapcsolásához
2. Állítsa be a hangerőt az audio forráson a jobb erősítés érdekében.
MEGJEGYZÉS: NE állítsa az audio forrás hangerejét túl nagyra, így elkerülhető az esetleges túlterhelés.
A készülék saját hangja nem hallható, ha az „AUDIO IN” aljzathoz (15) más audio forrás van csatlakoztatva.
A készülék saját hangja az összekötő kábel eltávolításakor azonnal visszatér.
Amikor az „audio in” (más kimenő hangforrás) funkció van használatban, a beállított ébresztés hangja a rádió
hallgatása közben lesz hallható.
Nyomja meg a powerr on/off alarm off gombot (14), és az ébresztőhang megszűnik.
A RÁDIÓ MŰKÖDÉSE
- Nyomja meg az on/off gombot (14) a rádió bekapcsolásához.
- Válassza ki a hullámsávot az AM/FM Frekvenciakapcsoló (2) segítségével.
- Az állomáskeresővel (8) állítsa be a kívánt rádióállomást.
- Nyomja meg a hang-erőszabályozó gombját (3)(4), a hangerő beállításához
- Nyomja meg az on/off gombot (14) a rádió kikapcsolásához.
Megjegyzés:
- Az AM sáv belső antennával fogja a rádiójeleket. A megfelelő vétel eléréséhez forgassa a készüléket.
- Győződjön meg róla, hogy az FM antenna teljességgel ki van tekerve és ki van húzva az FM vételéhez.
H 038
Page 39

RESET – alaphelyzetbe állítás
- A RESET gomb (17) a készülék alján található.
- Ha elemcserére van szükség, vagy a készülék nem megfelelően működik, nyomja meg ezt a gombot egy
golyóstoll segítségével.
- Ez visszaállít minden beállítást alaphelyzetbe, és minden adat (idő, ébresztés) is törlődik ekkor.
FIGYELMEZTETÉS
- Ne helyezzen semminemű, nyílt lángot kibocsátó forrást (pl. Meggyújtott gyertyát) a készülékre.
- Ne tegye a készüléket olyan helyre, szekrénybe, melynek nincs saját szellőzése.
- Tűzeset vagy sokk kockázatával járhat az is, ha a készüléket esőnek, vagy egyéb nedvességnek teszi ki.
- Ne tegye ki a terméket közvetlen napfénynek, szélsőséges hőmérsékleti hatásoknak, párának,
rezgéseknek, illetve ne helyezze túl poros környezetbe.
- Ne használjon súrolószert, benzolt, hígítót vagy egyéb oldószert a készülék tisztításához. Törölje át nem
karcoló mosószerrel, puha textil segítségével.
- Ne tegyen drótokat, szögeket stb. A készülék nyílásaiba.
SPECIFIKÁCIÓK
Frekvenciatartomány: AM 525 – 1615 kHz
Kimenő:
Áram: 28O mW
Hangszóró ellenállása: 8 ohm
Elem: 1 x CR2032, 3V Flat Lithium (nincs mellékelve)
Áramforrás: AC 230V~50 Hz, 5 watt
FIGYELMEZTETÉS (A BIZTONSÁGOS HASZNÁLAT ÉRDEKÉBEN)
Figyeljen a helyes feszültség kiválasztására amikor az AC vezetéket a hálózati áramellátáshoz csatlakoztatja.
Ellenkező esetben a készülék károsodhat.
Védje a nedvességtől:
Ne kerüljön a termék közelébe semmilyen folyadékkal töltött tárgy (pl. Váza); ne fröcskölje le, védje
mindennemű folyadék becsepegésétől.
Figyeljen a szellőzésre:
Semmilyen módon ne akadályozza meg a termék helyes szellőzését.
FM 87,5 – 108 MHz
H039
Page 40

DIAGRAM 1 DIAGRAM 2
NYÍL LEGFELÜL
FALICSAVAR ÉS RUDAK
• Ha a rádiós órát a falra kívánja helyezni.
• Akassza a falitatót a falra, a rudakat négy csavarral felrögzítve (2. Diagram).
• Helyezze a tartóra a készüléket, s bizonyosodjon meg arról, hogy az áramvezeték, illetve az FM antenna
külön, a tartón kívül esik.
• Szorítsa bele a tartó csavarját a készülék belsejébe. (3. Diagram).
• Ellenőrizze, hogy a falitatót, illetve a készüléket erősen rögzítette-e a falra.
DIAGRAM 3
FALITARTÓ
CSAVAR
CSAVAR
FAL
CSAVAR
CSAVAR
H 040
Page 41

KIEGÉSZÍTŐ INFORMÁCIÓK
Óvatosan bánjon az apró alkatrészekkel és elemekkel, és azokat ne nyelje le, mert ez komoly sérüléseket okozhat!
Gondoskodjon arról, hogy az apró alkatrészek és elemek ne kerüljenek gyermekek kezébe!
Fontos tanácsok a halláskárosodás elkerülésére
Figyelmeztetés:
Az Ön hallásáért nemcsak Ön, de mi is aggódunk.
Éppen ezért kérjük, legyen óvatos a készülék használatánál.
Azt ajánljuk, hogy: kerülje a nagy hangerővel való hallgatást.
Ha a készüléket gyermekek használják, ügyeljünk arra, hogy ne állítsák a készüléket túl hangosra.
Vigyázat!
A túl nagy hangerő a gyermekeknél gyógyíthatatlan károsodást okozhat.
Kérjük gondoskodjon róla, hogy a készülék burkolatának nyílásaiba SOHA senki, főképpen pedig gyermekek, ne
dughassanak bele semmit, ez ugyanis életveszélyes áramütéshez vezethet. A készülék burkolatát csak erre
megfelelően képzett szakember nyithatja fel.
A készüléket kizárólag a rendeltetésének megfelelően használjuk.
A készülék kizárólag lakásokban és üzletekben történő felhasználásra alkalmas.
Kérjük, őrizze meg a használati útmutatót, hogy az később is rendelkezésére álljon.
KIEGÉSZÍTŐ INFORMÁCIÓK
Környezetvédelmi tanácsok
Ezt a terméket az élettartama végén ne dobjuk a normál háztartási szemétbe, hanem adjuk le a villamos és
elektronikai hulladékok átvevőhelyén. A terméken található szimbólum, a használati útmutató vagy a csomagolás
felirata erre hívja fel a figyelmet.
A készülék anyagai a jelölésüknek megfelelően újrahasznosíthatóak. Az újrahasznosítással, az anyagok ismételt
felhasználásával, illetve a használt készülékek egyéb felhasználásával sokat tehetünk környezetünk megóvásáért.
A megfelelő hulladék-átvevőhelyről a helyi önkormányzatnál érdeklődhetünk.
Ne akadályozza a készülék szellőzését, például függönnyel, újsággal, takaróval vagy bútorral. A
szellőzőnyílásoknak mindig szabadon kell maradnia. A túlmelegedés kárt tehet a készülékben, és emiatt annak
élettartama lerövidülhet.
Meleg és forróság
Ne tegyük ki a készüléket a közvetlen napsütés hatásának. Ügyeljünk arra, hogy a készülék ne legyen
fűtőberendezés, nyílt láng vagy egyéb hőforrás közelében. A készülék szellőzőnyílásait mindig hagyjuk szabadon.
Nedvesség és tisztítás
Ez a készülék nem vízálló! Ne tegyük vízbe a lejátszót, és ügyeljünk arra, hogy ne is kerüljön vízzel érintkezésbe.
A lejátszóba bejutó víz súlyos károkat okozhat. A készülék megtisztítására ne használjunk alkoholt, ammóniát,
benzint, vagy súrolószert tartalmazó tisztítóanyagot, mivel ezek károsíthatják a lejátszót. A készülék megtisztítására
enyhén megnedvesített puha törlőruhát használjunk .
H 041
Page 42

MODELLO: 4556
AM /FM DOPPIO DISPLAY RADIO SVEGLIA CON CANCELLAZIONE WEEKEND
ATTENZIONE
RISCHIO DI SCOSSA ELETTRICA. NON
APRIRE.
ATTENZIONE: PER RIDURRE I RISCHI DI
SCOSSA ELETTRICA, NON RIMUOVETE IL
Il simbolo lampeggiante con
freccetta, all’interno di un triangolo
equilatero, è inteso al fine di
segnalare all’utente la presenza di
un “voltaggio pericoloso” non
isolato, all’interno della struttura,
che potrebbe essere di sufficiente
portata da causare rischio di scossa
elettrica a persone.
ISTRUZIONI D’USO
COPERCHIO (O IL RETRO). NON SI TROVANO
ALL’INTERNO, PARTI D’ALCUNA UTILITÀ
ALL’UTENTE. FARE RIFERIMENTO SOLO A
PERSONALE DI SERVIZIO QUALIFICATO.
9
10
Il punto esclamativo all’interno di un
triangolo equilatero è inteso al fine di
segnalare all’utente la presenza
d’importanti istruzioni di
funzionamento e manutenzione
(servizio) nel foglietto che
accompagna l’apparecchio.
17
6
12
16
4
14
13
1
3
7
19
5
15
11
2
8
1. DISPLAY LCD 11. SCAL A PARL ANTE E INDICE
2. TASTO FREQUENZA (FM/AM) 12. TASTO REGOLAZIONE ORA
3. CONTROLLO VOLUME ALTO 13. TASTO DI SELEZIONE ALLARME 1 / ALL ARME 2/
4. CONTROLLO VOLUME BASSO 14. TASTO DI ACCENSIONE ON/OFF ALLARME OFF
5. FILO AC 15. AUDIO A SPINA
6. SCOMPARTO BATTERIA 16. TASTO SNOOZE/SLEEP
7. FILODIFFUSIONE ANTENNA FM 17. TASTO RESET
8. CONTROLLO TUNING 18. BRACCIO APPARECCHIO
9. TASTO REGOLAZIONE ALLARME 2 19. ETICHETTA DESCRITTIVA (ATTACCATA DIETRO
10. TASTO REGOLAZIONE ALLARME 1 L’APPARECCHIO)
ALLARME 1+2
18
I 042.
Page 43

COLLEGAMENTO CORRENTE
Collegare il filo d’alimentazione AC ad una spina comune AC.
Premere successivamente il tasto Reset (17) con una penna a biro.
Questo apparecchio è dotato di un sistema di batteria posteriore, richiede una batteria al litio piatta 3 V
Inserire la batteria nello scomparto batteria.
Accertarsi che Il poli positivo e negativo (+ e -) siano attaccati ai poli corrispondenti sulla base dello
scomparto batteria.
NOTA:
Se si verifica un’assenza di corrente AC, l’orologio si accende automaticamente grazie al supporto della
batterie la memoria dell’orologio e del tempo continua a mantenersi.
Quando si riattiva la corrente AC, l’orologio si riattiva nuovamente all’AC.
OTA ESD
N
In caso di malfunzionamento dovuto alla scarica elettrostatica ripristinare il prodotto (può essere richiesta
il ricollegamento della fonte di corrente) per riprendere il normale funzionamento.
AVVERTENZE
Scollegare la presa dalla spina quando l’apparecchio non viene usato.
Per evitare il rischio di shock elettrico, non togliere la copertura dell’apparato.
Non ci sono parti utili all’interno della confezione.
Per prevenire pericolo di incendio o di shock non esporre l’apparecchio alla pioggia o all’umidità.
La spina è usata come dispositivo di sconnessione, il dispositivo di sconnessione rimarrà prontamente
funzionante.
ALLARME 1,2 SUONERIA
SVEGLIA
ALLARME 1,2 SUONERIA
RADIO
ALLARME 1,2 SUONERIA
SVEGLIA
MODALITÀ OROLOGIO DIGITALE
MODALITÀ OROLOGIO ANALOG
MODALITÀ OROLOGIO DIGITALE
NOTA:
REGOLAZIONE OROLOGIO, REGOLAZIONE
ALLARME/REGOLAZIONE DORMIENTE
SOLO IN MODALITÀ DIGITALE
GIORNO
DORMIENTE
DORMIENTE
ALLARME 1,2 SUONERIA
RADIO
I 043.
Page 44

REGOLARE O REGOLARE NUOVAMENTE L’ORARIO CORRENTE
MODALITÀ OROLOGIO
1. Tenere premuto per 2 secondi il tasto di regolazione ora (12) (posizione 1), intermittente giorno.
2. Premere il tasto volume alto (3) e il tasto di controllo volume basso (4) (posizione 2) per regolare
il giorno.
3. Premere il tasto di regolazione ora (12) (posizione 1) intermittente 24 ore / 12 ora
4. Premere il tasto controllo volume alto e il tasto volume basso, lampeggia l’ora.
5. Premere il tasto per regolare l’orario (12), intermittente ora
6. Premere il tasto controllo volume alto (3).( posizione 3) e il tasto volume basso, (4) (posizione
2) per regolare l’ora.
7. Premere il tasto per regolare l’orario (12), intermittenza minuti.
8. Premere il tasto controllo volume alto (3).( posizione 3) e il tasto volume basso, (4) (posizione
2) per regolare i minuti.
I 044.
Page 45

REGOLAZIONE ALLARME 1
MODALITÀ ALLARME 1
1. Premere il tasto di regolazione allarme 1 (10) (posizione 1) per entrare nel modo di regolazione di allarme
1.
2. Tenere premuto il tasto di regolazione di allarme 1 (10) (posizione 1) per 2 secondi, intermittente giorno
(diagramma 1).
3. Premere il tasto volume alto (3) e il tasto di controllo volume basso (4) (posizione 2) per regolare
il giorno.
4. Premere il tasto regolazione allarme 1 (10) (posizione 1) intermittente ora.
Premere il tasto volume alto (3) e il tasto di controllo volume basso (4) (posizione 2) per regolare
l’ora.
5. Premere il tasto regolazione allarme 1 (10) (posizione 1) intermittente minuti.
Premere il tasto volume alto (3) e il tasto di controllo volume basso (4) (posizione 2) per
regolare i minuti.
6. Premere il tasto regolazione allarme 1 (10) (posizione 1) intermittente campana.
Premere il tasto volume alto (3) e il tasto di controllo volume basso (4) (posizione 2) per
selezionare l’allarme 1 campanello e allarme radio.
I 045.
Page 46

DIAGRAMMA 1
MODO REGOLAZIONE
ALLARME 1 WEEKEND (DA
LUNEDI’ A DOMENICA)
REGOLAZIONE ALLARME 2
1. Tenere premuto il tasto allarme 2 (9) (posizione 1) per entrare nel modo allarme 2.
2. Tenere premuto il tasto allarme 2 (9) per 2 secondi, intermittente giorno (diagramma 2)
3. PREMERE IL TASTO SI CONTROLLO VOLUME ALTO (3) E IL TASTO CONTROLLO VOLUME
BASSO (4) (POSIZIONE 2) PER REGOLARE IL GIORNO.
4. Premere il tasto volume alto (3) e il tasto di controllo volume basso (4) (posizione 2) per
selezionare l’allarme 1 campanello e allarme radio.
5. Premere il tasto volume alto (3) e il tasto di controllo volume basso (4) (posizione 2) per
selezionare l’allarme 1 campanello e allarme radio.
6. Premere il tasto volume alto (3) e il tasto di controllo volume basso (4) (posizione 2) per
selezionare l’allarme 1 campanello e allarme radio.
MODO REGOLAZIONE
ALLARME 1 WEEKEND (LUN. A
VEN)
MODALITA ALLARME 2
MODO REGOLAZIONE
ALLARME 1 WEEKEND (SAB. A
DOM.)
I 046
Page 47

DIAGRAMMA 2
MODO REGOLAZIONE
ALLARME 2 WEEKEND
DIAGRAMM 3
REGOLAZIONE POTENZA ALLARME E ALLARME ON/OFF
Premere il tasto allarme 1/ allarme 2/ allarme 1+2 (13) per selezionare la sveglia con il campanello o la radio
(diagramma 3)
DURATA ALLARME
L’allarme con radio o con sveglia continuerà a funzionare per 1 ora se non viene premuta la chiave. L’allarme
si fermerà automaticamente e ricomincerà allo stesso orario nel giorno successivo.
DISATTIVARE L’ALLARME
Premere il tasto (14) per terminare l’allarme attuale e cancellare la funzione snooze.
MODO REGOLAZIONE
ALLARME 2 WEEKEND (LUNVEN)
ALLARME SUONERIA SVEGLIA
ALLARME SUONERIA RADIO
MODO ALLARME 2 WEEKEND
(SAB-DOM)
I 047
Page 48

DIAGRAMMA 4
MODALITA DORMIENTE
Per attivare la funzione sleep.
Quando si preme il tasto (16), sleep “90” mostra sul display lo sleep timer 90 minuti-off premendo il tasto
snooze/sleep (16) (Diagramma 4)
NOTA: PREMERE IL TASTO ON/OFF (14) PER DISATTIVARE LA FUNZIONE SLEEP.
Funzione snooze:
1. Premere il tasto sleep/snooze (16) per attivare la funzione snooze (allarme sveglia o radio cesserà)
quando vi è l’allarme.
2. L’intervallo è di 9 minuti.
LAVORARE CON FONTE AUDIO
1. Usare il cavo di connessione per unire la fonte audio e l’apparecchio.
2. Regolare il volume della fonte audio per ottenere un effetto di amplificazione migliore.
NOTA: NON regolare la fonte audio con un volume troppo alto per evitare sovraccarichi.
Il suono dell’apparecchio sarà eliminato e sostituito quando l’”AUDIO IN” CONNESSIONE (15) è
collegato all’altra fonte audio.
Il suono cesserà quando il filo sarà rimosso dalla spina.
Se è in uso la funzione “audio in” e la musica, il suono dell’allarme sarà inserito nella musica.
Per bloccare il suono, premere semplicemente il tasto power on/off allarme off.
FUNZIONAMENTO RADIO
– Premere il tasto on/off (14) per accendere la radio.
– Selezionare la rete AM o FM usando il tasto rete.(2)
– Selezionare la stazione usando il tasto di controllo (8)
– Premere il tasto di controllo volume (3)/(4) per regolare il volume come desiderato.
– Premere il tasto power on/off (14) per spegnere la radio.
Nota:
– La rete AM usa un’area direzionale interna. Ruotare la radio per una migliore ricezione.
– Assicurarsi che l’antenna FM (7) sia completamente allungata per la ricezione FM.
I 048
Page 49

RIPRISTINARE
- Il tasto di ripristino (17) è localizzato sulla sommità dell’apparecchio.
- Usare una penna a biro per premerlo qualora desideriate cambiare le batterie, o l’apparecchio non è
formato come previsto.
- Ciò porterà tutte le regolazioni a l fallimento e perderete ogni dato conservato (allarme e sveglia)
AVVERTENZE
- Sull’apparecchio non dovranno essere posizionati oggetti infiammabili come candele.
- Non posizionare l’apparecchio vicino a scaffali senza una propria ventilazione.
- Per evitare pericolo di incendio o shock, non esporre l’apparecchio alla pioggia o all’umidità.
- L’apparecchio non deve essere esposto alla luce diretta del sole a temperature molto alte o basse,
umidità, vibrazioni o posizionati in un ambiente polveroso.
- Non usare abrasivi, benzene, o altri solventi per pulire le superfici del’apparecchio. Per pulire, asciugare
con un leggere panno con un dolce detergente non-abrasivo.
- Non provare mai ad inserire fili, pinze o altri oggetti simili nelle ventole o aperture dell’apparecchio.
SPECIFICAZIONI
Frequenza: AM 525 – 1615 kHz
Presa esterna 280 W
Altoparlanti 8 ohm
Batteria: 1 x CR2032, 3 V litio piatto (non incluso)
Fonte di energia: AC 230 V – 50 Hz, 5 watts
ATTENZIONE: PER UN USO DI SICUREZZA
Selezionare il giusto voltaggio prima di collegare il filo di corrente AC alla comune presa. Tuttavia, potrebbe
causare danni all’apparecchio.
Avvertimenti riguardo ai pericoli legati ai liquidi:
Il prodotto non deve essere esposto a rischi di schizzi o vicino a contenitori di liquidi, quali vasi.
Avvertimenti legati alla ventilazione
La normale ventilazione dell’apparecchio non deve essere né limitata né ostacolata.
FM 87,5 – 108 MHz
I 049.
Page 50

DIAGRAMMA 1 DIAGRAMMA 2
FRECCIA ULLA PARTE SUPERIORE
VITI AL MURO E
STECCHE
• Predisporre sulla parete per appendere la radio sveglia.
• Appendere il supporto mensola fissando le 4 viti e le stecche saldamente alla parete.
• Porre l’unità sulla mensola assicurandosi che l’antenna FM e il cavo AM ne escano separate.
• Stringere le viti della mensola sotto all’unita (Diagramma 3).
• Ricontrollare di nuovo le mensole e l’unità al muro, assicurandosi che siano ben fissate.
DIAGRAMMA 3
FISSANTE AL MURO
VITE
VITE
MURO
VITE
VITE
I 050
Page 51

INFORMAZIONI AGGIUNTIVE
Prestate attenzione ai pezzettini e alle batterie, non inghiottiteli. Potrebbe essere nocivo alla vostra
salute e causare soffocamento. Prestate la massima attenzione a tenere i piccoli dispositivi e le
batterie lontani dalla portata dei bambini.
Importante suggerimento riguardo alla protezione dell’udito
Attenzione:
Avete a cuore il vostro udito, così come noi.
Pertanto, fate attenzione quando usate questo apparecchio.
La nostra raccomandazione è di: Evitare un volume eccessivo.
Dovesse l’apparecchio essere usato da bambini, assicuratevi che esso non sia regolato su un volume
eccessivo.
Attenzione! Un volume eccessivo potrebbe causare danni irreversibili all’udito dei vostri bambini.
MAI lasciare che nessuno, ed in particolar modo bambini, metta alcun oggetto sopra i buchi,
scappatoie o altre aperture sul dispositivo. Ciò potrebbe causare la morte da scossa elettrica. Il
dispositivo deve essere aperto solo da un assistente qualificato.
Usate l’apparecchio solo per il proposito per cui è stato disegnato.
L’apparecchio è destinato unicamente all’utilizzo in ambienti domestici e di lavoro.
Conservare accuratamente le istruzioni per l’uso per futuro riferimento.
INFORMAZIONI AGGIUNTIVE
Avvertenze per la tutela dell’ambiente
Una volta inutilizzabile il prodotto non deve essere smaltito con i rifiuti domestici ma portato presso
un punto di raccolta per il riciclo di apparecchiature elettriche. Ciò è indicato dal simbolo presente
sul prodotto, sulle istruzioni per l’uso o sulla confezione.
I materiali riciclabili sono riutilizzabili a seconda delle loro caratteristiche. Con il riutilizzo, con il
riciclaggio di materiale o altri tipi di riciclaggio di apparecchi vecchi fornirete un importante
contributo alla tutela ambientale.
Informatevi presso l’amministrazione comunale sui punti di smaltimento competenti.
Non ostacolate la ventilazione del dispositivo. Assicuratevi che né tende, giornali, coperte o mobili
blocchino le scappatoie della ventilazione dell’apparato. La ventilazione dev’essere costantemente
assicurata! Un eventuale surriscaldamento potrebbe causare seri danni al dispositivo e ridurre sia le
prestazioni che la durata del funzionamento.
Riscaldamento e calore
Non esponete l’apparecchio a luce del sole diretta. Assicuratevi che l’apparecchio non sia soggetto
a fonti di calore dirette come stufe o fiamme. Assicuratevi che le vie di ventilazione dell’apparecchio
non siano coperte.
Umidità e pulizia
L’apparecchio non è subacqueo! Non immergete il lettore nell’acqua. Non lasciate che il lettore venga a
contatto con acqua. Dell’acqua che dovesse incidentalmente cadere sul lettore potrebbe causare seri
danni. Non usate detergenti che contengano alcool, ammoniaca, benzene o abrasivi in quanto questi
potrebbero danneggiare il lettore. Per pulire, usate un panno soffice e umido.
I051
Page 52

MODELO: 4556
RADIO DESPERTADOR DE FRECUENCIA DUAL AM / FM CON OPCIÓN DE
DESACTIVACIÓN EN FIN DE SEMANA INCORPORADA
WWAARRNNIINNGG
DANGER OF A HAZARDOUS ELECTRIC
SHOCK. DO NOT OPEN
WARNING: TO REDUCE THE RISK OF AN
ELECTRIC SHOCK, DO NOT REMOVE THE
The triangular symbol with the
lightning Bolt warns the user to the
presence of dangerous non-isolated
voltage on the inside of this device
which may cause an electric shock.
INSTRUCCIONES DE MANEJO
FRONT OR BACK COVER. INSIDE THE UNIT,
THERE ARE NO PARTS THAT CAN BE
REPAIRED OR ADJUSTED BY THE USER.
PLEASE REFER TO QUALIFIED TECHNICIANS.
9
10
The triangular symbol with the
exclamation highlights important
points of which the user should refer
to the manual regarding maintenance
and repair.
17
6
12
16
4
14
13
1
3
7
19
5
15
11
2
8
1. PANTALLA LCD 11. BARRA E INDICADOR DEL DIAL
2. BOTÓN DE CAMBIO DE FRECUENCIA (FM/AM) 12. BOTÓN DE CONFIGURACIÓN DE LA
3. AUMENTAR VOLUMEN 13. BOTÓN DE SELECCIÓN DE ALARMA 1 /
4. DISMINUIR VOLUMEN 14. BOTÓN DE ENCENDIDO / APAGADO
5. CABLE DE CONEXIÓN CA 15. FUENTE DE AUDIO EXTERNA
6. COMPARTIMIENTO DE LA BATERÍA 16. TEMPORIZADOR / BOTÓN APAGADO
7. CABLE DE LA ANTENA FM 17. BOTÓN DE REENCENDIDO
8. CONTROL DE SINTONIZACIÓN 18. UNIDAD DE SOPORTE
9. BOTÓN DE CONFIGURACIÓN DE LA ALARMA 2 19. ETIQUETA DE VALORACIÓN (EN LA
10. BOTÓN DE CONFIGURACIÓN DE LA ALARMA 1 PARTE POSTERIOR DE LA UNIDAD)
18
HORA
ALARMA 2 / ALARMA 1+2
AUTOMÁTICO
E 052.
Page 53

CONEXIÓN ELÉCTRICA
Enchufe el cable de conexión CA a una fuente de alimentación CA.
A continuación pulse el botón de reencendido (17) con la punta de un bolígrafo.
Esta unidad lleva incorporada una batería de reserva. Una batería plana 3V de litio.
Inserte la batería en el compartimiento de la batería.
Asegúrese que los polos positivo y negativo (+ y -) se encuentren en la posición adecuada y en sus
terminales correspondientes dentro del compartimiento de la batería.
NOTA:
Si ocurriere un fallo en la fuente de alimentación CA, el reloj empezará a funcionar automáticamente con
la batería y seguirá funcionando, al igual que la memoria de la hora.
En cuanto se reestablezca la conexión CA, el reloj volverá a funcionar con ella.
vación ESD
Obser
En caso de un fallo por descarga electrostática, simplemente reencienda la unidad (vuelva a conectarla a
la fuente de alimentación requerida) y reinicie la operación normalmente.
ADVERTENCIA
Desconecte el enchufe de la fuente de Alimentación si no va a utilizar la unidad.
Para evitar riesgos de descarga eléctrica, no retire la tapa de la unidad.
El interior de la unidad contiene partes básicas para su funcionamiento.
Para evitar incendio o descargas peligrosas, no exponga la unidad a la lluvia o humedad.
El enchufe se utiliza para desconectar el aparato. Cuando éste se encuentre desconectado, deberá estar
listo para utilizarse.
RADIO ALARMA 1,2
TIMBRE DE LA ALARMA 1,2
RADIO ALARMA 1,2
MODO DE RELOJ DIGITAL
MODO DE RELOJ ANALÓGICO
MODO DE RELOJ DIGITAL
NOTA:
CONFIGURACIÓN DE LA HORA,
CONFIGURACIÓN DE LA ALARMA/
CONFIGURACIÓN DEL TEMPORIZADOR
ÚNICAMENTE EN MODO DE HORA DIGITAL
DÍA
TEMORIZADOR
ENCENDIDO
TEMPORIZADOR
ENCENDIDO
TIMBRE DE LA ALARMA
1,2
E 053.
Page 54

PARA CONFIGURAR O REAJUSTAR LA HORA ACTUAL
MODO DE
CONFIGURACIÓN DEL
RELOJ
1. Pulse y mantenga pulsado el botón de configuración de la hora (12) (posición 1) durante 2 segundos,
hasta que parpadee el día.
2. Pulse el botón aumentar volumen (3) y el botón disminuir volumen (4) (posición 2) para ajustar
el día.
3. Pulse el botón de configuración de la hora (12) (posición 1) hasta que parpadee 24 / 12 horas.
4. Pulse el botón aumentar volumen (3) y el botón disminuir volumen (4) (posición 2) hasta que
parpadee la hora.
5. Pulse el botón de configuración de la hora (12) (posición 1) hasta que parpadee la hora.
6. Pulse el botón aumentar volumen (3) y el botón disminuir volumen (4) (posición 2) para ajustar
la hora.
7. Pulse el botón de configuración de la hora (12) (posición 1) hasta que parpadeen los minutos.
8. Pulse el botón aumentar volumen (3) y el botón disminuir volumen (4) (posición 2) para ajustar
los minutos.
E 054.
Page 55

CONFIGURACIÓN DE LA ALARMA 1
MODO DE
CONFIGURACIÓN DE
LA ALARMA 1
1. Pulse el botón de configuración de la alarma 1 (10) (posición 1) para iniciar el modo de configuración de
la alarma 1.
2. Pulse y mantenga pulsado el botón de configuración de la alarma 1 (10) (posición 1) durante 2 segundos
hasta que parpadee el día. (Diagrama 1)
3. Pulse el botón aumentar volumen (3) (posición 3) y el botón disminuir volumen (4) (posición
2) para ajustar el día.
4. Pulse el botón de configuración de la alarma 1 (10) (posición 1) hasta que parpadee la hora.
Pulse el botón aumentar volumen (3) (posición 3) y el botón disminuir volumen (4) (posición
2) para ajustar la hora.
5. Pulse el botón de configuración de la alarma 1 (10) (posición 1) hasta que parpadeen los minutos.
Pulse el botón aumentar volumen (3) (posición 3) y el botón disminuir volumen (4) (posición
2) para ajustar los minutos.
6. Pulse el botón de configuración de la alarma 1 (10) (posición 1) hasta que parpadee la campana.
Pulse el botón aumentar volumen (3) (posición 3) y el botón disminuir volumen (4) (posición
2) para seleccionar el timbre de la alarma 1 y para la radio alarma.
E 055.
Page 56

DIAGRAMA 1
MODO DE CONFIGURACIÓN DE
LA ALARMA 1 EN FIN DE
SEMANA (DE LUNES A
DOMINGO)
CONFIGURACIÓN DE LA ALARMA 2
1. Pulse el botón de configuración de la alarma 2 (9) (posición 1) para iniciar el modo de configuración de la
alarma 2.
2. Pulse y mantenga pulsado el botón de configuración de la alarma 2 (9) durante 2 segundos hasta que
parpadee el día. (Diagrama 2)
3. Pulse el botón aumentar volumen (3) (posición 3) y el botón disminuir volumen (4) (posición
2) para ajustar el día.
4. Pulse el botón de configuración de la alarma 2 (9) (posición 1) hasta que parpadee la hora. Pulse el botón
aumentar volumen (3) (posición 3) y el botón disminuir volumen (4) (posición 2) para ajustar
la hora.
5. Pulse el botón de configuración de la alarma 2 (9) (posición 1) hasta que parpadeen los minutos. Pulse el
botón aumentar volumen (3) (posición 3) y el botón disminuir volumen (4) (posición 2) para
ajustar los minutos.
6. Pulse el botón de configuración de la alarma 2 (9) (posición 1) hasta que parpadee la campana. Pulse el
botón aumentar volumen (3) (posición 3) y el botón disminuir volumen (4) (posición 2) para
seleccionar el timbre de la alarma 1 y para la radio alarma.
DIAGRAMA 2
MODO DE CONFIGURACIÓN DE
LA ALARMA 1 EN FIN DE
SEMANA (DE LUNES A
VIERNES)
MODO DE
CONFIGURACIÓN DE
LA ALARMA 2
MODO DE CONFIGURACIÓN DE
LA ALARMA 1 EN FIN DE
SEMANA (DE SÁBADO A
DOMINGO)
E 056
Page 57

MODO DE CONFIGURACIÓN DE
LA ALARMA 2 EN FIN DE
SEMANA (DE LUNES A
DOMINGO)
DIAGRAMA 3
Configuración del tono de la alarma y la alarma on /off
Pulse el botón de selección de alarma 1 / alarma 2 / alarma 1+2 (13) para seleccionar la alarma por timbre
o radio. (Diagrama 3)
TIEMPO DE LA ALARMA
El timbre de la alarma o la radio alarma sonará durante 1 hora si no se pulsa ningún botón. La alarma se
detendrá automáticamente y volverá a sonar a la misma hora del día siguiente.
DETENER LA ALARMA
Pulse el botón de encendido / apagado (14) para detener la alarma. Así cancelará también la función del
temporizador.
MODO DE CONFIGURACIÓN DE
LA ALARMA 2 EN FIN DE
SEMANA (DE LUNES A
VIERNES)
ALARMA 1 CON TIMBRE
ALARMA 1 CON RADIO
MODO DE CONFIGURACIÓN DE
LA ALARMA 2 EN FIN DE
SEMANA (DE SÁBADO A
DOMINGO)
E 057.
Page 58

DIAGRAMA 4
MODO DE CONFIGURACIÓN DEL
TEMPORIZADOR
Para activar la función de apagado automático
Con la radio encendida, pulse el botón temporizador / apagado automático (16) y la pantalla mostrará “90”
antes de apagado automático que disminuirá de 2 segundos cada vez que pulse el botón temporizador /
apagado automático (16). (diagrama 4)
NOTA: pulse el botón de encendido / apagado (14) para detener el apagado automático.
Función del temporizador:
1. Pulse el botón temporizador / apagado automático (16) para activar la función del temporizador (timbre
de la alarma o radio alarma dejará de sonar) mientras suena la alarma.
2. El temporizador sonará a intervalos de 9 minutos.
MANEJO CON UNA FUENTE DE AUDIO
1. Use un cable que pueda conectar la fuente de audio a la unidad principal.
2. Ajuste el volumen de la fuente de audio con el fin de conseguir el mejor efecto amplificador.
OBSERVACIÓN: NO ajuste la fuente de audio a un volumen demasiado alto para evitar sobrecargas.
El sonido en la unidad principal se desactivará y será sustituido por una fuente de audio externa (15) a la que
esté conectada la unidad.
El sonido dejará de oírse una vez que se desconecte el cable del enchufe.
Si la fuente de audio externa está en funcionamiento y emitiendo música, el sonido de la alarma se insertará
en la música a la hora configurada.
Para detener el sonido y la alarma, simplemente pulse el botón de encendido /apagado (14).
MANEJO DE LA RADIO
- Pulse el botón de encendido /apagado (14) para encender la radio.
- Seleccione la frecuencia AM o FM por medio del botón de cambio de frecuencia (2).
- Seleccione la emisora por medio del control de sintonización (8).
- Pulse el botón de control de volumen (3)/(4) para ajustar el volumen.
- Pulse el botón de encendido / apagado (14) para apagar la radio.
Nota:
- La frecuencia AM utiliza una antena direccional interna. Rote la radio para conseguir una mejor
recepción.
- Asegúrese de que el cable de la antena FM (7) esté completamente desenrollado y extendido para
escuchar emisoras en la frecuencia FM.
E 058.
Page 59

REENCENDIDO
- El botón de reencendido (17) está situado en la parte inferior de la unidad.
- Use la punta de un bolígrafo para pulsar el botón siempre que cambie las pilas, o la unidad no funcione
correctamente.
- Esto hará que se reestablezcan los valores de configuración por defecto y perderá todos los datos
almacenados (configuración de la alarma y el reloj).
ADVERTENCIA
- No debe colocar sobre la unidad fuentes de fuego abierto, tales como velas.
- No coloque la unidad en estantes o librerías cerrados sin una ventilación apropiada.
- Para evitar incendios o descargas peligrosas, no exponga la unidad a la lluvia o cualquier tipo de
humedad.
- No debe exponer la unidad directamente a la luz del sol, temperaturas muy altas o muy bajas, humedad,
vibraciones o en un entorno polvoriento.
- No utilice abrasivos, benceno o disolventes para limpiar la superficie de la unidad. Para limpiarla, utilice
una toallita ligeramente humedecido con detergentes no abrasivos y un paño limpio y suave.
- No intente nunca insertar cables, agujas u otros objetos en la rejilla de ventilación o aperturas de la
unidad.
ESPECIFICACIÓN
Rango de frecuencia: AM 525 – 1615 kHz
Potencia de alimentación eléctrica: 280 mW
Impedancia del altavoz: 9 ohm
Batería de reserva: 1 batería plana CR2032, 3V de litio (no incluida)
Alimentación eléctrica: CA 230V ~50 Hz, 5 W
ATENCIÓN: POR SEGURIDAD DURANTE EL MANEJO
Seleccione el voltaje correcto antes de enchufar el cable de conexión CA en una fuente de alimentación. En
caso contrario, podría causar daños en la unidad.
Advertencia sobre derrames de líquidos:
No exponga el producto a riesgos de derrames de líquidos o lo coloque cerca de objetos que contengan
líquidos, tales como jarrones.
Advertencia sobre la ventilación:
No entorpezca la ventilación normal del producto.
FM 87.5 – 108 MHz
E 059.
Page 60

DIAGRAMA 1 DIAGRAMA 2
TORNILLOS DE PARED Y
BARRAS DE SUJECIÓN
TORNILLO
FLECHA HACIA
ARRIBA
TORNILLO
TORNILLO
• Escoja el lugar en el que desee colgar el radio-despertador.
• Cuelgue el soporte de pared atornillando 4 tornillos y apriételos a la pared (Diagrama 2).
• Coloque la unidad en el soporte asegurándose de que el cable de conexión CA y la antena FM queden
fuera del soporte.
• Apriete el tornillo del soporte en la parte inferior de la unidad (Diagrama 3).
• Vuelva a comprobar que el soporte de pared y la unidad estén correctamente instalados.
DIAGRAMA 3
PARED
CORCHETE DE
PARED
E 060.
TORNILLO
Page 61

NFORMACIÓN ADICIONAL
Cuidar que ellos no se traguen pequeñas piezas del aparato y las baterías. Si esto ocurre es muy
peligroso para su salud y puede provocar asfixia. Preste mucha atención de mantener los pequeños
aparatos y baterías fuera del alcance de los niños.
II
mportante aviso respecto a la protección de sus oídos
Cuidado:
Cuide usted de su capacidad auditiva, como lo hacemos nosotros.
Por lo tanto, tenga precaución cuando use el aparato.
Nuestra recomendación: Evite el volumen alto.
En caso que el aparato sea usado por los niños, asegúrese que la aplicación no este en alto volumen.
Peligro!
El alto volumen puede causar irreparables danos a los oídos de los niños.
NUNCA permita que alguna persona o en especial niños pongan objetos dentro de los huecos,
ranuras u otras aberturas del aparato. Esto puede provocar peligro de muerte por un choque
eléctrico. El aparato solo debe ser abierto por un asistente calificado.
Solamente use el aparato para los propósitos que fue diseñado.
El aparato está concebido exclusivamente para ser usado en viviendas y áreas de negocio.
Le recomendamos que conserve las instrucciones de manejo para un eventual uso posterior.
INFORMACIÓN ADICIONAL
Indicaciones sobre el medio ambiente
No deseche este producto en la basura doméstica una vez que se haya cumplido su vida de
funcionamiento, deposítelo en un punto de recogida de aparatos eléctricos y electrónicos. El
símbolo que se encuentra en el producto, el manual de usuario o el embalaje, hacen referencia a
este punto.
El plástico es reutilizable según esté indicado. Con la reutilización de productos de plástico
reciclado u otra clase de reciclaje de aparatos viejos, está contribuyendo de forma importante a la
conservación del medio ambiente.
No impida la ventilación del aparato. Asegúrese, que cortinas, periódicos, coberturas o muebles no
estén bloqueando las ranuras de ventilación del aparato. La ventilación debe asegurarse todo el
tiempo! El sobrecalentamiento puede causar serios daños en el interior del aparato y reduce su
buen funcionamiento y su tiempo de vida.
Caliente y Caluroso
No exponga el aparato a la luz directa del sol. Asegúrese que el aparato no esta expuesto
directamente a fuerzas calientes semejantes a calefactores o fuego directo. Asegúrese que la
ventilación de las ranuras del aparato no esté cubierta.
Humedad y limpieza
Este aparato no es impermeable! No sumerja el aparato en el agua. No permite que el aparato entre
en contacto con el agua. La entrada de agua en el aparato causa serios problemas y daños. No use
agentes limpiadores que contengan alcohol, amoniacos, benzinas o abrasivos estos pueden dañar
al aparato. Para la limpieza use un suave y húmedo paño.
E 061.
Page 62

MODELO: 4556
RÁDIO RELÓGIO AM / FM COM ECRÃ DUPLO E CANCELAMENTO DE FIM DE
SEMANA
CUIDADO
PERIGO DE CHOQUE ELÉCTRICO
NÃO ABRA
CUIDADO: PARA REDUZIR O PERIGO DE
CHOQUE ELÉCTRICO NÃO RETIRE A TAMPA
O símbolo de luz com o símbolo
de ponta da flecha, dentro de um
triangulo equilateral, tem a função
de alertar o usuário de uma da
presença de uma voltagem
perigosa não insulada com o
cercado que pode ter uma
magnitude suficiente para
constituir um risco de choques
eléctricos para pessoas.
INSTRUÇÕES DE UTILIZAÇÃO
(OU A PARTE DETRÁS). NÃO HÁ PARTES
UTILIZÁVEIS PELO USUÁRIO NO INTERIOR.
PARA TODAS AS REPARAÇÕES, REFIRA-SE A
EMPREGADOS QUALIFICADOS.
9
10
17
6
O ponto de exclamação com um
triangulo equilateral tem a função de
alertar o usuário da presença de
operações e instruções de
manutenção importantes nas
explicações acompanhando o
aparelho.
12
16
4
14
13
1
3
7
19
5
15
11
2
8
1. ECRÃ DE LCD 11. ESCALA E PONTEIRO
2. INTERRUPTOR DE BANDA (FM/AM) 12. BOTÃO DE AJUSTE DE HORA
3. CONTROLE DE AUMENTAR O VOLUME 13. BOTÃO DE SELECÇÃO DO ALARME 1 / ALARME 2
4. CONTROLE DE DIMINUIR O VOLUME 14. BOTÃO DE LIGA/DESLIGA PARA O ALARME
5. CABO AC 15. ENTRADA DE ÁUDIO
6. COMPARTIMENTO DE BATERIA 16. BOTÃO SONECA / DORMIR
7. ANTENA FM 17. BOTÃO RESET
8. CONTROLE DE SINTONIA 18. GRADE DO APARELHO
9. BOTÃO DE AJUSTE DE VOLUME 2 19. ETIQUETAS DE SEGURANÇA (NA PARTE DE TRÁS
10. BOTÃO DE AJUSTE DE VOLUME 1 DO APARELHO)
/ ALARME 1+2
18
P 062.
Page 63

CONEXÃO DA ENERGIA
Conecte o cabo de alimentação à uma tomada adequada de sua residência.
Então pressione o botão RESET (17) com uma caneta esferográfica.
O aparelho está equipado com um sistema de segurança com bateria, e requer uma bateria de 3V Plana
de Lítio.
Insira a bateria no compartimento para baterias.
Assegure-se de que as polaridades positivas e negativas (+ e -) nos terminais da bateria estejam
conectados correctamente no compartimento da bateria.
AVISO:
Se ocorrer falta de energia pela tomada, o relógio automaticamente será ligado à energia fornecida pela
bateria, mantendo a memória do relógio.
Quando voltar a energia pela tomada, o relógio voltará a ser utilizado pela mesma.
AÇÕES ESD
OBSERV
Em caso de mal funcionamento por descargas electrostáticas, reinicie o aparelho para voltar ao
funcionamento normal.
AVISO
Desconecte a ficha eléctrica da tomada quando não estiver sendo utilizado.
Para evitar riscos de choques eléctricos, não remova a tampa do aparelho.
Não há partes úteis ao usuário no interior.
Para evitar riscos incêndio ou choques não exponha o aparelho à chuva ou humidade.
A ficha eléctrica é utilizada para desconectar o aparelho, o aparelho desconectado deverá estar pronto
para a utilização.
Der Netzstecker stellt eine Trenneinheit dar. Die Trenneinheit sollte immer betriebsbereit sein.
ALARME 1,2 SINAL DE
CAMPAINHA
ALARME 1,2 SINAL
DE RÁDIO
ALARME 1,2 SINAL DE
CAMPAINHA
MODO DE HORA DIGITAL
MODO DE HORA ANALÓGICA
MODO DE HORA DIGITAL
NOTA:
AJUSTE DE HORA, AJUSTE DE
ALARME/AJUSTE DE DORMIR APENAS NO
MODO DE HORA DIGITAL.
DIA
DORMIR LIGADO
DORMIR LIGADO
ALARME 1,2 SINAL DE
RÁDIO
P 063.
Page 64

PARA AJUSTAR OU APAGAR A HORA ACTUAL
MODO DE AJUSTE DO
RELÓGIO
1. Pressione e segure o botão de ajuste de hora (12) (na posição 1) por 2 segundos, os dias irão piscar.
2. Pressione o controle de aumento de volume (3) e o controle para diminuir volume (4) (posição
2) para ajustar os dias.
3. Pressione o botão de ajuste de hora (12) (posição 1), 24 horas / 12 horas irão piscar.
4. Pressione o controle para aumentar o volume (3) (posição 3) e o controle de diminuir volume
(4) (posição 2), a hora irá piscar.
5. Pressione o botão de ajuste de hora (12) (posição 1), a hora irá piscar.
6. Pressione o botão de controle de aumento de volume (3) (posição 3) e o botão de controle de
diminuir volume (4) (posição 2) para ajustar a hora.
7. Pressione o botão de ajuste de hora (12) (posição 1), os minutos irão piscar.
8. Pressione o botão de controle de aumentar volume (3) (posição 3) e o botão de controle de diminuir
o volume (4) (posição 2) para ajustar os minutos.
P 064
Page 65

AJUSTE DO ALARME 1
MODO DE AJUSTE DO
ALARME 1
1. Pressione o botão de ajuste do alarme 1 (10) (posição 1) para entrar nas configurações do alarme 1.
2. Pressione e segure o botão de ajuste do alarme 1 (10) (posição 1) 2 segundos, dias irão piscar (Diagrama
1)
3. Pressione o controle de aumentar volume (3) (posição 3) e o controle de diminuir volume (4)
(posição 2) para ajustar os dias.
4. Pressione o botão de ajuste do alarme 1 (10) (posição 1) as horas irão piscar.
Pressione o controle de aumentar volume (3) (posição 3) e o controle de diminuir volume (4)
(posição 2) para ajustar a hora.
5. Pressione o botão de ajuste do alarme 1 (10) (posição 1) os minutos irão piscar.
Pressione o controle de aumentar volume (3) (posição 3) e o controle de diminuir volume (4)
(posição 2) para ajustar os minutos.
6. Pressione o botão de ajuste do alarme 1 (10) (posição 1) alarme 1 campainha irá piscar.
Pressione o controle de aumentar volume (3) (posição 3) e o controle de diminuir volume (4)
(posição 2) para seleccionar o alarme 1 campainha e rádio relógio.
P 065
Page 66

DIAGRAMA 1
MODO DE AJUSTE ALARME
FIM DE SEMANA 1 (SEGUNDA À
DOMINGO)
AJUSTE DE ALARME 2
1. Pressione o botão de ajuste de alarme 2 (9) (posição 1) para entrar no modo de ajuste do alarme 2.
2. Pressione e segure o botão de ajuste do alarme 2 (9) 2 segundos, os dias irão piscar (diagrama 2)
3. Pressione o botão de controle de aumentar volume (3) (posição 3) e o controle de volume de
diminuir para ajustar os dias.
4. Pressione o botão de ajuste de alarme 2 (9) (posição 1) a hora irá piscar. Pressione o botão de controle
de aumentar volume (3) (posição 3) e o controle de volume de diminuir (4) (posição 2)
para ajustar a hora.
5. Pressione o botão de ajuste de alarme 2 (9) (posição 1) os minutos irão piscar. Pressione o botão de
controle de aumentar volume (3) (posição 3) e o controle de volume de diminuir para ajustar os
minutos.
6. Pressione o botão de ajuste de alarme 2 (9) (posição 1) o alarme 2 da campainha irá piscar. Pressione
o botão de controle de aumentar volume (3) (posição 3) e o controle de volume de diminuir (4)
(posição 2) para ajustar o alarme 2 campainha e rádio relógio.
MODO DE AJUSTE ALARME
FIM DE SEMANA 1 (SEGUNDA À
SEXTA)
MODO DE AJUSTE DO
ALARME 2
MODO DE AJUSTE ALARME
FIM DE SEMANA 1 (SÁBADO À
DOMINGO)
P 066.
Page 67

DIAGRAMA 2
MODO DE AJUSTE DO ALARME
DE FIM DE SEMANA 2
(SEGUNDA À DOMINGO)
DIAGRAMA 3
Ajuste da saída do alarme e liga/desliga do alarme
Pressione o botão de selecção alarme 1 / alarme 2 / alarme 1+2 (13) para seleccionar o alarme de
despertar por campainha ou rádio. (Diagrama 3)
DURAÇÃO DO ALARME
O alarme por campainha ou rádio irá durar por uma hora até que qualquer botão seja pressionado. O alarme
irá parar automaticamente e iniciará na mesma hora no dia seguinte.
PARANDO O ALARME
Pressione o botão de liga/desliga (14) para parar o alarme actual e cancelar a função de soneca.
MODO DE AJUSTE DO ALARME
DE FIM DE SEMANA 2
(SEGUNDA Á SEXTA)
ALARME 1, SINAL DE CAMPAINHA
ALARME 1, SINAL DE RÁDIO
MODO DE AJUSTE DO ALARME
DE FIM DE SEMANA 2 (SÁBADO
À DOMINGO)
P 067.
Page 68

DIAGRAMA 4
AJUSTE DO MODO DE DORMIR
Para activar a função de dormir
Quando o rádio estiver ligado, pressione o botão soneca/dormir (16), dormir irá exibir “90” no ecrã por 2
segundos e diminuirá o tempo de dormir em 90 minutos, pressione o botão soneca/dormir (16) cada vez.
(diagrama 4)
AVISO: pressione o botão liga/desliga (14) para desligar a função de dormir.
Função de soneca:
1. Pressione o botão soneca/dormir (16) para activar a função de soneca
2. A soneca terá intervalos de 9 minutos.
UTILIZANDO FONTES DE ÁUDIO
1. Utilize um cabo de conexão para ligar a fonte de áudio e o aparelho principal.
2. Ajuste o volume da fonte de áudio para ter melhor efeito de amplificação.
OBSERVAÇÕES: NÃO ajuste o volume da fonte de áudio muito alto para evitar sobrecargas.
A saída de som do aparelho irá ser eliminada e reposta assim que a entrada “ÁUDIO IN” (15) tiver uma fonte
de áudio conectada.
O som voltará ao normal assim que o cabo de conexão for removido da entrada.
Se a função “áudio in” estiver em utilização e reproduzindo música, o alarme sonoro será inserido na música
durante a hora pré-ajustada.
Para parar o som, simplesmente pressione o botão de liga/desliga do alarme (14).
UTILIZAÇÃO DO RÁDIO
- Pressione o botão de liga/desliga (14) para ligar o rádio.
- Seleccione a banda AM ou FM utilizando o interr uptor de banda (2).
- Seleccione a estação utilizando o controle de sintonia (8).
- Pressione o botão de controle de volume (3)/(4) para ajustar o volume requerido.
- Pressione o botão liga/desliga (14) para desligar o rádio.
Aviso:
- A banda AM utiliza uma antena interna embutida, gire o rádio para obter melhor recepção.
- Assegure-se de que a antena FM (7) esteja completamente estendida para melhor recepção.
P 068.
Page 69

REINICIANDO
- O botão para reiniciar (17) está localizado na parte de baixo do aparelho.
- Utilize uma caneta esferográfica para pressiona-lo quando trocar as baterias, ou quando o aparelho não
estiver operando adequadamente.
- Este botão irá reiniciar as configurações padrões, e você perderá todos os dados armazenados
(configurações de alarme e hora).
CUIDADO
- Nenhuma fonte de chama aberta, tais como velas, deverão ser posicionada próximas ao aparelho.
- Não posicione o aparelho em prateleiras ou grades sem ventilação apropriada.
- Para prevenir riscos de incêndios ou choques, não exponha o aparelho a chuva ou outros tipos de
humidades.
- O aparelho não deverá ser exposto directamente à luz do sol, altas ou baixas temperaturas, humidade,
vibrações ou locais muito empoeirados.
- Não utilize materiais abrasivos, benzina, solventes ou outros diluentes para limpar a superfície do
aparelho. Para limpar utilize um pano limpo e suave com um pouco de detergente não abrasivo.
- Nunca tente inserir cabos, pinos, ou outros objectos nas aberturas de ventilação do aparelho
ESPECIFICAÇÕES
Alcance de frequência: AM 525 – 1615 kHz
Potência de saída: 280 mW
Impedância do alto-falante: 8 ohm
Bateria de reserva: 1 x CR2032, 3V Plana de lítio (não inclusa)
Fonte de alimentação: AC 230V ~50 Hz, 5 Watt
ATENÇÃO: PARA UTILIZAÇÃO SEGURA
Por favor, seleccione a tensão correcta antes de inserir a ficha eléctrica à tomada. Caso contrário, poderá
causar danos ao aparelho.
Aviso de gotejamento:
Este produto não deverá ser exposto à gotejamentos ou espirros de água, e que não haja outros objectos
preenchidos com líquidos, tais como vasos, sobre este produto.
Aviso de ventilação:
A ventilação normal deste produto não deverá ser impedida do seu uso.
FM 87,5 – 108 MHz
P 069.
Page 70

DIAGRAMA 1 DIAGRAMA 2
FLECHA NA PARTE DE CIMA
PARAFUSOS E PINOS
• Escolha a posição desejada na parede para pendurar o rádio relógio.
• Pendure a grade de montagem com 4 parafusos e aperte firme (Diagrama 2).
• Posicione o aparelho na grade e assegure-se de que o cabo de alimentação AC e a Antena FM estejam
separados para fora da grade.
• Aperte o parafuso da grade na parte de baixo do aparelho (Diagrama 3).
• Verifique novamente se a grade da parede e o aparelho estão firmemente fixados na parede.
DIAGRAMA 3
GRADE DE
MONTAGEM
PARAFUSO
PARAFUSO
PAREDE
PARAFUSO
PARAFUSO
P 070.
Page 71

MAIS INFORM-ÕES
Acautelar-se dos pequenos pedaços e pilhas, não engolir estes pedaços ou pilhas. Estes objectos
podem ser perigosos para a sua saúde e provocar o sufocamento. Prestar atenção e manter
pequenos dispositivos e pilhas fora de alcance das crianças.
Importantes avisos para a protecção dos ouvidos
Cuidado:
A sua audição é tão preciosa para si como para nós.
Portanto, por favor tenha cuidado com este equipamento.
Recomendamos: Evite volumes de som elevados.
Se o equipamento for utilizado por crianças, certifique-se que o volume do aparelho não está demasiado
elevado.
Atenção! Volumes demasiado elevados podem provocar danos irreparáveis à audição das crianças.
Nunca deixe a pessoa especialmente as crianças colocar os objectos dentro de buracos, ranhuras
ou outras aberturas. Estes procedimentos podem causar a morte através de choque eléctrico. O
dispositivo deve ser aberto somente e na presença do pessoal qualificado.
Por favor utilize o equipamento apenas de acordo com o regulamento descrito acima.
O aparelho foi concebido exclusivamente para ser utilizado no sector das actividades e habitação.
Por favor, guarde cuidadosamente as instruções de utilização para uma futura utilização.
MAIS INFORM-ÕES
Conselhos para protecção do ambiente
Este produto, no fim do seu período de vida útil, não deve ser depositado no lixo doméstico normal.
Deverá ser, pelo contrário, depositado num ponto de recolha para reciclagem de aparelhos
eléctricos e electrónicos. O símbolo no produto, as instruções de utilização e a embalagem
chamam a atenção para esse facto.
As matérias-primas são reutilizáveis de acordo com as suas características. Com a reutilização, a
utilização material ou outras formas de utilização de aparelhos velhos fazem com que dê um
contributo valioso para a protecção do nosso ambiente.
Por favor, informe-se junto das autoridades locais sobre os centros de recolha competentes.
Não impedir a ventilação dos dispositivos. Tenha a certeza que as curtinhas, os jornais, panos de
cobrir os mobiliários não impedir a ventilação das aberturas de aparelhos. A ventilação deve manterse a qualquer momento. Aquecer-se demais pode provocar sério dano no dispositivo e reduzir o seu
desempenho por toda a vida.
Calor
Não expor o aparelho directamente à luz solar. Tenha atenção para não expor o aparelho a fontes
de calor como aquecedores ou fontes de chama descoberta. Tenha atenção para que as fendas de
arejamento do aparelho não estejam cobertas.
Humidade e Limpeza
Este produto não é resistente à água. Não submergir o aparelho em água nem deixar que este entre
em contacto com água. Se penetrar água no aparelho pode provocar sérios danos. Não utilizar
agentes de limpeza que contenham álcool, amoníaco, benzol ou abrasivos, pois estes podem
danificar o aparelho. Utilize um pano macio e húmido para a limpeza..
P 071.
Page 72

MODEL : 4556
RADIO Z BUDZIKIEM W TRYBIE AM/ FM Z WYŚWIETLACZEM I OPCJĄ
WEEKENDOWEGO ANULOWANIA
UWAGA
RYZYKO PORAŻENIA PRĄDEM
NIE OTWIERAĆ
UWAGA: ABY UNIKNĄĆ PORAŻENIA PRĄDEM
NIE NALEŻY OTWIERAĆ OBUDOWY
SYMBOL zakończonej grotem
błyskawicy w trójkącie
równobocznym ma za zadanie
ostrzegać użytkownika o
obecności nie izolowanego,
niebezpiecznego napięcia o
wystarczającej wielkości, by móc
stanowić ryzyko porażenia prądem.
INSTRUKCJA OBSŁUGI
URZĄDZENIA. URZĄDZENIE NIE POSIADA
CZĘŚCI, KTÓRE MOGĄ BYĆ SERWISOWANE
PRZEZ UŻYTKOWNIKA
W SPRAWIE SERWISU NALEŻY. ZWRÓCIĆ SIĘ
DO WYKWALIFIKOWANEGO PERSONELU
SERWISOWEGO.
9
10
17
Wykrzyknik w środku trójkąta
równobocznego ma za zadanie
ostrzegać użytkownika o obecności
ważnych informacji dotyczących
obsługi i konserwacji urządzenia
znajdujących się w dołączonej
6
dokumentacji.
12
16
4
14
13
1
3
7
19
5
15
11
2
8
1. WYŚWIETLACZ LCD 11 PODZIAŁKA I WSKAŹNIK
2. PRZEŁĄCZNIK TRYBÓW FM/AM 12. PRZYCISK TIME SET (USTAWIENIE
3. ZWIĘKSZANIE NATĘŻENIA DŹWIĘKU 13. PRZYCISK WYBORU ALARM 1
(VOLUME UP) ALARM 2 / ALARM 1+2
4. ZMNIEJSZANIE NATĘŻENIA DŹWIĘKU 14. PRZYCISK ON/OFF (WŁ./ WYŁ.)
5. PRZEWÓD PRADU ZMIENNEGO (AC) 15. GNIAZDKO AUDIO IN
6. PRZEGRÓDKA NA BATERIE 16. PRZYCISK SNOOZE / SLEEP (DRZEMKA/
SEN)
7. ANTENA TRYBU FM 17. PRZYCISK RESET (PONOWNYCH
USTAWIEŃ)
8. POTENCJOMETR STROJENIA 18. WIESZAK URZĄDZENIA
9. PRZYCISK PROGRAMUJACY ALARM 2 19. NALEPKA ZE WSKAŹNIKAMI
10. PRZYCISK PROGRAMUJACY ALARM 1 (PRZYLEPIONA Z TYŁU URZĄDZENIA)
18
CZASU)
(VOLUME DOWN)ALARM OFF (ALARM
WYŁĄCZONY)
072.
Page 73

PODŁĄCZANIE DO ŹRÓDŁA PRĄDU
Umieść wtyczkę przewodu zasilającego AC do gniazdka prądu zmiennego (AC). Następnie wciśnij przycisk
RESET (17) za pomocą końcówki długopisu. To urządzenie jest wyposażone w system wspomagania
bateriami, wymaga baterii litowych 3V. Umieść baterie w przegródce na baterie, upewniając się, ze
dodatnie i ujemne zaciski baterii (+ i -) są połączone z odpowiednimi płytkami w przegródce na baterie.
UWAGA
Jeśli nastąpi awaria źródła prądu zmiennego, zegar automatycznie przełączy się na zasilanie bateriami,
zegar i pamięć nadal będą działać. Kiedy źródło prądu AC wznowi działanie, zegar przestawi się na
zasilanie prądem AC.
Uwaga ESD
W przypadku awarii z powodu wyładowań elektrostatycznych, zresetuj urządzenie
( może być konieczne odłączenie od źródła prądu) by przywrócić poprawne działanie
OSTRZEŻENIE
Odłącz wtyczkę sieciową od gniazdka jeśli nie jest w użyciu. By uniknąć ryzyka porażenia prądem, nie
zdejmuj obudowy urządzenia. Wewnątrz nie ma części nadających się do samodzielnej naprawy. By
zapobiec poparzeniu nie wystawiaj urządzenia na deszcz lub wilgoć. Wtyczka sieciowa jest używana jako
urządzenie rozłączające, urządzenie rozłączające powinno pozostawać gotowe do działania.
ALARM 1.2 BUDZENIE
PRZEZ DZWONEK (bell)
ALARM 1.2 BUDZENIE
PRZEZ RADIO
ALARM 1.2 BUDZENIE
PRZEZ RADIO
TRYB ZEGARA CYFROWEGO
TRYB ZEGARA ANALOGOWEGO
TRYB ZEGARA CYFROWEGO
UWAGA:
USTAWIENA CZASU (TIME SET), USTAWIENIA
ALARMU/ SNU (ALARM/ SLEEP) TYLKO W
TRYBIE CYFROWYM
DZIEŃ (day)
SPANIE (sleep on)
SPANIE (sleep on)
ALARM 1.2 BUDZENIE
PRZEZ DZWONEK (bell)
073
Page 74

BY USTAWIĆ LUB PRZESTAWIĆ AKTUALNY CZAS
TRYB USTAWIEŃ ZEGARA
1. Naciśnij przycisk ustawień czasu (12) (pozycja 1) i przytrzymaj 2 sekundy, dzień (day) mruga.
2. Naciśnij przycisk volume up (3) (pozycja 3) i przycisk volume down (4) (pozycja 2) by ustawić
dzień.
3. Naciśnij przycisk ustawień czasu (12) (pozycja 1), 24 hour / 12 hour mruga.
4. Naciśnij przycisk volume up (3) (pozycja 3) i przycisk volume down (4) (pozycja 2) by ustawić
24 hour / 12 hour.
5. Naciśnij przycisk ustawień czasu (12) (pozycja 1), hour (godzina) mruga.
6. Naciśnij przycisk volume up (3) (pozycja 3) i przycisk volume down (4) (pozycja 2) by ustawić
godzinę (hour) .
7. Naciśnij przycisk ustawień czasu (12) (pozycja 1), minute (minuta) mruga.
8. Naciśnij przycisk volume up (3) (pozycja 3) i przycisk volume down (4) (pozycja 2) by ustawić
minuty.
074
Page 75

USTAWIANIE ALARM 1 (BUDZIKA 1)
TRYB USTAWIEŃ ALARM 1
1. Naciśnij przycisk alarm 1 (10) (pozycja 1) by wejść do trybu ustawiń alar m 1.
2. Naciśnij przycisk alarm 1 (10) (pozycja 1) i przytr zymaj 2 sekundy, day (dzień) mruga. (Diagram 1)
3. Naciśnij przycisk volume up (3) (pozycja 3) i przycisk volume down (4) (pozycja 2) by ustawić
dzień.
4. Naciśnij przycisk alarm 1 (10) (pozycja 1) hour (godzina) mruga. Naciśnij przycisk volume up (3)
(pozycja 3) i przycisk volume down (4) (pozycja 2) by ustawić godzinę.
5. Naciśnij przycisk alarm 1 (10) (pozycja 1) minute (minuta) mruga. Naciśnij przycisk volume up (3)
(pozycja 3) i przycisk volume down (4) (pozycja 2)by ustawić minuty.
6. Naciśnij przycisk alarm 1 (10) (pozycja 1) alarm 1 bell (dzwonek) mruga. Naciśnij volume up (3)
(pozycja 3) i volume down (4) (pozycja 2) by wybrać alarm 1 bell (dzwonek) i radio alarm.
075
Page 76

DIAGRAM 1
WEEKENDOWY TRYB USTAWIEŃ
ALARM 1 (MON TO SUN –
PONIEDZIAŁEK DO NIEDZIELI)
USTAWIANIE ALARM 2
1. Naciśnij przycisk alarm 2 (9) (pozycja 1) by wejść w tryb ustawień alarm 2.
2. Naciśnij przycisk alarm 2 (9) i przytrzymaj 2 sekundy, day (dzień) mruga. (Diagram 2)
3. Naciśnij przycisk volume up (3) (pozycja 3) i przycisk volume down (4) (pozycja 2) by ustawić
day (dzień).
4. Naciśnij przycisk alarm 2 (9) (pozycja 1) hour (godzina) mruga. Naciśnij przycisk volume up (3)
(pozycja 3)i przycisk volume down (4) (pozycja 2) by ustawić godzinę.
5. Naciśnij przycisk alarm 2 (9) (pozycja 1) minute (minuta) mruga. Naciśnij przycisk volume up (3)
(pozycja 3) i przycisk volume down (4) (pozycja 2) by ustawić minuty.
6. Naciśnij przycisk alarm 2 (9) (pozycja 1) alarm 2 bell (dzwonek) mruga. Naciśnij przycisk volume up
(3) (pozycja 3) i przycisk volume down (4) (pozycja 2) by wybrać alarm 2 dzwonek i radio
alarm.
WEEKENDOWY TRYB USTAWIEŃ
ALARM 1 (MON TO FRI –
PONIEDZIAŁEK DO PIĄTKU))
TRYB USTAWIEŃ ALARM 2
WEEKENDOWY TRYB
USTAWIEŃ ALARM 1 (SAT TO
SUN – SOBOTA DO NIEDZIELI)
076
Page 77

DIAGRAM 2
WEEKENDOWY TRYB
USTAWIEŃ ALARM 2 (MON TO
SUN – PONIEDZIAŁEK DO
DIAGRAM 3
Ustawienie sygnału alarmu i on/ off (wł./ wył.) alarmu
Naciśnij przycisk wyboru dla alarm 1 / alarm 2 / alarm 1+2 (13), by wybrać budzenie przez dzwonek i radio.
(Diagram 3)
CZAS TRWANIA ALARMU
Sygnał dzwonka lub radio alarm będą działać przez 1 godzinę jeśli nie zostanie wciśnięty żaden przycisk.
Alarm wyłączy się automatycznie i zacznie działać ponownie następnego dnia, według ustawień.
WYŁĄCZENIE ALARMU
Naciśnij przycisk zasilania (14), by zatrzymać bieżący alarm a zarazem wyłączyć funkcję drzemki.
WEEKENDOWY TRYB
USTAWIEŃ ALARM 2 (MON TO
FRI – PONIEDZIAŁEK DO
PIĄTKU)
ALARM 1 – BUDZENIE PRZEZ DZWONEK
ALARM 2 – BUDZENIE PRZEZ RADIO
WEEKENDOWY TRYB
USTAWIEŃ ALARM 2 (SAT TO
SUN – SOBOTA DO NIEDZIELI)
077
Page 78

DIAGRAM 4
FUNKCJA SLEEP (SPANIE)
Aby włączyć funkcję sleep (spanie)
Gdy radio jest włączone, wciśnij przycisk snooze/sleep (16), na wyświetlaczu pokaże się ‘90’. Każde
wciśnięcie przycisku snooze/sleep (16) powoduje zmniejszenie 90-minutowego czasu spania o 2 sekundy.
WAŻNE: Wciśnij przycisk power on/off (zasilanie) (14), żeby wyłączyć funkcję spania.
Funkcja drzemki
1. Wciśnij przycisk snooze/sleep (16), żeby włączyć funkcję drzemki (dzwonek lub radio się zatrzyma), gdy
dzwoni budzik.
2. Drzemka przer ywa alarm na 9 minut.
PRACA ZE ŹRÓDŁEM AUDIO
1. Użyj kabla łączącego, w celu połączenia źródła audio do głównej jednostki.
2. Dostosuj dźwięk źródła audio, w celu uzyskania lepszego wzmocnienia.
UWAGA: NIE USTAWIAJ źródła audio na zbyt dużą głośność, żeby uniknąć przeładowania. Wyjście dźwięku
jednostki głównej zostanie zastąpione, gdy tylko GNIAZDKO ‘AUDIO IN’ (15) połączy się z innym źródłem
audio.
Jeśli funkcja ‘audio in’ jest używana i muzyka jest nadawana, dźwięk alarmu przerwie muzykę o ustalonym
czasie budzenia. Aby zatrzymać dźwięk, wystarczy wcisnąć przycisk power on/off (zasilanie) (14).
OBSŁUGA RADIA
- Wciśnij przycisk power on/off (zasilanie) (14), żeby włączyć radio.
- - W ybierz pasmo AM lub FM przy pomocy przełącznika pasma częstotliwości (2).
- Wybierz stację przy pomocy kontroli tuningu (8).
- Wciśnij przycisk kontroli głośności (3)/(4), żeby dostosować głośność.
- Przyciśnij przycisk power on/off (zasilanie) (14), żeby wyłączyć radio.
Ważne:
- Pasmo AM korzysta z wewnętrznej kierunkowej anteny. Obracaj radiem w celu uzyskania lepszego
odbioru.
- Upewnij się, że antena w kablu (7) jest całkowicie rozwinięta i rozciągnięta, w celu uzyskania lepszego
odbioru pasma FM
078
Page 79

RESET
- Przycisk reset (ponownych ustawień) (17) znajduje się na spodzie jednostki. Wciskaj go przy użyciu
długopisu za każdym razem, gdy zmieniasz baterie, albo urządzenie nie działa jak należy. Ustawienia
fabryczne zostaną przywrócone, a wszystkie zapisane informacje (ustawienia alarmu i zegara) zostaną
utracone.
OSTROŻNIE
- Na urządzeniu nie należy ustawiać otwartych źródeł ognia, jak np. świeczki.
- Nie ustawiaj jednostki w zamkniętych półkach lub regałach, gdzie nie ma prawidłowego przepływu
powietrza.
- W celu uniknięcia ryzyka pożaru lub porażenia prądem, nie wystawiaj jednostki na działanie deszczu lub
żadnego rodzaju wilgoci.
- Jednostka nie powinna być wystawiana na bezpośrednie działanie światła słonecznego, skrajnych
temperatur, wilgoci, wstrząsów, lub kurzu.
- Nie używaj środków żrących, benzyny, ani rozpuszczalników do czyszczenia powierzchni jednostki. W
celu umycia urządzenia, zwilż łagodnym detergentem i wyczyść miękką tkaniną.
- Nigdy nie próbuj umieszczać kabli, szpilek lub innych tego typu obiektów w otworach jednostki.
SPECYFIKACJA
Zakres fal: AM 525 - 1615 kHz
Moc wyjściowa: 280 mW
Impedancja głośnika: 8 ohm
Baterie: 1 x CR2032, 3V Litowe Ładowalne (NIEDOŁĄCZONE)
Źródło prądu: AC 230V ~50 Hz, 5 W
UWAGI DOTYCZĄCE BEZPIECZNEGO UŻYTKOWANIA
Wybierz odpowiednie napięcie, zanim podłączysz przewód elektryczny do gniazdka. W pr zeciwnym wypadku
może to spowodować uszkodzenie jednostki.
Ostrzeżenie dotyczące kapania:
Produkt nie powinien być wystawiany na kapanie ani rozlanie; żadne obiekty wypełnione płynem, takie jak
wazony, nie powinny być na nim ustawiane.
Ostrzeżenie dotyczące wentylacji:
Normalny przepływ powietrza produktu nie powinien być utrudniany przez celowe zatykanie otworów.
FM 87,5 - 108 MHz
079
Page 80

DIAGRAM 1 DIAGRAM 2
STRZAŁKA NA GÓRZE
ŚRUBKA ŚCIENNA Z
KOŁKAMI
• Wybier z miejsce na ścianie, gdzie chcesz powiesić zegar.
• Zawieś wieszak urządzenia przykręcając 4 śrubki i kołki mocno do ściany (Diagram 2)
• Zawieś jednostkę na wieszaku i upewnij się, że przewód elektryczny AC i antena FM wystają oddzielnie
poza wieszak.
• Przytwierdź śrubkę wieszaka do spodu jednostki (Diagram 3).
• Upewnij się, że zarówno wieszak, jak i jednostka, są mocno pr zytwierdzone do ściany.
DIAGRAM 3
WIESZAK URZĄDZENIA
ŚRUBKA
ŚRUBKA
ŚCIANA
ŚRUBKA
ŚRUBKA
080
Page 81

KIEGÉSZÍTŐ INFORMÁCIÓK
Óvatosan bánjon az apró alkatrészekkel és elemekkel, és azokat ne nyelje le, mert ez komoly sérüléseket okozhat!
Gondoskodjon arról, hogy az apró alkatrészek és elemek ne kerüljenek gyermekek kezébe!
Fontos tanácsok a halláskárosodás elkerülésére
Figyelmeztetés:
Az Ön hallásáért nemcsak Ön, de mi is aggódunk.
Éppen ezért kérjük, legyen óvatos a készülék használatánál.
Azt ajánljuk, hogy: kerülje a nagy hangerővel való hallgatást.
Ha a készüléket gyermekek használják, ügyeljünk arra, hogy ne állítsák a készüléket túl hangosra.
Vigyázat!
A túl nagy hangerő a gyermekeknél gyógyíthatatlan károsodást okozhat.
Kérjük gondoskodjon róla, hogy a készülék burkolatának nyílásaiba SOHA senki, főképpen pedig gyermekek, ne
dughassanak bele semmit, ez ugyanis életveszélyes áramütéshez vezethet. A készülék burkolatát csak erre
megfelelően képzett szakember nyithatja fel.
A készüléket kizárólag a rendeltetésének megfelelően használjuk.
A készülék kizárólag lakásokban és üzletekben történő felhasználásra alkalmas.
Kérjük, őrizze meg a használati útmutatót, hogy az később is rendelkezésére álljon.
KIEGÉSZÍTŐ INFORMÁCIÓK
Környezetvédelmi tanácsok
Ezt a terméket az élettartama végén ne dobjuk a normál háztartási szemétbe, hanem adjuk le a villamos és
elektronikai hulladékok átvevőhelyén. A terméken található szimbólum, a használati útmutató vagy a csomagolás
felirata erre hívja fel a figyelmet.
A készülék anyagai a jelölésüknek megfelelően újrahasznosíthatóak. Az újrahasznosítással, az anyagok ismételt
felhasználásával, illetve a használt készülékek egyéb felhasználásával sokat tehetünk környezetünk megóvásáért.
A megfelelő hulladék-átvevőhelyről a helyi önkormányzatnál érdeklődhetünk.
Ne akadályozza a készülék szellőzését, például függönnyel, újsággal, takaróval vagy bútorral. A
szellőzőnyílásoknak mindig szabadon kell maradnia. A túlmelegedés kárt tehet a készülékben, és emiatt annak
élettartama lerövidülhet.
Meleg és forróság
Ne tegyük ki a készüléket a közvetlen napsütés hatásának. Ügyeljünk arra, hogy a készülék ne legyen
fűtőberendezés, nyílt láng vagy egyéb hőforrás közelében. A készülék szellőzőnyílásait mindig hagyjuk szabadon.
Nedvesség és tisztítás
Ez a készülék nem vízálló! Ne tegyük vízbe a lejátszót, és ügyeljünk arra, hogy ne is kerüljön vízzel érintkezésbe.
A lejátszóba bejutó víz súlyos károkat okozhat. A készülék megtisztítására ne használjunk alkoholt, ammóniát,
benzint, vagy súrolószert tartalmazó tisztítóanyagot, mivel ezek károsíthatják a lejátszót. A készülék megtisztítására
enyhén megnedvesített puha törlőruhát használjunk.
081
Page 82

MODEL: 4556
AM / FM WEKKERRADIO MET DUBBEL SCHERM, MET WEEKENDSTOP
OPGELET
RISICO OP EEN GEVAARLIJKE SCHOK
NIET OPENEN
OPGELET: OM HET RISICO OP EEN
ELEKTRISCHE SCHOK TE VERMIJDEN, DE
Het driehoekige symbool met
bliksemschicht wijst de gebruiker
erop dat binnenin deze eenheid
een gevaarlijke niet geïsoleerde
spanning aanwezig is die tot een
elektrische schok kan leiden.
GEBRUIKSAANWIJZING
VOOR- OF ACHTERKANT NIET VERWIJDEREN.
BINNENIN BEVINDEN ZICH GEEN DELEN DIE
DOOR DE GEBRUIKER ONDERHOUDEN
KUNNEN WORDEN. DOE EEN BEROEP OP
EEN ERKENDE EN BEVOEGDE TECHNISCHE
DIENST
9
10
17
6
Het driehoekige symbool met
uitroepteken wijst de gebruiker erop
dat er belangrijke instructies
betreffende het gebruik en het
onderhoud opgenomen zijn in de
handleiding bij deze eenheid.
12
16
4
14
13
1
3
7
19
5
15
11
2
8
1. LCD SCHERM 11. FREQUENTIESCHAAL EN –WIJZER
2. FREQUENTIESCHAKELAAR (FM/AM) 12. TIJDSINSTELLINGSKNOP
3. VOLUMEVERHOGINGSKNOP 13. WEKKER 1 / WEKKER 2 / WEKKER 1+2
4. VOLUMEVERLAGINGSKNOP 14. AAN/UIT KNOP, WEKKER UIT KNOP
5. AC DRAAD 15. INGANG EXTERNE GELUIDSBRON
6. BATTERIJENCOMPARTIMENT 16. SNOOZE / SLAAP KNOP
7. FM ANTENNEDRAAD 17. RESETKNOP
8. FREQUENTIEZOEKKNOP 18. APPARAATCONSOLE
9. WEKKER 2 INSTELLINGSKNOP 19. TYPEL ABEL (VASTGEMAAK T AAN DE ACHTERKANT
10. WEKKER 1 INSTELLINGSKNOP VAN HET APPARAAT)
INSTELLINGSKNOP
18
082.
Page 83

STROOMVOORZIENING
Doe de stekker in een normaal stopcontact.
Druk de reset knop (17) in met een balpen.
Dit apparaat is voorzien van batterijbijstand, dit heeft een 3V Flat Lithium batterij nodig.
Doe de batterij in het batterijencompartiment
Zorg ervoor dat de positieve en negatieve (+ en -) uiteinden van de batterijen overeenkomen met de zelfde
uiteinden die zijn aangegeven op de plaat van het batterijencompartiment.
ONTHOUD:
Wenn ein Fehler beim Netzstrom auftritt, schaltet die Uhr automatisch auf Batteriebetrieb um und die
Uhrzeit läuft weiter.
Wenn der Netzstrom wieder verfügbar ist, schaltet die Uhr auf Netzstrombetrieb um.
ESO
In geval van disfunctioneren vanwege elektrostatische ontlading hoeft u slechts het product te resetten om
normaal gebruik te hervatten (opnieuw aansluiten kan vereist zijn).
WAARSCHUWING
Haal de stekker uit het stopcontact wanneer niet in gebruik.
Om het risico van elektrische schokken te voorkomen, niet de kap van het apparaat verwijderen.
Er zijn geen bruikbare voorwerpen binnenin.
Om brand- of schokgevaar te voorkomen, het apparaat niet blootstellen aan regen of vocht.
De stekker wordt gebruikt om het apparaat uit te zetten, dit is altijd bruikbaar.
ALARM 1,2 WEKKER - BEL
ALARM 1,2
WEKKERRADIOL
ALARM 1,2 WEKKER – BEL
DIGITALE WEKKERSTAND
ANALOGE WEKKERSTAND
DIGITALE WEKKERSTAND
ONTHOUD:
TIJDSINSTELLING, WEKKERINSTELLING EN
SLAAPINSTELLING ALLEEN IN DE DIGITALE
TIJDSSTAND
DAG
SLAAPSTAND AAN
SLAAPSTAND AAN
ALARM 1,2
WEKKERRADIO
083.
Page 84

INSTELLEN OF HERINSTELLEN VAN DE TIJD
KLOK-INSTELLINGSMODUS
1. Druk de tijdsinstelling knop (12) (positie 1) 2 seconden in, de dag knippert.
2. Druk de volumeverhoging knop (3) en de volumever laging knop (4) (positie 2) in om de dag in
te stellen.
3. Druk de tijdsinstelling knop (12) (positie 1) in, 24 uur / 12 uur knippert.
4. Druk de volumeverhoging knop (3) (positie 3) en volumeverlaging knop (4) (positie 2) in, uren
knipperen.
5. Druk de tijdsinstelling knop (12) (positie 1), uren knipperen.
6. Druk de volumeverhoging knop (3) (positie 3) en volumeverlaging knop (4) (positie 2) om het
uur in te stellen.
7. Druk de tijdsinstelling knop (12) (positie 1) in, minuten knipperen.
8. Druk de volumeverhoging knop (3) (positie 3) en volumeverlaging knop (4) (positie 2) om de
minuten in te stellen.
084.
Page 85

WEKKER 1 INSTELLEN
WEKKER 1
INSTELLINGSMODUS
1. Druk de wekker 1 instellingsknop (10) (positie 1) om in het wekker 1 instellingsmenu te komen.
2. Druk de wekker 1 instellingsknop (10) (positie 1) 2 seconden in, dag knippert. (Diagram 1)
3. Druk de volumeverhoging knop (3) (positie 3) en de volumeverlaging knop (4) (positie 2) in om
de dag in te stellen.
4. Druk de wekker 1 instellingsknop (10) positie 1) in, uren knipperen.
Druk de volumeverhoging knop (3) (positie 3) en de volumeverlaging knop (4) (positie 2) in om
de uren in te stellen.
5. Druk de wekker 1 instellingsknop (10) (positie 1) in, minuten knipperen.
Druk de volumeverhoging knop (3) (positie 3) en de volumeverlaging knop (4) (positie 2) in om
de minuten in te stellen.
6. Druk de wekker 1 instellingsknop (10) (positie 1) in, wekker 1 bel knippert.
Druk de volumeverhoging knop (3) (positie 3) en volumeverlaging knop (4) (positie 2) in, om
wekker 1 bel en wekkerradio in te stellen.
085
Page 86

DIAGRAM 1
WEEKEND WEKKER 1
INSTELLINGSMODUS (MA – ZO)
WEKKER 2 INSTELLING
1. Druk wekker 2 instellingsknop (9) (positie 1) in om in het wekker 2 instellingsmenu te komen.
2. Druk de wekker 2 instellingsknop (9) 2 seconden in, dag knippert. (Diagram 2)
3. Druk de volumeverhoging knop (3) (positie 3) en de volumeverlaging knop (4) (positie 2) in om
de dag in te stellen.
4. Druk de wekker 2 instellingsknop (9) (positie 1) in, uren knipperen. Druk de volumeverhoging knop
(3) (positie 3) en de volumeverlaging knop (4) (positie 2) in om de uren in te stellen.
5. Druk de wekker 2 instellingsknop (9) (positie 1) in, minuten knipperen. Druk de volumeverhoging
knop (3) (positie 3) en volumeverlaging knop (4) (positie 2) in om de minuten in te stellen.
6. Druk de wekker 2 instellingsknop (9) (positie 1) in, wekker 2 bel knippert. Druk volumeverhoging
knop (3) (positie 3) en volumeverlaging knop (4) (positie 2) in om de wekker 2 bel en
wekkerradio te selecteren.
WEEKEND WEKKER 1
INSTELLINGSMODUS (MA – VR)
ALARM 2
INSTELLINGSMODUS
WEEKEND WEKKER 1
INSTELLINGSMODUS (ZA – ZO)
086.
Page 87

DIAGRAM 2
WEEKEND WEKKER 2
INSTELLINGSMODUS
(MA – ZO)
DIAGRAM 3
Instelling weksignaal en wekker aan/uit
Druk wekker 1 / wekker 2 / wekker 1+2 instellingsknop (13) in om het weksignaal in te stellen (Diagram 3).
DUUR VAN HET WEKSIGNAAL
Het belsignaal of de wekkerradio zal één uur lang afgaan wanneer niet aangeraakt. Het alarm stopt dan
automatisch en zal de volgende dag op de zelfde tijd afgaan.
STOPPEN VAN HET WEKSIGNAAL
Druk de aan/uitknop (14) in om het gaande signaal te stoppen, dit schakelt ook de snooze functie uit.
WEEKEND WEKKER 2
INSTELLINGSMODUS
(MA – VR)
WEKKER 1 WEKKEN DOOR BEL
WEKKER 1 WEKKEN DOOR RADIO
WEEKEND WEKKER 2
INSTELLINGSMODUS (ZA – ZO)
087.
Page 88

DIAGRAM 4
SLAAPSTANDMODUS
Activeren van de slaapfunctie
Indien de radio aan staat, druk de snooze/slaapknop (16) in, slaap ‘90’ staat dan op het scherm, met de 2
seconden getallen. Verminder de slaaptimer vanaf 90 minuten door te drukken op de snooze/slaapknop
(16).
ONTHOUD: Druk de aan/uitknop (14) in om de slaapfunctie uit te zetten.
Snooze-functie
1. Druk de snooze/slaapknop (16) in om de snooze functie te activeren (het belsignaal of de radio zal
stoppen) wanneer wekker afgaat.
2. Snooze interval is 9 minuten.
WERKEN MET EEN EXTERNE GELUIDSBRON
1. Gebruik een verbindingskabel om de bron en de wekkerradio samen te voegen.
2. Verander het volume van de bron om een beter versterkingseffect te krijgen.
OPMERKING: Zet het volume bij de bron NIET te hoog om overbelasting te voorkomen.
Het signaal van de wekkerradio wordt vervangen wanneer de Ingang Externe Geluidsbron (AUDIO IN) (15)
verbinding heeft gemaakt met een andere geluidsbron.
Het normale signaal wordt hervat wanneer de verbindingskabel uit de ingang wordt gehaald.
Wanneer de ‘audio in’-functie in gebruik is en muziek speelt, zal het normale wekgeluid zich mengen met de
muziek op de vooringestelde wektijd.
Om het geluid te stoppen, slechts de aan/uitknop (14) indrukken.
GEBRUIK RADIO
- Druk de aan/uitknop (14) in om de radio aan te zetten.
- Kies het AM- of FM-frequentiebereik, door de schakelaar hiervoor (2) te gebruiken.
- Kies de zender door de frequentiesoek knop (8) te gebruiken.
- Gebruik de volumeknoppen (3)/(4) om het volume op het gewenste niveau te brengen.
- Gebruik de aan/uitknop (14) om de radio uit te zetten.
Onthoud:
- Het AM- frequentiebereik gebruikt een interne antenne. Draai de radio voor de beste ontvangst.
- Zorg dat de FM- draadantenne (7) compleet is uitgerold en zo lang mogelijk is voor FM- ontvangst.
088.
Page 89

RESET
- De reset knop (17) is geplaatst aan de onderkant van het apparaat.
- Gebruik een balpen om de knop in te drukken wanneer u de batterijen vervangt, of wanneer het apparaat
niet werkt als verwacht.
- Dit brengt alle instellingen terug naar de standaardinstellingen, en u verliest alle opgeslagen data (wekkeren klokinstellingen).
ATTENTIE
- Zet geen open vuurbronnen, zoals brandende kaarsen, op het apparaat.
- Plaats het apparaat niet in gesloten kasten of stellages zonder goede ventilatie.
- Om brand- en schokgevaar tegen te gaan, stelt u het apparaat niet bloot aan regen of elk ander type
vocht.
- Het is afgeraden het apparaat bloot te stellen aan direct zonlicht, zeer hoge of lage temperaturen, vocht,
trillingen, of het te plaatsen in een stoffige omgeving.
- Gebruik geen schuurmiddel, benzeen, thinner of andere oplosmiddelen om de oppervlakken van het
apparaat schoon te maken. Om het schoon te maken, veeg het af met een milde, niet-schurend
wasmiddel en een schone zachte doek.
- Probeer nooit om draden, pinnen of andere vergelijkbare objecten in de gaten en openingen van het
apparaat te stoppen.
SPECIFICATIES
Frequentiebereik: AM 525 – 1615 kHz
Uitgaande kracht: 280 mW
Weerstand speaker: 8 ohm
Batterijbijstand: 1 x CR2032, 3V Flat Lithium (niet bijgevoegd)
Stroombron: AC 230 V ~50 Hz, 5 Watt
ATTENTIE: VOOR VEILIG GEBRUIK
Kiest u alstublieft het correcte voltage voordat u de stekker inplugt in het stopcontact. Zo niet, dan kan het
schade veroorzaken aan het apparaat.
Waarschuwing voor druppelen:
Dit product mag niet worden blootgesteld aan druppels of spatten. Objecten, gevuld met vloeistoffen, als
vazen, mogen niet op het product worden geplaatst.
Waarschuwing t.b.v. ventilatie:
De ventilatie van het product mag niet worden tegengewerkt tijdens gebruik.
FM 87,5 – 108 MHz
089.
Page 90

DIAGRAM 1 DIAGRAM 2
PIJL BOVENAAN
MUUR SCHROEF EN
VERBINDINGEN
• Kies de gewenste positie op de muur om de wekkerradio op te hangen.
• Hang de muurbeugel op door 4 schroeven en verbindingen stevig in de muur vast te zetten.
• Plaats het apparaat op de beugel en wee ser zeker van dat de AC-draad en de FM-Antenne gescheiden
en buiten de beugel zijn.
• Schroef de beugelschroef vaster in de onderkant van het apparaat.
• Controleer of de muurbeugel en het apparaat stevig aan de muur hangen.
DIAGRAM 3
MUURBEUGEL
SCHROEF
SCHROEF
MUUR
SCHROEF
SCHROEF
090.
Page 91

BIJKOMENDE INFORMATIE
Let op bij kleine onderdelen en batterijen, niet doorslikken, dit kan tot ernstige schade of verstikking
leiden. Let er in het bijzonder bij kinderen op dat kleine onderdelen en batterijen buiten hun bereik
zijn.
Belangrijk advies omtrent het gehoor
Opgelet:
U geeft om uw gehoor, wij doen dat ook.
Wees daarom voorzichtig tijdens het gebruik van dit apparaat.
Onze aanbeveling: Vermijd hard geluid.
In het geval het apparaat door kinderen wordt gebruikt, zorg ervoor dat het volume niet te hard staat.
Opgelet!
Hard geluid kan onherstelbare schade aan het gehoor van een kind veroorzaken.
Laat NOOIT personen, in het bijzonder kinderen, voorwerpen in de gaten, schachten of andere
openingen van de behuizing steken; dit kan een dodelijke elektrische schok tot gevolg hebben. De
behuizing van het apparaat mag slechts door daartoe gekwalificeerde vaklui geopend worden.
Gebruik het apparaat alleen voor het doel waarvoor het is bestemd.
Het apparaat is uitsluitend bedoeld voor gebruik in huishoudelijke en zakelijke omgevingen.
Gelieve deze gebruiksaanwijzing zorgvuldig te bewaren voor later gebruik.
BIJKOMENDE INFORMATIE
Aanwijzingen inzake de milieubescherming
Dit product mag aan het einde van zijn levensduur niet samen met het normale huishoudelijke afval
verwijderd worden, maar moet afgegeven worden op een verzamelpunt voor de recycling van
elektrische en elektronische apparatuur. Het symbool op het product, in de gebruiksaanwijzing of
op de verpakking maakt u daarop attent.
De werkstoffen zijn volgens hun kenmerking herbruikbaar. Met het hergebruik, de stoffelijke
verwerking of andere vormen van recycling van oude apparaten levert u een belangrijke bijdrage tot
de bescherming van ons milieu.
Gelieve bij het gemeentebestuur informatie te vragen over het bevoegde verzamelpunt.
Verhinder nooit de ventilatie van het apparaat door middel van gordijnen, kranten, dekens of
meubelstukken. De ventilatiegaten moeten altijd vrij zijn. Oververhitting kan schade veroorzaken en
de levensduur van het apparaat verkorten.
Hitte en warmte
Stel het apparaat niet bloot aan direct zonlicht. Zorg ervoor dat het apparaat niet wordt blootgesteld
aan directe hittebronnen zoals verwarmingen en open vuur.
Zorg ervoor dat de ventilatiegaten niet zijn bedekt.
Vocht en reiniging
Dit product is niet waterdicht! Doop de speler niet in water. Voorkom dat de speler met water in
contact komt. Water in het apparaat kan tot ernstige beschadiging leiden. Gebruik geen
schoonmaakmiddelen die alcohol, ammoniak, benzeen of schuurmiddel bevatten aangezien deze
middelen de speler kunnen beschadigen. Om te reinigen, gebruik een zachte, vochtige doek.
091.
Page 92

MODEL: 4556
AM / FM DUÁLNÍ DISPLEJ HODINY RADIO S VÍKENDOVÝM NASTAVENÍM
POZOR
NEBEZPEČÍ ÚRAZU ELEKTRICKÝM
PROUDEM!
NEOTVÍREJTE: UPOZORNĚNÍ:
NEPOKOUŠEJTE SE ODSTRANIT KRYT
přístroje a možným rizikem úrazu
NÁVOD K POUŽITÍ
Tato značka varuje před
nebezpečným napětím uvnitř
elektrickým proudem.
VÝROBKU, RISKUJETE ÚRAZ ELEKTRICKÝM
PROUDEM. UVNITŘ VÝROBKU NEJSOU
ŽÁDNÉ SOUČÁSTKY KTERÉ BY MOHL
UŽIVATEL OPRAVIT SVÉPOMOCÍ. OPRAVY
PŘENECHEJTE POUZE AUTORIZOVANÉMU
SERVISU.
9
10
Tato značka oznamuje, že v návodu k
obsluze výrobku, který je součástí
výrobku jsou velmi důležité informace
o provozu a údržbě výrobku.
17
6
12
16
14
13
1
3
4
7
19
15
11
2
8
1. LCD DISPLEJ 11. ČÍSLICOVÝ DISPLEJ A UKAZATEL
2. VOLIČ (FM/AM) VLN 12. TLAČÍTKO NASTAVENÍ ČASU
3. ZVÝŠIT HLASITOST TLAČÍTKO 13. TLAČÍTKO BUDÍK 1 / BUDÍK 2 / BUDÍK 1+2
4. SNÍŽIT HLASITOST TLAČÍTKO 14. TLAČÍTKO VYPNUTÍ A ZAPNUTÍ ON/OFF
5. AC KABEL 15. AUDIO VSTUP
6. ČÁST PRO BATERIE 16. OPAKOVANÉ ZVONĚNÍ / AUTO VYPNUTÍ
7. FM ANTÉNA 17. TLAČÍTKO PRO VYMAZÁNÍ
8. LADÍCÍ KNOFLÍK 18. DRŽÁK
9. TLAČÍTKO BUDÍK 2 NASTAVENÍ 19. ETIKETA S OZNAČENÍM (NALEPENA NA SPODU
10. TLAČÍTKO BUDÍK 1 NASTAVENÍ PŘÍSTROJE)
18
092.
5
Page 93

PŘIPOJENÍ K ENERGII
Zapojte AC kabel do domácí zástrčky.
Potom zmáčkněte tlačítko Reset (17) pomocí propis ky.
Tento přístroj má zálohový systém pro případ výpadku elektřiny, jsou nutné 3 V ploché litinové baterie.
Vložte baterie do části pro baterie.
Pozitivní a negativní konec baterie ( + a -) musí být spojen s odpovídajícím koncem v části pro baterie.
POZNÁMKA:
Jestliže dojde k výpadku eklektické energie, přejde přístroj automaticky na baterie a hodiny a paměť se
nevymaže.
Když se elektrická energie obnoví, baterie se automaticky odpojí.
ESD POZNÁMKA
V případě poruchy v důsledku elektrického výboje pouze resetujte (odpojení z elektřiny může být nutné) k
obnovení normální funkčnosti
UPOZORNĚNÍ
Odpojte z elektřiny, když nepoužíváte.
Abyste předešli úrazu elektrickým proudem, nesundávejte obal přístroje.
Uvnitř nejsou vyměnitelné části.
Abyste předešli úrazu elektrickým proudem nebo požáru, nevystavujte dešti a vlhku.
Elektrický kabel slouží k odpojení z elektřiny, měl by proto být vždy přístupný.
BUDÍK 1,2 ZVONĚNÍ
BUDÍK 1,2 RADIO BUDÍK
BUDÍK 1,2 RADIO BUDÍK
MENU DIGITÁLNÍ HODINY
MENU ANALOGOVÝCH HODIN
MENU DIGITÁLNÍ HODINY
POZNÁMKA:
NASTAVENÍ ČASU, BUDÍKU/SPACÍHO REŽIMU
JE MOŽNÉ JEN V DIGITÁLNÍM MENU
DEN
SPÁT
SPÁT
BUDÍK 1,2 ZVONĚNÍ
093
Page 94

NASTAVIT NEBO VYMAZAT AK TUÁLNÍ ČAS
MENU NASTAVENÍ HODIN
1. Zmáčkněte a držte tlačítko nastavit čas (12) (pozice 1) 2 sekundy, den bliká.
2. Zmáčkněte tlačítko zvýšení hlasitosti (3) a tlačítko snížení hlasitosti (4) (pozice 2) a tlačítko
snížení hlasitosti (4) (pozice 2) pro nastavení dne.
3. Zmáčkněte tlačítko nastavit čas (12) (pozice 1), formát 24 hodin / 12 hodin bliká.
4. Zmáčkněte tlačítko zvýšení hlasitosti (3) (pozice 3) a tlačítko snížení hlasitosti (4) (pozice 2),
hodiny blikají.
5. Zmáčkněte tlačítko nastavit čas (12) (pozice 1), hodiny blikají.
6. Zmáčkněte tlačítko zvýšení hlasitosti (3) (pozice 3) a tlačítko snížení hlasitosti (4) (pozice 2) pro
nastavení hodin.
7. Zmáčkněte tlačítko nastavit čas (12) (pozice 1), minuty blikají.
8. Zmáčkněte tlačítko zvýšení hlasitosti (3) (pozice 3) a tlačítko snížení hlasitosti (4) (pozice 2) pro
nastavení minut.
094
Page 95

NASTAVIT BUDÍK 1
MENU NASTAVENÍ BUDÍKU 1
1. Zmáčkněte tlačítko nastavit budík 1 (10) (pozice 1) pro vstup do nastavení budíku 1.
2. Zmáčkněte a držte tlačítko nastavit budík 1 (10) (pozice 1) 2 sekundy, den bliká. (Obrázek 1)
3. Zmáčkněte tlačítko zvýšení hlasitosti (3) (pozice 3) a tlačítko snížení hlasitosti (4) (pozice 2) pro
nastavení dne.
4. Zmáčkněte tlačítko nastavit budík 1 (10) (pozice 1) hodiny blikají.
Zmáčkněte tlačítko zvýšení hlasitosti (3) (pozice 3) a tlačítko snížení hlasitosti (4) (pozice 2) pro
nastavení hodin.
5. Zmáčkněte tlačítko nastavit budík 1 (10) (pozice 1) minuty blikají.
Zmáčkněte tlačítko zvýšení hlasitosti (3) (pozice 3) a tlačítko snížení hlasitosti (4) (pozice 2) pro
nastavení minut.
6. Zmáčkněte tlačítko nastavit budík 1 (10) (pozice 1) budík 1 zvonek bliká.
Zmáčkněte tlačítko zvýšení hlasitosti (3) (pozice 3) a tlačítko snížení hlasitosti (4) (pozice 2)
pro vybrání na budíku 1 zvonk nebo radio budík.
.
095
Page 96

OBRÁZEK 1
NASTAVENÍ BUDÍKU 1 PRO
CELÝ TÝDEN (PO AŽ NE)
NASTAVIT BUDÍK 2
1. Zmáčkněte tlačítko nastavit budík 2 (9) (pozice 1) pro vstup do nastavení budíku 2.
2. Zmáčkněte a držte tlačítko nastavit budík 2 (9) (pozice 1) 2 sekundy, den bliká. (Obrázek 2)
3. Zmáčkněte tlačítko zvýšení hlasitosti (3) (pozice 3) a tlačítko snížení hlasitosti (4) (pozice 2) pro
nastavení dne.
4. Zmáčkněte tlačítko nastavit budík 2 (9) (pozice 1) hodiny blikají. Zmáčkněte tlačítko zvýšení hlasitosti
(3) (pozice 3) a tlačítko snížení hlasitosti (4) (pozice 2) pro nastavení hodin.
5. Zmáčkněte tlačítko nastavit budík 2 (9) (pozice 1) minuty blikají. Zmáčkněte tlačítko zvýšení hlasitosti
(3) (pozice 3) a tlačítko snížení hlasitosti (4) (pozice 2) pro nastavení minut.
6. Zmáčkněte tlačítko nastavit budík 2 (9) (pozice 1) budík 2 zvonek bliká.Zmáčkněte tlačítko zvýšení
hlasitost i (3) (pozice 3) a tlačítko snížení hlasitosti (4) (pozice 2) pro vybrání na budíku 2 zvonk
nebo radio budík.
NASTAVENÍ BUDÍKU 1 PRO
PRACOVNÍ TÝDEN (PO AŽ PÁ)
MENU NASTAVENÍ
BUDÍKU 2
NASTAVENÍ BUDÍKU 1 NA
VÍKEND (SO AŽ NE)
096
Page 97

OBRÁZEK 2
NASTAVENÍ BUDÍKU 2 PRO
CELÝTÝDEN (PO AŽ NE)
OBRÁZEK 3
Nastavení buzení a vypnutí buzení on/off
Zmáčkněte budík 1 / budík 2 / budík 1+2 tlačítko (13) pro výběr zvonku nebo radio budíku. (Obrázek 3)
DÉLKA BUZENÍ
Zvonek nebo radio budík zvoní 1 hodinu, není-li tlačítko zmáčknuto. Potom se budík automaticky vypne a
zazvoní příští den znovu v nastavený čas.
ZASTAVENÍ BUDÍKU
Zmáčkněte tlačítko (14) k vypnutí aktuálního budíku a také vypnete opětovné buzení.
NASTAVENÍ BUDÍKU 2 PRO
PRACOVNÍ TÝDEN (PO AŽ PÁ))
BUDÍK 1 ZVONĚNÍ
BUDÍK 1 RADIO BUDÍK
NASTAVENÍ BUDÍKU 2 NA
VÍKEND (SO AŽ NE)
097
Page 98

OBRÁZEK 4
MENU NASTAVENÍ SPANÍ
Zapnutí automatického vypnutí
Když hraje rádio zmáčkněte tlačítko snooze/sleep (16), vypnout "90“ se zobrazí na displeji za 2 sekundy sníží
čas vypnutí za 90 minut pomocí zmáčknutí tlačítka snooze/sleep (16). (Obrázek 4)
POZNÁMKA: Zmáčkněte tlačítko on/off (14) k vypnutí funkce automatického vypnutí.
Opětovné buzení:
1. Zmáčkněte tlačítko snooze/sleep (16) k zapnutí opětovného buzení (zvonek a radio budík přestane),
když zvoní.
2. Interval mezi opětovným buzením je 9 minut.
PRÁCE S AUDIO PŘÍSLUŠENSTVÍM
1. Použijte kabel k připojení audio příslušenství k přístroji.
2. Nastavte hlasitost audio příslušenství, abyste získali co nejlepší příjem.
POZNÁMKA: NENASTAVUJTE audio příslušenství na vysokou hlasitost, abyste předešli přetížení.
Zvuk hlavní jednotky bude eliminován, když je připojeno do "AUDIO" VSTUPU (15) jiné audio příslušenství.
Zvuk bude obnoven poté, co je odpojeno audio zařízení.
Jestliže je připojeno "audio" zařízení a je posloucháno rádio, budík přeruší hudbu v nastavenou hodinu.K
vypnutí buzení, zmáčkněte tlačítko on/off (14) vypnout.
OVLÁDÁNÍ RÁDIA
- Zmáčkněte tlačítko on/off (14) k zapnutí rádia.
- Vyberte AM nebo FM vlny pomocí voliče vln (2).
- Vyberte stanici pomocí ladícího knoflíku (8).
- Zmáčkněte tlačítko hlasitosti (3)/(4) pro nastavení hlasitosti.
- Zmáčkněte tlačítko on/off (14) k vypnutí rádia.
Poznámka:
- Vlny AM používají vnitřní směrovou anténu. Natočte rádio pro nejlepší příjem.
- Zajistěte aby FM anténa (7) byla zcela vytažená pro příjem FM.
VYMAZAT
- Tlačítko vymazat (17) je umístěno na spodu přístroje.
- Použijte propisku ke zmáčknutí tlačítka, když vyměňujete baterie nebo přístroj vykazuje poruchu.
- Toto vrátí nastavení na původní a vymaže všechna uložená data (budík a hodiny).
098
Page 99

POZOR
- Žádné otevřené ohně jako svíčky nedávejte na přístroj.
- Neumisťujte přístroj do uzavřených skříní bez ventilace.
- Abyste předešli požáru nebo úrazu elektrickým proudem, nevystavujte přístroj dešti a vlhku.
- Přístroj by neměl být vystaven přímému slunečnímu světlu, velmi nízkým nebo vysokým teplotám, vlhku,
vibracím, prašnému prostředí.
- Nepoužívejte drsné čistí prostředky, benzen, ředilo nebo jiná rozpouštědla k čištění povrchu přístroje.
Čistěte, otřením čistým, měkkým hadříkem s jemným saponátem.
- Nikdy nezkoušejte dráty, špendlíky nebo jiné takové objekty do ventilačních nebo jiných otvorů na
přístroji.
SPECIFIKACE
Frekvenční rozpětí: AM 525 – 1615 kHz
Výstupní energie: 280 mW
Odpor reproduktoru: 8 ohm
Baterie: 1 x CR2032, 3V Flat Lithium (nejsou přiloženy)
Zdroj energie: AC 230V ~50 Hz, 5 watt
POZOR: Z BEZPEČNOSTNÍCH DŮVODŮ
Prosím, vyberte správné elektrické napětí než zapojíte AC kabel do zástrčky doma. Jinak, můžete poškodit
výrobek.
Varování před namočením:
Výrobek nesmí být ponořen nebo polit vodou a předměty naplněné vodou jako např. vázy by neměly být
pokládány na výrobek.
Varování o ventilaci:
Běžná ventilace by neměla být omezena při používání.
FM 87,5 - 108 MHz
099
Page 100

OBRÁZEK 1 OBRÁZEK 2
STĚNOVÉ ŠROUBY A
HMOŽDINKY
ŠROUB
ŠIPKA NA VRCHU
ŠROUB
ŠROUB
• Vyber te místo na stěně, kam pověsíte rádio hodiny.
• Připevněte stěnový držák pomocí 4 šroubů a řádně utáhněte (Obr. 2).
• Nasaďte na stěnový držák a ujistěte se, že kabel AC a anténa FM jsou mimo držák.
• Utáhněte šroub na spodu přístroje (obr. 3).
• Znovu zkontrolujte, zda držák a hodiny pevně visí na stěně.
DIAGRAM 3
STĚNA
NÁSTĚNNÁ KONZOLA
100
ŠROUB
 Loading...