

Page 1
4224
Uhrenradio mit großem LCD-Display
Clock Radio with Large LCD Display
Radio-réveil avec grand affichage LCD
Rádiós óra nagy LCD kijelzővel
Radio sveglia con display LCD grande
Radio reloj con gran pantalla LCD
Rádio Despertador com Visor LCD Grande
Radiobudzik z dużym wyświetlaczem LCD
Klokradio met Grote LCD Display
Rádiobudík s velkým LCD displejem
Geniş LCD Ekranlı Saatli Radyo
Radio cu Ceas si Ecran Larg LCD
Радио и Часовник с голям дисплей
на течни кристали (LCD)
Часы-радио с большим ЖК дисплеем
BG
RU
Page 2
MODELL: 4224
Uhrenradio mit großem LCD-Display
SICHERHEITSBESTIMMUNGEN
VORSICHT
STROMSCHLAGGEFAHR
NICHT ÖFFNEN
VORSICHT: ZUR VERMEIDUNG VON
STROMSCHLAG GERÄTEGEHÄUSE
Der Blitz im gleichseitigen
Dreieck weist auf gefährliche
Hochspannung im Gerät hin,
die zu Stromschlag führen
kann.
NICHT ÖFFNEN. ES BEFINDEN SICH
KEINE VOM VERBRAUCHER
WARTBAREN TEILE IM INNERN DES
GERÄTS. REPARATUR UND
WARTUNG NUR DURCH
FACHPERSONAL.
Das Ausrufungszeichen
imgleichseitigen Dreieck
weist auf wichtige
Bedienungs- und
Wartungsanleitungen hin.
WEITERE INFORMATIONEN
Achtung bei Kleinteilen und Batterien, bitte nicht Verschlucken, dies kann zu ernsthaften Verletzungen
oder zum Ersticken führen. Achten Sie insbesondere bei Kindern darauf, dass Kleinteile und Batterien
außerhalb deren Reichweite aufbewahrt werden.
Wichtige Hinweise zum Gehörschutz
Vorsicht:
Ihr Gehör liegt Ihnen und auch uns am Herzen.
Deshalb seien Sie bitte vorsichtig beim Gebrauch dieses Gerätes.
Wir empfehlen: Vermeiden Sie hohe Lautstärken.
Sollte das Gerät von Kindern verwendet werden, so achten Sie darauf, dass das Gerät nicht zu laut
eingestellt wird.
Achtung!
Zu hohe Lautstärken können bei Kindern irreparable Schäden hervorrufen.
Lassen Sie NIEMALS Personen, und insbesondere keine Kinder, Gegenstände in Löcher, Schächte
oder andere Öffnungen des Gehäuses stecken; dies könnte zu einem tödlichen elektrischen Schlag
führen. Das Gerätegehäuse, darf nur von ausgebildetem Fachpersonal geöffnet werden.
Bitte verwenden Sie das Gerät nur seiner vorhergesehenen Bestimmung entsprechend. Das Gerät ist
ausschließlich für den Einsatz in Wohn- und Geschäftsbereichen bestimmt.
Bitte bewahren Sie die Bedienungsanleitung auch für späteres Nachschlagen sorgfältig auf.
Hinweise zum Umweltschutz
Dieses Produkt darf am Ende seiner Lebensdauer nicht über den normalen Haushaltsabfall entsorgt
werden, sondern muss an einem Sammelpunkt für das Recycling von elektrischen und elektronischen
Geräten abgegeben werden. Das Symbol auf dem Produkt, der Gebrauchsanleitung oder der
Verpackung weist darauf hin.
Die Werkstoffe sind gemäß ihrer Kennzeichnung wieder verwertbar. Mit der Wiederverwendung, der
stofflichen Verwertung oder anderen Formen der Verwertung von Altgeräten leisten Sie einen wichtigen
Beitrag zum Schutze unserer Umwelt.
Bitte erfragen Sie bei der Gemeindeverwaltung die zuständige Entsorgungsstelle.
2.
Page 3

Behindern Sie nicht die Belüftung des Gerätes, wie etwa mit Vorhängen, Zeitungen, Decken oder mit
Möbelstücken, die Belüftungsschlitze müssen immer frei sein. Überhitzung kann Schäden verursachen
und die Lebensdauer des Gerätes verkürzen.
Hitze und Wärme
Setzen Sie das Gerät nicht direkter Sonnenstrahlung aus. Achten Sie darauf, dass das Gerät keinen
direkten Wärmequellen wie Heizung oder offenem Feuer ausgesetzt ist. Achten Sie darauf, dass die
Lüftungsschlitze des Gerätes nicht verdeckt sind.
Feuchtigkeit und Reinigung
Dieses Produkt ist nicht wasserfest! Tauchen Sie das Gerät nicht in Wasser ein und lassen es auch nicht
mit Wasser in Berührung kommen. In das Gerät eindringendes Wasser kann ernsthafte Schäden
verursachen.
Verwenden Sie keine Reinigungsmittel, die Alkohol, Ammoniak, Benzin oder Schleifmittel enthalten, da
diese das Gerät beschädigen können. Verwenden Sie zum Reinigen ein weiches, leicht angefeuchtetes
Tuch.
Batterien fachgerecht entsorgen
Batterien gehören nicht in den Hausmüll. Die Batterien müssen bei einer Sammelstelle für Altbatterien
abgegeben werden. Werfen Sie Batterien niemals in Feuer.
SICHERHEITSHINWEISE
1. ALLE ANWEISUNGEN LESEN - Vor dem Betrieb des Gerätes sollten Sie alle Sicherheitshinweise und
Bedienungsanleitungen lesen.
2. ANWEISUNGEN AUFBEWAHREN - Die Sicherheitshinweise und Bedienungsanleitungen sollten für
zukünftigen Bezug aufbewahrt werden.
3. WARNUNGEN BEACHTEN - Die Warnungen auf dem Gerät und in der Bedienungsanleitung sollten
beachtet werden.
4. ANWEISUNGEN BEFOLGEN - Alle Bedienungs- und Verwendungsanweisungen sollten befolgt werden.
5. WASSER UND FEUCHTIGKEIT - Dieses Gerät nicht in der Nähe von Wasser verwenden, z.B. in der
Nähe einer Badewanne, eines Waschbeckens, einer Küchenspüle, in einem nassen Keller, in der Nähe
eines Schwimmbeckens usw.
6. BELÜFTUNG - Schlitze und Öffnungen im Gehäuse dienen der Belüftung. Sie sind für zuverlässigen
Betrieb des Gerätes und Schutz vor Überhitzung erforderlich und dürfen nicht blockiert oder abgedeckt
werden. Die Öffnungen sollten niemals dadurch blockiert werden, dass das Gerät auf ein Bett, ein Sofa,
einen Teppich oder eine ähnliche Oberfläche gestellt wird. Das Gerät sollte nur dann in Einbauinstallierung
wie in einem Bücherschrank oder einem Regal verwendet werden, wenn angemessene Belüftung
vorgesehen ist bzw. die Anweisungen des Herstellers befolgt worden sind.
7. WÄRME - Das Gerät sollte fern von Wärmequellen wie Radiatoren, Heizkörpern, Öfen und anderen
wärmeerzeugenden Geräten (einschließlich Verstärkern) aufgestellt werden.
8. STROMVERSORGUNG - Dieses Gerät sollte nur mit der auf dem Typenschild angegebenen
Stromversorgungsart betrieben werden. Wenn Sie nicht sicher sind, was für eine Stromversorgung Sie
haben, so wenden Sie sich bitte an Ihren Fachhändler oder Ihr Elektrizitätswerk. Beziehen Sie sich für
Batteriebetrieb oder andere Stromquellen bitte auf die Bedienungsanleitung.
9. NETZKABELSCHUTZ - Netzkabel sollten so verlegt werden, dass möglichst nicht darauf getreten wird
und dass sie nicht eingeklemmt werden, mit besonderer Beachtung der Kabel an Steckern,
Verlängerungskabeln und dem Austritt des Kabels aus dem Gerät.
10. NICHTBENUTZUNG – Ziehen Sie bei längerer Nichtbenutzung Netzstecker und Antennenkabel ab.
11. EINDRINGEN VON FREMDKÖRPERN UND FLÜSSIGKEITEN - Niemals Objekte irgendwelcher Art
durch die Öffnungen in das Gerät schieben, da diese unter hoher Spannung stehende Teile berühren oder
kurzschließen können, wodurch es zu Feuer oder Stromschlag kommen kann. Niemals Flüssigkeiten
irgendwelcher Art auf dem Gerät verschütten.
12. BESCHÄDIGUNG, DIE EINE WARTUNG ERFORDERT - Ziehen Sie stets den Netzstecker und wenden
sich an einen autorisierten Kundendienst, wenn:
3.
Page 4

a. das Netzkabel oder der Stecker beschädigt ist;
b. Flüssigkeit oder Fremdkörper in das Gerät eingedrungen sind;
c. das Gerät Regen oder Feuchtigkeit ausgesetzt war;
d. das Gerät nicht wie gewöhnlich funktioniert. Benutzen Sie bitte das Gerät und dessen Funktionen nur
wie in der Bedienungsanleitung beschrieben;
e. das Gerät fallen gelassen oder beschädigt wurde;
f. das Gerät schwere Veränderungen der Leistungsmerkmale zeigt.
13. WARTUNG - Versuchen Sie nicht, das Gerät selbst zu warten, da Sie sich durch Öffnen bzw. Entfernen
von Abdeckungen hohen Spannungen und sonstigen Gefahren aussetzen können. Wenden Sie sich mit
Wartung und Reparaturen stets an einen autorisierten Kundendienst.
14. REINIGUNG – Ziehen Sie vor dem Reinigen den Netzstecker. Benutzen Sie keine flüssigen oder
Sprühreiniger, sondern nur ein feuchtes Tuch. Folgen Sie den Reinigungshinweisen in der
Bedienungsanleitung.
15. GEWITTER – Ziehen Sie während eines Gewitters und bei längerer Nichtbenutzung Netzstecker und
Antennenkabel als zusätzlichen Schutz gegen Überspannung ab.
16. SICHERHEITSÜBERPRÜFUNG – Verlangen Sie nach einer Wartung stets eine Sicherheitsüberprüfung
durch den Kundendienst.
17. ÜBERLASTUNG – Überlasten Sie Steckdosen und Verlängerungskabel nicht, das kann zu Feuer und
Stromschlag führen.
18. ELEKTROSTATISCHE ENTLADUNG - Wenn ein Fehler angezeigt wird oder eine Fehlfunktion besteht,
das Netzkabel bitte herausziehen und alle Batterien entfernen. Danach das Netzkabel wieder
anschließen und die Batterien zurücksetzen.
Aufstellort des Gerätes
Vermeiden Sie eine Aufstellung des Gerätes in folgenden Bereichen:
1) mit direkter Sonneneinstrahlung, Einbau in Regalen oder Schränken ohne ausreichende Ventilation;
2) mit hoher Temperatur oder hoher Luftfeuchtigkeit;
3) mit übermäßiger Staubentwicklung;
4) mit Vibrationen, Stößen oder geneigter Oberfläche, hierdurch können Komponenten erheblich beschädigt
werden.
Stapeln
Stellen Sie das Gerät flach auf. Keine Verstärker oder andere Geräte, die sich erwärmen können, auf oder unter
dem Gerät abstellen.
Netzanschluss:
Zur Vermeidung von Fehlfunktionen, Feuer, Verletzungen und Stromschlag beachten Sie bitte folgende Hinweise:
• Überzeugen Sie sich vor Netzanschluss, dass Netzspannung und Angaben auf dem Typenschild
übereinstimmen (AC 230V~50Hz).
• Schließen Sie das Netzkabel an einer 230V~50Hz Steckdose an.
• Beim Ziehen des Netzsteckers fassen Sie bitte am Stecker an und nicht am Kabel, um Kabelbruch und
daraus resultierende Risiken zu vermeiden.
• Halten Sie den Netzstecker gut fest, wenn Sie den Stecker in die Steckdose stecken oder abziehen.
• Netzkabel nicht mit nassen Händen berühren.
• Netzkabel vor wärmeerzeugenden Geräten schützen.
• Ist das Gerät einmal herunter gefallen oder anderweitig beschädigt, dann schalten Sie es bitte aus und
lassen Sie es von einem Fachmann überprüfen.
Batterien:
• Bewahren Sie Batterien kinder- und haustiersicher auf.
• Achten Sie beim Einsetzen der Batterien auf die Polarität (+/-). Falsch eingesetzte Batterien können zu
Beschädigungen und/oder Fehlfunktionen führen.
4.
Page 5
• Entnehmen Sie erschöpfte Batterien aus dem Gerät. Entnehmen Sie die Batterien, wenn das Gerät für
einen längeren Zeitraum nicht benutzt wird, um ein Auslaufen der Batterien zu vermeiden.
• Werfen Sie Batterien nicht ins Feuer. Setzen Sie Batterien nicht offenen Flammen oder Erwärmung aus.
• Entsorgung von Batterien: erschöpfte Batterien müssen umweltgerecht entsorgt werden. Nähere
Informationen erhalten Sie von Ihrer örtlichen Umweltbehörde.
• Folgen Sie den Anleitungen der Batteriehersteller zur sicheren Benutzung und Entsorgung.
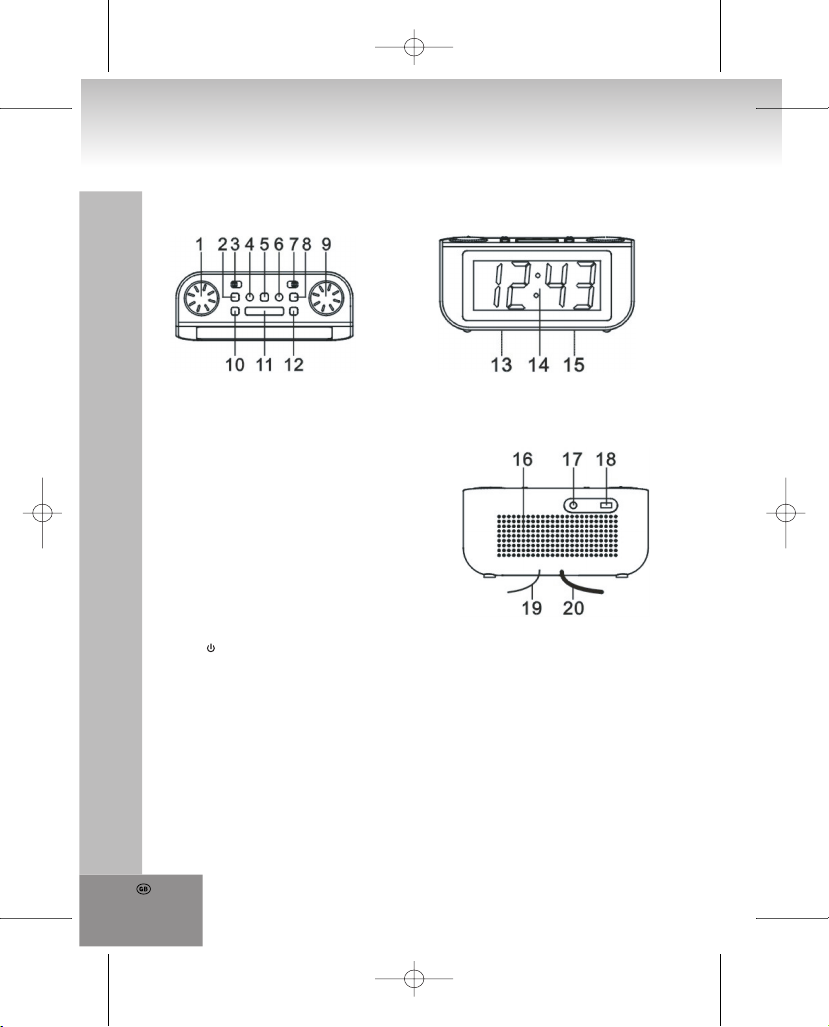
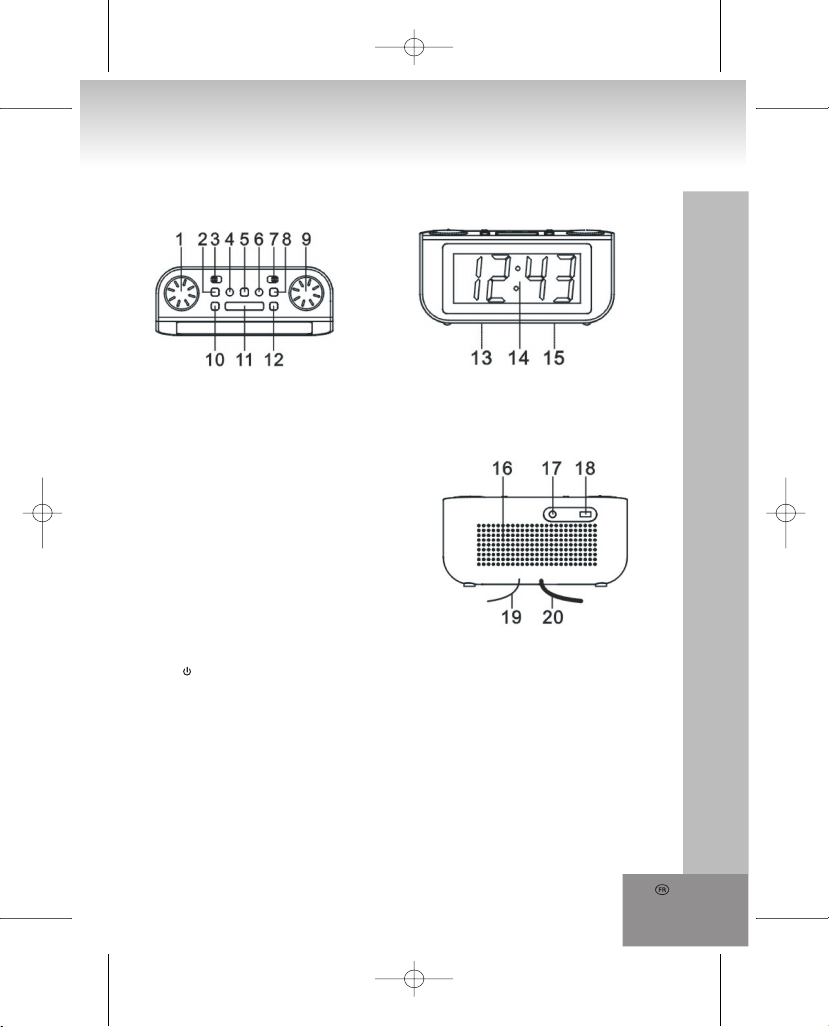
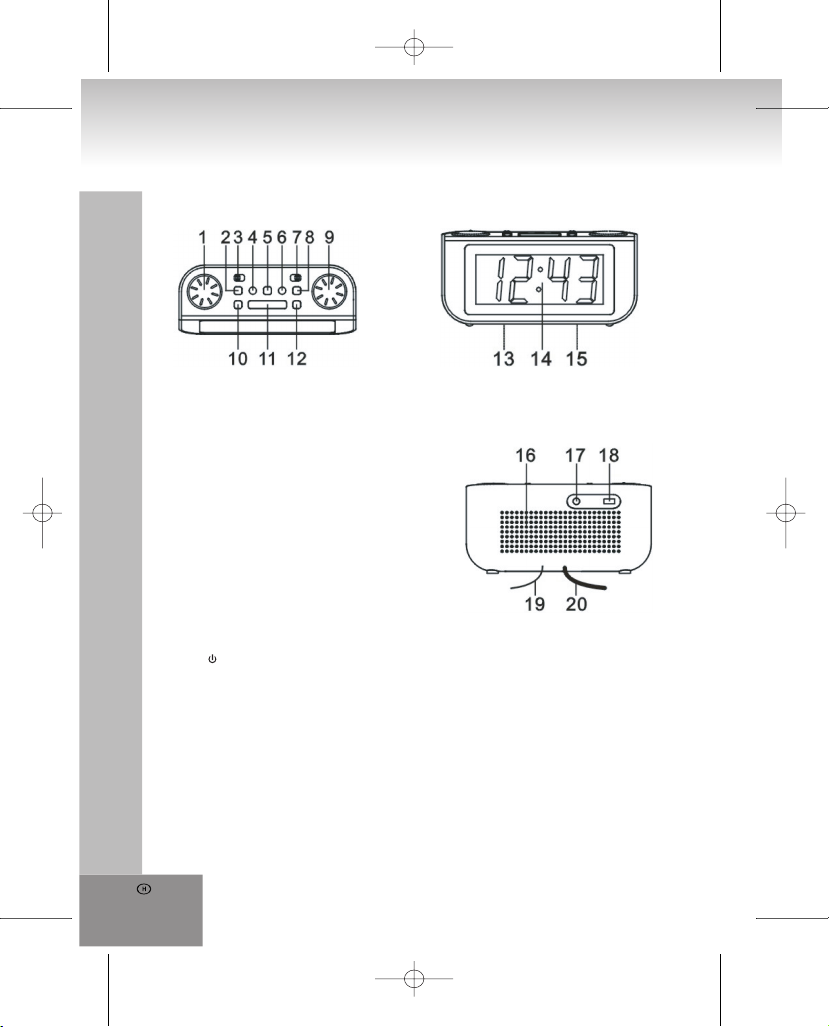
Tastenbelegung und Funktionen
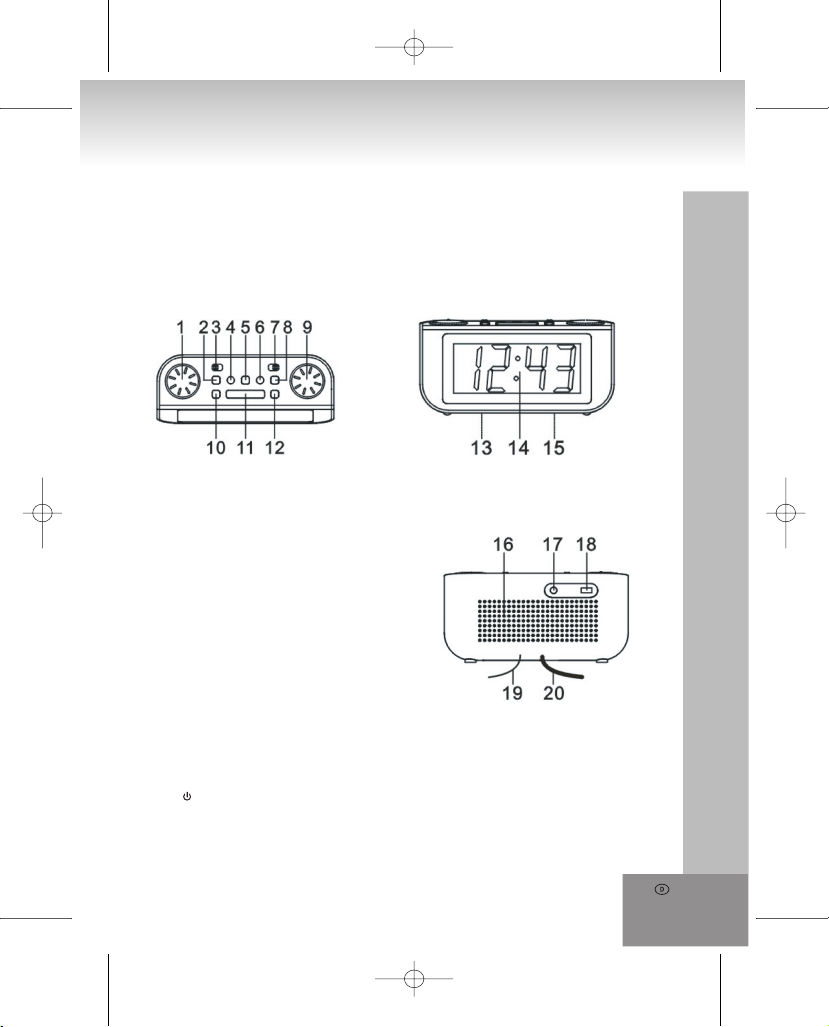
Draufsicht
Vorderansicht
1. volume min/max
Lautstärkeregler
2. time set
Einstellen der Uhrzeit (mit hour und min)
3. alarm radio/buzz
Umschalter Radio und Summer zum Wecken
4. min
Einstellen der Minuten der Uhrzeit, Alarmzeit oder
Einschlafzeit
5. alarm on/off
Ein-/Ausschalttaste für den Alarm
6. hour
Einstellen der Stunden der Uhrzeit, Alarmzeit oder
Einschlafzeit
7. band am/fm
Bandwahlschalter Mittelwelle (AM) und UKW (FM)
8. alarm set
Einstellen der Alarmzeit (mit hour und min)
9. tuning
Senderwahl
10. sleep
Einstellen der Einschlafzeit (mit hour und min)
11. snooze
Schlummertaste zum Weiterschlummern nach
erfolgtem Weckalarm oder Ausschalten des
Einschlaf-Timers
12. on/off
Ein- und Ausschalten des Radios
13. Typenschild
14. Display
15. Batteriefach
Rückansicht
16. Lautsprecher
17. line in Eingangsbuchse
18. dimmer low/high
Umschalten der Helligkeit des Displays
19. UKW Wurfantenne
20. Netzkabel
5.
Page 6

Anschlüsse
Antennenanschluss
Bitte benutzen Sie die mitgelieferte Wurfantenne zur Verbesserung des UKW Empfangssignals. Die Antenne
befindet sich auf der Geräterückseite. Wickeln Sie die Wurfantenne bitte vollständig ab.
Spannungsversorgung
Das Gerät arbeitet mit 230V~50Hz Netzspannung. Die Uhrzeit ist mit einer 3 Volt Lithium-Knopfzelle CR2032 (nicht
mitgeliefert) als Gangreserve notstromversorgt. Bei längerer Nichtbenutzung entnehmen Sie bitte die Batterie, um
ein Auslaufen zu vermeiden.
Schließen Sie das Gerät an keine andere Spannungsversorgung an, dies kann zu Beschädigungen am Gerät
führen, die nicht durch die Garantie abgedeckt sind.
Einsetzen/Austauschen der Notstrombatterie für die Gangreserve
Setzen Sie die Batterie in das Batteriefach zur Notstromversorgung der Uhr unten im Gerät ein. Zum Einsetzen der
Batterie benötigen Sie einen kleinen Kreuzschlitzschraubendreher. Beachten Sie hierbei bitte die Polarität.
Ersetzen Sie die Batterien einmal jährlich.
Bei Netzausfall oder wenn Sie vorübergehend den Netzstecker ziehen, bleiben Ihre Einstellungen des Uhrenradios
(Weckeinstellungen, Zeit usw.) gespeichert. Die Uhr schaltet automatisch auf die Gangreserve um.
Allgemeine Bedienungshinweise
Ein- und Ausschalten des Uhrenradios
Schalten Sie das Gerät stets mit on/off aus, wenn Sie es nicht benutzen. Mit Drehen des Lautstärkereglers
volume min/max stellen Sie die Lautstärke ein.
Wählen Sie das Frequenzband mit dem Bandumschalter band am/fm, hier schalten Sie zwischen UKW (FM) und
Mittelwelle (AM) um.
Aus Energiespargründen schalten Sie das Gerät bei Nichtbenutzung bitte aus. Bleibt das Gerät für einen längeren
Zeitraum unbenutzt, so empfehlen wir, ebenfalls den Netzstecker zu ziehen und die Batterie zur Gangreserve zu
entnehmen.
Im Display wird entweder die Uhrzeit oder die Frequenz des eingestellten Radiosenders angezeigt.
Das Gerät ist auf Dauerbetrieb ausgelegt, es ist entweder eingeschaltet oder in Betriebsbereitschaft (Stand-by).
Helligkeit des Displays
Die Helligkeit des Displays kann umgeschaltet werden. Hierzu befindet sich der Umschalter dimmer low/high auf der
Rückseite des Geräts. Bei Einstellung auf low haben Sie eine geringe Hintergrundbeleuchtung des Displays, bei
Einstellung auf high ist das Display heller.
Einstellen der Uhrzeit
Bei Erstanschluss wird im Display zunächst 0:00 angezeigt.
Halten Sie zunächst die time Taste gedrückt. Nehmen Sie die Einstellung der Stunden im 24-Stunden Format mit
hour vor.
Halten Sie die Taste zum schnellen Vorlauf der Stunden gedrückt oder tippen Sie die Taste mehrfach zur
Weiterschaltung um jeweils eine Stunde an.
Nehmen Sie nun die Einstellung der Minuten mit time (gedrückt halten) und min. vor.
Halten Sie die Taste zum schnellen Vorlauf der Minuten gedrückt oder tippen Sie die Taste mehrfach zur
Weiterschaltung um jeweils eine Minute an.
Die Uhrzeit ist nun eingestellt.
Radio
Zum Einschalten des Radios drücken Sie on/off . Im Display wird das Frequenzband (AM oder FM) sowie die
Frequenz (beispielsweise 100.6 MHz oder 525 KHz) angezeigt. Wählen Sie das Frequenzband mit dem
Bandumschalter band am/fm, hier schalten Sie zwischen UKW (FM) und Mittelwelle (AM) um.
6.
Page 7
Mit der Senderwahl tuning stellen Sie Ihren Lieblingssender ein, hierbei haben Sie ein großes Display der Frequenz.
Drehen Sie den Lautstärkeregler volume min/max zum Einstellen der Lautstärke.
Zum Ausschalten des Radios drücken Sie on/off .
Das Radio hat eine UKW-Wurfantenne auf der Rückseite, diese muss für besten Empfang voll abgewickelt werden.
Für besten Mittelwellenempfang richten Sie das Radio bitte aus.
line in Eingangsbuchse
An diesem Anschluss können Sie ein Zusatzgerät, wie beispielsweise einen portablen MP3-Player, über ein
Audiokabel mit 3,5mm Klinkenstecker (nicht mitgeliefert) anschließen. Die Wiedergabe erfolgt nun über Ihr
Uhrenradio.
Wecken mit Radio oder Summer
Stellen Sie den gewünschten Radiosender und die Lautstärke ein.
Halten Sie alarm set gedrückt und drücken Sie gleichzeitig hour zur Einstellung der Stunde der Weckzeit. Halten Sie
die Taste zum schnellen Vorlauf der Stunden gedrückt oder tippen Sie die Taste mehrfach zur Weiterschaltung um
jeweils eine Stunde an.
Dann halten Sie alarm set gedrückt und drücken gleichzeitig min zur Einstellung der Minuten der Weckzeit. Halten
Sie die Taste zum schnellen Vorlauf der Stunden gedrückt oder tippen Sie die Taste mehrfach zur Weiterschaltung
um jeweils eine Stunde an.
Drücken Sie die Ein-/Ausschalttaste für den Alarm alarm on/off, die Alarm-Kontrollanzeige im Display leuchtet auf.
Das Radio weckt Sie nun zur voreingestellten Zeit.
Zum Wecken mit Ihrem Lieblingssender stellen Sie alarm radio/buzz auf radio, es bleibt für eine Stunde
eingeschaltet. Danach schaltet es sich wieder automatisch aus.
Zum Wecken mit dem Summton anstatt Radio, stellen Sie alarm radio/buzz auf buzz.
Zum Ausschalten von Radio oder Summer drücken Sie alarm on/off, die Alarm-Kontrollanzeige im Display erlischt.
Am nächsten Tag werden Sie wieder zur gleichen Zeit geweckt.
Schlummerfunktion
Nach dem Wecken mit Summer oder Radio drücken Sie snooze zum Weiterschlummern für 5 Minuten, danach
ertönt der Weckalarm erneut.
Die Schlummerfunktion wird bis zu einer Stunde wiederholt oder bis Sie die Weckfunktion mit alarm on/off
ausschalten.
Nach einer Stunde stellt sich die Schlummerfunktion automatisch zurück.
Einschlafen mit Musik
Stellen Sie den gewünschten Radiosender und die Lautstärke ein.
Drücken Sie die Schlummertaste sleep, hiermit rufen Sie den Einschlaf-Timer auf, im Display wird 90 angezeigt und
SLEEP blinkt. Mit mehrfachem Tastendruck auf sleep schalten Sie die Einschlafzeit zwischen 90, 60, 30, und 10
Minuten um, die jeweilige Einschlafzeit wird im Display angezeigt und SLEEP blinkt für einen Moment. Nach einigen
Sekunden stellt sich die Anzeige auf die Radiofrequenz zurück und SLEEP leuchtet.
Nach der voreingestellten Zeit schaltet sich Ihr Radio automatisch aus.
Zum Ausschalten des Radios vor Ablauf der eingestellten Einschlafzeit drücken Sie snooze.
Einschlafen mit Radio und Wecken mit Radio oder Summer
Stellen Sie den gewünschten Radiosender und die Lautstärke ein.
Stellen Sie die Weckzeit wie zuvor beschrieben ein.
Drücken Sie sleep und stellen Sie die gewünschte Einschlafzeit wie oben beschrieben ein.
Das Radio schaltet sich nach der voreingestellten Einschlafzeit aus und weckt Sie am kommenden Morgen mit
Summer oder Radio, entsprechend Ihrer Einstellung.
7.
Page 8
Störungserkennung
Sollte sich mit dem System ein Problem ergeben, dann prüfen Sie bitte zunächst anhand dieser Liste, bevor Sie
sich an den Kundendienst wenden.
WARNUNG: Öffnen Sie keinesfalls das Gerät, sondern wenden sich mit Reparaturen oder Wartungen stets
an einen autorisierten Kundendienst.
Problem Mögliche Ursache Lösungsvorschlag
Kein Ton Lautstärke ist zu gering
Keine Tastenfunktion Elektrostatische Aufladung. Ziehen Sie den Netzstecker für
eingestellt.
Netzkabel ist nicht
angeschlossen.
Regeln Sie die Lautstärke.
Schließen Sie das Netzkabel
korrekt an.
einige Sekunden und
entnehmen Sie die Batterie der
Gangreserve, schalten Sie das
Gerät danach wieder ein.
Schlechter Empfang Schwaches Signal.
Technische Spezifikationen
Spannungsversorgung: AC 230V~50Hz
Gangreserve für die Uhrzeit: DC 3V Lithium-Knopfzelle (CR2032)
Frequenzbereich: UKW 87,5MHz – 108MHz
MW 525kHz – 1615kHz
Abmessungen: ca. 60 x 190 x 90 mm
Gewicht: ca. 600 g (ohne Batterie)
Änderungen, auch ohne Vorankündigung, vorbehalten.
Störungen durch andere
Elektrogeräte (Fernseher,
Videorekorder, Computer
usw.).
Richten Sie die Antenne aus.
Halten Sie Abstand zu anderen
Elektrogeräten.
8.
Page 9
MODEL: 4224
Clock Radio with Large LCD Display
SAFETY INSTRUCTIONS
WARNING
RISK OF ELECTRIC SHOCK
DO NOT OPEN
CAUTION: TO REDUCE THE RISK
A triangle with a lightning
symbol draws the user's
attention to "dangerous
voltage" without insulation in
the cabinet which may be
high enough to entail a risk of
electric shock.
OF ELECTRIC SHOCK, DO NOT
REMOVE COVER (OR BACK).
THERE ARE NO USER
SERVICEABLE PART INSIDE. REFER
SERVICING TO QUALIFIED
SERVICE PERSONNEL.
A triangle with an
exclamation mark draws the
user's attention to important
instructions for use and
maintenance in the
accompanying manual,
which should be studied.
FURTHER INFORMATION
Beware of small pieces and batteries, do not swallow them. It may be hazardous to your health and lead in
suffocation. Please, Make sure to keep small devices and batteries especially out of the reach of children.
Important advice regarding hearing protection
Caution:
You care for your hearing, and so do we.
Therefore, use caution while using this appliance.
Our recommendation: Avoid high volumes.
Children should be supervised while using headphones; make sure that the appliance is not set to high
volume.
Caution!
High volumes may cause irreparable damage to children’s ears.
NEVER let allow anyone, especially children, to put objects into the holes, slots or openings on this devise.
This may lead into death due to electric shock. The device must only be opened by a qualified assistant.
Only use the appliance for its intended purpose.
This device may only be used in housings and business premises.
Please keep this instruction manual for further reference.
Instructions on environment protection
Do not dispose of this product in the usual household garbage at the end of its life cycle; hand it over at a
collection point for the recycling of electrical and electronic appliances. The symbol on the product, the
instructions for use or the packing will inform about the methods for disposal.
The materials are recyclable as mentioned in its marking. By recycling, material recycling or other forms of
reutilization of old appliances, you are making an important contribution to protect our environment.
Please inquire at the community administration for the authorized disposal location.
9.
Page 10
Do not obstruct the ventilation of the device. Make sure, that no curtains, newspapers, furniture or any
other type of object are blocking the ventilation system of the apparatus. The ventilation system must be
clear of objects at all times! Overheating may lead into serious damage of the device and reduce its
performance and lifespan.
Heat and warmth
Do not expose the appliance to direct sunlight. Make sure that the appliance is not subject to direct heat
sources such as heaters or open fire. Make sure that the ventilation slots of the appliance are not covered.
Moisture and cleaning
This appliance is not waterproof! Do not immerse the unit in water. Do not allow the unit to come in contact
with water. If water gets inside the unit, it may cause serious damage.
Do not use cleaning agents that contain alcohol, ammoniac, benzene or abrasives as these could damage
the unit. For cleaning, use a soft, moistened cloth.
Professional recycling
Batteries and packaging should not be disposed of in the trash. Batteries must be handed over to a
collection centre for used batteries. Separating disposable packaging materials is ecologically friendly.
SAFETY INSTRUCTIONS
1. READ INSTRUCTIONS - All the safety and operating instructions should be read before the unit is
operated.
2. RETAIN INSTRUCTIONS - The safety and operating instruction should be retained for future reference.
3. HEED WARNINGS - All warnings on the unit and in the operating instructions should be adhered to.
4. FOLLOW INSTRUCTIONS - All operating instructions should be followed.
5. WATER AND MOISTURE - The unit should not be used near water, for example, near a bathtub,
washbowl, kitchen sink, laundry tub, swimming pool or in a wet basement.
6. VENTILATION – Openings in the device serve its proper ventilation, are necessary for the operation and
prevent overheating. The unit should be situated so that its location or position does not interfere with its
proper ventilation. Do not place on bed, sofa, rug or similar surface that may block the ventilation
openings, in a built-in installation, such as a bookcase or cabinet that may impede the flow of air through
the ventilation openings.
7. HEAT - The unit should be situated away from heat sources such as radiators, stoves, or other appliances
(including amplifiers) that produce heat.
8. POWER SOURCE - The unit should be connected to power supply only of the type described in the
operating instructions or as marked on the unit.
9. POWER CORD PROTECTION - Power supply cords should be routed so that they are not likely to be
walked on or pinched by items placed upon or against them.
10. NON-USE – During longer periods of non-use please disconnect from mains power supply and antenna.
11. OBJECT and LIQUID ENTRY - Care should be taken so that objects do not fall and liquids are not spilled
into the enclosure through openings.
12. DAMAGE REQUIRING SERVICE - The unit should be serviced by qualified service personnel when:
a. The power-supply cord or plug has been damaged.
b. Objects have fallen into, or liquid has been spilled into the unit enclosure.
c. The unit has been exposed to rain or moisture.
d. The unit does not appear to operate normally. Only use the units and controls as described in this
manual;
e. The unit has been dropped, or the enclosure damaged.
f. The unit displays serious changes in its performance.
10.
Page 11
13. SERVICING - The user should not attempt to service the unit beyond that described in the user operating
instructions. All other servicing should be referred to qualified service personnel.
14. CLEANING – Disconnect from mains power supply before cleaning. Do not use liquid or spray cleaners,
only use a damp cloth. Follow the care and maintenance instructions in this manual.
15. LIGHTNING – During lightning and longer periods of non-use please disconnect from mains power
supply and antenna.
16. SAFETY CHECK – After servicing the unit ask the customer service for a safety check.
17. OVERLOAD – To avoid fire and electric shock do not overload wall outlets and convenience receptacles.
18. ELECTROSTATIC DISCHARGE- Disconnect from mains power supply and remove batteries if the unit
malfunctions. Reconnect after a short time.
Installation
Avoid installing the player in areas of:
1) direct sunlight or heating radiators or closed automobiles;
2) high temperature or high humidity;
3) excessive dust;
4) excessive vibration, as the internal parts may be seriously damaged.
Stacking:
Place the unit in an upright position. Do not place the unit on or under amplifiers or other equipment, which may heat up.
Mains Power Supply:
Heed the following instructions to avoid malfunction, fire, injury and electric shock:
• Check if the mains voltage as shown on the type plate (under the set) corresponds to your local mains
voltage. This unit is designed for AC 230V~50Hz.
• Connect the mains lead to the AC mains socket and the wall outlet.
• To disconnect from wall outlet only pull the plug and not the cable.
• Hold the plug tight, when connecting to or disconnecting from wall outlet.
• Do not touch the power cord with wet hands.
• Protect the power cord from heat generating devices.
• Please turn off the unit and contact an authorized customer service if it has been dropped or is damaged
otherwise.
Battery Safety Precautions:
• Keep batteries away from children and pets.
• Insert the batteries observing the polarity (+/-). Failure to properly align the battery polarity can cause
personal injury and/or property damage.
• Remove exhausted batteries from the device. Remove the batteries when the device will not be used for
extended periods of time to prevent damage due to rusted or corroded batteries.
• Never throw batteries into the fire. Do not expose batteries to fire or other heat sources.
• Battery disposal: exhausted batteries must be properly disposed of and recycled in compliance with all
applicable laws. For detailed information contact your local municipality’s waste authority.
• Follow the battery manufacturer’s safety, usage and disposal instructions.
11.
Page 12
Location of Controls
Top View
Front View
1. volume min/max control
2. time set
Set current time (with hour and min)
3. alarm radio/buzz
Selector for wake-up mode
4. min
Set minutes of current time, alarm time and sleep
timer
5. alarm on/off
6. hour
Set hours of current time, alarm time and sleep timer
7. band am/fm
Band selector AM and FM
8. alarm set
Set alarm time (with hour and min)
9. tuning control
10. sleep
Set sleep timer (with hour and min)
11. snooze
Snooze function after alarm activation or turn off
sleep timer
12. on/off
Turn radio on/off
13. Type label
14. Display
15. Battery compartment
Rear View
16. Speaker
17. line in jack
18. dimmer low/high
Set display brightness with toggle switch
19. FM wire antenna
20. Mains power cable
12.
Page 13

Connections
Antenna Connection
The clock radio comes with an FM wire antenna at the rear; please extend for best reception.
Power Source
The unit is powered by 230V~50Hz mains power supply. The 3V Lithium button cell CR2032 (not supplied) is used
for clock back-up only. Please remove the battery during long period of non-use to avoid battery leakage.
To avoid damages not covered by the warranty only connect the unit to above power supply.
Insert/Change Back-Up Battery
Insert the back-up battery in the battery compartment at the bottom of the unit; you need a Phillips screwdriver to
open the battery compartment. Please observe the polarity.
Change the back-up battery once a year.
Your settings (alarm, current time, etc.) are retained during power failure or when temporarily disconnecting from
mains power supply; the unit automatically switches to back-up battery.
Basic Operation
Turn Clock Radio On/Off
Turn the radio off with the on/off , when not in use. Turn volume min/max to adjust the volume.
Select the frequency band with the band selector band am/fm, toggle between FM and AM.
After use, please turn the unit off. To save energy, please disconnect the unit from mains power supply and remove
the battery to avoid battery leakage when not in use for a long period of time.
The display either shows the current time or the frequency of the radio station.
The unit is designed for continuous operation; it is either in ON mode or in standby mode.
Display Brightness
You can set the brightness of the display with the toggle switch dimmer low/high at the rear of the unit. Set to low for
dim backlight, set to high for a brighter display.
Set Current Time
When first connecting the unit 0:00 is displayed.
Press and hold the time button and simultaneously press hour to set the hours in 24-hour mode.
Press and hold the button for fast setting or tap it briefly to increase the setting by one hour.
Now set the minutes with time (press and hold) and min.
Press and hold the button for fast setting or tap it briefly to increase the setting by one minute.
The current time is set.
Radio
Press on/off to turn the radio on. The display shows the frequency band (AM or FM) and the frequency (e.g. 100.6
MHz and 525 KHz). Select the frequency band with the band selector band am/fm, toggle between FM and AM.
With tuning you tune into your favourite station, the frequency is displayed in large digits on the display.
Turn volume min/max to adjust the volume.
Press on/off to turn the radio off.
The radio comes with an FM wire antenna; please unwind for best reception. For best AM reception please direct
the radio.
13.
Page 14

line in Jack
Connect your portable MP3 player or other audio devices via 3.5mm jack audio cable (not supplied) to play back via
your clock radio.
Wake to Radio or Buzzer
Select the desired radio station and volume level.
Press and hold the alarm set button and simultaneously press the hour set button to set the desired alarm hour.
Press and hold the button for fast setting or tap it briefly to increase the setting by one hour.
Now press and hold the alarm set button and simultaneously press the min set button to set the desired alarm
minutes. Press and hold the button for fast setting or tap it briefly to increase the setting by one minute.
Now press alarm on/off, the alarm indicator lights on the display. The radio will turn on to wake you at the preset
time with your favorite station. It will play for 1 hour and then automatically turn off.
For alarm with your favourite station set alarm radio/buzz to radio.
To wake to buzzer instead of radio, make sure to turn alarm radio/buzz to buzz.
Press alarm on/off to turn off radio or buzzer, the alarm indicator turns off.
The alarm will come on the next day at the same time.
Snooze Function
When the buzzer sounds or the radio turns on, press snooze to turn off buzzer or radio temporarily. Approx. 5
minutes later buzzer or radio will sound again.
The snooze function is repeated up to one hour or until you cancel it by pressing the alarm on/off button.
After 1 hour the snooze function is automatically reset.
Sleep to Radio
Select the desired radio station and volume level.
Press the sleep button to access the sleep timer; the display shows 90 and SLEEP. Repeatedly press sleep to adjust
the sleep time to 90, 60, 30, and 10 minutes, the corresponding time is displayed and SLEEP flashes for a few
seconds. The display returns to the frequency and SLEEP is displayed.
The radio will play for the set period and then turn off automatically.
To turn the radio off prior to the end of the preset period, simply press the snooze button.
Sleep to Radio and Wake to Radio or Buzzer
Select the desired radio station and volume level.
Press the sleep button and set the desired sleep period as described above.
Set the alarm as described above.
The radio turns off after the preset time and wakes you the next morning with buzzer or radio, according to your
setting.
14.
Page 15
Troubleshooting
If a fault occurs, first check the points listed below before taking the unit for repair.
If you are unable to solve a problem by following these tips, consult your dealer or authorized service center.
WARNING: Never open the device. Always refer service or maintenance to authorized customer service personnel.
Problem Reason Solution
No Sound Volume is set too low.
Key malfunction. Electrostatic charge. Turn the unit off and then back
Poor reception. Weak signal.
Technical Specifications
Mains power supply: AC 230V~50Hz
Back-up for current time, settings: DC 3V Lithium button cell (CR2032)
Frequency range: FM 87.5MHz – 108MHz
AM 525kHz – 1615kHz
Dimensions: approx. 60 x 190 x 90 mm
Weight: approx. 600 g (without battery)
Subject to changes without prior notice.
Mains power supply is not
connected.
Interference from other
electric appliances
(TV, VCR, Computer, etc.).
Adjust the volume.
Connect the power cord to the
wall outlet.
on.
Alternatively, turn off the unit,
disconnect the AC power cord
and the back-up battery and
then re-connect it.
Adjust the antenna.
Keep distance to other
electrical appliances.
15.
Page 16
MODELE: 4224
Radio-réveil avec grand affichage LCD
MESURES DE SECURITE
AVERTISSEMENT
RISQUE D’ELECTROCUTION
NE PAS OUVRIR
ATENTION: AFIN DE REDUIRE LES
Un triangle avec symbole
d’éclairattire l’attention de
l’utilisateur sur la présence de
"voltage dangereux" non isolé
dans le coffrage, pouvant être
assez puissant pour
provoquerune électrocution.
RISQUES D’ELECTROCUTION, NE
PAS RETIRER LE COFFRAGE
(AVANT OU ARRIERE). NE
CONTIENT AUCUNE PIECE
REMPLACABLE. CONFIER TOUTE
REPARATION A DU PERSONNEL
QUALIFIE.
Un triangle avec point
d’exclamation attire l’attention
de l’utilisateur sur la présence
dans le manuel d’instructions
importantes concernant
l’utilisation et lamaintenance,
et devant être consultées.
PLUS D’INFORMATIONS
Prenez garde aux petites pièces et aux piles, ne pas les avaler. Elles peuvent être dangereuses à la
santé et entraîner un étouffement. Plus particulièrement, veuillez vous assurer que les petits appareils et
les piles soient à l’abri de la portée des enfants.
Conseil important pour la protection de l’ouïe
Attention:
Nous tenons à votre ouïe autant que vous.
Par conséquent, prenez vos précautions lors de l’usage de cet appareil.
Notre recommandations: Evitez les volumes forts.
Les enfants doivent être surveillés lorsqu’ils utilisent des écouteurs ; assurez-vous que l’appareil ne soit
pas réglé sur un niveau de volume trop élevé.
Attention!
Les volumes élevés peuvent irrémédiablement endommager l’ouïe des enfants.
NE JAMAIS laisser une personne ou surtout un enfant mettre des objets dans les trous, fentes ou
autres ouvertures de l’appareil. Cela pourrait entraîner la mort par décharge électrique. L’appareil doit
être ouvert uniquement par un assistant qualifié.
Veuillez utiliser l’appareil uniquement aux fins pour lesquelles il a été créé.
Cet appareil est exclusivement destiné à l’usage dans des locaux privés ou à usage commercial.
Veuillez conserver ce manuel d’utilisation pour toute utilisation ultérieure.
Indications relatives à la protection de l’environnement
Au terme de sa durée de vie, ce produit ne doit pas être éliminé avec les ordures ménagères mais doit
être remisà un point de collecte destiné au recyclage des appareils électriques et électroniques. Le
symbole figurant sur le produit, la notice d’utilisation ou l’emballage vous indique cela.
Les matériaux sont recyclables conformément à leur marquage. Vous apportez une large contribution à
la protection de l’environnement par le biais du recyclage, de la réutilisation matérielle ou par les autres
formes de réutilisation des appareils usagés.
Veuillez vous adresser à la municipalité pour connaître la déchetterie compétente.
16.
Page 17
Ne gênez pas la ventilation du dispositif. Assurez-vous que rideaux, journaux, couvertures ou meubles ne
bloquent en aucun cas les fentes de ventilation de l’appareil. La ventilation doit être assurée à tout
moment! La surchauffe peut causer à l’appareil des dommages sérieux et réduire sa performance et sa
durée de vie.
La chaleur et sources de chaleur
Veuillez ne pas exposer l’appareil à la lumière directe (du soleil). Assurez-vous que l’appareil n’est pas en
contact direct avec des sources de chaleur telles qu’un chauffage ou un feu. Assurez-vous que les fentes
d’aération de l’appareil ne sont pas fermées.
Humidité et nettoyage
Cet appareil n’est pas étanche ! Ne pas l’immerger dans l’eau. Ne pas laisser l’appareil entrer en contact
avec de l’eau. Si de l’eau venait à pénétrer l’appareil, cela l’endommagerait gravement.
Ne pas utiliser d’agents nettoyants qui contiennent de l’alcool, de l’amoniaque, du benzine ou des abrasifs
car ils pourraient endommager l’appareil. Pour nettoyer, utilisez simplement un chiffon doux humide.
Recyclage professionnel
Les piles et l’emballage n’appartiennent pas à la catégorie des ordures ménagères. Les piles doivent être
dirigées vers un centre collectant les piles usagées. Les matériaux de l’emballage sont écologiques
MESURES DE SÉCURITÉ
1. LISEZ CES INSTRUCTIONS -Toutes les instructions de fonctionnement et de sécurité doivent être lues
avant de procéder à la mise en marche de l'appareil.
2. CONSERVER LES INSTRUCTIONS - Les instructions de fonctionnement et de sécurité doivent être
conservées pour toute consultation ultérieure.
3. RESPECTER TOUS LES AVERTISSEMENTS – Tous les avertissements sur l’appareil et dans le mode
d’emploi doivent être respectés.
4. SUIVRE LES INSTRUCTIONS – Toutes les instructions de fonctionnement doivent être suivies.
5. EAU ET HUMIDITE – L’appareil ne doit pas être utilisé à proximité de l’eau, par exemple, près d’une
baignoire, d’une bassine, d’un évier, d’une lessiveuse, d’une piscine ou dans un sous-sol humide.
6. VENTILATION- Les ouvertures de l’appareil permettent une bonne ventilation, elles sont nécessaires pour
un bon fonctionnement de l’appareil et pour empêcher les surchauffes. L’appareil doit être placé afin que
son emplacement ou sa position n’interfère avec la bonne ventilation. Ne placez pas l’appareil sur un lit,
sofa, tapis ou une autre surface similaire qui pourrait bloquer les trous de ventilation. Le placer dans un
meuble encastré, comme une bibliothèque ou une étagère encastrée, empêchera également une bonne
circulation de l’air.
7. CHALEUR – L’appareil doit être tenu à l’écart des sources de chaleur comme les radiateurs, fours ou
autres appareils émettant de la chaleur (y compris les amplificateurs).
8. SOURCE D’ALIMENTATION- L’appareil doit être branché sur une alimentation de même type que celle
décrite dans le mode d’emploi ou comme indiqué sur l’unité.
9. PROTECTION DU CORDON D’ALIMENTATION – Les cordons d’alimentation doivent être acheminés
afin que l’on ne marche pas dessus ou qu’ils ne soient pas pincés par des éléments placés dessus ou
contre eux.
10. PERIODE DE NON UTILISATION- Pendant ces périodes de non utilisation de l’appareil, veuillez
débrancher l’appareil sur l’alimentation principale et l’antenne.
11. INSERTION D’OBJET et de LIQUIDE – Une extrême vigilance est de rigueur afin qu’aucun objet ou
liquide n’entrent dans le châssis par les ouvertures.
12. DOMMAGES NECESSITANT UNE REPARATION – L’unité doit être réparée par du personnel de
réparation qualifié lorsque:
a. Le cordon d’alimentation ou la prise d’alimentation ont été endommagé.
b. Un liquide a été projeté sur l’appareil ou si un objet est tombé dans l’appareil.
c. Si l’unité a été exposée à la pluie ou à l’humidité,
17.
Page 18

d. L’appareil ne semble pas fonctionner normalement. Veuillez n’utiliser les appareils et les contrôles que
selon les instructions de ce manuel ;
e. L’appareil est tombé ou si le châssis a été endommagé.
f. L’unité indique de grave changement dans sa performance.
13. REPARATION – L’utilisateur ne doit pas tenter de réparer l’unité autrement qu’indiqué dans ce mode
d’emploi. Toutes les autres réparations doivent être effectuées par du service de réparation qualifié.
14. NETTOYAGE- Débranchez le câble d’alimentation de l’alimentation principale avant le nettoyage.
N’utilisez pas de nettoyants liquides ou de sprays, utilisez uniquement un linge humide. Suivez les
instructions de nettoyage et de maintenance de ce manuel.
15. ORAGE- Pendant les orages et les périodes de non utilisation, veuillez débrancher l’appareil sur
l’alimentation principale et l’antenne.
16. CONTRÖLE SECURITE- Après avoir fait réparé l’unité, demandez au service client d’effectuer un
contrôle sécurité.
17. SURCHARGE- Pour éviter les risques d’incendie et d’électrocution, ne surchargez pas les prises
murales et les multi prises.
18. DECHARGE ELECTROSTATIQUE - Débranchez de l’alimentation secteur et retirez les piles de
l’appareil s’il disfonctionne. Rebranchez-le après un moment.
Installation
Evitez d’installer le lecteur en ces endroits :
1) à lumière du soleil ou près de radiateurs qui chauffent ou près d’automobiles.
2) à des températures élevées ou à un taux d’humidité élevé
3) à la poussière excessive ;
4) aux vibrations excessives, car les parties internes pourraient être sérieusement endommagées.
Empilement :
Placez l’appareil en position verticale. Ne pas placer l’appareil sur ou sous les amplificateurs ou sur ou sous un
autre équipement qui pourrait chauffer.
Alimentation secteur:
Faites attention aux instructions suivantes afin d’éviter un dysfonctionnement, des blessures et une électrocution :
• Vérifee si la tension principale comme indiquée sur la plaque (sous l’appareil), correspond à la tension de
secteur locale. L’appareil est conçu pour du AC 230V~50Hz.
• Connectez le câble secteur à la prise secteur AC et à la prise murale.
• Pour débrancher de la prise murale, débranchez simplement la prise et non le câble.
• Maintenez fermement la prise lorsque vous la connectez et déconnectez à la prise murale.
• Ne touchez pas le cordon d’alimentation avec les mains mouillées.
• Protégez le cordon d’alimentation des appareils générant de la chaleur.
• Veuillez éteindre l’appareil s’il est tombé ou s’il a été endommagé de quelque autre manière que ce soit et
contactez immédiatement votre service clientèle.
Précautions de Sécurité de la pile :
• Veuillez mettre les piles à l’abri des enfants et des animaux.
• Insérez les piles en veillant à respecter la polarité (+/-). Ne pas respecter peut causer des blessures
personnelles et/ou endommager l’appareil.
• Retirez les piles usées de l’appareil. Retirez les piles lorsque l’appareil n’est pas utilisé pendant des
périodes prolongées et ce afin d’éviter de l’endommager par des piles rouillées ou oxydées.
• Ne jamais jeter de piles au feu. Ne pas exposer les piles au feu ou à d’autres sources de chaleur.
• Destruction de piles : les piles usagées doivent être jetées de manière appropriée et recyclées en
conformité avec les lois en vigueur. Pour des informations détaillées, contactez l'autorité de votre
municipalité en charge des déchets.
• Veuillez suivre les consignes de sécurité de votre fabricant de piles, les instructions d’utilisation et de
destruction.
18.
Page 19
Localisation des commandes
Vue du dessus
Vue Avant
1. Bouton volume min/max
2. time set
Règle l’heure en cours (avec hour et min).
3. alarm radio/buzz
Bouton de sélection radio/buzzer.
4. min
Règle les minutes de l’heure actuelle, de l’alarme et
de la veille.
5. alarm on/off
Bouton d'activation de l’alarme.
6. hour
Règle les heures de l’heure actuelle, de l’alarme et de
la veille.
7. band am/fm
Sélection de la bande de fréquence AM ou FM
8. alarm set
Règle l’heure de l’alarme (avec hour et min).
9. Contrôle tuning.
10. sleep
Règle l’heure de la veille (avec hour et min)
11. snooze
Fonction Sommeil après activation du réveil ou
désactivation du mode de veille.
12. on/off
Marche/Arrêt de la radio
13. Étiquette du type d’appareil
14. Écran d’affichage.
15. Compartiment de la pile.
Vue Arrière
16. Haut-parleur.
17. Prise line in.
18. dimmer low/high
Commutateur de luminosité.
19. Antenne FM filaire.
20. Câble d’alimentation principale
19.
Page 20
Connexions
Connexion de l’antenne
Le radio réveil est livré avec une antenne FM filaire intégrée située à l’arrière, dépliez-la afin d’obtenir une meilleure
réception.
Alimentation
Cette unité est conçue pour fonctionner avec une alimentation domestique CA 230V~50Hz. La pile au lithium 3V
CR2032 (non fournie) est utilisée seulement en cas de panne.
Veuillez retirer la pile pendant les périodes longues de non utilisation afin d’éviter les fuites en provenance de la
pile.
Afin d’éviter les dommages qui ne seront pas couverts par la garantie, veuillez brancher l’appareil uniquement à
l’alimentation précisée ci-dessus.
Insérer/changer la pile de sauvegarde
Insérez la pile de secours dans le compartiment prévu à cet effet sous l’appareil, en l’ouvrant à l’aide d’un tournevis
cruciforme. Respectez les polarités.
Changez la pile une fois par an.
Vos réglages (alarme, heure, etc) sont conservés durant les coupures de courant ou lorsque vous débranchez
l’appareil de l’alimentation. L’appareil passera automatiquement à l’alimentation par le biais de la pile de secours.
Fonctionnement Simple
Allumer/éteindre le radio réveil
Éteignez la radio avec le bouton on/off . Tournez le bouton volume min/max pour régler le volume.
Sélectionnez la bande de fréquence à l’aide du bouton de sélection de gamme band am/fm, faites le passer entre
AM et FM.
Une fois terminé, éteignez l’appareil quand vous ne l’utilisez plus. Afin d’économiser de l’énergie, veuillez
débrancher l’appareil de l’alimentation principale lorsque vous ne l’utilisez pas pendant une période prolongée.
L’heure ou la fréquence de la station de radio seront toujours affichées en fonction du mode choisi.
L’appareil est conçu pour un fonctionnement en continu, soit en mode ON ou en mode veille.
Réglage de la luminosité
Vous pouvez régler la luminosité de l’écran d’affichage à l’aide du commutateur dimmer low/high situé à l’arrière de
l’appareil. Réglez en position low pour une faible luminosité, et high pour une luminosité plus forte.
Régler l’heure en cours
Lorsque vous branchez l’appareil la première fois, 0:00 s’affiche.
Appuyez et maintenez le bouton time et appuyez à ce moment là sur le bouton hour pour régler les heures en mode
24H.
Appuyez et maintenez le bouton pour un réglage plus rapide ou appuyez brièvement dessus pour faire avancer les
heures une par une.
Maintenant vous pouvez régler les minutes avec le bouton time (maintenir le bouton appuyé) et min.
Appuyez et maintenez le bouton pour un réglage plus rapide ou appuyez brièvement dessus pour faire avancer les
minutes une par une.
L’heure actuelle sera réglée.
Radio
Appuyez sur on/off pour mettre en marche la radio. L’écran affiche la gamme d’ondes (AM ou FM) ainsi que la
fréquence (ex: 100.6 MHz ou 525 KHz)
source band am/fm, faites le passer entre AM et FM.
Tournez le bouton tuning pour régler votre station préférée, la fréquence sera affichée avec de grands
l’écran.
Tournez le bouton volume min/max pour régler le volume.
Appuyez sur le bouton on/off pour éteindre la radio.
.Sélectionnez la bande de fréquence avec le bouton de sélection de la
chiffres sur
20.
Page 21

La radio est fournie avec une antenne FM filaire, veuillez la dérouler pour obtenir une meilleure réception. Pour une
meilleure réception de la radio AM, orientez l’appareil.
Prise line in
Connectez votre lecteur MP3 portable ou tout autre appareil audio à l’aide d’un câble audio mu,i d'une prise de
3.5mm (non fourni) pour l’écouter sur votre radio réveil.
S’éveiller avec la radio ou avec le Buzzer
Sélectionnez la station de radio désirée et le niveau du volume.
Maintenez appuyé le bouton de réglage alarm set, puis appuyez en même temps sur le bouton de réglage hour pour
régler l'heure de l'alarme. Appuyez et maintenez le bouton pour un réglage plus rapide ou appuyez brièvement
dessus pour faire avancer les heures une par une.
Maintenez appuyé le bouton de réglage alarm set, puis appuyez en même temps sur le bouton de réglage min pour
régler l'heure de l'alarme. Appuyez et maintenez le bouton pour un réglage plus rapide ou appuyez brièvement
dessus pour faire avancer les minutes une par une.
Appuyez ensuite sur alarm on/off, le témoin lumineux s’allumera à l’affichage. La radio s'allumera pour vous
réveiller à l'heure préprogrammée avec votre radio préférée. La radio restera audible pendant 1 heure puis s’arrêtera
automatiquement.
Pour se réveiller avec la radio, réglez le bouton de contrôle alarm radio/buzz sur la position radio.
Pour se réveiller avec le buzzer à la place de la radio, assurez-vous de placer le bouton de contrôle alarm radio/buzz
sur la position buzz.
Appuyez sur alarm on/off pour éteindre la radio ou le buzzer, le témoin lumineux disparaîtra.
L’alarme s'activera le jour suivant à la même heure.
Fonction Sommeil
Lorsque le buzzer sonne ou que la radio se met en marche, appuyez sur le bouton snooze pour éteindre le buzzer
ou la radio temporairement. Puis le buzzer ou la radio fonctionneront à nouveau 5 minutes plus tard.
La fonction Sommeil sera répétée pendant une heure ou jusqu’à ce que vous l’annuliez en appuyant sur le bouton
alarm on/off.
Après 1 heure, la fonction Sommeil sera automatiquement réinitialisée.
S’endormir avec la radio
Sélectionnez la station de radio désirée et le niveau du volume.
Appuyez sur le bouton sleep pour accéder au minuteur ; l’écran affichera 90 et SLEEP. Appuyez successivement sur
sleep pour régler le temps de veille à 90, 60, 30 ou 10 minutes, le temps sélectionné s’affiche et SLEEP clignote
pendant quelques secondes.
L’écran retourne à la fréquence et SLEEP est affiché.
La radio fonctionnera durant le temps programmé et s'éteindra ensuite automatiquement.
Pour éteindre la radio avant que le temps réglé soit atteint, appuyez simplement une fois sur le bouton snooze.
S’endormir avec la radio et se réveiller avec la Radio ou le Buzzer
Sélectionnez la station de radio désirée et le niveau du volume.
Appuyez sur le bouton sleep et réglez le temps de veille désiré comme indiqué ci-dessus.
Régler l’alarme comme indiqué ci-dessus.
La radio s’éteint après le temps de veille sélectionné préalablement et s’allumera avec le buzzer ou la radio, selon
vos réglages.
21.
Page 22

Guide de dépannage
Si une erreur se produit, veuillez d’abord procéder à la vérification des points listés ci-dessous avant de faire réparer
l’appareil.
Si vous ne parvenez pas à résoudre le problème à l’aide de ces conseils, veuillez contacter votre revendeur ou votre
service de réparation agréé.
AVERTISSEMENT : Ne jamais ouvrir l’appareil. Veuillez toujours faire réparer ou entretenir l’appareil par un
personnel de réparation agréé.
Problème Cause Solution
Pas de son Le volume est réglé à un
Disfonctionnement des
touches.
Mauvaise réception Signal faible.
Spécifications techniques
Alimentation secteur: C 230V~50Hz
Sauvegarde de l’heure actuelle, réglages: CC 3V Pile bouton au lithium (CR2032)
Gamme de fréquence: FM 87.5MHz – 108MHz
M 525kHz – 1615kHz
Dimensions: environ 60 x 190 x 90 mm
Poids: environ 600 g (sans les piles)
Peut être sujet à modifications sans avis préalable.
niveau trop bas
L’alimentation n’est pas
branchée.
Décharge électrostatique Ziehen Sie den Netzstecker für
Il y a des interférences
causées par d’autres
appareils
( TV, magnétoscopes,
ordinateurs, etc.)
Réglez le volume.
Branchez le cordon
d’alimentation dans la prise
murale.
einige Sekunden und
entnehmen Sie die Batterie der
Gangreserve, schalten Sie das
Gerät danach wieder ein.
Réglez l’antenne.
Mettez à distance des autres
appareils électriques.
22.
Page 23
MODELL: 4224
Rádiós óra nagy LCD kijelzővel
BIZTONSÁGI ELŐÍRÁSOK
FIGYELEM
FESZÜLTSÉG ALATT!
NE NYISSA KI A BURKOLATOT!
VIGYÁZAT: AZ ÁRAMÜTÉS
A villámot tartalmazó
háromszög szimbólum arra
hívja fel a felhasználó
figyelmét, hogy a
készülékben szigetelés
nélküli nagy feszültségű
alkatrészek találhatók,
amelyek áramütést okozha
VESZÉLYÉNEK ELKERÜLÉSE
ÉRDEKÉBEN NE VEGYE LE A
KÉSZÜLÉK BURKOLATÁT. A
KÉSZÜLÉK BELSEJÉBEN NINCS
OLYAN ALKATRÉSZ, AMELYET
HÁZILAG LEHETNE
KARBANTARTANI. A KÉSZÜLÉK
JAVÍTÁSÁT
A felkiáltójelet tartalmazó
háromszög azt jelzi, hogy a
felhasználásról és a
karbantartásról fontos
információkat talál a
mellékelt kézikönyvben,
melyet tanulmányozzon át.
KIEGÉSZÍTŐ INFORMÁCIÓK
Óvatosan kezelje a kis alkatrészeket és az elemeket, ne nyelje le őket. Egészségkárosodást és fulladást
okozhatnak. Kérjük minden esetben bizonyosodjon meg róla, hogy a gyermekek nem férhetnek hozzá a
kis alkatrészekhez és különösen az elemekhez.
Fontos tanácsok a halláskárosodás elkerülésére
Figyelmeztetés:
Az Ön hallásáért nemcsak Ön, de mi is aggódunk.
Éppen ezért kérjük, legyen óvatos a készülék használatánál.
Azt ajánljuk, hogy: kerülje a nagy hangerővel való hallgatást.
Gyermekek csak felügyelet mellett használhatják a fülhallgatókat, ellenőrizze, hogy a készülék nincs
nagy hangerőre állítva.
Vigyázat!
A túl nagy hangerő a gyermekeknél gyógyíthatatlan károsodást okozhat.
Kérjük gondoskodjon róla, hogy a készülék burkolatának nyílásaiba SOHA senki, főképpen pedig
gyermekek, ne dughassanak bele semmit, ez ugyanis életveszélyes áramütéshez vezethet. A készülék
burkolatát csak erre megfelelően képzett szakember nyithatja fel.
A készüléket kizárólag a rendeltetésének megfelelõen használjuk.
A készülék kizárólag lakásokban és üzletekben történõ felhasználásra alkalmas.
Tartsa meg a használati útmutatót a későbbi referencia céljából.
Környezetvédelmi tanácsok
Ezt a terméket az élettartama végén ne dobjuk a normál háztartási szemétbe, hanem adjuk le a villamos
és elektronikai hulladékok átvevőhelyén. A terméken található szimbólum, a használati útmutató vagy a
csomagolás felirata erre hívja fel a figyelmet.
A készülék anyagai a jelölésüknek megfelelõen újrahasznosíthatóak. Az újrahasznosítással, az anyagok
ismételt felhasználásával, illetve a használt készülékek egyéb felhasználásával sokat tehetünk
környezetünk megóvásáért.
A megfelelõ hulladék-átvevõhelyrõl a helyi önkormányzatnál érdeklõdhetünk.
23.
Page 24
Ne akadályozza a készülék szellőzését, például függönnyel, újsággal, takaróval vagy bútorral. A
szellőzőnyílásoknak mindig szabadon kell maradnia. A túlmelegedés kárt tehet a készülékben, és emiatt
annak élettartama lerövidülhet.
Meleg és forróság
Ne tegyük ki a készüléket a közvetlen napsütés hatásának. Ügyeljünk arra, hogy a készülék ne legyen
fűtőberendezés, nyílt láng vagy egyéb hőforrás közelében. A készülék szellőzőnyílásait mindig hagyjuk
szabadon.
Nedvesség és tisztítás
A készülék nem vízálló! Soha se merítse vízbe. Gondoskodjon arról, hogy a készülék ne érintkezzen
vízzel. A készülékbe kerülő víz súlyosan megrongálhatják a készüléket.
Ne használjon alkoholos, ammóniás, benzolos vagy súrolószeres tisztítószereket, mivel ezek kárt
okozhatnak a készülékben. A tisztításhoz használjon nedves, puha anyagot.
Előírásos hulladék-elhelyezés
Az elemek és a csomagolóanyagok nem a háztartási szemétbe valók. Az elemeket a használt elemek
számára kijelölt gyűjtőhelyre vigyük. A csomagolóanyagok szelektív elhelyezése szintén védi
környezetünket.
BIZTONSÁGI ELŐÍRÁSOK
1. OLVASSA EL AZ UTASÍTÁSOKAT - Minden biztonsági és használati utasítást olvasson el a készülék
üzembe helyezése előtt.
2. ŐRIZZE MEG AZ ÚTMUTATÓT - A használati utasításokat őrizze meg, hisz később szüksége lehet rá.
3. FIGYELMEZTETÉSEK - A terméken és a használati útmutatóban található figyelmeztetéseket tartsa be.
4. KÖVESSE AZ UTASÍTÁSOKAT - A működtetési és használati utasításokat tartsa be.
5. VÍZ ÉS NEDVESSÉG - Ne használja a terméket víz (például fürdőkád, mosdókagyló, konyhai mosogató,
mosóteknő) közelében, úszómedence mellett vagy átnedvesedett alagsorban.
6. SZELLŐZÉS - A készüléken található nyílások a megfelelő szellőzést szolgálják, a működéshez valamint
a túlmelegedés elkerülése érdekében szükségesek. A készüléket úgy kell elhelyezni, hogy a helye vagy
helyzete ne zavarja a megfelelő szellőzést. A terméket ne tegye ágyra, kanapéra, pokrócra vagy más
hasonló felületre, amely elzárhatja a szellőzőnyílásokat, ne építse be olyan helyre pl. szekrénybe vagy
tartóba amely gátolhatja a légáramlást a szellőzőnyílásokon át.
7. HŐ - A terméket a hőforrásoktól, pl. radiátoroktól, konvektoroktól, kályháktól vagy más hőt termelő
készülékektől (beleértve az erősítőket is) távol kell elhelyezni.
8. ÁRAMFORRÁS - A terméket csak a használati útmutatóban megadottal vagy a törzslapon megjelölttel
egyező feszültséget szolgáltató áramforrásról szabad üzemeltetni.
9. HÁLÓZATI CSATLAKOZÓ KÁBEL VÉDELME - A hálózati csatlakozó kábeleket úgy kell vezetni, hogy
azokra ne lépjenek rá és a rájuk vagy melléjük helyezett tárgyakba ne akadhassanak bele.
10. HA NEM HASZNÁLJÁK - Ha hosszabb ideig nem használja a készüléket, húzza ki a hálózati csatlakozót
és az antennát.
11. TÁRGYAK és FOLYADÉKOK BEJUTÁSA - Vigyázni kell, hogy a burkolat nyílásain át semmilyen tárgy ne
essen, vagy folyadék ne folyjon a készülék belsejébe.
12. JAVÍTÁST IGÉNYLŐ SÉRÜLÉSEK - A készüléket képesítéssel rendelkező szakembernek kell
megjavítania, ha:
a. A hálózati vezeték vagy a csatlakozódugasz megsérült.
b. Folyadék vagy valamilyen tárgy került a készülék belsejébe.
c. A készüléket eső vagy víz érte.
d. A készülék rendellenesen működik. A készülék részeit és irányítóegységeit csak a használati
utasításban leírt módon használja.
e. A készülék leesett vagy a burkolata megsérült.
f. A készülék teljesítményében nagymértékű változás állt be.
24.
Page 25
13. SZERVIZELÉS - A felhasználó nem végezhet semmilyen olyan szervizelési műveletet a készüléken,
amely nincs leírva a használati útmutatóban. A javításokat csak képesítéssel rendelkező szakember
végezheti.
14. TISZTÍTÁS – Tisztítás előtt húzza ki a hálózati csatlakozót. Ne használjon folyékony vagy aeroszolos
tisztítószereket, csak nedves ruhát használjon. Kövesse a használati útmutatóban leírt tisztítási és
karbantartási utasításokat.
15. VILLÁMLÁS - Villámlás idején, és ha hosszabb ideig nem használja a készüléket, húzza ki a hálózati
csatlakozót és az antennát.
16. BIZTONSÁGI ELLENŐRZÉS - A szervizelést követően kérje meg a vevőszolgálatot, hogy végezzenek
biztonsági ellenőrzést a terméken.
17. TÚLTERHELÉS - A tűz és az áramütés elkerülése érdekében ne terhelje túl a fali csatlakozókat és az
egybeépített konnektor aljzatokat.
18. ELEKTROSZTATIKUS KISÜLÉS - A készülék rendellenes működése esetén húzza ki a hálózati kábelt a
fali aljzatból és a vegye ki az elemeket. Rövid időt követően újra csatlakoztathatja.
Üzembe helyezés
Kerülje a készülék használatát a következő helyeken:
1) közvetlen napfénynek kitett helyen, fűtőtestek közelében, zárt autókban;
2) magas hőmérséklet vagy páratartalom esetén;
3) ahol erős porszennyeződés van;
4) erős rezgéseknek kitett helyeken, mivel ez súlyosan károsíthatja a készülék belső alkatrészeit.
Elhelyezés:
Állítsa a készüléket álló helyzetbe. Ne helyezze a készüléket erősítőre vagy egyéb olyan készülékre, illetve alá,
amely felforrósodhat.
Hálózati csatlakozás:
A rendellenes működés, tűzveszély, sérülések és áramütések elkerülése érdekében tartsa be a következő
utasításokat:
• Ellenőrizze, hogy a helyi hálózati feszültség megfelel-e a készülék alján található típuslapon feltüntetett
feszültségnek. A készülék 230V~50Hz-es váltóáramra lett tervezve.
• Csatlakoztassa a hálózati kábelt az AC hálózati aljzathoz és a fali csatlakozóaljzathoz.
• A csatlakozás megszüntetéséhez mindig a csatlakozódugót húzza ki, ne a kábelt.
• A csatlakozódugót erősen fogja meg az aljzatba való bedugáskor, illetve az aljzatból való kihúzáskor.
• Ne érjen nedves kézzel a hálózati kábelhez.
• Óvja a hálózati kábelt a hőt termelő eszközöktől.
• Kapcsolja le a készüléket, ha leesett vagy egyéb károsodás érte, és vegye fel a kapcsolatot egy hivatalos
márkaszervizzel.
Az elemekkel kapcsolatos óvintézkedések:
• Az elemeket tartsa távol a gyermekektől és a háziállatoktól.
• Helyezze be az elemeket, ügyelve a polaritásra (+/-). A nem megfelelő polaritás személyi sérülést és/vagy
anyagi károkat okozhat.
• A kimerült elemeket távolítsa el a készülékből. A korrodált vagy kifolyt elemek által okozott károk elkerülése
érdekében az elemeket akkor is távolítsa el, ha a készüléket hosszú ideig nem használja.
• Soha ne dobja tűzbe az elemeket. Ne tegye ki az elemeket nyílt láng vagy sugárzó hő hatásának.
• Elemek ártalmatlanítása: a kimerült elemeket a hatályos jogszabályoknak megfelelően kell ártalmatlanítani
és újrahasznosítani. Bővebb információért forduljon a települése hulladékgazdálkodási hatóságához.
• Tartsa be az elem gyártója által előírt biztonsági, használati és ártalmatlanítási utasításokat.
25.
Page 26
A kezelőszervek elhelyezkedése
Felülnézet
Elölnézet
1. volume min/max szabályozógomb
2. time set
A pontos idő beállítása (a hour és min gombokkal)
3. alarm radio/buzz
Ébresztési mód választókapcsoló
4. min
A pontos idő, az ébresztési idő és az elalvási idő
perceinek beállítása
5. alarm on/off
6. hour
A pontos idő, az ébresztési idő és az elalvási idő
óráinak beállítása
7. band am/fm
AM/FM sávválasztó
8. alarm set
Ébresztési idő beállítása (a hour és min gombokkal)
9. tuning szabályozógomb
10. sleep
Elalvási időzítő beállítása (a hour és min gombokkal)
11. snooze
Szundi funkció az ébresztő bekapcsolása után, vagy
kikapcsolja az elalvási időzítőt
12. on/off
Rádió be-/kikapcsolása
26.
13. Típus címke
14. Kijelző
15. Elemtartó
Hátulnézet
16. Hangszóró
17. line in csatlakozó
18. dimmer low/high
A kijelző fényerejének beállítása
váltókapcsolóval
19. FM vezetékantenna
20. Hálózati tápkábel
Page 27

Csatlakozások
Az antenna csatlakoztatása
Az órás rádió egy FM vezetékantennával kerül szállításra; csavarja azt szét a jobb vétel érdekében.
Áramforrás
Az egység áramellátása 230V~50Hz hálózati áramforrásról történik. A 3V-os CR2032 lítium gombelem (nincs
mellékelve) csak az idő tárolására szolgál. Kérjük távolítsa el az elemet, ha hosszabb ideig nem használja a készüléket,
nehogy megfolyjon.
Az olyan károsodás elkerülése érdekében, amelyre nem vonatkozik a garancia, csak a fent megadott áramforráshoz
csatlakoztassa a készüléket.
A tárolást biztosító elem behelyezése/cseréje
Helyezze be a tárolást biztosító elemet az elemtartóba a készülék alján; szüksége lesz egy Phillips csavarhúzóra az
elemtartó kinyitásához. Figyeljen oda a helyes polaritásra.
Cserélje a tárolást biztosító elemet évente egyszer.
A beállítások (ébresztés, pontos idő, stb.) megmaradnak áramkimaradás esetén is, vagy amikor ideiglenesen
megszakítja az áramellátást; a készülék ilyenkor automatikusan a tárolást biztosító elemre vált.
Alapvető műveletek
A rádiós óra be-/kikapcsolása
Kapcsolja ki a rádiót az on/off gombbal, ha nem használja. Tekerje a volume min/max gombot a hangerő
beállításához.
Válassza ki a frekvenciasávot a band am/fm sávválasztó gombbal, az FM és AM lehetőségek között lehet váltani.
A használat után kapcsolja ki a készüléket. Energiatakarékosságból húzza ki a készüléket a hálózati csatlakozóból, és
távolítsa el az elemet, nehogy az megfolyjon, ha hosszabb ideig nem használja a berendezést.
A kijelzőn vagy a pontos idő, vagy a rádióállomás frekvenciája látható.
A készülék folyamatos működésre lett tervezve; az vagy BE van kapcsolva, vagy készenléti állapotban van.
Kijelző fényereje
Beállíthatja a kijelző fényerejét a dimmer low/high váltókapcsolóval a készülék hátulján. Kapcsolja low állásba a
halványabb háttérvilágításhoz, vagy állítsa high állásba, hogy a kijelző fényesebb legyen.
A pontos idő beállítása
Mikor először kapcsolja be a készüléket 0:00 lesz látható.
Nyomja le tartsa lenyomva a time gombot és ezzel egyidőben nyomja le a hour gombot az órák beállításához 24-órás
üzemmódban.
Nyomja le és tartsa lenyomva a gombot a gyors beállításhoz, vagy nyomja le rövid ideig, ha az órákat eggyel szeretné
növelni.
Most állítsa be a perceket a time (lenyomva tart) és a min gombok segítségével.
Nyomja le és tartsa lenyomva a gombot a gyors beállításhoz, vagy nyomja le rövid ideig, ha a perceket eggyel szeretné
növelni.
A pontos idő be van állítva.
Rádió
Nyomja meg az on/off gombot a rádió bekapcsolásához. A kijelzőn látható a frekvenciasáv (AM vagy FM) és a
frekvencia (pl 100.6 MHz vagy 525 KHz). Válassza ki a frekvenciasávot a band am/fm sávválasztóval, az FM és AM
lehetőségek között lehet váltani.
A tuning tekerésével behangolhatja a kedvenc adóját, a frekvencia nagyméretű számjegyekkel a kijelzőn látható.
Tekerje volume min/max gombot a hangerő beállításához.
Nyomja meg az on/off gombot a rádió kikapcsolásához.
27.
Page 28

A rádió egy FM vezetékantennával kerül szállításra; csavarja azt szét a jobb vétel érdekében. A legjobb AM vétel
érdekében irányítsa be a rádiót.
line in csatlakozó
Csatlakoztassa a hordozható MP3 lejátszóját, vagy más audio eszközt 3.5 mm-es audio kábel segítségével (nem
tartozék) a rádiós órán való lejátszáshoz.
Ébresztés rádióval vagy berregővel
Állítsa be a kívánt rádióállomást és a hangerőt.
Nyomja le és tartsa lenyomva az alarm set beállítógombot, és vele együtt nyomja le a hour beállítógombot az
ébresztés órájának beállításához. Nyomja le és tartsa lenyomva a gombot a gyors beállításhoz, vagy nyomja le rövid
ideig, ha az órákat eggyel szeretné növelni.
Most nyomja le és tartsa lenyomva az alarm set beállítógombot és vele együtt nyomja le a min beállítógombot az
ébresztés percének beállításához. Nyomja le és tartsa lenyomva a gombot a gyors beállításhoz, vagy nyomja le
rövid ideig, ha a perceket eggyel szeretné növelni.
Most nyomja le az alarm on/off gombot, a ébresztő jelzés kigyullad a kijelzőn. A rádió bekapcsol, hogy a kedvenc
állmása ébressze a beállított időpontban. 1 órán át fog működni, majd automatikusan kikapcsol.
Ahhoz, hogy a kedvenc rádióadója ébressze, állítsa az alarm radio/buzz gombot radio állásba.
A berregővel való ébresztéshez a rádió helyett, állítsa az alarm radio/buzz gombot buzz állásba.
Nyomja meg az alarm on/off gombot a rádió vagy a berregő kikapcsolásához, a ébresztő jelzés kialszik.
Az ébresztő másnap ugyanabban az időpontban bekapcsol.
Szundi funkció
Amikor a berregő megy, vagy a rádió bekapcsol, nyomja le a snooze gombot a berregő vagy a rádió ideiglenes
kikapcsolásához. Körülbelül 5 perccel később a berregő vagy a rádió újra felhangzik.
A szundi funkció ismétlődik egy órán keresztül vagy megszüntetheti azt az alarm on/off gomb megnyomásával.
1 óra eltelte után a szundi funkció automatikusan törlődik.
Elalvás rádióval
Állítsa be a kívánt rádióállomást és a hangerőt.
Nyomja meg a sleep gombot az elalvási időzítő eléréséhez, a kijelzőn megjelenik 90 és SLEEP felirat. Nyomja meg
többször egymás után a sleep gombot az elalvási idő 90, 60, 30, és 10 percre állításához, a megfelelő idő
megjelenik kijelzőn, és a SLEEP villog néhány másodpercig. A kijelző visszatér a frekvenciához, és a SLEEP
megjelenik.
A rádió a beállított ideig fog működni, majd automatikusan kikapcsol.
A rádió kikacsolásához a beállított idő letelte előtt, egyszerűen nyomja le a snooze gombot.
Elalvás rádióval és ébresztés rádióval és/vagy berregővel
Állítsa be a kívánt rádióállomást és a hangerőt.
Nyomja le a sleep gombot és állítsa be a kívánt elalvási időt a fent leírt módon.
Állítsa be az ébresztést a fent leírt módon.
A rádió kikapcsol a beállított idő letelte után és ébreszt a következő reggel rádióval vagy berregővel, a beállításoknak
megfelelően.
28.
Page 29

HIBAELHÁRÍTÁS
Hiba esetén a készülék javíttatása előtt először mindig haladjon végig az alábbi listán.
Ha így sem tudja megoldani a problémát, forduljon a készülék értékesítőjéhez vagy a legközelebbi szakszervizhez.
FIGYELMEZTETÉS: Soha ne nyissa fel a készüléket. A szervizelést és a karbantartást mindig bízza a
hivatalos vevőszolgálat szakembereire.
Problem Indok Megoldás
Nincs hang A hangerő túl alacsonyra
Nem működnek a gombok Elektrosztatikusan töltődtek. Kapcsolja a készüléket ki, majd
van állítva.
A hálózati kábel nincs
csatlakoztatva.
Állítsa be a hangerőt.
Csatlakoztassa a hálózati
kábelt a fali aljzatba.
újra be.
Másik lehetőség: kapcsolja ki a
készüléket, húzz a ki a hálózati
kábelt, vegye ki a készenléti
elemet, majd csatlakoztassa
újra a készüléket.
Rossz vétel Gyenge a jel.
Műszaki jellemzők
Hálózati áramellátás: AC 230V~50Hz
A pontos idő és a beállítások segédáram-ellátása: DC 3V lítium gombelem (CR2032)
Frekvenciatartomány: FM 87.5MHz – 108MHz
AM 525kHz – 1615kHz
Méretek: kb. 60 x 190 x 90 mm
Tömeg: kb. 600 g (elemek nélkül)
Előzetes értesítés nélkül megváltoztathatók.
Más elektronikus készülékek
interferenciát okoznak
(tévé, videófelvevő,
számítógép, stb.)
Állítson az antennán.
Tartsa a készüléket távol más
elektronikus készülékektől.
29.
Page 30
MODELLO: 4224
Radio sveglia con display LCD grande
ISTRUZIONI DI SICUREZZA
AVVERTIMENTO
RISCHIO DI SCOSSE
ELETTRICHE NON APRIRE
ATTENZIONE: PER RIDURRE IL
RISCHIO DI SCOSSE ELETTRICHE,
Il triangolo con inscritto il
simbolo di un lampo attira
l’attenzione dell’utente su
“voltaggio pericoloso” senza
isolamento all’interno
dell‘involucro, che potrebbe
essere sufficientemente alto
da costituire rischio di scosse.
NON RIMUOVERE LA COPERTURA
(O IL FONDO). ALL’INTERNO NON VI
È ALCUNA COMPONENTE CHE
POSSA ESSERE RIPARATA
DALL’UTENTE. PER LE
RIPARAZIONI, RIVOLGERSI A
PERSONALE QUALIFICATO.
Il triangolo con inscritto il
punto esclamativo attira
l’attenzione dell’utente su
importanti istruzioni relative
all’uso e alla.
INFORMAZIONI AGGIUNTIVE
Fare attenzione a piccoli pezzi e batterie. Non ingerire. Potrebbe essere pericoloso per la salute e
portare al soffocamento. Assicurarsi di tenere piccoli dispositivi e batterie fuori dalla portata soprattutto
dei bambini.
Importante suggerimento riguardo alla protezione dell’udito
Attenzione:
Avete a cuore il vostro udito, così come noi.
Pertanto, fate attenzione quando usate questo apparecchio.
La nostra raccomandazione è di: Evitare un volume eccessivo
Durante l'utilizzo delle cuffie, i bambini dovrebbero essere sorvegliati. Assicurarsi che l'apparecchio non
è utilizzato a volume eccessivo.
Attenzione!
Un volume eccessivo potrebbe causare danni irreversibili all’udito dei vostri bambini..
MAI lasciare che nessuno, ed in particolar modo bambini, metta alcun oggetto sopra i buchi, scappatoie
o alter aperture sul dispositivo. Ciò potrebbe causare la morte da scossa elettrica. Il dispositivo deve
essere aperto solo da un assistente qualificato.
Usate l'apparecchio solo per il proposito per cui è stato disegnato.
L'apparecchio è destinato unicamente all'utilizzo in ambienti domestici e di lavoro.
Conservare il manuale delle istruzioni per future consultazioni.
Avvertenze per la tutela dell’ambiente
Una volta inutilizzabile il prodotto non deve essere smaltito con i rifiuti domestici ma portato presso un
punto di raccolta per il riciclo di apparecchiature elettriche. Ciò è indicato dal simbolo presente sul
prodotto, sulle istruzioni per l’uso o sulla confezione.
I materiali riciclabili sono riutilizzabili a seconda delle loro caratteristiche. Con il riutilizzo, con il
riciclaggio dimateriale o altri tipi di riciclaggio di apparecchi vecchi fornirete un importante contributo alla
tutela ambientale. Informatevi presso l’amministrazione comunale sui punti di smaltimento competenti.
30.
Page 31

Non ostacolate la ventilazione del dispositivo. Assicuratevi che né tende, giornali, coperte o mobili
blocchino le scappatoie della ventilazione dell’apparato. La ventilazione dev’essere costantemente
assicurata! Un eventuale surriscaldamento potrebbe causare seri danni al dispositivo e ridurre sia le
prestazioni che la durata del funzionamento.
Riscaldamento e calore
Non esponete l’apparecchio a luce del sole diretta. Assicuratevi che l’apparecchio non sia soggetto a fonti
di calore dirette come stufe o fiamme. Assicuratevi che le vie di ventilazione dell’apparecchio non siano
coperte.
Umidità e pulizia
Questo apparecchio non è impermeabile! Non immergere il dispositivo in acqua. Evitare che il dispositivo
entri in contatto con l'acqua. L'ingresso di acqua all'interno del dispositivo potrebbe danneggiarlo
gravemente.
Non utilizzare detergenti che contengono alcol, ammoniaca, benzene o sostanze abrasive poiché
potrebbero danneggiare l'apparecchio. Per la pulizia, utilizzare un panno morbido inumidito.
Riciclaggio professionale
Le batterie e l’imballaggio non fanno parte della vostra spazzatura casalinga. Le batterie devono essere
passate ad un centro di raccolta per batterie usate. Disporre separatamente dei materiali d’imballaggio è
un aiuto alla conservazione dell’ambiente.
ISTRUZIONI DI SICUREZZA
1. LEGGERE LE ISTRUZION - Leggere tutte le istruzioni relative alla sicurezza e al funzionamento prima di
utilizzare l'apparecchio.
2. CONSERVARE LE ISTRUZIONI -- Le istruzioni relative alla sicurezza e al funzionamento devono essere
conservate per future consultazioni.
3. RISPETTARE LE AVVERTENZE - Rispettare tutte le avvertenze contenute nel manuale d’uso
dell’apparecchio.
4. SEGUIRE LE ISTRUZIONI - Seguire accuratamente tutte le istruzioni d’uso.
5. ACQUA ED UMIDITÀ - L’apparecchio non deve essere collocato vicino all’acqua, ad es. nei pressi di
vasche da bagno, lavabi, lavelli, vasche per il bucato, piscine o in seminterrati umidi.
6. VENTILAZIONE – Le aperture sull’apparecchio servono per la ventilazione e sono necessarie per il
funzionamento e la prevenzione del surriscaldamento. Non collocare l’apparecchio in ubicazioni che ne
prevengano la corretta ventilazione. Non collocare su letti, divani, tappeti o altre superfici simili sulle quali
le aperture potrebbero essere ostruite, in spazi chiusi quali librerie ed armadi, dove il flusso di aria nelle
aperture di ventilazione possa essere impedito.
7. CALORE - L’apparecchio non deve essere collocato vicino a fonti di calore, quali radiatori, stufe od altri
elettrodomestici (amplificatori inclusi) che producono calore.
8. ALIMENTAZIONE - L’apparecchio dovrebbe essere connesso solo a fonti di alimentazioni del tipo
descritto nel manuale d’uso o indicato sull’apparecchio stesso.
9. SALVAGUARDIA DEL CAVO DI ALIMENTAZIONE - Assicurarsi che i cavi di alimentazione non siano a
rischio di essere calpestati o schiacciati da oggetti posti al di sopra o a ridosso di essi.
10. IN CASO DI NON UTILIZZO – Durante lunghi periodi di non utilizzo, scollegare i cavi di alimentazione ed
antenna.
11. INGRESSO DI OGGETTI O LIQUIDI – Assicurarsi che oggetti o liquidi non penetrino nell’apparecchio
attraverso le aperture.
12. GUASTO CHE RICHIEDE ASSISTENZA - L'apparecchio dovrà ricevere assistenza da personale
qualificato se:
a. il cavo di alimentazione o la spina sono danneggiati;
b. oggetti o liquidi sono penetrati all’interno dell’involucro dell’apparecchio;
c. l’apparecchio è stato esposto a pioggia od umidità;
d. L'apparecchio sembra non funzionare normalmente. Utilizzare gli apparecchi e i comandi solo secondo
le descrizioni contenute in questo manuale;
e. l’apparecchio è stato fatto cadere o l’involucro è danneggiato;
f. l’apparecchio dimostra un serio calo nelle prestazioni.
31.
Page 32

13. ASSISTENZA – L’utente non è autorizzato a riparare l’apparecchio oltre i limiti descritti nel manuale
d’istruzioni per l’utente. Per ogni altra riparazione rivolgersi a personale di assistenza qualificato.
14. PULIZIA – Scollegare il cavo di alimentazione prima di pulire. Non utilizzare detergenti liquidi o spray, ma
un semplice panno umido. Seguire le istruzioni per la cura e manutenzione contenute nel presente
manuale.
15. ILLUMINAZIONE – Durante temporali e lunghi periodi di non utilizzo, scollegare il cavo di alimentazione
e l’antenna.
16. CONTROLLO DI SICUREZZA – Dopo aver ricevuto assistenza, fare richiesta presso il servizio clienti per
un controllo di sicurezza.
17. SOVRACCARICO – Per evitare incendi e scosse elettriche non sovraccaricare le prese elettriche e le
prese multiple.
18. SCARICA ELETTROSTATIC- Staccare la spina dall'impianto elettrico e togliere le batterie in caso di
malfunzionamento. Ricollegare dopo qualche tempo.
Installazione
Evitare d’installare il lettore in aree di:
1) diretta luce solare o termosifoni o automobili chiuse;
2) alta temperature o alta umidità;
3) polvere eccessiva;
4) vibrazione eccessiva, in quanto le parti interne potrebbero danneggiarsi.
Circuito d’attesa:
Posizionare l'apparecchio in posizione verticale. Non posizionare l'apparecchio sopra o sotto amplificatori o altre
apparecchiature che si scaldino.
Alimentazione:
Seguire le seguenti istruzioni per evitare malfunzionamento, lesioni o shock elettrico:
• Controllare se il voltaggio di rete indicato sull’etichetta (sotto il dispositivo) corrisponde al voltaggio locale.
L’unità è progettata per AC 230V~50Hz.
• Collegare il cavo alla presa AC e presa a parete.
• Per disinserire la spina dalla presa a parete, tirare dalla spina e non dal cavo.
• Tenere la presa stretta, durante la fase di connessione o disconnessione dalla presa a parete.
• Non toccare la spina con mani bagnate.
• Proteggere il cavo di rete da dispositivi che generano calore.
• Spegnere l'apparecchio e rivolgersi ad un servizio clienti autorizzato in caso sia caduto o si sia altrimenti
danneggiato.
Precauzioni di sicurezza per la batteria:
• Tenere le batterie lontano da bambini o animali domestici.
• Inserire le batterie rispettando la polarità (+/-). Se non le batterie non sono correttamente inserite,
potrebbero verificarsi lesioni e/o danni al dispositivo.
• Rimuovere le batterie esaurite dal dispositivo. Rimuovere le batterie quando il dispositivo non viene
utilizzato per lunghi periodi per prevenire danneggiamenti causati da batterie corrose.
• Non gettare le batterie nel fuoco. Non esporre le batterie a fuoco o altre fonti di calore.
• Smaltimento delle batterie: Le batterie esaurite devono essere smaltite correttamente e riciclate in
conformità con la normativa vigente. Per ottenere informazioni dettagliate, rivolgersi alle autorità locali
competenti in materia di rifiuti.
• Seguire le istruzioni relative alla sicurezza, l'uso e lo smaltimento, fornite dal produttore delle batterie.
32.
Page 33

Posizione dei comandi
Visione dall’alto
Visione frontale
1. Controllo volume min/max
2. time set
Imposta orario corrente (con hour e min)
3. alarm radio/buzz
Selettore della modalità sveglia
4. min
Imposta i minuti dell’orario corrente, orario della
sveglia e timer sleep
5. alarm on/off
6. hour
Imposta le ore dell’orario corrente, orario sveglia e
timer sleep
7. band am/fm
Selettore di banda AM e FM
8. alarm set
Imposta orario sveglia (con hour e min)
9. Controllo tuning
10. sleep
Imposta timer sleep (con hour e min)
11. snooze
Funzione Snooze dopo l’attivazione della sveglia o
disattivazione del timer sleep
12. on/off
Accensione/spegnimento della radio
13. Etichetta
14. Display
15. Vano batterie
Visione posteriore
16. Altoparlante
17. Presa line in
18. dimmer low/high
Imposta la luminosità del display con
commutatore
19. Antenna cavo FM
20. Cavo di rete
33.
Page 34

Connessioni
Connessione dell’antenna
La radio orologio è dotata di un’antenna FM sul retro, estenderla per una migliore ricezione.
Alimentazione di rete
L’unità è alimentata da alimentazione 230V~50Hz. La pila a cellula a litio CR2032 3V (non in dotazione) è utilizzata
solo per supporto a orologio. Rimuovere la batteria in caso di non utilizzo per lunghi periodi per evitare perdite della
batteria.
Per evitare guasti non coperti da garanzia collegare l’unità solo all’alimentazione menzionata.
Inserimento/sostituzione della batteria
Inserire una batteria nel vano batteria in basso all’unità; avete bisogno di un giravite Philips per aprire il vano
batteria. Rispettare la giusta polarità.
Sostituire la batteria di riserva una volta all’anno.
Le impostazioni (sveglia, orario corrente, ecc.) sono mantenute in caso di interruzione di alimentazione elettrica;
l’unità attiva automaticamente la batteria di riserva.
Funzioni base
Accensione/spegnimento della radio
Disattivare la radio con on/off , se non in uso. Utilizzare il comando volume min/max per regolare il volume.
Selezionare la frequenza di banda con il selettore di banda band am/fm, spostandosi tra FM e AM.
Dopo l’utilizzo spegnere l’unità. Per risparmiare energia scollegare l’unità dall’alimentazione di corrente e rimuovere
la batteria per evitare perdita di liquido, se il dispositivo non è utilizzato per lungo tempo.
Il display mostra l’orario corrente o la frequenza della stazione radio.
L’unità progettata per un funzionamento continuo, sia in modalità ON che standby.
Luminosità del display
E’ possibile impostare la luminosità del display con il commutatore dimmer low/high presente sul retro dell’unità.
Impostare su low per luminosità più scura, impostare su high per maggiore luminosità del display.
Come impostazione l’orario corrente
Alla prima connessione l’unità visualizza 0:00.
Tenere premuto il tasto time e premere simultaneamente hour per impostare le ore in modalità 24 ore.
Tenere premuto il tasto per l’impostazione rapida o premerlo una volta per aumentare l’impostazione di un’ora.
Impostare ora i minuti con time (tenere premuto) e min.
Tenere premuto il tasto per l’impostazione rapida o premerlo una volta per aumentare l’impostazione di un minuto.
L’orario corrente è impostato.
Radio
Premere on/off per accendere la radio. Il display mostra la frequenza di banda (AM o FM) e la frequenza (ad es.
100.6 MHz e 525 KHz). Selezionare la frequenza di banda con il selettore di banda band am/fm, spostandosi tra FM
e AM.
Con tuning è possibile sintonizzarsi alla stazione preferita, la frequenza viene visualizzata in cifre larghe sul display.
Utilizzare il comando volume min/max per regolare il volume.
Premere on/off per apegnere la radio.
La radio è dotata di un'antenna FM, stenderla per una migliore ricezione. La migliore ricezione AM si ottiene
spostando la radio.
34.
Page 35

Presa line in
Connettere il lettore MP3 portatile o altro dispositivo audio tramite la il cavo audio per presa cuffie 3.5 mm (non in
dotazione) per riprodurre audio tramite la radio sveglia.
Sveglia con radio o suoneria
Selezionare la stazione radio desiderata e il livello del volume.
Tenere premuto il tasto di impostazione alarm set e premere simultaneamente il tasto di impostazione hour per
impostare l’orario di sveglia desiderato. Tenere premuto il tasto per l’impostazione rapida o premerlo una volta per
aumentare l’impostazione di un’ora.
Tenere premuto il tasto di impostazione alarm set e premere simultaneamente il tasto di impostazione min per
impostare i minuti dell’orario di sveglia desiderato. Tenere premuto il tasto per l’impostazione rapida o premerlo una
volta per aumentare l’impostazione di un minuto.
Premere ora alarm on/off, l’indicatore compare sul display. La radio si accende per la sveglia all’orario stabilito con
la stazione preferita. Suonerà per 1 minuto e poi automaticamente si spegne.
Per la sveglia con la stazione preferita impostare alarm radio/buzz to radio.
Per svegliarsi con suoneria assicurarsi di regolare alarm radio/buzz su buzz.
Premere alarm on/off per spegnere la radio o suoneria, l’indicatore scompare dal display.
La sveglia si attiva il giorno successivo alla stessa ora.
Funzione Snooze
Se la suoneria o radio si accende, premere snooze per disattivare la suoneria o radio. Circa 5 minuti dopo la
suoneria o radio suonerà di nuovo.
La funzione Snooze viene ripetuta per un’ora o finché non viene annullata premendo il tasto alarm on/off.
Dopo 1 ora la funzione snooze si resetta automaticamente.
Da silenzioso a radio
Selezionare la stazione radio desiderata e il livello del volume.
Premere il tasto sleep per accedere al timer sleep; il display mostra 90 e SLEEP. Premere ripetutamente sleep per
regolare l’orario sleep a 90, 60, 30, e 10 minuti, l’orario corrispondente viene visualizzato e SLEEP lampeggia per
alcuni secondi. Il display ritorna alla frequenza e SLEEP viene visualizzato.
La radio si attiva all’orario desiderato e si spegne automaticamente.
Per spegnere la radio prima della fine del tempo prestabilito, premere il tasto snooze.
Da silenzioso a radio e da sveglia a radio o suoneria
Selezionare la stazione radio desiderata e il livello del volume.
Premere il tasto sleep e impostare il periodo silenzioso desiderato come descritto sopra..
Impostare la sveglia come descritto sopra.
La radio si spegne dopo l’orario preimpostato e si attiva il giorno successivo con la suoneria o radio a seconda
dell’impostazione.
35.
Page 36

Problemi e soluzioni
Se si verifica un problema, consultare i punti elencati di seguito prima di portare l'apparecchio a riparare.
Se non si è in grado di risolvere un problema seguendo i suggerimenti forniti, contattare il rivenditore o il centro di
assistenza autorizzato.
ATTENZIONE: Non aprire mai il dispositivo. Per le riparazioni e la manutenzione rivolgersi sempre al
personale del servizio di assistenza autorizzato.
Problema Causa Soluzione
Audio assente Volume troppo basso.
Malfunzionamento dei
pulsanti.
Scarsa qualità della
ricezione.
Specifiche tecniche
Alimentazione da impianto: AC 230V~50Hz
Riserva per l'orologio e le impostazioni: pila a cellula al litio DC 3V (CR2032)
Gamma di frequenza: FM 87.5MHz – 108MHz
AM 525kHz – 1615kHz
Dimensioni: circa. 60 x 190 x 90 mm
Peso: circa. 600 g (senza batteria)
Alimentazione non collegata.
Carica elettrostatica. Spegnere e riaccendere
Segnale debole.
Interferenza da altre
apparecchiature elettriche
(TV, Videoregistratore,
Computer, ecc.).
Soggetto a modifica senza preavviso.
Regolare il volume.
Inserire la spina nella presa a
muro.
l'apparecchio. In alternativa,
spegnere l'apparecchio,
staccare la spina e disinserire
la batteria di riserva, e poi
ricollegare il tutto.
Regolare l'antenna.
Mantenere una distanza
adeguata dalle altre
apparecchiature elettriche.
36.
Page 37

MODELO: 4224
Radio reloj con gran pantalla LCD
INSTRUCCIONES DE SEGURIDAD
ADVERTENCIA
RIESGO DE DESCARGA
ELÉCTRICA
Un triángulo con un símbolo de
rayo con punta dentro de un
triángulo tiene el propósito de
alertar al usuario de la
presencia de voltaje “peligroso”
no aislado dentro de la caja
que puede ser de suficiente
magnitud para constituir un
riesgo de descarga eléctrica a
los seres humanos.
ADVERTENCIA: PARA PREVENIR EL
RIESGO DE SUFRIR UNA
DESCARGA ELÉCTRICA, NO QUITE
LA CUBIERTA.. NO HAY PIEZAS A
LAS QUE PUEDA DAR SERVICIO
DENTRO. REFIERA TODO EL
SERVICIO A PERSONAL
CUALIFICADO.
Este signo de exclamación
dentro de un triángulo tiene el
propósito de alertar al usuario
de la existencia de
importantes instrucciones de
operación y mantenimiento
(servicio) en este manual.
INFORMACIÓN ADICIONAL
Tenga cuidado con las piezas pequeñas y las baterías, no las ingiera. Puede ser peligroso para su
salud y producir asfixia. Asegúrese de que mantiene los dispositivos pequeños y las baterías lejos del
alcance de los niños.
Aviso importante respecto a la protección de sus oídos
Cuidado:
Su capacidad auditiva nos preocupa tanto como a usted.
Por lo tanto, tenga precaución cuando use el aparato.
Le recomendamos que evite escuchar música a niveles altos de volumen.
Debe supervisar a los niños cuando utilicen los auriculares; asegúrese de que el aparato no está al
volumen máximo.
¡Peligro!
Niveles de volumen altos pueden causar daños irreparables a los oídos de los niños.
No permita NUNCA que nadie, en especial niños, ponga objetos dentro de los huecos, ranuras u otras
aberturas del aparato. Existe riesgo de sufrir descargas eléctricas que pueden causar la muerte. El
aparato solo debe ser abierto por un operario calificado.
Use el aparato únicamente para los propósitos que fue diseñado.
El aparato está concebido exclusivamente para ser usado en viviendas y áreas de negocio.
Asegúrese de que guarda el manual de instrucciones para futuras referencias.
Indicaciones sobre el medio ambiente
No deseche este producto en la basura doméstica una vez que se haya cumplido su vida útil,
deposítelo en un punto de recogida de aparatos eléctricos y electrónicos. El símbolo que se encuentra
en el producto, el manual de usuario o el embalaje, hacen referencia a este punto.
El plástico es reutilizable según esté indicado. Con la reutilización de productos de plástico u otra clase
de reciclaje de aparatos viejos, está contribuyendo de forma importante a la conservación del medio
ambiente.
Infórmese en su administración local sobre la entidad de eliminación de residuos competente.
37.
Page 38

No impida la ventilación del aparato. Asegúrese, que cortinas, periódicos, manteles o muebles no estén
bloqueando las ranuras de ventilación del aparato. ¡Se debe asegurar una ventilación correcta todo el
tiempo! El sobrecalentamiento puede causar serios daños en el interior del aparato, provocando
problemas de funcionamiento y acortando el tiempo de vida útil del producto.
Calor
No exponga el aparato a la luz solar directa. Asegúrese que el aparato no esta expuesto directamente a
Fuentes de calor como calefactores o fuego. Asegúrese que las ranuras de ventilación del aparato no esté
n cubiertas.
Humedad y limpieza
¡Este aparato no es resistente al agua! No sumerja la unidad en agua. No permita que la unidad entre en
contacto con el agua. Si el agua entra en ella puede provocar daños serios.
No use agentes de limpieza que contengan alcohol, amoniaco, benceno o abrasivos ya que pueden dañar
la unidad. Para limpiarlo use un paño suave ligeramente humedecido.
Reciclaje profesional
No deseche las pilas ni el material de embalaje con la basura doméstica. Las pilas deben ser recogidas
por el personal del centro recolector de baterías usadas. Desechar separadamente los materiales de
embalaje es de gran ayuda para el medio ambiente.
INSTRUCCIONES DE SEGURIDAD
1. LEA LAS INSTRUCCIONES – Debe leer todas las instrucciones de seguridad y funcionamiento antes de
utilizar el aparato.
2. GUARDE LAS INSTRUCCIONES – Debe guardar las instrucciones de seguridad y funcionamiento para
futuras referencias.
3. ADVERTENCIAS –Siga todas las advertencias en este aparato y en el manual de instrucciones.
4. SIGA LAS INSTRUCCIONES – Siga todas las instrucciones de seguridad de este manual.
5. AGUA Y HUMEDAD- No use este aparato cerca de Fuentes de agua, por ejemplo, cerca de bañeras,
palanganas, fregaderos, piscinas o bases mojadas.
6. VENTILACIÓN – las aperturas del dispositivo sirven para la ventilación del aparato, son necesarias para
el funcionamiento y prevención de sobrecalentamiento. El aparato tiene que estar colocado de forma que
su posición no interfiera con su propia ventilación. No coloque el aparato en camas, sofás, alfombras o
superficie similar que puede obstruir las aperturas de ventilación, en una instalación incorporada, tales
como una estantería o armario que impida el flujo de aire a través de las aperturas de ventilación.
7. CALOR – No coloque este aparato cerca de Fuentes de calor tales como radiadores, estufas u otros
aparatos (incluido amplificadores) que producen calor.
8. FUENTE ELÉCTRICA – Este aparato debe conectarse a la toma de corriente del tipo descrito en las
instrucciones de funcionamiento o escrito en el aparato.
9. PROTECCIÓN DEL CABLE DE ALIMENTACIÓN – el cable de alimentación tiene que ser guiado con el
fin de no andar sobre él o pinchado con artículos colocados en él o contra él.
10. DEJAR DE USAR – Durante largos periodos de tiempo sin usar el aparato, por favor, desconéctelo de la
toma de corriente y desconecte la antena también.
11. OBJETO Y ENTRADA DE LÍQUIDO – debe tener cuidado que ningún objeto o líquido caiga en el aparato
o sea vertido en las aperturas del aparato.
12. DAÑOS QUE REQUIEREN REVISIÓN – Esta unidad deber ser revisada por personal cualificado cuando:
a. El cable de alimentación o enchufe ha sido dañado.
b. Los objetos han sufrido una caída o cualquier líquido ha sido vertido en el aparato.
c. Este aparato ha sido expuesto a la lluvia o humedad.
d. La unidad parece que no funciona normalmente. Use las unidades y controles como se describe en
este manual;
e. Esta unidad ha sufrido una caída, o la carcasa está dañada.
f. El aparato no funciona correctamente.
38.
Page 39

13. FUNCIONAMIENTO – El usuario no debe usar el aparato para otros fines que no estén descritos en
este manual de instrucciones. Cualquier tipo de revisión debe hacerse por el personal cualificado.
14. LIMPIEZA – Desconecte el aparato de la toma de corriente antes de limpiarlo. No use líquido o
limpiadores en forma de pulverizador, use sólo un paño húmedo. Siga las instrucciones de cuidado y
mantenimiento de este manual.
15. RELÁMPAGOS – Durante relámpagos y largos periodos de no haber usado el aparato desconecte el
aparato de la toma de corriente y la antena.
16. COMPROBACIÓN DE SEGURIDAD – Después de vender el aparato pida al servicio de clientes de
hacer una comprobación de seguridad.
17. SOBRECARGA – Para evitar incendios y descargas eléctricas no sobrecargue su toma de corriente y su
receptáculos convenientes.
18. DESCARGA ELECTROESTÁTICA - Desconecte de la corriente principal y quite las baterías si la unidad
no funciona bien. Vuelva a conectarla después de un corto periodo de tiempo.
Instalación
Evite instalar el reproductor en áreas de:
1) Luz solar directa, radiadores de calor o automóviles cerrados.
2) Altas temperaturas o mucha humedad.
3) Polvo excesivo.
4) Vibración excesiva, ya que las piezas internas pueden averiarse gravemente.
Ubicación:
Coloque la unidad en posición vertical. No coloque la unidad sobre o debajo de amplificadores u otro equipo que
pueda calentar el aparato.
Fuente de voltaje:
Preste atención a las siguientes instrucciones para evitar el mal funcionamiento del dispositivo, incendios, heridas y
electrocución:
• Verifique si la fuente de voltaje, tal y como se indica en la placa (debajo del aparato), corresponde con su
fuente de voltaje local. Esta unidad está diseñada para CA 230V~50Hz.
• Conecte el cable de suministro de energía al zócalo de suministro de energía CA y al tomacorriente de la
pared.
• Para desconectarlo de la toma de corriente de la pared, tire de la clavija y no del cable.
• Mantenga la clavija presionada cuando la conecte o desconecte de la toma de corriente de la pared.
• No toque el cable de alimentación con las manos mojadas.
• Proteja el cable de alimentación de dispositivos que generen calor.
• Apague el aparato y contacte con un servicio técnico autorizado si se ha dejado caer o se ha dañado de
otra manera.
Precauciones de seguridad de la pila:
• Mantenga las pilas fuera del alcance de niños y mascotas.
• Inserte las pilas observando la polaridad (+/-). Alinear erróneamente la polaridad de la pila puede causar
heridas personales y/o daños materiales.
• Retire las pilas gastadas del dispositivo. Retire las pilas cuando el dispositivo no vaya a ser usado durante
extensos periodos de tiempo para prevenir daños causados por pilas oxidadas o corroídas.
• Nunca arroje las pilas al fuego. No exponga las pilas al fuego u otras fuentes de calor.
• Tirar las baterías: las baterías gastadas se deben tirar y reciclar según las leyes aplicables. Para
información más detallada contacte con las autoridades municipales sobre reciclaje.
• Siga las instrucciones de seguridad de uso y reciclaje del fabricante de baterías.
39.
Page 40

Situación de los controles
Vista Superior
Vista Frontal
1. Control volume min/max
2. time set
Ajusta la hora actual (con hour y min)
3. alarm radio/buzz
Selector del modo despertador
4. min
Ajusta los minutos de la hora actual, alarma y
temporizador de reposo
5. alarm on/off
6. hour
Ajusta las horas de la hora actual, alarma y
temporizador de reposo
7. band am/fm
Selector de banda AM y FM
8. alarm set
Ajusta la hora de la alarma (con hour y min)
9. Control tuning
10. sleep
Ajusta el temporizador de reposo (con hour y min)
11. snooze
Función siesta luego de la activación de la alarma o
del apagado del temporizador de reposo
12. on/off
Encendido /apagado de la radio
13. Etiqueta identificadora
14. Pantalla
15. Compartimiento de batería
Vista Inferior
16. Altavoz
17. Toma line in
18. dimmer low/high
Ajusta el brillo de la pantalla con un
interruptor
19. Antena de cable FM
20. Cable de alimentación
40.
Page 41

Conexiones
Conexión de la antena
El radio reloj viene con una antena de cable FM situada en la parte posterior, extiéndala para una mejor recepción.
Fuente de alimentación
Esta unidad se alimenta con 230V~50Hz de suministro eléctrico. La pila botón de Litio de 3V CR2032 (no
suministrada) se utiliza sólo como respaldo. Quite la batería si no la utiliza durante largos períodos para evitar
fugas.
Para evitar daños no cubiertos por la garantía, conecte la unidad sólo al tipo de alimentación descrito.
Colocación/Cambio de la batería de respaldo
Coloque la batería de respaldo en el compartimiento de la batería en la parte inferior de la unidad; necesitará un
destornillador Phillips para abrir el compartimiento de la batería. Observe la polaridad indicada.
Cambie la batería de respaldo una vez al año.
Sus ajustes (alarma, hora actual, etc.) se conservan durante los fallos de corriente o cuando se desconecta
temporalmente de la corriente; la unidad se conecta automáticamente a la batería de respaldo.
Funcionamiento básico
Encendido / Apagado del radio reloj
Apague la radio con on/off cuando no la utilice. Gire volume min/max para ajustar el volumen.
Seleccione la banda de frecuencia con el selector de banda band am/fm, cambie entre FM y AM.
Después de usarla, apague la unidad. Para ahorrar energía, desconecte la unidad de toma de alimentación, y quite
la batería si no la usa durante largos períodos para evitar fugas.
La pantalla muestra la hora actual o la frecuencia de la emisora de radio.
Esta unidad ha sido diseñada para un funcionamiento continuo; tanto si está en modo ON (encendido) como en
modo de espera.
Brillo de la pantalla
Puede ajustar el brillo de la pantalla con el interruptor dimmer low/high en la parte posterior de la unidad. Ajuste a
low para una luz tenue de fondo, ajuste a high para una pantalla más brillante.
Ajuste de la hora actual
Cuando conecte la unidad por primera vez se mostrará 0:00.
Presione y mantenga el botón time y simultáneamente presione hour para ajustar las horas en modo 24 horas.
Presione y mantenga el botón para un ajuste rápido o púlselo brevemente para incrementar en una hora.
Ahora ajuste los minutos con time (presione y mantenga) y min.
Presione y mantenga el botón para un ajuste rápido o púlselo brevemente para incrementar en un minuto.
Ha ajustado la hora actual.
Radio
Presione on/off para encender la radio. La pantalla muestra la banda de frecuencia (AM o FM) y la frecuencia
(ejemplos: 100.6 MHz y 525 KHz). Seleccione la banda de frecuencia con el selector de banda band am/fm, cambie
entre FM y AM.
Con tuning sintonice su emisora favorita, la frecuencia se muestra con dígitos grandes en la pantalla.
Gire volume min/max para ajustar el volumen.
Presione on/off para apagar la radio.
La radio viene con una antena de cable FM; despliéguela para una mejor recepción. Para una mejor recepción AM
oriente la radio.
41.
Page 42

Jack line in
Conecte su reproductor MP3 portátil u otro dispositivo de audio mediante cable de audio con toma de 3,5 mm (no
suministrado) para reproducirlo con su radio reloj.
Levantarse con la radio o el zumbido
Seleccione la emisora de radio deseada y el nivel del volumen.
Presione y sostenga el botón alarm set y simultáneamente presione el botón hour para ajustar la hora deseada para
la alarma. Presione y sostenga el botón para un ajuste rápido o púlselo brevemente para incrementar en una hora.
Ahora presione y sostenga el botón alarm set y simultáneamente presione el botón min para ajustar los minutos
deseados para la alarma. Presione y sostenga para un ajuste rápido o púlselo brevemente para incrementar en un
minuto.
Ahora presione alarm on/off, y el indicador de alarma se iluminará en la pantalla. La radio se encenderá para
despertarlo a la hora indicada en su emisora favorita. Se reproducirá durante 1 hora y luego se apagará
automáticamente.
Para una alarma en su emisora favorita ajuste alarm radio/buzz a radio.
Para levantarse con zumbido en lugar de con la radio, asegúrese de girar alarm radio/buzz a buzz.
Presione alarm on/off para apagar la radio o el zumbido, el indicador de alarma se apagará.
La alarma se volverá a encender al día siguiente a la misma hora.
Función siesta
Cuando el zumbido suena o la radio se enciende, presione snooze para apagar el zumbido o la radio
temporalmente. Aproximadamente 5 minutos más tarde el zumbido o la radio sonarán otra vez.
La función siesta se repite durante una hora o hasta que la cancele presionando el botón alarm on/off.
Después de 1 hora la función siesta se restablece automáticamente.
Reposo con la radio
Seleccione la emisora de radio deseada y el nivel del volumen.
Presione el botón sleep para acceder al temporizador de reposo; la pantalla muestra 90 y SLEEP. Presione
repetidas veces sleep para ajustar el tiempo para dormir a 90, 60, 30, y 10 minutos, el tiempo correspondiente se
muestra en la pantalla y parpadea SLEEP durante unos pocos segundos. La pantalla regresa a la frecuencia y se
muestra SLEEP.
La radio reproducirá por el período ajustado y luego se apagará automáticamente.
Para apagar la radio antes del final del período ajustado, simplemente presione el botón snooze.
Reposo con la radio y levantarse con la radio o el zumbido
Seleccione la emisora de radio deseada y el nivel de volumen.
Presione el botón sleep y ajuste el período de tiempo para dormir según lo descrito anteriormente.
Ajuste la alarma como se describe anteriormente.
La radio se apagará después del tiempo ajustado y lo despertará a la mañana siguiente con el zumbido o la radio,
según sus ajustes.
42.
Page 43

Guía solucionador de problemas
Si se produce un fallo, compruebe primero los puntos listados abajo antes de llevar el aparato a reparar. Si no
puede solucionar el problema siguiendo estos consejos, consulte su vendedor o servicio técnico autorizado.
ADVERTENCIA: nunca abra la unidad. Acuda siempre a un servicio técnico cualificado o a un servicio al
cliente autorizado.
Problema Razón Solución
No hay sonido Volumen ajustado está muy
Las teclas no funcionan
bien.
Recepción pobre. Señal débil.
Especificaciones Técnicas
Suministro de alimentación: CA 230V~50Hz
Respaldo de la hora actual, ajustes: Pila botón de Litio (CR2032) CC 3V
Rango de frecuencia: FM 87.5MHz – 108MHz
AM 525kHz – 1615kHz
Dimensiones: aprox. 60 x 190 x 90 mm
Peso: approx. 600 g (sin batería)
Sujeto a cambios sin previo aviso.
bajo.
No está conectado a la
alimentación.
Carga electrostática. Apague la unidad e inténtelo
Interferencias desde otros
aparatos eléctricos
(TV, VCR, Ordenador, etc.).
Ajuste el volumen.
Conecte el cable a la toma de
pared.
otra vez.
Como alternativa, apague la
unidad, desconéctelo de la
alimentación CA y de la batería
de respaldo y vuelva a
conectarlo.
Ajuste la antena.
Manténgalo a distancia de
otros aparatos eléctricos.
43.
Page 44

MODELO: 4224
Rádio Despertador com Visor LCD Grande
INSTRUCÇÕES DE SEGURANÇA
AVISO
RISCO DE CHOQUE
ELÉCTRICO NÃO ABRIR
CUIDADO: PARA REDUZIR O RISCO
DE CHOQUE ELÉCTRICO, NÃO
Um triângulo com um símbolo
de raio alerta o utilizador para
"tensão perigosa" sem
isolamento do revestimento,
a qual pode ser suficiente
para constituir risco de
choque eléctrico.
RETIRE A COBERTURA (OU O
REVESTIMENTO POSTERIOR). NO
INTERIOR, NÃO EXISTEM
COMPONENTES PASSÍVEIS DE
REPARAÇÃO PELO UTILIZADOR.
PARA FINS DE ASSISTÊNCIA,
CONSULTE UM TÉCNICO
QUALIFICADO
Um triângulo com um ponto
de exclamação alerta o
utilizador para a existência
de instruções importantes de
uso e manutenção no
manual incluído. O utilizador
deve ler estas instruções.
MAIS INFORMAÇÕES
Tenha cuidado com as peças pequenas e pilhas. Não engula esses artigos. Podem ser perigosos para
a sua saúde e provocar asfixia. Certifique-se que mantém estes pequenos dispositivos e pilhas fora do
alcance das crianças.
Importantes avisos para a protecção dos ouvidos
Cuidado:
A sua audição é tão preciosa para si como para nós.
Portanto, por favor tenha cuidado com este equipamento.
Recomendamos: Evite volumes de som elevados.
As crianças devem ser supervisionadas quando utilizam auscultadores; certifique-se que o volume do
aparelho não está demasiado elevado.
Atenção!
Volumes demasiado elevados podem provocar danos irreparáveis à audição das crianças.
Nunca deixe a pessoa especialmente as crianças colocar os objectos dentro de buracos, ranhuras ou
outras aberturas. Estes procedimentos podem causar a morte através de choque eléctrico. O
dispositivo deve ser aberto somente e na presença do pessoal qualificado.
Por favor utilize o equipamento apenas de acordo com o regulamento descrito acima. O aparelho foi
concebido exclusivamente para ser utilizado no sector das actividades e habitação.
Guarde este manual para futuras consultas.
Conselhos para protecção do ambiente
Este produto, no fim do seu período de vida útil, não deve ser depositado no lixo doméstico normal.
Deverá ser, pelo contrário, depositado num ponto de recolha para reciclagem de aparelhos eléctricos e
electrónicos. O símbolo no produto, as instruções de utilização e a embalagem chamam a atenção para
esse facto.
As matérias-primas são reutilizáveis de acordo com as suas características. Com a reutilização, a
utilização material ou outras formas de utilização de aparelhos velhos fazem com que dê um contributo
valioso para a protecção do nosso ambiente.
Por favor, informe-se junto das autoridades locais sobre os centros de recolha competentes.
44.
Page 45

Não impedir a ventilação dos dispositivos. Tenha a certeza que as curtinhas, os jornais, panos de cobrir os
mobiliários não impedir a ventilação das aberturas de aparelhos. A ventilação deve manter-se a qualquer
momento. Aquecer-se demais pode provocar sério dano no dispositivo e reduzir o seu desempenho por
toda a vida.
Calor
Não expor o aparelho directamente à luz solar. Tenha atenção para não expor o aparelho a fontes de calor
como aquecedores ou fontes de chama descoberta. Tenha atenção para que as fendas de arejamento do
aparelho não estejam cobertas.
Humidade e Limpeza
Este aparelho não é à prova de água. Não mergulhe o aparelho em água. Não deixe que este entre em
contacto com água. Se entrar água no aparelho, pode provocar sérios danos.
Não use agentes de limpeza que contenham álcool, amoníaco, benzeno ou abrasivos, pois podem
danificar o aparelho. Utilize um pano macio e húmido para limpar o aparelho.
Reciclagem Profissional
Pilhas e materiais de embalagem não pertencem ao lixo doméstico. As pilhas devem ser colocadas num
ponto de recolha para pilhas usadas. A separação dos materiais de embalagem preserva o ambiente.
INSTRUÇÕES DE SEGURANÇA
1. LER AS INSTRUÇÕES - Deve ler todas as instruções de segurança e funcionamento antes de utilizar o
aparelho.
2. MANTER AS INSTRUÇÕES - Deve guardar os manuais de instruções e segurança para futuras
consultas.
3. ATENÇÃO AOS AVISOS – Todos os avisos na unidade e nas instruções de funcionamento devem ser
seguidos.
4. SEGUIR AS INSTRUÇÕES – Todas as instruções de funcionamento devem ser seguidas.
5. ÁGUA E HUMIDADE – A unidade não deve ser usada perto da água, por exemplo, perto de uma
banheira lavatórios, lava-louças, máquinas de lavar, caves húmidas ou piscinas.
6. VENTILAÇÃO– As aberturas do aparelho servem para a sua própria ventilação, são necessárias para o
seu funcionamento e evitam um sobre aquecimento. Coloque o aparelho num local que não interfira com
uma ventilação adequada. Não o coloque em cima de camas, sofás, tapetes ou superficies semelhantes
que possam tapar as aberturas de ventilação, ou em estruturas fechadas, tais como estantes ou armários
que impeçam o fluxo de ar.
7. CALOR- o equipamento deve estar afastado de fontes de calor, tais como radiadores, saídas de ar
quente, fogões ou outros aparelhos (incluindo amplificadores de som) que produzam calor.
8. FONTE DE ALIMENTAÇÃO - O aparelho só funciona com o tipo de alimentação indicado na etiqueta.
9. PROTECÇÃO DO CABO DE ALIMENTAÇÃO - cabos de alimentação devem ser colocados de tal forma
que não possam ser pisados ou apertados pelos objectos colocados em cima deles ou contra eles.
10. PERÍODOS DE NÃO UTILIZAÇÃO – Desligue o aparelho da tomada quando não o utilizar durante um
longo período de tempo.
11. ENTRADA DE OBJECTOS E LÍQUIDOS - Deve tomar cuidado para que não entrem objectos ou salpicos
para dentro do aparelho.
12. DANOS QUE REQUEREM ASSISTÊNCIA TÉCNICA – a unidade deve ser reparada por pessoal da
assistência técnica qualificada quando:
a. A fonte de alimentação ou plugue foi danificado
b. Objectos cairam dentro, ou líquido foi derrubado dentro da unidade.
c. A unidade foi exposta à chuva e humidade.
d. O aparelho não parece funcionar normalmente. Use apenas os aparelhos e controlos como descrito
neste manual;
e. A unidade foi tombada, ou o corpo foi danificado.
f. A unidade exibe sérias mudanças no seu desempenho.
45.
Page 46

13. ASSISTÊNCIA TÉCNICA - O utilizador não deve tentar reparar o aparelho para além do descrito no
manual. Todas as reparações devem ser realizadas por pessoal técnico qualificado.
14. LIMPEZA – Desligue o aparelho da tomada antes de o limpar. Não utilize panos molhados ou aerosóis.
Utilize um pano húmido.
15. RELÂMPAGOS – During lightning and longer periods of non-use please disconnect from mains power
supply and antenna.
16. VERIFICAÇÃO DE SEGURANÇA – Após um serviço de assistência técnica peça para ser realizado
uma verificação de segurança.
17. SOBRECARGA – Para evitar fogo e choque eléctrico não sobrecarregue as tomadas e receptáculos.
18. DESCARGAS ELECTROESTÁTICAS – Se o aparelho apresentar anomalias no funcionamento,
desligue da corrente eléctrica e retire as pilhas. Volte a ligar passado algum tempo.
Instalação
Evite instalar o leitor em áreas expostas a:
1) luz solar directa, radiadores de calor ou veículos fechados;
2) altas temperaturas ou humidade elevada;
3) poeira excessiva;
4) vibração excessiva, na medida em que os componentes internos poderão sofrer danos graves.
Instalação em pilha:
Coloque o aparelho numa posição direita. Não coloque o aparelho em cima ou debaixo de amplificadores ou outro
equipamento que possa aquecer.
Fonte de alimentação:
Siga as instruções indicadas em seguida para evitar avarias, incêndios, ferimentos e choques eléctricos:
• Verifique se a tensão de alimentação indicada na placa de classificação (sob a unidade) corresponde à
tensão eléctrica local. Esta unidade foi concebida para 230V~50Hz AC.
• Ligue o cabo de alimentação à entrada de alimentação AC e à tomada de parede.
• Para desligar da tomada de parede, puxe apenas a ficha, não o cabo.
• Ao ligar e desligar da tomada de parede, segure firmemente a ficha.
• Não toque no cabo de alimentação com as mãos molhadas.
• Proteja o cabo de alimentação de dispositivos geradores de calor.
• Desligue o aparelho e contacte um serviço de cliente autorizado, caso o aparelho tenha caído ao chão,
esteja danificado ou outro aspecto semelhante.
Precauções de Segurança das Pilhas
• Mantenha as pilhas afastadas das crianças e dos animais.
• Introduza as pilhas tendo em atenção a polaridade (+/-). Se não alinhar correctamente a polaridade das
pilhas, poderão ocorrer ferimentos em pessoas e/ou danos em objectos.
• Retire as pilhas gastas do aparelho. Retire as pilhas em períodos de não utilização prolongada do
dispositivo, de modo a evitar danos decorrentes da oxidação ou corrosão das pilhas.
• Nunca lance pilhas para o lume. Não exponha as pilhas a fogo ou a outras fontes de calor.
• Descartagem de pilhas: as pilhas gastas devem ser descartadas correctamente e recicladas, de acordo
com as leis aplicáveis. Para informação detalhada, contacte a autoridade de detritos municipais do local
onde vive.
• Siga as normas de segurança do fabricante das pilhas em relação a utilização e descartagem.
46.
Page 47

Localização dos Controlos
Vista de Cima
Vista de Frente
1. Controlo volume min/max
2. time set
Definir a hora actual (com hour e min)
3. alarm radio/buzz
Selecionar o modo de Despertar
4. min
Definir os minutos da hora actual, do alarme e do
temporizador
5. alarm on/off
6. hour
Definir a hora actual, a hora do alarme e do
temporizador
7. band am/fm
Selector de banda AM e FM
8. alarm set
Definir a hora do alarme (com hour e min)
9. Controlo tuning
10. sleep
Definir o temporizador (com hour e min)
11. snooze
Função “Snooze” depois da activação do alarme ou
desligar o temporizador
12. on/off
Ligar/Desligar o rádio
13. Tipo de label
14. Visor
15. Compartimendo da Bateria
Vista Traseira
16. Coluna
17. Entrada line in
18. dimmer low/high
Definir a luminosidade do visor com o
comutador
19. Antena de fio FM
20. Cabo de ligação à corrente eléctrica
47.
Page 48

Ligações
Antena
O rádio relógio traz consigo uma antena de fio FM na parte traseira; estique-a para uma recepção melhor.
Fonte de Alimentação
O aparelho funciona através de uma fonte de alimentação de 230V~50Hz. A bateria de lítio CR2032 de 3V (não
vem com o aparelho) é usada apenas como fonte de alimentação suplementar para o relógio. Deverá retirar a
bateria caso não utilize o aparelho durante um largo período de tempo para evitar danos na bateria e no aparelho.
Apenas ligue o aparelho à fonte de alimentação acima mencionada para evitar danos não cobertos pela garantia.
Colocar/Trocar a bateria auxiliar
Coloque a bateria auxiliar no compartimento da bateria; necessita de uma chave de fendas Philips para abrir o
compartimento da bateria. Tenha em atenção a polaridade.
Deverá trocar a bateria auxiliar uma vez por ano.
As definições (alarme, hora actual, etc.) permanecem durante uma falha da energia ou quando desligar o aparelho
momentaneamente da fonte de corrente eléctrica; o aparelho muda automaticamente para a bateria auxiliar.
Funções Básicas
Ligar/Desligar o rádio relógio
Desligue o rádio com on/off , quando não o utilizar. Utilize volume min/max para ajustar o volume.
Seleccione a frequência da banda com o selector de banda band am/fm, entre FM e AM.
Depois de utilizar, desligue o aparelho. Para poupar energia, retire a ligação do aparelho à fonte de corrente
eléctrica e remova a bateria para evitar danos na bateria e no aparelho caso não preveja utilizar o aparelho durante
um longo período de tempo.
O visor mostra a hora actual ou a frequência da banda de rádio.
O aparelho foi fabricado para operar continuadamente; pode estar no modo ON ou no modo de espera.
Luminosidade do Visor
Pode definir a luminosidade do visor através do comutador dimmer low/high que se encontra na parte traseira do
aparelho. Seleccione low para um visor mais escurecido e high para um visor mais luminoso.
Definir a hora actual
O aparelho mostra 0:00 quando é ligado pela primeira vez.
Pressione e segure o botão time e, simultaneamente, pressione o botão hour para definir as horas no modo 24
horas.
Pressione e segure o botão para avançar rapidamente na hora ou clique levemente para aumentar apenas uma
hora. Agora, escolha os minutos com o botão time (pressione e segure) e min.
Pressione e segure o botão para avançar rapidamente nos minutos ou clique levemente para aumentar apenas um
minuto.
A hora actual está definida.
Rádio
Pressione on/off para ligar o rádio. O visor mostra a banda (AM ou FM) e a frequência (e.g. 100.6 MHz e 525
KHz). Seleccione a frequência da banda com band am/fm, entre FM e AM.
Com tuning procura a sua estação de rádio favorita, a frequência é mostrada em dígitos grandes no visor.
Movimente o botão volume min/max para ajustar o volume.
Pressione on/off para desligar o rádio.
O rádio traz uma antena de fio FM; estique-a para uma melhor recepção. Para uma melhor recepção AM,
direccione o rádio.
48.
Page 49

Entrada line in
Ligue o leitor MP3 portátil ou outro aparelho áudio através da entrada do cabo de áudio 3.5mm (não vem com o
aparelho) para fazer play back através do rádio relógio.
Despertar com Rádio ou Toque
Escolha a estação de rádio e o volume.
Pressione e segure o botão alarm set e, simultaneamente, pressione o botão hour para definir a hora do alarme.
Pressione e segure o botão para avançar rapidamente na hora ou clique levemente para aumentar apenas uma
hora.
Agora pressione e segure o botão alarm set e, simultaneamente, pressione o botão min para definir os minutos do
alarme. Pressione e segure o botão para avançar rapidamente nos minutos ou clique levemente para aumentar
apenas um minuto.
Agora pressione alarm on/off, o indicador de alarme acende-se no visor. O rádio despertará na hora e na estação
de rádio escolhidas. Irá despertar durante uma hora e depois desligar-se-á automaticamente.
Para despertar com a estação de rádio favorita, escolha alarm radio/buzz para radio.
Para despertar com o toque, deverá seleccionar alarm radio/buzz para buzz.
Pressione alarm on/off para desligar o rádio ou o toque, o indicador de alarme desliga-se.
O alarme é accionado automaticamente no dia seguinte à mesma hora.
Função Snooze
Quando o toque ou o rádio se ligam, pressione snooze para os desligar temporariamente. Passados aproximada
mente 5 minutos, o toque ou o rádio ligam-se outra vez.
A função Snooze repete-se durante uma hora ou até ser cancelada, através do botão alarm on/off .
Após uma hora a função Snooze é automaticamente desligada.
Temporizador com Rádio
Seleccione a rádio e o volume desejados.
Pressione o botão sleep para aceder ao temporizador; o visor mostra 90 e SLEEP. Pressione repetidamente sleep
para ajustar o tempo do temporizador para 90, 60, 30, e 10 minutos, o tempo correspondente é mostrado e SLEEP
ficará a piscar no visor durante alguns segundos. O visor volta à frequência e SLEEP é mostrado.
O rádio irá tocar durante o período seleccionado e depois desligar-se-á automaticamente.
Para desligar o rádio antes do fim do período seleccionado deverá simplesmente pressionar o botão snooze.
Temporizador com Rádio e Despertador com Rádio ou Toque
Seleccione a estação de rádio e o volume desejados.
Pressione o botão sleep e defina o período desejado para o temporizador, tal como descrito anteriormente.
Defina o alarme como descrito anteriormente.
O rádio desliga-se após o tempo seleccionado e despertará na manhã seguinte com o toque ou com o rádio,
dependendo das suas definições.
-
49.
Page 50

RESOLUÇÃO DE PROBLEMAS
Caso surja alguma avaria, verifique os pontos listados abaixo, antes de levar o aparelho para reparação:
Caso não consiga resolver o problema através destas dicas, consulte o seu vendedor ou centro de serviços
autorizado.
AVISO: Nunca abra o dispositivo. Solicite sempre assistência ou manutenção a pessoal qualificado e
autorizado.
Problema Razão Solução
Não há som O volume está demasiado
Mau funcionamento das
teclas
Recepção pobre Sinal fraco.
Technical Specifications
Corrente eléctrica: AC 230V~50Hz
Emergência para hora actual, definições: Pilha botão de 3V DC (CR2032)
Intervalo de frequência: FM 87.5MHz – 108MHz
AM 525kHz – 1615kHz
Dimensões: aprox. 60 x 190 x 90 mm
Peso: aprox. 600 g (sem pilhas)
Sujeito a alterações sem aviso prévio.
baixo.
O cabo de alimentação
principal não está ligado.
Carga electrostática. Desligue o aparelho e volte a
Interferências de outros
aparelhos
(TV, VCR, computador, etc.).
Ajustar o Volume.
Ligue a tomada à corrente
eléctrica.
ligar.
Ou então, desligue o aparelho,
desligue da corrente eléctrica e
a pilha de emergência e volte
a ligar.
Ajustar a antena.
Mantenha uma distância de
outros aparelhos.
50.
Page 51

MODEL: 4224
Radiobudzik z dużym wyświetlaczem LCD
ŚRODKI OSTROŻNOŚCI
OSTRZEZENIE
RYZYKO PORAŻENIA PRĄDEM
NIE OTWIERAJ
OSTRZEŻENIE: ABY UNIKNĄĆ
Trójkąt z symbolem pioruna
to znak odnoszący się do
“niebezpiecznego napięcia”,
braku izolacji, co może
przyczynić się do ryzyka
porażenia prądem.
RYZYKA PORAŻENIA PRĄDEM, NIE
ŚCIĄGAJ OBUDOWY RADIA.
KONIECZNE JEST, ABY WSZELKIE
NAPRAWY ODBYWAŁY SIĘ W
AUTORYZOWANYM SERWISIE.
Trójkąt z wykrzyknikiem to
znak odnoszący się do
ważnych instrukcji
użytkowania oraz
konserwacji. Znak pojawia się
w podręczniku użytkownika.
DALSZE INFORAMCJE
Należy uważać, aby nie połknąć niewielkich elementów lub baterii. Jest to niebezpieczne dla zdrowia i
może spowodować zadławienie. Prosimy o przechowywanie małych kawałków oraz baterii poza
zasięgiem dzieci.
Informacje dotyczące ochrony słuchu
Uwaga:
Twoje zdrowie jest ważne zarówno dla ciebie jak i dla nas.
Zachowaj więc wszelkie środki ostrożności korzystając z tego urządzenia.
Unikaj wysokiego poziomu głośności.
Dzieci korzystające ze słuchawek należy kontrolować; sprawdzić, czy ustawiona głośność nie jest zbyt
wysoka.
Uwaga!
Zbyt wysoki poziom głośności może prowadzić do uszkodzenia słuchu twoich dzieci.
NIE pozwalaj, aby ktokolwiek, zwłaszcza dzieci wkładały cokolwiek do otworów znajdujących się na
urządzeniu, w tym otworów wentylacyjnych. Grozi to porażeniem prądem. Obudowę mogą zdejmować
wyłącznie wykwalifikowani specjaliści.
Korzystaj z urządzenia wyłącznie w celach, do których zostało przeznaczone.
Urządzenie jest przeznaczone do użytku w domu lub na terenie firm.
Prosimy o zatrzymanie instrukcji do wglądu w przyszłości.
Ochrona środowiska
To urządzenie nie może być traktowane jak zwykłe odpady. Przekaż urządzenie do specjalnych miejsc
skupu I utylizacji urządzeń elektrycznych. Na urządzeniu lub opakowaniu znajduje się symbol, który
informuje o sposobie pozbycia się urządzenia. Wszystkie materiały mogą podlegać utylizacji. Możesz
znacznie przysłużyć się do ochrony środowiska utylizując urządzenie w odpowiedni sposób. Zapytaj
odpowiednie władze o miejsce utylizacji urządzeń elektrycznych.
Upewnij się, że otwory wentylacyjne nie są zasłonięte przez firanki, zasłon, gazety itp.
51.
Page 52

Otwory wentylacyjne zawsze muszą być odsłonięte. Przegrzanie urządzenia może powodować
uszkodzenie lub skrócić jego żywotność.
Ciepło
Nie wystawiaj urządzenia na działanie promieni słonecznych. Upewnij się, że urządzenie nie jest
wystawione na działanie ęródeł ciepła, takich jak grzejniki czy ogień. Upewnij się, że otwory wentylacyjne
urządzenia nie są zasłonięte.
Wilgoć oraz czyszczenie
Urządzenie nie jest wodoodporne! Nigdy nie zanurzać urządzenia w wodzie. Nie zezwalać na kontakt
urządzenia z wodą. Jeśli woda dostaje się do wewnątrz urządzenia, może spowodować poważne
uszkodzenia.
Nie korzystać z środków czyszczących zawierających alkohol, amoniak, benzen oraz środki czyszczące,
które mogą uszkodzić urządzenie. W celu czyszczenia użyć miękkiej, wilgotnej szmatki.
Pozbywanie się baterii
Baterie nie mogą być traktowane jak zwykłe śmieci. Przekaż baterie do oznaczonego punktu składowania
baterii. Nie wrzucaj baterii do ognia.
ŚRODKI OSTROŻNOŚCI
1. PRZECZYTAJ INSTRUKCJE – Należy zapoznać się ze wszystkimi instrukcjami obsługi oraz
bezpieczeństwa przed rozpoczęciem użytkowania.
2. ZACHOWAJ INSTRUKCJE – Instrukcje obsługi oraz bezpieczeństwa należy zachować do wglądu w
przyszłości.
3. WEŹ POD UWAGĘ OSTRZEŻENIA - Należy przestrzegać wszystkich ostrzeżeń opisanych na urządzeniu
i w instrukcji obsługi.
4. POSTĘPUJ ZGODNIE Z INSTRUKCJAMI - Należy postępować zgodnie ze wszystkimi instrukcjami.
5. WODA I WILGOĆ - Nie należy korzystać z urządzenia w pobliżu źródła wody, np. obok wanny, umywalki,
zlewozmywaka, pralni, basenu lub w wilgotnej piwnicy.
6. WENTYLACJA– Otwory w urządzeniu służą prawidłowej wentylacji, są konieczne do bezusterkowego
działania urządzenia i zapobiegają przegrzaniu. Urządzenie należy umieścić w takim miejscu lub pozycji,
aby prawidłowa wentylacja nie była utrudniona. Nie wolno go stawiać bezpośrednio na łóżku, kanapie,
dywanie lub żadnej innej tego typu powierzchni, ponieważ otwory wentylacyjne mogą zostać zakryte.
Umieszczenie urządzenia w zamkniętej przestrzeni, takiej jak szafka czy regał, może utrudniać przepływ
powietrza przez otwory wentylacyjne.
7. ŹRÓDŁA CIEPŁA - Urządzenie należy umieszczać z dala od źródeł ciepła, takich jak grzejniki, kuchenki,
lub innego tego typu sprzętu (włącznie ze wzmacniaczami), który wydziela ciepło.
8. ZASILANIE - Urządzenie należy podłączyć tylko do takiego źródła zasilania, jakie zostało opisane w
instrukcji obsługi lub oznaczone na obudowie.
9. ZABEZPIECZENIE PRZEWODU ZASILAJĄCEGO - Przewody zasilające należy poprowadzić w taki
sposób, aby nie znajdowały się one w przejściu, ani nie przyciskały ich pobliskie przedmioty.
10. OKRES NIEUŻYTKOWANIA - Podczas dłuższego okresu nieużytkowania urządzenia, należy odłączyć je
od sieci zasilającej i anteny.
11. CIAŁO OBCE LUB PŁYN W URZĄDZENIU - Należy zachować wszelką ostrożność, aby do urządzenia
nie dostały się przez otwory w obudowie żadne ciała obce, ani płyny.
12. USTERKA WYMAGAJĄCA NAPRAWY - Urządzenie należy skierować do wykwalifikowanego personelu
serwisowego, kiedy:
a. Przewód zasilający lub wtyczka zostały uszkodzone.
b. Do środka dostały się ciała obce lub płyny.
c. Zostało wystawione na działanie deszczu.
d. Urządzenie wydaje się nie funkcjonować normalnie. Wszelkie urządzenia oraz kontrolki mogą być użyte
wyłącznie zgodnie z opisem w podręczniku;
52.
Page 53

e. Urządzenie zostało upuszczone lub obudowa została uszkodzona.
f. Działanie urządzenia znacznie różni się od normalnego.
13. NAPRAWA - Użytkownik nie powinien podejmować prób naprawy urządzenia, za wyjątkiem sugestii
opisanych w instrukcji. Wszelkie naprawy techniczne powinny być skierowane do wykwalifikowanego
personelu serwisowego.
14. CZYSZCZENIE – Urządzenie należy odłączyć od sieci zasilającej przed przystąpieniem do czyszczenia.
Nie wolno stosować preparatów czyszczących w płynie ani aerozolu - przecierać tylko za pomocą
wilgotnej szmatki. Stosować się do instrukcji dotyczących czyszczenia i konserwacji zawartych w
niniejszej instrukcji.
15. WYŁADOWANIA ATMOSFERYCZNE - Podczas wyładowań atmosferycznych i dłuższego okresu
nieużytkowania urządzenia, należy odłączyć je od sieci zasilającej i anteny.
16. KONTROLA BEZPIECZEŃSTWA - Po dokonaniu przeglądu lub naprawy, serwisant powinien
przeprowadzić kontrolę sprawności.
17. PRZECIĄŻENIE - Aby uniknąć pożaru lub porażenia prądem, nie wolno przeciążać gniazd wtykowych
ściennych, ani przedłużaczy.
18. WYŁADOWANIE ELEKTROSTATYCZNE- Odłączyć od zasilania i wyjąć baterie, jeśli urządzenie nie
funkcjonuje prawidłowo. Ponownie podłączyć po krótkim czasie.
Instalacja
Unikaj instalacji na obszarach:
1) bezpośredniego nasłonecznienia, w pobliżu kaloryferów oraz w zamkniętych pojazdach
2) o wysokiej temperaturze i stopniu nawilżenia;
3) o wysokim stopniu zanieczyszczenia;
4) nadmiernych drgań, jako, że części wewnętrzne mogą zostać poważnie uszkodzone.
Przechowywanie w pozycji pionowej:
Ustawić odtwarzacz w pozycji pionowej. Nie umieszczać odtwarzacza pod lub na wzmacniaczach albo innych
urządzeniach, ponieważ prowadzi to do przegrzania.
Zasilanie sieci:
Należy uwzględnić poniższe instrukcje w celu uniknięcia nieprawidłowego funkcjonowania, pożaru, obrażeń ciała lub
porażenia prądem:
• Sprawdź, czy wartość napięcia podana na plakietce urządzenia (pod spodem) odpowiada wartościom
napięcia w twoim miejscu zamieszkania. Parametry zasilania to AC 230V~50Hz.
• Połącz przewód zasilania z gniazdem AC oraz gniazdem ściennym.
• Aby odłączyć od zasilania, należy pociągnąć za wtyczkę, nie za kabel.
• Należy mocno uchwycić wtyczkę podczas podłączania oraz odłączania urządzenia od gniazda w ścianie.
• Nie dotykaj przewodu zasilania mokrymi rękami.
• Chroń przewód zasilania przed urządzeniami generującymi ciepło.
• Wyłączyć urządzenie i skontaktować się z autoryzowanym serwisem konsumenckim, jeśli spadło lub
zostało uszkodzone w inny sposób.
Baterie- środki ostrożności:
• Przechowuj baterie z dala od dzieci oraz zwierząt.
• Włóż baterie z uwzględnieniem biegunowości (+/-). Nieprawidłowe ułożenie baterii doprowadza do
uszkodzeń ciała i/lub przedmiotów.
• Usuń wyczerpane baterie z urządzenia. Wyjmij baterie, jeśli nie korzystasz z urządzenia przez dłuższy
okres czasu, aby zapobiec uszkodzeniom wynikających z powodu zardzewiałych lub skorodowanych
baterii.
• Nigdy nie wrzucaj baterii do ognia. Nie wystawiaj baterii na działanie ognia ani źródeł ciepła.
• Wyrzucanie baterii: zużyte baterie należy wyrzucać lub utylizować zgodnie z odpowiednimi przepisami.
Skontaktować się z lokalnym przedstawicielem władz miejskich w celu uzyskania szczegółowej informacji.
• Postępować zgodnie z instrukcjami producenta dotyczącymi bezpieczeństwa, użytkowania oraz usuwania.
53.
Page 54

Lokalizacja elementów sterowania
Widok z góry
Widok z przodu
1. Regulacja volume min/max
2. time set
Ustawianie bieżącej godziny (z przyciskiem hour i
min)
3. alarm radio/buzz
Wybór trybu budzenia
4. min
Ustawianie minut bieżącej godziny, czasu budzika i
wyłącznika czasowego
5. alarm on/off
6. hour
Ustawianie godzin bieżącej godziny, czasu budzika i
wyłącznika czasowego
7. band am/fm
Wybór pasma AM i FM
8. alarm set
Ustawianie godziny budzika (z przyciskiem hour i
min)
9. Regulacja tuning
10. sleep
Ustawianie wyłącznika czasowego (z przyciskiem
hour i min)
11. snooze
Funkcja drzemki po włączeniu budzika lub
dezaktywacja wyłącznika czasowego
12. on/off
Włączanie/wyłączanie radia
13. Etykieta informacyjna
14. Wyświetlacz
15. Komora baterii
Widok z tyłu
16. Głośnik
17. Gniazdo line in
18. dimmer low/high
Ustawianie jasności wyświetlacza za pomocą
przełącznika
19. Przewodowa antena FM
20. Kabel zasilający
54.
Page 55

Połączenia
Połączenie antenowe
Radiobudzik wyposażony jest w znajdującą się z tyłu przewodową antenę FM; w celu uzyskania lepszego odbioru
należy ją rozwinąć.
Zasilanie
Urządzenie zasilane jest prądem o wartościach 230 V~50 Hz. Litowa bateria guzikowa 3 V CR2032 (nie jest
dołączona) służy wyłącznie jako rezerwowe zasilanie zegara. W czasie długich okresów nieużywania baterię należy
wyjąć, aby uniknąć jej wycieku.
Aby uniknąć uszkodzeń, których nie obejmuje gwarancja, urządzenie należy podłączać wyłącznie do zasilania
opisanego powyżej.
Wkładanie/wymiana baterii zapasowej
Włóż baterię zapasową do komory baterii na dole urządzenia; do otworzenia komory baterii niezbędny jest
śrubokręt firmy Phillips. Zwróć uwagę na biegunowość.
Baterię zapasową należy wymieniać raz do roku.
Dzięki baterii ustawienia użytkownika (budzik, bieżąca godzina itp.) są zachowywane podczas przerw w dopływie
prądu lub tymczasowego odłączenia od zasilania; urządzenie automatycznie przełącza się na zasilanie z baterii
zapasowej.
Podstawowe działanie
Włączanie/wyłączanie radiobudzika
Jeśli radio nie jest używane, wyłącz je za pomocą przycisku on/off . Obróć pokrętło volume min/max, aby
dostosować poziom głośności.
Wybierz pasmo częstotliwości za pomocą elementu wyboru pasma band am/fm, przełączając między pasmem FM a
AM.
Po zakończeniu używania wyłącz urządzenie. W celu oszczędzania energii odłączaj urządzenie od zasilania i
wyjmuj baterię, aby uniknąć jej wycieku, gdy urządzenie nie będzie używane przez dłuższy czas.
Na wyświetlaczu widoczna jest albo bieżąca godzina, albo częstotliwość stacji radiowej.
Urządzenie przeznaczone jest do ciągłego działania; znajduje się ono albo w trybie włączenia, albo gotowości.
Jasność wyświetlacza
Jasność wyświetlacza można ustawić za pomocą przełącznika dimmer low/high z tyłu urządzenia. Ustaw w pozycji
low w celu uzyskania ciemnego podświetlenia lub w pozycji high, aby rozjaśnić wyświetlacz.
Ustawianie bieżącej godziny
Po pierwszym podłączeniu urządzenia na wyświetlaczu widoczne jest wskazanie 0:00.
Naciśnij i przytrzymaj przycisk time oraz naciśnij jednocześnie przycisk hour, aby ustawić godziny w trybie
24-godzinnym.
Naciśnij i przytrzymaj przycisk, aby szybko ustawić lub naciśnij na krótko w celu zwiększenia ustawienia o jedną
godzinę.
Następnie ustaw minuty za pomocą przycisku time (naciśnij i przytrzymaj) oraz przycisku min.
Naciśnij i przytrzymaj przycisk, aby szybko ustawić lub naciśnij na krótko w celu zwiększenia ustawienia o jedną
minutę.
Bieżąca godzina została ustawiona.
Radio
NNaciśnij przycisk on/off , aby włączyć radio. Na wyświetlaczu widoczne będzie pasmo częstotliwości (AM lub
FM) i częstotliwość (np. 100.6 MHz i 525 KHz). Wybierz pasmo częstotliwości za pomocą elementu wyboru pasma
band am/fm, przełączając między trybem FM a AM.
Za pomocą pokrętła tuning ustaw ulubioną stację; widoczna na wyświetlaczu częstotliwość będzie przedstawiona w
postaci dużych cyfr.
55.
Page 56

Obróć pokrętło volume min/max, aby ustawić głośność.
Naciśnij przycisk on/off , aby wyłączyć radio.
Radio wyposażone jest w przewodową antenę FM; w celu uzyskania lepszego odbioru należy ją rozwinąć. W celu
uzyskania lepszego odbioru AM należy zmienić położenie radia.
Gniazdo line in
Przy użyciu kabla audio z 3,5-milimetrową wtyczką (nie jest dołączony) można podłączyć przenośny odtwarzacz
MP3 lub inne urządzenia audio w celu zapewnienia odtwarzania za pomocą radiobudzika.
Budzenie za pomocą radia lub alarmu dźwiękowego
Wybierz żądaną stację radiową i poziom głośności.
Naciśnij i przytrzymaj przycisk alarm set oraz naciśnij jednocześnie przycisk hour, aby ustawić żądaną godzinę
budzika. Naciśnij i przytrzymaj przycisk, aby szybko ustawić lub naciśnij na krótko w celu zwiększenia ustawienia o
jedną godzinę.
Następnie naciśnij i przytrzymaj przycisk alarm set oraz naciśnij jednocześnie przycisk min, aby ustawić żądaną
liczbę minut budzika. Naciśnij i przytrzymaj przycisk, aby szybko ustawić lub naciśnij na krótko w celu zwiększenia
ustawienia o jedną minutę.
Naciśnij przycisk alarm on/off; na wyświetlaczu zaświeci się wskaźnik budzika . Radio zostanie włączone w celu
obudzenia użytkownika o ustawionej godzinie i z ulubioną stacją. Będzie ona odtwarzana przez 1 godziny, a
następnie urządzenie zostanie automatycznie wyłączone.
W celu ustawienia budzenia za pomocą ulubionej stacji ustaw przełącznik alarm radio/buzz w pozycji radio.
Aby ustawić budzenie za pomocą alarmu dźwiękowego zamiast radia należy ustawić przełącznik alarm radio/buzz w
pozycji buzz.
Naciśnij przycisk alarm on/off, aby wyłączyć radio lub alarm dźwiękowy; wskaźnik budzika zniknie z
wyświetlacza.
Budzik zostanie włączony następnego dnia o tej samej porze.
Funkcja drzemki
Po włączeniu się alarmu dźwiękowego lub radia naciśnij przycisk snooze, aby tymczasowo wyłączyć alarm
dźwiękowy albo radio. Około 5 minut później alarm dźwiękowy lub radio włączy się ponownie.
Funkcja drzemki powtarzana jest maksymalnie przez godzinę lub do momentu jej anulowania przez naciśnięcie
przycisku alarm on/off.
Po upływie 1 godziny funkcja drzemki jest resetowana automatycznie.
Zasypianie przy radiu
Wybierz żądaną stację radiową i poziom głośności.
Naciśnij przycisk sleep, aby przejść do wyłącznika czasowego; na wyświetlaczu pojawi się wskazanie 90 i SLEEP.
Naciśnij kilkakrotnie przycisk sleep, aby ustawić czas uśpienia 90, 60, 30, lub 10 minut; na wyświetlaczu pojawi się
odpowiedni czas, a wskazanie SLEEP będzie migać przez kilka sekund. Następnie ponownie wyświetlona zostanie
częstotliwość i wskazanie SLEEP.
Radio będzie odtwarzane przez ustawiony czas, a następnie wyłączy się automatycznie.
Aby wyłączyć radio przed upływem ustawionego czasu, wystarczy nacisnąć przycisk snooze.
Zasypianie przy radiu i budzenie za pomocą radia lub alarmu dźwiękowego
Wybierz żądaną stację radiową i poziom głośności.
Naciśnij przycisk sleep i ustaw żądany czas uśpienia zgodnie z powyższym opisem.
Ustaw alarm zgodnie z powyższym opisem.
Radio zostanie wyłączone po upływie ustawionego czasu i włączone następnego dnia w celu obudzenia
użytkownika za pomocą alarmu dźwiękowego lub radia zgodnie z ustawieniem.
56.
Page 57

Rozwiązywanie problemów
W przypadku wystąpienia zakłóceń, sprawdzić poniższe punkty zanim zaniesiesz urządzenie do naprawy.
Jeśli rozwiązanie problemu nie jest możliwe wg poniższych wskazówek, skontaktować się ze sprzedawcą lub
autoryzowanym centrum serwisowym.
OSTRZEŻENIE: Nigdy nie otwierać obudowy urządzenia. Wszelkie naprawy techniczne lub
konserwacja powinny być skierowane do wykwalifikowanego personelu serwisowego.
Problem Przyczyna Rozwiązanie
Brak dźwięku Zbyt niski poziom głośności.
Nieprawidłowości w
działaniu przycisków.
Słaby odbiór. Słaby sygnał.
Specyfikacje techniczne
Zasilanie sieci: AC 230V~50Hz
Rezerwa dla ustawień bieżącej godziny: DC 3 V litowa bateria guzikowa (CR2032)
Częstotliwość: FM 87,5 MHz – 108 MHz
AM 525 kHz – 1615 kHz
Wymiary: ok. 60 x 190 x 90 mm
Ciężar: ok. 600 g (bez baterii)
Możliwość wprowadzenia zmian bez uprzedniego powiadomienia.
Niepodłączony kabel
zasilania.
Wyładowania
elektrostatyczne.
Zakłócenia ze strony innych
urządzeń elektrycznych
(TV, VCR, komputer, itp.).
Dostosować głośność
Podłączyć kabel zasilania do
gniazda ściennego.
Wyłączyć urządzenie i włączyć
z powrotem.
Alternatywnie, wyłączyć
urządzenie, odłączyć przewód
zasilania AC i włączyć z
powrotem.
Dostosować antenę.
Zachować odpowiednią
odległość od innych urządzeń
elektrycznych.
57.
Page 58

MODEL: 4224
Klokradio met Grote LCD Display
Veligheidsmaatregelen
WAARSCHUWING
RISICO VOOR EEN ELEKTRISCHE
SCHOK NIET OPENEN
PAS OP: OM HET RISICO VAN EEN
ELEKTRISCHE SCHOK TE
Een driehoek met een
bliksemschicht wil de
aandacht van de gebruiker
vestigen op “gevaarlijke
voltage”, zonder isolatie,
binnenin het apparaat die
hoog genoeg kan zijn om een
elektrische schok te
veroorzaken.
VERMINDEREN, DE BEHUIZING
(OF ACHTERKANT) NIET
VERWIJDEREN. ER ZIJN GEEN
ONDERDELEN DIE DOOR DE
GEBRUIKER ONDERHOUDEN
MOETEN WORDEN. LAAT
ONDERHOUD OVER AAN
GEKWALIFICEERD
ONDERHOUDSPERSONEEL.
Een driehoek met een
uitroepteken wil de aandacht
van de gebruiker vestigen op
belangrijke instructies voor
gebruik en onderhoud in de
bijgeleverde
gebruiksaanwijzing, die
zorgvuldig moeten worden
gelezen.
BIJKOMENDE INFORMATIE
Let op kleine onderdelen en batterijen, slik ze niet in. Het kan gevaarlijk zijn voor uw gezondheid en
leiden tot verstikking. Zorg er voor dat kleine onderdelen en batterijen vooral uit de handen van kinderen
blijven.
Belangrijk advies omtrent het gehoor
Opgelet:
U geeft om uw gehoor, wij doen dat ook.
Wees daarom voorzichtig tijdens het gebruik van dit apparaat.
Onze aanbeveling: Vermijd hard geluid.
Kinderen dienen onder toezicht te staan bij het gebruik van koptelefoons; controleer of het apparaat niet
op te hoog volume gezet is.
Opgelet!
Hard geluid kan onherstelbare schade aan het gehoor van een kind veroorzaken.
Laat NOOIT personen, in het bijzonder kinderen, voorwerpen in de gaten, schachten of andere
openingen van de behuizing steken; dit kan een dodelijke elektrische schok tot gevolg hebben. De
behuizing van het apparaat mag slechts door daartoe gekwalificeerde vaklui geopend worden.
Gebruik het apparaat alleen voor het doel waarvoor het is bestemd.
Het apparaat is uitsluitend bedoeld voor gebruik in huishoudelijke en zakelijke omgevingen.
Bewaar deze gebruiksaanwijzing voor toekomstig gebruik.
Aanwijzingen inzake de milieubescherming
Dit product mag aan het einde van zijn levensduur niet samen met het normale huishoudelijke afval
verwijderd worden, maar moet afgegeven worden op een verzamelpunt voor de recycling van
elektrische en elektronische apparatuur. Het symbool op het product, in de gebruiksaanwijzing of op de
verpakking maakt u daarop attent.
De werkstoffen zijn volgens hun kenmerking herbruikbaar. Met het hergebruik, de stoffelijke verwerking
of andere vormen van recycling van oude apparaten levert u een belangrijke bijdrage tot de
bescherming van ons milieu.
Gelieve bij het gemeentebestuur informatie te vragen over het bevoegde verzamelpunt.
58.
Page 59

Verhinder nooit de ventilatie van het apparaat door middel van gordijnen, kranten, dekens of
meubelstukken. De ventilatiegaten moeten altijd vrij zijn. Oververhitting kan schade veroorzaken en de
levensduur van het apparaat verkorten.
Hitte en warmte
Stel het apparaat niet bloot aan direct zonlicht. Zorg ervoor dat het apparaat niet wordt blootgesteld aan
directe hittebronnen zoals verwarmingen en open vuur.
Zorg ervoor dat de ventilatiegaten niet zijn bedekt.
Vocht en reiniging
Dit apparaat is niet waterbestendig! Dompel het apparaat niet onder in water. Laat het apparaat niet in
contact komen met water. Als er water in het apparaat komt, dan kan dat ernstige schade veroorzaken.
Gebruik geen schoonmaakmiddelen die alcohol, ammoniak, benzine of schuurmiddelen bevatten omdat
deze het apparaat kunnen beschadigen. Gebruik voor het schoonmaken een zachte vochtige doek.
Professionele recycling
Batterijen en verpakking horen niet thuis in het huisafval. De batterijen moeten worden ingeleverd bij een
verzamelpunt voor gebruikte batterijen. Verpakkingsmateriaal gescheiden deponeren is goed voor het
milieu.
VELIGHEIDSMAATREGELEN
1. LEES DE GEBRUIKSAANWIJZING – Alle veiligheids- en bedieningsaanwijzingen dienen gelezen te
worden voordat het apparaat gebruikt wordt.
2. BEWAAR DE GEBRUIKSAANWIJZING – De veiligheids en bedieningsaanwijzingen dienen bewaard te
worden voor toekomstig gebruik.
3. NEEM WAARSCHUWINGEN IN ACHT – Alle waarschuwing op het apparaat en handleiding dienen in
acht genomen te worden.
4. VOLG DE GEBRUIKSAANWIJZINGEN OP – Alle bedienings- en gebruiksaanwijzingen dienen opgevolgd
te worden.
5. WATER EN VOCHTIGHEID – Het apparaat dient niet in de nabijheid van water, bijvoorbeeld een badkuip,
wastafel, gootsteen, wasmand, zwembad of in een natte kelder gebruikt te worden.
6. VENTILATIE – De openingen in het apparaat zorgen er voor dat het apparaat goed geventileerd wordt, ze
zijn nodig voor het goed functioneren and het voorkomen van oververhitting. Het apparaat dient zodanig
geplaatst te worden op een locatie dat een goede ventilatie niet door gehinderd wordt. Zet het niet op een
bed, sofa tapijt of een soortgelijk oppervlak dat de ventilatiegleuven kan blokkeren of in een ingebouwde
installatie zoals een boekenkast of kastje dat de luchtstroom door de ventilatiegleuven kan verhinderen.
7. HITTE – Het apparaat dient niet in de nabijheid van hittebronnen zoals radiatoren, warmte roosters,
kachels of andere apparaten (waaronder versterkers) die hitte produceren, te staan.
8. ENERGIEBRONNEN – Dit product dient alleen gebruik te maken van het type energiebron aangegeven
op het markeringslabel.
9. STROOMSNOER BESCHERMING – Stroomsnoeren dienen zo gelegd te worden dat er niet makkelijk
overheen gelopen kan worden of ingedrukt worden door voorwerpen die bovenop of tegen ze geplaatst
worden.
10. PERIODEN VAN ONBRUIK – Haal de stekkers uit het stopcontact en maak de stekker van de antenne
los als het apparaat voor langere tijd niet gebruikt gaat worden.
11. VOORWERPEN EN VLOEISTOFFEN – Let er op dat er geen vreemde voorwerpen en vloeistoffen
gemorst worden in de openingen van het apparaat.
12. SCHADEONDERHOUD – Haal de stekker uit het stopcontact en breng het naar gekwalificeerd
onderhoudspersoneel in de volgende gevallen:
a. Als het stroomsnoer beschadigd is;
b. Als er vloeistof gemorst is of er voorwerpen in het apparaat gevallen zijn;
59.
Page 60

c. Als het apparaat blootgesteld is aan regen of water;
d. Het apparaat lijkt niet normaal te functioneren. Gebruik alleen de apparaaten en de bedieningen zoals
beschreven in deze gebruiksaanwijzing.
e. Als het apparaat gevallen of op een andere manier beschadigd is;
f. Als het apparaat een duidelijke verandering in functioneren vertoont;
13. ONDERHOUD – Behalve dan wat er aangegeven staat in de handleiding, dient de gebruiker niet zelf te
proberen het apparaat te repareren. Alle reparaties dienen uitgevoerd te worden door
onderhoudspersoneel.
14. HET SCHOONMAKEN – Haal de stekker uit het stopcontact vóór het schoonmaken. Gebruik geen
vloeibare schoonmaakmiddelen of aërosolmiddelen. Gebruik een vochtige doek voor het schoonmaken.
Volg de verzorging en onderhoud instructies in de handleiding.
15. BLIKSEM – voor extra bescherming voor dit product tijdens onweer, haalt u de stekker uit het stopcontact
en ontkoppel de antenne of het kabelsysteem.
16. VEILIGHEIDSCONTROLE – Na het afronden van onderhoud of reparaties aan dit apparaat, vraag de
onderhoudsmonteur om veiligheidscontroles uit te voeren.
17. OVERBELASTING – Overbelast stopcontacten, verlengsnoer of geïntegreerde stekkerdozen omdat dit
kan resulteren in brand of een elektrische schok.
18. ELECTROSTATISCHE ONTLADING – Haal de stekker uit het stopcontact en verwijder de batterijen als
het apparaat stoort. Sluit het na een korte tijd weer aan.
Installeren
Vermijd het installeren van de speler in ruimten met:
1) direct zonlicht of radiatoren of afgesloten auto’s;
2) hoge temperatuur of hoge vochtigheid;
3) veel stof;
4) veel trillingen, omdat de interne delen ernstig beschadigd kunnen raken.
Opstapelen
Plaats het apparaat in een rechtopstaande positie. Plaats de speler niet op of onder versterkers of ander apparatuur
wat warm kan worden.
Stroomnetwerkaansluiting:
Neem de volgende aanwijzingen in acht om defect raken, brand, letsel of elektrocutie te voorkomen:
• Controleer of het voltage van het stroomnet werk op het label (onder de set) overeenkomt met het voltage
van uw stroomnetwerk. Het apparaat is ontworpen voor AC 230V ~ 50Hz.
• Sluit het stroomsnoer aan op de netwisselspanning fitting en het stopcontact.
• Om de stekker uit het stopcontact te houden trek aan de stekker en niet aan de kabel.
• Houd de stekker goed vast bij het aansluiten of ontkoppelen er van uit het stopcontact.
• Raak het stroomsnoer niet aan niet aan met natte handen.
• Bescherm het stroomsnoer tegen hitte producerende apparaten.
• Schakel het apparaat uit en neem contact op met een geautoriseerde klantenservice als het gevallen is of
op een andere wijze beschadigd is.
Voorzorgsmaatregels m.b.t. batterijen:
• Houd batterijen uit de buurt van kinderen en huisdieren.
• Doe de batterijen er in, onderwijl de polariteit (+/-) in de gaten houdend. Het niet in acht nemen van de
batterijpolariteit kan letsel en/of schade aan eigendommen veroorzaken.
• Verwijder lege batterijen uit het apparaat. Verwijder de batterijen als het apparaat voor langere tijd niet
gebruikt gaat worden, dit om schade te voorkomen veroorzaakt door verroeste of geërodeerde batterijen.
• Gooi batterijen nooit in vuur. Stel de batterijen niet bloot aan vuur of andere hittebronnen.
60.
Page 61

• Het weggooien van batterijen: Lege batterijen moeten op de juiste wijze, met in achtneming van de wetten
die van toepassing zijn, weggegooid of gerecycled worden. Voor meer informatie kunt u contact opnemen
met uw gemeente.
• Neem de veiligheids-, gebruiks- en verwijderingsaanwijzingen van de batterijfabrikant in acht.
Plaats van de Bedieningen
VooraanzichtBovenaanzicht
1. volume min/max bediening
2. time set
Stel de actuele tijd in (met hour en min)
3. alarm radio/buzz
Kiezer voor de wekmodus
4. min
Stel de minuten van de actuele tijd, alarmtijd en
slaaptijd in
5. alarm on/off
6. hour
Stel de uren van de actuele tijd, alarmtijd en
slaaptijd in
7. band am/fm
Bandbreedte kiezer AM en FM
8. alarm set
Stel de wektimer in (met hour en min)
9. tuning-regeling
10. sleep
Stel de slaaptimer in (met uur en min)
11. snooze
Doezelfunctie na het activeren van het alarm of het
uitzetten van de slaaptimer
12. on/off
Zet de radio aan/uit
13. Typelabel
14. Beeldscherm
15. Batterijcompartiment
Achteraanzicht
16. Luidspreker
17. line in ingang
18. dimmer low/high
Stel de helderheid van het beeldscherm in
met de schakelaar
19. FM draadantenne
20. Voedingskabel
61.
Page 62

Aansluitingen
Antenne Aansluiting
De wekkerradio komt met een FM draadantenne aan de achterkant, verleng deze voor het beste ontvangst.
Voedingsbron
De unit wordt gevoed door 230V~50Hz netvoeding. De 3V Lithium celbatterij CR2032 (niet meegeleverd) wordt
alleen gebruikt voor back-up van de klok. Verwijder de batterij tijdens een lange periode van geen gebruik om
batterijlekkage te vermijden.
Sluit om schade die niet door de garantie wordt gedekt te vermijden de unit alleen aan op de bovenstaande
netvoeding.
Insteken/Verwisselen van de Back-Up Batterij
Steek de back-up batterij in het batterijcompartiment aan de onderkant van de unit; u heeft een Phillips
schroevendraaier nodig om het batterijcompartiment te openen. Let op de polariteit.
Verwissel de back-up batterij een keer per jaar.
Uw instellingen (alarm, actuele tijd, etc.) blijven bewaard tijdens een onderbreking van de voeding of als tijdelijk de
stekker uit het stopcontact wordt gehaald. De unit schakelt automatisch over naar de back-up batterij.
Basis Gebruik
Wekkerradio Aan-/Uitzetten
Zet indien niet in gebruik de radio uit met de on/off . Draai aan de volume min/max om de geluidssterkte te
regelen.
Selecteer bandbreedte frequentie met de bandbreedtekiezer band am/fm, schakel tussen FM en AM.
Zet de unit na gebruik uit. Haal indien de unit een lange periode niet wordt gebruikt de stekker uit het stopcontact
om energie te besparen en verwijder de batterij om batterijlekkage te vermijden.
Het beeldscherm toont de actuele tijd of het radiostation.
De unit is ontworpen voor continu gebruik; hij is in de ON modus of in de stand-by modus.
Helderheid van het Beeldscherm
U kan de helderheid van het beeldscherm instellen met de schakelaar dimmer low/high aan de achterkant van de
unit. Stel in op low om het achtergrondlicht te dimmen en stel in op high voor een helderde
beeldscherm.
Actuele Tijd Instellen
Bij de eerste aansluiting toont de unit 0:00.
Druk op de time knop, houd hem ingedrukt en druk tegelijkertijd op hour om de uren in de 24- uurs modus te zetten.
Druk op de knop en houd hem ingedrukt om snel in te stellen of druk hem kort in om de instelling met een uur te
verhogen.
Stel nu de minuten in met time (indrukken en vasthouden) en min.
Druk op de knop en houd hem ingedrukt om snel in te stellen of druk hem kort in om de instelling met een minuut te
verhogen.
De actuele tijd is ingesteld.
Radio
Druk op de on/off om de radio aan te zetten. Het beeldscherm toont de bandbreedte frequentie (AM of FM) en de
frequentie (bijv. 100.6 MHz en 525 KHz). Selecteer de bandbreedte frequentie met de bandbreedtekiezer band
am/fm, switch tussen FM en AM.
Tijdens het tuning van uw tune op uw favoriete station wordt de frequentie in grote cijfers op het beeldscherm
getoond.
Draai aan de volume min/max om de geluidssterkte te regelen.
Druk op de on/off om de radio uit te zetten.
62.
Page 63

De radio komt met een FM draadantenne; rol hem uit voor het beste ontvangst. Richt de radio voor het beste AM
ontvangst.
line in ingang
Sluit uw draagbare MP3 speler of een ander audio apparaat aan via een audio kabel met een 3,5mm contact (niet
meegeleverd) om via uw wekkerradio af te spelen.
Wakker worden met de Radio of de Buzzer
Selecteer het gewenste radiostation en het geluidssterkteniveau.
Druk op de alarm set knop, houd hem vast en druk tegelijkertijd op de hour instelknop om het gewenste wek uur in
te stellen. Druk op de knop en houd hem ingedrukt om snel in te stellen of druk hem kort in om de instelling met
een uur te verhogen.
Druk nu op de alarm set knop, houd hem vast en druk tegelijkertijd op de min instelknop om de gewenste
wekminuten in te stellen. Druk op de knop en houd hem ingedrukt om snel in te stellen of druk hem kort in om de
instelling met een minuut te verhogen.
Druk nu op alarm on/off, de wekkerindicator licht op het beeldscherm op. De radio zal aangaan om u te wekken
op de ingestelde tijd met uw favoriete station. Hij zal 1 uur spelen en daarna automatisch uitgaan.
Voor wekken met uw favoriete station stel alarm radio/buzz in op radio.
Weet zeker om wakker te worden met de buzzer i.p.v. de radio dat de alarm radio/buzz op buzz staat.
Druk op de alarm on/off om de radio of de buzzer uit te zetten. De wekkerindicator gaat uit.
De wekker zal de volgende dag op dezelfde tijd komen.
Doezelfunctie
Druk als de buzzer of de radio klinkt op snooze om de buzzer of radio tijdelijk uit te zetten. Ongeveer 5 minuten
later zal de buzzer of de radio opnieuw klinken.
De doezelfunctie herhaald tot een uur of totdat u hem afbreekt door op de alarm on/off knop te drukken.
Na een uur wordt de doezelfunctie automatisch opnieuw ingesteld.
Slapen met de Radio
Selecteer het gewenste radiostation en het geluidssterkteniveau.
Druk op de sleep knop om de slaaptimer binnen te gaan; het beeldscherm toont 90 en SLEEP. Druk herhaaldelijk
op sleep om de slaaptimer te regelen op 90, 60, 30, en 10 minuten. De overeenkomstige tijd wordt getoond en
SLEEP knippert enkele seconden. Het beeldscherm gaat terug naar de frequentie en SLEEP wordt getoond.
De radio zal de ingestelde periode spelen en daarna automatisch uitgaan.
Druk om de radio uit te zetten voor het einde van de ingestelde periode eenvoudig op de snooze knop.
Slapen met de Radio en Wakker worden met de Radio of de Buzzer
Selecteer het gewenste radiostation en het geluidssterkteniveau.
Druk op de sleep knop en stel de gewenste slaapperiode zoals hierboven beschreven in.
Stel de wekker zoals hierboven beschreven in.
De radio gaat uit na de ingestelde tijd en wekt u de volgende morgen met de buzzer of de radio,
overeenkomstig uw instelling.
63.
Page 64

Probleemoplossing
Als er een storing plaatsvindt, controleer dan eerst de onderstaande punten voordat u het apparaat wegbrengt ter
reparatie.
Als u niet in staat bent om het probleem op te lossen door de onderstaande stappen op te volgen neem dan
contact op met uw dealer of geautoriseerd reparatiecentrum.
WAARSCHUWING: Open het apparaat nooit. Laat onderhoud of reparatie altijd over aan gekwalificeerd
onderhoudspersoneel.
Probleem Reden Oplossing
Geen geluid. Het volume staat te zacht.
Toetsstoring Elektrostatische lading. Schakel het apparaat uit en
Slechte ontvangst. Zwak signaal
Technische Specificaties
Stroomnetwerk-aansluiting: AC 230V~50Hz
Backup voor huidige tijd, instellingen: DC 3V Lithium celbatterij (CR2032)
Frequentiebereik: FM 87.5MHz – 108MHz
AM 525kHz – 1615kHz
Afmetingen: ongeveer 60 x 190 x 90 mm
Gewicht: ongeveer 600 g (zonder batterij)
De stekker zit niet in het
stopcontact.
Interferentie van andere
elektrische apparaten
(TV, videorecorder, computer
enz.).
Specificaties kunnen zonder voorafgaande kennisgeving veranderd worden.
Pas het volume aan.
Sluit het stroomsnoer aan op
een stopcontact.
daarna weer aan.
Schakel, als alternatief, het
apparaat uit, haal de stekker
uit het stopcontact en verwijder
de backup batterij en sluit deze
daarna weer aan.
Pas de antenne aan.
Houd afstand van andere
elektrische apparaten.
64.
Page 65

MODEL: 4224
Rádiobudík s velkým LCD displejem
BEZPEČNOSTNÍ POKYNY
VAROVÁNÍ
NEBEZPEČÍ ZÁSAHU
ELEKTRICKÝM
PROUDEMNEOTEVÍRAT
Trojúhelník se symbolem
blesku upozorňuje uživatele
na neizolované „nebezpečné
napětí“ uvnitř přístroje, které
je dostatečně vysoké, aby
mohlo znamenat nebezpečí
zásahu elektrickým proudem.
UPOZORNĚNÍ: KE SNÍŽENÍ RIZIKA
ZÁSAHU ELEKTRICKÝM PROUDEM
NEODSTRAŇUJTE KRYT (NEBO
ZADNÍ ČÁST) UVNITŘ NEJSOU
ŽÁDNÉ UŽIVATELEM VYMĚNITELNÉ
SOUČÁSTKY S OPRAVOU SE
OBRAŤTE NA KVALIFIKOVANÉHO
TECHNIKA.
Trojúhelník se symbolem
vykřičníku upozorňuje
uživatele na důležité
instrukce k používání a
údržbě spolu s návodem,
který je třeba prostudovat.
DOPLŇUJÍCÍ INFORMACE
Pozor na malé díly a baterie. Spolknutí těchto předmětů může vést k vážnému zranění nebo
udušení. Hlavně dbejte na to, aby malé díly a baterie nebyly v dosahu dětí.
Důležitá rada týkající se ochrany sluchu
Upozornění
Máme starost o váš sluch tak jako vy.
Proto používejte tento spotřebič s rozvahou.
Naše doporučeni: Nepoužívejte vysoké hlasitosti.
Je nutné dohlédnout na děti, když používají sluchátka; přesvědčte se, že hlasitost není nastavena
příliš vysoko.
Upozornění!
Vysoká hlasitost může způsobit nenapravitelnou ztrátu dětského sluchu.
Nenechte NIKDY osoby, zvláště děti, strkat předměty do dírek, zdířek, nebo jiných otvorů na
přístroji. Může to vést ke smrtelnému zranění elektrickým proudem. Pouzdro přístroje smí otevřít
jedině odborník.
Použijte spotřebič pouze k účelu k jakému je určen.
Přístroj je určen výhradně pro použití v obytných a obchodních oblastech.
Prosím uschovejte si pečlivě tento návod k obsluze pro pozdější upotřebení.
Upozornění k ochraně životního prostředí
Tento výrobek se nesmí po ukončení své životnosti likvidovat s normálním domovním odpadem,
ale musí být odevzdán na sběrném místě pro recyklaci elektrických a elektronických přístrojů.
Symbol na výrobku, návodu k použití či obalu na to upozorňuje.
Materiály jsou recyklovatelné podle svých označení. Recyklací, využitím materiálů nebo jinou
formou zužitkování starých přístrojů důležitým způsobem přispíváte k ochraně našeho životního
prostředí.
Zeptejte se prosím obecní správy na příslušné likvidační místo.
65.
Page 66

Neblokujte větrání přístroje tím, že jej např. přikryjete látkou, novinami, nebo jiným kusem nábytku. Otvory
pro větrání musí zůstat vždy volné. Přehřátí může způsobit poškození a zkrátit životnost přístroje.
Teplo a horko
Nevystavujte spotřebič přímému slunečnímu záření. Přesvědčte se, že spotřebič není vystaven přímému
zdroji tepla jako jsou topná tělesa nebo přímý plamen. Přesvědčte se, že ventilační štěrbiny u spotřebiče
nejsou zakryty.
Vlhkost a čištění
Tento přístroj není vodotěsný! Neponořujte přístroj do vody. Nedovolte, aby přístroj přišel do kontaktu s
vodou. Jestliže voda vnikne do přístroje, může ho vážně poškodit. K čistění nepoužívejte čisticí prostředky,
které obsahují alkohol, čpavek, benzín nebo abrasivní čisticí prostředky protože by mohly přístroj poškodit.
K čištění použijte navlhčený měkký hadr.
Sběr odpadu
Baterie a obalový materiál nepatří do domácího odpadu. Baterie musí být vráceny do speciální sběrny pro
použité baterie. Oddělení obalového materiálu je z ekologického a ekonomického hlediska výhodné.
BEZPEČNOSTNÍ POKYNY
1. ČTĚTE POKYNY - před použitím přístroje si přečtěte veškeré bezpečnostní pokyny a návod k použití.
2. UCHOVEJTE POKYNY – návod k použití a bezpečnostní pokyny si uschovejte pro další použití.
3. VĚNUJTE POZORNOST VAROVÁNÍM – musí být dodržována veškerá varování a návod k použití.
4. DODRŽUJTE POKYNY – veškeré provozní pokyny musí být dodržovány.
5. VODA A VLHKOST - zařízení se nesmí používat v blízkosti vody, např. poblíž vany, umyvadla, dřezu,
prádelní kádě, ve vlhkém sklepení či v blízkosti plaveckého bazénu.
6. VĚTRÁNÍ – otvory v zařízení slouží pro správné odvětrání a jsou nezbytné pro provoz a zabraňují
přehřátí. Zařízení by mělo být umístěné tak, aby díky svému umístění či poloze nebylo zabráněno
správné ventilaci. Nepokládejte na postel, pohovku, koberec či podobné plochy, které mohou ucpat
ventilační otvory. Nevkládejte do knihoven či vestavěných skříní, které mohou zabraňovat proudění
vzduchu ventilačními otvory.
7. TEPLO – zařízení by mělo být umístěno v dostatečné vzdálenosti od tepelných zdrojů, jako jsou radiátory,
kamna či jiná zařízení (včetně zesilovačů), které produkují teplo.
8. ZDROJ ENERGIE – zařízení musí být zapojeno do takového typu síťového napájení, jenž je uvedeno v
provozních pokynech nebo označeno na zařízení.
9. OCHRANA PŘÍVODNÍHO KABELU – přívodní kabely by měly být vedeny tak, aby se na ně nešlapalo,
aby nebyly stlačovány předměty nad nebo vedle nich.
10. NEPOUŽÍVÁNÍ – pokud se zařízení delší dobu nepoužívá, odpojte jej prosím od sítě a antény.
11. VNIKNUTÍ PŘEDMĚTU či KAPALINY – je nutné dávat pozor, aby žádné předměty a jakékoli jiné
kapaliny nevnikly skrze otvory do zařízení.
12. POŠKOZENÍ VYŽADUJÍCÍ SERVIS – zařízení musí opravit kvalifikovaný servisní technik v následujících
případech:
a. přívodní kabel či zástrčka je poškozená.
b. do zařízení vnikly předměty či natekla kapalina.
c. zařízení bylo vystaveno na dešti či ve vodě.
d. Zdá se, že přístroj nepracuje, tak jak by měl. Používejte pouze jednotky a ovladače, které jsou
popsány v této příručce.
e. zařízení upadlo na zem nebo je poškozený kryt.
f. zařízení prokazuje patrnou změnu ve svém výkonu.
66.
Page 67

13. SERVIS – uživatel nesmí provádět údržbu jiným způsobem, než který je uveden v návodu k použití.
Veškeré opravy musí provádět kvalifikovaný servisní technik.
14. ČIŠTĚNÍ – před čištěním vypojte zařízení z el. sítě. Nepoužívejte tekuté čističe, používejte pouze vlhký
hadřík. Dodržujte instrukce pro údržbu a péči, uvedené v této příručce.
15. BOUŘKA – zařízení vypojte ze sítě a od antény při bouřce a pokud se zařízení delší dobu nepoužívá.
16. BEZPEČNOSTNÍ KONTROLA – pro provedení opravy požádejte zákaznický servis o provedení
bezpečnostní kontroly.
17. PŘETÍŽENÍ – aby nedošlo ke vzniku požáru či úrazu elektrickým proudem, nepřetěžujte el. zásuvky a
zabudované zdířky.
18. ELEKTROSTATICKÝ VÝBOJ- Odpojte přístroj z elektrické zásuvky a vyjměte baterie, jestliže přístroj
nefunguje. Po krátké době opět připojte.
Instalace
Neinstalujte přehrávač v místech, která jsou vystavena:
1) přímému slunečnímu světlu, v blízkosti topidel nebo v uzavřeném automobilu;
2) vysoké teplotě nebo vysoké vlhkosti;
3) nadměrné prašnosti;
4) nadměrným otřesům, protože by se mohly vážně poškodit vnitřní části.
Ukládání na sebe:
Postavte přístroj do svislé polohy. Přístroj neumísťujte na nebo pod zesilovače nebo jiné přístroje, které se mohou zahřát.
Napájení ze sítě:
Dodržujte následující pokyny, abyste předešli poruše, požáru, zranění nebo úrazu elektrickým proudem:
• Zkontrolujte, zda napětí sítě uvedené na štítku přístroje (pod přístrojem) koresponduje s vašim lokálním
napětím sítě. Tento přístroj je navržen pro napětí ST 230V~50Hz.
• Připojte síťovou šňůru do síťového konektoru AC (ST) a do zásuvky na stěně.
• Abyste odpojili šňůru ze zásuvky na stěně, vytáhněte ze stěny pouze zástrčku a ne kabel.
• Držte pevně zástrčku, když ji připojujete nebo odpojujete ze zásuvky na stěně.
• Nedotýkejte se napájecí šňůry mokrýma rukama.
• Chraňte napájecí šňůru před zařízeními, která vyvíjejí teplo.
• Pokud přístroj upadl nebo byl jiným způsobem poškozen, prosím vypněte ho a kontaktujte autorizovaný
zákaznický servis.
Bezpečnostní opatření týkající se baterie:
• Udržujte baterie mimo dosah dětí a domácích zvířat.
• Při vkládání baterií dodržujte jejich polaritu (+/-). Nedodržení správné polarity baterií může zapříčinit
zranění osob a/ nebo poškození majetku.
• Vybité baterie odstraňte ze zařízení. Odstraňte baterie ze zařízení, když jej nepoužíváte delší dobu, abyste
předešli poškození způsobenému korozí nebo vytečením baterií.
• Nikdy nevhazujte baterie do ohně. Nevystavujte baterie ohni nebo dalším zdrojům tepla.
• Likvidace baterií: vybité baterie musí být řádně zlikvidovány a recyklovány podle všech platných zákonů.
Podrobnější informace naleznete na Odboru likvidace odpadu na místní samosprávě.
• Dodržujte pokyny výrobce k bezpečnosti, použití a likvidaci baterií.
67.
Page 68

Umístění ovládacích prvků
Pohled shora
Pohled zepředu
1. volume min/max
2. time set
Nastavení aktuálního času (hour a min)
3. alarm radio/buzz
Ovládač funkce budíku
4. min
Nastavení minut aktuálního času, budíku a časovače
vypnutí
5. alarm on/off
6. hour
Nastavení hodin aktuálního času, budíku a časovače
vypnutí
7. band am/fm
Přepínač pásma AM a FM
8. alarm set
Nastavení času buzení (hour a min)
9. Ovladač tuning
10. sleep
Nastavení časovače vypnutí (hour a min)
11. snooze
Funkce “Snooze“ po aktivaci budíku nebo vypnutí
časovače vypínání
12. on/off
Zapnutí/vypnutí rádia
13. Typový štítek
14. Displej
15. Prostor pro záložní baterii
Pohled zezadu
16. Reproduktor
17. line in konektor
18. dimmer low/high
Nastavení jasu displeje páčkovým
přepínačem
19. Drátová anténa FM
20. Hlavní napájecí kabel
68.
Page 69

Připojení
Připojení antény
Rádiový budík má vzadu drátovou anténu FM, prosím rozmotejte ji, abyste zajistili lepší příjem signálu.
Zdroj elektrické energie
Přístroj je napájeno hlavním napájecím kabelem 230V~50Hz. 3V lithiová knoflíková baterie CR2032 (není přiložena)
se používá pouze jako záložní zdroj hodin. Pokud budík dlouho nepoužíváte, prosím vyjměte baterii, abyste zamezili
jejímu vytékání.
Abyste zamezili škodám, které nejsou kryty zárukou, připojujte přístroj pouze k výše zmíněným zdrojům elektrické
energie.
Vložení/výměna záložní baterie
Vložte záložní baterii do prostoru pro baterii na spodní části přístroje. Budete potřebovat křížový šroubovák, abyste
prostor pro baterii otevřeli. Prosím zachovejte polaritu.
Vyměňujte záložní baterii jednou ročně.
Vaše nastavení (budíku, aktuálního času, atd.) zůstane zachováno během selhání baterie nebo když je přístroj
dočasně odpojen od hlavního přívodu elektrické energie; přístroj se automaticky přepne na záložní baterii.
Základní obsluha
Zapnutí/vypnutí rádiového budíku
Vypněte rádio tlačítkem on/off , když ho nepoužíváte. Otočte knoflíkem volume min/max, abyste nastavili hlasitost.
Nastavte frekvenci rádia přepínačem pásma band am/fm, přepínejte mezi FM a AM.
Po použití prosím přístroj vypněte. Abyste šetřili energii, odpojte přístroj od přívodu elektrické energie a vyjměte
záložní baterii, abyste zamezili jejímu vytékání, když není rádiový budík dlouho používán.
Displej ukazuje buď aktuální čas nebo frekvenci rádiových stanic.
Přístroj je navržen pro nepřetržitou činnost; je buď v režimu “Zap.” nebo v pohotovostním režimu.
Jas displeje
Páčkovým přepínačem dimmer low/high na zadní straně přístroje můžete nastavit jas displeje. Pro ztlumené
podsvícení nastavte low, pro intenzivní podsvícení nastavte na high.
Nastavení aktuálního času
Když přístroj poprvé připojíte, na displeji se ukáže 0:00.
Zmáčkněte a podržte tlačítko time a přitom zmáčkněte tlačítko hour, abyste nastavili hodiny v 24hodinovém režimu.
Zmáčkněte a podržte tlačítko pro rychlé nastavení nebo na něj krátce poklepejte, abyste posunuli čas o hodinu.
Nyní nastavte minuty tlačítkem time (zmáčkněte a držte) a tlačítkem min.
Zmáčkněte a podržte tlačítko pro rychlé nastavení nebo na něj krátce poklepejte, abyste o minutu posunuli čas.
Aktuální čas je nastaven.
Rádio
Pro zapnutí rádia zmáčkněte on/off . Displej ukazuje frekvenční pásmo (AM nebo FM) a frekvenci stanic (např. 100,6
MHz a 525 KHz). Vyberte frekvenční pásmo pomocí přepínače pásma band am/fm, přepínejte mezi FM a AM.
S knoflíkem tuning naladíte svou oblíbenou stanici, frekvence je na displeji zobrazena velkými číslicemi.
Knoflíkem volume min/max nastavíte hlasitost rádia.
Zmáčkněte on/off , abyste rádio vypnuli.
69.
Page 70

Rádio je vybaveno drátovou anténou FM, prosím rozmotejte ji, abyste zajistili lepší příjem signálu. Pro lepší příjem
AM frekvencí prosím nasměrujte rádio.
line in konektor
Zapojte svůj přenosný MP3 přehrávač nebo jiný audio přístroj pomocí audio kabelu s konektorem 3,5 mm (není
přiložen), abyste přehrávali hudbu pomocí vašeho rádiového budíku.
Buzení rádiem/budíkem
Vyberte požadovanou rádiovou stanici a úroveň hlasitosti.
Zmáčkněte a podržte tlačítko alarm set a zároveň zmáčkněte tlačítko hour, abyste nastavili požadovaný čas budíku.
Zmáčkněte a podržte tlačítko pro rychlé nastavení nebo na něj krátce poklepejte, abyste o hodinu posunuli čas.
Nyní zmáčkněte a podržte tlačítko alarm set a zároveň zmáčkněte tlačítko min, abyste nastavili požadované minuty
na budíku. Zmáčkněte a podržte tlačítko pro rychlé nastavení nebo na něj krátce poklepejte, abyste o minutu
posunuli čas.
Nyní zmáčkněte tlačítko alarm on/off, indikátor budíku se rozsvítí na displeji. Rádiový budík se zapne ve Vámi
přednastaveném čase s naladěnou oblíbenou stanicí. Bude hrát 1 hodinu a pak se automaticky vypne.
Pro budík s Vaší oblíbenou stanicí prosím přepněte tlačítko alarm radio/buzz na radio.
Aby Vás vzbudil budík místo rádia, zajistěte, že je tlačítko alarm radio/buzz, přepnuto na buzz.
Zmáčkněte tlačítko alarm on/off, abyste rádio či budík vypnuli, pak se indikátor budíku vypne.
Budík se aktivuje příští den ve stejném čase.
Funkce Snooze
Když se spustí budík nebo se zapne rádio, zmáčkněte tlačítko snooze, abyste budík či rádio dočasně vypnuli.
Zhruba po 5ti minutách se budík či rádio opakovaně zapnou.
Funkce „Snooze“ je aktivní po jednu hodinu nebo dokud ji nevypnete zmáčknutím tlačítka alarm on/off.
Po jedné hodině se funkce „Snooze“ automaticky zastaví.
Časovač automatického vypnutí rádia
Vyberte požadovanou rádiovou stanici a hlasitost.
Zmáčkněte tlačítko sleep, abyste měli přístup k časovači; displej ukazuje 90 a SLEEP. Opakovaně zmáčkněte
tlačítko sleep, abyste nastavili časovač vypnutí na 90, 60, 30, nebo 10 minut, zobrazí se odpovídající čas a nápis
SLEEP několikrát zabliká.
Na displeji se opět zobrazí frekvence a funkce SLEEP je nastavena.
Rádio bude hrát po požadovanou dobu a pak se automaticky vypne.
Pokud chcete rádio vypnout ještě předtím, než je přednastaveno časovačem, jednoduše zmáčkněte tlačítko snooze.
Časovač automatického vypnutí rádia a buzení rádiem/budíkem
Vyberte požadovanou rádiovou stanici a hlasitost.
Zmáčkněte tlačítko sleep a nastavte požadovanou dobu, po které se rádio automaticky vypne, tak, jak je popsáno
výše.
Nastavte budík tak, jak je popsáno výše.
Rádio se automaticky vypne a příští den ráno Vás vzbudí budíkem či rádiem dle Vámi zadaného nastavení.
70.
Page 71

Řešení problémů
Pokud se vyskytne porucha, nejprve zkontrolujte níže uvedené body a teprve poté odneste přístroj do opravny.
Pokud nejste schopni problém vyřešit podle následujících tipů, kontaktujte svého prodejce nebo autorizovaný
zákaznický servis.
VAROVÁNÍ: Nikdy zařízení nedemontujte. Servis a údržbu vždy přenechejte technikovi autorizovaného
zákaznického střediska.
Problém Příčina Řešení
Žádný zvuk.
Nefungují tlačítka. Elektrostatický náboj. Přístroj vypněte a potom znovu zapněte.
Špatný příjem.
Technická data
Přívod elektrického proudu: ST 230 V~50 Hz
Záloha pro aktuální čas, nastavení: SS 3V Lithiová knoflíková baterie (CR2032)
Kmitočtový rozsah: FM 87,5MHz – 108MHz
AM 525kHz – 1615kHz
Rozměry: přibližně 60 x 190 x 90 mm
Hmotnost: přibližně 600 g (bez baterie)
Podléhá změnám bez předchozího upozornění.
Hlasitost je nastavena příliš
nízko.
Přístroj není připojen k
elektrické síti.
Slabý signál.
Rušení od jiných elektrických
přístrojů (televize, video,
počítač, atd.).
Nastavte hlasitost.
Připojte síťový kabel do zásuvky.
Případně přístroj vypněte, odpojte síťový kabel ze
zásuvky a vyjměte záložní baterii a poté
je opět připojte.
Nastavte anténu.
Udržujte přístroj v dostatečné vzdálenosti od jiných
elektrických zařízení.
71.
Page 72

MODELL: 4224
Geniş LCD Ekranlı Saatli Radyo
GÜVENLİK TALİMATLARI
UYARI
ELEKTRİK ÇARPABİLİR
AÇMAYINIZ DİKKAT: ELEKTRİK
Üzerinde şimşek sembolü
bulunan üçgen işaret
kullanıcıyı "Tehlikeli Akım"
konusunda uyararak cihaz
üzerinde yalıtım olmadığı için
bu akımın olası bir elektrik
çarpmasına sebep olacağı
hakkında da uyarır.
ÇARPMASININ ÖNÜNE GEÇMEK
İÇİN, KAPAĞI AÇMAYINIZ (VEYA
ARKA KISMI). KULLANICININ
ONARACAĞI PARÇA
BULUNMAMAKTADIR. UZMAN
EKİPLERLE TEMASA GEÇEREK
SORUNU GİDERİNİZ
Üzerinde ünlem işareti
bulunan üçgen işaret
kulanıcıyı kılavuzda yer alan
ve dikkatle okunması ve
takibedilmesi gereken
kullanma ve onarım
talimatları hakkında
bilgilendirir.
HARİCİ BİLGİLER
Küçük pil parçalarına dikkat ediniz, kesinlikle yutmayınız. Sağlığınıza zararlı olabilir ve kurşun sizi
boğabilir. Kü.ük parçaları özellikle pil parçalarını çocuklardan uzak tutunuz.
Kulak zarınızı korumak için önemli uyarılar
Uyarı:
Sizin kulak sağlığınız sizin için ve bizim için önemli.
Bu yüzden bu cihazı kullanırken dikkatli olunuz.
Bizim tavsiyemiz: fazla yüksek ses den kaçının.
Kulaklıkları kullanırken çocukların yanında bulununuz; sesin fala açık olmamasını sağlayınız.
Dikkat!
Fazla yüksek ses çocuklarda ağı hasara yol açabilir.
Kesinlikle şahısların bil hasa çocukarın küçük deliklere vya cihazın açık yerlerine herhangi bir şeyleri
sokmasına izin vermeyiniz. Aksi takdirde elektrik çarpma tehlikesi bulunmaktadır. Cihazın kapağı sadece
uzman kişiler tarafından açılmalıdır.
Lütfen cihazı sadece öngörüldüğü şekilde kullanınız.
Cihaz sadece mesken ve iş alanlarında kullanılmak üzere tasarlanmıştır.
İleride ihtiyacınız olduğunda bakmak için bu kılavuzu saklayınız.
Çevre koruma ile ilgili açıklamalar
Bu ürün, kulanım süresinin sona ermesiyle birlikte normal ev çöpü kanalıyla tasfiye edilmeyip, elektrik ve
elektronik cihazlarının geri dönüşüm toplama noktalarına bırakılmalıdır.
Ürünün, kullanma talimatının veya amabalajın üzerinde yer alan sembol buna işare etmektedir.
Hammaddeler, üzelerindeki işaretler uyarınca geri dönüştürülebilir özelliğe sahiptirler. Eski cihazların
geri dönüştürülmesi, maddi yönden değerlendirilmesi veya diğer şekillerdeki değerlendirilmelerine
bulunacağınız desteklerle, çevremizin korunması için önemli bir katkı sağlamış olacaksınız.
Lütfen bağlı bulunduğunuz belediye yönetiminden yetkili tasfiye noktasını öğreniniz.
72.
Page 73

Cihazın havalandırma deliklerini gazete, perde yorgan veya mobilya ile tıkamayınız. Havalandırma delikleri
her zaman açık kaması gerekmektedir. Fazla ısınma cihazın fazla ısınmasına sebep olabilir veya cihazın
ömrünü kısaltır.
Sıcaklık ve ısı
Cihazı güneş ışığının doğrudan yansımasından koruyunuz. Cihazın doğrudan sıcaklık üreten aletelerde
kalirüfer gibi açık ateşten vs. uzak tutunuz. Cihazın havalandırma deliklerinin kapalı olmadığından emin
olunuz.
Rutubet ve temizlik
Bu cihaz su geçirmez değildir! Cihazı suyla temas ettirmeyiniz. Cihazın su alabileceği yerlerden uzak
tutunuz. Cihaza su girerse şayet, ciddi hasara neden olabilir.
Cihazı temizlemek için içinde alkol, benzen veya cihazın dış yüzeylerine zarar verecek maddelerin
bulunduğu çözücü maddeler kullanmayınız. Bunun yerine, yumuşak, ve nemli bir bez kullanınız.
Uygun biçimde arıtma
Pil ve ambalajlar normal çöpe atılmaması gerekmektedir. Piller için özel bulunan yerlerde arıtılması
gerekmektedir. Ambalajları ayrı atmanız çevreyi korumanıza yardımcı olur.
GÜVENLİK TALİMATLARI
1. TALİMATLARI OKUYUNUZ – Cihaz çalıştırılmadan evvel tüm talimatların okunması gerekmektedir.
2. TALİMATLARI SAKLAYINIZ – ilerde bakmak üzere güvenlik ve çalıştırma talimatlarını saklayınız.
3. UYARILARI DİKKATE ALINIZ – Bu kılavuzda ve cihaz üzeinde gösterilen uyarılar dikkate alınmalıdır.
4. TALİMATLARI UYGULAYINIZ – Tüm çalıştırma talimatları uygulanmalıdır.
5. SU VE NEM – cihazın mesela küvet, lavabo, mutfak lavabosu, çamaşır leğeni, yüzme havuzu ya da ıslak
zeminler gibi su kaynaklarının yaknında kullanılmaması gerekmektedir.
6. HAVALANDIRMA– Cihazın açık kısımları cihazın havalandırılması içindir bu deliklerin açık olması
gerekmektedir. Cihazın bu havalandırma deliklerinin kapanmayacağı uygun bir yere konulması gerekir.
Deliklerin engelleneceği yatak, halı gibi yerlere koymayınız, yine deliklerin kapanacağı gömme dolaplara
mesla kitaplık veya deliklerin hava almasını engelleyecek kapalı yerlere koymayınız.
7. ISI – Bu cihazın kalorifer, soba gibi veya başka (yükselticiler de dahil) ısı kaynaklarından uzakta tutulması
gerekir.
8. GÜÇ KAYNAĞI – Cihazın kılavuzda belirtilen veya cihazın üzerinde yer alan güç kaynaklarına
bağlanması gerekir.
9. ELEKTRİK KABLOSUNUN KORUNMASI – kabloların üzerlerine basıldığında ezilecek veya herhangi
bir nesne gelecek şekilde döşenmemesi gerekmektedir.
10. KULANILMADIĞINDA – Cihazı uzunca bir süre kullanmayacaksanız elektrik ve anten bağlantısını kesiniz.
11. NESNE ve SIVI GİRİŞİ – Cihazın içine bir nesne düşmemesine veya sıvının akmamasına dikkat ediniz.
12. SERVİS GEREKTİREN HASARLAR – Şu hallerde servis elemanları çağrılmalıdır:
a. Elektrik kablosu veya fişi hasar gördüğünde.
b. Cihaza bir nesne düştüğünde veya içine bir sıvı aktığında.
c. Cihaz yağmur veya neme maruz kaldığında
d. Cihaz normal çalışmıyor gibi. Sadece bu kılavuzda belirtilen komut ve düğmeleri kullanınız;
e. Cihaz düşürüldüğünde veya gövdesi zarar gördüğünde.
f. Cihazın çalışma performansında düşüş gözlediğiniz durumlarda.
13. BAKIM – Kullanıcının bu kılavuzda belirtilen haller dışında kesinlikle tamir etmeye kalkışmamaı gerekir.
Kalan tüm hallerde bakımın uzman servis elemanarınca yapılması gerekmektedir.
14. TEMİZLEME – Temizlemeden evvel ciazı fişten çekiniz. Sıvı veya püskürtme temizleyiciler kullanmayınız,
sadece nemli bir bez kullanınız. Bu kılavuzdaki koruma ve temizleme talimatlrına uyunuz.
15. YILDIRIM – Yıldırım olduğu zamanlarda veya uzun bir süre kullanmadığınızda lütfen cihazı güş
kaynağından ve antenden çekiniz.
73.
Page 74

16. EMNİYET KONTROLÜ – Cihazın bakımından sonra servis elemanından emniyet testi yapmasını
isteyiniz.
17. AŞIRI ELEKTRİK – Yangın veya elektrik çarpmasının önüne geçmek için pirizlere ve ilave aksesuvarlara
aşırı elektrik yüklemeyiniz.
18. KISA DEVRE - Cihaz arıza yaptığında fişten çekiniz ve pilleri çıkartınız. Biraz bekledikten sonra tekrar
fişe takınız.
Kurulum
Cihazı şu yerlere kurmayınız:
1) doğrudan güneş ışığı alan veya sıcak radyatörlerin yanına ya da kapalı otomobillere koymayınız;
2) yüksek sıcaklık veya nemin olduğu yerler;
3) aşırı tozlu yerlere;
4) aşırı sallantının olduğu yerler, çünkü cihazın içindeki kısımlar hasar görebilir.
Konumlama:
Cihazı dik konumda tutunuz. Cihazı amfi ve benzeri cihazın altına veya yanına koymayınız, zira aşırı ısınabilir.
Ana Güç Kaynağı:
Arıza, yangın, yaralanma ve elektik çarpmasının önüne geçmek için:
• Cihazın çalışma voltajının etikettekinin (cihazın altındadır) aynı olduğunu konrol ediniz. Bu cihaz AC
230V~50Hz ile çalışmak üzere tasarlanmıştır.
• Ana ceryan kablosunu önce AC ceryan yuvasına sonra da duvar pirizine takınız.
• Duvardan fişi çekmek için kablonun fiş kısmından tutarak çekiniz, kablodan değil.
• Fişi duvar pirizinden öekerken sıkı tutunuz.
• Ceryan kablosuna asla ıslak elle dokunmayınız.
• Ceryan kablosunu ısı üreten cihazlardan uzak tutunuz.
• Cihazı düşürdüğünüzde veya benzeri bir durumda hemen cihazı kapatınız ve yetkili servisinize haber
veriniz.
Pil Emniyet Kuralları:
• Pilleri çocuklardan veya ev hayvanlarından uzak tutunuz.
• Pilleri takarken kutuplara (+/-) dikkat ediniz. Kutuplara bakmadan takarsanız yaralanmalara ve/veya mülke
zarar verebilirsiniz.
• Bitmiş pilleri cihazdan çıkarınız. Paslanmış veya oksitlenmiş pilleri zarar vermemeleri için uzun bir süre
cihazınızı kullanmayacaksanız cihazdan çıkarınız.
• Pilleri asla ateşe atmayınız. Pilleri ataşe veya ısı kaynaklarına maruz bırakmayınız.
• Pilin atılması: pilin yasalar çerçevesinde uygun olarak atık muamelesi görmesi gerekmektedir. Daha ayrıntılı
bilgi için belediyenizin atık merkeziyle temas kurunuz.
• Üreticinin emniyet, kullanım ve atıkla ilgili alimatlarına lütfen riayet ediniz.
74.
Page 75

Düğmelerin Yerleri
Üstten Görünüm
Önden Görünüm
1. volume min/max düğmesi
2. time set
saat ayarı (hour ve min ile)
3. alarm radio/buzz
uyanma konumunu ayarlama için
4. min
saat, alarm ve uyku süresinin dakikasını ayarlar
5. alarm on/off
6. hour
saat, alarm ve uyku süresinin saatini ayarlar
7. band am/fm
bant seçici AM ile FM
8. alarm set
alarm saatini ayarlar (hour ve min ile)
9. tuning düğmesi
10. sleep
uyku süresini ayarlar (hour ve min ile)
11. snooze
alarm sonrası uykuya devam veya uyku süresini
bitirme işlemini yapar
12. on/off
Radyoyu Açar/Kapatır
13. Tip etiketi
14. Ekran
15. Pil bölmesi
Arkadan Görünüm
16. hoparlör
17. line in yuvası
18. dimmer low/high
düğme ile ekran parlaklık ayarı
19. FM çubuk anteni
20. ana ceryan kablosu
75.
Page 76

Bağlantılar
Anten Bağlantısı
Radyonun bir de arkasında FM çubuk anteni vardır: daha iyi alım için lütfen iyice açınız
Güç Kaynağı
Cihaz 230V~50Hz ana güç kaynağıyla çalışmaktadır. 3V Lityum düğme pili CR2032 (beraber verilmez) sadece saat
yedeği içindir. Lütfen pilin akmasını önlemek için uzun bir süre cihazınızı kullanmayacaksanız fişten çekiniz.
Garanti kapsamının dışında kalan hasarları engellemek için cihazı belirtilen orandaki güç kaynağına bağlayınız.
Yedek Pili Takılması/Değiştirilmesi
Cihazın altındaki pil bölmesine yedek pili takınız; pil bölmesini açkmak için bir Phillips tornavidaya ihityacınız olacak.
Lütfen kutupara dikkat ediniz.
Yedek pili yılda bir defa değiştiriniz.
Ayarlarınız (alarm, saat, vb.) ceryan veya ana güç kaynağıya kesinti halinde yedek pili sayesinde korunacaktır; bu
durumda cihaz otomatik olarak yedek pili devreye sokacaktır.
Temel Çalıştırma İşlemleri
Saatli Radyonun Açılması/Kapatılması
Radyoyu kullanmadığınız zamanlarda on/off ile kapatınız. Ses ayarlamak için volume min/max düğmesini
döndürünüz.
Band seçici ile band am/fm, bandı FM veya AM olarak ayarlayınız.
Kullanım sonrasında, lütfen cihazı kapatınız. Enerjiden tasarruf etmek için, lütfen cihazınızı uzun bir süre
kullanmayacaksanız pil akmasını önlemek için ana ceryandan çekiniz.
Ekran ya istasyon frekansını ya da saati gösterecektir.
Cihaz ya AÇIK konumda, ya da bekleme konumunda devamlı surette çalışmak üzere tasarlanmıştır.
Ekran Parlaklığı
Ekranın parlaklığını cihazın arkasındaki düğmeleri dimmer low/high kullanarak ayarlayabilirsiniz. low ile loş ışığa,
high ile de daha parlak bir ekrana ayarlayabilirsiniz.
Saatin Ayarlanması
Cihazı ilk kez bağladığınızda 0:00 ekranda yanıp sönecektir.
time tuşunu basılı tutuyorken aynı anda hour tuşuna basarak saati 24-saat esasaına göre ayarlayınız.
Daha hızlı yar için tuşu basılı tutunuz veya bir saat atlatmak için kısa bir süre tek basınız.
Şimdi de time (basılı tutunuz) min dakikayı ayarlayınız.
Daha hızlı yar için tuşu basılı tutunuz veya bir dakika atlatmak için kısa bir süre tek basınız.
Saatiniz böyelikle ayarlandı.
Radyo
Radyoy açmak için on/off tuşuna basınız. ekranda frekans bandı (AM veya FM) ve frekans (ör. 100.6 MHz ve 525
KHz) görüntülenecektir. Bant seçici ile frekans bandını seçiniz band am/fm, FM ile AM arasında seçim yapınız.
tuning düğmesi ile istediğiniz istasyona gidebilirsiniz, frekans ekranda büyük rakamlarla görüntülenecektir.
Ses ayarlamak için volume min/max düğmesini döndürünüz.
Radyoyu kapatmak için on/off tuşuna basınız.
Radyonun bir de FM çubuk anteni bulunmaktadır; daha iyi alım için iyice açınız. Daha iyi AM alımı için radyoyu
döndürünüz.
76.
Page 77

line in Yuvası
seyyar MP3 çalarınızı veya diğer ses cihazınızı 3.5mm fişli ses kablosu ile (beraber verilmez) radyonuza takarak
dinleyebilirsiniz.
Radyo veya Zille Uyanma
İstediğiniz radyoyu bulunuz ve sesini ayarlayınız.
alarm set tuşunu basılı tutarak aynı anda hour ayar tuşun basarak istediğiniz alarm saatini ayarlayınız. Daha hızlı
ayar yapmak için tuşu basılı tutunuz veya bir saat atlatmak için kısa bir süre tek basınız.
Şimdi de alarm set tuşunu basılı tutarak aynı anda min ayar tuşuna basarak istediğiniz alarm dakikasını ayarlayınız.
Daha hızlı yar yapmak için tuşu basılı tutunuz veya bir dakika atlatmak için tuşa kısa bir süre tek basınız.
Şimdi alarm on/off bastığınızda, ekranda alarm göstergesi yanacaktır. Radyo ayarladığınız istasyonla sizi
ayarlanan saatte uyandıracaktır. 1 saat çaldıktan sonra otomatik olarak kapanacaktır.
İstediğiniz istasyonu ayarlamak için alarm radio/buzz konumundan radio konumuna almalısınız.
Radyo yerine zille uyanmak isterseniz, alarm radio/buzz konumundan buzz konumuna almalısınız.
Radyo veya zili kapatmak için alarm on/off basınız, alarm simgesi kaybolacaktır.
Alarm ertesi gün aynı saatte tekrar çalacaktır.
Uykuya Devam İşlevi
Zil çaldığında veya radyo çalıştığında, zil veya radyoyu geçici olarak kapatmak için snooze tuşuna basınız. Yaklaşık
5 dakika sonra zil veya radyo tekrar alarm verecektir.
Zille uyanma işlemi azami bir saate kadar ya da siz alarm on/off tuşuna basana kadar devam eder.
1 saat sonra uykuya devam işlevi otomatik olarak sıfırlanır.
Radyo ile Uyuma
İstediğiniz radyo istasyonunu ve sesini ayarlayınız.
Uyku süresini ayarlamak için sleep tuşuna basınız; ekran 90 ve SLEEP gösterecektir. Devamlı surette sleep tuşuna
basarak uyku süresini 90, 60, 30, ve 10 dakika olarak ayarlayınız, ayarlanan süre ekranda SLEEP olarak birkaç
saniye yanıp sönecektir. Ekran frekans göstergesine dönecek ve SLEEP görüntülenecektir.
Radyo ayaranan saatte çalışacak sonra da otomatik olarak kapanacaktır.
Radyoyu ayarlanan süreden evvele kapatmak için, tüm yapmanız gereken snooze tuşuna basmaktır.
Radyo ile Uyuma ve Radyo veya Zille Uyanma
İstediğiniz radyo istasyonunu ve sesini ayarlayınız.
sleep tuşuna basınız ve yukarıda analatıldığı gibi uyku saatini giriniz.
Alarm saatini de anlatıldığı gibi ayarlayınız.
Radyo ayarladığınız sürede kapanacak ve ertesi sabah sizi ya radyo ile ya da zille, yine ayarladığınız saatte
uyandıracaktır.
77.
Page 78

SORUN GİDERME
Bir hata oluştuğunda, cihazı herhangi bir tamir işlemine tabi tutmadan evvel aşağıdaki hususları kontrol ediniz.
Sorun talimatlara rağmen devam ediyorsa, satıcı veya yetkili servisinize başvurunuz.
UYARI: cihazı asla açmayınız. Daima uzman servis veya elemanlardan yardım alınız.
Sorun Sebep Çözüm
Ses Yok Ses düşük seviyeye
Tuşlar Çalışmıyor. Tuşlar kısa devre oluyordur. Cihazı kapatıp tekrar çalıştırınız.
Zayıf Sinyal. Sinyal zayıf.
Teknik Özellikler
Ana güç kaynağı: AC 230V~50Hz
Saat ve ayrla için yedek pil: DC 3V Lityum düğme pil (CR2032)
Frekans aralığı: FM 87.5MHz – 108MHz
AM 525kHz – 1615kHz
Boyutlar: approx. 60 x 190 x 90 mm
Ağırlık: yaklaşık 600 g (pil olmadan)
Önceden haber verileksizin özellikler değiştirilebilir.
ayarlanmıştır.
Ceryan kablosu bağlı değildir.
Diğer elektrikli aletler
(TV, VCR, Bilgisayar, vs.)
parazit yapıyodur.
Sesi ayarlayınız.
Ceryan kablosunu bir duvar
pirizine takınız.
Ya da, cihazı kapatınız, AC
kablosunu ve yedek pili
çıkarınız sonra yeniden
bağlayınız.
Anteni ayarlayınız.
Diğer elektrikli aletler arasında
mesafe bırakınız.
78.
Page 79

MODEL: 4224
Radio cu Ceas si Ecran Larg LCD
Instructiuni de Siguranta
ATENTIE
RISC DE ELECTROCUTARE
NU DESCHIDETI
ATENTIE: IN VEDEREA REDUCERII
RISCULUI DE ELECTROCUTARE, VA
Triunghiul cu simbolul
fulgerului atrage atentia
utilizatorului asupra existentei
“voltajului periculos”, a carui
valoare ridicata poate
produce electrocutari.
RUGAM SA NU SCOATETI CAPACUL
(SAU CARCASA DORSALA).
NU EXISTA PARTI SCHIMBABILE IN
INTERIOR. PENTRU REPARATII,
ADRESATI-VA PERSONALULUI DE
SPECIALITATE AUTORIZAT.
Triunghiul cu semnul
exclamarii atrage atentia
utilizatorului asupra
instructiunilor importante de
folosire si intretinere din
manualul aferent, care
trebuiesc studiate atent.
INFORMATII SUPLIMENTARE
Aveţi grijă la piesele de mici dimensiuni şi baterii, nu le înghiţiţi. Prezintă riscuri asupra sănătăţii dv. şi
poate conduce la asfixiere. Vă rugăm asiguraţi-vă că nu ţineţi dispozitivele de mici dimensiuni şi bateriile
la îndemâna copiilor.
Recomandare importanta pentru protectia auditiva
Atentie:
Simturile sunt importante pentru Dvs. dar si pentru noi.
Va rugam sa folositi cu grija acest aparat.
Va recomandam: Evitati volumul foarte inalt al sunetului.
Copiii trebuie supravegheaţi când folosesc căşti; asiguraţi-vă că aparatul nu este setat la volum mare.
Atentie!
Volumul inalt de sunet poate afecta auzul copiilor.
Nu lasati NICIODATA persoane, in special copiii, sa introduca obiecte in orificiile prevazute, fante sau
deschideri ale acestui aparat. In caz contrar, socul electric poate produce moartea persoanei respective.
Aparatul trebuie deschis doar de catre personalul calificat.
Folositi aparatul numai in scopul proiectat initial.
Acest aparat trebuie utilizat numai in spatii inchise: apartamente, birouri.
Vă rugăm păstraţi acest manual pentru consultări ulterioare.
Instructiuni de protectie a mediului
La sfarsitul duratei de viata a produsului, nu-l aruncati in gunoiul obisnuit de acasa; va rugam sa il
trimiteti la un punct de colectare pentru reciclarea dispozitivelor electrice si electronice. Acest simbol
aflat pe produs, impreuna cu instructiunile de utilizare si de ambalare ofera informatii legate de metoda
de aruncare.
Materialele sunt reciclabile, conform marcajelor. Prin reciclarea materialelor sau alte metode de
re-utilizare a dispozitivelor vechi, aduceti o contributie importanta in protejarea mediului.
Va rugam sa apelati la serviciile de administratie publica pentru aflarea adreselor de depozitare
autorizata.
79.
Page 80

Nu blocati aerisirea aparatului. Verificati sa nu existe perdele, reviste, mobila sau alte obiecte care sa
blocheze sistemul de ventilatie al aparatului. Sistemul de ventilatie trebuie sa fie departe de alte obiecte!
Supraincalzirea aparatului poate produce defectiuni grave, poate reduce performanta acestuia si durata de
viata.
Supraincalzire si incalzire
Nu expuneti aparatul in lumina directa a soarelui. Verificati daca aparatul nu este asezat langa surse
directe de caldura, cum sunt caloriferele sau focul. Asigurati-va ca fantele de aerisire ale aparatului nu sunt
acoperite.
Umezeala si curatare
Acest aparat nu este rezistent la apă. Nu băgaţi aparatul în apă. Nu lăsaţi aparatul să intre în contact cu
apa. Dacă apa pătrunde în interiorul aparatului, poate provoca deteriorări importante.
Nu folosiţi substanţe de curăţat care conţin alcool, amoniac, benzen sau abrazivi, deoarece acestea pot
deteriora aparatul, Pentru curăţare folosiţi o cârpă moale, umedă.
Reciclare profesionala
Bateriile si ambalajul nu trebuie aruncate la gunoiul menajer. Bateriile trebuie trimise unui punct special de
colectare a baterii vechi. Va rugams a protejati mediul inconjurator separand pe tipuri de ambalaje.
INSTRUCTIUNI DE SIGURANTA
1. CITITI INSTRUCTIUNILE – Citiţi toate instrucţiunile de siguranţă şi folosire înainte de a pune aparatul în
funcţionare.
2. PASTRATI INSTRUCTIUNILE – Păstraţi instrucţiunile de siguranţă şi folosire pentru consultări ulterioare.
3. URMARITI INSTRUCTIUNILE – Toate instructiunile de functionare si utilizare trebuie urmarite intocmai.
4. URMARITI INSTRUCTIUNILE – Toate instructiunile de functionare si utilizare trebuie urmarite intocmai.
5. APA SI UMEZEALA – Aparatul nu trebuie folosit aproape de o sursa de apa, cum ar fi cada din baie,
chiuvetele din baie sau bucatarie, recipientii de spalat rufe, subsol umed, piscine etc.
6. AERISIRE – Orificiile realizate in aparat sunt proiectate in scopul realizarii unei aerisiri corespunzatoare,
fiind necesare functionarii corecte si prevenind supraincalzirea aparatului. Sistemul trebuie asezat astfel
incat pozitia lui sa nu ii afecteze negativ aerisirea. Nu pozitionati aparatul in pat, pe canapea, pe covor sau
suprafete similare care pot bloca orificiile de aerisire, aflate in dispozitivele incorporate, cum este cazul
rafturilor de carti sau dulapurilor.
7. CALDURA – Aparatul trebuie asezat departe de surse de caldura, cum este cazul radiatoarelor,
caloriferelor, aragazelor sau altor tipuri similare de surse (inclusiv amplificatoarele) care emit caldura.
8. SURSE DE PUTERE – Produsul trebuie utilizat numai cu tipul de sursa de putere indicat in instructiunile
de utilizare sau cel marcat direct pe produs.
9. PROTEJAREA CABLULUI DE ALIMENTARE – Cablurile de alimentare trebuie directionate astfel incat
sa nu fie miscate sau modificate de obiectele aflate deasupra lor sau rezemate de ele.
10. PERIOADELE CAND NU UTILIZATI APARATUL – Atunci cand nu folositi aparatul pentru o perioada
lunga de timp, va rugam sa decuplati cablul de la sursa de putere si antena.
11. INTRODUCEREA OBIECTELOR sau LICHIDELOR – Aveti grija sa nu intre niciun obiect sau lichid in
interiorul aparatului.
12. DEFECTIUNI CE NECESITA REPARATII – Va rugam sa apelati numai la personalul autorizat calificat
atunci cand:
a. cablul de alimentare sau stecherul sunt stricate;
b. ati introdus lichid sau obiecte in interiorul aparatului;
c. caparatul a fost expus in ploaie sau a fost udat;
d. Aparatul pare ca nu funcţionează normal. Folosiţi funcţiile şi butoanele numai conform instrucţiunilor din
acest manual;
e. ati scapat aparatul din mana sau interiorul a fost afectat.
80.
Page 81

f. aparatul prezinta disfunctii in timpul operarii.
13. SERVICII – Utilizatorul nu trebuie sa incerce sa repare acest produs in afara indicatiilor amanuntite din
instrcutiunile de utilizare. Toate reparatiile trebuie realizate de catre personalul calificat autorizat.
14. CURATARE – Inainte de curatare, va rugam sa decuplati de la priza de perete. Nu folositi substante
lichide de curatare sau spray. Folositi doar o carpa umeda. Urmariti instructiunile de intretinere si
mentenanta din acest manual.
15. FULGERE – In timpul furtunilor cu fulgere, sau cand lasati aparatul singur pentru o durata mai lunga de
timp in care nu il folositi, va rugam sa il decuplati de la sursa de putere si sa deconectati antena.
16. VERIFICARE DE SIGURANTA – Dupa efectuarea reparatiilor, rugati tehnicianul sa verifice daca aparatul
functioneaza in conditii de siguranta.
17. SUPRAINCARCARE – Nu incarcati excesiv prizele de perete sau prizele multiple casnice. In caz contrar
riscati declansarea unui incendiu sau electrocutarii.
18. DESCARCARI ELECTROSTATICE – Dacă aparatul nu funcţionează corect scoateţi-l din priză şi scoateţi
bateriile. Băgaţi-l înapoi în priză după un scurt timp.
Instalarea
Evitati instalarea aparatului in zone de tipul:
1) lumina directa a soarelui, radiatoare generatoare de caldura sau in automobile inchise;
2) temperaturi sau umiditate inalta;
3) praf excesiv;
4) vibratii mari, care pot determina defectarea componentelor aparatului.
Inaltare
Amplasaţi aparatul în poziţie verticală. Nu puneţi aparatul pe sau sub staţii de amplificare sau alte dispozitive care
se pot încălzi.
Cablul de alimentare:
Urmariti instructiunile de mai jos in vederea evitarii defectiunilor, incendiilor, accidentelor sau electrocutarilor:
• Verificati daca valoarea curentului inscrisa pe placuta (sub aparat) corespunde cu cea a prizei locale.
Aceasta unitate este proiectata pentru CA 230V~50Hz.
• Conectati cablul de alimentare la o priza de perete de CA si apoi la mufa aparatului.
• Ca sa decuplati de la priza de perete, trageti de stecher si nu de cablu.
• Tineti bine de stecher, si apoi conectati sau decuplati de la priza de perete.
• Nu atingeti cablul de alimentare cu mainile umede.
• Protejati cablul de alimentare de dispozitivele generatoare de caldura.
• În cazul în care scăpaţi aparatul din mână sau îl deterioraţi în alt mod vă rugăm contactaţi un centru
autorizat de servicii cu clienţii.
Masuri de Siguranta pentru Baterii:
• Pastrati bateriile departe de accesul copiilor si animalelor de casa.
• Introduceti bateriile tinand cont de polaritati (+/-). In caz contrar, pot aparea accidente umane sau/si
materiale.
• Scoateti bateriile consumate din aparat. Scoateti bateriile atunci cand nu folositi aparatul pentru o perioada
mai lunga de timp, ca sa preveniti defectiunile ce pot aparea in urma ruginirii sau corodarii bateriilor.
• Nu aruncati niciodata bateriile in foc. Nu expuneti bateriile la flacara sau alte surse de caldura.
• Evacuarea bateriilor: bateriile epuizate trebuie evacuate în mod corespunzător şi reciclate în conformitate
cu legile în vigoare. Pentru informaţii detaliate contactaţi autoritatea locală pentru deşeuri.
• Urmaţi instrucţiunile de siguranţă, folosire şi evacuare ale producătorului bateriilor.
81.
Page 82

Pozitia Tastelor de Control
Vedere de Sus
Vedere Frontala
1. tasta volume min/max
2. time set
Setare timp exact (cu hour si min)
3. alarm radio/buzz
Selector pentru optiunea de trezire
4. min
Setare minute pentru timpul exact, ora alarmei si
cronometrul pentru somn
5. alarm on/off
6. hour
Setare ora pentru timpul exact, ora alarmei si
cronometrul pentru somn
7. band am/fm
Selector de banda AM si FM
8. alarm set
Setare timp alarma (cu hour si min)
9. buton tuning
10. sleep
Setare cronometru pentru somn (cu hour si min)
11. snooze
Functiune de atipire dupa activarea alarmei sau
oprire cronometru de somn
12. on/off
Pornire/oprire radio
13. Eticheta model
14. Ecran
15. Compartimentul bateriilor
Vedere din Spate
16. Difuzor
17. mufa line in
18. dimmer low/high
Setare luminozitate ecran cu comutator de
selectare
19. antena FM cu fir
20. cablu de alimentare
82.
Page 83

Conexiuni
Conectarea Antenei
Radioul cu ceas este prevazut la spatele unitatii cu o antena FM cu fir. Va rugam sa desfaceti antena pentru o mai
buna receptie.
Sursa de Alimentare
Unitatea este alimentata la o sursa de 230V~50Hz. Bateria plata cu litiu, de 3V, CR2032 (nu este prevazuta) este
folosita numai ca rezerva pentru ceas. Ca sa evitati scurgerile bateriilor, va rugam sa le scoateti in timpul
perioadelor lungi de timp in care nu folositi unitatea.
Ca sa evitati defectiunile ce nu sunt acoperite de garantie, conectati unitatea doar la sursa de alimentare specificata
mai sus.
Introducerea/Inlocuirea Bateriei de Rezerva
Introduceti bateria de rezerva in compartimentul aflat la baza unitatii. Veti avea nevoie de o surubelnita Phillips ca
sa deschideti compartimentul bateriei. Va rugam sa tineti cont de polaritatile marcate.
Inlocuiti bateria de rezerva o data pe an.
Setarile personale (alarma, timp exact etc.) sunt memorate in timpul caderilor de surent sau atunci cand decuplati
unitatea de la sursa de alimentare. Unitatea trece atunci automat pe bateria de rezerva.
Functionare Standard
Pornirea/Oprirea Radioului cu Ceas
Atunci cand cand nu il folositi, puteti opri radioul cu ajutorul butonului on/off . Rotiti butonul volume min/max ca sa
reglati volumul.
Selectati banda de frecventa cu ajutorul selectorului de banda band am/fm, alegand una din optiunile FM si AM.
Dupa utilizare, va rugam sa opriti unitatea. Ca sa economisiti curentul, va rugam sa decuplati unitatea de la sursa
de alimentare atunci cand cand nu o folositi mai mult timp si sa scoateti bateria ca sa evitati scurgerile.
Ecranul va afisa timpul exact sau frecventa postului de radio.
Unitatea este proiectata in vederea unei utilizari continue; ea se va afla in optiunea ON sau in optiunea standby.
Luminozitatea Ecranului
Puteti fixa luminozitatea ecranului cu ajutorul comutatorului de selctare dimmer low/high aflat la spatele unitatii.
Fixati pe pozitia low pentru lumina slaba de fond, si pe high pentru un ecran luminos.
Setarea Timpului Exact
Atunci cand conectati unitatea pentru prima oara, ecranul va afisa intermitent 0:00.
Tineti apasata tasta time si apoi apasati simultan tasta hour ca sa fixati orele in optiunea 24-ore.
Tineti apasata tasta ca sa setati rapid sau apasati scurt de cateva ori ca sa mariti valoarea cu cate o unitate.
Acum fixati minutele cu ajutorul time (tineti apasata tasta) si min.
Tineti apasata tasta ca sa setati rapid sau apasati scurt de cateva ori ca sa mariti valoarea cu cate o unitate.
Timpul exact este acum fixat.
Radio
Ca sa porniti radioul, apasati tasta on/off . Ecranul va afisa banda de frecventa (AM sau FM) si frecventa (de ex.
100.6 MHz si 525 KHz). Selectati banda de frecventa cu ajutorul selectorului de banda band am/fm, alegand una
din cele doua variante FM si AM.
Cu ajutorul tastei tuning reglati postul de radio favorit, frecventa aparand pe ecran in cifre.
Rotiti butonul volume min/max ca sa reglati volumul.
Ca sa opriti radioul, fixati selectorul de functiuni pe pozitia on/off .
Radioul este prevazut cu o antena FM cu fir; va rugam sa desfaceti antena pentru o mai buna receptie. Pentru o
mai buna receptie AM, va rugam sa modificati pozitia radioului.
83.
Page 84

Mufa line in
Conectati player-ul portabil MP3 sau alte dispozitive audio cu ajutorul cablului audio cu mufa de 3,5mm (nu este
prevazut) ca sa redati prin radioul cu ceas.
Trezirea cu Radio sau Buzzer
Selectati postul de radio dorit si nivelul volumului.
Tineti apasata tasta alarm set si apoi apasati simultan tasta hour ca sa fixati ora dorita pentru trezire. Tineti apasata
tasta ca sa setati rapid sau apasati scurt de cateva ori ca sa mariti valoarea cu cate o unitate.
Acum tineti apasata tasta alarm set si apoi apasati simultan tasta min ca sa fixati valoarea minutelor alarmei. Tineti
apasata tasta ca sa setati rapid sau apasati scurt de cateva ori ca sa mariti valoarea cu cate o unitate.
Acum apasati tasta alarm on/off, si indicatorul alarmei se va aprinde pe ecran. Radioul va porni ca sa va
trezeasca la ora dorita, cu postul de radio selectat. Radioul va functiona timp de 1 ora si apoi se va opri automat.
Pentru trezire cu postul de radio dorit, fixati butonul alarm radio/buzz pe pozitia radio.
Ca sa va treziti cu buzzer in locul radioului, va rugam sa rotiti butonul alarm radio/buzz pe pozitia buzz.
Apasati tasta alarm on/off ca sa opriti radioul sau buzzer-ul, si indicatorul alarmei se va stinge.
Alarma va porni in urmatoarea zi la aceeasi ora.
Functiunea Atipire
Atunci cand buzzer-ul suna sau radioul porneste, apasati tasta snooze ca sa opriti temporar buzzer-ul sau radioul.
Dupa aproximativ 5 minute, buzzer-ul sau radioul vor porni din nou.
Functiunea de atipire se repeta pana la cinci ori sau pana cand o anulati apasand tasta alarm on/off.
Dupa 1 ora, functiunea de atipire se va reseta automat.
Radio la Culcare
Selectati postul de radio dorit si nivelul de sunet.
Apasati tasta sleep ca sa accesati cronometrul pentru somn; ecranul va afisa mesajele 90 si SLEEP. Apasati de
cateva ori tasta sleep ca sa reglati timpul de dormire de 90, 60, 30, si 10 minute. Timpul corespunzator va fi afisat pe
ecran si mesajul SLEEP se va aprinde intermitentcateva secunde. Ecranul va reveni la frecventa anterioara si va
afisa SLEEP.
Radioul va functiona pe toata perioada setata si apoi se va opri automat.
Ca sa opriti radioul inainte de terminarea perioadei presetate, apasati pur si simplu tasta snooze.
Radio la Culcare si Trezire cu Radio sau Buzzer
Selectati postul de radio dorit si nivelul de sunet.
Apasati tasta sleep si apoi fixati perioada de somn dorita urmarind pasii de mai sus.
Fixati alarma urmarind pasii de mai sus.
Radioul se va opri supa timpul stabilit si va va trezi dimineata urmatoare cu buzzer sau radio, functie de setarile
personale.
84.
Page 85

Depanare
Dacă apare o problemă, verificaţi mai întâi punctele din lista de mai jos, înainte de a duce aparatul la reparat.
Dacă nu reuşiţi să rezolvaţi problema folosind aceste sfaturi, consultaţi furnizorul sau un centru autorizat de
depanare.
AVERTISMENT: Nu deschideţi niciodată aparatul. Apelaţi întotdeauna la personal autorizat de întreţinere şi
reparaţii.
Problema Motiv Soluţie
Lipsa sunetului. Volumul este setat prea
Funcţionare incorectă a
butoanelor.
Recepţie slabă. Semnal slab.
Specificaţii tehnice
Sursa de curent : CA 230V~50Hz
Bateria de siguranţă: CC 3V Baterie plata cu litiu (CR2032)
Gama de frecvenţe: FM 87,5MHz – 108MHz
AM 525kHz – 1615kHz
Dimensiuni: aprox. 60 x 190 x 90 mm
Greutate: aprox. 600 g (fără baterie)
Specificatiile de mai sus pot fi modificate de catre producator fara o notificare prealabila.
încet.
Aparatul nu este băgat în
priză.
Sarcină electrostatică. Opriţi şi porniţi din nou aparatul.
Interferenţă de la alte aparate
electrice (televizor, VCR,
calculator, etc.).
Ajustaţi volumul.
Băgaţi aparatul în priză.
Alternativ, opriţi aparatul,
scoateţi-l din priză, scoateţi
bateria de rezervă şi
reconectaţi.
Ajustaţi antena.
Păstraţi distanţă faţă de
celelalte aparate electrice.
85.
Page 86

МОДЕЛ: 4224
Радио и Часовник с голям дисплей на течни кристали (LCD)
Упътване за безопастност
ПРЕДУПРЕЖДЕНИЕ
РИСК ОТ ЕЛЕКТРОУДАР
НЕ ОТВАРЯЙТЕПРЕДУ
ПРЕЖДЕНИЕ: ЗА НАМАЛЯВАНЕ НА
РИСКА ОТ ЕЛЕКТРОУДАР, НЕ
Триъгълник със символ
светкавица обръща
внимание на „опасен
волтаж” без изолация в
корпуса, който може да е
достатъчно висок, за да
причини електрически удар.
ОТСТРАНЯВАЙТЕ КАПАКА ( ИЛИ
ЗАДНАТА ЧАСТ).ВЪТРЕ НЯМА ЧАСТИ
ПОДДАВАЩИ СЕ НА ПОПРАВКА ОТ
ПОТРЕБИТЕЛЯ. ОТНАСЯЙТЕ СЕ ЗА
ПОПРАВКА КЪМ КВАЛИФИЦИРАН
ПЕРСОНАЛ.
Триъгилник с удивителен
знак обръща внимание на
важни инструкции за
употреба и поддръжка в
придружаващото
ръководство, които трябва
да се запомнят.
ДОПЪЛНИТЕЛНА ИНФОРМАЦИЯ
Внимавайте с малки предмети и батерии, не ги гълтайте. Те могат да бъдат опасни за вашето
здраве и да предизвикат задушаване. Моля, уверете се, че съхранявате малки предмети и
батерии на недостъпни за деца места.
Важен съвет отнасящ се до защита на слуха
Предупреждение:
Вие се грижите за вашия слух, ние също.
Затова бъдете внимателни, когато използвате този уред.
Нашата препоръка: Избягвайте висок звук.
Трябва да наглеждате деца, които използват слушалки и да следите дали звука на устройството
не е настроен на високо равнище.
Предупреждение!
Високият звук може да причини непоправима вреда на детския слух.
НИКОГА не позволявайте на никого, особено на деца, да поставят предмети в отвори, цепнатини
или входове на този уред. Това може да доведе до смърт от електроудар. Уреда трябва да се
отваря само от квалифициран пресонал.
Използвайте уреда само за предназначената употреба.
Този уред може да се използва само ж дома или офиса.
Моля пазете това ръководство за употреба, за бъдещи справки.
Инструкции за опазване на околната среда
Не изхвърляйте продукта в обикновените домашни отпадъцислед края на жизнения му цикъл;
предайте го в събирателен пункт за рециклиране на електрически и електронни уреди. Символа
на продукта, инструкциите за употреба или опаковката ще информират за методите на
изхвърляне.
Материалите са годни за рециклиране, както е споменато в маркировката. Чрез рециклиране или
други форми на повторна употреба на стари уреди, вие допринасяте за защита на природната
среда.
Моля запитайте местната управа за оторизирано място за изхвърляне.
86.
Page 87

Не препречвайте вентилацията на уреда. Уверете се че пердета, вестници, мебели или други
предмети не блокират вентилационната система на апарата. Вентилационната система трябва да
може да функционира по всяко време! Прегряването може да доведе до сериозна повреда на уреда
и да намали неговото функциониране и живот.
Горещина и топлина
Не излагайте уреда на пряка слънчева светлина. Уверете се, че уреда не е изложен на директни
топлинни източници като радиатори или огън. Уверете се, че вентилационните отвори на уреда на са
закрити.
Влага и почистване
Този уред не е водоустойчив! Не го потаяйте във вода. Не позволявайте вода да попада върху уреда.
Ако вода влезе в уреда, това може да предизвика сериозна повреда.
Не използвайте почистващи препарати, които съдържат алкохол, амоняк, бензен или драскащи
повърхности, тъй като те могат да повредят уреда. За почистване използвайте мека, влажна кърпа.
Професионално рециклиране
Батерии и опаковки не трябва да се изхвърлят в общите отпадъци. Батерии трябва да се предават в
събирателен пункт за използвани батерии. Отделяне на еднократни опаковки е добре за
екологичната среда.
Упътване за безопастност
1. ПРОЧЕТЕТЕ УПЪТВАНЕТО – Преди да включите уреда трябва да прочетете всички напътствия за
сигурност и работа с него.
2. ЗАПАЗЕТЕ ИНСТРУКЦИИТЕ – Напътствията за работа и сигурност трябва да се запазят за бъдещи
справки.
3. СПЕЦИАЛНИ ПРЕДУПРЕЖДЕНИЯ – Трябва да се спазват всички предупреждения изписани върху
уреда и тези в упътването за употреба.
4. СЛЕДВАЙТЕ ИНСТРУКЦИИТЕ – Трябва да се спазват всички инструкции за употреба.
5. ВОДА И ВЛАГА – Уреда не би трябвало да се използва близо до вода, например близо до
душкабина, умивалник, кухненска мивка, открита пералня, плувен басейн или мокро антре.
6. ВЕНТИЛАЦИЯ – Отворите в уреда са направени за негова надеждна вентилация. Те са необходими
за да предпазват уреда от прегряване. Уреда трябва да е поставен така, че неговото
местонахождение или положение да не пречи за свободното му вентилиране(охлаждане). Не
поставяйте уреда върху легло, диван, одеало или подобна повърхност, която би могла да закрие
вентилационните му отвори, както и в затворени пространства като библиотека или шкаф, които
спират свободния приток на въздух през вентилационните отвори.
7. ТОПЛИНА – Уреда трябва да е разположен далече от източници на топлина като радиатори, печки
или друга техника, (включително усилвател), които могат да излъчват топлина.
8. ИЗТОЧНИК НА ЕНЕРГИЯ – Уреда трябва да се свърже към източник на енергия само от типа,
посочен в упътването за употреба или както е отбелязано върху него.
9. ЗАЩИТА НА ЗАХРАНВАЩИЯТ КАБЕЛ – Захранващите кабели трябва да бъдат инсталирани по
такъв начин, че да не се настъпват при ходене или пробиват от неща сложени върху или до тях.
10. НЕУПОТРЕБА – По време на дълги периоди на неупотреба на уреда, моля изключете го от
електрозахранването и антената.
11. ПРЕДПАЗВАНЕ ОТ ЗАМЪРСЯВАНИЯ И ТЕЧНОСТИ – Трябва да се внимава през отворите на
уреда да не навлизат външни предмети или течности.
12. ИЗИСКВАНИЯ ПРИ РЕМОНТ – Уреда трябва да бъде ремонтиран само от специално обучени
работници когато:
а. Захранващият кабел или щепсел е повреден.
б. Във вътрешността на уреда са попаднали външни предмети или течност.
87.
Page 88
в. Уреда е бил изложен на дъжд или влага.
г. Устройството не работи нормално. Използвайте съставните части и прибори само както е
описано в това ръководство;
д. Уреда е бил изпуснат или вътрешността му е повредена.
е. Уреда показва сериозни отклонения от нормалната си работа.
13. РЕМОНТ – Ползващият уреда не трябва да се опитва да го поправя при настъпили повреди
неописани в ръководството за употреба. Всички сложни ремонти трябва да се извършват от
специално обучени работници.
14. ПОЧИСТВАНЕ – Изключете уреда от електрическото захранване преди почистване. Не
използвайте течни или аерозолни почистващи препарати, а само мека, влажна кърпа. Следвайте
указанията за почистване и поддръжка описани в този наръчник.
15. ЗАЩИТА ОТ МЪЛНИЯ – По време на гръмотевична буря и дълги периоди на неупотреба, моля
изключвайте уреда от електрическото захранване и антената.
16. ПРОВЕРКА ЗА СИГУРНОСТ – След ремонт на уреда, помолете служителите от сервиза да
направят проверка за сигурност на уреда.
17. ПРЕТОВАРВАНЕ – За да избегнете опасност от възпламеняване и електрически удар не
претоварвайте контактите и разклонителите в които е включен уреда.
18. РАЗТОВАРВАНЕ ОТ ЕЛЕКТРОСТАТИЧНО НАПРЕЖЕНИЕ – Изключете от електрозахранването и
извадете батериите от устройството, ако устройството не работи както трябва. Свържете
захранването отново след малко време.
Инсталиране
Избягвайте инсталиране на плеъра на места където има:
1) директна слънчева светлина или в затворени автомобили;
2) висока температура или влажност;
3) прекомерна концентрация на прах;
4) прекомерна вибрация, тъй като вътрешни части могат сериозно да бъдат повредени.
Положение
Поставете уреда в изправена позиция. Не го поставяйте върху или под усилватели или други устройства,
които се нагряват.
Захранване от електрическата мрежа:
Спазвайте следните напътствия, за да избегнете повреда, възпламеняване, нараняване и токов удар:
• Проверете дали характеристиките на тока, посочени върху етикета (под дъното на уреда) отговарят
на местните ви стандарти. Този уред работи на Променлив Ток 230V~50Hz.
• Свържете кабела за захранване към контакт на стената.
• За да изключите уреда, само извадете кабела от контакта.
• Задържайте захранващия кабел здраво, когато го включвате или изключвате към контакта.
• Не пипайте кабела с мокри ръце.
• Пазете захранващия кабел от излъчващи топлина уреди.
• Моля изключете уреда и се свържете с оторизиран сервиз, когато уреда е изпуснат върху твърда
повърхност или повреден по друг начин.
Предпазни мерки за батериите:
• Съхранявайте батериите далече от деца и домашни любимци.
• Поставете батериите като спазвате поляритета им (+/-). Ако свържете батерията неправилно , това
може да доведе до нараняване и/или повреда на уреда.
• Сменете изтощените батерии от устройството. Свалете батериите, когато устройството няма да се
използва за дълго време, за да го предпазите от повреда от протичане на батериите или корозия на
накрайниците.
• Никога не хвърляйте батериите в огън. Не излагайте батериите на огън или други силни източници
на топлина.
88.
Page 89
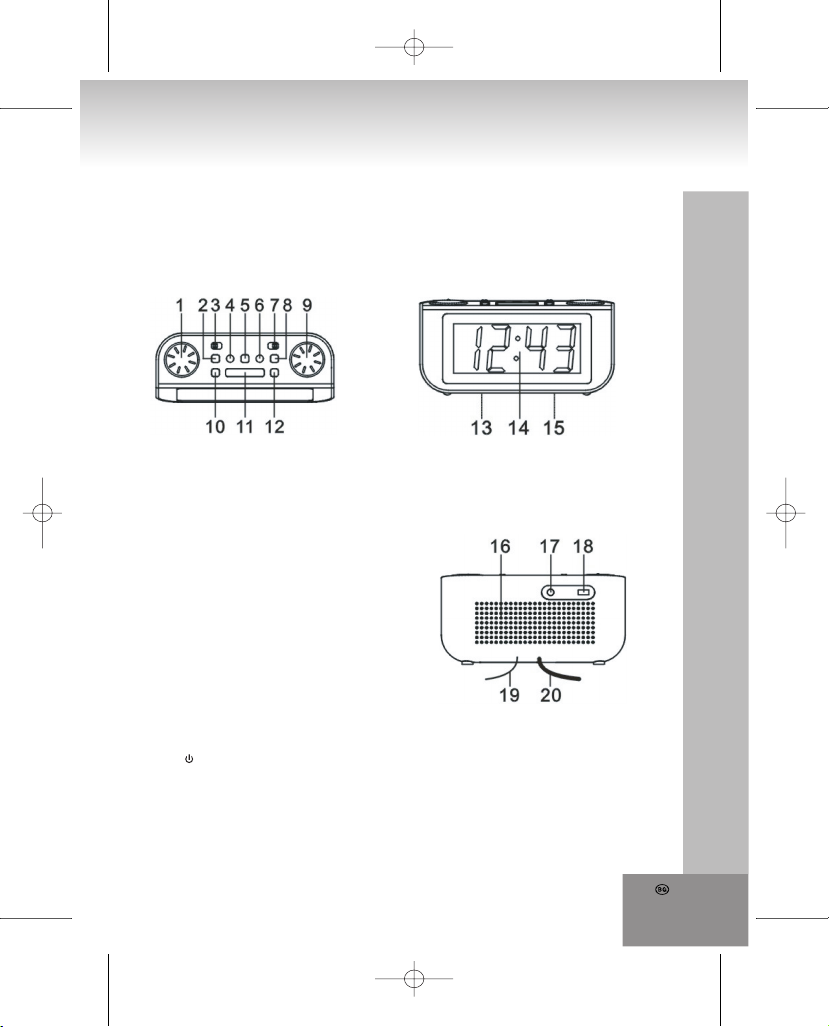
• Изхвърляне на батериите: изтощените батерии трябва да се изхвърлят само на определените за това
места и рециклирани според съответните закони. За по подробна информация се свържете с вашите
местни власти за рециклиране на вторични суровини.
• Следвайте напътствията на производителя на батeриите за употреба, сигурност и изхвърляне.
Разположение на копчетата и механизмите
Изглед отпредИзглед отгоре
1. volume min/max управление на звука
2. time set
Програмира текущото време (с hour и min)
3. alarm radio/buzz
Превключвател за режим на събуждане
4. min
Програмира минутите на текущото време, времето
за събуждане и заспиване
5. alarm on/off
6. hour
Настройва часовете на текущото време,
будилника и времето за заспиване
7. band am/fm
Превключвател за обхват AM и FM
8. alarm set
Програмира времето за събуждане (с hour и min)
9. tuning избор на станция
10. sleep
Настройва таймера за заспиване (с hour и min)
11. snooze
Включва функцията за отложено събуждане, след
активиране на будилника или изключва таймера
за заспиване
12. on/off
Включва и изключва радиото
13. Етикет
14. Дисплей
15. Място на батерията
Изглед отпред
16. Говорител
17. line in жак за външно устройство
18. dimmer low/high
Настройва осветеността на дисплея с
превключвател
19. Кабелна антена за ултракъси вълни FM
20. Кабел на електрозахранването
89.
Page 90

Изводи
Извод за антената
Радиочасовника е снабден с кабелна антена за ултракъси вълни FM, която се намира отзад на часовника;
моля, разпънете я за най-добро приемане.
Източник на електрозахранване
Това устройство е проектирано да работи с променлив домакински ток AC 230V~50Hz. Батерията тип “копче
”, 3V CR2032 (не е включена в комплекта), се използва само за захранване паметта на часовника. Моля
свалете батерията, ако не използвате часовника дълго време, за да избегнете протичането й.
За да избегнете повреди, които не се покриват от гаранцията, използвайте уреда само с ток, с посочените по
горе характеристики.
Поставяне/Смяна на Батерията за захранване на паметта
Поставете батерията за захранване на паметта в мястото за нея на дъното на устройството. Ще витрябва
отвертка Филипс, за да отворите капачето на поставката й. Моля спазвайте поляритета.
Сменяйте батерията веднъж в годината.
Вашите настройки (време за събуждане, час и др.) ще се запазят при спиране на тока; часовника
автоматично превключва захранването на паметта да става от батерията.
Управление на часовника
Включване/Изключване на радиочасовника
Изключете радиото с ключа on/off , когато не се употребява. Завъртете копчето volume min/max, за да
настроите звука.
Изберете честотен обхват с копчето за избор на обхват band am/fm , можете да избирате между FM и AM.
След употреба моля изключете устройството. За да пестите енергия, моля изключвайте устройството от
електрическата мрежа, когато не го използвате за дълги периоди от време.
Дисплеят показва или тикущото време, или честотата на приеманата в момента радиостанция.
Часовника е проектиран за продължителна работа. Той е или в режим ВКЛЮЧЕНО, или в режим изчакване.
Осветление на дисплея
Можете да програмирате осветеността на дисплея с превключвателя dimmer low/high, отзад на устройството.
Превключете на low, за по-слабо осветление и на high, за по-силно осветление на дисплея.
Настройка на текущото време
Когато за първи път включвате часовника, на екрана се изписва знака 0:00.
Натиснете и задръжте копчето time и едновременно натискайте копчето hour, за да настроите часовете в 24часов режим на изписване.
Натиснете и задръжте копчето, за бърза настройка или го натискайте леко последователно, за да
увеличавате настройката с един час.
Сега настройте минутите с копчето time, (натиснете и задръжте) и копчето min.
Натиснете и задръжте копчето за бързо избиране или го натискайте леко последователно, за да увеличавате
настройката с една минута.
Текущото време е настроено.
Радио
Натиснете копчето on/off , за да включите радиото. Дисплеят показва честотния вълнов обхват (AM или FM)
и честотата (например 100.6 MHz и 525 KHz). Изберете честотния вълнов обхват с копчето за избор на
обхват band am/fm, можете да избирате между Ултракъси (FM) и Средни вълни (AM
).
90.
Page 91

С копчето tuning, изберете желаната от вас станция, честотата ще се изпише с големи цифри на дисплея.
Завъртете копчето volume min/max, за да настроите звука.
Натиснете копчето on/off , за да изключите радиото.
Радиото е с кабелна антена за ултракъси вълни FM; моля развийте антената, за най-добро приемане. За найдобро приемане на средни вълни AM, моля насочете радиото в различни посоки.
line in Жак за външни устройства
Можете да свържете вашият MP3 плеър или друго звуково устройство чрез 3.5мм жак и аудио кабел
(не е включен в комплекта), и да го слушате през вашия радиочасовник.
Събуждане с радио или електронен звънец
Изберете желаната радиостанция и равнище на звука.
Натиснете и задръжте копчето alarm set и едновременно натиснете hour, за да изберете желаният час за
събуждане. Натиснете и задръжте копчето за бързо избиране или го натискайте леко последователно, за да
увеличавате настройката с един час.
Сега натиснете копчето alarm set, знакът за алармата светва на екрана и едновременно натиснете копчето
min set, за да настроите желаните минути, за събуждане. Натиснете и задръжте копчето за бързо избиране
или го натискайте леко последователно, за да увеличавате настройката с една минута.
Сега натиснете alarm on/off, знакът светва на екрана. Радиото ще се включи, за да ви събуди в настроения
час с вашата любима станция. Радиото ще работи 1 час и след това автоматично ще се изключи.
За да се събудите с любимата си радиостанция, превключете копчето alarm radio/buzz на положение radio.
За да се събудите с електронен звънец, вместо с радио, превключете копчето alarm radio/buzz на положение
buzz.
Натиснете копчето alarm on/off, за да изключите радиото или звънеца, знакът изчезва от екрана.
На следващия ден будилника ще се включи отнново в програмираното време.
Функция за забавено/отложено събуждане
Когато електронният звънец звънне или се включи радиото, натиснете копчето snooze, за да изключите
временно звънеца или радиото. Приблизително 5 минути по-късно, звънецът или радиото ще се включат
отново.
Функцията за отложено събуждане ще се повтаря до един час или, докато не я отмените с натискане на
копчето alarm on/off .
След 1 час функцията за отложено събуждане автоматично ще се анулира.
Заспиване с радио
Изберете желаната радиостанция и равнище на звука.
Натиснете копчето sleep, за да получите достъп до таймера за заспиване и дисплея ще покаже 90 и SLEEP.
Последователно натискайте копчето sleep, за да изберете време за заспиване от 90, 60, 30 и 10 минути.
Съответното време се изписва на екрана и сигналът SLEEP започва да мига за няколко секунди. Дисплеят се
връща на избраната честота и се изписва сигналът SLEEP .
Радиото ще свири по време на програмирания период, след което автоматично ще се изключи.
За да изключите радиото преди края на програмирания период, натиснете копчето snooze.
Заспиване с радио и събуждане с радио или звънец
Изберете желаната радиостанция и равнище на звука.
Натиснете копчето sleep и програмирайте времето за заспиване както е описано по горе.
Програмирайте будилника както е описано по горе.
Радиото ще се изключи след препрограмираното време и ще ви събуди на следващата сутрин с електронния
звънец или радиото както сте ги програмирали.
91.
Page 92

ОТСТРАНЯВАНЕ НА ПРОБЛЕМИ
Ако се появи повреда, първо проверете посочените по долу точки, преди да отнетесе уреда за поправка.
Ако не можете да отстраните проблема, прилагайки съветите по долу, посъветвайте се с вашия дилър или
препоръчан от нас сервизен център.
ПРЕДУПРЕЖДЕНИЕ: Никога не отваряйте уреда. За сервиз или поддръжка винаги се обръщайте
към оторизиран сервизен персонал.
Причина Причина Решение
Няма звук Звука е настроен твърде
Не работи копче. Еректростатично
Лошо приемане. Слаб сигнал.
Технически характеристики
Електрическо захранване Променлив ток: AC 230V~50Hz
Захранваща батерия за паметта
на часовника и настройките: DC 3V Литиева батерия тип “копче” (CR2032)
Честотен обхват: FM 87.5MHz – 108MHz
AM 525kHz – 1615kHz
Размери: приблизително 60 x 190 x 90 мм
Тегло: Приблизително 600 гр (без батерия)
Подлежи на промени без предупреждение.
ниско.
Не е включено
електрозахранването.
напрежение.
Влияние от други
електрически уреди
(телевизор,
видеокасетофон, компютър
и др.).
Настройте звука.
Включете уреда към
електрозахранващата мрежа.
Изключете устройството за
кратко и отново го включете.
Можете още и да изключите
устройството, да извадите
щепсела от контакта и
батерията за паметта и след
малко отново да ги включите.
Настройте антената.
Спазвайте определено
разстояние от други
електрически уреди.
92.
Page 93

MODEL: 4224
Часы-радио с большим ЖК дисплеем
УКАЗАНИЯ ПО ТЕХНИКЕ БЕЗОПАСНОСТИ
ВНИМАНИЕ
РИСК ЭЛЕКТРИЧЕСКОГО ШОКА НЕ
ОТКРЫВАТЬ
ВНИМАНИЕ: ДЛЯ СНИЖЕНИЯ РИСКА
без изоляции в корпусе,
которое может быть
достаточно высоким, чтобы
повлечь риск электрического
удара.
ПОРАЖЕНИЯ ТОКОМ НЕ СНИМАТЬ
КРЫШКУ (ИЛИ ЗАДНЮЮ СТОРОНУ).
ВНУТРИ НЕТ ЧАСТЕЙ,
ОБСЛУЖИВАЕМЫХ ПОЛЬЗОВАТЕЛЕМ.
ЗА ОБСЛУЖИВАНИЕМ ОБРАЩАЙТЕСЬ
К КВАЛИФИЦИРОВАННОМУ
СЕРВИСНОМУ ПЕРСОНАЛУ.
Треугольник с
восклицательным знаком
обращает внимание
пользователя на важные для
пользования инструкции и
обслуживание в прилагаемом
руководстве, которые должны
быть изучены.
ДАЛЬНЕЙШАЯ ИНФОРМАЦИЯ
Осторожно обращайтесь с малоразмерными компонентами и батарейками устройства, не
глотайте их; это опасно для здоровья и может привести к удушению. Убедитесь, что
малоразмерные компоненты и батарейки находятся в месте, недоступном для детей.
Важные рекомендации относительно защиты слуха
Внимание:
Вы бережете свой слух, мы тоже.
Поэтому будьте осторожны при пользовании данным прибором.
Наша рекомендация: Избегайте большой громкости.
Дети должны находиться под присмотром при использовании наушников; убедитесь, что
устройство не установлено на высокий уровень громкости.
Внимание!
Большая громкость может причинить непоправимый ущерб слуху детей.
НИКОГДА не позволяйте никому, особенно детям, вставлять предметы в отверстия или щели
этого прибора. Это может привести к смерти вследствие поражения электрическим током.
Открывать прибор может только квалифицированный помощник.
Используйте этот прибор только по предназначению.
Этот прибор может использоваться только в бытовых или офисных помещениях.
Сохраните, пожалуйста, данное руководство для справки.
Инструкции по защите окружающей среды
Не утилизируйте данный прибор в конце срока службы вместе с обычными бытовыми отходами;
передайте его в пункт сбора для переработки электрических или электронных устройств. Символ
на продукте, инструкции по использованию или упаковка содержат информацию о способе
утилизации.
Материалы подлежат переработке, как указано на маркировке. Благодаря переработке,
вторичному использованию материалов или иным способам утилизации старых приборов вы
осуществляете важный вклад в защиту окружающей среды.
Пожалуйста, узнайте в городской администрации расположение санкционированных пунктов
утилизации.
RU
93.
Page 94

Не препятствуйте вентиляции прибора. Убедитесь, что систему вентиляции прибора не закрывают
занавеси, газеты, мебель или предметы любого другого типа. Система вентиляции постоянно
должна быть свободной! Перегрев может привести к серьезным повреждениям прибора и снизить
его производительность и срок службы
Тепло и влажность
Не подвергайте прибор воздействию прямых солнечных лучей. Убедитесь, что прибор не
подвергается воздействию источников тепла, например, обогревателей или открытого огня.
Удостоверьтесь, что вентиляционные отверстия прибора не закрыты.
Влага и очистка
Данное устройство не является водонепроницаемым! Не погружайте его в воду. Не позволяйте
устройству контактировать с водой. Если вода попадет внутрь устройства, оно может быть серьезно
повреждено. Не используйте чистящие вещества, содержащие
алкоголь, аммиак, бензин или абразивы, так как это может повредить устройство. Для чистки
устройства используйте мягкую влажную вертошь.
Профессиональная переработка
Батареи и упаковка не должны утилизироваться вместе с отходами. Батареи должны передаваться
в центр сбора использованных батарей. Отделение одноразовых упаковочных материалов является
безвредным для окружающей среды.
УКАЗАНИЯ ПО ТЕХНИКЕ БЕЗОПАСНОСТИ
1. ВНИМАТЕЛЬНО ПРОЧТИТЕ ИНСТРУКЦИИ– Все указания по эксплуатации и технике безопасности
должны быть прочитаны до начала работы устройства.
2. СОХРАНИТЕ ИНСТРУКЦИИ- Указания по эксплуатации и технике безопасности должны быть
сохранены для справки.
3. ОБРАЩАЙТЕ ВНИМАНИЕ НА ПРЕДУПРЕЖДЕНИЯ — все предупреждения на корпусе устройства
и в руководстве по эксплуатации должны быть приняты во внимание.
4. СЛЕДУЙТЕ ИНСТРУКЦИЯМ — выполняйте все написанные инструкции по эксплуатации.
5. ВОДА И ВЛАГА — данное устройство нельзя использовать возле воды, например в ванной, в
раковине умывальника, плавательном бассейне или сыром подвале.
6. ВЕНТИЛЯЦИЯ — отверстия в корпусе устройства служат для вентиляции; они необходимы для
нормальной работы устройства, так как предотвращают его перегрев. Устройство должно быть
расположено таким образом, чтобы его местоположение не препятствовало его нормальной
вентиляции. Не располагайте устройство на кровати, диване, ковре или других подобных
поверхностях, или в таких местах как книжная полка или шкаф, где поток воздуха через отверстия
вентиляции будет затруднен.
7. ВЫСОКАЯ ТЕМПЕРАТУРА — устройство должно располагаться вдали от источников тепла, таких
как радиаторы отопления, кухонные плиты, или других устройств (включая усилители), которые
производят большое количество тепла.
8. ИСТОЧНИК ЭЛЕКТРОПИТАНИЯ — устройство должно быть подключено только к такому источнику
питания, тип которого описан в руководстве по эксплуатации, либо указан на корпусе устройства.
9. ШНУР ПИТАНИЯ — шнур электропитания должен пролегать таким образом, чтобы его не задевали
ногами, и не пережимали предметами, поставленными на него или рядом.
10. ПЕРЕРЫВЫ В РАБОТЕ — если устройство не используется длительное время, следует
отключить его от источника питания и антенны.
11. ПРЕДМЕТЫ И ЖИДКОСТИ — следует позаботиться о том, чтобы на устройство не падали
различные предметы, а в его отверстия не проливались жидкости.
12. РЕМОНТ ПОВРЕЖДЕНИЙ – устройство подлежит ремонту, выполняемым квалифицированным
персоналом, если:
a. Повреждены шнур или вилка электропитания.
b. Внутрь корпуса устройства попали предметы или жидкость.
c. Устройство подверглось воздействию дождя или влаги.
RU
94.
Page 95

d. Устройство не функционирует нормально. Используйте только те кнопки и блоки, которое
описаны в данном руководстве
e. Устройство было уронено, либо его корпус был поврежден.
f. Устройство демонстрирует значительные изменения в своей производительности.
13. ТЕХОБСЛУЖИВАНИЕ — пользователь не должен пытаться обслуживать данное устройство
свыше того, что указано в настоящем руководстве по эксплуатации. Все другие виды
обслуживания должны выполняться квалифицированным персоналом.
14. ЧИСТКА — перед тем, как чистить устройство, отсоедините его от источника питания. Не
используйте для чистки жидкие или аэрозольные моющие средства, используйте для этого только
влажную ветошь. Следуйте соответствующим указаниям, изложенным в данном руководстве.
15. ГРОЗА — во время грозы, а также в периоды длительного перерыва в эксплуатации устройства,
следует отключать его от источника электропитания и антенны.
16. ПРОВЕРКА БЕЗОПАСНОСТИ УСТРОЙСТВА — после ремонта/обслуживания устройства,
попросите службу работы с покупателями проверить безопасность устройства.
17. ПЕРЕГРУЗКА — во избежание опасности пожара или поражения электротоком, не перегружайте
домашнюю сеть электропитания.
18. ЭЛЕКТРОСТАТИЧЕСКИЙ РАЗРЯД — Если устройство не функционирует нормально, отключите
электропитание и извлеките из него батарейки. Через некоторое время снова подключите
электропитание.
Установка
Старайтесь не устанавливать плеер:
1) под прямые лучи солнца, возле радиаторов отопления или в закрытом автомобиле;
2) в местах с высокой температурой или влажностью;
3) там, где много пыли;
4) там, где есть чрезмерная вибрация, так как это может повредить внутренние компоненты
устройства.
Положение:
Поставьте устройство в вертикальное положение. Не ставьте устройство на или под усилитель или другое
оборудование, которое может разогреваться.
Электропитание:
Следуйте указаниям ниже, чтобы избежать неправильного функционирования устройства, риска пожара,
травмы или поражения электротоком:
• Убедитесь, что параметры электропитания, указанные на табличке (снизу), соответствуют
параметрам сети электропитания. Данное устройство предназначено для работы от сети
переменного тока, 230 В ~ 50 Гц.
• Вставьте шнур электропитания в розетку.
• Чтобы вынуть шнур электропитания из розетки, всегда беритесь за вилку, никогда не тяните за сам
шнур.
• Прочно удерживайте вилку, когда вставляете или вынимаете ее из розетки.
• Не прикасайтесь к шнуру электропитания мокрыми руками.
• Защитите шнур электропитания от устройств, генерирующих тепло.
• Если устройство было уронено или повреждено каким-либо другим образом, выключите его и
обратитесь в авторизованный сервис центр.
Меры предосторожности при обращении с батарейками:
• Храните батарейки в месте, недоступном для детей и домашних животных.
• Вставляйте батарейки, соблюдая полярность (+/-). Неправильно вставленные батарейки могут стать
причиной травмы или повреждения устройства.
• Разряженные батарейки следует удалять из устройства. Если устройство не будет использоваться
длительный период времени, также извлекайте из него батарейки, чтобы предотвратить
повреждение устройства, которое может произойти из-за коррозии батареек.
RU
95.
Page 96

• Никогда не бросайте батарейки в огонь. Не подвергайте батарейки воздействию огня или других
источников тепла.
• Утилизация батареек: разряженные батарейки должны быть утилизированы и переработаны в
соответствии с всеми применяемыми правовыми нормами. Для получения более подробной
информации обращайтесь в соответствующие муниципальные службы.
• Выполняйте указания производителя батареек по их эксплуатации, утилизации, и мерам
предосторожности при обращении с ними.
Расположение кнопок
Вид сверху
Вид спереди
1. Регулятор громкости volume min/max
2. time set
Установка текущего времени (кнопками hour и min)
3. alarm radio/buzz
Переключатель режима будильника
4. min
Установка минуты текущего времени, времени
будильника и таймера автоматического
выключения
5. alarm on/off
6. hour
Установка часа текущего времени, времени
будильника и таймера автоматического
выключения
7. band am/fm
Переключатель диапазонов AM и FM
8. alarm set
Установка времени будильника (кнопками hour и
min)
9. Ручка настройки tuning
10. sleep
Установка таймера автоматического выключения
(кнопками hour и min)
11. snooze
Функция повторного сигнала будильника (после
его срабатывания) или отключение таймера
автоматического выключения
12. on/off
ВКЛ/ВЫКЛ радио
RU
96.
13. Ярлык
14. Дисплей
15. Отсек для батареек
Вид сзади
16. Громкоговоритель
17. Гнездо line in
18. dimmer low/high
Установка яркости дисплея с помощью
тумблера
19. Проволочная FM антенна
20. Шнур электропитания
Page 97

Подключения
Подключение антенны
Часы-радио имеют проволочную FM антенну, расположенную на задней панели; для лучшего приема ее
следует полностью вытянуть.
Электропитание
Электропитание устройства осуществляется от источника переменного тока 230 В ~ 50 Гц. Литиевая
батарейка CR2032, 3 В, (не входит в комплект) используется только для сохранения настроек текущего
времени. Если устройство не используется длительное время, извлеките из него батарейку, так как она
может начать протекать.
Чтобы избежать повреждений, не подпадающих под гарантию, электропитание устройства должно
осуществляться только от вышеуказанного источника переменного тока.
Вставка/замена батарейки
Вставьте батарейку резервного питания в отсек для батареек, расположенный в нижней части устройства;
чтобы открыть отсек, Вам понадобится отвертка Phillips. Вставляя батарейку, соблюдайте, пожалуйста,
полярность.
Меняйте батарейку раз в год.
При пропадании электропитания или при отключении устройства от сети, все ваши настройки
(будильник, текущее время, и т.д.) сохраняются, так как устройство автоматически переходит на
электропитание от батарейки.
Основные операции
Включение и выключение часов-радио
Если устройство не используется, радио следует выключить с помощью выключателя on/off .
Отрегулируйте громкость с помощью ручки volume min/max.
Выберите частотный диапазон с помощью переключателя диапазонов band am/fm, можно переключаться
между диапазонами FM и AM.
После использования выключите устройство. Чтобы сэкономить электроэнергию, отсоедините устройство от
розетки электропитания, и если оно не используется длительное время, извлеките батарейку, так как она
может начать протекать.
На дисплее будет высвечиваться либо текущее время, либо частота радиостанции.
Устройство предназначено для беспрерывной работы; оно находится либо в режиме ВКЛ, либо в дежурном
режиме.
Яркость дисплея
Вы можете установить яркость дисплея с помощью тумблера dimmer low/high, расположенного на задней
панели устройства. Установите тумблер в положение low для слабой подсветки, или в положение high для
яркой подсветки дисплея.
Установка текущего времени
При первом включении устройства на дисплее будет мигать 0:00.
Нажмите с удержанием кнопку time, и одновременно с ней, кнопку hour, чтобы установить текущий час в 24часовом формате.
Нажимайте на кнопку с удержанием для быстрой установки, либо используйте кратковременные нажатия,
чтобы увеличивать значение на один час.
Теперь установите значение текущей минуты с помощью кнопок time (нажатие с удержанием) и min.
Нажимайте на кнопку с удержанием для быстрой установки, либо используйте кратковременные нажатия,
чтобы увеличивать значение на одну минуту.
Текущее время установлено.
RU
97.
Page 98
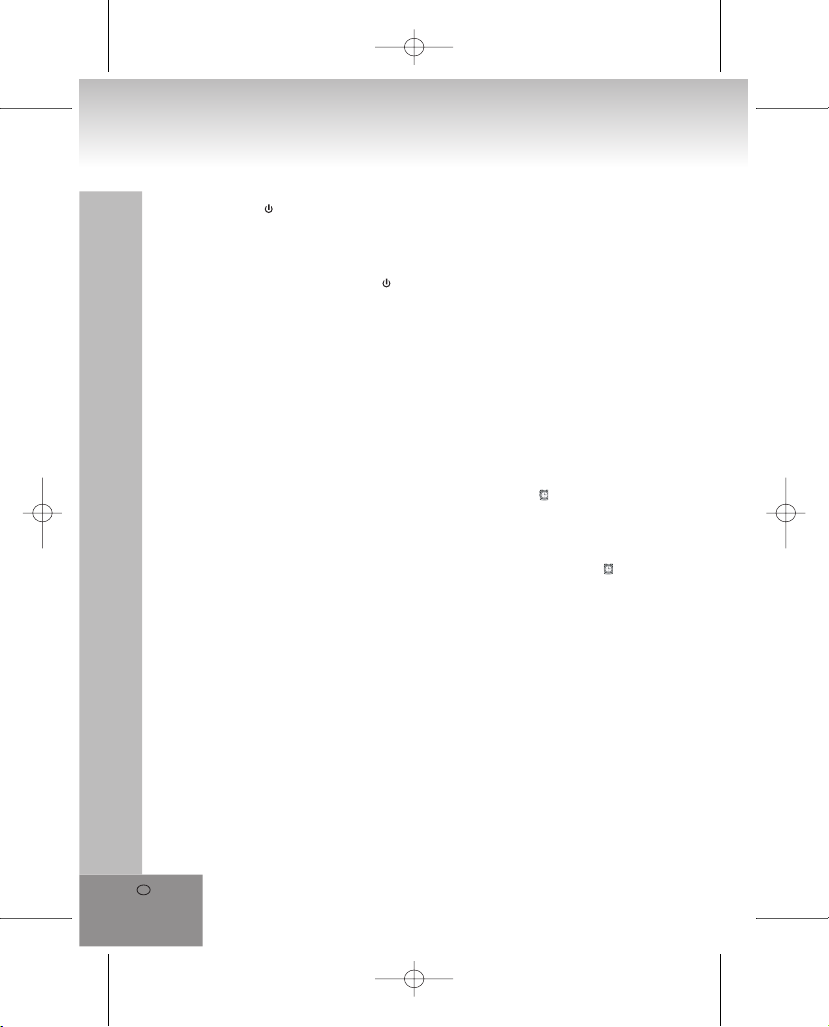
Радио
Нажмите кнопку on/off , чтобы включить радио. На дисплее высветится частотный диапазон (AM или FM), и
частота (например 100.6 MHz или 525 KHz). Частотный диапазон, FM или AM выбирается с помощью
тумблера band am/fm,.
Настройтесь на желаемую радиостанцию ручкой tuning, частота будет отображена на дисплее большими
цифрами.
Ручкой volume min/max отрегулируйте уровень громкости.
Чтобы выключить радио, нажмите кнопку on/off .
Радио имеет проволочную FM антенну; для лучшего приема ее следует полностью вытянуть. Чтобы улучшить
прием в диапазоне AM, поверните само устройство.
Гнездо line in
Вы можете подключить к этому гнезду переносной MP3 плеер или другое аудио устройство, посредством
кабеля с разъемом 3,5 мм (не входит в комплект), чтобы воспроизводить музыку через часы-радио.
Пробуждение от радио или будильника
Выберите желаемую радиостанцию, и установите уровень громкости.
Нажмите с удержанием кнопку alarm set, и одновременно с ней, нажмите кнопку hour, чтобы установить
желаемый час срабатывания будильника. Нажимайте на кнопку с удержанием для быстрой установки, либо
используйте кратковременные нажатия, чтобы увеличивать значение на один час.
Теперь нажмите с удержанием кнопку alarm set, и одновременно с ней, нажмите кнопку min, чтобы установить
желаемую минуту срабатывания будильника. Нажимайте на кнопку с удержанием для быстрой установки,
либо используйте кратковременные нажатия, чтобы увеличивать значение на одну минуту.
Теперь нажмите кнопку alarm on/off, на дисплее загорится индикатор будильника . Радио включится, чтобы
разбудить Вас в установленное время звуками Вашей любимой радиостанции. Радио будет включенным в
течение одного часа, после чего автоматически выключится.
For alarm with your favourite station set alarm radio/buzz to radio.
Чтобы проснуться от звонка будильника, а не от радио, убедитесь, что переключатель alarm radio/buzz
находится в положении buzz.
Чтобы выключить радио или будильник, нажмите на кнопку alarm on/off, индикатор будильника погаснет.
Будильник сработает на следующий день в это же время.
Функция повторного сигнала будильника
При срабатывании звонка будильника или включении радио, нажмите кнопку snooze, чтобы выключить на
время радио или будильник. Примерно через 5 минут радио (или будильник) зазвучит снова.
Функция повторного сигнала будильника может повторяться в течение одного часа, или до тех пор, пока вы не
отмените ее, нажав кнопку alarm on/off.
Через час функция повторного сигнала будильника автоматически переустанавливается.
Автоматическое выключение радио
Настройтесь на желаемую радиостанцию, и установите уровень громкости.
Нажмите кнопку sleep, чтобы активировать таймер автоматического выключения; на дисплее высветится 90 и
SLEEP. Нажимайте на кнопку sleep, чтобы установить интервал времени, равный 90, 60, 30, или 10 минут,
соответствующее значение будет отображаться на дисплее, где также, в течение нескольких секунд, будет
мигать слово SLEEP. После этого на дисплее будет опять высвечиваться частота и слово SLEEP.
Радио будет звучать в течение установленного периода, после чего автоматически выключится.
Чтобы выключить радио до истечения установленного периода, просто нажмите кнопку snooze.
RU
98.
Page 99

Автоматическое выключение радио и пробуждение от радио или будильника
Настройтесь на желаемую радиостанцию, и установите уровень громкости.
Нажмите кнопку sleep, и установите желаемый период времени до автоматического выключения, как было
описано выше.
Установите будильник, как описано выше.
Радио выключится через установленный промежуток времени, и разбудит Вас утром звонком будильника или
включением радио, в соответствии с Вашими настройками.
Устранение неисправностей
Если что-либо не работает, то перед тем, как нести устройство в службу ремонта, проверьте таблицу,
приведенную ниже.
Если Вы не можете решить проблему, следуя указанным шагам, проконсультируйтесь со своим продавцом
или обратитесь в авторизованный сервисный центр.
ПРЕДУПРЕЖДЕНИЕ: Никогда не открывайте прибор. Всегда обращайтесь к персоналу
авторизованного бюро обслуживания по поводу ремонта или обслуживания.
Проблема Причина Решение
Нет звука. Установлен слишком
Не работает кнопка. Электростатический
Плохой прием сигнала. Слабый сигнал.
Техническая спецификация
Электропитание: AC 230V~50Hz
Сохранение значения времени, настроек: 3 В, пост. ток литиевая батарейка (CR2032)
Частотный диапазон: FM 87,5 – 108 МГц
AM 525 – 1615 кГц
Размеры: примерно 60 x 190 x 90 мм
Вес: примерно 600 г (без батарейки)
Спецификация может быть изменена без предварительного уведомления.
низкий уровень громкости.
Не подсоединен шнур
электропитания
разряд.
Помехи от других
электроприборов
(ТВ, видеомагнитофон,
компьютер, и т.п.).
Отрегулируйте громкость.
Вставьте шнур
электропитания в настенную
розетку.
Выключите устройство, а
потом снова его включите.
Также можно выключить
устройство, отсоединить
шнур электропитания и
батарейку, а потом снова
подсоединить их.
Отрегулируйте положение
антенны.Держите другие
электроприборы на
расстоянии.
RU
99.
Page 100
© GmbH
Carl Zeiss Straße 8 •
63322 Rödermark
Telephone +49 6074/69 60 0 •
Fax +49 6074/69 60 169
01/08
 Loading...