

Page 1
00-4518 Cover 12/1/06 5:38 PM Page 1
2402N
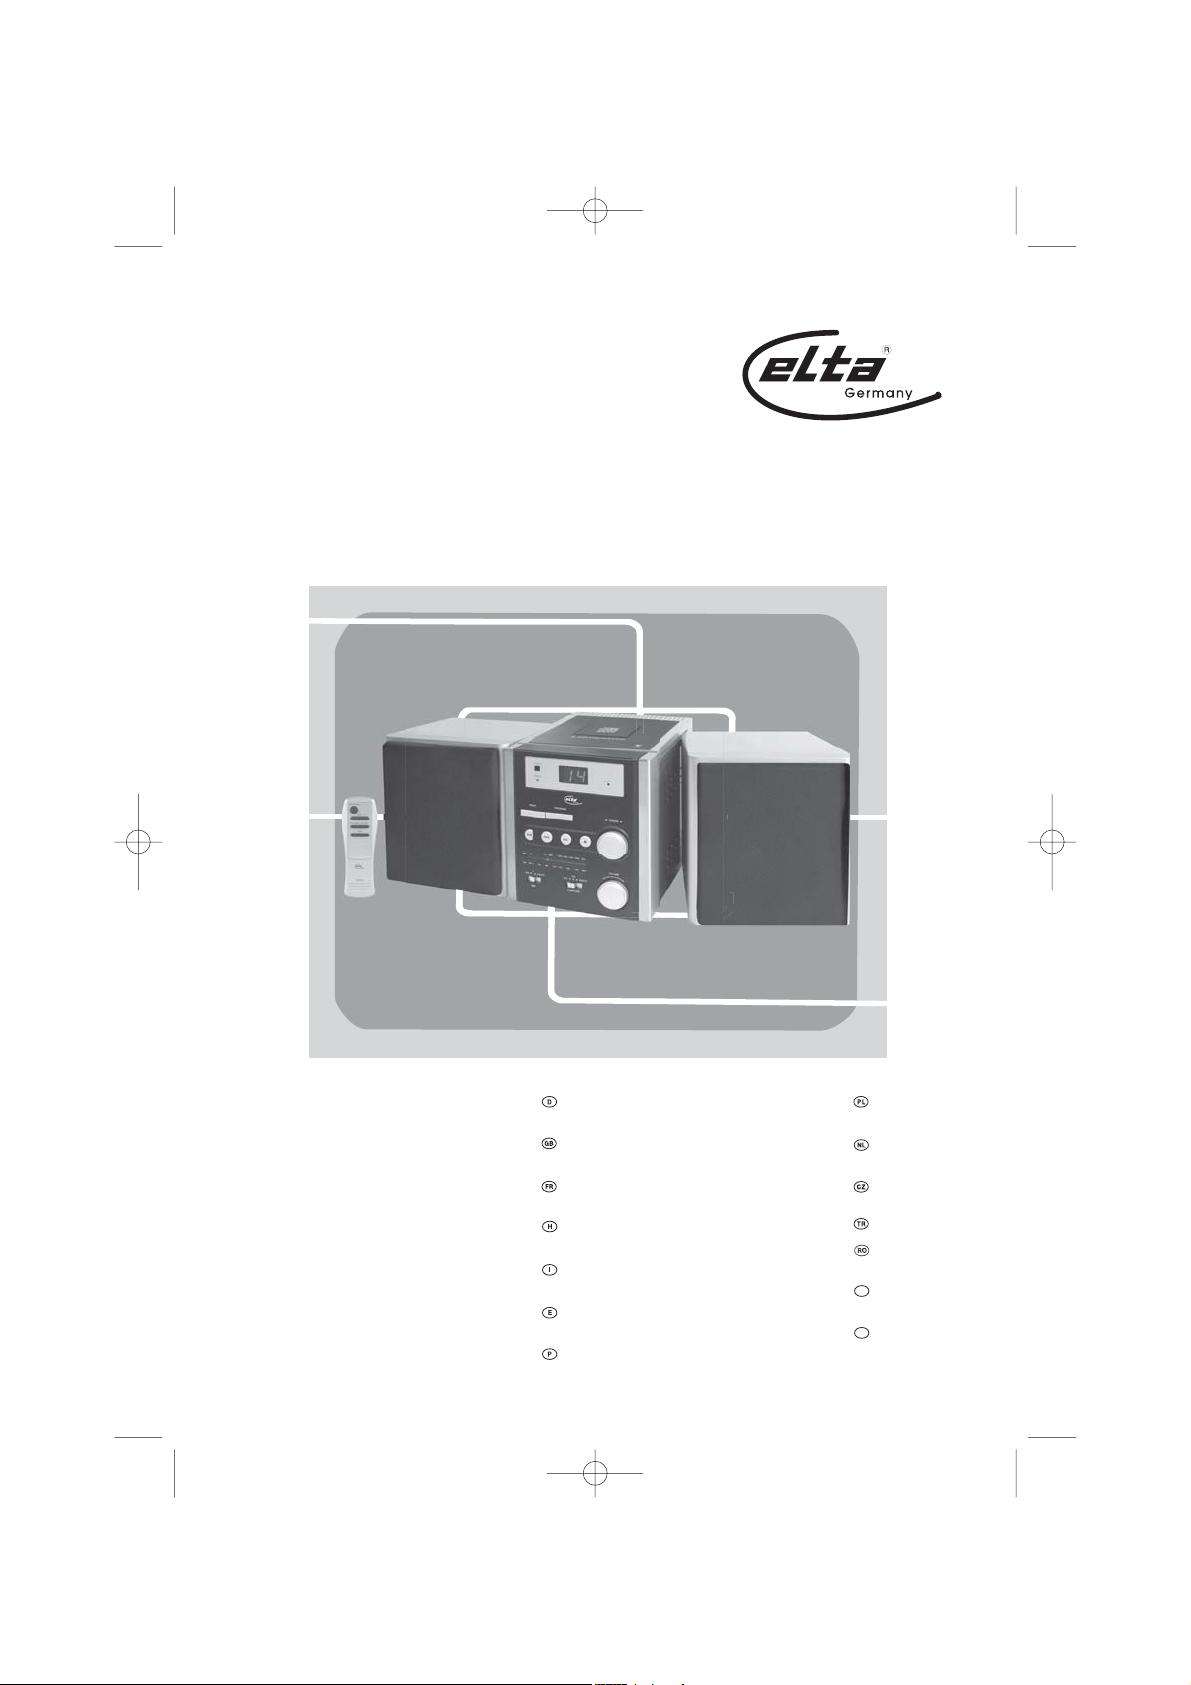
Music-Center mit CD-Player
Design Stereo
Design Stereo Music
Center With CD Player
Chaîne Stéréo Musique
avec Lecteur CD
Formatervezett Sztereó
Mikro Hifi CD-lejátszóval
Music Center Stereo
con lettore CD
Cadena musical estéreo de
diseño con reproductor de CD
Centro de Música Estéreo
de Design Com Leitor de CD
Stylowy zestaw muzyczny
stereo z odtwarzaczem CD
Design stereo music center
met CD-speler
Design stereo hudební centrum
s přehrávačem CD
CD Çalarlı Şık Tereo Müzik Seti
Combină Muzicală Stereo Design,
cu CD Player
Музикална стерео система със
CD плеър и изключителен дизайн
Музыкальный стерео-центр в
дизайнерском исполнении
с CD-плеером
BG
RU
Page 2

2.
MODELL: 2402N
Design Stereo Music-Center mit CD-Player
SICHERHEITSHINWEISE
STROMSCHLAGGEFAHR
VORSICHT: ZUR VERMEIDUNG VON
STROMSCHLAG GERÄTEGEHÄUSE
Der Blitz im gleichseitigen
Dreieck weist auf gefährliche
Hochspannung im Gerät hin,
die zu Stromschlag führen
kann.
NICHT ÖFFNEN. ES BEFINDEN SICH
KEINE VOM VERBRAUCHER
WARTBAREN TEILE IM INNERN DES
GERÄTS. REPARATUR UND
WARTUNG NUR DURCH
WEITERE INFORMATIONEN
Achtung bei Kleinteilen und Batterien, bitte nicht Verschlucken, dies kann zu ernsthaften
Schädigungen oder Erticken führen. Achten Sie insbesondere bei Kindern darauf, dass Kleinteile
und Batterien außerhalb deren Reichweite sind.
Wichtige Hinweise zum Gehörschutz
Vorsicht:
Ihr Gehör liegt Ihnen und auch uns am Herzen.
Deshalb seien Sie bitte vorsichtig beim Gebrauch dieses Gerätes.
Wir empfehlen: Vermeiden Sie hohe Lautstärken.
Sollte das Gerät von Kindern verwendet werden, achten Sie darauf, dass das Gerät nicht zu laut
eingestellt wird.
Achtung!
Zu hohe Lautstärken können bei Kindern irreparable Schäden hervorrufen.
VORSICHT
NICHT ÖFFNEN
FACHPERSONAL.
Das Ausrufungszeichen
imgleichseitigen Dreieck
weist auf wichtige
Bedienungs- und
Wartungsanleitungen hin.
Lassen Sie NIEMALS Personen, und insbesondere keine Kinder, Gegenstände in Löcher,
Schächte oder andere Öffnungen des Gehäuses stecken; dies könnte zu einem tödlichen
elektrischen Schlag führen. Das Gerätegehäuse, darf nur von ausgebildetem Fachpersonal
geöffnet werden.
Bitte verwenden Sie das Gerät nur seiner vorhergesehenen Bestimmung entsprechend. Das
Gerät ist ausschließlich für den Einsatz in Wohn- und Geschäftsbereichen bestimmt.
Bitte bewahren Sie die Bedienungsanleitung auch für eine spätere Verwendung sorgfältig auf.
Hinweise zum Umweltschutz
Dieses Produkt darf am Ende seiner Lebensdauer nicht über den normalen Haushaltsabfall
entsorgt werden, sondern muss an einem Sammelpunkt für das Recycling von elektrischen und
elektronischen Geräten abgegeben werden. Das Symbol auf dem Produkt, der Gebrauchsanlei
tung oder der Verpackung weist darauf hin.
Die Werkstoffe sind gemäß ihrer Kennzeichnung wieder verwertbar. Mit der Wiederverwendung,
der stofflichen Verwertung oder anderen Formen der Verwertung von Altgeräten leisten Sie einen
wichtigen Beitrag zum Schutze unserer Umwelt.
Bitte erfragen Sie bei der Gemeindeverwaltung die zuständige Entsorgungsstelle.
Page 3
Behindern Sie nicht die Belüftung des Gerätes, wie etwa mit Vorhängen, Zeitungen, Decken oder
mit Möbelstücken, die Belüftungsschlitze müssen immer frei sein. Überhitzung kann Schäden
verursachen und die Lebensdauer des Gerätes verkürzen.
Hitze und Wärme
Setzen Sie das Gerät nicht direkter Sonnenstrahlung aus. Achten Sie darauf, dass das Gerät
keinen direkten Wärmequellen wie Heizung oder offenem Feuer ausgesetzt ist. Achten Sie darauf,
dass die Lüftungsschlitze des Gerätes nicht verdeckt sind.
Feuchtigkeit und Reinigung
Dieses Produkt ist nicht wasserfest! Tauchen Sie den Player nicht in Wasser ein und lassen ihn
auch nicht mit Wasser in Berührung kommen. In den Player eindringendes Wasser kann ernsthafte
Schäden verursachen.
Verwenden Sie keine Reinigungsmittel, die Alkohol, Ammoniak, Benzen oder Schleifmittel
enthalten, da diese den Player beschädigen können. Verwenden Sie zum Reinigen ein weiches,
feuchtes Tuch.
Batterien fachgerecht entsorgen
Batterien gehören nicht in den Hausmüll. Die Batterien müssen bei einer Sammelstelle für
Altbatterien abgegeben werden. Werfen Sie Batterien niemals in Feuer.
WICHTIGE SICHERHEITSHINWEISE
1. ALLE ANWEISUNGEN LESEN - Vor Betrieb des Geräts sollten Sie alle Sicherheits- und
Bedienungsanleitungen lesen.
2. ANWEISUNGEN AUFBEWAHREN - Die Sicherheits- und Bedienungsanleitungen sollten für zukünftigen
Bezug aufbewahrt werden.
3. WARNUNGEN BEACHTEN - Die Warnungen auf dem Gerät und in der Bedienungsanleitung sollten
beachtet werden.
4. ANWEISUNGEN BEFOLGEN - Alle Bedienungs- und Verwendungsanweisungen sollten befolgt werden.
5. WASSER UND FEUCHTIGKEIT - Dieses Gerät nicht in der Nähe von Wasser verwenden, z.B. in der
Nähe einer Badewanne, eines Waschbeckens, einer Küchenspüle, eines Waschzubers, in einem nassen
Keller, in der Nähe eines Schwimmbeckens usw.
6. BELÜFTUNG - Schlitze und Öffnungen im Gehäuse dienen der Ventilation. Sie sind für zuverlässigen
Betrieb des Gerätes und Schutz vor Überhitzung erforderlich und dürfen nicht blockiert oder abgedeckt
werden. Die Öffnungen sollten niemals dadurch blockiert werden, dass das Gerät auf ein Bett, ein Sofa,
einen Teppich oder eine ähnliche Oberfläche gestellt wird. Das Gerät sollte nur dann in Einbauinstallierung
wie in einem Bücherschrank oder einem Regal verwendet werden, wenn angemessene Ventilation
vorgesehen ist bzw. die Anweisungen des Herstellers befolgt worden sind.
7. WÄRME - Das Gerät sollte fern von Wärmequellen wie Radiatoren, Heizkörpern, Öfen und anderen
wärmeerzeugenden Geräten (einschließlich Verstärkern) aufgestellt werden.
8. STROMVERSORGUNG - Dieses Gerät sollte nur mit der auf dem Typenschild angegebenen
Stromversorgungsart betrieben werden. Wenn Sie nicht sicher sind, was für eine Stromversorgung Sie
haben, so wenden Sie sich bitte an Ihren Fachhändler oder Ihr Elektrizitätswerk. Beziehen Sie sich für
Batteriebetrieb oder andere Stromquellen bitte auf die Bedienungsanleitung.
9. NETZKABELSCHUTZ - Netzkabel sollten so verlegt werden, dass möglichst nicht darauf getreten wird
und dass sie nicht eingeklemmt werden, mit besonderer Beachtung der Kabel an Steckern,
Verlängerungskabeln und dem Austritt des Kabels aus dem Gerät. Ziehen Sie das Netzkabel stets am
Stecker aus der Steckdose, ziehen Sie nicht am Kabel selbst.
10. NICHTBENUTZUNG – Ziehen Sie bei längerer Nichtbenutzung Netzstecker und Antennenkabel ab.
11. EINDRINGEN VON FREMDKÖRPERN UND FLÜSSIGKEITEN -
durch die Öffnungen in das Gerät schieben, da diese unter hoher Spannung stehende Teile berühren oder
kurzschließen können, wodurch es zu Feuer oder Stromschlag kommen kann. Niemals Flüssigkeiten
irgendwelcher Art auf dem Gerät verschütten.
12. BESCHÄDIGUNG, DIE EINE WARTUNG ERFORDERT -
und wenden sich an einen autorisierten Kundendienst, wenn:
Niemals Objekte irgendwelcher Art
Ziehen Sie stets den Netzstecker
3.
Page 4

4.
a. das Netzkabel oder der Stecker beschädigt ist;
b. Flüssigkeit oder Fremdkörper in das Gerät eingedrungen sind;
c. das Gerät Regen oder Feuchtigkeit ausgesetzt war;
d. das Gerät nicht wie gewöhnlich funktioniert. Stellen Sie nur jene Steuerungen ein, die in der
Bedienungsanleitung beschrieben sind;
e. das Gerät fallen gelassen oder beschädigt wurde;
f. das Gerät Leistungskraft verloren hat.
13. WARTUNG - Versuchen Sie nicht, das Gerät selbst zu warten, da Sie sich durch Öffnen bzw. Entfernen
von Abdeckungen hohen Spannungen und sonstigen Gefahren aussetzen können. Wenden Sie sich mit
Wartung und Reparaturen stets an einen autorisierten Kundendienst.
14. REINIGUNG – Ziehen Sie vor dem Reinigen den Netzstecker. Benutzen Sie keine flüssigen oder
Sprühreiniger, sondern nur ein feuchtes Tuch. Folgen Sie den Reinigungshinweisen in der
Bedienungsanleitung.
15. GEWITTER – Ziehen Sie während eines Gewitters und bei längerer Nichtbenutzung Netzstecker und
Antennenkabel als zusätzlichen Schutz gegen Überspannung ab.
16. SICHERHEITSÜBERPRÜFUNG – Verlangen Sie nach einer Wartung stets eine Sicherheitsüberprüfung
durch den Kundendienst.
17. ÜBERLASTUNG – Überlasten Sie Steckdosen und Verlängerungskabel nicht, das kann zu Feuer und
Stromschlag führen.
18. ELEKTROSTATISCHE ENTLADUNG - Wenn ein Fehler angezeigt wird oder eine Fehlfunktion besteht,
das Netzkabel rausziehen und alle Batterien entfernen. Danach das Netzkabel wieder anschließen.
ACHTUNG
DIESER CD-PLAYER IST EIN KLASSE 1 LASERPRODUKT UND BENUTZT SICHTBARE/UNSICHTBARE
LASERSTRAHLEN, DIE ZU GEFÄHRLICHER STRAHLENBELASTUNG FÜHREN KÖNNEN. BITTE
BETREIBEN SIE DEN CD-PLAYER ENTSPRECHEND DER BEDIENUNGSANLEITUNG.
UNSICHTBARE LASERSTRAHLUNG TRITT AUS, WENN DER DECKEL GEÖFFNET UND WENN DIE
SICHERHEITSVERRIEGELUNG ÜBERBRÜCKT IST. NICHT DEM STRAHL AUSSETZEN!
LASERLINSE NICHT BERÜHREN
STEUERUNGEN ODER EINSTELLUNGEN ANDERS ALS IN DIESER BEDIENUNGSANLEITUNG
BESCHRIEBEN KÖNNEN ZUR FREISETZUNG GEFÄHRLICHER STRAHLUNG FÜHREN.
ZUR VERMEIDUNG VON FEUER, STROMSCHLAG UND STÖRUNGEN NUR EMPFOHLENES ZUBEHÖR
VERWENDEN UND GERÄT WEDER REGEN NOCH FEUCHTIGKEIT AUSSETZEN.
Installation
Vermeiden Sie eine Aufstellung des Gerätes in folgenden Bereichen:
1) mit direkter Sonneneinstrahlung, Einbau in Regalen oder Schränken ohne ausreichende Ventilation;
2) mit hoher Temperatur oder hohe Luftfeuchtigkeit;
3) mit übermäßiger Staubentwicklung;
4) mit Vibrationen, Stößen oder auf geneigter Oberfläche, hierdurch können Komponenten erheblich
beschädigt werden.
Fremdkörper oder Finger im Gerät
Das berühren von Teilen innerhalb des Gerätes ist gefährlich und kann zu Beschädigungen führen. Bitte
demontieren Sie das Gerät nicht. Achten Sie darauf, dass keine Fremdkörper in das Laufwerk gelangen.
Magnetische Gegenstände meiden
Halten Sie magnetische Gegenstände wie beispielsweise nicht abgeschirmte Lautsprecher vom Gerät
entfernt.
Page 5
Stapeln
Stellen Sie das Gerät flach auf. Keine Verstärker oder andere Geräte, die sich erwärmen können, auf dem
Gerät abstellen.
Kondensation
Das Gerät funktioniert möglicherweise nicht richtig, wenn sich Feuchtigkeit im Innern befindet. Bitte schalten
Sie ihn aus und warten eine Stunde, bis sich die Feuchtigkeit verflüchtigt hat.
Netzanschluss:
Zur Vermeidung von Fehlfunktionen, Feuer, Verletzungen und Stromschlag beachten Sie bitte folgende
Hinweise:
• Überzeugen Sie sich vor Netzanschluss, dass Netzspannung und Angaben auf dem Typenschild
übereinstimmen (AC 230V~50Hz).
• Schließen Sie das Netzkabel an einer 230V~50Hz Steckdose an.
• Beim Ziehen des Netzsteckers fassen Sie bitte am Stecker an und nicht am Kabel um Kabelbruch und
daraus resultierende Risiken zu vermeiden.
• Halten Sie den Netzstecker gut fest, wenn Sie den Stecker in die Steckdose stecken oder abziehen.
• Netzkabel nicht mit nassen Händen berühren.
• Netzkabel vor wärmeerzeugenden Geräten schützen.
• Ist das Gerät einmal herunter gefallen oder anderweitig beschädigt, dann schalten Sie es bitte aus.
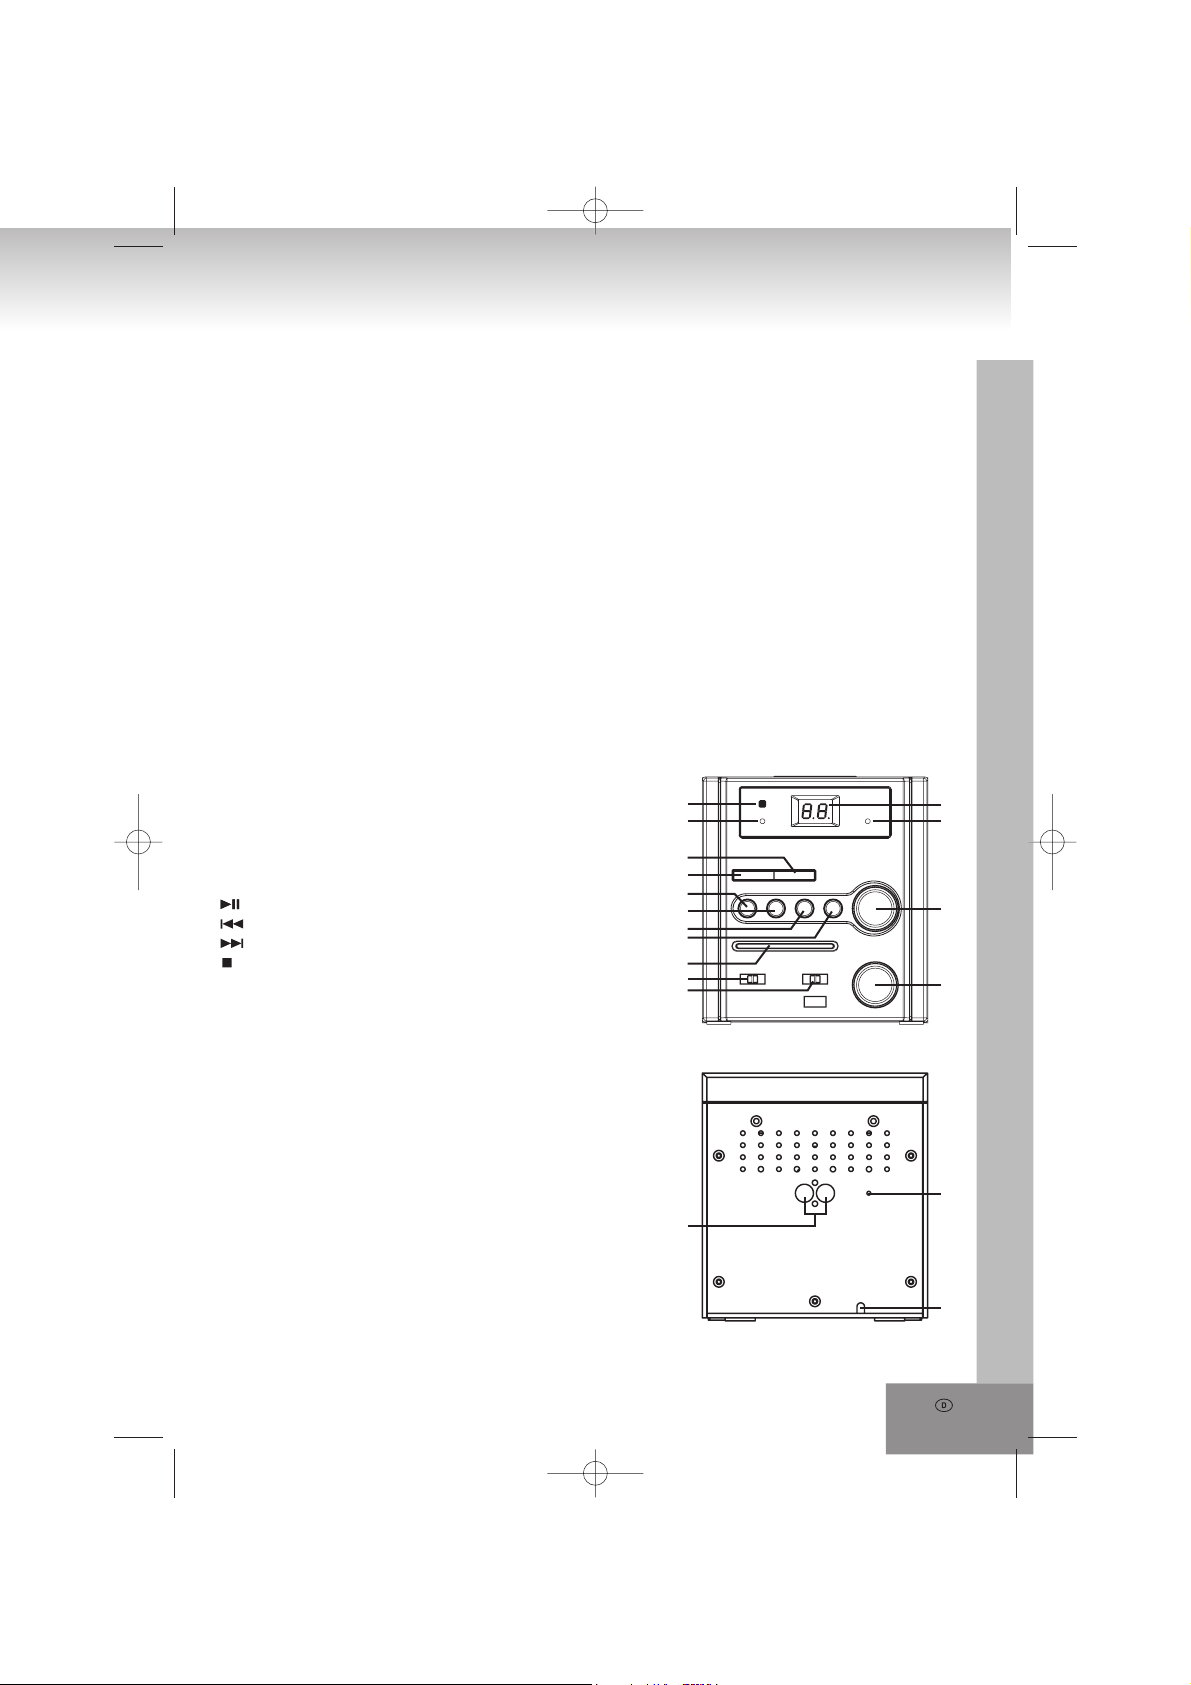
Tastenbelegung und Funktionen
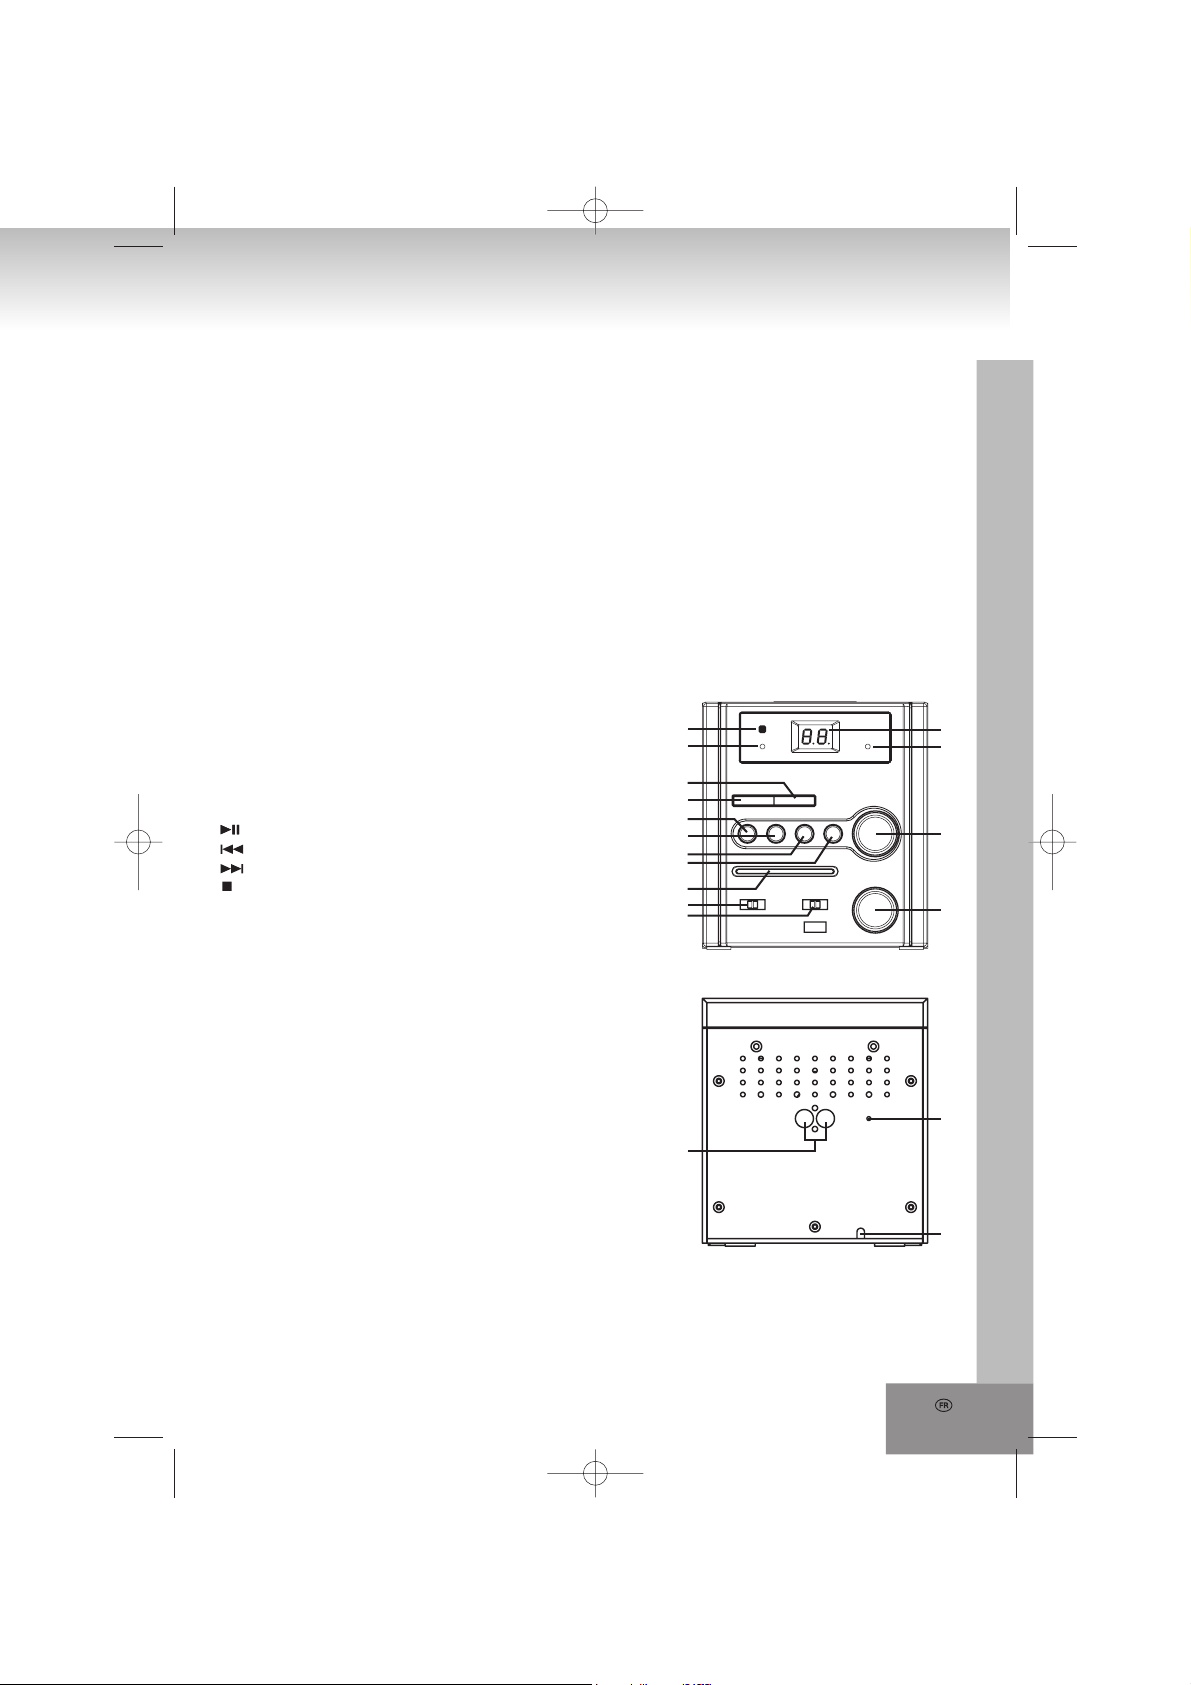
1. Fernbedienungs-SENSOR
2. POWER LED
3. PROGRAM: Programmmodus
4. REPEAT: Wiederholungsmodi
5. Wiedergabe/Pause
6. vorheriger Track/Tracksuche rückwärts
7. nächster Track/Tracksuche vorwärts
8. Wiedergabe beenden (Stopp)
9. Frequenzanzeige
10. BAND: Bandwahl MW (AM) / (FM)UKW Mono/(FM ST.)
UKW Stereo
11. FUNCTION: Funktionsumschalter (OFF, CD, RADIO)
12. VOLUME: Lautstärkeregler
13. ◄ TUNING ►: Senderwahl
14. FM ST.: LED Stereoanzeige
15. LED Display
16. SPEAKERS ( L / R ): Lautsprecherbuchse links/rechts
17. FM ANT.: UKW Wurfantenne
18. AC 230V~50Hz: Netzkabel
1
2
3
4
5
6
7
8
9
10
11
16
15
14
13
12
17
18
5.
Page 6
6.
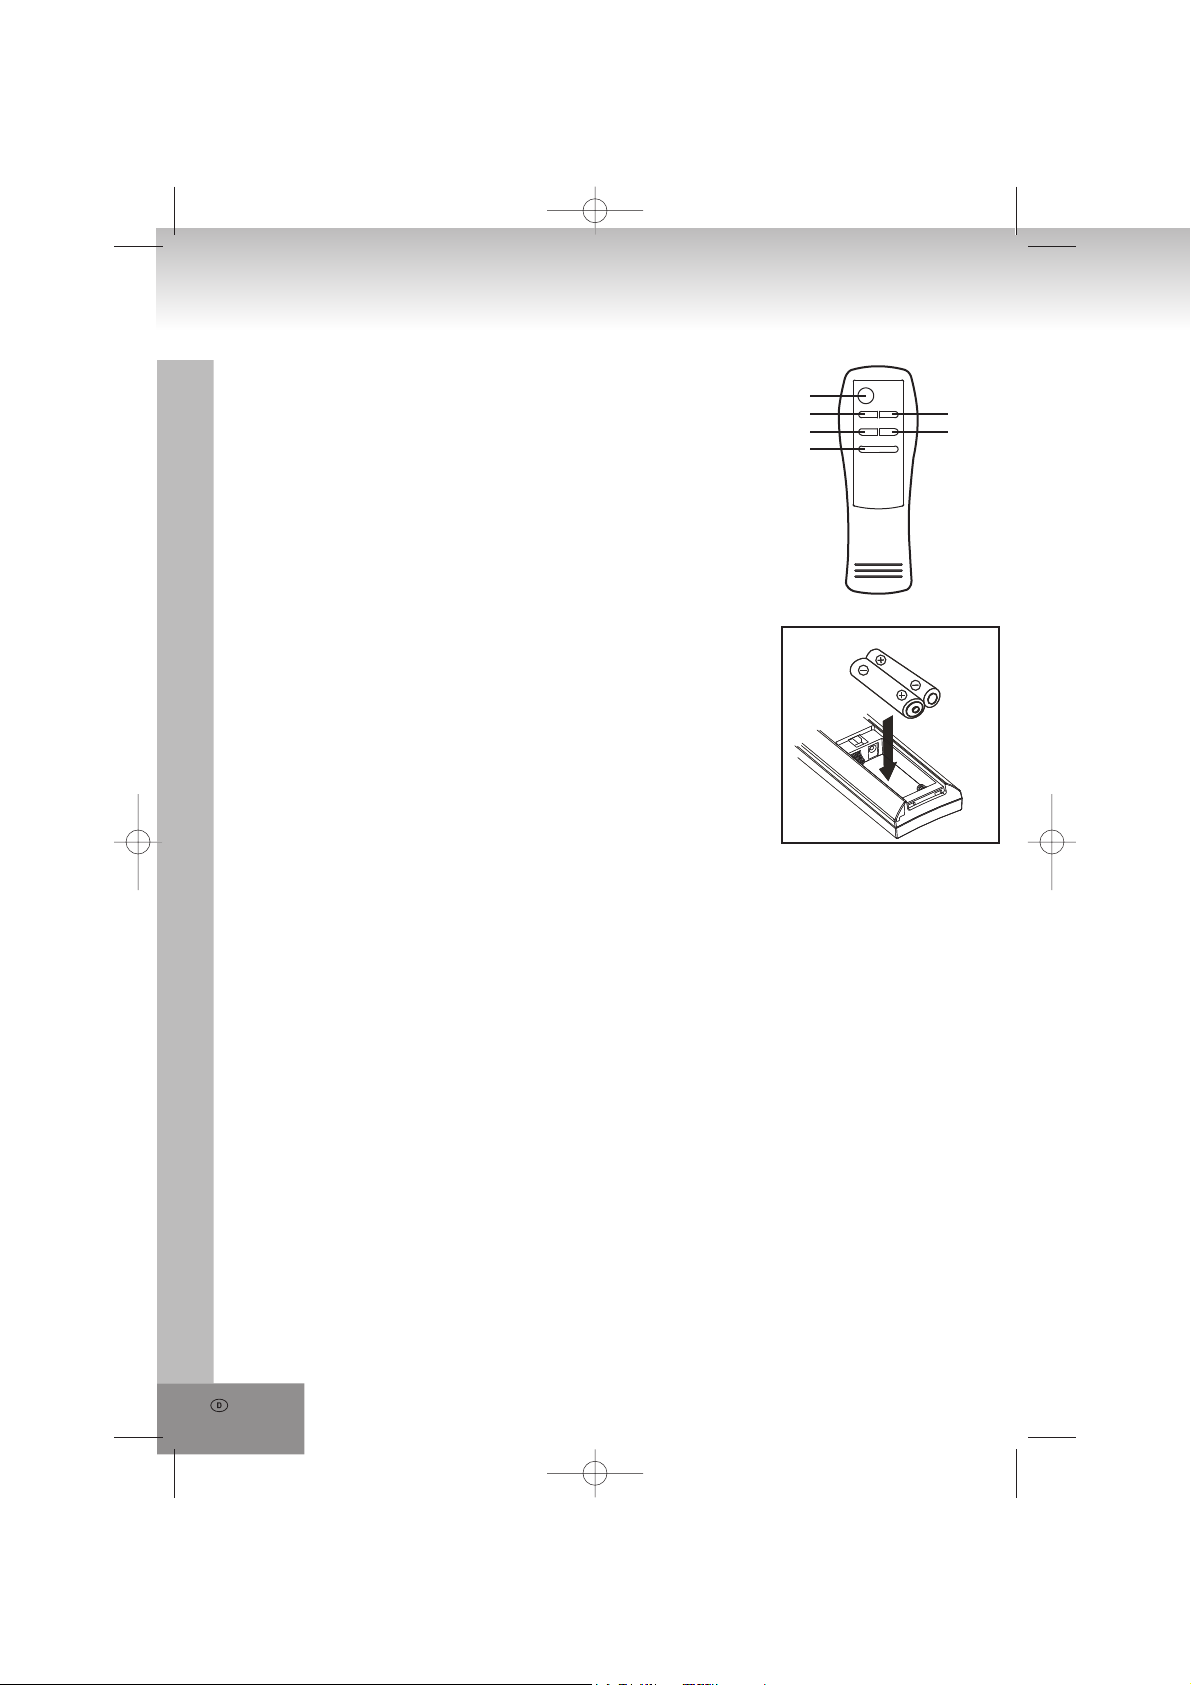
Fernbedienung
1. PLAY / PAUSE: Wiedergabe/Pause
2. SKIP -: vorheriger Track/Tracksuche rückwärts
3. PROGRAM: Programmmodus
4. STOP: Wiedergabe beenden
5. SKIP +: nächster Track/Tracksuche vorwärts
6. REPEAT: Wiederholungsmodi
1
2
3
4
5
6
Installation und Anschlüsse
Einsetzen der Batterien in die Fernbedienung (Batterien nicht
mitgeliefert)
1. Entfernen Sie den Batteriefachdeckel durch leichtes
Herunterdrücken und schieben ihn nach außen.
2. Setzen Sie zwei Batterien Typ „AAA, UM – 4“, 1,5 V ein. Achten Sie
beim Einsetzen der Batterien auf die im Batteriefach dargestellte
Polarität (“+” and “-”).
3. Schieben Sie den Deckel wieder auf das Batteriefach bis er einrastet.
Allgemeine Hinweise zu Batterien
• Folgen Sie den Sicherheits- und Benutzungshinweisen des Batterieherstellers.
• Bewahren Sie Batterien kindersicher und sicher vor Haustieren auf.
• Werfen Sie Batterien nicht ins Feuer. Setzen Sie Batterien weder Hitze noch Feuer aus.
• Entsorgung von Batterien: Entsorgen Sie erschöpfte Batterien entsprechend der örtlichen Gesetze und
Verordnungen. Für weitere Informationen setzen Sie sich bitte mit Ihrer Entsorgungsbehörde in
Verbindung.
• Vermischen Sie nicht alte mit neuen Batterien und keine normalen Batterien mit wiederaufladbaren
Batterien.
• Vermischen Sie keine unterschiedlichen Batterietypen: z.B. Alkali mit Zink-Kohle. Verwenden Sie nur
Batterien gleichen Typs.
• Bei längerer Nichtbenutzung entnehmen Sie bitte die Batterien.
• Falsche Verwendung von Batterien kann ein Auslaufen des Elektrolyten verursachen und das Batteriefach
angreifen oder die Batterien platzen lassen
Hinweise zur Fernbedienung:
• Lässt die Reichweite der Fernbedienung nach, dann sind die Batterien erschöpft und sie müssen ersetzt
werden.
• Drücken Sie sanft, aber fest auf die Tasten.
• Richten Sie die Fernbedienung aus nicht mehr als 6m Entfernung im Winkel von 60º auf das Sensorfenster
vorn im Gerät aus.
• Richten Sie keine hellen Lampen auf das Sensorfenster.
• Die Reichweite hängt von der Helligkeit des Raums ab.
• Gegenstände zwischen Fernbedienung und Sensorfenster blockieren die Übertragung.
• Benutzen Sie die Fernbedienung nicht gleichzeitig mit Fernbedienungen für andere Geräte.
Lautsprecheranschluss
Wickeln Sie die Lautsprecherkabel ab und stecken sie in die Lautsprecherbuchsen SPEAKERS (L / R) (16).
Page 7

Antennenanschluss
Wickeln Sie die UKW Wurfantenne FM ANT. (17) auf der Geräterückseite für besten Empfang voll ab.
Allgemeine Bedienungshinweise
Ein- und Ausschalten
Stellen Sie den Funktionsumschalter FUNCTION (11) stets auf die Position OFF, wenn Sie das Gerät nicht
benutzen.
Bei eingeschaltetem Gerät leuchtet die POWER LED rot auf.
1. Wählen Sie die Betriebsart mit FUNCTION (11) aus: OFF, CD, oder RADIO.
2. Mit VOLUME (12) auf dem Gerät stellen Sie die Lautstärke ein.
3. Zum Ausschalten stellen Sie den Funktionsumschalter FUNCTION (11) auf OFF.
Radio
1. Stellen Sie den Funktionsumschalter FUNCTION (11) auf RADIO.
2. Wählen Sie mit dem Bandwahlschalter BAND (10) den Frequenzbereich aus: AM (Mittelwelle),
FM (UKW Mono) oder FM ST. (UKW Stereo).
3. Stellen Sie mit dem ◄ TUNING ► (13) Drehknopf den gewünschten Sender ein. Die Frequenz können Sie
auf der Frequenzskala an der Zeigerposition ablesen.
4. Bei Bandwahl FM ST. (UKW Stereo) und Auffinden eines Stereosenders leuchtet die FM ST. LED vorn auf
dem Gerät.
5. Mit VOLUME (12) auf dem Gerät stellen Sie die Lautstärke ein.
FM Mono / Stereo
- Stellen Sie die Bandwahl BAND (10) auf FM für UKW-Empfang in Mono.
- Stellen Sie die Bandwahl BAND (10) auf FM ST. für UKW-Empfang in Stereo. Die FM ST. LED leuchtet auf.
Tipps für besseren Empfang
UKW (FM): Wickeln Sie die UKW Wurfantenne auf der Geräterückseite für besten Empfang voll ab.
Mittelwelle (AM): Die AM-Antenne ist eingebaut, bei schwachem Empfang richten Sie das Gerät bitte neu
aus.
Disc (Audio-CD)
Der CD-Player kann nur Audio-CD’s abspielen. Versuchen Sie nicht, MP3-CD’s, Daten-CD’s oder VCD/DVD
Discs wiederzugeben.
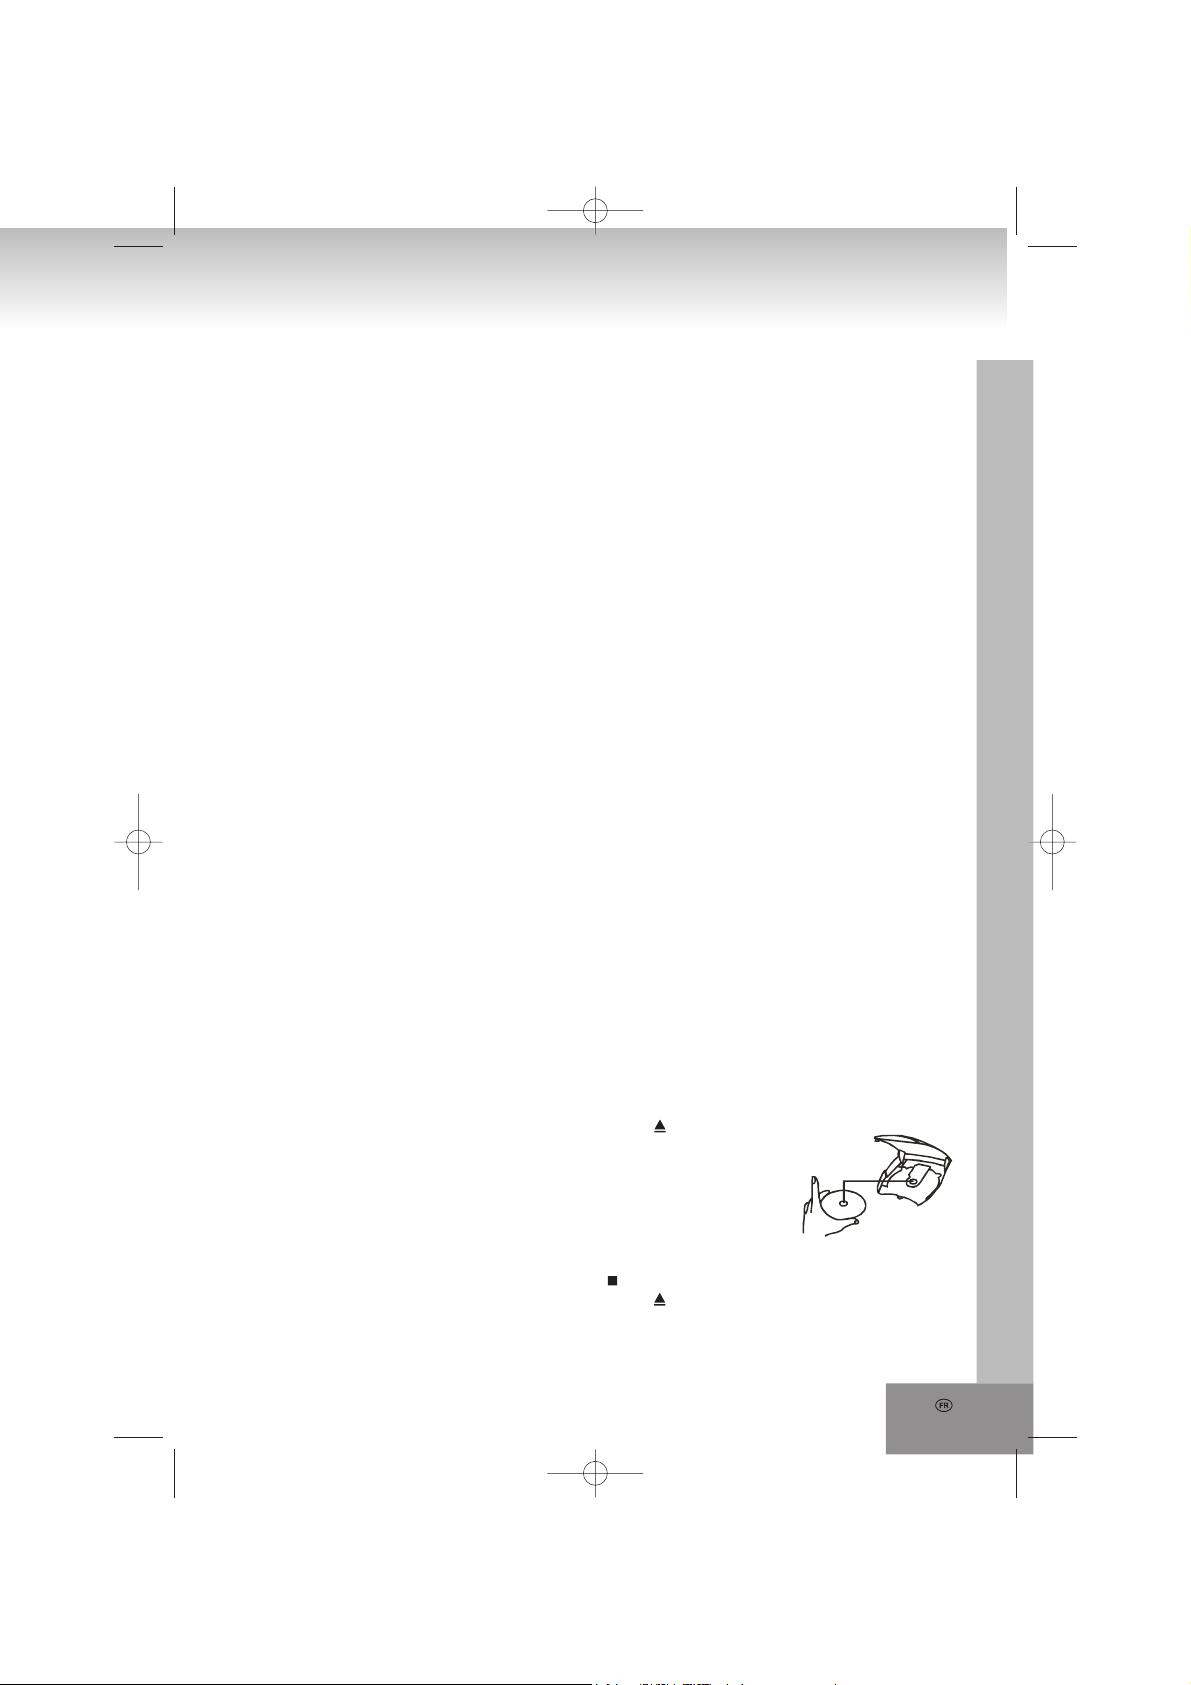
Laden einer Disc
1. Stellen Sie FUNCTION (11) auf die Position CD. Auf dem Display blinkt „- -“ und
nach ein paar Sekunden wird „no“ angezeigt.
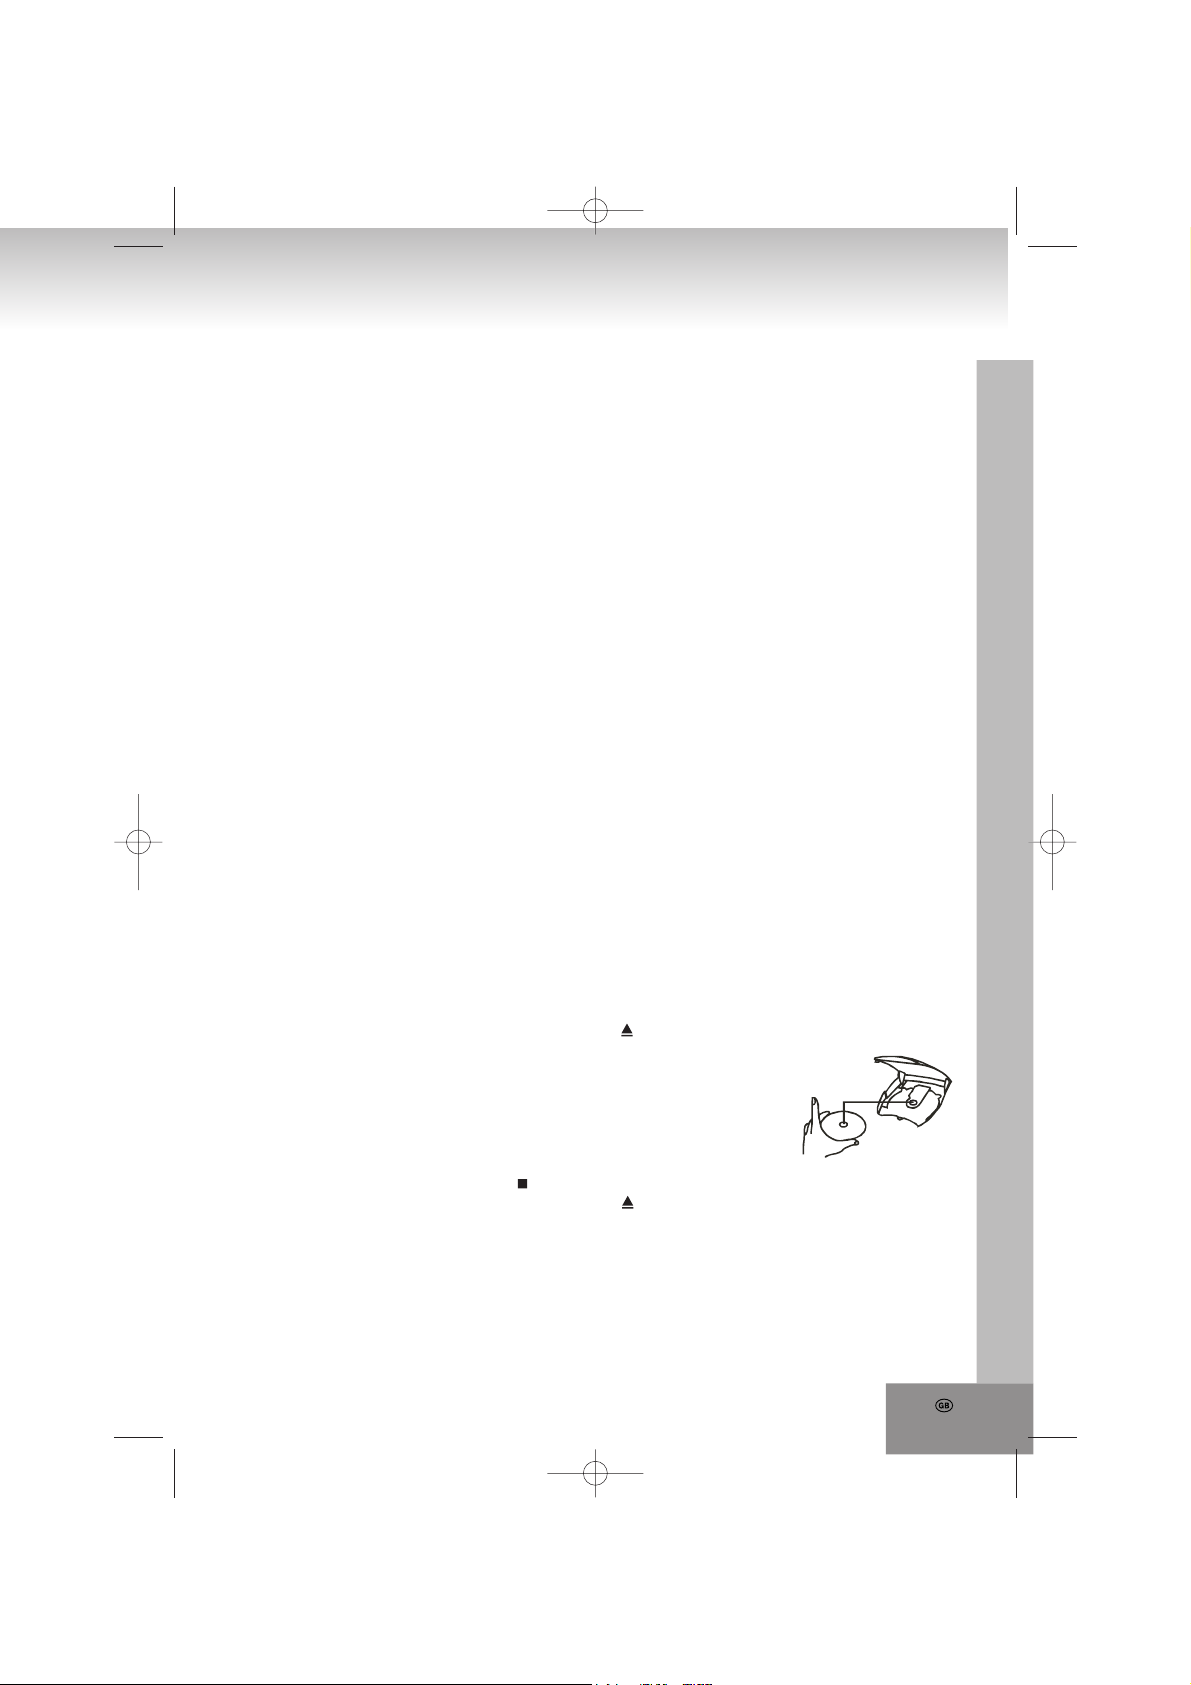
2. Öffnen Sie das CD-Laufwerk durch Drücken auf das Symbol /OPEN auf der
linken Seite der CD-Klappe. Das Display zeigt „- -“ an.
3. Legen Sie eine CD mit dem Aufdruck nach oben ein.
4. Schließen Sie die Klappe des CD Laufwerks manuell. Auf dem Display blinkt
„- -“ und nach ein paar Sekunden wird die Gesamtanzahl der Tracks (z.B. „20“) angezeigt.
Entnehmen einer Disc
1. Vergewissern Sie sich, dass sich das Gerät im Stoppmodus befindet (Taste (8)).
2. Öffnen Sie das CD-Laufwerk durch Drücken auf das Symbol /OPEN auf der rechten Seite der
CD-Klappe. Das Display zeigt „- -“ an.
3. Nehmen Sie die CD vorsichtig nach oben heraus, ohne die Oberflächen zu berühren.
4. Schließen Sie die Klappe des CD Laufwerks manuell.
5. Verstauen Sie die entnommene CD zum Schutz im entsprechenden Cover.
CD einlegen
7.
Page 8
8.
Wiedergabe von Discs
1. Legen Sie eine CD ein (siehe Abschnitt „Laden einer Disc“).
2. Starten Sie die Wiedergabe mit (1) am Gerät oder PLAY / PAUSE (1) auf der Fernbedienung. Das
Display zeigt die aktuelle Tracknummer an (z.B. „01.“). Der Punkt „.“ rechts zeigt den Wiedergabemodus
an.
3. Stellen Sie die Lautstärke mit VOLUME (12) ein.
4. Zur Unterbrechung der Wiedergabe drücken Sie erneut am Gerät oder PLAY / PAUSE (1) auf der
Fernbedienung. Die aktuelle Tracknummer blinkt im Display. Erneutes Drücken von (1) am Gerät oder
PLAY / PAUSE (1) auf der Fernbedienung setzt die Wiedergabe fort.
5. Zum Beenden der Wiedergabe drücken Sie (8) auf dem Gerät oder STOP (4) auf der Fernbedienung,
im Display wird die Gesamtzahl der Tracks angezeigt.
Hinweise:
Die CD Wiedergabe wird auch beendet, wenn:
a. die Klappe des CD-Laufwerks mit /OPEN geöffnet wird.
b. der Funktionsumschalter FUNCTION (11) auf RADIO geschoben wird.
c. alle Tracks der CD abgespielt wurden.
6. Entnehmen Sie die CD (siehe Abschnitt „Entnehmen einer Disc“)
7. Zum Ausschalten des Geräts stellen Sie FUNCTION (11) auf die Position OFF.
Hinweis: Beachten Sie bitte, dass die CD sich auch im Pausemodus weiterdreht, selbst wenn kein Ton zu
hören ist. Vergessen Sie nicht den Pausemodus auszuschalten, um einen unnötigen Motorlauf zu vermei
den.
Auswahl eines anderen Tracks (SKIP im Stoppmodus und während der Wiedergabe)
Während der Wiedergabe können Sie mit (6) oder (7) am Gerät oder mit SKIP - (2) oder SKIP + (5)
auf der Fernbedienung zum vorherigen oder nächsten Track springen.
1. Wählen Sie den Track im Wiedergabe-, Stopp- oder Pausemodus und starten die Wiedergabe mit (1)
auf dem Gerät oder PLAY / PAUSE (1) auf der Fernbedienung.
2. Mit einem kurzen Tastendruck auf (7) am Gerät oder SKIP + (5) auf der Fernbedienung springen Sie
zum nächsten Track oder drücken mehrmals auf die Taste, bis die gewünschte Tracknummer im Display
angezeigt wird.
3. Mit (6) auf dem Gerät oder SKIP - (2) auf der Fernbedienung kehren Sie zum Anfang des aktuellen
Tracks zurück.
4. Ein erneuter Tastendruck (innerhalb 1 Sekunde nach dem ersten Tastendruck) auf (6) oder SKIP - (2)
auf der Fernbedienung springt jeweils einen Track zurück.
Suche nach bestimmten Stelle (während der Wiedergabe)
Halten Sie (6) oder (7) auf dem Gerät oder SKIP - (2) oder SKIP + (5) auf der Fernbedienung zur
Suche nach der gewünschten Stelle innerhalb des Tracks gedrückt. Nach Loslassen der Taste wird die
normale Wiedergabe fortgesetzt.
Hinweis: Während der Suche wird die Lautstärke heruntergeregelt.
-
Programmierung von Tracks
Bis zu 20 Tracks können zur Wiedergabe in einer bestimmten Reihenfolge vorprogrammiert werden. Ein
Track kann auch mehr als einmal programmiert werden. Der CD-Player muss sich im Stoppmodus befinden
( (8) auf dem Gerät oder STOP (4) auf der Fernbedienung).
1. Drücken Sie PROGAM (3) oder auf der Fernbedienung zum Aufrufen des Programmmodus. Das Display
zeigt kurz „01“ (Speicherplatznummer) an und anschließend blinkt „00“.
2. Wählen Sie den gewünschten Track mit (6) oder (7) auf dem Gerät oder mit SKIP - (2) oder SKIP
+ (5) auf der Fernbedienung aus.
3. Speichern Sie den ausgewählten Titel mit einem Tastendruck auf PROGAM (3) auf dem Gerät oder der
Fernbedienung.
Page 9

4. Wiederholen Sie die Schritte 2 und 3 zum Speichern weiterer Tracks. Die Speicheplatznummer wird
automatisch erhöht.
5. Starten Sie die Wiedergabe der programmierten Tracks mit (1) auf dem Gerät oder
PLAY / PAUSE (1) auf der Fernbedienung.
6. Durch zweimaliges Drücken von (8) auf dem Gerät oder STOP (4) auf der Fernbedienung
beenden Sie die vorprogrammierte Wiedergabe.
Hinweise:
- Wechseln der Betriebsart oder setzen von FUNCTION (11) auf die Position OFF löscht die
programmierten Tracks.
- Mit (6) oder (7) auf dem Gerät oder mit SKIP - (2) oder SKIP + (5) auf der Fernbedienung kann
zum vorherigen oder nächsten Track in der programmierten Reihenfolge gesprungen werden.
- Durch wiederholtes Drücken von PROGAM (3) auf dem Gerät oder der Fernbedienung kann die
programmierte Reihenfolge kontrolliert werden.
- Wenn innerhalb von 30 Sekunden bei der Programmierung keine Taste gedrückt wurde, wird der
Programm-Modus verlassen.
Wiederholungsmodi
Ihnen stehen drei Wiedergabemodi zur Verfügung, die vor oder während der Wiedergabe mit REPEAT (4)
auf dem Gerät oder auf der Fernbedienung (6) aufgerufen und umgeschaltet werden können.
Jeder Tastendruck wechselt den Wiederholungsmodus wie folgt:
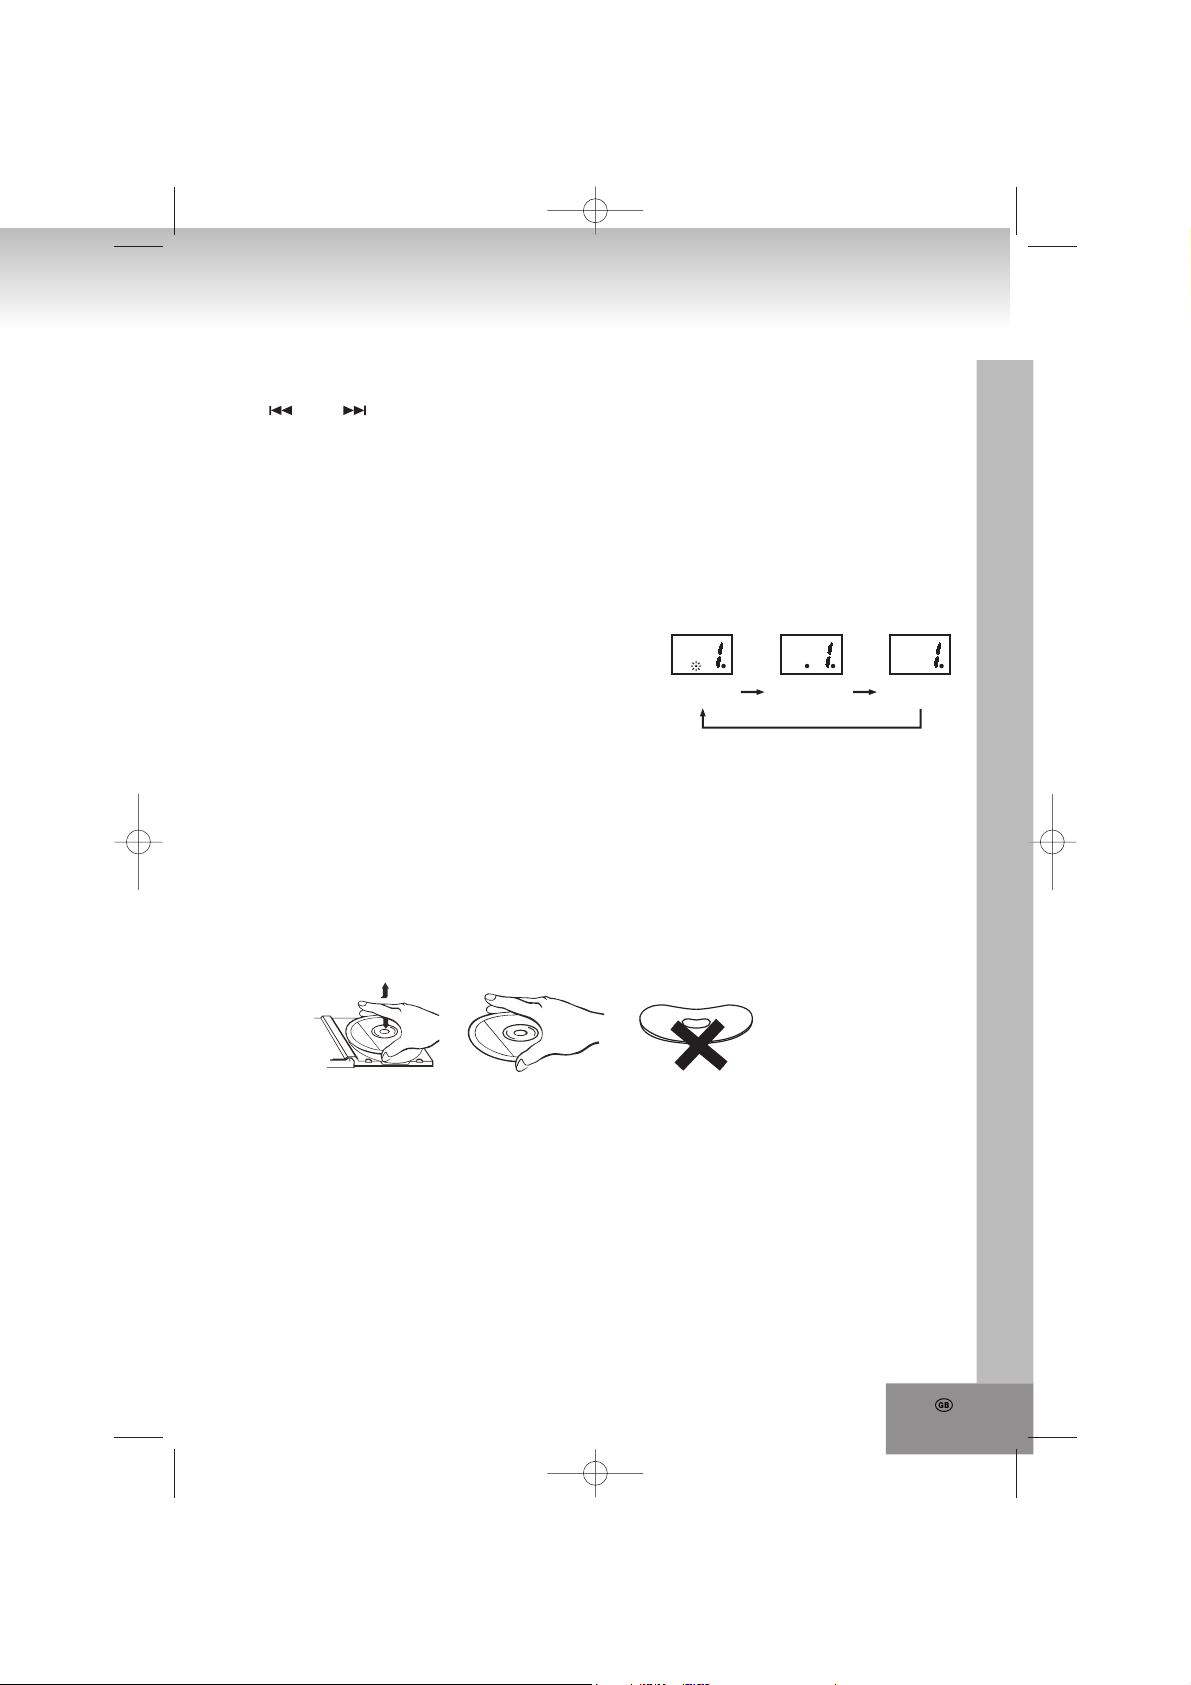
1. Zur ständigen Wiederholung des aktuellen Tracks drücken Sie
während der Wiedergabe einmal REPEAT (4) auf dem Gerät
oder der Fernbedienung (6). Auf dem Display blinkt die
Wiederholungsanzeige (Punkt „.“ zwischen den zwei Ziffern).
Track
wiederholen
Gesamte Disc
wiederholen
Normale
Wiedergabe
2. Zur ständigen Wiederholung der gesamten aktuellen Disc in
der aufgezeichneten Reihenfolge drücken Sie während der
Wiedergabe zweimal REPEAT (4) auf dem Gerät oder der Fernbedienung (6). Auf dem Display leuchtet
die Wiederholungsanzeige (Punkt „.“zwischen den zwei Ziffern) ständig.
3. Zur Rückkehr zur Normalwiedergabe drücken Sie erneut REPEAT (4) auf dem Gerät oder der
Fernbedienung (6). Das Display kehrt zur normalen Anzeige zurück.
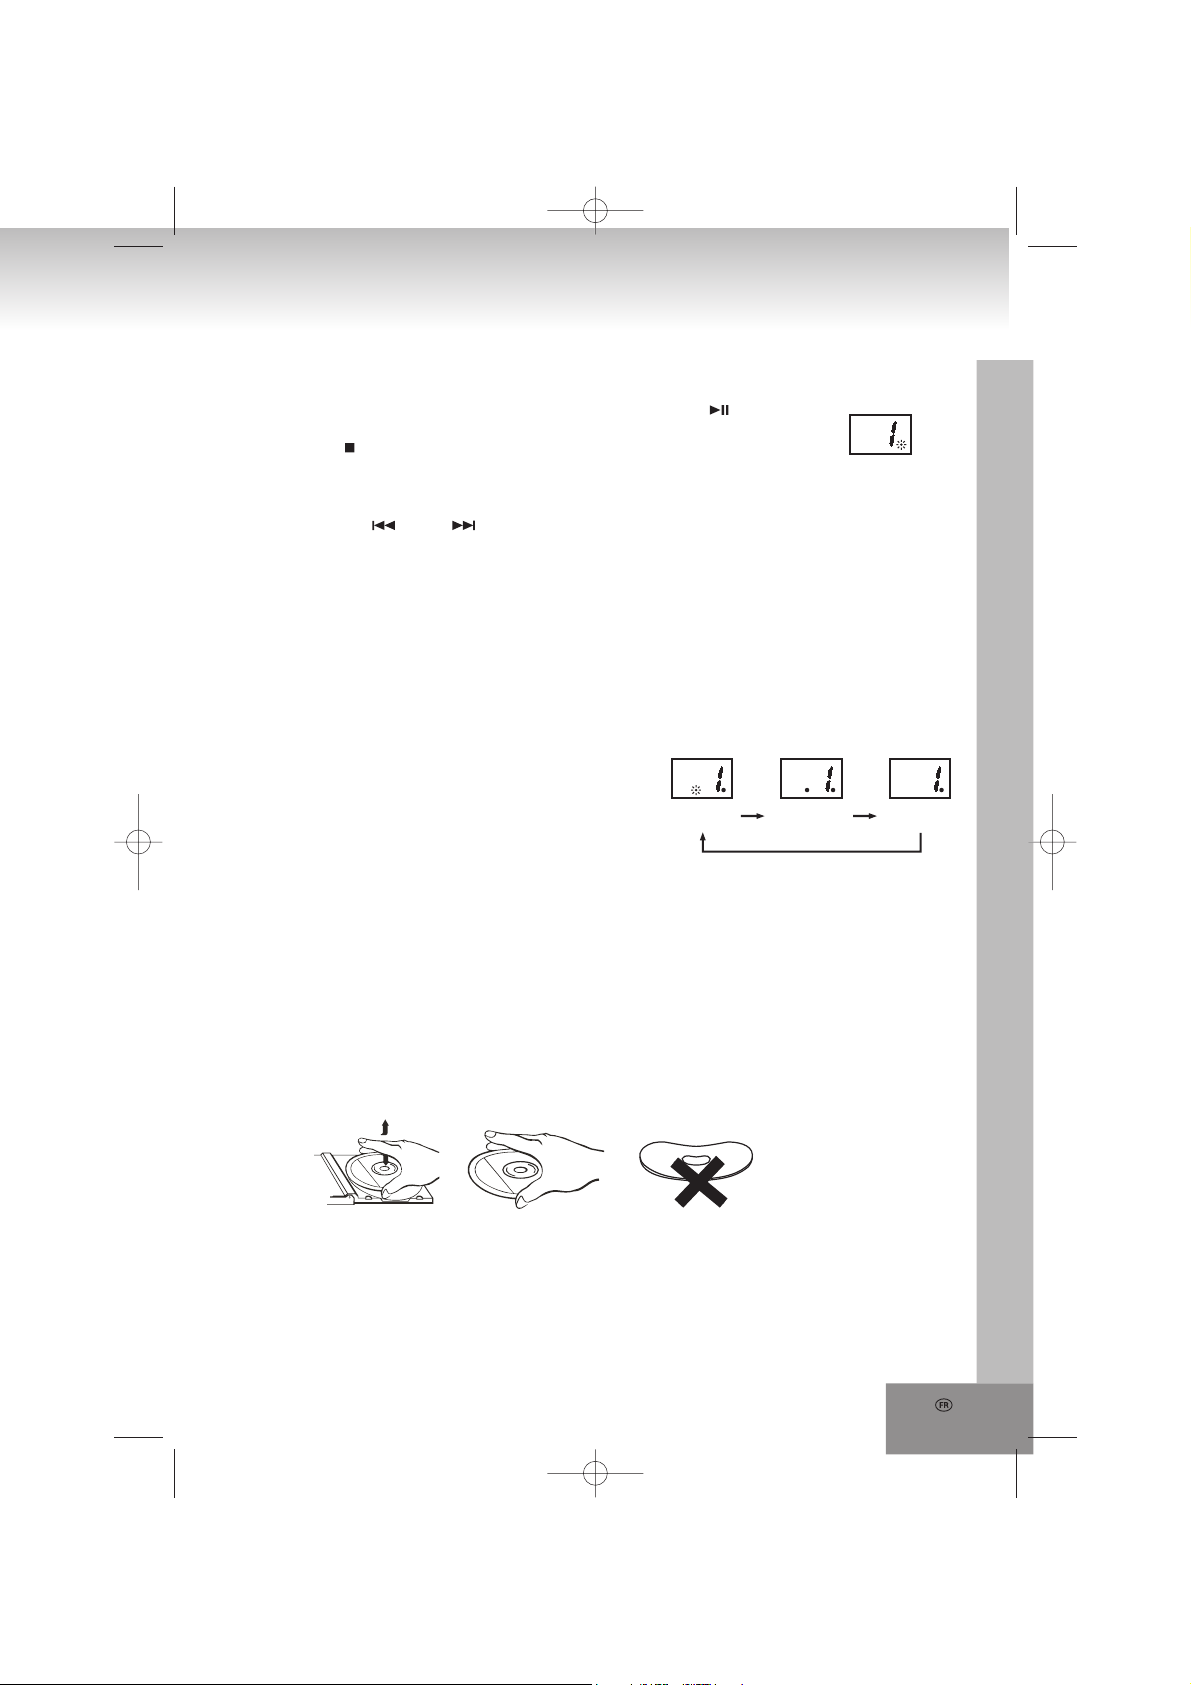
Behandlung und Pflege von Discs
Behandlung von CD’s
* Entnehmen Sie die CD aus dem Cover.
* Berühren Sie die Oberflächen nicht.
* Bringen Sie keine Aufkleber oder Beschriftungen auf CD’s an.
* Biegen Sie CD’s nicht.
Aufbewahrung
* Bewahren Sie CD’s in ihrem Cover auf.
* Setzen Sie CD’s nicht direkter Sonneneinstrahlung, hohen Temperaturen, Feuchtigkeit oder Staub aus.
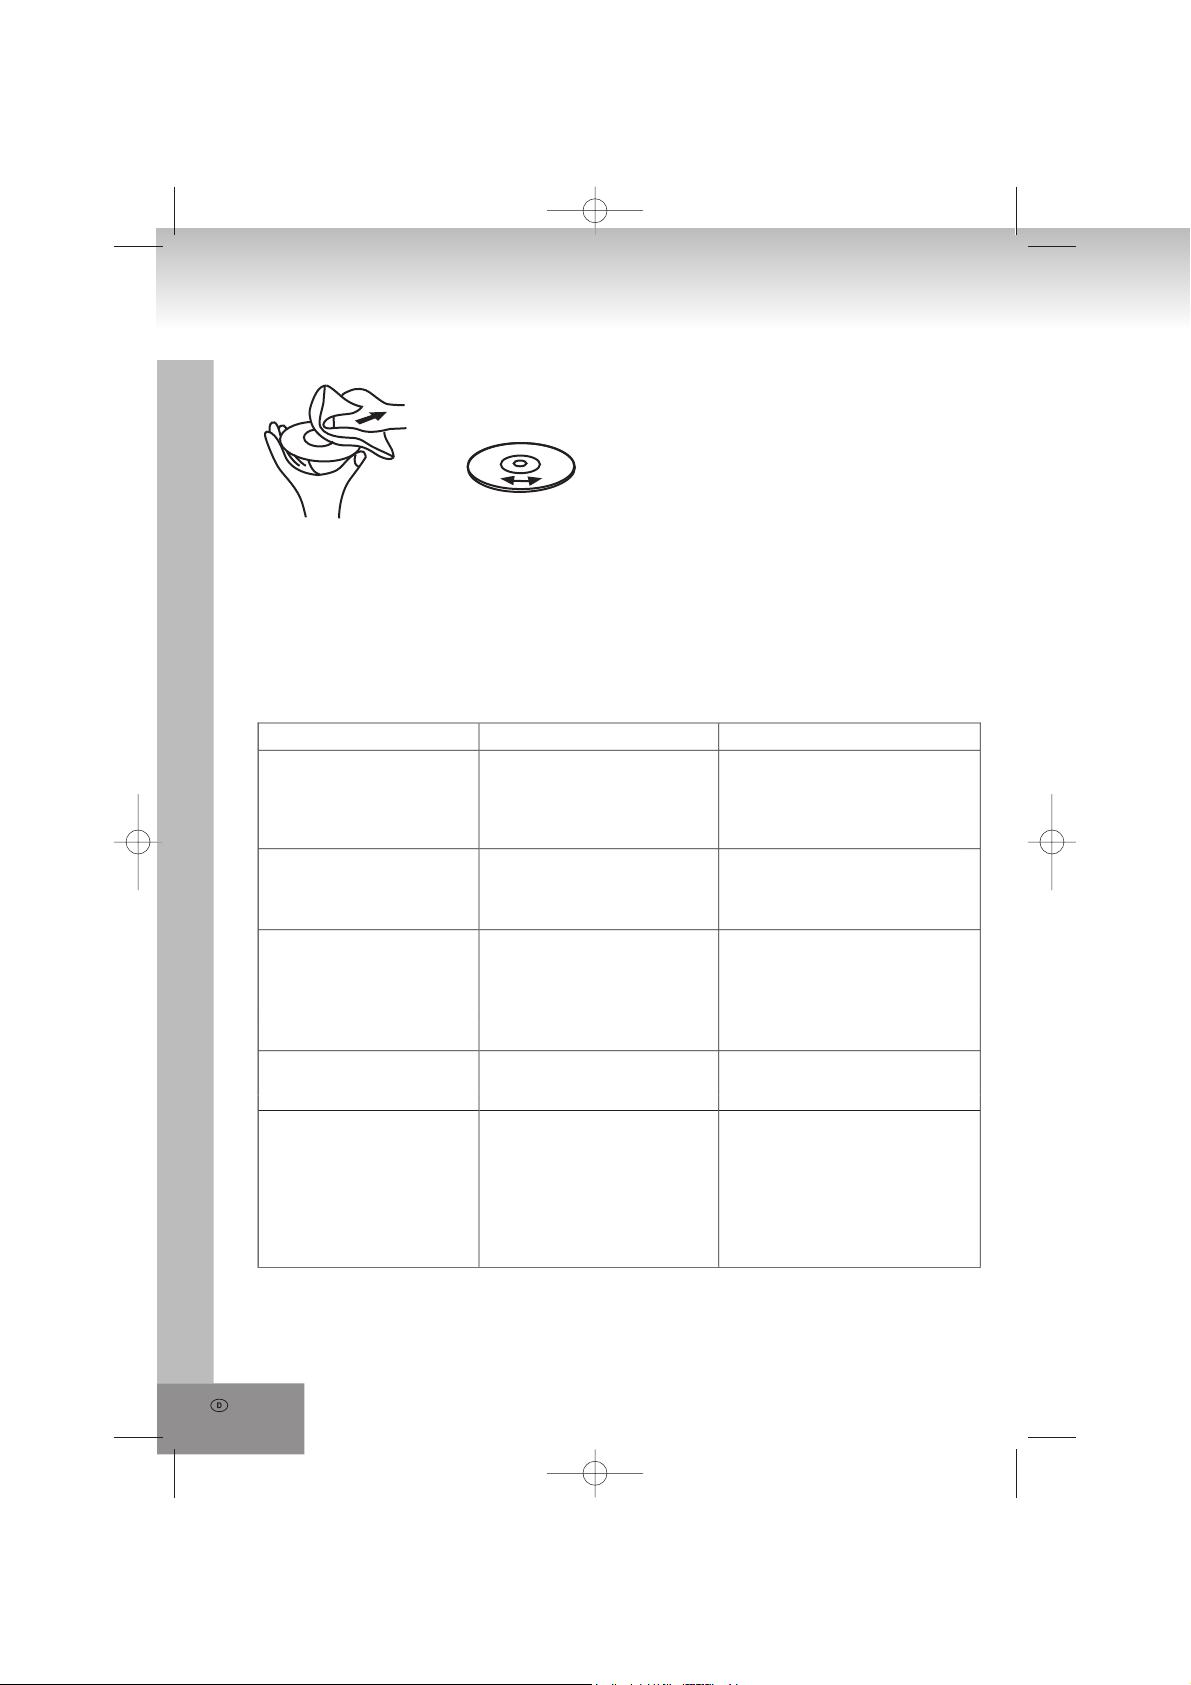
Reinigen von CD’s
* Reinigen Sie CD’s mit einem weichen Tuch.
* Reinigen Sie CD’s von innen nach außen.
9.
Page 10
10.
VON INNEN NACH AUSSEN
RICHTIG FALSCH
Störungserkennung
Sollte sich mit dem System ein Problem ergeben, dann überprüfen Sie zunächst mit dieser Liste, bevor Sie
sich an den Kundendienst wenden.
WARNUNG: Öffnen Sie keinesfalls das Gerät, sondern wenden sich mit Reparaturen oder Wartungen
stets an einen autorisierten Kundendienst.
PROBLEM MÖGLICHE URSACHE LÖSUNGSVORSCHLAG
ALLGEMEIN
Kein Ton
Keine Tastenfunktion Elektrostatische Aufladung. Ziehen Sie den Netzstecker für
Lautstärke ist zu gering
eingestellt.
Netzkabel ist nicht
angeschlossen.
Regeln Sie die Lautstärke.
Schließen Sie das Netzkabel
korrekt an.
einige Sekunden und schalten
das Gerät danach wieder ein.
RADIO
Schlechter Empfang
CD
CD springt
Anzeige: „no“ Keine CD eingelegt.
Schwaches Signal
Störungen durch andere
Elektrogeräte (Fernseher,
Videorekorder, Computer
usw.).
CD beschädigt oder
verschmutzt.
Die CD ist verschmutzt oder
beschädigt.
Die Laserlinse ist
beschlagen.
Antenne ausrichten:
UKW: Wurfantenne.
MW: Gerät ausrichten.
Halten Sie Abstand zu anderen
Elektrogeräten.
Ersetzen oder reinigen Sie die
Disc.
Legen Sie eine CD, CD-R oder
CD-RW ein.
Ersetzen oder reinigen Sie die
CD.(Siehe „Behandlung von
)
CD’s“
Warten bis die Laserlinse
wieder trocken ist.
Page 11

Technische Spezifikationen
Allgemein
Spannungsversorgung: AC 230V~50Hz
Fernbedienung: DC 3V (2 Batterien, Typ AAA, UM – 4, 1,5 V)
Leistungsaufnahme: 20 Watt
Radio
Frequenzbereich: UKW 87,5 – 108 MHz
MW 525 – 1615 kHz
CD Player
CD-Wiedergabesystem: Toplader
Tonabnehmer-Linse: 3 – Strahl-Laser
Abmessungen: ca. 515 x 150 x 165 mm (B x H x T)
Gewicht: ca. 3,0kg
Änderungen ohne vorherige Ankündigung vorbehalten.
11.
Page 12

12.
MODEL: 2402N
Design Stereo Music Center With CD Player
SAFETY INSTRUCTIONS
RISK OF ELECTRIC SHOCK
CAUTION: TO REDUCE THE RISK
OF ELECTRIC SHOCK. DO NOT
A triangle with a lightning
symbol draws the user's
attention to "dangerous
voltage" without insulation in
the cabinet which may be
high enough to entail a risk of
electric shock.
REMOVE COVER (OR BACK).
THERE ARE NO USER
SERVICEABLE PART INSIDE. REFER
SERVICING TO QUALIFIED
SERVICE PERSONNEL
FURTHER INFORMATION
Beware of small pieces and batteries, do not swallow them. It may be hazardous to your health
and lead into suffocation. Please, Make sure to keep small devices and batteries out of the reach
of children.
Important advice regarding hearing protection
Caution:
You care for your hearing, and so do we.
Therefore, use caution while using this appliance.
Our recommendation: Avoid high volumes.
Children should be supervised while using headphones; make sure that the appliance is not set to
high volume.
Caution!
High volumes may cause irreparable damage to children’s ears.
WARNING
DO NOT OPEN
A triangle with an
exclamation mark draws the
user's attention to important
instructions for use and
maintenance in the
accompanying manual,
which should be studied.
NEVER let allow anyone, especially children, to put objects into the holes, slots or openings on
this devise. This may lead into death due to electric shock. The device must only be opened by a
qualified assistant.
Only use the appliance for its intended purpose.
This device may only be used in housings and business premises.
Please keep this instruction manual for further reference.
Instructions on environment protection
Do not dispose of this product in the usual household garbage at the end of its life cycle; hand it
over at a collection point for the recycling of electrical and electronic appliances. The symbol on
the product, the instructions for use or the packing will inform about the methods for disposal.
The materials are recyclable as mentioned in its marking. By recycling, material recycling or other
forms of reutilization of old appliances, you are making an important contribution to protect our
environment.
Please inquire at the community administration for the authorized disposal location.
Page 13

Do not obstruct the ventilation of the device. Make sure, that no curtains, newspapers, furniture or
any other type of object are blocking the ventilation system of the apparatus. The ventilation system
must be clear of objects at all times! Overheating may lead into serious damage of the device and
reduce its performance and lifespan.
Heat and warmth
Do not expose the appliance to direct sunlight. Make sure that the appliance is not subject to direct
heat sources such as heaters or open fire. Make sure that the ventilation slots of the appliance are
not covered.
Moisture and cleaning
This appliance is not waterproof! Do not immerse player in water. Do not allow player to come in
contact with water. If water gets inside the player it may cause serious damage. Do not use cleaning
agents that contain alcohol, ammoniac, benzene or abrasives as these could damage the player.
For cleaning, use a soft, moistened cloth.
Professional recycling
Batteries and packaging should not be disposed of in the trash. Batteries must be handed over to a
collection centre for used batteries. Separating disposable packaging materials is ecologically
friendly.
SAFETY INSTRUCTIONS
1. READ INSTRUCTIONS - All the safety and operating instructions should be read before the unit is
operated.
2. RETAIN INSTRUCTIONS - The safety and operating instruction should be retained for future reference.
3. HEED WARNINGS - All warnings on the unit and in the operating instructions should be adhered to.
4. FOLLOW INSTRUCTIONS - All operating instructions should be followed.
5. WATER AND MOISTURE - The appliance should not be used near water, for example, near a bathtub,
washbowl, kitchen sink, laundry tub, swimming pool or in a wet basement.
6. VENTILATION - Openings in the device serve its proper ventilation, are necessary for the operation and
prevent overheating. The unit should be situated so that its location or position does not interfere with its
proper ventilation. Do not place on bed, sofa, rug or similar surface that may block the ventilation
openings, in a built-in installation, such as a bookcase or cabinet that may impede the flow of air through
the ventilation openings.
7. HEAT - The unit should be situated away from heat sources such as radiators, stoves, or other appliances
(including amplifiers) that produce heat.
8. POWER SOURCE - The unit should be connected to power supply only of the type described in the
operating instructions or as marked on the unit.
9. POWER CORD PROTECTION - Power supply cords should be routed so that they are not likely to be
walked on or pinched by items placed upon or against them. Always hold the plug rather then the power
cable when disconnecting from the mains outlet; never pull the cable.
10. NON-USE - During longer periods of non-use please disconnect from mains power supply and antenna.
11. OBJECT and LIQUID ENTRY - Care should be taken so that objects do not fall and liquids are not spilled
into the enclosure through openings.
12. DAMAGE REQUIRING SERVICE - The unit should be serviced by qualified service personnel when:
a. The power-supply cord or plug has been damaged.
b. Objects have fallen into, or liquid has been spilled into the unit enclosure.
c. The unit has been exposed to rain or moisture.
d. The appliance has been dropped, or the enclosure damaged. Only use controls and adjustments as
specified in the manual.
e. The unit does not appear to operate normally.
f . The device displays serious changes in its performance.
13.
Page 14

14.
13. SERVICING - The user should not attempt to service the unit beyond that described in the user operating
instructions. All other servicing should be referred to qualified service personnel.
14. CLEANING - Disconnect from mains power supply before cleaning. Do not use liquid or spray cleaners,
only use a damp cloth. Follow the care and maintenance instructions in this manual.
15. LIGHTNING - During lightning and longer periods of non-use please disconnect from mains power supply
and antenna.
16. SAFETY CHECK -
17. OVERLOAD - To avoid fire and electric shock do not overload wall outlets and convenience receptacles.
18. ELECTROSTATIC DISCHARGE -
malfunctions. Reconnect after a short time.
After servicing the unit ask the customer service for a safety check.
Disconnect from mains power supply and remove batteries if unit
CAUTION
THIS CD PLAYER IS A CLASS I LASER PRODUCT. HOWEVER, THIS CD PLAYER USES A
VISIBLE/INVISIBLE LASER BEAM, WHICH COULD CAUSE HAZARDOUS RADIATION EXPOSURE. BE
SURE TO OPERATE THE CD PLAYER CORRECTLY AS INSTRUCTED.
INVISIBLE LASER RADIATION WHEN COVER IS OPEN OR THE SECURITY INTERLOCK DEFEATED. DO
NOT EXPOSE TO BEAM!
DO NOT TOUCH THE LASER LENS.
USE OF CONTROLS OR ADJUSTMENTS OR PERFORMANCE OF PROCEDURES OTHER THAN THOSE
SPECIFIED HEREIN MAY RESULT IN HAZARDOUS RADIATION EXPOSURE.
TO REDUCE THE RISK OF FIRE OR ELECTRIC SHOCK AND ANNOYING INTERFERENCE USE ONLY
THE RECOMMENDED ACCESSORIES.
Installation
Avoid installing the player in areas of:
1) direct sunlight or heating radiators or closed automobiles;
2) high temperature or high humidity;
3) excessive dust;
4) excessive vibration, as the internal parts may be seriously damaged.
Foreign Objects or Fingers in the Device
NEVER allow anyone, especially children, to put objects into the holes, slots or openings on this device. This
may lead to death due to electric shock.
Avoid Magnetic Objects:
To avoid interferences keep magnetic objects, such as speakers, at a distance from the player.
Stacking
Place the player in an upright position. Do not place the player on amplifiers or other equipment, which may
heat up.
Condensation
If there is moisture inside the player, it may not operate properly. Please turn off the power supply and wait
about one hour for the moisture to evaporate.
Page 15
Mains Power Supply:
Heed the following instructions to avoid malfunction, fire, injury and electric shock:
• Check if the mains voltage as shown on the type plate (under the set) corresponds to your local mains
voltage. This unit is designed for AC 230V~50Hz.
• Connect the mains lead to the AC mains socket and the wall outlet.
• To disconnect from wall outlet only pull the plug and not the cable.
• Hold the plug tight, when connecting to or disconnecting from wall outlet.
• Do not touch the power cord with wet hands.
• Protect the power cord from heat generating devices.
• Please turn off the player if it has been dropped or is damaged otherwise.
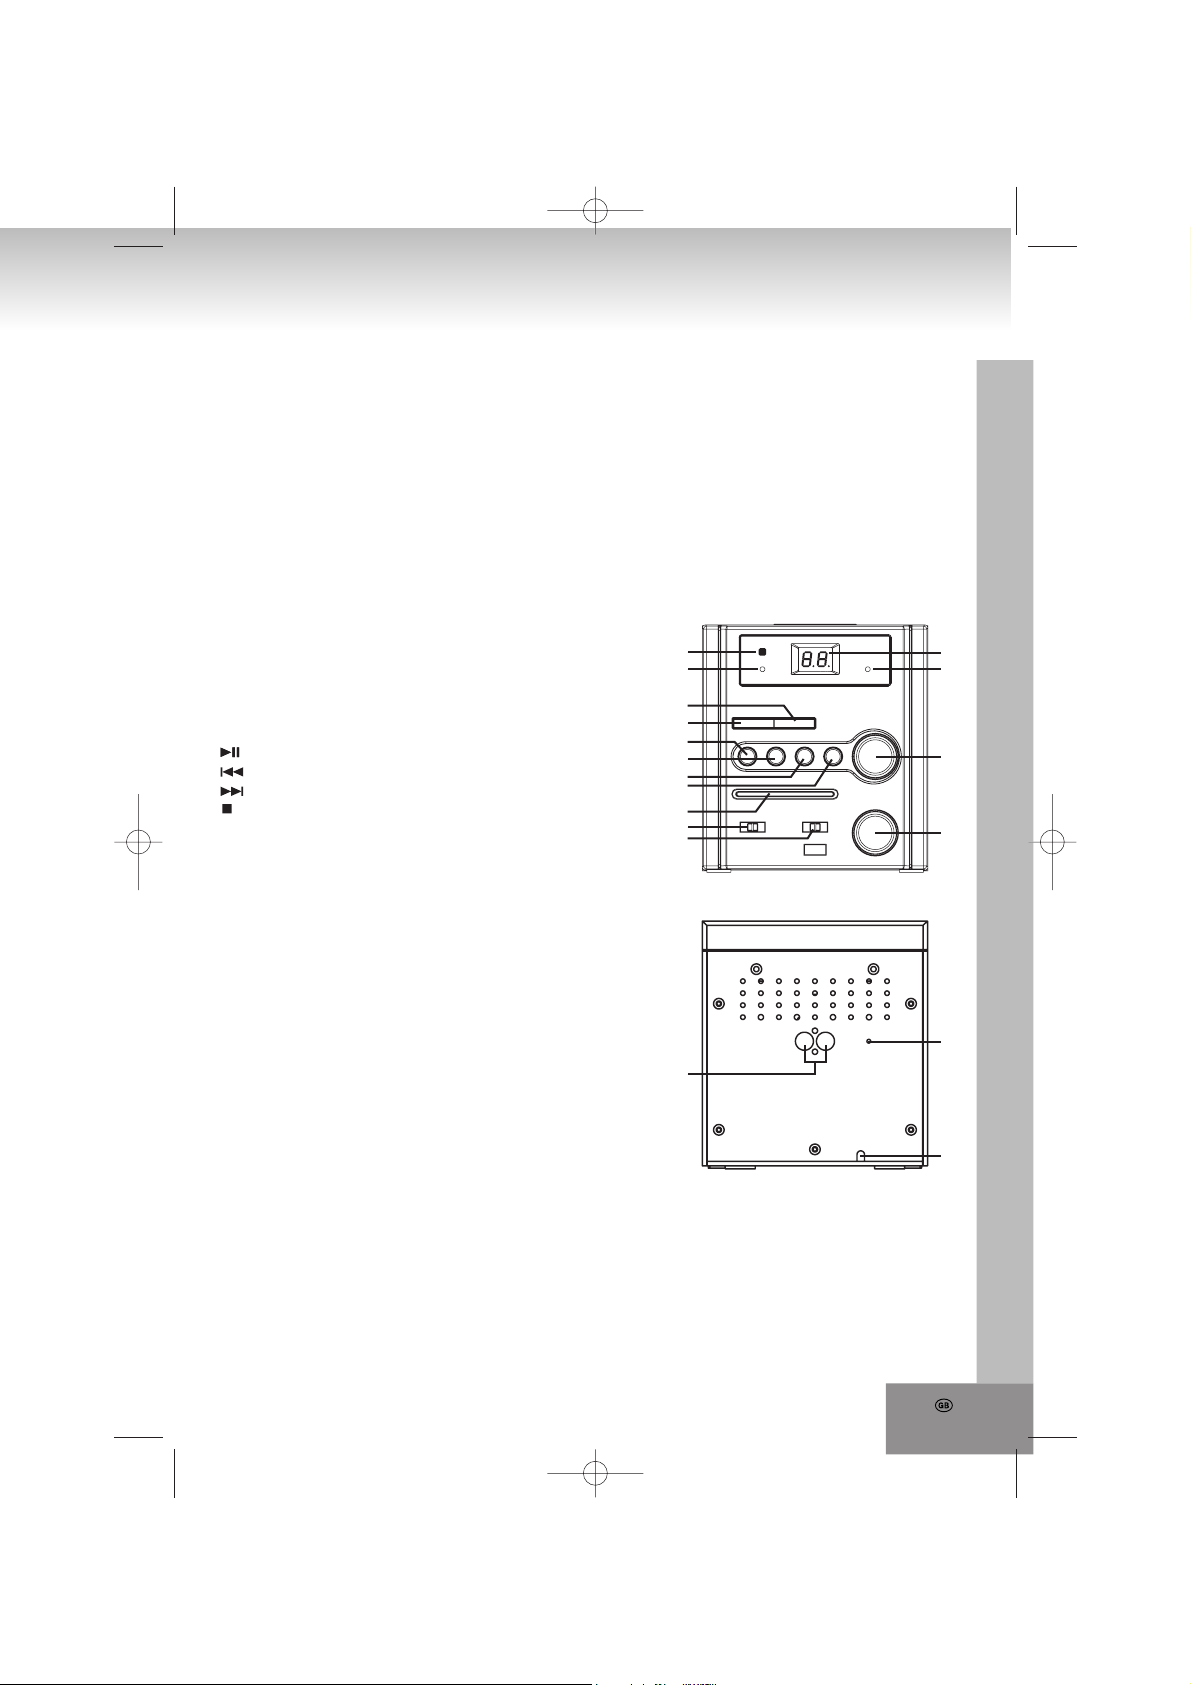
Location Of Controls
1. Remote control SENSOR
2. POWER LED
3. PROGRAM: Program mode
4. REPEAT: Repeat modes
5. : Play/pause
6. : Previous track / search track backward
7. : Next track / search track forward
8. Stop playback
9. Frequency indication
10. BAND: Band selector AM / FM Mono/FM ST. FM Stereo
11. FUNCTION: Selection of the audio source (OFF, CD,
RADIO)
12. VOLUME: Volume control
13. ◄ TUNING ►: Rotary knob
14. FM ST.: LED Stereo indication
15. LED display
16. SPEAKERS (L / R): Speaker jack left/right
17. FM ANT.: FM wire antenna
18. AC 230V~50Hz: Power cord
1
2
3
4
5
6
7
8
9
10
11
16
15
14
13
12
17
18
15.
Page 16
16.
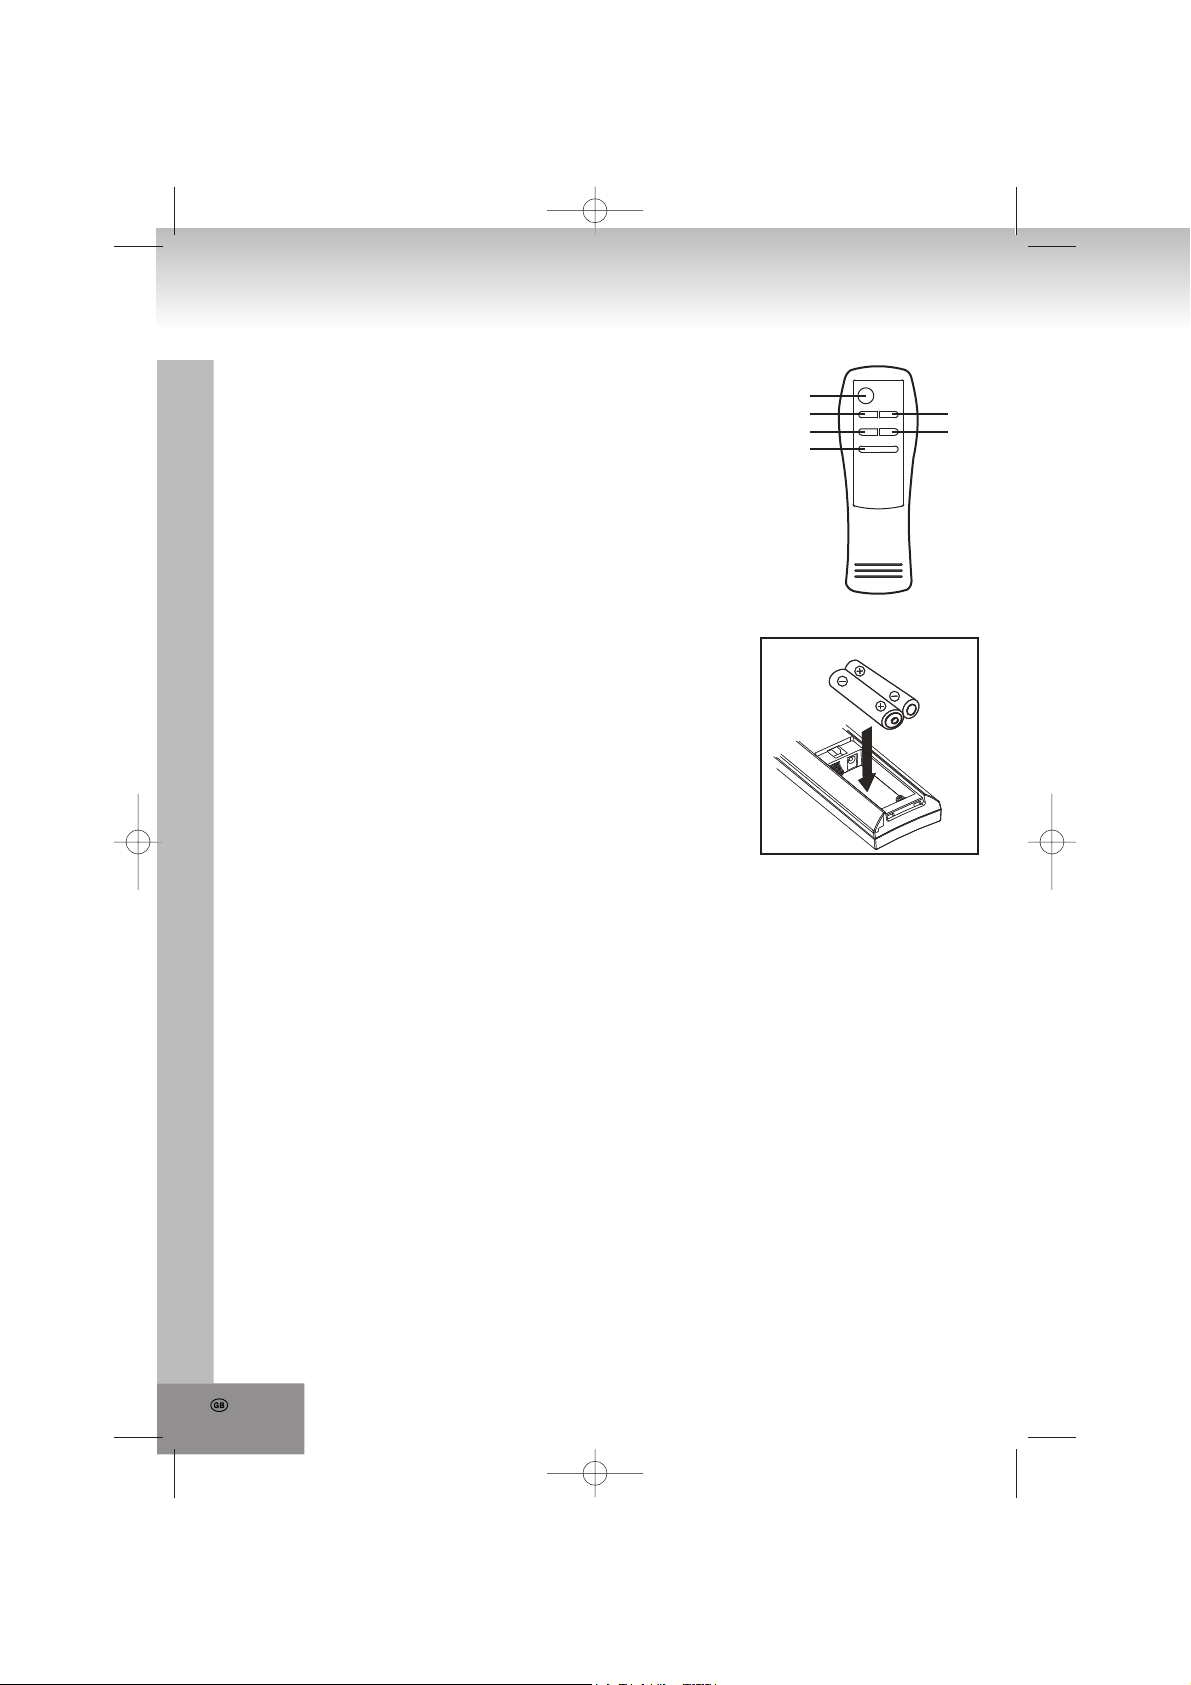
Remote control
1. PLAY / PAUSE: Play/pause
2. SKIP -: Previous track / search track backward
3. PROGRAM: Program mode
4. STOP: Stop playback
5. SKIP +: Next track / search track forward
6. REPEAT: Repeat modes
1
2
3
4
5
6
Installation and Connections
Insert batteries into the remote control (not supplied)
1. Remove the battery compartment cover by pressing it
down and sliding it out.
2. Insert 2 AAA batteries type “AAA / UM – 4“, 1.5V into the
battery compartment. Please observe the correct polarity as
marked with “+” and “-” inside the battery compartment.
3. Replace the cover by pushing onto the battery compartment
until it snaps in.
Battery Safety Precautions
• Follow the battery manufacturer’s safety and usage instructions.
• Keep batteries away from children and pets.
• Do not throw batteries into fire. Never expose batteries to heat or fire.
• Disposal of batteries: Dispose exhausted batteries according to the local laws and regulations. For further
information, please contact your disposal authority.
• Do not mix exhausted and new batteries or normal and rechargeable batteries.
• Do not mix different battery types (e.g. alkaline, zinc/carbon, rechargeable batteries). Use only batteries of
the same type and size.
• During longer periods of non-use, please remove the batteries.
• Wrong usage of batteries can cause a leaking of the electrolyte and corrode the battery compartment or let
the batteries burst.
Notes about the remote control:
• If the operation range of the remote control becomes smaller, the batteries are exhausted and must be
replaced.
• Press the keys soft, but firm.
• Direct the remote control unit from no more than about 6 m from the remote control sensor and within an
angle about 60° towards the sensor window on the front of the device.
• Do not direct bright lamps towards the sensor.
• The operation range depends on the brightness of the room.
• Objects between the remote control and sensor window block the transmission.
• Do not use the remote control simultaneously with remote controls of other devices.
Connection of the speakers
Uncoil the speaker wires and connect them to the speaker terminals SPEAKER (L / R) (16).
Page 17
Antenna connection
Uncoil the FM wire antenna FM ANT. (17) on the rear of the device completely for best FM reception.
General Operating Instructions
On/Off
Set the FUNCTION (11) selector always to the OFF position, if the device is not used.
If the device is turned on, the POWER LED lights up red.
1. Select the mode with FUNCTION (11): OFF, CD or RADIO.
2. Adjust the volume with VOLUME (12) at the device.
3. Turn off the device by setting FUNCTION (11) to the OFF position.
Radio
1. Set the FUNCTION selector (11) to the RADIO position.
2. Select with the BAND selector (10) the frequency range: AM, FM (FM Mono) or FM ST. (FM Stereo).
3. Select the desired station with the ◄ TUNING ► rotary knob (13). The frequency can be read on the
frequency dial at the pointer position.
4. If the band selector is set to FM ST. (FM Stereo) and a stereo broadcast is received, the FM ST. LED in
front of the device lights up.
5. Adjust the volume with VOLUME (12) at the device.
FM Mono / Stereo
- Mono: Set the BAND selector (10) to FM.
- Stereo: Set the BAND selector (10) to FM ST. The FM ST. LED lights up.
Recommendations for better reception
FM: Uncoil the FM wire antenna FM ANT. (17) on the rear of the device completely for best FM reception.
AM: The device has a built-in AM antenna. Change the position of the device if reception is poor.
Disc (Audio CD)
The CD player can only play audio CD’s. Never try to play MP3 CD’s, Data CD’s or VCD/DVD Discs.
Inserting a disc
1. Set the FUNCTION selector (11) to the CD position. On the display flashes “- -” and after a few seconds
“no“ will be indicated.
2. Open the door of the CD drive by pushing on the symbol /OPEN on the right side of the CD door. The
display shows “- -”.
3. Insert a CD with the cover side faced up.
4. Close the door of the CD drive manually. On the display “- -” flashes
and after a few seconds the total number of tracks (e.g. “20”) will be
shown.
Removing a disc
1. Make sure the device is in the stop mode ( (8) button).
2. Open the door of the CD drive by pushing on the symbol /OPEN on the right side of the CD door. The
display shows “- -”.
3. Remove carefully the CD upwards without touching the surface.
4. Close the door of the CD drive manually.
5. Store the removed CD in its cover.
INSERT A DISC
17.
Page 18
18.
Disc playback
1. Insert a CD (see section “Inserting a disc”).
2. Start the playback with (1) at the device or PLAY / PAUSE (1) on the remote control. The display
shows the current track number (e.g. “01.”). The dot “.” on the right indicates the playback mode.
3. Adjust the volume with the VOLUME (12).
4. To pause the playback press again at the device or PLAY / PAUSE (1) on the remote control. The
current track number flashes on the display. Continue the playback by pressing (1) again at the device
or PLAY / PAUSE (1) on the remote control.
5. To stop the playback press (8) at the device or STOP (4) on the remote control, the display shows the
total number of tracks.
Notes:
The CD playback will also be canceled, if:
a. the door of the CD drive is opened with /OPEN.
b. the function selector FUNCTION (11) is set to the RADIO position.
c. all tracks of the CD are played.
6. Remove the CD (see section “Removing a disc”)
7. Turn off the device by setting FUNCTION (11) to the OFF position.
Note: Please observe that the CD continues to rotate also in the pause mode, even as no sound can be
heard. Don’t forget to turn off the pause mode, to prevent needless operation of the motor.
Selecting a different track (SKIP in the stop mode and during playback)
During playback you can skip to the previous or next track with (6) or (7) at the device or with
SKIP - (2) or SKIP + (5) on the remote control.
1. During the playback, stop or pause mode select the track and start the playback with (1) at the device
or PLAY / PAUSE (1) on the remote control.
2. Briefly press (7) at the device or SKIP + (5) on the remote control to skip to the next track or press
repeatedly on this key, until the desired track number is shown on the display.
3. Press (6) on the device or SKIP - (2) on the remote control to return to the beginning of the current
track.
4. Press again (within 1 second after the first key stroke) (6) or SKIP - (2) on the remote control to skip
back one track at a time.
Searching a certain position (during playback)
Press and hold (6) or (7) at the device or SKIP - (2) or SKIP + (5) on the remote control to search
for the desired position within the track. The normal playback continues when the button is released.
Note: In search mode the volume is reduced.
Programming of tracks
Up to 20 tracks can be programmed in an arbitrary order. A track can be programmed more than one time.
The CD player must be in the stop mode ( (8) at the device or STOP (4) on the remote control).
1. Invoke the program mode with PROGAM (3) or on the remote control. The display shows briefly “01“
(memory location number) and afterwards “00“ flashes.
2. Select with the desired track with (6) or (7) at the device or with SKIP - (2) or SKIP + (5) on the
remote control.
3. Store the selected title by pressing PROGAM (3) at the device or on the remote control.
4. Repeat the steps 2 and 3 to program further tracks. The memory location number will be increased
automatically.
5. Start the playback of the programmed tracks with (1) at the device or PLAY / PAUSE (1) on the
remote control.
6. By pressing (8) twice at the device or STOP (4) on the remote control the
programmed playback will be canceled.
Page 19
Notes:
- Delete the programmed tracks by changing the mode or setting FUNCTION (11) to the OFF position.
- Press (6) or (7) at the device or SKIP - (2) or SKIP + (5) on the remote control to skip to the
previous or next track in the programmed order.
- By pressing repeatedly PROGAM (3) at the device or on the remote control the programmed order can
be verified.
- If within 30 seconds during the programming operation no button is pressed, the program-mode will be
exited.
Repeat modes
There are three repeat modes, which can be invoked and switched over with REPEAT (4) at the device or on
the remote control (6) during the playback mode.
Each key stroke changes the repeat mode as follows:
1. Press once REPEAT (4) at the device or on the remote
control (6) during the playback mode to repeat the current
track continually. The repeat indication (dot “.” between the
two digits) on the display flashes.
2. Press twice REPEAT (4) at the device or on the remote
REPEAT 1 REPEAT ALL
NORMAL
PLAYBACK
control (6) during the playback mode to repeat all tracks
on the current disc in their recorded sequence. The repeat
indication (dot “.” between the two digits) lights up permanent.
3. Press again REPEAT (4) at the device or on the remote control
(6) to return to the normal play mode. The display shows the
standard indication.
Handling And Cleaning Of Discs
HANDLING OF CD’s
* Remove the CD from its cover.
* Do not touch on the surfaces.
* Do not attach stickers on CD’s and do not write on them.
* Do not bend CD’s.
Storage
* Always store CD’s in their cover.
* Do not subject to direct sunlight, high temperatures, humidity or dust.
Cleaning CD’s
* Clean CD’s with a soft cloth.
* Clean CD’s from the centre to the edge.
19.
Page 20

20.
FROM THE CENTRE TO THE EDGE
CORRECT INCORRECT
TROUBLESHOOTING
If you experience any problem with this system, review the list below before you contact the customer
service.
WARNING: Never open the device. Always refer service or maintenance to authorized customer
service personnel.
SYMPTOM POSSIBLE CAUSE SOLUTION
GENERAL
No sound
The volume is set too low.
The power cord is not
connected.
Adjust the volume.
Connect the power cord
correctly.
No key function
RADIO
Poor reception
CD
CD skips
Display: “no” No CD inserted.
Electrostatic discharge. Disconnect from the mains for
Weak signal.
Interferences by other
appliances (TV sets, VCRs,
computers, etc.).
The CD is dirty or damaged. Replace or clean the disc.
The CD is dirty or damaged.
The laser lens is steamy.
a few seconds and then turn
on again.
Adjust antenna:
FM: Wire antenna.
AM: Direct the device.
Keep distance to other
appliances.
Insert a CD, CD-R or CD-RW.
Replace or clean the disc.
(See “Handling of CDs”)
Wait till the laser lens is dry.
Page 21
SPECIFICATIONS
General
Power Supply: AC 230V~50Hz
Remote control: DC 3V (2 batteries, type AAA, UM – 4, 1.5 V)
Power Consumption: 20 Watt
Radio
Frequency range: FM 87.5 – 108 MHz
AM 525 – 1615 kHz
CD player
CD Playback system: Top loader
Optical Pick-up Lens: 3 – Beam Laser
Dimensions: approx. 515 x 150 x 165 mm (W x H x D)
Weight: approx. 3,0kg
Subject to change without prior notice.
21.
Page 22
22.
MODELE: 2402N
Chaîne Stéréo Musique avec Lecteur CD
MESURES DE SECURITES
ATENTION: AFIN DE REDUIRE LES
Un triangle avec symbole
d’éclairattire l’attention de
l’utilisateur sur la présence de
"voltage dangereux" non isolé
dans le coffrage, pouvant être
assez puissant pour
provoquerune électrocution
RISQUESD’ELECTROCUTION, NE
PAS RETIRERLE COFFRAGE
PLUS D’INFORMATIONS
Prenez garde aux petites pièces et piles, ne les avalez pas. Cela pourrait être dangereux pour
votre santé et mener à l’étouffement. Prêtez l’attention la plus élevée pour garder les petits
appareils et piles hors de la portée des enfants.
Conseil important pour la protection de l’ouïe
Attention:
Nous tenons à votre ouïe autant que vous.
Par conséquent, prenez vos précautions lors de l’usage de cet appareil.
Notre recommandations: Evitez les volumes forts.
Dans le cas où des enfants utilisent l’appareil, assurez-vous que le volume n’est pas sur la
position éleve.
Attention!
Les volumes élevés peuvent irrémédiablement endommager l’ouïe des enfants.
AVERTISSEMENT RISQUE
D’ELECTROCUTION NE
PAS OUVRIR
(AVANT OU ARRIERE).NE
CONTIENT AUCUNE PIECE
REMPLACABLE.CONFIER
TOUTEREPARATION A DU
PERSONNEL QUALIFIE.
Un triangle avec point
d’exclamation attire
l’attention de l’utilisateur sur
la présence dans le manuel
d’instructions importantes
concernant l’utilisation et la
maintenance, et devant être
consultées.
NE JAMAIS laisser une personne ou surtout un enfant mettre des objets dans les trous, fentes ou
autres ouvertures de l’appareil. Cela pourrait entraîner la mort par décharge électrique. L’appareil
doit être ouvert uniquement par un assistant qualifié.
Veuillez utiliser l’appareil uniquement aux fins pour lesquelles il a été créé.
Cet appareil est exclusivement destiné à l’usage dans des locaux privés ou à usage commercial.
Veuillez conserver ce mode d`emploi pour utilisation ultérieure.
Indications relatives à la protection de l’environnement
Au terme de sa durée de vie, ce produit ne doit pas être éliminé avec les ordures ménagères
mais doit être remisà un point de collecte destiné au recyclage des appareils électriques et
électroniques. Le symbole figurant sur le produit, la notice d’utilisation ou l’emballage vous
indique cela.
Les matériaux sont recyclables conformément à leur marquage. Vous apportez une large
contribution à la protection de l’environnement par le biais du recyclage, de la réutilisation
matérielle ou par les autres formes de réutilisation des appareils usagés.
Veuillez vous adresser à la municipalité pour connaître la déchetterie compétente.
Page 23

Ne gênez pas la ventilation du dispositif. Assurez-vous que rideaux, journaux, couvertures ou
meubles ne bloquent en aucun cas les fentes de ventilation de l’appareil. La ventilation doit être
assurée à tout moment! La surchauffe peut causer à l’appareil des dommages sérieux et réduire sa
performance et sa durée de vie.
La chaleur et sources de chaleur
Veuillez ne pas exposer l’appareil à la lumière directe (du soleil). Assurez-vous que l’appareil n’est
pas en contact direct avec des sources de chaleur telles qu’un chauffage ou un feu. Assurez-vous
que les fentes d’aération de l’appareil ne sont pas fermées.
Humidité et nettoyage
L’appareil n’est pas étanche! Ne plongez pas l’appareil dans l’eau. Evitez son contact avec l’eau.
De l’eau dans l’appareil pourrait sérieusement l’endommager. N’employez pas de détergents
contenant de l’alcool, de l’ammoniaque, du benzène ou des abrasifs. Ces produits pourraient
endommager votre appareil. Pour nettoyer l’appareil, utilisez un chiffon doux et humide.
Recyclage professionnel
Les piles et l’emballage n’appartiennent pas à la catégorie des ordures ménagères. Les piles
doivent être dirigées vers un centre collectant les piles usagées. Les matériaux de l’emballage sont
écologiques.
MESURES DE SÉCURITÉ
1. LISEZ CES INSTRUCTIONS - Toutes les instructions de sécurité et d’utilisation doivent êtres lues avant ]
de faire fonctionner l’appareil.
2. CONSERVER LES INSTRUCTIONS - Les mesures de sécurité et de fonctionnement doivent être
conservées pour références ultérieures.
3. RESPECTER TOUS LES AVERTISSEMENTS - Tous les avertissements sur l’appareil et dans le mode
d’emploi doivent être respectés.
4. SUIVRE LES INSTRUCTIONS - Toutes les instructions de fonctionnement doivent être suivies.
5. EAU ET HUMIDITE - L’appareil ne doit pas être utilisé à proximité d’eau, par exemple : une baignoire, un
lavabo, un évier, une lessiveuse, une piscine ou un sous-sol humide.
6. VENTILATION - Les ouvertures de l’appareil permettent une bonne ventilation, elles sont nécessaires
pour un bon fonctionnement de l’appareil et pour empêcher les surchauffes. L’appareil doit être placé afin
que son emplacement ou sa position n’interfère avec la bonne ventilation. Ne placez pas l’appareil sur un
lit, sofa, tapis ou une autre surface similaire qui pourrait bloquer les trous de ventilation. Le placer dans un
meuble encastré, comme une bibliothèque ou une étagère encastrée, empêchera également une bonne
circulation de l’air.
7. CHALEUR - L’appareil doit être tenu à l’écart des sources de chaleur comme les radiateurs, fours ou
autres appareils émettant de la chaleur (y compris les amplificateurs).
8. SOURCE D’ALIMENTATION - L’appareil doit être branché sur une alimentation de même type que celle
décrite dans le mode d’emploi ou comme indiqué sur l’unité.
9. PROTECTION DU CORDON D’ALIMENTATION - Les cordons d’alimentation doivent être acheminés afin
que l’on ne marche pas dessus ou qu’ils ne soient pas pincés par des éléments placés dessus ou contre
eux. Toujours tenir la prise lorsque vous débranchez l’appareil de la prise murale et ne débranhchez pas
avec le câble d’alimentation, ne jamais tirer sur le câble.
10. PERIODE DE NON UTILISATION - Pendant ces périodes de non utilisation de l’appareil, veuillez
débrancher l’appareil sur l’alimentation principale et l’antenne.
11. INSERTION D’OBJET et de LIQUIDE - Une extrême vigilance est de rigueur afin qu’aucun objet ou
liquide n’entrent dans le châssis par les ouvertures.
12. DOMMAGES NECESSITANT UNE REPARATION - L’unité doit être réparée par du personnel de
réparation qualifié lorsque:
a. Le cordon d’alimentation ou la prise d’alimentation ont été endommagé.
b. Un liquide a été projeté sur l’appareil ou si un objet est tombé dans l’appareil.
c. Si l’unité a été exposée à la pluie ou à l’humidité.
23.
Page 24
24.
d. L’appareil est tombé ou l’enceinte est endommagée. N’utilisez que les commandes et les réglages
comme spécifié dans ce manuel.
e. L’appareil ne semble pas fonctionner normalement.
f . L’unité indique de grave changement dans sa performance.
13. REPARATION - L’utilisateur ne doit pas tenter de réparer l’unité autrement qu’indiqué dans ce mode
d’emploi. Toutes les autres réparations doivent être effectuées par du service de réparation qualifié.
14. NETTOYAGE -
N’utilisez pas de nettoyants liquides ou de sprays, utilisez uniquement un linge humide. Suivez les
instructions de nettoyage et de maintenance de ce manuel.
15. ORAGE - Pendant les orages et les périodes de non utilisation, veuillez débrancher l’appareil sur
l’alimentation principale et l’antenne.
16. CONTRÖLE SECURITE - Après avoir fait réparé l’unité, demandez au service client d’effectuer un
contrôle sécurité.
17. SURCHARGE - Pour éviter les risques d’incendie et d’électrocution, ne surchargez pas les prises murales
et les multi prises.
18. DECHARGE ELECTROSTATIQUE -
si l’unité ne fonctionne pas correctement. Rebranchez ensuite.
Débranchez le câble d’alimentation de l’alimentation principale avant le nettoyage.
Débranchez de l’alimentation principale et retirez les piles de l’unité
VERTISSEMENT
CE LECTEUR CD EST UN PRODUIT LASER DE CLASSE I CEPENDANT, CE LECTEUR CD UTILISE UN
RAYON LASER VISIBLE/INVISIBLE QUI POURRAIT ENTRAINER UNE EXPOSITION A DES RADIATIONS
DANGEREUSES . VEUILLEZ VOUS ASSUREZ DE FAIRE FONCTIONNER LE LECTEUR CORRECTE
MENT COMME INDIQUE.
RADIATION LASER INVISIBLE LORSQUE LE COUVERCLE EST OUVERT OU QUE LE VERROUILLAGE
DE SECURITE EST DETRUIT NE PAS EXPOSER AUX FAISCEAUX LUMINEUX !
NE PAS TOUCHER LA LENTILLE DU LASER
L’UTILISATION DE COMMANDES OU D’AJUSTEMENTS OU DE PERFORMANCE OU DE PROCEDURES
DIFFERENTES DE CELLES QUI SONT SPECIFIEES PEUVENT ENTRAINER UNE EXPOSITION A UNE
GRAVE RADIATION.
-
AFIN DE REDUIRE LES RISQUES D’INCENDIE, DE CHOC ELECTRIQUE OU D’INTERFERENCE,
N’UTILISEZ QUE LES ACCESSOIRES RECOMMANDES.
Installation
Evitez d’installer le lecteur en ces endroits :
1) à lumière du soleil ou près de radiateurs qui chauffent ou près d’automobiles.
2) à des températures élevées ou à un taux d’humidité élevé.
3) à la poussière excessive.
4) aux vibrations excessives, car les parties internes pourraient être sérieusement endommagées.
Objets étrangers ou Doigts dans l’appareil
NE JAMAIS laisser personne, et plus particulièrement les enfants, placer des objets dans les orifices, les
logements ou les ouvertures de l’appareil. Cela pourrait entraîner la mortpar électrocution.
Evitez les objets magnétiques :
Afin d’éviter les interférences mettez le lecteur à l’abri des objets magnétiques tels que les haut-parleurs.
Empilement
Placez le lecteur en positio verticale. Ne pas placer le lecteur sur les amplificateurs ou sur un autre équipement qui pourrait chauffer.
Page 25
Condensation :
S’il y a de l’humidité dans le lecteur, il se peut qu’il ne fonctionne pas correctement. Veuillez éteindre le courant
et attendre environ une heure que l’humidité s’évapore.
Alimentation secteur:
Faites attention aux instructions suivantes afin d’éviter un dysfonctionnement, des blessures et une
électrocution :
• Vérifee si la tension principale comme indiquée sur la plaque (sous l’appareil), correspond à la tension de
secteur locale. L’appareil est conçu pour du AC 230V~50Hz.
• Connectez le câble secteur à la prise secteur AC et à la prise murale.
• Pour débrancher de la prise murale, débranchez simplement la prise et non le câble.
• Maintenez fermement la prise lorsque vous la connectez et déconnectez à la prise murale.
• Ne touchez pas le cordon d’alimentation avec les mains mouillées.
• Protégez le cordon d’alimentation des appareils générant de la chaleur.
• Veuillez éteindre le lecteur s’il est tombé ou s’il a été endommagé de quelque autre manière.
Emplacement des commandes
1. Télécommande SENSOR
2. DEL POWER
3. PROGRAM: Mode programme
4. REPEAT: Modes Répétition
5. : Lecture/pause
6. : Piste précédente / recherche de piste précédente
7. : Piste suivante / recherche de piste suivante
8. : Arrêt de lecture
9. Indication de la fréquence
10. BAND: Sélecteur de bande AM / FM Mono/FM ST. stéréo
FM
11. FUNCTION: Sélection de la source audio (OFF, CD, RADIO)
12. VOLUME: Contrôle du volume
13. ◄ TUNING ►: Bouton rotatif
14. FM ST.: DEL Indicateur stéréo
15. Affichage à DEL
16. SPEAKERS (L / R): Prises Jack haut-parleurs gauche/droite
17. FM ANT.: Fil d’antenne FM
18. AC 230V~50Hz: Cordon d’alimentation
1
2
3
4
5
6
7
8
9
10
11
16
15
14
13
12
17
18
25.
Page 26

26.
Télécommande
1. PLAY / PAUSE: Lecture/pause
2. SKIP -: Piste précédente / recherche de piste précédente
3. PROGRAM: Mode programme
4. STOP: Arrêt de lecture
5. SKIP +: Piste suivante / recherche de piste suivante
6. REPEAT: Modes Répétition
1
2
3
4
5
6
Installation et Connexions
Insérer les piles dans la télécommande (non fournies)
1. Retirez le cache du compartiment de piles en appuyant dessus
et le faisant sortir par glissement.
2. Insérez 2 piles AAA de type “AAA / UM – 4“, 1.5V dans le
compartiment de piles. Veuillez observer la bonne polarité
comme indiqué à l’intérieur du compartiment par les signes “+” et “-”.
3. Replacez le couvercle en le poussant sur le compartiment de piles
jusqu’à ce qu’il claque.
Précautions de sécurité concernant les piles
• Veuillez suivre les instructions de sécurité et d’utilisation du fabricant.
• Veuillez mettre les piles à l’abri des enfants et des animaux domestiques.
• Ne pas jeter les piles au feu. Ne jamais exposer les piles à la chaleur ou au feu.
• Recyclage des piles: Recyclez les piles usagées selon les lois et régulations locales. Pour plus
d’informations, contactez les autorités locales de recyclage.
• Ne mélangez pas des piles neuves avec des piles usagées ou des piles ordinaires avec des piles
rechargeables.
• Ne mélangez pas des piles de types différents (ex : alcaline, zinc/carbone, piles rechargeables). N’utilisez
que des piles de même type et de même taille.
• Pendant des périodes prolongées de non-utilisation, veuillez retirer les piles.
• Si les piles sont mal utilisées, cela peut entraîner une fuite d’électrolyte et corroder le compartiment de
piles ou faire exploser les piles.
Notes à propos de la télécommande :
• Si le champ d’opération de la télécommande est amoindri, les piles sont usagées et doivent être changées.
• Appuyez doucement mais fermement sur les touches.
• Dirigez la télécommande à pas plus de 6 m du capteur de distance de la télécommande et dans un angle
d’environ 60° vers la fenêtre du capteur sur le devant de l’appareil.
• Ne pas diriger de lumières fortes vers le capteur.
• Le champ d’opération dépend de la luminosité de la pièce.
• Les objets placés entre la télécommande et la fenêtre du capteur bloquent la transmission.
• Ne pas utiliser la télécommande simultanément avec les télécommandes d’autres appareils.
Connexion des haut-parleurs
Déroulez les fils de haut-parleurs et connectez-les aux bornes des haut-parleurs SPEAKER (L / R) (16).
Page 27
Connection de l’antenne
Déroulez complètement le fil d’antenne FM FM ANT. (17) à l’arrière de l’appareil pour obtenir une réception
FM optimale.
Consignes d’utilisations générales
On/Off
Laissez le sélecteur FUNCTION (11) toujours en position OFF si l’appareil n’est pas utilisé.
Si l’appareil est allumé, la DEL POWER s’allume en rouge.
1. Sélectionnez le mode avec le sélecteur FUNCTION (11): OFF, CD ou RADIO.
2. Ajustez le volume avec le bouton VOLUME (12) situé sur l’appareil.
3. Eteignez l’appareil en plaçant le sélecteur FUNCTION (11) sur la position OFF.
Radio
1. Placez le sélecteur FUNCTION (11) sur la position RADIO.
2. Grâce au sélecteur BAND (10) sélectionnez la bande de fréquence : AM, FM (FM Mono) ou FM ST. (FM
Stéréo).
3. Sélectionnez la station désirée grâce au bouton rotatif ◄ TUNING ► (13). La fréquence peut être
visualisée sur le cadran de fréquences par le biais du curseur.
4. Si le sélecteur de bande est placé sur FM ST. (FM Stéréo) et qu’une diffusion FM est captée, la DEL FM
ST. située à l’avant de l’appareil s’allume.
5. Ajustez le volume avec le bouton VOLUME (12) situé sur l’appareil.
FM Mono / Stéréo
- Mono : Placez le sélecteur BAND (10) sur FM.
- Stéréo : Placez le sélecteur BAND (10) sur FM ST. La DEL FM ST. s’allume.
Recommandations afin d’obtenir une réception optimale
FM : Déroulez complètement le fil d’antenne FM FM ANT. (17) situé à l’arrière de l’appareil pour obtenir une
réception FM optimale.
AM : L’appareil possède une antenne AM intégrée. Changez la position de l’appareil si la réception est
mauvaise.
Disque (CD Audio)
Le lecteur CD ne peut lire que des CD Audio. Ne tentez jamais de lire des CD MP3, CD de données ou des
VCD/DVD.
Insérer un disque
1. Placez le sélecteur FUNCTION (11) sur la position CD. Le signe “- -” clignote sur l’affichage.
Quelques secondes après, le signe “no” s’affiche.
2. Ouvrez la porte du lecteur de CD en appuyant sur le symbole /OPEN situé sur
la partie droite de la porte du lecteur de CD. L’affichage indique “- -”.
3. Insérez un CD avec la face couverte vers le haut.
4. Refermez manuellement la porte du lecteur de CD. Le signe “- -” clignote sur
l’affichage. Quelques secondes après, le nombre total de pistes (ex : “20”)
s’affiche.
Retirer un disque
1. Assurez vous que l’appareil soit en mode Arrêt (bouton (8)).
2. Ouvrez la porte du lecteur de CD en appuyant sur le symbole /OPEN situé sur la partie droite de la
porte du lecteur de CD. L’affichage indique “- -”.
3. Retirez le CD prudemment vers le haut sans toucher la surface.
4. Refermez manuellement la porte du lecteur de CD.
5. Rangez le CD dans son boîtier.
INSÉREZ UN DISQUE
27.
Page 28
28.
Lecture du disque
1. Insérez un CD (voir la section “Insérer un disque”).
2. Lancez la lecture en appuyant sur le bouton (1) situé sur l’appareil ou sur la touche PLAY / PAUSE
(1) de la télécommande. L’affichage indique le numéro de la piste en cours (ex : “01.”). Le point “.” sur la
droite indique le mode de lecture.
3. Ajustez le volume avec le bouton VOLUME (12).
4. Afin de mettre en pause la lecture appuyez une nouvelle fois sur le bouton situé sur l’appareil ou sur
la touche PLAY / PAUSE (1) de la télécommande. Le numéro de la piste en cours clignote sur l’affichage.
Continuez la lecture en appuyant une nouvelle fois sur le bouton (1) situé sur l’appareil ou sur la
touche PLAY / PAUSE (1) de la télécommande.
5. Afin d’arrêter la lecture appuyez sur le bouton (8) situé sur l’appareil ou sur la touche STOP (4) de la
télécommande, l’affichage indique le nombre total de pistes.
Remarques:
La lecture du CD s’arrêtera également si:
a. la porte du lecteur CD s’ouvre en appuyant le bouton /OPEN.
b. le sélecteur de fonction FUNCTION (11) est placé sur la position RADIO.
c. toutes les pistes du CD sont jouées.
6. Retirez le CD (voir la section “Retirer un disque”).
7. Eteignez l’appareil en plaçant le sélecteur FUNCTION (11) sur la position OFF.
Remarque: Le CD continue à tourner en mode pause, même si aucun son n’est audible. N’oubliez pas de
stopper le mode pause, afin d’éviter d’utiliser le moteur inutilement.
Sélectionner une piste différente (SKIP dans le mode stop et en cours de lecture)
En cours de lecture vous pouvez passer à la piste suivante ou précédente en appuyant sur les boutons
(6) ou (7) situés sur l’appareil ou sur les touches SKIP - (2) ou SKIP + (5) de la télécommande.
1. Pendant les modes lecture, stop ou pause, sélectionnez la piste et débutez la lecture en appuyant sur le
bouton (1) situé sur l’appareil ou sur la touche PLAY / PAUSE (1) de la télécommande.
2. Pressez brièvement le bouton (7) situé sur l’appareil ou sur la touche SKIP + (5) de la télécommande
pour passer à la piste suivante ou pressez consécutivement cette touche jusqu'à ce que le numéro de la
piste désiré soit indiqué sur l’affichage.
3. Pressez le bouton (6) situé sur l’appareil ou sur la touche SKIP - (2) de la télécommande pour
retourner au début de la piste en cours.
4. Pressez une nouvelle fois (dans la seconde suivant le premier appui) sur le bouton (6) ou sur la
touche SKIP - (2) de la télécommande pour revenir en arrière piste par piste.
Recherche d’une certaine position (en cours de lecture)
Appuyez et maintenez les boutons (6) ou (7) situés sur l’appareil ou les touches SKIP - (2) ou SKIP
+ (5) de la télécommande pour trouver la position désirée dans la piste. La lecture normale continue après
relâchement du bouton.
Remarque: En mode recherche, le volume est diminué.
Programmation des pistes
Jusqu’à 20 pistes peuvent être programmées dans un ordre arbitraire. Une piste peut être programmée plus
d’une fois. Le lecteur CD doit être à l’arrêt ( (8) sur l’appareil ou STOP (4) sur la télécommande).
1. Sélectionnez le mode programme en appuyant sur le bouton PROGAM (3) ou sur la télécommande.
L’affichage indique brièvement “01” (nombre de l’emplacement mémoire) et le signe “00” clignote par la
suite.
2. Sélectionnez la piste désirée avec les boutons (6) ou (7) situés sur l’appareil ou avec les
touches SKIP - (2) ou SKIP + (5) de la télécommande.
3. Enregistrez le titre sélectionné en pressant le bouton PROGAM (3) situé sur l’appareil ou sur la télécom
mande.
Page 29
4. Répétez les étapes 2 et 3 afin de programmer les autres pistes. Le nombre de l’emplacement mémoire
augmentera automatiquement.
5. Lancez la lecture des pistes programmées en appuyant sur le bouton (1) situé sur
l’appareil ou sur la touche PLAY / PAUSE (1) de la télécommande.
6. Presser le bouton (8) deux fois sur l’appareil ou la touche STOP (4) de la
télécommande annule la lecture des pistes programmées.
Remarques:
- Effacez les pistes programmées en plaçant le sélecteur FUNCTION (11) en position OFF.
- Pressez les boutons (6) ou (7) situés sur l’appareil ou les touches SKIP - (2) ou SKIP + (5) de la
télécommande pour passer à la piste suivante ou précédente dans l’ordre programmé.
- L’ordre programmé peut être vérifié en pressant consécutivement le bouton PROGAM (3) situé sur
l’appareil ou sur la télécommande.
- Si aucun bouton n’est appuyé pendant 30 secondes durant la phase de programmation, le mode
programme s’arrêtera.
Modes répétition
Trois modes de répétitions sont disponibles, appuyez sur le bouton REPEAT (4) situé sur l’appareil ou sur la
télécommande (6) pour y accéder en cours de lecture.
Chaque pression de touche change le mode de répétition comme suivant :
1. Pressez une fois le bouton REPEAT (4) situé sur l’appareil
ou sur la télécommande (6) en cours de lecture afin de
répéter continuellement la piste en cours. L’indication de
répétition (point “.” entre les deux digits) clignote sur
l’affichage.
2. Pressez deux fois le bouton REPEAT (4) situé sur l’appareil
REPETER 1
REPETER
TOUT
LECTURE
NORMALE
ou sur la télécommande (6) en cours de lecture afin de
répéter toutes les pistes sur le disque en cours dans leur
séquence enregistrée. L’indication de répétition (point “.” entre
les deux digits) s’allume de manière permanente.
3. Pressez une nouvelle fois le bouton REPEAT (4) situé sur l’appareil ou sur la télécommande (6) pour
retourner au mode de lecture normal. L’indication de l’affichage redevient standard.
Manipulation er nettoyage des disques
MANIPULATION DES CD
* Retirez le CD de son boîtier.
* Ne pas toucher les surfaces.
* Ne pas apposer d’autocollants ou écrire sur le CD .
* Ne pas plier le CD.
Stockage
* Toujours ranger les CD dans leur boîtier.
* Ne pas exposer à la lumière directe du soleil, à des températures élevées, à l’humidité ou à la poussière.
Nettoyer le CD
* Nettoyer le CD à l’aide d’un chiffon doux.
* Nettoyer le CD du centre vers l’extérieur.
29.
Page 30

30.
DU CENTRE VERS L’EXTÉRIEUR
CORRECT INCORRECT
GUIDE DE DEPANNAGE
Si vous rencontrez des problèmes avec cet appareil, veuillez d’abord consulter la liste ci-dessous avant de
contacter le service client.
AVERTISSEMENT : Ne jamais ouvrir l’appareil. Veuillez toujours faire réparer ou entretenir l’appareil
par un personnel de réparation agréé.
Problème Cause possible Solution
GENERAL
Pas de son
Le volume n’est assez haut.
Le cordon d’alimentation
n’est pas connecté.
Ajustez le volume.
Connectez le cordon
d’alimentation.
Pas de fonction des
touches
RADIO
Mauvaise réception
CD
Le CD saute
Affichage “no” Aucun CD.
Décharge électrostatique Débranchez du secteur
pendant quelques secondes
et rallumez ensuite.
Signal faible.
Des interférences causées
par d’autres appareils
(postes de TV, VCR,
ordinateurs, etc.)
Le CD est sale ou
endommagé.
Le CD est sale ou
endommagé.
La lentille du laser est
embuée.
Ajustez l’antenne.
FM: fil d’antenne.
AM: replacez l’appareil.
Le placer à distance des autres
appareils.
Remplacez ou nettoyez le
disque.
Insérer un CD, CD-R ou
CD-RW.
Remplacez ou nettoyez le
disque.(Voir “manipulation
des CD”)
Attendre que la lentille du
laser soit sèche.
Page 31

SPECIFICATIONS
Générales
Alimentation: AC 230V~50Hz
Télécommande: 3V DC (2 piles, type AAA, UM – 4, 1.5 V)
Consommation d’énergie : 20 Watt
Radio
Gamme de fréquences : FM 87.5 – 108 MHz
AM 525 – 1615 kHz
Lecteur de CD
Système de Lecture de CD : Chargement par le haut
Dispositif de lecture optique : 3 – Faisceau Laser
Dimensions: ca. 515 x 150 x 165 mm (L x H x P)
Poids : ca. 3,0kg
Peut être sujet à modifications sans avis préalable.
31.
Page 32

32.
MODELL: 2402N
Formatervezett Sztereó Mikro Hifi CD-lejátszóval
BIZTONSÁGI ELŐÍRÁSOK
FIGYELEM
FESZÜLTSÉG ALATT!
NE NYISSA KI A BURKOLATOT!
VIGYÁZAT: AZ ÁRAMÜTÉS
VESZÉLYÉNEK ELKERÜLÉSE
A villámot tartalmazó
háromszög szimbólum arra
hívja fel a felhasználó
figyelmét, hogy a
készülékben szigetelés
nélküli nagy feszültségű
alkatrészek találhatók,
amelyek áramütést okozha
ÉRDEKÉBEN NE VEGYE LE A
KÉSZÜLÉK BURKOLATÁT. A
KÉSZÜLÉK BELSEJÉBEN NINCS
OLYAN ALKATRÉSZ, AMELYET
HÁZILAG LEHETNE
KARBANTARTANI. A KÉSZÜLÉK
JAVÍTÁSÁT
KIEGÉSZÍTŐ INFORMÁCIÓK
Óvatosan bánjon az apró alkatrészekkel és elemekkel, és azokat ne nyelje le, mert ez komoly
sérüléseket okozhat!
Gondoskodjon arról, hogy az apró alkatrészek és elemek ne kerüljenek gyermekek kezébe.
Fontos tanácsok a halláskárosodás elkerülésére
Figyelmeztetés:
Az Ön hallásáért nemcsak Ön, de mi is aggódunk.
Éppen ezért kérjük, legyen óvatos a készülék használatánál.
Azt ajánljuk, hogy: kerülje a nagy hangerővel való hallgatást.
Ha a készüléket gyermekek használják, ügyeljünk arra, hogy ne állítsák a készüléket túl
hangosra.
Vigyázat!
A túl nagy hangerő a gyermekeknél gyógyíthatatlan károsodást okozhat.
A felkiáltójelet tartalmazó
háromszög azt jelzi, hogy a
felhasználásról és a
karbantartásról fontos
információkat talál a
mellékelt kézikönyvben,
melyet tanulmányozzon át.
Kérjük gondoskodjon róla, hogy a készülék burkolatának nyílásaiba SOHA senki, főképpen pedig
gyermekek, ne dughassanak bele semmit, ez ugyanis életveszélyes áramütéshez vezethet. A
készülék burkolatát csak erre megfelelően képzett szakember nyithatja fel.
A készüléket kizárólag a rendeltetésének megfelelõen használjuk.
A készülék kizárólag lakásokban és üzletekben történõ felhasználásra alkalmas.
Kérjük, őrizze meg a használati útmutatót, hogy az később is rendelkezésére álljon.
Környezetvédelmi tanácsok
Ezt a terméket az élettartama végén ne dobjuk a normál háztartási szemétbe, hanem adjuk le a
villamos és elektronikai hulladékok átvevőhelyén. A terméken található szimbólum, a használati
útmutató vagy a csomagolás felirata erre hívja fel a figyelmet.
A készülék anyagai a jelölésüknek megfelelõen újrahasznosíthatóak. Az újrahasznosítással, az
anyagok ismételt felhasználásával, illetve a használt készülékek egyéb felhasználásával sokat
tehetünk környezetünk megóvásáért.
A megfelelõ hulladék-átvevõhelyrõl a helyi önkormányzatnál érdeklõdhetünk.
Page 33

Ne akadályozza a készülék szellőzését, például függönnyel, újsággal, takaróval vagy bútorral. A
szellőzőnyílásoknak mindig szabadon kell maradnia. A túlmelegedés kárt tehet a készülékben, és
emiatt annak élettartama lerövidülhet.
Meleg és forróság
Ne tegyük ki a készüléket a közvetlen napsütés hatásának. Ügyeljünk arra, hogy a készülék ne
legyen fűtőberendezés, nyílt láng vagy egyéb hőforrás közelében. A készülék szellőzőnyílásait
mindig hagyjuk szabadon.
Nedvesség és tisztítás
Ez a készülék nem vízálló! Ne tegyük vízbe a lejátszót, és ügyeljünk arra, hogy ne is kerüljön vízzel
érintkezésbe.
A lejátszóba bejutó víz súlyos károkat okozhat. A készülék megtisztítására ne használjunk alkoholt,
ammóniát, benzint, vagy súrolószert tartalmazó tisztítóanyagot, mivel ezek károsíthatják a lejátszót.
A készülék megtisztítására enyhén megnedvesített puha törlőruhát használjunk.
Előírásos hulladék-elhelyezés
Az elemek és a csomagolóanyagok nem a háztartási szemétbe valók. Az elemeket a használt
elemek számára kijelölt gyűjtőhelyre vigyük. A csomagolóanyagok szelektív elhelyezése szintén
védi környezetünket.
BIZTONSÁGI ELŐÍRÁSOK
1. OLVASSA EL AZ UTASÍTÁSOKAT - A készülék működtetése előtt az összes biztonsági és működtetési
utasítást olvassa el.
2. ŐRIZZE MEG AZ ÚTMUTATÓT - A biztonsági és működtetési útmutatókat tartsa meg a későbbi
használatra.
3. FIGYELMEZTETÉSEK - A terméken és a használati útmutatóban található figyelmeztetéseket tartsa be.
4. KÖVESSE AZ UTASÍTÁSOKAT - A működtetési és használati utasításokat tartsa be.
5. VÍZ ÉS NEDVESSÉG - Ne használja a terméket víz (például fürdőkád, mosdókagyló, konyhai mosogató,
mosóteknő) közelében, úszómedence mellett vagy átnedvesedett alagsorban.
6. SZELLŐZÉS - A készüléken található nyílások a megfelelő szellőzést szolgálják, a működéshez valamint
a túlmelegedés elkerülése érdekében szükségesek. A készüléket úgy kell elhelyezni, hogy a helye vagy
helyzete ne zavarja a megfelelő szellőzést. A terméket ne tegye ágyra, kanapéra, pokrócra vagy más
hasonló felületre, amely elzárhatja a szellőzőnyílásokat, ne építse be olyan helyre pl. szekrénybe vagy
tartóba amely gátolhatja a légáramlást a szellőzőnyílásokon át.
7. HŐ - A terméket a hőforrásoktól, pl. radiátoroktól, konvektoroktól, kályháktól vagy más hőt termelő
készülékektől (beleértve az erősítőket is) távol kell elhelyezni.
8. ÁRAMFORRÁS - A terméket csak a használati útmutatóban megadottal vagy a törzslapon megjelölttel
egyező feszültséget szolgáltató áramforrásról szabad üzemeltetni.
9. HÁLÓZATI CSATLAKOZÓ KÁBEL VÉDELME - A hálózati csatlakozó kábeleket úgy kell vezetni, hogy
azokra ne lépjenek rá és a rájuk vagy melléjük helyezett tárgyakba ne akadhassanak bele. Mindig inkább
a csatlakozót fogja meg és ne a kábelt, amikor áramtalanítja a készüléket; soha ne húzza a kábelt.
10. HA NEM HASZNÁLJÁK - Ha hosszabb ideig nem használja a készüléket, húzza ki a hálózati csatlakozót
és az antennát.
11. TÁRGYAK és FOLYADÉKOK BEJUTÁSA - Vigyázni kell, hogy a burkolat nyílásain át semmilyen tárgy ne
essen, vagy folyadék ne folyjon a készülék belsejébe.
12. JAVÍTÁST IGÉNYLŐ SÉRÜLÉSEK - A készüléket képesítéssel rendelkező szakembernek kell
megjavítania, ha:
a. A hálózati vezeték vagy a csatlakozódugasz megsérült.
b. Folyadék vagy valamilyen tárgy került a készülék belsejébe.
c. A készüléket eső vagy víz érte.
d. A készüléket leejtették vagy a burkolatot károsodás érte. Csak a kézikönyvben meghatározott
kezelőszerveket és beállításokat alkalmazza.
e. Az egység a jelek szerint nem működik rendesen.
f. A készülék teljesítményében nagymértékű változás állt be.
33.
Page 34

34.
13. SZERVIZELÉS - A felhasználó nem végezhet semmilyen olyan szervizelési műveletet a készüléken,
amely nincs leírva a használati útmutatóban. A javításokat csak képesítéssel rendelkező szakember
végezheti.
14. TISZTÍTÁS - Tisztítás előtt húzza ki a hálózati csatlakozót. Ne használjon folyékony vagy aeroszolos
tisztítószereket, csak nedves ruhát használjon. Kövesse a használati útmutatóban leírt tisztítási és
karbantartási utasításokat.
15. VILLÁMLÁS - Villámlás idején, és ha hosszabb ideig nem használja a készüléket, húzza ki a hálózati
csatlakozót és az antennát.
16. BIZTONSÁGI ELLENŐRZÉS - A szervizelést követően kérje meg a vevőszolgálatot, hogy végezzenek
biztonsági ellenőrzést a terméken.
17. TÚLTERHELÉS - A tűz és az áramütés elkerülése érdekében ne terhelje túl a fali csatlakozókat és az
egybeépített konnektor aljzatokat.
18. ELEKTROSZTATIKUS KISÜLÉS -
vegye ki az elemeket. Kis idő elteltével csatlakoztassa újra.
Ha a készülék hibásan működik, húzza ki a hálózati csatlakozót és
FIGYELEM
EZ A CD-LEJÁTSZÓ I-ES OSZTÁLYÚ LÉZERT HASZNÁLÓ TERMÉK. MINDAZONÁLTAL A KÉSZÜLÉK
OLYAN LÁTHATÓ/LÁTHATATLAN LÉZERSUGARAT HASZNÁL, AMELY VESZÉLYES SUGÁRZÁST
FEJTHET KI. MINDIG ÜGYELJEN ARRA, HOGY A CD-LEJÁTSZÓT AZ ÚTMUTATÁSOK SZERINT
HASZNÁLJA.
LÁTHATATLAN LÉZERSUGÁRZÁS A BURKOLAT FELNYITÁSAKOR VAGY A BIZTONSÁGI RETESZ
KIIKTATÁSAKOR. NE TEGYE KI MAGÁT A SUGÁRZÁSNAK!
NE ÉRJEN A LÉZER LENCSÉJÉHEZ.
AZ ITT LEÍRTAKTÓL ELTÉRŐ SZABÁLYOZÁSOK VAGY BEÁLLÍTÁSOK, VALAMINT ELJÁRÁSOK
ALKALMAZÁSA VESZÉLYES SUGÁRZÁST EREDMÉNYEZHET.
A TŰZ ÉS AZ ELEKTROMOS ÁRAMÜTÉS, VALAMINT A KELLEMETLEN INTERFERENCIA ELKERÜLÉSE
ÉRDEKÉBEN CSAK AZ AJÁNLOTT TARTOZÉKOKAT HASZNÁLJA.
Üzembe helyezés
Kerülje a készülék használatát a következő helyeken:
1) közvetlen napfénynek kitett helyen, fűtőtestek közelében, zárt autókban;
2) magas hőmérséklet vagy páratartalom esetén;
3) ahol erős porszennyeződés van;
4) erős rezgéseknek kitett helyeken, mivel ez súlyosan károsíthatja a készülék belső alkatrészeit.
Idegen tárgyak és ujjak a készülékben
SOHA ne engedje, különösen gyerekeknek, hogy a készülék nyílásaiba bármit behelyezzenek, mert ez akár
halálos áramütéshez is vezethet.
Kerülje a mágneses tárgyakat:
Az interferenciák elkerülése érdekében tartsa távol a mágneses tárgyakat (pl. hangszórók) a lejátszótól.
Elhelyezés
A lejátszót álló pozícióban helyezze el. Ne tegye erősítőre vagy más olyan berendezésre, amely
felmelegedhet.
Páralecsapódás
A készülék belsejébe kerülő nedvesség rendellenes működést okozhat. Kapcsolja ki az áramellátást és várjon
kb. egy órát, amíg a nedvesség elpárolog.
Page 35

Hálózati csatlakozás:
A rendellenes működés, tűzveszély, sérülések és áramütések elkerülése érdekében tartsa be a következő
utasításokat:
• Ellenőrizze, hogy a helyi hálózati feszültség megfelel-e a készülék alján található típuslapon feltüntetett
feszültségnek. A készülék 230V~50Hz-es váltóáramra lett tervezve.
• Csatlakoztassa a hálózati kábelt az AC hálózati aljzathoz és a fali csatlakozóaljzathoz.
• A csatlakozás megszüntetéséhez mindig a csatlakozódugót húzza ki, ne a kábelt.
• A csatlakozódugót erősen fogja meg az aljzatba való bedugáskor, illetve az aljzatból való kihúzáskor.
• Ne érjen nedves kézzel a hálózati kábelhez.
• Óvja a hálózati kábelt a hőt termelő eszközöktől.
• Kapcsolja ki a lejátszót, ha leesett vagy más módon károsodott.
A kezelőszervek elhelyezése
1. Távirányító kezelőgombok SENSOR
2. POWER LED
3. PROGRAM: Program mód
4. REPEAT: Ismétlés módok
5. : Lejátszás/pillanat állj
6. : Előző szám / szám keresése vissza
7. : Következő szám / szám keresése előre
8. : Lejátszás leállítása
9. Frekvencia kijelzés
10. BAND: Sáv-választó AM / FM Mono/FM ST. FM Sztereó
11. FUNCTION: Audio forrás kiválasztása (OFF, CD, RADIO)
12. VOLUME: Hangerő szabályozó
13. ◄ TUNING ►: Forgógomb
14. FM ST.: LED Sztereó kijelzés
15. LED kijelző
16. SPEAKERS (L / R): Hangszóró jack aljzat bal/jobb
17. FM ANT.: FM huzal antenna
18. AC 230V~50Hz: Áramkábel
1
2
3
4
5
6
7
8
9
10
11
16
15
14
13
12
17
18
35.
Page 36

36.
Távirányító
1. PLAY / PAUSE: Lejátszás/pillanat állj
2. SKIP -: Előző szám / szám keresése vissza
3. PROGRAM: Program-mód
4. STOP: Lejátszás leállítása
5. SKIP +: Következő szám / számkeresése vissza
6. REPEAT: Ismétlés módok
1
2
3
4
5
6
Üzembe helyezés és csatlakozások
Elemek behelyezése a távirányítóba (az elemeket külön kell
megvásárolni)
1. Nyomja meg és csúsztassa ki, majd távolítsa el az elemtartó fedelét.
2. Helyezzen be 2 db 1,5 V-os AAA / UM–4 típusú elemet az
elemtartóba. Ügyeljen a polaritásra, amit az elemtartó belsejében
levő “+” és “-” jelzések mutatnak.
3. Pattintsa vissza a fedelet az elemtartóra.
Biztonsági előírások az elemekkel kapcsolatban
• Tartsa be az elem gyártójának biztonsági és használati utasításait.
• Tartsa távol az elemeket a gyermekektől és a háziállatoktól.
• Ne dobja tűzbe az elemeket, ne tegye ki az elemeket hő vagy nyílt láng hatásának.
• Elemek eltávolítása: A kimerült elemeket a helyi jogszabályoknak megfelelően távolítsa el. További
információ céljából lépjen kapcsolatba a hulladékgyűjtéssel foglalkozó hatósággal.
• Ne keverje a kimerült és új elemeket vagy a normális elemeket és újratölthető akkukat.
• Ne keverje a különböző elem/akku fajtákat (pl. alkáli, cink/szén elemek, újratölthető akkuk).Csak azonos
típusú és méretű elemeket használjon.
• Ha a készüléket hosszabb ideig nem használja, távolítsa el az elemeket.
• Az elemek nem megfelelő használata az elektrolit kifolyását, az elemtartó korrodálódását és az elemek
felrobbanását eredményezheti.
Megjegyzések a távirányítóval kapcsolatban:
• Ha a távirányító hatósugara csökken, akkor az elemek kimerültek és cserére szorulnak.
• A gombokat óvatosan, de határozottan nyomja meg.
• Fordítsa a távirányítót legfeljebb 6 méteres távolságból és 60°-os szögön belül a készülék előlapján
található érzékelőablak felé.
• Ne irányítson erős fényforrást az érzékelő felé.
• A hatósugár a szoba megvilágításától is függ.
• A távirányító és az érzékelőablak között levő tárgyak blokkolják a jelátvitelt.
• Ne használja a távirányítót egyszerre más készülékek távirányítójával.
A hangszórók csatlakoztatása
Tekerje le a hangszórókábeleket és csatlakoztassa őket a SPEAKER (L / R) (16) aljzatokhoz.
Page 37

Antenna csatlakoztatás
Teljesen egyenesítse ki az FM huzalantennát: FM ANT. (17) a készülék hátulján a legjobb FM vétel céljából.
Általános kezelési útmutató
Be/Ki
Ha a készülék nincs használatban, mindig állítsa a FUNCTION (11) választót az OFF (ki) állásba.
Ha a készülék be van kapcsolva, a POWER (áram) LED piros színnel világít.
1. Válassza ki a módot a következőkkel: FUNCTION (11): OFF, CD vagy RADIO.
2. Állítsa be a hangerőt a készüléken a következővel: VOLUME (12).
3. Kapcsolja ki a készüléket a FUNCTION (11) a következőre állításával: OFF állás.
Rádió
1. Állítsa a FUNCTION választót (11) a RADIO állásba.
2. Válassza a ki a BAND választóval (10) a frekvencia-tartományt: AM, FM (FM Mono) vagy FM ST. (FM
Sztereó).
3. Válassza ki a kívánt állomást a ◄ TUNING ► forgógombbal (13). A frekvencia leolvasható a
frekvenciaskálán a mutató állásánál.
4. Ha a sáv-választó a következőn áll: FM ST. (FM Sztereó) és sztereó adás vétele történik, a készülék elején
lévő FM ST. LED világít.
5. Állítsa be a hangerőt a VOLUME (12) gombbal a készüléken.
FM Mono / Sztereó
- Mono: Állítsa a BAND választót (10) a következőre: FM.
- Sztereó: Állítsa a BAND választót (10) a következőre: FM ST. Ekkor az FM ST. LED világít.
Javaslat a jobb vételhez
FM: Tekerje ki teljesen az FM huzalantennát: FM ANT. (17) a készülék hátulján a legjobb FM vétel érdekében
AM: A készülék beépített AM antennával rendelkezik. Változtassa meg a készülék pozícióját, ha a vétel
gyenge.
Lemez (Audio CD)
A CD lejátszó csak audio CD-ket tud lejátszani. Soha ne próbáljon MP3 CD-ket, adat CD-ket vagy VCD/DVD
lemezeket.
Lemez behelyezése
1. Állítsa a FUNCTION választót (11) a CD pozícióba. A kijelzőn a “- -” villog és pár másodperc múlva a
következő jelenik meg: “no”.
2. Nyissa ki a CD lejátszó ajtaját a /OPEN jel megnyomásával a CD
ajtó jobb oldalán. A kijelző ekkor ezt mutatja: “- -”.
3. Helyezzen be egy CD-t a borító oldallal felfelé.
4. Zárja be kézzel a CD lejátszó ajtaját. A kijelzőn a “- -” villog,majd
pár másodperc múlva az összes zeneszám száma (pl.. “20”) jelenik meg.
Lemez kivétele
1. Győződjön meg arról, hogy a készülék az “állj” módban van ( (8) gomb).
2. Nyissa ki CD lejátszó ajtaját az /OPEN jel megnyomásával a CD ajtó jobb oldalán, Ekkor a kijelző a
következőt mutatja “- -”.
3. Vegye ki óvatosan a CD-t felfelé a felület érintése nélkül.
4. Zárja be kézzel a CD lejátszó ajtaját.
5. Tárolja a kivett CD-t a tokjában.
HELYEZZEN BE
EGY LEMEZT
37.
Page 38

38.
Lemez lejátszása
1. Helyezzen be egy CD-t (ld. a “Lemez behelyezése” részt).
2. Indítsa el a lejátszást a következővel: (1) a készüléken vagy a PLAY / PAUSE (1) gombbal a a
távirányítón. A kijelző az aktuális zeneszámot mutatja (pl.. “01.“). A jobb oldalon lévő pont “.” a lejátszás
módot jelzi.
3. Állítsa be a hangerőt a következővel: VOLUME (12).
4. A lejátszás “pillanat állj” helyzetbe állításához nyomja meg ismét a gombot a készüléken vagy a PLAY
/ PAUSE (1) gombot a távirányítón. Az aktuális zeneszám ekkor a kijelzőn villog. Folytassa a lejátszást a
(1) gomb ismételt megnyomásával a készüléken vagy a PLAY / PAUSE (1) gombbal a távirányítón.
5. A lejátszás megállításához nyomja meg a (8) gombot a készüléken vagy a STOP (4) gombot a
távirányítón, ekkor a kijelző az összes zeneszám darabszámát mutatja.
Megjegyzés:
A CD lejátszás akkor is megszakad, ha:
a. a CD lejátszót kinyitjuk a következővel: /OPEN.
b. a funkcióválasztó - FUNCTION (11) a RADIO helyzetbe van állítva.
c. a CD összes számát lejátszottuk.
6. Vegye ki a CD-t (ld. a “
7. Kapcsolja ki a készüléket a FUNCTION (11) gomb OFF pozícióba állításával.
Megjegyzés: Kérjük, vegye figyelembe, hogy a CD tovább forog a „pillanat állj” módban is, még ha hang
nem is hallható. Ne felejtse el a “pillanat állj” módot kikapcsolni, hogy elkerülje a motor szükségtelen
működtetését.
Egy másik szám kiválasztása (SKIP – ugrás – az „állj” és lejátszás közben)
A lejátszás közben átugorhat a következő vagy előző számra a (6) vagy (7) gombbal a készüléken
vagy a SKIP - (2) vagy SKIP + (5) gombbal a távirányítón.
1. A lejátszás, állj vagy pillanat állj közben válassza ki a számot és indítsa el a lejátszást a (1) gombbal a
készüléken vagy a PLAY / PAUSE (1) gombbal a távirányítón.
2. Röviden nyomja meg a (7) gombot a készüléken vagy a SKIP + (5) a távirányítón a következő
számra való ugráshoz vagy nyomja meg ismételten e gombot, amíg a kívánt zeneszám meg nem jelenik
a kijelzőn.
3. Nyomja meg a (6) gombot a készüléken vagy a SKIP - (2) gombot a távirányítón az aktuális szám
elejére való visszatéréshez.
4. Ismételten nyomja meg (1 másodpercen belül minden gombnyomás között) a (6) gombot a
készüléken vagy a SKIP - (2) gombot a távirányítón ahhoz, hogy egyszerre egy számmal visszaugorjon.
Bizonyos pozíció megkeresése (lejátszás idején)
Nyomja meg és tartsa lenyomva a (6) vagy (7) gombot a készüléken vagy a SKIP - (2) vagy SKIP +
(5) a távirányítón, hogy megkeresse a számon belüli pozíciót. A normál lejátszás folytatódik, amikor a
gombot elengedi.
Megjegyzés: A keresés módban a hangerő csökken.
Lemez kivétele”)
Zeneszámok beprogramozása
Maximum 20 szám programozható be tetszőleges sorrendben. Egy szám egynél többször
beprogramozható. A CD lejátszónak az “állj” (stop) módban kell lennie (a (8) gomb a készüléken vagy
STOP (4) gomb a távirányítón).
1. Hívja elő a program módot a PROGAM (3) gombbal a készüléken vagy a távirányítón. A kijelző röviden a
következőt mutatja: “01” (memória hely szám), majd a “00” villog.
2. Válassza ki a kívánt számot a (6) vagy (7) gombbal a készüléken vagy a SKIP - (2) vagy SKIP +
(5) gombbal a távirányítón.
3. Tárolja a kiválasztott címet a PROGAM (3) gombbal a készüléken vagy a távirányítón.
4. Ismételje meg a 2 és 3 lépéseket a további számok beprogramozásához. A memóriahely száma
automatikusan emelkedik.
Page 39

5. Indítsa el a beprogramozott számok lejátszását a (1) gombbal a készüléken vagy a PLAY / PAUSE (1)
gombbal a távirányítón.
6. A (8) gomb kétszeri megnyomásával a készüléken vagy a STOP (4)
gombbal a távirányítón a beprogramozott lejátszás törlődik.
Megjegyzések:
- Törölje a beprogramozott számokat a mód megváltoztatásával vagy a FUNCTION (11) gomb OFF (ki)
állásba helyezésével.
- Nyomja meg a (6) vagy (7) gombot a készüléken vagy a SKIP - (2) vagy SKIP + (5) gombbal a
távirányítón hogy átugorjon az előző vagy következő számra a beprogramozott sorrendben.
- A PROGAM (3) gomb ismételt megnyomásával a készüléken vagy a távirányítón a beprogramozott
sorrend megerősíthető.
- Ha a programozási művelet során semmilyen gombot nem nyom meg, kilépés történik a program
módból.
Ismétlés módok
Háromféle ismétlési mód van, amelyek előhívhatók és átkapcsolhatók a REPEAT (4) gombbal a készüléken
vagy a távirányítón (6) a lejátszás módban.
Minden egyes gombnyomás a következőképpen változtatja meg az ismétlés módot:
1. Nyomja meg a REPEAT (4) gombot a készüléken (6)
a lejátszás módban, hogy az aktuális számot folyamatosan
lejátssza. Az ismétlés kijelzése (pont “.” a két számjegy
között) villog a kijelzőn.
2. Nyomja meg kétszer a REPEAT (4) gombot a készüléken
vagy a távirányítón (6) a lejátszás módban, hogy
ISMÉTLEL - 1
ISMÉTEL -
MIND
NORMÁL
LEJÁTSZÁS
megismételje az aktuális lemez összes számát a felvétel
sorrendjében. Az ismétlés kijelzése (pont “.“ a két számjegy
között) folyamatosan világít.
3. Nyomja meg ismét a REPEAT (4) gombot a készüléken vagy a
távirányítón (6) a normál lejátszás módba. A kijelző a szokványos jelzéseket mutatja ekkor.
A lemezek kezelése és tisztítása
A CD-K KEZELÉSE
* Vegye ki a CD-t a tokból.
* Ne érjen a felületéhez.
* Ne ragasszon öntapadó címkéket a CD-khez és ne írjon azokra.
* Ne hajlítsa meg a CD-ket.
Tárolás
* A CD-ket mindig a tokban tárolja.
* Ne tegye ki közvetlen napsugárzásnak, magas hőmérsékletnek, nedvességnek vagy pornak.
A CD-k tisztítása
* A CD-ket puha törlőruhával tisztítsa.
* A CD-ket a középponttól kifelé haladva tisztítsa.
39.
Page 40

40.
A KÖZÉPTŐL A SZÉLE FELÉ
HELYES HELYTELEN
HIBAELHÁRÍTÁS
Ha bármilyen problémát tapasztal a készülék használata során, előbb nézze át az alábbi listát mielőtt
kapcsolatba lép a vevőszolgálattal.
FIGYELMEZTETÉS: Soha ne nyissa fel a készüléket. A szervizelést és a karbantartást mindig bízza a
hivatalos vevőszolgálat szakembereire.
TÜNET LEHETSÉGES OK MEGOLDÁS
ÁLTALÁNOS
Nincs hang
A hangerő túl halk.
Az áramhálózati kábel nincs
csatlakoztatva.
Állítsa be a hangerőt.
Csatlakoztassa megfelelően
a hálózati kábelt.
Nem működnek a gombok
RADIO
Gyenge vétel
CD
A CD átugrál
Kijelzés: “no” Nincs behelyezve CD.
Elektrosztatikus kisülés. Kapcsolja ki, majd ismét
Túl gyenge a jel.
Interferencia más
készülékekkel (TV-készülékek,
videomagnók, számítógépek
stb.)
A CD piszkos vagy sérült. Cserélje ki vagy tiszítsa meg
A CD piszkos vagy sérült.
A lézerlencse bepárásodott.
kapcsolja be a készüléket.
Állítsa be az antennát:
FM: Huzal-antenna.
AM: Állítsa irányba a
készüléket.
Tartson távolságot a más
készülékektől.
a lemezt.
Helyezzen be egy CD, CD-R
vagy CD-RW lemezt.
Cserélje ki vagy tisztítsa meg a
lemezt.(Ld. “A CD-k kezelése”)
Várjon, amíg a lézerlemez
megszárad.
Page 41

MŰSZAKI ADATOK
Általános tudnivalók
Áramellátás: 230 V ~50 Hz váltakozóáram
Távirányító: DC 3V (2 elem, AAA típus, UM – 4, 1.5 V)
Energiafogyasztás: 20 Watt
Rádió
Frekvencia tartomány: FM 87.5 – 108 MHz
AM 525 – 1615 kHz
CD lejátszó
CD lejátszás rendszer: Felültöltő
Optikai szedőfej: 3 – Nyalábos lézer (Beam Laser)
Méretek: kb. 515 x 150 x 165 mm (W x H x D)
Súly: kb. 3,0kg
Előzetes bejelentés nélkül változhatnak.
41.
Page 42

42.
MODELLO: 2402N
Music Center Stereo con lettore CD
ISTRUZIONI DI SICUREZZA
Il triangolo con inscritto il
simbolo di un lampo attira
l’attenzione dell’utente su
“voltaggio pericoloso” senza
isolamento all’interno
dell‘involucro, che potrebbe
essere sufficientemente alto
da costituire rischio di scosse.
INFORMAZIONI AGGIUNTIVE
Prestate attenzione ai pezzettini e alle batterie, non inghiottiteli. Potrebbe essere nocivo alla
vostra salute ecausare soffocamento. Prestate la massima attenzione a tenere i piccoli dispositivi
e le batterie lontani dalla portata dei bambini.
Importante suggerimento riguardo alla protezione dell’udito
Attenzione:
Avete a cuore il vostro udito, così come noi.
Pertanto, fate attenzione quando usate questo apparecchio.
La nostra raccomandazione è di: Evitare un volume eccessivo.
Dovesse l’apparecchio essere usato da bambini, assicuratevi che esso non sia regolato su un
volume eccessivo.
Attenzione!
Un volume eccessivo potrebbe causare danni irreversibili all’udito dei vostri bambini.
AVVERTIMENTO
RISCHIO DI SCOSSE ELETTRICHE
RISCHIO DI SCOSSE ELETTRICHE,
NON RIMUOVERE LA COPERTURA
(O IL FONDO). ALL’INTERNO NON VI
NON APRIRE
ATTENZIONE: PER RIDURRE IL
è ALCUNA COMPONENTE CHE
POSSA ESSERE RIPARATA
DALL’UTENTE. PER LE RIPARAZ
IONI, RIVOLGERSI A PERSONALE
QUALIFICATOED SERVICE
PERSONNEL.
Il triangolo con inscritto il
punto esclamativo attira
l’attenzione dell’utente su
importanti istruzioni relative
-
all’uso e alla
MAI lasciare che nessuno, ed in particolar modo bambini, metta alcun oggetto sopra i buchi,
scappatoie o alter aperture sul dispositivo. Ciò potrebbe causare la morte da scossa elettrica. Il
dispositivo deve essere aperto solo da un assistente qualificato.
Usate l'apparecchio solo per il proposito per cui è stato disegnato.
L'apparecchio è destinato unicamente all'utilizzo in ambienti domestici e di lavoro.
Conservare accuratamente le istruzioni per l’uso per futuro riferimento.
Avvertenze per la tutela dell’ambiente
Una volta inutilizzabile il prodotto non deve essere smaltito con i rifiuti domestici ma portato
presso un punto di raccolta per il riciclo di apparecchiature elettriche. Ciò è indicato dal simbolo
presente sul prodotto, sulle istruzioni per l’uso o sulla confezione.
I materiali riciclabili sono riutilizzabili a seconda delle loro caratteristiche. Con il riutilizzo, con il
riciclaggio dimateriale o altri tipi di riciclaggio di apparecchi vecchi fornirete un importante
contributo alla tutela ambientale. Informatevi presso l’amministrazione comunale sui punti di
smaltimento competenti.
Page 43

Non ostacolate la ventilazione del dispositivo. Assicuratevi che né tende, giornali, coperte o mobili
blocchino le scappatoie della ventilazione dell’apparato. La ventilazione dev’essere costantemente
assicurata! Un eventuale surriscaldamento potrebbe causare seri danni al dispositivo e ridurre sia le
prestazioni che la durata del funzionamento.
Riscaldamento e calore
Non esponete l’apparecchio a luce del sole diretta. Assicuratevi che l’apparecchio non sia soggetto
a fonti di calore dirette come stufe o fiamme. Assicuratevi che le vie di ventilazione dell’apparecchio
non siano coperte.
Umidità e pulizia
L’apparecchio non è subacqueo! Non immergete il lettore nell’acqua. Non lasciate che il lettore
venga a contatto con acqua. Dell’acqua che dovesse incidentalmente cadere sul lettore potrebbe
causare seri danni. Non usate detergenti che contengano alcool, ammoniaca, benzene o abrasivi in
quanto questi potrebbero danneggiare il lettore. Per pulire, usate un panno soffice e umido.
Riciclaggio professionale
Le batterie e l’imballaggio non fanno parte della vostra spazzatura casalinga. Le batterie devono
essere passate ad un centro di raccolta per batterie usate. Disporre separatamente dei materiali
d’imballaggio è un aiuto alla conservazione dell’ambiente.
ISTRUZIONI DI SICUREZZA
1. LEGGERE LE ISTRUZIONI - Leggere attentamente le istruzioni di sicurezza e d’uso prima di adoperare
l’apparecchio.
2. CONSERVARE LE ISTRUZIONI - Le istruzioni di sicurezza e d’uso dovrebbero essere conservate per
riferimento futuro.
3. RISPETTARE LE AVVERTENZE - Rispettare tutte le avvertenze contenute nel manuale d’uso
dell’apparecchio.
4. SEGUIRE LE ISTRUZIONI - Seguire accuratamente tutte le istruzioni d’uso.
5. ACQUA ED UMIDITÀ - L’apparecchio non deve essere collocato vicino all’acqua, ad es. nei pressi di
vasche da bagno, lavabi, lavelli, vasche per il bucato, piscine o in seminterrati umidi.
6. VENTILAZIONE – Le aperture sull’apparecchio servono per la ventilazione e sono necessarie per il
funzionamento e la prevenzione del surriscaldamento. Non collocare l’apparecchio in ubicazioni che ne
prevengano la corretta ventilazione. Non collocare su letti, divani, tappeti o altre superfici simili sulle quali
le aperture potrebbero essere ostruite, in spazi chiusi quali librerie ed armadi, dove il flusso di aria nelle
aperture di ventilazione possa essere impedito.
7. CALORE - L’apparecchio non deve essere collocato vicino a fonti di calore, quali radiatori, stufe od altri
elettrodomestici (amplificatori inclusi) che producono calore.
8. ALIMENTAZIONE - L’apparecchio dovrebbe essere connesso solo a fonti di alimentazioni del tipo
descritto nel manuale d’uso o indicato sull’apparecchio stesso.
9. SALVAGUARDIA DEL CAVO DI ALIMENTAZIONE - Assicurarsi che i cavi di alimentazione non siano a
rischio di essere calpestati o schiacciati da oggetti posti al di sopra o a ridosso di essi. Tirare sempre dalla
spina e non dal cavo durante la disconnessione dalla rete di alimentazione: non tirare mai dal cavo.
10. IN CASO DI NON UTILIZZO – Durante lunghi periodi di non utilizzo, scollegare i cavi di alimentazione ed
antenna.
11. INGRESSO DI OGGETTI O LIQUIDI – Assicurarsi che oggetti o liquidi non penetrino nell’apparecchio
attraverso le aperture.Non smontare.
12. GUASTO CHE RICHIEDE ASSISTENZA - L'apparecchio dovrà ricevere assistenza da personale
qualificato se:
a. il cavo di alimentazione o la spina sono danneggiati;
b. oggetti o liquidi sono penetrati all’interno dell’involucro dell’apparecchio;
c. l’apparecchio è stato esposto a pioggia od umidità;
d. L’apparecchio è caduto e l’interno è danneggiato. Utilizzare solo controlli e accessori specificati nel
manuale.
e. L’unità non sembra funzionare normalmente.
f. l’apparecchio dimostra un serio calo nelle prestazioni.
43.
Page 44

44.
13. ASSISTENZA – L’utente non è autorizzato a riparare l’apparecchio oltre i limiti descritti nel manuale
d’istruzioni per l’utente. Per ogni altra riparazione rivolgersi a personale di assistenza qualificato.
14. PULIZIA – Scollegare il cavo di alimentazione prima di pulire. Non utilizzare detergenti liquidi o spray, ma
un semplice panno umido. Seguire le istruzioni per la cura e manutenzione contenute nel presente
manuale.
15. ILLUMINAZIONE – Durante temporali e lunghi periodi di non utilizzo, scollegare il cavo di alimentazione e
l’antenna.
16. CONTROLLO DI SICUREZZA –
un controllo di sicurezza.
17. SOVRACCARICO – Per evitare incendi e scosse elettriche non sovraccaricare le prese elettriche e le
prese multiple.
18. SCARICA ELETTROSTATICA –
funziona a dovere. Riconnettere dopo breve tempo.
Dopo aver ricevuto assistenza, fare richiesta presso il servizio clienti per
Scollegare dall’alimentazione e rimuovere le batterie se l’unità non
ATTENZIONE
IL LETTORE CD È UN PRODOTTO LASER DI CLASSE I. QUESTO LETTORE CD UTILIZZA UN RAGGIO
LASER /VISIBILEINVISIBILE CHE POTREBBE CAUSARE ESPOSIZIONE A RADIAZIONI PERICOLOSE.
UTILIZZARE IL LETTORE CD CORRETTAMENT COME DESCRITTO.
RADIAZIONE LASER INVISIBILE QUANDO LA COPERTURA È APERTA O IL DISPOSITIVO DI BLOCCO È
DISATTIVATO. NON ESPORSI AL RAGGIO!
NON TOCCARE LA LENTE LASER.
UN UTILIZZO DEI COMANDI O REGOLAZIONI O UN’ESECUZIONE DI PROCEDURE DIVERSE DA
QUELLE SPECIFICAT NEL PRESENTE MANUALE POTREBBERO CAUSARE ESPOSIZIONE A
RADIAZIONI PERICOLOSE.
PER RIDURRE IL RISCHIO DI FUCO O SHOCK ELETTRICO ED EVITARE INTERFERENZE UTILIZZARE
SOLO ACCERROSI CONSIGLIATI.
Installazione
Evitare d’installare il lettore in aree di:
1) diretta luce solare o termosifoni o automobili chiuse;
2) alta temperature o alta umidità;
3) polvere eccessiva;
4) vibrazione eccessiva, in quanto le parti interne potrebbero danneggiarsi.
Oggetti estranei o dita nel dispositivo
NON permettere a nessuno, in particolare bambini, in inserire oggetti nei fori, ingressi o aperture del dispositivo. Potrebbe verificarsi morte per shock elettrico.
Evitare oggetti magnetici:
Tenere oggetti magnetici come altoparlanti, ad una certa distanza dal lettore.
Circuito d’attesa:
Mettere il lettore in posizione verticale. Non poggiare il lettore su amplificatori o altri dispositivi che potrebbero
riscaldarsi.
Condensa:
Se si forma umidità all’interno dell’unità non potrebbe funzionare bene. Tirare la spina dalla presa e attendere
una ora circa per far evaporare l’umidità.
Page 45

Alimentazione:
Seguire le seguenti istruzioni per evitare malfunzionamento, lesioni o shock elettrico:
• Controllare se il voltaggio di rete indicato sull’etichetta (sotto il dispositivo) corrisponde al voltaggio locale.
L’unità è progettata per AC 230V~50Hz.
• Collegare il cavo alla presa AC e presa a parete.
• Per disinserire la spina dalla presa a parete, tirare dalla spina e non dal cavo.
• Tenere la presa stretta, durante la fase di connessione o disconnessione dalla presa a parete.
• Non toccare la spina con mani bagnate.
• Proteggere il cavo di rete da dispositivi che generano calore.
• Spegnere il lettore se è caduto o danneggiato.
Posizione dei Comandi
1. Sensore telecomando SENSOR
2. LED POWER
3. PROGRAM: Modalità programma
4. REPEAT: Modalità ripetizione
5. : Play/pausa
6. : Traccia precedente / Ricerca all'indietro nella traccia
7. : Traccia successiva / Ricerca in avanti nella traccia
8. : Stop riproduzione
9. Indicazione frequenza
10. BAND: Selettore di banda AM / FM Mono/FM ST. FM
Stereo
11. FUNCTION: Selezione della sorgente audio (OFF, CD,
RADIO)
12. VOLUME: Controllo del volume
13. ◄ TUNING ►: Manopola
14. FM ST.: LED indicazione Stereo
15. Display LED
16. SPEAKERS (L / R): Presa altoparlanti sx/dx
17. FM ANT.: Antenna filare FM
18. AC 230V~50Hz: Cavo di alimentazione
1
2
3
4
5
6
7
8
9
10
11
16
15
14
13
12
17
18
45.
Page 46

46.
Telecomando
1. PLAY / PAUSE: Play/pausa
2. SKIP -: Traccia precedente / Ricerca all'indietro nella traccia
3. PROGRAM: Modalità programma
4. STOP: Stop riproduzione
5. SKIP +: Traccia successiva / Ricerca in avanti nella traccia
6. REPEAT: Modalità ripetizione
1
2
3
4
5
6
Installazione e collegamenti
sInserimento delle batterie nel telecomando (non fornite)
1. Rimuovere il coperchio del vano batterie premendolo verso il basso
e facendolo scorrere verso l'esterno.
2. Inserire 2 batterie di tipo AAA /UM-4 da 1,5V nel vano batterie.
[Translator's note: the original text reads “2 AA batteries type “AAA /
UM – 4“; “AA” and “AAA” indicate quite different sizes. Maybe there is
a mistake?] Rispettare la polarità indicata con i simboli “+” e “-”
all'interno del vano.
3. Riposizionare il coperchio spingendolo sul vano batteria fino a quando
si incastra.
Precauzioni di sicurezza relative alle batterie
• Seguire le istruzioni relative alla sicurezza e all'uso fornite dal
sproduttore delle batterie.
• Tenere le batterie fuori dalla portata di bambini e animali domestici.
• Non gettare le batterie nel fuoco. Non esporre mai le batterie a calore e fuoco.
• Smaltimento delle batterie: Smaltire le batterie esaurite in conformità alle disposizioni locali vigenti. Per
ulteriori informazioni, contattare le autorità competenti.
• Non utilizzare contemporaneamente batterie nuove ed usate o normali e ricaricabili.
• Non utilizzare contemporaneamente batterie di diverso tipo (ad es., alcaline, zinco/carbonio, ricaricabili).
Utilizzare esclusivamente batterie dello stesso tipo e dimensione.
• Durante periodi prolungati di inutilizzo, rimuovere le batterie.
• L'uso errato delle batterie può causare perdite dell'elettrolite e corrodere il vano delle batterie, nonché far
esplodere le batterie stesse.
Annotazioni sul telecomando:
• Se la portata del funzionamento del telecomando diminuisce significa che le batterie sono esaurite ed è
necessario sostituirle.
• Premere i tasti con delicatezza, ma anche con fermezza.
• Puntare il telecomando verso il sensore sulla parte anteriore del dispositivo da una distanza non superiore
a 6 metri e con un angolo di 60°.
• Non dirigere forti luci verso il sensore.
• La portata di funzionamento dipende dalla luminosità della stanza.
• Oggetti interposti tra il telecomando e il sensore bloccano la trasmissione.
• Non utilizzare il telecomando simultaneamente a telecomandi di altri dispositivi.
Collegamenti degli altoparlanti
Svolgere i cavi degli altoparlanti e collegarli ai terminali SPEAKER (L / R) (16).
Page 47

Collegamento dell'antenna
Svolgere completamente l'antenna filare FM FM ANT. (17) sul retro del dispositivo per ottenere la migliore
ricezione FM.
Istruzioni generali di funzionamento
Accensione/Spegnimento
Quando il dispositivo non è in uso, impostare sempre il selettore FUNCTION (11) su OFF.
Quando il dispositivo viene acceso, il LED POWER si accende di rosso.
1. Selezionare la modalità mediante FUNCTION (11): OFF, CD o RADIO.
2. Regolare il volume mediante VOLUME (12) sul dispositivo.
3. Spegnere il dispositivo posizionando FUNCTION (11) su OFF.
Radio
1. Impostare il selettore FUNCTION (11) su RADIO.
2. Mediante il selettore BAND (10) selezionare la banda di frequenza: AM, FM (FM Mono) o FM ST.
(FM Stereo).
3. Selezionare la stazione desiderata mediante la manopola ◄ TUNING ► (13). La frequenza è visibile sul
quadrante a seconda della posizione dell'indicatore.
4. Se il selettore di banda è impostato su FM ST. (FM Stereo) e viene ricevuta una trasmissione in stereo, si
accende il LED FM ST. sulla parte anteriore del dispositivo.
5. Regolare il volume mediante VOLUME (12) sul dispositivo.
FM Mono / Stereo
- Mono: Impostare il selettore BAND (10) su FM.
- Stereo: Impostare il selettore BAND (10) su FM ST. Si accende il LED FM ST.
Consigli per ottenere una migliore ricezione
FM: Svolgere completamente l'antenna filare FM FM ANT. (17) sul retro del dispositivo per ottenere la
migliore ricezione FM.
AM: Il dispositivo presenta un'antenna AM incorporata. Se la qualità della ricezione è scadente, cambiare la
posizione del dispositivo.
Dischi (CD Audio)
Il lettore CD è in grado di riprodurre esclusivamente CD audio. Evitare di riprodurre CD contenenti MP3, dati
o VCD/DVD.
Inserimento dischi
1. Impostare il selettore FUNCTION (11) su CD. Sul display lampeggia “- -“
e dopo qualche secondo compare la scritta “no“.
2. Aprire lo sportello del vano CD esercitando una leggera pressione sul
simbolo /OPEN sulla destra dello sportello stesso. Sul display compare “- -“.
3. Inserire il CD con l'etichetta rivolta verso l'alto.
4. Chiudere lo sportello del vano CD manualmente. Sul display lampeggia “- -“ e dopo alcuni secondi
compare il numero totale delle tracce (ad es. “20“).
Rimozione dischi
1. Assicurarsi che il dispositivo sia in Stop (Pulsante (8)).
2. Aprire lo sportello del vano CD esercitando una leggera pressione sul simbolo /OPEN sulla destra dello
sportello stesso. Sul display compare “- -“.
3. Togliere il CD muovendolo, con attenzione, verso l'alto senza toccarne le superfici.
4. Chiudere lo sportello del vano CD manualmente.
5. Riporre il CD nella sua custodia.
INSERIRE UN DISCO
47.
Page 48

48.
Riproduzione dischi
1. Inserire un CD (fare riferimento alla sezione “Inserimento dischi“).
2. Avviare la riproduzione mediante (1) sul dispositivo o PLAY / PAUSE (1) sul telecomando. Sul display
compare il numero di traccia corrente (ad es., “01.“). Il puntino „.“ sulla destra indica la modalità di
riproduzione.
3. Regolare il volume mediante VOLUME (12).
4. Per sospendere la riproduzione premere nuovamente sul dispositivo o PLAY / PAUSE (1) sul
telecomando. Il numero di traccia corrente lampeggia sul display. Continuare con la riproduzione
premendo nuovamente (1) sul dispositivo o PLAY / PAUSE (1) sul telecomando.
5. Per interrompere la riproduzione premere (8) sul dispositivo o STOP (4) sul telecomando, sul display
compare il numero totale delle tracce.
Note:
La riproduzione del CD viene interrotta anche quando:
a. lo sportello del vano CD viene aperto mediante /OPEN.
b. il selettore di funzione FUNCTION (11) viene posizionato su RADIO.
c. tutte le tracce del CD siano state riprodotte.
6. Rimuovere il CD (fare riferimento alla sezione “Rimozione dischi“)
7. Spegnere il dispositivo impostando FUNCTION (11) su OFF.
Nota: Si noti che il CD continua a ruotare anche quando in pausa, anche se non è presente l'audio. Non
dimenticare di disattivare la pausa per evitare il funzionamento inutile del motorino.
Selezione di un'altra traccia (SKIP in Stop e durante la riproduzione)
Durante la riproduzione è possibile saltare alla traccia precedente o successiva mediante (6) o (7)
sul dispositivo o SKIP - (2) o SKIP + (5) sul telecomando.
1. Durante la riproduzione, in stop o in pausa, selezionare la traccia e avviare la riproduzione mediante
(1) sul dispositivo o PLAY / PAUSE (1) sul telecomando.
2. Premere brevemente (7) sul dispositivo or SKIP + (5) sul telecomando per saltare alla traccia
successiva; oppure, premere ripetutamente il tasto fino a quando sul display compare il numero della
traccia desiderata.
3. Premere (6) sul dispositivo o SKIP - (2) sul telecomando per tornare all'inizio della traccia corrente.
4. Premere nuovamente (entro 1 secondo dalla prima pressione) (6) o SKIP - (2) sul telecomando per
saltare indietro di una traccia alla volta.
Ricerca di una determinata posizione (durante la riproduzione)
Tenere premuto (6) o (7) sul dispositivo o SKIP - (2) o SKIP + (5) sul telecomando per individuare la
posizione desiderata lungo una traccia. Al rilascio del pulsante continua la riproduzione normale.
Nota: Durante la ricerca il volume viene ridotto.
Programmazione delle tracce
Si possono programmare nell'ordine desiderato fino a 20 tracce. Una traccia può essere inserita più volte
nella stessa sequenza. Il lettore CD deve essere in Stop ( (8) sul dispositivo o STOP (4) sul telecomando).
1. Richiamare la modalità di programmazione mediante PROGRAM (3) sul dispositivo o sul telecomando.
Sul display compare brevemente “01“ (numero della posizione di memoria) e poi “00“ lampeggia.
2. Selezionare la traccia desiderata con (6) o (7) sul dispositivo o con SKIP - (2) o SKIP + (5) sul
telecomando.
3. Memorizzare il titolo prescelto premendo PROGRAM (3) sul dispositivo o sul telecomando.
4. Ripetere i punti 2 e 3 per programmare altre tracce. Il numero della posizione di memoria aumenta
automaticamente.
5. Avviare la riproduzione delle tracce programmate mediante (1) sul dispositivo o
PLAY / PAUSE (1) sul telecomando.
6. Premendo due volte (8) sul dispositivo o STOP (4) sul telecomando si annulla la
riproduzione programmata.
Page 49

Note:
- Le tracce programmate possono essere cancellate cambiando modalità o posizionando FUNCTION (11)
su OFF.
- Premere (6) o (7) sul dispositivo o SKIP - (2) o SKIP + (5) sul telecomando per saltare alla
traccia precedente o successiva nella sequenza programmata.
- Premendo ripetutamente PROGRAM (3) sul dispositivo o sul telecomando si può verificare la sequenza
programmata.
- Se durante la programmazione non si preme alcun pulsante per 30 secondi, si esce dalla modalità di
programmazione.
Modalità di ripetizione
Sono disponibili tre modalità di ripetizione che possono essere richiamate e modificate mediante REPEAT (4)
sul dispositivo o sul telecomando (6) durante la riproduzione.
Ad ogni pressione la modalità di ripetizione viene modificata come segue:
1. Premere una volta REPEAT (4) sul dispositivo o sul
telecomando (6) durante la riproduzione per ripetere la
traccia corrente in modo continuo. L'indicazione della
ripetizione (il puntino “.“ tra le due cifre) lampeggia sul display.
2. Premere due volte REPEAT (4) sul dispositivo o sul
RIPETI 1 RIPETI TUTTO
RIPRODUZIONE
NORMALE
telecomando (6) durante la riproduzione per ripetere tutte le
tracce sul disco nella sequenza originale. L'indicazione della
ripetizione (il puntino “.“ tra le due cifre) rimane
permanentemente accesa.
3. Premere nuovamente REPEAT (4) sul dispositivo o sul telecomando (6) per tornare alla riproduzione
normale. Sul display compare l'indicazione standard.
Maneggiare e pulire dischi
TRATTAMENTO DEI CD
* Togliere il CD dalla custodia.
* Non toccare le superfici.
* Non applicare adesivi e non scrivere sui dischi.
* Non piegare i CD.
Stoccaggio
* Riporre sempre i CD nella loro custodia.
* Evitare che i dischi siano esposti alla luce solare diretta, a temperature elevate, umidità e polvere.
Pulizia dei CD
* Pulire i CD con un panno morbido.
* Pulire i CD dal centro verso il bordo.
49.
Page 50

50.
DAL CENTRO VERSO IL BORDO
CORRETTO SCORRETTO
PROBLEMI E SOLUZIONI
Se si verifica un problema, prima di contattare l'assistenza clienti, verificare l'elenco di seguito.
ATTENZIONE: Non aprire mai il dispositivo. Per le riparazioni e la manutenzione rivolgersi sempre al
personale del servizio di assistenza autorizzato.
SINTOMO POSSIBILE CAUSA SOLUZIONE
GENERALE
Nessun suono
Nessuna funzione di tasti Scarica elettrostatica. Scollegare dalla rete per pochi
Volume troppo basso.
Cavo di alimentazione non
collegato.
Regolare il volume.
Collegare correttamente il cavo
sdi alimentazione.
secondi e poi collegare
nuovamente.
RADIO
Ricezione scarsa
CD
CD salta
Display: no “ CD assente.
Segnale debole.
Interferenze di altri dispositivi
(TV, VCR, computer, ecc.).
CD sporco o danneggiato. Sostituire o pulire il disco.
CD sporco o danneggiato.
Condensa sulla lente laser.
Regolare l'antenna:
FM: antenna filare.
AM: orientare il dispositivo.
Mantenere una certa distanza
da altre apparecchiature.
Inserire un CD, CD-R o CD-RW.
Sostituire o pulire il disco.
(Fare riferimento a
„Trattamento dei CD“
Attendere fino a quando la lente
laser sia asciutta.
)
Page 51

SPECIFICHE TECNICHE
Generali
Alimentazione: AC 230V~50Hz
Funzionamento della batteria: DC 3V (2 batterie di tipo AAA, UM – 4, da 1,5 V)
Consumo: 20 Watt
Radio
Gamma di frequenza: FM 87,5 – 108 MHz
AM 525 – 1615 kHz
Lettore CD
Sistema riproduzione CD: Caricamento dall'alto
Lente della testina di lettura: 3 – Raggio Laser
Dimensioni: circa. 515 x 150 x 165 mm (W x H x D)
Peso: circa. 3,0kg
Soggetto a modifica senza preavviso.
51.
Page 52

52.
MODELO: 2402N
Cadena musical estéreo de diseño con reproductor de CD
INSTRUCCIONES DE SEGURIDAD
ADVERTENCIA
RIESGO DE DESCARGA
ELÉCTRICA
Un triángulo con un símbolo
de rayo con punta dentro de
un triángulo tiene el propósito
de alertar al usuario de la
presencia de voltaje
“peligroso” no aislado dentro
de la caja que puede ser de
suficiente magnitud para
constituir un riesgo de
descarga eléctrica a los seres
humanos.
ADVERTENCIA: PARA PREVENIR EL
RIESGO DE SUFRIR UNA
DESCARGA ELÉCTRICA, NO QUITE
LA CUBIERTA.. NO HAY PIEZAS A
LAS QUE PUEDA DAR SERVICIO
DENTRO. REFIERA TODO EL
SERVICIO A PERSONAL.
INFORMACIÓN ADICIONAL
Vigile que nadie se trague las piezas pequeñas ni las pilas del aparato, puesto que es potencialmente muy dañino para la salud y puede provocar asfixia. Preste mucha atención especialmente
en el caso de los niños.
Aviso importante respecto a la protección de sus oídos
Cuidado:
Su capacidad auditiva nos preocupa tanto como a usted.
Por lo tanto, tenga precaución cuando use el aparato.
Le recomendamos que evite escuchar música a niveles altos de volumen.
En caso de que el aparato sea usado por niños, asegúrese que no la usen a un volumen muy
alto.
¡Peligro!
Niveles de volumen altos pueden causar daños irreparables a los oídos de los niños.
Este signo de exclamación
dentro de un triángulo tiene
el propósito de alertar al
usuario de la existencia de
importantes instrucciones de
operación y mantenimiento
(servicio) en este manual.
No permita NUNCA que nadie, en especial niños, ponga objetos dentro de los huecos, ranuras u
otras aberturas del aparato. Existe riesgo de sufrir descargas eléctricas que pueden causar la
muerte. El aparato solo debe ser abierto por un operario calificado.
Use el aparato únicamente para los propósitos que fue diseñado.
El aparato está concebido exclusivamente para ser usado en viviendas y áreas de negocio.
Le recomendamos que conserve las instrucciones de uso para un eventual uso posterior.
Indicaciones sobre el medio ambiente
No deseche este producto en la basura doméstica una vez que se haya cumplido su vida útil,
deposítelo en un punto de recogida de aparatos eléctricos y electrónicos. El símbolo que se
encuentra en el producto, el manual de usuario o el embalaje, hacen referencia a este punto.
El plástico es reutilizable según esté indicado. Con la reutilización de productos de plástico u otra
clase de reciclaje de aparatos viejos, está contribuyendo de forma importante a la conservación
del medio ambiente.
Infórmese en su administración local sobre la entidad de eliminación de residuos competente.
Page 53

No impida la ventilación del aparato. Asegúrese, que cortinas, periódicos, manteles o muebles no
estén bloqueando las ranuras de ventilación del aparato. ¡Se debe asegurar una ventilación
correcta todo el tiempo! El sobrecalentamiento puede causar serios daños en el interior del aparato,
provocando problemas de funcionamiento y acortando el tiempo de vida útil del producto.
Calor
No exponga el aparato a la luz solar directa. Asegúrese que el aparato no esta expuesto directamente a Fuentes de calor como calefactores o fuego. Asegúrese que las ranuras de ventilación del
aparato no esté n cubiertas.
Humedad y limpieza
Este aparato no es impermeable! No sumerja el aparato en el agua. No permite que el aparato
entre en contacto con el agua. La entrada de agua en el aparato causa serios problemas y daños.
No use agentes limpiadores que contengan alcohol, amoniacos, benceno o abrasivos. Éstos
pueden dañar al aparato. Para la limpieza use un paño suave y húmedo.
Reciclaje profesional
No deseche las pilas ni el material de embalaje con la basura doméstica. Las pilas deben ser
recogidas por el personal del centro recolector de baterías usadas. Desechar separadamente los
materiales de embalaje es de gran ayuda para el medio ambiente.
INSTRUCCIONES DE SEGURIDAD
1. LEA LAS INSTRUCCIONES – Lea atentamente las instrucciones de seguridad y funcionamiento antes de
usar el aparato.
2. GUARDE LAS INSTRUCCIONES – Guarde estas instrucciones de seguridad y funcionamiento para un
uso futuro.
3. ADVERTENCIAS –Siga todas las advertencias en este aparato y en el manual de instrucciones.
4. SIGA LAS INSTRUCCIONES – Siga todas las instrucciones de seguridad de este manual.
5. AGUA Y HUMEDAD – El aparato no debe usarse cerca del agua, como cerca de una bañera, lavabo,
fregadero de cocina, lavadero, piscina o en un sótano húmedo.
6. VENTILACIÓN – las aperturas del dispositivo sirven para la ventilación del aparato, son necesarias para
el funcionamiento y prevención de sobrecalentamiento. El aparato tiene que estar colocado de forma que
su posición no interfiera con su propia ventilación. No coloque el aparato en camas, sofás, alfombras o
superficie similar que puede obstruir las aperturas de ventilación, en una instalación incorporada, tales
como una estantería o armario que impida el flujo de aire a través de las aperturas de ventilación.
7. CALOR – No coloque este aparato cerca de Fuentes de calor tales como radiadores, estufas u otros
aparatos (incluido amplificadores) que producen calor.
8. FUENTE ELÉCTRICA – Este aparato debe conectarse a la toma de corriente del tipo descrito en las
instrucciones de funcionamiento o escrito en el aparato.
9. PROTECCIÓN DEL CABLE DE ALIMENTACIÓN – el cable de alimentación tiene que ser guiado con el
fin de no andar sobre él o pinchado con artículos colocados en él o contra él.Mejor agarre el enchufe y no
el cable cuando vaya a desconectarlo de la toma de corriente; nunca tire del cable.
10. DEJAR DE USAR – Durante largos periodos de tiempo sin usar el aparato, por favor, desconéctelo de la
toma de corriente y desconecte la antena también.
11. OBJETO Y ENTRADA DE LÍQUIDO – debe tener cuidado que ningún objeto o líquido caiga en el aparato
o sea vertido en las aperturas del aparato.
12. DAÑOS QUE REQUIEREN REVISIÓN – Esta unidad deber ser revisada por personal cualificado cuando:
a. El cable de alimentación o enchufe ha sido dañado.
b. Los objetos han sufrido una caída o cualquier líquido ha sido vertido en el aparato.
c. Este aparato ha sido expuesto a la lluvia o humedad.
d. El aparato ha caído, o el chasis se ha dañado. Use solamente los controles y ajuste especificados en
el manual.
e. La unidad no parece funcionar con normalidad.
f. El aparato no funciona correctamente.
53.
Page 54

54.
13. FUNCIONAMIENTO – El usuario no debe usar el aparato para otros fines que no estén descritos en este
manual de instrucciones. Cualquier tipo de revisión debe hacerse por el personal cualificado.
14. LIMPIEZA –
limpiadores en forma de pulverizador, use sólo un paño húmedo. Siga las instrucciones de cuidado y
mantenimiento de este manual.
15. RELÁMPAGOS –
aparato de la toma de corriente y la antena.
16. COMPROBACIÓN DE SEGURIDAD – Después de vender el aparato pida al servicio de clientes de hacer
una comprobación de seguridad.
17. SOBRECARGA –
receptáculos convenientes.
18. DESCARGA ELECTROESTÁTICA-
funciona bien. Vuelva a conectar después un periodo corto de tiempo.
Desconecte el aparato de la toma de corriente antes de limpiarlo. No use líquido o
Durante relámpagos y largos periodos de no haber usado el aparato desconecte el
Para evitar incendios y descargas eléctricas no sobrecargue su toma de corriente y su
Desconecte de la toma de tierra y retire las baterías si el aparato no
ADVERTENCIA
ESTE REPRODUCTOR DE CD ES UN PRODUCTO LASER DE CLASE I. SIN EMBAGO, UTILIZA UN RAYO
LASER VISIBLE/INVISIBLE, QUE PUEDE CAUSAR EXPOSICIÓN A RADIACIÓN PELIGROSA.
ASEGURESE DE QUE EL REPRODUCTOR DE CD OPERA CORRECTAMENTE COMO SE MUESTRA EN
LAS INSTRUCCIONES.
SE PUEDE PRODUCIR UNA RADIACIÓN DE LÁSER INVISIBLE AL ABRIR LA COBERTURA O EL
BLOQUEO DE SEGURIDAD FALLA. NO SE EXPONGA A LOS RAYOS.
NO TOQUE LA LENTE DEL LÁSER.
El USO DE LOS CONTROLES, AJUSTES O PRESTACIONES DE PROCEDIMIENTOS DIFERENTES A LOS
QUE AQUÍ SE ESPECIFICAN PUEDE DAR COMO RESULTADO EXPOSICION A RADIACIÓN PELIGROSA.
PARA REDUCIR EL RIESGO DE FUEGO O DE DESCARGA ELÉCTRICA Y DE INTERFERENCIAS
MOLESTAS USE SOLO LOS ACCESORIOS RECOMENDADOS.
Instalación
Evite instalar el reproductor en áreas de:
1) Luz solar directa, radiadores de calor o automóviles cerrados.
2) Altas temperaturas o mucha humedad.
3) Polvo excesivo.
4) Vibración excesiva, ya que las piezas internas pueden averiarse gravemente.
Objetos externos o dedos en el dispositivo.
NUNCA le permita a nadie, en especial a los niños, introducir objetos en los orificios, ranuras o aperturas de
este dispositivo. Esto puede conducir a la muerte por electrocución.
Evite objetos magnéticos:
Para evitar interferencias mantenga los objetos magnéticos, tales como los altavoces, a una distancia
prudente del reproductor.
Ubicación:
Ubique el reproductor en posición vertical. No lo sitúe sobre amplificadores u otros equipos que puedan
calentarse.
Condensación:
Si hay humedad dentro del reproductor, puede que no funcione apropiadamente. Por favor apague el
suministro de energía y espere alrededor de una hora hasta que la humedad se evapore.
Page 55

Fuente de voltaje:
Preste atención a las siguientes instrucciones para evitar el mal funcionamiento del dispositivo, incendios,
heridas y electrocución:
• Verifique si la fuente de voltaje, tal y como se indica en la placa (debajo del aparato), corresponde con su
fuente de voltaje local. Esta unidad está diseñada para CA 230V~50Hz.
• Conecte el cable de suministro de energía al zócalo de suministro de energía CA y al tomacorriente de la
pared.
• Para desconectarlo de la toma de corriente de la pared, tire de la clavija y no del cable.
• Mantenga la clavija presionada cuando la conecte o desconecte de la toma de corriente de la pared.
• No toque el cable de alimentación con las manos mojadas.
• Proteja el cable de alimentación de dispositivos que generen calor.
• Por favor apague el reproductor si ha sufrido algún golpe o algún daño.
Ubicación de los controles
1. SENSOR de control remoto
2. Indicador luminoso POWER
3. PROGRAM: Modo Programa
4. REPEAT: Modos de Repetición
5. : Reproducir/Detener
6. : Pista anterior / búsqueda de pista hacia atrás
7. : Pista siguiente / búsqueda de pista hacia adelante
8. : Detener reproducción
9. Indicación de frecuencia
10. BAND: Selector de banda AM / FM Mono/FM ST. FM
Estéreo
11. FUNCTION: Selección de la fuente de audio (OFF, CD,
RADIO)
12. VOLUME: Control de volumen
13. ◄ TUNING ►: Mando giratorio
14. FM ST.: Indicador luminoso LED de Estéreo
15. Indicador luminoso
16. SPEAKERS (L / R): Toma de altavoz izquierda/derecha
17. FM ANT.: Antena de hilo FM
18. AC 230V~50Hz: Cable de alimentación
1
2
3
4
5
6
7
8
9
10
11
16
15
14
13
12
17
18
55.
Page 56

56.
Mando a distancia
1. PLAY / PAUSE: Reproducir/Pausa
2. SKIP -: Pista anterior / búsqueda de pista hacia atrás
3. PROGRAM: Modo Programa
4. STOP: Detener reproducción
5. SKIP +: Pista siguiente / búsqueda de pista hacia adelante
6. REPEAT: Modos de Repetición
1
2
3
4
5
6
Instalación y conexiones
Coloque las baterías en el control remoto (no proporcionadas)
1. Quite la tapa del compartimiento de las baterías presionándola
hacia abajo y deslizándola hacia afuera.
2. Inserte 2 baterías “AAA / UM – 4“ de 1.5V en el compartimiento de
las baterías. Tenga en cuenta la polaridad correcta marcada con “+”
y “-” dentro del compartimiento de las baterías.
3. Vuelva a colocar la tapa empujándola sobre el compartimiento de la
batería hasta que encaje.
Precauciones de seguridad de la batería
• Siga las instrucciones de seguridad y uso del fabricante de las baterías.
• Mantenga las baterías lejos del alcance de niños y animales.
• No tire las baterías al fuego. Nunca exponga las baterías al calor o al fuego..
• Desecho de baterías: Deseche las baterías agotadas de acuerdo con las leyes y regulaciones locales.
Para más información póngase en contacto con la autoridad local para la disposición de desechos.
• No mezcle baterías agotadas con baterías nuevas o baterías normales con recargables.
• No mezcle diferentes tipos de baterías (p.e. baterías alcalinas, de zinc/carbón, recargables). Utilice sólo
baterías del mismo tipo y tamaño.
• Si no lo utiliza durante largos periodos de tiempo , quite las baterías.
• El mal uso de las baterías puede causar que el electrolito gotee y que corroa el compartimiento de la
batería o hacer que las baterías estallen.
Notas sobre el control remoto:
• Si el rango de funcionamiento del control remoto disminuye, las baterías se gastan y se deben reemplazar.
• Presione las teclas suavemente pero con firmeza.
• Dirija la unidad del control remoto desde no más de 6 m del sensor del control remoto y en un ángulo de
saprox. 60° hacia la ventana del sensor en la parte frontal del dispositivo.
• No dirija lámparas brillantes hacia el sensor.
• El rango de funcionamiento depende del brillo de la habitación.
• Los objetos entre el control remoto y la ventana del sensor bloquean la transmisión.
• No use el control remoto simultáneamente con controles remotos de otros dispositivos.
Conexión de los altavoces
Desenrolle el cable de los altavoces y conéctelos a los terminales de los altavoces SPEAKER (L / R) (16).
Page 57

Conexión de la antena
Desenrolle completamente la antena de hilo FM FM ANT. (17) situada en la parte trasera del aparato para
una mejor recepción FM.
Instrucciones de funcionamiento generales
Encendido/Apagado
Ajuste el selector FUNCTION (11) siempre en la posición OFF, si no va a utilizar el aparato.
Si enciende el aparato, el indicador de POWER se pondrá rojo.
1. Seleccione el modo mediante FUNCTION (11): OFF, CD o RADIO.
2. Ajuste el volumen mediante VOLUME (12) en el aparato.
3. Apague el aparato ajustando FUNCTION (11) a la posición OFF.
Radio
1. Ajuste el selector FUNCTION (11) hasta la posición RADIO.
2. Seleccione mediante el selector BAND (10) el rango de frecuencia: AM, FM (FM Mono) o FM ST. (FM
Estéreo).
3. Seleccione la estación deseada mediante el mando giratorio ◄ TUNING ► (13). La frecuencia se puede
leer en el dial de la frecuencia en la posición del puntero.
4. Si el selector de banda es ajustado a FM ST. (FM Estéreo) y se recibe emisión en estéreo, el indicador
luminoso FM ST. de la parte frontal del aparato se encenderá.
5. Ajuste el volumen mediante VOLUME (12) del aparato.
FM Mono / Estéreo
- Mono: Ajuste el selector BAND (10) a FM.
- Estéreo: Ajuste el selector BAND (10) a FM ST. El indicador luminoso FM ST. se encenderá.
Recomendaciones para una mejor recepción
FM: Desenrolle completamente la antena de hilo FM FM ANT. (17) situada en la parte trasera del aparato
para una mejor recepción FM.
AM: El aparato dispone de una antena AM incorporada. Cambie la posición del aparato si la recepción es
pobre.
Disco (Audio CD)
El reproductor de CD sólo puede reproducir CD de audio. Nunca intente reproducir CD de MP3, de datos o
discos VCD/DVD.
Insertar un disco
1. Ajuste el selector FUNCTION (11) a la posición CD. En la pantalla de visualización parpadea “- -“ y,
pasados unos segundos se mostrará “no“.
2. Abra la tapa del dispositivo de CD presionando sobre el símbolo /OPEN del
lado derecho de la tapa del CD. En la pantalla de visualización aparece “- -“.
3. Inserte un CD con la parte de la cubierta hacia arriba.
4. Cierre la tapa del dispositivo de CD manualmente. En la pantalla de
visualización parpadea “- -“ y pasados unos segundos se muestra el número
total de pistas (p.e. “20“).
Extraer un disco
1. Asegúrese de que el aparato se encuentra en el modo Detención (botón (8)).
2. Abra la tapa del dispositivo de CD presionando sobre el símbolo /OPEN del lado derecho de la tapa del
CD. En la pantalla de visualización aparece “- -“.
3. Extraiga con cuidado el CD boca arriba sin tocar la superficie del CD.
4. Cierre la tapa del dispositivo de CD manualmente.
5. Almacene el CD extraído en su cubierta.
INSERTE UN DISCO
57.
Page 58

58.
Reproducir un disco
1. Inserte un CD (ver sección “Insertar un disco“).
2. Empiece la reproducción mediante (1) en el aparato o PLAY / PAUSE (1) en el mando a distancia.
En la pantalla de visualización se muestra el número de pista actual (p.e. “01.“). El punto „.“ de la parte
derecha indica el modo reproducción.
3. Ajuste el volumen mediante VOLUME (12).
4. Para pausar la reproducción pulse de nuevo en el aparato o PLAY / PAUSE (1) en el mando a
distancia. El número de pista actual parpadeará en la pantalla de visualización. Para continuar con la
reproducción pulse (1) de nuevo en el dispositivo o PLAY / PAUSE (1) en el mando a distancia.
5. Para detener la reproducción pulse (8) en el dispositivo o STOP (4) en el mando a distancia, en la
pantalla de visualización aparecerá el número total de pistas.
Notas:
La reproducción del CD también se cancelará en caso que:
a. la tapa del dispositivo de CD se abra mediante /OPEN.
b. el selector de función FUNCTION (11) se ajuste hasta la posición RADIO.
c. se reproduzcan todas las pistas del CD.
6. Extraiga el CD (ver sección “Extraer un disco“)
7. Apague el aparato ajustando FUNCTION (11) a la posición OFF.
Nota: Asegúrese de que el CD sigue rotando también en el modo de pausa, incluso cuando no se oye
ningún sonido. No se olvide de desactivar el modo de pausa para evitar el funcionamiento innecesario del
motor.
Selección de una pista diferente (SALTO en el modo detención y durante la reproducción)
Durante la reproducción puede saltar a la pista anterior o siguiente mediante (6) o (7) en el
dispositivo o mediante SKIP - (2) o SKIP + (5) en el mando a distancia.
1. Durante los modos de reproducción, detención o pausa seleccione la pista y empiece la reproducción
mediante (1) en el dispositivo o PLAY / PAUSE (1) en el mando a distancia.
2. Pulse brevemente (7) en el dispositivo o SKIP + (5) en el mando a distancia para saltar a la pista
siguiente o pulse repetidamente este botón, hasta que el número de pista deseado se muestre en la
pantalla de visualización.
3. Pulse (6) en el dispositivo o SKIP - (2) en el mando a distancia para regresar al principio de la pista
actual.
4. Pulse de nuevo (1 segundo después de pulsar el botón por primera vez) (6) o SKIP - (2) en el mando
a distancia para retroceder una pista canción cada vez.
Búsqueda de una posición concreta (durante la reproducción)
Pulse y mantenga (6) o (7) en el aparato, o SKIP - (2) o SKIP + (5) en el mando a distancia para
buscar la posición deseada dentro de la canción. La reproducción normal continúa cuando se libera el
botón.
Nota: En el modo de búsqueda el volumen se reduce.
Programación de las pistas
Se pueden programar hasta 20 pistas en un orden aleatorio. Una pista puede ser programada más de una
vez. El reproductor de CD debe estar en el modo detención ( (8) en el dispositivo o STOP (4) en el mando
a distancia).
1. Seleccione el modo de programa mediante PROGAM (3) o en el mando a distancia. En la pantalla de
visualización aparece momentáneamente “01“ (número de posición de la memoria) y a continuación
parpadea “00“.
2. Seleccione la pista deseada mediante (6) o (7) en el dispositivo, o mediante
SKIP - (2) o SKIP + (5) en el mando a distancia.
3. Almacene el título seleccionado pulsando PROGAM (3) en el dispositivo o en el
mando a distancia.
Page 59

4. Repita los pasos 2 y 3 para programar más pistas. El número de posición de la memoria aumentará
automáticamente.
5. Empiece la reproducción de las pistas programadas mediante (1) en el dispositivo o PLAY / PAUSE (1)
en el mando a distancia.
6. Si pulsa (8) dos veces en el dispositivo o STOP (4) en el mando a distancia, la reproducción
programada quedará cancelada.
Notas:
- Elimine las pistas programadas cambiando el modo o ajustando FUNCTION (11) a la posición OFF.
- Pulse (6) o (7) en el dispositivo, o SKIP - (2) o SKIP + (5) en el mando a distancia para saltar a
la pista anterior o siguiente en el orden programado.
- Si pulsa repetidamente PROGAM (3) en el dispositivo o en el mando a distancia se puede verificar el
orden programado.
- Si al cabo de 30 segundos durante el proceso de programación no se pulsa ningún botón, el modo
programa se cancelará.
Modos de repetición
Existen tres modos de repetición, que se pueden activar y cambiar mediante REPEAT (4) en el aparato o en
el mando a distancia (6) durante el modo de reproducción.
Cada vez que pulse el botón el modo cambia de la manera siguiente:
1. Pulse una vez REPEAT (4) en el aparato o en el mando a
distancia (6) durante el modo de reproducción para repetir
continuamente la pista actual. El indicador de repetición (punto
“.“ entre los dos dígitos) parpadea en la pantalla de visualización.
2. Pulse dos veces REPEAT (4) en el aparato o en el mando a
REPETIR 1
REPETIR
TODO
REPRODUC-
CIÓN NORMAL
distancia (6) durante el modo de reproducción para repetir todas
las pistas del disco actual en la secuencia almacenada. El
indicador de repetición (punto “.“ entre los dos dígitos) se ilumina permanentemente.
3. Pulse de nuevo REPEAT (4) en el aparato o en el mando a distancia (6) para regresar al modo de
reproducción normal. En la pantalla de visualización se muestra la indicación estándar.
Manejo y limpieza de los discos
MANEJO DE LOS CD´s
* Quite la cobertura del CD.
* No toque las superficies.
* No pegue pegatinas sobre la superficie de los CD´s y no escriba sobre estos
* No doble los CD´s.
Almacenamiento
* Guarde siempre los CD´s en su cobertura.
* No exponga los CD´s a los rayos directos solares, altas temperaturas, humedad o suciedad.
Limpieza de los CD’s
* Limpie los CD´s con una gamuza suave.
* Limpie los CD´s desde el centro a los extremos.
59.
Page 60

60.
DESDE EL CENTRO A LOS EXTREMOS
CORRECTO INCORRECTO
GUÍA SOLUCIONADOR DE PROBLEMAS
Si experiencia algún problema con este sistema, revise la lista proporcionada antes de contactar con el
servicio al cliente.
ADVERTENCIA: nunca abra la unidad. Acuda siempre a un servicio técnico cualificado o a un
servicio al cliente autorizado.
SÍNTOMA POSIBLE CAUSA SOLUCIÓN
GENERAL
No hay sonido
No funcionan las teclas Descarga electrostática. Desconéctelo del cable por
El volumen está ajustado
demasiado bajo.
El cable de alimentación no
sestá conectado.
Ajuste el volumen.
Conecte el cable de
alimentación correctamente.
unos pocos segundos y luego
enciéndalo de nuevo.
RADIO
Recepción pobre
CD
El CD salta
Pantalla: “no“ No hay CD insertado.
Señal débil.
Interferencias por otros
electrodomésticos
(Televisores, VCRs,
sordenadores, etc.).
El CD está sucio o dañado. Limpie o reemplace el disco.
El CD está sucio o dañado.
El lente del láser está
sentelado.
Ajuste la antena:
FM: antena de hilo.
AM: encare el aparato.
Mantenga la distancia con
sotros aparatos.
Inserte un CD, CD-R o CD-RW.
Sustituya o limpie el disco.
(Ver “Manejo de los CD´s“
Espere hasta que el lente del
láser esté seca.
)
Page 61

ESPECIFICACIONES
General
Suministro de corriente: CA 230V~50Hz
Mando a distancia: CC 3V (2 baterías, tipo AAA, UM – 4, 1,5 V)
Consumo de energía: 20 Vatios
Radio
Rango de frecuencia: FM 87.5 – 108 MHz
AM 525 – 1615 kHz
Reproductor de CD
Sistema de reproducción de CD: Cargador
Lente de captación óptico: Láser de 3 haces
Dimensiones: aprox. 515 x 150 x 165 mm (A x Al. x P)
Peso: aprox. 3,0kg
Sujeto a cambios sin previo aviso.
61.
Page 62

62.
MODELO: 2402N
Centro de Música Estéreo de Design Com Leitor de CD
INSTRUCÇÕES DE SEGURANÇA
Um triângulo com um símbolo
de raio alerta o utilizador para
"tensão perigosa" sem
isolamento do revestimento,
a qual pode ser suficiente
para constituir risco de
choque eléctrico.
MAIS INFORMAÇÕES
Acautelar-se dos pequenos pedaços e pilhas, não engolir estes pedaços ou pilhas. Estes
objectos podem ser perigosos para a sua saúde e provocar o sufocamento. Prestar atenção e
manter pequenos dispositivos e pilhas fora de alcance das crianças.
Importantes avisos para a protecção dos ouvidos
Cuidado:
A sua audição é tão preciosa para si como para nós.
Portanto, por favor tenha cuidado com este equipamento.
Recomendamos: Evite volumes de som elevados.
Se o equipamento for utilizado por crianças, certifique-se que o volume do aparelho não está
demasiado elevado.
Atenção!
Volumes demasiado elevados podem provocar danos irreparáveis à audição das crianças.
Nunca deixe a pessoa especialmente as crianças colocar os objectos dentro de buracos,
ranhuras ou outras aberturas. Estes procedimentos podem causar a morte através de choque
eléctrico. O dispositivo deve ser aberto somente e na presença do pessoal qualificado.
RISCO DE CHOQUE ELÉCTRICO
CUIDADO: PARA REDUZIR O RISCO
DE CHOQUE ELÉCTRICO, NÃO
RETIRE A COBERTURA (OU O
REVESTIMENTO POSTERIOR). NO
COMPONENTES PASSÍVEIS DE
REPARAÇÃO PELO UTILIZADOR.
PARA FINS DE ASSISTÊNCIA,
AVISO
NÃO ABRIR
INTERIOR, NÃO EXISTEM
CONSULTE UM TÉCNICO
QUALIFICADO
Um triângulo com um ponto
de exclamação alerta o
utilizador para a existência
de instruções importantes de
uso e manutenção no
manual incluído. O utilizador
deve ler estas instruções.
Por favor utilize o equipamento apenas de acordo com o regulamento descrito acima. O aparelho
foi concebido exclusivamente para ser utilizado no sector das actividades e habitação.
Por favor, guarde cuidadosamente as instruções de utilização para uma futura utilização.
Conselhos para protecção do ambiente
Este produto, no fim do seu período de vida útil, não deve ser depositado no lixo doméstico
normal. Deverá ser, pelo contrário, depositado num ponto de recolha para reciclagem de
aparelhos eléctricos e electrónicos. O símbolo no produto, as instruções de utilização e a
embalagem chamam a atenção para esse facto.
As matérias-primas são reutilizáveis de acordo com as suas características. Com a reutilização,
a utilização material ou outras formas de utilização de aparelhos velhos fazem com que dê um
contributo valioso para a protecção do nosso ambiente.
Por favor, informe-se junto das autoridades locais sobre os centros de recolha competentes.
Page 63

Não impedir a ventilação dos dispositivos. Tenha a certeza que as curtinhas, os jornais, panos de
cobrir os mobiliários não impedir a ventilação das aberturas de aparelhos. A ventilação deve
manter-se a qualquer momento. Aquecer-se demais pode provocar sério dano no dispositivo e
reduzir o seu desempenho por toda a vida.
Calor
Não expor o aparelho directamente à luz solar. Tenha atenção para não expor o aparelho a fontes
de calor como aquecedores ou fontes de chama descoberta. Tenha atenção para que as fendas de
arejamento do aparelho não estejam cobertas.
Humidade e Limpeza
Este produto não é resistente à água. Não submergir o aparelho em água nem deixar que este
entre em contacto com água. Se penetrar água no aparelho pode provocar sérios danos. Não
utilizar agentes de limpeza que contenham álcool, amoníaco, benzol ou abrasivos, pois estes
podem danificar o aparelho. Utilize um pano macio e húmido para a limpeza.
Reciclagem Profissional
Pilhas e materiais de embalagem não pertencem ao lixo doméstico. As pilhas devem ser colocadas
num ponto de recolha para pilhas usadas. A separação dos materiais de embalagem preserva o
ambiente.
INSTRUÇÕES DE SEGURANÇA
1. LER AS INSTRUÇÕES – Toda a segurança e as instruções de funcionamento devem ser lidas antes da
unidade ser operada.
2. MANTER AS INSTRUÇÕES – A segurança e a instrução de funcionamento devem ser mantidas para
referência futura.
3. ATENÇÃO AOS AVISOS – Todos os avisos na unidade e nas instruções de funcionamento devem ser
seguidos.
4. SEGUIR AS INSTRUÇÕES – Todas as instruções de funcionamento devem ser seguidas.
5. ÁGUA E LÍQUIDOS – O aparelho não deve ser usado perto de água, por exemplo, perto de uma
banheira, pia para lavagem, lava-loiças, piscina ou num ambiente húmido.
6. VENTILAÇÃO– As aberturas do aparelho servem para a sua própria ventilação, são necessárias para o
seu funcionamento e evitam um sobre aquecimento. Coloque o aparelho num local que não interfira com
uma ventilação adequada. Não o coloque em cima de camas, sofás, tapetes ou superficies semelhantes
que possam tapar as aberturas de ventilação, ou em estruturas fechadas, tais como estantes ou armários
que impeçam o fluxo de ar.
7. CALOR- o equipamento deve estar afastado de fontes de calor, tais como radiadores, saídas de ar
quente, fogões ou outros aparelhos (incluindo amplificadores de som) que produzam calor.
8. FONTE DE ALIMENTAÇÃO - O aparelho só funciona com o tipo de alimentação indicado na etiqueta.
9. PROTECÇÃO DO CABO DE ALIMENTAÇÃO - cabos de alimentação devem ser colocados de tal forma
que não possam ser pisados ou apertados pelos objectos colocados em cima deles ou contra eles.
Ceryan kablosunu fişten çekerken daima fiş kısmından tutunuz; asla kablodan tutup çekmeyiniz.
10. PERÍODOS DE NÃO UTILIZAÇÃO – Desligue o aparelho da tomada quando não o utilizar durante um
longo período de tempo.
11. ENTRADA DE OBJECTOS E LÍQUIDOS - Deve tomar cuidado para que não entrem objectos ou salpicos
para dentro do aparelho.
12. DAMAGE REQUIRING SERVICE - A unidade deve ser reparada por pessoal da assistência técnica
qualificada quando:
a. A fonte de alimentação ou plugue foi danificado
b. Objectos cairam dentro, ou líquido foi derrubado dentro da unidade.
c. A unidade foi exposta à chuva e humidade.
d. O aparelho tenha caído no chão ou esteja danificado. Use apenas os controlos e ajustes especificados
no manual.
e. O aparelho não parece funcionar normalmente.
f. A unidade exibe sérias mudanças no seu desempenho.
63.
Page 64

64.
13. ASSISTÊNCIA TÉCNICA - O utilizador não deve tentar reparar o aparelho para além do descrito no
manual. Todas as reparações devem ser realizadas por pessoal técnico qualificado.
14. LIMPEZA – Desligue o aparelho da tomada antes de o limpar. Não utilize panos molhados ou aerosóis.
Utilize um pano húmido.
15. RELÂMPAGOS –
eléctrica e a antena.
16. VERIFICAÇÃO DE SEGURANÇA –
verificação de segurança.
17. SOBRECARGA –
18. DESCARGAS ELECTROESTÁTICAS – Desconecte das fontes de alimentação e remova as pilhas se a
unidade funciona mal. Reconece depois de um período pequeno de tempo.
Durante trovoadas e períodos mais longos de não utilização, desligue da corrente
Após um serviço de assistência técnica peça para ser realizado uma
Para evitar fogo e choque eléctrico não sobrecarregue as tomadas e receptáculos.
CUIDADO
ESTE LEITOR DE CDs É UM PRODUTO LASER CLASSE I. NO ENTANTO, ESTE LEITOR DE CDs UTILIZA
UM FEIXE DE LASER VISÍVEL/INVISÍVEL QUE PODE PROVOCAR EXPOSIÇÕES A RADIAÇÃO
PERIGOSA. CERTIFIQUE-SE DE QUE UTILIZA O LEITOR DE CDs CORRECTAMENTE, DE ACORDO
COM AS INSTRUÇÕES.
RADIAÇÃO LASER INVISÍVEL COM A COBERTURA ABERTA OU O BLOQUEIO DE SEGURANÇA
DESACTIVADO. EVITE A EXPOSIÇÃO AO FEIXE!
NÃO TOQUE NA LENTE DE LASER.
A UTILIZAÇÃO DE CONTROLOS OU AJUSTES OU A EXECUÇÃO DE PROCEDIMENTOS DIFERENTES
DOS ESPECIFICADOS NO PRESENTE MANUAL PODERÁ RESULTAR NA EXPOSIÇÃO A RADIAÇÃO
PERIGOSA.
PARA REDUZIR O RISCO DE INCÊNDIO OU CHOQUE ELÉCTRICO E INTERFERÊNCIA NOCIVA, UTILIZE
APENAS OS ACESSÓRIOS RECOMENDADOS.
Instalação
Evite instalar o leitor em áreas expostas a:
1) luz solar directa, radiadores de calor ou veículos fechados;
2) altas temperaturas ou humidade elevada;
3) poeira excessiva;
4) vibração excessiva, na medida em que os componentes internos poderão sofrer danos graves.
Objectos Estranhos ou Dedos no Dispositivo
NUNCA deixe ninguém, especialmente crianças, introduzir objectos nos orifícios, nas ranhuras ou aberturas
do dispositivo. Este procedimento poderá provocar a morte por choque eléctrico.
Evitar Objectos Magnéticos:
Para evitar interferências, mantenha os objectos magnéticos, tais como colunas, afastados do leitor.
Instalação em pilha:
Coloque o leitor numa posição vertical. Não coloque o leitor sobre amplificadores ou outro equipamento que
possa aquecer.
Condensação:
Se existir humidade no interior do aparelho, este poderá não funcionar correctamente. Para evaporar a
humidade, desligue a fonte de alimentação e aguarde cerca de uma hora.
Page 65

Fonte de alimentação:
Siga as instruções indicadas em seguida para evitar avarias, incêndios, ferimentos e choques eléctricos:
• Verifique se a tensão de alimentação indicada na placa de classificação (sob a unidade) corresponde à
tensão eléctrica local. Esta unidade foi concebida para 230V~50Hz AC.
• Ligue o cabo de alimentação à entrada de alimentação AC e à tomada de parede.
• Para desligar da tomada de parede, puxe apenas a ficha, não o cabo.
• Ao ligar e desligar da tomada de parede, segure firmemente a ficha.
• Não toque no cabo de alimentação com as mãos molhadas.
• Proteja o cabo de alimentação de dispositivos geradores de calor.
• Se o leitor tiver sofrido uma queda ou outro tipo de dano, desligue-o.
Localização dos Controlos
1. Controlo Remoto SENSOR
2. POWER LED
3. PROGRAM: Modo de Programa
4. REPEAT: Repetir Modos
5. : Girar/pausar
6. : Trilha anterior / procurar trilha para trás
7. : Próxima Trilha / procurar trilha para frente
8. : Parar playback
9. Indicação de Freqüência
10. BAND: Banda selectora AM / FM Mono/FM ST. FM Estéreo
11. FUNCTION: Selecção da fonte de áudio (OFF, CD, RADIO)
12. VOLUME: Controlo do Volume
13. ◄ TUNING ►: Botão rotativo
14. FM ST.: LED de Indicação de Estéreo
15. LED do mostrador
16. SPEAKERS (L / R): Plugue do Microfone esquerdo/direito
17. FM ANT Cabo da antena FM
18. AC 230V~50Hz: Cabo de Alimentação
1
2
3
4
5
6
7
8
9
10
11
16
15
14
13
12
17
18
65.
Page 66

66.
Controlo Remoto
1. PLAY / PAUSE: Girar/pausar
2. SKIP -: Trilha anterior / procurar trilha para trás
3. PROGRAM: Modo de Programa
4. STOP: Parar playback
5. SKIP +: Próxima Trilha / procurar trilha para frente
6. REPEAT: Repetir Modos
1
2
3
4
5
6
Instalação e Ligações
Introduzir as pilhas no controlo remoto (não incluídas)
1. Remova a tampa do compartimento da bateria, ao premir para baixo
e deslizar para fora.
2. ntroduza 2 pilhas de tipo “AAA / UM – 4“, de 1,5V no compartimento
das pilhas. Tenha em atenção a correcta polaridade, marcada com “+”
e “-” no interior do compartimento das pilhas.
3. Volte a colocar a tampa ao empurrar no compartimento das pilhas
até fixar.
Cuidados de Segurança com as Pilhas
• Siga as normas de segurança do fabricante das pilhas em relação a
utilização.
• Mantenha as pilhas afastadas de crianças e animais.
• Não atire as pilhas para o fogo. Nunca exponha as pilhas ao calor ou fogo.
• Descarte das pilhas: Descarte as pilhas usadas de acordo com as leis locais e regulamentos. Para
informação adicional, por favor, contacte as autoridades de descarte.
• Não misture pilhas usadas e novas ou pilhas normais e pilhas recarregáveis.
• Não misture tipos diferentes de pilhas (por exemplo alcalino, zinco/carbono, pilhas recarregáveis). Use só
pilhas do mesmo tipo e tamanho.
• Remova as pilhas durante longos períodos sem utilizar o aparelho.
• Uma má utilização das pilhas pode causar fugas de electrólitos e corroer o compartimento das pilhas ou
fazer com que as pilhas rebentem.
Notas sobre o controlo remoto:
• Se o intervalo de funcionamento do controlo remoto se tornar inferior, significa que as pilhas estão gastas
e devem ser substituídas.
• Prima as teclas de forma suave, mas fime.
• Dirija o aparelho relativo ao controlo remoto a uma distância não superior a 6 metros ao sensor do controlo
remoto e dentro de um ângulo de 60ª em direcção ao sensor na parte da frente do aparelho.
• Não dirija luzes brilhantes para o sensor.
• O intervalo de funcionamento depende da luminosidade do aparelho.
• Os objectos entre o controlo remoto e o sensor no aparelho bloqueiam a transmissão.
• Não utilize o controlo remoto em simultâneo com controlos remotos de outros aparelhos.
Ligar às colunas
Desenrole os cabos das colunas e ligue aos terminais das colunas SPEAKER (L / R) (16).
Page 67

Conecção da Antena
Desenrole completamente o cabo da Antena FM FM ANT. (17) na parte traseira do equipamento para o
melhor recebimento FM.
Instrucções Gerais de Operação
On/Off
Ajustar FUNCTION (11) selector sempre para a posição OFF, se o equipamento não estiver em uso.
Se o equipamento estiver ligado, o POWER LED acende vermelho
1. Seleccione o modo com FUNCTION (11): OFF, CD ou RADIO.
2. Ajuste o volume com VOLUME (12) no equipamento.
3. Desligue o equipamento ajustando FUNCTION (11) para a posição OFF.
Rádio
1. Ajuste o selector de FUNCTION (11) para a posição RADIO.
2. Seleccione com o selector BAND (10) o nível de freqüência: AM, FM (FM Mono) ou FM ST. (FM Estéreo).
3. Seleccione a estação desejada com o ◄ TUNING ► botão rotativo (13). A freqüência pode ser lida no dial
de freqüência na posição do ponteiro indicador.
4. Se o selector de banda está ajustado para FM ST. (FM Estéreo) e uma transmissão estéreo é recebida, o
LED FM ST na frente do equipamento acende.
5. Ajuste o volume com VOLUME (12) no equipamento.
FM Mono / Stereo
- Mono: Ajuste o selector BAND (10) para FM.
- Estéreo: Ajuste o selector BAND (10) para FM ST. O LED FM ST acende.
Recomendações para melhor recebimento
FM: Desenrole completamente o cabo da Antena FM FM ANT. (17) na parte traseira do equipamento para
melhor recebimento FM.
AM: O equipamento tem uma antena AM embutida. Troque a posição do equipamento se o recebimento está
pobre.
Disco (CD de Áudio)
O leitor de CD somente pode ler CDs. Nunca tente ler CDs de MP3 CD’s, CDs de dados ou Discos
VCD/DVD.
Inserindo um disco
1. Ajuste o selector FUNCTION (11) para a posição CD. No ecrã flameja “- -“ e
depois de alguns segundos indicará “no“.
2. Abra a porta do drive de CD primando o símbolo /OPEN no lado direito da
porta de CD. O ecrã exibe “- -“.
3. Insira o CD com a cobertura para cima.
4. Feche a porta do drive de CD manualmente. No ecrã flameja “- -“ e depois
de alguns segundos o número total de trilhas será exibido (e.g. “20“).
Retirando um disco
1. Tenha certeza de que o equipamento está no modo stop ( (8) botão).
2. Abra a porta do drive de CD primando no símbolo /OPEN no lado direito da porta de CD. O ecrã
mostra “- -“.
3. Remova cuidadosamente por cima o CD sem tocar na superfície.
4. Feche a porta do drive de CD manualmente.
5. Guarde o CD removido em sua capa.
INSIRA UM DISCO
67.
Page 68

68.
Playback do Disco
1. Insira um CD (veja secção “Inserindo um disco“).
2. Inicie o playback com (1) no equipamento ou PLAY / PAUSE (1) no controlo remoto. O ecrã exibe o
número da trilha atual (por exemplo "01. "). O ponto ". " à direita indica o modo de playback.
3. Ajuste o volume com o VOLUME (12).
4. Para interromper o playback prima novamente no equipamento ou PLAY / PAUSE (1) no controlo
remoto. O número atual da trilha flameja no ecrã. Continue o playback primando (1) novamente no
equipamento ou PLAY / PAUSE (1) no controlo remoto.
5. Para interromper o playback prima (8) no equipamento ou STOP (4) no controlo remoto. O ecrã exibe
o número total de trilhas.
Notas:
O playback do CD também será cancelado, se:
a. a porta do drive de CD está aberta com /OPEN.
b. o selector de função FUNCTION (11) está ajustado para a posição RADIO.
c. todas as trilhas do CD são giradas.
6. Remova o CD (veja secção "Remover um disco")
7. Desligue o equipamento ajustando FUNCTION (11) para a posição OFF.
Nota: Por favor, observe que o CD continua também girando no modo de pausa, até mesmo quando
nenhum som pode ser ouvido. Não esqueça de desligar o modo de pausa, para prevenir operação
desnecessária do motor.
Seleccionando uma trilha diferente (SALTE no modo stop e durante o playback)
Durante o playback você pode saltar para a trilha anterior ou posterior com (6) ou (7) no equipamento ou com SKIP - (2) ou SKIP + (5) no controlo remoto.
1. Durante o playback, o modo stop ou modo de pausa seleciona a trilha e começa o playback com (1)
no equipamento ou com PLAY / PAUSE (1) no controlo remoto.
2. Prima brevemente (7) no equipamento ou SKIP + (5) no controlo remoto salte à próxima trilha ou
prima repetidamente nesta chave, até que o número da trilha desejada é mostrada no ecrã.
3. Prima (6) no equipamento ou SKIP - (2) no controlo remoto para voltar ao começo da trilha atual.
4. Prima novamente (dentro de 1 segundo depois do primeiro toque da chave) (6) or SKIP - (2) no
controlo remoto para saltar uma atrás de cada vez.
Procurando uma certa posição (durante o playback)
Prima e segure (6) ou (7) no equipamento ou SKIP - (2) ou SKIP + (5) no controlo remoto procurar
a posição desejada dentro da trilha. O playback normal continua quando o botão é liberado.
Nota: Em modo de procura o volume fica reduzido.
Programação das Trilhas
Até 20 trilhas podem ser programadas em uma ordem arbitrária. Uma trilha pode ser programada mais de
uma vez. O leitor de CD deve estar no modo de stop ( (8) no equipamento ou STOP (4) no controlo
remoto).
1. Chame o modo de programa com PROGAM (3) ou no controlo remoto. O ecrã exibe brevemente “01“
(número local de memória) e depois “00“ flameja.
2. Seleccione a trilha desejada com (6) ou (7) no equipamento ou com
SKIP - (2) ou SKIP + (5) no controlo remoto.
3. Armazene o título seleccionado primando PROGAM (3) no equipamento ou no controlo remoto.
4. Repita os passos 2 e 3 para programar trilhas adicionais. O número local de memória será aumentado
automacticamente.
5. Comece o playback das trilhas programadas com (1) no equipamento ou
PLAY / PAUSE (1) no controlo remoto.
6. Primando (8) duas vezes no equipamento ou STOP (4) no controlo remoto será cancelado o playback
programado.
Page 69

Notas:
- Apague as trilhas programadas mudando o modo ou ajustando FUNCTION (11) para posição OFF.
- Prime (6) ou (7) no equipamento ou SKIP - (2) ou SKIP + (5) no controlo remoto para saltar à
trilha anterior ou posterior na ordem programada.
- Primando repetidamente PROGAM (3) no equipamento ou no controlo remoto pode ser verificada a
ordem programada.
- Se dentro de 30 segundos durante a operação de programação não for primado nenhum botão, o
programa-modo sairá.
Repetir modos
Há três modos de repetição que podem ser invocados e podem ser trocados com REPEAT (4) no equipa
mento ou no controlo remoto (6) durante o modo de playback.
Cada toque de chave muda o modo de repetir como segue:
1. Prima uma vez REPEAT (4) no equipamento ou no controlo
remoto (6) durante o modo de playback para repetir a trilha
actual continuamente. A indicação repetida (ponto “.“entre os
dois dígitos) no ecrã flameja.
REPETIR 1
REPETIR
TODAS
REPRODUÇÃO
NORMAL
2. Prima duas vezes REPEAT (4) no equipamento ou no controlo
remoto (6) durante o modo de playback para repetir todas as
trilhas no disco actual na sucessão registrada. A indicação
repetida (ponto “.“entre os dois dígitos)flameja permanentemente.
3. Prima novamente REPEAT (4) no equipamento ou no controlo remoto (6) para voltar ao modo de giro
normal. O ecrã exibe a indicação standard.
Manuseamento e Limpeza de Discos
MANUSEAMENTO DE CDs
* Retire o CD da caixa.
* Não toque nas superfícies.
* Não cole etiquetas nem escreva nos CDs.
* Não sobre os CDs.
-
Armazenamento
* Guarde sempre os CDs na respectiva caixa.
* Não exponha os CDs a luz solar directa, temperaturas elevadas, humidade ou pó.
Limpar CDs
* Limpe os CDs com um pano macio.
* Limpe os CDs do centro para a extremidade.
69.
Page 70

70.
DO CENTRO PARA A EXTREMIDADE
CORRECTO INCORRECTO
RESOLUÇÃO DE PROBLEMAS
Se ocorrer algum problema com este sistema, consulte a lista seguinte antes de contactar o serviço de
clientes.
AVISO: Nunca abra o dispositivo. Solicite sempre assistência ou manutenção a pessoal qualificado e
autorizado.
Sintoma Causa possível Solução
GERAIS
Sem som
O volume está ajustado
muito baixo.
O cabo de alimentação não
está conectado.
Ajuste o volume.
Conecte o cabo de alimentação
correctamente.
Os botões não funcionam
RÁDIO
Recepção insuficiente
CD
CD salta
Visor: „no“ Nenhum CD inserido.
Descarga electrostática. Desligue a unidade da corrente
Sinal fraco.
Interferências provocadas
por outros aparelhos
(televisores, gravadores de
vídeo, computadores, etc.).
O CD está sujo ou estragado. Substitua ou limpe o disco.
O CD está sujo ou estragado.
A lente de laser tem vapor.
durante alguns segundos e, em
seguida, ligue-a novamente.
Ajuste antena:
FM: Cabo da antena.
AM: Direccione o equipamento.
Mantenha distância de outros
electrodomésticos.
Insira um CD, CD-R ou CD-RW.
Substitua ou limpe o disco.
(Veja "Manipulação de CDs")
Espere até a lente de laser
estar seca.
Page 71

ESPECIFICAÇÕES
Gerais
Fonte de alimentação: 230V~50Hz AC
Controlo remoto: DC 3V (2 pilhas, type AAA, UM – 4, 1.5 V)
Consumo de energia: 20 Watts
Rádio
Nível de frqüência: FM 87.5 – 108 MHz
AM 525 – 1615 kHz
Leitor de CD
Sistema de Playback do CD: o carregador de Topo
Lentes Ópticas: 3 - Faixo de Laser
Dimensões: Aprox. 515 x 150 x 165 mm (L x A x P)
Peso: Aprox. 3,0kg
Sujeito a alteração sem aviso prévio.
71.
Page 72

72.
MODEL: 2402N
Stylowy zestaw muzyczny stereo z odtwarzaczem CD
ŚRODKI OSTROŻNOŚCI
OSTRZEZENIE
RYZYKO PORAŻENIA PRĄDEM
NIE OTWIERAJ
OSTRZEŻENIE: ABY UNIKNĄĆ
RYZYKA PORAŻENIA PRĄDEM, NIE
Trójkąt z symbolem pioruna
to znak odnoszący się do
“niebezpiecznego napięcia”,
braku izolacji, co może
przyczynić się do ryzyka
porażenia prądem.
ŚCIĄGAJ OBUDOWY RADIA.
KONIECZNE JEST, ABY WSZELKIE
NAPRAWY ODBYWAŁY SIĘ W
AUTORYZOWANYM SERWISIE.
DALSZE INFORAMCJE
Zwróć uwagę na małe części urządzenia oraz baterie. Nie połykaj ich; może to spowodować
poważne zagrożenie w tym uduszenie. Zwróć szczególną uwagę na dzieci. Trzymaj małe części
urządzenia z dala od dzieci.
Informacje dotyczące ochrony słuchu
Uwaga:
Twoje zdrowie jest ważne zarówno dla ciebie jak i dla nas.
Zachowaj więc wszelkie środki ostrożności korzystając z tego urządzenia.
Unikaj wysokiego poziomu głośności.
Jeżeli urządzenie jest obsługiwane przez dzieci, nie pozwól na odtwarzanie muzyki zbyt głośno.
Uwaga!
Zbyt wysoki poziom głośności może prowadzić do uszkodzenia słuchu twoich dzieci.
Trójkąt z wykrzyknikiem to
znak odnoszący się do
ważnych instrukcji
użytkowania oraz
konserwacji. Znak pojawia
się w podręczniku
użytkownika.
Nie pozwalaj komukolwiek, zwłaszcza dzieciom, wkładać niczego do otworów, otworów wentyl
acyjnych lub dziur; może to doprowadzić do porażenia prądem. Obudowa urządzenia może być
zdjęta wyłącznie przez wykwalifikowanych specjalistów. Korzystaj z urządzenia wyłącznie w
celach, do których zostało przeznaczone.
Urządzenie jest przeznaczone do użytku wewnętrznego.
Zachowaj instrukcję obsługi do przyszłego wglądu.
Ochrona środowiska
To urządzenie nie może być traktowane jak zwykłe odpady. Przekaż urządzenie do specjalnych
miejsc skupu I utylizacji urządzeń elektrycznych. Na urządzeniu lub opakowaniu znajduje się
symbol, który informuje o sposobie pozbycia się urządzenia. Wszystkie materiały mogą podlegać
utylizacji. Możesz znacznie przysłużyć się do ochrony środowiska utylizując urządzenie w
odpowiedni sposób. Zapytaj odpowiednie władze o miejsce utylizacji urządzeń elektrycznych.
Upewnij się, że otwory wentylacyjne nie są zasłonięte przez firanki, zasłon, gazety itp.
Page 73

Otwory wentylacyjne zawsze muszą być odsłonięte. Przegrzanie urządzenia może powodować
uszkodzenie lub skrócić jego żywotność.
Ciepło
Nie wystawiaj urządzenia na działanie promieni słonecznych. Upewnij się, że urządzenie nie jest
wystawione na działanie ęródeł ciepła, takich jak grzejniki czy ogień. Upewnij się, że otwory
wentylacyjne urządzenia nie są zasłonięte.
Wilgoć oraz czyszczenie
To urządzenie nie jest odporne na wilgoć. Trzymaj urządzenie z dala od wody oraz wilgoci.
Woda może spowodować poważne uszkodzenia. Do czyszczenia nie używaj środków
zawierających alkohol, amoniak, benzen oraz środków żrących. Mogą uszkodzić urządzenie. Czyść
urządzenie miękką, wilgotną szmatką.
Pozbywanie się baterii
Baterie nie mogą być traktowane jak zwykłe śmieci. Przekaż baterie do oznaczonego punktu
składowania baterii.
Nie wrzucaj baterii do ognia.
ŚRODKI OSTROŻNOŚCI
1. PRZECZYTAJ INSTRUKCJE - Należy przeczytać wszystkie instrukcje dotyczące bezpieczeństwa i
obsługi przed uruchomieniem urządzenia.
2. ZACHOWAJ INSTRUKCJE - Instrukcje dotyczące bezpieczeństwa i obsługi należy zachować do
wykorzystania w przyszłości.
3. WEŹ POD UWAGĘ OSTRZEŻENIA - Należy przestrzegać wszystkich ostrzeżeń opisanych na urządzeniu
i w instrukcji obsługi.
4. POSTĘPUJ ZGODNIE Z INSTRUKCJAMI - Należy postępować zgodnie ze wszystkimi instrukcjami.
5. WODA I WILGOĆ - Nie należy korzystać z urządzenia w pobliżu wody, na przykład, obok wanny,
umywalki, zlewozmywaka, miednicy, na terenie basenu lub w wilgotnej piwnicy.
6. WENTYLACJA - Otwory w urządzeniu służą prawidłowej wentylacji, są konieczne do bezusterkowego
działania urządzenia i zapobiegają przegrzaniu. Urządzenie należy umieścić w takim miejscu lub pozycji,
aby prawidłowa wentylacja nie była utrudniona. Nie wolno go stawiać bezpośrednio na łóżku, kanapie,
dywanie lub żadnej innej tego typu powierzchni, ponieważ otwory wentylacyjne mogą zostać zakryte.
Umieszczenie urządzenia w zamkniętej przestrzeni, takiej jak szafka czy regał, może utrudniać przepływ
powietrza przez otwory wentylacyjne.
7. ŹRÓDŁA CIEPŁA - Urządzenie należy umieszczać z dala od źródeł ciepła, takich jak grzejniki, kuchenki,
lub innego tego typu sprzętu (włącznie ze wzmacniaczami), który wydziela ciepło.
8. ZASILANIE - Urządzenie należy podłączyć tylko do takiego źródła zasilania, jakie zostało opisane w
instrukcji obsługi lub oznaczone na obudowie.
9. ZABEZPIECZENIE PRZEWODU ZASILAJĄCEGO - Przewody zasilające należy poprowadzić w taki
sposób, aby nie znajdowały się one w przejściu, ani nie przyciskały ich pobliskie przedmioty. Zawsze
należy trzymać za wtyczkę, a nie za przewód zasilający podczas rozłączania urządzenia z sieci. Nie
ciągnąć za przewód.
10. OKRES NIEUŻYTKOWANIA - Podczas dłuższego okresu nieużytkowania urządzenia, należy odłączyć je
od sieci zasilającej i anteny.
11. CIAŁO OBCE LUB PŁYN W URZĄDZENIU - Należy zachować wszelką ostrożność, aby do urządzenia
nie dostały się przez otwory w obudowie żadne ciała obce, ani płyny.
12. USTERKA WYMAGAJĄCA NAPRAWY - Urządzenie należy skierować do wykwalifikowanego personelu
serwisowego, kiedy:
a. Przewód zasilający lub wtyczka zostały uszkodzone.
b. Do środka dostały się ciała obce lub płyny.
c. Zostało wystawione na działanie deszczu.
73.
Page 74

74.
d. Urządzenie spadło lub posiada uszkodzoną obudowę. Korzystaj z kontrolek i dokonuj regulacji w
sposób opisany w podręczniku.
e. Urządzenie wydaje się funkcjonować nieprawidłowo.
f . Działanie urządzenia znacznie różni się od normalnego.
13. NAPRAWA -
opisanych w instrukcji. Wszelkie naprawy techniczne powinny być skierowane do wykwalifikowanego
personelu serwisowego.
14. CZYSZCZENIE - Urządzenie należy odłączyć od sieci zasilającej przed przystąpieniem do czyszczenia.
Nie wolno stosować preparatów czyszczących w płynie ani aerozolu - przecierać tylko za pomocą
wilgotnej szmatki. Stosować się do instrukcji dotyczących czyszczenia i konserwacji zawartych w
niniejszej instrukcji.
15. WYŁADOWANIA ATMOSFERYCZNE -
nieużytkowania urządzenia, należy odłączyć je od sieci zasilającej i anteny.
16. KONTROLA BEZPIECZEŃSTWA - Po dokonaniu przeglądu lub naprawy, serwisant powinien
przeprowadzić kontrolę sprawności.
17. PRZECIĄŻENIE - Aby uniknąć pożaru lub porażenia prądem, nie wolno przeciążać gniazd wtykowych
ściennych, ani przedłużaczy.
18. WYŁADOWANIE ELEKTROSTATYCZNE -
niego baterie, jeżeli występuje wadliwe jego działanie. Po chwili podłączyć ponownie do sieci zasilającej.
Użytkownik nie powinien podejmować prób naprawy urządzenia, za wyjątkiem sugestii
Podczas wyładowań atmosferycznych i dłuższego okresu
Urządzenie należy odłączyć od sieci zasilającej i wyjąć z
UWAGA
NINIEJSZY ODTWARZACZ CD JEST PRODUKTEM LASEROWYM KLASY I. JEDNAKŻE KORZYSTA ON Z
WIDZIALNEJ/NIEWIDZIALNEJ WIĄZKI LASERA, KTÓRA MOŻE STWORZYĆ RYZYKO SZKODLIWYCH
ODDZIAŁYWAŃ. ODTWARZACZ NALEŻY OBSŁUGIWAĆ ZGODNIE Z INSTRUKCJAMI.
PROMIENIOWANIE NIEWIDZIALNEGO LASERA, przy OTWARTEJ POKRYWIE LUB OBEJŚCIU BLOKADY
ZABEZPIECZAJĄCEJ. NIE NARAŻAĆ SIĘ NA DZIAŁANIE PROMIENIA!
NIE DOTYKAĆ SOCZEWKI LASERA.
OBSŁUGA LUB REGULACJA URZĄDZENIA, A TAKŻE POSTĘPOWANIE W SPOSÓB NIEZGODNY Z
ZAWARTYMI INSTRUKCJAMI MOŻE NARAZIĆ UŻYTKOWNIKA NA SZKODLIWE ODDZIAŁYWANIE.
ABY ZMNIEJSZYĆ RYZYKO POŻARU LUB PORAŻENIA ELEKTRYCZNEGO I DOKUCZLIWYCH
ZAKŁÓCEŃ, NALEŻY KORZYSTAĆ TYLKO Z ZALECANYCH AKCESORIÓW.
Instalacja
Unikaj instalacji na obszarach:
1) bezpośredniego nasłonecznienia, w pobliżu kaloryferów oraz w zamkniętych pojazdach
2) o wysokiej temperaturze i stopniu nawilżenia;
3) o wysokim stopniu zanieczyszczenia;
4) nadmiernych drgań, jako, że części wewnętrzne mogą zostać poważnie uszkodzone.
Przedmioty lub palce w urządzeniu
NIGDY nie pozwól, aby nikt, w szczególności dzieci, nie wkładał żadnych przedmiotów do otworów, slotów lub
innych zagłębień w urządzeniu. Może to spowodować śmierć na skutek porażenia prądem.
Unikaj przedmiotów magnetycznych:
Aby uniknąć zakłóceń, należy trzymać przedmioty magnetyczne, takie jak głośniki, w bezpiecznej odległości
od odtwarzacza.
Przechowywanie w pozycji pionowej
Ustaw odtwarzacz w pozycji pionowej. Nie umieszczaj odtwarzacza na wzmacniaczach lub innych
urządzeniach, ponieważ prowadzi to do jego przegrzania.
Page 75

Kondensacja
Jeśli urządzenie jest zawilgocone od wewnątrz, może nie działać prawidłowo. Należy wyłączyć zasilanie i
poczekać około jednej godziny na odparowanie wilgoci.
Zasilanie sieci:
Należy uwzględnić poniższe instrukcje w celu uniknięcia nieprawidłowego funkcjonowania, pożaru, obrażeń
ciała lub porażenia prądem:
• Sprawdź, czy wartość napięcia podana na plakietce urządzenia (pod spodem) odpowiada wartościom
napięcia w twoim miejscu zamieszkania. Parametry zasilania to AC 230V~50Hz.
• Połącz przewód zasilania z gniazdem AC oraz gniazdem ściennym.
• Aby odłączyć od zasilania, należy pociągnąć za wtyczkę, nie za kabel.
• Należy mocno uchwycić wtyczkę podczas podłączania oraz odłączania urządzenia od gniazda w ścianie.
• Nie dotykaj przewodu zasilania mokrymi rękami.
• Chroń przewód zasilania przed urządzeniami generującymi ciepło.
• Wyłącz odtwarzacz, jeśli spadł lub został uszkodzony w inny sposób.
Rozmieszczenie kontrolek
1. SENSOR pilota
2. Dioda LED POWER
3. PROGRAM: Tryb programowania
4. REPEAT: Tryby powtarzania
5. : Odtwarzanie/pauza
6. : Poprzedni utwór/szukanie do tyłu
7. : Następny utwór/szukanie do przodu
8. : Zatrzymanie odtwarzania
9. Wskaźnik częstotliwości
10. BAND: Selektor pasma AM / FM Mono/FM ST. FM Stereo
11. FUNCTION: Wybór źródła audio (OFF, CD, RADIO)
12. VOLUME: Kontrolka głośności
13. ◄ TUNING ►: Pokrętło
14. FM ST.: Wskaźnik stereo LED
15. Wyświetlacz LED
16. SPEAKERS (L / R): Gniazdko typu jack do głośników
lewy/prawy
17. FM ANT.: Antena FM
18. AC 230V~50Hz: Przewód zasilania
1
2
3
4
5
6
7
8
9
10
11
16
15
14
13
12
17
18
75.
Page 76

76.
Pilot
1. PLAY / PAUSE: Odtwarzanie/pauza
2. SKIP -: Poprzedni utwór/szukanie do tyłu
3. PROGRAM: Tryb programowania
4. STOP: Zatrzymanie odtwarzania
5. SKIP +: Następny utwór/szukanie do przodu
6. REPEAT: Tryby powtarzania
1
2
3
4
5
6
Instalacja i połączenia
Wkładanie baterii do pilota (brak w zestawie)
1. Zdejmij osłonę komory baterii poprzez naciśnięcie i zsunięcie.
2. Włóż 2 baterie AA typu “AAA / UM – 4”, 1.5V do komory baterii.
Sprawdź oba bieguny, zaznaczone za pomocą “+” oraz “-”
wewnątrz komory baterii.
3. Nałóż z powrotem pokrywę, aż zatrzaśnie się na komorze baterii.
Baterie- środki ostrożności
• Postępuj zgodnie z instrukcjami producenta baterii w kwestii
bezpieczeństwa oraz użytkowania.
• Przechowuj baterie z dala od dzieci oraz zwierząt.
• Nie wolno wrzucac baterii do ognia. Nie dopuszczaj do styczności baterii z gorącem lub ogniem.
• Wyrzucanie baterii: Zużyte baterie wyrzucaj według miejscowych praw i przepisów. W celu uzyskania
dalszych informacji, prosimy o kontakt z odpowiedzialnymi za utylizację władzami.
• Nie mieszaj zużytych i nowych baterii oraz baterii zwykłych z akumulatorkami.
• Nie mieszaj różnych rodzajów baterii (np. alkaliczne, cynkowo-węglowe, akumulatorki). Używaj baterii tylko
tego samego typu i o tym samym rozmiarze.
• Podczas dłuższych okresów niekorzystania z urządzenia, należy wyjąć baterie.
• Nieprawidłowe użycie baterii może doprowadzić do wycieku elektrolitu i uszkodzić komorę baterii lub
sprzyja wybuchom baterii
Uwagi dotyczące pilota:
• Jeśli zmniejsza się zasięg operacyjny pilota, oznacza to wyczerpanie baterii i konieczność ich wymiany.
• Delikatnie, lecz stanowczo naciśnij przyciski
• Skieruj pilota z odległości nie większej niż 6 m od czujnika pilota i w obrębie kąta około 60° w kierunku
okna czujnika w przednie j części urządzenia.
• Nie ustawiaj lamp w kierunku czujnika.
• Zasięg roboczy zależy od jasności w pokoju.
• Przedmioty między pilotem a oknem czujnika blokują transmisję.
• Nie korzystaj z pilota jednocześnie z pilotami do zdalnego sterowania innymi urządzeniami.
Podłączenie głośników
Rozwiń przewody głośnika i podłącz je do zacisków w głośniku SPEAKER (L / R) (16).
Podłączenie anteny
Rozwiń antenę FM FM ANT. (17) całkowicie w tylnej częsci urządzenia aby uzyskać jak najlepszy odbiór
FM.
Page 77

Instrukcje użytkowania ogólnego
Włączanie/wyłączanie
Ustawiaj selektor FUNCTION (11) zawsze w pozycji OFF jeśli urządzenie nie jest w użyciu.
Jeśli urządzenie jest włączone, dioda LED POWER świeci się na czerwono.
1. Wybierz tryb za pomocą FUNCTION (11): OFF, CD lub RADIO.
2. Dostosuj głośność za pomocą VOLUME (12) na urządzeniu.
3. Wyłącz urządzenie ustawiając FUNCTION (11) w pozycji OFF.
Radio
1. Ustaw selector FUNCTION (11) w pozycji RADIO.
2. Wybierz zasięg częstotliwości za pomocą selektora BAND (10) zasięg częstotliwości: AM, FM (FM Mono)
lub FM ST. (FM Stereo).
3. Wybierz pożądaną stację pokrętłem ◄ TUNING ► (13). Częstotliwość można odczytać na skali z pozycji
wskaźnika.
4. Jeśli selektor pasma jest ustawiony w pozycji FM ST. (FM Stereo) i odbywa się nadawanie stereo, świeci
się dioda LED FM ST. z przodu urządzenia świeci się.
5. Dostosuj głośność za pomocą VOLUME (12) na urządzeniu.
FM Mono / Stereo
- Mono: Ustaw selektor BAND (10) w pozycji FM.
- Stereo: Ustaw selektor BAND (10) w pozycji FM ST. Dioda LED FM ST. świeci się.
Zalecenia w celu uzyskania lepszego odbioru
FM: Rozwiń antenę FM ANT. całkowicie(17) z tyłu urządzenia, aby uzyskać jak najlepszy odbiór FM.
AM: Urządzenie posiada wbudowaną antenę AM. W razie problemów z odbiorem, należy zmienić lokalizację
urządzenia.
Płyty (Audio CD)
Odtwarzacz CD odczytuje tylko płyty audio CD. Nie naley odtwarzać płyt MP3 CD, CD z danymi lub płyt
VCD/DVD.
Wkładanie płyty
1. Ustaw selektor FUNCTION (11) wpozycji CD. Na ekranie miga “- -” i po kilku sekundach wyświetli się “no”.
2. Otwórz drzwiczki napędu CD, naciskając symbol /OPEN w prawej
części drzwiczek kieszeni CD. Wyświetlacz pokazuje “- -”.
3. Włóż płytę CD etykietką do góry.
4. Zamknij kieszeń CD ręcznie. Na ekranie miga “- -” i po kilku sekundach
wyświetli się całkowia liczba utworów (np. “20”).
Wyjmowanie płyty
1. Sprawdź, czy urządzenie jest w trybie stop ( (8) przycisk).
2. Otwórz kieszeń CD przyciskając symbol /OPEN z prawej strony kieszeni CD. Na ekranie miga “- -”.
3. Ostrożnie unieś płytę CD w górę nie dotykając jej powierzchni.
4. Zamknij kieszeń CD ręcznie.
5. Schowaj płytę do pudełka.
WŁÓŻ PŁYTĘ
77.
Page 78

78.
Odtwarzanie płyty
1. Włóż płytę CD (patrz rozdział “Wkładanie płyty”).
2. Rozpocznij odtwarzanie za pomocą (1) na urządzeniu lub PLAY / PAUSE (1) na pilocie. Ekran
wyświetla numer odtwarzanego utworu (np. “01.”). Kropka “.” po prawej wskazuje na tryb odtwarzania.
3. Dostosuj głośność za pomocą VOLUME (12).
4. Aby przerwać odtwarzanie przyciśnij ponownie na urządzeniu lub PLAY / PAUSE (1) na pilocie.
Numer odtwarzanego utworu miga na ekranie. Ay wznowić odtwarzanie przyciśnij (1) ponownie na
urządzeniu lub PLAY / PAUSE (1) na pilocie.
5. Aby zatrzymać odtwarzanie przyciśnij (8) na urządzeniu lub STOP (4) na pilocie, Ekran wyświetla
całkowitą liczbę utworów.
Uwagi:
Odtwarzanie płyty CD także zostanie zatrzymane jeżeli:
a. kieszeń CD zostanie otwarta za pomocą /OPEN.
b. selektor funkcji FUNCTION (11) ustawiony jest w pozycji RADIO.
c. wszystkie utwory na płycie CD zostaną odtworzone.
6. Usuń płytę CD (patrz rozdział “Wyjmowanie płyty”)
7. Wyłącz urządzenie ustawiając FUNCTION (11) w pozycji OFF.
Uwaga: Pamiętaj, że płyta CD obraca się także w trybie pauzy, nawet jeśli nie słychać dźwięku. Nie
zapomnij wyłączyć trybu pauzy, aby zapobiec niepotrzebnej pracy silnika.
Wybieranie innego utworu (PRZEJŚCIE w trybie stop i podczas odtwarzania)
Podczas odtwarzania możesz przejśc do poprzedniego lub następnego utworu za pomocą (6) lub
(7) na urządzeniu lub za pomocą SKIP - (2) lub SKIP + (5) na pilocie.
1. Podczas trybu odtwarzania, stop lub pauzy wybierz utwór i rozpocznij odtwarzanie za pomocą (1) na
urządzeniu lub PLAY / PAUSE (1) na pilocie.
2. Przez chwilę przyciskaj (7) na urządzeniu lub SKIP + (5) na pilocie aby przejść do następnego utworu
lub kilkakrotnie przyciskaj na ten przycisk, aż pożądany numer utworu wyświetli się na ekranie.
3. Przyciśnij (6) na urządzeniu lub SKIP - (2) na pilocie aby wrócić do początku obecnego utworu.
4. Przyciśnij ponownie (w ciągu 1 sekundy od pierwszego przyciśnięcia) (6) lub SKIP - (2) na pilocie aby
przejść do poprzednich utworów pojedynczo.
Wyszukiwanie pożądanej pozycji (podczas odtwarzania)
Naciśnij i przytrzymaj (6) lub (7) na urządzeniu lub SKIP - (2) lub SKIP + (5) na pilocie, aby
wyszukać pożądanego momentu utworu. Gdy przycisk zostanie zwolniony, kontynuowane będzie normalne
odtwarzanie.
UWAGA:
W trybie szukania, głośność jest zredukowana
Programowanie utworów
W dowolnej kolejności zaprogramować można do 20 utworów. Utwór można zaprogramować więcej niż raz.
Odtwarzacz CD musi być w trybie zatrzymania ( (8) na urządzeniu lub STOP (4) na pilocie).
1. Przywołaj tryb programowy za pomocą PROGAM (3) lub na pilocie. Wyświetlacz pokaże krótko “01”
(numer lokalizacji w pamięci) a później migające “00”.
2. Wybierz pożądany utwór za pomocą (6) lub (7) na urządzeniu lub za pomocą SKIP - (2) lub SKIP
+ (5) na pilocie.
3. Zachowaj wybrany tytuł przez przyciśnięcie PROGAM (3) na urządzeniu lub na pilocie.
4. Powtórz kroki 2 i 3 , aby zaprogramować kolejne utwory. Numer lokalizacji w pamięci wzrośnie
automatycznie.
5. Rozpocznij odtwarzanie zaprogramowanych utworów za pomocą (1) na urządzeniu lub PLAY /
PAUSE (1) na pilocie.
6. Przez naciśnięcie (8) dwa razy na urządzeniu lub STOP (4) na pilocie,
zaprogramowane odtwarzanie zostanie anulowane.
Page 79

Uwagi:
- Anuluj zaprogramowane utwory przez zmianę trybu lub ustawienie FUNCTION (11) w pozycji OFF.
- Naciśnij (6) lub (7) na urządzeniu lub SKIP - (2) lub SKIP + (5) na pilocie, aby przejść do
następnego lub poprzedniego utworu w zaprogramowanej kolejności.
- Przez powtórne naciskanie PROGAM (3) na urządzeniu lub pilocie, można sprawdzić zaprogramowaną
kolejność.
- Jeśli podczas programowania, nie zostanie naciśnięty żaden przycisk, nastąpi wyjście z trybu
programowania.
Tryby powtarzania
Są trzy tryby powtarzania, które mogą zostać przywołane i przełączone za pomocą REPEAT (4) na
urządzeniue lub pilocie (6)podczas trybu odtwarzania.
Każde naciśnięcie przycisku następująco zmieni tryb powtarzania :
1. Naciśnij raz REPEAT (4) na urządzeniu lub na pilocie
(6) podczas trybu odtwarzania, aby powtarzać ciagle
dany utwór. Wzkaźnik powtarzania (kropka “.” między
dwoma cyframi) na wyświetlaczu miga.
2. Naciśnij dwa razy REPEAT (4) na urządzeniu lub pilocie
POWTÓRZ 1
POWTORZ
WSZYSTKIE
NORMALNE
ODTWARZANIE
(6) w trybie odtwarzania, aby powtórzyć wszystkie utwory
na danej płycie w kolejności ich nagrania. Wzkaźnik
powtarzania (kropka “.” między dwoma cyframi) będzie
się świeciła ciągle.
3. Naciśnij jeszcze raz REPEAT (4) na urządzeniu lub pilocie (6) aby powrócić do trybu normalnego.
Wyświetlacz pokaże standardowy wskaźnik.
Posługiwanie się płytami oraz ich czyszczenie
OBCHODZENIE SIĘ Z PŁYTAMI CD
* Wyjmij płytę z pudełka.
* Nie dotykaj jej powierzchni.
* Nie przytwierdzaj na płytach naklejek, ani nie pisz po nich.
* Nie zginaj płyt CD.
Przechowywanie
* Zawsze przechowuj płyty CD w swoich pudełkach.
* Nie wystawiać na bezpośrednie działanie promieni słonecznych, wysokich temperatur, wilgotności czy
kurzu.
Czyszczenie płyt CD
* Do czyszczenia używaj tylko miękkiej szmatki.
* Płytę przecieraj ruchem od środka na zewnątrz.
79.
Page 80

80.
OD CZĘŚCI CENTRALNEJ DO KRAWĘDZI
PRAWIDŁOWO NIEPRAWIDŁOWO
ROZWIĄZYWANIE PROBLEMÓW
Jeżeli odtwarzacz wydaje się nie działać prawidłowo, należy najpierw sprawdzić poniższą listę przed
skontaktowaniem się z autoryzowanym centrum napraw.
OSTRZEŻENIE: Nigdy nie otwierać obudowy urządzenia. Wszelkie naprawy techniczne lub konserwacja powinny być skierowane do wykwalifikowanego personelu serwisowego.
PROBLEM MOŻLIWA PRZYCZYNA ROZWIĄZANIE
OGÓLNE
Brak dźwięku
Zbyt niski poziom głośności.
Niepodłączony przewód
zasilania.
Dostosuj głośność.
Podłącz prawidłowo przewód
zasilania
Klawisze nie funkcjonują
RADIO
Słaby odbiór
CD
CD przeskakuje
Wyświetlacz: “no” Brak CD w kieszeni.
Wyładowania
elektrostatyczne.
Słaby sygnał.
Zakłócenia pochodzące od
innych urządzeń (TV, VCR,
komputer, itp.).
Brudna lub uszkodzona
płyta CD.
Brudna lub uszkodzona
płyta CD.
Zaparowana głowica
laserowa.
Należy odłączyć urządzenie od
sieci na kilka sekund, a
następnie włączyć je ponownie.
Dostosuj antenę:
FM: Rozwiń antenę
AM: Pokieruj urządzeniem.
Zachowaj odpowiednią
odległość od innych urządzeń.
Wymień lub wyczyść płytę.
Włóż CD, CD-R lub CD-RW.
Wymień lub wyczyść płytę.
(Patrz “Obchodzenie się z
płytami CD”)
Poczekaj aż głowica lasera
wyschnie.
Page 81

DANE TECHNICZNE
Ogólne
Zasilanie: AC 230 V ~ 50 Hz
Pilot: DC 3V (2 baterie, typu AAA, UM – 4, 1.5 V)
Pobór mocy: 20 Watt
Radio
Zasięg częstotliwości: FM 87.5 – 108 MHz
AM 525 – 1615 kHz
Odtwarzacz CD
System odtwarzania CD : Ładowanie od góry
Optyczna głowica Pick-up: Laser o trzech promieniach
Wymiary: ok. 515 x 150 x 165 mm (W x H x D)
Waga: ok. 3,0kg
Dane techniczne mogą ulec zmianie bez uprzedniego zawiadomienia.
81.
Page 82

82.
MODEL: 2402N
Design stereo music center met CD-speler
VELIGHEIDSMAATREGELEN
ELEKTRISCHE SCHOK
PAS OP: OM HET RISICO VAN EEN
Een driehoek met een
bliksemschicht wil de
aandacht van de gebruiker
vestigen op “gevaarlijke
voltage”, zonder isolatie,
binnenin het apparaat die
hoog genoeg kan zijn om een
elektrische schok te
veroorzaken.
ELEKTRISCHE SCHOK TE
VERMINDEREN, DE BEHUIZING (OF
ACHTERKANT) NIET VERWIJDEREN.
ER ZIJN GEEN ONDERDELEN DIE
DOOR DE GEBRUIKER ONDER-
HOUDEN MOETEN WORDEN. LAAT
ONDERHOUD OVER AAN
GEKWALIFICEERD ONDERHOUD
BIJKOMENDE INFORMATIE
Let op bij kleine onderdelen en batterijen, niet doorslikken, dit kan tot ernstige schade of
verstikking leiden. Let er in het bijzonder bij kinderen op dat kleine onderdelen en batterijen buiten
hun bereik zijn.
Belangrijk advies omtrent het gehoor
Opgelet:
U geeft om uw gehoor, wij doen dat ook.
Wees daarom voorzichtig tijdens het gebruik van dit apparaat.
Onze aanbeveling: Vermijd hard geluid.
In het geval het apparaat door kinderen wordt gebruikt, zorg ervoor dat het volume niet te hard
staat.
Opgelet!
Hard geluid kan onherstelbare schade aan het gehoor van een kind veroorzaken.
WAARSCHUWING
RISICO VOOR EEN
SPERSONEEL.
Een driehoek met een
uitroepteken wil de aandacht
van de gebruiker vestigen op
belangrijke instructies voor
gebruik en onderhoud in de
bijgeleverde gebruiksaanwijzing, die zorgvuldig moeten
-
worden gelezen.
Laat NOOIT personen, in het bijzonder kinderen, voorwerpen in de gaten, schachten of andere
openingen van de behuizing steken; dit kan een dodelijke elektrische schok tot gevolg hebben.
De behuizing van het apparaat mag slechts door daartoe gekwalificeerde vaklui geopend worden.
Gebruik het apparaat alleen voor het doel waarvoor het is bestemd.
Het apparaat is uitsluitend bedoeld voor gebruik in huishoudelijke en zakelijke omgevingen.
Gelieve deze gebruiksaanwijzing zorgvuldig te bewaren voor later gebruik.
Aanwijzingen inzake de milieubescherming
Dit product mag aan het einde van zijn levensduur niet samen met het normale huishoudelijke
afval verwijderd worden, maar moet afgegeven worden op een verzamelpunt voor de recycling
van elektrische en elektronische apparatuur. Het symbool op het product, in de gebruiksaanwijz
ing of op de verpakking maakt u daarop attent.
De werkstoffen zijn volgens hun kenmerking herbruikbaar. Met het hergebruik, de stoffelijke
verwerking of andere vormen van recycling van oude apparaten levert u een belangrijke bijdrage
tot de bescherming van ons milieu.
Gelieve bij het gemeentebestuur informatie te vragen over het bevoegde verzamelpunt.
Page 83

Verhinder nooit de ventilatie van het apparaat door middel van gordijnen, kranten, dekens of
meubelstukken. De ventilatiegaten moeten altijd vrij zijn. Oververhitting kan schade veroorzaken en
de levensduur van het apparaat verkorten.
Hitte en warmte
Stel het apparaat niet bloot aan direct zonlicht. Zorg ervoor dat het apparaat niet wordt blootgesteld
aan directe hittebronnen zoals verwarmingen en open vuur.
Zorg ervoor dat de ventilatiegaten niet zijn bedekt.
Vocht en reiniging
Dit product is niet waterdicht! Doop de speler niet in water. Voorkom dat de speler met water in
contact komt. Water in het apparaat kan tot ernstige beschadiging leiden. Gebruik geen
schoonmaakmiddelen die alcohol, ammoniak, benzeen of schuurmiddel bevatten aangezien deze
middelen de speler kunnen beschadigen. Om te reinigen, gebruik een zachte, vochtige doek.
Professionele recycling
Batterijen en verpakking horen niet thuis in het huisafval. De batterijen moeten worden ingeleverd
bij een verzamelpunt voor gebruikte batterijen. Verpakkingsmateriaal gescheiden deponeren is
goed voor het milieu.
VELIGHEIDSMAATREGELEN
1. LEES DE GEBRUIKSAANWIJZING – Alle veiligheids- en bedieningsaanwijzingen dienen gelezen te
worden voordat het apparaat gebruikt wordt.
2. BEWAAR DE GEBRUIKSAANWIJZING – De veiligheids en bedieningsaanwijzingen dienen bewaard te
worden voor toekomstig gebruik.
3. NEEM WAARSCHUWINGEN IN ACHT – Alle waarschuwing op het apparaat en handleiding dienen in
acht genomen te worden.
4. VOLG DE GEBRUIKSAANWIJZINGEN OP – Alle bedienings- en gebruiksaanwijzingen dienen opgevolgd
te worden.
5. WATER EN VOCHT – Gebruik het apparaat niet in de buurt van water, bijvoorbeeld bij een badkuip,
wasbak, keukenaanrecht, wasteil, zwembad of in een vochtige kelder.
6. VENTILATIE – De openingen in het apparaat zorgen er voor dat het apparaat goed geventileerd wordt, ze
zijn nodig voor het goed functioneren and het voorkomen van oververhitting. Het apparaat dient zodanig
geplaatst te worden op een locatie dat een goede ventilatie niet door gehinderd wordt. Zet het niet op een
bed, sofa tapijt of een soortgelijk oppervlak dat de ventilatiegleuven kan blokkeren of in een ingebouwde
installatie zoals een boekenkast of kastje dat de luchtstroom door de ventilatiegleuven kan verhinderen.
7. HITTE - Het apparaat dient niet in de nabijheid van hittebronnen zoals radiatoren, warmte roosters,
kachels of andere apparaten (waaronder versterkers) die hitte produceren, te staan.
8. ENERGIEBRONNEN – Dit product dient alleen gebruik te maken van het type energiebron aangegeven
op het markeringslabel.
9. STROOMSNOER BESCHERMING – Stroomsnoeren dienen zo gelegd te worden dat er niet makkelijk
overheen gelopen kan worden of ingedrukt worden door voorwerpen die bovenop of tegen ze geplaatst
worden. Houd het electriciteitssnoer altijd bij de stekker vast wanneer u het uit het stopcontact haalt; trek
nooit aan het snoer zelf.
10. PERIODEN VAN ONBRUIK – Haal de stekkers uit het stopcontact en maak de stekker van de antenne
los als het apparaat voor langere tijd niet gebruikt gaat worden.
11. VOORWERPEN en VLOEISTOFFEN – Let er op dat er geen vreemde voorwerpen en vloeistoffen
gemorst worden in de openingen van het apparaat.
12. SCHADEONDERHOUD – Haal de stekker uit het stopcontact en breng het naar gekwalificeerd
onderhoudspersoneel in de volgende gevallen:
a. Als het stroomsnoer beschadigd is;
b. Als er vloeistof gemorst is of er voorwerpen in het apparaat gevallen zijn;
c. Als het apparaat blootgesteld is aan regen of water;
d. Het apparaat is gevallen of de behuizing is beschadigd. Gebruik de bedieningselementen
alleen zoals aangegeven in de gebruiksaanwijzing.
83.
Page 84

84.
e. Het apparaat lijkt niet normaal te functioneren.
f. Als het apparaat een duidelijke verandering in functioneren vertoont;
13. ONDERHOUD – Behalve dan wat er aangegeven staat in de handleiding, dient de gebruiker niet zelf te
proberen het apparaat te repareren. Alle reparaties dienen uitgevoerd te worden door
onderhoudspersoneel.
14. HET SCHOONMAKEN – Haal de stekker uit het stopcontact vóór het schoonmaken. Gebruik geen
vloeibare schoonmaakmiddelen of aërosolmiddelen. Gebruik een vochtige doek voor het schoonmaken.
Volg de verzorging en onderhoud instructies in de handleiding.
15. BLIKSEM – voor extra bescherming voor dit product tijdens onweer, haalt u de stekker uit het stopcontact
en ontkoppel de antenne of het kabelsysteem.
16. VEILIGHEIDSCONTROLE – Na het afronden van onderhoud of reparaties aan dit apparaat, vraag de
onderhoudsmonteur om veiligheidscontroles uit te voeren.
17. OVERBELASTING – Overbelast stopcontacten, verlengsnoer of geïntegreerde stekkerdozen omdat dit
kan resulteren in brand of een elektrische schok.
18. ELECTROSTATISCHE ONTLADING –
wanneer het toestel niet goed functioneert. Sluit het opnieuw aan na verloop van tijd.
Ontkoppel van het voedingsnet en verwijder de batterijen
OPGELET
DEZE CD-SPELER IS EEN KLASSE I LASER PRODUCT. ECHTER DEZE CD-SPELER GEBRUIKT EEN
ZICHTBARE/ONZICHTBARE LASERSTRAAL WELKE VOOR BLOOTSTELING AAN GEVAARLIJK
STRALING KAN ZORGEN ALS DEZE VRIJKOMT. ZORG ER VOOR OM DE CD TE BEDIENEN ZOALS
AANGEGEVEN.
ONZICHTBARE LASERSTRALING KOMT VRIJ WANNEER DE BEHUIZING GEOPEND WORDT OF ALS
DE INTERNE BEVEILIGING UITGESCHAKELD WORDT. VOORKOM BLOOTSTELLING AAN DE STRAAL!
RAAK DE LASERLENS NIET AAN.
VERKEERT GEBRUIK VAN DE BESTURING, AANPASSINGEN, PRESTATIES OF PROCEDURES KAN
RESULTEREN IN EEN GEVAARLIJKE BLOOTSTELLING AAN STRALING.
OM HET RISICO VAN BRAND OF ELECTROCUTIE AND STORENDE INTERFERENTE TE
VERMINDEREN DIENT U ALLEEN DE AANBEVOLEN ACCESSOIRES TE GEBRUIKEN.
Installeren
Vermijd het installeren van de speler in ruimten met:
1) direct zonlicht of radiatoren of afgesloten auto’s;
2) hoge temperatuur of hoge vochtigheid;
3) veel stof;
4) veel trillingen, omdat de interne delen ernstig beschadigd kunnen raken.
Vreemde voorwerpen en vingers in het apparaat.
Laat NOOIT iemand, vooral kinderen niet, voorwerpen in de gaten, gleuven of openingen van dit apparaat
doen. Dit kan leiden tot een fatale elektrische schok.
Vermijd magnetische objecten:
Om interferentie te vermijden dient u magnetische voorwerpen zoals luidsprekers uit de buurt van de speler te
houden.
Opstapelen:
Zet de speler in een rechtopstaande positie. Plaats de spel4er niet op versterkers of ander apparatuur wat
warm kan worden.
Page 85

Condensatie:
Als er vocht in de speler zit, dan zal het apparaat misschien niet goed functioneren. Doe de stekker uit het
stopcontact en wacht ongeveer een uur om het vocht te laten verdampen.
Stroomnetwerkaansluiting:
Neem de volgende aanwijzingen in acht om defect raken, brand, letsel of elektrocutie te voorkomen:
• Controleer of het voltage van het stroomnet werk op het label (onder de set) overeenkomt met het voltage
van uw stroomnetwerk. Het apparaat is ontworpen voor AC 230V ~ 50Hz.
• Sluit het stroomsnoer aan op de netwisselspanning fitting en het stopcontact.
• Om de stekker uit het stopcontact te houden trek aan de stekker en niet aan de kabel.
• Houd de stekker goed vast bij het aansluiten of ontkoppelen er van uit het stopcontact.
• Raak het stroomsnoer niet aan niet aan met natte handen.
• Bescherm het stroomsnoer tegen hitte producerende apparaten.
• Schakel de speler uit als het gevallen is of op een andere wijze beschadigd is geraakt.
Waar zit wat
1. SENSOR voor de afstandsbediening
2. POWER LED
3. PROGRAM: Programmeermodus
4. REPEAT: Herhaalmodus
5. : Start/pauze
6. : Vorige track / track terugspoelen
7. : Volgende track / track vooruitspoelen
8. : Stop afspelen
9. Frequentieweergave
10. BAND: Bandkeuzeschakelaar AM / FM Mono/FM ST. FM
Stereo
11. FUNCTION: Selectie van de audiobron (OFF, CD, RADIO)
12. VOLUME: Volumeregeling
13. ◄ TUNING ►: Draaiknop
14. FM ST.: LED Stereoweergave
15. LED display
16. SPEAKERS (L / R): Luidsprekeruitgang links/rechts
17. FM ANT.: FM draadantenne
18. AC 230V~50Hz: Voedingskabel
1
2
3
4
5
6
7
8
9
10
11
16
15
14
13
12
17
18
85.
Page 86

86.
Afstandsbediening
1. PLAY / PAUSE: Start/pauze
2. SKIP -: Vorige track / track terugspoelen
3. PROGRAM: Programmeermodus
4. STOP: Stop afspelen
5. SKIP +: Volgende track / track vooruitspoelen
6. REPEAT: Herhaalmodus
1
2
3
4
5
6
Installatie en aansluitingen.
Hoe de batterijen (niet meegeleverd) in de afstandbediening te doen.
1. Verwijder het batterijcompartimentdeksel door het naar beneden te
drukken en het naar buiten te schuiven.
2. Doe er 2 AAA-batterijen, in van het type AAA /UM – 4. Neem de juiste
polariteit zoals aangegeven met “+” en “-“ aan de binnenkant van het
batterijcompartiment, in acht.
3. Doe de deksel er opnieuw op door het op het batterijcompartiment te
drukken totdat het vastklikt.
Voorzorgsmaatregels m.b.t. batterijen.
• Neem de veiligheids- en, gebruiksaanwijzingen van de batterijfabrikant in acht.
• Houd batterijen uit de buurt van kinderen en huisdieren.
• Gooi de batterijen niet in vuur. Stel de batterijen nooit bloot aan hitte of vuur.
• Batterijen verwijderen: Dank uitgeputte batterijen af conform lokale wetgeving en regulaties. Voor meer
informatie, neem a.u.b. contact op met uw autoriteiten i.v.m. afvalverwerking.
• Combineer geen uitgeputte met nieuwe batterijen of normale met oplaadbare batterijen.
• Combineer geen verschillende types batterijen (bijv. alkaline, zink/koolstof, oplaadbare batterijen). Gebruik
uitsluitend batterijen van hetzelfde type en dezelfde afmeting.
• Verwijder de batterijen wanneer het apparaat voor langere tijd niet gebruikt gaat worden.
• Verkeerd gebruik van batterijen kan lekken van het elektrolyt veroorzaken en het batterijcompartiment laten
corroderen of de batterijen laten barsten.
Opmerking over de afstandbediening:
• Als de reikwijdte van de afstandbediening korter wordt, dan zijn de batterijen bijna leeg en dienen deze
vervangen te worden.
• Druk zacht maar stevig op de toetsen.
• Richt de afstandbediening niet verder dan ongeveer 6 m van de afstandsbedieningsensor en binnen een
hoek van 60° naar het sensorvenster aan de voorzijde van het apparaat.
• Richt geen felle lampen op de sensor.
• De functioneringsreikwijdte is afhankelijk van de helderheid in de kamer.
• Voorwerpen tussen de afstandbediening en het sensorvenster blokkeren de transmissie.
• Gebruik de afstandbediening niet tegelijkertijd met afstandbedieningen van andere apparaten.
Het aansluiten van de luidsprekers
Wikkel de luidspreker draden af en sluit deze aan op de luidsprekeraansluitingen: SPEAKER (L/R) (16).
Page 87

Antenneverbinding
Wikkel de FM draadantenne FM ANT. (17) op de achterkant van het apparaat volledig uit voor de beste FM
ontvangst.
Algemene Gebruiksaanwijzingen
Aan/Uit
Stel de FUNCTION (11) keuzeschakelaar altijd in op stand OFF position, wanneer het apparaat niet in
gebruik is.
Als het apparaat ingeschakeld is, licht de POWER LED rood op.
1. Selecteer de modus met FUNCTION (11): OFF, CD of RADIO.
2. Pas het volume aan met VOLUME (12) op het apparaat.
3. Schakel het apparaat uit door FUNCTION (11) op stand OFF te zetten.
Radio
1. Stel de FUNCTION keuzeschakelaar (11) in op stand RADIO.
2. Selecteer met de BAND keuzeschakelaar (10) het frequentiebereik: AM, FM (FM Mono) of FM ST.
(FM Stereo).
3. Selecteer het gewenste station met de ◄ TUNING ► draaiknop (13). De frequentie kan afgelezen worden
op de frequentieweergave bij de positie van de pointer.
4. Wanneer de bandkeuzeschakelaar ingesteld is op FM ST. (FM Stereo) en een stereo uitzending wordt
ontvangen, licht de FM ST. LED op de voorkant van het apparaat op.
5. Pas het volume aan met VOLUME (12) op het apparaat.
FM Mono / Stereo
- Mono: Stel de BAND keuzeschakelaar (10) in op FM.
- Stereo: Stel de BAND keuzeschakelaar (10) in op FM ST. De FM ST. LED zal oplichten.
Aanbevelingen voor betere ontvangst
FM: Wikkel de FM draadantenne FM ANT. (17) op de achterkant van het apparaat volledig uit voor de beste
FM ontvangst.
AM: Het apparaat is voorzien van een ingebouwde AM antenne. Verplaats het apparaat als de ontvangst
slecht blijkt.
Disk (Audio CD)
De CD-speler kan uitsluitend audio CD’s afspelen. Probeer nooit MP3 CD’s, Data CD’s of VCD/DVD’s af te
spelen.
Een disk plaatsen
1. Stel de FUNCTION keuzeschakelaar (11) in op stand CD. Op de display
knippert “- -“ en na enkele seconden zal “no“ worden aangegeven.
2. Open het klepje van de CD-houder door op het symbooltje /OPEN op de
rechterzijde van het CD-klepje te drukken. De display vertoont “- -“.
3. Plaats een CD met de bedrukte zijde omhoog wijzend.
4. Sluit het klepje van de CD-houder handmatig. Op de display knippert “- -“ en na enkele seconden zal het
totaal aantal tracks (bijv. “20“) worden aangegeven.
Een disk er uithalen
1. Zorg voor dat het apparaat in stopmodus staat ( (8) toets).
2. Open het klepje van de CD-houder door op het symbooltje /OPEN op de rechterzijde van het CD-klepje
te drukken. De display vertoont “- -“.
3. Haal de CD er voorzichtig omhoog uit, zonder het oppervlak aan te raken.
4. Sluit het klepje van de CD-houder handmatig
5. Bewaar de CD in het bestemde doosje.
EEN DISK PLAATSEN
87.
Page 88

88.
Een disk afspelen
1. Plaats een CD (zie paragraaf “Een disk plaatsen“).
2. Start het afspelen met (1) op het apparaat of PLAY / PAUSE (1) op de afstandsbediening. De display
vertoont het huidige tracknummer (bijv. “01.“). Het puntje „.“ aan de rechterkant verwijst naar de
afspeelmodus.
3. Pas het volume aan met VOLUME (12).
4. Om het afspelen te pauzeren drukt u nogmaals op op het apparaat of PLAY / PAUSE (1) op de
afstandsbediening. Het huidige tracknummer knippert op de display. Hervat het afspelen door nogmaals
op (1) op het apparaat te drukken of op PLAY / PAUSE (1) op de afstandsbediening.
5. Druk op (8) op het apparaat of op STOP (4) op de afstandsbediening om het afspelen te stoppen, de
display geeft het totaal aantal tracks aan.
Opmerkingen:
Het afspelen van een CD wordt tevens geannuleerd wanneer:
a. het klepje van de CD-houder wordt geopend met /OPEN.
b. de functiekeuzeschakelaar FUNCTION (11) wordt ingesteld op stand RADIO.
c. alle tracks van de CD zijn afgespeeld.
6. Haal de CD eruit (zie paragraaf “Een disk er uithalen“).
7. Zet het apparaat uit door FUNCTION (11) op stand OFF te zetten.
Opmerking: Vergeet niet dat de CD ook in pauzemodus blijft draaien, zelfs als u geen geluid kunt horen.
Het is dus belangrijk de pauzemodus uit te schakelen, om onnodige werking van de motor te vermijden.
Een andere track selecteren (OVERSLAAN in de stopmodus en tijdens het afspelen)
Tijdens het afspelen kunt u overslaan naar de vorige of volgende track met (6) of (7) op het
apparaat of met SKIP - (2) of SKIP + (5) op de afstandsbediening.
1. Selecteer de track tijdens het afspelen, in stop –of pauzemodus en start het afspelen met (1) op het
apparaat of met PLAY / PAUSE (1) op de afstandsbediening.
2. Druk kort op (7) op het apparaat of SKIP + (5) op de afstandsbediening om over te slaan naar de
volgende track of druk meerdere keren op deze toets, totdat het gewenste tracknummer op de display
verschijnt.
3. Druk op (6) op het apparaat of SKIP - (2) op de afstandsbediening om terug te keren naar het begin
van de huidige track.
4. Druk nogmaals (binnen 1 seconden na de eerste keer indrukken) op (6) of SKIP - (2) op de
afstandsbediening om telkens één track terug over te slaan.
Naar een bepaalde positie spoelen (tijdens het afspelen)
Houd (6) of (7) op het apparaat of SKIP - (2) of SKIP + (5) op de afstandsbediening ingedrukt om
naar de gewenste positie binnen de track te spoelen. Wanneer u de toets loslaat, vervolgt het normale
afspelen.
Opmerking: In spoelmodus wordt het volume verlaagd.
Tracks programmeren
Maximaal 20 tracks kunnen in een door u gekozen volgorde geprogrammeerd worden. Dezelfde track kan
meer dan één keer geprogrammeerd worden. De CD-speler moet in stopmodus staan ( (8) op het
apparaat of STOP (4) op de afstandsbediening).
1. Start de programmermodus met PROGAM (3) op het apparaat of de afstandstandsbediening. De display
geeft kort “01“ weer (nummer van de geheugenlokatie) en vervolgens knippert “00“.
2. Selecteer de gewenste track met (6) of (7) op het apparaat of met SKIP - (2)
of SKIP + (5) op de afstandsbediening.
3. Sla de geselecteerde titel op door PROGAM (3) in te drukken op het apparaat of de afstandsbediening.
4. Herhaal de stappen 2 en 3 om meerdere tracks te programmeren. Het nummer van de geheugenlokatie
zal automatisch verhoogd worden.
5. Start het afspelen van de geprogrammeerde tracks met (1) op het apparaat of met PLAY / PAUSE (1)
Page 89

op de afstandsbediening.
6. Door tweemaal op (8) op het apparaat of STOP (4) op de afstandsbediening te drukken zal het
geprogrammeerd afspelen geannuleerd worden.
Opmerkingen:
- Wis de geprogrammeerde tracks door de modus te veranderen of door FUNCTION (11) op stand OFF te
zetten.
- Druk op (6) of (7) op het apparaat of SKIP - (2) op SKIP + (5) op de afstandsbediening om over
te slaan naar de vorige of volgende track in de geprogrammeerde volgorde.
- Door meerdere malen op PROGAM (3) op het apparaat of de afstandsbediening te drukken kunt u de
geprogrammeerde volgorde controleren.
- Als binnen 30 seconden tijdens het programmeerproces geen toets wordt ingedrukt, zal de
programmeermodus afgebroken worden.
Herhaalmodi
Er zijn drie herhaalmodi beschikbaar, welke geactiveerd en verwisseld kunnen worden met REPEAT (4) op
het apparaat of de afstandsbediening (6).
Elke keer dat u de toets indrukt, verandert de herhaalmodus als volgt:
1. Druk tijdens het afspelen eenmaal op REPEAT (4) op het
apparaat of de afstandsbediening (6) om de huidige track
continu te herhalen. De herhaalindicatie (puntje “.“ tussen de
twee cijfers) knippert op de display.
2. Druk tijdens het afspelen tweemaal op REPEAT (4) op het
HERHAAL 1 HERHAAL
ALLE
NORMAAL
AFSPELEN
apparaat of de afstandsbediening (6) om alle tracks van de
huidige disk in de opgenomen volgorde ervan te herhalen.
De herhaalindicatie (puntje “.“ tussen de twee cijfers) zal permanent oplichten.
3. Druk tijdens het afspelen nogmaals op REPEAT (4) op het apparaat of de afstandsbediening (6) om terug
te keren naar normale afspeelmodus. De display zal de standaard indicatie aangeven.
Het behandelen en schoonmaken van disks.
OMGAAN MET CD´s
* Haal de CD uit het doosje.
* Raak de oppervlakken niet aan.
* Plak geen stickers op de CD’s en schrijf er niet op.
* Buig CD’s niet.
Bewaren
* Bewaar CD’s altijd in de doosjes.
* Stel de CD's niet bloot aan direct zonlicht, hoge temperaturen, vocht of stof.
Reinigen van CD’s
* Reinig CD’s met een zachte doek.
* Veeg vanuit het midden naar de rand over de CD’s.
89.
Page 90

90.
VANUIT HET MIDDEN NAAR DE RAND TOE
CORRECT INCORRECT
PROBLEEMOPLOSSING
Wanneer u problemen met dit apparaat ondervindt, raadpleeg dan eerst onderstaande lijst voordat u contact
opneemt met de klantenservice.
WAARSCHUWING: Open het apparaat nooit. Laat onderhoud of reparatie altijd over aan gekwali
ficeerd onderhoudspersoneel.
Probleem Mogelijke oorzaak Oplossing
ALGEMEEN
Geen geluid.
Het volume is te laag
ingesteld.
De voedingskabel is niet
aangesloten.
Pas het volume aan.
Sluit de voedingskabel correct
aan.
-
De toetsen functioneren
niet.
RADIO
Slechte ontvangst.
CD
CD slaat over
Display: „no“ Geen CD geplaats.
Elektrostatische ontlading. Haal de stekker uit het
Zwak signaal
Interferenties van andere
apparaten (TV, videorecorder,
computers enz.).
De CD is vuil of beschadigd. Maak de disk schoon of
De CD is vuil of beschadigd.
De laserlens is beslagen.
stopcontact voor enkele
seconden en schakel het
apparaat dan weer in.
Pas de antenne aan:
FM: Draadantenne.
AM: Richt het gehele apparaat.
Houd het uit de buurt van
andere apparatuur.
vervang het.
Plaats een CD, CD-R of
CD-RW.
Vervang de disk of maak deze
schoon.(Zie „CD’s hanteren“)
Wacht totdat de laserlens
droog is.
Page 91

SPECIFICATIES
Algemeen
Voeding: 230V~50Hz AC(wisselstroom)
Afstandsbediening: DC 3V (2 batterijen, type AAA, UM – 4, 1,5 V)
Stroomverbruik: 20 Watt
Radio
Frequentiebereik: FM 87.5 – 108 MHz
AM 525 – 1615 kHz
CD-speler
CD Afspeelsysteem: Toplader
Optische Pick-up Lens: 3 – Stralen Laser
Afmetingen: ongeveer. 515 x 150 x 165 mm (B x H x D)
Gewicht: ongeveer. 3,0kg
Specificaties kunnen veranderd worden zonder voorafgaande kennisgeving.
91.
Page 92

92.
MODEL: 2402N
Design stereo hudební centrum s přehrávačem CD
BEZPEČNOSTNÍ POKYNY
VAROVÁNÍ
NEBEZPEČÍ ZÁSAHU
Trojúhelník se symbolem
blesku upozorňuje uživatele
na neizolované „nebezpečné
napětí“ uvnitř přístroje, které
je dostatečně vysoké, aby
mohlo znamenat nebezpečí
zásahu elektrickým proudem.
ELEKTRICKÝM PROUDEMNEOTE-
UPOZORNĚNÍ: KE SNÍŽENÍ RIZIKA
ZÁSAHU ELEKTRICKÝM PROUDEM
NEODSTRAŇUJTE KRYT (NEBO
ZADNÍ ČÁST) UVNITŘ NEJSOU
ŽÁDNÉ UŽIVATELEM VYMĚNITELNÉ
SOUČÁSTKY S OPRAVOU SE
OBRAŤTE NA KVALIFIKOVANÉHO
VÍRAT
TECHNIKA.
DOPLŇUJÍCÍ INFORMACE
Pozor na malé díly a baterie. Spolknutí těchto předmětů může vést k vážnému zranění, nebo
udušení.
Hlavně dbejte na to, aby malé díly a baterie nebyly v dosahu dětí.
Důležitá rada týkající se ochrany sluchu
Upozornění:
Máme starost o váš sluch tak jako vy.
Proto používejte tento spotřebič s rozvahou.
Naše doporučeni: Nepoužívejte vysoké hlasitosti.
V případě, že je spotřebič používán dětmi, přesvědčte se, že není hlasitost příliš vysoká.
Upozornění!
Vysoká hlasitost může způsobit nenapravitelnou ztrátu dětského sluchu.
Trojúhelník se symbolem
vykřičníku upozorňuje
uživatele na důležité
instrukce k používání a
údržbě spolu s návodem,
který je třeba prostudovat.
Nenechte NIKDY osoby, zvláště děti, strkat předměty do dírek, zdířek, nebo jiných otvorů na
přístroji.
Může to vést ke smrtelnému zranění elektrickým proudem. Pouzdro přístroje smí otevřít jedině
odborník.
Použijte spotřebič pouze k účelu k jakému je určen.
Přístroj je určen výhradně pro použití v obytných a obchodních oblastech.
Prosíme, uschovejte si pečlivě tento návod k obsluze pro pozdější upotřebení.
Upozornění k ochraně životního prostředí
Tento výrobek se nesmí po ukončení své životnosti likvidovat s normálním domovním odpadem,
ale musí být odevzdán na sběrném místě pro recyklaci elektrických a elektronických přístrojů.
Symbol na výrobku, návodu k použití či obalu na to upozorňuje.
Materiály jsou recyklovatelné podle svých označení. Recyklací, využitím materiálů nebo jinou
formou zužitkování starých přístrojů důležitým způsobem přispíváte k ochraně našeho životního
prostředí.
Zeptejte se prosím obecní správy na příslušné likvidační místo.
Page 93

Neblokujte větrání přístroje tím, že jej např. přikryjete látkou, novinami, nebo jiným kusem nábytku.
Otvory pro větrání musí zůstat vždy volné.
Přehřátí může způsobit poškození a zkrátit životnost přístroje.
Teplo a horko
Nevystavujte spotřebič přímému slunečnímu záření. Přesvědčte se, že spotřebič není vystaven
přímému zdroji tepla jako jsou topná tělesa nebo přímý plamen. Přesvědčte se, že ventilační
štěrbiny u spotřebiče nejsou zakryty.
Vlhkost a čištění
Tento spotřebič není vodotěsný! Neponořte spotřebič do vody. Nenechte spotřebič přijít do kontaktu
s vodou. Voda vniknoucí do spotřebiče může tento spotřebič vážně poškodit.
K čistění nepoužívejte čistící prostředky, které obsahují alkohol, čpavek, benzín nebo hrubé
předměty protože by poškodily spotřebič. Jako čisticí prostředek použijte navlhčený jemný kus látky.
Sběr odpadu
Baterie a obalový materiál nepatří do domácího odpadu. Baterie musí být vráceny do speciální
sběrny pro použité baterie. Oddělení obalového materiálu je z ekologického a ekonomického
hlediska výhodné.
BEZPEČNOSTNÍ POKYNY
1. ČTĚTE POKYNY – před započetím manipulování se zařízením je nutné pročíst veškeré bezpečnostní
pokyny a návod k použití.
2. UCHOVEJTE POKYNY – návod k použití a bezpečnostní pokyny musí být uchovány pro další použití.
3. VĚNUJTE POZORNOST VAROVÁNÍM – musí být dodržována veškerá varování a návod k použití.
4. DODRŽUJTE POKYNY – veškeré provozní pokyny musí být dodržovány.
5. VODA A VLHKOST – zařízení se nesmí používat v blízkosti vody, např. poblíž vany, umyvadla, dřezu,
prádelní kádě, ve vlhkém sklepení či v blízkosti plaveckého bazénu.
6. VĚTRÁNÍ – otvory v zařízení slouží pro správné odvětrání a jsou nezbytné pro provoz a zabraňují
přehřátí. Zařízení by mělo být umístěné tak, aby díky svému umístění či poloze nebylo zabráněno
správné ventilaci. Nepokládejte na postel, pohovku, koberec či podobné plochy, které mohou ucpat
ventilační otvory. Nevkládejte do knihoven či vestavěných skříní, které mohou zabraňovat proudění
vzduchu ventilačními otvory.
7. TEPLO – zařízení by mělo být umístěno v dostatečné vzdálenosti od tepelných zdrojů, jako jsou radiátory,
kamna či jiná zařízení (včetně zesilovačů), které produkují teplo.
8. ZDROJ ENERGIE – zařízení musí být zapojeno do takového typu síťového napájení, jenž je uvedeno v
provozních pokynech nebo označeno na zařízení.
9. OCHRANA PŘÍVODNÍHO KABELU – přívodní kabely by měly být vedeny tak, aby se na ně nešlapalo,
aby nebyly stlačovány předměty nad nebo vedle nich. Při vypojování zařízení z elektrické zásuvky vždy
držte raději zástrčku než přívodní kabel – nikdy netahejte za kabel.
10. NEPOUŽÍVÁNÍ – během delšího období, kdy přístroj nepoužíváte, odpojte přístroj ze sítě a od antény.
11. VNIKNUTÍ PŘEDMĚTŮ A KAPALIN – Dávejte dobrý pozor, aby na přístroj nebo do jeho otvorů nespadly
předměty nebo se do nich nerozlily kapaliny.
12. POŠKOZENÍ VYŽADUJÍCÍ SERVIS – zařízení musí opravit kvalifikovaný servisní technik v následujících
případech:
a. přívodní kabel či zástrčka je poškozená.
b. do zařízení vnikly předměty či natekla kapalina.
c. zařízení bylo vystaveno na dešti či ve vodě.
d. Zařízení spadlo na zem nebo je poškozený kryt. Používejte pouze ovládací a regulační prvky dle
pokynů v příručce.
e. Zdá se, že přístroj nepracuje normálně.
f . zařízení prokazuje patrnou změnu ve svém výkonu.
93.
Page 94

94.
13. SERVIS – uživatel nesmí provádět údržbu jiným způsobem, než který je uveden v návodu k použití.
Veškeré opravy musí provádět kvalifikovaný servisní technik.
14. ČIŠTĚNÍ – před čištěním vypojte zařízení z el. sítě. Nepoužívejte tekuté čističe, používejte pouze vlhký
hadřík. Dodržujte instrukce pro údržbu a péči, uvedené v této příručce.
15. BOUŘKA –
16. BEZPEČNOSTNÍ KONTROLA –
bezpečnostní kontroly.
17. PŘETÍŽENÍ – aby nedošlo ke vzniku požáru či úrazu elektrickým proudem, nepřetěžujte el. zásuvky a
zabudované zdířky.
18. ELEKTROSTATICKÝ VÝBOJ –
zařízení. Po krátké době opět připojte.
zařízení vypojte ze sítě a od antény při bouřce a pokud se zařízení delší dobu nepoužívá.
pro provedení opravy požádejte zákaznický servis o provedení
zařízení vypojte z el. zásuvky a vyjměte baterie v případě poruchy na
UPOZORNĚNÍ
TENTO CD PŘEHRÁVAČ SPADÁ DO LASEROVÝCH VÝROBKŮ TŘÍDY I. V TOMTO CD PŘEHRÁVAČI SE
POUŽÍVÁ VIDITELNÝ / NEVIDITELNÝ LASEROVÝ PAPRSEK, VYSTAVENÍ JEHO ZÁŘENÍ MŮŽE BÝT
NEBEZPEČNÉ. POUŽÍVEJTE CD PŘEHRÁVAČ POUZE DLE POKYNŮ.
NEVIDITELNÉ LASEROVÉ ZÁŘENÍ PŘI OTEVŘENÉM KRYTU ČI PŘERUŠENÍ BEZPEČNOSTNÍ
POJISTKY. NEVYSTAVUJTE SE PAPRSKU!
NEDOTÝKEJTE SE LASEROVÝCH ČOČEK.
JINÉ POUŽITÍ A ÚPRAVY OVLÁDÁNÍ, NASTAVENÍ, VÝKONU, ČI POSTUPŮ NEŽ JAKÉ JSOU POPSÁNY V
TÉTO PŘÍRUČCE MŮŽE BÝT PŘÍČINOU VYSTAVENÍ SE NEBEZPEČNÉ RADIACI.
PRO SNÍŽENÍ NEBEZPEČÍ POŽÁRU NEBO ÚRAZU ELEKTRICKÝM PROUDEM A TAKÉ RUŠENÍ
POUŽÍVEJTE POUZE DOPORUČENÉ PŘÍSLUŠENSTVÍ.
Instalace
Neinstalujte přehrávač v místech, která jsou vystavena:
1) přímému slunečnímu světlu, v blízkosti topidel nebo v uzavřeném automobilu;
2) vysoké teplotě nebo vysoké vlhkosti;
3) nadměrné prašnosti;
4) nadměrným otřesům, protože by se mohly vážně poškodit vnitřní části.
Cizí předměty nebo prsty v zařízení
NIKDY nedovolte nikomu, obzvláště dětem, aby vkládali předměty nebo prsty do otvorů, slotů nebo
otevřených částí tohoto zařízení. Mohlo by to vést k úmrtí vzhledem k úrazu elektrickým proudem.
Nevystavujte magnetickým předmětům:
Abyste předešli interferencím, udržujte magnetické předměty, jako například reproduktory, v dostatečné
vzdálenosti od přehrávače.
Ukládání na sebe
Umístěte přehrávač v kolmé poloze. Nepokládejte přehrávač na zesilovače nebo další zařízení, která se
mohou zahřívat.
Kondenzace
Jestliže se uvnitř přehrávače kondenzuje pára, nemusí fungovat správně. Prosím odpojte přehrávač od zdroje
elektrické energie a počkejte asi hodinu, dokud se vlhkost nevypaří.
Page 95

Napájení ze sítě:
Dodržujte následující pokyny, abyste předešli poruše, požáru, zranění nebo úrazu elektrickým proudem:
• Zkontrolujte, zda napětí sítě uvedené na štítku přístroje (pod přístrojem) koresponduje s vašim lokálním
napětím sítě. Tento přístroj je navržen pro napětí ST 230V~50Hz.
• Připojte síťovou šňůru do síťového konektoru AC (ST) a do zásuvky na stěně.
• Abyste odpojili šňůru ze zásuvky na stěně, vytáhněte ze stěny pouze zástrčku a ne kabel.
• Držte pevně zástrčku, když ji připojujete nebo odpojujete ze zásuvky na stěně.
• Nedotýkejte se napájecí šňůry mokrýma rukama.
• Chraňte napájecí šňůru před zařízeními, která vyvíjejí teplo.
• Prosím vypněte přehrávač, jestliže vám upadl nebo se jinak poškodil.
Umístění ovládacích prvků
1. Čidlo SENSOR dálkového ovladače
2. KONTROLKA POWER
3. PROGRAM: Režim programování
4. REPEAT: Režimy opakování
5. : Přehrávat/Pozastavit
6. : Předchozí stopa / vyhledávat stopu vzad
7. : Další stopa / vyhledávat stopu vpřed
8. : Zastavit přehrávání
9. Údaj frekvence
10. BAND: Volič pásma AM / FM Mono/FM ST. FM Stereo
11. FUNCTION: Výběr audio zdroje (OFF, CD, RADIO)
12. VOLUME: Ovládání hlasitosti
13. ◄ TUNING ►: Otočný knoflík
14. FM ST.: Kontrolka označení sterea
15. Displej LED
16. SPEAKERS (L / R): Zdířka reproduktoru - levý/pravý
17. FM ANT.: Prutová anténa FM
18. AC 230V~50Hz: Síťový kabel
1
2
3
4
5
6
7
8
9
10
11
16
15
14
13
12
17
18
95.
Page 96

96.
Dálkový ovladač
1. PLAY / PAUSE: Přehrávat/Pozastavit
2. SKIP -: Předchozí stopa / vyhledávat stopu vzad
3. PROGRAM: Režim programování
4. STOP: Zastavit přehrávání
5. SKIP +: Další stopa / vyhledávat stopu vpřed
6. REPEAT: Režimy opakování
1
2
3
4
5
6
INSTALACE A ZAPOJENÍ
Vložte baterie do dálkového ovladače (nejsou součástí dodávky)
1. Vysuňte kryt oddělení pro baterie jeho stlačením dolů a vysunutím
krytu směrem ven.
2. Vložte dvě AA baterie typu “AAA / UM – 4”, 1,5V do oddělení pro
baterie. Prosím zachovejte správnou polaritu, která je vyznačena
symboly “+” a “-” uvnitř oddělení pro baterie.
3. Nasuňte zpět kryt jeho zatlačením na oddělení pro baterie dokud
nezaskočí.
Bezpečnostní opatření týkající se baterie
• Dodržujte pokyny týkající se bezpečnosti, použití a likvidace vydané výrobcem.
• Udržujte baterie mimo dosah dětí a domácích zvířat.
• Nevhazujte baterie do ohně. Nikdy nevystavujte baterie teplu nebo ohni.
• Nakládání s bateriemi: Nakládejte s prázdnými bateriemi podle místních zákonů a předpisů. Další
informace požadujte od úřadu, pověřeným likvidací odpadu.
• Nekombinujte prázdné a nové baterie či běžné a nabíjecí baterie.
• Nekombinujte baterie různých typů (např. alkalické, zinko-uhlíkové, nabíjecí baterie). Používejte pouze
baterie stejného typu a velikosti.
• Během delšího období nepoužívání prosím vyjměte baterie ven.
• Špatné použití baterií může zapříčinit vytečení elektrolytu a korozi v oddělení pro baterie nebo požár
baterií.
Poznámky k dálkovému ovladači:
• Jestliže provozní rozsah dálkového ovladače se zmenší, baterie jsou vybité a musí být vyměněny.
• Tlačítka na ovladači stiskněte jemně, ale pevně.
• Nasměrujte jednotku dálkového ovladače ne více než ze 6 m od snímače dálkového ovladače a v rámci
úhlu 60° vůči okénku snímače na přední straně zařízení.
• Nesměrujte jasné světelné zdroje směrem ke snímači.
• Provozní dosah je závislý na světelných podmínkách místnosti.
• Předměty umístěné mezi dálkovým ovladačem a okénkem snímače naruší přenos.
• Nepoužívejte dálkový ovladač současně s dálkovými ovladači dalších přístrojů.
Připojení reproduktorů
Odmotejte kabely reproduktorů a připojte je k levému (L) a pravému (R) terminálu reproduktorů SPEAKER (L
/ R) (16).
Page 97

Připojení antény
Zcela rozviňte prutovou FM anténu FM ANT. (17) na zadní straně přístroje pro nejkvalitnější příjem FM.
Obecné provozní pokyny
ZAPNUTÍ / VYPNUTÍ
Jestliže se přístroj nepoužívá, vždy nastavte přepínač FUNCTION (11) do polohy OFF.
Jestliže je přístroj zapnutý, kontrolka POWER svítí červeně.
1. Zvolte režim pomocí FUNCTION (11): OFF, CD či RADIO.
2. Nastavte hlasitost pomocí tlačítka VOLUME (12) na přístroji.
3. Přístroj vypněte nastavením přepínače FUNCTION (11) do polohy OFF.
Rádio
1. Nastavte přepínač (11) FUNCTION do polohy RADIO.
2. Frekvenční rozsah zvolte pomocí voliče BAND (10): AM, FM (FM Mono) či FM ST. (FM Stereo).
3. Zvolte požadovanou stanici pomocí otočného knoflíku ◄ TUNING ► (13). Frekvenci je možné číst na
číselníku frekvence v pozici ukazatele.
4. Jestliže je volič pásma nastaven na FM ST. (FM Stereo) a je přijímáno vysílání, kontrolka přístroje FM ST.
svítí.
5. Nastavte hlasitost pomocí tlačítka VOLUME (12) na přístroji.
FM Mono / Stereo
- Mono: Nastavte přepínač BAND (10) do polohy FM.
- Stereo: Nastavte přepínač BAND (10) do polohy FM ST. Indikátor FM ST se rozsvítí.
Doporučení pro zlepšení příjmu
FM: Zcela rozviňte prutovou FM anténu FM ANT. (17) na zadní straně přístroje pro nejkvalitnější příjem FM.
AM: Přístroj má vestavěnou anténu AM. Pokud je příjem slabý, změňte polohu přístroje.
Disk (audio CD)
CD přehrávač může přehrávat pouze audio CD. Nikdy se nepokoušejte přehrávat disky MP3, datové disky či
disky VCD/DVD.
Vkládání disků
1. Nastavte přepínač (11) FUNCTION do polohy CD. Na displeji se rozbliká “- -” a po několika vteřinách se
zobrazí nápis “no”.
2. Otevřete dvířka jednotky CD zatlačením na znak /OPEN, který se
nachází na pravé straně dvířek CD. Na displeji se zobrazí nápis “- -“.
3. Vložte CD vždy potisknutou stranou nahoru.
4. Ručně otevřete dvířka mechaniky CD. Na displeji začne blikat nápis
“- -” a po několika vteřinách se zobrazí celkový počet stop (např. “20”).
Vyjmutí disku
1. Ujistěte se, že je přístroj v režimu zastavení (tlačítko (8)).
2. Otevřete dvířka jednotky CD zatlačením na znak /OPEN, který se nachází na pravé straně dvířek CD.
Na displeji se zobrazí nápis “- -”.
3. Vyjměte opatrně CD směrem nahoru, aniž se dotknete jeho povrchu.
4. Ručně otevřete dvířka mechaniky CD.
5. Uložte vyjmuté CD do příslušného obalu.
VLOŽTE DISK
97.
Page 98

98.
Přehrávání disku
1. Vložte disk CD (viz. část “Vložení disku”).
2. Spusťte přehrávání pomocí tlačítka (1) na přístroji či tlačítka PLAY / PAUSE (1) na dálkovém ovladači.
Na displeji se zobrazí číslo aktuální stopy (např. “01.”). Tečka “.” napravo značí režim přehrávání.
3. Nastavte hlasitost pomocí ovladače VOLUME (12).
4. Pozastavte přehrávání opětovným stlačením tlačítka na přístroji či tlačítka PLAY / PAUSE (1) na
dálkovém ovladači. Číslo aktuální stopy začne blikat na displeji. Spusťte přehrávání opět stlačením
tlačítka (1) na přístroji či tlačítka PLAY / PAUSE (1) na dálkovém ovladači.
5. Pokud chcete zastavit přehrávání, stlačte tlačítko (8) na přístroji či tlačítko STOP (4) na dálkovém
ovladači. Na displeji se zobrazí celkový počet stop.
Poznámky:
Přehrávání disku CD se také zastaví pokud:
a. jsou dvířka jednotky CD otevřená tlačítkem /OPEN.
b. je přepínač funkcí FUNCTION (11) nastaven do polohy RADIO.
c. jsou již všechny stopy disku CD přehrány.
6. Vyjměte disk CD (viz. část “Vyjmutí disku
7. Přístroj vypněte nastavením přepínače FUNCTION (11) do polohy OFF.
Poznámka: Všimněte si prosím, že se disk CD stále otáčí i v režimu pozastavení, i když není reprodukován
žádný zvuk. Nezapomeňte vypnout režim pozastavení, aby nedocházelo k nepotřebnému chodu motoru.
Výběr jiné stopy (SKIP v režimu zastavení a během přehrávání)
Během přehrávání je možné přejít na předchozí či následující stopu za pomocí tlačítka (6) či (7) na
přístroji či tlačítka SKIP - (2) či SKIP + (5) na dálkovém ovladači.
1. Zvolte stopu během režimu přehrávání, zastavení či pozastavení a spusťte přehrávání pomocí tlačítka
(1) na přístroji či tlačítka PAUSE (1) na dálkovém ovladači.
2. Chcete-li přejít na následující stopu stlačte krátce tlačítko (7) na přístroji či tlačítko SKIP + (5) na
dálkovém ovladači, nebo opakovaně stlačte toto tlačítko, dokud se na displeji nezobrazí číslo stopy.
3. Jestliže se chcete vrátit na začátek aktuální stopy, stlačte tlačítko (6) na přístroji či tlačítko SKIP - (2)
na dálkovém ovladači.
4. Opět stlačte tlačítko (během 1 vteřiny od prvního stlačení tlačítka) (6) či tlačítko SKIP - (2) na
dálkovém ovladači pro přejití o jednu stopu vzad.
Vyhledávání jisté polohy (během reprodukce)
Stlačte a přidržte tlačítko (6) či (7) na přístroji či tlačítko SKIP - (2) či SKIP + (5) na dálkovém
ovladači pro vyhledání požadovaného místa ve stopě. Když uvolníte tlačítko, pokračuje normální přehráván
Poznámka: V režimu vyhledávání se hlasitost ztlumí.
”).
í.
Programování stop
Lze naprogramovat až 20 stop v libovolném pořadí. Stopu je možné naprogramovat častěji. CD přehrávač
musí být v režimu zastavení (tlačítko ( (8) na přístroji či tlačítko STOP (4) na dálkovém ovladači).
1. Vyvolejte režim programování tlačítkem PROGAM (3) či dálkovým ovladačem. Na displeji se krátce
zobrazí nápis “01” (číslo paměťového místa) a poté se rozbliká “00”.
2. Vyberte požadovanou stopu pomocí tlačítka (6) či (7) na přístroji či tlačítka SKIP - (2) či SKIP +
(5) na dálkovém ovladači.
3. Zvolený nadpis uložte stlačením tlačítka PROGAM (3) na přístroji či dálkovým ovladačem.
4. Opakujte kroky 2 a 3 při programování dalších stop. Číslo paměťového místa se automaticky navýší.
5. Spusťte přehrávání naprogramovaných stop pomocí tlačítka (1) na přístroji či tlačítka PLAY / PAUSE
(1) na dálkovém ovladači.
6. Stlačením tlačítka (8) dvakrát na přístroji či tlačítka STOP (4) na dálkovém
ovladači se naprogramované přehrávání stornuje.
Page 99

Poznámky:
- Naprogramované stopy vymažete změnou režimu či nastavením přepínače FUNCTION (11) do polohy
OFF.
- Stlačte tlačítko (6) či (7) na přístroji či tlačítko SKIP - (2) či SKIP + (5) na dálkovém ovladači pro
přejití na předchozí či následující stopu v naprogramovaném pořadí.
- Opakovaným stlačením tlačítka PROGAM (3) na přístroji či dálkovým ovladačem lze ověřit
naprogramované pořadí.
- Pokud při programování nestlačíte během 30 sekund žádné tlačítko, opustíte režim programování.
Režimy opakování
K dispozici jsou 3 režimy opakování, které během režimu přehrávání lze vyvolat a přepínat tlačítkem
REPEAT (4) na přístroji či na dálkovém ovladači (6).
Jednotlivá stlačení tlačítka mění režim opakování následovně:
1. Během přehrávání stlačte jednou tlačítko REPEAT (4)
na přístroji či na dálkovém ovladači (6) pro nepřetržité
opakování aktuální stopy. Označení opakování (tečka “.”
mezi dvěmi číslicemi) začne na displeji blikat.
2. Během režimu přehrávání stlačte dvakrát tlačítko REPEAT
OPAKOVAT 1
OPAKOVAT
VŠE
BĚŽNÉ
PŘEHRÁVÁNÍ
(4) na přístroji či na dálkovém ovladači (6) pro opakování
všech stop na aktuálním disku v zaznamenaném pořadí.
Označení opakování (tečka “.” mezi dvěmi číslicemi) začne
na displeji trvale svítit.
3. Opět stlačte tlačítko REPEAT (4) na přístroji či na dálkovém ovladači (6) pro návrat do režimu běžného
přehrávání. Na displeji se zobrazí standardní označení.
Manipulace s disky a čištění
MANIPULACE S DISKY CD
* Vyjměte disk CD z krytu.
* Nedotýkejte se ploch.
* Nelepte na disky CD nálepky a nepište na ně.
* Disky CD neohýbejte.
Skladování
* Disky CD vždy ukládejte do svých obalů.
* Nevystavujte disky přímému slunci, vysokým teplotám, vlhkosti či prachu.
Čištění disků CD
* Disky CD čistěte měkkým hadříkem.
* Disky CD čistěte od středu k okraji.
99.
Page 100

100.
OD STŘEDU KE KRAJI
SPRÁVNĚ NESPRÁVNĚ
ŘEŠENÍ PROBLÉMŮ
Jestliže se u tohoto systému projeví nějaké problémy, pročtěte seznam níže před tím, než budete kontaktovat zákaznické středisko.
VAROVÁNÍ: Nikdy zařízení nedemontujte. Servis a údržbu vždy přenechejte technikovi
autorizovaného zákaznického střediska.
PŘÍZNAK MOŽNÁ PŘÍČINA ŘEŠENÍ
OBECNÉ
Žádný zvuk
Hlasitost je nastavena na
příliš nízkou úroveň.
Není připojena přívodní šňůra.
Nastavte hlasitost.
Správně zapojte přívodní šňůru.
Žádní klíčová funkce
RADIO
Špatný příjem
CD
CD přeskakuje
Displej: “no” Není vložen žádný disk CD.
Elektrostatický výboj. Odpojte zástrčku z elektrické
Slabý signál.
Interference s jinými přístroji
(TV přijímače, videorekordéry,
počítače, atd.).
Disk CD je znečištěný či
poškozený.
Disk CD je znečištěný či
poškozený.
Laserová čočka je zamlžená.
sítě na několik sekund a potom
přístroj znovu zapojte.
Nastavte anténu:
FM: Prutová anténa.
AM: Nasměrujte přístroj.
Mějte ve vzdálenosti od jiných
přístrojů.
Vyměňte nebo vyčistěte disk.
Vložte disk CD, CD-R či
CD-RW.
Vyměňte či vyčistěte disk CD.
(Viz. část “Manipulace s disky
CD”)
Sečkejte, dokud se laserová
čočka nevysuší.
 Loading...