

Page 1

R
R
2382IP
SISTEMA DE SOM DESIGN COM LEITOR DE P
CD/USB/SD/MP3 E IPOD DOCKING STATION
CENTRUM MUZYCZNE Z CD/USB/MP3 I
CZYTNIKIEM KART SD ORAZ
STACJĄ DOKUJĄCĄ IPOD
DESIGN MUSIC-CENTER MET
CD/USB/SD-KAART - MP3-SPELER
EN IPOD DOCKING STATION
MIKROSYSTÉM S CD/USB/ČTEČKOU
KARET SD - MP3 PŘEHRÁVAČEM
A IPOD DOCKING STATION
CCDD//UUSSBB//SSDD KKAARRTTLLII MMPP33 ÇÇAALLAARRLLII VVEE
ÝÝPPOODD VVEERRÝÝ AAKKTTAARRMMAA ÝÝSSTTAASSYYOONNLLUU
DDEESSIIGGNN MMÜÜZZÝÝKK MMEERRKKEEZZÝÝ
DESIGN MUSIC-CENTER MIT CD/USB/SD-CARD D
- MP3-PLAYER UND IPOD DOCKING STATION
DESIGN MUSIC CENTER WITH CD/USB/SD CARD
- MP3 PLAYER AND IPOD DOCKING STATION
CHAÎNE HI-FI DESIGN AVEC LECTEUR
CD/USB/CARTE SD - MP3 ET
STATION DE DOCKAGE IPOD
FORMATERVEZETT MINI HIFI TORONY H
CD/USB/SD-KÁRTYA, MP3 LEJÁTSZÓVAL
ÉS IPOD DOKKOLÓ ÁLLOMÁSSAL
MUSIC-CENTER CON LETTORE DI SCHEDA I
CD/USB/SD - MP3 E STAZIONE DOCKING IPOD
EQUIPO DE MÚSICA DE DISEÑO CON E
REPRODUCTOR DE CD/USB/MP3
TARJETA SD Y PLATAFORMA PARA IPOD
00-2382IP Cover 9/15/06 12:06 PM Page 3
Page 2
WARNUNG: Um der Gefahr des Stromschlages vorzubeugen, das Gerät bitte nicht Regen oder Feuchtigkeit aussetzen.
SICHERHEITSHINWEISE
Die Stromversorgung des Gerätes immer unterbrechen, wenn das Gerät nicht benutzt wird. Das Gerät bitte nicht Regen oder
Feuchtigkeit aussetzen.
ACHTUNG: Um die Gefahr eines Stromschlages zu vermeiden, das Gehäuse oder den hinteren Bereich des Gerätes nicht
öffnen. Es befinden sich keine vom Verbraucher zu reparierenden Bestandteile im Gerät. Nur von qualifiziertem Personal
reparieren lassen.
SICHERHEITSHINWEISE
1. LESEN SIE DIE ANWEISUNGEN – Bevor Sie das Gerät bedienen, sollten alle Sicherheits- und Bedienungsanweisungen
gelesen werden.
2. AUFBEWAHREN DER ANLEITUNG – Die Sicherheits- und Bedienungsanweisungen sollten zum späteren Nachschlagen
aufbewahrt werden.
3. BEACHTUNG VON WARNHINWEISEN – Alle Warnungen am Gerät und in der Bedienungsanleitung sollten ebenfalls
beachtet werden.
4. BEFOLGUNG DER ANWEISUNGEN – Alle Bedienungs- und Gebrauchsanweisungen sollten befolgt werden.
5. WASSER UND FEUCHTIGKEIT – Das Gerät darf nicht in der Nähe von Wasser, beispielsweise in der Nähe von
Badewannen, Waschkübeln, Waschbecken und Schwimmbecken oder in nassen Kellern benutzt werden.
6. BELÜFTUNG – Das Gerät sollte so aufgestellt werden, dass die Belüftung des Gerätes nicht beeinträchtigt wird.
Beispielsweise das Gerät nicht auf einem Bett, Sofa, Teppich oder einer ähnlichen Oberfläche aufstellen, da sonst die
Ventilationsöffnungen bedeckt werden. Das Gerät nicht in Einbauschränken oder Bücherregalen aufstellen. Dies könnte die
Luftzirkulation behindern.
7. HITZE – Das Gerät sollte nicht in der Nähe von Hitzequellen wie Heizkörpern, Heizflächen, Öfen oder anderen Geräten,
die Hitze erzeugen (inklusive Verstärkern), aufgestellt werden.
8. STROMQUELLEN – Das Gerät darf nur an Stromquellen angeschlossen werden, die in der Bedienungsanleitung
beschrieben oder auf dem Gerät gekennzeichnet sind.
9. ERDUNG UND POLARISATION – Es müssen Vorkehrungen getroffen werden, um sicherzustellen, dass Erdungs- oder
Polarisationseinrichtungen des Gerätes nicht umgangen werden.
D 2.
MODEL 2382IP
DESIGN MUSIC-CENTER MIT CD/USB/SD-CARD - MP3-PLAYER UND
IPOD DOCKING STATION
Das dreieckige Blitzsymbol mit
Pfeilkopf weist den Benutzer auf
das Vorhandensein von nichtisolierter "gefährlicher Spannung"
im Inneren des Gerätes hin, die
ausreichen kann, um für Personen
die Gefahr eines elektrischen
Schlages darzustellen.
VORSICHT
GEFAHR EINES ELEKTRISCHEN SCHLAGES,
NICHT ÖFFNEN
VORSICHT: UM DIE GEFAHR EINES
ELEKTRISCHEN SCHLAGES ZU REDUZIEREN
DIE FRONT- (BZW. RÜCK-) ABDECKUNG
NICHT ENTFERNEN ES SIND KEINE VOM
BENUTZER ZU WARTENDEN TEILE IM
INNEREN VORHANDEN
WARTUNGSARBEITEN QUALIFIZIERTEM
FACHPERSONAL ÜBERLASSEN
Das dreieckige Symbol mit dem
Ausrufezeichen weist den Benutzer
auf wichtige Bedienungs- und
Wartungs- (Reparatur-) hinweise hin,
die in dieser Gebrauchsanweisung
enthalten sind.
KLASSE 1 LASERPRODUKT
ACHTUNG !
Es entsteht unsichtbare Laserstrahlung, wenn die
Verriegelung geöffnet und gelöst wird. Nicht in
den Strahl sehen.
01-2382IP-GE 9/15/06 12:09 PM Page 2
Page 3

10. SCHUTZ DES NETZKABELS – Das Netzkabel sollte so gelegt werden, dass niemand auf die Verkabelung treten kann und
dass keine anderen Gegenstände auf die Verkabelung gestellt werden könnten. Dabei sollte besonders auf die Bereiche
um den Anschluss des Kabels an Steckdosen und am Kabelausgang des Gerätes geachtet werden.
11. REINIGUNG – Das Gerät sollte nur so gesäubert werden, wie es der Hersteller empfiehlt.
12. HOCHSPANNUNGSLEITUNGEN – Die Außenantenne sollte nicht in der Nähe von Hochspannungsleitungen aufgestellt
werden.
13. LÄNGERER NICHTGEBRAUCH DES GERÄTES – Wenn das Gerät lange nicht gebraucht wird, sollte das Netzkabel von
der Stromversorgung getrennt werden.
14. EINTRITT VON OBJEKTEN ODER FLÜSSIGKEITEN – Es sollte darauf geachtet werden, dass keine Objekte oder
Flüssigkeiten durch die Geräteöffnungen in das Gerät gelangen können.
15. WARTUNG – Der Verbraucher sollte das Gerät so warten, wie es vom Hersteller empfohlen und beschrieben wird. Alle
anderen Wartungen sollten von qualifiziertem Wartungspersonal durchgeführt werden.
16. REPARATUR VON SCHÄDEN – Das Gerät sollte vom qualifiziertem Personal gewartet werden, wenn:
A. Stromverkabelung oder Stecker beschädigt sind.
B. Objekte oder Flüssigkeiten in das Gerät gelangt sind.
C. Das Gerät Regen ausgesetzt war.
D. Das Gerät fallengelassen oder das Gehäuse beschädigt wurde.
E. Wenn das Gerät nicht ordnungsgemäß funktioniert oder die Leistung des Gerätes sich merklich geändert hat.
VOR DEM GEBRAUCH
AUFSTELLEN
• Packen Sie alle Teile aus und entfernen Sie die Schutzhüllen.
• Legen Sie die Batterien in die Fernbedienung.
• Schließen Sie das Gerät nicht an die Stromversorgung an, bevor Sie nicht die Stromspannung überprüft und alle anderen
Verbindungen gesteckt haben.
• Verschließen Sie keine Belüftungsöffnungen. Achten Sie drauf, dass einige Zentimeter Platz für die Belüftung um das Gerät
gelassen wird.
ANSCHLÜSSE
1. Verbinden Sie den rechten und den linken Lautsprecher mit der rechten und der linken Lautsprecherbuchse.
2. Bevor Sie das Gerät an die Steckdose anschließen, stellen Sie sicher, dass die Stromspannung an der Steckdose der auf
der Rückseite des Gerätes angegebenen Spannung entspricht.
BEDIENUNG / COMPACT DISC
Bedenken Sie die nächsten Punkte, da verschmutzte, zerkratzte oder verbogene CDs Geräusche oder Unterbrechungen beim
Abspielen erzeugen können.
• Wenn Sie die CD halten, achten Sie darauf, nicht die Abspieloberfläche anzufassen.
• Die CDs nicht an folgenden Plätzen aufstellen:
In der Nähe von Heizkörpern oder anderen heißen Orten; An feuchten oder staubigen Orten.
• Um Staub- oder Fingerabdrücke von der Abspieloberfläche zu entfernen, benutzen Sie ein weiches Tuch. Die CD immer
von innen nach außen abwischen.
EINLEGEN DER CD
• Auf OPEN/CLOSE drücken
• Legen Sie eine CD (mit der Beschriftung nach oben) in das CD-Fach.
• Drücken Sie OPEN/CLOSE, um das CD-Fach zu schließen.
Die Anzeige zeigt die Anzahl der Titel auf der CD.
D 3.
01-2382IP-GE 9/15/06 12:09 PM Page 3
Page 4

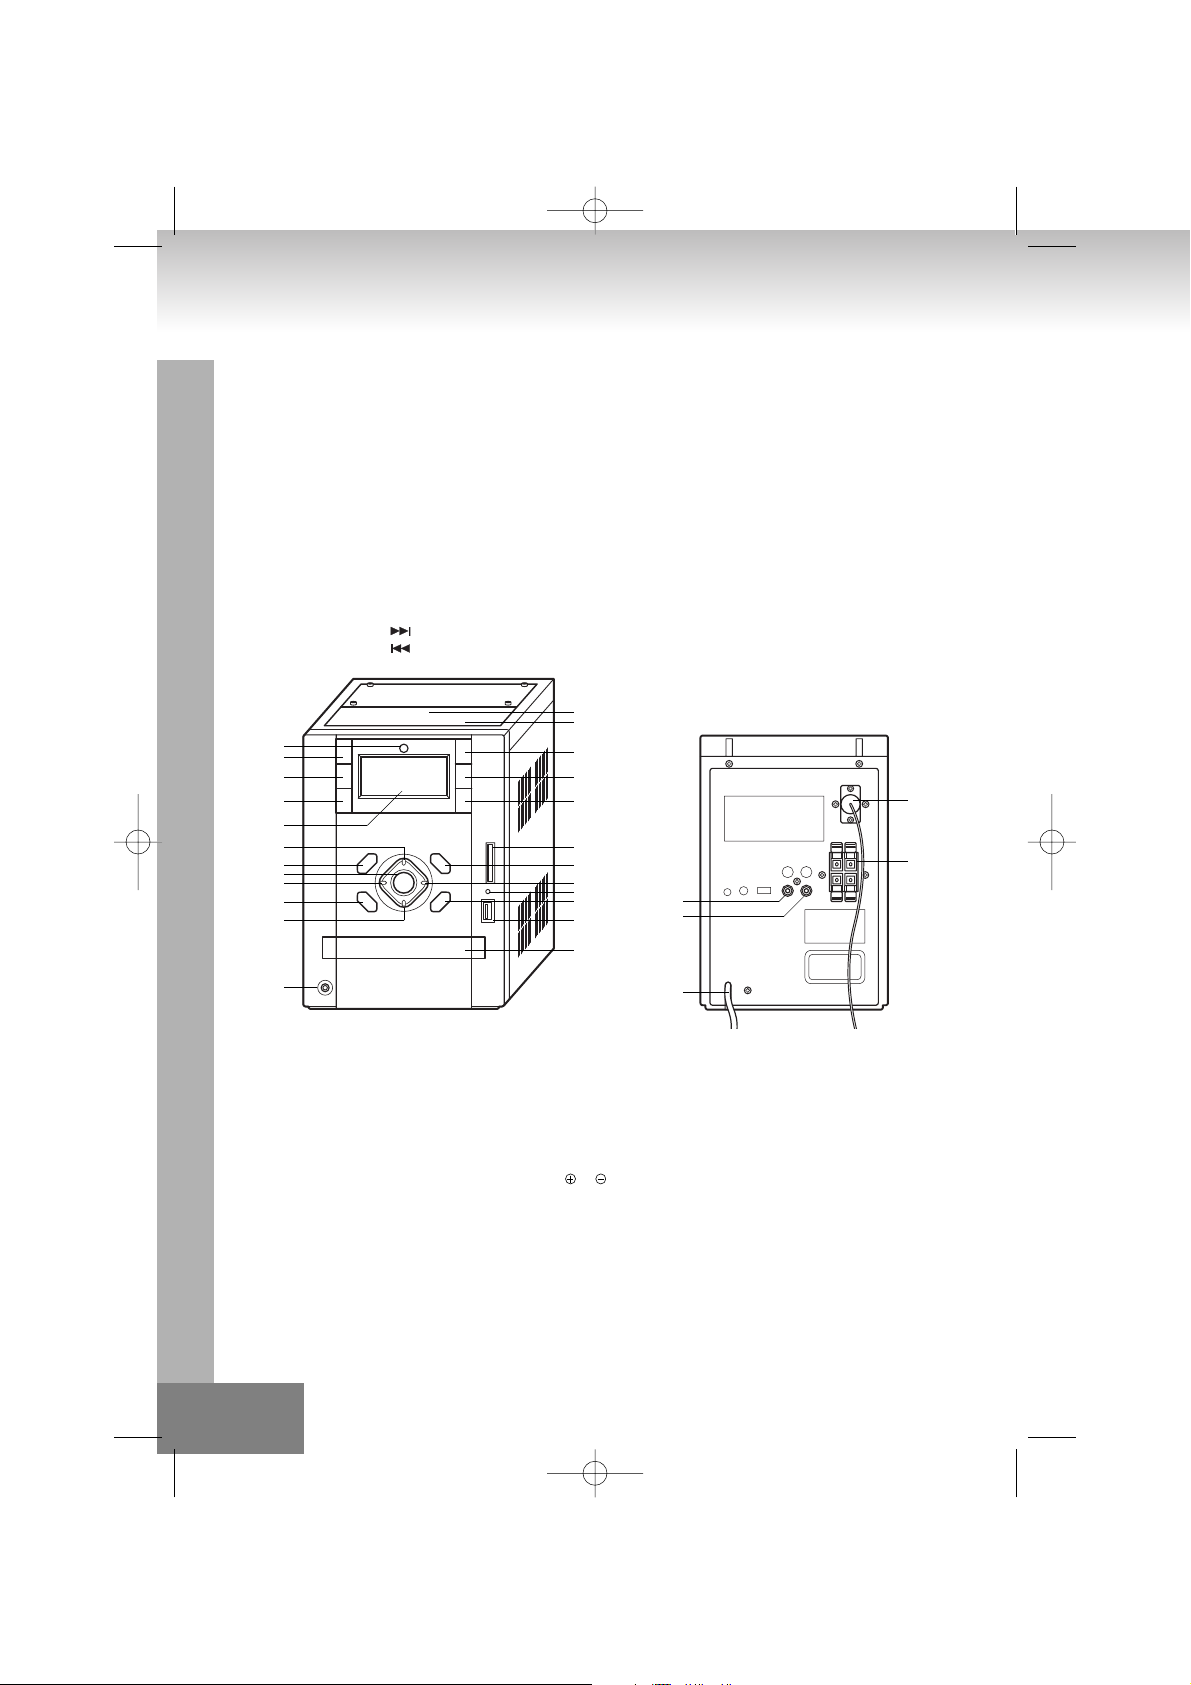
BEDIENELEMENTE UND EIGENSCHAFTEN
1. Taste STANDBY/ON
2. LCD-ANZEIGE
3. Taste FUNCTION
4. FERNBEDIENUNGSSENSOR
5. Taste VOLUME+
6. Taste VOLUME–
7. MMC-Kartenschacht
8. Taste TUNER/BAND
9. Taste PRESET EQ
10. Taste MEM/CLK-ADJ
11. CD-KLAPPE
12. KOPFHÖRERBUCHSE
13. Taste CD DOOR OPEN/CLOSE
14. Taste PLAY/PAUSE
15. Taste SKIP/TUNING
16. Taste SKIP/TUNING
FERNBEDIENUNGSFUNKTIONEN
Vorbereitung zum Gebrauch
• Einlegen der Batterien in die Fernbedienung
1. Nehmen Sie den Batteriefachdeckel von der Rückseite der Fernbedienung ab.
2. Legen Sie zwei „UM4/AAA/R03” Batterien ein.
• Legen Sie die Batterien in die mit und gekennzeichneten Batteriesteckplätze ein (Polarität beachten).
3. Schließen Sie den Batteriefachdeckel wieder.
• Auswechseln der Batterien
• Wenn die Fernbedienungsfunktionen nicht mehr richtig reagieren und die Erkennungsreichweite geringer wird, wechseln
Sie bitte die Batterien gegen neue aus.
Benutzung der Fernbedienungseinheit
Um die Fernbedienung zu benutzen, richten Sie die Fernbedienung auf den FERNBEDIENUNGSSENSOR am Gerät und
drücken Sie die Knöpfe auf der Fernbedienung. Die Fernbedienung arbeitet bis ungefähr 6 m Entfernung. Wenn die
D 4.
17. MMC Karten- und USB-Anzeige
18. USB-Anschluss
19. Taste ST OP
20. Taste ALBUM/MEMORY CH. +
21. Taste ALBUM/MEMORY CH. –
22. Taste Random
23. UKW-Antenne
24. Lautsprecherausgang
25. Netzkabel
26. I-POD-STECKERKLAPPE
27. I-POD-STECKER
28. AUX IN Rechts
29. AUX IN Links
13
20
27
26
1
4
3
21
7
19
10
17
15
18
23
24
11
8
2
5
9
28
29
25
22
14
16
6
12
01-2382IP-GE 9/15/06 12:09 PM Page 4
Page 5

Fernbedienung schräg gehalten wird, ist die Erkennungsreichweite kleiner. Benutzen Sie deswegen die Fernbedienung direkt
vor dem Sensor.
Setzen Sie den FERNBEDIENUNGSSENSOR keinem starken Licht aus (direktem Sonnenlicht oder künstlichem Licht) und
achten Sie darauf, dass zwischen der Fernbedienung und dem FERNBEDIENUNGSSENSOR keine Hindernisse stehen.
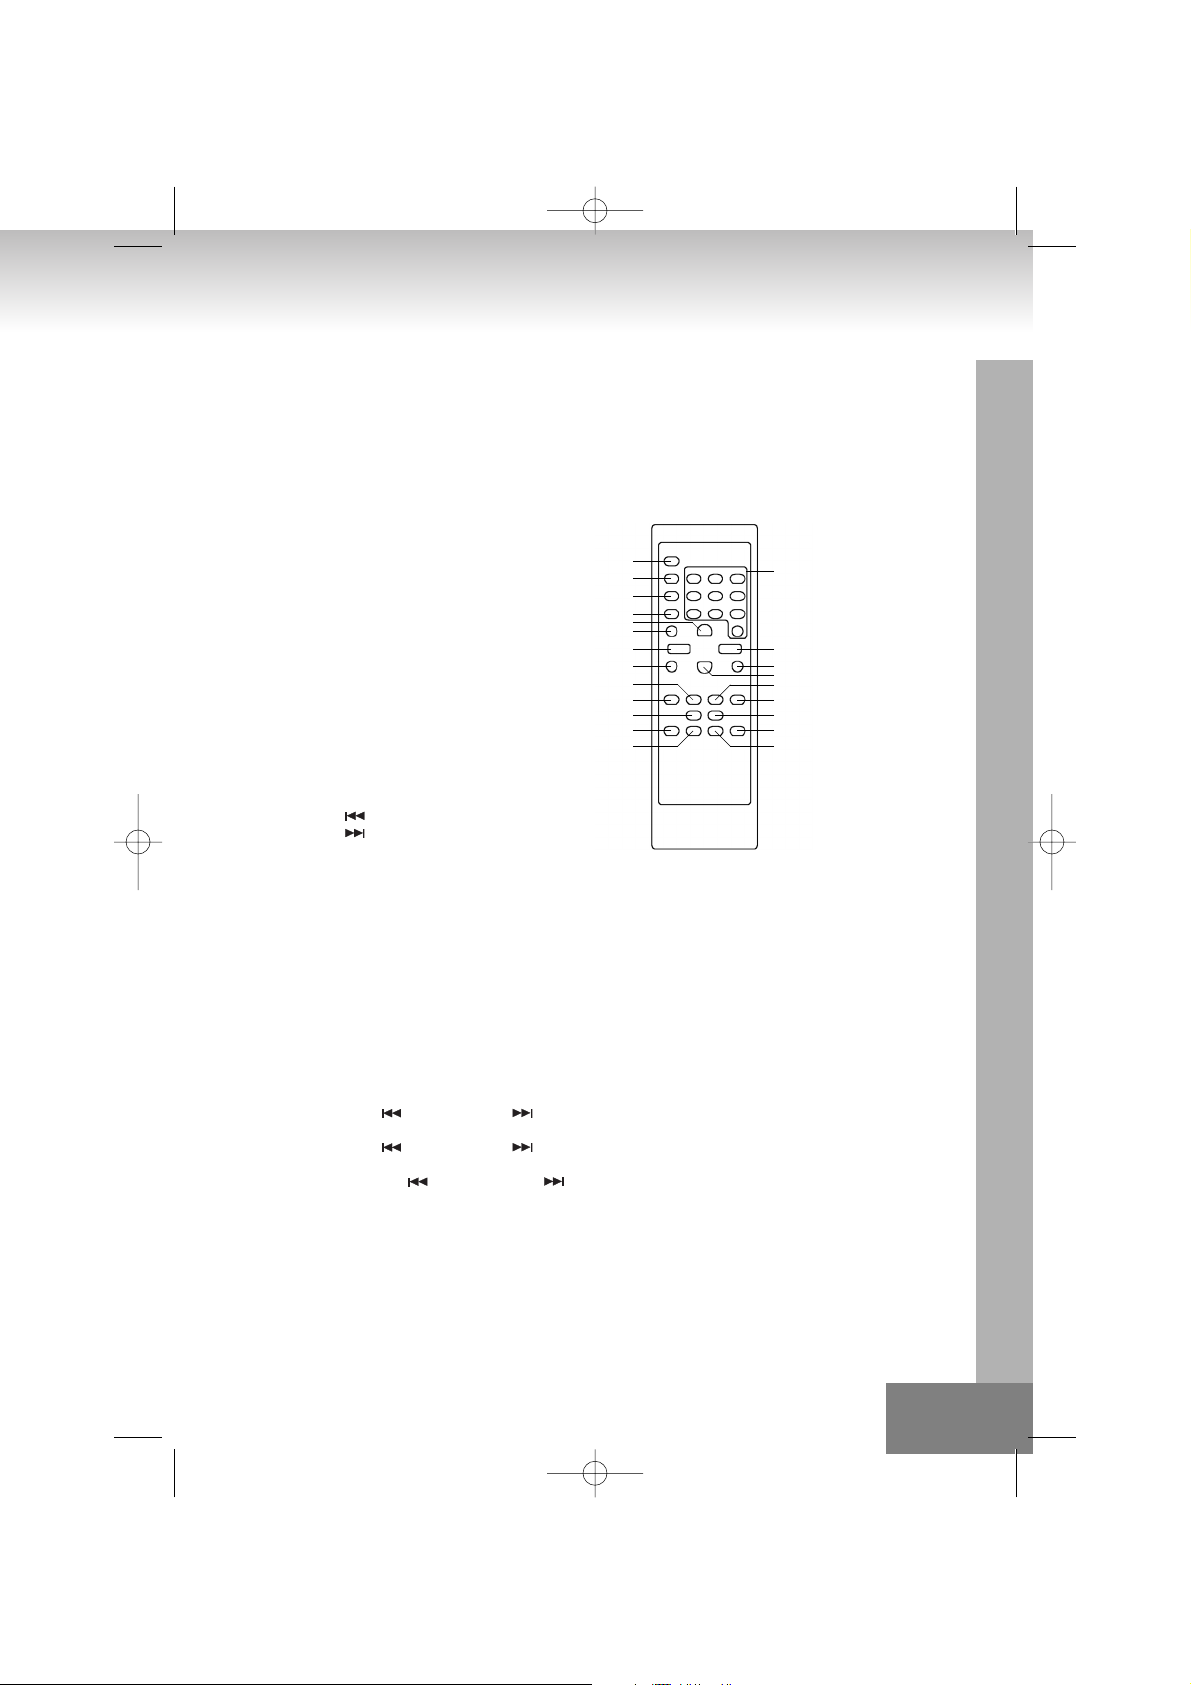
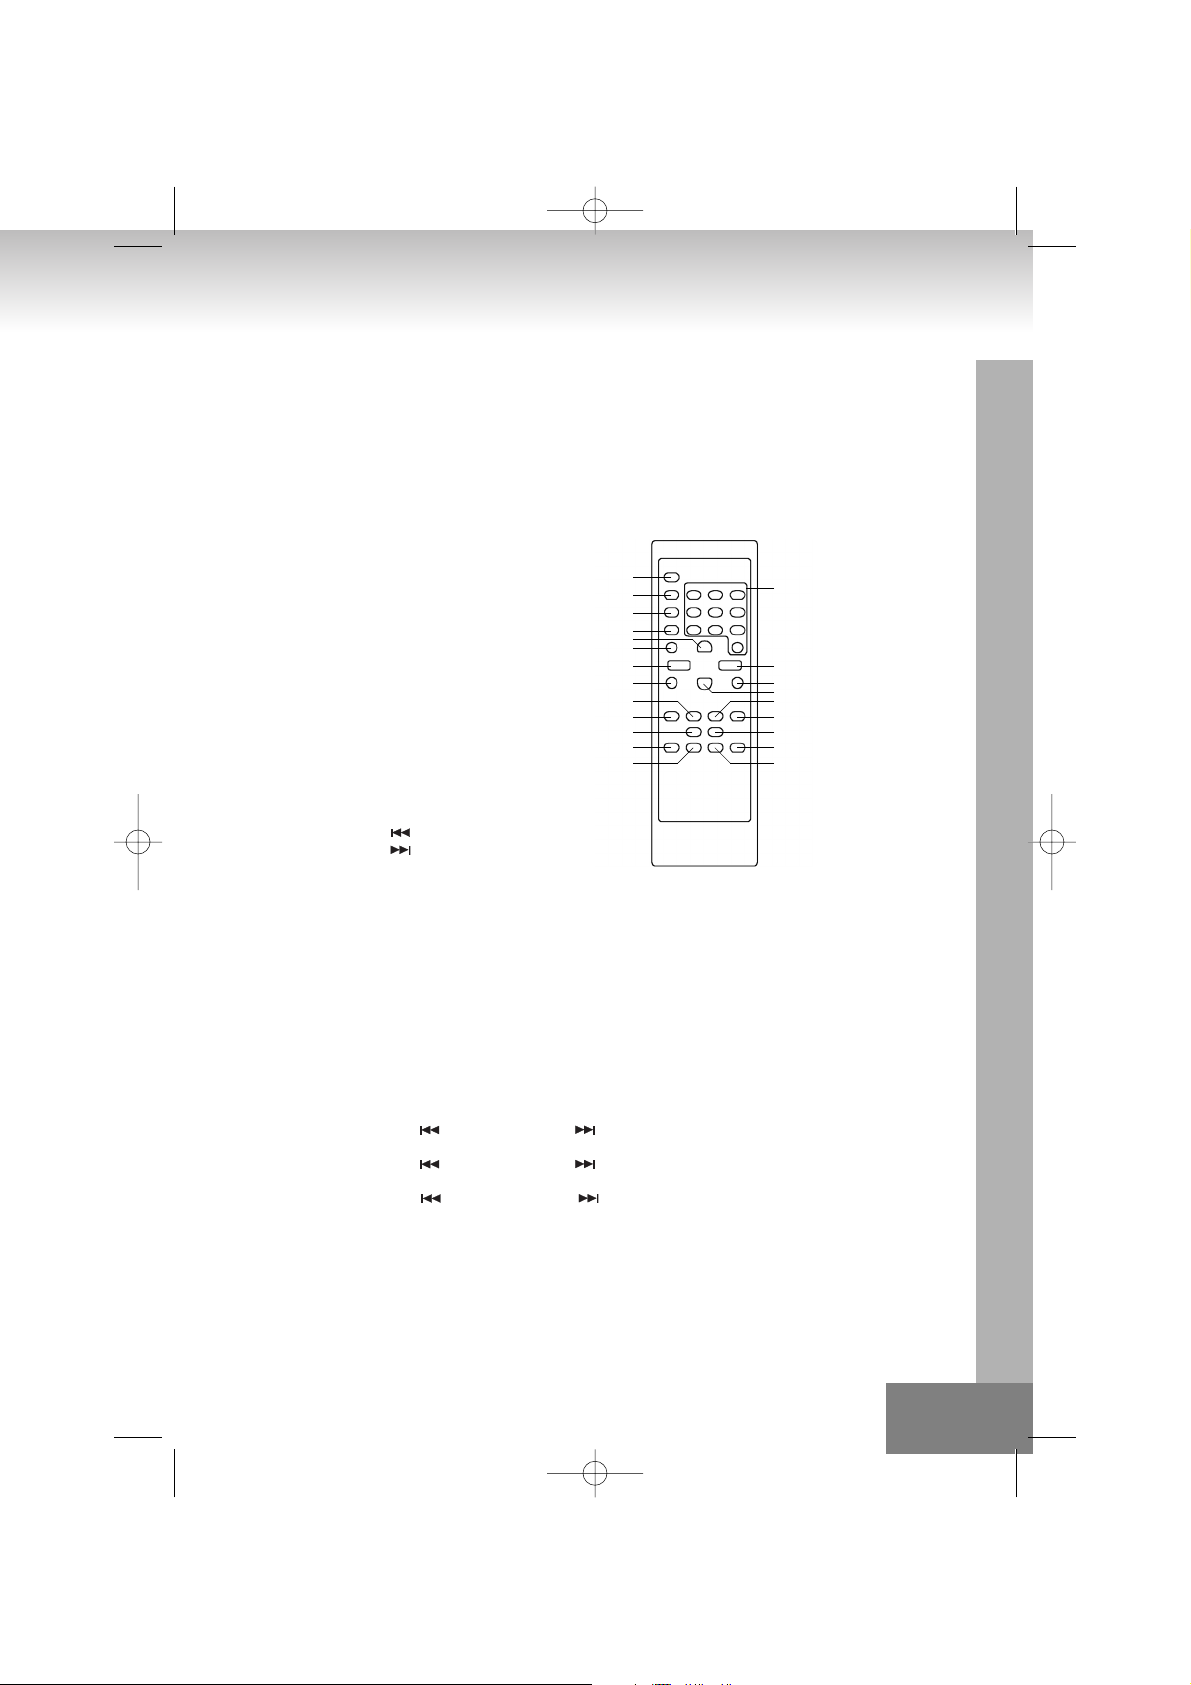
FERNBEDIENUNG
1. Taste STANDBY
2. Taste SLEEP
3. Taste INTRO
4. Taste RANDOM/RDS
5. Taste MUTE
6. Taste ID3/FIND/ST./ESP
7. Taste VOLUME
8. Taste PLAY/PAUSE
9. Taste ALBUM/MEMORY CH.+
10. Taste ALBUM/MEMORY CH.–
11. Taste REPEAT
12. Taste FUNCTION
13. Taste TUNER/BAND
14. Taste Numeric
15. Taste VOLUME+
16. Ta ste STOP
17. Ta st e EQ
18. Taste SKIP/TUNING
19. Taste SKIP/TUNING
20. Taste MEM/CLK-ADJ
21. Taste TIMER
22. Taste I-POD
FUNKTION / Erklärung
STANDBY ON/ OFF
Wenn Sie das Gerät an die Stromversorgung anschließen, wechselt das Gerät in den Standby-Modus. Auf der Anzeige
erscheint --:--
• Um das Gerät einzuschalten, drücken Sie die STANDBY-Taste.
• Die Standby-Funktion des Gerätes bleibt erhalten, solange das Gerät eingeschaltet ist.
• Um die Stromversorgung komplett zu unterbrechen, ziehen Sie das Netzkabel aus der Steckdose.
ZEITEINSTELLUNG
• Wenn Sie zum ersten Mal das Gerät an die Steckdose anschließen, wechselt das Gerät in den Standby-Modus. Die Anzeige
zeigt --:--
• Im Standby-Modus halten Sie die Taste [MEM/CLK-ADJ] länger als 3-5 Sekunden gedrückt und auf der Anzeige erscheint
12H/24.
• Drücken Sie SKIP/TUNING oder SKIP/TUNING , um das gewünschte Zeitformat 12H oder 24H einzustellen.
• Drücken Sie [MEM/CLK-ADJ] noch einmal um, die Stundeneinstellung auszuwählen. Die 1. und 2. Ziffer von “00” beginnen
zu blinken.
• Drücken Sie SKIP/TUNING oder SKIP/TUNING , um die richtige Stundenzahl einzustellen.
• Drücken Sie [MEM/CLK-ADJ] noch einmal, um die Minuteneinstellung auszuwählen. Die 3. und 4. Ziffer beginnen zu
blinken.
• Drücken Sie SKIP/TUNING oder SKIP/TUNING , um die richtige Minutenzahl einzustellen. Drücken Sie
[MEM/CLK-ADJ], um die richtige Minutenzahl zu speichern.
• Die gesamte Zeitinformation wird entweder im 12H- oder 24H-Format angezeigt.
D 5.
14
15
16
17
18
19
20
21
22
1
2
3
4
6
5
7
8
10
11
12
13
9
01-2382IP-GE 9/15/06 12:09 PM Page 5
Page 6

FUNKTIONSAUSWAHL
• Wenn die Funktionstaste gedrückt wird, ändert sich der Modus.
• Die Anzeige ändert sich: TUNER > CD/MP3 > I-POD > AUX > CARD-USB >
PLAY/PAUSE
• Wiedergabe beginnen oder anhalten.
STOP
• Im Wiedergabemodus oder Pause-Modus: Wechseln zum Stopp-Modus oder zum Programmeingabemodus.
• In Programmeingabemodus: Um aus dem Programmeingabemodus heraus zu kommen, löschen Sie den
Programmspeicher und gehen Sie zum Stopp-Modus.
• Zufallswiedergabe-Modus: Wechseln Sie zum Stopp-Modus und betätigen Sie die Zufallswiedergabe-Funktion.
WIEDERHOLUNG
• CD normal abspielen: Einen Titel wiederholen > alle Titel wiederholen> Wiederholung aus.
• Musik-CD-Rom normal abspielen: Eine Datei wiederholen > Alle Dateien wiederholen > Album wiederholen > Wiederholung
aus.
• Zufallswiedergabe-Modus: Zufallswiederholung eines Titels > Zufällig abspielen.
• Programmabspielmodus: Wiederholung eines Programms > Alle Programme wiederholen
SPEICHER
CD/MP3-Modus:
1. Bis zu 64 Titel können programmiert werden.
2. Drücken Sie die Stopptaste, um das Abspielen zu beenden.
3. Drücken Sie die MEM/CLK-ADJ-Taste, um den Programmmodus anzuschalten.
4. Geben Sie die Titelnummer direkt mit der Fernbedienung ein, wenn Sie den Titel ändern möchten.
5. Drücken Sie die MEM/CLK-ADJ-Taste wieder, um den Programmpunkt zu bestätigen.
6. Nachdem Sie alle erwünschten Tracks gespeichert haben, drücken Sie die Play-Taste, um den Programmmodus zu
beenden.
7. Drücken Sie die Play-Taste, um das Programm abzuspielen.
RADIO-Modus:
1. Bis zu 30 UKW- und 10 MW-Radiosender können einprogrammiert werden.
2. Mit der Taste FUNCTION können Sie das Radio anschalten und zwischen UKW und MW umschalten.
3. Um die Frequenz manuell einzustellen, drücken Sie die Tasten SKIP/TUNING oder SKIP/TUNING .
4. Um die Frequenz automatisch einzustellen, halten Sie die Tasten SKIP/TUNING oder SKIP/TUNING 2 Sekunden
lang gedrückt. Das System stoppt, wenn der nächste Sender erreicht wird.
5. Um die eingestellte Frequenz zu speichern, drücken Sie die Taste MEM/CLK-ADJ.
6. Drücken Sie die Taste MEMORY CH- oder MEMORY CD+, um die Speicherposition auszuwählen.
7. Drücken Sie die Taste MEM/CLK-ADJ noch einmal, um die Frequenz zu speichern.
SKIP/TUNING
CD/MP3-Modus:
• Im Stopp-Modus: Wechseln Sie zyklisch im Stopp-Modus den ersten Wiedergabetitel [Datei], das heißt, dass die Auswahl
wieder vom Anfang beginnt, nachdem der letzte Titel erreicht wurde.
• Im Programmeingabemodus: Wechseln Sie zum nächsten Titel [Datei] um ein Programm zu erstellen.
• Im Wiedergabe-Modus, Pause-Modus, Programmwiedergabe-Modus: Durch einmaliges Drücken springt der abgespielte
Titel [Datei] im normalen Play/Pause-Modus zum nächsten Titel [Datei]. Im Programm Play/Pause-Modus springt der Titel
zum nächsten Programmindextitel [Datei]. Im Zufalls-Play/Pause-Modus springt der Titel zum nächsten zufälligen Titel
[Datei]. Wenn Sie die Taste länger als 0,7 Sekunden drücken, wird der Schnellvorlauf aktiviert.
RADIO-Modus:
• Die empfangene Frequenz wird durch Drücken erhöht.
• Wenn diese Taste länger als 0,7 Sekunden gedrückt wird, beginnt die automatische Einstellung.
D 6.
01-2382IP-GE 9/15/06 12:09 PM Page 6
Page 7

SKIP/TUNING
CD/MP3-Modus:
• Im Stopp-Modus: Wechseln Sie zyklisch im Stopp-Modus den ersten Wiedergabetitel [Datei]. Das heißt, dass nachdem der
erste Titel erreicht wurde, beginnt die Auswahl wieder beim letzen Titel [Datei].
• Im Programm-Eingabemodus: Wechseln Sie zum vorherigen Titel [Datei], um ein Programm zu erstellen.
• Im Wiedergabe-Modus, Pause-Modus, Programmwiedergabe-Modus: Durch einmaliges Drücken springt der abgespielte
Titel [Datei] im normalen Play/Pause-Modus zum nächsten Titel [Datei], im Programmwiedergabe-/Pause-Modus zum
nächsten Programmindextitel [Datei], im zufälligen Play-/Pause-Modus zum nächsten zufälligen Titel [Datei]. Wenn Sie
während des Play-/Pause-Modus die Taste länger als 0,7 Sekunden drücken, wird der Schnellvorlauf aktiviert.
RADIO-Modus:
• Die empfangene Frequenz wird durch Drücken schrittweise verringert.
• Wenn diese Taste länger als 0,7 Sekunden gedrückt wird, beginnt die automatische Einstellung.
ALBUM/MEMORY CH.+
MP3-Modus:
• Im Stopp-Modus: Wechseln Sie den beginnenden Ordner zum nächsten Ordner während des Stopp-Modus, zyklisch zum
ersten Ordner, wenn vorher der letzte Ordner erreicht wurde.
• Programmeingabemodus: Wechseln Sie das Album für die Programmauswahl zum ersten Album des folgenden Ordners,
zyklisch zum ersten Ordner, wenn vorher der letzte Ordner erreicht wurde.
• Im normalen Wiedergabemodus: Überspringen Sie das gerade abgespielte Album zum ersten Album des folgenden
Ordners.
RADIO Modus:
• Der voreingestellte Speicher wird aufsteigender Reihenfolge abgerufen.
ALBUM/MEMORY CH.–
MP3 Modus:
• Im Stopp-Modus: Wechseln Sie den beginnenden Ordner zum vorhergehenden Ordner während des Stopp-Modus,
zyklisch zum letzen Ordner, wenn vorher der erste Ordner erreicht wurde.
• Programmeingabemodus: Wechseln Sie das Album für die Programmauswahl zum ersten Album des vorhergehenden
Ordners, zyklisch zum letzten Ordner, wenn vorher der erste Ordner erreicht wurde.
• Im normalen Wiedergabemodus: Überspringen Sie das gerade abgespielte Album zum ersten Album des vorhergehenden
Ordners.
RADIO-Modus:
• Der voreingestellte Speicher wird absteigender Reihenfolge abgerufen..
NUMMERNTASTE
• Wählen Sie den gewünschten Titel.
• Drücken sie die Play-Taste, um die Wiedergabe zu beginnen.
INTRO
• Bei Auswahl dieser Funktion auf der Fernbedienung während der Wiedergabe im CD/MP3-Modus werden die ersten zehn
Sekunden eines jeden Titels abgespielt.
ZUFALLSWIEDERGABE
• Normal Stopp: Schalten Sie die Zufallsfunktion ein und wechseln Sie in den Zufallsabspielmodus.
• Einen Titel wiederholen/Datei-Stopp-Modus, Ordner wiederholen Stopp-Modus und alle Titel wiederholen/Ordner StoppModus: Jeder Wiederholungsmodus wird beendet und das System wechselt zum Zufallsmodus.
ID3/FIND/ST./ESP
CD-Modus:
• Drücken Sie die Taste [ID3/FIND/ST/ESP], um die 10-Sekunden Antischockfunktion zu aktivieren.
• Drücken Sie diese Taste [ID3/FIND/ST/ESP] noch einmal, um ESP zu deaktivieren.
D 7.
01-2382IP-GE 9/15/06 12:09 PM Page 7
Page 8
MP3-Modus:
• Drücken Sie die Taste [ID3/FIND/ST./ESP] einmal, um in den Dateisuchmodus zu wechseln.
• Drücken Sie SKIP/TUNNING oder SKIP/TUNNING , um den gewünschten Ordner zu wählen.
• Drücken Sie die Taste-[ID3/FIND/ST./ESP] zweimal, um in den Albumsuchmodus zu wechseln.
• Drücken Sie die Tasten SKIP/TUNING oder SKIP/TUNING , wenn der erwünschte Albumtitel angezeigt wird.
• Drücken Sie die Taste PLAY, um den Titel abzuspielen.
• Drücken Sie die Taste [ID3/FIND/ST./ESP] länger als 3-5 Sekunden und der ID3-TAG wird angezeigt.
• Drücken Sie die Taste-[ID3/FIND/ST./ESP] noch einmal 3-5 Sekunden lang und die Abspielzeit wird wieder angezeigt.
RADIO-Modus:
• Drücken Sie die Taste [ID3/FIND/ST./ESP], um zum UKW-Stereo und Mono-Modus zu wechseln.
EQ BEDIENUNG
• EQ zeigt den voreingestellten Tonklang an.
• Wenn Sie die EQ-Taste drücken, wird der Tonklang gewechselt: PASS >CLASSIC >ROCK > POP >JAZZ >
STUMMSCHALTUNG
• Den Ton stumm schalten.
LAUTSTÄRKE+/–
• Lautstärke erhöhen.
• Lautstärke reduzieren.
TIMER AN/ AUS
1. Wird in irgendeinem Modus die Taste [TIMER] länger als 3-5 Sekunden gedrückt, beginnt die Stundenanzeige zu blinken.
2. Drücken Sie SKIP/TUNING oder SKIP/TUNING , um die richtige Zeit einzustellen.
3. Drücken Sie die Taste [TIMER] wieder, um die Minuteneinstellung auszuwählen und die dritte und vierte Stelle der
Zeitanzeige beginnen zu blinken.
4. Drücken Sie SKIP/TUNING oder SKIP/TUNING , um die richtige Minutenzahl einzustellen. Drücken Sie die Taste
[TIMER], um die Zeit zu speichern.
5. Drücken Sie die Taste [TIMER] erneut. Auf der Anzeige erscheint TIMER OFF. Wenn Sie die Taste [TIMER] noch einmal
drücken, blinkt die Stundenanzeige.
6. Drücken Sie SKIP/TUNING oder SKIP/TUNING , um die richtige Stundenzahl einzustellen.
7. Drücken Sie die Taste [TIMER] erneut, um die Minuteneinstellung auszuwählen. Die dritte und vierte Stelle der Zeitanzeige
beginnen zu blinken.
8. Drücken Sie SKIP/TUNING oder SKIP/TUNING , um die korrekte Minutenzahl einzustellen. Drücken Sie [TIMER],
um die korrekte Minuteneinstellung zu speichern.
9. Drücken Sie wieder [TIMER], um die Funktionseinstellung auszuwählen. Die Funktion blinkt.
10. Drücken Sie SKIP/TUNING oder SKIP/TUNING , um den gewünschten Sender einzustellen.
11 Drücken Sie wieder die Taste [TIMER], um zur Lautstärkeeinstellung zu gelangen. Die Lautstärkeanzeige blinkt.
12. Drücken Sie SKIP/TUNING oder SKIP/TUNING , um die gewünschte Lautstärke einzustellen.
13. Drücken Sie die Taste [TIMER] erneut, bis das Gerät zum normalen Modus zurückkehrt und das Logo angezeigt wird.
SCHLAF-FUNKTION
• Drücken Sie diesen Knopf, um die Schlaf-Funktion zu aktivieren, die Schlafeinstellungszeit zu ändern und die Schlaffunktion
zu deaktivieren. Die Anzeige wechselt von 90>80>70>-->10 auf Off. Wenn die Schlaftaste aktiviert ist, zählt das System die
Zeit bis null rückwärts. Danach schaltet sich das System automatisch aus.
D 8.
01-2382IP-GE 9/15/06 12:09 PM Page 8
Page 9
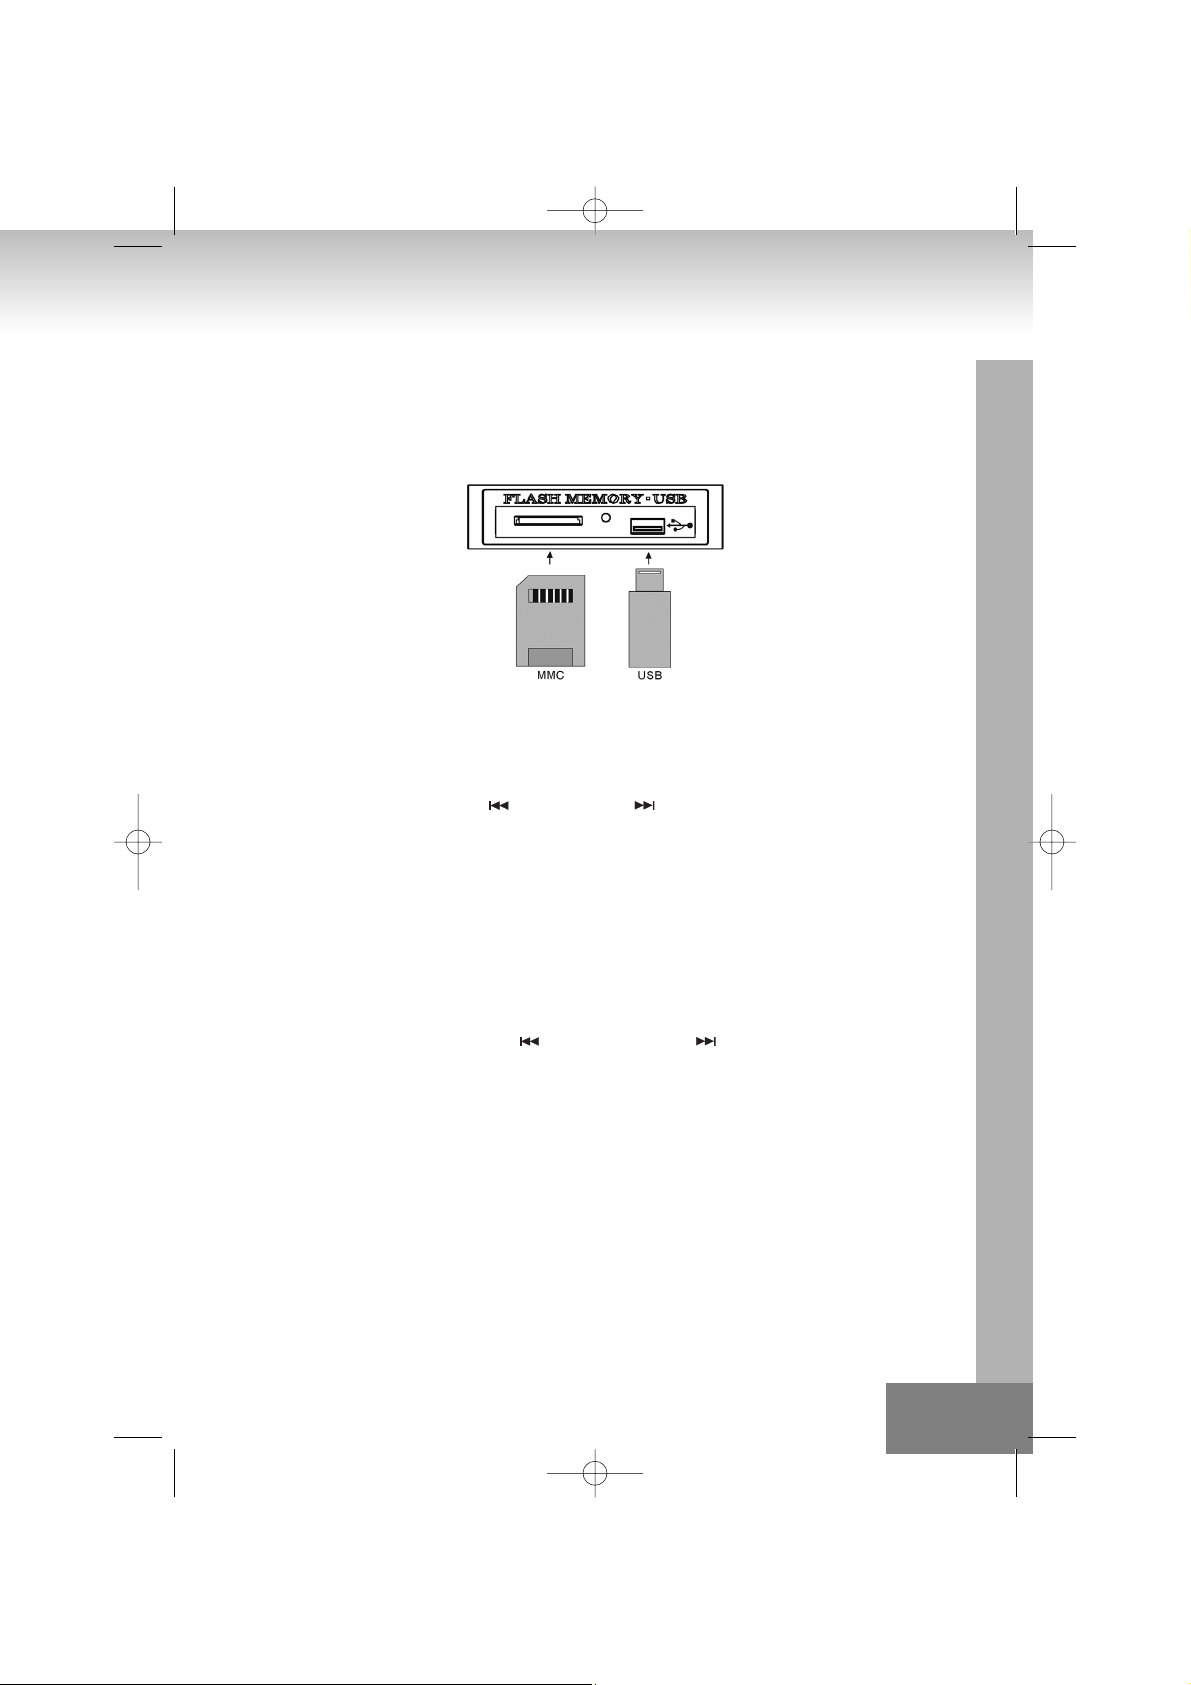
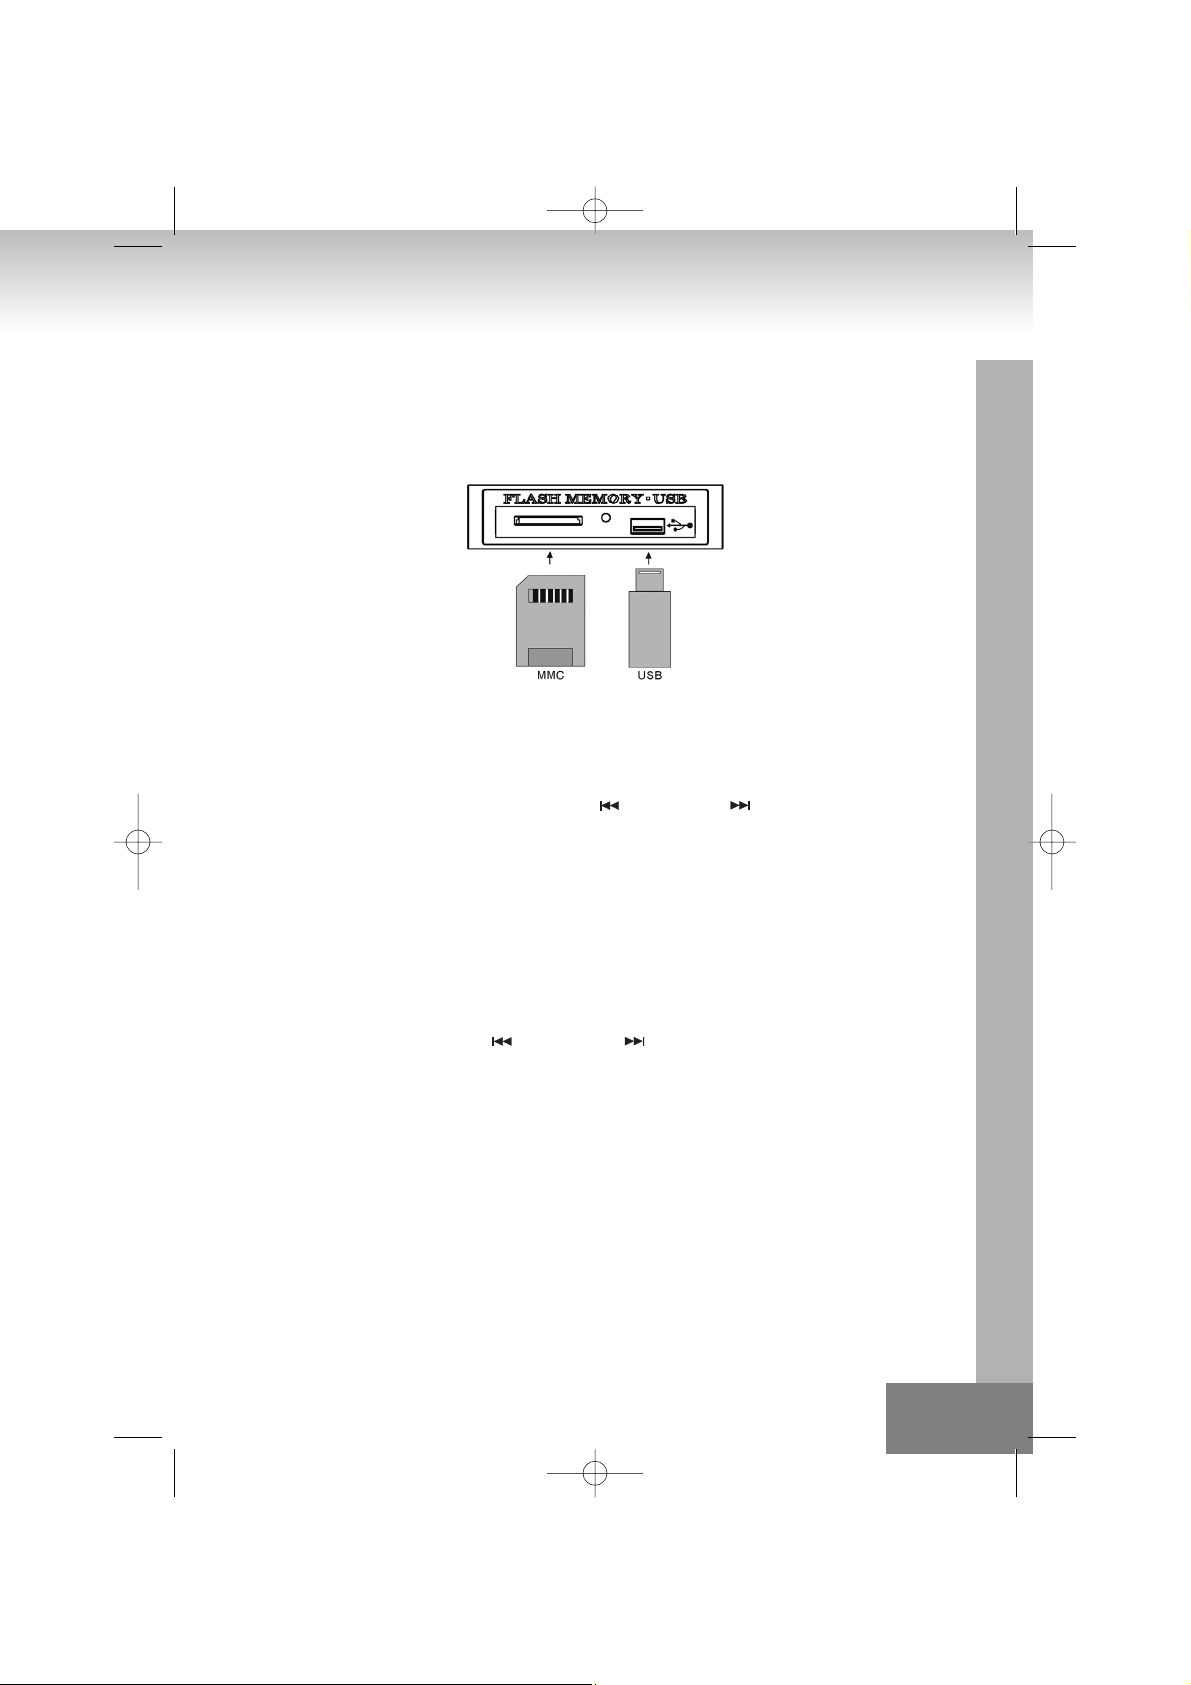
KARTEN-/ USB-BASISFUNKTIONEN
1. Beim Einlegen einer Speicherkarte bzw. Anschließen von USB-Speichern wird deren Inhaltsverzeichnis angezeigt.
2. Drücken Sie die Taste PLAY/PAUSE. 01 wird angezeigt und die Wiedergabe beginnt. Wechseln Sie zu Pause und zurück.
Im Pause-Modus blinkt die Anzeige.
3. Wenn Sie die Taste STOP drücken, wird das Inhaltsverzeichnis angezeigt.
RADIO/Bedienung
Bedienen Sie das Radio bitte in der angegebenen Reihenfolge.
1. Drücken Sie die Taste STANDBY, um das Gerät einzuschalten.
2. Drücken Sie die Taste „FUNCTION“, um den TUNER-Modus auszuwählen.
3. Drücken Sie die Taste TUNER/BAND, um das Frequenzband (UKW oder MW) auszuwählen.
4. Stellen Sie mit der Taste SKIP/TUNING oder SKIP/TUNING den gewünschten Radiosender ein.
5. Stellen Sie den Lautstärkepegel durch Drücken der Tasten vol+ und vol- ein.
RDS-GRUNDEINSTELLUNGEN
Zur Änderung der RDS-Anzeigeinformationen: FREQUENCY>PS>PT Y>RT>
1. Drücken Sie einmal die Taste RANDOM/RDS, um PS anzuzeigen. Dann leuchtet die RDS-Anzeige und der Name der
Station erscheint. Es erscheint NO PS, wenn kein RDS-Signal ausgesendet wird.
2. Drücken Sie zweimal die Taste RANDOM/RDS und PTY wird angezeigt. Dann leuchtet die RDS-Anzeige auf und der
Programmtyp wird angezeigt. NO PTY wird angezeigt, wenn kein RDS-Signal gesendet wird.
3. Drücken Sie dreimal die Taste RDS MODE, um RT anzuzeigen. Dann leuchtet die RDS-Anzeige und die Textnachricht, die
von der Station gesendet wird, erscheint. NO RT wird angezeigt, wenn kein RDS gesendet wird.
Die erwünschte Programmtyp-Sendestation suchen:
1. Drücken Sie die Taste RDS SEARCH. PTY SEL wird angezeigt.
2. Jedes Mal, wenn Sie die Taste SKIP/TUNING oder Taste SKIP/TUNING drücken, zeigt die Anzeige eine Kategorie
in folgender Reihenfolge: NEWS [Nachrichten] > AFFAIRS [Politik] > INFO [Informationen] > SPORT [Sport] > EDUCATE
[Bildung] > DRAMA [Hörspiel]> CULTURE [Kultur] > SCIENCE [Wissenschaft] > VARIED [Verschiedenes] > POP M
[Popmusik] > ROCK M [Rockmusik] > M O R M [Middle of the road] > LIGHT M [Leichte Musik] > CLASSICS [Klassik] >
OTHER M [andere Musik] > WEATHER [Wetter] > FINANCE [Finanzen] > CHILDREN [Kindersendungen] > SOCIAL A
[Gesellschaft] > RELIGION [Religion] > PHONE IN [Sendungen mit Zuhörerbeteiligung] > TRAVEL [Reise] > LEISURE
[Entspannung] > JAZZ [Jazz] > COUNTRY [Country] > NATIONAL [Volksmusik] > OLDIES [Oldies] >FOLK M [Folk Musik] >
DOCUMENT [Dokumentationen] > NEWS [Nachrichten]
3. Drücken Sie beim Suchen die Taste RDS SEARCH innerhalb von ungefähr 10 Sekunden noch einmal. „SEARCH“ und der
ausgewählte PTY Code erscheint auf der Anzeige. Das Gerät durchsucht eine Liste von 30 voreingestellten Sendern, ob
die Kategorie, die Sie eingestellt haben, darin enthalten ist und geht dann zu diesem Sender. Wenn kein Programm
gefunden wird, erscheint auf der Anzeige: „NOT FOUND“.
HINWEIS:
Wenn Sie UKW-Sendungen hören, ist es angebracht, dass Sie die UKW-Antenne auf der Rückseite des Gerätes ganz
abwickeln.
Wenn sie MW-Radiosender hören wollen, ist es angebracht, dass Sie das Gerät dementsprechend aufstellen.
D 9.
Kartenfach und USB-Buchse
01-2382IP-GE 9/15/06 12:09 PM Page 9
Page 10

I-POD-FUNKTION
• Öffnen Sie die I-Pod Klappe und stecken Sie den I-POD in den I-Pod-Anschluss. Der I-Pod beginnt sich aufzuladen und die
Anzeige zeigt den Aufladestatus an.
• Drücken Sie die Funktionstaste und wählen Sie die I-Pod Funktion. Daraufhin beginnt der I-Pod mit der Wiedergabe.
• Drücken Sie SKIP/TUNING oder SKIP/TUNING , um den nächsten oder vorherigen Titel auszuwählen.
SPEZIFIKATIONEN
Stromversorgung : AC 230V ~ 50Hz
Leistungsaufnahme : 38 Watt
Radio : MW 525 – 1615 KHz
UKW 87,5 – 108 MHz
Kassettenteil
Bandlaufgeschwindigkeit : 4,75 cm/sek.
Tonhöhenschwankung : < 0,4%
Frequenzbereich : 125Hz – 6,3KHz
CD
Disk-Typ : CD/CD-R/CD-RW / CD-DA /MP3
Frequenzbereich (-3dB) : 60 – 16.000 Hz
Signal-Lautstärkeverhältnis : >60 dB
Klirrfaktor : <0,3%
UNSERE GERÄTE UNTERLIEGEN SOWOHL IM QUALITÄTSBEREICH ALS AUCH IN DER LEISTUNG FORTWÄHRENDEN
VERBESSERUNGEN. DAHER BEHALTEN WIR UNS DAS RECHT VOR, SPEZIFIKATIONEN OHNE VORANKÜNDIGUNG ZU
ÄNDERN.
WEITERE INFORMATIONEN
Achtung bei Kleinteilen und Batterien, bitte nicht Verschlucken, dies kann zu ernsthaften Schädigungen oder
Erticken führen. Achten Sie inbesondere bei Kindern darauf, dass Kleinteile und Batterien ausserhalb deren
Reichweite sind.
Wichtige Hinweise zum Gehörschutz
Vorsicht:
Ihr Gehör liegt Ihnen und auch uns am Herzen.
Deshalb seien Sie bitte vorsichtig beim Gebrauch dieses Gerätes.
Wir empfehlen: Vermeiden Sie hohe Lautstärken.
Sollte das Gerät von Kindern verwendet werden, achten Sie darauf, dass das Gerät nicht zu laut eingestellt wird.
Achtung!
Zu hohe Lautstärken können bei Kindern irreparable Schäden hervorrufen.
Lassen Sie NIEMALS Personen, und insbesondere keine Kinder, Gegenstände in Löcher, Schächte oder andere
Öffnungen des Gehäuses stecken; dies könnte zu einem tödlichen elektrischen Schlag führen. Das
Gerätegehäuse, darf nur von ausgebildetem Fachpersonal geöffnet werden.
D 10.
01-2382IP-GE 9/15/06 12:09 PM Page 10
Page 11
Bitte verwenden Sie das Gerät nur seiner vorhergesehenen Bestimmung entsprechend. Das Gerät ist
ausschließlich für den Einsatz in Wohn- und
Geschäftsbereichen bestimmt.
Bitte bewahren Sie die Bedienungsanleitung auch für eine spätere Verwendung sorgfältig auf.
Hinweise zum Umweltschutz
Dieses Produkt darf am Ende seiner Lebensdauer nicht über den normalen Haushaltsabfall entsorgt werden,
sondern muss an einem Sammelpunkt für das Recycling von elektrischen und elektronischen Geräten abgegeben
werden. Das Symbol auf dem Produkt, der Gebrauchsanleitung oder der Verpackung weist darauf hin.
Die Werkstoffe sind gemäß ihrer Kennzeichnung wiederverwertbar. Mit der Wiederver wendung, der stofflichen
Verwertung oder anderen Formen der Verwertung von Altgeräten leisten Sie einen wichtigen Beitrag zum Schutze
unserer Umwelt.
Bitte erfragen Sie bei der Gemeindeverwaltung die zuständige Entsorgungsstelle.
Behindern Sie nicht die Belüftung des Gerätes, wie etwa mit Vorhängen, Zeitungen, Decken oder mit
Möbelstücken, die Belüftungsschlitze müsssen immer frei sein. Überhitzung kann Schäden verursachen und die
Lebensdauer des Gerätes verkürzen.
Hitze und Wärme
Setzen Sie das Gerät nicht direkter Sonnenstrahlung aus. Achten Sie darauf, das das Gerät keinen direkten
Wärmequellen wie Heizung oder offenem Feuer ausgesetzt ist. Achten Sie darauf, das die Lüftungsschlitze des
Gerätes nicht verdeckt sind.
Feuchtigkeit und Reinigung
Dieses Produkt ist nicht wasserfest! Tauchen Sie den Player nicht in Wasser ein und lassen ihn auch nicht mit
Wasser in Berührung kommen. In den Player eindringendes Wasser kann ernsthafte Schäden verursachen.
Verwenden Sie keine Reinigungsmittel, die Alkohol, Ammoniak, Benzen oder Schleifmittel enthalten, da diese den
Player beschädigen können. Verwenden Sie zum Reinigen ein weiches, feuchtes Tuch.
Batterien fachgerecht entsorgen
Batterien gehören nicht in den Hausmüll. Die Batterien müssen bei einer Sammelstelle für Altbatterien abgegeben
werden. Werfen Sie Batterien niemals in Feuer.
D 11.
01-2382IP-GE 9/15/06 12:09 PM Page 11
Page 12

WARNING: To prevent fire or shock hazard, do not expose this appliance to rain or moisture.
SAFETY PRECAUTION
This appliance must be disconnected from the mains when not in use. Do not allow this appliance to be exposed to rain or
moisture.
CAUTION: To reduce the risk of electric shock, do not remove cover (or back). No user-serviceable parts inside. Refer
servicing to qualified service personnel.
SAFETY INSTRUCTIONS
1. READ INSTRUCTIONS – All the safety and operating instructions should be read before the appliance is operated.
2. RETAIN INSTRUCTIONS – The safety and operating instruction should be retained for future reference.
3. HEED WARNINGS – All warnings on the appliance and in the operating instructions should be adhered to .
4. FOLLOW INSTRUCTIONS – All operating and use instructions should be followed.
5. WATER AND MOISTURE – The appliance should not be used near water, for example, near a bathtub, washbowl, kitchen
sink, laundry tub, swimming pool or in a wet basement.
6. VENTILATION – The appliance should be situated so that its location or position does not interfere with its proper ventilation,
for example, the appliance should not be situated on a bed, sofa , rug or similar surface that may block the ventilation
openings; Do not place in built–in installation openings; such as a bookcase or cabinets that may impede the flow of air
through the ventilation openings.
7. HEAT – The appliance should be situated away from heat sources such as radiators, heat registers, stoves, or other
appliance (including amplifiers) that produce heat.
8. POWER SOURCES – The appliance should be connected to a power supply only of the type described in the operating
instructions or as marked on the appliance.
9. GROUNDING AND POLARISATION – Precautions should be taken to ensure that the grounding or polarisation means of
the appliance are not defeated.
10. POWER CORD PROTECTION – Power supply cords should be routed so that they are not likely to be walked on or pinched
by items placed upon or against them, paying particular attention to cords at plugs, convenience receptacles, and the point
at which they exit from the appliance.
12.
MODEL 2382IP
DESIGN MUSIC CENTER WITH CD/USB/SD CARD - MP3 PLAYER AND
IPOD DOCKING STATION
The triangular symbol with the
lightning Bolt warns the user to the
presence of dangerous nonisolated voltage on the inside of
this device which may cause an
electric shock.
WARNING
DANGER OF A HAZARDOUS ELECTRIC
SHOCK. DO NOT OPEN
WARNING: TO REDUCE THE RISK OF AN
ELECTRIC SHOCK, DO NOT REMOVE THE
FRONT OR BACK COVER. INSIDE THE UNIT,
THERE ARE NO PARTS THAT CAN BE
REPAIRED OR ADJUSTED BY THE USER.
PLEASE REFER TO QUALIFIED TECHNICIANS.
The triangular symbol with the
exclamation highlights important
points of which the user should refer
to the manual regarding maintenance
and repair.
CLASS 1 LASER PRODUCT
CAUTION !
Invisible laser radiation when open and interlocks
defeated. Avoid exposure to beam.
02-2382IP-GB 9/15/06 12:10 PM Page 12
Page 13
11. CLEANING – The appliance should be cleaned only as recommended by the manufacturer.
12. POWER LINES – An outdoor antenna should be located away from power lines.
13. NONUSE PERIODS – The power cord of the appliance should be unplugged from the outlet when the appliance is to be
left unused for a long period of time.
14. OBJECT and LIQUID ENTRY – Care should be taken so that objects do not fall and liquids are not spilled into the enclosure
through openings.
15. SERVICING – The user should not attempt to service the appliance beyond that described in the user’s operating
instructions. All other servicing should be referred to qualified service personnel.
16. DAMAGE REQUIRING SERVICE – The appliance should be serviced by qualified service personnel when:
A. The power-supply cord or plug has been damaged.
B. Objects have fallen into, or liquid has been spilled into the appliance enclosure.
C. The appliance has been exposed to rain.
D. The appliance has been dropped, or the enclosure damaged.
E. The appliance does not appear to operate normally or exhibits a marked change in performance
PREPARATION FOR USE
INSTALLATION
• Unpack all par ts and remove protective material.
• Insert the batteries into the remote control transmitter.
• Do not connect the unit to the mains before checking the mains voltage and before all other connections have been made.
• Do not cover any vents and make sure that there is a space of several centimetres around the unit for ventilation.
CONNECTIONS
1) Connect left and right speaker to left and right speaker jacks.
2) Before connecting the unit to the mains, make sure that the AC voltage printed on the back plate is the same as the AC
voltage from your wall outlet.
OPERATION / COMPACT DISC
Bear in mind the following points as dirt; scratches or warping of the disc can cause broken or intermittent sound and also noise.
• When holding the discs, take care not to touch the playing surface.
• Do not place discs in the following locations:
Near a heating device or place where the temperature is high; In damp or dusty areas.
• Wipe away any fingerprints or dust on the playing surface of a disc using a soft cloth. Always wipe from the inside toward
the outside of the disc.
LOADING THE DISC
• Press OPEN/CLOSE
• Insert a disc (printed side up) in the tray.
• Press OPEN/CLOSE to close the tray.
The display shows the discs total number of tracks.
13.
02-2382IP-GB 9/15/06 12:10 PM Page 13
Page 14

CONTROLS AND FEATURES
1. STANDBY/ON button
2. LCD DISPLAY
3. FUNCTION button
4. REMOTE SENSOR
5. VOLUME+ button
6. VOLUME- button
7. MMC Card slot
8. TUNER/BAND button
9. PRESET EQ button
10. MEM/CLK-ADJ button
11. CD DOOR
12. HEADPHONE JACK
13. CD DOOR OPEN/CLOSE button
14. PLAY/PAUSE button
15. SKIP/TUNING button
16. SKIP/TUNING button
REMOTE CONTROL FUNCTIONS
Preparation before use
• Installing batteries in the remote control unit
1. Remove the battery cover from the back of the remote control unit.
2. Insert two “UM4/AAA/R03” size batteries.
• Insert the batteries with the and terminals matching the indication inside the battery compartment.
3. Replace the cover.
• Battery replacement
• When the remote control operation becomes unstable or t he distance from which the remote control works is shorter,
replace the batteries with new ones.
14.
17. MMC Card and USB indicator
18. USB Socket
19. STOP button
20. ALBUM/MEMORY CH. + button
21. ALBUM/MEMORY CH. – button
22. Random button
23. FM antenna
24. Speaker output
25. Power cord
26. I-POD SOCKET DOOR
27. I-POD SOCKET
28. AUX Right INPUT
29. AUX Left INPUT
13
20
27
26
1
4
3
21
7
19
10
17
15
18
23
24
11
8
2
5
9
28
29
25
22
14
16
6
12
02-2382IP-GB 9/15/06 12:10 PM Page 14
Page 15
Using the remote control unit
To use the remote unit, point at the REMOTE SENSOR and press the buttons gently and firmly. Remote control operation is
possible within approximate 18ft(6m). However, since the remote control range is less when the unit is used at an angle, use
directly in front of the REMOTE SENSOR, for maximum distance.
Do not expose the REMOTE SENSOR to strong light (direct sunlight or artificial lighting) and make sure that there are no
obstacles between the REMOTE SENSOR and the remote control unit.
REMOTE CONTROL
1. STANDBY button
2. SLEEP button
3. INTRO button
4. RANDOM/RDS Button
5. MUTE button
6. ID3/FIND/ST./ESP button
7. VOLUME- button
8. PLAY/PAUSE button
9. ALBUM/MEMORY CH.+ button
10. ALBUM/MEMORY CH.- button
11. REPEAT button
12. FUNCTION button
13. TUNER/BAND button
14. Numeric Button
15. VOLUME+ Button
16. STOP button
17. EQ button
18. SKIP/TUNING button.
19. SKIP/TUNING button
20. MEM/CLK-ADJ button.
21. TIMER button
22. I-POD button
OPERATION/ Description
STANDBY ON/OFF
When you first plug the unit into the mains, the unit will go into standby mode. The display will show --:--
• You can press STANDBY to switch on the unit.
• The standby function of the unit remains on until the unit is switched on.
• Pull the main plug out of the wall socket if you want to switch off the main voltage completely.
CLOCK SETTING
• When you first plug the unit into the mains, the unit will go into standby mode. The display will show --:--
• In standby mode hold [MEM/CLK-ADJ] this key for more than 3-5 sec the first second display 12H/24 will flashes.
• Press SKIP/TUNING or SKIP/TUNING to set the correct 12H or 24H hour format.
• Press [MEM/CLK-ADJ] again to select the hour setting, the first second digit of “00” flashes.
• Press SKIP/TUNING or SKIP/TUNING to set the correct hour.
• Press [MEM/CLK-ADJ] again to select the minutes setting, the third fourth digit of “00” flashes,
• press the SKIP/TUNING or SKIP/TUNING to set the correct minutes. Press [MEM/CLK-ADJ] to lock in the
correct minute.
• All the time information is shown in either 12H or 24H format.
15.
14
15
16
17
18
19
20
21
22
1
2
3
4
6
5
7
8
10
11
12
13
9
02-2382IP-GB 9/15/06 12:10 PM Page 15
Page 16
FUNCTION SELECT
• The function when it presses this key, the mode is changed.
• Display changes: TUNER > CD/MP3 > I-POD > AUX > CARD-USB >
PLAY/PAUSE
• To start playback or interrupt playback.
STOP
• In Play mode or Pause mode: Changing to Stop mode or Program Entry mode during program play.
• In Program Entry mode: Exit the Program Entry mode, clear program memory and change to Stop mode.
• In Random Play mode: Changing to Stop mode and release Random function.
REPEAT
• CDDA Normal play: Repeat 1 track >Repeat all track>Repeat Off
• Music CDROM Normal play:Repeat 1 file > Repeat >all file > Repeat Album >Repeat Off
• Random play mode:Random Repeat 1 track >Random play
• Program play mode:Repeat 1 program >?Repeat all program >Program play
MEMORY
CD/MP3 mode:
1. Up to 64 tracks can be programmed.
2. Press stop key to stop playing.
3. Press MEM/CLK-ADJ key to turn on or off the program mode
4. Change the track no by pressing the num. Key from remote directly.
5. Press MEM/CLK-ADJ key again to save and increase the program step.
6. After programmed all desired track, press play key to end the program mode.
7. Press play key to start program play.
RADIO mode:
1. Up to 30 stations in FM and 10 stations in AM can be programmed.
2. FUNCTION Keys It is use to turn on the radio, and toggle the AM and FM band.
3. To tune the frequency manually, press SKIP/TUNING or SKIP/TUNING key.
4. To tune the frequency automatically, hold the SKIP/TUNING or SKIP/TUNING key on panel for 2 second. The
system will stop when next station is arrived.
5. To store the current radio station frequency, Press MEM/CLK-ADJ key.
6. Press MEMORY CH- or MEMORY CH+ key to select the memory position.
7. Press MEM/CLK-ADJ key again to store the frequency.
SKIP/TUNING
CD/MP3 Mode:
• In stop mode: Change the starting play track [file] during stop mode, cyclic to the first track if it is in the last track.
• In Program Entry mode: Change to the next track [file] for program select.
• In Play mode, Pause mode, Program Play mode: Single pressed, skip the playing track [file] to next track [file] for normal
play/pause mode, to next program index track [file] for program play/pause mode, to next random track [file] for random
play/pause mode. Continue pressed, fast forward during play/pause when pressed more than 0.7 sec.
RADIO Mode:
• The receiving frequency is stepped up by pushing.
• Pushing this key for more than 0.7 sec starts auto tuning.
16.
02-2382IP-GB 9/15/06 12:10 PM Page 16
Page 17
SKIP/TUNING
CD/MP3 Mode:
• In stop mode: Change the starting play track [file] during stop mode, cyclic to the last track [file] if it is in the first track [file]
• In Program Entry mode: Change to the previous track [file] for program select.
• In Play mode, Pause mode, Program Play mode: Single pressed, skip the playing track [file] to previous track [file] for normal
play/pause mode, to previous program index track [file] for program play/pause mode. Continue pressed, fast forward
during play/pause when pressed more than 0.7 sec.
RADIO Mode:
• The receiving frequency is stepped up by pushing.
• Auto-tuning is started by pushing this key for more than 0.7 sec.
ALBUM/MEMORY CH.+
MP3 Mode:
• In stop mode: Skip the starting play folder to next folder during stop mode, cyclic to the first folder if it is in the last folder.
• In Program Entry mode: Change the album for program select to next folder’s first album, cyclic to the first folder if it is in
the last folder.
• In Normal Play mode: Skip the playing album to the next folder’s first album.
RADIO Mode:
• the preset memory is called in ascending order.
ALBUM/MEMORY CH.–
MP3 Mode:
• In stop mode: Skip the star ting play folder to previous folder during stop mode, cyclic to the last folder if it is in the first folder.
• In Program Entry mode: Change the album for program select to previous folder’s first album, cyclic . to the last folder if it
is in the first folder.
• In Normal Play mode: Skip the playing album to the previous folder’s first album.
RADIO Mode:
• The preset memory is called in descending order.
NUMERIC KEY
• select the desired track
• Press the play button to start playing.
INTRO
• By selecting this function on the remote control while in CD/MP3 mode, the first 10 seconds of each track only will be
played.
RANDOM
• Normal stop: Enable Random function and changing to Random Play mode.
• Repeat 1 track / file stop mode, Repeat Folder stop mode and Repeat all track / file stop mode: It will turn off all Repeat
mode, and change system to Random mode.
ID3/FIND/ST./ESP
CD Mode:
• Press [ ID3/FIND/ST./ESP] this key the 10 sec Electronic Shock protection clean.
• Press [ ID3/FIND/ST./ESP] this key again to return ESP.
17.
02-2382IP-GB 9/15/06 12:10 PM Page 17
Page 18
MP3 Mode:
• Press [ ID3/FIND/ST./ESP]this key once, FILE search mode changed.
• Press SKIP/TUNING or SKIP/TUNING to select the desired FILE.
• Press [ ID3/FIND/ST./ESP]this key twice, ALBUM search mode changed.
• Press SKIP/TUNING or SKIP/TUNING keys When the desired ALBUM track is displayed,.
• Press the PL AY keys then start play the track.
• Press [ ID3/FIND/ST./ESP] this key for more than 3-5 sec, ID3 TAG is displayed.
• Press [ ID3/FIND/ST./ESP] this key again for more than 3-5 sec, return the Playing time display.
RADIO Mode:
• Press [ ID3/FIND/ST./ESP] this key select the FM Stereo and Mono Mode.
EQ CONTROL
• EQ shows the present sound tone.
• When you press the EQ button, the sound tone changes: PASS >CLASSIC >ROCK > POP >JAZZ >
MUTE
• Mute the sound.
VOLUME+/–
• Increases volume.
• Reduces volume.
TIMER ON/OFF
1. In any mode hold [TIMER] key for more than 3-5 sec, display then the hour digit of will flashes.
2. Press SKIP/TUNING or SKIP/TUNING to set the correct hour.
3. Press [TIMER] again to select the minutes setting, the third fourth digit of flashes,
4. press the SKIP/TUNING or SKIP/TUNING to set the correct minutes. Press [TIMER] to lock in the correct minute.
5. Press [TIMER] again to display TIMER OFF, Press [TIMER] again to hour digit of will flashes .
6. Press SKIP/TUNING or SKIP/TUNING to set the correct hour.
7. Press [TIMER] again to select the minutes setting, the third fourth digit of flashes,
8. press the SKIP/TUNING or SKIP/TUNING to set the correct minutes. Press [TIMER] to lock in the correct minute.
9. Press [TIMER] again to select the function setting, the function of flashes,
10. press the SKIP/TUNING or SKIP/TUNING to set the desired function station.
11. Press [TIMER] again to the volume Increases or Reduces setting, the volume of flashes,
12. press the SKIP/TUNING or SKIP/TUNING to set the desired volume sound level station.
13. Press [TIMER] key again until it return to normal mode and the display will show the logo.
SLEEP
• Press sleep key to turn on sleep function, change sleep time and turn off sleep function; The display will change from
90>80>70>-->10 off; If sleep key is activated, the system will count down until sleep time is zero, then the system turn off
automatically.
18.
02-2382IP-GB 9/15/06 12:10 PM Page 18
Page 19
CARD-USB BASIC OPERATION
1. Insertion Memory Card and USB, Then TOC Information is displayed.
2. Press PLAY/PAUSE key, then 01 is displayed and start play. Pause on/off alternately. On pause condition, display is
flashing.
3. Press STOP key, then TOC is displayed
TUNER/ Operate
Operate in the order shown
1. Press STANDBY to switch on the unit.
2. Press the source selection button ”FUNCTION”.to TUNER mode.
3. Press the TUNER/BAND button to select the band (FM or AM).
4. Tune to the required station by pressing the SKIP/TUNING or SKIP/TUNING button.
5. Adjust the volume sound level by pressing vol+ or vol- button.
RDS BASIC OPERATION
To change RDS display information: FREQUENCY> PS>PTY>RT>
1. Press the RANDOM/RDS button once, PS is displayed. Then, the RDS indicator light up and the station name appears.
NO PS appears if no RDS signal is sent.
2. Press the RANDOM/RDS button twice, PTY is displayed. Then, the RDS indicator light up and the broadcast program type
appears. NO PTY appears if no RDS signal is sent.
3. Press RDS MODE button three times, RT is displayed. Then, the RDS indicator light up and a text message sent by the
station appears. NO RT appears if no RDS signal is sent
To search desired program type broadcast station:
1. Press RDS SEARCH button. PTY SEL is displayed.
2. Each time you press the SKIP/TUNING or SKIP/TUNING button, the display shows a category in the following
order: NEWS > AFFAIRS > INFO > SPORT > EDUCATE > DRAMA > CULTURE>SCIENCE > VARIED > POP M > ROCK M
> M O R M> LIGHT M > CLASSICS > .OTHER M > WEATHER > FINANCE > CHILDREN > SOCIAL A > RELIGION > PHONE
IN > TRAVEL > LEISURE > JAZZ > COUNTRY > NATIONAL > OLDIES > FOLK M > DOCUMENT > NEWS
3. Press RDS SEARCH button within approx 10 seconds again While searching, "SEARCH" and the selected PTY code
alternately appear on the display The Unit search 30 preset stations and stops when it finds a station of the category you
have selected, then tunes into that station. If no program is found, "NOT" and "FOUND" alternately appear on the display.
NOTE:
When listening to FM broadcasts it is advisable to fully extend the wire FM antenna on the rear cover.
When listening to AM broadcasts it is advisable to adjust the position of the am loop for optimum reception.
19.
Card slot and USB Socket
02-2382IP-GB 9/15/06 12:10 PM Page 19
Page 20
I-POD FUNCTION.
• Open the I-Pod door and put the I-Pod in the I-Pod socket, then the I-Pod unit charging and the display will show the
charging situation.
• Press the function button and select I-Pod function, then the I-Pod will start play directly.
• Press the SKIP/TUNING or SKIP/TUNING to select next or pervious track
SPECIFICATIONS
Power Supply : AC 230V ~50Hz
Power Consumption : 38 watts
Radio Section : AM 525 – 1615 KHz
FM 87.5 – 108 MHz
Cassette section
Tape speed : 4.75cm/sec.
Wow and Flutter : < 0.4%
Frequency response : 125Hz - 6.3KHz
Compact Disc Section
Disc Type : CD/CD-R/CD-RW / CD-DA /MP3
Frequency Response (-3dB) : 60 – 16,000 Hz
Signal-to-noise Ratio : >60 dB
Harmonic Distortion : <0.3%
CONTINUOUS IMPROVEMENTS ARE BEING MADE TO OUR EQUIPMENT BOTH IN QUALITY AND PERFORMANCE, THUS
WE RESERVE THE RIGHT TO ALTER SPECIFICATIONS WITHOUT NOTICE
MORE INFORMATION
Beware of small pieces and batteries, do not swallow them. It may be hazardous to your health and lead into
suffocation. Please, Make sure to keep small devices and batteries out of the reach of children.
Important advice regarding hearing protection
Caution:
You care for your hearing, and so do we.
Therefore, use caution while using this appliance.
Our recommendation: Avoid high volumes.
Children should be supervised while using headphones; make sure that the appliance is not set to high volume.
Caution!
High volumes may cause irreparable damage to children’s ears.
NEVER let allow anyone, especially children, to put objects into the holes, slots or openings on this devise. This
may lead into death due to electric shock. The device must only be opened by a qualified assistant.
20.
02-2382IP-GB 9/15/06 12:10 PM Page 20
Page 21

Only use the appliance for its intended purpose.
This device may only be used in housings and business premises.
Please keep this instruction manual for further reference.
Instructions on environment protection
Do not dispose of this product in the usual household garbage at the end of its life cycle; hand it over at a collection
point for the recycling of electrical and electronic appliances. The symbol on the product, the instructions for use
or the packing will inform about the methods for disposal.
The materials are recyclable as mentioned in its marking. By recycling, material recycling or other forms of reutilization of old appliances, you are making an important contribution to protect our environment.
Please inquire at the community administration for the authorized disposal location.
Do not obstruct the ventilation of the device. Make sure, that no curtains, newspapers, furniture or any other type
of object are blocking the ventilation system of the apparatus. The ventilation system must be clear of objects at all
times! Overheating may lead into serious damage of the device and reduce its performance and lifespan.
Heat and warmth
Do not expose the appliance to direct sunlight. Make sure that the appliance is not subject to direct heat sources
such as heaters or open fire. Make sure that the ventilation slots of the appliance are not covered.
Moisture and cleaning
This appliance is not waterproof! Do not immerse player in water. Do not allow player to come in contact with water.
If water gets inside the player it may cause serious damage. Do not use cleaning agents that contain alcohol,
ammoniac, benzene or abrasives as these could damage the player. For cleaning, use a soft, moistened cloth.
Professional recycling
Batteries and packaging should not be disposed of in the trash. Batteries must be handed over to a collection
centre for used batteries. Separating disposable packaging materials is ecologically friendly.
21.
02-2382IP-GB 9/15/06 12:10 PM Page 21
Page 22

MISE EN GARDE: Pour éviter les risques de feu ou d’électrocution, protéger l’appareil de la pluie et de l’humidité.
CONSIGNES DE SECURITE
L’appareil doit être déconnecté de la centrale quand il n’est pas utilisé. Ne pas laisser l’appareil exposé a la pluie ou a l’humidité.
ATTENTION: Pour réduire les risques d’électrocution, ne pas enlever la façade (ni l’arrière). Rien d’utile pour l’utilisateur ne se
trouve a l’intérieur. Adressez-vous au personnel qualifie pour des réparations.
CONSIGNES DE SECURITE
1. A LIRE – Toutes les consignes de sécurité ainsi que les consignes d’utilisation doivent être lues avant toute utilisation.
2. A RETENIR – Toutes les consignes de sécurité et d’emploi doivent être retenues pour des références ultérieures.
3. MISE EN GARDE – Lisez attentivement et comprenez toutes les consignes d’utilisation et de sécurité.
4. SUIVRE LES CONSIGNES –
Toutes les consignes d’utilisation doivent être suivies.
5. EAU ET HUMIDITE – Ne pas utiliser cet appareil a proximité d’eau, comme une baignoire, une machine a laver, un évier,
une piscine ou un sous-sol humide.
6. AERATION – L’appareil doit être positionne pour éviter tout obstacle a sa ventilation. Par exemple, l’appareil ne doit pas être
pose sur un lit, un canapé ou un tapis ni sur toute autre surface susceptible de gêner sa ventilation. Ne pas placer l’appareil
dans un endroit clos, comme entre des étagères. Cela peut dégrader la qualité de la ventilation.
7. CHALEUR – Placer l’appareil loin des sources de chaleur, telles que les radiateurs, des fours, ou tout autre appareil
produisant de la chaleur (y compris les enceintes).
8. ALIMENTATION – L’appareil doit être branche uniquement avec le type de câbles mentionne dans les consignes d’utilisation
ou inscrit sur l’appareil.
9. FIXATIONS ET STABILITE – Des précautions doivent être prises pour s’assurer que le mécanisme de fixation de l’appareil
n’est pas défaillant.
10. CABLES D’ALIMENTATION – Les câbles d’alimentation doivent être places de façon a éviter de marcher dessus ou qu’ils
soient tires par des objets adjacents, Avec une attention particulière aux prises et au point de sortie des câbles de l’appareil.
22.
MODEL 2382IP
CHAÎNE HI-FI DESIGN AVEC LECTEUR CD/USB/CARTE SD - MP3 ET
STATION DE DOCKAGE IPOD
Le voyant lumineux, inscrit dans un
triangle équilatéral et dont le
symbole est une flèche, avertit le
consommateur d’une ‘dangereuse
tension’ non isolée dans le boîtier
de l’article, qui pourrait avoir une
amplitude suffisante pour causer
une électrocution.
ATTENTION
RISQUE D’ELECTROCUTION. NE PAS OUVRIR
ATTENTION: AFIN DE REDUIRE LES RISQUES
D’ELECTROCUTION, NE PAS RETIRER LE
COUVERCLE (OU LE DOS). AUCUNE PIECE A
L’INTERIEUR N’EST UTILE AU
CONSOMMATEUR. POUR UN DEPANNAGE,
SE REFERER AU PERSONNEL QUALIFIE.
Le point d’exclamation à l’intérieur
d’un triangle équilatéral avertit le
consommateur de la présence
d’instructions importantes
concernant le fonctionnement et
l’entretien (dépannage) dans le mode
d’emploi de l’appareil.
PRODUIT LASER DE CLASSE 1
ATTENTION !
Radiation laser invisible quand ouvert et
déverrouille. Eviter toute exposition aux rayons.
03-2382IP-FR 9/15/06 12:11 PM Page 22
Page 23

11. ENTRETIEN – L’appareil doit être nettoyé exclusivement comme recommandé par le constructeur.
12. LIGNES A HEUTES TENSION – Une antenne extérieur doit être placée loin des lignes a haute tension.
13. PERIODES DE NON UTILISATION – En cas de non utilisation de l’appareil pour une période prolongée, le câble
d’alimentation doit être débranché
14. LIQUIDES ET OBJETS EXTERIEURS – Ne pas laisser des objets ou des liquides s’introduire dans l’appareil.
15. DEPANNAGE – L’utilisateur ne doit pas tenter de réparer l’appareil au delà de ce décrit dans les consignes d’utilisation.
Toute autre besoin intervention doit être signifié au personnel qualifié.
16. DEGATS REQUERRANT DEPANNAGE– L’appareil doit être réparé par du personnel qualifié quand :
A. Le câble d’alimentation a été endommagé.
B. Des objets ou des liquides se sont introduits dans l’appareil.
C. L’appareil a été expose a la pluie.
D. L’appareil a subit une chute et s’est endommage.
E. L’appareil ne semble plus fonctionner normalement, ou montre une baisse marquée quant aux performances.
PREPARATION A L’UTILISATION
INSTALLATION
• Déballez tous les composants et retirez le matériel de protection.
• Insérez les piles dans la télécommande.
• Ne pas brancher les éléments a la base avant d’avoir vérifier le courant et tous les autres branchements.
• Ne couvrez aucune sortie d’aération. Et assurez-vous qu’il y a plusieurs centimètres d’espace autour de la sortie d’aération.
BRANCHEMENTS
1. Branchez les enceintes droite et gauche aux prises jacks droite et gauche.
2. Avant de brancher les éléments, assurez-vous que le voltage inscrit a l’arrière de l’appareil est le même que celui de la prise
murale.
UTILISATION / DISQUE COMPACT
Gardez bien a l’esprit que la saleté, les accros et rayures sur un disque peuvent provoquer des altérations sonores.
• Quand vous tenez un disque, faites attention a ne pas toucher la face gravée.
• Ne pas placer les disques dans les endroits suivants :
Près d’une source de chaleur ou dans un endroit ou la température est élevée; dans l’humidité ou la saleté.
• Enlevez toute empreinte de doigts ou poussière de la surface du disque avec un tissue doux. Toujours enlever la saleté de
l’intérieur du disque vers l’extérieur.
INSERER UN DISQUE
• Appuyez sur OPEN/CLOSE
• Insérez un disque(cote imprime en haut)dans le tiroir.
• Appuyez sur OPEN/CLOSE pour fermer le tiroir. L’écran montre le nombre de pistes présentes sur le disque.
23.
03-2382IP-FR 9/15/06 12:11 PM Page 23
Page 24
CONTROLES GENERALS
1. Bouton STANDBY/ON
2. Ecran LCD
3. Bouton FUNCTION
4. Télécommande tactile
5. Bouton VOLUME+
6. Bouton VOLUME-
7. Port pour carte MMC
8. Bouton TUNER/BAND
9. Bouton PRESET EQ
10. Bouton MEM/CLK-ADJ
11. Tiroir CD
12. Prises jack pour casque
13. Bouton CD DOOR OPEN/CLOSE
14. Bouton PLAY/PAUSE
15. Bouton SKIP/TUNING
16. Bouton SKIP/TUNING
FONCTIONS DE LA TELECOMMANDE
Préparation a l’utilisation
• Installation des piles dans la télécommande
1. Retirez le couvercle a l’arrière de la télécommande.
2. Insérez deux piles ”UM4/AAA/R03” (LR6)
• Insérez les piles en faisant concorder les inscriptions et dans le compar timent a piles.
3. Remettez le couvercle.
• Changement des piles
• Remplacez les piles quand l’efficacité de la télécommande diminue ou quand la distance de fonctionnement diminue.
24.
17. Indicateur carte MMC et USB
18. Port USB
19. Bouton STOP
20. Bouton ALBUM/MEMORY CH. +
21. Bouton ALBUM/MEMORY CH. –
22. Bouton Random
23. Antenne radio
24. Sortie pour enceintes
25. Câble d’alimentation
26. Port I-POD
27. Port pour I-POD
28. Entrée AUXILIAIRE droite
29. Entrée AUXILIAIRE gauche
13
20
27
26
1
4
3
21
7
19
10
17
15
18
23
24
11
8
2
5
9
28
29
25
22
14
16
6
12
03-2382IP-FR 9/15/06 12:11 PM Page 24
Page 25
Utilisation de la télécommande
Pour utiliser la télécommande, dirigez-la vers le capteur de la base et appuyez doucement mais fermement sur les boutons. La
télécommande fonctionnement dans un rayon d’approximativement 6 mètres. Toutefois, comme le rayon d’action de la
télécommande est réduit lorsque la base est positionnée dans un angle, utilisez-la en face du capteur de la base pour une
efficacité maximum.
N’exposez pas la télécommande a de la forte lumière (naturelle ou artificielle) et faites en sorte qu’il n’y ait pas d’obstacle entre
la télécommande et le capteur de la base.
TELECOMMANDE
1. Bouton STANDBY
2. Bouton SLEEP
3. Bouton INTRO
4. Bouton RANDOM/RDS
5. Bouton MUTE
6. Bouton ID3/FIND/ST./ESP
7. Bouton VOLUME
8. Bouton PLAY/PAUSE
9. Bouton ALBUM/MEMORY CH.+
10. Bouton ALBUM/MEMORY CH.-
11. Bouton REPEAT
12. Bouton FUNCTION
13. Bouton TUNER/BAND
14. Bouton Numeric
15. Bouton VOLUME+
16. Bouton STOP
17. Bouton EQ
18. Bouton SKIP/TUNING
19. Bouton SKIP/TUNING
20. Bouton MEM/CLK-ADJ
21. Bouton TIMER
22. Bouton I-POD
UTILISATION/ Description
STANDBY ON/ OFF
Lorsque vous branchez pour la première fois l’appareil, il est en mode "standby". L’écran affiche -- :--
• Vous pouvez appuyer sur STANDBY pour allumer l’appareil.
• La fonction "standby" demeure jusqu'à ce que l’appareil soit allumé.
• Débranchez le câble d’alimentation de la prise si vous voulez arrêter complètement l’appareil.
REGLAGE DE L’HEURE
• Lorsque vous branchez pour la première fois l’appareil, il est en mode "standby" L’écran affiche -- :--
• En mode appuyer sur la touche [MEM/CLK-ADJ] pendant 3 a 5 secondes. L’inscription 12H/24 va clignotter.
• Appuyez sur SKIP/TUNING ou sur SKIP/TUNING pour choisir le format de l’heure (12h ou 24h)
• Appuyez sur [MEM/CLK-ADJ] a nouveau pour régler l’heure. L’inscription “00” clignotte.
• Appuyez sur SKIP/TUNING ou sur SKIP/TUNING pour regler les heures.
• Appuyez sur [MEM/CLK-ADJ] pour régler les minutes. L’inscription “00” clignotte.
• Appuyez sur SKIP/TUNING ou sur SKIP/TUNING pour régler les minutes. Appuyez a nouveau sur [MEM/CLKADJ] pour enregistrer l’heure.
• Les informations concernant l’heure sont affichées dans les formats 12H ou 24H
25.
14
15
16
17
18
19
20
21
22
1
2
3
4
6
5
7
8
10
11
12
13
9
03-2382IP-FR 9/15/06 12:11 PM Page 25
Page 26
CHOISIR LES FONCTIONS
• Quand cette touche est pressée, le mode est change.
• L’affichage change: TUNER > CD/MP3 > I-POD > AUX > CARD-USB >
PLAY/PAUSE
• Pour commencer ou interrompre la lecture.
STOP
• Pendant la lecture ou la pause: Passe en mode Stop ou en mode Program Entry pendant la lecture.
• En mode Program Entry: Sort du mode Program Entry, efface les programmes et passe en mode Stop
• En mode Random Play: Passe en mode Stop et arrête la fonction Random.
REPEAT
• En lecture CDDA normale : répète 1 piste> répète toutes les pistes>ne répète pas.
• En mode lecture de CDROM: répète 1 piste > répète toutes les pistes > répète album >ne répète pas.
• En mode Random: répète aléatoirement 1 piste >lecture aléatoire
• En mode lecture programmée: répète 1 programme >répète tous les programmes >lecture programmée.
MEMOIRE
Mode CD/MP3:
1. Jusqu'à 64 pistes peuvent etre programmées.
2. Appuyez sur stop pour arrêter la lecture.
3. Appuyez sur MEM/CLK-ADJ pour arreter le mode programme.
4. Changez de No de piste en appuyant sur les touches numérotées de la télécommande.
5. Appuyez a nouveau sur MEM/CLK-ADJ pour enregistrer le programme.
6. Apres avoir programme toutes les pistes désirées, appuyez sur play pour terminer le mode programme.
7. Appuyez sur la touche play pour jouer le programme.
Mode RADIO:
1. Jusqu'à 30 stations en FM et 10 stations en AM peuvent être enregistrées.
2. Le bouton FUNCTION sert a allumer la radio et a passer des ondes FM aux AM et inversement.
3. Pour régler les stations manuellement, appuyez sur les boutons SKIP/TUNING ou SKIP/TUNING .
4. Pour régler automatiquement les stations, tenez appuyés les boutons SKIP/TUNING et SKIP/TUNING pendant 2
secondes. Le système de recherche s’arrête quand une station est trouvée.
5. Pour enregistrer la fréquence actuelle, appuyez sur MEM/CLK-ADJ.
6. Appuyez sur MEMORY CH- ou MEMORY CH+ pour choisir l’ordre d’enregistrement.
7. Appuyez sur MEM/CLK-ADJ a nouveau pour enregistrer la fréquence.
SKIP/TUNING
Mode CD/MP3:
• En mode stop: change la première chanson jouée, les faisant défiler en cercle.
• En mode Programme: passe a la piste suivante.
• En mode lecture, pause et jouer programme: Une seule pression démarre la piste suivante en mode lecture normale,
démarre la piste suivante programmée en programme mode, démarre une piste au hasard en mode aléatoire. Une pression
continue accélère la vitesse du morceau au bout de 0,7 secondes.
Mode RADIO:
• La fréquence de réception s’élève avec la pression.
• Tenir cette touche appuyée plus de 0,7 secondes démarre la recherche automatique.
26.
03-2382IP-FR 9/15/06 12:11 PM Page 26
Page 27

SKIP/TUNING
Mode CD/MP3:
• En mode Stop: Change la première chanson jouée, les faisant défiler en cercle.
• En mode Programme: Passe a la piste précédente pour les programmes.
• En mode lecture, pause et programme: Une seule pression démarre la piste précédente en mode lecture normale, démarre
la piste précédente programmée en programme mode. Une pression continue revient en arrière dans la musique au bout
de 0,7 secondes.
Mode RADIO :
• La fréquence de réception s’abaisse avec la pression.
• Tenir cette touche appuyée plus de 0,7 secondes démarre la recherche automatique.
ALBUM/MEMORY CH.+
En mode MP3:
• En mode Stop: change la première chanson jouée, les faisant défiler en cercle.
• En mode programme: remplace l’album programme par le suivant, revenant au premier a la fin des albums enregistrés.
• En mode lecture normal: Passe de l’album actuelle au suivant.
En mode RADIO :
• Les stations enregistres sont jouées dans l’ordre croissant.
ALBUM/MEMORY CH.–
En mode MP3:
• En mode Stop: change la première chanson jouée, les faisant défiler en cercle.
• En mode programme: change l’album actuel pour l’album programmé comme le précédent, revenant au début a la fin des
albums.
• En mode lecture normale: Change l’album actuel pour le précédent.
En mode RADIO:
• Les stations radio enregistrées défilent dans l’ordre décroissent.
TOUCHES NUMÉRIQUES
• Choisissez la piste désirée
• Appuyez sur le bouton ”play” pour lancer la lecture.
INTRO
• En mode CD/MP3, cette fonction ne joue que les 10 premières secondes de chaque piste.
ALEATOIRE
• En mode normal stoppé: Enclenche le mode aléatoire.
• En mode répète 1 piste stoppé, répète sélection stoppé et répète toutes les pistes stoppé: Désactive tous les mode
”répète” et passe en mode random.
ID3/FIND/ST./ESP
En mode CD:
• Appuyez sur [ID3/FIND/ST./ESP] ce bouton pour activer la protection électronique anti-choc de 10 secondes.
• Appuyez de nouveau sur [ID3/FIND/ST./ESP] cette touche pour revenir a la protection electronique anti-choc.
27.
03-2382IP-FR 9/15/06 12:11 PM Page 27
Page 28
En mode MP3:
• Appuyez cette touche [ID3/FIND/ST./ESP] une fois pour activer le mode de recherche de fichiers.
• Appuyez sur SKIP/TUNING ou SKIP/TUNING pour choisir le FICHIER désiré.
• Appuyez deux fois sur [ID3/FIND/ST./ESP] cette touche pour choisir l’ALBUM.
• Appuyez sur SKIP/TUNING ou SKIP/TUNING pour choisir l’ALBUM.
• Appuyez sur PL AY pour jouer la musique.
• Appuyez sur [ID3/FIND/ST./ESP] cette touche entre 3 et 5 secondes pour afficher l’ ID3 TAG.
• Appuyez de nouveau sur [ID3/FIND/ST./ESP] cette touche pour revenir a l’affichage du temps des morceaux.
En mode RADIO:
• Appuyez sur [ID3/FIND/ST./ESP] cette touche pour choisir entre l’onde FM stéréo et mono.
BOUTON EQ
• EQ montre le type de son actuel.
• En appuyant sur le bouton EQ, le type de son change: PASS >CLASSIC >ROCK > POP >JAZZ >
SILENCE
• Couper le son.
VOLUME+/-
• Monte le son
• Baisse le son
MINUTEUR ON/OFF
1. Dans tous les modes, tenez le bouton [TIMER] entre 3 et 5 secondes et l’heure s’affiche.
2. Appuyez sur SKIP/TUNING ou SKIP/TUNING pour régler les heures.
3. Appuyez de nouveau sur [TIMER] pour passer au réglage des minutes.
4. Appuyez sur SKIP/TUNING ou SKIP/TUNING pour régler les minutes. Appuyez sur [TIMER] pour enregistrer
l’heure.
5. Appuyez encore sur [TIMER] pour afficher TIMER OFF. Appuyez encore sur [TIMER] et les heures vont clignoter.
6. Appuyez sur SKIP/TUNING ou SKIP/TUNING pour régler les heures.
7. Appuyez de nouveau sur [TIMER] pour passer au réglage des minutes, les 3eme et 4eme chiffres.
8. Appuyez sur SKIP/TUNING ou SKIP/TUNING pour régler les minutes. Appuyez sur [TIMER] pour enregistrer les
minutes.
9. Appuyez sur [TIMER] a nouveau pour accéder aux réglages des fonctions, Les fonctions clignotent,
10. Appuyez sur SKIP/TUNING ou SKIP/TUNING pour choisir la fonction désirée.
11. Appuyez encore sur [TIMER] pour accéder au réglage du volume, Le volume clignote,
12. Appuyez sur SKIP/TUNING ou SKIP/TUNING pour régler le volume.
13. Appuyez enfin sur [TIMER] jusqu’au retour au mode normal et l’écran affichera le logo .
SOMMEIL
• Appuyez sur le bouton sommeil pour passer en mode sommeil, changer le compte a rebours et sortir du mode sommeil.
L’écran affichera: 90>80>70>-->10 off; Si le mode sommeil est active, le system lance un compte a rebours jusqu'à zéro,
Et l’appareil s’éteint automatiquement.
28.
03-2382IP-FR 9/15/06 12:11 PM Page 28
Page 29

UTILISATION SOMMAIRE DES CARTE-USB
1. A l’insertion d’une carte mémoire ou d’un périphérique USB, l’écran en affiche le contenu.
2. Appuyez sur le bouton PLAY/PAUSE, 01 s’affiche et la piste se lance. Mettez la pause alternativement. En pause, l’écran
clignote.
3. Appuyez sur STOP et le contenu du périphérique est affiché.
UTILISATION DE LA RADIO
Opérez dans l’ordre suivant.
1. Appuyez sur STANDBY pour allumer l’appareil.
2. Appuyez sur le bouton FUNCTION jusqu’au mode TUNER.
3. Appuyez sur le bouton TUNER/BAND pour choisir la longueur d’onde.
4. Réglez la fréquence désirée avec les boutons SKIP/TUNING et SKIP/TUNING .
5. Ajustez le volume avec les bouton vol+ et vol-.
UTILISATION SOMMAIRE DU RDS
Informations sur le RDS: FREQUENCY>PS>PTY>RT>
1. Appuyez sur RANDOM/RDS, PS est affiché. L’indicateur RDS s’allume. NO PS apparaît si aucun signal RDS n’est émis.
2. Appuyez deux fois sur RANDOM/RDS, PTY s’affiche. L’indicateur RDS s’allume et le type d’émission apparaît. NO PTY
apparaît si aucun signal RDS n’est émis.
3. Appuyez sur RDS MODE trois fois et RT s’affiche. L’indicateur RDS s’allume et un message envoyé par la station apparaît.
NO RT apparaît si aucun signal RDS n’est émis.
Pour chercher un genre de programme radiodiffuse.
1. Appuyez sur RDS SEARCH. PTY SEL s’affiche.
2. A chaque pression sur les boutons SKIP/TUNING ou SKIP/TUNING , l’écran affiche les catégories dans cet ordre:
NEWS [NOUVELLES] > AFFAIRS [POLITIQUE] > INFO > SPORT > EDUCATE [EDUCATION] > DRAMA [COMEDIE] >
CULTURE > SCIENCE > VARIED [MIXED] > POP M [POP MUSIQUE] > ROCK M [ROCK MUSIQUE] > M O R M > LIGHT
M [MUSIQUE CALME] > CLASSICS [MUSIQUE CLASSIQUE] > OTHER M [AUTRES MUSIQUES] > WEATHER [METEO]
> FINANCE > CHILDREN [ENFANTS] > SOCIAL A [SOCIAL] > RELIGION > PHONE IN [DEBAT] > TRAVEL [VOYAGE] >
LEISURE [DETENTE] > JAZZ > COUNTRY > NATIONAL > OLDIES [LES CLASSIQUES] > FOLK M [MUSIQUE FOLK] >
DOCUMENT [DOCUMENTAIRES] > NEWS [NOUVELLES]
3. Appuyez sur RDS SEARCH durant 10 secondes pendant la recherche automatique, "SEARCH" (recherche) et le PTY
sélectionné vont apparaitre alternativement sur l’ecran L’appareil cherche l’une des 30 stations enregistrées et s’arrête
lorsqu’il en trouve une de la catégorie sélectionnée. Si aucune station n’est trouvée, "NOT” et "FOUND" apparaissent
alternativement sur l’ecran.
NOTE:
Quand vous écoutez la radio en ondes FM, il est recommande d’étendre au maximum l’antenne radio.
Quand vous écoutez la radio en ondes AM, il est conseillé de positionner l’appareil dans la position optimum de réception.
29.
Port pour la carte mémoire et port USB
03-2382IP-FR 9/15/06 12:11 PM Page 29
Page 30
FONCTIONNEMENT DU I-POD
• Ouvrez le port I-Pod et branchez-y le I-Pod, L’unité I-Pod se charge et le niveau de chargement s’affiche a l’écran.
• A l’aide du bouton fonction, sélectionnez la fonction I-Pod Et le I-Pod commence à jouer directement.
• Appuyez sur les boutons SKIP/TUNING ou SKIP/TUNING pour changer de morceau.
CARACTERISTIQUES
Alimentation : AC 230V ~50Hz
Consommation : 38 watts
Radio : AM 525 – 1615 KHz
: FM 87.5 – 108 MHz
A propos des cassettes
Vitesse de lecture : : 4,75 cm/sec.
Tampon : : < 0,4%
Fréquence de réponse : : 125Hz - 6.3KHz
A propos des CD
Types de disques : CD/CD-R/CD-RW / CD-DA /MP3
Fréquence de réponse (-3dB) : 60 – 16.000 Hz
Limite avant signal de bruits : >60 dB
Distorsions harmoniques : <0,3 %
DES AMELIORATIONS CONTINUELLES SONT EFFECTUEES SUR NOS EQUIPPEMENTS TANT SUR LE QUALITEE QUE
SUR LA PERFORMANCE. NOUS NOUS RESERVONS LE DROIT A TOUTE MODIFICATION DE LA NOTICE.
PLUS D’INFORMATIONS
Prenez garde aux petites pièces et piles, ne les avalez pas. Cela pourrait être dangereux pour votre santé et mener
à l'étouffement. Prêtez l'attention la plus élevée pour garder les petits appareils et piles hors de la portée des
enfants.
Conseil important pour la protection de l’ouïe
Attention:
Nous tenons à votre ouïe autant que vous.
Par conséquent, prenez vos précautions lors de l’usage de cet appareil.
Notre recommandations: Evitez les volumes forts.
Dans le cas où des enfants utilisent l’appareil, assurez-vous que le volume n’est pas sur la position élevée.
Attention!
Les volumes élevés peuvent irrémédiablement endommager l’ouïe des enfants.
NE JAMAIS laisser une personne ou surtout un enfant mettre des objets dans les trous, fentes ou autres ouvertures
de l’appareil. Cela pourrait entraîner la mort par décharge électrique. L’appareil doit être ouvert uniquement par un
assistant qualifié.
Veuillez utiliser l'appareil uniquement aux fins pour lesquelles il a été créé.
Cet appareil est exclusivement destiné à l'usage dans des locaux privés ou à usage commercial.
30.
03-2382IP-FR 9/15/06 12:11 PM Page 30
Page 31

Veuillez conserver ce mode d`emploi pour utilisation ultérieure.
Indications relatives à la protection de l’environnement
Au terme de sa durée de vie, ce produit ne doit pas être éliminé avec les ordures ménagères mais doit être remis
à un point de collecte destiné au recyclage des appareils électriques et électroniques. Le symbole figurant sur le
produit, la notice d’utilisation ou l’emballage vous indique cela.
Les matériaux sont recyclables conformément à leur marquage. Vous apportez une large contribution à la
protection de l’environnement par le biais du recyclage, de la réutilisation matérielle ou par les autres formes de
réutilisation des appareils usagés.
Veuillez vous adresser à la municipalité pour connaître la déchetterie compétente.
Ne gênez pas la ventilation du dispositif. Assurez-vous que rideaux, journaux, couvertures ou meubles ne bloquent
en aucun cas les fentes de ventilation de l’appareil. La ventilation doit être assurée à tout moment! La surchauffe
peut causer à l’appareil des dommages sérieux et réduire sa performance et sa durée de vie.0
La chaleur et sources de chaleur
Veuillez ne pas exposer l’appareil à la lumière directe (du soleil). Assurez-vous que l’appareil n’est pas en contact
direct avec des sources de chaleur telles qu’un chauffage ou un feu. Assurez-vous que les fentes d’aération de
l’appareil ne sont pas fermées.
Humidité et nettoyage
L’appareil n’est pas étanche! Ne plongez pas l’appareil dans l’eau. Evitez son contact avec l’eau. De l’eau dans
l’appareil pourrait sérieusement l’endommager.
N’employez pas de détergents contenant de l’alcool, de l’ammoniaque, du benzène ou des abrasifs. Ces produits
pourraient endommager votre appareil. Pour nettoyer l’appareil, utilisez un chiffon doux et humide.
Recyclage professionnel
Les piles et l’emballage n’appartiennent pas à la catégorie des ordures ménagères. Les piles doivent être dirigées
vers un centre collectant les piles usagées. Les matériaux de l’emballage sont écologiques.
31.
03-2382IP-FR 9/15/06 12:11 PM Page 31
Page 32

FIGYELMEZTETÉS: Az áramütés veszélyének elkerülése céljából ne tegyük ki a készüléket eső vagy nedvesség hatásának.
BIZTONSÁGI ELŐÍRÁSOK
Mindig szakítsuk meg a készülék áramellátását, amikor az nincs használatban. Ne tegyük ki a készüléket eső vagy nedvesség
hatásának.
FIGYELMEZTETÉS: Az áramütés veszélyének elkerülése céljából ne nyissuk fel a készülékházat vagy a készülék hátulját. A
készülék belsejében nincsenek a felhasználó által javítandó alkatrészek. A javítást mindig bízzuk szakemberre.
BIZTONSÁGI ELŐÍRÁSOK
1. OLVASSUK EL A HASZNÁLATI ÚTMUTATÓT - Mielőtt a készülék kezelését megkezdenénk, olvassunk el minden biztonsági
előírást és kezelési útmutatást.
2. AZ ÚTMUTATÓ MEGŐRZÉSE – A biztonsági előírásokat és a használati útmutatót őrizzük meg, hogy azok a későbbiekben
is rendelkezésünkre álljanak.
3. A FIGYELMEZTETÉSEK BETARTÁSA – A készüléken és a használati útmutatóban található figyelmeztetéseket be kell
tartani.
4. AZ ÚTMUTATÁSOK KÖVETÉSE – Kövessünk minden, a használatra és a kezelésre vonatkozó útmutatást.
5. VÍZ ÉS NEDVESSÉG – A készüléket nem szabad víz, például fürdőkád, mosóteknő, mosdó vagy úszómedence közelében
és nedves pincében használni.
6. SZELLŐZÉS – A készüléket úgy helyezzük el, hogy annak szellőzése ne legyen akadályozva. A készüléket ne helyezzük
például ágyra, heverőre, szőnyegre vagy hasonló felületre, mert ezek elzárhatják a szellőző nyílásokat. Ne tegyük a
készüléket beépített szekrénybe vagy könyvespolc rekeszébe. Ez zavarhatja a levegő keringését.
7. MELEG – A készüléket ne tegyük meleg tárgyak, például fűtőtestek, fűtőfelületek, kályha vagy egyéb hőt termelő
készülékek (például erősítő) közelébe.
8. ÁRAMFORRÁS – A készüléket csak olyan áramforráshoz szabad csatlakoztatni, amely a használati útmutatóban le van írva,
vagy a készüléken meg van jelölve.
9. FÖLDELÉS ÉS SZTATIKUS ELEKTROMOSSÁG – Feltétlenül tegyünk meg minden szükséges intézkedést annak
biztosítása céljából, hogy ne legyenek megkerülve a készülék földelési és feltöltődés elleni berendezései.
10. A HÁLÓZATI CSATLAKOZÓKÁBEL VÉDELME – A hálózati csatlakozókábelt úgy kell vezetni, hogy senki ne tudjon rálépni,
és ne lehessen tárgyakat rátenni. Különösképpen vigyázzunk a kábelnek azokra a szakaszaira, amelyek a dugaszoló aljzat
és a készülék kábel-kimenete közelében vannak.
H 32.
MODEL 2382IP
FORMATERVEZETT MINI HIFI TORONY CD/USB/SD-KÁRTYA,
MP3 LEJÁTSZÓVAL ÉS IPOD DOKKOLÓ ÁLLOMÁSSAL
1. OSZTÁLYÚ LÉZERTERMÉK
VIGYÁZAT !
Láthatatlan lézersugár lép ki, ha a reteszelést
megnyitjuk és kioldjuk. Ne nézzünk bele a
sugárba.
Az egyenlő oldalú háromszögben
nyílban végződő villám szimbólum
arra figyelmeztet, hogy a készülék
belsejében nem leszigetelt,
veszélyes magasfeszültségű áram
található, amely komoly áramütést
okozhat!
FIGYELEM!
ÁRAMÜTÉS VESZÉLYE
NE NYISSA FEL!
FIGYELEM: AZ ÁRAMÜTÉS VESZÉLYÉNEK
ELKERÜLÉS ÉRDEKÉBEN NE TÁVOLÍTSA EL A
FEDELET (VAGY A HÁTLAPOT)! ITT
NINCSENEK A FELHASZNÁLÓ SZÁMÁRA
HOZZÁFÉRHETŐ ALKATRÉSZEK. A JAVÍTÁST
BÍZZA SZAKEMBERRE!
Az egyenlő oldalú háromszögben
lévő felkiáltójel szimbólum arra
figyelmeztet, hogy a készülékkel
szállított dokumentumokban a
használattal és karbantartással
(javítással) kapcsolatos fontos
útmutatások találhatók.
04-2382IP-HU 9/15/06 12:12 PM Page 32
Page 33

11. TISZTÍTÁS – A készüléket csak a gyártó által ajánlott módon szabad tisztítani.
12. NAGYFESZÜLTSÉGŰ VEZETÉKEK – A külső antennát nem szabad nagyfeszültségű vezetékek közelében elhelyezni.
13. HA A KÉSZÜLÉKET HOSSZABB IDEIG NEM HASZNÁLJUK – Ha a készüléket hosszabb ideig nem kívánjuk használni,
húzzuk ki a hálózati csatlakozódugaszt az aljzatból.
14. TÁRGY VAGY FOLYADÉK BEJUTÁSA A KÉSZÜLÉKBE – Ügyeljünk arra, hogy a készülék belsejébe semmilyen tárgy vagy
folyadék ne juthasson be a készülék nyílásain keresztül.
15. KARBANTARTÁS – A felhasználónak a készüléket a gyártó ajánlásai, és leírásai szerint kell karbantartania. Minden egyéb
karbantartást bízzunk szakemberre.
16. A KÁROK MEGJAVÍTÁSA – A készüléket mindig képzett szakemberrel javíttassuk akkor, ha:
A. A hálózati csatlakozókábel vagy a dugasz megsérül.
B. Valamilyen tárgy vagy folyadék jutott a készülékbe.
C. A készülék esőnek volt kitéve.
D. A készülék leesett vagy a készülékház megsérült.
E. A készülék nem működik előírásosan vagy a teljesítménye észrevehetően megváltozott.
A HASZNÁLAT ELŐTT
ELHELYEZÉS
• Csomagoljuk ki a készülék részeit, és távolítsuk el a védőfóliákat.
• Tegyük be az elemeket a távirányítóba.
• A készüléket ne csatlakoztassuk a hálózathoz addig, amíg nem ellenőriztük azt, hogy a hálózati feszültség megfelelő, és
amíg nem hoztuk létre az összes többi csatlakozást.
• Ne zárjuk el a szellőzőnyílásokat. Ügyeljük arra, hogy a készülék körül néhány centiméteres hely maradjon.
CSATLAKOZTATÁSOK
1. Csatlakoztassuk a jobboldali és a baloldali hangszórót a jobboldali és a baloldali hangszóró-aljzathoz.
2. Mielőtt a készüléket a hálózati aljzathoz csatlakoztatnánk, győződjünk meg arról, hogy a helyi hálózat feszültsége megegyezik
a készülék hátulján megadott feszültséggel.
KEZELÉS / CD LEMEZ
Tartsuk szem előtt a következő pontokat, mivel az elszennyeződött, karcos vagy elgörbült CD-k zajokat és szakadozottságot
okozhatnak a lejátszásnál.
• A CD lemezt úgy fogjuk, hogy az adathordozó felületéhez ne érjünk hozzá.
• Ne tartsuk a CD-ket a következő helyeken:
fűtőtest vagy más meleg tárgy közelében; nedves helyen vagy poros helyen.
• A pornak és az ujjlenyomatoknak az adathordozó felületről történő eltávolításához egy puha törlőruhát használjunk. A CD-t
mindig a közepétől kifelé irányuló mozdulatokkal töröljük le.
A CD BEHELYEZÉSE
• Nyomjuk meg az OPEN/CLOSE gombot
• Tegyünk be egy CD-t (a címkés oldalával felfelé a CD-fészekbe).
• Nyomjuk meg az OPEN/CLOSE gombot a CD fészek bezárásához.
A kijelzőn látható a CD-n szereplő műsorszámok száma.
H 33.
04-2382IP-HU 9/15/06 12:12 PM Page 33
Page 34

KEZELŐELEMEK ÉS TULAJDONSÁGAIK
1. KÉSZENLÉT/BE (STANDBY/ON) gomb
2. LCD-KIJELZŐ
3. FUNKCIÓ (FUNCTION) gomb
4. ÁVÉRZÉKELŐ
5. HANGERŐ+ (VOLUME+) gomb
6. HANGERŐ– (VOLUME–) gomb
7. MMC kártyanyílás
8. HANGOLÁS/HULLÁMSÁV (TUNER/BAND)
9. EKVALÍZER (PRESET EQ) gomb
10. MEMÓRIA/ÓRABEÁLLÍTÁS (MEM/CLK-ADJ) gomb
11. CD-ZÁRÓLAP
12. FEJHALLGATÓ-ALJZAT
13. CD-AJTÓ NYITÁS/ZÁRÁS (CD DOOR OPEN/CLOSE) gomb
14. LEJÁTSZÁS/SZÜNET (PLAY/PAUSE) gomb
15. LÉPTETÉS/HANGOLÁS (SKIP/TUNING) gomb
16. LÉPTETÉS/HANGOLÁS (SKIP/TUNING) gomb
A TÁVIRÁNYÍTÓ FUNKCIÓI
Előkészületek a használathoz
• Az elemek behelyezése a távirányítóba
1. Vegyük le az elemfészek fedelét a távirányító hátoldaláról.
2. Tegyünk be két „UM4/AAA/R03” elemet.
• Az elemeket a és a jelölésű helyekre tegyük be (ügyelve a polaritásra).
3. Tegyük vissza az elemfészek fedelét.
• Az elemek kicserélése
• Ha a távirányító funkciói már nem működnek megfelelően, és a hatósugár lecsökken, akkor cseréljük ki az elemeket újakra.
H 34.
17. MMC kártya- és USB-kijelző
18. USB csatlakozó
19. STOP gomb
20. ALBUM/MEMÓRIA CSAT. +
(ALBUM/MEMORY CH. +) gomb
21. ALBUM/MEMÓRIA CSAT. –
(ALBUM/MEMORY CH. –) gomb
22. Véletlenszerű (Random) gomb
23. URH-antenna
24. Hangszóró-kimenet
25. Hálózati csatlakozókábel
26. I-POD-CSATLAKOZÓ ZÁRÓLAP
27. I-POD-CSATLAKOZÓ
28. AUX IN, jobboldali
29. AUX IN, baloldali
13
20
27
26
1
4
3
21
7
19
10
17
15
18
23
24
11
8
2
5
9
28
29
25
22
14
16
6
12
04-2382IP-HU 9/15/06 12:12 PM Page 34
Page 35

A távirányító használata
A távirányítót úgy használjuk, hogy azt a készülék TÁVÉRZÉKELŐJÉRE irányítjuk, és megnyomjuk a megfelelő gombokat. A
távirányító hatósugara körülbelül 6 m. Ha a távirányítót ferdén tartjuk, akkor csökken a hatósugara. Éppen ezért irányítsuk a
távirányítót mindig közvetlenül az érzékelőre.
Ne tegyük ki a TÁVÉRZÉKELŐT erős fény hatásának (közvetlen napsütésnek vagy mesterséges fénynek), és ügyeljünk arra,
hogy ne legyenek akadályok a távirányító és a TÁVÉRZÉKELŐ között.
A TÁVIRÁNYÍTÓ
1. KÉSZENLÉT (STANDBY) gomb
2. ELALVÁS (SLEEP) gomb
3. INTRO gomb
4. VÉLETLENSZERŰ/RDS (RANDOM/RDS) gomb
5. NÉMÍTÁS (MUTE) gomb
6. ID3/KERESÉS/SZTEREÓ/ESP
(ID3/FIND/ST./ESP) gomb
7. HANGERŐ (VOLUME) gomb
8. LEJÁTSZÁS/SZÜNET (PLAY/PAUSE) gomb
9. ALBUM/MEMÓRIA CS.+
(ALBUM/MEMORY CH.+) gomb
10. ALBUM/MEMÓRIA CS.–
(ALBUM/MEMORY CH.–) gomb
11. ISMÉTLÉS (REPEAT) gomb
12. FUNKCIÓ (FUNCTION) gomb
13. TUNER/HULLÁMSÁV (TUNER/BAND) gomb
14. Számgombok
15. HANGERŐ+ (VOLUME+) gomb
16. STOP gomb
17. EKVALÍZER (EQ) gomb
18. LÉPTETÉS/HANGOLÁS (SKIP/TUNING) gomb
19. LÉPTETÉS/HANGOLÁS (SKIP/TUNING) gomb
20. MEMÓRIA/ÓRABEÁLLÍTÁS (MEM/CLK-ADJ) gomb
21. IDŐZÍTŐ (TIMER) gomb
22. I-POD gomb
FUNKCIÓ / magyarázat
STANDBY ON/ OFF
Amikor a készüléket áram alá helyezzük, a készülék készenléti állapotba kerül. A kijelzőn a következő látható --:--
• A készülék bekapcsolásához nyomjuk meg a STANDBY gombot.
• Amíg a készülék be van kapcsolva, addig a készenléti funkció megmarad.
• Az áramellátás teljes megszakításához húzzuk ki a csatlakozódugaszt a hálózati aljzatból.
AZ IDŐ BEÁLLÍTÁSA
• Amikor a készüléket legelőször áram alá helyezzük, a készülék készenléti állapotba kerül. A kijelzőn a következő látható --:--
• Tartsuk a készenléti állapotban a [MEM/CLK-ADJ] gombot 3-5 másodpercnél hosszabb ideig lenyomva. A kijelzőn 12H/24
látható.
• Nyomjuk meg a SKIP/TUNING vagy a SKIP/TUNING gombot, az idő kijelzés 12 órás vagy 24 órás beállításához.
• Nyomjuk meg még egyszer a [MEM/CLK-ADJ] gombot az óra beállításához. A “00” 1. és 2. számjegye villogni kezd.
• Nyomjuk meg a SKIP/TUNING vagy a SKIP/TUNING gombot, a pontos idő órájának beállításához.
• Még egyszer nyomjuk meg a [MEM/CLK-ADJ] gombot a perc beállításához. A 3. és 4. számjegy villogni kezd.
• Nyomjuk meg a SKIP/TUNING vagy a SKIP/TUNING gombot, a pontos idő percének beállításához. Nyomjuk meg
a [MEM/CLK-ADJ] gombot, a perc-adat betárolásához.
• A készülék az időt 12 órás vagy 24 órás formátumban mutatja.
H 35.
14
15
16
17
18
19
20
21
22
1
2
3
4
6
5
7
8
10
11
12
13
9
04-2382IP-HU 9/15/06 12:12 PM Page 35
Page 36

A FUNKCIÓ KIVÁLASZTÁSA
• Ha megnyomjuk a funkció-gombot, akkor megváltozik az üzemmód.
• A kijelző ezt mutatja: TUNER > CD/MP3 > I-POD > AUX > CARD-USB >
LEJÁTSZÁS/SZÜNET
• A lejátszás elkezdése vagy ideiglenes leállítása.
STOP
• Lejátszási vagy szünet üzemmódban: Átváltás stop üzemmódra vagy programozási üzemmódra.
• A programozási üzemmódban: Az üzemmódból történő kilépéshez töröljük a program-memóriát, és lépjünk át a stop
üzemmódba.
• A véletlenszerű lejátszási üzemmódban: Lépjünk át a stop üzemmódba, és indítsuk el a véletlenszerű lejátszási funkciót.
ISMÉTLÉS
• CD normál lejátszása: Egy műsorszám ismétlése > az összes műsorszám ismétlése > ismétlés kikapcsolva.
• Zenei CD-ROM normál lejátszása: Egy fájl ismétlése > az összes fájl ismétlése > album ismétlése > ismétlés kikapcsolva.
• Véletlenszerű lejátszási üzemmód: Egy műsorszám véletlenszerű ismétlése > véletlenszerű lejátszás.
• Program-lejátszási üzemmód: Egy program ismétlése > az összes program ismétlése
MEMÓRIA
CD/MP3-üzemmód:
1. Legfeljebb 64 műsorszám programozható be.
2. Nyomjuk meg a Stop gombot, a lejátszás leállításához.
3. Nyomjuk meg a MEM/CLK-ADJ gombot, a programozási üzemmód kikapcsolásához.
4. A műsorszámok számait a távirányítóval vigyük be, ha egy műsorszámot módosítani akarunk.
5. Nyomjuk meg ismét a MEM/CLK-ADJ gombot, az adott programpont igazolásához.
6. Miután az összes műsorszámot betároltuk, a Play gomb megnyomásával lépjünk ki a programozási üzemmódból.
7. A Play gomb megnyomásával indítsuk el a program lejátszását.
RÁDIÓ üzemmód:
1. Legfeljebb 30 URH és 10 középhullámú rádióadót programozhatunk be.
2. A FUNCTION gomb segítségével kapcsolhatjuk be a rádiót, és ezzel válthatunk át az URH és a KH között.
3. A frekvencia manuális beállításához nyomjuk meg a SKIP/TUNING vagy a SKIP/TUNING gombot.
4. A frekvencia automatikus beállításához tartsuk lenyomva a SKIP/TUNING vagy a SKIP/TUNING gombot, 2
másodpercig. A rendszer leáll, amikor eléri a következő rádióadót.
5. A beállított frekvencia betárolásához nyomjuk meg a MEM/CLK-ADJ gombot.
6. A kívánt tárhely kiválasztásához nyomjuk meg a MEMORY CH- vagy a MEMORY CD+ gombot.
7. A frekvencia betárolásához még egyszer nyomjuk meg a MEM/CLK-ADJ gombot.
LÉPTETÉS/HANGOLÁS
CD/MP3 üzemmód:
• Stop üzemmódban: Váltogassuk ciklikusan a stop üzemmódban az első lejátszandó műsorszámot [fájlt], ilyenkor tehát a
legutolsó műsorszám után a lejátszás újra az elejéről indul.
• Programozási üzemmódban: Egy program elkészítéséhez lépjünk a következő műsorszámhoz [fájlhoz].
• Lejátszási, szünet és program-lejátszási üzemmódban: Egyszeri lenyomással a lejátszott műsorszám [fájl] normál
lejátszási/szünet üzemmódban a következő műsorszámhoz [fájlhoz] ugrik. Program-lejátszási/szünet üzemmódban a
műsorszám a program-index következő műsorszámához [fájljához] ugrik. Véletlenszerű lejátszási/szünet üzemmódban a
műsorszám a véletlenszerűen kiválasztott következő műsorszámhoz [fájlhoz] ugrik. Ha a gombot 0,7 másodpercnél
hosszabb ideig nyomjuk meg, akkor a gyors előre futtatás aktiválódik.
RÁDIÓ üzemmód:
• A vételi frekvenciát a gomb megnyomásával növeljük.
• Ha a gombot 0,7 másodpercnél hosszabb ideig nyomjuk meg, akkor az automatikus beállítás indul el.
H 36.
04-2382IP-HU 9/15/06 12:12 PM Page 36
Page 37

LÉPTETÉS/HANGOLÁS
CD/MP3 üzemmód:
• Stop üzemmódban: Stop üzemmódban váltogassuk ciklikusan az elsőnek lejátszott műsorszámot [fájlt]. Ekkor tehát az első
műsorszám elérésekor a lejátszás újra az utolsó műsorszámmal [fájllal] indul.
• Programozási üzemmódban: A programozáshoz lépjünk az előző műsorszámhoz [fájlhoz].
• Lejátszási, szünet-, program-lejátszási üzemmódban: A gomb egyszeri lenyomásával a lejátszott műsorszám [fájl] normál
lejátszási/szünet üzemmódban a következő műsorszámhoz [fájlhoz], program-lejátszási/szünet üzemmódban a következő
program-index szerinti műsorszámhoz [fájlhoz], véletlenszerű lejátszási/szünet üzemmódban a következő véletlenszerűen
kiválasztott műsorszámhoz [fájlhoz] ugrik. Ha lejátszási/szünet üzemmódban a gombot 0,7 másodpercnél hosszabb ideig
nyomjuk le, a gyors előrefutás aktiválódik.
RÁDIÓ üzemmód:
• A gomb megnyomásával lépésről lépésre csökkentjük a vételi frekvenciát.
• Ha a gombot 0,7 másodpercnél hosszabb ideig nyomjuk le, elindul az automatikus beállítás.
ALBUM/MEMÓRIA CS.+
MP3 üzemmód:
• Stop üzemmódban: A stop üzemmód alatt váltsuk ciklikusan a kezdődő mappát a következő mappára, illetve az első
mappára, ha előtte elértük a legutolsó mappát.
• Programozási üzemmódban: A program kiválasztás albumát váltsuk a következő mappa első albumára, illetve ciklikusan az
első mappára, ha előtte elértük a legutolsó mappát.
• Normál lejátszási üzemmódban: Ugorjuk át az éppen lejátszott albumot a következő mappa első albumához.
RÁDIÓ üzemmód:
• A készülék az előre beállított memóriát növekvő sorrendben hívja be.
ALBUM/MEMÓRIA CS.–
MP3 üzemmód:
• Stop üzemmódban: Váltsuk át a kezdődő mappát az előző mappára a stop üzemmódban, illetve ciklikusan a legutolsó
mappára, ha előtte elértük az első mappát.
• Programozási üzemmódban: Váltsuk át a program-kiválasztás albumát az előző mappa első albumára, illetve ciklikusan a
legutolsó mappára, ha előtte elértük az első mappát.
• Normál lejátszási üzemmódban: Ugorjuk át az éppen lejátszott albumot az előző mappa első albumához.
RÁDIÓ üzemmód:
• A készülék az előre beállított memóriát csökkenő sorrendben hívja be.
A SZÁMGOMBOK
• Válasszuk ki a kívánt műsorszámot.
• A lejátszás elindításához nyomjuk meg a Play gombot.
AZ INTRO
• Ha ezt a funkciót választjuk ki a távirányítón, miközben CD/MP3 üzemmódban folyik a lejátszás, akkor a készülék minden
egyes műsorszám első tíz másodpercét játssza le.
A VÉLETLENSZERŰ LEJÁTSZÁS
• Normál Stop: Kapcsoljuk be a véletlenszerű lejátszási funkciót, és lépjünk át a véletlenszerű lejátszási üzemmódba.
• Egy műsorszám ismétlése/fájl-stop üzemmód, egy mappa ismétlése stop üzemmód és minden műsorszám
ismétlése/mappa stop üzemmód: Mindegyik ismétlési üzemmód leáll, és a rendszer átáll a véletlenszerű lejátszási
üzemmódra.
ID3/FIND/ST./ESP
CD üzemmód:
• A 10 másodperces rezgésvédő funkció aktiválásához nyomjuk meg a [ID3/FIND/ST/ESP] gombot.
• Az ESP kikapcsolásához még egyszer nyomjuk meg a [ID3/FIND/ST/ESP] gombot.
H 37.
04-2382IP-HU 9/15/06 12:12 PM Page 37
Page 38

MP3 üzemmód:
• Nyomjuk meg a [ID3/FIND/ST./ESP] gombot egyszer a fájlkeresési üzemmód bekapcsolásához.
• Nyomjuk meg a SKIP/TUNING vagy a SKIP/TUNING gombot, a kívánt mappa kiválasztásához.
• Nyomjuk meg a -[ID3/FIND/ST./ESP] gombot kétszer, az album-keresési üzemmód bekapcsolásához.
• Nyomjuk meg a SKIP/TUNING vagy a SKIP/TUNING gombot, amikor a kívánt album címe megjelenik.
• Nyomjuk meg a PLAY gombot, a műsorszám lejátszásához.
• Nyomjuk meg a [ID3/FIND/ST./ESP] gombot 3-5 másodpercnél hosszabb ideig, és az ID3 címke megjelenik.
• Nyomjuk meg a [ID3/FIND/ST./ESP] gombot még egyszer 3-5 másodpercig, és a lejátszási idő újra látható lesz.
RÁDIÓ üzemmód:
• Nyomjuk meg a [ID3/FIND/ST./ESP] gombot, az URH sztereó és monó üzemmódra történő átváltáshoz.
AZ EKVALÍZER KEZELÉSE
• Az EQ megmutatja az előre beállított hangzást.
• Ha megnyomjuk az EQ gombot, akkor váltjuk a hangzást: PASS >KLASSZIKUS >ROCK > POP >JAZZ >
NÉMÍTÁS
• A hang kikapcsolása.
HANGERŐ +/–
• A hangerő növelése.
• A hangerő csökkentése.
AZ IDŐZÍTŐ BEKAPCSOLÁSA/KIKAPCSOLÁSA
1. Ha bármelyik üzemmódban megnyomjuk a [TIMER] gombot 3-5 másodpercnél hosszabb ideig, akkor az óra számjegyei
villogni kezdenek.
2. Nyomjuk meg a SKIP/TUNING vagy a SKIP/TUNING gombot, a pontos idő beállításához.
3. Nyomjuk meg ismét a [TIMER] gombot, a perc-beállítás kiválasztásához. Ekkor az idő harmadik és negyedik számjegye kezd
el villogni.
4. Nyomjuk meg a SKIP/TUNING vagy a SKIP/TUNING gombot, a pontos idő perc-részének beállításához. Nyomjuk
meg a [TIMER] gombot, a pontos idő betárolásához.
5. Nyomjuk meg ismét a [TIMER] gombot. A kijelzőn TIMER OFF (IDŐZÍTŐ KIKAPCSOLVA) felirat jelenik meg. Ha még egyszer
megnyomjuk a [TIMER] gombot, akkor az óra számjegyei villogni kezdenek.
6. Nyomjuk meg a SKIP/TUNING vagy a SKIP/TUNING gombot, az óra beállításához.
7. Nyomjuk meg ismét a [TIMER] gombot, a perc beállításának kiválasztásához. Az időzítés kijelzésének harmadik és negyedik
számjegye villogni kezd.
8. Nyomjuk meg a SKIP/TUNING vagy a SKIP/TUNING gombot, az időzítés perc részének beállításához. Nyomjuk
meg a [TIMER] gombot, a perc-beállítás betárolásához.
9. Nyomjuk meg ismét a [TIMER] gombot, a funkció-beállítás kiválasztásához. A funkció villogni kezd.
10. Nyomjuk meg a SKIP/TUNING vagy a SKIP/TUNING gombot, a kívánt rádióadó beállításához.
11 Nyomjuk meg ismét a [TIMER] gombot, hogy a hangerő-beállításhoz eljussunk. A hangerő kijelzése villogni kezd.
12. Nyomjuk meg a SKIP/TUNING vagy a SKIP/TUNING gombot, a kívánt hangerő beállításához.
13. Nyomjuk meg ismét a [TIMER] gombot, amíg a készülék vissza nem tér a normál üzemmódra, és az logó meg nem jelenik.
ELALVÁSI FUNKCIÓ
• Ennek a gombnak a megnyomásával kapcsolhatjuk be az elalvási funkciót, módosíthatjuk az elalvási időt és kikapcsolhatjuk
a funkciót. A kijelzés minden egyes gombnyomásra változik a következőképpen: 90>80>70>-->10 és Off (kikapcsolva).
Amikor az elalvási funkció be van kapcsolva, akkor a rendszer nulláig visszaszámlál. Ekkor automatikusan kikapcsol.
H 38.
04-2382IP-HU 9/15/06 12:12 PM Page 38
Page 39

KÁRTYA-/ USB-ALAPFUNKCIÓK
1. Ha beteszünk egy memóriakártyát, illetve csatlakoztatunk egy USB tárolót, akkor a kijelzőn megjelenik ezek tartalma.
2. Nyomjuk meg a PLAY/PAUSE gombot. A kijelzőn 01 látható, és a lejátszás elindul. A szünet és a vissza funkció itt is
működik. Szünet üzemmódban a kijelző villog.
3. Ha megnyomjuk a STOP gombot, a kijelzőn a tartalomjegyzék látható.
RÁDIÓ/kezelés
A rádió kezelése az alábbi sorrendben történik:
1. Nyomjuk meg a STANDBY gombot, a készülék bekapcsolása céljából.
2. Nyomjuk meg a „FUNCTION“ gombot, a TUNER üzemmód kiválasztásához.
3. Nyomjuk meg a TUNER/BAND gombot, a hullámsáv (URH vagy KH) kiválasztásához.
4. Állítsuk be a SKIP/TUNING gomb vagy a SKIP/TUNING gomb segítségével a kívánt rádióadót.
5. A hangerőt a vol+ és a vol- gombok megnyomásával állítsuk be.
RDS-ALAPBEÁLLÍTÁSOK
Az RDS kijelzési információinak megváltoztatásához: FREQUENCY>PS>PTY>RT>
1. Nyomjuk meg egyszer a RANDOM/RDS gombot, a PS (rádióadó) megjelenítéséhez. Ekkor kigyullad az RDS kijelzés, és
megjelenik a rádióadó neve. Ha az adó nem sugároz RDS-jelet, akkor NO PS felirat látható.
2. Nyomjuk meg kétszer a RANDOM/RDS gombot és a PTY (program-típus) jelenik meg. Ez után kigyullad az RDS kijelzés,
és a programtípus látható a kijelzőn. Ha az adó nem sugároz RDS-jelet, akkor NO PTY felirat látható.
3. Nyomjuk meg háromszor az RDS MODE gombot, és az RT (rádiós szöveg) jelenik meg. Ezután kigyullad az RDS kijelzés
és látható az adó által sugárzott szöveges üzenet. Ha az adó nem sugároz RDS-jelet, akkor NO RT felirat látható.
A kívánt programtípust sugárzó adó keresése:
1. Nyomjuk meg az RDS SEARCH gombot. PTY SEL felirat jelenik meg.
2. Ahányszor megnyomjuk a SKIP/TUNING vagy a SKIP/TUNING gombot, annyiszor jelenik meg egy kategória, a
következő sorrendben: NEWS [hírek] > AFFAIRS [politika] > INFO [információk] > SPORT [sport] > EDUCATE [oktatás] >
DRAMA [hangjáték]> CULTURE [kultúra] > SCIENCE [tudomány] > VARIED [vegyes] > POP M [popzene] > ROCK M
[rockzene] > M O R M [útinform] > LIGHT M [könnyűzene] > CLASSICS [klasszikus zene] > OTHER M [egyéb zene] >
WEATHER [időjárás] > FINANCE [pénzügy] > CHILDREN [gyermekműsorok] > SOCIAL A [társadalom] > RELIGION [vallás]
> PHONE IN [betelefonálós műsorok] > TRAVEL [utazás] > LEISURE [szabadidő] > JAZZ [jazz] > COUNTRY [country] >
NATIONAL [népzene] > OLDIES [slágermúzeum] >FOLK M [folk zene] > DOCUMENT [dokumentum műsorok] > NEWS
[hírek]
3. Keresésnél nyomjuk meg az RDS SEARCH gombot kb. 10 másodpercen belül még egyszer. „SEARCH“ és a kiválasztott
PTY kód jelenik meg a kijelzőn. A készülék 30 előre beállított adó listáját vizsgálja át, hogy azok valamelyike sugározza-e a
keresett kategóriát. Ha megtalálja, akkor rááll a megfelelő adóra. Ha egyetlen ilyen adót sem talál, akkor „NOT FOUND“
felirat jelenik meg.
TANÁCS:
Ha URH-adást hallgatunk, akkor célszerű a készülék hátulján található URH antennát teljesen letekercselni.
Ha középhullámú rádióadót akarunk hallgatni, akkor a készüléket célszerű a megfelelő irányba állítani.
H 39.
Kártyanyílás és USB csatlakozó
04-2382IP-HU 9/15/06 12:12 PM Page 39
Page 40

I-POD-FUNKCIÓ
• Nyissuk ki az I-Pod zárófedelet, és dugjuk be az I-POD-ot az I-Pod csatlakozóba. Az I-Pod elkezd feltöltődni, és a kijelzőn
látható a feltöltődés státusza.
• Nyomjuk meg a funkció-gombot és válasszuk ki az I-Pod funkciót. Ekkor az I-Pod megkezdi a lejátszást.
• Nyomjuk meg a SKIP/TUNING vagy a SKIP/TUNING gombot, ha a következő, illetve az előző műsorszámhoz
akarunk lépni.
MŰSZAKI ADATOK
Áramigény : 230 V ~50 Hz váltakozó áram
Teljesítmény-felvétel : 38 watt
Rádió : KH 525 – 1615 KHz
URH 87,5 – 108 MHz
Magnó egység
Szalagsebesség : 4,75 cm/sec
Hangmagasság-ingadozás : < 0,4%
Frekvencia-tartomány : 125 Hz – 6,3 KHz
CD egység
Lemez-típus : CD/CD-R/CD-RW / CD-DA /MP3
Frekvencia-tartomány (-3dB) : 60 – 16.000 Hz
Jel/zaj-viszony : >60 dB
Torzítási tényező : <0,3%
KÉSZÜLÉKEINKET MIND A MINŐSÉG, MIND A TELJESÍTMÉNY TERÉN FOLYAMATOSAN TOVÁBBFEJLESZTJÜK. ÉPPEN
EZÉRT FENNTARTJUK MAGUNKNAK A MŰSZAKI ADATOK MINDEN ELŐZETES ÉRTESÍTÉS NÉLKÜL TÖRTÉNŐ
MEGVÁLTOZTATÁSÁNAK JOGÁT.
KIEGÉSZÍTŐ INFORMÁCIÓK
Óvatosan bánjon az apró alkatrészekkel és elemekkel, és azokat ne nyelje le, mert ez komoly sérüléseket okozhat!
Gondoskodjon arról, hogy az apró alkatrészek és elemek ne kerüljenek gyermekek kezébe!
Fontos tanácsok a halláskárosodás elkerülésére
Figyelmeztetés:
Az Ön hallásáért nemcsak Ön, de mi is aggódunk.
Éppen ezért kérjük, legyen óvatos a készülék használatánál.
Azt ajánljuk, hogy: kerülje a nagy hangerővel való hallgatást.
Ha a készüléket gyermekek használják, ügyeljünk arra, hogy ne állítsák a készüléket túl hangosra.
Vigyázat!
A túl nagy hangerő a gyermekeknél gyógyíthatatlan károsodást okozhat.
Kérjük gondoskodjon róla, hogy a készülék burkolatának nyílásaiba SOHA senki, főképpen pedig gyermekek, ne
dughassanak bele semmit, ez ugyanis életveszélyes áramütéshez vezethet. A készülék burkolatát csak erre
megfelelően képzett szakember nyithatja fel.
H 40.
04-2382IP-HU 9/15/06 12:12 PM Page 40
Page 41

A készüléket kizárólag a rendeltetésének megfelelően használjuk.
A készülék kizárólag lakásokban és üzletekben történő felhasználásra alkalmas.
Kérjük, őrizze meg a használati útmutatót, hogy az később is rendelkezésére álljon.
Környezetvédelmi tanácsok
Ezt a terméket az élettartama végén ne dobjuk a normál háztartási szemétbe, hanem adjuk le a villamos és
elektronikai hulladékok átvevőhelyén. A terméken található szimbólum, a használati útmutató vagy a csomagolás
felirata erre hívja fel a figyelmet.
A készülék anyagai a jelölésüknek megfelelően újrahasznosíthatóak. Az újrahasznosítással, az anyagok ismételt
felhasználásával, illetve a használt készülékek egyéb felhasználásával sokat tehetünk környezetünk megóvásáért.
A megfelelő hulladék-átvevőhelyről a helyi önkormányzatnál érdeklődhetünk.
Ne akadályozza a készülék szellőzését, például függönnyel, újsággal, takaróval vagy bútorral. A
szellőzőnyílásoknak mindig szabadon kell maradnia. A túlmelegedés kárt tehet a készülékben, és emiatt annak
élettartama lerövidülhet.
Meleg és forróság
Ne tegyük ki a készüléket a közvetlen napsütés hatásának. Ügyeljünk arra, hogy a készülék ne legyen
fűtőberendezés, nyílt láng vagy egyéb hőforrás közelében. A készülék szellőzőnyílásait mindig hagyjuk szabadon.
Nedvesség és tisztítás
Ez a készülék nem vízálló! Ne tegyük vízbe a lejátszót, és ügyeljünk arra, hogy ne is kerüljön vízzel érintkezésbe.
A lejátszóba bejutó víz súlyos károkat okozhat. A készülék megtisztítására ne használjunk alkoholt, ammóniát,
benzint, vagy súrolószert tartalmazó tisztítóanyagot, mivel ezek károsíthatják a lejátszót. A készülék megtisztítására
enyhén megnedvesített puha törlőruhát használjunk.
Előírásos hulladék-elhelyezés
Az elemek és a csomagolóanyagok nem a háztartási szemétbe valók. Az elemeket a használt elemek számára
kijelölt gyűjtőhelyre vigyük. A csomagolóanyagok szelektív elhelyezése szintén védi környezetünket.
H 41.
04-2382IP-HU 9/15/06 12:12 PM Page 41
Page 42

ATTENIONE: Per prevenire incendi o scosse elettriche, non esporre questo apparecchio a pioggia o umidità.
AVVERTENZE PER LA SICUREZZA
Questo apparecchio deve essere scollegato dalla rete elettrica quando non lo si usa. Non permettere che questo apparecchio
venga esposto a pioggia o umidità.
ATTENZIONE: Per ridurre il rischio di scossa elettrica, non rimuovere il coperchio (o retro). L’interno non contiene parti
riparabili. Riferirsi a personale di assistenza qualificato.
AVVERTENZE
1. LEGGERE LE ISTRUZIONI – Leggere attentamente le avvertenze e le istruzioni prima di usare l’apparecchio.
2. CONSERVARE LE ISTRUZIONI – Conservare le avvertenze e le istruzioni per riferimento futuro.
3. SEGUIRE LE AVVERTENZE – Prestare attenzione a tutte le avvertenze poste sull’apparecchio o nelle istruzioni d’uso.
4. SEGUIRE LE ISTRUZIONI – Seguire attentamente tutte le istruzioni d’uso.
5. ACQUA ED UMIDITÀ – Non usare l’apparecchio vicino all’acqua, ad esempio nei pressi di vasche, lavandini, lavabi, catini,
piscine o in seminterrati umidi.
6. VENTILAZIONE – L’apparecchio deve essere collocato in modo da non ostruirne la corretta ventilazione. per esempio,
l’apparecchio non deve essere collocato su letti, divani, tappeti o superfici simili che potrebbero ostruirne le aperture di
ventilazione. Non collocare in spazi chiusi, quali librerie o armadi. Dove il passaggio di aria nelle aperture di ventilazione può
essere bloccato.
7. CALORE – L’apparecchio deve essere tenuto distante da fonti di calore, quali stufe, termosifoni ed altri dispositivi (inclusi
amplificatori) che producono calore.
8. ALIMENTAZIONE – L’apparecchio deve essere connesso solo al tipo di alimentazione elettrica descritto nel manuale d’uso
o contrassegnato sull’apparecchio stesso.
9. MESSA A TERRA E POLARIZZAZIONE – Assicurarsi con ogni precauzione che l’apparecchio sia sempre capace di
scaricare a terra.
10. SALVAGUARDIA DEL CAVO DI ALIMENTAZIONE – I cavi elettrici devono essere disposti in maniera da evitarne il
calpestamento o lo schiacciamento a causa di oggetti posti sopra o a ridosso di essi, prestando particolare attenzione ai
cavi vicino alla presa, ad altre prese di elettrodomestici, e nel punto in cui escono dall’apparecchio.
I 42.
MODEL 2382IP
MUSIC-CENTER CON LETTORE DI SCHEDA CD/USB/SD - MP3 E
STAZIONE DOCKING IPOD
Il simbolo lampeggiante con
freccetta, all’interno di un triangolo
equilatero, è inteso al fine di
segnalare all’utente la presenza di
un “voltaggio pericoloso” non
isolato, all’interno della struttura,
che potrebbe essere di sufficiente
portata da causare rischio di
scossa elettrica a persone.
ATTENZIONE
RISCHIO DI SCOSSA ELETTRICA. NON
APRIRE.
ATTENZIONE: PER RIDURRE I RISCHI DI
SCOSSA ELETTRICA, NON RIMUOVETE IL
COPERCHIO (O IL RETRO). NON SI TROVANO
ALL’INTERNO, PARTI D’ALCUNA UTILITÀ
ALL’UTENTE. FARE RIFERIMENTO SOLO A
PERSONALE DI SERVIZIO QUALIFICATO.
Il punto esclamativo all’interno di un
triangolo equilatero è inteso al fine di
segnalare all’utente la presenza
d’importanti istruzioni di
funzionamento e manutenzione
(servizio) nel foglietto che
accompagna l’apparecchio.
PRODOTTO LASER DI CLASSE 1
ATTENZIONE !
Presenza di radiazioni laser non visibili quando
aperto e con bloccaggio disinserito. Evitare
l’esposizione al raggio.
05-2382IP-IT 9/15/06 12:13 PM Page 42
Page 43

11. PULIZIA – L’apparecchio deve essere pulito solo come raccomandato del produttore.
12. LINEE ELETTRICHE – L'antenna esterna deve essere collocata distante dalle linee elettriche.
13. PERIODI DI NON UTILIZZO – Il cavo di alimentazione deve essere scollegato dalla presa, quando non si usa l’apparecchio
per un lungo periodo di tempo.
14. INGRESSO DI OGGETTI E LIQUIDI – Evitare con cura che oggetti cadano all’interno dell’apparecchio e che liquidi filtrino
all’interno dalle aperture.
15. ASSISTENZA – L’utente non dovrà tentare di riparare l’apparecchio oltre i limiti specificati nel manuale d’uso per l’utente.
Qualsiasi altra riparazione dovrà essere effettuata da personale di assistenza qualificato.
16. DANNO CHE RICHIEDE ASSISTENZA – L’apparecchio deve essere riparato solo da personale di assistenza qualificato
quando:
A. Il cavo o la spina di alimentazione sono danneggiati.
B. Oggetti sono caduti o liquidi sono filtrati all’interno dell’apparecchio.
C. L’apparecchio è stato esposto a pioggia.
D. L’apparecchio è caduto, o l’involucro esterno è stato danneggiato.
E. L’apparecchio non sembra funzionare correttamente o le sue prestazioni sono chiaramente alterate.
PREPARAZIONE ALL’USO
INSTALLAZIONE
• Togliere tutte le parti dall’imballaggio e rimuovere il materiale protettivo.
• Inserire le batterie nel telecomando.
• Non connettere l’apparecchio alla rete elettrica prima di aver controllato il voltaggio disponibile ed aver completato tutte le
altre connessioni.
• Non ostruire le aperture di ventilazione ed assicurarsi che ci sia uno spazio di aerazione di alcuni centimetri intorno
all’apparecchio.
CONNESSIONI
1. Connettere le casse destra e sinistra ai relativi spinotti.
2. Prima di connettere l’apparecchio alla rete elettrica, assicurarsi che il voltaggio AC indicato sulla targhetta posta sul retro
corrisponda al voltaggio AC disponibile.
USO / COMPACT DISC
Tenere ben presente quanto segue, in quanto sporcizia, graffi e deformità del disco possono causare suono interrotto od
intermittente e rumore di fondo.
• Quando si tengono in mano i dischi, prestare attenzione a non toccare la superficie di lettura.
• Non collocare i dischi nei seguenti posti:
Vicino ad apparecchi per il riscaldamento o posti con alta temperatura; in aree umide o polverose.
• Pulire ogni impronta digitale o polvere sulla superficie di lettura del disco usando un panno morbido. Pulire sempre
strofinando dall’interno all’esterno del disco.
CARICARE IL DISCO
• Premere OPEN/CLOSE
• Inserire un disco (con la parte stampata in alto) nel tray.
• Premere OPEN/CLOSE per chiudere il tray.
Il display mostrerà il numero totale di brani del disco.
I 43.
05-2382IP-IT 9/15/06 12:13 PM Page 43
Page 44

COMANDI E CARATTERISTICHE
1. Tasto STANDBY/ON
2. DISPLAY LCD
3. Tasto FUNCTION
4. SENSORE A DISTANZA
5. Tasto VOLUME+
6. Tasto VOLUME-
7. Slot Scheda MMC
8. Tasto TUNER/BAND
9. Tasto PRESET EQ
10. Tasto MEM/CLK-ADJ
11. SPORTELLO CD
12. SPINOTTO CUFFIE
13. Tasto CD DOOR OPEN/CLOSE
14. Tasto PLAY/PAUSE
15. Tasto SKIP/TUNING
16. Tasto SKIP/TUNING
FUNZIONI DEL TELECOMANDO
Preparazione prima dell’uso
• Installare le batterie nel telecomando.
1. Rimuovere il coperchio del vano batterie dal retro del telecomando.
2. Inserire due batterie di tipo “UM4/AAA/R03”.
• Inserire le batterie con i poli e corrispondenti alle indicazioni contenute all’interno del vano.
3. Rimettere il coperchio.
• Sostituzione delle batterie
• Quando l’uso del telecomando diventa instabile o la sua distanza operativa diminuisce, sostituire le batterie con delle nuove.
I 44.
17. Scheda MMC ed indicatore USB
18. Presa USB
19. Tasto ST OP
20. Tasto ALBUM/MEMORY CH. +
21. Tasto ALBUM/MEMORY CH. –
22. Tasto Random
23. Antenna FM
24. Uscita Casse
25. Cavo di alimentazione
26. Porta presa I-POD
27. Presa I-POD
28. Entrata AUX Destro
29. Entrata AUX Sinistro
13
20
27
26
1
4
3
21
7
19
10
17
15
18
23
24
11
8
2
5
9
28
29
25
22
14
16
6
12
05-2382IP-IT 9/15/06 12:13 PM Page 44
Page 45

Uso del telecomando
Per usare il telecomando, puntarlo al SENSORE A DISTANZA e premere i tasti con delicatezza e decisione.
L’uso del telecomando è possibile entro circa 6 metri. Tuttavia, dato che il raggio del telecomando diminuisce aumentando
l’angolo di utilizzo, usarlo direttamente di fronte al SENSORE A DISTANZA per ottenere la massima distanza.
Non esporre il SENSORE A DISTANZA a luce forte (raggi diretti del sole od illuminazione artificiale) ed assicurarsi che non ci
siano ostacoli tra esso ed il telecomando.
TELECOMANDO
1. Tasto STANDBY
2. Tasto SLEEP
3. Tasto INTRO
4. Tasto RANDOM/RDS
5. Tasto MUTE
6. Tasto ID3/FIND/ST./ESP
7. Tasto VOLUME-
8. Tasto PLAY/PAUSE
9. Tasto ALBUM/MEMORY CH.+
10. Tasto ALBUM/MEMORY CH.-
11. Tasto REPEAT
12. Tasto FUNCTION
13. Tasto TUNER/BAND
14. Tasto Numeric
15. Tasto VOLUME+
16. Ta sto STOP
17. Ta st o EQ
18. Tasto SKIP/TUNING
19. Tasto SKIP/TUNING
20. Tasto MEM/CLK-ADJ
21. Tasto TIMER
22. Tasto I-POD
USO/Descrizione
STANDBY ON/ OFF
Quando si inserisce la spina per la prima volta, l’apparecchio entrerà in stand-by.
Sul display si potrà leggere --:--
• Premere STANDBY se si desidera attivare l’apparecchio.
• La funzione di stand-by dell’apparecchio rimane attiva fino a che questo non è spento.
• Estrarre la spina dalla presa elettrica se si desidera escludere la corrente elettrica completamente.
REGOLAZIONE DELL’OROLOGIO
• Quando si inserisce la spina per la prima volta, l’apparecchio entrerà in stand-by. Sul display si potrà leggere --:--
• In modalità stand-by tenere premuto [MEM/CLK-ADJ] questo tasto per più di 3-5 secondi e sul display si vedrà lampeggiare
12H/24.
• Premere SKIP/TUNING o SKIP/TUNING per impostare il formato prescelto di visualizzazione tra 12 e 24 ore.
• Premere [MEM/CLK-ADJ] nuovamente per selezionare le impostazioni dell’ora, la prima e seconda cifra di “00”
lampeggeranno.
• Premere SKIP/TUNING o SKIP/TUNING per impostare l’ora corretta.
• Premere [MEM/CLK-ADJ] nuovamente per selezionare l’impostazione dei minuti, la terza e quarta cifra di “00”
lampeggeranno.
• Premere SKIP/TUNING o SKIP/TUNING per impostare i minuti corretti. Premere [MEM/CLK-ADJ] per
confermare i minuti corretti.
• L’ora può essere mostrata sia in formato 12 ore sia in formato 24 ore.
I 45.
14
15
16
17
18
19
20
21
22
1
2
3
4
6
5
7
8
10
11
12
13
9
05-2382IP-IT 9/15/06 12:13 PM Page 45
Page 46

SELEZIONE FUNZIONE
• Premendo questo tasto si cambia la modalità.
• Cambi del display: TUNER > CD/MP3 > I-POD > AUX > CARD-USB >
PLAY/PAUSE
• Per avviare o interrompere la riproduzione.
STOP
• In modalità Riproduzione o Pausa: Passa in modalità Arresto o modalità Inserimento Programma durante la riproduzione di
un programma.
• In modalità Inserimento Programma: Esce dalla modalità Inserimento Programma, azzera la memoria del programma e
passa in modalità Arresto.
• In modalità Riproduzione Casuale: Passa in modalità Arresto ed annulla la funzione Casuale.
RIPETI
• Riproduzione normale CDDA: Ripeti 1 brano>Ripeti tutti i brani>Ripeti Disattivo
• Riproduzione normale CD-ROM musicale: Ripeti 1 brano>Ripeti tutti i brani>Ripeti Disattivo
• Modalità riproduzione casuale: Ripeti 1 brano>Ripeti tutti i brani>Ripeti Disattivo
• Modalità riproduzione programmata: Ripeti 1 brano>Ripeti tutti i brani>Ripeti Disattivo
MEMORIA
Modalità: CD/MP3
1. È possibile programmare fino a 64 brani.
2. Premere il tasto stop per arrestare la riproduzione.
3. Premere il tasto MEM/CLK-ADJ per attivare o disattivare öa modalità programma.
4. Cambiare il numero del brano utilizzando direttamente la tastiera numerica del telecomando.
5. Premere nuovamente il tasto MEM/CLK-ADJ per salvare e muovere al passaggio successivo.
6. Dopo aver programmato i brani desiderati, premere il tasto play per completare la programmazione.
7. Premere il tasto play per iniziare a riprodurre il programma.
Modalità RADIO:
1. È possibile programmare fino a 30 stazioni in FM e 10 stazioni in AM.
2. Usare il tasto FUNCTION per accendere la radio e scegliere tra AM e FM.
3. Per regolare manualmente la frequenza, premere il tasto SKIP/TUNING o SKIP/TUNING .
4. Per regolare manualmente la frequenza, tenere premuto il tasto SKIP/TUNING o SKIP/TUNING sul pannello per
2 secondi. Il sistema si fermerà sulla prossima stazione sintonizzabile.
5. Per memorizzare la frequenza della stazione radio corrente, premere il tasto MEM/CLK-ADJ.
6. Premere il tasto MEMORY CH- o MEMORY CH+ per scegliere la posizione in cui memorizzare.
7. Premere ancora il tasto MEM/CLK-ADJ per memorizzare la frequenza.
SKIP/TUNING
Modalità CD/MP3:
• In modalità arresto: Cambia il brano [file] iniziale, selezionando il primo brano se si è sull’ultimo.
• In modalità Inserisci Programma: Passa al brano [file] successivo per la programmazione.
• In modalità Riproduzione, Pausa e Riproduzione Programma: Premendo una volta, passa al brano [file] successivo nella
modalità di normale riproduzione/pausa, al brano [file] programmato successivo in modalità riproduzione/pausa
programma, sceglie casualmente il brano [file] successivo in modalità riproduzione/pausa casuale. Tenere premuto questo
tasto per più di 0,7 secondi per l’avanzamento veloce del brano.
Modalità RADIO:
• Premendolo si avanza la frequenza di ricezione.
• Tenendo premuto questo tasto per più di 0,7 secondi si avvia la sintonizzazione automatica.
I 46.
05-2382IP-IT 9/15/06 12:13 PM Page 46
Page 47

SKIP/TUNING
Modalità CD/MP3:
• In modalità arresto: Cambia il brano [file] iniziale in modalità arresto, selezionando il primo brano se si è sull’ultimo.
• In modalità Inserisci Programma: Passa al brano [file] precedente per la programmazione.
• In modalità Riproduzione, Pausa e Riproduzione Programma: Premendo una volta, passa al brano [file] precedente nella
modalità di normale riproduzione/pausa, al brano [file] programmato precedente in modalità riproduzione/pausa
programma. Tenere premuto questo tasto per più di 0,7 secondi per il riavvolgimento veloce del brano.
Modalità RADIO:
• Premendolo si diminuisce la frequenza di ricezione.
• Tenendo premuto questo tasto per più di 0,7 secondi si avvia la sintonizzazione automatica.
ALBUM/MEMORY CH.+
Modalità MP3:
• In modalità arresto: Passa dalla cartella iniziale a quella successiva, selezionando la prima cartella se si è sull’ultima.
• In modalità Inserisci Programma: Passa all’album successivo per la programmazione, selezionando la prima cartella se si è
sull’ultima.
• In modalità Riproduzione Normale: Passa dall’album corrente al primo album della cartella successiva.
Modalità RADIO:
• la memoria pre-impostata viene richiamata in ordine ascendente.
ALBUM/MEMORY CH.–
Modalità MP3:
• In modalità arresto: Passa dalla cartella iniziale a quella precedente, selezionando l’ultima cartella se si è sulla prima.
• In modalità Inserisci Programma: Passa all’album precedente per la programmazione, selezionando l’ultima cartella se si è
sulla prima.
• In modalità Riproduzione Normale: Passa dall’album corrente al primo album della cartella precedente.
Modalità RADIO:
• la memoria pre-impostata viene richiamata in ordine discendente.
TASTO NUMERICO
• Seleziona il brano prescelto
• Premere il tasto play per iniziare la riproduzione
INTRO
• Selezionando questa funzione dal telecomando in modalità CD/MP3, verranno riprodotti i 10 secondi iniziali di ciascun
brano.
CASUALE
• Arresto normale: Attiva la funzione Casuale e passa alla modalità Riproduzione Casuale.
• Modalità arresto Ripeti 1 brano / file, Modalità arresto Ripeti Cartella e modalità arresto Ripeti tutti i brani / file: Annulla tutte
le modalità Ripeti e passa alla modalità Casuale.
ID3/FIND/ST./ESP
Modalità CD:
• Premere il tasto [ID3/FIND/ST./ESP] per selezionare il metodo di pulizia Electronic Shock Protection, della durata di 10
secondi.
• Premere il tasto [ID3/FIND/ST./ESP] per avviare l’ESP.
I 47.
05-2382IP-IT 9/15/06 12:13 PM Page 47
Page 48

Modalità MP3:
• Premere il tasto [ID3/FIND/ST./ESP] una volta per passare alla modalità Ricerca FILE.
• Premere SKIP/TUNING o SKIP/TUNING per selezionare il FILE desiderato.
• Premere il tasto [ID3/FIND/ST./ESP] due volte per passare alla modalità Ricerca ALBUM.
• Premere SKIP/TUNING o SKIP/TUNING quando appare il brano desiderato dell’ALBUM.
• Premere il tasto PLAY per avviare la riproduzione.
• Premere il tasto [ID3/FIND/ST./ESP] per più di 3-5 secondi per visualizzare ID3 TAG.
• Premere ancora il tasto [ID3/FIND/ST./ESP] per più di 3-5 secondi per tornare alla visualizzazione del tempo di
Riproduzione.
Modalità RADIO:
• Premere il tasto [ID3/FIND/ST./ESP] per scegliere tra FM Stereo ed FM Mono.
COMANDO EQ
• EQ mostra l’impostazione corrente del tono del suono.
• Premendo il tasto EQ, il tono del suono cambia: PASS >CLASSIC >ROCK > POP >JAZZ >
ESCLUSIONE DELL’AUDIO (MUTE)
• Esclude l’audio
VOLUME +/–
• Aumenta il volume:
• Riduce il volume.
TIMER ATTIVO/DISATTIVO
1. In qualsiasi modalità, tenere premuto il tasto [TIMER] per più di 3-5 secondi, fino a quando le cifre dell’ora lampeggeranno.
2. Premere SKIP/TUNING o SKIP/TUNING per impostare l’ora corretta.
3. Premere ancora [TIMER] per selezionare l’impostazione dei minuti, e la terza e quarta cifra lampeggeranno.
4. Premere SKIP/TUNING o SKIP/TUNING per impostare i minuti corretti. Premere [TIMER] per confermare le
impostazioni dei minuti.
5. Premere ancora [TIMER] per visualizzare TIMER OFF. Premere ancora [TIMER] per far lampeggiare le cifre dell’ora.
6. Premere SKIP/TUNING o SKIP/TUNING per impostare l’ora corretta.
7. Premere ancora [TIMER] per selezionare l’impostazione dei minuti, e la terza e quarta cifra lampeggeranno,
8. Premere SKIP/TUNING o SKIP/TUNING per impostare i minuti corretti. Premere [TIMER] per confermare le
impostazioni dei minuti.
9. Premere ancora [TIMER] per selezionare le impostazioni di funzione, e la funzione lampeggerà,
10. Premere SKIP/TUNING o SKIP/TUNING per impostare la stazione di funzione desiderata.
11. Premere ancora [TIMER] per selezionare le impostazioni di Aumento e Diminuzione del volume, ed il volume lampeggerà,
12. Premere SKIP/TUNING o SKIP/TUNING per impostareil volume desiderato per la stazione.
13. Premere ancora [TIMER] fino a tornare in modalità normale ed il display visualizzerà il simbolo .
SPEGNIMENTO AUTOMATICO
• Premere il tasto SLEEP per attivare, impostare e disattivare la funzione di spegnimento automatico; Il display visualizzerà
nell’ordine: 90>80>70>-->10 off; Se il tasto SLEEP è attivato, il sistema conterà alla rovescia fino a zero, per poi spegnersi
automaticamente.
I 48.
05-2382IP-IT 9/15/06 12:13 PM Page 48
Page 49

OPERAZIONE DI BASE SCHEDA USB
1. All’inserimento di Schede di Memoria e USB apparirà una schermata di Informazioni sulla Tabella dei Contenuti.
2. Premendo il tasto PLAY/PAUSE, si avvierà la riproduzione e sul display apparirà 01. Attivare e disattivare la pausa in
successione. Quando in pausa, il display lampeggerà.
3. Premere il tasto STOP, e verrà visualizzato il TOC.
RADIO/Uso
Usare nell’ordine mostrato
1. Premere STANDBY per accendere l’apparecchio.
2. Spostare il tasto di selezione sorgente ”FUNCTION” in modalità TUNER.
3. Premere il tasto TUNER/BAND per selezionare la banda di frequenza (FM o AM).
4. Sintonizzare la stazione desiderata premendo il tasto SKIP/TUNING o SKIP/TUNING .
5. Regolare il volume dell’audio premendo il tasto VOLUME+ o VOLUME-.
OPERAZIONI DI BASE RDS
Per visualizzare le informazioni RDS: FREQUENCY>PS>PTY>RT>
1. Premere il tasto RANDOM/RDS una volta per visualizzare PS. L’indicatore RDS si illuminerà ed apparirà il nome della
stazione. In assenza di un segnale RDS non apparirà nessun PS.
2. Premere il tasto RANDOM/RDS due volte per visualizzare PTY. L’indicatore RDS si illuminerà ed apparirà il tipo di
programma trasmesso. In assenza di un segnale RDS non apparirà nessun PTY.
3. Premere il tasto RANDOM/RDS tre volte per visualizzare RT. L’indicatore RDS si illuminerà ed apparirà un messaggio di
testo trasmesso dalla stazione. In assenza di un segnale RDS non apparirà nessun RT.
Per cercare la stazione che trasmette il tipo di programma desiderato.
1. Premere il tasto RDS SEARCH per visualizzare PTY SEL.
2. Ad ogni successiva pressione del tasto SKIP/TUNING o SKIP/TUNING , il display visualizzerà le seguenti
categorie nell’ordine qui elencato: NEWS [Notizie] > AFFAIRS [Politica] > INFO [Informazioni] > SPORT [Sport]> EDUCATE
[Educazione] > DRAMA [Teatro]> CULTURE [Cultura] > SCIENCE [Scienza] > VARIED [Varietà] > POP M [Musica Pop] >
ROCK M [Musica Rock] > M O R M [Musica M.O.R.] > LIGHT M [Musica leggera] > CLASSICS [Musica Classica] > OTHER
M [Altra musica] > WEATHER [Previsioni del tempo] > FINANCE [Finanza] > CHILDREN [Bambini] > SOCIAL A [Politiche
sociali] > RELIGION [Religione] > PHONE IN [Telefona in diretta] > TRAVEL [Viaggi] > LEISURE [Tempo libero] > JAZZ >
COUNTRY > NATIONAL [Nazionale] > OLDIES [Classici] > FOLK M [Musica Folk] > DOCUMENT [Documenti] > NEWS
[Notizie]
3. Premere ancora il tasto RDS SEARCH per circa 10 secondi durante la ricerca, e sul display appariranno alternativamente
“SEARCH” ed il codice PTY selezionato. L’apparecchio cercherà nelle 30 stazioni pre-selezionate fino a sintonizzarne una
con il programma della categoria prescelta. Se non viene trovato nessun programma, sul display si leggerà alternativamente
"NOT" e "FOUND".
NOTA:
Quando si ascoltano programmi in FM si consiglia di srotolare completamente il cavo antenna FM posto sul retro
dell’apparecchio.
Quando si ascoltano programmi in AM si consiglia di regolare la posizione dell’antenna AM per una ricezione ottimale.
I 49.
Slot scheda e presa USB
05-2382IP-IT 9/15/06 12:13 PM Page 49
Page 50

FUNZIONE I-POD
• Aprire lo spor tellino per l’I-Pod ed inserire l’I-Pod nell’apposita presa, l’I-Pod andrà in carica ed il display mostrerà il livello
raggiunto.
• Premere il tasto funzione e selezionare la funzione I-Pod, e l’I-Pod si avvierà automaticamente.
• Premere il tasto SKIP/TUNING o SKIP/TUNING per selezionare il brano successivo o precedente.
SPECIFICHE
Alimentazione : AC 230 ~V 50 Hz
Consumo Energetico : 38 watts
Radio : AM 525 – 1615 KHz
FM 87,5 – 108 MHz
Sezione mangianastri
Velocità nastro : 4,75 cm/sec.
Vibrazione ed imprecisioni del motore : < 0,4%
Risposta in frequenza : 125Hz - 6.3KHz
Sezione Compact Disc
Tipo di disco : CD/CD-R/CD-RW / CD-DA /MP3
Risposta in frequenza (-3dB) : 60 – 16.000 Hz
Rapporto Segnale/Disturbo : >60 dB
Distorsione Armonica : <0,3%
MIGLIORAMENTI CONTINUI VENGONO APPORTATI ALLA NOSTRA ATTREZZATURA, SIA NELLA QUALITÀ CHE NELLE
PRESTAZIONI,
PER CUI CI RISERVIAMO IL DIRITTO DI MODIFICARE LE SPECIFICHE SENZA PREAVVISO.
INFORMAZIONI AGGIUNTIVE
Prestate attenzione ai pezzettini e alle batterie, non inghiottiteli. Potrebbe essere nocivo alla vostra salute e causare
soffocamento. Prestate la massima attenzione a tenere i piccoli dispositivi e le batterie lontani dalla portata dei
bambini.
Importante suggerimento riguardo alla protezione dell’udito
Attenzione:
Avete a cuore il vostro udito, così come noi.
Pertanto, fate attenzione quando usate questo apparecchio.
La nostra raccomandazione è di: Evitare un volume eccessivo.
Dovesse l’apparecchio essere usato da bambini, assicuratevi che esso non sia regolato su un volume eccessivo.
Attenzione!
Un volume eccessivo potrebbe causare danni irreversibili all’udito dei vostri bambini.
MAI lasciare che nessuno, ed in particolar modo bambini, metta alcun oggetto sopra i buchi, scappatoie o altre
aperture sul dispositivo. Ciò potrebbe causare la morte da scossa elettrica. Il dispositivo deve essere aperto solo
da un assistente qualificato.
I 50.
05-2382IP-IT 9/15/06 12:13 PM Page 50
Page 51
Usate l'apparecchio solo per il proposito per cui è stato disegnato.
L'apparecchio è destinato unicamente all'utilizzo in ambienti domestici e di lavoro.
Conservare accuratamente le istruzioni per l’uso per futuro riferimento.
Avvertenze per la tutela dell’ambiente
Una volta inutilizzabile il prodotto non deve essere smaltito con i rifiuti domestici ma portato presso un punto di
raccolta per il riciclo di apparecchiature elettriche. Ciò è indicato dal simbolo presente sul prodotto, sulle istruzioni
per l’uso o sulla confezione.
I materiali riciclabili sono riutilizzabili a seconda delle loro caratteristiche. Con il riutilizzo, con il riciclaggio di
materiale o altri tipi di riciclaggio di apparecchi vecchi fornirete un importante contributo alla tutela ambientale.
Informatevi presso l’amministrazione comunale sui punti di smaltimento competenti.
Non ostacolate la ventilazione del dispositivo. Assicuratevi che né tende, giornali, coperte o mobili blocchino le
scappatoie della ventilazione dell’apparato. La ventilazione dev’essere costantemente assicurata! Un eventuale
surriscaldamento potrebbe causare seri danni al dispositivo e ridurre sia le prestazioni che la durata del
funzionamento.
Riscaldamento e calore
Non esponete l’apparecchio a luce del sole diretta. Assicuratevi che l’apparecchio non sia soggetto a fonti di calore
dirette come stufe o fiamme. Assicuratevi che le vie di ventilazione dell’apparecchio non siano coperte.
Umidità e pulizia
L’apparecchio non è subacqueo! Non immergete il lettore nell’acqua. Non lasciate che il lettore venga a contatto
con acqua. Dell’acqua che dovesse incidentalmente cadere sul lettore potrebbe causare seri danni. Non usate
detergenti che contengano alcool, ammoniaca, benzene o abrasivi in quanto questi potrebbero danneggiare il
lettore. Per pulire, usate un panno soffice e umido.
Riciclaggio professionale
Le batterie e l’imballaggio non fanno parte della vostra spazzatura casalinga. Le batterie devono essere passate ad
un centro di raccolta per batterie usate. Disporre separatamente dei materiali d’imballaggio è un aiuto alla
conservazione dell’ambiente.
I 51.
05-2382IP-IT 9/15/06 12:13 PM Page 51
Page 52

ATENCIÓN: Para evitar riesgos de electrocutarse o de que se prenda fuego, evite exponer el aparato a lluvia o humedad.
PRECAUCIONES DE SEGURIDAD
Desenchufe el aparato de la red eléctrica cuando no lo esté usando. No permita que este aparato esté expuesto a la lluvia o
la humedad.
PRECAUCIÓN: Para minimizar el riesgo de electrocutarse, no abra la carcasa. No hay partes que deban ser reparadas por el
usuario en el interior. Las reparaciones deben ser llevadas a cabo por personal cualificado.
INSTRUCCIONES DE SEGURIDAD
1. LEA LAS INSTRUCCIONES – Lea atentamente todas las instrucciones de uso y de seguridad antes de usar el aparato.
2. GUARDE LAS INSTRUCCIONES – Guarde las instrucciones de seguridad y de uso para futuras consultas.
3. TENGA EN CUENTA LOS AVISOS – Debe pegar todos los avisos del aparato y de las instrucciones de uso.
4. SIGA LAS INSTRUCCIONES – Siga todas las instrucciones de uso y funcionamiento.
5. AGUA Y HUMEDAD – Este aparato no se debe usar cerca de agua, como por ejemplo cerca de la bañera, palanganas, el
fregadero, piscinas o en sótanos húmedos.
6. VENTILACIÓN – El aparato se debe colocar de modo que su ubicación o posición no interfieran en su ventilación. Por
ejemplo, no sitúe el aparato sobre camas, sofás, alfombras o superficies similares que podrían bloquear las aberturas de
ventilación. No lo coloque en instalaciones como estanterías o armarios que puedan impedir el flujo de aire necesario a
través de las aberturas de ventilación.
7. CALOR – El aparato debe situarse lejos de fuentes de calor como radiadores, estufas u otros aparatos (incluidos
amplificadores) que produzcan calor.
8. FUENTE DE ENERGÍA – El aparato debe conectarse únicamente a una fuente de energía del tipo descrito en las
instrucciones o marcado en el aparato.
9. PUESTA A TIERRA Y POLARIZACIÓN – Se deben tomar precauciones para asegurar que la puesta a tierra y la polarización
del aparato sea la correcta.
10. PROTECCIÓN DEL CABLE – El cable eléctrico se debe colocar de modo que no sea probable que alguien camine sobre
él o que sea aplastado por objetos colocados encima o contra él. Ponga especial atención al cable cerca del enchufe, al
enchufe y al punto en que sale del aparato.
E 52.
MODEL 2382IP
EQUIPO DE MÚSICA DE DISEÑO CON REPRODUCTOR DE CD/USB/MP3
TARJETA SD Y PLATAFORMA PARA IPOD
El símbolo de flecha luminosa en
el interior de un triángulo
equilátero, sirve para alertar al
usuario de la presencia de “voltaje
peligroso” no aislado en el
compartimiento del producto, que
podría constituir una descarga
eléctrica para personas.
CUIDADO
RIESGO DE DESCARGA ELECTRICA
NO ABRIR
CUIDADO: PARA REDUCIR EL RIESGO DE
DESCARGA ELECTRICA, NO LEVANTAR LA
TAPA (O PARTE TRASERA). NO HAY PARTES
DE UTILIDAD PARA EL USUARIO EN EL
INTERIOR. ACUDIR A PERSONAL
CUALIFICADO.
El signo de exclamación dentro del
triángulo equilátero sirve para alertar
al usuario la presencia de
importantes instrucciones de manejo
y mantenimiento en la literatura que
acompaña el aparato.
PRODUCTO LÁSER DE CLASE 1
¡ PRECAUCIÓN !
Hay emisión de radiación láser cuando el aparato
está abierto y los bloqueos no funcionan. Evite la
exposición al haz.
06-2382IP-ES 9/15/06 12:14 PM Page 52
Page 53

11. LIMPIEZA – Limpie el aparato sólo como lo recomienda el fabricante.
12. LÍNEAS ELÉCTRICAS – Se debe colocar la antena de exterior lejos de las líneas eléctricas.
13. PERIODOS DE NO UTILIZACIÓN - Desenchufe el cable de la toma de corriente si no debe usar el aparato durante un
periodo de tiempo prolongado.
14. ENTRADA DE OBJETOS Y LÍQUIDOS – Evite que caigan objetos ni se derramen líquidos al interior de la carcasa a través
de las aberturas.
15. REPARACIÓN – El usuario no debe tratar de reparar el aparato más allá de lo que se describe en las instrucciones de uso.
Cualquier otra reparación debe ser acarreada por personal cualificado.
16. DAÑOS QUE REQUIEREN REPARACIÓN – El aparato debe ser revisado por personal cualificado cuando:
A. El cable o el enchufe estén dañados.
B. Hayan caído objetos o se hayan derramado líquidos al interior del aparato.
C. Se haya expuesto el aparato a la lluvia.
D. El aparato se haya caído, o la carcasa esté dañada.
E. El aparato parece no funcionar normalmente o muestra un cambio en su funcionamiento.
PREPARACIÓN PARA EL USO
INSTALACIÓN
• Desembale todos los componentes y quite el material protector.
• Coloque las pilas en el control remoto.
• No conecte el equipo a la corriente sin antes comprobar el voltaje de la red ni antes de haber realizado todas las otras
conexiones.
• No cubra las aberturas de ventilación y asegúrese que haya un espacio de varios centímetros alrededor del equipo para
permitir una ventilación correcta.
CONEXIONES
1. Conecte los altavoces derecho e izquierdo a las salidas de altavoz derecha e izquierda respectivamente.
2. Antes de conectar el equipo a la corriente, compruebe que el voltaje AC indicado en la placa de características sea el
mismo que el suministrado en la toma de corriente.
FUNCIONAMIENTO / DISCOS COMPACTOS
Tenga presentes los siguientes puntos puesto que los discos rallados, sucios o combados pueden provocar un sonido roto o
intermitente, o incluso ruido.
• Cuando coja discos vigile de no tocar la superficie grabada.
• No ponga discos en los siguientes lugares:
Cerca de emisores de calor o lugares con temperatura elevada ni en áreas húmedas o polvorientas.
• Limpie las marcas de los dedos o el polvo que pueda haber en la superficie grabada del disco con un paño suave. Limpie
siempre de dentro hacia fuera.
CARGAR DISCOS
• Pulse OPEN/CLOSE
• Ponga un disco (con la etiqueta hacia arriba) en la bandeja.
• Pulse OPEN/CLOSE para cerrar la bandeja.
Se muestra el número de pistas total del disco por pantalla.
E 53.
06-2382IP-ES 9/15/06 12:14 PM Page 53
Page 54

CONTROLES Y PRESTACIONES
1. Botón STANDBY/ON
2. Pantalla LCD
3. Botón FUNCTION
4. SENSOR REMOTO
5. Botón VOLUME+
6. Botón VOLUME-
7. Puerto para Tarjeta MMC
8. Botón TUNER/BAND
9. Botón PRESET EQ
10. Botón MEM/CLK-ADJ
11. TAPA DEL CD
12. SALIDA DE AURICULARES
13. Botón CD DOOR OPEN/CLOSE
14. Botón PLAY/PAUSE
15. Botón SKIP/TUNING
16. Botón SKIP/TUNING
FUNCIONES DEL CONTROL REMOTO
Preparación para el uso
• Ponga las pilas en el control remoto.
1. Quite la tapa del compartimiento para pilas de la parte trasera del control remoto.
2. Inserte dos pilas de tamaño “UM4/AAA/R03”.
• Ponga las pilas con los terminales y de modo que concuerden con las indicaciones dentro del compartimiento para
pilas.
3. Coloque la tapa.
• Sustituir las pilas
• Cuando el funcionamiento del control remoto se vuelva inestable o la distancia de detección disminuya, sustituya las pilas
por otras nuevas.
E 54.
17. Indicador de Tarjeta MMC y USB
18. Puerto USB
19. Botón STOP
20. Botón ALBUM/MEMORY CH. +
21. Botón ALBUM/MEMORY CH. –
22. Botón Random
23. Antena FM
24. Salida de altavoces
25. Cable de alimentación
26. TAPA del PUERTO I-POD
27. PUERTO I-POD
28. ENTRADA AUX Derecho
29. ENTRADA AUX Izquierdo
13
20
27
26
1
4
3
21
7
19
10
17
15
18
23
24
11
8
2
5
9
28
29
25
22
14
16
6
12
06-2382IP-ES 9/15/06 12:14 PM Page 54
Page 55

Usar el control remoto.
Para usar el control remoto, apúntelo hacia el SENSOR REMOTO y pulse los botones suave pero firmemente. El control remoto
funciona a una distancia de hasta 6m aproximadamente. No obstante, esta distancia es menor si se usa el control remoto con
un ángulo respecto al equipo. Úselo directamente en frente del SENSOR REMOTO para una distancia máxima.
No exponga el SENSOR REMOTO a luz intensa (luz solar directa o luz artificial) y asegúrese de que no haya obstáculos entre
el SENSOR REMOTO y el control remoto.
CONTROL REMOTO.
1. Botón STANDBY
2. Botón SLEEP
3. Botón INTRO
4. Botón RANDOM/RDS
5. Botón MUTE
6. Botón ID3/FIND/ST./ESP
7. Botón VOLUME-
8. Botón PLAY/PAUSE
9. Botón ALBUM/MEMORY CH.+
10. Botón ALBUM/MEMORY CH.–
11. Botón REPEAT
12. Botón FUNCTION
13. Botón TUNER/BAND
14. Botón Numeric
15. Botón VOLUME+
16. Botón STOP
17. Botón EQ
18. Botón SKIP/TUNING
19. Botón SKIP/TUNING
20. Botón MEM/CLK-ADJ
21. Botón TIMER
22. Botón I-POD
FUNCIONAMIENTO/ Descripción
STANDBY ON/ OFF
Cuando enchufe el equipo a la corriente, el equipo se pondrá en modo espera. Aparecerá --:-- por pantalla.
• Puede pulsar STANDBY para encender el equipo.
• La función de espera del equipo permanece activa hasta que se enciende el equipo.
• Desenchufe el equipo de la toma de corriente si quiere apagarlo completamente.
AJUSTAR EL RELOJ
• Cuando enchufe el equipo a la toma de corriente, éste se pondrá en modo espera. Aparecerá --:-- por pantalla.
• En modo espera, pulse [MEM/CLK-ADJ] durante más de 3-5 segundos hasta que parpadee 12H/24 en la pantalla.
• Pulse SKIP/TUNING o SKIP/TUNING para ajustar el formato de 12H o 24H según desee.
• Pulse [MEM/CLK-ADJ] de nuevo para seleccionar el ajuste de la hora. Los dos primeros dígitos parpadearán “00”.
• Pulse SKIP/TUNING o SKIP/TUNING para ajustar la hora correcta.
• Pulse [MEM/CLK-ADJ] de nuevo para seleccionar el ajuste de los minutos. El tercer y el cuarto dígitos parpadearán “00”.
• Pulse SKIP/TUNING o SKIP/TUNING para ajustar los minutos. Pulse [MEM/CLK-ADJ] de nuevo para memorizar
el minuto ajustado.
• Toda la información de la hora se muestra en formato 12H o 24H.
E 55.
14
15
16
17
18
19
20
21
22
1
2
3
4
6
5
7
8
10
11
12
13
9
06-2382IP-ES 9/15/06 12:14 PM Page 55
Page 56

SELECCIONAR FUNCIÓN
• Cuando pulse la tecla FUNCTION el modo cambiará.
• El indicador cambia: TUNER > CD/MP3 > I-POD > AUX > CARD-USB >
PLAY/PAUSE
• Para empezar o interrumpir la reproducción.
STOP
• En modo Reproducción o modo Pausa: Cambia a modo Parada o modo Programar durante una reproducción programada.
• En modo Programar: Sale del modo Programar, limpiando la memoria programada y volviendo a modo Parada.
• En modo Reproducción Aleatoria: Cambia a modo Parada y sale de la función Aleatoria.
REPETIR
• Reproducción Normal CDDA: Repite 1 pista > Repite todas las pistas > Repetición desactivada.
• Reproducción normal de CDROM de música: Repite 1 archivo > Repite el disco > Repetición desactivada.
• Modo Reproducción aleatoria: Repite 1 pista aleatoria > Reproducción aleatoria.
• Modo Reproducción programada: Repite 1 pista > Repite todo el programa > Reproducción programada.
MEMORIA
Modo CD/MP3:
1. Se pueden programar hasta 64 pistas.
2. Pulse STOP para parar la reproducción.
3. Pulse MEM/CLK-ADJ para poner en marcha o parar el modo Programar.
4. Cambie el número de pista pulsando la tecla correspondiente del teclado numérico del control remoto.
5. Pulse MEM/CLK-ADJ para guardar y continuar entrando pistas al programa.
6. Cuando haya programado todas las pistas deseadas, pulse play para finalizar el modo Programar.
7. Pulse play de nuevo para empezar la reproducción del programa.
Modo RADIO:
1. Se pueden programar hasta 30 emisoras FM y 10 emisoras AM.
2. Use la tecla FUNCTION para poner en marcha la radio y cambiar entre las bandas AM y FM.
3. Para sintonizar manualmente, pulse SKIP/TUNING o SKIP/TUNING .
4. Para sintonizar automáticamente, mantenga pulsada la tecla SKIP/TUNING o SKIP/TUNING del cuadro frontal
durante 2 segundos. El sistema parará la búsqueda cuando encuentre una emisora.
5. Para memorizar la emisora, pulse la tecla MEM/CLK-ADJ.
6. Pulse MEMORY CH- o MEMORY CH+ para seleccionar la posición de memoria.
7. Pulse MEM/CLK-ADJ de nuevo para memorizar la frecuencia.
SKIP/TUNING
Modo CD/MP3:
• En modo Parada: Cambia la pista inicial [archivo], pasando a la primera pista desde la última.
• En modo Programar: Cambia a la pista siguiente [archivo] para seleccionar el programa.
• En modo Reproducción, modo Pausa, modo Reproducción programada: Pulsado una vez, salta a la pista [archivo]
siguiente, en reproducción/pausa normal, a la siguiente pista [archivo] del programa en modo reproducción/pausa normal,
a la siguiente pista [archivo] en modo reproducción/pausa normal. Si se mantiene pulsado durante más de 0,7 segundos
en modo reproducción/pausa, realiza un avance rápido.
Modo RADIO:
• Sube un paso la frecuencia recibida cuando se aprieta.
• Si se mantiene pulsado más de 0,7 segundos empieza a auto sintonizar.
E 56.
06-2382IP-ES 9/15/06 12:14 PM Page 56
Page 57

SKIP/TUNING
Modo CD/MP3:
• En modo parada: Cambia la pista [archivo] inicial en modo parada, pasando a la primera pista [archivo] desde la última.
• En modo Programar: Cambia a la pista [archivo] anterior para seleccionar el programa.
• En modo Reproducción, modo Pausa, modo Reproducción programada: Si se pulsa una vez, salta la pista [archivo] en
reproducción a la pista [archivo] anterior en modo reproducción/pausa normal, a la pista [archivo] programada anterior en
modo reproducción/pausa programada normal. Si se mantiene pulsado durante más de 0,7 segundos en modo
reproducción/pausa, realiza un retroceso rápido.
Modo RADIO:
• Baja un paso la frecuencia recibida cuando se aprieta.
• Si se mantiene pulsado más de 0,7 segundos empieza a auto sintonizar.
ALBUM/MEMORY CH.+
Modo MP3:
• En modo Parada: Cambia el directorio de inicio al siguiente en modo parada, pasando al primer directorio si está en el
último.
• En modo Programar: Cambia el álbum para seleccionar al primer álbum del siguiente directorio, volviendo al primer
directorio si está en el último.
• En modo Reproducción normal: Salta al primer álbum del siguiente directorio.
Modo RADIO:
• Se llaman las presintonías en orden ascendente.
ALBUM/MEMORY CH.–
Modo MP3:
• En modo Parada: Cambia el directorio de inicio al anterior en modo parada, pasando al último directorio si está en el
primero.
• En modo Programar: Cambia el álbum para seleccionar al primer álbum del directorio directorio, volviendo al primer
directorio si está en el último.
• En modo Reproducción normal: Salta al primer álbum del directorio anterior.
Modo RADIO:
• Se llaman las presintonías en orden descendente.
Teclas Numéricas
• Seleccione la pista deseada
• Pulse play para empezar a reproducir.
INTRO
• Cuando seleccione esta función desde el control remoto mientras se está en modo CD/MP3 se reproducirán solamente
los primeros 10 segundos de cada pista.
REPRODUCCIÓN ALEATORIA
• En modo Parada: Cambia a modo Reproducción Aleatoria.
• Repetir 1 pista / archivo en modo parada, Repetir Directorio en modo parada y Repetir todas las pistas / archivos en modo
parada: Para el modo Repetir, y cambia el sistema a modo Aleatorio.
ID3/FIND/ST./ESP
Modo CD:
• Pulse [ID3/FIND/ST./ESP] para limpiar la protección de Conmoción Electrónica de 10 seg.
• Pulse [ID3/FIND/ST./ESP] de nuevo para volver a ESP.
E 57.
06-2382IP-ES 9/15/06 12:14 PM Page 57
Page 58

Modo MP3:
• Pulse [ID3/FIND/ST./ESP] una vez para cambiar a modo búsqueda de ARCHIVO.
• Pulse SKIP/TUNING o SKIP/TUNING para seleccionar el ARCHIVO deseado.
• Pulse [ID3/FIND/ST./ESP] dos veces para cambiar a modo búsqueda de ÁLBUM.
• Pulse SKIP/TUNING o SKIP/TUNING para buscar el ALBUM deseado.
• Pulse PL AY para empezar la reproducción.
• Pulse [ID3/FIND/ST./ESP] durante más de 3-5 segundos para mostrar la Etiqueta ID3.
• Pulse [ID3/FIND/ST./ESP] nuevamente durante más de 3-5 segundos para volver a mostrar el tiempo de reproducción.
Modo RADIO:
• Pulse [ID3/FIND/ST./ESP] para seleccionar modo FM Estéreo o Mono.
CONTROL EQ
• EQ muestra el estilo de sonido actual.
• Cuando pulse el botón EQ, el estilo de sonido cambia: PASS >CLASSIC >ROCK > POP >JAZZ >
SILENCIO
• Silencia el sonido.
VOLUME+/–
• Incrementa el volumen.
• Reduce el volumen.
TEMPORIZADOR ON/OFF
1. Pulse [TIMER] durante más de 3-5 segundos. Los dígitos de la hora en pantalla parpadearán.
2. Pulse SKIP/TUNING o SKIP/TUNING para ajustar la hora.
3. Pulse [TIMER] de nuevo para seleccionar el ajuste de minutos. El tercer y el cuarto dígitos parpadearán.
4. Pulse SKIP/TUNING o SKIP/TUNING para ajustar los minutos. Pulse [TIMER] para memorizar el minuto.
5. Pulse [TIMER] de nuevo para mostrar TIMER OFF. Pulse [TIMER] de nuevo y los dígitos de la hora parpadearán.
6. Pulse SKIP/TUNING o SKIP/TUNING para ajustar la hora.
7. Pulse [TIMER] de nuevo para seleccionar el ajuste de minutos. El tercer y el cuarto dígitos parpadearán.
8. Pulse SKIP/TUNING o SKIP/TUNING para ajustar los minutos. Pulse [TIMER] para memorizar el minuto.
9. Pulse [TIMER] de nuevo para seleccionar el ajuste de función. La función parpadea.
10. Pulse SKIP/TUNING o SKIP/TUNING para seleccionar la función deseada.
11. Pulse [TIMER] de nuevo para Aumentar o Reducir el volumen. El volumen parpadea.
12. Pulse SKIP/TUNING o SKIP/TUNING para ajustar el nivel de volumen deseado.
13. Pulse [TIMER] de nuevo hasta que vuelva a modo normal. Se mostrará el logo en la pantalla.
APAGADO AUTOMÁTICO
• Pulse sleep para habilitar la función de apagado automático, cambiar el tiempo antes del apagado automático o deshabilitar
la función. Se mostrará 90>80>70>-->10 off en la pantalla. Si se activa la función de apagado automático el sistema hará
una cuenta atrás hasta cero. Entonces el sistema se apagará automáticamente.
E 58.
06-2382IP-ES 9/15/06 12:14 PM Page 58
Page 59

OPERACIONES BÁSICAS CON TARJETA DE MEMÓRIA Y USB
1. Cuando inserte una tarjeta de memoria o un USB se mostrará la información del Índice.
2. Pulse PLAY/PAUSE. Aparece 01 en la pantalla y empieza la reproducción. Pulsar más veces pausa/reproduce
alternativamente. Cuando está en pausa la pantalla parpadea.
3. Pulse STOP. Se muestra el Índice.
RADIO/Funcionamiento
Proceder en el orden mostrado
1. Pulse STANDBY para poner en marcha el equipo.
2. Pulse el botón de selección de fuente “FUNCTION” hasta el modo TUNER.
3. Pulse TUNER/BAND para seleccionar la banda (AM o FM).
4. Sintonice la emisora deseada con los botones SKIP/TUNING o SKIP/TUNING .
5. Ajuste el nivel de volumen con los botones VOL+/-.
RDS- FUNCIONAMIENTO BÁSICO
Para cambiar la información RDS mostrada: FREQUENCY>PS>PTY>RT>
1. Pulse el botón RANDOM/RDS una vez. Se muestra PS. El indicador RDS se ilumina y aparece el nombre de la emisora.
Aparece NO PS si no hay señal RDS.
2. Pulse dos veces el botón RANDOM/RDS para mostrar PTY. El indicador RDS se ilumina y se muestra el tipo de programa
emitido. Aparece NO PTY si no hay señal RDS.
3. Pulse dos veces el botón RANDOM/RDS para mostrar RT. El indicador RDS se ilumina y se muestra el mensaje de texto
enviado por la emisora. Aparece NO RT si no hay señal RDS.
Para buscar la emisora con el tipo de programa deseado.
1. Pulse RDS SEARCH. Se muestra PTY SEL.
2. Cada vez que pulse los botones SKIP/TUNING o SKIP/TUNING se muestra una categoría en el siguiente orden:
NEWS [Noticias] > AFFAIRS [Política] > INFO [Información] > SPORT [Deportes] > EDUCATE [Educativos] > DRAMA
[Drama] > CULTURE [Cultura] > SCIENCE [Ciencia] > VARIED [Variados] > POP M [Música Pop] > ROCK M [Música Rock]
> M O R M [Música de carretera] > LIGHT M [Música ligera] > CLASSICS [Clásica] > OTHER M [Otras músicas] >
WEATHER [El tiempo] > FINANCE [Negocios] > CHILDREN [Niños] > SOCIAL A [Sucesos] > RELIGION [Religión] > PHONE
IN [Llamadas] > TRAVEL [Viaje] > LEISURE [Ocio] > JAZZ > COUNTRY [Country] > NATIONAL [Nacional] > OLDIES
[Grandes éxitos] > FOL. M [Música Folk] > DOCUMENT [Documentales] > NEWS [Noticias]
3. Pulse de nuevo RDS SEARCH en unos 10 segundos mientras busca. Aparecen alternativamente “SEARCH” y el código
PTY seleccionados en la pantalla. El equipo busca en las 30 emisoras preseleccionadas y se para cuando encuentra una
emisora con la categoría seleccionada. Entonces sintoniza esta emisora. Si no se encuentra ningún programa aparecen
“NOT” y “FOUND” alternativamente por pantalla.
NOTA:
Se recomienda extender totalmente la antena de FM de la cubierta posterior cuando esté escuchando emisiones FM.
Se recomienda ajustar la posición del lazo AM cuando esté escuchando emisiones AM para optimizar la recepción.
E 59.
Ranura para Tarjeta y puerto USB
06-2382IP-ES 9/15/06 12:14 PM Page 59
Page 60

FUNCIÓN I-POD
• Abra la tapa del I-POD y ponga el I-POD en la ranura para I-POD. Se carga entonces la información contenida en el I-POD,
y por pantalla se indica esta situación.
• Pulse FUNCTION para seleccionar la función I-POD. Empezará la reproducción desde el I-POD directamente.
• Pulse SKIP/TUNING o SKIP/TUNING para seleccionar la pista siguiente o la anterior.
ESPECIFICACIONES
Alimentación: : AC 230V ~50Hz
Consumo : 38 watts
Radio : AM 525 – 1615 KHz
FM 87.5 – 108 MHz
Sección del casete
Velocidad de la cinta : 4.75cm/sec.
Wow y Flutter : < 0.4%
Frecuencias : 125Hz - 6.3KHz
Sección de Disco Compacto
Tipos de disco : CD/CD-R/CD-RW / CD-DA /MP3
Frecuencias(-3dB) : 60 – 16.000 Hz
Relación Señal/Ruido : >60 dB
Distorsión Armónica : <0.3%
SE HACEN MEJORAS CONTÍNUAMENTE EN NUESTROS EQUIPOS TANTO EN CALIDAD COMO EN FUNCIONAMIENTO.
POR LO TANTO NOS RESERVAMOS EL DERECHO DE ALTERAR LAS ESPECIFICACIONES SIN AVISAR.
INFORMACIÓN ADICIONAL
Cuidar que ellos no se traguen pequeñas piezas del aparato y las baterías. Si esto ocurre es muy peligroso para
su salud y puede provocar asfixia. Preste mucha atención de mantener los pequeños aparatos y baterías fuera del
alcance de los niños.
Importante aviso respecto a la protección de sus oídos
Cuidado:
Cuide usted de su capacidad auditiva, como lo hacemos nosotros.
Por lo tanto, tenga precaución cuando use el aparato.
Nuestra recomendación: Evite el volumen alto.
En caso que el aparato sea usado por los niños, asegúrese que la aplicación no este en alto volumen.
Peligro!
El alto volumen puede causar irreparables danos a los oídos de los niños.
NUNCA permita que alguna persona o en especial niños pongan objetos dentro de los huecos, ranuras u otras
aberturas del aparato. Esto puede provocar peligro de muerte por un choque eléctrico. El aparato solo debe ser
abierto por un asistente calificado.
E 60.
06-2382IP-ES 9/15/06 12:14 PM Page 60
Page 61

Solamente use el aparato para los propósitos que fue diseñado.
El aparato está concebido exclusivamente para ser usado en viviendas y áreas de negocio.
Le recomendamos que conserve las instrucciones de manejo para un eventual uso posterior.
Indicaciones sobre el medio ambiente
No deseche este producto en la basura doméstica una vez que se haya cumplido su vida de funcionamiento,
deposítelo en un punto de recogida de aparatos eléctricos y electrónicos. El símbolo que se encuentra en el
producto, el manual de usuario o el embalaje, hacen referencia a este punto.
El plástico es reutilizable según esté indicado. Con la reutilización de productos de plástico reciclado u otra clase
de reciclaje de aparatos viejos, está contribuyendo de forma importante a la conservación del medio ambiente.
Infórmese en su administración local sobre la entidad de eliminación de residuos competente.
No impida la ventilación del aparato. Asegúrese, que cortinas, periódicos, coberturas o muebles no estén
bloqueando las ranuras de ventilación del aparato. La ventilación debe asegurarse todo el tiempo! El
sobrecalentamiento puede causar serios daños en el interior del aparato y reduce su buen funcionamiento y su
tiempo de vida.
Caliente y Caluroso
No exponga el aparato a la luz directa del sol. Asegúrese que el aparato no esta expuesto directamente a fuerzas
calientes semejantes a calefactores o fuego directo. Asegúrese que la ventilación de las ranuras del aparato no
esté cubierta.
Humedad y limpieza
Este aparato no es impermeable! No sumerja el aparato en el agua. No permite que el aparato entre en contacto
con el agua. La entrada de agua en el aparato causa serios problemas y daños. No use agentes limpiadores que
contengan alcohol, amoniacos, benzinas o abrasivos estos pueden dañar al aparato. Para la limpieza use un suave
y húmedo paño.
Reciclaje profesional
Baterías y empajes no deben estar in el basurero de su casa. Las baterías deben ser recogidas por el personal
del centro recolector de baterías usadas. Disponga por separado de los materiales de empaque es una ayuda para
la ecología.
E 61.
06-2382IP-ES 9/15/06 12:14 PM Page 61
Page 62

AVISO: Para evitar incêndios e choques eléctricos, não exponha este aparelho à chuva ou à humidade.
PRECAUÇÕES DE SEGURANÇA
Este aparelho deve ser desligado da tomada quando não estiver em uso. Não deixe que este aparelho seja exposto à chuva
ou à humidade.
CUIDADO: Para reduzir o risco de choque eléctrico, não retire a parte externa (nem a traseira). As partes internas devem ser
consertadas por técnicos autorizados somente.
INSTRUÇÕES DE SEGURANÇA
1. LEIA AS INSTRUÇÕES – Todas as instruções de funcionamento e segurança devem ser lidas antes de o aparelho ser
ligado.
2. GUARDE AS INSTRUÇÕES – As instruções de segurança e funcionamento devem ser guardadas para futuras referências.
3. ATENÇÃO ÀS INSTRUÇÕES – Todos os avisos no aparelho e no manual devem ser seguidos.
4. SIGA AS INSTRUÇÕES – Todas as instruções de funcionamento devem ser seguidas.
5. ÁGUA E HUMIDADE – O aparelho não deve ser usado perto de água, como em banheiras, pias, tanques, piscinas ou
porões molhados, por exemplo.
6. VENTILAÇÃO – O aparelho deve ser colocado de forma que sua posição não interfira na ventilação. Não coloque-o em
sofás, camas, tapetes ou superfícies similares que bloqueiem as aberturas. Não coloque-o em locais embutidos, como
estantes de livros ou armários, que possam impedir o fluxo de ar através das aberturas de ventilação
7. CALOR – O aparelho deve ser colocado longe de fontes de calor, como radiadores, fornos ou outros aparelhos (incluindo
amplificadores) que produzam calor.
8. FONTE DE ENERGIA – O aparelho deve ser conectado com uma fonte de energia apenas do tipo descrito neste manual
ou como marcado no próprio aparelho.
9. FIAÇÃO E POLARIZAÇÃO – Deve-se tomar precauções para garantir que a fiação do aparelho não seja danificada.
10. PROTECÇÃO DO FIO – Deve-se colocar o fio em lugar seguro, para que não seja pisado ou amassado por outros objectos
colocados sobre o fio, prestando atenção principalmente nos fios , tomadas adequadas e no ponto a partir do qual o fio
sai do aparelho.
P 62.
MODEL 2382IP
SISTEMA DE SOM DESIGN COM LEITOR DE CD/USB/SD/MP3 E
IPOD DOCKING STATION
O símbolo de luz com o símbolo
de ponta da flecha, dentro de um
triangulo equilateral, tem a função
de alertar o usuário de uma da
presença de uma voltagem
perigosa não insulada com o
cercado que pode ter uma
magnitude suficiente para
constituir um risco de choques
eléctricos para pessoas.
CUIDADO
PERIGO DE CHOQUE ELÉCTRICO
NÃO ABRA
CUIDADO: PARA REDUZIR O PERIGO DE
CHOQUE ELÉCTRICO NÃO RETIRE A TAMPA
(OU A PARTE DETRÁS). NÃO HÁ PARTES
UTILIZÁVEIS PELO USUÁRIO NO INTERIOR.
PARA TODAS AS REPARAÇÕES, REFIRA-SE A
EMPREGADOS QUALIFICADOS.
O ponto de exclamação com um
triangulo equilateral tem a função de
alertar o usuário da presença de
operações e instruções de
manutenção importantes nas
explicações acompanhando o
aparelho.
PRODUTO LASER CLASSE 1
CUIDADO !
Radiação invisível de laser ao abrir, e também se
a trava estiver danificada. Evite exposição ao raio.
07-2382IP-PT 9/15/06 12:16 PM Page 62
Page 63

11. LIMPEZA – O aparelho deve ser limpado somente como recomendado pelo fabricante.
12. LINHAS DE ENERGIA – A antena externa deve ser colocada longe de linhas de energia.
13. PERÍODOS SEM USO – O fio deve ser desligado da tomada quando o aparelho não for ser usado por um longo período.
14. INFILTRAÇÃO DE OBJECTOS E LÍQUIDOS – Deve-se tomar cuidado para não deixar objectos ou líquidos caírem dentro
do aparelho.
15. CONSERTOS – O proprietário não deve tentar consertar o aparelho além do que estiver descrito neste manual. Todos os
outros consertos devem ser realizados por técnicos qualificados.
16. DANOS A SER CONSERTADOS –
O aparelho deve ser consertado apenas por técnicos autorizados quando:
A. O fio eléctrico ou o plug da tomada estiverem danificados.
B. Objectos ou líquidos caírem dentro da abertura do aparelho.
C. O aparelho for exposto à chuva.
D. O aparelho cair, ou se a parte externa estiver danificada.
E. O aparelho não funcionar adequadamente ou apresenta uma grande mudança em seu desempenho.
PREPARO PARA O USO
INSTALAÇÃO
• Remova toda a embalagem.
• Insira as pilhas no controle remoto.
• Não ligue o aparelho na tomada antes de verificar a voltagem e antes de fazer todas as conexões.
• Não cubra nenhuma entrada de ventilação e certifique-se de que há espaço o bastante (alguns centímetros) ao redor do
aparelho.
CONEXÕES
1. Ligue as caixas de som direita e esquerda nas entradas de caixas de som.
2. Antes de ligar o aparelho na tomada, certifique-se de que a voltagem AC impressa na placa traseira é a mesma voltagem
da tomada.
FUNCIONAMENTO / DISCO COMPACTO
Nos seguintes tópicos, lembre-se de que poeira, arranhões e danos no disco podem causar sons quebrados ou intermitentes,
bem como chiado.
• Ao segurar o disco, cuidado para não tocar na superfície a ser lida.
• Não coloque o disco nos seguintes locais:
Perto de fontes de calor ou locais onde a temperatura seja alta, e em locais sujos ou empoeirados.
• Limpe quaisquer impressões digitais ou poeira da superfície a ser lida usando um pano húmido. Sempre limpe o disco na
direcção do centro para fora.
LEITURA DO DISCO
• Pressione OPEN/CLOSE
• Insira um disco (com o lado escrito para cima) no leitor.
• Pressione OPEN/CLOSE para fechar.
O visor mostra o número total de faixas do disco.
P 63.
07-2382IP-PT 9/15/06 12:16 PM Page 63
Page 64

CONTROLES E OUTRAS PARTES
1. Botão STANDBY/ON
2. VISOR LCD
3. Botão FUNCTION
4. SENSOR REMOTO
5. Botão VOLUME+
6. Botão VOLUME–
7. Entrada para cartão MMC
8. Botão TUNER/BAND
9. Botão PRESET EQ
10. Botão MEM/CLK-ADJ
11. LEITOR DE CD
12. ENTRADA PARA AUSCULTADORES
13. Botão CD DOOR OPEN/CLOSE
14. Botão PLAY/PAUSE
15. Botão SKIP/TUNING
16. Botão SKIP/TUNING
FUNÇÕES DO CONTROLE REMOTO
Preparação antes do uso
• Instalação das pilhas no controle remoto:
1. Retire a tampa da caixa de pilhas da parte de trás do controle.
2. Coloque duas pilhas tamanho “UM4/AAA/R03”.
• Coloque as baterias com as polaridades e de acordo com a indicação dentro do compar timento de pilhas.
3. Recoloque a tampa.
• Troca de pilhas
• Quando o controle remoto ficar instável ou a distância de funcionamento diminuir, coloque pilhas novas.
P 64.
17. Indicador de cartão MMC e USB
18. Entrada USB
19. Botão STOP
20. Botão ALBUM/MEMORY CH. +
21. Botão ALBUM/MEMORY CH. –
22. Botão Random
23. Antena FM
24. Saída dos alto-falantes
25. Fio electrico
26. I-POD SOCKET DOOR
27. I-POD SOCKET
28. AUX Right INPUT
29. AUX Left INPUT
13
20
27
26
1
4
3
21
7
19
10
17
15
18
23
24
11
8
2
5
9
28
29
25
22
14
16
6
12
07-2382IP-PT 9/15/06 12:16 PM Page 64
Page 65

Uso do controle remoto
Para usar o controle remoto, aponte para o SENSOR REMOTO e pressione os botões leve e firmemente. O controle funciona
até aproximadamente 6m (18pés) de distância. Porém, visto que o raio do controle é menor quando o aparelho não está numa
posição perpendicular ao controle, use-o directamente na frente no SENSOR REMOTO, para a distância máxima.
Não exponha o SENSOR REMOTO a luzes fortes (luz directa do sol ou iluminação artificial) e certifique-se de que não há
obstáculos entre o SENSOR REMOTO e o controle remoto.
CONTROLE REMOTO
1. Botão STANDBY
2. Botão SLEEP
3. Botão INTRO
4. Botão RANDOM/RDS
5. Botão MUTE
6. Botão ID3/FIND/ST./ESP
7. Botão VOLUME-
8. Botão PLAY/PAUSE
9. Botão ALBUM/MEMORY CH.+
10. Botão ALBUM/MEMORY CH.–
11. Botão REPEAT
12. Botão FUNCTION
13. Botão TUNER/BAND
14. Botão Numeric
15. Botão VOLUME+
16. Botão STOP
17. Botão EQ
18. Botão SKIP/TUNING
19. Botão SKIP/TUNING
20. Botão MEM/CLK-ADJ
21. Botão TIMER
22. Botão I-POD
FUNCIONAMENTO/Descrição
STANDBY ON/ OFF
Ao ligar o aparelho na tomada, ele entra em modo de espera automaticamente. Aparecerá --:-- no visor.
• Aperte STANDBY para ligar o aparelho.
• O modo de espera no aparelho permanece ligado até que o aparelho seja realmente ligado.
• Retire o fio da tomada para desligar o fornecimento de energia completamente.
AJUSTE DO RELÓGIO
• Ao ligar o aparelho na tomada, ele entra em modo de espera automaticamente. Aparecerá --:-- no visor.
• No modo de espera, segure [MEM/CLK- ADJ] por mais de 3-5 seg, até que apareça 12H/24 no visor.
• Aperte SKIP/TUNING ou SKIP/TUNING para escolher entre os formatos 12H ou 24H.
• Pressione [MEM/CLK-ADJ] novamente para entrar no ajuste do relógio, até que os dois primeiros dígitos “00” comecem
a piscar.
• Pressione SKIP/TUNING ou SKIP/TUNING até chegar na hora correcta.
• Pressione [MEM/CLK-ADJ] novamente para passar para o ajuste de minutos, e os dígitos “00” posteriores começam a
piscar.
• Pressione SKIP/TUNING ou SKIP/TUNING até chegar nos minutos correctos. Pressione [MEM/CLK-ADJ] para
confirmar os minutos.
• Todas as informações relativas à hora são mostradas tanto no formato 12H quanto no 24H.
P 65.
14
15
16
17
18
19
20
21
22
1
2
3
4
6
5
7
8
10
11
12
13
9
07-2382IP-PT 9/15/06 12:16 PM Page 65
Page 66

SELECÇÃO DE FUNÇÃO
• Ao pressionar esta tecla, muda-se o modo.
• A sequência do visor é: TUNER > CD/MP3 > I-POD > AUX > CARD-USB >
PLAY/PAUSE
• Para iniciar ou interromper a reprodução.
STOP
• No modo Play ou Pause: Muda para o modo Stop ou para o modo Program Entry durante a reprodução programada.
• No modo Program Entry: Sai do modo Program Entry, limpa a memória e muda para o modo Stop.
• No modo Random Play: Muda para o modo Stop e libera a função Random.
REPETIR
• Reprodução normal de CDDA: Repete 1 faixa>Repete tudo>Repetição deslig.
• Reprodução de CDROM de áudio: Repete 1 faixa>Repete tudo>Repete álbum>Repetição deslig.
• Modo Random Play: Repete 1 faixa aleatória>Reprodução aleatória
• Modo Program Play: Repete 1 programaçao>Repete todas as programações>Reprodução programada
MEMÓRIA
Modo CD/MP3:
1. Pode-se programar até 64 faixas.
2. Pressione a tecla Stop para parar a reprodução.
3. Pressione a tecla MEM/CLK-ADJ para ligar ou desligar o modo de programação.
4. Mude o número da faixa pressionando as teclas numéricas no controle.
5. Pressione a tecla MEM/CLK-ADJ novamente para salvar e aumentar a programação.
6. Após programar todas as faixas desejadas, pressione a tecla Play para sair do modo de programação.
7. Pressione a tecla Play para iniciar a reprodução programada.
Modo RADIO:
1. Pode-se programar cerca de 30 estações de FM e 10 de AM.
2. A tecla FUNCTION é usada para ligar o rádio e mudar de frequência AM para FM, ou o contrário.
3. Para sintonizar a frequência manualmente, pressione as teclas SKIP/TUNING ou SKIP/TUNING .
4. Para sintonizar a frequência automaticamente, segura as teclas SKIP/TUNING ou SKIP/TUNING no painel por 2
segundos. O sistema irá parar na próxima estação receptada.
5. Para gravar a frequência da estação de rádio, pressione MEM/CLK-ADJ.
6. Pressione as teclas MEMORY CH- ou MEMORY CH+ para escolher a posição na memória.
7. Pressione a tecla MEM/CLK-ADJ novamente para salvar a frequência na memória.
SKIP/TUNING
Modo CD/MP3.
• No modo Stop: Mude a faixa inicial [arquivo] durante o modo Stop, e pula para a primeira faixa, caso esteja na última faixa.
• No modo Program Entry: Mude a próxima faixa [arquivo] para a selecção de programação.
• Nos modos Play, Pause, Program Play: Pressione uma vez para pular a faixa [arquivo] para a próxima [arquivo] para o modo
Play/Pause normal, para a próxima faixa na lista de programação [arquivo] para o modo Progam Play/Pause, para a
próxima faixa aleatória [arquivo] no modo Random Play/Pause. Manter o botão pressionado por mais de 0,7 seg avança
rapidamente durante o modo Play/Pause.
Modo RADIO:
• A frequência recebida é aumentada ao aper tar.
• Pressionar essa tecla por mais de 0,7 seg inicia a sintonia automática.
P 66.
07-2382IP-PT 9/15/06 12:16 PM Page 66
Page 67

SKIP/TUNING
Modo CD/MP3:
• No modo Stop: Muda a faixa inicial [arquivo] durante o modo Stop, pula para a primeira faixa [arquivo] se estiver na última
faixa [arquivo].
• No modo Program Entry: Muda para a faixa anterior [arquivo] no modo Program select.
• Nos modos Play, Pause, Program Play: Pressione uma vez para pular a faixa [arquivo] para a anterior [arquivo] para o modo
Play/Pause normal, para a faixa anterior na lista de programação [arquivo] para o modo Progam Play/Pause. Manter o
botão pressionado por mais de 0,7 seg volta rapidamente durante o modo Play/Pause.
Modo RADIO:
• As frequência recebida é diminuída ao apertar.
• Pressionar essa tecla por mais de 0,7 seg inicia a sintonia automática.
ALBUM/MEMORY CH.+
Modo MP3:
• No modo Stop: Pula a pasta inicial para a próxima pasta durante o modo Stop, e volta para a primeira pasta se estiver na
última.
• No modo Program Entry: Muda o álbum do selecção de programação para o primeiro álbum da próxima pasta, e volta para
a primeira pasta se estiver na última.
• No modo Normal Play: Pula o álbum para o primeiro álbum da próxima pasta.
Modo RADIO:
• A estações na memória são passadas em ordem crescente.
ALBUM/MEMORY CH.–
Modo MP3:
• No modo Stop: Pula a pasta inicial para a anterior no modo Stop, e volta para a primeira pasta se estiver na última.
• No modo Program Entry: Muda o álbum do selecção de programação para o primeiro álbum da pasta anterior, e volta para
a última pasta se estiver na primeira.
• No modo Normal Play: Pula o álbum para o primeiro álbum da pasta anterior.
Modo RADIO:
• As estações na memória são passadas em ordem decrescente.
TECLADO NUMÉRICO
• Escolha a faixa desejada.
• Pressione a tecla Play para iniciar a reprodução.
INTRO
• Ao seleccionar esta função no controle remoto durante o modo CD/MP3, serão tocados somente os primeiros 10
segundos de cada faixa.
ALEATÓRIO
• Normal Stop: Activa a função Aleatório e muda para o modo Random Play.
• Repete 1 faixa / arquivo no modo Stop, Repete a Pasta no modo Stop e Repete todas as faixas / arquivos no modo Stop:
O modo Repeat será desligado e o sistema mudará para o modo Random.
ID3/FIND/ST./ESP
Modo CD:
• Pressione [ID3/FIND/ST./ESP] por 10 segundos para activar a protecção contra choque.
• Pressione [ID3/FIND/ST./ESP] novamente para retornar para ESP.
P 67.
07-2382IP-PT 9/15/06 12:16 PM Page 67
Page 68

Modo MP3:
• Pressione [ID3/FIND/ST./ESP] uma vez para mudar para o modo de busca de arquivo.
• Pressione SKIP/TUNING ou SKIP/TUNING para seleccionar o arquivo desejado.
• Pressione [ID3/FIND/ST./ESP] duas vezes para mudar para o modo de busca de álbum.
• Pressione SKIP/TUNING ou SKIP/TUNING quando aparecer a faixa do álbum desejada.
• Pressione a tecla PLAY para iniciar a reprodução da faixa.
• Pressione [ID3/FIND/ST./ESP] por mais de 3-5 seg, até aparecer ID3 TAG.
• Pressione [ID3/FIND/ST./ESP] novamente por mais de 3-5 para mostrar o tempo de reprodução.
Modo RADIO:
• Pressione [ID3/FIND/ST./ESP] para escolher entre os modos FM Estéreo e Mono.
CONTROLE EQ
• EQ mostra o tom do som.
• Ao pressionar o botão EQ, o tom muda da seguinte forma: PASS >CLASSIC >ROCK > POP >JAZZ >
MUDO
• Desliga o som.
VOLUME+/–
• Aumenta o volume.
• Reduz o volume.
LIGA/DESLIGA TIMER
1. Em qualquer modo, segure a tecla [TIMER] por mais de 3-5 seg, e aparecerá a hora no visor.
2. Pressione SKIP/TUNING ou SKIP/TUNING para ajustar a hora correcta.
3. Pressione [TIMER] novamente para seleccionar o ajuste de horas, e os primeiros dois dígitos piscarão.
4. Pressione SKIP/TUNING ou SKIP/TUNING até chegar à hora correcta. Pressione [TIMER] para confirmar a hora.
5. Pressione [TIMER] novamente para aparecer TIMER OFF. Pressione [TIMER] novamente e os dígitos correspondentes à
hora piscarão.
6. Pressione SKIP/TUNING ou SKIP/TUNING até chegar à hora correcta.
7. Pressione [TIMER] novamente para seleccionar o ajuste dos minutos, e os últimos dois dígitos piscarão.
8. Pressione SKIP/TUNING ou SKIP/TUNING até chegar aos minutos correctos. Pressione [TIMER] para confirmar
os minutos.
9. Pressione [TIMER] novamente para seleccionar o ajuste de função, que começa a piscar,
10. e então pressione SKIP/TUNING ou SKIP/TUNING para colocar na função desejada.
11. Pressione [TIMER] novamente para aumentar ou diminuir o volume, que começa a piscar,
12. e então pressione SKIP/TUNING ou SKIP/TUNING para escolher o volume desejado.
13. Pressione [TIMER] novamente até que volte para o modo normal e o visor mostrará o logo .
SLEEP
• Pressione a tecla Sleep na função Sleep para mudar o tempo ou desligar a função Sleep. Aparece no visor a seguinte
ordem: 90>80>70>-->10 Off; Se a função Sleep estiver activada, o sistema fará uma contagem regressiva, e então será
desligado automaticamente.
P 68.
07-2382IP-PT 9/15/06 12:16 PM Page 68
Page 69

OPERAÇÕES BÁSICAS COM CARTÃO-USB
1. Ao se inserir um Cartão de Memória e USB, as informações do Índice são mostradas.
2. Pressione a tecla PLAY/PAUSE e então aparece 01 no visor e a reprodução é iniciada. Pressione Liga/Desliga
alternadamente. Se estiver pausado, o visor começa a piscar.
3. Pressione a tecla STOP, e as informações são mostradas novamente.
RADIO/Funcionamento
Siga a ordem mostrada:
1. Pressione STANDBY para ligar o aparelho.
2. Pressione o botão de selecção de fonte “FUNCTION” até o modo TUNER.
3. Pressione o botão TUNER/BAND para escolher a frequência (FM ou AM).
4. Sintonize a estação desejada com as teclas SKIP/TUNING ou SKIP/TUNING .
5. Ajuste o volume pressionando as teclas Vol+ ou Vol-.
RDS-OPERAÇÕES BÁSICAS
Para mudar as informações RDS: FREQUENCY>PS>PTY>RT>
1. Pressione o botão RANDOM/RDS uma vez até que apareça PS. Em seguida, o indicador RDS acende e o nome da
estação aparece. Aparece NO PS se não houver captação de sinal RDS.
2. Pressione o botão RANDOM/RDS duas vezes, e aparece PTY. Em seguida, o indicador RDS aparece e o tipo de programa
aparece. Aparece NO PTY se não houver captação de sinal RDS.
3. Pressione o botão RDS MODE três vezes, e aparece RT. Em seguida, o indicador RDS aparece e a mensagem de texto
emitida pela estação aparece. Aparece NO RT se não houver captação de sinal RDS.
Para buscar tipos programados desejados.
1. Pressione o botão RDS SEARCH. Aparece PTY SEL.
2. A cada vez que as teclas SKIP/TUNING ou SKIP/TUNING são pressionadas, o visor mostra uma categoria na
seguinte ordem: NEWS [Noticiário] > AFFAIRS [Política] > INFO [Informações] > SPORT [Desportos] > EDUCATE
[Educação] > DRAMA > CULTURE [Cultura] > SCIENCE [Ciência] > VARIED [Variedades] > POP M [Música Pop] > ROCK
M [Música Rock] > M O R M [Estilo MORM – para ouvir ao conduzir] > LIGHT M [Música Light] > CLASSICS [Clássicos] >
OTHER M [Outras músicas] > WEATHER [Clima] > FINANCE [Finanças] > CHILDREN [Infantil] > SOCIAL A [Social] >
RELIGION [Religião] > PHONE IN [Phone In] > TRAVEL [Viagens] > LEISURE [Lazer] > JAZZ > COUNTRY > NATIONAL
[Nacional] > OLDIES [Antigas] > FOLK M [Música folk] > DOCUMENT [Documentos] > NEWS [Noticiário]
3. Pressione o botão RDS SEARCH dentro de aproximadamente 10 seg novamente durante a busca, aparece “SEARCH” e
o código PTY escolhido alternadamente no visor. O aparelho busca 30 estações e pára ao encontrar um estação na
categoria seleccionada, e então sintoniza nela. Se nada for encontrado, aparece “NOT” e “FOUND” alternadamente no
visor.
NOTA:
Ao ouvir transmissões FM, aconselha-se que a antena FM seja estendida na parte de trás.
Ao ouvir transmissões AM, aconselha-se o ajuste da posição da antena AM para uma recepção melhor.
P 69.
Entrada para cartão e cabo USB
07-2382IP-PT 9/15/06 12:16 PM Page 69
Page 70

FUNÇÃO I-POD
• Abra a tampa da parte feita para o I-Pod e coloque o I-Pod no encaixe. O I-Pod começara a carregar e o visor mostrará o
andamento.
• Pressione a tecla FUNCTION e seleccione a função do I-Pod, e o I-Pod iniciará então a reprodução directamente.
• Pressione SKIP/TUNING ou SKIP/TUNING para avançar ou voltar a faixa.
ESPECIFICAÇÕES
Fornecimento de Energia : AC 230V ~50Hz
Consumo de Energia : 38 watts
Rádio : AM 525 – 1615 KHz
FM 87.5 – 108 MHz
Parte da fita cassete
Velocidade da fita : 4.75cm/sec.
Flutuação de Velocidade : < 0.4%
Resposta em frequência : 125Hz - 6.3KHz
Parte do CD
Tipos de Disco : CD/CD-R/CD-RW / CD-DA /MP3
Resposta em frequência (-3dB) : 60 – 16.000 Hz
Razão sinal/ruído : >60 dB
Distorção Harmónica : <0.3%
CONTÍNUAS MELHORIAS SÃO REALIZADAS EM NOSSOS EQUIPAMENTOS, TANTO EM QUALIDADE QUANTO EM
DESEMPENHO, PORTANTO RESERVAMO-NOS O DIREITO DE ALTERAR AS ESPECIFICAÇÕES SEM AVISO.
MAIS INFORMAÇÕES
Acautelar-se dos pequenos pedaços e pilhas, não engolir estes pedaços ou pilhas. Estes objectos podem ser
perigosos para a sua saúde e provocar o sufocamento. Prestar atenção e manter pequenos dispositivos e pilhas
fora de alcance das crianças.
Importantes avisos para a protecção dos ouvidos
Cuidado:
A sua audição é tão preciosa para si como para nós.
Portanto, por favor tenha cuidado com este equipamento.
Recomendamos: Evite volumes de som elevados.
Se o equipamento for utilizado por crianças, certifique-se que o volume do aparelho não está demasiado elevado.
Atenção!
Volumes demasiado elevados podem provocar danos irreparáveis à audição das crianças.
Nunca deixe a pessoa especialmente as crianças colocar os objectos dentro de buracos, ranhuras ou outras
aberturas. Estes procedimentos podem causar a morte através de choque eléctrico. O dispositivo deve ser aberto
somente e na presença do pessoal qualificado.
P 70.
07-2382IP-PT 9/15/06 12:16 PM Page 70
Page 71

Por favor utilize o equipamento apenas de acordo com o regulamento descrito acima. O aparelho foi concebido
exclusivamente para ser utilizado no sector das actividades e habitação.
Por favor, guarde cuidadosamente as instruções de utilização para uma futura utilização.
Conselhos para protecção do ambiente
Este produto, no fim do seu período de vida útil, não deve ser depositado no lixo doméstico normal. Deverá ser,
pelo contrário, depositado num ponto de recolha para reciclagem de aparelhos eléctricos e electrónicos. O
símbolo no produto, as instruções de utilização e a embalagem chamam a atenção para esse facto.
As matérias-primas são reutilizáveis de acordo com as suas características. Com a reutilização, a utilização
material ou outras formas de utilização de aparelhos velhos fazem com que dê um contributo valioso para a
protecção do nosso ambiente.
Por favor, informe-se junto das autoridades locais sobre os centros de recolha competentes.
Não impedir a ventilação dos dispositivos. Tenha a certeza que as curtinhas, os jornais, panos de cobrir os
mobiliários não impedir a ventilação das aberturas de aparelhos. A ventilação deve manter-se a qualquer
momento. Aquecer-se demais pode provocar sério dano no dispositivo e reduzir o seu desempenho por toda a
vida.
Calor
Não expor o aparelho directamente à luz solar. Tenha atenção para não expor o aparelho a fontes de calor como
aquecedores ou fontes de chama descoberta. Tenha atenção para que as fendas de arejamento do aparelho não
estejam cobertas.
Humidade e Limpeza
Este produto não é resistente à água. Não submergir o aparelho em água nem deixar que este entre em contacto
com água. Se penetrar água no aparelho pode provocar sérios danos. Não utilizar agentes de limpeza que
contenham álcool, amoníaco, benzol ou abrasivos, pois estes podem danificar o aparelho. Utilize um pano macio
e húmido para a limpeza.
Reciclagem Profissional
Pilhas e materiais de embalagem não pertencem ao lixo doméstico. As pilhas devem ser colocadas num ponto de
recolha para pilhas usadas. A separação dos materiais de embalagem preserva o ambiente.
P 71.
07-2382IP-PT 9/15/06 12:16 PM Page 71
Page 72

OSTRZEŻENIE: Aby zapobiec ryzyku porażenia prądem i pożaru nie należy wystawiać urządzenia na działanie deszczu ani wilgoci.
ŚRODKI OSTROŻNOŚCI
Urządzenie należy odłączyć z gniazda zasilania w przypadku nie używania przez dłuższy czas. Urządzenia nie należ narażać na
działanie wody bądź wilgoci.
UWAGA: Aby uniknąć porażenie prądem nie należy zdejmować pokrywy (ani tylnej części urządzenia). Wewnątrz nie znajdują
się części, które mogą być naprawiane przez użytkownika. Naprawy muszą być dokonywane przez wykwalifikowanych
pracowników serwisu.
INSTRUKCJE BEZPIECZEŃSTWA
1. INSTRUKCJE – Przed przystąpieniem do pracy należy zapoznać się z instrukcją obsługi oraz regulacjami dotyczącymi
bezpieczeństwa.
2. ZACHOWANIE INSTRUKCJI – Zachowaj instrukcję obsługi do wglądu.
3. OSTRZEŻENIE – Wszystkie ostrzeżenia oraz uwagi dotyczące urządzenia powinny być przestrzegane.
4. PRZESTRZEGANIE INSTRUKCJI – Wszystkie instrukcje odnośnie obsługi urządzenia powinny być przestrzegane.
5. WODA ORAZ WILGOĆ - Urządzenie nie powinno być odtwarzane w mokrym pomieszczeniu, blisko wody, na przykład
wanny, zlewu, basenu.
6. WENTYLACJA – Urządzenie powinno być umieszczone w miejscu, które nie blokuje odpowiedniej wentylacji, nie należy
umieszczać urządzenia na łóżku, sofie, dywanie oraz na podobnej powierzchni, która może zablokować odpowiednią
wentylację; Nie umieszczaj urządzenia w miejscach zabudowanych; na przykład na półce na książki bądź szafkach, gdyż
może to blokować przepływ powietrza przez otwory wentylacyjne.
7. CIEPŁO – Urządzenie powinno być umieszczone z dala od grzejników, piecyków (włączając wzmacniacze) oraz innych
urządzeń produkujących ciepło.
8. ŹRÓDŁO PRĄDU – Urządzenie powinno być podłączone wyłącznie do źródła prądu opisanego w instrukcji obsługi bądź
wyszczególnionego na urządzeniu.
9. UZIEMIENIE POLARYZACJA – Upewnij się, że urządzenie jest odpowiednio uziemione.
10. ZABEZPIECZENIE KABLA ZASILANIA – Kabel zasilania powinien być umieszczony w miejscu gdzie nie jest on narażony na
przygniecenie, zerwanie bądź nadepnięcie, zwróć szczególną uwagę na wtyczkę, bolce oraz miejsce w którym kabel
zasilania łączy się z urządzeniem.
72.
MODEL 2382IP
CENTRUM MUZYCZNE Z CD/USB/MP3 I CZYTNIKIEM KART SD
ORAZ STACJĄ DOKUJĄCĄ IPOD
PRODUKT LASEROWY KLASY 1
UWAGA !
W przypadku otwarcia bądź uszkodzenia blokady
niewidzialne promieniowanie. Unikaj kontaktu z
wiązką laserową.
SYMBOL zakończonej grotem
błyskawicy w trójkącie
równobocznym ma za zadanie
ostrzegać użytkownika o
obecności nie izolowanego,
niebezpiecznego napięcia o
wystarczającej wielkości, by móc
stanowić ryzyko porażenia prądem.
UWAGA
RYZYKO PORAŻENIA PRĄDEM
NIE OTWIERAĆ
UWAGA: ABY UNIKNĄĆ PORAŻENIA PRĄDEM
NIE NALEŻY OTWIERAĆ OBUDOWY
URZĄDZENIA. URZĄDZENIE NIE POSIADA
CZĘŚCI, KTÓRE MOGĄ BYĆ SERWISOWANE
PRZEZ UŻYTKOWNIKA
W SPRAWIE SERWISU NALEŻY. ZWRÓCIĆ SIĘ
DO WYKWALIFIKOWANEGO PERSONELU
SERWISOWEGO.
Wykrzyknik w środku trójkąta
równobocznego ma za zadanie
ostrzegać użytkownika o obecności
ważnych informacji dotyczących
obsługi i konserwacji urządzenia
znajdujących się w dołączonej
dokumentacji.
08-2382IP-PL 9/15/06 12:16 PM Page 72
Page 73

11. KONSERWACJA – Urządzenie powinno być konserwowane w sposób zalecany przez producenta.
12. LINIE WYSOKIEGO NAPIĘCIA – Antena zewnętrzna powinna być umieszczona z dala od linii wysokiego napięcia.
13. OKRES NIEUŻYWANIA – W przypadku, gdy urządzenie nie jest używane przez dłuższy okres czasu kabel zasilania
powinien być odłączony od gniazda sieci.
14. MAŁE PRZEDMIOTY ORAZ ZALANIE – Zwróć uwagę, aby małe przedmioty nie wpadły do środka urządzenia oraz aby nie
zostało ono zalane.
15. NAPRAWA – Jeżeli sposób rozwiązania problemu nie został podany w instrukcji obsługi użytkownik nie powinien sam
podejmować prób naprawy urządzenia. Wszystkie takie naprawy powinny być dokonane przez serwis autoryzacyjny.
16. USZKODZENIA WYMAGAJĄCE NAPRAW Y – Urządzenie powinno być naprawione wyłącznie przez specjalistów, gdy:
A. Kabel zasilania bądź wtyczka zostały uszkodzone.
B. Przedmiot wpadł do środka, bądź urządzenie zostało zalane.
C. Urządzenie zostało wystawione na działanie deszczu.
D. Urządzenie zostało upuszczone bądź obudowa została zniszczona.
E. Urządzenie nie pracuje prawidłowo bądź odnotowano znaczną zmianę w działaniu urządzenia.
PRZED PIERWSZYM UŻYCIEM
INSTALACJA URZĄDZENIA
• Ostrożnie wyjmij wszystkie części urządzenia i usuń wszystkie materiały zabezpieczające.
• Włóż baterię do pilota sterowania.
• Przed podłączeniem urządzenia do źródła prądu sprawdź napięcie w sieci oraz podłącz wszystkie inne elementy.
• Nie zakrywaj otworów wentylacyjnych oraz upewnij się, że wokół urządzenia jest kilka centymetrów przestrzeni, która
zapewni odpowiednią wentylację.
PODŁĄCZENIE
1. Podłącz lewy oraz prawy głośnik odpowiednio do lewego i prawego gniazda typu jack.
2. Przed podłączeniem urządzenia do sieci AC upewnij się, że napięcie w sieci jest takie same jak zlecane przez producenta.
ODTWARZANIE PŁYTY CD
Pamiętaj, że brudna, zadrapana płyta może spowodować zakłócenia w odbiorze dźwięku oraz może doprowadzić do
uszkodzenia urządzenia.
• Gdy trzymasz płytę w ręku uważaj by nie dotykać jej powierzchni.
• Nie umieszczaj płyt w pobliżu:
Urządzeń produkujących ciepło bądź w miejscu, w którym panuje wysoka temperatura; W brudnych i wilgotnych miejscach.
• Wytrzyj odciski palców z powierzchni płyty używając miękkiej szmatki. Zawsze wycieraj w kierunku od wewnątrz do zewnątrz
płyty.
URUCHAMIANIE PŁYTY CD
• Naciśnij przycisk OPEN/CLOSE
• Włóż płytę (nadrukiem do góry).
• Naciśnij przycisk OPEN/CLOSE aby zamknąć.
Wyświetlacz pokazuje liczbę utworów na płycie.
73.
08-2382IP-PL 9/15/06 12:16 PM Page 73
Page 74
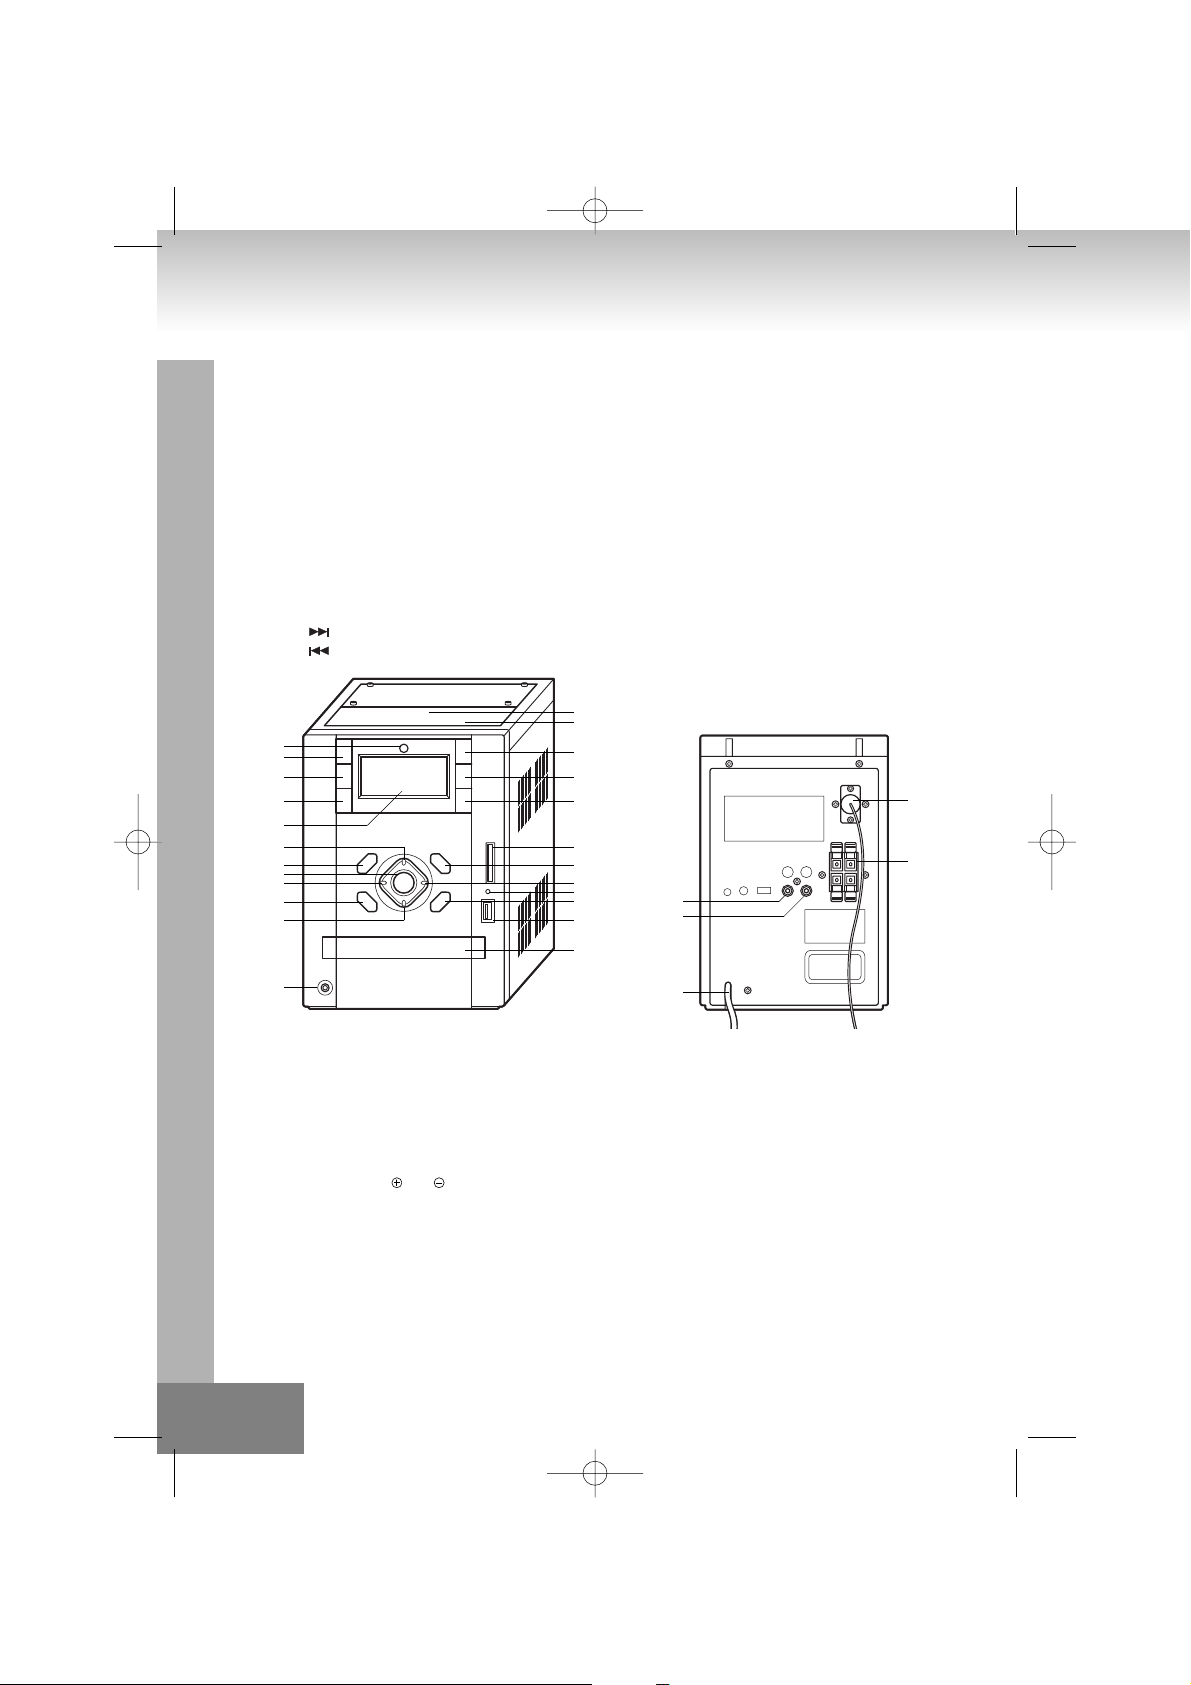
USTAWIENIA ORAZ FUNKCJE
1. Przycisk STANDBY/ON
2. Wyświetlacz LCD
3. Przycisk FUNCTION
4. CZUJNIK PILOTA
5. Przycisk VOLUME+
6. Przycisk VOLUME–
7. Wejście na karty MMC
8. Przycisk TUNER/BAND
9. Przycisk PRESET EQ
10. Przycisk MEM/CLK-ADJ
11. DŹWICZKI CD
12. WEJŚCIE NA SŁUCHAWKI
13. Przycisk CD DOOR OPEN/CLOSE
14. Przycisk PLAY/PAUSE
15. Przycisk SKIP/TUNING
16. Przycisk SKIP/TUNING
FUNKCJE ZDALNEGO STEROWANIA
Przed pierwszym użyciem
• Instalowanie baterii do pilota zdalnego sterowania
1. Otwórz pokrywę w tylnej części pilota.
2. Włóż dwie baterie typu “UM4/AAA/R03”.
• Włóż baterie zgodnie z oraz oznaczonym na pilocie.
3. Załóż pokrywę ponownie.
• Wymiana baterii
• W przypadku gdy pilot działa niestabilnie bądź zmniejszył się dystans w którym działa prawidłowo należy wymienić baterie.
74.
17. Wyświetlacz kart MMC oraz USB
18. Gniazdo USB
19. Przycisk STOP
20. Przycisk ALBUM/MEMORY CH. +
21. Przycisk ALBUM/MEMORY CH. –
22. Przycisk Random
23. Antena FM
24. Wyjście na głośniki
25. Kabel zasilania
26. DŹWICZKI I-POD
27. GNIAZDO I-POD
28. Prawe WEJŚCIE AUX
29. Lewe WEJŚCIE AUX
13
20
27
26
1
4
3
21
7
19
10
17
15
18
23
24
11
8
2
5
9
28
29
25
22
14
16
6
12
08-2382IP-PL 9/15/06 12:16 PM Page 74
Page 75

Sterowanie pilotem
Aby użyć pilota skieruj go w stronę CZUJNIKA zainstalowanego na urządzeniu. Następnie delikatnie wybierz funkcję, którą
chcesz użyć. Sterowanie pilotem jest możliwe w odległości około 6 metrów. Aczkolwiek dystans ten może być mniejszy, gdy
używasz pilota pod pewnym kątem, aby uzyskać największy dystans używaj pilota bezpośrednio przed CZUJNIKIEM.
Unikaj narażania CZUJNIKA na działanie silnego światła (słonecznego bądź sztucznego) i upewnij się, że pomiędzy
CZUJNIKIEM a pilotem nie ma żadnych przeszkód.
PILOT ZDALNEGO STEROWANIA
1. Przycisk STANDBY
2. Przycisk SLEEP
3. Przycisk INTRO
4. Przycisk RANDOM/RDS
5. Przycisk MUTE
6. Przycisk ID3/FIND/ST./ESP
7. Przycisk VOLUME-
8. Przycisk PLAY/PAUSE
9. Przycisk ALBUM/MEMORY CH.+
10. Przycisk ALBUM/MEMORY CH.–
11. Przycisk REPEAT
12. Przycisk FUNCTION
13. Przycisk TUNER/BAND
14. Przycisk Numeric
15. Przycisk VOLUME+
16. Przycisk STOP
17. Przycisk EQ
18. Przycisk SKIP/TUNING
19. Przycisk SKIP/TUNING
20. Przycisk MEM/CLK-ADJ
21. Przycisk TIMER
22. Przycisk I-POD
STEROWANIE/ Opis
STAN OCZEKIWANIA WŁĄCZONY/ WYŁĄCZONY
Gdy po raz pierwszy podłączysz urządzenie do źródła prądu pozostanie ono w stanie oczekiwania. Na wyświetlaczu pojawi
się --:--
• Możesz nacisnąć STANDBY aby włączyć urządzenie.
• Urządzenie pozostanie w trybie oczekiwania aż do jego uruchomienia.
• Wyciągnij wtyczkę z gniazda zasilania, jeżeli chcesz całkowicie wyłączyć urządzenie.
USTAWIENIE ZEGARA
• Gdy po raz pierwszy podłączysz urządzenie do sieci pozostanie ono w stanie oczekiwania. Na wyświetlaczu pojawi się --:--
• W trybie oczekiwania naciśnij przycisk [MEM/CLK-ADJ] przez 3-5 sekund, pojawi się informacja 12H/24.
• Naciśnij przycisk SKIP/TUNING bądź SKIP/TUNING , aby wybrać format godziny 12H lub 24H.
• Ponownie naciśnij przycisk [MEM/CLK-ADJ] aby wybrać ustawienia godziny, pierwsza oraz druga cyfra „00” zacznie migać.
• Naciśnij przycisk SKIP/TUNING lub SKIP/TUNING , aby ustawić godzinę.
• Ponownie naciśnij przycisk [MEM/CLK-ADJ] aby wybrać ustawienia minuty, trzecia i czwarta cyfra „00” zacznie migać.
• Naciśnij przycisk SKIP/TUNING lub SKIP/TUNING , aby ustawić minutę. Naciśnij przycisk [MEM/CLK-ADJ], aby
zakończyć ustawianie godziny.
• Godzina może być wyświetlana zarówno w formacie 12H jak i 24H.
75.
14
15
16
17
18
19
20
21
22
1
2
3
4
6
5
7
8
10
11
12
13
9
08-2382IP-PL 9/15/06 12:16 PM Page 75
Page 76

TRYB ODTWARZANIA
• Tryb odtwarzania zostanie zmieniony wraz z naciśnięciem przycisku.
• Wyświetlacz pokaże: TUNER > CD/MP3 > I-POD > AUX > CARD-USB >
PLAY/PAUSE
• Naciśnij, aby rozpocząć bądź przerwać odtwarzanie.
STOP
• W trybie odtwarzania oraz pauzy: Zatrzymuje odtwarzanie bądź przechodzi do trybu programowania.
• W trybie programowania: Wychodzi z trybu programowania, resetuje pamięć oraz zatrzymuje odtwarzanie.
• W trybie wybierania losowego: Zatrzymuje odtwarzanie oraz wyłącza wybiernie losowe.
FUNKCJA POWTÓRZ
• W trybie CDDA: Powtórz 1 utwór >Powtórz wszystkie utwory > Powtarzanie wyłączone
• W trybie CDROM: Powtórz 1 utwór >Powtórz wszystkie utwory > Powtarzanie wyłączone
• W trybie powtórz: Powtórz 1 utwór >Powtórz
• W trybie zaprogramowanym: Powtórz 1 program >Powtórz wszystkie programy > Powtarzanie wyłączone
PAMIĘĆ
Tryb CD/MP3:
1. Zaprogramowanych może być do 64 utworów.
2. Naciśnij przycisk stop, aby zatrzymać odtwarzanie.
3. Naciśnij przycisk MEM/CLK-ADJ, aby włączyć lub wyłączyć tryb programowania.
4. Zmień numer utworu naciskając klawisz num. na pilocie.
5. Ponownie naciśnij przycisk MEM/CLK-ADJ aby zapisać i przejść dalej.
6. Po zaprogramowaniu naciśnij przycisk play aby zakończyć tryb programowania.
7. Naciśnij przycisk play aby rozpocząć odtwarzanie.
Tryb RADIO:
1. Zaprogramowanych może być do 30 stacji radiowych FM i 10 stacji AM.
2. Naciśnij przycisk FUNCTION aby włączyć radio, oraz aby przełączyć z trybu FM do AM i odwrotnie.
3. Aby dostroić radio ręcznie naciśnij przycisk SKIP/TUNING lub SKIP/TUNING .
4. Aby dostroić radio automatycznie przytrzymaj przycisk SKIP/TUNING lub SKIP/TUNING przez 2 sekundy.
System automatycznie wyszuka stacje.
5. Aby zapisać wyszukaną stacje naciśnij przycisk MEM/CLK-ADJ.
6. Naciśnij przycisk MEMORY CH- lub MEMORY CH+, aby wybrać pozycję, na której stacja ma zostać zapisana.
7. Ponownie naciśnij przycisk MEM/CLK-ADJ, aby zapisać wybraną stacje.
PRZESKAKIWANIE/ DOSTRAJANIE
Tryb CD/MP3:
• W trybie stop: Zmienia numer utworu do odtworzenia, w tym przeskakuje do pierwszego, jeżeli był to ostatni.
• W trybie programowania: Zmienia numer utworu [file] do zaprogramowania na następny.
• W trybie odtwarzania, pauzy, programowania: Pojedyncze naciśnięcie, przeskakuje do następnego utworu [file] w trybie
odtwarzania, do następnego zaprogramowanego utworu [file] w trybie programowania, do następnego wybranego utworu
[file] w trybie wybranym. W trybie odtwarzania naciśnij ten przycisk przez dłuższy czas, aby przeskakiwać do przodu o 0.7
sekund danego utworu.
Tryb RADIO:
• Naciśnij przycisk, aby dostroić stację.
• Naciśnięcie, przez dłużej niż 0.7 sekund rozpocznie programowanie automatyczne .
76.
08-2382IP-PL 9/15/06 12:16 PM Page 76
Page 77

SKIP/TUNING
Tryb CD/MP3:
• W trybie stop: Zmienia numer utworu [file] do odtworzenia, w tym przeskakuje do pierwszego, jeżeli był to ostatni.
• W trybie programowania: Zmienia numer utworu [file] do zaprogramowania na poprzedni.
• W trybie odtwarzania, pauzy, programowania: Pojedyncze naciśnięcie, przeskakuje do poprzedniego utworu [file] w trybie
odtwarzania, do poprzedniego zaprogramowanego utworu [file] w trybie programowania. W trybie odtwarzania naciśnij ten
przycisk przez dłuższy czas, aby przeskakiwać wstecz o 0.7 sekund danego utworu.
Tryb RADIO:
• Naciśnij przycisk, aby dostroić stację radiową.
• Naciśnięcie przez dłużej niż 0.7 sekund rozpocznie programowanie automatyczne .
ALBUM/MEMORY CH.+
Tryb MP3:
• W trybie stop: przeskakuje do kolejnego albumu, w tym przeskakując do pierwszego, jeżeli był to ostatni.
• W trybie programowania: Przeskakuje do kolejnego albumu do zaprogramowania, w tym przeskakując do pierwszego, jeżeli
był to ostatni.
• W trybie odtwarzania: Przeskakuje do kolejnego odtwarzanego albumu.
Tryb RADIO:
• Zapisuje stacje radiowe w kolejnośc rosnącej.
ALBUM/MEMORY CH.–
Tryb MP3:
• W trybie stop: przeskakuje do poprzedniego albumu, w tym przeskakując do ostatniego, jeżeli był to pierwszy.
• W trybie programowania: Przeskakuje do poprzedniego albumu do zaprogramowania, w tym przeskakując do ostatniego,
jeżeli jest był pierwszy.
• W trybie odtwarzania: Przeskakuje do poprzedniego odtwarzanego albumu.
Tryb RADIO:
• Zapisuje stacje radiowe w kolejnośc malejącej.
Klawiatura Numeryczna
• Zaznacz wybrany utwór.
• Naciśnij przycisk play, aby rozpocząć odtwarzanie.
INTRO
• Zaznaczając tą funkcję w trybie CD/MP3, odtwarzane będzie tylko 10 sekund każdego utworu.
WYBIERANIE LOSOWE
• W trybie wyłączonym: Włącza tryb wybierania losowego.
• Powtórz utwór 1 / w trybie wyłączonym, Powtórz katalog i odtwórz wszystkie pliki/ w trybie wyłączonym: Wyłącza
wybieranie powtórzone i przechodzi do trybu wybierania losowego.
ID3/FIND/ST./ESP
Tryb CD:
• Naciśnij przycisk [ID3/FIND/ST./ESP] przez 10 sec, aby wyłączyć podręczną pamięć ochrony danych przed Wstrząsami.
• Ponownie naciśnij przycisk [ID3/FIND/ST./ESP] przez 10 sec, aby włączyć podręczną pamięć ochrony danych przed
Wstrząsami.
77.
08-2382IP-PL 9/15/06 12:16 PM Page 77
Page 78

Tryb MP3:
• Naciśnij przycisk [ID3/FIND/ST./ESP], aby przejść do trybu wyszukania PLIKU
• Naciśnij przycisk SKIP/TUNING lub SKIP/TUNING , aby wybrać PLIK.
• Naciśnij przycisk [ID3/FIND/ST./ESP] dwukrotnie, aby przejść do trybu wyszukania ALBUMU.
• Naciśnij przycisk SKIP/TUNING lub SKIP/TUNING , aby wybrać ALBUM.
• Naciśnij przycisk PLAY, aby rozpocząć odtwarzanie.
• Naciśnij przycisk [ID3/FIND/ST./ESP] przez 3-5 sec, aby przejść do tryby ID3 TAG.
• Ponownie naciśnij przycisk [ID3/FIND/ST./ESP] przez 3-5 sec, aby powrócić do trybu odtwarzania.
Tryb RADIO:
• Naciśnij przycisk [ID3/FIND/ST./ESP], aby wybrać pomiędzy trybem FM Stereo a Mono.
USTAWIENIE EQ
• EQ pokazuje aktualne ustawienia tonu dźwięku.
• W przypadku naciśnięcia przycisku EQ ton dźwięku zmieni się następująco: PASS >CLASSIC >ROCK > POP >JAZZ >
WYCISZENIE
• Wycisza głos.
POZIOM GŁOŚNOŚCI+/–
• Zwiększanie poziomu głośności.
• Zmniejszanie poziomu głośności.
BUDZIK WŁĄCZONY/WYŁĄCZONY
1. Naciśnij przycisk [TIMER] przez 3-5 sekund, wyświetlą się cztery cyfr y, które zaczną migać (wszystkie tryby).
2. Naciśnij przycisk SKIP/TUNING lub SKIP/TUNING , aby ustawić godzinę.
3. Ponownie naciśnij przycisk [TIMER], aby wybrać ustawienie minut, trzecia oraz czwarta cyfra zaczną migać.
4. Naciśnij przycisk SKIP/TUNING lub SKIP/TUNING , aby ustawić minuty. Naciśnij przycisk [TIMER], aby zachować
minuty.
5. Ponownie naciśnij przycisk [TIMER], aby ustawić zegarek. Ponownie naciśnij przycisk [TIMER], aby wybrać ustawienie
godziny.
6. Naciśnij przycisk SKIP/TUNING lub SKIP/TUNING , aby ustawić godzinę.
7. Ponownie naciśnij przycisk [TIMER], aby powrócić do ustawień minut, trzecia oraz czwarta cyfra zaczną migać.
8. Naciśnij przycisk SKIP/TUNING lub SKIP/TUNING , aby ustawić minuty. Naciśnij przycisk [TIMER], aby zachować
minuty.
9. Ponownie naciśnij przycisk [TIMER], aby wybrać ustawienie funkcji, wybrana funkcja zacznie migać,
10. naciśnij przycisk SKIP/TUNING lub SKIP/TUNING aby wybrać odpowiednią stacje.
11. Ponownie naciśnij przycisk [TIMER], aby wybrac ustawienia poziomu głośności. na wyświetlaczu pojawi się poziom
głośności,
12. Naciśnij przycisk SKIP/TUNING lub SKIP/TUNING , aby ustawić poziom głośności.
13. Ponownie naciśnij przycisk [TIMER], aby powrócić do normalnego trybu, wyświetlacz pokaże logo .
FUNKCJA SLEEP
• Naciśnij przycisk sleep, aby włączyć funkcję sleep, zmienić ustawiania, bądź wyłączyć funkcję; Wyświetlacz pokaże kolejno
90>80>70>-->10 wyłącz; Jeżeli funkcja sleep jest aktywna system odliczy czas aż do końca, wtedy urządzenie wyłączy się
automatycznie.
78.
08-2382IP-PL 9/15/06 12:16 PM Page 78
Page 79

OBSŁUGA KART PAMIĘCI-USB
1. W przypadku włożenia karty pamięci bądź USB wyświetli się lista utworów.
2. Naciśnij przycisk PLAY/PAUSE, aby odtworzyć utwór 01. Naciśnij przycisk pause, aby zatrzymać odtwarzanie. W trybie
pauzy wyświetlacz będzie migał.
3. Naciśnij przycisk STOP, aby powrócić do listy utworów.
Tryb RADIO/Obsługa
Używać zgodnie z poniższą instrukcją
1. Naciśnij przycisk STANDBY, aby włączyć urządzenie.
2. Naciśnij przycisk ”FUNCTION” i przełącz na tryb TUNER.
3. Naciśnij przycisk TUNER/BAND, aby wybrać pasmo FM lub AM.
4. Wyszukaj porządanej stacji używając przycisku SKIP/TUNING lub SKIP/TUNING .
5. Dostosuj poziom głośności przyciskami vol+ lub vol-.
SYSTEM RDS
Zmiana ustawień RDS: FREQUENCY>PS>PTY>RT>
1. Naciśnij przycisk RANDOM/RDS, wyświetli się informacja o aktywnej częstotliwości PS. Na wyświetlaczu zaświeci się RDS
i pokażą się nazwy stacji. W przypadku braku sygnału RDS, nie zostanie wyświetlona informacja PS.
2. Naciśnij przycisk RANDOM/RDS dwukrotnie, wyświetli się informacja o aktywnej częstotliwości PTY. Na wyświetlaczu
zaświeci się RDS i pokażą się nazwy stacji. W przypadku braku sygnału RDS, nie zostanie wyświetlona informacja PTY.
3. Naciśnij przycisk RDS MODE trzykrotnie, wyświetli się informacja o aktywnej częstotliwości RT. Na wyświetlaczu zaświeci
się RDS i pokaże się wiadomość wyslana przez stację. W przypadku braku sygnału RDS, nie zostanie wyświetlona
informacja RT.
Aby wyszukać program wybierz stację.
1. Naciśnij przycisk RDS SEARCH. Na wyświetlaczu zaświeci się PTY SEL.
2. Za każdym razem, gdy naciśniesz przycisk SKIP/TUNING lub SKIP/TUNING system wyświetli tematy w
następującej kolejności: NEWS [Nowości] > AFFAIRS [Polityka] > INFO [Wiadomości] > SPORT [Sport] > EDUCATE
[Edukacja] > DRAMA [Dramat] > CULTURE [Kultura] > SCIENCE [Nauka] > VARIED [Różne] > POP M [Muzyka Pop] > ROCK
M [Muzyka Rock] > M O R M [Muzyka Różna] > LIGHT M [Relaks] > CLASSICS [Klasyka] > OTHER M [Inna] > WEATHER
[Pogoda] > FINANCE [Finanse] > CHILDREN [Dzieci] > SOCIAL A [Sprawy socjalne] > RELIGION [Religia] > PHONE IN
[Zadzwoń] > TRAVEL [Podróże] > LEISURE [Czas wolny] > JAZZ > COUNTRY [Country] > NATIONAL [Narodowa] > OLDIES
[Starsze] > FOLK M > DOCUMENT [Dokumentarne] > NEWS [Wydarzenia]
3. W trakcie wyszukiwania naciśnij przycisk RDS SEARCH przez około 10 sekund. Funkcja "SEARCH" lub PTY pokażą się na
wyświetlaczu. Urządzenie przeszukuje 30 stacji i zatrzyma się w momencie, gdy wyszuka kategorię, którą wybrałeś,
następnie przełączy się na znalezioną stacje. W przypadku, gdy kategoria nie została znaleziona, na wyświetlaczu pojawi
się informacja "NOT" oraz "FOUND".
INFORMACJA:
Słuchając radia FM zaleca się całkowite rozłożenie anteny, co znacznie poprawi odbiór.
Słuchając radia AM zaleca się całkowite rozłożenie anteny oraz jej ręczne dostrojenie, co znacznie poprawi odbiór.
79.
Gniazdo kart pamięci oraz USB
08-2382IP-PL 9/15/06 12:16 PM Page 79
Page 80

FUNKCJE I-POD
• Otwórz pokrywę I-Pod oraz zainstaluj I-Pod do gniazda I-Pod, teraz I-Pod jest ładowany a wyświetlacz pokaże postęp w
ładowaniu.
• Naciśnij przycisk funkcje i wybierz tryb I-Pod, I-Pod zacznie odtwarzać automatycznie.
• Naciśnij przycisk SKIP/TUNING lub SKIP/TUNING , aby wybrać następny bądź poprzedni utwór.
SPECYFIKACJA TECHNICZNA
Źródło zasilania : AC 230V ~50Hz
Zużycie prądu : 38 watów
Radio : MW 525 – 1615 KHz
UKW 87.5 – 108 MHz
Kaseta
Szybkość : 4.75cm/sec.
Zniekształcenie : < 0.4%
Charakterystyka częstotliwościowa : 125Hz - 6.3KHz
Odtwarzacz płyt CD
Formaty płyt : CD/CD-R/CD-RW / CD-DA /MP3
Charakterystyka częstotliwościowa (-3dB) : 60 – 16.000 Hz
Względny wskaźnik szumów : >60 dB
Zniekształcenie : <0.3%
PRODUKT TEN JEST STALE UDOSKONALANY, ZARÓWNO POD WZGLĘDEM JAKOŚCIOWYM JAK I WYDAJNOŚCIOWYM,
SPECYFIKACJA MOŻE ULEC ZMIANIE BEZ UPRZEDNIEGO POWIADOMIENIA.
DODATKOWE INFORMACJE
Uważaj na małe elementy i baterie, nie połknij ich. To może być niebezpieczne dla zdrowia lub doprowadzić do
uduszenia. Zwróć najwyższą uwagę, aby małe elementy i baterie znajdowały się poza zasięgiem dzieci.
Ważna rada dotycząca ochrony słuchu
Ostrożnie:
Tak jak ty, dbamy o twój zmysł słuchu.
Bądź ostrożny gdy używasz tego urządzenia.
Nasze zalecenie: Unikaj wysokiej siły głosu.
Upewnij się że siła głosu nie jest wysoka, gdy z urządzenia korzystają dzieci.
Uwaga!
Wysoka siła głosu może spowodować nieodwracalne pogorszenie słuchu dziecka.
Nie pozwól, aby osoby a w szczególności dzieci wkładały jakiekolwiek obiekty do otworów w urządzeniu. Może to
doprowadzić do śmierci, z powodu porażenia prądem elektrycznym. Urządzenie może być otwierane tylko przez
doświadczony personel.
80.
08-2382IP-PL 9/15/06 12:16 PM Page 80
Page 81

Używaj urządzenia tylko w celach do których zostało zaprojektowane.
Urządzenie jest przeznaczone wyłącznie do użytku domowego lub biurowego.
Instrukcję obsługi należy zachować aby zawsze był wgląd do zawartych w niej informacji.
Wskazówki dotyczące ochrony środowiska
Po zakończeniu okresu trwałości produktu nie wolno wyrzucać do śmieci z gospodarstwa domowego. Powinien
być on oddany do punktu zbiórki urządzeń elektronicznych i elektrycznych przeznaczonych do recyclingu.
Wskazuje na to symbol na produkcie, w instrukcji obsługi lub opakowaniu.
Materiały nadają się do ponownego przetworzenia zgodnie z ich oznakowaniem. Dzięki ponownemu
przetworzeniu, właściwej utylizacji lub innym formom wykorzystania star ych urządzeń mają Państwo ważny wkład
w ochronie naszego środowiska.
Proszę zapytać się w administracji gminnej o właściwe miejsce utylizacji.
NIGDY nie ograniczaj wentylacji urządzenia. Upewnij się czy zasłony, gazety, pokrowce lub meble nie zasłaniają
otworów wentylacyjnych. Wentylacja musi być zapewniona bez przerwy. Przegrzanie może doprowadzić do
poważnych uszkodzeń urządzenia oraz zredukować jego sprawność i trwałość.
Temperatura i ciepło
Nie wystawiaj urządzenia na bezpośrednie działanie promieni słonecznych. Upewnij się, że urządzenie nie jest
wystawione na bezpośrednie działanie źródeł ciepła takich jak ogrzewanie lub ogień. Upewnij się, że otwory
wentylacyjne urządzenia nie są zakryte.
Wilgoć i czyszczenie
Urządzenie nie jest wodoodporne! Nie zanurzaj odtwarzacza w wodzie. Nie dopuszczaj do kontaktu odtwarzacza
z wodą. Woda padająca na odtwarzacz może spowodować poważne uszkodzenia. Nie używaj środków
czyszczących, które zawierają alkohol, amoniak, benzynę lub mają rysujący charakter, ponieważ mogą
doprowadzić do zniszczenia odtwarzacza. Do czyszczenia używaj miękkiej i wilgotnej szmatki.
Profesjonalny recykling
Nie wyrzucaj baterii i opakowania do normalnego pojemnika na śmieci. Baterie należy przekazać do miejsca
składowania używanych baterii. Segregacja materiałów opakowaniowych jest sprzyjająca dla środowiska.
81.
08-2382IP-PL 9/15/06 12:16 PM Page 81
Page 82

WAARSCHUWING: Stel, om brand- of schokgevaar te verminderen, dit apparaat niet bloot aan regen of vocht.
VEILIGHEIDSVOORSCHRIFT
Dit apparaat mag niet met het stopcontact verbonden zijn wanneer niet in gebruik. Stel dit apparaat niet bloot aan regen of
vocht.
LET OP: Verwijder de kap (of achterkant) niet, om het risico op elektrische schokken te verminderen. Binnenin bevinden zich
geen onderdelen voor eigen gebruik. Laat onderhoud over aan een expert.
VEILIGHEIDSINSTRUCTIES
1. LEES DE INSTRUCTIES – Alle veiligheids- en gebruiksinstructies moeten worden gelezen voor het apparaat wordt gebruikt.
2. BEWAAR INSTRUCTIES – De veiligheids- en gebruiksinstructies moeten worden bewaard voor toekomstige naslag.
3. LET OP WAARSCHUWINGEN – Alle waarschuwingen op het apparaat en in de gebruiksaanwijzing moeten in acht worden
genomen.
4. VOLG DE INSTRUCTIES OP – Alle gebruiks- en bedieningsinstructies moeten worden opgevolgd.
5. WATER EN VOCHT – Het apparaat mag niet in de buurt van water worden gebruikt, bijvoorbeeld bij een badkuip, wasbak,
wasmachine, zwembad of in een vochtige kelder.
6. VENTILATIE – Het apparaat mag niet zó worden geplaatst, dat de locatie of stand ventilatie tegenwerkt, het apparaat mag
bijvoorbeeld niet worden geplaatst op een bed, sofa, deken of een gelijksoortig oppervlak dat de ventilatieopeningen kan
blokkeren; Plaats het apparaat niet in inbouwinstallatie openingen, zoals een (boeken)kast die de luchtstroom door de
ventilatieopeningen tegen kan werken.
7. HITTE – Het apparaat moet uit de buurt van hittebronnen als radiatoren, verwarmingsinstallaties, fornuizen of andere
apparaten (inclusief versterkers) die hitte produceren worden geplaatst.
8. VERMOGENSBRONNEN – Het apparaat mag alleen worden verbonden met een vermogensbron van het type als
beschreven in de gebruiksaanwijzing of als aangegeven op het apparaat.
9. GRONDEN EN POLARISATIE – U moet voorzorgsmaatregelen nemen om ervoor te zorgen dat de gronding of polarisatie
van het apparaat niet wordt tegengewerkt.
10. BESCHERMING STROOMDRAAD – Verstop stroomkabels, zodat er niet overheen gelopen wordt of dat voorwerpen die
erop of ertegen geplaatst worden niet in de kabels steken, let vooral op kabels bij stekkers, verlengsnoeren en het punt
waar de kabels het apparaat verlaten.
82.
MODEL 2382IP
DESIGN MUSIC-CENTER MET CD/USB/SD-KAART - MP3-SPELER EN
IPOD DOCKING STATION
EERSTEKLAS LASERPRODUCT
LET OP !
Onzichtbare laserstraling wanneer geopend en
de tussensloten niet werken. Vermijd blootstelling
aan de straal.
Het driehoekige symbool met
bliksemschicht wijst de gebruiker
erop dat binnenin deze eenheid
een gevaarlijke niet geïsoleerde
spanning aanwezig is die tot een
elektrische schok kan leiden.
OPGELET
RISICO OP EEN GEVAARLIJKE SCHOK
NIET OPENEN
OPGELET: OM HET RISICO OP EEN
ELEKTRISCHE SCHOK TE VERMIJDEN, DE
VOOR- OF ACHTERKANT NIET VERWIJDEREN.
BINNENIN BEVINDEN ZICH GEEN DELEN DIE
DOOR DE GEBRUIKER ONDERHOUDEN
KUNNEN WORDEN. DOE EEN BEROEP OP
EEN ERKENDE EN BEVOEGDE TECHNISCHE
DIENST
Het driehoekige symbool met
uitroepteken wijst de gebruiker erop
dat er belangrijke instructies
betreffende het gebruik en het
onderhoud opgenomen zijn in de
handleiding bij deze eenheid.
09-2382IP-NL 9/15/06 12:17 PM Page 82
Page 83

11. SCHOONMAKEN – Het apparaat mag alleen worden schoongemaakt zoals de fabrikant aanbeveelt.
12. HOOGSPANNINGSKABELS – Een buitenantenne moet uit de buurt van hoogspanningskabels worden geplaatst.
13. PERIODEN ZONDER GEBRUIK – De stekker moet uit het stopcontact worden gehaald wanneer het apparaat lange tijd niet
gebruikt gaat worden.
14. BINNENDRINGEN VAN VOORWERPEN EN VLOEISTOFFEN – Zorg ervoor dat voorwerpen niet binnen in het apparaat
vallen, en vloeistoffen niet door de openingen kunnen sijpelen.
15. ONDERHOUD – De gebruiker moet niet proberen zelf het apparaat te repareren als dit buiten de gebruiksaanwijzing gaat.
Al het andere onderhoud moet worden overgelaten aan een expert.
16. TE REPAREREN SCHADE – Het apparaat moet worden gerepareerd door een expert wanneer:
A. De stroomkabel of stekker beschadigd is.
B. Voorwerpen of vloeistoffen de behuizing van het apparaat zijn binnengedrongen.
C. Het apparaat is blootgesteld aan regen.
D. Het apparaat is gevallen, of de behuizing is beschadigd.
E. Het apparaat niet normaal lijkt te werken, of een opmerkelijke verandering in de prestaties vertoont.
VOORBEREIDING VOOR GEBRUIK
INSTALLATIE
• Haal alle onderdelen uit de verpakking en verwijder beschermend materiaal.
• Voer de batterijen in de afstandsbediening in.
• Verbind het apparaat niet met het stopcontact voor u het voltage heeft gecontroleerd en voor alle andere verbindingen zijn
gemaakt.
• Bedek geen ventilatieopeningen en zorg ervoor dat er een ruimte van enkele centimeters rond het apparaat overblijft voor
ventilatie.
VERBINDINGEN
1. Verbind de linker- en de rechterluidspreker met de linker- en rechteringangen hiervoor
2. Wees er zeker van dat, voor u het apparaat met het stopcontact verbindt, het op de achterkant aangegeven voltage gelijk
is met het voltage in uw stopcontact.
GEBRUIK / CD
Onthoud dat stof, krassen of het gebruik van een gebogen cd onderbroken geluid en lawaai kan veroorzaken.
• Raak het speeloppervlak niet aan als u de cd’s vasthoudt.
• Plaats cd’s niet op de volgende locaties:
In de buurt van een verwarmingsapparaat of een plaats waar de temperatuur hoog is; in een vochtige of stoffige omgeving.
• Veeg vingerafdrukken of stof weg van het speeloppervlak met behulp van een zachte doek. Veeg altijd van de binnenkant
naar de buitenkant van de cd.
DE CD INVOEREN
• Druk op OPEN/CLOSE
• Voer een cd (geprinte kant boven) in de houder in.
• Druk op OPEN/CLOSE om de houder te sluiten.
Het scherm toont het total aantal nummers op de cd.
83.
09-2382IP-NL 9/15/06 12:17 PM Page 83
Page 84

BEDIENING EN MOGELIJKHEDEN
1. STANDBY/ON knop
2. LCD SCHERM
3. FUNCTION knop
4. INFRAROOD ONTVANGER
5. VOLUME+ knop
6. VOLUME– knop
7. MMC Card opening
8. TUNER/BAND knop
9. PRESET EQ knop
10. MEM/CLK-ADJ knop
11. CD INGANG
12. INGANG KOPTELEFOON
13. CD INGANG OPEN/CLOSE knop
14. PLAY/PAUSE knop
15. SKIP/TUNING knop
16. SKIP/TUNING knop
FUNCTIES AFSTANDSBEDIENING
Voorbereiding voor gebruik
• Batterijen in de afstandsbediening invoeren
1. Verwijder het klepje van de achterkant van de afstandsbediening.
2. Voer twee “UM4/AAA/R03“ batterijen in.
• Voer de batterijen met de en uiteinden in zoals aangegeven in het batterijencompartiment.
3. Plaats het klepje terug.
• Batterijen vervangen
• Als het gebruik van de afstandsbediening onstabiel wordt, of de afstand van waar de afstandsbediening werkt, korter wordt,
moet u de batterijen vervangen door nieuwe.
84.
17. MMC Card en USB indicator
18. USB ingang
19. STOP knop
20. ALBUM/MEMORY CH + knop
21. ALBUM/MEMORY CH – knop
22. Random knop
23. FM antenne
24. Uitgang luidspreker
25. Stroomkabel
26. KLEP I-POD INGANG
27. I-POD INGANG
28. AUX Rechterinvoer
29. AUX Linkerinvoer
13
20
27
26
1
4
3
21
7
19
10
17
15
18
23
24
11
8
2
5
9
28
29
25
22
14
16
6
12
09-2382IP-NL 9/15/06 12:17 PM Page 84
Page 85

Het gebruik van de afstandsbediening
Richt op de INFRAROOD ONTVANGER en druk de knoppen zachtjes, maar goed in, om de afstandsbediening te kunnen
gebruiken. Gebruik van de afstandsbediening is mogelijk op een afstand van ongeveer 6 meter maximaal. Omdat de afstand
waarop de afstandsbediening echter te gebruiken is kleiner is wanneer het apparaat met een hoek wordt gebruikt, kunt u de
afstandsbediening het best recht voor de INFRAROOD ONTVANGER gebruiken, voor de maximale afstand.
Stel de INFRAROOD ONTVANGER niet bloot aan sterk licht (direct zonlicht of kunstbelichting) en zorg ervoor dat zich geen
obstakels bevinden tussen de INFRAROOD ONTVANGER en de afstandsbediening.
AFSTANDSBEDIENING
1. STANDBY knop
2. SLEEP knop
3. INTRO knop
4. RANDOM/RDS knop
5. MUTE knop
6. ID3/FIND/ST./ESP knop
7. VOLUME- knop
8. PLAY/PAUSE knop
9. ALBUM/MEMORY CH.+ knop
10. ALBUM/MEMORY CH.- knop
11. REPEAT knop
12. FUNCTION knop
13. TUNER/BAND knop
14. Numeric knop
15. VOLUME+ knop
16. STOP knop
17. EQ knop
18. SKIP/TUNING knop
19. SKIP/TUNING knop
20. MEM/CLK-ADJ knop
21. TIMER knop
22. I-POD knop
GEBRUIK/ Beschrijving
STANDBY ON/ OFF
Het apparaat gaat in de standby stand zodra u de stekker in het stopcontact steekt. Het scherm toont --:--
• U kunt op STANDBY drukken om het apparaat aan te zetten.
• De standby functie van het apparaat blijft aan totdat het apparaat wordt aangezet.
• Haal de stekker uit het stopcontact als u de stroomtoevoer geheel af wil sluiten.
INSTELLEN KLOK
• Het apparaat gaat in de standby stand zodra u de stekker in het stopcontact steekt. Het scherm toont --:--
• Houd in standby stand [MEM/CLK- ADJ] langer dan 3,5 seconden vast. Het scherm 12/24H knippert.
• Druk op SKIP/TUNING of SKIP/TUNING om het juiste 12 of 24-uursformaat te verkrijgen.
• Druk weer op [MEM/CLK- ADJ] om de uurinstelling te kiezen, De eerste twee nummers "00" knipperen.
• Druk op SKIP/TUNING of SKIP/TUNING om het juiste uur in te stellen.
• Druk weer op [MEM/CLK- ADJ] om de minuteninstelling te kiezen, de laatste twee nummers “00” knipperen,
• Druk op de SKIP/TUNING of de SKIP/TUNING knop om de juiste minutenstand te kiezen. Druk op [MEM/CLKADJ] om de juiste stand vast te zetten.
• Alle tijdsinformatie wordt getoond in 12- of 24-uursformaat.
85.
14
15
16
17
18
19
20
21
22
1
2
3
4
6
5
7
8
10
11
12
13
9
09-2382IP-NL 9/15/06 12:17 PM Page 85
Page 86

FUNCTIEKEUZE
• Wanneer deze toets wordt ingedrukt wordt de functie veranderd.
• Het scherm verandert: TUNER > CD/MP3 > I-POD > AUX > CARD-USB >
PLAY/PAUSE
• Om het afspelen te beginnen of onderbreken.
STOP
• In de afspeelstand of de pauzestand: Verandert naar de stopstand of programmakeuze functie tijdens het afspelen van een
programma.
• In de programmakeuze functie: Verlaat de programmakeuze functie, wist het programmageheugen en verandert naar de
stopstand.
• In de random speelstand: Verandert naar de stopstand en verlaat de random functie.
REPEAT
• CDDA normale speelstand: Herhaal 1 nummer > Herhaal alle nummers > Repeat uit
• Muziek CDROM normale speelstand: Herhaal 1 bestand > Herhaal alle bestanden > Herhaal Album > Repeat uit
• Random speelstand: 1 nummer random herhalen > Random afspelen
• Programma speelstand: Herhaal 1 nummer > Herhaal het programma > Programma afspelen
GEHEUGEN
CD/MP3:
1. Er kunnen tot 64 nummers worden geprogrammeerd.
2. Druk op de stopknop om het afspelen te beëindigen.
3. Druk op de MEM/CLK-ADJ knop om de programma functie aan of uit te zetten
4. Verander het af te spelen nummer door het nummer direct vanaf de afstandsbediening in te toetsen.
5. Druk weer op de MEM/CLK-ADJ knop om het nummer op te slaan en het volgende nummer te kiezen.
6. Na alle gewenste nummers gekozen te hebben drukt u op de play knop om de programmakeuze functie te verlaten.
7. Druk op de play knop om het programma af te spelen.
RADIO:
1. Er kunnen tot 30 zenders in FM en 10 zenders in AM worden geprogrammeerd.
2. FUNCTION knoppen. Te gebruiken om de radio aan te zetten en over te schakelen tussen de AM en FM bandbreedtes.
3. Druk op de SKIP/TUNING of de SKIP/TUNING knop om de frequentie handmatig te kiezen.
4. Houd de SKIP/TUNING of de SKIP/TUNING knop langer dan 2 seconden vast om de frequentie automatisch vast
te stellen. Het system stopt als het volgende station is bereikt.
5. Druk op de MEM/CLK-ADJ knop om de frequentie van de huidige zender op te slaan.
6. Druk op de MEMORY CH- of MEMORY CH+ knop om het de plaats in het geheugen te kiezen.
7. Druk op de MEM/CLK-ADJ knop om de frequentie op te slaan.
SKIP/TUNING
CD/MP3:
• In de stopstand: Verander het eerst te spelen nummer (bestand) tijdens de stopstand, cyclisch naar het eerste nummer als
het laatste nummer wordt aangegeven.
• In de programmakeuze functie: Verander naar het volgende nummer (bestand) voor programmakeuze.
• In de speelstand, pauzestand, programma speelstand: Eenmaal indrukken, verander het te spelen nummer (bestand) naar
het volgende nummer (bestand) voor normale speel/pauzestand, naar het volgende geprogrammeerde nummer (bestand)
in de programma speel/pauzestand, naar het volgende willekeurige nummer (bestand) in de random speel/pauzestand.
Blijvend ingedrukt spoelt de speler snel vooruit in de speel/pauzestand als de toets langer dan 0,7 seconden wordt
ingedrukt.
RADIO:
• De ontvangen frequentie wordt veranderd door de knop in te drukken.
• Als u deze knop langer dan 0,7 seconden ingedrukt houdt wordt de frequentie automatisch afgesteld.
86.
09-2382IP-NL 9/15/06 12:17 PM Page 86
Page 87

SKIP/TUNING
CD/MP3
• In de stopstand: Verandert het eerst te spelen nummer (bestand) tijdens de stopstand, Cyclisch naar het eerste nummer
(bestand) als het laatste nummer (bestand) is aangegeven.
• In de programmakeuze functie: Verandert naar het laatste nummer (bestand) tijdens het samenstellen van het programma.
• In de speelstand, pauzestand, programma speelstand: Eenmaal ingedrukt, verander het spelende nummer (bestand) naar
het vorige nummer (bestand) in de normale speel/pauzestand, naar het vorige geprogrammeerde nummer (bestand) in de
programma speel/pauzestand. Als deze knop 0,7 seconden blijft ingedrukt, spoelt de cd terug tijdens de
speel/pauzestand.
RADIO:
• De ontvangen frequentie wordt verlaagd door deze toets in te drukken.
• Als deze toets langer dan 0,7 seconden wordt vastgehouden wordt automatisch een zender gezocht.
ALBUM/MEMORY CH.+
MP3:
• In de stopstand: Verander de te spelen map tijdens de stopstand, cyclisch naar de eerste map als de laatste map is
aangegeven.
• In de programmakeuze functie: Verander het album voor programmakeuze naar het eerste album van de volgende map,
cyclisch naar de eerste map wanneer de laatste map wordt aangegeven.
• In de normale speelstand:
Verandert het te spelen album naar het eerste album van de volgende map.
RADIO:
• Het vooringestelde geheugen wordt in opgaande volgorde opgeroepen.
ALBUM/MEMORY CH.–
MP3:
• In de stopstand: Verander de eerst te spelen map naar de vorige tijdens de stopstand, cyclisch naar de laatste map wanneer
de eerste map wordt aangegeven.
• In de programmakeuze stand: Verander het album voor programmakeuze naar het eerste album van de vorige map, cyclisch
naar de laatste map als de eerste wordt aangegeven.
• In de normale speelstand: Verander het te spelen album naar het eerste album van de vorige map.
RADIO:
• Het vooringestelde geheugen wordt in afgaande volgorde opgeroepen.
NUMERIEKE TOETSEN
• Kies het gewenste nummer
• Druk op de play knop om het afspelen te beginnen.
INTRO
• Door deze functie te kiezen op de afstandsbediening wanneer in CD/MP3 stand, worden alleen de eerste 10 seconden
van elk nummer afgespeeld.
RANDOM
• Normale stopstand: Zet de random functie aan en verander naar random speelstand.
• Repeat 1 nummer/bestand stopstand, Repeat map stopstand en Repeat alle nummers stopstand: Dit zet de Repeat stand
af, en verandert het systeem naar de Random stand.
ID3/FIND/ST./ESP
CD:
• Druk [ID3/FIND/ST./ESP] 10 seconden in om de Electronic Shock Protection te beëindigen.
• Druk weer op [ID3/FIND/ST./ESP] om de ESP terug te krijgen.
87.
09-2382IP-NL 9/15/06 12:17 PM Page 87
Page 88

MP3:
• Druk eenmaal op [ID3/FIND/ST./ESP] om te veranderen naar het BESTAND zoeken.
• Druk op SKIP/TUNING of SKIP/TUNING om het gewenste BESTAND te kiezen.
• Druk tweemaal op [ID3/FIND/ST./ESP], verandert naar ALBUM zoeken.
• Druk op SKIP/TUNING of SKIP/TUNING . Als het gewenste ALBUM nummer wordt getoond,
• drukt u op de PL AY knop om het afspelen te beginnen.
• Druk [ID3/FIND/ST./ESP] langer dan 3,5 seconden in, ID3 TAG wordt getoond.
• Druk weer langer dan 3,5 seconden op [ID3/FIND/ST./ESP] om terug te keren naar het speeltijd scherm.
RADIO:
• Druk op [ID3/FIND/ST./ESP] om de FM Stereo of Mono stand te kiezen.
EQ BEDIENING
• EQ toont de huidige speelwijze.
• Als u de EQ knop indrukt verandert de speelwijze: PASS > CLASSIC >ROCK >POP >JAZZ >
STIL
• Verdooft het geluid.
VOLUME+/–
• Verhoogt het geluidsniveau.
• Verlaagt het geluidsniveau.
TIMER AAN/UIT
1. Houd in elke stand de [TIMER] knop meer dan 3,5 seconden vast, dan gaat het uurnummer van het scherm knipperen.
2. Druk op SKIP/TUNING of SKIP/TUNING om het juiste uur in te stellen.
3. Druk weer op de [TIMER] knop om de minutenstand in te stellen, de laatste twee nummers knipperen.
4. Druk op de SKIP/TUNING of de SKIP/TUNING knop om de juiste minuten in te stellen. Druk op [TIMER] om de
juiste minuten vast te stellen.
5. Druk weer op [TIMER] om TIMER OFF te tonen. Druk weer op [TIMER] om het uurnummer te laten knipperen.
6. Druk op SKIP/TUNING of SKIP/TUNING om het juiste uur in te stellen.
7. Druk weer op de [TIMER] knop om de minuteninstelling te kiezen. De laatste twee getallen knipperen.
8. Druk op SKIP/TUNING of SKIP/TUNING om het juiste aantal minuten in te stellen. Druk op [TIMER] om de juiste
tijd vast te zetten.
9. Druk weer op [TIMER] om de functie instelling te kiezen, De functie indicator knippert,
10. druk op de SKIP/TUNING of SKIP/TUNING om de gewenste functie te kiezen.
11. Druk weer op [TIMER] om het volume te bepalen. De volumeïndicator knippert.
12. Druk op de SKIP/TUNING of de SKIP/TUNING om het gewenste geluidsniveau in te stellen.
13. Druk weer op [TIMER] tot het scherm terugkeert op de normale stand en het scherm toont.
SLAPEN
• Druk op de slaapknop om de slaapfunctie te kiezen, de slaaptijd te veranderen en de slaapfunctie uit te zetten. Het scherm
verandert van 90>80>70>-->10 off. Als de slaaptoets is geactiveerd telt het systeem terug tot de slaaptijd nul is. Het
systeem gaat dan automatisch uit.
88.
09-2382IP-NL 9/15/06 12:17 PM Page 88
Page 89

GEBRUIK CARD-USB
1. Als een Memory Card of USB wordt ingevoerd, wordt een TOC (Table of Content) getoond.
2. Druk op de PLAY/PAUSE knop. Dan wordt 01 getoond en begint het afspelen. Pauze staat aan of uit. Als de pauzestand
aanstaat knippert het scherm.
3. Druk op de STOP knop, dan wordt TOC getoond.
RADIO/Bediening
Bedien de radio als volgt
1. Druk op STANDBY om het apparaat aan te zetten.
2. Zet de "FUNCTION" knop op TUNER.
3. Druk op de TUNER/BAND toets om de bandbreedte (FM of AM) te kiezen.
4. Kies het gewenste station door de SKIP/TUNING of SKIP/TUNING knoppen te gebruiken.
5. Verander het geluidsniveau door de vol+ of de vol- knop te gebruiken.
RDS-BASISGEBRUIK
Om de getoonde RDS informatie te tonen: FREQUENCY>PS>PTY>RT>
1. Druk eenmaal op de RANDOM/RDS knop, PS is getoond. Daarna licht de RDS indicator op en verschijnt de naam van de
zender. NO PS verschijnt als geen RDS signaal wordt verzonden.
2. Druk tweemaal op de RANDOM/RDS knop, PTY wordt getoond. Daarna licht de RDS indicator op en het uitgezonden
programmatype verschijnt. NO PTY verschijnt als geen RDS signaal wordt uitgezonden.
3. Druk driemaal op de RDS MODE knop, RT wordt getoond. Daarna licht de RDS indicator op en verschijnt een tekstbericht,
verzonder door de zender. Als geen RDS signaal wordt verzonden verschijnt NO RT.
Om het gewenste uitgezonden programmatype te kiezen:
1. Druk op de RDS SEARCH knop. PTY SEL wordt getoond.
2. Elke keer als u de SKIP/TUNING of de SKIP/TUNING knop indrukt toont het scherm een categorie in de volgende
volgorde: NEWS [NIEUWS] > AFFAIRS [ZAKEN] > INFO [INFORMATIE] > SPORT [SPORT] > EDUCATE [ONDERWIJS] >
DRAMA [DRAMA] > CULTURE [CULTUUR] > SCIENCE [WETENSCHAP] > VARIED [DIVERSEN] > POP M> ROCK M> M O
R M > LIGHT M [LICHT M] > CLASSICS [KL ASSIEKERS] > OTHER M [ANDER M] > WEATHER [WEER] > FINANCE
[ECNOMIE] > CHILDREN [KINDEREN] > SOCIAL A [SOCIAAL A] > RELIGION [GELOOF] > PHONE IN [BELSPEL] >
TRAVEL [REIZEN] > LEISURE [VERMAAK] > JAZZ > COUNTRY > NATIONAL [NATIONAAL] > OLDIES [GOUDEN OUDE] >
FOLK M > DOCUMENT [REPORTAGES] > NEWS [NIEUWS]
3. Druk binnen 10 seconden op de RDS SEARCH knop tijdens het zoeken. “SEARCH” en de gekozen PTY code verschijnen
om en om op het scherm. Het apparaat zoekt op 30 vooringestelde zenders en stopt als een zender uit de door u gekozen
categorie is gevonden. Daarna schakelt de radio over naar deze zender. Als geen programma is gevonden, verschijnen
“NOT” en “FOUND” om en om op het scherm.
ONTHOUD:
Als u luistert naar een FM uitzending is het te adviseren om de gehele FM antenne af te wikkelen.
Als u naar AM-uitzendingen luistert is het te adviseren om de positie van het apparaat te veranderen voor optimale ontvangst.
89.
Card en USB ingang
09-2382IP-NL 9/15/06 12:17 PM Page 89
Page 90

I-POD FUNCTIE
• Open de I-pod klep en steek de I-pod in de I-pod ingang, daarna laadt de I-Pod op en toont het scherm de oplaadstatus.
• Druk op de functieknop en kies I-Pod, de I-Pod begint het afspelen direct.
• Druk op SKIP/TUNING of SKIP/TUNING om het volgende of vorige nummer te kiezen.
GEGEVENS
Vermogenstoevoer : AC 230V ~50 Hz
Vermogensverbruik : 38 Watt
Radio : MW 525 – 1615 Khz
UKW 87,5 – 108 MHz
Cassettegedeelte
Bandsnelheid : 4,75 cm/sec.
Verdraaiing : < 0,4 %
Reactie op frequentie : 125 Hz – 6,3 KHz
CD-gedeelte
Soorten schijven : CD/CD-R/CD-RW/CD-DA/MP3
Reactie op frequentie (-3dB): : 60 – 16.000 Hz
Signaal/Lawaai ratio : >60 dB
Harmonieverstoring : <0,3%
ER WORDEN ALTIJD VERBETERINGEN AANGEBRACHT AAN ONZE APPARATUUR, IN KWALITEIT EN PRESTATIES,
WIJ BEHOUDEN ONS HET RECHT VOOR DEZE GEGEVENS TE WIJZIGEN ZONDER HIEROVER TE BERICHTEN.
BIJKOMENDE INFORMATIE
Let op bij kleine onderdelen en batterijen, niet doorslikken, dit kan tot ernstige schade of verstikking leiden. Let er
in het bijzonder bij kinderen op dat kleine onderdelen en batterijen buiten hun bereik zijn.
Belangrijk advies omtrent het gehoor
Opgelet:
U geeft om uw gehoor, wij doen dat ook.
Wees daarom voorzichtig tijdens het gebruik van dit apparaat.
Onze aanbeveling: Vermijd hard geluid.
In het geval het apparaat door kinderen wordt gebruikt, zorg ervoor dat het volume niet te hard staat.
Opgelet!
Hard geluid kan onherstelbare schade aan het gehoor van een kind veroorzaken.
Laat NOOIT personen, in het bijzonder kinderen, voorwerpen in de gaten, schachten of andere openingen van de
behuizing steken; dit kan een dodelijke elektrische schok tot gevolg hebben. De behuizing van het apparaat mag
slechts door daartoe gekwalificeerde vaklui geopend worden.
90.
09-2382IP-NL 9/15/06 12:17 PM Page 90
Page 91

Gebruik het apparaat alleen voor het doel waarvoor het is bestemd.
Het apparaat is uitsluitend bedoeld voor gebruik in huishoudelijke en zakelijke omgevingen.
Gelieve deze gebruiksaanwijzing zorgvuldig te bewaren voor later gebruik.
Aanwijzingen inzake de milieubescherming
Dit product mag aan het einde van zijn levensduur niet samen met het normale huishoudelijke afval verwijderd
worden, maar moet afgegeven worden op een verzamelpunt voor de recycling van elektrische en elektronische
apparatuur. Het symbool op het product, in de gebruiksaanwijzing of op de verpakking maakt u daarop attent.
De werkstoffen zijn volgens hun kenmerking herbruikbaar. Met het hergebruik, de stoffelijke verwerking of andere
vormen van recycling van oude apparaten levert u een belangrijke bijdrage tot de bescherming van ons milieu.
Gelieve bij het gemeentebestuur informatie te vragen over het bevoegde verzamelpunt.
Verhinder nooit de ventilatie van het apparaat door middel van gordijnen, kranten, dekens of meubelstukken. De
ventilatiegaten moeten altijd vrij zijn. Oververhitting kan schade veroorzaken en de levensduur van het apparaat
verkorten.
Hitte en warmte
Stel het apparaat niet bloot aan direct zonlicht. Zorg ervoor dat het apparaat niet wordt blootgesteld aan directe
hittebronnen zoals verwarmingen en open vuur.
Zorg ervoor dat de ventilatiegaten niet zijn bedekt.
Vocht en reiniging
Dit product is niet waterdicht! Doop de speler niet in water. Voorkom dat de speler met water in contact komt. Water
in het apparaat kan tot ernstige beschadiging leiden. Gebruik geen schoonmaakmiddelen die alcohol, ammoniak,
benzeen of schuurmiddel bevatten aangezien deze middelen de speler kunnen beschadigen. Om te reinigen,
gebruik een zachte, vochtige doek.
Professionele recycling
Batterijen en verpakking horen niet thuis in het huisafval. De batterijen moeten worden ingeleverd bij een
verzamelpunt voor gebruikte batterijen. Verpakkingsmateriaal gescheiden deponeren is goed voor het milieu.
91.
09-2382IP-NL 9/15/06 12:17 PM Page 91
Page 92

VAROVÁNÍ: Abyste předešli nebezpečí vzniku ohně nebo šoku, nevstavujte přístroj dešti a vlhku.
BEZPEČNOSTNÍ OPATŘENÍ
Pokud není používán, musí být přístroj odpojen od elektrického proudu. Nevstavujte přístroj dešti a vlhku.
UPOZORNĚNÍ: Pro snížení rizika elektrického šoku nikdy sami nesundavejte kryt. Nikdy neopravujte žádnou z částí sami.
Svěřte opravu přístroje kvalifikovanému servisnímu personálu.
BEZPEČNOSTNÍ POKYNY
1. POZORNĚ SI PŘEČTĚTE NÁVOD – Přečtěte si všechny bezpečnostní pokyny a návod k použití před manipulací s
přístrojem.
2. PONECHTE SI NÁVOD – Ponechte si bezpečnostní pokyny a návod k použití, abyste se k němu mohli v případě potřeby
vracet.
3. VĚNUJTE POZORNOST VAROVÁNÍM – Dodržujte všechny instrukce a varování na zařízení a v návodu k použití.
4. DODRŽUJTE POKYNY – Dodržujte všechny provozní pokyny.
5. VODA A VLHKOST – Nepoužívejte zařízení v blízkosti vody, např. vany, umyvadla, kuchyňského dřezu, bazénu nebo ve
vlhkém prostředí.
6. VĚTRÁNÍ – Umísťujte přístroj vždy tak, aby jeho poloha umožňovala dostačující ventilaci, např. Nepokládejte přístroj na
postel, pohovku, koberec a další povrchy, které mohou blokovat ventilační otvory; Neumísťujte jej dále do uzavřených kusů
nábytku, např. do knihovny nebo obývací stěny, které by mohly omezit přístup vzduchu k ventilačním otvorům.
7. ZDROJE TEPLA – Umístěte přístroj v dostatečné vzdálenosti od zdrojů tepla, např. radiátorů, sporáků, a dalších zařízení,
které vytvářejí teplo (včetně reproduktorů).
8. ZDROJ ENERGIE – Zapojujte přístroj pouze do typu napájecího zdroje, uvedeného v návodu k použití nebo vyznačeného
na přístroji.
9. UZEMNĚNÍ A POLARIZACE – Ujistěte se, že prostředky uzemnění a polarizace přístroje nebyly poškozeny.
10. OCHRANA SÍŤOVÉHO KABELU – Umístěte kabely přístroje tak, aby nedošlo k jejich poškození. Ujistěte se, že nejsou
překážkou v chůzi po místnosti a nepokládejte na ně žádné předměty. Věnujte zvýšenou pozornost bezpečnosti kabelů u
zástrček, zásuvek a v místech, kde se kabely připojují k přístroji.
92.
MODEL 2382IP
MIKROSYSTÉM S CD/USB/ČTEČKOU KARET SD - MP3 PŘEHRÁVAČEM A
IPOD DOCKING STATION
LASEROVÝ VÝROBEK TŘÍDY 1
UPOZORNĚNÍ !
Když je přístroj otevřen, může dojít k úniku
neviditelného laserového záření. Nevystavujte se
paprsku.
Tato značka varuje před
nebezpečným napětím uvnitř
přístroje a možným rizikem úrazu
elektrickým proudem.
POZOR
NEBEZPEČÍ ÚRAZU ELEKTRICKÝM
PROUDEM!
NEOTVÍREJTE: UPOZORNĚNÍ:
NEPOKOUŠEJTE SE ODSTRANIT KRYT
VÝROBKU, RISKUJETE ÚRAZ ELEKTRICKÝM
PROUDEM. UVNITŘ VÝROBKU NEJSOU
ŽÁDNÉ SOUČÁSTKY KTERÉ BY MOHL
UŽIVATEL OPRAVIT SVÉPOMOCÍ. OPRAVY
PŘENECHEJTE POUZE AUTORIZOVANÉMU
SERVISU.
Tato značka oznamuje, že v návodu k
obsluze výrobku, který je součástí
výrobku jsou velmi důležité informace
o provozu a údržbě výrobku.
10-2382IP-CZ 9/15/06 12:18 PM Page 92
Page 93

11. ČIŠTĚNÍ – Přístroj by měl být čištěn pouze podle instrukcí výrobce.
12. ELEKTRICKÉ VEDENÍ – Umístěte venkovní anténu mimo elektrické vedení.
13. KDYŽ PŘÍSTROJ NEPOUŽÍVÁTE – Síťový kabel přístroje by měl být odpojen ze sítě pokud není přístroj delší dobu používán.
14. PŘEDMĚTY A KAPALINY – Věnujte pozornost aby se do přístroje otvory nedostal cizí předmět nebo kapalina.
15. OPRAVY – Uživatel by se neměl pokoušet o údržbu přístroje jinak, než je popsáno v návodu k použití. Ostatní způsoby
údržby by měl přenechat odbornému pracovníkovi servisu.
16. POŠKOZENÍ VYŽADUJÍCÍ OPRAVU – Přístroj může být opraven pouze odborným pracovníkem servisu, když:
A. Byl poškozen síťový kabel nebo zástrčka.
B. Do krytu přístroje se dostal cizí předmět nebo se do něj vylila kapalina.
C. Přístroj byl vystaven dešti.
D. Přístroj upadl na zem nebo se jinak poškodil kryt.
E. Přístroj nefunguje obvyklým způsobem a vykazuje chování odlišné od běžného chodu.
PŘÍPRAVA K POUŽITÍ
INSTALACE
• Vybalte všechny části a odstraňte ochranný obal.
• Vložte baterie do dálkového ovládání.
• Nikdy nepřipojujte přístroj do sítě před kontrolou voltáže sítě a propojením všech částí přístroje.
• Nezakrývejte ventilační otvory a ujistěte se, že je okolo přístroje ponechán prostor několika centimetrů pro správné větrání
přístroje.
PŘIPOJENÍ
1. Připojte levý a pravý reproduktor do vstupů pro reproduktory (jack).
2. Před připojením přístroje do sítě se ujistěte, že AC voltáž, vyznačená na zadní straně, se shoduje s AC voltáží vaší zásuvky.
PROVOZ / KOMPAKTNÍ DISK
Mějte na paměti, že špínavý, pokrábaný nebo zohýbaný disk může být příčinou špatého nebo přerušovaného zvuku.
• Při manipulaci s disky se nikdy nedotýkejte hrací plochy.
• Nikdy nepokládejte disky na následující místa:
Do blízkosti zdrojů tepla nebo míst s vyšší teplotou; na vlhká a prašná místa.
• Otřete všechny otisky prstů nebo prach na hrací ploše disku měkkým hadříkem.
Vždy otírejte disk od vnitřní strany k vnější.
NAČÍTÁNÍ DISKU
• Stiskněte OPEN/CLOSE
• Vložte disk (potištenou stranou nahoru) do mechaniky.
• Stiskněte OPEN/CLOSE pro zavření mechaniky.
Na displeji se zobrazí počet stop disku.
93.
10-2382IP-CZ 9/15/06 12:18 PM Page 93
Page 94

OVLÁDÁNÍ A VLASTNOSTI
1. Tlaãítko STANDBY/ON
2. LCD DISPLEJ
3. Tlaãítko FUNCTION
4. SENZOR DÁLKOVÉHO OVLÁDÁNÍ
5. Tlaãítko VOLUME+
6. Tlaãítko VOLUME–
7. Otvor pro MMC Kartu
8. Tlaãítko TUNER/BAND
9. Tlaãítko PRESET EQ
10. Tlaãítko MEM/CLK-ADJ
11. DVÍ€KA CD MECHANIKY
12. VSTUP PRO SLUCHÁTKA
13. Tlaãítko CD DOOR OPEN/CLOSE
14. Tlaãítko PLAY/PAUSE
15. Tlaãítko SKIP/TUNING
16. Tlaãítko SKIP/TUNING
FUNKCE DÁLKOVÉHO OVLÁDÁNÍ
Přípravy před použitím
• Instalace baterií v dálkovém ovládání přístroje
1. Vyjměte zadní kryt dálkového ovládání.
2. Vložte dvě baterie velikosti “UM4/AAA/R03”.
• Vložte baterie vývody a dle znázornění uvnitř prostoru pro baterie.
3. Uzavřete kryt.
• Výměna baterií
• Když provoz dálkového ovládání začne kolísat nebo funguje pouze na kratší vzdálenost než je obvyklé, vyměňte baterie v
ovládání za nové.
94.
17. Ukazatel MMC Karty a USB
18. Zdířka USB
19. Tlačítko STOP
20. Tlačítko ALBUM/MEMORY CH. +
21. Tlačítko ALBUM/MEMORY CH. –
22. Tlačítko Random
23. Anténa FM
24. Výstup pro reproduktor
25. Síťový kabel
26. Otvor pro zásuvku I-POD
27. Zásuvka I-POD
28. Pravý VSTUP z jiného zdroje (AUX)
29. Levý VSTUP z jiného zdroje (AUX)
13
20
27
26
1
4
3
21
7
19
10
17
15
18
23
24
11
8
2
5
9
28
29
25
22
14
16
6
12
10-2382IP-CZ 9/15/06 12:18 PM Page 94
Page 95

Používání dálkového ovládání
Pro používání dálkového ovládání namiřte na SENZOR DÁLKOVÉHO OVLÁDÁNÍ a stiskněte tlačítka zlehka, ale pevně. Používání
dálkového ovládání je možné přibližně do vzdálenosti 6 metrů (18 stop). Vzhledem k tomu, že dosah dálkového ovládání je nižší
při používání šikmo, pro dosažení maximální vzdálenosti jej používejte přímo před SENZOREM DÁLKOVÉHO OVLÁDÁNÍ.
Nevystavujte SENZOR DÁLKOVÉHO OVLÁDÁNÍ silnému světlu (přímému slunečnímu nebo umělému světlu) a ujistěte se, že
mezi SENZOREM a dálkovým ovládáním nejsou žádné překážky.
DÁLKOVÉ OVLÁDÁNÍ
1. Tlačítko STANDBY
2. Tlačítko SLEEP
3. Tlačítko INTRO
4. Tlačítko RANDOM/RDS
5. Tlačítko MUTE
6. Tlačítko ID3/FIND/ST./ESP
7. Tlačítko VOLUME-
8. Tlačítko PLAY/PAUSE
9. Tlačítko ALBUM/MEMORY CH.+
10. Tlačítko ALBUM/MEMORY CH.–
11. Tlačítko REPEAT
12. Tlačítko FUNCTION
13. Tlačítko TUNER/BAND
14. Tlačítko Numeric
15. Tlačítko VOLUME+
16. Tlačítko STOP
17. Tlačítko EQ
18. Tlačítko SKIP/TUNING
19. Tlačítko SKIP/TUNING
20. Tlačítko MEM/CLK-ADJ
21. Tlačítko TIMER
22. Tlačítko I-POD
PROVOZ/ Popis
STANDBY ON/ OFF
Když přístroj poprvé zapojíte do sítě, spustí se v pohotovostním režimu (standby). Na displeji se ukáže --:--
• Přístroj zapnete stisknutím STANDBY.
• Přístroj zůstane v pohotovostním režimu dokud není zapnut.
• Pokud chcete přístroj zcela vypnout, vytáhněte síťový kabel ze zásuvky.
NASTAVENÍ HODIN
• Když přístroj poprvé zapojíte do sítě, spustí se v pohotovostním režimu (standby). Na displeji se ukáže --:--
• V režimu standby podržte tlačítko [MEM/CLK-ADJ] 3-5 vteřin a na displeji zabliká 12H/24.
• Stiskněte tlačítko SKIP/TUNING nebo SKIP/TUNING a vyberte formát času 12H nebo 24H.
• Pro nastavení hodin stiskněte znovu [MEM/CLK-ADJ], první a druhá číslice “00” začnou blikat.
• Stiskněte tlačítko SKIP/TUNING nebo SKIP/TUNING a nastavte hodiny.
• Pro nastavení minut stiskněte znovu [MEM/CLK-ADJ], třetí a čtvrtá číslice “00” začnou blikat,
• Stiskněte tlačítko SKIP/TUNING nebo SKIP/TUNING a nastavte minuty. Pro potvrzení času stiskněte [MEM/CLKADJ].
• Informace o času se zobrazí ve formátu 12H nebo 24H.
95.
14
15
16
17
18
19
20
21
22
1
2
3
4
6
5
7
8
10
11
12
13
9
10-2382IP-CZ 9/15/06 12:18 PM Page 95
Page 96

VOLBA FUNKCÍ
• Zmáčknutím tlačítka měníte režim.
• Na displeji se ukáže: TUNER > CD/MP3 > I-POD > AUX > CARD-USB >
PLAY/PAUSE
• Spouští nebo přerušuje přehrávání.
STOP
• V režimu Play nebo Pause: Změní do režimu Stop nebo Program Entry během přehrávání programu.
• V režimu Program Entry: Ukončí režim Program Entry, vyprázdní paměť programů a změní na režim Stop.
• V režimu Random Play: Změní do režimu Stop a zruší funkci Random.
OPAKOVÁNÍ
• Normální přehrávání CDDA: Opakovat 1 stopu >Opakovat všechny stopy >Zastavit opakování
• Normální přehrávání hudebního CDROM: Opakovat 1 stopu >Opakovat všechny stopy >Opakovat album >Zastavit
opakování
• Režim nahodilého přehrávání (Random): Nahodile přehrát 1 stopu >Nahodilé přehrávání
• Režim přehrávání programu: Opakovat 1 program >?Opakovat celý program >Přehrát program
PAMĚŤ
Režim CD/MP3:
1. Je možné naprogramovat až 64 stop.
2. Stiskněte Stop pro zastavení přehrávání.
3. Pro spuštění nebo vypnutí programovacího režimu stiskněte MEM/CLK-ADJ.
4. Změňte číslo stopy tlačítkem „num.“ Na dálkovém ovládání nebo přímo.
5. Pro uložení stopy a načtení další stiskněte znovu MEM/CLK-ADJ.
6. Po naprogramování všech požadovaných stop stiskněte play pro ukončení režimu programování.
7. Stiskněte play pro spuštění přehrávání.
Režim RADIO:
1. Je možné naprogramovat až 30 FM stanic a 10 AM stanic.
2. Tlačítko FUNCTION slouží k zapnutí rádia a nastavení pásma AM a FM.
3. Pro ruční nastavení frekvence stiskněte SKIP/TUNING nebo SKIP/TUNING .
4. Pro automatické nastavení frekvence podržte tlačítko SKIP/TUNING nebo SKIP/TUNING 2 vteřiny. Systém se
zastaví na nejbližší stanici.
5. Pro uložení frekvence současné stanice stiskněte MEM/CLK-ADJ.
6. Pro volbu pozice v paměti stiskněte MEMORY CH- nebo MEMORY CH+.
7. Pro uložení frekvence stiskněte znovu MEM/CLK-ADJ.
SKIP/TUNING
Režim CD/MP3:
• V režimu Stop: Posune se na další stopu [soubor] v režimu zastavení, pokud je na poslední stopě, přeskočí cyklicky na první.
• V režimu Program Entry: Posune se na další stopu [soubor] pro volbu programu.
• V režimu Play, Pause, Program Play: Jeden stisk, v normálním režimu play/pause přeskočí z hrající stopy na další stopu
[soubor], v režimu programování play/pause přeskočí na další programovanou stopu [soubor], při režimu nahodilého
(Random) přehrávání Play/Pause přeskočí náhodně na další stopu [soubor]. Stisk delší než 0,7 sek. spustí v režimu
play/pause rychlé přetáčení vpřed.
Režim RADIO:
• Stisknutím je zesilována přijímaná frekvence.
• Při stisknutí delším než 0,7 sek. spustí automatické ladění.
96.
10-2382IP-CZ 9/15/06 12:18 PM Page 96
Page 97

SKIP/TUNING
Režim CD/MP3:
• V režimu Stop: Změní nastavenou stopu [soubor] v režimu zastavení, pokud je na první stopě, přeskočí cyklicky na poslední.
• V režimu Program Entry: Posune se na předchozí stopu [soubor] pro volbu programu.
• V režimu Play, Pause, Program Play: Jeden stisk, v normálním režimu play/pause přeskočí z hrající stopy na předchozí stopu
[soubor], v režimu programování play/pause přeskočí na předchozí programovanou stopu [soubor]. Stisk delší než 0,7 sek.
spustí v režimu play/pause rychlé přetáčení zpět.
Režim RADIO:
• Stisknutím je tlumena přijímaná frekvence.
• Při stisknutí delším než 0,7 sek. spustí automatické ladění.
ALBUM/MEMORY CH.+
Režim MP3:
• V režimu Stop: Přeskočí nastavený soubor na další v režimu zastavení, pokud je na posledním souboru, přeskočí cyklicky
na první.
• V režimu Program Entry: Posune se na začátek následujícího alba pro volbu programu, pokud je v posledním souboru,
přeskočí cyklicky na první.
• V normálním režimu Play:
Přeskočí z hrajícího alba na první album následujícího souboru.
Režim RADIO:
• vyvolá nastavenou paměť ve vzestupném pořadí.
ALBUM/MEMORY CH.–
Režim MP3:
• V režimu Stop: Přeskočí nastavený soubor na předchozí v režimu zastavení, pokud je na prvním souboru, přeskočí cyklicky
na poslední.
• V režimu Program Entry: Posune se na začátek předchozího alba pro volbu programu, pokud je v posledním souboru,
přeskočí cyklicky na první.
• V normálním režimu Play:
Přeskočí z hrajícího alba na první album předchozího souboru.
Režim RADIO:
• vyvolá nastavenou paměť v sestupném pořadí.
NUMERICKÉ KLÁVESY
• Zvolte požadovanou stopu
• Stiskněte tlačítko Play pro přehrávání.
INTRO
• Při volbě této funkce na dálkovém ovládání v režimu CD/MP3 se přehraje pouze prvních 10 vteřin každé stopy.
NAHODILÉ PŘEHRÁVÁNÍ (RANDOM)
• Normální nastavení: Umožňuje funkci Random a změnu do režimu Random.
• Režim Opakovat 1 stopu / soubor, režim Opakovat Složku, režim Opakovat všechny stopy / soubory:
Zastaví všechny režimy Repeat (opakování) a přepne na režim Random.
ID3/FIND/ST./ESP
Režim CD:
• Stisknutí tlačítka [ID3/FIND/ST./ESP] aktivuje 10 vteřinový program vyrovnání otřesů (Electronic Shock protection).
• Znovu stiskněte [ID3/FIND/ST./ESP] pro návrat z ESP.
97.
10-2382IP-CZ 9/15/06 12:18 PM Page 97
Page 98

Režim MP3:
• Jedno stisknutí tlačítka [ID3/FIND/ST./ESP] přepne do režimu vyhledávání souborů.
• Stiskněte SKIP/TUNING or SKIP/TUNING pro výběr požadovaného souboru.
• Dvojí stisknutí tlačítka [ID3/FIND/ST./ESP] přepne do režimu vyhledávání alb.
• Stiskněte SKIP/TUNING or SKIP/TUNING pro výběr požadovaného alba.
• Stiskněte PLAY pro přehrání stopy.
• Stisknutí tlačítka [ID3/FIND/ST./ESP] na dobu delší než 5 vteřin zobrazí displej ID3.
• Znovu stiskněte tlačítko [ID3/FIND/ST./ESP] déle než 3-5 vteřin pro návrat na displej ukazující hrací dobu.
Režim RADIO:
• Stisknutím tlačítka [ID3/FIND/ST./ESP] zvolíte režim FM Stereo nebo Mono.
OVLADAČ EQ
• EQ ukazuje tón přehrávaného zvuku.
• Stisknutím tlačítka EQ volíte zvykový tón: PASS >CLASSIC >ROCK > POP >JAZZ >
ZTLUMENÍ ZVUKU (MUTE)
• Vypíná zvuk.
HLASITOST+/–
• Zesiluje hlasitost.
• Ztlumuje hlasitost.
ČASOVÝ SPÍNAČ ON/OFF
1. Když v jakémkoliv režimu podržíte tlačítko [TIMER] déle než 3-5 vteřin, číslice nastavení hodin začne blikat.
2. Stisknutím SKIP/TUNING nebo SKIP/TUNING nastavíte požadovanou hodinu.
3. Znovu stiskněte [TIMER] pro nastavení požadovaných minut, třetí a čtvrtá číslice začne blikat.
4. Stisknutím SKIP/TUNING nebo SKIP/TUNING nastavíte požadované minuty. Pro potvrzení času stiskněte
[TIMER].
5. Znovu stiskněte [TIMER] pro vypnutí časového spínače, zobrazí se TIMER OFF. Znovu stiskněte [TIMER] a číslice nastavení
hodin začne blikat.
6. Stisknutím SKIP/TUNING nebo SKIP/TUNING nastavíte požadovanou hodinu.
7. Znovu stiskněte [TIMER] pro nastavení požadovaných minut, třetí a čtvrtá číslice začne blikat.
8. Stisknutím SKIP/TUNING nebo SKIP/TUNING nastavíte požadované minuty. Pro potvrzení času stiskněte
[TIMER].
9. Pro výběr volby funkce znovu stiskněte [TIMER], začne blikat funkce,
10. stisknutím SKIP/TUNING nebo SKIP/TUNING nastavíte požadovanou stanici.
11. Znovu stiskněte [TIMER] pro nastavení hlasitosti, začne blikat hlasitost,
12. stisknutím SKIP/TUNING nebo SKIP/TUNING nastavíte požadovanou hlasitost.
13. Znovu stiskněte [TIMER] pro návrat do normálního režimu, na displeji se zobrazí .
REŽIM USÍNÁNÍ
• Stisknutím tlačítka režimu usínání aktivujete funkci, změníte čas usínání nebo funkci usínání vypnete; Na displeji se zobrazí
postupně 90>80>70>-->10 off; Pokud je funkce usínání aktivovaná, systém bude odpočítávat čas až na nulu, pak se systém
automaticky vypne.
98.
10-2382IP-CZ 9/15/06 12:18 PM Page 98
Page 99

ZÁKLADNÍ OBSLUHA USB KARTY
1. Po vložení paměťové karty a USB se zobrazí informace o obsahu (Table of Content).
2. Stisknutí tlačítka PLAY/PAUSE, zobrazí stopu 01 a spustí přehrávání. Pozastaví a znovu spustí přehrávání. Ve stavu Pause
displej bliká.
3. Stisknutím tlačítka STOP zobrazíte obsah.
RADIO/Ovládání
Používejte v uvedeném pořadí
1. Stiskněte STANDBY pro zapnutí přístroje.
2. Nastavte volbu ”FUNCTION” do režimu TUNER.
3. Stiskněte TUNER/BAND a vyberte požadované pásmo (FM nebo AM).
4. Nalaďte požadovanou stanici tlačítky SKIP/TUNING nebo SKIP/TUNING .
5. Nastavte hlasitost tlačítky vol+ a vol-.
ZÁKLADNÍ OBSLUHA RDS
Pro volbu informací na displeji RDS: FREQUENCY>PS>PTY>RT>
1. Jedním stisknutím tlačítka RANDOM/RDS zobrazíte displej PS. Poté se rozsvítí indikátor RDS a objeví se název stanice.
Pokud není signál RDS, objeví se NO PS.
2. Dvojím stisknutím tlačítka RANDOM/RDS zobrazíte displej PTY. Poté se rozsvítí indikátor RDS a zobrazí se typ vysílaného
programu. Pokud není signál RDS, objeví se NO PTY.
3. Trojím stisknutím tlačítka RDS MODE zobrazíte displej RT. Poté se rozsvítí indikátor RDS a zobrazí se textová zpráva vysílaná
stanicí. Pokud není signál RDS, objeví se NO RT.
Pro vyhledání požadovaného typu vysílaného programu.
1. Stiskněte tlačítko RDS SEARCH a zobrazí se PTY SEL.
2. Každým stisknutím tlačítka SKIP/TUNING nebo SKIP/TUNING zobrazíte kategorie v tomto pořadí: NEWS
[ZPRÁVY] > AFFAIRS [POLITIKA] > INFO [INFORMACE] > SPORT [SPORT]> EDUCATE [VZDĚLÁNÍ] > DRAMA [DRAMA] >
CULTURE [KULTURA] > SCIENCE [VĚDA] > VARIED [RŮZNÉ] > POP M [POP HUDBA] > ROCK M [ROCKOVÁ HUDBA] >
M O R M [HUDBA NA CESTU] > LIGHT M [LEHKÁ HUDBA] > CLASSICS [KLASICKÁ HUDBA] > OTHER M [DALŠÍ HUDBA]
> WEATHER [POČASÍ] > FINANCE [FINANCE] > CHILDREN [DĚTI] > SOCIAL A [ZE SPOLEČNOSTI] > RELIGION
[NÁBOŽENSTVÍ] > PHONE IN [TELEFONY] > TRAVEL [CESTOVÁNÍ] > LEISURE [VOLNÝ ČAS] > JAZZ > COUNTRY
[COUNTRY HUDBA] > NATIONAL [NÁRODNÍ HUDBA] > OLDIES [STARÉ HITY] > FOLK M [FOLKOVÁ HUDBA] >
DOCUMENT [DOKUMENTY] > NEWS [ZPRÁVY]
3. Stiskněte tlačítko RDS SEARCH asi na 10 vteřin během vyhledávání, na displeji se objeví "SEARCH" a kód zvolené PTY.
Přístroj prohledá 30 předvolených stanic a zastaví se na stanici v kategorii, kterou jste zvolili. Pokud není nalezen žádný
program, na displeji se střídavě objeví "NOT" a "FOUND".
POZNÁMKA:
Při poslechu FM vysílání je doporučeno zcela rozvinout FM anténu na zadním krytu.
Při poslechu AM vysílání je doporučeno upravit polohu AM smyčky pro maximální příjem.
99.
Otvor pro kartu a USB zdířka
10-2382IP-CZ 9/15/06 12:18 PM Page 99
Page 100

FUNKCE I-POD
• Otevřete dvířka I-Pod a vložte I-Pod do zdířky, na displeji se zobrazí stav nabíjení I-Pod a přístroj začne nabíjet.
• Stiskněte tlačítko volby funkce a zvolte funkci I-Pod, I-Pod spustí přehrávání.
• Stisknutím tlačítka SKIP/TUNING nebo SKIP/TUNING zvolíte další nebo předchozí stopu.
TECHNICKÉ ÚDAJE
Zdroj napájení : AC 230V ~50Hz
Spotřeba energie : 38 wattů
Rádio : MW 525 – 1615 KHz
UKW 87,5 – 108 MHz
Kazeta
Rychlost pásky : 4,75cm/sek
Výkyvy posunu : < 0,4%
Frekvence : 125Hz – 6,3KHz
Kompaktní disk
Typ disku : CD/CD-R/CD-RW / CD-DA /MP3
Frekvence (-3dB) : 60 – 16 000 Hz
Poměr signál-zvuk : >60 dB
Zkreslení zvuku : <0,3%
PŘÍSTROJ JE NADÁLE ZDOKONALOVÁN JAK V OBLASTI KVALITY TAK I VÝKONU, PROTO SI VÝROBCE PONECHÁVÁ
PRÁVO NA ZMĚNU TECHNICKÝCH VLASTNOSTÍ BEZ UPOZORNĚNÍ.
DOPLŇUJÍCÍ INFORMACE
Pozor na malé díly a baterie. Spolknutí těchto předmětů může vést k vážnému zranění, nebo udušení.
Hlavně dbejte na to, aby malé díly a baterie nebyly v dosahu dětí.
Důležitá rada týkající se ochrany sluchu
Upozornění
Máme starost o váš sluch tak jako vy.
Proto používejte tento spotřebič s rozvahou.
Naše doporučeni: Nepoužívejte vysoké hlasitosti.
V případě, že je spotřebič používán dětmi, přesvědčte se, že není hlasitost příliš vysoká.
Upozornění
Vysoká hlasitost může způsobit nenapravitelnou ztrátu dětského sluchu.
Nenechte NIKDY osoby, zvláště děti, strkat předměty do dírek, zdířek, nebo jiných otvorů na přístroji.
Může to vést ke smrtelnému zranění elektrickým proudem. Pouzdro přístroje smí otevřít jedině odborník.
100.
10-2382IP-CZ 9/15/06 12:18 PM Page 100
 Loading...