

Page 1
R
R
2322
STEREOFONICZNY ZESTAW
MUZYCZNY DESIGN Z
ODTWARZACZEM CD/MP3
EQUIPO DE MÚSICA ESTÉREO DE E
DISEÑO CON REPRODUCTOR
DE CD Y MP3
SISTEMA DE SOM ESTÉREO P
DESIGN COM LEITOR DE CD/ MP3
STEREO HUDEBNÍ SYSTÉM S
CD/ MP3-PŘEHRÁVAČEM
CCDD// MMPP33 ÇÇAALLAARRLLýý DDEESSIIGGNN
SSTTEERREEOO MMUUSSIICC-- CCEENNTTEERR
DESIGN STEREO MUSIC-CENTER D
MIT CD/ MP3- PLAYER
DESIGN STEREO MUSIC CENTER
WITH CD/MP3 PLAYER
DESIGN STEREO MUSIC-CENTER
MET CD/ MP3-SPELER
CHAÎNE HI-FI STÉRÉO DESIGN
AVEC LECTEUR CD/MP3
STEREO MUSIC- CENTER CON I
LETTORE CD/ MP3
FORMATERVEZETT SZTEREÓ MINI H
TORONY, CD/MP3-LEJÁTSZÓVAL
00-2322 Cover 6/20/06 11:48 AM Page 3
Page 2

D 02.
MODEL: 2322
DESIGN STEREO MUSIC- CENTER MIT CASSETTE UND CD/MP3-PLAYER
Das dreieckige Blitzsymbol mit
Pfeilkopf weist den Benutzer auf
das Vorhandensein von nichtisolierter "gefährlicher Spannung"
im Inneren des Gerätes hin, die
ausreichen kann, um für Personen
die Gefahr eines elektrischen
Schlages darzustellen.
VORSICHT
GEFAHR EINES ELEKTRISCHEN SCHLAGES,
NICHT ÖFFNEN
VORSICHT: UM DIE GEFAHR EINES
ELEKTRISCHEN SCHLAGES ZU REDUZIEREN
DIE FRONT- (BZW. RÜCK-) ABDECKUNG
NICHT ENTFERNEN ES SIND KEINE VOM
BENUTZER ZU WARTENDEN TEILE IM
INNEREN VORHANDEN
WARTUNGSARBEITEN QUALIFIZIERTEM
FACHPERSONAL ÜBERLASSEN
Das dreieckige Symbol mit dem
Ausrufezeichen weist den Benutzer
auf wichtige Bedienungs- und
Wartungs- (Reparatur-) hinweise hin,
die in dieser Gebrauchsanweisung
enthalten sind.
SICHERHEITSMASSNAHMEN
Dieses Gerät muß von der Steckdose getrennt werden, wenn es nicht benutzt wird.
Lassen Sie es nicht zu, dass das Gerät Regen oder Feuchtigkeit ausgesetzt wird.
VORSICHT:
Um das Risiko eines elektrischen Schlages zu reduzieren, entfernen Sie nicht das Gehäuse (oder die
Rückseite).Keine vom Benutzer zu wartende Teile im Geräte inneren. Zur Wartung wenden Sie sich bitte an
qualifiziertes Servicepersonal.
SICHERHEITSANWEISUNGEN
1. LESEN SIE DIE ANWEISUNGEN- Alle Sicherheits- und Bedienungsanweisungen sollten gelesen werden,
bevor Sie das Gerät in Betrieb nehmen.
2. ANWEISUNGEN AUFBEWAHREN - Die Sicherheits- und Bedienungsanweisungen sollten für spätere
Fragen aufbewahrt werden.
3. WARNUNGEN BEHERZIGEN - Sie sollten sich an alle Warnungen auf dem Gerät oder in den
Bedienungsanweisungen halten.
4. FOLGEN SIE DEN ANWEISUNGEN - Alle Bedienungs- und Nutzungsanweisungen sollten befolgt werden.
5. WASSER UND FEUCHTIGKEIT - Das Gerät sollte nicht in der Nähe von Wasser, zum Beispiel in der Nähe
von Badewannen, Waschschüsseln, Küchenbecken, Waschmaschinen, Schwimmbecken oder in feuchten
Kellern.
6. BELÜFTUNG - Das Gerät sollte so platziert werden, so das die Position nicht eine richtige Belüftung
beeinflusst. Zum Bespiel sollte das Gerät nicxht auf Betten, Sofas, Teppichen oder ähnlichen Oberflächen
abgestellt werden, die die Belüftungsöffnungen blockieren können. Bauen Sie das Gerät nicht in
Öffnungen ein, wie zum Besipiel Bücherregale oder Schränke, die, die Lüftung behindern könnten.
7. HITZE - Das Gerät sollte nicht in der Nähe von Wärmequellen, wie Heizstrahlern, Hitzeverzeichnissen,
Herden oder anderen Geräten (auch Verstärker) aufgetsellt werden, die Hitze produzieren.
8. STROMQUELLE - Das Gerät sollte nur mit einem Stromanschluss verbunden werden, wie er in den
Bedienungsanweisungen beschrieben wird oder auf dem Gerät vermerkt ist.
9. ERDUNG UND POLARITÄT - Vorsichtsmaßnahmen sollten eingehalten werden, um sicherzustellen, dass
Erdung und Polarität nicht eingeschränkt sind.
10. NETZKABELSCHUTZ - Das Netzanschlusskabel sollte so verlegt werden, dass man nicht darüberläuft oder
zerknickt durch Dinge auf oder an dem Kabel, widmen Sie besondere Aufmerksamkeit den Steckern am
Kabel, Behältern und der Stelle an der das Kabel aus dem Gerät kommt.
KLASSE 1 LASER
PRODUKT
VORSICHT!
Unsichtbarer Laserstrahlenaustritt, wenn
geöffnet und der Verschluss nicht
eingerastet ist.Vermeiden Sie es, sich
den Strahlen auszusetzen.
01-2322_GE 6/20/06 11:19 AM Page 02
Page 3
Page 4

D 04.
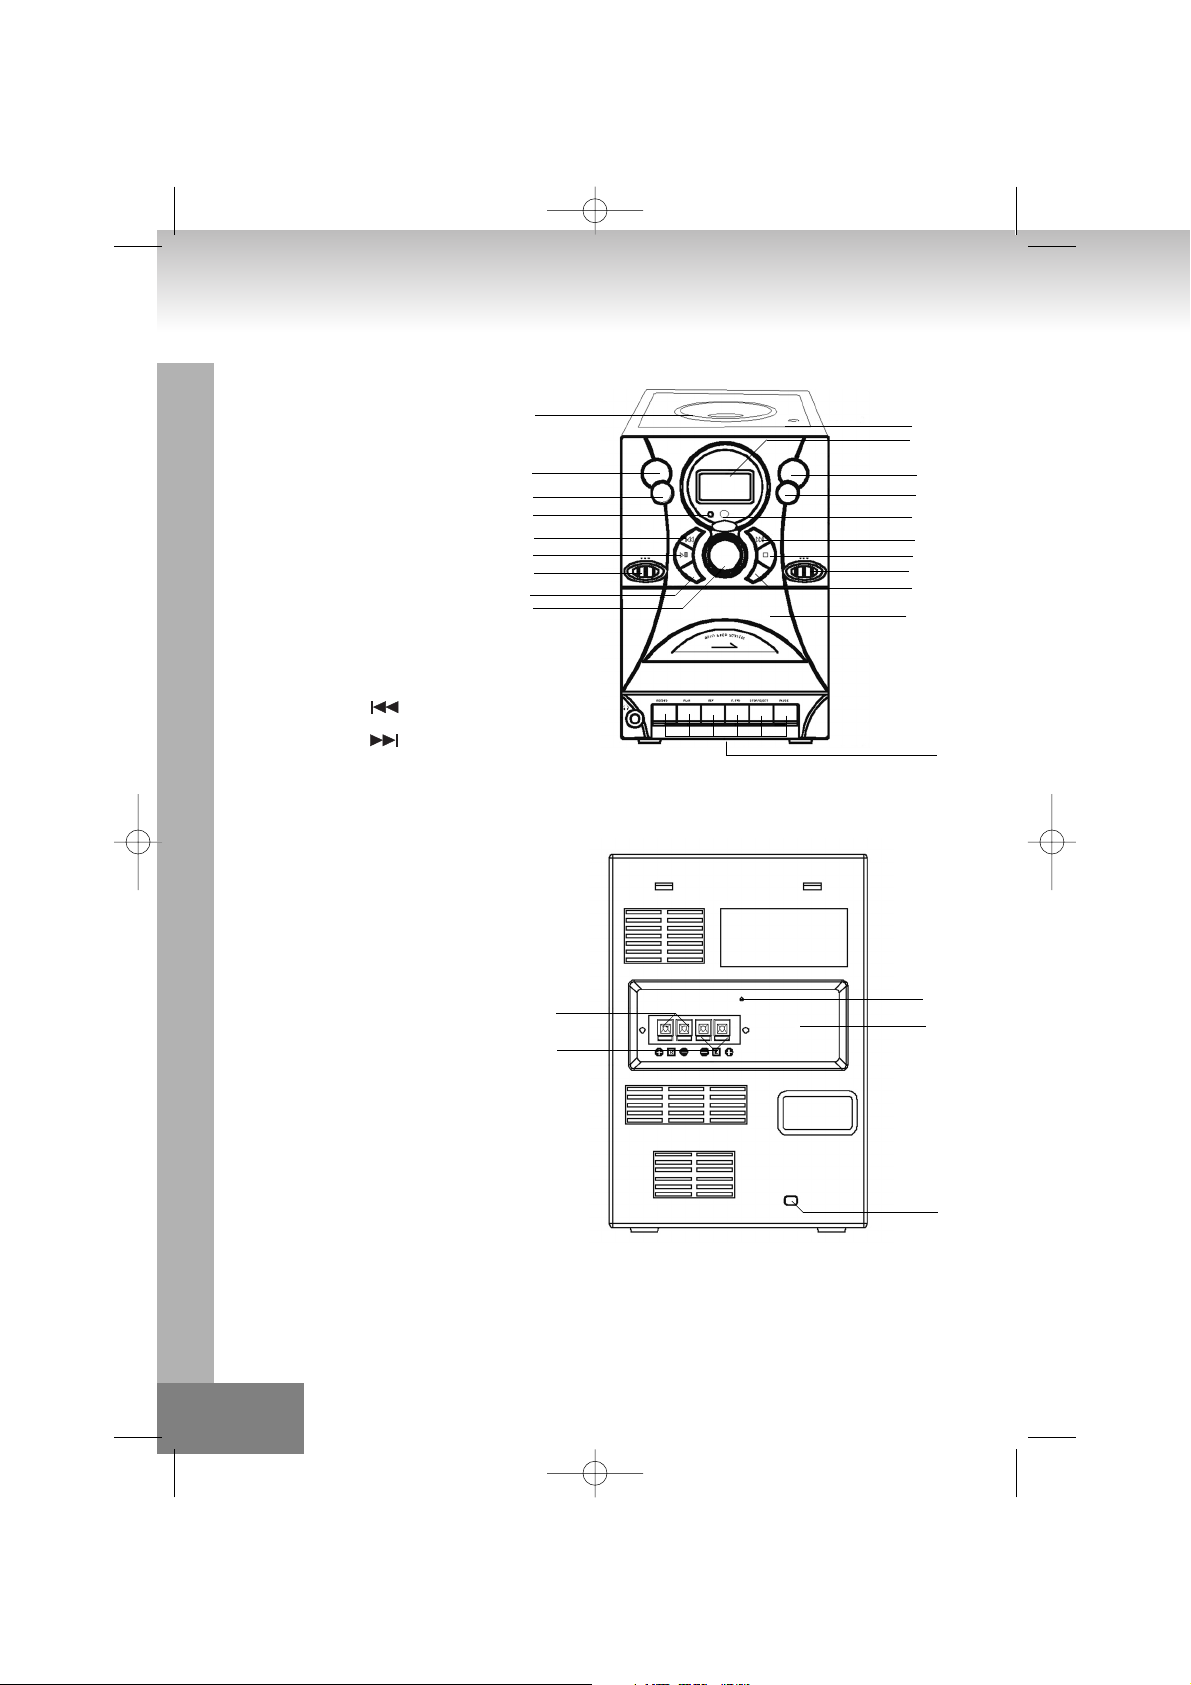
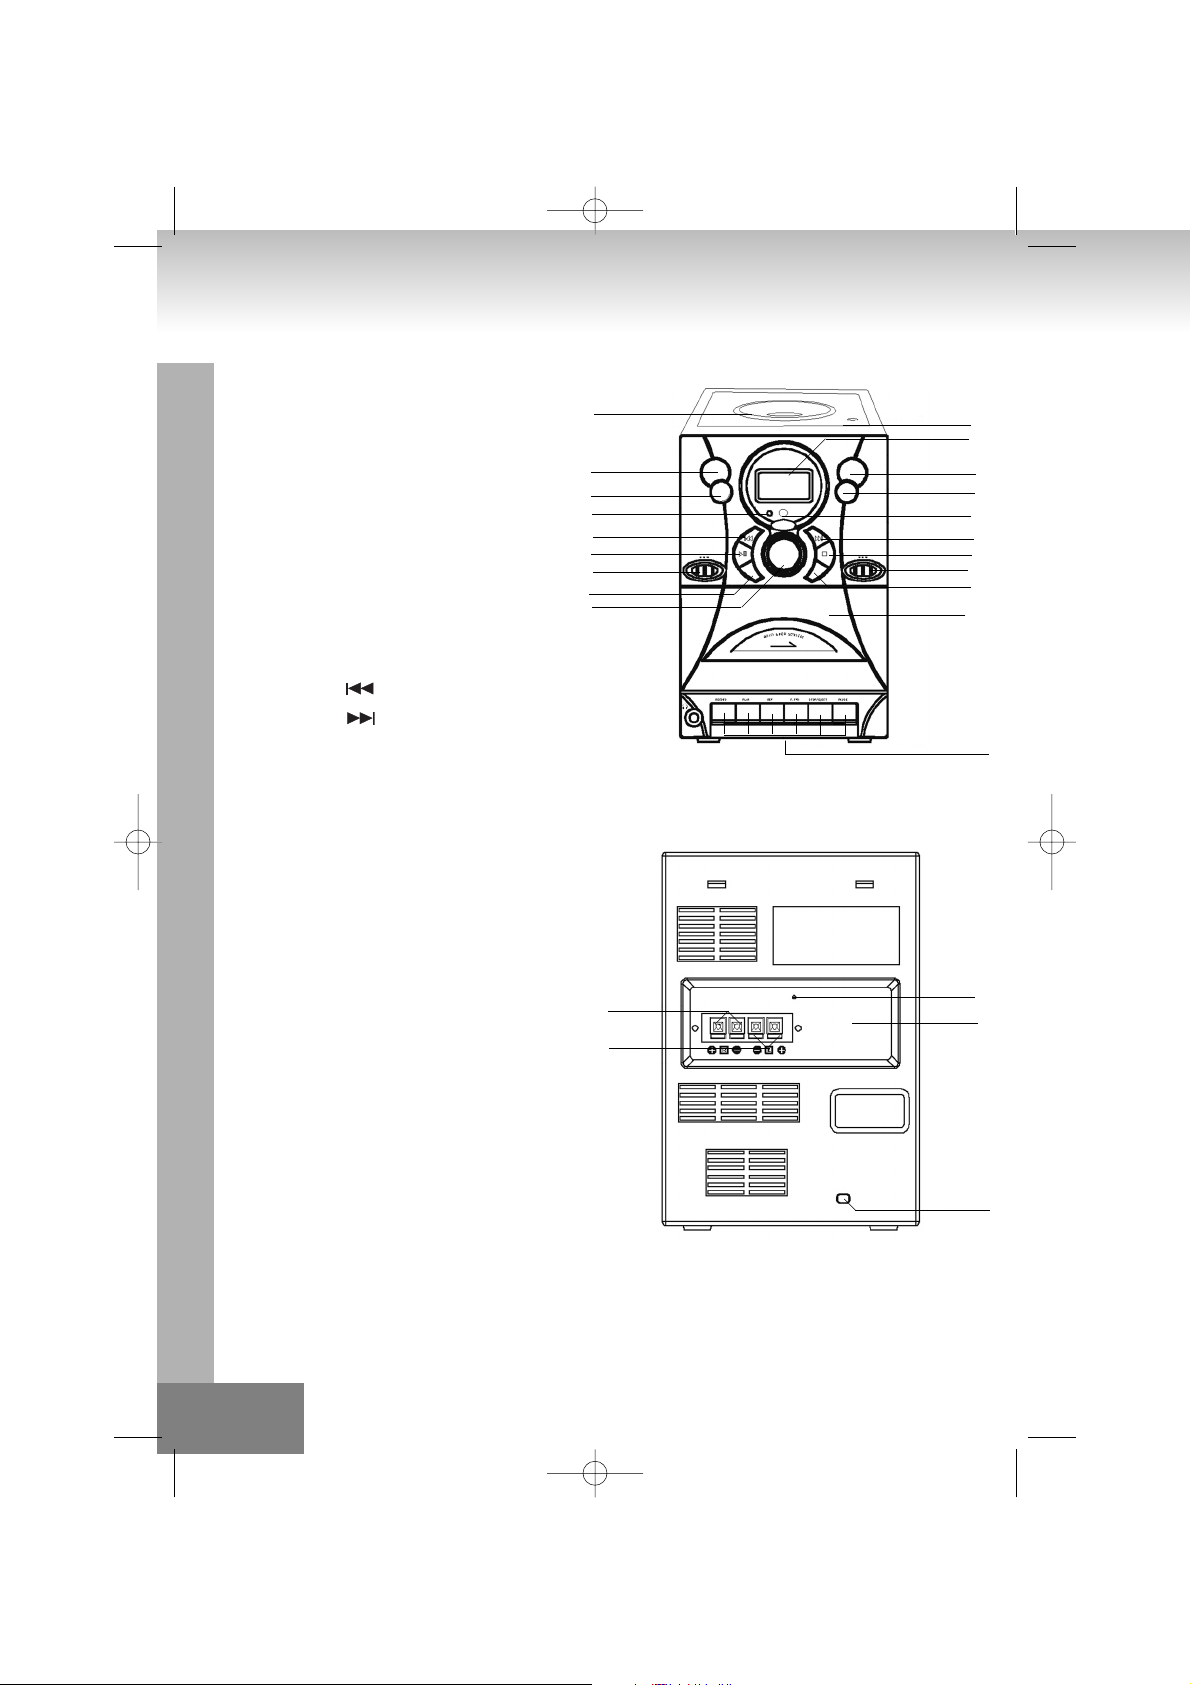
BEDIENUNG UND MERKMALE
1. CD-FACH
2. CD-FACH OPEN/CLOSE [AUF/ZU]
3. LCD ANZEIGE
4. VOLUME UP [LAUTSTÄRKE HOCH]
5. VOLUME DOWN
[LAUTSTÄRKE RUNTER]
6. FOLDER [ORDNER] KNOPF
7. X-BASS [EXTRA BASS] BUTTON
8. LEISTUNGSANZEIGE
9. FERNBEDIENUNGSSENSOR
10. SKIP [SPRINGEN] TASTE
11. SKIP [SPRINGEN] TASTE
12. PLAY/PAUSE [WIEDERGABE/PAUSE] TASTE
13. STOP [STOPP] BUTTON
14. FUNCTION [FUNKTION] WAHLSCHALTER
(TAPE, CD/MP3, TUNER) [KASETTE, CD/MP3,
RADIO]
15. BAND [BANDBREITE] WAHLSCHALTER (AM,
FM, FM ST.)
16. MODE [MODUS] KNOPF(REPEAT, RANDOM)
[WIEDERHOLUNG/ZUFALLSWIEDERGABE]
17. PROGRAMM [PROGRAMM] KNOPF
18. TUNING [ABSTIMMUNGS] KNOPF
19. KASETTENFACH
20. KOPFHÖRERBUCHSE
21. RECORD/PL AY [AUFNAHME/WIEDERGABE]
ABSPIELKONTROLLE
22. FM ANTENNENKABEL
23. LAUTSPRECHER LINKS
24. LAUTSPRECHER RECHTS
25. NETZKABEL
26. BEAT CUT
17
15
13
11
9
7
6
2
3
21
19
1
4
5
8
10
12
14
16
18
22
26
25
23
24
01-2322_GE 6/20/06 11:19 AM Page 04
Page 5
FERNBEDIENUNGSFUNKTIONEN
Vorbereitung vor dem Gebrauch
• Legen Sie Batterien in die Fernbedienung ein.
• Entfernen Sie den Batteriefachdeckel auf der Rückseite der Fernbedienung.
• Legen Sie zwei Batterien der Größe „UM4/AAA“ ein.
• Legen Sie die Batterien mit den Anschlüssen und passend zu den Anzeigen in das Batteriefach
ein.
• Setzen Sie den Deckel wieder ein.
Batterien austauschen
• Wenn die Bedienung der Fernbedienung unzuverlässig wird oder die Entfernung von der eine Bedienung
möglich ist, kürzer wird, tauschen Sie die Batterien gegen neue aus.
Die Fernbedienung benutzen
Um die Fernbedienung zu benutzen, zeigen Sie auf den REMOTE SENSOR und drücken Sie die Tasten sanft
und bestimmt. Ein Bedienen der Fernbedienung ist innerhalb von ungefähr 18 ft (6 m) möglich.
Wenn Sie die Fernbedienung angewinkelt verwenden, wird die Reichweite der Fernbedienung geringer, aber
nicht ausschlaggebend. Benutzen Sie sie direkt vor dem REMOTE SENSOR für maximale Reichweite. Setzen
Sie den REMOTE SENSOR keinem starken Licht aus (direktes Sonnenlicht oder künstliches Licht) und
versichern Sie sich, dass sich keine Hindernisse zwischen REMOTE SENSOR und Fernbedienung befinden.
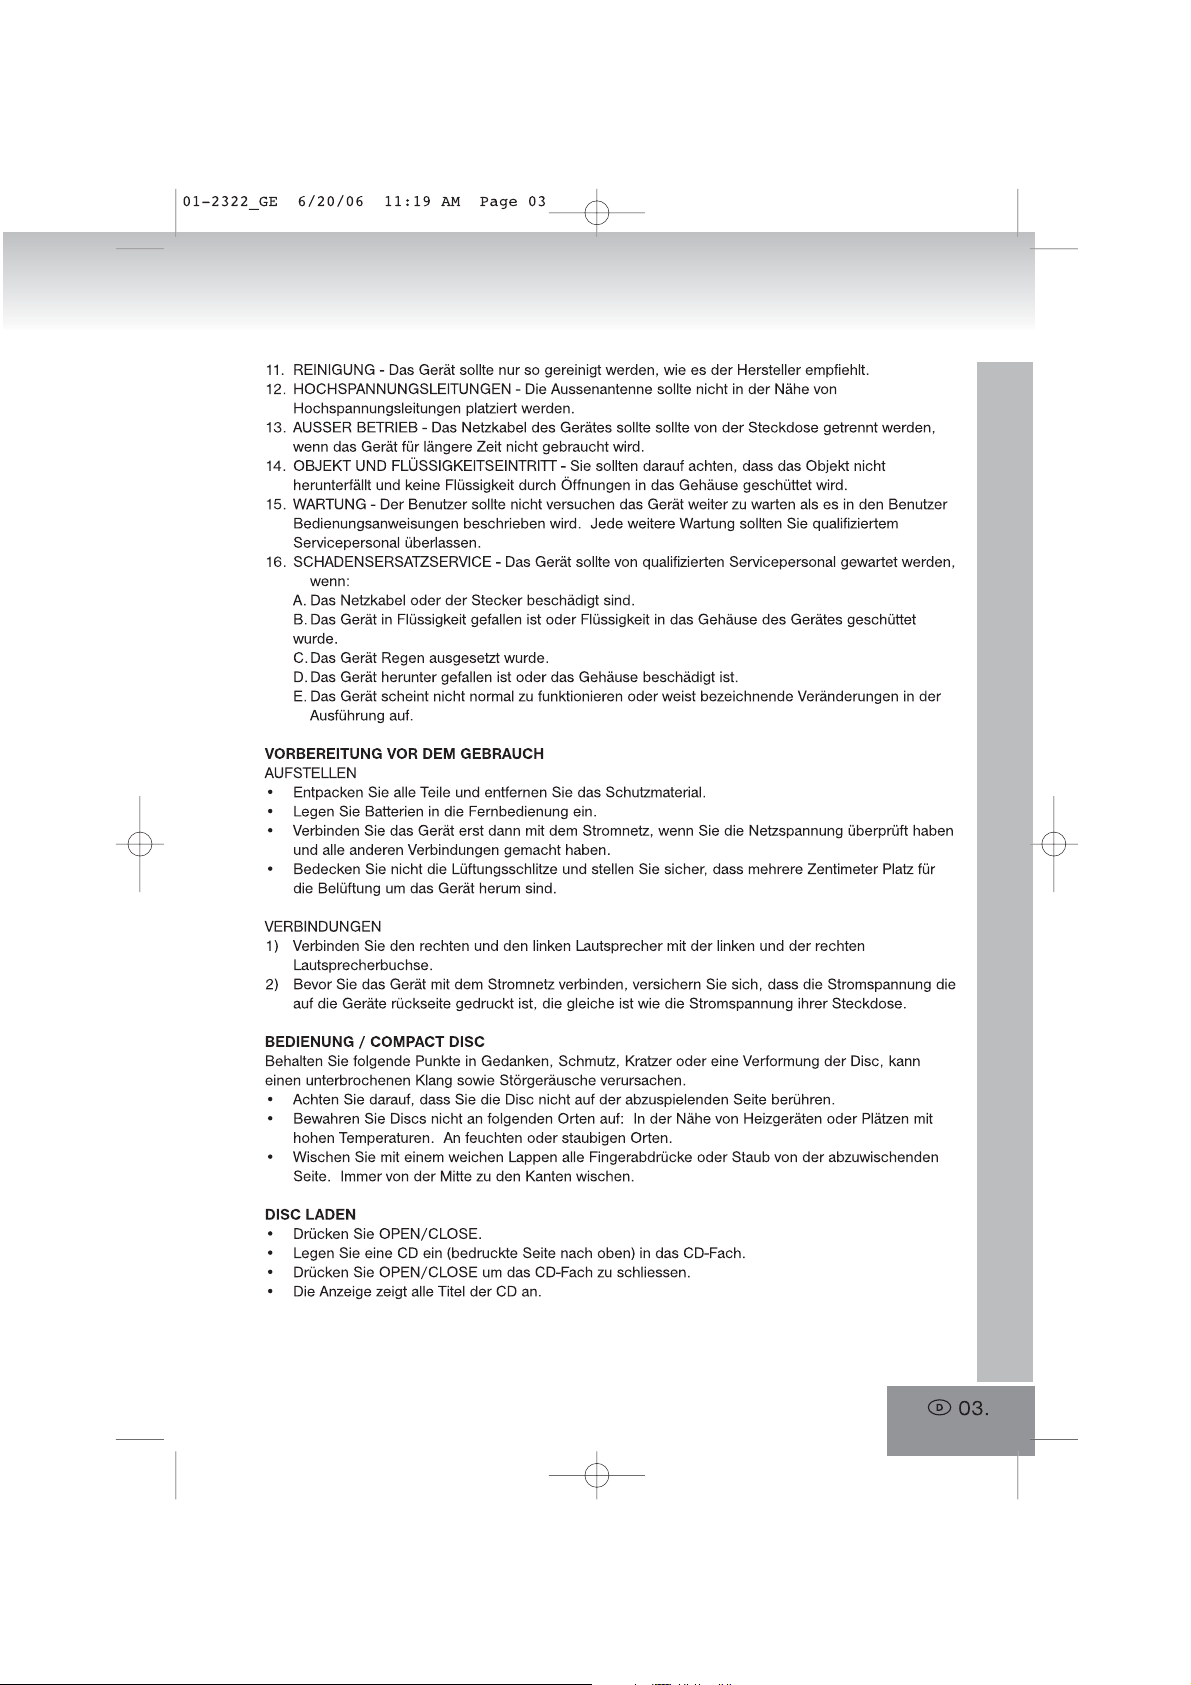
FERNBEDIENUNG
1. Folder [Ordner] Taste
2. Folder [Ordner] Taste
3. PLAY / PAUSE [Wiedergabe/Pause] Taste
4. STOP [STOPP] Taste
5. SKIP [SPRINGEN] + Taste
6. SKIP [SPRINGEN] - Taste
7. MODE [MODUS] Taste
8. PROGRAM [PROGRAMM] Taste
Tasten Funktion BEDIENUNG
POWER Knopf Zum Einschalten des Gerätes
VOLUME +/- - Um die Lautstärke auf- oder absteigend passend einzustellen.
WIEDERGABE/PAUSE
• Wiedergabe aus dem Stoppmodus starten.
• Pause während der Wiedergabe.
• Aus der Pause in die Wiedergabe zurückkehren.
STOPP
• Im Wiedergabe und Pause Modus. In den Stopp Modus oder Programmeintritt wechseln während der
Wiedergabe.
• Im Programmeintritts Modus: Verlassen Sie den Programmeintritt Modus, löschen Sie die gespeicherten
Programme und wechseln Sie in den Stopp Modus.
• Zufallswiedergabe (Mode Knopf) Wechseln Sie in den Stopp Modus und verlassen Sie die
Zufallswiedergabe.
D 05.
+
01-2322_GE 6/20/06 11:19 AM Page 05
1
6
4
7
2
3
5
8
Page 6
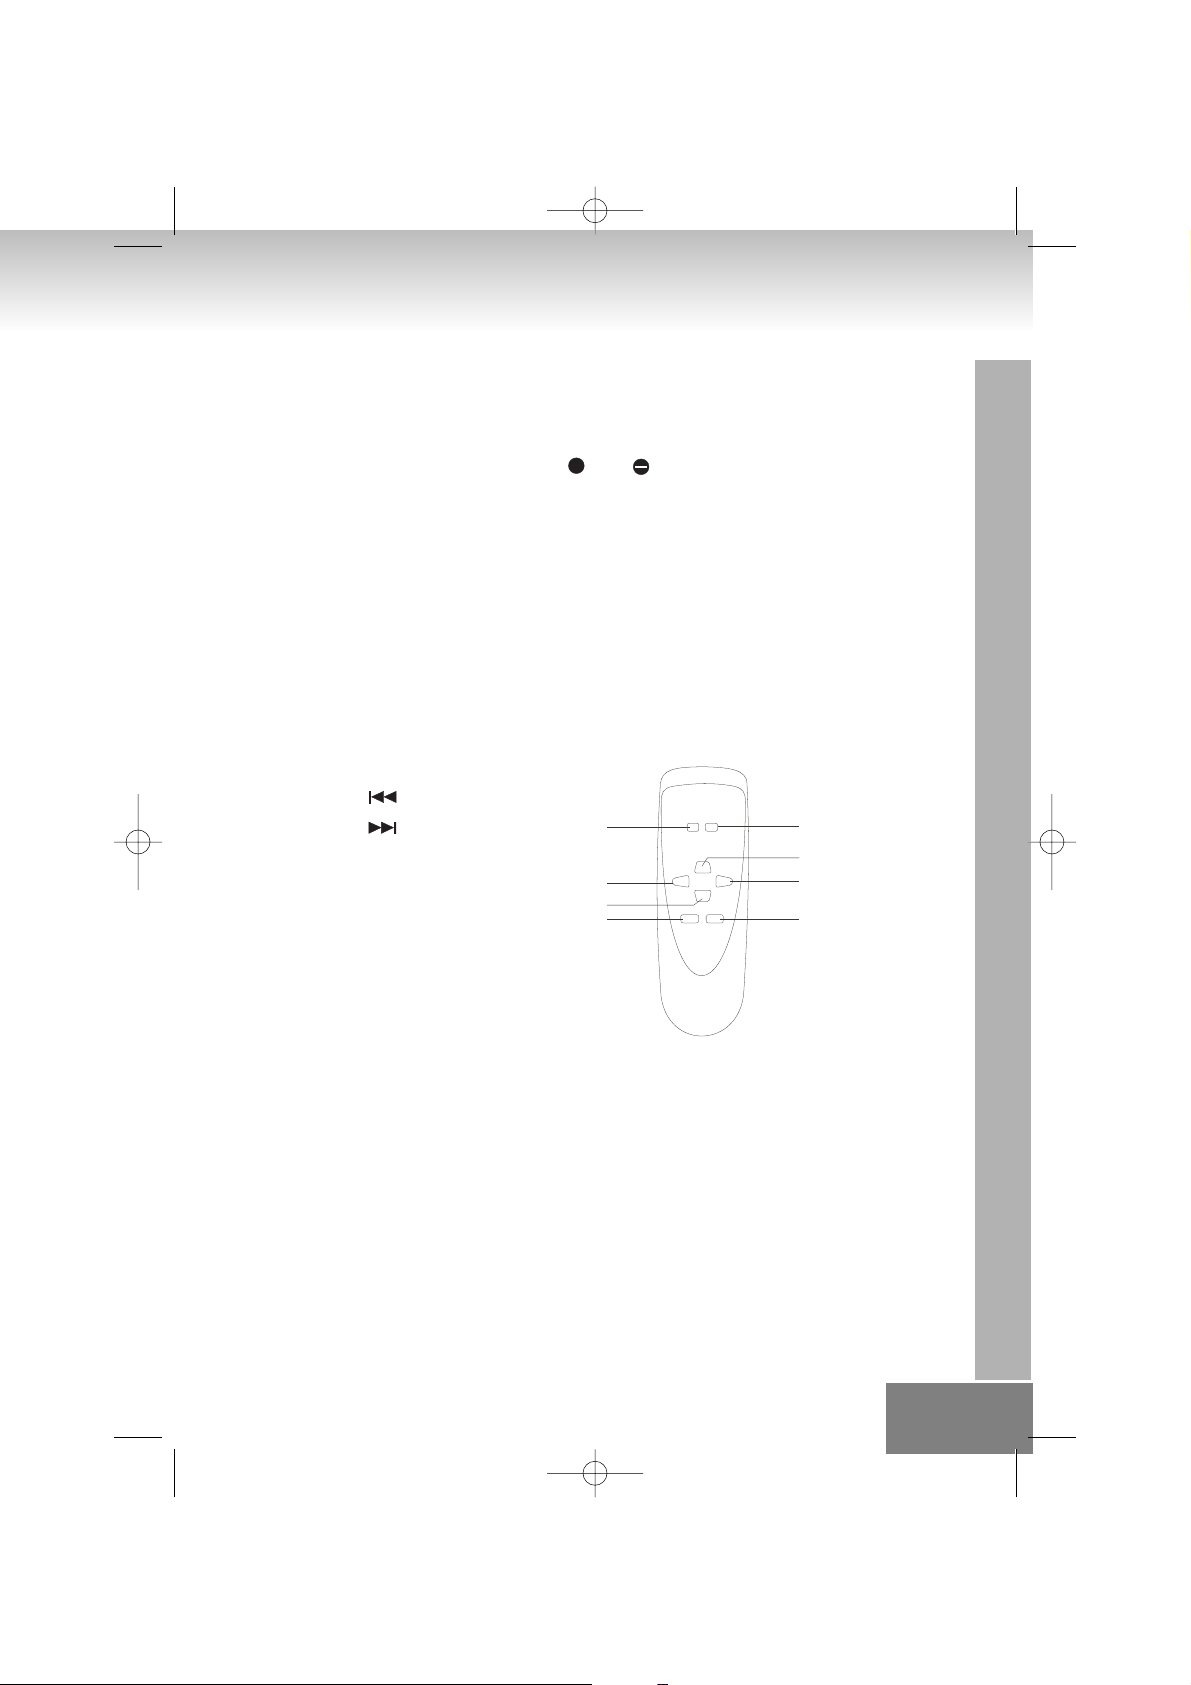
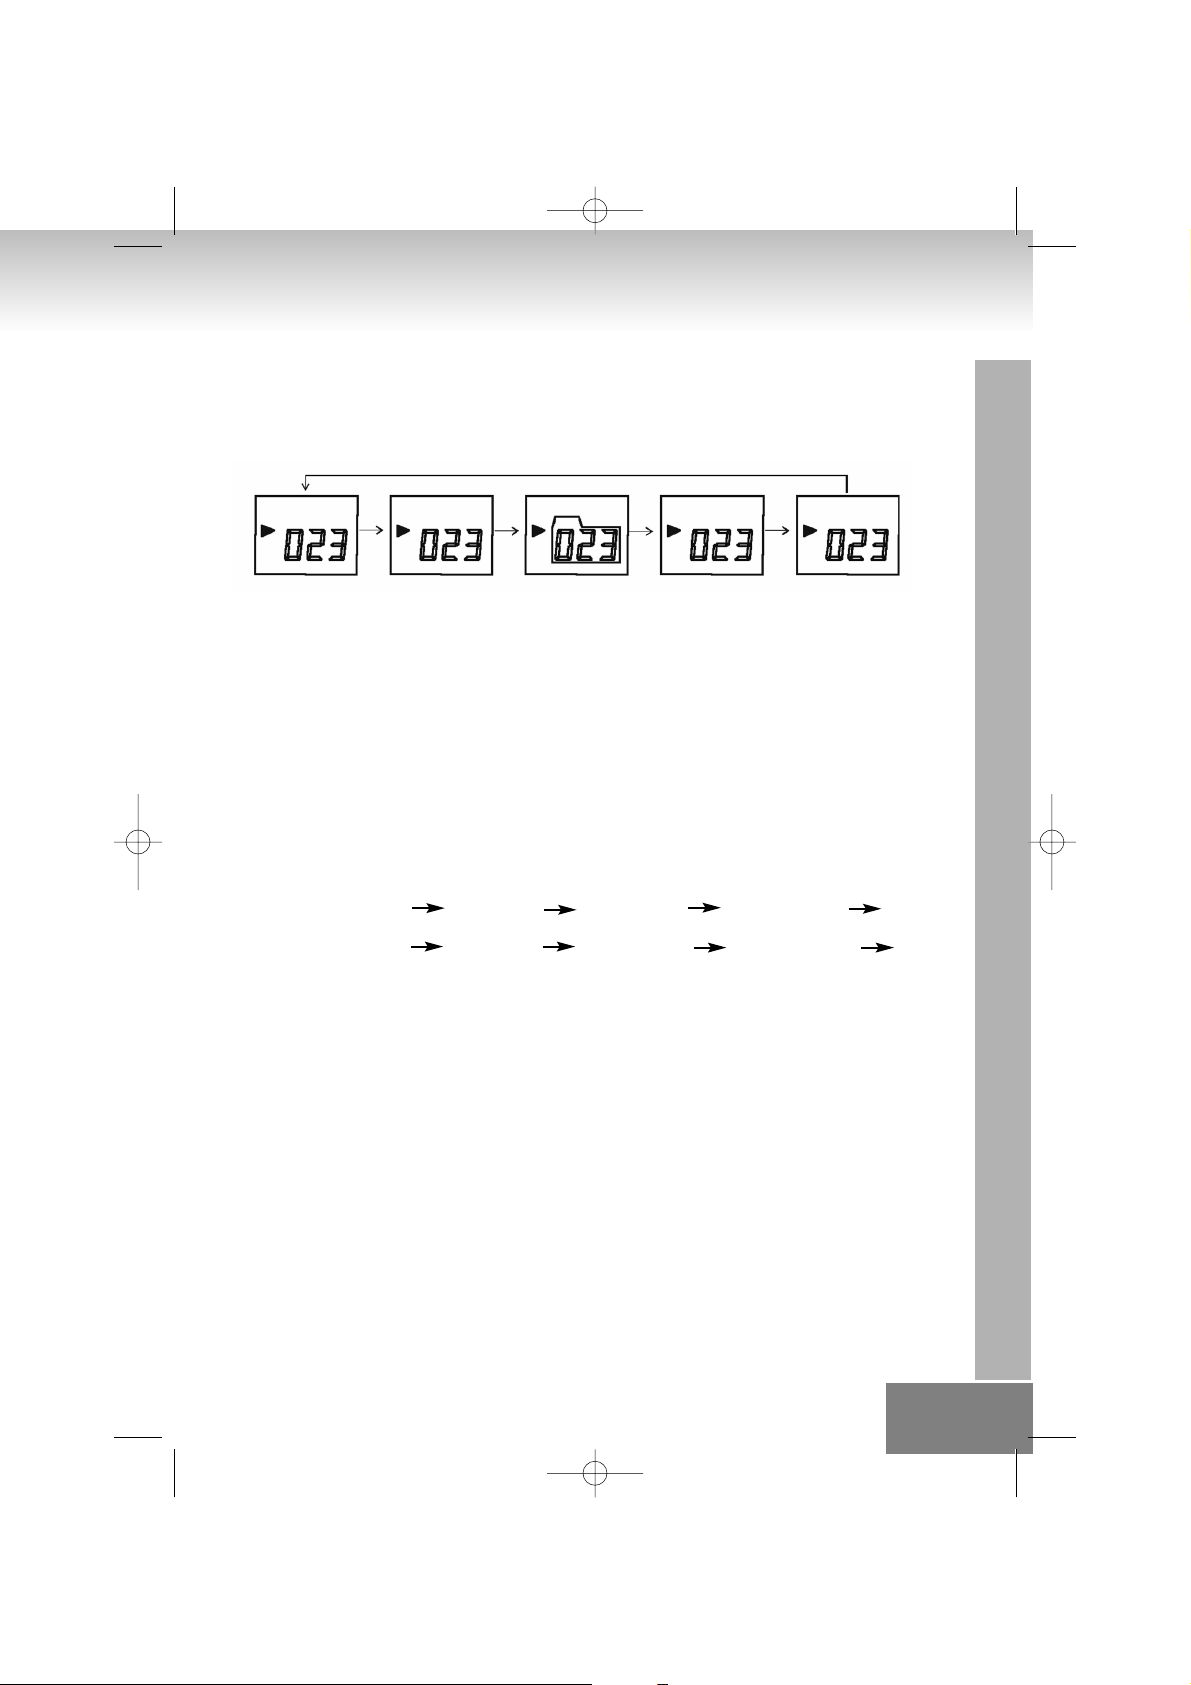
PROGRAM Taste [Funktionserklärung]
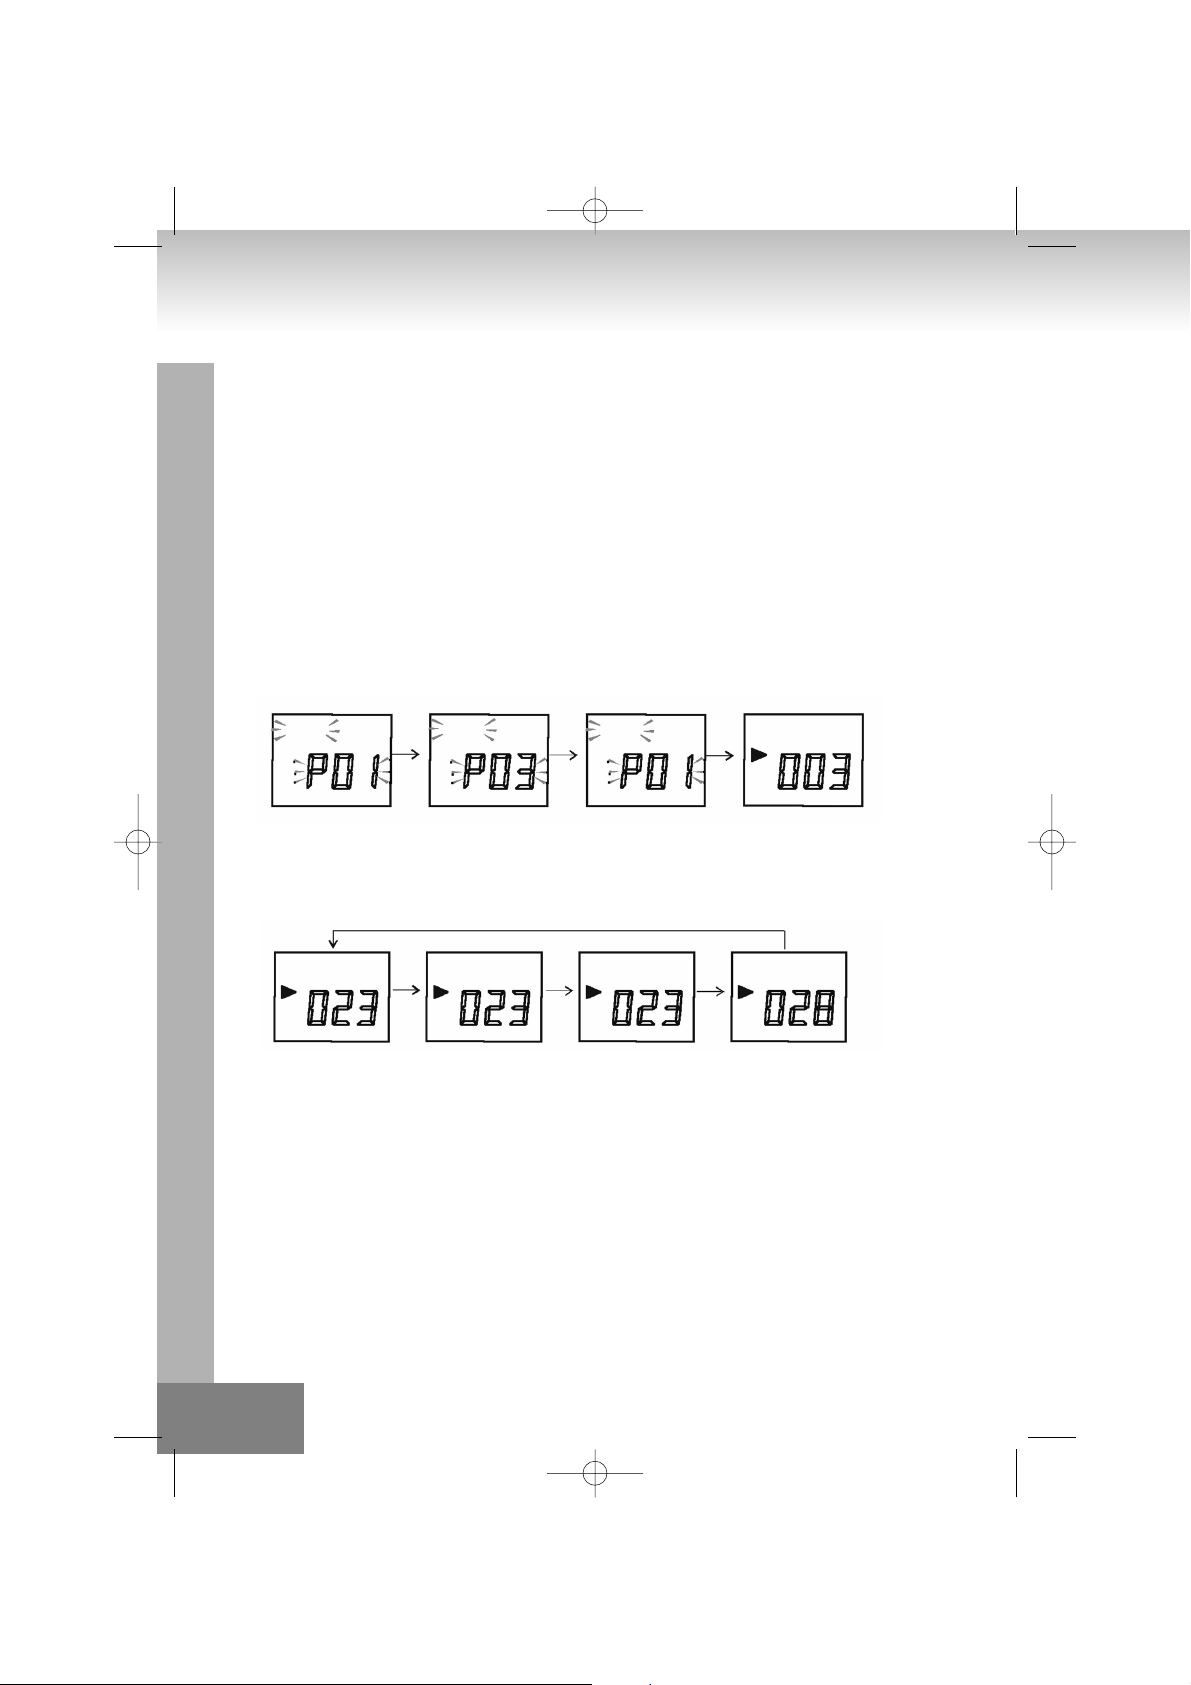
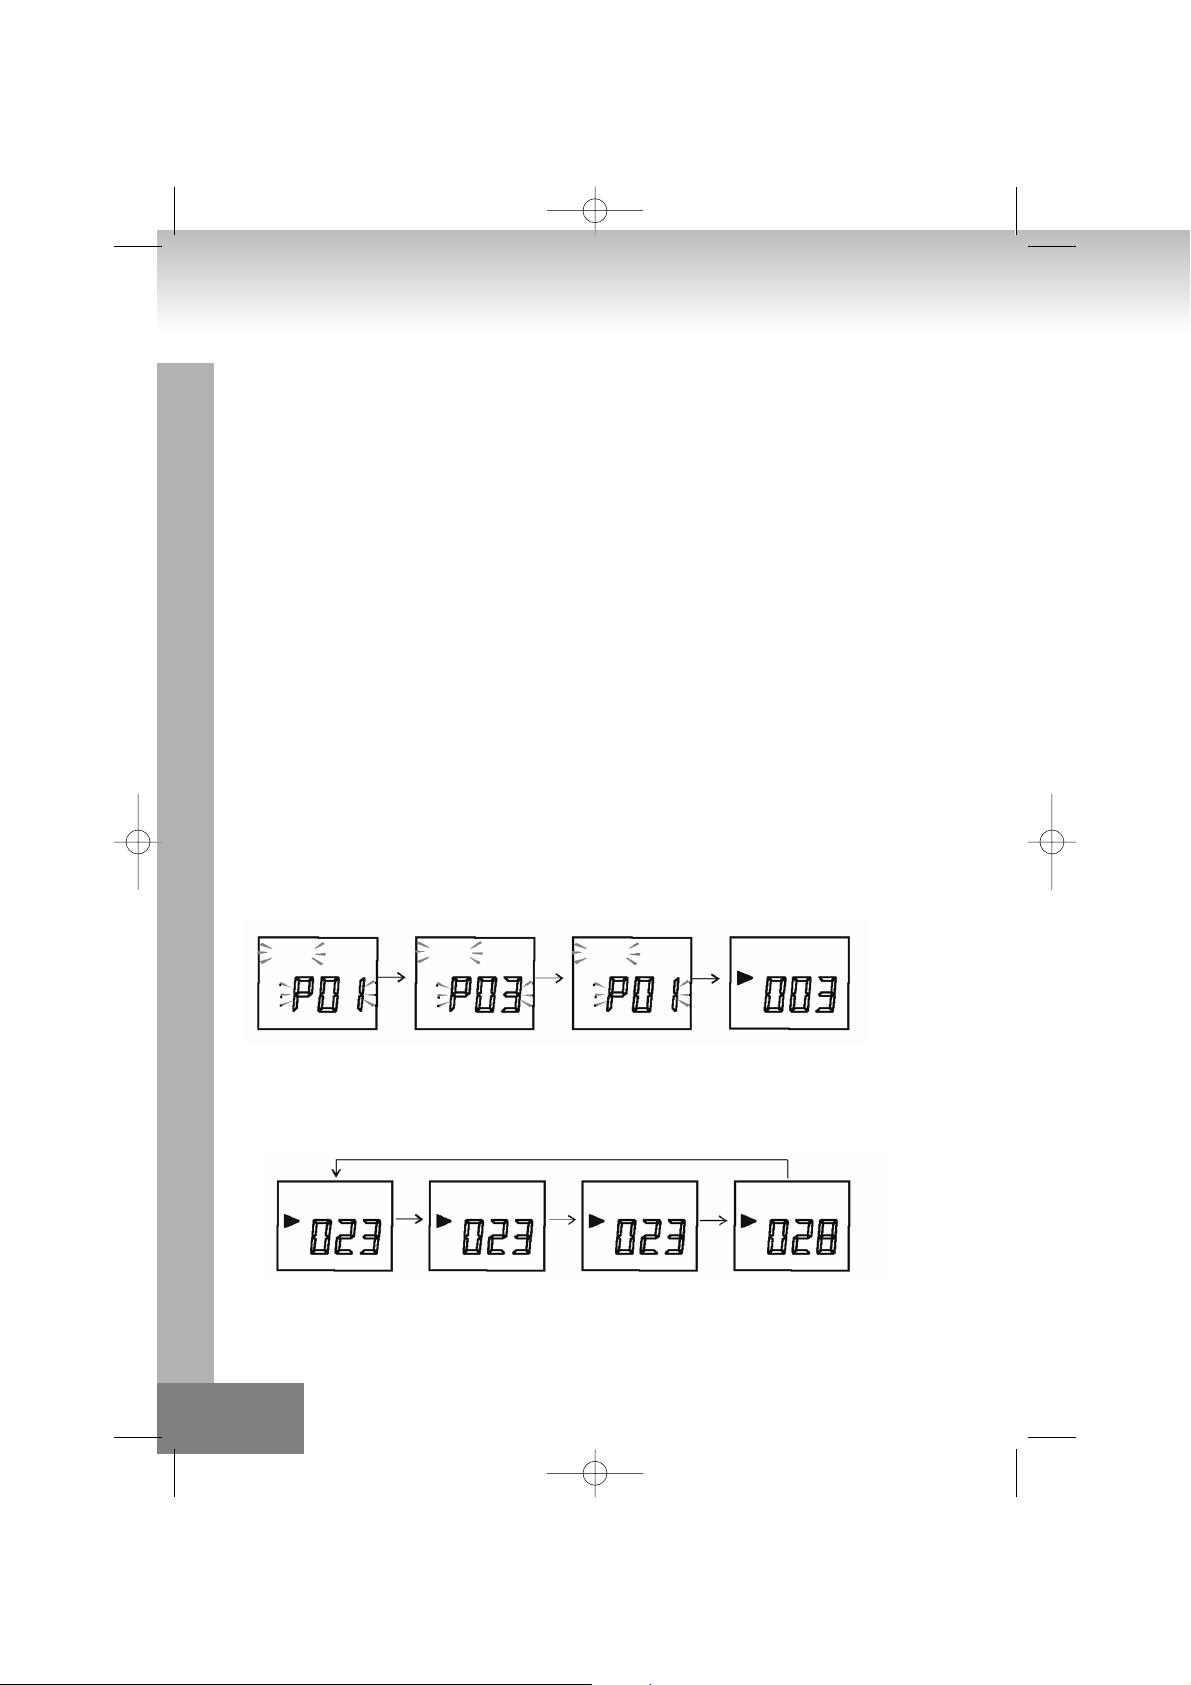
1. Wenn die Taste [PROGRAM] gedrückt wird während sich die CD im Stopp Modus befindet, stellt das
System auf Programm Modus um. Im Programm Modus leuchten auf der Anzeige Titel, Nummer und
PROGRAM in einem 500 ms Intervall auf (Anzeige 1).
2. Wenn die Taste [FF/SKIP+] / [FB/SKIP-] gedrückt ist, wählt das System die Titelnummer aus die es
verzeichnen kann.
3. Wenn die Taste [PROGRAM] gedrückt wird, nachdem Sie eine Titelnummer ausgewählt haben, bewahrt
das System den Titel und geht in den nächsten Programm Modus.(Anzeige 2).
4. Das System kann 20 Programme für den CD Modus / 10 Programme für MP3 behalten.
Nachdem das System 20 Programme behalten hat, kann kein weiteres Lied mehr aufgenommen werden.
Solang das System 20 Programme beinhaltet, können keine anderen Programme aufgenommen werden.
Die PROGRAM Anzeige lässt “P 01“in einem 500 ms Intervall aufblitzen.
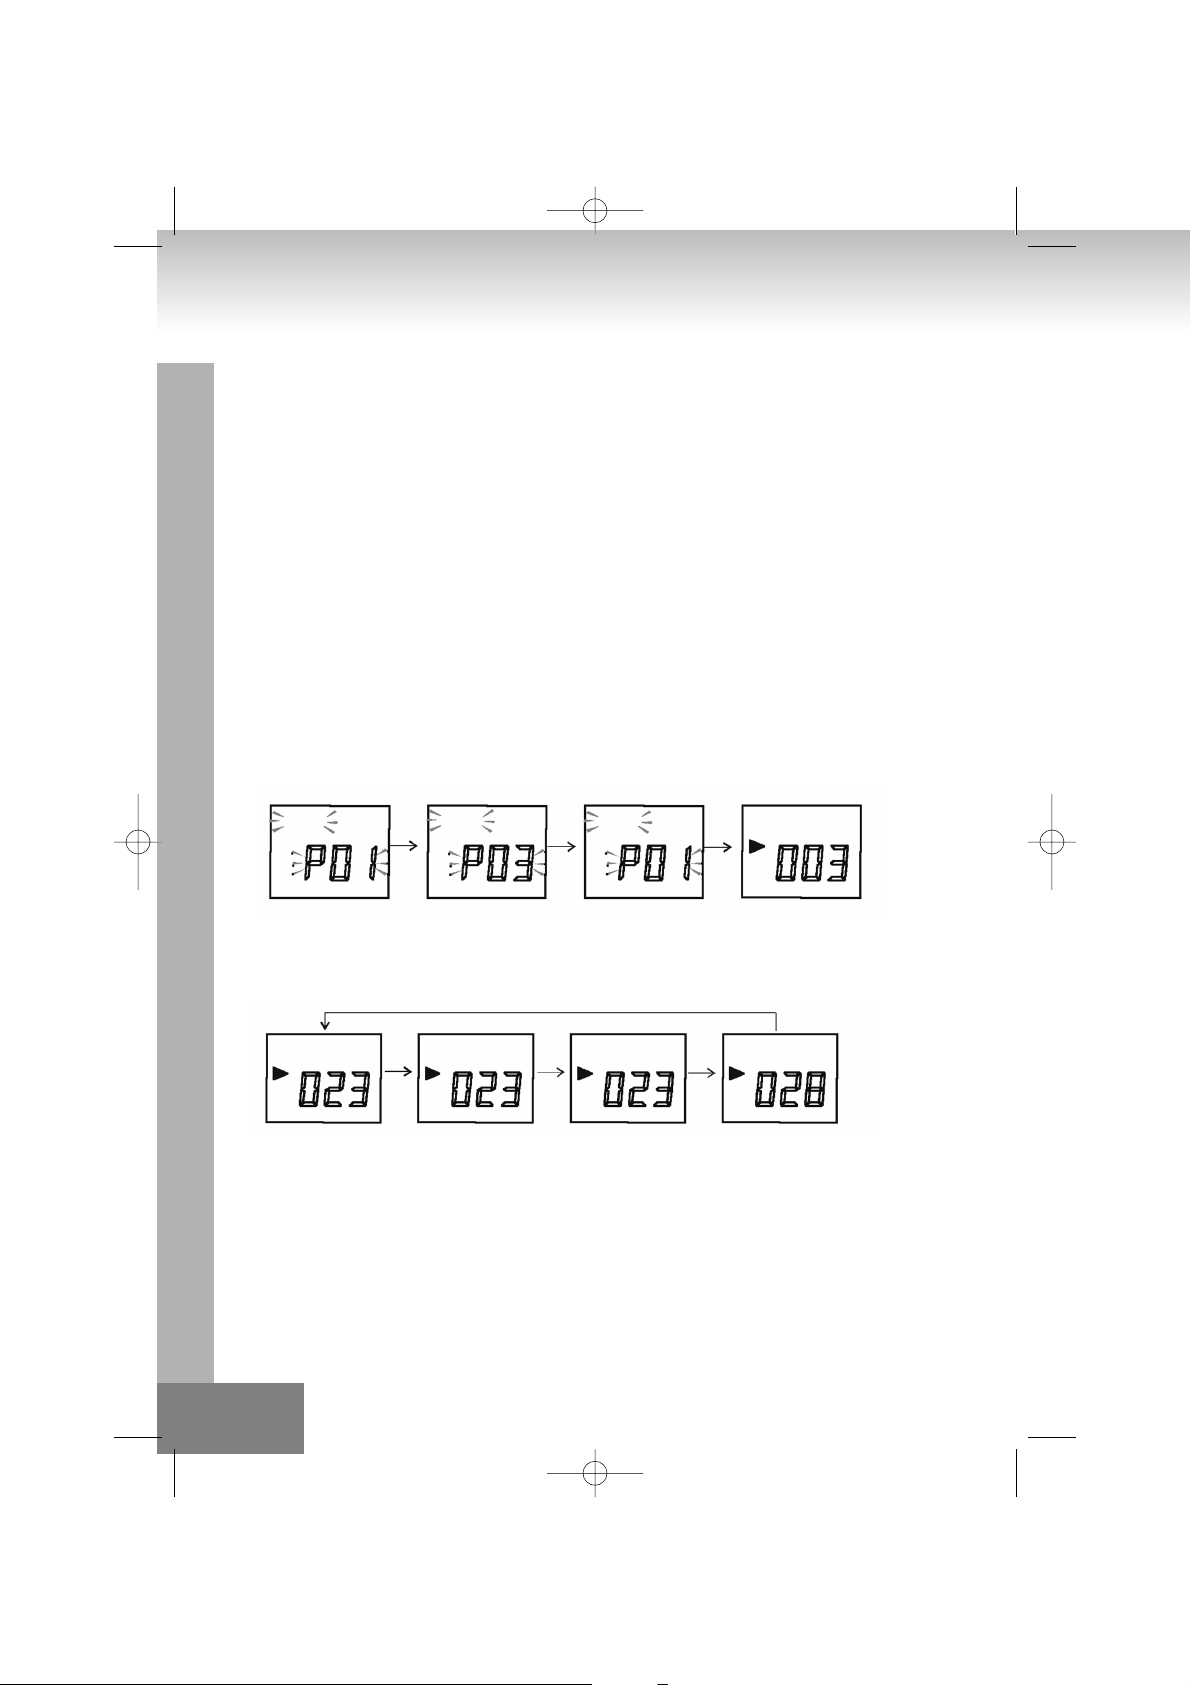
5. Wenn während des Programm Modus die Taste [STOP] gedrückt wird, entfernt das System die Inhalte des
Programms und streicht den Programm Modus.
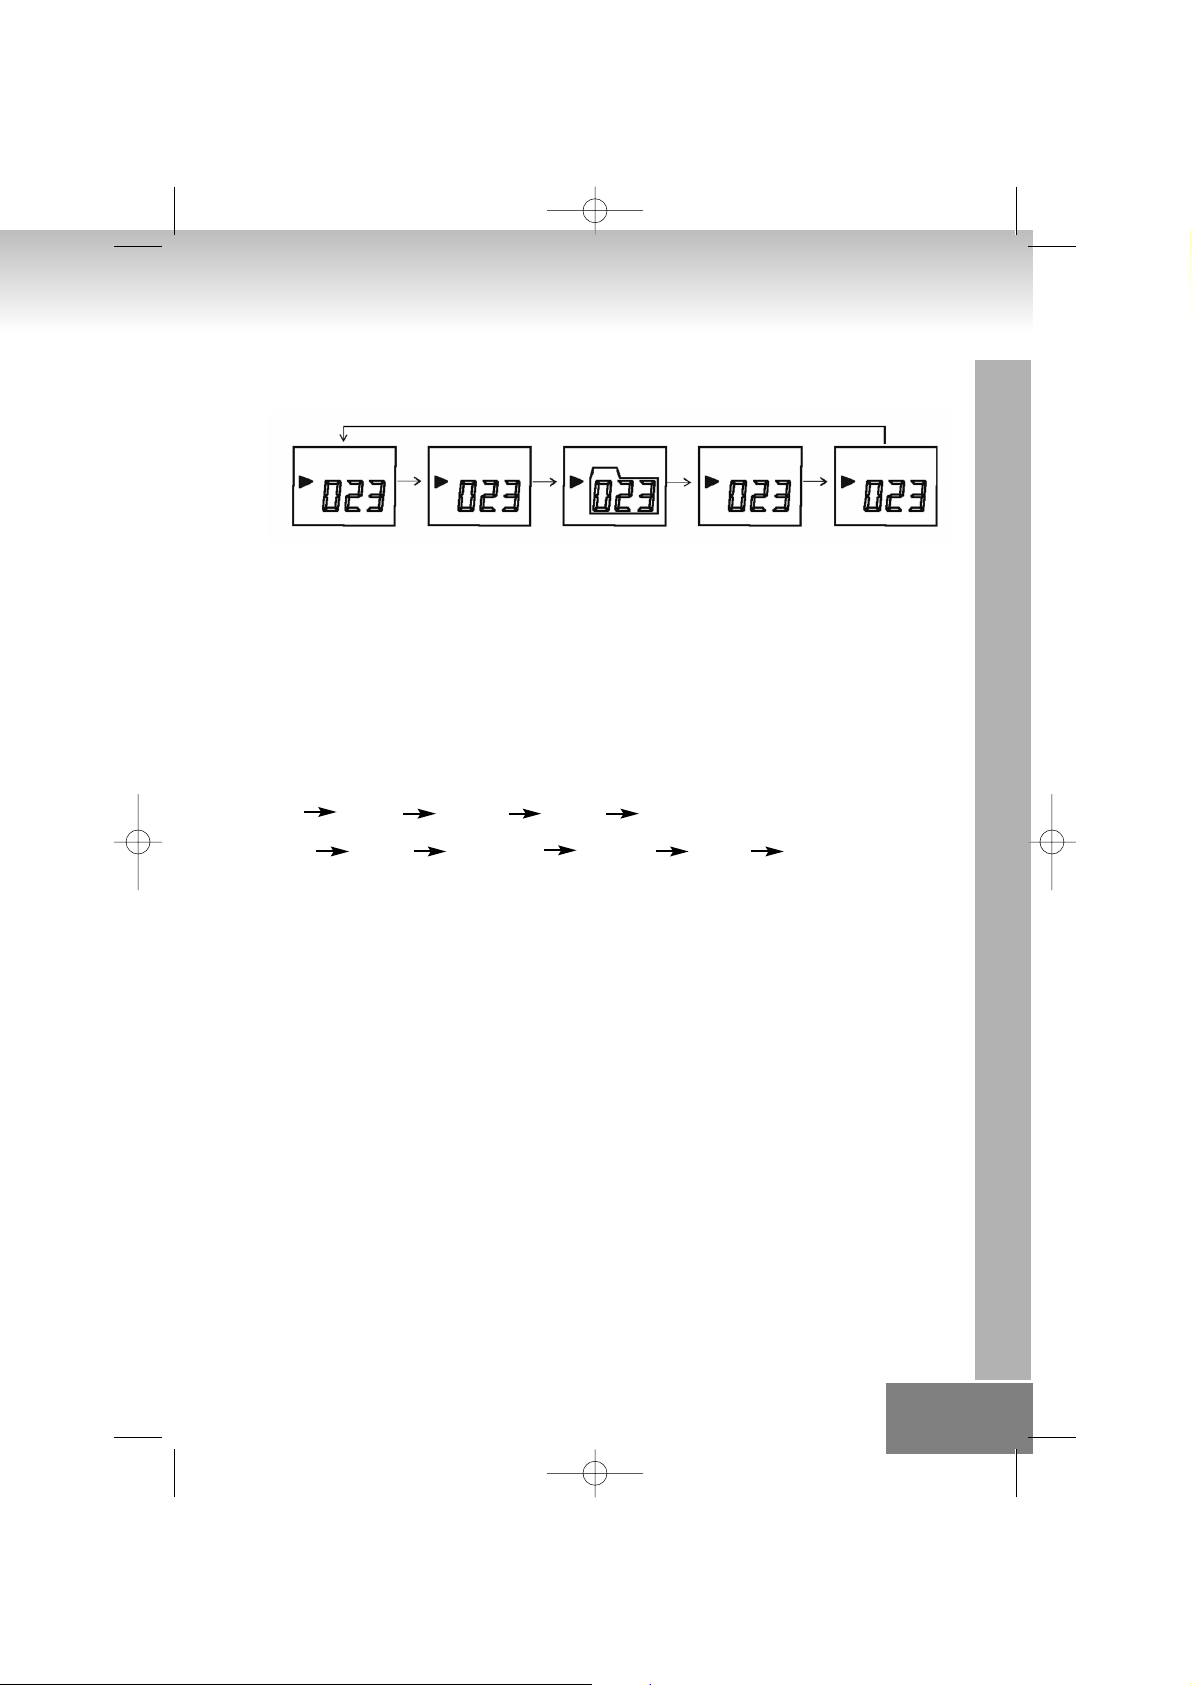
6. Wenn die Taste [PLAY/PAUSE] gedrückt wird während das System mehr als ein Programm beinhaltet,
startet es die Programmwiedergabe. Während der Programmwiedergabe zeigt das Display PROGRAM
wird wiedergegeben.(Anzeige 4).
7. Wenn die Taste [FF/SKIP+] / [FB/SKIP-] gedrückt wird während der Programmwiedergabe, springt das
System zum nächsten / vorherigen Programm.
8. Wenn dieTaste [STOP] gedrückt wird während der Programmwiedergabe, stoppt das System und wechselt
in den Stopp Modus. Bis die Taste [STOP] im Stopp Modus gedrückt ist, bewahrt das System die
Programminhalte.
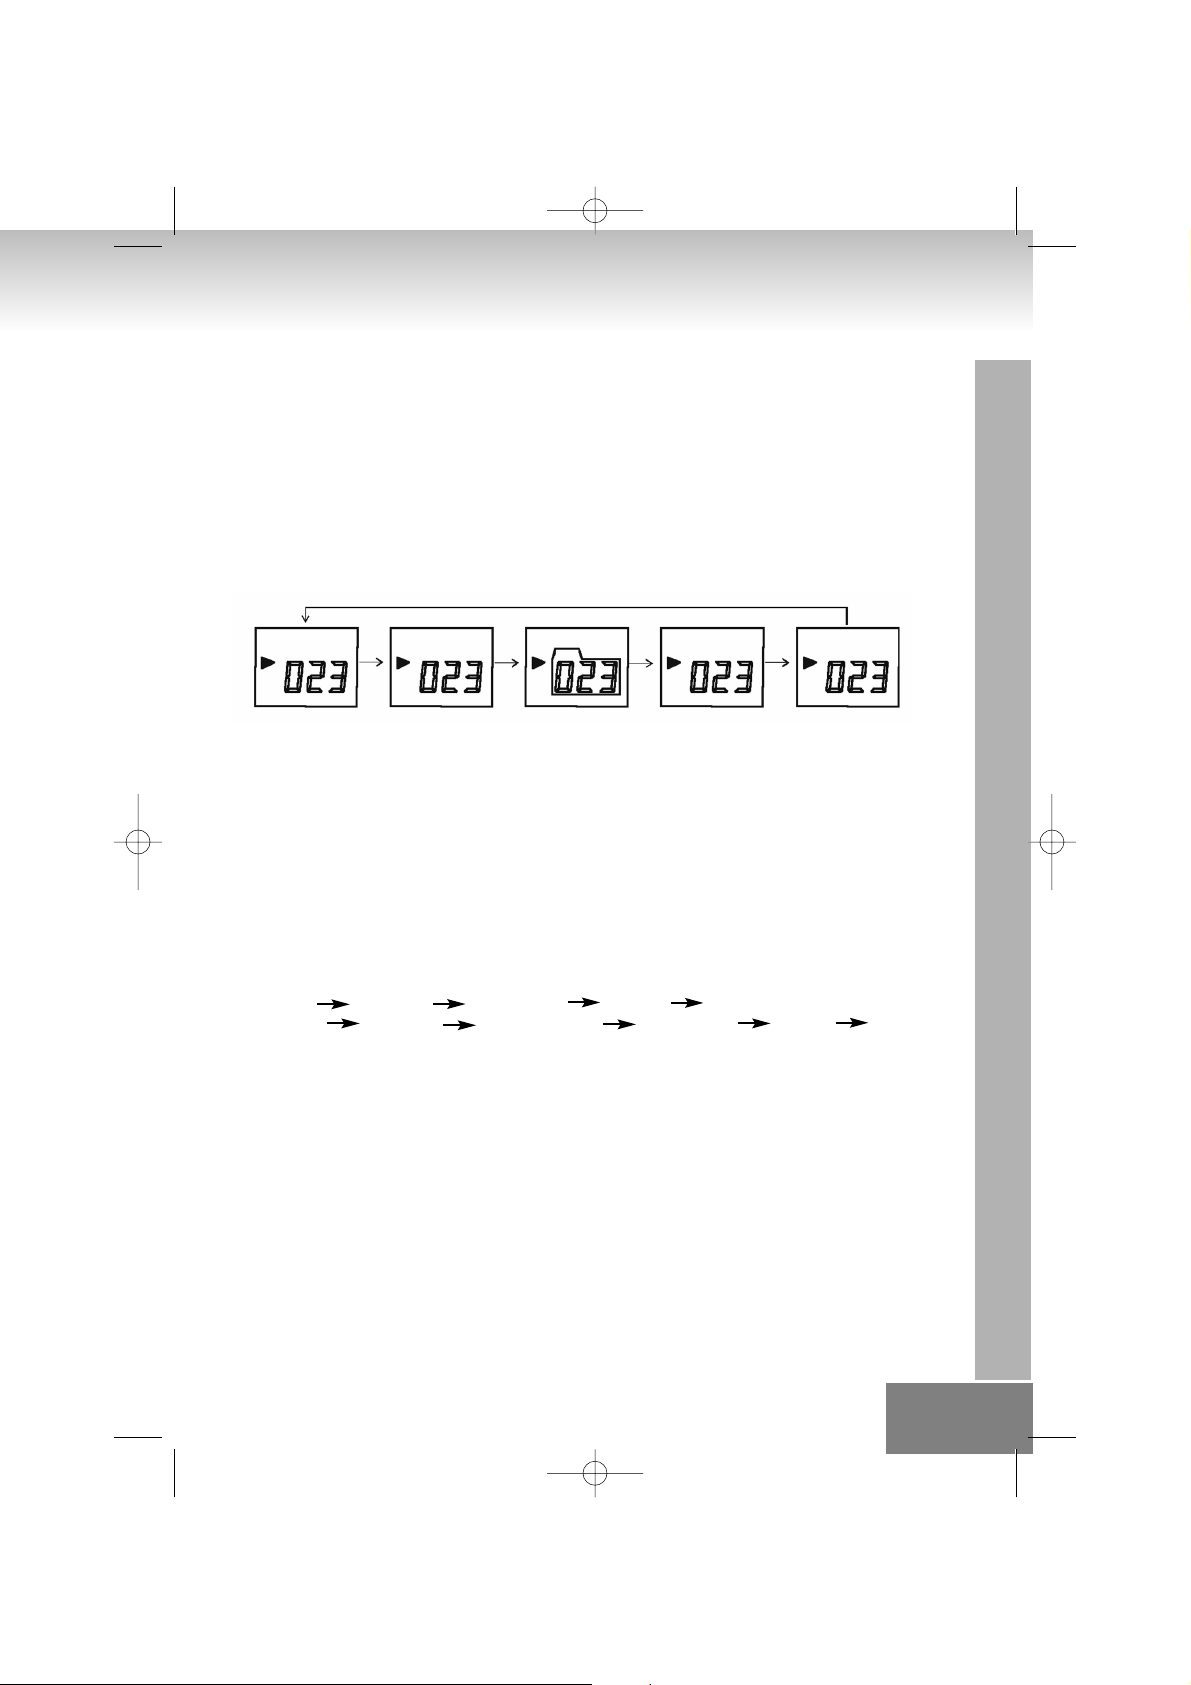
Die Taste MODE [Funktionserklärung]
CD Modus:
1. Wenn die Taste [MODE] gedrückt wird wechselt das system den Modus (in folgender Weise).
2. Innerhalb des Modus Repeat-1 wiederholt das System den aktuell gespielten Titel einer CD.
3. Wenn im Modus Repeat-all der letzte Titel eines Programms erreicht ist, springt es für gewöhnlich zum
ersten Titel zurück.
4. Wenn ein ganzer Titel während der Zufallswiedergabe endet oder die Taste [STOP] während der
Zufallswiedergabe gedrückt wird, geht das system in den Stoppmodus und setzt den Modus
Zufallswiedergabe zurück.
5. Wenn die Taste [FF/SKIP+] im Modus Zufallswiedergabe gedrückt wird, springt das System zum nächsten
Zufallstitel. Wenn die Taste [FF/SKIP+] während des letzten Titels eines gedrückt wird, sucht das System
nach der nächsten Runde Zufallstitel.
D 06.
PROGRAM
(ANZEIGE 1 )
(ANZEIGE 2 )
(ANZEIGE 3)
(ANZEIGE 4)
PROGRAM
PROGRAM
PROGRAM
REP
REP
ALL
RANDOM
KEINE WIEDERHOLUNG
& ZUFALLSWIEDERGABE
WIEDERHOLE ALLE
WIEDERHOLE-1
ZUFALLSWIEDERGABE
01-2322_GE 6/20/06 11:19 AM Page 06
Page 7
6. Wenn die Taste [FF/SKIP-] während des Modus Zufallswiedergabe gedrückt wird, sucht das System den
Anfang des aktuellen Titels, springt aber keinen Titel zurück.
MP3 Modus
1. Wenn die Taste [MODE] gedrückt wird wechselt das System den Modus. (in folgender Weise).
2. Innerhalb des Modus Repeat-1 wiederholt das System den aktuell gespielten Titel einer MP3.
3. Innerhalb des Modus Repeat-folder wiederholt das system den aktuellen Titel des MP3 Ordners.
4. Wenn im Modus Repeat-all der letzte Titel eines Programms erreicht ist, springt es für gewöhnlich zum
ersten Titel zurück.
5 Wenn ein ganzer Titel während der Zufallswiedergabe endet oder die Taste [STOP] während der
Zufallswiedergabe gedrückt wird, geht das System in den Stoppmodus und setzt den Modus
Zufallswiedergabe zurück.
6. Wenn die Taste [FF/SKIP+] im Modus Zufallswiedergabe gedrückt wird, springt das System zum nächsten
Zufallstitel. Wenn die Taste [FF/SKIP+] während des letzten Titels eines Ordners gedrückt wird, sucht das
System nach der nächsten Runde Zufallstitel.
7. Wenn die Taste [FF/SKIP-] während des Modus Zufallswiedergabe gedrückt wird, sucht das System den
Anfang des aktuellen Titels, springt aber keinen Titel zurück.
MODUS
CD: Keine Wiederholung Wiederhole 1 Wiederhole alle Zufallswiedergabe Keine
Wiederholung.
MP3:Keine Wiederholung Wiederhole 1 Wiederhole alle Zufallswiedergabe Keine
Wiederholung.
ZUFALLSWIEDERGABE
1. Drücken Sie den Knopf RANDOM, um mit dem Anhören zu beginnen. Alle Titel der Disc sollen zufällig
wiedergegeben werden. Wählen sie die Funktion Random. Dafür drücken Sie den Knopf Mode und
wählen Random to start aus, um die Zufallswiedergabe zu starten.
MP3’S EINPROGRAMMIEREN
Die MP3 Wiedergabe ermöglicht es 10 Titel in der Reihenfolge Ihrer Wahl einzuprogrammieren.
1. Drücken Sie den Knopf PROGRAM im Stoppmodus. Die Anzeige wird “P01” und “PROGRAM anzeigen
und blinken.”
2. Drücken Sie die Knöpfe FF/SKIP+ und FF/SKIP- um den gewünschten Titel zu einprogrammieren
auszuwählen Oder Drücken sie die Knöpfe FOLDER DN und FOLDER UP auf der Fernbedienung, um die
Auswahl des nächsten gewünschten Titel eines Ordners zu kontrollieren.
3. Drücken Sie den Knopf PROGRAM um in den Speicher zu gelangen.
4. Um weiter einzuprogrammieren, wiederholen sie die Schritte 2 und 3.
5. Drücken Sie den Knopf PLAY / PAUSE im Modus Programm, um die einprogrammierten Titel
wiederzugeben.
D 07.
KEINE
WIEDERHOLUNG
& ZUFALLSWIEDERGABE
ALBUM
MP3
WIEDERHOLE
ORDNER
MP3
MP3
RANDOM
WIEDERHOLE
ALLEL
WIEDERHOLE-1
ZUFALLSWIEDERGABE
MP3
MP3
REP
REP
REP
ALL
01-2322_GE 6/20/06 11:19 AM Page 07
Page 8

SKIP +
• Wenn Sie die beginnende Titelwiedergabe im Stoppmodus wechseln, zirkuliert es zum ersten Titel zurück
sofern es der letzte Titel ist.
• Springen Sie zum nächsten Titel ind er normalen Wiedergabe.
Es zirkuliert zum ersten Titel zurück, wenn es der letzte Titel ist.
• Wenn die Taste länger als 0,5 sec. gedrückt wird, wird ein schnelles Vorspulen ausgeführt.
• Springen sie zum nächsten einprogrammierten Titel während der Programmwiedergabe. Es zirkuliert zum
ersten programmierten Titel zurück.
• Springen Sie zum nächsten Zufallstitel innerhalb der Zufallswiedergabe
SKIP -
• Wechseln Sie die beginnende Titelwiedergabe innerhalb des Stoppmodus. Es zirkuliert zurück zum letzten
Titel, wenn es der erste Titel ist.
• Springen Sie zum vorherigen Track innerhalb der normalen Wiedergabe. Zirkuliert zum letzten Titel, wenn
es der erste Titel ist.
• Wenn die Taste länger als 0,5 sec. gedrückt wird, wird ein schnelles zurückspulen eingeleitet.
• Springen Sie zum vorherigen einprogrammierten Titel der Programmwiedergabe. Es zirkuliert zum ersten
einprogrammierten Titel.
FOLDER
• Wenn sich das System im Stoppmodus befindet: Für MP3, springt zum nächsten Ordner in aufsteigender
Reihenfolge und zeigt die ältere Nummer an.
• Wenn Sich das System im Wiedergabemodus befindet: Für MP3, springt zum nächsten Ordner in
aufsteigender Reihenfolge. Startet die Wiedergabe des ersten Titels im Ordner und zeigt den aktuellen
Ordner und die Nummer an. Taste einmal drücken. Aktuelle Ordnernummer leuchtet auf für 3 sec.
Taste nochmals drücken. Ein Ordner höher wird ausgeführt.
+/= BASS
• Drücken sie den Knopf X-BASS und wählen Sie den Bass Boost Effekt aus.
KASSETTENFUNKTION
Bewegen um die Kassetenfunktion auszuwählen
RECORD/PLAY ABSPIELKONTROLLE
• RECORD: Aufnahme starten.
• PLAY: Kassetenwiedergabe starten.
• REWIND: Schnelles Zurückspulen der Kassete.
• F.FWD: Scnelles Vorspulen der Kassete
• STOP/EJ: Stoppen und Auswerfen der Kassete.
• PAUSE: Unterbrechen der Aufnahme und Wiedergabe.
D 08.
01-2322_GE 6/20/06 11:19 AM Page 08
Page 9

KASSETENDECK
Versichern Sie sich bevor Sie das Kassetendeck betreiben, ob der Wahlschalter Function sich im Modus
Kassete befindet.
WIEDERGABE
• Stellen Sie den Wahlschalter Function auf den Modus Kassette.
• Drücken Sie den Knopf Eject um das Kassetenfach zu öffnen.
• Platzieren Sie das Kassetenband mit der abzuspielenden Seite Richtung Fenster.
• Schliessen Sie das Kassetenfach.
• Drücken Sie den Knopf Play um die Wiedergabe zu starten.
• Die wiedergabe stoppt, wenn das Band sein Ende erreicht.
• Drücken Sie die Taste Stop, wenn Sie die Wiedergabe vor dem Bandende stoppen möchten.
AUFNEHMEN VON RADIO / CD
• Drücken sie den Knopf Function, wählen Sie “RADIO” oder “CD” um die Aufnahmequelle zu wählen.
• Bitte legen sie eine Leerkassete ein
• Drücken sie zuerst den Knopf PAUSE.
• Dann drücken Sie die Knöpfe PLAY und RECORD zusammen.
• Spielen Sie die gewählte Aufnahmequelle ab.
• Während der Aufnahme den Knopf PAUSE lösen.
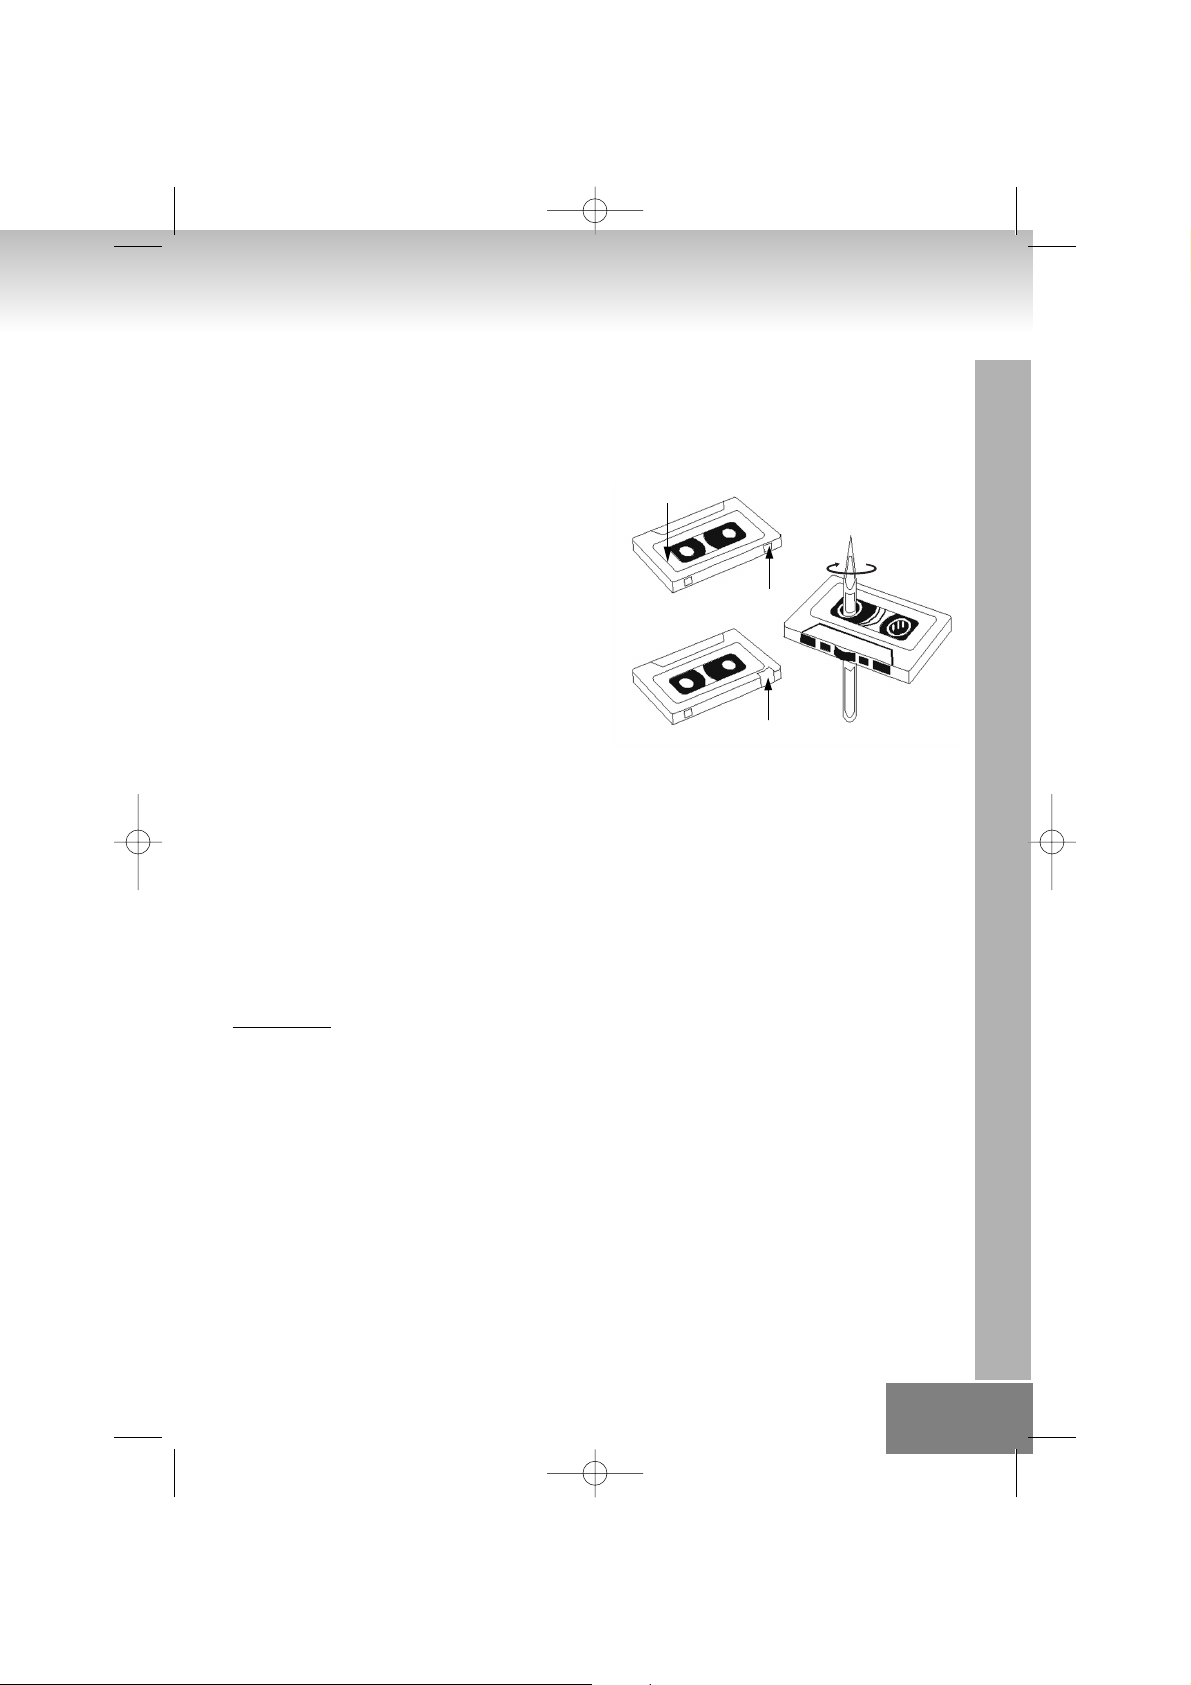
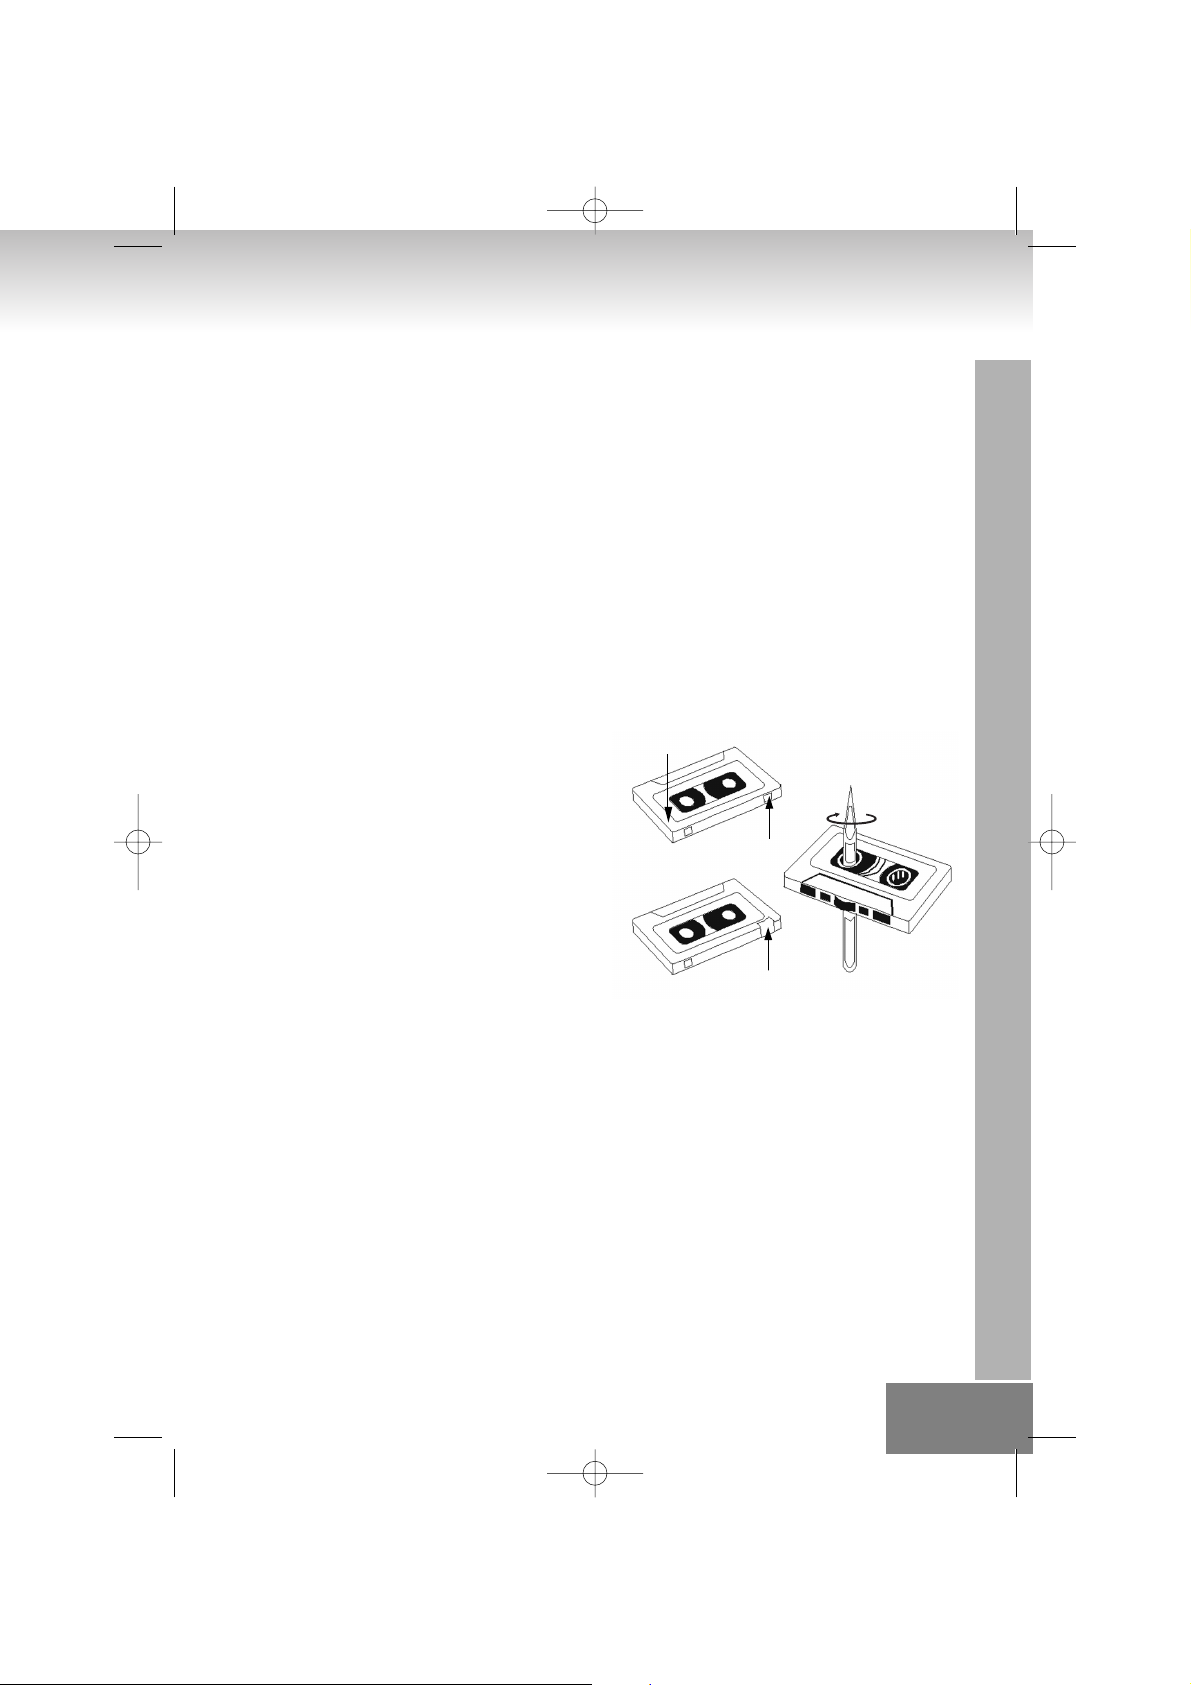
1. LEIERNDES BAND (Abb.1) ---- Überprüfen Sie
leierndes Band und ziehen Sie es mit einem Bleistift
oder ähnlichen wieder fest auf. Leierndes Band
könnte zerissen oder eingeklemmt werden im
Mechanismus.
2. VERSEHENTLICHES LÖSCHEN VERHINDERN
(Abb.2) ---- Benutzen Sie einen Schraubenzieher oder
anderes spitzes Werkzeug um den kleinen Plastikstift
herauszubrechen.
3. ÜBERSPIELEN (Abb.3) ---- Bedecken Sie die
Stiftöffnung mit etwas Klebeband.
RADIOBETRIEB
SENDEREINSTELLEN
• Drücken sie den Knopf Function, um das Gerät auf “RADIO” oder Radio Modus zu stellen.
Die Radiofunktionsanzeige wird aufleuchten.
• Wählen Sie den Empfangsbereich mit dem Knopf BAND aus.
• Drehen Sie den Schalter TUNING auf den gewünschten Sender.
ANMERKUNG:
Wenn Sie FM Radioprogramm hören ist es ratsam die FM Antenne auf der Gehäuserückseite voll auszuziehen.
Wenn Sie AM Radioprogramm hören ist es ratsam die Position des Helmes einzustellen für einen optimalen
Empfang.
D 09.
Seite A
Stift für Seite A
Klebeband
Abb.1
Abb.2
Abb.3
01-2322_GE 6/20/06 11:19 AM Page 09
Page 10

Was ist MP3?
MP3 ist die Abkürzung für MPEG Audio Layer 3. MPEG bezeiht sich auf Moving Pictures Experts Group.
MP3 sind digitalisierte Audiodateien die geschrumpft wurden aber immer noch ihre originale Klangqualität
bewahren. MP3 werden weitestgehend als das populärste Speicher- und Abspielformat erkannt.
Die digitalen Audiodateien, gespeichert auf MP3 Disc, können auf MP3 Playern abgespielt werden.
MP3 Discs können 150-200 Lieder auf einer Cd speichern.
Energieversorgung: AC ~230V 50Hz
Stromverbrauch: 15 Watts
Ausgangsleistung: 2 Watts X 2 RMS into 8 OHM
(Je Kanal):
Radioabschnitt: AM 525 – 1615 kHz
FM 87,5 – 108 MHz
Compact Disc – Abschnitt:
Übertragungsbereich (-3dB): 60 – 16,000 Hz
Signal-RauschLeistungsverhältnis: 60 dB
Klirrfaktor: 0.4%
Kompatibel mit: CD-DA, CD-R, CD-RW, MP3
Kassetenabschnitt:
Bandgeschwindigkeit: 4.75 cm / sec.
Tonhöhenschwankung: < 0.4%
Übertragungsbereich: 100 Hz - 6.3 KHz
D 010.
01-2322_GE 6/20/06 11:19 AM Page 010
Page 11
D 011.D 01.
WEITERE INFORMATIONEN
Achtung bei Kleinteilen und Batterien, bitte nicht Verschlucken, dies kann zu ernsthaften
Schädigungen oder Erticken führen. Achten Sie inbesondere bei Kindern darauf, dass Kleinteile
und Batterien ausserhalb deren Reichweite sind.
Wichtige Hinweise zum Gehörschutz
Vorsicht:
Ihr Gehör liegt Ihnen und auch uns am Herzen.
Deshalb seien Sie bitte vorsichtig beim Gebrauch dieses Gerätes.
Wir empfehlen: Vermeiden Sie hohe Lautstärken.
Sollte das Gerät von Kindern verwendet werden, achten Sie darauf, dass das Gerät nicht zu laut eingestellt wird.
Achtung! Zu hohe Lautstärken können bei Kindern irreparable Schäden hervorrufen.
Lassen Sie NIEMALS Personen, und insbesondere keine Kinder, Gegenstände in Löcher,
Schächte oder andere Öffnungen des Gehäuses stecken; dies könnte zu einem tödlichen
elektrischen Schlag führen. Das Gerätegehäuse, darf nur von ausgebildetem Fachpersonal
geöffnet werden.
Bitte verwenden Sie das Gerät nur seiner vorhergesehenen Bestimmung entsprechend.
Bitte bewahren Sie die Bedienungsanleitung auch für eine spätere Verwendung sorgfältig auf.
Hinweise zum Umweltschutz
Dieses Produkt darf am Ende seiner Lebensdauer nicht über den normalen Haushaltsabfall
entsorgt werden, sondern muss an einem Sammelpunkt für das Recycling von elektrischen und
elektronischen Geräten abgegeben werden. Das Symbol auf dem Produkt, der
Gebrauchsanleitung oder der Verpackung weist darauf hin.
Die Werkstoffe sind gemäß ihrer Kennzeichnung wiederverwertbar. Mit der Wiederverwendung,
der stofflichen Verwertung oder anderen Formen der Verwertung von Altgeräten leisten Sie einen
wichtigen Beitrag zum Schutze unserer Umwelt.
Bitte erfragen Sie bei der Gemeindeverwaltung die zuständige Entsorgungsstelle.
Behindern Sie nicht die Belüftung des Gerätes, wie etwa mit Vorhängen, Zeitungen, Decken oder
mit Möbelstücken, die Belüftungsschlitze müsssen immer frei sein. Überhitzung kann Schäden
verursachen und die Lebensdauer des Gerätes verkürzen.
Hitze und Wärme
Setzen Sie das Gerät nicht direkter Sonnenstrahlung aus. Achten Sie darauf, das das Gerät keinen
direkten Wärmequellen wie Heizung oder offenem Feuer ausgesetzt ist. Achten Sie darauf, das die
Lüftungsschlitze des Gerätes nicht verdeckt sind.
Feuchtigkeit und Reinigung
Dieses Produkt ist nicht wasserfest! Tauchen Sie den Player nicht in Wasser ein und lassen ihn
auch nicht mit Wasser in Berührung kommen. In den Player eindringendes Wasser kann ernsthafte
Schäden verursachen. Verwenden Sie keine Reinigungsmittel, die Alkohol, Ammoniak, Benzen
oder Schleifmittel enthalten, da diese den Player beschädigen können.
01-2322_GE 6/20/06 11:19 AM Page 011
Page 12
SAFETY PRECAUTION
This appliance must be disconnected from the mains when not in use. Do not allow this appliance to be
exposed to rain or moisture.
CAUTION : To reduce the risk of electric shock, do not remove cover (or back). No user-serviceable parts
inside. Refer servicing to qualified service personnel.
SAFETY INSTRUCTIONS
1. READ INSTRUCTIONS – All the safety and operating instructions should be read before the appliance is
operated.
2. RETAIN INSTRUCTIONS – The safety and operating instruction should be retained for future reference.
3. HEED WARNINGS – All warnings on the appliance and in the operating instructions should be adhered to
.
4. FOLLOW INSTRUCTIONS – All operating and use instructions should be followed.
5. WATER AND MOISTURE – The appliance should not be used near water, for example, near a bathtub,
washbowl, kitchen sink, laundry tub, swimming pool or in a wet basement.
6. VENTIL ATION – The appliance should be situated so that its location or position does not interfere with its
proper ventilation, for example, the appliance should not be situated on a bed, sofa , rug or similar surface
that may block the ventilation openings; Do not place in built–in installation openings; such as a bookcase
or cabinets that may impede the flow of air through the ventilation openings.
7. HEAT – The appliance should be situated away from heat sources such as radiators, heat registers, stoves,
or other appliance (including amplifiers) that produce heat.
8. POWER SOURCES – The appliance should be connected to a power supply only of the type described in
the operating instructions or as marked on the appliance.
9. GROUNDING AND POLARISATION – Precautions should be taken to ensure that the grounding or
polarisation means of the appliance are not defeated.
10. POWER CORD PROTECTION – Power supply cords should be routed so that they are not likely to be
walked on or pinched by items placed upon or against them, paying particular attention to cords at plugs,
convenience receptacles, and the point at which they exit from the appliance.
012.
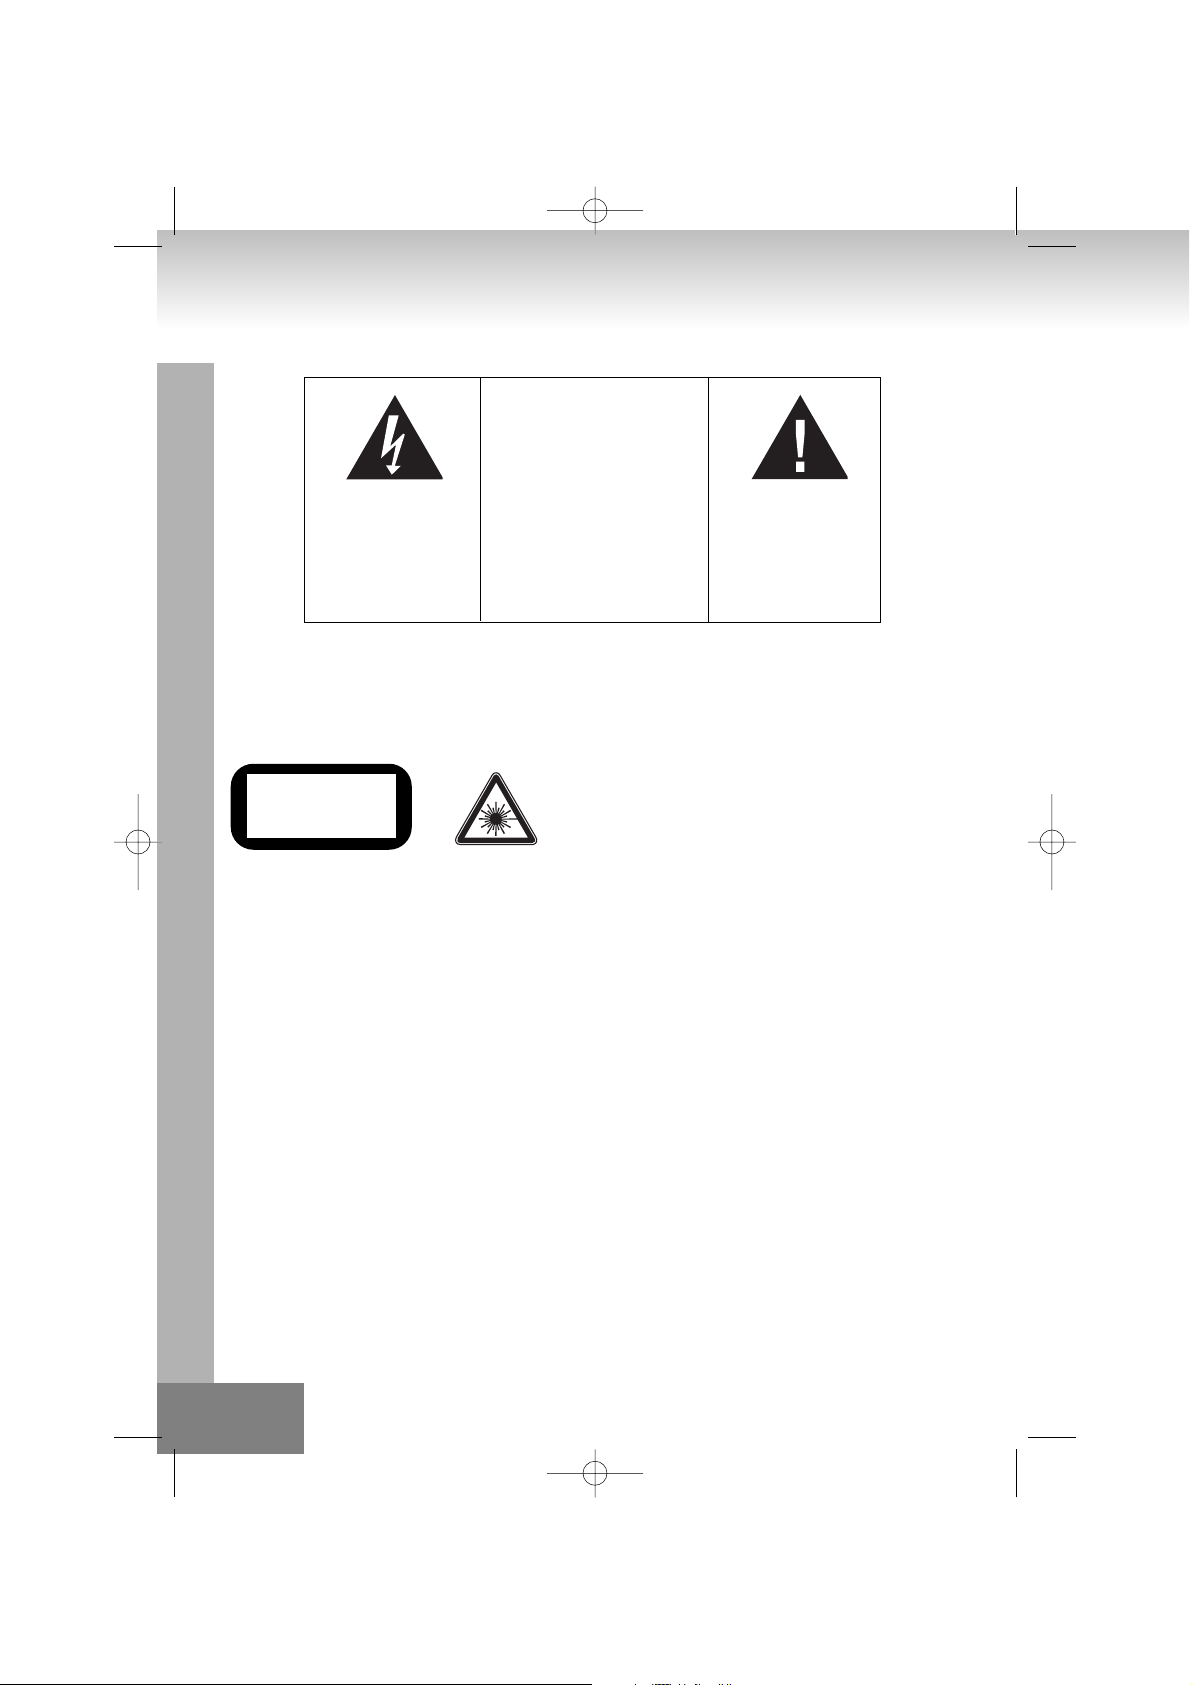
The triangular symbol with the
lightning Bolt warns the user to the
presence of dangerous non-isolated
voltage on the inside of this device
which may cause an electric shock.
WARNING
DANGER OF A HAZARDOUS ELECTRIC
SHOCK. DO NOT OPEN
WARNING: TO REDUCE THE RISK OF AN
ELECTRIC SHOCK, DO NOT REMOVE THE
FRONT OR BACK COVER. INSIDE THE UNIT,
THERE ARE NO PARTS THAT CAN BE
REPAIRED OR ADJUSTED BY THE USER.
PLEASE REFER TO QUALIFIED TECHNICIANS.
The triangular symbol with the
exclamation highlights important
points of which the user should refer
to the manual regarding maintenance
and repair.
CLASS 1
LASER PRODUCT
CAUTION !
Invisible laser radiation when open and
interlocks defeated. Avoid exposure
to beam.
02-2322_EN 6/20/06 11:20 AM Page 02
Page 13

013.
11. CLEANING – The appliance should be cleaned only as recommended by the manufacturer.
12. POWER LINES – An outdoor antenna should be located away from power lines.
13. NONUSE PERIODS – The power cord of the appliance should be unplugged from the outlet when
the appliance is to be left unused for a long period of time.
14. OBJECT and LIQUID ENTRY – Care should be taken so that objects do not fall and liquids are not
spilled into the enclosure through openings.
15. SERVICING – The user should not attempt to service the appliance beyond that described in the
user’s operating instructions. All other servicing should be referred to qualified service personnel.
16. DAMAGE REQUIRING SERVICE – The appliance should be serviced by qualified service personnel
when:
A. The power-supply cord or plug has been damaged.
B.Objects have fallen into, or liquid has been spilled into the appliance enclosure.
C.The appliance has been exposed to rain.
D.The appliance has been dropped, or the enclosure damaged.
E. The appliance does not appear to operate normally or exhibits a marked change in performance
PREPARATION FOR USE
INSTALLATION
• Unpack all parts and remove protective material.
• Insert the batteries into the remote control transmitter.
• Do not connect the unit to the mains before checking the mains voltage and before all other
connections have been made.
• Do not cover any vents and make sure that there is a space of several centimeters around the unit
for ventilation.
CONNECTIONS
1) Connect left and right speaker to left and right speaker jacks.
2) Before connecting the unit to the mains, make sure that the AC voltage printed on the back plate is
the same as the AC voltage from your wall outlet.
OPERATION / COMPACT DISC
Bear in mind the following points since any dirt; scratches or warping of the disc can cause broken or
intermittent sound and also noise.
• When holding the discs, take care not to touch the playing surface.
• Do not place discs in the following locations:
Near a heating device or place where the temperature is high;
In damp or dusty areas.
• Wipe away any fingerprints or dust on the playing surface of a disc using a soft cloth. Always wipe
from the inside toward the outside of the disc.
LOADING THE DISC
• Press OPEN/CLOSE
• Insert a CD (printed side up) in the tray.
• Press OPEN/CLOSE to close the CD door.
• The display shows the CD’s total number of tracks.
02-2322_EN 6/20/06 11:20 AM Page 03
Page 14

014.
CONTROLS AND FEATURES
1. CD DOOR
2. CD DOOR OPEN/CLOSE
3. LCD DISPLAY
4. VOLUME UP
5. VOLUME DOWN
6. FOLDER BUTTON
7. X-BASS BUTTON
8. POWER INDICATOR
9. REMOTE SENSOR
10. SKIP BUTTON
11. SKIP BUTTON
12. PLAY/PAUSE BUTTON
13. STOP BUTTON
14. FUNCTION SELECTOR
(TAPE, CD/MP3, TUNER)
15. BAND SELECTOR (AM, FM, FM ST.)
16. MODE BUTTON
(REPEAT, RANDOM)
17. PROGRAMM BUTTON
18. TUNING BUTTON
19. CASSETTE DOOR
20. PHONES JACK
21. RECORD/PL AY DECK CONTROL
22. FM ANT. WIRE
23. SPEAKER LEFT
24. SPEAKER RIGHT
25. POWER CORD
26. BEAT CUT
17
15
13
11
9
7
6
2
3
21
19
1
4
5
8
10
12
14
16
18
22
26
25
23
24
02-2322_EN 6/20/06 11:20 AM Page 04
Page 15
REMOTE CONTROL FUNCTIONS
Preparation before use
• Installing batteries in the remote control unit
• Remove the battery cover from the back of the remote control unit.
• Insert two “UM4/AAA” size batteries.
• Insert the batteries with the and terminals matching the indication inside the battery compartment.
• Replace the cover.
• Battery replacement
• When the remote control operation becomes unstable or the distance from which remote control is
possible becomes shorter, replace the batteries with new ones.
Using the remote control unit
To use the remote unit, point at the REMOTE SENSOR and press the buttons gently and firmly. Remote control
operation is possible within approximate 18ft(6m). However, since the remote control range is less when the
unit is used at an angle, use directly in front of the REMOTE SENSOR, for maximum distance.
Do not expose the REMOTE SENSOR to strong light (direct sunlight or artificial lighting) and make sure that
there are no obstacles between the REMOTE SENSOR and the remote control unit.
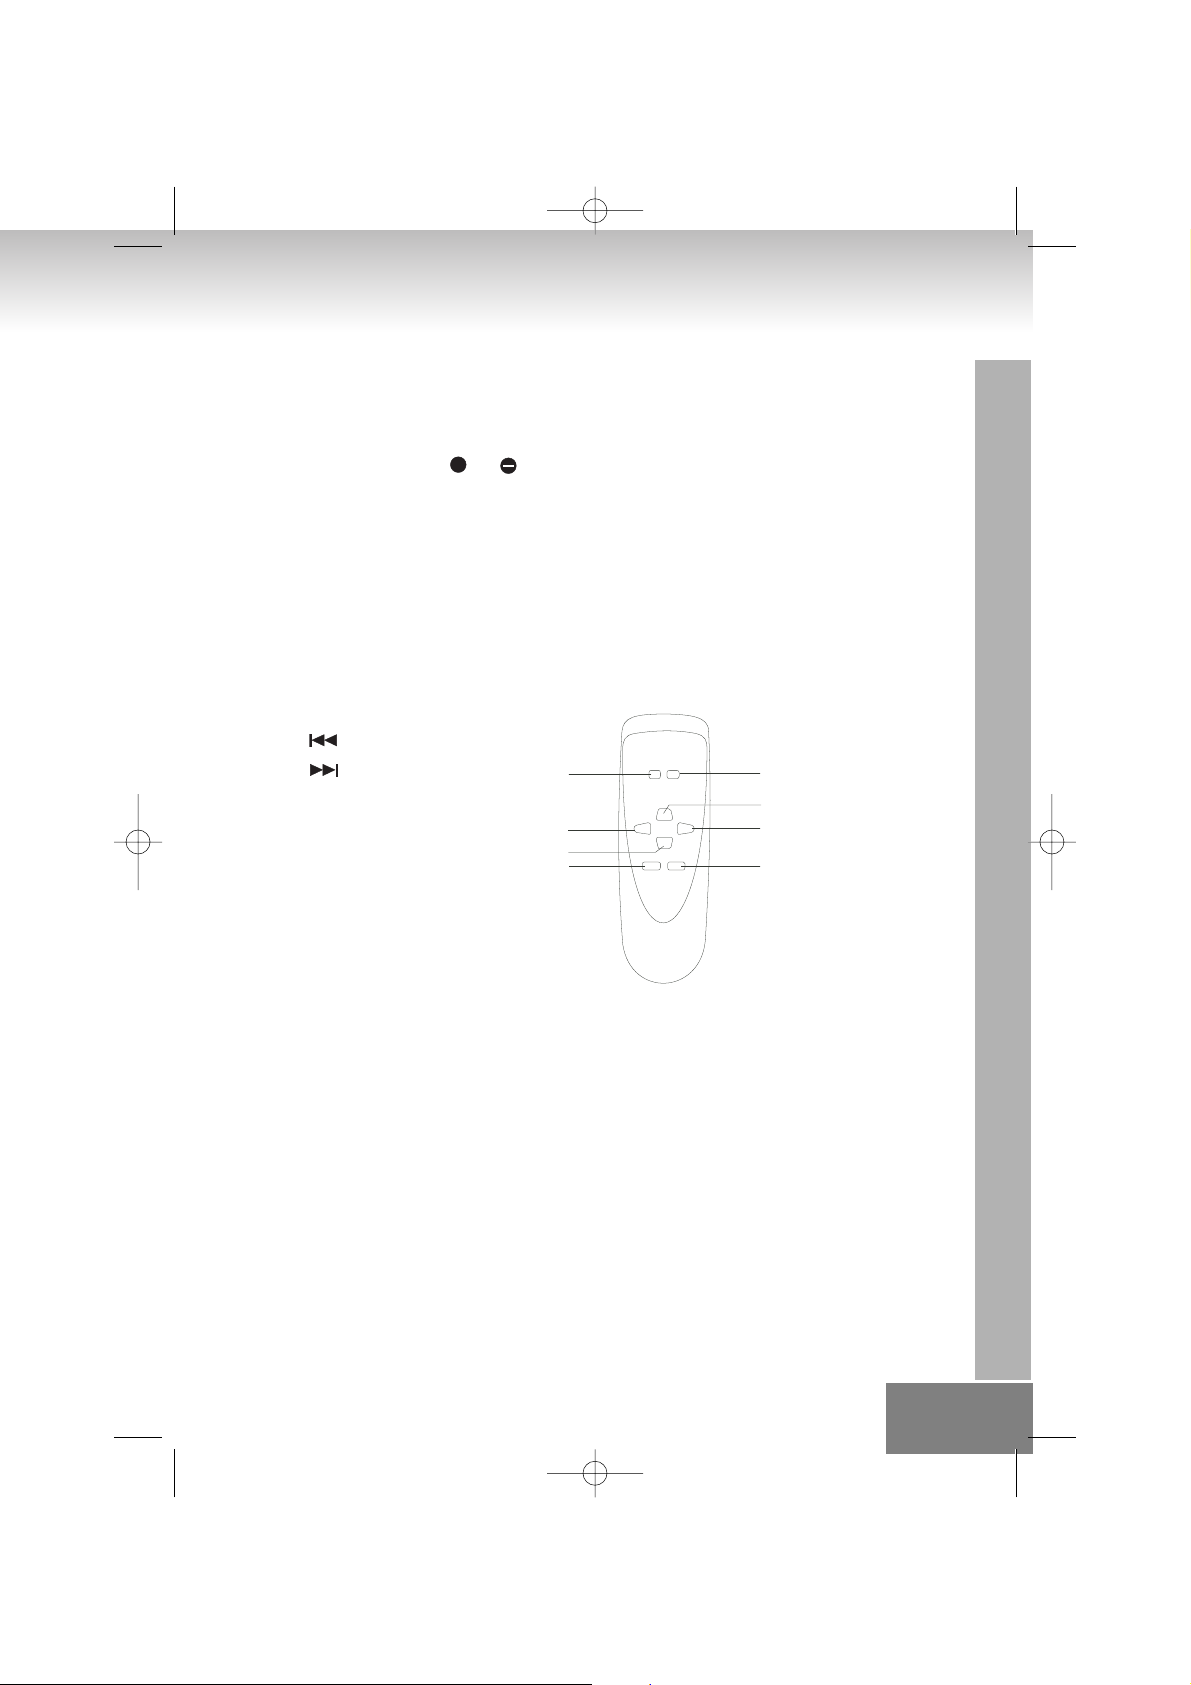
REMOTE CONTROL
1. Folder button
2. Folder button
3. PLAY / PAUSE button
4. STOP button
5. SKIP + button
6. SKIP – button
7. MODE button
8. PROGRAM button
Key Function OPERATION
POWER BUTTON - To turn on the Unit
VOLUME +/- - To increase and decrease the volume sound to suitable level
PLAY/PAUSE
• Start playing from stop mode.
• Start pause during play.
• Return to play mode from a pause.
STOP
• In Play mode or Pause mode: Changing to Stop mode or Program Entry mode during program play.
• In Program Entry mode: Exit the Program Entry mode, clear program memory and change to Stop mode.
• In Random Play (Mode Button): Changing to Stop mode and release Random function.
015.
+
02-2322_EN 6/20/06 11:20 AM Page 05
1
6
4
7
2
3
5
8
Page 16
PROGRAM key [Function Explanation]
1. If [PROGRAM] key is pressed during the CD stop mode, the system goes to the program mode. During the
program mode, the track number and PROGRAM display will flash in the 500[ms] interval (Display 1).
2. If [FF/SKIP+] / [FB/SKIP-] key is pressed, the system chooses the track number which it wants to register.
3. If [PROGRAM] key is pressed after choosing a track number, the system keeps the track number, and goes
to next program mode (Display 2).
4. The system can hold 10 programs for CD Mode / 10 programs for MP3. After the system held 20
programs, it can’t keep another song. During the system holding 20 programs, it can't keep other program.
PROGRAM display and “P 01“ will flash in the 500[ms] interval
5. If [STOP] key is pressed during the program mode, the system removes the contents of the program, and
cancels the program mode.
6. If [PLAY/PAUSE] key is pressed during the system holding the program of more than one, it starts the
program play. During the program play, Display shows PROGRAM is play (display 4).
7. If [FF/SKIP+] / [FB/SKIP-] key is pressed during the program play, the system skips to next / previous
program.
8. If [STOP] key is pressed during the program play, the system stops the program play, and goes the stop
mode. Until [STOP] key is pressed during the stop mode, the system keeps the contents of the program.
MODE key [Function Explanation]
CD Mode:
1. If [MODE] key is pressed, the system changes the mode(as follows intention).
2. During the repeat-1 mode, the system repeats the current track of the CD.
3. During the repeat-all mode, if it reaches the end of the tune of the final track, it is usually returned to the
head track.
4. If whole track was finished during the random play mode or if [STOP] key is pressed during the random play
mode, the system goes to the stop mode and cancels the random play mode.
5. If [FF/SKIP+] key is pressed during the random play mode, the system skips next at random. If [FF/SKIP+]
key is pressed on the tune of the final track, the system searches next lap at random.
6. If [FB/SKIP-] key is pressed during the random play mode, the system searches the beginning of the
current track, but doesn’t skip track down.
016.
PROGRAM
(DISPLAY 1 )
(DISPLAY 2 )
(DISPLAY 3 )
(DISPLAY 4 )
PROGRAM
PROGRAM
PROGRAM
REP
REP
ALL
RANDOM
NO REPEAT& RANDOM REPEAT ALL
REPEAT-1 RANDOM
02-2322_EN 6/20/06 11:20 AM Page 06
Page 17
MP3 Mode:
1. If [MODE] key is pressed, the system changes the mode(as follows intention).
2. During the repeat-1 mode, the system repeats the current track of the MP3
3. During the repeat-folder mode, the system repeats the current folder track of the MP3
4. During the repeat-all mode, if it reaches the end of the tune of the final track, it is usually returned to the
head track.
5. If whole track was finished during the random play mode or if [STOP] key is pressed during the random play
mode, the system goes to the stop mode and cancels the random play mode.
6. If [FF/SKIP+] key is pressed during the random play mode, the system skips next at random. If [FF/SKIP+]
key is pressed on the tune of the final track, the system searches next lap at random.
7. If [FB/SKIP-] key is pressed during the random play mode, the system searches the beginning of the
current track, but doesn’t skip track down.
MODE
CD: None Repeat 1 Repeat all Random None.
MP3: None Repeat 1 Repeat folder Random all Random None.
RANDOM
1. Press RANDOM button to begin listening, all the tracks on the disc should be played randomly. Select the
Random function and press the Mode button and selection Random to start random playback.
PROGRAMMING MP3
The MP3 player enable program 10 tracks in a sequence of your choice.
1. Press PROGRAM button in stop mode the display will show “P01” and “PROGRAM” will be blinking.
2. Press FF/SKIP+ and FB/SKIP- button to select the desired track to be programmed. or Press FOLDER DN
and FOLDER UP button on the remote control to select the desired next folder’s track to be programmed.
3. Press PROGRAM button to entry memory.
4. Continue to program, repeat steps 2 and 3.
5. Press PLAY / PAUSE button on program mode to play the programmed tracks.
SKIP +
• Change the starting play track during stop mode, cyclic to the first track if it is in the last track.
• Skip to the next track during Normal Play, cyclic to the first track if it is in the last track.
• When Key is pushed more than 0.5sec, Fast-Forward is executed.
• Skip to the next programmed track during Program play, cyclic to the first programmed track.
• Skip to the next random track during Random play.
017.
NO REPEAT& RANDOM
ALBUM
MP3
REPEAT FOLDER
MP3
MP3
RANDOM
REPEAT ALL
REPEAT-1
RANDOM
MP3
MP3
REP
REP
REP
ALL
02-2322_EN 6/20/06 11:20 AM Page 07
Page 18

SKIP -
• Change the starting play track during stop mode, cyclic to the last track if it is in the first track.
• Skip to the previous track during Normal play, cyclic to the last track if it in the first track.
• When key is pushed more than 0.5 sec, Fast – reverse is executed.
• Skip to the previous programmed track during Program play, cyclic to the first programmed track.
FOLDER
• When the system is STOP mode, For MP3, Skip up to next folder in increasing order and display folder
number.
• When the system is PLAY mode, For MP3, Skip up to next folder number in increasing order, start play
head track of the folder and display current folder and track number Press key once, current folder number
is flashing for 3s, press key again folder up is executed.
FOLDER
• When the system is STOP mode, For MP3, Skip up to next folder in decreasing order and display folder
number.
• When the system is PLAY mode, For MP3, Skip up to next folder number in decreasing order, start play
head track of the folder and display current folder and track number Press key once, current folder number
is flashing for 3s, press key again folder up is executed.
+/= BASS
• Press the +/- BASS button and select the Bass Boost effect.
TAPE FUNCTION
Move to select TAPE FUNCTION
RECORD/PLAY DECK CONTROLS
• RECORD : to start recording.
• PLAY : to start cassette playback.
• REWIND : to fast rewind the cassette.
• F.FWD : to fast forward the cassette.
• STOP/EJ : to stop and eject the cassette.
• PAUSE : to interrupt recording or playback
CASSETTE DECK
Before operating the cassette deck, make sure Function Selector is in the Tape mode.
PLAYBACK
• Set Function Selector to Tape mode.
• Press Eject button to open the cassette door
• Place the cassette tape into Deck, with the side to be played facing the window.
• Close cassette door and Press Play button to start playback.
• Playback stops when the tape reaches the end.
• Press Stop button if you want to stop playback before the end of the tape
02-2322_EN 6/20/06 11:20 AM Page 08
018.
Page 19
RECORDING FROM RADIO / CD
• Push function button “RADIO”, or “CD” to select the sound source.
• Place a blank tape into Deck
• Press PAUSE button first and then Press PLAY and RECORD buttons together.
• Play the selected sound source.
• When recording, release PAUSE button
1. TAPE SLACK (Fig.1) ---- Check and tighten slack
tape before use with a pencil or similar tool. Slack
tape may possibly break or get jammed in the
mechanism.
2. TO PREVENT ACCIDENTAL ERASURE (Fig.2)----
Use a screwdriver or other pointed tool to break off
the plastic tabs.
3. TO RECORD AGAIN (Fig.3) ---- Cover the tab
openings with cellophane tape.
RADIO OPERATION
TUNING
• Push function button “RADIO” to set unit to Radio mode. Radio Function Indicator will light up
• Select the tuning range with the BAND button.
• Rotate TUNING CONTROL to select the desired station.
NOTE:
When listening to FM broadcasts it is advisable to extend fully the wire FM antenna on the rear cover.
When listening to AM broadcasts it is advisable to adjust the position of the helmet for optimum reception.
What is MP3?
MP3 is a short form for MPEG Audio Layer 3. MPEG refers to the Moving Pictures Experts Group. MP3s are
digital audio files that have been shrunken down while still maintaining their original sound quality. MP3s are
widely recognized as the most popular format for Storing and listening to music. The digital audio files stored
on MP3 disc can be played on MP3 player. MP3 disc can have 150-200 songs in one CD.
019.
Side A
Tab for side A
Cellophane tape
Fig.1
Fig.2
Fig.3
02-2322_EN 6/20/06 11:20 AM Page 09
Page 20
Power Supply : AC ~230V 50Hz
Power Consumption : : 15 watts
Output Power (Per channel) : 2 Watts X 2 RMS into 8 OHM
Radio Section : AM 525 – 1615 KHz
: FM 87.5 – 108 MHz
Compact Disc Section
Frequency Response (-3dB) : 60 – 16,000 Hz
Signal-to-noise Ratio : 60 dB
Harmonic Distortion : 0.4%
Compatible with : CD-DA, CD-R, CD-RW, MP3
Cassette section :
Tape speed : 4.75cm/sec.
Wow and Flutter : < 0.4%
Frequency response : 100Hz - 6.3KHz
02-2322_EN 6/20/06 11:20 AM Page 010
020.
Page 21

MORE INFORMATION
Beware of small pieces and batteries, do not swallow them. It may be hazardous to your health and
lead into suffocation. Please, Make sure to keep small devices and batteries out of the reach of
children.
Important advice regarding hearing protection
Caution:
You care for your hearing, and so do we.
Therefore, use caution while using this appliance.
Our recommendation: Avoid high volumes.
Children should be supervised while using headphones; make sure that the appliance is not set to high volume.
Caution!
High volumes may cause irreparable damage to children’s ears.
NEVER let allow anyone, especially children, to put objects into the holes, slots or openings on
this devise. This may lead into death due to electric shock. The device must only be opened by a
qualified assistant.
Only use the appliance for its intended purpose.
This device may only be used in housings and business premises.
Please keep this instruction manual for further reference.
Instructions on environment protection
Do not dispose of this product in the usual household garbage at the end of its life cycle; hand it
over at a collection point for the recycling of electrical and electronic appliances. The symbol on
the product, the instructions for use or the packing will inform about the methods for disposal.
The materials are recyclable as mentioned in its marking. By recycling, material recycling or other
forms of re-utilization of old appliances, you are making an important contribution to protect our
environment.
Please inquire at the community administration for the authorized disposal location.
Do not obstruct the ventilation of the device. Make sure, that no curtains, newspapers, furniture or
any other type of object are blocking the ventilation system of the apparatus. The ventilation system
must be clear of objects at all times! Overheating may lead into serious damage of the device and
reduce its performance and lifespan.
Heat and warmth
Do not expose the appliance to direct sunlight. Make sure that the appliance is not subject to direct
heat sources such as heaters or open fire. Make sure that the ventilation slots of the appliance are
not covered.
Moisture and cleaning
This appliance is not waterproof! Do not immerse player in water. Do not allow player to come in
contact with water. If water gets inside the player it may cause serious damage. Do not use
cleaning agents that contain alcohol, ammoniac, benzene or abrasives as these could damage the
player. For cleaning, use a soft, moistened cloth.
02-2322_EN 6/20/06 11:21 AM Page 011
021.
Page 22
022.
CONSIGNES DE SECURITE
Cet appareil doit être débranché du secteur lorsque vous ne l’utilisez pas.
Ne pas laisser cet appareil être en contacte avec la pluie ou l’humidité.
MISE EN GARDE :
Pour éviter les risques d’électrocution ne pas détacher le revêtement (ni le panneau arrière).
Il n’y a aucun élément a l’intérieur qui soit réglable/ réparable par l’utilisateur. Toute modification ou réparation
doit être remise a un réparateur qualifié.
CONSIGNES DE SECURITE
1. LISEZ CES CONSIGNES - Veuillez lire la totalité des consignes de sécurité et d’utilisation avant d’utiliser
l’appareil.
2. CONSERVEZ CES CONSIGNES - Ces consignes de sécurité et mode d’emploi doivent être conservés en
cas de besoin futur.
3. OBEISSEZ LES MISE EN GARDE - Veuillez obéir la totalité des mises en garde imprimées sur l’appareil ou
dans le mode d’emploi.
4. OBEISSEZ CES CONSIGNES - Veuillez obéir toutes consignes d’opération et d’utilisation.
5. L’EAU ET L’HUMIDITE - Cet appareil ne devrait pas être utilisé à proximité de l’eau, par exemple, près du
bain, du lavabo, de l’évier, de la machine à laver, de la piscine ou dans un sous-sol humide.
6. AERATION - Cet appareil doit être placé de façon à ce que son positionnement n’obstrue pas son système
d’aération. Par exemple, l’appareil ne devrait pas être placé sur un lit, canapé, tapis ou autre surface de
ce genre, pouvant bloquée les bouches d’aération. Ne pas placer l’appareil à l’intérieur d’une installation
comme une étagère ou un placard pouvant empêcher l’air de circuler normalement à travers les bouches
d’aération.
7. CHALEUR - L’appareil devrait être placé loin de source de chaleur comme les radiateurs, registre de
chaleur, cuisinière, ou d’autres appareils (les amplificateurs également) pouvant produire de la chaleur.
8. ALIMENTATION ELECTRIQUE - L’appareil doit être branché sur une source d’électricité correspondant à
ce qui est décris dans le mode d’emploi ou directement imprimé sur l’appareil.
9. MISE A TERRE ET POL ARISATION - Des précautions doivent être prises pour vous assurez que la mise à
terre ou la polarisation de l’appareil ne sont pas court-circuités.
10. PROTECTION DU FIL D’ALIMENTATION - Les fils d’alimentation doivent être placés de sorte à ce que
personne ne puissent marcher dessus ou qu’aucun objet ne puissent les abîmés en étant posés dessus,
tout en faisant particulièrement attention aux prises sur le mur et sur l’appareil.
PRODUIT LASER
DE CLASSE 1
ATTENTION !
Présence de radiation laser invisible
lorsque l’appareil est ouvert ou que les
verrouillages sont cassés.
Eviter de vous exposer au laser.
Le voyant lumineux, inscrit dans un
triangle équilatéral et dont le
symbole est une flèche, avertit le
consommateur d’une ‘dangereuse
tension’ non isolée dans le boîtier
de l’article, qui pourrait avoir une
amplitude suffisante pour causer
une électrocution.
ATTENTION
RISQUE D’ELECTROCUTION. NE PAS OUVRIR
ATTENTION: AFIN DE REDUIRE LES RISQUES
D’ELECTROCUTION, NE PAS RETIRER LE
COUVERCLE (OU LE DOS). AUCUNE PIECE A
L’INTERIEUR N’EST UTILE AU
CONSOMMATEUR. POUR UN DEPANNAGE,
SE REFERER AU PERSONNEL QUALIFIE.
Le point d’exclamation à l’intérieur
d’un triangle équilatéral avertit le
consommateur de la présence
d’instructions importantes
concernant le fonctionnement et
l’entretien (dépannage) dans le mode
d’emploi de l’appareil.
03-2322_FR 6/20/06 11:22 AM Page 02
Page 23

023.
11. NETTOYAGE - L’appareil doit être nettoyé selon les recommandations du fabricant.
12. FILS ELECTRIQUE - L’antenne externe doit être placée loin des fils électriques.
13. PERIODES DE NON-USAGE - Le fil d’alimentation devrait être débranché du secteur lorsque
l’appareil n’est pas utilisé pendant longtemps.
14. INFILTRATION D’OBJETS OU DE LIQUIDES - Prenez garde à ce que des objets externes ou des
liquides ne s’infiltrent pas dans les orifices.
15. ENTRETIEN - L’utilisateur ne doit jamais essayer de modifier ou réparer l’appareil en dehors de ce
qui est décris dans le mode d’emploi. Toute modification ou réparation doit être remise a un
réparateur qualifié.
16. DOMMAGES SOLLICITANT DES REPARATIONS - Cet appareil devrait être réparé par un technicien
qualifié lorsque :
A. Le fil d’alimentation ou la prise est endommagé.
B.Des objets ou des liquides se sont introduits dans l’appareil.
C.L’appareil a été en contacte avec de l’eau.
D.L’appareil est tombé ou le revêtement de l’appareil est endommagé.
L’appareil n’a pas l’air de fonctionner normalement ou vous remarquez un changement dans son
fonctionnement.
PREPARATION POUR L’UTILISATION
INSTALLATION
• Déballez tous les éléments et enlever toute forme d’emballage.
• Introduisez les piles dans la télécommande.
• Ne pas brancher l’appareil sur le secteur avant de vérifier le voltage du secteur et avant de vérifier
que tous les branchements sont en place.
• Ne pas recouvrir les bouches d’aérations et assurez-vous de qu’il y ait un espace de quelques
centimètres autour des bouches d’aération de l’appareil.
BRANCHEMENTS
1) Branchez les enceintes gauche et droite dans les prises qui leurs sont destinées.
2) Avant de brancher l’appareil sur le secteur, assurez-vous que le voltage AC indiqué sur sa plaque
arrière correspond à celui du secteur.
MODE D’EMPLOI/ CD
Suivez les conseils suivants, car toute poussière, éraflures ou voilures sur le CD peut déformer le son ou
entraîner des bruits.
• Lorsque vous tenez un disque, faites attention de ne pas toucher la surface servant à la lecture.
• Ne pas placer un disque dans les endroits suivants :
Près d’un appareil chauffant ou d’un endroit ou la température est haute.
Dans un endroits humide et poussiéreux.
• Essuyez toutes marques de doigts ou de poussière de la surface de lecture du disque à l’aide d’un
chiffon doux.
Toujours essuyez de l’intérieur vers l’extérieur du disque.
LECTURE DU CD
• Appuyez sur OPEN/CLOSE.
• Introduisez un CD (face imprimée vers le haut) dans le tiroir.
• Appuyez sur OPEN/CLOSE pour fermer la portière du lecteur de CD.
• L’écran affiche le nombre total de chanson sur ce CD.
03-2322_FR 6/20/06 11:22 AM Page 03
Page 24
024.
COMMANDES ET CARACTERISTIQUES
1. PORTIERE DU LECTEUR DE CD
2. PORTIERE DU LECTEUR DE CD OPEN/CLOSE
[OUVRIR/FERMER]
3. AFFICHEUR LCD
4. VOLUME UP [AUGMENTER LE SON]
5. VOLUME DOWN [BAISSER LE SON]
6. BOUTON FOLDER [FICHIER]
7. BOUTON X-BASS [BASSE EXTRA]
8. INDICATEUR DE COURANT
9. CAPTEUR DE L A COMMANDE
10. BOUTON SKIP [SAUTER]
11. BOUTON SKIP [SAUTER]
12. BOUTON PLAY/PAUSE [LECTURE/PAUSE]
13. BOUTON STOP [ARRET]
14. SELECTEUR DE [ FUNCTION FONCTION] (TAPE, CD/MP3, TUNER) [(CASSETTE,
CD/MP3, RADIO)]
15. SELECTEUR DE BAND [LONGUEUR D’ONDE]
(AM, FM, FM ST)
16. BOUTON MODE [SELECTEUR DE MODE]
(REPEAT, RANDOM) [(REPETER, ALEATOIRE)]
17. BOUTON PROGRAM [PROGRAMMER]
18. BOUTON TUNING [REGLAGE]
19. PORTIERE DU LECTEUR DE CASSETTE
20. PRISE DES ECOUTEURS
21. COMMANDES RECORD/PL AY
[ENREGISTRER/LECTURE]
22. FIL DE L’ANTENNE FM
23. ENCEINTE GAUCHE
24. ENCEINTE DROITE
25. FIL D’ALIMENTATION
26. BEAT CUT
17
15
13
11
9
7
6
2
3
21
19
1
4
5
8
10
12
14
16
18
22
26
25
23
24
03-2322_FR 6/20/06 11:22 AM Page 04
Page 25

FONCTIONS DE LA TELECOMMANDE
Préparation avant l’utilisation
• Veuillez introduire les piles dans la télécommande.
• Détachez le couvercle du boîtier des piles, situé au dos de la télécommande.
• Introduisez deux piles de type « UM4/AAA ».
• Introduisez-les en vous assurant que les bouts et correspondent à la polarisation indiquée à
l’intérieur du boîtier.
• Replacez le couvercle.
Remplacement des piles
• Lorsque l’opération de la télécommande devient irrégulière ou que la distance avec laquelle elle fonctionne
se réduit, veuillez changer les piles.
Utilisation de la télécommande
Pour utiliser la télécommande, il vous suffit d’orienter le CAPTEUR DE LA TELECOMMANDE et d’appuyez
doucement mais fermement sur le bouton.
L’utilisation de la télécommande est possible d’à peu près 6 mètres.
Néanmoins, parce que la distance est réduite lorsque vous l’utilisez à une angle, veuillez l’utiliser directement
devant le CAPTEUR DE LA TELECOMMANDE, pour optimiser la distance de réception. Ne pas exposer le
CAPTEUR DE LA TELECOMMANDE à de la lumière trop puissante (comme le soleil ou des lampes artificielles)
et assurez-vous à ce qu’aucun obstacle ne intervienne entre le CAPTEUR DE LA TELECOMMANDE et la
télécommande.
TELECOMMANDE
1. Bouton folder [fichier]
2. Bouton folder [fichier]
3. Bouton PLAY/PAUSE [LECTURE/PAUSE]
4. Bouton STOP [ARRET]
5. Bouton SKIP + [SAUTER]
6. Bouton SKIP - [SAUTER]
7. Bouton MODE [SELECTEUR DE MODE]
8. Bouton PROGRAM [PRODRAMMER]
OPERATION des touches
BOUTON POWER Pour allumer l’appareil.
VOLUME +/- - Pour augmenter ou baisser le son au niveau adéquat.
LECTURE/PAUSE
• Démarrer la lecture lorsque l’appareil est arrêté.
• Mettre sur pause lorsqu’il est en lecture.
• Retourner en mode lecture depuis une pause.
025.
+
03-2322_FR 6/20/06 11:22 AM Page 05
1
6
4
7
2
3
5
8
Page 26
ARRET
• En mode Lecture ou mode Pause : Pour changer du mode lecture d’un programme au mode Stop ou pour
visionner le programme.
• En mode Visionnage de Programme : Sortir du mode Visionnage de Programme, effacer le mémoire ou
arrêter la lecture.
• En mode Aléatoire (bouton Mode) : Pour arrêter la lecture et arrêter la fonction Aléatoire.
Touche pour PROGRAMMER [Explication de la Fonction]
1. Wenn die Taste [PROGRAM] gedrückt wird während sich die CD im Stopp Modus befindet, stellt das
System auf Programm Modus um. Im Programm Modus leuchten auf der Anzeige Titel, Nummer und
PROGRAM in einem 500 ms Intervall auf (Anzeige 1).
2. Wenn die Taste [FF/SKIP+] / [FB/SKIP-] gedrückt ist, wählt das System die Titelnummer aus die es
verzeichnen kann.
3. Wenn die Taste [PROGRAM] gedrückt wird, nachdem Sie eine Titelnummer ausgewählt haben, bewahrt
das System den Titel und geht in den nächsten Programm Modus.(Anzeige 2).
4. Das System kann 20 Programme für den CD Modus / 10 Programme für MP3 behalten.
Nachdem das System 20 Programme behalten hat, kann kein weiteres Lied mehr aufgenommen werden.
Solang das System 20 Programme beinhaltet, können keine anderen Programme aufgenommen werden.
Die PROGRAM Anzeige lässt “P 01“in einem 500 ms Intervall aufblitzen.
5. Wenn während des Programm Modus die Taste [STOP] gedrückt wird, entfernt das System die Inhalte des
Programms und streicht den Programm Modus.
6. Wenn die Taste [PLAY/PAUSE] gedrückt wird während das System mehr als ein Programm beinhaltet,
startet es die Programmwiedergabe. Während der Programmwiedergabe zeigt das Display PROGRAM
wird wiedergegeben.(Anzeige 4).
7. Wenn die Taste [FF/SKIP+] / [FB/SKIP-] gedrückt wird während der Programmwiedergabe, springt das
System zum nächsten / vorherigen Programm.
8. Wenn dieTaste [STOP] gedrückt wird während der Programmwiedergabe, stoppt das System und wechselt
in den Stopp Modus. Bis die Taste [STOP] im Stopp Modus gedrückt ist, bewahrt das System die
Programminhalte.
Touche pour choisir le MODE [Explication de la Fonction]
Mode CD :
1. Si vous appuyez sur la touche [MODE], le système changera de mode. (voir ci-dessous)
026.
PROGRAM
(AFFICHEUR 1 )
(AFFICHEUR 2 )
(AFFICHEUR 3)
(AFFICHEUR 4)
PROGRAM
PROGRAM
PROGRAM
REP
REP
ALL
RANDOM
PAS DE REPETITION NI
DE LECTURE ALEATOIRE
REPETER TOUS
REPETER-1
ALEATOIRE
03-2322_FR 6/20/06 11:22 AM Page 06
Page 27
2. Lorsque vous êtes en mode Repeat-1, le système répétera le morceau du CD en court.
3. Lorsque vous êtes en mode Repeat-all, après avoir atteint la fin du CD l’appareil recommencera la lecture
depuis le début.
4. Lorsque l’appareil est en mode de lecture aléatoire et que le disque st fini ou que vous appuyez sur la
touche [STOP] pendant la lecture aléatoire, l’appareil s’arrêtera et la fonction aléatoire d’annulera.
5. Si vous appuyez sur le bouton [FF/SKIP+] vous pourrez ainsi changer de morceau de manière aléatoire.
Si vous appuyez sur le bouton [FF/SKIP+] à la fin du CD la lecture recommencera de manière aléatoire.
6. Si vous appuyez sur le bouton [FB/SKIP-] lorsque vous êtes en mode aléatoire vous changerez de morceau
vers le début mais ne reviendra pas forcement en arrière.
Mode MP3
1. Si vous appuyez sur la touche [MODE] pour changer le mode (voir ci-dessous).
2. Lorsque vous êtes en mode Repeat-1, le système répétera le morceau MP3 en court.
3. Lorsque vous êtes en mode Repeat-folder, le système répétera le fichier en court de lecture.
4. Lorsque vous êtes en mode Repeat-all, après avoir atteint la fin du CD l’appareil recommencera la lecture
depuis le début.
5 Lorsque l’appareil est en mode de lecture aléatoire et que le disque st fini ou que vous appuyez sur la
touche [STOP] pendant la lecture aléatoire, l’appareil s’arrêtera et la fonction aléatoire d’annulera.
6. Si vous appuyez sur le bouton [FF/SKIP+] vous pourrez ainsi changer de morceau de manière aléatoire.
Si vous appuyez sur le bouton [FF/SKIP+] à la fin, la lecture recommencera de manière aléatoire.
7. Si vous appuyez sur le bouton [FB/SKIP-] lorsque vous êtes en mode aléatoire vous changerez de morceau
vers le début mais ne reviendra pas forcement en arrière.
MODE
CD : Aucun Répéter 1 Répéter tous Aléatoire Aucun
MP3 : Aucun Répéter 1 Répéter le fichier Répéter tous Aléatoire Aucun…
ALEATOIRE
1. Appuyez sur le bouton RANDOM pour commencer à écouter. Tous les morceaux du disque seront joués
de manière aléatoire. Pour choisir la fonction Random, appuyez sur le bouton Mode puis appuyez sur
Random pour débuter la lecture aléatoire.
PROGRAMMATION DES MP3
Ce lecteur MP3 vous permet de programmer 10 morceaux dans l’ordre que vous désirez.
1. Appuyez sur le bouton PROGRAM lorsque vous êtes en mode arrêt.
L’écran affichera « P01 » et « PROGRAM » clignotera.
2. Si vous appuyez sur le bouton [FF/SKIP+]/[FB/SKIP-] vous pourrez ainsi choisir quel morceau vous
désirez enregistrer Ou Si vous appuyez sur le bouton FOLDER DN et FOLDER UP sur la télécommande
cela vous permettra de passer à la programmation suivante.
3. Appuyez sur le bouton PROGRAM pour mémoriser le morceau.
4. Suivez de nouveau les étapes 2 et 3 pour continuer à programmer.
5. Appuyez sur le bouton PLAY/PAUSE en mode programmation pour débuter la lecture du programme.
027.
PAS DE REPETITION
NI DE LECTURE
ALEATOIRE
ALBUM
MP3
REPETER LE
FICHIER
MP3
MP3
RANDOM
REPETER TOUS
REPETER-1
ALEATOIRE
MP3
MP3
REP
REP
REP
ALL
03-2322_FR 6/20/06 11:22 AM Page 07
Page 28
SKIP +
• Changez le morceau en mode arrêt, avancez au premier morceau lorsque vous arrivez au dernier morceau.
• Avancez au prochain morceau lorsque l’appareil est en mode Lecture Normale.
Avancez jusqu’au premier morceau lorsque vous arrivez au dernier morceau.
• Lorsque vous appuyez sans arrêt pendant plus de 0,5 sec. Vous avancerez à l’intérieur du morceau.
• Avancez jusqu’au prochain morceau programmé lorsque vous êtes en mode Programmation.
Avancez jusqu’au premier morceau lorsque vous arrivez au dernier morceau.
• Avancez jusqu’au prochain morceau de manière aléatoire lorsque vous êtes en mode Aléatoire.
SKIP -
• Changez le morceau en mode arrêt
Avancez jusqu’au dernier morceau lorsque vous arrivez au premier morceau.
• Retournez au morceau précédent lorsque l’appareil est en mode Lecture Normale.
Avancez jusqu’au dernier morceau lorsque vous arrivez au premier morceau.
• Lorsque vous appuyez sans arrêt pendant plus de 0,5 sec. Vous reculerez à l’intérieur du morceau.
• Reculez jusqu’au morceau suivant programmé lorsque vous êtes en mode Programmation.
Reculez jusqu’au morceau suivant de manière aléatoire lorsque vous êtes en mode Aléatoire.
FOLDER
• Lorsque le système est en mode ARRET : En mode MP3, avance au prochain fichier en ordre croissant et
affiche l’ancien numéro.
• Lorsque le système est en mode LECTURE : En mode MP3, avance au prochain fichier en ordre croissant.
Débute la lecture à partir du premier morceau et affiche le fichier et le numéro du morceau en cours.
Appuyez sur la touche une seule fois. Le numéro du fichier actuel clignote pendant 3 sec.
Appuyez de nouveau sur la touche. Vous êtes remonté dans le fichier.
FOLDER
• Lorsque le système est en mode ARRET : En mode MP3, avance au prochain fichier en ordre décroissant
et affiche l’ancien numéro.
• Lorsque le système est en mode LECTURE : En mode MP3, avance au prochain fichier en ordre
décroissant.
Débute la lecture à partir du premier morceau et affiche le fichier et le numéro du morceau en cours.
Appuyez sur la touche une seule fois. Le numéro du fichier actuel clignote pendant 3 sec.
Appuyez de nouveau sur la touche. Vous êtes remonté dans le fichier.
+/- BASS
• Appuyez sur le bouton+/- -BASS et choisissez la fonction pour augmenter la Bass.
FONCTION CASSETTE
Déplacez-le pour choisir la FONCTION CASSETTE
COMMANDES RECORD/PLAY
• RECORD : pour commencer un enregistrement.
• PLAY : pour débuter la lecture d’une cassette.
• REWIND : pour rembobiner rapidement la cassette.
• F.FWD : pour faire avancer rapidement la cassette.
• STOP/EJ : pour arrêter et éjecter la cassette.
• PAUSE : Pour interrompre l’enregistrement ou la lecture.
028.
03-2322_FR 6/20/06 11:22 AM Page 08
Page 29
MAGNETOPHONE
Avant d’utiliser le magnétophone, assurez-vous à ce que le Sélecteur de Function soit en mode Cassette.
LECTURE
• Réglez le Sélecteur de Function sur le mode Cassette.
• Appuyez sur le bouton Eject pour ouvrir la portière du magnétophone.
• Introduisez la cassette dans le magnétophone en vous assurant que la face que vous désirez lire est face
à la fenêtre.
• Refermez la portière du magnétophone.
• Appuyez sur le bouton Play pour débuter la lecture.
• La lecture s’arrête lorsque la cassette prend fin.
• Appuyez sur le bouton Stop si vous vous arrêter la lecture avant la fin de la cassette.
ENREGISTRER A PARTIR DE LA RADIO/D’UN CD
• Appuyez sur le bouton Function pour choisir entre « RADIO » ou « CD ».
• Placez une cassette vierge dans le magnétophone.
• Appuyez d’abord sur PAUSE.
• Puis, appuyez sur PLAY et RECORD simultanément.
• Mettez en marche la source de musique que vous désirez.
• Lorsque vous enregistrez, relâchez le bouton PAUSE.
1. LA BOBINE DE LA CASSETTE (Fig. 1) ---Vérifiez et resserrez la bobine de la cassette à l’aide
d’un crayon ou d’un ustensile semblable.
Si la bobine est mal serrée, elle peut se casser ou
rester coincer dans le mécanisme.
2. POUR EVITER D’EFFACER ACCIDENTELEMENT
(Fig. 2) ---- Utilisez un tournevis ou autre ustensile
pointu pour casser les languettes de plastiques.
3. POUR ENREGISTRER DE NOUVEAU (Fig. 3) ---Recouvrez les trous où étaient les languettes avec de
la cellophane.
MODE D’EMPLOI DE LA RADIO
REGLAGE
• Placez le bouton Function sur « RADIO » pour régler l’appareil sur le mode Radio.
L’indicateur de la Function Radio s’allumera.
• Choisissez la longueur d’onde à l’aide du bouton BANDE.
• Tournez le bouton REGLAGE pour choisir la chaîne radio désirée.
CONSEIL :
Lorsque vous écoutez une émission FM, nous vous conseillons de détendre complètement le fil de l’antenne
FM sur le panneau arrière.
Lorsque vous écoutez une émission AM, nous vous conseillons de régler la position du casque pour améliorer
la réception.
029.
Face A
Languette pour la
face A
Cellophane
Fig.1
Fig.2
Fig.3
03-2322_FR 6/20/06 11:22 AM Page 09
Page 30
Qu’est-ce qu’un MP3 ?
MP3 est Le MP3 est l'abréviation de MPEG Audio Layer 3.
MPEG est l’abréviation de Moving Pictures Experts Group.
Les MP3s sont des fichiers numériques audio qui ont été compressés tout en conservant la qualité originale du
son. Les MP3s sont reconnus mondialement comme étant le format le plus répandu pour Sauvegarder et
écouter de la musique. Les fichiers numériques audio sauvegardés sur un disque MP3 peuvent être jouer sur
un lecteur MP3. Les disques MP3 peuvent contenir entre 150-200 chansons par CD.
Alimentation : AC ~230V 50Hz
Consommation : 15 watts
Courant de Sortie : 2 Watts X 2 RMS en 8 OHM
(Par chaîne)
Section radio : AM 540 – 1600 KHz
FM 88 – 108 MHz
Section Lecteur de CD:
Fréquence : 60 – 16,000 Hz
(-3dB) :
Rapport Réception/bruit : 60 dB
Distorsion harmonique : 0.4%
Compatible avec : CD-DA, CD-R, CD-RW, MP3
Section magnétophone :
Vitesse de lecture : 4.75 cm / sec.
Pleurage et distorsion : < 0.4%
Fréquence : 100 Hz - 6.3 KHz
030.
03-2322_FR 6/20/06 11:22 AM Page 010
Page 31

031.
PLUS D’INFORMATIONS
Prenez garde aux petites pièces et piles, ne les avalez pas. Cela pourrait être dangereux pour votre
santé et mener à l'étouffement. Prêtez l'attention la plus élevée pour garder les petits appareils et
piles hors de la portée des enfants.
Conseil important pour la protection de l’ouïe
Attention:
Nous tenons à votre ouïe autant que vous.
Par conséquent, prenez vos précautions lors de l’usage de cet appareil.
Notre recommandations: Evitez les volumes forts.
Dans le cas où des enfants utilisent l’appareil, assurez-vous que le volume n’est pas sur la position élevée.
Attention! Les volumes élevés peuvent irrémédiablement endommager l’ouïe des enfants.
NE JAMAIS laisser une personne ou surtout un enfant mettre des objets dans les trous, fentes ou
autres ouvertures de l’appareil. Cela pourrait entraîner la mort par décharge électrique. L’appareil
doit être ouvert uniquement par un assistant qualifié.
Veuillez utiliser l’appareil uniquement aux fins pour lesquelles il a été créé.
Cet appareil est exclusivement destiné à l'usage dans des locaux privés ou à usage commercial.
Veuillez conserver ce mode d`emploi pour utilisation ultérieure.
PLUS D’INFORMATIONS
Indications relatives à la protection de l’environnement
Au terme de sa durée de vie, ce produit ne doit pas être éliminé avec les ordures ménagères mais
doit être remis à un point de collecte destiné au recyclage des appareils électriques et
électroniques. Le symbole figurant sur le produit, la notice d’utilisation ou l’emballage vous indique
cela.
Les matériaux sont recyclables conformément à leur marquage. Vous apportez une large
contribution à la protection de l’environnement par le biais du recyclage, de la réutilisation matérielle
ou par les autres formes de réutilisation des appareils usagés.
Veuillez vous adresser à la municipalité pour connaître la déchetterie compétente.
Ne gênez pas la ventilation du dispositif. Assurez-vous que rideaux, journaux, couvertures ou
meubles ne bloquent en aucun cas les fentes de ventilation de l’appareil. La ventilation doit être
assurée à tout moment! La surchauffe peut causer à l’appareil des dommages sérieux et réduire sa
performance et sa durée de vie.
La chaleur et sources de chaleur
Veuillez ne pas exposer l’appareil à la lumière directe (du soleil). Assurez-vous que l’appareil n’est
pas en contact direct avec des sources de chaleur telles qu’un chauffage ou un feu. Assurez-vous
que les fentes d’aération de l’appareil ne sont pas fermées.
Humidité et nettoyage
L’appareil n’est pas étanche! Ne plongez pas l’appareil dans l’eau. Evitez son contact avec l’eau. De l’eau
dans l’appareil pourrait sérieusement l’endommager. N’employez pas de détergents contenant de l’alcool,
de l’ammoniaque, du benzène ou des abrasifs. Ces produits pourraient endommager votre appareil. Pour
nettoyer l’appareil, utilisez un chiffon doux et humide.oder Schleifmittel enthalten, da diese den Player
beschädigen können.
03-2322_FR 6/20/06 11:22 AM Page 011
Page 32

H 032.
BIZTONSÁGI FELHÍVÁSOK
Ha a készülék nincs használatban, akkor ne legyen a hálózati áramra csatlakoztatva.
Ne tegye ki a készüléket esőnek, vagy egyéb nedvességnek.
FELHÍVÁS
Hogy az áramütésveszély kockázatát elkerülje, ne távolítsa el a készülék borítását.
Semmi olyat nem talál belül, mely Önnek hasznos lehet. Szervizeléshez képzett szakember segítségét vagye
igénybe.
BIZTONSÁGI UTASÍTÁSOK
1. OLVASSA VÉGIG AZ UTASÍTÁSOKAT - A biztonsági és használati utasításokat még a készülék beüzemelése
előtt olvassa el.
2. ŐRIZZE MEG AZ ÚTMUTATÓKAT - A biztonsági és használati útmutatót értemes megőrizni, hisz később
szükség lehet rá.
3. VEGYE KOMOLYAN A FIGYELMEZTETÉSEKET - A kezelési útmutatóban és a készüléken leírt minden
figyelmeztetést pontosan tartson be.
4. KÖVESSE AZ UTASÍTÁSOKAT - Kövesse a működéssel és a használattal kapcsolatos utasításokat.
5. VÍZ ÉS EGYÉB NEDVESSÉG - Ne használja a készüléket víz közelében, tehát fürdőkád, mosótál,
mosogató, úszómedence, nedves pince stb. közelében.
6. SZELLŐZÉS - Tegye a készüléket a megfelelő helyre és helyzetbe úgy, hogy saját szellőzése akadálytalan
maradjon. Ne tegye tehát ágyra, kerevetre, szőnyegre stb., mert ezek elzárhatják a szellőzőnyílásait.
Ne tegye beépített nyílásokba, akár egy könyvespolc vagy szekrény megakadályozhatja a levegő
átáramlását a szellőzőnyílásokon.
7. HŐ - Ne legyen a készülék semmilyen hőforrás közelében: radiátorok, tűzhelyek, vagy bármi más készülék
(akár erősítő) amely hőt termel.
8. ÁRAMELLÁTÁS - Csak a kezelési útmutatóban leírt, vagy a készüléken jelzett áramforráshoz
csatlakoztatható a készülék.
9. FÖLDELÉS ÉS POLARIZÁCIÓ - Érdemes óvintézkedéseket tenni a készülék megfelelő földelése és
polarizációja érdekében.
1O. VEZETÉKEK VÉDELME - Az áramvezetékeket javasolt úgy vezetni, hogy azokra lehetőleg ne lépjünk rá,
illetve ne tegyünk rá olyan tárgyakat, melyek leszorítják, különösen ügyeljünk a csatlakozók, dugaljzatok
közelében, illetve a készülékből való kivezetésnél.
ELSŐ OSZTÁLYÚ
LÉZER TERMÉK
FIGYELEM
Kinyitáskor láthatatlan lézersugár hagyja
el a készüléket.
Ne tegye ki túlzott napfénynek
Az egyenlő oldalú háromszögben
nyílban végződő villám szimbólum
arra figyelmeztet, hogy a készülék
belsejében nem leszigetelt,
veszélyes magasfeszültségű áram
található, amely komoly áramütést
okozhat!
FIGYELEM!
ÁRAMÜTÉS VESZÉLYE
NE NYISSA FEL!
FIGYELEM: AZ ÁRAMÜTÉS VESZÉLYÉNEK
ELKERÜLÉS ÉRDEKÉBEN NE TÁVOLÍTSA EL A
FEDELET (VAGY A HÁTLAPOT)! ITT
NINCSENEK A FELHASZNÁLÓ SZÁMÁRA
HOZZÁFÉRHETŐ ALKATRÉSZEK. A JAVÍTÁST
BÍZZA SZAKEMBERRE!
Az egyenlő oldalú háromszögben
lévő felkiáltójel szimbólum arra
figyelmeztet, hogy a készülékkel
szállított dokumentumokban a
használattal és karbantartással
(javítással) kapcsolatos fontos
útmutatások találhatók.
04-2322_HU 6/20/06 11:22 AM Page 02
Page 33

H 033.
11. TISZTÍTÁS - A készüléket kizárólag a gyártó javaslata szerint szabad tisztítani.
12. Közelébe - Az antenna ne kerüljön mágneses terek közelébe.
13. HASZNÁLATON KÍVÜL - Ha hosszabb időre nem használja a készüléket, a vezetéket húzza ki a
konnektorból.
14. FOLYADÉK VAGY EGYÉB TÁRGYAK - Vigyázzon, hogy ne kerüljön víz, vagy bármilyen tárgy a
készülék nyílásain keresztül a szerkezet belsejébe.
15. SZERVIZ - Azokon a teendőkön túl, melyek a kezelési útmutatóban vannak leírva, ne próbálja a
készüléket szerelni, ehhez képzett szakember segítségét vegye igénybe.
A készülék szakszerű szervizt igényel a következő esetekben:
A. Az áramellátás csatlakozója, vagy vezetéke megsérült.
B. Víz, vagy valamilyen tárgy került a szerkezet belsejébe.
C.A készüléket eső érte.
D.A készülék leesett, vagy a műszerdoboz megsérült.
E. Ha a készülék nem megfelelően működik illetve teljesítménye észrevehetően megváltozik.
ELŐKÉSZÍTÉS A HASZNÁLATHOZ
ÜZEMBE HELYEZÉS
• Csomagolja ki a készüléket, és távolítsa el a védőanyagokat.
• Helyezze be az elemeket a távvezérlőbe.
• Ne csatlakoztassa a készüléket a hálózati áramba, csak ha ellenőrizte a feszültséget, illetve hogy
minden egyéb csatlakozó a helyén van.
• Ne fedje le a levegőztetőket, és biztosítson a készülék körül néhány centiméternyi helyet az optimális
szellőzéshez.
CSATLAKOZÓK
1) Csatlakoztassa a jobb illetve a bal hangszórót a megfelelő jobb és bal bemenethez.
2) Mielőtt a készüléket a hálózati áramhoz kapcsolná ellenőrizze, hogy a készülék hátulján jelzett AC
feszültség megegyezik az ön konnektorának feszültségével.
MŰKÖDÉS / COMPACT DISC (CD)
hangminőség drasztikus romlásához vezethet (megszakadás, zajok, stb.).
• Ha megfog egy lemezt ne érintse a lejátszott (adathordozó) felületet.
• Ne tegye a lemezt a következő helyekre:
Fűtésre szolgáló készülékhez közel, vagy egyéb magas hőmérsékletű helyre.
Nyirkos illetve poros helyekre.
Ha a lejátszófelületre por vagy ujjlenyomat kerül, azokat távolítsa el puha ruha segítségével.
A lemez törlése közben mindig belülről kifele haladjon.
A CD LEMEZ BEHELYEZÉSE
• Nyomja meg az OPEN/CLOSE gombot
• Helyezze be a CD-t a lejátszóba (a nyomtatott oldalával felfelé).
• Nyomja meg az OPEN/CLOSE gombot a CD ajtajának bezárásához.
• A kijelző ekkor kiírja, hogy hány szám van a CD-n.
.
04-2322_HU 6/20/06 11:22 AM Page 03
Page 34
H 034.
KEZELŐSZERVEK ÉS RÉSZEGYSÉGEK
1. CD AJTÓ
2. CD AJTÓ OPEN/CLOSE (KINYITÁS)
3. LCD KIJELZŐ
4. VOLUME UP HANGERŐ NÖVELÉSE
5. VOLUME DOWN HANGERŐ CSÖKKENTÉSE
6. FOLDER GOMB
7. X-BASS GOMB (MÉLYHANGKIEMELÉS)
8. A BEKAPCSOLT ÁLLAPOT JELZŐFÉNYE
9. A TÁVVEZÉRLŐ ÉRZÉKELŐJE
10. SKIP GOMB
11. SKIP GOMB
12. PLAY/PAUSE GOMB (INDÍTÁS/SZÜNET)
13. STOP (LEÁLLÍTÁS) GOMB
14. FUNCTION VÁLASZTÓKAPCSOLÓ (TAPE, CD/MP3, TUNER)
(KAZETTA, CD/MP3, RÁDIÓ)
15. BAND (AM, FM, FM ST.) HULLÁMSÁV KIVÁLASZTÓ
16. MODE (MÓD) KIVÁLASZTÓ GOMB(REPEAT, RANDOM)
(ISMÉTLÉS, VÉLETLENSORRENDŰ LEJÁTSZÁS)
17. PROGRAM GOMB
18. TUNING ÁLLOMÁSKERESŐ
19. KAZETTAAJTÓ
20. FÜLHALLGATÓBEMENET
21. RECORD/PLAY KAZETTALEJÁTSZÓ-VEZÉRLŐ
22. FM ANTENNA VEZETÉK
23. HANGSZÓRÓ (BAL)
24. HANGSZÓRÓ (JOBB)
25. ÁRAMVEZETÉK
26. ÜTEMJELZŐ
17
15
13
11
9
7
6
2
3
21
19
1
4
5
8
10
12
14
16
18
22
26
25
23
24
04-2322_HU 6/20/06 11:22 AM Page 04
Page 35

A TÁVVEZÉRLŐ HASZNÁLATA
Előkészítés használat előtt
• Elemek behelyezése
• Vegye le az elemtartó fedelét a távvezérlőről.
• Helyezzen be 2 db “UM4/AAA“ típusú elemet.
• Helyezze be az elemeket az elemtartóban jelzett irányok szerint.
• Illessze vissza a fedelet.
Elemek eltávolítása
• Amennyiben a távvezérlés már nem tökéletesen működik, illetve a működési távolság egyre rövidebbé válik,
cserélje ki az elemeket újakra.
A távvezérlőegység használata
Irányítsa a távvezérlőt az érzékelő irányába, s nyomja a gombokat, határozottan, de ne túl erősen.
A távvezérlő maximális működési távolsága kb. 18ft (6m).
Ha már az érzékelési távolság rövidül, és a készülék egy sarokban van elhelyezve, a lehető legnagyobb távolság
érdekében használja a távvezérlőt szemben, az érzékelő irányában.
Ne tegye ki az érzékelőt túl nagy természetes vagy mesterséges fénynek, és bizonyosodjon meg róla, hogy a
távvezérlő és az érzékelő közé semmilyen akadály nem került.
A TÁVVEZÉRLŐ GOMBJAI
1. Folder (mappa) gomb
2. Folder (mappa) gomb
3. PLAY / PAUSE gomb
4. STOP gomb
5. SKIP gomb
6. SKIP gomb
7. MODE gomb
8. PROGRAM gomb
Nyomógombok működése
POWER GOMB – A készülék bekapcsolása
VOLUME +/- - A hangerő növelése és csökkentése a megfelelő szintre.
PLAY/PAUSE
• Indítás leállított módból.
• Pillanatmegállítás (szünet) lejátszás közben.
• Újraindítás lejátszási szünetből.
STOP
• Lejátszás (Play) vagy szünet (Pause) alatt: leállítás (Stop), vagy program hozzáadása (Program Entry)
programozott lejátszás közben.
• Program hozzáadása (Program Entry) módban: Kilépés a Program Entry módból, a programok törlése, és
áttérés leállított (Stop) módba.
• Véletlensorrendű lejátszás (Random Play - Mode gomb) közben: Leállított módba való áttérés a
véletlensorrendű lejátszás feloldása.
PROGRAM gomb (Funkció)
H 035.
+
04-2322_HU 6/20/06 11:22 AM Page 05
1
6
4
7
2
3
5
8
Page 36

1. Ha a [PROGRAM] gomb megnyomott állapotban van mikor a CD le van állítva, a rendszer program módba
tér át. Ebben a módban a zeneszám és a PROGRAM kijelzője 500[ms] intervallumot fog jelezni (1. kijelző)
2. Az [FF/SKIP+] / [FB/SKIP-] gombok lenyomásával kikeresheti a tárolni kívánt számot.
3. A [PROGRAM] gomb lenyomásával a rendszer tárolja a kívánt számot, és továbblép a következő programra.
(2. kijelző)
4. A rendszer 2O szám tárolására képes CD módban, illetve 1O szám tárolható MP3 módban.
2O szám kiválasztása után (CD) a rendszer új számot már nem tárol.
2O program kiválasztása után (CD) a rendszer új programot már nem tárol.
A PROGRAM kijelző és a “P 01“ 500[ms] intervallumban fog jelezni.
5. Program módban a [STOP] gomb lenyomásakor a rendszer törli a tárolt programokat, ekkor a program mód
is leáll.
6. A [PLAY/PAUSE] gomb megnyomása esetén elindul a programozott lejátszás, amennyiben a rendszerben
egynél több szám tárolásra került.
Programozott lejátszás közben a kijelzőn a PROGRAM látható(4. kijelző)
7. Ha programozott lejátszás módban megnyomja az [FF/SKIP+] / [FB/SKIP-] gombok valamelyikét, a gép a
következő, avagy az előző programra lép.
8. Program módban a [STOP] gomb lenyomásakor a program mód leáll, és a rendszer leállított (Stop) módba
lép. A tárolt program mindaddig megmarad, míg leállított módban meg nem nyomja a [STOP] gombot.
MODE gomb [Funkciók]]
CD mód
1. A [MODE] gomb lenyomásakor a rendszer a kiválasztott módba lép.
2. A repeat-1 mód alatt a rendszer a CD épp lejátszott zeneszámát ismétli meg.
3. A repeat-all mód kiválasztása esetén amikor a CD a végére ért, a lejátszás azonnal újraindul az első
számmal.
4. A random (véletlensorrendű lejátszás) akkor ér véget, ha az összes szám már lejátszásra került, vagy ha
megnyomja a [STOP] gombot lejátszás közben.
5. Az [FF/SKIP+] gomb lenyomásával (random módban) a következő automatikusan kiválasztott számra
léphet. Ha az utolsó szám után nyomja meg az [FF/SKIP+] gombot, a rendszer újabb véletlenszerűen
kiválasztott számra lép
6. Ha random módban az [FB/SKIP-] gombot nyomja meg, a rendszer az épp lejátszott szám elejére lép, nem
lép az előző számra.
MP3 Modus
H 036.
PROGRAM
(1. KIJELZŐ)
(2. KIJELZŐ)
(3. KIJELZŐ)
(4. KIJELZŐ)
PROGRAM
PROGRAM
PROGRAM
REP
REP
ALL
RANDOM
REPEAT&RANDOM KI
REPEAT AL
REPEAT-1
RANDOM
04-2322_HU 6/20/06 11:22 AM Page 06
Page 37

1. A [MODE] gomb lenyomásakor a rendszer a kiválasztott módba lép.
2. A repeat-1 mód alatt a rendszer az épp lejátszott MP3-as számot ismétli meg
3. A repeat folder módban a rendszer az aktuális mappa MP3-as számait ismétli meg.
4. A repeat-all mód kiválasztása esetén amikor az utolsó szám is a végére ért, a lejátszás azonnal újraindul az
első számmal.
5. A random (véletlensorrendű lejátszás) akkor ér véget, ha az összes szám már lejátszásra került, vagy ha
megnyomja a [STOP] gombot lejátszás közben.
6. Az [FF/SKIP+] gomb lenyomásával (random módban) a következő automatikusan kiválasztott számra
léphet.
Ha az utolsó szám után nyomja meg az [FF/SKIP+] gombot, a rendszer újabb véletlenszerűen kiválasztott
számra lép
7. Ha random módban az [FB/SKIP-] gombot nyomja meg, a rendszer az épp lejátszott szám elejére lép, nem
lép az előző számra.
MÓDOK
CD: None Repeat 1 Repeat all Random None.
MP3: None Repeat 1 Repeat folder Random all Random None.
RANDOM (Véletlensorrendű lejátszás)
1. Nyomja meg a RANDOM gombot, és a lemez számait véletlensorrendű lejátszással hallgathatja meg.
Válassza ki a Random funkciót, nyomja meg a Mode gombot, és a véletlensorrendű lejátszás elindul.
MP3 PROGRAMOZOTT LEJÁTSZÁSA
Az MP3 lejátszóval lehetősége van 1O számot programozott lejátszásra tárolni.
1. Leállított módban nyomja meg a PROGRAM gombot, a “P01” és a “PROGRAM” villózni fog a kijelzőn.
2. A számok közti választáshoz nyomja le a FF/SKIP illetve a FB/SKIP- gombot.
A mappák közti váltáshoz nyomja meg a FOLDER DN illetve a FOLDER UP gombokat a távvezérlőn.
3. Nyomja le a PROGRAM gombot a szám eltárolásához.
4. A további számok beprogramozásához ismételje el a 2. illetve 3. lépéseket.
5. Program módban nyomja meg a PLAY / PAUSE gombot a programozott lejátszás elindításához.
SKIP +
• Leállított módban a lejátszandó számok közt egyet lép előre (illetve az utolsó számról az elsőre)
• Normál lejátszás alatt a lejátszandó számok közt egyet lép előre (illetve az utolsó számról az elsőre)
• Amennyiben O.5 másodpercnél tovább tartja lenyomva, a gyors előretekerés funkció indul el.
• Programozott lejátszás alatt a következő beprogramozott számra lép. (illetve az utolsó beprogramozott
számról az elsőre)
• Random (Véletlensorrendű lejátszás) alatt a következő véletlenszerűen kiválasztott számra lép.
SKIP -
H 037.
REPEAT&RANDOM KI
ALBUM
MP3
REPEAT FOLDER
MP3
MP3
RANDOM
REPEAT ALL
REPEAT-1
RANDOM
MP3
MP3
REP
REP
REP
ALL
04-2322_HU 6/20/06 11:22 AM Page 07
Page 38

Page 39

Page 40

Page 41

H 041.
KIEGÉSZÍTŐ INFORMÁCIÓK
Óvatosan bánjon az apró alkatrészekkel és elemekkel, és azokat ne nyelje le, mert ez komoly sérüléseket okozhat!
Gondoskodjon arról, hogy az apró alkatrészek és elemek ne kerüljenek gyermekek kezébe!
Fontos tanácsok a halláskárosodás elkerülésére
Figyelmeztetés:
Az Ön hallásáért nemcsak Ön, de mi is aggódunk.
Éppen ezért kérjük, legyen óvatos a készülék használatánál.
Azt ajánljuk, hogy: kerülje a nagy hangerővel való hallgatást.
Ha a készüléket gyermekek használják, ügyeljünk arra, hogy ne állítsák a készüléket túl hangosra.
Vigyázat!
A túl nagy hangerő a gyermekeknél gyógyíthatatlan károsodást okozhat.
Kérjük gondoskodjon róla, hogy a készülék burkolatának nyílásaiba SOHA senki, főképpen pedig gyermekek, ne
dughassanak bele semmit, ez ugyanis életveszélyes áramütéshez vezethet. A készülék burkolatát csak erre
megfelelően képzett szakember nyithatja fel.
A készüléket kizárólag a rendeltetésének megfelelően használjuk.
A készülék kizárólag lakásokban és üzletekben történő felhasználásra alkalmas.
Kérjük, őrizze meg a használati útmutatót, hogy az később is rendelkezésére álljon.
KIEGÉSZÍTŐ INFORMÁCIÓK
Környezetvédelmi tanácsok
Ezt a terméket az élettartama végén ne dobjuk a normál háztartási szemétbe, hanem adjuk le a villamos és
elektronikai hulladékok átvevőhelyén. A terméken található szimbólum, a használati útmutató vagy a csomagolás
felirata erre hívja fel a figyelmet.
A készülék anyagai a jelölésüknek megfelelően újrahasznosíthatóak. Az újrahasznosítással, az anyagok ismételt
felhasználásával, illetve a használt készülékek egyéb felhasználásával sokat tehetünk környezetünk megóvásáért.
A megfelelő hulladék-átvevőhelyről a helyi önkormányzatnál érdeklődhetünk.
Ne akadályozza a készülék szellőzését, például függönnyel, újsággal, takaróval vagy bútorral. A
szellőzőnyílásoknak mindig szabadon kell maradnia. A túlmelegedés kárt tehet a készülékben, és emiatt annak
élettartama lerövidülhet.
Meleg és forróság
Ne tegyük ki a készüléket a közvetlen napsütés hatásának. Ügyeljünk arra, hogy a készülék ne legyen
fűtőberendezés, nyílt láng vagy egyéb hőforrás közelében. A készülék szellőzőnyílásait mindig hagyjuk szabadon.
Nedvesség és tisztítás
Ez a készülék nem vízálló! Ne tegyük vízbe a lejátszót, és ügyeljünk arra, hogy ne is kerüljön vízzel érintkezésbe.
A lejátszóba bejutó víz súlyos károkat okozhat. A készülék megtisztítására ne használjunk alkoholt, ammóniát,
benzint, vagy súrolószert tartalmazó tisztítóanyagot, mivel ezek károsíthatják a lejátszót. A készülék megtisztítására
enyhén megnedvesített puha törlőruhát használjunk .
04-2322_HU 6/20/06 11:22 AM Page 011
Page 42

I 042.
ISTRUZIONI DI SICUREZZA
Questo apparecchio deve essere disconnesso dalla presa quando non è in uso.
Non esporre l’apparecchio alla pioggia o all’umidità.
ATTENZIONE:
Per ridurre il rischio di scossa elettrica, non togliere il coperchio (o il retro).
Non parti utilizzabili all’interno.
ISTRUZIONI DI SICUREZZA
1. LEGGERE LE ISTRUZIONI - Prima che l’apparecchio sia messo in funzione devono essere lette tutte le
istruzioni d’uso.
2. CONSERVARE LE ISTRUZIONI - Le istruzioni di sicurezza e d’uso devono essere conservate per futuri
riferimenti.
3. AVVERTENZE DI MANUTENZIONE - Tutte le avvertenze sul prodotto e nelle istruzioni d’uso devono essere
incluse.
4. ISTRUZIONI DA SEGUIRE - Tutte le istruzioni d’uso devono essere seguite.
5. ACQUA E UMIDITA’ - L’apparecchio non deve essere usato vicino all’acqua, per esempio, vicino la vasca
da bagno, al lavabo, lavello, pila, piscine o su una superficie bagnata.
6. VENTILAZIONE - L’apparecchio potrebbe essere posto in modo tale che il suo posto o posizione non
interferisca con la sua naturale ventilazione. Per esempio, l’apparecchio non dovrebbe essere posto su un
letto, sofà, tappeto o simili superfici che potrebbero bloccare le aperture per la ventilazione.
Non posizionare su aperture istallate come librerie o armadietti che possono impedire il flusso d’aria
attraverso le aperture di ventilazione.
7. CALORE - L’apparecchio dovrebbe essere posto fuori dalle fonti di calore come termosifoni, stufe, o altri
apparecchi (compresi gli amplificatori) che producono calore.
8. FONTI DI ENERGIA - L’ apparecchio dovrebbe essere collegato ad un supporto di energia soltanto del tipo
descritto nel libretto di istruzioni o come indicato sull’apparecchio.
9. COLLEGAMENTO E POLARIZZAZIONE - Dovrebbero essere prese delle precauzioni per assicurare che il
collegamento o la polarizzazione dell’apparecchio non siano annullate.
10. PROTEZIONE DEL CAVO ELETTRICO - I cavi elettrici dovrebbero essere tirati fuori in modo tale che non
siano pestati da oggetti posti sopra o vicino ad essi, facendo particolare attenzione ai cavi, contenitori
d’interesse, e al punto in cui escono dall’apparecchio.
PRODOTTO
LASER CLASSE 1
ATTENZIONE!
Invisibile radiazione laser quando si apre
e si aziona dispositivo di blocco.
Evitare l’esposizione ai raggi.
Il simbolo lampeggiante con
freccetta, all’interno di un triangolo
equilatero, è inteso al fine di
segnalare all’utente la presenza di
un “voltaggio pericoloso” non
isolato, all’interno della struttura,
che potrebbe essere di sufficiente
portata da causare rischio di scossa
elettrica a persone.
ATTENZIONE
RISCHIO DI SCOSSA ELETTRICA. NON
APRIRE.
ATTENZIONE: PER RIDURRE I RISCHI DI
SCOSSA ELETTRICA, NON RIMUOVETE IL
COPERCHIO (O IL RETRO). NON SI TROVANO
ALL’INTERNO, PARTI D’ALCUNA UTILITÀ
ALL’UTENTE. FARE RIFERIMENTO SOLO A
PERSONALE DI SERVIZIO QUALIFICATO.
Il punto esclamativo all’interno di un
triangolo equilatero è inteso al fine di
segnalare all’utente la presenza
d’importanti istruzioni di
funzionamento e manutenzione
(servizio) nel foglietto che
accompagna l’apparecchio.
05-2322_IT 6/20/06 11:23 AM Page 02
Page 43

I 043.
11. PULIZIA - L’apparecchio dovrebbe essere pulito soltanto come raccomandato dal venditore.
12. FILTRI D’ENERGIA - Un’antenna esterna dovrebbe essere posti fuori dai filtri d’energia.
13. PERIODI DI NON USO - Il cavo energetico dell’apparecchio potrebbe essere tolta dal cavo quando
l’apparecchio è lasciato inutilizzato per un lungo periodo.
14. OGGETTO e ENTRATA DI LIQUIDO - La cura dovrebbe essere fatta in modo tale che gli oggetti non
cadano e i liquidi non entrino dalle aperture.
15. ASSISTENZA - L’utente non deve tentare di riparare l’apparecchio aldilà di quello che è descritto nel
libretto d’istruzioni. Tutti I tipi di assistenza devono far riferimento a personale qualificato.
16. RICHIESTA DI ASSISTENZA DANNI - L’apparecchio dovrebbe essere assistito da personale quando:
A. Il cavo elettrico o la spina sono stati danneggiati.
B.Gli oggetti sono caduti all’interno o del liquido si è introdotto nelle fessure.
C.L’apparecchio è stato esposto alla pioggia.
D.L’apparecchio è stato bagnato o la chiusura danneggiata.
E. L’apparecchio non sembra funzionare regolarmente o mostra un evidente cambiamento nel
funzionamento
PREPARAZIONE PER L’USO
ISTALLAZIONE
• Spacchettare tutte le parti e rimuovere il materiale protettivo.
• Inserire le batterie nel trasmettitore di controllo remoto.
• Non collegare l’apparecchio alla spina prima di controllare il voltaggio e prima che tutti gli altri
collegamenti vengano fatti.
• Non coprire le aperture e siate sicuri che ci sia uno spazio di diversi centimetri attorno
all’apparecchio per la ventilazione.
COLLEGAMENTI
1) Collegare l’altoparlante destro e sinistro.
2) Prima di collegare l’apparecchio alle spine, assicurarsi che il voltaggio AC stampato sul piatto
posteriore sia lo stesso del voltaggio AC della vostra spina sul muro.
FUNZIONAMENTO/COMPACT DISC
Tenere a mente I seguenti punti affinché alcuna sporcizia, graffi del disco possano causare rottura o
suoni intermittenti e anche rumore.
• Quando inserite I dischi, fate attenzione a non toccare la superficie esecutiva.
• Non mettere I dischi nei seguenti luoghi:
Vicino a fonti di calore o posti dove la temperatura è alta;
In aree umide o polverose.
• Rimuovere ogni impronta o polvere sulla superficie d’esecuzione di un disco usando un panno
leggere.
Rimuovere sempre dall’interno del disco verso l’esterno
CARICAMENTO DEL DISCO
• Premere OPEN/CLOSE.
• Inserire nel vassoio un CD (stampato).
• Premere OPEN/CLOSE per chiudere il comparto CD.
• Il display mostra il numero totale delle tracce del CD.
05-2322_IT 6/20/06 11:23 AM Page 03
Page 44
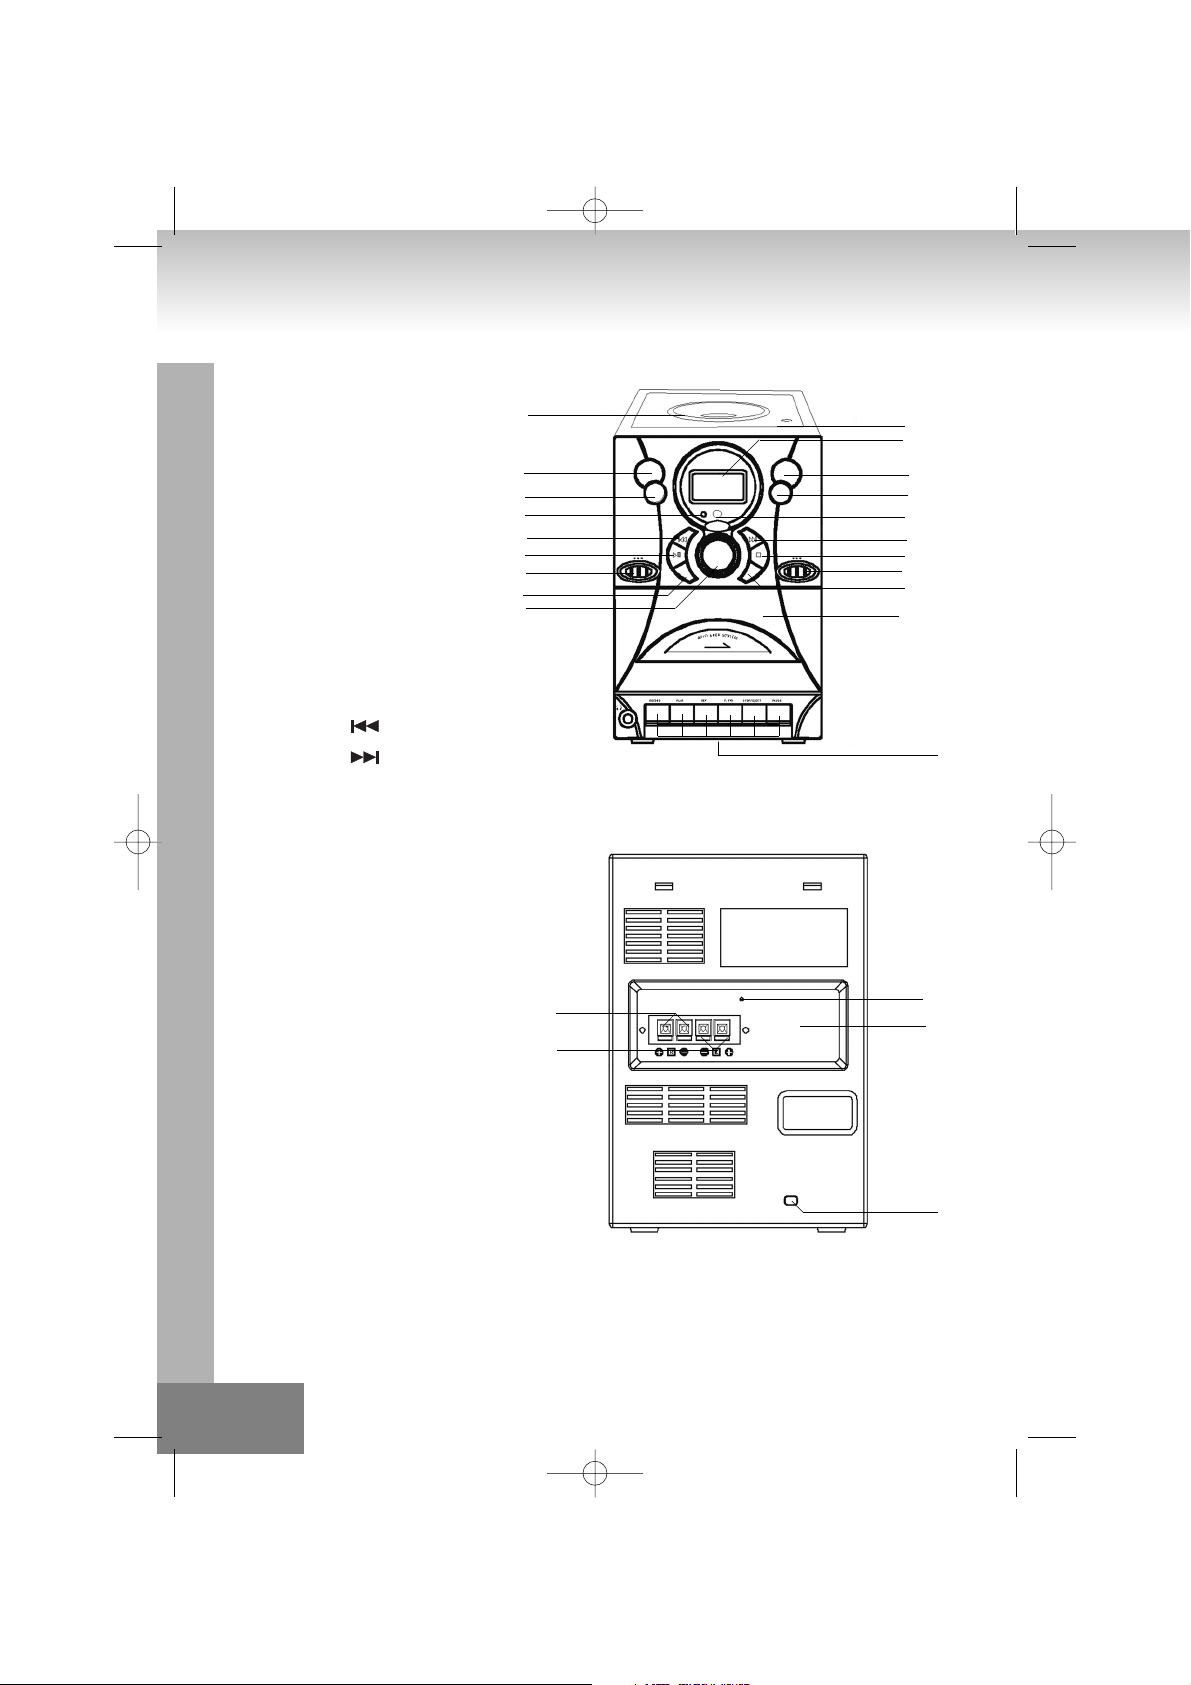
I 044.
CONTROLLI E CARATTERISTICHE
1. SPORTELLO CD
2. SPORTELLO CD OPEN/CLOSE
[Aprire/Chiudere]
3. DISPLAY LCD
4. VOLUME UP [Volume alto]
5. VOLUME DOWN [Volume basso]
6. TASTO FOLDER
[Dispositivo di piegatura]
7. TASTO +/ - BASS [Bassi-+/ - ]
8. INDICATORE ENERGIA
9. SENSORE REMOTO
10. TASTO SKIP [Silenzioso]
11. TASTO SKIP [Silenzioso]
12. TASTO PLAY/PAUSE [Play/Pausa]
13. TASTO STOP
14. SELETTORE FUNCTION [Funzione] (TAPE,
CD/MP3, TUNER)
15. SELETTORE BAND [Rete] (AM, FM, FM ST.)
16. TASTO MODE [Modo] (REPEAT, RANDOM)
[Ripetere, Casuale]
17. TASTO PROGRAM [Programma]
18. TASTO TUNING [Sintonia]
19. SCOMPARTO CASSETTA
20. CUFFIE
21. CONTROLLO LETTORE RECORD/PLAY
[Registrazione/Play]
22. CAVO
23. ALTOPARLANTE SINISTRO
24. ALTOPARLANTE DESTRO
25. CAVO ENERGIA
26. BEAT CUT
17
15
13
11
9
7
6
2
3
21
19
1
4
5
8
10
12
14
16
18
22
26
25
23
24
05-2322_IT 6/20/06 11:23 AM Page 04
Page 45

FUNZIONE DI CONTROLLO REMOTO
Preparazione prima dell’uso
• Istallare le batterie nell’unità di controllo remoto
• Togliere il coperchio batteria dal retro dell’unità di controllo remoto.
• Inserire batterie di due misure “UM4/AAA”.
• Inserire le batterie con terminali e con indicazione all’interno dello scomparto batteria.
• Sostituire il coperchio.
Sostituzione Batteria
• Quando il funzionamento di controllo remoto diventa instabile o la distanza dal controllo remoto è possibile
diventa più breve, sostituire la batterie con delle nuove.
Usare l’apparecchio di controllo remoto
Per usare l’unità remota, puntare al SENSORE REMOTO e premere I tasti fermamente.
Il funzionamento di controllo remoto è possibile in 18 ft approssimativamente (6 m.)
Tuttavia, dal momento che il controllo remoto è di meno quando l’apparecchio è usato oblique, usare
direttamente di fronte al SENSORE REMOTO, ad una distanza massima.
Non esporre il SENSORE REMOTO per una luce forte (luce diretta del sole o artificiale) e rendersi certi che
non ci siano ostacoli tra il SENSORE REMOTO e l’unità di controllo remoto.
CONTROLLO REMOTO
1. Tasto Folder [Dispositivo di piegatura]
2. Tasto Folder [Dispositivo di piegatura]
3. Tasto PLAY / PAUSE [Play/Pausa]
4. Tasto STOP
5. Tasto SKIP [Salto] +
6. Tasto SKIP [Salto] -
7. Tasto MODE [Modo]
8. Tasto PROGRAM [Programma]
FUNZIONAMENTO Funzione chiave
TASTO POWER - Per sintonizzare l’apparecchio
VOLUME +/- - Per aumentare o diminuire il volume ad un livello consigliabile
PLAY/PAUSE
• Iniziare a suonare dal modo stop.
• Attivare pausa durante l’esecuzione.
• Ritornare al modo play da una pausa.
STOP
• Nel modo Play o nel modo Pausa:
Cambiare al modo Play o modo Entrata Programma durante il funzionamento programma.
• Nel modo di Entrata Programma:
Uscire il modo di programma entrata, pulire il programma memoria e cambiare al modo stop.
• Nell’esecuzione occasionale (tasto Mode):
Cambiare al modo stop e rilasciare la funzione casuale.
I 045.
+
05-2322_IT 6/20/06 11:23 AM Page 05
1
6
4
7
2
3
5
8
Page 46

Chiave PROGRAMMA [Spiegazione Funzione]
1. Se la chiave [PROGRAM] è premuta durante il modo stop CD, il sistema va al modo programma.
Durante il modo programma, il numero della traccia e il display PROGRAM lampeggerà ad intervalli di 500
[ms] (Display 1).
2. Se è premuta la chiave[FF/SKIP+] / [FB/SKIP-], il sistema sceglie il numero di traccia che vuole registrare.
3. Se è premuta la chiave [PROGRAM] dopo aver scelto un numero di traccia, il sistema tiene il numero di
traccia, e va al modo del prossimo programma (Display 2).
4. Il sistema può portare 20 programmi per modo CD/ 10 programmi per MP3.
Dal momento che il sistema ha 20 programmi, può tenere un’altra canzone.
Mentre il sistema sostiene 20 programma, può tenere un altro programma.
Il display PROGRAM e “P 01“ lampeggeranno ad intervalli di 500 [ ms].
5. Se la chiave [STOP] è premuta durante il modo programma, il sistema rimuove I contenuti del programma,
e cancella il modo programma.
6. Se è premuta la chiave [PLAY/PAUSE] durante il sistema di conduzione del programma di più di uno, inizia
l’esecuzione del programma. Durante il programma di esecuzione, il display mostra che è PROGRAM in
esecuzione (display 4).
7. Se è premuta la chiave [FF/SKIP+] / [FB/SKIP-] durante il programma di esecuzione, il sistema salta al
prossimo(precedente programma.
8. Se è premuta la chiave [STOP] durante il programma di esecuzione, il sistema blocca il programma di
esecuzione e va al modo stop.
Fino a quando la chiave [STOP] è premuta durante il modo stop, il sistema tiene I contenuti del programma.
Chiave MODE [Spiegazione Funzione]
Modo CD :
1. Se la chiave [MODE]è premuta, il sistema cambia il modo (come segue intenzione).
2. Durante il modo Repeat-1, il sistema ripete la traccia corrente del CD.
3. Durante il modo Repeat-all, se raggiunge la fine del tono della traccia finale, ritorna generalmente alla
traccia iniziale.
4. Se l’intera traccia è finita durante il modo di esecuzione casuale o se la chiave [STOP] è premuta durante
il modo di esecuzione casuale, il sistema va al modo stop e cancella il modo di esecuzione casuale.
5. Se è premuta la chiave [FF/SKIP+] durante il modo di esecuzione casuale, il sistema sala a quello casuale.
Se è premuta la chiave [FF/SKIP+] sul tono della traccia finale, il sistema ricerca il prossimo giro a caso.
6. Se è premuta la chiave [FB/SKIP-] durante il modo di esecuzione casuale, il sistema cerca l’inizio della
traccia corrente, ma non salta la traccia.
I 046.
PROGRAM
(DISPLAY 1 )
(DISPLAY 2 )
(DISPLAY 3 )
(DISPLAY 4 )
PROGRAM
PROGRAM
PROGRAM
REP
REP
ALL
RANDOM
[NON RIPETERE E
CAUSALE
RIPETERE TUTTO
RIPETERE-1
CASUALEE
05-2322_IT 6/20/06 11:23 AM Page 06
Page 47

Modo MP3:
1. Se è premuta la chiave [MODE], il sistema cambia il modo (secondo le intenzioni).
2. Durante il modo Repeat-1 il sistema ripete la traccia corrente dell’MP3
3. Durante il modo Repeat-folder, il sistema ripete la cartella di tracce correnti dell’MP3
4. Durante il modo Repeat-all, se raggiunge la fine del tono dell’ultima traccia, è generalmente ritornato alla
traccia iniziale.
5 Se l’intera traccia è terminata durante l’esecuzione casuale o se la chiave [STOP] è premuta durante il modo
di esecuzione casuale, il sistema va al modo stop e cancella il modo si esecuzione casuale.
6. Se è premuta la chiave [FF/SKIP+] durante il modo di esecuzione casuale, il sistema salta al casuale.
Se è premuta la chiave [FF/SKIP+] sul tono dell’ultima traccia, il sistema cerca il prossimo giro a caso.
7. Se è premuta la chiave [FB/SKIP-] durante il modo di esecuzione casuale, il sistema ricerca l’inizio della
traccia corrente ma non salta indietro.
MODO
CD: Niente Ripetere 1 Ripetere tutto Casuale Niente.
MP3: Niente Ripetere 1 Ripetere tutto Casuale Niente.
RANDOM
1. Premere il tasto RANDOM per iniziare l’ascolto.
Tutte le tracce sul disco dovrebbero essere eseguite casualmente.
Selezionare la funzione Random e premere il tasto Mode e selezionare Random per iniziare il playback
random.
PROGRAMMARE MP3
Il lettore MP3 permette di programmare 10 tracce secondo la propria scelta.
1. Premere il tasto PROGRAM nel modo stop.
Il display mostrerà “P01” e “PROGRAM” brillerà ad intervalli.
2. Premere il tasto FF/SKIP+ e FB/SKIP- per selezionare la traccia desiderata che deve essere programmata.
o Premere il tasto FOLDER DN e FOLDER UP su controllo remoto per selezionare la prossima traccia di
da programmare.
3. Premere il tasto PROGRAM per entrare nella memoria.
4. Per continuare a programmare, ripetere il passo 2 e 3.
5. Premere il tasto PLAY / PAUSE sul programma modo per eseguire le tracce programmate.
SKIP +
• Cambiare la traccia di esecuzione durante il modo stop, scorrendo alla prima traccia se è nell’ultima.
• Saltare alla traccia successive durante il normale play.
Scorrere alla prima traccia se è nell’ultima traccia.
• Quando la chiave è premuta più di 0,5 secondi, il riavvolgimento veloce è attivato.
• Saltare alla successive traccia programmata durante il programma di esecuzione.
Scorrere alla prima traccia programmata.
• Saltare alla successive traccia casuale durante l’esecuzione casuale.
I 047.
NON RIPETERE E
CASUALE
ALBUM
MP3
RIPETERE
CARTELLA
MP3
MP3
RANDOM
RIPETERE
TUTTO
RIPETERE-1
CASUALE
MP3
MP3
REP
REP
REP
ALL
05-2322_IT 6/20/06 11:23 AM Page 07
Page 48

SKIP -
• Cambiare la traccia già in esecuzione durante il modo stop.
Andare all’ultima traccia se è nella prima traccia.
• Saltare la traccia precedente durante l’esecuzione normale.
Andare all’ultima traccia se è nella prima traccia.
• Quando la chiave è spinta per più si 5 secondi, il riavvolgimento veloce viene eseguito.
• Saltare alla traccia programmata precedente durante il programma di esecuzione.
Andare alla prima traccia programmata.
FOLDER
• Quando il sistema è col metodo STOP:
Per MP3, saltare alla prossima cartella per aumentare l’ordine e mostrare un numero più vecchio.
• Quando il sistema è col modo PLAY: Per MP3, saltare al numero di cartella successiva in ordine crescente.
Cominciare ad eseguire la traccia iniziale della cartella e del display della cartella corrente e il numero della
traccia Premere una volta la chiave. Il numero di cartella corrente è lampeggiante per 3 secondi.
Premere di nuovo la chiave. La cartella è eseguita.
FOLDER
• Quando il sistema è col metodo STOP:
Per MP3, saltare alla cartella successive in ordine decrescente e mostrare il numero della cartella.
• Quando il sistema è nel modo PLAY: Per MP3, saltare al numero successivo in ordine decrescente.
Iniziare la traccia principale della cartella e mostrare la cartella corrente e il numero della traccia
Premere una volta la chiave. Il numero della cartella corrente lampeggia per 3 secondi.
Premere di nuovo la chiave L’archivio è eseguito.
+/= BASS
• Premere il tasto +/ - BASS e selezionare l’effetto Bass Boster.
FUNZIONE TAPE
Muovere per selezionare FUNCTION TAPE
CONTROLLO LETTORE RECORD/PLAY
• RECORD: per iniziare la registrazione.
• PLAY: per iniziare la registrazione della cassetta.
• REWIND: per riavvolgere velocemente la cassetta.
• F.FWD: per far proseguire velocemente la cassetta.
• STOP/EJ: per fermare ed espellere la cassetta.
• PAUSE: per interrompere la registrazione o il playback della cassetta
LETTORE CASSETTA
Prima di mettere in funzione il lettore cassetta, siate sicuri che il selettore Function sia sul modo Tape.
PLAYBACK
• Posizionare il selettore Function per il modo Tape.
• Premere il tasto Eject per aprire la porta della cassetta.
• Posizionare la cassetta nell’apposito posto con il lato rivolto verso la finestra.
• Sportello chiusura cassetta.
• Premere il tasto Play per iniziare il playback.
• Il playback si blocca quando la cassetta arriva alla fine.
• Premere il tasto Stop se volete fermare il playback prima della fine della cassetta.
I 048.
05-2322_IT 6/20/06 11:23 AM Page 08
Page 49

REGISTRARE DA RADIO / CD
• Premere il tasto Function “RADIO o “CD” per selezionare una fonte di suono.
• Posizionare una cassetta vuota.
• Premere prima il tasto PAUSE.
• Dopo premere I tasti PLAY e RECORD insieme.
• Azionare la fonte di suono selezionata.
• Quando si registra, lasciare il tasto PAUSE.
1. LENTEZZA DEL TAPE (Fig. 1) ---Controllare la
lentezza del tape prima di usare una matita o oggetti
simili. La lentezza del tape possibilmente può
rompere o inceppare il meccanismo.
2. PER PREVENIRE CANCELLATURA ACCIDENTALE
(Fig. 2) --- Usare un cacciavite o un altro arnese
appuntito per rompere le linguette di plastica.
3. PER REGISTRARE DI NUOVO (Fig. 3) --- Coprire le
aperture striscetta con il cellofan.
FUNZIONAMENTO RADIO
SINTONIA
• Premere il tasto Function “RADIO” per posizionare l’apparecchio sul modo Radio.
L’indicatore di funzione radio si accenderà
• Selezionare il campo di sintonizzazione con il tasto BAND
• Ruotate TUNING per selezionare la stazione radio desiderata.
NOTA:
Quando ascoltate la frequenza FM è consigliabile estendere completamente l’antenna FM.
Quando ascoltate le frequenze FM è consigliabile regolare la posizione dell’elmetto per un’ottima ricezione.
Che cos
’è l’ MP3?
MP3 è una forma breve per MPEG Audio Layer 3.
MPEG si riferisce al gruppo di esperti.
Gli MP3 sono files audio digitali che quando sono stati contratti hanno mantenuto ancora la loro qualità originale
di suono.
Gli MP3 sono riconosciuti come I formato più popolare per conservare e ascoltare la musica.
I files audio digitali conservati in un disco MP3 può essere messi in funzione sul lettore MP3.
Il disco MP3 può contenere 150-200 canzoni in un CD.
I 049.
Lato A
Linguetta per
lato A
Cassetta cellofan
Fig.1
Fig.2
Fig.3
05-2322_IT 6/20/06 11:23 AM Page 09
Page 50

Energia: AC ~230V 50Hz
Consumo energetico: 15 watts
Cavo energetico 2 Watts X 2 RMS in 8 OHM
(Per canale):
Sezione Radio: AM 525 – 16150 KHz
FM 87,5 – 108 MHz
Sezione Compact Disc:
Risposta di frequenza 60 – 16,000 Hz
(-3dB)
Segnale radio: 60 dB
Distorsione armonica: 0.4%
Compatibile con: CD-DA, CD-R, CD-RW, MP3
Sezione cassetta:
Velocità 4.75 cm / sec.
< 0.4%
Risposta di Frequenza 100 Hz - 6.3 KHz
I 050.
05-2322_IT 6/20/06 11:23 AM Page 010
Page 51

I 051.
INFORMAZIONI AGGIUNTIVE
Prestate attenzione ai pezzettini e alle batterie, non inghiottiteli. Potrebbe essere nocivo alla vostra
salute e causare soffocamento. Prestate la massima attenzione a tenere i piccoli dispositivi e le
batterie lontani dalla portata dei bambini.
Importante suggerimento riguardo alla protezione dell’udito
Attenzione:
Avete a cuore il vostro udito, così come noi.
Pertanto, fate attenzione quando usate questo apparecchio.
La nostra raccomandazione è di: Evitare un volume eccessivo.
Dovesse l’apparecchio essere usato da bambini, assicuratevi che esso non sia regolato su un volume
eccessivo.
Attenzione! Un volume eccessivo potrebbe causare danni irreversibili all’udito dei vostri bambini.
MAI lasciare che nessuno, ed in particolar modo bambini, metta alcun oggetto sopra i buchi,
scappatoie o altre aperture sul dispositivo. Ciò potrebbe causare la morte da scossa elettrica. Il
dispositivo deve essere aperto solo da un assistente qualificato.
Usate l’apparecchio solo per il proposito per cui è stato disegnato.
L’apparecchio è destinato unicamente all’utilizzo in ambienti domestici e di lavoro.
Conservare accuratamente le istruzioni per l’uso per futuro riferimento.
INFORMAZIONI AGGIUNTIVE
Avvertenze per la tutela dell’ambiente
Una volta inutilizzabile il prodotto non deve essere smaltito con i rifiuti domestici ma portato presso
un punto di raccolta per il riciclo di apparecchiature elettriche. Ciò è indicato dal simbolo presente
sul prodotto, sulle istruzioni per l’uso o sulla confezione.
I materiali riciclabili sono riutilizzabili a seconda delle loro caratteristiche. Con il riutilizzo, con il
riciclaggio di materiale o altri tipi di riciclaggio di apparecchi vecchi fornirete un importante
contributo alla tutela ambientale.
Informatevi presso l’amministrazione comunale sui punti di smaltimento competenti.
Non ostacolate la ventilazione del dispositivo. Assicuratevi che né tende, giornali, coperte o mobili
blocchino le scappatoie della ventilazione dell’apparato. La ventilazione dev’essere costantemente
assicurata! Un eventuale surriscaldamento potrebbe causare seri danni al dispositivo e ridurre sia le
prestazioni che la durata del funzionamento.
Riscaldamento e calore
Non esponete l’apparecchio a luce del sole diretta. Assicuratevi che l’apparecchio non sia soggetto
a fonti di calore dirette come stufe o fiamme. Assicuratevi che le vie di ventilazione dell’apparecchio
non siano coperte.
Umidità e pulizia
L’apparecchio non è subacqueo! Non immergete il lettore nell’acqua. Non lasciate che il lettore venga a
contatto con acqua. Dell’acqua che dovesse incidentalmente cadere sul lettore potrebbe causare seri
danni. Non usate detergenti che contengano alcool, ammoniaca, benzene o abrasivi in quanto questi
potrebbero danneggiare il lettore. Per pulire, usate un panno soffice e umido.
05-2322_IT 6/20/06 11:23 AM Page 011
Page 52

E 052.
ADVERTENCIA DE SEGURIDAD
Este aparato debe desconectarse de la fuente de alimentación si no se utiliza.
No exponga este aparato a la lluvia o lugares de humedad
ADVERTENCIA:
Para reducir posibles riesgos de descarga eléctrica, no retire la tapa (o parte trasera).
En el interior del aparato no hay partes utilizables para el usuario.
INSTRUCCIONES DE SEGURIDAD
1. LEA LAS INSTRUCCIONES - Es necesario leer la instrucciones de manejo y de seguridad antes de utilizar
el aparato.
2. CONSERVE L AS INSTRUCCIONES - Deberá conservar las instrucciones de manejo y de seguridad para
consultas posteriores.
3. ADVERTENCIAS IMPORTANTES - Todas las advertencias sobre el manejo del aparato y así como las
instrucciones de manejo deben conservarse.
4. SIGA LAS INSTRUCCIONES - Deben seguirse todas las instrucciones de manejo.
5. AGUA Y HUMEDAD - No debe usarse el aparato cerca de lugares con agua, tales como bañeras,
palanganas, fregaderos, tinas de limpieza, piscinas o superficies húmedas.
6. VENTILACIÓN - Debe situar el aparato en un lugar y en una posición que entorpezca su ventilación
correcta. Por ejemplo, no debe colocar el aparato en una cama, un sofá, una alfombra o superficies
similares que puedan tapar las aberturas de ventilación. No coloque el aparato en lugares cerrados esté
en uso, tales como estanterías o armarios, que puedan impedir la salida de aire por las aberturas de
ventilación.
7. CALOR - El aparato debe mantenerse alejado de fuentes de calor, tales como radiadores, contadores de
calor, hornos u otros aparatos (incluidos amplificadores) que produzcan calor.
8. FUENTES DE ALIMENTACIÓN - Conecte el aparato únicamente a tipos de fuente de alimentación
descritos en el manual de instrucciones de manejo o señalados en el aparato.
9. TOMA A TIERRA Y POLARIZACIÓN - Debe tomar precauciones para asegurar que los medios de la toma
a tierra o la polarización del aparato no estén dañados.
10. PROTECCIÓN DEL CABLE DE CONEXIÓN - Los cables de conexión deberán estar colocados en lugares
seguros con el fin de evitar pisarlos o pincharlos con objetos situados cerca del aparato, en especial los
cables y enchufes, receptáculos de conveniencia y el punto del que proviene el aparato.
PRODUCTO
LASER CLASE 1
¡ADVERTENCIA!
Radiación láser invisible al abrir el
aparato y soltar los puntos de cierre.
Evite exponer el aparato a rayos.
The triangular symbol with the
lightning Bolt warns the user to the
presence of dangerous non-isolated
voltage on the inside of this device
which may cause an electric shock.
WARNING
DANGER OF A HAZARDOUS ELECTRIC
SHOCK. DO NOT OPEN
WARNING: TO REDUCE THE RISK OF AN
ELECTRIC SHOCK, DO NOT REMOVE THE
FRONT OR BACK COVER. INSIDE THE UNIT,
THERE ARE NO PARTS THAT CAN BE
REPAIRED OR ADJUSTED BY THE USER.
PLEASE REFER TO QUALIFIED TECHNICIANS.
The triangular symbol with the
exclamation highlights important
points of which the user should refer
to the manual regarding maintenance
and repair.
06-2322_ES 6/20/06 11:24 AM Page 02
Page 53

E 053.
11. LIMPIEZA - El aparato debe limpiarse únicamente como recomienda el fabricante.
12. LÍNEAS DE CONEXIÓN - Deberá colocarse una antena externa fuera de las líneas de conexión.
13. PERÍODOS DE INUTILIZACIÓN - El cable de conexión del aparato debe desconectarse del enchufe
cuando no se utilice durante un período de tiempo largo.
14. ENTRADA DE OBJETOS Y LÍQUIDOS - Debe poner atención en no dejar caer objetos o líquidos
dentro de las aberturas del aparato.
15. SERVICIO - El usuario no debe intentar realizar maniobras que no se describan en el manual de
instrucciones del usuario.Las acciones que no se mencionen en él deberán llevarlas a cabo un
personal de servicio cualificado.
16. DAÑOS QUE REQUIEREN UN SERVICIO - El aparato necesita el servicio de una personal
cualificado cuando:
A. El cable de conexión o enchufe estén dañados.
B.Hayan caído objetos o líquidos dentro del aparato.
C.El aparato haya sido expuesto a la lluvia.
D.El aparato haya caído o su superficie haya resultado dañado.
E. El aparato no funciona normalmente o muestra cambios bruscos de funcionamientos
PREPARACIÓN PARA SU MANEJO
INSTALACIÓN
• Desenvuelva todas las partes y retire el material de protección.
• Inserte las pilas dentro del mando a distancia.
• No conecte la unidad en el enchufe antes de comprobar el voltaje de la fuente de alimentación y
antes de haber realizado todas las demás conexiones.
• No cubra ninguna de las aberturas para asegurar un espacio de varios centímetros alrededor del
aparato para permitir su ventilación.
CONEXIONES
1) Conecte los altavoces izquierdo y derecho en las salidas izquierda y derecha respectivamente.
2) Antes de conectar la unidad al enchufe, asegúrese de que el voltaje AC indicado en la placa
posterior es el mismo que el de la fuente de alimentación.
MANEJO / DISCO COMPACTO
No pase por alto los siguientes puntos, pues cualquier suciedad, rayas u otros defectos en el disco
pueden causar un sonido roto intermitente, así como ruidos.
• Cuando coja los discos, tenga cuidado en no tocar la superficie de reproducción.
• No coloque los discos en los siguientes lugares:
Cerca de dispositivos de calor o lugares de alta temperatura;
En lugares húmedos o polvorientos.
• Limpie cualquier huella o polvo en la superficie de reproducción de un disco con un paño suave.
Limpie el disco siempre desde dentro hacia fuera.
CARGAR EL DISCO
• Pulse OPEN/CLOSE.
• Inserte el CD (con la parte impresa hacia arriba) en la bandeja.
• Pulse OPEN/CLOSE para cerrar la bandeja.
• La pantalla mostrará el número total de pistas.
06-2322_ES 6/20/06 11:24 AM Page 03
Page 54

E 054.
CONTROLES Y APLICACIONES
1. BANDEJA DEL CD
2. OPEN/CLOSE [Abrir/Cerrar] LA BANDEJA DEL
CD
3. PANTALLA LCD
4. VOLUME UP [Aumentar Volumen]
5. VOLUME DOWN [Disminuir Volumen]
6. BOTÓN FOLDER [Carpeta]
7. BOTÓN +/-- BASS
8. INDICADOR DE ENCENDIDO
9. SENSOR REMOTO
10. BOTÓN SKIP [Saltar]
11. BOTÓN SKIP [Saltar]
12. BOTÓN PLAY/PAUSE [Reproducir/Pausa]
13. BOTÓN STOP [Detener]
14. SELECTOR DE FUNCTION [Funciones] (TAPE, CD/MP3, TUNER) [Cinta, CD/MP3,
Radio]
15. SELECTOR DE BAND [Banda] (AM, FM, FM ST.)
16. BOTÓN MODE [Modo] (REPEAT, RANDOM)
[Repetir, Aleatorio]
17. BOTÓN PROGRAM [Programar]
18. BOTÓN TUNING [Sintonización]
19. BANDEJA DE CINTAS
20. SALIDA DE AURICULARES
21. CONTROL DE RECORD/PL AY
(Grabar/Reproducir)
22. CABLE DE LA ANTENA FM
23. ALTAVOZ IZQUIERDO
24. ALTAVOZ DERECHO
25. CABLE DE CONEXIÓN
26. BEAT CUT
17
15
13
11
9
7
6
2
3
21
19
1
4
5
8
10
12
14
16
18
22
26
25
23
24
06-2322_ES 6/20/06 11:24 AM Page 04
Page 55

FUNCIONES DEL MANDO A DISTANCIA
Preparación antes de su uso
• Instale las pilas en la unidad del mando a distancia
• Retire la tapa del compartimiento de las pilas de la parte posterior del mando a distancia.
• Inserte dos pilas “UM4/AAA”.
• Inserte las pilas con los terminales y de forma que coincidan con lo indicado en el compartimiento.
• Vuelva a colocar la tapa.
Sustitución de las pilas
• Cuando el mando a distancia deje de funcionar de forma constante y o la distancia desde lo maneja se
reduce, cambie las pilas.
Utilización del mando a distancia
Para utilizar el mando a distancia, apunte al SENSOR REMOTO y pulse los botones suave y firmemente.
El mando puede utilizarse a una distancia máxima aproximada de 6 metros.
Sin embargo, la distancia puede ser menor si se utiliza desde distintos ángulos, por lo que es recomendable
que el SENSOR REMOTO esté justo enfrente del mando para aprovechar su máxima distancia.
No exponga el SENSOR REMOTO a una luz muy potente (luz del Sol o artificial) y asegúrese de que no haya
obstáculos entre el SENSOR REMOTO y el mando a distancia
MANDO A DISTANCIA
1. Botón Folder [Carpeta]
2. Botón Folder [Carpeta]
3. Botón PLAY/PAUSE [Reproducir/Pausa]
4. Botón STOP [Detener]
5. Botón SKIP [Saltar] +
6. Botón SKIP [Saltar] -
7. Botón MODE [Modo]
8. Botón PROGRAM [Programar]
MANEJO Del Botón De Funciones
BOTÓN POWER Encienda La Unidad
VOLUME +/- - Para aumentar o disminuir el volumen del sonido como desee
REPRODUCIR/PAUSA
• Inicie la reproducción desde el modo detener.
• Active el modo pausa durante la reproducción.
• Vuelva al modo reproducción desde el modo pausa.
DETENER
• En los modos Reproducir o Pausa: Cambie al modo stop o al modo de Programación de entrada durante
la reproducción del programa.
• En el modo Programación de entrada: Salga del modo de Programación de entrada, borrar la memoria
programada y cambie al modo Stop.
• En reproducción aleatoria (botón Mode): Cambie al modo Stop y desactive la función aleatoria.
Botón PROGRAM [Explicación de la función]
E 055.
+
06-2322_ES 6/20/06 11:24 AM Page 05
1
6
4
7
2
3
5
8
Page 56

1. Si pulsa el botón [PROGRAM] mientras el CD se encuentra en modo Stop, el sistema irá al modo de
programación. Durante el modo de programación, el número de la pista y PROGRAM parpadearán a un
intervalo de 500 [ms] (Indicación 1).
2. Si pulsa [FF/SKIP+] / [FB/SKIP-], selecciona el número de pista que desea guardar.
3. Si pulsa [PROGRAM] después de elegir una pista, el sistema la guarda y pasa al siguiente modo de
programación (Indicación 2).
4. El sistema puede guardar hasta 20 pistas en el modo CD / 10 pistas en el modo MP3.
Tras programar 20 pistas, no podrá guardar más canciones.
Durante la programación, no podrá realizar ninguna otra función.
La pantalla mostrará PROGRAM y “P 01”, que parpadearán a un intervalo de 500 [ms].
5. Si pulsa [STOP] durante el modo de programación, el sistema borrará las pistas guardadas y cancelará el
modo de programación.
6. Si pulsa [PLAY/PAUSE] durante la programación, empezará a reproducción dicha programación.
Durante la reproducción de la programación, la pantalla mostrará PROGRAM
(Indicación 4).
7. Si pulsa [FF/SKIP+] / [FB/SKIP-] durante la reproducción de la programación, saltará a la pista siguiente
/ anterior programada.
8. Si pulsa [STOP] durante la reproducción de la programación, detendrá la reproducción y activará el modo
stop. El contenido de la programación se mantendrá hasta que pulse [STOP] en el modo stop.
Botón MODE [Explicación De La Función]
CD Modus:
1. Si pulsa [MODE], cambiará el modo (en el siguiente orden).
2. En el modo Repeat-1, se reproducirá constantemente el pista actual del CD.
3. En el modo Repeat-all, cuando el CD llegue a su última pista, volverá a empezar a sonar desde la primera
pista.
4. Si se han escuchado todas las pistas pulsa [STOP] en el modo aleatorio o si, se detendrá la reproducción
y desactivará el modo aleatorio.
5. Si pulsa [FF/SKIP+] durante el modo aleatorio, saltará a una pista de forma aleatoria.
Si pulsa [FF/SKIP+] durante la reproducción de la última pista, el sistema buscará otra pista de forma
aleatoria.
6. Si pulsa [FB/SKIP-] durante una reproducción aleatoria, volverá a sonar la canción actual desde el
principio, pero no puede volver a escuchar la anterior.
Modo MP3:
1. Si pulsa [MODE], cambiará de modo (en el siguiente orden).
E 056.
PROGRAM
(INDICACIÓN 1 )
(INDICACIÓN 2 )
(INDICACIÓN 3 )
(INDICACIÓN 4 )
PROGRAM
PROGRAM
PROGRAM
REP
REP
ALL
RANDOM
NO REPETIR Y
ALEATORIO
REPETIR TODO
REPETIR-1
ALEATORIO
06-2322_ES 6/20/06 11:24 AM Page 06
Page 57

2.
Durante el modo Repeat-1, se repetirán la pista actual del MP3.
3. Durante el modo Repeat-folder, se repetirá la carpeta actual del MP3
4. Durante el modo Repeat-all, cuando termine de sonar la última pista, volverá a empezar a sonar desde la
primera pista.
5 Si en el modo aleatorio se han reproducido todas las pistas o pulsa [STOP], se detendrá la reproducción
y cancelará el modo aleatorio.
6. Si pulsa [FF/SKIP+] durante el modo aleatorio, saltará a una pista de forma aleatoria.
Si pulsa [FF/SKIP+] al final de la última pista, se volverá a reproducir una nueva pista de forma aleatoria.
7. Si pulsa [FB/SKIP-] durante una reproducción aleatoria, volverá a sonar la canción actual desde el
principio, pero no puede volver a escuchar la anterior.
MODO
CD: Ninguna Repetir 1 Repetir todo Aleatorio Ninguna.
MP3: Ninguna Repetir 1 Repetir carpeta Repetir todo Aleatorio Ninguna,.
ALEATORIO
1. Pulse RANDOM para empezar a escuchar.
Todas las pistas del disco de reproducirán de forma aleatoria.
Seleccione la función Random y pulse Mode para empezar la reproducción aleatoria.
PROGRAMAR EL MP3
El reproductor MP3 le permite programar 10 pistas en una secuencia.
1. Pulse el botón PROGRAM en el modo stop. En la pantalla parpadearán “P01” y “PROGRAM”.
2. Pulse FF/SKIP+ y FB/SKIP-para seleccionar la pista que desea programar.
o bien Pulse el botón FOLDER DN y FOLDER UP en el mando a distancia para programar la pista siguiente
de la carpeta.
3. Pulse PROGRAM para grabar la pista en la memoria.
4. Siga programando repitiendo los pasos 2 y 3.
5. Pulse PLAY/PAUSE en el modo de programación para reproducir las pistas programadas.
SKIP +
• Cambie la pista de reproducción durante el modo stop.
• Salte a la siguiente pista durante la reproducción normal.
Volverá a la primera pista si se encuentra en la última.
• Si pulsa el botón durante más de 0,5 seg., empezará el avance rápido.
• Salte a la siguiente pista programada durante la reproducción de la programación.
Volverá a la primera pista programada.
• Salta a la siguiente pista de forma aleatoria durante la reproducción aleatoria.
SKIP -
• Cambia la primera pista de reproducción en el modo stop.
E 057.
NO REPETIR Y
ALEATORIO
ALBUM
MP3
REPETIR
CARPETA
MP3
MP3
RANDOM
REPETIR TODO
REPETIR-1
ALEATORIO
MP3
MP3
REP
REP
REP
ALL
06-2322_ES 6/20/06 11:24 AM Page 07
Page 58

Page 59

Page 60

Page 61

E 061.
NFORMACIÓN ADICIONAL
Cuidar que ellos no se traguen pequeñas piezas del aparato y las baterías. Si esto ocurre es muy
peligroso para su salud y puede provocar asfixia. Preste mucha atención de mantener los pequeños
aparatos y baterías fuera del alcance de los niños.
II
mportante aviso respecto a la protección de sus oídos
Cuidado:
Cuide usted de su capacidad auditiva, como lo hacemos nosotros.
Por lo tanto, tenga precaución cuando use el aparato.
Nuestra recomendación: Evite el volumen alto.
En caso que el aparato sea usado por los niños, asegúrese que la aplicación no este en alto volumen.
Peligro!
El alto volumen puede causar irreparables danos a los oídos de los niños.
NUNCA permita que alguna persona o en especial niños pongan objetos dentro de los huecos,
ranuras u otras aberturas del aparato. Esto puede provocar peligro de muerte por un choque
eléctrico. El aparato solo debe ser abierto por un asistente calificado.
Solamente use el aparato para los propósitos que fue diseñado.
El aparato está concebido exclusivamente para ser usado en viviendas y áreas de negocio.
Le recomendamos que conserve las instrucciones de manejo para un eventual uso posterior.
INFORMACIÓN ADICIONAL
Indicaciones sobre el medio ambiente
No deseche este producto en la basura doméstica una vez que se haya cumplido su vida de
funcionamiento, deposítelo en un punto de recogida de aparatos eléctricos y electrónicos. El
símbolo que se encuentra en el producto, el manual de usuario o el embalaje, hacen referencia a
este punto.
El plástico es reutilizable según esté indicado. Con la reutilización de productos de plástico
reciclado u otra clase de reciclaje de aparatos viejos, está contribuyendo de forma importante a la
conservación del medio ambiente.
No impida la ventilación del aparato. Asegúrese, que cortinas, periódicos, coberturas o muebles no
estén bloqueando las ranuras de ventilación del aparato. La ventilación debe asegurarse todo el
tiempo! El sobrecalentamiento puede causar serios daños en el interior del aparato y reduce su
buen funcionamiento y su tiempo de vida.
Caliente y Caluroso
No exponga el aparato a la luz directa del sol. Asegúrese que el aparato no esta expuesto
directamente a fuerzas calientes semejantes a calefactores o fuego directo. Asegúrese que la
ventilación de las ranuras del aparato no esté cubierta.
Humedad y limpieza
Este aparato no es impermeable! No sumerja el aparato en el agua. No permite que el aparato entre
en contacto con el agua. La entrada de agua en el aparato causa serios problemas y daños. No use
agentes limpiadores que contengan alcohol, amoniacos, benzinas o abrasivos estos pueden dañar
al aparato. Para la limpieza use un suave y húmedo paño.
06-2322_ES 6/20/06 11:24 AM Page 011
Page 62

P 062.
PRECAUÇÕES DE SEGURANÇA
Este aparelho deve ser desconectado da tomada quando não estiver em uso.
Não deixe este aparelho exposto à chuva ou humidade.
CUIDADO:
Para reduzir o risco de choques eléctricos, não remova a tampa (ou parte de trás).
Não há partes úteis ao usuário dentro deste aparelho. Deixe a manutenção para o pessoal de serviço
qualificado.
INSTRUÇÕES DE SEGURANÇA
1. LEIA AS INSTRUÇÕES - Todas as instruções de segurança deverão ser lidas antes do aparelho ser
utilizado.
2. MANTENHA AS INSTRUÇÕES - As instruções de segurança e utilização deverão ser mantidas para
referencias futuras.
3. ATENÇÃO AOS AVISOS - Todos os avisos deste aparelho e no manual de instruções deverão ser seguidos.
4. SIGA AS INSTRUÇÕES - Todas as instruções de utilização e operação deverão ser seguidas.
5. ÁGUA E HUMIDADE - Este aparelho não deve ser utilizado próximo à água, por exemplo, próximo à
banheiras, bacias, pia de cozinha, lavadeira, piscinas ou locais molhados.
6. VENTILAÇÃO - O aparelho deve ser estar devidamente disposto para que assim, a sua posição não interfira
com a sua ventilação apropriada. Por exemplo, o aparelho não deve ser posto sobre camas, sofás, tapetes
ou superfícies similares que possam bloquear as aberturas para ventilação. Não posicione-o em mobília
embutida, tais como prateleiras ou armários, pois estes podem impedir o fluxo de ar pelas aberturas de
ventilação.
7. AQUECIMENTO - Este aparelho deve ser posto longe de fontes de calor, tais como radiadores, fogões, e
outros aparelhos (incluindo amplificadores) que produzem calor.
8. FONTES DE ENERGIA - O aparelho deverá estar conectado apenas à tomadas do tipo descrito no manual
de instruções ou como marcado no aparelho.
9. NEUTRALIZAÇÃO E POLARIZAÇÃO - Deverão ser tomadas as precauções necessárias para assegurar
que a neutralização e polarização do aparelho não estejam danificadas.
10. PROTECÇÃO DO CABO DE ALIMENTAÇÃO - O cabo de alimentação deve estar devidamente guiado para
que não possam ser pisados ou dobrados, ou forçados por outros objectos. Mantenha atenção às fichas
eléctricas, tomadas, e no ponto de saída do aparelho.
PRODUTO DE
LASER CLASSE 1
CUIDADO!
Radiação invisível de laser quando
aberta ou forçada as travas.
Evite a exposição do laser.
O símbolo de luz com o símbolo
de ponta da flecha, dentro de um
triangulo equilateral, tem a função
de alertar o usuário de uma da
presença de uma voltagem
perigosa não insulada com o
cercado que pode ter uma
magnitude suficiente para
constituir um risco de choques
eléctricos para pessoas.
CUIDADO
PERIGO DE CHOQUE ELÉCTRICO
NÃO ABRA
CUIDADO: PARA REDUZIR O PERIGO DE
CHOQUE ELÉCTRICO NÃO RETIRE A TAMPA
(OU A PARTE DETRÁS). NÃO HÁ PARTES
UTILIZÁVEIS PELO USUÁRIO NO INTERIOR.
PARA TODAS AS REPARAÇÕES, REFIRA-SE A
EMPREGADOS QUALIFICADOS.
O ponto de exclamação com um
triangulo equilateral tem a função de
alertar o usuário da presença de
operações e instruções de
manutenção importantes nas
explicações acompanhando o
aparelho.
07-2322_PT 6/20/06 11:25 AM Page 02
Page 63

P 063.
11. LIMPEZA - Este aparelho deverá ser limpado apenas como descrito pela fábrica.
12. CABOS DE ENERGIA - A antena externa deve ser posta longe dos cabos de energia.
13. PERÍODOS SEM UTILIZAÇÃO - O cabo de alimentação no aparelho deve ser desconectado da
tomada quando o aparelho for deixado por longos períodos sem utilização.
14. ENTRADA DE LÍQUIDOS E OBJECTOS - Cuidados deverão ser tomados para que objectos e
líquidos não caiam dentro do aparelho ou próximo à suas entradas.
15. MANUTENÇÃO - O usuário não deverá tentar efectuar a manutenção além do descrito no manual de
instruções do usuário. Toda manutenção deve ser deixada para o pessoal de serviço qualificado.
16. DANOS QUE REQUEREM MANUTENÇÃO - O aparelho deve ser enviado para o pessoal de serviço
qualificado quando:
A. O cabo de alimentação e ficha eléctrica estão danificados.
B.Objectos ou líquidos caíram dentro do aparelho.
C.O aparelho foi exposto à chuva.
D.O aparelho foi derrubado, ou danificado.
E. O aparelho não parece funcionar apropriadamente ou exibe sérias mudanças de performance.
PREPARAÇÃO PARA A UTILIZAÇÃO
INSTALAÇÃO
• Remova todo o material de embalagem e material protector.
• Insira as baterias no controle remoto.
• Não conecte este aparelho à tomada antes de verificar a tensão da tomada e antes de que todas as
outras conexões tenham sido feitas.
• Não cubra as ventilações e assegure-se de que há espaço de vários centímetros em volta do
aparelho para a ventilação.
CONEXÕES
1) Conecte os alto-falantes esquerdos e direitos em suas respectivas entradas.
2) Antes de conectar o aparelho à tomada, assegure-se de que a tensão AC impressa na parte de trás
do aparelho seja igual à tensão da sua tomada.
UTILIZAÇÃO / DISCO COMPACTO
Preste atenção aos seguintes pontos, pois quaisquer sujidade, arranhões, ou embrulhos no disco
podem causar pausas ou interrupções no som e também causar ruídos.
• Ao manusear os discos, assegure-se de não tocar a superfície de reprodução.
• Não disponha os discos nos seguintes locais:
Próximos a dispositivos de calor ou locais com altas temperaturas;
Locais húmidos ou empoeirados.
• Limpe as impressões digitais ou poeiras na superfície de reprodução utilizando um pano suave.
Sempre limpe o disco de dentro para fora.
INSERINDO O DISCO
• Pressione OPEN/CLOSE
• Insira o CD na bandeja (com o lado impresso para cima).
• Pressione OPEN/CLOSE para fechar a porta do CD.
• O ecrã irá exibir o número total de faixas do CD.
07-2322_PT 6/20/06 11:25 AM Page 03
Page 64

P 064.
CONTROLES E FUNÇÕES
1. PORTA DO CD
2. OPEN/CLOSE [ABRE/FECHA] DA PORTA DO
CD
3. ECRÃ LCD
4. VOLUME UP [AUMENTO DO
VOLUME]
5. VOLUME DOWN
[DIMINUIÇÃO DO VOLUME]
6. BOTÃO FOLDER [FICHEIRO]
7. BOTÃO X-BASS [BAIXO]
8. INDICADOR DE ENERGIA
9. SENSOR INFRAVERMELHO
10. BOTÃO SKIP [AVANÇAR]
11. BOTÃO SKIP [AVANÇAR]
12. BOTÃO PLAY/PAUSE [REPRODUZIR/PAUSAR]
13. BOTÃO STOP [PARAR]
14. SELECTOR FUNCTION [FUNÇÃO] (TAPE,
CD/MP3, TUNER) [CASSETE, CD/MP3,
SINTONIZADOR]
15. SELECTOR BAND [BANDA] (AM, FM, FM ST.)
16. BOTÃO MODE [MODO] (REPEAT, RANDOM)
[REPETIR, ALEATÓRIO]
17. BOTÃO PROGRAM [PROGRAMAÇÃO]
18. BOTÃO TUNING [SINTONIA]
19. PORTA DO CASSETE
20. AURICULARES
21. CONTROLE RECORD/PL AY
[GRAVAR/REPRODUZIR]
22. ANTENA FM
23. ALTO-FALANTE ESQUERDO
24. ALTO-FALANTE DIREITO
25. CABO DE ALIMENTAÇÃO
26. BEAT CUT
17
15
13
11
9
7
6
2
3
21
19
1
4
5
8
10
12
14
16
18
22
26
25
23
24
07-2322_PT 6/20/06 11:25 AM Page 04
Page 65

FUNÇÃO DO CONTROLE REMOTO
Preparação antes da utilização
• Instalação das baterias no controle remoto.
• Remova a tampa do compartimento de baterias na parte de trás do controle remoto.
• Insira duas baterias do tamanho “UM4/AAA”.
• Insira as baterias com os terminais e correspondendo as indicações de dentro do compartimento
de baterias.
• Volte a colocar a tampa.
Reposição das baterias
• Quando a utilização do controle remoto ficar instável ou a distância de alcance ficar menor, faça a
reposição das baterias imediatamente.
Utilizando o controle remoto
Para a utilização do controle remoto, mire o SENSOR INFRAVERMELHO e pressione os botões gentilmente.
A utilização do controle remoto é possível em uma distância de aproximadamente 18ft (6m).
No entanto, a distância de eficiência do controle remoto é reduzida dependendo do ângulo utilizado, por isso,
mire directamente ao SENSOR INFRAVERMELHO para obter o maior alcance.
Não exponha o SENSOR INFRAVERMELHO á luz forte (luz directa do sol ou artificial) e assegure-se de que
não haja obstáculos entre o SENSOR INFRAVERMELHO e o controle remoto.
CONTROLE REMOTO
1. Botão Folder [ficheiro]
2. Botão Folder [ficheiro]
3. Botão PLAY / PAUSE [REPRODUZIR / PAUSAR]
4. Botão STOP [PARAR]
5. Botão + SKIP [PULAR]
6. Botão - SKIP [PULAR]
7. Botão MODE [MODO]
8. Botão PROGRAM [PROGRAMAR]
Tecla de função OPERAÇÃO
BOTÃO POWER - Liga o aparelho
VOLUME +/- - Aumenta ou diminui o volume do som à um nível adequado.
REPRODUZIR/PAUSAR
• Inicie a reprodução no modo parado.
• Inicia a pausa durante a reprodução.
• Retorna ao modo de reprodução no modo de pausa.
PARAR
• No modo de Reprodução ou no modo de Pausa:
Mudando do modo de Parar ao modo de Programação durante o modo de reprodução.
• No modo de Programação: Saia do modo de Programação, limpe a memória e mude para o modo de
Parar.
• Na Reprodução Aleatória (Botão Mode): Mudando do modo de Parar e soltando a função Aleatória.
P 065.
+
07-2322_PT 6/20/06 11:25 AM Page 05
1
6
4
7
2
3
5
8
Page 66

Tecla PROGRAM [explicação da função]
1. Se a tecla [PROGRAM] for pressionada durante o modo de Parar do CD, o sistema irá ao modo de
programação. Durante o modo de programação, o número de faixa e PROGRAM irão aparecer no ecrã
no intervalo de 500 [ms] (ecrã 1 ).
2. Se a tecla [FF/SKIP+] / [FB/SKIP -] for pressionada, o sistema seleccionará o número de faixa o qual
quiser registar.
3. Se a tecla [PROGRAM] for pressionada após a selecção do número de faixa, o sistema irá manter o
número da faixa e irá ao próximo modo de programação.(ecrã 2).
4. O sistema pode armazenar até 20 programações para o modo de CD / 10 programações para MP3.
Após o sistema armazenar 20 programações, ele não poderá armazenar outras músicas.
Quando o sistema armazenar 20 programações, ele não poderá efectuar outras programações.
O ecrã PROGRAM e “P 01” irá piscar no intervalo de 500 [ms].
5. Se a tecla [STOP] for pressionada durante o modo de programação, o sistema irá remover as informações
de programação, e cancelará o modo de programação.
6. Se a tecla [PLAY/PAUSE] for pressionada durante o armazenamento da programação por mais de uma vez,
ele irá iniciar a reprodução da mesma. Durante a reprodução da programação, o ecrã irá exibir PROGRAM
está em reprodução.(ecrã 4).
7. Se a tecla [FF/SKIP+] / [FB/SKIP-] for pressionada durante a reprodução da programação, o sistema irá
avançar / voltar à programação.
8. Se a tecla [STOP] for pressionada durante a reprodução de programação, o sistema irá parar a reprodução
programada e irá ao modo de Parar. Até que a tecla [STOP] seja pressionada durante o modo de Parar, o
sistema irá manter o conteúdo da programação.
Tecla MODE [explicação de função]
Modo de CD:
1. Se a tecla [MODE] for pressionada, o sistema irá mudar o modo (como a seguir).
2. Durante o modo de Repeat-1, o sistema irá repetir a faixa actual do CD.
3. Durante o modo de Repeat-all, ao chegar ao fim do disco, o sistema irá voltar a reproduzir a partir da
primeira faixa.
4. Se toda a faixa for terminada durante o modo de reprodução aleatória, ou se a tecla [STOP] for pressionada
durante o modo de reprodução aleatória, o sistema irá para o modo
5. Se a tecla [FF/SKIP+] for pressionada durante o modo de reprodução aleatória, o sistema irá pular
aleatoriamente. Se a tecla [FF/SKIP+] for pressionada durante a última faixa, o sistema irá pular para a
próxima faixa aleatoriamente.
6. Se a tecla [FB/SKIP-] for pressionada durante o modo de reprodução aleatória, o sistema buscará o
começo da faixa actual, mas não irá pular para trás as faixas.
P 066.
PROGRAM
(ECRÃ 1 )
(ECRÃ 2 )
(ECRÃ 3 )
(ECRÃ 4 )
PROGRAM
PROGRAM
PROGRAM
REP
REP
ALL
RANDOM
SEM REPETIR &
ALEATÓRIO
REPETIR TODAS
REPETIR-1
ALEATÓRIO]
07-2322_PT 6/20/06 11:25 AM Page 06
Page 67

Modo MP3:
1. Se a tecla [MODE] for pressionada, o sistema irá o modo (como a seguir).
2. Durante o modo Repeat-1, o sistema irá repetir a faixa actual do MP3
3. Durante o modo Repeat-folder, o sistema irá repetir o ficheiro actual do MP3
4. Durante o modo Repeat-all, se chegar ao fim da faixa, o reprodutor irá repetir todas as faixas novamente.
5 Se toda a faixa for terminada durante o modo de reprodução aleatória ou se a tecla [STOP] for pressionada
durante o modo de reprodução aleatória, o sistema irá ao modo de Parar e cancelará o modo de
reprodução aleatória.
6. Se a tecla [FF/SKIP+] for pressionada durante o modo de reprodução aleatória, o sistema irá avançar para
a próxima faixa aleatoriamente.
Se a tecla [FF/SKIP+] for pressionada no final da faixa, o sistema irá avançar para a próxima faixa.
7. Se a tecla [FB/SKIP-] for pressionada durante o modo de reprodução aleatória, o sistema buscará o
começo da faixa actual, mas não pulará a faixa.
MODO
CD: Nenhum Repetir 1 Repetir todas Aleatório Nenhum.
MP3: Nenhum Repetir 1 Repetir ficheiro Repetir todas Aleatório Nenhum.
ALEATÓRIO
1. Pressione o botão RANDOM para iniciar a escuta.
Todas as faixas no disco serão reproduzidas aleatoriamente.
Seleccione a função Random e pressione o botão Mode, e a selecção aleatória irá começar a reproduzir.
PROGRAMANDO O MP3
O reprodutor de MP3 possibilita a programação em qualquer sequência de 10 faixas.
1. Pressione o botão PROGRAM no modo de Parar. O ecrã irá exibir “P01” e “PROGRAM” irá piscar.
2. Pressione o botão FF/SKIP+ e FB/SKIP- para seleccionar a faixa desejada à ser programada.
Ou Pressione o botão FOLDER DN e FOLDER UP no controle remoto para seleccionar a próxima faixa do
ficheiro à ser programada.
3. Pressione o botão PROGRAM para inserir na memória.
4. Continue a programação, repita os passos 2 e 3.
5. Pressione o botão PLAY / PAUSE no modo de programação para reproduzir a faixa programada.
SKIP+
• Mude a faixa de reprodução inicial durante o modo de Parar, cíclica à primeira faixa se estiver na última
faixa.
• Pule para a próxima faixa durante a reprodução normal.
Cíclica à primeira faixa se estiver na última faixa.
• Quando a tecla for pressionada por mais de 0.5 seg., o avanço rápido será executado.
• Avance para a próxima faixa programada durante a reprodução programada.
Cíclica à primeira faixa programada.
• Avance para a próxima faixa aleatória durante a reprodução aleatória.
P 067.
NÃO REPETIR &
ALEATÓRIOE
ALBUM
MP3
REPETIR O
FICHEIRO
MP3
MP3
RANDOM
REPETIR TODAS
REPETIR-1
ALEATÓRIO
MP3
MP3
REP
REP
REP
ALL
07-2322_PT 6/20/06 11:25 AM Page 07
Page 68

SKIP -
• Mude a faixa inicial de reprodução durante o modo de Parar.
Cíclica à última faixa se estiver na primeira faixa.
• Pule para a faixa anterior durante a reprodução normal.
Cíclica à última faixa se estiver na primeira faixa.
• Quando a tecla for pressionada por mais de 0.5 segundos, a faixa irá rebobinador.
• Pule para a faixa programada anteriormente durante a reprodução programada.
Cíclica à primeira faixa
FOLDER
• Quando o sistema estiver no modo de Parar:
Para MP3, avance para o próximo ficheiro em maior ordem e número de exibição.
• Quando o sistema estiver em modo de REPRODUÇÃO:
Para MP3, avance para o próximo número de ficheiro em maior ordem.
Inicie a reprodução na primeira faixa do ficheiro e será exibido o ficheiro actual e o número da faixa.
Pressione a tecla uma vez. O número de ficheiro actual estará piscando por 3 segundos.
Pressione a tecla novamente. O ficheiro será executado.
FOLDER
• Quando o sistema estiver em modo de Parar.
Para o MP3, avance ao próximo ficheiro em ordem menor e será exibido o número do ficheiro.
• Quando o sistema estiver em modo de REPRODUÇÃO:
Para MP3, avance ao próximo número de ficheiro em ordem maior.
Inicie a reprodução à partir da primeira faixa do ficheiro e será exibido o ficheiro actual e número de faixa.
Pressione uma vez a tecla. O número do ficheiro actual piscará por 3 segundos.
Pressione a tecla novamente Será executado o comando para avançar o ficheiro.
+/= BASS
• Pressione o botão+/ - BASS e seleccione o efeito Bass Boost.
FUNÇÃO DO CASSETE
Mova para a selecção FUNÇÃO CASSETE
CONTROLE DE GRAVAÇÃO/REPRODUÇÃO
• RECORD: para iniciar a gravação.
• PLAY: para iniciar a reprodução do cassete.
• REWIND: para rebobinador o cassete.
• F.FWD: para avançar o cassete.
• STOP/EJ: para parar ou ejectar o cassete.
• PAUSE: para interromper a gravação ou reprodução.
CASSETE
Antes de operar o cassete, assegure-se de que o selector Function esteja no modo Cassete.
REPRODUÇÃO
• Ajuste o selector Function para o modo Tape.
• Pressione o botão Eject para abrir a porta do cassete.
• Posicione a fita cassete no aparelho com a parte à ser reproduzida virada para fora.
• Feche a porta do cassete.
• Pressione o botão Play para iniciar a reprodução.
• A reprodução irá parar quando chegar ao final da fita cassete.
• Pressione o botão Stop se quiser parar a reprodução antes de terminar a fita.
P 068.
07-2322_PT 6/20/06 11:25 AM Page 08
Page 69

GRAVANDO DO RÁDIO / CD
• Pressione o botão Function para “RADIO”, ou “CD” para seleccionar a fonte de som.
• Posicione uma fita virgem no aparelho.
• Pressione o botão Pause primeiramente.
• Então pressione os botões PLAY e RECORD juntos.
• Reproduza a fonte seleccionada de som.
• Quando estiver gravando, solte o botão PAUSE.
1. FOLGA NA FITA (Ilustr. 1) ---- Verifique e aperte as
folgas na fita antes de utilizar, com um lápis ou
utensílio similar. Folgas na fita podem causar danos
ou enroscar dentro do mecanismo.
2. PARA PREVENIR APAGAMENTOS ACIDENTAIS
(Ilustr. 2) ---- Utilize uma chave de fenda ou outro
utensílio similar para quebrar as abas de plástico.
3. PARA VOLTAR A GRAVAR (Ilustr. 3) ---- Tampe as
aberturas das abas com fita celofane.
UTILIZAÇÃO DO RÁDIO
SINTONIA
• Pressione o botão Function em “RADIO” para ajustar o modo de rádio.
O indicador de função de rádio irá acender-se.
• Seleccione o alcance de sintonia com o botão BAND.
• Gire o controle TUNING para seleccionar a estação desejada.
AVISO:
Quando ouvir à transmissões FM, é recomendável que estenda totalmente a antena FM da parte de trás.
Quando ouvir á reproduções AM, é recomendável que ajuste a posição do casco para melhor recepção.
O q
ue é MP3?
MP3 é a abreviação para MPEG AUDIO LAYER 3.
MPEG se refere à Moving Pictures Experts Group.
MP3 são formatos de áudio digital que foram encolhidos, mas mantendo a qualidade de som original.
Os MP3 são reconhecido como os mais populares formatos de armazenamento de música.
Os dados de áudio digital armazenados em MP3 podem ser reproduzidos em reprodutores de MP3.
Um disco de MP3 pode ter de 150-200 músicas em um único CD.
P 069.
Lado A
Aba para lado A
Fita celofane
Ilustr. 1
Ilustr.
2
Ilustr. 3
07-2322_PT 6/20/06 11:25 AM Page 09
Page 70

Tensão de operação: AC 230 ~50Hz
Consumo de potência: 15 Watt
Potência de saída: 2 Watt X 2 RMS em 8 OHM
(Por canal):
Secção de rádio: AM 525 – 1615 KHz
FM 87,5 – 108 MHz
Secção de disco compacto:
Frequência de resposta: 60 – 16,000 Hz
(-3dB):
Taxa de sinal-à-ruído: 60 dB
Distorção harmónica 0.4%
Compatível com: CD-DA, CD-R, CD-RW, MP3
Secção do cassete:
Velocidade da fita: 4.75 cm / sec.
Wow e Flutter: < 0.4%
Frequência de resposta: 100 Hz - 6.3 KHz
P 070.
07-2322_PT 6/20/06 11:25 AM Page 010
Page 71

MAIS INFORM-ÕES
Acautelar-se dos pequenos pedaços e pilhas, não engolir estes pedaços ou pilhas. Estes objectos
podem ser perigosos para a sua saúde e provocar o sufocamento. Prestar atenção e manter
pequenos dispositivos e pilhas fora de alcance das crianças.
Importantes avisos para a protecção dos ouvidos
Cuidado:
A sua audição é tão preciosa para si como para nós.
Portanto, por favor tenha cuidado com este equipamento.
Recomendamos: Evite volumes de som elevados.
Se o equipamento for utilizado por crianças, certifique-se que o volume do aparelho não está demasiado
elevado.
Atenção! Volumes demasiado elevados podem provocar danos irreparáveis à audição das crianças.
Nunca deixe a pessoa especialmente as crianças colocar os objectos dentro de buracos, ranhuras
ou outras aberturas. Estes procedimentos podem causar a morte através de choque eléctrico. O
dispositivo deve ser aberto somente e na presença do pessoal qualificado.
Por favor utilize o equipamento apenas de acordo com o regulamento descrito acima.
O aparelho foi concebido exclusivamente para ser utilizado no sector das actividades e habitação.
Por favor, guarde cuidadosamente as instruções de utilização para uma futura utilização.
MAIS INFORM-ÕES
Conselhos para protecção do ambiente
Este produto, no fim do seu período de vida útil, não deve ser depositado no lixo doméstico normal.
Deverá ser, pelo contrário, depositado num ponto de recolha para reciclagem de aparelhos
eléctricos e electrónicos. O símbolo no produto, as instruções de utilização e a embalagem
chamam a atenção para esse facto.
As matérias-primas são reutilizáveis de acordo com as suas características. Com a reutilização, a
utilização material ou outras formas de utilização de aparelhos velhos fazem com que dê um
contributo valioso para a protecção do nosso ambiente.
Por favor, informe-se junto das autoridades locais sobre os centros de recolha competentes.
Não impedir a ventilação dos dispositivos. Tenha a certeza que as curtinhas, os jornais, panos de
cobrir os mobiliários não impedir a ventilação das aberturas de aparelhos. A ventilação deve manterse a qualquer momento. Aquecer-se demais pode provocar sério dano no dispositivo e reduzir o seu
desempenho por toda a vida.
Calor
Não expor o aparelho directamente à luz solar. Tenha atenção para não expor o aparelho a fontes
de calor como aquecedores ou fontes de chama descoberta. Tenha atenção para que as fendas de
arejamento do aparelho não estejam cobertas.
Humidade e Limpeza
Este produto não é resistente à água. Não submergir o aparelho em água nem deixar que este entre
em contacto com água. Se penetrar água no aparelho pode provocar sérios danos. Não utilizar
agentes de limpeza que contenham álcool, amoníaco, benzol ou abrasivos, pois estes podem
danificar o aparelho. Utilize um pano macio e húmido para a limpeza..
P 071.
07-2322_PT 6/20/06 11:25 AM Page 011
Page 72
072.
ZALECENIA BEZPIECZEŃSTWA
Jeśli nie korzysta się z urządzenia, wówczas należy je odłączyć od zasilania.
Nie należy wystawiać urządzenia na kontakt z deszczem lub wilgocią.
UWAGA:
Aby zminimalizować ryzyko porażenia prądem, nie zdejmuj pokrywy (ani tylnej części urządzenia).
Wewnątrz nie znajdują się części, które mogłyby być naprawiane przez użytkownika. Urządzenie musi być
naprawiane przez wykwalifikowanych pracowników serwisu.
INSTRUKCJE BEZPIECZEŃSTWA
1. PRZECZYTAJ INSTRUKCJĘ OBSŁUGI - Przed uruchomieniem urządzenia należy przeczytać instrukcje
bezpieczeństwa i instrukcje dotyczące obsługi urządzenia.
2. ZACHOWAJ INSTRUKCJĘ OBSŁUGI - Należy zachować instrukcję obsługi, aby móc skonsultować się z
nią w przyszłości.
3. OSTRZEŻENIA DOTYCZĄCE BEZPIECZEŃSTWA - Należy stosować się do wszystkich ostrzeżeń
znajdujących się na urządzeniu i wymienionych w instrukcji obsługi.
4. STOSUJ SIĘ DO INSTRUKCJI - Należy stosować się do wszystkich instrukcji bezpieczeństwa i instrukcji
dotyczących obsługi.
5. WODA I WILGOĆ - Nie należy korzystać z urządzenia w pobliżu wody, np. w pobliżu wanny, zlewu,
umywalki, basenu lub w wilgotnej piwnicy.
6. WENTYLACJA - Urządzenie powinno znajdować się w miejscu, w którym zapewniona jest odpowiednia
wentylacja. Na przykład, urządzenie nie powinno być umieszczane na łóżku, sofie, dywanie lub podobnych
powierzchniach, które mogą zablokować otwory wentylacyjne. Nie umieszczaj urządzenia w miejscach
takich, jak półki na książki lub gabloty, gdyż może to utrudnić przepływ powietrza przez otwory
wentylacyjne.
7. GORĄCO - Należy ustawiać urządzenie z dala od źródeł gorąca, takich jak grzejniki, piekarniki, lub innych
(w tym wzmacniaczy), które emitują ciepło.
8. ŹRÓDŁA MOCY - Urządzenie powinno być podłączone wyłącznie do źródeł mocy, które są wymienione w
instrukcji obsługi lub na obudowie urządzenia.
9. UZIEMIANIE I POLARYZACJA - Należy podjąć środki ostrożności, które zapewniają odpowiednie
uziemienie i polaryzację.
10. OCHRONA KABLA ZASILANIA - Należy poprowadzić kable zasilania w sposób uniemożliwiający
nadepnięcie na nie lub przygniecenie przez inne przedmioty. Należy zwrócić szczególną uwagę na wtyczki,
gniazdka i miejsca, w których kable wychodzą z urządzenia.
PRODUKT
LASEROWY 1
KLASY
UWAGA!
Po otwarciu urządzenia i usunięciu
zabezpieczeń pojawia się niewidzialne
promieniowanie laserowe.Unikaj kontaktu
z wiązką lasera.
SYMBOL zakończonej grotem
błyskawicy w trójkącie
równobocznym ma za zadanie
ostrzegać użytkownika o
obecności nie izolowanego,
niebezpiecznego napięcia o
wystarczającej wielkości, by móc
stanowić ryzyko porażenia prądem.
UWAGA
RYZYKO PORAŻENIA PRĄDEM
NIE OTWIERAĆ
UWAGA: ABY UNIKNĄĆ PORAŻENIA PRĄDEM
NIE NALEŻY OTWIERAĆ OBUDOWY
URZĄDZENIA. URZĄDZENIE NIE POSIADA
CZĘŚCI, KTÓRE MOGĄ BYĆ SERWISOWANE
PRZEZ UŻYTKOWNIKA
W SPRAWIE SERWISU NALEŻY. ZWRÓCIĆ SIĘ
DO WYKWALIFIKOWANEGO PERSONELU
SERWISOWEGO.
Wykrzyknik w środku trójkąta
równobocznego ma za zadanie
ostrzegać użytkownika o obecności
ważnych informacji dotyczących
obsługi i konserwacji urządzenia
znajdujących się w dołączonej
dokumentacji.
08-2322_PL 6/20/06 11:26 AM Page 02
Page 73

073.
11. CZYSZCZENIE - Należy czyścić urządzenie wyłącznie w sposób zalecany przez producenta.
12. LINIE WYSOKIEGO NAPIĘCIA - Zewnętrzna antena powinna być umieszczona z dala od linii
wysokiego napięcia.
13. GDY NIE KORZYSTASZ Z URZĄDZENIA - Jeśli nie korzystasz z urządzenia przez długi okres czasu,
wówczas odłącz kabel zasilania od gniazdka zasilania.
14. PRZEDOSTANIE SIE PŁYNÓW I PRZEDMIOTÓW DO WNĘTRZA - Należy uważać, aby żadne
przedmioty nie dostały się do urządzenia przez otwory wentylacyjne, ani aby woda nie została wylana
na urządzenie.
15. SERWISOWANIE - Użytkownik nie powinien samemu próbować naprawy urządzenia, za wyjątkiem
sytuacji opisanych w instrukcji obsługi. Wszystkie pozostałe naprawy powinny zostać dokonywane
przez wykwalifikowanych pracowników serwisu.
16. USZKODZENIA WYMAGAJĄCE NAPRAWY W SERWISIE - Urządzenie powinno być naprawiane
przez wykwalifikowanych pracowników serwisu, gdy:
A. Kabel zasilający lub wtyczka zostały uszkodzone.
B. Do urządzenia przedostały się przedmioty lub płyn został wylany na urządzenie.
C.Urządzenie zostało wystawione na działanie deszczu.
D.Urządzenie zostało upuszczone lub obudowa została uszkodzona.
E. Urządzenie nie działa w normalny sposób lub wykazuje znaczna zmianę w sposobie
funkcjonowania.
PRZED PIERWSZYM URUCHOMIENIEM
INSTALACJA
• Rozpakuj wszystkie części i usuń elementy pakujące.
• Zainstaluj baterie w przekaźniku zdalnego sterowania.
• Zanim podłączysz urządzenie do zasilania sprawdź, czy napięcie w gniazdku zasilania jest
odpowiednie i czy wszystkie połączenia są poprawne.
• Nie przykrywaj otworów wentylacyjnych i upewnij się, ze przestrzeń wokół urządzenia zapewnia
odpowiednia wentylację.
POŁĄCZENIA
1) Podłącz lewy i prawy głośnik do lewego i prawego gniazda na głośniki.
2) Przed podłączeniem urządzenia do gniazda zasilania upewnij się, że napięcie gniazda zasilania i
informacja o napięciu znajdująca się na tylnej części urządzenia są zgodne.
OBSŁUGA / PŁYTA CD
Zapamiętaj następujące punkty, gdyż brud, zadrapania lub wykrzywienie płyty mogą spowodować, że
dźwięk będzie zniekształcony lub przerywany.
• Jeśli trzymasz płytę, wówczas staraj się nie dotykać niezadrukowanej powierzchni.
• Nie umieszczaj płyt w następujących miejscach:
W pobliżu urządzeń emitujących ciepło lub w miejscach, w których temperatura jest wysoka;
W miejscach wilgotnych lub zakurzonych.
• Za pomocą miękkiej szmatki usuń kurz i odciski palców, znajdujące się na płycie.
Zawsze czyść płytę w kierunku od środka do zewnątrz.
WKŁADANIE PŁYTY
• Naciśnij OPEN/CLOSE.
• Włóż płytę CD (zadrukowaną stroną skierowaną w górę) na tacę.
• Naciśnij OPEN/CLOSE, aby zamknąć drzwi przegrody na CD.
• Na wyświetlaczu pojawi się całkowita liczba utworów znajdujących się na płycie.
08-2322_PL 6/20/06 11:26 AM Page 03
Page 74

074.
BUDOWA I STEROWANIE
1. DRZWI PRZEGRODY NA CD
2. OPEN/CLOSE
[OTWIERANIE/ZAMYKANIE] DRZWI
PRZEGRODY NA CD
3. W YŚWIETLACZ LCD
4. VOLUME UP
[ZWIĘKSZANIE GŁOŚNOŚCI]
5. VOLUME DOWN
[ZMNIEJSZANIE GŁOŚNOŚCI]
6. PRZYCISK FOLDER
7. PRZYCISK +/--BASS
8. KONTROLKA ZASILANIA
9. CZUJNIK ZDALNEGO STEROWANIA
10. PRZYCISK SKIP [PRZESKAKIWANIE]
11. PRZYCISK SKIP [PRZESKAKIWANIE]
12. PRZYCISK PLAY/PAUSE [ODTWARZANIE/PAUZA]
13. PRZYCISK STOP [ZATRZYMANIE]
14. PRZEŁĄCZNIK FUNCTION [FUNKCJI](TAPE, CD/MP3,
TUNER) [KASETA, CD/MP3, RADIO]
15. PRZEŁĄCZNIK BAND [PASMA] (AM, FM, FM ST.)
16. PRZYCISK MODE [TRYB](REPEAT, RANDOM)
[POWTARZANIE, LOSOWE ODTWARZANIE]
17. PRZYCISK PROGRAMM [PROGRAMOWANIE]
18. PRZYCISK TUNING [DOSTRAJANIE]
19. DRZWI PRZEGRODY NA KASETĘ
20. GNIAZDO SŁUCHAWEK
21. UKŁAD STEROWANIA RECORD/PLAY
[NAGRYWANIE/ODTWARZANIE]
22. ANTENA FM
23. LEWY GŁOŚNIK
24. PRAWY GŁOŚNIK
25. KABEL ZASILAJĄCY
26. BEAT CUT
17
15
13
11
9
7
6
2
3
21
19
1
4
5
8
10
12
14
16
18
22
26
25
23
24
08-2322_PL 6/20/06 11:26 AM Page 04
Page 75

FUNKCJE PILOTA ZDALNEGO STEROWANIA
Przed pierwszym uruchomieniem
• Instalowanie baterii w pilocie zdalnego sterowania
• Zdejmij pokrywę komory na baterie z tylnej części pilota.
• Włóż dwie baterie rozmiaru „UM4/AAA”.
• Włóż baterie zgodnie z oznaczeniami i , umieszczonymi wewnątrz komory na baterie.
• Nałóż z powrotem pokrywę.
Wymiana baterii
• Gdy pilot zdalnego sterowania nie działa poprawnie lub zmniejsza się odległość, z której można obsługiwać
urządzenie za pomocą pilota, wówczas należy wymienić baterie.
Obsługa pilota zdalnego sterowania
Aby obsługiwać urządzenie za pomocą pilota zdalnego sterowania, skieruj pilota w stronę CZUJNIKA
ZDALNEGO STEROWANIA. Delikatnie i stanowczo naciskaj przyciski.
Obsługa urządzenia za pomocą pilota możliwa jest w zasięgu mniej więcej 6 metrów.
Zasięg ten jest mniejszy, gdy pilot jest nie jest skierowany bezpośrednio, ale pod pewnym kątem do CZUJNIKA
ZDALNEGO STEROWANIA.
Nie wystawiaj CZUJNIKA ZDALNEGO STEROWANIA na działanie silnego światła (bezpośrednie promienie
słoneczne lub sztuczne oświetlenie). Upewnij się, że między pilotem i CZUJNIKIEM ZDALNEGO STEROWANIA
nie ma żadnych przeszkód.
PILOT ZDALNEGO STEROWANIA
1. Przycisk Folder
2. Przycisk Folder
3. Przycisk PLAY / PAUSE [Odtwarzanie / Pauza]
4. Przycisk STOP [Zatrzymanie]
5. Przycisk SKIP [Przeskakiwanie] +
6. Przycisk SKIP [Przeskakiwanie] -
7. Przycisk MODE [Tryb]
8. Przycisk PROGRAM [Programowanie]
OBSŁUGA Głównych Funkcji
PRZYCISK POWER - Włączanie urządzenia
VOLUME +/- - Zwiększanie lub zmniejszanie poziomu głośności
PLAY/PAUSE
• Rozpoczęcie odtwarzania z trybu zatrzymania.
• Wstrzymanie odtwarzania.
• Powrót do odtwarzania.
STOP
• W trybie Odtwarzania lub Pauzy: Przejście w tryb Zatrzymania lub Programowania podczas odtwarzania.
• W trybie Programowania: Wyjdź z tr ybu Programowania, wyczyść pamięć i przejdź do trybu Zatrzymania.
• W trybie Losowego Odtwarzania (Przycisk Mode): Przejście w tryb Zatrzymania i wyłączenie funkcji
Losowego Odtwarzania
075.
+
08-2322_PL 6/20/06 11:26 AM Page 05
1
6
4
7
2
3
5
8
Page 76

Przycisk PROGRAM [Wyjaśnienie Funkcji]
1. Jeśli przycisk [PROGRAM] zostanie naciśnięty w trybie zatrzymania CD, system przejdzie do trybu
programowania. W trybie programowania numer utworu i PROGRAM migają na wyświetlaczu co 500 [ms].
(Wyświetlacz 1).
2. Jeśli zostanie naciśnięty przycisk [FF/SKIP+] / [FB/SKIP-], wówczas system wybierze numer utworu, który
będzie zapamiętany.
3. Jeśli po wybraniu numeru utworu naciśniesz przycisk [PROGRAM], wówczas system zapamięta numer
utworu i przejdzie do następnego programowania. (Wyświetlacz 2).
4. System może zapamiętać 20 programów w Trybie CD / 10 programów dla MP3. Po zapamiętaniu 20
programów nie jest możliwe zapamiętanie kolejnego utworu. Jeśli zapamiętane jest 20 programów,
wówczas nie można zapamiętać innego programu. PROGRAM i "P 01" będą migać na wyświetlaczu co
500 [ms].
5. Jeśli w trybie programowania zostanie naciśnięty przycisk [STOP], wówczas system usunie zawartość
pamięci i wyjdzie z trybu programowania.
6. Jeśli w systemie zapamiętany jest przynajmniej jeden program, wówczas naciśnięcie przycisku
[PLAY/PAUSE] spowoduje rozpoczęcie zaprogramowanego odtwarzania. W trybie programowania na
wyświetlaczu pojawia się PROGRAM (wyświetlacz 4).
7. Jeśli przycisk [FF/SKIP+] / [FB/SKIP-] zostanie naciśnięty w trybie programowania, wówczas system
przeskakuje do następnego / poprzedniego programu.
8. Jeśli w trybie programowania zostanie naciśnięty przycisk [STOP], wówczas system zatrzymuje tryb
zaprogramowanego odtwarzania i przechodzi w tryb zatrzymania. System nie usuwa zawartości pamięci,
dopóki w trybie zatrzymania nie zostanie naciśnięty przycisk [STOP].
Przycisk MODE [Wyjaśnienie Funkcji]
Tryb CD:
1. Jeśli naciśnięty zostanie przycisk [MODE], wówczas system zmienia tryb (w zależności od wyboru).
2. W trybie Repeat-1 system powtarza bieżący utwór z płyty CD.
3. W trybie Repeat-all po zakończeniu odtwarzania wszystkich utworów system powraca do odtwarzania
pierwszego utworu.
4. Jeśli wszystkie utworu zostały odtworzone w trybie losowego odtwarzania lub jeśli został naciśnięty przycisk
[STOP], wówczas system przechodzi do trybu zatrzymania i wyłącza tryb losowego odtwarzania.
5. Jeśli w trybie losowego odtwarzania zostanie naciśnięty przycisk [FF/SKIP+], wówczas system przeskakuje
do następnego losowego utworu. Jeśli podczas odtwarzania ostatniego utworu zostanie naciśnięty
przycisk [FF/SKIP+], wówczas system rozpocznie odtwarzanie utworów od początku.
6. Jeśli w trybie losowego odtwarzania zostanie naciśnięty przycisk [FB/SKIP-], wówczas system przeskoczy
do początku bieżącego utworu.
076.
PROGRAM
(WYŚWIETLACZ 1)
(WYŚWIETLACZ 2)
(WYŚWIETLACZ 3)
(WYŚWIETLACZ 4)
PROGRAM
PROGRAM
PROGRAM
REP
REP
ALL
RANDOM
BEZ POWTARZANIA I
LOSOWEGO
ODTWARZANIA
POWTARZANIE
WSZYSTKICH
POWTARZANIE-1
LOSOWE
ODTWARZANIE
08-2322_PL 6/20/06 11:26 AM Page 06
Page 77

Tryb MP3:
1. Jeśli zostanie naciśnięty przycisk [MODE], wówczas system przejdzie do innego trybu (w zależności od
wyboru).
2. W trybie REPEAT-1 system powtarza bieżący plik MP3
3. W trybie REPEAT-folder system powtarza bieżący folder plików MP3
4. Po zakończeniu odtwarzania wszystkich utworów w trybie REPEAT-all system rozpoczyna odtwarzanie
utworów od początku.
5 Jeśli w trybie losowego odtwarzania zakończy się odtwarzanie całego utworu lub zostanie naciśnięty
przycisk [STOP], wówczas system przejdzie do trybu zatrzymania i zakończy tryb losowego odtwarzania.
6. Jeśli w trybie losowego odtwarzania zostanie naciśnięty przycisk [FF/SKIP+], wówczas system przeskakuje
do następnego losowego utworu. Jeśli podczas odtwarzania ostatniego utworu zostanie naciśnięty
przycisk [FF/SKIP+], wówczas system rozpocznie odtwarzanie utworów od początku.
7. Jeśli w trybie losowego odtwarzania zostanie naciśnięty przycisk [FB/SKIP-], wówczas system przeskoczy
do początku bieżącego utworu.
TRYB
CD:Żaden Powtarzanie 1 Powtarzanie wszystkich Losowe odtwarzanie Żaden.
MP3:Żaden Powtarzanie 1 Powtarzanie folderu Powtarzanie wszystkich Losowe
odtwarzanie Żaden…
LOSOWE ODTWARZANIE
1. Naciśnij przycisk RANDOM, aby rozpocząć odtwarzanie. Wszystkie utwory na płycie będą odtwarzane w
losowej kolejności. Wybierz funkcję Random. Naciśnij przycisk Mode i wybierz funkcję Losowego
odtwarzania, aby rozpocząć losowe odtwarzanie.
PROGRAMOWANIE MP3
Odtwarzacz MP3 umożliwia zaprogramowanie 10 utworów w dowolnej kolejności.
1. W trybie zatrzymania naciśnij przycisk PROGRAM. Na wyświetlaczu zacznie migać „P01” i „PROGRAM”.
2. Naciśnij przycisk FF/SKIP+ i przycisk FB/SKIP-, aby wybrać utwór, który chcesz zaprogramować.
lub Naciśnij przycisk FOLDER DN i FOLDER UP na pilocie zdalnego sterowania, aby z innego folderu
wybrać utwór, który chcesz zaprogramować.
3. Naciśnij przycisk PROGRAM, aby zapisać utwór w pamięci.
4. W celu zaprogramowania kolejnych utworów powtarzaj krok 2 i 3.
5. W trybie programowania naciśnij przycisk PLAY / PAUSE, aby odsłuchać zaprogramowane utwory.
SKIP +
• W trybie zatrzymania przeskakiwanie do innego utworu.
• W trybie Normalnego Odtwarzania przeskakiwanie do następnego utworu.
Jeśli wybrany był ostatni utwór na liście, wówczas przeskakiwanie do pierwszego utworu na liście.
• Jeśli przycisk jest przytrzymany dłużej niż 0,5 sek., wówczas włącza się funkcja szybkiego przewijania w
przód.
• W trybie Zaprogramowanego odtwarzania przeskakiwanie do następnego zaprogramowanego utworu.
Jeśli odtwarzany był ostatni utwór na liście, wówczas przeskakiwanie do pierwszego utworu na liście.
• W trybie Losowego odtwarzania przeskakiwanie do następnego losowego utworu.
077.
BEZ POWTARZANIA I
LOSOWEGO
ODTWARZANIA
ALBUM
MP3
POWTARZANIE
FOLDERU
MP3
MP3
RANDOM
POWTARZANIE
WSZYSTKICH
POWTARZANIE-1
LOSOWE
ODTWARZANIE
MP3
MP3
REP
REP
REP
ALL
08-2322_PL 6/20/06 11:26 AM Page 07
Page 78

SKIP -
• W trybie zatrzymania przeskakiwanie do innego utworu. Jeśli wybrany był pierwszy utwór na liście,
wówczas przeskakiwanie do ostatniego utworu na liście.
• W trybie Normalnego Odtwarzania przeskakiwanie do poprzedniego utworu. Jeśli odtwarzany był pierwszy
utwór na liście, wówczas przeskakiwanie do ostatniego utworu na liście.
• Jeśli przycisk jest przytrzymany dłużej niż 0,5 sek., wówczas włącza się funkcja szybkiego przewijania w
tył.
• W trybie Zaprogramowanego odtwarzania przeskakiwanie do poprzedniego zaprogramowanego utworu.
Przeskakiwanie aż do pierwszego zaprogramowanego utworu na liście.
FOLDER (Mappa)
• Gdy system jest w trybie ZATRZYMANIA: Dla odtwarzacza MP3, przeskakiwanie w przód do następnego
folderu i wyświetlanie numeru folderu.
• Gdy system jest w trybie ODTWARZANIA: Dla odtwarzacza MP3, przeskakiwanie w przód do następnego
folderu. Rozpoczęcie odtwarzania pierwszego utworu i wyświetlanie numeru bieżącego folderu oraz
utworu. Naciśnij jednokrotnie przycisk. Numer bieżącego folderu będzie migał przez 3 sekundy.
Ponownie naciśnij przycisk. System przejdzie do następnego folderu.
FOLDER (Mappa)
• Gdy system jest w trybie ZATRZYMANIA: Dla odtwarzacza MP3, przeskakiwanie w tył do poprzedniego
folderu i wyświetlanie numeru folderu.
• Gdy system jest w trybie ODTWARZANIA: Dla odtwarzacza MP3, przeskakiwanie w tył do poprzedniego
folderu. Rozpoczęcie odtwarzania pierwszego utworu i wyświetlanie numeru bieżącego folderu oraz
utworu. Naciśnij jednokrotnie przycisk. Numer bieżącego folderu będzie migał przez 3
sekundy.
Ponownie naciśnij przycisk. System przejdzie do poprzedniego folderu.
+/= BASS
• Naciśnij przycisk +/ - BASS i wybierz efekt Bass Boost.
MAGNÓKAZETTA-LEJÁTSZÓ
Válassza ki a TAPE funkciót
Felvétel/Lejátszás a kazettás magnóval.
• RECORD : elindítja a felvételt.
• PLAY: elindítja a kazetta lejátszását.
• REWIND: gyors visszacsévélés.
• F.FWD : gyors előretekerés.
• STOP/EJ : a kazetta leállítása, és kiadása.
• PAUSE : a lejátszás, vagy a felvétel megállítása.
UKŁAD STEROWANIA KASETY
Przed rozpoczęciem obsługi układu sterowania kasety upewnij się, że Przełącznik Function jest ustawiony na
pozycję Kaseta.
ODTWARZANIE
• Ustaw przełącznik Function na pozycji Tape.
• Naciśnij przycisk Eject, aby otworzyć drzwi przegrody na kasetę.
• Włóż kasetę do przegrody stroną, którą chcesz odtwarzać, skierowaną do siebie.
• Zamknij drzwi przegrody na kasetę.
• Naciśnij przycisk Play, aby rozpocząć odtwarzanie.
• Odtwarzanie zakończy się, gdy zostanie osiągnięty koniec kasety.
• Naciśnij przycisk Stop, jeśli chcesz zatrzymać odtwarzanie przed końcem kasety.
078.
08-2322_PL 6/20/06 11:26 AM Page 08
Page 79

NAGRYWANIE Z RADIA / PŁYTY CD
• Wybierz źródło, ustawiając przełącznik Function na pozycji „RADIO” lub „CD”.
• Włóż pustą kasetę do przegrody.
• Najpierw naciśnij przycisk PAUSE.
• Następnie naciśnij jednocześnie przyciski PLAY i RECORD.
• Rozpocznij odtwarzanie z wybranego źródła.
• Podczas nagrywania uwolnij przycisk PAUSE.
1. LUŹNA TAŚMA (Rys. 1) --- Przed nagrywaniem
sprawdź, czy taśma jest naciągnięta. Jeśli nie,
wówczas naciągnij ją za pomocą ołówka lub
podobnego narzędzia. Źle naciągnięta taśma może
wkręcić się w mechanizm.
2. ABY ZAPOBIEC PRZYPADKOWEMU WYMAZANIU
KASETY (Rys. 2) --- Za pomocą śrubokrętu lub
podobnego narzędzia wyłam plastikowe
zabezpieczenia.
3. ABY PONOWNIE NAGRAĆ (Rys. 3) --- Za pomocą
celofanowej taśmy zaklej otwór, w którym były
zabezpieczenia.
OBSŁUGA RADIA
DOSTRAJANIE
• Ustaw przycisk Function na pozycji “RADIO”, uruchomić tryb Radio.
Zapali się Kontrolka Funkcyjna Radia.
• Wybierz zakres częstotliwości za pomocą przycisku BAND.
• Przekręć GAŁKĘ TUNING, aby wybrać odpowiednią stację.
INFORMACJA:
Podczas słuchania stacji FM zaleca się pełne rozłożenie anteny FM, znajdującej się z tylu urządzenia.
Podczas słuchania stacji AM zaleca się dopasowanie pozycji urządzenia tak, aby uzyskać optymalny odbiór.
Czym jes
t MP3?
MP3 jest skróconą formą MPEG Audio Layer 3.
MPEG oznacza Moving Picture Experts Group.
MP3 to cyfrowe pliki audio, których rozmiar został zmniejszony przy jednoczesnym zachowaniu oryginalnej
jakości dźwięku.
MP3 jest obecnie najpopularniejszym formatem przechowywania i odsłuchiwania plików muzycznych.
Cyfrowe pliki audio przechowywane na dyskach MP3 mogą być odtwarzane za pomocą odtwarzacza MP3.
Płyta MP3 może zawierać 150-200 utworów.
079.
Strona A
Zabezpieczeni
e dla strony A
Taśma celofanowa
Rys. 1
Rys. 2
Rys. 3
08-2322_PL 6/20/06 11:26 AM Page 09
Page 80

Zasilanie: Prąd zmienny (AC) ~230V 50Hz
Zużycie Mocy: 15 Watów
Moc Wyjściowa: 2 Waty x 2 RMS po 8 omów
(Na każdym kanale):
Radio: AM 525 – 1615 KHz
FM 87,5 – 108 MHz
Odtwarzacz CD:
Charakterystyka Częstotliwości 60 – 16,000 Hz
(-3dB):
Względny Wskaźnik Szumów: 60 dB
Zniekształcenia Harmoniczne: 0.4%
Kompatybilne z: CD-DA, CD-R, CD-RW, MP3
Odtwarzanie kaset:
Prędkość kasety: 4.75 cm / sek.
„Wow and Flutter”: < 0.4%
Charakterystyka częstotliwości 100 Hz - 6.3 KHz
080.
08-2322_PL 6/20/06 11:26 AM Page 010
Page 81

081.
KIEGÉSZÍTŐ INFORMÁCIÓK
Óvatosan bánjon az apró alkatrészekkel és elemekkel, és azokat ne nyelje le, mert ez komoly sérüléseket okozhat!
Gondoskodjon arról, hogy az apró alkatrészek és elemek ne kerüljenek gyermekek kezébe!
Fontos tanácsok a halláskárosodás elkerülésére
Figyelmeztetés:
Az Ön hallásáért nemcsak Ön, de mi is aggódunk.
Éppen ezért kérjük, legyen óvatos a készülék használatánál.
Azt ajánljuk, hogy: kerülje a nagy hangerővel való hallgatást.
Ha a készüléket gyermekek használják, ügyeljünk arra, hogy ne állítsák a készüléket túl hangosra.
Vigyázat!
A túl nagy hangerő a gyermekeknél gyógyíthatatlan károsodást okozhat.
Kérjük gondoskodjon róla, hogy a készülék burkolatának nyílásaiba SOHA senki, főképpen pedig gyermekek, ne
dughassanak bele semmit, ez ugyanis életveszélyes áramütéshez vezethet. A készülék burkolatát csak erre
megfelelően képzett szakember nyithatja fel.
A készüléket kizárólag a rendeltetésének megfelelően használjuk.
A készülék kizárólag lakásokban és üzletekben történő felhasználásra alkalmas.
Kérjük, őrizze meg a használati útmutatót, hogy az később is rendelkezésére álljon.
KIEGÉSZÍTŐ INFORMÁCIÓK
Környezetvédelmi tanácsok
Ezt a terméket az élettartama végén ne dobjuk a normál háztartási szemétbe, hanem adjuk le a villamos és
elektronikai hulladékok átvevőhelyén. A terméken található szimbólum, a használati útmutató vagy a csomagolás
felirata erre hívja fel a figyelmet.
A készülék anyagai a jelölésüknek megfelelően újrahasznosíthatóak. Az újrahasznosítással, az anyagok ismételt
felhasználásával, illetve a használt készülékek egyéb felhasználásával sokat tehetünk környezetünk megóvásáért.
A megfelelő hulladék-átvevőhelyről a helyi önkormányzatnál érdeklődhetünk.
Ne akadályozza a készülék szellőzését, például függönnyel, újsággal, takaróval vagy bútorral. A
szellőzőnyílásoknak mindig szabadon kell maradnia. A túlmelegedés kárt tehet a készülékben, és emiatt annak
élettartama lerövidülhet.
Meleg és forróság
Ne tegyük ki a készüléket a közvetlen napsütés hatásának. Ügyeljünk arra, hogy a készülék ne legyen
fűtőberendezés, nyílt láng vagy egyéb hőforrás közelében. A készülék szellőzőnyílásait mindig hagyjuk szabadon.
Nedvesség és tisztítás
Ez a készülék nem vízálló! Ne tegyük vízbe a lejátszót, és ügyeljünk arra, hogy ne is kerüljön vízzel érintkezésbe.
A lejátszóba bejutó víz súlyos károkat okozhat. A készülék megtisztítására ne használjunk alkoholt, ammóniát,
benzint, vagy súrolószert tartalmazó tisztítóanyagot, mivel ezek károsíthatják a lejátszót. A készülék megtisztítására
enyhén megnedvesített puha törlőruhát használjunk.
08-2322_PL 6/20/06 11:26 AM Page 011
Page 82

082.
VEILIGHEIDSMAATREGELEN
Dit apparaat moet worden afgesloten van het lichtnet wanneer niet in gebruik.
Stel dit apparaat niet bloot aan regen of vocht.
WEES VOORZICHTIG:
Om het risico op elektrische schokken te verminderen, de bedekking (of achterkant) niet verwijderen.
Er zitten geen bruikbare voorwerpen binnenin. Laat onderhoud over aan gekwalificeerd personeel.
VEILIGHEIDSVOORSCHRIFTEN
1. LEES DE INSTRUCTIES - Al de veiligheids- en gebruiksvoorschriften zouden moeten worden gelezen voordat
het apparaat in gebruik genomen wordt.
2. BEWAAR DE INSTRUCTIES - De veiligheids- en gebruiksvoorschriften zouden moeten worden bewaard voor
toekomstige naslag.
3. VEILIGHEIDS- EN GEZONDHEIDSWAARSCHUWING - Alle waarschuwingen op het apparaat en in de
gebruiksaanwijzing moeten worden opgevolgd.
4. VOLG DE INSTRUCTIES OP - Al de gebruiksvoorschriften moeten worden opgevolgd.
5. WATER EN VOCHT - Het apparaat moet niet worden gebruikt in de buurt van water, bijvoorbeeld een bad,
wastafel, wasbak, wasmachine, zwembad of in een vochtige kelder.
6. VENTIL ATIE - Het apparaat moet zó worden geplaatst dat de ventilatie niet verstoord wordt.
Het apparaat moet bijvoorbeeld niet worden geplaatst op een bed, sofa, gordijn of een gelijksoortig oppervlak
dat de ventilatieschachten kan blokkeren. Plaats het apparaat niet in ingebouwde kasten of rekken, die de
luchtstroom door de ventilatieschachten tegen zouden kunnen werken.
7. HITTE - Het apparaat moet uit de buurt van hittebronnen zoals radiatoren, fornuizen of andere apparaten die
warmte produceren (inclusief versterkers).
8. VERMOGENSBRONNEN - Het apparaat moet alleen worden aangesloten aan een vermogensbron van het
type dat is beschreven in de gebruiksaanwijzing of zoals aangegeven op het apparaat.
9. AARDEN EN POL ARISATIE - Men moet voorzorgsmaatregelen nemen om er zeker van te zijn dat het aarden
of de polarisatie van het apparaat niet teniet gedaan worden.
10. BESCHERMING STROOMKABEL - Stroomkabels moeten worden weggewerkt zodat er niet makkelijk
overheen gelopen wordt, of dat voorwerpen die op of tegen de stroomkabel staan niet in de kabel steken. Let
extra op bij kabels bij stekkers, verlengsnoeren en het punt waar de kabels het apparaat verlaten.
EERSTE KLAS
LASER PRODUCT
WEES VOORZICHTIG!
Onzichtbare laserstraling als het apparaat
geopend is en de tussenverbindingen
uitstaan. Voorkom blootstelling aan de
laserstraal.
Het driehoekige symbool met
bliksemschicht wijst de gebruiker
erop dat binnenin deze eenheid
een gevaarlijke niet geïsoleerde
spanning aanwezig is die tot een
elektrische schok kan leiden.
OPGELET
RISICO OP EEN GEVAARLIJKE SCHOK
NIET OPENEN
OPGELET: OM HET RISICO OP EEN
ELEKTRISCHE SCHOK TE VERMIJDEN, DE
VOOR- OF ACHTERKANT NIET VERWIJDEREN.
BINNENIN BEVINDEN ZICH GEEN DELEN DIE
DOOR DE GEBRUIKER ONDERHOUDEN
KUNNEN WORDEN. DOE EEN BEROEP OP
EEN ERKENDE EN BEVOEGDE TECHNISCHE
DIENST
Het driehoekige symbool met
uitroepteken wijst de gebruiker erop
dat er belangrijke instructies
betreffende het gebruik en het
onderhoud opgenomen zijn in de
handleiding bij deze eenheid.
09-2322_NL 6/20/06 11:29 AM Page 02
Page 83

083.
11. SCHOONMAKEN - Het apparaat moet alleen zó worden schoongemaakt als aanbevolen door de
fabrikant.
12. HOOGSPANNINGSKABELS - Een evt. buitenantenne moet niet in de buurt van
hoogspanningskabels worden geplaatst.
13. PERIODEN VAN GEEN-GEBRUIK - De stekker van het apparaat moet uit het stopcontact worden
gehaald wanneer het apparaat gedurende lange tijd niet gebruikt gaat worden.
14. CONTACT MET VLOEISTOFFEN EN ANDERE VOORWERPEN - Men moet ervoor zorgen dat
voorwerpen niet in het apparaat vallen en vloeistoffen niet door de openingen het apparaat kunnen
binnendringen.
15. ONDERHOUD - De gebruiker kan beter niet proberen in het onderhoud verder te gaan dan is
beschreven in de gebruiksaanwijzing. Al het andere onderhoud moet worden overgelaten aan
gekwalificeerd personeel.
16. REPARATIE NA SCHADE - Het apparaat moet worden gerepareerd door gekwalificeerd personeel
wanneer:
A. De stroomkabel of de stekker beschadigd is.
B.Voorwerpen in het apparaat zijn gevallen of vloeistoffen het apparaat zijn binnengedrongen.
C.Het apparaat blootgesteld is aan regen.
D.Het apparaat is gevallen of de bedekking beschadigd is.
E. Het apparaat niet normaal lijkt te werken of een duidelijke verandering in de prestaties laat zien
VOORBEREIDINGEN VOOR GEBRUIK
INSTALLATIE
• Pak alle onderdelen uit en verwijder beschermend materiaal.
• Doe batterijen in de afstandsbediening.
• Verbind het apparaat niet met het stopcontact voor het voltage te controleren en voordat alle andere
verbindingen gemaakt zijn.
• Bedek geen ventilatiegaten en wees er zeker van dat er enkele centimeters ruimte om het apparaat
heen is voor ventilatie.
VERBINDINGEN
1) Verbind de linker- en rechterluidspreker met de linker- en rechter luidsprekeringangen.
2) Wees er voor het verbinden met het stopcontact zeker van, dat het voltage dat op de achterkant
staat het zelfde is als dat van het stopcontact.
GEBRUIK / COMPACT DISC
Neem deze punten ter harte aangezien stof, krassen, of het kromtrekken van de cd kunnen leiden tot
verstoord geluid, niet meer werken, of een hoop lawaai.
• Raak het speeloppervlak niet aan wanneer u een cd vasthoudt.
• Leg cd's niet op de volgende plaatsen: In de buurt van een verwarmingsinstallatie of op een plaats
waar de temperatuur hoog is; Op vochtige of stoffige plaatsen.
• Veeg vingerafdrukken of stof op het speeloppervlak van de cd weg met een zachte doek.
Veeg de cd altijd van binnen naar buiten af.
HET INVOEREN VAN DE CD
• DRUK OPEN/CLOSE in.
• Voer een cd in (geprinte kant boven) in de speler.
• Druk OPEN/CLOSE in om de speler dicht te doen.
• Het scherm laat zien hoeveel nummers de cd in totaal bevat.
09-2322_NL 6/20/06 11:29 AM Page 03
Page 84

084.
BEDIENING EN VOORZIENINGEN
1. CD SPELER
2. CD SPELER OPEN/CLOSE [Open/Dicht]
3. LCD SCHERM
4. VOLUME UP [Geluid omhoog]
5. VOLUME DOWN [Geluid omlaag]
6. FOLDER [Map] KNOP
7. X-BASS KNOP
8. AAN-/UIT-INDICATOR
9. INFRAROOD ONTVANGER
10. SKIP [Overslaan] KNOP
11. SKIP [Overslaan] KNOP
12. PLAY/PAUSE [Spelen/Pauze] KNOP
13. STOP KNOP
14. FUNCTION [Functie] SCHAKELAAR
(TAPE, CD/MP3, TUNER) [Cassette, CD/MP3, Radio]
15. BAND [Bandbreedte] SCHAKELAAR (AM, FM,
FM ST.)
16. MODE [Speelwijze] KNOP(REPEAT, RANDOM)
[Herhaal, Vrije keuze]
17. PROGRAM [Programmering] KNOP
18. TUNING [Radioïnstelling] KNOP
19. CASSETTE-INVOER
20. TELEFOONINGANG
21. RECORD/PL AY [Opnemen/Spelen] BEDIENING
CASSETTESPELER
22. FM ANTENNEDRAAD
23. LINKERLUIDSPREKER
24. RECHTERLUIDSPREKER
25. STROOMDRAAD
26. BEAT CUT
17
15
13
11
9
7
6
2
3
21
19
1
4
5
8
10
12
14
16
18
22
26
25
23
24
09-2322_NL 6/20/06 11:29 AM Page 04
Page 85

FUNCTIE AFSTANDSBEDIENING
Voorbereidingen voor gebruik
• Invoer van batterijen in de afstandsbediening
• Verwijder de batterijbedekking van de achterkant van de afstandsbediening.
• Voer twee “UM4/AAA”-batterijen in.
• Voer de batterijen met de en uiteinden in, gelijk met wat wordt aangegeven in de batterijhouder.
• Plaats de bedekking terug.
Vervangen van batterijen
• Wanneer het gebruik van de afstandsbediening onregelmatigheden vertoont of het bereik van de
afstandsbediening kleiner wordt, vervang dan de batterijen door nieuwe
Gebruik van de afstandsbediening
Om de afstandsbediening te gebruiken, richt op de INFRAROOD-ONTVANGER en druk de knoppen zachtjes
en goed in.
Gebruik van de afstandsbediening is mogelijk op een afstand van ongeveer 6 meter.
Het bereik van de afstandsbediening is echter minder wanneer het wordt gebruikt vanuit een hoek, voor
maximale afstand, gebruiken de afstandsbediening recht voor de INFRAROOD-ONTVANGER.
Stel de INFRAROOD-ONTVANGER niet bloot aan sterk licht (direct zonlicht of kunstlicht) en zorg ervoor dat zich
geen obstakels bevinden tussen de INFRAROOD-ONTVANGER en de afstandsbediening.
AFSTANDSBEDIENING
1. Folder [Map] knop
2. Folder [Map] knop
3. PLAY/ PAUSE [Spelen/Pauze] knop
4. STOP knop
5. SKIP [Overslaan] X knop
6. SKIP [Overslaan] X knop
7. MODE [Speelwijze] knop
8. PROGRAM [Programmeren] knop
GEBRUIK Sleutelfuncties
POWER-KNOP Om het apparaat aan te zetten
VOLUME +/- - Om het geluid te verhogen of te verlagen naar het gewenste niveau
SPELEN/PAUZE
• Spelen beginnen vanuit de stopstand.
• Pauze starten vanuit de speelstand.
• Terug naar speelstand vanuit pauze.
STOP
• In de speel- of de pauzestand: Verander naar de stopstand of het programmakeuzemenu tijdens spelen.
• In het programmakeuzemenu: Verlaat het programmakeuzemenu, wis het programmageheugen en
verander naar de stopstand.
• In de vrije keuzestand (Mode knop): Verander naar de stopstand en stop het gebruik van de vrije
keuzestand.
085.
+
09-2322_NL 6/20/06 11:29 AM Page 05
1
6
4
7
2
3
5
8
Page 86

PROGRAM functie [Uitleg functie]
1. Als de [PROGRAM] knop wordt ingedrukt tijdens de stopstand, gaat het systeem naar de programmastand.
Tijdens de programmastand knipperen het nummer dat speelt en het PROGRAM-scherm in een 500 [ms]
interval (Scherm 1).
2. Als de [FF/SKIP+] / [FB/SKIP-] knop wordt ingedrukt, kiest het systeem het nummer dat geregistreerd
wordt.
3. Als de [PROGRAM] knop wordt ingedrukt na het kiezen van een nummer, onthoudt het systeem het
nummer en gaat verder naar de volgende programmakeuze (Scherm 2).
4. Het programma kan 20 nummers bevatten voor cd’s / 10 nummers voor MP3.
Wanneer het systeem 20 nummers onthoudt, kan er niet nog een nummer worden onthouden.
Wanneer het systeem 20 nummers onthoud kan geen nieuw programma worden ingevoerd.
PROGRAM scherm en “P 01” knipperen in de 500 [ms] interval.
5. Als de [STOP] knop wordt ingedrukt gedurende de programmastand, verwijdert het systeem het
programma en verlaat de programmastand.
6. Als de [PLAY/PAUSE] knop wordt ingedrukt wanneer het systeem een programma, groter dan één
nummer, onthoudt, wordt dat programma gestart. Gedurende het spelen van een programma toont het
scherm dat PROGRAM speelt (Scherm 4).
7. Als de [FF SKIP+] / [FB SKIP-] wordt ingedrukt gedurende het spelen van een programma, gaat het
systeem over naar het volgende nummer dat het programma aangeeft.
8. Als de [STOP] knop wordt ingedrukt gedurende het spelen van een programma, stopt het systeem het
programma en gaat over naar de stopstand. Het systeem onthoudt het programma, totdat de [STOP] knop
wordt ingedrukt in de stopstand.
Die Taste MODE [Funktionserklärung]
CD Stand:
1. Als de [MODE] knop wordt ingedrukt, verandert het systeem de speelwijze (dit wordt als volgt bedoeld).
2. Gedurende de Repeat-1 stand herhaalt het systeem het huidige nummer dat gespeeld wordt.
3. Gedurende de Repeat-all stand gaat de cd terug naar het begin als het einde bereikt is.
4. Als de hele cd is gespeeld in de vrije keuzestand of als de [STOP] knop wordt ingedrukt gedurende deze
stand, gaat het systeem naar de stopstand en houdt op met de vrije keuzestand.
5. Als [FF/SKIP+] knop wordt ingedrukt gedurende de vrije speelstand gaat het systeem over naar een
nummer dat het zelf kiest. Als de [FF/SKIP+] knop wordt ingedrukt tijdens het spelen van het laatste
nummer, wordt het volgende nummer door het systeem zelf gekozen.
6. Als de [FB/SKIP-] knop wordt ingedrukt gedurende de vrije speelstand gaat het systeem terug naar het
begin van het huidige nummer, maar geen nummers omlaag. Anfang des aktuellen Titels, springt aber
keinen Titel zurück.
086.
PROGRAM
(SCHERM 1)
(SCHERM 2)
(SCHERM 3)
(SCHERM 4)
PROGRAM
PROGRAM
PROGRAM
REP
REP
ALL
RANDOM
GEEN HERHALING OF
VRIJE KEUZE
HERHAAL ALLES
HERHAAL-1
VRIJE KEUZE
09-2322_NL 6/20/06 11:29 AM Page 06
Page 87

MP3 Stand:
1. Als de [MODE] knop wordt ingedrukt verandert het systeem de speelwijze (de bedoeling is als volgt).
2. Gedurende de Repeat-1 stand herhaalt het systeem het huidige nummer van de MP3.
3. Gedurende de Repeat-folder stand herhaalt het systeem de huidige map van de MP3
4. Gedurende de Repeat-all stand gaat het systeem na het eind van het laatste nummer terug naar het begin
van de MP3.
5 Als het hele bestand gespeeld is tijdens de vrije keuzestand of wanneer [STOP] is ingedrukt in deze stand
gaat het systeem naar de stopstand en houdt op met de vrije keuzestand.
6. Wanneer [FF/SKIP+] wordt ingedrukt tijdens de vrije speelstand kiest het systeem het volgende nummer
zelf.
Wanneer [FF/SKIP+] wordt ingedrukt tijdens het spelen van het laatste nummer, kiest het systeem het
volgende nummer zelf.
7. Wanneer [FB/SKIP-] wordt ingedrukt gedurende de vrije keuzestand gaat het systeem terug naar het begin
van het huidige nummer, maar niet terug naar een vorig nummer
MODE knop
CD: Geen Herhaal 1 Herhaal alles Vrije keuze Geen.
MP3: Geen Herhaal 1 Herhaal map Herhaal alles Vrije keuze Geen.
VRIJE KEUZESTAND
1. Druk de RANDOM knop om het luisteren te beginnen. Al de nummers in het bestand moeten naar willekeur
worden gespeeld. Selecteer de Random functie en druk de Mode knop in, stand Random om het afspelen
naar willekeur te beginnen.
MP3 PROGRAMMEREN
De MP3 speler kan tot 10 nummers programmeren in de volgorde van uw keuze.
1. Druk de PROGRAM knop in tijdens de stopstand. Het scherm laat “P01” zien en “PROGRAM” knippert.
2. Druk de FF/SKIP+ en de FB/SKIP- knop in om het gewenste nummer te programmeren.
of Druk de FOLDER DN en de FOLDER UP knoppen op de afstandsbediening in om het volgende nummer
uit een andere map te programmeren.
3. Druk de PROGRAM knop in om bij het geheugen te komen.
4. Ga door met programmeren, herhaal de stappen 2 en 3.
5. Druk op de PLAY/PAUSE knop in de programmastand om de geprogrammeerde nummers te spelen.
SKIP +
• Veranderen van het startnummer tijdens de stopstand, cyclisch naar het eerste nummer als het laatste
weergegeven wordt.
• Ga door naar het volgende nummer gedurende normale speelstand. Cyclisch naar het eerste nummer
wanneer het laatste gespeeld wordt.
• Wanneer de knop langer dan 0,5 sec wordt ingedrukt, wordt het Fast-Forward gebruikt.
• Doorgaan naar het volgende geprogrammeerde nummer gedurende de programmastand.
Cyclisch naar het volgend geprogrammeerde nummer.
• Doorgaan naar het volgende willekeurige nummer tijdens de vrije keuzestand.
SKIP -
087.
GEEN
HERHALING &
VRIJE KEUZE
ALBUM
MP3
HERHAAL MAP
MP3
MP3
RANDOM
HERHAAL ALLES
HERHAAL-1
VRIJE KEUZE
MP3
MP3
REP
REP
REP
ALL
09-2322_NL 6/20/06 11:29 AM Page 07
Page 88

Page 89

• Druk de Function-knoppen “RADIO” of “CD” in om de geluidsbron te kiezen.
• Plaats een lege cassette in de speler.
• Druk eerst de PAUSE-knop in.
• Druk dan tegelijk de PLAY- en de RECORD-knoppen in.
• Speel de gekozen geluidsbron af.
• Zorg ervoor dat de PAUSE-knop niet ingedrukt staat als u opneemt.
1. CASSETTEDRAAD (Fig. 1) ---- Controleer de draad voor gebruik, en maak het
strakker met een potlood of een
dergelijk voorwerp. De draad kan breken of
verstrikt raken in het mechanisme.
2. HET VOORKOMEN VAN ONBEDOELD WISSEN
(Fig. 2) ---- Breek de plastic schijfjes af met een
schroevendraaier of een ander puntig voorwerp.
3. OPNIEUW OPNEMEN (Fig. 3) ---- Dek de
openingen, waar de plastic schijfjes eerder
zaten, af met
cellofaantape.
GEBRUIK RADIO
AFSTELLEN
• Druk de Function-knop “RADIO” om het apparaat op de Radiostand te zetten.
De radio-functieïndicator licht op.
• Kies het Frequentiebereik met de BAND-knop.
• Draai de TUNING-knop om de gewenste zender te kiezen.
ONTHOUD:
Het is aangeraden om de FM-antenne geheel op te zetten als u luistert naar een FM-uitzending.
Voor optimale ontvangst van AM-zenders is het aangeraden, de positie van de ontvanger te veranderen.
W
at is MP3?
MP3 is de afkorting van MPEG Audio Layer 3.
MPEG staat voor Moving Pictures Experts Group.
MP3's zijn digitale audiobestanden die zijn verkleind terwijl ze toch hun originele kwaliteit behouden.
MP3 wordt algemeen erkend als de populairste manier om muziek op te slaan en te luisteren.
De digitale audiobestanden op een MP3-schijf kunnen worden afgespeeld op een MP3-speler.
Een MP3-schijf kan 150-200 nummers bevatten.
089.
Kant A
Schijfje bij kant
A
Cellofaantape
Figuur 1
Figuur 2
Figuur .3
09-2322_NL 6/20/06 11:29 AM Page 09
Page 90

Vermogensbron: AC ~230V 50 Hz
Stroomverbruik: 15 Watt
Uitgaand vermogen 2 Watt x 2 RMS staat tot 8 Ohm
(per kanaal):
Frequentiebereik radio: AM 525 –1615 KHz
FM 87,5 – 108 MHz
CD-compartiment:
Reactie op Frequenties 60 – 16,000 Hz
(-3dB):
Ratio tot waar er goed geluid
kan worden gespeeld: 60 dB
Harmonische vervorming: 0.4%
Kan het volgende afspelen: CD-DA, CD-R, CD-RW, MP3
Cassettecompartiment:
Bandsnelheid: 4.75 cm / sec.
‘Gejengel’: < 0.4%
Reactie op frequenties: 100 Hz - 6.3 KHz
090.
09-2322_NL 6/20/06 11:29 AM Page 010
Page 91

091.
BIJKOMENDE INFORMATIE
Let op bij kleine onderdelen en batterijen, niet doorslikken, dit kan tot ernstige schade of verstikking
leiden. Let er in het bijzonder bij kinderen op dat kleine onderdelen en batterijen buiten hun bereik
zijn.
Belangrijk advies omtrent het gehoor
Opgelet:
U geeft om uw gehoor, wij doen dat ook.
Wees daarom voorzichtig tijdens het gebruik van dit apparaat.
Onze aanbeveling: Vermijd hard geluid.
In het geval het apparaat door kinderen wordt gebruikt, zorg ervoor dat het volume niet te hard staat.
Opgelet!
Hard geluid kan onherstelbare schade aan het gehoor van een kind veroorzaken.
Laat NOOIT personen, in het bijzonder kinderen, voorwerpen in de gaten, schachten of andere
openingen van de behuizing steken; dit kan een dodelijke elektrische schok tot gevolg hebben. De
behuizing van het apparaat mag slechts door daartoe gekwalificeerde vaklui geopend worden.
Gebruik het apparaat alleen voor het doel waarvoor het is bestemd.
Het apparaat is uitsluitend bedoeld voor gebruik in huishoudelijke en zakelijke omgevingen.
Gelieve deze gebruiksaanwijzing zorgvuldig te bewaren voor later gebruik.
BIJKOMENDE INFORMATIE
Aanwijzingen inzake de milieubescherming
Dit product mag aan het einde van zijn levensduur niet samen met het normale huishoudelijke afval
verwijderd worden, maar moet afgegeven worden op een verzamelpunt voor de recycling van
elektrische en elektronische apparatuur. Het symbool op het product, in de gebruiksaanwijzing of
op de verpakking maakt u daarop attent.
De werkstoffen zijn volgens hun kenmerking herbruikbaar. Met het hergebruik, de stoffelijke
verwerking of andere vormen van recycling van oude apparaten levert u een belangrijke bijdrage tot
de bescherming van ons milieu.
Gelieve bij het gemeentebestuur informatie te vragen over het bevoegde verzamelpunt.
Verhinder nooit de ventilatie van het apparaat door middel van gordijnen, kranten, dekens of
meubelstukken. De ventilatiegaten moeten altijd vrij zijn. Oververhitting kan schade veroorzaken en
de levensduur van het apparaat verkorten.
Hitte en warmte
Stel het apparaat niet bloot aan direct zonlicht. Zorg ervoor dat het apparaat niet wordt blootgesteld
aan directe hittebronnen zoals verwarmingen en open vuur.
Zorg ervoor dat de ventilatiegaten niet zijn bedekt.
Vocht en reiniging
Dit product is niet waterdicht! Doop de speler niet in water. Voorkom dat de speler met water in
contact komt. Water in het apparaat kan tot ernstige beschadiging leiden. Gebruik geen
schoonmaakmiddelen die alcohol, ammoniak, benzeen of schuurmiddel bevatten aangezien deze
middelen de speler kunnen beschadigen. Om te reinigen, gebruik een zachte, vochtige doek.
09-2322_NL 6/20/06 11:29 AM Page 011
Page 92

092.
BEZPEČNOSTNÍ UPOZORNĚNÍ
Přístroj musí být odpojen z elektřiny, když není používán.
Nedovolte, aby přístroj byl vystaven dešti a vlhku.
VORSICHT:
Abyste předešli úrazu elektrickým proudem, nesundávejte obal (nebo zadní část).
Uvnitř nejsou opravitelné části. Obraťte se na kvalifikovaného opraváře
BEZPEČNOSTNÍ UPOZORNĚNÍ
1. PŘEČTĚTE SI NÁVOD - Před použitím si přečtěte všechna bezpečnostní doporučení a návod k použití.
2. USCHOVEJTE NÁVOD. - Bezpečnostní doporučení a návod k použití uschovejte pro pozdější nahlédnutí.
3. VĚNUJTE POZORNOST VAROVÁNÍM - Všem varováním na přístroji a v návodu k použití by měla být
věnována pozornost.
4. NÁSLEDUJTE NÁVOD - Návod k použití a všechny instrukce by měli být následovány.
5. VODA A VLHKO - Přístroj by neměl být používán v blízkosti vody například v blízkosti vany, umyvadla, dřezu,
škopku na praní, koupaliště nebo ve vlhkých suterénech.
6. VENTILACE - Přístroj by měl být umístěn tak, aby byla zajištěna jeho správná ventilace.
Například, přístroj by neměl být umístěn na posteli, pohovce, koberci nebo podobném povrchu, který
blokuje ventilační otvory.
Neumisťujte do skříní, které zamezují volnému proudění vzduchu ventilačními otvory.
7. TEPLO - Přístroj by měl být umístěn mimo zdroje tepla jako jsou radiátory, kamna a jiné přístroje (včetně
zesilovačů), které produkují teplo.
8. ZDROJE ENERGIE - Přístroj by měl být zapojen pouze do elektrické sítě, která odpovídá popisu v návodu
nebo označení přímo na přístroji.
9. UZEMĚNÍ A POLARIZACE - Pozornost by měla být věnována tomu, aby bylo zajištěno uzemnění a
polarizace přístroje.
10. OCHRANA KABELU - Kabely by měli být veden tak, aby nemohly být náhodně pošlapány nebo skřípnuty,
věnujte pozornost speciálně šňůře a zástrčce, přijímačům a bodům, ve kterých vystupují z přístroje.
LASEROVÝ
PŘÍSTROJ PRVNÍ
TŘÍDY
POZOR!
Neviditelná laserová radiace, když je
západka otevřená nebo poškozená.
Nevystavujte slunečním paprskům.
Tato značka varuje před
nebezpečným napětím uvnitř
přístroje a možným rizikem úrazu
elektrickým proudem.
POZOR
NEBEZPEČÍ ÚRAZU ELEKTRICKÝM
PROUDEM!
NEOTVÍREJTE: UPOZORNĚNÍ:
NEPOKOUŠEJTE SE ODSTRANIT KRYT
VÝROBKU, RISKUJETE ÚRAZ ELEKTRICKÝM
PROUDEM. UVNITŘ VÝROBKU NEJSOU
ŽÁDNÉ SOUČÁSTKY KTERÉ BY MOHL
UŽIVATEL OPRAVIT SVÉPOMOCÍ. OPRAVY
PŘENECHEJTE POUZE AUTORIZOVANÉMU
SERVISU.
Tato značka oznamuje, že v návodu k
obsluze výrobku, který je součástí
výrobku jsou velmi důležité informace
o provozu a údržbě výrobku.
10-2322_CZ 6/20/06 11:30 AM Page 02
Page 93

093.
11. ČISTĚNÍ - Přístroj by měl být čištěn pouze způsobem doporučeným výrobcem.
12. ELEKTRICKÉ VEDENÍ - Venkovní anténa by měla být umístěna mimo elektrické vedení.
13. MIMO PROVOZ - Přístroj by měl být odpojen z elektřiny, když ho nebudete delší dobu používat.
14. SPADNUTÍ A VNIKNUTÍ TEKUTIN - Dávejte pozor, aby vám přístroj nespadl na zem a nebyl polit
tekutinou, která by otvory vnikla dovnitř.
15. OPRAVY - Uživatel by se neměl snažit opravovat přístroj dále, než je opsáno v návodu k použití.
Pro další opravy je nutno vyhledat kvalifikovanou opravnu.
16. POŠKOZENÍ VYŽADUJÍCÍ OPRAVU - Přístroj by měl být opraven servisním centrem, když:
A. Byl poškozen kabel nebo zástrčka.
B. Přístroj spadl do tekutiny nebo byl polit tekutinou.
C.Přístroj byl vystaven dešti.
D.Přístroj spadl na zem nebo je poškozený obal.
E. Přístroj nepracuje normálně nebo vykazuje znatelné změny ve výsledném efektu.
PŘÍPRAVA K POUŽÍTÍ
INSTALACE
• Vybalte všechny části a odstraňte ochranné obaly.
• Vložte baterie do dálkového ovladače.
• Nezapojujte přístroj do elektrické sítě dokud, nezkontrolujete napětí a dokud nebylo vše ostatní
propojeno.
• Nezakrývejte ventilační otvory a ujistěte se, že kolem přístroje je prostor několika centimetrů pro
ventilaci.
ZAPOJENÍ
1) Zapojte levý a pravý reproduktor do levého a pravého vstupu.
2) Než přístroj zapojíte do elektrické sítě, ujistěte se, že napětí na etiketě na spodní straně přístroje je
shodné s napětím v zásuvce.
OVLÁDÁNÍ / KOMPAKTNÍ DISK
Mějte na paměti, že jakákoliv špína, poškrábání nebo deformace na disku může poškodit nebo ovlivnit
zvuk a také hlasitost.
• Když se uchopujete disky, nikdy se nedotýkejte záznamové vrstvy.
• Nepokládejte disky na následující místa:
Blízko zdrojů tepla nebo do míst, kde je vysoká teplota.
Na vlhká a prašná místa.
• Odstraňte otisky prstů a prach ze záznamové plochy pomocí měkkého hadříku.
Vždy otírejte disk z vnitřku směrem ven.
VLOŽENÍ DISKU
• Zmáčkněte OPEN/CLOSE.
• Vložte CD (popsanou stravou nahoru) na tácek.
• Zmáčkněte OPEN/CLOSE pro zavření CD dveří.
• Displej zobrazí celkový počet nahrávek.
10-2322_CZ 6/20/06 11:30 AM Page 03
Page 94

094.
OVLADAČE A ZNAKY
1. CD DVEŘE
2. CD DVEŘE OPEN/CLOSE
[OTEVŘÍT/ZAVŘÍT]
3. LCD DIPLEJ
4. VOLUME UP [ZVÝŠIT HLASITOST]
5. VOLUME DOWN
[SNÍŽIT HLASITOST]
6. FOLDER [SLOŽKA] TLAČÍTKO
7. X-BASS [X-BASY] TLAČÍTKO
8. INDICATOR ZAPNUTÍ
9. SENSOR DÁLKOVÉHO OVLÁDÁNÍ
10. SKIP [PŘESKOČIT] TLAČÍTKO
11. SKIP [PŘESKOČIT] TLAČÍTKO
12. PLAY/PAUSE [HRÁT/PAUZA] TLAČÍTKO
13. STOP [ZASTAVIT] TLAČÍTKO
14. FUNCTION [FUNKCE] NASTAVENÍ(TAPE,
CD/MP3, TUNER) [KAZETA, CD/MP3, RÁDIO]
15. BAND [VLNY] NASTAVENÍ (AM, FM, FM ST.)
16. MODE [REŽIM] TLAČÍTKO(REPEAT, RANDOM)
[OPAKOVAT, NÁHODNĚ]
17. PROGRAMM [PROGRAM] TLAČÍTKO
18. TUNING [LADĚNÍ] TLAČÍTKO
19. KAZETOVÁ DVÍŘKA
20. VSTUP PRO SLUCHÁTKA
21. RECORD/PLAY [NAHRÁVAT/HRÁT] OVLADAČ
22. FM ANTÉNA
23. LEVÝ REPRODUKTOR
24. PRAVÝ REPRODUKTOR
25. KABEL
26. REGULACE HLASITOSTI
17
15
13
11
9
7
6
2
3
21
19
1
4
5
8
10
12
14
16
18
22
26
25
23
24
10-2322_CZ 6/20/06 11:30 AM Page 04
Page 95

FUNKCE DÁLKOVÉHO OVLADAČE
Příprava k použití
• Vložte baterie do dálkového ovladače.
• Sundejte víko baterií na zadní straně dálkového ovladače.
• Vložte dvě “UM4/AAA baterie.
• Vložte baterie tak, aby konce a korespondovaly s označením uvnitř otvoru pro baterie.
• Nasaďte víko.
Výměna baterií
• Když je dálkové ovládání nespolehlivé nebo se citelně zkrátí vzdálenost, na kterou ovladač reaguje, vyměňte
baterie za nové.
Používání dálkového ovládání
Pro použití dálkového ovladače, namiřte na SENZOR DÁLKOVÉHO OVLÁDÁNÍ a jemně zmáčkněte tlačítko.
Dálkové ovládání je možné přibližně v rozsahu 6 metrů.
Nicméně, vzdálenost je kratší, když je přístroj mimo přímý v dosah, je-li ovladač namířen přímo na SENZOR
DÁLKOVÉHO OVLÁDÁNÍ je vzdálenost maximální.
Nevystavujte SENZOR DÁLKOVÉHO OVLÁDÁNÍ silnému světlu ( přímému slunečnímu záření nebo umělému
osvětlení) a ujistěte se, že nejsou překážky mezi SENZOREM DÁLKOVÉHO OVLÁDÁNÍ a dálkovým ovladačem.
DÁLKOVÝ OVLADAČ
1. Folder [Složka] tlačítko
2. Folder [Složka] tlačítko
3. PLAY / PAUSE [HRÁT / PAUZA] tlačítko
4. STOP [ZASTAVIT] tlačítko
5. SKIP [PŘESKOČIT] + tlačítko
6. SKIP [PŘESKOČIT] - tlačítko
7. MODE [REŽIM] tlačítko
8. PROGRAM [PROGRAM] tlačítko
Klíčové funkce ovládání
POWER TLAČÍTKO Pro zapnutí přístroje
HLASITOST +/- - Ke zvýšení a snížení hlasitosti na požadovanou úroveň.
HRÁT/PAUZA
• Začít hrát, je-li vypnuto.
• Nastavení pauzy.
• Ukončit pauzu.
ZASTAVIT
• V režimu hrát nebo pauza:
K zastavení nebo vstoupení do programu během naprogramovaného přehrávání.
• V režimu naprogramování: K opuštění naprogramovaného přehrávání, vymazání paměti a zastavení.
• V režimu náhodného přehrávání (Mode tlačítko): K zastavení a ukončení funkce náhodného přehrávání.
095.
+
10-2322_CZ 6/20/06 11:30 AM Page 05
1
6
4
7
2
3
5
8
Page 96

Funkce PROGRAM [Vysvětlení funkce]
1. Jestliže je [PROGRAM] tlačítko zmáčknuto v režimu zastavit CD, systém přejde do menu program.
V menu program bude číslo stopy a PROGRAM blikat na displeji v 500 [ms] intervalu.
(Displej 1).
2. Jestliže je [FF/SKIP+] / [FB/SKIP-] tlačítko zmáčknuto, systém vybere stopu, kterou chcete
naprogramovat.
3. Jestliže je tlačítko [PROGRAM] zmáčknuto po vybrání čísla stopy, systém zachová číslo stopy a vstoupí do
dalšího menu programu. (Displej 2).
4. Systém může mít 20 programů pro CD režim / 10 programů pro MP3.
Poté, co systém má 20 programů, nemůže být přidána další píseň.
V případě, že systém má 20 programů, nemůže být přidán další program.
PROGRAM zobrazí a bude “P 01“ blikat v 500 [ms] intervalu.
5. Jestliže je [STOP] tlačítko zmáčknuto v menu program, systém odstraní obsah programu a zruší menu
program.
6. Jestliže je [PLAY/PAUSE] tlačítko zmáčknuto v menu program více jak jednou, začne se přehrávat
naprogramované. Během naprogramovaného přehrávání, displej zobrazí PROGRAM.
(Displej 4).
7. Jestliže je [FF/SKIP+] / [FB/SKIP-] tlačítko zmáčknuto během naprogramovaného přehrávání, systém
přeskočí na následující / předchozí program.
8. Jestliže je [STOP] tlačítko zmáčknuto během naprogramovaného přehrávání, systém zastaví přehrávání a
vstoupí do režimu vypnuto.
Pokud tlačítko [STOP] je zmáčknuto během režimu vypnuto, systém ponechá obsah programu.
Funkce MODE[Vysvětlení funkce]
CD režim:
1. Jestliže je [MODE] tlačítko zmáčknuto, systém změní režim. (jak je zamýšleno).
2. V režimu Repeat-1, systém opakuje současnou stopu na CD.
3. V režimu Repeat-all, jestliže dojde na konec písně poslední stopy, obvykle se vrátí na začátek stopy.
4. Jestliže je celá stopa přehrána v režimu náhodně nebo je-li stlačeno tlačítko [STOP] v režimu náhodného
přehrávání, systém se vypne a zruší se náhodné přehrávání.
5. Jestliže je [FF/SKIP+] tlačítko zmáčknuto v režimu náhodného přehrávání, systém přeskočí na následující
náhodnou skladbu.
Jestliže je [FF/SKIP+] tlačítko zmáčknuto při poslední písni, systém zahájí další náhodné přehrávání.
6. Jestliže je [FB/SKIP+] tlačítko zmáčknuto v režimu náhodného přehrávání, systém najde začátek současné
stoupy, ale nepřeskočí dolů.
096.
PROGRAM
(DISPLEJ 1)
(DISPLEJ 2)
(DISPLEJ 3)
(DISPLEJ 4)
PROGRAM
PROGRAM
PROGRAM
REP
REP
ALL
RANDOM
NEOPAKOVAT A NÁHODNĚ
OPAKOVAT V‚E
OPAKOVAT-1
NÁHODNĚ
10-2322_CZ 6/20/06 11:30 AM Page 06
Page 97

MP3 režim:
1. Jestliže je [MODE] tlačítko zmáčknuto, systém změní režim. (jak je zamýšleno).
2. V režimu Repeat-1, systém opakuje současnou stopu na MP3.
3. V režimu Repeat-folder, systém opakuje současnou složku.
4. V režimu Repeat-all, jestliže dojde na konec písně poslední stopy, obvykle se vrátí na začátek stopy.
5 Jestliže je přehrána celá stopa během náhodného přehrávání nebo když je zmáčknuto tlačítko [STOP],
systém přejde do režimu vypnuto a ukončí náhodné přehrávání.
6. Jestliže je zmáčknuto tlačítko [FF/SKIP+] během náhodného přehrávání, systém přejde na další náhodný
výběr.
Jestliže je zmáčknuto tlačítko [FF/SKIP+] při písni poslední stopy, systém zahájí další cyklus náhodného
přehrávání.
7. Jestliže je zmáčknuto tlačítko [FB/SKIP+] během náhodného přehrávání, systém vyhledá začátek současné
stopy, ale nejde dolů.
REŽIM
CD: Nenastaven Zopakovat 1 Zopakovat vše Náhodně Nenastaven.
MP3: Nenastaven Zopakovat 1 Zopakovat vše Náhodně Nenastaven.
NÁHODNĚ
1. Zmáčkněte RANDOM tlačítko k zahájení poslechu.
Všechny stopy na disku by měli být přehrány náhodně.
Vyberte funkci RANDOM a zmáčkněte tlačítko Mode a vyberte Random k zahájení náhodného přehrávání.
NAPROGRAMOVÁNÍ MP3
MP3 přehrávač umožňuje naprogramovat 10 stop dle vašeho výběru.
1. Zmáčkněte PROGRAM tlačítko v režimu zastaveno.
Displej ukáže “P01” a bude“PROGRAM” blikat.
2. Zmáčkněte FF/SKIP+ a FB/SKIP- tlačítko pro výběr požadované stopy k naprogramovaní.
nebo Zmáčkněte FOLDER DN a FOLDER UP tlačítko na dálkovém ovladači pro výběr dalšího souboru k
naprogramování.
3. Zmáčkněte tlačítko PROGRAM pro vstup do paměti.
4. Pokračujte v programování, zopakujte kroky 2 a 3.
5. Zmáčkněte tlačítko PLAY / PAUSE v režimu programovat a naprogramované stopy se začnou přehrávat.
SKIP +
• Změna první stopy v režimu zastaveno, přeskočení na první stopu, je-li na poslední stopě.
• Přeskočit na následující stopu během Normálního přehrávání. Nastavení jako první stopa, je-li to poslední
stopa.
• Když je tlačítko zmáčknuto déle než 0,5 sec. posune se rychle dopředu.
• Přeskočí na další stopu v naprogramovaném přehrávání. Návrat na první naprogramovanou stopu.
• Přeskočit na další náhodnou stopu při náhodném přehrávání.
097.
NEOPAKOVAT A
NÁHODNĚ
ALBUM
MP3
OPAKOVAT
SLOŽKU
MP3
MP3
RANDOM
OPAKOVAT V‚E
OPAKOVAT-1
NÁHODNĚ
MP3
MP3
REP
REP
REP
ALL
10-2322_CZ 6/20/06 11:30 AM Page 07
Page 98

SKIP -
• Změna první stopy v režimu zastaveno. Přeskočení na poslední stoupu, je-li na první stopě.
• Přeskočit na předcházející stopu během Normálního přehrávání.
Přeskočení na poslední stoupu, je-li na první stopě.
• Když je tlačítko zmáčknuto déle než 0,5 sec., posune se rychle dozadu.
• Přeskočí na předchozí stopu v naprogramovaném přehrávání.
Návrat na první naprogramovanou stopu.
FOLDER
• Když je systém v režimu STOP: MP3 přeskočí na další soubor, s vyšším pořadovým číslem a displej zobrazí
pořadové číslo.
• Když je systém v režimu PLAY: MP3 přeskočí na další soubor, s vyšším pořadovým číslem.
Začne hrát první stopu souboru a displej zobrazí soubor a stopu jež jsou přehrávány.
Zmáčkněte tlačítko jednou. Číslo současného souboru bude 3 sec. blikat.
Zmáčkněte tlačítko znovu. Další soubor.
FOLDER
• Když je systém v režimu STOP:
MP3 přeskočí na další soubor s nižším pořadovým číslem a displej zobrazí pořadové číslo.
• Když je systém v režimu PLAY: MP3 přeskočí na další soubor s nižším pořadovým číslem
Začne hrát první stopu souboru a displej zobrazí soubor a stopu jež jsou přehrávány.
Zmáčkněte tlačítko jednou. Číslo současného souboru bude 3 sec. blikat.
Zmáčkněte tlačítko znovu. Další soubor.
+/= BASS
• Zmáčkněte tlačítko +/ - BASS a vyberte zesílení basů.
FUNKCE KAZETY
Vyberte z funkcí kazety
RECORD/PLAY TLAČÍTKA NA DESCE
• RECORD: začít nahrávat
• PLAY: začít přehrávat kazetu.
• REWIND: rychle přemotat zpět kazetu.
• F.FWD: rychle přemotat dopředu kazetu.
• STOP/EJ: zastavit a vysunout kazetu.
• PAUSE: přerušit přehrávání nebo nahrávání.
KAZETOVÁ ČÁST
Před zacházením s kazetovou části se ujistěte, že je nastaveno na režim Kazeta.
PŘEHRÁVÁNÍ
• Nastavte volič Function do režimu Tape.
• Zmáčkněte tlačítko Eject k otevření dvířek.
• Vložte kazetu stranou. která má být přehrávána směren ven.
• Zvřete dvířka.
• Zmáčkněte Play tlačítko k zahájení přehrávání.
• Přehrávání skončí, když se kazeta dostane na konec.
• Zmáčkněte tlačítko Stop, jestliže chcete ukončit přehrávání dříve, než se kazeta dostane na konec.
098.
10-2322_CZ 6/20/06 11:30 AM Page 08
Page 99

NAHRÁVÁNÍ Z RÁDIA / CD
• Zmáčkněte tlačítko Function “RADIO” nebo “CD” pro výběr zvukového zdroje.
• Vložte práznou kazetu.
• Zmáčkněte tlačítko PAUSE.
• Potom zmáčkněte najednou tlačítko PLAY a RECORD.
• Přehrát vybraný zvukový zdroj.
• Nahrávání zahájíte uvolněním tlačítka PAUSE.
1. PÁSKA KAZETY (Obr. 1) ---- Zkontrolujte a utáhněte
pásku kazety pomocí např. tužky před použitím.
Páska kazety se může přetrhnout nebo zaseknout v
mechanismu.
2. ABYSTE PŘEDEŠLI NÁHODNÉMU PONIČENÍ (Obr.
2) -- -- Použijte šroubovák nebo podobný předmět k
rozbití plastového okna.
3. OPĚTOVNÉ NANRÁNÍ (Obr. 3) -- -- Přikryjte otvor
celofánovou páskou.
OVLÁDÁNÍ RÁDIA
LADĚNÍ
• Nastavte tlačítko Function na “RADIO” pro nastavení režimu rádia.
Idikátro radia se rozsvítí.
• Vyberte vlny pomocí BAND tlačítka.
• Naladte požadovanou stanici pomocí TURNING OVLADAČE.
POZNÁMKA:
Když posloucháte FM vysílání, je dobré zcela vytáhnout anténu na zadní straně.
Když posloucháte AM vysílání, je dobré nastavit přístroj do vhodné pozice.
Co je t
o MP3?
MP3 je kratší forma pro MPEG zvukovou vrstvu 3.
MPEG odkazuje na Pohyblivé obrázky expresní skupiny.
MP3s ke digitální zvukový\ soubor, který byl zmenšen při zachování původní zvukové kvality.
MP3 je široce rozpoznatelný nejpopulárnější formát pro Uchovávání a poslouchání hudby.
Digitální zvukové soubory uložené na MP3 disku mohou být přehrány v MP3 přehrávači.
MP3 přehrávač může mít 150-200 písní na jednom CD.
099.
Strana A
Okno stana A
Celofánová páska
Obr.1
Obr. 2
Obr..3
10-2322_CZ 6/20/06 11:30 AM Page 09
Page 100

 Loading...