


Quick Reference Guide
Issue 1.1
August 2010
Cat. #: SMR-3011-0110
©2010 Elspec Ltd, All rights reserved.
All product names are trademarks of their respective companies.
Shop for Elspec products online at:
www.PowerMet erStore.com
1.877.766.5412

Shop for Elspec products online at:
www.PowerMet erStore.com
1.877.766.5412

BLACKBOX PORTABLE QUICK REFERENCE GUIDE
August 2010
Elspec | Warranty Notice
i
Warranty Notice
Each Elspec product is warranted to be free from defects in material and
workmanship under normal use and service. The warranty period is one year
and begins on the date of shipment. Parts, product repairs, and services are
warranted for 90 days. This warranty extends only to the original buyer or
end-user customer and does not apply to fuses, disposable batteries, or to
any product which, in Elspec's opinion, has been misused, altered, neglected,
contaminated, or damaged by accident or abnormal conditions of operation
or handling. Elspec warrants that the software will operate substantially in
accordance with its functional specifications for 90 days and that it has been
properly recorded on non-defective media. Elspec does not warrant that the
software will be error free and operate without interruption.
Elspec authorized resellers shall extend this warranty on new and unused
products to end-user customers only but do not have authority to extend a
greater or different warranty on behalf of Elspec. Warranty support is
available only if the product is purchased through an Elspec authorized sales
outlet or Buyer has paid the applicable international price. Elspec reserves
the right to invoice Buyer for importation costs of repair/replacement parts
when the product is purchased in one country are submitted for repair in
another country.
Elspec’s warranty obligation is limited, at Elspec's option, to refund of the
purchase price, free of charge repair, or replacement of a defective product
which is returned to Elspec within the warranty period. To obtain warranty
service, contact Elspec directly to obtain return authorization information,
and then send the product to Elspec, with a description of the problem,
postage and insurance prepaid (FOB destination). Elspec assumes no risk for
damage in transit. Following warranty repair, the product will be returned to
the Buyer, transportation prepaid (FOB destination). If Elspec determines
that the failure was caused by neglect, misuse, contamination, alteration,
accident, or abnormal condition of operation of handling, including
overvoltage failures caused by use outside the product's specified rating, or
normal wear and tear of mechanical components, Elspec will provide an
estimate of repair costs and obtain authorization before commencing work.
Following repair, the product will be returned to the Buyer, transportation
prepaid, and the Buyer will be billed for the repair and return postage
transportation charges (FOB Shipping Point).
This warranty is the Buyer's sole and exclusive remedy and is in lieu of all
other warranties, express or implied, including but not limited to any implied
warranty of merchantability or fitness for a particular purpose. Elspec shall
not be liable for any special, indirect, incidental, or consequential damages or
losses, including loss of data arising from any cause or theory.
Shop for Elspec products online at:
www.PowerMet erStore.com
1.877.766.5412

August 2010
BLACKBOX PORTABLE QUICK REFERENCE GUIDE
ii
Warranty Notice | Elspec
Since some countries or states do not allow limitation of the term of an
implied warranty, or exclusion or limitation of incidental or consequential
damages, the limitations and exclusions of this warranty may not apply to
every buyer. If any provision of this Warranty is held invalid or
unenforceable by a court or other decision-maker of competent jurisdiction,
such holding will not affect the validity or enforceability of any other
provision.
Notice regarding Proprietary rights
This publication contains information proprietary to Elspec-Ltd. By
accepting and using this manual, you agree that the information contained
herein will be used solely for the purpose of operating equipment of ElspecLtd.
Shop for Elspec products online at:
www.PowerMet erStore.com
1.877.766.5412

BLACKBOX PORTABLE QUICK REFERENCE GUIDE
August 2010
Elspec | Table of Contents
iii
Table of Contents
I INTRODUCTION ..........................................................................................I—1
Overview .......................................................................................... I—1
Functionality, Features, and Ease of Use ........................................... I—2
Product Features .............................................................................. I—3
II BEFORE GETTING STARTED ................................................................ II—1
Safety Information .......................................................................... II—1
Standard Accessories ....................................................................... II—2
Controls and Indicators .................................................................... II—4
Front Panel ............................................................................................................. II—4
Rear Panel .............................................................................................................. II—4
Reference ............................................................................................................... II—5
III ON SITE SETUP ....................................................................................... III—1
Step 1: Connect the AC Power Supply ............................................. III—2
Step 2: Establish a Connection with the Unit ................................... III—3
Wired or Wireless Single PC Connection .............................................................. III—3
Integrated Router ................................................................................................. III—3
Wi-Fi Access Point ................................................................................................. III—4
Step 3: Wire the Voltage and Current Measurement Inputs ............ III—5
Connect Voltage Cords ......................................................................................... III—5
Attach Current Clamps .......................................................................................... III—6
Step 4: Configure the Unit .............................................................. III—7
Login to the Internal Website ............................................................................... III—7
Unit Setup ............................................................................................................. III—8
Voltage and Frequency ......................................................................................... III—8
Currents ................................................................................................................ III—9
Shop for Elspec products online at:
www.PowerMet erStore.com
1.877.766.5412

August 2010
BLACKBOX PORTABLE QUICK REFERENCE GUIDE
iv
Table of Contents | Elspec
Step 5: Verify the Measurement Readings .................................... III—10
Summary ............................................................................................................. III—10
Voltage & Current ............................................................................................... III—11
Monitoring/Power .............................................................................................. III—11
Step 6: Start/Stop PQZIP Recording .............................................. III—12
IV DOWNLOADING AND ANALYZING RECORDED DATA................. IV—1
PQSCADA/Investigator Key Features & Benefits ............................. IV—1
Download Recorded Data with PQSCADA ....................................... IV—2
Building a Site Structure........................................................................................ IV—2
Adding a Node ...................................................................................................... IV—3
Verifying System Time Settings ............................................................................. IV—4
Enabling the Node ................................................................................................. IV—4
Data Export and Reporting ................................................................................... IV—5
Templates ............................................................................................................. IV—5
Viewing Downloaded Data with Investigator .................................. IV—6
Adding a Node ...................................................................................................... IV—6
Views ............................................................................................. IV—7
Multi-View ............................................................................................................ IV—7
Trend View ............................................................................................................ IV—8
Trend Grid View .................................................................................................... IV—8
Spectrum View ...................................................................................................... IV—9
Viewing Minimum, Maximum and Average Values of a Voltage Harmonics ...... IV—10
CBEMA View ....................................................................................................... IV—10
Zooming In/Out ........................................................................... IV—11
Tools ............................................................................................ IV—12
Append Back ....................................................................................................... IV—13
Back ..................................................................................................................... IV—14
Append Forward ................................................................................................. IV—14
Forward ............................................................................................................... IV—15
Expand Time........................................................................................................ IV—15
Previous Time/Next Time.................................................................................... IV—16
Shop for Elspec products online at:
www.PowerMet erStore.com
1.877.766.5412

BLACKBOX PORTABLE QUICK REFERENCE GUIDE
August 2010
Elspec | Table of Contents
v
Trend Data Exporting .......................................................................................... IV—16
Crosshairs ............................................................................................................ IV—17
Multiple Panes .................................................................................................... IV—17
V CIRCUIT TOPOLOGIES ............................................................................ V—1
Single Phase with Neutral (Single LN) .................................................................... V—2
Single Phase without Neutral (Single LL) ............................................................... V—2
Single Split Phase (2Phase TR) ............................................................................... V—2
Three Wire Delta (Delta 3 Wire) ............................................................................ V—3
Grounded Delta (Delta 3 Wire) .............................................................................. V—3
Four Wire WYE (WYE 4 Wire) ................................................................................ V—4
Three Wire WYE (Delta 3 Wire) ............................................................................. V—4
Delta High Leg (Delta 3 Wire) ................................................................................ V—5
Delta Open Leg (Delta 3 Wire) ............................................................................... V—5
Shop for Elspec products online at:
www.PowerMet erStore.com
1.877.766.5412

Shop for Elspec products online at:
www.PowerMet erStore.com
1.877.766.5412

BLACKBOX PORTABLE QUICK REFERENCE GUIDE
August 2010
Elspec | Introduction
I—1
Dedicated Tablet PC
G4500 BLACKBOX Portable
I Introduction
Overview
The ELSPEC G4500/3500 SERIES BLACKBOX Portable high-definition
Power Quality meter delivers superior accuracy and analysis features for
advanced power quality surveys by recording all parameters all the time.
Powered by revolutionary PQZip compression technology, the G4500/3500
SERIES BLACKBOX Portable is capable of recording up to 1000 times
more information than competitive instruments with equivalent memory
sizes. The complimentary PQSCADA software package provides an
innovative and convenient way of performing the most complicated power
quality investigations
A State of the Art PQSCADA Investigator application helps to explore
power quality events, zooming in and out on any parameter at High
Definition resolution, from months to microseconds in mouse-click speed
and simplicity.
The Embedded Website is the user interface to the unit. Real time
parameters can be viewed and the unit configuration can be performed using
the website. The optional dedicated Tablet PC enables configuring,
analyzing, and displays all monitored real time values of the device.
This document is a Quick Reference Guide intended to provide a quick and
easy reference for the setup up, configuration, and use of the BLACKBOX
device. For a more detailed reference document, please refer to the G4500
User Guide on the BLACKBOX CD included with each device.
Shop for Elspec products online at:
www.PowerMet erStore.com
1.877.766.5412

August 2010
BLACKBOX PORTABLE QUICK REFERENCE GUIDE
I—2
Introduction | Elspec
Functionality, Features, and Ease of Use
Superior Accuracy: Elspec’s unique measurement method uses dual
range gain of 2 x 16 bit to yield superior accuracy exceeding IEC 61000-4-
30 Class A requirements and therefore captures the finest Power Quality
parameter details and differences.
Threshold Free Setup: Continuous unlimited onboard recording of all
parameters at the highest sampling rate of 1024/512 samples per cycle,
therefore there is no need to worry about missed events due to incorrect
setup.
PQZIP Compression Technology: The unique patented PQZIP
compression technology enables you to store up to 1000 times more
information than typical file formats. This allows storage of complete
and precise data for extended periods of time.
Continuous Recording of all Parameters: The BLACBOX’s unique
continuous recording feature allows you to identify, not just the failure,
but the condition(s) that lead to the failure.
Post Processing: Elspec’s Power Quality Investigator software allows
for powerful, but simple to use, Post processing and report generation.
Highest Sampling Rate: The G4500/3500 SERIES Portable samples
all channels simultaneously at the highest sampling rate of 1024/512
samples per cycle for voltage and 256 for Current, without the need to
set any thresholds or triggers.
SCADA Compatible: The G4500/3500 SERIES is equipped with
standard Industrial protocols for seamless integration with SCADA
systems.
Long Life Battery: The portable contains a lithium battery that will
provide up to 2 hours of fully functional operation without an external
AC/DC power source.
Standard Compliance Testing: The BLACKBOX Portable provides
PQ parameters according to EN50160 and IEC 61000-4-15 as well as
other National Standards. Custom Standards can be modified per
customer request.
Integrated I/O & Compression: The device contains integrated I/O
GPS options, Digital Inputs, Relays, and Temperature input.
Plug and Play: Automatic setup with self identifying probes.
Shop for Elspec products online at:
www.PowerMet erStore.com
1.877.766.5412

BLACKBOX PORTABLE QUICK REFERENCE GUIDE
August 2010
Elspec | Introduction
I—3
Product Feature Chart
G3500
G4500
Real-time Measurements
Voltage/current: per phase, average, unbalance
Power: real, reactive, apparent, power factor, frequency
Energy: bi-directional, total, import, export, net
Demand: block, rolling block, thermal, predicted
Sampling rate, maximum samples/cycle
512
1024
Harmonics (individual, even, odd, total) up to
255th
511th
Measurement according to IEC 61000-4-30
Cycle by Cycle RMS, Frequency and Harmonics
Measurement during overloading (from nominal)
X10
X10
Battery Backup
2 Hours
2 Hours
Type of Analog to Digital converter
16/20* bit
16/20* bit
Data and Waveforms Logs
Cycle-by-cycle PQZIP logging
Event logs
Waveform logs
Min/max logs for any parameter
Timestamps, resolution in micro seconds
Time SYNC accuracy via LAN (Fast Ethernet Link) or via GPS + PPS
50-100 μs
50-100 μs
Storage Capacity
Internal Memory
2 GB
32 GB
Recording Time (depending on selected resolution)
3 Months
Unlimited
Power Quality Analysis
Sag/swell monitoring
Symmetrical Components: zero, negative, and positive
Transient detection, microseconds (50Hz/60Hz)
39/32.5 μs
19.5/16μs
Flicker (IEC 61000-4-15)
Fast Flickering
Compliance testing to EN50160
EN50160 Timestamps
Configurable for IEEE 519-1992, IEEE 1159, SEMI
Time stamps of above
Inter-harmonics
Product Features
Shop for Elspec products online at:
www.PowerMet erStore.com
1.877.766.5412

August 2010
BLACKBOX PORTABLE QUICK REFERENCE GUIDE
I—4
Introduction | Elspec
Product Feature Chart
G3500
G4500
Communication Ports and I/O
Digital Inputs
4
4
OPC Gateway: other RS-485/422 accessible via OPC
Ethernet Ports
1
3
Onboard DNP3 Protocol
Modbus/TCP
Modbus/RTU
Power Over Ethernet (PoE)- Out
RS232 port RS-485/422 port
Onboard Comprehensive Web Server
Onboard OPC (Open Connectivity) Server
Wi-Fi Communications (802.11g)
N/A
PCMCIA Extension Slot
N/A
External Temperature Sensor Socket
Parameter
Uncertainty
Measuring Range
Frequency
±10 mHz
42.5 Hz – 69 Hz
Magnitude of Supply
Voltage
±0.1% of Udin
10% – 150% of Udin
Flicker
±5% of reading
0.2 – 10 Pst
Supply Voltage Dips
and Swells
Magnitude: ±0.2% of
Udin
Duration: ±1 cycle
N/A
Voltage Interruptions
Duration: ±1 cycle
N/A
Unbalance
±0.15%
0.5% – 5% u2
0.5% – 5% u0
Harmonics
IEC 61000-4-7
Class I
10% – 200% of
Class 3 of IEC
61000-2-4
Interharmonics
IEC 61000-4-7
Class I
10% – 200% of
Class 3 of IEC
61000-2-4
Under-Deviation and
Over-Deviation
±0.1% of Udin
10% – 150% of Udin
Standard IEC 61000-430 Class A Compliance
• Aggregations
• Time Clock Uncertainty
• Flagging
• Transient Influence Quantities
Shop for Elspec products online at:
www.PowerMet erStore.com
1.877.766.5412

BLACKBOX PORTABLE QUICK REFERENCE GUIDE
July 2010
Elspec | Before Getting Started
II—1
To avoid electrical shock or fire:
Review the entire manual before using the instrument and its
accessories and observe all warnings and cautions.
Avoid working alone.
Do not operate the Instrument around explosive gas or vapor.
Use only insulated current and voltage probes.
Before use, inspect the instrument, voltage, current probes, leads and
accessories for mechanical damage, and replace when damaged. Pay
special attention to the insulation surrounding the connectors and
plugs.
Remove all probes, test leads, and accessories that are not in use.
Make sure the instrument is properly grounded through the power
cord to protective earth ground.
Do not apply input voltages above the rating of the instrument as
shown on the name plate.
Do not insert metal objects into connectors and openings.
Never open instrument’s enclosure during operation; dangerous
voltages are present.
Use the instrument only as specified in this manual, or the protection
provided by the instrument may be impaired.
Do not expose the instrument to extreme moisture and or rain.
Do not operate the instrument or its accessories when found wet for
any reason.
II Before Getting Started
Safety Information
Shop for Elspec products online at:
www.PowerMet erStore.com
1.877.766.5412
July 2010
BLACKBOX PORTABLE QUICK REFERENCE GUIDE
II—2
Before Getting Started | Elspec
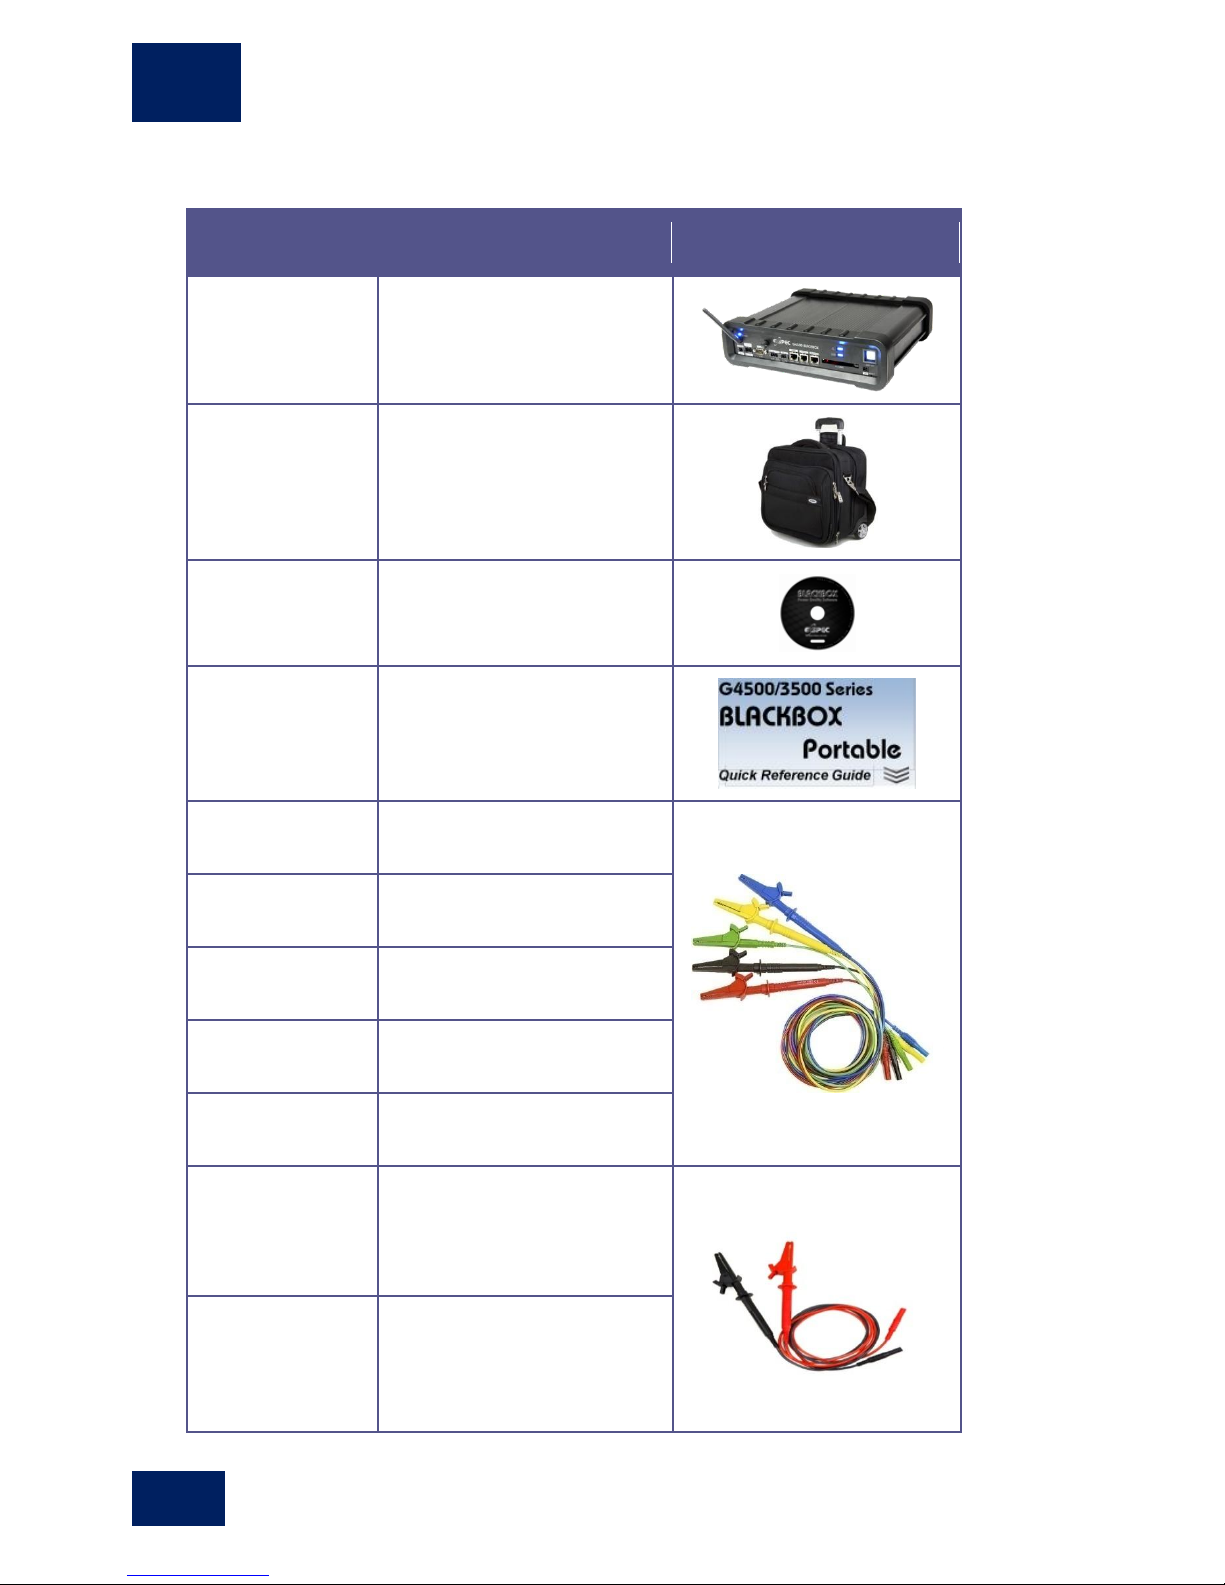
Part Number
Description
Illustration
SPG-4500-0190
SPG-3500-0190
G4500(shown) or G3500
BLACKBOX Unit
MEB-2999-0000
Trolley Carrying Case
SOF-4000-0001
Elspec BLACKBOX Software
Installation CD
SMR-3011-0110
Quick Reference Guide
EAH-4303-5100
Black AC Voltage Cord with
Crocodile Clip + Fuse (3M)
EAH-4303-5200
Red AC Voltage Cord with
Crocodile Clip + Fuse (3M)
EAH-4303-5300
Blue AC Voltage Cord with
Crocodile Clip + Fuse(3M)
EAH-4303-5400
Yellow AC Voltage Cord with
Crocodile Clip + Fuse(3M)
EAH-4303-9500
Green AC Voltage Cord with
Crocodile Clip(3M)
EAH-4303-5100
Black DC Voltage Cord with
Crocodile Clip + Fuse (3M)
EAH-4303-5200
Red DC Voltage Cord with
Crocodile Clip + Fuse (3M)
Standard Accessories
Shop for Elspec products online at:
www.PowerMet erStore.com
1.877.766.5412

BLACKBOX PORTABLE QUICK REFERENCE GUIDE
July 2010
Elspec | Before Getting Started
II—3
ENT-1002-0190
48VDC terminal block
connector (RoHS Compliant)
ENT-1002-0191
Temperature sensor terminal
block connector PT100 type
(RoHS Compliant)
ENT-1004-0190
RS485/422 Communication
terminal block connector
(RoHS Compliant)
ENT-2008-0190
Multi IO terminal block
connector (RoHS Compliant)
ENT-1003-0190
Relay terminal block
connector (RoHS Compliant)
TOE-0010-0013
LAN communication cord
length: 2M
EPC-2012-2190*
Power Cable for Cont. Europe
10A/125V, straight, 1.8M,
Black
EPC-7012-2190*
Power Cable for North
America 10A/125V, straight,
1.8M, Black
SOA-9045-3001**
3000 Amp Flexible Current
Clamp (Set of 4)
* Only one power cord is included and will depend on the region to which the shipment is made.
** Other Measurement clamps are available to be ordered separately. Please refer to the G4500
Portable User Manual or the price list.
Shop for Elspec products online at:
www.PowerMet erStore.com
1.877.766.5412
July 2010
BLACKBOX PORTABLE QUICK REFERENCE GUIDE
II—4
Before Getting Started | Elspec
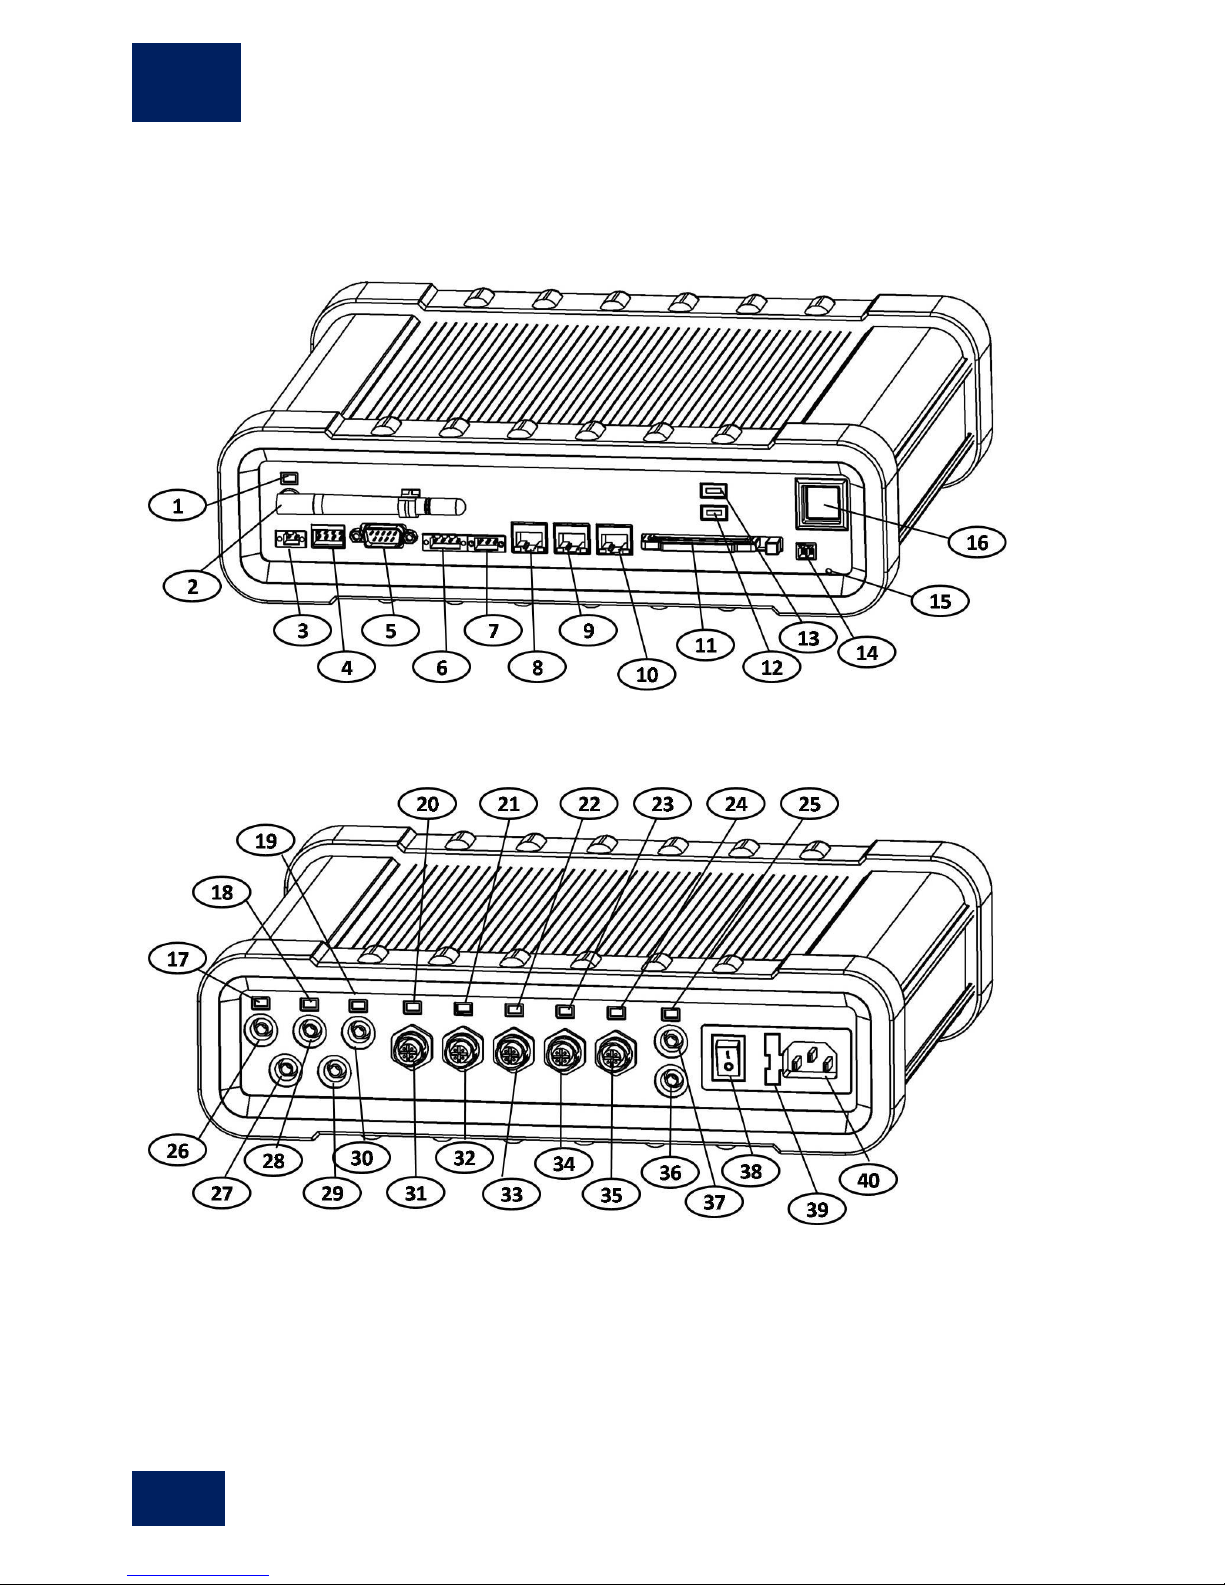
Controls and Indicators
Front Panel
Rear Panel
Shop for Elspec products online at:
www.PowerMet erStore.com
1.877.766.5412

BLACKBOX PORTABLE QUICK REFERENCE GUIDE
July 2010
Elspec | Before Getting Started
II—5
#
Description
Comments
1
Wi-Fi activity indicator
Available only in the G4500
2
Wi-Fi antenna
Available only in the G4500
3
Auxiliary power supply socket
4
Digital/Irig B Input socket
5
RS232 communication socket
6 RS485/422 communication socket
7 Relay
8
WAN – 10/100Mb RJ45 Ethernet
socket
Available only in the G4500
9
LAN1 – 10/100Mb RJ45 Ethernet
socket
Available only in the G4500
10
LAN2/LCD – 10/100Mb RJ45
Ethernet socket
11
PCMCIA Extension slot
Available only in the G4500
12
Battery status indicator
13
Operational status indicator
14
External temperature sensor socket
15
Reset to “factory defaults” button
16
Operation ON/OFF switch with
indicator
17
L1 voltage “presence” indicator
18
L2 voltage “presence” indicator
19
L3 voltage “presence” indicator
20
I1/L1 current probe detection
indicator
21
I2/L2 current probe detection
indicator
22
I3/L3 current probe detection
indicator
Reference
Shop for Elspec products online at:
www.PowerMet erStore.com
1.877.766.5412

July 2010
BLACKBOX PORTABLE QUICK REFERENCE GUIDE
II—6
Before Getting Started | Elspec
#
Description
Comments
23
I4/Neutral current probe detection
indicator
24
IDC/Earth probe detection indicator
25
VDC “presence” indicator
Available only in the G4500
26
L1 voltage sensor socket
27
Neutral voltage sensor socket
28
L2 voltage sensor socket
29
Earth/Ground reference socket
30
L3 voltage sensor socket
31
I1/L1 current probe socket
32
I2/L2 current probe socket
33
I3/L3 current probe socket
34
I4/Neutral current probe socket
35
IDC/Earth current probe socket
Available only in the G4500
36
VDC (minus) probe socket
Available only in the G4500
37
VDC (plus) probe socket
Available only in the G4500
38
Main Power supply ON/OFF Switch
39
Fuse holder
40
Main Power Supply inlet socket
Shop for Elspec products online at:
www.PowerMet erStore.com
1.877.766.5412

BLACKBOX PORTABLE QUICK REFERENCE GUIDE
July 2010
Elspec | On Site Setup
III—1
Connect the AC Power Supply
Establish a Connection with the Unit
Wire the Voltage and Current Measurement Inputs
Configure the Unit
Verify the Measurement Readings
Start/Stop PQZip Recording
III On Site Setup
The On Site Setup chapter is a simple step by step procedure for the setup
of the BLACKBOX Portable device on site. After the initial setup and
configuration, the Downloading and Analyzing Recorded Data on
page IV—1 provides detailed explanations of how to work with the
powerful, yet simple, PQSCADA and Investigator software applications.
Shop for Elspec products online at:
www.PowerMet erStore.com
1.877.766.5412

July 2010
BLACKBOX PORTABLE QUICK REFERENCE GUIDE
III—2
On Site Setup | Elspec
Status
State
Flashing
blue
Main or auxiliary power applied, Battery
charging
Solid
blue
Main or auxiliary power applied, Battery
fully charged
Red
No main or auxiliary power available,
Powered by internal battery
The unit can run on battery power for up to two
hours
Also, the device can be powered using the
Auxiliary DC Voltage Supply, please refer to the
BLACKBOX User Guide for more details.
85-260V AC ±10%, 50/60Hz
OR
120-370V DC
35-55 VDC Watt maximum
2A/250V fuse holder
Allow only suitable fuse replacement!
Make sure the Instrument is properly grounded through
the power cord to protective earth ground.
Step 1: Connect the AC Power Supply
To connect the AC power supply:
1. Connect the female end of the Power Cable to the Main Power
Supply inlet socket (40) of the unit.
2. Connect the male plug end of the Power Cable to the electrical supply
outlet.
3. Turn the Main Power Supply On/Off switch (36) to the On position.
4. Press the Operation ON/OFF switch with indicator (16).
5. Verify the unit is running on AC Power using the status indicator lights
(as below).
Shop for Elspec products online at:
www.PowerMet erStore.com
1.877.766.5412

BLACKBOX PORTABLE QUICK REFERENCE GUIDE
July 2010
Elspec | On Site Setup
III—3
Step 2: Establish a Connection with the Unit
Wired or Wireless Single PC Connection
The most convenient way to connect a Dedicated Tablet or any other PC is
by using a Wi-Fi or wired Ethernet link. It is best to make only one
connection type at time, and when a wired connection is used, disconnect or
disable the wireless link.
Technically, any of the available Ethernet ports can be used for a single PC
connection. However, the most recommended is a LAN1 option (as shown
above) because of the integrated DHCP server available thru that port.
When connected, a PC will automatically obtain an IP address configuration
which allows a seamless connection to the BLACKBOX Portable’s internal
WEB/FTP servers as well as to a router management WEB server.
Integrated Router
The G4500 BLACKBOX Portable (not available on the G3500) contains an
integrated IEEE 802.11g/b router preconfigured as an industry standard
access point. This is to provide the most convenient and simplest
connectivity with the Dedicated Tablet PC.
Shop for Elspec products online at:
www.PowerMet erStore.com
1.877.766.5412

July 2010
BLACKBOX PORTABLE QUICK REFERENCE GUIDE
III—4
On Site Setup | Elspec
There are alternative connection options available.
For more details, please refer to the G4500
BLACKBOX User Guide.
Wi-Fi Access Point
You may select the device according to the serial number. Eg: EG4500_
[device serial number]. The device serial number is located on the name plate as
shown below.
The Wi-Fi link is active when a Wi-Fi activity indicator light is flashing or solid blue.
Shop for Elspec products online at:
www.PowerMet erStore.com
1.877.766.5412

BLACKBOX PORTABLE QUICK REFERENCE GUIDE
July 2010
Elspec | On Site Setup
III—5
Make sure that the voltage measurement ground is
connected first, then neutral, and finally the phases.
Refer
Circuit Topologies on page V—1
in order to
interface the device with your circuit topology.
Step 3: Wire the Voltage and Current Measurement
Inputs
Connect Voltage Cords
The BLACKBOX Portable provides 4 fast sampling AC Voltage Sensor
Sockets and a VDC Probe Socket
To attach the AC Voltage Cords:
1. Attach voltage cords to the Voltage Sensor Sockets on the device
according to the color codes.
2. Attach Crocodile clips from the voltage cords to the measured power
source.
3. Verify connection with the Presence- Indication LEDs as above. The
LED light illuminates in blue for voltage levels above 10% of the
nominal value.
Shop for Elspec products online at:
www.PowerMet erStore.com
1.877.766.5412

July 2010
BLACKBOX PORTABLE QUICK REFERENCE GUIDE
III—6
On Site Setup | Elspec
The current clamps are calibrated from the factory
for a specific phase. Please make sure that you pay
attention to the phase connections.
The current clamps convert current to low voltage.
Refer to
Circuit Topologies on page V—1
to interface
the device with your circuit topology.
Attach Current Clamps
The BLACKBOX Portable provides 4 AC and 1 AC/DC Current Probe
Sockets.
The AC Current Probe Sockets are marked as I1-I4.
To attach Current Clamps:
1. Connect each current phase clamp (neutral if applicable) to its
corresponding Current Probe Socket.
2. Connect the measurement end of current clamp to the measured power
source.
Shop for Elspec products online at:
www.PowerMet erStore.com
1.877.766.5412

BLACKBOX PORTABLE QUICK REFERENCE GUIDE
July 2010
Elspec | On Site Setup
III—7
The Website is optimized to work with Microsoft©
Explorer 7. Other web browser applications can
limit some functionality and/or show an incorrect
layout.
If you need to change the default IP address or have
any difficulties connecting to the unit, please refer
to the G4500 BLACKBOX User Guide for more
details.
Step 4: Configure the Unit
Before any measurements are taken with the device, some basic
configurations in the Web Interface are required.
Login to the Internal Website
When a wireless Ethernet connection is established, the internal Website can
be accessed by simply typing the device IP address into the address field on a
WEB browser application (G4500 default factory IP 192.168.1.1, G3500
default factory IP 169.254.249.247)
When the device IP address is unknown, use the Elspec Search utility to
discover it. Please refer to the G4500 BLACKBOX User Guide for details
on using Elspec Search to locate the unit.
Login as Administrator (Password: 12345) in order to set
configuration options.
Shop for Elspec products online at:
www.PowerMet erStore.com
1.877.766.5412

July 2010
BLACKBOX PORTABLE QUICK REFERENCE GUIDE
III—8
On Site Setup | Elspec
Unit Setup
From ConfigurationDevice Info, enter the <Site Name>, then
click Apply Changes.
You may also enter the description, Operator, and Company; however it is
not required at this time.
A confirmation window appears:
Voltage and Frequency
From ConfigurationVoltages & Frequency, enter the correct
nominal values for Voltage and Frequency, then click Apply Changes.
If measuring to PTs, then enable the PT ratio and set Primary and
Secondary values
Shop for Elspec products online at:
www.PowerMet erStore.com
1.877.766.5412

BLACKBOX PORTABLE QUICK REFERENCE GUIDE
July 2010
Elspec | On Site Setup
III—9
Currents
From ConfigurationCurrents, enter the correct current nominals,
then click Apply Changes.
If measuring using CT’s, then verify/set the CT Primary and Secondary
ratios.
If measuring with mini clamps, please verify the Primary and Secondary
ratios as well as the Clamp info for accuracy.
Shop for Elspec products online at:
www.PowerMet erStore.com
1.877.766.5412

July 2010
BLACKBOX PORTABLE QUICK REFERENCE GUIDE
III—10
On Site Setup | Elspec
Step 5: Verify the Measurement Readings
In order to ensure the correct measurement readings of the device, we
strongly recommend that you verify the voltage and current measurements,
as well as, the phase direction of the current clamps.
Summary
From the Monitoring Summary, Verify the DSP Synchronization
is On and the Phase order is 123.
Shop for Elspec products online at:
www.PowerMet erStore.com
1.877.766.5412

BLACKBOX PORTABLE QUICK REFERENCE GUIDE
July 2010
Elspec | On Site Setup
III—11
Voltage & Current
From MonitoringVoltage & Current, verify RMS values for both
voltage and current are the expected values.
If incorrect, check the PT/CT ratios as well as the connection of the voltage
and current probes to the device and the power source.
Monitoring/Power
From MonitoringPower, verify the Active power readings are
positive integers.
If the active power reading in any phase is negative (yellow highlight), then
change the relevant phase from Normal to Reverse in
ConfigurationCurrents or reverse the polarity of the current clamp at
the power source by changing the direction.
Generators commonly display a negative Active power value.
Shop for Elspec products online at:
www.PowerMet erStore.com
1.877.766.5412

July 2010
BLACKBOX PORTABLE QUICK REFERENCE GUIDE
III—12
On Site Setup | Elspec
We strongly recommend that you verify the system
time for accuracy before recording any data.
Step 6: Start/Stop PQZIP Recording
In order to record actual data for further analysis by PQSCADA and
Investigator, you must first enable the PQZIP recording.
To enable PQZIP Recording:
1. From ConfigurationPQZIP Recording, select Enable, then click
Apply Changes.
2. It is recommended to record the starting/ending time and date of each
measurement set. This helps to locate individual measurement sets at a
later date.
3. After all data measurements have been taken, then you need to stop the
PQZIP recording (Disable PQZIP).
To Disable PQZIP Recording:
From ConfigurationPQZIP Recording, select Disable, then click
Apply Changes.
Shop for Elspec products online at:
www.PowerMet erStore.com
1.877.766.5412

BLACKBOX PORTABLE QUICK REFERENCE GUIDE
July 2010
Elspec | Downloading and Analyzing Recorded Data
IV—1
IV Downloading and Analyzing Recorded Data
This section of the Quick start Guide describes how to begin working with
PQSCADA and Investigator software to review and analyze data in recorded
data files. Use it to become familiar with the PQSCADA and Investigator
interface and features. The BLACKBOX CD enclosed contains all of the
required software in an easy to use Auto-Run format.
PQSCADA/Investigator Key Features & Benefits
Auto reports generation: Automatic reports are generated through the
pre-defined Tasks functions that allow you to set regularly scheduled
exports – COMTRADE, PQDIF, and/or reports – PDF, EXCEL,
HTML according to a specified event or time trigger (monthly, daily,
weekly, and fixed).
Automatic Notification: Three possible notification possibilities: email,
SMS, and Pop-Ups. The notification is triggered by events by predefined or user defined electrical events.
Analyze the data: Using a series of views to see different aspects of it,
including summaries, trends, spectral of Volt/Amps/Hz, events,
harmonics, THD, Flicker, power and energy.
Multiple device synchronization: Elspec’s Investigator allows you to
view multiple devices synchronized in time. You can adjust the data
shown by turning on and off display of different devices and select other
parameters. You can focus on the specifics that help you analyze and
understand the power quality data.
Generate reports: the Investigator software application builds reports
based on EN 50160 and other specific national standards. Additional
standards templates can be modified upon request.
Organized Data: by establishing a Node/Site all devices are mapped on
the tree structure for easy navigation and orientation of the recorded
data.
Shop for Elspec products online at:
www.PowerMet erStore.com
1.877.766.5412

July 2010
BLACKBOX PORTABLE QUICK REFERENCE GUIDE
IV—2
Downloading and Analyzing Recorded Data | Elspec
For more details, please refer to the PQSCADA
User Manual.
Download Recorded Data with PQSCADA
Establish a connection between the device and the PQSCADA in order to
import and view the measurement data. The following steps assume that
you have PQSCADA and Investigator installed on your PC.
Building a Site Structure
The purpose of a Site is to organize the Nodes by a common set of
characteristics (i.e. location).
To add a Site:
1. Double click the PQSCADA icon on your desktop to start.
2. From the Nodes/Sites tab, right click Local Computer or selected
site, then select Add Site
3. Enter configuration values in the Add Site window. (in our example, we
assigned PQS Site as the new site name)
Shop for Elspec products online at:
www.PowerMet erStore.com
1.877.766.5412

BLACKBOX PORTABLE QUICK REFERENCE GUIDE
July 2010
Elspec | Downloading and Analyzing Recorded Data
IV—3
Adding a Node
A Node is a logical representation of the physical device location that
performs all of the following functions:
Retrieves and de-compresses the PQZip files
Parses and stores the data into the correct database.
Calculates queries in real time.
For each monitored device, a
To add a Node to the Site:
Node
must be created.
1. Right click PQS Site, then select Add Node.
2. From the Add Node window, Add a Node names Test Node to PQS
Site.
3. Attach the device to the node using the default/assigned IP address
(192.168.1.1) for this device.
Shop for Elspec products online at:
www.PowerMet erStore.com
1.877.766.5412

July 2010
BLACKBOX PORTABLE QUICK REFERENCE GUIDE
IV—4
Downloading and Analyzing Recorded Data | Elspec
Verifying System Time Settings
The downloading and analyzing of data with the Software applications is
time sensitive, therefore we strongly recommend that you verify that all time
settings between your system, the PQSCADA, and Investigator are
synchronized.
To verify system time settings:
Verify the system time settings
Enabling the Node
To enable the Node in PQSCADA:
Right click the Node, then click Enable.
The PQSCADA is now downloading data from the device.
Shop for Elspec products online at:
www.PowerMet erStore.com
1.877.766.5412

BLACKBOX PORTABLE QUICK REFERENCE GUIDE
July 2010
Elspec | Downloading and Analyzing Recorded Data
IV—5
Data Export and Reporting
The PQSCADA allows you to set regularly scheduled exports and/or
reports according to a specified event or time trigger (monthly, daily, weekly,
and fixed) using the Tasks function.
With tasks you can:
Export data in PQZIP, PQDIF, or Comtrade format
Generate reports according to EN50160 and other National
Standards
Set automatic notifications
As with most PQSCADA components, you may access the
Tasks
through
either the View or Administrative console. The default is View mode.
1. From the Tasks Tab, right click the Site, then select Add Task.
2. Follow the Job Selection Wizard to define the Task Configuration.
Templates
Templates are used to define the Events, Parameters, and Configurations for
utilization by different tasks. By using templates, you can save the time of
redefining all variables across multiple tasks. A single template can serve
multiple tasks and a single task can have multiple templates.
To define a template, simply follow the step-by-step Template Wizard
instructions.
Shop for Elspec products online at:
www.PowerMet erStore.com
1.877.766.5412

July 2010
BLACKBOX PORTABLE QUICK REFERENCE GUIDE
IV—6
Downloading and Analyzing Recorded Data | Elspec
Sometimes the application will take a few minutes
to find the Site and Node, and for PQSCADA to
start processing the data.
Viewing Downloaded Data with Investigator
With the Elspec Power Quality Investigator, you can download, review and
analyze data that has been organized by the Elspec PQSCADA. The Elspec
Power Quality Investigator is an innovative tool which helps analyze
electrical network anomalies while investigating power quality issues and
eventually generate reports according to different PQ Standards such
EN50160.
Adding a Node
From the main menu, select FileScan Local Sites, then view with
Investigator.
Shop for Elspec products online at:
www.PowerMet erStore.com
1.877.766.5412

BLACKBOX PORTABLE QUICK REFERENCE GUIDE
July 2010
Elspec | Downloading and Analyzing Recorded Data
IV—7
Icon
View Type
Trend View
Events View
Spectrum View
Summary View
Trend Grid View
CBEMA View
Views
Multi-View
The Elspec Investigator is a multi-view application, which means that you
can open and operate a number of views of any type simultaneously (Trend
2 and Events 2 in our example).
You may also view multiple devices simultaneously synchronized in time.
This unique feature is useful to identify a common fault between multiple
devices at different locations.
Shop for Elspec products online at:
www.PowerMet erStore.com
1.877.766.5412

July 2010
BLACKBOX PORTABLE QUICK REFERENCE GUIDE
IV—8
Downloading and Analyzing Recorded Data | Elspec
Trend View
A Trend view is a continuous trend graph of data parameters over time.
Trend Grid View
A trend grid view is simply a tabular representation of the trend view. Each
measurement point in the table is plotted in graphical format in the Trend
View
Shop for Elspec products online at:
www.PowerMet erStore.com
1.877.766.5412

BLACKBOX PORTABLE QUICK REFERENCE GUIDE
July 2010
Elspec | Downloading and Analyzing Recorded Data
IV—9
Spectrum View
A spectrum view represents the harmonic spectrum over a period of time. In
the graph below, we can clearly see the Harmonic Min/Max values for the
given time period (one day). This is a unique feature because we are
measuring harmonics for a given period of time, and the display shows the
Min/Max values measured during the time period.
As you pass the mouse over a specific harmonic on the graph, a message
box appears as above displaying all relevant information.
Shop for Elspec products online at:
www.PowerMet erStore.com
1.877.766.5412

July 2010
BLACKBOX PORTABLE QUICK REFERENCE GUIDE
IV—10
Downloading and Analyzing Recorded Data | Elspec
Viewing Minimum, Maximum and Average Values of a Voltage
Harmonics
In order to utilize the functionality of the Spectrum View, it may be helpful
to view both the Average and the MinMax views of the voltage under
investigation.
CBEMA View
The CBEMA (Computer and Business Equipment Manufacturers'
Association) is a power quality graph that plots the depth or deviation of
voltage dips and overvoltage on the x-axis and the duration on the y-axix.
Each event is plotted according to severity as defined by the CBEMA
standard.
Shop for Elspec products online at:
www.PowerMet erStore.com
1.877.766.5412

BLACKBOX PORTABLE QUICK REFERENCE GUIDE
July 2010
Elspec | Downloading and Analyzing Recorded Data
IV—11
Zooming In/Out
A very important feature of the Investigator application is the ability to drill
in to a higher resolution around a specific point in time. With mouse click
simplicity, you can drill down from a year to a millisecond. The higher the
resolution, the more precise the graph you receive.
To Zoom In/Out
From the graph, left click the mouse at the beginning of the desired
zoom in period, drag the mouse across (dotted line region), then release
at the end.
In the graph below, we are examining a voltage dip event that occurred
around January 30, 2009. The zoom in feature allows us to zoom in to take a
closer look at this event from a span of several days to microseconds as seen
in the examples to follow.
From Days......
Shop for Elspec products online at:
www.PowerMet erStore.com
1.877.766.5412

July 2010
BLACKBOX PORTABLE QUICK REFERENCE GUIDE
IV—12
Downloading and Analyzing Recorded Data | Elspec
Icon
Tool
Toolbar
Append Back
Back
Forward
Append Forward
Expand Time
Previous Time
Next Time Frame
Favorites
To Microseconds……..
The illustration below represents a zoom in to microseconds of a voltage
drop event and the corresponding waveforms during the same time period.
Tools
Once a view is established, it is possible to change the view with the tool
buttons at the top of the Main Viewing area.
Shop for Elspec products online at:
www.PowerMet erStore.com
1.877.766.5412

BLACKBOX PORTABLE QUICK REFERENCE GUIDE
July 2010
Elspec | Downloading and Analyzing Recorded Data
IV—13
From the original Trend view as below of L1 Min/Max, the following
screens will show how to change the views easily using these tools. Each
view can be changed according to a pre-set time period.
Append Back
Appending back means that you leave the end time intact and move the start
time back by a selected amount (five minutes in our example).
Shop for Elspec products online at:
www.PowerMet erStore.com
1.877.766.5412

July 2010
BLACKBOX PORTABLE QUICK REFERENCE GUIDE
IV—14
Downloading and Analyzing Recorded Data | Elspec
Back
You may select Back to shift the current time duration back a specified
amount of time (five minutes in our example).
Append Forward
Appending forward means that you leave the start time intact and move the
end time forward by a selected amount (ten minutes in our example).
Shop for Elspec products online at:
www.PowerMet erStore.com
1.877.766.5412

BLACKBOX PORTABLE QUICK REFERENCE GUIDE
July 2010
Elspec | Downloading and Analyzing Recorded Data
IV—15
Forward
You may select Forward to shift the current time duration forward a
specified amount of time (three minutes in our example).
Expand Time
To expand or zoom out from a view, use the Expand Time button.
Shop for Elspec products online at:
www.PowerMet erStore.com
1.877.766.5412

July 2010
BLACKBOX PORTABLE QUICK REFERENCE GUIDE
IV—16
Downloading and Analyzing Recorded Data | Elspec
From here, it is possible to select the Zoom out ratio. Therefore an X3
ratio yields the three time larger interval as below
Previous Time/Next Time
In order to move back to the previous time selection, use the Previous
Time button. To move in the opposite direction, use the Next Time
frame button
.
Trend Data Exporting
It is possible to export the graphic files in the following formats:
Shop for Elspec products online at:
www.PowerMet erStore.com
1.877.766.5412

BLACKBOX PORTABLE QUICK REFERENCE GUIDE
July 2010
Elspec | Downloading and Analyzing Recorded Data
IV—17
Crosshairs
This option allows you to more clearly identify an area of interest.
Multiple Panes
A graph can contain multiple parameters. In order to separate each in order
to investigate further, it is sometimes easier to separate each parameter into
its own pane.
Shop for Elspec products online at:
www.PowerMet erStore.com
1.877.766.5412

July 2010
BLACKBOX PORTABLE QUICK REFERENCE GUIDE
IV—18
Downloading and Analyzing Recorded Data | Elspec
A new window is created splitting each parameter (L1, L2, and L3 into its
own pane.
Shop for Elspec products online at:
www.PowerMet erStore.com
1.877.766.5412

BLACKBOX PORTABLE QUICK REFERENCE GUIDE
July 2010
Elspec | Circuit Topologies
V—1
V Circuit Topologies
The BLACKBOX Portable provides 4 fast sampling AC/DC voltage inputs
and an auxiliary DC voltage output (VDC). For measuring current, the
Portable offers 4 AC and 1 AC/DC current measuring input socket. The
current measuring input sockets actually measure Voltage at a low range
therefore the risk of electrical shock is minimized.
The device is designed to serve in virtually any circuit topology
configuration.
The pages to follow will show some of the most popular power topologies
with suggested connection diagrams. The correct Power Configuration
settings appear in parenthesis next to each configuration. The available
choices from the ConfigurationVoltage & Frequency section appear
below.
Shop for Elspec products online at:
www.PowerMet erStore.com
1.877.766.5412

July 2010
BLACKBOX PORTABLE QUICK REFERENCE GUIDE
V—2
Circuit Topologies | Elspec
Single Phase with Neutral (Single LN)
Single Phase without Neutral (Single LL)
Single Split Phase (2Phase TR)
Shop for Elspec products online at:
www.PowerMet erStore.com
1.877.766.5412

BLACKBOX PORTABLE QUICK REFERENCE GUIDE
July 2010
Elspec | Circuit Topologies
V—3
Three Wire Delta (Delta 3 Wire)
Grounded Delta (Delta 3 Wire)
Shop for Elspec products online at:
www.PowerMet erStore.com
1.877.766.5412

July 2010
BLACKBOX PORTABLE QUICK REFERENCE GUIDE
V—4
Circuit Topologies | Elspec
Four Wire WYE (WYE 4 Wire)
Three Wire WYE (Delta 3 Wire)
Shop for Elspec products online at:
www.PowerMet erStore.com
1.877.766.5412

BLACKBOX PORTABLE QUICK REFERENCE GUIDE
July 2010
Elspec | Circuit Topologies
V—5
Delta High Leg (Delta 3 Wire)
Delta Open Leg (Delta 3 Wire)
Shop for Elspec products online at:
www.PowerMet erStore.com
1.877.766.5412

Shop for Elspec products online at:
www.PowerMet erStore.com
1.877.766.5412

Shop for Elspec products online at:
www.PowerMet erStore.com
1.877.766.5412

International
North America
Europe
Elspec Ltd.
Elspec North America Inc.
Elspec Portugal Lda.
Caesarea Industrial Park
POB 3019, 4 HaShoham St.
Zone 23, Israel 38900
500 West South Street
Freeport, IL 61032
U.S.A.
Zona Industrial - Fase 1
4900-231 Chafe - Viana do Castelo
Portugal
Tel: +972 4 6272 470
Tel: +1 815 266 4210
Tel: +351 258 351 920
Fax: +972 4 6272 465
Fax: +1 815 266 8910
Fax: +351 258 351 607
e-mail: info@elspec-ltd.com
e-mail: info@elspecna.com
e-mail: info@elspecportugal.com
Shop for Elspec products online at:
www.PowerMet erStore.com
1.877.766.5412
 Loading...