

Elsner WS1 Color, WS1000 Color Installation And Operation Manual
WS1 Color
Control System for Buildings and for Conservatories
Installation and Operation
EN
WS1000 Color
Control System for Buildings and for Conservatories
including WS1Color-PF and WS1000Color-PF

1 Contents
1. Description ................................................... 7
1.1. Field of application ............................................................................ 8
1.1.1. Delivery scope ........................................................................................................ 8
1.2. Connection and control options ........................................................ 9
1.2.1. Automatic functions in overview ....................................................................... 11
2. Operation and use ....................................... 15
2.1. Weather data display (starting image) ............................................. 16
2.2. The touch display ............................................................................. 18
2.3. Manually operate drives and devices ............................................... 19
2.3.1. The „Manual“ menu ............................................................................................ 19
2.3.2. External buttons ................................................................................................... 20
2.3.3. Internal buttons (group buttons) ........................................................................ 21
2.3.4. Remote control .................................................................................................... 21
2.4. Navigation in the System menu ....................................................... 21
2.4.1. Input keyboard for names and codes ................................................................ 22
2.5. Slideshow ........................................................................................ 23
3. Automatic settings ..................................... 25
3.1. Automatic settings .......................................................................... 26
3.1.1. Safety notice for automatic and alarm functions .............................................. 26
3.1.2. Power failure, maintenance works, etc. (restart of control) ............................. 26
3.2. Automatic settings for drive groups and devices ............................ 27
3.2.1. Drives and devices without automatic functions .............................................. 27
3.2.2. Automatic awning settings ................................................................................. 27
3.2.3. Automatic blind and roller shutter settings ....................................................... 33
3.2.4. Automatic window settings ................................................................................ 40
3.2.5. Automatic ventilation settings ............................................................................ 47
3.2.6. Automatic heating settings ................................................................................. 53
3.2.7. Automatic air-conditioner settings ..................................................................... 55
3.2.8. Automatic light settings ...................................................................................... 57
3.2.9. Automatic roof gutter heating settings .............................................................. 58
3.2.10.Set up alarm ........................................................................................................ 59
3.2.11.Setting motion detectors .................................................................................... 60
3.3. Adjust general automatic settings ................................................... 60
3.3.1. Adjust twilight value ............................................................................................ 60
3.3.2. Adjust movement delays (shading elements) ................................................... 61
3.3.3. Set timer ............................................................................................................... 61
3.3.4. Adjust ventilation block ....................................................................................... 62
3.3.5. Set night-time re-cooling (ventilation) ............................................................... 63
Elsner Elektronik GmbH • Herdweg 7 • D-75391 Gechingen • Germany
Control System WS1 Color / WS1000 Color • from software version 1.705
Status: 19.11.2012 • Subject to technical changes. Errors excepted.

2 Contents
3.3.6. Adjust frost alarm ................................................................................................ 64
3.3.7. Set movement limitations (window) .................................................................. 65
3.3.8. Setting a wind delay (shades) ............................................................................ 65
3.3.9. Define automatic reset ........................................................................................ 66
4. Installation .................................................. 67
4.1. Procedure ......................................................................................... 68
4.1.1. Notes on installation ........................................................................................... 68
4.1.2. Notes on wireless equipment ............................................................................. 69
4.1.3. Safety notice for automatic and alarm functions .............................................. 69
4.1.4. Power failure, maintenance works, etc. (restart of control) ............................. 69
4.2. Installation of the P03i-GPS Weather Station .................................. 70
4.2.1. Mounting of the weather station ........................................................................ 70
Installation position .............................................................................................. 70
Preparation of the weather station ...................................................................... 71
Layout of the circuit board ................................................................................... 72
Mounting the weather station ............................................................................. 72
4.2.2. Installation notes for the weather station .......................................................... 73
Maintenance .......................................................................................................... 73
4.3. Installation of a WGTH-UP Indoor Sensor ........................................ 73
4.3.1. Installation of the indoor sensor ........................................................................ 74
Installation location .............................................................................................. 74
Layout .................................................................................................................... 75
Rear view ............................................................................................................... 75
Installation ............................................................................................................. 75
4.3.2. Notes on mounting and commissioning ........................................................... 76
4.3.3. Establish radio connection with WGTH-UP ....................................................... 76
4.4. Installation of the control unit ......................................................... 76
4.4.1. Installation of the control unit WS1000 Color ................................................... 76
Preparing the installation location ...................................................................... 76
Preparing for installation ..................................................................................... 77
Wall-fitting ............................................................................................................. 78
Cavity wall fitting .................................................................................................. 79
Assembling the control unit with concealed box .............................................. 79
Structure of the connector board WS1000 Color ............................................... 80
Structure of the connector board WS1000 Color-PF ......................................... 81
4.4.2. Installation of the control unit WS1 Color ......................................................... 81
Structure of the connector board WS1 Color-PF ............................................... 87
4.4.3. Connect drives and devices ................................................................................ 87
Connect drive groups ........................................................................................... 87
Connect devices to the multifunctional outputs ................................................ 88
Connect devices to the multifunctional inputs ................................................... 88
Connecting drives and devices wirelessly .......................................................... 89
Elsner Elektronik GmbH • Herdweg 7 • D-75391 Gechingen • Germany
Control System WS1 Color / WS1000 Color • from software version 1.705
Status: 19.11.2012 • Subject to technical changes. Errors excepted.

3 Contents
5. Commissioning ........................................... 91
5.1. Procedure ......................................................................................... 92
5.1.1. Start control unit .................................................................................................. 92
5.1.2. Check sensor functions ....................................................................................... 93
6. Basic Setting ............................................... 95
6.1. The “Installation” menu .................................................................. 96
6.1.1. Set up drives and drive groups .......................................................................... 96
Tips on connecting windows ............................................................................... 99
6.1.2. Assign external buttons .................................................................................... 100
6.1.3. Assign internal buttons (group buttons) ......................................................... 101
6.1.4. Set up multifunctional outputs ......................................................................... 103
6.1.5. Set up multifunctionals inputs ......................................................................... 104
6.1.6. Wireless connections ........................................................................................ 105
Learn wireless connection ................................................................................. 106
Status ................................................................................................................... 106
Delete wireless connection ................................................................................ 110
6.1.7. Indoor sensor for weather display ................................................................... 110
6.1.8. Settings for communication with KNX (WS1000 only) .................................. 111
6.1.9. Setting Camera Inputs ....................................................................................... 112
6.1.10.Configuring internal thermometer/hygrometer of WS1 ................................ 113
6.1.11.Define channel order ........................................................................................ 113
6.2. WS1 / WS1000 Settings ................................................................. 114
6.2.1. Settings ............................................................................................................... 114
Enter time and date manually ........................................................................... 114
Change language ................................................................................................ 115
Adjust screen ...................................................................................................... 115
Select time zone .................................................................................................. 116
Enter location (only DCF weather stations) ...................................................... 117
Calibrate touch .................................................................................................... 117
6.2.2. Service settings .................................................................................................. 117
Reset (new start) ................................................................................................. 118
Factory settings ................................................................................................... 118
Internal area ........................................................................................................ 118
6.2.3. Access code ........................................................................................................ 118
6.2.4. Using an SD card (only WS1000 Color) ........................................................... 119
Show images on display .................................................................................... 120
Saving and loading configuration data ............................................................ 121
7. Tables, diagrams, maintenance ................ 123
7.1. Care and maintenance ................................................................... 124
Maintenance of the weather station ................................................................. 124
Elsner Elektronik GmbH • Herdweg 7 • D-75391 Gechingen • Germany
Control System WS1 Color / WS1000 Color • from software version 1.705
Status: 19.11.2012 • Subject to technical changes. Errors excepted.

4 Contents
Maintenance of the control unit ........................................................................ 124
7.2. Technical specifications ................................................................ 124
7.2.1. Technical specifications Control Unit WS1 Color ........................................... 124
7.2.2. Technical specifications Control Unit WS1000 Color ..................................... 125
7.2.3. Technical specifications P03i-GPS ................................................................... 125
7.2.4. Technical specifications WGTH-UP .................................................................. 126
7.2.5. Units for sun and wind ...................................................................................... 127
7.3. Alarm and error messages ............................................................. 128
7.3.1. Weather data display messages ....................................................................... 128
7.3.2. “Manual” menu messages ............................................................................... 129
7.4. Connection diagrams ..................................................................... 130
7.4.1. Diagrams WS1 ................................................................................................... 130
7.4.2. Diagrams WS1000 ............................................................................................. 133
7.4.3. Connection of several drives to one 230 V drive output ................................ 136
7.4.4. Use drive outputs for centralised control ........................................................ 137
Centralised control with IMSG 230 Motor Control Units (230 V drive output) 137
Centralised control with IMSG-UC Motor Control Units ................................. 138
7.5. Personal automatic settings data .................................................. 139
Elsner Elektronik GmbH • Herdweg 7 • D-75391 Gechingen • Germany
Control System WS1 Color / WS1000 Color • from software version 1.705
Status: 19.11.2012 • Subject to technical changes. Errors excepted.
5 Explanation of symbols
Installation, inspection, commissioning and troubleshooting of the device
must only be carried out by a competent electrician.
This manual is subject to changes an is readjusted to new software versions. The revision status (software version and date) can be found in the footer of the contents.
If you have got a device with a more recent software version, please have a look at
www.elsner-elektronik.de in the „Service“ menu, if there is a more current version
of the manual available.
Explanation of the symbols used in this manual
Danger of death by electrocution!
Advice on dangers concerning work on electrical terminals, components etc.
Safety measures to protect the life and health of relevant personnel.
Safety instruction!
Instructions that must strictly be observed to ensure the safe operation of the
control unit. Safety measures to protect against damage to persons or property.
“Control unit”
The symbol is followed by a menu path. In this menu the settings just
described can be changed.
“Manual”
The symbol is followed by chapter information with a page number. In this
chapter you will find additional information about the setting just described.

6 Explanation of symbols

7 Description
1. Description
Control System WS1 Color / WS1000 Color • Status: 19.11.2012 • Errors excepted. Subject to technical changes.

8 Description
1.1. Field of application
The control system was developed so that the different technical equipment installed
in conservatories and buildings could be centrally controlled. The control units offer
the highest measure of flexibility with regard to connections, allowing settings to be
optimally and individually adjusted to the circumstances on site. Please use this operational guide to adjust the automatic functions to your requirements and enable comfortable manual operation.
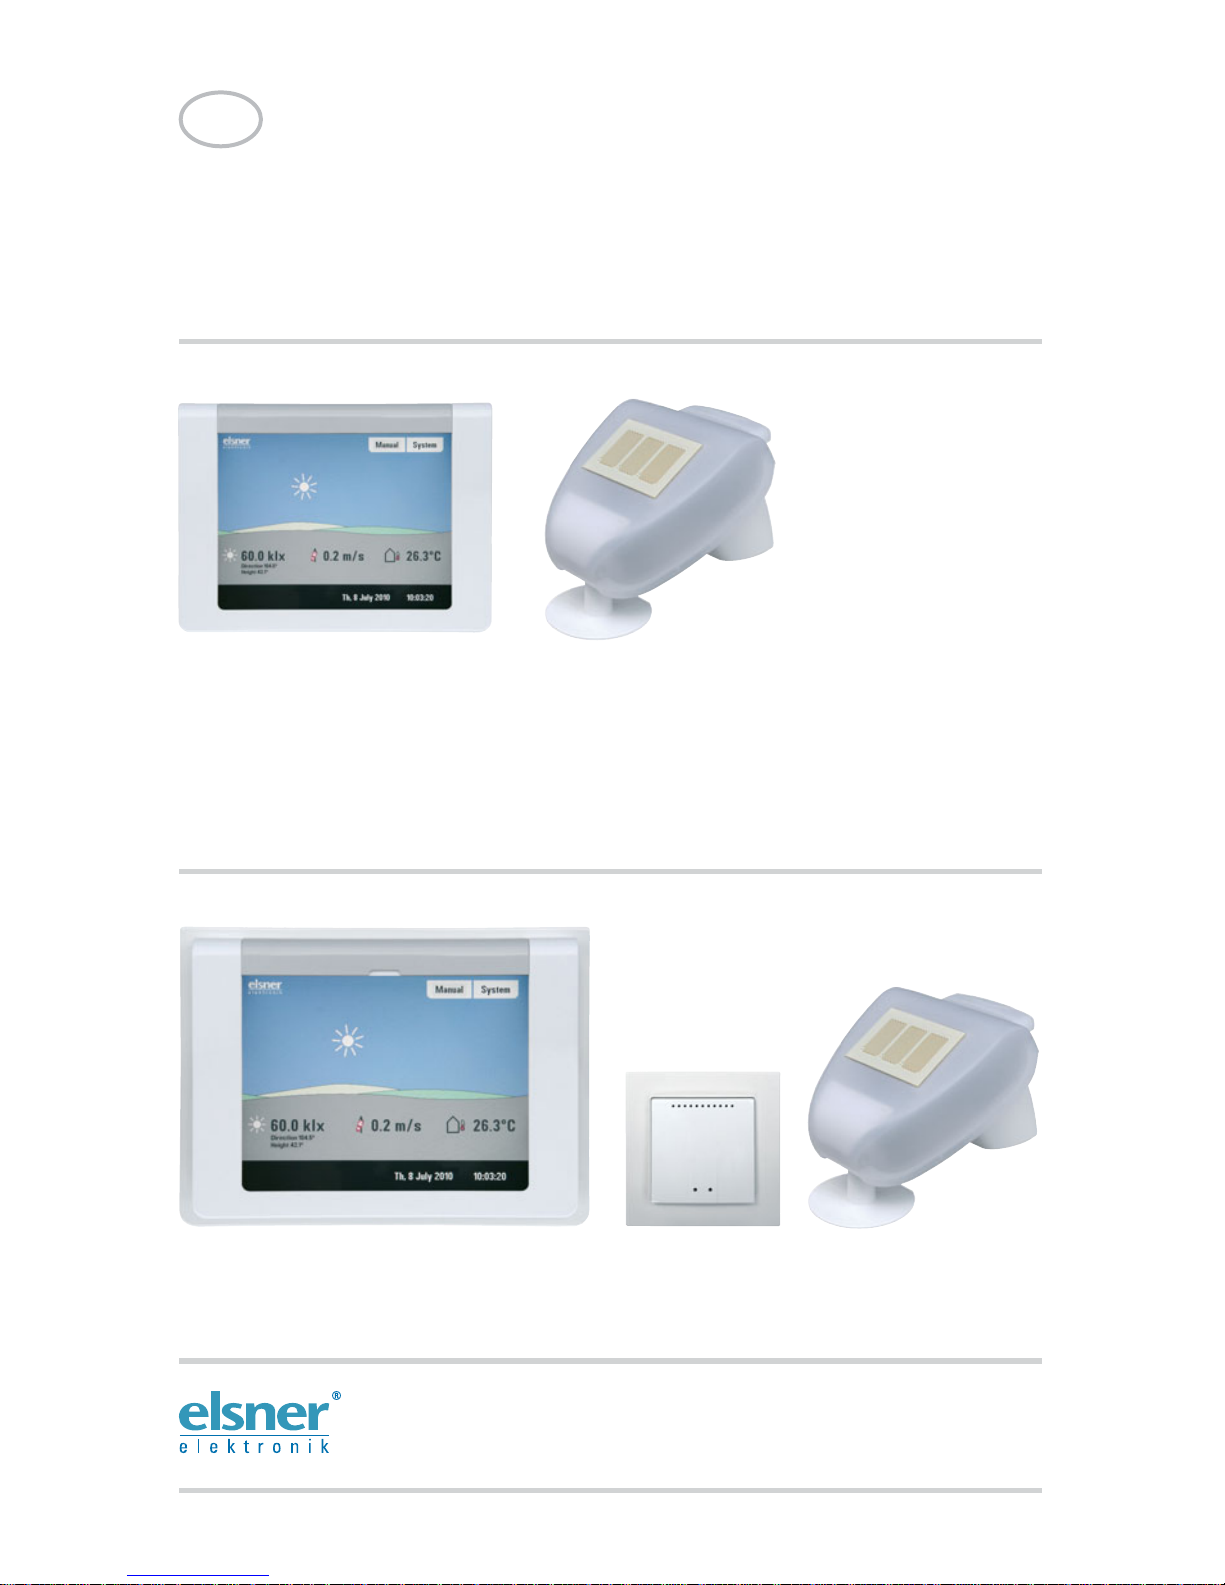
1.1.1. Delivery scope
• Central control and operations unit
WS1 Color: With integrated indoor sensor. With 1, 2, 3 or 4 drive outputs for
230 V motors or without drive outputs, depending on model.
WS1 Color-PF: With integrated indoor sensor. With 1, 2, 3 or 4 potential-free
drive outputs, depending on model.
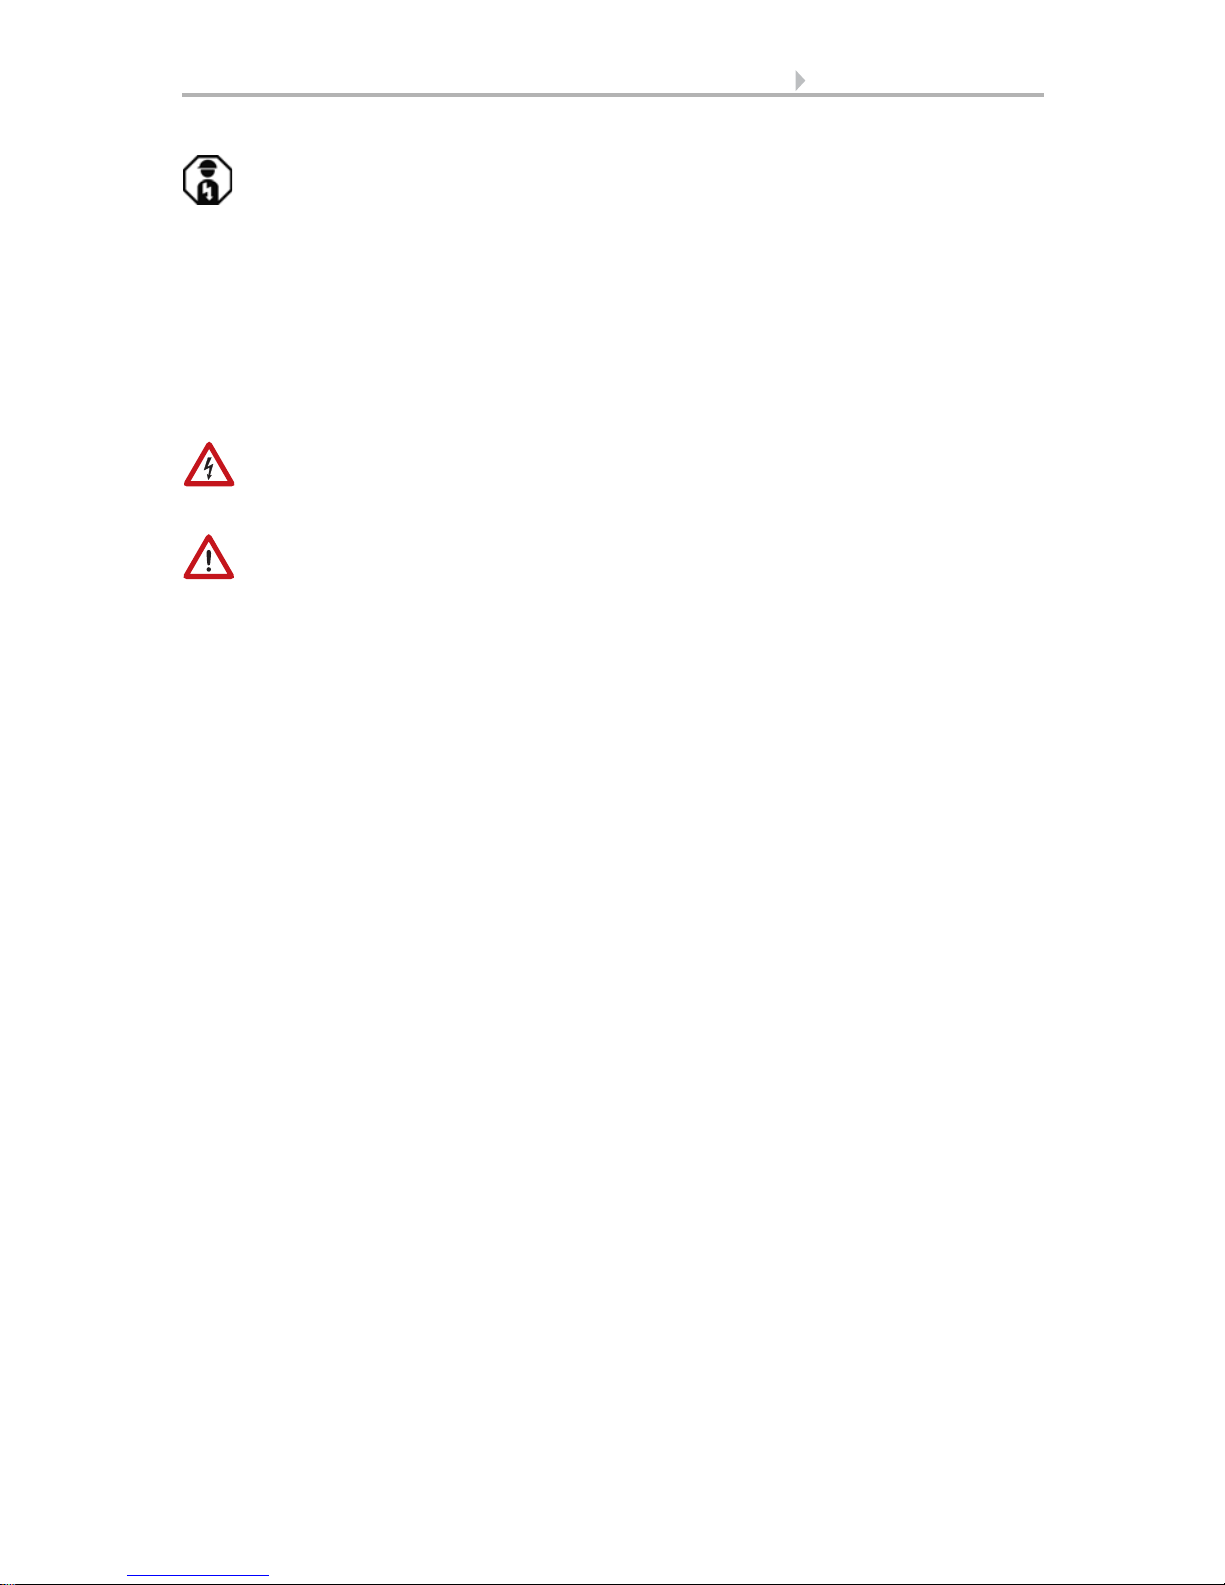
WS1000 Color: With 4, 6, 8 or 10 drive outputs for 230 V motors, depending on
model.
WS1000 Color-PF: With 4, 6, 8 or 10 potential-free drive outputs, depending on
model.
• Weather station
•Manual
Additionally with WS1000 Color:
• WGTH-UP indoor sensor with frame
(You need a socket ø 60 mm, 42 mm deep additionally)
•Stylus
Control System WS1 Color / WS1000 Color • Status: 19.11.2012 • Errors excepted. Subject to technical changes.
9 Description
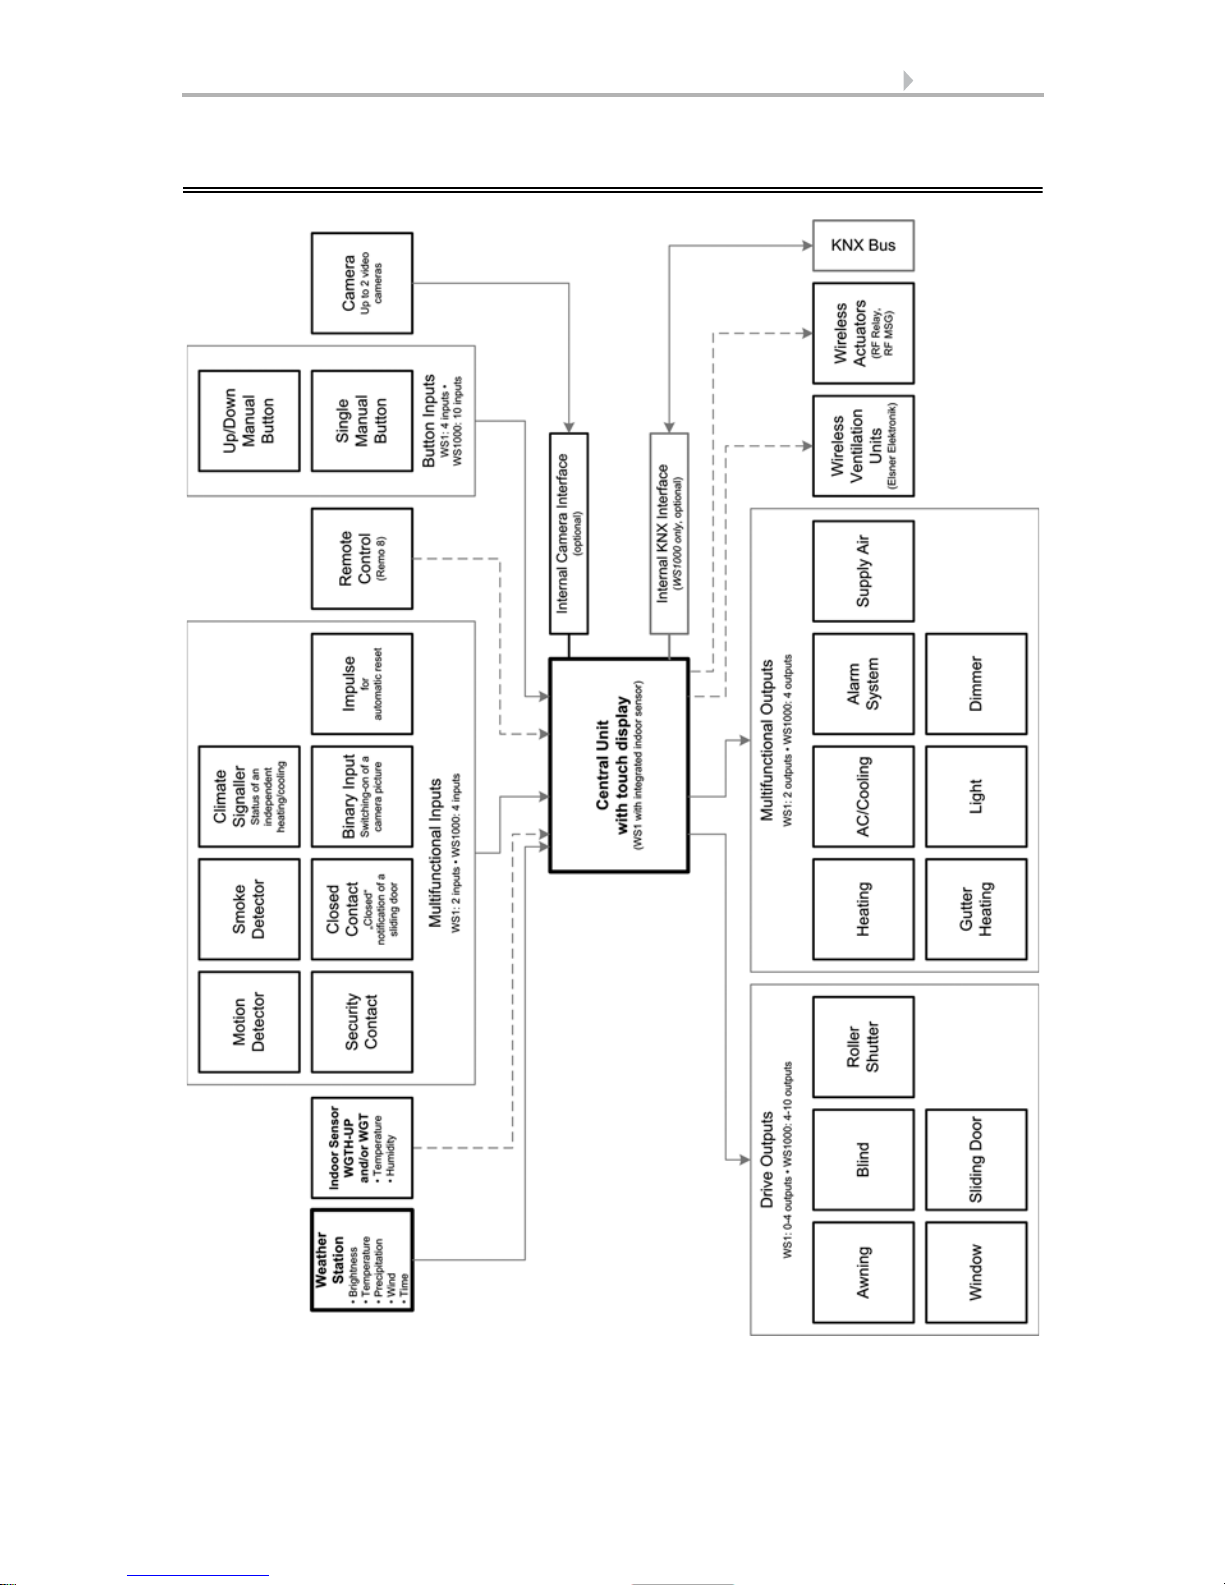
1.2. Connection and control options
Control System WS1 Color / WS1000 Color • Status: 19.11.2012 • Errors excepted. Subject to technical changes.

10 Description
The following environmental parameters will be measured and displayed:
• Outdoor and indoor temperature
• Air humidity inside
• Lighting (intensity and direction, twilight recognition)
•Wind speed
•Precipitation
•Time/date
The following drives can be connected to the drive outputs:
(WS1 Color: 0-4 drive outputs, WS1000 Color: 4-10 drive outputs)
• Electrically-operated awnings
• Electrically-operated blinds
• Electrically-operated shutters
• Electrically-operated windows and sliding roofs
• Electrically-operated sliding doors
The following devices can be connected to the multifunctional outputs:
(WS1 Color: 2 MF outputs, WS1000 Color: 4 MF outputs)
•Heating
• Cooling
• Alarm equipment
• Lighting
• Roof gutter heating
• Ventilation units
• Dimmer (for a light)
The following can be connected to the multifunctional inputs:
(WS1 Color: 2 MF inputs, WS1000 Color: 4 MF inputs)
• Motion detector
• Smoke detector
• Climate sensor (A climate or heating unit which is independent of the control
unit. Status query “active”/“not active”, for cancelling ventilation)
• Safety contacts to keep drives in secured position
• Closed-contact for closing notification of a sliding door
• Impulse for automatic reset (e.g. button or impulse at alarm activation)
• Binary contact
The following devices can be connected via a wireless connection:
• WGTH-UP indoor sensors for temperature and humidity measurement at
various places in the room. This allows various climate areas to be realised (e.
g. living and plant areas in the conservatory)
• WGT temperature sensor for temperature measurement at various places in
the room and, for example, in the ground for control of the floor heating
• Radio remote control Remo 8
• Elsner ventilation devices (WL610, WL305, WFL)
Control System WS1 Color / WS1000 Color • Status: 19.11.2012 • Errors excepted. Subject to technical changes.

11 Description
• Fan module RF-VM for connecting fans/circulating air heating units from other
manufacturers
• RF relay (radio relay, On/Off)
• RF MSG (radio motor control device, Up/Down)
The following additional options are available:
• Connection of up to 10 external Up/Down wall buttons for manual operation of
drives and devices on the spot
• Connection of up to 2 video cameras via an optional camera interface
The followingfunctions are available with WS1000 Color only:
• Presentation of a slideshow on SD card, data storage on SD card
• Communication with the KNX bus system via an optional KNX interface
1.2.1. Automatic functions in overview
Devices connected via the “Dimmer” output (e.g. lighting) have no automatic functions. They can however be operated manually via the display.
Sliding doors also have no automatic functions. They can be fitted with a close-contact (to a multifunctional input) and be manually operated via the display.
Automatic functions for windows/sliding roofs:
• Opening above a selectable indoor temperature (can be switched off)
• Opening above a selectable air humidity level in the room (can be switched off)
• Close when the supply air temperature is higher than the room temperature
(can be switched off)
• Night-time re-cooling (settable running times)
• Daily forced closure (settable running times)
• Outdoor temperature block: Block beneath a selectable outdoor temperature
(can be switched off)
• Keep closed in a period which can be set
• Frost alarm: Close in case of precipitation beneath a selectable outdoor
temperature (can be switched off)
• Wind alarm: Close when a selectable wind speed is exceeded (can be switched
off)
• Rain alarm: Close when there is precipitation or move to a gap (can be switched
off)
• Closing when cooling/air-conditioning unit is active
If a motion detector is connected, windows will be closed automatically when a breakin alarm is triggered. If a smoke detector is connected, windows will be opened automatically when a fire alarm is triggered.
Step windows will be opened step-by-step. An opening position can be set for sliding
windows.
Control System WS1 Color / WS1000 Color • Status: 19.11.2012 • Errors excepted. Subject to technical changes.

12 Description
Automatic functions for awnings:
• Extend according to brightness and the position of the sun
or retract regardless of brightness (extending only manually)
or extend regardless of brightness (visual protection, automatically retraction
only when there is a rain or wind alarm)
• Adjustable movement position
• Keep retracted until a selectable indoor temperature is reached
(can be switched off)
• Outdoor temperature block: Block beneath a selectable outdoor temperature
(can be switched off)
• Frost alarm: Retract in case of precipitation beneath a selectable outdoor
temperature (can be switched off)
• Wind alarm: Retract when a selectable wind speed is exceeded (can be
switched off)
• Rain alarm: Retract when there is precipitation (can be switched off)
If a smoke detector is connected, awnings will be automatically retracted when a fire
alarm is triggered.
Automatic functions for blinds:
• Closing according to brightness or position of the sun
or keep open regardless of brightness (only time-controlled or manual closing)
or keep closed regardless of brightness (visual protection, automatically retract
only when there is a rain or wind alarm) with light reversal
• Adjustable movement position and slat position (slat tracking of the sun height
possible)
• Leave open until a selectable indoor temperature is reached
(can be switched off)
• Close at night/twilight (can be switched off)
• Close daily (settable running times)
• Outdoor temperature block: Block beneath a selectable outdoor temperature
(can be switched off)
• Frost alarm: Retract in case of precipitation beneath a selectable outdoor
temperature (can be switched off)
• Wind alarm: Retract when a selectable wind speed is exceeded (can be
switched off)
• Rain alarm: Retract when there is precipitation (can be switched off)
If a smoke detector is connected, blinds will be opened automatically when a fire alarm
is triggered.
Automatic functions for shutters:
• Closing according to brightness or position of the sun
or keep open regardless of brightness (only time-controlled or manual closing)
or keep closed regardless of brightness (visual protection, automatic retraction
only when there is a rain or wind alarm)
• Adjustable movement position
Control System WS1 Color / WS1000 Color • Status: 19.11.2012 • Errors excepted. Subject to technical changes.

13 Description
• Leave open until a selectable indoor temperature is reached
(can be switched off)
• Close at night/twilight Leave open until
• Close daily (settable running times)
• Outdoor temperature block: Block beneath a selectable outdoor temperature
(can be switched off)
• Frost alarm: Retract in case of precipitation beneath a selectable outdoor
temperature (can be switched off)
• Wind alarm: Retract when a selectable wind speed is exceeded (can be
switched off)
• Rain alarm: Retract when there is precipitation (can be switched off)
If a smoke detector is connected, shutters will be opened automatically when a fire
alarm is triggered.
Automatic functions for heatings:
• Switch on daily below a selectable indoor temperature
• Night setback (with adjustment of time and temperature until the setback is
made)
If a smoke detector is connected, the heating will be automatically switched off when
a fire alarm is triggered.
Automatic functions for coolings and air-conditioning units:
• Switch on daily above a selectable indoor temperature
• Night mode (with adjustment of time and temperature until cooling takes
place)
• Cancel ventilation when cooling/air-conditioning unit is active
If a smoke detector is connected, the cooling will be automatically switched off when
a fire alarm is triggered.
Automatic ventilation functions:
• Ventilation above a selectable indoor temperature (can be switched off)
• Ventilation above a selectable air humidity level in the room
(can be switched off)
• Winter operation: supply air will be closed below a selectable outdoor
temperature (can be switched off)
• Summer operation: supply air will be shut off if outdoor temperature is higher
than room temperature
• Adjustable minimum and maximum speeds for motorised fans
• Night-time re-cooling (settable running times)
• Daily forced ventilation (settable running times)
• Additionally with roof ventilators WL610 and WL305: recirculating air for heat
recovery; recirculating air to avoid condensation
• Cancel ventilation when cooling/air-conditioning unit is active
Control System WS1 Color / WS1000 Color • Status: 19.11.2012 • Errors excepted. Subject to technical changes.

14 Description
If a smoke detector is connected, ventilation will be activated automatically when there
is a fire alarm.
Automatic functions for light:
• Switch on daily (settable running times, with and without twilight recognition)
• Switch on at twilight
• Switch on when an alarm triggers (motion/smoke detector)
Automatic functions for roof gutter heatings:
• Switch on within an adjustable temperature range
Automatic alarm settings:
• Motion detector: The period of alarm readiness is adjustable. If the alarm is
triggered within this period, all windows close. After 5 minutes without a new
alarm signal, normal automatic operation will be resumed.
• Smoke detector: When the alarm triggers, shades retract (escape routes),
windows open, ventilators open/switch on (getting rid of smoke) and heatings
and air conditioners switch off. No manual operation is possible. An acoustic
warning signal will sound at the control system.
Control System WS1 Color / WS1000 Color • Status: 19.11.2012 • Errors excepted. Subject to technical changes.

15 Operation and use
2. Operation and use
Control System WS1 Color / WS1000 Color • Status: 19.11.2012 • Errors excepted. Subject to technical changes.
16 Operation and use
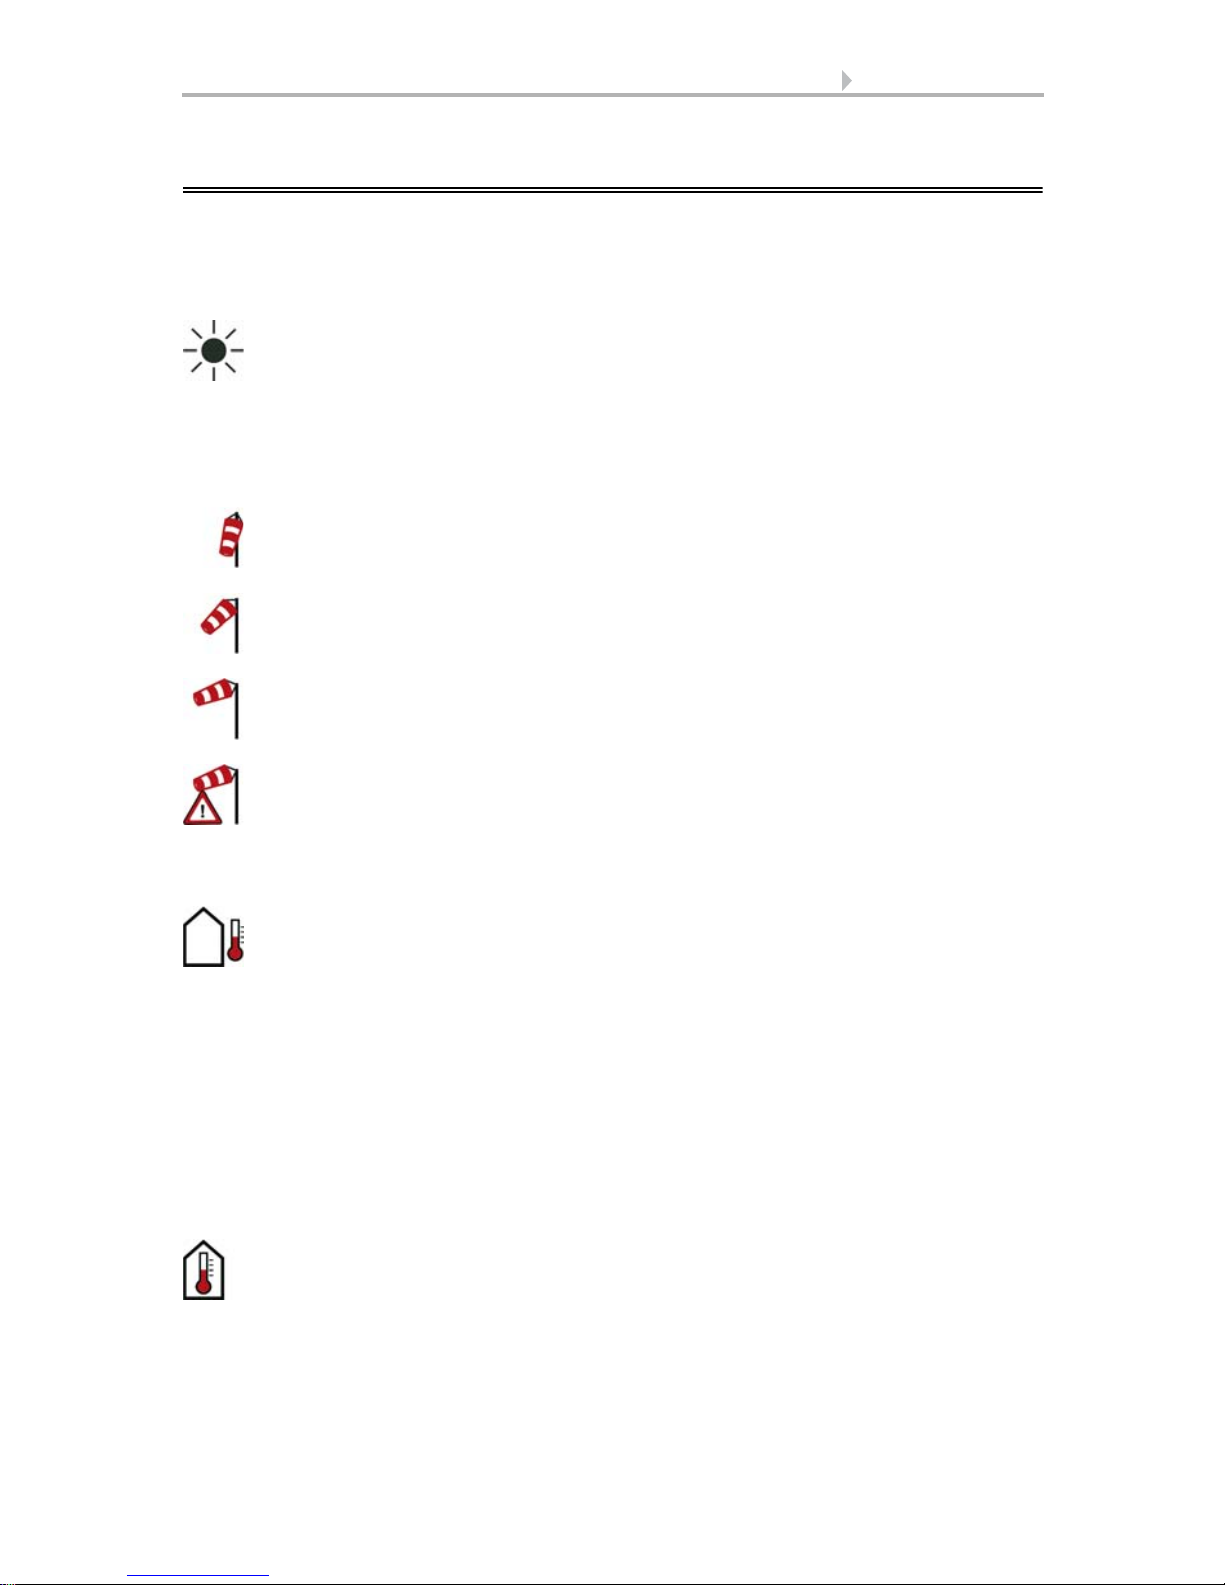
Intensity: Light intensity (brightness) in Lux (lx) or Kilolux (klx)
Direction: Direction (azimuth) in degrees
Height: Elevation over the horizon in degrees
Calm: up to 1.9 m/s
Slight wind: 2.0 to 9.9 m/s
Strong wind: 10.0 m/s and up
A caution flag appears besides the wind symbol if wind alarm has been
triggered for a drive.
Outdoor temperature at the weather station in degrees Celsius (°C)
Temperature in degrees Celsius (°C)
Air humidity in %RH
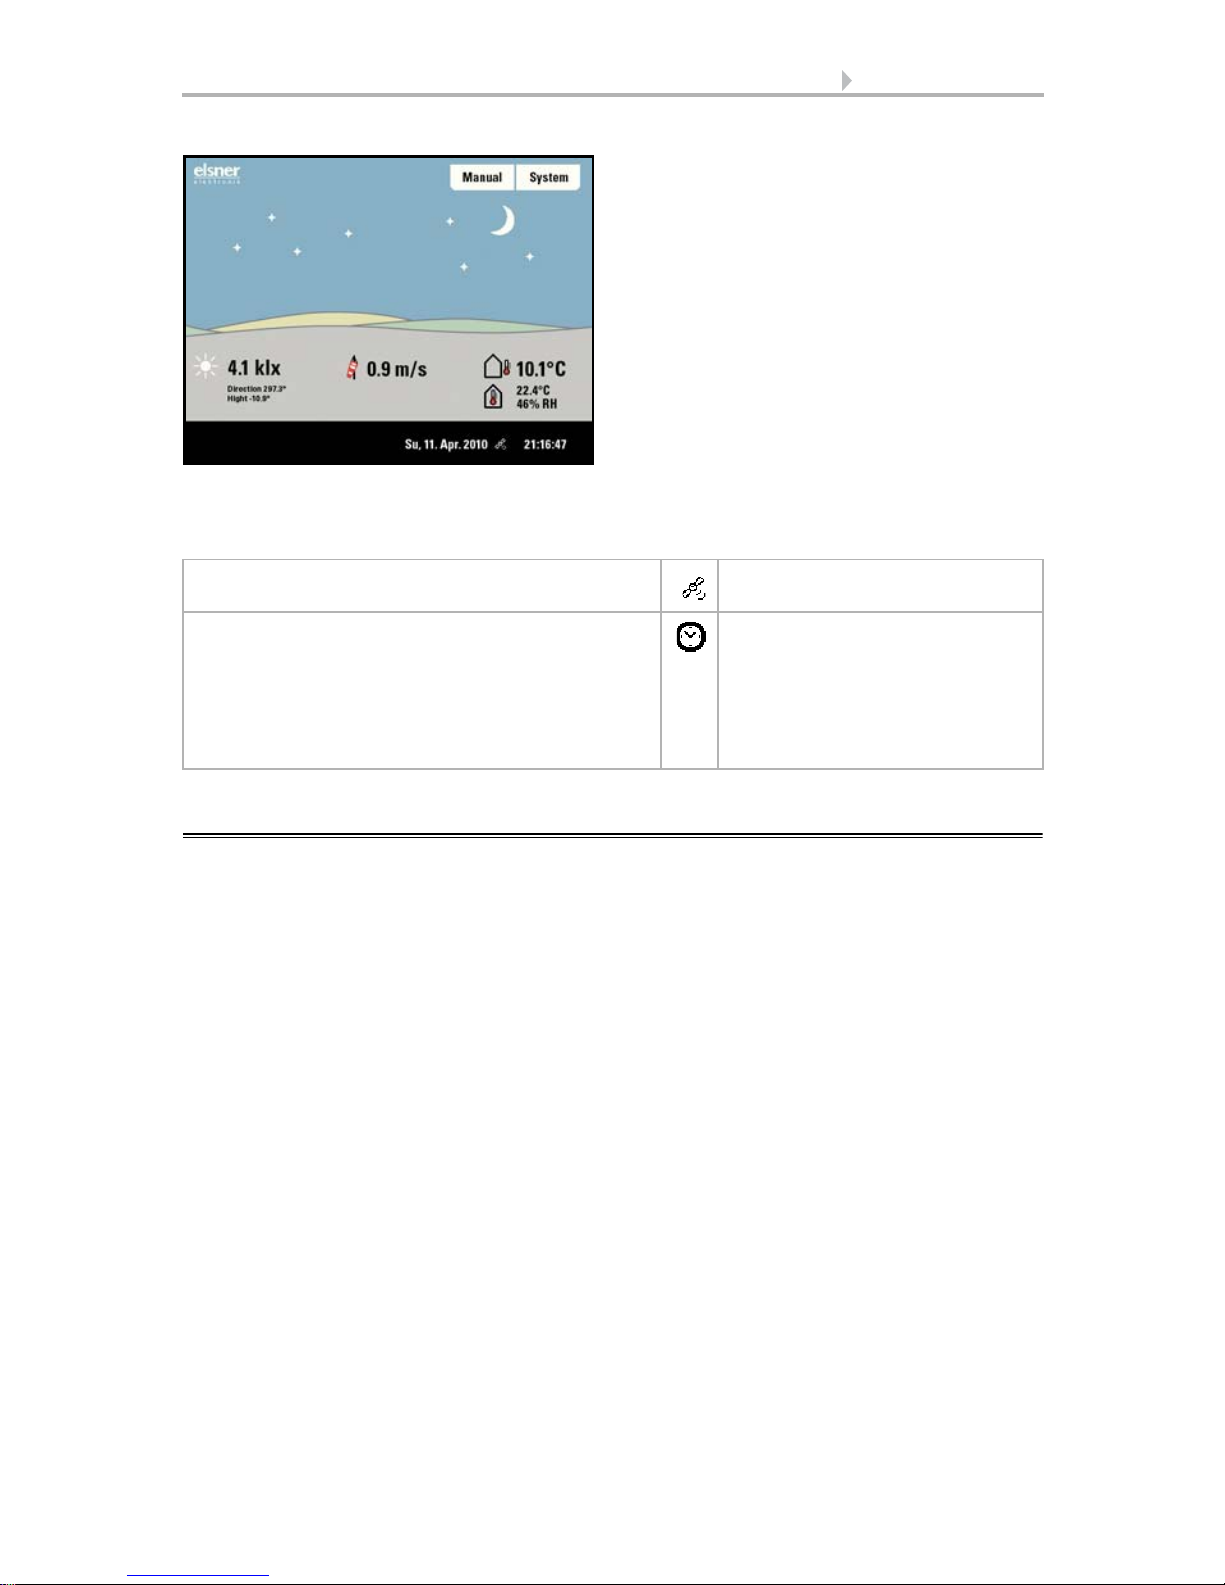
2.1. Weather data display (starting image)
As a starting image, the control system shows the current weather data:
Sun data
Wind
The wind speed will be shown in metres per second (m/s) and the windsock changes:
Outdoor temperature
Night-time Re-cooling, Frost Alarm and Window Movement Limitation are dis-
played in turn next to the outdoor temperature value as long as the relevant function
is active.
3.3. Set night_time re-cooling (ventilation)
3.3. Adjust frost alarm
3.3. Set movement limitations (windows)
Indoor information
Control System WS1 Color / WS1000 Color • Status: 19.11.2012 • Errors excepted. Subject to technical changes.

17 Operation and use
Sunny or cloudy:
The sun moves across the sky according to
its current direction and height.
Rain:
When there is a precipitation report and
temperatures above -3 °C, it is raining.
Snow:
When there is a precipitation report and
temperatures below -3 °C, it is snowing.
You may select which indoor information is displayed (e. g. if several sensors are connected).
System > Installation > Weather Display
6.1. Indoor sensor for weather display
The general weather situation is shown graphically:
Control System WS1 Color / WS1000 Color • Status: 19.11.2012 • Errors excepted. Subject to technical changes.
18 Operation and use
Night:
At night (twilight) the display will be darker; instead of the sun, the moon and stars
will appear.
The date and time will be shown on the lower right on the display. The following symbols are displayed, depending on which source the time signal is from:
GPS reception (from weather station) Satellite
Reception of time via KNX bus
(WS1000 Color)
Position must be entered manually for shading
control:
System > WS1000 Settings > Settings > Position
6.2.1.Enter position
Clock
2.2. The touch display
Manual control, as well as setting the defaults for the automatic functions and the connected equipment, is via the control’s touch display. The button surfaces are operated
in this area by touching the display. When a button is activated, there is visual feedback
and a brief audio signal sounds.
If the push buttons shown do not match up with the touch-sensitive surfaces (you have
to press “next to the button”), the touch display can be calibrated as follows.
System > WS1 / WS1000 Settings > Settings > Calibrate touch
6.2.1. Calibrate touch
Operating the display with long fingernails will not damage the screen or the touch
function. Touching the display with very hard or pointed objects (e.g. those made from
glass, gems or metal) should be avoided as this can cause marks.
A stylus is enclosed with the WS1000 control system. It can be stored in the tray beneath the covering lid.
Control System WS1 Color / WS1000 Color • Status: 19.11.2012 • Errors excepted. Subject to technical changes.
19 Operation and use
Use the arrow keys to scroll through the list.
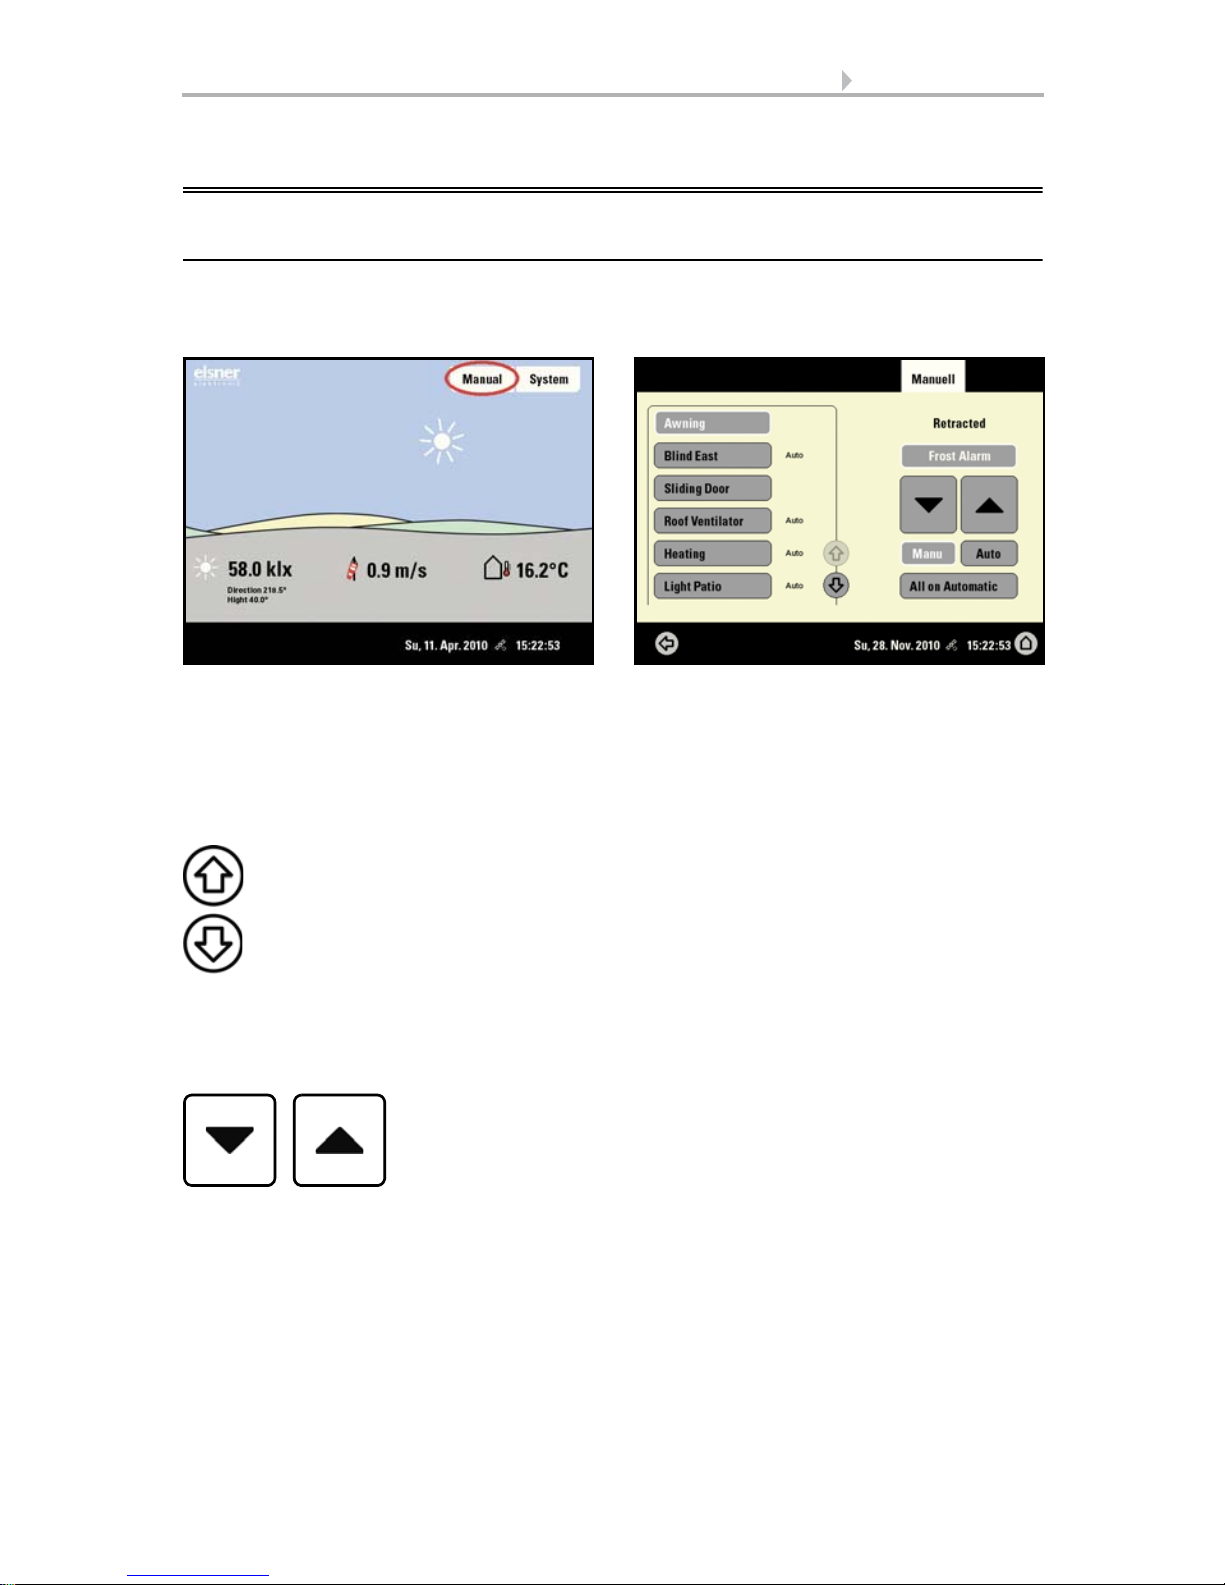
2.3. Manually operate drives and devices
2.3.1. The „Manual“ menu
You can reach the menu for manual control of drives and equipment by using the button Manual:
Here you can operate all connected drives and devices directly: Use the buttons to select the name of the drive or device you want to operate. You can change the order of
the list in the System menu.
System > Installation > Channel Order
6.1. Define channel order
The selected device is marked in white. On the right-hand side you will receive status
information (e.g. on/off, open/closed, exhaust air level, error messages) and various
control options (up/down arrow keys or on/off buttons).
The Down and Up buttons are fitted with automatic time functions. The drive can be
precisely positioned with brief button presses (less than 1 second, short audio signal).
For shutters and roller blinds, only a short step-movement command is triggered. If the
button is pressed for longer than 1 second (higher audio signal: locking signal), the
drive moves independently to the end position. A brief press in the opposite direction
stops the drive.
For shades and windows, the movement position is shown in percent above the Up-/
Down buttons (for blinds, also the slat position). For radio motor control units, the po-
Control System WS1 Color / WS1000 Color • Status: 19.11.2012 • Errors excepted. Subject to technical changes.

20 Operation and use
Manu Auto
Automatic Reset
Back to the weather data display (starting image)
sition shown can deviate from the movement position set in the automatic mode by up
to 2%.
If a drive group is momentarily blocked for manual operation by a rain, wind or frost
alarm, the arrow keys will be greyed out and may not be used. The message “Rain
alarm” and/or “Wind alarm” is shown.
The frost alarm can be deactivated by pressing the corresponding button (see diagram); manual operation is then possible again. The frost block will then be first active
for this drive again when it is reactivated manually or the next time the frost alarm is
triggered.
The drive and hangings may be damaged if a firmly frozen
outdoor shading is moved!
Whether a drive or device is in automatic mode or manually operated can be recognised from the white marking on the buttons on the right and the text “Auto” next to
the name button in the list on the left. By pressing the button you can switch from one
to another.
After being operated manually the drive or device remains in manual mode. The automatic functions are thus switched off and only the rain and wind protection will be carried out. The equipment will only switch back into automatic mode when reset by hand
(“Manu” button) or through the daily automatic reset. In the Automatic menu, the automatic reset can be activated separately for each drive group and each device.
This button allows you to perform the automatic reset manually. All systems for which
an automatic reset has been set are then set to automatic mode.
2.3.2. External buttons
As well as operating the controls via the display, it is possible to connect external buttons (wall buttons) to the control unit. In the System menu the individual buttons can
be assigned to any drives or devices.
System > Installation > Ext. Buttons
6.1. Assign external buttons
Control System WS1 Color / WS1000 Color • Status: 19.11.2012 • Errors excepted. Subject to technical changes.
21 Operation and use
2.3.3. Internal buttons (group buttons)
It is possible to operate several drives or devices at the same time via a collective group
button (internal software button). This makes it possible to close all windows with a
single button press, for example. These group buttons can be set up in the System
menu.
System > Installation > Int. Buttons
6.1. Assign internal buttons (group buttons)
2.3.4. Remote control
Drives and equipment can be controlled by using the remote controller Remo 8, which
can be ordered among the accessories. The hand-held transmitter must be configured
in the control as a participant to the radio network. Then follows the allocation of drives
and equipment to the eight remote control channels. In the control, several Remo 8 devices can be configured.
6.1. Wireless connections
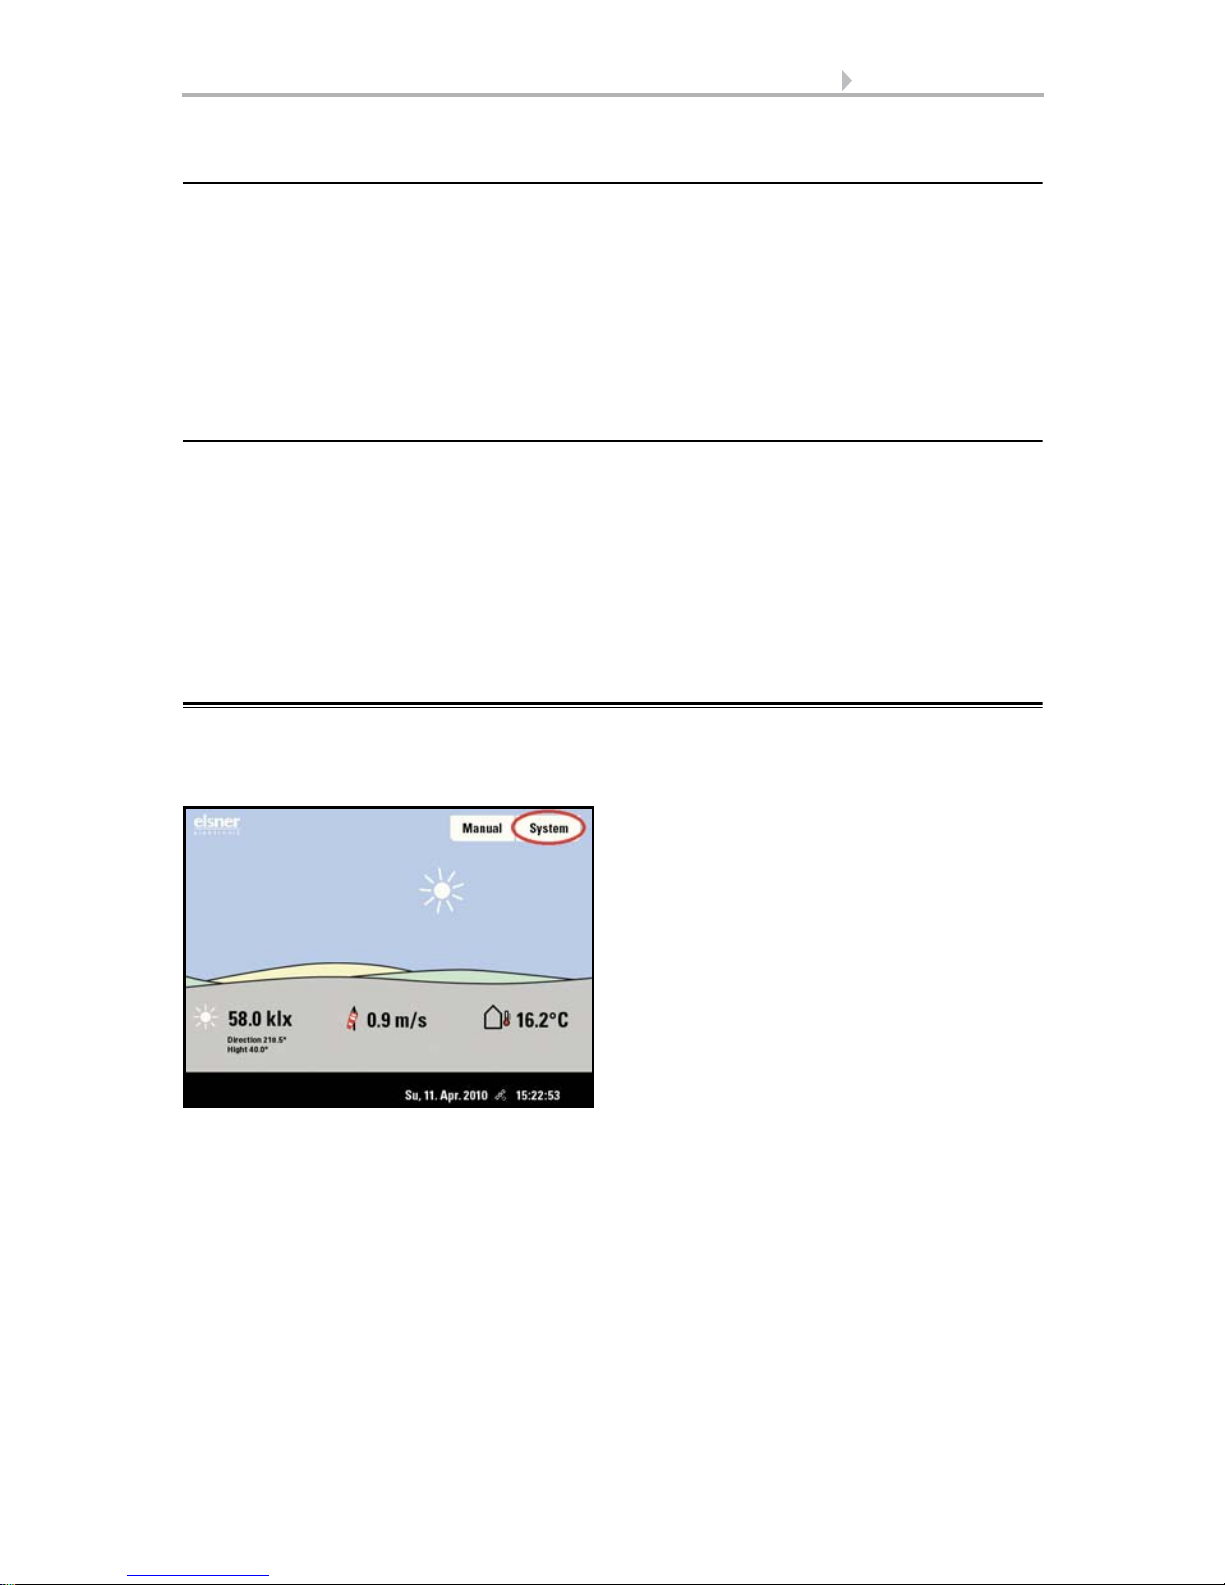
2.4. Navigation in the System menu
All settings for drives and devices, for the automation and the control system are
changed in the System menu, which you reach via the System button:
In three sub-menus you can carry out the following adjustments:
Installation:
• Specify fundamental characteristics of the drives at inputs/outputs
• Set up wireless connections to devices
• Define the order in which the drives and devices are shown (e.g. in the manual
menu)
Automatic settings:
• Define automatic functions for the individual drives and devices
Control System WS1 Color / WS1000 Color • Status: 19.11.2012 • Errors excepted. Subject to technical changes.

22 Operation and use
Back to the previous menu level (only settings already saved with OK will
be applied)
Back to the weather data display (starting image)
Confirms (saves) adjustments made
Info button: Appears in many menus next to the option settings. Press the
button for an explanation of the function shown in the upper display area.
Press again for the explanation to disappear.
Selects the input keyboard for letters and numbers.
ABC
Selects the input keyboard for symbols and umlauts.
&
Delete. Removes the preceding character.
• Adjust general automatic settings: Twilight value, movement delays, forced
closure, ventilation block and automatic reset
Control Settings:
• Change personal data such as Time/Date and location and adjust the screen
display to your personal preferences
• Restart the control unit, reset to factory defaults and change internal settings
• Set an access code to protect the “Installation” and “Automatic Settings”
menus from unauthorised changes.
The following buttons are needed constantly for navigation in the System menu:
On the top right, beneath the System field, is shown which menu you are currently in
as well as the path by which you arrived there. For example, if you are in the Automation menu for the light intensity of the “South awning”, the path will be:
System > Automation > Awning > Awning South > Intensity
2.4.1. Input keyboard for names and codes
In some menus an input keyboard for names and codes appears. The words can be
typed in completely normally.
Special keys:
Control System WS1 Color / WS1000 Color • Status: 19.11.2012 • Errors excepted. Subject to technical changes.
23 Operation and use
Shift key. Switches between upper and lower case letters.
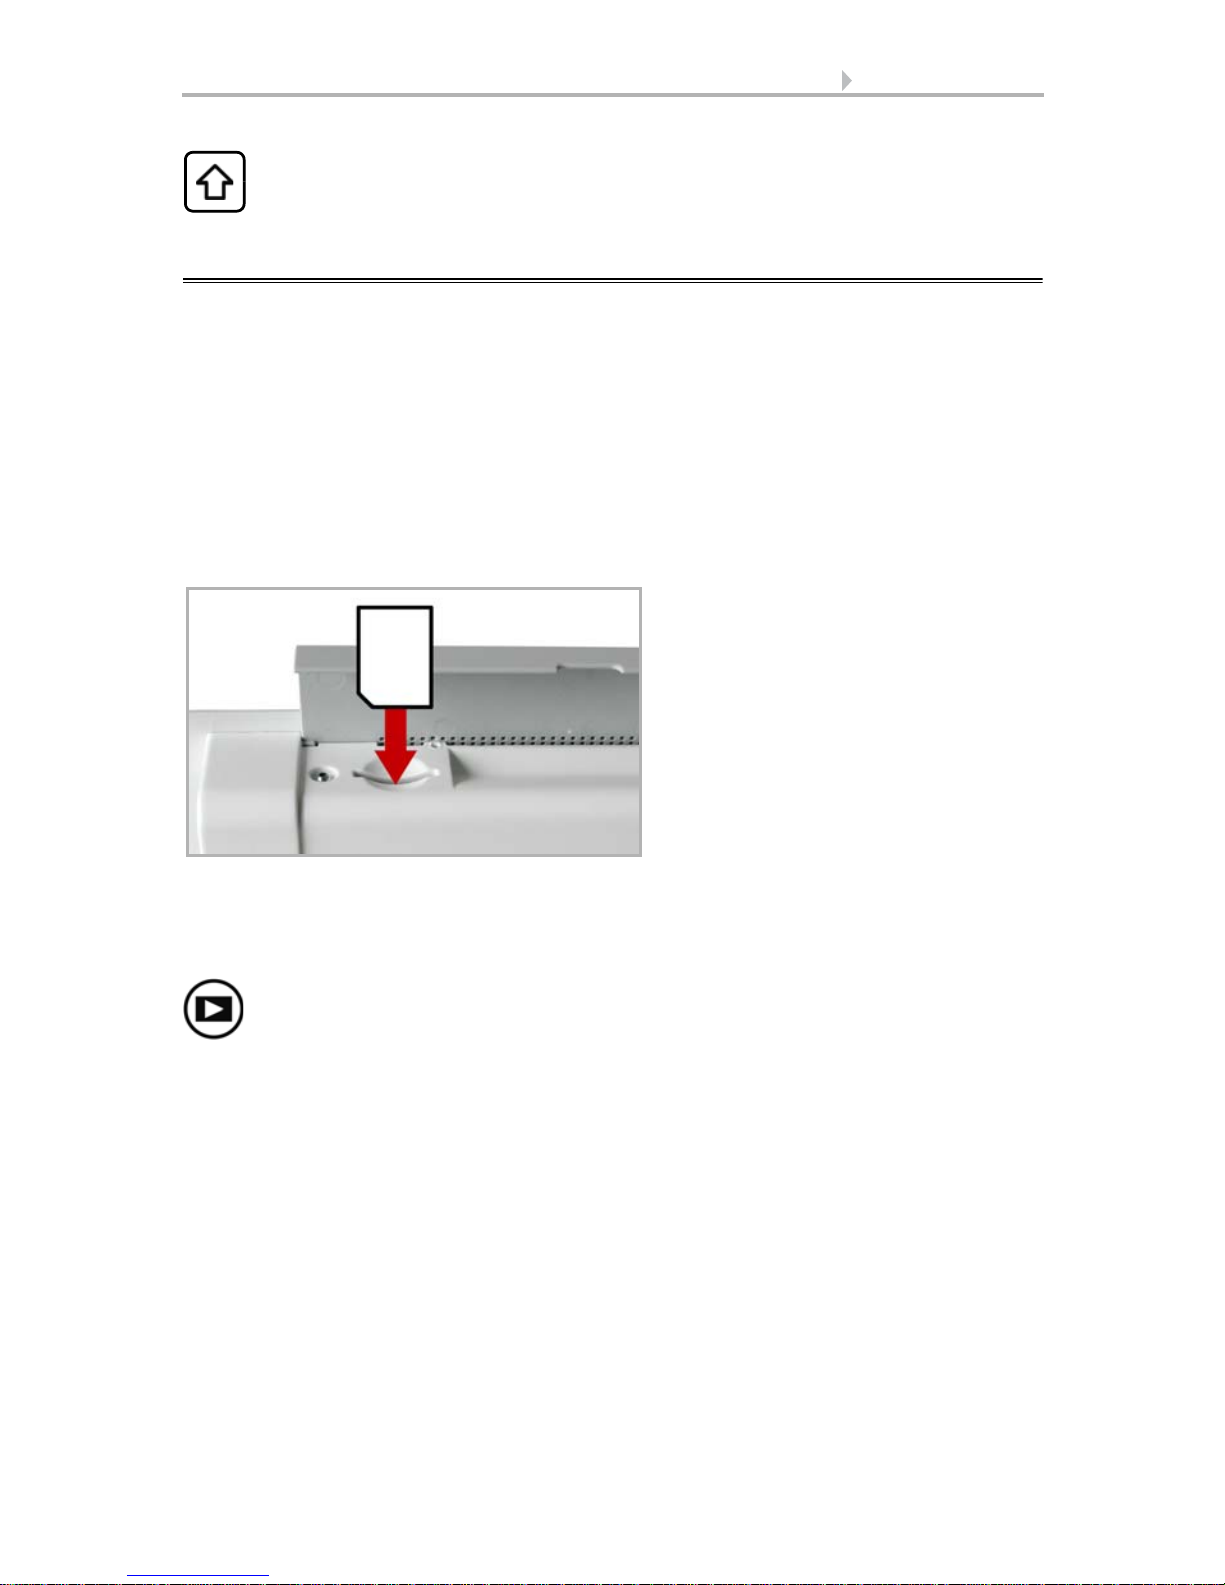
The SD card slot can be found beneath
the covering flap. The SD card is
pushed into the slot, until it clicks into
place.
oder
Press „play-back“ to start the slideshow.
2.5. Slideshow
This function is not available with WS1 Color.
The WS1000 Color can play back digitally-stored image data as a slideshow. For this,
the image data must be saved onto an SD card and fulfil the following requirements:
• Data format Bitmap (BMP)
• Size 640 x 480 pixels
• Color intensity 24 bit or 16 bit
•No compression (RLE)
• The data must be saved in the uppermost level of the card's directory (root
directory)
The card will automatically be recognised. If image data are stored on the card, the
symbol for „play-back“ appears at the bottom right-hand side of the weather data display.
The image changes approx. every 45 seconds (for images with 24-bit color intensity).
To return to the weather data display, touch the screen or remove the SD card (briefly
press down on the card so that it pops out).
Further information about the image display can be found in chapter
6.2. Using an SD card
Control System WS1 Color / WS1000 Color • Status: 19.11.2012 • Errors excepted. Subject to technical changes.

24 Operation and use
Control System WS1 Color / WS1000 Color • Status: 19.11.2012 • Errors excepted. Subject to technical changes.

25 Automatic settings
3. Automatic settings
Control System WS1 Color / WS1000 Color • Status: 19.11.2012 • Errors excepted. Subject to technical changes.
26 Automatic settings
3.1. Automatic settings
In the menu System > Automatic Settings you can make the following adjustments:
• Define automatic functions for the individual drives and devices
• Adjust general automatic settings: Twilight value, movement delays, timer,
ventilation block, night time re-cooling, frost alarm and automatic reset
In order to set the automatic functions, the basic settings must already have been
made.
6. Basic setting
Please adjust the settings for drives and devices to your individual circumstances. Only
in this way can alarm and blocking functions like rain or wind warnings help to protect
external awnings or prevent rain from coming in through the window.
3.1.1. Safety notice for automatic and alarm
functions
When it starts to rain, depending on the amount of rain and the temperature, some
time may pass before the rain is recognised by the weather station. For electrically-operated windows or sliding roofs, a closing time must also be taken into account. Moisture-sensitive objects should therefore not be placed in an area where they may be
damaged by precipitation penetrating inside. Please remember also that, for example,
when it starts to rain during a power outage, the windows will no longer close automatically, if no emergency power generator is fitted.
Please note that the rails of externally mounted blinds, awnings and shutters can ice
up. If the drive group is then moved, the shade and drives may suffer damage.
It is imperative you take care that no-one is in the movement
area of the equipment parts moved by electrical motors (danger
of crushing!).
The appropriate building regulations are to be observed.
3.1.2. Power failure, maintenance works, etc.
(restart of control)
If a power outage occurs, the control unit can no longer control the connected drives!
If the functional scope must be guaranteed even during a power cut, an emergency
power unit with a corresponding switch from network power to emergency operation
should be installed by the customer.
Settings saved in the control unit programme will be maintained even during a power
outage.
Control System WS1 Color / WS1000 Color • Status: 19.11.2012 • Errors excepted. Subject to technical changes.

27 Automatic settings
If cleaning or maintenance work is to be carried out in the conservatory/building, the
control unit should be de-energised and secure against restart by disconnection of the
customer-installed fuse. This ensures that the connected drives cannot start.
After every re-start (e. g. return of voltage after mains failure or
manual reset) all drives and devices are in automatic mode.
3.2. Automatic settings for drive groups
and devices
3.2.1. Drives and devices without automatic
functions
Devices connected via the “Dimmer” output (e.g. lighting) have no automatic functions. They can however be operated manually via the display.
Sliding doors also have no automatic functions. They can also be operated manually
via the display. In addition, sliding doors can be fitted with a close-contact (connection
to a multifunctional input). In this way the control unit knows whether the door is open
or closed.
3.2.2. Automatic awning settings
For connected awnings or awning groups the following automatic settings can be
changed:
• Light intensity
• Direction of sun
• Height of sun
• Movement position
• Indoor sensor to be used for the awning
• Indoor temperature block
• Outdoor temperature block
• Frost alarm
• Wind alarm
• Rain alarm
• Enable/Disable automatic reset
Alarm functions
Alarm functions are used for awnings in manual and in automatic mode.
Fire alarm of a smoke detector has highest priority. All awnings are retracted and cannot be influenced either by automatic or manual.
Control System WS1 Color / WS1000 Color • Status: 19.11.2012 • Errors excepted. Subject to technical changes.

28 Automatic settings
Automatic
Settings
AwningSystem
Intensity
Direction of sun
During frost, wind or rain alarm the awnings are retracted and cannot be manually
extended.
Shade settings
The settings are only executed if an awning is in automatic mode and none of the alarm
functions named above is active.
Highest priority is assigned to the outdoor temperature-block, followed by the in-
door temperature-block (retract).
Only when the direction and height of the sun agree and there is no active block is the
automatic shading by light intensity engaged.
Setting of the automatic
The automatic awning functions can be accessed by pressing the buttons:
Now you can select individual awnings and adjust their settings. For each awning the
following settings can be changed:
Press the button to set the brightness above which the awning will be deployed to offer
shade.
Adjust value:
Default setting: 40 kLux.
7.2. Units for sun and wind
Remain retracted:
awning will then remain retracted unless it is manually operated.
Confirm your setting with the OK button.
For the automatic system to react, the set light intensity value must be exceeded or undercut for the duration of the delay times. This prevents constant extensions and retraction of the awning during rapid-changing light conditions. The movement delays
can be adjusted.
System > Automatic Settings > General Settings > Movement Delays
3.3. Adjust movement delays (shading elements)
Use the arrow buttons to change the value as you wish.
If the awning should not react to the brightness, select Never. The
Press the button to set the range (sun direction) in which the sun shall be, so that the
awning provides shade.
Control System WS1 Color / WS1000 Color • Status: 19.11.2012 • Errors excepted. Subject to technical changes.

29 Automatic settings
Height of sun
Movem. Position
Sensor Selection
All directions: If the sun’s orientation is not decisive for shading purposes, select All
sides (default setting).
Direction:
If the shade should only be deployed when the sun is in a specific orientation, select as appropriate: West, South-West, South, South-East or East. The thick-
ened part of the circle in the centre shows the selected area.
Enter angle:
To set the range in which shading shall be provided in exact numbers,
press the “from 0°” or “to 360°” and adjust the numeric values with the arrows keys
that appear.
Confirm your setting with the OK button.
For as long as no time signal has been received and the time has not been entered
manually (the display on the control unit will show "Please set clock!"), the shades will
only be controlled based on light intensity, temperature and alarm reports. The position of the sun will not be taken into account.
Press the button to set the range (sun height) in which the sun shall be, so that the awning provides shade.
Any angle:
If the height of the sun is not decisive for shading purposes, select Any
height (default setting).
Enter angle:
To exactly specify the hight numerically, change the number values
“smaller 90°” or “larger 0°” with the adjacent arrow keys. The thickened part of the
graphic shows you the selected area.
Confirm your setting with the OK button.
For as long as no time signal has been received and the time has not been entered
manually (the display on the control unit will show "Please set clock!"), the shades will
only be controlled based on light intensity, temperature and alarm reports. The position of the sun will not be taken into account.
Press the button to set the movement position for the automatic mode. With the arrow
keys, specify the movement position in % (0% = fully retracted, 100% = fully extended).
Default setting: 75%.
Confirm your setting with the OK button.
Press the button to select the indoor sensor the control system will use for this awning
(Pre-setting: Internal sensor at WS1, first sensor in the list at WS1000). As long as “No
Sensor” is selected, the indoor temperature will not be taken into account by the control system for this shade.
Control System WS1 Color / WS1000 Color • Status: 19.11.2012 • Errors excepted. Subject to technical changes.
 Loading...