

Page 1

ELSA ECOMOTM 22H99
User Manual
Page 2

Copyright © 1998 ELSA AG, Aachen (Germany)
All rights reserved worldwide. No part of this publication may be reproduced, transmitted, transcribed,
or stored in any information retrieval system, or translated into any human or computer language in any
form or by any means without the express written permission by ELSA. It is against the law to copy this
manual or the software, in part or whole, in any medium, for any purpose other than to aid the purchaser
in the operation on a single computer system.
ELSA AG is a DIN EN ISO 9001 certified company. With the certificate of May 16, 1995, the authorized
certification institute TÜV CERT has confirmed the conformity of ELSA AG with the worldwide quality
standard DIN EN ISO 9001. The certificate number of ELSA AG is 09 100 5069.
Trademarks
All brands or product names are or may be trademarks of their respective owners. The ELSA logo is a
registered trademark of ELSA AG, Aachen, Germany. ELSA reserves the right to vary specifications without notice and accepts no liability for technical errors and/or omissions.
Aachen, February 1999
No. 21600/0299
Page 3
Preface
Thank you for placing your trust in this ELSA product. With the
ECOMO 22H99
you have
selected one of ELSA's high-end monitors. ELSA products are subject to the highest of
standards in production and quality control which are the foundation for consistently
high product quality. This monitor was especially designed for the demands of professional users, and distinguishes itself with an extraordinary degree of reliability.
If you have questions to the topics covered in this manual or require additional help, our
online services are at your disposal around the clock. The complete range of support
and services provided by ELSA can be found in the "Advice and help” chapter.
In very urgent cases the ELSA Hotline can be reached under the following number:
+49-(0)241-606-6135
Page 4

Before you continue
How to set up your ECOMO 22H99 is described in the Installation Guide. Please refer to
this information first before you start reading this manual.
Page 5
ELSA ECOMO 22H99
V
Contents
Introduction ....................................................................................................................1
Monitor features..................................................................................................... 1
Package contents.................................................................................................... 2
Installation notice ................................................................................................... 2
CE conformity and FCC radiation standard............................................................. 3
Aspects of your monitor ...............................................................................................5
The front control panel............................................................................................ 5
Rear connectors panel ............................................................................................ 6
Monitor installation ......................................................................................................7
The USB function under Windows.......................................................................... 7
What does USB stand for?................................................................................. 7
Who can use USB?............................................................................................. 7
Checking for USB support.................................................................................. 8
The USB connection................................................................................................ 9
All under control.................................................................................................... 10
USB monitor installation.................................................................................. 10
Configuring the display with a USB monitor ................................................... 10
The on-screen display ................................................................................................ 13
How to navigate the OSD ..................................................................................... 13
Monitor settings ..........................................................................................................15
After switching on................................................................................................. 15
Plug&Play ......................................................................................................... 15
Language.......................................................................................................... 15
Adjustment functions............................................................................................ 16
Overview of all pages ...................................................................................... 18
An optimized working environment ......................................................................... 23
Monitor picture quality .................................................................................... 23
Tips for an ergonomic working environment........................................................ 23
Lighting in your working environment ............................................................. 23
The work desk.................................................................................................. 24
The seating position......................................................................................... 24
The monitor position....................................................................................... 24
Cleaning your monitor........................................................................................... 24
Technical data ............................................................................................................ 25
Power management function................................................................................ 26
Factory settings..................................................................................................... 26
Page 6

ELSA ECOMO 22H99
VI
The VGA D-shell socket .................................................................................. 27
Video input connection to an Apple-Macintosh computer ............................. 27
BNC connectors ............................................................................................... 28
Troubleshooting .......................................................................................................... 29
Problem solving..................................................................................................... 29
Restraining wires.................................................................................................. 30
Appendix ............................................................................................................... 31
TCO '99.................................................................................................................. 31
Advice and help .................................................................................................... 34
Software updates ............................................................................................ 34
Who to contact?............................................................................................... 34
ELSA-ServiceDirect for ELSA ECOMO ™ Monitors.............................................. 36
Warranty conditions ............................................................................................. 37
Page 7

Introduction
ELSA ECOMO 22H99
1
Introduction
This manual tells you how to connect, adjust and care for your monitor. This manual also
provides technical specifications and instructions for troubleshooting problems you may
experience with your monitor.
Monitor features
The Diamond monitor is an intelligent, microprocessor-based monitor compatible with
most analog RGB (red, green, blue) display standards, including PS/V
®
, PS/2®, Apple
®
Macintosh®, Centris, Quadra, Macintosh II and Power Macintosh products.
It provides crisp text and vivid color graphics with VGA, SVGA, XGA (non-interlaced), and
most Macintosh compatible color graphics boards.
쮿
The monitor’s wide auto-scanning compatibility range makes it possible to upgrade
graphics boards or software without needing to purchase a new monitor.
쮿
Digitally controlled auto-scanning is done using an internal microprocessor, for
horizontal scan frequencies between 30kHz and 121kHz, and vertical scan frequencies between 50Hz and 160Hz. The microprocessor-based intelligence allows the
monitor to operate in each frequency mode with the precision of a fixed frequency
monitor.
쮿
The monitor contains resident memory for pre-programmed screen display standards and is also capable of storing additional user adjustment parameters.
쮿
The monitor is capable of producing a non-interlaced maximum addressable resolution format of 1800 dots x 1440 lines. This display is well suited for windowing environments.
쮿
Because of the analog signal inputs, the monitor can display an unlimited palette of
colors that can be manually adjusted to suit your specific needs.
쮿
The monitor has a power management function according to VESA
TM
-DPMSTM standard. To save energy, the monitor must be connected to a system compliant with
this standard. (Refer to your computer and/or graphics board instructions for proper
operation.)
쮿
To ensure the easy installation and operation of this monitor, an on-screen display
(OSD) presents all of the functions for setup and adjustment.
쮿
The monitor complies with the safety standards UL 1950, CSA C22.2 No.950 and
EN60950; FCC Class-B, VCCI Class-B and EN55022 Class-B for EMI; MPR-II; and with
Page 8

Introduction
ELSA ECOMO 22H99
2
the ergonomics standards ISO 9241-3, ISO9241-7 and ISO9241-8. The monitor also
complies with TCO’99 guideline for environmentally friendly use.
쮿
Digital chassis design for lighter, more compact housing and improved display performance.
쮿
The world standard DIAMONDTRON tube upgraded with improved focus and convergence for supersharp and pure picture images.
쮿
The monitor complies with Video Electronics Standards Association (VESA
TM
)
DDC
TM
1/2B(EDID) specification. If your computer provides DDCTM1/2B(EDID)
function, the setup takes place automatically.
쮿
USB self-powered hub with 2 upstream ports and 3 downstream ports.
Package contents
Please ensure that the delivery is complete. When opening the package, please check
that the following components are included:
쮿
Installation Guide
쮿
User Manual
쮿
Monitor
쮿
VGA connector cable and USB upstream cable
쮿
Power cord
쮿
ELSA CD with INF files
쮿
Ferrous core
Please contact your dealer if any part is missing or damaged.
ELSA reserves the right to make changes to the package contents without prior notice.
Installation notice
The installation of the
ECOMO 22H99
is described in the enclosed Installation Guide. Of
particular interest is the USB port. The supplied USB cable establishes an additional connection between monitor and computer. Please note that the computer and the operating
system feature USB functions. (➞page 9).
Page 9
Introduction
ELSA ECOMO 22H99
3
CE conformity and FCC radiation standard
CE
This equipment has been tested and found to comply with the limits of the European
Council Directive on the approximation of the laws of the member states relating to electromagnetic compatibility (89/336/EEC) according to EN 55022 class B.
FCC
This equipment has been tested and found to comply with the limits for a Class B digital
device pursuant to Part 15 of the Federal Communications Commission (FCC) Rules.
CE and FCC
These limits are designed to provide reasonable protection against radio frequency interference in a residential installation. This equipment generates, uses, and can radiate
radio frequency energy. It may interfere with to radio communications if not installed and
used in accordance with the instructions. However, there is no guarantee that interference will not occur in a particular installation. If this equipment does cause interference
to radio or television reception (this can be determined by turning this equipment off and
on), the user is encouraged to try to correct the interference by one or more of the following measures:
쮿
Reorient or relocate the receiving antenna.
쮿
Increase the distance between this equipment and the receiver.
쮿
Connect the equipment to an outlet on a circuit other than that to which the receiver
is connected.
쮿
Consult your dealer or an experienced radio/TV technician.
쮿
Caution: To comply with the limits for an FCC Class B computing device, always use
a shielded signal cable.
Caution to the user: The Federal Communications Commission warns the user that changes or modifications to the unit not expressly approved by the party responsible for compliance could void the user's authority to operate the equipment.
Page 10

Introduction
ELSA ECOMO 22H99
4
Page 11
Aspects of your monitor
ELSA ECOMO 22H99
5
Aspects of your monitor
The front control panel
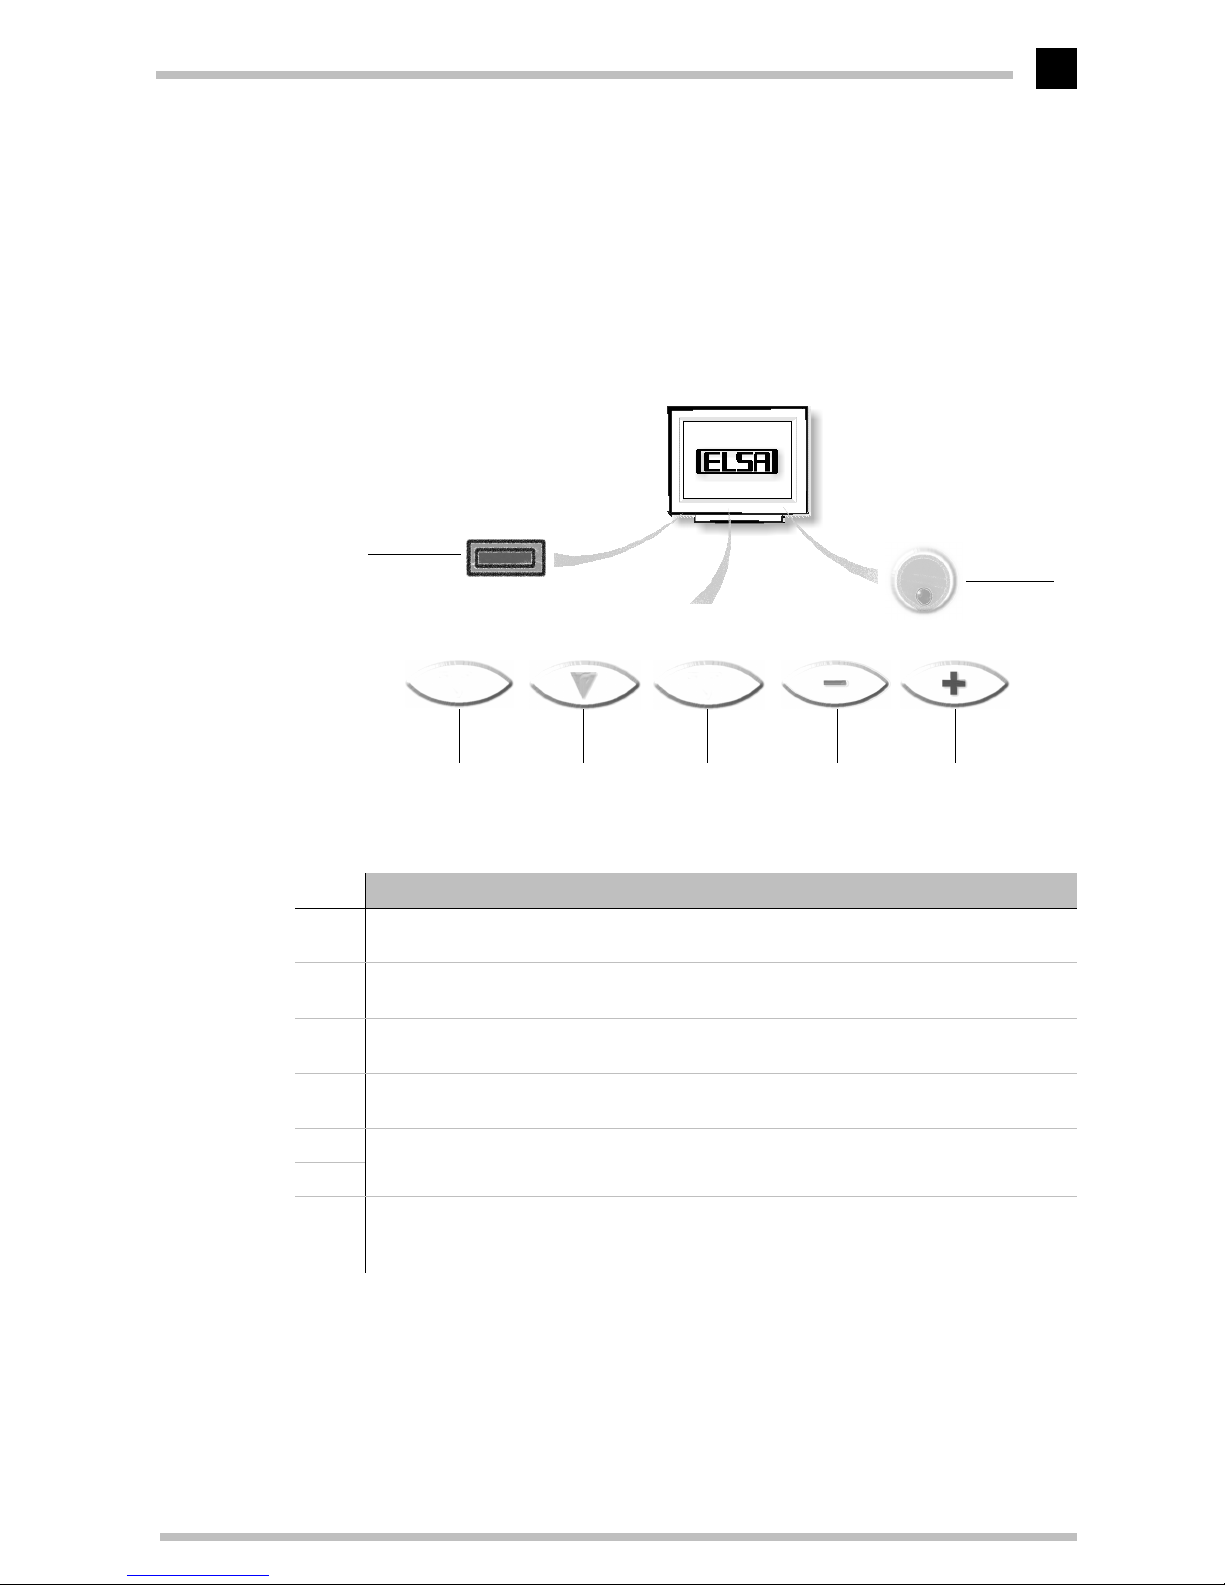
The lower front of the monitor features a row of switches and buttons which allow you
to tune the picture settings precisely.
쐋
쐏쐄
쐂쐇
ENTERBNC/D-SUB
쐃
쐆
SCROLL
왗
/ – – /
왘
Function
쐃
Downstream ports
To connect to USB equipped peripherals, e. g., USB camera, keyboard and printer, etc.
쐇
Input connector select key (BNC/D-SUB)
Press the BNC or D-SUB key to select the signal input connector.
쐋
Scroll key
Press this key to select the group icon in the main menu.
쐏
Enter key
Press this key to fix or to unfix the item icon.
쐄
Function adjust keys
Press the adjust keys to select the item icons and to adjust the image on the screen.
쐂
쐆
Power-On indicator
This indicator lights up green when the monitor power is on. It shows amber when the
monitor is in the power management modes.
Page 12
Aspects of your monitor
ELSA ECOMO 22H99
6
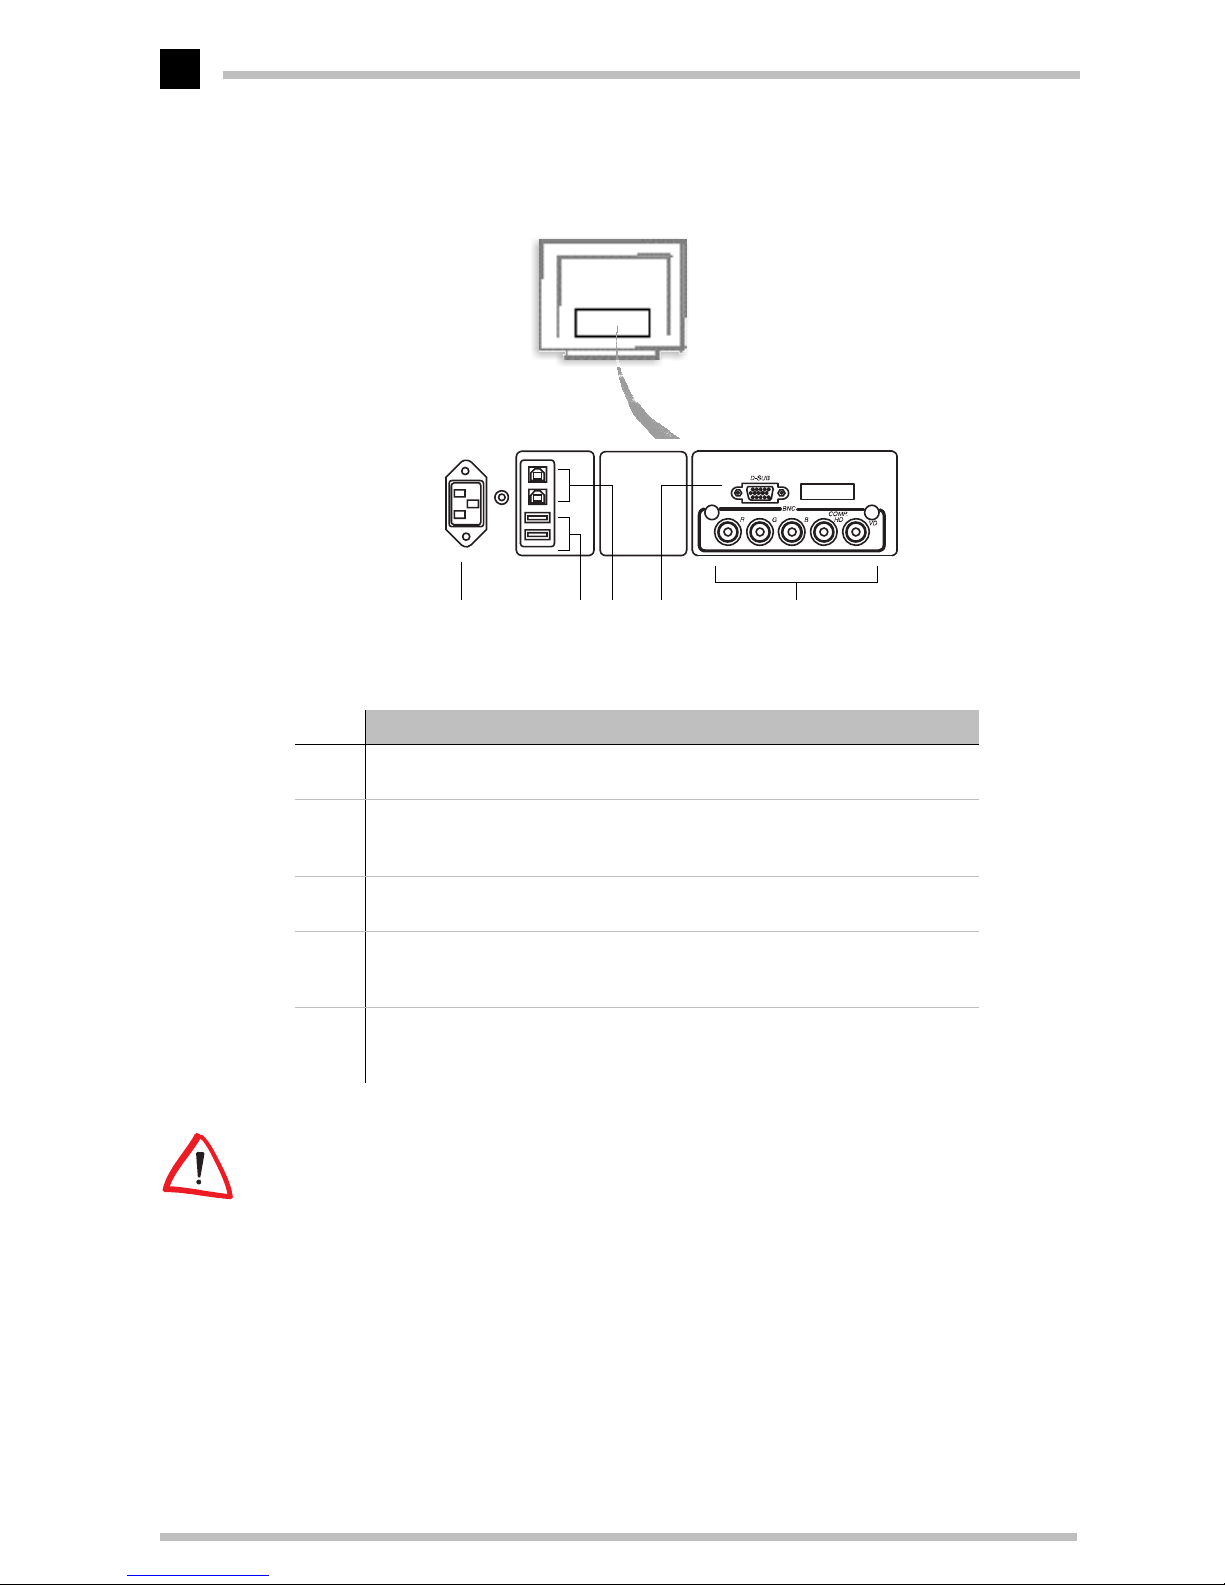
Rear connectors panel
Only graphics input 1 is DDC-compatible. This connection must be used for data about
the ECOMO 22H99 to be transferred.
쐃
쐇쐋
쐏쐄
Function
쐃
AC power connector
Plug the power cord in here.
쐇
Downstream ports
To connect to USB equipped peripherals, e.g. USB camera, keyboard, printer,
etc.
쐋
Upstream ports
To connect to USB equipped computers, please use the enclosed USB cable.
쐏
Signal input 1 connector (HD15, D-SUB)
Plug the cable carrying the signal from the graphics board to the monitor into
this socket.
쐄
Signal input 2 connector 2 (BNC)
A special BNC cable must be connected to these five sockets to connect the
monitor to the graphics board signal.
Page 13

Monitor installation
ELSA ECOMO 22H99
7
Monitor installation
The
ECOMO 22H99
supports USB and is provided with special software. In this chapter
you will learn more about USB and how to install the monitor under your operating system.
The USB function under Windows
What does USB stand for?
USB stands for “Universal Serial Bus“ and defines a new interface standard which is
clearly more convenient for the PC user. This increased convenience concerns the connection and configuration of peripheral devices. Up to 127 peripherals such as keyboard,
mouse, modem removable drives and digital cameras for videoconferencing can be connected to a USB system. With USB, each peripheral device is configured automatically.
The USB standard defines an uniform connector type, making special cables, proprietary
connectors and interfaces and special installation software unnecessary. This eliminates
the all-too-familiar cable spaghetti that can result and the risk of hardware damage due
to an incorrect connection. The fact that all the devices can be connected to each
other—similar to a network—is also a great advantage. It means a high degree of flexibility when planning the layout of the devices: Not all peripheral devices have to be connected centrally to the computer.
Who can use USB?
The USB function is available to you if your hardware and operating system support USB.
In this case, it is the Windows system that checks the hardware, sets up the USB and
controls the attached devices.
USB support is already integrated in Windows 98. This may be different with older versions of Windows 95, as not all versions support USB.
Page 14
Monitor installation
ELSA ECOMO 22H99
8
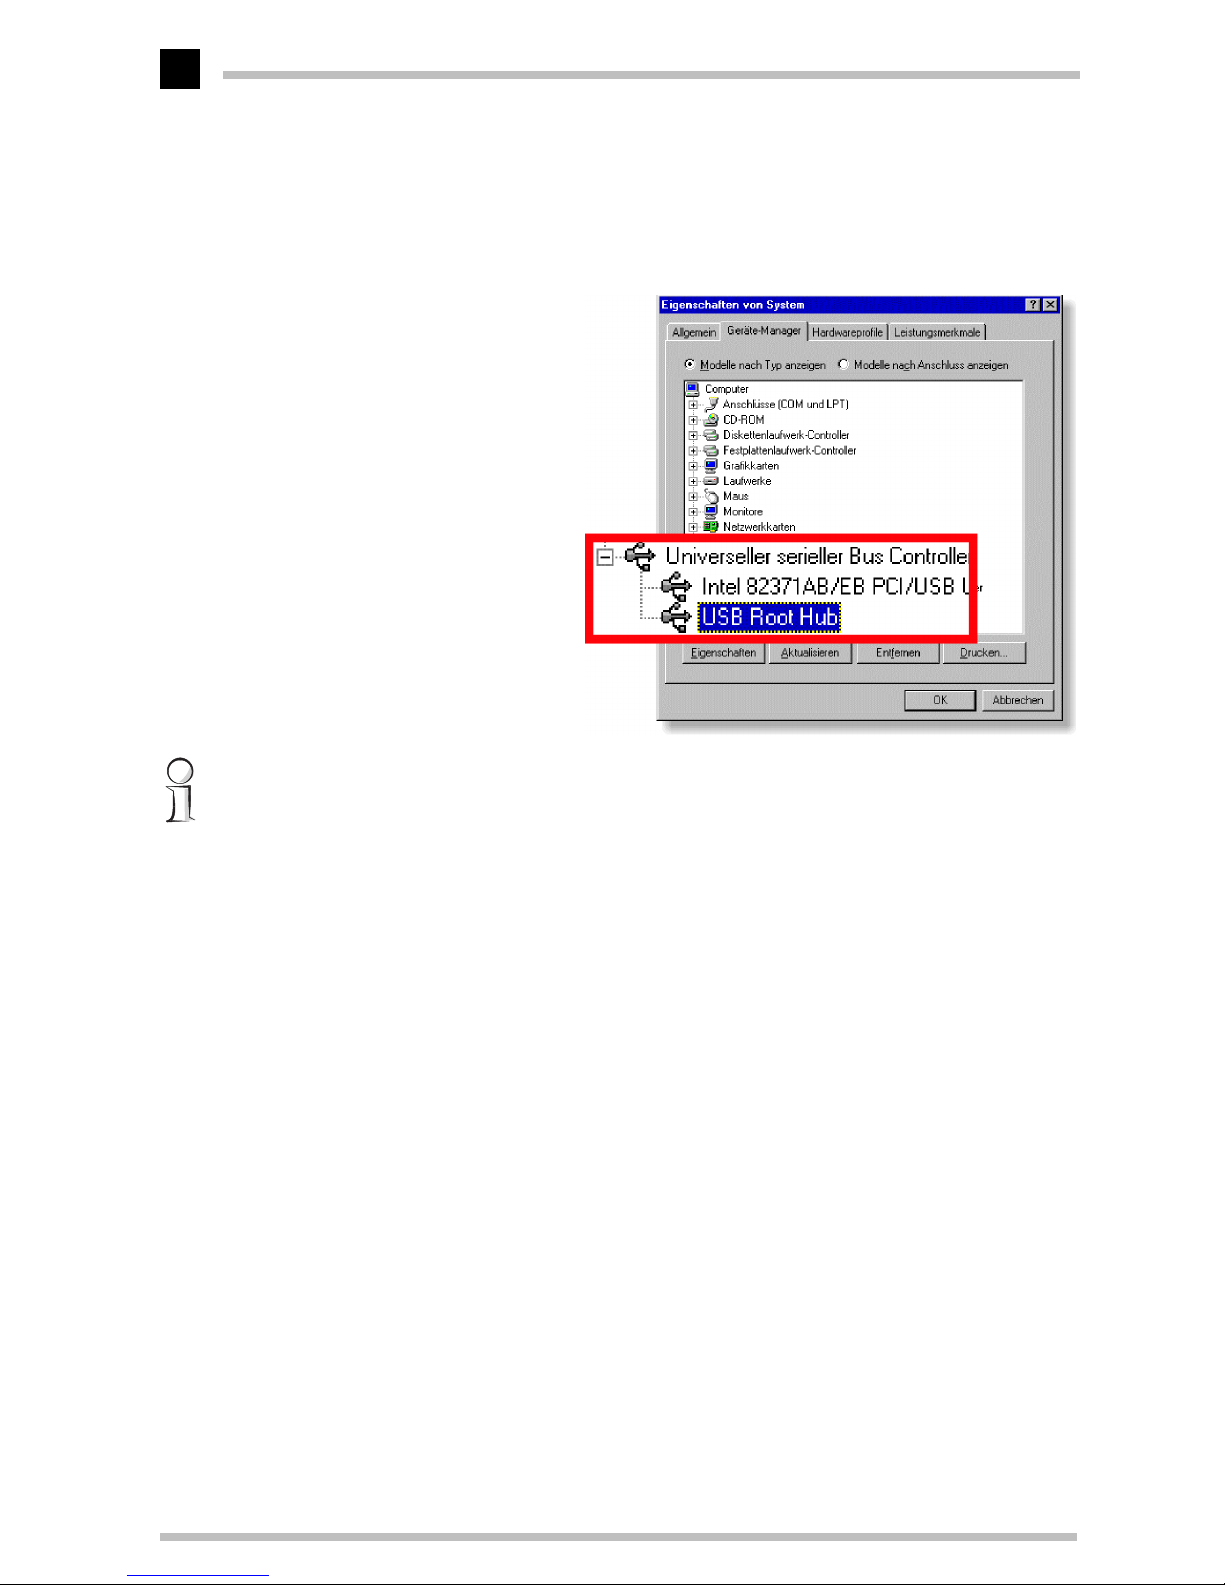
Checking for USB support
Open up the Control Panel by selecting
Start
왘
Settings
왘
System
. In the Device
Manager, view the list of devices available in the system.
For further information on USB please refer to www.usb.org.
The Windows system Device Manager shows you whether the USB
controller is installed or not.
Page 15
Monitor installation
ELSA ECOMO 22H99
9
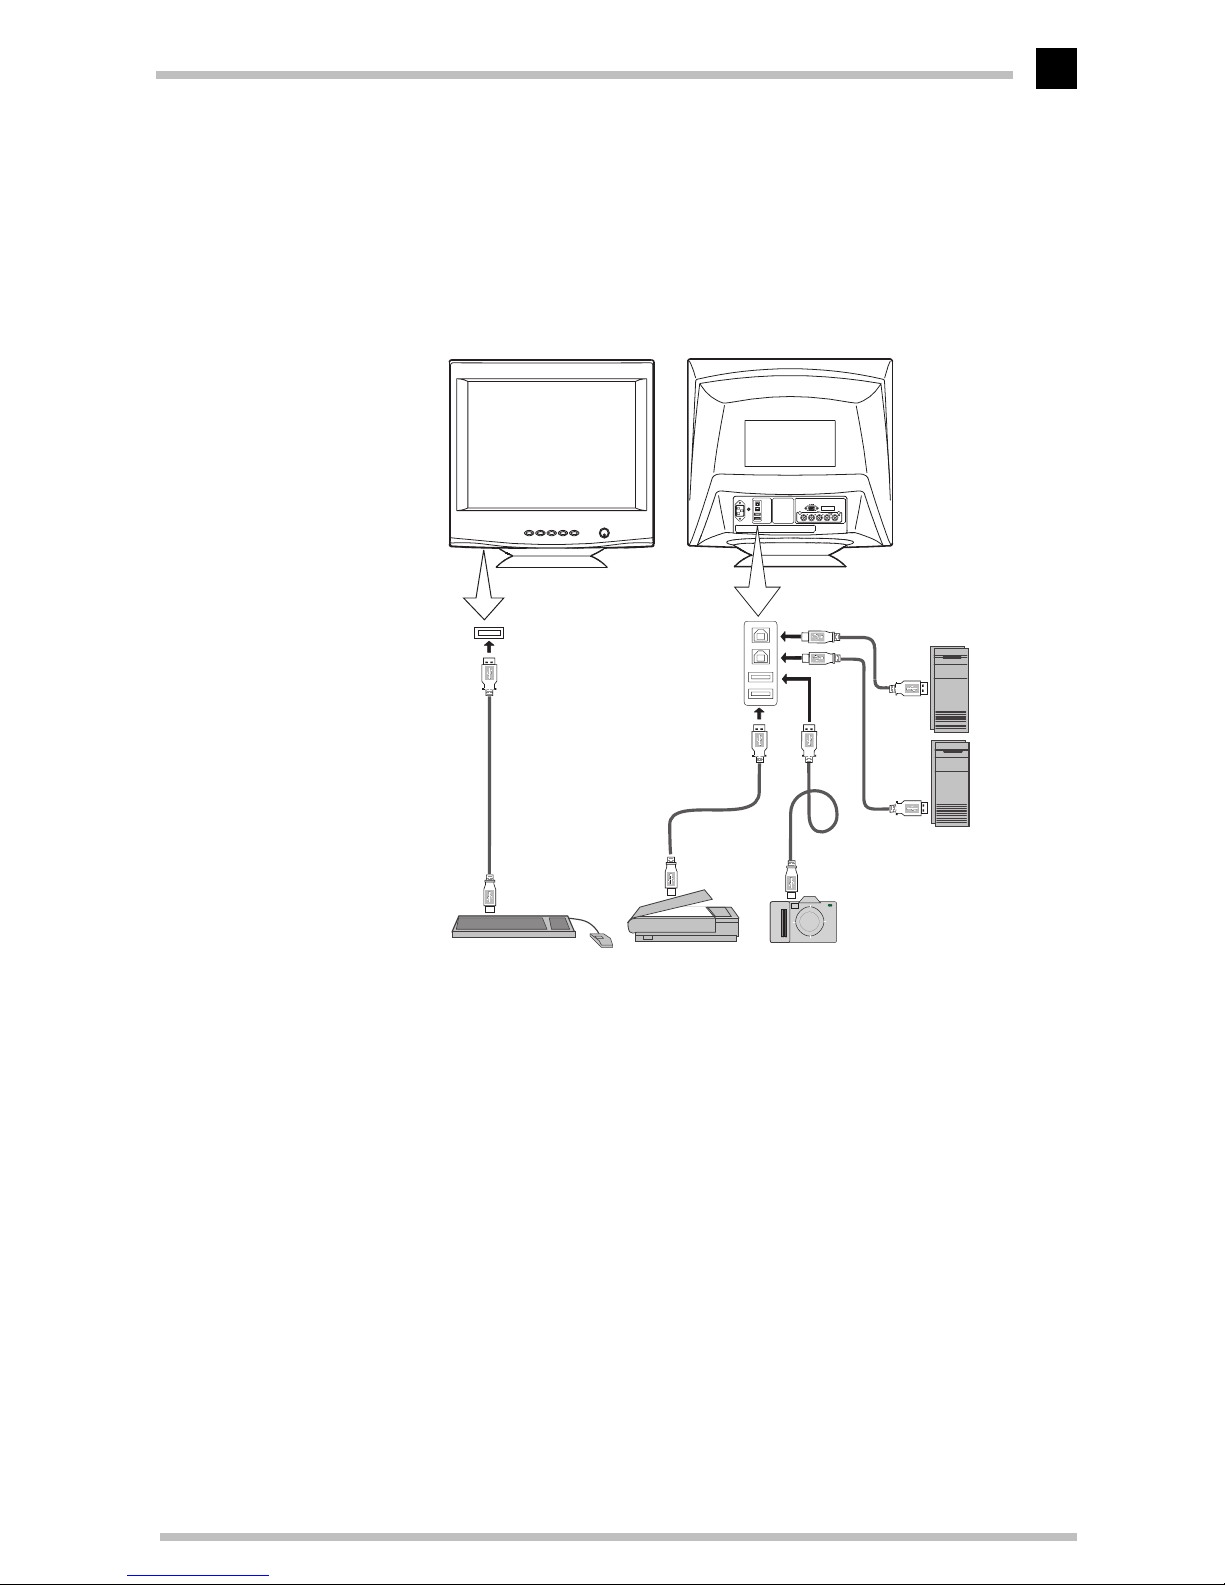
The USB connection
A USB cable for connecting your monitor to your computer is supplied. The following diagram shows the various options possible within a USB system:
If you use the supplied USB cable to connect your computer and ELSA monitor, it is recommended that you place the accompanying ferrous core around the cable. This core
reduces the electromagnetic interference from the monitor which would otherwise detrimentally effect the signal transmission.
햲
Place the ferrous core around the cable. Make sure that the separation between the
core and the monitor’s USB socket is at least 3 cm.
햳
Squeeze the core closed until it snaps shut.
Downstream port
Keyboard Scanner Digital camera
Computer
Upstream ports
Downstream ports
Page 16
Monitor installation
ELSA ECOMO 22H99
10
All under control
Among other things it is possible to configure the monitor conveniently via software. A
program with which you can configure the main display settings directly is included with
your ELSA monitor.
USB monitor installation
When you insert the supplied CD, the ELSA setup program usually starts up automatically. After you have specified the monitor type, you can select the component to be
installed in the list and click on
Install
.
If the program does not automatically start after the CD is inserted, you should run it manually. Select the CD drive in Explorer and start the CDSETUP.EXE program in the root
directory of the CD.
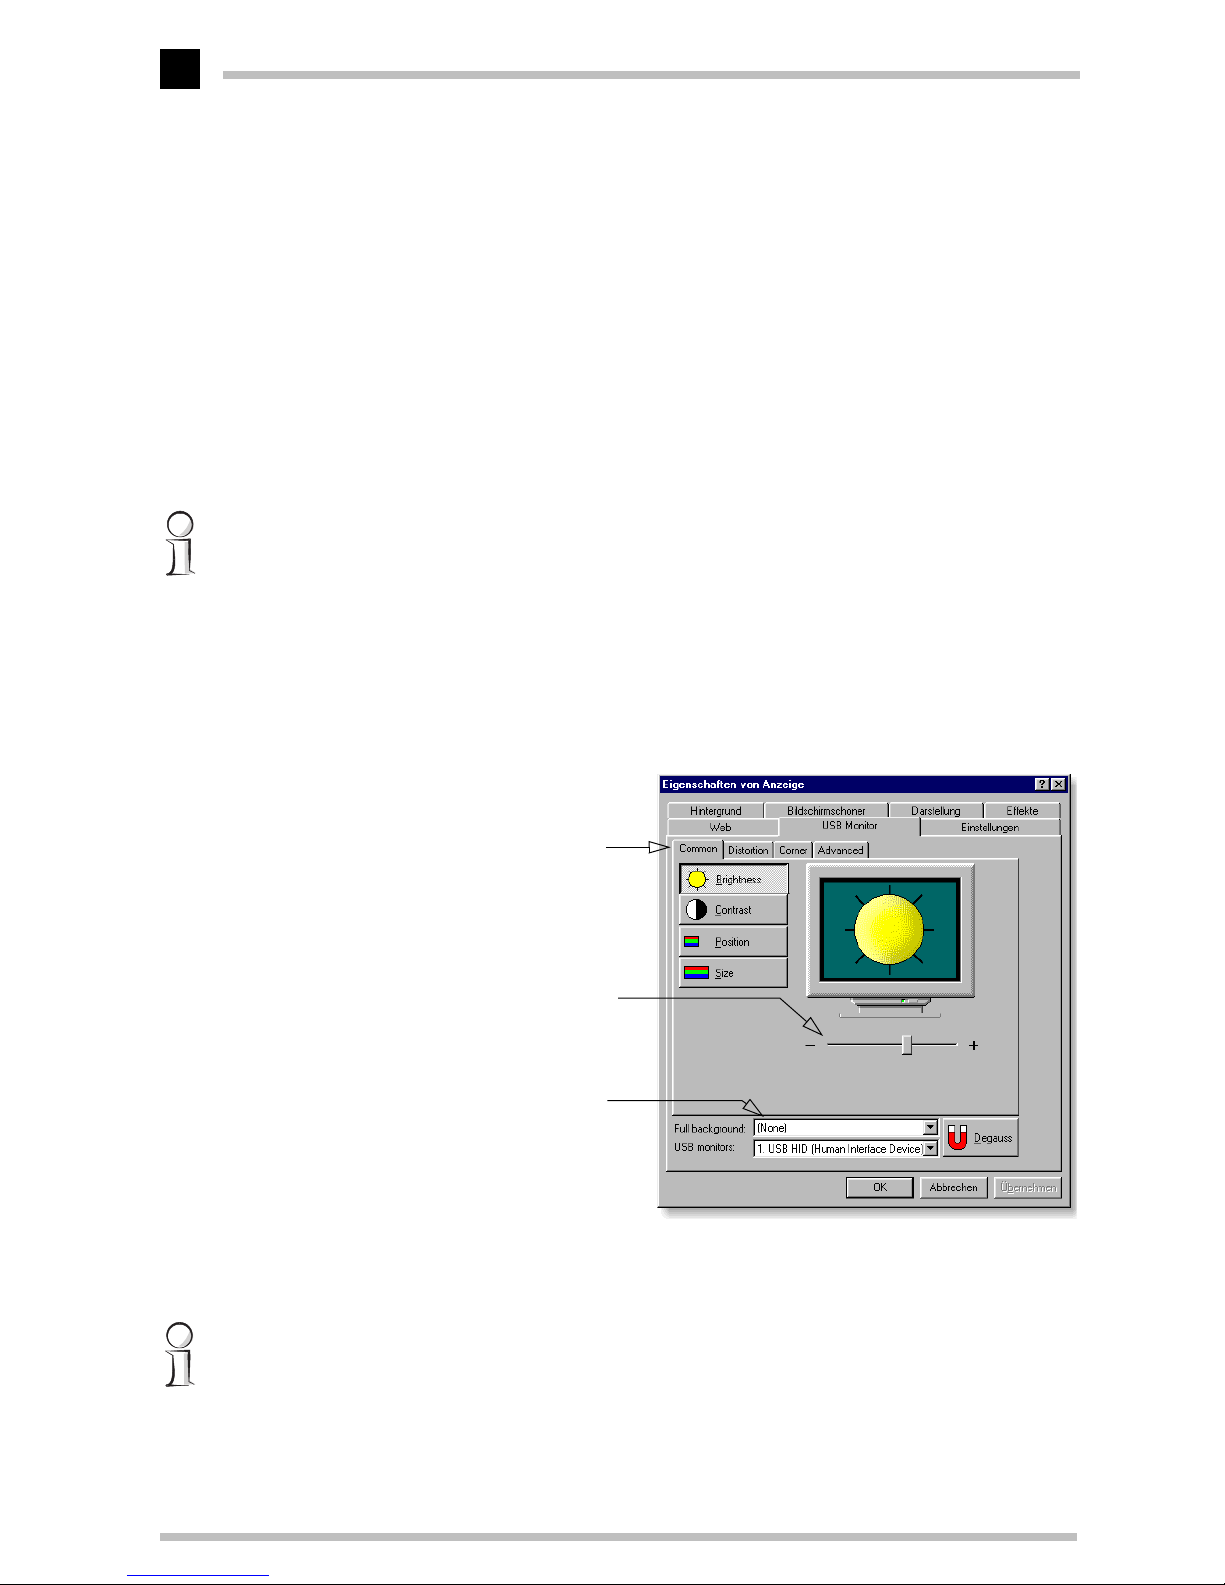
Configuring the display with a USB monitor
After the installation you will find the USB monitor in the Control Panel under Display
Properties. Select
Start
왘
Settings
왘
Control Panel
and start the
Display
program.
In the 'Display Properties' dialog box you will find the 'ECOMO 22H99 USB Monitor' tab.
Configuration using sliders is easy and intuitive. The resulting effects are displayed
immediately.
If you want to make display corrections in small increments you can use the arrow keys
(a) instead of the mouse to change the values gradually.
Feel free to experiment and try out the different possibilities. The settings are only saved
when you confirm them by pressing
Apply
or OK.
Increased clarity with tabs for each
individual display setting
arious test patterns and colors facilitate
onitor setup
Values are easy to set with sliders
Page 17

Monitor installation
ELSA ECOMO 22H99
11
An overview of the possible settings
쮿
Brightness
쮿
Contrast
쮿
Position and size
쮿
Display geometry and distortions
– Parallelogram effect
–Trapeze effect
– Rotation (Tilt)
– Pincushion Balance
Press the
Degauss
button to remove magnetic distortions from the display.
Page 18

Monitor installation
ELSA ECOMO 22H99
12
Page 19
The on-screen display
ELSA ECOMO 22H99
13
The on-screen display
The on-screen menu (OSD) makes light work of fine tuning the picture on your monitor.
The range of settings includes the simple brightness adjustment to the detailed correction of pin-cushion curvature or distortion. The on-screen display appears as soon the
'Menu' button on the control panel is pressed. Once in the on-screen display, you can
use the buttons to access the various pages of the menu.
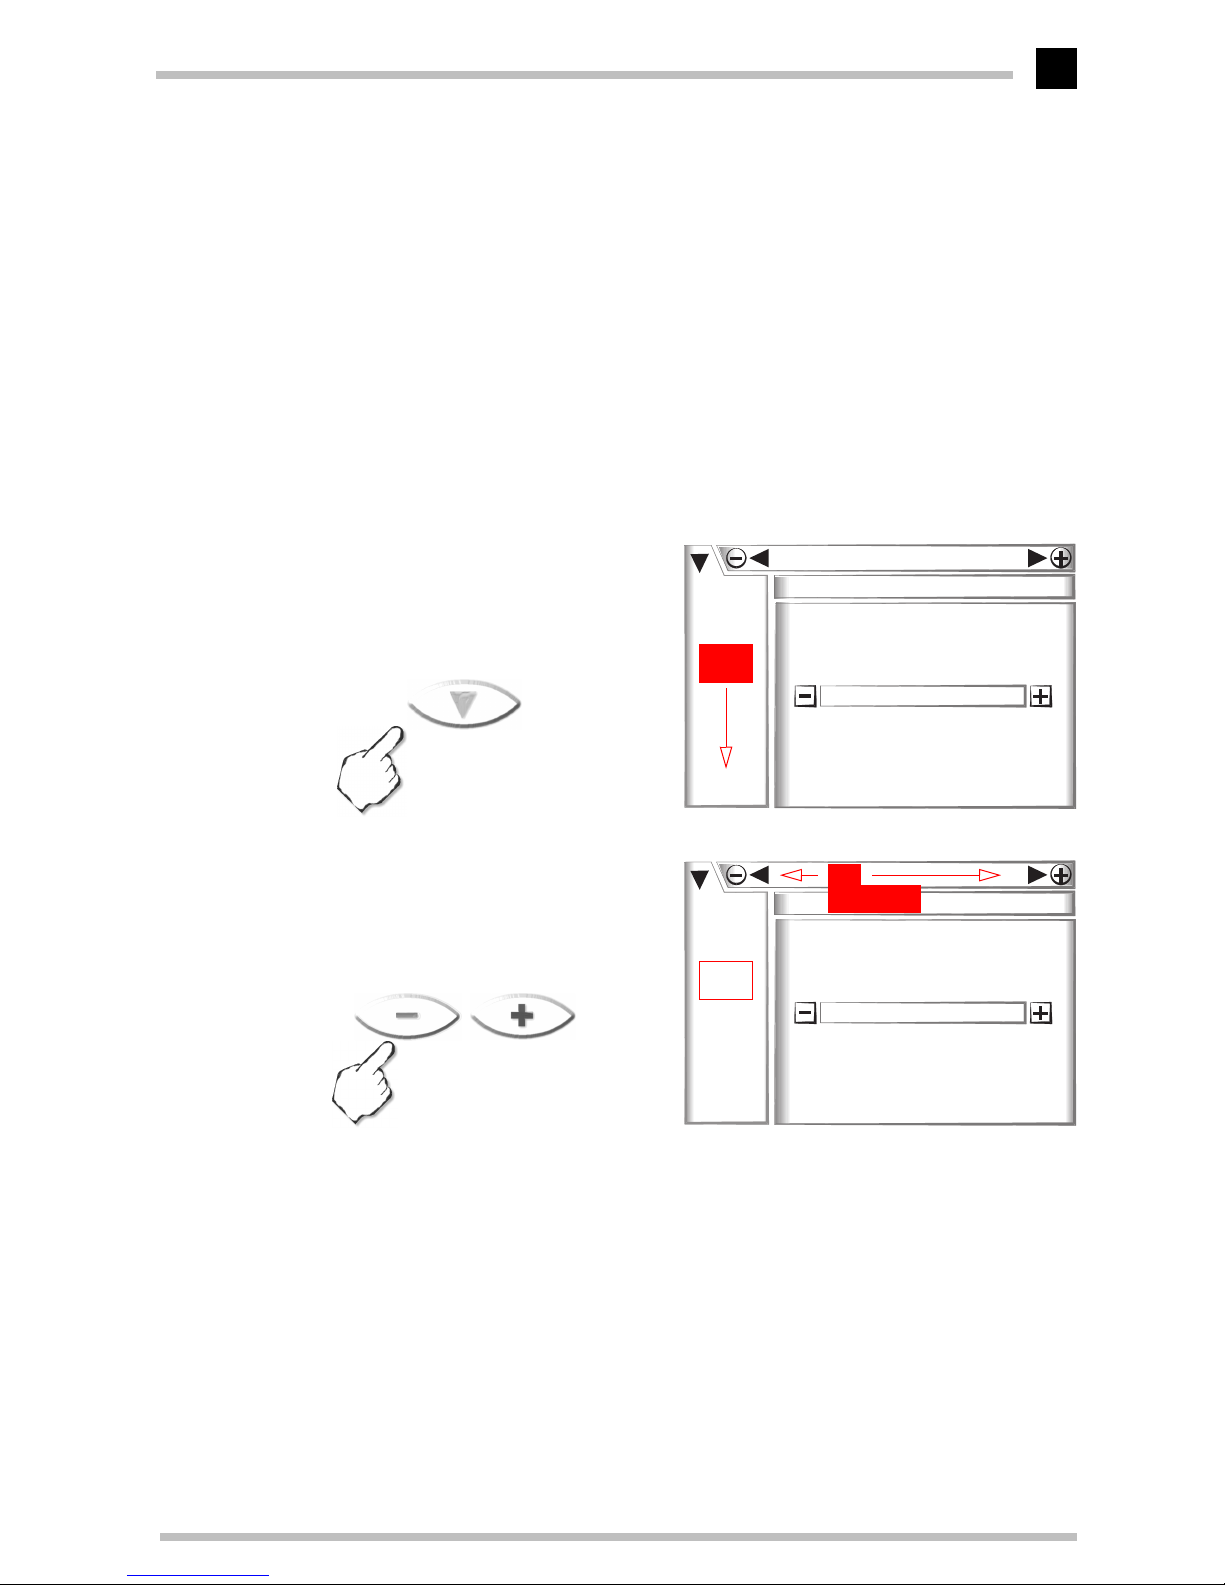
How to navigate the OSD
햲
Press any button to display the OSD screen.
햳
Select the group icon within the
main menu by pressing this button.
햴
Select the item within the sub
menu by pressing the +/- buttons.
SCROLL
왗
/ – – /
왘
Page 20
The on-screen display
ELSA ECOMO 22H99
14
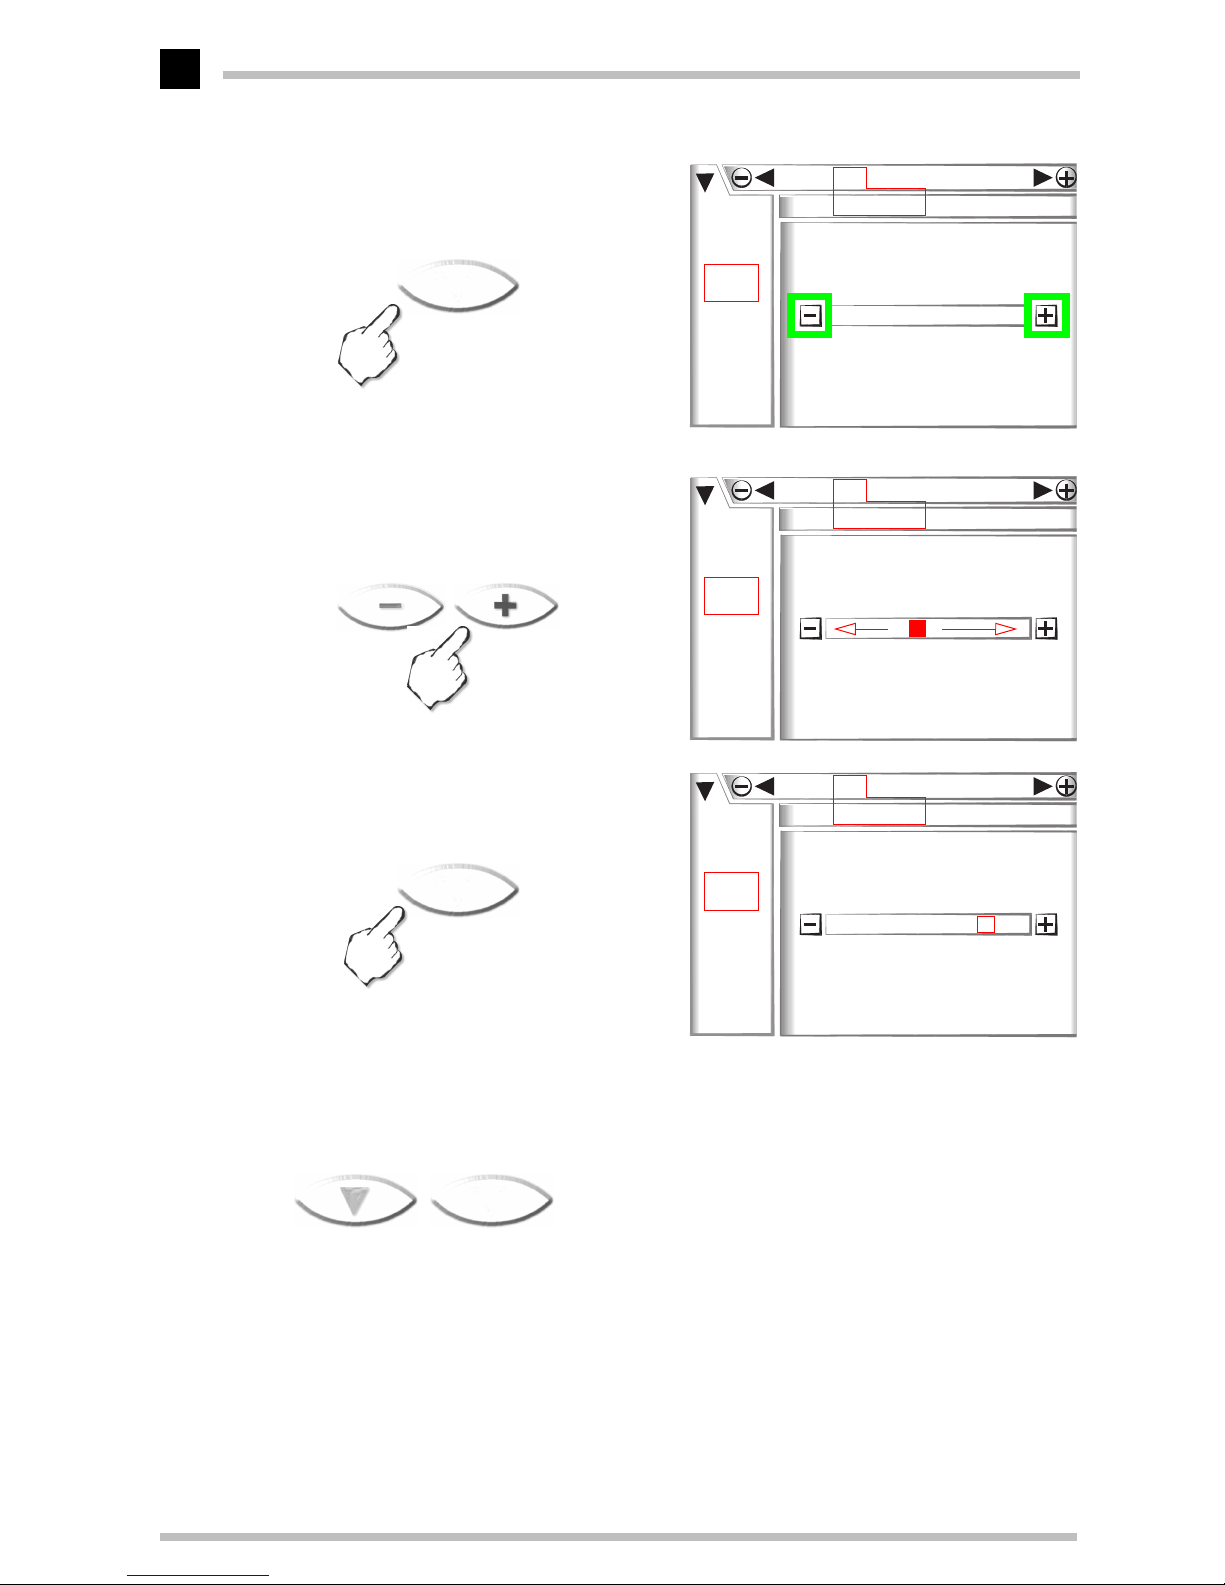
햵
Select the highlighted option by
pressing the ENTER button.
햶
Adjust values and functions by
pressing the +/- buttons.
햷
Confirm your selection by pressing the ENTER button.
After ten seconds of inactivity, the OSD screen automatically disappears. Press the following button combination to switch the OSD off immediately.
ENTER
왗
/ – – /
왘
ENTER
ENTER
SCROLL
Page 21
Monitor settings
ELSA ECOMO 22H99
15
Monitor settings
The monitor settings can be fine tuned according to your preferences. Don’t be afraid to
experiment with the monitor and try out all of the options for adjustment. If the picture
has gone completely astray, just press the RESET “emergency button” to restore the factory settings.
After switching on
Plug&Play
Modern graphics boards and the
ECOMO 22H99
can communicate using the DDC (Dis-
play Data Channel). The
ECOMO 22H99
can send its parameters to the graphics board
and, in turn, the graphics board ensures that the monitor operates at the highest possible
refresh rate for the resolution selected. This means that you will immediately get a picture that requires only minor adjustment. Check the fine tuning of the picture and make
adjustments for the relative light levels within your working environment.
You will now find out what settings are possible and how to solve any problems.
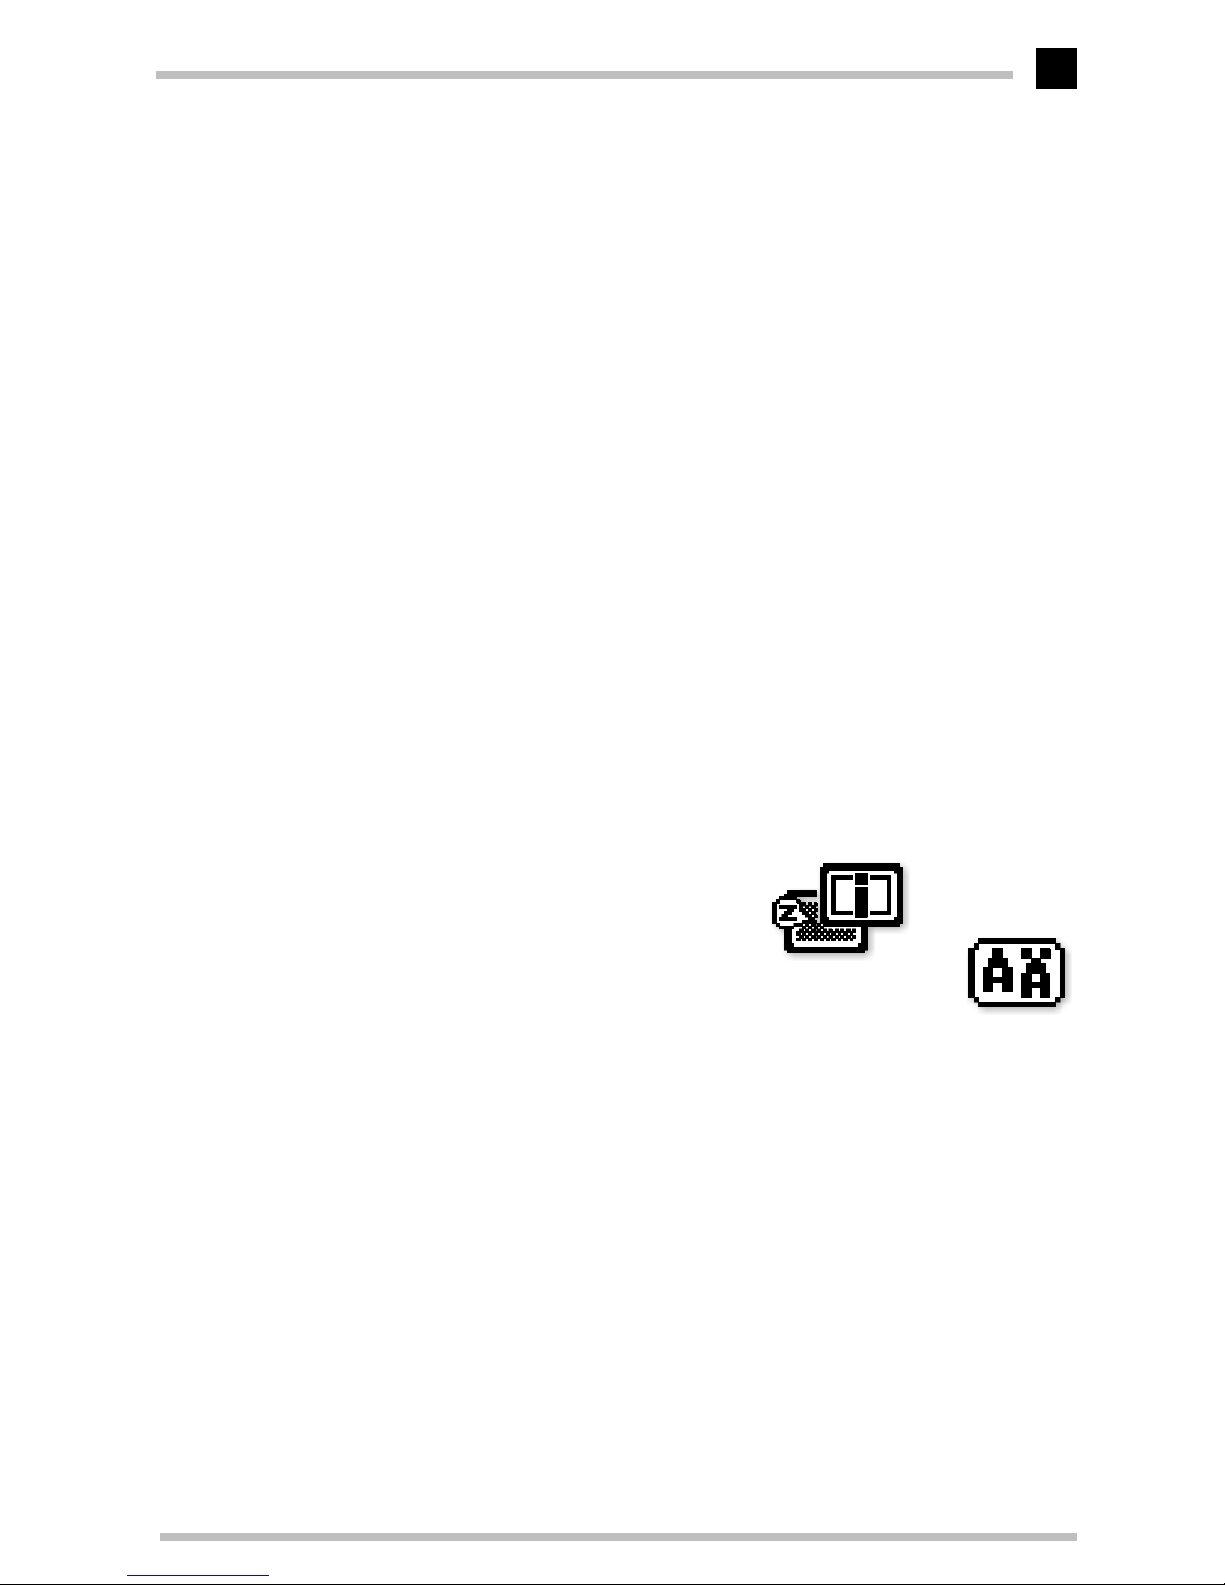
Language
The
ECOMO 22H99
can display its on-screen
menus in a variety of languages. To change the
language used for the on-screen menu, simply
call up the menu page illustrated here and
select the language you want.
왘
왔
Page 22
Monitor settings
ELSA ECOMO 22H99
16
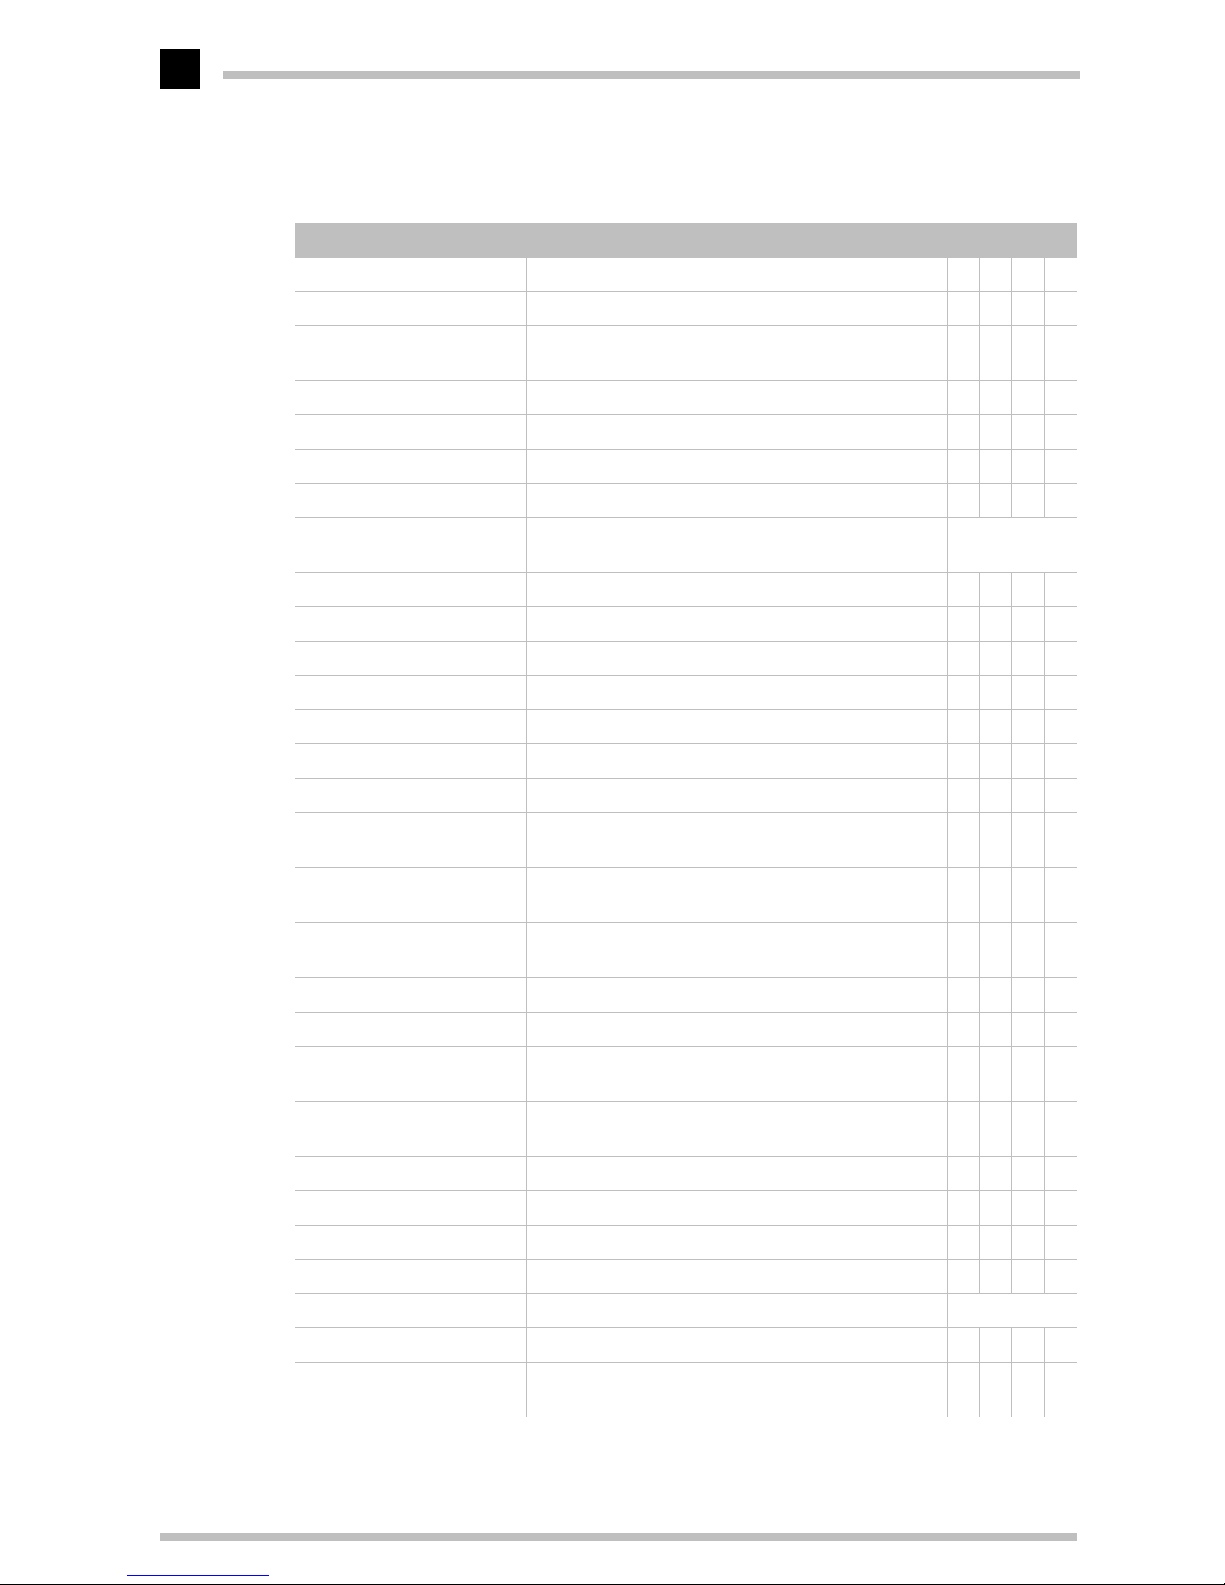
Adjustment functions
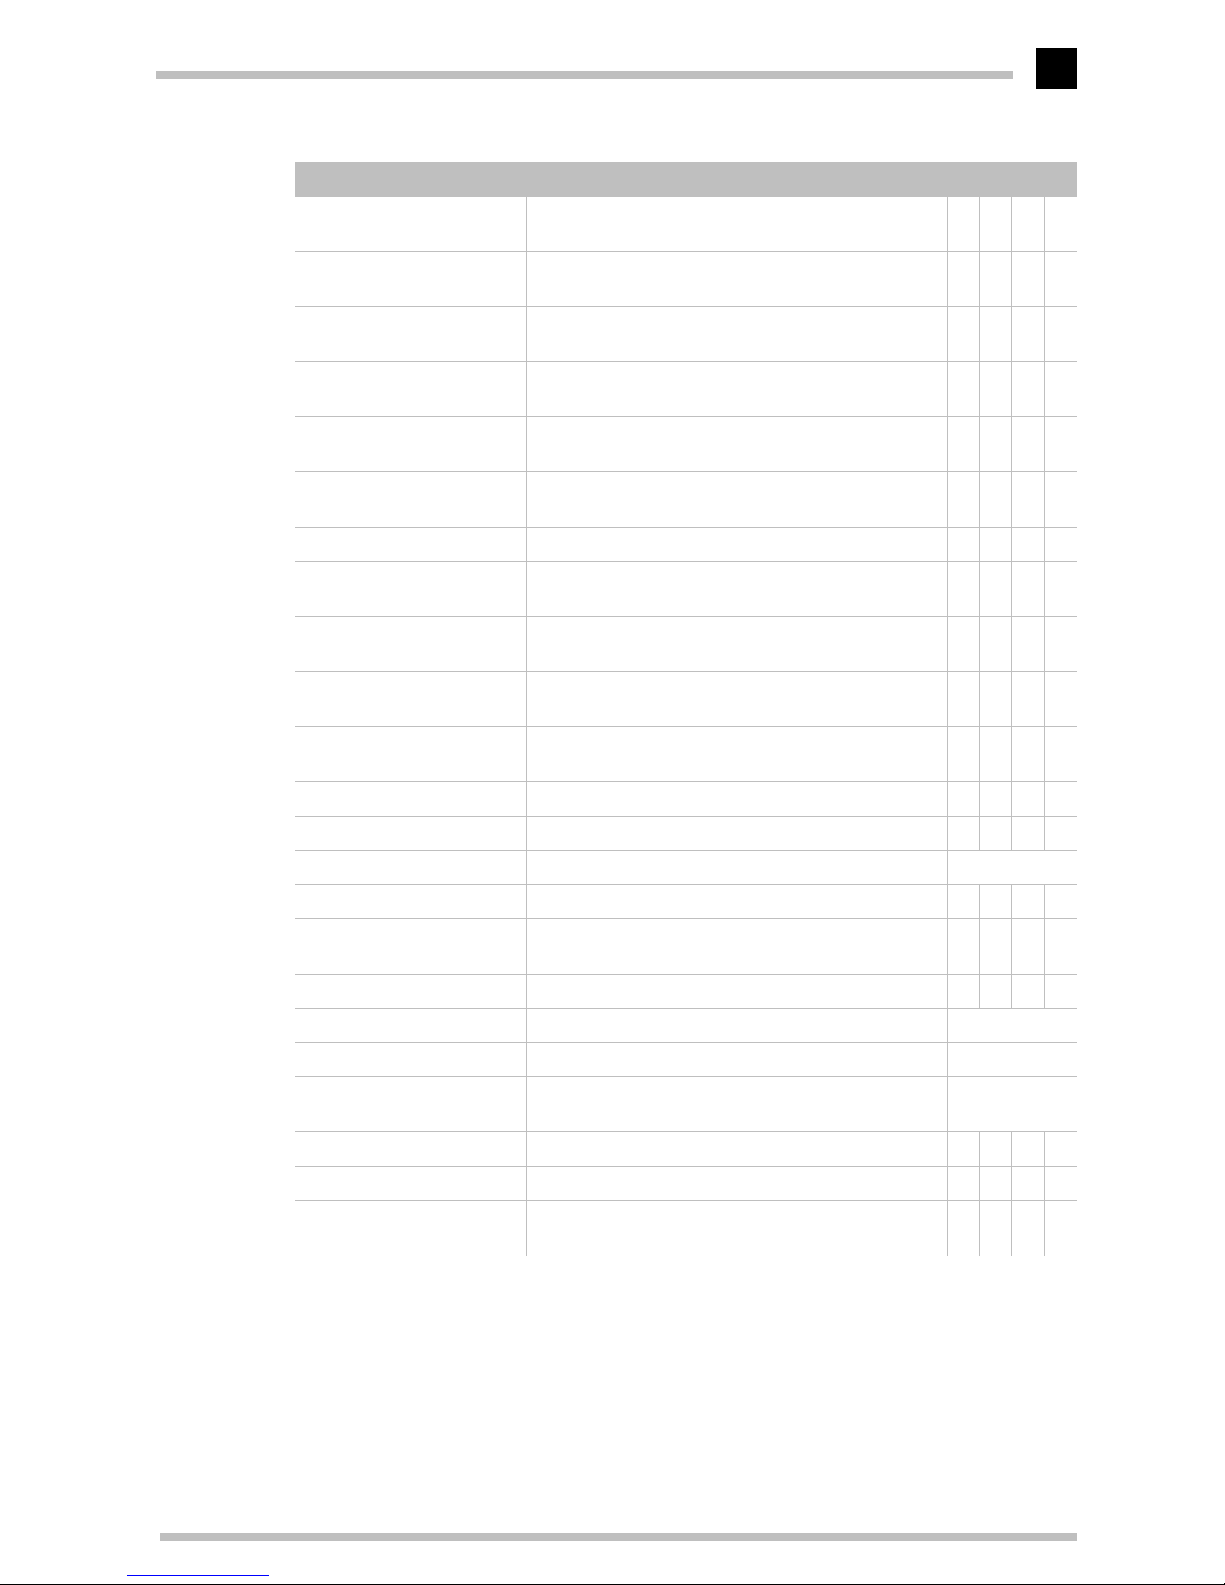
Function Available A B C D
CONTRAST Adjusts the contrast level.
✓✓✓
BRIGHT Adjusts the black level of the screen.
✓✓✓
COLOR NO Select the preferable color from Color 1, Color 2 and
Color 3
✓
R-GAIN Provides the red-color balances for the display.
✓✓✓
G-GAIN Provides the green-color balances for the display.
✓✓✓
B-GAIN Provides the blue-color balances for the display.
✓✓✓
COLOR TEMPERATURE Adjusts the color temperature
✓✓
COLOR RESET Restores each color gain and color temperature to the
factory settings.
–
H-SIZE Adjusts the horizontal size.
✓✓✓
H-PHASE Adjusts the horizontal position.
✓✓✓
H-POSITION Adjusts the horizontal position of the screen.
✓
V-SIZE Adjusts the vertical size.
✓✓✓
V-POSITION Adjusts the vertical position.
✓✓✓
PCC-AMP Straightens the left and right sides.
✓✓✓
PCC-PHASE Adjusts the parallelism of the left and right sides.
✓✓✓
PCC-CENTER Adjusts the pincushioning near the vertical center of
the screen.
✓✓✓
TOP-PCC Adjusts the pincushioning at the top corners of the
screen.
✓✓✓
BOTTOM-PCC Adjusts the pincushioning at the bottom corners of
the screen.
✓✓✓
PIN-BALANCE Adjusts the curvature of the left and right sides.
✓✓✓
KEY-BALANCE Adjusts the vertical slant or tilt.
✓✓✓
CORNER-BALANCE Adjusts the curvature of the left and right sides of the
image at the corners of the screen.
✓✓✓
PCC-CENTER-BALANCE Adjusts the curvature of the both sides of the image
at the center of the screen.
✓✓✓
V-LIN-BALANCE Centers the linearity of the vertical axis of the screen.
✓✓✓
V-LIN Adjusts the linearity of the vertical axis of the screen.
✓✓✓
ROTATION Adjusts the rotation.
✓✓✓
ZOOM Zooms the screen to all sides.
✓✓✓
GEOMETRY RESET Restores to the factory preset level. –
TEXT MODE To get a preferrable image for your work.
✓
H-CONVERGENCE Adjusts the horizontal alignment of the red, green
and blue beams.
✓✓✓
Page 23
Monitor settings
ELSA ECOMO 22H99
17
A.
Press "GEOMETRY RESET" to restore to the factory preset level.
B.
Press the plus and minus buttons together to restore to the factory preset level.
C.
Press "ALL RESET" to restore to the factory preset level.
D.
This data set is independent of changes to the signal timing.
V-CONVERGENCE Adjusts the vertical alignment of the red, green and
blue beams
✓✓✓
V-CONVERGENCE-TOP Adjusts the upper vertical alignment of the red, green
and blue beams.
✓✓✓
V-CONVERGENCE-BOTTOM Adjusts the bottom vertical alignment of the red,
green and blue beams.
✓✓✓
H-CONVERGENCE-RIGHT Adjusts the horizonta alignment of the red, green and
blue beams on the right part of the screen.
✓✓✓
H-CONVERGENCE-LEFT Adjusts the horizontal alignment of the red, green
and blue beams on the left part of the screen.
✓✓✓
MOIRE CANCEL When setting to ON, the moire level on the screen
can be decreased by the MOIRE CANCEL LEVEL
✓✓✓
MOIRE CANCEL LEVEL Adjusts the moire level on the screen.
✓✓
CORNER PURITY TL Adjusts the purity of the top-left corners of the
screen.
✓✓✓
CORNER PURITY TR Adjusts the purity of the top-right corners of the
screen.
✓✓✓
CORNER PURITY BL Adjusts the purity of the bottom-left corners of the
screen.
✓✓✓
CORNER PURITY BR Adjusts the purity of the bottom-right corners of the
screen.
✓✓✓
CLAMP PULSE POSITION Selects the position of the clamp pulse.
✓
VIDEO LEVEL Selects video level 1.0V or 0.7V.
✓
DEGAUSS Eliminates possible color shading or impurity. –
POWER-SAVE Activates the power save mode.
✓✓
OSD CONTROL LOCK Locks the OSD function to keep the OSD screen you
desired.
✓
OSD POSITION Moves the OSD screen position.
✓✓
ALL RESET Restores all items to the factory preset level. –
GTF AUTO ADJUST Adjusts the screen size and distortion automatically. –
DIAGNOSIS Indicates the current scanning frequency, user preset
timing number.
–
LANGUAGE Selects the language used on OSD screen.
✓
USB UP-STREAM Selects the upstream port which you want to use.
✓✓
USB PORT COMBINATION. Selects the combination of the upstream port and sig-
nal input connector.
✓✓
Function Available A B C D
Page 24
Monitor settings
ELSA ECOMO 22H99
18
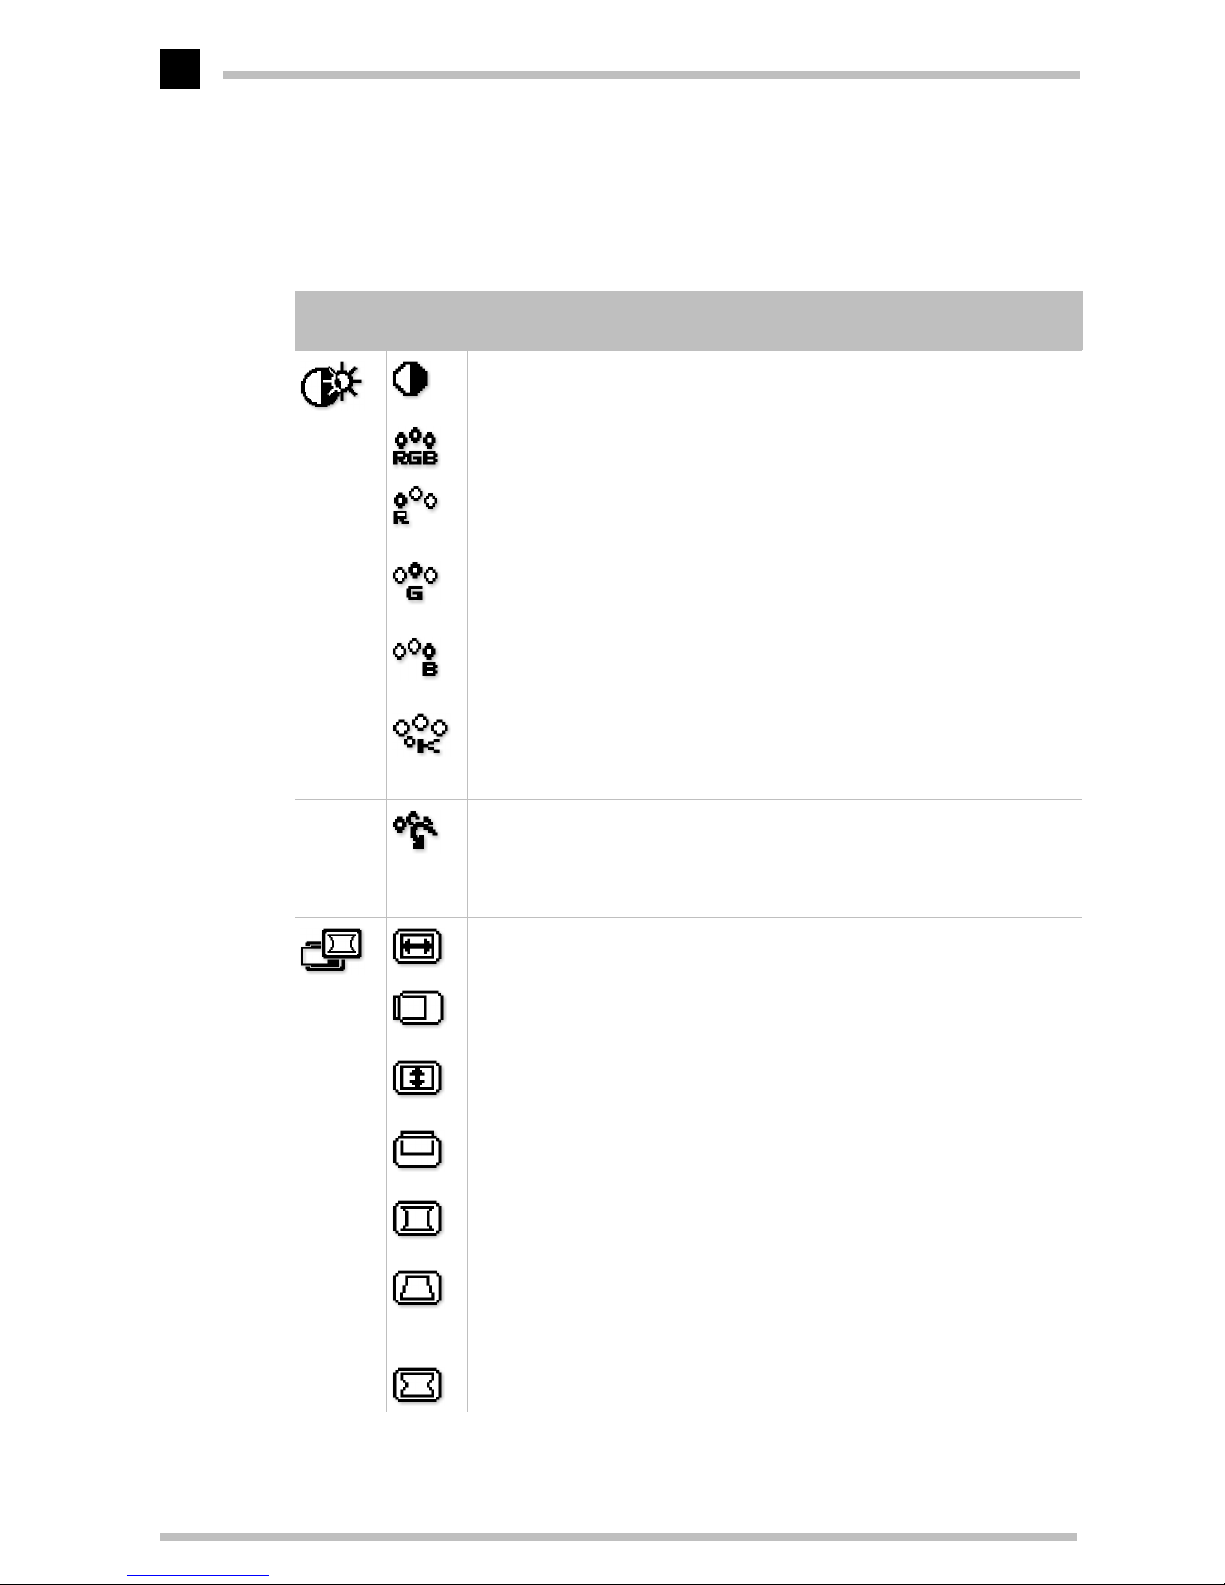
Overview of all pages
The following overview has been drawn up to help you navigate your way through the
nine menu pages and their contents.
Group
Icon
Symbol Function Key '–' Key '+'
CONTRAST
To decrease the contrast. To increase the contrast.
COLOR NO
To select color 1, color 2, color 3.
R-Gain
To decrease red color
level of the color mode
selected by "COLOR NO".
To increase red color level
of the color mode selected
by "COLOR NO".
G-Gain
To decrease green color
level of the color mode
selected by "COLOR NO.
To increase green color
level of the color mode selected by "COLOR NO.
B-Gain
To decrease blue color
level of the color mode
selected by "COLOR NO.
To increase blue color level
of the color mode selected
by "COLOR NO.
COLOR
TEMPERATURE
To decrease the color temperature of the color
mode selected by "COLOR
NO.
To increase the color temperature of the color mode
selected by "COLOR NO.
COLOR RESET
– To restore the color-gain
and color temperature of
the color mode selected by
"COLOR NO to the factory
preset.
H-SIZE
To narrow the width of the
image on the screen.
To expand the width of the
image on the screen.
H-PHASE
To move the image on the
screen to the left.
To move the image on the
screen to the right.
H-POSITION
To move the image to the
left.
To move the image to the
right.
V-POSITION
To move the image down. To move the image up.
PCC-AMP
To collapse the center of
the image.
To expand the center of the
image.
PCC-PHASE
To decrease the width at
the top of the screen
image and to increase the
width at the bottom.
To increase the width at
the top of the screen
image and to decrease the
width at the bottom.
PCC-CENTER
To narrow the center of
the image horizontally.
To expand the center of the
image horizontally.
Page 25
Monitor settings
ELSA ECOMO 22H99
19
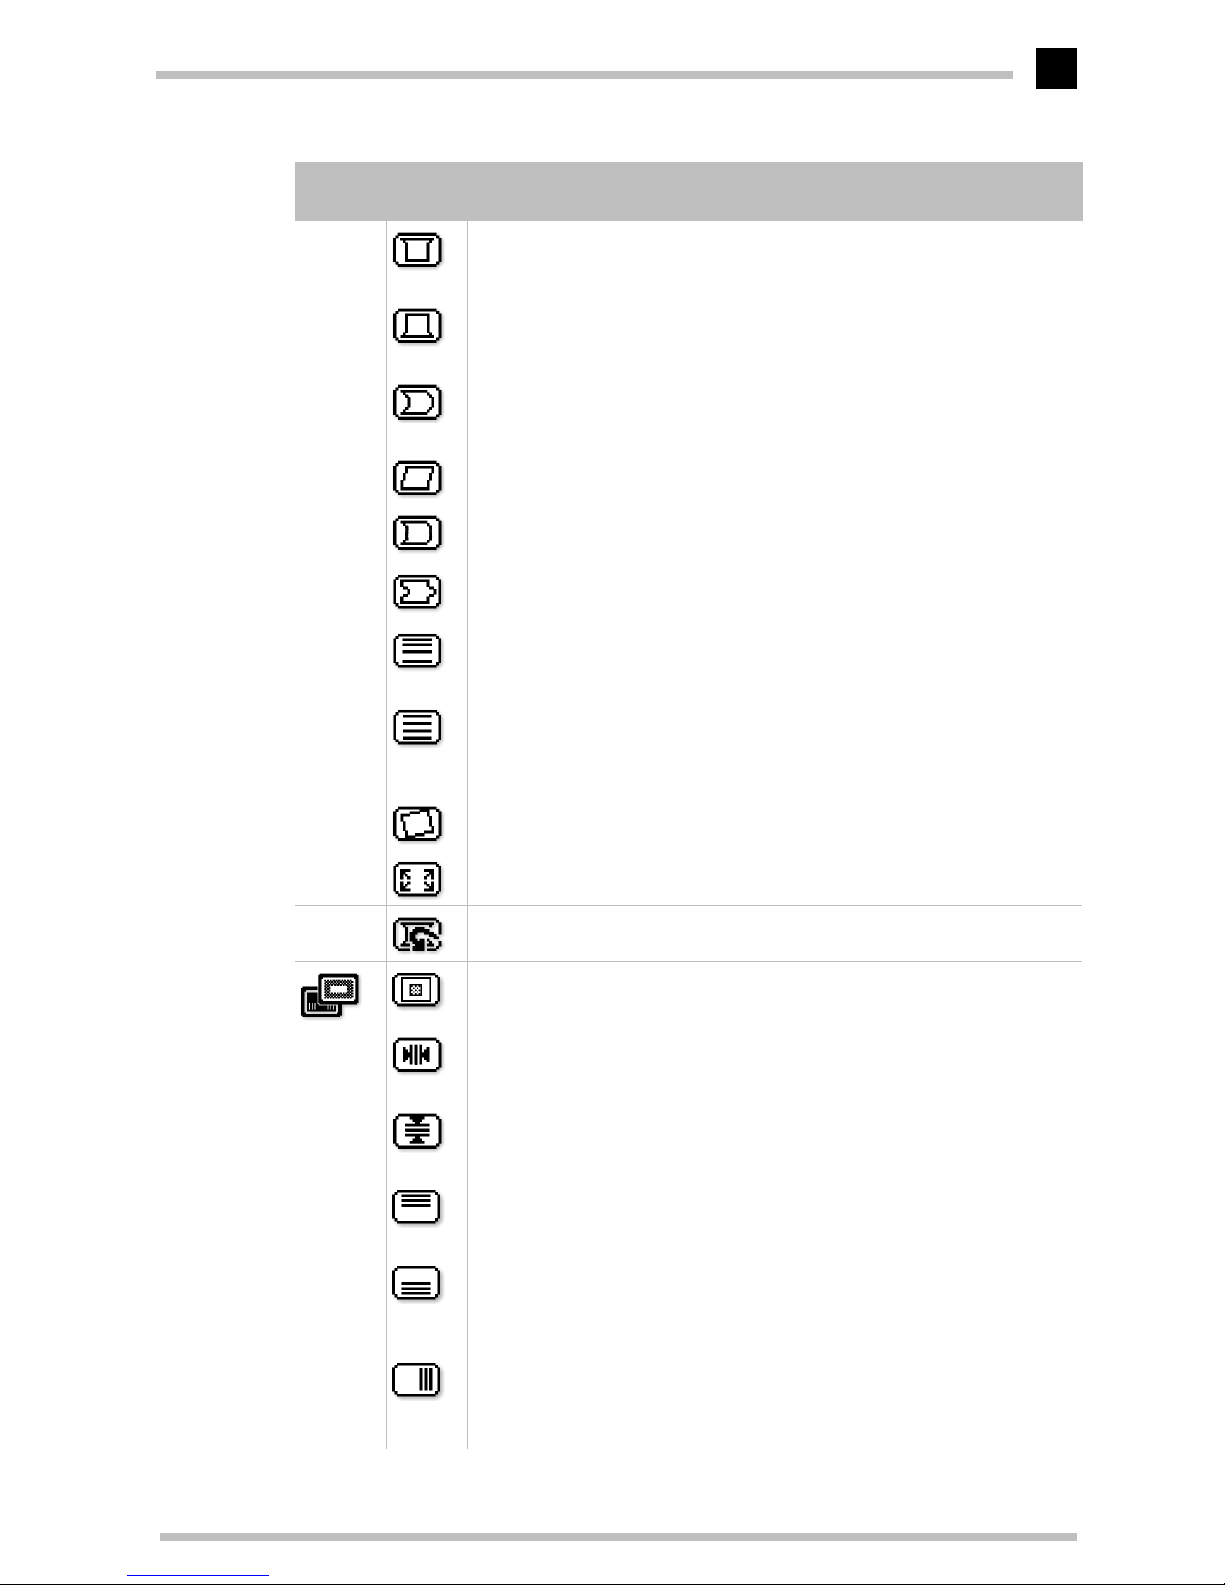
TOP-PCC
To expand the width of
the screen image near the
corners of top.
To narrow the width of the
screen image near the corners of top.
BOTTOM-PCC
To expand the width of
the screen image near the
corners of bottom.
To narrow the width of the
screen image near the corners of bottom.
PIN-BALANCE
To move the top and bottom of the screen image
to the right.
To move the top and bottom of the screen image to
the left.
KEY-BALANCE
To make the screen slant
to the left.
To make the screen slant
to the right.
CORNERBALANCE
To move the corners of the
screen image to the right.
To move the corners of the
screen image to the left.
PCC-CENTERBALANCE
To move the center of the
image to the left.
To move the center of the
image to the right.
V-LIN-BALANCE
To vertically expand the
bottom of the screen and
compress the top.
To vertically compress the
bottom of the screen and
compress the top.
V-LIN
To vertically compress the
center of the screen and
expand the top and bottom.
To vertically expand the
center of the screen and
compress the top and bottom.
ROTATION
To rotate the image counterclockwise.
To rotate the image clockwise.
ZOOM
To narrow the screen to
all sides.
To expand the screen to all
sides.
GEOMETRY RESET
– To restore to factory preset
level.
TEXT MODE
To select "SHARP" mode. To select "SMOOTH"
mode.
H-CONVERGENCE
To move the red to the left
and the blue to the right.
To move the red to the
right and the blue to the
left.
V-CONVERGENCE
To move the red to the
lower and the blue to the
upper.
To move the red to the
upper and the blue to the
lower.
V-CONVERGENCETOP
To move the red to the
lower and the blue to the
upper of top screen.
To move the red to the
upper and the blue to the
lower of top screen.
V-CONVERGENCEBOTTOM
To move the red to the
upper and the blue to the
lower on the bottom
screen.
To move the red to the
lower and the blue to the
upper on the bottom
screen.
H-CONVERGENCERIGHT
To move the red to the
right and the blue to the
left on the right part of
screen.
To move the red to the left
and the blue to the right on
the right part of screen.
Group
Icon
Symbol Function Key '–' Key '+'
Page 26
Monitor settings
ELSA ECOMO 22H99
20
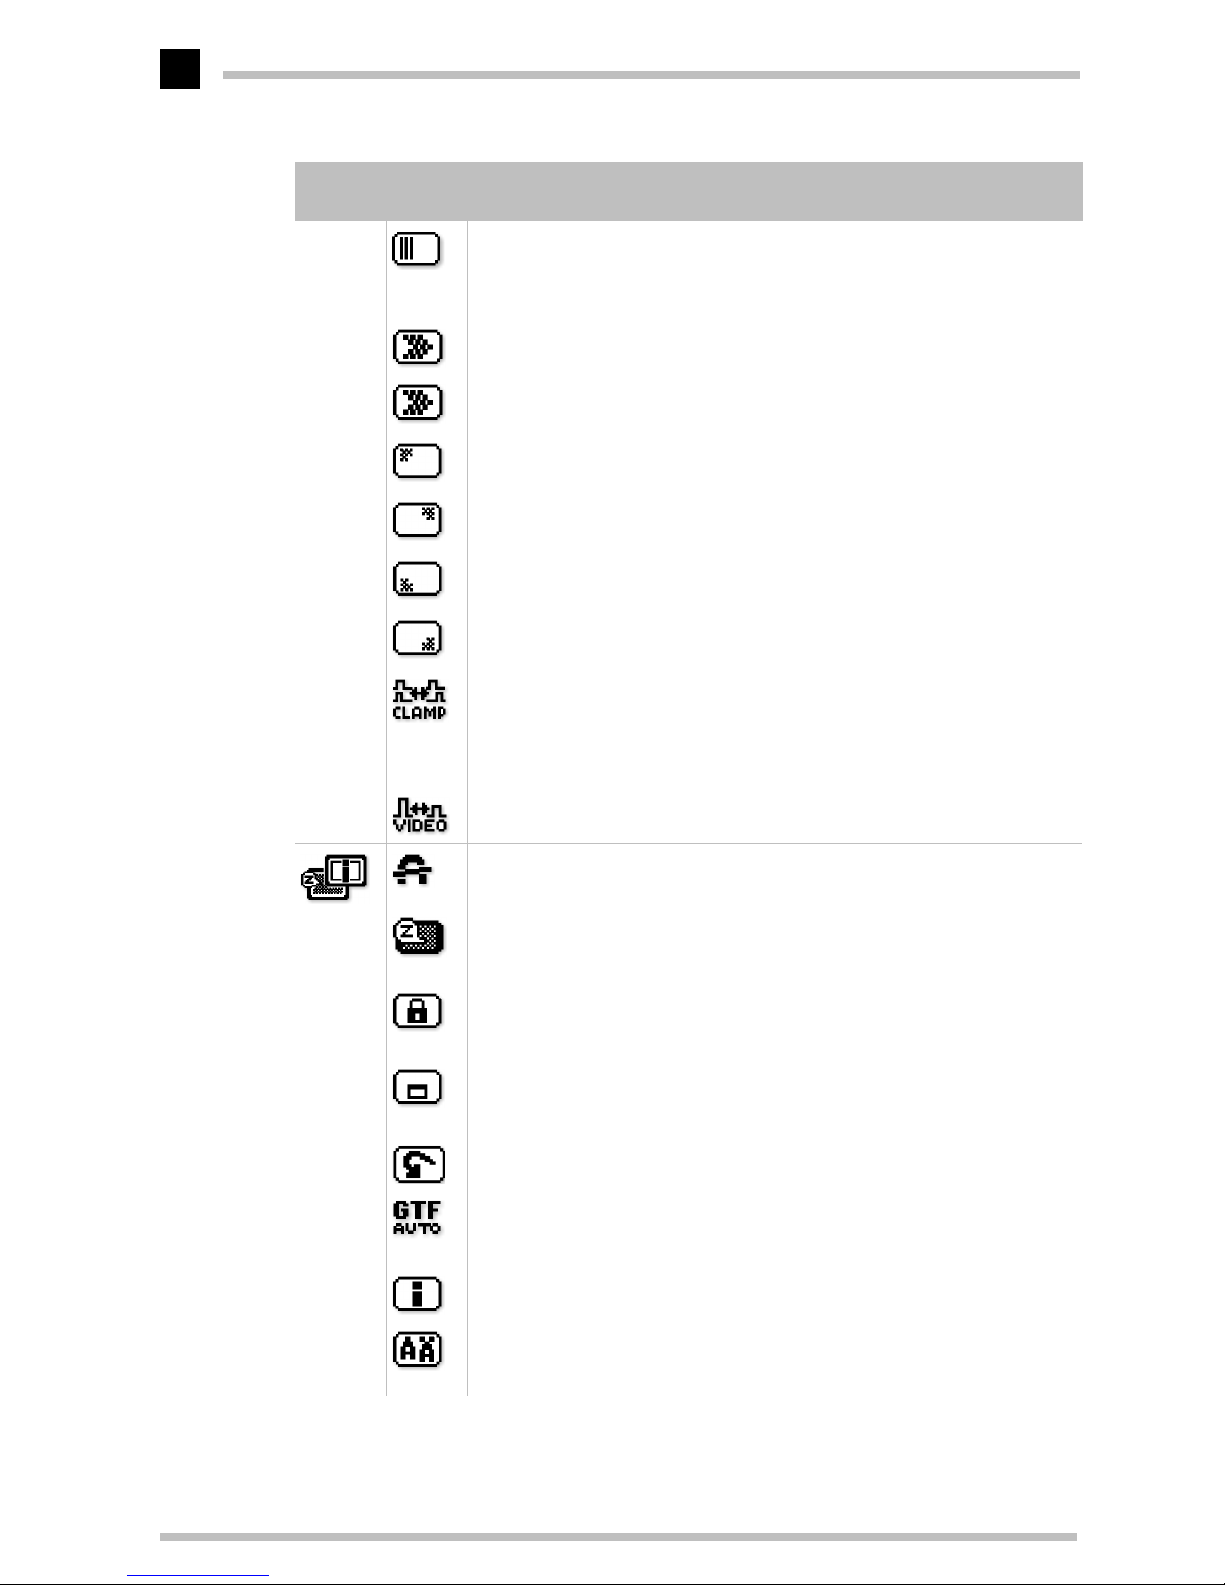
H-CONVERGENCELEFT
To move the red to the left
and the blue to the right
on the left part of screen.
To move the red to the
right and the blue to the
left on the left part of
screen.
MOIRE CANCEL
To select the Moire Cancel mode off.
To select the Moire Cancel
mode on.
MOIRE CANCEL
LEVEL
To decrease the level of
the moire-clear wave.
To increase the level of the
moire-clear wave.
CORNER PURITY
(TL)
To adjust the purity condition on the top-left corner.
CORNER PURITY
(TR)
To adjust the purity condition on the top-right corner.
CORNER PURITY
(BL)
To adjust the purity condition on the bottom-left corner.
CORNER PURITY
(BR)
To adjust the purity condition on the bottom-right corner.
CLAMP PULSE
POSITION
To clamp the video signal
at the front of the H-Sync
pulse.
To clamp the video signal
at the back of the H-Sync
pulse. If you connect to
Macintosh, press plus
buton.
VIDEO LEVEL
To select 1.0V of video
input.
To select 0.7V of video
input.
DEGAUSS
– To eliminate possible color
shading or impurity.
POWER SAVE
To select the constant
power consumption
mode.
To select the power-save
mode.
쐃
CONTROL LOCK
To unlock the OSD
function.
To lock the OSD function
except for "BRIGHTNESS"
and "CONTRAST".
OSD POSITION
To move the OSD screen
position in a counter
clockwise direction.
To move the OSD screen
position in a clockwise
direction.
ALL RESET
– To restore all items to the
factory preset.
GTF AUTO ADJUST
– To adjust screen size, posi-
tion and distortions automatically.
DIAGNOSIS
It shows the current scanning frequency, Preset No.,
and signal input connection.
LANGUAGE
To choose the language used on OSD.
ENG......English, FRA......French,ESP......Spanish,
ITA......Italian,GER......German,JPN......Japanese
Group
Icon
Symbol Function Key '–' Key '+'
Page 27
Monitor settings
ELSA ECOMO 22H99
21
쐃
This locks the OSD function to prevent changes being made to your settings.
Press the plus button to lock the OSD function. You can adjust only "BRIGHTNESS" and "CONTRAST" in
this state. Press minus button to unlock the OSD.
쐇
The active upstream port is colored blue in the OSD.
In case that either the upstream port ROOT-A or ROOT-B is chosen by this function, the auto-change of
the upstream port is not available.
It may take about 15 seconds until the USB devices have been recognized by the computer after the upst-
ream port is changed.
쐋
Ensure the operation of the devices connected to the downstream ports before changing USB upstream
ports. It may take approximately 15 seconds until the devices have been recognized by the computer and
start to operate after the upstream ports are changed.
Do not change the upstream ports during recognition to prevent errors of the operation of devices or
application software.
Close all Windows programs before changing upstream ports.
쐇
USB UP-STREAM
THE USB functions of the
computer connected to
Upstream port ROOT-A
become active.
THE USB functions of the
computer connected to
Upstream port ROOT-B
become active.
쐋
USB PORT
COMBINATION
The Upstream port ROOTA is assigned to signal
input connector D-SUB
and ROOT-B is assigned to
BNC.
The Upstream port ROOTA is assigned to signal
input connector BNC and
ROOT-B is assigned to DSUB.
Group
Icon
Symbol Function Key '–' Key '+'
Page 28

Monitor settings
ELSA ECOMO 22H99
22
Page 29
An optimized working environment
ELSA ECOMO 22H99
23
An optimized working environment
You have already taken a significant step towards this goal: you have acquired a monitor
with technology guaranteeing optimized ergonomics and a minimum of stress at your
place of work. Equally important is the overall arrangement of your working environment,
which includes some basic rules about working with a monitor.
The ELSA ECOMO 22H99 complies with the latest EU ergonomics guidelines (90/270/
EEC) for work places with monitors, which came into effect on the 1.1.97.
Monitor picture quality
The screen must display a stable picture. How can you check this? Simply focus on a
fixed point next to your screen. If you can see a perceptible flickering of the picture, you
can try and adjust the brightness and contrast to stabilize the picture. If this does not
help, then try to increase the display refresh rate with your graphics card driver.
Tips for an ergonomic working environment
Lighting in your working environment
The lighting in your place of work should not perceptibly flicker. Avoid placing monitors
directly next to windows and be sure that there is the possibility to reduce the intrusion
of strong sunlight such as with a blind. When arranging desks, make sure that the direction of view is parallel with the lighting. The direction of view to the monitor should be
parallel to the windows. Glare and reflections can be reduced by an anti-reflective layer
(Lambda/4 anti-reflection) on the screen.
You can check whether or not your place of work meets these basic rules:
쮿
Are you facing a window when looking at your monitor?
쮿
Does your monitor screen show any reflections from windows or lighting?
Page 30
An optimized working environment
ELSA ECOMO 22H99
24
The work desk
The top of the work desk should be at a height of 72cm. The desk top should be around
80 cm deep and of sufficient length. There should be a suitable separation between the
operator and the monitor which, for a 17" monitor, is recommended to be at least 45cm
and for a 21“ monitor, should be about 80cm.
The seating position
The seating position is most important for work in comfort and without problems. A rule
of thumb is: sit with a straight back and ensure that your arms and legs are bent at approximately 90°. Your feet should also rest flat on the floor.
It is important that you frequently shift your seating position – to practice the so-called
"dynamic sitting" – and that you stand up once in a while.
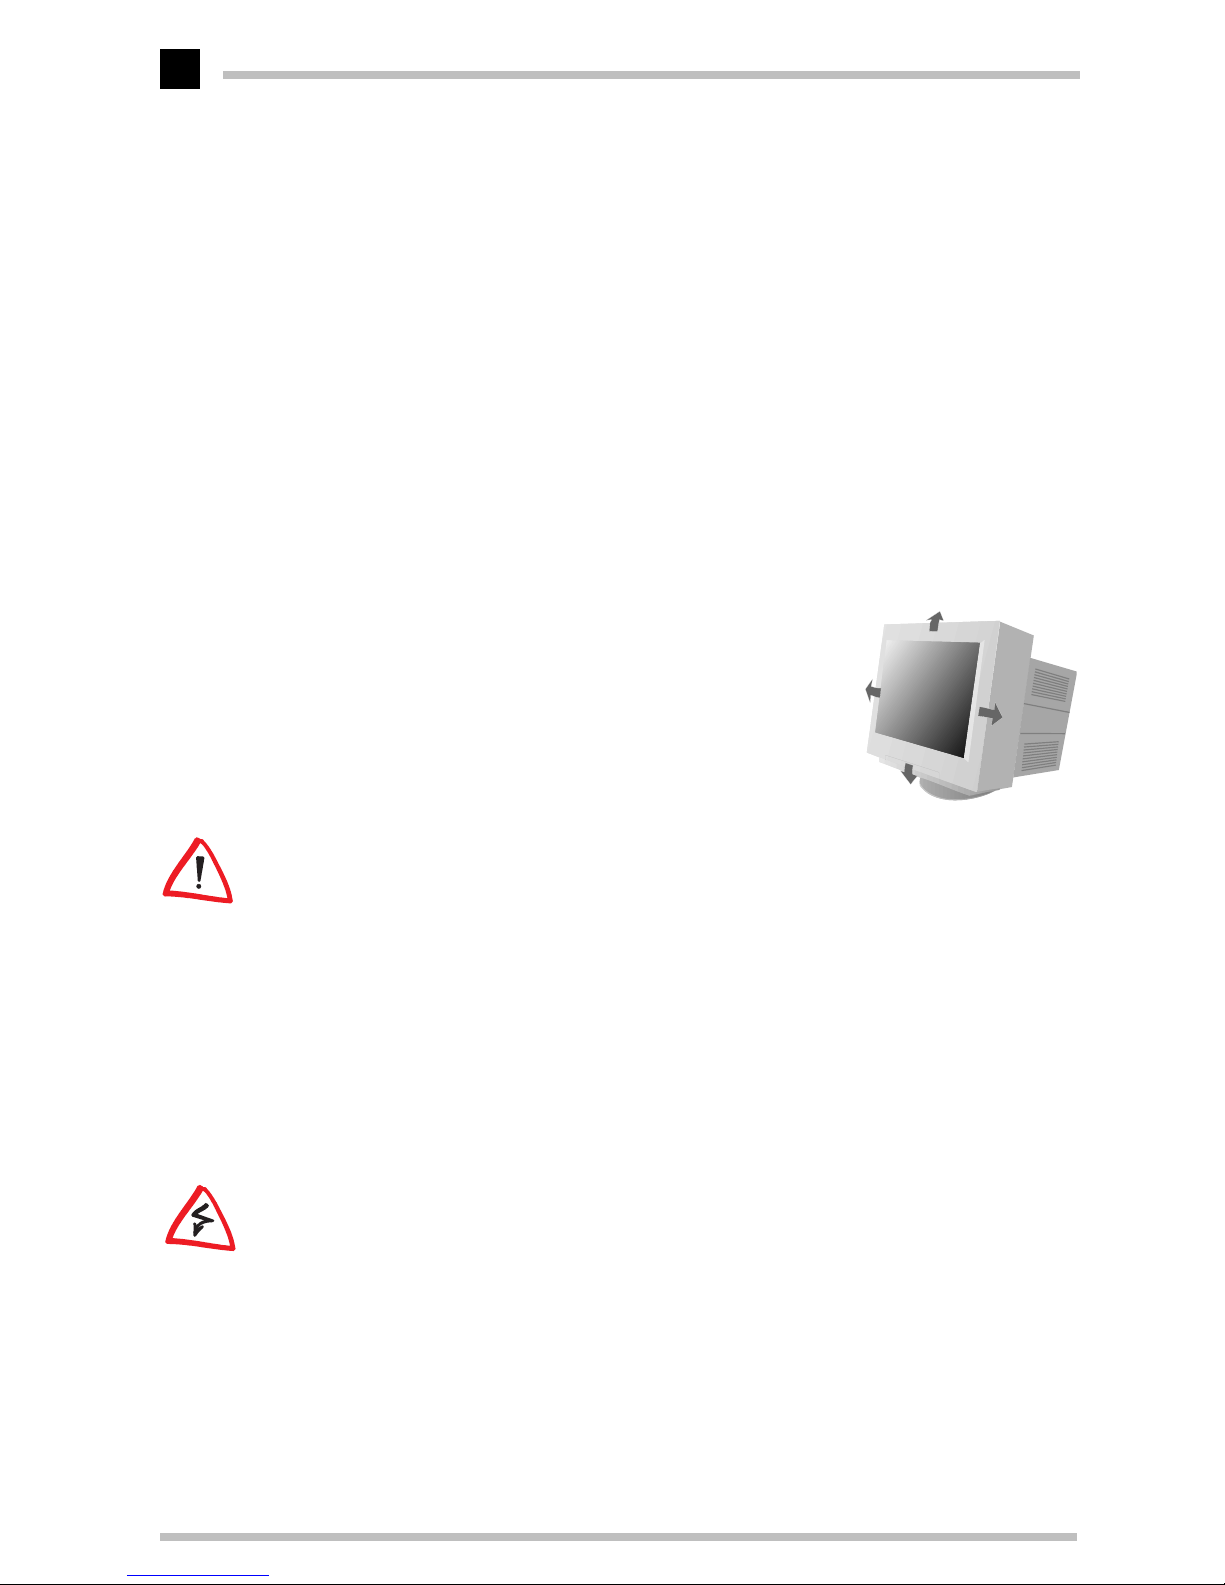
The monitor position
The
ECOMO 22H99
can be tilted and swiveled so
that you can set up the monitor position to your
liking.
When swiveling or tilting, please support the
monitor with both hands
When selecting the monitor position, be sure not to place it directly on the computer housing.
Cleaning your monitor
When cleaning the monitor, please follow these guidelines:
쮿
Always unplug the monitor before cleaning
쮿
Wipe the screen and cabinet front and sides with a soft cloth
쮿
If the screen requires more than dusting, apply household window cleaner to a soft
cloth to clean the monitor screen
Do not use benzene, thinner or any volatile substances to clean the unit as the finish may
be permanently marked. Never leave the monitor in contact with rubber or vinyl for an
extended period.
Page 31

Technical data
ELSA ECOMO 22H99
25
Technical data
CRT
Diagonal 55cm / 22",
viewable display size 51cm, 20"
Gun In-line
Deflection angle 90 °
Phosphors Red, green, blue
(P22, medium short persistence)
Phosphor color
coordinates
RedGreenBlue
X = 0.625 X = 0.29 X = 0.150
Y = 0.34 Y = 0.605 Y = 0.07
Slot mask 0.25 - 0.27mm
Face plate anti-glare, anti-reflective, anti-static coating
Focusing method Dynamic beam forming
Input signal
Video 0.7V RGB analog
Synchronization Synchronization signals on green or separate horizontal/
vertical synchronization or composite synchronization
Interface
Input connector DB9-15P and 5-pin BNC
Input impedance 75Ω (video) 1kΩ (sync)
USB
Function Self powered HUB complying with Universal Serial Bus
Specification Rev.1.0
USB Monitor Control to adjust the image on screen by
USB commands from the computer.
Interface 2 Upstream ports / 12Mbps.
3 Upstream ports / 12Mbps, 1.5Mbps, possible to supply
500mA max. per each Downstream port.
Frequency range
Horizontal: 30 - 121kHz, vertical: 50 - 160Hz
Resolution
Horizontal: up to 1800 pixels, vertical: up to 1440 lines at 80Hz
Warm-up time
30min. to reach optimum performance temperature
Brightness
100cd/m2, standard full white video
Blanking time
Horizontal
욷
2.3µs
Vertical
욷
450µs
Viewable display
393 x 295mm
9300K 6500K 5000K Gamma value (γ) = 2.5
X = 0.283 ± 0.02 X = 0.313 ± 0.02 X = 0.346 ± 0.02
Y = 0.298 ± 0.02 Y = 0.329 ± 0.02 Y = 0.359 ± 0.02
Color temperature
9300K-5000K
Power supply
AC 100-120 V/220-240 V; ±10 %, 50-60 Hz, 155 W (typical)
170W (typ.) with USB operation
Operating
environment
Temperature
Humidity
5° - 35 °C
10 - 90% relative air humidity
Housing
500 x 500 x 482mm (W x H x D)
Weight
33kg approx.
Tilt/
swivel base
Tilt angle
Swivel angle
-5° - +15°
± 90°
Approvals/
Safety (CE) EN 60950
certifications
EMC (CE/FCC) EN 55022 Class B, EN 50082-1, EN 60555-2
X-radiation German X-ray regulations dated 1987-01-08
Others TCO ’99
VESA DPMS
EPA Energy Star
MPR-II
ISO 9241-3 (certified by TÜV Ergonomie)
ZHI/618
NUTEK Spec. 803299/94
Page 32
Technical data
ELSA ECOMO 22H99
26
Power management function
The
ECOMO 22H99
complies with the guidelines set by VESA and Energy Star together
with the stringent standards of NUTEK. The
ECOMO 22H99
will automatically reduce
power consumption in three stages if the monitor is connected to a graphics board complying with VESA DPMS. You can set the delay time before the monitor enters the power
saving mode using the on-screen menu.
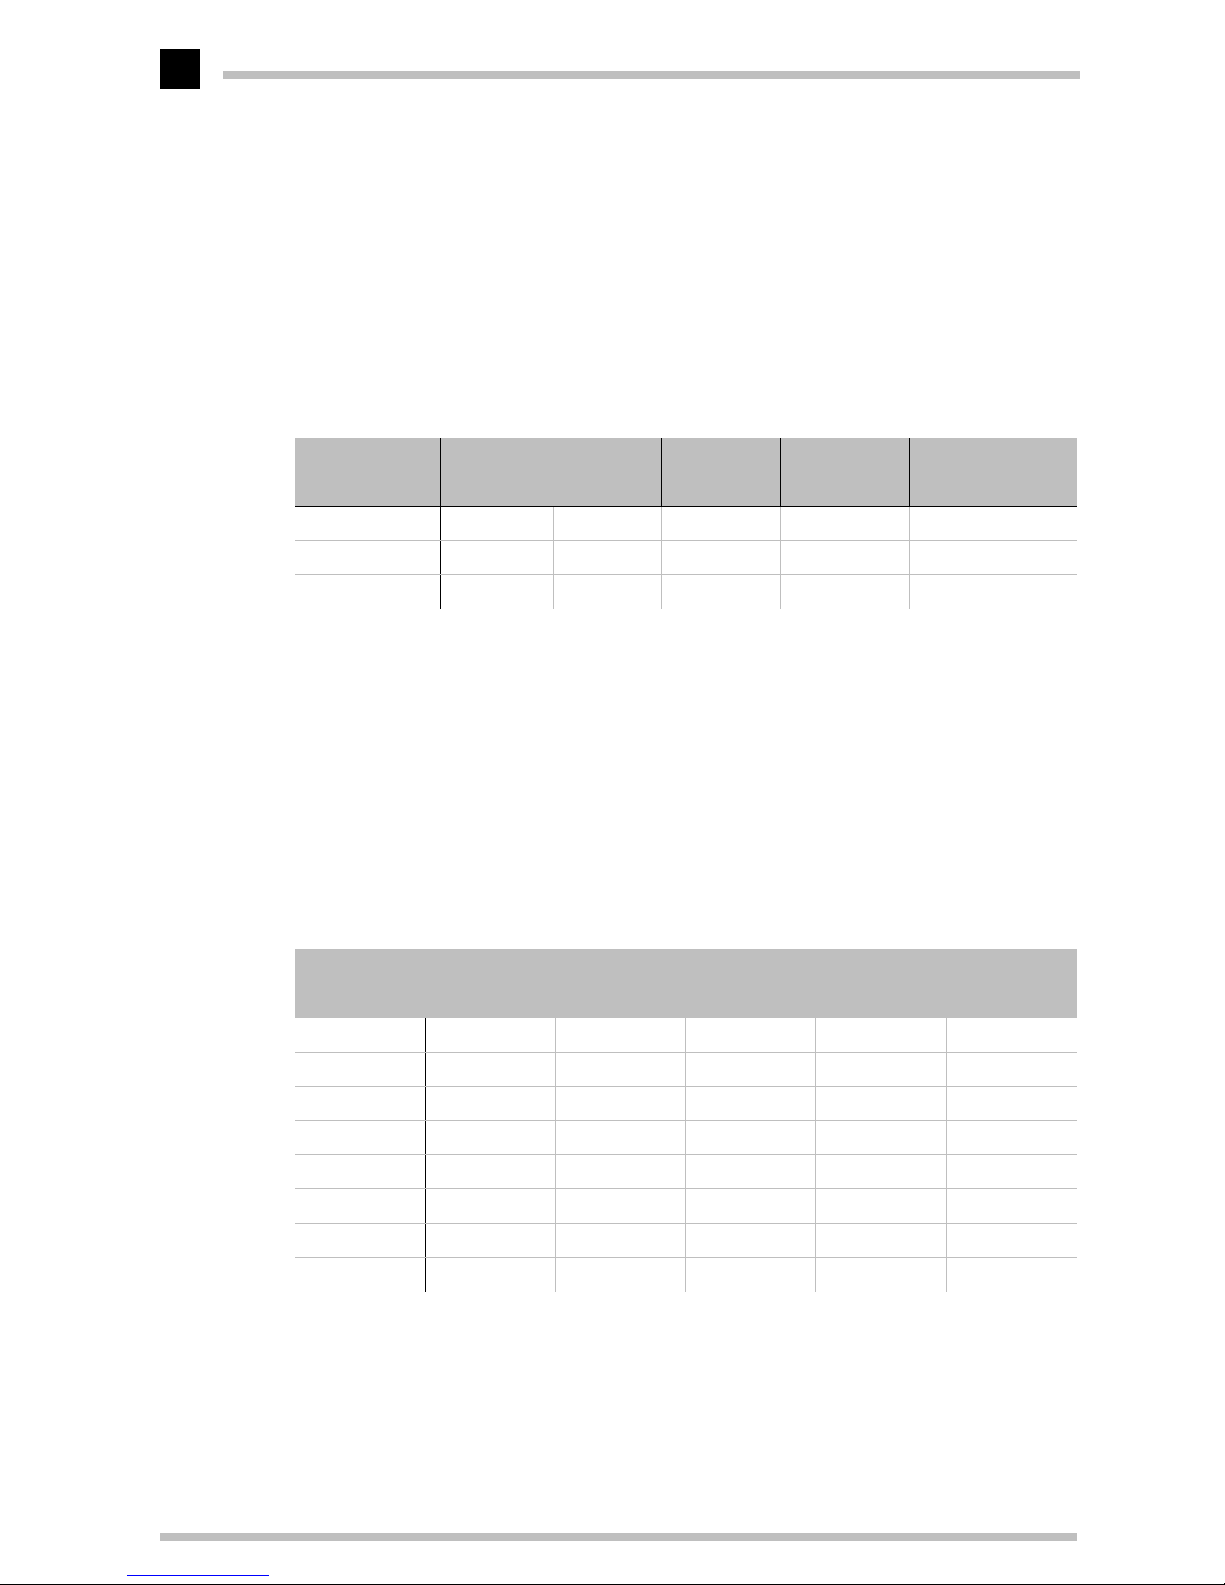
The following table gives you an overview.
Factory settings
To minimize the need for adjustment, the factory has preset popular display standards
into the monitor. Picture size and centering are automatically adjusted if any of these display standards is detected. All the factory presets may be overwritten by adjusting the
user controls. The monitor is capable of automatically storing up to 12 additional display
standards. The new display information must differ from any of the existing display standards by at least 1kHz for the horizontal scan frequency or 5 Hz for the vertical scan frequency or the sync signal polarities must be different.
Mode Synchronization Signal Power Con-
sumption
Recovery
Time
Power Indicator
Horizontal Vertical
Stand-by mode no yes
울
15W approx. 3sec orange
Suspend mode yes no
울
15W approx. 3sec orange
Active-off mode no no
울
5W approx. 10sec orange
Preset timing Fh (kHz) Fv (Hz)
Polarity
H V
640x480 N.I. 31,5 60,0 – –
640x480 N.I. 37,5 75,0 – –
800x600 N.I. 46,9 75,0 + +
1024x768 N.I. 60,0 75,0 + +
1152x870 N.I. 68,7 75,1 – –
1280x1024 N.I. 80,0 75,0 + +
1280x1024 N.I. 91,1 85,0 + +
1600x1200 N.I. 93,7 75,0 + +
Page 33
Technical data
ELSA ECOMO 22H99
27
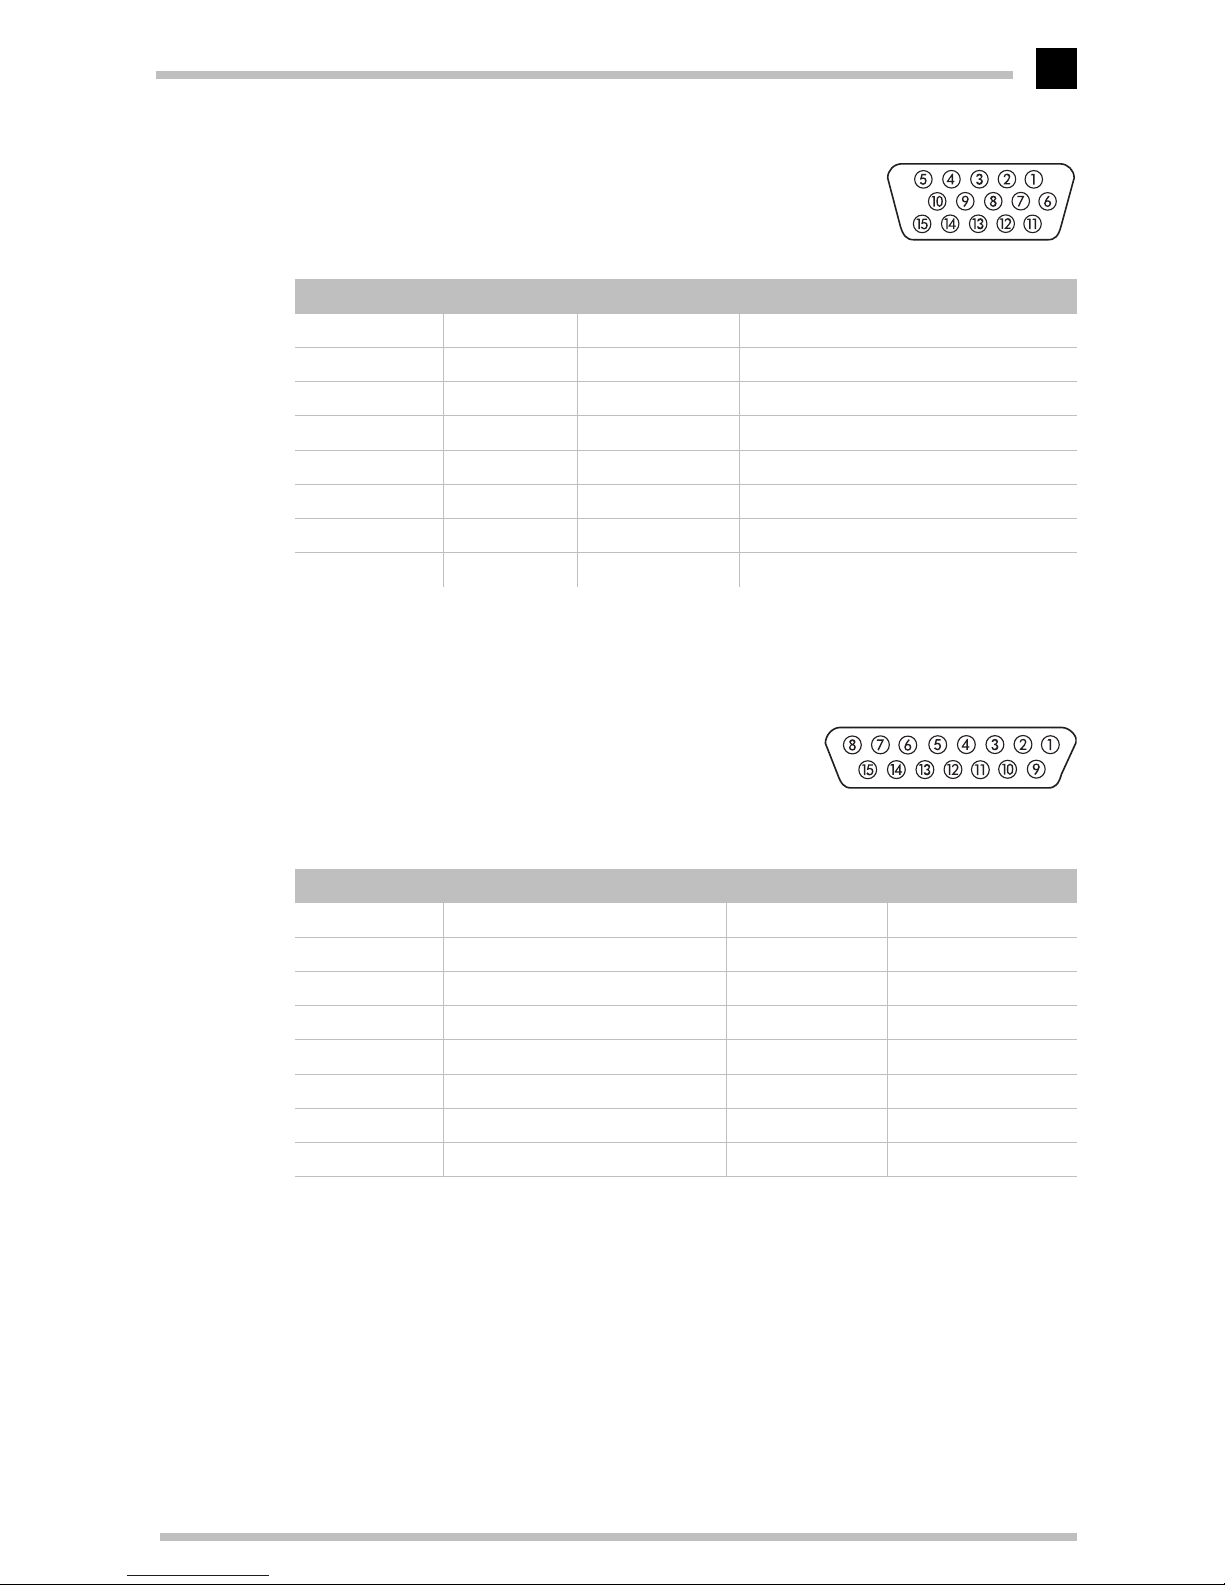
The VGA D-shell socket
Pin assignment
The
ECOMO 22H99
issues analog signals in accordance with the requirements of Guide-
line RS-170. The synchronization information is sent separately.
Video input connection to an
Apple-Macintosh computer
Pin assignment
Connection Signal Connection Signal
1Red 9 +5 V
2 Green 10 Sync ground
3 Blue 11 Monitor ID2
4 Monitor ID0 12 Bidirectional data (SDA, DDC1/2B)
5 DDC ground 13 Horizontal synchronization
6 Red ground 14 Vertical synchronization
7 Green ground 15 Data timing (SCL, DDC2B)
8 Blue ground
Pin Signal Pin Signal
1 Red ground 9 BLUE Video
2 RED video 10 Sense 2
3 C-sync 11 C & V sync Ground
4Sense 0 12V-sync
5 GREEN video (mono video) 13 Blue ground
6 Green ground 14 H-sync Ground
7Sense 1 15H-sync
8 Not used
H-sync = scan frequency, V-sync = Refresh rate
Tabelle 1:
Page 34
Technical data
ELSA ECOMO 22H99
28
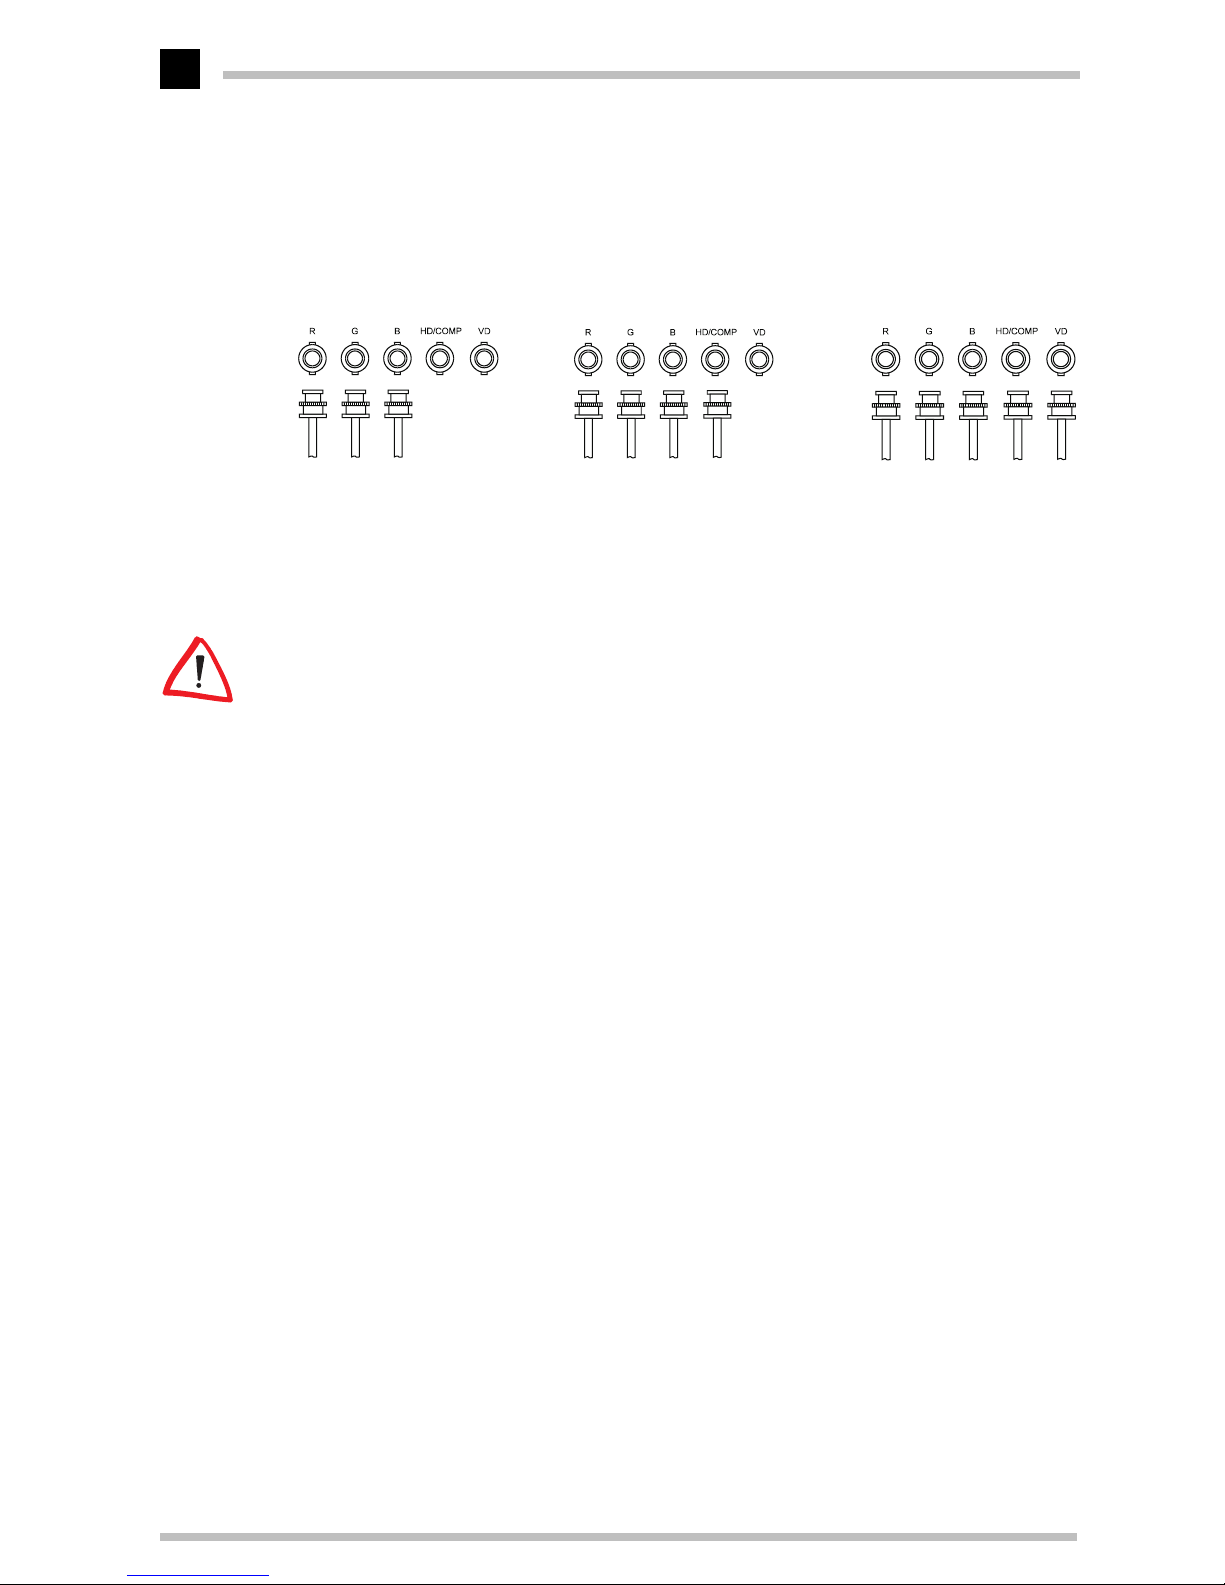
BNC connectors
The second input for the video signal ist the BNC connection with five sockets. The connection cable betwenn the monitor
Connecting the BNC cables when using a composite green signal with sync.
Connecting the BNC cables when using an externally composed sync.
Connecting the BNC cables when using a separate horizontal and vertical sync.
The BNC connection does not support the DDC functions.
쐃쐇 쐋
Page 35
Troubleshooting
ELSA ECOMO 22H99
29
Troubleshooting
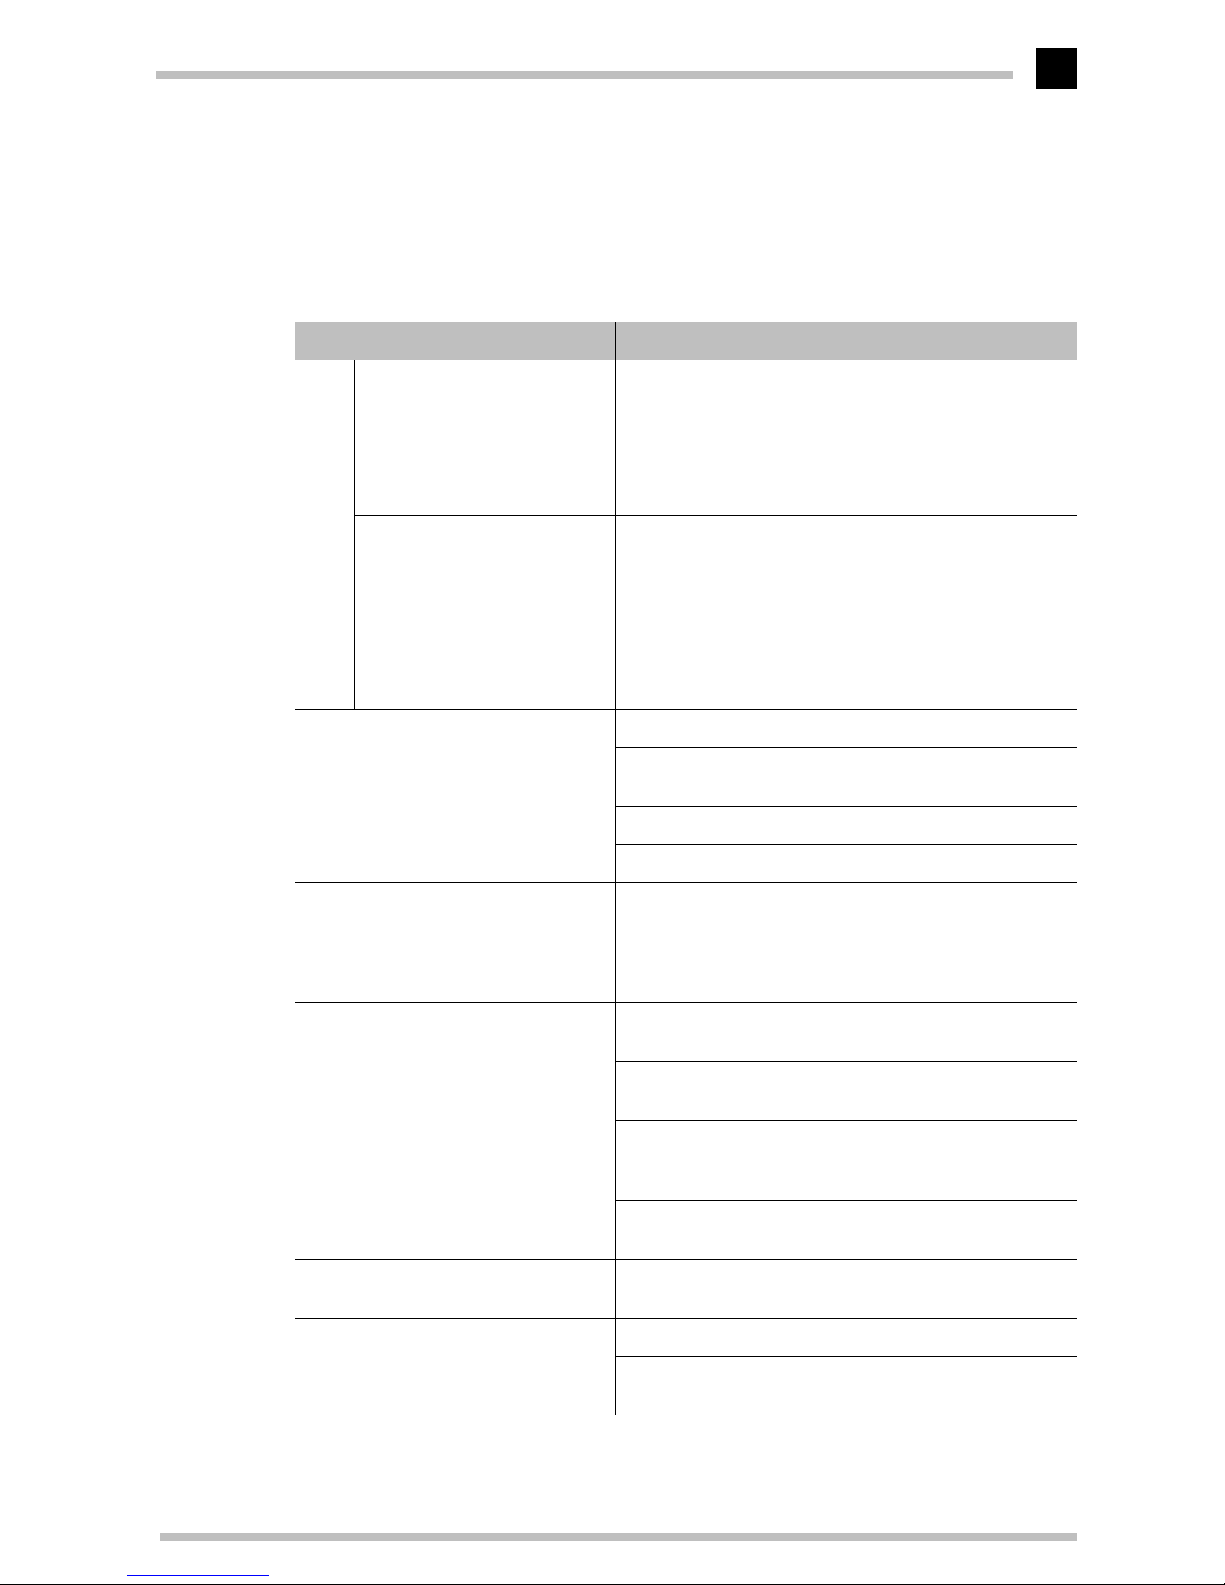
Problem solving
Problem What you can do
No
picture
LED On?
(Green)
Check, if AC power chord is disconnected or monitor
switched of.
LED Off Is the monitor switched on?
Is the AC power chord properly connected?
LED On?
(Amber)
Signal cable disconnected?
BNC cables are misconnected or the green cable is disconnected
Computer power switch
Power Management function is activ
The following message appears
ATTE NT ION
NO SIGNAL
Signal cable disconnected.
BNC cables are misconnected or the green cable is discon-
nected.
Computer power switch.
Power management function is active.
The following message appears
ATTE NT ION
SIGNAL FREQUENCY IS OUT OF RANGE
Input signal frequency range is disagreement
CGA Mode is not available.
MDA Mode is not available.
EGA Mode is not available.
Display is missing, center shifts, or too
small or too large of a display size
Do "GEOMETRY-RESET" or "ALL RESET" for a standard signal.
Adjust H-SIZE, V-SIZE, H-PHASE, and V-POSITION with nonstandard signals.
Monitor may not be able to get full-screen image depend on
signal. In this case, please select other resolution, or other
vertical refresh timing.
Make sure you wait a few seconds after adjusting the size
of the image before changing or disconnecting the signal.
Display is dark or too bright "VIDEO LEVEL" is not at the appropriate position for your
graphics adapter output.(0.7V or 1.0Vp-p)
No operation of the USB devices [Generic USB HUB] is not listed in [Device Manager].
On the OSD screen, the Upstream port to which the USB
device you want to use is connected is not colored by blue.
Page 36
Troubleshooting
ELSA ECOMO 22H99
30
Restraining wires
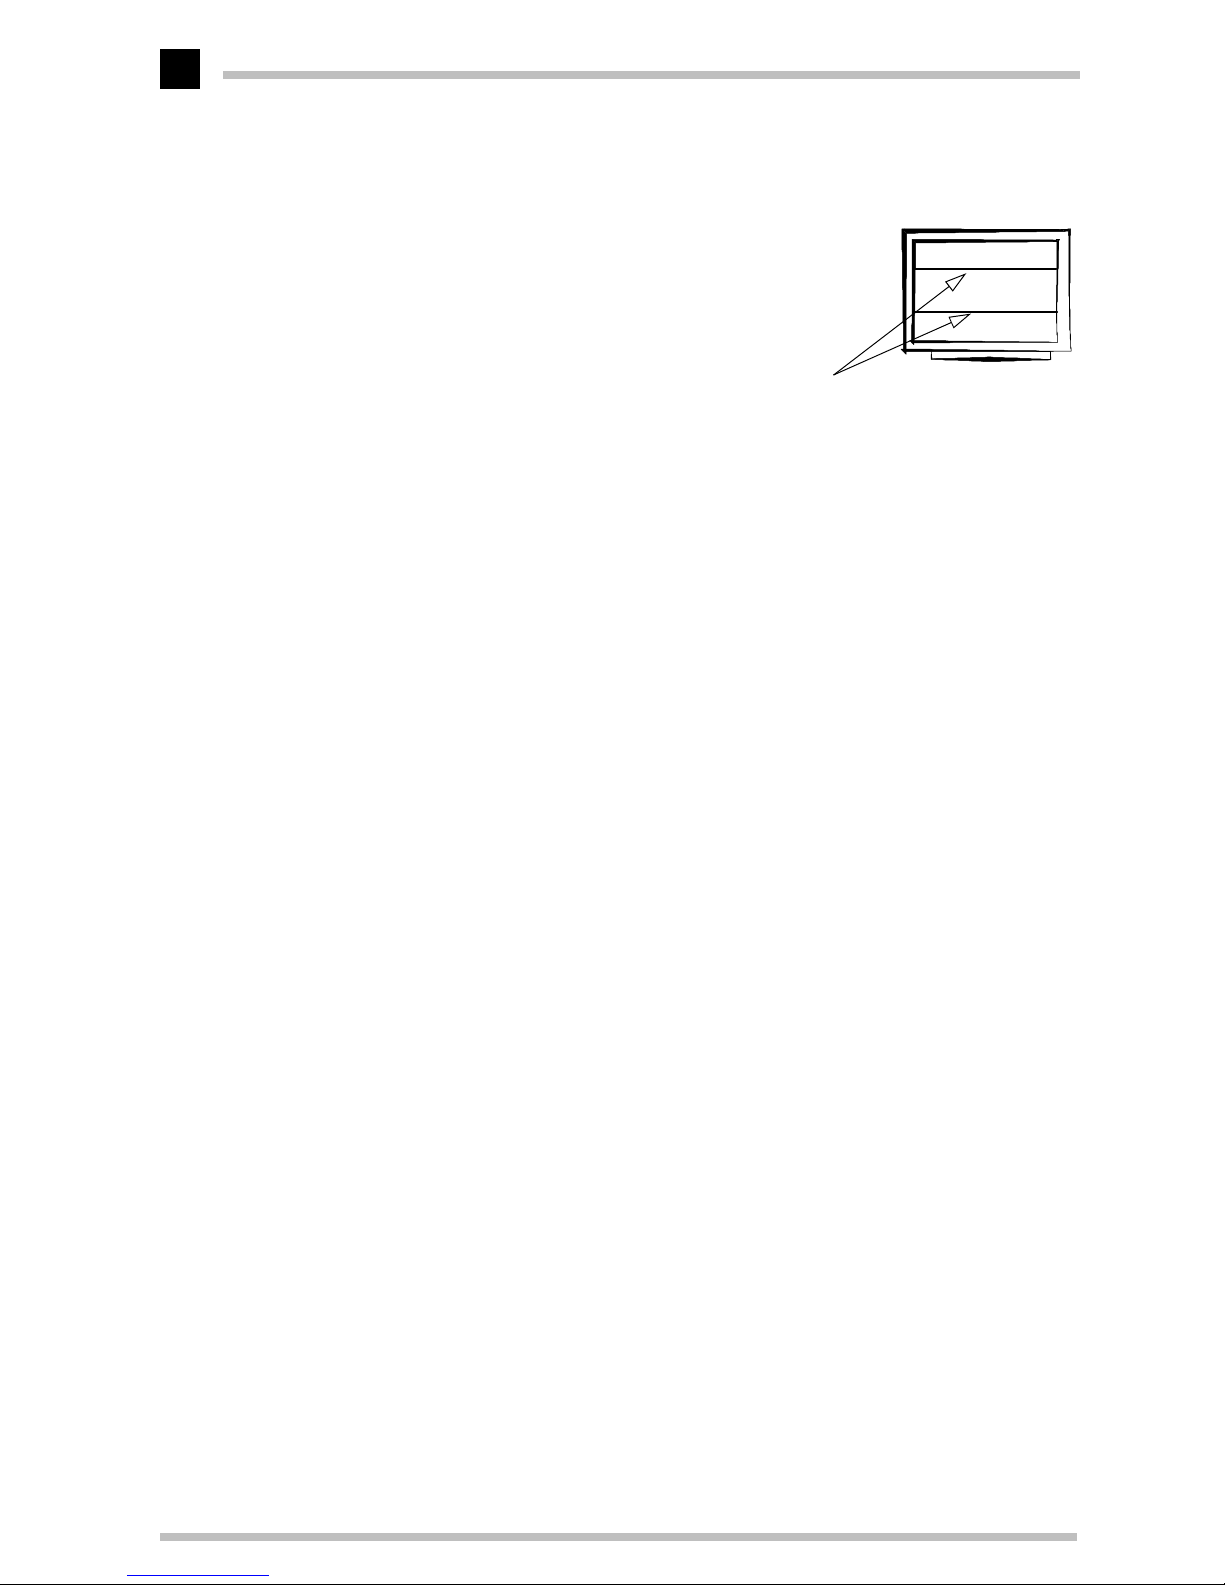
You may notice two thin, horizontal lines in the
picture. This is not a defect, but a phenomenon
common to monitors which use the aperture
grille CRT technology.
These lines are shadows produced by the
restraining wires which reduce the aperture
grille’s sensitivity to vibration .
Restraining Wires
Page 37

ELSA ECOMO 22H99
31
Appendix
TCO '99
Congratulations! You have just purchased a TCO'99 approved and labelled product! Your
choice has provided you with a product developed for professional use. Your purchase
has also contributed to reducing the burden on the environment and also to the further
development of environmentally adapted electronics products.
Why do we have environmentally labelled computers?
In many countries, environmental labelling has become an established method for
encouraging the adaptation of goods and services to the environment. The main problem,
as far as computers and other electronics equipment are concerned, is that environmentally harmful substances are used both in the products and during their manufacture.
Since it is not so far possible to satisfactorily recycle the majority of electronics equipment, most of these potentially damaging substances sooner or later enter nature.
There are also other characteristics of a computer, such as energy consumption levels,
that are important from the viewpoints of both the work (internal) and natural (external)
environments. Since all methods of electricity generation have a negative effect on the
environment (e.g. acidic and climate-influencing emissions, radioactive waste), it is vital
to save energy. Electronics equipment in offices is often left running continuously and
thereby consumes a lot of energy.
What does labelling involve?
This product meets the requirements for the TCO'99 scheme which provides for international and environmental labelling of personal computers. The labelling scheme was
developed as a joint effort by the TCO (The Swedish Confederation of Professional
Employees), Svenska Naturskyddsforeningen (The Swedish Society for Nature Conservation) and Statens Energimyndighet (The Swedish National Energy Administration).
Approval requirements cover a wide range of issues: environment, ergonomics, usability,
emission of electric and magnetic fields, energy consumption and electrical and fire
safety.
The environmental demands impose restrictions on the presence and use of heavy metals, brominated and chlorinated flame retardants, CFCs (freons) and chlorinated solvents,
among other things. The product must be prepared for recycling and the manufacturer is
obliged to have an environmental policy which must be adhered to in each country where
the company implements its operational policy.
Page 38

ELSA ECOMO 22H99
32
The energy requirements include a demand that the computer and/or display, after a certain period of inactivity, shall reduce its power consumption to a lower level in one or
more stages. The length of time to reactivate the computer shall be reasonable for the
user.
Labelled products must meet strict environmental demands, for example, in respect of
the reduction of electric and magnetic fields, physical and visual ergonomics and good
usability.
Below you will find a brief summary of the environmental requirements met by this product. The complete environmental criteria document may be ordered from:
쮿
TCO Development
SE-114 94 Stockholm, Sweden
Fax: +46 8 782 92 07
Email (Internet): [email protected]
Current information regarding TCO'99 approved and labelled products may also be
obtained via the Internet, using the address:
쮿
http://www.tco-info.com/
Environmental requirements
Flame retardants
Flame retardants are present in printed circuit boards, cables, wires,
casings and housings. Their purpose is to prevent, or at least to delay the spread of fire.
Up to 30% of the plastic in a computer casing can consist of flame retardant substances.
Most flame retardants contain bromine or chloride, and those flame retardants are chemically related to another group of environmental toxins, PCBs. Both the flame retardants
containing bromine or chloride and the PCBs are suspected of giving rise to severe health
effects, including reproductive damage in fish-eating birds and mammals, due to the bioaccumulative* processes. Flame retardants have been found in human blood and
researchers fear that disturbances in foetus development may occur.
The relevant TCO'99 demand requires that plastic components weighing more than 25
grams must not contain flame retardants with organically bound bromine or chlorine.
Flame retardants are allowed in the printed circuit boards since no substitutes are available.
Cadmium* *
Cadmium is present in rechargeable batteries and in the color-generating
layers of certain computer displays. Cadmium damages the nervous system and is toxic
in high doses. The relevant TCO'99 requirement states that batteries, the color-generating layers of display screens and the electrical or electronics components must not contain any cadmium.
Mercury* *
Mercury is sometimes found in batteries, relays and switches. It damages
the nervous system and is toxic in high doses. The relevant TCO'99 requirement states
Page 39

ELSA ECOMO 22H99
33
that batteries may not contain any mercury. It also demands that mercury is not present
in any of the electrical or electronics components associated with the labelled unit.
CFCs (freons)
The relevant TCO'99 requirement states that neither CFCs nor HCFCs may
be used during the manufacture and assembly of the product. CFCs (freons) are sometimes used for washing printed circuit boards. CFCs break down ozone and thereby damage the ozone layer in the stratosphere, causing increased reception on earth of
ultraviolet light with e.g. increased risks of skin cancer (malignant melanoma) as a consequence.
Lead* *
Lead can be found in picture tubes, display screens, solders and capacitors.
Lead damages the nervous system and in higher doses, causes lead poisoning. The relevant TCO´99 requirement permits the inclusion of lead since no replacement has yet been
developed.
* Bio-accumulative is defined as substances which accumulate within living organisms
** Lead, cadmium and mercury are heavy metals which are bio-accumulative.
Page 40

ELSA ECOMO 22H99
34
Advice and help
If you encounter any problems during the installation or operation of your ELSA product,
please consult this manual first.
If you have further questions, you can contact our Support team. Ensure that you can provide the following information.
쮿
Exact model name of your ELSA monitor.
쮿
The type of graphics board and the BIOS version (displayed when starting the computer).
쮿
Operating systemand hardware environment.
Software updates
The latest versions of the ELSA software are always available for download from our
Internet WWW site www.elsa.de and direct via FTP from ftp.elsa.com. You will also find
a wealth of information and answers to frequently asked questions (FAQs). Before you
contact the ELSA Support team, please make sure that you are using the latest ELSA software (driver, firmware or INF file) versions.
Who to contact?
First you should contact the dealer where you bought your ELSA product. If there are still
questions remaining, contact one of the following:
쮿
ELSA on the Internet
쮿
ELSA by Mail
If you are not sure whether your product is defective or if the problem is just a driver
which is incorrectly installed, please cal^ql the ELSA Support hotline before you send the
board for repair.
쮿
ELSA support hotline +49-241-606-6135
If you have any questions about the ELSA ServiceDirect program or the progress of your
repair, please call.
ELSA WWW site www.elsa.de
Or write to ELSA ELSA AG
Computergrafik Support
Sonnenweg 11
52070 Aachen
Germany
Mondays to Fridays from 9.00 am until 5.00 pm (CET)
Page 41

ELSA ECOMO 22H99
35
쮿
ELSA service hotline +49-241-6065112
쮿
ELSA world wide
You can contact the ELSA subsidiaries:
ELSA, Inc.
ELSA Asia, Inc.
ELSA
Japan, Inc.
2231 Calle De Luna
Santa Clara, CA 95054
USA
Phone:
Fax:
+1-408-919-9100
+1-800-272-ELSA
+1-408-919-9120
7F-11, No. 188, Sec. 5
Nanking East Road
Taipei 105
Taiwan, R.O.C.
Phone:
Fax:
+886-2-2768
57
30
+886-2-2766
08
73
Mita Suzuki Building 3F
5-20-14 Shiba, Minato-ku
Tokyo 108-0014
Japan
Phone:
Fax:
+81-3-5765-7391
+81-3-5765-7235
Page 42

ELSA ECOMO 22H99
36
ELSA-ServiceDirect for
ELSA ECOMO
™
Monitors
3-Year Warranty Including ELSA-Onsite
As of the purchase date 01.01.1998, ELSA grants a three-year warranty on
ELSA
ECOMO
1)
monitors including ELSA-ServiceDirect. ELSA strives to offer its customers top
product quality with its extensive quality assurance measures. If, however, the customer
makes a complaint, this service program guarantees perfect support and repair procedures to minimize any inconvenience. As well as repairs carried out free of charge, the
following ServiceDirect services are offered within the extended scope of the warranty.
ELSA-Onsite: 3 years of onsite service for ELSA monitors—free of charge
You can avail of the numerous advantages of our onsite services for
ELSA ECOMO
mon-
itors throughout Europe
2)
. If you discover a fault with your monitor, you first contact our
support team. If your monitor requires repairs within the warranty period of three years,
you are provided with a replacement unit within 24 hours
3)
which we deliver to your
workplace. Your repaired monitor will be returned to you as soon as possible. The advantage of this offer is that you have no downtime or transport expenses. ELSA's customer
service ensures that all transporting procedures are dealt with in the correct manner.
Your direct contact partner at ELSA-ServiceDirect
As an ELSA customer, you will receive support and advice from ELSA's customer service
at all stages of the warranty services being carried out.
The ELSA support hotline is the first number to dial if you discover a
malfunction or fault on your monitor.
ELSA Monitor Support Hotline
+49-(0)241-606-6135
If you have general questions on ServiceDirect, on the progress of
repair work, contact the ELSA service hotline.
ELSA Service Hotline
+49-(0)241-606-5112
1) Applies to all
ELSA ECOMO
monitors purchased after January 1, 1998.
2) For
ELSA ECOMO 21H97
, a 4 week DoA warranty is granted outside of Germany instead.
3) Provided that the complete documentation reaches the ELSA support team by 11.00 a.m. by mail or directly via the computer graphics faxline— Tel.:
+49-(0)241-606-6399. Please note that warranty services are only granted for faults which are covered within the framework of our General Terms of
Warranty, valid for the Federal Republic of Germany (refer to our Internet site: www.elsa.com).
If the ELSA service cannot find fault with the unit claimed to be defective, we will invoice you for DM 200 plus V.A.T. to cover inspection costs and
replacement of the unit.
Page 43

ELSA ECOMO 22H99
37
Warranty conditions
The ELSA AG warranty, valid as of June 01, 1998, is given to purchasers of ELSA products in addition to
the warranty conditions provided by law and in accordance with the following conditions:
1 Warranty coverage
a) The warranty covers the equipment delivered and all its parts. Parts will, at our sole discretion, be
replaced or repaired free of charge if, despite proven proper handling and adherence to the operating instructions, these parts became defective due to fabrication and/or material defects. Also we
reserve the right to replace the defective product by a successor product or repay the original purchase price to the buyer in exchange to the defective product. Operating manuals and possibly supplied software are excluded from the warranty.
b) Material and service charges shall be covered by us, but not shipping and handling costs involved
in transport from the buyer to the service station and/or to us.
c) Replaced parts become property of ELSA.
d) ELSA are authorized to carry out technical changes (e.g. firmware updates) beyond repair and re-
placement of defective parts in order to bring the equipment up to the current technical state. This
does not result in any additional charge for the customer. A legal claim to this service does not ex-
ist.
2 Warranty period
The warranty period for ELSA products is six years. Excepted from this warranty period are ELSA color
monitors and ELSA videoconferencing systems with a warranty period of 3 years. This period begins at
the day of delivery from the ELSA dealer. Warranty services do not result in an extension of the warranty
period nor do they initiate a new warranty period. The warranty period for installed replacement parts
ends with the warranty period of the device as a whole.
3 Warranty procedure
a) If defects appear during the warranty period, the warranty claims must be made immediately, at
the latest within a period of 7 days.
b) In the case of any externally visible damage arising from transport (e.g. damage to the housing), the
transport company representative and ELSA should be informed immediately. On discovery of dam-
age which is not externally visible, the transport company and ELSA are to be immediately informed
in writing, at the latest within 7 days of delivery.
c) Transport to and from the location where the warranty claim is accepted and/or the repaired device
is exchanged, is at the purchaser's own risk and cost.
d) Warranty claims are only valid if the original purchase receipt is returned with the device.
4 Suspension of the warranty
All warranty claims will be deemed invalid
a) if the device is damaged or destroyed as a result of acts of nature or by environmental influences
(moisture, electric shock, dust, etc.),
b) if the device was stored or operated under conditions not in compliance with the technical specifi-
cations,
Page 44

ELSA ECOMO 22H99
38
c) if the damage occurred due to incorrect handling, especially to non-observance of the system de-
scription and the operating instructions,
d) if the device was opened, repaired or modified by persons not authorized by ELSA,
e) if the device shows any kind of mechanical damage,
f) if in the case of an ELSA Monitor, damage to the cathode ray tube (CRT) has been caused especially
by mechanical load (e.g. from shock to the pitch mask assembly or damage to the glass tube), by
strong magnetic fields near the CRT (colored dots on the screen), or through the permanent display
of an unchanging image (phosphor burnt),
g) if, and in as far as, the luminance of the TFT panel backlighting gradually decreases with time, or
h) if the warranty claim has not been reported in accordance with 3a) or 3b).
5 Operating mistakes
If it becomes apparent that the reported malfunction of the device has been caused by unsuitable software, hardware, installation or operation, ELSA reserves the right to charge the purchaser for the resulting testing costs.
6 Additional regulations
a) The above conditions define the complete scope of ELSA’s legal liability.
b) The warranty gives no entitlement to additional claims, such as any refund in full or in part. Com-
pensation claims, regardless of the legal basis, are excluded. This does not apply if e.g. injury to
persons or damage to private property are specifically covered by the product liability law, or in cas-
es of intentional act or culpable negligence.
c) Claims for compensation of lost profits, indirect or consequential detriments, are excluded.
d) ELSA is not liable for lost data or retrieval of lost data in cases of slight and ordinary negligence.
e) In the case that the intentional or culpable negligence of ELSA employees has caused a loss of data,
ELSA will be liable for those costs typical to the recovery of data where periodic security data back-
ups have been made.
f) The warranty is valid only for the first purchaser and is not transferable.
g) The court of jurisdiction is located in Aachen, Germany in the case that the purchaser is a merchant.
If the purchaser does not have a court of jurisdiction in the Federal Republic of Germany or if he
moves his domicile out of Germany after conclusion of the contract, ELSA’s court of jurisdiction ap-
plies. This is also applicable if the purchaser's domicile is not known at the time of institution of
proceedings.
h) The law of the Federal Republic of Germany is applicable. The UN commercial law does not apply
to dealings between ELSA and the purchaser.
 Loading...