

Page 1
Read and
Retain for
Future
Reference
Cooper Bussmann
2080E-T Managed Ethernet Switch
User Manual
Version 1.0
Page 2

Cooper Bussmann 2080E-T Managed Ethernet Switch User Manual
Interference Issues
This equipment has been tested and found to comply with the limits for a Class A digital device, pursuant to
Part15 of the FCC rules. These limits are designed to provide reasonable protection against harmful interference
in a commercial or industrial installation. This equipment generates, uses, and can radiate radio frequency energy,
and may cause harmful interference to radio communications if not installed and used in accordance with the
instructions.
UL Listed Models
When operating at elevated temperature extremes, the surface may exceed +75°C. For user safety, the 2080E-T
should be installed in a restricted access location. The openings on the enclosure are for air convection. Protect the
equipment from overheating. Do not cover the openings.
UL Notice
This equipment shall be powered using an external listed power supply with LPS outputs or a Class 2 Power
Supply. The 2080E-T must be properly grounded for surge protection before use.
Hazardous Location Notices
This equipment is suitable for use in Class I, Division 2, Groups A, B, C, and D; ambient temperature –40˚C to +50˚C
or non-hazardous locations only.
WARNING: EXPLOSION HAZARD
Do not disconnect equipment unless power has been removed or the area is known to be non-hazardous.
WARNING: EXPLOSION HAZARD
Substitution of any components may impair suitability for Class I, Division 2.
WARNING: EXPLOSION HAZARD
The area must be known to be non-hazardous before servicing or replacing the unit and before installing the unit.
FCC Warning
This equipment has been tested and found to comply with the limits for a Class-A digital device, pursuant to
Part15 of the FCC rules. These limits are designed to provide reasonable protection against harmful interference in
a residential installation. This equipment generates, uses, and can radiate radio frequency energy, and may cause
harmful interference to radio communications if it is not installed and used in accordance with the instructions.
However, there is no guarantee that interference will not occur in a particular installation. If this equipment does
cause harmful interference to radio or television reception (which can be determined by turning the equipment off
and on) try to correct the interference by one or more of the following measures:
• Reorient or relocate the receiving antenna.
• Increase the separation between the equipment and receiver.
• Connect the equipment to an outlet on a different circuit from that to which the receiver is connected.
• Consult the dealer or an experienced radio or TV technician for assistance.
CE Mark Warning
This is a Class-A product. In a domestic environment this product may cause radio interference, in which case you
may be required to take adequate measures.
Important Notice
Cooper Bussmann/ELPRO Technologies reserves the right to modify the equipment, its specification, or this manual
without prior notice in the interest of improving performance, reliability, or servicing. At the time of publication all
data is correct for the operation of the equipment at the referenced voltage and/or temperature. Performance data
indicates typical values related to the particular product.
2 www.cooperbussmann.com/wirelessresources
Rev Version 1.0
Page 3

Cooper Bussmann 2080E-T Managed Ethernet Switch User Manual
No part of this documentation or information supplied may be divulged to any third party without the express
written consent of Cooper Bussmann/ELPRO Technologies. Products offered may contain software that is
proprietary to Cooper Bussmann/ELPRO Technologies. The offer or supply of these products and services does not
include or infer any transfer of ownership.
Release Notice
This is the November 2013 release of the 2080E-T Managed Ethernet Switch User Manual version 1.0, which
applies to firmware version 1.10.
Follow Instructions
Read this entire manual and all other publications pertaining to the work to be performed before installing,
operating, or servicing this equipment. Practice all plant and safety instructions and precautions. Failure to follow
the instructions can cause personal injury and/or property damage.
Proper Use
Any unauthorized modifications to or use of this equipment outside its specified mechanical, electrical, or other
operating limits may cause personal injury and/or property damage, including damage to the equipment. Any such
unauthorized modifications: (1) constitute “misuse” and/or “negligence” within the meaning of the product warranty,
thereby excluding warranty coverage for any resulting damage; and (2) invalidate product certifications or listings.
www.cooperbussmann.com/wirelessresources
3Rev Version 1.0
Page 4

Cooper Bussmann 2080E-T Managed Ethernet Switch User Manual
CONTENTS
Chapter 1 - INTRODUCTION ...................6
1.1 Module Identification ......................6
1.2 Mechanical Specifications ..................6
1.3 Order Information .........................7
1.4 Hardware Features .......................7
1.5 Software Features ........................8
1.6 Package Contents ........................9
Chapter 2 - HARDWARE DESCRIPTION. . . . . . . . .10
2.1 Front Panel .............................10
2.2 Top View ..............................11
2.3 LED Indicators ..........................11
2.4 Pin-hole Reset Button ....................12
Chapter 3 - HARDWARE INSTALLATION ........13
3.1 Installation Steps ........................13
3.2 DIN Rail Mounting .......................13
3.3 Wall Mount Plate Mounting ................14
3.4 Wiring the Power Inputs ..................15
3.5 Wiring the Fault Alarm Contact .............16
3.6 Cabling ................................16
Chapter 4 - NETWORK APPLICATIONS .........17
4.1 Pro-Ring2se Application ..................17
Chapter 5 - CONSOLE-BASED MANAGEMENT ...19
5.1 Connecting to the Console Port ............19
5.2 Pin Assignment .........................19
5.3 Logging onto the Console Interface .........19
5.4 CLI Management ........................20
Chapter 6 - WEB-BASED MANAGEMENT .......21
6.1 Preparing for Web Management ............21
6.2 System Login ...........................21
6.3 Web Page Overview .....................22
6.4 System Menu ...........................22
6.4.1 General ............................22
Switch Information .................22
Asset ...........................23
CPU Load Average ................24
6.4.2 Time - SNTP ........................25
6.4.3 Account - Admin .....................27
6.4.4 IP Addressing – IPV4 .................27
6.4.5 Syslog .............................28
Syslog Configuration ...............28
Syslog Log .......................29
6.4.6 SNMP .............................29
SNMP Agent .....................29
SNMP Trap Configuration ...........30
SNMPv3 .........................31
6.4.7 System Alert ........................35
System Alert Relay Alarm ...........35
System Alert Event ................35
6.4.8 DHCP Server ........................36
DHCP Server Configuration ..........36
DHCP Server Client Table ...........37
DHCP Server IP Binding ............37
6.5 Configure Menu .........................38
6.5.1 Port ...............................38
Port Configuration .................38
Port Status .......................39
Port Statistics ....................39
Port Alert ........................40
6.5.2 Rate Control ........................41
Rate Limit ........................41
Storm Control ....................42
6.5.3 Aggregation ........................43
Aggregation Configuration ...........43
Aggregation Status ................44
6.5.4 Spanning Tree .......................44
RSTP Settings ....................45
RSTP Information ..................46
6.5.5 Redundancy - Pro-Ring2se ............47
6.5.6 Multicast Support ...................48
IGMP Snooping ...................48
Static Filtering ....................49
6.5.7 LLDP ..............................50
LLDP Configuration ................50
LLDP Neighbors ...................51
6.5.8 Filtering Data Base ...................51
Filtering Data Base Configuration .....51
Dynamic MAC Table ...............52
6.5.9 VLAN ..............................52
VLAN Configuration ................52
VLAN Switch Status ................56
6.5.10 QoS ..............................56
QoS Global Settings ...............56
Port Priority ......................57
COS Mapping to Queue ............57
DSCP Mapping to Queue ...........58
6.5.11 Port Mirroring ......................59
6.6 Security Menu ..........................59
6.6.1 IP Source Guard Configuration ..........59
Static Table ......................60
6.6.2 802.1X/Radius .......................61
802.1X/Radius Configuration .........61
802.1X/Radius Port Setting ..........63
802.1X/Radius Port Status ..........63
6.6.3 MAC Filtering .......................64
6.6.4 Port Security ........................64
6.7 Maintenance ...........................65
6.7.1 Save Configuration ...................65
6.7.2 Restart Device .......................65
4 www.cooperbussmann.com/wirelessresources
Rev Version 1.0
Page 5

Cooper Bussmann 2080E-T Managed Ethernet Switch User Manual
6.7.3 Factory Defaults .....................65
6.7.4 Firmware Upgrade ...................66
6.7.5 Export/Import .......................67
6.7.6 Diagnostics .........................69
Ping ............................69
6.8 Troubleshooting .........................69
Appendix A - RJ-45 PIN ASSIGNMENT .........70
10 /100BASE-TX Pinouts .....................70
RJ-45 Pin Assignments ......................70
10/100Base-TX Cable Schematic ..............70
Appendix B - COMMAND SETS ...............71
802.1x Commands ..........................71
Admin Password Commands .................72
Backup and Restore Commands ..............72
CLI Commands ............................73
DHCP Server Commands ....................73
Factory Default Command ....................74
Fault Alarm Commands ......................74
IGMP Commands ..........................75
IP Security Commands ......................76
IP Setting Commands .......................76
LLDP Commands ...........................77
Loading Average Commands .................77
Logout Command ..........................77
MAC Address Table Commands ...............77
MAC Blacklist Commands ....................78
Multicast Static Filtering Table Commands .......78
Ping Command ............................78
Port Control Commands .....................79
Port Monitoring Commands ..................80
Port Security Commands. . . . . . . . . . . . . . . . . . . . .80
Port Statistics Commands ....................80
Port Status Command .......................81
Pro-Ring2se Commands .....................81
Rate Limit Commands .......................82
RSTP Commands ..........................82
Save Configuration Command ................83
SNMP Commands ..........................83
SNTP Commands ..........................84
Switch Setting Commands ...................85
System Event Log Command .................85
System Reboot Command ...................85
System Warning Commands ..................86
Traffic Prioritization Commands ...............86
Trunk Commands ..........................87
Upgrade Firmware Commands ................88
VLAN Commands ..........................88
www.cooperbussmann.com/wirelessresources
5Rev Version 1.0
Page 6

Cooper Bussmann 2080E-T Managed Ethernet Switch User Manual
ChapTEr 1 - INTrODUCTION
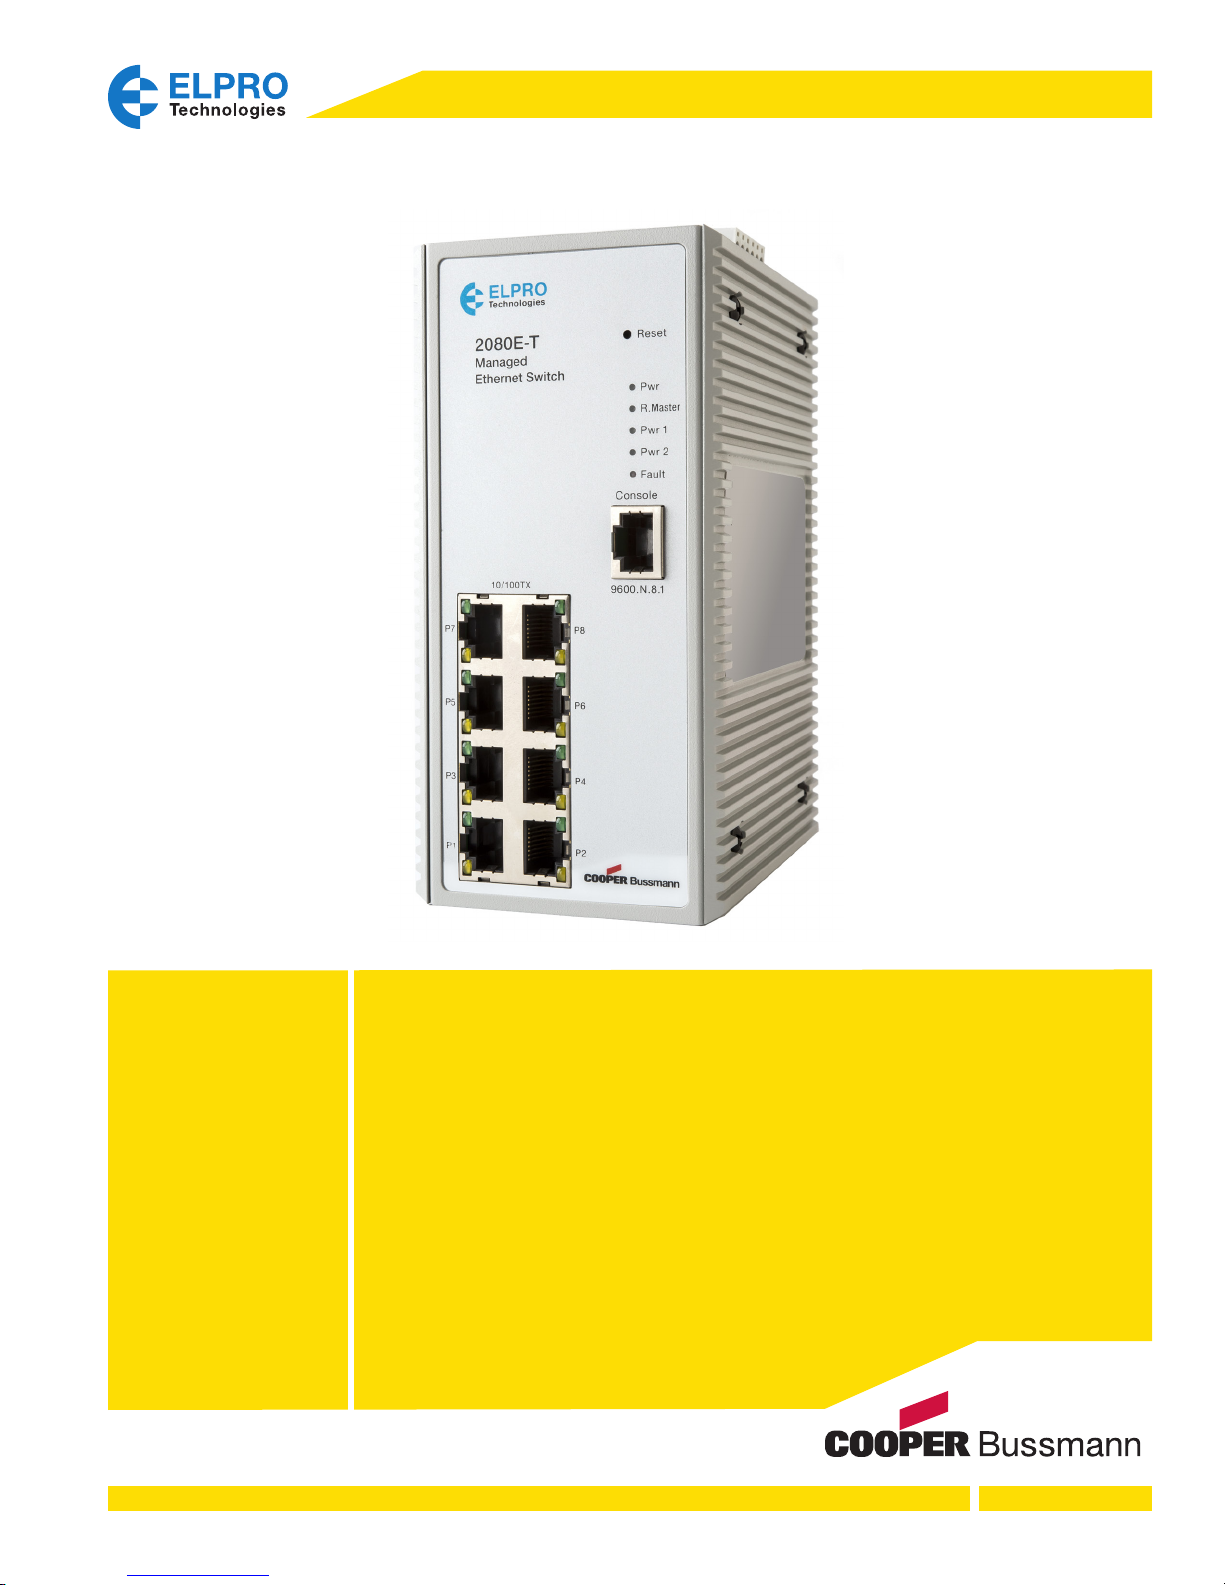
The 2080E-T Managed Ethernet Switch is is an 8-Port 10/100 TX switch that provides a cost effective solution that
meets the high reliability requirements demanded by industrial applications.
1.1 Module Identification
The identification label is located on the bottom of the 2080E-T Switch. This label contains the model number,
temperature range, power range, serial number, and all certifications.
Figure 1 Module Identification Label
1.2 Mechanical Specifications
This section provides the exterior dimensions of the 2080E-T Ethernet Switch.
Figure 2 2080E-T Mechanical Specifications
6 www.cooperbussmann.com/wirelessresources
Rev Version 1.0
Page 7

Cooper Bussmann 2080E-T Managed Ethernet Switch User Manual
1.3 Order Information
Item Product Code Description Data Sheet
Ethernet Switch 2080E-T 8 Port 10/100TX Managed Ethernet Switch 10102
1.4 Hardware Features
Feature Description
Standard
Switch Architecture
Transfer Rate
Packet Buffer
MAC Address
Flash ROM
DRAM
Connector
Network Cable
IEEE 802.3 10Base-T Ethernet
IEEE 802.3u 100Base-TX
IEEE802.3x Flow Control and Back Pressure
IEEE802.3ad Port Trunk with LACP
IEEE802.1d Spanning Tree/ IEEE802.1w Rapid Spanning Tree
IEEE802.1p Class of Service
IEEE802.1Q VLAN Tag
IEEE 802.1X User Authentication (Radius)
IEEE802.1ab LLDP
Back-plane (Switching Fabric): 1.6 Gbps
Packet Throughput Ability (Full-Duplex): 1.8 Mpps @ 64 bytes
14,880 pps for Ethernet Port
148,800 pps for Fast Ethernet Port
1 Mbits
8K MAC Address Table
4 Mbytes
32 Mbytes
10/100TX: 8 x RJ-45 with Auto MDI/MDI-X function
RS-232 Connector: RJ-45 type
10Base-T: 2-pair UTP/STP Cat. 3, 4, 5/ 5E cable, EIA/TIA-568 100-ohm (100m)
100Base-TX: 2-pair UTP/STP Cat. 5/ 5E cable, EIA/TIA-568 100-ohm (100m)
Protocol
LED
Power Supply
Power Consumption
Operating Humidity
Operating Temperature
Storage Temperature
Case Dimension
Installation
EMI
CSMA/CD
IGMPv1/v2, GVRP, RSTP/STP, LLDP, LACP, SNMPv1/v2c/v3, DHCP Server/Client/Port and IP
Binding, DNS, TFTP, SNTP, HTTP, Telnet, Syslog, 802.1X
Authentication/Radius
Per unit: Power (Green), Power 1 (Green), Power 2 (Green), Fault (Red), R. Master (Green)
8 port 10/100: Link/Activity (Green), Full Duplex/Collision (Amber)
External Power Supply: DC 12–48V, Redundant power DC 12–48V and connective removable
terminal block for master and slave power
7.86 Watts (Full load)
5% to 95% (Non-condensing)
-40°C to 75°C
-40°C to 85°C
IP-30, 74 mm (W) x 105 mm (D) x 152 mm (H)
DIN Rail and Wall Mount Ear
FCC Class A, CE EN61000-4-2, CE EN61000-4-3, CE EN-61000-4-4, CE EN61000-4-5,
CE EN61000-4-6, CE EN61000-4-8, CE EN61000-4-11, CE EN61000-4-12, CE EN61000-6-2, CE
EN61000-6-4
www.cooperbussmann.com/wirelessresources
7Rev Version 1.0
Page 8

Cooper Bussmann 2080E-T Managed Ethernet Switch User Manual
Feature Description
Safety
Stability Testing
UL, cUL, CE/EN60950-1
UL Class 1 Division II for Group A, B, C and D Hazardous Location
IEC60068-2-32 (Free fall), IEC60068-2-27 (Shock), IEC60068-2-6 (Vibration)
1.5 Software Features
Feature Description
Management
SNMP MIB
VLAN
Port Trunk with LACP
LLDP
Spanning Tree
Pro-Ring2se
Quality of Service
SNMP v1, v2c, v3/ Web/Telnet/CLI/InVision NMS
RFC 1215 Trap, RFC1213 MIBII, RFC 1157 SNMP MIB, RFC 1493 Bridge MIB, RFC 2674 VLAN
MIB, RFC 1643 Ethernet-like, RFC 1757 RMON, RSTP MIB, Private MIB (el2080et.mib), LLDP MIB
Port Based VLAN
IEEE 802.1Q Tag VLAN (256 entries)/ VLAN ID (up to 4K, VLAN ID can be assigned from 1 to4094)
GVRP (256 Groups)
LACP Port Trunk: four trunk groups/maximum four trunk members
Supports LLDP allowing switch to advertise its identification and capability on the LAN
IEEE802.1d Spanning Tree
IEEE802.1w Rapid Spanning Tree
Supports Pro-Ring2se. Provides redundant backup feature and recovery
Quality of service is determined by port, tag, and IPv4 type of service, IPv4 differentiated services
Class of Service
Port Security
Port Mirror
IGMP
IP Security
Login Security
Bandwidth Control
Flow Control
System Log
Relay Alarm
SNMP Trap
Supports IEEE802.1p Class of service, per port provides four priority queues
Supports 100 entries of MAC address for static MAC and another 100 for MAC filter
Supports 3 mirroring types: RX, TX and both packet
Supports IGMP Snooping v1,v2
256 Multicast Groups and IGMP Query
Supports 10 IP addresses that have permission to access the switch management and to prevent
unauthorized intruder
Supports IEEE802.1X Authentication/RADIUS/Telnet
Supports ingress packet filter and egress packet limit
The egress rate control supports all packet types, and the limit rates are 100K to 102400 Kbps
(10/100). Ingress filter packet type combination rules are Broadcast/Multicast/Unknown Unicast
packet, Broadcast/Multicast packet, Broadcast packets only and All of packet. The packet filter
rate can be set from 100K to 102400 Kbps (10/100).
Supports flow control for full-duplex and back pressure for half-duplex
Supports system log record and remote system log server
Provides one relay output for port breakdown, power fail
Alarm relay current carry ability: 1A @ 24 Vdc
• Link up trap
• Link down trap
• Cold start trap
• Authentication failure
Private/Specific Trap:
• DC power status trap
• Topolpgy change trap
8 www.cooperbussmann.com/wirelessresources
Rev Version 1.0
Page 9

Cooper Bussmann 2080E-T Managed Ethernet Switch User Manual
Feature Description
DHCP
DNS
SNTP
Firmware Update
Configuration Upload/
Download
ifAlias
Provides DHCP client/ DHCP server/port and IP binding
Provides DNS client feature and supports primary and secondary DNS server
Supports SNTP to synchronize system clock in Internet
Supports TFTP/Web firmware update
Supports binary format configuration file for system quick installation
Supports TFTP backup and restore
Each port allows importing 128-bits of alphabetic string on SNMP and CLI interface
1.6 Package Contents
Compare the contents of the 2080E-T Switch with the following standard content list. If any item is damaged or
missing, contact your local dealer for service.
• 8-port 10/100TX Managed Industrial Switch x 1
• Pluggable terminal block x 1
• Mounting plate x 2
• RJ-45 to DB-9 female cable x 1
• Installation Guide
• Quick Start Guide
www.cooperbussmann.com/wirelessresources
9Rev Version 1.0
Page 10
Cooper Bussmann 2080E-T Managed Ethernet Switch User Manual
ChapTEr 2 - harDWarE DESCrIpTION
This chapter describes hardware specifications, ports, cabling information, and wiring installation information for the
2080E-T.
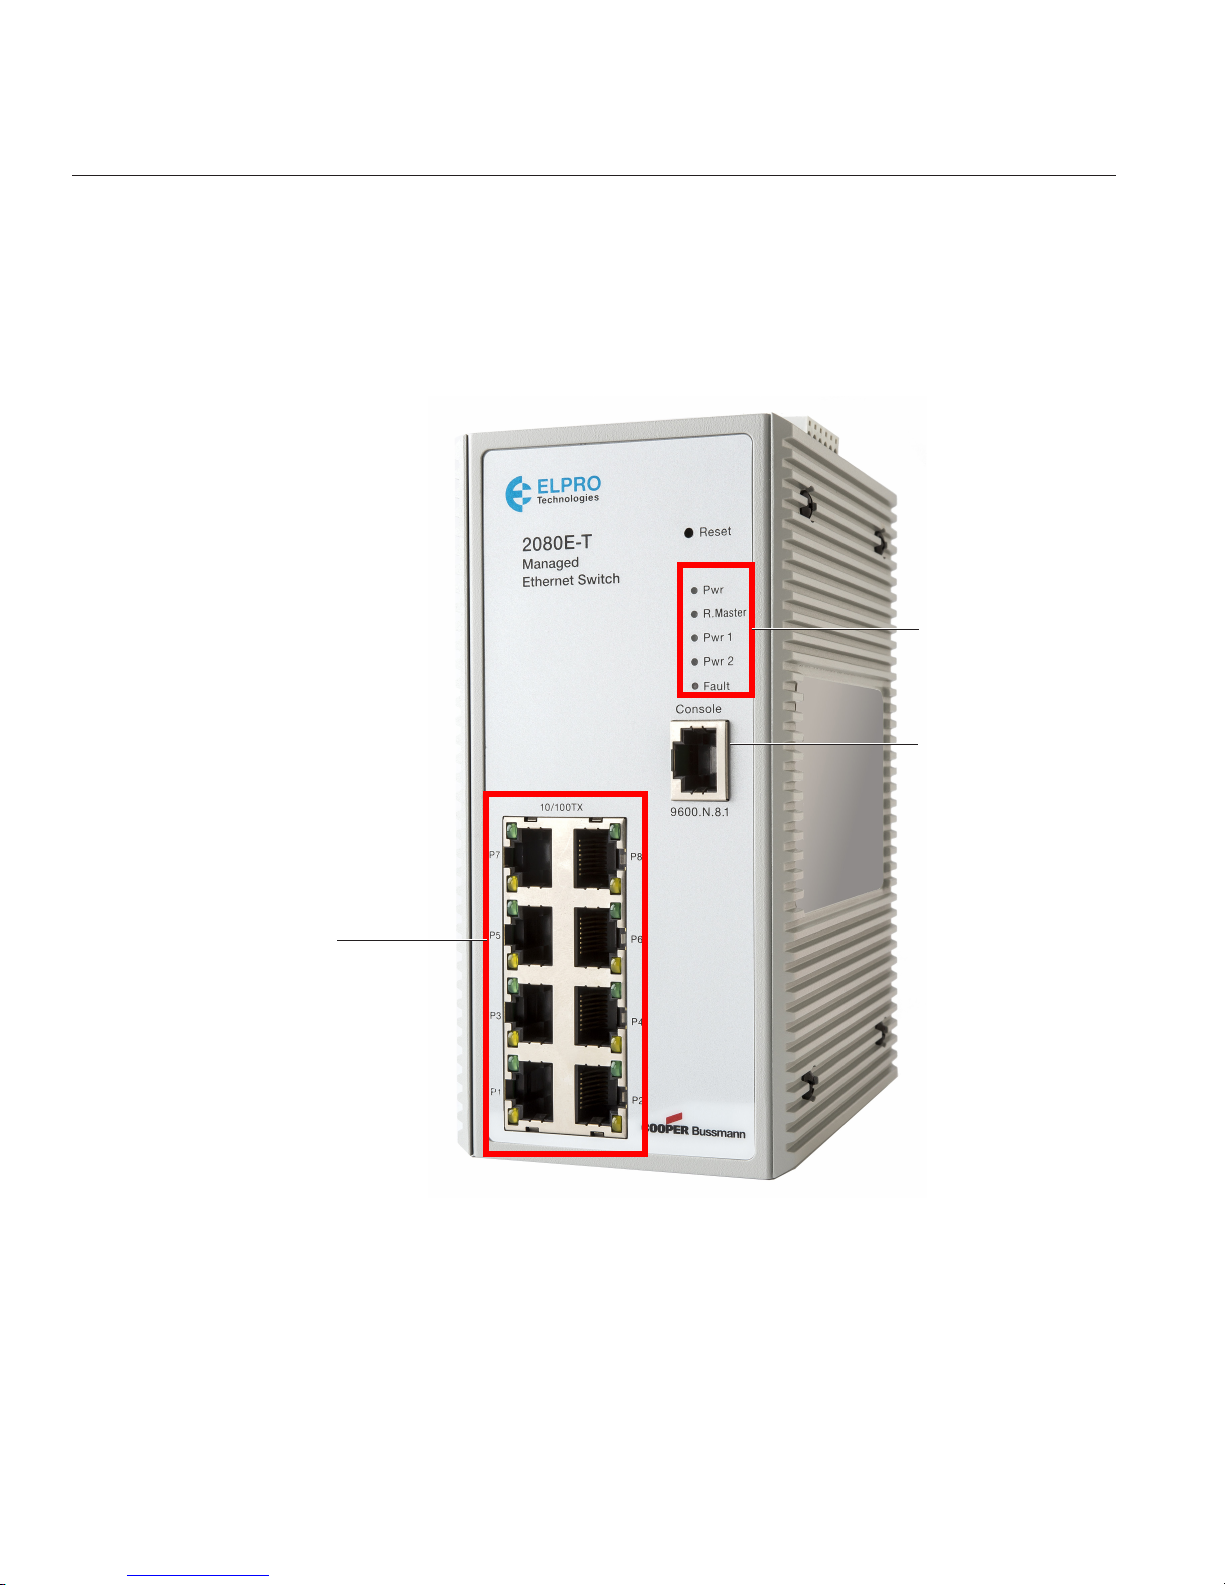
2.1 Front Panel
The front panel includes eight 10/100 TX RJ-45 ports, one RS-232 connector (RJ-45 type) for connecting to a
console (terminal or PC), a pin-hole reset button, and diagnostic LEDs.
LEDs
10/100 TX Ports (8)
Console Port
Figure 3 Front Panel of 2080E-T Switch
10 www.cooperbussmann.com/wirelessresources
Rev Version 1.0
Page 11

Cooper Bussmann 2080E-T Managed Ethernet Switch User Manual
2.2 Top View
The top panel of the 2080E-T Switch includes one terminal block connector. The terminal block has two DC power
inputs and one fault alarm.
Figure 4 Top Panel of 2080E-T Switch
2.3 LED Indicators
The diagnostic LEDs are located on the front panel of the 2080E-T Switch, and provide real-time information about
the system. The following table describes LED states.
LED Color State Description
Pwr
R.Master
Pwr1
Pwr2
Fault
P1–P8
Green On The switch unit is powered on
Off No power
Green On The switch is a master in Pro-Ring2se group
Off The switch is a slave in Pro-Ring2se group, or Pro-Ring2se is
disabled
Green On Power 1 is active
Off Power 1 is inactive
Green On Power 2 is active
Off Power 2 is inactive
Red On Power or port failure
Blinking Location alert
Off No failure
Green On A network device is detected
Blinking The port is transmitting or receiving packets from the TX device
Amber On The port is operating in full-duplex mode
Off No device attached
Blinking Packet collision occurred
Off The port is in half-duplex mode or no device is attached
www.cooperbussmann.com/wirelessresources
11Rev Version 1.0
Page 12

Cooper Bussmann 2080E-T Managed Ethernet Switch User Manual
2.4 Pin-hole Reset Button
Pressing the pin-hole reset button for more than five seconds will cause the 2080E-T to return to its factory default
settings.
12 www.cooperbussmann.com/wirelessresources
Rev Version 1.0
Page 13
Cooper Bussmann 2080E-T Managed Ethernet Switch User Manual
ChapTEr 3 - harDWarE INSTaLLaTION
This chapter describes how to install the 2080E-T Managed Ethernet Switch.
3.1 Installation Steps
1. Unpack the 2080E-T Ethernet Switch.
The DIN rail is screwed onto the switch by default. To wall mount the 2080E-T Switch, refer to “3.3 Wall Mount
Plate Mounting.”
2. Hang the switch on the DIN rail track or wall.
3. Power on the switch.
For information on wiring the power, see “3.4 Wiring the Power Inputs.”
When the switch is powered on, the power LED turns on. Refer to “2.3 LED Indicators” for information about
the LEDs.
4. Prepare the twisted-pair straight-through Category 5 cable for the Ethernet connection.
5. Insert one end of the RJ-45 (Category 5) cable into the Ethernet port (RJ-45 port) on the 2080E-T Switch and
insert the other end of the same cable into the Ethernet port (RJ-45 port) on the network device (a switch, PC,
or server).
The UTP port (RJ-45) LED on the 2080E-T will turn on when the cable is connected to the network device. See
“2.3 LED Indicators” for details about the LEDs.
NOTE Make sure that the connected network device supports MDI/MDI-X. If it does not, use the
crossover Category-5 cable.
6. When all connections are set and the LEDs all indicate status is normal, the installation is complete.
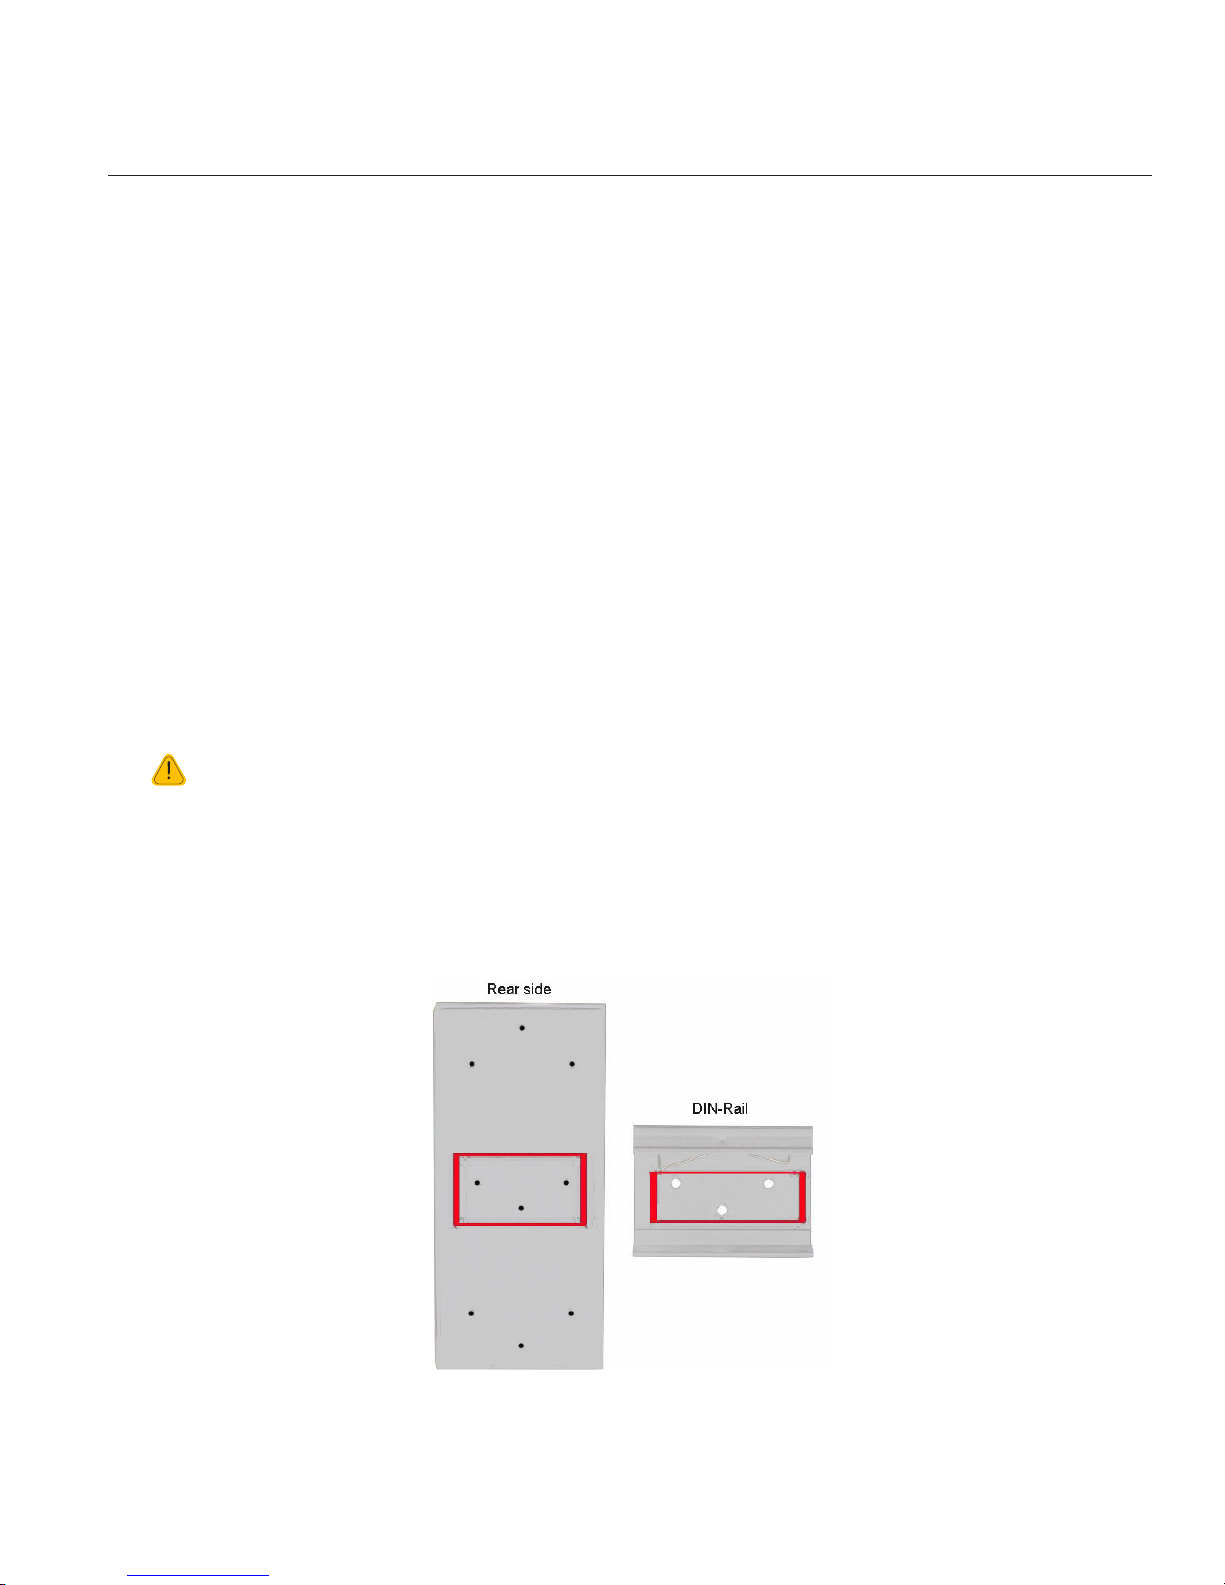
3.2 DIN Rail Mounting
The 2080E-T normally ships from the factory with the DIN rail mount kit installed. If the DIN rail is not installed, refer
to Figure 5 to screw the DIN rail onto the switch. Then, follow the steps to mount the switch.
Figure 5 Rear Side of 2080E-T Switch and DIN Rail
www.cooperbussmann.com/wirelessresources
13Rev Version 1.0
Page 14
Cooper Bussmann 2080E-T Managed Ethernet Switch User Manual
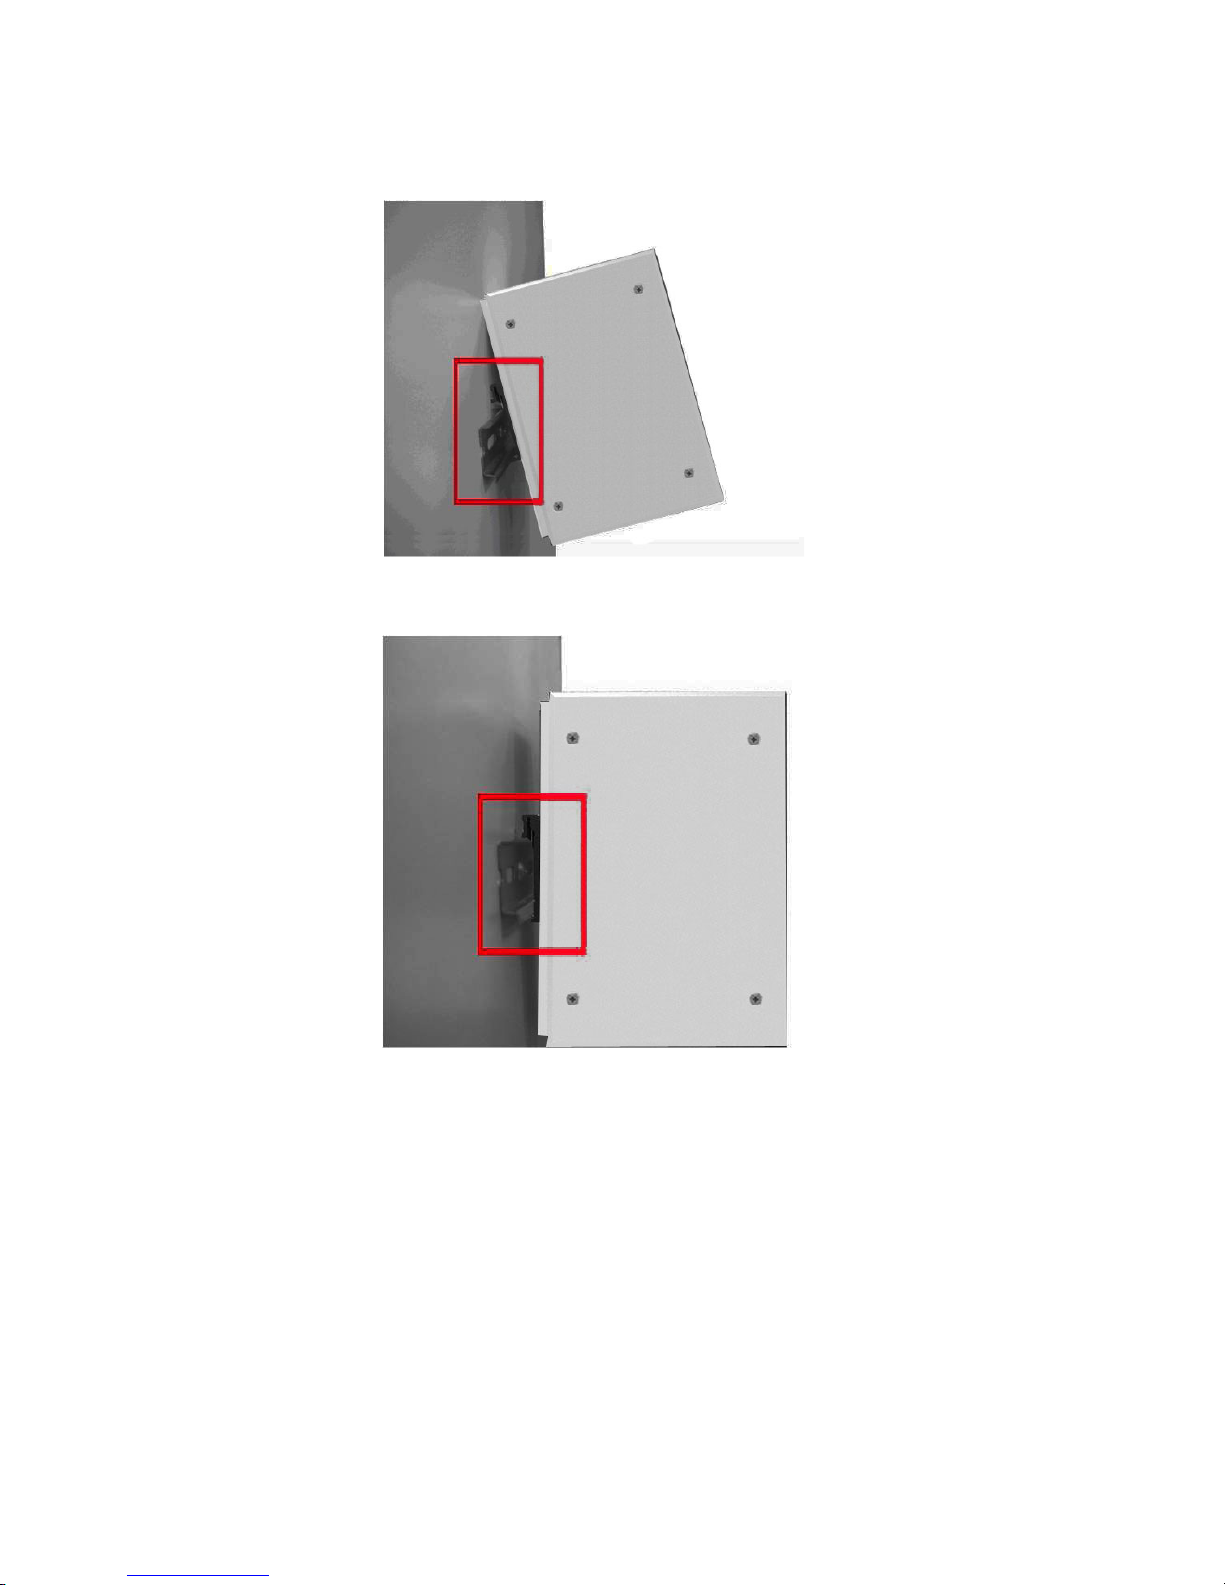
1. Insert the top of the DIN rail into the track.
2. Press the DIN rail into the track.
3. Check that the DIN rail is firmly secured to the DIN rail track.
To remove the industrial switch from the track, reverse the steps above.
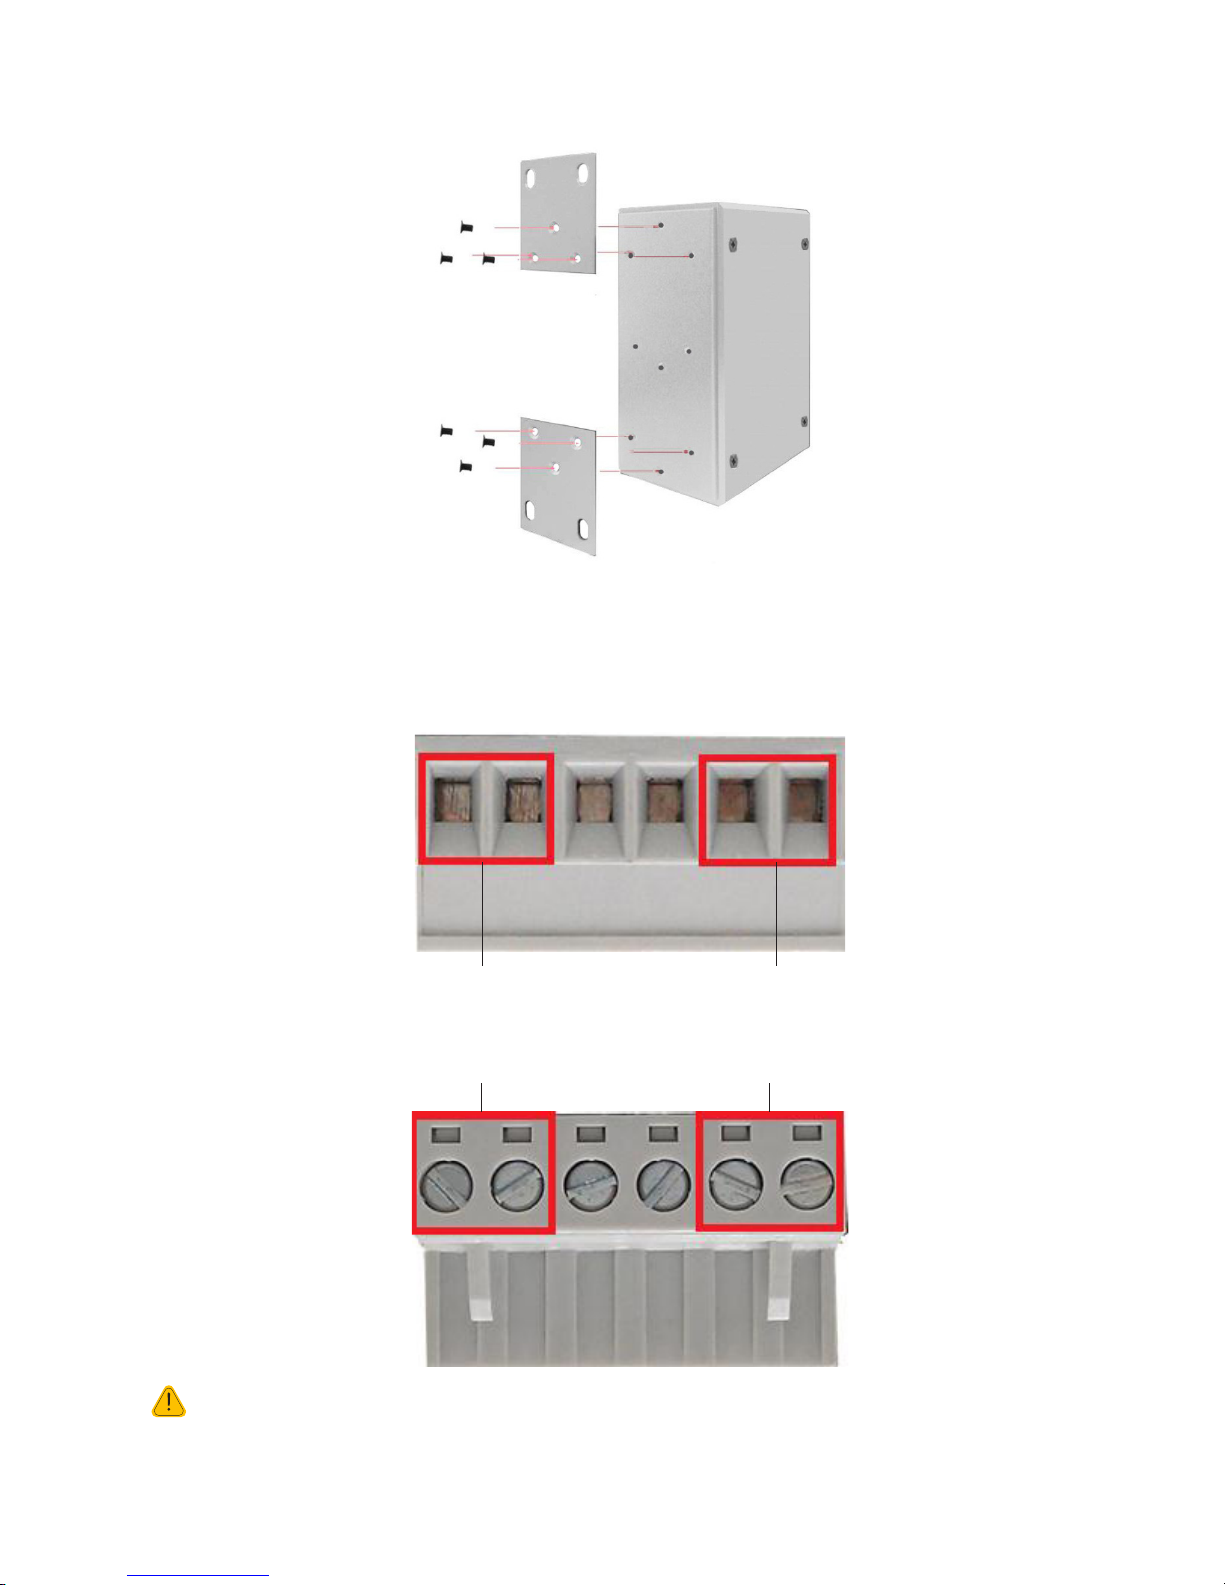
3.3 Wall Mount Plate Mounting
Follow these steps to mount the switch using a wall mount plate.
1. Loosen the screws to remove the DIN rail from the 2080E-T Switch.
2. Place the wall mount plate on the rear panel of the switch.
3. Use the screws to screw the wall mount plate onto the switch.
4. Use the hook holes at the corners of the wall mount plate to hang the switch on the wall.
5. To remove the wall mount plate, reverse the steps above.
14 www.cooperbussmann.com/wirelessresources
Rev Version 1.0
Page 15
Cooper Bussmann 2080E-T Managed Ethernet Switch User Manual
3.4 Wiring the Power Inputs
Use the following steps below to insert the power wire.
1. Insert the DC power wires into the contacts for power 1 and power 2, as shown below.
Power 2Power 1
2. Tighten the wire-clamp screws to prevent the wires from coming loose.
Power 2Power 1
NOTE The wire gauge for the terminal block should be within the range 12–24 AWG.
www.cooperbussmann.com/wirelessresources
15Rev Version 1.0
Page 16

Cooper Bussmann 2080E-T Managed Ethernet Switch User Manual
3.5 Wiring the Fault Alarm Contact
The fault alarm contacts are in the middle of the terminal block connector, as shown in Figure 6. Insert the wires
into the fault alarm contacts. After the wires are inserted, the switch detects the fault status of the power failure or
port link failure, and then forms an open circuit. Figure 7 shows an application example for wiring the fault alarm
contacts.
NOTE The wire gauge for the terminal block should be within the range 12–24 AWG.
Figure 6 Terminal Block
3.6 Cabling
Use four twisted-pair, Category 5 (or above) cabling for the RJ-45 port connection. The cable between the switch
and the link partner (for example, switch, hub, workstation) must be less than 100 meters (328 ft) long.
16 www.cooperbussmann.com/wirelessresources
Figure 7 Application Example
Rev Version 1.0
Page 17
Cooper Bussmann 2080E-T Managed Ethernet Switch User Manual
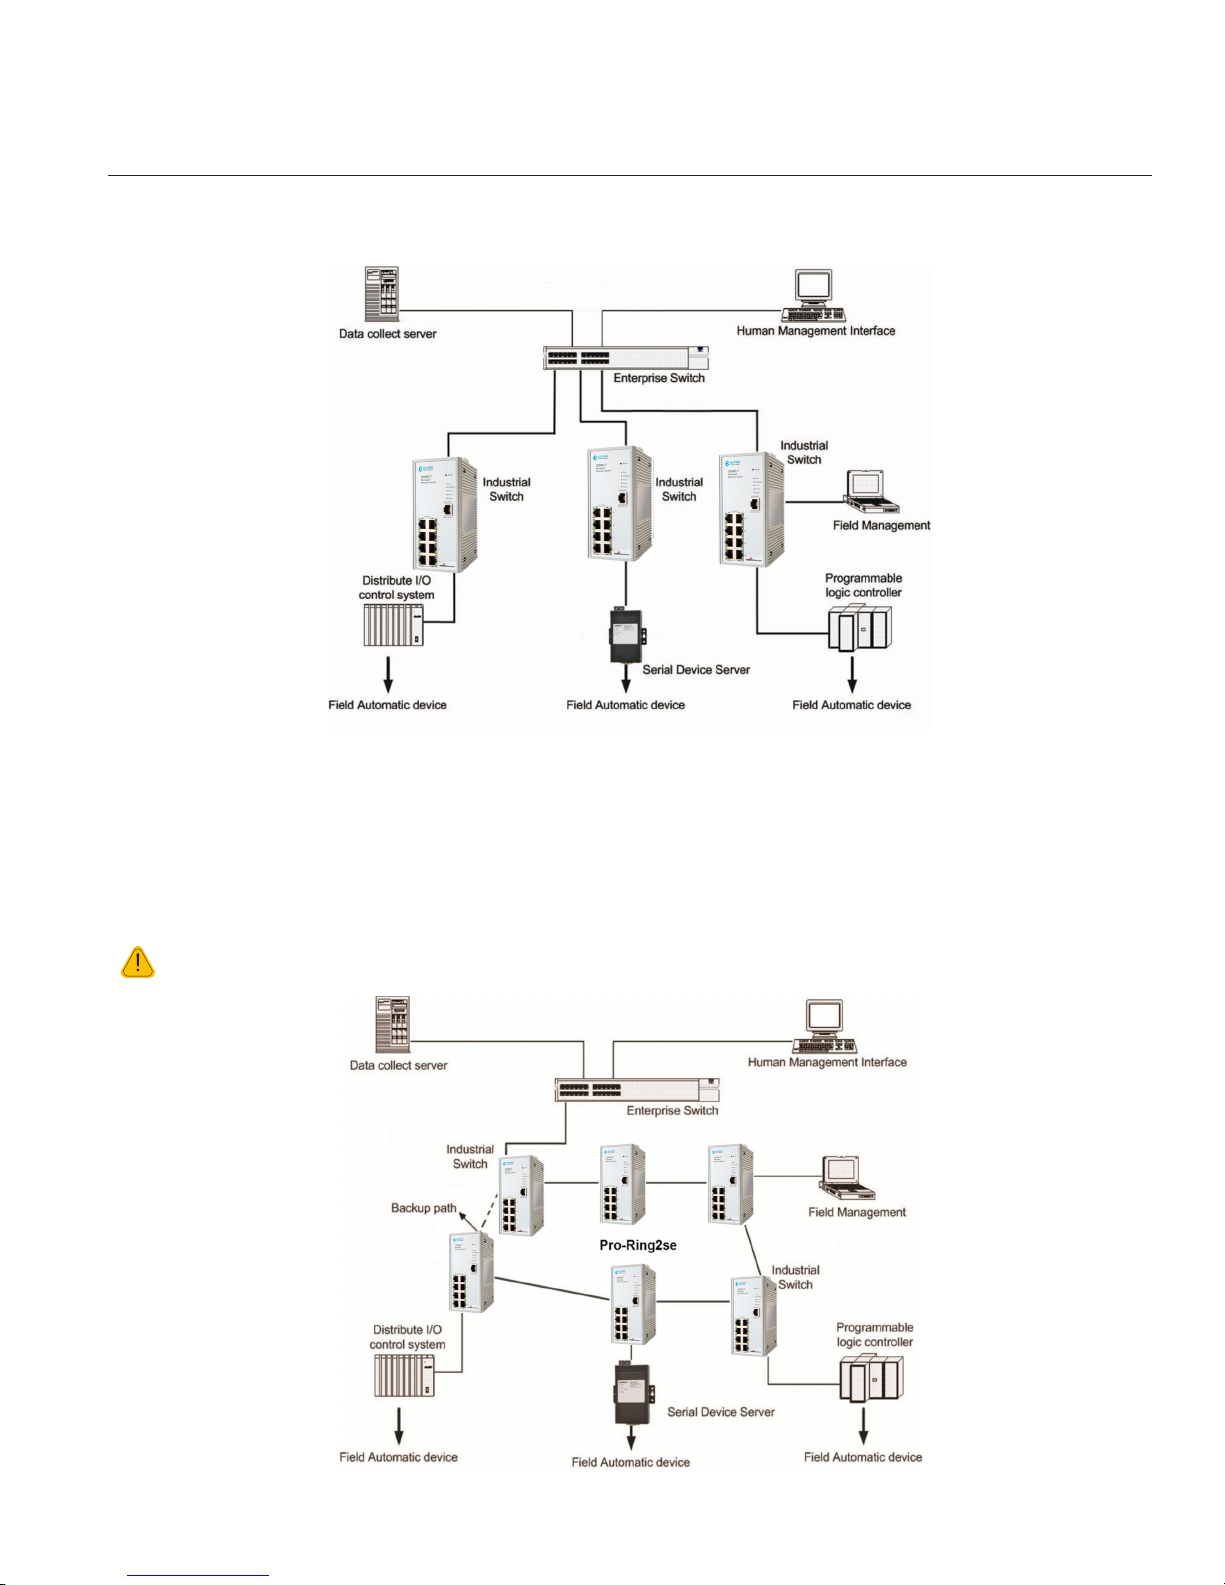
ChapTEr 4 - NETWOrK appLICaTIONS
This chapter provides sample applications for the Cooper Bussmann/ELPRO Technologies Industrial Ethernet
Switches.
Figure 8 Sample Application
4.1 Pro-Ring2se Application
Pro-Ring2se is a new ring mechanism for the Cooper Bussmann/ELPRO Technologies Industrial Ethernet Switches.
As Figure 10 shows, Pro-Ring2se can be constructed using two ports of the same type in each 2080E-T. Refer to
the section “6.5.5 Redundancy - Pro-Ring2se” for information on configuring each switch to enable the Pro-Ring2se
feature.
NOTE Pro-Ring2se is not compatible with other Pro-Ring mechanisms.
Figure 9 Pro-Ring2se Application
www.cooperbussmann.com/wirelessresources
17Rev Version 1.0
Page 18
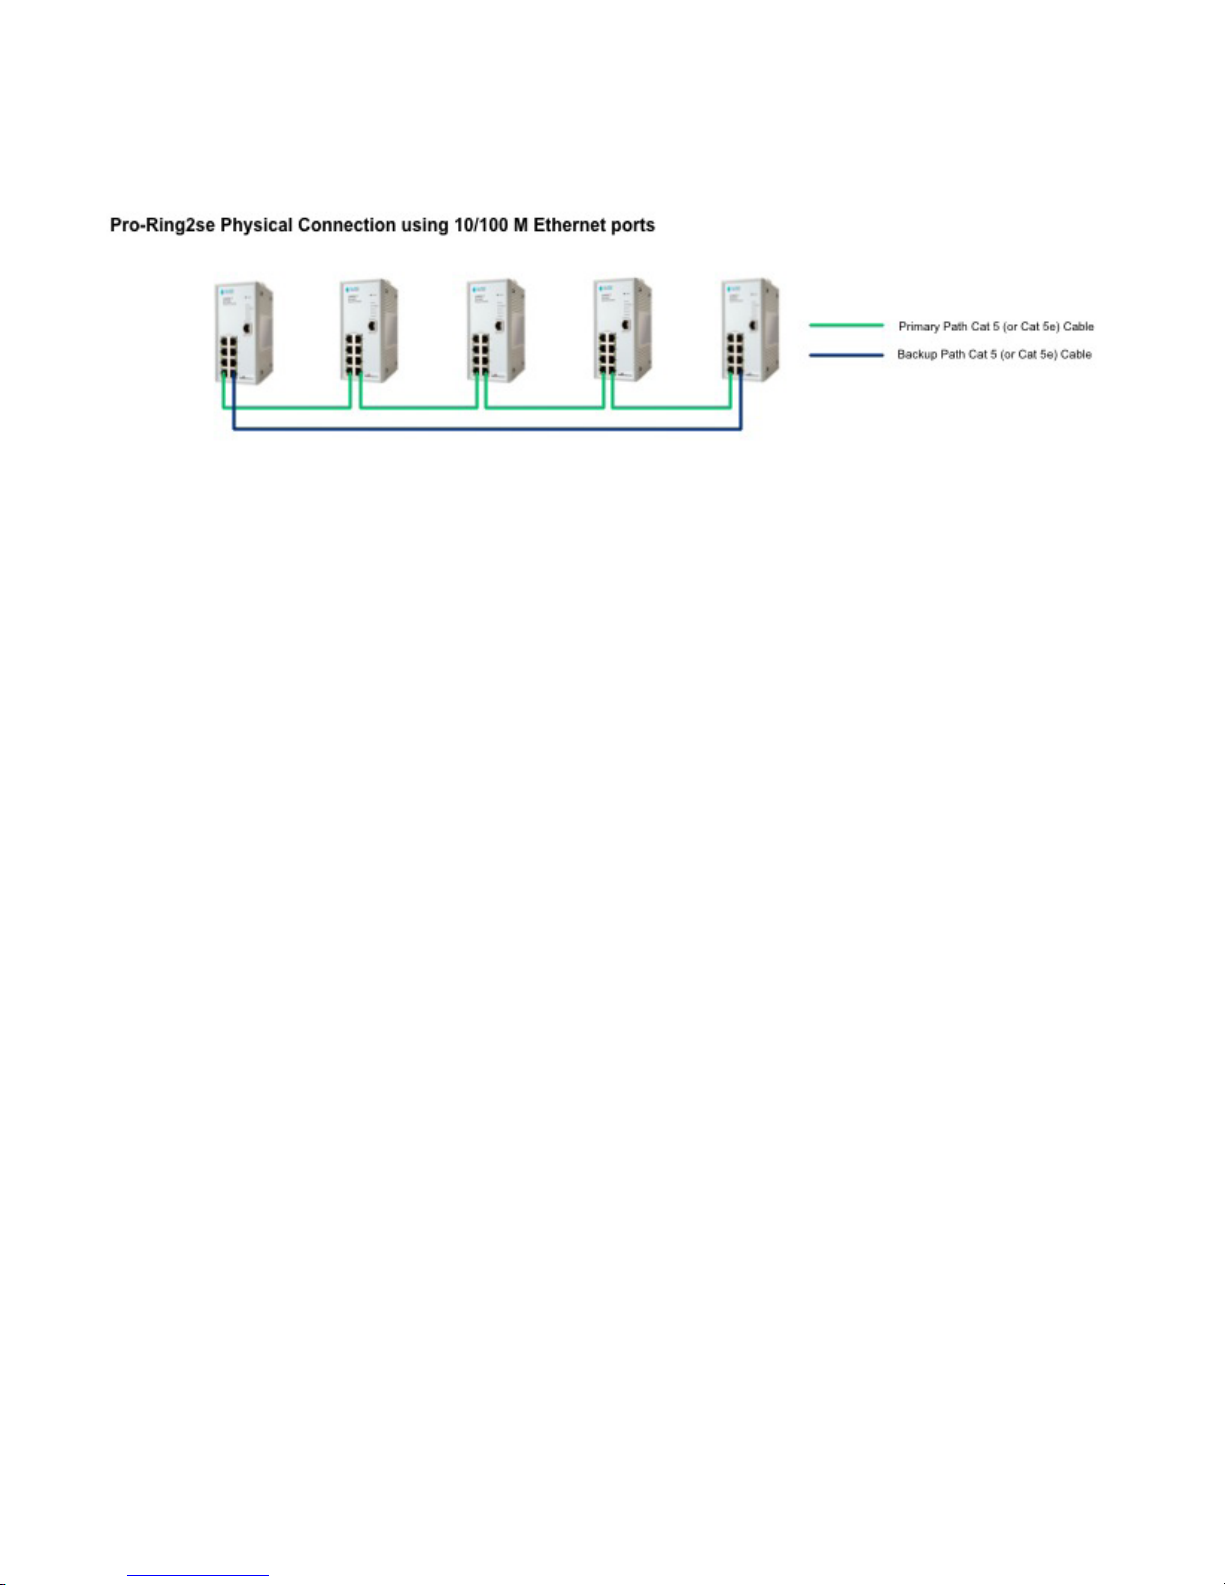
Cooper Bussmann 2080E-T Managed Ethernet Switch User Manual
Figure 10 Pro-Ring2se Connection Example
18 www.cooperbussmann.com/wirelessresources
Rev Version 1.0
Page 19
Cooper Bussmann 2080E-T Managed Ethernet Switch User Manual
ChapTEr 5 - CONSOLE-BaSED MaNaGEMENT
The 2080E-T Managed Ethernet Switch supports a CLI command interface that can be accessed by connecting the
switch to a terminal or a PC running a terminal emulator. This chapter describes how to connect and log onto the
Console port (see Figure 3). Refer to “Appendix B - COMMAND SETS” for command descriptions and examples.
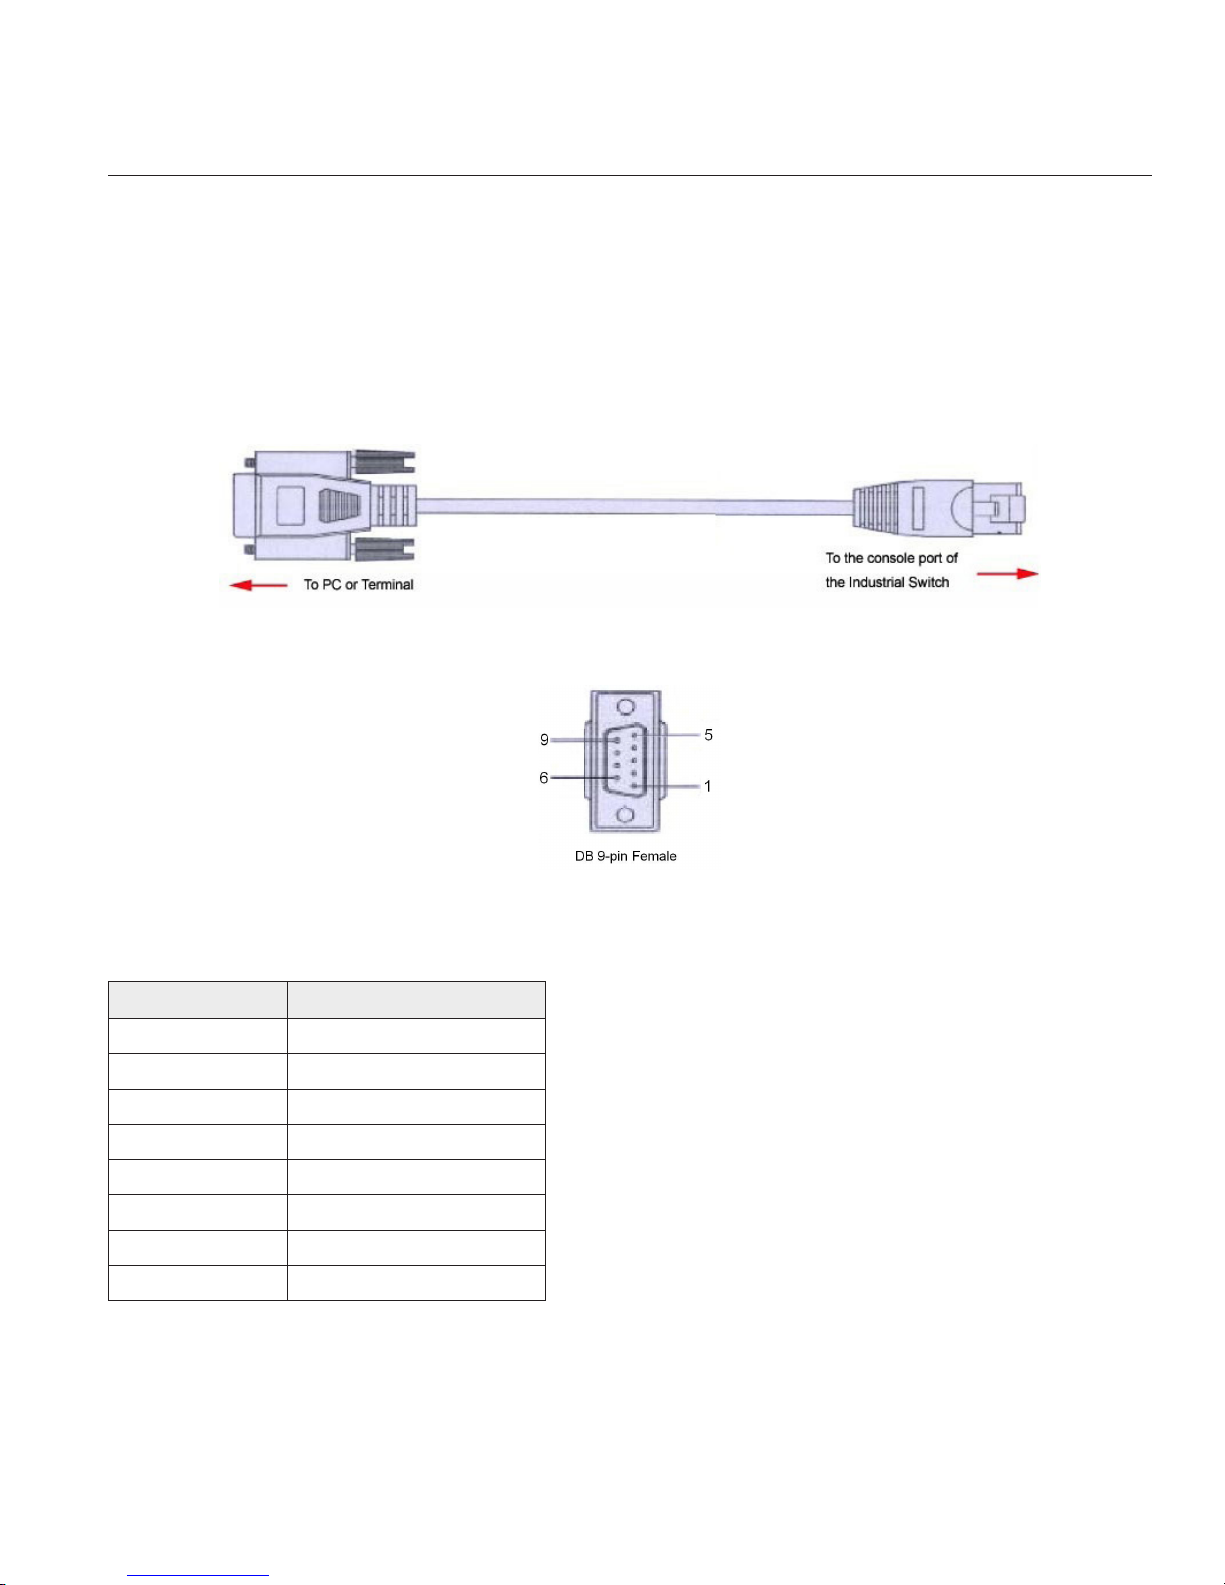
5.1 Connecting to the Console Port
A RS-232 to RJ-45 connector cable is supplied with the switch (Figure 11). Connect the RS-232 connector to PC
or terminal and the RJ-45 connector to the console port of the 2080E-T switch. The connected terminal or PC must
support a terminal emulation program, such as HyperTerminal or PuTTY.
Figure 11 RS-232 TO RJ-45 Connector
Figure 12 DB-9 Pin Female
5.2 Pin Assignment
DB-9 Connector RJ-45 Connector
NC 1 Orange/White
2 2 Orange
3 3 Green/White
NC 4 Blue
5 5 Blue/White
NC 6 Green
NC 7 Brown/White
NC 8 Brown
5.3 Logging onto the Console Interface
1. After connecting the 2080E-T Switch to the PC, turn on the PC.
For connection instructions, see “5.1 Connecting to the Console Port.”
2. Run the terminal emulation program (for example, HyperTerminal or PuTTY) and configure its communication
parameters to match the following default characteristics of the console port.
www.cooperbussmann.com/wirelessresources
19Rev Version 1.0
Page 20

Cooper Bussmann 2080E-T Managed Ethernet Switch User Manual
• Baud Rate: 9600 bps
• Data Bits: 8
• Parity: none
• Stop Bit: 1
• Flow control: none
Figure 13 Communication Parameters
3. After setting the communication parameters, click OK.
4. At the blank screen, press Enter to display the login prompt.
5. At the login prompt, type the default user name “admin” and press Enter. When prompted for a password,
type the default password “password” and press Enter (see Figure 14)
The Main Menu of Console Management appears.
Figure 14 Console Login
5.4 CLI Management
The system supports the console management CLI commands. After logging on to the system, you will see a
command prompt. To enter the CLI management interface, type the “enable” command. See “Appendix B COMMAND SETS” for command descriptions and examples.
20 www.cooperbussmann.com/wirelessresources
Figure 15 CLI Command Interface
Rev Version 1.0
Page 21
Cooper Bussmann 2080E-T Managed Ethernet Switch User Manual
ChapTEr 6 - WEB-BaSED MaNaGEMENT
The 2080E-T Switch has an embedded Web-based management utility that resides in flash memory on its CPU
board. This utility offers advanced features that allow you to manage the switch from anywhere on the network
through a standard browser such as Microsoft® Internet Explorer®. The utility supports Internet Explorer version8.0
or later, and has Java Applets for reducing network bandwidth consumption and enhancing access speed and
screen display. This chapter provides information on the configuration and functions of the 2080E-T Web-based
management utility.
6.1 Preparing for Web Management
Before using the Web-based Management Utility, install the 2080E-T Switch on the network and make sure that all
PCs on the network can connect with the switch through the Web browser. The default IP address, subnet mask,
username, and password for the 2080E-T Switch are as follows:
• IP Address: 192.168.1.88
• Subnet Mask: 255.255.255.0
• Default Gateway: 192.168.1.254
• User Name: admin
• Password: password
6.2 System Login
Follow these steps to log on to the Web-based Management Utility.
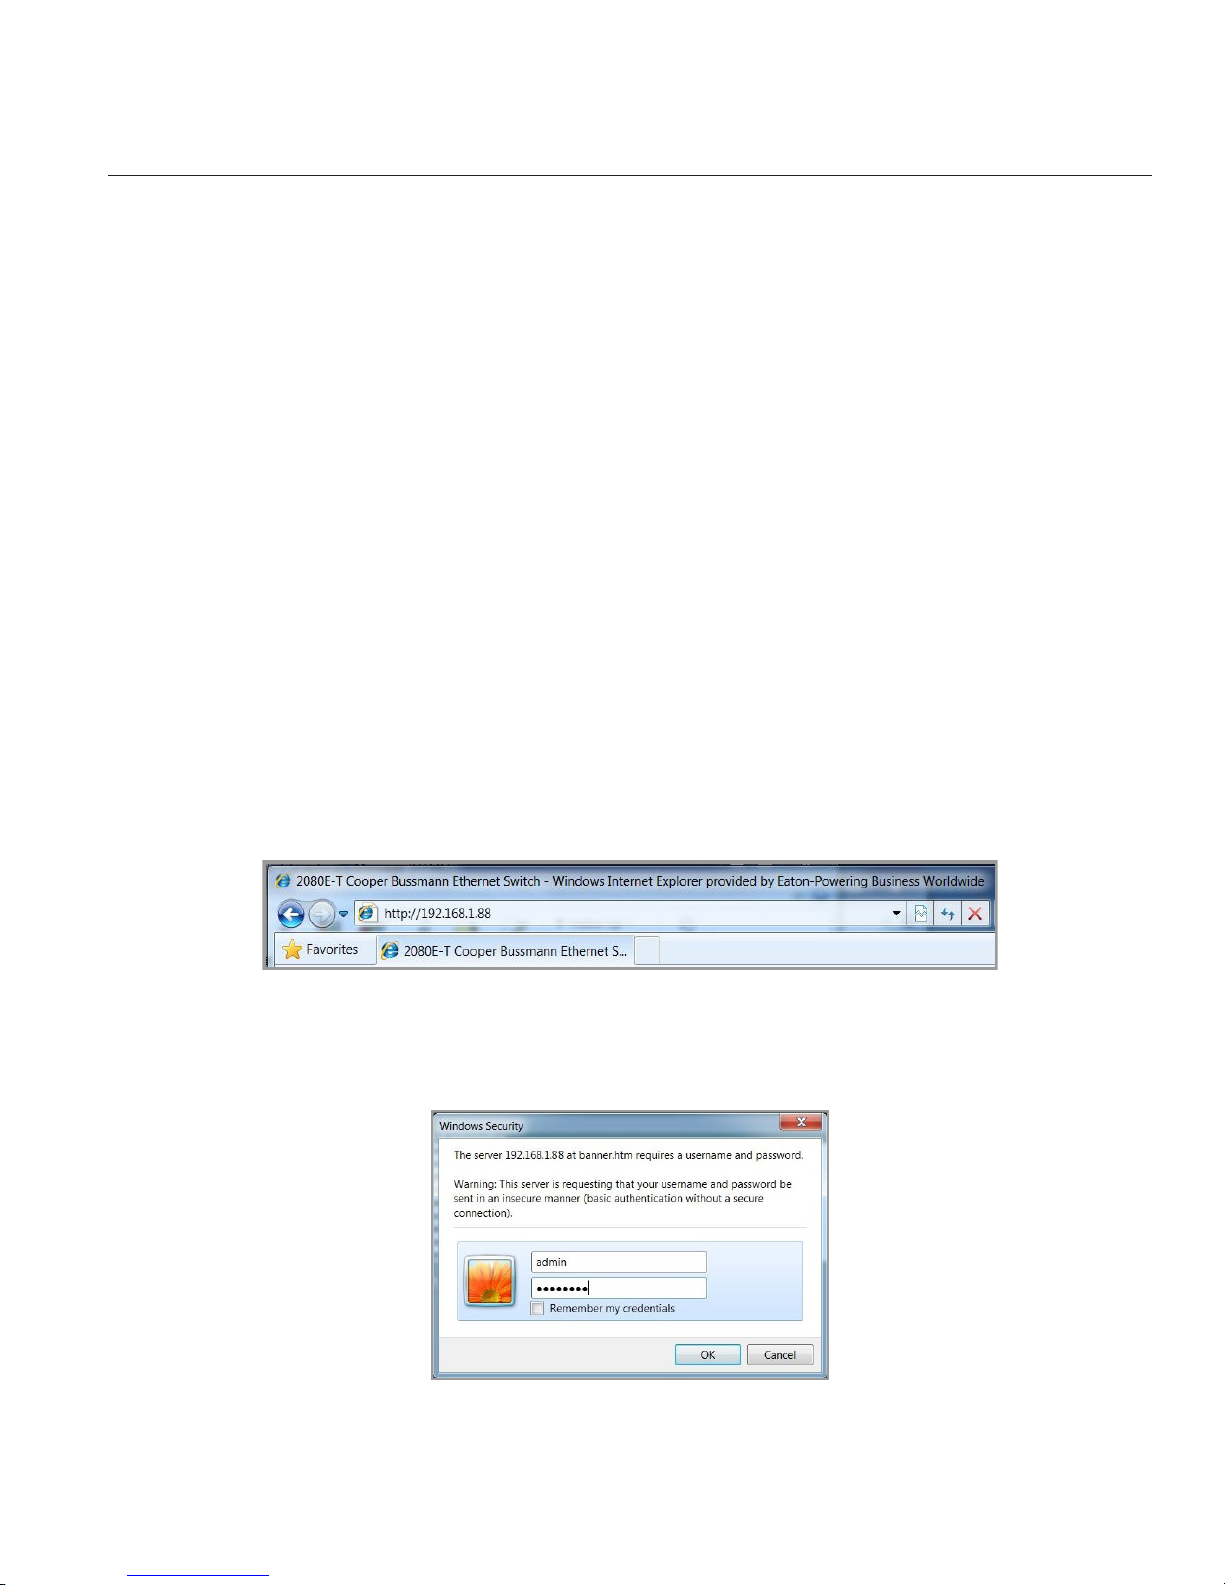
1. Launch Internet Explorer on the PC.
2. Type “http://” followed by the IP address of the switch, and then press Enter.
The login screen appears.
3. Type the user name and password.
The default username is “admin” and default password is “password”.
4. Press Enter or click OK.
The home page of the Web-based Management utility appears (see Figure 16).
www.cooperbussmann.com/wirelessresources
21Rev Version 1.0
Page 22
Cooper Bussmann 2080E-T Managed Ethernet Switch User Manual
6.3 Web Page Overview
The Web-based Management Utility uses a standard Web interface with the menu tree on the left. Click to
expand a menu, and click to collapse a menu. You can also expand or collapse the entire menu tree by clicking
Open All or Close All. Click a menu item go to the page.
The Help button at the bottom of each page displays additional information about page contents.
Figure 16 Home Page - Web-based Management Utility
6.4 System Menu
6.4.1 General
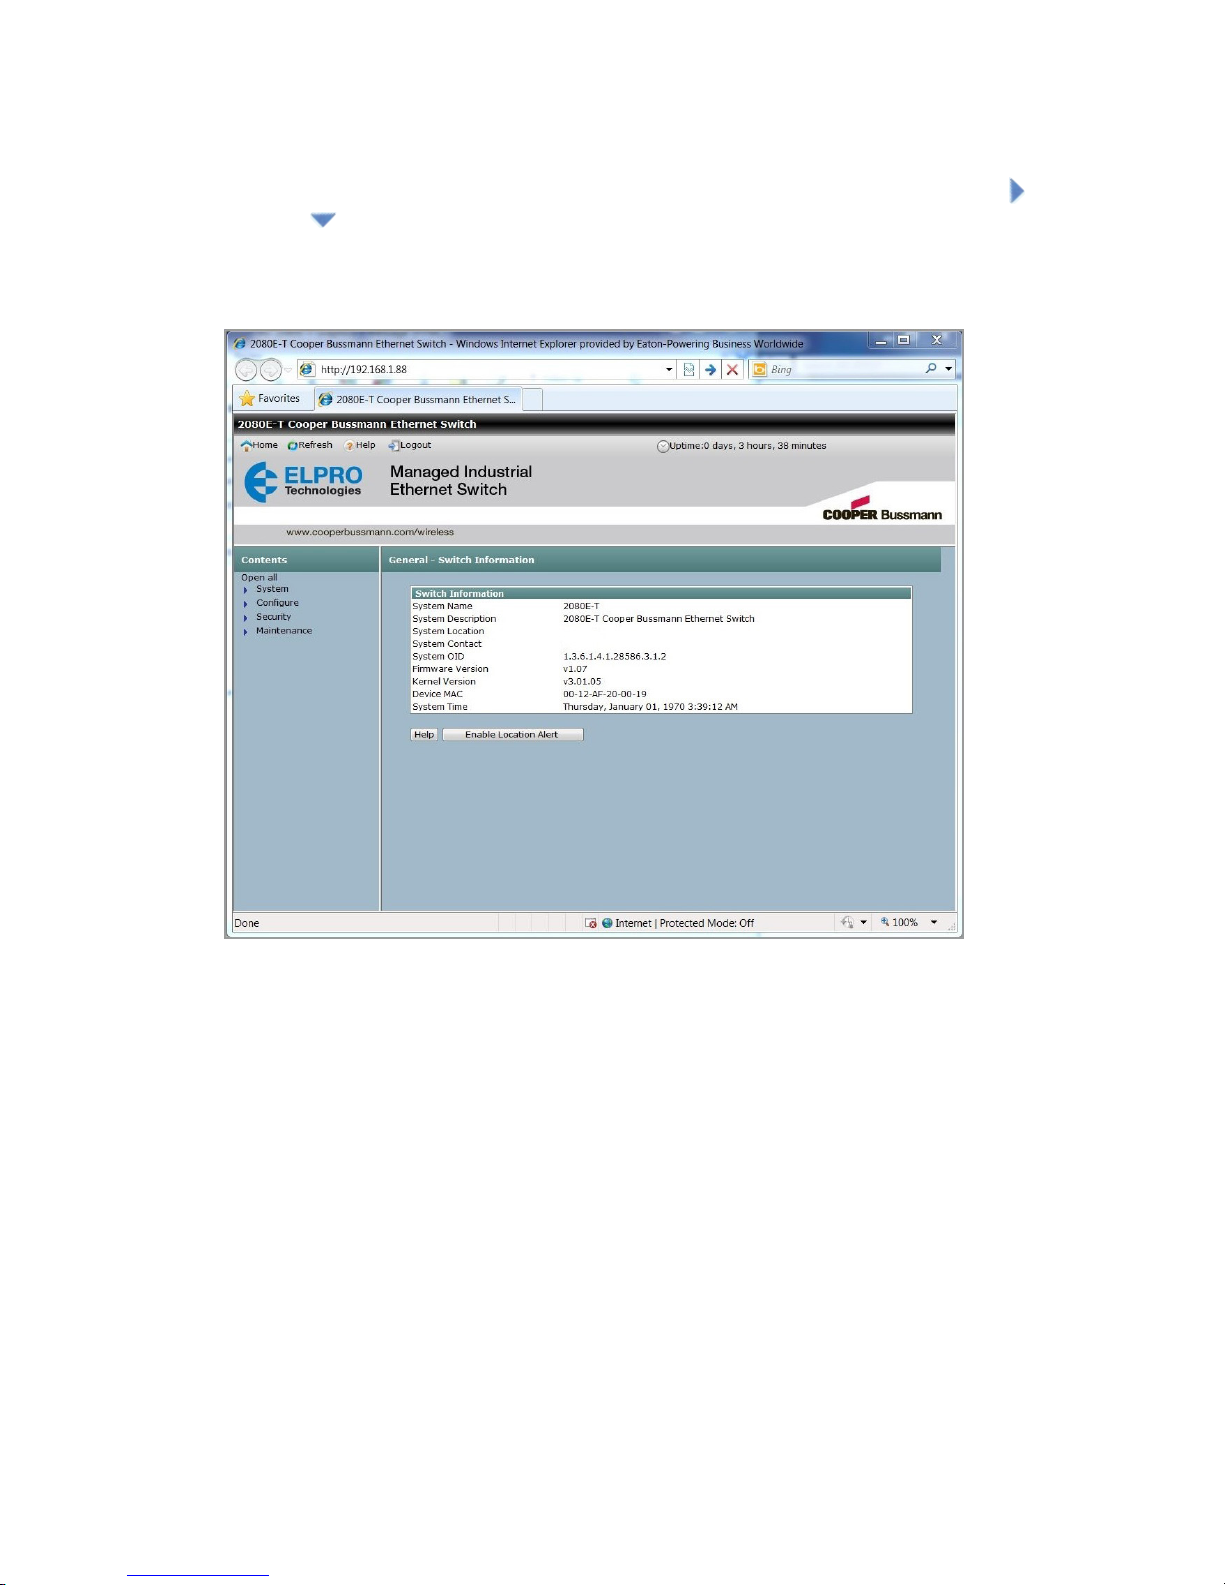
Switch Information
The Switch Information page (Figure 17) appears when you log on to the Web-based Management utility. You
can also display this page by choosing System-->General-->Switch Information. Switch information includes the
system name, description, location and contact personnel to identify the switch. The information is read-only.
22 www.cooperbussmann.com/wirelessresources
Rev Version 1.0
Page 23
Cooper Bussmann 2080E-T Managed Ethernet Switch User Manual
Figure 17 Switch Information Page
System Name System name of the switch.
System Description Switch description.
System Location Physical location of the switch.
System Contact Name of contact person or organization.
System OID SNMP OID of switch.
Firmware Version Switch firmware version.
Kernel Version Kernel software version.
Device MAC Unique hardware address assigned by the manufacturer.
System Time Current time on switch.
Enable Location Alert Click to cause the fault LED on the switch to flash.
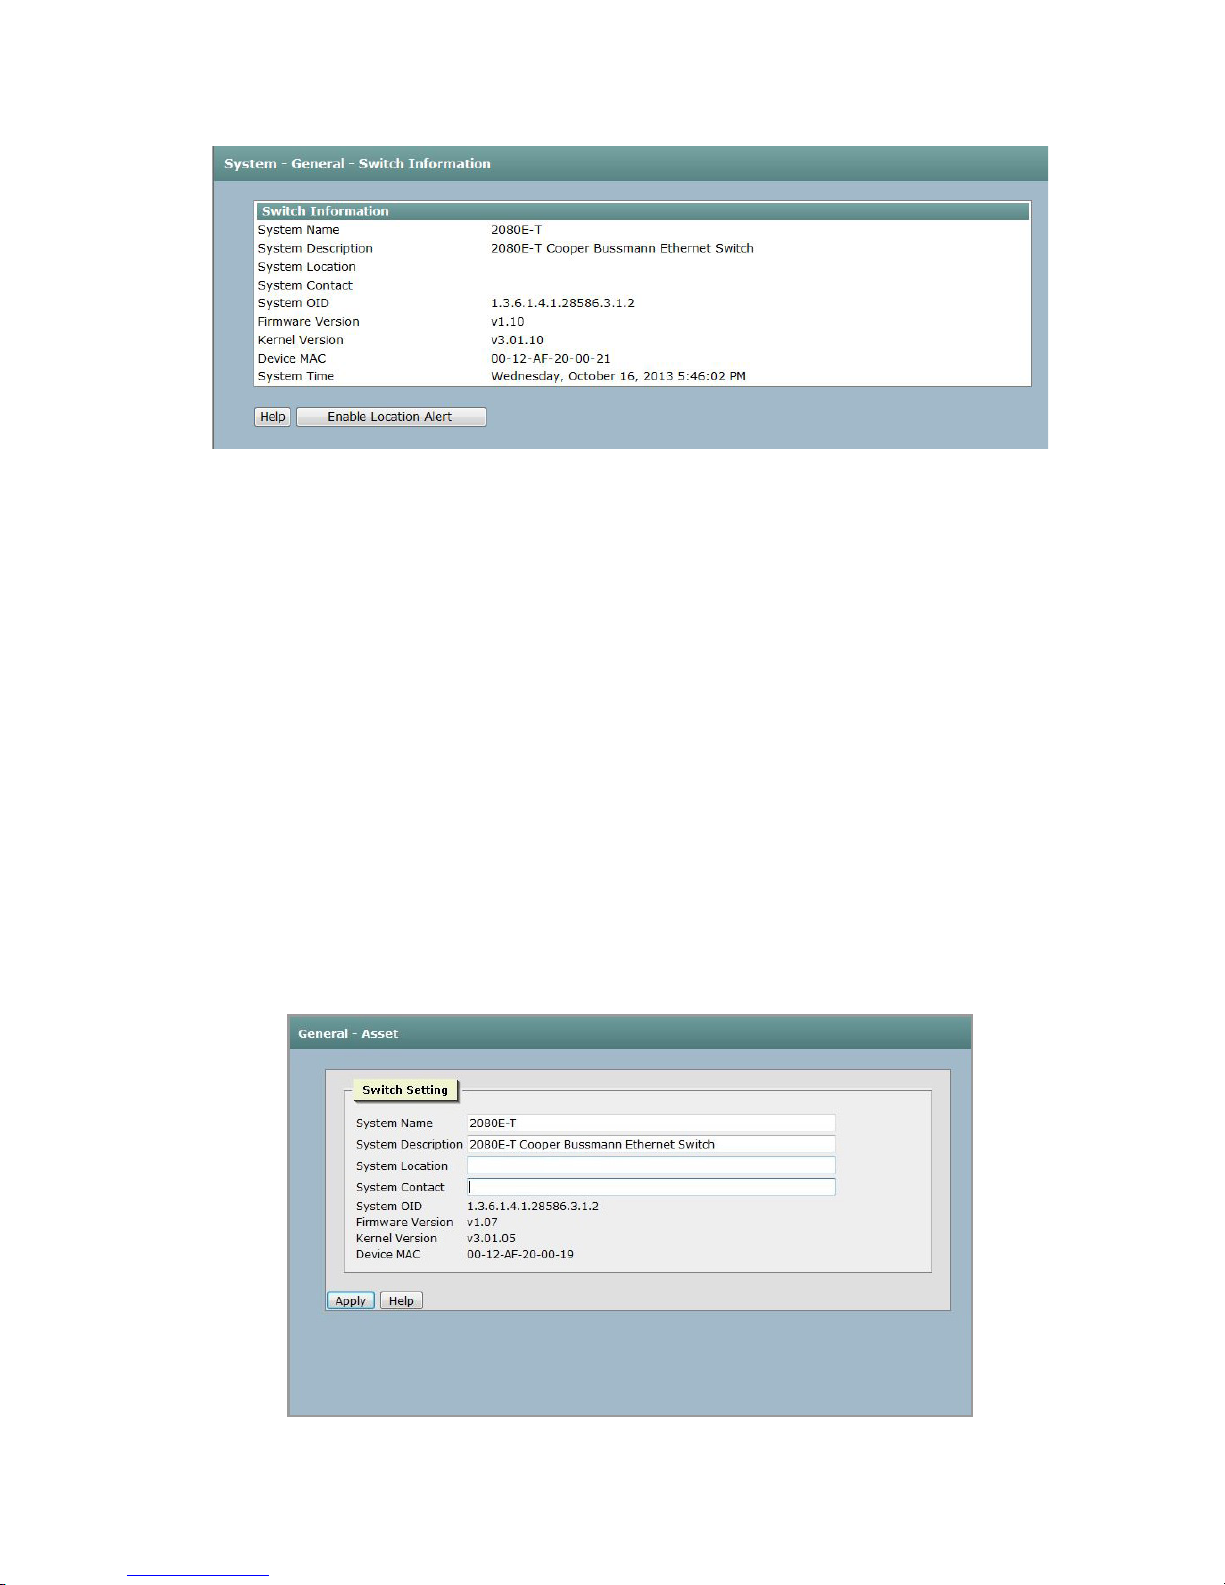
Asset
The Asset page allows you to change switch settings, including the system name, description, location, and contact
information. Choose System-->General-->Asset to display this page.
Figure 18 Asset Page
www.cooperbussmann.com/wirelessresources
23Rev Version 1.0
Page 24
Cooper Bussmann 2080E-T Managed Ethernet Switch User Manual
System Name Assign the system name of the switch (the maximum length is 64 bytes).
System Description Switch description.
System Location Physical location of the switch (the maximum length is 64 bytes).
System Contact Name of contact person or organization.
System OID: SNMP OID of switch.
Firmware Version Displays the switch’s firmware version.
Kernel Version Displays the kernel software version.
Device MAC Displays the unique hardware address assigned by manufacturer.
Apply Click to apply the settings.
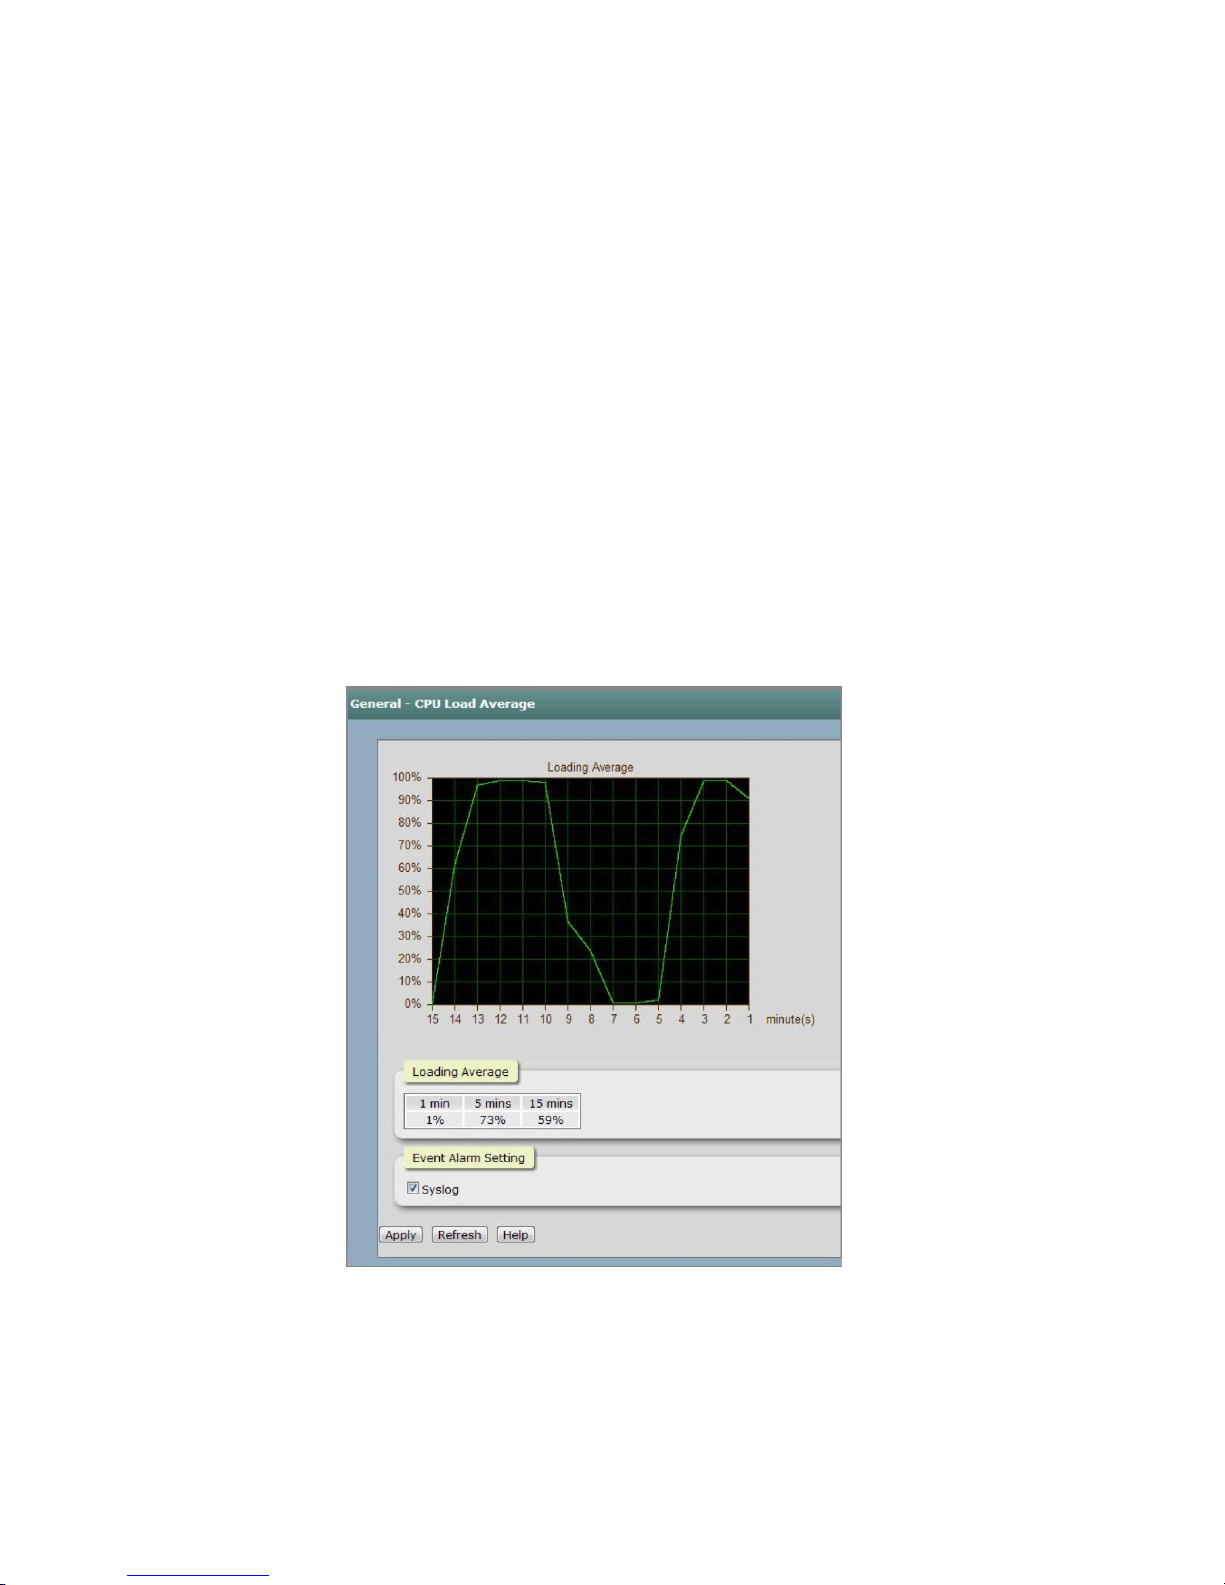
CPU Load Average
To display the CPU load average for the switch, choose System-->General-->CPU Load Average. The load
is averaged over the previous 1-minute, 5-minute, and 15-minute intervals, as shown in Figure 19. The X-axis
indicates the minute intervals, and the Y-axis indicates the average CPU load. When the average CPU load reaches
90% the system logs an event alarm to the Syslog if the Syslog checkbox is selected under Event Alarm Setting at
the bottom of the page. To enable the Syslog, see “6.4.5 Syslog.”
Loading Average Displays the CPU load statistics.
Event Alarm Setting Select the Syslog checkbox if you want an alarm to be logged to the Syslog when
the CPU load exceeds 90% utilization.
Apply Click to apply the Event Alarm Setting.
Refresh Click to reload the graph and table.
24 www.cooperbussmann.com/wirelessresources
Figure 19 CPU Load Average Page
Rev Version 1.0
Page 25
Cooper Bussmann 2080E-T Managed Ethernet Switch User Manual
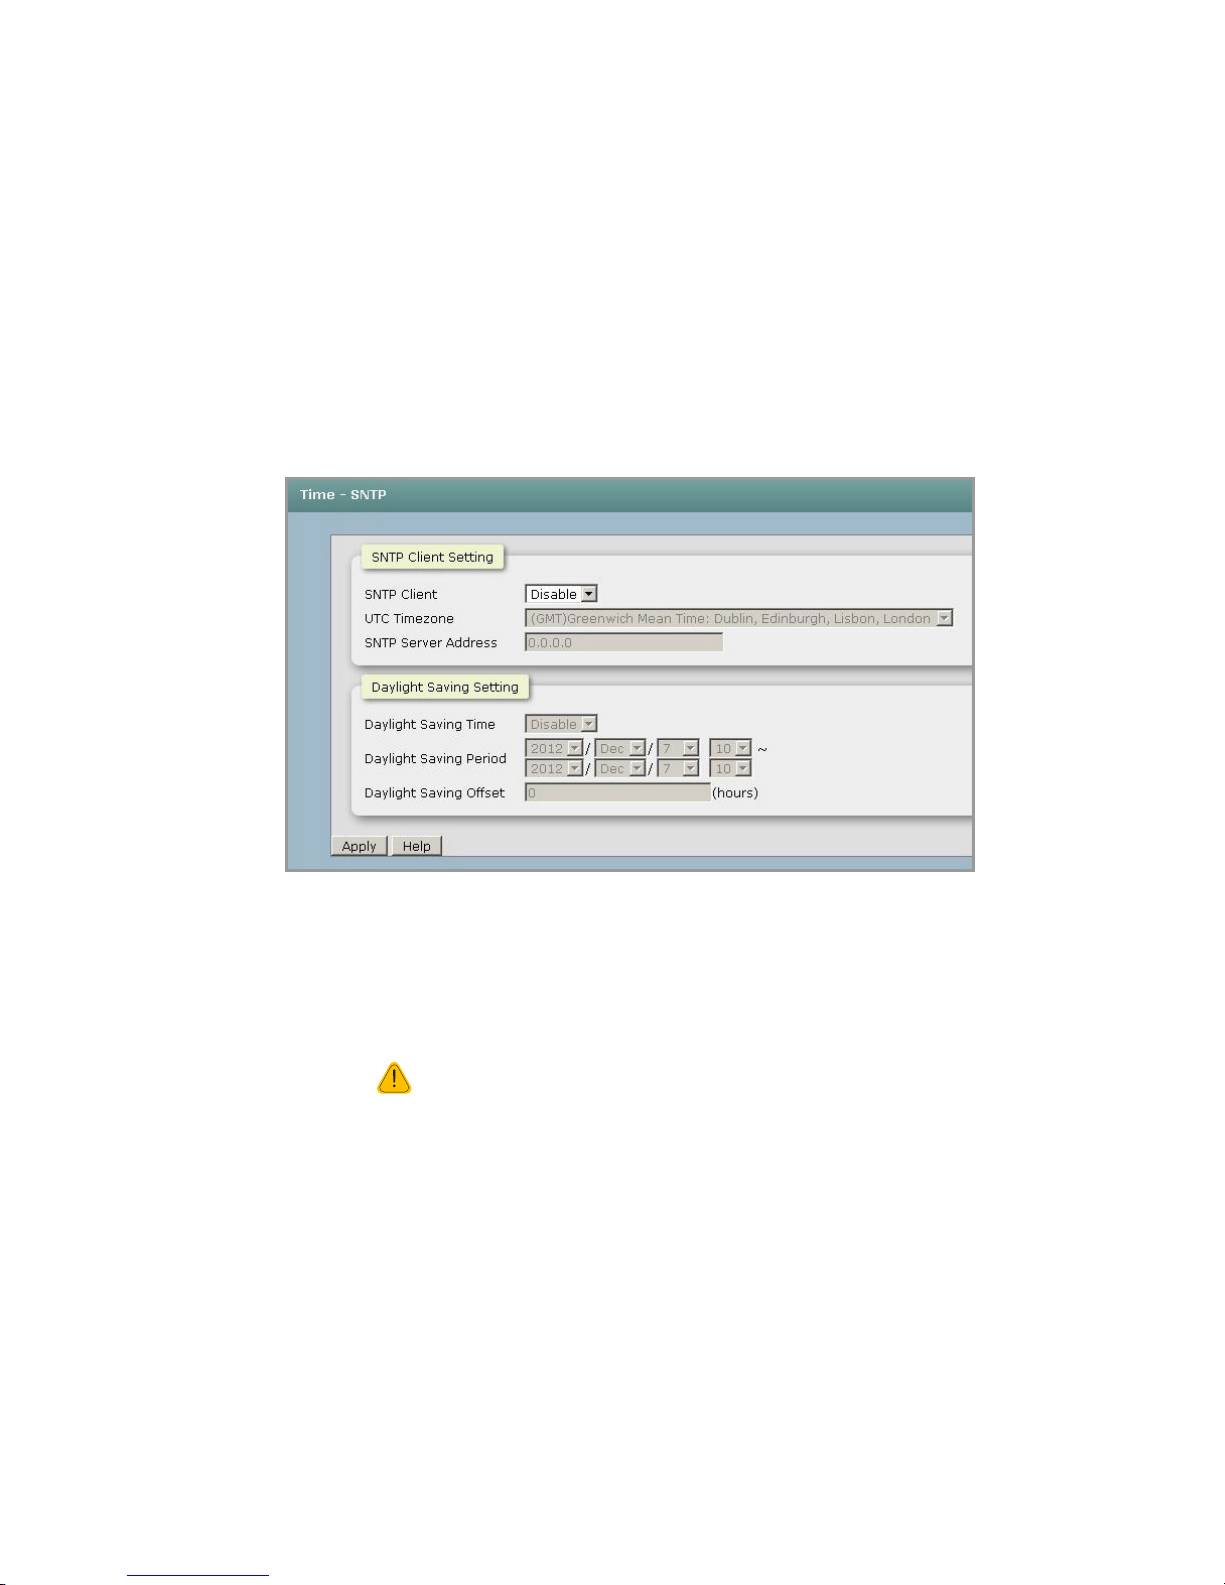
6.4.2 Time - SNTP
To enable or disable the SNTP time function or set daylight savings time, choose System-->Time-->SNTP.
SNTP (Simple Network Time Protocol) is a simplified version of NTP which is an Internet protocol used to
synchronize the clocks of computers to a specified time reference. Because time typically advances, the time on
various node stations will be different. For the communicating programs running on those devices, this causes time
to jump forward and backward—an undesirable effect. Therefore, the switch provides comprehensive mechanisms
to access national time and frequency dissemination services, and organize the time-synchronization subnet and
the local clock in each participating subnet peer.
Daylight saving time (DST) is the convention of advancing clocks so that afternoons have more daylight and
mornings have less. Typically, clocks are adjusted forward one hour near the start of spring and are adjusted back
an hour in autumn.
Figure 20 SNTP Page
SNTP Client Enable or disable the SNTP function to get the time from the SNTP server. When
enabled, the SNTP client uses the service from the SNTP server and the system time
will follow the SNTP server. When disabled, local time is used without any SNTP
server information.
NOTE when SNTP is enabled, a network connection between the 2080E-T
switch and the SNTP server is required for the SNTP client within the switch
to receive and synchronize time information to the time provided by the
SNTP server.
UTC Timezone Universal Time Coordinated. Sets the local time zone for the switch location. See
Table 1 for a list of time zones.
SNTP Sever Address Sets the SNTP server IP address. You can enter the IP address of a local network
time server or an Internet time server.
Daylight Saving Time Allows you to enable or disable the Daylight Saving Period and Daylight Saving
Offset settings. When enabled, the Daylight Savings settings are in effect, and when
disabled, these settings are ignored.
Daylight Saving
Period
Sets the daylight saving beginning date and time and ending date and time. Enter
the date in the format YYYYMMDD and the time in the format HH:MM (leave a space
between YYYYMMDD and HH:MM).
www.cooperbussmann.com/wirelessresources
25Rev Version 1.0
Page 26

Cooper Bussmann 2080E-T Managed Ethernet Switch User Manual
Daylight Saving
Offset
For non-US and European countries, specify the amount of time for day light
savings. You can specify between 0 and 12 hours.
Apply Click to apply the settings.
Table 1
Local Time Zone Conversion from UTC Time at 12:00 UTC
November Time Zone - 1 hour 11 am
Oscar Time Zone -2 hours 10 am
ADT - Atlantic Daylight -3 hours 9 am
AST - Atlantic Standard
-4 hours 8 am
EDT - Eastern Daylight
EST - Eastern Standard
-5 hours 7 am
CDT - Central Daylight
CST - Central Standard
-6 hours 6 am
MDT - Mountain Daylight
MST - Mountain Standard
-7 hours 5 am
PDT - Pacific Daylight
PST - Pacific Standard
-8 hours 4 am
ADT - Alaskan Daylight
ALA - Alaskan Standard -9 hours 3 am
HAW - Hawaiian Standard -10 hours 2 am
Nome, Alaska -11 hours 1 am
CET - Central European
+1 hour 1 pm
FWT - French Winter
MET - Middle European
MEWT - Middle European Winter
SWT - Swedish Winter
EET - Eastern European, USSR Zone 1 +2 hours 2 pm
BT - Baghdad, USSR Zone 2 +3 hours 3 pm
ZP4 - USSR Zone 3 +4 hours 4 pm
ZP5 - USSR Zone 4 +5 hours 5 pm
ZP6 - USSR Zone 5 +6 hours 6 pm
WAST - West Australian Standard +7 hours 7 pm
CCT - China Coast, USSR Zone 7 +8 hours 8 pm
JST - Japan Standard, USSR Zone 8 +9 hours 9 pm
EAST - East Australian Standard GST
+10 hours 10 pm
Guam Standard, USSR Zone 9
IDLE - International Date Line
NZST - New Zealand Standard
NZT - New Zealand
26 www.cooperbussmann.com/wirelessresources
+12 hours Midnight
Rev Version 1.0
Page 27
Cooper Bussmann 2080E-T Managed Ethernet Switch User Manual
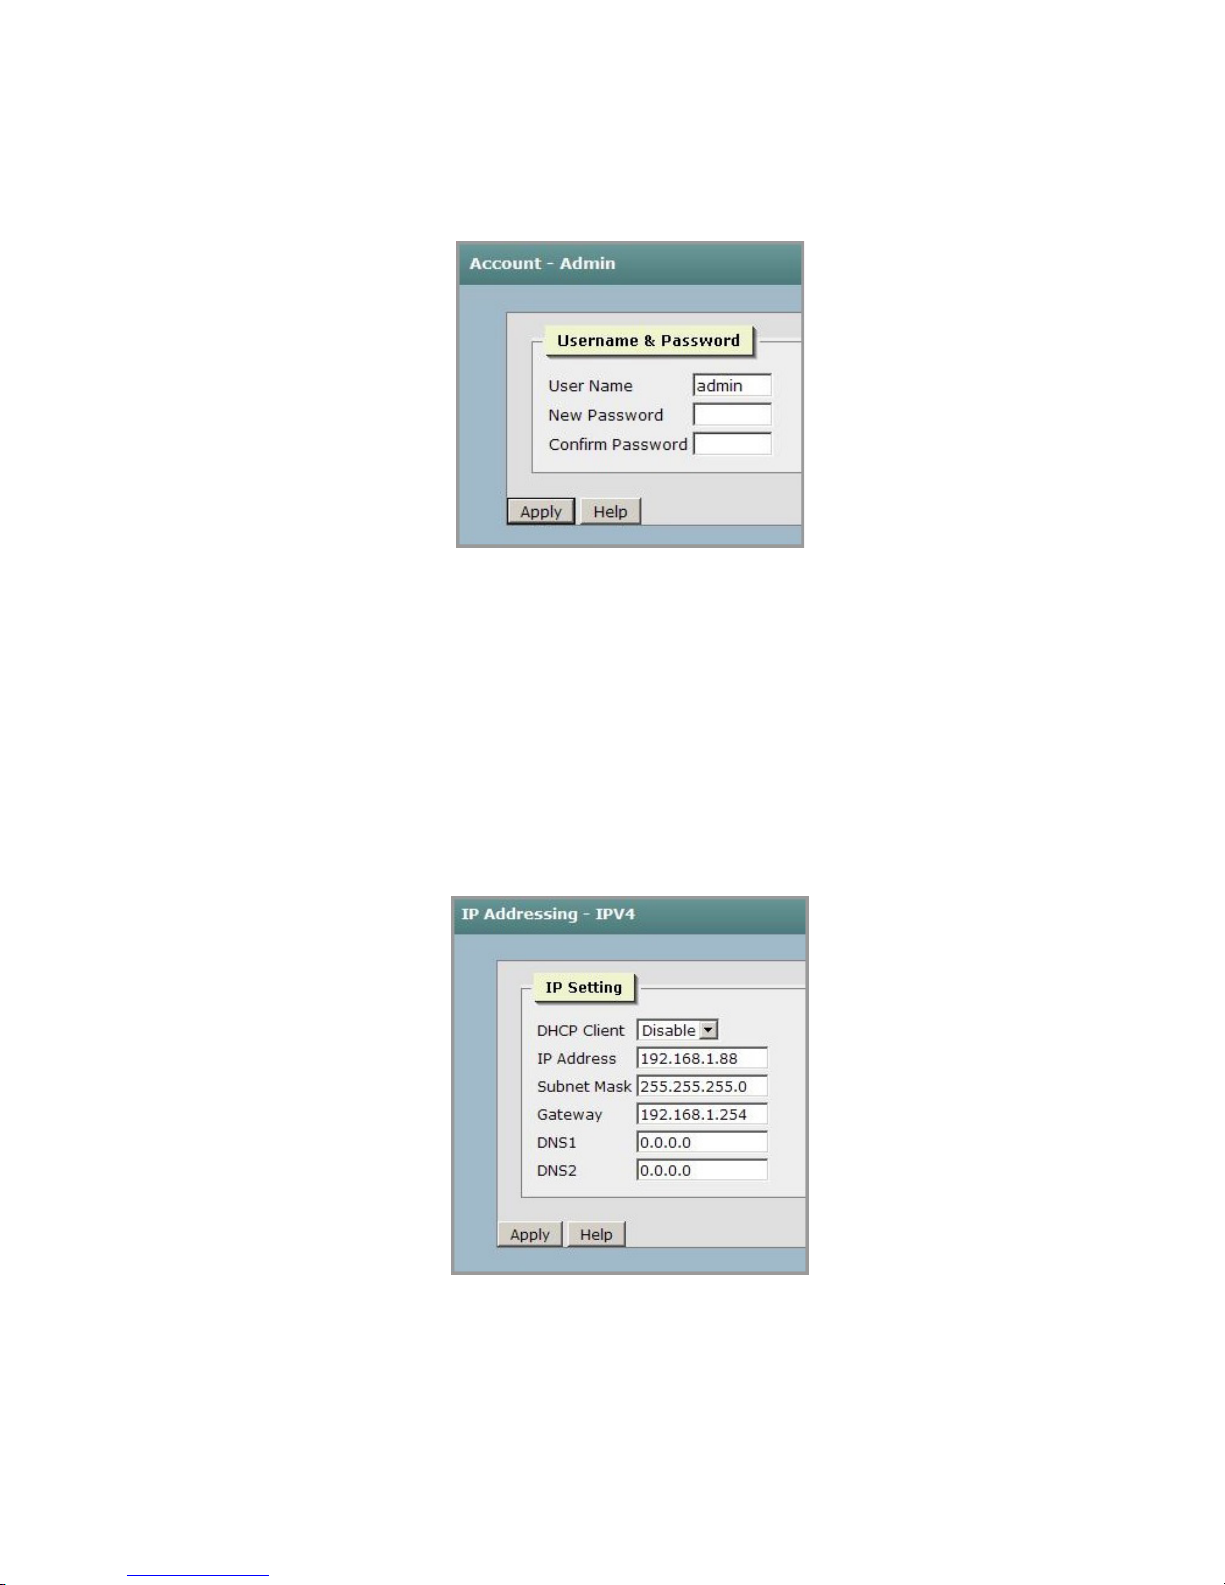
6.4.3 Account - Admin
Use the Admin page to change the login username and password for the Web-based Management utility to ensure
access security. Choose System-->Account-->Admin to display this page.
Figure 21 Admin Page
User Name Type the new user name (the default is “admin”).
New Password Type the new password.
Confirm Password Re-type the new password.
Apply Click to apply the settings.
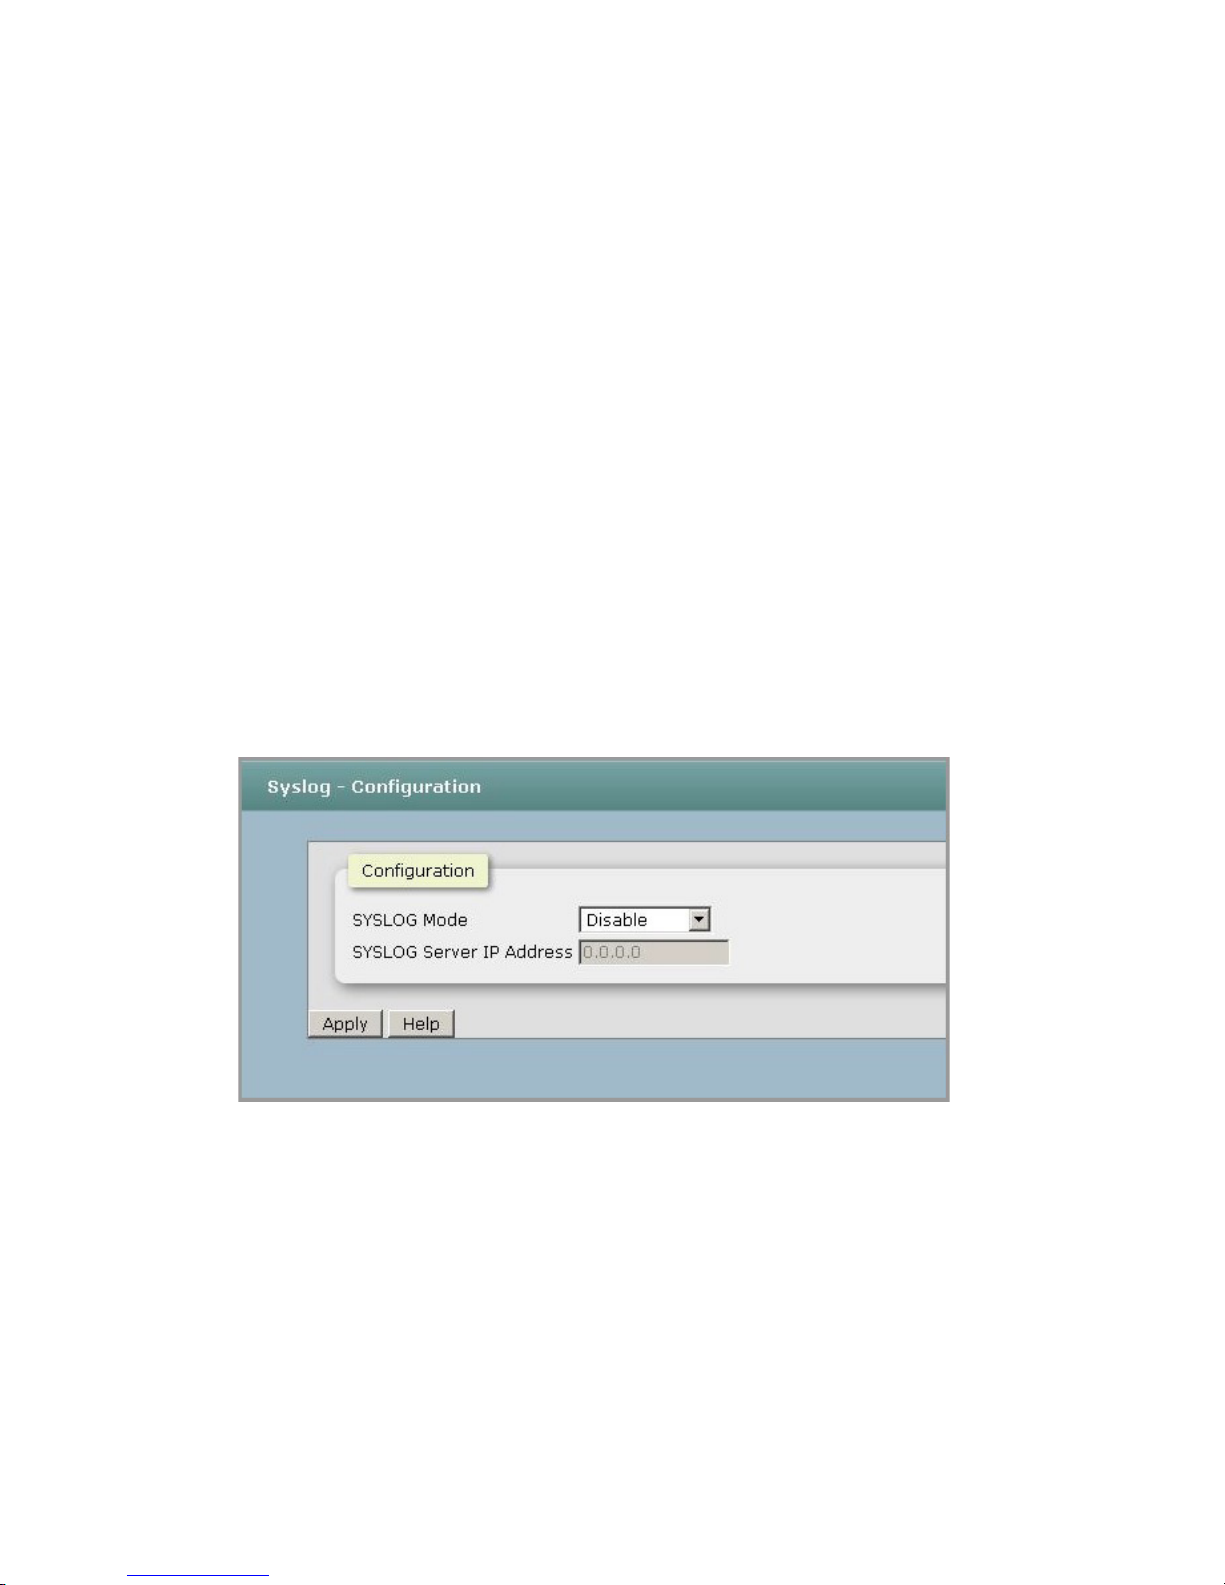
6.4.4 IP Addressing – IPV4
The 2080E-T Switch needs to be assigned an IP address that identifies it on the network. You can select a method
of assigning IP address to the switch by choosing System-->IP Addressing-->IPV4.
DHCP Client Enable or disable the DHCP client function. When the DHCP client function is
enabled, the switch will automatically obtain an IP address from the network DHCP
server. The default IP address will be replaced by the assigned IP address from the
DHCP server. After you click Apply, a message informs you that when the DHCP
client is enabled the current IP address will be lost and you will need to find the new
IP obtained from the DHCP server.
Figure 22 IPV4 Page
www.cooperbussmann.com/wirelessresources
27Rev Version 1.0
Page 28
Cooper Bussmann 2080E-T Managed Ethernet Switch User Manual
IP Address Enter a static IP address to the switch from the subnet address range that the
network is using. If the DHCP Client option is enabled, the switch is configured as a
DHCP client. The network DHCP server will assign the IP address to the switch and
the switch displays it in this column. The default IP address is 192.168.1.88. You can
also choose an IP address manually when the DHCP Client option is disabled.
Subnet Mask Enter the subnet mask of the IP address. You need to specify the subnet mask if the
DHCP Client option is disabled.
Gateway Enter the network gateway for the switch. You need to specify the gateway if the
DHCP Client option is disabled. The default gateway address is 192.168.1.254.
DNS1 Enter the primary DNS IP address.
DNS2 Enter the secondary DNS IP address.
Apply Click to apply the settings.
6.4.5 Syslog
Syslog Configuration
The Syslog (system event log) may be sent to the client only, server only, or both the client and server. The type of
events that are issued to the client or server depends on the system event selection on the System Alert - Event
page (see “System Alert Event”).
To configure the Syslog, choose System-->Syslog-->Configuration.
Figure 23 Syslog Configuration Page
Syslog Mode Select the system log mode:
• Client Only—The system event log will only be sent to this interface of the
switch.
• Server Only—The system event log will only be sent to the remote system log
server with its IP address assigned.
• Both—The system event log will be sent to the remote server and this interface.
• Disable—No system event log is generated or sent.
Syslog Server IP
Address
When the Syslog Mode option is set as “Server Only” or “Both,” enter the system log
server IP address to which the log will be sent.
Apply Click to apply the settings.
28 www.cooperbussmann.com/wirelessresources
Rev Version 1.0
Page 29
Cooper Bussmann 2080E-T Managed Ethernet Switch User Manual
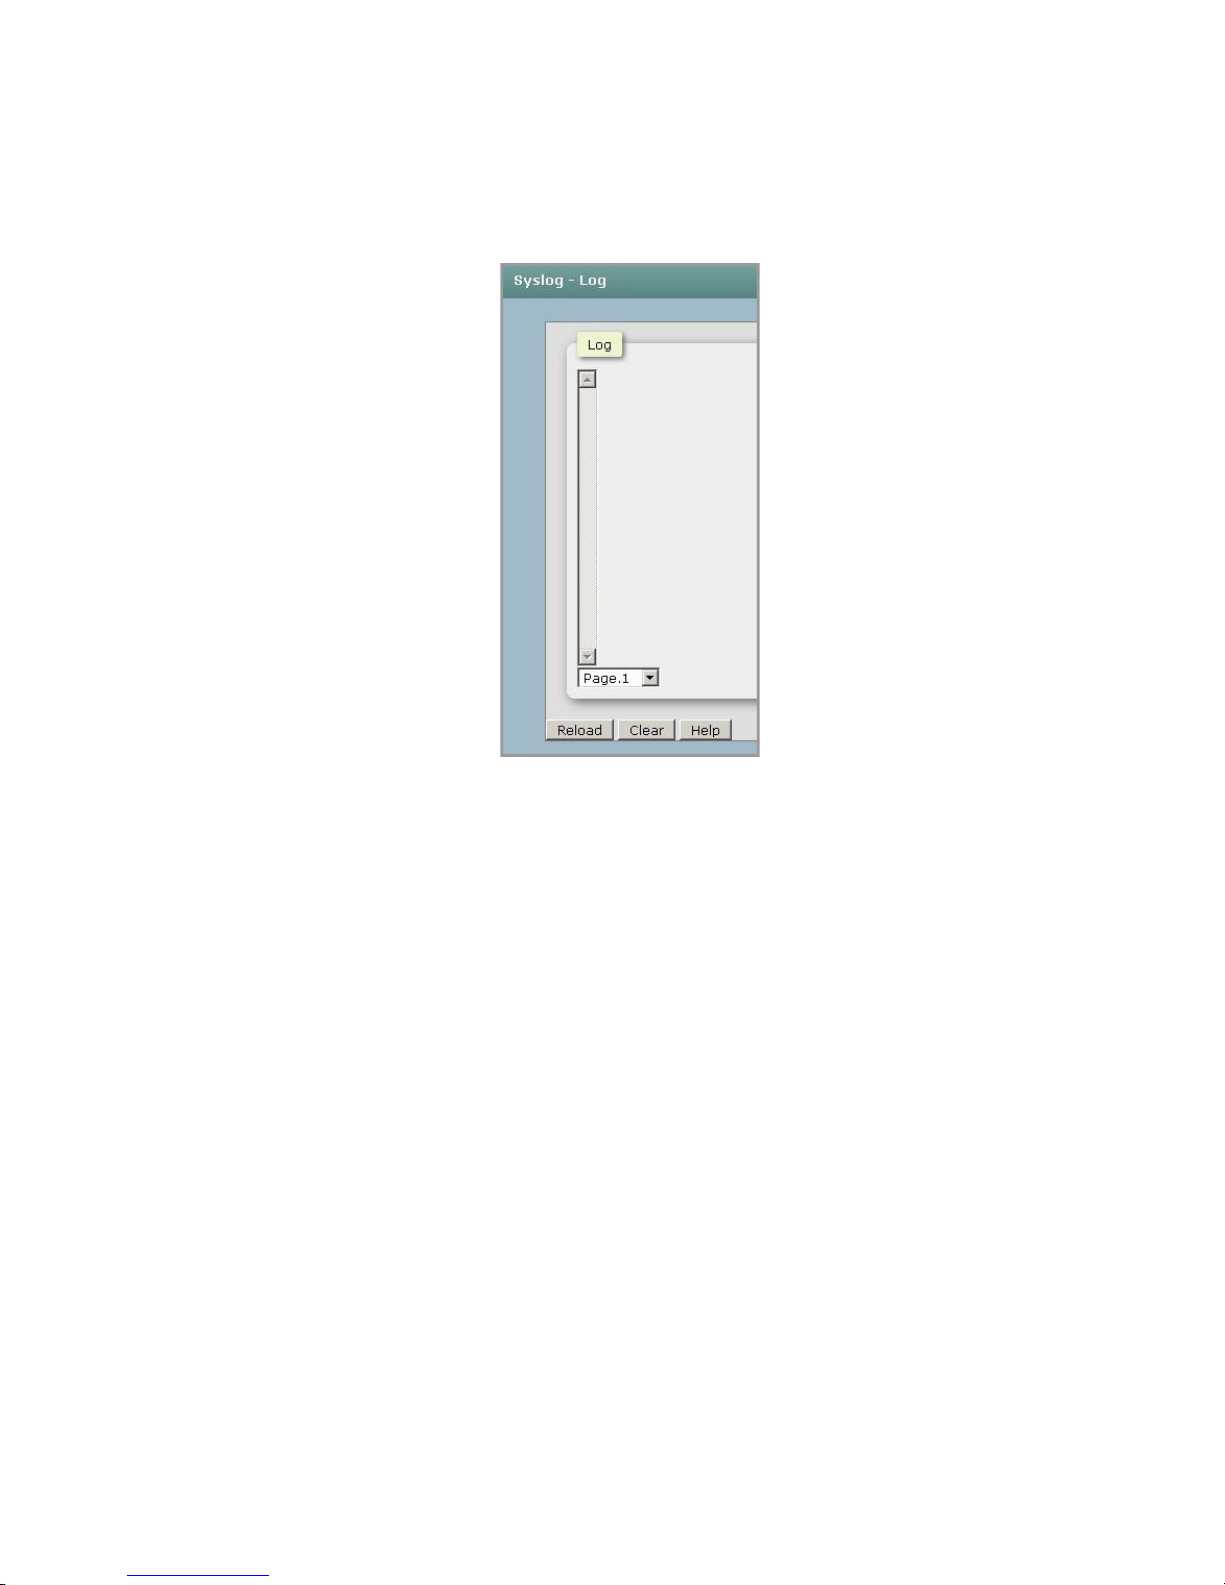
Syslog Log
To display the current system event log (Figure 24), choose System-->Syslog-->Log. Click Reload or press F5 to
refresh the page to view the most recent events.
Figure 24 Log Page
Reload Reloads the current log.
Clear Clears the log contents.
6.4.6 SNMP
SNMP Agent
Simple Network Management Protocol (SNMP) is the protocol developed to manage nodes (for example, servers,
workstations, routers, switches and hubs) on an IP network. SNMP enables network administrators to manage
network performance, find and solve network problems, and plan for network growth. Network management
systems learn of problems by receiving traps or change notices from network devices implementing SNMP.
To configure SNMP agent settings, choose System-->SNMP-->Agent.
www.cooperbussmann.com/wirelessresources
29Rev Version 1.0
Page 30

Cooper Bussmann 2080E-T Managed Ethernet Switch User Manual
Figure 25 SNMP Agent Configuration
Agent Mode Select the SNMP version (V1/V2c or V3) that you want to use. And then click Apply to
switch to the selected SNMP version mode.
SNMP V1/V2c
Community
Allows you to define the new community string set and remove the unwanted
community string.
Community String Enter the name string.
Privilege • Read Only—Enables requests accompanied by this community string to display
MIB-object information.
• Read and Write—Enables requests accompanied by this community string to
display MIB-object information and to set MIB objects.
SNMPv3 Engine ID SNMPv3 engineID value of the entity hosting the management information.
Each SNMPv3 agent has an engine ID that uniquely identifies the agent in the
device and also provides unique identification of the MIB objects within a domain. In
SNMPv3 communication, the engine ID is used as an identifier for an agent among
different agents.
Apply Click to apply the settings.
SNMP Trap Configuration
A trap manager is a management station that receives the SNMP trap messages generated by the switch. If no trap
manager is defined, no traps will be issued.
To configure a trap manager, choose System-->SNMP-->Trap. Assign an IPaddress, enter the SNMP community
strings, and select the SNMP trap version.
SNMP Trap supports the following events.
Generic-Traps:
• Link up trap
• Link down trap
• Cold start trap
• Authentication failure
Private/Specific Traps:
30 www.cooperbussmann.com/wirelessresources
Rev Version 1.0
Page 31

Cooper Bussmann 2080E-T Managed Ethernet Switch User Manual
• DC power status trap
• Topology change trap
Figure 26 SNMP - Trap (Trap Manager)
Server IP Enter the IP address of the trap manager.
Community Enter the community string for the trap station.
Trap Version Select the SNMP trap version type—v1 or v2c.
Add Click to apply the settings.
Remove To remove the community string, select the community string listed in the current
manager’s field and click Remove.
SNMPv3
Version 3 of SNMP includes new security and administration features and capabilities unique to this version.
The new security features include:
• Confidentiality—Packet encryption prevents snooping by an unauthorized source.
• Integrity—Message integrity ensures that a packet has not been tampered with while in transit. This includes
an optional packet replay protection mechanism.
• Authentication—Verfies that the message is from a valid source.
The new administration features include:
• Authorization and view-based access control
• Logical contexts
• Usernames and key management
• Remotely configurable via SNMP operations
To configure the switch to use SNMP version 3, choose System-->SNMP-->SNMPv3.
The Context tab allows you to configure the SNMPv3 context table. An SNMPv3 context is a collection of
management information items that can be accessed by an SNMPv3 entity. A context is identified by the SNMPv3
engineID value of the entity hosting the management information (this can be found in System-->SNMP-->Agent)
and a context name that identifies the specific context.
www.cooperbussmann.com/wirelessresources
31Rev Version 1.0
Page 32

Cooper Bussmann 2080E-T Managed Ethernet Switch User Manual
An item of management information may exist in more than one context. An SNMP entity potentially has access to
many contexts. In other words, if an item of management information has been defined under a certain context by
an SNMPv3 entity, any management application can access that information by providing that context name.
Figure 27 SNMPv3 Context Tab
Context Name Enter a name for the context table.
Apply Click to apply the setting.
The User tab allows you to add a user profile or remove an existing user profile.
Figure 28 SNMPv3 User Tab
User ID Enter the name of the new user profile.
Authentication
Enter the password to be used to authenticate the user who is accessing the context.
Password
Privacy Password Enter the password to be used as a key to encrypt the packets.
Add Adds the new user.
Remove Removes an existing user profile. Enter the user’s user ID, authentication password,
and privacy password, and then click Remove.
32 www.cooperbussmann.com/wirelessresources
Rev Version 1.0
Page 33

Cooper Bussmann 2080E-T Managed Ethernet Switch User Manual
Use the Group tab to configure the SNMPv3 group table The group name created in this tab is associated with
the user ID. Both the group name and the user ID are used as parameters to create entries in the access table that
appears in the Access tab.
Figure 29 SNMPv3 Group Tab
Current Group
Content
Security Name
(User ID)
List of existing groups (and their associated user IDs). To remove a group, select the
group and click Remove.
User name of the user to be added to the group or removed from the group. This
must be a user name that you have set up in the User tab.
Group Name Name of the group to which the user is to be added.
Add Adds the user to the group.
Remove Removes the group name (associated with a user) currently selected in the Current
Group Content field.
Use the Access tab to configure the SNMPv3 access table. The entries in this table define different access profiles.
Each access profile can be identified by its context prefix and group name. An access profile is associated with a
security level, context matching rule, and names of read, write, and modify MIB views. An MIB view can be created
in the MIB View tab.
Figure 30 SNMPv3 Access Tab
www.cooperbussmann.com/wirelessresources
33Rev Version 1.0
Page 34

Cooper Bussmann 2080E-T Managed Ethernet Switch User Manual
Current Access
Lists the existing access table profiles.
Tables
Context Prefix Enter the context prefix to be used to identify the context name.
Group Name Enter the group name associated with this access profile.
Security Level Select a security level for users of the access profile:
• NoAuthNoPriv—User is not authenticated. Packets are not encrypted.
• AuthNoPriv—User is authenticated. Packets are not encrypted.
• AuthPriv—User is authenticated. Packets are encrypted.
Context Match Rule Select the rule that will apply to a context match:
• Exact—Context name of a request must match the context prefix to access MIB
views defined in this access profile.
• Prefix—Initial substring of the context name of a request must match the context
prefix value to access MIB views defined in this access profile.
Read View Name Enter the name of the MIB view defining the MIB objects for which read access is
requested. If here is no Read View Name, read access is not granted. MIB views are
defined in the MIB View tab.
Write View Name Enter the name of MIB view defining the MIB objects for which write access is
requested. If there is no Write View Name, write access is not granted. MIB views are
defined in the MIB View tab.
Notify View Name Enter the name of the MIB view defining the MIB objects which may be included in a
notification request. MIB views are defined in the MIB View tab.
Add Adds the new access profile.
Remove Removes the access profile selected in the Current Access Tables list.
Use the MIB View tab to configure the management information base (MIB) table.
34 www.cooperbussmann.com/wirelessresources
Figure 31 SNMPv3 MIB View Tab
Rev Version 1.0
Page 35

Cooper Bussmann 2080E-T Managed Ethernet Switch User Manual
Current MIB Tables Lists the existing MIB views.
View Name Enter the name of the MIB view to be added (or removed).
Sub-OID Tree Enter the OID defining the root of the subtree to which the view will be included or
excluded.
Type Select whether the sub-OID tree should be included with or excluded from the named
view.
Add Adds the new MIB view.
Remove Removes the MIB view selected in the Current MIB Tables list.
6.4.7 System Alert
System Alert Relay Alarm
The Fault Relay Alarm function provides power failure and port link down/broken detection. To configure this
function, choose System-->System Alert-->Relay Alarm.
For the power failure settings, if the power input 1 and power input 2 are installed and the checkboxes for PWR1
and PWR 2 are selected, the fault LED on the front panel will turn on when a power failure occurs.
For the port link down/broken setting, if the checkbox for a port is selected the fault LED will turn on when that port
fails. See “3.5 Wiring the Fault Alarm Contact” for information on failure detection.
Figure 32 System Alert - Relay Alarm (Fault Relay Alarm)
Power Failure
Setting
Port Link Down/
Broken Setting
Apply Click to apply the setting.
Select the checkbox if you want the fault LED indicator (PWR 1, PWR 2) on the panel
to turn on when power fails.
Select the port checkbox if you want the fault LED on the panel to turn on for that
port when the port link is down or broken.
System Alert Event
If the Syslog Mode option is enabled on the Syslog Configuration page (see “6.4.5 Syslog”) you can use the System
Alert-Event page to select whether system restart, power status, and SNMP authentication failure events are sent to
the Syslog.
To display this page, choose System-->System Alert-->Event.
www.cooperbussmann.com/wirelessresources
35Rev Version 1.0
Page 36

Cooper Bussmann 2080E-T Managed Ethernet Switch User Manual
NOTE If you also want the port event log to be sent to the Syslog server, be sure to set the triggers (link
up, link down, and both) in the Port Alert page (see “Port Alert”).
Figure 33 System Alert - Event
System Restart When enabled, the system will issue an alert to the system log server when the
device executes a cold start. It may take a minute after the cold start before the event
appears in the system log server.
Power Status When enabled, the system will issue an alert to the system log server when input
power to the switch becomes unstable.
SNMP Authentication
Failure
When enabled, the system will issue an alert to the system log server when SNMP
authentication fails.
Apply Click to apply the setting.
6.4.8 DHCP Server
Dynamic Host Configuration Protocol (DHCP) is a protocol for assigning dynamic IP addresses to devices on a
network. With dynamic addressing, a device can have a different IP address each time it connects to the network.
In some systems, the device IP address can change while it is still connected. DHCP also supports a mix of static
and dynamic IP addresses. Dynamic addressing simplifies network administration because the software keeps track
of IP addresses rather than requiring an administrator to manage the task. This means that a new computer can be
added to a network without manually assigning it a unique IP address.
DHCP Server Configuration
To configure the switch as a DHCP server, choose System-->DHCP Server-->Server Configuration.
36 www.cooperbussmann.com/wirelessresources
Rev Version 1.0
Page 37

Cooper Bussmann 2080E-T Managed Ethernet Switch User Manual
Figure 34 DHCP Server Configuration
DHCP Server Enable or disable the DHCP server function on the switch. When enabled,
the switch will be the DHCP server on your local network.
Start IP Address Enter the IP address that is the beginning of the dynamic IPaddress range.
For example, if the dynamic IP address is between 192.168.1.100 and
192.168.1.200, the start IP address would be 192.168.1.100.
End IP Address Enter the IP address that is the end of the dynamic IP address range.
For example, if the dynamic IP address is between 192.168.1.100 and
192.168.1.200, the end IP address would be 192.168.1.200.
Subnet Mask Enter the subnet mask of the IP configuration.
Gateway Enter the IP address of the gateway in your network.
DNS Enter the domain name server IP address in your network.
Lease Time (Hour) Enter the number of hours after which the client will reset the dynamic IP
address.
Apply Click to apply the settings.
DHCP Server Client Table
When the DHCP server function is enabled, the system will collect the DHCP client information including the
assigned IP address, the MAC address of the client device, the IP assigning type, status, and lease time.
To view the DHCP server client table, choose System-->DHCP Server-->Client Table.
DHCP Server IP Binding
You can specify (bind) an IPaddress for each port. When the device connects to the port and requests an IP
address, the system will assign the IP address that is bound with the port.
To configure IP address binding, choose System-->DHCP Server-->IP Binding.
Figure 35 Client Table
www.cooperbussmann.com/wirelessresources
37Rev Version 1.0
Page 38

Cooper Bussmann 2080E-T Managed Ethernet Switch User Manual
Apply Click to apply the setting.
6.5 Configure Menu
Figure 36 IP Binding
6.5.1 Port
Port Configuration
To configure the settings of each port to control the connection parameters, choose
Configure-->Port-->Configuration. The status of each port is listed at the bottom of the page.
Figure 37 Port Configuration
State Allows you to enable or disable the port. When the port is disabled, it will not receive
or transmit packets.
Speed/Duplex You can choose a port speed setting, or choose Auto Negotiation for the port to
negotiate the speed. The port speed options are 100 FULL, 100 HALF, 10 FULL and
10 HALF.
38 www.cooperbussmann.com/wirelessresources
Rev Version 1.0
Page 39

Cooper Bussmann 2080E-T Managed Ethernet Switch User Manual
Flow Control Flow control determines whether the receiving node sends feedback to the sending
node. Three options are available:
• Disable—Disables flow control capability.
• Symmetric—Flow control is determined by auto-negotiation, and is only used
when both linked ports have flow control enabled.
• Asymmetric—Flow control is always active, regardless of whether the linked
partner port is enabled.
Alias Allows you to add a description to let the manager know what device is connected
to the port.
Apply Click to apply the settings.
Port Status
The Port Status page displays the status of port configuration settings. To display this page, choose
Configure-->Port-->Status.
Figure 38 Port Status
Port Statistics
The Port Statistics page displays the real-time packet transfer status for each port. You can use this information to
plan and implement the network, or to troubleshoot a problem when there are collisions or there is heavy traffic.
To display port statistics, choose Configure-->Port-->Port Statistics.
www.cooperbussmann.com/wirelessresources
39Rev Version 1.0
Page 40

Cooper Bussmann 2080E-T Managed Ethernet Switch User Manual
Figure 39 Port Statistics
Port Port number.
Type Displays the current speed of connection to the port.
Link Current link status:
• Up—Link is operational.
• Down—Link is not operational.
State State set on the Port Configuration page (see “6.5.1 Port”). When the state is
disabled, the port will not transmit or receive packets.
TX Good Packet Number of good packets transmitted via this port.
TX Bad Packet Number of bad packets transmitted via this port. Bad packets include undersized
packets (less than 64 octets), oversized packets, CRC errors, fragments, and jabber
packets.
RX Good Packet Number of good packets received via this port.
RX Bad Packet Number of bad packets received by this port. Bad packets include undersized
packets (less than 64 octets), oversized packets, CRC errors, fragments, and jabber
packets.
TX Abort Packet Number of packets aborted during transmission.
Packet Collision Number of packet collisions.
Drop Packet Number of dropped packets.
RX Bcast Packet Number of broadcast packets received.
RX Mcast Packet Number of multicast packet received.
TX Mcast Packet Number of multicast packet transmitted.
Clear Click to clear all counts.
Port Alert
If the Syslog Mode is enabled on the Syslog Configuration page (see “6.4.5 Syslog”) the event log will be sent to
the system log server. If you also want the port event log to be sent to the system log server, you need to set the
triggers (link up, link down, and both) in the Port Alert page.
40 www.cooperbussmann.com/wirelessresources
Rev Version 1.0
Page 41

Cooper Bussmann 2080E-T Managed Ethernet Switch User Manual
To display this page, choose Configure-->Port-->Port Alert.
Figure 40 Port Alert
Port Event For the Port Event menus to become available, the “Client Only” option in Syslog
Configuration must be enabled (see “6.4.5 Syslog”).
There are four port event options:
• Link Up—The system will only issue a log message when the link-up event
occurs for the port.
• Link Down—The system will only issue a log message when the link-down
event occurs for the port.
• Link Up & Link Down—The system will issue a log message at the time when
the port connection is link-up or link-down.
• Disable—No event will be sent to the system log.
Apply Click to apply the setting.
6.5.2 Rate Control
Rate Limit
You can set the bandwidth rate and frame limitation type for each port. To display this page, choose
Configure-->Rate Control-->Rate Limit.
www.cooperbussmann.com/wirelessresources
41Rev Version 1.0
Page 42

Cooper Bussmann 2080E-T Managed Ethernet Switch User Manual
Figure 41 Rate Limit
Egress Setting Allows you to set the egress rate limit (in kbps) for each port. The range is from 100
kbps to 102400 kbps (100 Mbps). Note that 1 Mbps is equal to 1024 kbps. Zero
indicates no egress rate limit.
Apply Click to apply the settings.
Storm Control
Use this page to set the ingress rate limit and select what kind of frames are to be filtered by the ingress rate limit.
To display this page, choose Configure-->Rate Control-->Storm Control.
42 www.cooperbussmann.com/wirelessresources
Figure 42 Storm Control
Rev Version 1.0
Page 43

Cooper Bussmann 2080E-T Managed Ethernet Switch User Manual
Ingress Limit
Frame Type
Select the frame type to be filtered:
• All
• Broadcast/Multicast/Flooded Unicast
• Broadcast/Multicast
• Broadcast only
Broadcast/Multicast/Flooded Unicast, Broadcast/Multicast, and Broadcast only
types are only for ingress frames. The egress rate only supports the “All” type.
Ingress Set the ingress rate limit, in kbps. (One Mbps is equal to 1024 kbps.) The range is
from 100 kbps to 102400 kbps (100 Mbps). Zero indicates no ingress rate limit.
Apply Click to apply the settings.
6.5.3 Aggregation
Aggregation Configuration
Port trunking is the combination of several ports or network cables to expand the connection speed beyond the
limits of any single port or network cable. Link Aggregation Control Protocol (LACP), is a protocol running on layer2
that provides a standardized means (in accordance with IEEE 802.3ad) to bundle several physical ports together
to form a single logical channel. All the ports within the logical channel (logical aggregation) work at the same
connection speed. LACP operation requires full-duplex mode.
To configure port aggregation, choose Configure-->Aggregation-->Configuration.
Group ID Select the trunk group to which the port is to be assigned (Trunk1, Trunk2, Trunk3,
or Trunk4), or select “None” if you do not want the port assigned to any trunk group.
The default Group ID is “None.”
Figure 43 Aggregation Configuration
www.cooperbussmann.com/wirelessresources
43Rev Version 1.0
Page 44
Cooper Bussmann 2080E-T Managed Ethernet Switch User Manual
Type Select the trunk group type for the port (Static or LACP).
• Static—When Static is selected as the trunk group type for a port, the port
belongs to the trunk group whose ID is selected in Group ID drop down menu
for that port. Static trunk groups are only allowed to aggregate traffic in two to
four ports.
When ports belong to a static trunk, the traffic in the trunk group is distributed
evenly among the ports belonging to the trunk group. No protocol handshake is
necessary between the 2080E-T Switch and the ports.
• LACP—When LACP is selected as the trunk group type for a port, the port
belongs to the trunk group whose ID is selected in Group ID drop down menu
for that port. LACP trunk groups are only allowed to aggregate traffic in two to
four ports.
The number of ports that carry traffic in LACP trunk is determined by the Group
ID Work Port drop down menu for that trunk. The number of ports that carry
traffic should be less than or equal to the number of ports selected for that
LACP trunk.
If the number of work ports selected for the LACP trunk is less than the number
of ports that belong to the LACP trunk, the non-working port(s) will remain idle
and in standby. In this configuration, if a working port fails, one of the nonworking ports will be brought in to carry traffic in place of the failed working
port. The 2080E-T Switch uses IEEE 802.3ad LACP protocol to negotiate an
agreement with its member ports.
Work Ports This menu only applies to LACP trunks. Work Ports allow you to choose the total
number of ports that are used to carry packet traffic.
Apply Click to apply the settings.
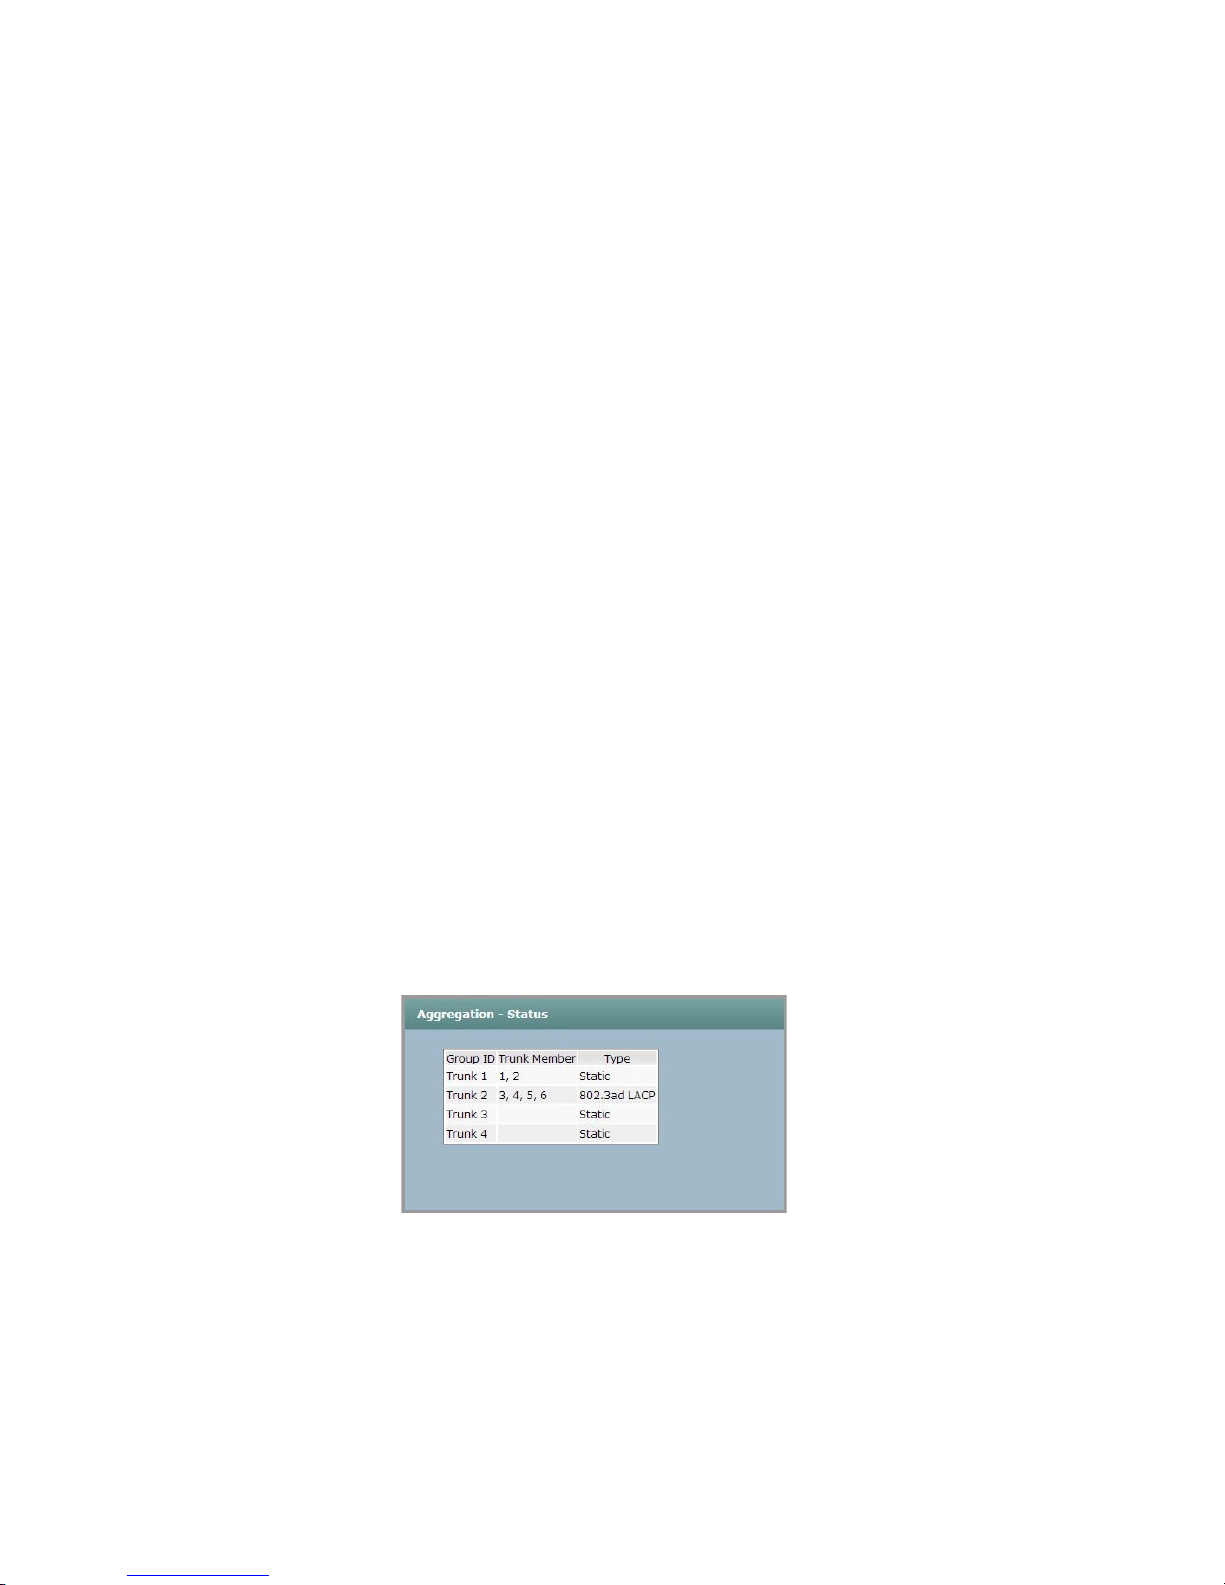
Aggregation Status
The Aggregation Status page displays the current port aggregation settings. To display this page, choose
Configure-->Aggregation-->Status.
Figure 44 Aggregation Status
6.5.4 Spanning Tree
Rapid Spanning Tree Protocol (RSTP) is an evolution of the Spanning Tree Protocol (STP) and provides faster
spanning tree convergence after a topology change. The system also supports STP, and will auto-detect whether
the connected device is running STP or RSTP protocol.
44 www.cooperbussmann.com/wirelessresources
Rev Version 1.0
Page 45

Cooper Bussmann 2080E-T Managed Ethernet Switch User Manual
RSTP Settings
The Spanning Tree - RSTP Settings page provides the bridge and port configuration interface for RSTP. You can
assign a higher or lower priority to each port. When RSTP is enabled, the port with the higher priority is in the
forwarding state and other ports are blocked to make certain there is no loop in the LAN.
To configure RSTP settings, choose Configure-->Spanning Tree-->RSTP Settings.
Figure 45 RSTP Setting
RSTP Mode
Enable or disable the RSTP function. When enabled, you can set the configuration fields
on this page.
Priority Enter a priority value for the switch. Within the network, the switch assigned the
lowest value will have the highest priority and is selected as the root switch. If you
change the value, you will need to reboot the switch. The value must be a multiple
of 4096 according to the protocol standard rule. The root switch is responsible for
recovering the backup path when it finds that switch connections have been broken
for a period.
Max Age Enter the number of seconds that this device waits before checking to see if it should
change to a different state. Enter a value from 6 to 40.
Hello Time Enter the time interval (in seconds) at which the switch sends out the BPDU packet to
check the RSTP status. Enter a value from 1 to 10.
Forward Delay Time Enter the number of seconds that a port waits before changing from its Rapid
Spanning-Tree Protocol learning and listening states to the forwarding state. Enter a
value from 4to30.
Admin Non STP Select the port that you do not want enabled with RSTP.
Path Cost Enter a number from 1to 200,000,000 to indicate how suitable this port is as a node
for the Spanning Tree topology. A lower value indicates greater suitability.
Priority Decide which port should be blocked by setting its priority as the lowest. Enter a
number from 0 to 240 that is a multiple of 16. For example, 0,16, or 32.
www.cooperbussmann.com/wirelessresources
45Rev Version 1.0
Page 46

Cooper Bussmann 2080E-T Managed Ethernet Switch User Manual
P2P The rapid state transitions possible within RSTP depend on whether the port
concerned can only be connected to a specific bridge (it is served by a point-to-point
LAN segment), or can be connected to two or more bridges (it is served by a shared
medium LAN segment).
This function allows the P2P (point-to-point) status of the link to be manipulated
administratively. Select from the following settings:
• True—The port is to be regarded as a point-to-point link.
• False—The port is to be regarded as a shared link.
• Auto—The link type is to be determined by the auto-negotiation between the two
peers.
Edge The edge port is directly connected to end stations will not create a bridging loop in
the network.
• True—Configures the port as an edge port.
• False—Configures the port as a non-edge port.
Apply Click to apply the settings.
RSTP Information
To display the port and switch information for RSTP, choose Configure-->Spanning Tree-->RSTP Information.
Bridge ID The root switch is determined by bridge ID. The switch with the lowest bridge ID
will become the root switch. The bridgeID is a combination of the bridge priority
number (which is configurable) and the MAC address of the switch. For example, in
the bridgeID “32768.0200.0000.1111,” the bridge priority number is “32768” and the
switch MACaddress is “0200.0000.1111.” The bridge priority default is 32768, and
can only be configured in multiples of 4096.
Root Priority The bridge priority of the switch determined to be the root switch.
46 www.cooperbussmann.com/wirelessresources
Figure 46 RSTP Information
Rev Version 1.0
Page 47

Cooper Bussmann 2080E-T Managed Ethernet Switch User Manual
Root Port The port used to connect to the root switch. This port has the lowest root path cost.
Root Path Cost Indicates how suitable this port is as a node for the Spanning Tree topology. A lower
value indicates greater suitability.
Max Age Time The number of seconds that this device waits before checking to see if it should
change to a different state.
Hello Time The time interval (in seconds) at which the switch sends out the BPDU packet to
check the RSTP status.
Forward Delay Time The number of seconds a port waits before changing from Rapid Spanning Tree
Protocol learning and listening states to the forwarding state.
6.5.5 Redundancy - Pro-Ring2se
To configure Pro-Ring2se function on the 2080E-T Switch, choose Configure-->Redundancy-->Pro-Ring2se. For
examples of Pro-Ring2se connection options, see “4.1 Pro-Ring2se Application.”
Pro-Ring2se
Enable or disable the Pro-Ring2se function.
Protocol
Mode
Master/Slave
At least one switch must play the role of ring master switch in a ring topology. The
ring master switch is responsible for checking the connections in a ring topology.
Checking ring connections is performed by sending a BPDU packet every 10 ms
across the ring from master switch.
Primary Port
Any two ports from a switch can be chosen to build the ring topology.
Secondary port
Figure 47 Pro-Ring2se
NOTE Additional switches can take the role of master switch. In this
case, multiple switches can be redundant with each other. However, it is
recommended that you not set too many switches as master switch because
resources are consumed to negotiate the selection of the primary master
switch.
www.cooperbussmann.com/wirelessresources
47Rev Version 1.0
Page 48

Cooper Bussmann 2080E-T Managed Ethernet Switch User Manual
Control VLAN ID Because the Pro-Ring2se master switch generates BPDU packets every 10 ms to
check the connection status, and the same BPDU packet is used by other switches
to find a target switch, it is better to isolate the BPDU packets used for checking
connection status from those used for other purposes. The best way to resolve this
is to use VLAN for isolating the BPDU packets. The default Control VLAN ID for the
connection status checking is set to “1” if you do not use VLAN. If there is another
need to use VLAN ID 1, you can set a unique VLAN ID for this field.
NOTE This is a required field.
Protect VLAN IDs This field is used if the system requires a trunk VLAN ID for communicating with other
switches. If not, the default value is “1.” This option lets the switch know what VLAN
group will be isolated with Control VLAN. Enter all VLAN group IDs in this column,
except the control VLAN ID.
NOTE This is a required field.
Status Shows the current status of ring ports.
Ring State:
• Complete—The switch has Pro-Ring2se topology enabled, and the cable is
installed.
• Linkdown—One or two of the port links are down.
• Idle—The switch is configured with Pro-Ring2se topology.
Primary Port:
• Linkup—This ring port is connected to another switch’s ring port, and is
functioning okay.
• Linkdown—This ring port has no connection.
• Blocking—This ring port is dedicated to use the backup path.
Secondary Port:
Same as Primary Port. If disabling Pro-Ring2se after enabling redundancy, the
setting of VLAN will not be cleared, the “disable Pro-Ring2se” will not affect the
original VLAN operation.
6.5.6 Multicast Support
The Internet Group Management Protocol (IGMP) is an internal protocol of the Internet Protocol (IP) that manages
multicast traffic by using switches, routers, and hosts that support IGMP. Enabling IGMP allows the ports to detect
IGMP queries, report packets, and manage IP multicast traffic through the switch. IGMP has three fundamental
types of messages, as shown in the following table.
Message Description
Query A message sent from the querier (IGMP router or switch) asking for a response from
each host belonging to the multicast group.
Report A message sent by a host to the querier to indicate that the host wants to be or is
already a member of a given group indicated in the report message.
Leave Group A message sent by a host to the querier to indicate that the host has quit being a
member of a specific multicast group.
IGMP Snooping
If the switch supports IP multicast, you can enable the IGMP protocol. To display this page, choose
Configure-->Multicast Support-->IGMP Snooping. When IGMP Snooping is enabled, the IGMP snooping
information displays on the page. IP multicast addresses range from 224.0.0.0 through 239.255.255.255.
48 www.cooperbussmann.com/wirelessresources
Rev Version 1.0
Page 49

Cooper Bussmann 2080E-T Managed Ethernet Switch User Manual
NOTE There must be at least one switch that is enabled for IGMP query in your network. All other switches
must enable IGMP snooping.
Figure 48 IGMP Snooping
IGMP Snooping Enable or disable the IGMP protocol.
IGMP Query Mode Enable or disable the IGMP query function. The IGMP query information will be
displayed in IGMP Snooping Table section.
IGMP Unregister
Stream
Specify how the switch should process the IGMP unregistered stream:
• Source Only—IGMP unregister stream packets are sent to the source port
from which those packets were received.
• Blocking—IGMP Unregister Stream packets are dropped.
• Flooding—IGMP Unregister Stream packets are sent to all ports.
IGMP Snooping
Displays the the IGMP query information.
Table
Apply Click to apply the settings.
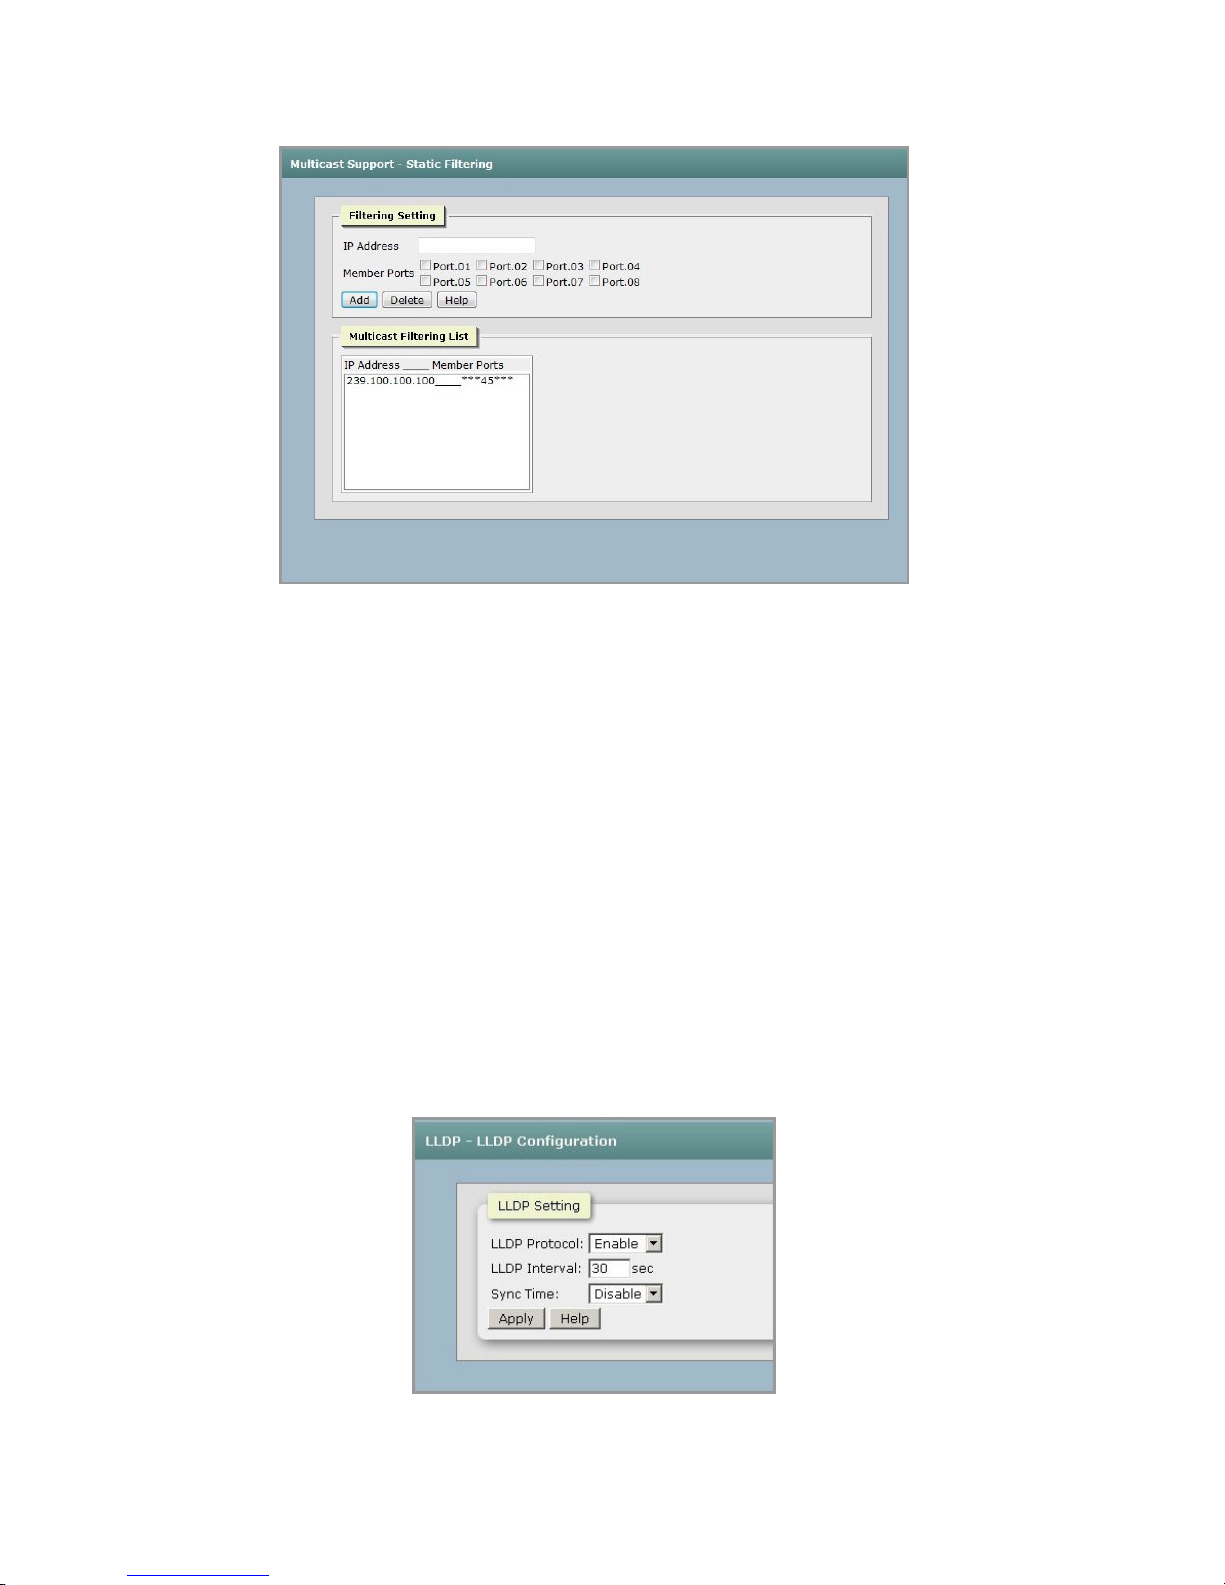
Static Filtering
Multicasts are similar to broadcasts in that they are sent to all end stations on a LAN or VLAN. With multicast
filtering, end stations can receive multicast traffic if the connected ports are included in the specified multicast
groups, and network devices only forward multicast traffic to the ports that are connected to the registered end
stations.
To configure filtering, choose Configure-->Multicast Support-->Static Filtering.
www.cooperbussmann.com/wirelessresources
49Rev Version 1.0
Page 50
Cooper Bussmann 2080E-T Managed Ethernet Switch User Manual
Figure 49 Static Filtering
IP Address Assign a multicast group IP address in the range 224.0.0.0 to 239.255.255.255.
Member Ports Select the port checkbox to include the port as a member in the specified multicast
group IP address.
Add Click to add the address to the multicast filtering list.
Delete Click to remove a selected filter.
6.5.7 LLDP
Link Layer Discovery Protocol (LLDP) is defined in the IEEE802.1AB, and is an emerging standard that provides a
solution for the configuration issues caused by expanding LANs. LLDP specifically defines a standard method for
Ethernet network devices, such as switches, routers and wireless LAN access points, to advertise information about
themselves to other nodes on the network and store the information they discover. LLDP runs on all 802 media. The
protocol runs over the data-link layer only, allowing two systems running different network layer protocols to learn
about each other.
LLDP Configuration
To configure LLDP, choose Configure-->LLDP-->LLDP Configuration.
LLDP Protocol Enable or disable the LLDP function.
50 www.cooperbussmann.com/wirelessresources
Figure 50 LLDP Configuration
Rev Version 1.0
Page 51

Cooper Bussmann 2080E-T Managed Ethernet Switch User Manual
LLDP Interval Set the interval (in seconds) for advertising the switch information to other nodes.
Sync Time Enables or disables switch clock synchronization using LLDP.
Apply Click to apply the settings.
LLDP Neighbors
The LLDP Neighbors page displays information about the port neighbors discovered using the LLDP protocol. To
display this page, choose Configure-->LLDP-->LLDP Neighbors.
Figure 51 LLDP Neighbors
6.5.8 Filtering Data Base
Filtering Data Base Configuration
To configure the filtering data base, choose Configure-->Filtering Data Base-->Configuration.
Figure 52 Filtering Data Base - Configuration
www.cooperbussmann.com/wirelessresources
51Rev Version 1.0
Page 52

Cooper Bussmann 2080E-T Managed Ethernet Switch User Manual
MAC Address
Configuration
Set the aging time (in seconds) for the MAC address table.
Select the Auto Flush checkbox if you want the MAC address table to be erased if
the port link fails.
Security Enable or disable secure learning mode. When enabled, only static MAC addresses
are learned; all other frames are dropped.
NOTE Before enabling security, make sure that the link used for managing
the switch is added to the Static MAC Table otherwise the management link
will be lost and can only be restored by using another non-secure port or by
connecting to the switch via the serial interface.
Apply Click to apply the settings.
Dynamic MAC Table
To monitor the learning status of the MAC address table associated with a port, choose Configure-->Filtering Data
Base-->Dynamic MAC Table. The MAC address table lists the addresses of the devices that the port has “learned”
are connected to it. Clicking Clear MAC Table will delete current list, requiring that the port re-learn the MAC
addresses of its devices and rebuild the table.
Figure 53 Filtering Data Base - Dynamic MAC Table
Port No. Select a port to view its MAC address table.
Current MAC
Lists the MAC addresses of the devices connected to the selected port.
Address
Clear MAC Table Clears the MAC address table. The port will need to re-learn the addresses of devices
connected to it and rebuild the MAC address table.
6.5.9 VLAN
A virtual LAN (VLAN) is a logical network group that limits the broadcast domain and allows you to isolate network
traffic so that members of the same VLAN only receive traffic from each other. Creating a VLAN on a switch is the
logical equivalent of reconnecting a group of network devices to another Layer 2 switch. However, all the network
devices are still physically plugged into the same switch.
VLAN Configuration
To configure VLAN, choose Configure-->VLAN-->VLAN Configuration. The 2080E-T Switch supports two VLAN
modes—802.1Q (tagged-based) VLAN, and port-based VLAN. These modes are described on the following pages.
By default, VLAN operation is disabled.
52 www.cooperbussmann.com/wirelessresources
Rev Version 1.0
Page 53

Cooper Bussmann 2080E-T Managed Ethernet Switch User Manual
802.1Q VLAN Mode—If you choose 802.1Q VLAN mode (Figure 54), you can see the link type, untagged VID, and
tagged VID information of each port.
Figure 54 VLAN Configuration - 802.1Q VLAN
Operation Mode Select the VLAN operation mode, or disable VLAN. The following fields appear when
you choose 802.1Q VLAN mode.
GVRP mode GARP VLAN Registration Protocol or Generic VLAN Registration Protocol (GVRP) is
a protocol that facilitates control of virtual local area networks (VLANs) within a larger
network. GVRP conforms to the IEEE 802.1Q specification, which defines a method
of tagging frames with VLAN configuration data. This allows network devices to
dynamically exchange VLAN configuration information with other devices.
Management LAN ID Set the VLAN group that can access the switch (only ports with this VLAN ID can
access the switch). The default “0” means devices on all ports can access the switch.
Link Type There are four link types to choose from:
• Access Link—This link type only supports untagged VID. The access link is a
segment that provides the link path for one or more stations to the VLAN-aware
device. An access port (untagged port), connected to the access link, has an
untagged VID (also called PVID). When an untagged frame is received by the
access port, the switch inserts a four-byte tag into the frame. The contents of
the last 12-bits of the tag is untagged VID. When this frame is sent out through
any of the access ports of the same PVID, the switch will remove the tag from
the frame to restore it to what it was. Ports with the same untagged VID are
regarded as members of the same VLAN group.
NOTE Because the access port does understand a tagged frame, the
column field of Tagged VID is not available.
www.cooperbussmann.com/wirelessresources
53Rev Version 1.0
Page 54

Cooper Bussmann 2080E-T Managed Ethernet Switch User Manual
• IQ Trunk Link—This link type only supports multiple tagged VIDs. The IQ trunk
link is a segment that provides the link path for one or more VLAN-aware devices
(switches). A trunk port, connected to the trunk link, has an understanding of
tagged frame, which is used for communication among VLANs across switches.
Which frames of the specified VIDs will be forwarded depends on the values
filled in the Tagged VID column field. Use a comma to separate two VIDs.
NOTE A trunk port does not insert a tag into an untagged frame,
and therefore the untagged VID column field is not available. It is not
necessary to type “1” in the tagged VID. The trunk port will forward the
frames of VLAN 1. The trunk port must be connected to a trunk/hybrid
port on the other switch. The tagged VID of the two ports must be the
same.
• Hybrid Link—This link type supports untagged VID and multiple tagged VIDs.
The hybrid link is a segment that consists of access and trunk links. The hybrid
port has the features of both access and trunk ports. A hybrid port has a PVID
belonging to a particular VLAN, and also forwards the specified tagged frames
across switches for the purpose of VLAN communication.
• Hybrid Link (QinQ)—(Double Tag VLAN) Link is segment that consists of Hybrid
QinQ Double Tag VLAN access and trunk links. QinQ is the technique also
known as provider bridging, Stacked VLANs.
The original 802.1Q VLAN specification allows a single Virtual Local Area
Network (VLAN) header to be inserted into an Ethernet frame. QinQ allows
multiple VLAN headers to be inserted into a single frame, an essential capability
for implementing Metro Ethernet network topologies.
In Metro Ethernet networks, fewer IP v4 addresses are used by using QinQ. A
QinQ type VLAN can save IPv4 addresses by populating groups of sub-VLANs in
a VLAN and utilizing the default gateway IP address of Double Tag VLAN sharing
the same IP subnet mask.
Double Tag VLAN in Layer 2 also provides enhanced security between
customers that are served by the same default gateway by segregating between
the sub-VLANs even when they are located in the same LAN and have the same
IP subnet mask.
In a multiple VLAN header context, out of convenience the term “VLAN tag” or
just “tag” for short is often used in place of “802.1Q VLAN header”. QinQ allows
multiple VLAN tags in an Ethernet frame; together these tags constitute a tag
stack. When used in the context of an Ethernet frame, a QinQ frame is a frame
that has two VLAN 802.1Q headers (double-tagged).
NOTE It is not necessary to type ‘1’ in the tagged VID. The hybrid port
will forward the frames of VLAN 1. The trunk port must be connected to
a trunk/hybrid port of the other switch. Both the tagged VID of the two
ports need to be the same.
Untagged VID Assigns an untagged VID to the port. This field is available when the Link Type is set
to Access Link or Hybrid Link. Enter a number between 1 and 4094.
Tagged VID Assigns a tagged VID to the port. This field is available when the Link Type is set to
Trunk Link or Hybrid Link. Enter a number between 1 and 4094.
Apply Click to apply the settings.
54 www.cooperbussmann.com/wirelessresources
Rev Version 1.0
Page 55

Cooper Bussmann 2080E-T Managed Ethernet Switch User Manual
Port Based VLAN Mode—Port Based VLAN mode provides a simple way to create a VLAN. To create a new port
based VLAN, first choose “Port Based” in the Operation Mode field (see Figure 55), and then click Add. The screen
now looks like Figure 56. Simply name the VLAN, assign a VLAN ID, and select the ports to be included in the
VLAN.
Figure 55 VLAN Configuration - Port-based VLAN (Step 1)
Operation Mode Select “Port Based” to create a port based VLAN.
Add Click to add a new port based VLAN. The screen in Figure 56 appears, where you can
configure the new VLAN.
Edit To edit a VLAN, click the VLAN name in the list and click Edit. The screen in Figure 56
appears, where you can change the VLAN name, and add or remove ports from the
VLAN.
Delete To delete a VLAN, click the VLAN name in the list and click Delete.
Figure 56 VLAN Configuration - Port-based VLAN (Step 2)
www.cooperbussmann.com/wirelessresources
55Rev Version 1.0
Page 56

Cooper Bussmann 2080E-T Managed Ethernet Switch User Manual
Operation Mode Select the VLAN operation mode or disable VLAN. The following fields appear when
you choose Port Based VLAN mode.
Group Name Assign a name to the VLAN.
VLAN ID Assign an identifier to the VLAN.
Add To add a port to the VLAN, click the port in the left port column and click Add. The
port appears in the right column, indicating that it is in the VLAN.
Remove To remove a port from the VLAN, click the port in the right column and click Remove.
Apply Click to apply the settings.
VLAN Switch Status
Use the Switch Status page to see the status of VLAN settings. To display this page, choose
Configure-->VLAN-->Switch Status.
Figure 57 VLAN Switch Status
6.5.10 QoS
Quality of Service (QoS) allows you to assign a priority to various applications, users, or data flows, or guarantee
a specific level of performance to a data flow. QoS guarantees are important if network capacity is insufficient,
particularly for real-time streaming multimedia applications, such as voice-over-IP and video teleconferencing.
These applications often require a fixed bit rate. They are also delay sensitive and are in networks where capacity
is a limited resource—for example, cellular data communication. In the absence of network congestion, QoS
mechanisms are not required.
QoS Global Settings
To configure QoS policy, choose Configure-->QoS-->Global Settings. You can choose an 8-4-2-1 queuing
scheme, a strict priority scheme, or select a priority type.
56 www.cooperbussmann.com/wirelessresources
Figure 58 QoS Global Settings
Rev Version 1.0
Page 57

Cooper Bussmann 2080E-T Managed Ethernet Switch User Manual
QoS Mode Select from the following modes, or select “Disable” to turn off QoS.
• Port Based—The output priority is determined by the ingress port.
• COS Only—The output priority is determined by COS (Class of Service) only.
• TOS Only—The output priority is determined by TOS (Type of Service) only.
• COS First—The output priority is determined by COS and TOS, but COS first.
• TOS First— The output priority is determined by COS and TOS, but TOS first.
QoS Policy Select the QoS policy rule:
Using the 8,4,2,1 weight fair queue scheme—The switch will follow 8:4:2:1 rate to
process priority queue from the highest to the lowest queue. For example, 8 high
queue packets, 4 middle queue packets, 2 low queue packets, and 1 lowest queue
packet are all transmitted at the same time, in accordance with the 8, 4, 2, 1 policy
rule.
Use a strict priority scheme—The switch will always process packets in the higher
queue first, until the higher queue is empty.
Apply Click to apply the settings.
Port Priority
When the QoS Mode on the QoS - Global Settings page is set to “Port Based,” you can set the queuing policy for
each port.
To display the QoS Port Priority page, choose Configure-->QoS-->Port Priority.
Figure 59 Port Priority
Priority Select from four priority levels: High, Middle, Low, or Lowest.
Apply Click to apply the settings.
COS Mapping to Queue
When QoS Mode field on the QoS Global Settings page is set to “COS Only” or “COS First,” you can set the COS
queuing policy for each port.
To set up COS mapping to queue, choose Configure-->QoS-->CoS Mapping to Queue.
www.cooperbussmann.com/wirelessresources
57Rev Version 1.0
Page 58

Cooper Bussmann 2080E-T Managed Ethernet Switch User Manual
Figure 60 COS Mapping to Queue
COS Priority Each COS has four priority levels to choose from: High, Middle, Low, Lowest.
COS Port Default Assign a default priority value to each port. A default priority is considered and
determined by the ingress port when an ingress packet has no VLAN tag.
Apply Click to apply the setting.
DSCP Mapping to Queue
This page allows you to set the default priority for incoming packets that do not have a priority assigned to them.
To configure DSCP mapping to queue, choose Configure-->QoS-->DSCP Mapping to Queue.
58 www.cooperbussmann.com/wirelessresources
Figure 61 DSCP Mapping to Queue
Rev Version 1.0
Page 59

Cooper Bussmann 2080E-T Managed Ethernet Switch User Manual
DSCP priority The system provides 0–63 DSCP priority levels. Each level has four priority types:
High, Middle, Low, and Lowest. When an IP packet is received, the system will check
the DSCP level value in the packet and grant it the appropriate priority. For example,
if you set DSCP level 25 as “High,” and system finds that the DSCP value of the
received IP packet is 25, the packet will receive highest priority.
Apply Click to apply the settings.
6.5.11 Port Mirroring
Port mirroring is a method for monitoring traffic in switched networks. Traffic through ports can be monitored by
one specified port, which means traffic going in or out of monitored (source) ports will be duplicated into mirror
(destination) ports.
To set up port mirroring, choose Configure-->Mirroring.
NOTE All the duplicated data of the source port can be separated with RX and TX. If you want to collect
multi-source ports at the same time, you can assign the TX of one destination port to be responsible for
collecting all the TX data of source ports and assign another RX of destination port to be responsible for
collecting all the RX data of source ports.
Destination Port Set which switch port will be responsible for collecting the data that was duplicated
from the source port.
Source Port Set which switch port will have its data duplicated and sent to the destination port.
Apply Click to apply the settings.
6.6 Security Menu
The Security function allows you to block unauthorized clients.
6.6.1 IP Source Guard Configuration
IP Source Guard allows you to limit the number of personnel authorized to manage the switch through HTTP and
Telnet services by restricting access to ten IP addresses.
To configure this function, choose Security-->IP Source Guard-->Configuration.
Figure 62 Mirroring
www.cooperbussmann.com/wirelessresources
59Rev Version 1.0
Page 60

Cooper Bussmann 2080E-T Managed Ethernet Switch User Manual
Figure 63 IP Source Guard - Configuration
IP Security Mode Enable or disable IP security. When security is enabled, the fields on this page
become active.
Enable Web
Management
When this checkbox is selected, any device whose IP address matches one of the
10IPaddresses in the Security IP1–IP10 table (see the next section) will be given
permission to access this switch via HTTP service.
Enable Telnet
Management
When this checkbox is selected, any device whose IP address matches one of the
10IP addresses in the Security IP1–IP10 table (see the next section) will be given
permission to access this switch via Telnet service.
Enable SNMP
Management
When this checkbox is selected, any device whose IPaddress matches one of the
10IPaddresses in the Security IP1–IP10 table (see the next section) will be given
permission to access this switch via SNMP service.
Apply Click to apply the settings.
Static Table
The system allows you to assign up to ten IP addresses for access security. When IP Security Mode is enabled on
the IP Source Guard Configuration page, only these ten IP addresses will be able to access and manage the switch
through the HTTP/Telnet/SNMP service.
To set up the IP address table, click the Static Table tab on the IP Source Guard Configuration page. (To display
this page, choose Security-->IP Source Guard-->Configuration.)
NOTE Remember to choose Maintenance-->Save Configuration, and then click “Save” to save the new
configuration. Otherwise, the new configuration will be lost when the switch powers off. See “6.7.1 Save
Configuration.”
60 www.cooperbussmann.com/wirelessresources
Rev Version 1.0
Page 61
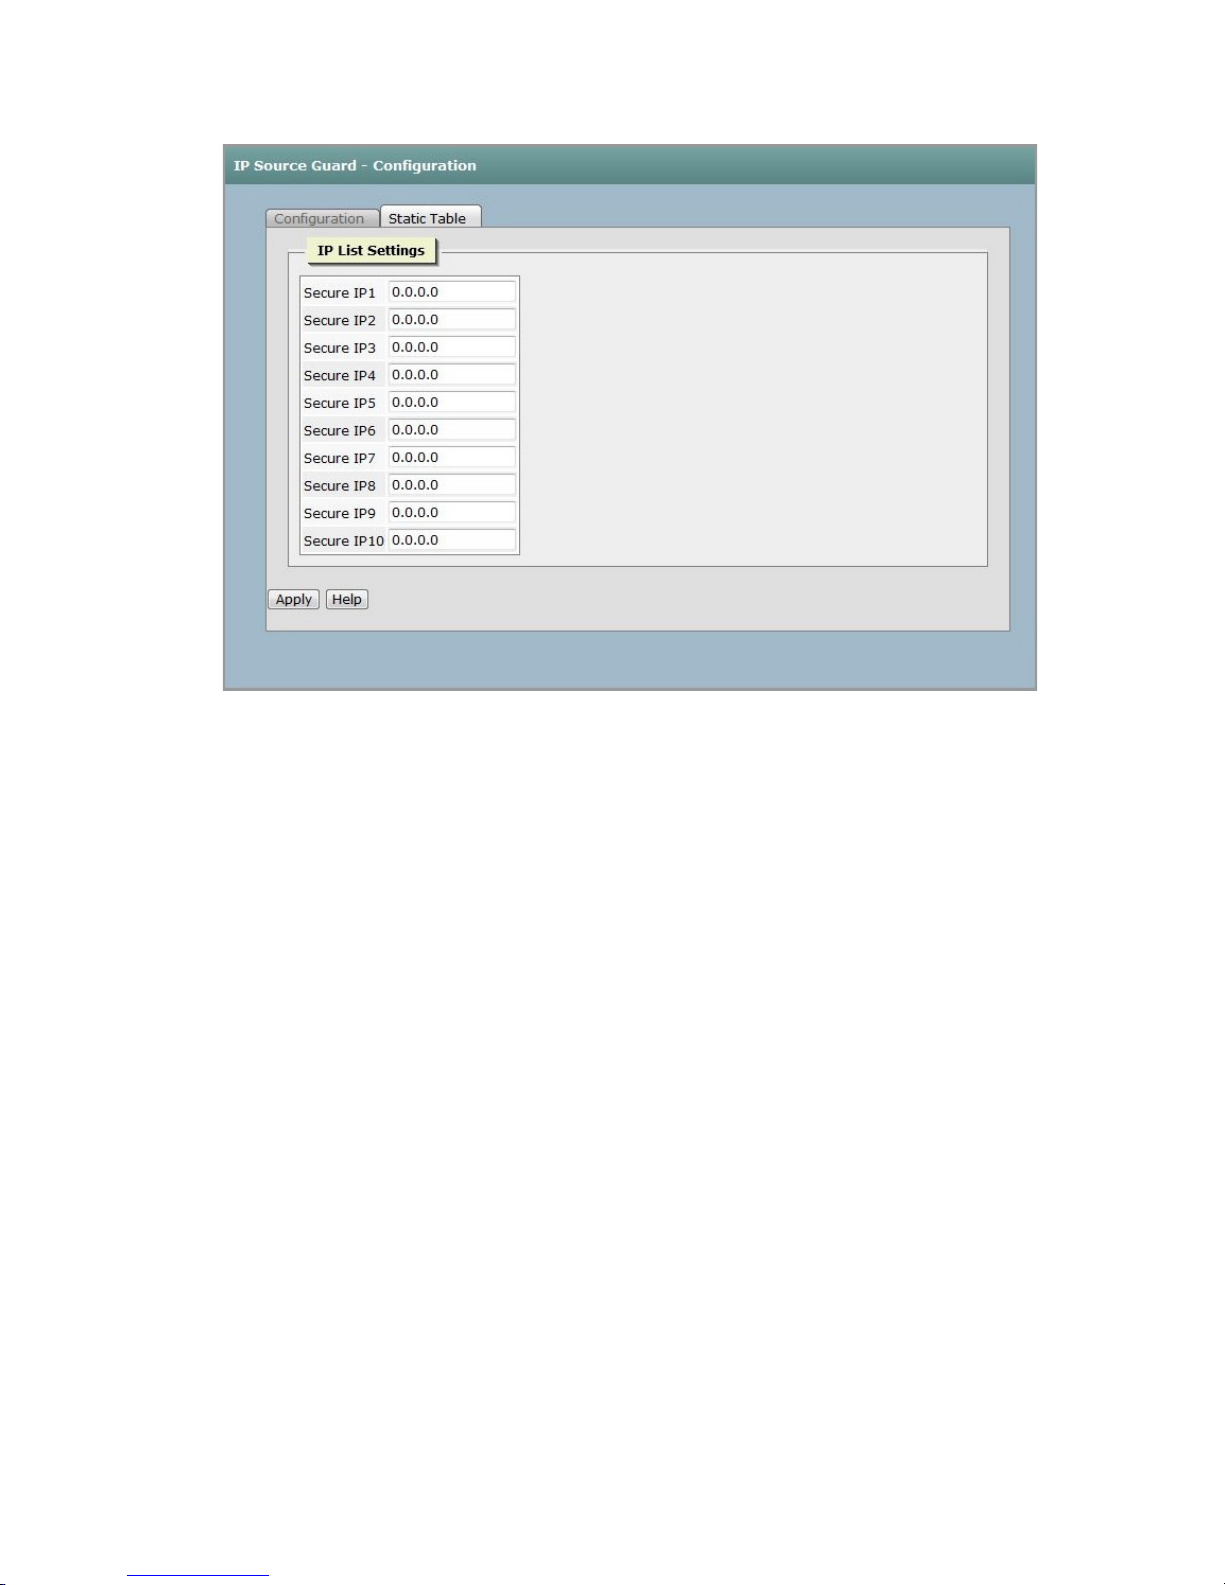
Cooper Bussmann 2080E-T Managed Ethernet Switch User Manual
Figure 64 IP Source Guard - Static Table
Security IP 1–10 Enter the IP addresses that will be allowed to access and manage the switch through
the HTTP/Telnet service.
Apply Click to apply the settings.
6.6.2 802.1X/Radius
The IEEE authentication specification 802.1X prevents the client from accessing a wireless access point or
wired switch until it provides security information, such as a user name and password, which is verified by an
authentication server (for example, a RADIUS server).
802.1X/Radius Configuration
Use the 802.1x/Radius - Configuration page to configure a RADIUS server. To display this page, choose
Security-->802.1x/Radius-->Configuration.
www.cooperbussmann.com/wirelessresources
61Rev Version 1.0
Page 62

Cooper Bussmann 2080E-T Managed Ethernet Switch User Manual
Figure 65 802.1X Radius - Configuration
IEEE 802.1x Protocol
Enable or disable 802.1x protocol. When enabled, the configuration parameters
become available.
Radius Server IP Assign the RADIUS server IP address.
Server Port Set the UDP destination port for authentication requests to the specified RADIUS
server.
Accounting Port Set the UDP destination port for accounting requests to the specified RADIUS server.
Shared Key Set an encryption key for use during authentication sessions with the specified
RADIUS server. This key must match the encryption key used on the RADIUS server.
NAS, Identifier Set the identifier for the RADIUS client.
Quiet Period Set the number of seconds during which the port will not attempt to acquire a
supplicant.
TX Period Set the number of seconds that the port waits before retransmitting the next EAPOL
PDU during an authentication session.
Supplicant Timeout Set the number of seconds that the switch waits for a supplicant response to an EAP
request.
Server Timeout Set the number of seconds that the switch waits for a server response to an
authentication request.
Max Requests Set the number of authentications that must time-out before authentication fails and
the authentication session ends.
Re-Auth period Set the number of seconds after which connected clients must be re-authenticated.
Apply Click to apply the settings.
62 www.cooperbussmann.com/wirelessresources
Rev Version 1.0
Page 63

Cooper Bussmann 2080E-T Managed Ethernet Switch User Manual
802.1X/Radius Port Setting
You can configure the 802.1x authentication state for each port. To configure the port settings, choose
Security-->802.1x/Radius-->Port Settings.
Figure 66 802.1X Radius - Port Setting
Port Authorization
Mode
You can choose from the following authorization states:
• Reject—The specified port is required to be held in the unauthorized state.
• Accept—The specified port is required to be held in the authorized state.
• Authorize—The specified port is set to the Authorized or Unauthorized state
in accordance with the outcome of an authentication exchange between the
supplicant and the authentication server.
• Disable—When disabled, the specified port works without complying with 802.1x
protocol.
Apply Click to apply the settings.
802.1X/Radius Port Status
To display the authorization status of a port, choose Security-->802.1x/Radius-->Port Status (see Figure 67).
Figure 67 802.1X Radius - Port Status
www.cooperbussmann.com/wirelessresources
63Rev Version 1.0
Page 64

Cooper Bussmann 2080E-T Managed Ethernet Switch User Manual
6.6.3 MAC Filtering
To block an unauthorized MAC address by switch, choose Security-->MAC Filtering. The MAC blacklist shows the
list of MAC addresses that are currently blocked.
Figure 68 MAC Filtering
MAC Address
Enter a MAC address that you want add or delete from the MAC blacklist. Addresses
on the blacklist will be blocked by the switch.
Add, Delete Click Add to add the address to the MAC blacklist, or click Delete to remove the
address from the MAC blacklist.
6.6.4 Port Security
To block (or unblock) a MAC address by port, choose Security-->Port Security.
64 www.cooperbussmann.com/wirelessresources
Figure 69 Port Security
Rev Version 1.0
Page 65

Cooper Bussmann 2080E-T Managed Ethernet Switch User Manual
MAC Address
Port No.
Add, Delete Click Add to add the address to the Port Security List, or click Delete to remove the
Enter a MAC address that you want add or delete from the Port Security List.
Addresses on this list will be allowed access to the port.
Select a port number.
address from the Port Security List.
6.7 Maintenance
6.7.1 Save Configuration
The Save Configuration page allows you to save the current switch settings. To display this page, choose
Maintenance-->Save Configuration.
Figure 70 Save Configuration
6.7.2 Restart Device
To reboot the switch, choose Maintenance-->Restart Device, and then click Reboot.
Figure 71 Restart Device
6.7.3 Factory Defaults
To reset the switch to its default configuration, choose Maintenance-->Factory Defaults, and then click Reset. You
have the option of keeping the current IP address, username, and password settings.
Figure 72 Factory Defaults
www.cooperbussmann.com/wirelessresources
65Rev Version 1.0
Page 66

Cooper Bussmann 2080E-T Managed Ethernet Switch User Manual
6.7.4 Firmware Upgrade
The firmware upgrade software image for the 2080E-T Switch can be obtained by contacting a Sales
Representative. To upgrade the firmware from a TFTP server or a website, choose Maintenance-->Firmware
Upgrade. Click the tab for the upgrade method you want to use.
NOTE If you are updating the firmware from a TFTP server, before you begin make sure that the firmware
image has been copied to the default directory on the TFTP server.
Figure 73 Firmware Upgrade - TFTP
TFTP Server IP
Enter your TFTP server IP address.
Address
Firmware File Name Enter the name of the new firmware image file.
Upgrade Click to upgrade to the new firmware.
The Web tab allows you to use a browser to update the firmware on your hard drive. This function is not supported
by the Google Chrome browser.
Browse Click to locate the new firmware image file.
Upgrade Click to upgrade to the new firmware.
66 www.cooperbussmann.com/wirelessresources
Figure 74 Firmware Upgrade - Web
Rev Version 1.0
Page 67

Cooper Bussmann 2080E-T Managed Ethernet Switch User Manual
6.7.5 Export/Import
You can back up (export) the current configuration from flash ROM to the TFTP server or a local computer
connected to the 2080E-T Switch (see Figure 75). You can also recover (import) a previous backup configuration to
restore the settings (see Figure 76). This saves having to manually reconfigure settings.
To use the export or import function, choose Maintenance-->Export/Import.
All system parameters except the following are backed up and restored with the import/export operation.
System/General-Asset /Switch Settings:
• System Name
• System Description
• System Location
• System Contact
System/IP Addressing/IPV4 IP Settings:
• DHCP Client
• IP Address
• Subnet Mask
• Gateway
• DNS1
• DNS2
System/Account – Admin Settings:
• User Name
• New Password
• Confirm Password
NOTE The 2080E-T Web server works best when used with Internet Explorer. The Google Chrome browser
does not support exporting to or importing from a local computer (computer connected to the switch).
To export a configuration file to a TFTP server, enter the TFTP server IP address and the backup file name, and
then click Backup in the upper part of the Export tab.
To export a configuration file to a local computer connected to the 2080E-T Switch, click Backup in the bottom
part of the Export tab.
Figure 75 Export Tab
www.cooperbussmann.com/wirelessresources
67Rev Version 1.0
Page 68

Cooper Bussmann 2080E-T Managed Ethernet Switch User Manual
TFTP Server IP
Address
Allows you to back up the configuration file to the TFTP server. Enter the TFTP
serverIP.
Backup File Name Enter the file name.
Backup Click to backup the configuration. To backup to the TFTP server, click Backup in the
upper box. To backup to the local computer connected to the 2080E-T Switch, click
Backup in the lower box.
To import a configuration file that was exported to a TFTP server, enter the TFTP server IP address and the backup
file name, and then click Restore in the upper part of the Import tab.
To import a configuration file that was exported to a local computer connected to the 2080E-T Switch, use the
Browse button to locate the backup file, and then click Restore in the bottom part of the Import tab.
Figure 76 Import Tab
TFTP Server IP
Address
Allows you to import a configuration file from the TFTP server. Enter the TFTP
serverIP.
Restore File Name Enter the file name to be restored.
Browse Allows you to import a configuration file from a local computer connected to the
2080E-T Switch. Click Browse and to locate the file.
Restore Click to restore the backup.
68 www.cooperbussmann.com/wirelessresources
Rev Version 1.0
Page 69

Cooper Bussmann 2080E-T Managed Ethernet Switch User Manual
6.7.6 Diagnostics
Ping
To ping other network devices, choose Maintenance-->Diagnostics-->Ping, enter the IP address you want to ping,
and then click Active.
Figure 77 Diagnostics - Ping
6.8 Troubleshooting
Follow these steps to troubleshoot switch problems.
1. Verify that you are using the right power cord or adapter (DC 12–48V).
2. Verify that you are using the proper UTP/STP cable to construct the user network.
3. Use the LED indicators to help diagnose the problem.
4. If the power indicator does not turn on when the power cord is plugged in, you may have a problem with
5. If the LED indicators are normal and the connected cables are correct but packets still cannot be transmitted,
WARNING Do not use a power adapter with DC output greater than 48V, or it may damage the device.
Use unshielded twisted-pair (UTP) or shield twisted-pair (STP) cable for RJ-45 connections, depending on the
connector type on the switch. Use 100Ω Category 3, 4 or 5 cables for 10 Mbps connections, 100Ω Category5
cable for 100 Mbps connections. In addition, make sure that the length of any twisted-pair connection does
not exceed 100 meters (328 ft).
To assist in identifying problems, the switch can be easily monitored through the panel indicators, which
describe common problems you may encounter and indicate where you can find solutions.
power cord. Check for loose power connections, power losses or surges at the power outlet. If you still cannot
resolve the problem, contact your local dealer for assistance.
check the configuration or status of the system’s Ethernet devices.
www.cooperbussmann.com/wirelessresources
69Rev Version 1.0
Page 70

Cooper Bussmann 2080E-T Managed Ethernet Switch User Manual
appENDIx a - rJ-45 pIN aSSIGNMENT
The UTP/STP ports will automatically detect fast Ethernet (10Base-T/100Base-TXconnections). Auto MDI/MDIX
means that the switch can connect to another switch or workstation without changing straight-through or crossover
cabling. See the figures in this appendix for straight through and crossover cable schematics.
10 /100BASE-TX Pinouts
With a 10/100BASE-TX cable, pins 1 and 2 are used for transmitting data, and pins 3 and 6 are used for receiving
data.
RJ-45 Pin Assignments
Pin Number Assignment
1 Tx+
2 Tx-
3 Rx+
6 Rx-
NOTE The “+” and “-” signs represent the polarity of the
wires that make up each wire pair.
The following table shows the 10/100BASE-TX MDI and MDI-X port pin outs.
Pin Number MDI-X Signal Name MDI Signal Name
1 Receive Data plus (RD+) Transmit Data plus (TD+)
2 Receive Data minus (RD-) Transmit Data minus (TD-)
3 Transmit Data plus (TD+) Receive Data plus (RD+)
6 Transmit Data minus (TD-) Receive Data minus (RD-)
10/100Base-TX Cable Schematic
Figure 78 and Figure 79 show the 10/100Base-TX cable schematic.
Figure 78 Straight-through Cable Schematic
70 www.cooperbussmann.com/wirelessresources
Figure 79 Crossover Cable Schematic
Rev Version 1.0
Page 71

Cooper Bussmann 2080E-T Managed Ethernet Switch User Manual
appENDIx B - COMMaND SETS
This appendix describes the command sets for the 2080E-T Managed Ethernet Switch. The commands are
associated with a user level, described in the following key.
E = User EXEC
P = Privileged EXEC
G = Global configuration
V = VLAN database
I = Interface configuration
802.1x Commands
CLI Commands Level Description Example
8021x enable G Enable IEEE802.1x function. switch>enable
switch#configure
switch(config)# 8021x enable
8021x system radiusip
[Radius Server IP]
8021x system serverport
[Port Number]
8021x system
accountport
[Port Number]
8021x system sharedkey
[SharedKey]
8021x system nasid
[NAS ID]
8021x misc quietperiod
[Seconds]
G Use the 802.1x system radius IP
global configuration command to
change the radius server IP address.
G Use the 802.1x system server port
global configuration command to
change the radius server port.
G Use the 802.1x system account port
global configuration command to
change the accounting port.
G Use the 802.1x system share key
global configuration command to
change the shared key value.
G Use the 802.1x system nasid global
configuration command to change the
NAS ID.
G Use the 802.1x misc quiet period
global configuration command to
specify the quiet period value of the
switch.
switch>enable
switch#configure
switch(config)# 8021x system radiusip
192.168.1.1
switch>enable
switch#configure
switch(config)# 8021x system
serverport 1815
switch>enable
switch#configure
switch(config)# 8021x system
accountport1816
switch>enable
switch#configure
switch(config)# 8021x system
sharedkey123456
switch>enable
switch#configure
switch(config)# 8021x system nasid
test1
switch>enable
switch#configure
switch(config)# 8021x misc
quietperiod 10
8021x misc txperiod
[Seconds]
8021x misc supptimeout
[Seconds]
G Use the 802.1x misc TX period global
G Use the 802.1x misc supp timeout
switch>enable
configuration command to set the TX
period.
global configuration command to set
the supplicant timeout.
www.cooperbussmann.com/wirelessresources
switch#configure
switch(config)# 8021x misc txperiod 5
switch>enable
switch#configure
switch(config)# 8021x misc
supptimeout 20
71Rev Version 1.0
Page 72

Cooper Bussmann 2080E-T Managed Ethernet Switch User Manual
CLI Commands Level Description Example
8021x misc
servertimeout
[Seconds]
G Use the 802.1x misc server timeout
global configuration command to set
the server timeout.
switch>enable
switch#configure
switch(config)#8021x misc
servertimeout 20
8021x misc maxrequest
[number]
8021x misc reauthperiod
[Seconds]
8021x portstate
[disable | reject | accept |
authorize]
show 8021x P Displays a summary of the 802.1x
no 8021x G Disable 802.1x function. switch>enable
G Use the 802.1x misc max request
global configuration command to set
the MAX requests.
G Use the 802.1x misc reauth period
global configuration command to set
the reauthorization period.
I Use the 802.1x port state interface
configuration command to set the
state of the selected port.
properties and also the port sates.
switch>enable
switch#configure
switch(config)#8021x misc
maxrequest 3
switch>enable
switch#configure
switch(config)#8021x misc
reauthperiod 3000
switch>enable
switch#configure
switch(config)#interface fastethernet 3
switch(config-if)#8021x portstate
authorize
switch>enable
switch#show 8021x
switch#configure
switch(config)#no 8021x
Admin Password Commands
CLI Commands Level Description Example
admin username
[Username]
admin password
[Password]
show admin P Show administrator information. switch>enable
G Change a login username (maximum
10 characters).
G Specify a password (maximum
10characters).
switch>enable
switch#configure
switch(config)#admin username
xxxxxx
switch>enable
switch#configure
switch(config)#admin password
xxxxxx
switch#show admin
Backup and Restore Commands
CLI Commands Level Description Defaults/Example
tftp
[server IP]
backup
[file name]
G Save configuration to TFTP. Need to
specify the IP address of TFTP server
and the file name of image.
switch>enable
switch#configure
switch(config)#tftp 192.168.1.120
backup 123.bin
72 www.cooperbussmann.com/wirelessresources
Rev Version 1.0
Page 73

Cooper Bussmann 2080E-T Managed Ethernet Switch User Manual
CLI Commands Level Description Defaults/Example
tftp
[server IP]
restore
[file name]
G Get configuration from TFTP server.
Need to specify the IP address of the
TFTP server and the file name of the
image.
switch>enable
switch#configure
switch(config)#tftp 192.168.1.120
restore 123.bin
CLI Commands
CLI Commands Level Description Example
enable E Enter Privileged EXEC mode. switch>enable
quit E Logout command line shell. switch>quit
show E Show switch configuration. switch>show config
uptime E Show system up time. switch>uptime
disable P Leave Privileged EXEC mode. switch>enable
switch#disable
configure P Enter Global Configuration mode. switch>enable
switch#configure
end G Leave Global Configuration mode. switch>enable
switch#>configure
switch(config)#end
switch#>
exit G Leave Global Configuration mode. switch>enable
switch#>configure
switch(config)#exit
switch#>
DHCP Server Commands
CLI Commands Level Description Example
dhcpserver enable G Enable DHCP server. switch>enable
switch#configure
switch(config)#dhcpserver enable
dhcpserver lowip
[Low IP]
dhcpserver highip
[High IP]
dhcpserver subnetmask
[Subnet mask]
G Configure low IP address for IP
address pool.
G Configure high IP address for IP
address pool.
G Configure subnet mask for DHCP
clients.
switch>enable
switch#configure
switch(config)#dhcpserver lowip
192.168.1.100
switch>enable
switch#configure
switch(config)#dhcpserver highip
192.168.1.200
switch>enable
switch#configure
switch(config)#dhcpserver
subnetmask 255.255.255.0
www.cooperbussmann.com/wirelessresources
73Rev Version 1.0
Page 74

Cooper Bussmann 2080E-T Managed Ethernet Switch User Manual
CLI Commands Level Description Example
dhcpserver gateway
[Gateway]
dhcpserver dnsip
[DNS IP]
dhcpserver leasetime
[Hours.]
dhcpserver ipbinding
[IP address]
show dhcpserver
configuration
show dhcpserver clients P Show client entries of DHCP server. switch>enable
G Configure gateway for DHCP clients. switch>enable
switch#configure
switch(config)#dhcpserver gateway
192.168.1.254
G Configure DNS IP address for DHCP
clients.
G Configure lease time (hours.) switch>enable
I Set static IP address for DHCP clients
by port.
P Show configuration of DHCP server. switch>enable
switch>enable
switch#configure
switch(config)#dhcpserver dnsip
192.168.1.1
switch#configure
switch(config)#dhcpserver leasetime 1
switch>enable
switch#configure
switch(config)#interface fastEthernet 2
switch(config-if)#dhcpserver ipbinding
192.168.1.1
switch#show dhcpserver
configuration
switch#show dhcpserver clients
show dhcpserver
ip-binding
no dhcpserver G Disable DHCP server function. switch>enable
P Show IP-Binding information of DHCP
server.
switch>enable
switch#show dhcpserver ip-binding
switch#configure
switch(config)#no dhcpserver
Factory Default Command
CLI Commands Level Description Example
default
[keepip|keepadmin|both]
G Restore to factory default
configuration.
switch>enable
switch#configure
switch(config)#default both
Fault Alarm Commands
CLI Commands Level Description Example
fault-relay power
[number] [enable/disable]
fault-relay
[enable/disable]
G Configure relay alarm for power
failure.
I Configure relay alarm for port link
down/broken.
switch>enable
switch#configure
switch(config)#fault-relay power 1
enable
switch>enable
switch#configure
switch(config)#interface fastEthernet 1
switch(config-if)#fault-relay enable
show fault-relay P Show fault relay alarm setting. switch>enable
74 www.cooperbussmann.com/wirelessresources
switch#show fault-relay
Rev Version 1.0
Page 75

Cooper Bussmann 2080E-T Managed Ethernet Switch User Manual
CLI Commands Level Description Example
no fault-relay G Disable fault relay alarm function. switch>enable
switch#configure
switch(config)#no fault-relay
IGMP Commands
CLI Commands Level Description Example
igmp enable G Enable IGMP snooping function. switch>enable
switch#configure
switch(config)#igmp enable
igmp query
[auto/fource]
igmp unregister
[flooding/blocking/
sourceonly]
igmp last-query-count
[1–2 sec.]
igmp last-query-interval
[1–250 tenths of a sec.]
igmp query-interval
[1–250 sec.]
igmp query-responseinterval
[1–250 tenths of a sec.]
G Configure IGMP query mode. switch>enable
switch#configure
switch(config)#igmp query auto
G Configure IGMP unregister stream. switch>enable
switch#configure
switch(config)#igmp unregister
flooding
G Configure last member query count. switch>enable
switch#configure
switch(config)# igmp last-query-count 1
G Configure last member query interval. switch>enable
switch#configure
switch(config)#igmp last-queryinterval 100
G Configure query interval. switch>enable
switch#configure
switch(config)#igmp query-interval
100
G Configure query response interval. switch>enable
switch#configure
switch(config)#igmp query-responseinterval 100
show igmp configuration P Show IGMP configuration. switch>enable
show igmp table P Show IGMP snooping table. switch>enable
no igmp G Disable IGMP snooping function. switch>enable
no igmp query G Disable IGMP query. switch>enable
switch#show igmp configuration
switch#show igmp table
switch#configure
switch(config)#no igmp
switch#configure
switch(config)#no igmp query
www.cooperbussmann.com/wirelessresources
75Rev Version 1.0
Page 76

Cooper Bussmann 2080E-T Managed Ethernet Switch User Manual
IP Security Commands
CLI Commands Level Description Example
security enable G Enable IP security function. switch>enable
switch#configure
switch(config)#security enable
security http G Enable IP security of HTTP server. switch>enable
switch#configure
switch(config)#security http
security telnet G Enable IP security of telnet server. switch>enable
switch#configure
switch(config)#security telnet
security snmp G Enable IP security of SNMP server. switch>enable
switch#configure
switch(config)#security snmp
security ip
[Index(1..10)]
[IP Address]
show security P Show the information of IP security. switch>enable
no security G Disable IP security function. switch>enable
no security http G Disable IP security of HTTP server. switch>enable
no security telnet G Disable IP security of Telnet server. switch>enable
no security snmp G Disable IP security of SNMP server. switch>enable
G Set the IP security list. switch>enable
switch#configure
switch(config)#security ip 1
192.168.1.55
switch#show security
switch#configure
switch(config)#no security
switch#configure
switch(config)#no security http
switch#configure
switch(config)#no security telnet
switch#configure
switch(config)#no security snmp
IP Setting Commands
CLI Commands Level Description Example
ip address
[Ip-address]
[Subnet-mask]
[Gateway]
ip dhcp G Enable DHCP client function of
show ip P Show IP information of switch. switch>enable
76 www.cooperbussmann.com/wirelessresources
G Configure the IP address of switch. switch>enable
switch.
switch#configure
switch(config)#ip address 192.168.1.1
255.255.255.0 192.168.1.254
switch>enable
switch#configure
switch(config)#ip dhcp
switch#show ip
Rev Version 1.0
Page 77

Cooper Bussmann 2080E-T Managed Ethernet Switch User Manual
CLI Commands Level Description Example
no ip dhcp G Disable DHCP client function of
switch.
switch>enable
switch#configure
switch(config)#no ip dhcp
LLDP Commands
CLI Commands Level Description Example
lldp enable G Enable LLDP function. switch>enable
switch#configure
switch(config)#lldp enable
lldp interval
[TIME sec]
lldp synctime
[enable|disable]
show lldp P Show LLDP information. switch>enable
no lldp G Disable LLDP. switch>enable
G Configure LLDP interval. switch>enable
switch#configure
switch(config)#lldp interval 1800
G Enable or disable LLDP sync time. switch>enable
switch#configure
switch(config)#lldp synctime enable
switch#show lldp
switch#configure
switch(config)#no lldp
Loading Average Commands
CLI Commands Level Description Example
loadavg E Show system load average. switch>loadavg
event loadavg syslog G Set system load average event type. switch>enable
switch#configure
switch(config)#event loadavg syslog
Logout Command
CLI Commands Level Description Example
logout E Logout command line shell. switch>logout
MAC Address Table Commands
CLI Commands Level Description Example
show mac-address-table I Show MAC address table. switch>enable
switch#configure
switch(config)#interface fastethernet 2
switch(config-if)#show mac-addresstable
show mac-address-table all
P Show MAC address table (all). switch>enable
switch#show mac-address-table all
www.cooperbussmann.com/wirelessresources
77Rev Version 1.0
Page 78

Cooper Bussmann 2080E-T Managed Ethernet Switch User Manual
CLI Commands Level Description Example
no mac-address-table G Remove dynamic entry of MAC
address table.
agingtime
[seconds 0–3825 steps
15]
auto-flush
[enable|disable]
G Configure MAC address table aging
time.
G Auto flush MAC address table when
ports link is down.
switch>enable
switch#configure
switch(config)#no mac-address-table
switch>enable
switch#configure
switch(config)#agingtime 30
switch>enable
switch#configure
switch(config)#auto-flush enable
MAC Blacklist Commands
CLI Commands Level Description Example
mac-address-table filter
hwaddr
[HW-Addr]
show mac-address-table
filter
no mac-address-table
filter hwaddr
[HW-Addr]
G Configure a MAC address entry of the
interface (filter).
P Show the MAC address table (filter). switch>enable
G Remove a MAC address entry from
the table (filter).
switch>enable
switch#configure
switch(config)#mac-address-table
filter hwaddr 000012348678
switch#show mac-address-table filter
switch>enable
switch#configure
switch(config)#no mac-address-table
filter hwaddr 000012348678
Multicast Static Filtering Table Commands
CLI Commands Level Description Example
multicast-filtering
[IP_addr]
no multicast-filtering
[IP_addr]
show multicast-filtering P Show multicast filtering table. switch>enable
I Configure the multicast filtering entry
of the interface.
I Remove multicast filtering entry of
interface.
switch>enable
switch#configure
switch(config)#interface fastEthernet 2
switch(config)#multicast-filtering
225.100.100.100
switch>enable
switch#configure
switch(config)#interface fastEthernet 2
switch(config-if)#no multicast-filtering
225.100.100.100
switch#show multicast-filtering
Ping Command
CLI Commands Level Description Example
ping
[ip]
E Ping function. switch>ping 192.168.1.1
78 www.cooperbussmann.com/wirelessresources
Rev Version 1.0
Page 79

Cooper Bussmann 2080E-T Managed Ethernet Switch User Manual
Port Control Commands
CLI Commands Level Description Example
interface fastEthernet
[Portid]
state
[enable|disable]
duplex
[full | half]
speed
[10|100|auto]
flowcontrol mode
[symmetric|asymmetric]
no flowcontrol I Disable flow control of interface. switch>enable
G Choose the port for modification. switch>enable
switch#configure
switch(config)#interface fastEthernet 2
I Use the state interface configuration
command to specify the state mode
of operation for Ethernet ports. Use
the disable form of this command to
disable the port.
I Use the duplex configuration
command to specify the duplex mode
of operation for fast Ethernet.
I Use the speed configuration
command to specify the speed mode
of operation for fast Ethernet.
I Configure flow control. switch>enable
switch>enable
switch#configure
switch(config)#interface fastEthernet 2
switch(config-if)#state disable
switch>enable
switch#configure
switch(config)#interface fastEthernet 2
switch(config-if)#duplex full
switch>enable
switch#configure
switch(config)#interface fastEthernet 2
switch(config-if)#speed 100
switch#configure
switch(config)#interface fastEthernet 2
switch(config-if)#flowcontrol mode
asymmetric
switch#configure
switch(config)#interface fastEthernet 2
switch(config-if)#no flowcontrol
security enable I Enable security. switch>enable
switch#configure
switch(config)#interface fastEthernet 2
switch(config-if)#security enable
no security I Disable security. switch>enable
switch#configure
switch(config)#interface fastEthernet 2
switch(config-if)#no security
alias
[name]
show interface
configuration
I Set port alias name. switch>enable
switch#configure
switch(config)#interface fastEthernet 2
switch(config-if)#alias 1111
I Show interface configuration status. switch>enable
switch#configure
switch(config)#interface fastEthernet 2
switch(config-if)#show interface
configuration
www.cooperbussmann.com/wirelessresources
79Rev Version 1.0
Page 80

Cooper Bussmann 2080E-T Managed Ethernet Switch User Manual
Port Monitoring Commands
CLI Commands Level Description Example
monitor destination
[RX|TX|Both]
monitor source
[RX|TX|Both]
show monitor P Show port monitor information. switch>enable
show monitor I Show port monitor information. switch>enable
no monitor I Disable source port of monitor. switch>enable
I Configure destination port of monitor. switch>enable
switch#configure
switch(config)#interface fastEthernet 2
switch(config-if)#monitor destination
rx
I Configure source port of monitor. switch>enable
switch#configure
switch(config)#interface fastEthernet 2
switch(config-if)#monitor source rx
switch#show monitor
switch#configure
switch(config)#interface fastEthernet 2
switch(config-if)#show monitor
switch#configure
switch(config)#interface fastEthernet 2
switch(config-if)#no monitor
Port Security Commands
CLI Commands Level Description Example
mac-address-table static
hwaddr
[HW-Addr]
show mac-address-table
static
no mac-address-table
static hwaddr
[HW-Addr]
I Configure the MAC address entry of
the interface (static).
P Show MAC address table (static). switch>enable
I Remove an entry from the MAC
address table of interface (static).
switch>enable
switch#configure
switch(config)#interface fastEthernet 2
switch(config-if)#mac-address-table
static hwaddr 000012345678
switch#show mac-address-table
static
switch>enable
switch#configure
switch(config)#interface fastEthernet 2
switch(config-if)#no mac-addresstable static hwaddr 000012345678
Port Statistics Commands
CLI Commands Level Description Example
show interface
accounting
I Show interface statistic counter. switch>enable
switch#configure
switch(config)#interface fastEthernet 2
switch switch (config-if)#show
interface accounting
80 www.cooperbussmann.com/wirelessresources
Rev Version 1.0
Page 81

Cooper Bussmann 2080E-T Managed Ethernet Switch User Manual
CLI Commands Level Description Example
no accounting I Clear interface accounting
information.
switch>enable
switch#configure
switch(config)#interface fastEthernet 2
switch(config-if)#no accounting
Port Status Command
CLI Commands Level Description Example
show interface status I Show interface actual status. switch>enable
switch#configure
switch(config)#interface fastEthernet 2
switch switch (config-if)#show
interface status
Pro-Ring2se Commands
CLI Commands Level Description Example
pro-ring2se enable G Enable Pro-Ring2se. switch>enable
switch#configure
switch(config)# pro-ring2se enable
pro-ring2se mode
[master|transit]
G Configure mode. switch>enable
switch#configure
switch(config)# pro-ring2se mode
master
pro-ring2se primary-port
[Port number]
pro-ring2se secondaryport
[Port number]
pro-ring2se control-vlan
[Vlan ID]
pro-ring2se protect-vlan
[Vlan list]
show pro-ring2se P Show Pro-Ring2se configuration. switch>enable
no pro-ring2se G DisablePro-Ring2se. switch>enable
G Configure primary port. switch>enable
G Configure secondary port. switch>enable
G Configure control VLAN. switch>enable
G Configure protect VLAN. switch>enable
switch#configure
switch(config)# pro-ring2se primaryport 7
switch#configure
switch(config)# pro-ring2se
secondary-port 8
switch#configure
switch(config)# pro-ring2se controlvlan 100
switch#configure
switch(config)# pro-ring2se protectvlan 200
switch# show pro-ring2se
switch#configure
switch(config)# no pro-ring2se
www.cooperbussmann.com/wirelessresources
81Rev Version 1.0
Page 82

Cooper Bussmann 2080E-T Managed Ethernet Switch User Manual
Rate Limit Commands
CLI Commands Level Description Example
ratelimit type all I Set interface ingress limit frame type
to “accept all frame.”
ratelimit type broadcastmulticast-flooded-unicast
ratelimit type broadcastmulticast
ratelimit type broadcastonly
ratelimit in
[kbps]
I Set interface ingress limit frame type
to “accept broadcast, multicast, and
flooded unicast frame.”
I Set interface ingress limit frame type
to “accept broadcast and multicast
frame.”
I Set interface ingress limit frame type
to “only accept broadcast frame.”
I Set interface input bandwidth. Zero
means no limit.
switch>enable
switch#configure
switch(config)#interface fastEthernet 2
switch(config-if)#ratelimit type all
switch>enable
switch#configure
switch(config)#interface fastEthernet 2
switch(config-if)#ratelimit type
broadcast-multicast-flooded-unicast
switch>enable
switch#configure
switch(config)#interface fastEthernet 2
switch(config-if)#ratelimit type
broadcast-multicast
switch>enable
switch#configure
switch(config)#interface fastEthernet 2
switch(config-if)#ratelimit type
broadcast-only
switch>enable
switch#configure
switch(config)#interface fastEthernet 2
switch(config-if)#ratelimit in 160
ratelimit out
[kbps]
show ratelimit I Show interfaces bandwidth control. switch>enable
I Set interface output bandwidth.
Rate range is from 100 kbps to
102400kbps or to 256000 kbps for
giga ports. Zero means no limit.
switch>enable
switch#configure
switch(config)#interface fastEthernet 2
switch(config-if)#ratelimit out 160
switch#configure
switch(config)#interface fastEthernet 2
switch(config-if)#show ratelimit
RSTP Commands
CLI Commands Level Description Example
rstp enable G Enable RSTP. switch>enable
switch#configure
switch(config)#rstp enable
rstp priority
[0–61440]
rstp max-age
[6–40]
rstp hello-time
[1–10]
G Configure RSTP bridge priority
parameter.
G Configure RSTP max age parameter. switch>enable
G Configure RSTP hello time parameter. switch>enable
switch>enable
switch#configure
switch(config)#rstp priority 4096
switch#configure
switch(config)#rstp max-age 6
switch#configure
switch(config)#rstp hello-time1
82 www.cooperbussmann.com/wirelessresources
Rev Version 1.0
Page 83

Cooper Bussmann 2080E-T Managed Ethernet Switch User Manual
CLI Commands Level Description Example
rstp forward-time
[4–30]
rstp path-cost
[0:auto,1-200000000]
rstp port-priority
[0-240]
rstp admin-p2p
[Auto|True|False]
rstp admin-edge
[True|False]
rstp admin-non-stp
[True|False]
G Configure RSTP forward time
parameter.
I Path cost on this interface. switch>enable
I Port priority on this interface. switch>enable
I Admin P2P on this interface. switch>enable
I Admin Edge on this interface. switch>enable
I Admin NonSTP on this interface. switch>enable
switch>enable
switch#configure
switch(config)#rstp forward-time 4
switch#configure
switch(config)#interface fastEthernet 2
switch(config-if)#rstp path-cost 20
switch#configure
switch(config)#interface fastEthernet 2
switch(config-if)#rstp port-priority 16
switch#configure
switch(config)#interface fastEthernet 2
switch(config-if)#rstp admin-p2p false
switch#configure
switch(config)#interface fastEthernet 2
switch(config-if)#rstp admin-edge
false
switch#configure
switch(config)#interface fastEthernet 2
switch(config-if)#rstp admin-non-stp
false
show rstp G Show RSTP information. switch>enable
switch#show rstp
no rstp G Disable RSTP. switch>enable
switch#configure
switch(config)#no rstp
Save Configuration Command
CLI Commands Level Description Example
write memory P Save user configuration into
permanent memory (flash ROM).
switch>enable
switch#write memory
SNMP Commands
CLI Commands Level Description Example
snmp agent-mode
[v1v2c|v3]
snmp community-strings
[Community]
right
[RO/RW]
G Select the agent mode of SNMP. switch>enable
switch#configure
switch(config)#snmp agent-mode
v1v2c
G Add SNMP community string. switch>enable
switch#configure
switch(config)#snmp community-
strings public right ro
www.cooperbussmann.com/wirelessresources
83Rev Version 1.0
Page 84

Cooper Bussmann 2080E-T Managed Ethernet Switch User Manual
CLI Commands Level Description Example
snmp trap server
[IP address]
community
[Community-string]
trap-version
[v1|v2c]
snmp v3-user
[UserID]
password
[Authentication Password]
[Privacy Password]
no snmp communitystrings
[Community]
no snmp trap server
[IP Address]
G Configure SNMP server host
information and community string.
switch>enable
switch#configure
switch(config)#snmp trap server
192.168.1.120 community public trapversion v2c
G Create a SNMPv3 user profile. switch>enable
switch#configure
switch(config)#snmp v3-user admin
password 123 123
G Disable SNMP community strings
function.
switch>enable
switch#configure
switch(config)#no snmp communitystrings public
G Remove SNMP trap setting. switch>enable
switch#configure
switch(config)#no snmp trap server
192.168.1.120
no snmp v3-user
[UserID] password
[Authentication Password]
[Privacy Password]
G Remove SNMPv3 user profile. switch>enable
switch#configure
switch(config)#no snmp v3-user
admin password 123 123
SNTP Commands
CLI Commands Level Description Example
sntp enable G Enable the SNTP function. switch>enable
switch#configure
switch(config)#sntp enable
sntp ip
[IP]
sntp timezone
[Timezone] Format: [1–63]
sntp daylight G Enable daylight saving time. If
sntp daylight-period
[Start time]
[End time]
Forrmat:
[yyyymmdd-hh:mm]
G Set the SNTP server IP address.
Ifthe SNTP function is inactive, this
command cannot be applied.
G Set timezone index, use “show sntp
timzezone” command to get more
information about the index number.
the SNTP function is inactive, this
command cannot be applied.
G Set period of daylight saving time.
If SNTP function is inactive, this
command cannot be applied.
Parameter format:
[yyyymmdd-hh:mm]
switch>enable
switch#configure
switch(config)#sntp ip 192.168.1.1
switch>enable
switch#configure
switch(config)#sntp timezone 22
switch>enable
switch#configure
switch(config)#sntp daylight
switch>enable
switch#configure
switch(config)#sntp daylight-period
20120808-01:01 20120809-01:01
84 www.cooperbussmann.com/wirelessresources
Rev Version 1.0
Page 85

Cooper Bussmann 2080E-T Managed Ethernet Switch User Manual
CLI Commands Level Description Example
sntp daylight-offset
[Minute]
show sntp P Show SNTP information. switch>enable
show sntp timezone P Show index number of time zone list. switch>enable
no sntp G Disable SNTP function. switch>enable
no sntp daylight G Disable daylight saving time. switch>enable
G Set offset of daylight saving time.
If SNTP function is inactive, this
command cannot be applied.
switch>enable
switch#configure
switch(config)#sntp daylight-offset 60
switch#show sntp
switch#show sntp timezone
switch#configure
switch(config)#no sntp
switch#configure
switch(config)#no sntp daylight
Switch Setting Commands
CLI Commands Level Description Example
show terminal P Show console information. switch>enable
switch#show terminal
system name
[System Name]
system location
[System Location]
system description
[System Description]
system contact
[System Contact]
show system-info E Show system information. switch>show system-info
G Configure system name. switch>enable
switch#configure
switch(config)#system name xxx
G Set switch system location string. switch>enable
switch#configure
switch(config)#system location xxx
G Set switch system description string. switch>enable
switch#configure
switch(config)#system description xxx
G Set switch system contact window
string.
switch>enable
switch#configure
switch(config)#system contact xxx
System Event Log Command
CLI Commands Level Description Example
show syslog P Show SYSLOG configuration and log
System Reboot Command
CLI Commands Level Description Example
reload G Reboot switch. switch>enable
switch>enable
table.
www.cooperbussmann.com/wirelessresources
switch#show syslog
switch#configure
switch(config)#reload
85Rev Version 1.0
Page 86

Cooper Bussmann 2080E-T Managed Ethernet Switch User Manual
System Warning Commands
CLI Commands Level Description Example
syslog mode
[client|server|both]
syslog ip
[IP address]
show syslog P
no syslog G
event system-restart
syslog
event authenticationfailure syslog
G Specified the log mode. switch>enable
switch#configure
switch(config)# syslog mode both
G Set system log server IP address. switch>enable
switch#configure
switch(config)# syslog ip
192.168.1.100
Show SYSLOG configuration and log
table.
switch>enable
switch#configure
switch#show syslog
Disable system log functon.
switch>enable
switch#configure
switch(config)#no syslog
G Set device restart event type. switch>enable
switch#configure
switch(config)#event system-restart
syslog
G Set Authentication failure event type. switch>enable
switch#configure
switch(config)#event authenticationfailure syslog
event syslog
[Link-UP|Link-Down|Both]
I Set port event for SYSLOG. switch>enable
switch#configure
switch(config)#interface fastethernet 3
switch(config-if)#event syslog both
show event P Show event selection. switch>enable
switch#show event
no event system-restart
syslog
G Disable device restart event type. switch>enable
switch#configure
switch(config)#no event systemrestart syslog
no event authenticationfailure syslog
G Disable Authentication failure event
type.
switch>enable
switch#configure
switch(config)#no event
authentication-failure syslog
no event syslog I Disable port event for system log. switch>enable
switch#configure
switch(config)#interface fastethernet 3
switch(config-if)#no event syslog
Traffic Prioritization Commands
CLI Commands Level Description Example
qos prioritytype
G Setting of QoS priority type. switch>enable
[port-based|cos-only|tosonly|cos-first|tos-first]
86 www.cooperbussmann.com/wirelessresources
switch#configure
switch(config)#qos prioritytype portbase
Rev Version 1.0
Page 87

Cooper Bussmann 2080E-T Managed Ethernet Switch User Manual
CLI Commands Level Description Example
qos policy
[weighted-fair|strict]
qos priority portbased
[Port]
[lowest|low|middle|high]
qos priority cos
[Priority]
[lowest|low|middle|high]
qos priority
cosportdefault
[Port][Priority]
qos priority tos
[Priority]
[lowest|low|middle|high]
show qos P Displays the information of QoS
G Select QoS policy scheduling. switch>enable
G Configure port-based priority. switch>enable
G Configure COS Priority. switch>enable
G Configure COS Port default switch>enable
G Configure TOS Priority switch>enable
configuration.
switch#configure
switch(config)#qos policy weighted-fair
switch#configure
switch(config)#qos priority portbased
1 low
switch#configure
switch(config)#qos priority cos 0
middle
switch#configure
switch(config)#qos priority
cosportdefault 1 1
switch#configure
switch(config)#qos priority tos 3 high
switch>enable
switch#configure
switch#show qos
no qos G Disable QoS function. switch>enable
switch#configure
switch(config)#no qos
Trunk Commands
CLI Commands Level Description Example
aggregator priority
[1–65535]
aggregator group
[GroupID] [Port-list]
lacp
workp
[Workport]
G Set port group system priority. switch>enable
switch#configure
switch(config)#aggregator priority 22
G Assign a trunk group with LACP
active.
[GroupID]: 1–3
[Port-list]: Member port list. This
parameter can be a port range (for
example, 1-4) or a port list separate
by a comma (for example, 2, 3, 6).
[Workport]: The number of work
ports. This value cannot be less than
zero or greater than the number of
member ports.
switch>enable
switch#configure
switch(config)#aggregator group 1
1-4 lacp workp 2
or
switch(config)#aggregator group 2
1,4,3 lacp workp 3
aggregator activityport
[Group ID]
[Port Numbers]
G Set activity port. switch>enable
switch#configure
switch(config)#aggregator activityport
1 2
www.cooperbussmann.com/wirelessresources
87Rev Version 1.0
Page 88

Cooper Bussmann 2080E-T Managed Ethernet Switch User Manual
CLI Commands Level Description Example
aggregator group
[GroupID] [Port-list]
nolacp
show aggregator P Show information for trunk group. switch>enable
no aggregator lacp
[GroupID]
no aggregator group
[GroupID]
G Assign a static trunk group.
[GroupID]: 1–3
[Port-list]: Member port list. This
parameter can be a port range (for
example,1-4) or a port list separate by
a comma (for example, 2, 3, 6).
G Disable the LACP function of trunk
group.
G Remove a trunk group. switch>enable
switch>enable
switch#configure
switch(config)#aggregator group 1
2-4 nolacp
or
switch(config)#aggregator group 1
3,1,2 nolacp
switch#show aggregator 1
or
switch#show aggregator 2
or
switch#show aggregator 3
switch>enable
switch#configure
switch(config)#no aggregator lacp 1
switch#configure
switch(config)#no aggregator group 1
Upgrade Firmware Commands
CLI Commands Level Description Defaults/Example
tftp
[server IP]
upgrade
[file name]
G Upgrade firmware by TFTP. Need to
specify the IP address of the TFTP
server and the file name of image.
switch>enable
switch#configure
switch(config)#tftp 192.168.1.120
upgrade image.bin
VLAN Commands
CLI Commands Level Description Example
vlan database P Enter VLAN configure mode. switch>enable
switch#vlan database
vlanmode
[portbase| 802.1q |
disable| gvrp]
Ported Based VLAN Configuration
V Set switch VLAN mode. switch>enable
switch#vlan database
switch(vlan)#vlanmode portbase
or
switch(vlan)#vlanmode 802.1q
or
switch(vlan)#vlanmode disable
or
switch(vlan)#vlanmode gvrp
88 www.cooperbussmann.com/wirelessresources
Rev Version 1.0
Page 89

Cooper Bussmann 2080E-T Managed Ethernet Switch User Manual
CLI Commands Level Description Example
vlan port-based grpname
[Group Name]
grpid
[GroupID]
port
[PortNumbers]
show vlan
[GroupID]
or
show vlan
no vlan
[VID]
IEEE 802.1Q VLAN
vlan 8021q mnt-vid
[VID]
vlan 8021q name
[GroupName]
vid
[VID]
V Add new port based VALN. switch>enable
switch#vlan database
switch(vlan)#vlan port-based grpname
test grpid 2 port 2-4
or
switch(vlan)#vlan port-based grpname
test grpid 2 port 2,3,4
V Show VLAN information. switch>enable
switch#vlan database
switch(vlan)#show vlan 2
V Delete port base group ID. switch>enable
switch#vlan database
switch(vlan)#no vlan 2
V Configure management VID (0 is
disabled).
switch>enable
switch#vlan
database
switch(vlan)#vlan 8021q mnt-vid 22
V Change the name of VLAN group.
If the group does not exist, this
command cannot be applied.
switch>enable
switch#vlan database
switch(vlan)#vlan 8021
vid22
q name test
vlan 8021q port
[PortNumber]
access-link untag
[UntaggedVID]
vlan 8021q port
[PortNumber]
trunk-link tag
[TaggedVID List]
vlan 8021q port
[PortNumber]
hybrid-link untag
[UntaggedVID]
tag
[TaggedVID List]
V Assign a access link for VLAN by
port. If the port belongs to a trunk
group, this command cannot be
applied.
V Assign a trunk link for VLAN by port.
If the port belongs to a trunk group,
this command cannot be applied.
V Assign a hybrid link for VLAN by port.
If the port belongs to a trunk group,
this command cannot be applied.
switch>enable
switch#vlan database
switch(vlan)#vlan 8021q port 3
access-link untag 22
switch>enable
switch#vlan database
switch(vlan)#vlan 8021q port 3 trunk-
link tag 2,3,6,99
or
switch(vlan)#vlan 8021q port 3 trunk-
link tag 3-20
switch>enable
switch#vlan database
switch(vlan)#vlan 8021q port 3 hybrid-
link untag 4 tag 3,6,8
or
switch(vlan)#vlan 8021q port 3 hybrid-
link untag 5 tag 6-8
www.cooperbussmann.com/wirelessresources
89Rev Version 1.0
Page 90

Cooper Bussmann 2080E-T Managed Ethernet Switch User Manual
CLI Commands Level Description Example
vlan 8021q port
[PortNumber]
hybrid-link-qinq untag
[UntaggedVID]
tag
[TaggedVID List]
vlan 8021q aggreator
[GroupID]
access-linkuntag
[UntaggedVID]
vlan 8021q aggreator
[GroupID]
trunk-link tag
[TaggedVID List]
vlan 8021q aggreator
[GroupID]
hybrid-link untag
[UntaggedVID]
tag
[TaggedVID List]
V Assign a qinq link for VLAN by port. If
the port belongs to a trunk group, this
command cannot be applied.
V Assign a access link for VLAN by
trunk group.
V Assign a trunk link for VLAN by trunk
group.
V Assign a hybrid link for VLAN by trunk
group.
switch>enable
switch#vlan database
switch(vlan)#vlan 8021q port 3 hybridlink-qinq untag 4 tag 3,6,8
or
switch(vlan)#vlan 8021q port 3 hybridlink-qinq untag 5 tag 6-8
switch>enable
switch#vlan database
switch(vlan)#vlan 8021q aggreator 3
access-link untag 33
switch>enable
switch#vlan database
switch(vlan)#vlan 8021q aggreator 3
trunk-link tag 2,3,6,99
or
switch(vlan)#vlan 8021q aggreator 3
trunk-link tag 3-20
switch>enable
switch#vlan database
switch(vlan)#vlan 8021q aggreator 3
hybrid-link untag 4 tag 3,6,8
or
switch(vlan)#vlan 8021q aggreator 3
hybrid-link untag 5 tag 6-8
vlan 8021q aggreator
[GroupID]
hybrid-link-qinq untag
[UntaggedVID]
tag
[TaggedVID List]
show vlan
[GroupID]
or
show vlan
no vlan
[GroupID]
V Assign a qinq link for VLAN by trunk
group.
switch>enable
switch#vlan database
switch(vlan)#vlan 8021q aggreator 3
hybrid-link-qinq untag 4 tag 3,6,8
or
switch(vlan)#vlan 8021q aggreator 3
hybrid-link-qinq untag 5 tag 6-8
V Show VLAN information. switch>enable
switch#vlan database
switch(vlan)#show vlan2
V Delete port base group ID. switch>enable
switch#vlan database
switch(vlan)#no vlan2
90 www.cooperbussmann.com/wirelessresources
Rev Version 1.0
Page 91

Cooper Bussmann 2080E-T Managed Ethernet Switch User Manual
appENDIx C - GLOSSarY
Term Definition
AWG
Bandwidth
CLI
COS
CSMA/CD
DHCP
DIN Rail
DNS
DSCP
GVRP
HTTP
IEEE
IGMP Snooping
I/O
IP
American wire gauge (AWG), also known as the Brown & Sharpe wire gauge, is a
standardized wire gauge system used predominantly in the United States and Canada for the
diameters of round, solid, nonferrous, electrically conducting wire.
The maximum data transfer speed available to a user through a network.
A command-line interface (CLI) is a means of interacting with a computer program where
the user (or client) issues commands to the program in the form of successive lines of text
(command lines).
Class of service (COS) is a parameter used in data and voice protocols to differentiate
the types of payloads contained in the packet being transmitted. The objective of such
differentiation is generally associated with assigning priorities to the data payload.
Carrier Sense Multiple Access/Collision Detection is the access method used on an Ethernet
network. A network device transmits data after detecting that a channel is available. However,
if two devices transmit data simultaneously, the sending devices detect a collision and
retransmit after a random time delay.
Dynamic Host Configuration Protocol is a utility that enables a server to dynamically assign
IP addresses from a predefined list and limit their time of use so that they can be reassigned.
Without DHCP, an IT manager would need to manually enter in all the IP addresses of all the
computers on the network. If DHCP is used, whenever a computer logs onto the network, it
automatically gets an IP address assigned to it.
A DIN rail is a metal rail of a standard type widely used for mounting circuit breakers and
industrial control equipment inside equipment racks.
Domain Name Service is a program that translates URLs to IP addresses by accessing a
database maintained on a collection of Internet servers. The program works behind the
scenes to facilitate surfing the Web with alpha versus numeric addresses. A DNS server
converts a name like mywebsite.com to a series of numbers like 107.22.55.26. Every website
has its own specific IP address on the Internet.
Differentiated Services Code Point (DSCP) is a field in an IP packet that enables different
levels of service to be assigned to network traffic. This is achieved by marking each packet
on the network with a DSCP code and appropriating to it the corresponding level of service.
GARP VLAN Registration Protocol or Generic VLAN Registration Protocol (GVRP) is a
protocol that facilitates control of virtual local area networks (VLANs) within a larger network.
GVRP conforms to the IEEE 802.1Q specification, which defines a method of tagging frames
with VLAN configuration data. This allows network devices to dynamically exchange VLAN
configuration information with other devices.
The Hypertext Transfer Protocol (HTTP) is an application protocol for distributed,
collaborative, hypermedia information systems, and is the foundation of data communication
for the World Wide Web. Hypertext is a multi-linear set of objects, building a network by using
logical links (the so-called hyperlinks) between the nodes (text or words). HTTP is the protocol
to exchange or transfer hypertext.
Institute of Electrical and Electronics Engineers, New York, www.ieee.org. A membership
organization that includes engineers, scientists and students in electronics and allied fields.
It has more than 300,000 members and is involved with setting standards for computers and
communications.
IGMP snooping is the process of listening to Internet Group Management Protocol (IGMP)
network traffic. The feature allows a network switch to listen in on the IGMP conversation
between hosts and routers. By listening to these conversations the switch maintains a map of
which links need which IP multicast streams. Multicasts may be filtered from the links that do
not need them, and this controls which ports receive specific multicast traffic.
Input/0utput. The term used to describe any operation, program or device that transfers data
to or from a computer.
Internet protocol. A set of rules used to send and receive messages across local networks
and the Internet.
www.cooperbussmann.com/wirelessresources
91Rev Version 1.0
Page 92

Cooper Bussmann 2080E-T Managed Ethernet Switch User Manual
Term Definition
IP Address
IPv4
LACP
LAN
LED
LLDP
MAC Address
MDI/MDIX
PPP
Point-to-Point
RJ-45
Router
RSTP/STP
RX
Server
SNMP
A 32-bit number that identifies each sender or receiver of information that is sent across the
Internet. An IP address has two parts: an identifier of a particular network on the Internet
and an identifier of the particular device (which can be a server or a workstation) within that
network.
Internet Protocol version 4 (IPv4) is the fourth version in the development of the Internet
Protocol (IP) and the first version of the protocol to be widely deployed. It is one of the core
protocols of standards-based internet working methods of the Internet, and routes most
traffic in the Internet.
Within the IEEE specification, the Link Aggregation Control Protocol (LACP) provides a
method to control the bundling of several physical ports together to form a single logical
channel. LACP allows a network device to negotiate an automatic bundling of links by
sending LACP packets to the peer (directly connected device that also implements LACP).
Local Area Network. A system of connecting PCs and other devices within the same physical
proximity for sharing resources such as an Internet connections, printers, files and drives.
A light-emitting diode (LED) is a semiconductor light source. LEDs are used as indicator
lamps in many devices.
The Link Layer Discovery Protocol (LLDP) is a vendor-neutral link layer protocol in the
Internet Protocol Suite used by network devices for advertising their identity, capabilities, and
neighbors on an IEEE 802 local area network, principally wired Ethernet.
Media Access Control address. A unique code assigned to most forms of networking
hardware. The address is permanently assigned to the hardware. Limiting a wireless
network’s access to hardware, such as wireless cards, is a security feature employed by
closed wireless networks. However, an experienced hacker armed with the proper tools can
still figure out an authorized MAC address, masquerade as a legitimate address, and access
a closed network.
Every wireless 802.11 device has its own specific MAC address hard-coded into it. This
unique identifier can be used to provide security for wireless networks. When a network uses
a MAC table, only 802.11 radios that have had their MAC addresses added to that network’s
MAC table will be able to get onto the network.
A Medium Dependent Interface (MDI) describes the interface (both physical and electrical)
in a computer network from a physical layer implementation to the physical medium used
to carry the transmission. Ethernet over twisted pair also defines a medium dependent
interface crossover (MDIX) interface. Auto-MDIX ports on newer network interfaces detect
if the connection would require a crossover, and automatically chooses the MDI or MDIX
configuration to properly match the other end of the link.
The Point-to-Point Protocol (PPP) is a data link protocol commonly used in establishing a
direct connection between two networking nodes. It can provide connection authentication,
transmission encryption (using ECP, RFC 1968), and compression.
Standard connectors used in Ethernet networks. RJ-45 connectors are similar to standard
RJ-11 telephone connectors, except that RJ-45 connectors can have up to eight wires,
whereas telephone connectors have four wires.
A device that forwards data from one WLAN or wired local area network to another.
In 2001, the IEEE introduced Rapid Spanning Tree Protocol (RSTP) as 802.1w. RSTP
provides significantly faster spanning tree convergence after a topology change, introducing
new convergence behaviors and bridge port roles to do this. RSTP was designed to be
backwards-compatible with standard STP.
Receive.
A computer that provides its resources to other computers and devices on a network. These
include print servers, Internet servers and data servers. A server can also be combined with a
hub or router.
Simple Network Management Protocol (SNMP) is an Internet-standard protocol for managing
devices on IP networks. Devices that typically support SNMP include routers, switches,
servers, workstations, printers, modem racks and so on. It is used mostly in network
management systems to monitor network-attached devices for conditions that warrant
administrative attention.
92 www.cooperbussmann.com/wirelessresources
Rev Version 1.0
Page 93

Cooper Bussmann 2080E-T Managed Ethernet Switch User Manual
Term Definition
SNMP Trap
SNTP
STP
Sub Network or
Subnet
Switch
Telnet
TFTP
Transmit Power
UDP
UL
UTC
VLAN
VPN
WAN
Wi-Fi
SNMP traps are notifications or messages sent by a networked device to a management
system. The messages are sent over the UDP protocol. The SNMP trap includes the
IPaddress of the sender, the generic ID, specific ID, OID and corresponding value.
Simple Network Time Protocol (SNTP) is a less complex implementation of NTP, using the
same protocol, but without requiring the storage of state over extended periods of time. It
is used in some embedded devices and in applications where high accuracy timing is not
required.
Network Time Protocol (NTP) is a networking protocol for clock synchronization between
computer systems over packet-switched, variable-latency data networks.
The Spanning Tree Protocol (STP) is a network protocol that ensures a loop-free topology
for any bridged Ethernet local area network. The basic function of STP is to prevent bridge
loops and the broadcast radiation that results from them. Spanning tree also allows a network
design to include spare (redundant) links to provide automatic backup paths if an active link
fails, without the danger of bridge loops, or the need for manual enabling/disabling of these
backup links.
Found in larger networks, these smaller networks are used to simplify addressing between
numerous computers. Subnets connect together through a router.
A type of hub that efficiently controls the way multiple devices use the same network so that
each can operate at optimal performance. A switch acts as a networks traffic cop. Rather
than transmitting all the packets it receives to all ports as a hub does, a switch transmits
packets to only the receiving port.
Telnet is a network protocol used on the Internet or local area networks to provide a
bidirectional interactive text-oriented communication facility using a virtual terminal
connection.
Trivial File Transfer Protocol (TFTP) is a file transfer protocol notable for its simplicity. It is
generally used for automated transfer of configuration or boot files between machines in a
local environment.
The power (usually expressed in mW or dBm) at which the wireless device transmits.
The User Datagram Protocol (UDP) is one of the core members of the Internet protocol suite,
the set of network protocols used for the Internet. With UDP, computer applications can send
messages, in this case referred to as datagrams, to other hosts on an Internet Protocol (IP)
network without prior communications to set up special transmission channels or data paths.
Underwriter Laboratories (UL) is one of several companies approved to perform safety testing
by the US federal agency Occupational Safety and Health Administration (OSHA).
Coordinated Universal Time (UTC) is the primary time standard by which the world regulates
clocks and time. It is one of several closely related successors to Greenwich Mean Time
(GMT). For most purposes, UTC is synonymous with GMT.
Virtual LAN (VLAN) is a logical network grouping that limits the broadcast domain and allows
you to isolate network traffic so that members of the same VLAN only receive traffic from
each other. Creating a VLAN on a switch is the logical equivalent of reconnecting a group
of network devices to another Layer 2 switch. However, all the network devices are still
physically plugged into the same switch.
Virtual Private Network (VPN) is a type of technology designed to increase the security
of information transferred over the Internet. VPN can work with either wired or wireless
networks, as well as with dial-up connections over POTS. VPN creates a private encrypted
tunnel from the end user’s computer, through the local wireless network, through the Internet,
all the way to the corporate servers and database.
Wide Area Network. A communication system of connecting PCs and other computing
devices across a large local, regional, national or international geographic area. Also used to
distinguish between phone-based data networks and Wi-Fi. Phone networks are considered
WANs and Wi-Fi networks are considered Wireless Local Area Networks (WLANs).
Wireless Fidelity. An interoperability certification for wireless local area network (LAN)
products based on the Institute of Electrical and Electronics Engineers (IEEE) 802.11
standard.
www.cooperbussmann.com/wirelessresources
93Rev Version 1.0
Page 94

Notes
Cooper Bussmann 2080E-T Managed Ethernet Switch User Manual
94
www.cooperbussmann.com/wirelessresources
Rev Version 1.0
Page 95

Customer Assistance
Technical Support:
United States:+1 866 713 4409
Australasia.: +61 7 3352 8624
Other: +1 604 944 9247
Email: ELPRO-Support@cooperindustries.com
Website: www.cooperbussmann.com/wireless
Australasia Fax: +61 7 33528677
US Fax: +1 925 924 8502
Online Resources
Visit www.cooperbussmann.com/wirelessresources
for the following resources and more:
• User Manuals
• Installation Guides
• Configuration Software
• Datasheets
• Dimensional Drawings
North America & Latin America
5735 W. Las Positas Suite 100
Pleasanton, California 94588 USA
Telephone: +1 925 924 8500
elpro-sales@cooperindustries.com
Australia, New Zealand
Cooper Technology Centre
Suite 2.01, Quad 2, 8 Parkview Drive
Sydney Olympic Park, NSW, 2127, AUSTRALIA
Telephone: +61 2 8787 2777
elpro-sales@cooperindustries.com
China
955 Shengli Road
East Area of Zhangjiang High-Tech Park
Shanghai, 201201, CHINA
Telephone: +86 21 2899 3600
elpro-sales@cooperindustries.com
Southeast Asia
2 Serangoon North Avenue 5
# 06-01 Fu Yu Building, 554911, SINGAPORE
Telephone: +65 6645 9888
elpro-sales@cooperindustries.com
©2013 Cooper Bussmann
www.cooperbussmann.com/wireless
Your Authorized Cooper Bussmann Distributor is:
The trade names and brand names contained herein are valuable trademarks of Cooper Industries in the U.S. and other countries. You are not
permitted to use the Cooper Trademarks without the prior written consent of Cooper Industries.
Rev Version 1.0
www.cooperbussmann.com/wirelessresources
95
 Loading...