

Page 1
PULSAR-EQmini v 1.03
10.12.2011
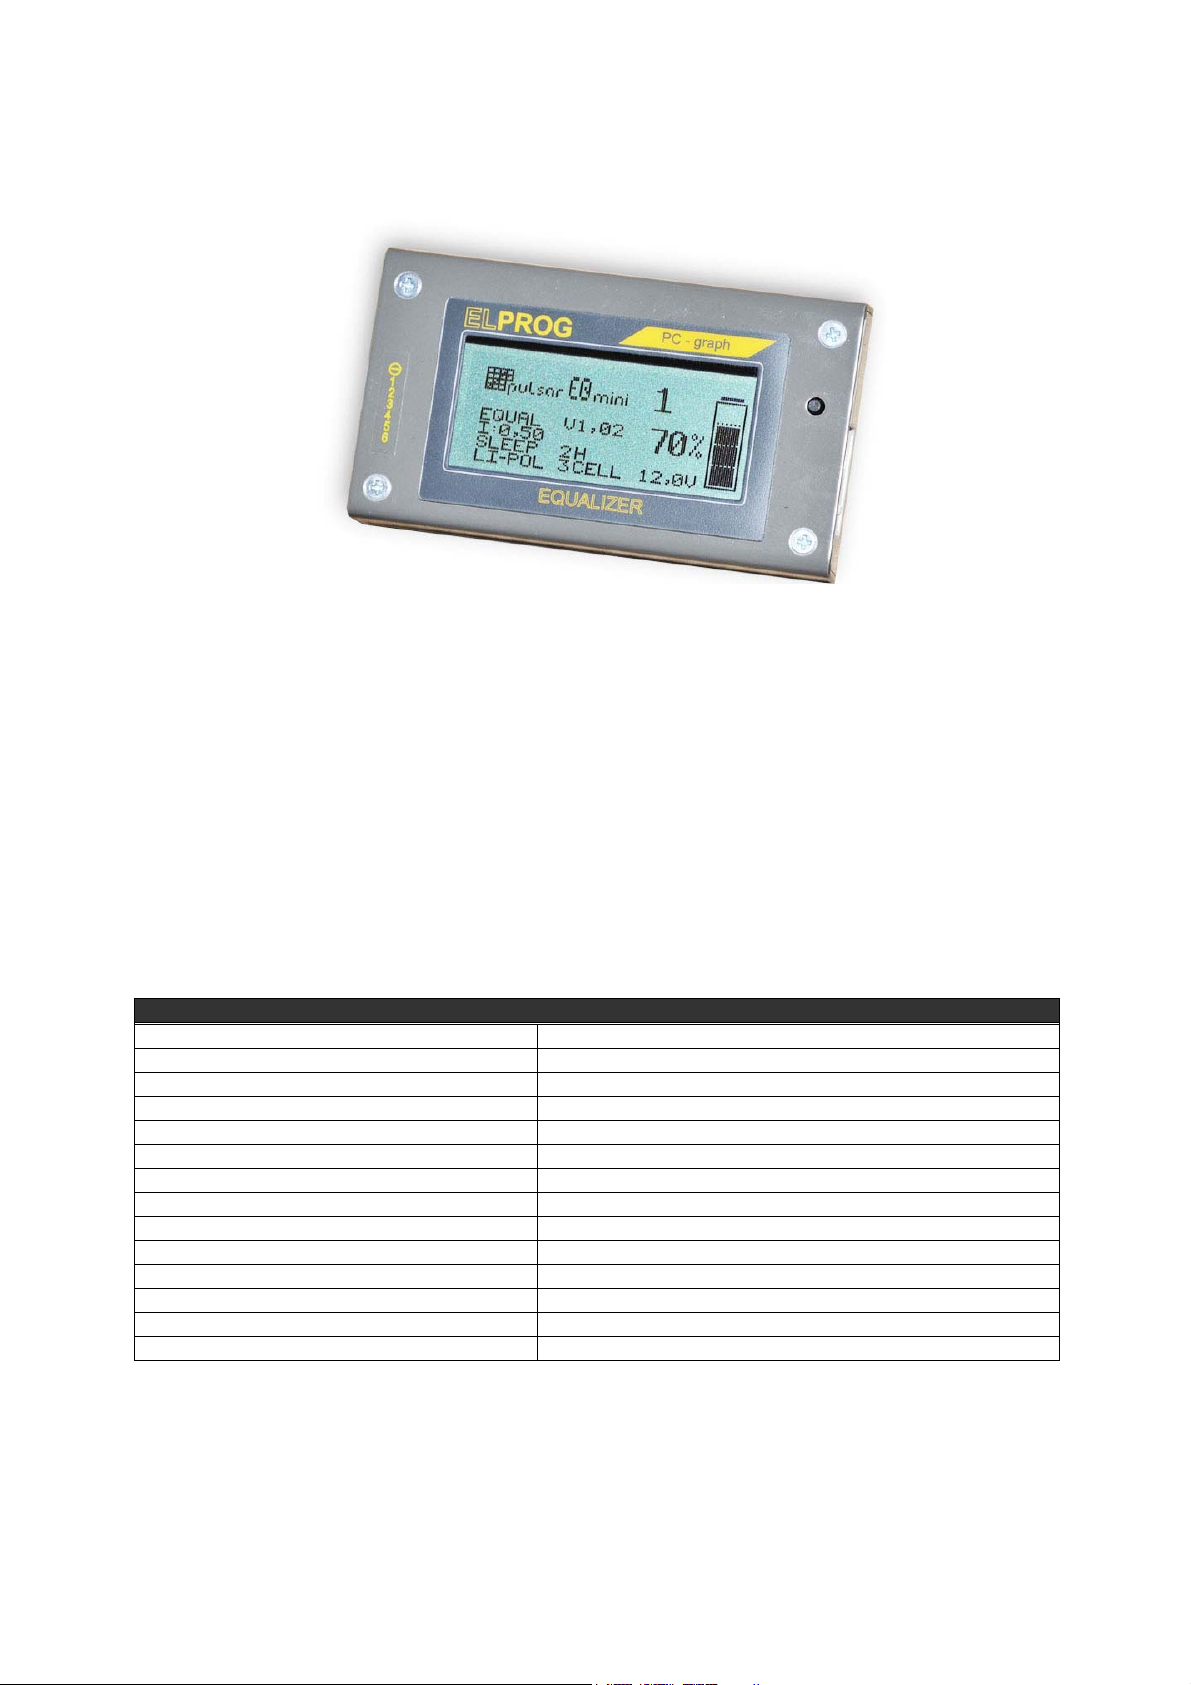
Pulsar-EQmini is a professional, CPU controlled equalizer-balancer and cell tester for all Li-xxx cells.
Pulsar-EQmini is capable of highly accurate and extremely fast extremely fast equalization of individual cells
within the battery packs which may contain between 2 to 6 cells. The cells are protected against overcharging or
excessive discharging. The high, constant power (up to 15W) and precise algorithms of equalizing current
control allows this device to work with battery packs with capacity of 0.1Ah to over 10Ah (even during fast
charging). During the design process of the device, we focused o n the ability of the full output of information
about equalizing and the state of battery pack. Built in d isplay shows charging/discharging process graph, bar
graphs of balancing process, actual voltage of each cell, min-max values etc. In add ition, PC software included
with Pulsar-EQmini allows you to analyze and check your packs in detail.
When connected to some chargers like Pulsar 1, Pulsar 2, Pulsar 2+ or Akumatik, Pulsar-EQmini can
force charger to reduce charging/discharging current if the voltage on any of the cells reach dangerous value (too
low or too high). This feature requires a special cable to connect Pulsar-EQmini to the charger.
Technical data
Cell types Li-Ion, Li-Pol, Li-Ph (Li-Ion FePO4)
Number of cells 2-6 cell (6 Channels)
Working voltage 6 – 30 V
Max. balancing power 15 W
Max. equalizing current (per cell) 0,25 A ; 0,5 A ; 0,75 A (continuous current)
Min. equalizing current (per cell) 25 mA ; 50 mA ; 75 mA (continuous current)
Quiescent current 6 mA for 2 cells ; 8 mA for 6 cells
Work modes Test, Equal, Fast
Memory cells 3 independent
Timer (sleep) 2 h; 4 h; and no limit
Display LCD 133x64
Sound alerts Yes
Dimensions 60 x 108 x 15 mm (W x L x H)
Weight 120 g
Page 2

Precautions
- Read the manual thoroughly before usage of the Pulsar-EQmini
- Under any circumstances, do not modify the device
- Check the connections every time you use Pulsar-EQmini
- Protect against dust and humidity
- Don’t insert any things into the ventilating holes
- Contact an authorized service if any improper behavior is observed
- Don’t leave working device unattended
EU – Certificate of conformity
Pulsar-EQmini is made according to the common safety rules. Also it meet a conditions of the home
appliances rules like: EN 60335-1; EN 50081-1, EN 50082-1 and EN 50082- 2
Device is signed with CE mark: Dispose electronic devices according
ELPROG to your country regulations!
ul. Przemysłowa 1/611
PL 35-105 Rzeszów
General Distribution:
pp-rc Modellbau Piechowski
Weidenstieg2
25337 Kölln-Reisiek
GERMANY
Tel.: +49 4121 740486 Fax: +49 4121 750676 www.pp-rc.de WEEE-Reg.-Nr DE77074747
Introduction
Lithium cells can be charged up to the voltage particular for th e specific cell type. For example: Li-Po v oltage is
4.20V per single cell. Overcharging can lead to cell damage or even self ignition. When using Li-Po-accupacks,
the voltage of the cells in an accupack tend to drift. Th is can lead to dangerous voltage differences between the
cells in an accupack. Each charging process increases this difference. It can lead to the battery pack damage. The
more cells, the more caution is required.
Example: If you want to charge a 5S-Li-Po-Accupack, the charger will charge the pack to the cut-off Voltage,
which is 21V in this case. (5 x 4.2 V). Assume 4 of the cells have a voltage of 4,1 V then the charger would end
the charging process when the fifth cell has a voltage of 4.6 V. Overcharging this cell is dangero us and may
cause a fire. Balancer will avoid this and protect your accupack.
Balancer and Equalizer differ in the way they operate. A balancer can only equalize the cells during charging.
Once a cell reaches the charge cut-off voltage, charging of this cells is terminated by diverting the charge current
into resistors, converting the energy into heat.(like a Voltage Limiter) An equalizer is able to equalize the voltage
of cells in an accupack without the charging process. Today’s equalizers transfer the energy of the cells with the
highest voltage to the cells with the lowest voltage in the accupack. Equalization of the accupacks is quite
difficult if no cooling fan is used. It requires a smart control of the lost energy, especially in such small device
like Pulsar-EQmini.
Pulsar-EQmini was developed as a pocket size device, which (beside of its main purpose, which is accupacks
equalization) can be used as a fast Li-Xxx packs tester.
In addition, Pulsar-EQmini can be connected to the Pulsar chargers (made by ELPROG) in Fast mode.
It hast to be mentioned, that equalizing of the cells in accupack is not required every time you charge them. You
will learn from experience, how your accupacks perform in the term of voltage drifting, thus you will know,
when to equalize the accupack.
However, we suggest to use the Pulsar-EQmini every time, to play it safe side and always have full control over
your expensive lithium packs.
Page 3
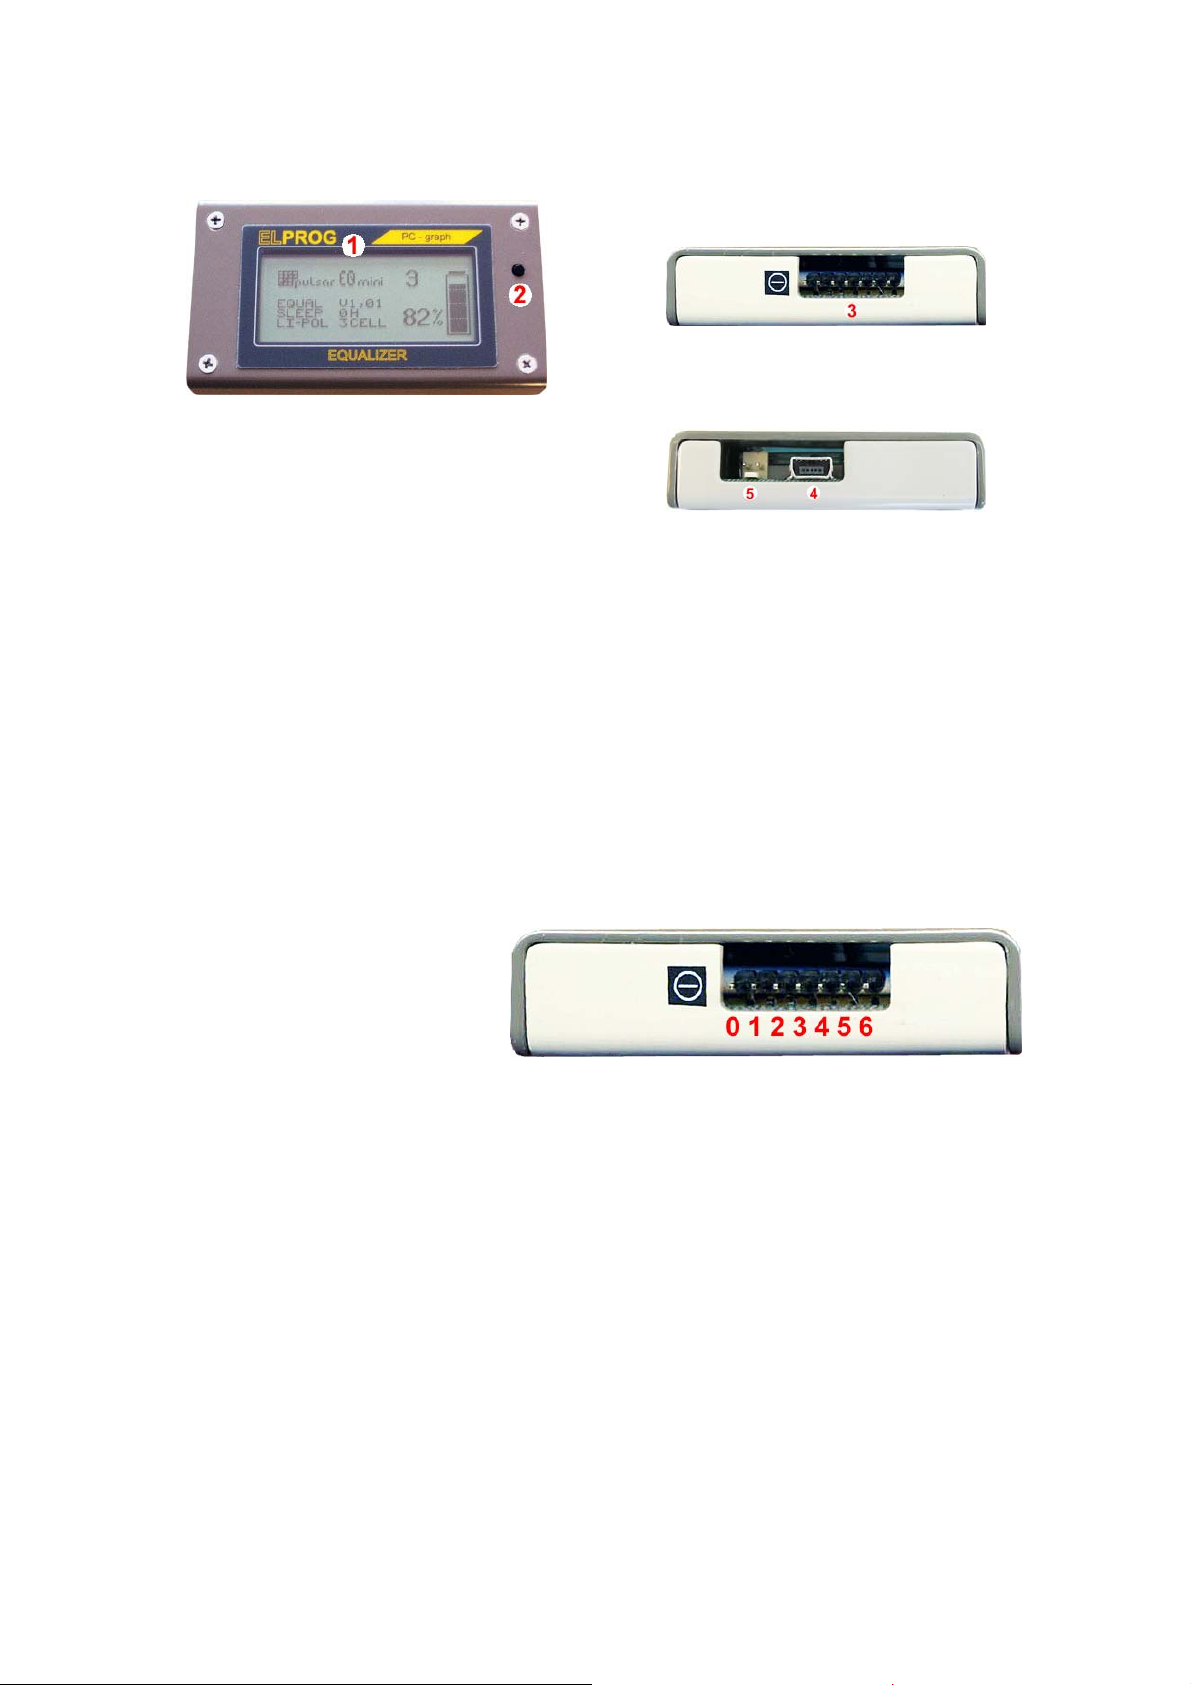
Connectors and controls
1. LCD display
2. Control but t on
3. Accupack socket
4. USB (cable inc l uded)
5. Pulsar communication socket
Sockets
Accupack
The accupack (2 to 6 cells) can be connected to the Pulsar-EQmini’s 7-pin socket (nr 3 above). Please, pay
attention when connecting the accupack. Carefully check polarity of th e pack to avoid short circuit or da mage of
the pack or device.
Description of the accupack socket:
PC
Pulsar-EQmini can be connected to the PC computer using USB cable. Included software let’s you control,
analyze and save the processes.
0 - cell 1 (minus)
1 + cell 1 (plus)
2 + cell 2 (plus)
3 + cell 3 (plus)
4 + cell 4 (plus)
5 + cell 5 (plus)
6 + cell 6 (plus)
Settings and operation
Pulsar-EQmini can be operated using only one button. There are two different modes of the control button:
Long press (over 1s) and brief press (under 1s)
Short press is used to change screen and confirm of the settings or changes.
Long press is used to enter settings mode.
Connection of the accupack to the Pulsar-EQmini is acknowledged by short “beep”. Push the button briefly to
start device with previously adjusted parameters. Further button’s pressing will switch display modes. If you
want to change parameters – press the button longer than 1s.
ATTENTION: If the process doesn’t start within 15 seconds, there will appear the information „PUSH
BUTTON“ and an acoustic signal.
Page 4

Memory
After settings mode is activated, memory number (1, 2 or 3) is flashing for ab. Each memory can store different
settings of: work mode, power settings, sleep timer and the battery type. It’s very useful especially when
working with different cell types. When memory number is flashing, brief pressing of the button will switch
memory cell repeatedly: 1-2, 2-3, 3-1 etc. If no other changes required – press the button for more than 1s what
cause the device to quit the settings mode. However, if you want to change parameters for current memory cell,
leave the button untouched for ab. 3s. Pulsar-EQmini will jump to the parameters.
Caution – memory change will cancel all previous alerts.
Work mode
Actual work mode is flashing. You can change work mode (in a loop) just by brief button push. Work modes
are: Equal, Fast, Test.
Equal - this is the standard mode of operation. The voltage of the cells in an accupack are equalized during
charging / discharging or without a charger connected. Please keep in mind, that below the start voltage
Fast - this special operation mode has been developed for charging in the Fast-mode of the Pulsar 2 charger.
Test - in this mode, all cell parameters will be displayed on the disp lay or can be recorded on your PC.
* Delta 10 mV / 20 mV to 5 mV / 10 mV – means, that equalization will be started when the vo ltage difference
reach 10mV / 20 mV and will be finished when drop below 5 mV / 10 mV. Equalization isn’t possible if the
voltage difference don’t reach “start voltage” (see Cells table). In some extreme situations (very high voltage
differences) pre-equalization will be performed.
After work mode is set, wait ab. 3s to let Pulsar-EQmini jump to the power settings.
for balancing (refer to table Cell Types) no equalizing will be carried out. (Delta 10 mV to 5 mV)*
Less precise, but very fast algorithm (delta 20 mV to 10 mV)*
EQUALIZING WILL NOT TAKE PLACE. No charger needs to be connected in this mode. With the
test mode the behavior of an accupack can be recorded, simulating the actual loads on the accupack
during its use in the model.
Power settings
Pulsar-EQmini has very high power, which means, that it can work with bigger and bigger capacity cells and
more and more cell numbers which can be charger using higher current value. Although, the power of can be too
high for small cells, the equalizing current can be set in 3 steps:
I = 0,25; I = 0,50 and I = 0,75
These values represent the maximum continuous equalizing current per cell in Amperes. For charging cells up to
a capacity of 2000 mAh with a charge current of 1.5 C, the lowest performance level of I = 0.25 is sufficient.
Lower value of „I” the more precise equalization, but longer time of the process
Sleep timer
Once having set the performance level you can now limit the maximum operating time. Selecting “0H” disables
this function. Selecting „2H“ and „4H“ you set the maximum operating time to 2 hours and 4 hours respectively.
When approaching the maximum operating time, Pulsar-EQmini will finish the equalization process and
flashing “SLEEP” will be displayed.
Cell type
The last item of the menu is accutype. Following settings are available at the moment:
Li-Po (Lithium-Polymer); Li-Ion (Lithium-Ionen); Li-Ph (Lithium-FePO
Display contrast adjustment
Push the button until 2 beep heard (after the first one, display go es blank). Short pressing of the button after that
will increase display’s contrast to the desired level (20 step loop). After desired contrast level is achieve d, leave
the button for 6s to store your adjustment.
4)
Page 5
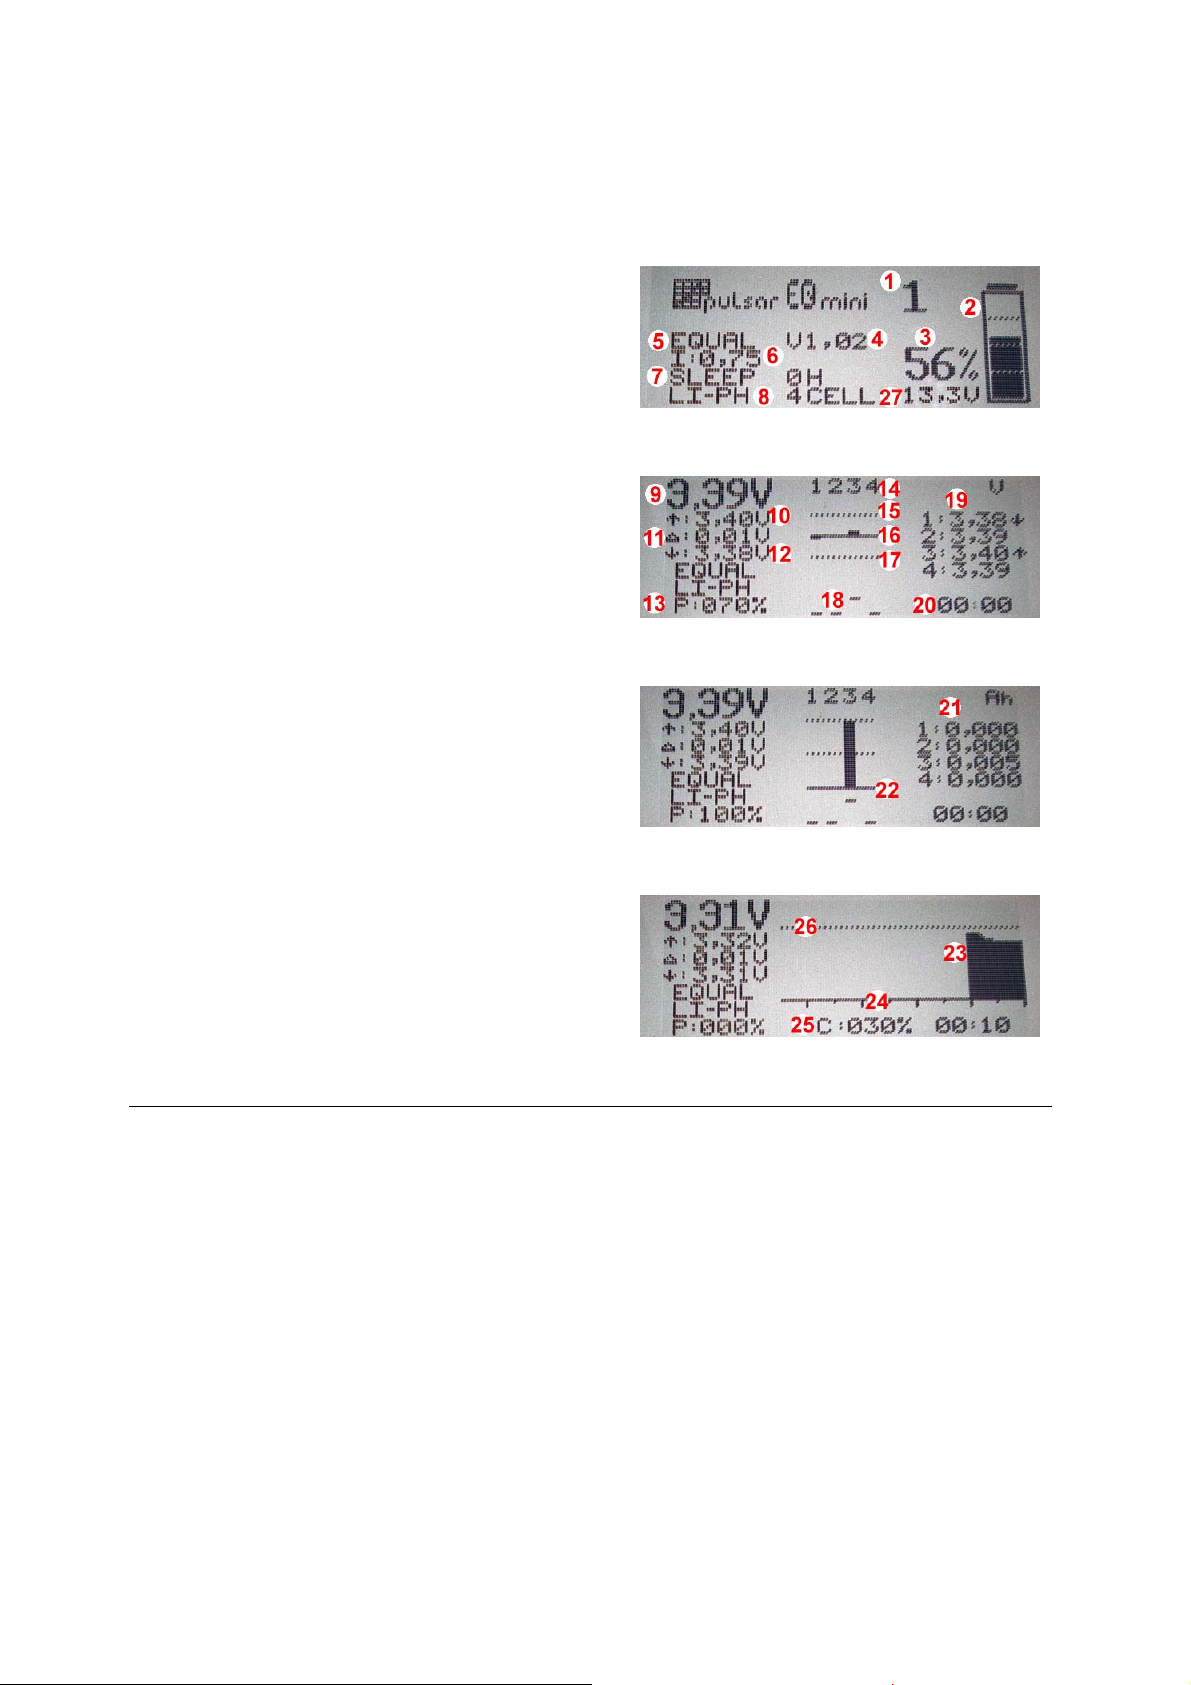
Displayed information
Brief pressing of the button will switch between the pages:
Initial and configuration screen
1. Memory number
2. Battery load indicator
3. Battery load in % *
4. Firmware version
5. Work mode
6. Maximal equalizing current (for single channel)
7. Sleep timer after 0 (switched off), 2 or 4h
8. Cell type (Li-Pol, Li-Ion, Li-Ph)
9. Average cells voltage
10. Highest cell voltage in the pack
11. Difference between the cells with the highest and
lowest voltage level in the pack
12. Lowest cell voltage in the pack
13. Actual, Maximal peak level / Maximal current.
14. Number of cells (4 cells pack pictured)
15. +0,05 V (marker)
16. Bar graph – average voltage and volt age deviation for
each cell
17. –0,05 V (marker)
18. Saturation of each, single channel (higher value means
higher equalizing current)
19. Voltage of each cell. The cells with highest and lowest
voltage are additionally marked with arrows.
20. Time hh:mm
21. Load [Ah] converted to the heat during equalization
process.
22. Bar graphs – display values of p.21.
23. Voltage graph
24. Time scale (10 min/5 min)
25. Battery pack charge (%) *
26. Final charging voltage level
27. Accupack voltage
* - estimated value (different packs can show different
numbers)
Graphics
When the device works with full power, its case can get hot (even up to 50°C). That temperature will cause LCD
display decrease of brightness. This is nothing unusual and will not damage LCD display. Pulsar-EQmini has
its own temperature sensor which will decrease device’s equalizing power (maximal equalizing current will be
decreased). Keep device uncovered and ensure, its bottom plate has enough clearance to allow free air
circulation.
Screen 1
Screen 2
Screen 3
Page 6

Cells (parameters)
Cell type Li-Ion Li-Pol Li-Ph
Full name Lithium-Ion Lithium-Polymer Lithium-FePO4
Nominal voltage 3,60 V 3,70 V 3,30 V
Discharge Cut Off Voltage (p. 15)** 3,00 V 3,30 V 2,80 V
max. Charge Cut Off Voltage (p. 14) ** 4,10 V 4,20 V 3,65 V
Current reduction voltage 4,15 V 4,25 V 3,80 V
max. Emergency Shut Off Voltage 4,25 V 4,35 V 4,10 V
Voltage to start equalizing 3,85 V 3,95 V 3,48 V
min. Emergency Shut Off Voltage 2,50 V 2,70 V 2,00 V
Emergency Shut Off
If one cell in the accupack exceeds the max. or min. emergency shut off voltage, the Pulsar-EQmini indicates
this with an acoustic alarm signal. A sound alert is started whenever a switch off voltage value is reache d (see:
Cells). This sound alert can be switched off by button push. An average voltage value (graphics p.9) and number
of the cell which caused this alert will be flashing on the display (Graphics p.14).
Working in connection with Pulsar chargers (starting from versions 1V55, 2V10, 2+V10)
Whichever cell reach voltage of current reduction (see: Cells), a charger will decrease charging current until cell
voltage fall under that value. If a sound alert is being generated, but accupack isn't connected via balancer's
switching socket, charger will decrease charging current. A number of the cell which caused this charging
current decrease will be flashing on the display (Graphics p14).
Adjusting of parameters
Adjusting of Power level according to the battery pack is quite easy. When charging is going to an end and you
notice that:
• Device is frequently changing of the peak level (Graph. P.18) with up to 20% (graph p.13) – it means that
there’s to high current level (there are a high voltage oscillations on the computer graph)
• Peak level on the equalized channels is on the max level (over 80%) for a longer time – you can increase the
equalizing current.
Generally, for the cells with high internal resistance and lower capacity, equalizing current should be decreased.
For worse cells it is recommended to use Fast mode.
EQUAL mode is very precise. In the Fast mode you can use higher currents.
Firmware - upgrade
The Pulsar-EQmini is ready for a simple Firmware-Upgrade with your PC. First download the software (exeFile) to you PC-hard drive. The Pulsar-EQmini must be connected to your PC via the USB port (proper USB
driver has to be installed first – these are automatically installed if Equal PC-graph software was installed). In
order to prevent problems during the upgrade, close all other programs before you proceed. Start the upgrade
program. After your PC say’s that device is connected to the USB port, connect any accu cell and start the
upgrade process by clicking on the Upgrade software button.
CAUTION
Balancer hast to remain on the start-up screen. Don’t Press the button after you connect the accupack.
Interrupting of the upgrade process can cause device’s damage!
Page 7
PC software (Pulsar-EQmini v1.08)
The Pulsar-EQmini comes with a Software CD. Communication between the device and the PC computer is
done using USB port. This is a helpful feature to analyze the state of cells in an accupack (for example: to find a
broken cell).
Installation
This software can work on any version of Windows system (95, 98, 2000, ME, XP, Vista). Softwar e installation
is performed automatically and doesn’t need any additional info. After the device is prop erly connected using
USB cable, “USB connected” message is displayed on the bottom of the software’s main window.
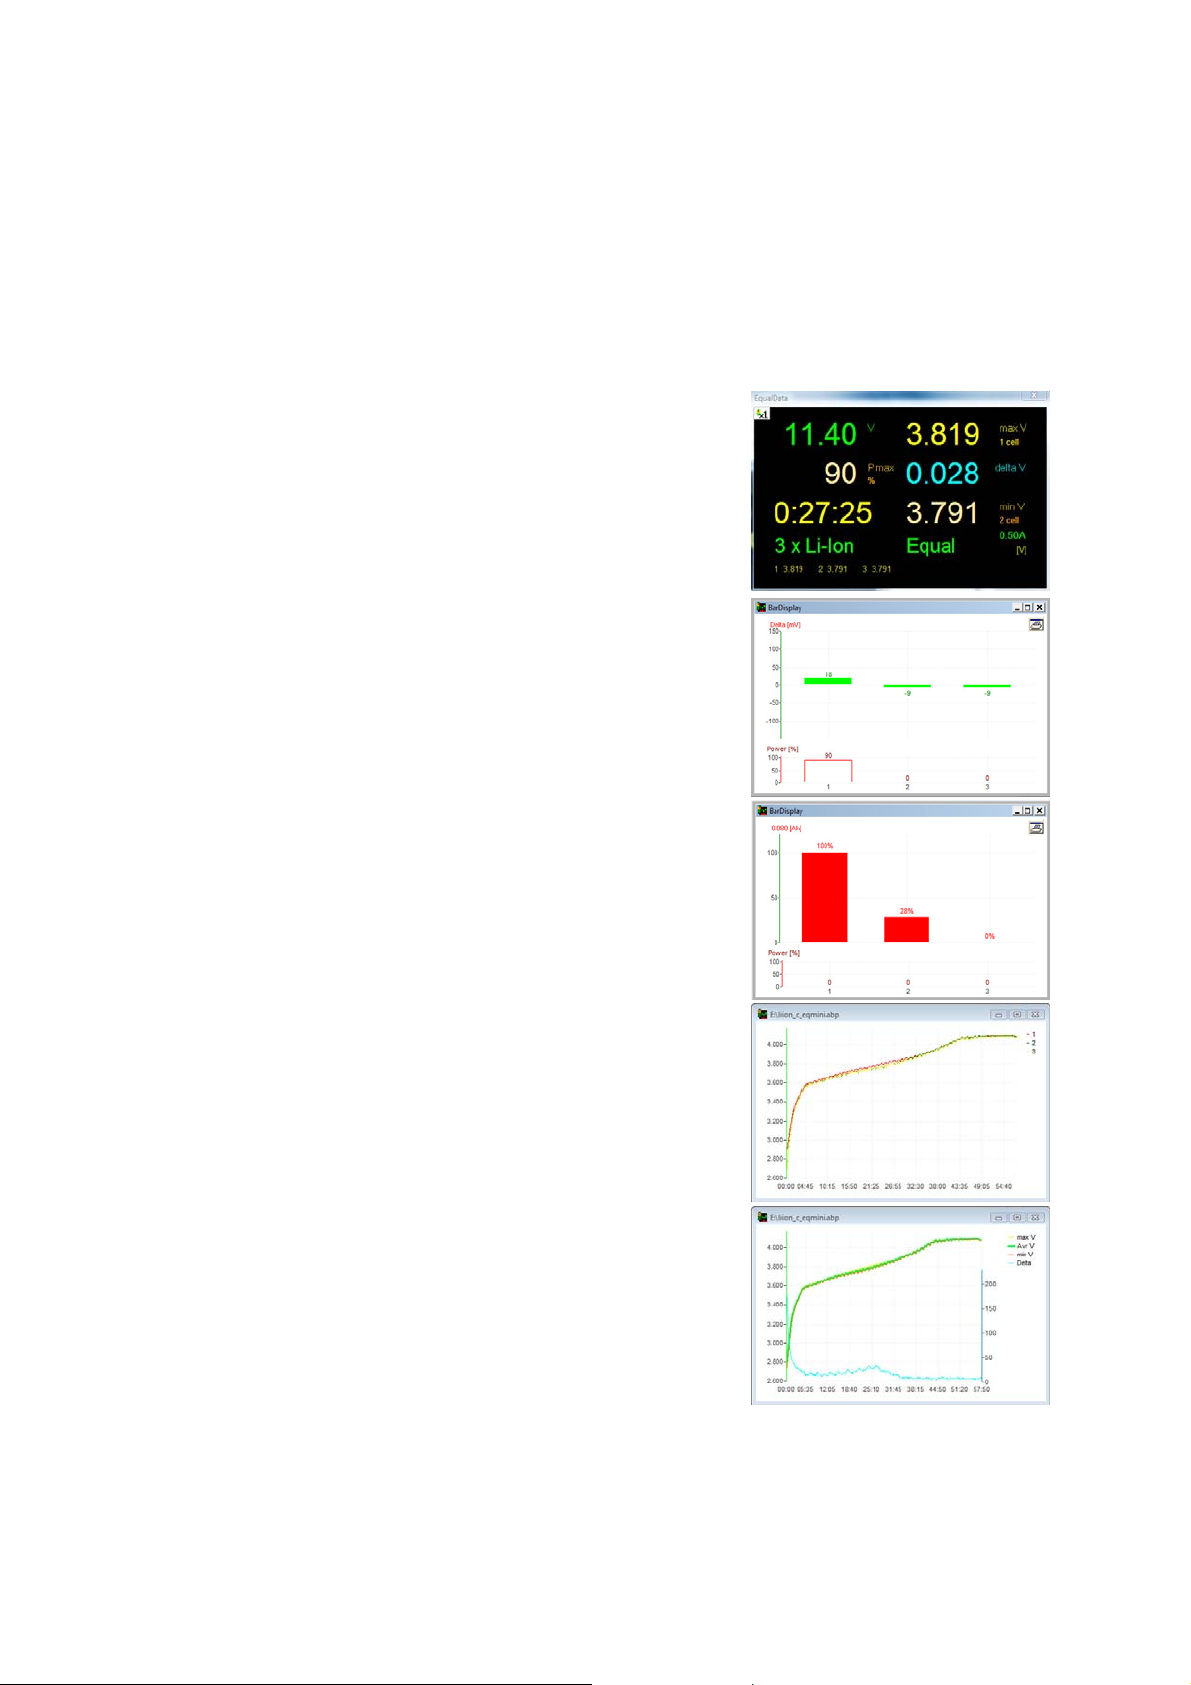
EqualData window
This window displays the data in form of real time numbers.
(Voltage, Equalizing Performance (%), Process time, min/max
Voltage, delta-Voltage, Number of Cells, cell type, mode of
Operation and Voltage for all cells). Clicking on the single cell
symbol in the upper left corner (x1), the voltage will be displayed
calculated for one cell.
BarDisplay window
Upper part – the green bar graph – displays the voltage differences on
each cell according to the average voltage of the battery pack (green line).
Negative deviations (down) and positiv e (up) contains value of deviation
(in mV).
Bottom part – red bar graph – displays peak level of each channel. After
the “Ah” button is clicked (on the main window) there’s actual load of
each cells displayed. “Ah” value is calculated according to the lowest bar
and means 100%. Bars are calculated in %.
Linear graphs - window
By clicking on the „Average“ button you can switch between two graph
modes:
• First one show voltage curves of the all cells in the battery pack. By
clicking of the single line you make it bold, what makes reading
easier.
• Second one show Tyree curves. The bold, green one (Avr V) shows
an average voltage. Remaining two lines – yellow (max V) and
Orange one (min V) – show maximal and minima voltage of the
battery pack. The blue one, on the bottom of the window, show
voltage difference (Delta) in the process,
Zoom and scroll
With your left mouse button you can zoom into a fraction of the curves. A double click gets you back to the
original window (un-zoom). With your right mouse button you can scroll to the right and left in the zoomed
Window.
Page 8

Rec button
Clicking of the „REC“-symbol will start or stop the data recording on your PC.
Caution
Due to pulse nature of the devices work process, there are periodic drops of the voltage. It is OK and doesn’t
mean anything’s wrong. It has no influence on the equalizing or PC recording process.
Warranty conditions
1. ELPROG guarantees problems free function of this device (for which this warranty card was issued) in
period of 24 months starting on the purchase date (Only if used according to its specification).
2. In case of any failures (during the warranty period) a free of charge repairing will be done.
3. Any complaints should be sent to ELPROG.
4. ELPROG will fix the device in max. 14 days.
6. ELPROG has no responsibility for any damages due to:
• Improper connections
• Any change into the device, changes in the device, flooding with water or other fluids;
• Intentional damages;
Other unlucky causes (i.e. fire, flood, thunder strike etc.);
Manufacturer & Service: Distribution & Service
ELPROG pp-rc Modellbau
Ul. Przemysłowa 1/611 Weidenstieg 2
35-105 Rzeszów 25337 Kölln-Reisiek
Poland Germany
www.pp-rc.de
WEEE-Reg.-Nr DE77074747
Note
 Loading...